Users Manual
1
BM-150R
•Please read the following warnings before using the product.
•Shapes and colors of the images shown in this manual may differ from the actual products.
•Contents of the manuals may differ based on the software versionof products
or conditions of the wireless provider.
2
PIDION is a Leading Brand in the mobile industry. Bluebird Soft Inc. is a trusted global company which
represents high technology and is currently registered worldwide with its PIDION trademark legally
protected by law.
This manual is protected by Copyright Laws.
This manual has been produced by Bluebird Soft Inc. Please note that there may be editorial mistakes or possible omission of
information.
Programs embedded in the product are legally protected. Unauthorized copying, transferring, or deletion is strictly prohibited.
There may be a few operational problems caused by the application environment, application program, or other surrounding
machinery.
This product generates, uses and can radiate radio frequency energy and if not installed and used in accordance with the
instructions, it may cause harmful interference to radio communications. Service related to human security is not provided as
there may be a possibility of confusion in the electric waves ofthe product.
Registered Trademark
Information to the User
This equipment has been tested and found to comply with the limits for a Class B digital device, pursuant to part 15 of the FCC
Rules. These limits are designed to provide reasonable protection against harmful interference in a residential installation. This
equipment generates, uses and can radiate radio frequency energy and, if not installed and used in accordance with the instructions,
may cause harmful interference to radio communications. However, there is no guarantee that interference will not occur in a
particular installation.
If this equipment does cause harmful interference to radio or television reception, which can be determined by turning the
equipment off and on, the user is encouraged to try to correct the interference by one more of the following measures:
Reorient or relocate the receiving antenna.
Increase the separation between the equipment and receiver.
Connect the equipment into an outlet on a circuit different from that to which the receiver is connected.
Consult the dealer or an experienced radio/TV technician for help.
Changes or modifications not expressly approved by the manufacturer could void the user’s
authority to operate the equipment.

FCC RF EXPOSURE INFORMATION
WARNING! Read this information before using your phone
In August 1996 the Federal Communications Commission (FCC) of the United States with its action in Report and Order FCC 96-326 adopted
an updated safety standard for human exposure to radio frequency (RF) electromagnetic energy emitted by FCC regulated transmitters.
Those guidelines are consistent with the safety standard previously set by both U.S. and international standards bodies. The design of this
phone complies with the FCC guidelines and these international standards.
CAUTION : Use only the supplied or an approved antenna. Unauthorized antennas, modifications, or attachments could impair call quality,
damage the phone, or result in violation of FCC regulations. Do not use the phone with a damaged antenna. If a damaged antenna comes
into contact with the skin, a minor burn may result. Please contact your local dealer for replacement antenna.
Body-worn Operation
This device was tested for typical body-worn operations with the back of the phone kept 1.5 cm. from the body.
SAR compliance for body-worn operation is restricted to belt-chips, holsters or similar accessories that have no metalic component in the
assembly.
The SAR limit of USA (FCC) is 1.6 W/kg averaged over one gram of tissue.
BM-150R Device(FCC ID: SS4BM150R) has also been tested against this SAR limit. The highest SAR value reported under this standard
during product certification for use at the ear 0.724 W/kg and when properly worn on the body is 1.27 W/kg.
WARNING
Any changes or modification not expressly approved by the party responsible could void the users’ authority to operate the device.
Knowing the product

4
Declaration of Conformity
PDAType
BM-150RModel
I hereby declare that the product.
Satisfies all the technical regulations applicable to the
product within the scope of Council
Directives 99/5/EC, 89/336/EEC, and 73/23/EEC:
Council Rec. 99/519/ECHealth
EN 60950-1Safety
ETSI EN 301 489-1/7/17, EN 55022, EN 55024EMC
ETSI EN 301 511 / ETSI EN 300 328Radio
All essential radio test suites have been carried out.
NOTIFIED BODY : EMCCert Dr.Rasek
- Address
Boelwiese 5, 91320 Ebermannstadt, Germany,
Identification Number: 0678
MANUFACTURER or AUTHORISED REPRESENTATIVE :
−Address:
Bluebird Soft., Inc.
558-5, Sinsa-dong, Kangnam-gu, Seoul, Korea
This declaration is issued under the sole responsibility of the
manufacturer and, if applicable, his authorized representative.
POINT OF CONTRACT:
+82-2-548-0870Fax number
+82-2-548-0740Phone number
Bluebird Soft., Inc.Company

5
I. Getting Started
1. Activating Your Phone
2. Synchronize with ActiveSync
II. Understanding Your Phone
1. Features of Your Phone
2. What’s in the box?
3. Closed View of Your Phone
4. Install/Remove the Battery
5. MiniSD Memory Card
6. Battery & LED status
III. Learning the Basics
1. Powering On/Off the Phone
2. Resetting Your Phone
3. Starting your PDA
4. Using the Stylus
5. Entering Text
IV. Call Functions
1. Turning the Phone
Functions On/Off
2. Phone Program
3. Calling and Receiving
4. Contacts
V. Camera
Using the Camera
VI. DMB
1. Opening & Closing
2. Screen Configuration
3. Operation Guide
4. Capture Screen
5. Setting
VII. Changing Your Settings
1. Personal Tab
2. System Tab
3. Connections Tab
VIII. Information
1. Safety Information
2. Troubleshooting
3. Customer Service
4. Service Center Information
Certification of Quality
Authenticity of Facts
Table of Contents
………… 4
………… 5
………… 6
………… 7
………… 8
………… 9
………… 9
………… 10
………… 11
………… 11
………… 12
………… 12
………… 13
………… 15
………… 16
………… 17
………… 18
………… 33
………… 34
………… 35
………… 36
………… 20
………… 21
………… 22
………… 23
………… 24
………… 19
………… 38
………… 39
………… 25
………… 27
………… 30
6
I.Getting Started
1. Activating Your Phone
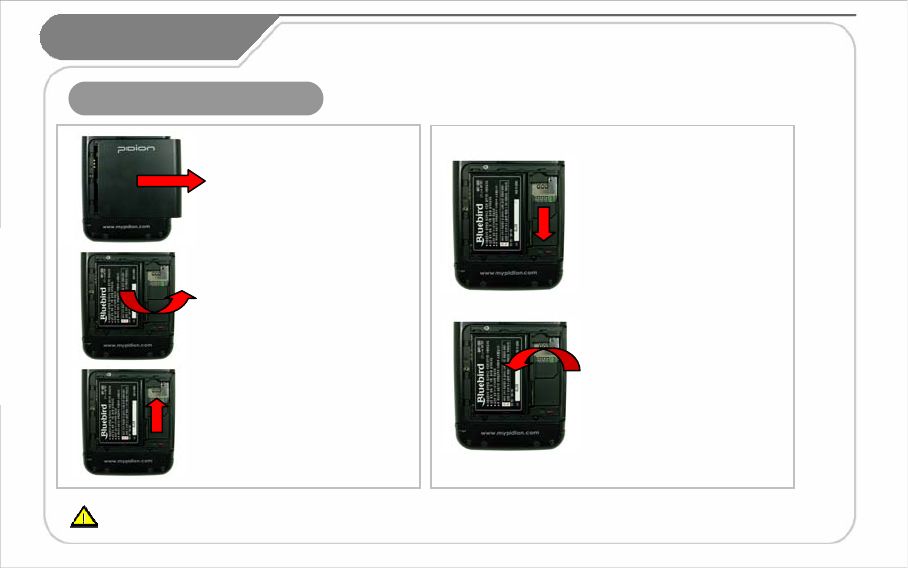
[Remove the Battery]
1. Push down using both thumbs
to remove battery cover.
2. Raise the battery by using the
groove on the lower part to remove
the battery.
[Install the Battery]
Insert the SIM card with its gold
contacts face down.
Its cut off corner should match the
cut off corner in the slot.
[Insert the SIM Card]
To remove the SIM card, lightly
slide it away from slot.
[Remove the SIM Card]
The plug-in SIM card and its contants can be easily damaged by scratches or bending.
Use caution when inserting or removing the card and keep all SIM cards out of reach of children.
1. Put the battery in line with
the left part of the PDA
and then push the right part to
lock.
2. Put the projected part of the
cover on top of the groove in
the back and then push
carefully with both thumbs.
7
2. Synchronize with ActiveSync
I.Getting Started
This is based on Microsoft ActiveSync 4.2 English Version. If you use a different version, it may differ from the instructions of the manual.
You may download the most recent version from the Microsoft website in case you lose the CD bundle.
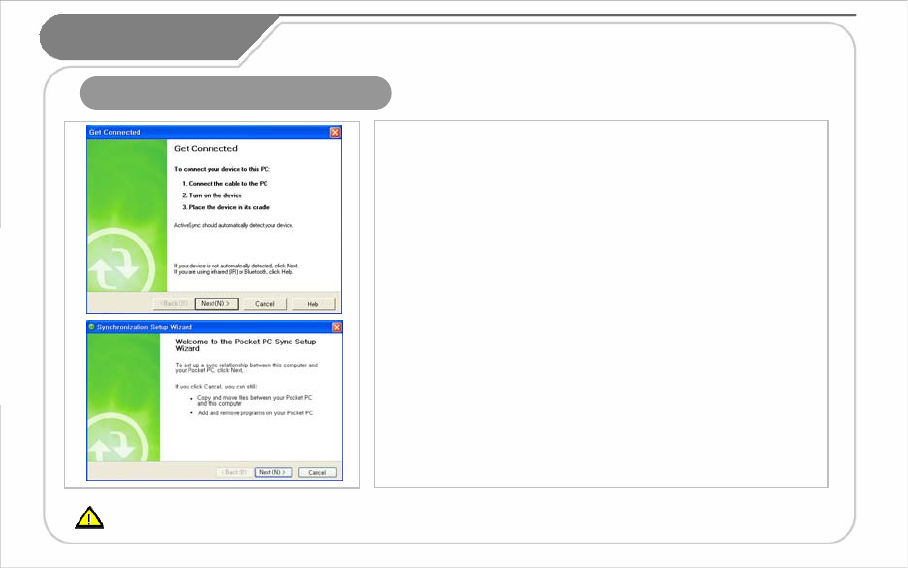
1. Installing Microsoft ActiveSync on Your PC
Install the Microsoft ActiveSync from the supplied Getting Started CD.
You can also download the latest version of ActiveSync from the Microsoft website.
2. Connecting the PDA to Your PC
After installation connect the PDA to the PC according to the following instructions:
① Connect the cable to the PC
② Turn on the PDA
③ Connect the cable to the PDA
If connected properly, the wizard for the setup synchronization will start.
(If the connecting cable is moving or loose, it may cause an automatic stop of the
Active Sync or re-synchronization. Please re-connect the cable again.)
3. Setting up a Partner Relationship
• Standard Partner Relationship: Proceed according to the explanation of the wizard for
setting up synchronization.
- Besides standard functions, data such as favourites, address, schedule, work, and
incoming mail will all be synchronized with the latest information maintained.
• Guest Partner Relationship : Choose ‘Cancel’ while proceeding with Wizard to set up
synchronization.
-Fundamental functions such as copying or transferring of data in between the PC and
PDA, program installation, and so forth may be used.

8
II. Understanding
Your Phone
Your Phone
1. Features of Your Phone
Single Band (Cellular, KPCS Band)
CDMA 1x, EVDO
CDMA
SpecificationDivision
Frequency: 2,402MHz ~ 2,480MHz
Number of channels: 79
Antenna power: 0.01mW and less
Modulation type: F1D
Bluetooth
Frequency: 2,402MHz ~ 2,480MHz
Number of channels: 13
Antenna power: 10mW and less
Modulation type: G1D, D2D
Used certified module (SWL-2560S)
WLAN
Quad Band (850/900/1800/1900 MHz)
GPRS Multislot Class 12, Class B
GSM
IrDA Port, 24Pin Port Interface
4° to 122° F/-20° to 50° C
Operation
Temperature
1.1 Client / HostUSB
T-DMBDMB
MiniSDSlot
Bluetooth 1.2 Class 2Bluetooth
1.2m concrete dropEnvironment
72(W) x 134(L) x 18.5(T) mmDimension
1,230mAh Li-onBattery
1.3M PixelCamera
Select from the following.
GSM & WLAN(802.11b/g),
CDMA 1x & WLAN(802.11b/g),
CDMA 1x-EVDO & WLAN(802.11b/g)
Communication
Select from the following.
3.5” QVGA 240x320 Touch Screen
3.5” VGA 480x640 Touch Screen
Display
RAM: 64MB, ROM: 512MBMemory
Windows Mobile 5.0OS
Intel PXA270 520MHzCPU
SpecificationDivision
The FCC ID SS4BM150R can only support GSM.
The GPRS/EDGE and WLAN can not be operated simultaneously .
9
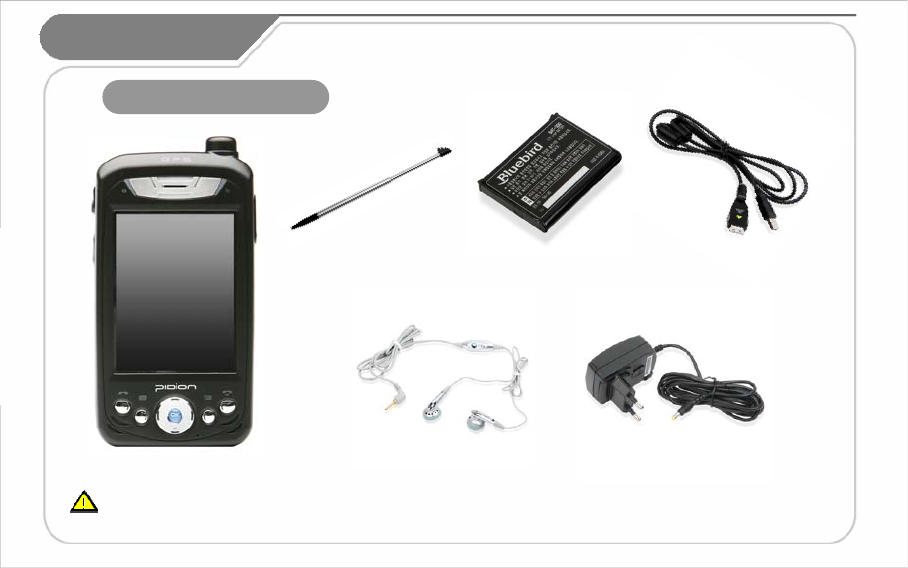
2. What’s in the box?
[Main Body]
[Stylus Pen]
[Earphones]
[USB Cable]
[Adaptor]
II. Understanding
Your Phone
Thank you for purchasing a PIDION Product. Please make sure all the above components are included.
The pictures and photos in this manual may slightly differ due to model compositions.
(When purchasing extra accessories please go to your nearest dealer.)
[Standard Battery]
10
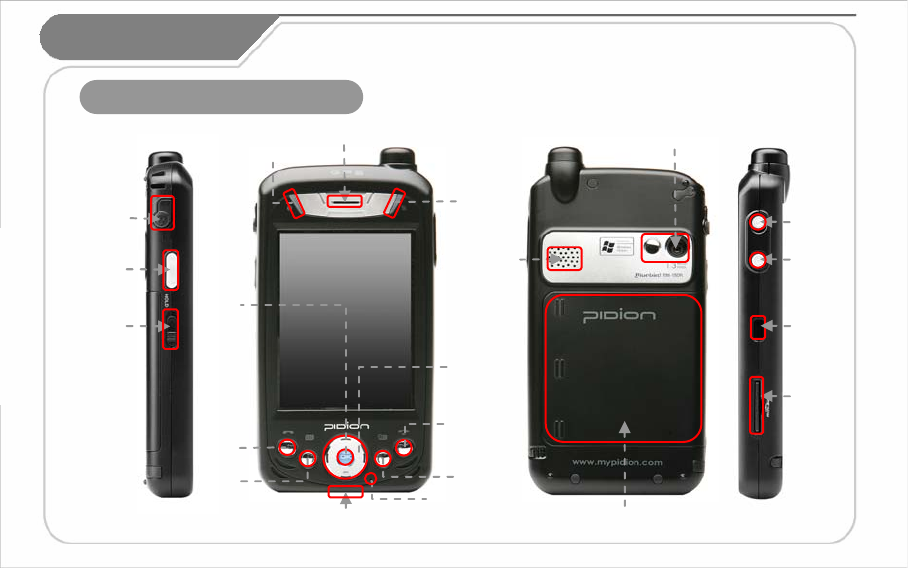
3. Closed View of Your Phone
Battery Charge LED
24pin Charging Terminal
(Lower Section)
Radio
Function
LED
MiniSD
Card Slot
Headset
Jack
Camera
Key
Volume Key
Camera
Receiver
Microphone
Speaker
Battery Cover
Power
ON/OFF
Key
IrDA
PORT
II. Understanding
Your Phone
Hold
/Unhold
Send
Key
Left
Soft
Key
End
Key
Right
Soft
Key
OK
Key
4-Way
Navigation
Key
11
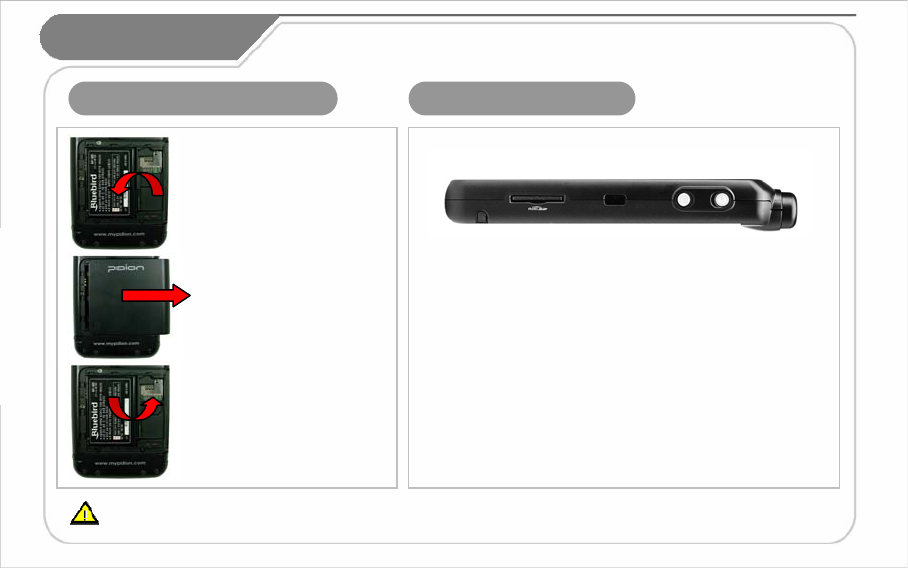
4. Install/Remove the Battery 5. MiniSD Memory Card
• Important data should always be
saved on the computer. The company
will not take any responsibility for the
loss of data on this product.
• If the memory card cannot be
removed easily, instead of removing it
with force, inquire to the service center
for its removal, or ask for an exchange
or refund of the product.
[Install the Battery]
[Remove the Battery]
1. Put the battery in line with
the left part of the PDA
and then push the right part to
lock.
2. Put the projected part of the
cover on top of the groove in
the back and then push
carefully with both thumbs.
1. Push down using both thumbs
to remove the cover.
2. Raise the battery by using the
groove on the lower part to remove
the battery.
II. Understanding
Your Phone
• Frequent insertion/removal of
the memory card, or applying
too much force to it, may cause
the product to malfunction.
• Card removal and turning the
power off/on using the memory
card may result in loss of data
or cause the memory card and
PDA to malfunction.
Make sure that the gold plate terminal of the memory card is pointed
towards the back when inserting into the MiniSD slot. For removal
push the exposed part of the memory card. It will pop out.
We strongly recommend that you use the adapter which was purchased with the product for charging the battery. However, the 24 pin charger of an ordinary
mobile phone may also be used to charge the PDA battery. (Due to the characteristics of a standard charger, there may be small discharge of electricity
despite the charger being fully charged.)
12
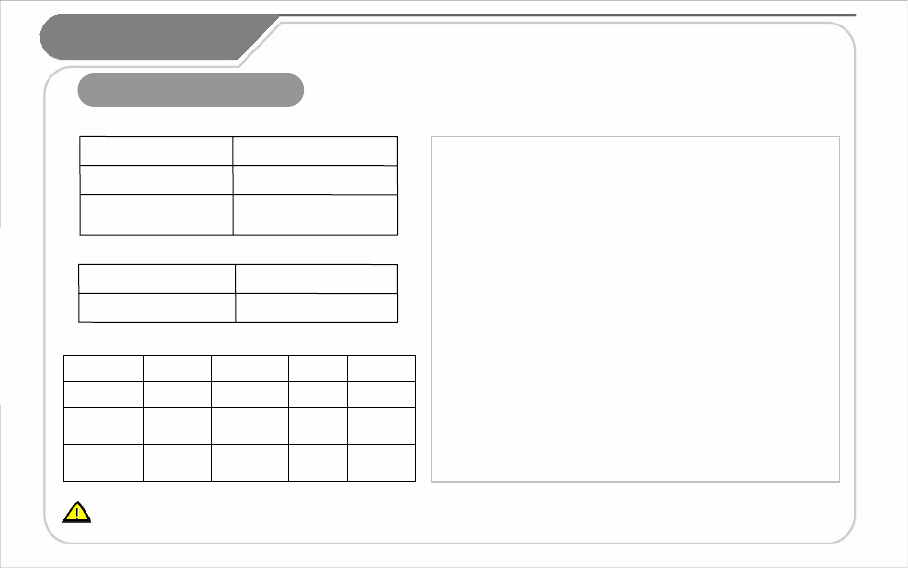
6. Battery & LED status
[ Safety Notice for Using the Battery ]
Standby: 15 hours
Phone call: 5 hours 30
minutes
Approximately 2 hours
Charge on a connection to
the Adapter
Maximum hours of use
when charged
Approximately 4 hours
Charge on a connection
from the USB
[ Hours for Charging & Use ]
[ Battery Charge LED]
[ Radio Function LED ]
GreenOrange
After ChargingWhile Charging
II. Understanding
Your Phone
Blinking
Slowly
---Standby
Blinking
Quickly
--Searching
AmberBlueBlueBlueIn Use
PhoneDMBBluetoothWLANDivision
•Batteries are expendable products and with regular use over time
they will lose there ability to fully charge.
• The battery may overheat from its application environment.
• If the fully charged battery lasts only half the time from its originally
purchased state, you should purchase a new battery. (Batteries have
a 6 month period guarantee.)
• The time that a battery may last may differ according to the lighting
of the monitor, temperature, length of its use, etc.
• Battery exhaustion may be considerably faster in areas where
Bluetooth, wireless Internet, or phones cannot be used.
(Bluetooth, wireless Internet, and phone functions should be turned
off when these functions are not in use. This will help save the
battery.)
•Leaving the battery on the re-charger after it has been recharged,
will not damage the battery.
• If the cables to the main body are not properly connected, the lights
on the main body may not come on during the recharging process.
Always check and make sure that all cables are connected properly.
• Do not remove the battery while it is in use. This may result in
damage of data and the PDA may be initialized.
• If the battery is not sufficiently charged, the PDA may turn off while
in use. Always check and make sure that the battery your using has
been sufficiently charged.
If the battery is running low on power, a warning notice may appear on the monitor with a warning sound.
Charging and usage hours may differ from that of the manual, according to the user’s application environment.
New batteries are not charged, therefore you must fully charge the battery before use.
13
III. Learning
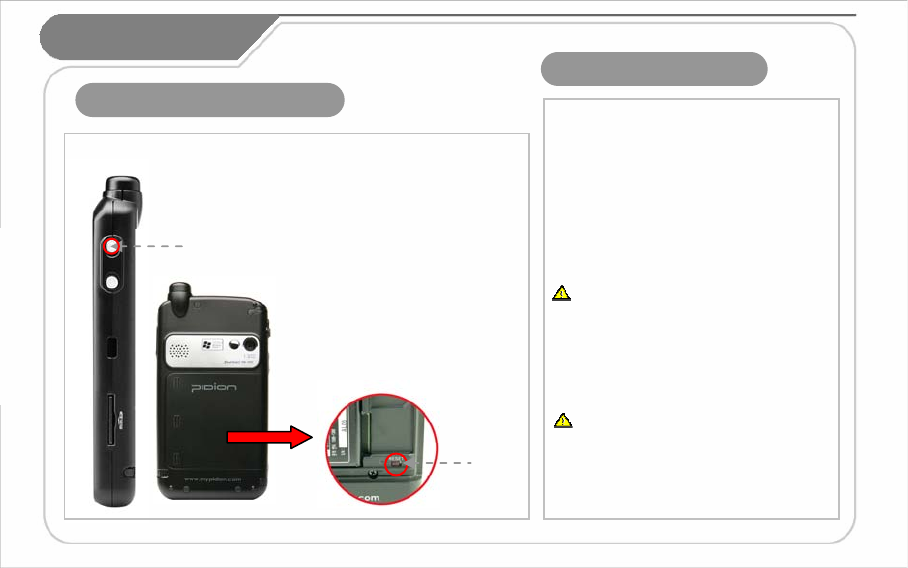
1. Powering On/Off the Phone
2. Resetting Your Phone
Power
button
Reset
Button
The power button is located on the right side of the
product.
The power button should be pressed shortly.
the Basics
Remove
Battery
Cover
If the power button is pushed for
more than 3 seconds, the LCD
Back Light will turn On/Off.
Even when the power is turned off,
if the GSM modem is turned on the
PDA will also power on
automatically so you can answer
the phone.
<Soft Reset>
Exemplary Situations
When memory conversion is not processed
smoothly due to long hours of program use,
or when there is an unexpected error resulting
in a clash between programs, and so forth.
(This function is equivalent to rebooting the PC)
Process Method
Press the reset button located at the back of the
body using the Stylus Pen.
Safety Precautions
All unsaved files will be lost and programs
currently in use will be shut down
when the screen is initialized.
<Hard Reset>
Send Key + OK Key + Reset Button
Safety Precautions
All data will be lost and all programs will be
initialized as they were when first purchased.
Please note that all addresses, schedules, and
information saved in the memory of the PDA will
be lost when processing hard reset.
14
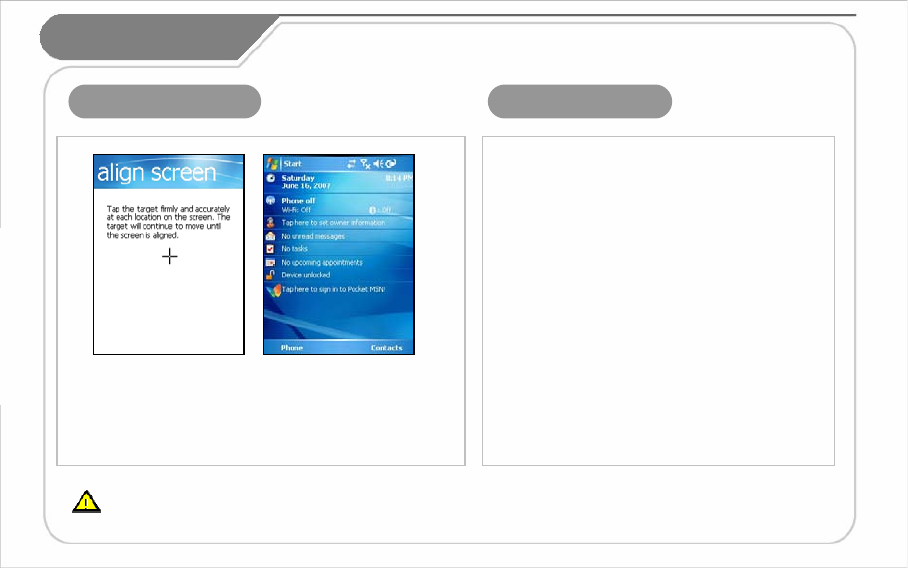
1. Turn the PDA power on.
2. Windows Mobile Logo will appear.
3. Touch the cross mark on the screen and follow it.
4. Proceed by following the instructions on the screen.
5. After finishing the setting, the ‘today’ screen will appear.
3. Starting your PDA 4. Using the Stylus
The provided Stylus pen may be used to directly process
a program and input information on the touch screen.
Pressing
This means using the Stylus pen by pressing it one time
to open, close, or cancel something.
(This is equivalent to pushing the right button of the
mouse when using the computer.)
Dragging
Upon choosing an item, you can select the area of the
item from the list by using the Stylus pen.
(This is equivalent to mouse drag when using the
computer)
Pressing for a While/Few Seconds
If you want to see extra functions of the chosen item(s),
push the Stylus pen for a few seconds to see the
pop-up menu screen.
(This is equivalent to clicking the right button on the
mouse when using the computer.)
III. Learning
the Basics
If the cross mark is not accurately pressed, the same screen may appear repeatedly.
Please use only the Stylus Pen and refrain from using pins or sharp objects.
(Using sharp objects may cause damage to the LCD monitor.)

15
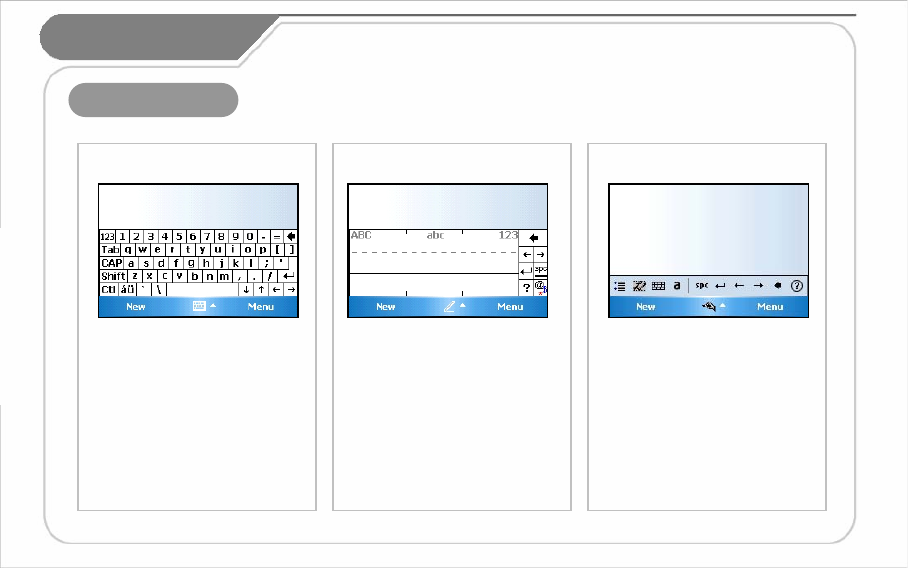
5. Entering Text
There are five different character
input methods available.
They are:
1. Block Recognizer
2. Built-in Numeric Keypad
3. Keyboard
4. Letter Recognizer
5. Transcriber
[ Selecting Text Input Mode ]
III. Learning
the Basics
This input method uses the traditional
writing area box split in the middle.
The left side is used to write letters
and the right side is for number entry.
Symbols and common functions are
located in other smaller boxes located
in the right of the writing box area.
[ Block Recognizer ]
Using Keypad, you can type letters,
punctuation, numbers, and other
Special characters into text entry fields
or other applications available
on your PDA.
[ Built-in Numeric Keypad ]
16
5. Entering Text
[ Keyboard ]
III. Learning
the Basics
This option allows you to enter text
using your own handwriting.
The screen is divided into three
different areas. A capital letter area,
small letter area, and a number area.
Characters are entered by printing
letters in each area. The character is
then analyzed and typed on the
screen automatically.
[ Letter Recognizer ]
The transcriber option is similar to
the letter recognizer, except instead of
entering characters into a designated
area, you can enter entire words and
sentences using your own handwriting.
Transcriber supports both printing and
cursive writing styles and then
automatically types the information
on the screen.
[ Transcriber ]
This input method displays
an on-screen keyboard that can be
used to input characters by tapping
the screen using the stylus pen.
17
IV. Using the Phone
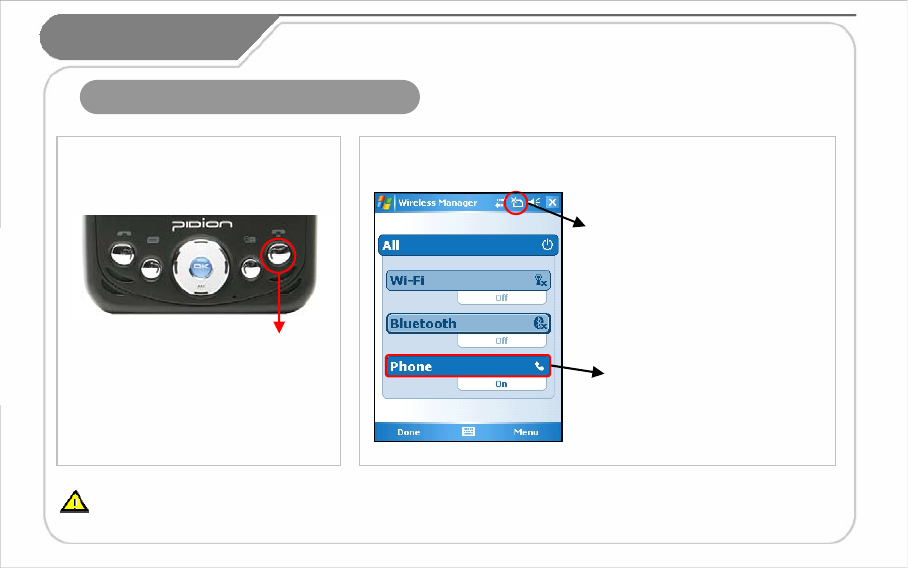
1. Turning the Phone Functions On/Off
Please refrain from using the phone while driving or walking. This is very dangerous and may be illegal in your country.
If the end key is pushed for more
than 3 seconds, the Phone
Functions will turn On/Off.
[ Using the Key ]
Touch this part
or select [Wireless Manager] from
[Start]→[Settings]→[Connections]
tabs
Touch this part to turn On/Off.
[ Using Wireless Manager]
End Key
18
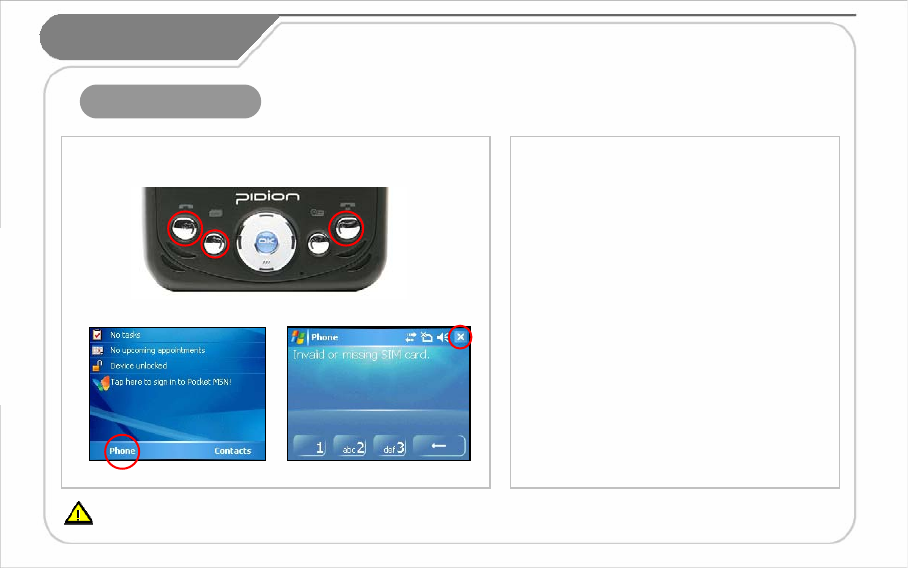
2. Phone Program
Method of Operation
①Press Send Key on the PDA.
②Press Left Soft Key
③Touch [Phone] on the lower part of the
‘Today’ screen.
Exit Method
④ Press End Key on the PDA.
⑤Touch the [X] button on the upper right
part of the ‘phone’ screen.
Please refrain from using the phone while driving or walking. This is very dangerous and may be illegal in your country.
①
③
④
⑤
[ Key ]
[ ‘Today’ screen ] [‘Phone’ Screen ]
IV. Using the Phone
②
19
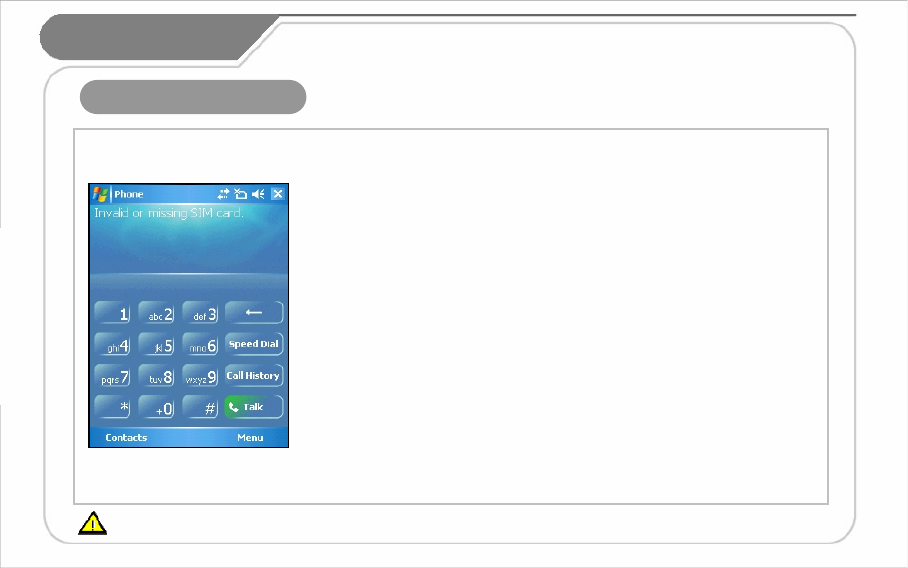
3. Calling and Receiving
Calling
1. Call the number by using the PDA keypad input screen,
and then press Send Key.
2. Push the [Talk] button by using the keypad on the screen.
Receiving
1. Press Send Key on the PDA.
2. Touch the [Answer] button on the lower left part of the screen.
Refuse Calls
-Touch the [Ignore] button on the lower right part of the screen to refuse a call.
(Pressing the volume controller on the left side of the PDA will only mute the bell.)
Finishing the Call
1. Press End Key on the PDA.
2. Touch the [Finish] button appearing on the phone screen.
Please refrain from using the phone while driving or walking. This is very dangerous and may be illegal in your country.
IV. Using the Phone

20
4. Contacts
Please refrain from using the phone while driving or walking. This is very dangerous and may be illegal in your country.
IV. Using the Phone
Using Contacts
① Contacts may be searched by inputting the name/number or by touching the tab button.
② Contacts Menu
- New Contact : Register new contact
- Copy/Delete Contact : The chosen contact will be copied/deleted.
- View By : Contacts will be indicated according to name/company.
- Filter : Filter mode can be inputted to show only relevant items.
③ Various options can be used by touching the contact for a few seconds.
- Calling a company/home/mobile number: Calls will be made to theenlisted numbers.
- Sending E-mails: E-mails may be sent to the enlisted e-mail address.
- Sending Text Messages : Text messages may be sent to the enlisted numbers.
Registration of New Contacts
1. Register new contacts by touching [New Contact].
2. Input the name and occupation into the appropriate office columns.
21
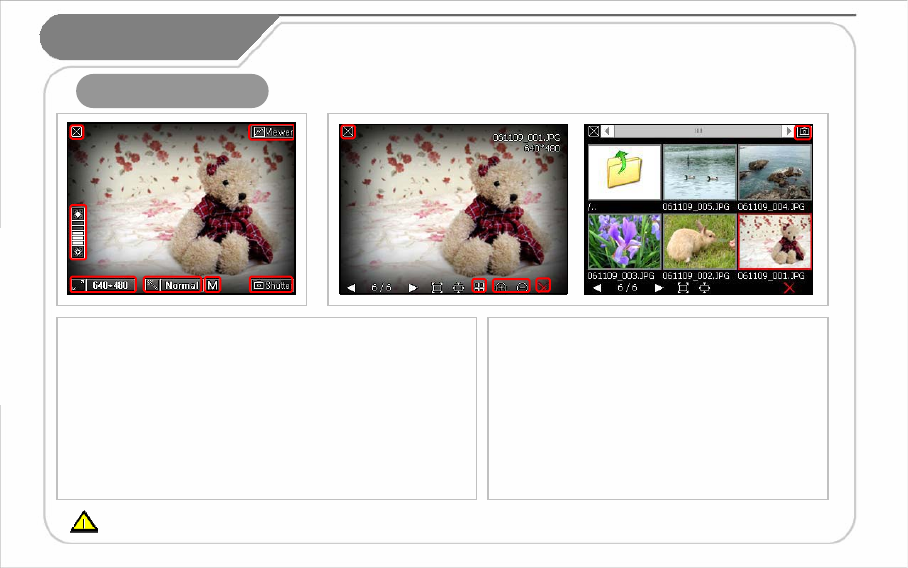
Using the Camera
Press either the Camera Key on the right side of the product,
or launch [Start]→[Programs]→[Camera]
Set Screen
① Close Camera Program
②Adjust Brightness
③ Set Resolutions: 320*240~1280*960
④ Special Effects: Normal, Gray, Sepia, Negative
⑤ Image Quality Setup : High, Medium, Low
①
②
③④
⑤⑥
⑦①
②
④
⑤
Press the viewer button on the upper right hand
corner of the screen.
Set Screen
① Close the Photo Album
②Brief View
③ Zoom In/Zoom Out
④ Delete
⑤ Move to camera mode
⑥Photograph
⑦Photo Album
③④
If the battery does not have enough power, the camera might automatically turn off or may not start. It will automatically power off if it is not used for more
than 1 minute. The camera will automatically exit when operating the DMB. The Camera and DMB cannot be processed simultaneously.
V. Camera
22
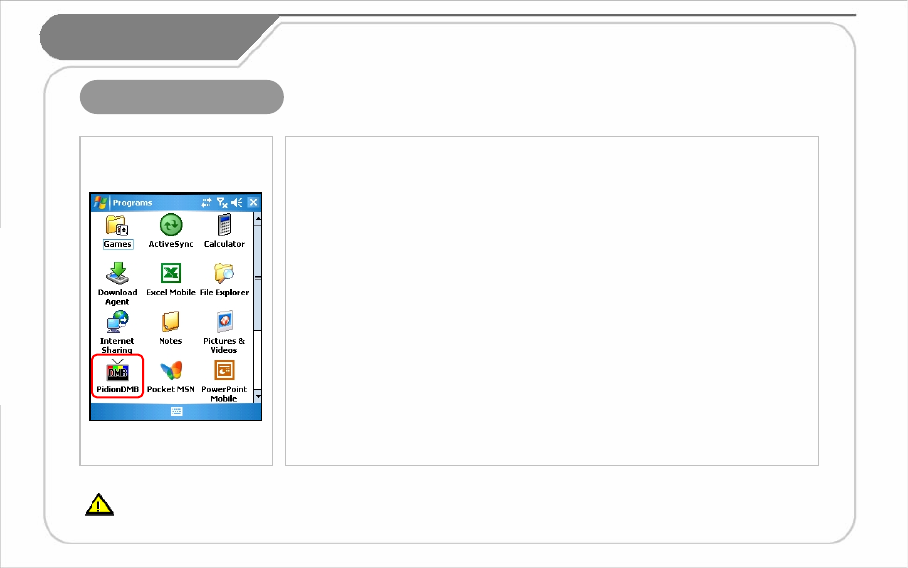
1. Opening & Closing
You can watch and listen to terrestrial DMB and radio.
How to open
[Start]→[Program]→[PidionDMB]
How to close
1. Closing the program is identical to the process for other programs.
(Press the “X” button at the upper right corner of the program window.)
2. The program closes when the “OK” button of the keypad is pressed.
Fully extend the antenna for reception when viewing terrestrial DMB
broadcasts, and when not viewing, collapse and insert the antenna within
the main unit.
If executing other programs while running the DMB program, normal program operation is not guaranteed.
Avoid DMB viewing while performing activities such as driving or walking, as doing so can be dangerous.
Applying excessive force to the antenna can result in its damage. If opening the camera during DMB operation, the DMB broadcast automatically
ends, as simultaneous running of the camera and DMB function is not possible .
VI. DMB
23
If executing other programs while running the DMB program, normal program operation is not guaranteed.
Avoid DMB viewing while performing activities such as driving or walking, as doing so can be dangerous.
Applying excessive force to the antenna can result in its damage.
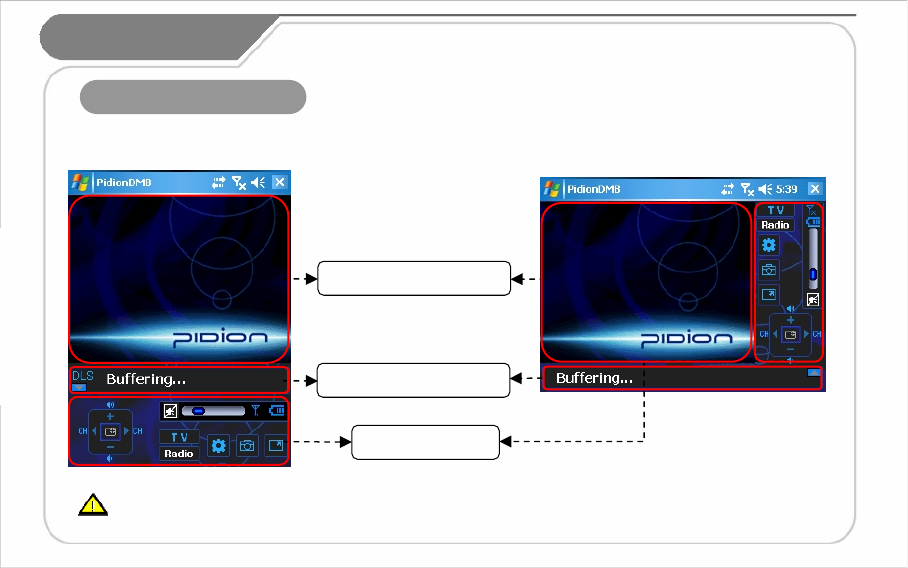
2. Screen Configuration
Control Menu Display
Upper Display Area
[ Vertical Mode ] [ Horizontal Mode ]
DMB Status Display
VI. DMB
24
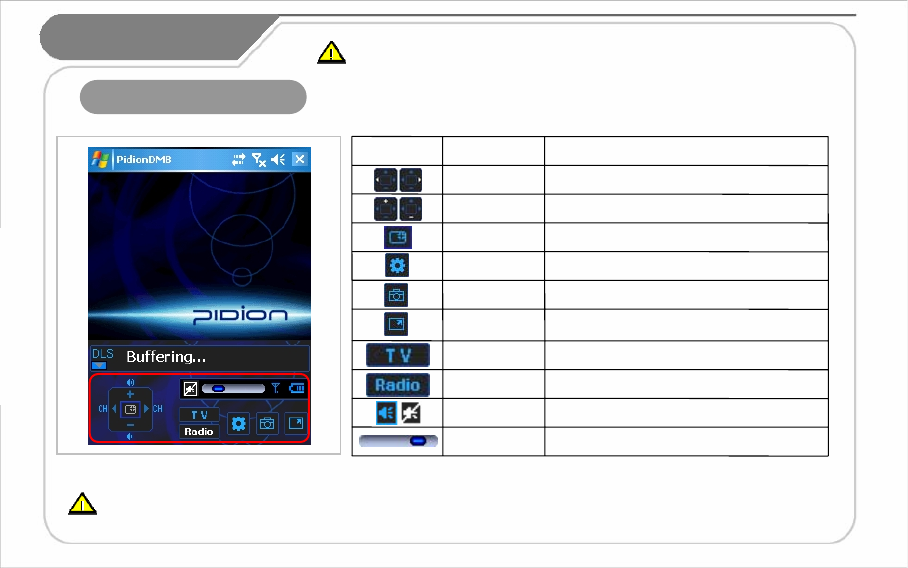
3. Operation Guide
Adjust volume.
Mute volume regardless of level.
Switch from TV Mode to Radio Mode.
Switch from Radio Mode to TV Mode.
Enlarge screen size to full.
Save screen shots.
Set DMB options.
Set screen size.
Adjust volume.
Change channels.
DescriptionNameIcon
Left/Right
Volume Bar
Mute
Radio Mode
TV Mode
Full Screen
Capture
Setting
Toggle
Up/Down
If executing other programs while running the DMB program, normal program operation is not guaranteed.
Avoid DMB viewing while performing activities such as driving or walking, as doing so can be dangerous.
Applying excessive force to the antenna can result in its damage.
When opening the DMB program, the message “The player is being closed due to initialization failure.
Check the player installation file again and retry.“ may appear. In such cases, the DMB program
can be used normally once again, after removing any unnecessary programs that may have been
installed in the screen on the same day. Such problems can result due to limitations of Microsoft
Windows Mobile 5.0, and thus, maintaining a non-excessive quantity of installed programs is
recommended.
VI. DMB
25
If executing other programs while running the DMB program, normal program operation is not guaranteed.
Avoid DMB viewing while performing activities such as driving or walking, as doing so can be dangerous.
Applying excessive force to the antenna can result in its damage.
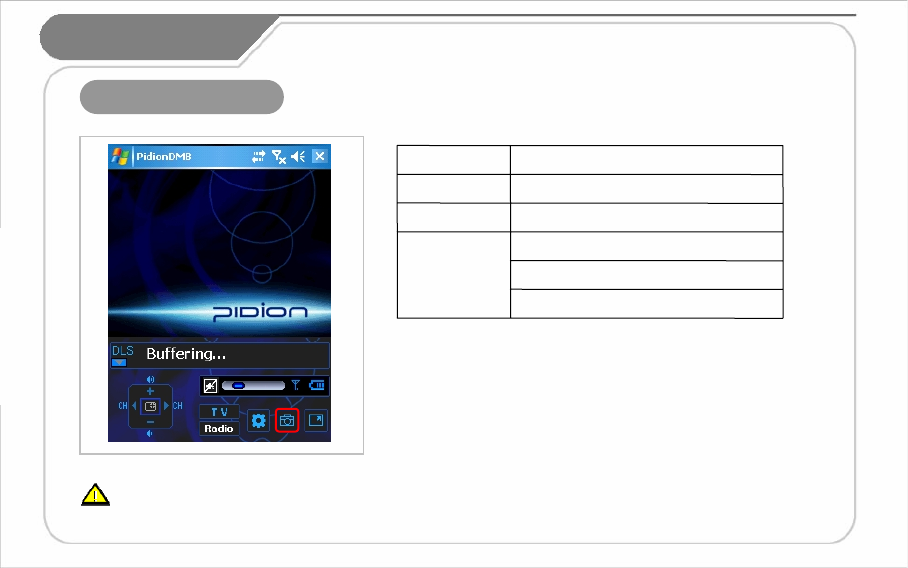
4. Capture Screen
Capture Size: 320 x 240
File Extension: JPEG
File Name: Date and time of captureFile Attributes
Within the My Documents folder.Folder to save
Press the capture icon. Capture Type
DescriptionDivision
VI. DMB
26
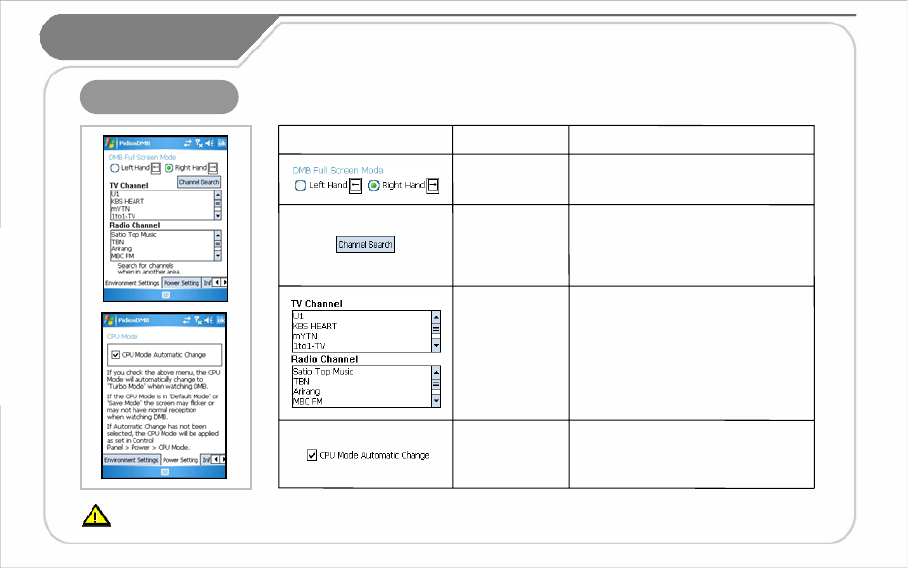
5. Setting
If executing other programs while running the DMB program, normal program operation is not guaranteed.
Channel searching times can be prolonged in areas that do not receive DMB broadcasting or in locations where reception is weak.
In addition, the reception of DMB broadcasting may be impossible in areas where radio waves are blocked, such as basements and interiors of
certain buildings.
Lists divided by TV and radio channels
that are results of a channel search;
double-click any entry to view.
DMB TV/Radio
Channel List
When checked, the turbo mode is
engaged automatically when viewing
DMB broadcasts to facilitate smooth
viewing.
CPU Mode
Automatic
Change
Perform an automatic search of the
current region for TV/radio channels
that can be added.
DMB TV/Radio
Channel
Search
Set orientation to left hand or right
hand in full screen mode.
Full Screen
Mode
DescriptionNameScreen
VI. DMB
27
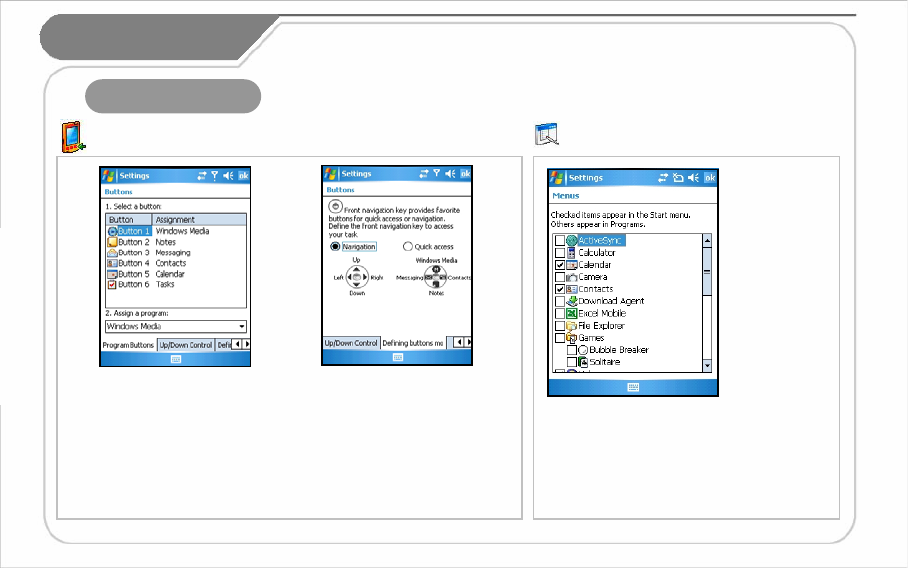
[ Buttons ]
Method of changing the shortcut key
allocation program: Choose the button
that you want to set up, then choose
the program you need from the
allocation program below.
Programs you can choose: Aside from
the basic programs, you can institute
personally installed programs.
[ Menus ]
Programs that can be used will appear
on the check list. The checked icon will
appear on the title bar of the start menu.
(You may check up to 7 items.)
This is used for
setting up the
start menu of
the title bar.
1. Personal Tab
VII. Changing
Your Settings
[Start]→[Settings]→[Personal]→[Menus]
[Start]→[Settings]→[Personal]→[Buttons]
Defining Buttons mode:
Front navigation key provides
favorite buttons for quick access or
navigation.
28
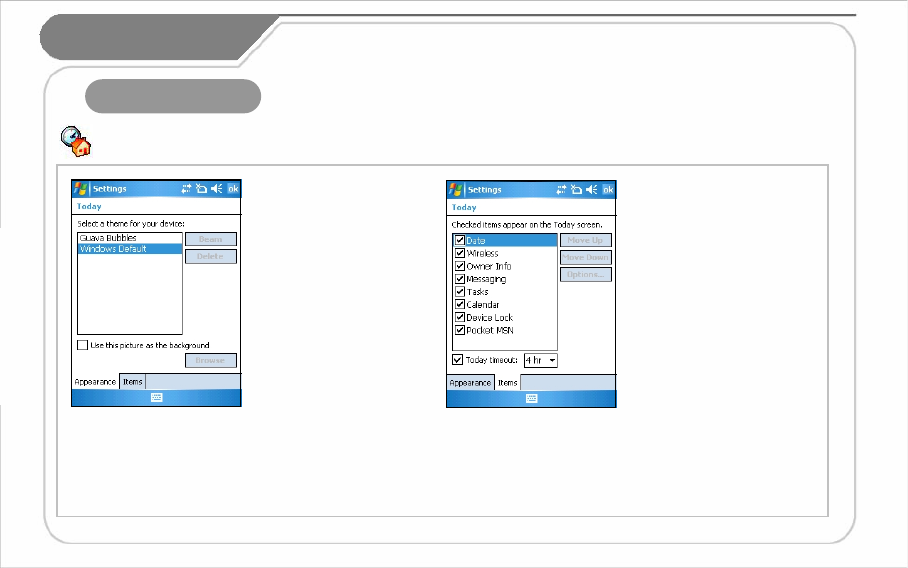
[ Today ]
The skin file (*.TSK) will appear on the background
image setup after it has been printed into ‘My
Documents’.
It will appear on the ‘Today’ screen according to the
order that it appeared on the screen. This order may
be changed by moving it up or down.
You may choose the skin
and the surrounding screen
according to your taste.
[Start]→[Settings]
→[Personal]→[Today]
Choose the categories that
appear on the [today]screen.
[Start]→[Setting]
→[Personal]→[Today]
1. Personal Tab
VII. Changing
Your Settings
29
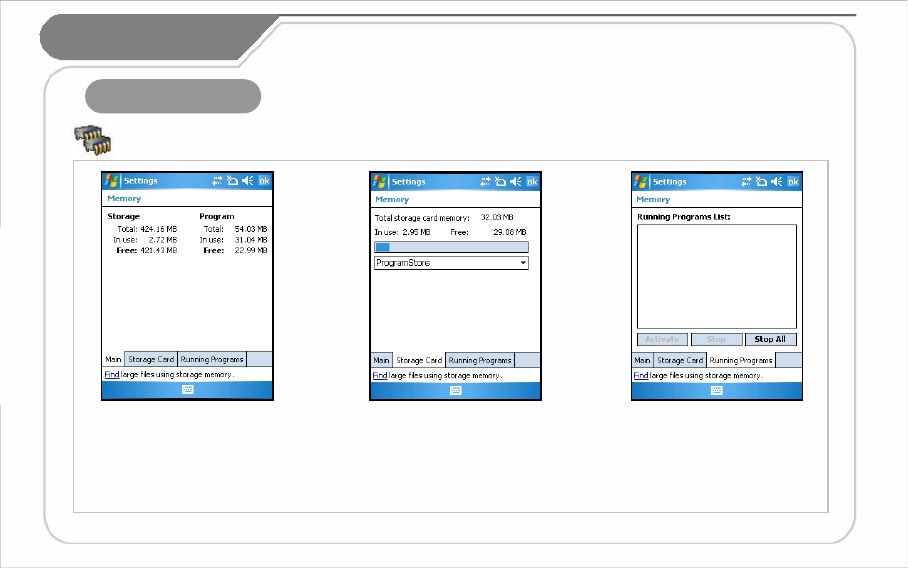
[ Memory ]
This indicates the present condition
of the Program Store (Used
Capacity, Remaining Capacity),
and the Mini SD memory card
that is inserted into the PDA.
This indicates the current
operating program lists, so
you may choose to stop all or
part of the programs.
[Start]→[Settings]
→[System]→[Memory]
This shows the current status of
the memory (the memory used
and remaining).
2. System Tab
VII. Changing
Your Settings

30
[ Screen ]
[Start]→[Settings]→[System]→[Screen]
The screen may be converted to portrait or landscape (right-
handed, left-handed). You may readjust the stylus point by
pressing the [Align Screen]. The text size that appears on the
screen may be adjusted in 5 stages.
This indicates the list of programs
installed personally or by a group.
[Start]→[Settings]
→[System]→[Remove Programs]
[ Remove Programs ]
Choose the program that needs to be deleted
from the list and press [Remove] for an
automatic deletion.
2. System Tab
VII. Changing
Your Settings
31
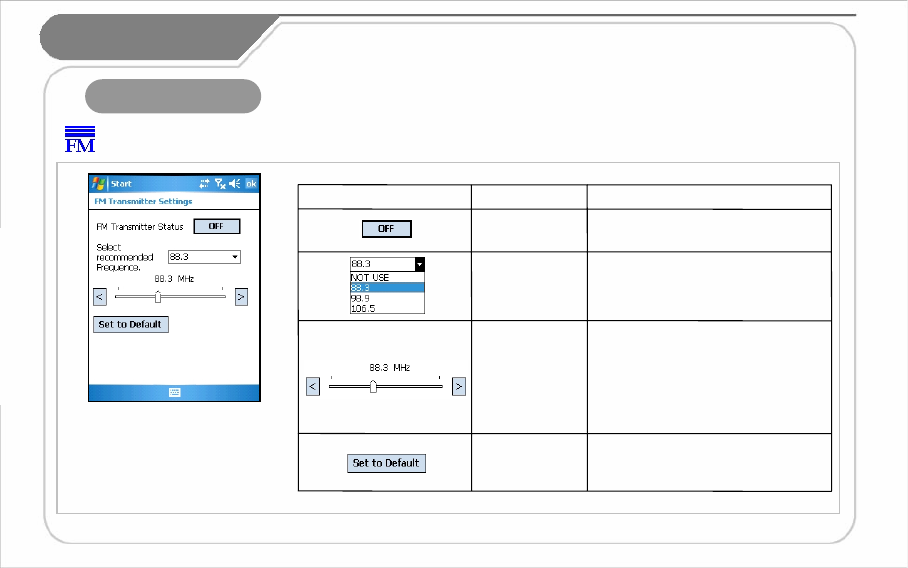
[FM Transmitter ]
[Start]→[Settings]
→[System]→[FM Transmitter]
2. System Tab
VII. Changing
Your Settings
The FM Transmitter can be used to
listen to music files in a PDA via a car
stereo.
Use the left/right buttons to select a
frequency within the range of 88 ~
108 MHz.
Frequency
Selection
Return to default settings. Initialization
88.3 / 98.9 / 106.5 MHz
Select from 3 recommended
frequencies. (Select “NOT USE” if
none of the 3 recommended
frequencies are to be used.)
Recommended
frequency
Selection
When power is on: ON
When power is off: OFF
Power On/Off
DescriptionNameScreen
32
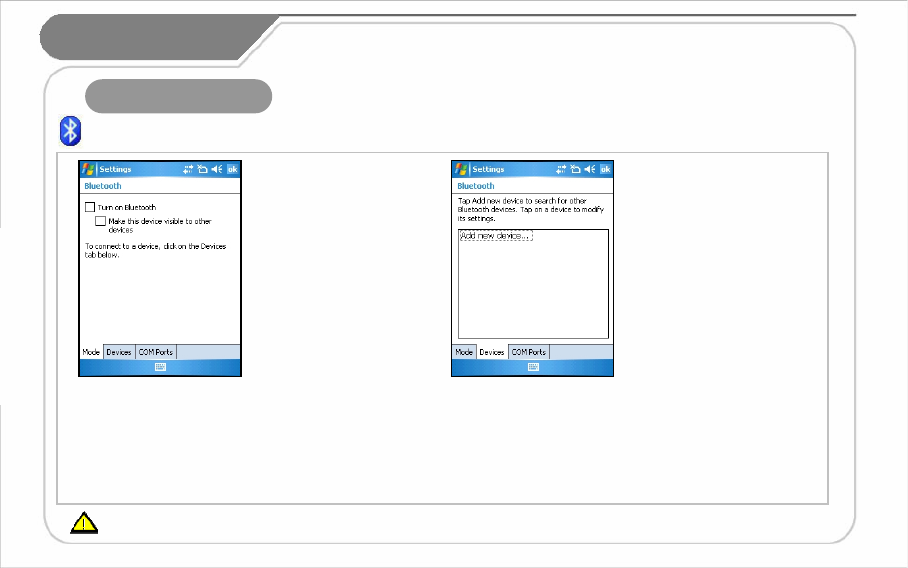
[ Bluetooth ]
Setup for the communication
of Bluetooth equipment.
[Start]→[Settings]
→[Connections]→[Bluetooth]
Bluetooth Setup Method
1. On touching the [Add new
device…], it will scan the
surrounding Bluetooth device.
2. Select the device to connect
and press [Next].
3. Input the pass key to setup for
a secured connection and then
choose [Next].
(Check the relevant device
manuals, as the pass key for
each device is different.)
4. Check the indicated name
and see whether the connecting
operation is correct. Then select
[End].
5. The process has been
successfully completed when the
model no. and icon of the
product appears on the screen.
The pairing method may be different for each Bluetooth device. Please check the manual.
Turn on Bluetooth : Setup as Use/Non-use.
(The removal of this function when not in use may prolong the life
of the battery.)
Make this device visible to other devices :
This enables the search of BM-500 from other devices.
It scans the
surrounding Bluetooth
device and conducts
pairing.
3. Connections Tab
VII. Changing
Your Settings
33
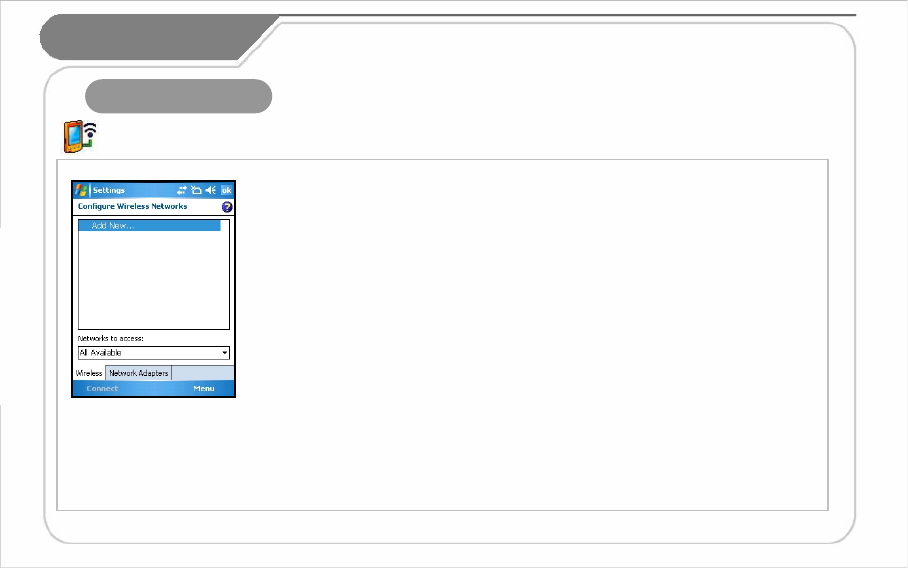
[ Wi-Fi ]
Wireless LAN Setup sets up the network card
environment which connects it to the surrounding AP
through the setting up of the wireless LAN.
Set Up Method for Wireless LAN
1. If you turn on Wi-Fi from Wireless Manager,
it will search the AP within the vicinity and show it on the screen.
2. Choose the AP from the wireless network list indicated
and press [Connect].
- If the AP information cannot be received
please set it up manually.
1. Touch [Add New…] from the Configure Wireless Networks window.
2. Input the AP name of [Network name].
Then check the AP setup content.
3. Press [Finish].
4. The AP name will appear on the screen list.
5. The process will be completed by pressing [Connect].
Set Up Wireless LAN
through Wi-Fi.
[Start]→[Settings]
→[Connections]→[Wi-Fi]
3. Connections Tab
VII. Changing
Your Settings
34
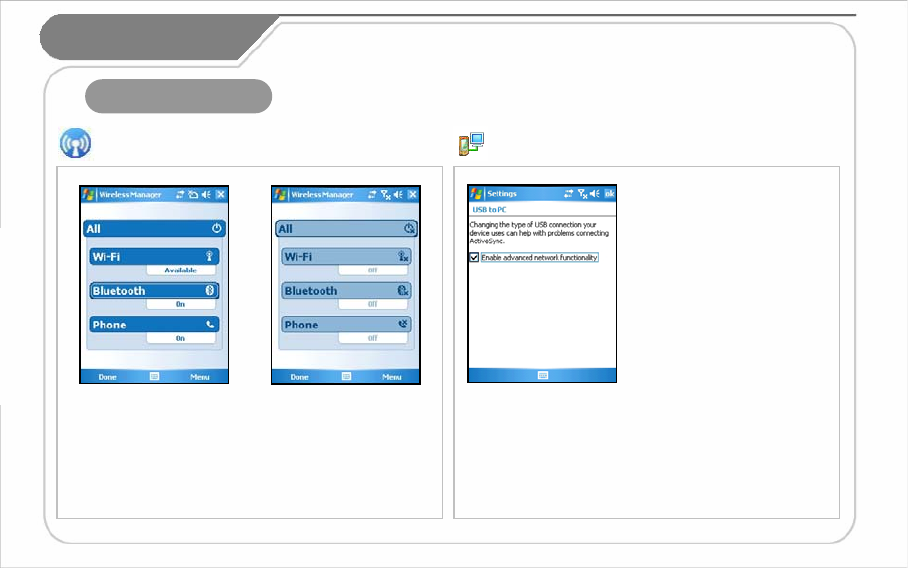
[ Wireless Manager ]
By touching [All], you may start 3 functions at the same time.
[Wi-Fi], [Bluetooth], [Phone] may be turned on or off
separately. When turning on these functions, a detailed setup
is possible through the [Settings] that appears on the lower
part of the screen. Also, turning off the [Menu] button on the
lower right of the screen may be used to set up individual
settings.
[ USB-PC Connect ]
If you decide to uncheck [Enable advanced network
functionality], the PC will not synchronize.
If ActiveSync does not synchronize after a right
connection to the PC, please recheck the checking
status.
You may set up the sync
environment with the PC.
[Start]→[Settings]
→[Connections]→[USB to PC]
3. Connections Tab
[Start]→[Settings]→[Connections]→[Wireless Manager]
VII. Changing
Your Settings

35
Please abide by these instructions as they will ensure safe and proper use of the product.
VIII. Information
1. Safety Information
1. Safety Instructions for Recharging Batteries
• If the main body of the product or the battery has been submerged under water, do not attempt to dry it by heater or microwave.
•(Wet PDA or battery changes the label color. Malfunction with colored label can not be serviced under warranty service.)
• Please make sure objects such as necklaces or rings are not placed near the battery connection terminal (the metal plate parts)
which may transfer electricity to it.
• When using a battery after it has not been used for a long period of time, you should leave it in room temperature after fully recharging it.
Extended periods of not using the battery will affect its capacity and durability.
• Even if the battery has been recharged, its possible hours of use may shorten due to the lowering of electric voltage.
• Please use only the instructed type of battery and adapter. Do not use any products of the PDA for any other purpose other than
those specified in the users manual.
•(If these instructions are not followed, it might result in an explosion of the product and may shorten the lifespan of the battery,
PDA, or adapter.)
2. Safety Warnings for Use of the Phone
• Using the phone while driving (bicycles, automobiles, motorcycles, etc.), walking, climbing, and so forth is strictly prohibited.
3. Other Instructions
• Data may be damaged due to careless use of the customer or during the process of repair. It is vital that such data is separately kept,
as the company will not take any responsibility for damages of these accounts.
• Upon malfunctions, do not reconstruct or dismantle the product. Immediately send these components to the Customer Service Center.
• Please turn off the power in explosive areas (in planes or hospitals) as there may be danger due to electronic wave problems.
• Please stop using the PDA and consult a medical expert in case of any allergic reactions to the product.
• Please do not dye or paint any part of the PDA. This may damagethe product.
• High temperatures or high humidity may damage the product.
• The screen may be damaged if sharp objects such as pins, nails or pens are used instead of the Stylus Pen.
• Please avoid vibrations or shocks. When not in use, please place in a safe spot after unplugging the power cable.
• Place the adapter in a firm position so it will not move. If smoke or an irregular sound comes from the PDA, immediately turn it off,
unplug it, and separate the adapter plug. Also remove the adapter plug in case of thunder and lightning.
•There will be no service offered relating to human security, as there may be a possibility of confusion in the electric waves of the product.

36
VIII. Information
2. Troubleshooting
Q : What should I do if the PDA gets wet?
A : First, remove the battery from the PDA and lay it out to dry. If it does not operate properly after being dried,
then the main board or other components may need to be exchanged. Please visit your nearest customer service center.
Q : The PDA Power does not come on.
A : Recharge for a certain amount of time and check it again. If it still does not power on, please visit your nearest
customer service center for advice.
Q : The PDA does not recharge.
A : Check whether the adapter of the PDA and PC has been connected properly and wipe the charge terminal if needed.
If it still does not operate properly, please visit your nearest customer service center for advice.
Q : Calling and receiving calls are not smooth and the connection is frequently cut short while talking on the phone.
A : The electronic wave condition might be unstable. Move to a different area and try again.
Q : Voice reverberates while talking on the phone.
A : Adjust the volume or try again after moving to a different area.
Q : The PDA has been over heated.
A : Such conditions may arise due to long hours of using the phone, game, or internet.
However, this will not effect the functions of the product.
Q : The battery life span seems to have shortened.
A : Batteries are expendable products. Each time you use it the life span of each new recharge will slowly become
shorter and shorter till it is no longer capable of being recharged anymore.
37
3. Customer Service
[Before Requesting After-Sales Service]
For any enquires of problems or inconveniences while using the product
please call +82-2-1588-1380.
[Bluebird Soft Customer Service]
[Registering for After-Sales Service
VIII. Information
•According to company rules, registering for customer service requires prepaid postal or delivery service, or visitation.
•If you have purchased the product through any store other than Bluebird Soft, you have to be registered as a user in order to request
customer service.
•In order to be registered as a user, call Bluebird Soft Inc. Call center number: +82-2-1588-1380.
•When you register for customer service, you need to attach the purchase receipt with the product.
•If you also post your name, contact number, address, and the problematic symptoms, the product will go through a faster and more
efficient examination.
•You can either ask for service from the company you purchased it from, or talk directly to customers service at Bluebird Soft Inc.
•Do not intentionally damage the label on the product.
•Customers may have disadvantages if the label is damaged.
•If you have to return the product to Bluebird Soft Inc., you need to put it in a safely packed box.
•We do not warrant you for the damages incurred during transportation. Please use the original box of the product and bubble wrap it.
•Transport the product safely. Bluebird Soft Inc. is not responsible for any components lost during the transportation.
• Phone : +82-2-1588-1380
• Fax : +82-2-548-0870
• E-Mail : gcs@bluebird.co.kr
• Address : Customers Service Center 2nd Floor,
558-8, Sinsa-dong Gangnam-gu Seoul, Korea
< Hours >
• Mon.-Fri. : 9 A.M. ~ 6 P.M. (GMT Time: +9 Hours)
• Sat. : 9 A.M. ~ 2 P.M.
• We are not open on Sundays and National Holidays.
• Please backup all the data in your PDA before requesting
customer service.
• We do not backup products registered at the customers
service center. Therefore, we are not responsible for any
damage or loss of data.
38
Exchange after adding 10% to the depreciated price of the
fix price (the highest price–purchased price).
RepaymentImpossible to exchange.
When it is impossible to repair within 1 month.
Exchange after depreciation of the fixed price.
Exchange or
Repayment
When the manufacturer has lost the product in
which the customer has requested for a repair
Impossible
Repairs
5 problems in all different parts
Charged Repair
Exchange or
Repayment
The same problem occurs 4 times
Charged Repair
Repair Free of
Charge
The same problem occurs 3 times
Possible
Repairs
RepaymentWhen it is impossible to exchange within 1 month
Exchange or
Repair Free of
Charge
An important repair is needed after 1 month of exchange
Exchange or
Repair Free of
Charge
Requesting important repairs within 1 month since purchase date
Exchange or
Repayment
When requesting important repairs within 10 days of purchase
After term of guarantee
Within the Term
of Guarantee
Contents of Compensation
Type of Customer Damage
[ Regulations on Free/Charging Repairs]
Abiding to the Regulations of Customer Damage Repayment, Terms of Component Possession: 3 years
Exchange will be made to the same product. If an exchange for the same product is impossible, then it will be exchanged for a similar product.
However, there should be a repayment if the customer does not want an exchange for a similar product. Repayment amount should be the amount written
in the receipt. If the price on the receipt is higher than the price, than the usual price will be used as a standard, considering that other incidental expenses
had been added to the higher price.
4. Service Center Information
VIII. Information

39
Charged Service
1. If it is not a default, it will be charged when requesting for after-sales service.
- Service request due to inappropriate use of the customer
- Loss of a PIN number
- Use of programs that might effect the program (over-clock, forceful changes in the input of the system, personal developments)
2. Default due to a mistake on the part of the customer
-Default due to inappropriate or careless use of the product
(dropping, submersion under water, shock, damage, unreasonable operations, etc).
-Default due to a repair or unauthorized technician.
-Default caused intentionally or by carelessness of the customer.
-Default due to the use of fraudulent parts or components.
3. Other cases
-Default due to nature (fire, damage due to sea wind, flood damage, etc.).
-Expendable parts have exhausted there life (batteries, antenna, or other component parts).
4. Regulations of treatment after charged service
- If the same default occurs on the part that had been repaired within a 2 months(60 days) period, it will be provided with free of
charge repair service.
There will be no returning of goods or repayment upon the following situation:
Removal of the sealing of the product if it had been sealed.
If the product has been damaged due to careless use by the customer or due to a natural disaster (floods, rain, fire, etc.).
Loss of product or other components (CD, diskette, manual, connecting cables, etc).
Damage to the product after 10 days of purchase, the product will either be exchanged or provided with after-sales service
(note, returning of goods or repayment is not allowed).
4. Service Center Information
VIII. Information

40
1 year from purchase
Term of
Guarantee
Place of
Purchase
Manufacture
Number
Date of
Purchase
BM-150R
Name of Model
PDA
Name of
Product
Certificate
of Guarantee
Thank you for purchasing a product from Bluebird Soft Inc.
If a circumstance arises where you lose a receipt or the certificate of guarantee, then the term of guarantee will be calculated 3
months (certified by the number of the manufacture, a certificate of inspection) after the date of manufacture.
In case of accessories (such as batteries), only those that match the sales list managed by the service center will be eligible for
customer service.
A repair or an exchange of batteries that does not match the sales list of the service center due to the carelessness of the customer
will be fully charged.
< Guarantee of the Product >
1. Due to the regulations of the customer damage compensation, Bluebird Soft Inc. (hereafter Bluebird) will guarantee the products
as follows:
2. If Bluebird had been notified of the defaults within the term of the guarantee and the extent of guarantee, Bluebird will repair or
exchange those products according to the guarantee policies.
3. If Bluebird cannot repair or exchange defaulted products that had been sent within the term of the guarantee, but falls within the
coverage of the guarantee policies, Bluebird will compensate forthe products.
4. Bluebird does not have any responsibility to repair, exchange, or repay products until the customer returns the defaulted product.
The exchanged product will be provided with one that has a quality equal to that of the brand new product.
5. Bluebird will guarantee those products that are from countries in which Bluebird rightfully distributed the guaranteed products.
6. Bluebird products may include parts, composition, accessories, and materials that have the same capability as a brand new
product.
7. If it is a software product, guaranteed service will be offered only in cases where the programming commands cannot be launched.
Bluebird cannot guarantee that the product will never stop or there will never be an error when using the product.

41
Authenticated Facts
Name of Authenticator : Bluebird Soft Inc.
Name of Product : Wireless product for the wireless data communication system
Name of Model : BM-150R
Date of Production : 2007. .
Manufacturer/Country : Bluebird Soft Inc./ Republic of Korea
Authenticator Identification : BBS