BLUEBIRD BM300 Personal PDA with Bluetooth and WLAN User Manual PPTVIEW
BLUEBIRD INC. Personal PDA with Bluetooth and WLAN PPTVIEW
UserManual.wiki
>
BLUEBIRD
>
BM300 User Manual
>
User Manual
Contents
1.
User Manual
2.
User manual
User Manual
Navigation menu
Upload a User Manual
Namespaces
Wiki Guide
HTML
PDF
Info
Views
User Manual
Discussion / Help
Navigation
![4 Product Components [Body] [Stylus] [Ear phone] [USB cable] [Adapter] [Standard Battery] [User’s Manual, CD] Product Information Thanks for your purchasing PIDION. Make sure that the package contains all of the above contents. The picture or photo may differ from that illustrated in the user’s manual according to the model (If you want additional accessories, contact Customer Information Service Center).](https://usermanual.wiki/BLUEBIRD/BM300.User-Manual/User-Guide-727137-Page-4.png)
![6 Each Part Name and Button Product Information [Wireless Indicator LED] [Battery Indicator LED] [Job] [Received Letter Box] [Omni-directional Function Key] [Calendar] [Media Player] [Speaker] [Speaker] [IrDA Port] [24 pin terminal] [DMB Antenna] [SD Card Slot] [2.5 pi Earphone Jack] [Hand strap] [Power Button] [DMB Button] [HOLD] [Battery Cover] [Reset Button] [LCD]](https://usermanual.wiki/BLUEBIRD/BM300.User-Manual/User-Guide-727137-Page-6.png)
![7 Product Information [Mic] [HOLD] [3.5 pi earphone jack] [Send Button] [Previous Button] [M Button] [Next Button] [Play/Stop Button] If you have no remote controller provided with the shipment of product, it may be impossible to operate. Always use only the remote controller provided with the product. If installed or removed at the body by force, it can cause a failure to the equipment. [Vol. +- Button] Using Remote Controller Hold Volume DOWN Volume UP Media player operation Next music of media player Play/pause of media player Previous music of media player Short – Memo Long – Vocal recording General Control Hold Vol. - Vol. + M Next channel Next Screen Toggle Play/Pause Previous channel Previous Short – Memo Long – Vocal recording Send DMB Control Button Name Used for listening to the music, watching video or DMB, and etc. Vocal recording enabled through microphone and hands free through Internet Telephone. Operable only in the approved program. HOLD button separated from the that of body. HOLD function enabled only in the Remote Controller.](https://usermanual.wiki/BLUEBIRD/BM300.User-Manual/User-Guide-727137-Page-7.png)
![8 Product Information Battery Installation and Removing [Battery Installation] [Removing the Battery] 1. If pushing the center of battery cover slightly, the cover removes. 2. Using the stylus, remove the battery from the right groove. 1. Slip the battery into the battery compartment top edge first. 2. Insert the Battery Cover. Always charge the battery only using the supplied adapter. It can be charged with 24 pin(The Standard specified by the Ministry of Information and Communication) charger for general mobile phones. (It may be discharged gradually after full charging due to the nature of the standard charger). SD Memory Card • Frequent insertion/removal of memory or excessive force can cause a failure on the equipment. • If removed the card and turned off the power while using the memory card, it can cause a data loss or mis-operation of memory card and PDA. • Always backup the important data at PC. Otherwise, the manufacturer assumes no liability for data loss. • If the memory card removed well, do not remove the card forcedly and contact the AS center. If necessary, you can replace it with the applicable product or refund it. Battery Installation Grip Insertion Area After the metal terminal of memory faced toward the bottom of rear, push to the end. If slightly pressed the end of memory visible at SD Slot, it removes.](https://usermanual.wiki/BLUEBIRD/BM300.User-Manual/User-Guide-727137-Page-8.png)
![12 Basic Information Input Method [ Keyboard ] 1. Press the input field using the stylus. 2. Keyboard appears at the bottom of screen. 3. If Writing Recognition appears, press the arrow area at the bottom of screen. 4. Press the keyboard in the Conversion Menu to change into virtual keyboard. Click Hangle, Number, or English if necessary to write the letter. Shift, Ctrl key are used as in the general keyboard. Hanja Input Method First write Hangle and then press the Hanja key. And the applicable Hanja appears. If selected the Hanja to be entered, Hangle changes into Hanja. Symbol Input Method Press a vowel of Hangle and then Hanja Key, and Symbol Select screen appears. Press and select the symbol to be entered, and a consonant changes into a symbol. [ Entering Typed Text ] 1. Press ‘Entering Typed Text’ using the stylus. 2. ‘Letter Recognizer’ appears at the bottom of screen. 3. If a keyboard appears, press the arrow object at the bottom of screen. 4. In Conversion Menu, press ‘Entering Typed Text’ . In ‘Entering Typed Text’ column, write Hangle, English, Hanja, and etc. to make it recognized and entered automatically. Clearly write in the orders of an initial, neutral, and final letter. Too slow writing or big gaps between words (vowels and consonants) may cause a hasty letter recognition before writing completed. Exactly complete the start and end of words such as ‘ㅁ’ and ‘ㅇ’. Write a final consonant exactly. If scribbled words, it may be mixed with other words due to poor recognition. [ Keyboard ] [ Entering Typed Text ]](https://usermanual.wiki/BLUEBIRD/BM300.User-Manual/User-Guide-727137-Page-12.png)
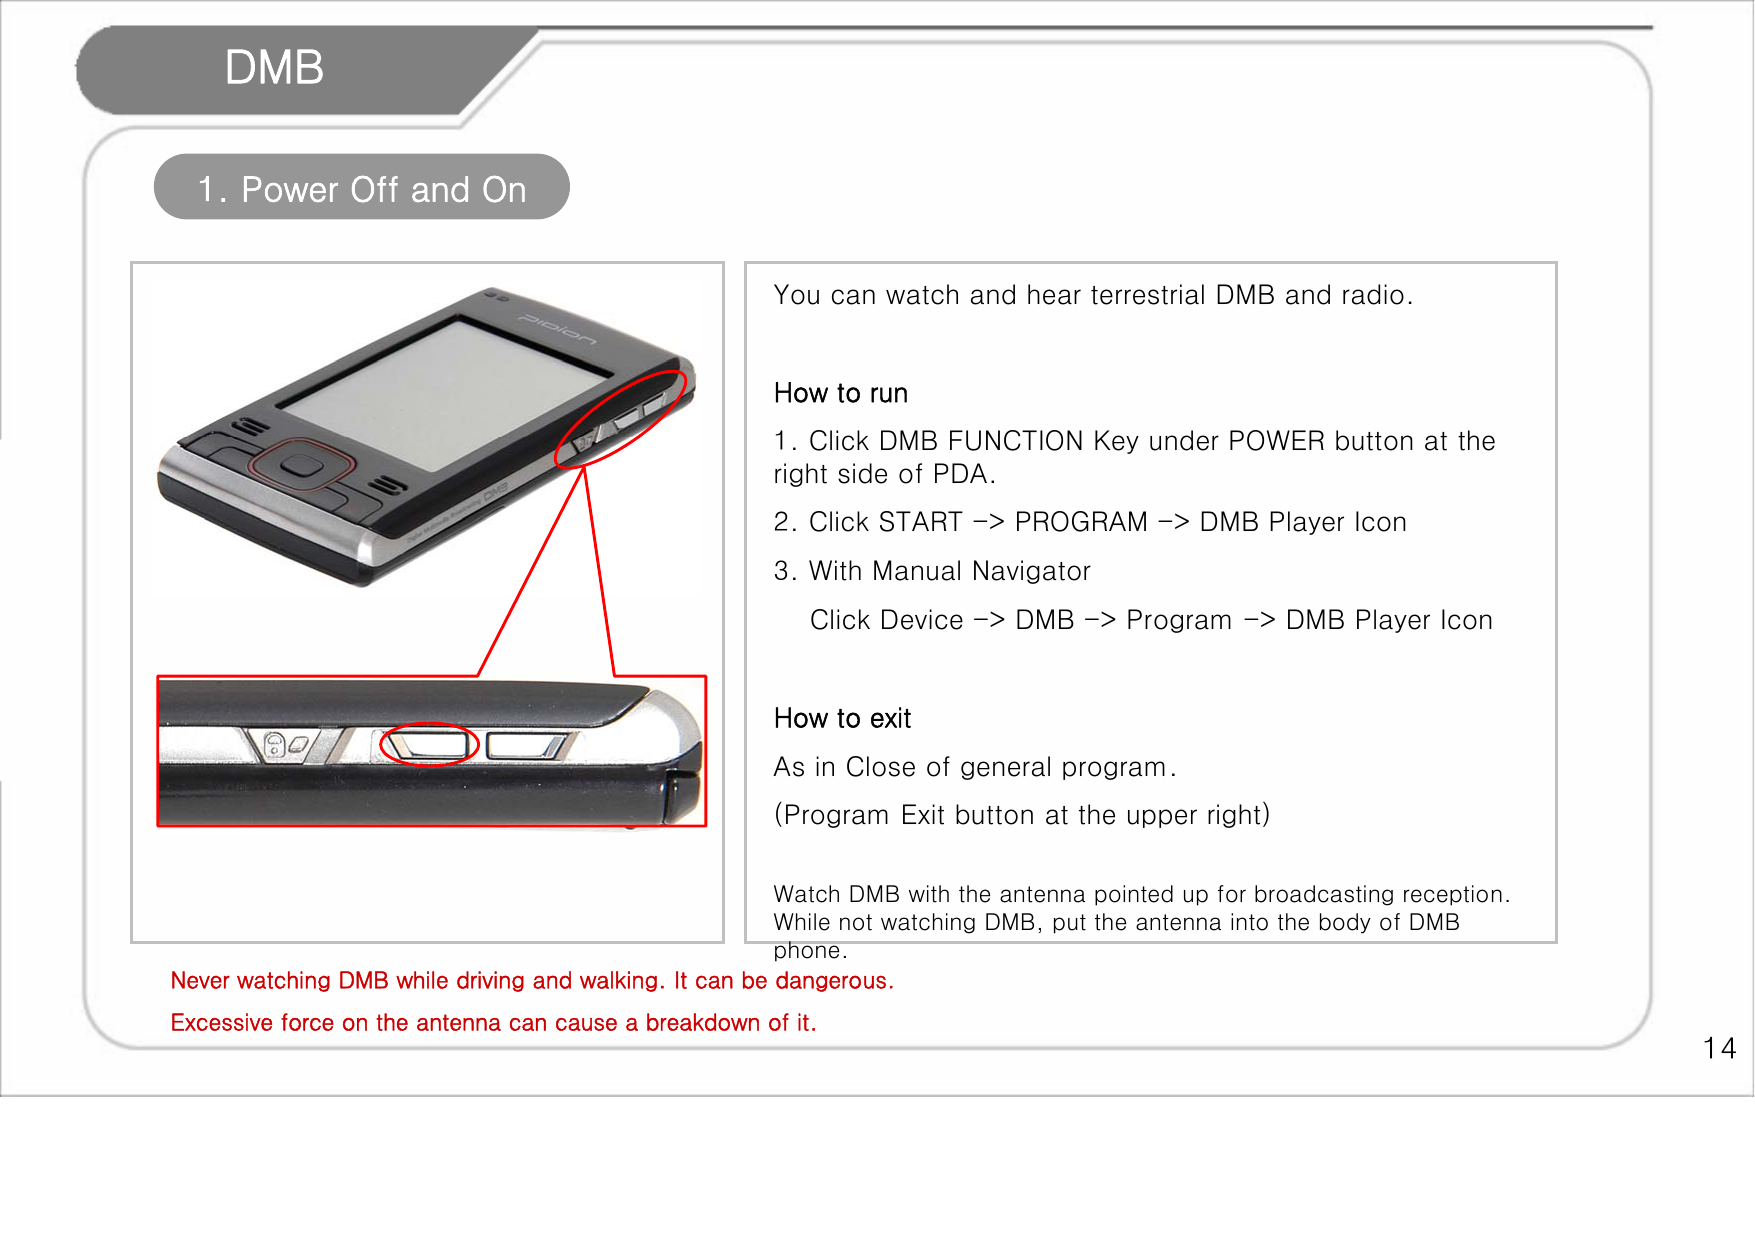
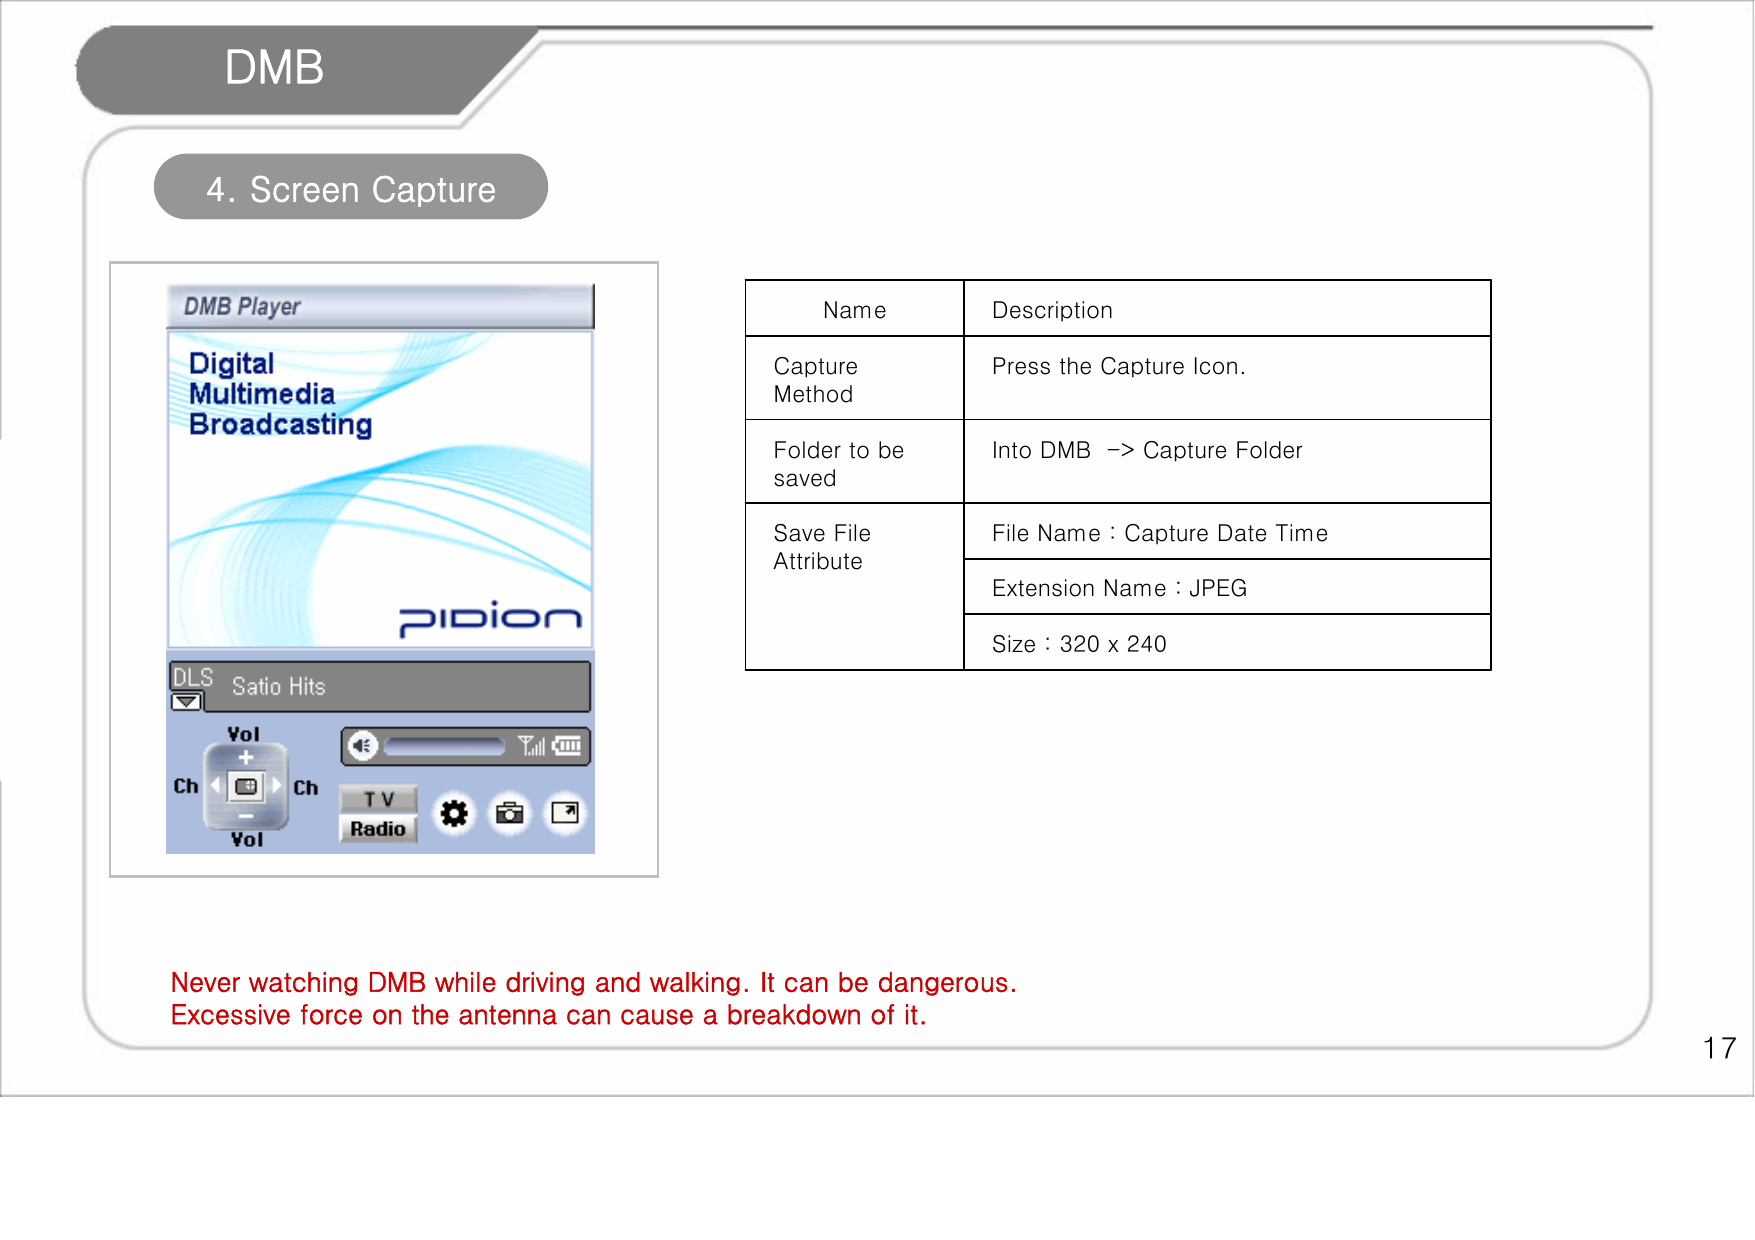
![15 DMB Avoid watching DMB while driving and walking. It can be dangerous. If excessive forces applied at the antenna, it can cause a breakdown. 2. Screen Control Menu Area DLS and DMB Information Display Area (Channel , Reception rate, power) Upper Display Area Program Title Bar [ Vertical Mode ] [Horizontal Mode ]](https://usermanual.wiki/BLUEBIRD/BM300.User-Manual/User-Guide-727137-Page-15.png)

![20 Settings 1. Personal Settings [Button] How to change Short Key Allocation Program: Select the button and then the program you want to allocate in the Program Allocation. If you selected the necessary program, press OK. Available Program : You can setup all the programs to be installed as well as basic programs. [Menu] All available programs appears in checklists. Check off the items you want to appear in the Title Bar Start Menu. If not checked, it appears in the Program Window. You may only have 7 items selected at any time. Used to change 4 Short keys below PDA. Tab : Start-> Settings -> Personal -> Button Icon Used to setup which program appear in Title Bar Start Menu. Tab : Start-> Settings -> Personal -> Menu Icon](https://usermanual.wiki/BLUEBIRD/BM300.User-Manual/User-Guide-727137-Page-20.png)
![21 Settings 1. Personal Settings [Today] Indication Type Tab : If copied the skin file(*.TSK) into My Documents besides 2 skins, basically provided, it appears in Background Screen Setup List. Select the desired skin from Background Screen Setup List and then press OK. Item Tab : As appeared in the list, it appears in Today screen. After selecting from the list, you can change the order using Up and Down keys. Allows you to select and draw up the background skin and screen to the style you want. Tab : Start-> Settings -> Personal -> Today Icon Used to select the Program Information to be appeared in Today. Tab : Start-> Settings -> Personal -> Today Icon](https://usermanual.wiki/BLUEBIRD/BM300.User-Manual/User-Guide-727137-Page-21.png)
![22 Settings 2. System Settings [Memory] Storage Card Tab : You can know the used conditions (used memory, available memory) of SD memory card, inserted into PDA. Running Program Tab : Displays running program lists and allows you to stop or pause. Main Memory Tab : You can know the current state (used memory, available memory) of PDA Memory.](https://usermanual.wiki/BLUEBIRD/BM300.User-Manual/User-Guide-727137-Page-22.png)
![23 Settings 2. System Settings [Screen] How to realign the screen : 1. Select the direction of realignment to Vertical or Horizontal (Right Hand, Left Hand). 2. Press OK to realign the screen. Use “Screen Alignment” to re-align the stylus point accurately. Text Size Settings : Allows you to control the text size into 5 stages. Lists the programs to be installed by an individual or the organization as well as OS-provided basic programs. [Removing Programs] Removing Program : 1. Select the program you wish to remove in the List. 2. Then, press “Remove” button, and it will be removed automatically.](https://usermanual.wiki/BLUEBIRD/BM300.User-Manual/User-Guide-727137-Page-23.png)
![24 Settings 3. Connections Settings [Bluetooth] Allows you to communicate with Bluetooth devices. Tab : Start-> Settings -> Connections -> Bluetooth Pairing Methods are device dependent. Please refer to ‘Bluetooth Product Manual Turn On Bluetooth : If checked off or not, it indicates Used/Not Used. In not use, always do not check this box. (To prevent a battery loss). Settings enable to be searched from the other devices : Check off this box to make BM-300 discoverable to other devices. Bluetooth Settings 1. Press “New Partnership… “ to scan the surrounding Bluetooth devices. 2. Select the device to be connected and then press “Next” button. 3. Enter the ‘passkey’ for the device and press “Next” button. (Passkey is device dependent. Please refer to ‘Bluetooth Product Manual’). 4. Tab a device name to be connected and then press “Finish”. 5. The model name and icon appear and allow you to use them. Make the surrounding Bluetooth devices to perform pairing.](https://usermanual.wiki/BLUEBIRD/BM300.User-Manual/User-Guide-727137-Page-24.png)
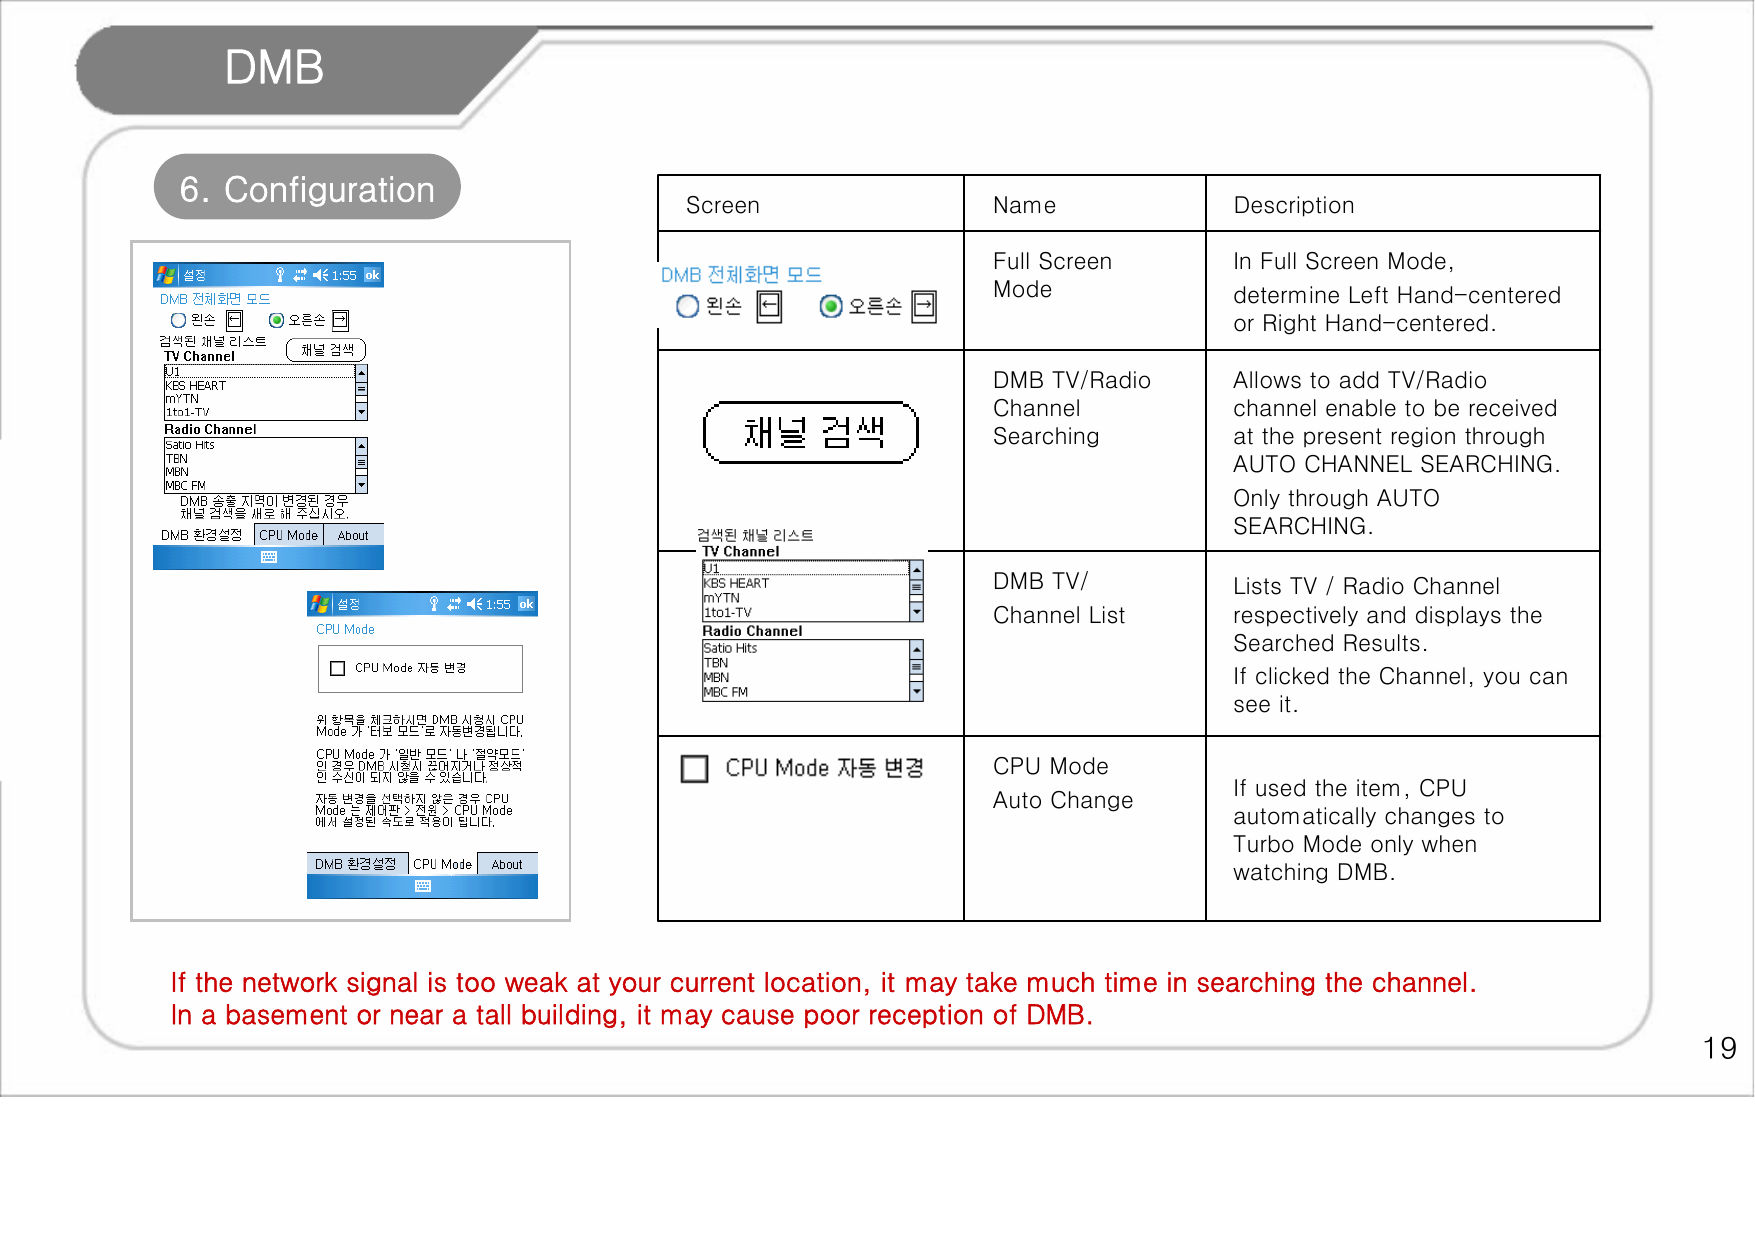
![25 설정 3. 연결 환경 [Network Card] Wi-Fi를 통한 무선 인터넷을 설정하고 사용하실 수 있습니다. Tab : Start -> Settings-> Connections -> Network Card Wireless Internet Settings 1. If turned on Wi-Fi item of Wireless Manager, it detects the surrounding AP and shows up in the List. 2. Select the AP from Wireless Network Lists and press “Connect”. If no AP information, enter it manually. 1. In Wireless Network Lists window, click “Add New”. 2. Enter the AP Name at “Network Name” in the Wireless Network Attributes” And, check off the AP Settings. 3. Press “OK” button. 4. You returns to the initial screen and the AP name you entered shows up in the screen. 5. Press “OK” button. 6. Press “Connect” to connect with Wireless LAN. Wireless Internet Settings allow you to setup the Network Card Settings enable to be connected at the surrounding AP.](https://usermanual.wiki/BLUEBIRD/BM300.User-Manual/User-Guide-727137-Page-25.png)
![26 Settings 3. Connections Settings [Wireless Manager] Course : Start -> Settings -> Connections -> Wireless Manager Use “All” button to turn ON/OFF two functions at a time. Use “Wi-Fi” and “Bluetooth” buttons enable to turn ON/OFF respectively. If turned on “Wi-Fi” or “Bluetooth”, it enables to perform detailed settings active. Though OFF, you can perform settings using Menu Button at the bottom of screen. [USB-PC Connection] If unchecked “Advanced Network Function Used” box, the synchronization is disabled between PC. If Active Sync performed the synchronization improperly after normal booting of PC, ensure where the checkbox checked off properly. Allows you to set the communication settings between PC. Tab : Start -> Settings-> Connections -> USB-PC](https://usermanual.wiki/BLUEBIRD/BM300.User-Manual/User-Guide-727137-Page-26.png)
![28 Appendix 2. Customer Service Center [Before A/S] If you encounter problems or errors when using the product, please call 1588-1380. [ Bluebird Soft Customer Service Center] Before A/S, you must backup your files and data from your equipment. In A/S center, we will not backup the data separately. Therefore, we will not be liable for any data loss/deletion. Tel. No. : 1588-1380 Fax. : 548-0870 E-Mail : bluebird@bluebird.co.kr Office Hours Weekdays : A.M. 9 : 00 ~ P.M. 6:00 Saturdays : A.M. 9 : 00 ~ P.M. 2:00 Sundays and Holidays off. A/S Reception Method We make it a rule to receive A/S off by mail, home-delivery, or visit. If you purchased the product by third-party company, not by the manufacturer, you must do the user registration at our company before A/S. For the user registration, contact Bluebird soft Inc., Call Center(1588-1380). When sending to A/S center, please enclosure a bill or a receipt. If you sent along with the customer name, address, phone number, and symptoms, it can be treated more rapidly. You can ask A/S to the company you purchased or our company’s Customer Service Center. Please do not damage the label which attached to the product by intention. Due to damaged label, the customer can be in a disadvantageous position. When sending the product to Bluebird for A/S, you must put it in a protective container. The damaged product during transportation is not guaranteed by our company. It is recommended to use the container and protective cover, provided with the product. Transport it in safe. Bluebird shall have no liability for missed equipment during transportation.](https://usermanual.wiki/BLUEBIRD/BM300.User-Manual/User-Guide-727137-Page-28.png)
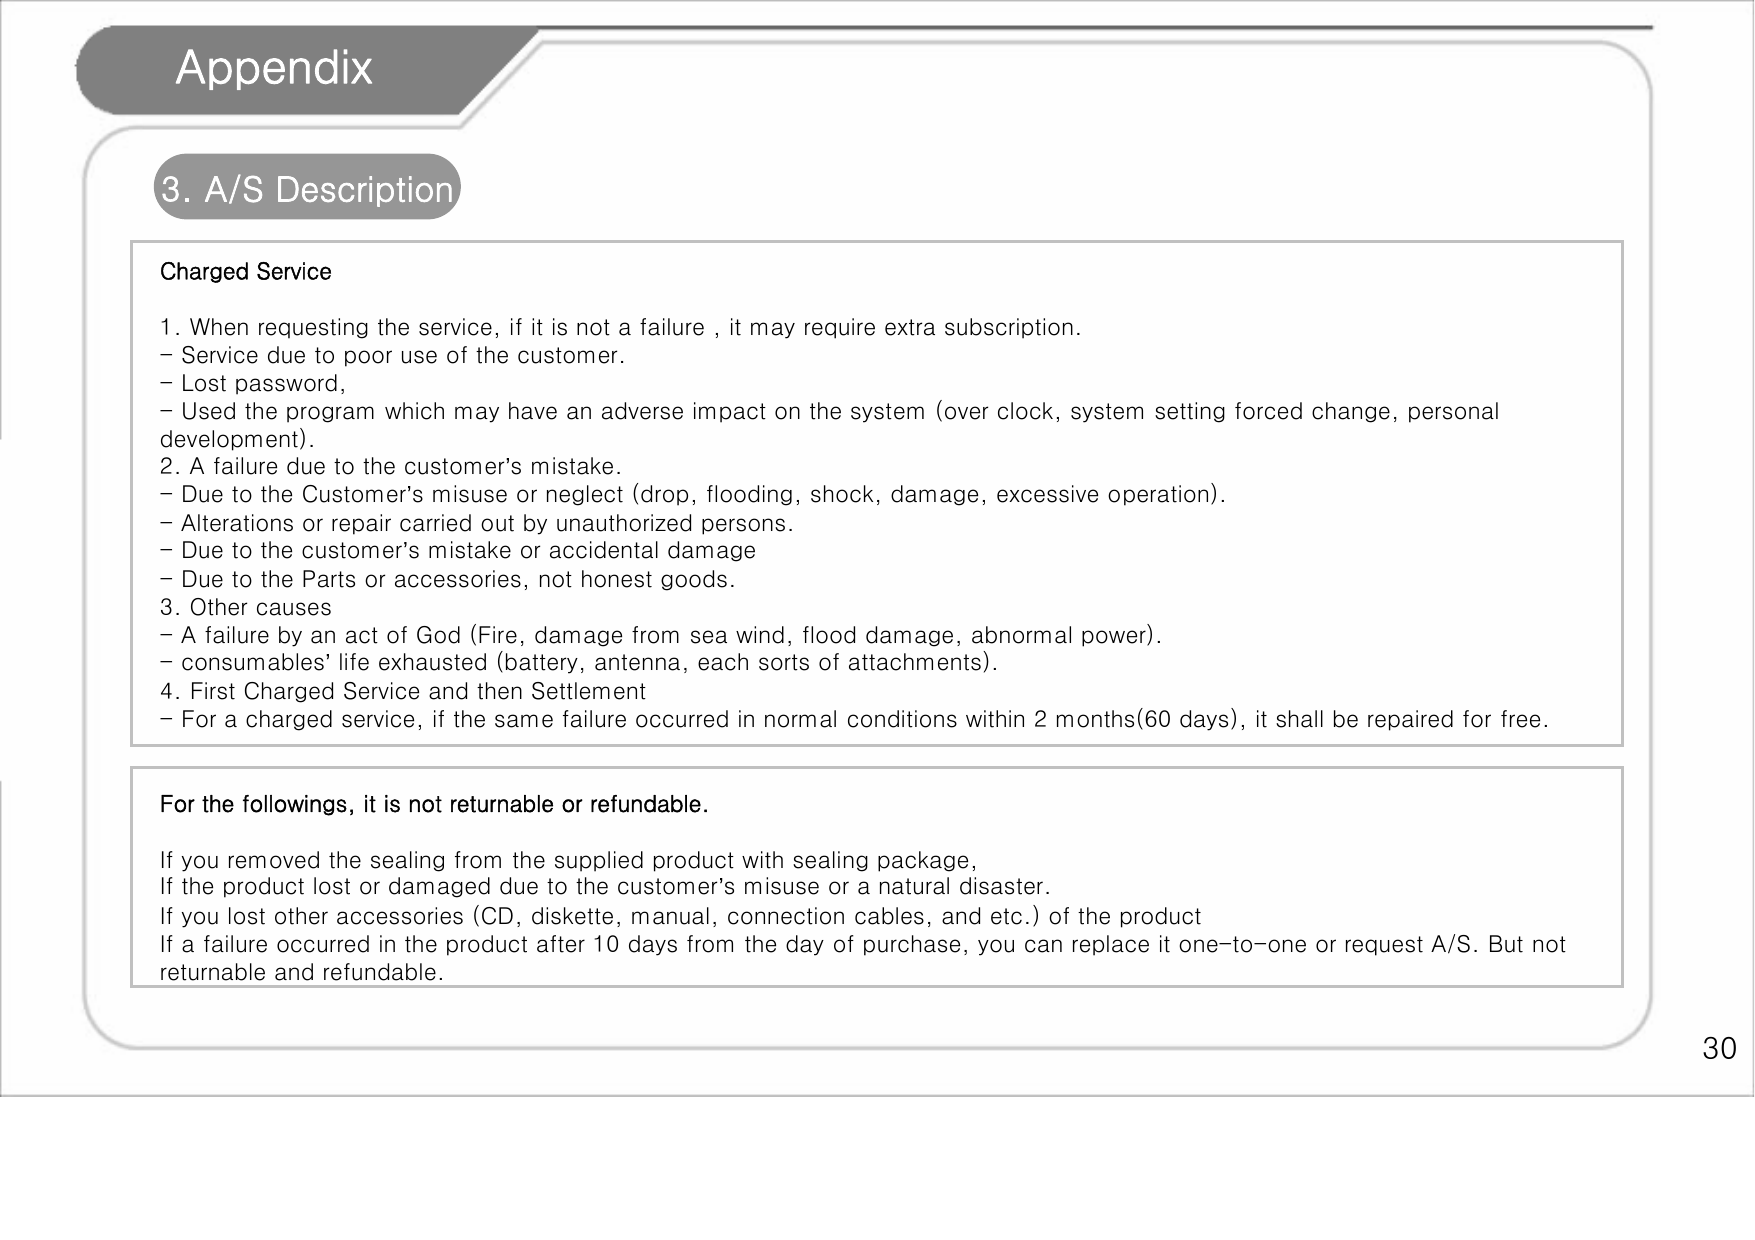
![29 Fixed Amount Depreciation plus 10% additional charges (The Max. price – the price purchased) Refund When impossible to replace When impossible to repair within 1 month Fixed Amount Depreciation and then replace Replace or refund. When we missed the product asked to be repaired by the customer. Un-repairable When a failure occurred 5 times due to several defects. A charged repair Replace or refund. When a failure occurred 4 times due to the same defects. A charged repair Repair for free When a failure occurred 3 times due to the same defects. Repairable Refund Replacement Impossible within 1 month. Replace or refund. Required the important repair within 1 month after being replaced. Replace or repair for free Required the important repair within 1 month after purchasing. Replace or refund. Required the important repair within 10 days after purchasing. After the guaranteed Period Within the guaranteed Period Compensation Customer Loss Type [ Charged or Free A/S Regulations] According to the Regulations on the Customer Claims Compensation. Parts maintenance period : 3 years Replace with the same product. If impossible to replace with the same product, replace with the equivalent. But, if the customer didn’t want the equivalent, refund it. Refund based on the price as written in a receipt when you purchased the product. If the price of a bill higher than ordinary price, refund based on ordinary price in that it might include other additional charges. 3. A/S Description Appendix](https://usermanual.wiki/BLUEBIRD/BM300.User-Manual/User-Guide-727137-Page-29.png)