User Manual

1
User Manual
BLUEBIRD INC.
LTE Phone
Trade Mark: Bluebird
Model: SF550

2
CONTENTS
1. Key Operation: ...................................................................................................... 5
2. Main Features: Single SIM—4G ............................................................................ 6
3. Basic Operations: .................................................................................................. 9
4. Getting Started: ................................................................................................... 13
5. Contacts ............................................................................................................... 19
6. Phone: ................................................................................................................. 22
7. Messages: ............................................................................................................ 26
8. Email: ................................................................................................................... 30
9. Browser: .............................................................................................................. 33
10. Calendar: ........................................................................................................... 34
11. Settings: ............................................................................................................. 34
12、USB Connection .............................................................................................. 45

3
13、Clock & Alarm ................................................................................................. 46
14、Search .............................................................................................................. 47
15、Sound Recorder ............................................................................................... 47
16、File Manager ................................................................................................... 48
17、APK/App Installer ............................................................................................ 49
18、Camera ............................................................................................................ 49
19、Music Player .................................................................................................... 50

4
20、GPS .................................................................................................................. 51
21、Maps ................................................................................................................ 53
Product Specifications: ........................................................................................... 58
5
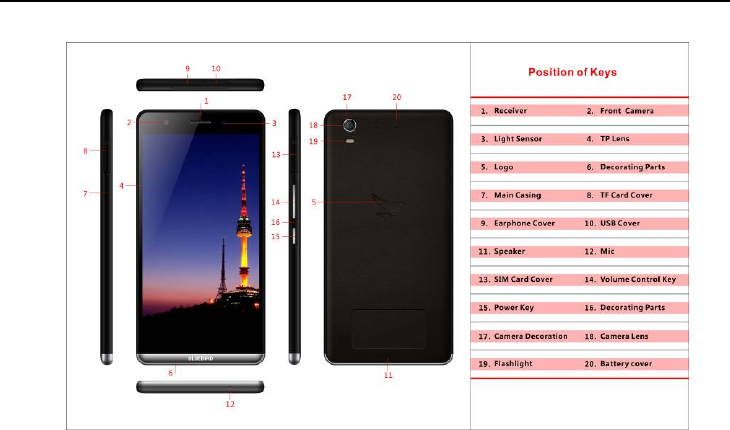
1. Key Operation:

5 6
2. Main Features: Single SIM—4G
Calling & SMS enabled
13.97 cm HD (1080x1920)Capacitive Touch Screen
Android Operating System, v 5.1.1 Lollipop
1.21 GHz 4-Core Processor for Ultra-fast speed
Wi-Fi 802.11 a/b/g/n
Supports APK application and installation.
Audio Player
Video Player
Video Recorder
13MP rear main Camera and 5MP Front-facing
Front Digital Camera
Note
This manual contains important safety measures and information to use the product correctly. In order to
avoid using improperly, please read the manual carefully before using it.
● Never use the device in extremely cold, hot, dusty and moist environment.
z Please avoid the device from falling down, being hit strongly and suffering severe vibrations.
Otherwise, it would lead to damage or abnormal display of the Device Screen. User shall be held

7
responsible for the damage in such circumstances.
z Battery life will vary with the conditions and environment in which Device is in use.
z Please charge the battery in time if any following conditions:
A. The system warns that the power is low.
B. There is no response when operating the keys.
z When you are formatting or uploading or downloading the documents do not disconnect the
device suddenly. If you do like that probably it leads to device failure. Aura 1 is not responsible
for any document losses incurred due to damage or repair the machine or other reasons. If you
have any questions, please connect to the dealer. Do not disassemble the machine
independently. Otherwise, you will lose the warranty that our company is committed to. The
user will be responsible for the entire problem caused by disassembling the machine without
permission.
z Because the difference of calculating the capacity, the player system firmware and FLASH
memory FAT partition table should occupy certain memory space. There might be some

8
discrepancies between the memory capacity marked on the logo and the memory capacity
connected to PC, which depend on the firmware version and FLASH category used by the
Device.
z The product performance and functionality may be different with different version of
software. We’ll not give further notice. The company reserves the right to improve the
product.

9
3. Basic Operations:
● Power On/ OFF
Power On: In the power-off status, press the power button for few seconds, the unit will enter the
main interface after the boot. (Slightly longer boot time, please be patient.)
Power Off: In the power-on status, press the power button for few seconds, a pop-up interface
will be displayed. From that select “Power off” option to shutdown the device. Otherwise click on
"Back Key" to be in Power On state. In main interface press the power button to close or lock the
screen. Press the power button again to open the screen and then swipe up to unlock and return to
the main interface.
Main Interface operation:
To set or change the Widgets do long press at any point on the main interface.
Start application: Click the "Application icon" will open the application
Main Function Menu Operation:
Padding screen can switch between the main screen page.

10
The appeared window shows all the features of the machine icon, click on any icon to access the
relevant function interface.
Click on the main interface key “Home” key to return to the main interface which is Home Screen of
your Aura 1.
Use the notifications panel
To open the notifications panel, tap the indicator icons area. To hide the panel, drag the bottom of the
panel upwards.
From the notifications panel, you can view your device’s current status and use the following options:
●Wi-Fi: Activate or deactivate the Wi-Fi feature.
●Airplane mode: You can turn On/Off your device to Airplane mode.
●Auto rotaon: Allow or prevent the interface from rotang when you rotate the device.
●Bluetooth: Turn On/Off bluetooth
●Brightness: Increase or decrease brightness.
●Sengs: You can find all the sengs of SF550 here.
11
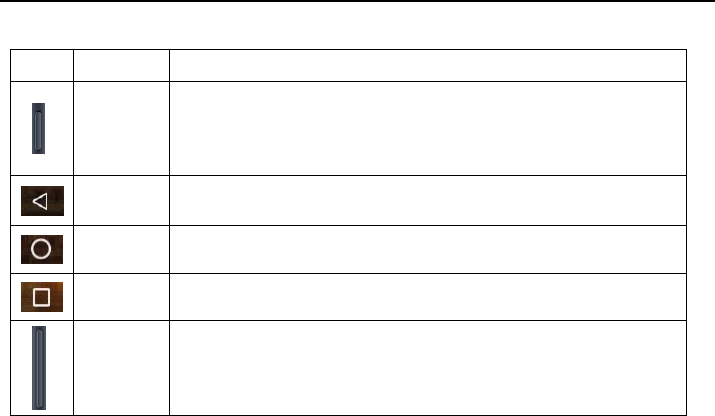
Key Operations
Key Function
Power Key/
Lock
Turn Off/On the device (press and hold); Reset the device (press and hold
down volume key and power key at the same time for 8-10 seconds); Lock
and Unlock the screen.
Back Return to the previous screen.
Home Return to the Home screen.
Recently Open the recently application.
Volume Adjust the device’s volume.
12

13
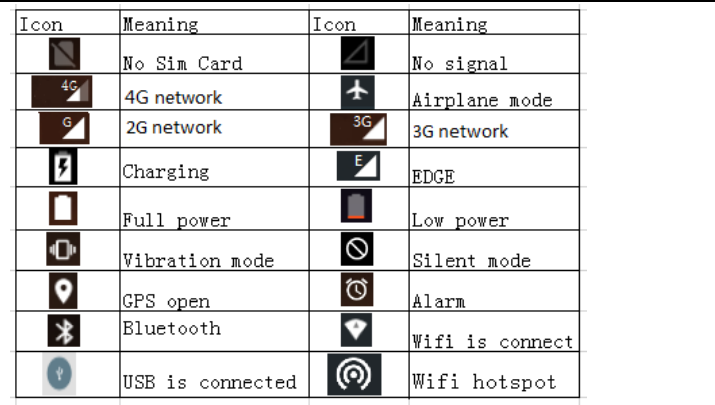
Note:The machine software is constantly upgraded; the status indicator may be different with your
device, subject to the actual equipment.
4. Getting Started:
4.1 Insert the SIM Card
Insert the SIM card when you need a cellular service. Do not insert a memory card into the SIM card
slot.
4.2 Charge the battery
Before using the device for the first time or when the battery has been unused for an extended period,
you must charge the battery. You can charge the battery with a travel adapter or by connecting the
device to a computer with a USB cable.
●Use only our approved chargers and cables. Unapproved chargers or cables may cause baeries to
explode or damage your device.
When your battery is low, the device will emit a warning tone and show a low battery message.
Recharge your battery to continue using your device.

14
●If the baery is completely discharged, you cannot turn on the device, even with the travel adapter
connected. Allow a depleted battery to charge for a while before you try to turn on the device.
4.3 Use the touch screen
Your device’s touch screen lets you easily select items or perform functions. Learn basic actions for
using the touch screen.
● Do not press the touch screen with sharp tools on the touch screen. Doing so may damage the touch
screen or cause it to malfunction.
● Do not allow the touch screen to come into contact with other electrical devices. Electrostatic
discharges can cause the touch screen to malfunction.
● Do not allow the touch screen to come into contact with liquids. The touch screen may malfuncon
in humid conditions or when exposed to liquids.
● For opmal use of the touch screen, remove the screen protecon film before using your device.
Control your touch screen with the following actions:
Tap

15
Touch once to select or launch a menu, or option, or an application.
Tap and hold
Tap an item and hold it for more than 2 seconds.
Drag
Tap an item and move it to a new location.

16
Double-tap
Tap an item twice quickly.
Flick
Briskly scroll up, down, left, or right to move through lists or screens.

17
Pinch
Place two of your fingers far apart, and then pinch them together.
● Your device turns off the touch screen when you do not use it for a specified period. To turn on the
screen, press the Power key.

18
Shortcuts
To customize different home screen, you can add apps shortcut; reposition the shortcut. long press
and drag the icon to be added to the main screen.
Widgets
You can add a clock, music player and calendar widgets on the main screen.
Long press the screen to open the application menu and then click widgets
Then long press any widget drag it to the screen.

19
Wallpapers
1. Click Settings>Display>Wallpaper
Click “Gallery” Can select the system your own pictures as wallpapers.
Click “Live Wallpapers” Can select the system live wallpapers as wallpapers.
Click “Photos” Can select the photo as wallpapers.
Click “Wallpapers” Can select the system pictures as wallpapers.
5. Contacts
You can save contacts, phone numbers and e-mail and other related information.

20
New contact
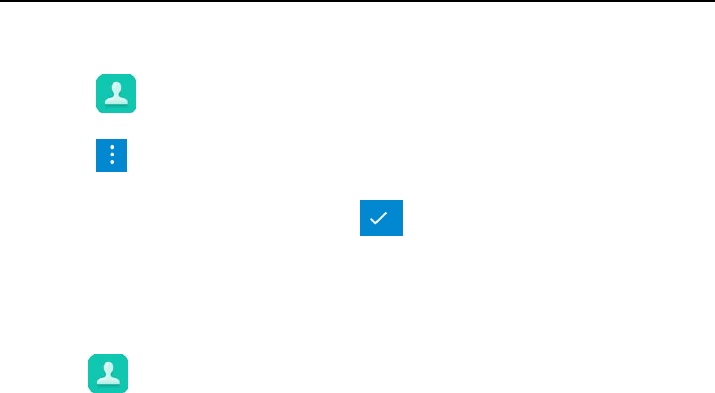
Steps: Contacts> new contact
1. Enter your contact’s information.
2. Click “ ” to save the contact.
Edit contacts/ Delete contacts
Edit contacts:
1. Click open the contact list.
2. Choose the contact you want to edit,click “ ”. After editing, click “ ” to save the
21
contact.
Delete contacts:
1. Click open the contact list.
2. Click ,in the pop-up menu, choose “Delete”
3. Check the contacts you want to delete, click “ ” to delete the checked contacts.
Backup contacts
You can export your contact data to the Storage.
Steps:
1. Click ,open the contact list.

22
2. Click > Import/export.
3. Click “Export to storage”
Import contacts
Import from Storage
Steps: 1. Click open the contact list.
2. Click > Import/export.
3. Click “Import from storage”.
6. Phone:
Learn to use calling functions, such as making and answering calls, using options available during a call, or

23
customizing and using call-related features.
Make a call
1. In the application list, select →Keypad, and then enter an area code and a phone number.
2. Select to make a voice call.
3. Select to end the call.
Answer a call
1. During an incoming call, select and then drag your finger outside of the large circle.
To mute the ringtone, press the Volume key.
2. Select to end the call.

24
Reject a call
During an incoming call, select and then drag your finger left side to reject the call.
To send a message to the caller when you reject a call, drag the reject message bar at the bottom of
the screen upwards.
Make an international call
1. In the application list, select →Keypad, and then tap and hold 0+ to insert the + character.
2. Enter a complete number (country code, area code, and phone number).
3. Select to dial the number.
Use a headset
Connect a headset to your device to answer and control calls conveniently.
View and dial a missed call

25
Your device will show missed calls. To return the call, tap the indicator icons area and drag it
downwards to open the notifications panel, and then select the missed call notification.
Set call diverting
Call diverting is a network feature that sends incoming calls to a specified number. You can set this
feature separately for several conditions.
1. In the application list, select Phone.
2. Press the Option key and select Sengs → Call settings→Call forwarding → a call type.
3. Select a condition.
4. Enter a number to which calls will be forwarded and select Enable.
Your setting will be sent to the network.
Set call barring
Call barring is a network feature that restricts certain types of calling or prevents others from making calls
with your device.
1. In the application list, select Phone.

26
2. Press the Option key and select Sengs →Call sengs →Call barring→ a call type.
3. Select a call barring option.
4. Enter a call barring password and select OK.
Your setting will be sent to the network. Please contact network operator to activate this function.
Set call waiting
Call waiting is a network feature that alerts you to an incoming call while you are on another call. This
feature is available only for voice calls.
1. In the application list, select Phone.
2. Press the Opon key and select Call sengs →Cal settingsl →Addional sengs →Call waing.
Your setting will be sent to the network.
View a call or message log
You can view logs of calls and messages that are filtered by type.
7. Messages:
Learn to create and send text (SMS) or multimedia (MMS) messages, and view or manage messages that

27
you have sent or received.
Send a text message
1. In the application list, select →Click to create a new message.
2. Add recipients:
●Enter phone numbers manually and separate them with a semicolon or a comma.
●Select phone numbers from your call, message, or contact lists by selecng
3. Select the text field and enter your message text.
To insert emoticons, press the Option key and select Insert smiley.
4. To send the message, select
Send a multimedia message

28
1. In the application list, select →Click to create a new message.
2. Add recipients:
●Enter phone numbers or email addresses manually and separate them with a semicolon or a comma.
●Select phone numbers or email addresses from your call, message, or contact lists by selecng
When you enter an email address, the device will
Convert the message to a multimedia message.
3. Select the text field and enter your message text.
To insert emoticons, press the Option key and select Insert smiley.
4. Select and attach a file.
5. Press the Option key and select Add subject, and then enter a subject.

29
6. To send the message, select
View a text or multimedia message
1. In the application list, select Messaging.
Your messages are grouped by contact as a message thread.
2. Select a contact.
3. Select a multimedia message to view more details.
Listen to a voicemail message
If you have set your device to divert missed calls to the voicemail server, callers may leave voicemail
messages when you miss calls.
1. In the application list, select Phone →Keypad, and then tap and hold
2. Follow the instructions from the voicemail server.
You must save the voicemail server number before accessing the voicemail server. Contact your service

30
provider for this number.
To use SMS and Calling Feature Make sure a Valid SIM card is inserted in the SIM slot.
8. Email:
Click on the icon “Email” to enter user account interface and then log in to send and receive emails.
(To use Gmail & other Google Services, you are required to register a Google account on your Smart
Device.)
Steps:
Click Email.
Account setup:
1. Enter the e-mail address and password, and then click “Next”.
2. Select the type of the Email account:POP3/IMAP/Exchange。If you do not know the configuration
parameters, you can consult the e-mail service provider.
3. You can set the frequency of mail checks.After setting, click Next.
31
4. Created name and signature, for your account.
You can also set multiple email addresses:
1.After Set the initial e-mail address,Click ,select "Settings" option to enter the account
settings page.
2. Click the "Add Account" to add other email accounts.
Write and send messages
Steps:Click E-mail.
1. Click to editor the e-mail message.
2. Enter the E-mail address of the recipient.
3. Enter a subject.

32
4. Write the message content.
5. Click to send the E-mail.
View and save e-mail
Receiving e-mail messages stored in the network service provider's mail server before download to
the device.
·Select the e-mail to read in the Inbox.
·Click the attachment icon can view e-mail attachments.
·Click Save to download attachments, attachments are usually stored in your SD card.
Reply e-mail
· In the Inbox, select the mail you want to reply, click to reply.

33
9. Browser:
Under the main menu, click “Browser" to enter into the internet interface.
Click “website column” to pop up the keyboard for new website address; Click “content column “to pop up
to pop up the keyboard for new search content.
Steps:Click Browser.
·You can click on the tab bar to open pages.
·Click you can close the page.
·Click you can refresh the page.
·Click you can add a bookmark of the current page.
·Select “Bookmark”, you can view all of your bookmarks.
·Select “History”,you can view browsing history and clear browsing data.
·Select “Settings” you can do more actions.

34
10. Calendar:
In the main menu screen click "Calendar" icon, you can have access to the calendar display, then view or
set it.
Setps:Click Calendar.
New event
Click to set new event, enter the event option, click on Done to save the event.
11. Settings:
Click “Settings” option can enter the system menu setting interface.
A. Wireless and Networks

35
Wi-Fi: turn on/off WI-FI.
Click “Refresh” to scan all the WIFI networks available within the range
Click ”Add network” to pop up Diaglog box. User can add the aimed network to the WIFI network list after
setting the network SSID and the security. Click on any network, pass the safety test (input the wireless
password), and then click “Connect” to set this network as current online network.
Click to pop up “Advanced Settings interface” for advanced settings
On / off the WLAN
Steps:Click Settings>WIRELESS & NETWORKS
Click switch to turn on or off the WLAN.

36
Search and connect WLAN
1. Click Settings>WIRELESS & NETWORKS
2. Open the WLAN, your device will automatically list’s the networks.
·If you select an open network, you can directly connect to the network.
·If you select an encrypted network, you must enter a password to connect to the network.
·Click on the "Add Network" can add a new WLAN.
When your device is connected to the network, symbol will appear in the status bar.
Note:When you enter the network coverage, and your WLAN is turned on, your device will
automatically reconnect to the network you have connected.

37
B. Bluetooth
On / off the Bluetooth
Steps:Click Settings>Bluetooth
Click switch to turn on or off the Bluetooth.
Connect the equipment to the new equipment
1. To confirm the device you want to pair with Bluetooth connectivity is turned on and visible.
2. After turn on Bluetooth, the device will scan all bluetooth available within the range.
3. Select a device in the list to connect.
4. Enter the PIN (ex. 0000), then press the “Pair” to connect the device.
When Bluetooth is turned on, symbol will be displayed in the status bar.

38
Note: Bluetooth device connection methods may be different. This manual is for reference only.
Disconnect the Bluetooth and equipment
Device: Click the device name, which you want to disconnect in the list, and then click “Unpair” to
disconnect.
C. Sound & notification
This can be used to set in Default Notifications, volume up/down, notification tone, key sound and
screen locked tone.
D. Display
Enter this to set the screen brightness, auto rotate screen, wallpaper, font sizes, etc.
E. Storage
User can view the internal memory, SD card capacity, free space and relevant operations.
F. Battery
Click to check the battery status of your SF550.
G.Apps
Check all the apps in the unit which is downloading or in operation.

39
H. Date & time
Steps:Click Settings>Date & time.
Note:If you check the “Automatic data & time” and “Automatic time zone”,the device will be based
on the network automatically adjust the display time and date and time zone.
If you want to set up your own time, do not check these two options.
If you want set up time by yourself:
·Click “Set date” then adjust the date, month and year, and then touch the list.
·Click “Select time zone”, and then select your time zone in the list.
·Click “Set time”, adjust the hours and minutes.
·You can check or uncheck the “Use 24-hour format”, switch between 12 hours or 24 hours
format.
·Click “Choose date format”, and then select your desired date display format.

40
I. Language & input
Steps:Click Settings>Language & input>Language.
Select the language you want to use.
J. Display
1) Brightness
Steps:Click Settings>Display>Brightness.
When the “Choose Brightness Settings”,click “Brightness”, adjust the brightness in the pop-up box.

41
2) Sleep
Steps:Click Settings>Display>Sleep
Set the screen auto-lock delay time.
3) When device is rotated
Steps:Click Settings>Display> When device is rotated
Set the screen auto rotate.

42
K. Backup & reset
You can use this feature to erases all data on phone:
Note:This operation will clear the following data in your device.
a) Your account. b) System and application’s data and settings. c) Application.
Does not clear the following data:
a) System software and bundled applications.
Steps:Click Settings>Backup & reset>Factory data reset.
L. Security
Protect your SIM card by PIN
You set a PIN (Personal Identification Number) to protect the SIM card.
·Set a PIN.

43
Steps:Click Settings>Security> Set up SIM card lock> Lock SIM
Use the keyboard to enter the PIN code. If you want to change the PIN, please click“Change SIM PIN”.
Note:You do not need to enter the PIN at any time to make an emergency call.
·Unlock the SIM card
If you enter the wrong PIN code more than the allowed times (3 times), your SIM card will become
the “PUK locked.” You must enter the PUK code in order to restore the device.This password will be
provided with the service provider's SIM card.
Screen security
You can lock the screen or request to draw the screen unlock pattern every time you start the device.
·Screen lock.
Will have the following screen Unlock mode:

44
·Swipe
Swipe is the system default unlock method.It will into the lock screen after the device is turned on.
·Create a screen unlock pattern.
Create a personal screen unlock pattern can improve the security of the devices.
Steps:1. Click Settings>Security>Screen lock>Pattern.
2. Read the instructions on the screen,and then click “Next”.
3. Draw at least four points connected to the vertical, horizontal or diagonal direction.
Note:You must use the finger slide on the screen to draw the unlock pattern, rather than click on the
point.
4. The device will record the unlock pattern and then click on “Continue”.
5. Draw the unlock pattern again and then click on “Confirm”.
Note:1. If you do not want to unlock pattern appears on the screen,un-check “Make the pattern
visible”.

45
2. To change the screen unlock pattern, please enter the interface of the screen unlock
pattern, confirmed once the original stored pattern, and then touch the "pattern"
option to draw a new pattern.
3. If you fail to draw the correct unlock pattern for five times, the screen will prompt you
must wait 30 seconds later to try again.
12、USB Connection
You can use the USB data cable to connect the device to the computer, in order to transfer pictures,
videos, music and more between storage and computer.
1. Using a USB data cable to connect the device to high-speed USB port on your computer.
2. The status bar will show the USB connection icon

46
3. Click the "Media device (MTP)": Lets you transfer media files on windows or using Android File
Transfer on Mac (see www.android.com/filetransfer)
4. Click the "Camera (PTP)" : Lets you transfer photos using camera software and transfer any files on
computers that don’t support MTP
5. Click "Charging" : Lets you only charge the device.
13、Clock & Alarm
In the main menu interface, click the "Clock" option, enter the clock Interface.
Click any point on the screen to adjust the brightness of the screen & to use the Device as Clock.
Click on ” ” to add alarm function.

47
Steps:Click Clock>alarm set.
Add alarm, set the alarm information, then click OK.
14、Search
Under the main menu click the into the following interface
Under the searching interface, Input character then Click
15、Sound Recorder
Under the state of main menu, select “Record” option, enter into the Record interface. Click
button to start record; Click button to stop record and save it; click to display current

48
recording file.
Steps:Click Sound recorder.
Record button.
Stop recording.
After the recording is completed, you can press the button to play the audio you just
recorded.
16、File Manager
In the "File Explorer", the list shows all the files in the phone storage. Click to enter one layer by one
layer, which lists the files under the current folder.
49
17、APK/App Installer
This device supports APK installation & uninstallation.
Click any APK in the File Manager to access installation Interface. Click “Installation” to start installing
this APK.
Uninstallation: enter “applications interface “in the “setting“menu to uninstall the APK
18、Camera
In the main menu interface, click the "camera " option, you can enter the camera interface
Click it to change to video and start

50
Click it to change to photo-shoot
Press shutter to start capture panorama
Click it to change main camera to Front-facing camera
Click it to view image if you have a photo or more
Click it to set camera parameters
19、Music Player
In the main menu interface, click the "Play Music" into the file list interface, select any music to play.

51
Shuffle icon: Click to open or close the Shuffle
Click the icon to set the "repeat the current song, repeat all songs, repeat off", etc.
Click the icon to play on last song.
Click to pause and play the current song.
Click to play the next song
20、GPS
Your device is equipped with a global positioning system (GPS) receiver. Learn to activate location
services and use additional GPS functions.
For better reception of GPS signals, avoid using your device in the following conditions:
●Between buildings, in tunnels or underground passages, or inside buildings

52
●In poor weather
●Around high voltage or electromagnec fields
●In a vehicle with sun protection film
Do not touch or cover the area around the antenna with your hands or other objects while using the GPS
functions.
This feature may be unavailable depending on your region or service provider.
Activate location services
You must activate location services to receive location information or search the map.
In the applicaon list, select Sengs →Locaon
services.
Details
The map allows you to track your current location, view traffic conditions, as well as receive detailed
direction of the destination. Provide a search tool that allows you to find a place to go or address of the
vector.

53
Note:·You must open4G/ 3G/GPRS or WIFI to use the map.
·Maps application does not cover all countries and cities.
·Open the location service.
You must open the location service first in order to open the map and search for your location or
search a place to go.
Steps:Click Settings>Location services.
Check Google's location services, GPS satellites, or both two.
Note:Check GPS satellites,can search the street map that you want to go but, this must be in the
sunny state of the atmosphere, and will consume more power.
21、Maps

54
Steps:Click Maps.
·Search My position on the map.
In the map interface, click ,then your location on the map will display a flashing blue dot.
·Search the place you want to go.
1. In the map interface,click “Search Maps”.
2. Enter the name of the place you want to search, you can choose to enter an address, city, or the
building name (for example: The Oriental Pearl).
Note:When you enter the place, the map will prompt you the list of places have searched. Just click
on the list address, then you can display its location on the map.
3. Click , the search results will display on the map.
4. Click the text box to display the search details about the places and the operation.

55
View Maps
While viewing the map, you can use the following zoom and navigation skills.
Zoom the map.
Through the fingers outward or inward sliding the screen at the same time, can zoom in or out the
map.
Change the map mode.
Click to change the map mode.
·Traffic (only to the specific area):Real-time traffic updates will display a different color lines on the
road, each color represents a different traffic movement speed.
·Satellite:Use the same satellite data as Google Earth. However, satellite imagery is not a real-time
video. Google Earth will achieve the best quality images, but most of the images have a history of one to
three years.

56
·Terrain:This mode is the default view, not only can display the name of the map will be added to the
streets, rivers, lakes, mountains, parks and the border.
FAQ (Frequently Asked Questions):
Smart Device could not be power on
Check if the battery is empty.
Check it again after connects the power adapter.
If you still cannot power on after charging, please contact the dealer.
No sound is available when playing.
Please check if the volume is set to 0.
Garbled screen

57
Please check whether it has set the correct language option, the language chosen can set in the (settings)
=> (language &input) =>(Language)
The files cannot be downloaded
Confirm the connection between the computer and the player is proper
Confirm whether the memory is full of storage space.
Confirm whether there is any damage in the USB cable.

58
Product Specifications:
Model Number SF550
Screen Size
13.97cm Capacitive Touch Screen with 1080x1920 pixel
Resolution
Screen Operation Capacitive Touch Screen
SIM SIM GSM 4G-3G
Calling/SMS Yes
4G Yes
3G Yes
WIFI Yes

59
Water Resistant
Water Resistance phone subjected to close all connectors
of phone properly; to avoid customer issues
GPS Yes
OS Android OS, v5.1.1 Lollipop
Camera
13 MP Rear main camera and 5MP Front-facing camera,
Digital Front

60
FCC Statement
This equipment has been tested and found to comply with the limits for a
Class B digital device, pursuant to part 15 of the FCC Rules. These limits are
designed to provide reasonable protection against harmful interference in a
residential installation. This equipment generates, uses and can radiate radio
frequency energy and, if not installed and used in accordance with the
instructions, may cause harmful interference to radio communications.
However, there is no guarantee that interference will not occur in a particular
installation. If this equipment does cause harmful interference to radio or
television reception, which can be determined by turning the equipment off
and on, the user is encouraged to try to correct the interference by one or more
of the following measures:
• Reorient or relocate the receiving antenna.

61
• Increase the separation between the equipment and receiver.
• Connect the equipment into an outlet on a circuit different from that to
which the receiver is connected.
• Consult the dealer or an experienced radio/TV technician for help.
Caution: Any changes or modifications to this device not explicitly approved
by manufacturer could void your authority to operate this equipment.
This device complies with part 15 of the FCC Rules. Operation is subject to the
following two conditions: (1) This device may not cause harmful interference, and (2)
this device must accept any interference received, including interference that may
cause undesired operation.

62
Warning
1) This product conforms with standard EN50332. Use careful with the earphone
maybe possible excessive sound pressure from earphones and headphones can cause
hearing loss.
2) The product shall only be connected to a USB interface of version USB2.0
Please use common USB Cable or original charger, Otherwise, It may result to danger.
When you use a charger for charging, adapter shall be installed near the equipment
and shall be easily accessible.
Manufacturer of Power Adapter: KUANTECH CO LTD
Model: KSA29B0500200D5
Parameters of Power adapter: INPUT: AC 100`240V 50/60Hz 0.5A
OUTPUT: 5V/2A

63
3) Extreme Operating Temperature : -20~+45℃
4) For 5G WIFI application, The device is designed to operate only in slave mode and
can not operate in master mode. The device is defined as a client device for 5G WIFI
application. The device is designed to use indoor only (for 5G WIFI application).
CAUTION: RISK OF EXPLOSION IF BATTERY IS REPLACED BY AN
INCORRECT TYPE. DISPOSE OF USED BATTERIES ACCORDING TO THE
INSTRUCTIONS.

64
Specific Absorption Rate (SAR) information:
This phone meets the government's requirements for exposure to radio waves. The
guidelines are based on standards that were developed by independent scientific
organizations through periodic and thorough evaluation of scientific studies. The
standards include a substantial safety margin designed to assure the safety of all
persons regardless of age or health.
FCC RF Exposure Information and Statement The SAR limit of USA (FCC) is 1.6
W/kg averaged over one gram of tissue. Device types: LTE Phone (FCC ID:
SS4SF550) has also been tested against this SAR limit. This device was tested for
typical body-worn operations with the back of the phone kept 10mm from the body.
To maintain compliance with FCC RF exposure requirements, use accessories that
maintain a 10mm separation distance between the user's body and the back of the

65
phone. The use of belt clips, holsters and similar accessories should not contain
metallic components in its assembly. The use of accessories that do not satisfy these
requirements may not comply with FCC RF exposure requirements, and should be
avoided.
Body-worn Operation
This device was tested for typical body-worn operations. To comply with RF exposure
requirements, a minimum separation distance of 10mm must be maintained between
the user’s body and the handset, including the antenna. Third-party belt-clips, holsters,
and similar accessories used by this device should not contain any metallic
components. Body-worn accessories that do not meet these requirements may not
comply with RF exposure requirements and should be avoided. Use only the supplied
or an approved antenna.

66
Declaration Of Conformity
Hereby, BLUEBIRD INC. declares that this LTE Phone is in compliance with the
essential requirements and other relevant provisions of directive 1995/5/EC.