BOSCH Dishwasher Manual L0304245
User Manual: BOSCH BOSCH Dishwasher Manual BOSCH Dishwasher Owner's Manual, BOSCH Dishwasher installation guides
Open the PDF directly: View PDF ![]() .
.
Page Count: 32
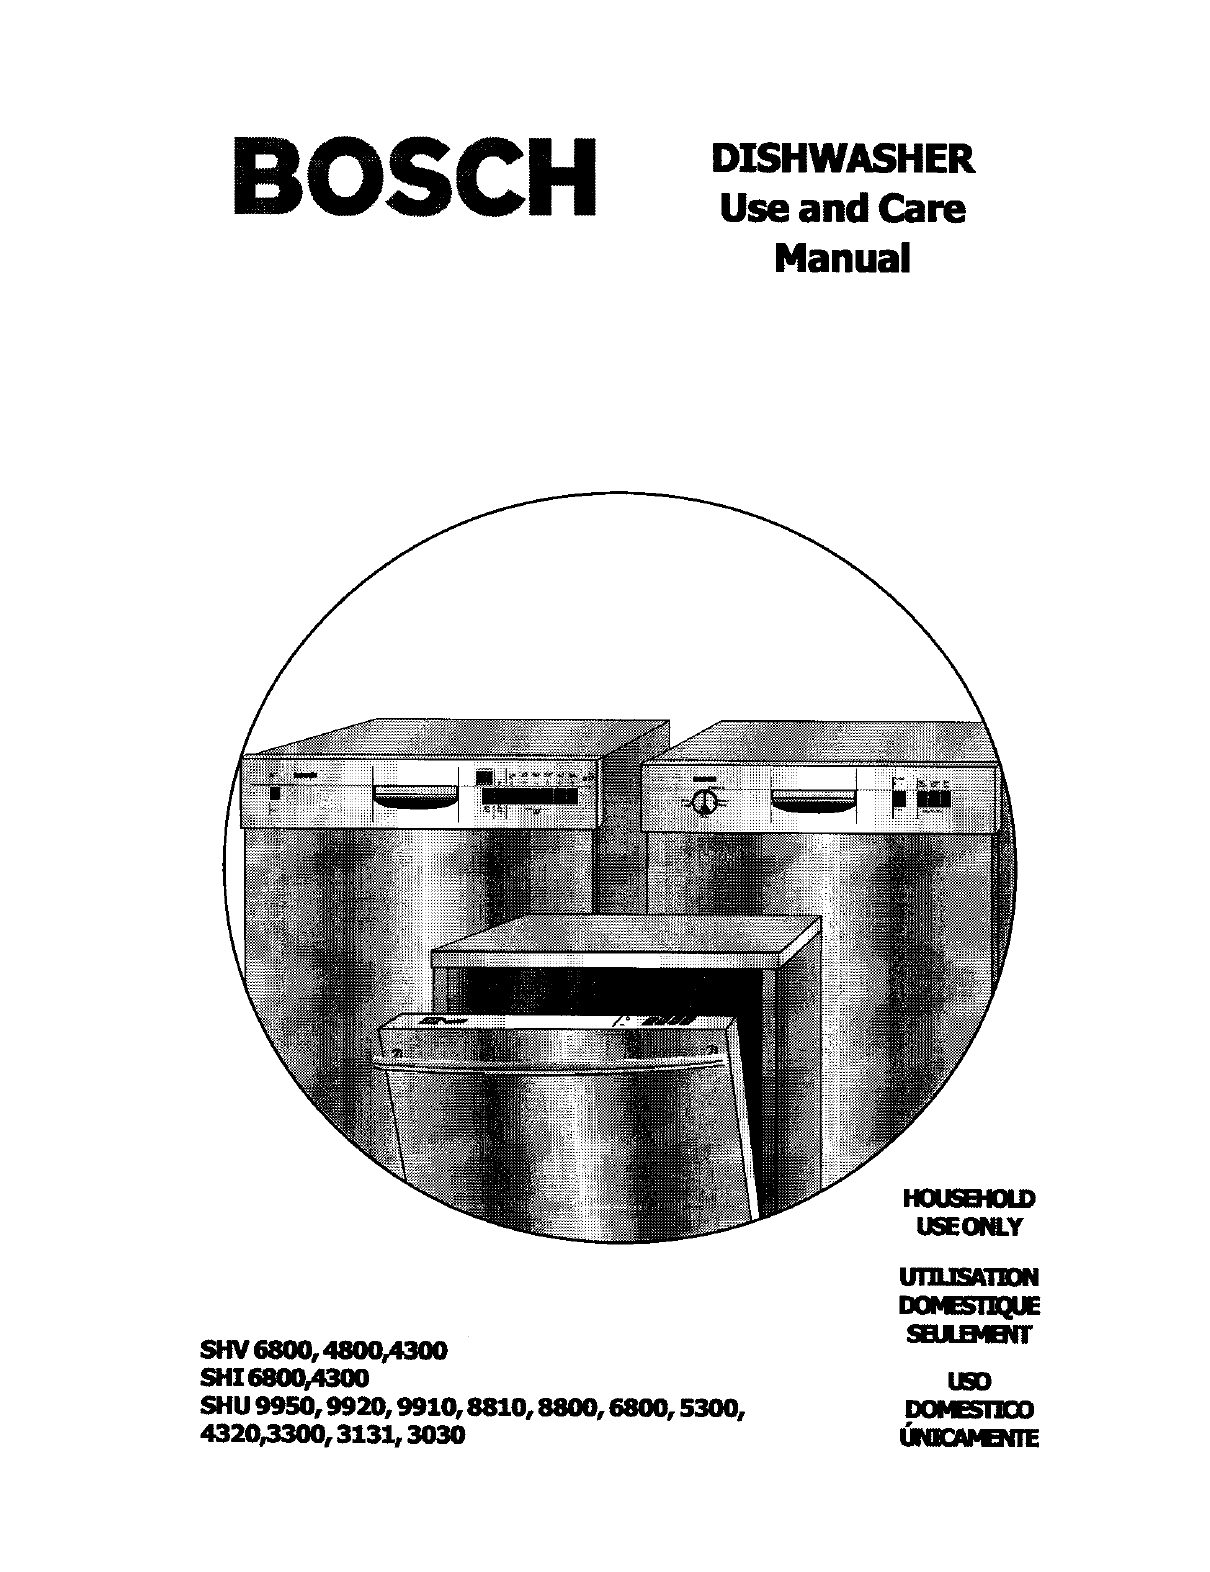
BOSCH DXSHWASHER
Use and Care
Manual
SHV 6800, 4800,4300
SHZ_N0,4300
SHU _50, €_20, 9910, 8810, 8800,16800, 5300r
4320,3300, 3131, 3030
HOUSBt0LD
U6EONLY
DOMem'JnQ_
DOHESI'JE_

CONGRATULA'rlONS!
Congratulations, and Thank You from B_H*
ainiiiii
Enjoy!
r as well
ii_i¸ _
iiiii_iiii
www.boschappliances.com ENGI TSH - 1
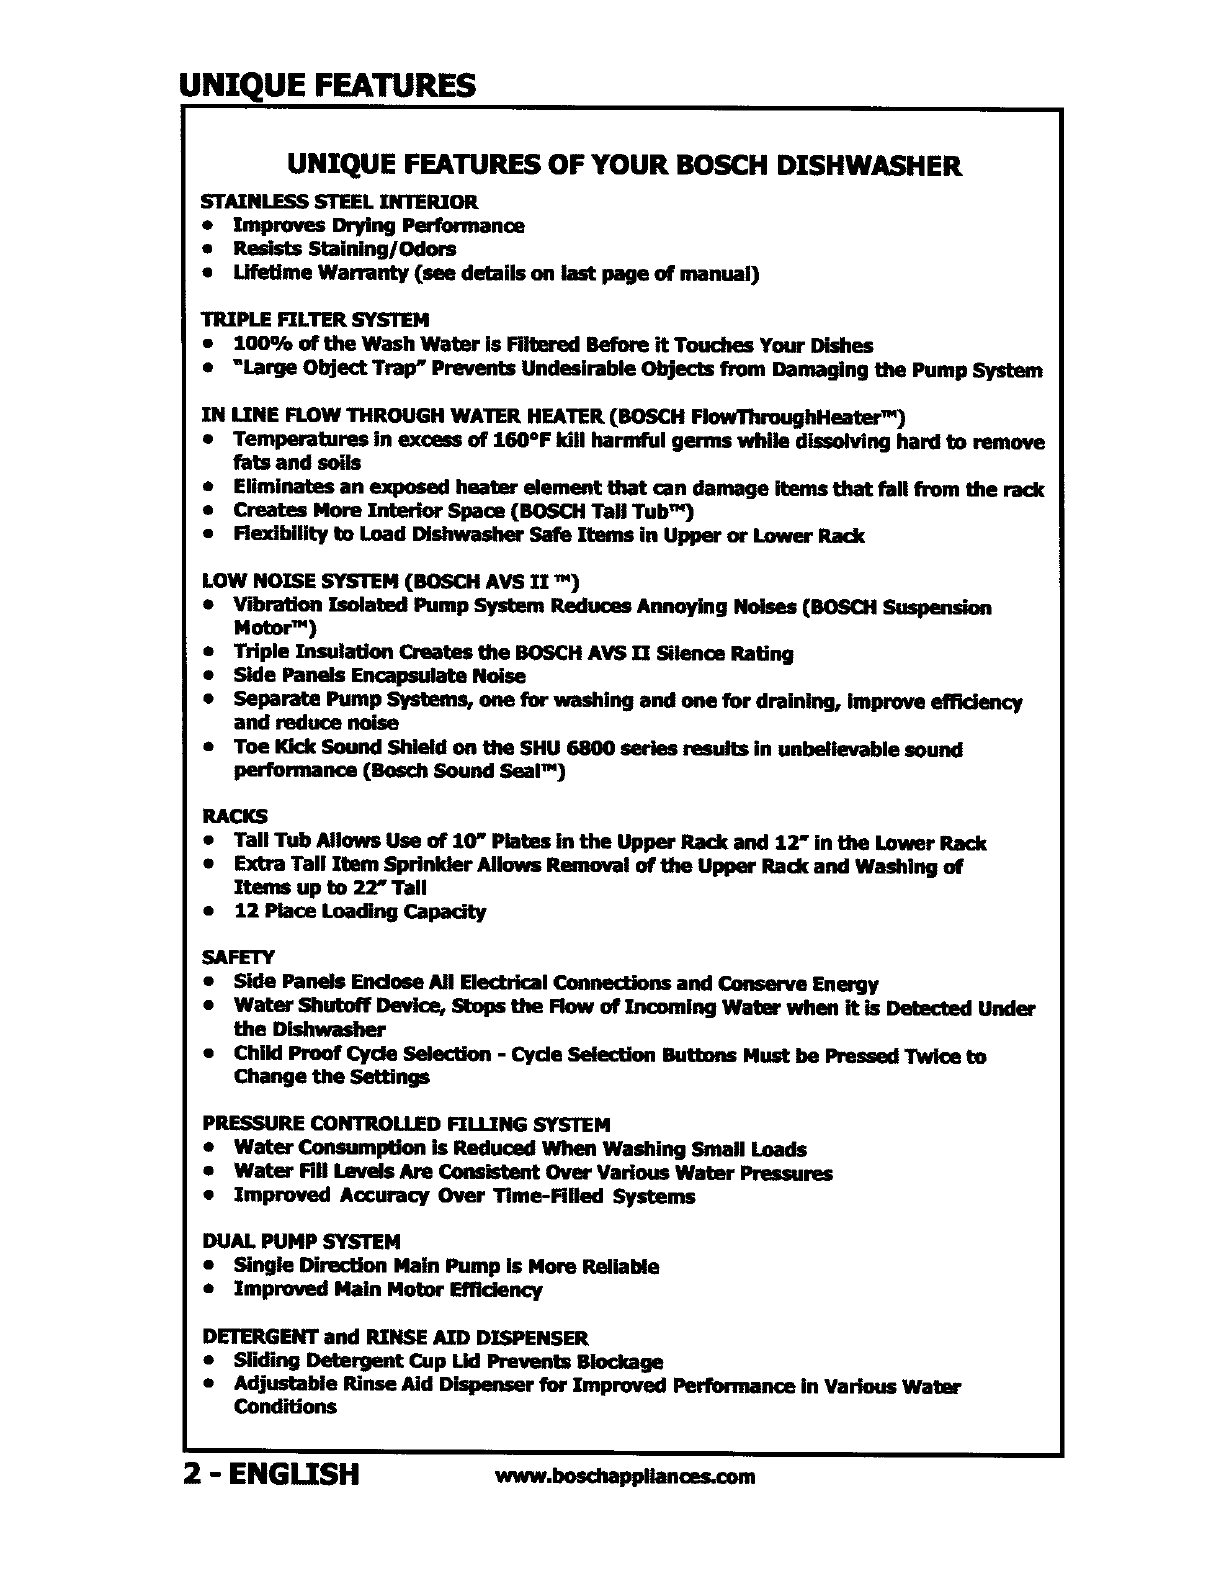
UNIQUE FEATURES
UNIQUE FEATURES OF YOUR BOSCH DISHWASHER
STAXNLESS STEEL IN/1ERXOR
• Improves Drying Performance
• Resists Staining/Odors
•LifeUme Warranty (see details on last page of manual)
TRIPLE FILTER SYSTEM
•100% of the Wash Water is FUtered Before it Touches Your Dishes
•"Large Object Trap" Prevents Undesirable Objects from Damaging the Pump System
IN LINE FLOW THROUGH WATER HEATER (BOSCH FlowThroughHeator TM)
•Temperatures in excess of 160OF kill harmful germs while dissolving hard to remove
fats and soils
•Eliminates an exposed heater element that can damage items that fall from the rack
•Creates More _Space (BOSCH Tall Tub")
•Flexibility to Load Dishwasher Safe Xtoms in Upper or Lower Rack
LOW NOSE SYSTEM (BOSCH AVS II .4)
•Vibration Isoiatod Pump System Reduces Annoying Noises (BOSCH Suspension
Motor:")
•Triple Insulation Creates the BOSCH AVS IX Silence RaUng
•Side Panels Encapsulate Noise
•Separate Pump Systems, one for washing and one for draining, Improve efficiency
and reduce noise
•Toe Kick Sound Shield on the SHU 6800 series rseuits in unbelievable sound
performance (Bosch Sound Seal--)
RACKS
•Tall Tub Allows Use of 10" Plates in the Upper Rack and 12" in the Lower Rack
•Extra Tall ]tom Sprinkler Allows Removal of the Upper Rack and Washing of
Items up to 2Z" Tall
•12 Place Loading Capacity
SAFETY
•Side Panels Enclose All Electr_:al ConnecUons and Conserve Energy
•Watar Shutoff Devicee Stops the Flow of Zncoming Water when it is Detected Under
the Dishwesher
•ChiM Proof Cycle SelecUon -Cyde Selection Buttons Must be Pressed Twice to
Change the Settings
PRESSURE CONTROLLED FILI2NG SYSTEM
•Water Consumption is Reduced When Washing Small Loads
•Water Fill Levels Are Consistent Over Various Water Pressures
•Tmproved Accuracy Over Time-Filled Systems
DUAL PUMP SYSTEM
• Single Direction Main pump is More RellaMe
•improved Main Motor Efficiency
DETERGENT and RINSE AID DISPENSER
•Sliding Detergent Cup Lid Prevents Blockage
•Adjustable Rinse Aid Dispenser for Improved Performance in Various Water
CondiUons
2 - ENGI TSH www.boschappliances.cem
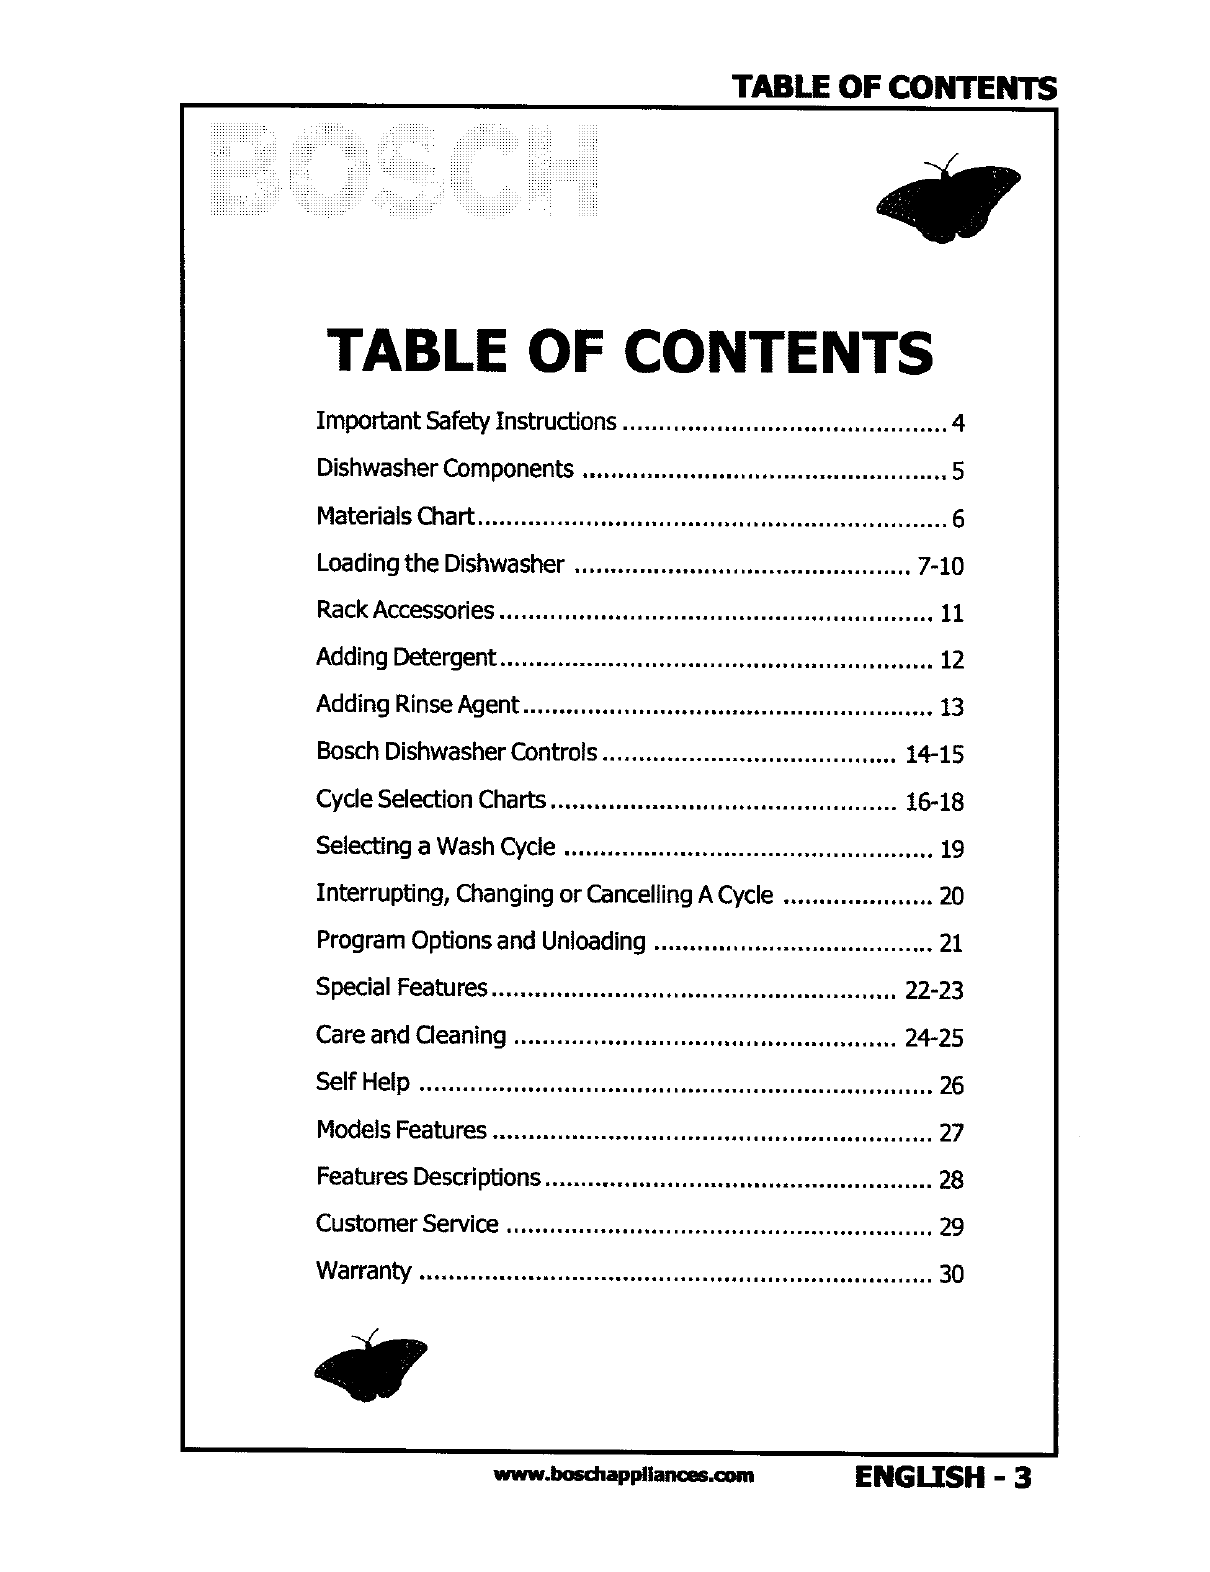
TABLE OF CONTENTS
TABLE OF CONTENTS
Important Safety Instructions ............................................. 4
Dishwasher Components ................................................... 5
Materials Chart ................................................................. 6
Loading the Dishwasher ............................................... 7-10
Rack Accessories ............................................................ ii
Adding Detergent ............................................................ 12
Adding Rinse Agent ......................................................... 13
BoschDishwasher controls ......................................... 14-15
CycleSelectionCharts................................................ 16-18
Selectinga Wash Cycle ................................................... 19
Interrupting, Changingor CancellingA Cycle ..................... 20
ProgramOptionsand Unloading ....................................... 21
SpecialFeatures........................................................ 22-23
Care and Cleaning ..................................................... 24-25
Self Help ....................................................................... 26
Models Features ............................................................. 27
Features Descriptions...................................................... 28
Customer Service ........................................................... 29
Warranty ....................................................................... 30
ww_.b_hap_,a,o_.om ENGLISH - 3
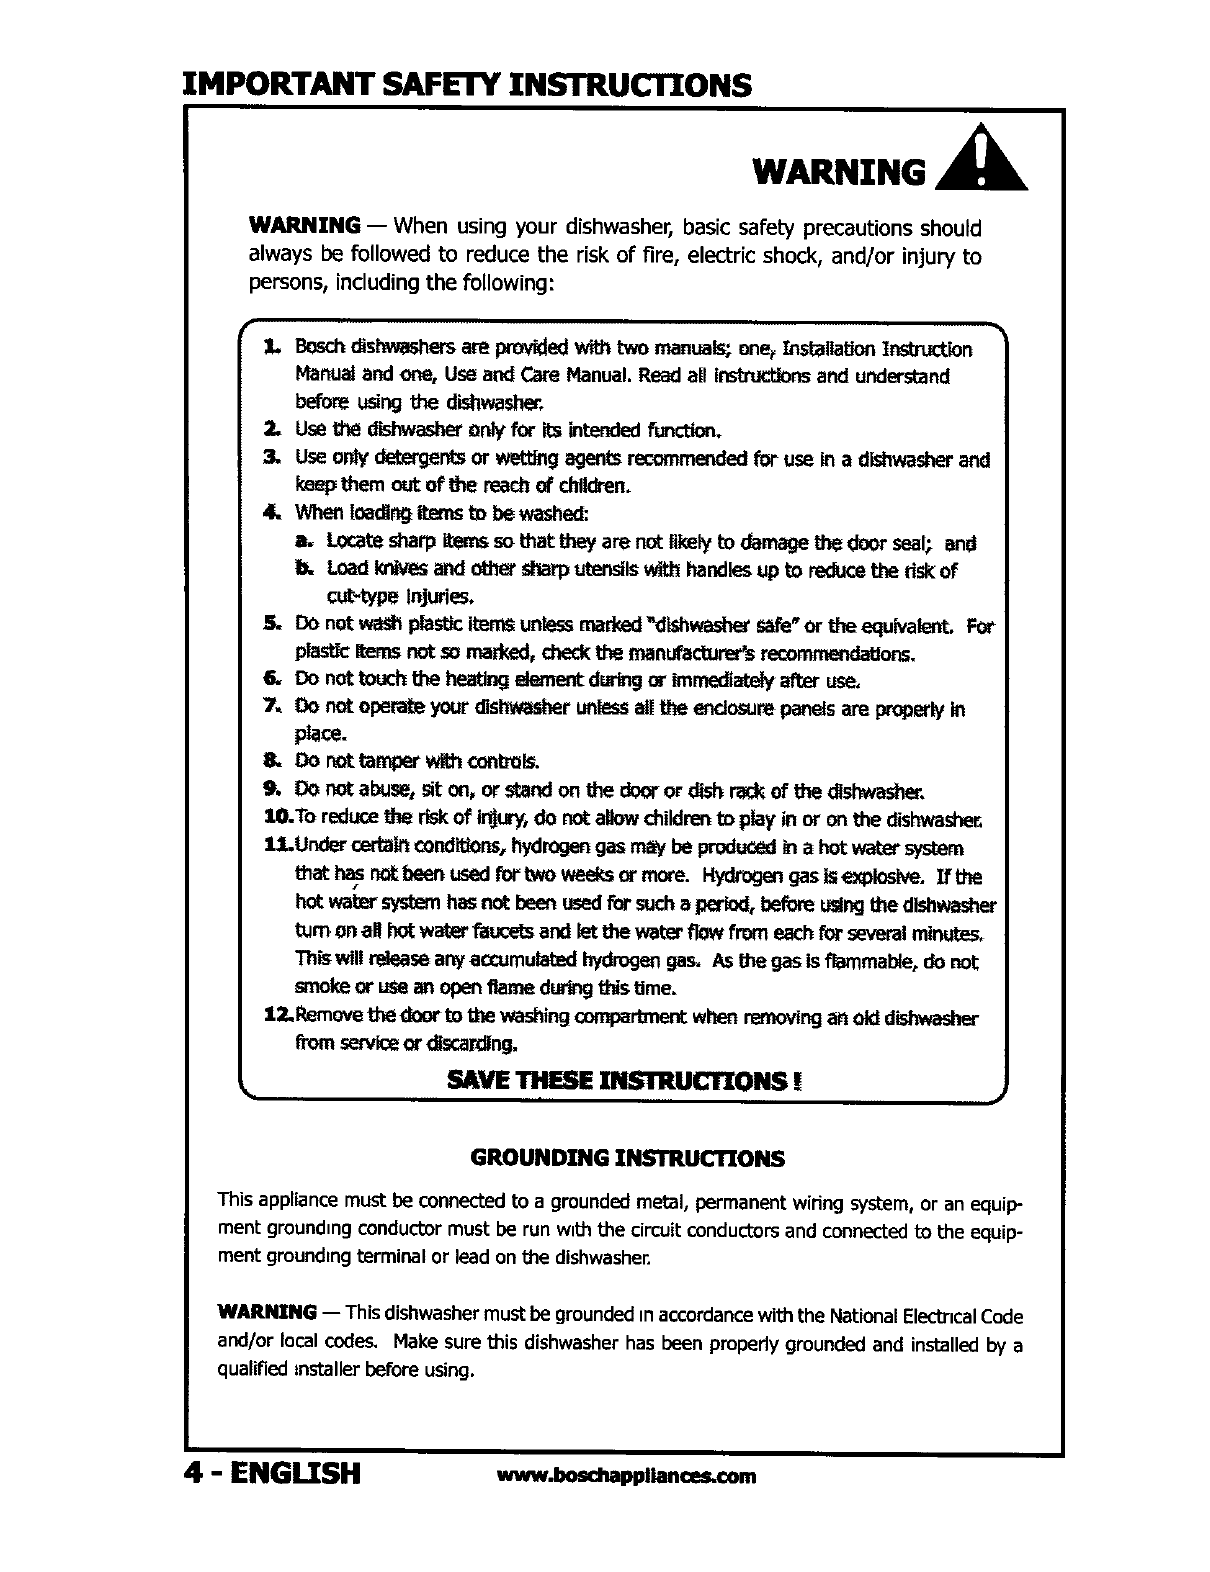
IMPORTANT SAFETY INSTRUCTIONS
WARNING
WARNING -- When using your dishwasher, basic safety precautions should
always be followed to reduce the risk of fire, electric shock, and/or injury to
persons, including the following:
1. Boschdishwashersare providedwt_ two manuals; onesb_sta,ation Instruction
Hanual and one, Use and Care Hanual. Read all I_ and understand
beforeusingthe dishward_er,
2. Use the dishwashe_only for its intended fonction.
3. Use ordy detergents or wetting agents recommended for use in a dishwasher and
keep them out of _e reach of children.
4, When loadift_3items 1_,lie washed:
tL Locate sharp items so thai: they are not ii_ly to damage _door seal; and
b. Load knivesand other sharp utensilswith handlesup to reduce the fl_ of
cut-type Injuries.
5. DO not wa_ plastic items untessmarked_'dtshwashe¢safe"or the equivalent. FOr
plastic bins not so marked, check the manufacturer's r_.
6. Do not to_h t_ heating etement duringor immediately after use,
7, Oo not opera_ your dishwasher unlessalltheenclosurepanels are properly in
place.
&Do r_t tamper with o0ntmls.
9. Do not abuse, sit on, or stand on the door or dish rack of the dishwasher,
ll_To reduce the ri_ of In_, do not allow childrento play in or on the dishwashe_
1J..Und_ certa_ condP_ons,hydrogengas may be producedin a hot water system
Itlat ha_snotbeon usedtor two weeks or more. Hydrogengaslsexpinslve. Ifthe
hot water sys_m has not been usedfor suchaperiod, before u_ng the dishwater
turn on all hot wafterPar_s and let the water flow from each for severalminutes_
This will release any aocumulated hydrogengas. As the gasls flammable, do not
smoke or use an open fl_me duringthis Ume.
l_Remove the _to _washingcen"4_rbxiertwhen r_'r_ovinga_ old dishwasher
from serviceor (l_;cal'ding,
SAVE THESE INSTRUCTIONS !
GROUNDING INSTRUCTIONS
This appliance must be connectedto a grounded metal, permanent winng system, or an equip-
ment ground=ngconductormust be run wlt_ the circuitconductors and connectedto the equip-
ment groundingterminal or lead on the dishwasher.
WARNING -- This dishwashermust be groundedin accordancewith the NationalElecbrlcalCode
and/or local cedes. Hake sure this dishwasherhas been pmpedy grounded and installed by a
qualified =nstallerbefore using.
4 - ENGLISH www.boeJ ppllance €om
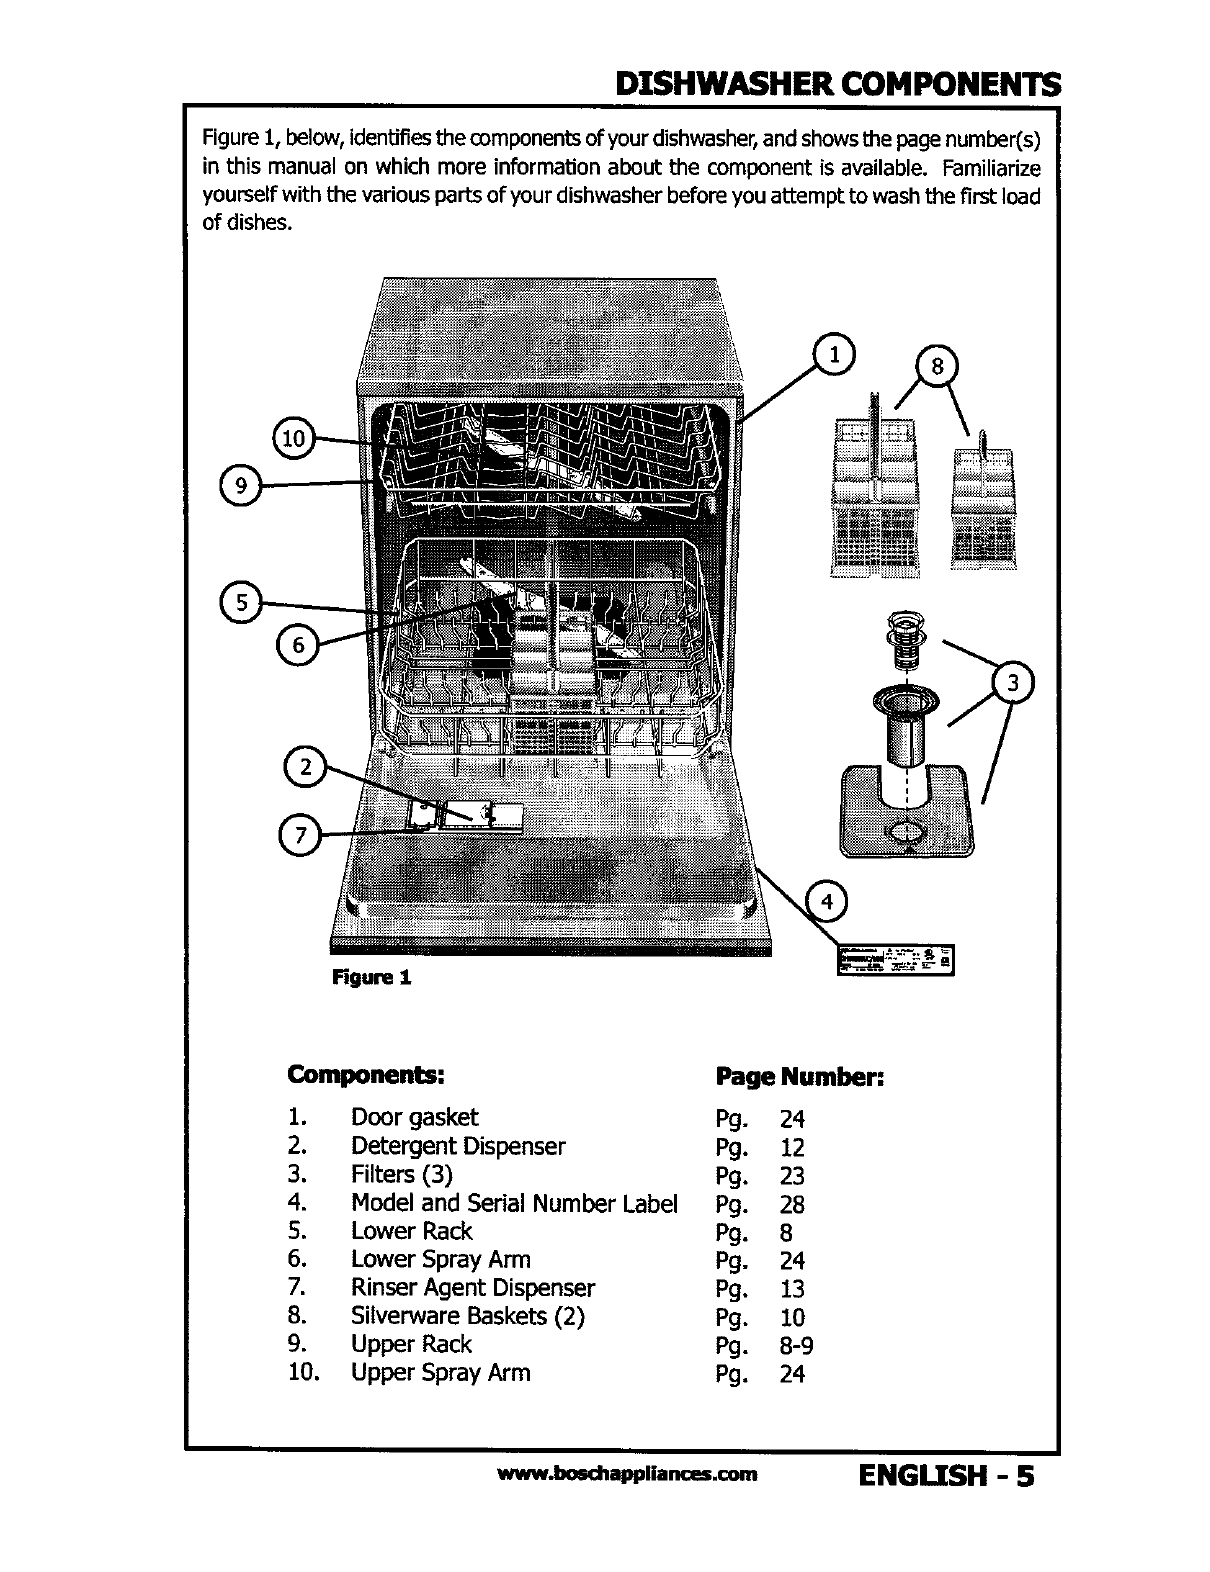
DZSHWASHER COMPONENTS
Figure1, below, identifies the components of your dishwasher, and shows the page number(s)
in this manual on which more informalion about the component is available. Familiarize
yourself with the various parts of your dishwasher before you attempt to wash the first load
of dishes.
Figure I
Components: Page Number:
1. Door gasket Pg. 24
2. Detergent Dispenser Pg. 12
3. Filters (3) Pg. 23
4. Model and Serial Number Label Pg. 28
5. Lower Rack Pg. 8
6. Lower Spray Arm Pg. 24
7. Rinser Agent Dispenser Pg. 13
8. Silverware Baskets (2) Pg. 10
9. Upper Rack Pg. 8-9
10. Upper Spray Arm Pg. 24
www.bo_happ.an_.o=m ENGI TSH - 5
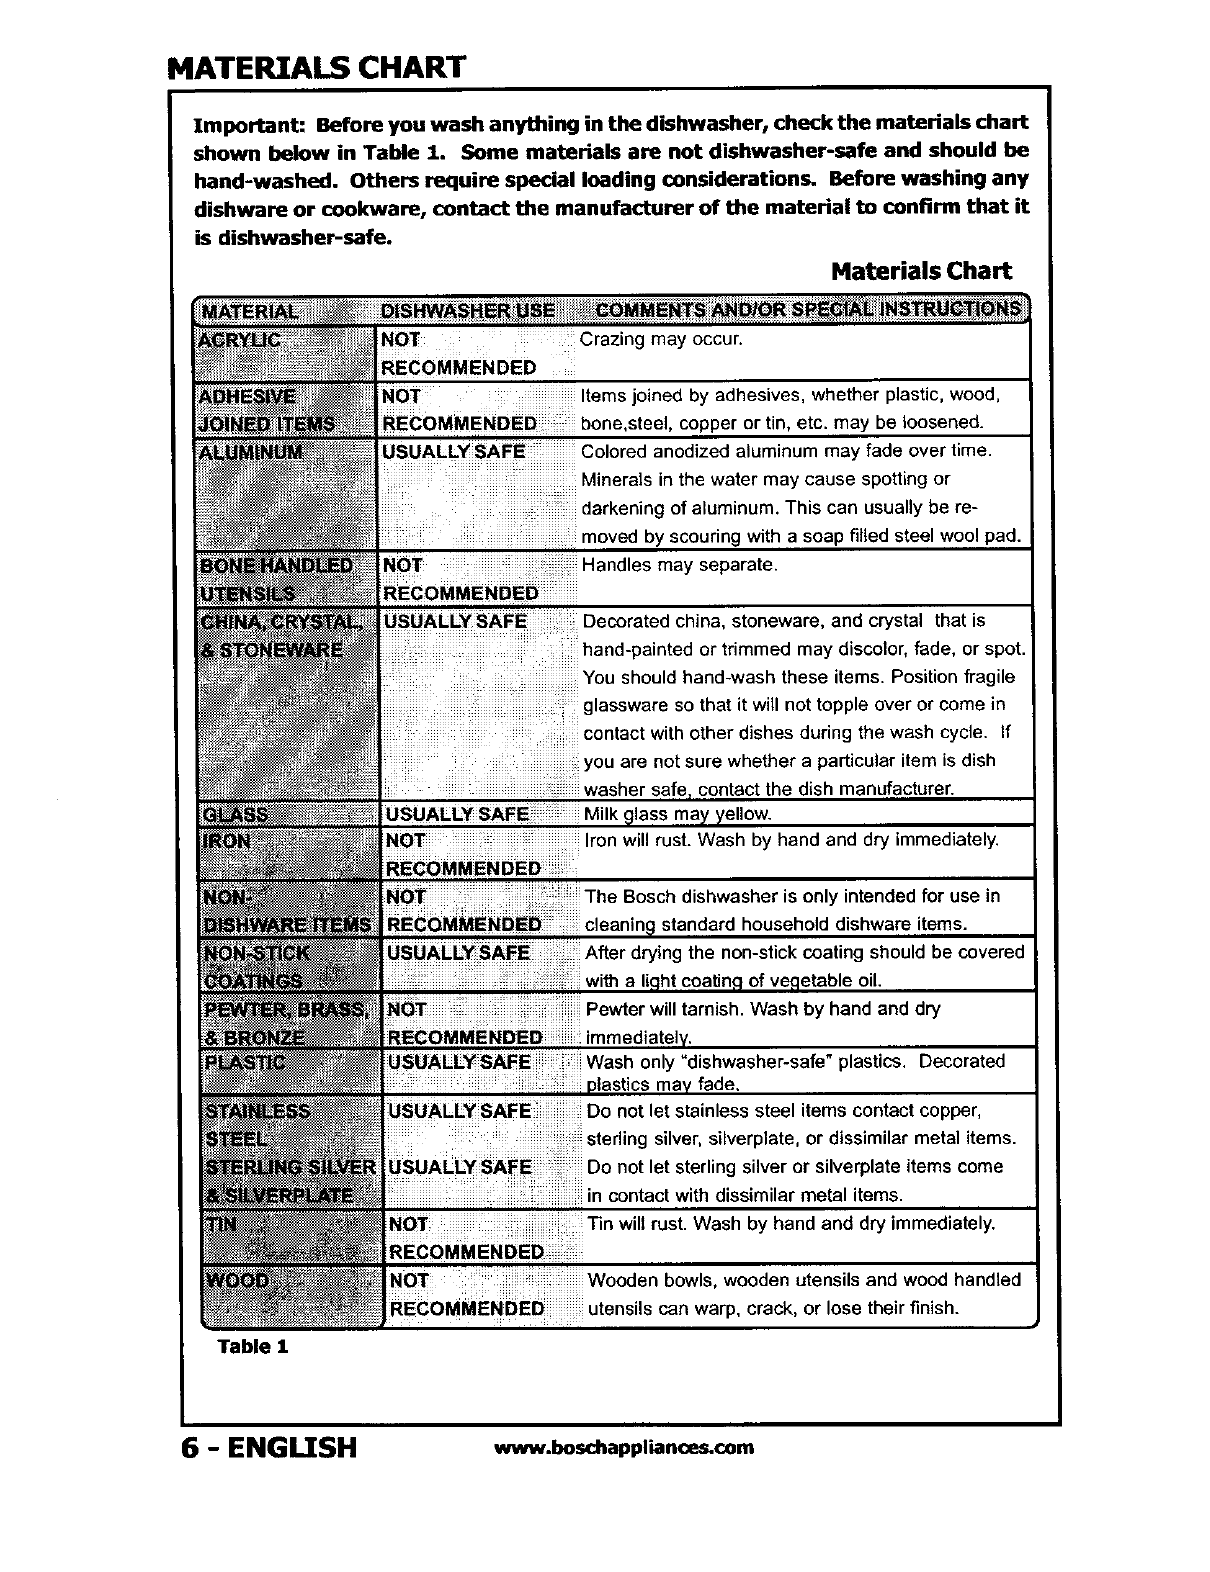
MATERIALS CHART
Important: Before you wash anything in the dishwasher, check the materials chart
shown below in Table 1. Some materials are not dishwasher-safe and should he
hand-washed. Others require special loading considerations. Before washing any
dishware or cookware, contact the manufacturer of the material to confirm that it
is dishwasher-safe.
Materials Chart
NOT Crazing may occur.
RECOMMENDED
NOT Items joined by adhesives, whether plastic, wood,
RECOMMENDED bone,steel, copper or tin, etc. may be loosened.
USUALLY SAFE Colored anodized aluminum may fade over time.
Minerals in the water may cause spotting or
darkening of aluminum. This can usually be re-
moved by scouring with a soap filled steel wool pad.
NQT Handles may separate.
USUALLY SAFE Decorated china, stoneware, and crystal that is
hand-painted or trimmed may discolor, fade, or spot.
You should haod-wash these items. Position fragile
glassware so that it will not topple over or come in
contact with other dishes during the wash cycle, if
you are not sure whether a particular item is dish
safe contact the dish manufacturer.
Milk glass may yellow.
Iron will rust. Wash by hand and dry immediately.
NOT
RECOMMENDED
NOT Wooden bowls, wooden utensils and wood handled
RECOMMENDED utensils can warp, crack, or lose their finish.
Table 1
The Bosch dishwasher is only intended for use in
standard household dishware items.
USUALLY SAFE After drying the non-stick coating should be covered
wi_ a I oil.
NOT Pewter will tarnish. Wash by hand and dry
RECOMMENDED :immediately.
USUALLYSAFE Wash only "dishwasher-safe" plastics. Decorated
plastics may fade.
USUALLY SAFE Do not let stainless steel items contactcopper,
sterling silver, silverplate, or dissimilarmetal items.
USUALLY SAFE Do not let sterling silver or silverplate items come
in contactwith dissimilarmetal items.
Tin will rust. Wash by hand and dry immediately.
6 - ENGLISH www.boschappliances.com
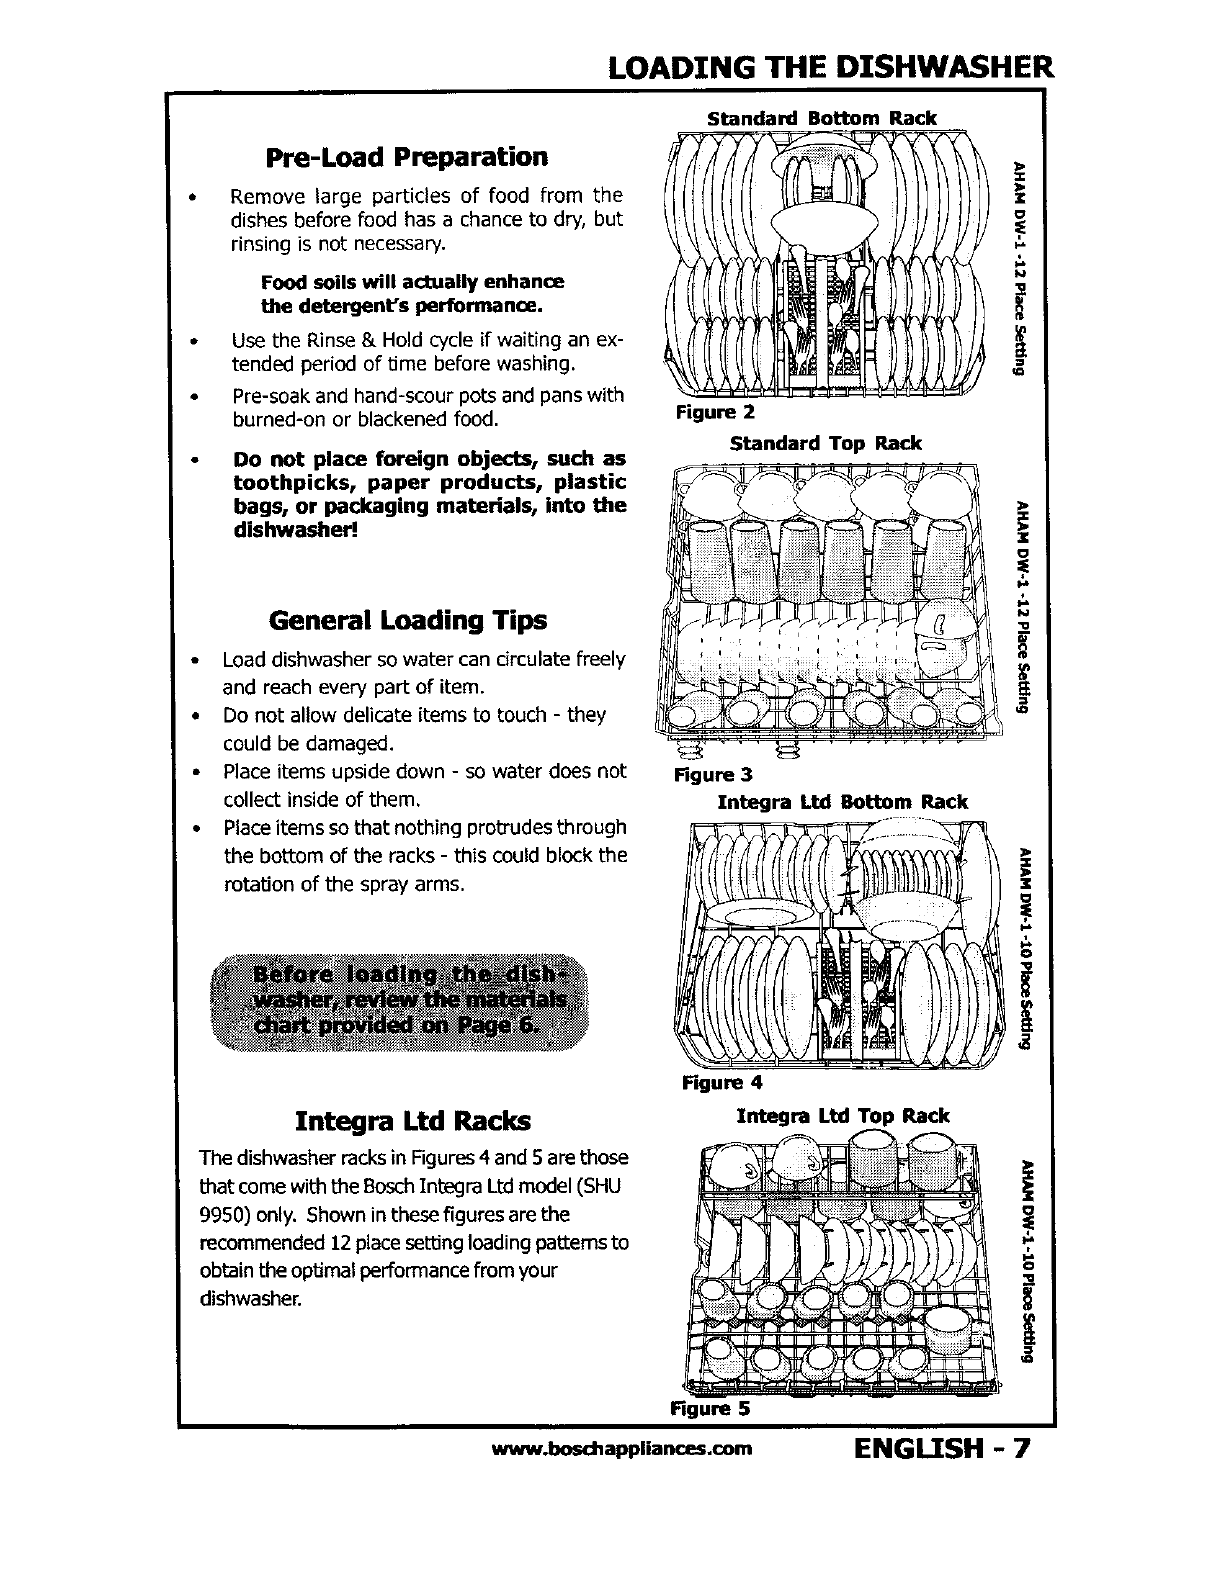
Pre-Load Preparation
Remove large particles of food from the
dishes before food has a chance to dry, but
rinsing is not necessary.
Food soils will actually enhance
the detergent's performance.
Use the Rinse & Hold cycle if waiting an ex-
tended period of time before washing.
Pre-soak and hand-scour pots and pans with
burned-on or blackened food.
Do not place foreign objects, such as
toothpicks, paper products, plastic
bags, or packaging materials, into the
dishwasher!
LOADING THE DISHWASHER
Standard Bottom Rack
Figure 2
Standard Top Rack
General Loading Tips
• Load dishwasher so water can circulate freely
and reach every part of item.
• Do not allow delicate items to touch - they
could be damaged.
• Place items upside down - so water does not
collect inside of them.
• Place items so that nothing prob'udes through
the bottom of the racks - this could block the
rotation of the spray arms.
Integra Ltd Racks
The dishwasher racks in Figures 4 and 5 are those
that come with the Bosch Integra Lid model (SHU
9950) only. Shown in these figures are the
recommended 12 place setting loading patterns to
obtain the optimal performance from your
dishwasher.
Figure 3
Integra Ltd Bottom Rack
Figure 4
Integra Ltd Top Rack i
i
t
Figure 5
www.boschappliances.com ENGLISH - 7
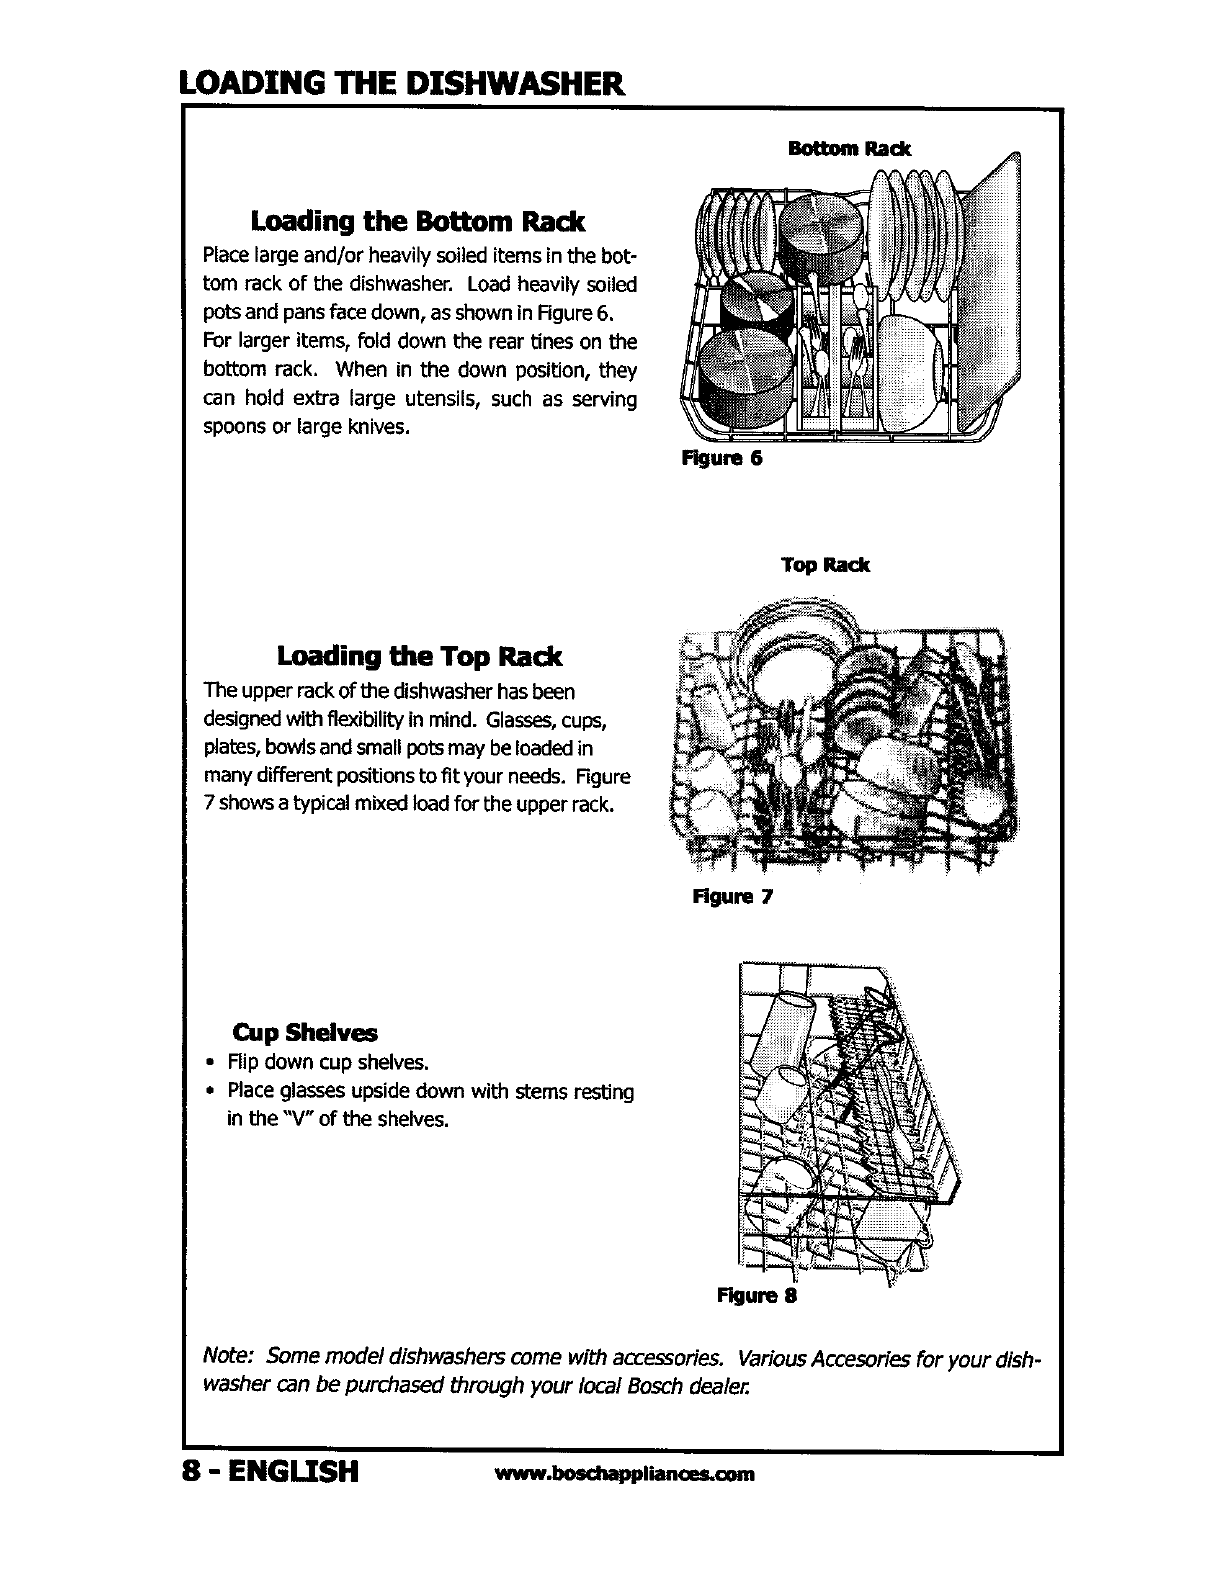
LOADTNG THE D][SHWASHER
Figure 6
Figure 7
Bottom Rack
Loading the Bottom Rack
Place large and/or heavily soiled items in the bot-
tom rack of the dishwasher. Load heavily soiled
pots and pans face down, as shown in Figure 6.
For larger items, fold down the rear tines on the
bottom rack. When in the down position, they
can hold extra large utensils, such as serving
spoons or large knives.
Top Rack
Loading the Top Rack
The upper rack of the dishwasher has been
designed with flexibility in mind. Glasses,cups,
plates, bowls and small pots may be loaded in
many different positions to fit your needs. Figure
7showsa typical mixed load for the upper rack.
Cup Shelves
• Flipdowncupshelves.
• Placeglassesupsidedown with stemsresting
in the "V" of the shelves.
Figure 8
Note: Some model dishwashers come with accessories. Various Accesories for your dish-
washer can be purchased through your local Bosch dealer.
8-ENGI TSH wv,w.boschapp.an=Lcom
LOADING THE DISHWASHER
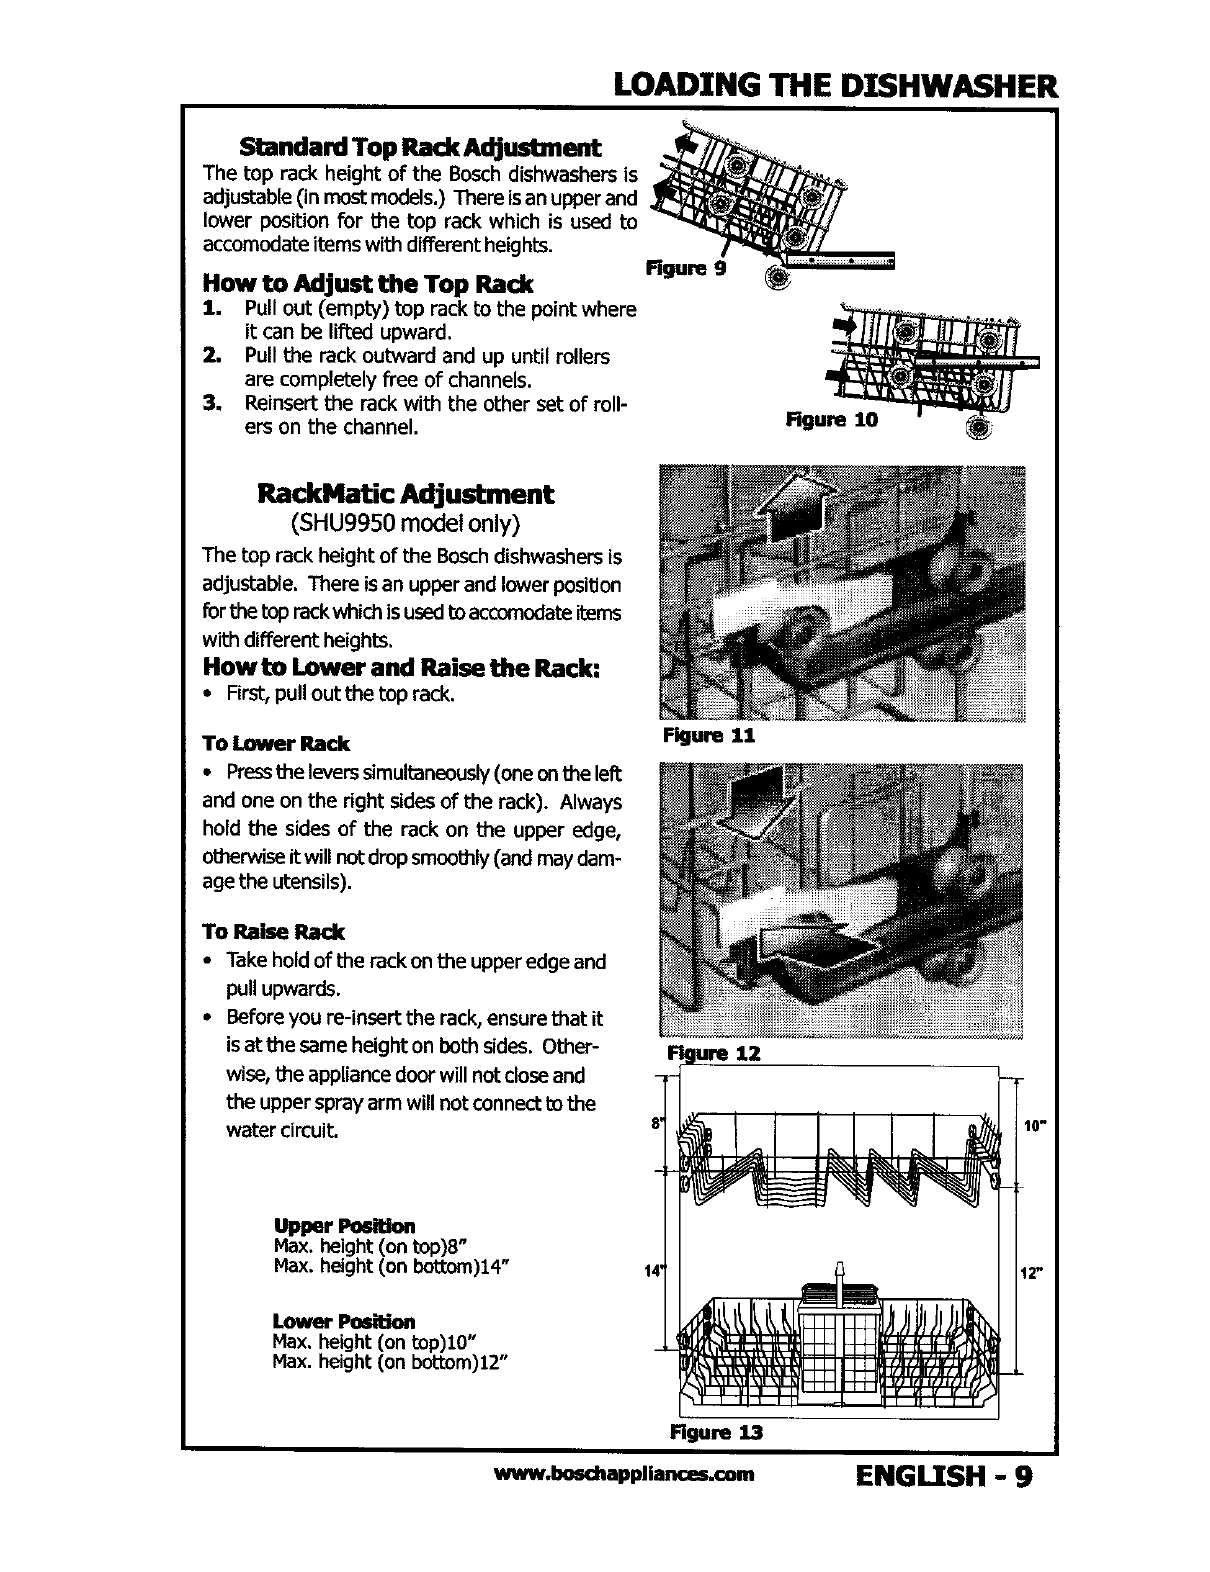
Standard Top Rack Adjustment
The top rack height of the Bosch dishwashers is
adjustable (in most models.) There is an upper and
lower position for the top rack which is used to
accomodate items with different heights.
How to Adjust the Top Rack
1. Pull out (empty) top rack to the point where
it can be lifted upward.
2. Pull the rack outward and up until rollers
are completely free of channels.
3, Reinsert the rack with the other set of roll-
ers on the channel.
figure 9
Figure 10
RackHaUc Adjustment
(SHU9950 model only)
The top rack height of the Bosch dishwashers is
adjustable. There is an upper and lower posildon
forthe top rackwhich is used to accomodate items
with different heights.
How to Lower and Raise the Rack:
•First, pull outthe top rack.
To lewer Rack
•Pressthe levers simultaneously (one on the left
and one on the right sidesof the rack). Always
hold the sides of the rack on the upper edge,
ot_rwise it will not drop smoothly (and may dam-
age the utensils).
To Raise Rack
•Take hold of the rack on the upper edge and
pull upwards.
•Before you re-insert the rack, ensure that it
is _: the same height on both sides. Other-
wise, the appliance door will not closeand
the upper spray arm will not connect to the
water circuit.
Upper Position
Max. height (on top)8"
Max. height (on bottom)14"
Lower Position
Max. height (on top)10"
Max. height (on boltom)12"
Figure 11
Rgum 13
www.boschappliances.com ENGI TSH - 9
LOADING THE DzSHWASHER
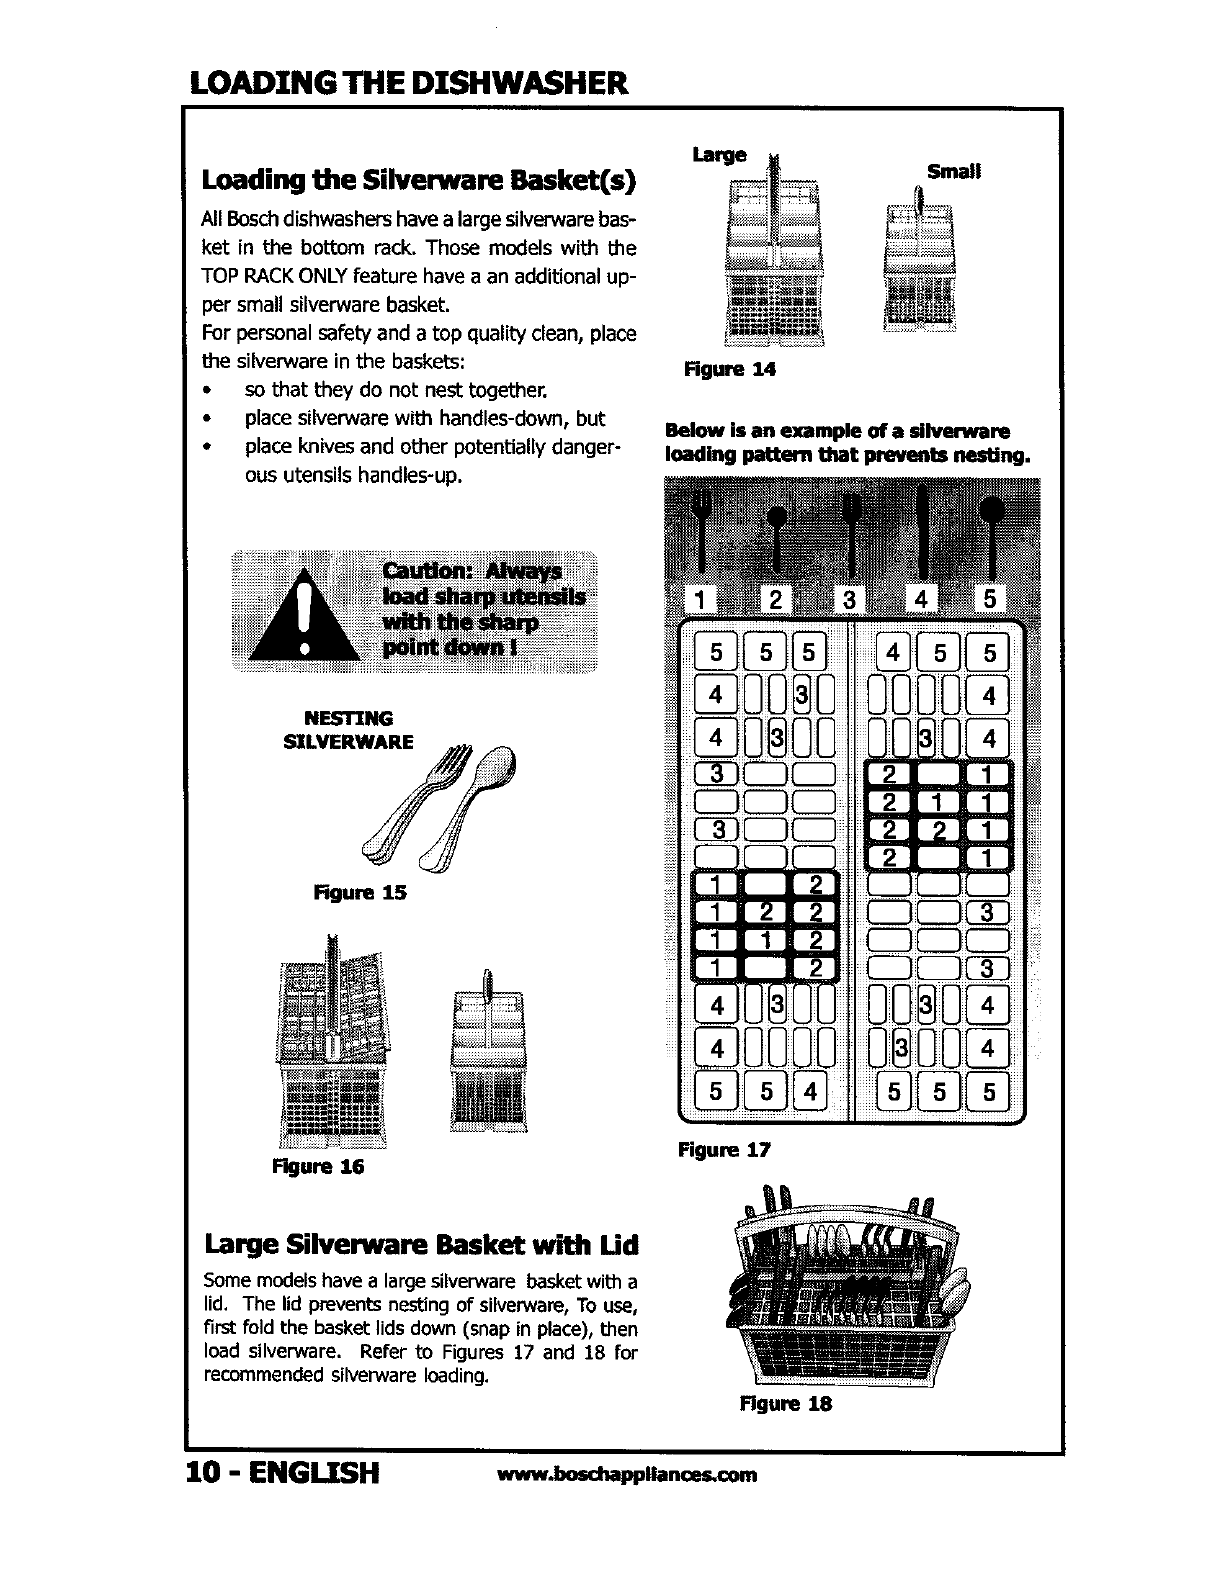
Loading the Silverware Basket(s)
All Bosch dishwashers have a large silverware bas-
ket in the bottom rack. Those models with the
TOP RACK ONLY feature have a an additional up-
per small silverware basket.
For personal safety and a top quality clean, place
the silverware in the baskets:
•so that they do not nest together.
• place silverware with handles-down, but
• place knives and other potentially danger-
ous utensils handles-up.
Large
Rgure 14
Small
Below is an example of a silverware
loading pattern that prevents nesting.
NESTING
SXLVERWARE
Figure 15
Figure 16 figure 17
Figure 18
Large Silverware Basket with Ud
Some models have alarge silverware basket with a
lid. The lid prevents nesting of silverware, To use,
first fold the basket lids down (snap in place), then
load silverware. Refer to Figures 17 and 18 for
recommended silverware loading.
10 - ENGI TSH www.boschapp|ianceLcom
RACKACCESSORIES
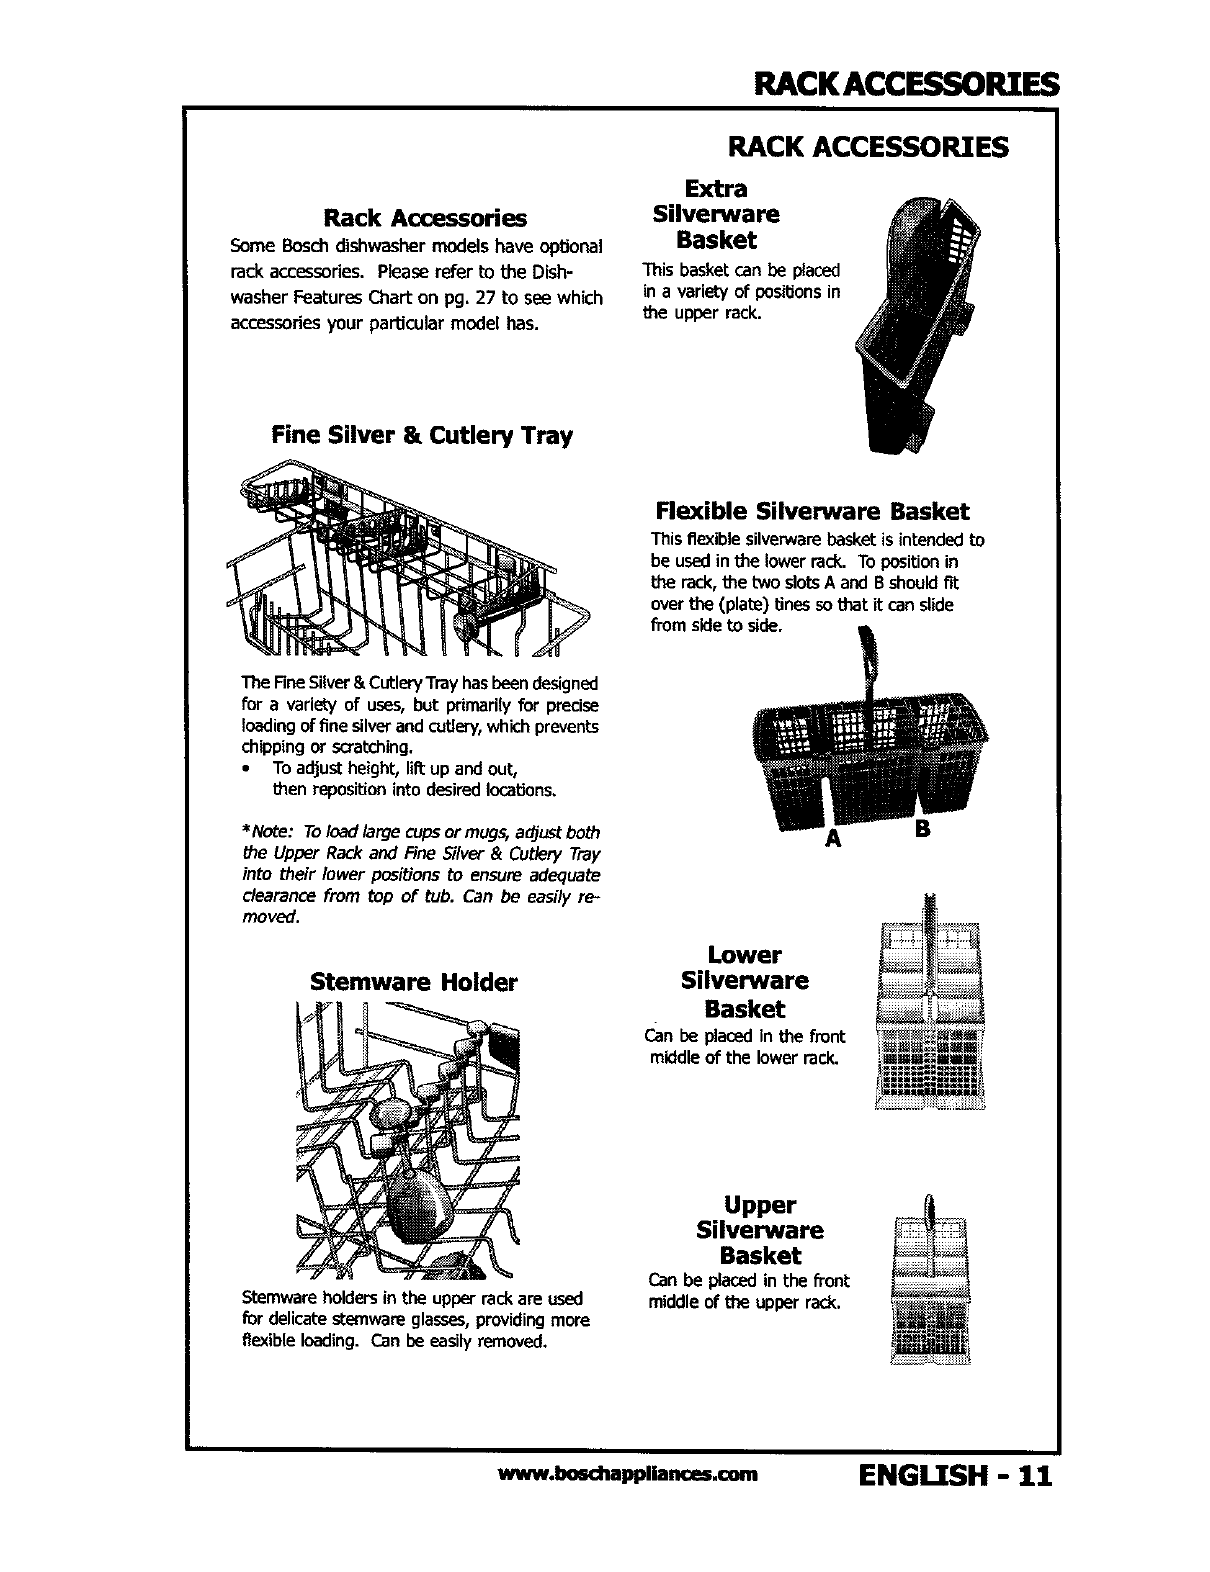
Rack Accessories
Some Bosch dishwasher models have optional
rack accessohes. Please refer to the Dish-
washer Features Chart on pg. 27 to see which
accessories your parUcular model has.
RACK ACCESSORIES
Extra
Silverware
Basket
This basket can be placed
in a variety of positionsin
the upper rack.
Fine Silver & Cutlery Tray
Flexible Silverware Basket
This flexible silverware basket is intended to
be used in the lower rack. To position in
the rack, the two slotsA and B shouldfit
over the (plate) tines so that it can slide
from side to side.
The FineSilver& CutleryTray hasbeen designed
for a variety of uses, but primarily for precise
loading of fine silverand cutlery,which prevents
chipping or scratching.
•Toadjust height, lie up and out,
then reposition into desired locations.
*Note: Toload large cups or mugs, adjust both
the Upper Rack and Fire Silver &Cutlery Tray
into their lower positions to ensure adequate
clearance from top of tub. Can be easily re-
moved.
Stemware Holder
A
Lower
Silverware
Basket
Can be placed in the front
middleof the lower rack.
B
Stemware holdersin the upper rack are used
for delicatestemware glasses,providing more
flexible loading. Can be easily removed.
Upper
Silverware
Basket
Can be placed in the front
middle of the upper rack.
www.boschappliances,com ENGU[SH -11

ADDING DETERGENT
Selecting the Right Detergent
Use only dishwashing detergent in your Bosch dish-
washer. It is highly recommended to use powder
detergent that DOES NOT contain a drying agent
additive. Use of other types of detergents may re..................
suit in excessive suds. Concentrated detergents
usuallycall for lower usage than standard detergents.
Please refer to Table 2 for recommended detergent
usage.
Filling the
Detergent Dispenser
1. Locate the detergent dispenser on the inside
door of the dishwasher (see Figure 1).
2. Open the detergent dispenser cover by push-
ing the release tab.
3. Fill dispenser. Refer to Table 2 to determine the
amount of detergent necessary for your water
and wash type. Use the measurement lines in-
side the detergent dispenser as a fill guide.
4. Close dispenser. With fingers on arrow, slide
cover over the detergent chamber and press
down on the arrow until it clicks shut.
For the best washing
sul_Kis importa_to use
the Correct type and
iiiiii; ¸ ;
Detergent DispenserCover
Figure 19 b
_ _m _ m m
Figure 20
The detergent will be dis-
pensed automatically during
the wash porUon of the cycle.
Recommended Detergent Usage
25-45 ml
Table 2
[5-25 ml 15 mt
12 - ENGLISH www.boschappliancer_com
ADDING R]NSE AGENT
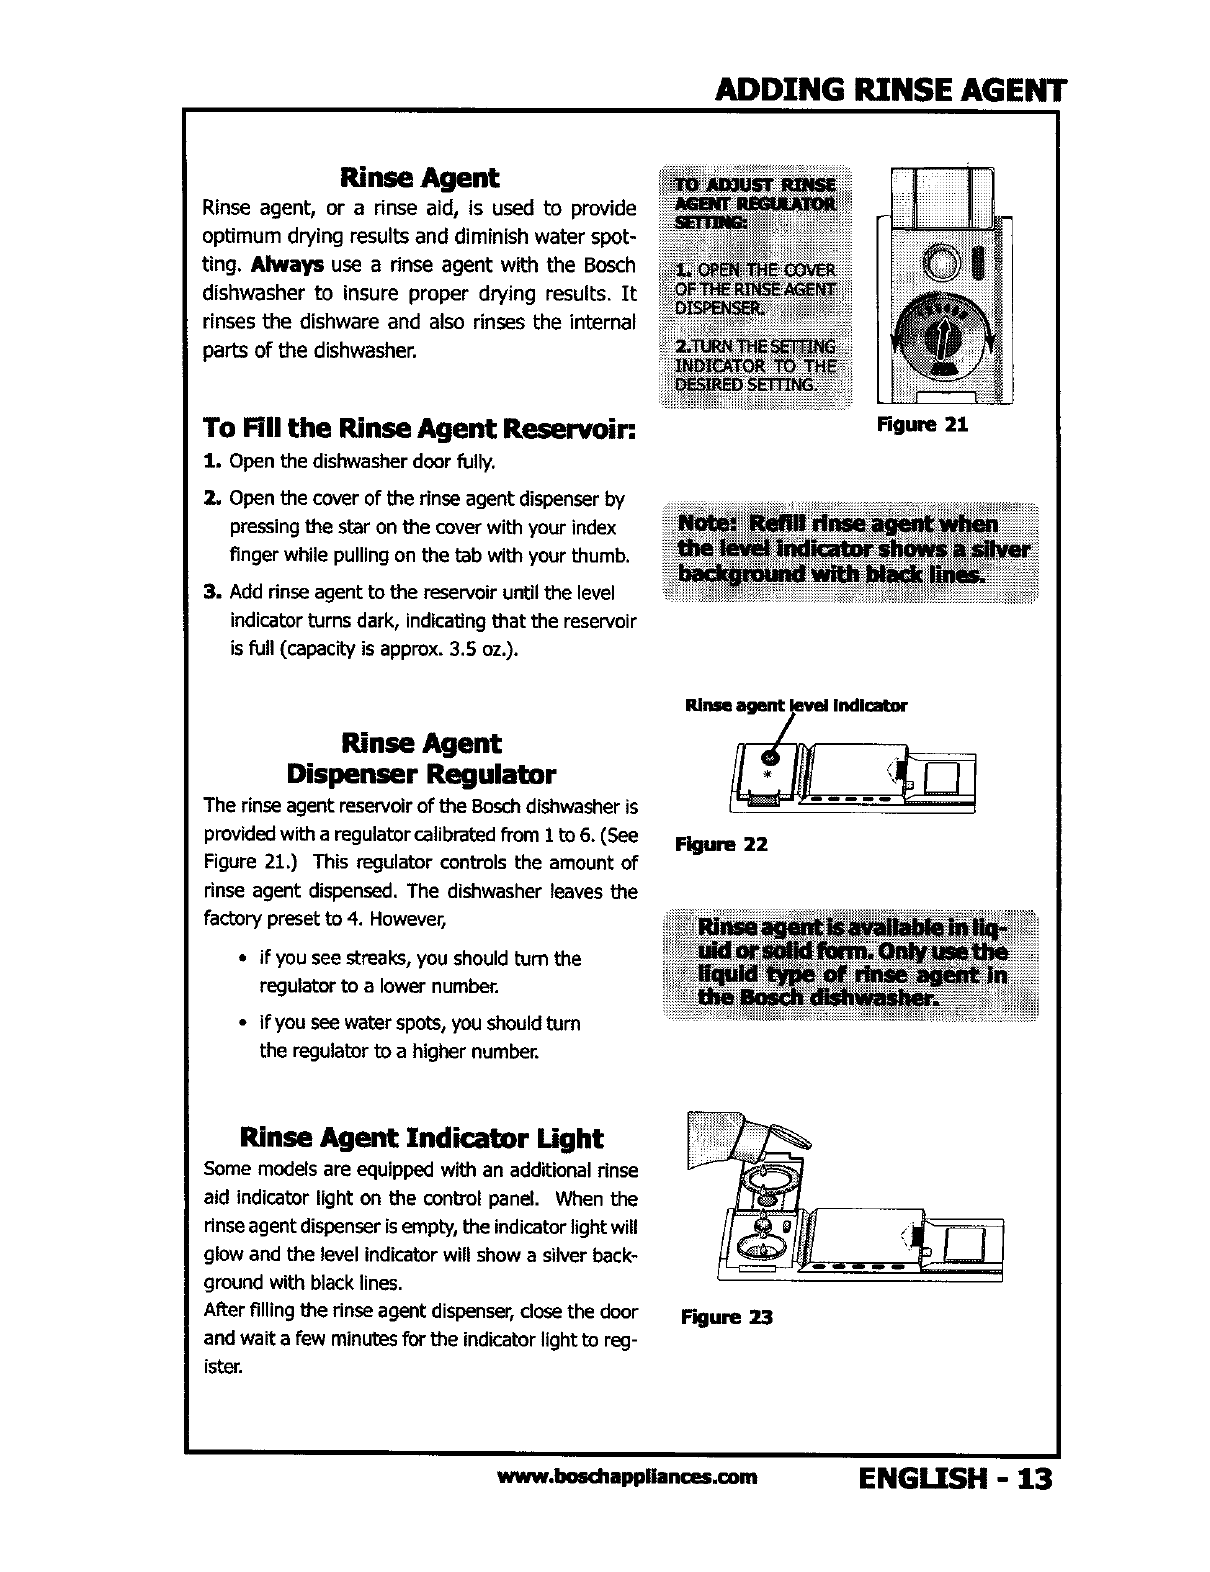
Rinse Agent
Rinse agent, or a rinse aid, is used to provide
optimum drying results and diminish water spot-
ting. AhHays use a rinse agent with the Bosch
dishwasher to insure proper drying results. It
rinses the dishware and also rinses the internal
parts of the dishwasher.
To Fill the Rinse Agent Reservoir:
1. Open the dishwasher door fully.
2. Open the cover of the rinse agent dispenserby
pressing the star on the cover with your index
finger while pulling on the tab with your thumb.
3. Add rinse agent to the reservoir until the level
indicatorturns dark, indicatingthat the reservoir
is full (capacity is approx. 3.5 oz.).
Rinse Agent
Dispenser Regulator
The rinse agent reservoir of the Bosch dishwasher is
provided with a regulator calibrated from I to 6. (See
Figure 21.) This regulator controls the amount of
rinse agent dispensed. The dishwasher leaves the
factory preset to 4. However,
•if you see streaks, you should turn the
regulator to a lower number.
•if you see water spots,you should turn
the regulator to ahigher number.
figure 21
Rinseagent level indicator
Figure 22
Rinse Agent Znd_cator Ught
Some models are equipped with an additional rinse
aid indicator light on the conb'olpanel. When the
rinse agent dispenser is empty, the indicatorlight will
glow and the level indicatorwill show asilver back-
ground with black lines.
After fillingthe rinse agent dispenser, dose the door
and wait a few minutes for the indicatorlight to reg-
ister.
Fkjure 23
www.bosdlappllances.com ENGI TSH - 13
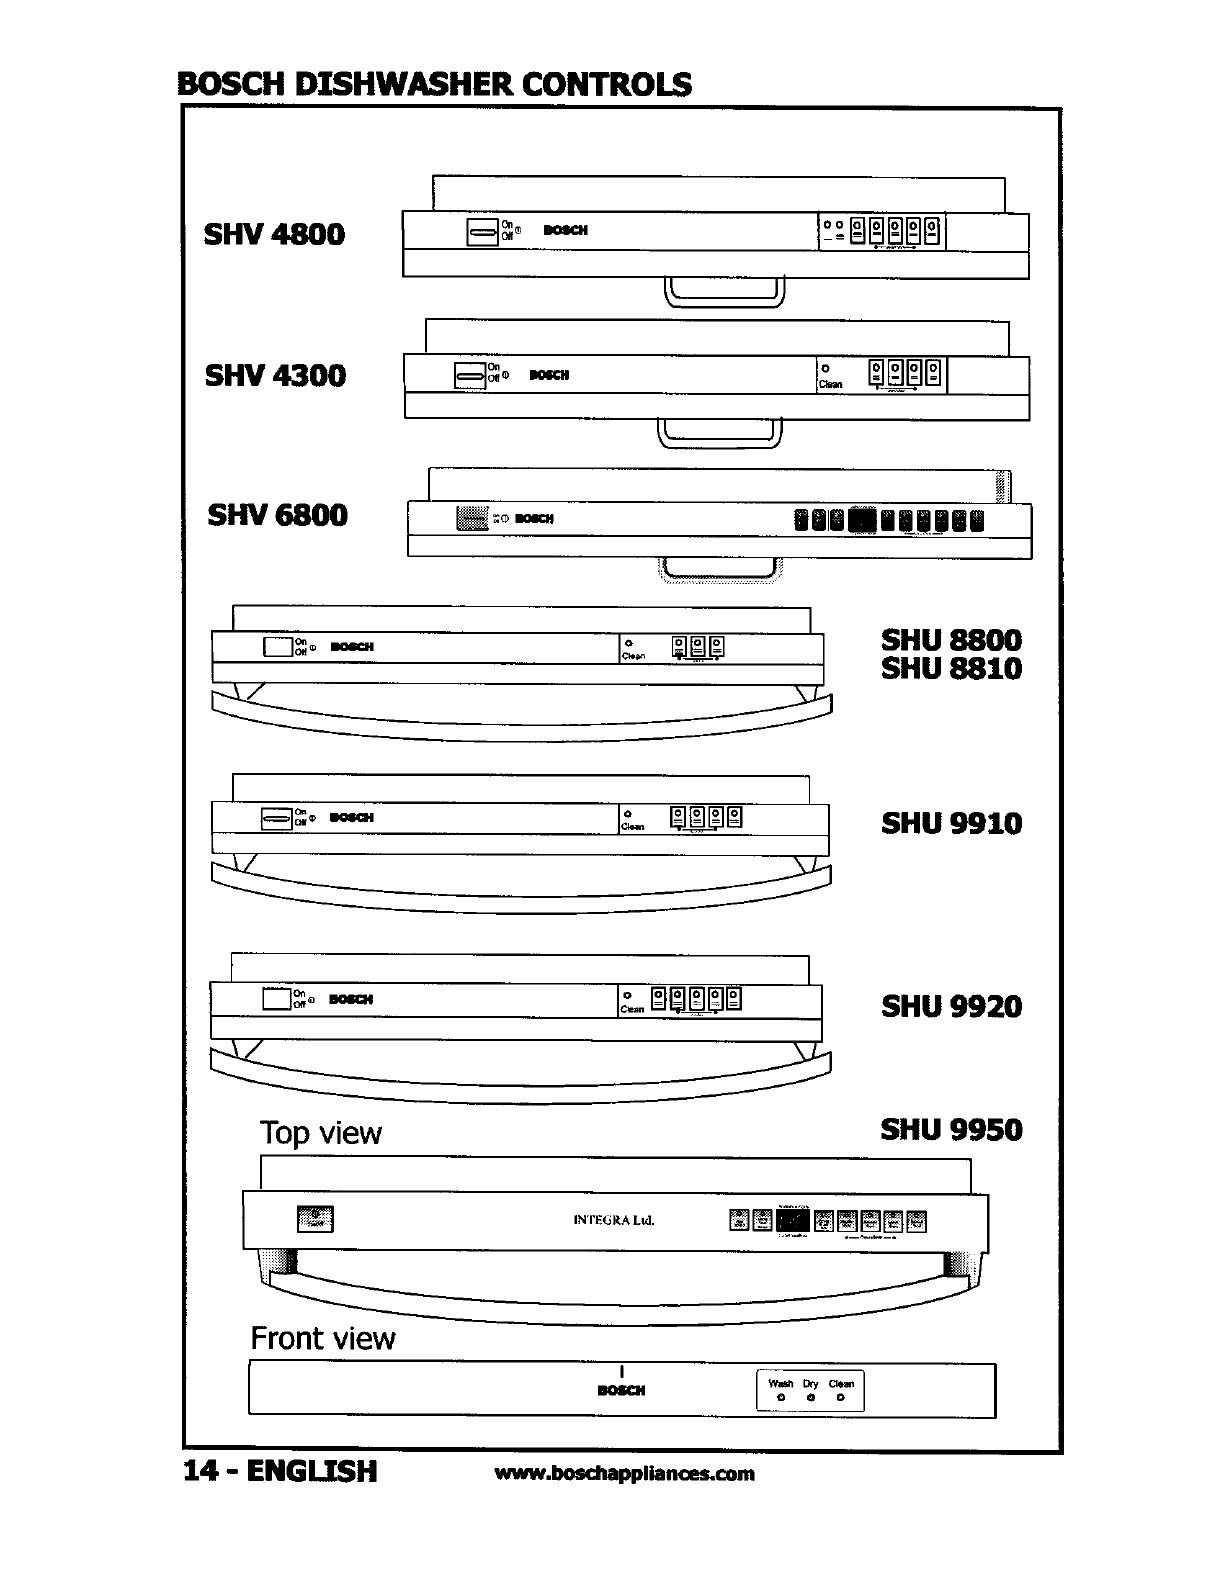
BOSCH DISHWASHER CONTROLS
SHV 48OO
SHV 4300
SHV 6800
I
[
F-I_o m
I:- _1 I
m|i|ii|iiul
I
1SHU 8800
SHU 8810
IeL ISHU 9910
I
F-l_o ,_.
Top view
I
Front view
[
I
I_.-_
IN'I'EGP.AL_.
I
m
SHU 9920
SHU 9950
I
14- ENGLTSH www.boschappliances.com
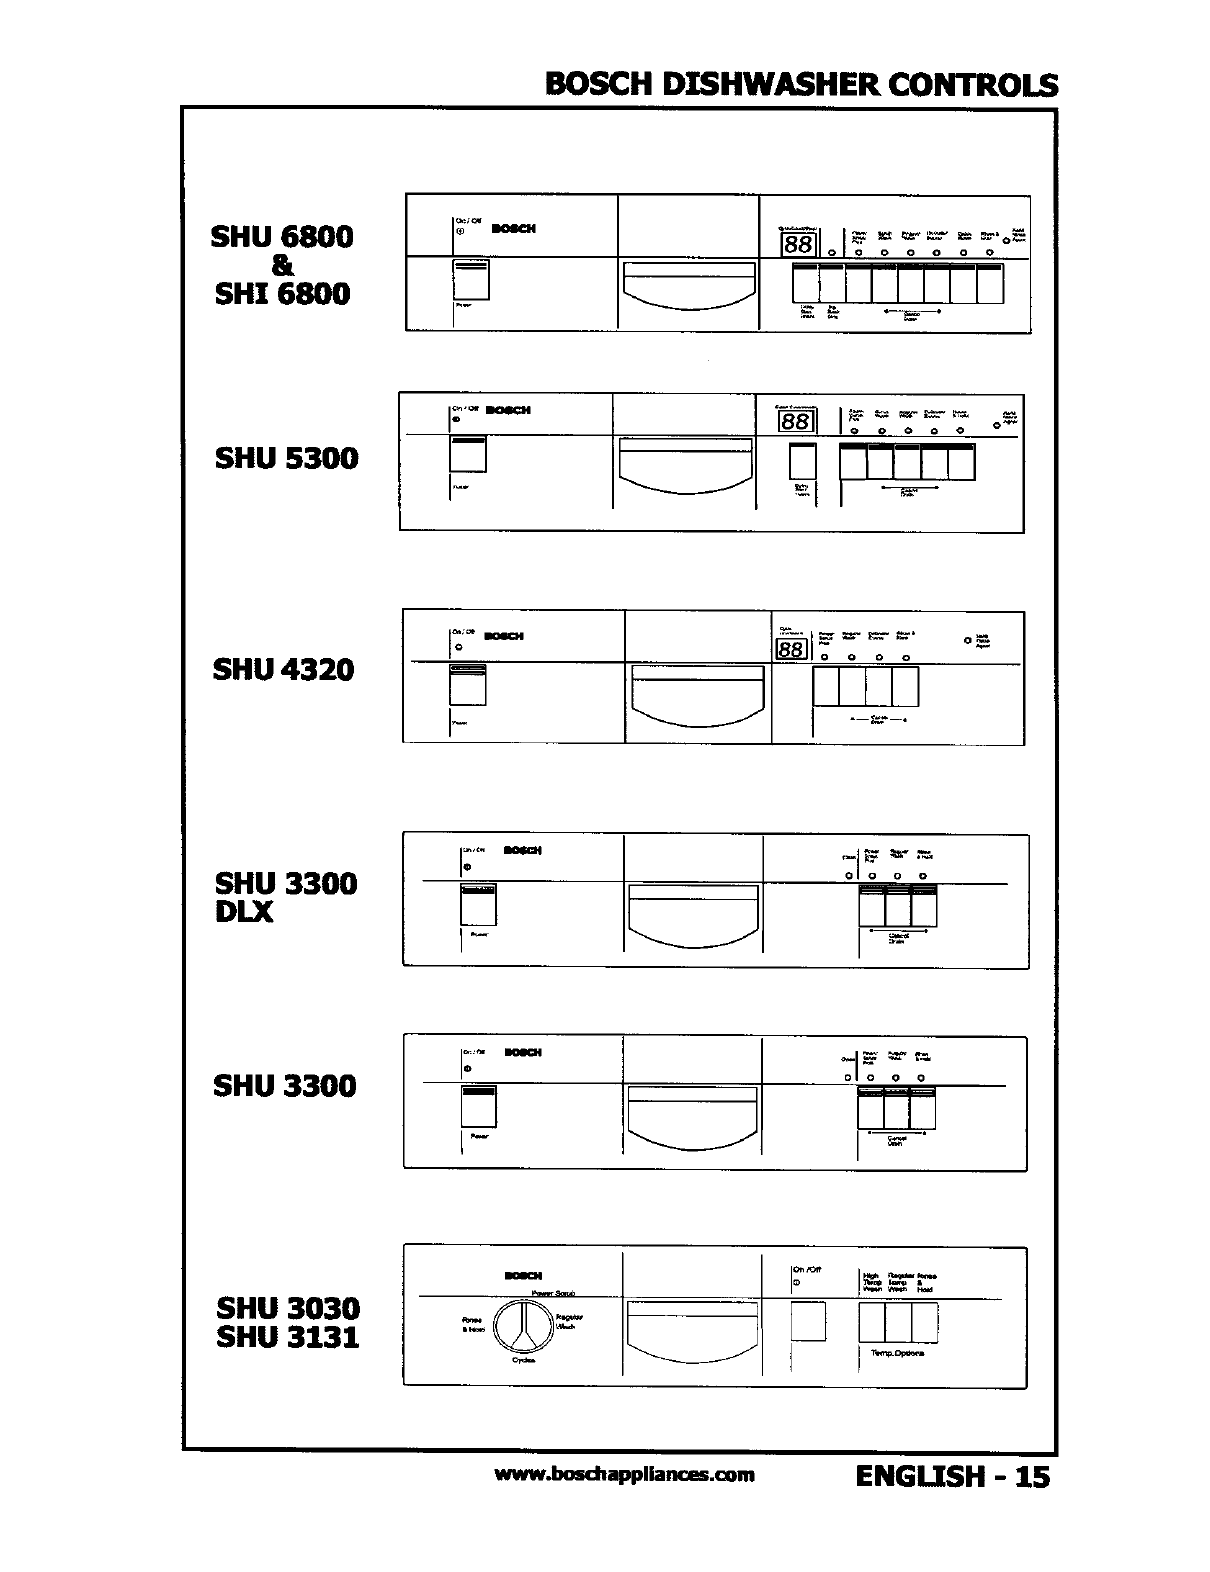
BOSCH DISHWASHER CONTROLS
SHU 6800
&
SHI 6800 r-
HI I_ o -
o o o o o
FF_T_-FI
SHU 5300 []
P
i_ _ _'_ °_-/
o oooo
0Ill111 1
SHU 4320 []
i-
o o o
o_.
SHU 3300
DLX I-
moloo
I=
SHU 3300 o o o o
SHU 3030
SHU 3131
www.boschappliancu.com ENGI TSH - 15
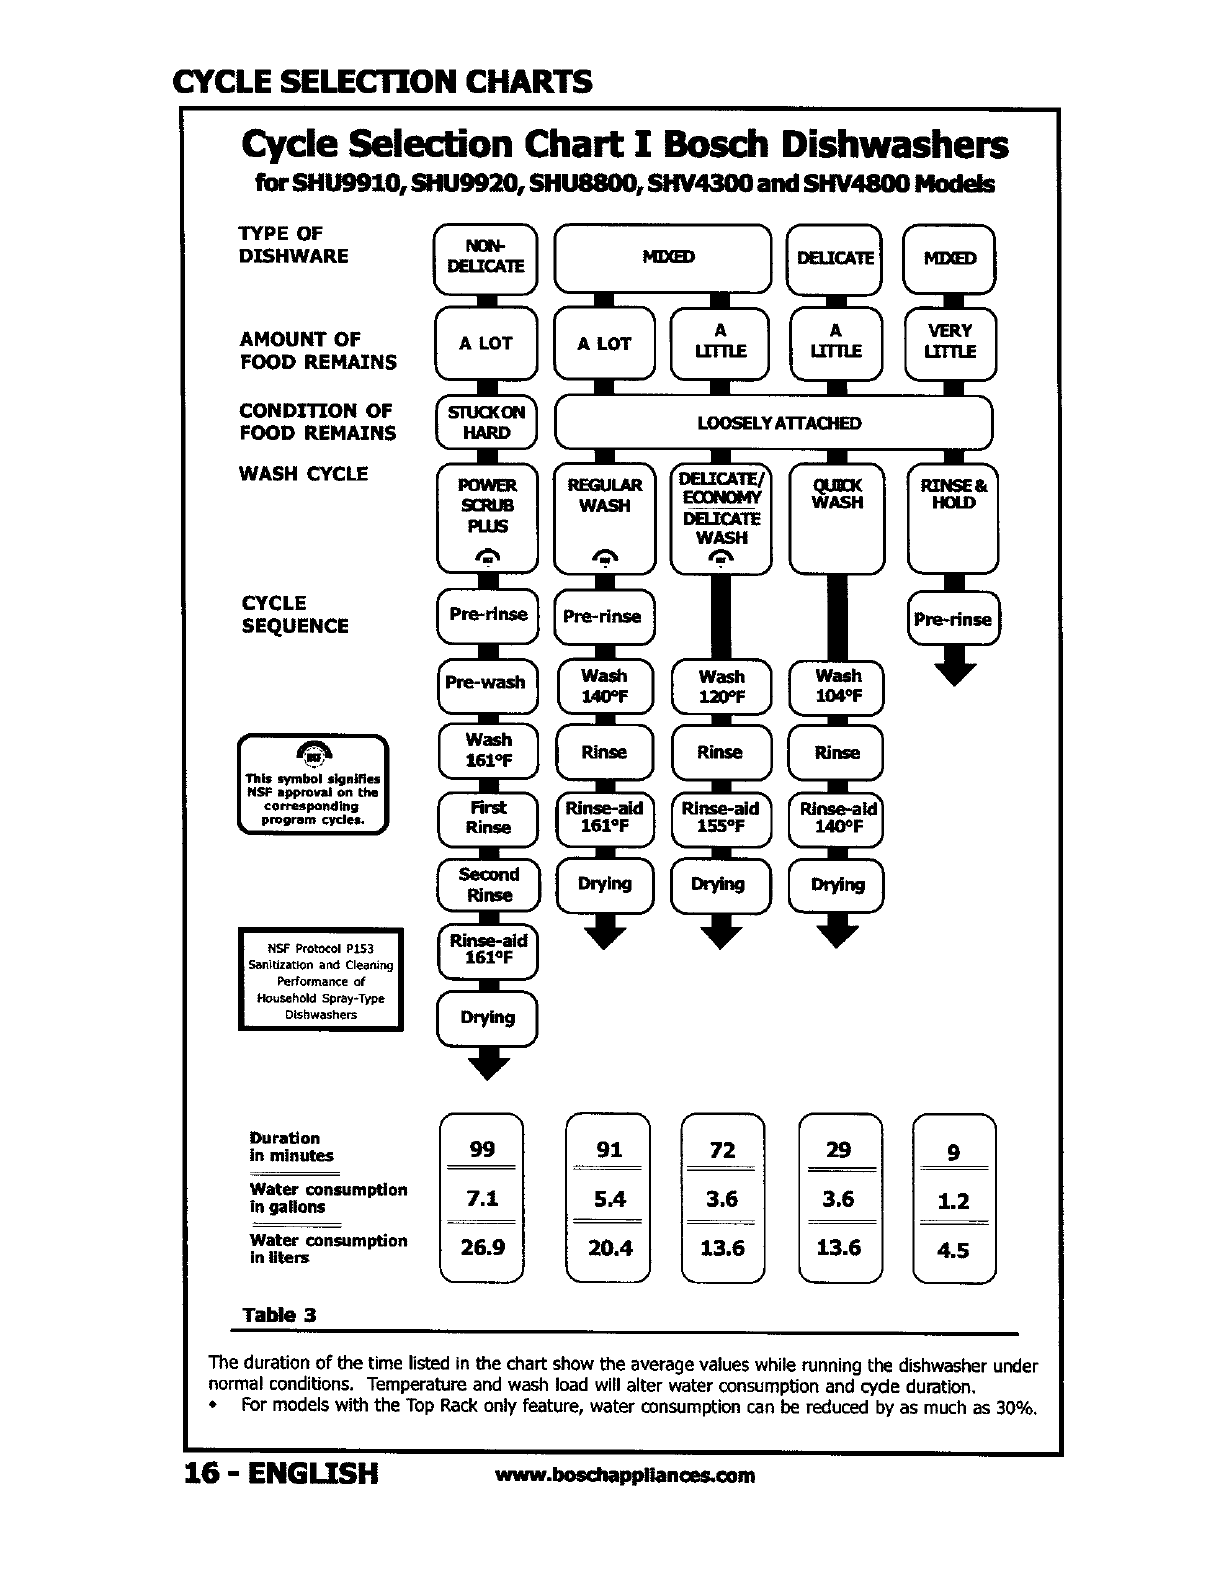
CYCLE SELECTION CHARTS
Cycle Selection Chart I Bosch Dishwashers
for SHU9910e SHU9920, SHU8800, SHV4300 and SHV4800 Models
DISHWARE
AMOUNT OF
FOOD REMAINS
oo.=.O.OF C
FOOD REMAINS
WASH CYCLE
CYCLE
SEQUENCE
IThis symbol signifies I
LNSF approvalon thel
¢orres_ndtng
prosram Cycles.
I NSF ProtOcOl P153 I
Sani_zaUon and Cleaning
Performance of
Household Spray-Type
Dishwashers
DuraUon
in minutes 99 I 91 72 29
Water consumption 7.1 I 5A 3.6 3.6
in gallons
Water consumption 26.9 I20.4 13.6 :1.3.6
in liters
9 I
1.2 I
4.S I
TaMe 3
Thedurationof the time listedin the chartshowthe averagevalueswhilerunningthe dishwasherunder
normal conditions.Temperatureandwash load will alter water consumptionand c/de duration.
•For modelswiththe Top Rackonly feature, water consumption can be reducedby as muchas30%.
16 - ENGLISH www.boschapplianceLcom
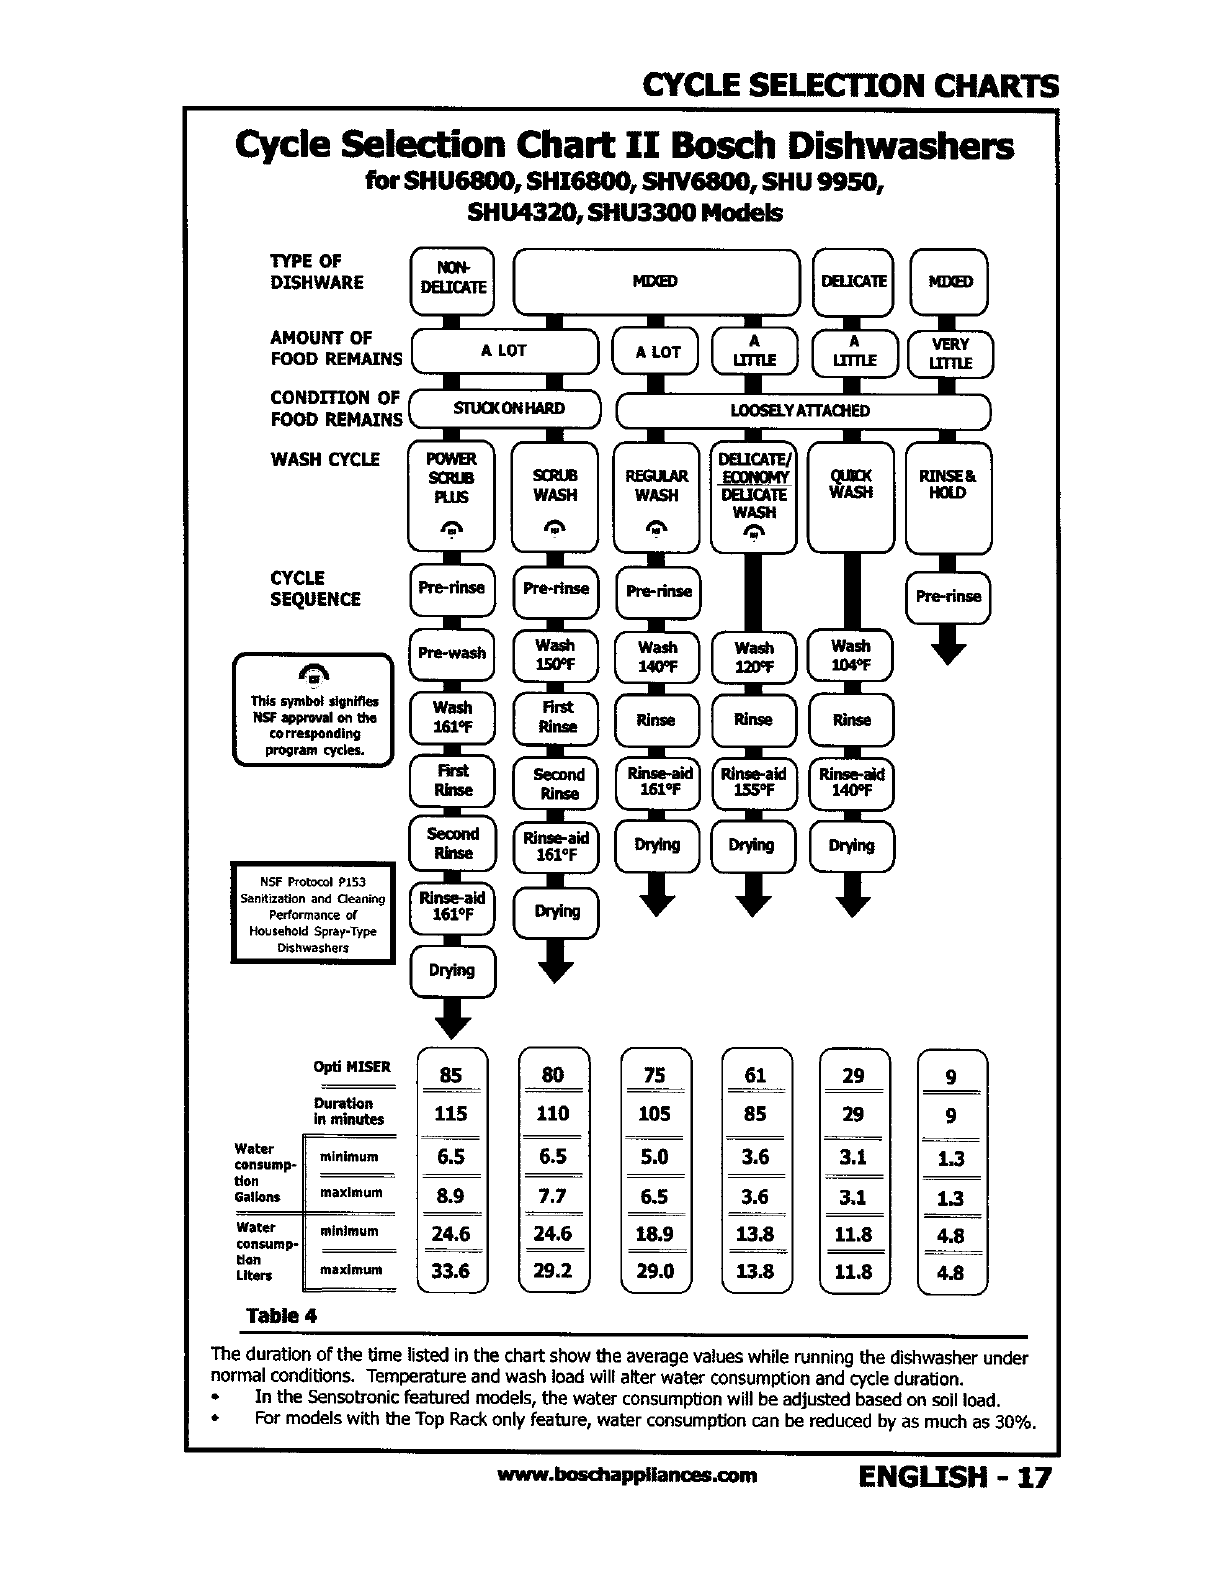
CYCLE SELECTION CHARTS
Cycle Selection Chart 11 Bosch Dishwashers
for SHU6800n SHI6800, SHV6800! SHU 9950,
SHU4320, SHU3300 aodels
TYPE OF
DISHWARE
AMOUNT OF
FOOD REMAINS
CONDITION OF
FOOD REMAINS
WASH CYCLE
CYCLE @SEQUENCE
Opti MISER
Duration
in minutes
Water minimum
consump*
tion
Gallons maximum
Water minimum
€ollsump-
tlon
Liters maximum
Table 4
85 I 80 75
115 I 105
--,8"9' I 8"5
__18"9
33.6 I_ _29"0
61 29 9
85 29 9
3.6 3.1 1.3 I
3.6 3,1 1_ I
13.8 11.8 4.8 I
13,8 11,8 4.8 I
Thedurationof the time listedin the chartshowthe averagevalueswhile runningthe dishwasherunder
normalcondiUons.Temperatureandwashloadwill alterwaterconsumptionandcycleduration.
•In the Sensotronicfeatured models,the water consumptionwill beadjustedbasedonsoilload.
•Formodelswitht_e Top Rackonly feature,water consumptioncan be reducedby as muchas30%.
www.boschappliances.com ENGI TSH -17
CYCLE SELECTION CHARTS
Cycle Selection Chart XXIBosch Dishwashers
for SHU3030 and SHU3131 Models only
LOOSELYATTACHED
IN MINUTES 98 90 1
_[
WATER
CONSUMPTION 8.9 I8.9 6.5 6.5 I1.19
IN GALLONS
WATER 33.75 I33.75 25.35 25.35 I 4.5
CONSUMPTION
IN LITERS _ _ _ _
Table 4
Note: On the SHU 3030 and SHU 3130, when you select"Rinse & Hold" on the "Start and Run
Knob",you must also select:"Rinse& Hold"on the "Temp. Options"button. If not, the unit will go
into heat delay, which will cause an extended run time.
Soap shouM not be used _ _ "R/nse & Ho/d" cycle.
18 - ENGLISH www.boschappiiances.com
SELECTING A WASH CYCLE
Selecting a Wash Cycle
The dishwasherwillwash and drythe contentsbased
on cycleselection made, Refer to Tables3, 4and 5:
Wash Cycle Selection Chart to select the most ap-
propriate cycle for the wash load.
Follow these steps to select a cycle and start the
dishwasher: Various Model Types
SHUISHT Models:
1. Closethe dishwasher door, making sure
that door latches are closed,
2. Press the on/off switch.
3. Select the button for the program
desired,=
4. The dishwasher wellstart automatically
and continue to the end of the selected
cycle.
5. At the end of the cycle the dishwasher
will stop and either the "Clean"lightwill
becomeilluminated,the LEDdisplaywill
show"CL"or "0", or the dishwasherwill
beep.
SHU 991019920/99501 8800 & 8810
Models & SHV Models:
1. Open dishwasherdoor.
2. Pressthe on/off switch.
3. Pushthe button once for the program
desired.
4. Closedoor until it latchesand the pro-
gram wellbegin.
5. Same as #5 above.
SHU/SH!
Rgure 24
SHU 9950
I I
Figure 25
SHU 991019920 & SHV Models
I[]_.- I;:B_]_BBI
I
Figure 26
Push the desired butb)n TWO TIMES
if another program button is lit up.
www.boschappllances.€om ENGLISH -19

INTERRUPTJ[NG, CHANGING OR CANCELI TNG A CYCLE
Cycle Interruption
As a safetyfeature the dishwasherwill automatically
turn itselfoff whenever the door isopened. However,
if the dooris opened quicklywhile in a wash or rinse
cyclesome water may splashout of the dishwasher.
Forthis reason it is recommendedthat the machine
alwaysbe swibchedoff bL:_oreopeningthe door.
To Tnterrupt a Cycle
1. Pressthe on/off button to stop operation.
2, Wait at least 10 seconds(or untilthe water noises
stop) before opening the door,
To Resume a Cycle
I. SHU/SHI models, closethedoor and
press the on/off button.
2. SHV models, push the on/off button
and close the door.
Changing a Cycle
For Bosch dishwashermodels SH16800 and 4320,
SHU 5300, 5310 and 6800 press the program
button of the desiredcycle TWICE. For all other
Bosch dishwasher models, press the program
button of the desired cycle ONCE. The chosen
cycle button (or the lightabove it) becomesillu-
minated, showing that it has been selected.
* SHU3030 and SHU 3130 models do not have
program lights.
Cancelling a Cycle
Eachcontrol panel showswhich buttons to simulta-
neouslypush to cancela cycle. Referto your dish-
washer to find the canceldrain buttonson your par-
ticular model.
1. _ess the indicated buttons at the same
time and hold for approximately3 seconds.
2. When the drain pump noisesstopand the
LED displayor dean lightindicate that the
end of the cycle has been reached, the dish
washer is reset.
3. Pressthe on/off button to turn the
dishwasheroff.
4. The dishwasheris now ready to run a
selected cycle. Add more detergent if
necessary.
ON/OFF BUTTON
L
Figure 27
CHANGE CYCLE
0 0 _i 0
°_"
Figure 28
CANCEL CYCLE
o 0
Figure 29
20 -ENGLISH www.boschappliances.com
PROGRAM OPTIONS & UNLOADING
Program Feablres for Inl_cjra lid.
Wash Ught is illuminated when anywash cycle is in
operation up until the oompletlon of bhefinaldnse cycle.
Dry Light is illuminated during the condensation
drying phase.
Clean Light is illuminated when the dishes are
cleaned, dried and ready to be unloaded.
I Wash Dry Clean ]
• 0 0
Condensation Drying
The combination of a high final rinse tempera-
ture, the tub's cool stainless steel interior and
the sheeting action of a Rinse Agent result in
effective and efficient drying. The closed con-
densation drying feature is hygienic, and saves
energy and money.
Figure 30
Note: For BEST DRYING results, it is essential to
use a RINSE AGENT and keep the Rinse
Dispenser FULL. (See Figure 31).
Additional Drying Temperature
for Models SHU995215/6UC:
I. Open the door, hold down the "Regular" but-
ton and simultaneously turn the dishwasher on.
The display will blink with a code of "0" or "1".
Release the buttons. You are in program mode.
2. If the display blinks with a"0'_ you are programmed
for a lower temperature rinse. If the display blinks
with a "I", you are programmed for a higher tem-
perature rinse, thus improving dish drying.
3. To change the program code, press the _Regu-
lar" button.
4-.When you have the desired code selected, turn
the dishwasher off to take it out of program mode.
• Note: For the SHV 6800 models, push "Power
Scrub" button in lieu of "Regular" button.
Unloading
When unloading the dishwasher always unload the
lower rack first and then unload the upper rack. This
will minimize the chance of water drops from the
upper rack falling on the dishes in the lower rack.
The silverware basket(s) of the Bosch dishwasher
can be removed for easy unloading.
The dishware tends to get hot immediately following
a completed cyde. If the door is opened slightly for
afew minutes before unloading, the disheswill cool
more quickly.
Figure 31
figure 32
www.boschappllances.com ENGLISH - 21
SPECIAL FEATURES
Please refer to the (pg. 27, Table 6) features chart to determine which spec_l features
your parUcular model dishwasher has.
Delayed Start
On Bosch dishwasherswith a 2 digitLED display,the
start of the washing cycle can be delayed for up to
9 hours, and the models with a 3 digit display up to
19 hrs. Follow these steps to delay the start of a
wash cycle:
1. For SHU/SHI models, close the door until
it snaps shut, for SHV and SHU9950
models open door to reveal LED display.
2. Press the on/off button. The indicator
light for the cycle that was last selected
illuminates.
3. Immediately press the timer button la-
beled DELAY-START-HOURS and the LED
display will show "lh".
4. Press the DELAY-START-HOURS button as
many times as necessary until the LED
display shows the desired num-
ber of hours. (Ex: lh, 2h, 3h...).
DELAY START BUTTON
o o o o o
R)ure 33
The Top Rack Only-- Cyde
Some BOSCH models have aTop Rack Only cycle
that saves energy and water when you have only a
small load of dishes. Also, youll use less detergent
for the Top Rack Only cycle. The washing time,
however, is not reduced.
The upper rackof the dishwasher hasbeen designed
with flexibility in mind. You can load glasses, cups,
plates, bowls and small pots in many different posi-
tions to fit your needs. Figure 34 shows atypical
mixed load placedcorrectly inthe upper rack for the
Top Rack Only cycle.
OpUMzSER
(SHU9950 & SHV6800 models only)
The OptiMISER Cycle is used in conjunction with an-
other wash cycle. OptiHISER cuts down the amount
of time it takes to wash a load of dishes.
1. Turn dishwasher on.
2. Choose a wash program and push it's button.
3. Then, push the OptiHISER button.
figure 34
Refill Rinse Agent
omnHmi
Cycle Countdown
Figure 35
22 -ENGLISH www.boschappliances,com
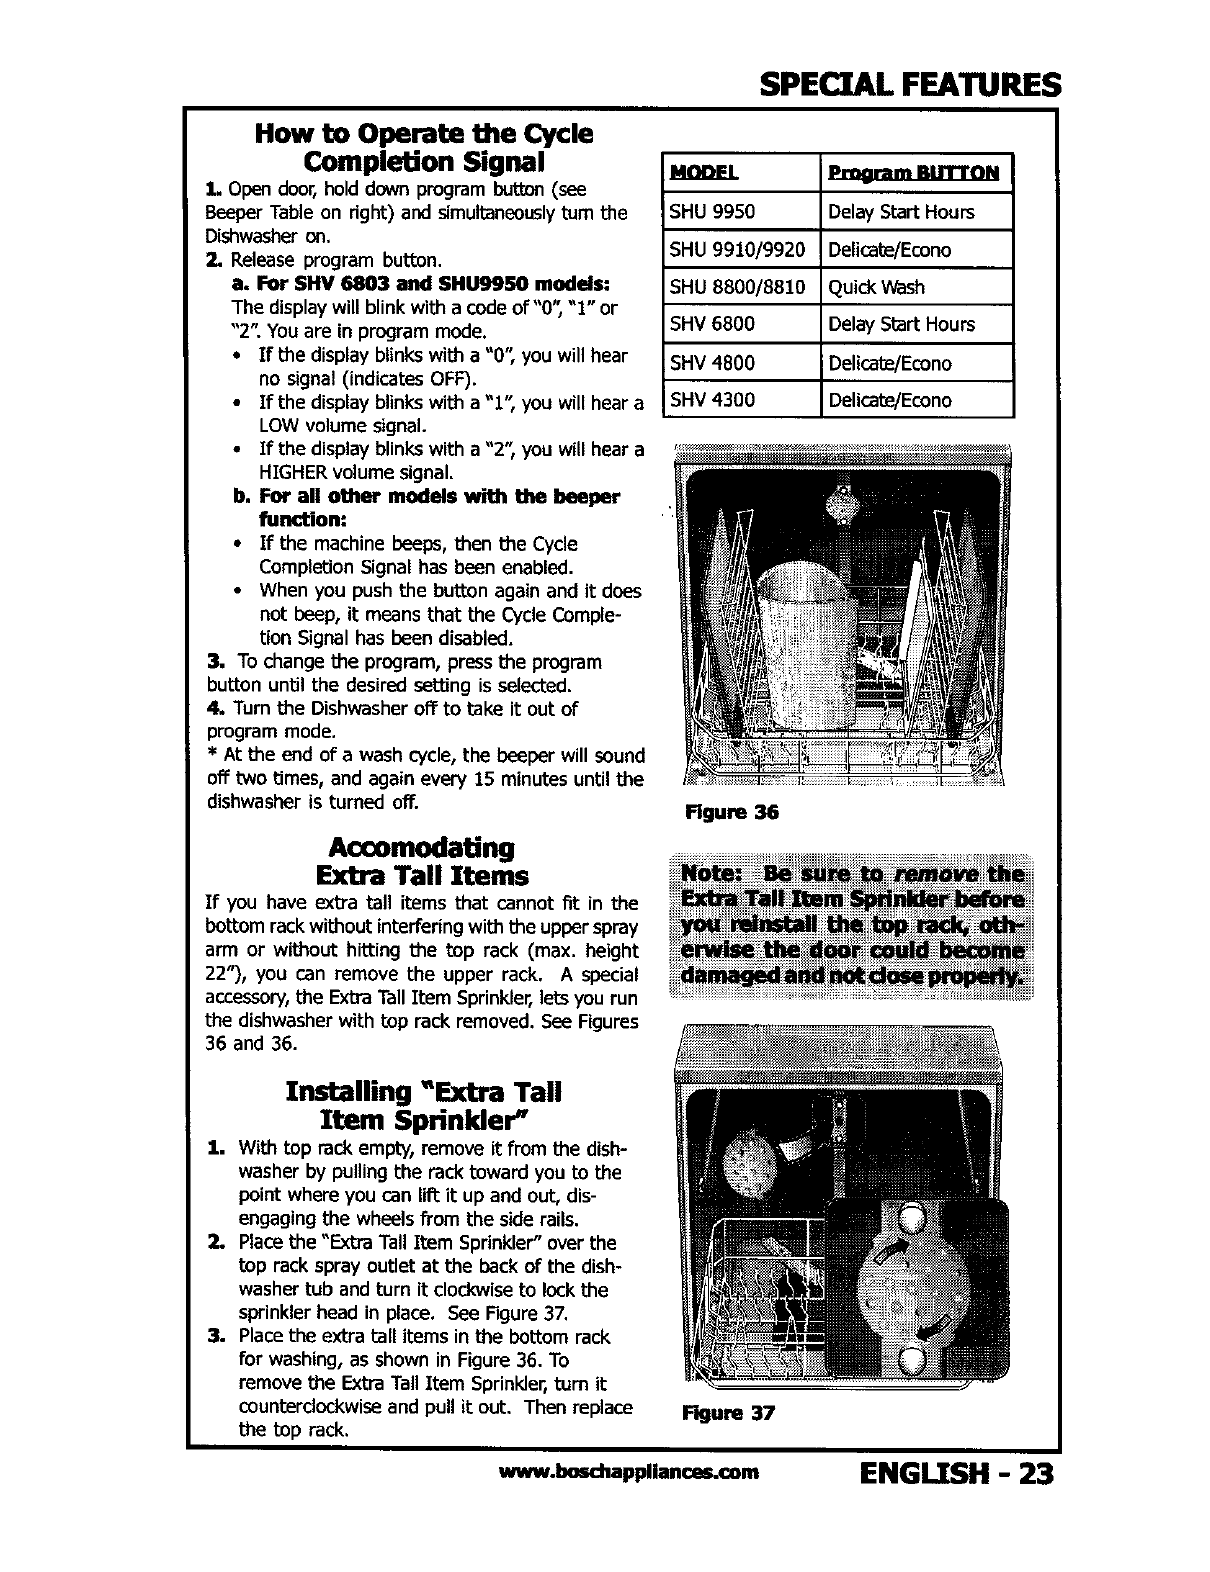
SPECIAL FEATURES
How to Operate the Cycle
Completion Signal
1. Open door, hold down program button(see
Beeper Table on right) and simultaneously turn the
Dishwasher on,
ZRelease program button.
a. For SHV 6803 and SHU9950 models:
The display will blink with acodeof"O_ "1" or
"2". You are in program mode.
•If the display blinks with a "0", you will hear
no signal (indicates OFF).
•If the display blinks with a "1" you will hear a
LOW volume signal.
•If the display blinks with a "2", you will hear a
HIGHER volume signal.
b, For all other models with the beeper
function:
•Ifthe machine beeps, then the Cycle
Completion Signal has been enabled.
• When you push the button again and it does
not beep, it means that the Cycle Comple-
tion Signal has been disabled.
3. To change the program, pressthe program
button until the desired setting is selected.
4. Turn the Dishwasher off to take it out of
program mode.
*At the end of a wash cycle, the beeper will sound
off two times, and again every 15 minutes until the
dishwasher is turned off.
mP_m_am_Balzl_ou
SHU 9950 DelayStart Hours
SHU 9910/9920 Delicate/Econo
SHU 8800/8810 QuickWash
SHV 6800 Delay Start Hours
SHV 4800 Delicate/Econo
SHV 4300 Delicate/Econo
Figure 36
Accomodating
Extra Tall Items
If you have extra tall items that cannot fit in the
bottom rack without interfering with the upper spray
arm or without hitting the top rack (max. height
22"), you can remove the upper rack. A special
accessory, the Extra Tall Item SprinkleGlets you run
the dishwasher with top rack removed. See Figures
36 and 36.
Xnstalling "Extra Tall
Ztem Sprinkler _
1. With top rack empty, remove it from the dish-
washer by pulling the rack toward you to the
point where you can lit_ it up and out, dis-
engaging the wheels from the side rails.
2. Place the "Extra Tall Item Sprinkler"over the
top rack spray outlet at the back of the dish-
washer tub and turn it clockwise to lock the
sprinkler head in place. See Figure 37.
31. Place the extra tall items in the bottom rack
for washing, as shown in Figure 36. To
remove the Extra Tall Item Sprinkler,tom it
counterclockwise and pull it out. Then replace
the top rack. Flgure 37
www.boschappliances.com ENGI TSH -23
CARE AND CLEANING
General Maintenance
Certain areas of your Bosch Dishwasher require
periodic owner inspection. The following mainte-
nance tasks can be performed to help assuretop
performance:
•Check the Large Object Trap *
•Check the Wash Arms
•Clean Stainless Steel Tnner Door
•Clean Door Panel
(Stainless Steel or Colored)
•Clean the Door Gasket
These tasks are described in subsequent sections.
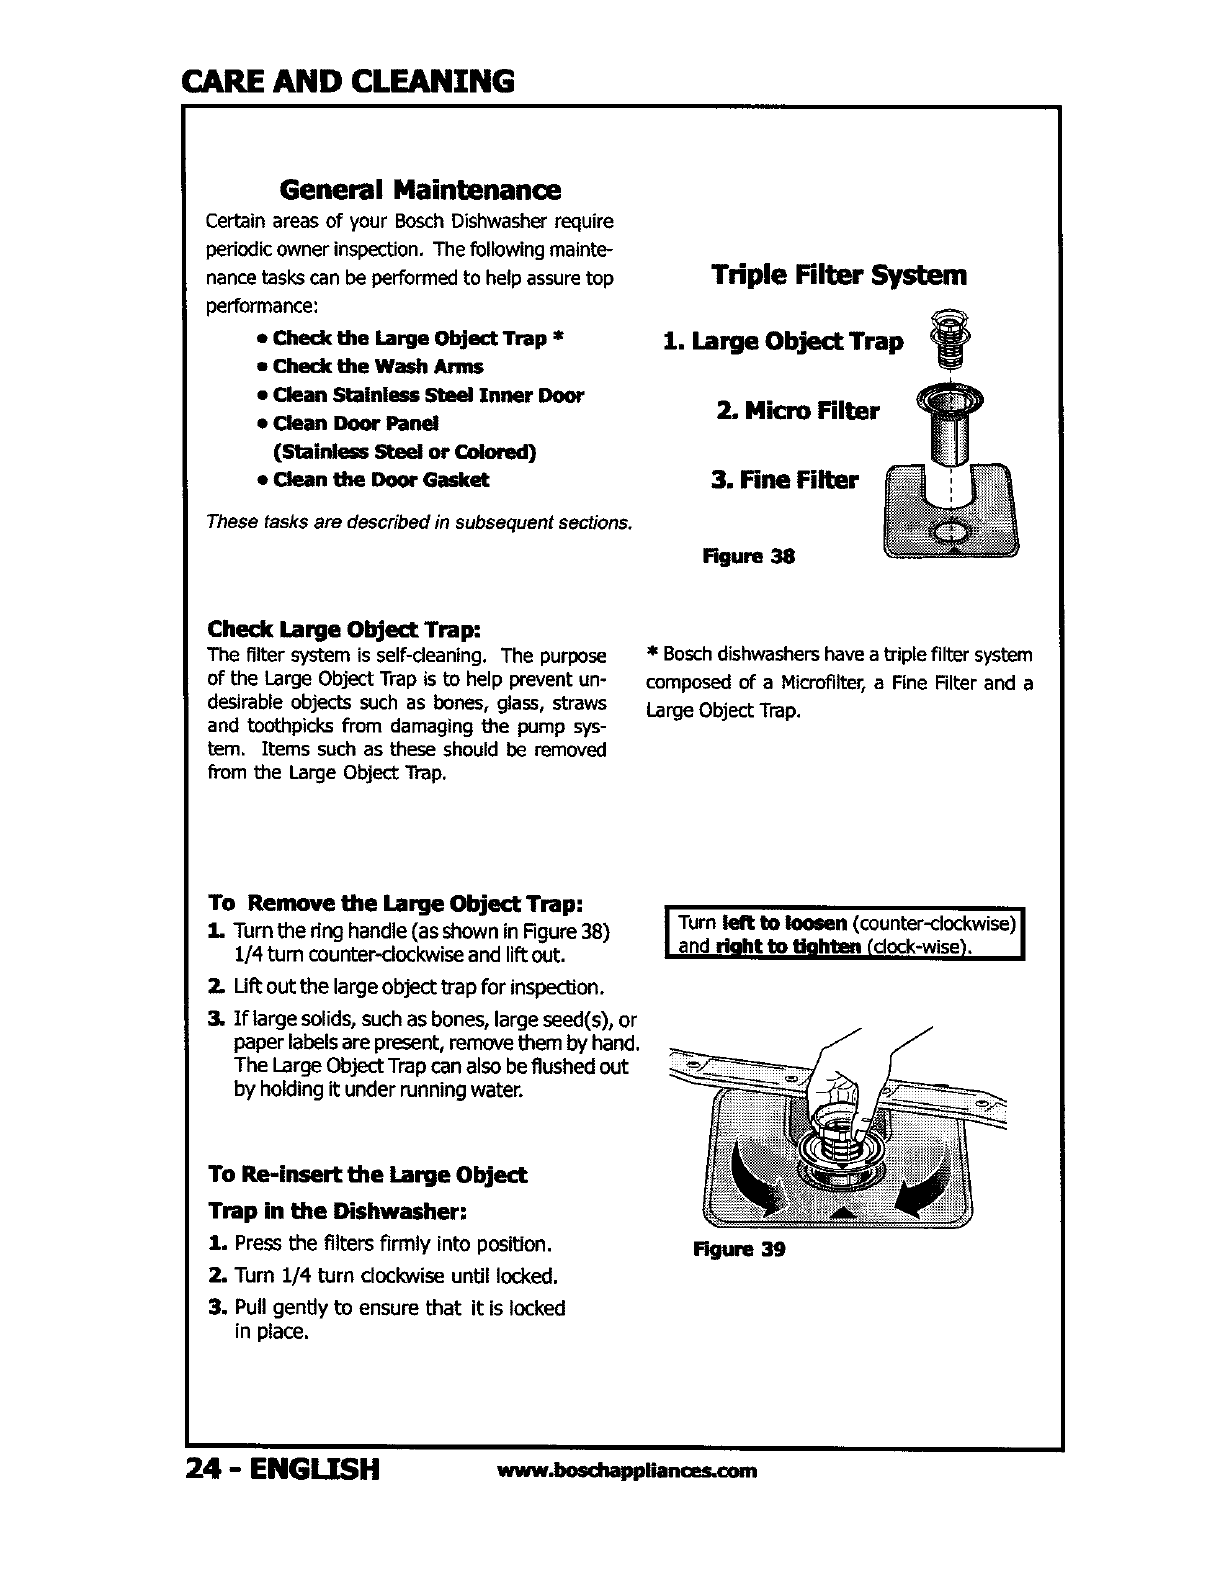
Triple Filter System
1. Large Object Trap
2, Micro Filter
3. Fine Filter
Figure 38
Check Large Object Trap:
The filter system is self-deaning. The purpose
of the Large Object Trap is to help prevent un-
desirable objects such as bones, glass, straws
and toothpicks from damaging the pump sys-
tem. Items such as these should be removed
from the Large Object Trap.
• Boschdishwashers have atriple filter system
composed of aMicrordter, a Fine Filter and a
Large Object Trap.
To Remove the Large Object Trap:
1. Turn the ring handle (as shown in Figure 38)
1/4 turn counter-clockwise and lift out.
2, Lift out the large object trap for insgedJon.
3. If large solids, such as bones, large seed(s), or
paper labels are present, remove them by hand.
The Large Object Trap can also be flushed out
by holding it under running water.
ITurn lelt to loosen (counter-clockwise) l
and riaht to th:lhtan (clock-wise_. I
To Re-insert the Large Object
Trap in the Dishwasher:
1. Press the filters firmly into position.
2. Turn 1/4 turn clockwise until locked.
3. Pull gently to ensure that it is locked
in place.
Figure 39
24- ENGLISH www.bosd_ppl_nc_com
CARE AND CLEANING
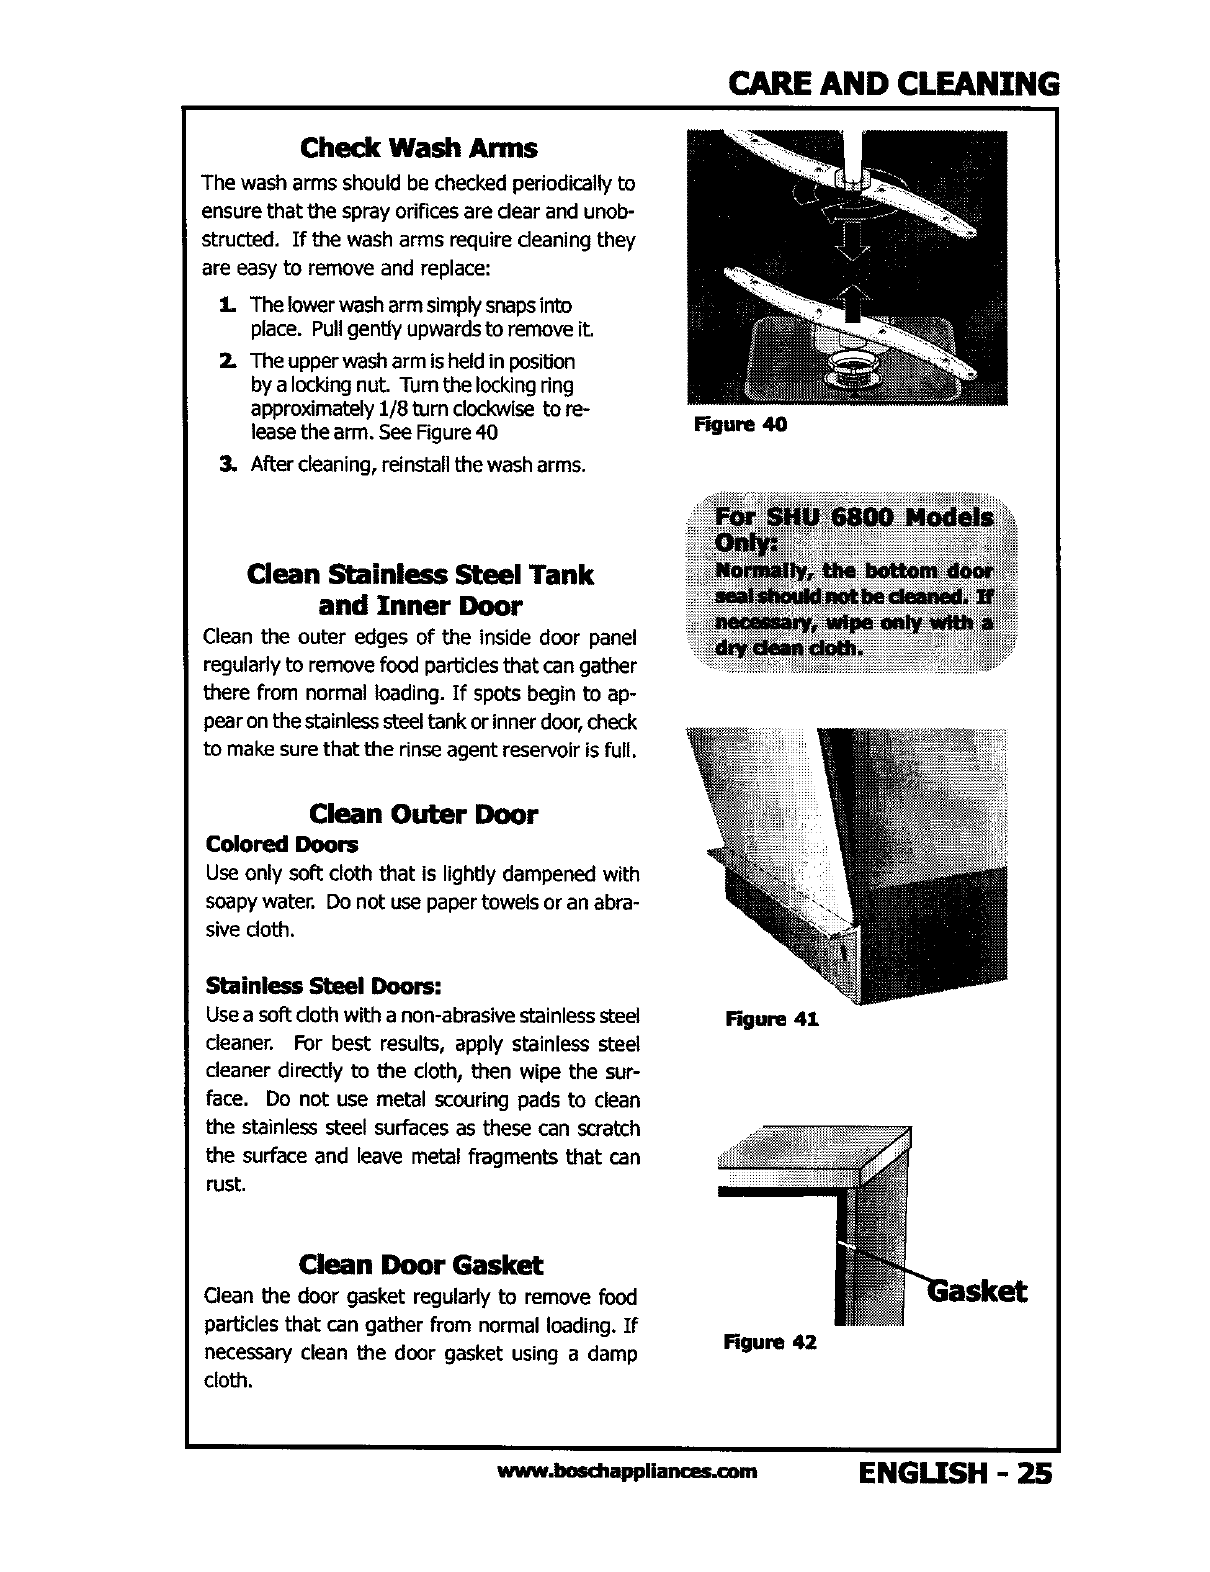
Check Wash Arms
The wash arms should be checked periodically to
ensure that the spray orifices are dear and unob-
structed. If the wash arms require cleaning they
are easy to remove and replace:
1. The lower wash arm simply snaps into
place. Pull gently upwards to remove it.
The upper wash arm is held in posilJon
by a locking nut. Turn the locking ring
approximately 1/8 turn clockwise to re-
lease the arm. See Figure 40
3, After cleaning, reinstall the wash arms.
Clean Stainless Steel Tank
and Inner Door
Clean the outer edges of the inside door panel
regularly to remove food particles that can gather
there from normal loading. If spots begin to ap-
pear on the stainless steel tank or inner door, check
to make sure that the rinse agent reservoir is full.
Clean Outer Door
Colored Doors
Use only soft cloth that is lightly dampened with
soapy water. Do not use paper towels or an abra-
sive doth.
Stainless St_l Doom:
Use a soft cloth with a non-abrasive stainless steel
cleaner. For best results, apply stainless steel
cleaner directly to the cloth, then wipe the sur-
face. Do not use metal scouring pads to clean
the stainless steel surfaces as these can scratch
the surface and leave metal fragments that can
rust.
Clean Door Gasket
Clean t_e door gasket regularly to remove food
particles that can gather from normal leading. If
necessary clean the door gasket using a damp
cloth.
_u_ 40
figure 41
figure 42
www.boschapp,_nces=om ENGLISH -25
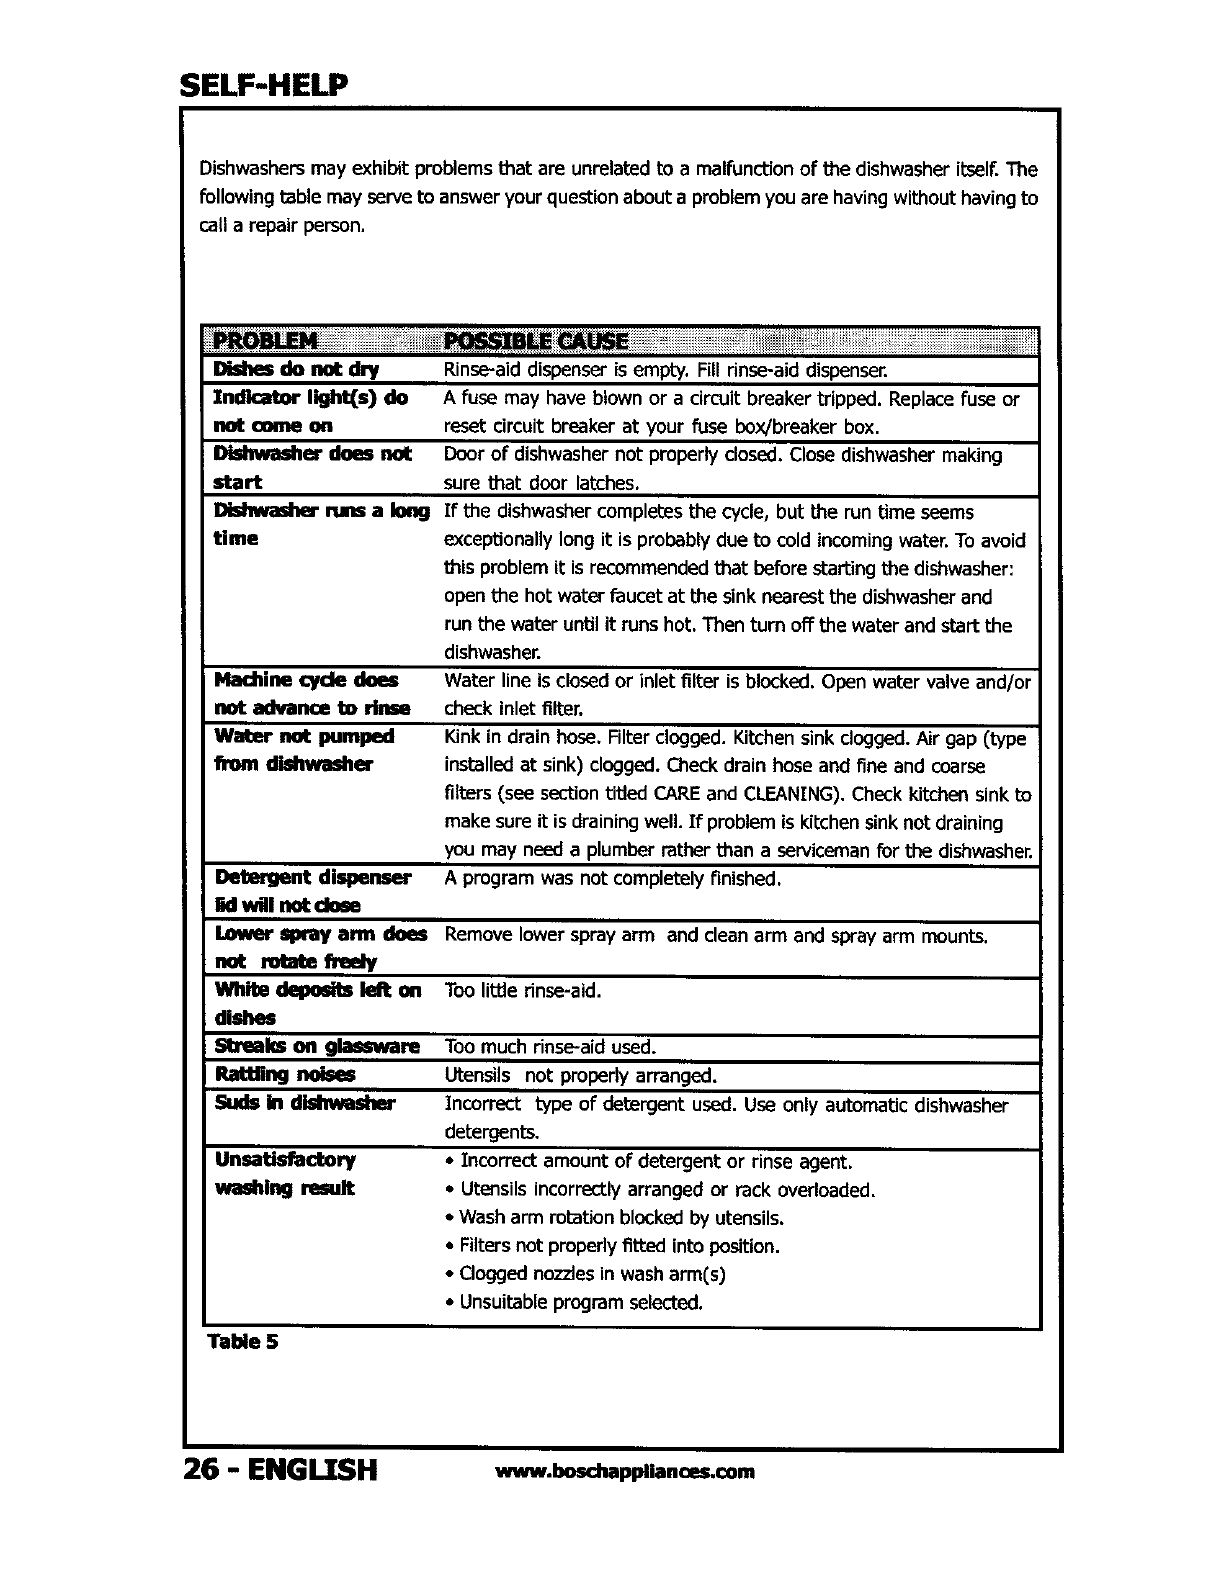
SELF-HELP
Dishwashers may exhibit problems that are unrelated to a malfunctionof the dishwasher itself.The
following table may serve to answer your question about a problem you are having without having to
call a repair person.
Dishes do not dry
Indicator light(s) do
not come on
Dishwasher does not
start
IXsJurdsherrims a long
Ume
Machine c/de does
not advance I= rinse
Wa_r not pumped
hom dishwasher
_nt dispenser
UwUl not dose
Lower spray arm does
not rota_ freely
Whb deposas lelt on
dishes
Streaks on glassware
Rattling noises
Suds in dishwasher
UnsaUs_ctory
washing result
Rinse-aid dispenser is empty. Fill rinse-aid dispenser.
A fuse may have biown or a circuit breaker tripped. Replace fuse or
reset circuit breaker at your fuse box/breaker box.
Door of dishwasher not properly dosed. Close dishwasher making
sure that door latches.
If the dishwasher completes the cycle, but the run time seems
exceptionally long it is probably due to cold incomingwater. To avoid
this problem it is recommended that before starting the dishwasher:
open the hot water faucet at the sink nearest the dishwasher and
run the water until it runs hot. Then turn off the water and start the
dishwasher.
Water line is closed or inlet filter is blocked. Open water valve and/or
check inlet filter.
Kink in drain hose, Filter clogged. Kitchen sink dogged. Air gap (type
installed at sink) clogged. Check drain hose and fine and coarse
filters (see section titled CARE and CLEANING). Check kitchen sink to
make sure it is draining well. If problem is kitchen sink not draining
you may need a plumber rather than a serviceman for the dishwasher.
Aprogram was not completely finished.
Remove lower spray arm and cleanarm and spray arm mounts.
Too little rinse-aid.
Too much rinse-aid used.
Utensils not properly arranged.
Incorrect type of detergent used. Use only automatic dishwasher
detergents.
•Incorrect amount of detergent or rinse agent,
•Utensils incorrectlyarranged or rack overloaded.
• Wash arm rotation blocked by utensils.
• Filters not properly fitted into position.
• Clogged nozzles in wash arm(s)
• Unsuitable program selected.
Table 5
26 - ENGI TSH www.boschappllances.€om

MODELS FEATURES
Ms 8
Model O E co r_
Features OR o"c'_ ooo o _o o_ _o oo _ _ oo_o _o
L E -_ >D> -_ "_ _ D -_ _ D -_D D
SS "r _ "r "r _: : "r _ m ",-,- :-r-r: z
FEATURES u_ m mm m m m m u_ u_ mu_ mu_ m
161°F Wash Temperature ••••••••• • •151°F •• • 151°I:
Bosch Sensotronic" ••-• • • • •
BoschTopRackOnly'"Wash • • •
Power Scrub Plus Cycle •• ° • • • • • • ° • • • •
Power Scrub Cycle ••
ScrubWash Cycle • • •
Regular Wash Cycle • * ° • • • • ° ° • • • • • • •
Delicate&JorEconomy Wash Cycle- • • • • • • •° °
Quick Wash Cycle •....
Rinse& HoldCycle ••°•• • ° • • • . • • •
Height-AdjustableUpper Rack • • • • .... • • ° •
FlipTineson BottomRack ° • • • ° ° ••,•
Flip Tines on Top Rack .
Electronic Controls ° - • • • • • • • • • ° • °
Delay Start •••••
Digital Countdown Display ••••,°
Bosch AVS II TM Silence Rating 47 46 49 48 52 54 52 48 48 S4 52 56 50 46 54 54
"Refill Rinse Agent" Light • • • ° • • ° •
CycleCompletionSignal -• • • . ° ° °
RackmatJc •
Opti-MISER "°
Upper Silverware Basket • • • °
Lower Silverware Basket ••••• ° • ° , • •• • . . •
Flexible Silverware Basket
Extra Silverware Basket °
Stemware Holder °
Fine Silver/Cutlery Tray
PART NUMBER
ACCESSORIES CHART
SSdoor with SShandle (SHV Series only)* SGZ
SS door frame and front: (SHU Series only; acceptsSS panel only)*SGZ
Almond door frame and front (Accepts almond panel only)
Heavy-duty white door frame kit** (For l/B" to 1/4" panels)
Heavy-duty blackdoor frame kit** (For 1/8" to 1/4" panelsI
Adaptor kit for 60 cm cabinet
Extra large knife rack
Glass rack insert for bottom rack (max. ht. 13.5'5
Table 6
1005 UC
1025 UC
_Z 1024 UC
SGZ 1042 UC
SGZ 1046 UC
SGZ 1040 UC
SGZ 1000 UC
SGZ 2004 UC
*SS = Stainless Steel
www.boschappllances.€om ENGLISH - 27
BOSCH DISHWASHER FEATURES DESCRIPTZONS
Bosch AVS I][ TM Silence RaUng: A two-pump motor system, suspensionmotor,and triple
insulation make Bosch the quietest dishwashers in North America.
Bosch SoundSeal": An added measure of insulation on the SHU 6800 series in the form of a
sound tight seal eliminating noise typically emitted from the toe-kick area.
Bosch Suspension Motor": By suspending the motor in air, any vibration that may be
caused is eliminated.
Condensation Drying: The combination of a high final rinse temperature, the tub's cool
stainless steel interior, and the sheeting action of a Rinse Agent result in effective and emcient
drying. The closed condensation drying feature is hygienic, and saves energy and money.
Cyde Completion Signal: An optional beeper which lets you know when the cycle is
complete.
DencatalEconomy or "Delicate Wash" C/de: Saves water and energy, while removing
loosely attached food from delicate dishware.
Delay Start: Delay the dishwasher'sstart for up to nine hours.
Digital Countdown Display: Lets you know exactly when the cycle will be complete.
Electronic Controls: Easy to use push button controls with programs
Bosch Row-Through Heater": Water passes through a heating chamber where it is
efficiently heated to temperatures up to 161°F.
Four-level Wash: Multiple spraying levels provide optimal disbursement of fresh water.
Height-Adjustable Upper Rack: Raiseor lower the top rack to fit items up to 1';" tall in the
bottom rack, or up to 10" tall in the top rack.
LED Sequence Indicator. Indicates the current point in the wash cycle, so you'll know if it's
OK to add a last-minute dish.
Exceptionally Low Watat- Usage: Bosch dishwashers use very little water -- as low as 2.5
gallons in the Delicate/Economy cycle.
Flip 11nes: Fold-down tines in the bottom rack accommodate even large cookware.
Nylon Racks: Eliminate cuts and nicks with nylon-coated racks featuring afive-year warranty.
Power Scrub Plus €/de: For heavy loads with stuck-on food, this powerful cycle features an
extra 125°pre-wash to soak food loose.
Quick Wash Cycle: Cleans lightly soiled dishes in a short 29-minute cycle. Good for glass-
ware, coffee cups, etc.
"Refill Rinse AgenlL_Light: Lets you know when you need to add more rinse agent.
Regular Wash Cycle= Good for everyday loads with loosely attached food.
Rinse &llold Cycle= If you don't want to wash right away, use this cycle to rinse the
dishware, then hold it until you have a full load.
_ni©l_: Proven scanning technology checks the condition of the water, then
automatically decides whether a second fresh-water fill is necessary.
Scrub Wash C/de-" For stuck-on foods that don't require soaking, this powerful cycle uses
less water than the Power Scrub Plus Cycle.
_ulinlesa Steel Ik_dll Tall Tub": Provides the assurance of a lifetime warranty against
rust-through with a hygienic interior surface.
Bosch Top Rack Only TM Wash: When you don"( have a full load of dishes to wash, this
feature washes just those on the top rack, saving water.
Triple File System-- Three built-in filters ensure the distribution of clean water throughout
the wash cycle, and an added safety feature preventing any foreign materials from clogging
the main pump or drain pump.
OpUINI_ER" C/de-- This cycle is used in conjunction with another program cycle to cut down
the program wash time.
RadrJ_laticm: To adjust the height of the top rack, simply push the rackmatik side tabs inward
to adjust the rack up or down.
28 - ENGI TSH www.bosshapplianceLcom
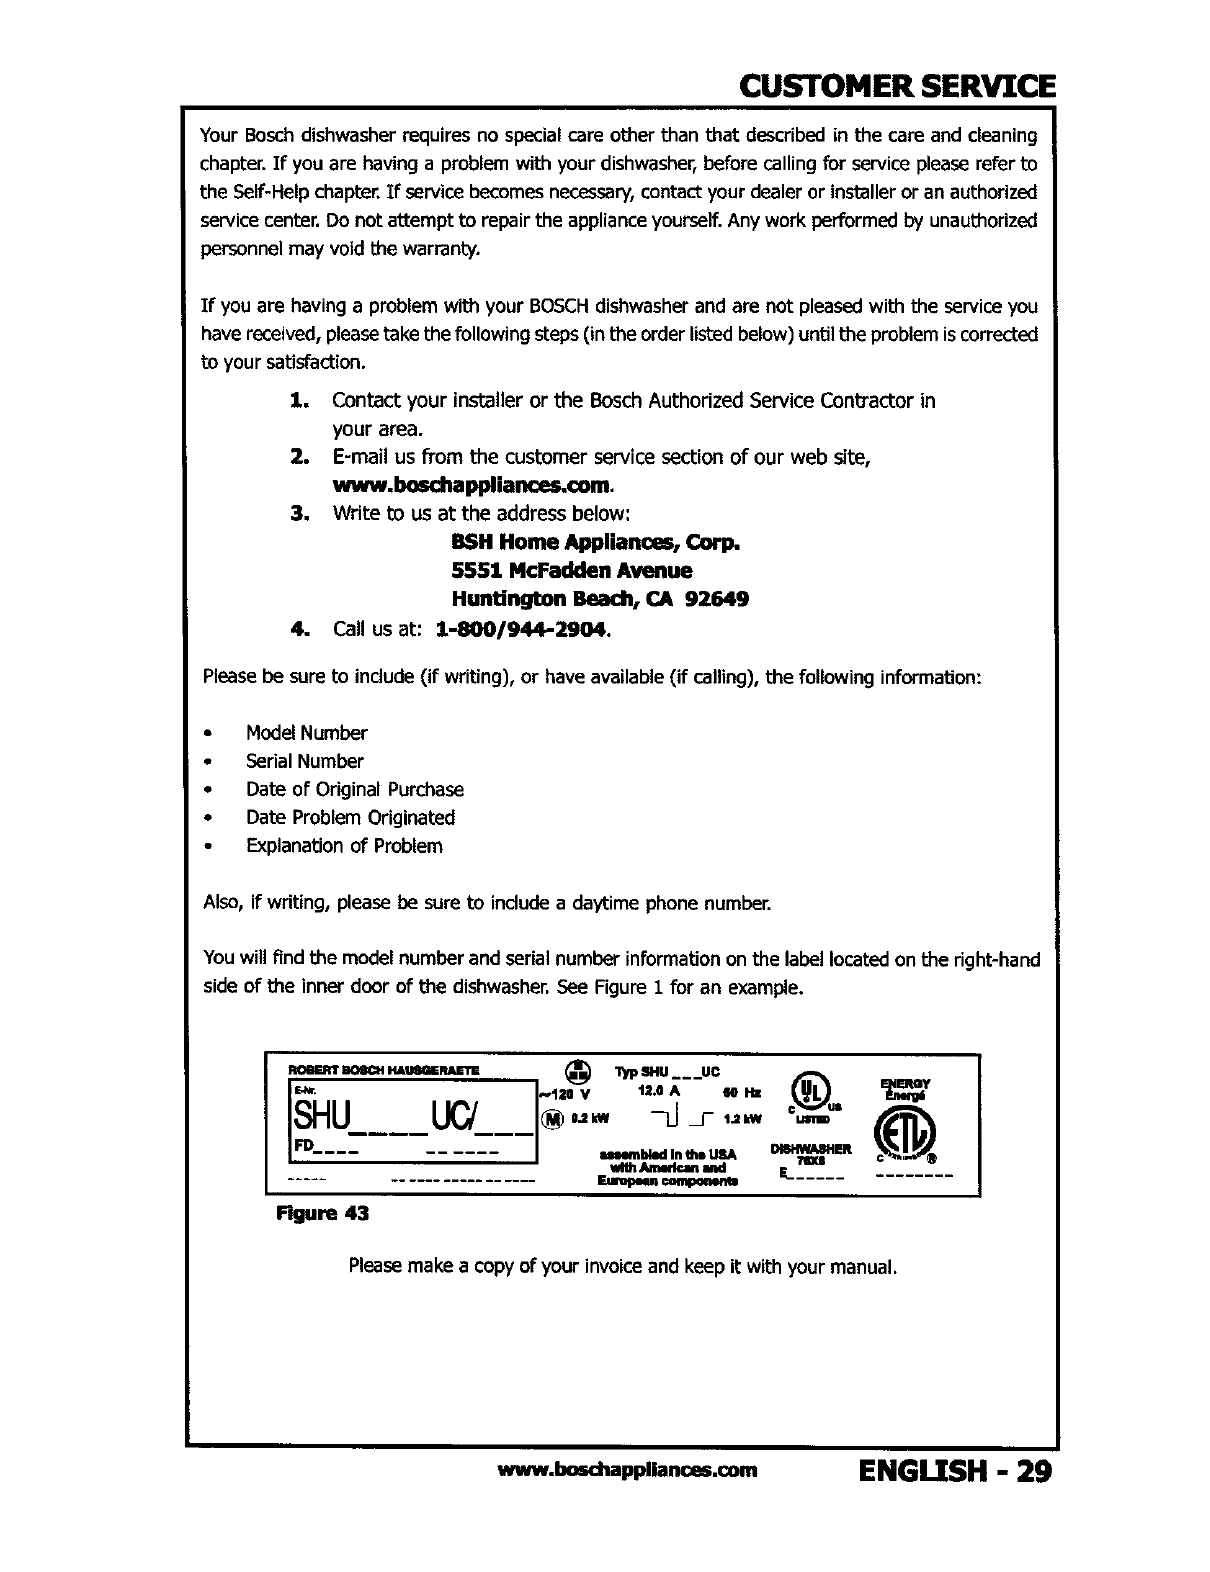
CUSTOMER SERVICE
Your Bosch dishwasher requires no special care other than that described in the care and cleaning
chapter.If you are having a problem with your dishwasher,before calling for serviceplease refer to
the Self-Help chapter,If service becomesnecessary,contact your dealer or installer or an authorized
servicecenter, Do not attempt to repair the applianceyourself. Any work performed by unauthorized
personnel may void the warrant'/.
If you are having a problem with your BOSCHdishwasherand are not pleased with the service you
have received,pleasetake the following steps(in the orderlisted below) untilthe problemiscorrected
to your satisfaction.
1. Contact your installer or the Bosch Authorized Service Contractor in
your area.
2, E-mail us from the customer service section of our web site,
www.lx]m:happliances,€om.
3. Write to us at the address below:
BSH Home Appliances, Corp,
5551 McFadden Avenue
Huntington Beach, CA 92649
4. Call us at: 1-800/944-2904.
Please be sure to include (if writing), or have available (if calling), the following information:
•Model Number
•Serial Number
•Date of Original Purchase
• Date ProblemOriginated
•Explanationof Problem
Also, if writing, please be sure to indude a daytime phone number.
You will find the model number and serial number information on the label located on the right-hand
side of the inner door of the dishwasher. See Figure 1 for an example.
mm H_USQERAEI1E
Figure 43
Iauembled In the USA _R
v4thAmmlcanmd E_
_€_,em.mw ..... - .......
UmTD
Pleasemake a copyof your invoiceand keep it with your manual.
www.boschappliances.oom ENGLISH -29
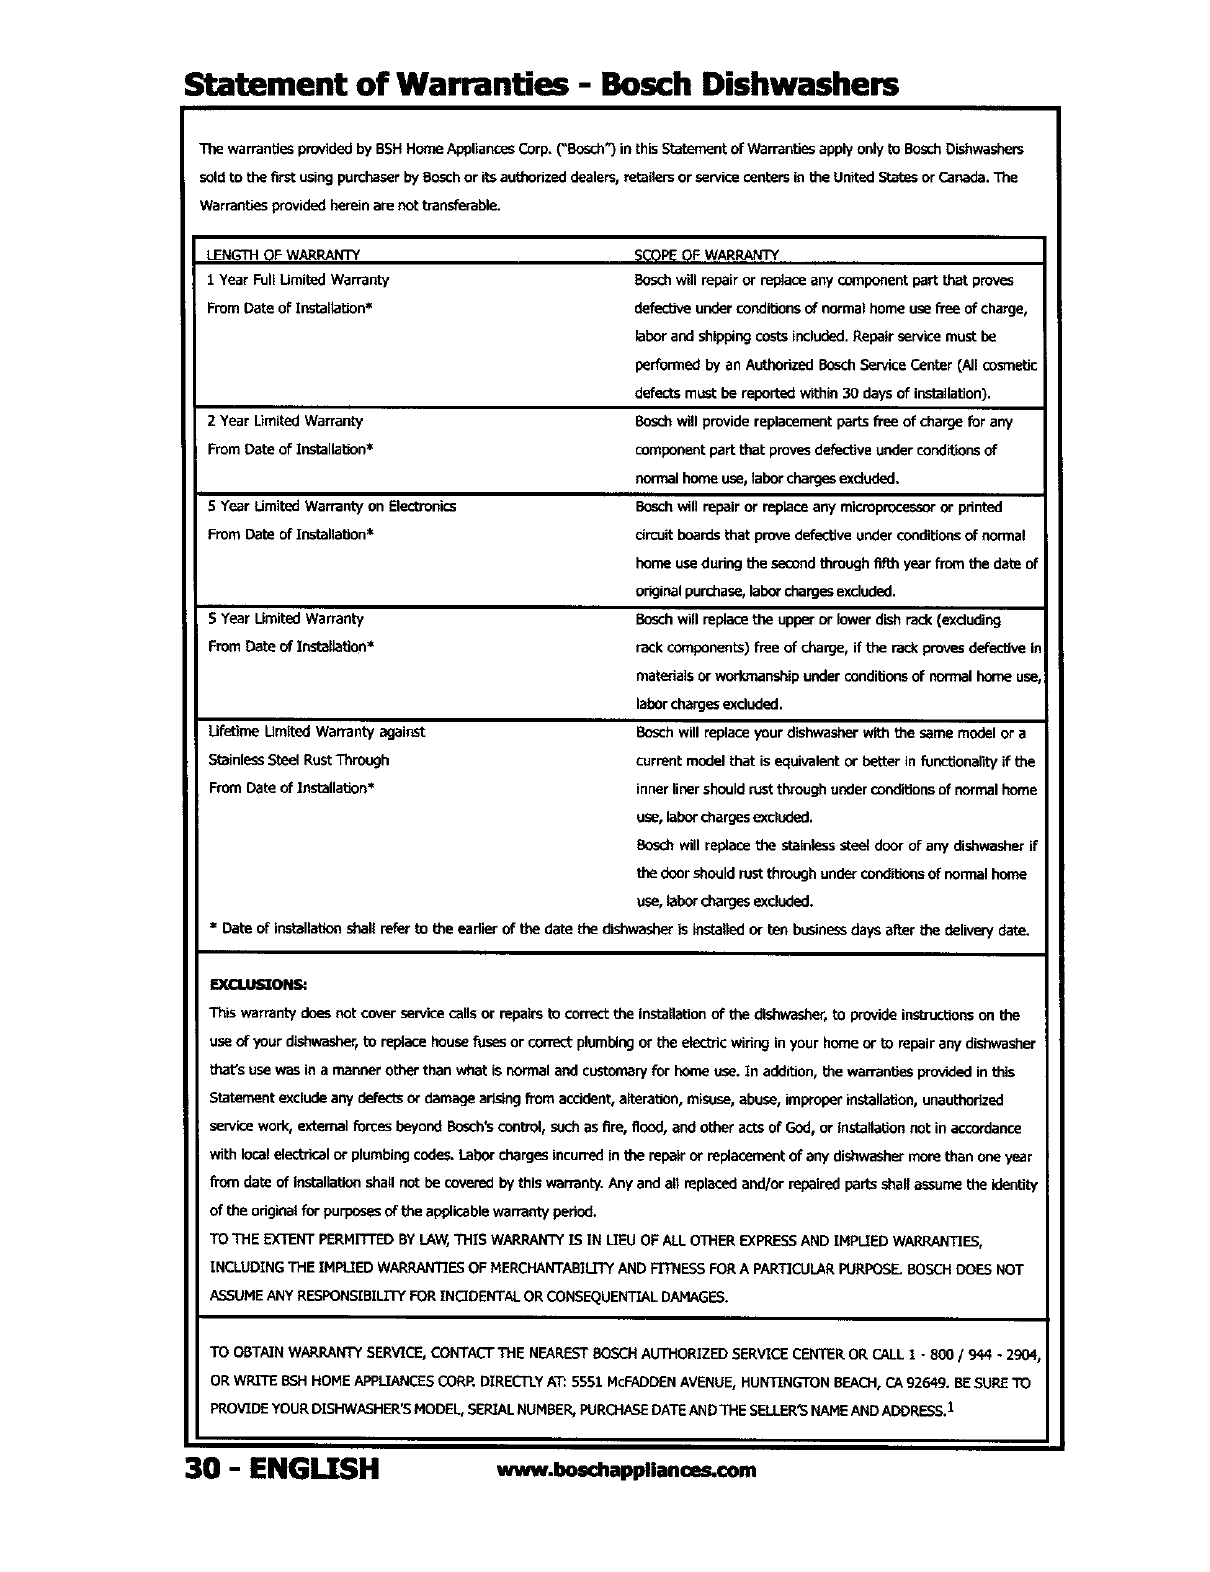
Statement of Warranties - Bosch Dishwashers
The warrantiesprovidedbyBSH HomeAppliances Corp.C'BCech")in thisStatement of Warrantiesapplyonlyto BoschDishwashers
soldto the firstusingpurchaserby Boschor itsauthorizeddealers,retailersor servicecentersin the United Statesor Canada."me
Warrantiesprovidedhereinare nottransferable.
LENGTHOF WARRANTY
Year Full Umited Warranty
From Dateof Installation*
2Year Umlted Warranty
FromDate of Installation*
5Year Umited Warl_nty on Electronics
FromDate of Installation*
S Year Umiteq warranty
FromDate of Installation =
Ufotime Umited Warranty against
StainlessSteel RustThrongh
From Dateof ]nstallaUon*
SCOPEOF WARRANTY
Boschwill repairor replaceany componentpartthat prove_
underconditionsof normalhome usefree ofcharge,
labor andshippingcostsincluded. Repair sarvico must be
performedby an AuthorizedBoschService Center(All cosmetic
defectsmust be reportedwithin 30 days of inst_llation).
Boschwill providereplacementpartsfree of chargefor any
componentpart that provesdefectiveunder conditions of
normalhomeuse,laborchargesexcluded.
Boschwill repairor replaceany mlcroproces_oror pdnted
circuitboardsthat provedefectiveunderconditionsof normal
home useduringthe secondthrough fifth year from the date of
originalpurchase, labor chargesexcluded.
Bosch will replacethe upper or lower dishtad( (excluding
rack components)free of charge, if the rack provesdefectivein
materials or w(xkn_nship underconditions of normalhome use
laborchargesexcluded.
BoschWIUreplaceyour dishwasherwith the same model or a
current modelthat is equivalentor better in fonctionality if the
innerlinershouldrustthrough underconditionsof normalhome
use,laborchargesexcluded.
Bcech will replacethe stainlesssteel doorof any dishwasherif
the doorshould rustthroughunderconditionsof normalhome
usa,labor d_argesexcluded.
=Date of installationshallrefer to the eadier of the date the dishwas_w.=ris installedor ten businessdaysafter the delivery date.
EX£LUSXONS:
This warranty does not cover service calla or repairs to con_ct the Installation of the dishwasher, to provide instructions on the
use of your dishweshe_, to replace house fosas or correct plumbing or the electric wiring in your home or to repair any dishv_sher
that's usa was in a manner other than what is normal and customary for home use. II1 addition, the warranties provided in this
Statement exclude any defects or damage arising from accident, alteration, misuse, abuse, improper instanation, unauthorized
sarvlce work, external forces beyond Bosch_ control, such as fire, flood, and other acts of God, or Installation not in accordance
with local electrical or plumbing cede_ Labor charges incurred in the repair or replacement of any dishwesher more than one year
fTom date of Installabun shall not be covered by this warranty. Any and all replaced aed/or repaired parts shall as3urne the identity
of the odginal for purposes of the applicable warranty period.
TO THE EXTENT PERMrI'rED BY LAW, THIS WARRANTY IS IN LIEU OF ALL OldER EXPRESS AND IMPLIED WARRANTIES,
INCLUDING THE IMPLIED WARRANTIES OF MERCHANTABILITY AND FITNESS FOR A PARTICULAR PURPOSE. BOSCH DOES NOT
ASSUME ANY RESPONSIBILIIY FOR INC]DENTAJ. OR CONSEQUENTIAL DAMAGES.
TO OBTAIN WARRANTY SERV1CE, CONTACT THE NEAREST BOSCH AUTHORIZED SERVICE CENTER OR CALL 1 -800 /944 - 290'1,
OR WR.I"rE BSH HOME APPLIANCES CORP. DIRECTLY AT: 555t McFADDEN AVENUE, HUNTINGTON BEACH, CA 92649. BESURE TO
PROVIDE YOUR DL_HWASHER'S MODEL, SERIAL NUMBER, PURCHASE DATE AND THE SELLER'S NAME AND ADDRESS. 1
30 -ENGLTSH www.boschapplianceLcom

BOSCH
56 02 04 2335 (8108)/CS# 481837
