BREITLING USA XB55 Connected wrist-watch User Manual Calibre B55 mode d emploi GB
BREITLING USA, INC. Connected wrist-watch Calibre B55 mode d emploi GB
UserManual.wiki
>
BREITLING USA
>
XB55 User Manual
UserManual.pdf
Navigation menu
Upload a User Manual
Namespaces
Wiki Guide
HTML
PDF
Info
Views
User Manual
Discussion / Help
Navigation
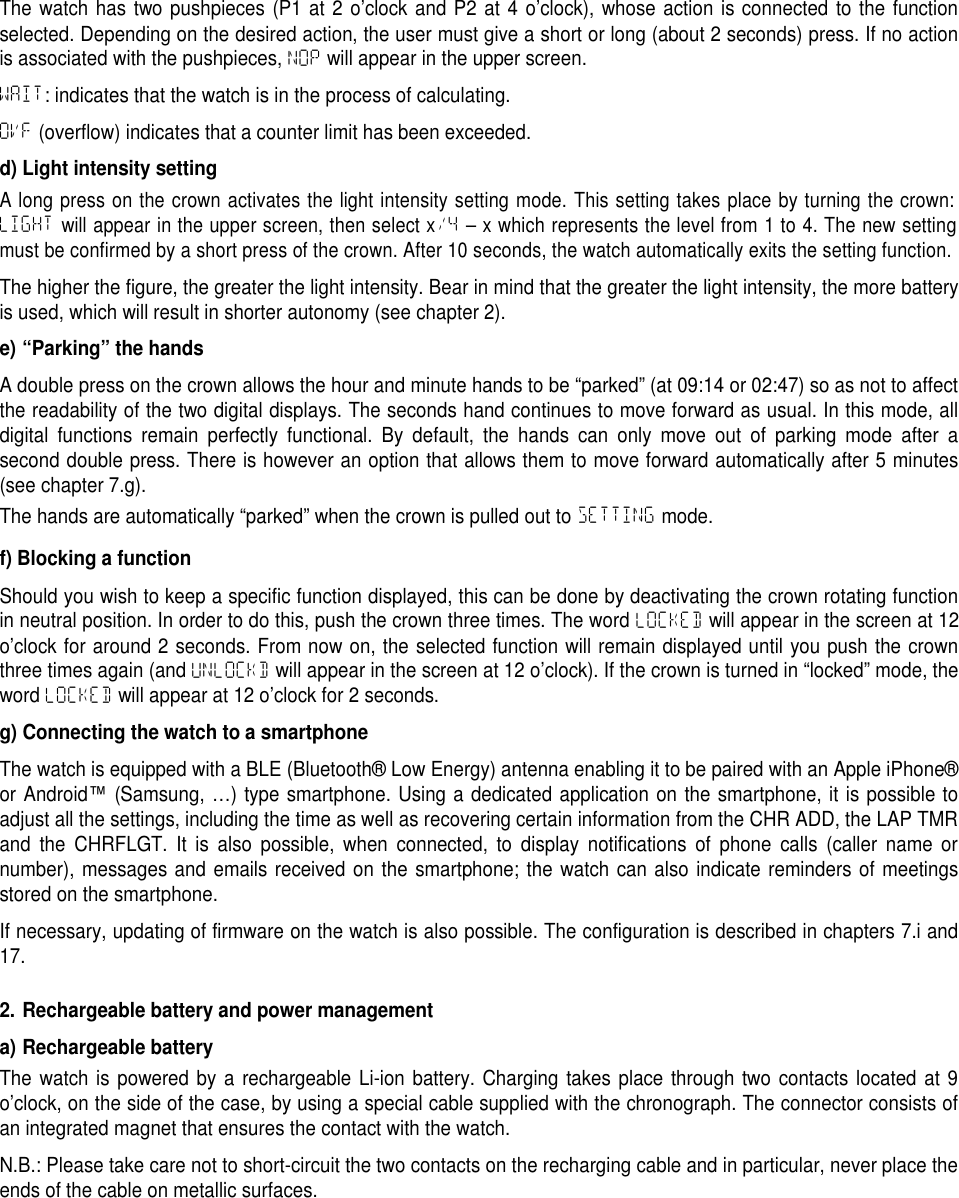
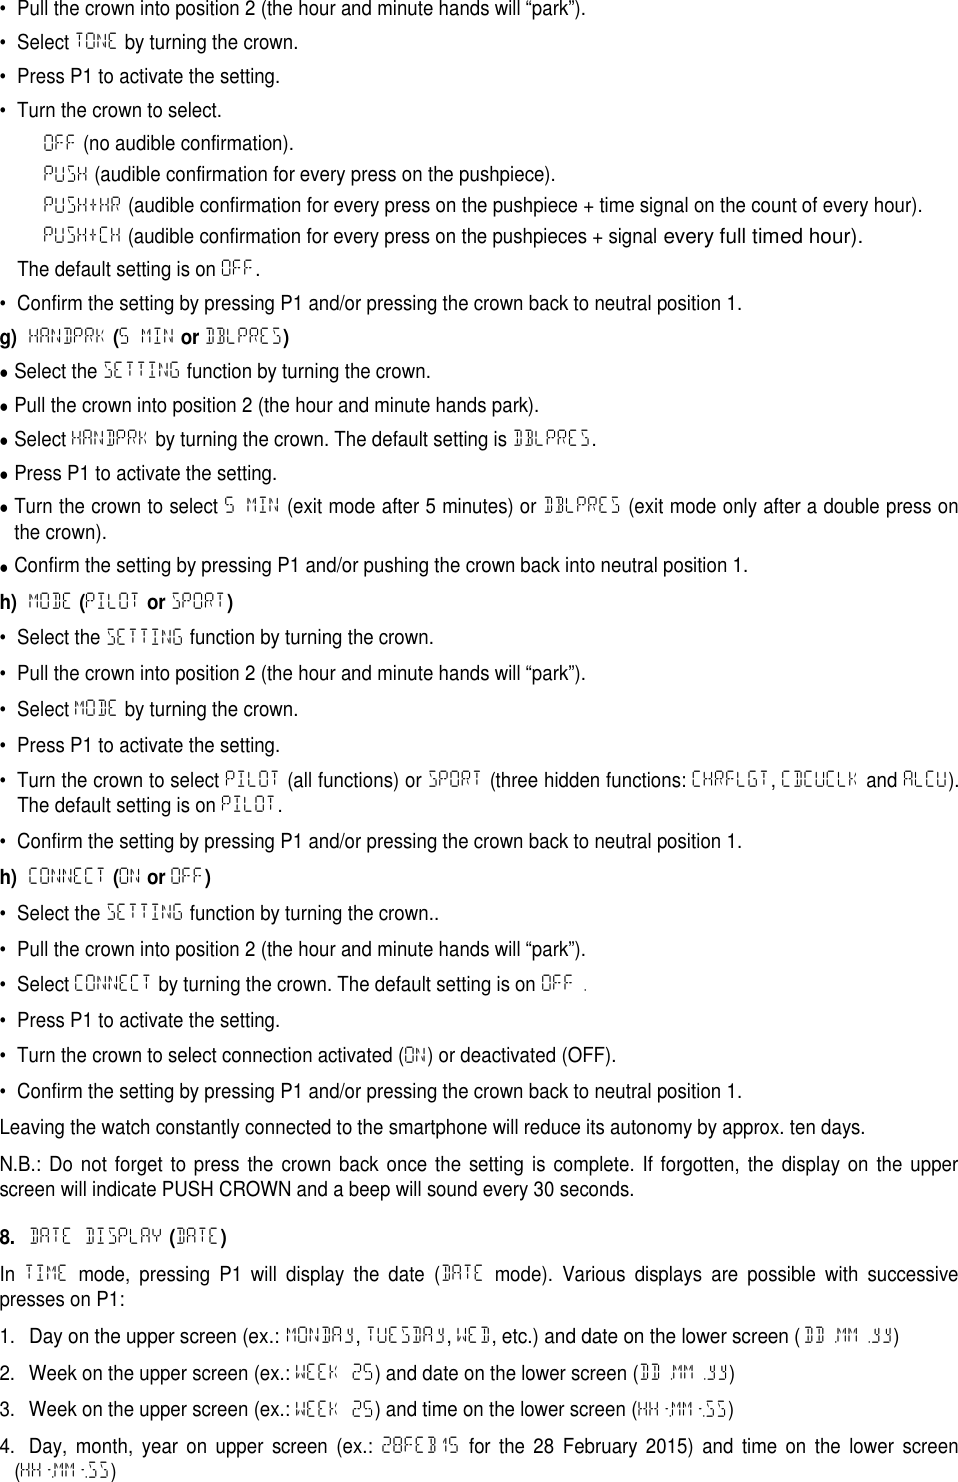
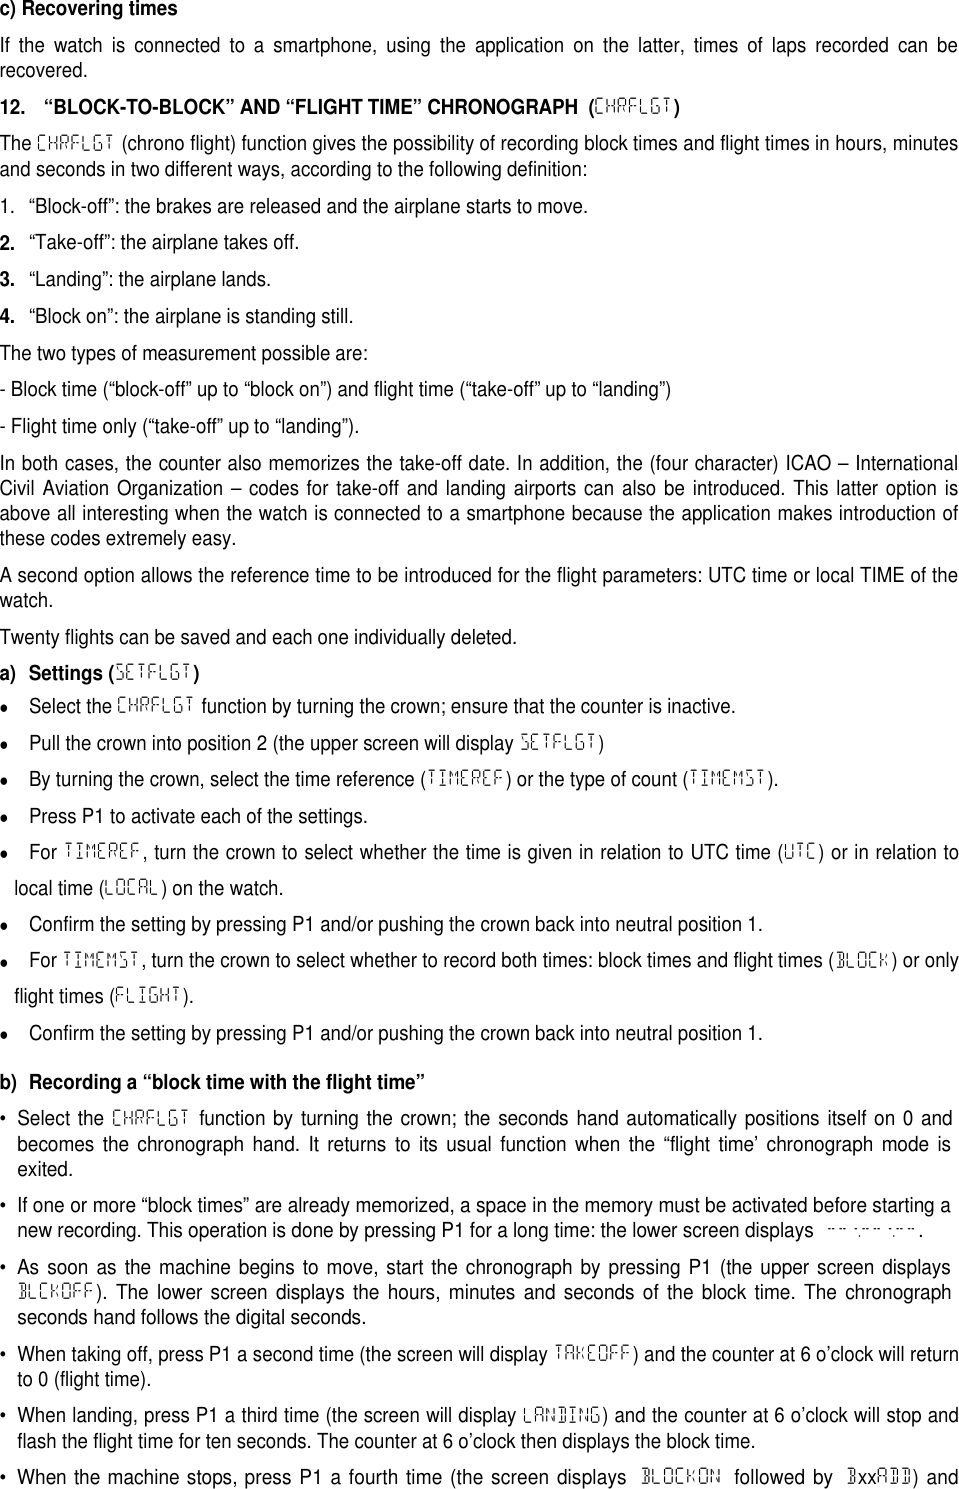
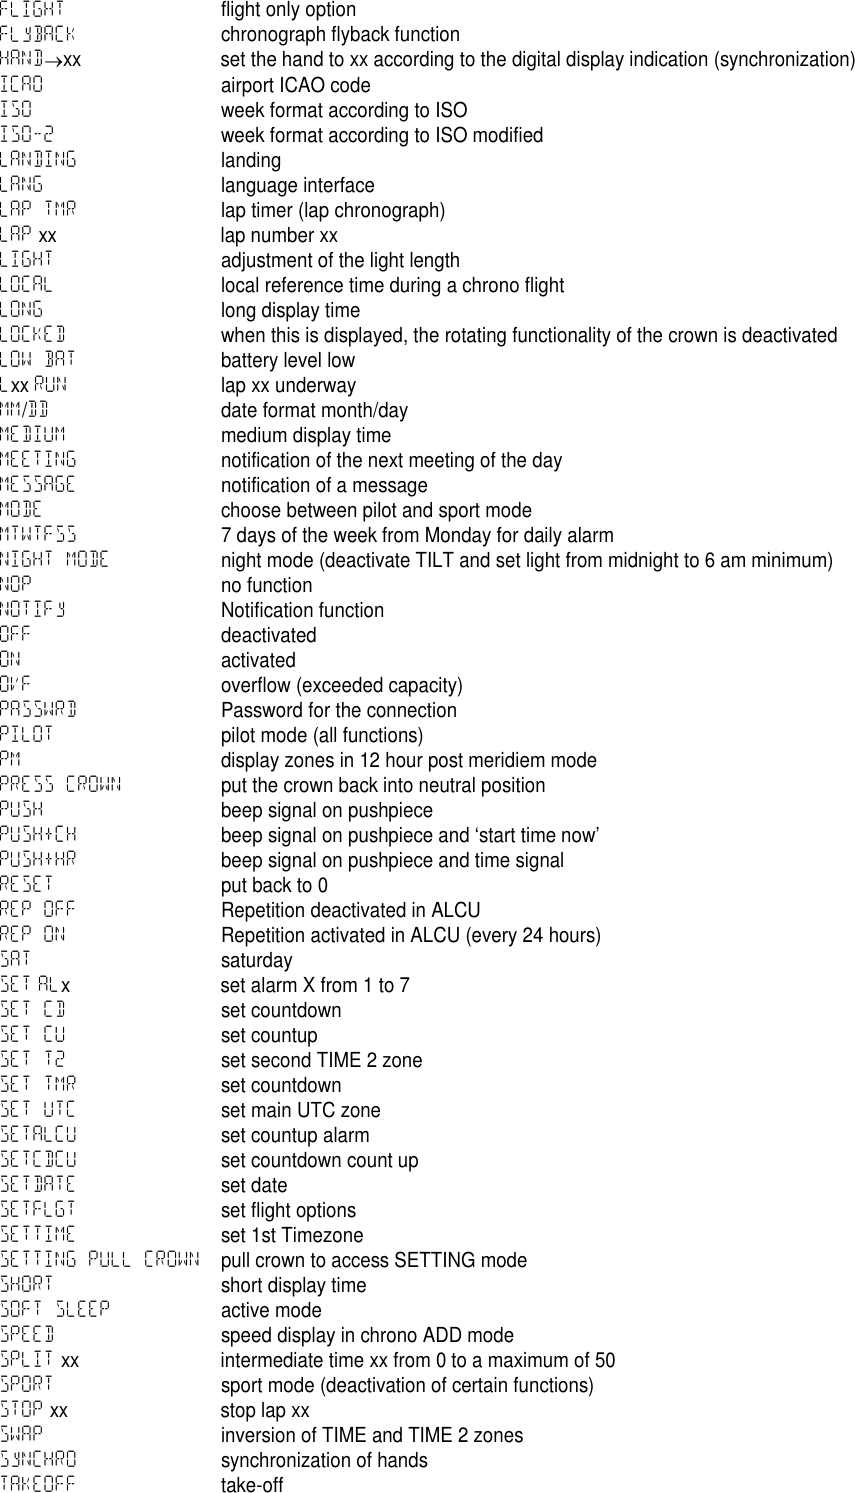
![TYPICAL AUTONOMY IN DAYS / INTENSITY CONTROL01020304050601 2 3 4Autonomie typique en joursRéglage de l'intensitéConnection OFFConnection ONConnection ON + NotificationsGraph 1: Typical autonomy in number of days for 10 minutes use of the light and 10 seconds per day of alarm(vibrate function and buzzer) with or without a connection and 20 notifications according to the light intensity setting.AUTONOMY (DAYS) / DAILY LIGHT USE (MINUTES)0510152025300 2 4 6 8 10 12 14 16 18 20Autonomie [jours]Utilisation journalière de la lumière [minutes]Connexion ON + 20 Notificationsintensité 1intensité 2intensité 3intensité 4Graph 2: Typical autonomy in days (connection ON with 20 notifications per day) according to the use of light inminutes per day (for the four intensity settings).The autonomy of the watch depends on how it is used. The main consumers of energy are the LCD display lighting,the vibration function, followed to a lesser degree by the audible alarm and the BLE connection. The more theseelements are used, the less autonomy the watch will have. The two graphs (1 & 2) provide typical autonomy valuesaccording to light usage.b) Power managementThe watch is equipped with an intelligent power management system serving to optimize its autonomy. The ultimateaim is to avoid having to re-adjust it once again after a “stop”. Depending on the status of the battery charge, thewatch will inform the user of the need to charge. Parallel to this it will deactivate high-consumption functions little bylittle as the battery is used up. The sequence includes three successive levels:1.1stlevel:The seconds hand moves forward in 4-second increments every 4 seconds. The analog and digitaltimes are correctly shown, and the digital functions and alarms are operational.2.2ndlevel:The seconds hand is stopped at 12 o’clock, the high-consumption functions (light, vibrate, function“beeps” and BLE connection) are deactivated. With each press on the crown, the LOW BAT indicator appears onthe upper screen instead of and in place of the light. If the watch is configured in DISPOFF mode (display onlywith the light – see chapter 7.d), it automatically goes to DISP ON mode. The analog time (without the seconds)and the digital time are correctly indicated, the digital functions are operational and the alarms only work with the](https://usermanual.wiki/BREITLING-USA/XB55/User-Guide-2799910-Page-5.png)

![Recommendations:Used batteries and used watch components should not be disposed in litters,but correctly recycled according to local regulations. We recommend the disposalof such parts via your watch dealer. You will thereby contribute to environmentaland public health protection.21. CERTIFICATIONSEUROPEAUSTRIAGREECENORWAYBELGIUMHUNGARYPOLANDBULGARIAICELANDPORTUGALCYPRUSIRELANDROMANIACZECH REPUBLICITALYSLOVAKIADENMARKLATVIASLOVENIAESTONIALITHUANIASPAINFINLANDLUXEMBOURGSWEDENFRANCEMALTASWITZERLANDGERMANYNETHERLANDSUNITED KINGDOMUSA/ CANADARadiofrequency radiation exposure Information:For body worn operation, this watch has been tested and meets the FCC RF exposure guidelineswhen used with Breitling SA accessories supplied or designated for this product. Use of otheraccessories may not ensure compliance with FCC RF exposure guidelines.Breitling Exospace B55FCC ID: OPFXB55IC: 11807A-XB55This device complies with Part 15 of the FCC Rules and with Industry Canada licence-exempt RSS standard(s). Operation issubject to the following two conditions: (1) this device may not cause harmful interference, and (2) this device must accept anyinterference received, including interference that may cause undesired operation.Le présent appareil est conforme aux CNR d'Industrie Canada applicables aux appareils radioexempts de licence. L'exploitation est autorisée aux deux conditions suivantes: (1) l'appareil ne doit pas produire de brouillage, et(2) l'utilisateur de l'appareil doit accepter tout brouillage radioélectrique subi, même si le brouillage est susceptible d'encompromettre le fonctionnement.NOTICE:This device complies with Part 15 of the FCC Rules [and with Industry Canada licence-exempt RSSstandard(s)].Operation is subject to the following two conditions:(1) this device may not cause harmful interference, and(2) this device must accept any interference received, including interference that may causeundesired operation.Le présent appareil est conforme aux CNR d'Industrie Canada applicables aux appareils radio exemptsde licence. L'exploitation est autorisée aux deux conditions suivantes:(1) l'appareil ne doit pas produire de brouillage, et](https://usermanual.wiki/BREITLING-USA/XB55/User-Guide-2799910-Page-25.png)