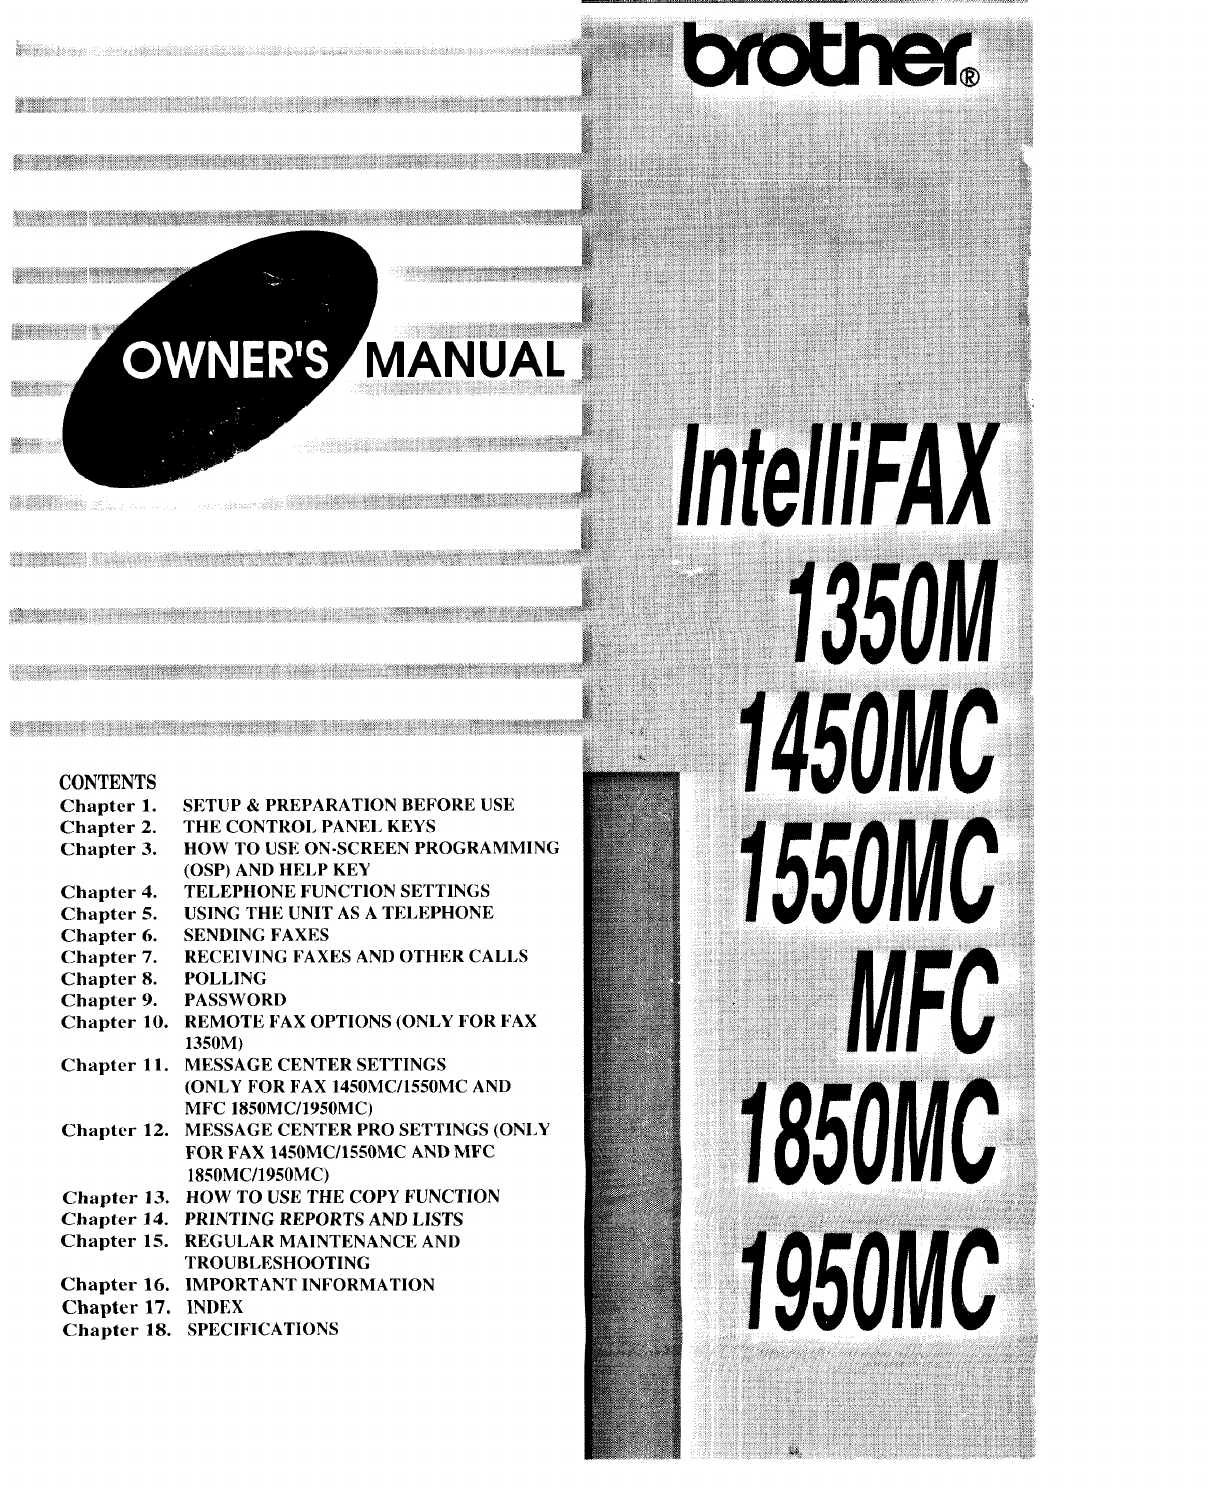
BROTHER Fax Machines Manual 97120064
User Manual: BROTHER BROTHER Fax Machines Manual BROTHER Fax Machines Owner's Manual, BROTHER Fax Machines installation guides
Open the PDF directly: View PDF ![]() .
.
Page Count: 181 [warning: Documents this large are best viewed by clicking the View PDF Link!]
®iiii!!iiiiii!iiiiii!iiiiii
UAL
iiiiii!iiii_iiiiii_iiiiiiiii
CONTENTS
Chapter 1.
Chapter 2.
Chapter 3.
Chapter 4.
Chapter 5.
Chapter 6.
Chapter 7.
Chapter 8.
Chapter 9.
Chapter 10.
Chapter 11.
Chapter 12.
Chapter 13.
Chapter 14.
Chapter 15.
Chapter 16.
Chapter 17.
Chapter 18.
SETUP & PREPARATION BEFORE USE
THE CONTROl, PANEl, KEYS
HOW TO USE ON-SCREEN PROGRAMMING
(OSP) AND HELP KEY
TELEPHONE FUNCTION SETTINGS
USING THE UNIT AS A TELEPHONE
SENDING FAXES
RECEIVING FAXES AND OTHER CALLS
POLLING
PASSWORD
REMOTE FAX OPTIONS (ONLY FOR FAX
1350M)
MESSAGE CENTER SETTINGS
(ONLY FOR FAX 1450MC/1550MC AND
MFC 1850MC/1950MC)
MESSAGE CENTER PRO SETTINGS (ONLY
FOR FAX 1450MC/1550MC AND MFC
1850MC/1950MC)
HOW TO USE THE COPY FUNCTION
PRINTING REPORTS AND LISTS
REGULAR MAINTENANCE AND
TROUBLESHOOTING
IMPORTANT INFORMATION
INDEX
SPECIFICATIONS
ii:iiiiii
iiiiiiiii!iill
iililiiili_iili
iiiiiiii_!ili
i iili!i:ii
i_ilii!i!iilii
iiiiiii;iiiii
[Only tbr MFC 1550MGi1950MC)
Thank You
For your Purchase
... and look for afree Starter Pack
of Laser Plain Paper
inside your MFC Carton
Thank you for your purchase of the Brother Plain Paper
Multi-Function Center.
In order for you to begin using your new MFC, we have
provided you with a free starter package of high quality laser
plain paper (located inside the MFC Carton).
Your new plain paper MFC works with virtually any plain
paper, but we recommend a laser plain paper* for the best
results when using your MFC as a printer.
*laser plain paper is available at almost any, office supply store.
CONTENTS
..................... FOR YOUR INFORMATION
Chapter 1.
Chapter 2.
oI.SETUP & PREPARATION BEFORE USE 1-1
Common Misunderstandings about Fax Machines ............................... 1-I
What Are Fax Tones? .................................................................... 1-1
Why Does the Ring Change in F/T Mode? ............................................... l- 1
What is the Fax "Handshake"? .................................................. 1-2
What Causes the Transmission Verification Report to Print
"Result: NG"? ...................................................................................... 1-2
Is This a Fax Call? ..................................................................................... 1-2
How Can I Send the Call to My Fax Machine? ......................................... 1-3
What is the Difference Between Automatic and Manual Transmission?.. 1-3
What is the Difference Between Automatic and Manual Dialing? ........... 1-3
What Should I Do If My Fax Machine Does Not Have a Dial Tone? ...... 1-3
Choosing a Suitable Place for Your Fax Machine ........................................... 1-4
The Good Places ........................................................................................ 1-4
And the Bad Places .................................................................................... 1-4
Packing List .................................................................................................... 1-5
Setting up Your Fax Machine .......................................................................... 1-6
• Roll Over Phone Lines .............................................................................. 1-9
• Two Line Phone System ............................................................................ 1-9
• Converting Telephone Wall Outlets ........................................................ 1-10
• Installing a Fax Machine, Two Line TAD and Two Line Telephone ..... 1-10
• Multi Line Connections (PBXs) .............................................................. l-I 1
• Connecting to a Private Branch Exchange .............................................. 1-11
• Custom Features on Your Phone Line ..................................................... I-11
•:- THE CONTROL PANEL KEYS 2-1
TELEPHONE AREA ...................................................................................... 2-2
ONE-TOUCH AREA ...................................................................................... 2-3
FUNCTION AND USER SETTING AREA ................................................... 2-4
MESSAGE CENTER AREA .......................................................................... 2-5
Chapter 3. .:.
Chapter 4. .:.
HOW TO USE ON-SCREEN PROGRAMMING (OSP) AND
HELP KEY 3-1
User-friendly Programming ....................................................................... 3- l
On-screen Programming (OSP) ...................................................................... 3-l
Using the Function Mode to A_cess On-screen Programming (OSP) ............. 3- I
Alternating Displays for On-screen Programming (OSP) ............................... 3-2
Function Selection Table ............................................................................... 3-2
Help Key .......................................................................................................... 3-9
How to Print a Help List .................................................................................. 3-9
How to Enter Text in Function Mode .............................................................. 3-9
How to Enter Special Characters, Symbols and Punctuation Marks in
Function Mode ............................................................................................... 3-lO
TELEPHONE FUNCTION SETTINGS 4-1
Setting the Dialing Mode (Tone/Pulse) ......................................................... 4-I
Setting the Beeper Sound Level ...................................................................... 4-1
Setting the Date and Time .............................................................................. 4-2
Setting the Station ID ....................................................................................... 4-3
Storing One-Touch Dial Numbers ................................................................... 4-4
CONTENTS
Chapter 5.
Chapter 6.
• Type, ol Numbel._ ........................ 4-6
•Chain Dialing .............................................. 4-6
Storing Speed-Dial Numbers .......................................................... 4-6
•When You Wish to Change the Stored One-Touch and Speed-Dial
Numbers (During Step 4 on Page 4-4, 7) .............................................. 4-8
• Memory Storage ...................................................................................... 4-8
Setting Up Number Groups ............................................................................. 4-8
-_.USING THE UNIT AS A TELEPHONE 5-1
Manual Dialing ......................................................................................... 5-1
One-Touch Dialing ...................................................................................... 5-1
Speed Dialing ................................................................................................... 5-1
• Using HOLD, PAUSE, #with the Telephone ........................................ 5-1
• On Hook Dialing ....................................................................................... 5-1
Searching the Telephone Index ........................................................................ 5-2
o;. SENDING FAXES 6-1
A) DOCUMENT BASICS .............................................................................. 6-1
The Size of Your Documents .......................................................................
How to Insert the Document ...................................................................... 6-1
The Auto Document Feeder (ADF) .......................................................... 6-2
Getting Ready to Send a Fax ..................................................................... 6-2
SETTING THE RESOLUTION ......................................................... 6-2
SETTING THE CONTRAST ............................................................. 6-3
B) BASIC FAX TRANSMISSIONS .............................................................. 6-4
• Sending a Fax ...................................................................................... 6-4
• Talking to the Other Party When Sending a Fax ................................ 6-4
Sending a Fax Automatically .................................................................... 6-4
Sending a Fax Manually ............................................................................ 6-5
Automatic and Manual Re-dialing ............................................................ 6-5
• Optional Settings When You Send a Fax Manually ........................... 6-5
C) ADVANCED FAX TRANSMISSIONS ................................................... 6-6
Sending a Fax by Using Super Quick-Scan (Memory Transmission) ....... 6-6
• If You Get a MEMORY FULL Message When Trying to Send
a Fax by Using Super Quick-Scan ...................................................... 6-6
• Printing Page Headers ......................................................................... 6-6
Delayed Transmission ............................................................................... 6-7
Setting the Daily Timer (for Delayed Transmissions) ............................... 6-7
Broadcasting .............................................................................................. 6-8
• Getting Familiar with the Broadcasting Function ............................... 6-8
Sending by Multi-Transmission ................................................................ 6-9
Interrupting the Timer and Polled Job ..................................................... 6- l0
Canceling a Job ........................................................................................ 6-11
D) FAX TRANSMISSION OPTIONS ......................................................... 6-12
Setting the Overseas Mode ...................................................................... 6-12
Setting Your Fax MachineforMultipleResolutionTransmission.........6-13
Sending aFax with an ElectronicCover Page Message ......................... 6-14
•The Comments Selection on the Cover Page .................................. 6-14
Customizing Your Cover Page Comment ............................................... 6-15
Printing the Cover Page .......................................................................... 6-15
CONTENTS
Chapter 7.
To Alwav,s Send at Co_ el Page .............. 6-16
• Sending an Automatic Cover Page ............. 6-16
Sending a Fax When the Cover Page ls ON ............ 6-17
When Using the Cover Page Temporarily ............................................... 6-17
Sending a Fax with Call Reservation ................................................ 6-18
• Using the Call Reservation Function ................................................ 6-19
Pt lntmg the Call Back Message ............................................................... 6-19
ECM (Error Correction Mode) ................................................................ 6-20
Error Re-Transmission ............................................................................ 6-20
Next-FAX Reservation .......................................................................... 6-21
•1. RECEIVING FAXES AND OTHER CALLS
A)
B)
C_
D_
7-1
BASIC SETUP TO RECEIVE FAXES .......................................................
Selecting an Answer Mode ........................................................................ 7-1
Manual Reception (MANUAL Mode) ......................................... 7-2
Automatic Fax Only Reception (AUTO Mode) ....................................... 7-2
Setting the Ring Delay .......................................................................... 7-2
The F/T Switch (F/T Mode) ....................................................... 7-3
Recording an F/T Outgoing Message (OGM)
(Only for FAX 1450MC/1550MC and MFC 1850MC/1950MC) ............. 7-4
Setting the F/T Ring Time ......................................................................... 7-5
Smoothing .................................................................................................. 7-5
Setting the Size of the Recording Paper .................................................... 7-6
Printing a Reduced Size Copy of the Incoming Document ....................... 7-7
Using Auto Reduction Ratios .............................................................. 7-7
Fixed Reduction .................................................................................. 7-7
• Selecting the Ratios of Fixed Reduction ............................................. 7-8
Speaker Volume ........................................................................................ 7-9
Ring Volume ............................................................................................. 7-9
• Reception into Memory/Out of Paper Reception .............................. 7-10
REMOTE ACTIVATION ....................................................................... 7-11
What is Remote Activation? .................................................................... 7-11
• Connecting an External or Extension Telephone .............................. 7-11
Using Remote Codes ............................................................................... 7-11
Using the Activation Code: ............................................................... 7-12
Using the Deactivation Code: ........................................................... 7-12
Making the Remote Codes Easier to Use ................................................ 7-12
Troubleshooting ....................................................................................... 7-12
Changing and Registering Remote Codes ............................................... 7-13
CONNECTING A TELEPHONE ANSWERING DEVICE (TAD) ....... 7-14
How to Use External TAD with the Unit
(The TAD Mode for FAX 1350M) ....................................................... 7-14
• Connecting an External TAD to the Unit .......................................... 7-14
Example of the Sequence of External TAD Reception
(Sequence of TAD Mode for FAX 1350M) ............................................ 7-15
Hookup .................................................................................................... 7-15
Recording the TAD's Outgoing Message (OGM) .................................. 7-15
DISTINCTIVE RINGING ...................................................................... 7-16
Distinctive Ringing .................................................................................. 7-16

CONTENTS
Chapter 8. .:-
Chapter 9. .:.
Chapter I0. .:.
What Is Distinctive Ringing? ..................... 7-16
Can My Fax Machine Use Distinctive Ringing '_ .......................... 7-16
Can I Change the Setting Later? ..................................................... 7-16
How Will the Fax Machine Treat All Other Distinctive Ringing? ... 7-16
How Does the Distinctive Ringing Function Work? ........................ 7-16
What is the Advantage of Using the Distinctive Ringing Function? 7-16
Setting the Distinctive Ringing Function ................................................ 7-17
• While You Are Setting the Distinctive Ringing Function: ............... 7-18
• Once You Have Finished Setting the Distinctive Ringing Function: 7-18
How to Turn the Distinctive Ringing Function ON or OFF .................... 7-19
E) CALLER ID ........................................................................................... 7-20
What is Caller ID? ................................................................................... 7-20
Advantages of Caller ID .......................................................................... 7-20
How Does the Caller ID Work? .............................................................. 7-20
The Caller ID Appears on the Display When Your Telephone
Rings .................................................................................................. 7-20
The Caller ID is Stored in Your Machine's Memory ........................ 7-21
Scanning through a Caller ID from the Memory ..................................... 7-21
• Clearing the Caller ID Stored into Memory ..................................... 7-21
Printing the Caller ID List ....................................................................... 7-22
POLLING 8-1
• What Is Polling? ........................................................................................ 8-1
• How Does It Work? ................................................................................... 8-1
• When to Use Polling? ................................................................................ 8-1
Polling Another Fax Machine (Calling) ......................................................... 8-2
Setting up Polled Waiting (Being Called) ...................................................... 8-2
Secure Polling .................................................................................................. 8-3
Polling Another Brother Fax Machine with Secure Code (Calling) ................ 8-3
Setting up Polled Waiting with Secure Polling (Being Called) ....................... 8-4
Delayed Polling ................................................................................................ 8-5
Setting up Polled Waiting with Super Quick-Scan .......................................... 8-5
Sequential Polling ........................................................................................... 8-6
PASSWORD 9-1
• What Is Password? .................................................................................... 9-1
• How Does the Password Work? ................................................................ 9-1
• When to Use Password Plus? .................................................................. 9-1
Sending Faxes with a Password ....................................................................... 9-1
Receive Password ............................................................................................ 9-2
REMOTE FAX OPTIONS (ONLY FOR FAX 1350M) 10-1
Setting the Fax Storage ................................................................................ 10-1
Paging/Fax Forwarding .................................................................................. 10-2
Setting Up Paging and Registering the Paging Number ................................ 10-3
Setting Up Fax Forwarding and Registering the Fax Forwarding Number... 10-4
What Is Remote Control Access? .................................................................. 10-5
Setting the Remote Access Code ................................................................... 10-5
How to Use Remote Access and Control Codes ........................................... 10-6
Remote Retrieval ........................................................................................... 10-6
I I
CONTENTS
Chapter 11.
•When to Pies,, the Remote Accc_,, Code ...... 10-6
Remote Control Commands ............................................ 10-'7
Printing a Fax Message ....................................................................... I0-'7
Retrieving the Memory Status List and Fax Messages Remotely ................. 10-8
Changing the Fax Forwarding Number Remotely ........................................ 10-8
.:- MESSAGE CENTER MODE SETTINGS
(ONLY FOR FAX 1450MC/1550MC, MFC 1850MC/1950MC) 11-1
A) GETTING STARTED ............................................................................ 11-1
What Is the Message Center Mode? ........................................................ 11-1
What Do IWant the Message Center to Do? .......................................... 11-2
Flowchart Sequence of an Incoming Call ................................................ 11-3
The 3 Basic Steps to Turn the Message Center Mode On ....................... 1-7
Setting the Message Storage .................................................................... 1-7
Recording the MSG CTR Outgoing Message (MSG CTR OGM) .......... 1-8
Activating the Message Center Mode ..................................................... 1-9
B) GETTING YOUR MESSAGES .............................................................. 1-9
How Will I Know Messages Have Been Received? ............................... 1-9
• What Happens When the Memory Is Full ........................................ 1-9
Playing an Incoming Voice Message (ICM) and Recorded Memo
(or Voice Alarm) ................................................................................... 11-10
Back-up Printing Option ........................................................................ 11-10
Printing a Fax Message .......................................................................... 11-11
• Erasing and Printing FAX Messages .............................................. 11-11
Calling Your Message Center for Messages (See Remote Retrieval)... 11-11
C) ERASING YOUR MESSAGES ............................................................ 11-12
Erasing Incoming Voice Messages, Fax Messages and Recorded
Memo (or Voice Alarm) ........................................................................ 11-12
One by One Erasing ....................................................................... 11-12
All in One Erasing ........................................................................... 11-12
D) CHANGE THE OUTGOING MESSAGE ............................................ 11-13
Playing Your Outgoing Message (OGM) .............................................. 11-13
Erasing Your Outgoing Message (OGM) .............................................. 11-13
E) MORE FEATURES .............................................................................. 11-14
Setting the Toll Saver ............................................................................ 11-14
Setting the Maximum Time for Incoming Messages
(ICM MAX. TIME) ............................................................................... 11-14
Changing the Recording Mode Setting (Voice Quality) ....................... 11-15
Recording a Conversation ..................................................................... 11 -15
Recording a Memo ................................................................................ 11-16
F) PAGING/FAX FORWARDING ........................................................... 11-16
What is Paging/Fax Forwarding? ......................................................... 11-16
Setting Up Paging (Registering Paging Number) .................................. 11-17
Setting Up Fax Forwarding (Registering Fax Forwarding Number) .... 11-19
• Memory Back-up of Message Center Memory ............................... 11-19
Changing the Fax Forwarding Number Remotely ................................ 11-19
G) REMOTE RETRIEVAL ........................................................................ 11-19
What Is Remote Control Access? .......................................................... 11-19
Setting the Remote Access Code ........................................................... 11-20
CONTENTS
Chapter 12.
H)
U,,mg the Re/note Acce,,,, Code ............. 11-21
Remote Control Conunands ..................................... 11-22
Retrieving the Memory Status List and Fax Messages Remotely ......... 11-23
Changing the Fax Forwarding Number Remotely ................................ 11-23
VOICE ALARM .................................................................................... 11-24
Voice Alarm .......................................................................................... 11-24
Setting the Voice Alarm ....................................................................... 11-24
• Recording Voice Messages for the Voice Alarm ............................ 11-25
How Will the Voice Alarm Perform When the Set Time Comes ........ 11-26
Using the Voice Alarm' Playing Entries, Erasing Entries One by One,
Erasing All at Once ................................................................................ 11-27
Remote Control of the Voice Alarm ...................................................... 11-27
°:*MESSAGE CENTER PRO SETTINGS
(ONLY FOR FAX 1450MC/1550MC, MFC 1850MC/1950MC) 12-1
A) GETTING STARTED .......................................................................... 12-1
What is Message Center Pro? ............................................................... 12-1
What Fax-on-Demand and Voice-on-Demand Do .................................. 12-1
• Application Examples of Fax-on-Demand/Voice-on-Demand
Features ............................................................................................. 12-2
What the Personal Mailbox Does ............................................................ 12-2
• Application Examples of Personal Madbox ...................................... 12-3
How the Caller Accesses the Fax-on-Demand, Voice-on-Demand
Memory Boxes or Personal Mailboxes ................................................... 12-4
B) SETTING UP THE FAX/VOICE-ON-DEMAND ................................ 12-5
• * 1st Level OGM: (Message Center Pro Outgoing Message) ........... 12-6
• ** 2nd Level OGM: (Fax-on-Demand, Voice-on-Demand,
Mailbox Outgoing Message) ............................................................ 12-6
• Access to the Target Memory Box: ................................................... 12-6
Setting up Step la: For Fax-on-Demand ................................................ 12-7
Storing/Erasing/Printing Fax Information in a Memory Box ........... 12-7
Setting up Step 1b: For Voice-on-Demand ........................................... 12-10
Recording!Erasing/Playing Voice Information in a Memory Box .. 12-10
C) SETTING UP THE PERSONAL MAILBOX ...................................... 12-12
Setting up Step lc: For Personal Mailbox ............................................. 12-12
A Password and Recording a Personal Mailbox OGM for the
Mailbox .......................................................................................... 12-12
Setting up Step 2: Recording!Erasing/Playing the 2nd Level OGM
for each Fax-on-Demand, Voice-on-Demand, and Personal Mailbox .. 12-13
Recording an OGM ......................................................................... 12-13
Erasing an OGM .............................................................................. 12-14
Playing an OGM ............................................................................. 12-15
Setting up Step3: Recording/Erasing/Playing the Ist Level OGM
(Message Center Pro OGM) ................................................................. 12-16
Recording the Message Center Pro OGM ....................................... 12-16
Erasing the Message Center Pro OGM ........................................... 12-17
Playing the Message Center Pro OGM ........................................... 12-17
Setting up Step 4: Turning on the Message Center Pro ......................... 12-18
D) LISTENING TO ICMs (Incoming Messages) ...................................... 12-18
CONTENTS
Chapter 13. .:.
Chapter I4. .:.
Chapter 15. .:.
Chapter 16.
Chapter 17.
Chapter 18.
L,,temng to the ICMs m the Personal Madboxe_ .... 12-IS
Retrieving the ]CMs (Incoming Messages) m the Personal Mailbox
Remotely .................................................................................. 12-19
Recording a Memo in Personal Mailbox on the Machine ..................... 12-20
Erasing ICMs (Incoming Messages) from the Personal Mailboxes ...... 12-21
Erasing Voice ICMs One by One .................................................... 12-21
Erasing All of the Fax/Voice ICMs at One Time ........................... 12-22
HOW TO USE THE COPY FUNCTION 13-1
Making a Single Copies ............................................................................... 13-l
Making Multiple Copies ................................................................................ 13-2
• What to Do When You Get a"MEMORY FULL" Message while
Making Copies ....................................................................................... 13-2
Making Reduced and Enlarged Copies .......................................................... 13-3
PRINTING REPORTS AND LISTS 14-1
Activity Report Interval ................................................................................. 14-2
Printing the All Dial List ............................................................................... 14-3
Transmission Verification (Xmit) Report ...................................................... 14-4
Memory Status List ........................................................................................ 14-6
REGULAR MAINTENANCE AND TROUBLESHOOTING15-1
Regular Maintenance ............................................................................ 15-1
Paper Jams ..................................................................................................... 15-2
Fixing a Document Jam ........................................................................ 15-2
Fixing a Recording Paper Jam ................................................................. 15-2
Optional Memory Board ................................................................................ 15-3
Troubleshooting ............................................................................................. 15-4
Error Messages ........................................................................................ 15-4
Other Problems ........................................................................................ 15-5
•:o IMPORTANT INFORMATION 16-1
Standard Telephone and FCC Notices (Applies only to 120V model) .......... 16-l
Important Safety Instructions ......................................................................... 16-3
•:oINDEX 17-1
o:oSPECIFICATIONS 18-1
How to Use This Owner's Manual
Thank you for purchasing a Brother fax machine. This thx machine has been designed
to be simple to use, but you can utilize it to its fullest potential by taking some time to
read this owner's manual. You will be ready to use the fax machine as soon as you read
the first four chapters. Then you can refer to topics in the remaining chapters, as
needed.
Structure of the Manual
• Chapters 1-4
How to set up the fax machine and what you need to know before you use it.
•Chapters 5-7
Basic operations, how to send and receive faxes.
•Chapters 8-12
Advanced operations for sending and receiving faxes.
•Chapter 13
How to copy.
•Chapter 14
How to print reports and lists.
•Chapters 15-19
Important Information.
Finding Information in the Owner's Manual
• Use the table of contents. This side of the manual is coded so you can find topics
easily.
• If there is a key on the fax machine you are not familiar with, refer to chapter
2.
• To find information about a function, refer to the "Function Selection Table" in
chapter 3.
• If you have trouble, refer to chapter 15 on troubleshooting.
• Use the chapter 17 index.
Test Sheet Procedure
Please fill out the TEST SHEET and fax it to 1-908-469-4547 (USA), 1-514-685-0702
(CANADA) as your first transmission. This will verify that your fax machine is
properly installed.
When this document is received at Brother Diagnostic Center, a confirmation sheet will
be sent back to your machine from Brother Automatic Fax Back Response System (USA
only). Be sure to set up your "Station ID". (See page 4-3.)
USA
FAX NO.
TEL NO.
CANADA
FAX NO.
TEL NO.
1-908-469-4547 (Fax Transmission Only)
1-800-284-4FAX (Voice Phone Only)
1-800-284-4329
1-514-685-0702
1-800-853-6660
SETUP& PREPARATION BEFORE USE
H ,,I ............].Un Ir
I. SETUP & PREPARATION BEFORE USE _. ,
Common Misunderstandings about Fax Machines
This section is for people who are using a fax machine for the first time. Its purpose is tO take away
the mystery. Once you understand the meaning of the new tones you will be hearing on your phone
line, you will be able to send and receive faxes with ease. This will help you troubleshoot an
occasional problem with a fax transmission, by listening through your one-way speaker to
discover the problem.
What Are Fax Tones?
First the sending machine sends CNG tones, soft intermittent beeps at 4 second
intervals. You will hear then] when you dial and press the START key. CNG stands for "calling"
tones. They continue for 30 seconds after dialing: during that time the sending machine must
begin the "handshake" with the receiving machine. Each time you send an "automatic" fax
transmission, you are sending calling tones over the phone line. Learn to listen for these soft beeps
each time you answer a phone on your fax line so you will know if you are receiving a fax message.
Then the receiving machine responds with fax receiving tones, loud chirping sounds.
When a machine begins the receiving mode cycle, it will chirp for 40 seconds over the phone line.
At the same time, the fax machine's display screen will say "receiving". If you set your machine
to AUTO answer mode for a dedicated fax line, it will answer every call automatically with fax
receiving tones. Sometimes people will call your fax line by mistake and hang up when they hear
the shrill chirping sounds. Your machine is not malfunctioning when it continues to say
"receiving"; it must complete its 40 second cycle, even though the call was not a fax message and
the caller hung up. To take your machine out of receiving mode, press the STOP key.
The fax machine answers with a short beep when it answers in F/T or Message Center mode.
This can not be changed. After the beep the fax machine listens for CNG tones. When it hears CNG
tones, it responds with receiving tones.
Why Does the Ring Change in FIT Mode?
When a double-ring (short, short) occurs after the normal long rings in the Fax/Tel
Switch (Ffr mode), it means your fax machine is telling you to take over a call. The fax
machine has answered either a telephone call or a manual fax (no calling tones). When you hear
the double-ring, pick up any extension phone or the handset of your fax machine.
'it'":.
1-1
,'. SETUP& PREPARATION BEFORE USE ,-
What is the Fax "Handshake"?
The calling machine sends CNG tones (beeps) and the receiving machine sends receiving tones
(chirps). During the handshake these tones must overlap for 2-4 seconds so the fax machines can
set up protocol. The sending machine states how it is sending the message; the receiving machine
answers whether it is capable of receiving that way. The sending machine's CNG tones continue
for only 30 seconds after the number is dialed. Calls must be answered within 4 rings (20-22
seconds) or less, because the handshake can not begin until the call is answered. With 4 rings,
only 8-10 seconds are left for the fax machines to hear their tones clearly and communicate.
Timing is crucial.
When you have a telephone answering device (TAD) on your fax line, you can set the TAD to
answer in 4 rings as long as you record a 5 second silence as the beginning of your OGM (outgoing
message) (see page 7-14 for more information.). This will prevent the OGM from covering up the
fax tones during the 8 seconds that are left for the handshake. As soon as your TAD answers a
call, your fax machine will listen for fax tones for 30 seconds. So you must limit your speaking to
20 seconds (25 second total OGM). Since many people dial manually without realizing they are
not sending fax tones, you should give your Remote Activation Code (_<51) as the last part of your
20 second Message. For example: "After the beep, either leave a message or send a fax by pressing
_<51." (See page 7-11 for more information.)
What Causes the Transmission Verification Report to Print "Result: NG"?
During the handshake, the document(s) you are sending begin to roll through the feeder and stop
until the handshake is completed and the machines are ready to send and receive the data. If there
is noise or static on the phone line or if the machines do not agree on protocol, they drop their baud
rate to the next lower level and try again. The initial baud rate is 14400, then 12000, 9600, 7200,
4800 and finally 2400. (The Fax 1350M begins at 9600 baud.) Transmissions as low as 2400 baud
can be successful. So, do not stop your machine. If the transmission fails, a Transmission
Verification Report will be printed automatically with "Result: NG". This usually means the
transmission was "No Good" because of temporary noise or static on the phone line. Try to send
the fax again. Also, you may try sending a fax to other locations to see if the problem is on the phone
line at your end.
Is This a Fax Call?
There are three signs that the call you answered is a fax. You will hear either soft intermittent
beeps (Automatic transmission), silence (Manual transmission) or the voice of someone telling
you he or she is trying to send you a fax (Manual transmission). Do not hang up the handset.
It is very frustrating for the person who hears you repeatedly answer and hang up. People who
dial manually are waiting to hear fax tones before pressing START. You must activate your fax
machine to take over the call before you disconnect the line by replacing the handset.
nl town ..... ! ? I!rl ...... ::':............ ::7_
SETUP & PREPARATION BEFORE USE
How Can I Send the Call to My Fax Machine?
When you answer a call that is a fax transmission, you must activate your fax machine to go into
fax receiving tones (chirping) before you hang up. If you have answered the fax handset, press the
START key and hang up immediately. If you are on another phone, there is no START key so you
must press your three-digit Remote Activation Code. The factory default setting is $51. Press the
code quickly and wait to hear your fax machine chirp through the handset. It takes 3 seconds for
the fax to respond. You can press the code as many times as needed.
What is the Difference Between Automatic and Manual Transmission?
Automatic transmission is the easiest way to send a fax. Simply place the document(s) face
down in the feeder, dial the phone number and press the START key immediately. Do not pick
up the handset or press the HOOK key. Calling tones will go over the phone line.
Manual transmission occurs when you start with a dial tone before you dial, by lifting the
handset or pressing the HOOK key. You will hear the rings on the phone line. You must wait to
hear the receiving machine answer with a chirp before you press the START key. If you wait too
long to press START without a document in the feeder, your fax machine will go into receiving mode
instead of sending and you will see "receiving" on the screen.
What is the Difference Between Automatic and Manual Dialing?
Automatic dialing is when you dial by pressing the keys where you stored a number. Your fax
machine stores two kinds of automatic dialing numbers: One-Touch and Speed-Dial. Reserve
your most frequently dialed numbers (and Groups) for your One-Touch keys; all you have to do is
press the One-Touch key followed by the START key (2 key strokes). To use a Speed-Dial number,
press the Speed-Dial key and the two-digit code you used to store the number, followed by the
START key (4 key strokes). You can dial automatically using One-Touch and Speed-Dial numbers
for both automatic and manual transmissions.
Manual dialing is simply pressing all the digits of the phone number. You can dial manually for
both automatic and manual transmissions.
What Should I Do If My Fax Machine Does Not Have a Dial Tone?
There are three jacks in the back of the fax machine: LINE, EXT and PC I/F. Double-check that
the telephone line cord is plugged into the LINE jack and not into EXT or PC I/F. (Plugging the
telephone line cord into the EXT or PC I/F jack is the most common cause of no dial tone.)
If the telephone line cord is plugged into the LINE jack of the fax machine and you do not get a dial
tone, test the phone line. Go to another phone and check for a dial tone; then bring that working
telephone and line cord and plug them into the wall jack for your fax machine. If you do not get a
dial tone with the working phone, the problem is the phone line. Call the Telephone Company and
report the problem.
1-3
SETUP& PREPARATIONBEFOREUSE
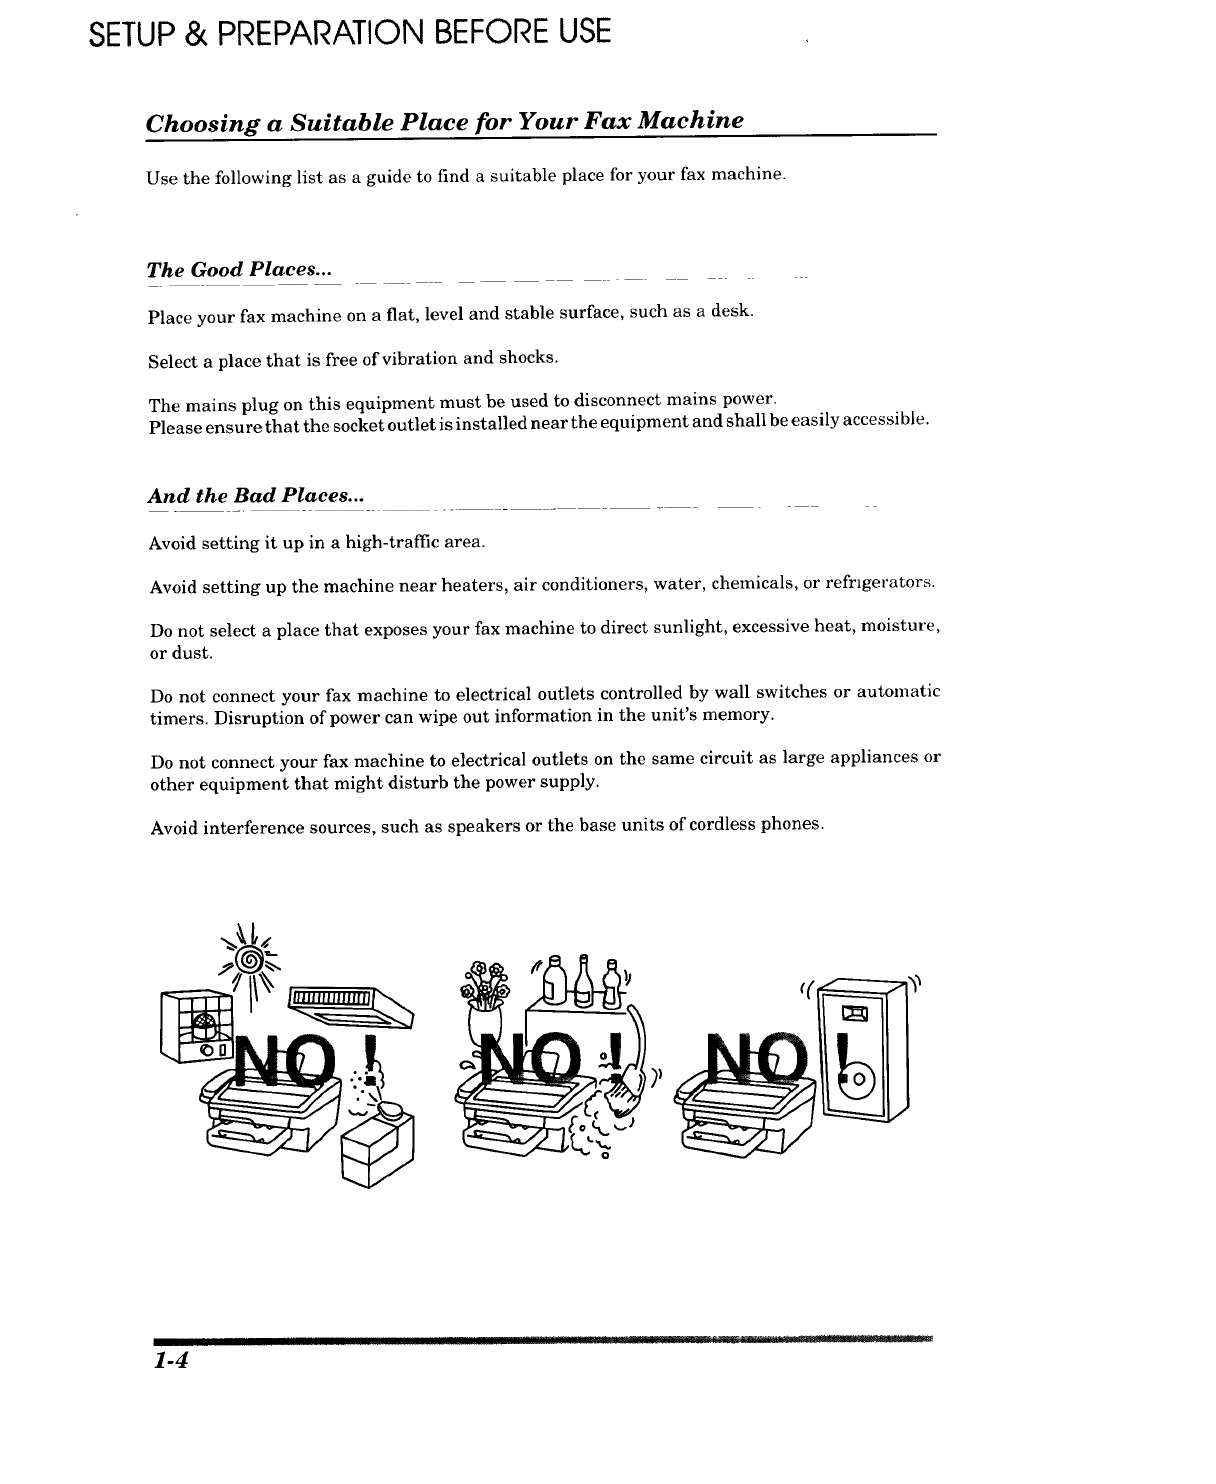
Choosing a Suitable Place for Your Fax Machine
Use the following list as a guide to find a suitable place for your fax machine.
The Good Places...
Place your fax machine on a flat, level and stable surface, such as a desk.
Select a place that is free of vibration and shocks.
The mains plug on this equipment must be used to disconnect mains power.
Please ensure that the socket outlet is installed near the equipment and shall be easily accessible.
And the Bad Places...
Avoid setting it up in a high-traffic area.
Avoid setting up the machine near heaters, air conditioners, water, chemicals, or refrigerators.
Do not select a place that exposes your fax machine to direct sunlight, excessive heat, moisture,
or dust.
Do not connect your fax machine to electrical outlets controlled by wall switches or automatic
timers. Disruption of power can wipe out information in the unit's memory.
Do not connect your fax machine to electrical outlets on the same circuit as large appliances or
other equipment that might disturb the power supply.
Avoid interference sources, such as speakers or the base units of cordless phones.
1-4
SETUP & PREPARATION BEFORE USE
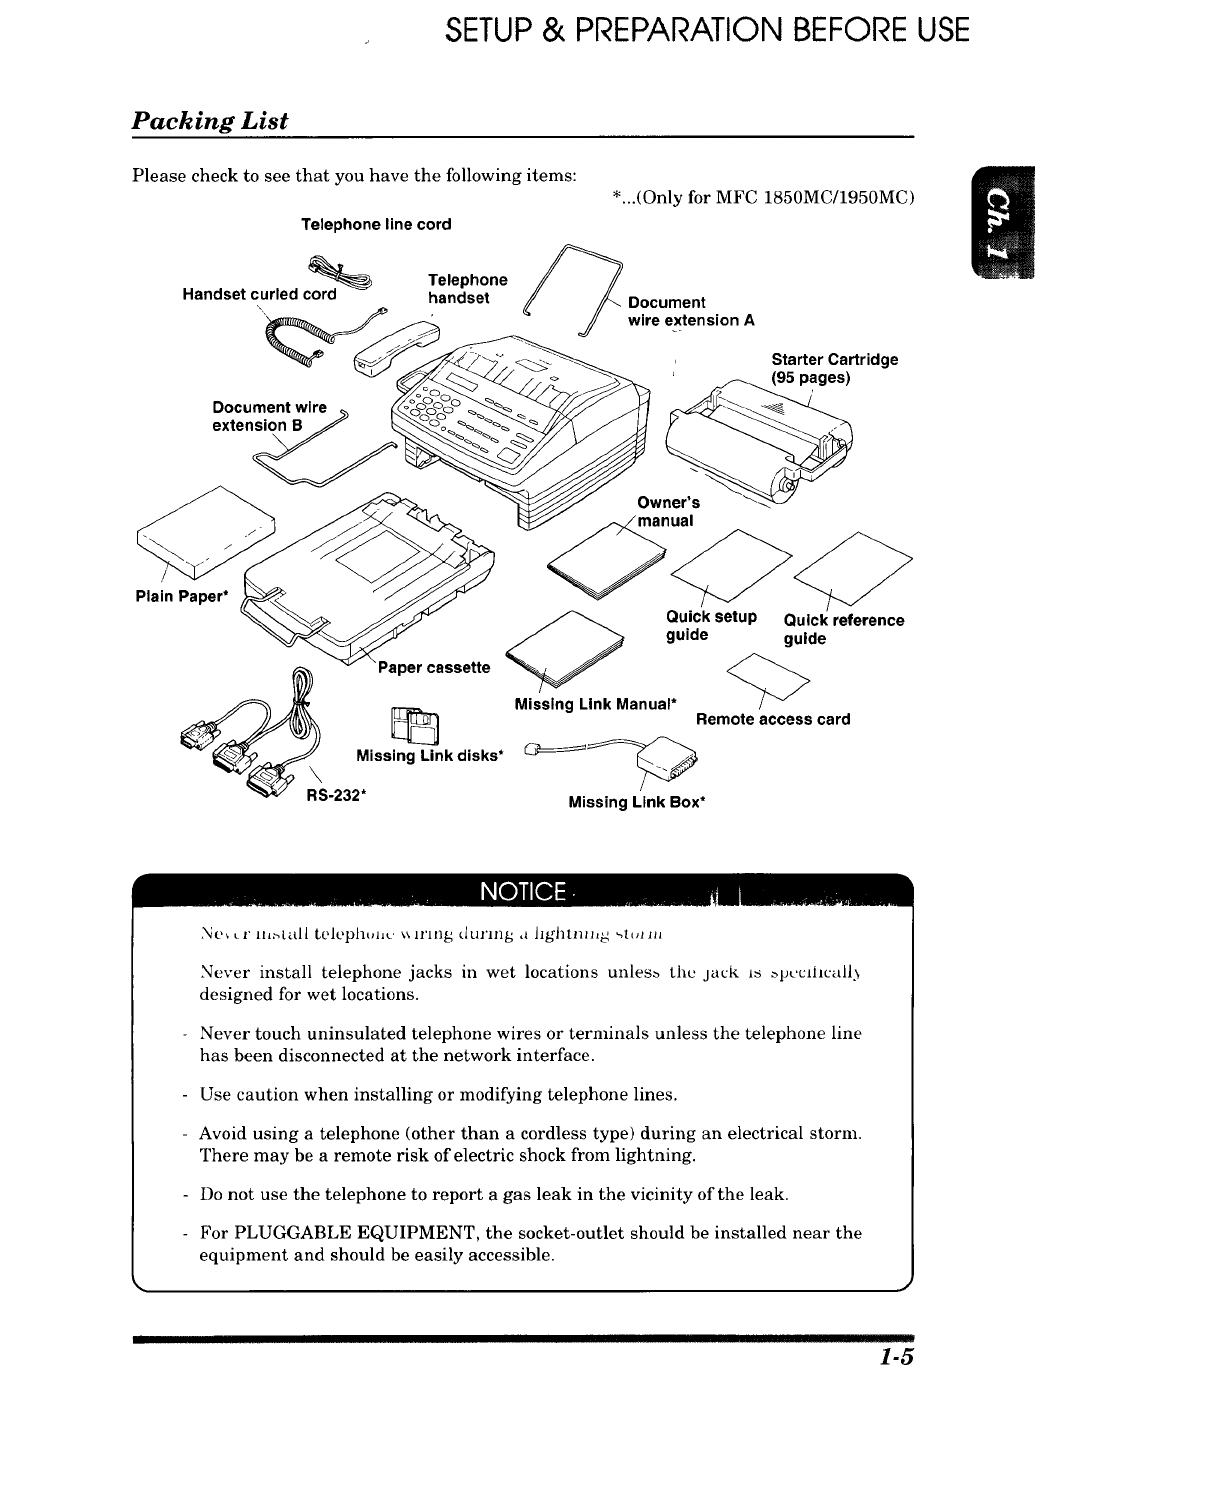
Packing List
Please check to see that you have the following items:
Telephone line cord
*...(Only for MFC 1850MC/1950MC)
Telephone
Handset curled cord handset Document
"'_l_,_ _F-__ wire extension A
Documentwlre _ ____
extenS__wner__"
Starter Cartridge
(95 pages)
/
Plain Paper*
Quick setup Quick reference
guide guide
Paper cassette
_S _ Missing Link Manual* Remote access card
.232Missing_Link disks* G_==__
Missing Link Box*
x_¢,_ •l' th_lO.li teleplltmt: ',_ ll'la_ _lUl'lllg ,l Jightnl_g ",hJl m
Never install telephone jacks in wet locations unles_ tim jack i_ _pu, clilcadl 3
designed for wet locations.
Never touch uninsulated telephone wires or terminals unless the telephone line
has been disconnected at the network interface.
Use caution when installing or modifying telephone lines.
- Avoid using a telephone (other than a cordless type) during an electrical storm.
There may be a remote risk of electric shock from lightning.
Do not use the telephone to report a gas leak in the vicinity of the leak.
For PLUGGABLE EQUIPMENT, the socket-outlet should be installed near the
equipment and should be easily accessible.
1-5
SETUP & PREPARATION BEFORE USE
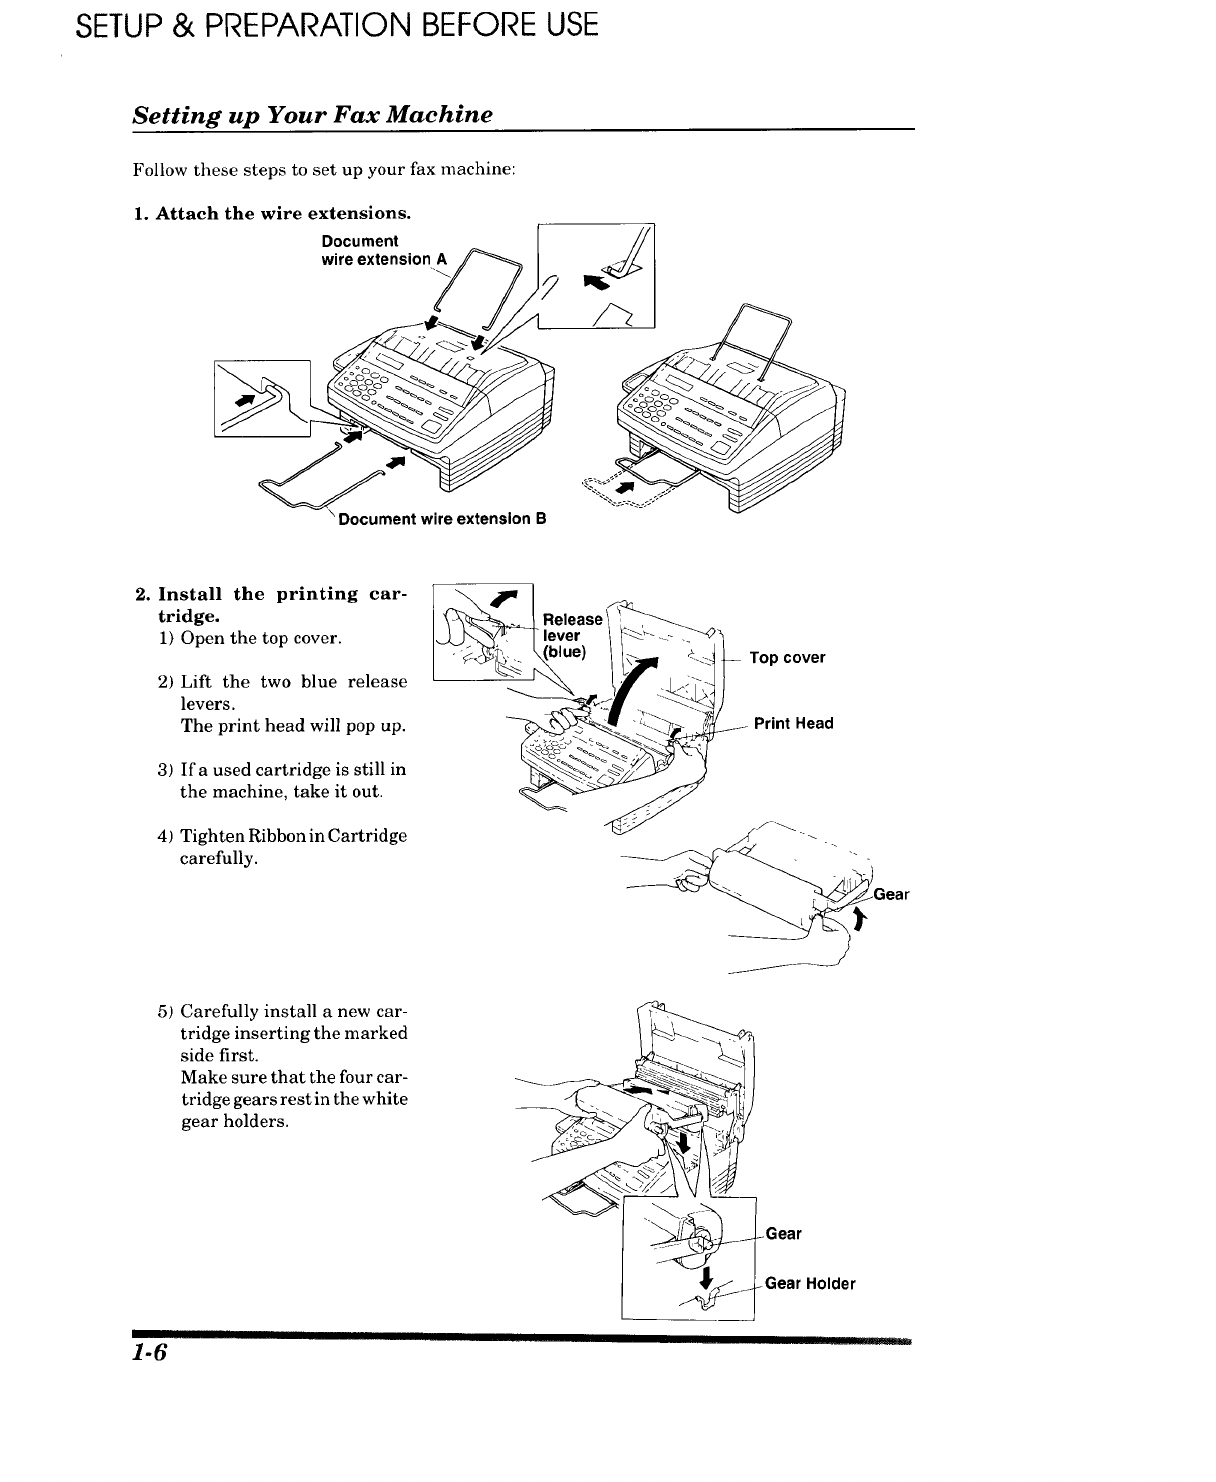
Setting up Your Fax Machine
Follow these steps to set up your fax machine:
1. Attach the wire extensions.
Document
wire extension A
\Document wire extension B
,<.ooo_
2. Install the printing car-
tridge.
1) Open the top cover.
2) Lift the two blue release
levers.
The print head will pop up.
3) Ifa used cartridge is still in
the machine, take it out.
4) Tighten Ribbon in Cartridge
carefully.
Top cover
Print Head
5) Carefully install a new car-
tridge inserting the marked
side first.
Make sure that the four car-
tridge gears rest in the white
gear holders.
-Gear
-Gear Holder
II
1-6 ........'_-

SETUP & PREPARATION BEFORE USE
6) Push the print head down
slowly and completely.
Make sure it latches.
7) Close the top cover.
NOTE: The starter car-
tridge prints only 95 pages.
3. Install the Paper Cassette.
The paper cassette can hold about 200 sheets of paper (201bs).
1) Raise the paper cassette slightly and pull it toward you to remove.
2) Take offthe cover.
3) Push the paper plate down
until it locks into position.
Paper plate
Paper plate
4) Adjust the paper setting to
letter or legal position de-
pending upon the size you
are using. When you use
legal size paper, press the
button and pull the front
part of the cassette toward
you. /
/
Letter /
Position Legal
Position
Z
Ad usted
to Legal
Position
1-7
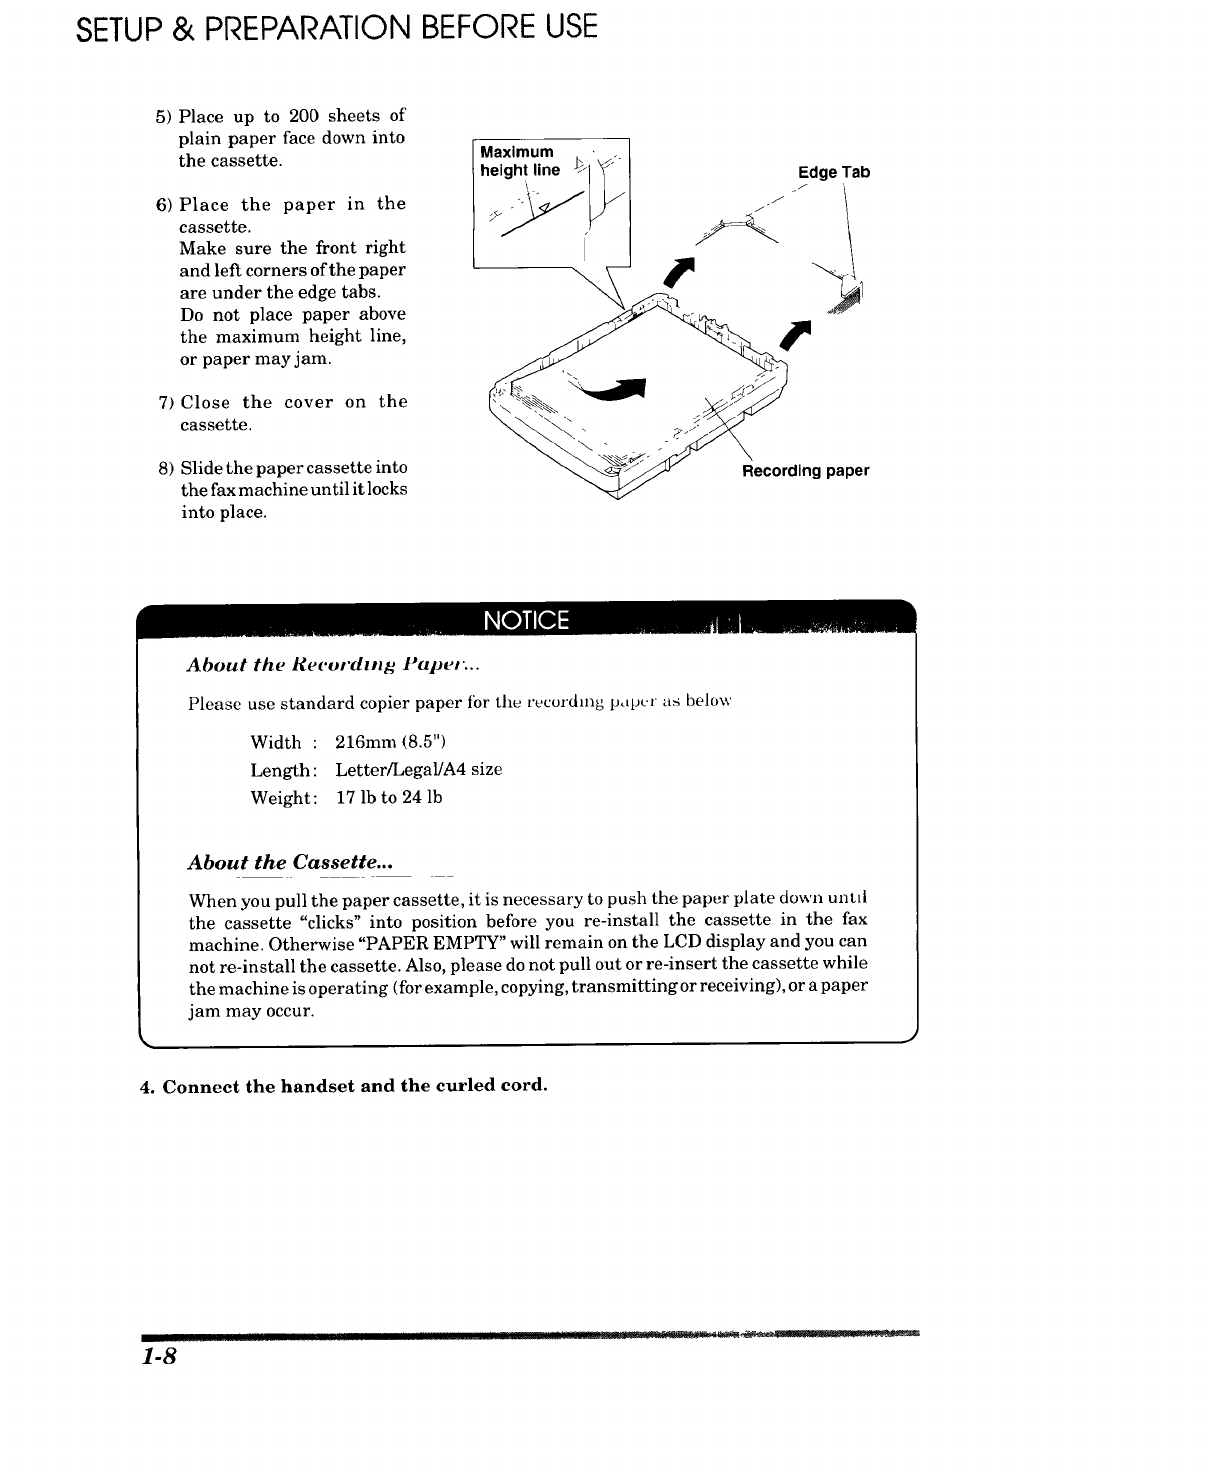
SETUP & PREPARATION BEFORE USE
5)
6)
7)
8)
Place up to 200 sheets of
plain paper face down into
the cassette.
Place the paper in the
cassette.
Make sure the front right
and left corners of the paper
are under the edge tabs.
Do not place paper above
the maximum height line,
or paper may jam.
Close the cover on the
cassette.
Slide the paper cassette into
the fax machine until it locks
into place.
Maximum
height line _-
\
Edge Tab
f
Recording paper
About the Recordzng l'ap_,r...
Please use standard copier paper tbr tim recording pdpc_' as below
Width : 216mm (8.5")
Length : Letter/Legal/A4 size
Weight: 17 lb to 24 lb
About the Cassette...
When you pull the paper cassette, it is necessary to push the paper plate down unnl
the cassette "clicks" into position before you re-install the cassette in the fax
machine. Otherwise "PAPER EMPTY" will remain on the LCD display and you can
not re-install the cassette. Also, please do not pull out or re-insert the cassette while
the machine is operating (for example, copying, transmitting or receiving), or a paper
jam may occur.
4. Connect the handset and the curled cord.
1-8

SETUP& PREPARATION BEFORE USE
5. Connect the power cord.
When you connect the power, the display will show "01/01/1996 00:00".
2. Since the machine is grounded through the power outlet, you _,m i,__t_,__'L.,,,L, _('ll
from potentially hazardous electrical conditions on the telephone network by
keeping the power to your fax machine on when you connect it to a telephone line.
3. Lightning and Power Surges can damage this product! We recommend that you
use a quality Surge Protection Device on the AC power line as well as the
telephone line or unplug the lines during a lightning storm.
6. Connect the telephone line.
5o
Wire extention
/i
Telephone line cord
Handset curled cord
FOR YOUR INFORMATION
Roll Over Phone Lines
A roll over phone system is a group of two or more separate telephone lines that pass
incoming calls to each other if they are busy. The calls are usually passed down or
"rolled over" to the next available phone line in a preset order.
Your fax machine can work in a roll over system as long as it is the last
number in the sequence so the call can not roll away. Do not put the fax machine
on any of the other numbers. When the other lines are busy and a second fax call is
received, the fax call is transferred to a line that does not have a fax machine.
Two Line Phone System
A two line phone system is nothing more than two separate phone numbers on the same
wall outlet. The two phone numbers can be on separate jacks (RJll) or combined into
one jack (RJ14). Your fax machine must be plugged into an RJll jack. RJll and RJ14
jacks may be equal in size and appearance and both may contain 4 wires (black, red,
green, yellow). To test the type ofjack, plug in a two line phone and see if it can access
both lines. If it can, you must separate the lines for your fax machine.
..II
1-9
SETUP& PREPARATION BEFORE USE
1-10
FOR YOUR INFORMATION
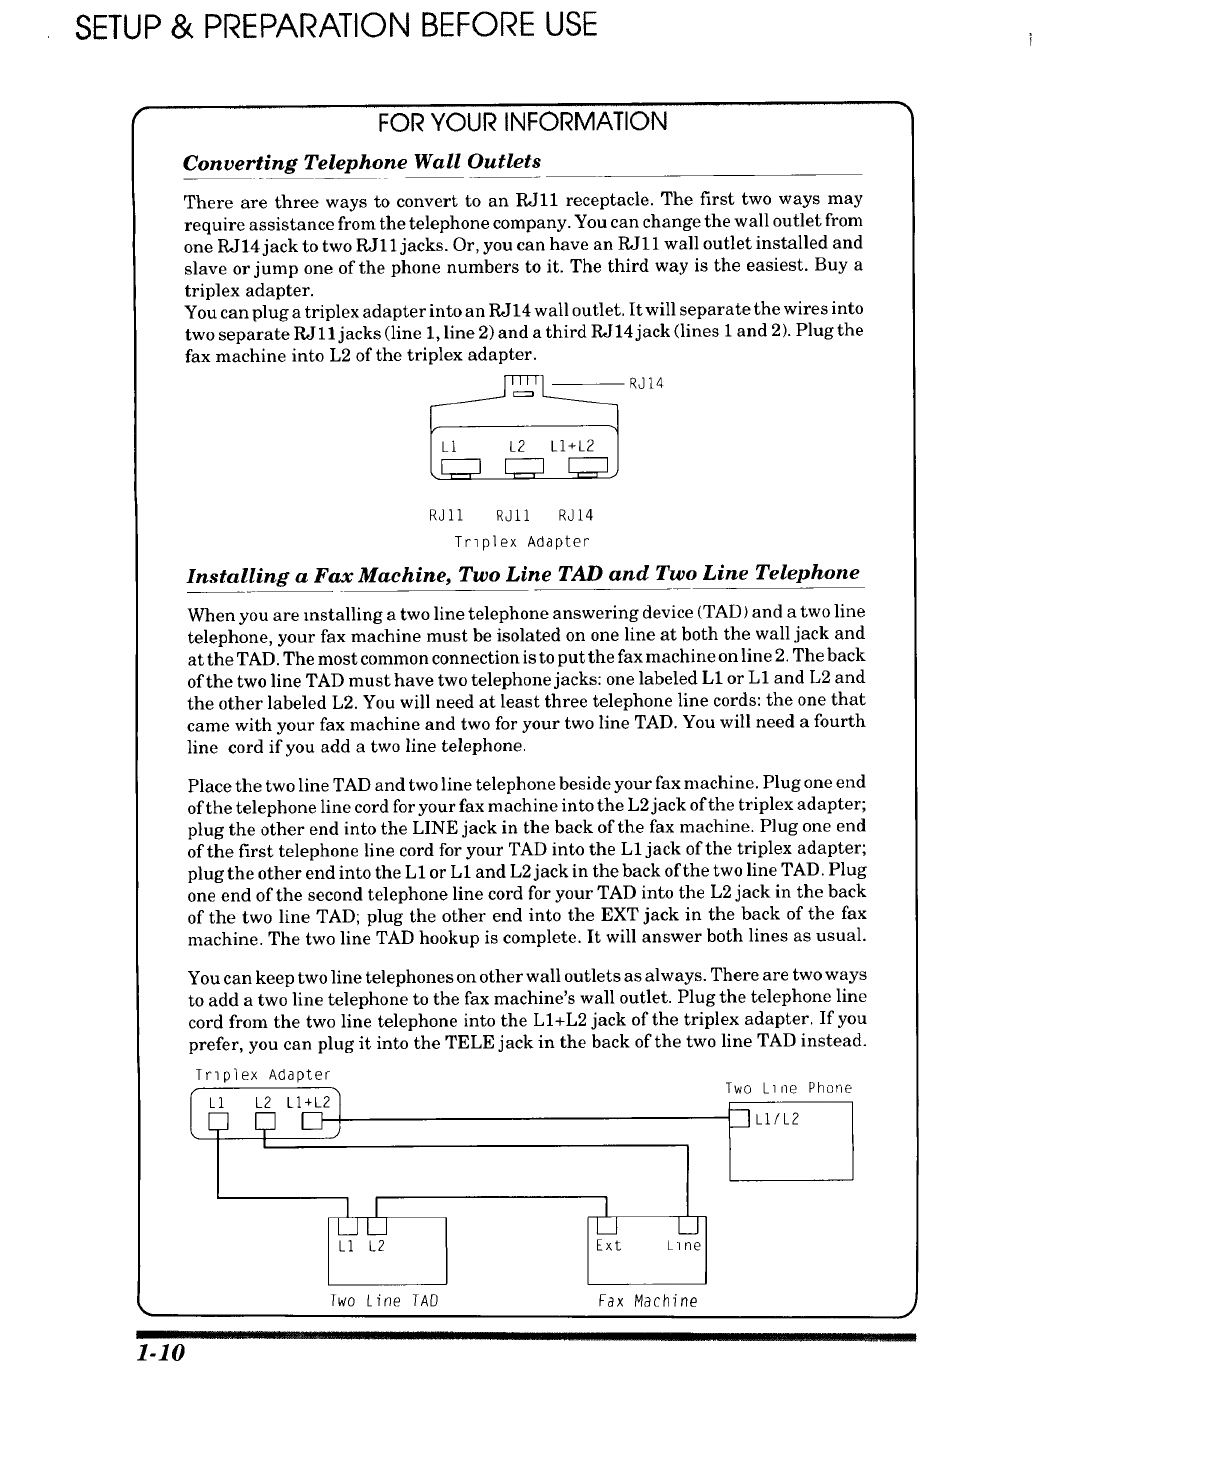
Converting Telephone Wall Outlets
There are three ways to convert to an RJ11 receptacle. The first two ways may
require assistance from the telephone company. You can change the wall outlet from
one RJ 14 jack to two RJ 11jacks. Or, you can have an RJ 11 wall outlet installed and
slave or jump one of the phone numbers to it. The third way is the easiest. Buy a
triplex adapter.
You can plug a triplex adapter into an RJ14 wall outlet. It will separate the wires into
two separate RJll jacks (line 1, line 2) and a third RJ14 jack (lines 1 and 2). Plug the
fax machine into L2 of the triplex adapter.
RJ14
RJ11 RJ11 RJI4
Trlplex Adapter
Installing aFax Machine, Two Line TAD and Two Line Telephone
When you are installing a two line telephone answering device (TAD) and a two line
telephone, your fax machine must be isolated on one line at both the wall jack and
at the TAD. The most common connection is to put the fax machine on line 2. The back
of the two line TAD must have two telephone jacks: one labeled L1 or L1 and L2 and
the other labeled L2. You will need at least three telephone line cords: the one that
came with your fax machine and two for your two line TAD. You will need a fourth
line cord if you add a two line telephone.
Place the two line TAD and two line telephone beside your fax machine. Plug one end
of the telephone line cord for your fax machine into the L2jack of the triplex adapter;
plug the other end into the LINE jack in the back of the fax machine. Plug one end
of the first telephone line cord for your TAD into the L1 jack of the triplex adapter;
plug the other end into the L1 or L1 and L2 jack in the back of the two line TAD. Plug
one end of the second telephone line cord for your TAD into the L2 jack in the back
of the two line TAD; plug the other end into the EXT jack in the back of the fax
machine. The two line TAD hookup is complete. It will answer both lines as usual.
You can keep two line telephones on other wall outlets as always. There are two ways
to add a two line telephone to the fax machine's wall outlet. Plug the telephone line
cord from the two line telephone into the LI+L2 jack of the triplex adapter. If you
prefer, you can plug it into the TELE jack in the back of the two line TAD instead.
TrTplex Adapter Two Line Phone
I I
IIII
L_l L2
Two Line TAD
LI
Fax Machine
IIIIHIIIIIII......
SETUP & PREPARATION BEFORE USE
FOR YOUR INFORMATION
Multi Line Connections (PBXs)
Most offices use a central telephone system. While it is often relatively simple to
connect the machine to a key system or a PBX (private branch exchange), we suggest
that you contact the company that installed your telephone system and ask them to
connect the fax machine for you.
It is advisable to have a separate line for the fax machine. You can then leave the
machine in AUTO Answer Mode to receive faxes at any time of the day or night.
If the fax machine is to be connected to a multi-line system, ask your installer to
connect the unit to the last line on the system. This will prevent the unit from being
activated each time a telephone call is received.
• As with all fax units this machine must be connected to a two wire system. If your
line has more than two wires, proper connection of the fax machine can not be
made.
Connecting to a Private Branch Exchange
The following points should be kept in mind if you are installing the machine to work
with a private branch exchange (PBX).
1) It is not guaranteed that the unit will operate correctly under all circumstances
with PBXs. Any cases of difficulty should be reported first to the company that
handles your PBX.
2) If all incoming calls will be answered by a switchboard operator, it is recom-
mended that the Answer Mode be set to be MANUAL. (See page 7-2.) All incoming
calls should initially be regarded as telephone calls.
3) The unit may be used with either the pulse or tone dialing telephone types.
Custom Features on Your Phone Line
If you have Call Waiting, Ring Master, Voice Mail, an Answering Service, an Alarm
System, or any other custom feature on your telephone line, it may create a problem
in the operation of your fax machine.
1-11
THE CONTROL PANEL KEYS
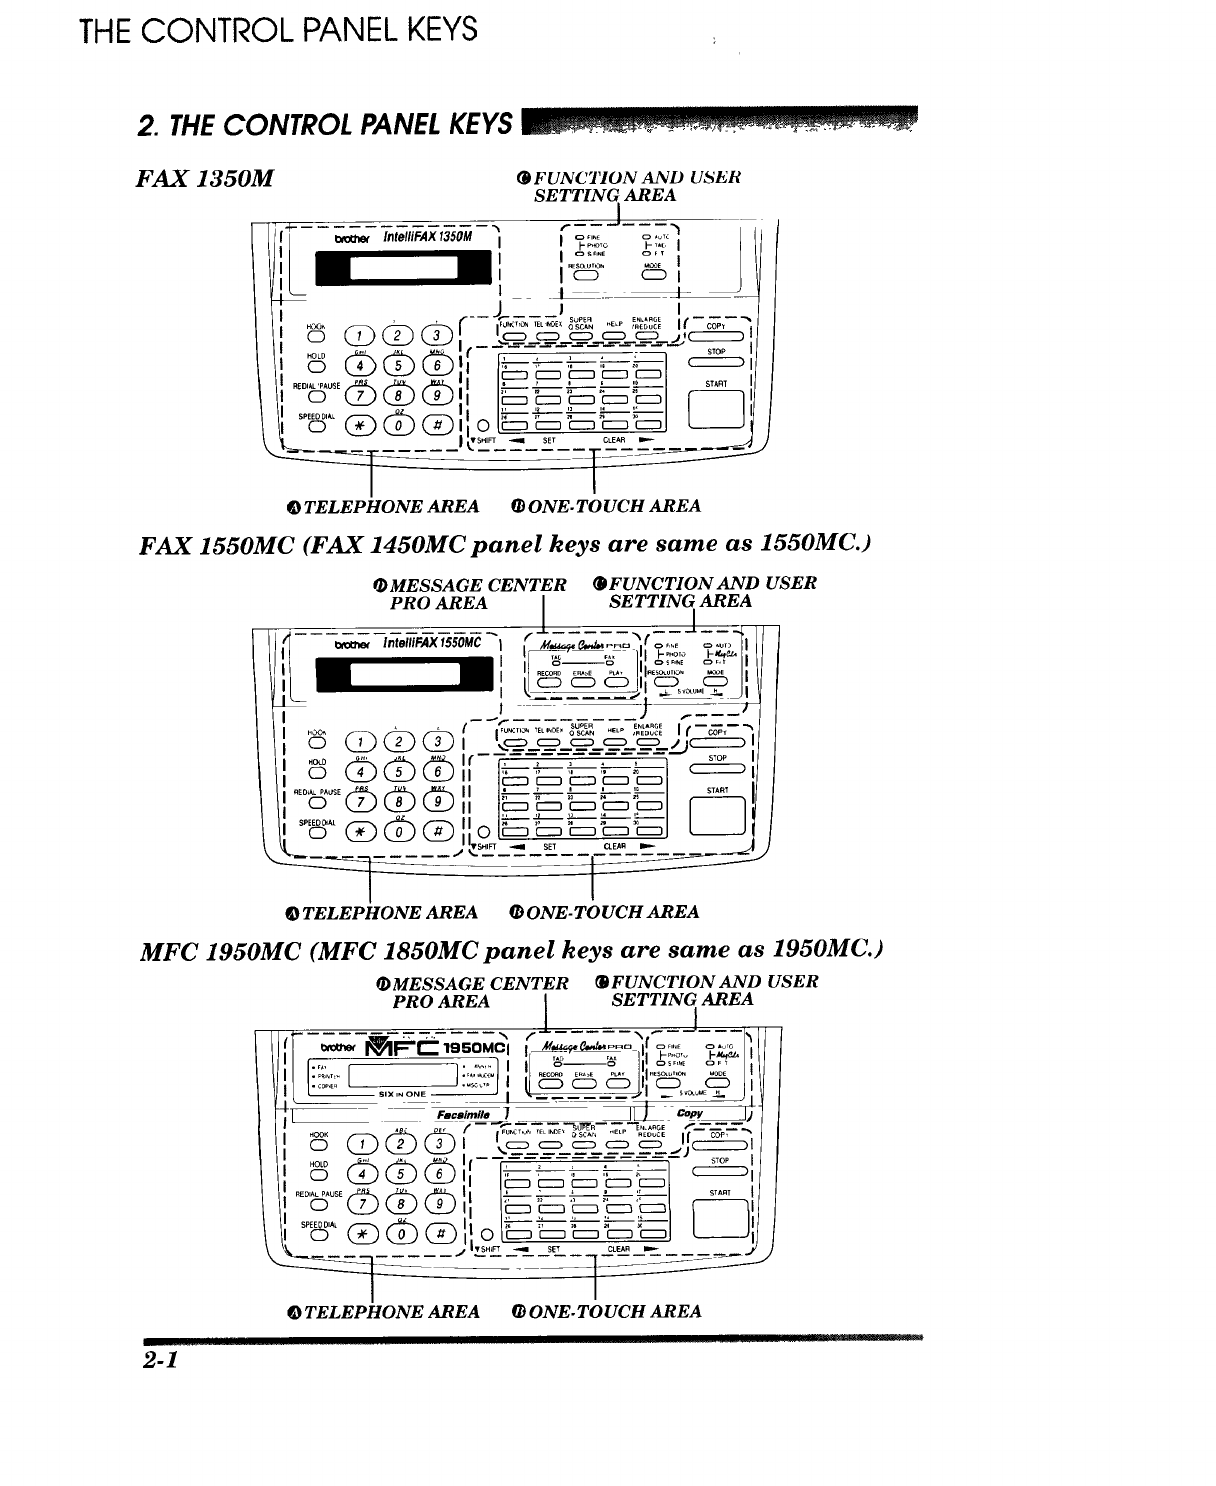
2. THECONTROL PANELKEYS I
FAX 1350M (])FUNCTION AND USER
SETTING AREA
l
1[J¢ _ ,.,.,,FAx,ssoM", _ ..... :2"_ I
i I- _o h,,c i
l llll _I I.........
/_,, J. J i
! 1', © WL)W_ 3L23'. __-_-__-L_-_---c_---,>'c:::=_
tt' ,:,E,_,,,,P,,_,SE.-=k _ _ '1 I_ '--_'--_1 ST,,T
_i |,SHIFT _ SET CLEAR _
(_TELEPHONE AREA @ONE-TOUCH AREA
FAX 1550MC (FAX 1450MC panel keys are same as 1550MC.)
(_ FUNCTION AND USER
/
@ONE-TOUCH AREA
J
MFC 1950MC (MFC 1850MC panel keys are same as 1950MC.)
(DMESSAGE CENTER _FUNCTION AND USER
PRO AREA ISETTING AREA
' -_ ..... ,_--_ " _o:!!!° °o;:
I_-- SIX,N ONE _ _ Iv U_E .
.OLO "' I(,,_._____ I
/ I'. ......... EE_ _ A'% II I'r'--' _ _ r--" ,_i ..... tl l
} IIi 0 (,._7_ 8(,.__)9L_9Jl I I'_'c::_'_'_-_"_::31 f-----_lJl
S_EEOO,A, I ;+----_-- "_-- "}-- _-- I
\/i o L--J',/I
@TELEPHONE AREA OONE-TOUCH AREA
.......... irl
2-1

THE CONTROL PANEL KEYS
•TELEPHONE AREA
(_-'.Y:-- ,_....
IMFC 1850MC
1. Liquid Crystal Display 2. Number Keys
The LCD displays messages that
will help you set up and operate
your fax machine. (On-Screen
Programming) (See page 3-1.)
3. HOOK
This key lets you dial telephone
and fax numbers without lifting
the handset. (See page 5-1.)
4. HOLD
You can use this key to put a call
on hold. (See page 5-1.)
5. REDIAL/PA USE
This key re-dials the last number
called. (See page 6-5.) This key is
also used to insert a pause in
autodial numbers.
(See page 4-5, 5-1.)
6. SPEED DIAL
These twelve keys are used to
dial phone and fax numbers (see
page 5-1), and can also be used
as an alphanumeric keyboard
fOrenteringinformation into the
x machine (see page 3-9-10).
/
I\ I:;0'::L /J..s0c,,
,.IL\,.---- s,x..o,..,=/Facsimile
.... ___:
NWL.O I -- 1
REO_IAL/PAUSEI1_ __PRs ruv wxr 1_1_-_
SPEEDDIALI'_" _ _ 1#"
_- _ VSHIFT -
This key lets you access previ-
ously stored speed dial phone
numbers by entering a two digit
number. (See page 4-6, 5-1.)
2-2
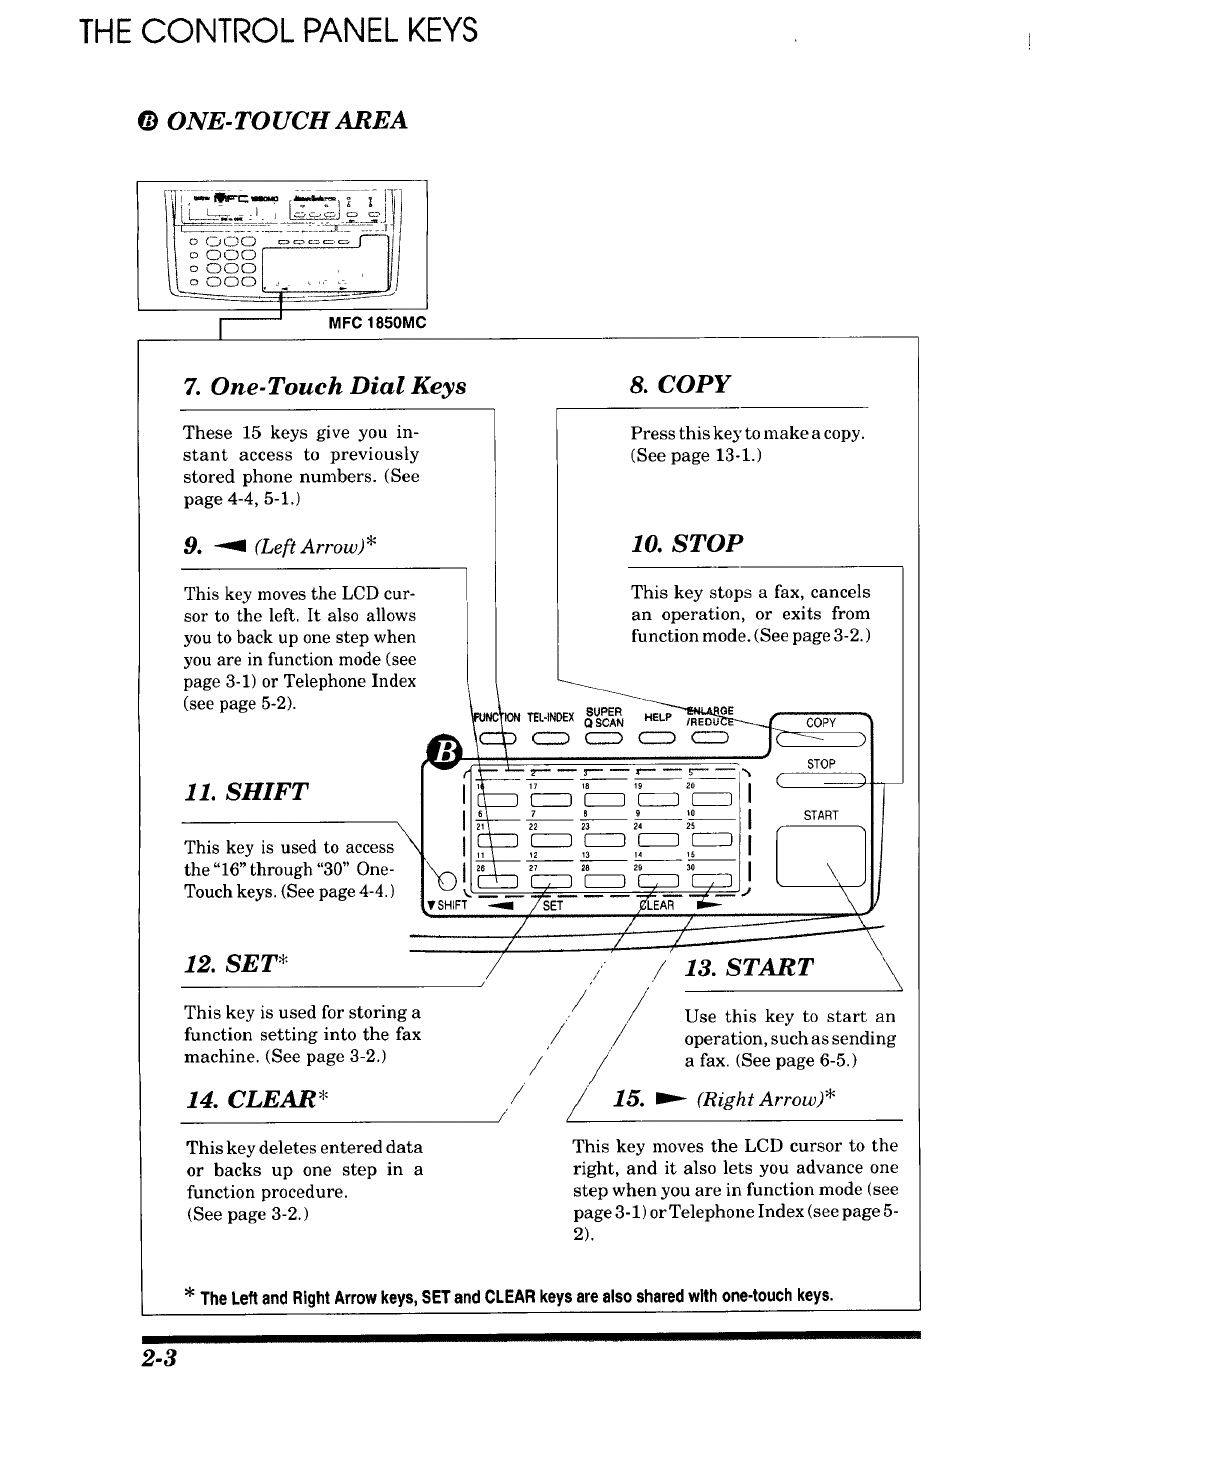
THE CONTROL PANEL KEYS j
0ONE-TOUCH AREA
ooo U/
o 000 ,
o 000 ..... ,
[-- MFC 1850MC
7. One-Touch Dial Keys
These 15 keys give you in-
stant access to previously
stored phone numbers. (See
page 4-4, 5-1.)
9. "_ (Left Arrow)*
This key moves the LCD cur-
sor to the left. It also allows
you to back up one step when
you are in function mode (see
page 3-1) or Telephone Index
(see page 5-2).
11. SHIFT
\
This key is used to access',
the "16" through "30" One-
Touch keys. (See page 4-4.)
8. COPY
Press this key to make a copy.
(See page 13-1.)
10. STOP
This key stops a fax, cancels
an operation, or exits from
function mode. (See page 3-2.)
COPY
12. SET*
This key is used for storing a
function setting into the fax
machine. (See page 3-2.)
14. CLEAR*
This key deletes entered data
or backs up one step in a
function procedure.
(See page 3-2.)
/
/
/
13. START '\
Use this key to start an
operation, such as sending
a fax. (See page 6-5.)
15..,.'- (Right Arrow)*
This key moves the LCD cursor to the
right, and it also lets you advance one
step when you are in function mode (see
page 3-1) or Telephone Index (see page 5-
2).
*TheLeft andRightArrowkeys,SET andCLEARkeysare alsosharedwithone-touchkeys.
2-3
THE CONTROL PANEL KEYS
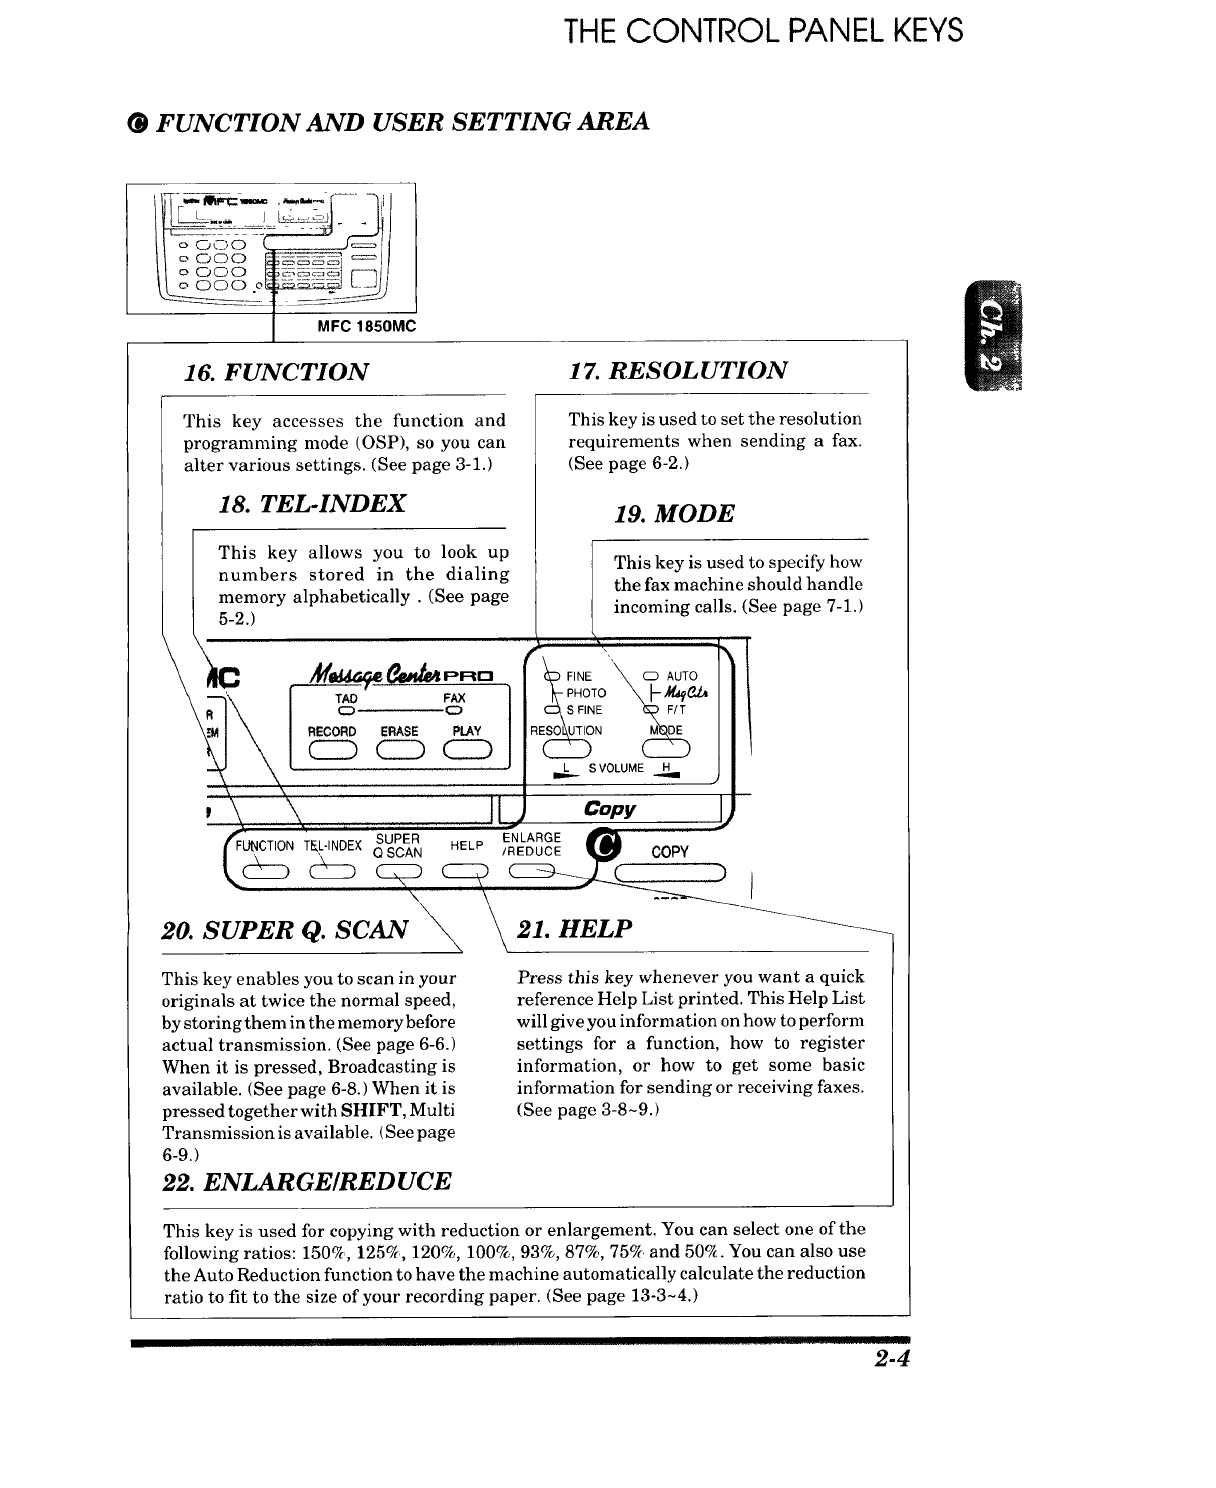
•FUNCTION AND USER SETTING AREA
I_o_oo0_ _:='_'_ ,_ f---- qlll
o ooo _ _1/
.0___
_- _--_F C185-_-_0 MC
16. FUNCTION 17. RESOLUTION
This key accesses the function and
programming mode (OSP), so you can
alter various settings. (See page 3-1.)
18. TEL-INDEX
This key allows you to look up I
numbers stored in the dialing
memory alphabetically. (See page
5-2.)
This key is used to set the resolution
requirements when sending a fax.
(See page 6-2.)
TAD FAX
C3 o
RECORD ERASE PLAY
CDOCD
19. MODE
This key is used to specify how
the fax machine should handle
incoming calls. (See page 7-1.)
ESO_UTIoFINE"_CD AUTO
_.OTO\ I-,_
SFINE (_F/T
LI_ S VOLUME H
',11. copy I
z_-,,o_,s_?_ _'_ ,_"'9_OUOE_ 00_¥-"
20. SUPER Q. SCAN _ _ 21. HELP _-_
This key enables you to scan in your
originals at twice the normal speed,
by storing them in the memory before
actual transmission. (See page 6-6.)
When it is pressed, Broadcasting is
available. (See page 6-8.) When it is
pressed together with SHIFT, Multi
Transmission is available. (See page
6-9.)
22. ENLARGE/REDUCE
Press this key whenever you want a quick
reference Help List printed. This Help List
will give you information on how to perform
settings for a function, how to register
information, or how to get some basic
infornmtion for sending or receiving faxes.
(See page 3-8-9.)
This key is used for copying with reduction or enlargement. You can select one of the
following ratios: 150%, 125%, 120%, 100%, 93%, 87%, 75% and 50el. You can also use
the Auto Reduction function to have the machine automatically calculate the reduction
ratio to fit to the size of your recording paper. (See page 13-3-4.)
2-4
THE CONTROL PANEL KEYS
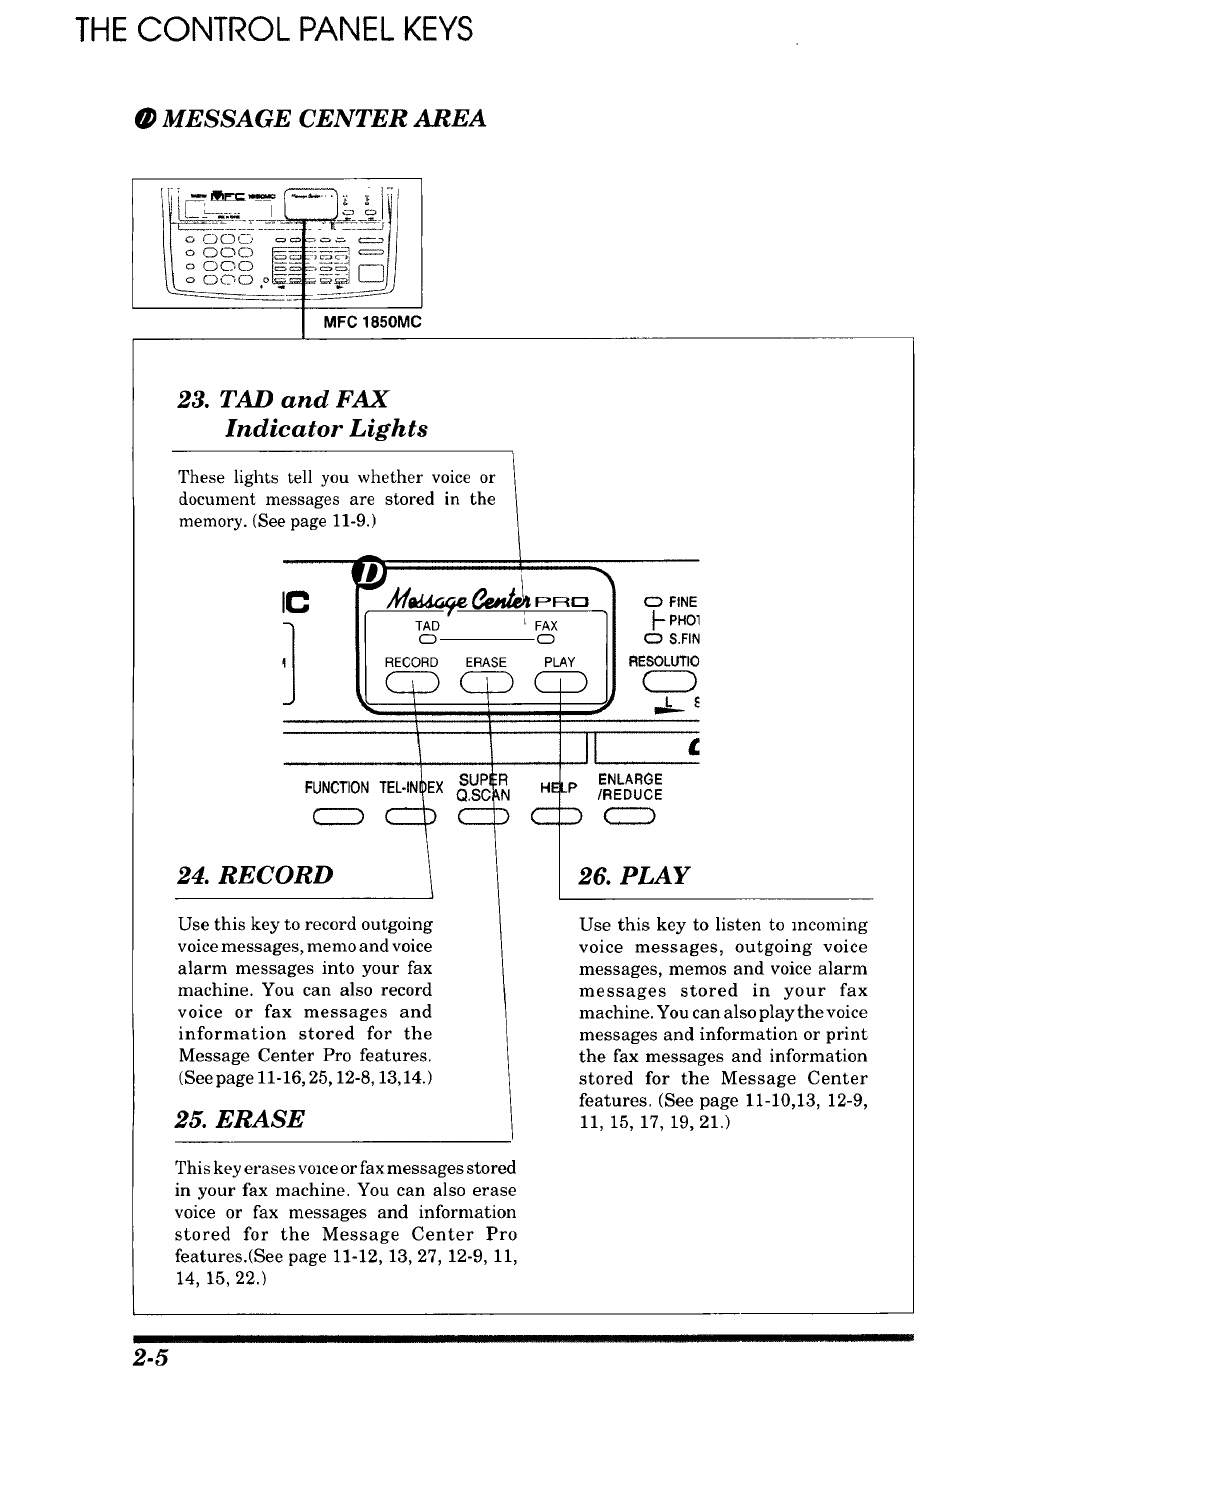
0MESSAGE CENTER AREA
I _ m_,._=_
tl ° ooo
oOOCD o_
7,.,',,. _ ._ ;;J
MFC 1850MC
23. TAD and FAX
Indicator Lights
These lights tell you whether voice or
document messages are stored in the
memory. (See page 11-9.)
,o 1
, I CZ) CZD
RIIP_SUP ENLARGE
FUNCTIONTEL-IN _(_.S'C_ HELP /REDUCE
- 1
C::D C C_ :-D CZ_
24. RECORD
Use this key to record outgoing
voice messages, memo and voice
alarm messages into your fax
machine. You can also record
voice or fax messages and
information stored for the
Message Center Pro features.
(See page 11-16, 25,12-8,13,14.)
25. ERASE
26. PLAY
Use this key to listen to incoming
voice messages, outgoing voice
messages, memos and voice alarm
messages stored in your fax
machine. You can also play the voice
messages and information or print
the fax messages and information
stored for the Message Center
features. (See page 11-10,13, 12-9,
11, 15, 17, 19, 21.)
This key erases voice or fax messages stored
in your fax machine. You can also erase
voice or fax messages and information
stored for the Message Center Pro
features.(See page 11-12, 13, 27, 12-9, 11,
14, 15, 22.)
2-5
HOW TO USE ON-SCREEN PROGRAMMING AND HELP KEY
3. HOWTOUSEON-SCREENPROGRAMMING(OSP)AND HELPKEY
User-friendly Programming
We have designed your fax machine with on-screen programming and a HELP key, user-fi'mndly
programming that helps you take full advantage of all the functions your fax machine has to offer.
On-screen Programming (OSP)
Since your fax programming is done on the LCD, we created step-by-step on-screen prompt
messages to help you program your fax machine. All you need to do is follow the prompt
instructions as they guide you through the function menu selections and programming options
and settings.
Using the Function Mode to Access On-screen Programming (OSP)
You can access the function nmde by pressing FUNCTION found in the Function and User
Setting Area of your fax Control Panel. (See page 2-4.)
When you enter function mode, your fax machine will display a list of Level One Functions to
choose from (see pages 3-2 through 3-7 for these Level One Functions), as seen below.
Left arrow
sequence
I111 IIIHI
Press FUNCTION
[ENTER NO. & SET )
[1.TEMP.SETTINGS )
(Z.CANCELJOB
( 3.PRINT REPORTS )
( 4.SET AUTO DIAL )
( 5.USER OPTIONS ,)
( 6.TEL OPTIONS )
( 7.SETUP SYSTEM
( 8.SETUP MSG CTR )
( 9.SETUP MC PRO
(O.INTERRUPT ,)
HI!! [ I !l
Right arrow or
auto scroll
sequence
[]H[l[llllg 3-1
(Only for FAX 1450MC/
1550MC and MFC 1850MC/
1950MC, FAX 1350M is
"8.REMOTE FAX OPT and
has not function 9.')
HOW TO USE ON-SCREEN PROGRAMMING AND HELP KEY i
t
These function options will appear one after the other on the display. You can then choose one of
these options by pressing SET when the option you want appears on the LCD.
You can also move through the function menu options at a faster rate by pressing _ (right
arrow). (See page 2-3 to locate this key on your Control Panel.) When you find the option you want,
press SET.
You can simply press the Level One Function number associated with each option (refer to pages
3-2 through 3-7).
HelpfulHints If you want to exit function mode, simply press STOP. Also, if you select the
wrong menu, and wish to return to the previous step, press CLEAR.
Alternating Displays for On-screen Programming (OSP)
(( SPEAKER:HIGH )
ALTERNATE
(SELECT <- -> & SET )
When you see alternating displays, the LCD will
usually alternate between the currently selected
option, and a help message giving brief instruc-
tions on how to proceed. The example shows the
current speaker volume is high and prompts you
to use -_, (left arrow) and _ (right arrow) to
change the setting, and then to press SET to store
it.
Function Selection Table
If you have a basic understanding of how to program a fax machine, you can perform most of the
programming settings without the owner's manual. To help you understand the function
selections, options, and settings that are found in your fax programs, we have the following
Function Selection Table.
Read through this table to gain a basic understanding of what your new fax nmdel can do, and
then the next section will begin instructing you how to use on-screen programming.
Level one
function
1. TEMP.
(TEMPORARY)
SETTINGS
Level two
function
1.TIMER
2. POLLING
3. CALLRE-
SERVE
Explanation of Options
Use this for sending documents at a later
time.
Polling is the process of retrieving faxes
from another machine. You can also choose
whether you want your polling secured.
STANDARD/SECURE
You can send a fax and then talk to the
recipient using the CALL RESERVE
function.
ON/OFF
Factory
setting
STAN-
DARD
OFF
Page
6-7
8-1-6
6-18~19
3-2
.... :::::'2-
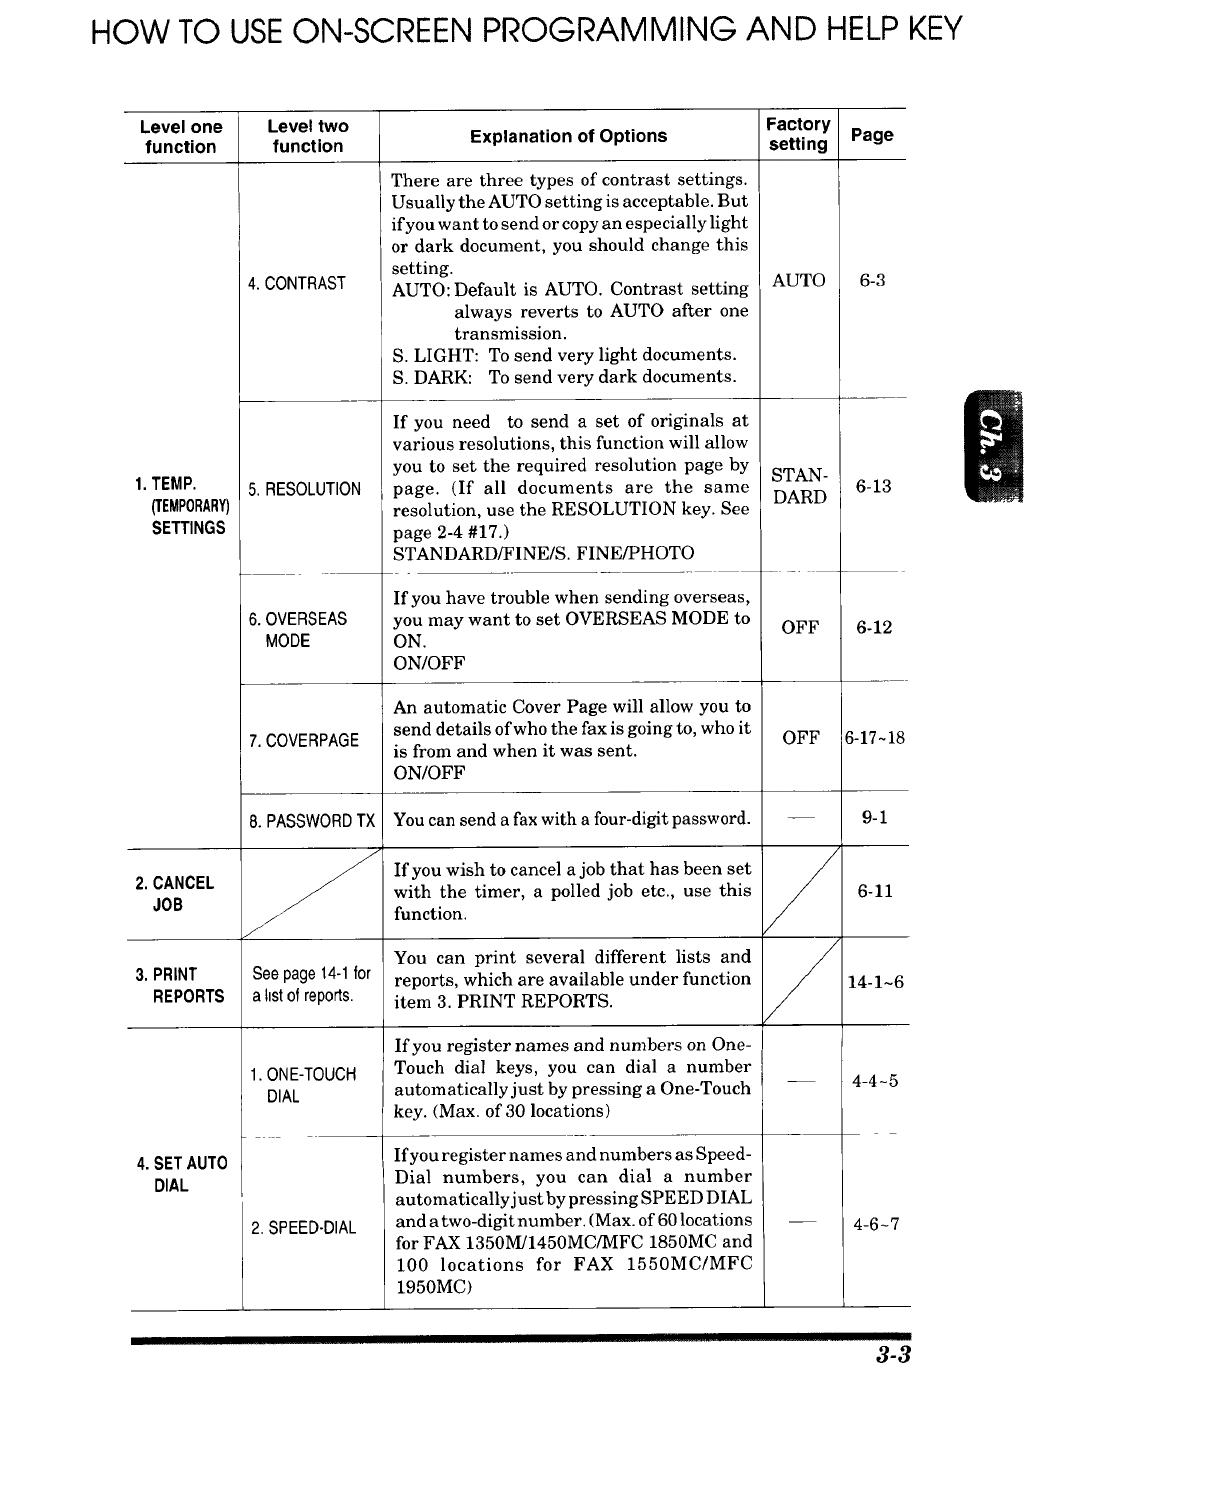
HOW TO USE ON-SCREEN PROGRAMMING AND HELP KEY
Level one
function
1. TEMP.
(TEMPORARY)
SETTINGS
2. CANCEL
JOB
3. PRINT
REPORTS
4. SETAUTO
DIAL
Level two
function
4. CONTRAST
5. RESOLUTION
6. OVERSEAS
MODE
7. COVERPAGE
8. PASSWORDTX
Seepage14-1for
ahstof reports.
1.ONE-TOUCH
DIAL
2. SPEED-DIAL
Explanation of Options
There are three types of contrast settings.
Usually the AUTO setting is acceptable. But
if you want to send or copy an especially light
or dark document, you should change this
setting.
AUTO: Default is AUTO. Contrast setting
always reverts to AUTO after one
transmission.
S. LIGHT: To send very light documents.
S. DARK: To send very dark documents.
If you need to send a set of originals at
various resolutions, this function will allow
you to set the required resolution page by
page. (If all documents are the same
resolution, use the RESOLUTION key. See
page 2-4 #17.)
STANDARD/FINE/S. FINE/PHOTO
If you have trouble when sending overseas,
you may want to set OVERSEAS MODE to
ON.
ON/OFF
An automatic Cover Page will allow you to
send details of who the fax is going to, who it
is from and when it was sent.
ON/OFF
You can send a fax with a four-digit password.
If you wish to cancel a job that has been set
with the timer, a polled job etc., use this
function.
You can print several different lists and
reports, which are available under function
item 3. PRINT REPORTS.
If you register names and numbers on One-
Touch dial keys, you can dial a number
automatically just by pressing a One-Touch
key. (Max. of 30 locations)
If you register names and numbers as Speed-
Dial numbers, you can dial a number
automatically just by pressing SPEED DIAL
and a two-digit number. (Max. of 60 locations
for FAX 1350M/1450MC/MFC 1850MC and
100 locations for FAX 1550MC/MFC
1950MC)
Factory
setting Page
AUTO 6-3
STAN- 6-13
DARD
OFF
OFF
/
/
6-12
6-17~18
9-1
6-11
14-1~6
4-4~5
4-6-7
3-3
HOW TO USE ON-SCREEN PROGRAMMING AND HELP KEY
Level one Level two Explanation of Options Factory
function function setting
4. SETAUTO
DIAL
5. USER
OPTIONS
6. TEL
OPTIONS
3. SETUP
GROUPS
1. SMOOTHING
2. BEEPER
3. COVERPG
ON/OFF
4. ERRORRE-TX
5. REDUCTION
6. RCDPAPER
1. TONE/PULSE
2. RINGDELAY
3. SPEAKER
VOLUME
This is used for setting up a group number
used for broadcasting.
Smoothing enhances the appearance of in-
coming faxes.
If you set SMOOTHING to ON, you will
receive messages with the smoothing
enhancement.
ON/OFF
You can adjust the volume of the beeper with
this function.
OFF/LOW/HIGH
If you set COVERPAGE to ON, you can send
your documents with a Cover Page generated
by your machine. When the COVERPAGE
setting is ON, you can select a Cover Page
comment.
ON/OFF
If you set ERROR RE-TRANSMISSION to
ON, the machine automatically resends the
page once an error occurs.
ON/OFF
You can avoid having an incoming fax on
separate pages by printing a reduced copy of
the incoming document. The reduction
methods are AUTO or Fixed ratio:
AUTO/100%/93%/87%/75%
You can select one of 3 sizes of recording
paper. The machine automatically will adjust
the size of the incoming document or original
document so that it fits the paper size you
have selected.
LETTER_EGAL/A4
There are two different dial types and you
must select the type of signal suitable for
your telephone line.
TONE/PULSE
This is the number of rings before the fax
machine answers the call when in F/T or
AUTO Answer Mode.
0/1/2/3/4 rings
You can adjust the speaker volume with this
function.
OFF/LOW/HIGH
ON
LOW
OFF
OFF
AUTO
LETTER
TONE
LOW
Page
4-8~9
7-5
4-1-2
6-16
6-20
7-7-8
7-6
4-1
7-2
7-9
3-4
HOW TO USE ON-SCREEN PROGRAMMING AND HELP KEY
Level one
function
6. TEL
OPTIONS
7. SETUP
SYSTEM
Level two
function
4. F/'TRING
TIME
5. RINGVOLUME
6. DISTINCTIVE
7. CALLERID
1. DATE/TIME
2. DAILYTIMER
3. INTERVAL
4. STATIONID
E
5. REMOTE
CODE
6. SET
COVERPAGE
7. SET
PASSWORD
Explanation of Options
Ffr RING TIME sets the time for sinmlated
ringing in F/T mode.
10/20/30/60 seconds
The settings are OFF/LOW/HIGH.
If you have distinctive ringing service from
your phone company, you can use this
function to register the ringing pattern of
your fax number. And if you set it to ON, you
can use the registered number as a fax
number only.
OFF/ON/SET
You can display the last 30 caller IDs that
are stored in the memory.
If you enter the date and time in 24-hour
format, the LCD will display the date and
time and they will also be printed on outgo-
ing faxes.
If you frequently have delayed jobs, all for
execution at the same time each day, you can
program that time. Once you register it, you
do not need to enter that time,just set Timer
Transmission in temporary settings.
You can select the time interval at which the
activity report is printed.
6/12/24 hours, 2/4/7 days, OFF
You can enter your name or company name,
fax number and telephone number in
STATION ID.
It is printed at the top of each page of every
outgoing fax. It is also printed on the
automatic Cover Page.
If you enter a REMOTE CODE, you can
activate or deactivate the fax machine from
a remote telephone.
ON/OFF
You can register your own two custom
comments on the Cover Page.
You can set up a password for receiving
documents.
ON/PLUS/OFF
Factory
setting Page
20 7-5
HIGH 7-9
OFF 7-16~19
7-21
01/01/1996 4-2
00:00
00:00 6-7 -8
ON
.51 (ACT)
#511DEACT
OFF 14-2
4-3
7-13
6-15
OFF 9-2
3-5
HOW TO USE ON-SCREEN PROGRAMMING AND HELl-' KI::Y
Level one
function
7. SETUP
SYSTEM
8. REMOTE
FAXOPT
(OnlyforFAX
1350M)
8. SETUP
MSGCTR
(Onlyfor
FAX
1450MC/
1550MC/
MFC
1850MC/
1950MC)
Level two
function
8. MISSINGLINK
(ONLYforMFC
1850MC!1950MC)
1. FAXSTORAGE
2. FAXFWD/
PAGING
3. REMOTE
ACCESS
4, PRINTFAX
1. MESSAGE
STORAGE
2. BACKUPPRINT
3. FAXFWD/
PAGING
4. REMOTE
ACCESS
Explanation of Options
You can select the output device that will
receive fax message. (MFC 1850MC/
1950MC). (FAX 1350M/1450MC/1550MC are
available when The optional Missing Link is
connected.)
You can store the incoming fax messages in
the memory. Then you can use the convenient
remote control functions.
ON/OFF
You can choose among PAGING, FAX
FORWARDING or OFF. PAGING ON will
cause the fax machine to page you when it
receives a fax message. FAX FORWARDING
ON will cause the machine to send any
stored faxes that are received to another
predetermined fax number.
OFF/FAX FORWARD/PAGING
You can register a REMOTE ACCESS ID (3
digits) allowing you to remotely operate the
machine. (Example :Retrieving an incoming
fax message)
You can print incoming faxes that were
stored in the memory.
You can select memory usage of the machine
in MESSAGE CENTER mode.
FAX:ON/OFF, TAD:ON/EXT/OFF
You can set the machine to print a back-up
copy of faxes that are received into the
Message Center memory.
ON/OFF
You can choose among PAGING, FAX
FORWARDING or OFF. PAGING ON will
cause the fax machine to page you when it
receives a fax message. FAX FORWARDING
ON will cause the fax machine to send any
stored faxes that are received to another
predetermined fax number.
OFF/FAX FORWARD/PAGING
You can register a REMOTE ACCESS ID (3
digits) allowing you to remotely operate the
machine. (Example :Retrieving an incoming
fax message.)
Factory
setting Page
See the
PC Missing
PRIMARY Link
Manual
OFF 10-1
OFF 10-2~5
159_< 10-5-8
10-7
FAX:OFF 11-7
TAD: ON
ON 11-10
OFF 11-16~19
159_< 11-20
i
............. I riTi i _ r
,:7-6

HOW TO USEON-SCREEN PROGRAMMING AND HELP KEY
Levelone
8.
function
SETUP
MSGCTR
(Onlyfor
FAX
1450MC/
1550MC/
MFC
1850MC/
1950MC)
9. SETUPMC
PRO (Only
for FAX
1450MC/
1550MC/
MFC
1850MC/
1950MC)
0. INTERRUPT
Leveltwo
function
5. ICMMAX.TIME
6. OGM
7. PRINTFAX
8. RECORDING
MODE
9. TOLLSAVER
1. MSGCTR PRO
2. OGM
3. MAILBOX
4. FAXINFO
5. VOICEINFO
Explanation of Options
This is the maximum length of voice
information in Voice-on-Demand, the ICMs
in Personal Mailbox and Message Center,
Memos and Voice Alarm recordings.
20125130135140/45/50/55/60 seconds
The machine has two types of OGM (Outgo-
ing Messages) for MSG CTR and FAX/TEL
switch. After selecting the message type,
you can play, record or erase.
You can print incoming faxes that were
stored in MSG CTR memory.
To get more recording time for incoming
messages and memos, change the sound
quality setting from HIGH to NORMAL.
HIGH/NORMAL
If you set TOLL SAVER to ON, you can
check ifa message was received by the ring
delay. Toll Saver overrides the Ring Delay
setting.
ON/OFF
You can turn the Message Center Pro Mode
on or off with this switch.
ON/OFF
You can record Level 1 and 2 OGMs for
callers, telling them what to do in each step.
MSG CTR PRO/MAIL BOX/FAX ON DE-
MAND/VOICE ON DEMAND
There are 5 personal mail boxes. For each
mail box, an owner of the box can record his/
her own OGM for callers. 01/02/03/04/05
You can store the fax information for each
Fax-on-Demand memory box. You have up
to 99 memory boxes. 01-99 (The number of
available boxes depends upon the length of
your messages.)
You can store the voice information for each
Voice-on-Demand memory box. Use numbers
01-99 for memory boxes. (The number of
available boxes depends upon the amount of
information you store.)
You can send a fax without canceling the
timer or polled waiting, even if there are
documents in the feeder, by "interrupting"
it.
Factory
setting
3O
MSG
CTR
OGM
HIGH
OFF
OFF
MSG
CTR
PRO
01
Page
11-14~15
7-4
11-11
11-15
11-14
12-18
12-12-16
12-12
12-7~8
12-10
6-10
i_r
3-7
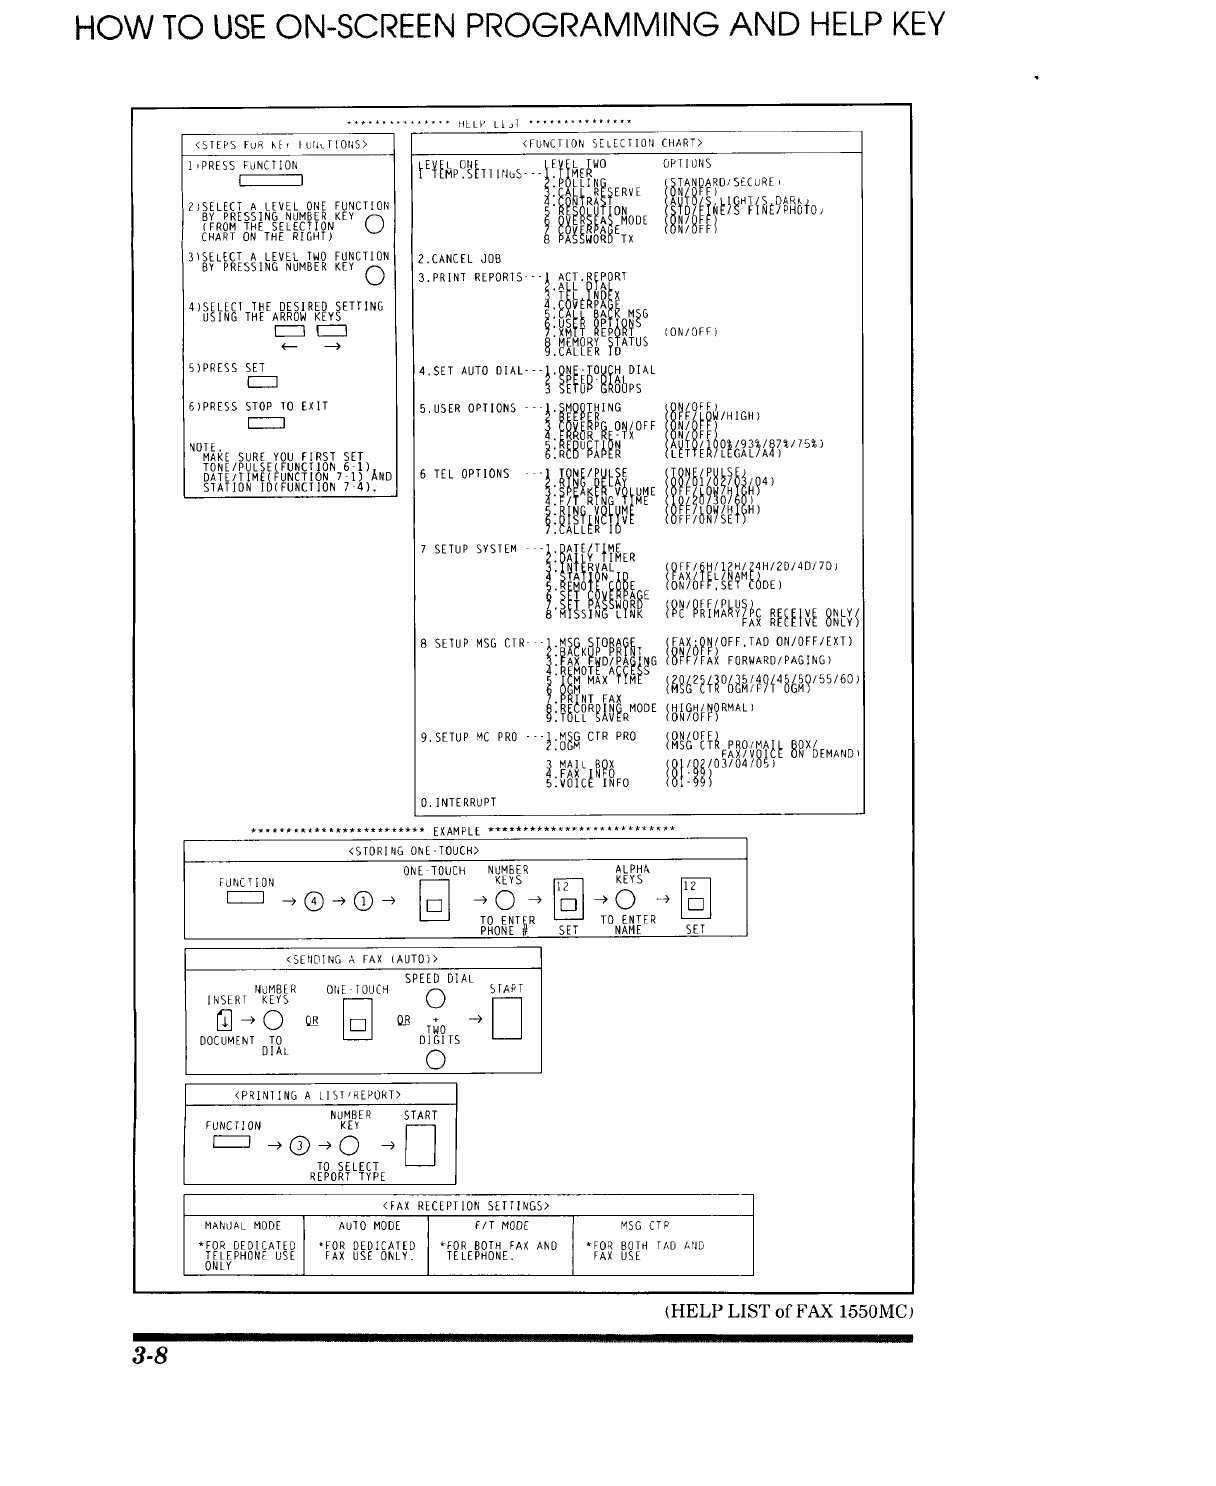
HOW TO USE ON-SCREEN PROGRAMMING AND HELP KEY
<STEPS FuR klr fur;LTIONB>
,PRESS FUNCTION
i-----I
2;SELECT A LEVEL ONE FUNCT[ON
BY PRESSING NUMBER KEY
(FROM THE SELECTION LJ
CHART ON THE RIGHT)
31SELECT A LEVEL TWO FUNCTION
BY PRESSING NUMBER KEY L)
4)SELECT THE DESIRED SETTING
USING THE ARROW KEYS
l---l IZZZ]
<--
5)PRESS SET
[ZZZ]
6)PRESS STOP TO EXIT
NOTE.
MAKE SURE YOU FIRST SET
TONE/PULSE FUNCTION 6 I).
DATE/TIMEIFUNCT ON 7 I) AND
STATION ID(FDNCTION 7 4).
• "++* HLLP L[J] ''***"+'*******
<FUNCTION SELECTION [HART>
IEVEL ONE LEVEL TWO OPTIONS
TEMP.SETIIN_B'--I.TIMER
2.POLLING STANDARD/SECuRE_
_.CA_LR_E+ERVE(ONZOEE,
•_ oR /AU+O/S.LI0"T/S+DAR_,
(STD/FINE/S FINE/PHOTO_
MODE (ON/OFF)
_VERP_IE(0N,0F.
8 PASSWORD TX
2.CANCEL JOB
3.PRINT REPORTS --I ACT.REPORT
Z.ALL DIAL
3 TEL.INDEX
4 COVERPAGE
5]CALL BACK MSG
US R PT S
+'MEMORYSTATUS
9.CALLER ID
4.SET AUTO DIAL---I.ONETOUCH DIAL
PE-AL
_E_u__DuPs
B.USER OPTIONS--'I.SMOOTHING ON/OFF)
tl_g!R o,o,0PP'+'HIGN/
P_Eg_OFF (ON/OFF)NFF
'R U T N AUYOIIO0%/93%/87%/75%)
_:R_B _Ab_R LETTER/LEGAL/A4)
l_T_i_'i_oE6 TEL OPTIONS vYLuME
4:F/T RING TIME
RN V M
7.CALLER D
7 SETUP SYSTEM -'i DAFE/TIME
2_DAILY TIMER
+il
IMI E
', _LE
Ii I:IL+
8 MISSING LINK
8 SETUP MSG CTR
_.i FAX
_[ )ING MODE
;AVER
-- M G
9.SETUP MC PRO I _ Z 0 _" C T RPRO
MAIL BOX
. FAX INFO
5.VOICE INFO
O. INTERRUPT
FF/GH/12H/24H/2D/4DiTD)
_AX/TEL/NAME)
ON/OFF,SET CODE)
IDN,OFP/PLUSI
PC PRIMARY/PC _If_t_ ONLY/
FAX ONLY)
(FAX:ON/OFF,TAD ON!OFFIEXT)
N OFF
I_FIIFAX FORWARD/PAGING
_0/25130/35140/45/50/55/60;
SG CTR OGMiF/T OGM)
HIGH/NORMAL)
ON/OFF)
ON/OFF)
(MSG CTR PROIMAIL BOX/
/_l_f_+_n_EON_DEMAND,
************************* EXAMPLE ***************************
<STORING ONE-TOUCH>
ONE TOUCH NUMBER ALPHA
FUNCTION _-1 KEYS _ KEYS _]
r--_ _>®+©+ +0-> ->0
TO ENTER TO ENTER
PHONE # SET NAME SET
<SENDING A FAX (AUTO)>
SPEED DIAL
NUMBER ONE TOUCH SFAPT
"++++rq °i3++o+ +,+++
DOCUMENT TO DIGITS
DIAL 0
<PRINTING A LIST_REPORT>
NUMBER START
FUNCTION KE_ []]
--->@ _ © -->
TO SELECT
REPORT TYPE
MANUAL MODE
*FOR DEDICATED
TELEPHONE USE
ONLY ]<FAX RECEPTION SETTINGS>
AuTO MODE E/T MODE
*FOR DEDICATED *FOR BOTH FAX AND
FAX USE ONLY. TELEPHONE. MSG CTP
*FOR BOTH TAD AND
FAX USE
(HELP LIST of FAX 1550MC
3-8

HOW TO USEON-SCREEN PROGRAMMING AND HELP KEY
Help Key
Press this key whenever you need a quick reference Help List printed. This Help List will give
you information on how to perform settings for a function, how to register information, or how to
get some basic infor,nation for sending or receiving faxes.
How to Print a Help List
Press HELP to get a printout of the Help List. Use it when you need inibrmation about how to
register or set one of the functions, or how to send or receive faxes. You can request a printout
whenever the machine meets the following conditions:
-while the LCD displays the date and time.
-while the machine is timer waiting.
-while the machine is polled/polling waiting.
-while the machine is at level one or two of the function menu.
-while you are using the phone.
How to Enter Text in Function Mode
Number keys have two or three letters printed above it. The following keys "1", "#" and "'*" have
no printed letters because they have special characters.
ABC DEF
(2) @
GHI JKL MNO
@@(3)
PRS TUV WXY
QZ
By pressing the appropriate number key the correct number of times, you can access
the character you want. When you are making certain settings, such as the Station ID, you
need to enter text into your fax machine.
Key
2
3
4
5
6
7
8
9
0
once twice three times four times
A
D
G
J
M
P
T
W
Q
B
E
H
K
N
R
U
X
Z
C
F
I
L
O
S
V
Y
0
2
3
4
5
6
7
8
9
Q
Let's say that you want to enter the initials "BR". Follow the example below.
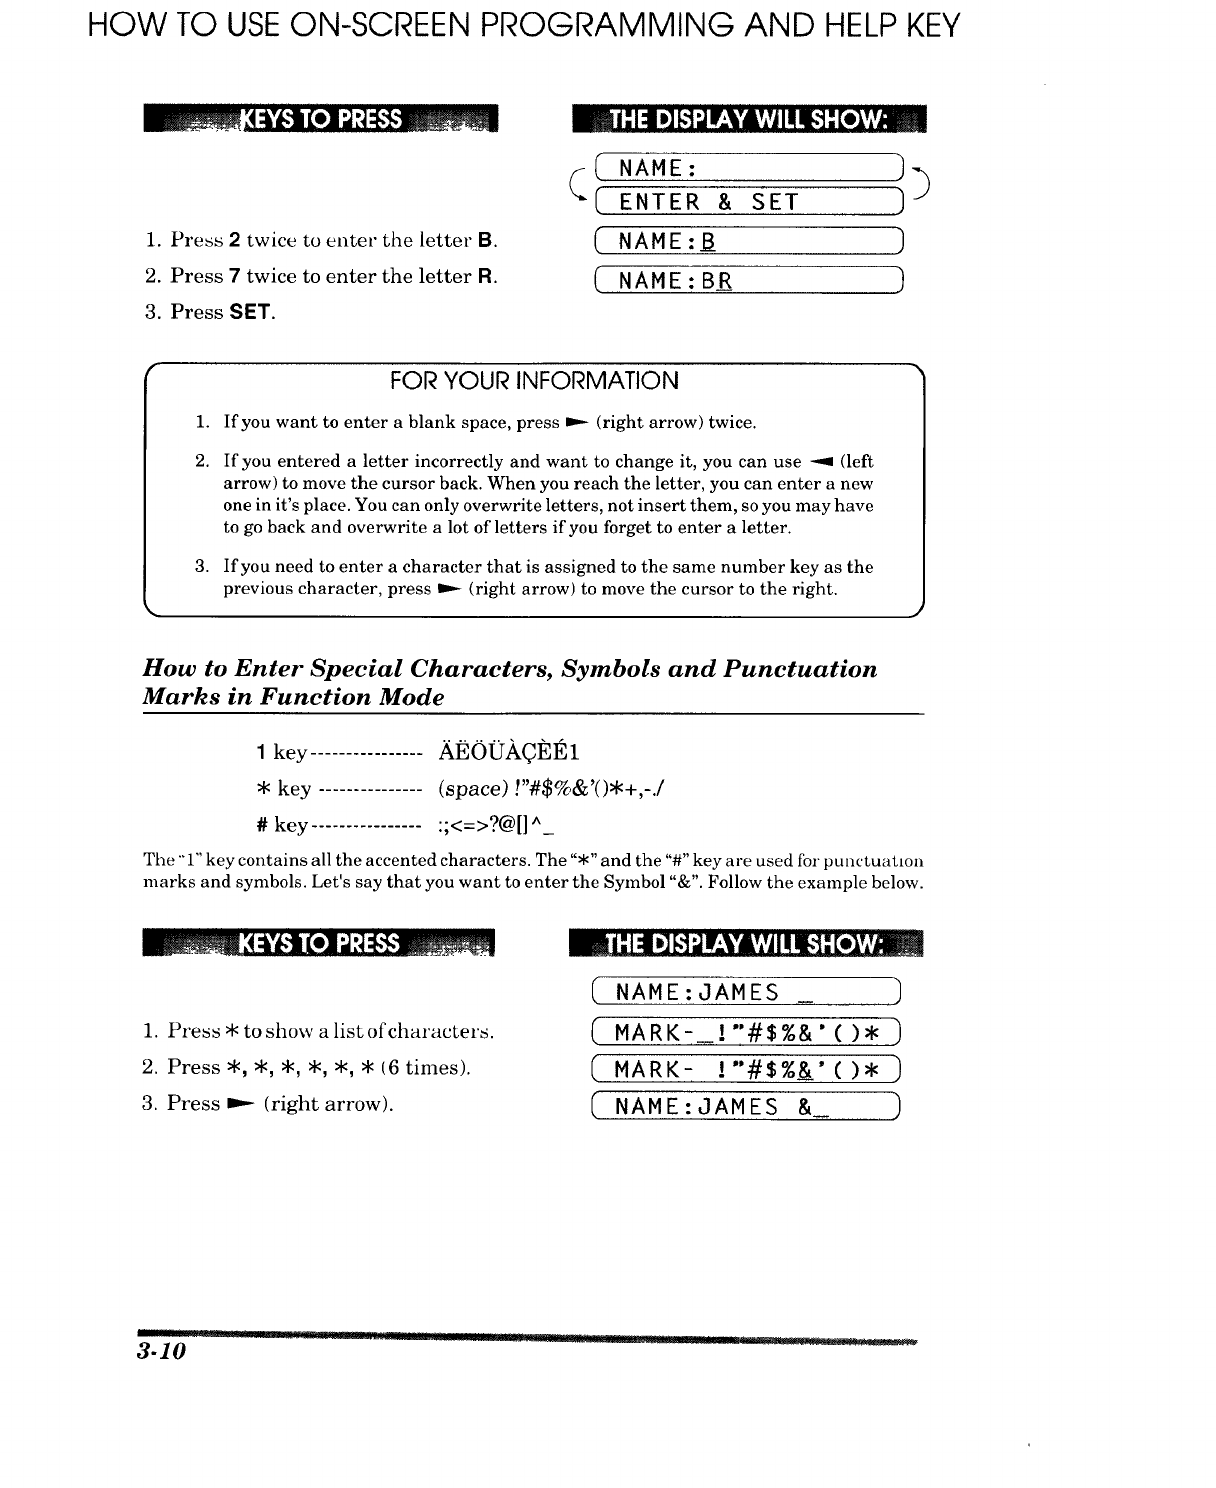
HOW TO USE ON-SCREEN PROGRAMMING AND HELP KEY
1. Press 2 twice to enter the letter B.
2. Press 7 twice to enter the letter R.
3. Press SET.
(( NAME: ]_
(ENTER & SET
(NAME :B )
(NAME :B_R )
1.
2.
3.
FOR YOUR INFORMATION
If you want to enter a blank space, press ..-- (right arrow) twice.
If you entered a letter incorrectly and want to change it, you can use _.9 (left
arrow) to move the cursor back. When you reach the letter, you can enter a new
one in it's place. You can only overwrite letters, not insert them, so you may have
to go back and overwrite a lot of letters if you forget to enter a letter.
If you need to enter a character that is assigned to the same number key as the
previous character, press _ (right arrow) to move the cursor to the right.
How to Enter Special Characters, Symbols and Punctuation
Marks in Function Mode
*key (space) !"#$%&'()*+,-./
# key ................ :;<=>?@[] ^_
The "'1"key contains all the accented characters. The "*" and the "#" key are used for punctuahon
marks and symbols. Let's say that you want to enter the Symbol "&". Follow the example below.
1. Press *to show a list of characters.
2. Press *, *, *, *, *, * (6 times).
3. Press ,.-- (right arrow).
-- i11:11D][,_]_I'_'I'A','JI! !._l: [•_','_
(NAME:JAMES _ -]
( MARK-_!"#$%&" ( )* )
( MARK- !"#$%&_'()* )
( NAME:JAMES &_ )
-- ...---- 1 ...............
• .. '..... _ ......... . I I ...... r_L_i ¸" =-_ ..................
3-10
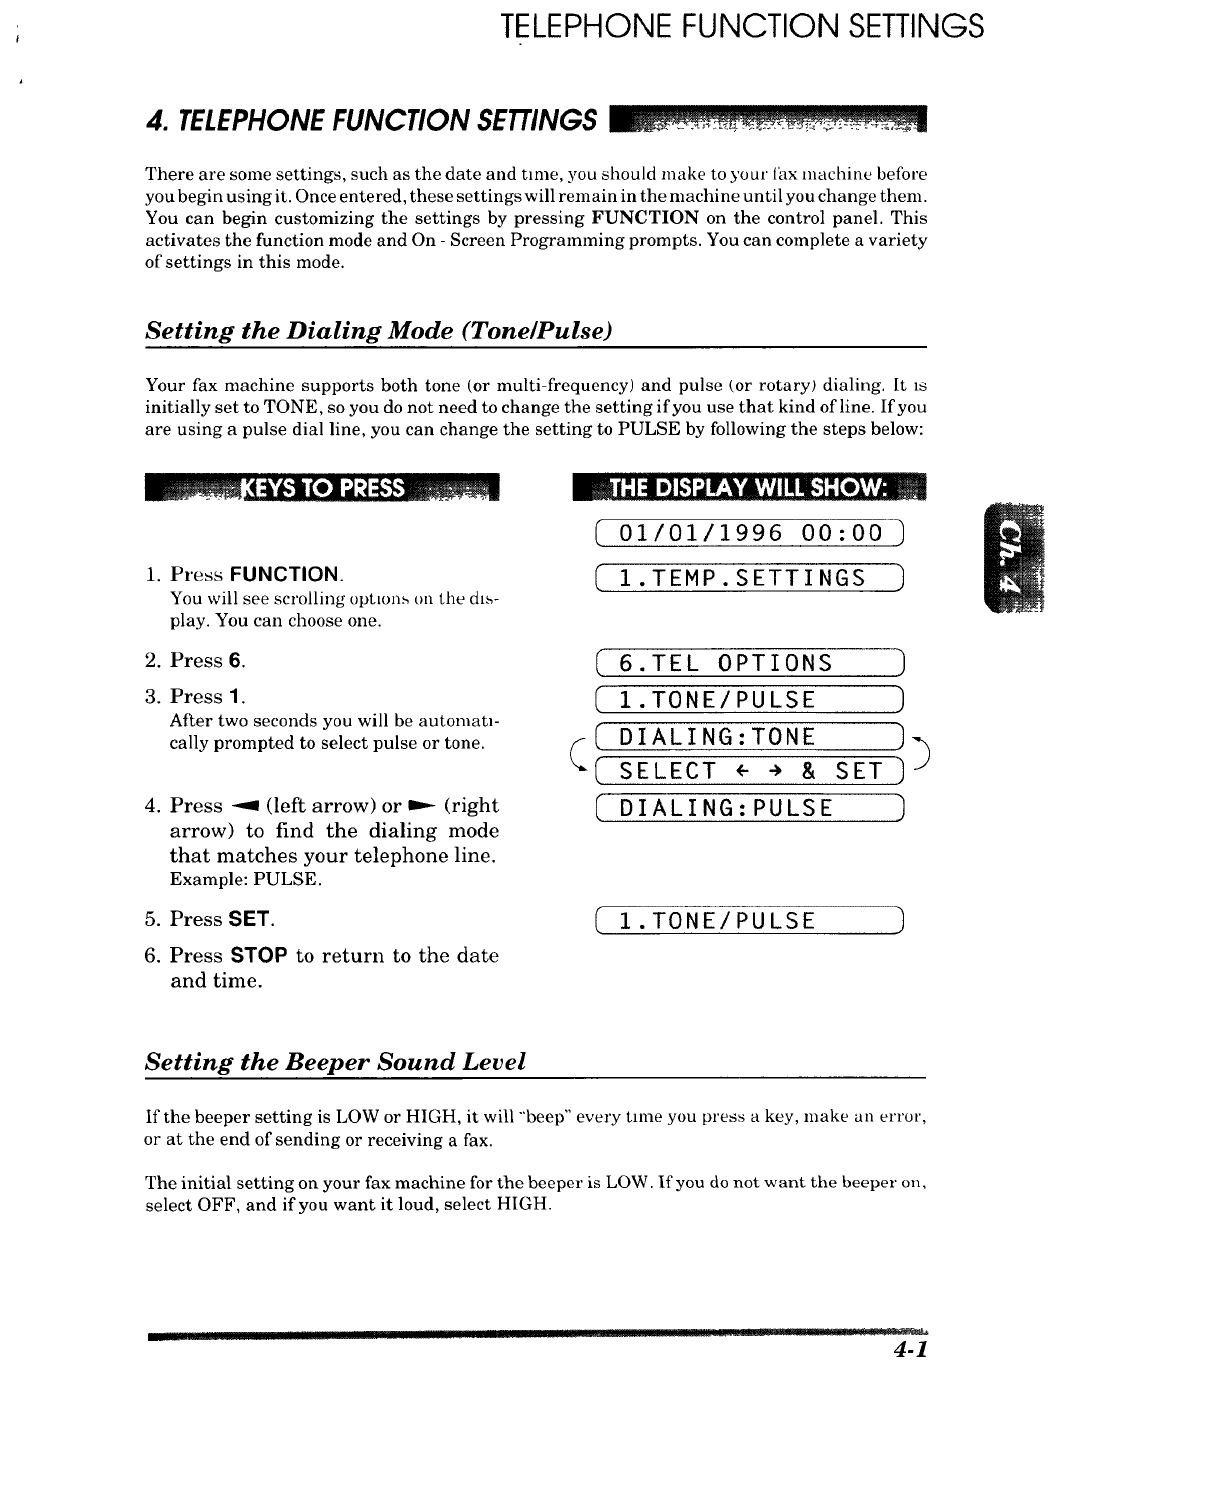
TELEPHONE FUNCTION SETTINGS
4. TELEPHONE FUNCTION SETTINGS ___
There are some settings, such as the date and nine, you should make to your tax machine before
you begin using it. Once entered, these settings will remain in the nmchine until you change them.
You can begin customizing the settings by pressing FUNCTION on the control panel. This
activates the function mode and On - Screen Programming prompts. You can complete a variety
of settings in this mode.
Setting the Dialing Mode (Tone/Pulse)
Your fax nmchine supports both tone (or multi-frequency) and pulse (or rotary) dialing. It is
initially set to TONE, so you do not need to change the setting if you use that kind of line. If you
are using a pulse dial line, you can change the setting to PULSE by following the steps below:
1. Press FUNCTION.
You will see scrolling optlon._ on the dts-
play. You can choose one.
2. Press 6.
3. Press 1.
After two seconds you will be automan-
cally prompted to select pulse or tone.
,Press _ (left arrow) or _ (right
arrow) to find the dialing mode
that matches your telephone line.
Example: PULSE.
(01/01/1996 00:00
( 1.TEMP.SETTINGS)
( 6.TEL OPTIONS
_1. TONE/PULSE
DIALING:TONE _(
"_I SELECT + ÷ & SET)
( DIALING:PULSE ]
1 . TONE/PULSE
5. Press SET.
6. Press STOP to return to the date
and time.
Setting the Beeper Sound Level
If the beeper setting is LOW or HIGH, it will "'beep" every time you press a key, make an error,
or at the end of sending or receiving a fax.
The initial setting on your fax machine for the beeper is LOW. If you do not want the beeper on,
select OFF, and if you want it loud, select HIGH.
.................... _. ' ...... ""' " 111! "q7 ..... ?_:1"".T5_,71_
4-1
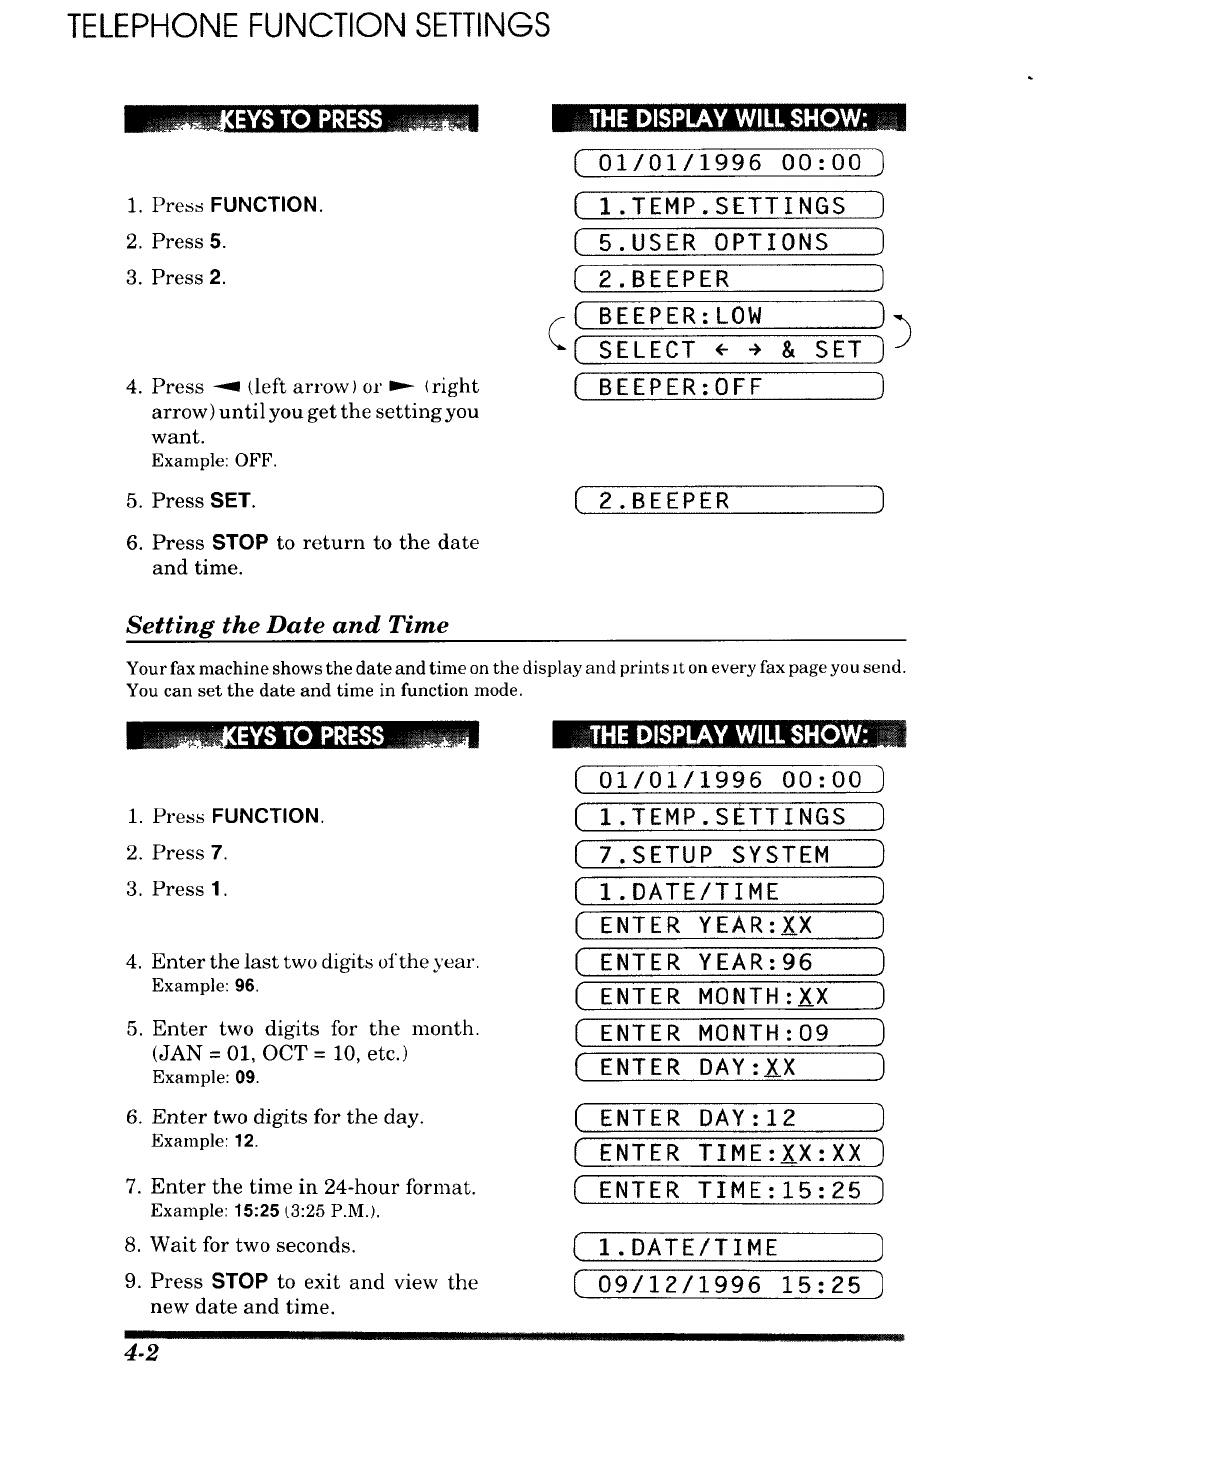
TELEPHONE FUNCTION SETTINGS
,• .. . ! I
1. Press FUNCTION.
2. Press 5.
3. Press 2.
.Press --_ deft arrow) or m-- (right
arrow) until you get the setting you
want.
Example: OFF.
m | l 1:1.J _,'_;IF:VIi','I I111,'ll[.I'A_II_
C01/01/1996 00:00
[ 1.TEMP.SETTINGS
5.USER OPTIONS )
2.BEEPER ]
( BEEPER: LOW ]
SELECT,--, SET]
(BEEPER:OFF
5. Press SET. (_ 2. B E E P E R
6. Press STOP to return to the date
and time.
Setting the Date and Time
Your fax machine shows the date and time on the display and prints it on every fax page you send.
You can set the date and time in function mode.
mill :1'1[-'t;;IF-VA','IIl!II-'ll [el','i_
1. Press FUNCTION.
2. Press 7.
3. Press 1.
.
.
Enter the last two digits of the year.
Example: 96.
Enter two digits for the month.
(JAN =01, OCT =10, etc.)
Example: 09.
(01/01/1996 00:00
I.TEMP.SETTINGS
( 7.SETUP SYSTEM
[1.DATE/TIME
ENTER YEAR:XX ]
ENTER YEAR:96 ]
LENTER MONTH:_X )
ENTER MONTH:09
ENTER DAY:XX ]
.
.
,
9.
Enter two digits for the day.
Example: 12.
Enter the time in 24-hour format.
Example: 15:25 t3:25 P.M.).
Wait for two seconds.
Press STOP to exit and view the
new date and time.
(
(
(
ENTER DAY:12
ENTER TIME:XX:XX ]
ENTER TIME:15:25 )
(1.DATE/TIME )
(09/12/1996 15:25 )
!IHI ,H[:
4-2
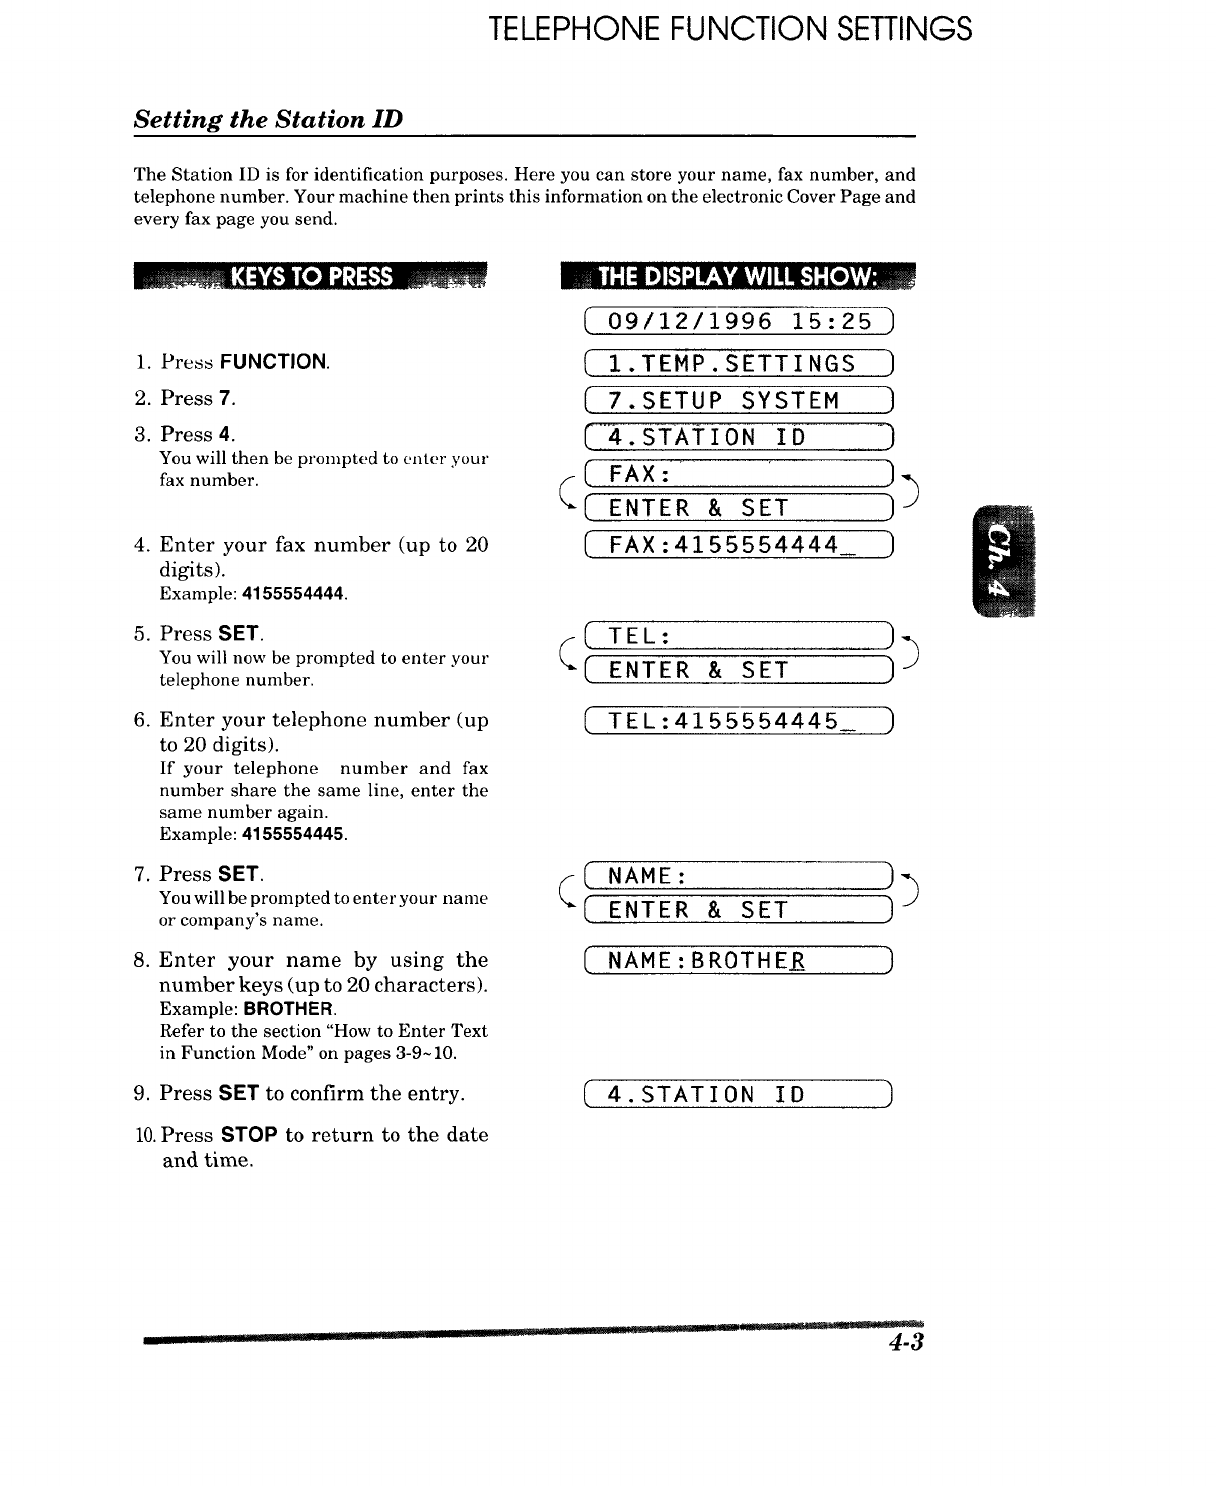
TELEPHONE FUNCTION SETTINGS
Setting the Station ID
The Station ID is for identification purposes. Here you can store your name, fax number, and
telephone number. Your machine then prints this information on the electronic Cover Page and
every fax page you send.
_I: I:iifl B']'-]ir:¥dk';_IqII_"]'-[el',
1. Press FUNCTION.
2. Press 7.
3. Press 4.
You will then be prompted to enter your
fax number.
4. Enter your fax number (up to 20
digits).
Example: 4155554444.
5. Press SET.
You will now be prompted to enter your
telephone number.
6. Enter your telephone number (up
to 20 digits).
If your telephone number and fax
number share the same line, enter the
same number again.
Example: 4155554445.
7. Press SET.
You will be prompted to enter your name
or company's name.
8. Enter your name by using the
number keys (up to 20 characters).
Example: BROTHER.
Refer to the section "How to Enter Text
in Function Mode" on pages 3-9~ 10.
9. Press SET to confirm the entry.
10.Press STOP to return to the date
and time.
(09/12/1996 15:25 -)
( 1. TEMP. SETTINGS )
[ 7.SETUPSYSTE. )
( 4.STATION ID )
[ FAX: )
,,--
_( ENTER & SET )
( FAX:4155554444_ )
(( TEL: )_
( ENTER & SET )
( TEL:4155554445_ )
(( NAME:
[ENTER & SET )
(NAME:BROTHER )
4.STATION ID
....... L ............_yL ..... 4-3
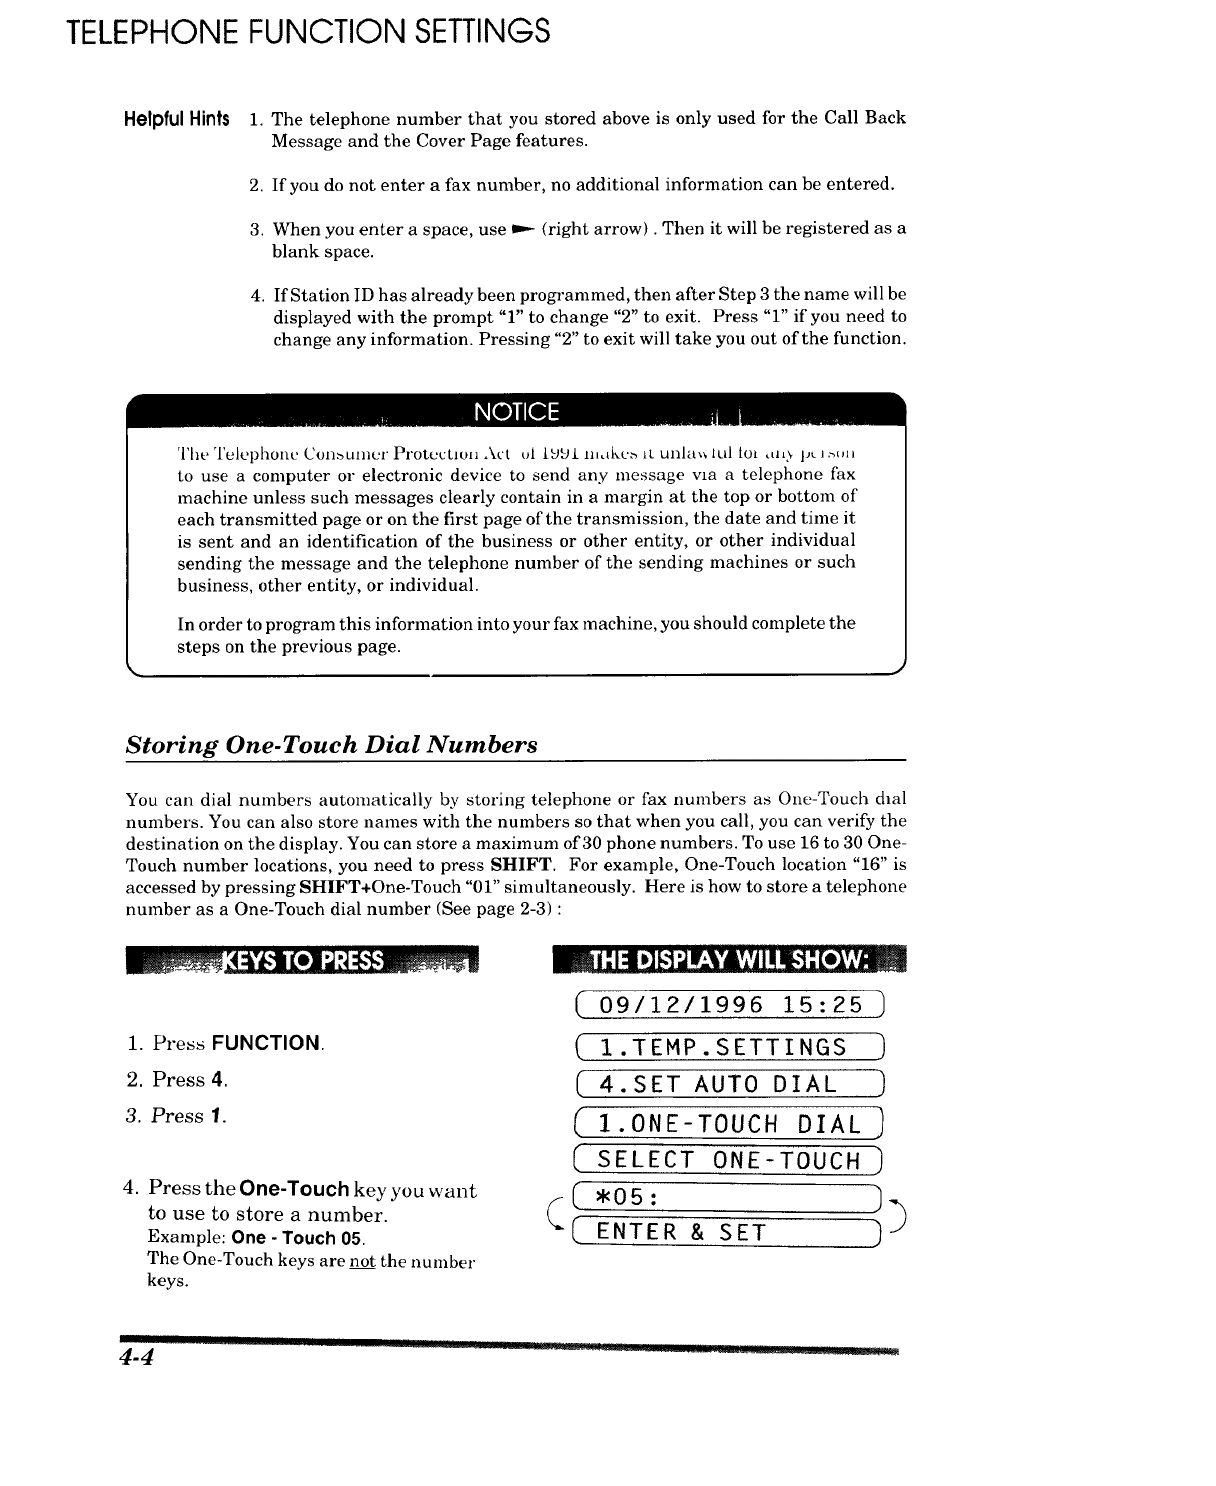
TELEPHONE FUNCTION SETTINGS
Helpful Hints 1. The telephone number that you stored above is only used for the Call Back
Message and the Cover Page features.
2. If you do not enter a fax number, no additional information can be entered.
3. When you enter a space, use P.- (right arrow). Then it will be registered as a
blank space.
4. If Station ID has already been programmed, then after Step 3 the name will be
displayed with the prompt "1" to change "2" to exit. Press "1" if you need to
change any information. Pressing "2" to exit will take you out of the function.
The Telol)bom' Consumer ProtouLion Act t)l _UUL ll,,_kc'> 11_ul]l_l_ lul loi _tl_> l_t l ._on
to use a computer or electronic device to send any message via a telephone fax
machine unless such messages clearly contain in a margin at the top or bottom of
each transmitted page or on the first page of the transmission, the date and time it
is sent and an identification of the business or other entity, or other individual
sending the message and the telephone number of the sending machines or such
business, other entity, or individual.
In order to program this information into your fax machine, you should complete the
steps on the previous page.
Storing One-Touch Dial Numbers
You can dial numbers autonmtically by storing telephone or fax numbers as One-Touch dial
numbers. You can also store names with the numbers so that when you call, you can verify the
destination on the display. You can store a maximum of 30 phone numbers. To use 16 to 30 One-
Touch number locations, you need to press SHIFT. For example, One-Touch location "16" is
accessed by pressing SHIFT+One-Touch "01" simultaneously. Here is how to store a telephone
number as a One-Touch dial number (See page 2-3) :
1. Press FUNCTION.
2. Press 4.
3. Press 1.
4. Press the One-Touch key you want
to use to store a number.
Example: One - Touch 05.
The One-Touch keys are not the number
keys.
_ i: 14 D]b't;,llr._VAv,,jIIII_]: [e).t,v_
(09/12/1996 15:25 ]
( I.TEMP.SETTINGS
( 4.SETAUTODIAL )
(1.ONE-TOUCH DIAL)
[seLect OnE-TOucH)
(,os:
-C ENTer & sET )
! I
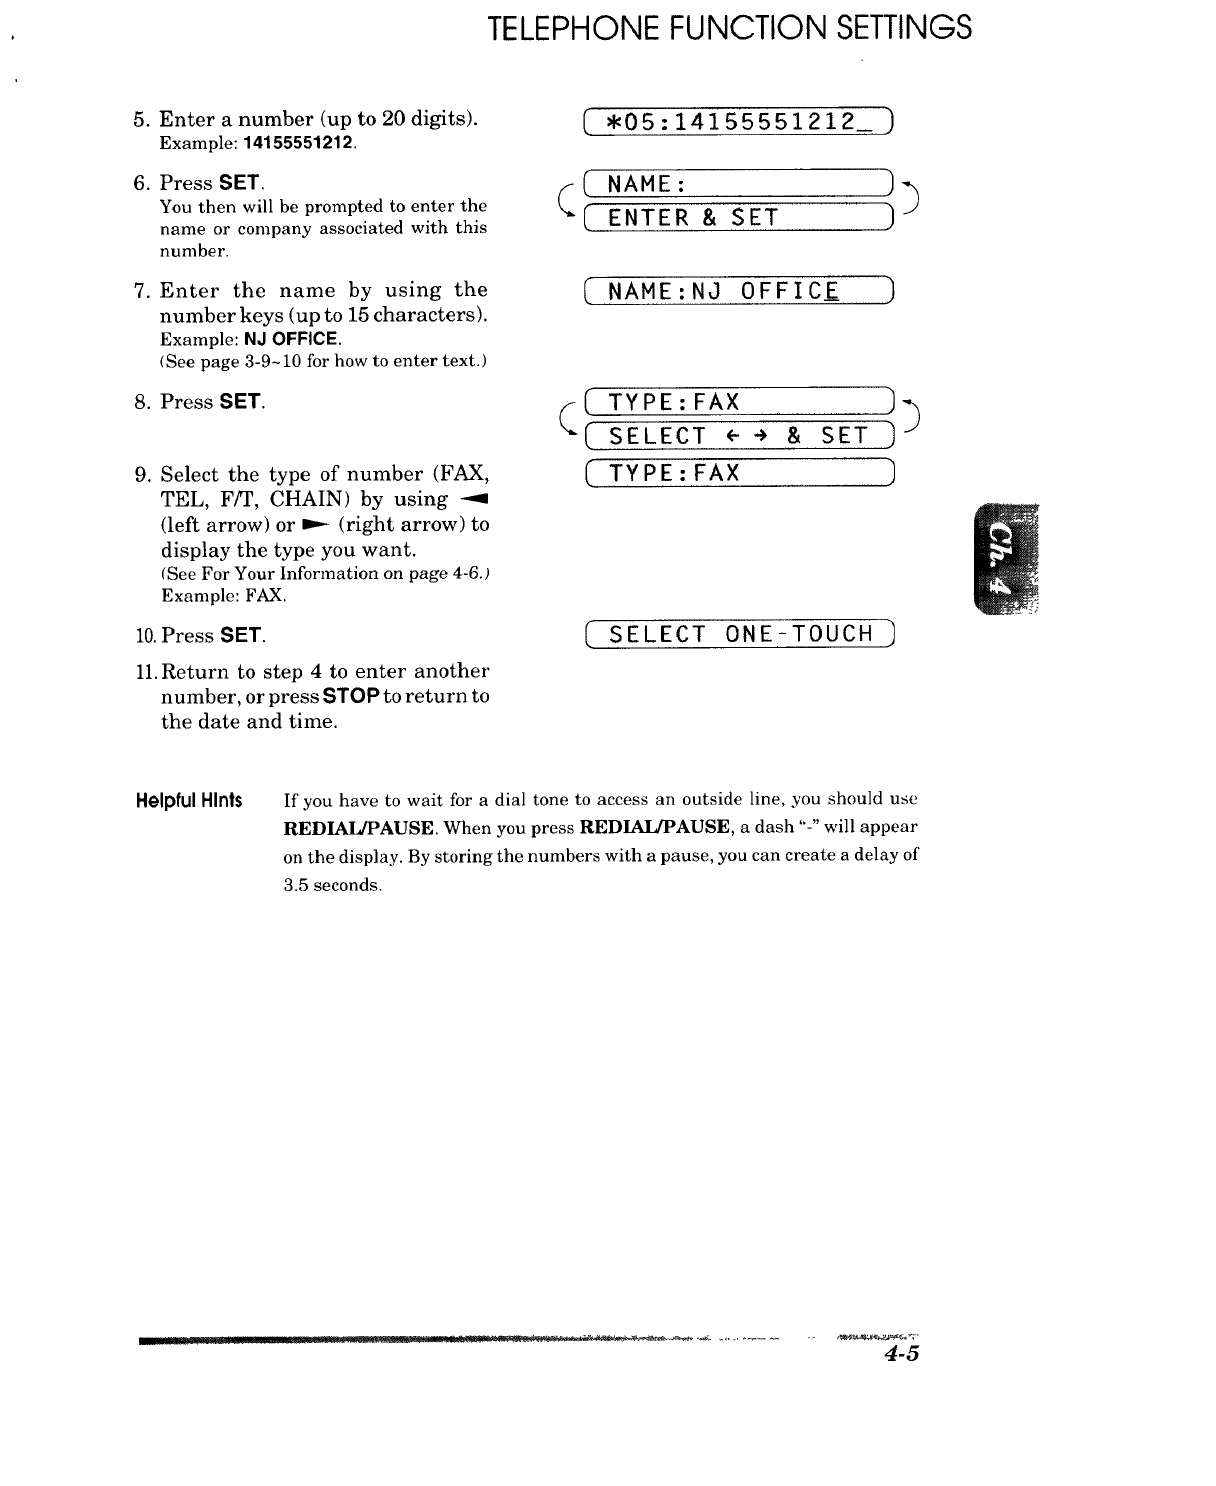
TELEPHONE FUNCTION SETTINGS
5. Enter a number (up to 20 digits).
Example: 14155551212.
6. Press SET.
You then will be prompted to enter the
name or company associated with this
number.
7. Enter the name by using the
number keys (up to 15 characters).
Example: NJ OFFICE.
(See page 3-9-10 for how to enter text.)
8. Press SET.
9. Select the type of number (FAX,
TEL, F/T, CHAIN) by using -_.
(left arrow) or _ (right arrow) to
display the type you want.
(See For Your Information on page 4-6.)
Example: FAX.
10.Press SET.
11.Return to step 4 to enter another
number, or press STOP to return to
the date and time.
( _05:14155551212_ )
(( NA.E: ))
( ENTER &SET )
(NAME:NJ OFFICE )
f( TYPE:FAX
( SELECT <- ÷
( TY P E : FAX
& SET )
]
(SELECT ONE-TOUCH ]
Helpful Hlnts If you have to wait for a dial tone to access an outside line, you should use
RED_AUSE. When you press REDIAI_/PAUSE, a dash "-" will appear
on the display. By storing the numbers with a pause, you can create a delay of
3.5 seconds.
4-5
TELEPHONE FUNCTION SETTINGS
FOR YOUR INFORMATION
Types of Numbers
When you store a number as a One-Touch or as a Speed-Dial number, you have a
choice of choosing the type of number. There are 4 options:
1. FAX (A fax number).
2. TEL (A telephone number).
3. Ffr (Both a fax number and a telephone number)
4. CHAIN (A number, usually an access code, for chain dialing).
Chain Dialing
Chain dialing is used to store a very long dialing sequence. You can spread the
number over two or more keys if you register the first key(s) in the sequence as type
"Chain". Chain tells the system that the dialing sequence is not completed
and that there is more to follow. The last key in the sequence must be any other
dial type (either FAX, TEL or F/T). You can use any combination of One-Touch,
Speed-Dial and manually dialed numbers in a chain.
If you must wait for another dial tone at any point in the dialing sequence, store a
pause at that point in the number by pressing the PAUSE/REDIAL key. (If you need
a pause that is longer than 3.5 seconds, call our Fax Diagnostic Center at 1-800-284-
4329 (USA), 1-800-853-6660 (CANADA) for assistance.) Only one pause can be
stored in each One-Touch and Speed-Dial number.
When you are ready to dial the chain number, simply press the keys one after the
other in sequence and then press START.
Chain dialing makes using access codes easy. Sometimes you may want to choose
from among several long-distance carriers when you make a call; rates may vary
depending upon the time and destination. To take advantage of low rates, you can
store the access code of a long-distance carrier as you would a regular number and
register it as a "chain" number. Then to dial, press this (access code) number followed
by the regular number and START.
You can set up chain dialing for phone/credit card numbers, the same way. However,
when using chain dialing, do NOT send a cover page because your credit
card number will be on it.
Storing Speed-Dial Numbers
When you store a phone or fax number as a Speed-Dial number, you must enter a two-digit
number, from 01 to 60 for FAX 1350M, 1450MC and MFC 1850MC and from 01 to 00 for FAX
1550MC and MFC 1950MC using the number keys. For example, you cannot enter "5". You must
enter"05". You can store as many as 60 numbers (FAX 1350M/1450MC and MFC 1850MC) or 100
numbers (FAX 1550MC and MFC 1950MC)as Speed-Dial numbers.
........ !!! !! .._JJI_IH'II
4-6
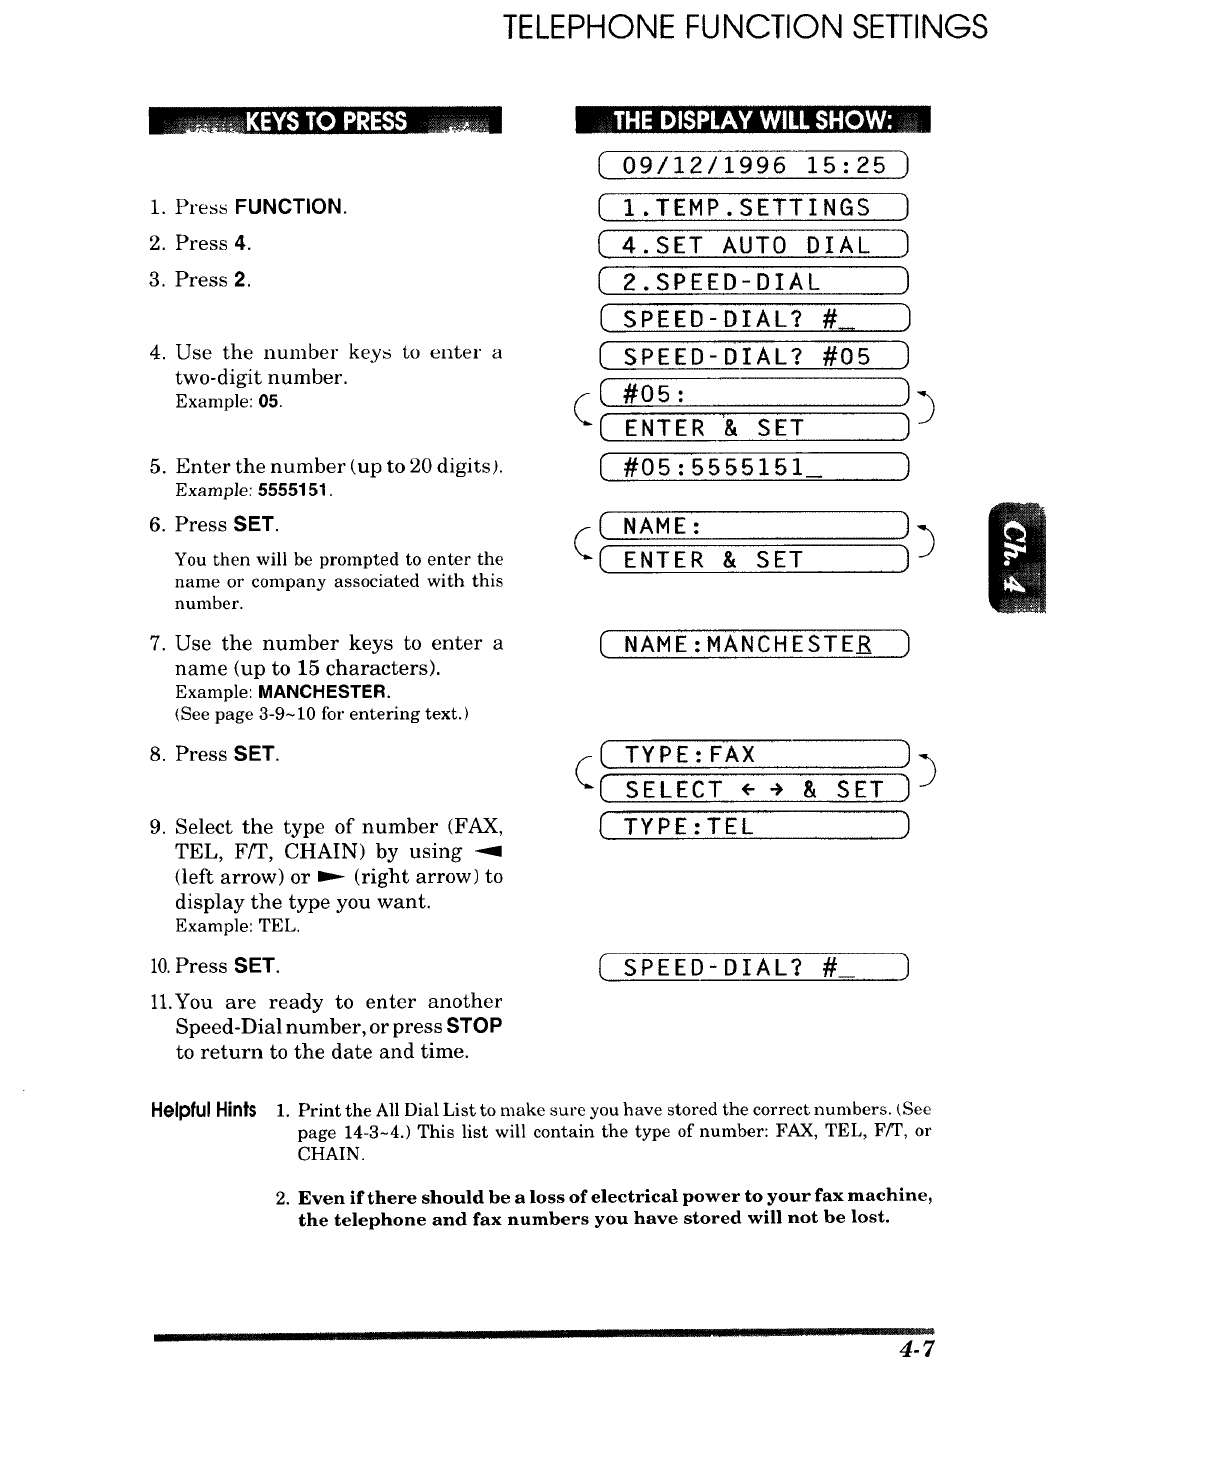
TELEPHONE FUNCTION SETTINGS
ii i illll ill i ill Ulll
1. Press FUNCTION.
2. Press 4.
3. Press 2.
4. Use the number keys to enter a
two-digit number.
Example: 05.
5. Enter the number (up to 20 digits).
Example: 5555151.
6. Press SET.
You then will be prompted to enter the
name or company associated with this
number.
7. Use the number keys to enter a
name (up to 15 characters).
Example: MANCHESTER.
(See page 3-9~10 for entering text.)
8. Press SET.
9. Select the type of number (FAX,
TEL, F/T, CHAIN) by using --9
(left arrow) or ,..- (right arrow) to
display the type you want.
Example: TEL.
10.Press SET.
11.You are ready to enter another
Speed-Dial number, or press STOP
to return to the date and time.
i i ii • •
__ |: 14 ._1[:'__ IE_ llVl I111-'l.[elVI__
09/12/1996 15:25
( I.TEMP.SETTINGS )
4.SET AUTO DIAL )
(2.SPEED-DIAL )
( SPEED-DIAL? #_ ]
( SPEED-DIAL? #05 1
( #o5: ])(
--( ENTER & SET ]
[ #05:5555151_ )
(NAME: )_
['- ENTER & SET ,] J
( NAME:MANCHESTER )
( TY P E : FAX
FsE,ECT
TYPE : TEL
& SET ]
)
( SPEED-DIAL? #_ )
Helpful Hints 1. Print the All Dial List to make sure you have stored the correct numbers, tSee
page 14-3-4.) This list will contain the type of number: FAX, TEL, F/T, or
CHAIN.
2. Even if there should be a loss of electrical power to your fax machine,
the telephone and fax numbers you have stored will not be lost.
.... !! ! Illl I I flllllPill [11_ I!11B! .... i_'l I]
4-7
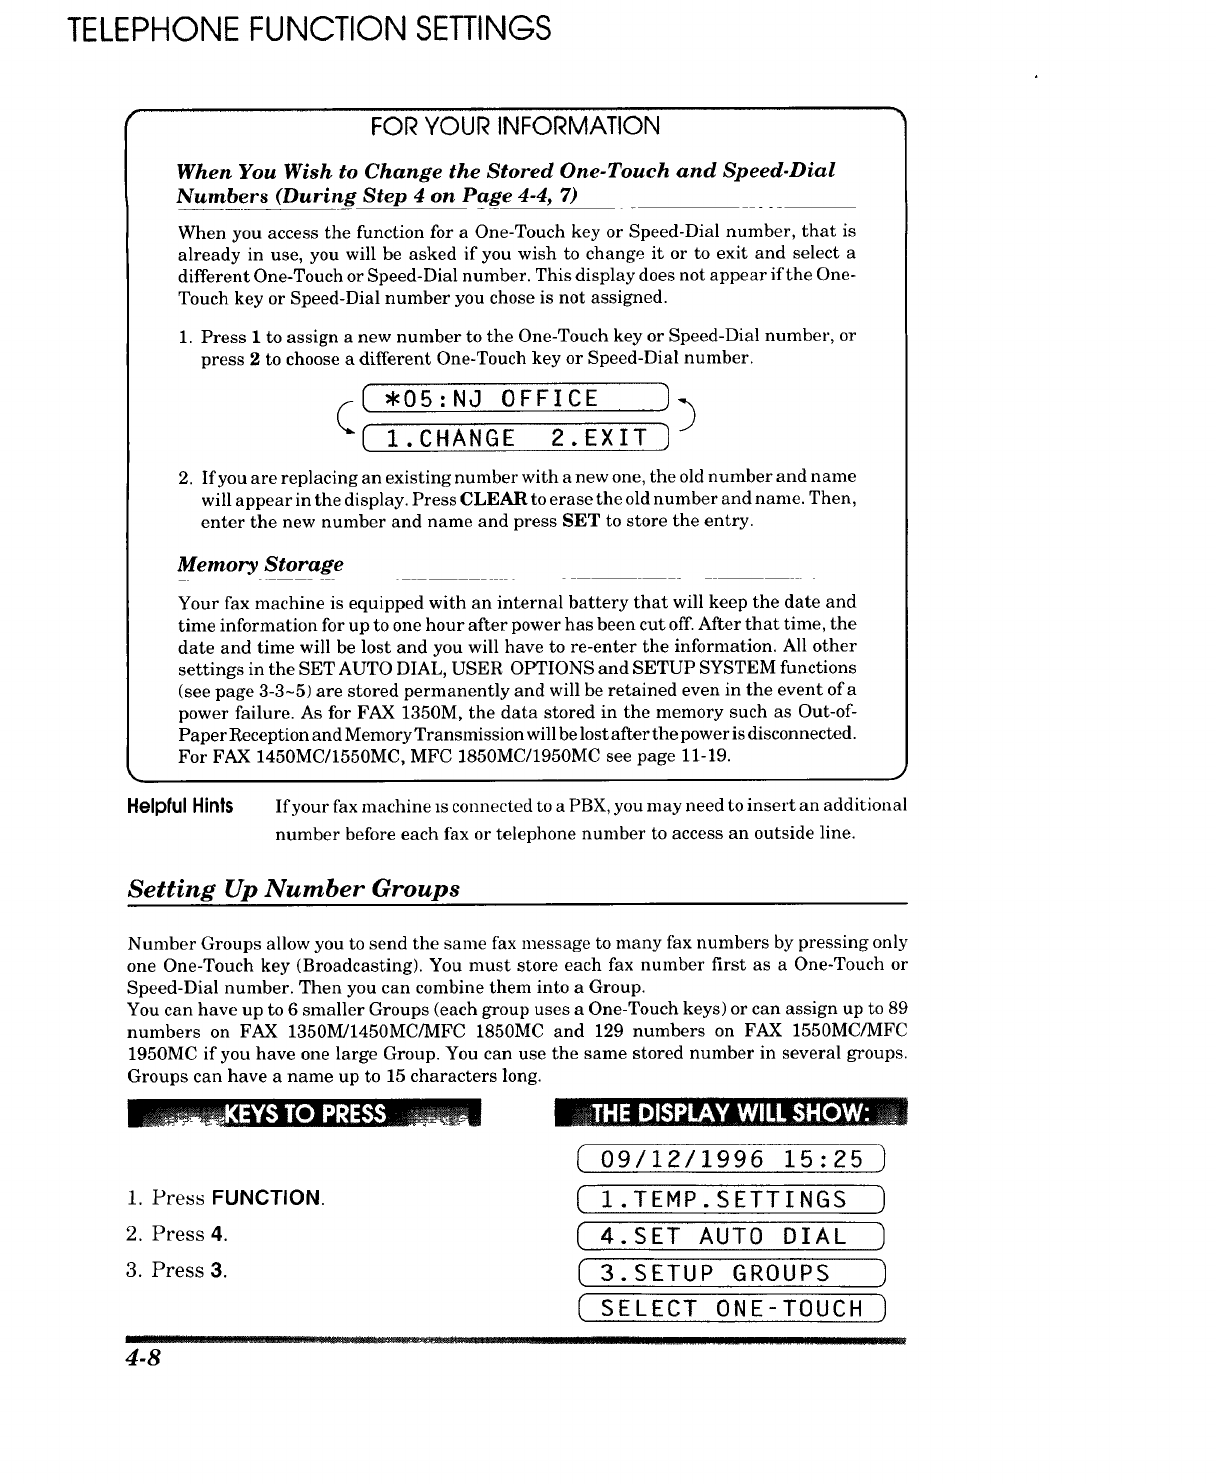
TELEPHONEFUNCTION SETTINGS
FOR YOUR INFORMATION
When You Wish to Change the Stored One-Touch and Speed-Dial
Numbers (During Step 4 on Page 4-4, 7)
When you access the function for a One-Touch key or Speed-Dial number, that is
already in use, you will be asked if you wish to change it or to exit and select a
different One-Touch or Speed-Dial number. This display does not appear if the One-
Touch key or Speed-Dial number you chose is not assigned.
1. Press ito assign a new number to the One-Touch key or Speed-Dial number, or
press 2to choose a d£fferent One-Touch key or Speed-Dial number.
(( ,0s: NJOFFICE I)
( 1.CHANGE 2.EXIT )
2. If you are replacing an existing number with a new one, the old number and name
will appear in the display. Press CLEAR to erase the old number and name. Then,
enter the new number and name and press SET to store the entry.
Memory Storage
Your fax machine is equipped with an internal battery that will keep the date and
time information for up to one hour after power has been cut off. After that time, the
date and time will be lost and you will have to re-enter the information. All other
settings in the SET AUTO DIAL, USER OPTIONS and SETUP SYSTEM functions
(see page 3-3~5) are stored permanently and will be retained even in the event of a
power failure. As for FAX 1350M, the data stored in the memory such as Out-of-
Paper Reception and Menmry Transmission will be lost after the power is disconnected.
For FAX 1450MC/1550MC, MFC 1850MC/1950MC see page 11-19.
Helpful Hints Ifyour fax machine is connected to a PBX, you may need to insert an additional
number before each fax or telephone number to access an outside line.
Setting Up Number Groups
Number Groups allow you to send the same fax message to many fax numbers by pressing only
one One-Touch key (Broadcasting). You must store each fax number first as a One-Touch or
Speed-Dial number. Then you can combine them into a Group.
You can have up to 6 smaller Groups (each group uses a One-Touch keys) or can assign up to 89
numbers on FAX 1350M/1450MC/MFC 1850MC and 129 numbers on FAX 1550MC/MFC
1950MC if you have one large Group. You can use the same stored number in several groups.
Groups can have a name up to 15 characters long.
_[4:k'_'tti[e)l"-]"_::[,,$__ g_J l-"I:flD][,,"]dIFVA','I Itlql-"]:[_V._i!!_ _
1. Press FUNCTION.
2. Press 4.
3. Press 3.
4-8
( 09/12/1996 15:25 ]
( I.TEMP.SETTINGS )
( 4.SET AUTO DIAL ]
(3. SETUP GROUPS 1
I SELECT ONE-TOUCH )
I ..............................................I!
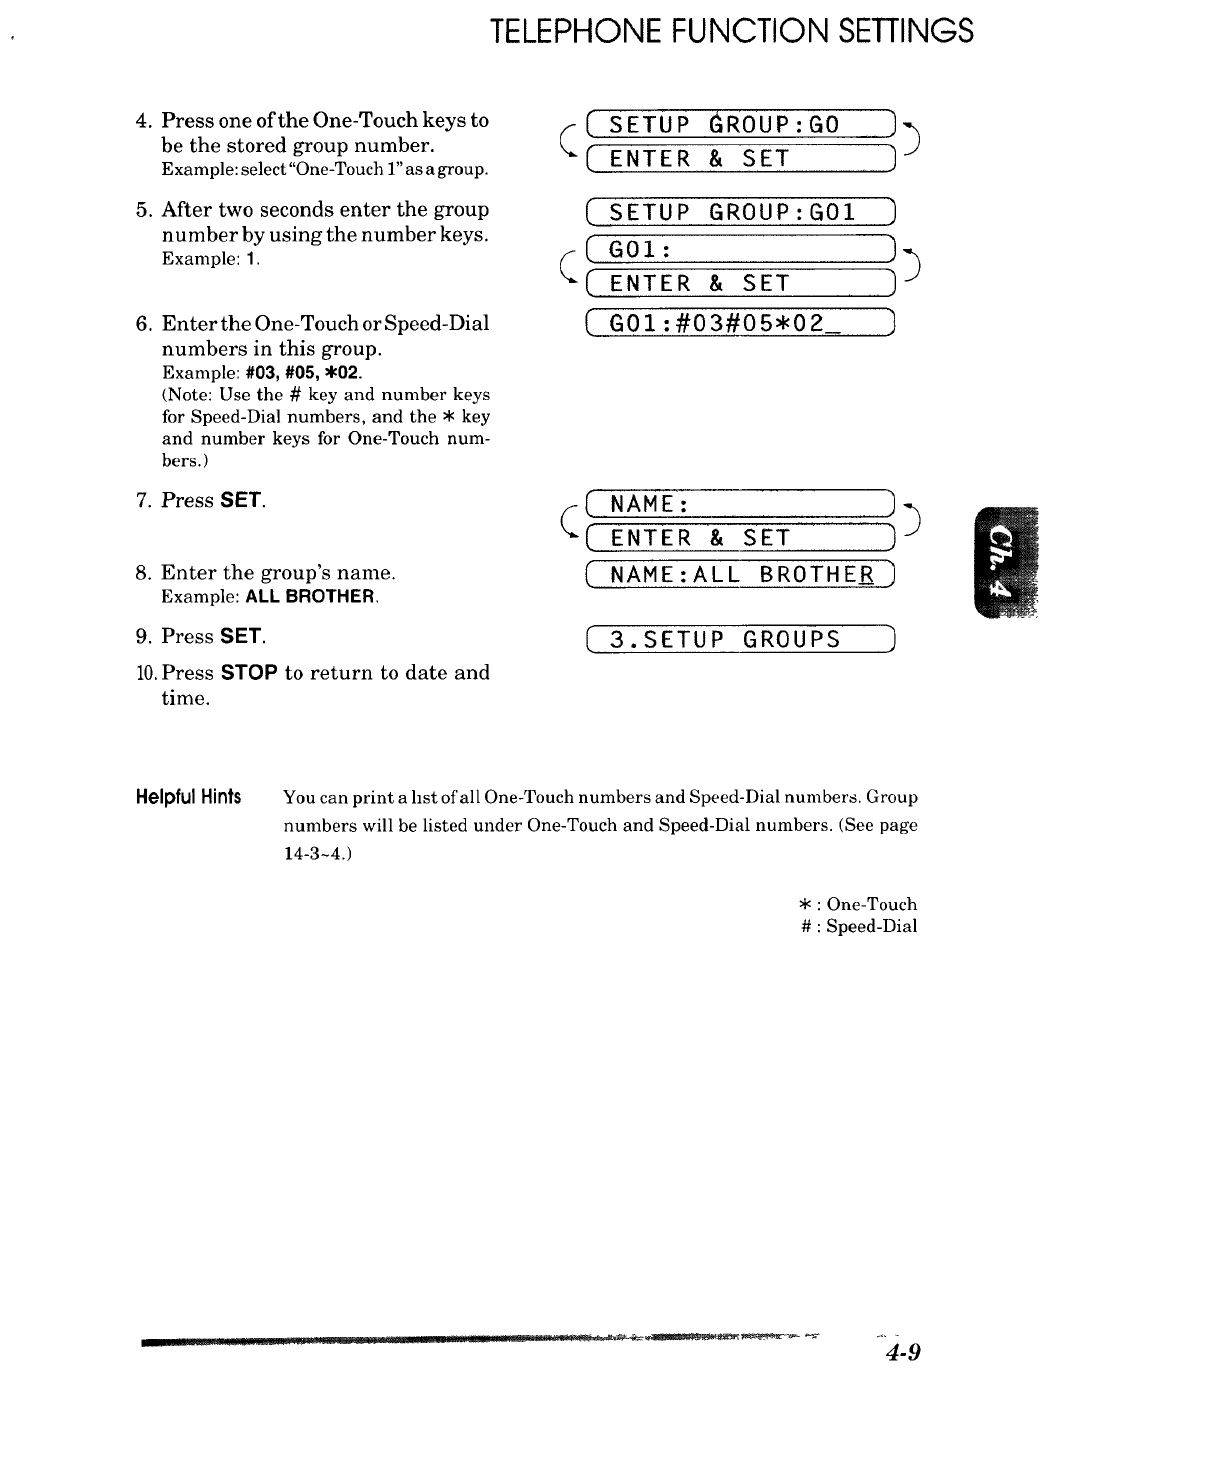
TELEPHONE FUNCTION SETTINGS
4. Press one of the One-Touch keys to
be the stored group number.
Example: select"One-Touch 1"as a group.
5. After two seconds enter the group
number by using the number keys.
Example: 1.
6. Enter the One-Touch or Speed-Dial
numbers in this group.
Example: #03,#05,_02.
(Note: Use the # key and number keys
for Speed-Dial numbers, and the $ key
and number keys for One-Touch num-
bers. )
7. Press SET.
8. Enter the group's name.
Example: ALL BROTHER.
9. Press SET.
10.Press STOP to return to date and
time.
_( SETUP GROUP:GO ]_
[ ENTER & SET ]
( SETUP GROUP:G01 )
(Gol- ))C
"( ENTER & SET ]
GO1 :#03#05*02_ ]
(_" NAME: ]-)
(ENTER & SET ]-"
(NAME :ALL BROTHER )
3.SETUP GROUPS
Helpful Hints You can print a last of all One-Touch numbers and Speed-Dial numbers. Group
numbers will be listed under One-Touch and Speed-Dial numbers. (See page
14-3-4.)
_<: One-Touch
# : Speed-Dial
USING THE UNIT AS A TELEPHONE
5. USING THEUNIT AS A TELEPHONE
Your fax machine call be used to make regular telephone calls. You can d,al numbers manually,
by pressing the number keys, or by using One-Touch or Speed-Dialing.
Manual Dialing
1. Pick up the handset, or press HOOK.
2. When you hear a dial tone, you can begin dialing by pressing the number keys.
3. If you used HOOK to dial, pick up the handset when the call is answered.
One- Touch Dialing
1. Pick up the handset, or press HOOK.
2. When you hear a dial tone, press the One-Touch key.
3. If you used HOOK, pick up the handset when the call is answered.
If you try to use a One-Touch number that has not been stored on the key you pressed, you w_ll
hear a warning sound and the display will say,"NOT REGISTERED". The display will return to
normal after 2 seconds.
Speed Dialing
1. Pick up the handset or press HOOK.
2. when you hear a dial tone, press SPEED DIAL and then press the two-digit Speed-Dial
number.
3. If you used HOOK, pick up the handset when the call is answered.
FOR YOUR INFORMATION
Using HOLD, PAUSE, # with the Telephone
- Use REDIAL /PAUSE for putting a 3.5 second pause between numbers.
-Use HOLD to put a call on hold. You can put down the handset without
disconnecting the call. You must pick up the fax handset to release the call from
HOLD.
- Use # temporarily to switch the dialing type from "pulse" to"tone". This key is also
used for push-button services, such as those offered by banks, credit card companies,
or paging services.
On Hook Dialing
When you make a call using HOOK, you can listen to the other end through the one-
way speaker of the machine, but they can't hear you unless you pick up the handset.
Also, if you press HOOK again before you pick up the handset, the call will be
disconnected.
5-1 .... I " 11111 !! I ...... -'._:""'.'£""ZL"_'i.'Y.:':.::::.'-L'"Y=i'- "'"_==='
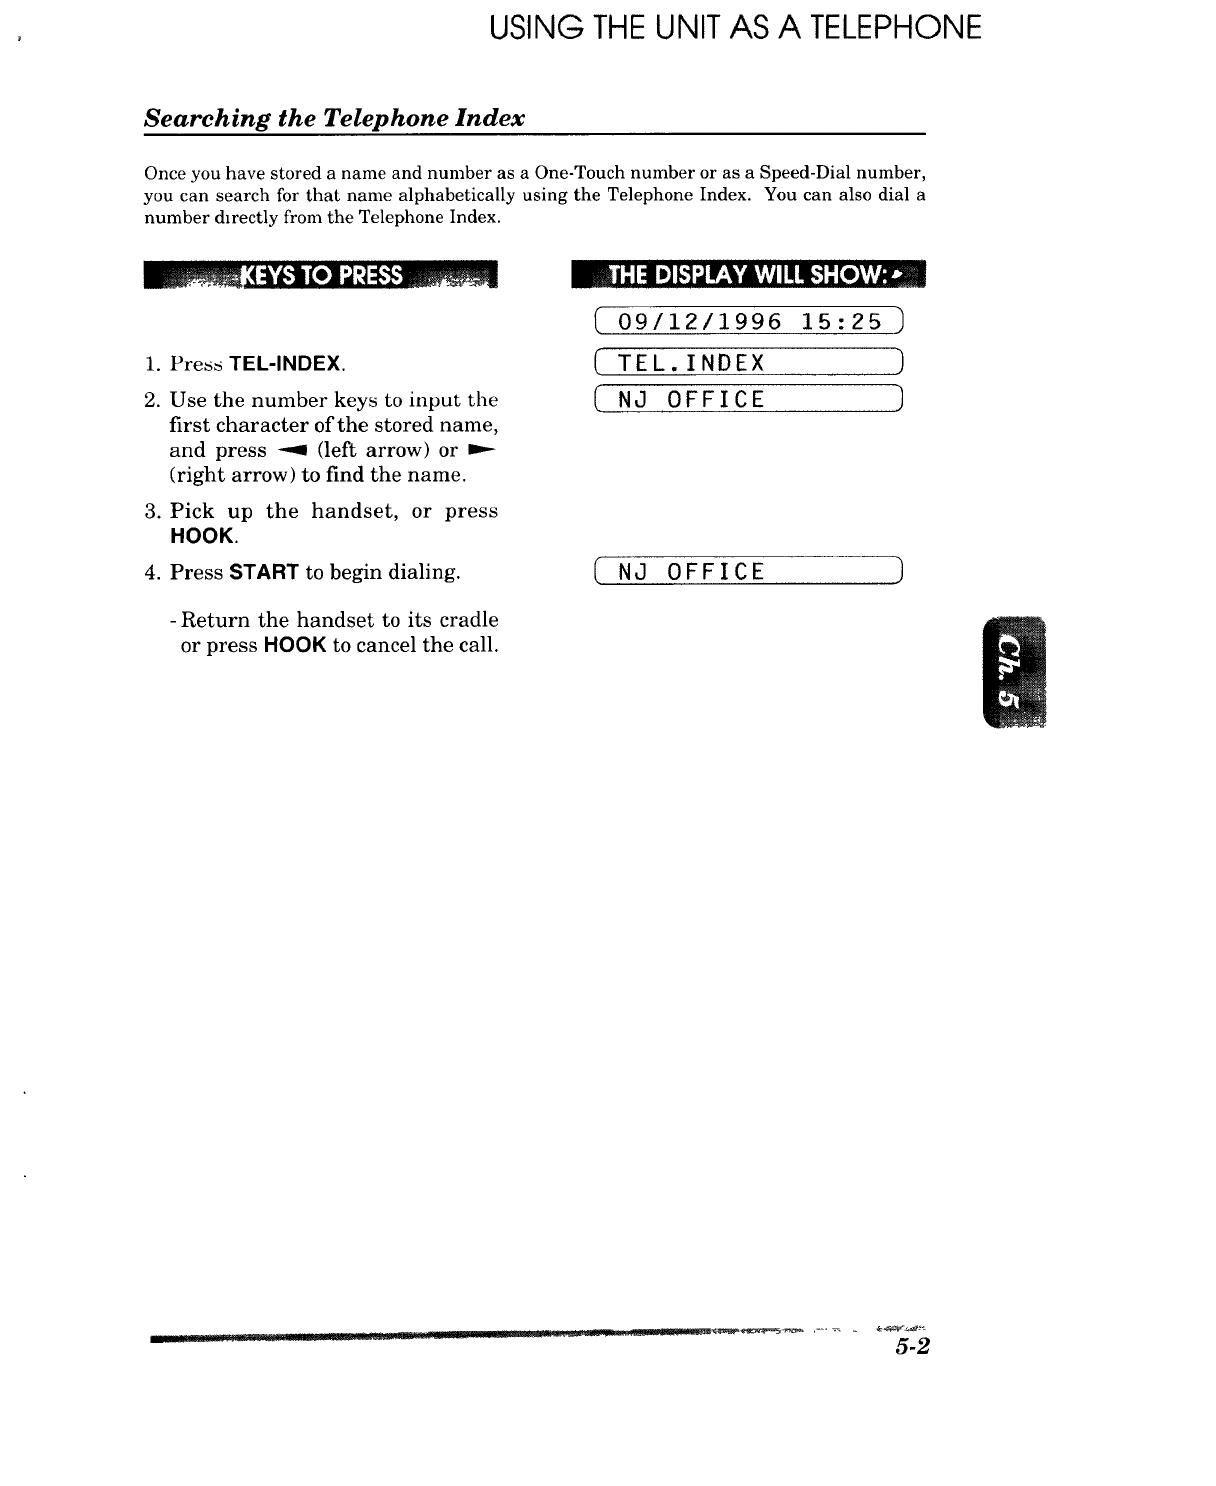
USING THE UNIT AS A TELEPHONE
Searching the Telephone Index
Once you have stored a name and number as a One-Touch number or as a Speed-Dial number,
you can search for that name alphabetically using the Telephone Index. You can also dial a
number directly from the Telephone Index.
m |-' 1:11Dlb']_Ir_.YAVAIIIII[,']:[olV_
1. Press TEL-INDEX.
2. Use the number keys to input the
first character of the stored name,
and press _ (left arrow) or ,,--
(right arrow) to find the name.
3. Pick up the handset, or press
HOOK.
4. Press START to begin dialing.
-Return the handset to its cradle
or press HOOK to cancel the call.
(09/12/1996 15:25 )
( TEL. INDEX )
(NJ OFFICE )
(NJ OFFICE
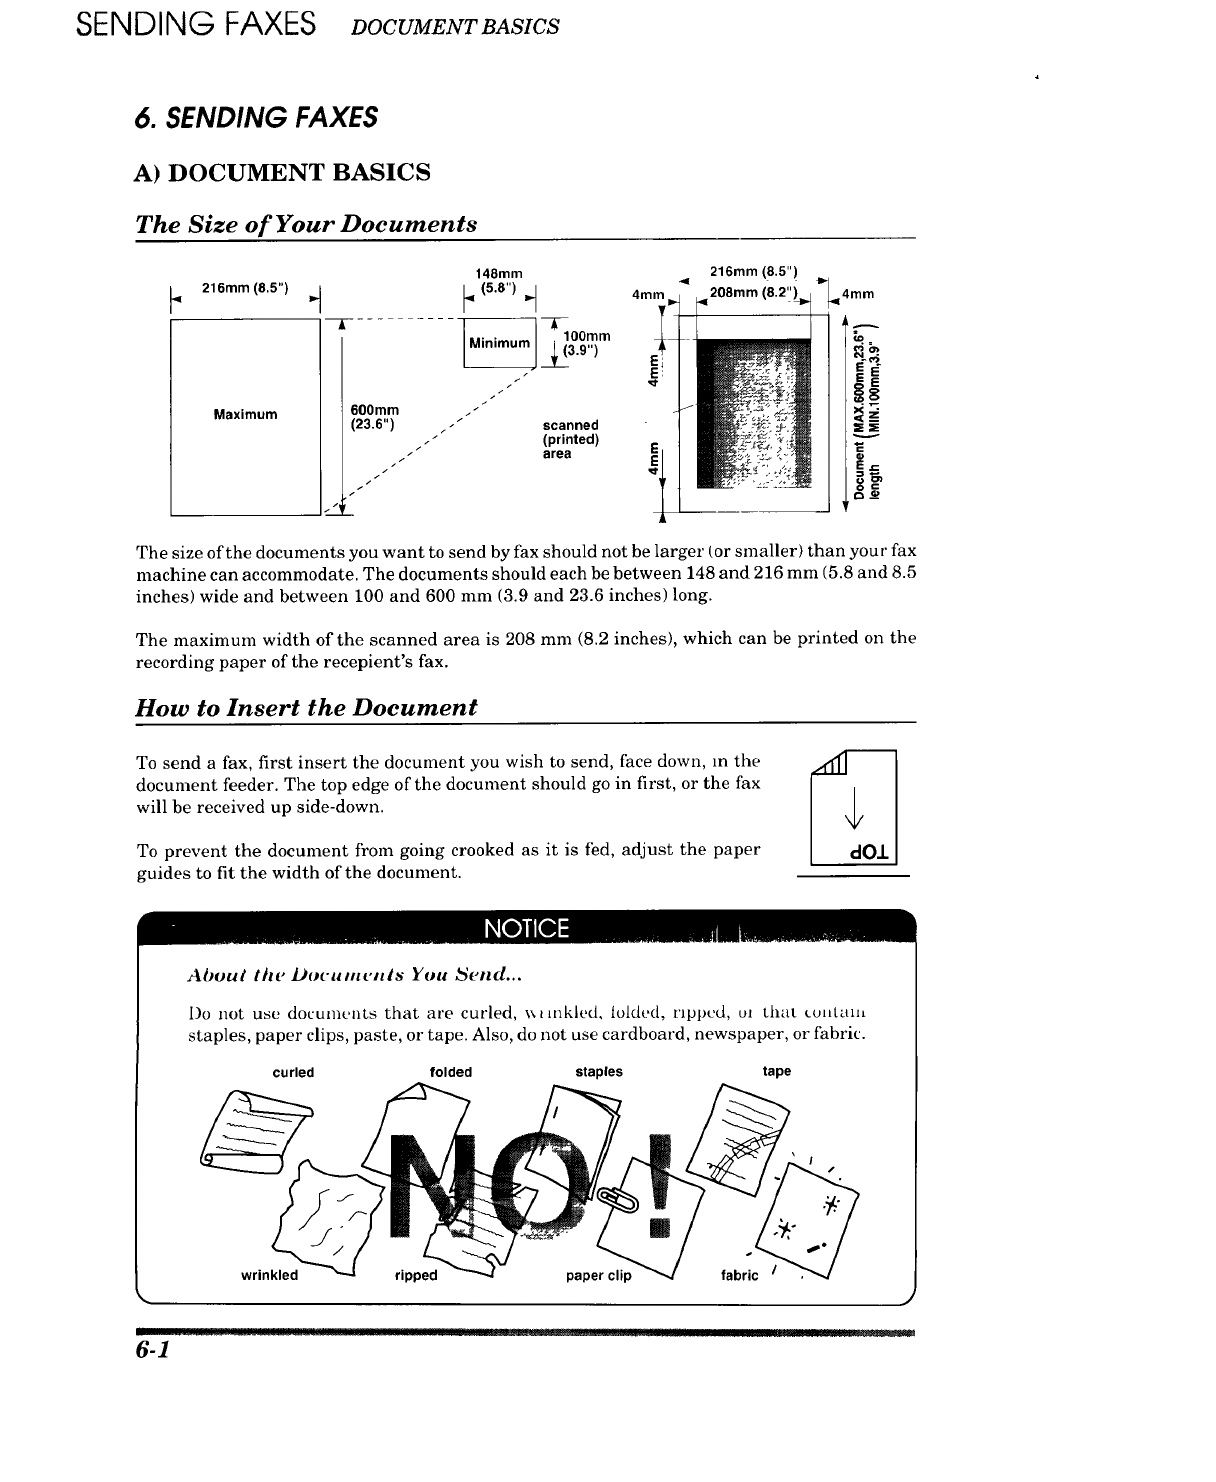
SENDING FAXES DOCUMENTBASICS
6. SENDING FAXES
A) DOCUMENT BASICS
The Size of Your Documents
216mm (8.5")
Maximum
148mm
J_1.0ram
Minimum I(3.9")
/
/
600mm ."
(23.6") /scanned
/
.'" (printed)
._-area
/
/
/
4mm
216mm (8.5")
< 208ram (8.2"_ "<4mm
€o
=
The size of the documents you want to send by fax should not be larger (or smaller) than your fax
machine can accommodate. The documents should each be between 148 and 216 mm (5.8 and 8.5
inches) wide and between 100 and 600 mm (3.9 and 23.6 inches) long.
The maximum width of the scanned area is 208 mm (8.2 inches), which can be printed on the
recording paper of the recepient's fax.
How to Insert the Document
To send a fax, first insert the document you wish to send, face down, m the
document feeder. The top edge of the document should go in first, or the fax
will be received up side-down.
To prevent the document from going crooked as it is fed, adjust the paper
guides to fit the width of the document.
+
dO.L
_o]Ko]_mmmimumim
About tit(, Do('ul.c_Is You _end...
I)o not use documcats that are curled, \x_mklcd, toldcd, ripped, ul that cuHtam
staples, paper clips, paste, or tape. Also, do not use cardboard, newspaper, or fabric.
curled folded staples tape
JJ
6-1
wrinkled ripped paper clip fabric /
.. _E[gkiL. !All
J
irl]l! ]...... JU[..
DOCUMENT BASICS SENDING FAXES
The Auto Document Feeder (ADF)
The Auto Document Feeder (ADF) automatically feeds documents (up to 20 pages} into the fax
machine, one at a time. The thickness and weight of the documents should fall into the following
categories:
Thickness: For one sheet: 0.07 to 0.12 mm (2.8 x 10³ to 4.7 x 10.3 inches).
For multiple sheets: 0.07 to 0.10 mm (2.8 x 10.3to 3.9 x 10.3inches).
Weight: For one sheet: 52 to 85 g/m 2(0.07 x 10.3to 0.121 x 10⁻³lbs/inch2).
For multiple sheets: 52 to 80 g/m 2(0.07 x 10.3to 0.114 x 10.3lbs/inch2).
As a reference, please note that the paper on which this is printed has the following thickness and
weight:
Thickness: 0.10mm (3.9 x 10 .3inches)
Weight: 80g/m 2(0.114 x 10.3lbs/inch 2)
Before inserting documents into the document feeder, fan the sheets of paper to make sure the
documents are not stuck together. Then tap the leading edge on a table so that all the pages are
even when placed in the feeder. Make sure you always put the documents in face down.
Getting Ready to Send a Fax
SETTING THE RESOLUTION
You can choose a setting (STANDARD, FINE, SUPERFINE, or PHOTO) for the resolution any
time before you press START or COPY. You can choose a setting by pressing the RESOLUTION
\\ //
key. ( O means light off. S means light on.)
STANDARD 0FINE
PHOTO
OS.FINE
The STANDARD resolution can be used for most typewritten
text. When the STANDARD setting is on, both lights are off.
Transmission speed is normal.
FINE
SUPERFINE
PHOTO
\\ //
DFINE
_-- PHOTO
OS.FINE
0FINE
PHOTO
/gl,. S.FINE
\\ //
FINE
_-- PHOTO
S.FINE
/ix ``.
The FINE resolution is an ideal setting to use if you want to send
documents that have small print. When the FINE setting is on,
the FINE light will be lit.
Transmission speed is slower than STANDARD.
The SUPERFINE resolution is a good setting to use for documents
with very small print or artwork. When the SUPERFINE setting
is on, the S. FINE light will be lit.
Transmission speed is slower than FINE.
The PHOTO resolution is ideal for sending documents that have
varying shades of gray, such as photographs. The PHOTO setting
is on when both lights are lit.
Transmission speed is slower than FINE.
To set different resolutions for each page of a multi page document, refer to "Multiple Resolution
Transmission" on page 6-13.
I!!!!!|'u!! ............ I 6-2
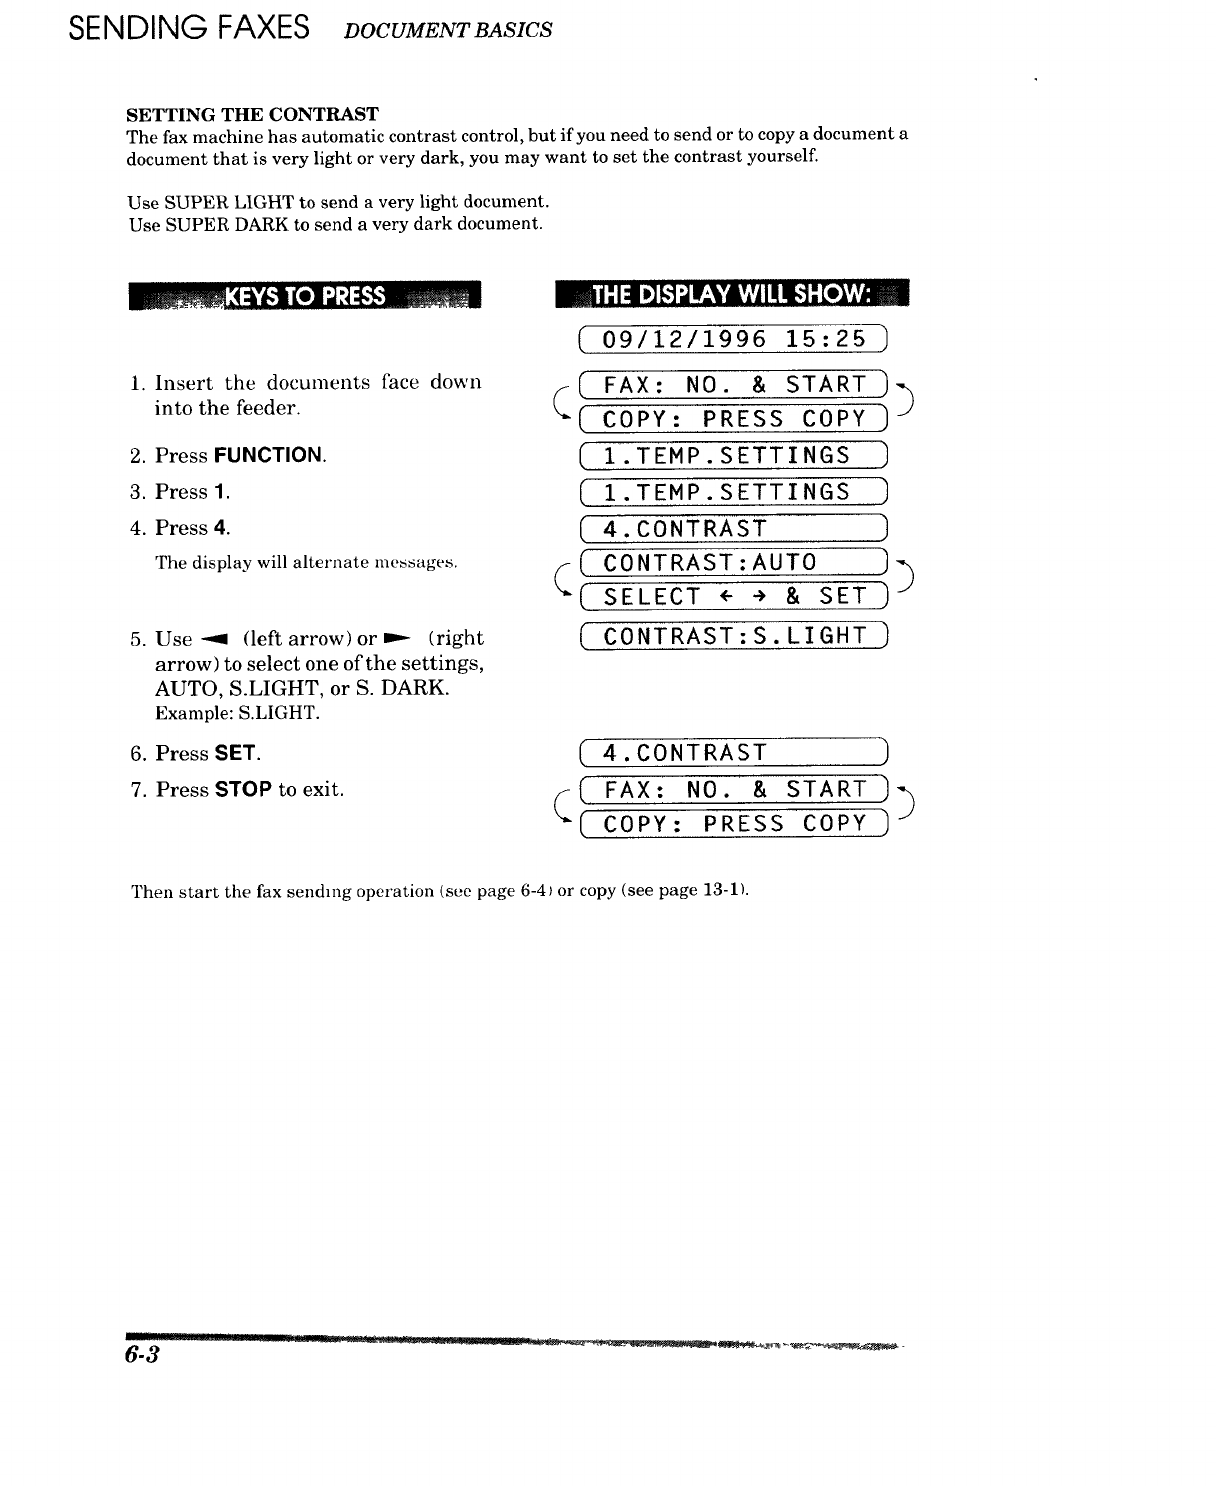
SENDING FAXES DOCUMENTBASICS
SETTING THE CONTRAST
The fax machine has automatic contrast control, but if you need to send or to copy a document a
document that is very light or very dark, you may want to set the contrast yourself.
Use SUPER LIGI-tT to send a very light document.
Use SUPER DARK to send a very dark document.
1. Insert the documents face down
into the feeder.
2. Press FUNCTION.
3. Press 1.
4. Press 4.
The display will alternate messages.
5. Use -.9 (left arrow) or .--- (right
arrow) to select one of the settings,
AUTO, S.LIGHT, or S. DARK.
Example: S.LIGHT.
6. Press SET.
7. Press STOP to exit.
m Ii 11.]FI_r._Y,IVl Il 1,1:[elv,v_m
(_ 09/12/1996 15:25 ]
_( FAX: NO. & START )]
COPY: PRESS COPY ]
( 1.TEMP.SETTINGS )
( I.TEMP.SETTINGS ]
4. CONTRAST )
(( CONTRAST: AUTO )]
(._SELECT <- ÷ & SET )
( CONTRAST:S.LIGHT ]
(4. CONTRAST )
_(_FAX: NO. & START )_
( COPY: PRESS COPY )
Then start the fax sending operation (see page 6-41 or copy (see page 13-1).
6-3
BASIC FAX TRANSMISSIONS SENDING FAXES
i
B) BASIC FAX TRANSMISSIONS
FOR YOUR INFORMATION
Sending a Fax
There are 3 basic ways of sending a fax:
1) Manual transmission:
You can talk or listen to the other party before you send a fax by picking up the
handset and dialing the number. After the other party has finished talking and
has pushed its START button, you will be able to send your fax by pressing your
START key and putting the handset back down in its cradle. (If you call and all
you hear is the chirping sound of a fax machine, you can go ahead and press your
START key, and then put down the handset.)
2) Automatic transmission:
a.
b.
c.
You can send a fax without picking up the handset or without pressing HOOK
by dialing the fax number and then pressing START.
One-Touch Dialing
Press one of the One-Touch keys. (The nmnbers must be stored beforehand. See
page 4-4.) Then press START.
Speed-Dialing
Press SPEED DIAL, then use the number keys to enter a two-digit number.
For example, press "05" for 5. (The numbers must be stored beforehand. See page
4-6.) Then press START.
Telephone Index
You can use the Tel-Index to make telephone or fax calls.(See page 5-2.)
3) Delayed transmission:
It is possible to send documents at a later time by using the TIMER function. (See
page 6-7.)
Talking to the Other Party When Sending a Fax
When you are sending a fax manually and you hear the recipient's voice instead of
fax tones, you can use the handset to have a conversation. When or if you want to then
send a fax, ask the person on the other line to press START on his/her fax machine
and when you hear fax tones you can press START to begin sending your fax.
Sending a Fax Automatically
mi: I:l @[-q_ Ir=YA','j Il!_q: [_',_
[ 09/12/1996 15:25 ]
1. Insert the documents thee down ( FAX: NO. & START ))
into the feeder. Q( COPY: PRESS COPY )
__ __ !! .. IIII II ......... 6-4
SENDING FAXES BAsteFAXTRANSMISSIONS
2. Enter a fax number.
Example: One-Touch dialing.
3. Press START.
( NJ OFFICE
( DIALING' '
( SENDING P.01
]
)
)
Sending a Fax Manually
1. Insert the documents lace down
into the feeder. (_
.
,
Pick up the handset or press HOOK
and listen for the dial tone.
Enter the fax number.
You can use manual dialing, One-Touch
dialing, Speed Dialing, or Tel-Index.
m i ] 14.] [,!_WaY&VlIIII_t: [el','_
( 09/12/1996 15:25 )
( FAX: NO. & START )-%
(COPY: PRESS COPY ] J
( ENTER FAX NO. )_
( PRESS START KEY )J
(NJ OFFICE ]
4. When you hear a fax tone, press (" S E ND I NG
START.
Your fax machine will begin sending the
documents.
Return the handset to its cradle, if
you did not use HOOK.
.
Automatic and Manual Re-dialing
Ifa number you have dialed is busy or your call did not go through for some other reason, you can
re-dial that number. There are two ways to re-dial, "automatic" and "manual." Automatic
redialing can only be used for faxes that were sent using automatic transmission--not for
telephone calls. The fax machine automatically will re-dial the number 3 times at 5 minute
intervals before giving up. It will re-dial the last dialed nu tuber when you press REDIAL/PAUSE
(manual re-dialing).
FOR YOUR INFORMATION
Optional Settings When You Send a Fax Manually
L
• Resolution (See page 6-2, 6-13.) ° Contrast (See page 6-3.)
• Cover Page (See page 6-17.) • Overseas Mode (See page 6-12.)
• Call Reservation (See page 6-18.)
!1!1 ............. L................
6-5
ADVANCED FAX TRANSMISSIONS SENDING FAXES
C) ADVANCED FAX TRANSMISSIONS
Sending a Fax by Using Super Quick-Scan (Memory Transmission)
If you are thxing a set oI'documents that are confidential m nature or you just need your original
documents back right away, you don't have to stand at the machine and wait for the transmission
of each page to be completed. You can use Super Quick-Scan in order to get your original
documents back before transmission.
1. Insert the documents into the
feeder.
2. Press SUPER Q.SCAN.
The display indicates how much memory
is available.
3. Enter the fax number.
4. Press STARTto begin scanning the
documents into memory. Once
completed,the fax machine will dial
the destination.
(09112/1996 15:25 ]
( FAX: NO' &START ]_
( COPY: PRESS COPY )J
( MEMORY 100% )
( ENTER FAX NO. )
( NJ OFFICE ]
( MEMORY 100% )
FOR YOUR INFORMATION
If You Get a MEMORY FULL Message When Trying to Send a Fax by
Using Super Quick-Scan
If the memory becomes full when scanning page one, the display shows "PRESS
STOP KEY", then press STOP to abort the job.
If the memory becomes full on page 2or more of a multi-page document, you will be
prompted to press START to send the portion already scanned, or STOP to abort the
job.
Printing Page Headers
Your fax machine can print a page header on top of every document you send. It is
printed on the receiving party's fax paper. It contains the date and time of
transmission, your fax number and name (Station ID), and page number. Of course
you need to register your Station ID beforehand for that information to be available.
(See page 4-3.)
Transmission Date and Time
r
L09/12/1996 15:25
Station ID
4155554444 BROTHER
Page Number
PAGE 01
•rr! ....... 11 n r 6-6
SENDING FAXES ADVANCED FAX TRANSMISSIONS
Delayed Transmission
You can set the timer to send documents at a later time (up to 24 hours later). Your fax machine
will also produce a report, the "Delayed Sending Report", after the fax is sent. You can set up to
three different documents for delayed transmission.
.Insert the documents into the
feeder.
2. Press SUPER Q.SCAN if you use
memory transmission; if not you
can send your fax normally.
3. Press FUNCTION.
4. Press 1.
5. Press 1.
6. Enter the time in 24-hour format
using the number keys.
Example: 19:45 (7:45 P.M.).
7. Wait for two seconds.
8. Press STOP.
9. Enter the fax number.
10.Press START.
The fax machine will wait until the
specified time to call.
m i: 14 .] 1,']"Jr.'VAVi II_I_!: [e]L',vh=_
(_09/12/1996 15:25
(( FAX: NO. & START _
( COPY: PRESS COPY
MEMORY 1_00% _
_( ENTER FAX NO )
(I.TEMP.SETTINGS ]
( I.TEMP.SETTINGS )
(1. TIMER
( SET TIME=O0:O0 )
( SET TIME--19:45 )
(
(1. TIMER
( ENTER FAX NO. )-%
(MEMORY 100% ) J
[NJ O FICE )
( 09/12/1996 15:25 )
Setting the Daily Timer (for Delayed Transmissions)
The Daily Timer function lets you send a fax at a set time every day. This is handy for sending
delayed jobs that must go out at the same time daily. Once you enter the time, you don't have to
enter it again. The setting will stay the same until you change it. So you can use it everyday, or
only on days when you need it.
i.Press FUNCTION.
2. Press 7.
3. Press 2.
niI:14 D]_:,];jwr-'¥&VJI! I_1: [o_
(__09/12/1996 15:25
1.TEMP.SETTINGS
(7.SETUP SYSTEM ]
( 2.DAILY TIMER ]
6-7
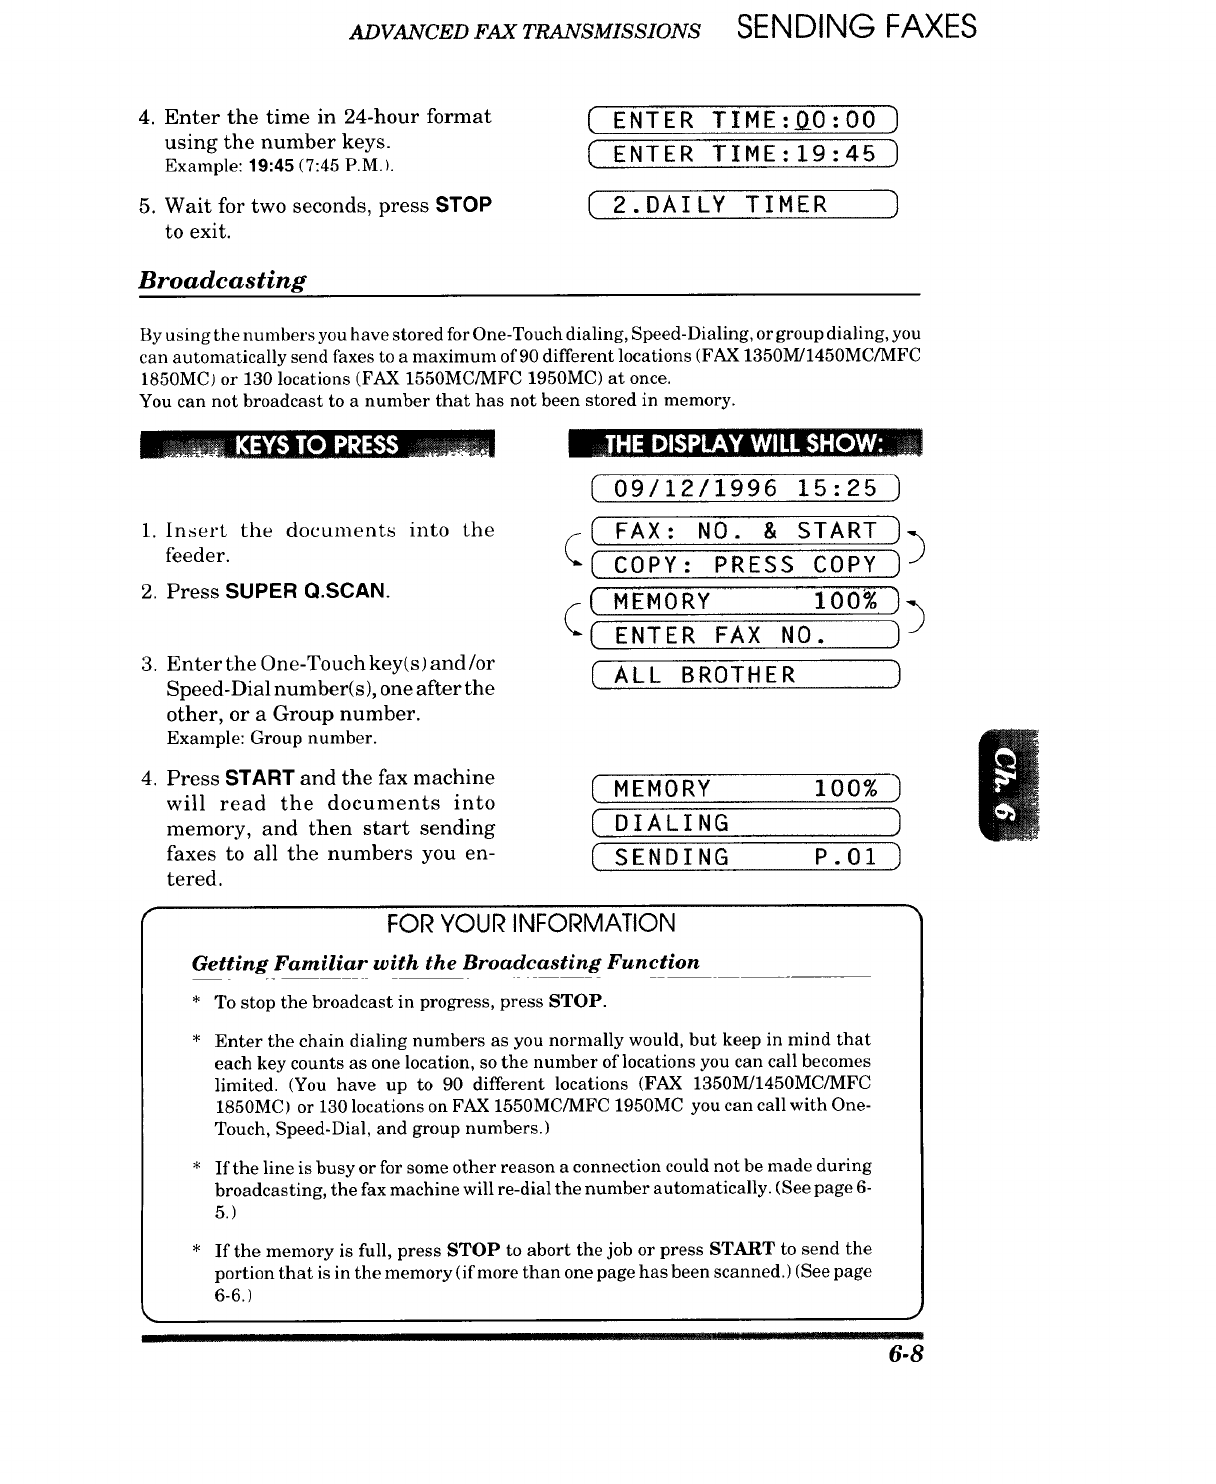
ADVANCED FAX TRANSMISSIONS SENDING FAXES
4. Enter the time in 24-hour format
using the number keys.
Example: 19"45 (7:45 P.M.I.
5. Wait for two seconds, press STOP
to exit.
( ENTER TIME:QO:O0 ]
( ENTER TIME:19:45 )
2.DAILY TIMER ]
Broadcasting
By using the numbers you have stored for One-Touch dialing, Speed-Dialing, or group dialing, you
can autonmtically send faxes to a maximum of 90 different locations (FAX 1350M/1450MC/MFC
1850MC) or 130 locations (FAX 1550MC/MFC 1950MC) at once.
You can not broadcast to a number that has not been stored in memory.
m|l,i,"
_i-"I:I _]H "JIFVdlkV,vlIII_']-"[o]kvLl..=_
09/12/1996 15:25 )
(
1. Insert tile documents into the ( FAX: NO. & START )
feeder. (( COPY: PRESS COPY ] )
2. Press SUPER Q.SCAN.
(( MEMORY 1_00_ ))
(ENTER FAX NO )
3. Enter the One-Touch key(s) and/or
Speed-Dialnumber(s),oneafterthe ( AL LBROTH E R )
other, or a Group number.
Example: Group number.
100%
4. Press START and the fax machine
will read the documents into
memory, and then start sending
faxes to all the numbers you en-
tered.
(
[
(
MEMORY
DIALING
SENDING P.01
)
]
FOR YOUR INFORMATION
Getting Familiar with the Broadcasting Function
* To stop the broadcast in progress, press STOP.
* Enter the chain dialing numbers as you normally would, but keep in mind that
each key counts as one location, so the number of locations you can call becomes
limited. (You have up to 90 different locations (FAX 1350M/1450MC/MFC
1850MC) or 130 locations on FAX 1550MC/MFC 1950MC you can call with One-
Touch, Speed-Dial, and group numbers.}
* If the line is busy or for some other reason a connection could not be made during
broadcasting, the fax machine will re-dial the number automatically. (See page 6-
5.)
* If the memory is full, press STOP to abort the job or press START to send the
portion that is in the memory (if more than one page has been scanned.) (See page
6-6.)
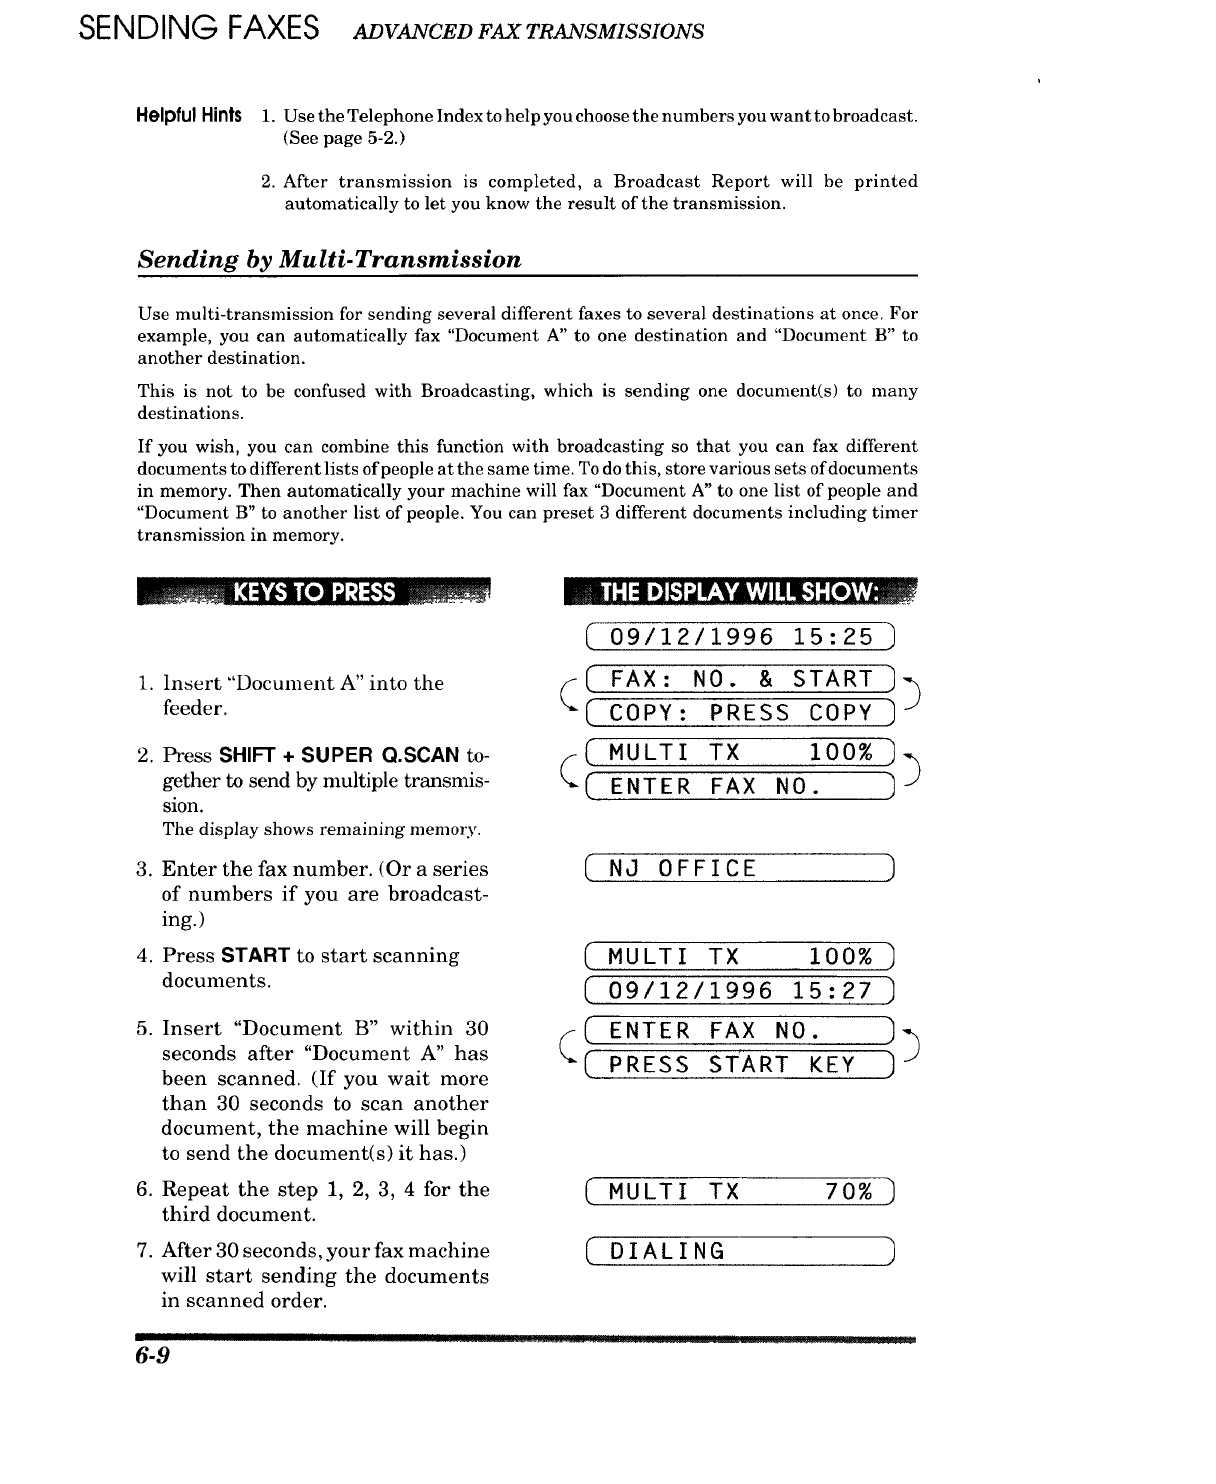
SENDING FAXES ADVANCEDFAXTRANSMISSIONS
Helpful Hints 1. Use the Telephone Index to help you choose the numbers you want to broadcast.
(See page 5-2.)
2. After transmission is completed, a Broadcast Report will be printed
automatically to let you know the result of the transmission.
Sending by Multi-Transmission
Use multi-transmission for sending several different faxes to several destinations at once. For
example, you can automatically fax "Document A" to one destination and "Document B" to
another destination.
This is not to be confused with Broadcasting, which is sending one document(s) to ninny
destinations.
If you wish, you can combine this function with broadcasting so that you can fax different
documents to different lists of people at the same time. To do this, store various sets of documents
in memory. Then automatically your machine will fax "Document A" to one list of people and
"Document B" to another list of people. You can preset 3 different documents including timer
transmission in memory.
,
.
.
,
.
.
.
Insert "Document A" into the
feeder.
Press SHIFT + SUPER Q.SCAN to-
gether to send by multiple transmis-
sion.
The display shows remaining memory.
Enter the fax number. (Or a series
of numbers if you are broadcast-
ing.)
Press START to start scanning
documents.
Insert "Document B" within 30
seconds after "Document A" has
been scanned. (If you wait more
than 30 seconds to scan another
document, the machine will begin
to send the document(s) it has.)
Repeat the step 1, 2, 3, 4 for the
third document.
After 30 seconds, your fax machine
will start sending the documents
in scanned order.
09/12/1996 15:25 ]
FAX: NO. & START ]_
(( COPY: PRESS COPY ]
( MU,TITX _i00 ])
(_ ENTER FAX NO
( NJ OFFICE
( MULTI TX 100% )
( 09/12/1996 15.27 )
(( ENTER FAX NO. ]]
( PRESS START KEY )
CMULTI TX 70%
DIALING
)
)
6-9 II I_ ....... II!IH I ................... I ........................... _ ......... Jill
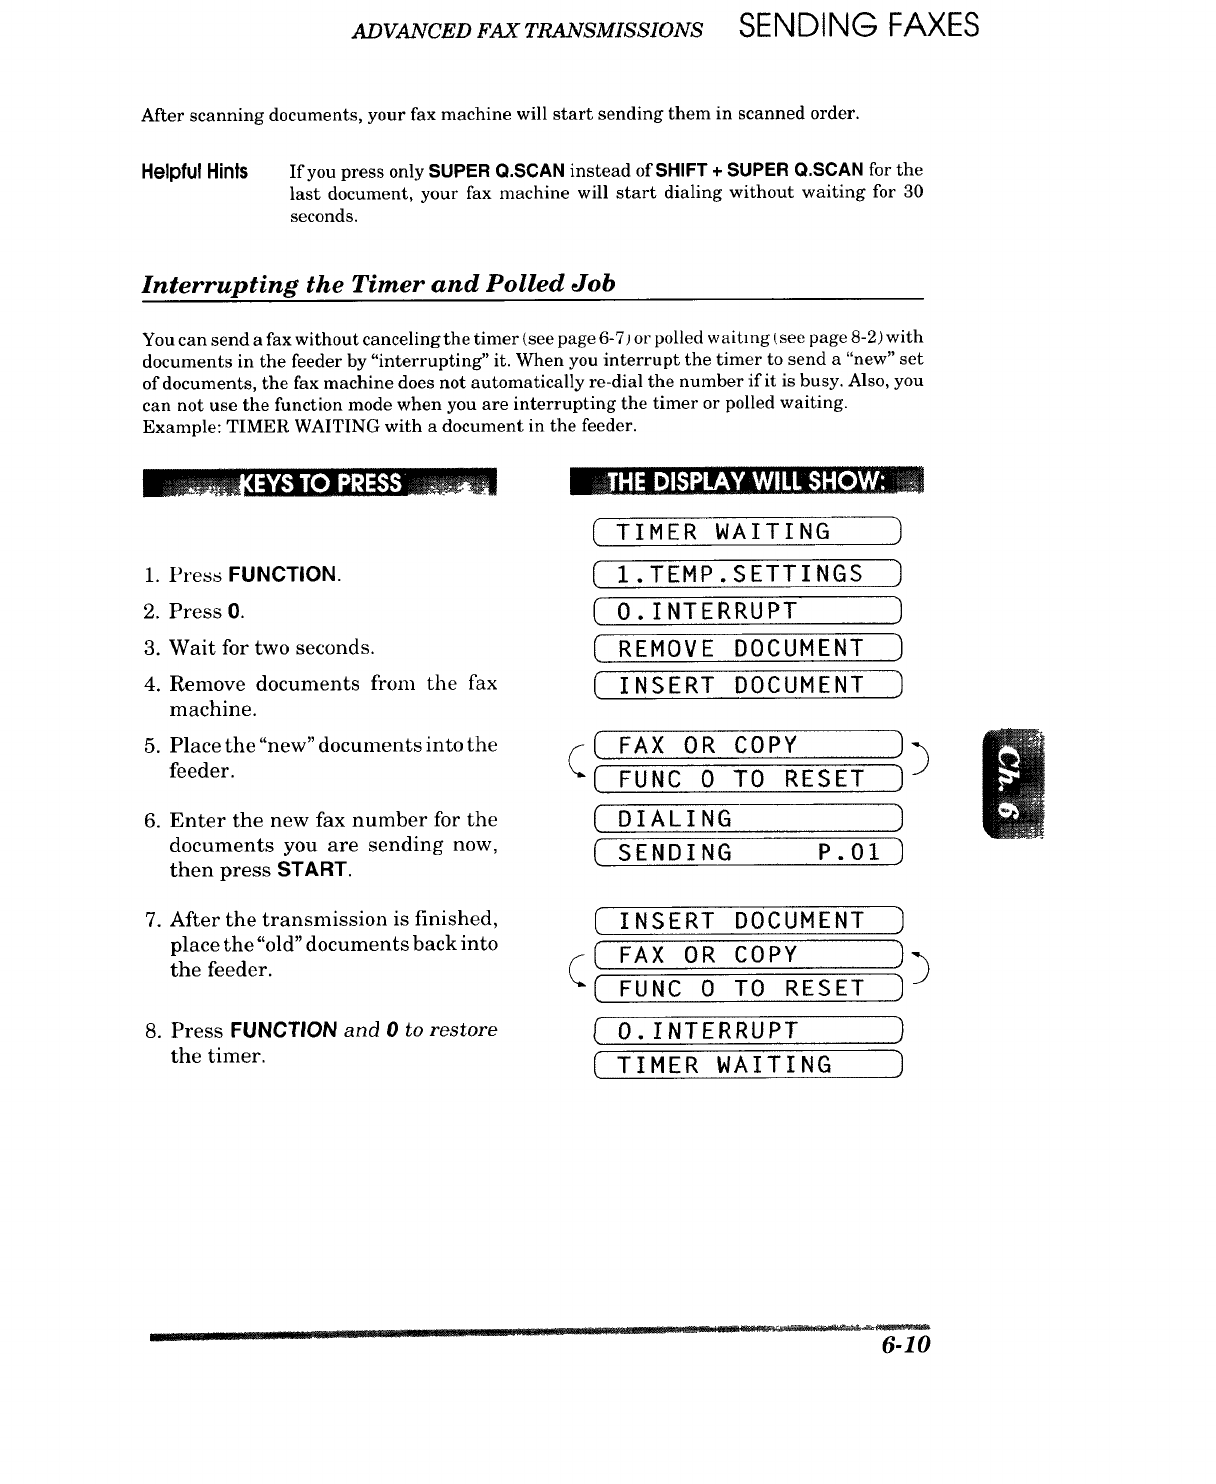
ADVANCED FAX TRANSMISSIONS SENDING FAXES
After scanning documents, your fax machine will start sending them in scanned order.
Helpful Hints If you press only SUPER Q.SCAN instead of SHIFT + SUPER Q.SCAN for the
last document, your fax machine will start dialing without waiting for 30
seconds.
Interrupting the Timer and Polled Job
You can send a fax without canceling the timer (see page 6-7j or polled waiting (see page 8-2) with
documents in the feeder by "interrupting" it. When you interrupt the timer to send a "new" set
of documents, the fax machine does not automatically re-dial the number if it is busy. Also, you
can not use the function mode when you are interrupting the timer or polled waiting.
Example: TIMER WAITING with a document in the feeder.
m mHHm,
1. Press FUNCTION.
2. Press 0.
3. Wait for two seconds.
4. Remove documents from the fax
machine.
5. Place the "new" documents into the
feeder.
6. Enter the new fax number for the
documents you are sending now,
then press START.
7. After the transmission is finished,
place the "old" documents back into
the feeder.
8. Press FUNCTION and 0to restore
the timer.
( TIMER WAITING )
( 1.TEMP.SETTINGS ]
(0.INTERRUPT )
( REMOVE DOCUMENT )
( INSERT DOCUMENT )
(" FAX OR COPY )'-_
(FUNC 0 TO RESET ) J
( DIALING )
(" SENDING P.01 )
( INSERT DOCUMENT ]
(FAX OR COPY ]]
( FUNC 0 TO RESET ]
O. INTERRUPT )
( TIMER WAITING ]
_l] ...... _ ....... '-- ....... i_ • -- __,,,_ _¢',._
6-10
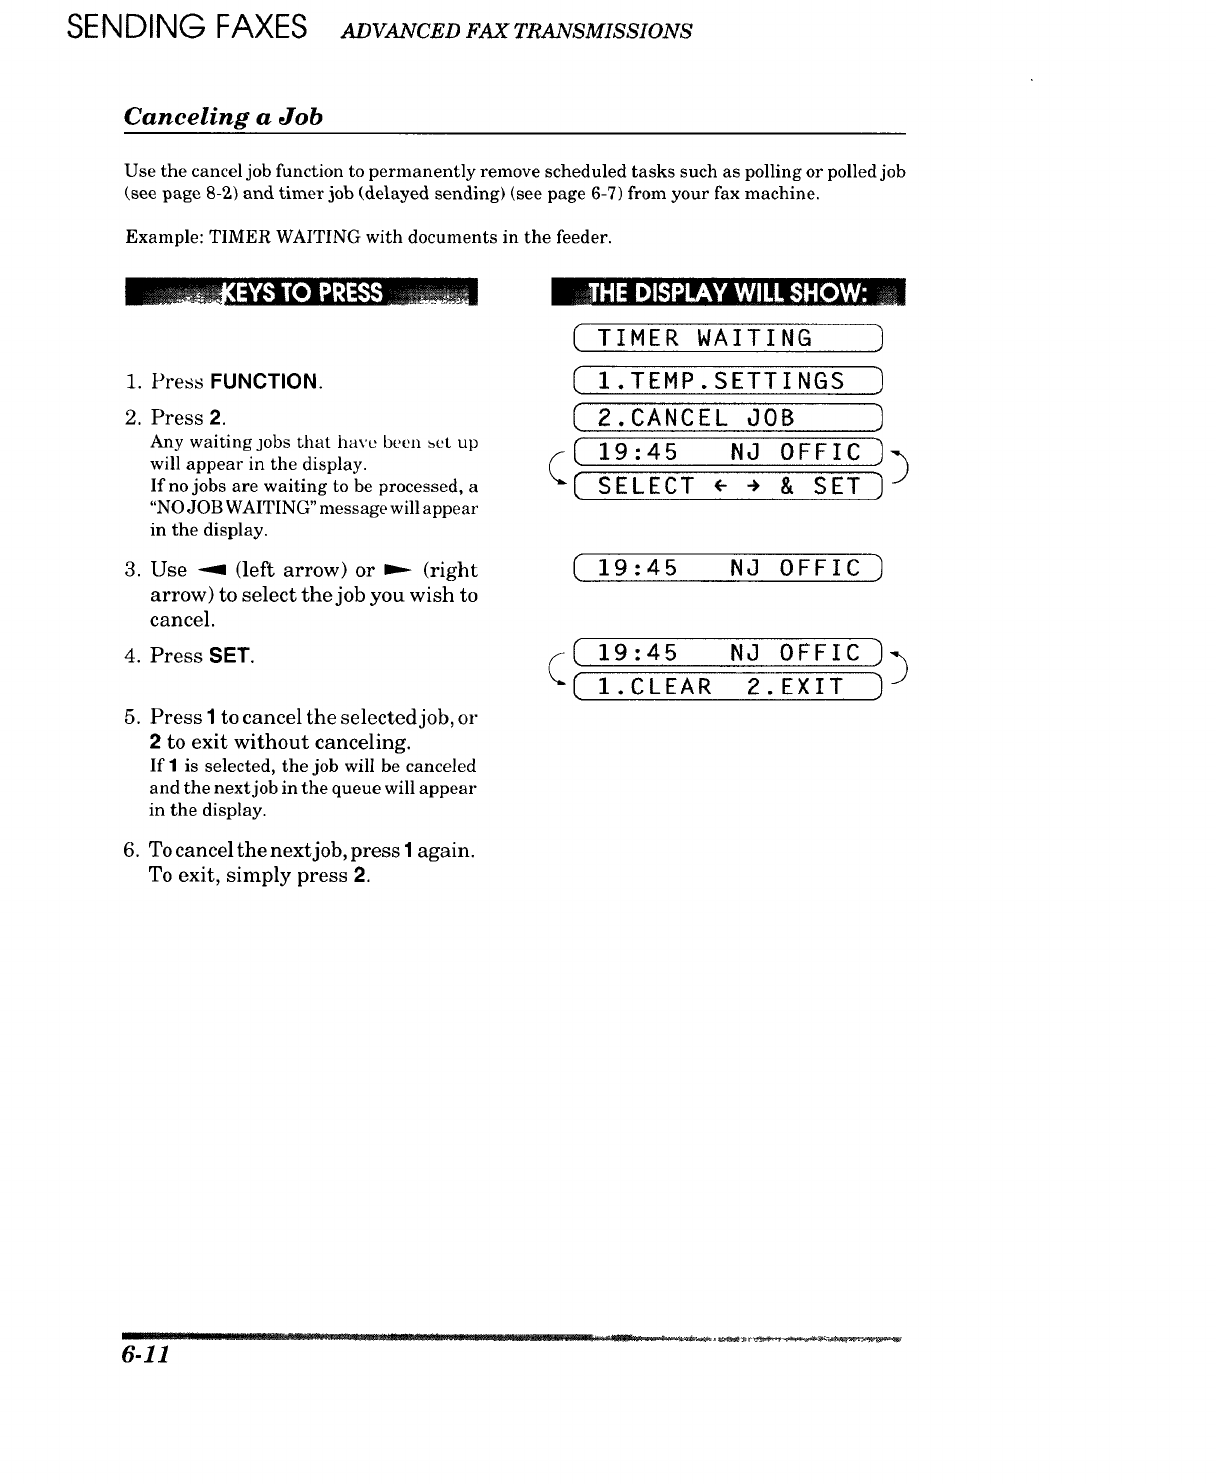
SENDING FAXES ADVANCED FAX TRANSMISSIONS
Canceling a Job
Use the cancel job function to permanently remove scheduled tasks such as polling or polled job
(see page 8-2) and timer lob (delayed sending) (see page 6-7) from your fax machine.
Example: TIMER WAITING with documents in the feeder.
_. |'- I :i D]_']_ tE.VAv_vjIII_',] -'[e]vjv_
.
2.
,
.
Press FUNCTION.
Press 2.
Any waiting jobs that have been _ct up
will appear in the display.
If no jobs are waiting to be processed, a
"NO JOB WAITING" message will appear
in the display.
Use --9 (left arrow) or _ (right
arrow) to select the job you wish to
cancel.
Press SET.
.
.
Press I to cancel the selected job, or
2 to exit without canceling.
If Iis selected, the job will be canceled
and the next job in the queue will appeal"
in the display.
To cancel the next job, press I again.
To exit, simply press 2.
( TIMER WAITING )
( I.TEMP.SETTINGS )
( 2.CANCEL JOB ]
((. 19:45 NJ OFFIC ))
( SELECT <- ÷ & SET )
19:45 NJ OFFIC ]
((. 19:45 NJ 0FFIC _
1.CLEAR 2.EXIT
I_N!!
6-11
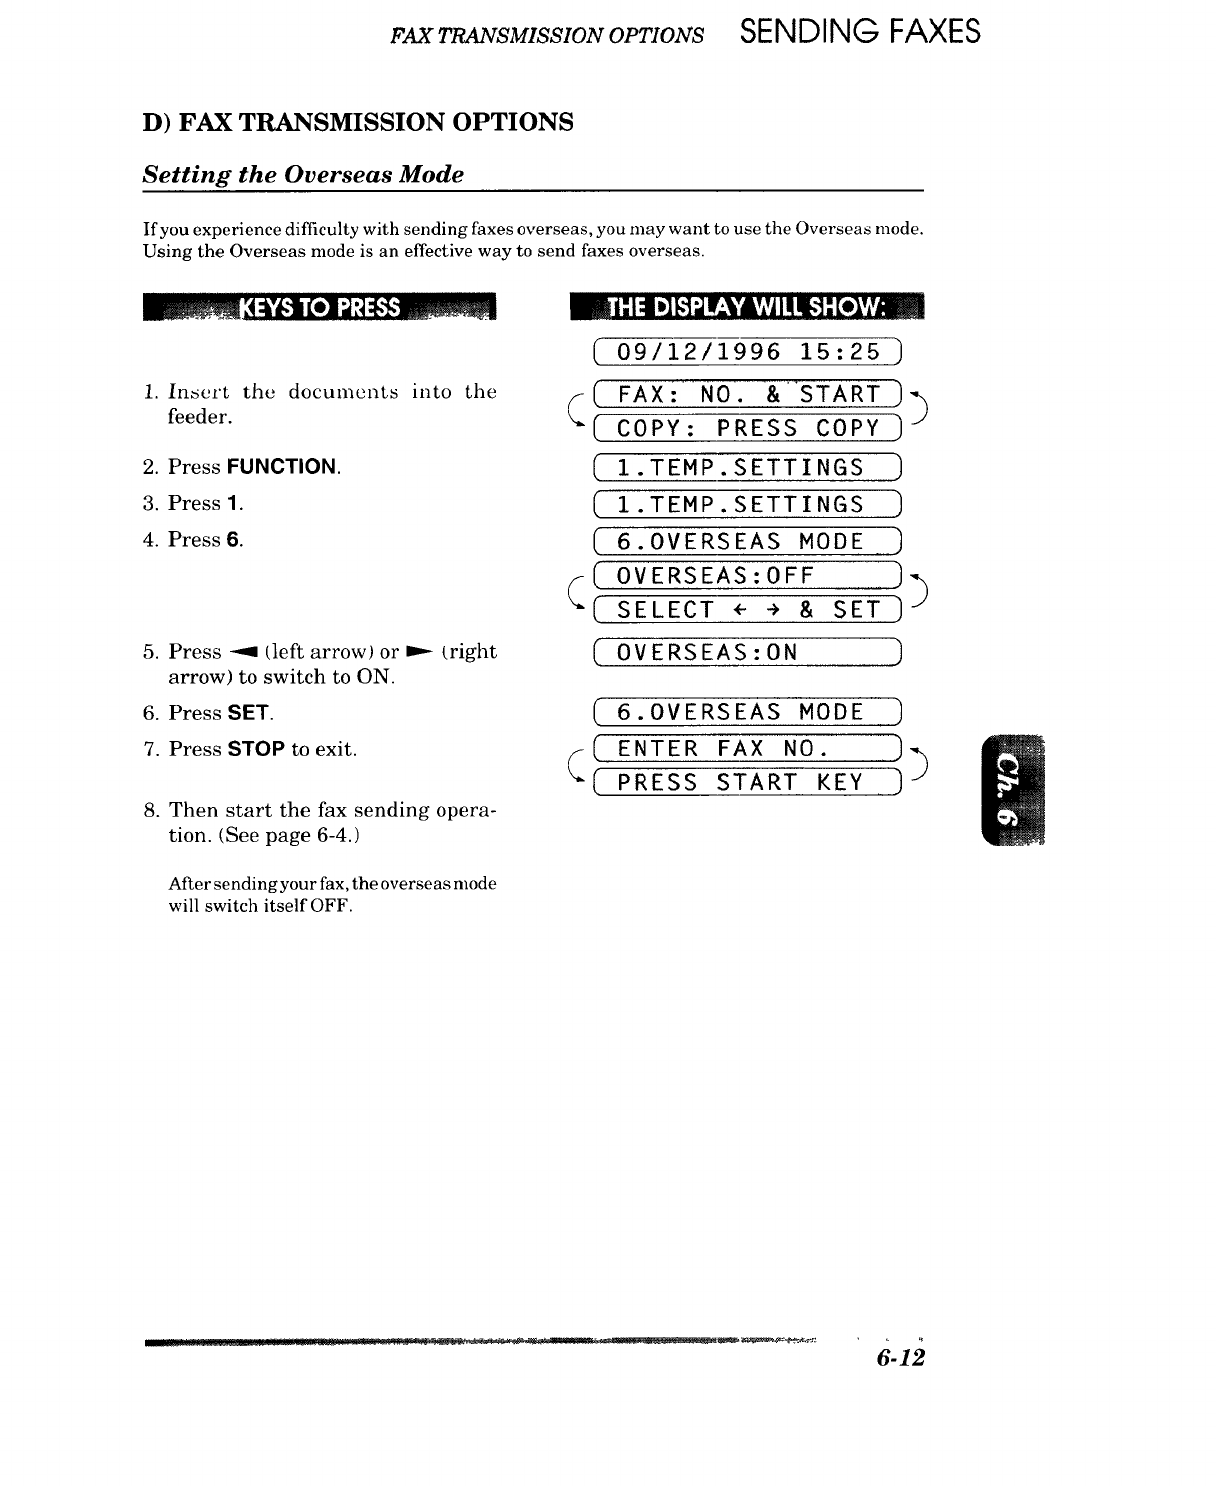
FAX TRANSMISSION OPTIONS SENDING FAXES
D) FAX TRANSMISSION OPTIONS
Setting the Overseas Mode
If you experience difficulty with sending faxes overseas, you may want to use the Overseas mode.
Using the Overseas mode is an effective way to send faxes overseas.
1. Insert the documents into tile
feeder.
2. Press FUNCTION.
3. Press 1.
4. Press 6.
5. Press --_ (left arrow) or P-_ (right
arrow) to switch to ON.
6. Press SET.
7. Press STOP to exit.
8. Then start the fax sending opera-
tion. (See page 6-4.)
(
(
(
(
(
(
(
(
(
09/12/1996 15:25 )
FAX: NO. & START )_
COPY: PRESS COPY ) J
1.TEMP.SETTINGS )
1.TEMP.SETTINGS )
6.OVERSEAS MODE )
OVERSEAS:OFF )_
SELECT ÷ ÷ & SET )
OVERSEAS:ON )
( 6.OVERSEAS MODE )
( ENTER FAX NO. ]_
_( PRESS START KEY )
After sendingyour fax, the overseas mode
will switch itself OFF.

SENDING FAXES FAXTRANSMISSIONOPTIONS
Setting Your Fax Machine for Multiple Resolution Transmission
This is a temporary setting for the current transmission,job only.
You can set the resolution of the documents you send by pressing RESOLUTION. Once you set
the resolution, all the pages will be sent at the same resolution. However, there may be times
when you want to send some pages at one resolution, such as "standard", and ether pages in
another resolution, such as"photo." If you send all pages in photo resolution, for instance, it would
take a great deal of time. It is better to specify the resolution for each page to minimize
transmission time. This is made possible by using the 1.TEMP. SETTINGS function.
1. Insert the documents into the
feeder.
m
m|"1:11_][,"];,llr.'YAv,vji III_]: [e_',v.._U_
( 09/12/1996 15:25
(( FAX: NO. & START ))
(COPY: PRESS COPY ]
2. Press FUNCTION.
3. Press 1.
4. Press 5.
.
.
.
.
9.
Press -.9 (left arrow) or _ (right
arrow) to find the resolution you
want for the first page of your
documents.
Example: FINE.
Press SET.
Return to step 5 for setting the resolution
for page 2 and the following pages.
When you finish setting the resolu-
tion for all your pages, press STOP.
Enter the fax number.
Press START.
The resolution will revert to STAND-
ARD after the documents have been sent.
(
( 1.TEMP.SETTINGS )
(1.TEMP.SETTINGS
( 5. RESOLUTION
(PAGE 01:STANDARD )'%
( SELECT <- -> &SET ) .J
( PAGE 01:FINE )
PAGE 02:FINE
FAX: NO. & START-]
(( COPY: PRESS COPY )
___ :i'" "_-12 ....... I1"117
6-13
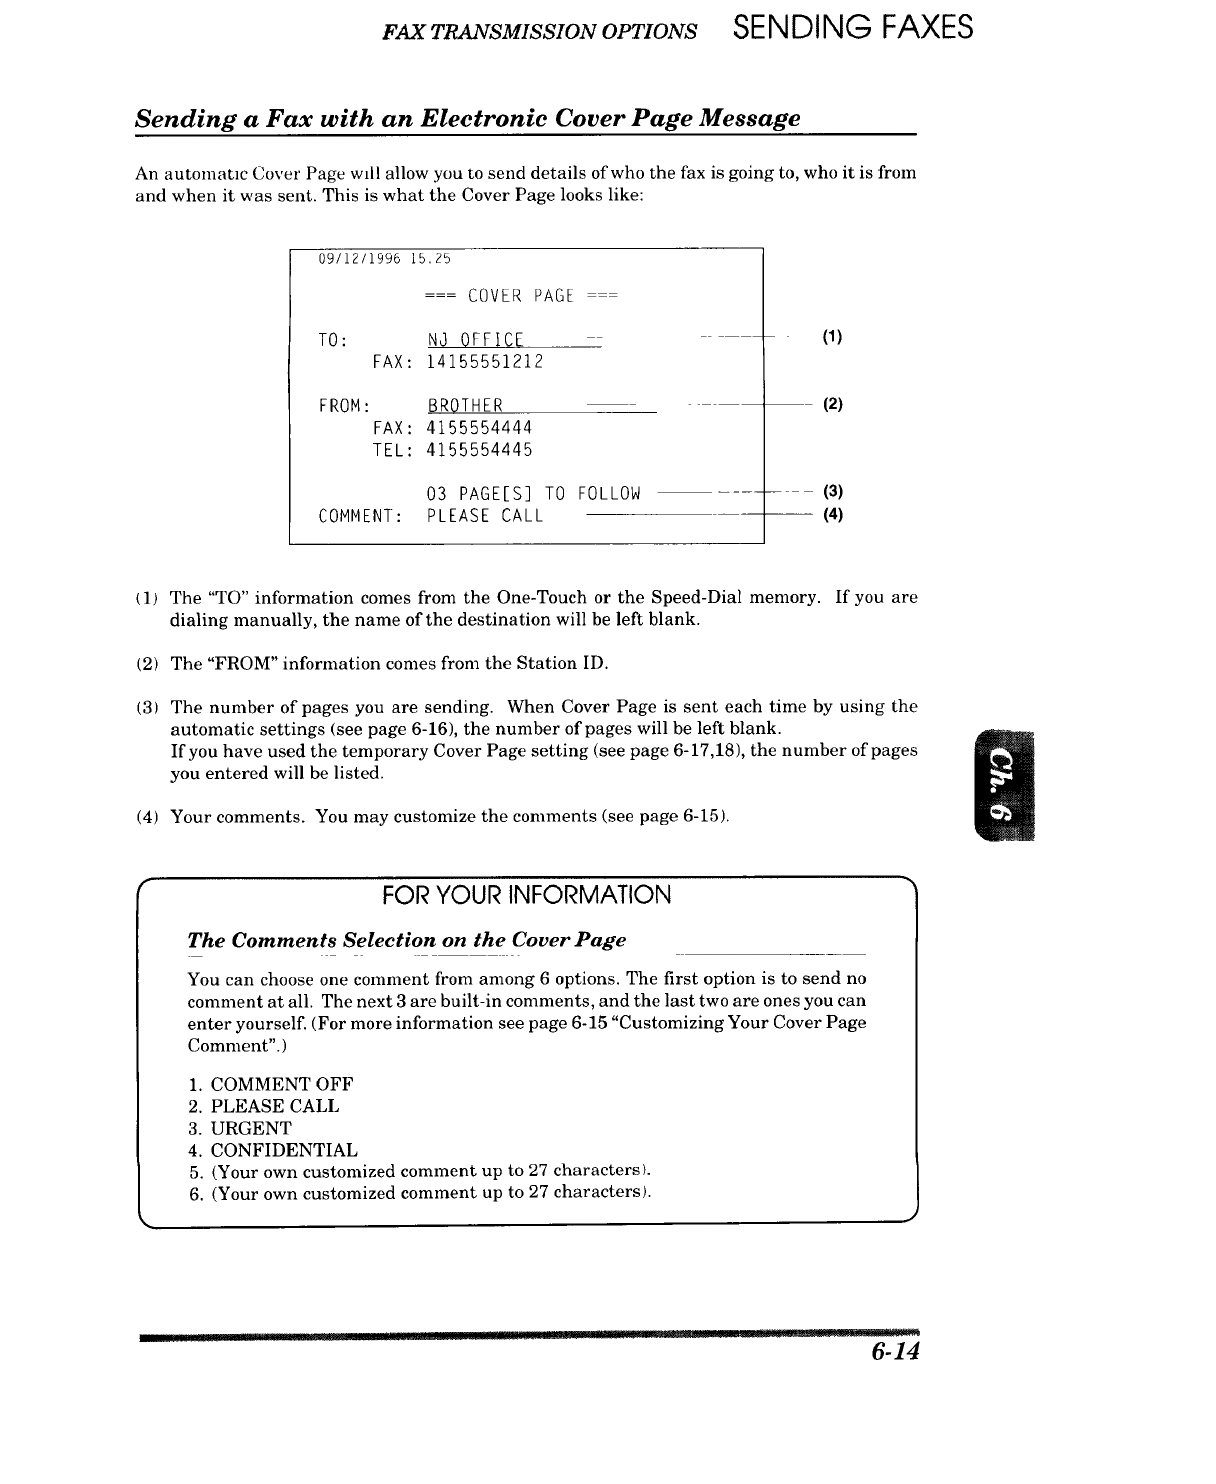
FAX TRANSMISSION OPTIONS SENDING FAXES
Sending a Fax with an Electronic Cover Page Message
An automanc Cover Page wall allow you to send details of who the fax is going to, who it is from
and when it was sent. This is what the Cover Page looks like:
09/12/1996 15.25
COVER PAGE
TO: NJ OFFICE
FAX: 14155551212
FROM: BROTHER
FAX: 4155554444
TEL: 4155554445
03 PAGE[S] TO FOLLOW
COMMENT: PLEASE CALL
(1)
(2)
(3)
(4)
{1)
(2)
(3)
The "TO" information comes from the One-Touch or the Speed-Dial menmry. If you are
dialing manually, the name of the destination will be left blank.
The "FROM" information comes from the Station ID.
The number of pages you are sending. When Cover Page is sent each time by using the
automatic settings (see page 6-16), the number of pages will be left blank.
If you have used the temporary Cover Page setting (see page 6-17,18), the number of pages
you entered will be listed.
(4) Your comments. You may customize the comments (see page 6-15).
FOR YOUR INFORMATION
The Comments Selection on the Cover Page
You can choose one comment from among 6 options. The first option is to send no
comment at all. The next 3 are built-in comments, and the last two are ones you can
enter yourself. (For more information see page 6-15 "Customizing Your Cover Page
Comment".)
1. COMMENT OFF
2. PLEASE CALL
3. URGENT
4. CONFIDENTIAL
5. (Your own customized comment up to 27 characters).
6. (Your own customized comment up to 27 characters).
.................. I B_.. rp! ...... rr .!. [1! ....... 'TC 7..... C::TT_" ._.-
6-14
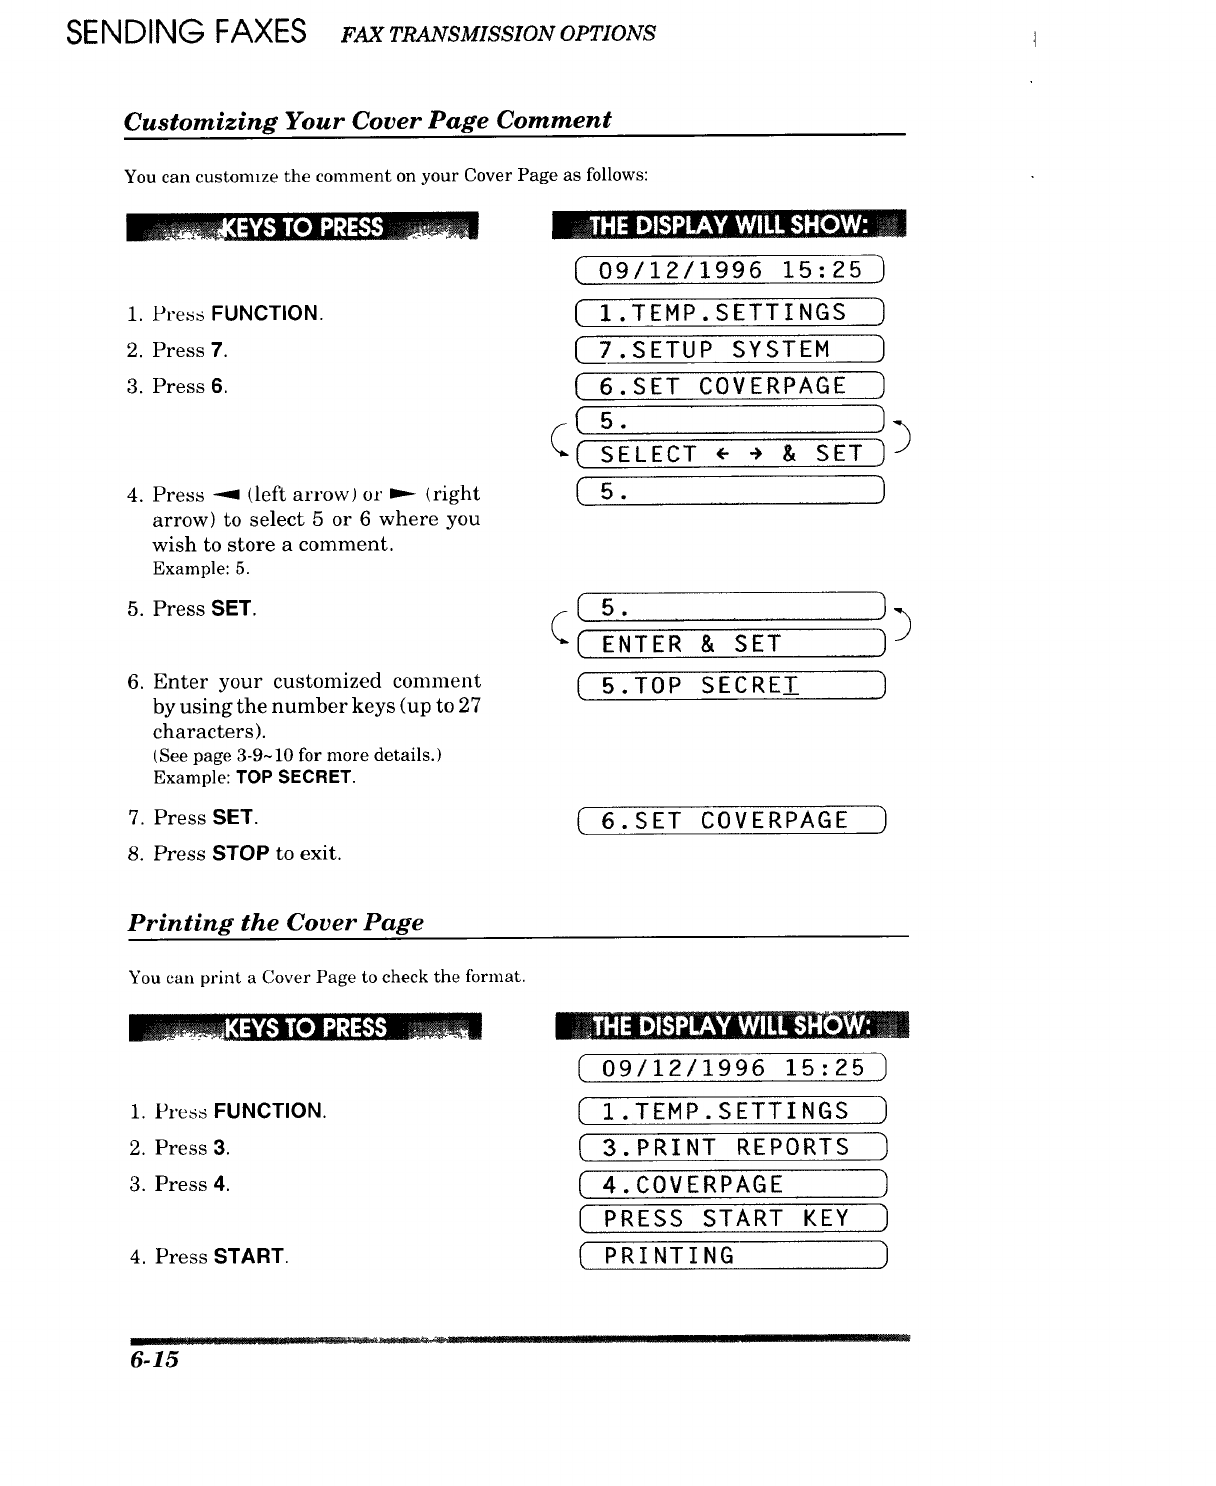
SENDING FAXES FAXTRANSMISSIONOPTIONS
Customizing Your Cover Page Comment
You can customzze the comment on your Cover Page as follows:
1. Press FUNCTION.
2. Press 7.
3. Press 6.
4. Press _ (left arrow) or _ (right
arrow) to select 5 or 6 where you
wish to store a comment.
Example: 5.
5. Press SET.
.
.
8.
Enter your customized comment
by using the number keys (up to 27
characters).
(See page 3-9~10 for more details.)
Example: TOP SECRET.
Press SET.
Press STOP to exit.
= iI."1:11D]_,1",JIV_,%'A,,,jI ! I,']; _o:_v,'_
(09/12/1996 15:25
1.TEMP.SETTINGS 1
( 7.SETUP SYSTEM 1
6.SET COVERPAGE 1
(Is. 1
SELECT (" ÷ & SET ,)_
[5. :7
(5. ]
(( ENTER & SET ))
(5. TOP SECRET )
6.SET COVERPAGE )
Printing the Cover Page
You can print a Cover Page to check the format.
1. Press FUNCTION.
2. Press 3.
3. Press 4.
4. Press START.
! i'i | i]_.-]_l_,\'lu, i ilit_,- f_
09112/1996 15:25
( 1.TEMP.SETTINGS
( 3.PRINT REPORTS
4.COVERPAGE
( PRESS START KEY
PRINTING
6-15
]InIni[]=[]
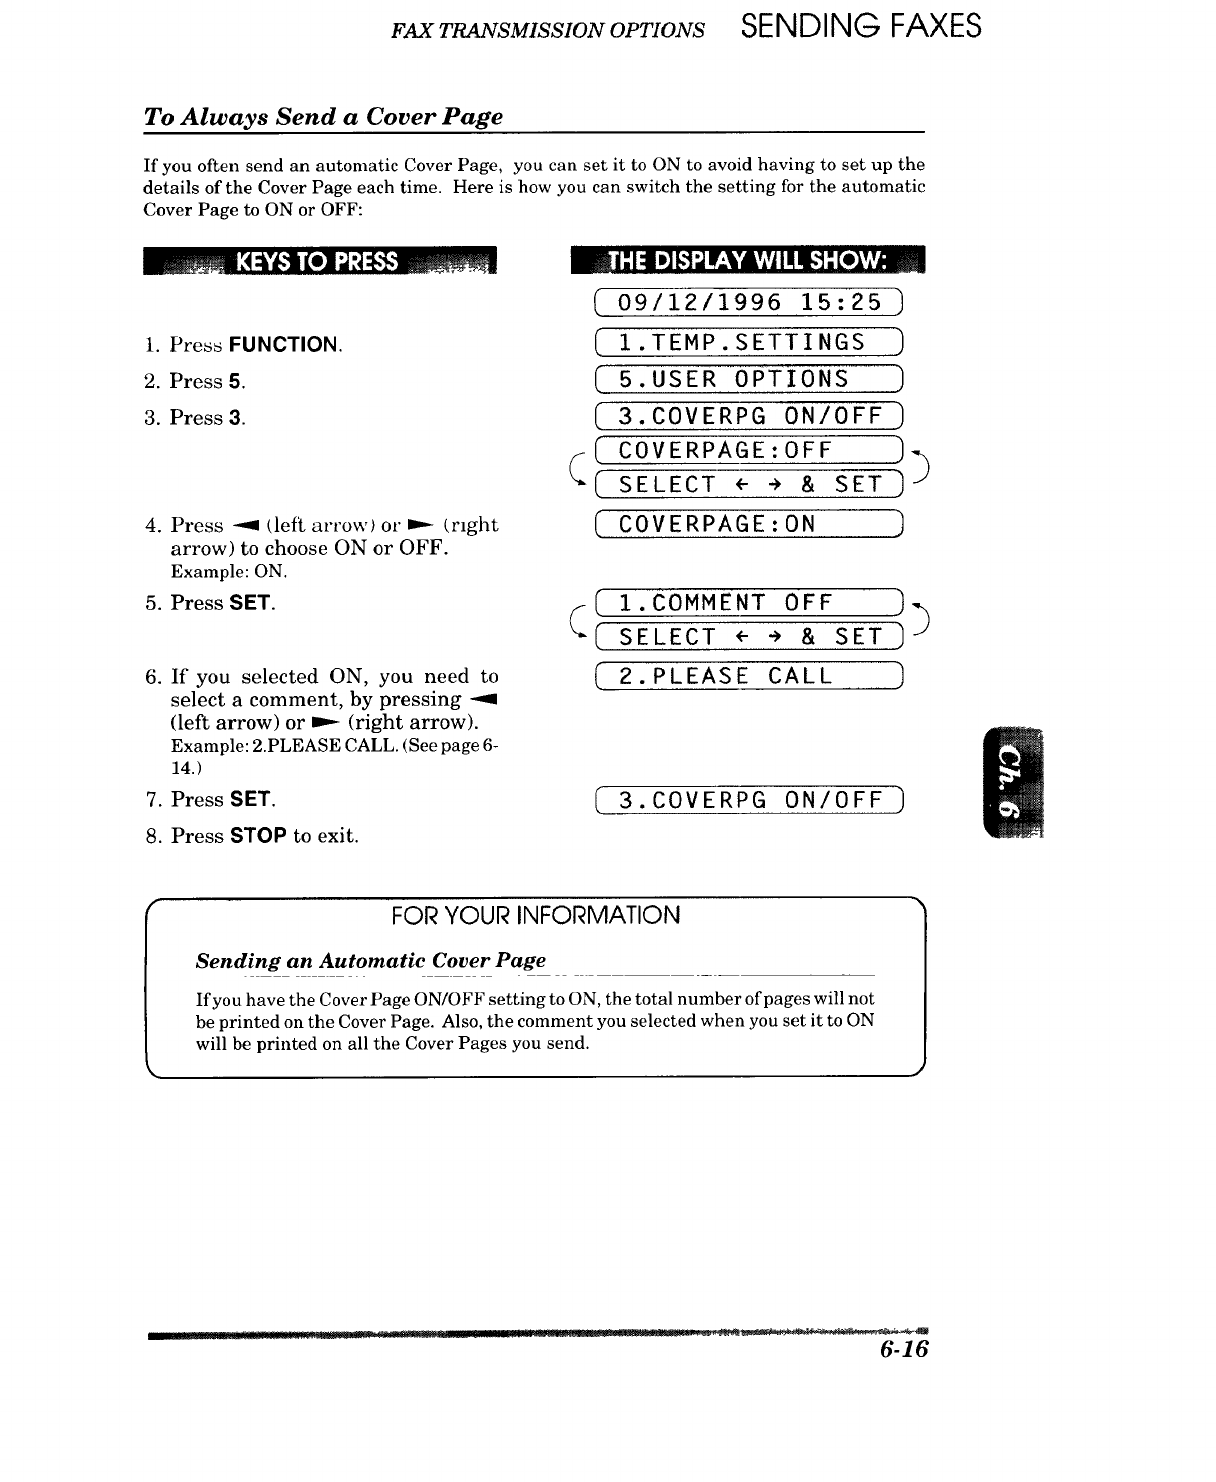
FAX TRANSMISSION OPTIONS SENDING FAXES
To Always Send a Cover Page
If you often send an automatic Cover Page, you can set it to ON to avoid having to set up the
details of the Cover Page each time. Here is how you can switch the setting for the automatic
Cover Page to ON or OFF:
1. Press FUNCTION.
2. Press 5.
3. Press 3.
4. Press -.9 tier1, arrow) or _ trlght
arrow) to choose ON or OFF.
Example: ON.
5. Press SET.
6. If you selected ON, you need to
select a comment, by pressing --9
(left arrow) or _ (right arrow).
Example: 2.PLEASE CALL. (See page 6-
14.)
7. Press SET.
8. Press STOP to exit.
i,. 111:ll I,]!,.1r,,11r_"%'&vlvlII I1,.I"-[e:lv,v,i.=,,_
( 09/12/1996 15:25 )
( 1.TEMP.SETTINGS )
( 5.USER OPTIONS )
( 3.COVERPG ON/OFF )
COVERPAGE:OFF ))
(SELECT e ÷ & SET ]
( COVERPAGE:ON ]
( 1.C0MMENT OFF )
( SELECT • -> & SET J"
( 2. PLEASE CALL ]
( 3.COVERPG ON/OFF
FOR YOUR INFORMATION
Sending an Automatic Cover Page
If you have the Cover Page ON/OFF setting to ON, the total number of pages will not
be printed on the Cover Page. Also, the comment you selected when you set it to ON
will be printed on all the Cover Pages you send.
6-16
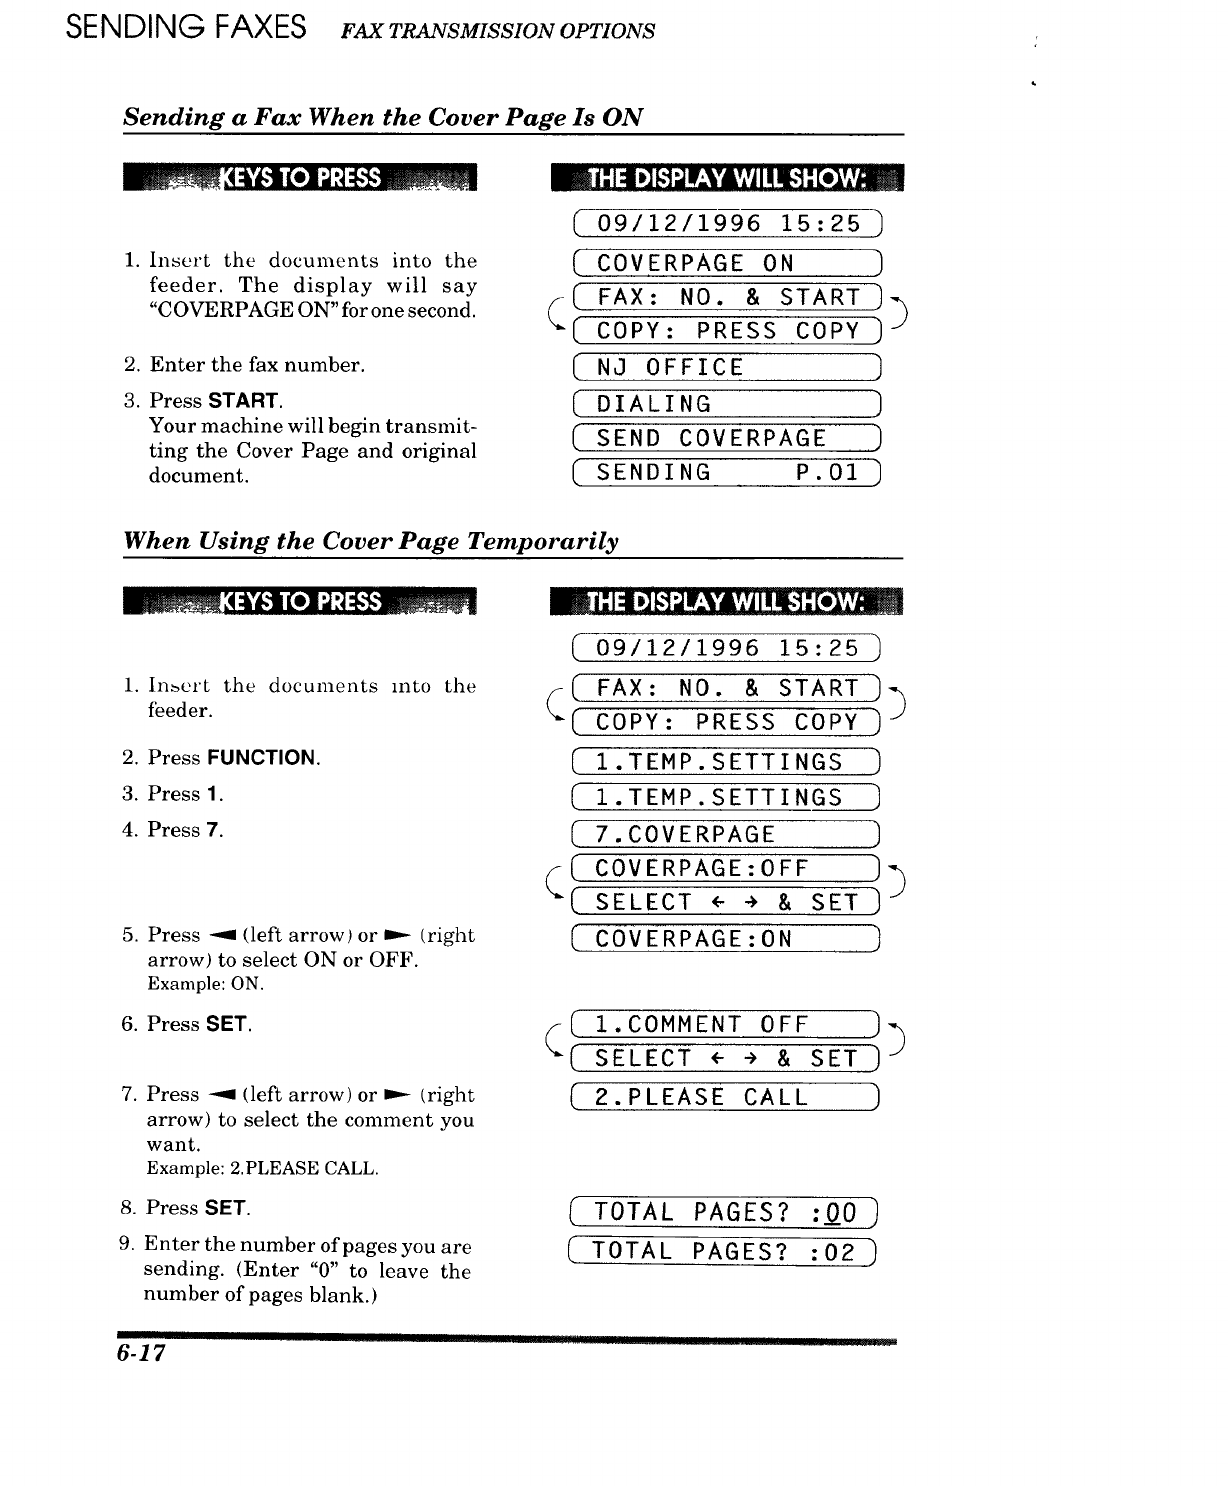
SENDING FAXES FAXTRANSMISSIONOPTIONS
Sending a Fax When the Cover Page Is ON
1. Insert the documents into the
feeder. The display will say
"COVERPAGE ON" for one second.
.
3.
Enter the fax number.
Press START.
Your machine will begin transmit-
ting the Cover Page and original
document.
_|-"I::11D][,,']_Ir-_k'AYjItl_'] -"[e]v,v.AiWl
(09/12/1996 15:25 ]
( COVERPAGE ON
( FAX: NO. & START ]_
( COPY: PRESS COPY J
NO OFFICE ]
(DIALING ]
( SEND COVERPAGE )
( SENDING P.01
When Using the Cover Page Temporarily
1. In_crt the documents into the
feeder.
2. Press FUNCTION.
3. Press I.
4. Press 7.
5. Press -41 (left arrow} or _ (right
arrow) to select ON or OFF.
Example: ON.
6. Press SET.
.
.
9.
Press --9 (left arrow) or D-- (right
arrow) to select the comment you
want.
Example: 2.PLEASE CALL.
Press SET.
Enter the number of pages you are
sending. (Enter "0" to leave the
number of pages blank.)
J:l:l,Ira-Jr._,'A,,,_tIm._:[,_,,,_
(09/12/1996 15:25 )
( FAX: NO. & START )_
(
--( COPY: PRESS COPY )
( 1.TEMP.SETTINGS )
( 1.TEMP.SETTINGS )
7.COVERPAGE )
COVERPAGE:OFF ))(
--( SELECT ÷ ÷ & SET )
[ COVERPAGE:ON )
( 1.COMMENT OFF )_(
"_( SELECT <" ÷ & SET)
( 2. PLEASE CALL )
( TOTAL PAGES? :_0 )
( TOTAL PAGES? :02_
• ..LI I I rl
6-17
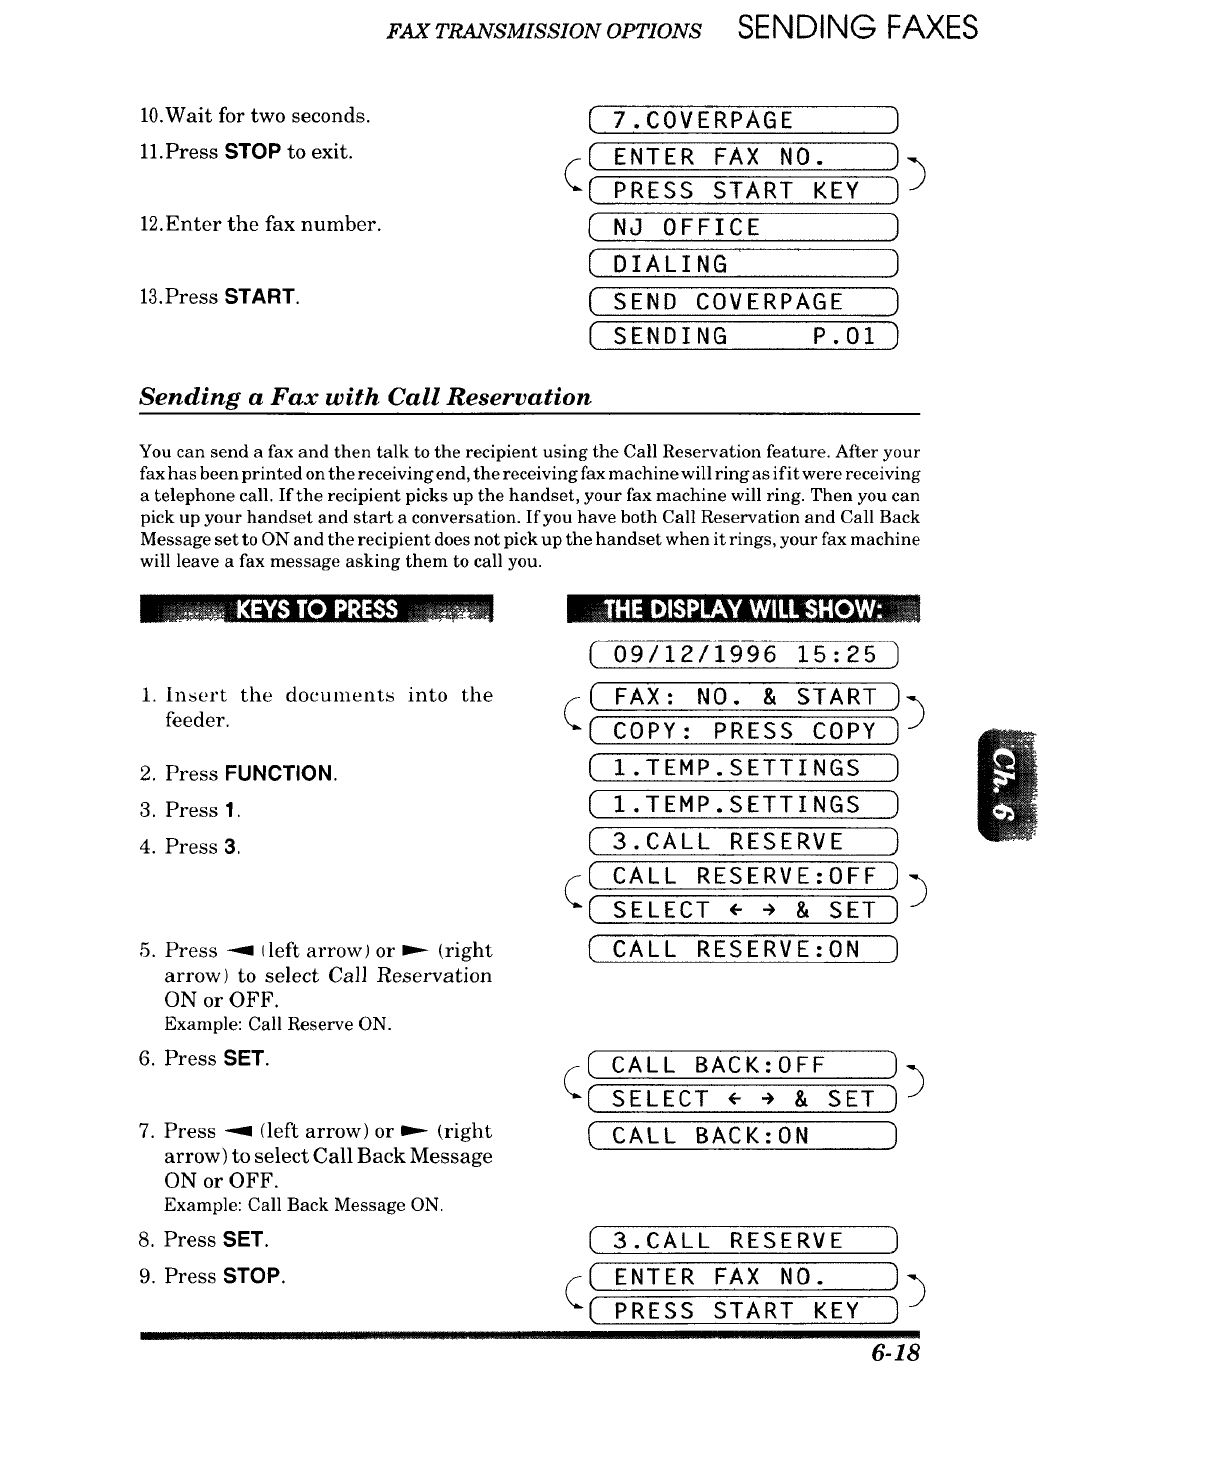
FAX TRANSMISSION OPTIONS SENDING FAXES
10.Wait for two seconds.
ll.Press STOP to exit.
12.Enter the fax number.
13.Press START.
( 7.C0VERPAGE ]
(ENTER FAX NO. ]
_( PRESS START KEY ]_
( NJ 0FFICE ]
(OIALING )
(SENDCOVERPAGE)
( SENDING P.01 ]
Sending a Fax with Call Reservation
You can send a fax and then talk to the recipient using the Call Reservation feature. After your
fax has been printed on the receiving end, the receiving fax machine will ring as if it were receiving
a telephone call. If the recipient picks up the handset, your fax machine will ring. Then you can
pick up your handset and start a conversation. If you have both Call Reservation and Call Back
Message set to ON and the recipient does not pick up the handset when it rings, your fax machine
will leave a fax message asking them to call you.
1. Insert the documents into the
feeder.
2. Press FUNCTION.
3. Press 1.
4. Press 3.
5. Press --9 (left arrow) or _ (right
arrow) to select Call Reservation
ON or OFF.
Example: Call Reserve ON.
6. Press SET.
7. Press "9 (left arrow) or _ (right
arrow) to select Call Back Message
ON or OFF.
Example: Call Back Message ON.
(
(
(
(
(
(
(
(
(
09/12/1996 15:25 ]
FAX: NO. & START )_
COPY: PRESS COPY] J
I.TEMP.SETTINGS ]
I.TEMP.SETTINGS )
3. CALL RESERVE )
CALL RESERVE:OFF ])
SELECT e ÷ & SET ]
CALL RESERVE:0N ]
(( CALL BACK:OFF ")_
( SELECT + ÷ & SET )
(CALL BACK: ON ]
8. PressSET. ( 3.CALL RESERVE ]
9. PressSTOP. _( ENTER FAX NO. ]_
( PRESSSTARTKEY ]
6-18
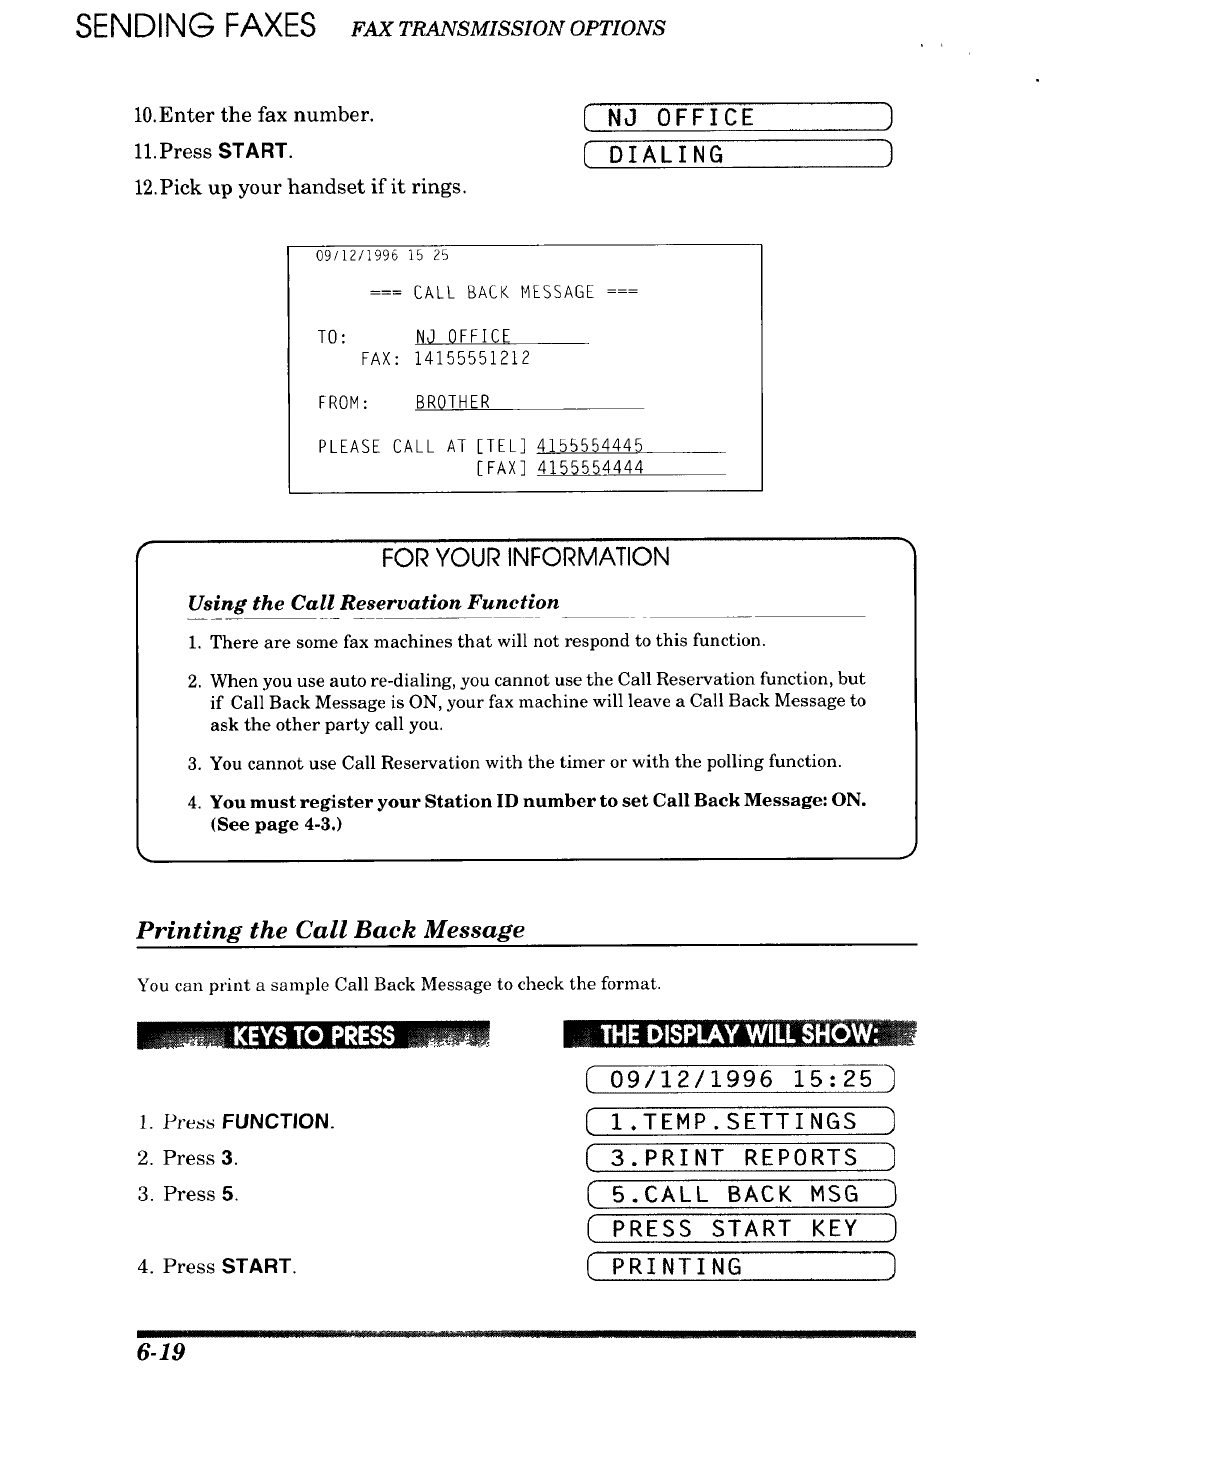
SENDING FAXES FAXTRANSMISSIONOPTIONS
10.Enter the fax number.
11.Press START.
12.Pick up your handset if it rings.
(NJ OFFICE
( DIALING
)
]
09/12/1996 15 25
TO:
=== CALL BACK MESSAGE ===
NO OFFICE
FAX: 14155551212
FROM: BROTHER
PLEASE CALL AT [TEL] 4155554445
[FAX] 4155554444
FOR YOUR INFORMATION
Using the Call Reservation Function
1. There are some fax machines that will not respond to this function.
2. When you use auto re-dialing, you cannot use the Call Reservation function, but
if Call Back Message is ON, your fax machine will leave a Call Back Message to
ask the other party call you.
3. You cannot use Call Reservation with the timer or with the polling function.
4. You must register your Station ID number to set Call Back Message: ON.
(See page 4-3.)
Printing the Call Back Message
You can print a sample Call Back Message to check the format.
1. Press FUNCTION.
2. Press 3.
3. Press 5.
4. Press START.
( 09/12/1996 15:25 ]
(" 1.TEMP. SETTINGS ]
( 3.PRINTREPORTS]
( S.CALLBACKMSG)
( PRESS START KEY )
(PRINTING ]
6-19
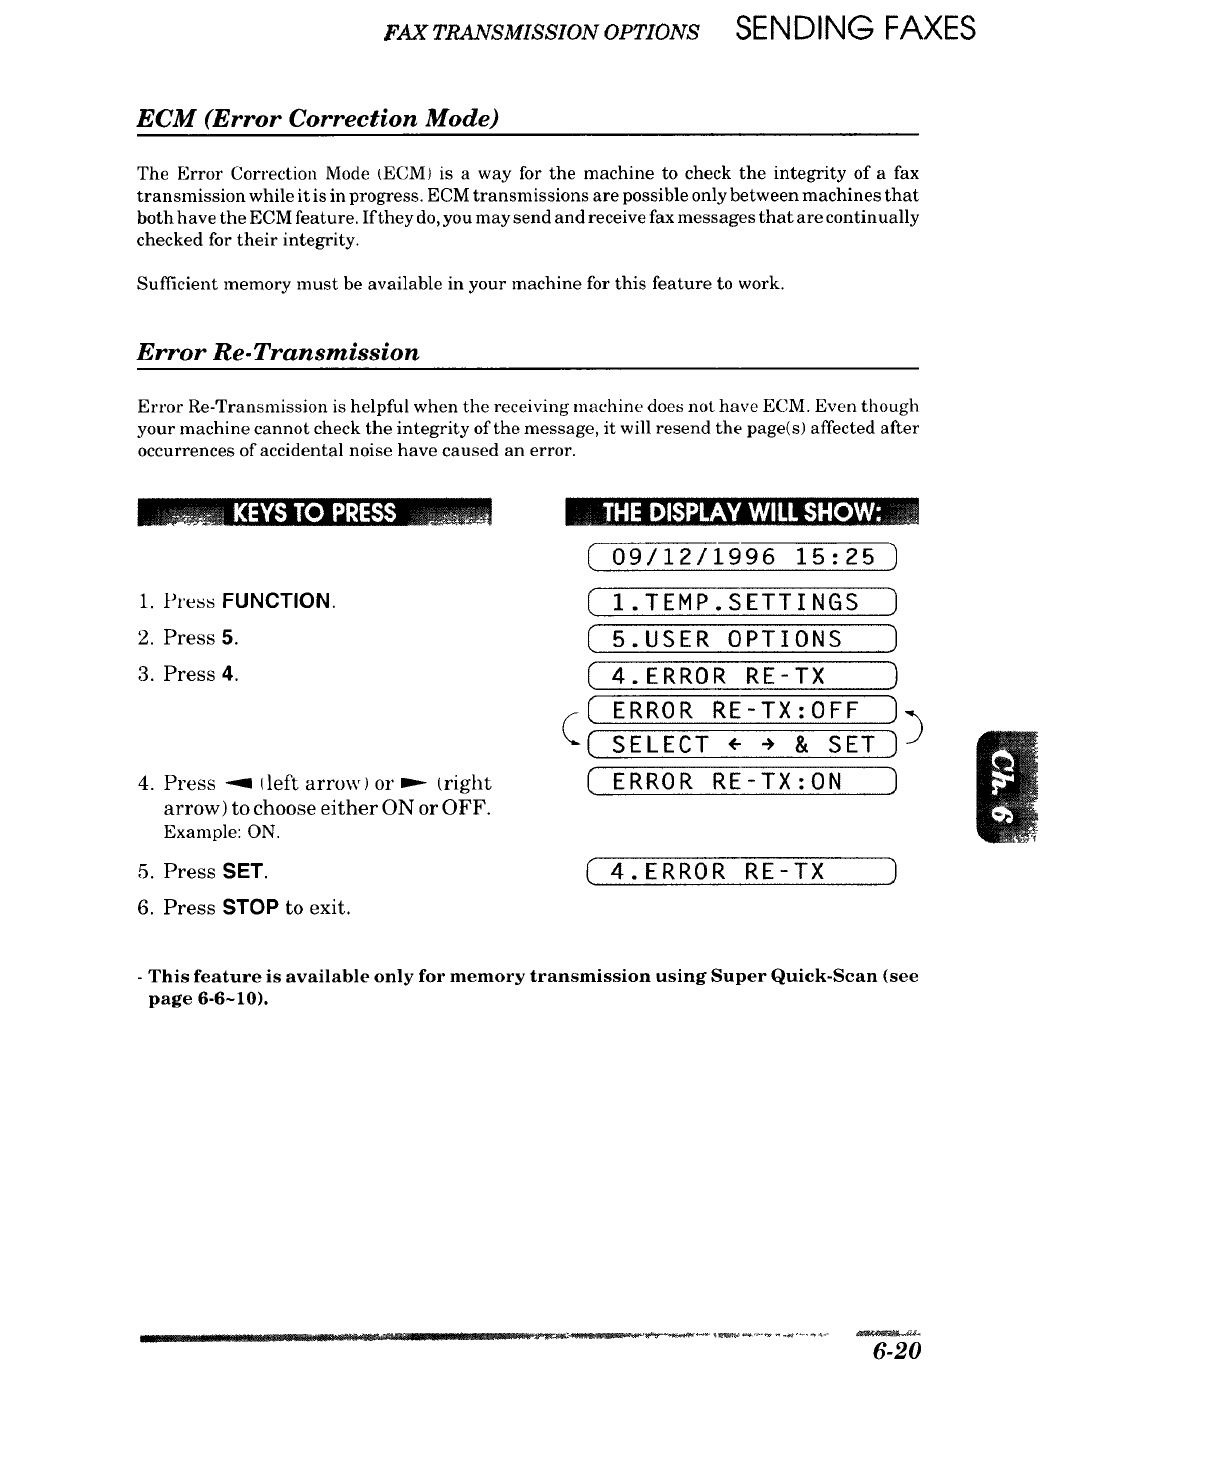
FAX TRANSMISSION OPTIONS SENDING FAXES
ECM (Error Correction Mode)
The Error Correction Mode tECM) is a way for the machine to check the integrity of a fax
transmission while it is in progress. ECM transmissions are possible only between machines that
both have the ECM feature. If they do, you may send and receive fax messages that are continually
checked for their integrity.
Sufficient memory nmst be available in your machine for this feature to work.
Error Re.Transmission
Error Re-Transmission is helpful when the receiving machine does not have ECM. Even though
your machine cannot check the integrity of the message, it will resend the page(s) affected after
occurrences of accidental noise have caused an error.
,_€:k'_-'ll[all "J:1:[,'!-_
1. Press FUNCTION.
2. Press 5.
3. Press 4.
4. Press -,-I (left arrow) or _-- (right
arrow) to choose either ON or OFF.
Example: ON.
5. Press SET.
6. Press STOP to exit.
i
mi:i :i,] m I.vA,,,JtI
(09/12/1996 15:25 ]
I.TEMP.SETTINGS
( 5.USER OPTIONS )
(4.ERROR RE-TX )
ERROR RE-TX:OFF I_C
"'( SELECT <'- -)' & SET )
( ERROR RE-TX:ON )
4.ERROR RE-TX )
- This feature is available only for memory transmission using Super Quick-Scan (see
page 6-6-10).
6-20
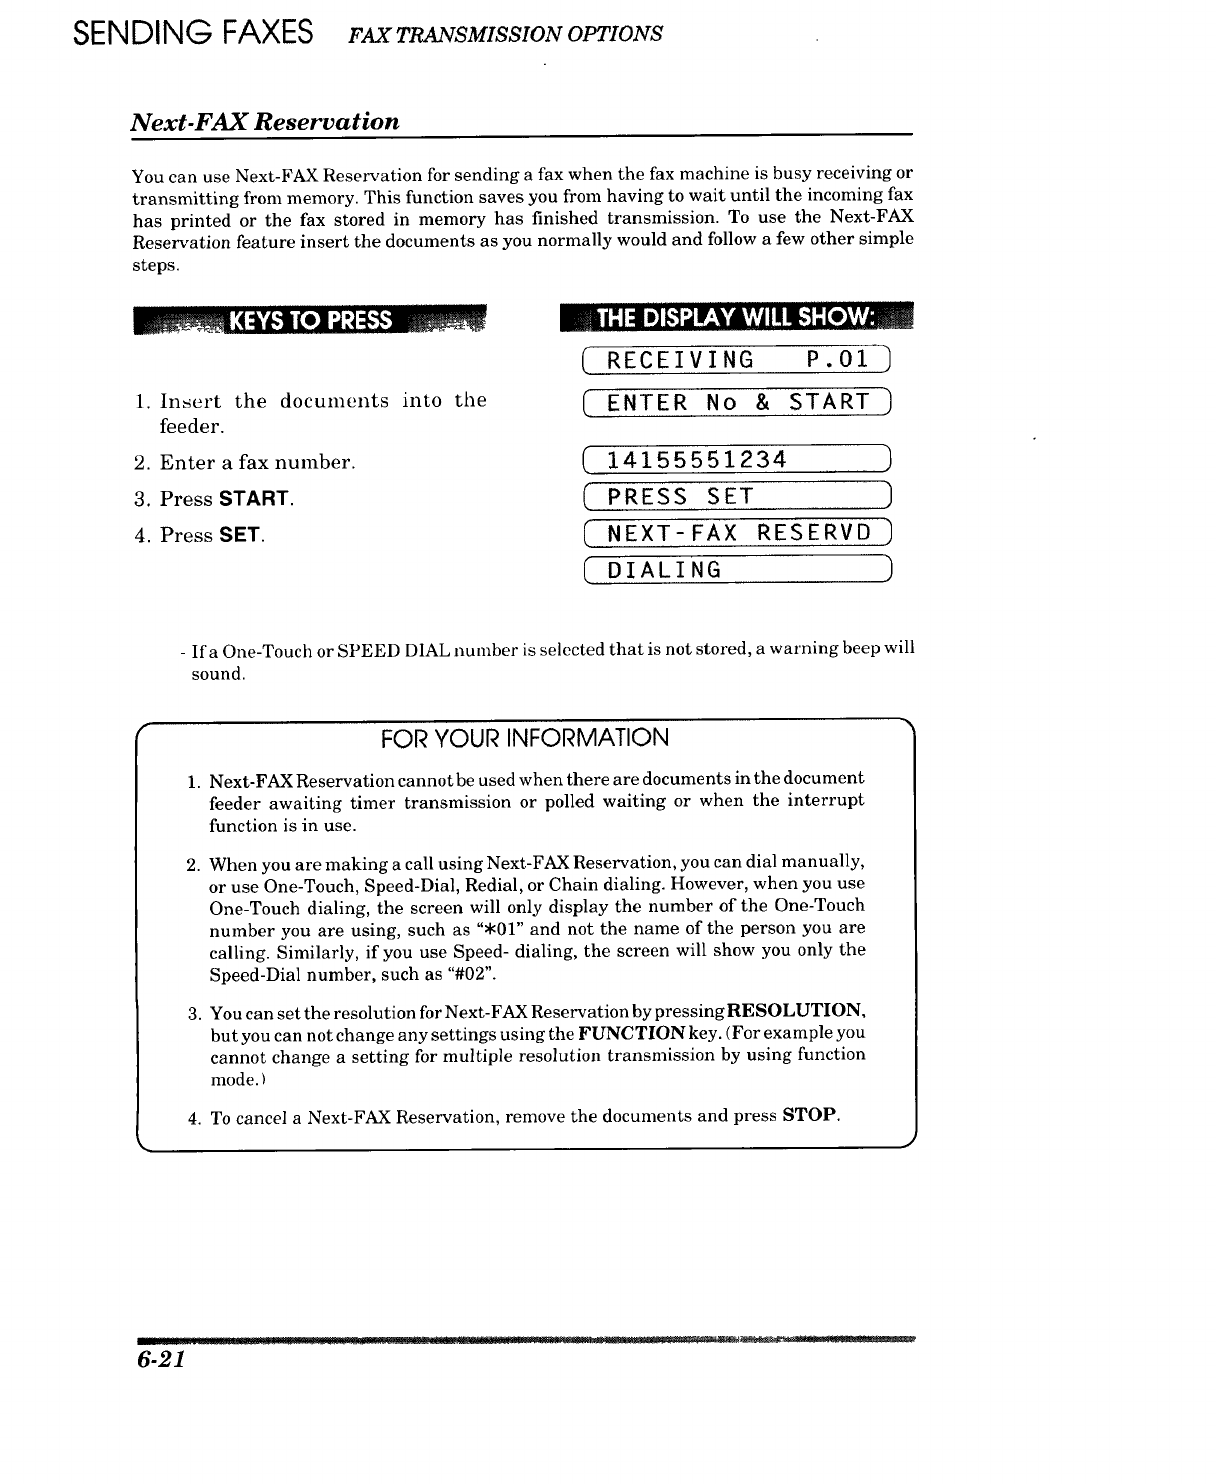
SENDING FAXES FAX TRANSMISSION OPTIONS
Next-FAX Reservation
You can use Next-FAX Reservation for sending a fax when the fax machine is busy receiving or
transmitting from memory. This function saves you from having to wait until the incoming fax
has printed or the fax stored in memory has finished transmission. To use the Next-FAX
Reservation feature insert the documents as you normally would and follow a few other simple
steps.
Ill Illi IIIIr I I ]
[RECEIVING P.01)
i. Insert the docun]ents into the ( ENTER NO & START )
feeder.
2. Enter a fax number. ( 1 41 5 5 5 5 1 2 3 4 )
3. Press STABT. ( P R E S S S ET )
4. PressSET. (NEXT-FAX RESERVD
(DIALING )
- Ifa One-Touch or SPEED DIAL number is selected that is not stored, a warning beep will
sound.
2.
3.
FOR YOUR INFORMATION
Next-FAX Reservation cannot be used when there are documents in the document
feeder awaiting timer transmission or polled waiting or when the interrupt
function is in use.
When you are making a call using Next-FAX Reservation, you can dial manually,
or use One-Touch, Speed-Dial, Redial, or Chain dialing. However, when you use
One-Touch dialing, the screen will only display the number of the One-Touch
number you are using, such as "*01" and not the name of the person you are
calling. Similarly, if you use Speed- dialing, the screen will show you only the
Speed-Dial number, such as "#02".
You can set the resolution for Next-FAX Reservation by pressing RESOLUTION,
but you can not change any settings using the FUNCTION key. (For example you
cannot change a setting for multiple resolution transmission by using function
mode. )
4. To cancel a Next-FAX Reservation, remove the documents and press STOP.
6-21
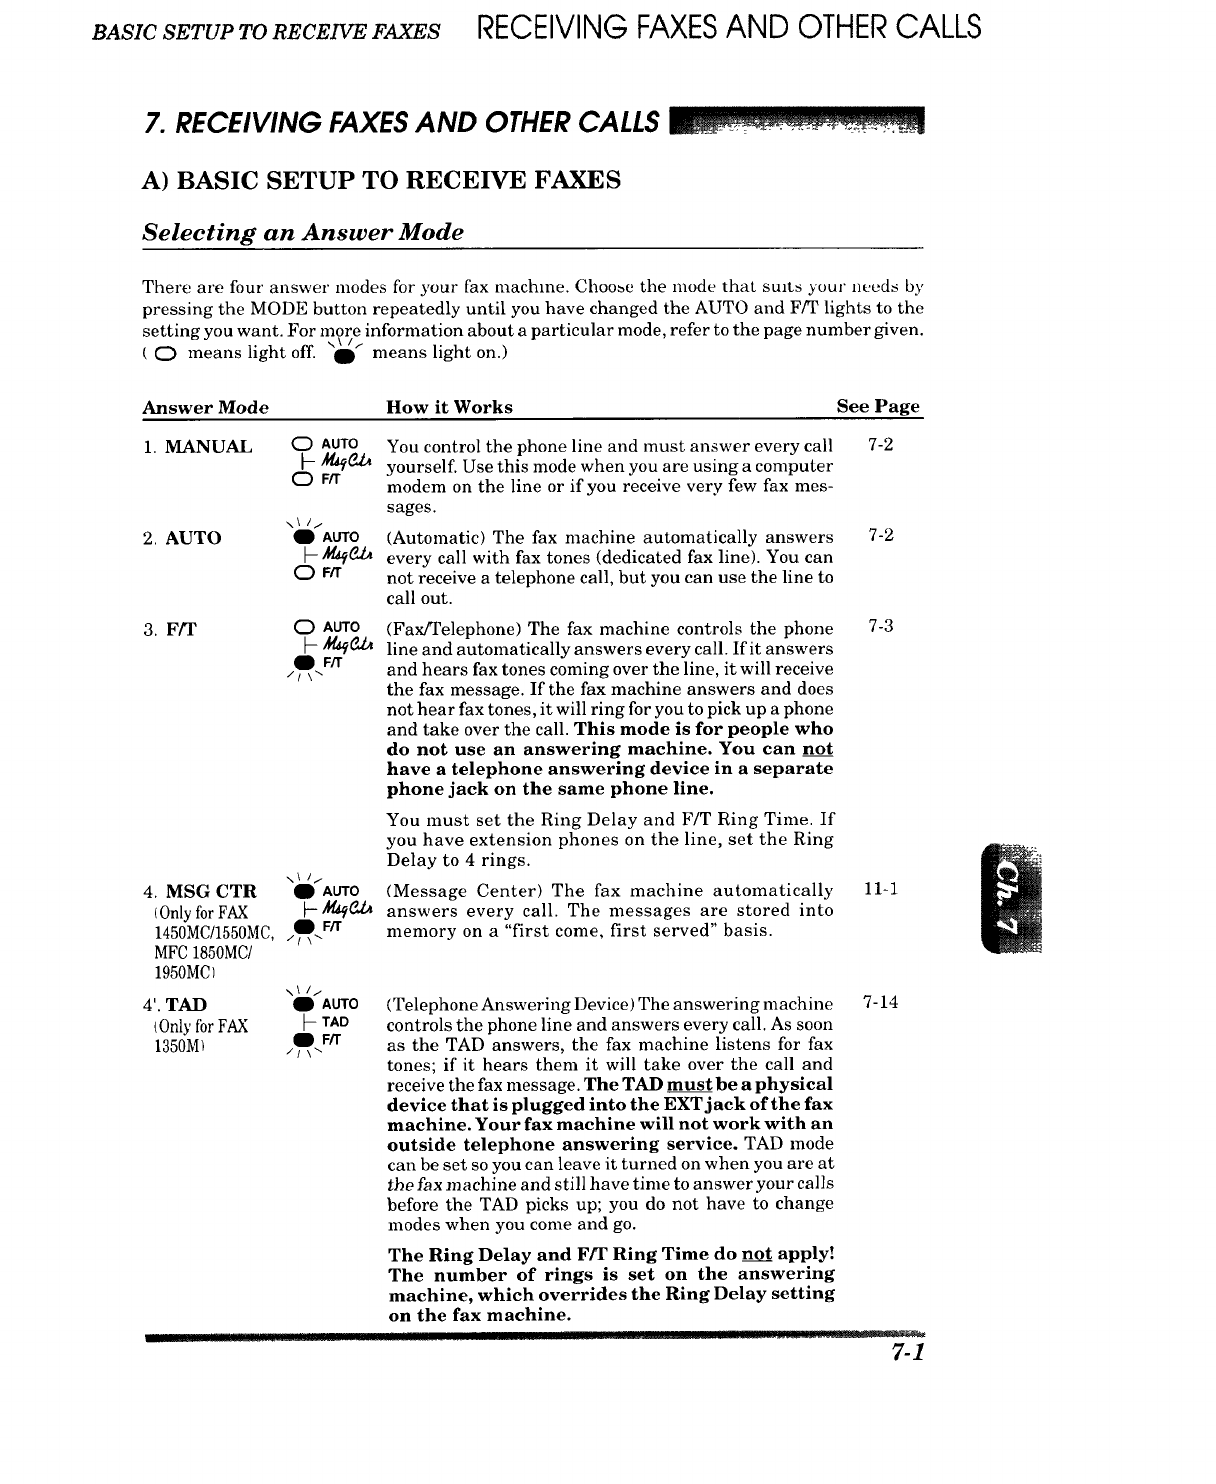
BASIC SETUP TO RECEIVE FAXES RECEIVINGFAXESAND OTHERCALLS
7. RECEIVING FAXESAND OTHERCALLS ....... :2 Y
A) BASIC SETUP TO RECEIVE FAXES
Selecting an Answer Mode
There are four answer modes for your fax machme. Choo_e the inode that suits your needs by
pressing the MODE button repeatedly until you have changed the AUTO and Ffr lights to the
setting you want. For more information about a particular mode, refer to the page number given.
( 0 means light off. \\/1
O means light on.)
Answer Mode How it Works See Page
1. MANUAL 0AUTO You control the phone line and must answer every call 7-2
I- _t_ yourself. Use this mode when you are using a computer
OFrr modem on the line or if you receive very few fax mes-
sages.
\\ //
2. AUTO O Affro (Automatic) The fax machine automatically answers 7-2
[-M_i_ every call with fax tones (dedicated fax line). You can
OFtr not receive a telephone call, but you can use the line to
call out.
3. Ffr OAtrro (Fax/Telephone) The fax machine controls the phone 7-3
[- M_iOM_ line and automatically answers every call. If it answers
OFtr
/ \ _ and hears fax tones coming over the line, it will receive
the fax message. If the fax machine answers and does
not hear fax tones, it will ring for you to pick up a phone
and take over the call. This mode is for people who
do not use an answering machine. You can not
have a telephone answering device in a separate
phone jack on the same phone line.
\\ //
4. MSG CTR OAUTO
(Only for FAX F- 2d_
1450MC/1550MC, _D..Ffr
MFC 1850MC/
1950MCI
\\ //
4'. TAD OAUTO
{0nly for FAX [- TAD
OFfr
1350M) _ / \ _
You must set the Ring Delay and F/T Ring Time. If
you have extension phones on the line, set the Ring
Delay to 4 rings.
(Message Center) The fax machine automatically
answers every call. The messages are stored into
memory on a "first come, first served" basis.
11-1
(Telephone Answering Device) The answering machine
controls the phone line and answers every call. As soon
as the TAD answers, the fax machine listens for fax
tones; if it hears them it will take over the call and
receive the fax message. The TAD _must be a physical
device that is plugged into the EXTjack of the fax
machine. Your fax machine will not work with an
outside telephone answering service. TAD mode
can be set so you can leave it turned on when you are at
the fax machine and still have time to answer your calls
before the TAD picks up; you do not have to change
modes when you come and go.
7-14
The Ring Delay and Ffr Ring Time do not apply!
The number of rings is set on the answering
machine, which overrides the Ring Delay setting
on the fax machine.
7-1
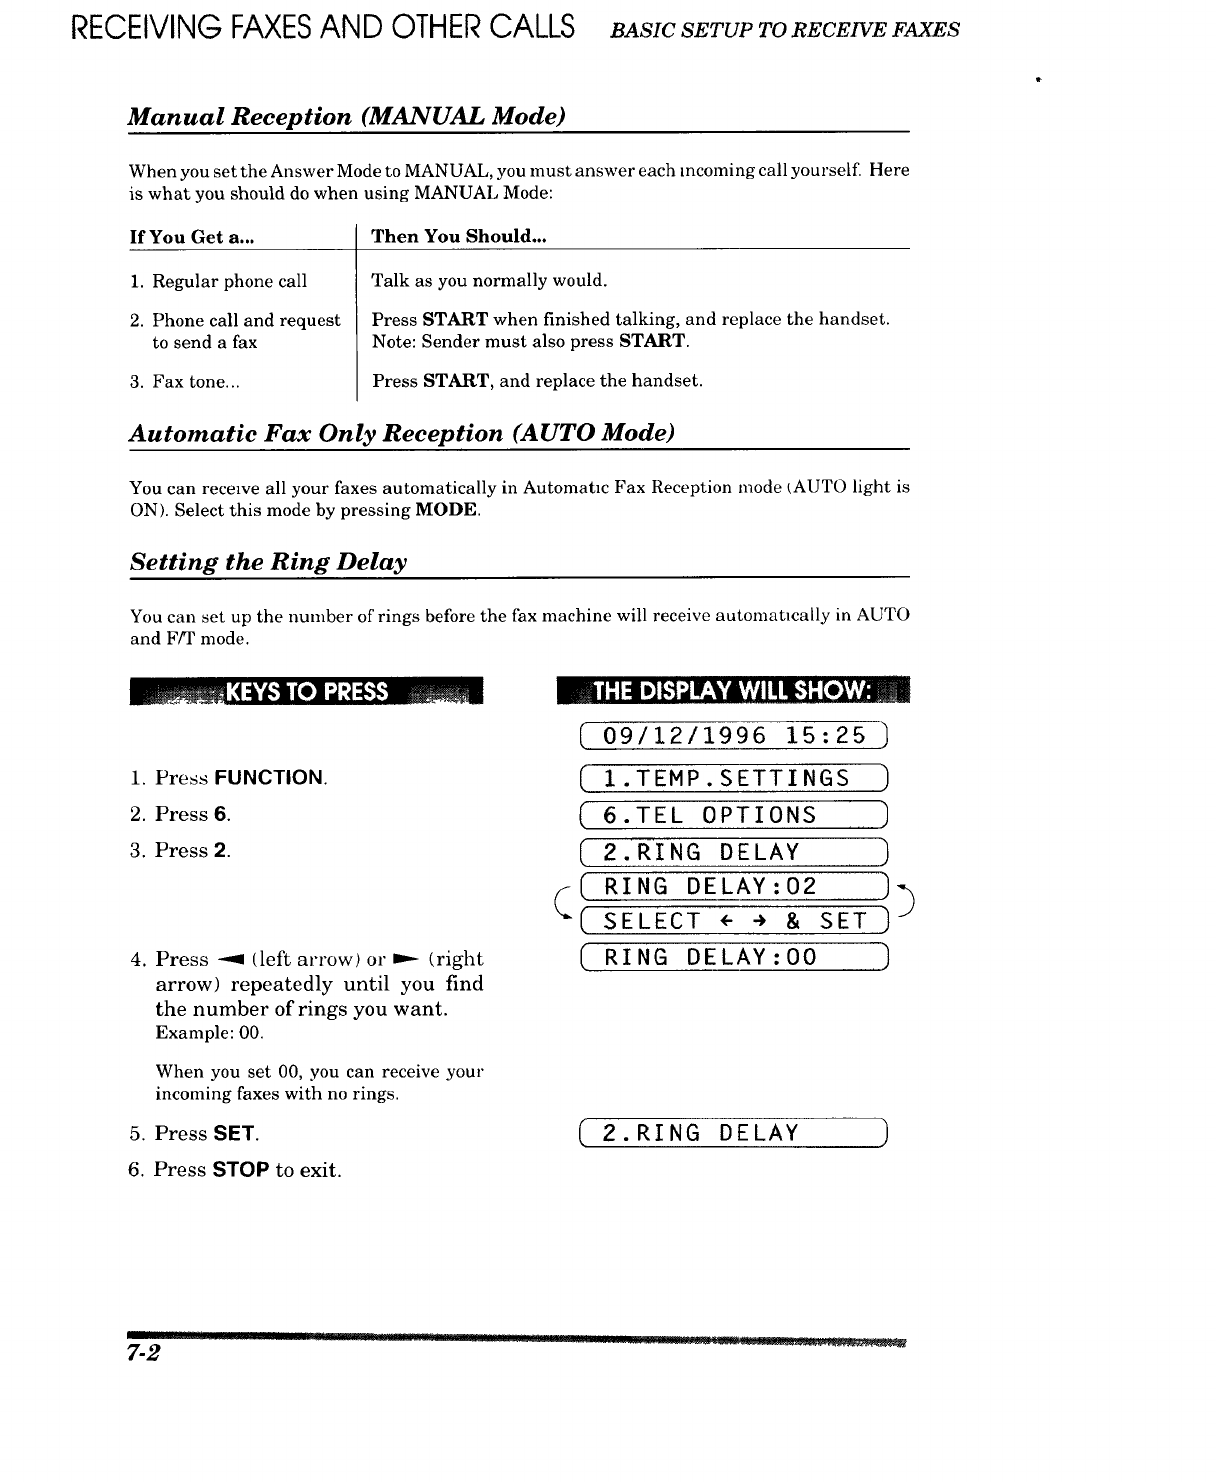
RECEIVING FAXESAND OTHERCALLS BASICSETUPTORECEIVEFAXES
Manual Reception (MANUAL Mode)
When you set the Answer Mode to MANUAL, you must answer each incoming call yourself. Here
is what you should do when using MANUAL Mode:
If You Get a...
1. Regular phone call
2. Phone call and request
to send a fax
3. Fax tone...
Then You Should...
Talk as you normally would.
Press START when finished talking, and replace the handset.
Note: Sender must also press START.
Press START, and replace the handset.
Automatic Fax Only Reception (AUTO Mode)
You can receive all your faxes automatically in Automatm Fax Reception mode (AUTO light is
ON). Select this mode by pressing MODE.
Setting the Ring Delay
You can set up the number of rings before the fax machine will receive automatically in AUTO
and F/T mode.
1. Press FUNCTION.
2. Press 6.
3. Press 2.
.
.
6.
Press ---I (left arrow) or m.- (right
arrow) repeatedly until you find
the number of rings you want.
Example: 00.
When you set 00, you can receive your
incoming faxes with no rings.
Press SET.
Press STOP to exit.
_ t; 1:11D][_1r,i'__'lh'&';lIq,_l_ [elV_
( 09/12/1996 15:25 ]
( 1.TEMP.SETTINGS )
( 6.TEL OPTIONS ]
2.RING DELAY )
(( RING DELAY:02 ]]
( SELECT <- ÷ & SET ]
(RING DELAY:O0 ]
2.RING DELAY )
p11] .. I .... I I!1 " ............... "_ _,_ .......
7-2
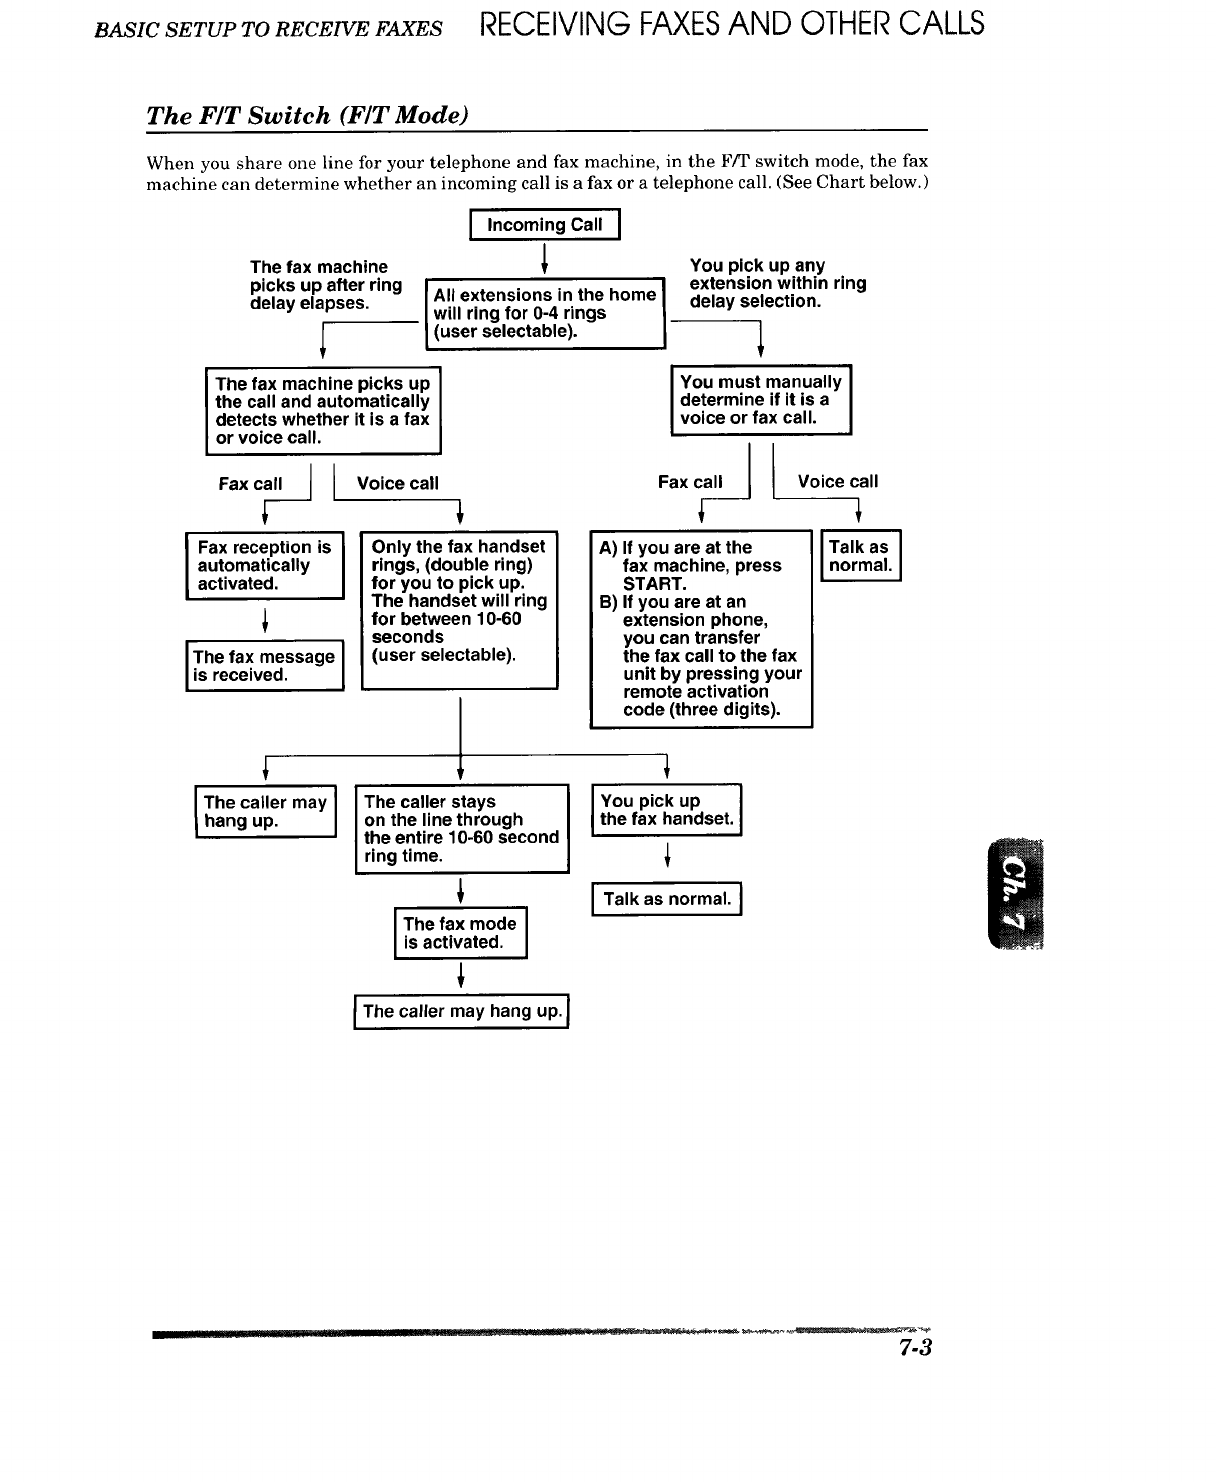
BASICSETUPTORECEIVEFAXES RECEIVING FAXESAND OTHERCALLS
The FIT Switch (FIT Mode)
When you share one line for your telephone and fax machine, in the F/T switch mode, the fax
machine can determine whether an incoming call is a fax or a telephone call. (See Chart below.)
I Incoming Call I
The fax machine
picks upafter ring I
delay elapses. IAll extensions in the home
will ring for 0-4 rings
l(user selectable).
The fax machine picks up
the call and automatically
detects whether it is a fax
or voice call.
Faxcall J I
Fax reception is I
automatically I
i activated.
I The fax message I
is received. I
Voice call
Only the fax handset
rings, (double ring)
for you to pick up.
The handset will ring
for between 10-60
seconds
(user selectable).
You pick up any
Iextension within ring
delay selection.
I ou must manually
determine if it is a
voice or fax call.
/
Fax call [ Voice call
J
ITalkasI
normal. I
A) If you are at the
fax machine, press
START.
B) If you are at an
extension phone,
you can transfer
the fax call to the fax
unit by pressing your
remote activation
code (three digits).
I hecaer a'll
hang up. The caller stays
on the line through
the entire 10-60 second
ring time.
I The fax mode I
is activated.
IThecaller may hang up. I
IY°upickup I
the fax handset.
I Ta,kasnormal, I
.... 7-3
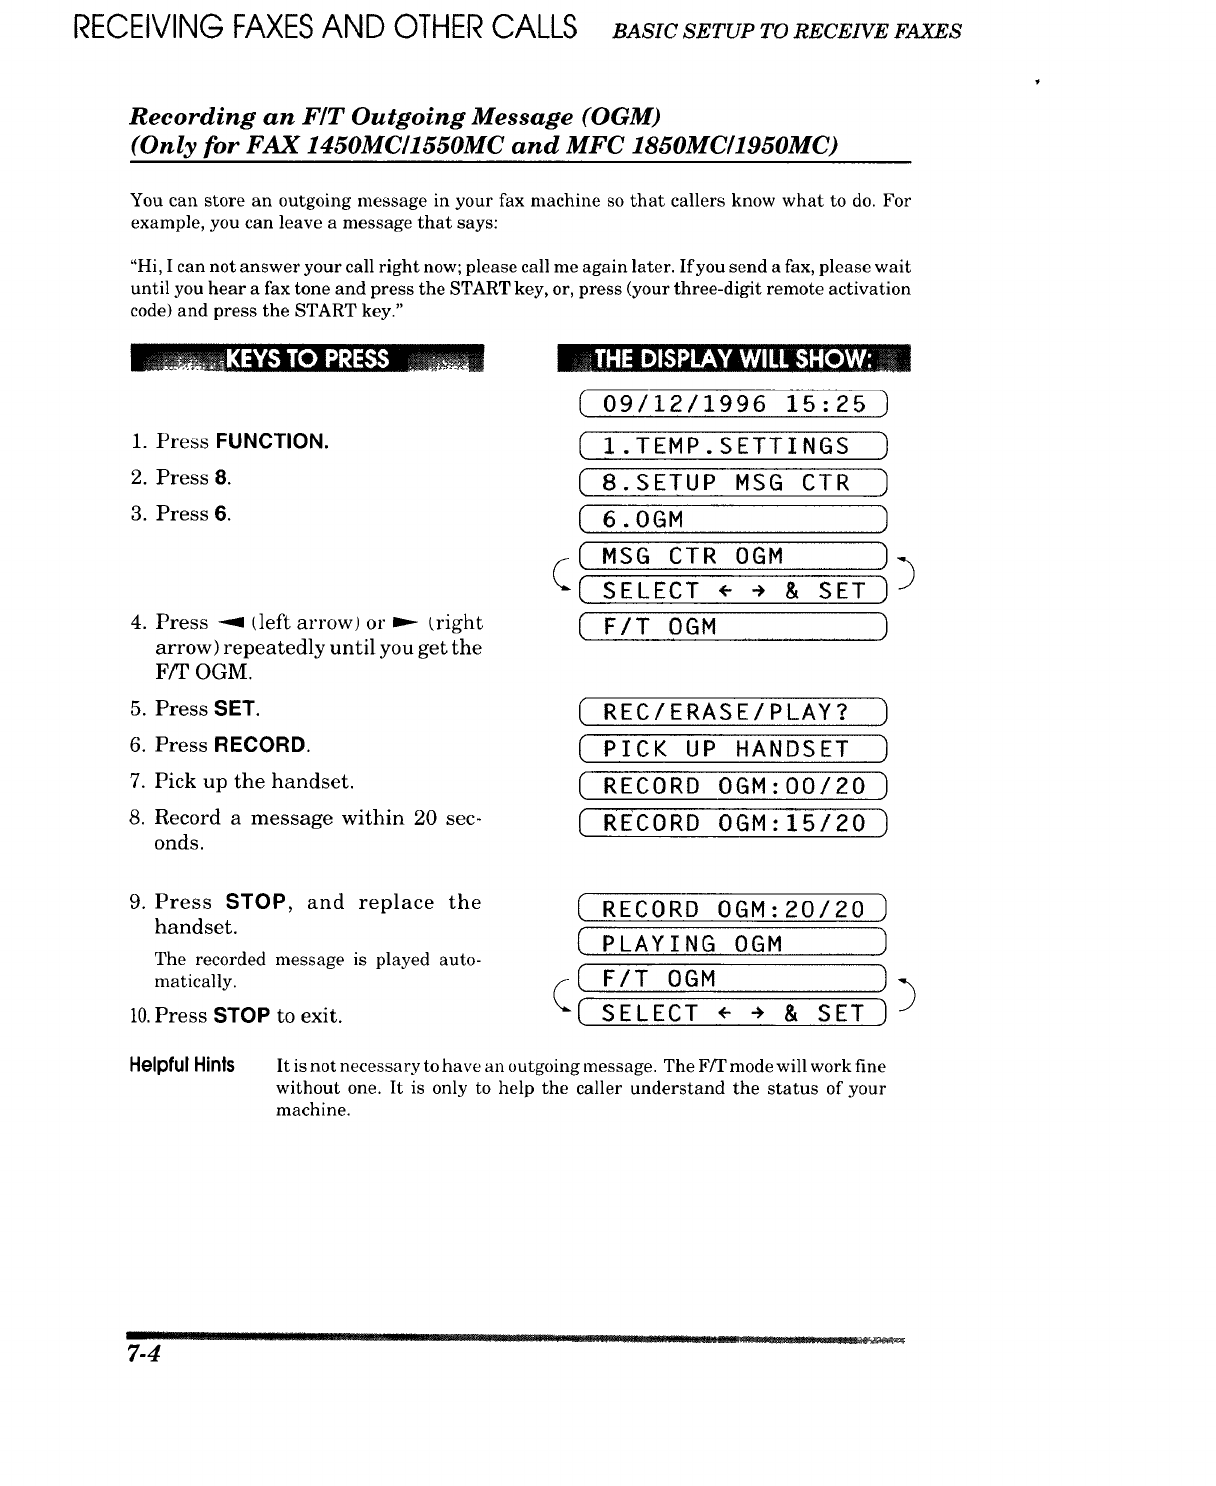
RECEIVINGFAXESAND OTHERCALLS BASZCSETUPTORECEIVEFAXES
Recording an FIT Outgoing Message (OGM)
(Only for FAX 1450MC/1550MC and MFC 1850MC/1950MC)
You can store an outgoing message in your fax machine so that callers know what to do. For
example, you can leave a message that says:
"Hi, I can not answer your call right now; please call me again later. If you send a fax, please wait
until you hear a fax tone and press the START key, or, press (your three-digit remote activation
code) and press the START key."
,'4:t'/_l (ell -J:_:[,$_
1. Press FUNCTION.
2. Press 8.
3. Press 6.
4. Press -9= (left arrow) or _ £right
arrow) repeatedly until you get the
F/T OGM.
5. Press SET.
6. Press RECORD.
7. Pick up the handset.
8. Record a message within 20 sec-
onds.
_m l" 1:11D][.!_Ir_.¥'dkv,vA1I!I_',]:[e),v,v_!_
(09/12/1996 15:25 )
1.TEMP.SETTINGS
( 8.SETUP MSG CTR )
(6. OGM )
(MSG CTR OGM 3
_( SELECT ÷ ÷ & SET )_
( F/T OGM )
( REC/ERASE/PLAY? )
PICK UP HANDSET
RECORD OGM:O0/20
( RECORD 0GM:15/20 )
9. Press STOP, and replace the
handset.
The recorded message is played auto-
matically.
i0.Press STOP to exit.
(RECORD OGM:20/20 )
( PLAYING OGM __
f( F/T OGM )
(. SELECT ÷ ÷ & SET )
Helpful Hints It is not necessary to have an outgoing message. The F/T mode will work fine
without one. It is only to help the caller understand the status of your
machine.
....... [_r]![l[! [P]!f![]!Ill ......
7-4

BASICSETUPTORECEIVEFAXES RECEIVING FAXESAND O IHI-I CALLb
Setting the FIT Ring Time
You can specify the nmxinmm time you want the fax machine to ring (double ring) to notify you
after it has answered a telephone call; there are four predefined settings: 10, 20, 30, or 60 seconds.
During this time, only the fax machine will ring. No other phones on the same line will ring.
1. Press FUNCTION.
2. Press 6.
3. Press 4.
mi-"I:l DII-T-]Ir-',*AVJIII_1-"[o1Y_
( 09/12/1996 15:25 )
( 1. TEMP.SETTINGS ]
( 6.TEL OPTIONS )
( 4.F/T RING TIME )
(( RING TIME:20 SEe )
(SELECT ÷ ÷ & SET ]
4. Press --_ tlett arrow) or _--£rlght
arrow) repeatedly until you find
the setting you want.
Example: 10 sec.
(RING TIME:IO SEC
5. PressSET. ( 4.F/T RING TIME )
6. Press STOP to exit.
Smoothing
The smoothing feature enhances the apt)earance of incoming faxes by making the lines smooth
and takes no additional time. This function does not apply to outgoing faxes, or to lists or reports
you print. The initial setting is ON.
•• • D '
1. Press FUNCTION.
2. Press 5.
3. Press 1.
4. Press -'9 (left arrow) or _ (right
arrow) to choose ON or OFF.
Example: OFF.
5. Press SET.
6. Press STOP to exit.
.... ! IIIl'"ll]l..
( 09/12/1996 15:25
(1.TEMP.SETTINGS )
(5.USER OPTIONS )
(1.SMOOTHING ]
(( SMOOTHING:ON )_
_( SELECT ÷ ÷ & SET )
(SMOOTHING:OFF )
(1.SMOOTHING
rIt,", Iml ...... I[ imm 7-5
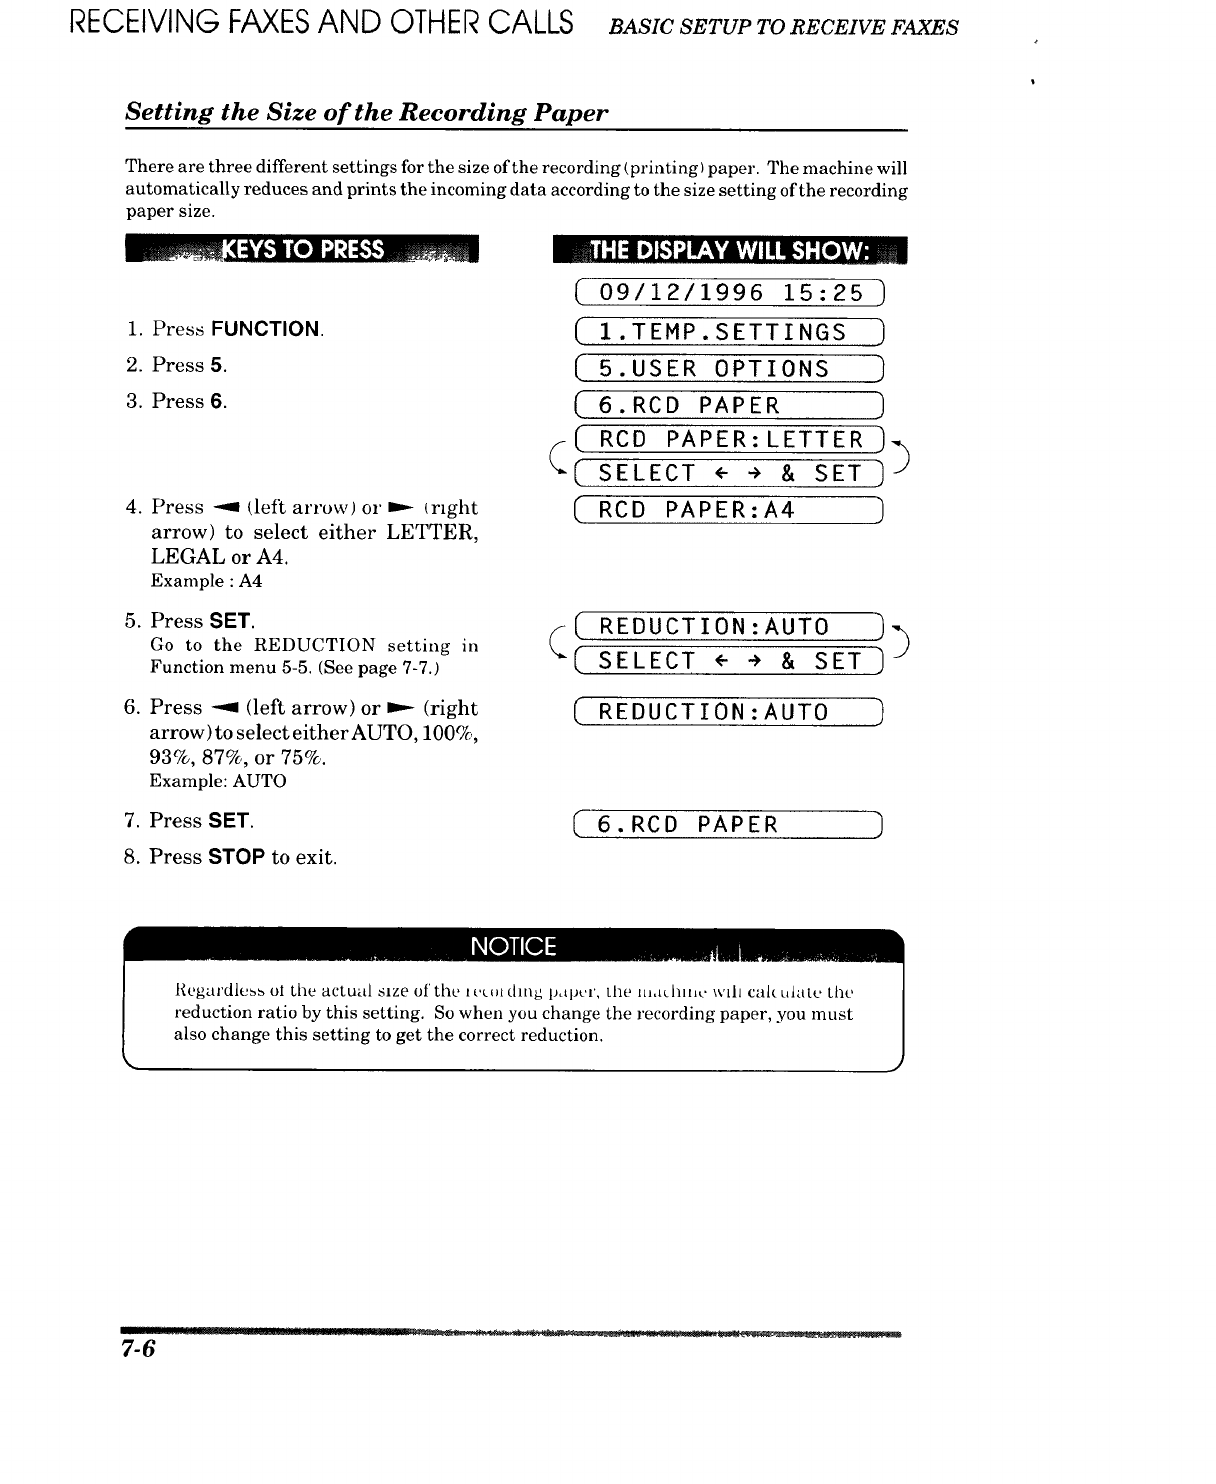
RECEIVINGFAXESAND OTHERCALLS BASICSETUPTORECEIVEFAXES
Setting the Size of the Recording Paper
There are three different settings for the size of the recording (printing) paper. The nmchine will
automatically reduces and prints the incoming data according to the size setting of the recording
paper size.
/i;l:ilP][-1" ; ,,, ,.
1. Press FUNCTION.
2. Press 5.
3. Press 6.
.Press --_ (left arrow) or D._ Irlght
arrow) to select either LETTER,
LEGAL or A4.
Example : A4
09/12/1996 15:25
( )
( 1.TEMP.SETTINGS ]
( 5.USER OPTIONS ]
( 6.RCD PAPER ]
( RCD PAPER:LETTER _
f
_( SELECT÷ _ _ SET]
( RCD PAPER:A4 )
5. Press SET.
Go to the REDUCTION setting in
Function menu 5-5. (See page 7-7.)
( REDUCTION:AUTO )_
{( SELECT,--,_ SET)
.Press --9 (left arrow) or D.- (right
arrow) to select either AUTO, 100%,
93%, 87%, or 75%.
Example: AUTO
REDUCTION:AUTO )
7. PressSET. ( 6.RCD PAPER
8. Press STOP to exit.
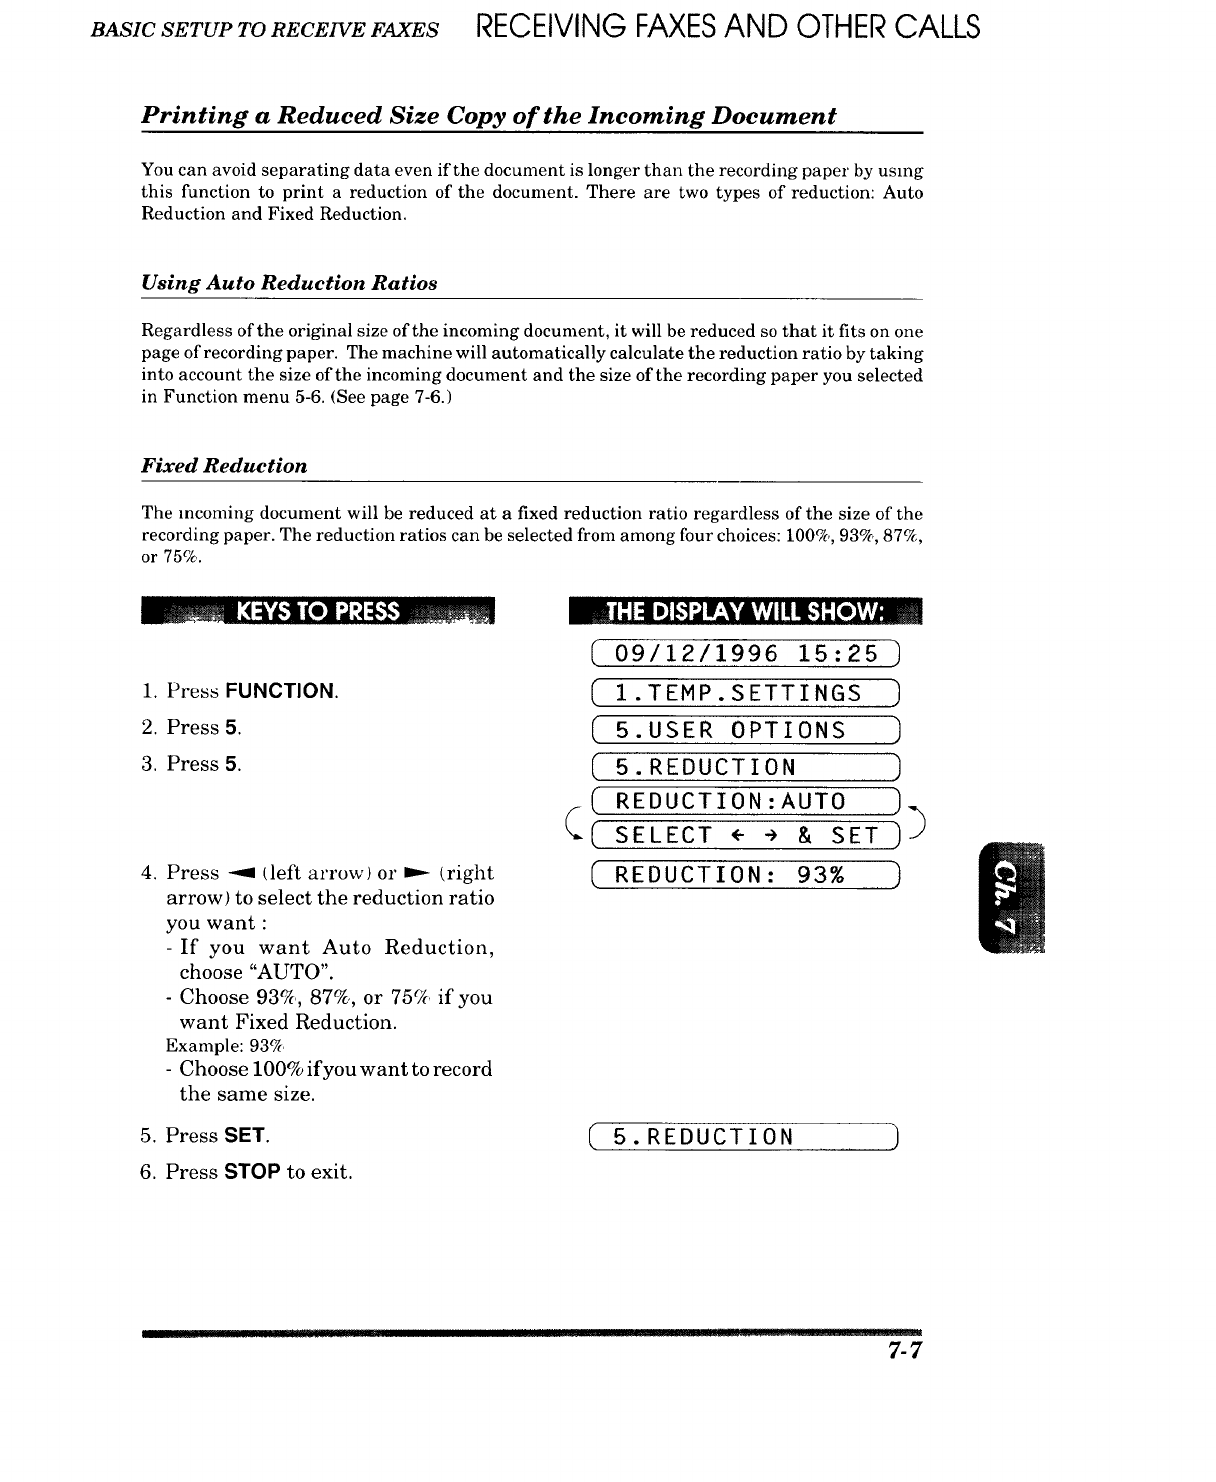
BASICSETUPTORECEIVEFAXES RECEIVING FAXESAND OTHERCALLS
Printing a Reduced Size Copy of the Incoming Document
You can avoid separating data even if the document is longer than the recording paper by using
this function to print a reduction of the document. There are two types of reduction: Auto
Reduction and Fixed Reduction.
Using Auto Reduction Ratios
Regardless of the original size of the incoming document, it will be reduced so that it fits on one
page of recording paper. The machine will automatically calculate the reduction ratio by taking
into account the size of the incoming document and the size of the recording paper you selected
in Function menu 5-6. (See page 7-6.)
Fixed Reduction
The incoming document will be reduced at a fixed reduction ratio regardless of the size of the
recording paper. The reduction ratios can be selected from among four choices: 100%, 93%, 87%,
or 75%.
ii'1_ [D]_.1_IEl_'dk'#iIIIII[-!-"[elY#.,
1. Press FUNCTION.
2. Press 5.
3. Press 5.
4. Press -9 (left arrow) o1"_ (right
arrow) to select the reduction ratio
you want :
-If you want Auto Reduction,
choose "AUTO".
- Choose 93%, 87%, or 75% if you
want Fixed Reduction.
Example: 93%
- Choose 100% if you want to record
the same size.
5. Press SET.
6. Press STOP to exit.
( 09/12/1996 15:25 )
( 1.TEMP.SETTINGS )
( 5.USER OPTIONS ]
(5.REDUCTION )
(( REDUCTION:AUTO )
( SELECT ÷ ÷ & SET )1
REDUCTION: 93%
5.REDUCTION
r... 7-7

RECEIVING FAXESAND OTHERCALLS BaSicSETUPTORECEIVEFAXES
"10U (.,lit u',(' .'\Lit() [{t)ductlOh [0 11_llkl(.l' lllCOllllll_ tit)(. Lllll(_'lll_b tO IlL U[I I)lll_' 13,I_L' ul
recording paper, only as long as the original document is not longer than legal size.
If the original is longer than legal size, the data will not be reduced (see the For
Your Information below.) and will carry over to print on a second page.
When you use Auto Reduction and you receive an incoming document that is
smaller than your recording paper, no reduction will take place.
When selecting Fixed Reduction, you must consider the size of the recording paper
as registered in Function menu 5-6. (See page 7-6.)
FOR YOUR INFORMATION
Selecting the Ratios of Fixed Reduction
Otherpartysendsyoua documentthe
size of...
Letterdocument(8.5"x11")
(mostlyDomesticcommunications)
A4 document(8.2"xl 1.6")
(mostlyInternationalcommunications)
Legaldocuments(8.5"x14")
Yourreceivingpapersizeis:
Letter
A4, Legal
Letter
A4
Legal
Letter
Legal
Recommended Reduction
Ratiois:
93%
1OO%
87%
93%
100%
75%
93%
7-8
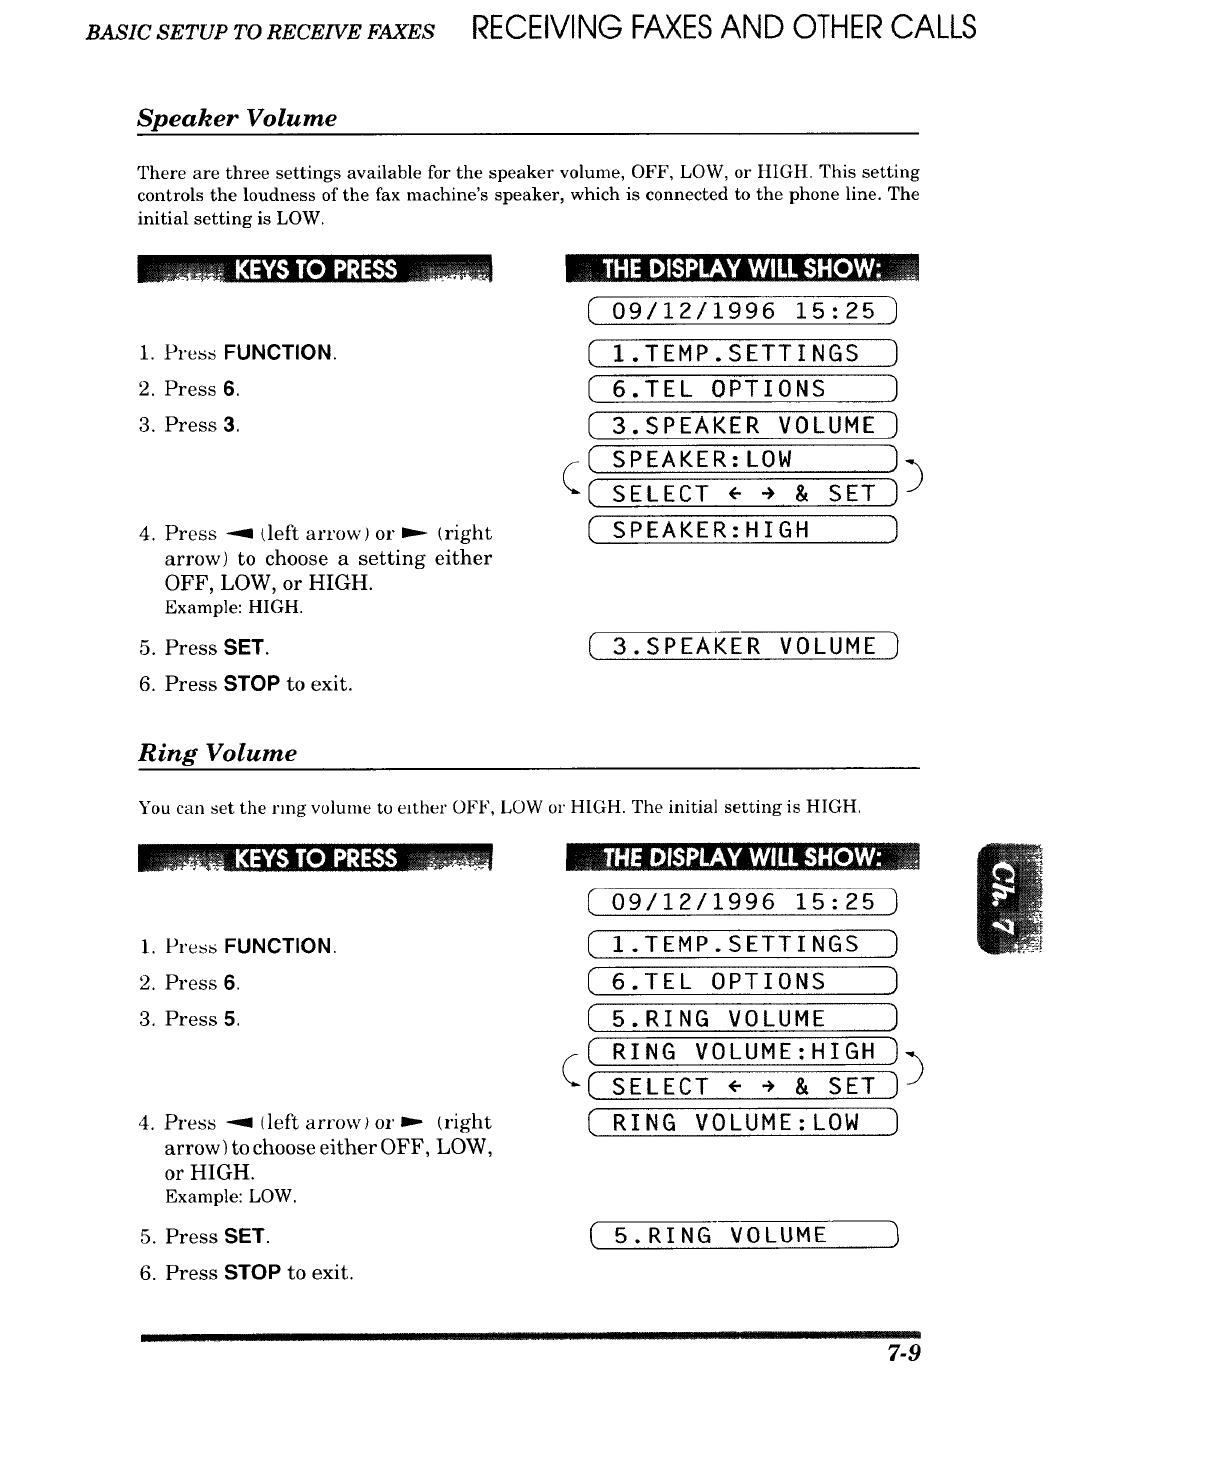
B_Ic s_,7'ut,7'onECE_EF4X_,S RECEIVING FAXESAND OTHERCALLS
Speaker Volume
There are three settings available for the speaker volume, OFF, LOW, or HIGH. This setting
controls the loudness of the fax machine's speaker, which is connected to the phone line. The
initial setting is LOW.
1. Press FUNCTION.
2. Press 6.
3. Press 3.
4. Press -_. (left arrow) or _ (right
arrow) to choose a setting either
OFF, LOW, or HIGH.
Example: HIGH.
(
(
[
[
(
(
[
09/12/1996 15:25 ]
1.TEMP.SETTINGS )
6.TEL OPTIONS ,)
3.SPEAKER VOLUME )
SPEAKER:LOW ]
SELECT SET]"
SPEAKER:HIGH ]
5. PressSET. (_ 3.SPEAKER VOLUME ]
6. Press STOP to exit.
Ring Volume
You can set the ring volume to either OFF, LOW or HIGH. The initial setting is HIGH.
1. Prc_s FUNCTION.
2. Press 6.
3. Press 5.
4. Press --9 (left arrow) o1"...- (right
arrow) to choose either OFF, LOW,
or HIGH.
Example: LOW.
5. Press SET.
m i" I=II.] gl: W-'VAv,vlI! ILl: [eiVm_,,,
C
C
(
(
(
(
09/12/1996 15:25 )
I.TEMP.SETTINGS )
6.TEL OPTIONS )
5.RING VOLUME )
RING VOLUME:HIGH )
SELECT ÷ ÷ & SET ]J
RING VOLUME:LOW ]
5.RING VOLUME
6. Press STOP to exit.
I [11|1 I III!1 7-9
RECEIVINGFAXESAND OTHERCALLS BASZCSETUPTORECEIVEFAXES
Helpful Hints Even if you select OFF, the ring volume will be LOW for F/T ringing, Call
Reservation ringing and when the Distinctive ringing mode is SET.
FOR YOUR INFORMATION
Reception into MemorylOut of Paper Reception
If the paper cassette is empty, the LCD will display the message "PAPER EMPTY".
Then please add more recording paper. (See page 1-7.)
Your fax machine will automatically store any incoming faxes in its memory if it runs
out of paper. The contents of the memory will be printed when you replace the new
recording paper. The memory will not be lost as long as you do not turn off the
machine or disconnect the power.
7-10
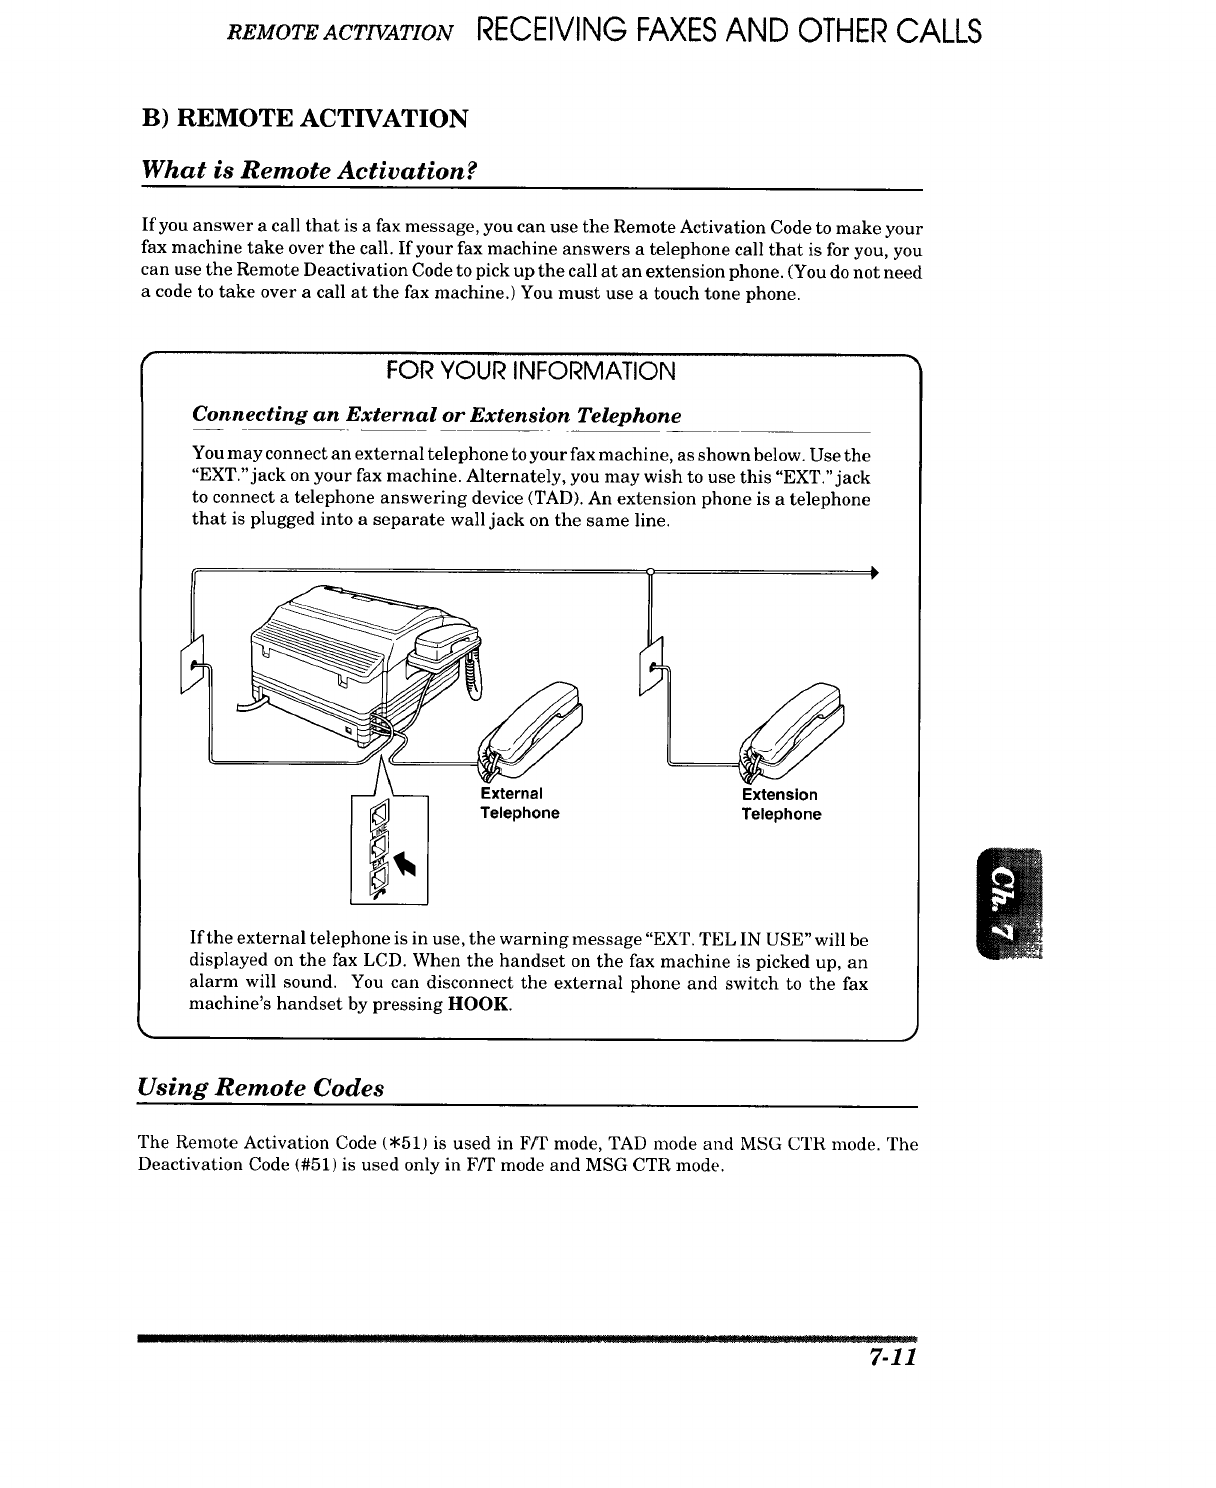
REMOTEACTIVATIONRECEIVING FAXESAND OTHERCALLS
B) REMOTE ACTIVATION
What is Remote Activation?
If you answer a call that is a fax message, you can use the Remote Activation Code to make your
fax machine take over the call. If your fax machine answers a telephone call that is for you, you
can use the Remote Deactivation Code to pick up the call at an extension phone. (You do not need
a code to take over a call at the fax machine.) You must use a touch tone phone.
FOR YOUR INFORMATION
Connecting an External or Extension Telephone
You may connect an external telephone to your fax machine, as shown below. Use the
"EXT." jack on your fax machine. Alternately, you may wish to use this "EXT." jack
to connect a telephone answering device (TAD). An extension phone is a telephone
that is plugged into a separate wall jack on the same line.
External
Telephone
Extension
Telephone
If the external telephone is in use, the warning message "EXT. TEL IN USE" will be
displayed on the fax LCD. When the handset on the fax machine is picked up, an
alarm will sound. You can disconnect the external phone and switch to the fax
machine's handset by pressing HOOK.
Using Remote Codes
The Remote Activation Code (.51) is used in F/T mode, TAD mode and MSG CTR mode. The
Deactivation Code (#51) is used only in Ffr mode and MSG CTR mode.
7-11
RECEIVING FAXESAND OTHERCALLS REMOTEACTIVATION ]
Using the Activation Code:
When you are at the fax machine, you will probably answer incoming calls before your fax
machine or answering machine is programmed to pick up. If you answer a call and no one
seems to be on the line, assume it is a fax message. Do not hang up. You must activate your
fax machine to take over the call first. (If you are holding the fax handset,just press START and
hang up.) If you are on an extension/external phone, press ,51 and wait for your fax machine
to respond before you hang up. After 3 seconds you will hear receiving tones (chirps) through
the handset of extension phone. Then hang up. You can repeat the code as many times as needed.
Your fax machine will take over the call and print the fax message. If your caller wants to talk
before sending the fax, you can have a conversation first and then activate your fax machine with
the code.
The Remote Activation Code can also be used by your callers. When you are using a TAD, your
outgoing message (OGM) should end with the statement "to send a fax, press .51". (See the
section on Connecting a Telephone Answering Device for more information.)
Using the Deactivation Code:
When your fax machine is in Ffr mode, sometimes it will answer a call that is not fax calling tones
(a telephone call or manual fax). It will respond with a double ring (short, short) to alert you to
take over. Because it has already answered the call, only the fax machine will ring, extension
phones are no longer connected to the call. Pick up any phone except external phone on the line.
To take over the call at the fax machine:
Pick up the handset of the fax machine and talk to the caller as usual. If no one is there or someone
is trying to send you a manual fax, press the START key and replace the handset. Your fax
machine will display "receiving" and print the incoming fax message.
To take over the call at an extension phone:
Pick up the handset on another telephone and press #51 quickly during the silence between
the double ring pattern. When the fax machine hears the code it will stop ringing and let you
speak with the caller. If no one is on the line or someone is trying to send you a manual fax, send
the call back to the fax machine (.51).
Making the Remote Codes Easier to Use
You can change the codes at any time. It may be easier for you and your callers to press the _amc
key three times (Example: *** and ###). Although you can change the codes to any numbers you
want, try to avoid using digits for the Activation Code. The Remote Activation Code can not match
any number you dial. If you try to dial a phone number that includes the Activation Code, your
fax machine will go into receiving mode.
Troubleshooting
Somenmes other equipment on your phone hne rese_-ces a key that is in the Activation or
Deactivation code. (Some answering machines reserve the "*" key.) If the code you use to retrieve
messages from your answering machine causes the line to be disconnected, try changing the
Remote Codes. Change *51 to ### and #51 to 999. The Remote Activation and Deactivation Codes
nmy not work with some telephone systems or telephone sets.
NOTE: If you accidentally pick up an extension phone when a fax message is being received, you
may disrupt the transmission or render some portions unreadable.
7-12
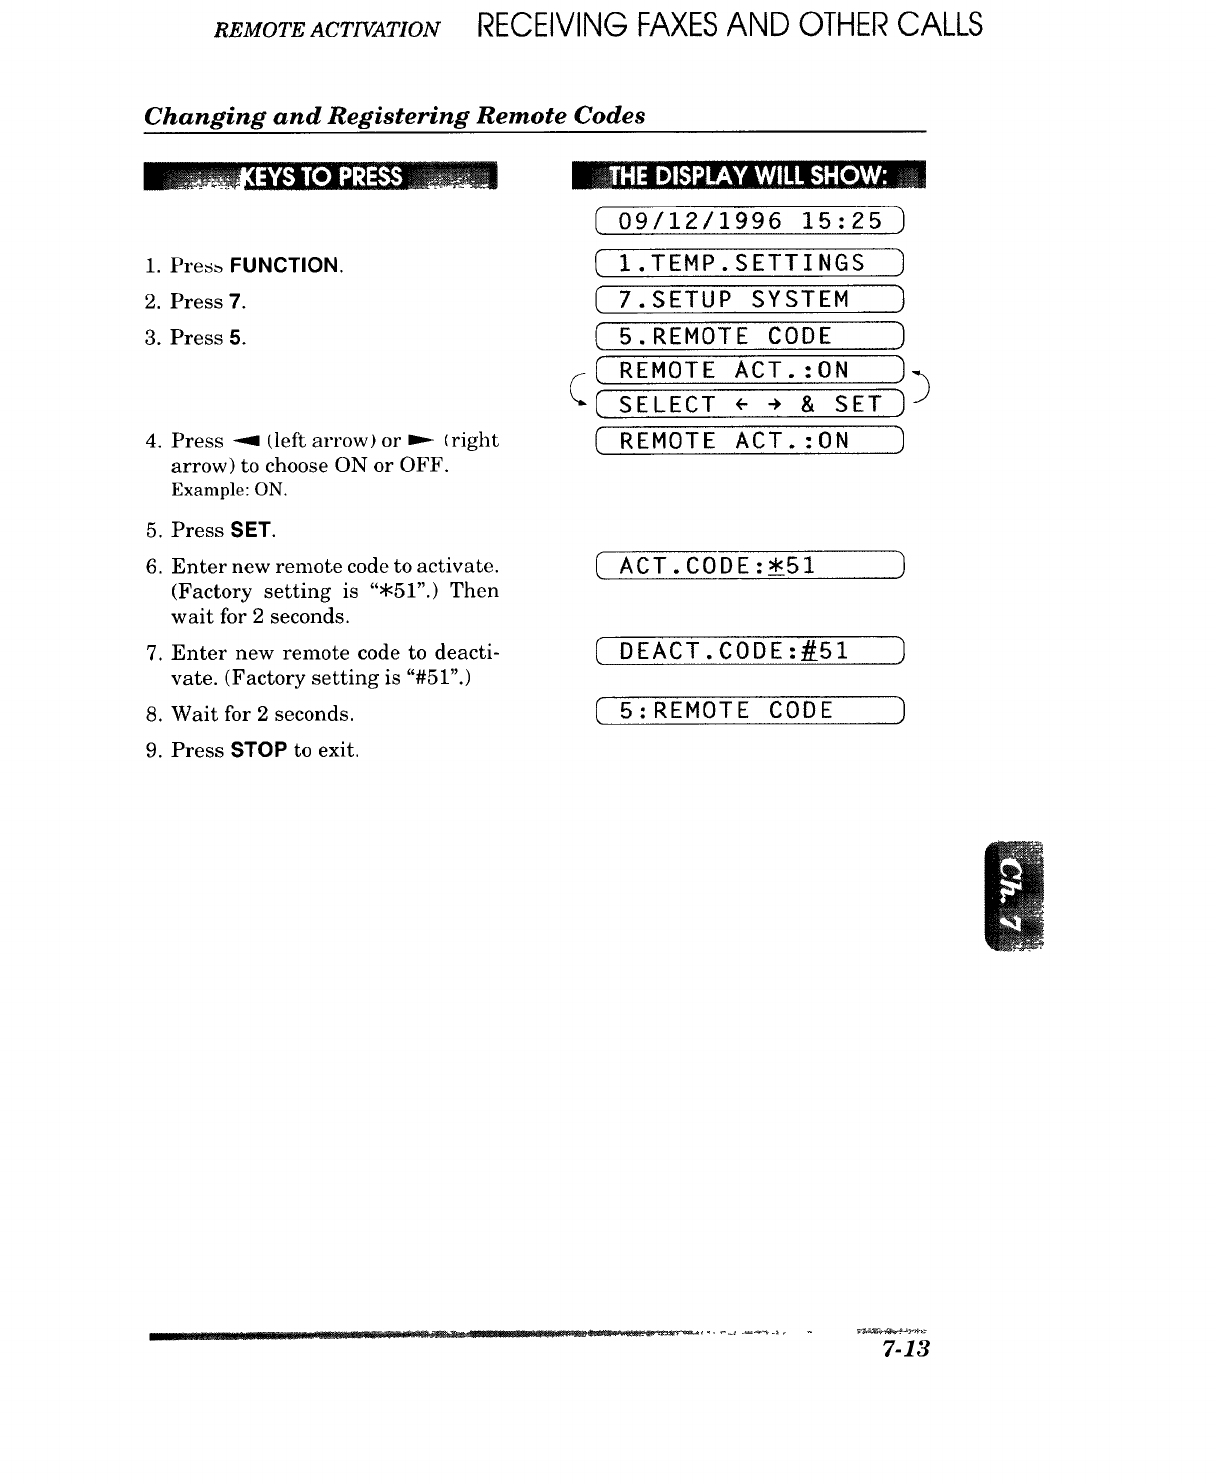
REMOTEACTIVATION RECEIVING FAXESAND OTHERCALLS
Changing and Registering Remote Codes
i. Pres= FUNCTION.
2. Press 7.
3. Press 5.
4. Press --_ (left arrow) or _ (right
arrow) to choose ON or OFF.
Example: ON.
5. Press SET.
6. Enter new remote code to activate.
(Factory setting is ".51".) Then
wait for 2 seconds.
7. Enter new remote code to deacti-
vate. (Factory setting is "#51".)
8. Wait for 2 seconds.
9. Press STOP to exit.
m_*_]"4,] F.1_nr=YAvjI!nl.-]:[o_.vJmm
(09/12/1996 15:25 )
1.TEMP.SETTINGS ]
( 7.SETUP SYSTEM )
5.REMOTE CODE )
(REMOTE ACT. :0" )--_
( SELECT <" * & SET ,)
J
( REMOTE ACT.:ON ]
ACT.CODE:*51
(DEACT.CODE:#51 ]
( 5:REMOTE CODE )
7-13
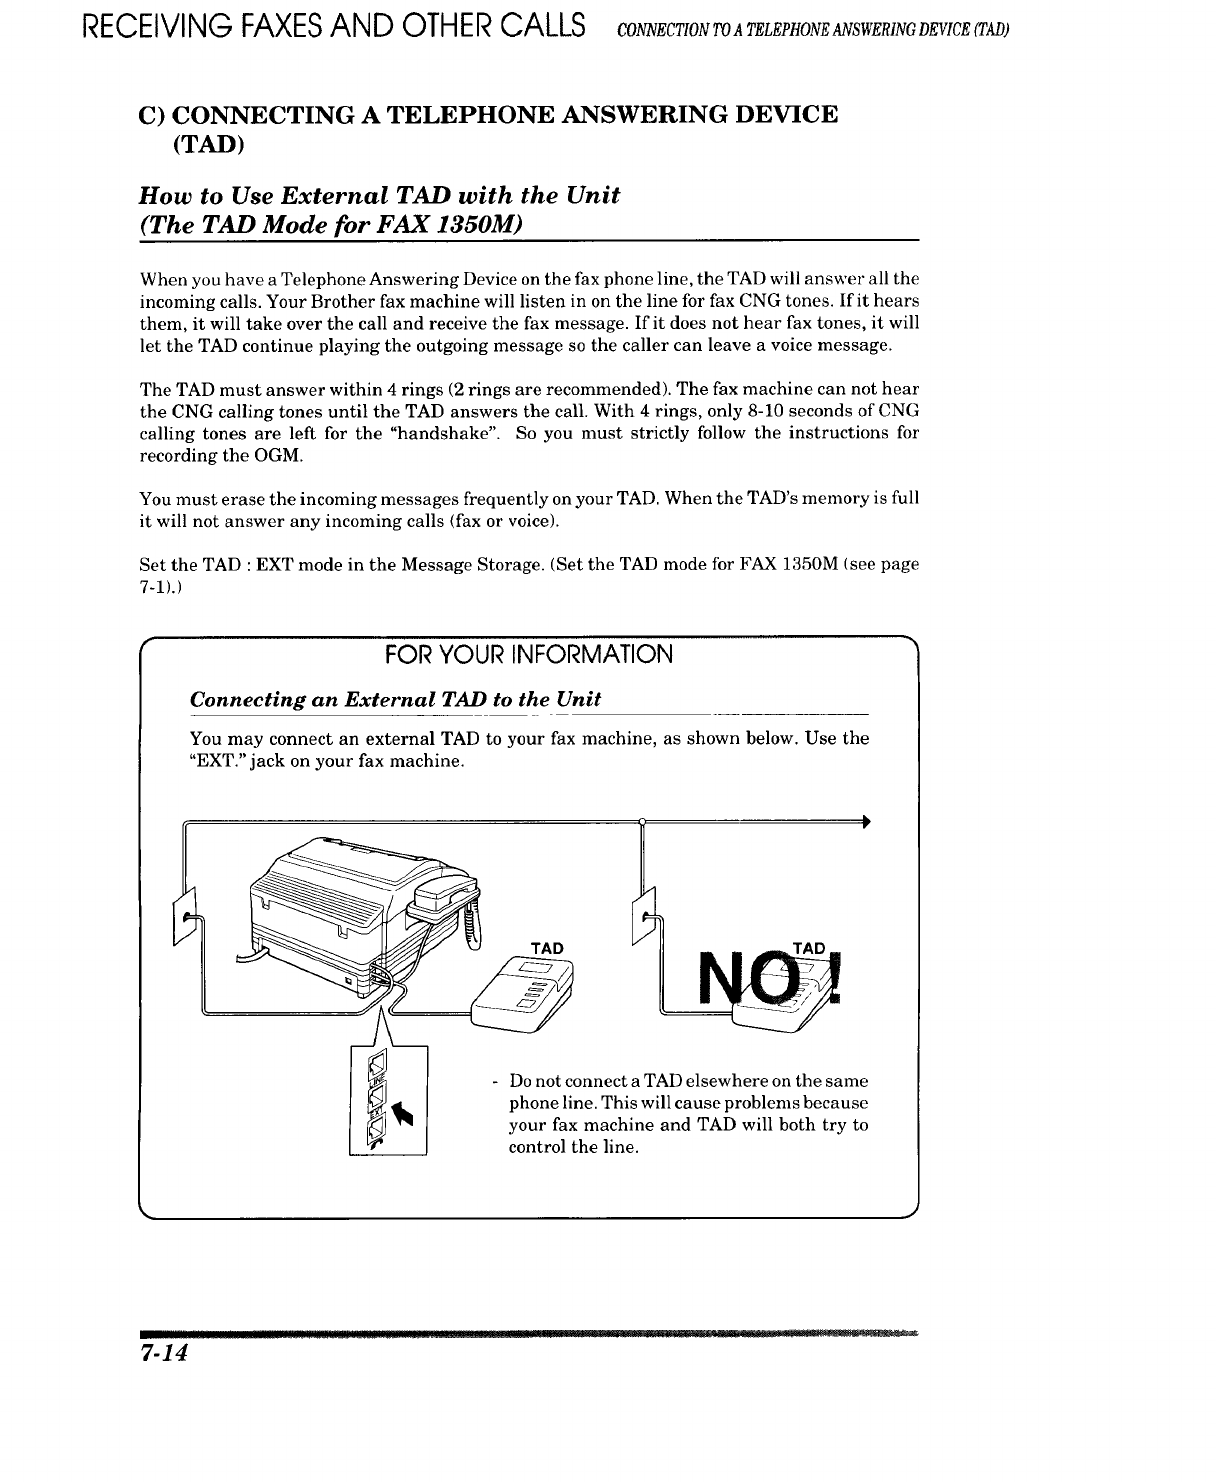
RECEIVING FAXESAND OTHERCALLS CO CrIONrOAr LE ON SW RINCD VIC CrA
C) CONNECTING A TELEPHONE ANSWERING DEVICE
(TAD)
How to Use External TAD with the Unit
(The TAD Mode for FAX 1350M)
When you have a Telephone Answering Device on the fax phone line, the TAD will answer all the
incoming calls. Your Brother fax machine will listen in on the line for fax CNG tones. If it hears
them, it will take over the call and receive the fax message. If it does not hear fax tones, it will
let the TAD continue playing the outgoing message so the caller can leave a voice message.
The TAD must answer within 4 rings (2 rings are recommended). The fax machine can not hear
the CNG calling tones until the TAD answers the call. With 4 rings, only 8-10 seconds of CNG
calling tones are left for the "handshake". So you must strictly follow the instructions for
recording the OGM.
You must erase the incoming messages frequently on your TAD. When the TAD's memory is full
it will not answer any incoming calls (fax or voice).
Set the TAD : EXT mode in the Message Storage. (Set the TAD mode for FAX 1350M (see page
7-1).)
FOR YOUR INFORMATION
Connecting an External TAD to the Unit
You may connect an external TAD to your fax machine, as shown below. Use the
"EXT." jack on your fax machine.
. _ TAD
__ -Do not connect a TAD elsewhere on the same
phone line. This will cause problems because
your fax machine and TAD will both try to
control the line.
IM!I!IH! ! _! ......................... " ....... . ........
7-14
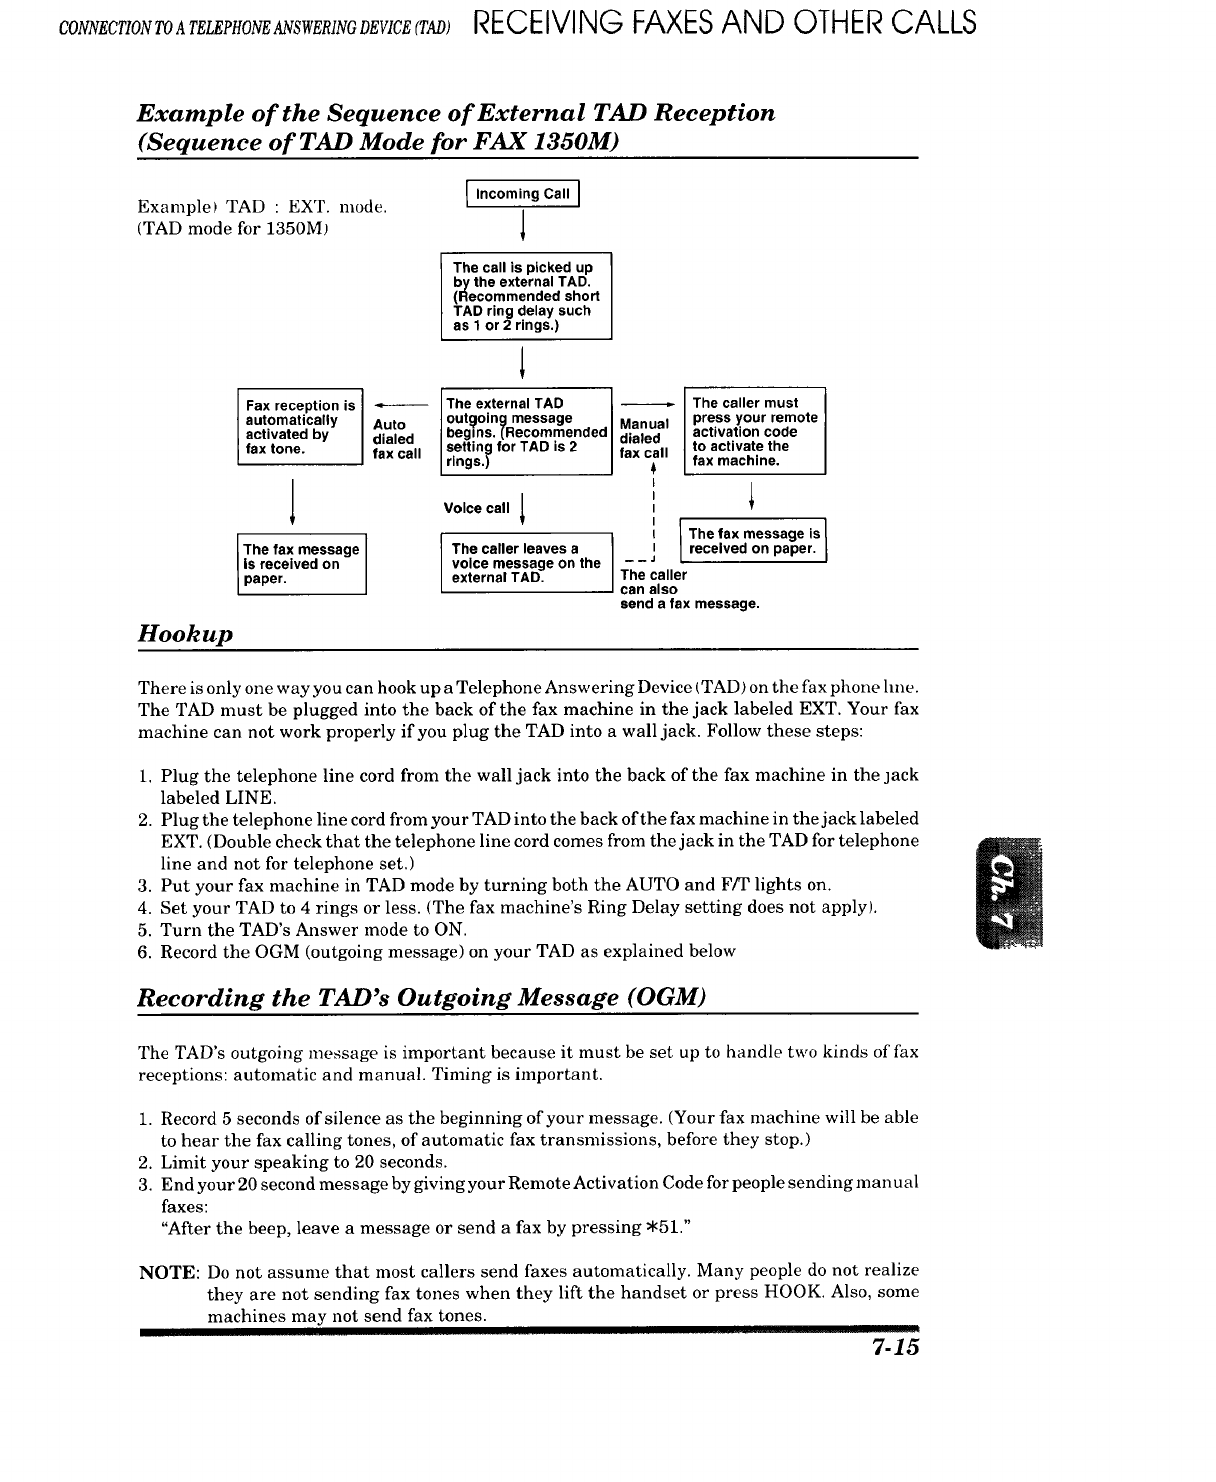
CONNECTIONTOA TEL@HONEANSWERINGDEVICE(TAD) RECEIVINGFAXESAND 01HER CALLS
Example of the Sequence of External TAD Reception
(Sequence of TAD Mode for FAX 1350M)
Incoming Call ]
Examplel TAD : EXT. mode.
(TAD mode for1350M) I
IFax reception is
automatically
activated by
fax tone.
l
The fax message
is received on
paper,
The call is picked up
the external TAD.
commended short
TAD ring delay such
as 1 or 2 rings.)
1
The external TAD
Aut_ out_loing message
begins. (Recommended
dialed setting for TAD is 2
fax call r ngs.)
Voice call 1
The caller leaves a
voice message on the
external TAD.
Ma-_ual The caller must
press your remote
dialed activation code
fax II to activate the
ca fax machine.
I
I
I=[The fax message is I
II received on paper. I
The caller
can also
send a fax message,
Hookup
There is only one way you can hook up a Telephone Answering Device (TAD) on the fax phone line.
The TAD must be plugged into the back of the fax machine in the jack labeled EXT. Your fax
machine can not work properly if you plug the TAD into a wall jack. Follow these steps:
1. Plug the telephone line cord from the wall jack into the back of the fax machine in the jack
labeled LINE.
2. Plug the telephone line cord from your TAD into the back of the fax machine in the jack labeled
EXT. (Double check that the telephone line cord comes from the jack in the TAD for telephone
line and not for telephone set.)
3. Put your fax machine in TAD mode by turning both the AUTO and F/T lights on.
4. Set your TAD to 4 rings or less. (The fax machine's Ring Delay setting does not apply).
5. Turn the TAD's Answer mode to ON.
6. Record the OGM (outgoing message) on your TAD as explained below
Recording the TAD's Outgoing Message (OGM)
The TAD's outgoing message is important because it must be set up to handle two kinds of fax
receptions: automatic and manual. Timing is important.
1. Record 5 seconds of silence as the beginning of your message. (Your fax machine will be able
to hear the fax calling tones, of automatic fax transmissions, before they stop.)
2. Limit your speaking to 20 seconds.
3. End your 20 second message by giving your Remote Activation Code for people sending manual
faxes:
"After the beep, leave a message or send a fax by pressing .51."
NOTE: Do not assume that most callers send faxes automatically. Many people do not realize
they are not sending fax tones when they lift the handset or press HOOK. Also, some
machines may not send fax tones.
7-15
RECEIVING FAXESAND OTHERCALLS D,STINCTIVER*NOINO
D) DISTINCTIVE RINGING
Distinctive Ringing
What Is Distinctive Ringing?
Distinctive ringing is a service offered by the telephone carriers that allows you to have several
different numbers on one phone line, each with it own distinctive ringing pattern. This way, when
you get an incoming call, you can identify the number being called by its ring. Your local telephone
company can provide more information about this service. The service is usually offered as a
monthly charge to your normal telephone bill.
Can My Fax Machine Use Distinctive Ringing?
Yes, it has a distinctive ringing function that allows you to register the distinctive ringing pattern
of an additional phone number on the line (See page 7-17-18). The number you register must be
the number you want to use as your dedicated fax number. Once you register the ringing pattern,
the fax machine will be able to identify its own incoming calls and automatically receive faxes at
that number. You can register only one ringing pattern. There are some ringing patterns that can
not be registered.
Can I Change the Setting Later?
Yes, you can change or cancel the distinctive ringing setting anytime.
How Will the Fax Machine Treat All Other Distinctive Ringing?
It will act the way it normally does. In other words, the fax machine will treat all the other
unregistered, distinctive rings according to the machine's answer mode setting (MANUAL,
AUTO, F/T, or TAD). For instance, ifa call comes in that is not for your (registered) dedicated fax
number, and the machine is set to MANUAL, the fax machine will respond as per the MANUAL
mode.
How Does the Distinctive Ringing Function Work ?
When you receive an incoming call, the fax machine compares the ring pattern with the one that
is registered. If the two are identical, then the fax machine automatically accepts the call as an
incoming fax. Otherwise, the fax machine will treat the call in the usual way, depending on the
machine's answer mode setting (MANUAL, AUTO, F/T, or TAD (1350M)fMSG CTR (1450MC/
1550MC, 1850MC/1950MC)). The function has 3 modes: (ON, SET, OFF). Set it to ON when you
want to use it, and to OFF when you do not want to use it. Use the SET mode for registering a
number.
What is the Advantage of Using the Distinctive Ringing Function?
By registering a ring pattern (see page 7-17-18) you may operate your fax machine in the most
efficient way possible should you require the distinctive ringing service. With the distinctive
function ON, you can receive your faxes automatically, and people who call you on one of your
other numbers do not have to talk to your fax machine. It basically gives you two independent
numbers by using only one line.
7-16
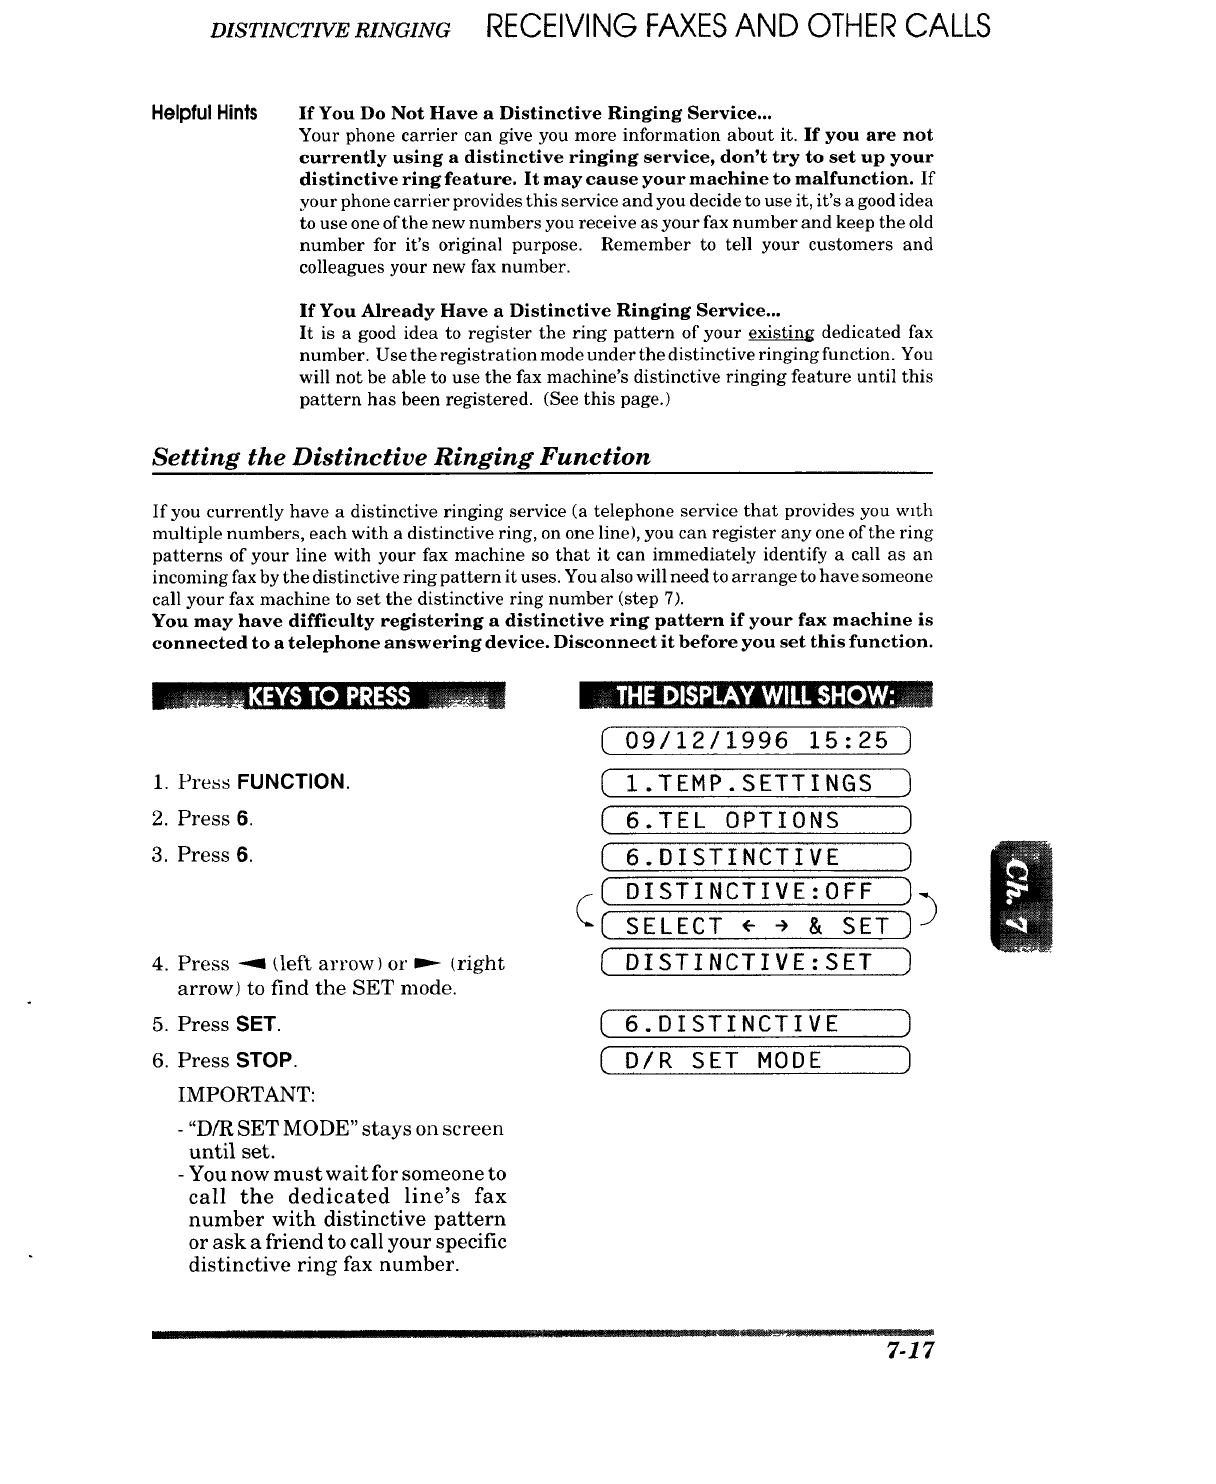
DISTINCT1VERINGINGRECEIVING FAXESAND OTHERCALLS
Helpful Hints If You Do Not Have a Distinctive Ringing Service...
Your phone carrier can give you more information about it. If you are not
currently using a distinctive ringing service, don't try to set up your
distinctive ring feature. It may cause your machine to malfunction. If
your phone carrier provides this service and you decide to use it, it's a good idea
to use one of the new numbers you receive as your fax number and keep the old
number for it's original purpose. Remember to tell your customers and
colleagues your new fax number.
If You Already Have a Distinctive Ringing Service...
It is a good idea to register the ring pattern of your existing dedicated fax
number. Use the registration mode under the distinctive ringing function. You
will not be able to use the fax machine's distinctive ringing feature until this
pattern has been registered. (See this page.)
Setting the Distinctive Ringing Function
If you currently have a distinctive ringing service (a telephone service that provides you with
multiple numbers, each with a distinctive ring, on one line), you can register any one of the ring
patterns of your line with your fax machine so that it can immediately identify a call as an
incoming fax by the distinctive ring pattern it uses. You also will need to arrange to have someone
call your fax machine to set the distinctive ring number (step 7).
You may have difficulty registering a distinctive ring pattern if your fax machine is
connected to a telephone answering device. Disconnect it before you set this function.
1. Press FUNCTION.
2. Press 6.
3. Press 6.
4. Press --_ deft arrow) or m-- (right
arrow) to find the SET mode.
5. Press SET.
6. Press STOP.
IMPORTANT:
- "DFR SET MODE" stays on screen
until set.
- You now must wait for someone to
call the dedicated line's fax
number with distinctive pattern
or ask a friend to call your specific
distinctive ring fax number.
m II"i:11*_[,'];,IlF-Y&VAIIII_'F [tY,!_
(
(09/12/1996 15:25 ]
1.TEMP.SETTINGS ]
6.TEL OPTIONS )
6.DISTINCTIVE )
DISTINCTIVE:OFF ] %
CSELECT SET
( DISTINCTIVE:SET )
(6.DISTINCTIVE )
( D/R SET MODE ]
7-17
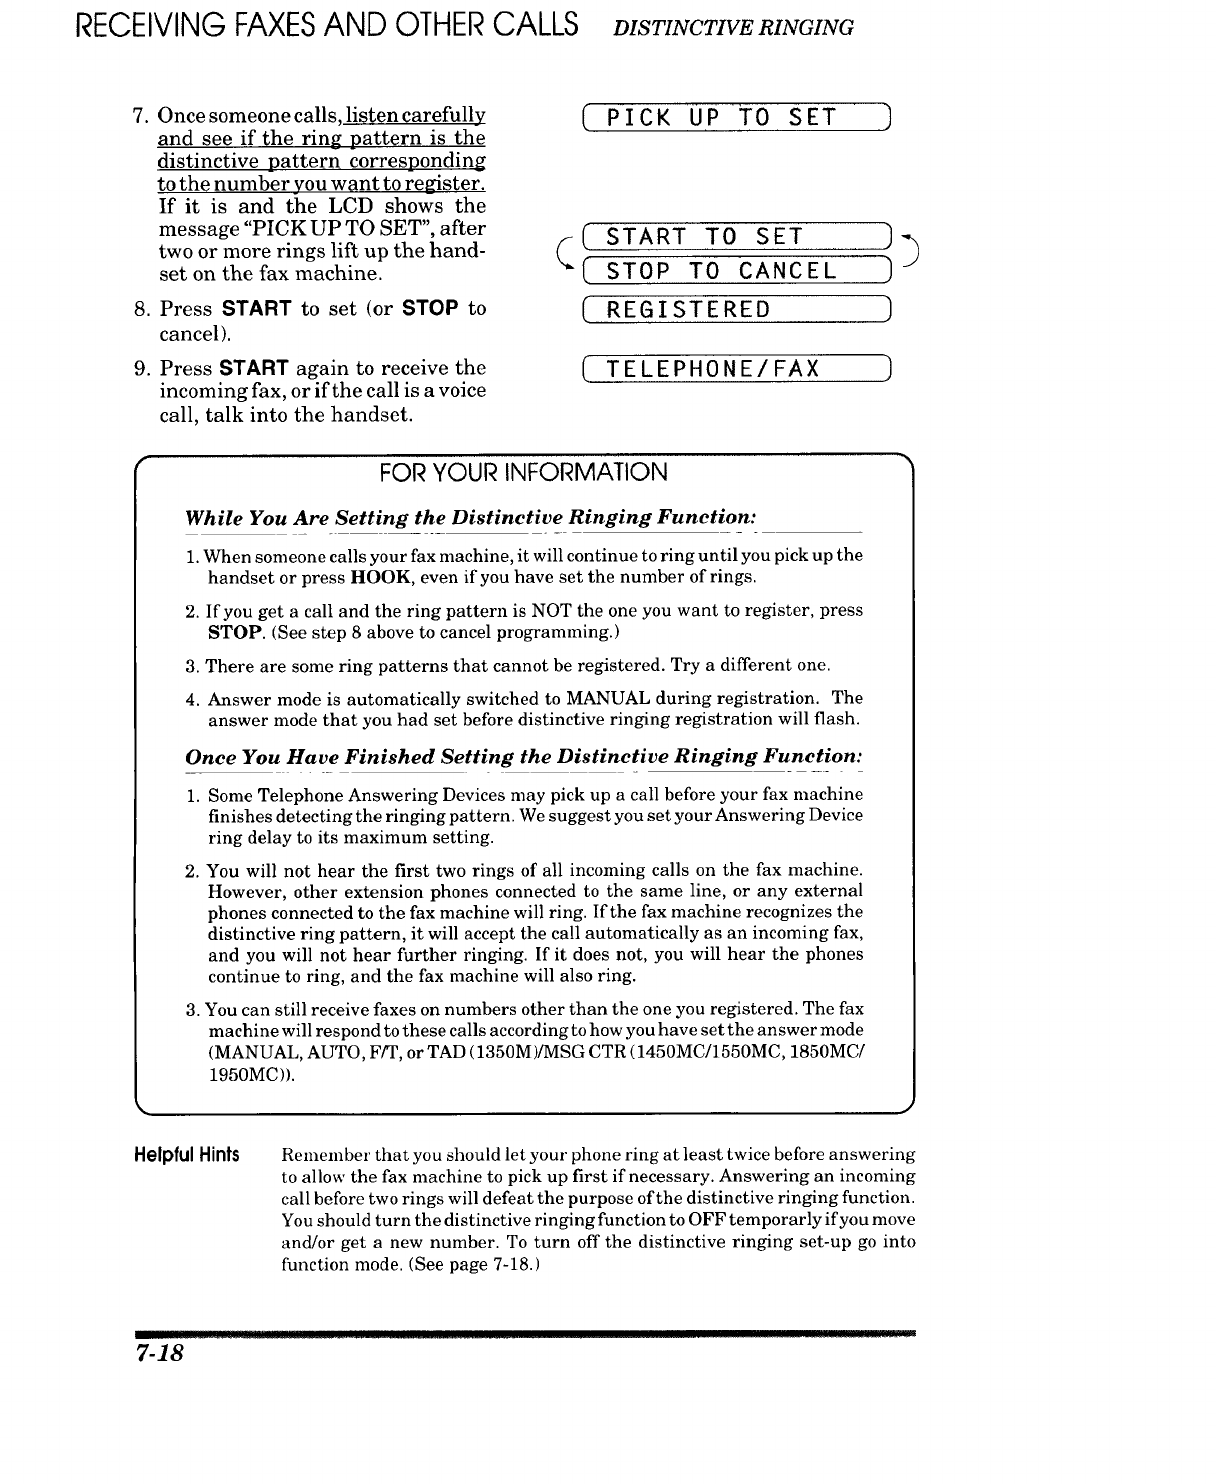
RECEIVINGFAXESAND OTHERCALLS DISTINCTIVERINGING
7. Once someone calls, listen carefully ( P I CK U P TO SET
and see if the ring pattern is the
distinctive pattern corresponding
to the number you want to register.
If it is and the LCD shows the
message "PICK UP TO SET", after
two or more rings lift up the hand-
set on the fax machine.
8. Press START to set (or STOP to
cancel).
9. Press START again to receive the
incoming fax, or if the call is a voice
call, talk into the handset.
f_ START TO SET
(STOP TO CANCEL
(REGISTERED
TELEPHONE/FAX
)
)
FOR YOUR INFORMATION
While You Are Setting the Distinctive Ringing Function:
1. When someone calls your fax machine, it will continue to ring until you pick up the
handset or press HOOK, even if you have set the number of rings.
2. If you get a call and the ring pattern is NOT the one you want to register, press
STOP. (See step 8 above to cancel programming.)
3. There are some ring patterns that cannot be registered. Try a different one.
4. Answer mode is automatically switched to MANUAL during registration. The
answer mode that you had set before distinctive ringing registration will flash.
Once You Have Finished Setting the Distinctive Ringing Function:
1. Some Telephone Answering Devices may pick up a call before your fax machine
finishes detecting the ringing pattern. We suggest you set your Answering Device
ring delay to its maximum setting.
2, You will not hear the first two rings of all incoming calls on the fax machine.
However, other extension phones connected to the same line, or any external
phones connected to the fax machine will ring. If the fax machine recognizes the
distinctive ring pattern, it will accept the call automatically as an incoming fax,
and you will not hear further ringing. If it does not, you will hear the phones
continue to ring, and the fax machine will also ring.
3. You can still receive faxes on numbers other than the one you registered. The fax
machine will respond to these calls according to how you have set the answer mode
(MANUAL, AUTO, F/T, or TAD (1350M)/MSG CTR 1450MC/1550MC, 1850MC/
1950MC)).
Helpful Hints Remember that you should let your phone ring at least twice before answering
to allow the fax machine to pick up first if necessary. Answering an incoming
call before two rings will defeat the purpose of the distinctive ringing function.
You should turn the distinctive ringing function to OFF temporarly if you move
and/or get a new number. To turn off the distinctive ringing set-up go into
function mode. (See page 7-18.)
7-18
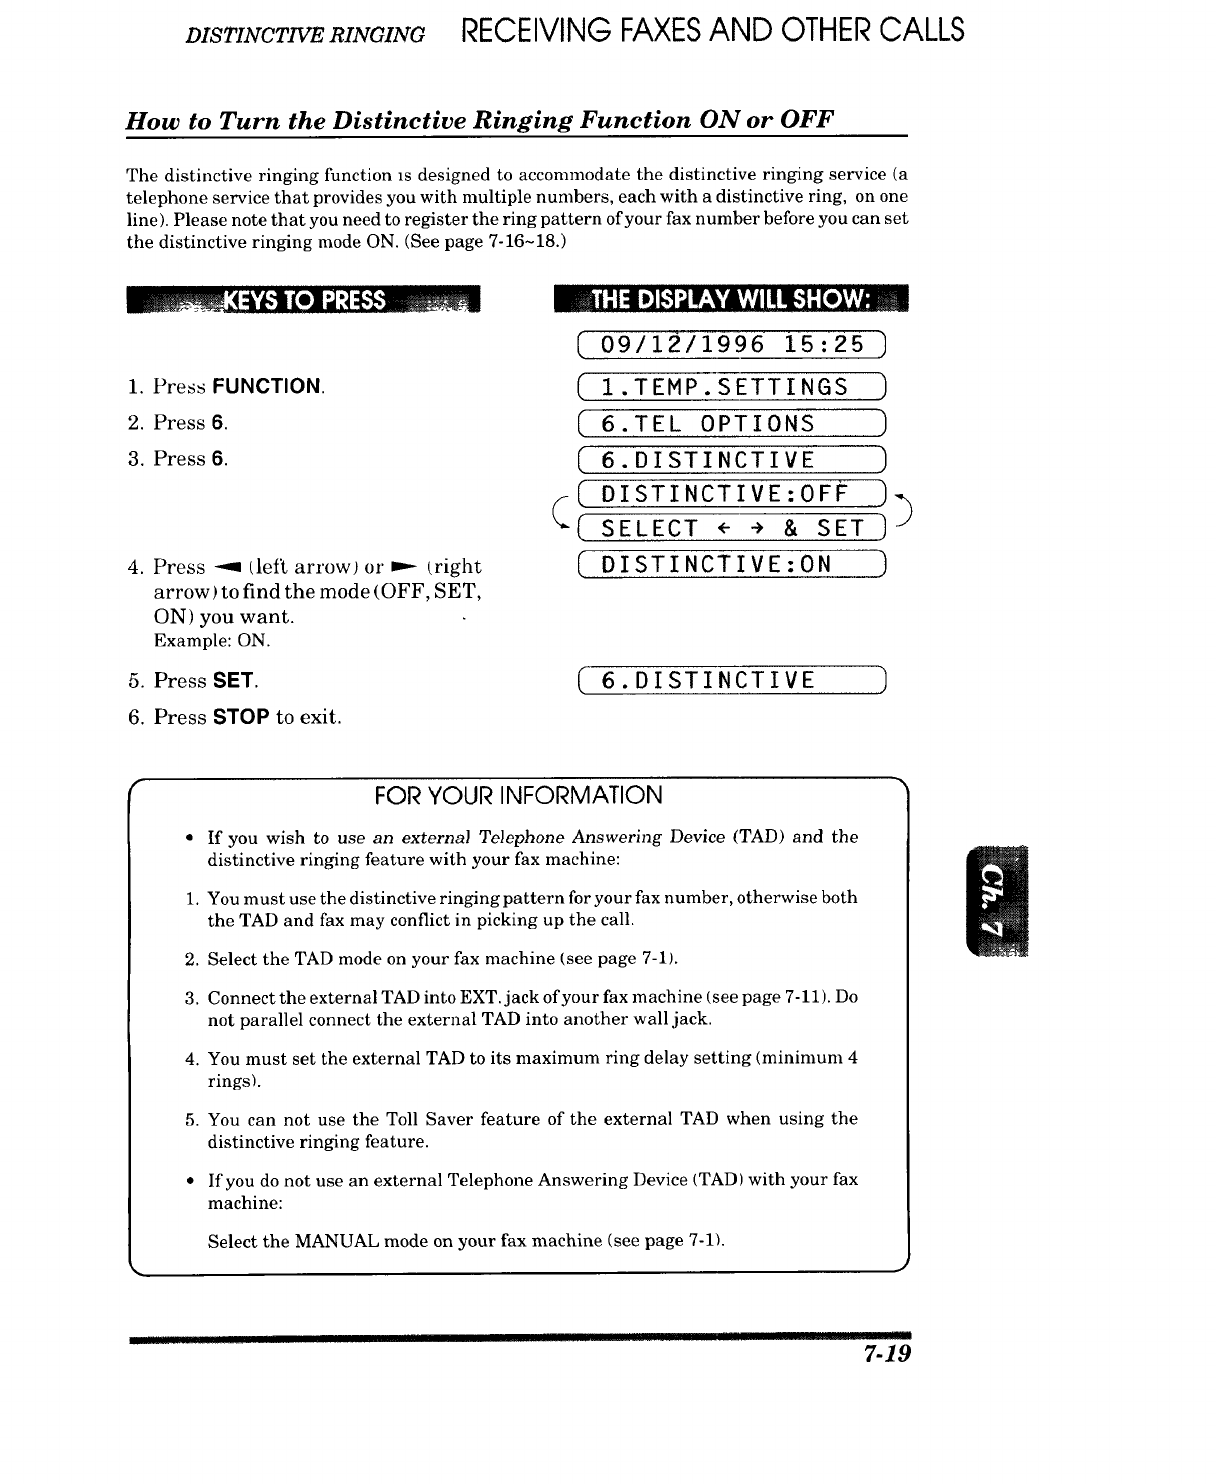
DISTINCTIVERINGING RECEIVING FAXESAND OTHERCALLS
How to Turn the Distinctive Ringing Function ON or OFF
The distinctive ringing function is designed to accommodate the distinctive ringing service (a
telephone service that provides you with multiple numbers, each with a distinctive ring, on one
line). Please note that you need to register the ring pattern of your fax number before you can set
the distinctive ringing mode ON. (See page 7-16-18.)
1. Press FUNCTION.
2. Press 6.
3. Press 6.
4. Press _ tleft arrow) or _ £right
arrow) to find the mode (OFF, SET,
ON) you want.
Example: ON.
_,_ |: !:11D][,']"JIr_'¥A',_vj!H_'] "[e]hv_l._.
( 09/12/1996 15:25 ]
C I.TEMP.SETTINGS )
( 6.TEL OPTIONS )
( 6.DISTINCTIVE )
( DI,STINCTIVE:OFF ,,J
_( SELECT <- -> & SET ]_
(DISTINCTIVE:ON )
5. Press SET. (- 6.DISTINCTIVE ]
6. Press STOP to exit.
FOR YOUR INFORMATION
•If you wish to use an external Telephone Answering Device (TAD) and the
distinctive ringing feature with your fax machine:
1. You must use the distinctive ringing pattern for your fax number, otherwise both
the TAD and fax may conflict in picking up the call.
2. Select the TAD mode on your fax nmchine (see page 7-1_.
3. Connect the external TAD into EXT. jack of your fax machine (see page 7-11). Do
not parallel connect the external TAD into another wall jack.
4. You must set the external TAD to its maximmn ring delay setting (minimum 4
rings).
5. You can not use the Toll Saver feature of the external TAD when using the
distinctive ringing feature.
•If you do not use an external Telephone Answering Device (TAD) with your fax
machine:
Select the MANUAL mode on your fax machine (see page 7-1).
__JL .......... ! ...... mN 7-19
RECEIVING FAXESAND OTHERCALLS CALL ,RW
E) CALLER ID
What is Caller ID?
Caller ID is atelephone service that allows the subscriber to see a display of the caller's phone
number (or name in certain states) as the telephone rings. It is a fast way to screen your calls. You
can respond quickly to calls you missed, because Caller IDs are received and stored in your
machine's memory.
To get tile Caller |D 5ervice. apply lot" thL, Caller ID ._(., vl(t. at )_,ul local Lelcpho.,
company.
The type of service varies from state to state and :s determined by your telephone
company. Your particular service may display only the caller's phone number or the
caller's number and/or name.
%)
Advantages of Caller ID
For Business
All businesses profit from a quicker response to customer calls. Businesses that provide marl
order services, money-lending services or provide confidential information, can protect them-
selves from false orders or acceptance of false identification.
At Home
Residential customers can protect themselves from unwanted calls.
How Does the Caller ID Work ?
The Caller ID Appears on the Display When Your Telephone Rings
As your telephone rings, the D:splay shows you the caller's phone number (or caller's name in
certain states). You will know who is calling before you pick up the handset or before your
machine autonmtically receives the call. Once you pick up the handset, the caller's ID
disappears. If both the caller's phone number and name are received, only the name will appear
on the Display. You will see the first 16 characters of the number or name.
Helpful Hints • If"OUT OF AREA" appears on the Display, it means that the call came from
outside your caller ID service area.
• If"PRIVATE CALL" appears on the Display, it means the caller intentionally
blocked the transmission of his/her ID.
• If no caller ID was transmitted to your fax machine, "CALL PICKUP" will
remain on the display.
NOTE: Please setup the number of rings 02 and more to have the Caller ID. If you set up the
number of rings to 01, you can not receive the Caller ID.
Jl[ .............. " ._ ......................... r_Lk_... __ ......... ,illl__
7-20
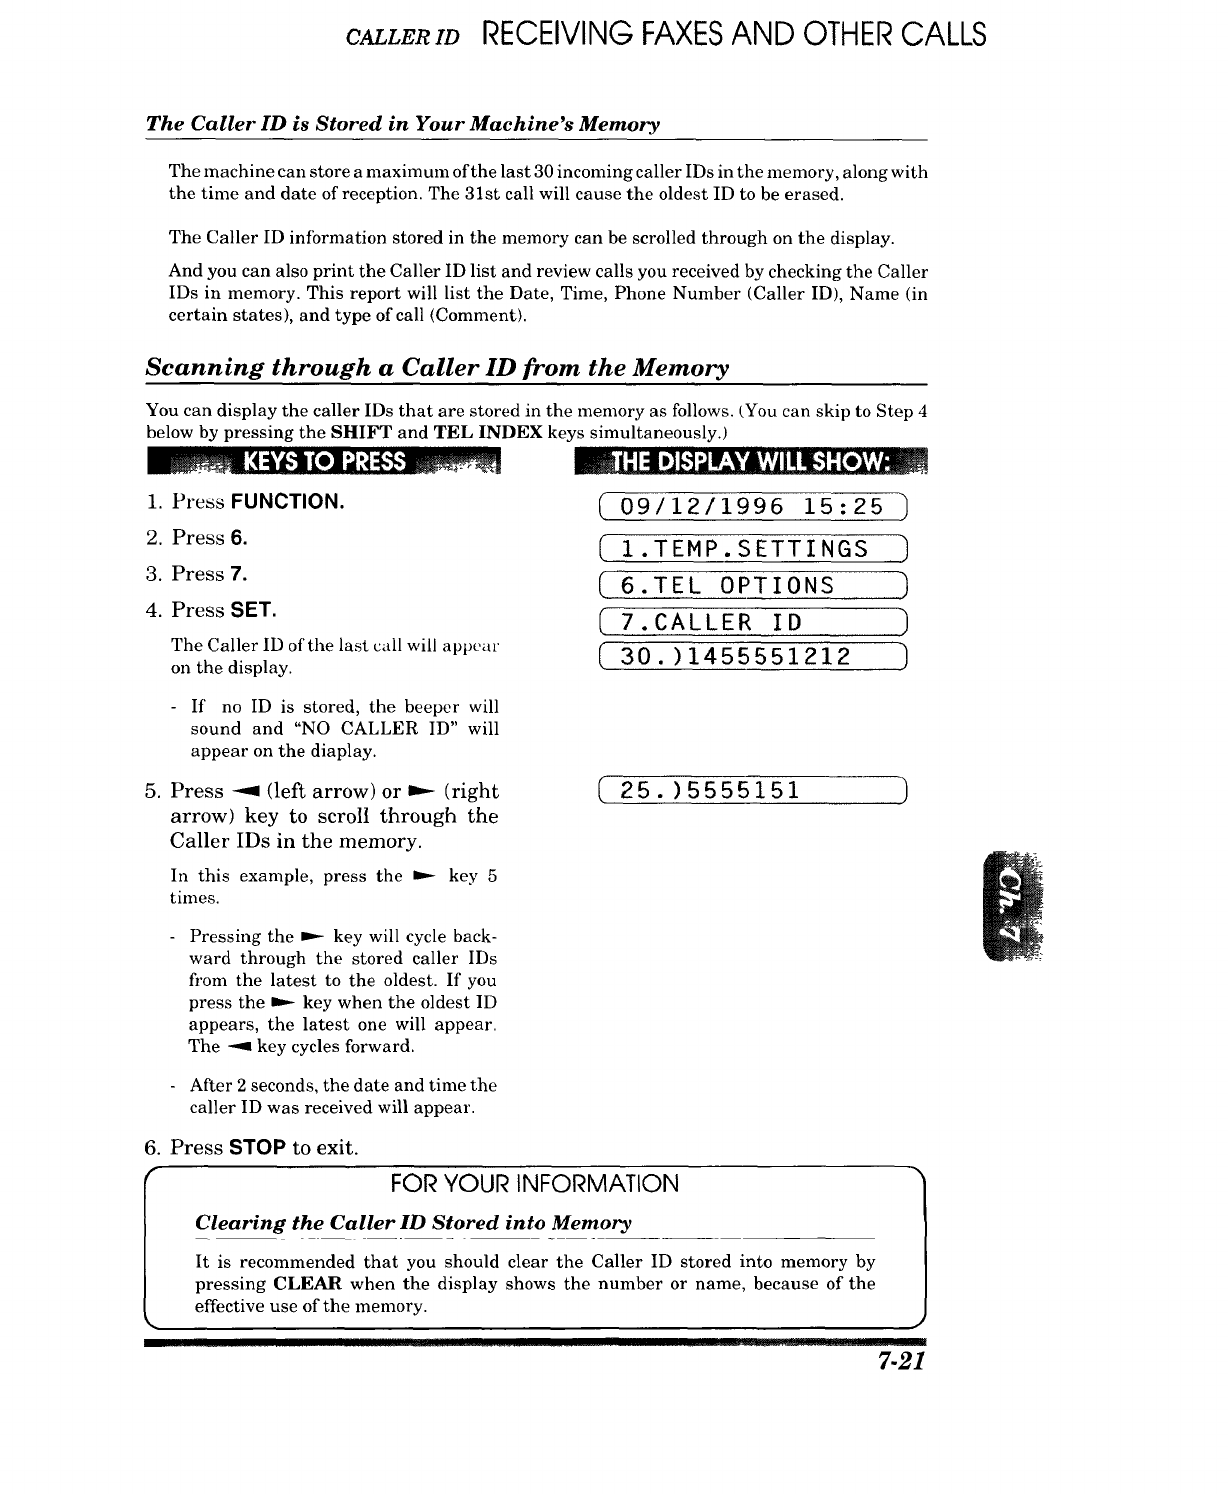
CALLERID RECEIVING FAXESAND OTHERCALLS
The Caller ID is Stored in Your Machine's Memory
The machine can store a nmximum of the last 30 incoming caller IDs in the memory, along with
the time and date of reception. The 31st call will cause the oldest ID to be erased.
The Caller ID information stored in the memory can be scrolled through on the display.
And you can also print the Caller ID list and review calls you received by checking the Caller
IDs in memory. This report will list the Date, Time, Phone Number (Caller ID), Name (in
certain states), and type of call (Comment).
Scanning through a Caller ID from the Memory
You can display the caller IDs that are stored in the memory as follows. (You can skip to Step 4
below by pressing the SHIFT and TEL INDEX keys simultaneously.)
1. Press FUNCTION.
2. Press 6.
3. Press 7.
4. Press SET.
The Caller ID of the last call wiLl appear
on the display.
If no ID is stored, the beeper will
sound and "NO CALLER ID" will
appear on the diaplay.
5. Press -91 (left arrow) or _ (right
arrow) key to scroll through the
Caller IDs in the memory.
In this example, press the b.- key 5
times.
l:t:::tt,] ;,1 I,
(09/12/1996 15:25
(1.TEMP.SETTINGS
(6.TEL OPTIONS
7. CALLER ID )
( 30. )1455551212 ")
(25.)5555151
Pressing the P-- key will cycle back-
ward through the stored caller IDs
fl'om the latest to the oldest. If you
press the _ key when the oldest ID
appears, the latest one will appear.
The -_, key cycles forward.
After 2 seconds, the date and time the
caller ID was received will appear.
6. Press STOP to exit.
FOR YOUR INFORMATION
Clearing the Caller ID Stored into Memory
It is recommended that you should clear the Caller ID stored into memory by
pressing CLEAR when the display shows the number or name, because of the
effective use of the memory.
IlflI!IHIPHPHI[r! I ........... IF!r rlr =
7.21
RECEIVING FAXESAND OTHERCALLS CALLERW
Printing the Caller ID List
You can print a listing of the Caller IDs for the last 30 calls received. Both telephone and fax calls
will be listed.
__ _I:i'_.'tl_e]'J'_ :g__ _ |-'1:11_]M;,lI'-'VAVJIi I_t -"[elVAw_m
09/12/1996 15:25 )
i. Pre_sFUNCTION. [ 1 .TEMP.SETTINGS )
2. Press3. _ 3. PRINT REPORTS
3. Pressg. [ 9.CALLER ID )
4. Press SET
Wait 2 seconds until you see the ( PRESS START KEY ]
prompt at the right.
5. Press START. (P R I N T I N G ]
•Sample of Caller ID List
DATE TIME
01 09/04 13:45
02 09/04 13:45
03 09/04 13:45
04 09/04 13:45
05 09/04 13:45
06 09/04 13:45
07 09/04 13:45
08 09/04 13:45
09 09/04 13:45
I0 09/04 13:45
11 09/04 13:45
CALLER ID
5551212
5551212
5551111
5551010
5552222
5552323
5550000
5551212
5551234
5551010
5550101
CALLER IO LISI I
] lIME : 09_04/1996 14:05
NAME :
FAX :
TEL :
® ®
NAME
KOUJI TAKEYAMA
KOUJI TAKEYAMA
SMITH SHARON
KOUJI TAKEYAMA
SMITH SHARON
JONES JENNIFER
COMMENT
TEL RX
TEL
TEL RX
TAD RX
TAD
TEL RX
TEL TX
RX
TX
TAD RX
NOTE: "TX" means Transmit, "RX" means Receive.
CONTENTS OF THE LIST:
DATE & TIME ,_)
CALLER ID ,_)
NAME (ONLY WHEN AVAILABLE),_
COMMENT
COMMENTS WILL INCLUDE:
•TX means your machine sent a fax message when it was polled or called.
• RX means your machine received a fax message (other than when polled or called).
• TEL means you answered a telephone call by your fax machine, external TAD or external phone.
• TAD means you received an ICM in your Message Center memory (Only for FAX 1450MC/
1550MC, MFC 1850MC/1950MC/.
BLANK means the call was not answered or you answered by extension phone.
.... UL_
7-22
POLLING
8. POLLING
FOR YOUR INFORMATION
What Is Polling?
Polling is the process of retrieving faxes from another fax machine. You may use
your machine to "poll" other machines, or you may ask someone to poll your machine.
The party who polls pays for the cost of the call.
How Does It Work ?
First all parties set up their fax machines so that they can accommodate polling.
Then one party leaves documents in the fax machine so that the other party can call
and have the documents sent to them.
Polling side_--_
c.,,
9
Receive document
PO,
When to Use Polling?
Use polling to control the cost of who pays for sending a fax.
1. If you want to pay for the cost of the call: Send out faxes to other parties as you
normally would, and if another party has documents to send you, ask if you can
poll for them.
2. If you want others to pay for the cost of the call: Ask them to poll your fax machine
for documents they want, and have them fax any documents that you want.
* There are some fax machines that will not respond to the polling function.
Helpful Hints Using Polling Effectively (Examples)
Problem No. 1: You want another party to send you a long fax, but the3, do not
want to pay for the call.
Solution: Ask them to leave the document in their fax machine so you can
poll for it.
Problem No. 2: Sales representatives have difficulty sending in faxes to the
head office's fax machine because it is busy so much of the time
Solution: Head office can poll the sales representatives' fax machines.
Problem No. 3: Because of the time or location, it is cheaper for someone else to
call you than it is for you to make the call.
Solution: Ask the other party to poll for the documents and offer to pay for
the call at their lower rate.
PIll . I 8-1
POLLING
Polling Another Fax Machine (Calling)
Once you have set up polling, as described below, and the other party has set their fax machine
to "POLLED WAITING", you can automatically receive their documents.
blake sure there are no documents
in your feeder.
1. Press FUNCTION.
2. Press 1.
3. Press 2.
4. Wait for two seconds.
5. Press SET.
6. Press STOP.
7. Enter the fax number.
Example: One-touch dialing.
8. Press START.
B_ |" I::11D]g%]IraV&VjIIII_ -"[e_v;J_!
09/12/1996 15:25 ]
(1.TEMP.SETTINGS ]
(1.TEMP. SETTINGS )
C2.POLLING
(C POLLING:STANDARD ))
( SELECT <" "> & SET)
(
(2. POLLING )
C ENTER FAX NO. )_
( PRESS START KEY ) J
(NJ OFFICE ]
[ DIALING ]
( RECEIVING P.01 I
Setting up Polled Waiting (Being Called)
Polled Waiting is when you place a document in your fax machine and set your machine to allow
another fax machine to retrieve that document. Your fax machine will print a Polled Report
after the transmission.
1. Place the documents into the (beder.
2. Press FUNCTION.
3. Press 1.
4. Press 2.
5. Wait for two seconds.
6. Press SET.
_ =:!4,]m==,._,Av,,ji!_-_:[ol,,,_
(
(
09/12/1996 15:25
( FAX: NO. & START )',_
( COPY: PRESS COPY ) J
(1.TEMP.SETTINGS
1 .TEMP. SETTINGS ]
(Z.PO,LING )
(POLLING:STANDARD ))
[SELECT <-- -> & SET ]
{ 2.POLLING ]
.............. _r .1jr .....
8-2
POLLING
7. Press STOP.
8. Press START and wait for the poll-
ing call to come in.
( PRESS START KEY )
( POLLED WAITING )
Secure Polling
Secure Polling is a way to keep your documents and others' from falling into unauthorized hands
while the fax machines are set up for polling. You can use Secure Polling _ with another
Brother fax machine. Your four-digit ID number must be entered on the fax machine that polls
for your documents.
Polling Another Brother Fax Machine with Secure Code (Calling)
You can poll another Brother fax machine that has Secure Polling by following the steps below.
You need to make sure you are using the same ID number as the other party.
Make sure no documents are in the
feeder.
1. Press FUNCTION.
2. Press 1.
3. Press 2.
4. Wait for two seconds.
5. Press -_ (left arrow) or _ (right
arrow) to find the POLLING
SECURE setting.
6. Press SET.
7. Enter a four-digit number. This is
the security code of the fax machine
you are polling.
Example: 1234.
8. Wait for two seconds.
9. Press STOP.
10.Enter the fax number.
Example: One-Touch dialing.
11.Press START.
m1"-I:i D]g'];jIF.'YAVII! I_']:[e]LV_
( 09/12/1996 15:25
(1.TEMP.SETTINGS ]
1.TEMP.SETTINGS ]
2.POLLING ]
( POLLING:STANDARD ])
(
"'( SELECT <- ÷ & SET ]
(POLLING:SECURE ]
(POLLING ID:XXXX )
( POLLING ID:1234 ]
( 2.POLLING )
_( ENTER FAX NO. ])
( PRESS START KEY )
( NJ OFFICE )
( DIALI NG
( RECEIVING P.OI
W] ....
]
)
I ........ .'L .... I..... IHIIIII .. 8-3

POLLING
Setting up Polled Waiting with Secure Polling (Being Called)
Secure Polling allows you to create a Polling ID number to protect your documents during polled
waiting mode. Anyone who polls your machine must enter this polling ID number.
1. Insert the documents into the
feeder.
2. Press FUNCTION.
3. Press 1.
4. Press 2.
5. Wait for two seconds.
.Press --_ (left arrow) or _ (right
arrow) to find the POLLING
SECURE setting.
!-'1;11D][,,"];lIFVAYJIll II,'l I[oX_,'_
(09/12/1996 15:25 )
(( FAX: NO. & START _
COPY: PRESS COPY )
(I.TEMP.SETTINGS ]
1.TEMP.SETTINGS )
2.POLLING )
POLLING:STANDARD ))(
"*( SELECT <- "> & SET)
( POLLING:SECURE )
7. PressSET. ( POLLING ID:XXXX )
8. Enter a four-digit number. ( P 0 L L I NG I D : 1 2 3 4
Example: 1234.
9. Wait for two seconds. ( 2. P 0 L L I N G )
lO.PressSTOP. (PRESS START KEY )
ll.Press START and wait for the ( POLLED WAITING )
polling call to come in.
8-4
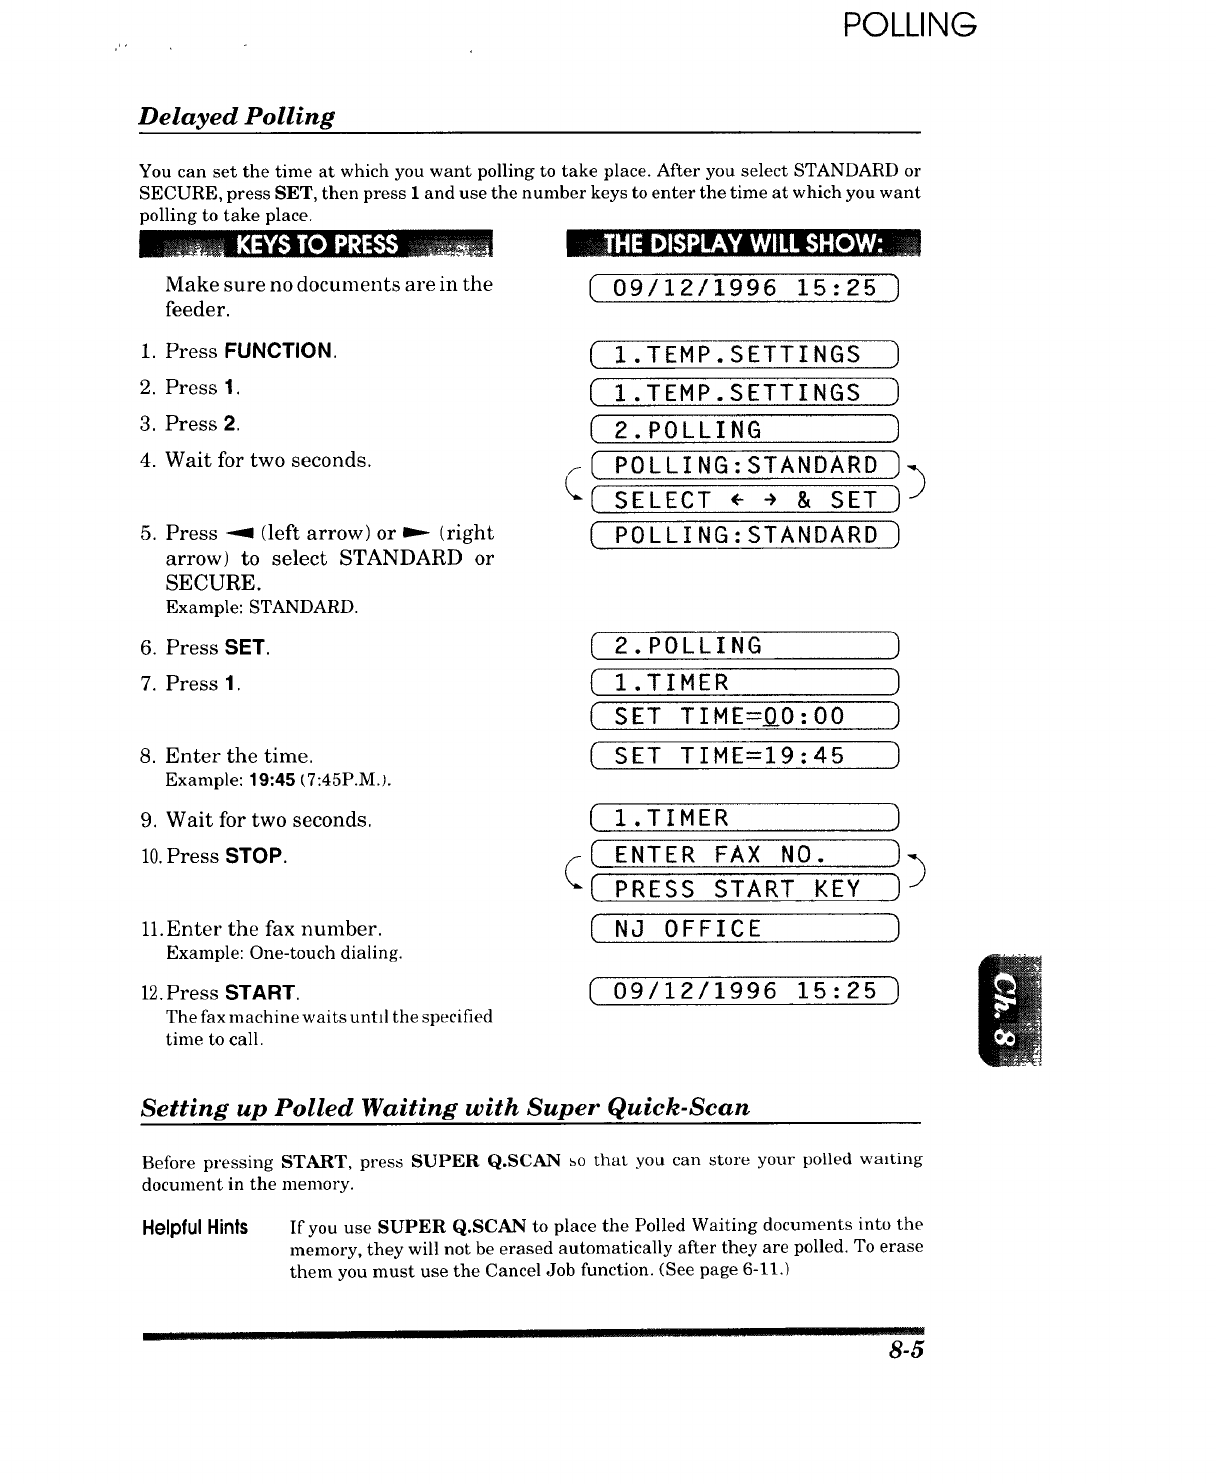
POLLING
Delayed Polling
You can set the time at which you want polling to take place. After you select STANDARD or
SECURE, press SET, then press 1 and use the number keys to enter the time at which you want
polling to take place.
_[4:_%1(e]'>_ __,_ _ 1:!:liP][.']:jIr-*Y&v,'jIqqi-')"[e]v,'j,m__
Make sure no documents are in the
feeder. (09/12/1996 15:25 ]
1. Press FUNCTION.
2. Press 1.
3. Press 2.
4. Wait for two seconds.
5. Press "9' (left arrow) or _ (right
arrow) to select STANDARD or
SECURE.
Example: STANDARD.
6. Press SET.
7. Press 1.
8. Enter the time.
Example: 19:45 (7:45P.M.L
9. Wait for two seconds.
10.Press STOP.
11.Enter the fax number.
Example: One-touch dialing.
12. Press START.
The fax machine waits untd the specified
time to call.
(I.TEMP.SETTINGS ]
(I.TEMP.SETTINGS )
(2.POLLING
F( POLLING:STANDARD 1)
_( SELECT ÷ ÷ &SET )
(POLLING:STANDARD )
(
(
(
(
2.POLLING )
1.TIMER )
SET TIME=_O:O0 1
SET TIME=I9:45 )
( 1.TIMER
(( ENTER FAX "0. ))
( PRESS START KEY )
NJ OFFICE ]
09/12/1996 15:25 )
Setting up Polled Waiting with Super Quick-Scan
Before pressing START, press SUPER Q.SCAN bo that you can store your polled waiting
document in the memory.
Helpful Hints If you use SUPER Q.SCAN to place the Polled Waiting documents into the
memory, they will not be erased automatically after they are polled. To erase
them you must use the Cancel Job function. (See page 6-113
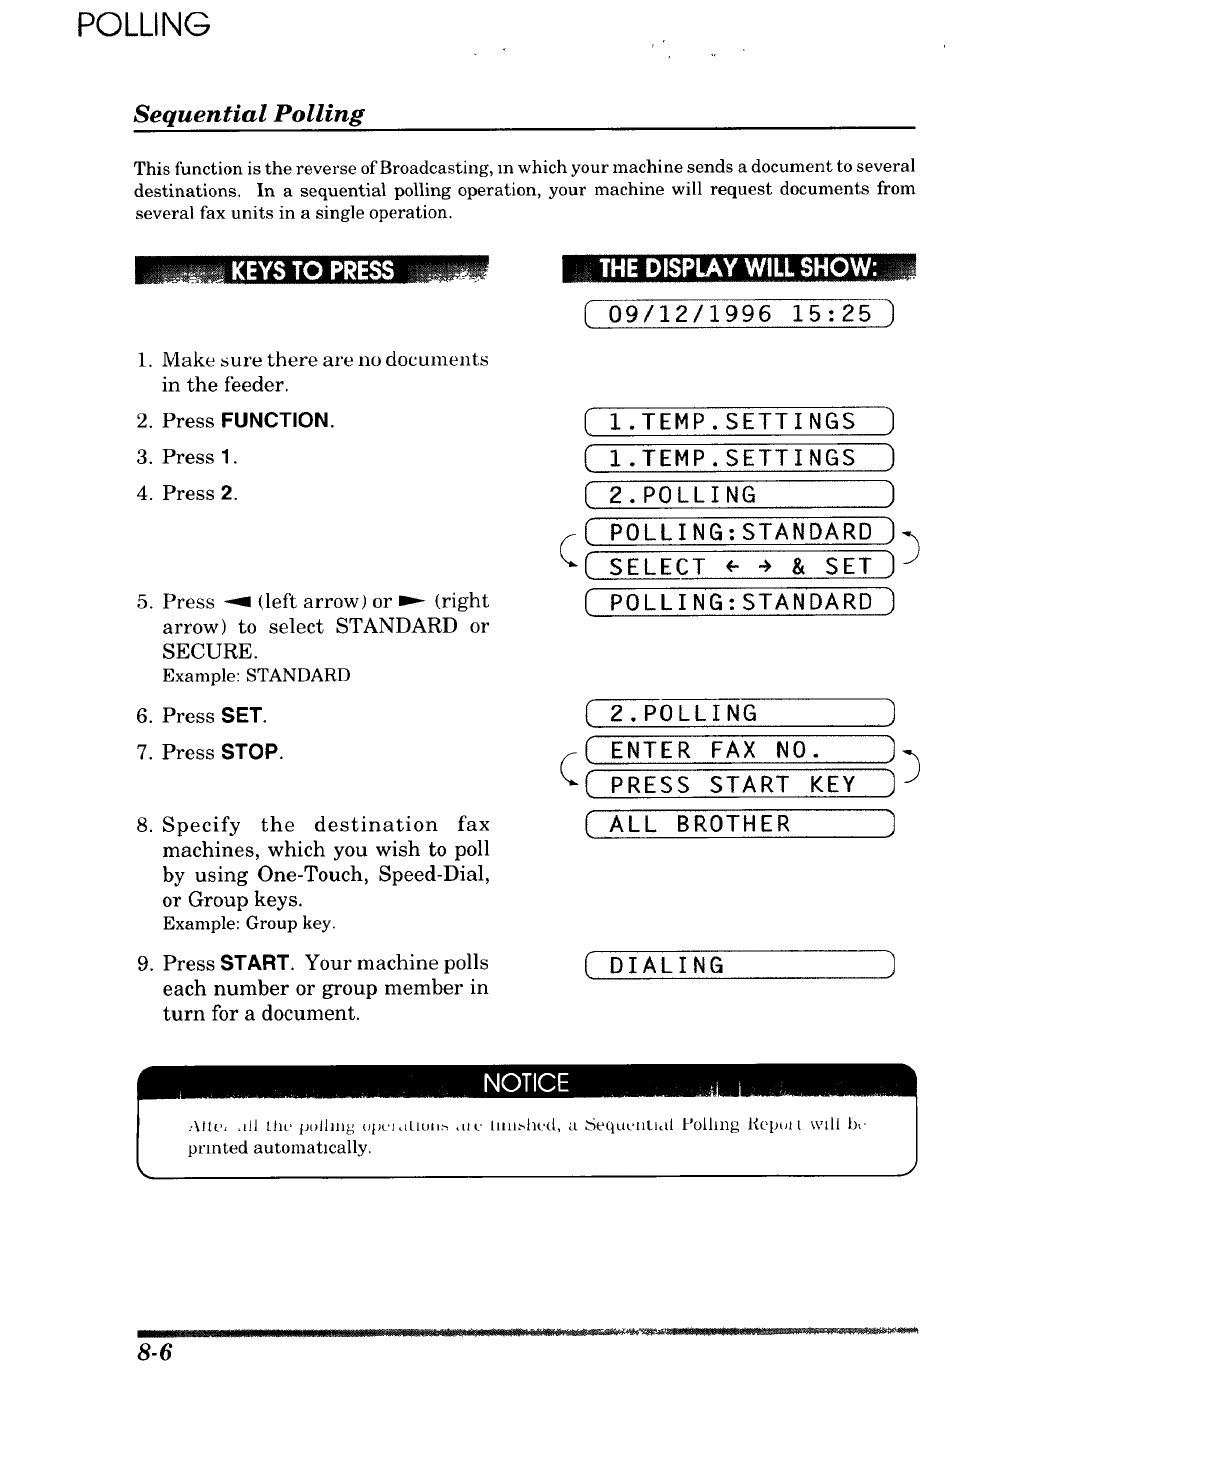
POLLING
Sequential Polling
This function is the reverse of Broadcasting, m which your machine sends a document to several
destinations. In a sequential polling operation, your machine will request documents from
several fax units in a single operation.
1. Make sure there are no documents
in the feeder.
2. Press FUNCT{ON.
3. Press 1.
4. Press 2.
5. Press -'9 (left arrow) or _-_ (right
arrow) to select STANDARD or
SECURE.
Example: STANDARD
6. Press SET.
7. Press STOP.
.
.
Specify the destination fax
machines, which you wish to poll
by using One-Touch, Speed-Dial,
or Group keys.
Example: Group key.
Press START. Your machine polls
each number or group member in
turn for a document.
m i -"1:11D]g__ IK*VA','j III !!.._: [ol','_
(09/12/1996 15:25 )
(
[ 1.TEMP.SETTINGS )
( 1.TEMP.SETTINGS )
( 2.POLLING )
(POLLING:STANDARD )
( SELECT ÷ + & SET )J
(POLLING:STANDARD )
(-2.POLLING )
(ENTER FAX NO. ]3(
"*( PRESS START KEY ]
(ALL BROTHER ]
(DIALING
[_[o]Ke]:
,,\ltt', all tht' pulling upul_tmi,._ ,tlc' linJ_-tied, tt _equu, ntJ,tl _'oihng tiepul t will b,.
printed automatmally.
8-6
":TZ""-_:Z'Z'Z'L"*_'-"7 ". L." : .'77 12,_1_2":': "_' "_*_v_ "
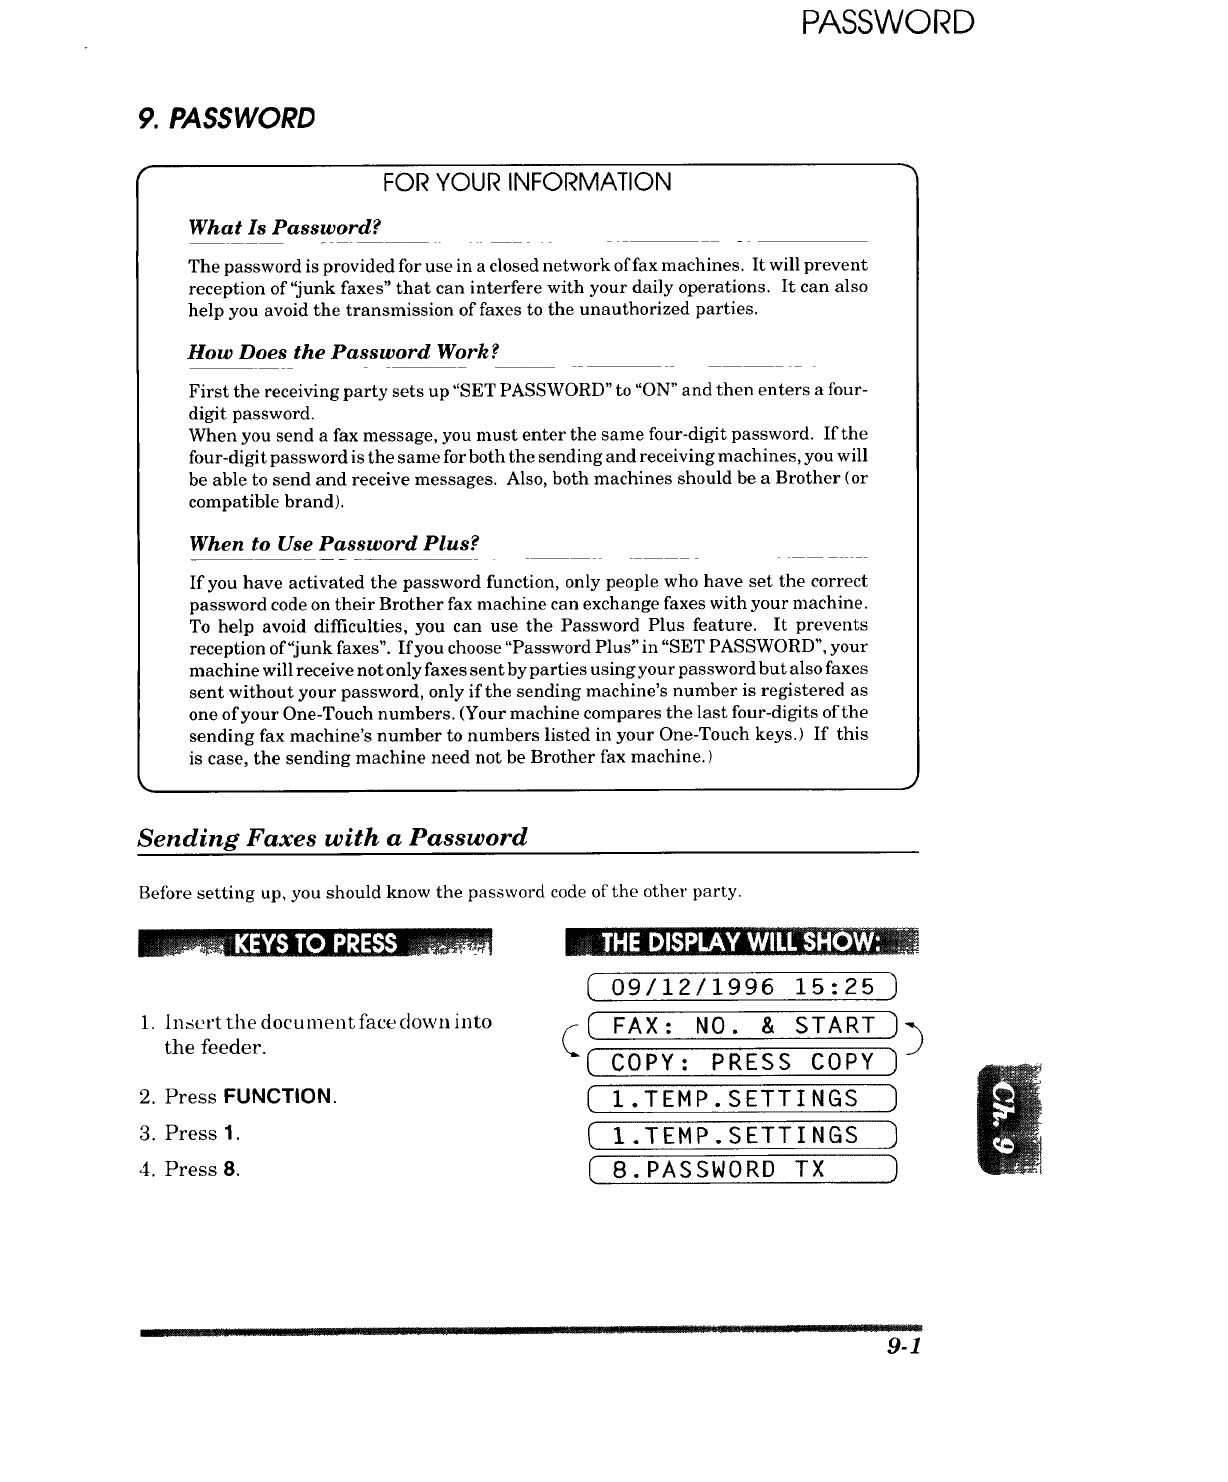
PASSWORD
9. PASSWORD
FOR YOUR INFORMATION
What Is Password?
The password is provided for use in a closed network of fax machines. It will prevent
reception of"junk faxes" that can interfere with your daily operations. It can also
help you avoid the transmission of faxes to the unauthorized parties.
How Does the Password Work?
First the receiving party sets up "SET PASSWORD" to "ON" and then enters a four-
digit password.
When you send a fax message, you must enter the same four-digit password. If the
four-digit password is the same for both the sending and receiving machines, you will
be able to send and receive messages. Also, both machines should be a Brother (or
compatible brand).
When to Use Password Plus?
If you have activated the password function, only people who have set the correct
password code on their Brother fax machine can exchange faxes with your machine.
To help avoid difficulties, you can use the Password Plus feature. It prevents
reception of"junk faxes". If you choose "Password Plus" in "SET PASSWORD", your
machine will receive not only faxes sent by parties using your password but also faxes
sent without your password, only if the sending machine's number is registered as
one of your One-Touch numbers. (Your machine compares the last four-digits of the
sending fax machine's number to numbers listed in your One-Touch keys.) If this
is case, the sending machine need not be Brother fax machine.)
Ww
Sending Faxes with a Password
Before setting up, you should know the password code of the other party.
| 11i41_ [,,11l:li,,il I'I i_ l_ivi
(09/12/1996 15:25
1. thefeeder.in_ertthed°cunlentfaced°wnint° (- ( FAX :NO. & START ]
-C coPY: PRESScoPY
2. Press FUNCTION. (1.TEMP.SETTINGS ]
3. Press1. ( 1.TEMP.SETTINGS ]
4. PressB. ( 8. PASSWORD TX )
II I ] Ifil ! IIII .-1!]1!..... " :1 11 1"_ ........
9-1
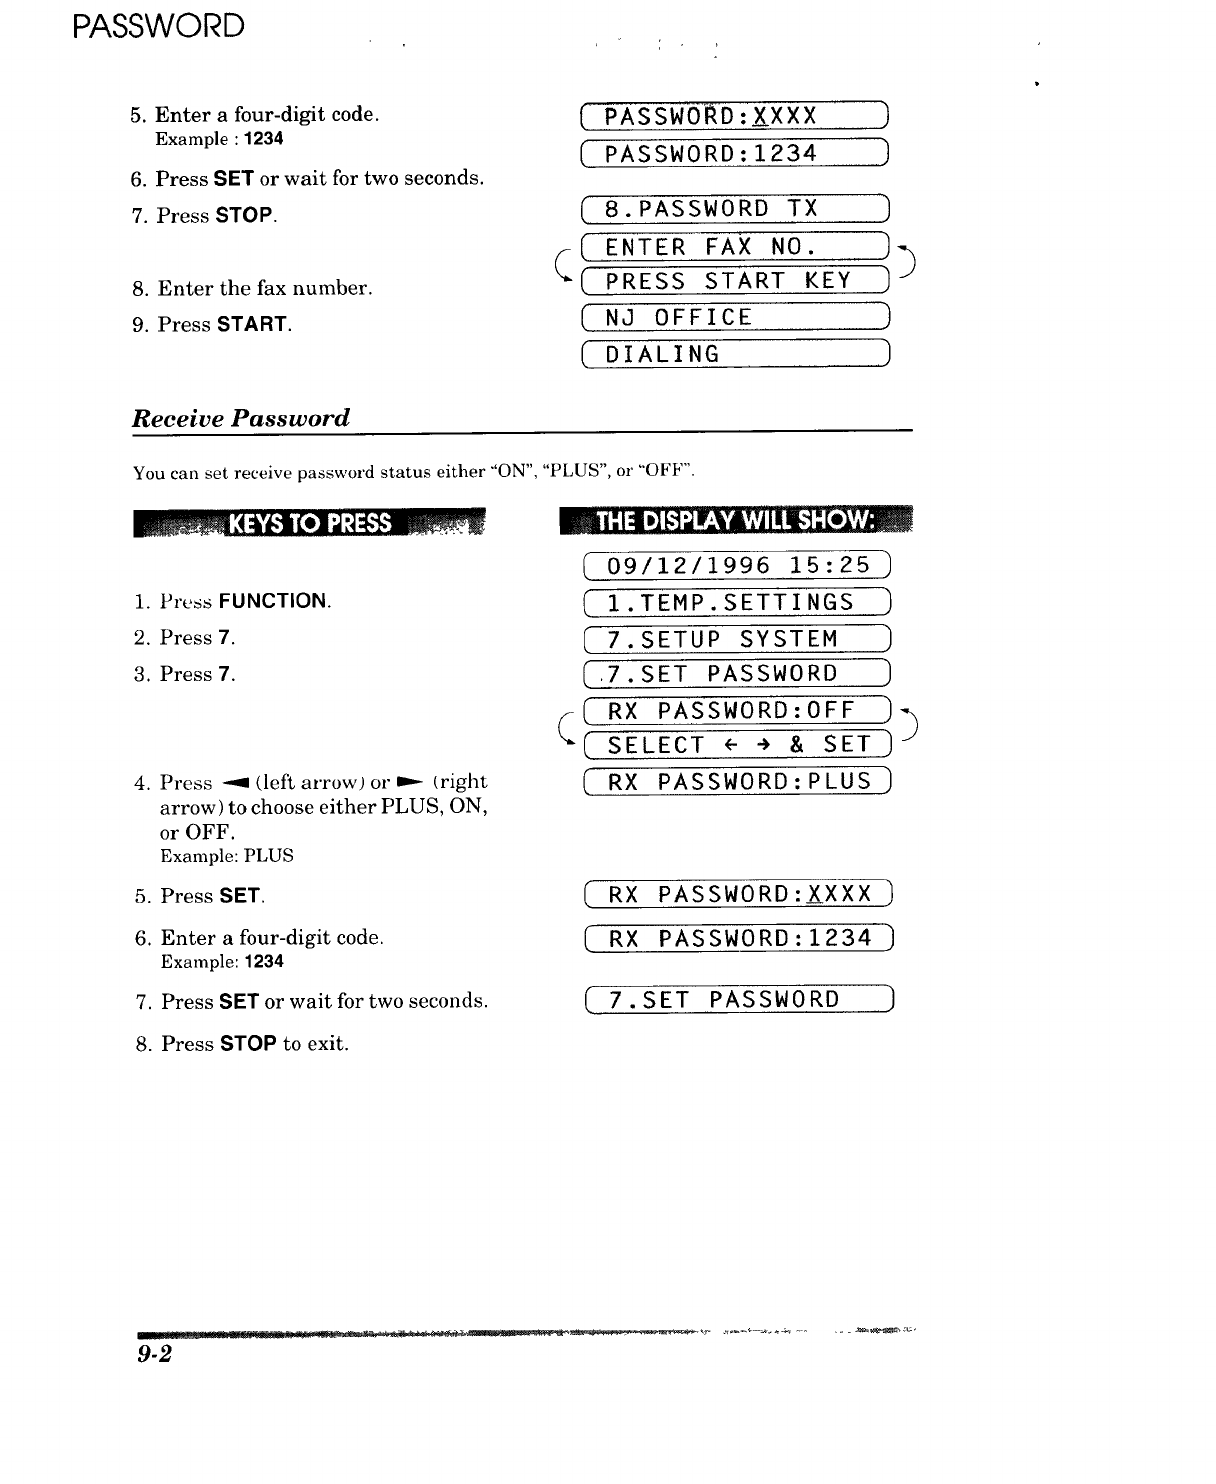
PASSWORD
5. Enter a four-digit code.
Example : 1234
6. Press SET or wait for two seconds.
7. Press STOP.
8. Enter the fax number.
9. Press START.
[ PASSWO_D:XXXX
PASSWORD:1234
[
[
8.PASSWORD TX
ENTER FAX NO.
PRESS START KEY
NJ OFFICE
DIALING
)
]
]
]
)
)
)
Receive Password
You can set receive password status either "'ON", "PLUS", o1""OFF".
1. Press FUNCTION.
2. Press 7.
3. Press 7.
.Press --9 (left arrow) or _ (right
arrow) to choose either PLUS, ON,
or OFF.
Example: PLUS
i:It,]Ft_r:VA','Ai!_i,']:[,,:L','_
(
(09/12/1996 15:25 )
(I.TEMP.SETTINGS)
( 7.SETUP SYSTEM )
_.7.SET PASSWORD )
RX PASSWORD:OFF )_
( SELECT ÷ ÷ & SET ) J
RX PASSWORD:PLUS
5. Press SET. (RX PASSWORD:XXXX
6. Enter a four-digit code. ( R X P A S S W0 R D :1234 )
Example: 1234
7. Press SET or wait for two seconds. 7.SET PASSWORD )
8. Press STOP to exit.
9-2
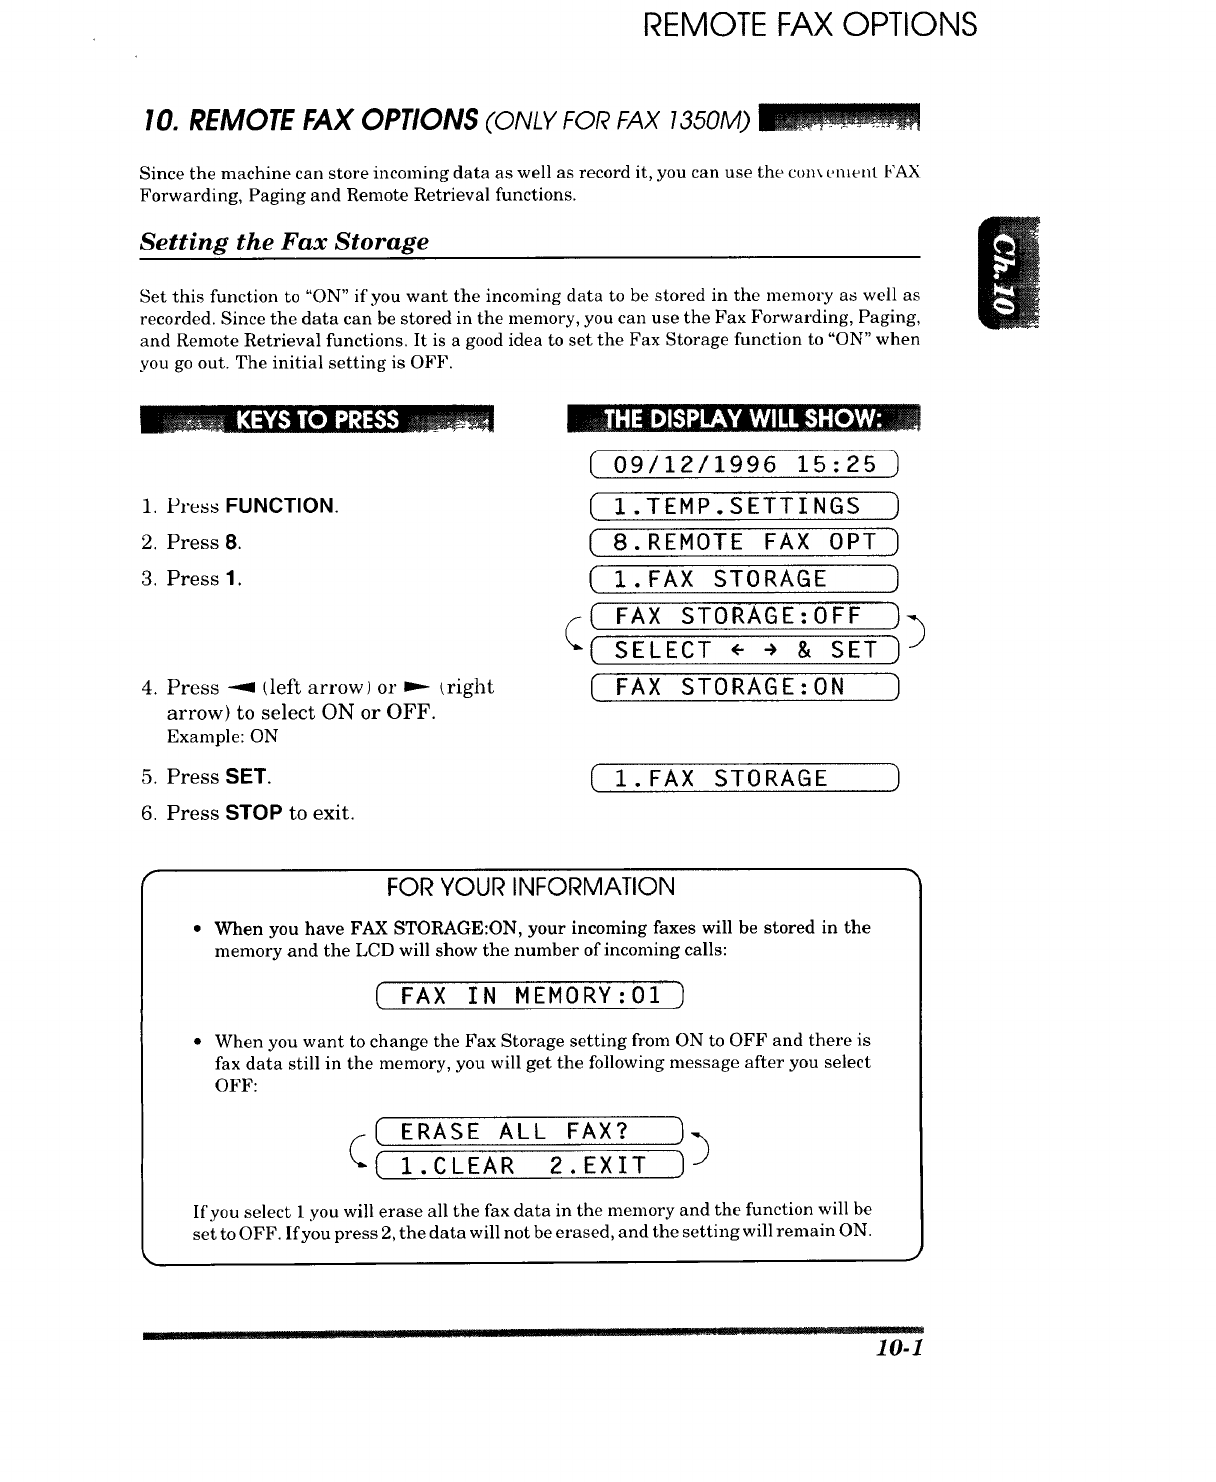
REMOTE FAX OPTIONS
I0. REMOTE FAX OPTIONS (ONLY FORFAX 1350M)
Since the machine can store incoming data as well as record it, you can use the conx cment FAX
Forwarding, Paging and Remote Retrieval functions.
Setting the Fax Storage
Set this function to "ON" if you want the incoming data to be stored in the memory as well as
recorded. Since the data can be stored in the memory, you can use the Fax Forwarding, Paging,
and Remote Retrieval functions. It is a good idea to set the Fax Storage function to "ON" when
you go out. The initial setting is OFF.
1. Press FUNCTION.
2. Press 8.
3. Press 1.
4. Press --9 (left arrow) or _.- (right
arrow) to select ON or OFF.
Example: ON
5. Press SET.
6. Press STOP to exit.
_ i :]'4 D][.1r,]IE¥'&VIIIII_! -"[e_,,,,_
(09/12/1996 15:25 )
( 1.TEMP.SETTINGS )
( 8.REMOTE FAX OPT ]
( 1.FAX STORAGE
( FAX STORAGE:OFF )_
(-
"-( SE,ECT<--, SET)
(FAX STORAGE:ON ]
( 1.FAX STORAGE
FOR YOUR INFORMATION
• When you have FAX STORAGE:ON, your incoming faxes will be stored in the
memory and the LCD will show the number of incoming calls:
(FAX IN MEMORY:01
• When you want to change the Fax Storage setting from ON to OFF and there is
fax data still in the memory, you will get the following message after you select
OFF:
ERASE ALL FAX? I_
(( 1.CLEAR 2.EXIT
If you select 1you will erase all the fax data in the memory and the function will be
set to OFF. If you press 2, the data will not be erased, and the setting will remain ON.
....... dJ. E[ I! .... • ........... ' I!lll .10-1
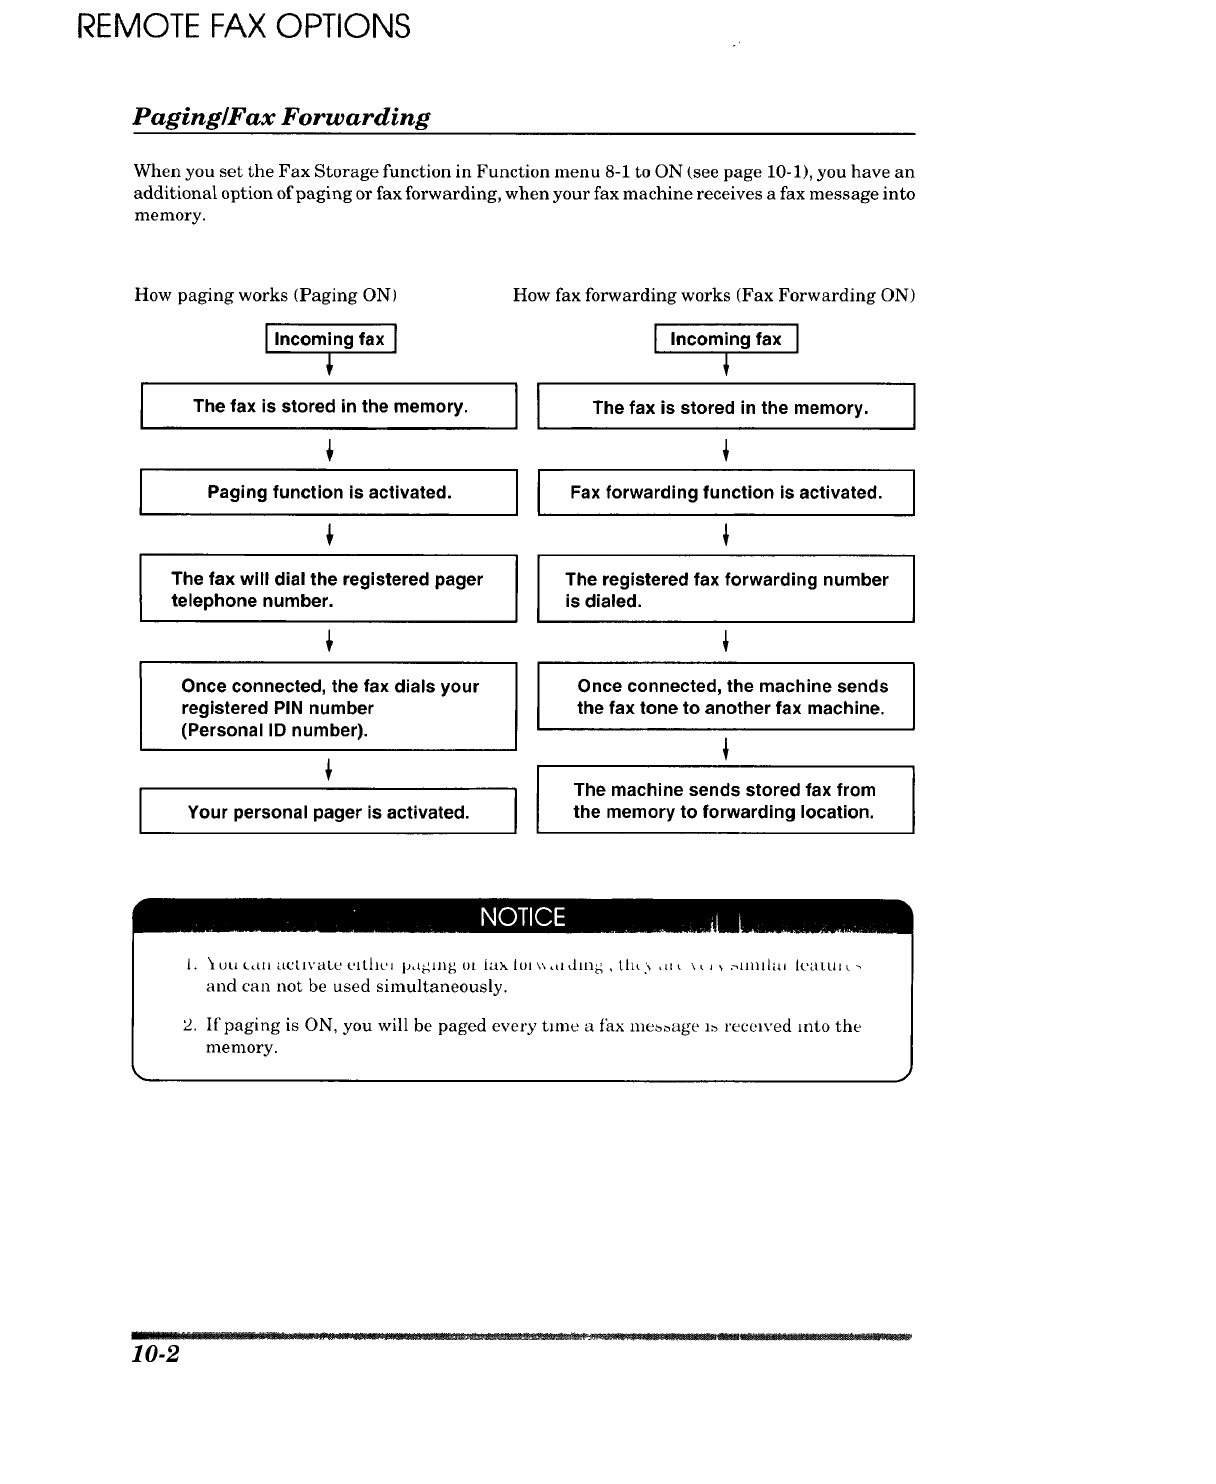
REMOTE FAX OPTIONS
Paging/Fax Forwarding
When you set the Fax Storage function in Function menu 8-1 to ON (see page 10-1), you have an
additional option of paging or fax forwarding, when your fax machine receives a fax message into
memory.
How paging works (Paging ON)
[Incoming fax [
The fax is stored in the memory. I
Paging function is activated.
The fax will dial the registered pager
telephone number.
Once connected, the fax dials your
registered PIN number
(Personal ID number).
t
Your personal pager is activated. [
I
How fax forwarding works (Fax Forwarding ON)
Incoming fax ]
IThe fax is in [
m
stored the memory.
I
Fax forwarding function is activated. [
m
m
The registered fax forwarding number [
m
is dialed. I
Once connected, the machine sends [
the fax tone to another fax machine. I
IThe machine sends stored fax from [the memory to forwarding location.
i. _ ou L,tli _ti_II\'_IL_' t'ltllt'J |)d_llll_ ,Ol J_iX |01 \\ ,il dln_ , tht [_ ,ll t \ t J _ mlllllllil |L'_iLHI u
and can not be used simultaneously.
2. If paging is ON, you will be paged every tram a fhx me_age 1._ recewed into the
memory.
10-2
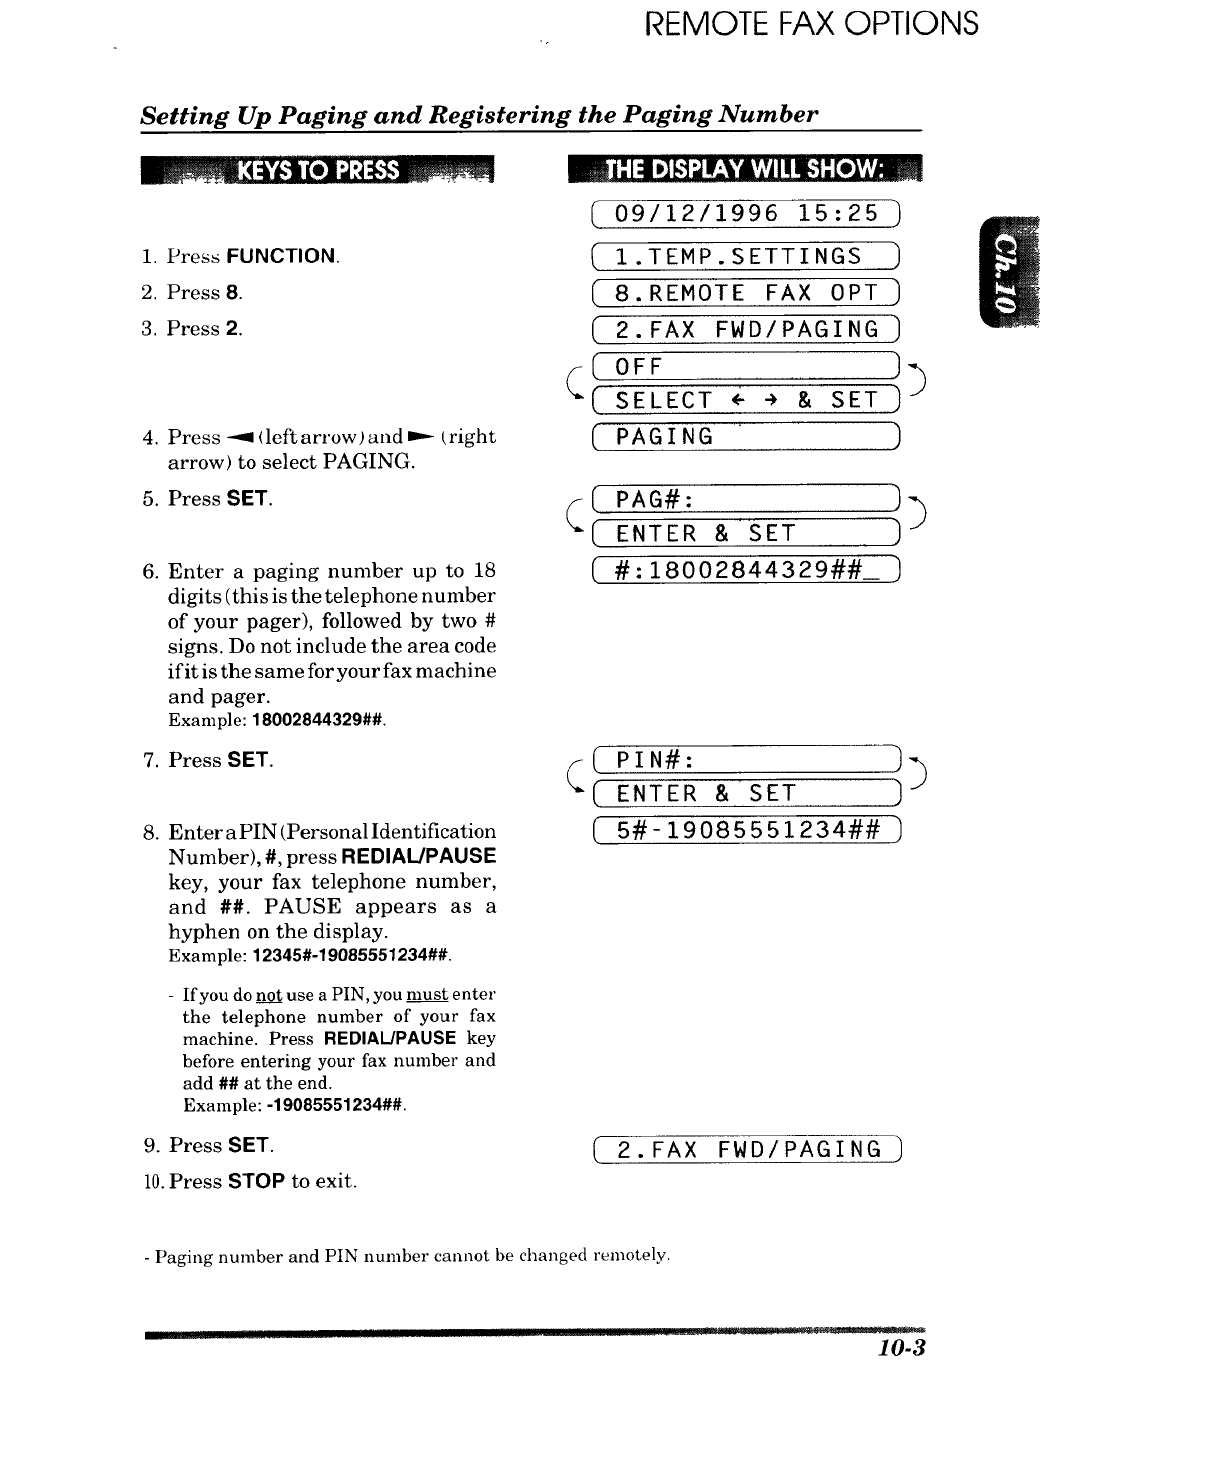
REMOTE FAX OPTIONS
Setting Up Paging and Registering the Paging Number
1. Press FUNCTION.
2. Press 8.
3. Press 2.
4. Press -_. (leftarrow)and _ (right
arrow) to select PAGING.
5. Press SET.
6. Enter a paging number up to 18
digits (this is the telephone number
of your pager), followed by two #
signs. Do not include the area code
if it is the same for your fax machine
and pager.
Example: 18002844329##.
7. Press SET.
8. Enter a PIN (Personal Identification
Number), #, press REDIAL/PAUSE
key, your fax telephone number,
and ##. PAUSE appears as a
hyphen on the display.
Example: 12345#-19085551234##.
-If you do not use a PIN, you must enter
the telephone number of your fax
machine. Press REDIAL/PAUSE key
before entering your fax number and
add ## at the end.
Example: -19085551234##.
9. Press SET.
10.Press STOP to exit.
_i; 14 D_H'J r-'¥'&Vil I_,i: [e_V_
( 09/12/1996 15:25 )
( 1.TEMP.SETTINGS)
( 8.REMOTE FAX OPT ]
( 2.FAX FWD/PAGING ]
(OFF ))
(SELECT <---')& SET ]
(PAGING )
(( PAG#: )_
(ENTER & SET ]
(#:18002844329##_ ]
(PIN#: )_
(*( ENTER & SET ]
( 5#-19085551234## I
2.FAX FWD/PAGING ]
- Paging number and PIN number cannot be changed remotely.
!!!!]!!.... I , I rm[ml Illl ._:7...::=:_ ..... ....:. _..____ 10-3
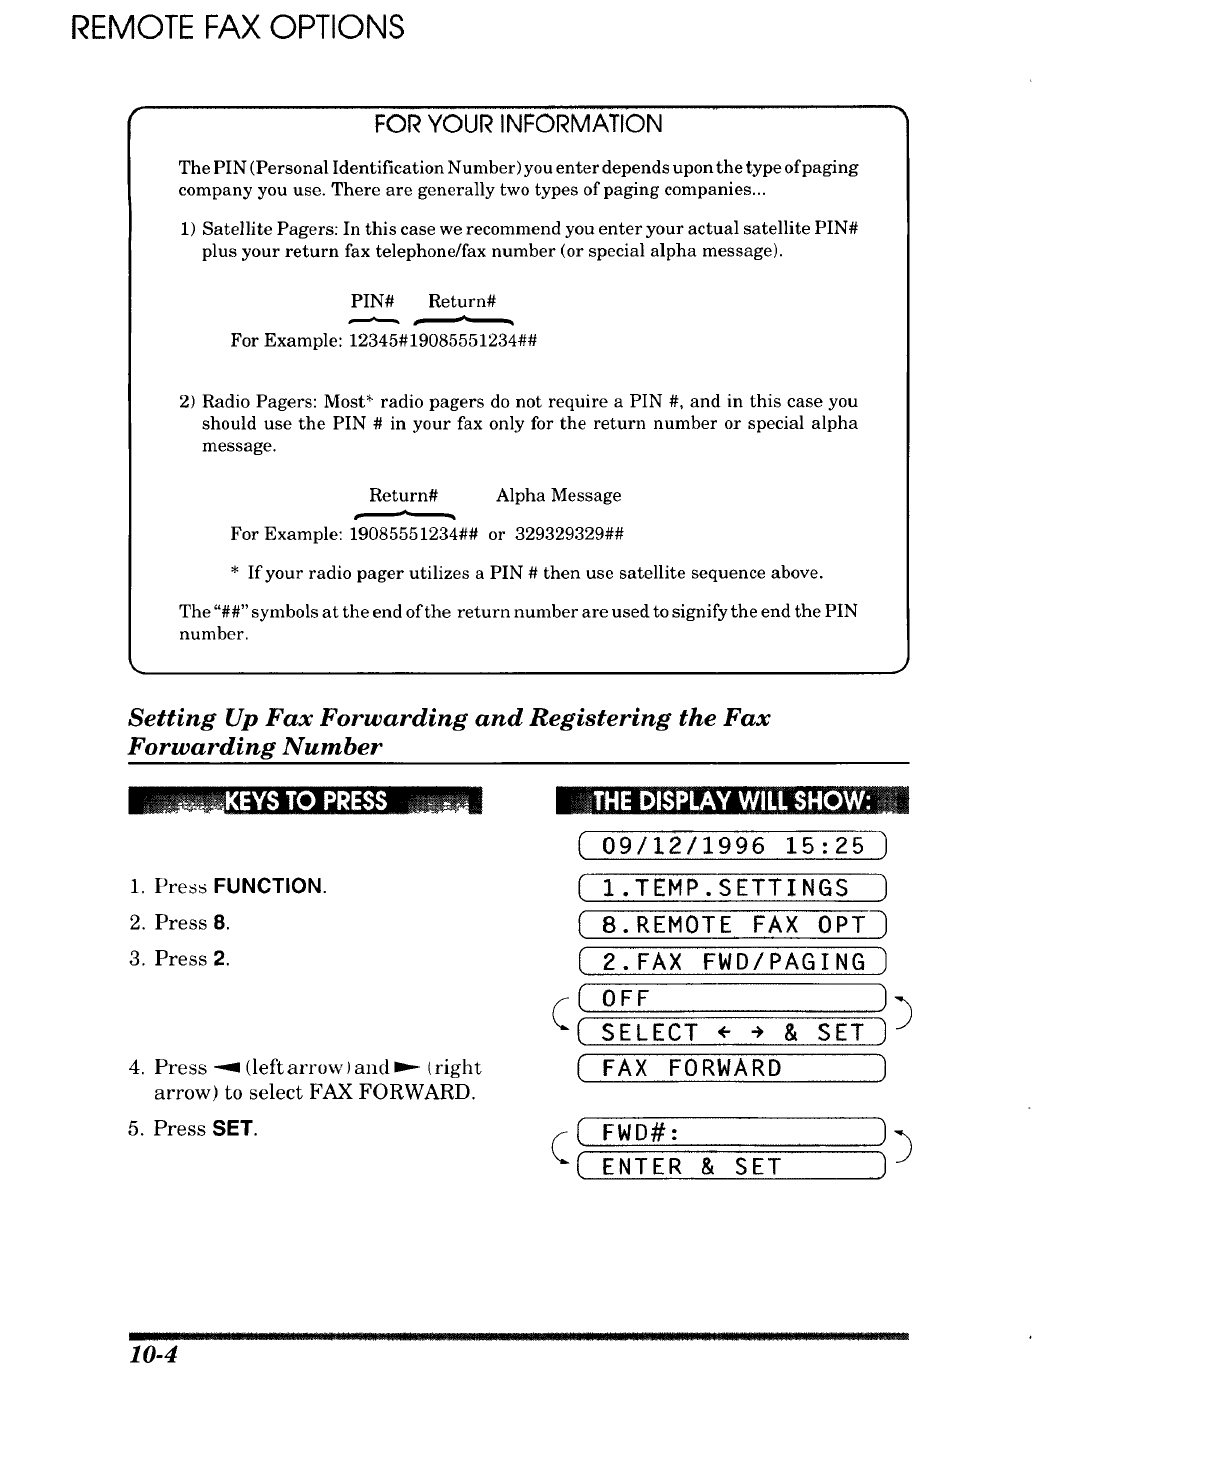
REMOTE FAX OPTIONS
FOR YOUR INFORMATION
The PIN (Personal Identification Number) you enter depends upon the type of paging
company you use. There are generally two types of paging companies...
1) Satellite Pagers: In this case we recommend you enter your actual satellite PIN#
plus your return fax telephone/fax number (or special alpha message).
PIN# Return#
For Example: 12345#19085551234##
2) Radio Pagers: Most* radio pagers do not require a PIN #, and in this case you
should use the PIN # in your fax only for the return number or special alpha
message.
Return# Alpha Message
For Example: 19085551234## or 329329329##
* If your radio pager utilizes a PIN # then use satellite sequence above.
The "##" symbols at the end of the return number are used to signify the end the PIN
number.
Setting Up Fax Forwarding and Registering the Fax
Forwarding Number
1. Press FUNCTION.
2. Press 8.
3. Press 2.
4. Press -_1 (left arrow )and m,-- (right
arrow) to select FAX FORWARD.
5. Press SifT.
em i: I| D][_,]_W_.VA,,,jII I€1:_m
( 09/12/1996 15:25 )
( 1.TEMP.SETTINGS )
(8.REMOTE FAX OPT
( 2.FAX FWD/PAGING )
( OFF ))
(
"( SELECT <- -> & SET ]
( FAX FORWARD )
( FWD#: )_
((ENTER & SET ).Y
10-4
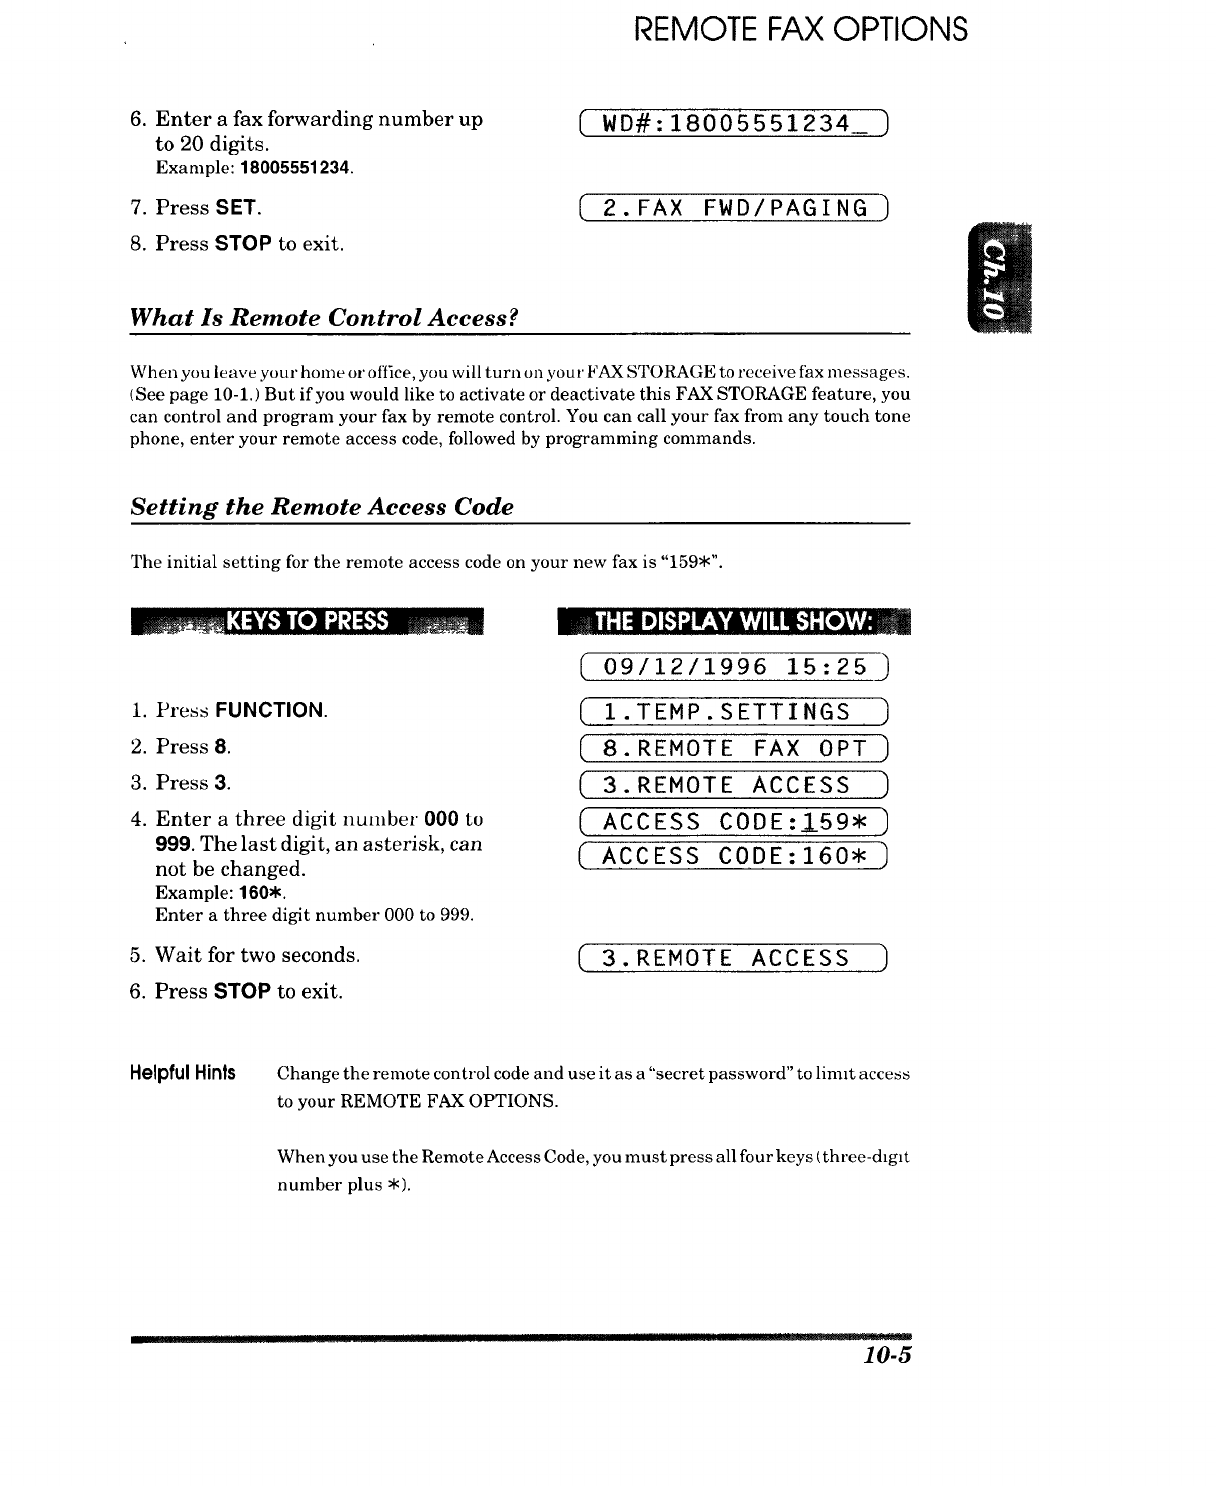
REMOTE FAX OPTIONS
6. Enter a fax forwarding number up
to 20 digits.
Example: 18005551234.
(WD#:18005551234_ )
7. PressSET. ( 2. FAX FWD/PAGING ]
8. Press STOP to exit.
What Is Remote Control Access?
When you leave your home or office, you will turn on your FAX STORAGE to receive fax messages.
(See page 10-1.) But if you would like to activate or deactivate this FAX STORAGE feature, you
can control and program your fax by remote control. You can call your fax from any touch tone
phone, enter your remote access code, followed by programming commands.
Setting the Remote Access Code
The initial setting for the remote access code on your new fax is "159.".
1. Press FUNCTION.
2. Press 8.
3. Press 3.
4. Enter a three digit number 000 to
999. The last digit, an asterisk, can
not be changed.
Example: 160..
Enter a three digit number 000 to 999.
5. Wait for two seconds.
6. Press STOP to exit.
( 09/12/1996 15:25
( I.TEMP.SETTINGS )
( S.REMOTEFAXOPT)
(3.REMOTE ACCESS )
(ACCESS CODE:j59* ]
( ACCESS CODE:160,
3.REMOTE ACCESS ]
Helpful Hints Change the remote control code and use it as a "secret password" to limit access
to your REMOTE FAX OPTIONS.
When you use the Remote Access Code, you must press all four keys (three-d_g_t
number plus *).
H!! !!!1 ........ I Ifllll mill _. L : "11:1"1::" ":::L::." .....
10-5
REMOTE FAX OPTIONS
How to Use Remote Access and Control Codes
1. Call from a touch tone phone.
2. Enter your fax machine's number.
3. Enter your Remote Access Code immediately after your fax machine answers
with a beep. (See page 10-5.)
4. If you hear a long beep, it means your machine has received fax message(s).
If you do not hear a long beep, it means your fax machine did not receive
message(s).
5. Next you will hear a series of two short beeps, during which you can enter a
Remote Control Command. (See page 10-7.)
Enter a Remote Control Command..
7. After finishing one command, you can enter the next command during another
series of two short beeps.
8. Press 90 to exit remote control.
If you perform a wrong operation, you will hear three short beeps.
If you wait more than 30 seconds during the series of two short beeps, your machine will
disconnect the line.
Remote Retrieval
If you have set your FAX STORAGE: ON to store incoming fax messages, you have the abihty to
retrieve these fax messages from any remote group 3 facsimile machine.
Remote fax retrieval is accomplished via remote control access commands, which are described
in the remainder of this chapter.
FOR YOUR INFORMATION
When to Press the Remote Access Code
Just after the line is connected, you should enter the remote access code from any
touch tone phone. Make sure that you enter the remote access code while you do NOT
hear any chirping sound of a fax machine. If the fax machine is set to MANUAL
mode, it will answer the call after 20 rings. You will have 30 seconds to press the
remote access code or the line will be disconnected.
!1!!
10-6

REMOTE FAX OPTIONS
Remote Control Commands
You can control your fax machine with the following remote control commands.
Detail OperationRemote control command
95
96
97
98
Changing Fax Forwarding
/Paging setting
1 OFF
2Fax Forwarding
3 Paging
4 FAX FWD No.
5 FWD No. Confirm
6 Fax Storage ON
7 Fax Storage OFF
Retrieve FAX
1 Memory Status List
2 00 Retrieve all FAXES
2 "MSG No." 00
Retrieve by MSG
number
3 Erase FAX in the
memory
Check the receiving status
1 FAX
Change Answer Mode
1 TAD
2 F]T
3 AUTO
If you hear one long beep, the change is accepted. If you hear three
short beeps, you can not change it because the conditions (ex.
registering fax forwarding or paging number) have not been
completed. You can register your fax forwarding number by using
4. FAX FWD No. (see page 10-8). Once you have registered the
number, the machine will automatically turn to "FAX FWD:ON"
mode. Then, receive a Memory Status List by entering 961 (see page
10-8). Check the List to make sure the Fax Forwarding number you
registered is correct. Then enter the confirmation command 955.
Now the machine will start Fax Forwarding.
You can set FAX STORAGE ON or OFF.
You can use a remote fax machine to receive a List or stored fax
message(s). (See page 10-8.)
If you hear one long beep, you can erase fax message(s) from the
memory.
You can check whether your fax machine has received any fax
message(s). If yes, you will hear one long beep. If no, you will hear
three short beeps.
If you hear one long beep, you can change the Answer Mode. If you
hear three short beeps, you can not change it.
90 Exit After a long beep, you can exit remote control.
Printing a Fax Message
You can print a fax message that is stored in the memory.
mi'.14.]_,1_lr,_¥'A,,Vtll_!":[e]hv
1. Press FUNCTION.
2. Press 8.
3. Press 4.
4. Press START.
5. Press STOP to exit.
(FAX IN MEMORY:03 )
(I.TEMP.SETTINGS )
( 8.REMOTE FAX OPT ]
(4.PRINT FAX ]
( PRESS START KEY 1
(PRINTING )
(4.PRINT FAX )
1 I mIll _1 I
10-7
REMOTE FAX OPTIONS
Retrieving the Memory Status List and Fax Messages Remotely
From a remote fax machine, you can retrieve your Memory Status List to see if you have any
stored fax messages in the memory. Then you can retrieve all or only specified fax messages that
are on the list.
1. Pick up the handset of a remote touch tone fax machine.
2. Dial your fax machine's number.
3. When your fax machine answers with a beep, immediately press your Remote
Access Code (159.).
4. As soon as you hear two (2) short beeps, press 961.
5. When you hear your fax machine through the handset responding with afax
tone, press START and hold the handset if you want to retrieve fax messages also.
(If you wish to retrieve only the Memory Status List, re_e_placethe handset.)
6. Your remote fax machine will print the Memory Status List. (See page 14-5.)
7. Look at the Memory Status List to see if there are any fax messages you want to
retrieve.
8. Press 96 2 as soon as you hear two (2) short beeps.
After 96 2, enter the two-digit message numbers from the Memory Status List
(ex. 01 ) and end by pressing 00.
ex.) To receive NO.1 and NO.2 messages, press 96 2 01 02 00.
If you want to retrieve all messages, simply press 00.
ex.) To retrieve all fax messages, press 96 2 00.
9. When you hear your fax machine through the handset responding with afax
tone, press START.
10.Replace the handset.
ll.Your remote fax machine will print the fax messages.
Changing the Fax Forwarding Number Remotely
1. Pick up the handset of a remote fax machine.
2. Dial your fax machine's number.
3. When your fax machine answers with a beep, immediately press your Remote
Access Code (169.).
4. As soon as you hear two (2) short beeps, press 954.
5. Enter your new Fax Forwarding number using the number keys (up to 20 digits).
You can not register * and # as dial numbers. Use * to create a pause between
the dial numbers.
6. Press # after entering the new number.
7. As soon as you hear the next two (2) short beeps, press 961.
8. When you hear your fax machine through the handset responding with a fax
tone, press START and hold the handset.
9. Your remote fax machine will print the Memory Status List. Look at the list to
make sure the new Fax Forwarding number you registered is correct.
10. If the new number is correct, wait for the next two (2) short beeps, and press 955.
(If the new number is incorrect, press 954 and reenter the number beginning at
Step 5.)
ll.Replace the handset. Your new Fax Forwarding number is activated.
10-8
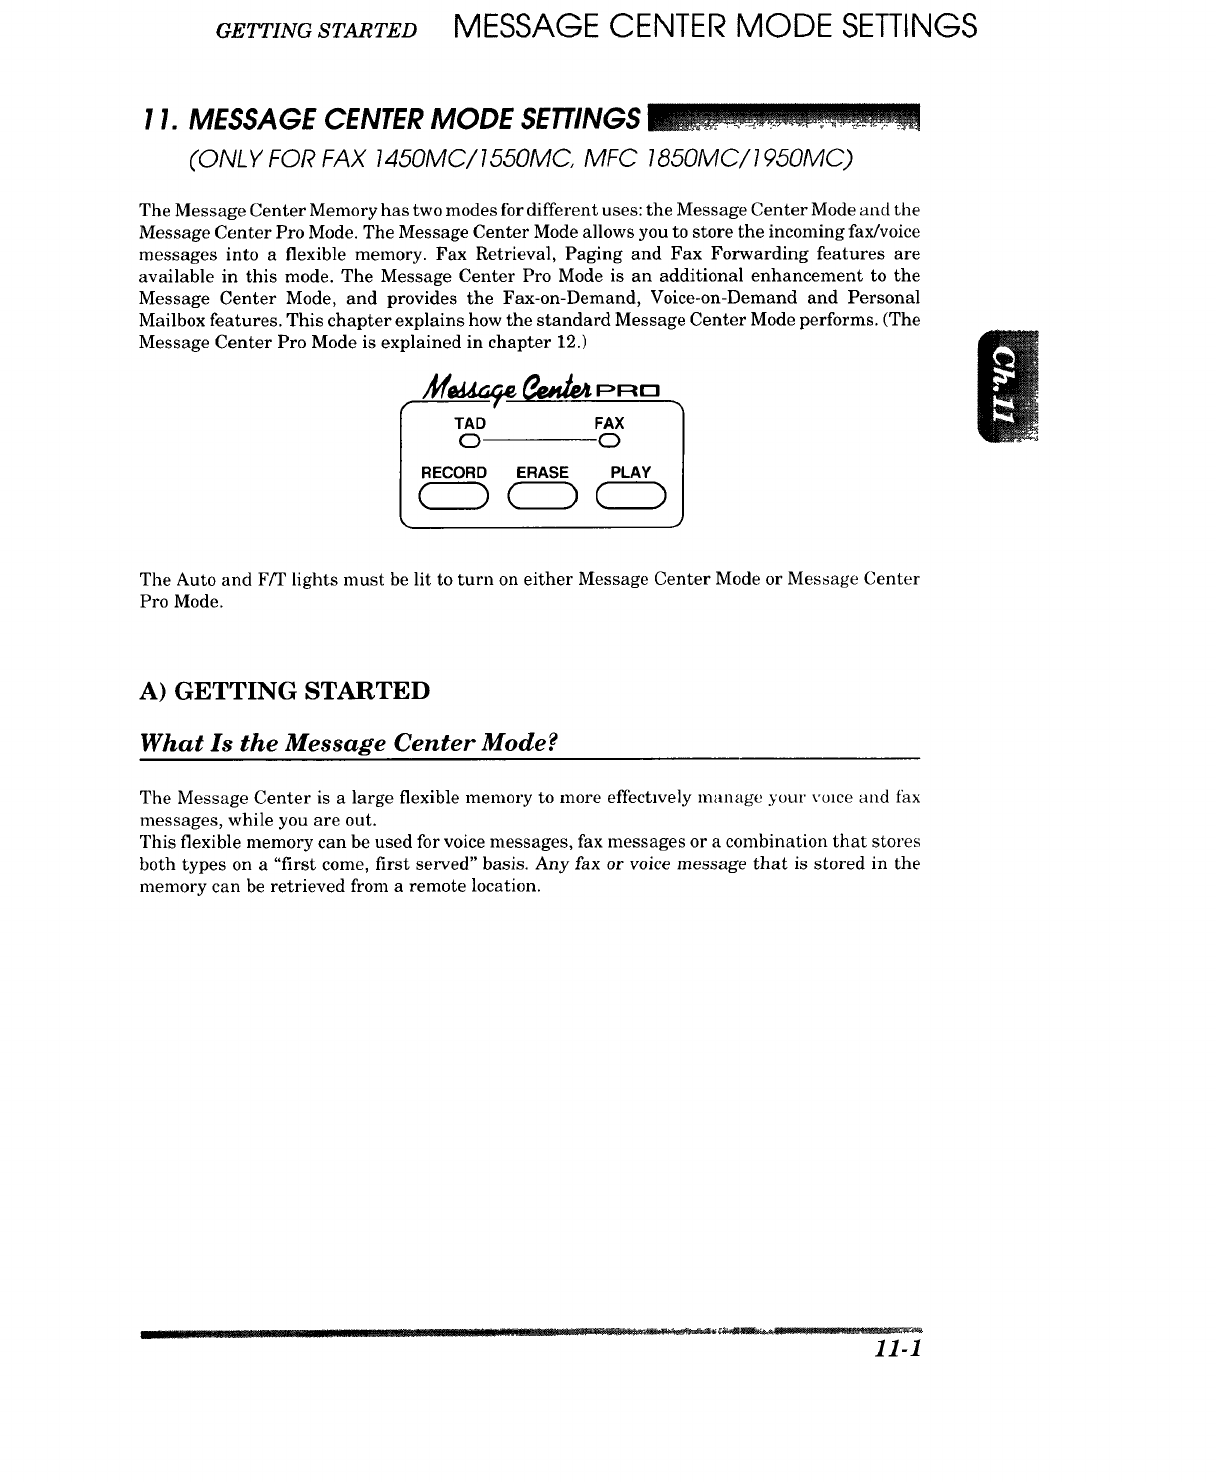
GETTINGSTARTED MESSAGE CENTER MODE SETTINGS
1I. MESSAGE CENTER MODE SETTINGS
(ONLY FOR FAX 1450MC/1550MC, MFC 1850MC/1950MC)
The Message Center Memory has two modes for different uses: the Message Center Mode anti the
Message Center Pro Mode. The Message Center Mode allows you to store the incoming fax/voice
messages into a flexible memory. Fax Retrieval, Paging and Fax Forwarding features are
available in this mode. The Message Center Pro Mode is an additional enhancement to the
Message Center Mode, and provides the Fax-on-Demand, Voice-on-Demand and Personal
Mailbox features. This chapter explains how the standard Message Center Mode performs. (The
Message Center Pro Mode is explained in chapter 12.)
PRD
TAD FAX
O C)
RECORD ERASE PLAY 1
The Auto and Ffr lights must be lit to turn on either Message Center Mode or Message Center
Pro Mode.
A) GETTING STARTED
What Is the Message Center Mode?
The Message Center is a large flexible memory to more effechvely manage your voice and thx
messages, while you are out.
This flexible memory can be used for voice messages, fax messages or a combination that stores
both types on a "first come, first served" basis. Any fax or voice message that is stored in the
memory can be retrieved from a remote location.
11-1
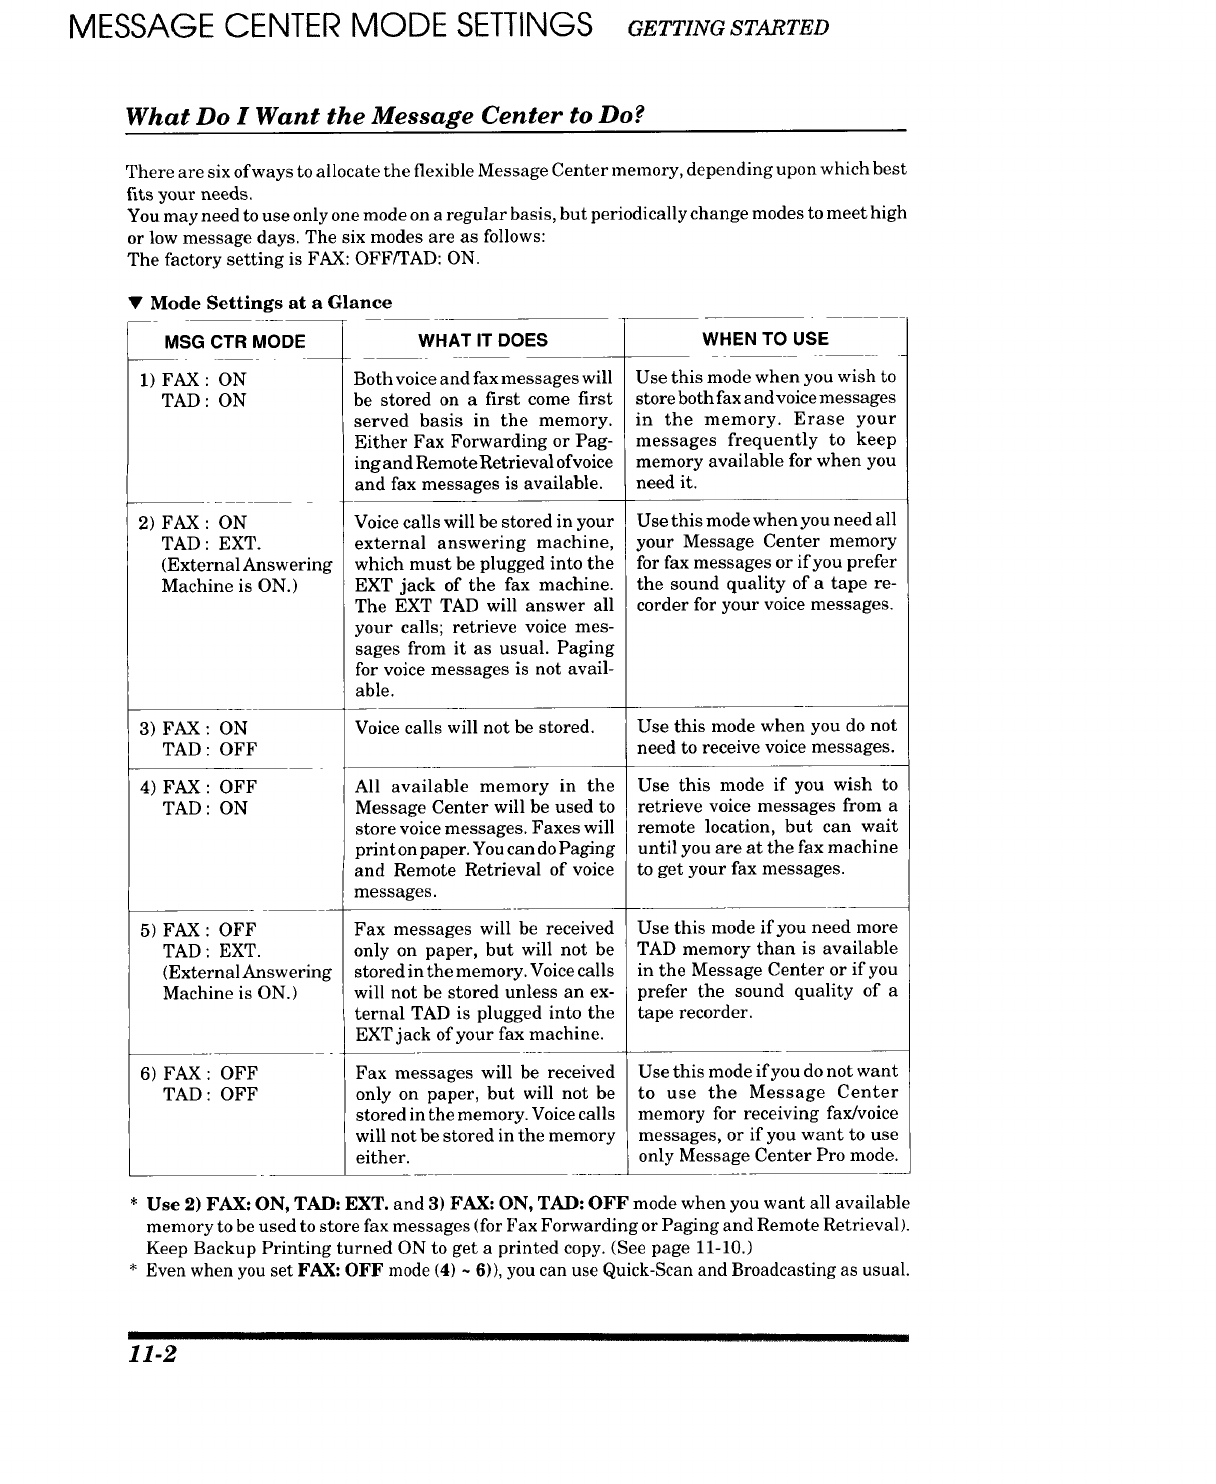
MESSAGE CENTER MODE SETTINGS GETTINGSTARTED
What Do I Want the Message Center to Do?
There are six of ways to allocate the flexible Message Center memory, depending upon which best
fits your needs.
You may need to use only one mode on a regular basis, but periodically change modes to meet high
or low message days. The six modes are as follows:
The factory setting is FAX: OFF/TAD: ON.
•Mode Settings at a Glance
MSG CTR MODE
1) FAX : ON
TAD : ON
2) FAX : ON
TAD : EXT.
(External Answering
Machine is ON.)
3) FAX : ON
TAD : OFF
WHAT IT DOES
4) FAX : OFF
TAD : ON
5) FAX : OFF
TAD : EXT.
(ExternalAnswering
Machine is ON.)
6) FAX : OFF
TAD : OFF
Both voice and fax messages will
be stored on a first come first
served basis in the memory.
Either Fax Forwarding or Pag-
ing and Remote Retrieval of voice
and fax messages is available.
Voice calls will be stored in your
external answering machine,
which must be plugged into the
EXT jack of the fax machine.
The EXT TAD will answer all
your calls; retrieve voice mes-
sages from it as usual. Paging
for voice messages is not avail-
able.
Voice calls will not be stored.
All available memory in the
Message Center will be used to
store voice messages. Faxes will
print on paper. You can do Paging
and Remote Retrieval of voice
messages.
Fax messages will be received
only on paper, but will not be
stored in the memory. Voice calls
will not be stored unless an ex-
ternal TAD is plugged into the
EXT jack of your fax machine.
Fax messages will be received
only on paper, but will not be
stored in the memory. Voice calls
will not be stored in the memory
either.
WHEN TO USE
Use this mode when you wish to
store both fax and voice messages
in the memory. Erase your
messages frequently to keep
memory available for when you
need it.
Use this mode when you need all
your Message Center memory
for fax messages or if you prefer
the sound quality of a tape re-
corder for your voice messages.
Use this mode when you do not
need to receive voice messages.
Use this mode if you wish to
retrieve voice messages from a
remote location, but can wait
until you are at the fax machine
to get your fax messages.
Use this mode if you need more
TAD memory than is available
in the Message Center or if you
prefer the sound quality of a
tape recorder.
Use this mode if you do not want
to use the Message Center
memory for receiving fax/voice
messages, or if you want to use
only Message Center Pro mode.
* Use 2) FAX: ON, TAD: EXT. and 3) FAX: ON, TAD: OFF mode when you want all available
memory to be used to store fax messages (for Fax Forwarding or Paging and Remote Retrieval).
Keep Backup Printing turned ON to get a printed copy. (See page 11-10.)
* Even when you set FAX: OFF mode (4) ~ 6)), you can use Quick-Scan and Broadcasting as usual.
11-2
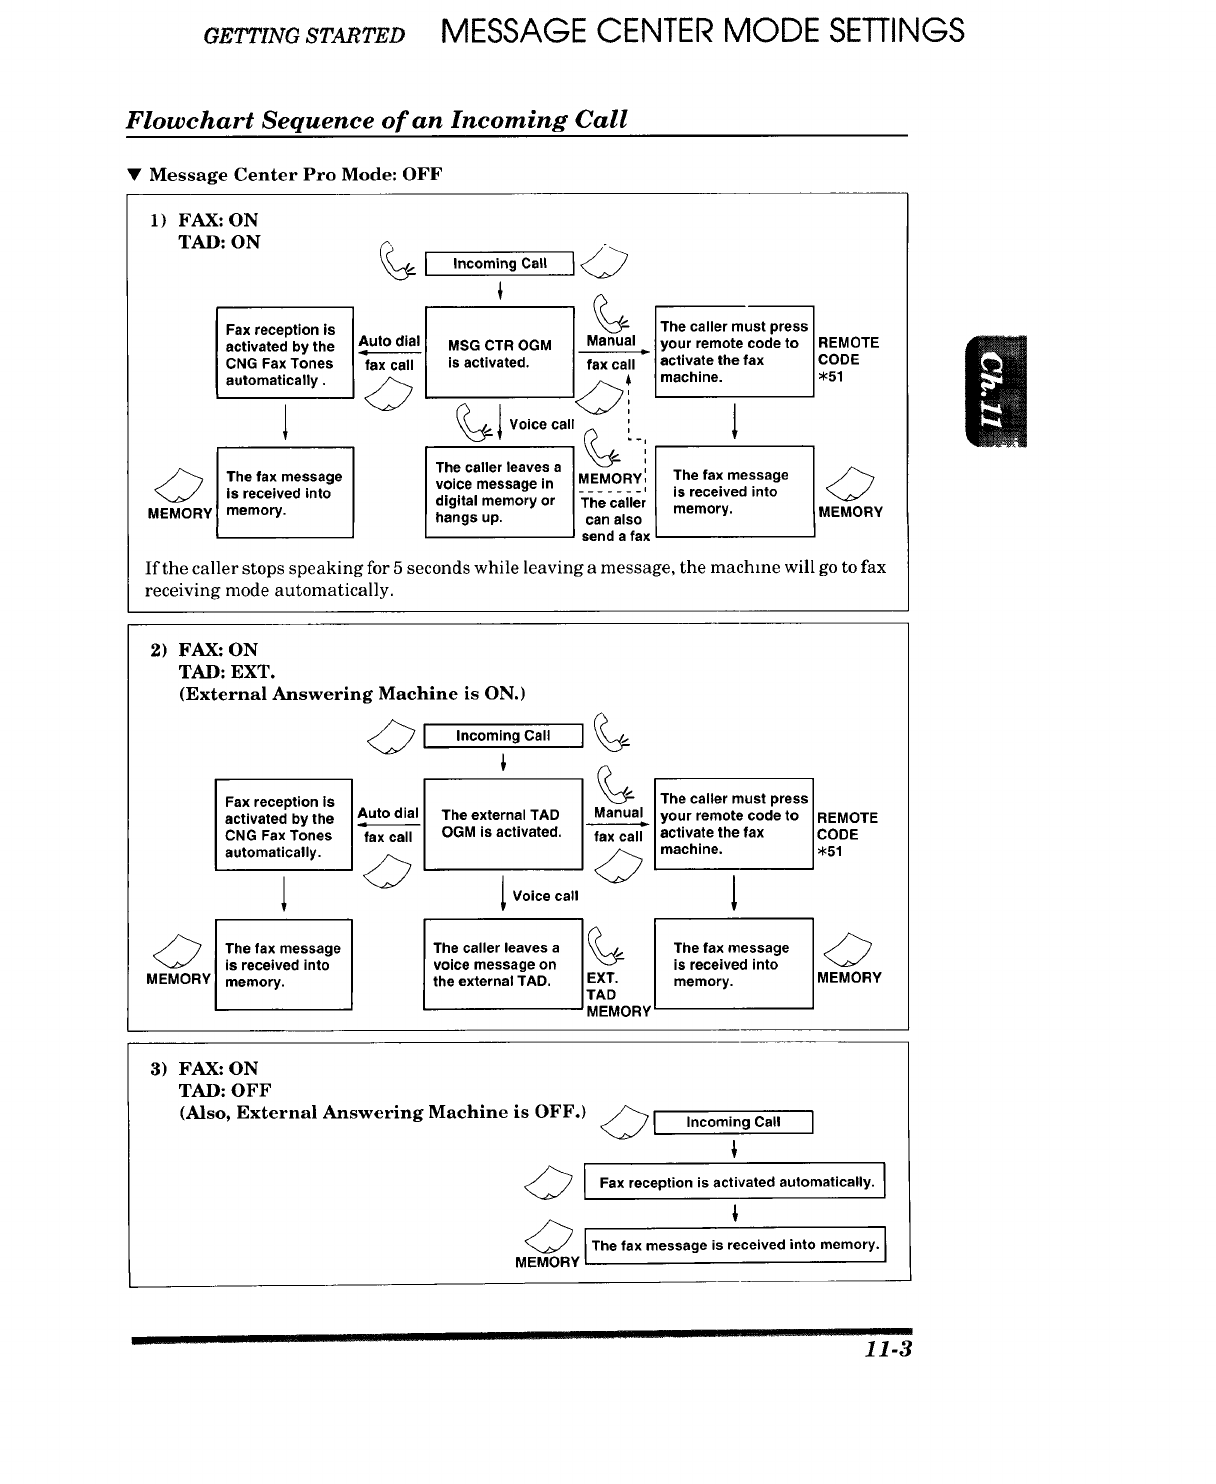
GETTINGSTARTED MESSAGE CENTER MODE SETTINGS
Flowchart Sequence of an Incoming Call
•Message Center Pro Mode: OFF
1) FAX: ON
TAD: ON
MEMORY
Fax reception is
activated by the
CNG Fax Tones
automatically.
The fax message
is received into
memory.
Auto dial
Incoming Call
Ma_u_ The caller must press
MSG CTR OGM nlal your remote code to REMOTE
is activated. _ail- activate the fax CODE
machine. ,51
Voice call (._, -,
The caller leaves a _ "
voice message in /IEMORY', The fax message
...... ' is received into
digital memory or fhe caller memory. MEMORY
hangs up. can also
send a fax I
If the caller stops speaking for 5 seconds while leaving a message, the machine will go to fax
receiving mode automatically.
2) FAX: ON
TAD: EXT.
(External Answering Machine is ON.)
MEMORY
Fax reception is
activated by the
CNG Fax Tones
automatically.
The fax message
is received into
memory.
<_[ Incoming Call
_1 The external TAD
fax call OGM is activated.
IVoice call
voice message on
the external TAD.
ORY
l Thecaerus'ass
_ your remote codeto REMOTE
activate the fax CODE
mach ne. .51
l
The fax message
is received into
memory. MEMORY
3) FAX: ON
TAD: OFF
(Also, External Answering Machine is OFF.)
[
Incoming Call ]
Fax reception is activated automatically. I
m
_[ The fax message is received into memory. I
1
MEMORY i
............ H-3
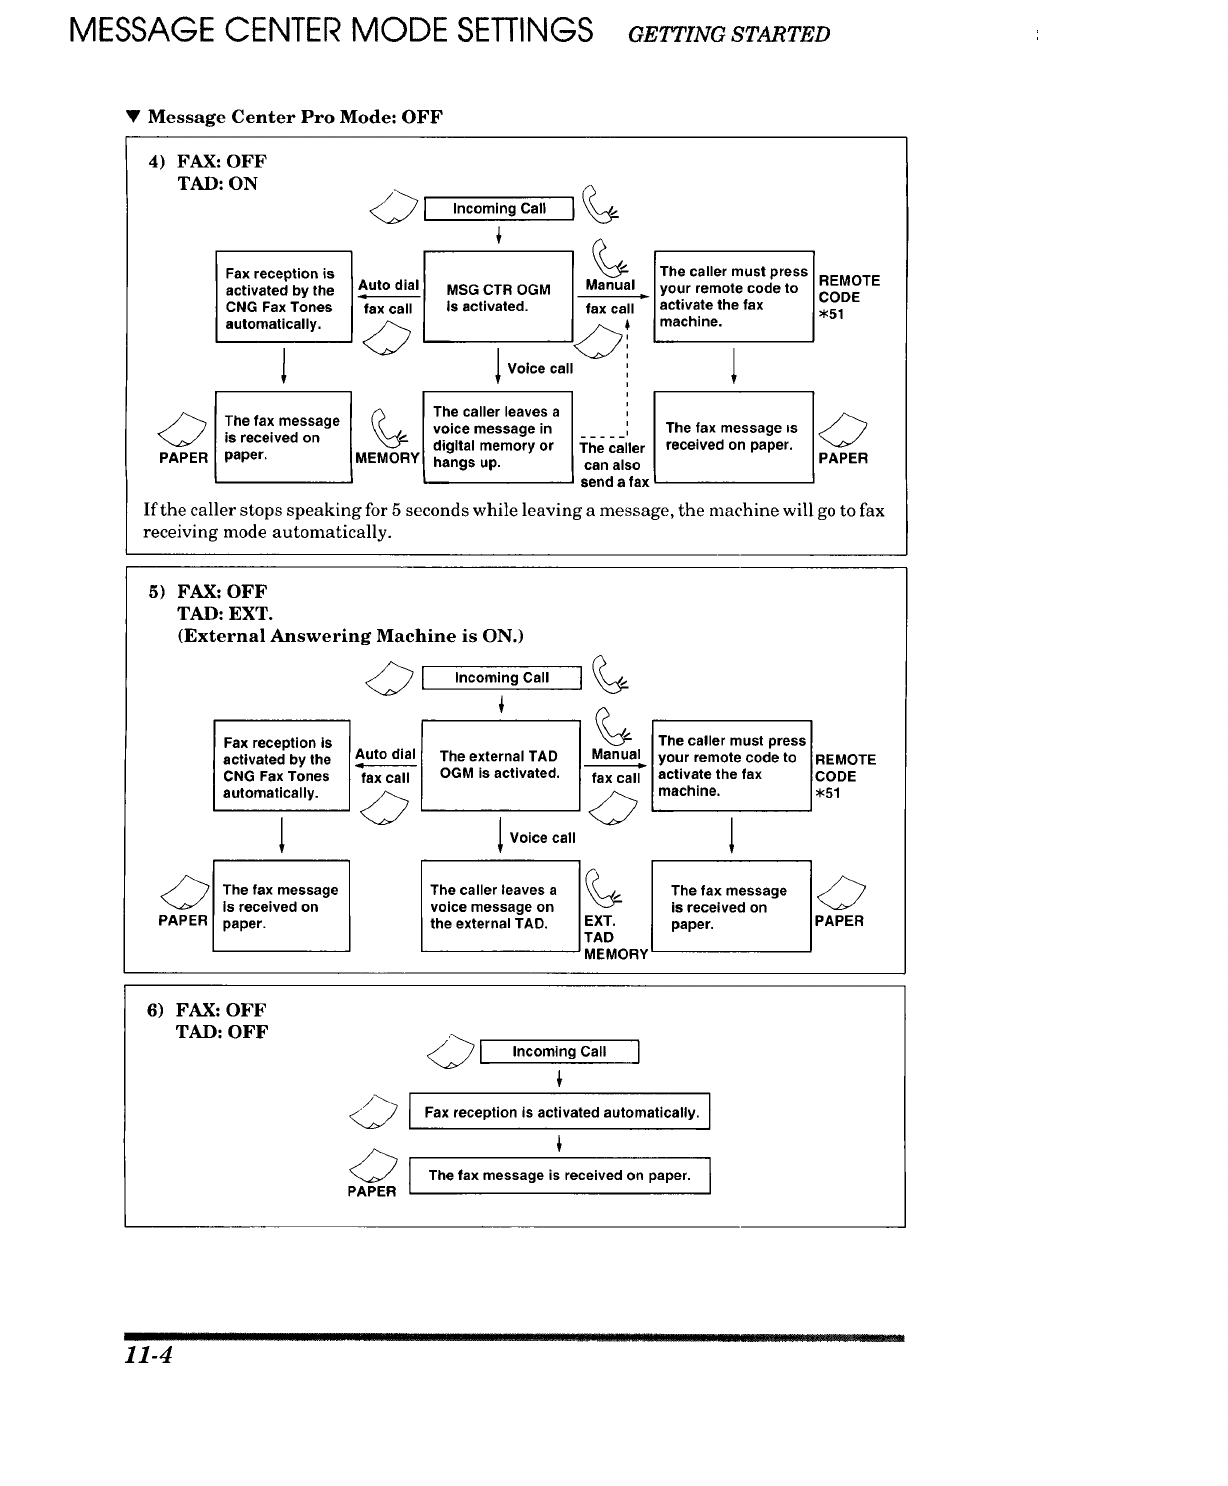
MESSAGE CENTER MODE SETTINGS GETTINGSTARTED
•Message Center Pro Mode: OFF
4) FAX: OFF
TAD: ON
PAPER
Fax reception is
activated by the
CNG Fax Tones
automatically.
The fax message
is received on
paper.
Auto dial
1.
Incoming Call I
MSG CTR OGM I Man_u_al
Is activated.
IVoice call ',
i
I
The caller leaves a Tl_e calerl
voice message in
digital memory or
hangs up. can also
send a fax
The caller must press REMOTE
your remote code to rnn_
activate the fax ....
machine. J_<51
The fax message is
received on paper. PAPER
If the caller stops speaking for 5 seconds while leaving a message, the machine will go to fax
receiving mode automatically.
5)
PAPER
FAX: OFF
TAD: EXT.
(External Answering Machine is ON.)
I
Fax reception is Auto dial
activated by the The external TAD
CNG Fax Tones fax call OGM is activated.
automatically.
The fax message
Is received on
paper.
Incoming Call
IVoice call
The caller leaves a
voice message on
the external TAD. iA_I_MoRY
The caller must press REMOTE
Manual your remote code to
activate the fax CODE
mach ne.
U' .51
6) FAX: OFF
TAD: OFF
PAPER I
Incoming Call I
Fax reception is activated automatically. /
The fax message is received on paper. I
i
I
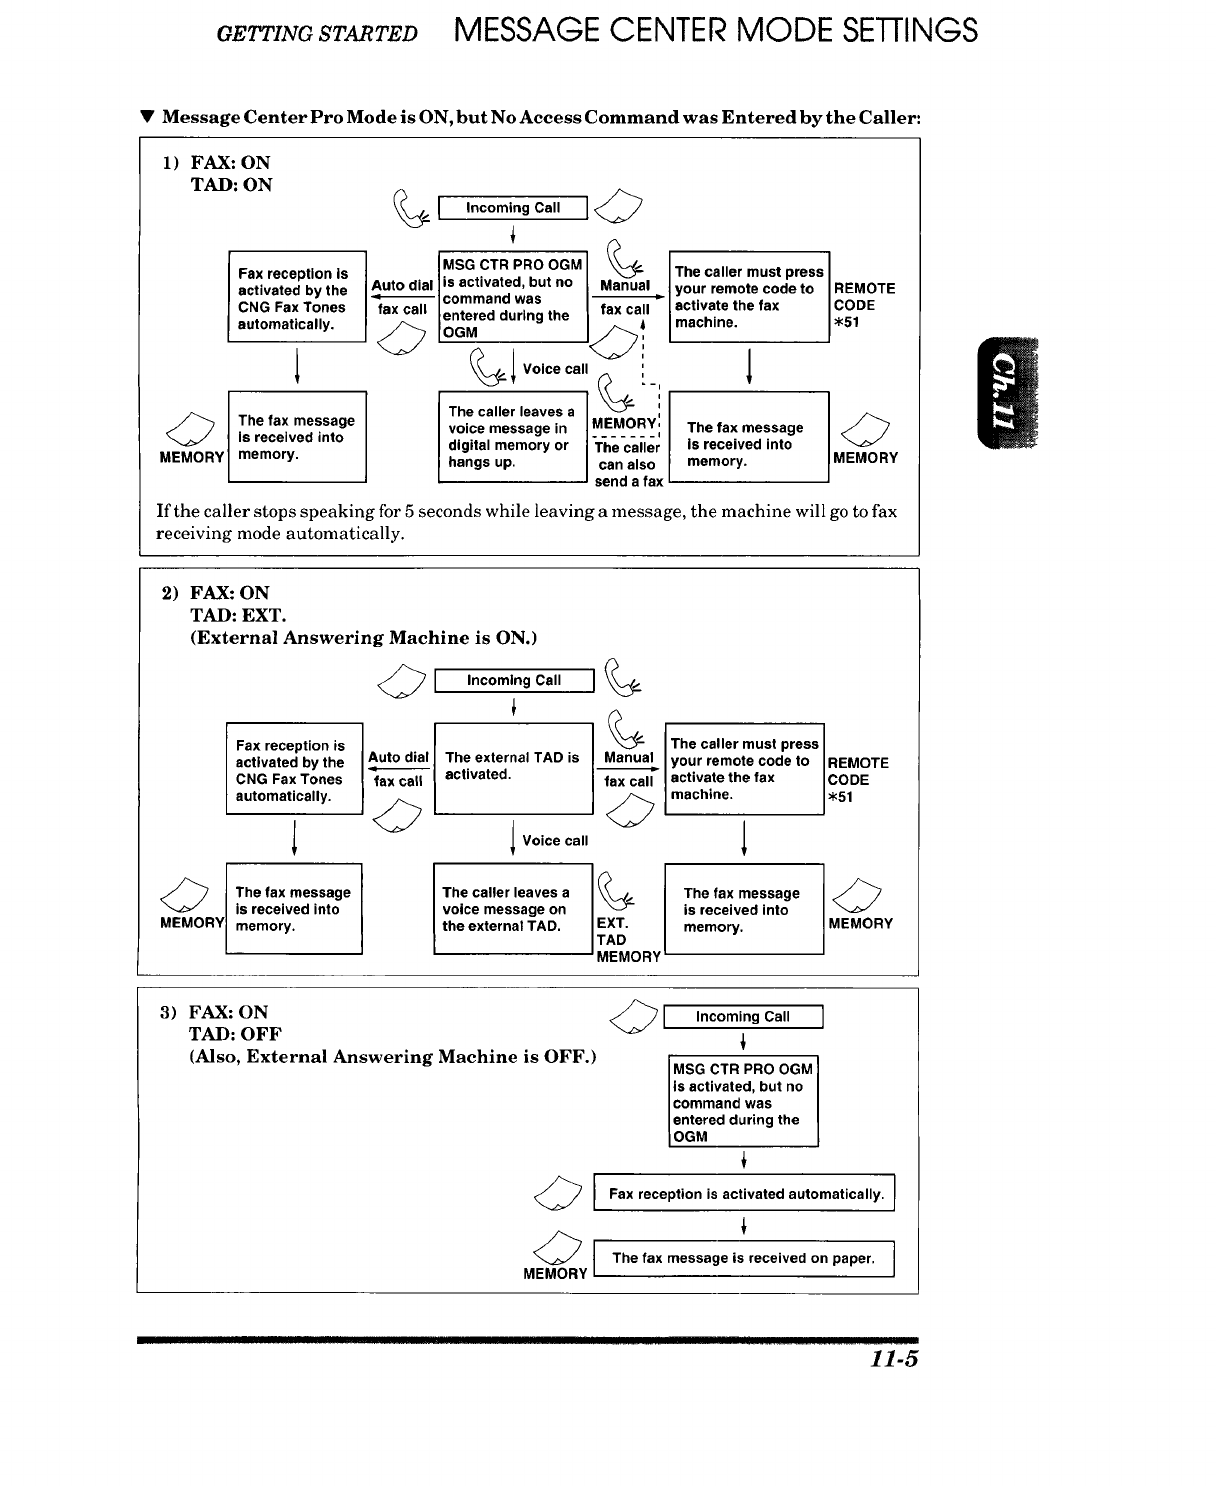
O rrmGSTARTED MESSAGE CENTER MODE SEI-flNGS
•Message Center Pro Mode is ON, but No Access Command was Entered by the Caller:
1) FAX: ON
TAD: ON
MEMORY
Fax reception Is
activated by the
CNG Fax Tones
automatically.
The fax message
Is received into
memory.
1 Incoming Call I
[MSG CTR PRO OGM %The caller must press
Auto dial/is activated, but no Manual your remote code to REMOTE
faxcal_-l:°tmrmdddur_ag the _activate the fax CODE
I_[OGM _____ machne. _<51
%1 VOice call ' 1
'_,
The caller leaves a _EMORY I
voice message in The fax message
digital memory or :l'llecaller is received into
hangs up. can also memory. MEMORY
send a fax
If the caller stops speaking for 5 seconds while leaving a message, the machine will go to fax
receiving mode automatically.
2) FAX: ON
TAD: EXT.
(External Answering Machine is ON.)
Incoming Call
Fax reception is IAuto dial I
activated by the The external TAD is
CNG Fax Tones fax call activated.
automatically. } _ I
l I v°ice call
The fax message
is received into
MEMORY memory.
The caller leaves a
voice message on
the external TAD.
]%
%
%
EXT.
TAD
MEMORY
1
The caller must pressl
your remote code to IREMOTE
i
activate the fax I CODE
machine. ],51
1
The fax message
is received into
memory. MEMORY
3) FAX: ON
TAD: OFF
(Also, External Answering Machine is OFF.)
I
MEMORY I
_1 Incoming Call ]
MSG CTR PRO OGM ]
is activated, but no
command was I
entered during the
OGM
Fax reception is activated automatically. I
m
m
The fax message is received on paper. ]
I
11-5

MESSAGE CENTER MODE SETTINGS GETTINGSTARTED
•Message Center Pro Mode is ON, but No Access Command was Entered by the Caller:
4) FAX: OFF
TAD: ON
PAPER
Fax reception is
activated by the
CNG Fax Tones
automatically.
The fax message
is received on
paper.
I Incoming Call I
MSG.CTR PROOGM I _I The caller must press
Auto dial is ac.vamd, bul no Manual I your remote code to
command was _I activate the fax
Ifaxcal, l entered during the i fax c_l I.,._hin.
lVo,ceca,,,' 1
i
I 1
The caller leaves a
voice message in The fax message is
digital memory or l"l_e caller received on paper.
JMEMORY hangs up. _can also
i send a fax
REMOTE
CODE
"51
PAPER
If the caller stops speaking for 5 seconds while leaving a message, the machine will go to fax
receiving mode automatically.
5) FAX: OFF
TAD: EXT.
(External Answering Machine is ON.)
Fax reception is Auto dial
activated by the
CNG Fax Tones fax call
automatically.
Incoming Call
Theexterna,TAOis Manual
activated-
IVoice call
The caller leaves a (_ I
voice message on
the external TAD. EXT. I
TAD /
MEMORY L
The caller must press
your remote code to REMOTE
activate the fax CODE
mach ne. I _<51
1
The fax message
is received on
paper. PAPER
6) FAX: OFF
TAD: OFF
PAPER I
_[ Incoming Call ]
MSG CTR PRO OGM I
is activated, but no
Icommand was I
lentered during the I
IOGM I
Fax reception is activated automatically. I
i
The fax message is received on paper.
!!1_1!r!!lll : :, .:::_: _]_i! II I III-III_ ......
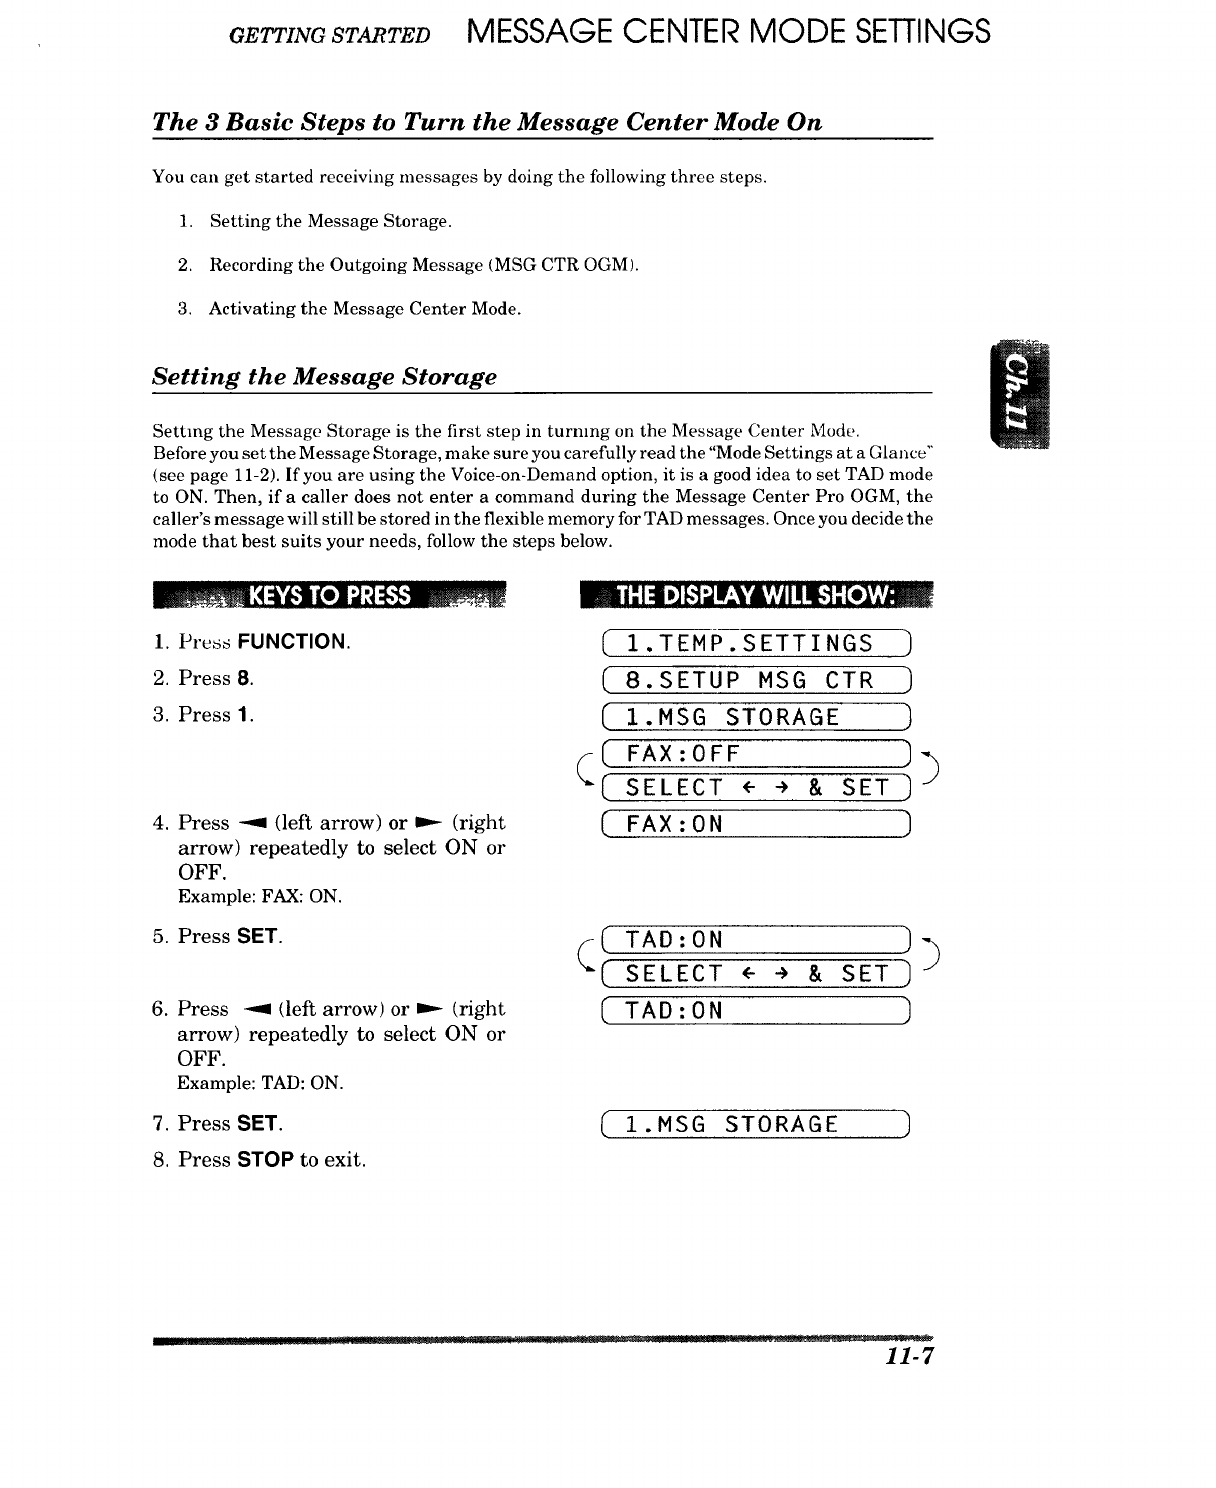
GETTINGSTARTED MESSAGE CENTER MODE SETTINGS
The 3 Basic Steps to Turn the Message Center Mode On
You can get started receiving messages by doing the following three steps.
1. Setting the Message Storage.
2. Recording the Outgoing Message (MSG CTR OGM).
3. Activating the Message Center Mode.
Setting the Message Storage
Setting the Message Storage is the first step in turning on the Message Center Mode.
Before you set the Message Storage, make sure you carefully read the "Mode Settings at a Glance"
(see page 11-2). If you are using the Voice-on-Demand option, it is a good idea to set TAD mode
to ON. Then, if a caller does not enter a command during the Message Center Pro OGM, the
caller's message will still be stored in the flexible memory for TAD messages. Once you decide the
mode that best suits your needs, follow the steps below.
1. Press FUNCTION.
2. Press 8.
3. Press 1.
4. Press -_ (left arrow) or m,- (right
arrow) repeatedly to select ON or
OFF.
Example: FAX: ON.
5. Press SET.
6. Press ---I (left arrow) or _ (right
arrow) repeatedly to select ON or
OFF.
Example: TAD: ON.
7. Press SET.
8. Press STOP to exit.
m mr," -' lnO A
( 1.TEMP.SETTINGS )
( 8.SETUP MSG CTR )
[ 1.MSG STORAGE ]
FAx:OFF ]
(
-( SELECT,--, SET)
(FAX:ON ]
_( TAD:ON ]
SELECT <---'>& SET
(TAD:ON ]
1.MSG STORAGE ]
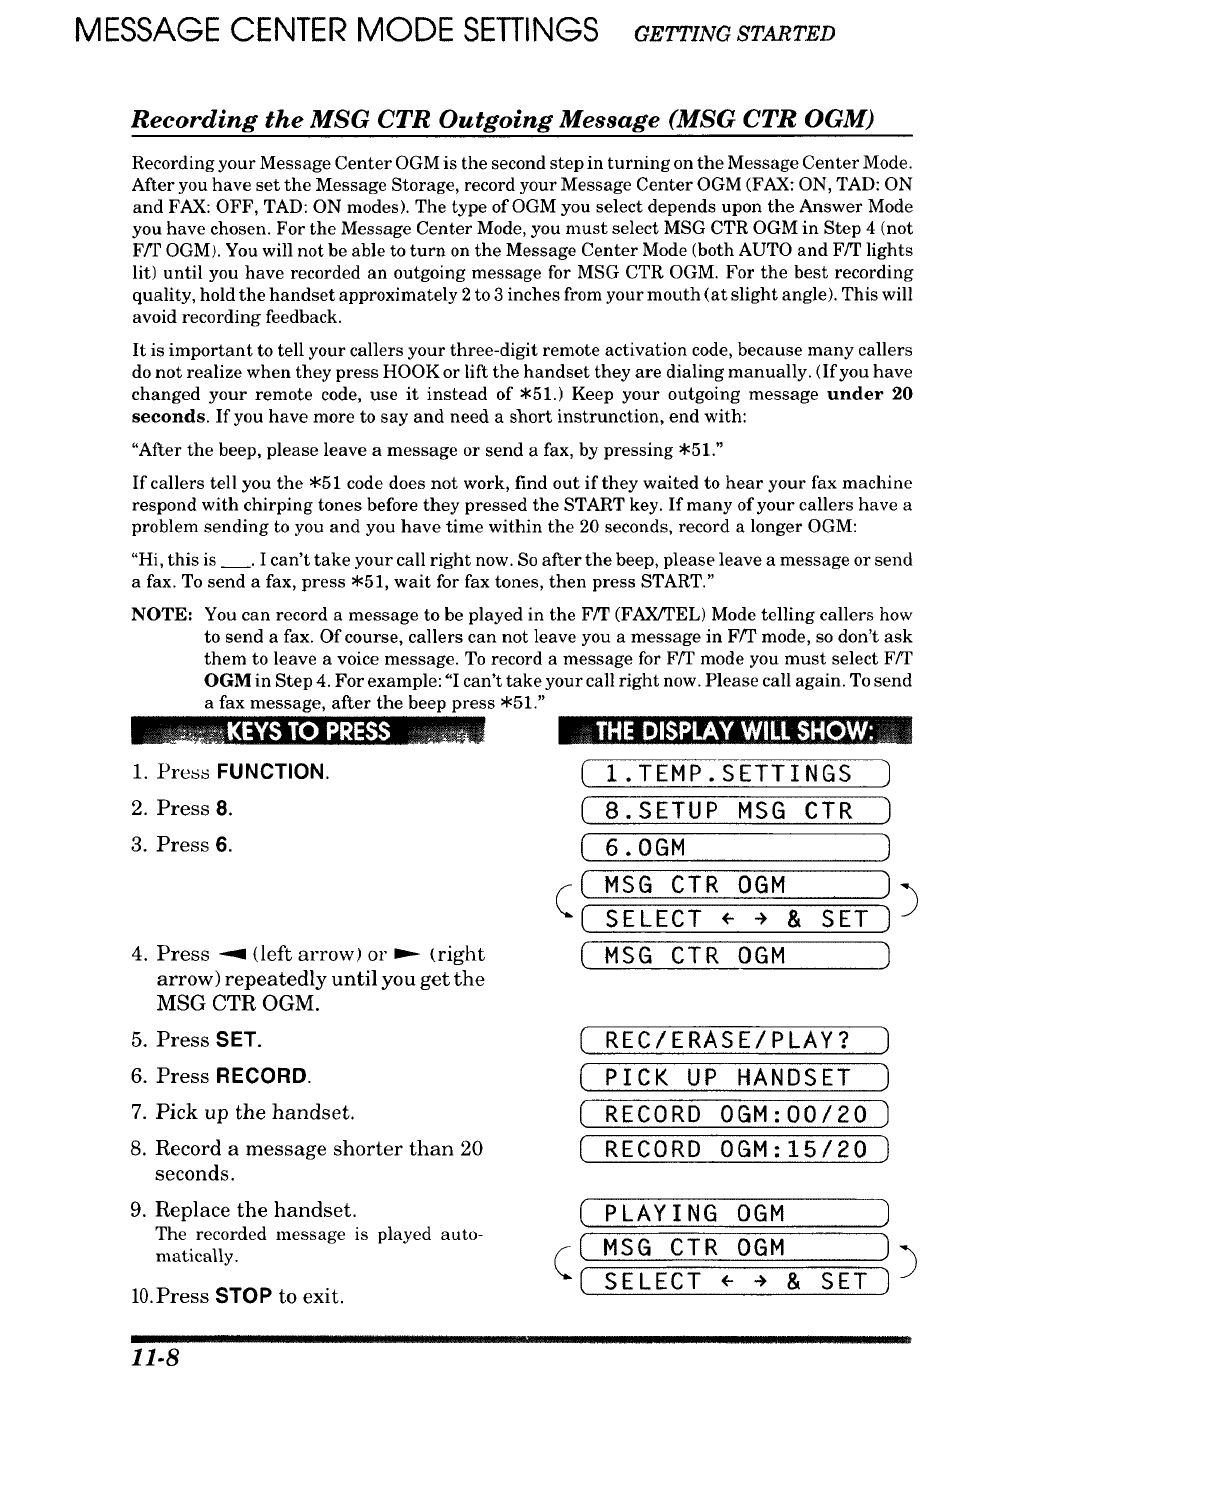
MESSAGE CENTER MODE SETTINGS GE INO STARTED
Recording the MSG CTR Outgoing Message (MSG CTR OGM)
Recording your Message Center OGM is the second step in turning on the Message Center Mode.
After you have set the Message Storage, record your Message Center OGM (FAX: ON, TAD: ON
and FAX: OFF, TAD: ON modes). The type of OGM you select depends upon the Answer Mode
you have chosen. For the Message Center Mode, you must select MSG CTR OGM in Step 4 (not
F/T OGM). You will not be able to turn on the Message Center Mode (both AUTO and F/T lights
lit) until you have recorded an outgoing message for MSG CTR OGM. For the best recording
quality, hold the handset approximately 2 to 3 inches from your mouth (at slight angle). This will
avoid recording feedback.
It is important to tell your callers your three-digit remote activation code, because many callers
do not realize when they press HOOK or lift the handset they are dialing manually. (If you have
changed your remote code, use it instead of .51.) Keep your outgoing message under 20
seconds. If you have more to say and need a short instrunction, end with:
"After the beep, please leave a message or send a fax, by pressing 51.
If callers tell you the .51 code does not work, find out if they waited to hear your fax machine
respond with chirping tones before they pressed the START key. If many of your callers have a
problem sending to you and you have time within the 20 seconds, record a longer OGM:
"Hi, this is . I can't take your call right now. So after the beep, please leave a message or send
a fax. To send a fax, press .51, wait for fax tones, then press START."
NOTE: You can record a message to be played in the F/T (FAX/TEL) Mode telling callers how
to send a fax. Of course, callers can not leave you a message in F/T mode, so don't ask
them to leave a voice message. To record a message for F/T mode you must select F/T
OGM in Step 4. For example: "I can't take your call right now. Please call again. To send
a fax message, after the beep press .51."
1. Press FUNCTION.
2. Press 8.
3. Press 6.
4. Press _ (left arrow) or _ (right
arrow) repeatedly until you get the
MSG CTR OGM.
5. Press SET.
6. Press RECORD.
7. Pick up the handset.
8. Record a message shorter than 20
seconds.
9. Replace the handset.
The recorded message is played auto-
matically.
10.Press STOP to exit.
_ |" i:11m][,"]_Ir_4k'AVjIIII_i "[o]hL_m
(1.TEMP.SETTINGS ]
( 8.SETUPMSGCTR )
( 6. OGM ]
(( MSG CTR OGM ))
[ SELECT <--÷a SET )
(MSG CTR OGM ]
( REC/ERASE/PLAY? )
( PICK UP HANDSET )
( RECORD OGM:O0/20 ]
C RECORD 0GM:15/20
( P LAY I NG OGM -_
( MSG CTR OGM ]_
(SELECT <- -> & SET ] J
11-8
I i i. im..m 1ir
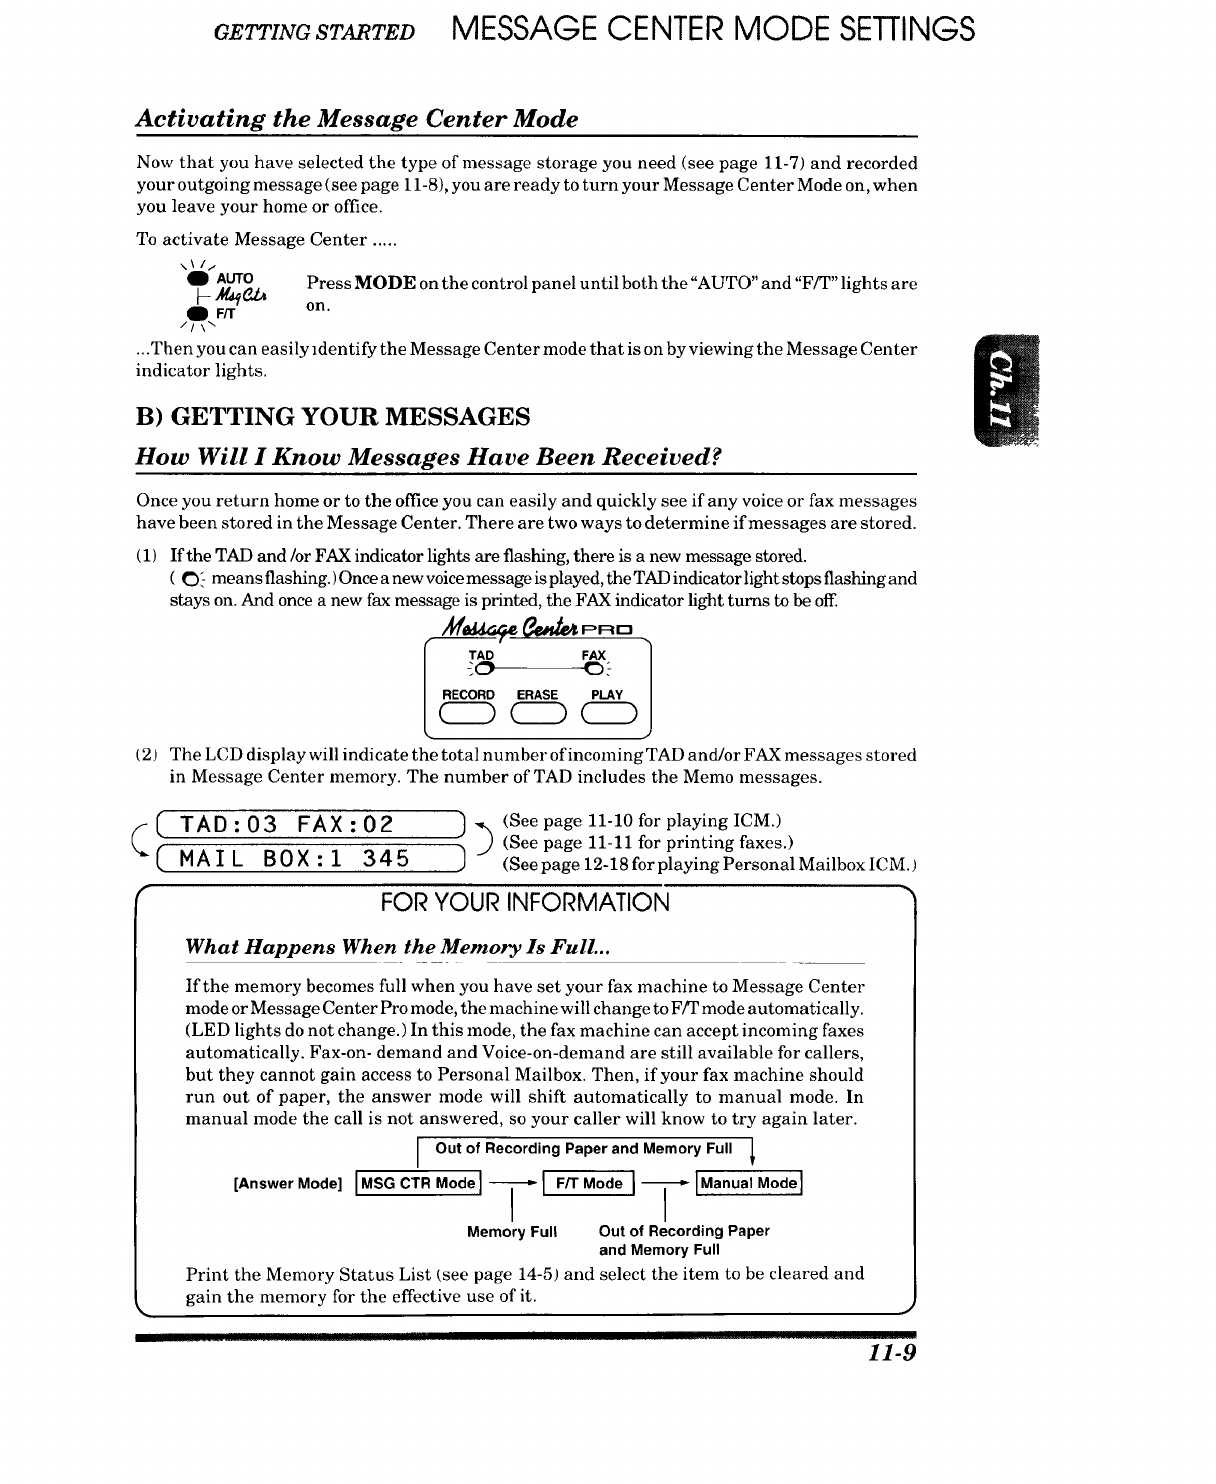
GETTINGSTARTED MESSAGE CENTER MODE SETTINGS
Activating the Message Center Mode
Now that you have selected the type of message storage you need (see page 11-7) and recorded
your outgoing message (see page 11-8), you are ready to turn your Message Center Mode on, when
you leave your home or office.
To activate Message Center .....
\\//
SAUTO Press MODE on the control panel until both the"AUTO" and "F/T" lights are
/Q...FfI" on.
...Then you can easily identify the Message Center mode that is on by viewing the Message Center
indicator lights.
B) GETTING YOUR MESSAGES
How Will I Know Messages Have Been Received?
Once you return home or to the office you can easily and quickly see if any voice or fax messages
have been stored in the Message Center. There are two ways to determine if messages are stored.
(1)
(2)
If the TAD and/or FAX indicator lights are flashing, there is a new message stored.
( O_- means flashing.) Once a new voice message is played, the TAD indicator light stops flashing and
stays on. And once a new fax message is printed, the FAX indicator light turns to be off.
TAD FAX ]
RECORD ERASE PLAY
The LCD display will indicate the total number of incoming TAD and/or FAX messages stored
in Message Center memory. The number of TAD includes the Memo messages.
(([
f
TAD:03 FAX:02
MAIL BOX:I 345 _ See page 11-10 for playing ICM.)
(See page 11-11 for printing faxes.)
(See page 12-18 for playing Personal Mailbox ICM.)
FOR YOUR INFORMATION
What Happens When the Memory Is Full...
If the memory becomes full when you have set your fax machine to Message Center
mode or Message Center Pro mode, the machine will change to Ffr mode automatically.
(LED lights do not change.) In this mode, the fax machine can accept incoming faxes
automatically. Fax-on- demand and Voice-on-demand are still available for callers,
but they cannot gain access to Personal Mailbox. Then, if your fax machine should
run out of paper, the answer mode will shift automatically to manual mode. In
manual mode the call is not answered, so your caller will know to try again later.
IOut of RecordingPaper andMemory Full
1
[AnswerMode] [MSGCTRModeJT ] F/TMode [-_]ManualMode]
MemoryFull Out of RecordingPaper
and Memory Full
Print the Memory Status List (see page 14-5) and select the item to be cleared and
gain the memory for the effective use of it.
,mIH|HIlmlmr 11-9
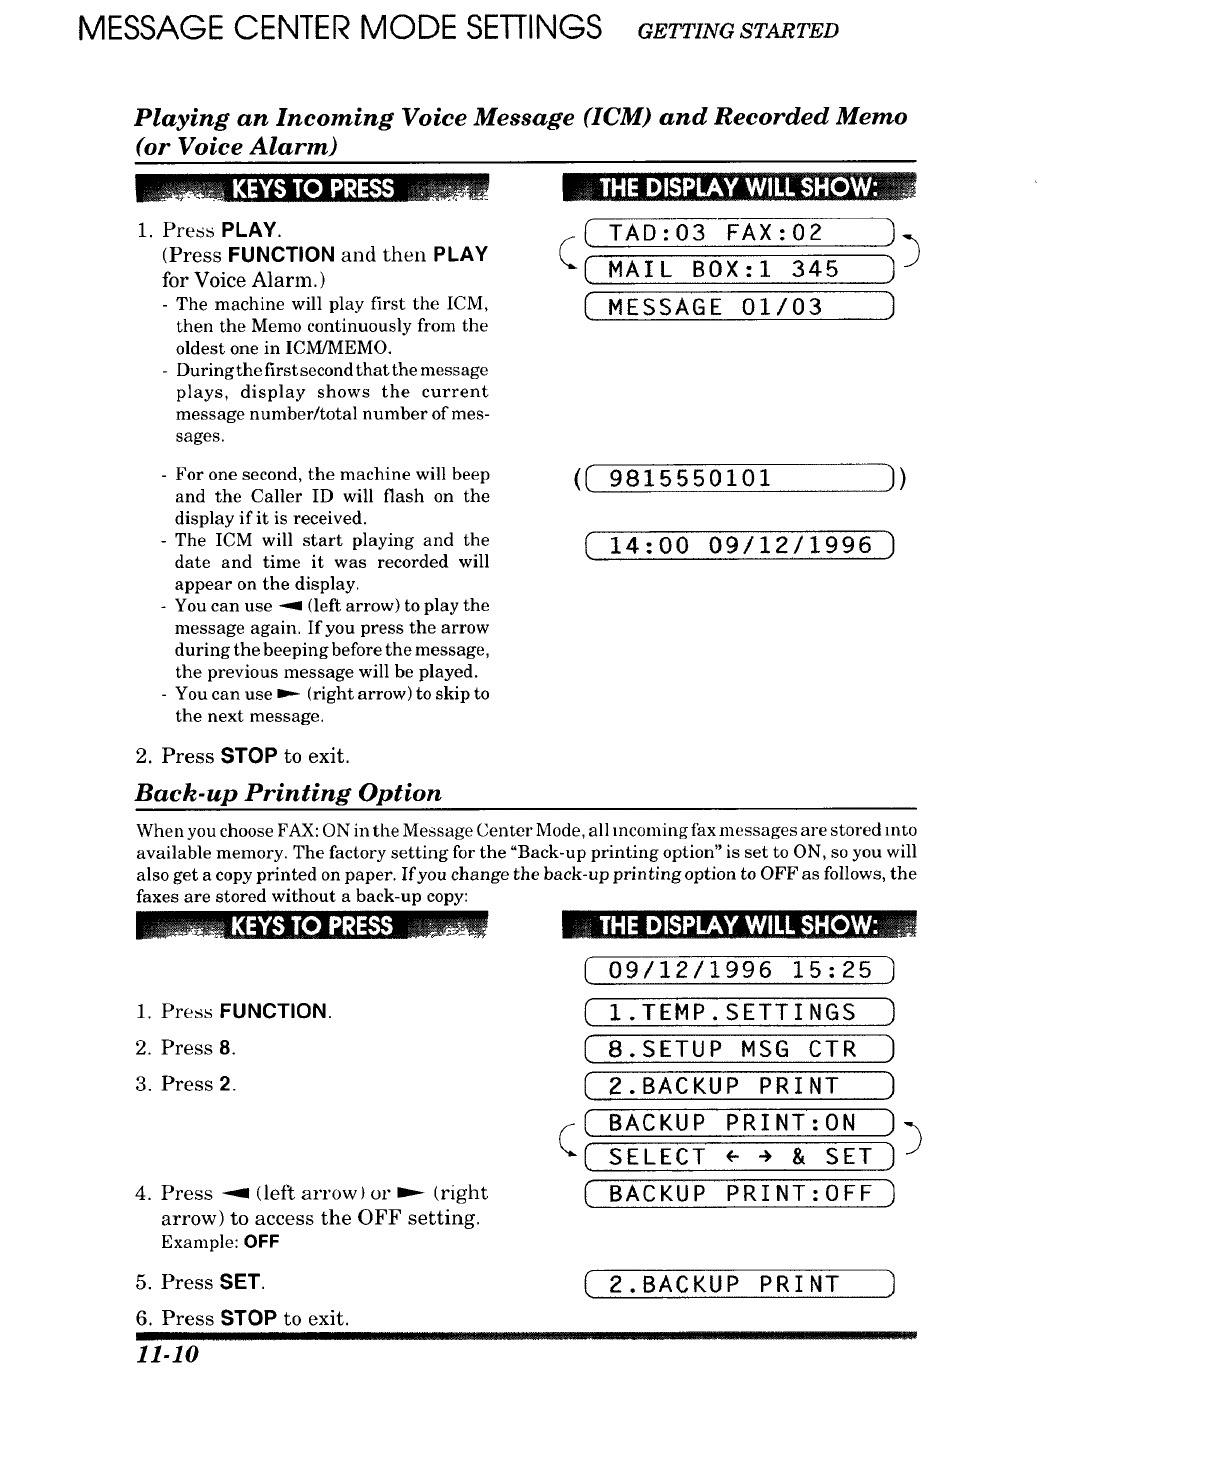
MESSAGE CENTER MODE SETTINGS GETTINGSTARTED
Playing an Incoming Voice Message (ICM) and Recorded Memo
(or Voice Alarm)
I_ 1"1:1P]_l _ W.=_v,vj!I !,!; [elv;m
,Press PLAY.
(Press FUNCTION and then PLAY
for Voice Alarm.)
- The machine will play first the ICM,
then the Memo continuously from the
oldest one in ICM/MEMO.
- Duringthe first second that the message
plays, display shows the current
message number/total number of mes-
sages.
(( TAD:o3FAX-02
[.AILBOX:l345 )
[_.ESSAGE01/03 ]
- For one second, the machine will beep
and the Caller ID will flash on the
display if it is received.
- The ICM will start playing and the
date and time it was recorded will
appear on the display.
- You can use -9 (left arrow) to play the
message again. If you press the arrow
during the beeping before the message,
the previous message will be played.
- You can use _ (right arrow) to skip to
the next message.
(( 9815550101 ))
( 14:00 09/12/1996 )
2. Press STOP to exit.
Back-up Printing Option
When you choose FAX: ON in the Message Center Mode, all incoming fax messages are stored into
available memory. The factory setting for the "Back-up printing option" is set to ON, so you will
also get a copy printed on paper. If you change the back-up printing option to OFF as follows, the
faxes are stored without a back-up copy:
1. Press FUNCTION.
2. Press 8.
3. Press 2.
4. Press -11 (left arrow} or _-- (right
arrow) to access the OFF setting.
Example: OFF
m i-"I=IID][,.'i"-JIL._k',A',vjIIIl.'l: [e],v;_
5. Press SET.
6. Press STOP to exit.
11-10
(. 09/12/1996 15:25 )
(I.TEMP.SETTINGS )
(8.SETUP MSG CTR )
2.BACKUP PRINT )
_( BACKUP PRINT:ON )_
I SELECT <- ÷ & SET ]
C BACKUP PRINT:OFF )
2.BACKUP PRINT
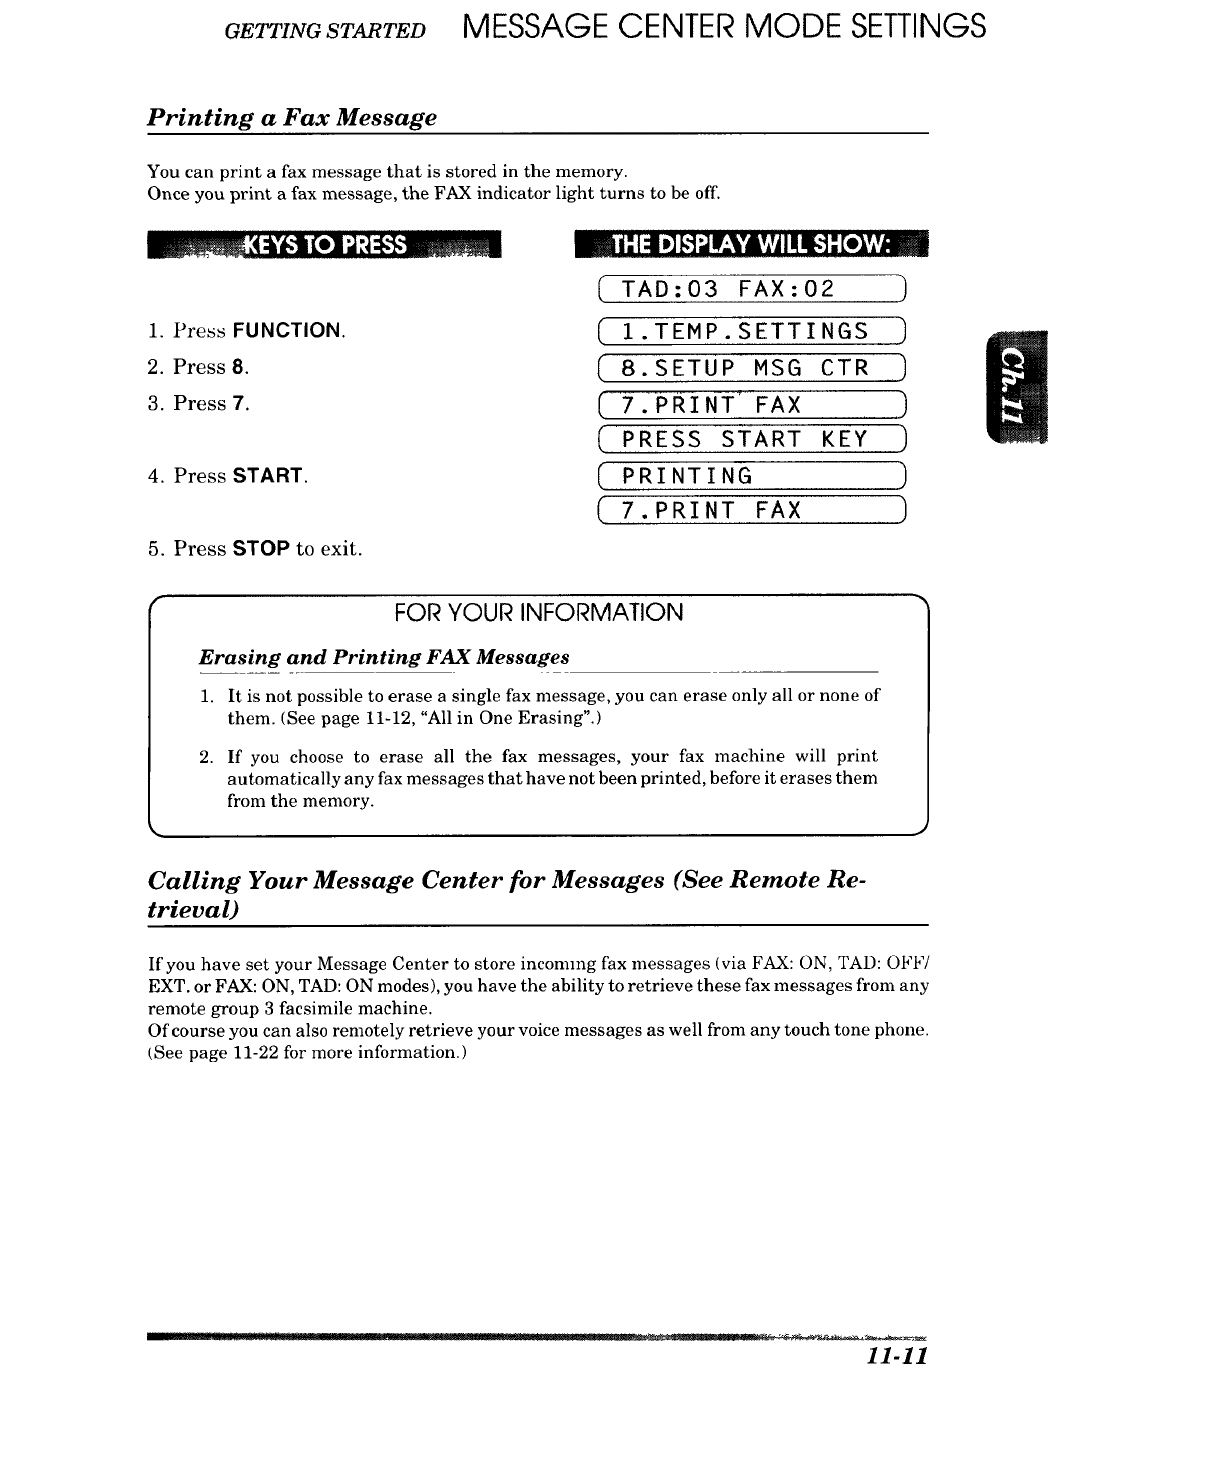
GETTINGSTARTED MESSAGE CENTER MODE SETTINGS
Printing a Fax Message
You can print a fax message that is stored in the memory.
Once you print a fax message, the FAX indicator light turns to be off.
_ :___col'_'• •,._'_-__"
1. Press FUNCTION.
2. Press 8.
3. Press 7.
4. Press START.
5. Press STOP to exit.
TAD:03 FAX:02 )
(, 1.TEMP.SETTINGS )
( 8.SETUP MSG CTR ]
( 7. PRINT* FAX )
( PRESS START KEY )
[PRINTING )
( 7.PRINT FAX )
FOR YOUR INFORMATION
Erasing and Printing FAX Messages
1. It is not possible to erase a single fax message, you can erase only all or none of
them. (See page 11-12, "All in One Erasing".)
2. If you choose to erase all the fax messages, your fax machine will print
automatically any fax messages that have not been printed, before it erases them
from the memory.
Calling Your Message Center for Messages (See Remote Re-
trieval)
If you have set your Message Center to store incoinlng fax messages (via FAX: ON, TAD: OFF/
EXT. or FAX: ON, TAD: ON modes), you have the ability to retrieve these fax messages from any
remote group 3 facsimile machine.
Of course you can also remotely retrieve your voice messages as well from any touch tone phone.
(See page 11-22 for more information.)
11-11
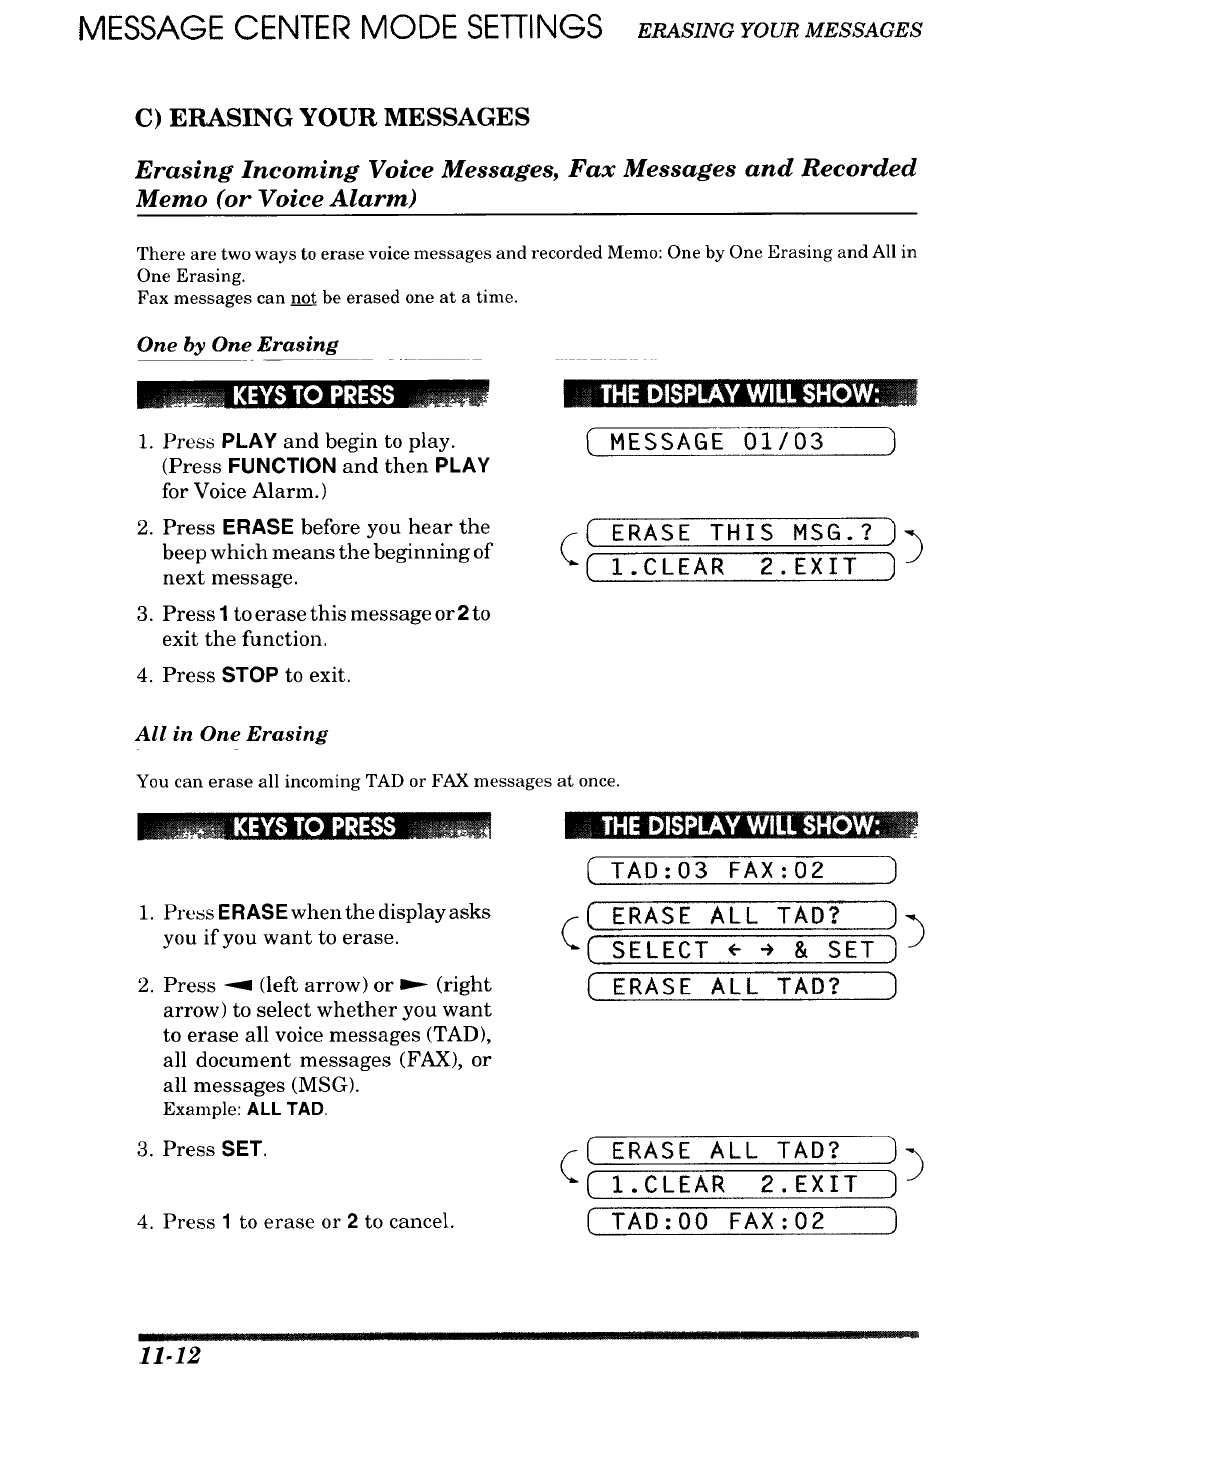
MESSAGE CENTER MODE SETTINGS ERASINGYOURMESSAGES
C) ERASING YOUR MESSAGES
Erasing Incoming Voice Messages, Fax Messages and Recorded
Memo (or Voice Alarm)
There are two ways to erase voice messages and recorded Memo: One by One Erasing and All in
One Erasing.
Fax messages can not be erased one at a time.
One by One Erasing
,'4:k'J,'l(oil .a._,%_
.
.
.
Press PLAY and begin to play.
(Press FUNCTION and then PLAY
for Voice Alarm.)
Press ERASE before you hear the
beep which means the beginning of
next message.
Press 1to erase this message or 2 to
exit the function.
ml: i4 D]_'.._k_'r, vjttitll,,"]-"[_,'_,mplW
(MESSAGE 01/03 )
( ERASE THIS MSG.? )_
(( 1.CLEAR 2.EXIT ]
4. Press STOP to exit.
All in One Erasing
You can erase all incoming TAD or FAX messages at once.
.
,
Press ERAS Ewhen the display asks
you if you want to erase.
Press --9 (left arrow) or P.- (right
arrow) to select whether you want
to erase all voice messages (TAD),
all document messages (FAX), or
all messages (MSG).
Example: ALL TAD.
3. Press SET.
4. Press 1to erase or 2 to cancel.
In 1"!:1.] k];,iIr=YdiVji ! I_t; [o:li,VlW_
(TAD:03 FAX:02 )
(.( ERASE ALL TAD? ])
( SELECT <- -> & SET
[ ERASE ALL TAD? ]
( ERASE ALL TAD? ]
(
"_( 1.CLEAR 2.EXIT
(TAD:O0 FAX:02
...... ! .... _'_L]l! ]l[!r
11-12
I H$II
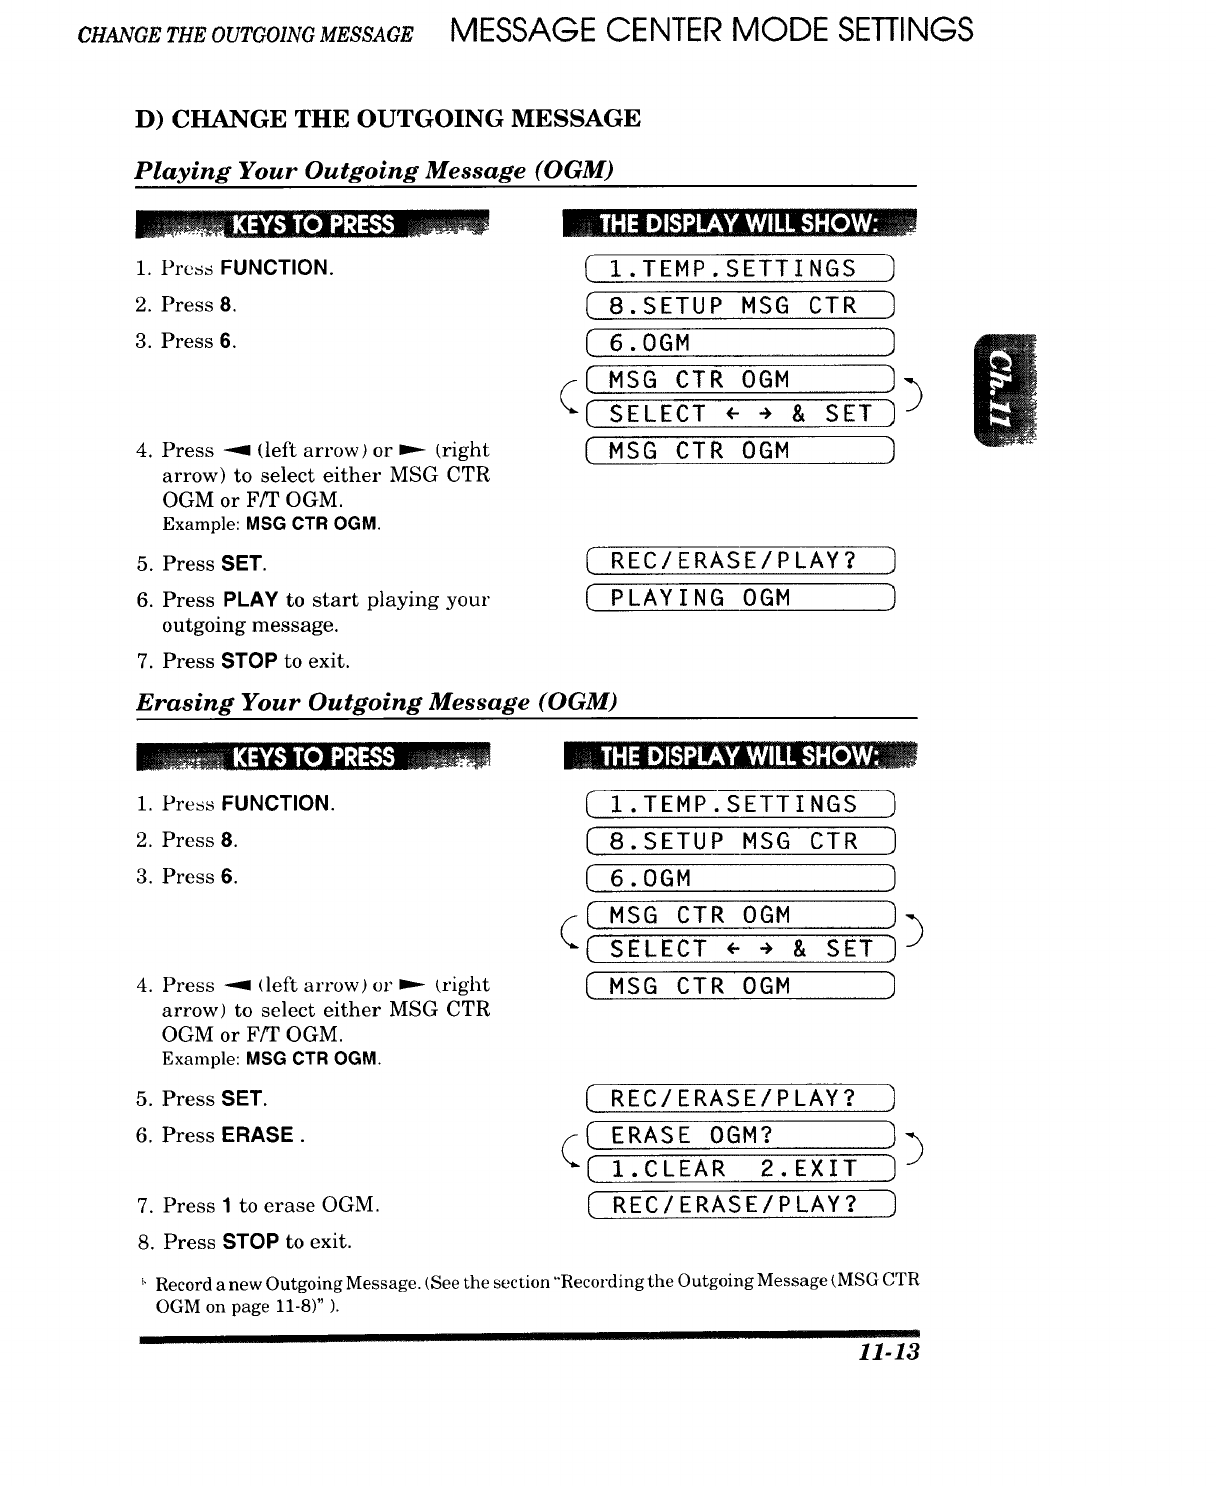
CHANGETHEOUTGOINGMESSAGE MESSAGE CENTER MODE SETTINGS
D) CHANGE THE OUTGOING MESSAGE
Playing Your Outgoing Message (OGM)
1. Press FUNCTION.
2. Press 8.
3. Press 6.
.
.
6.
Press --_ (left arrow) or m.- (right
arrow) to select either MSG CTR
OGM or Ffr OGM.
Example: MSG CTR OGM.
Press SET.
Press PLAY to start playing your
outgoing message.
7. Press STOP to exit.
-_- 1-'1:11_[-l;,,llr.'V&V_ltl!l-']-"[e_v,_
(
( 1.TEMP.SETTINGS )
_ 8.SETUP MSG CTR ]
(6.0GM ]
[.sG CTRoG.
_" SELECT <- -> & SET ] _Y
( MSG CTR OGM ]
REC/ERASE/PLAY? ]
(PLAYING OG" ]
Erasing Your Outgoing Message (OGM)
1. Press FUNCTION.
2. Press 8.
3. Press 6.
4. Press -9, (left arrow) or m-- £right
arrow) to select either MSG CTR
OGM or F/T OGM.
Example: MSG CTR OGM.
5. Press SET.
6. Press ERASE.
7. Press 1to erase OGM.
8. Press STOP to exit.
m 1"11 t] [,:']"Jl'_'¥&',vjII !,'] -"[e!T£_
(1.TEMP.SETTINGS ]
( 8.SETUP MSG CTR )
(6.OGM ]
_ MSG CTR OGM ])(
--{ SELECT ÷ ÷ & SET
MSG CTR OGM ]
(REC/ERASE/PLAY? ]
(C ERASEOG.?
( 1.CLEAR 2.EXIT ]
( REC/ERASE/PLAY? 1
_"Record a new Outgoing Message. (See the section "Recording the Outgoing Message £MSG CTR
OGM on page 11-8)" ).
11-13
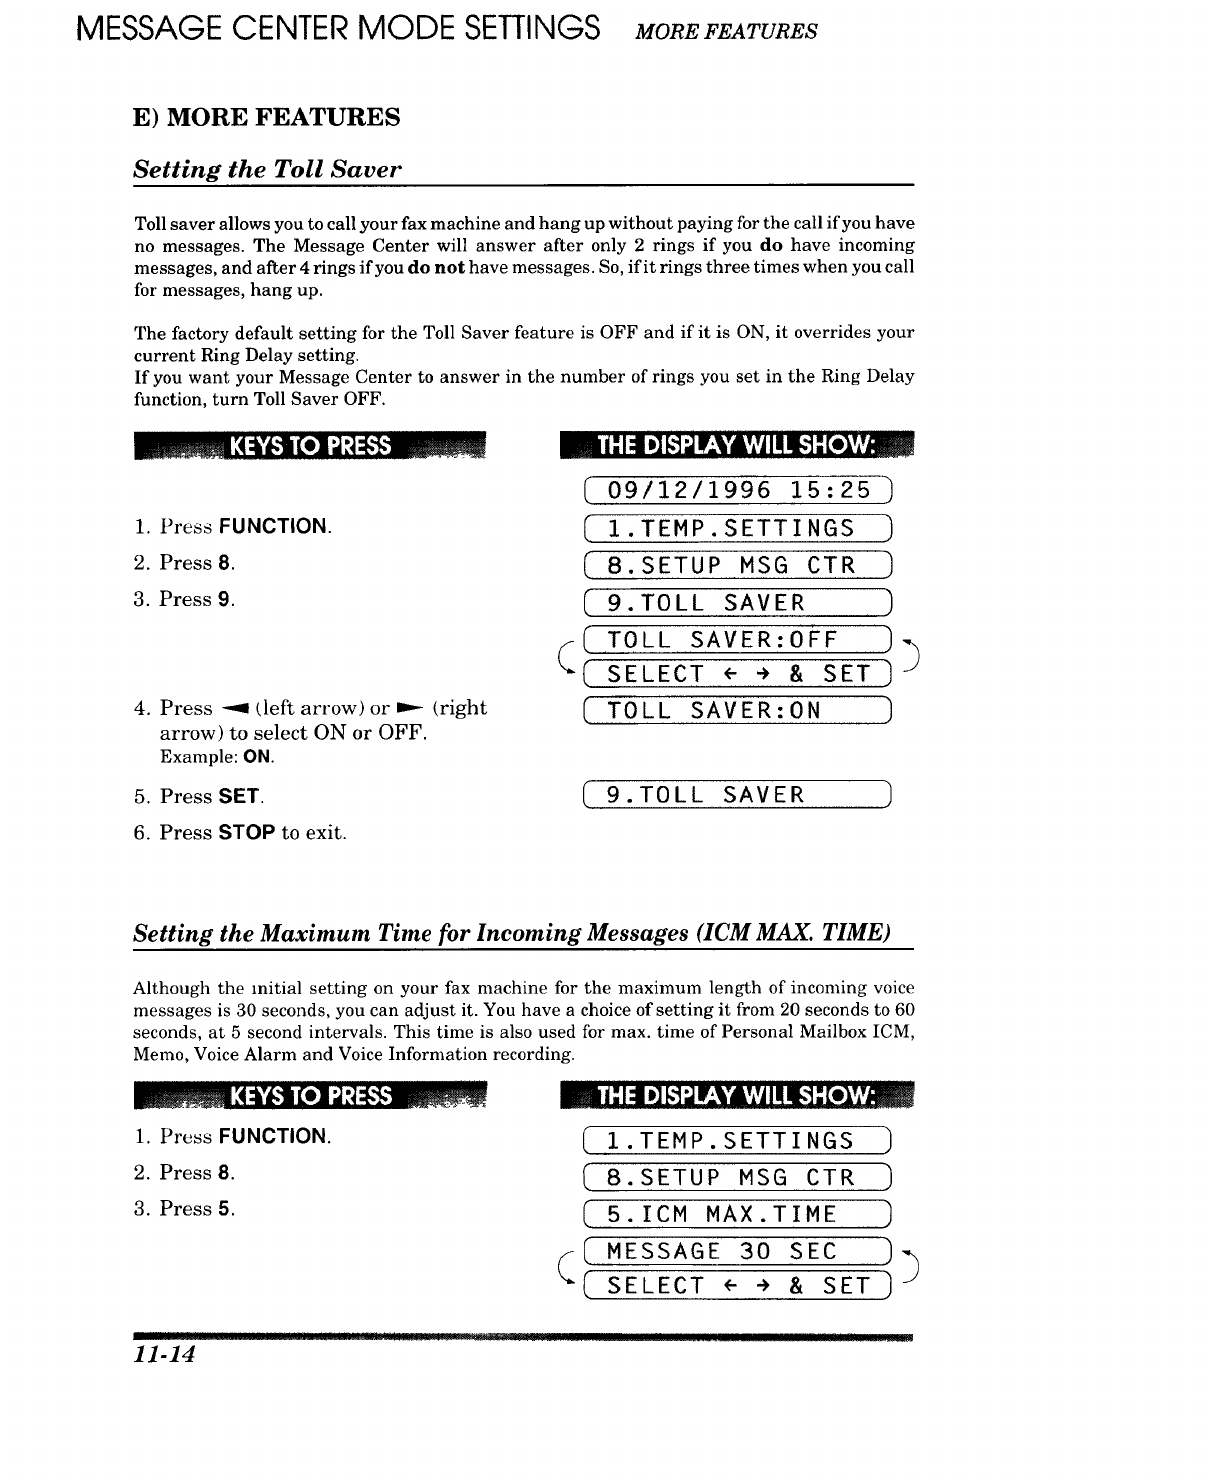
MESSAGE CENTER MODE SETTINGS MOREFEATURES
E) MORE FEATURES
Setting the Toll Saver
Toll saver allows you to call your fax machine and hang up without paying for the call if you have
no messages. The Message Center will answer after only 2 rings if you do have incoming
messages, and after 4 rings if you do not have messages. So, if it rings three times when you call
for messages, hang up.
The factory default setting for the Toll Saver feature is OFF and if it is ON, it overrides your
current Ring Delay setting.
If you want your Message Center to answer in the number of rings you set in the Ring Delay
function, turn Toll Saver OFF.
1. Press FUNCTION.
2. Press 8.
3. Press 9.
4. Press --_ deft arrow) or _(right
arrow) to select ON or OFF.
Example: ON.
(09/12/1996 15:25
(I.TEMP.SETTINGS )
( B.SETUP MSG CTR ]
C 9. TOLL SAVER
( TOLL SAVER:OFF )
(_ SELECT <'-"> & SET? )
(TOLL SAVER:ON )
5. Press SET. (.__9. T 0 L L S A V E R .)
6. Press STOP to exit.
Setting the Maximum Time for Incoming Messages (ICM MAX. TIME)
Although the initial setting on your fax machine for the maximum length of incoming voice
messages is 30 seconds, you can adjust it. You have a choice of setting it from 20 seconds to 60
seconds, at 5 second intervals. This time is also used for max. time of Personal Mailbox ICM,
Memo, Voice Alarm and Voice Information recording.
t ttttttt
mmmm+m_[4:_'1,1lie] dt+:_$--mm_+++m _i -"1:11D][.,"]_lf_'_k'dl,','jI t!W[,.."]."[e],v,'_
1. Press FUNCTION.
2. Press 8.
3. Press 5.
1.TEMP.SETTINGS ]
8.SETUP MSG CTR
5.ICM MAX.TIME
C.EssAG 3o sEc )
(,.
r
11-14 I1111"1I II '1eFT .................. [I !! ........ III_I M!1 !111 .........
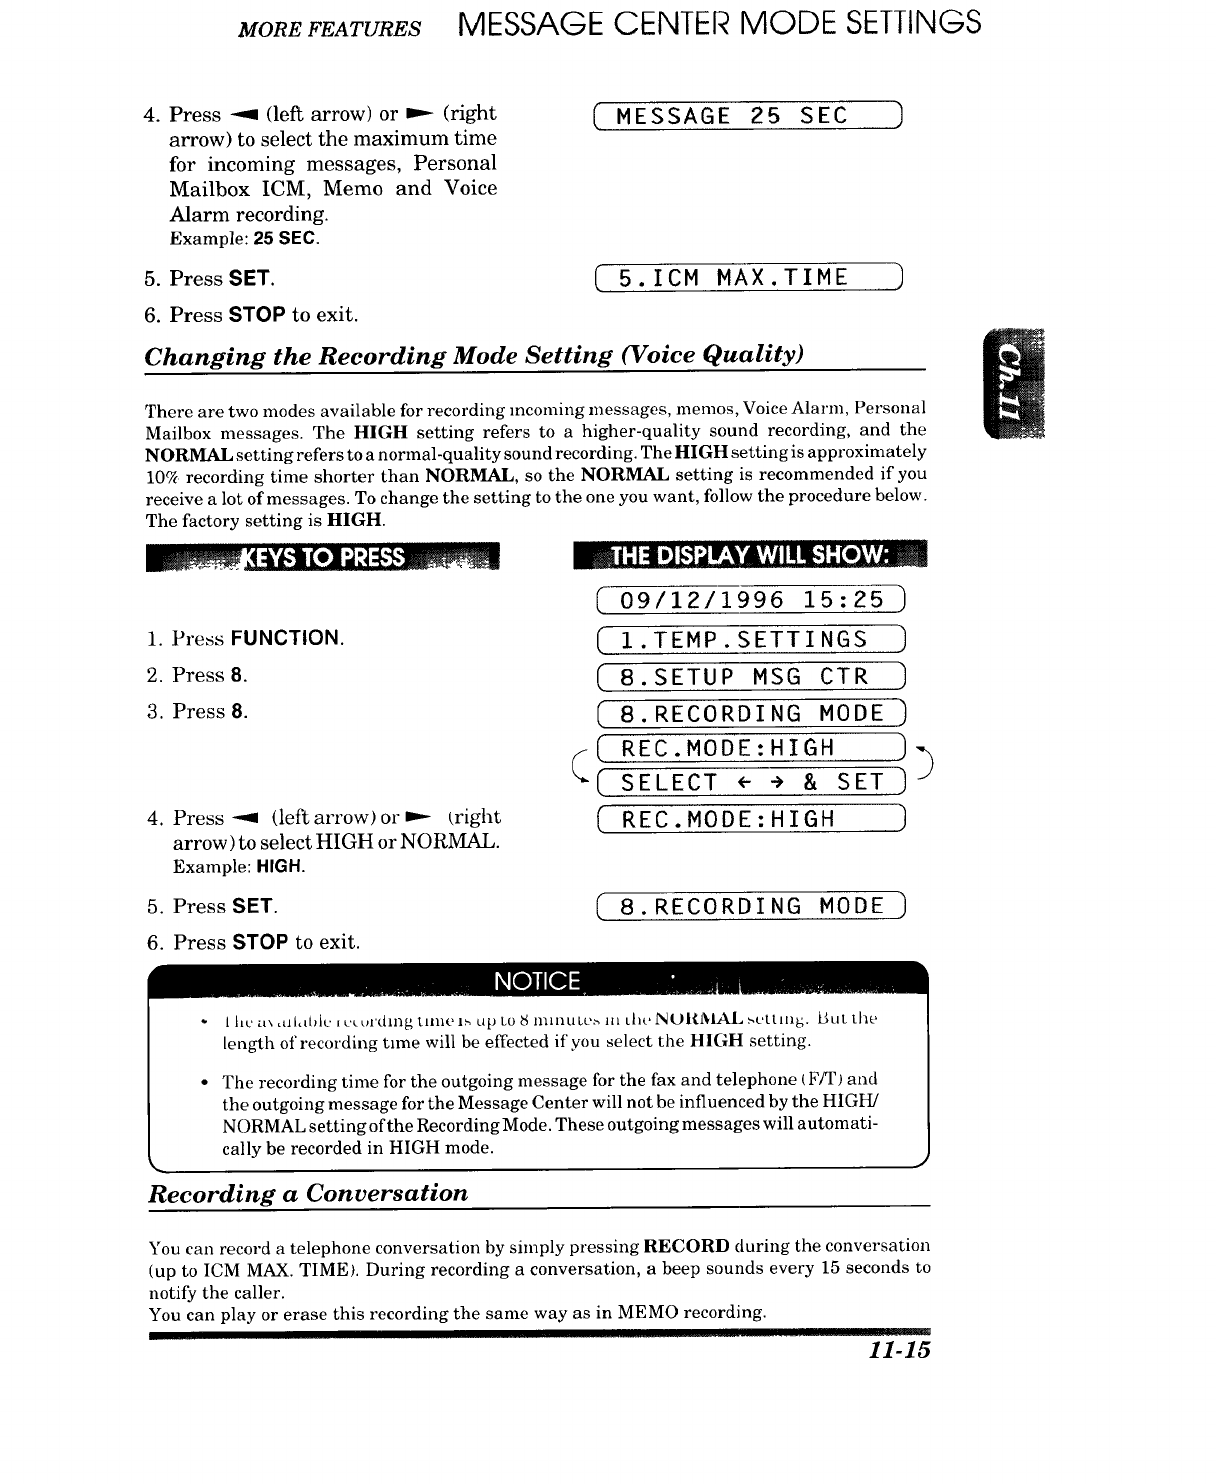
MOREFEATURES MESSAGE CENTER MODE SETTINGS
4. Press ---1 (left arrow) or 1..-- (right
arrow) to select the maximum time
for incoming messages, Personal
Mailbox ICM, Memo and Voice
Alarm recording.
Example: 25 $EC.
(MESSAGE 25 SEC ,]
5.PressSET. ( 5.1CM MAX.TIME )
6. Press STOP to exit.
Changing the Recording Mode Setting (Voice Quality)
There are two modes available for recording mcoming messages, memos, Voice Alarm, Personal
Mailbox messages. The HIGH setting refers to a higher-quality sound recording, and the
NORMAL setting refers to a normal-quality sound recording. The HIGH setting is approximately
10_ recording time shorter than NORMAL, so the NORMAL setting is recommended if you
receive a lot of messages. To change the setting to the one you want, follow the procedure below.
The factory setting is HIGH.
_:t'_t (e]'J fl:kg_._ _ |'- 14 ,] [,']_ r-'V&','A1U_!"-[e_'.'_! m
1. Press FUNCTION.
2. Press 8.
3. Press 8.
4. Press _ (left arrow)or _ £right
arrow) to select HIGH or NORMAL.
Example: HIGH.
( 09/12/1996 15:25 )
(1.TEMP.SETTINGS ]
( 8.SETUP MSG CTR ]
( 8.RECORDING MODE )
_( REC.MODE:HIGH )
(SELECT ÷ ÷ & SET )
[REC.MODE:HIGH ]
5. PressSET. ( 8. RECORDING MODE )
6. Press STOP to exit.
" I hL' vt,. d]l,d)lL' tu"._ul'(_ilng IAIII(' In U[) LO L'tnUlIULL'_ ill Lht' _ (}|{i]tlAL .".t'tLlllL_. _3LIL Lilt'
length of recording time will be effected if you select the HIGH setting.
•The recording time for the outgoing message for the fax and telephone (F/T) and
the outgoing message for the Message Center will not be influenced by the HIGH/
NORMAL setting of the Recording Mode. These outgoing messages will automati-
cally be recorded in HIGH mode.
Recording a Conversation
You can record a telephone conversation by simply pressing RECORD during the conversation
(up to ICM MAX. TIME). During recording a conversation, a beep sounds every 15 seconds to
notify the caller.
You can play or erase this recording the same way as in MEMO recording.
......... 1i-15
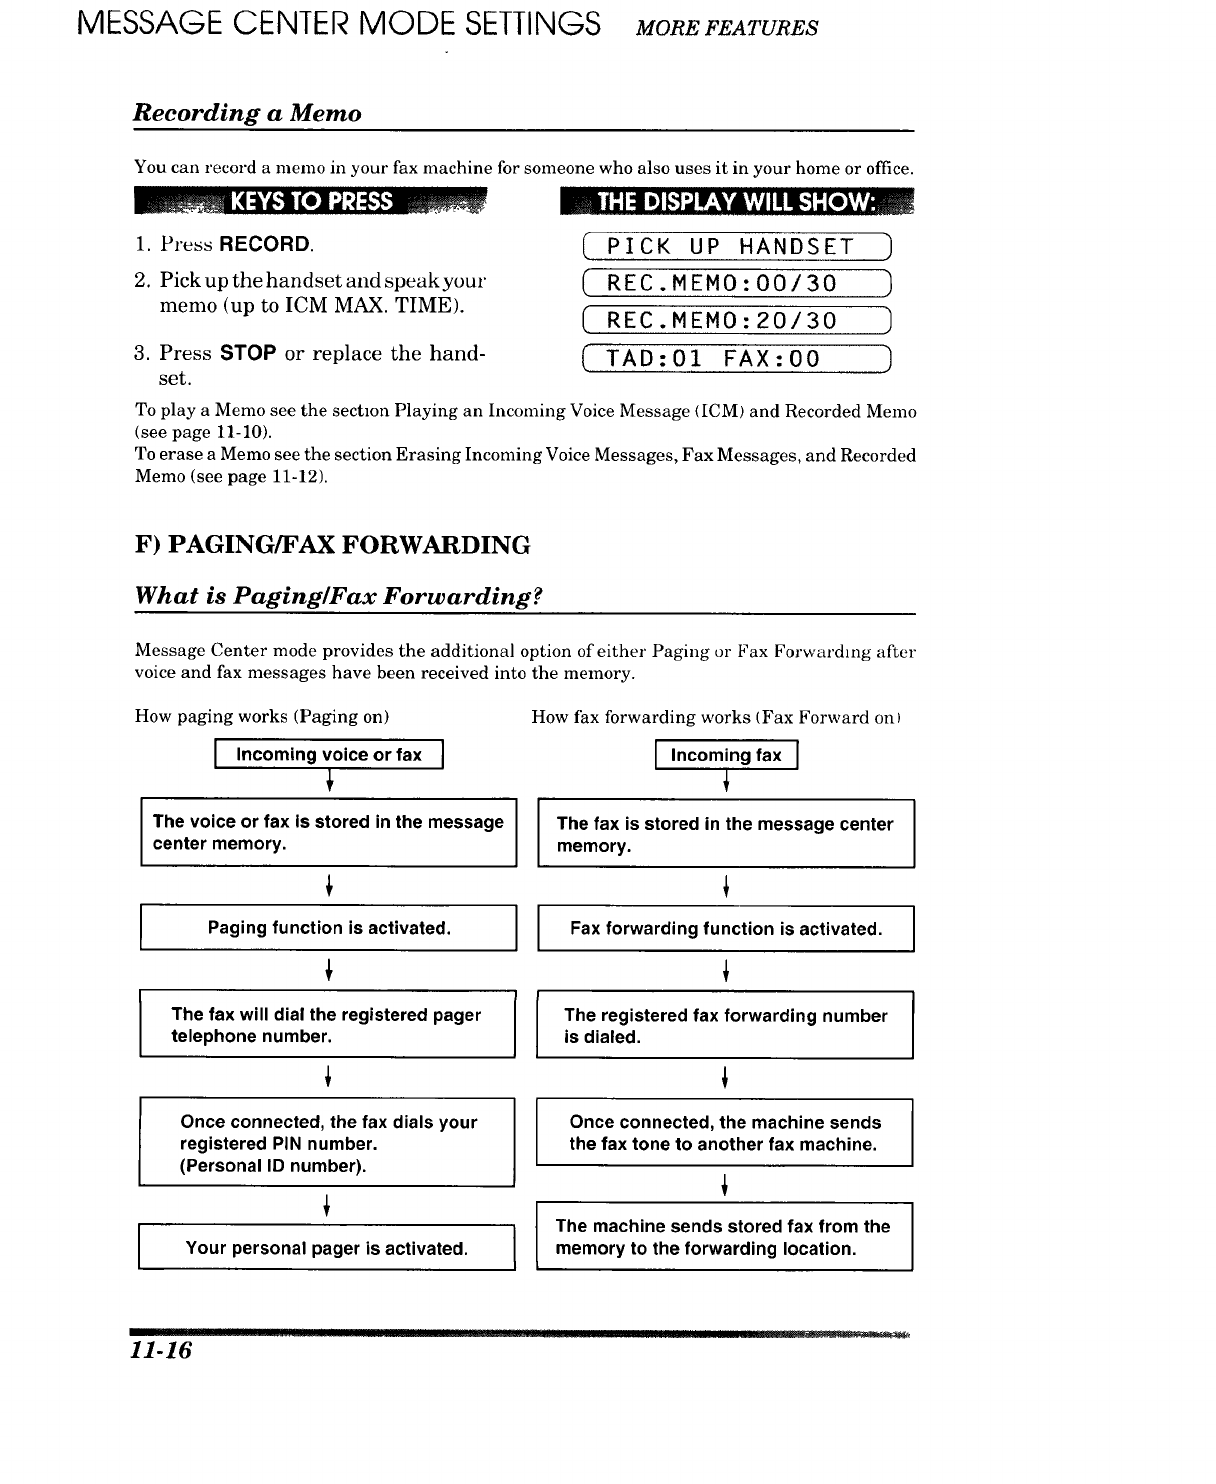
MESSAGE CENTER MODE SETTINGS MOREFEATURES
Recording a Memo
You can record a memo in your fax nmchine for someone who also uses it in your home or office.
1. Press RECORD.
2. Pick up the handset and speakyom"
memo (up to ICM MAX. TIME).
3. Press STOP or replace the hand-
set.
m/ -"I:n D][,..]_tr_,Ik'AVjI tlti.-]'-[o],V,w!w___*
(PICK UP HANDSET
(REC.MEMO:O0/30 )
[REC.MEMO:20/30
(TAD:01 FAX:O0 )
To play a Memo see the section Playing an Incoming Voice Message ([CM) and Recorded Memo
(see page 11-10).
To erase a Memo see the section Erasing Incoming Voice Messages, Fax Messages, and Recorded
Memo (see page 11-12).
F) PAGING/FAX FORWARDING
What is Paging/Fax Forwarding?
Message Center mode provides the additional option of either Paging o1"Fax Forwarding after
voice and fax messages have been received into the memory.
How paging works (Paging on)
I Incoming voice or fax
The voice or fax is stored in the message
center memory.
Paging function is activated.
The fax will dial the registered pager
telephone number.
Once connected, the fax dials your
registered PIN number,
(Personal ID number).
IYour personal pager is activated. IL
How fax forwarding works (Fax Forward on)
I Inc°ming fax I
The fax is stored in the message center
memory.
Fax forwarding function is activated,
The registered fax forwarding number
is dialed,
Once connected, the machine sends
the fax tone to another fax machine.
The machine sends stored fax from the
memory to the forwarding location,
I
I
I ! !!1! !!1!! !
11-16 g_!l !!!!'!'!! ?! ? ___ • .......... •:=:::::::i: :_ '_.?1_
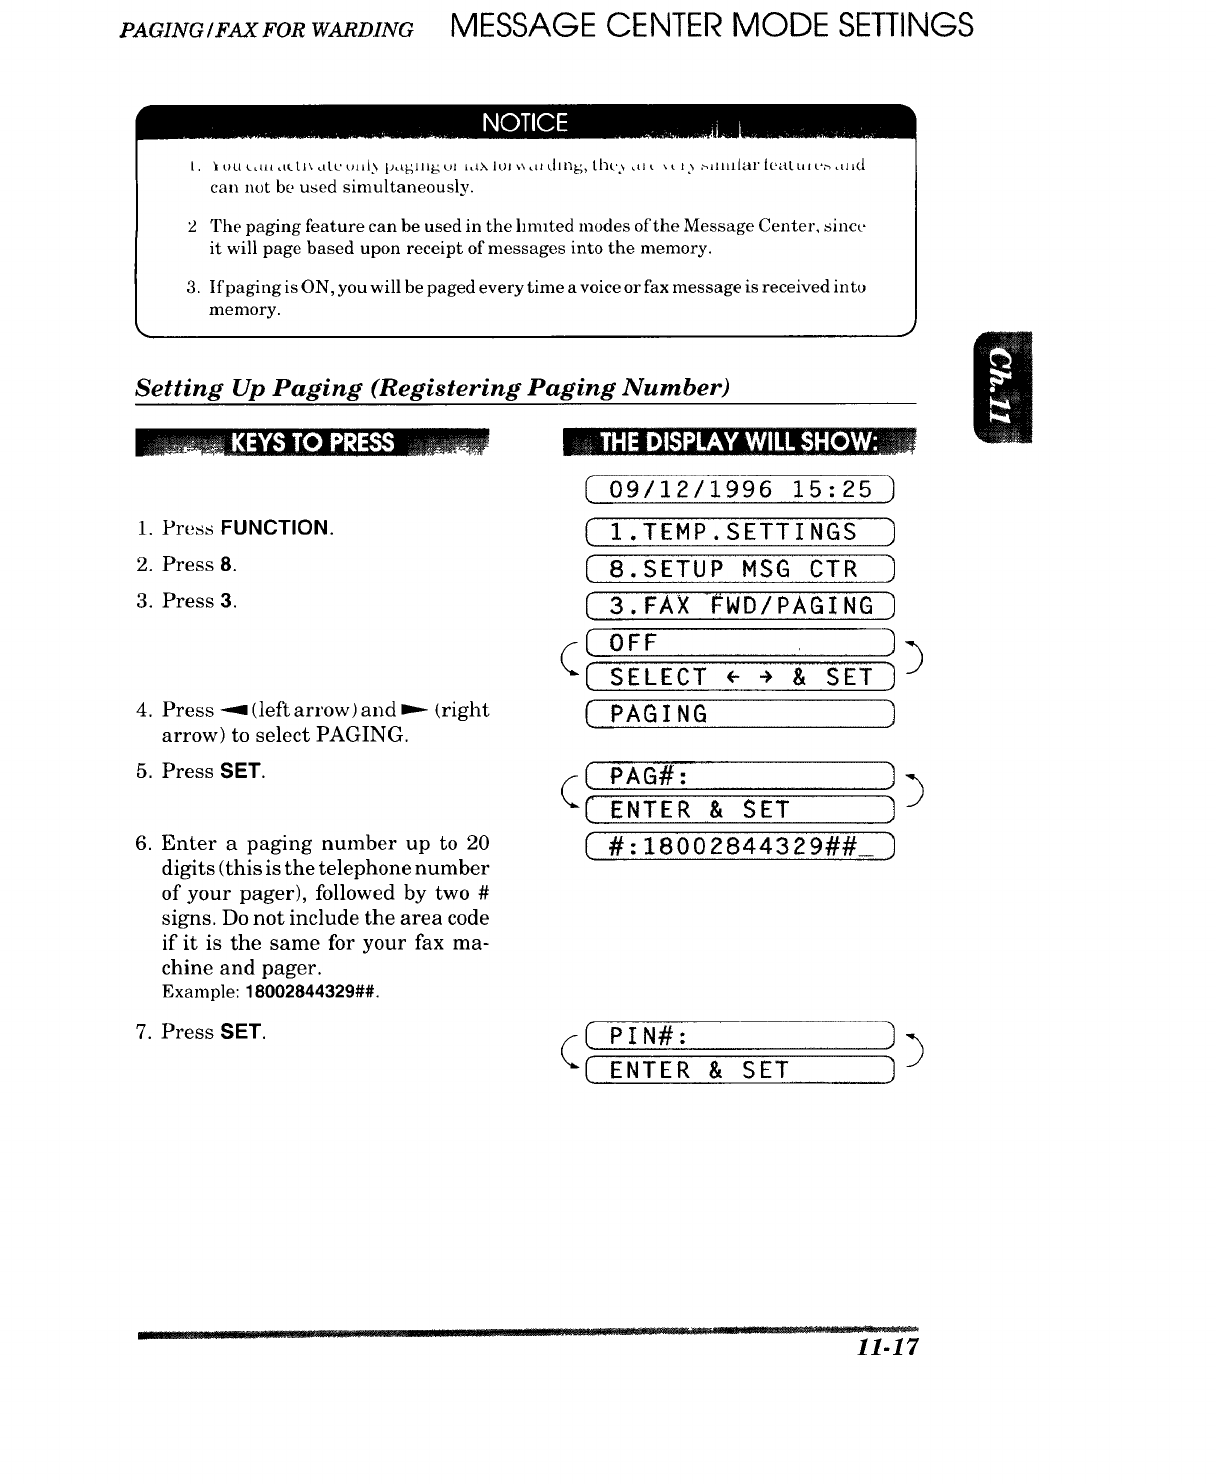
PAGING/FAXFORWARDING MESSAGE CENTER MODE SETTINGS
1. It}LIL_H[dLLI\d[L'tHI[> [)_tBII|_uI ldXItH _,tltiln_,t[]c_ ,tit xt t) .,_lllll[al'|Olt[ult._,tlK_
can not be used simultaneously.
2 The paging feature can be used in the lnmted modes of the Message Center, since
it will page based upon receipt of messages into the memory.
3. If paging is ON, you will be paged every time a voice or fax message is received into
memory.
Setting Up Paging (Registering Paging Number)
1. Press FUNCTION.
2. Press 8.
3. Press 3.
4. Press --_ (left arrow) and _ [right
arrow) to select PAGING.
5. Press SET.
6. Enter a paging number up to 20
digits (this is the telephone number
of your pager), followed by two #
signs. Do not include the area code
if it is the same for your fax ma-
chine and pager.
Example: 18002844329##.
7. Press SET.
•m,_i;]'_ i] F'];jIrA'&YjII!_']-"[-]A'_
(
09/12/1996 15:25 ]
(1.TEMP.SETTINGS )
(" 8.SETUP MSG CTR )
(3.FAX '_WD/PAGING )
CoFF ) )
[ SELECT ÷ ÷ & SET)
(PAGING )
([PAG#: ]
[ENTER & SET ]
( #:18002844329##_ )
F-( PIN#: ) )
x. ENTER & SET
I1-17
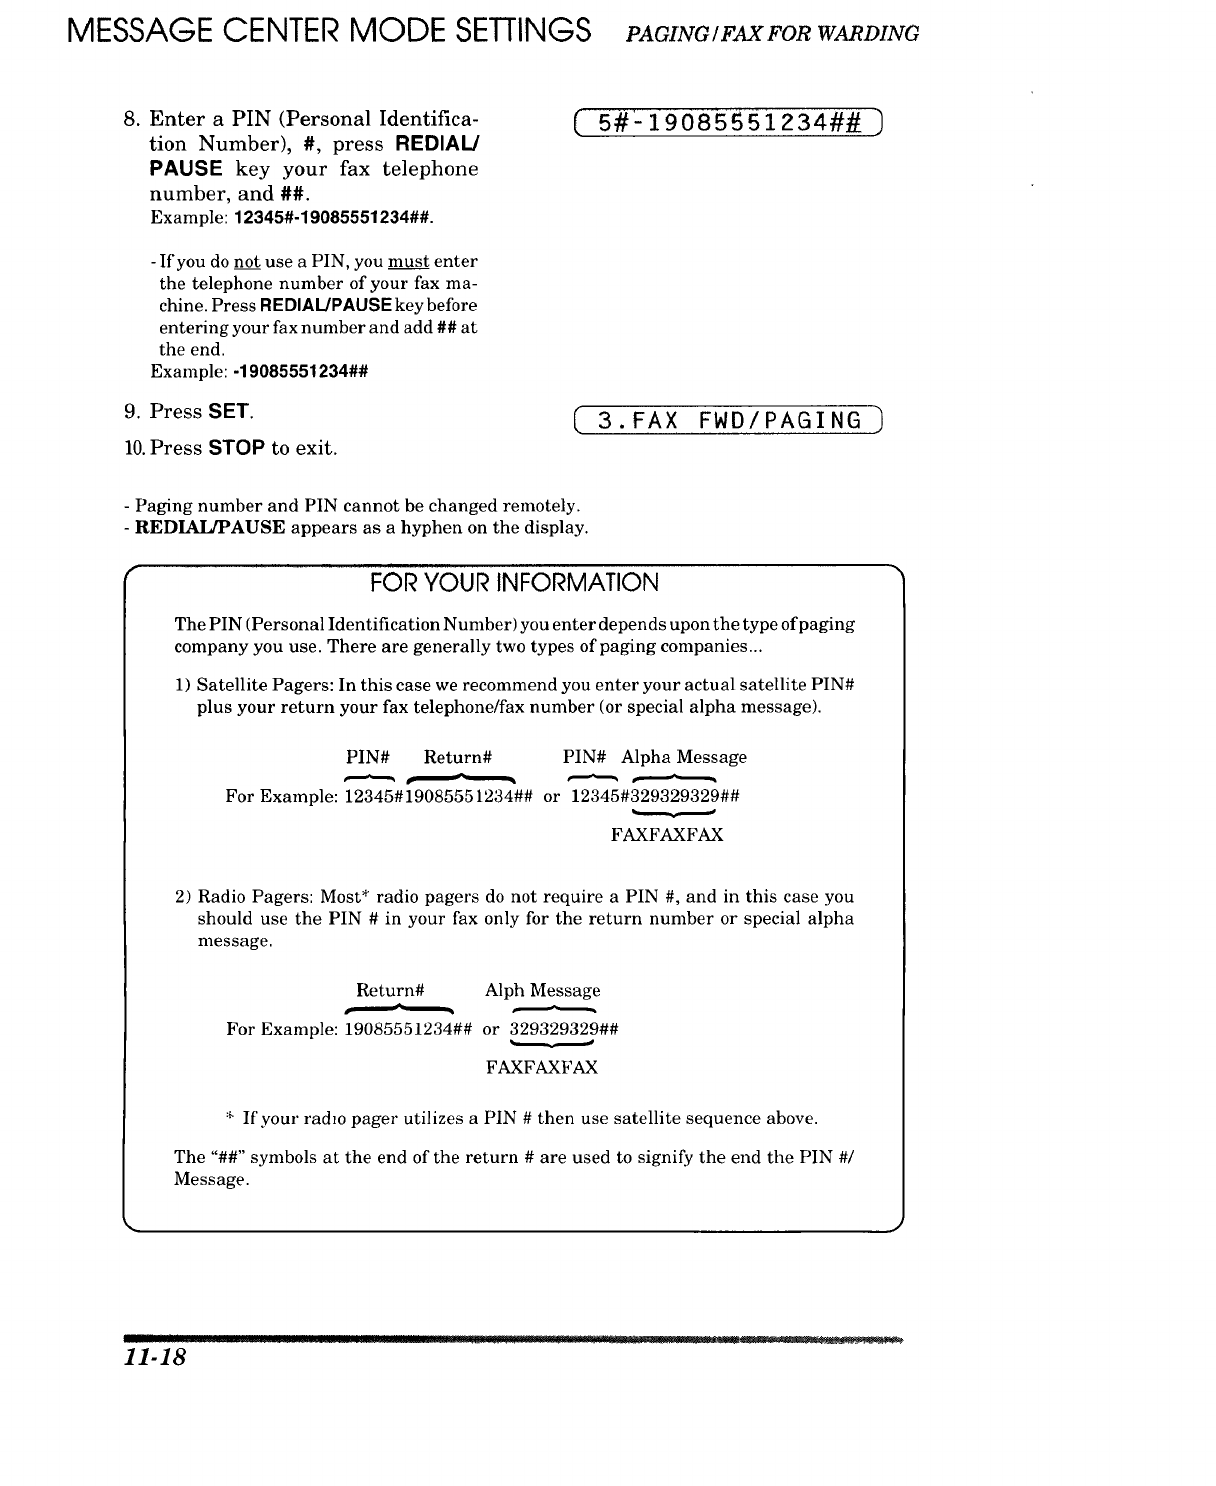
MESSAGE CENTER MODE SETTINGS PAGING/FAXFORWARDING
8. Enter a PIN (Personal Identifica-
tion Number), #, press REDIAL/
PAUSE key your fax telephone
number, and ##.
Example: 12345#-19085551234##.
- If you do not use a PIN, you must enter
the telephone number of your fax ma-
chine. Press REDIAL/PAUSE key before
entering your fax number and add ## at
the end.
Example: -19085551234##
9. Press SET.
10. Press STOP to exit.
[ 5#L19085551234## )
( 3.FAX FWD/PAGING )
- Paging number and PIN cannot be changed remotely.
- REDIAI]PAUSE appears as a hyphen on the display.
FOR YOUR INFORMATION
The PIN (Personal Identification Number) you enter depends upon the type of paging
company you use. There are generally two types of paging companies...
1) Satellite Pagers: In this case we recommend you enter your actual satellite PIN#
plus your return your fax telephone/fax number (or special alpha message).
PIN# Return# PIN# Alpha Message
For Example: 12345#i9085551234"## or 12345#329329329##
T
FAXFAXFAX
2) Radio Pagers: Most* radio pagers do not require a PIN #, and in this case you
should use the PIN # in your fax only for the return number or special alpha
message.
Return# Alph Message
For Example: 19085551234## or 329329329##
• ,,o
T
FAXFAXFAX
*If your radm pager utilizes a PIN # then use satellite sequence above.
The "##" symbols at the end of the return # are used to signify the end the PIN #/
Message.
11-18

REMOTERETRIEVAL MESSAGE CENTER MODE SETTINGS
Setting Up Fax Forwarding (Registering Fax Forwarding Number)
1. Press FUNCTION.
2. Press 8.
3. Press 3.
4. Press --9 (lei_ arrow)and _ (right
arrow) to select FAX FORWARD.
5. Press SET.
6. Enter a fax forwarding number up
to 20 digits.
Example: 18005551234.
7. Press SET.
8. Press STOP to exit.
m II; 1:1D][,:']QV.,,_"dIVAIIIIIq,,']-"[olvi',Umll
( 09/12/1996 15:25 ]
[ I.TEMP.SETTINGS )
(8.SETUPMSGCTR )
( 3.FAX FWD/PAGING )
oFF ))
(" SELECT <'-"_ & SET )
FAX FORWARD )
(( WD#: ) )
( ENTER & SET )
( WD#:18005551234_ ,)
( 3.FAX FWD/PAGING ]
FOR YOUR INFORMATION
Memory Back-up of Message Center Memory
After you plug in the electrical cord, it will take a few days to charge the battery for
memory backup of the Message Center memory. It will keep memory for several
hours at full charge after a power interruption occurs.
• J
Changing the Fax Forwarding Number Remotely
You can change the Fax Forwarding number remotely fi'om any touch tone phone. See page 11-
22 for more information.
G) REMOTE RETRIEVAL
What Is Remote Control Access?
When you leave your home or office and turn on your Message Center to receive voice andJor fax
messages, you can call your machine from any touch tone phone or remote group 3 fax machine
and retrieve those messages. You can also program and control your Message Center with control
codes when you call. (See the Remote Control Commands on page 11-22 for more information
about the settings you can change remotely.)
[ml i
11-19
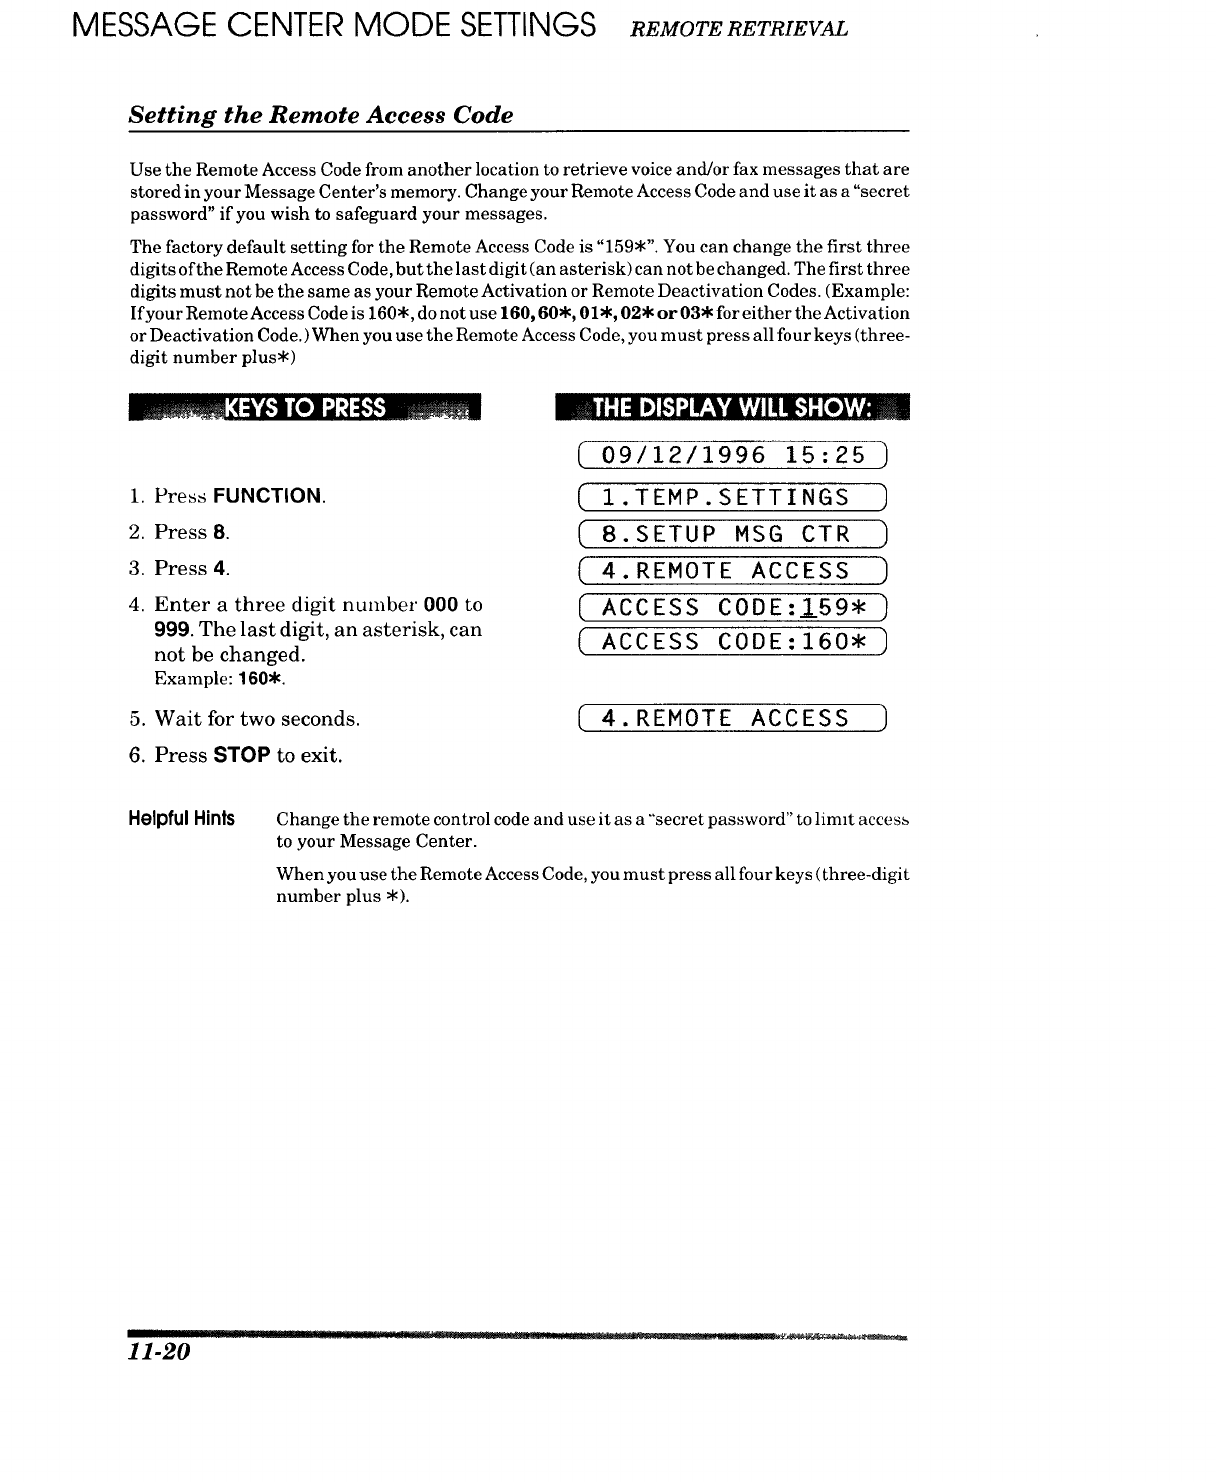
MESSAGE CENTER MODE SETTINGS REMOTERETRIEVAL
Setting the Remote Access Code
Use the Remote Access Code from another location to retrieve voice and/or fax messages that are
stored in your Message Center's memory. Change your Remote Access Code and use it as a "secret
password" if you wish to safeguard your messages.
The factory default setting for the Remote Access Code is "159_<". You can change the first three
digits of the Remote Access Code, but the last digit (an asterisk) can not be changed. The first three
digits must not be the same as your Remote Activation or Remote Deactivation Codes. (Example:
Ifyour Remote Access Code is 160_<, do not use 160, 60>k,01>k, 02* or 03>kfor either the Activation
or Deactivation Code.) When you use the Remote Access Code, you must press all four keys (three-
digit number plush<)
1. Press FUNCTION.
2. Press 8.
3. Press 4.
4. Enter a three digit number 000 to
999. The last digit, an asterisk, can
not be changed.
Example: 160..
5. Wait for two seconds.
6. Press STOP to exit.
m I"1:1D]F']d7;Y&v;_Iqqi,-]"[ely;him
09/12/1996 15:25 )
( I.TEMP.SETTINGS )
8.SETUP MSG CTR )
4.REMOTE ACCESS
ACCESS CODE:159_
(ACCESS CODE:160_
(4. REMOTE ACCESS
Helpful Hints Change the remote control code and use it as a "'secret password" to limit access
to your Message Center.
When you use the Remote Access Code, you must press all four keys (three-digit
number plus _<).
11-20
REMOTERETRIEVAL MESSAGE CENTER MODE SETTINGS
Using the Remote Access Code
1. Pick up the handset of a remote touch tone phone or fax machine.
2. Dial your fax machine's number.
3. When your fax machine answers with a beep, immediately press your Remote
Access Code (159$).
If your fax machine is in MANUAL mode, you can access the Message Center by waiting for
20 rings and then pressing the code within 30 seconds.
4. The fax machine will tell you the kind of message(s) it has received:
One long beep:
Two long beeps:
Three long beeps:
(No long beeps:
Received FAX message(s).
Received TAD message(s).
Received both FAX and TAD messages.
No message(s) have been received.)
5. As soon as you hear two (2) short beeps, press a Control Command.
Each time your fax machine completes an instruction, it gives two (2) short beeps telling you
to enter the next command; if you wait longer than 30 seconds to enter the command, your
machine will disconnect the line. If you perform a wrong operation, yon will hear three (3) short
beeps.
6. When you are ready to exit remote control mode, press 90 to reset your machine.
11-21
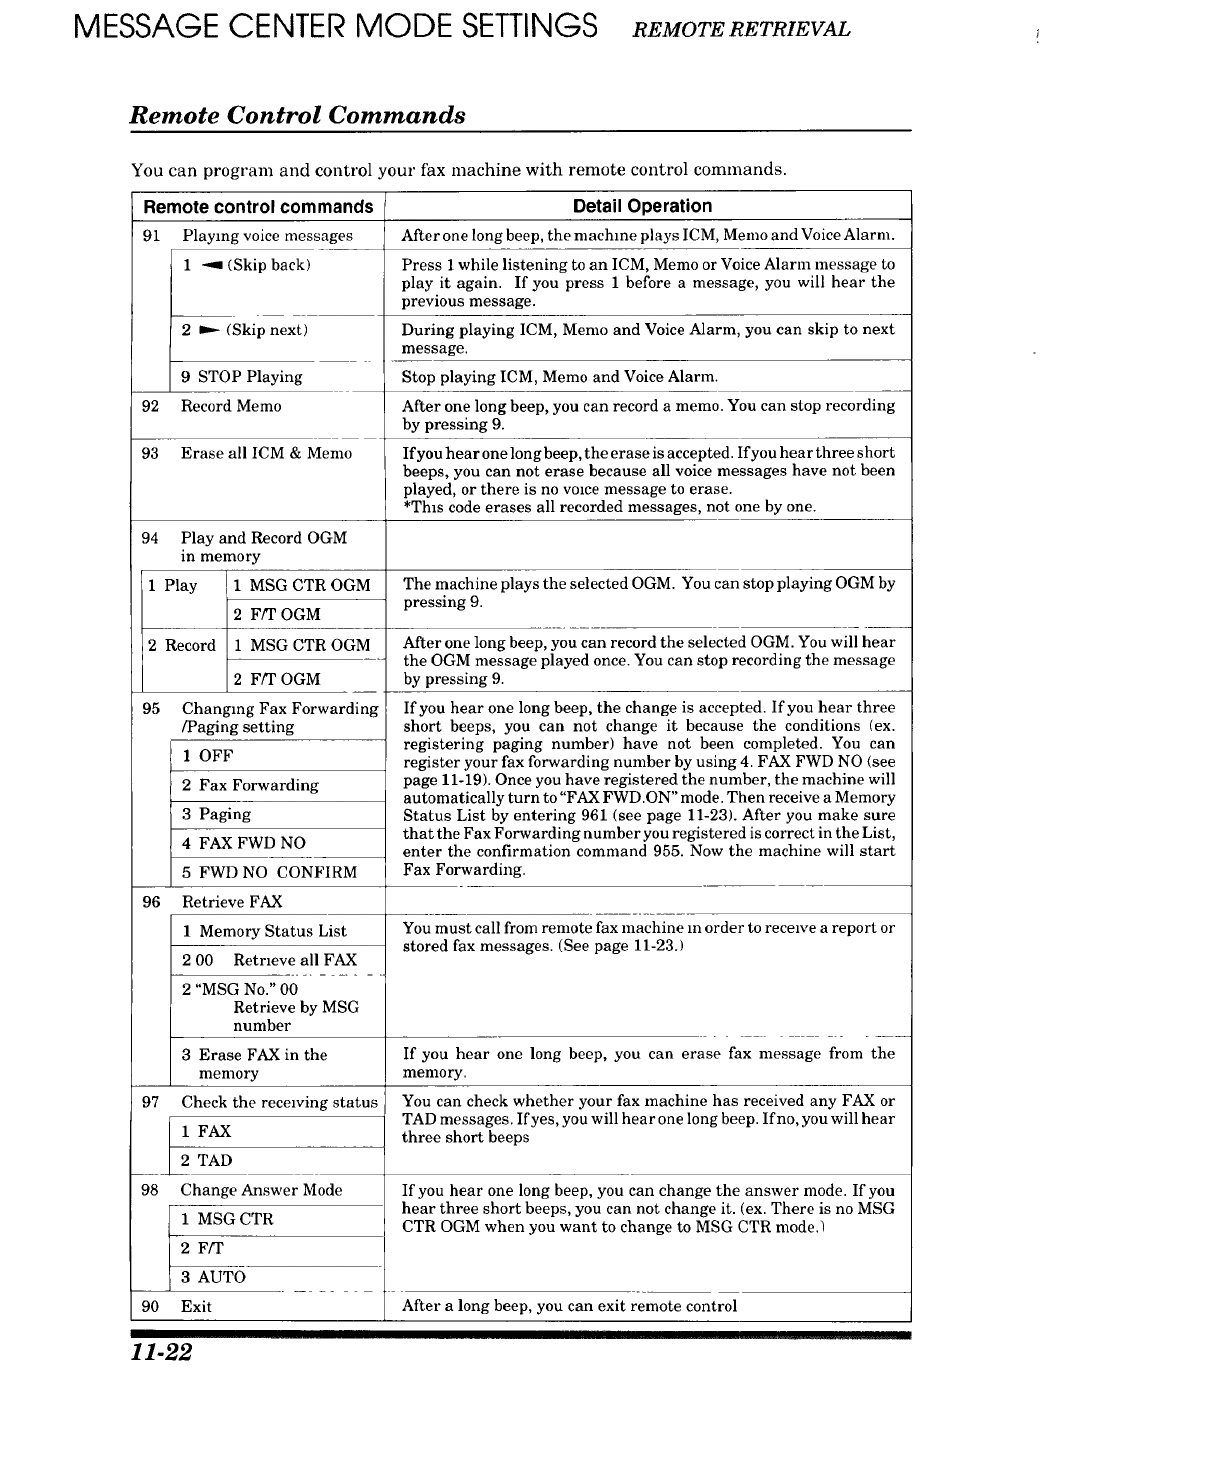
MESSAGE CENTER MODE SETTINGS REMOTERETRIEVAL
Remote Control Commands
You can program and control tour fax machine with remote control commands.
Remote control commands
91 Playmgvoice messages
92
93
1 _ (Skip back)
2 P'_ (Skip next)
9 STOP Playing
Record Memo
Erase all ICM & Memo
94 Play and Record OGM
in memory
1 Play I 1 MSG CTR OGM
2 F/T OGM
2 Record 1 MSG CTROGM
2 Fff OGM
95 Changmg Fax Forwarding
/Paging setting
1 OFF
2 Fax Forwarding
3 Paging
4 FAX FWD NO
5 FWD NO CONFIRM
96 Retrieve FAX
1 Memory Status List
2 00 Retrmve all FAX
2 "MSG No." 00
Retrieve by MSG
number
3 Erase FAX in the
memory
97 Check the receiving status
1 FAX
2 TAD
98 Change Answer Mode
1 MSG CTR
2 F/T
3 AUTO
90 Exit
Detail Operation
After one long beep, the machine plays ICM, Memo and Voice Alarm.
Press 1 while listening to an ICM, Memo or Voice Alarm message to
play it again. If you press 1 before a message, you will hear the
previous message.
During playing ICM, Memo and Voice Alarm, you can skip to next
message.
Stop playing ICM, Memo and Voice Alarm.
After one long beep, you can record a memo. You can stop recording
by pressing 9.
If you hear one long beep, the erase is accepted. If you hear three short
beeps, you can not erase because all voice messages have not been
played, or there is no vome message to erase.
*This code erases all recorded messages, not one by one.
The machine plays the selected OGM. You can stop playing OGM by
pressing 9.
After one long beep, you can record the selected OGM. You will hear
the OGM message played once. You can stop recording the message
by pressing 9.
If you hear one long beep, the change is accepted. If you hear three
short beeps, you can not change it because the conditions (ex.
registering paging number) have not been completed. You can
register your fax forwarding number by using 4. FAX FWD NO (see
page 11-19). Once you have registered the number, the machine will
automatically turn to "FAX FWD.ON" mode. Then receive a Memory
Status List by entering 961 (see page 11-23). After you make sure
that the Fax Forwarding number you registered is correct in the List,
enter the confirmation command 955. Now the machine will start
Fax Forwarding.
You must call from remote fax machine m order to receive a report or
stored fax messages. (See page 11-23.)
If you hear one long beep, you can erase fax message from the
menmry.
You can check whether your fax machine has received any FAX or
TAD messages. If yes, you will hear one long beep. if no, you will hear
three short beeps
If you hear one long beep, you can change the answer mode. If you
hear three short beeps, you can not change it. (ex. There is no MSG
CTR OGM when you want to change to MSG CTR mode.)
After a long beep, you can exit remote control
11-22
REMOTERETRIEVAL MESSAGE CENTER MODE SEI-rlNGS
Retrieving the Memory Status List and Fax Messages Remotely
From a remote fax machine, you can retrieve your Memory Status List to see if you have any
stored fax messages in the memory. Then you can retrieve all or only specified fax messages that
are on the list.
1. Pick up the handset of a remote touch tone fax machine.
2. Dial your fax machine's number.
3. When your fax machine answers with a beep, immediately press your Remote
Access Code (159*).
4. As soon as you hear two (2) short beeps, press 961.
5. When you hear your fax machine through the handset responding with a fax
tone, press START and hold the handset if you want to retrieve fax messages also.
(If you wish to retrieve only the Memory Status List, re__placethe handset.)
6. You remote fax machine will print the Memory Status List. (See page 12-5.)
7. Look at the Memory Status List to see if there are any fax messages you want to
retrieve.
8. Press 96 2 as soon as you hear two (2) short beeps.
After 96 2, enter the two-digit message numbers from the Memory Status List
(ex. 01 ) and end by pressing 00.
ex.) To receive NO.1 and NO.2 messages, press 96 201 02 00.
If you want to retrieve all messages, simply press 00.
ex.) To retrieve all fax messages, press 96 2 00.
9. When you hear your fax machine through the handset responding with afax
tone, press START.
10.Replace the handset.
ll.Your remote fax machine will print the fax messages.
Changing the Fax Forwarding Number Remotely
1. Pick up the handset of a remote fax machine.
2. Dial your fax machine's number.
3. When your fax machine answers with a beep, immediately press your Remote
Access Code (159*).
4. As soon as you hear two (2) short beeps, press 954.
5. Enter your new Fax Forwarding number using the number keys (up to 20 digits).
You can not register *and # as dial numbers. Use * to create a pause between
the dial numbers.
6. Press # after entering the new number.
7. As soon as you hear the next two (2) short beeps, press 961.
8. When you hear your fax machine through the handset responding with a fax
tone, press START and hold the handset.
9. Your remote fax machine will print the Memory Status List. Look at the list to
make sure the new Fax Forwarding number you registered is correct.
10.If the new number is correct, wait for the next two (2) short beeps, and press 955.
(If the new number is incorrect, press 954 and reenter the number beginning at
Step 5.)
ll.Replace the handset. Your new Fax Forwarding number is activated.
• r]r
11-23
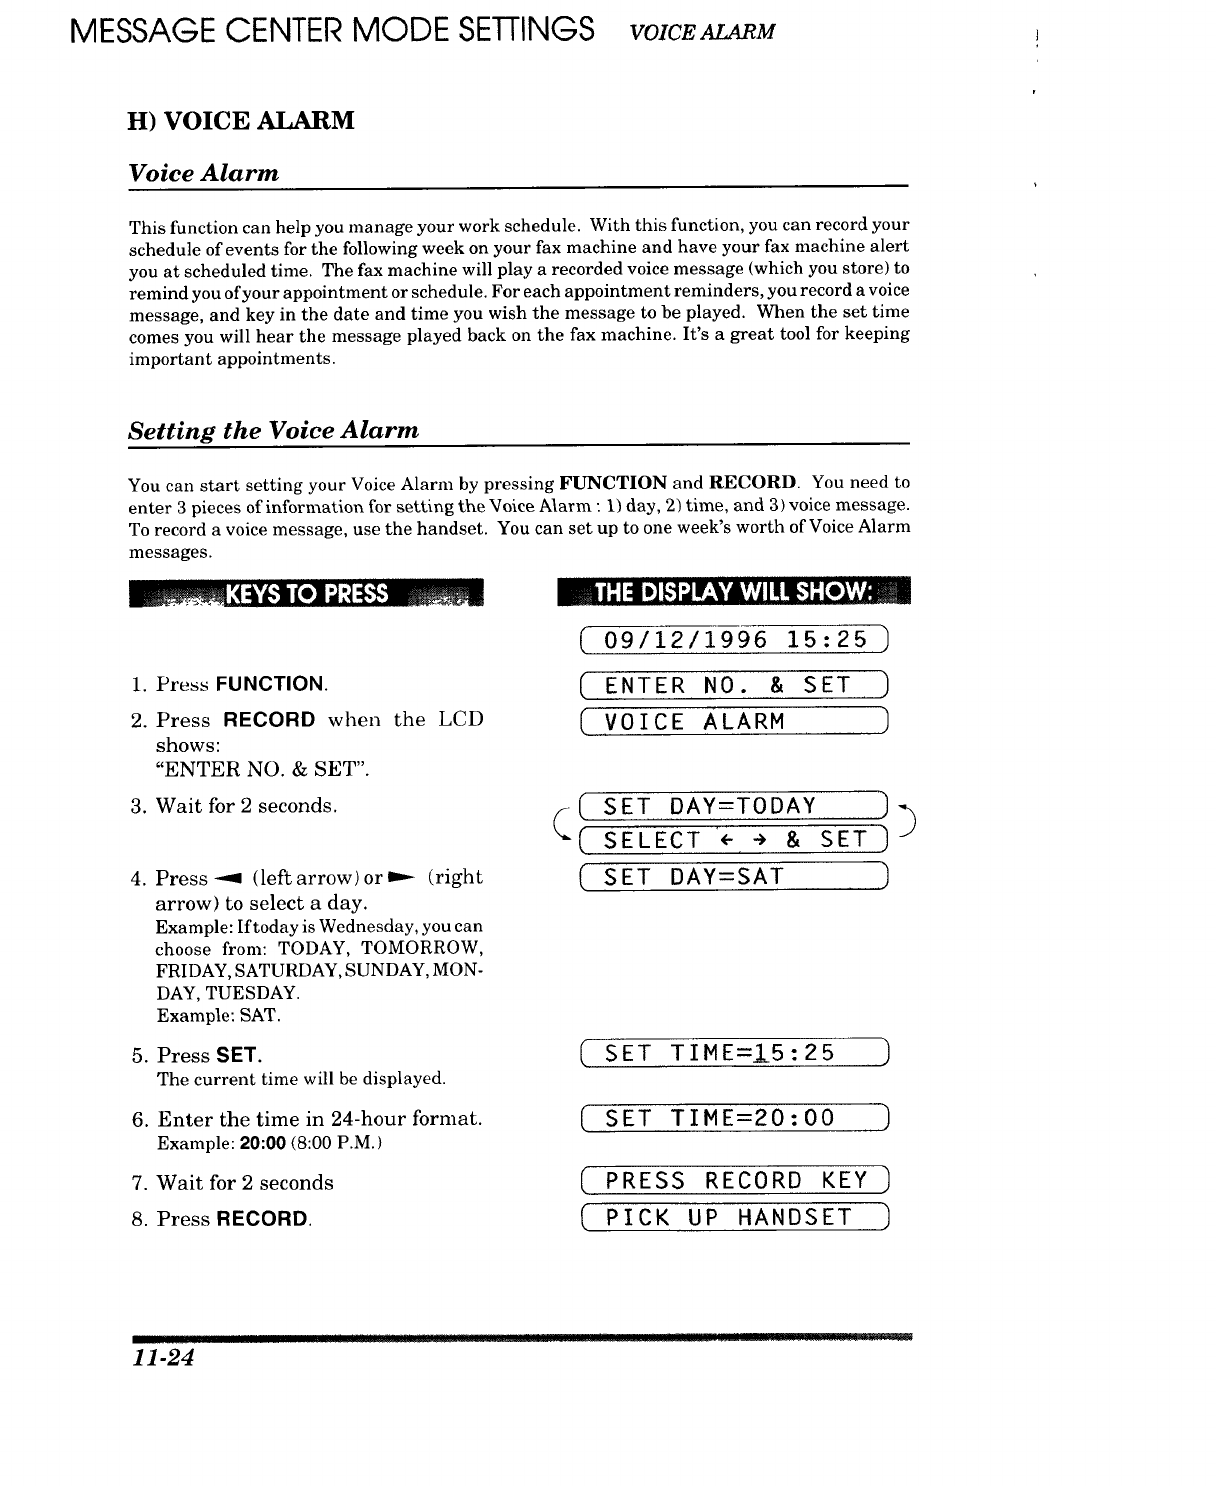
MESSAGE CENTER MODE SETTINGS VOZCE, M
H) VOICE _M
Voice Alarm
This function can help you manage your work schedule. With this function, you can record your
schedule of events for the following week on your fax machine and have your fax machine alert
you at scheduled time. The fax machine will play a recorded voice message (which you store) to
remind you of your appointment or schedule. For each appointment reminders, you record a voice
message, and key in the date and time you wish the message to be played. When the set time
comes you will hear the message played back on the fax machine. It's a great tool for keeping
important appointments.
Setting the Voice Alarm
You can start setting your Voice Alarm by pressing FUNCTION and RECORD. You need to
enter 3 pieces of information for setting the Voice Alarm : 1) day, 2) time, and 3) voice message.
To record a voice message, use the handset. You can set up to one week's worth of Voice Alarm
messages.
, IIII m I' 1:11_ [,1_llr;_'&Vj III11,1"[olV,l,mm
(09/12/1996 15:25
1. Press FUNCTION.
2. Press RECORD when
shows:
"ENTER NO. & SET".
3. Wait for 2 seconds.
the LCD
.
.
Press --_ (left arrow) or _ (right
arrow) to select a day.
Example: If today is Wednesday, you can
choose from: TODAY, TOMORROW,
FRIDAY, SATURDAY, SUNDAY, MON-
DAY, TUESDAY.
Example: SAT.
Press SET.
The current time will be displayed.
(ENTER NO. & SET )
[VOlCEALARM
((L
(
SET DAY=TODAY
SELECT ÷ ÷& SET
SET DAY=SAT
SET TIME=f5:25 )
]
6. Enter the time in 24-hour format.
Example: 20:00 (8:00 P.M.)
7. Wait for 2 seconds
8. Press RECORD.
(SET TIME=20:O0 )
( PRESS RECORD KEY )
(PICK UP HANDSET )
III1! ...,i,,, .... !11!! !!! ! !1 !
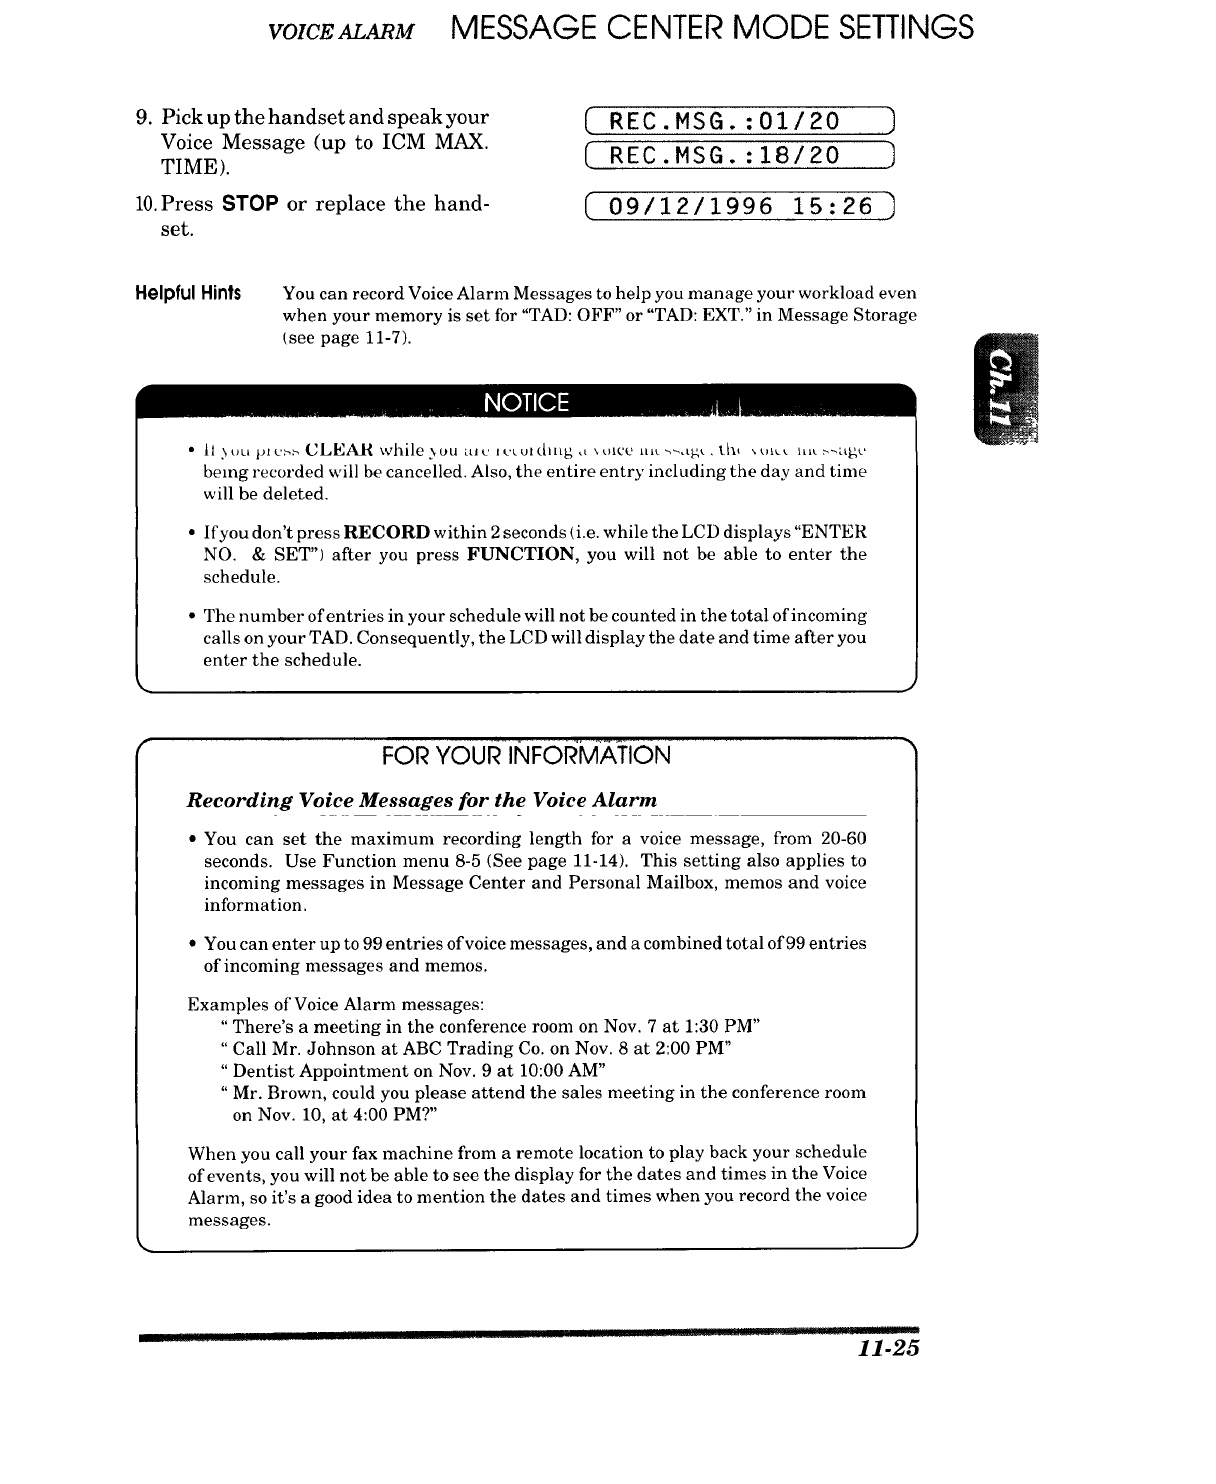
VOICE M MESSAGE CENTER MODE SETTINGS
9. Pick up the handset and speak your
Voice Message (up to ICM MAX.
TIME).
10.Press STOP or replace the hand-
set.
( REC.MSG. :01/20 )
C REC.MSG. :18/20 )
( 09/12/1996 15:26 )
Helpful Hints You can record Voice Alarm Messages to help you manage your workload even
when your memory is set for "TAD: OFF" or "TAD: EXT." in Message Storage
[see page 11-7).
[_o]l[o]:
being recorded will be cancelled. Also, the entire entry including the day and time
will be deleted.
If you don't press RECORD within 2 seconds d.c. while the LCD displays "ENTER
NO. & SET") after you press FUNCTION, you will not be able to enter the
schedule.
The number of entries in your schedule will not be counted in the total of incoming
calls on your TAD. Consequently, the LCD will display the date and time after you
enter the schedule.
FOR YOURINFOI_MA,iiON
Recording Voice Messages for the Voice Alarm
•You can set the maximum recording length for a voice message, from 20-60
seconds. Use Function menu 8-5 (See page 11-14). This setting also applies to
incoming messages in Message Center and Personal Mailbox, memos and voice
information.
• You can enter up to 99 entries of voice messages, and a combined total of 99 entries
of incoming messages and memos.
Examples of Voice Alarm messages:
"There's a meeting in the conference room on Nov. 7 at 1:30 PM"
" Call Mr. Johnson at ABC Trading Co. on Nov. 8 at 2:00 PM"
" Dentist Appointment on Nov. 9 at 10:00 AM"
" Mr. Brown, could you please attend the sales meeting in the conference room
on Nov. 10, at 4:00 PM?"
When you call your fax machine from a remote location to play back your schedule
of events, you will not be able to see the display for the dates and times in the Voice
Alarm, so it's a good idea to mention the dates and times when you record the voice
messages.
___ ....... ]IIIgl! rigW ..... L!tJIL ....... i ___]r. 11-25
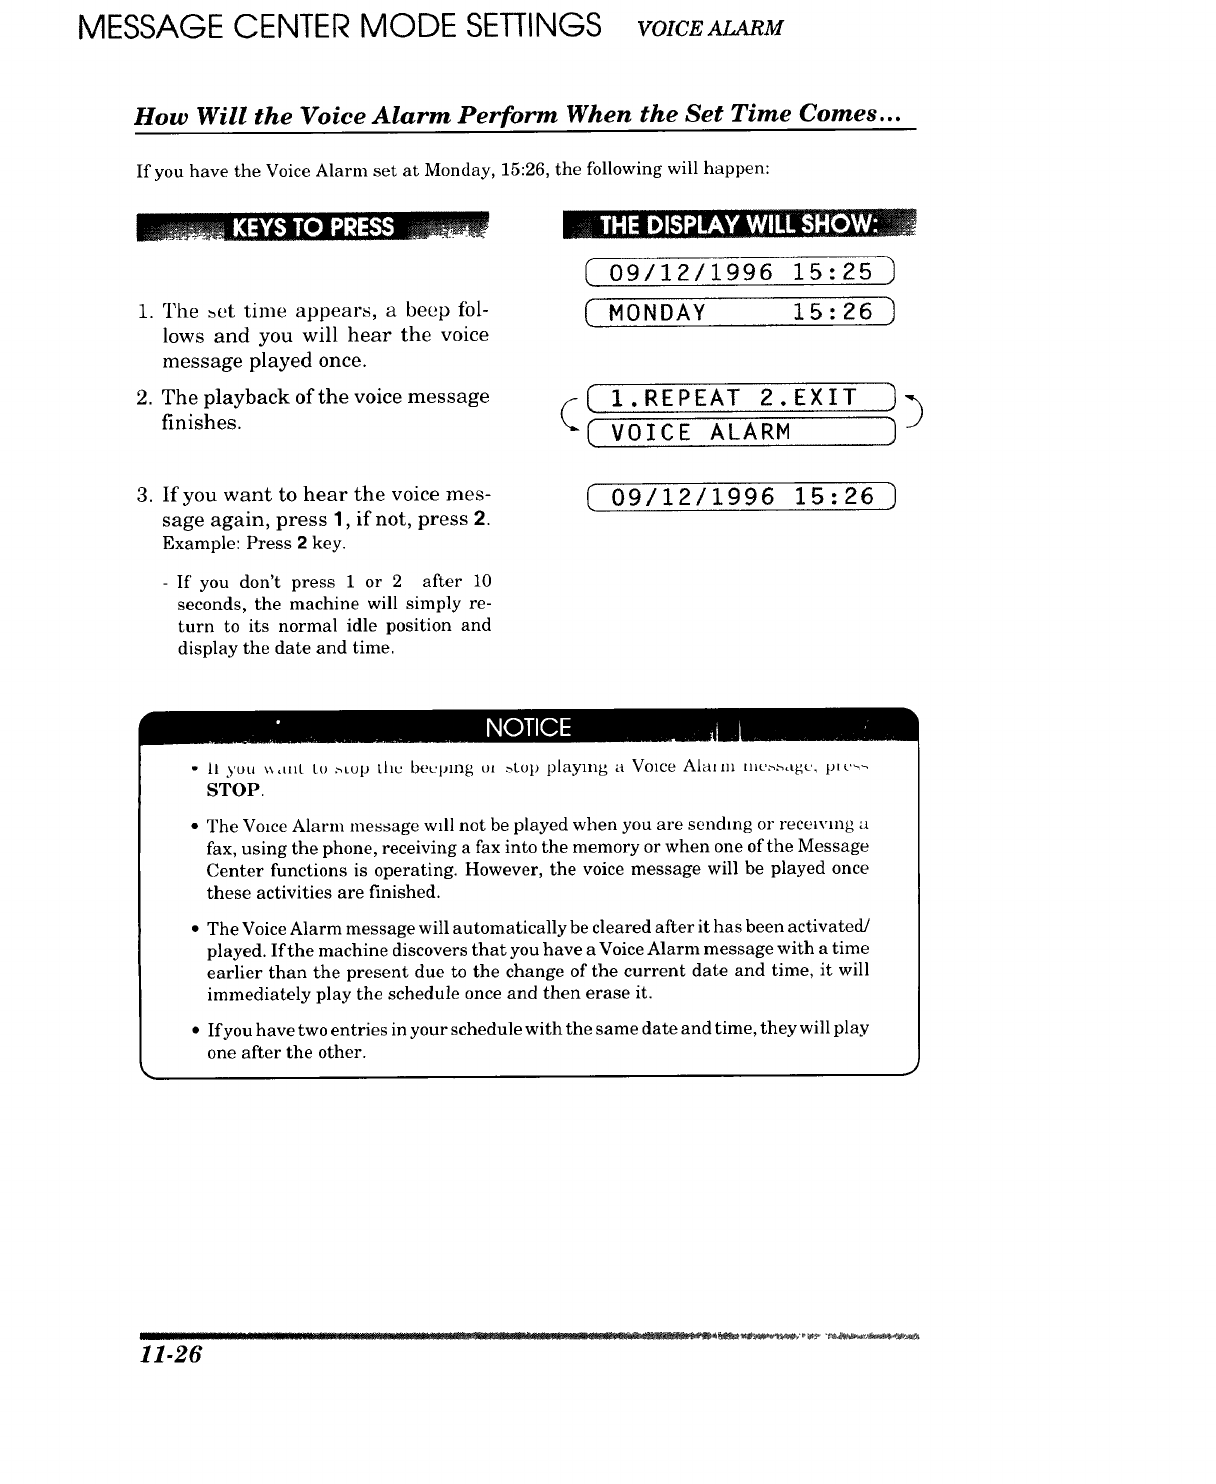
MESSAGE CENTER MODE SETTINGS VOICEALARM
How Will the Voice Alarm Perform When the Set Time Comes...
If you have the Voice Alarm set at Monday, 15:26, the following will happen:
1. The _ct time appears, a beep fbl-
lows and you will hear the voice
message played once.
2. The playback of the voice message
finishes.
mn i" I :i Plb-i_ Ir_,¥A,,_j]I!I_i: [*_,,v_
__09/12/1996 15:25 ]
(MONDAY 15:26 ]
(( 1.REPEAT 2.EXIT _
( voice ARM
3. If you want to hear the voice mes-
sage again, press 1, if not, press 2.
Example: Press 2 key.
- If you don't press 1 or 2 after 10
seconds, the machine will simply re-
turn to its normal idle position and
display the date and time.
(09/12/1996 15:26 )
I_o_l[_l -..j
11 you _x,mt to _top l.hc beL, pmg m .-,Lop playing a Voice Ala[m lllL'_Sdg_', pl("_
STOP.
2'he Voice Alarm message will not be played when you are sending or recen*mg a
fax, using the phone, receiving a fax into the memory or when one of the Message
Center functions is operating. However, the voice message will be played once
these activities are finished.
The Voice Alarm message will automatically be cleared after it has been activated/
played. If the machine discovers that you have a Voice Alarm message with a time
earlier than the present due to the change of the current date and time, it will
immediately play the schedule once and then erase it.
If you have two entries in your schedule with the same date and time, they will play
one after the other.
..... "...............................212............_._._..:_ "" _2.2 ..___,_I;:L ". _'_4_ "__
11-26
VOICEALARM MESSAGE CENTER MODE SETTINGS
Using the Voice Alarm: Playing Entries, Erasing Entries One by
One, Erasing All at Once
Once you press FUNCTION, be ready to press PLAY, or ERASE imme&ately, depending upon
whether you want to play an entry or erase everything. For instructions on how to play and how
to erase, refer to the instructions in the ICM, Memo section. (See page 11-10, 11-12.) When you
play an entry, the display will show you the date and time of your scheduled entries. You can
delete entries one by one, the same way you would do so for incoming messages or memos: press
ERASE while playing an entry.
11you don t pl (..,> I*LA_ or ]:,RASE wltlun 2 >ccund._ tl.c. _ lille the Lt_ Ddl_pl,_ 3 >
"ENTER NO. & SET") after you press FUNCTION, you will not be able to play
back or delete entries.
If you don't press FUNCTION, and just press PLAY, you will only be able to hear
incoming messages and memos. You won't be able to hear the Voice Alarm
messages.
If you don't press FUNCTION, and just press ERASE, you will only be able to
delete incoming messages and memos. Voice Alarm messages will not be deleted.
Remote Control of the Voice Alarm
When you are o11 the road, you can call your fax machine and play back your Voice Alarm
messages. (See Page 11-22.)
m
• _oU c_tn[tot >eL the Voice Ald_m b 3 tt,ntott, cuiitl'ol.
• Also, note that you will only be able to hear the recorded Vmce Alal., J,_('._.tb;l 'l ou
will not be able to see the dates and times of the schedule on the display, so it's a
good idea to record important dates and times as part of your Voice Alarm
messages when you first record them.
11-27
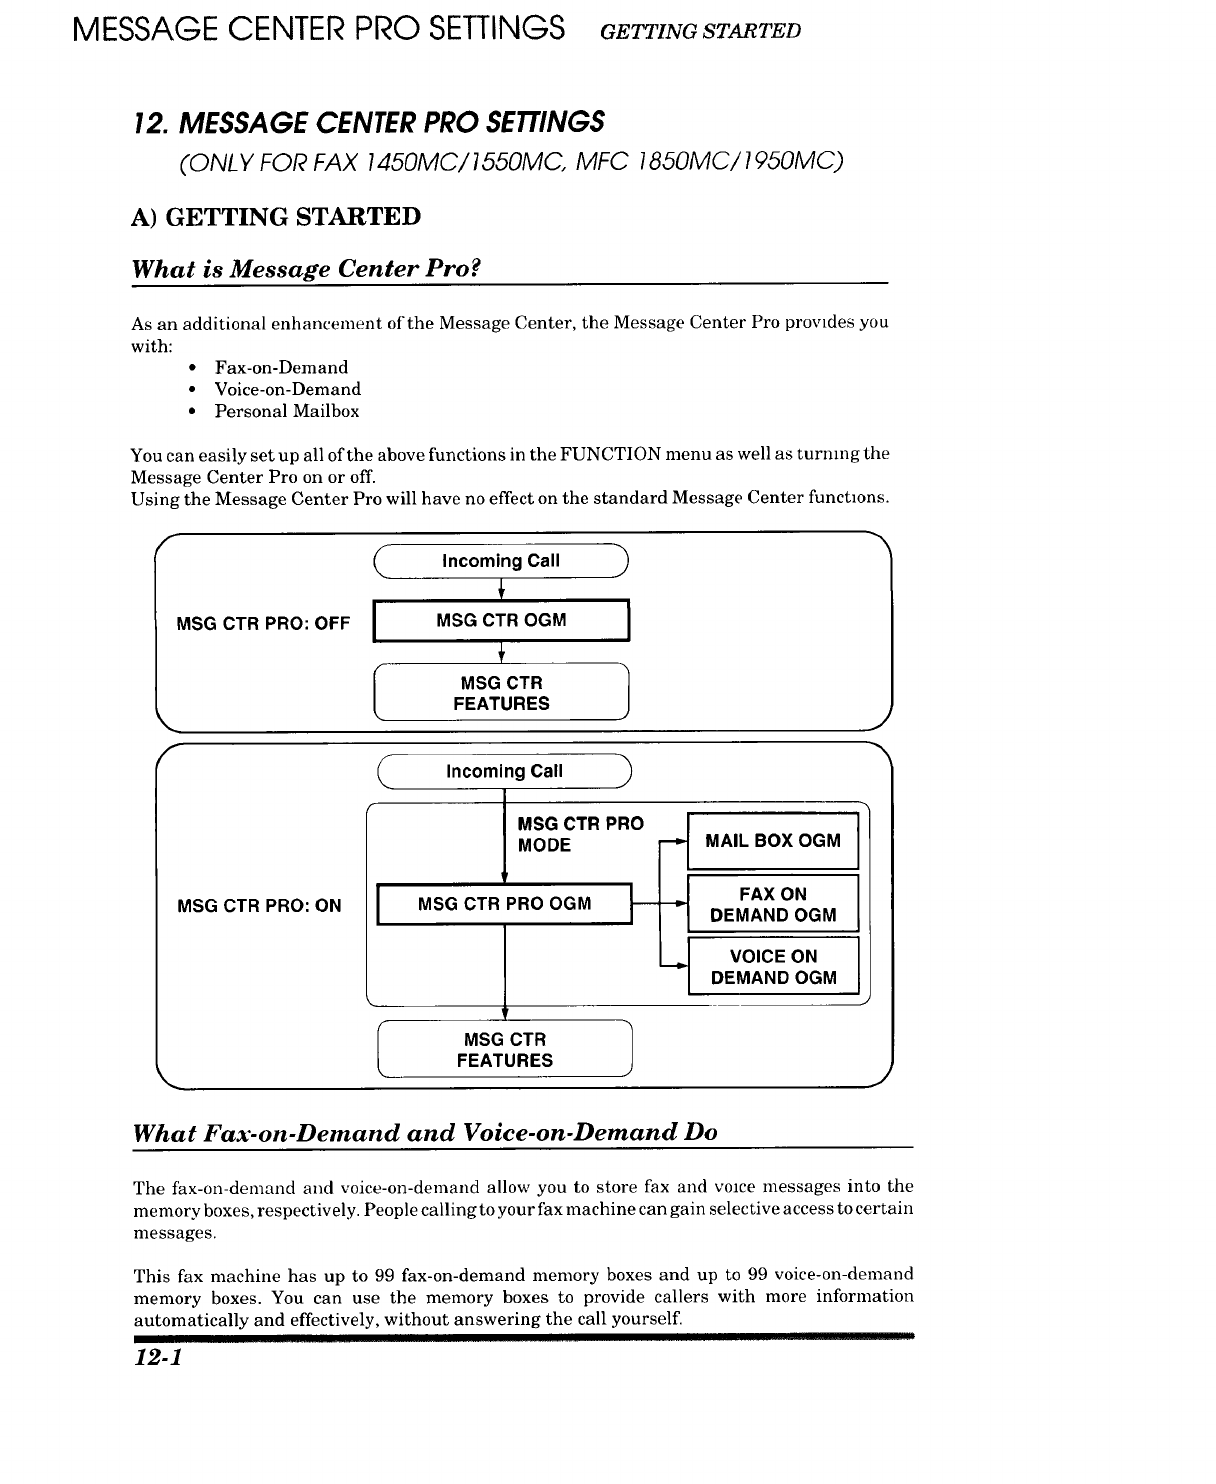
MESSAGE CENTER PRO SETTINGS GETTINGSTARTED
12. MESSAGE CENTER PRO SETTINGS
(ONL Y FOR FAX 1450MC/1550MC, MFC 1850MC/1950MC)
A) GETTING STARTED
What is Message Center Pro?
As an additional enhancement of the Message Center, the Message Center Pro provides you
with:
• Fax-on-Demand
• Voice-on-Demand
• Personal Mailbox
You can easily set up all of the above functions in the FUNCTION menu as well as turmng the
Message Center Pro on or off.
Using the Message Center Pro will have no effect on the standard Message Center functmns.
F
MSG CTR PRO: OFF
(Incoming Call )
MSG CTR OGM I
I
I
÷
MSG CTR 1
FEATURES
F
MSG CTR PRO: ON
(Incoming Call )
J MODE
MSG CTR PRO OGM
MSG CTR PRO [__ MAIL BOX OGM
FAX ON
DEMAND OGM
VOICE ON
DEMAND OGM
MSG CTR
FEATURES
J
J
What Fax-on-Demand and Voice-on-Demand Do
The fax-on-demand and voice-on-demand allow you to store fax and voace messages into the
memory boxes, respectively. People calling to your fax machine can gain selective access to certain
messages.
This fax machine has up to 99 fax-on-demand memory boxes and up to 99 voice-on-demand
memory boxes. You can use the memory boxes to provide callers with more information
automatically and effectively, without answering the call yourself.
12-1
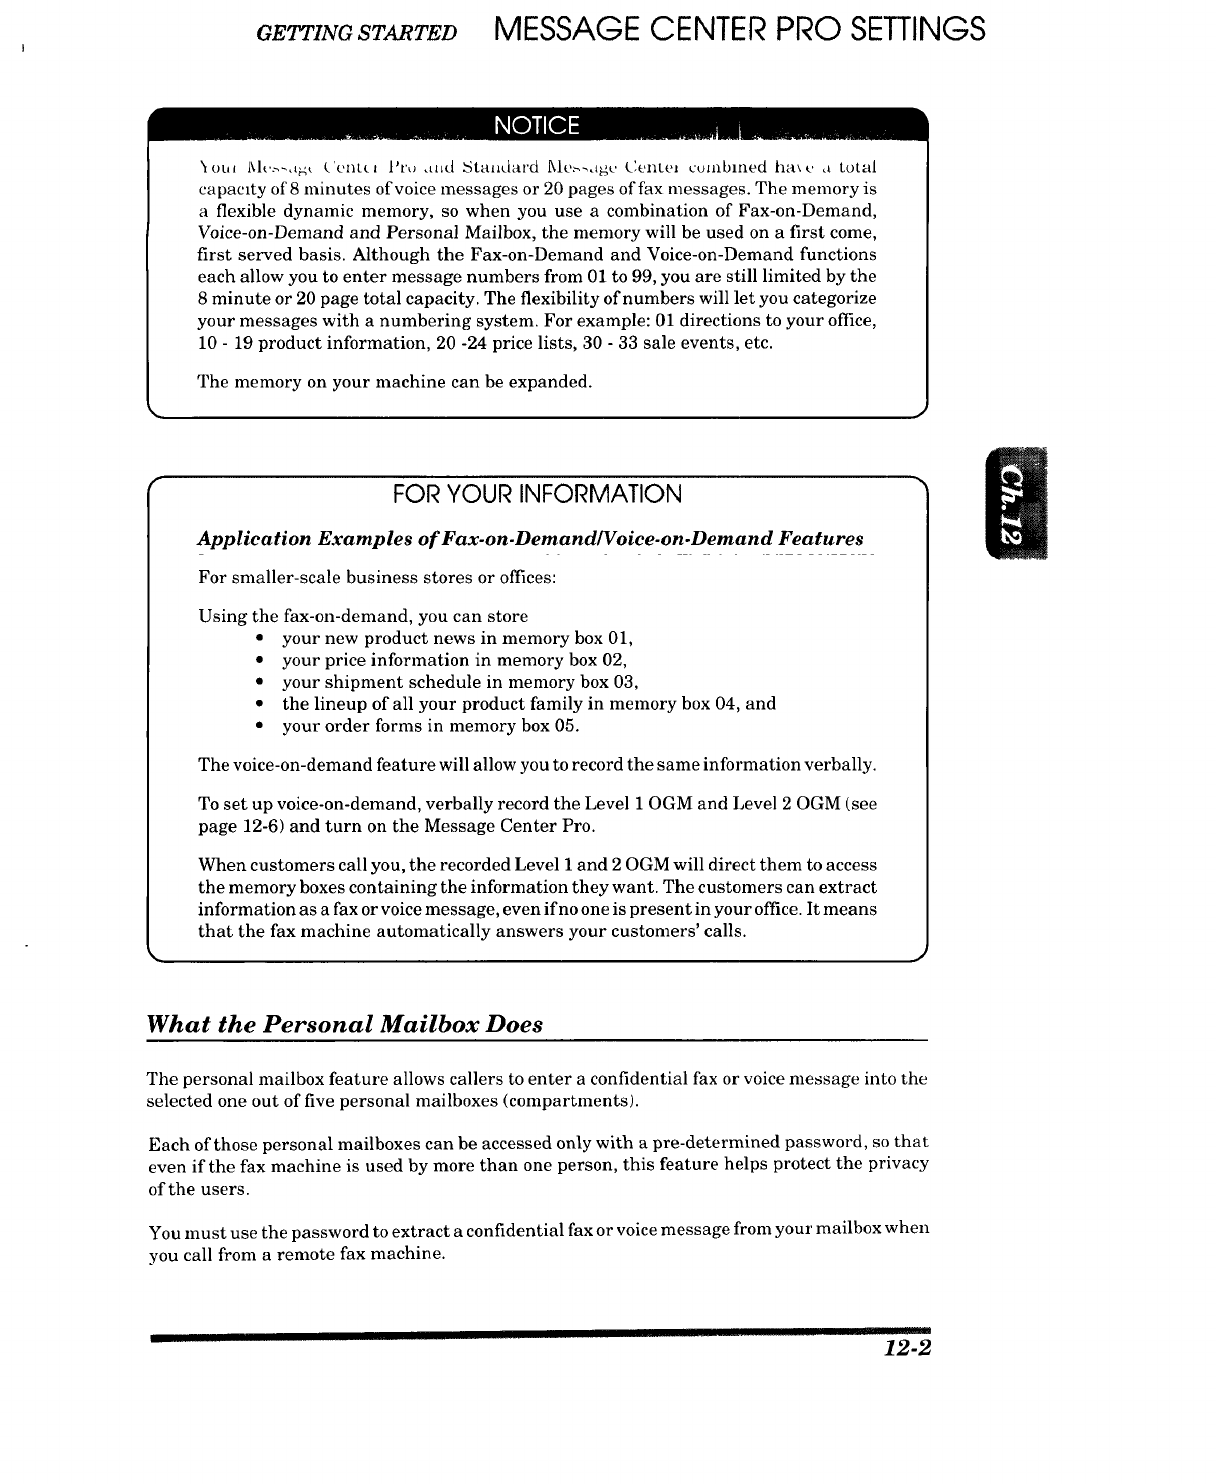
GETTINGSTARTED MESSAGE CENTER PRO SETTINGS
l[o]j[o] .j
"_ot. l\l_.._.,t_t ('cnttt l'ru .._d Standard l_lc._._g(. Centei combined ha_e atotal
capacity of 8 minutes of voice messages or 20 pages of fax messages. The memory is
a flexible dynamic memory, so when you use a combination of Fax-on-Demand,
Voice-on-Denmnd and Personal Mailbox, the memory will be used on a first come,
first served basis. Although the Fax-on-Demand and Voice-on-Demand functions
each allow you to enter message numbers from 01 to 99, you are still limited by the
8 minute or 20 page total capacity. The flexibility of numbers will let you categorize
your messages with a numbering system. For example: 01 directions to your office,
10 - 19 product information, 20 -24 price lists, 30 - 33 sale events, etc.
The memory on your machine can be expanded.
FOR YOUR INFORMATION
Application Examples of Fax-on-Demand/Voice-on.Demand Features
For smaller-scale business stores or offices:
Using the fax-on-demand, you can store
• your new product news in memory box 01,
• your price information in memory box 02,
• your shipment schedule in menmry box 03,
• the lineup of all your product family in memory box 04, and
• your order forms in memory box 05.
The voice-on-demand feature will allow you to record the same information verbally.
To set up voice-on-demand, verbally record the Level 10GM and Level 20GM (see
page 12-6) and turn on the Message Center Pro.
When customers call you, the recorded Level I and 20GM will direct them to access
the memory boxes containing the information they want. The customers can extract
information as a fax or voice message, even if no one is present in your office. It means
that the fax machine autonmtically answers your customers' calls.
What the Personal Mailbox Does
The personal mailbox feature allows callers to enter a confidential fax or voice message into the
selected one out of five personal mailboxes (compartments).
Each of those personal mailboxes can be accessed only with a pre-determined password, so that
even if the fax machine is used by more than one person, this feature helps protect the privacy
of the users.
You must use the password to extract a confidential fax or voice message from your mailbox when
you call from a remote fax machine.
-12-2
MESSAGE CENTER PRO SETTINGS GETTINGSTARTED
FOR YOUR INFORMATION
Application Examples of Personal Mailbox
For smaller-scale business stores or offices:
In abusiness office where sales persons work out of the office, assign personal
mailbox 01 to Mr. A, 02 to Mrs. B, 03 to Ms. C, ... Customers with orders or inquiries
can gain direct access to the appropriate person for a quicker response.
For residential users:
At home, assign personal mailbox 01 to Father, 02 to Mother, 03 to Sis, 04 to Junior,
.... That way, all family member's messages will be organized in a group for each
person, for quick and easy retrieval.
NOTE: The password for a personal mailbox can be easily registered, changed or
checked on the display through function menu 9-3.
12-3
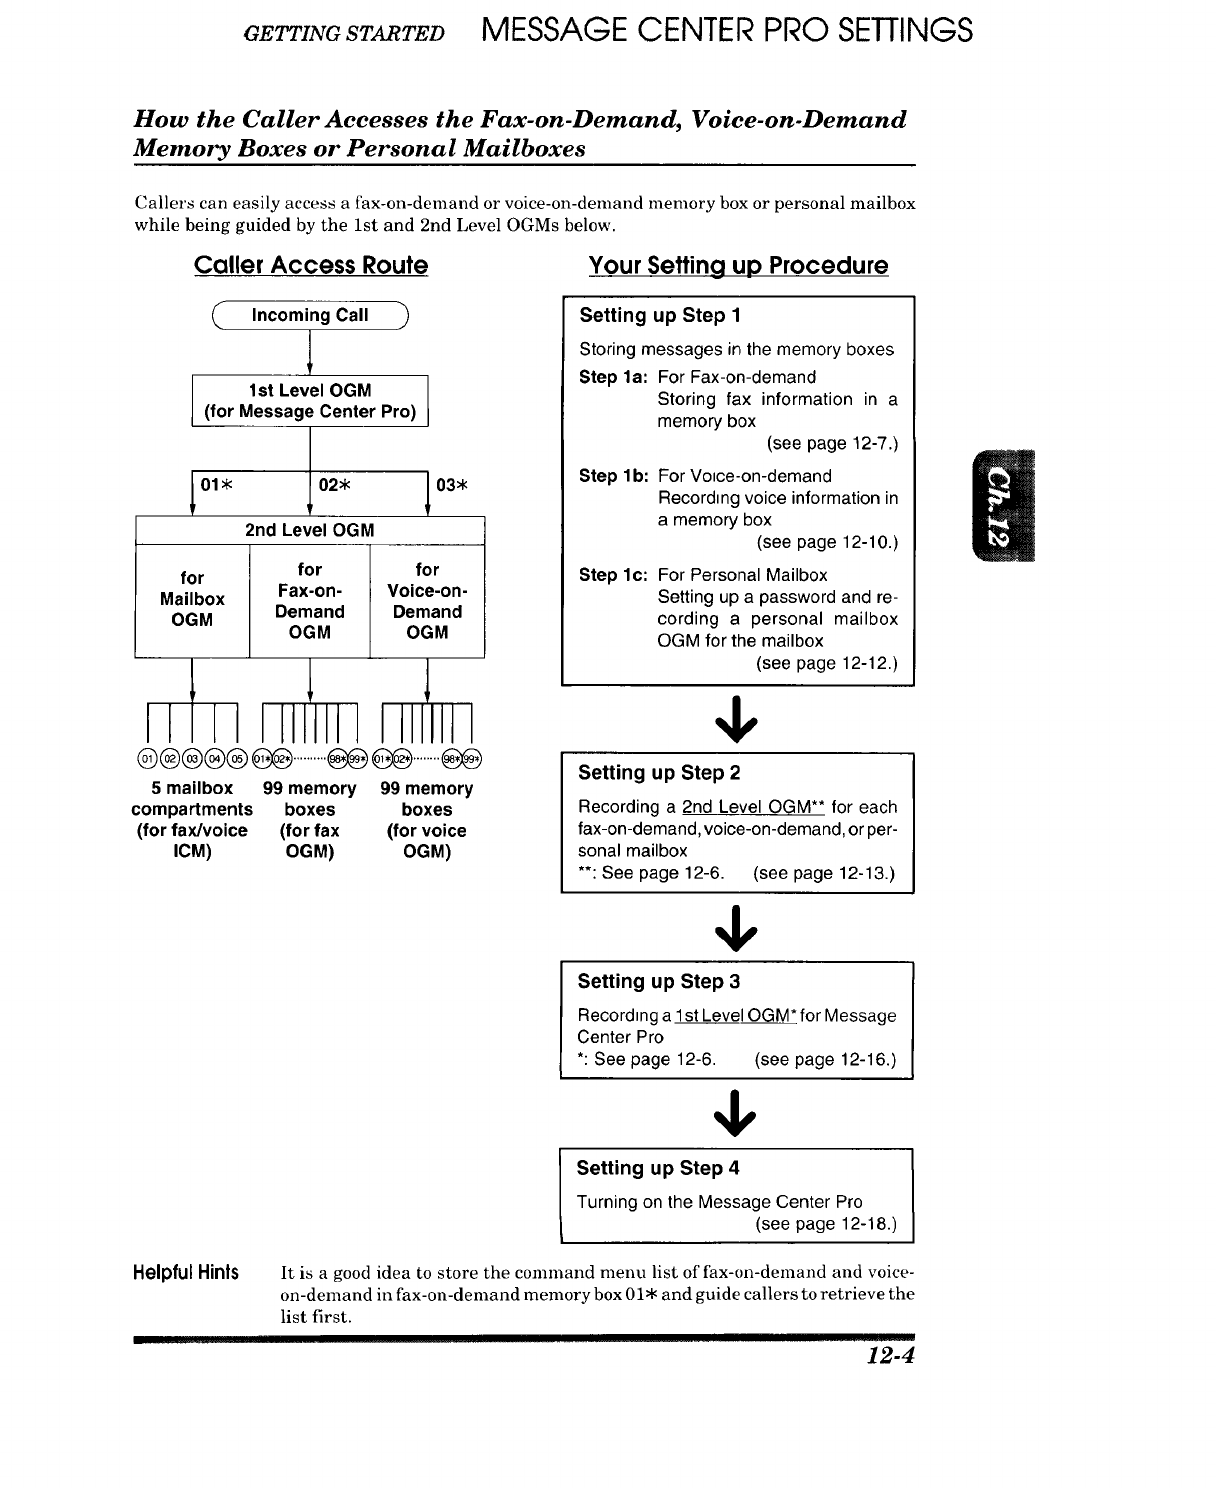
GETTINGSTARTED MESSAGE CENTER PRO SETTINGS
How the Caller Accesses the Fax-on-Demand, Voice-on-Demand
Memory Boxes or Personal Mailboxes
Callers can easily access a fax-on-demand or voice-on-demand memory box or personal mailbox
while being guided by the 1st and 2nd Level OGMs below.
Caller Access Route Your Setting up Procedure
Incoming Call )
l1st Level OGM
(for Message Center Pro)
01. 02*
2nd Level OGM
for
Mailbox
OGM
for
Fax-on-
Demand
OGM
for
Voice-on-
Demand
OGM
Ft I I ILIIllllI II 'Jill
@@@®®6@..........@@@@........@@
5 mailbox 99 memory 99 memory
compartments boxes boxes
(for fax/voice (for fax (for voice
ICM) OGM) OGM)
Setting up Step 1
Storing messages in the memory boxes
Step la: For Fax-on-demand
Storing fax information in a
memory box
(see page 12-7.)
Step I b:
Step lc:
For Voice-on-demand
Recording voice information in
a memory box
(see page 12-10.)
For Personal Mailbox
Setting up a password and re-
cording a personal mailbox
OGM for the mailbox
(see page 12-12.)
4,
Setting up Step 2
Recording a 2nd Level OGM** for each
fax-on-demand, voice-on-demand, or per-
sonal mailbox
**: See page 12-6. (see page 12-13.)
Setting up Step 3
Recording a 1st Level OGM* for Message
Center Pro
*: See page 12-6. (see page 12-16.)
Setting up Step 4
Turning on the Message Center Pro
(see page 12-18.)
Helpful Hints It is a good idea to store the command menu list of fax-on-demand and voice-
on-demand in fax-on-demand memory box 01. and guide callers to retrieve the
list first.
12-4
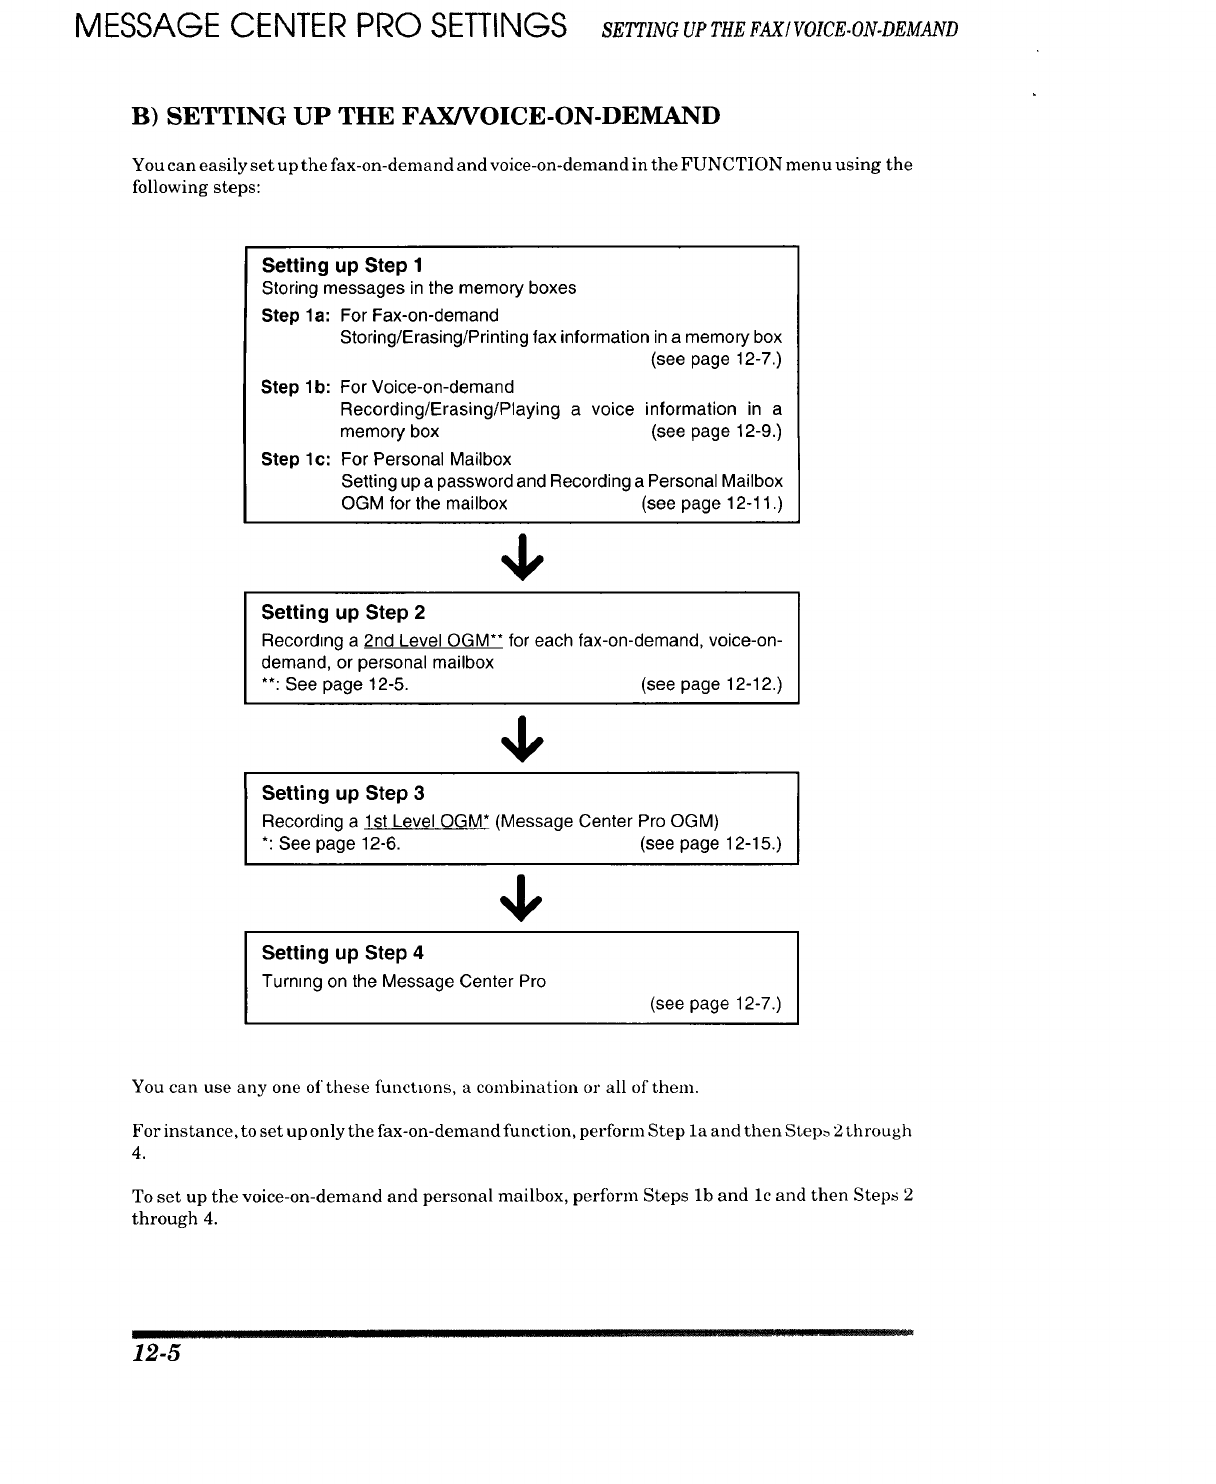
MESSAGE CENTER PRO SETTINGS SErrINGUPrHSF, /VO CE.ON.DEM D
B) SETTING UP THE FAX/VOICE-ON-DEMAND
You can easily set up the fax-on-demand and voice-on-demand in the FUNCTION menu using the
following steps:
Setting up Step 1
Storing messages in the memory boxes
Step la: For Fax-on-demand
Storing/Erasing/Printing fax information in a memory box
(see page 12-7.)
Step lb: For Voice-on-demand
Recording/Erasing/Playing a voice information in a
memory box (see page 12-9.)
Step lc: For Personal Mailbox
Setting up a password and Recording a Personal Mailbox
OGM for the mailbox (see page 12-11.)
Setting up Step 2
Record,rig a 2nd Level OGM** for each fax-on-demand, voice-on-
demand, or personal mailbox
**: See page 12-5. (see page 12-12.)
Setting up Step 3
Recording a 1st Level OGM* (Message Center Pro OGM)
*: See page 12-6. (see page 12-15.)
Setting up Step 4
Turning on the Message Center Pro
(see page 12-7.)
You can use any one of these functions, a combination or all of them.
For instance, to set up only the fax-on-demand function, perform Step la and then Step_ 2 through
4.
To set up the voice-on-demand and personal mailbox, perform Steps lb and lc and then Steps 2
through 4.
-12-5

8ETTINGUPTHEFAX/VOICE-ON-DEMAND MESSAGE CENTER PRO SETTINGS
FOR YOUR INFORMATION
*1st Level OGM: (Message Center Pro Outgoing Message)
When the call is connected to your fax machine, the 1st Level OGM will tell the caller
that he/she should press 01., 02* or 03* to access the 2rid level OGM for fax-on-
demand, voice-on-demand, or mailbox, during or after the OGM.
The OGM also will tell that callers can leave voice messages or fax messages by
pressing the remote activation code when or after the OGM.
** 2nd Level OGM: (Fax-on-Demand, Voice-on.Demand, Mailbox
Outgoing Message)
Next, the 2nd Level OGM will tell the caller the titles of messages stored and their
memory box numbers. For the mailbox, it will tell the assigned persons' names and
mailbox numbers.
Access to the Target Memory Box:
Target memory box is the mailbox compartment where a caller can record a personal
message for the person assigned to that mailbox.
The caller can access a memory box following the instructions of the 2nd level OGM.
For the mailbox, the caller can record his/her fax or voice message into the target
mailbox after checking the name of the person assigned to that mailbox by the
personal mailbox OGM.
J
Ul rllllln 12-6

MESSAGE CENTER PRO SETTINGS $ETTINGUPTHEFAXIVOICE-ON-DEMAND
Setting up Step la: For Fax-on-Demand
Storing/Erasing/Printing Fax Information in a Memory Box
Storing Fax Information in a Memory Box with Multi-Resolution Page by Page
"Fax information is the fax document you are storing in a fax-on demand memory box for your
callers to retrieve.
You can store each fax-on-demand information at different resolution page by page as follows:
1. Place the document into the feeder.
2. Press FUNCTION.
- If you want to store fax information at
various resolutions page by page, follow
these steps below. If not, skip to the
step 9 below.
3. Press 1.
4. Press 5.
5. Press _. (left arrow) or ..-- (right
arrow) to find the resolution you
want for the page in your
documents.
Example: FINE.
6. Press SET.
Return to step 5 for setting the resolution
for page 2 and the following pages.
7. When you finish setting the
resolution for all your pages, press
STOP.
8. Press FUNCTION.
9. Press 9.
10.Press 4.
ll.Press SET.
ml'1:11 D]g] :,llEV|','I I ! I[':t: [elVN!i..
(09/12/1996 15:25
_I FAX: NO. & START )'_
COPY: PRESS COPY
(1.TEMP.SETTINGS )
(1.TEMP.SETTINGS
(5.RESOLUTION ]
( PAGE 01:STANDARD ]_(
"-(.SELECT,- -, SET)
(PAGE OI:FINE )
(PAGE 02:FINE
(_ FAX: NO. & START ]_
COPY: PRESS COPY ]
(1.TEMP.SETTINGS _)
( 9. SETUP MC PRO
(._4. FAX INF0 .]
(FAXNO.:_ ]
12-7 ......... I ]r I![]k
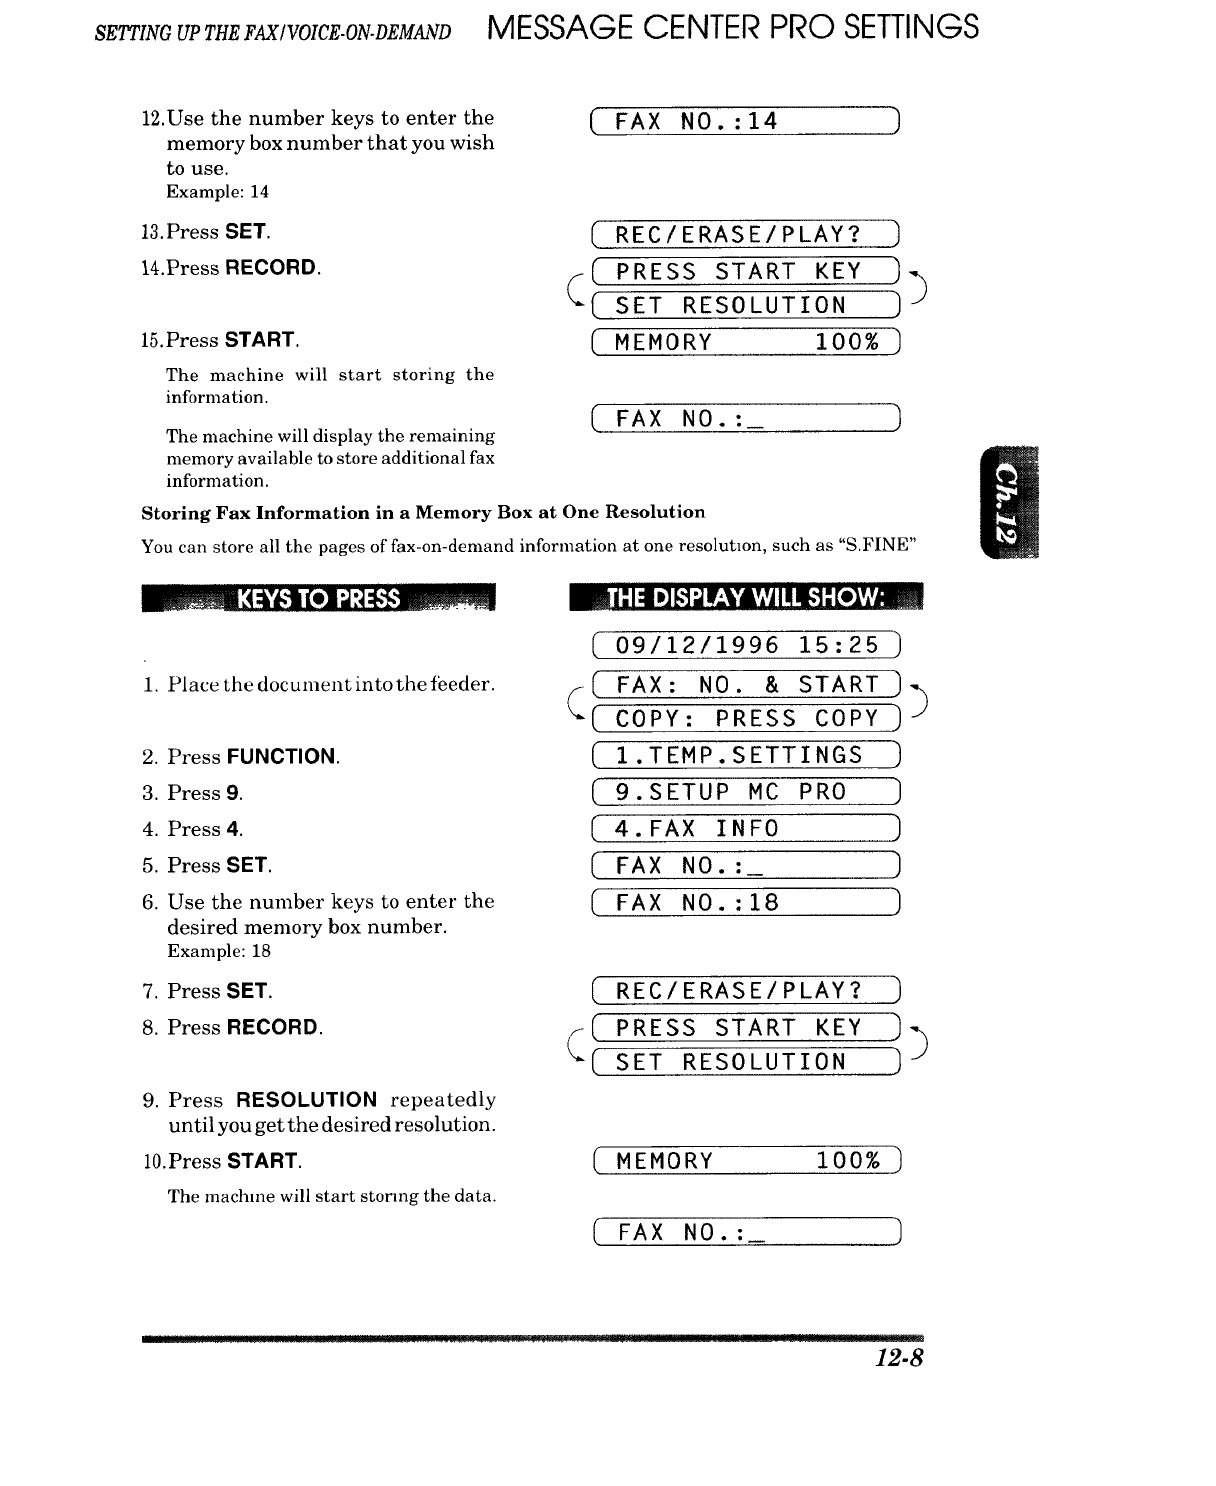
SETTING UP THE FAXIVOICE-ON-DEMAND MESSAGE CENTER PRO SETTINGS
12.Use the number keys to enter the
memory box number that you wish
to use.
Example: 14
FAX NO. : 14
13.Press SET. ( REC/ERASE/PLAY?
14.Press RECORD.
( PRESS START KEY )_
"*L SET RESOLUTION ]
15.PressSTART. ( MEMORY 100% ]
The machine will start storing the
information.
The machine will display the remaining
memory available to store additional fax
information.
FAX NO. :_
Storing Fax Information in a Memory Box at One Resolution
You can store all the pages of fax-on-demand information at one resolution, such as "S.FINE"
1. Place the document into the feeder.
2. Press FUNCTION.
3. Press 9.
4. Press 4.
5. Press SET.
6. Use the number keys to enter the
desired memory box number.
Example: 18
7. Press SET.
8. Press RECORD.
9. Press RESOLUTION repeatedly
until you get the desired resolution.
mi: 1:11D][,']"Jir;ik*Avl iiIi_,]: [e]hvn_l,,
( 09/12/1996 15:25 )
(FAX: NO. & START ) -%
( COPY: PRESS COPY )J
( 1.TEMP.SETTINGS )
( 9. SETUP MC PRO ]
( 4.FAX INFO )
( FAx No.:_ ]
( tax No.:18 ]
( REC/ERASE/PLAY? )
(( PRESS START KEY ,))
( SET RESOLUTION ]
10.PressSTART. ( MEMORY 100% )
The machine will start storing the data.
CFAX NO. :_
12-8

MESSAGE CENTER PRO SETTINGS 8ETTINGUPTHEFAXIVOICE-ON-DEMAND
Erasing Fax Information in a Memory Box
You can erase the fax information you have stored previously in the memory boxes.
.
.
Press ERASE in the step 8 in the
above procedure.
Press 1 then the machine will erase
the fax information you stored in
memory box 14.
The machine status will return to step 7
above.
/ i" 1:11D]F,'_"JIr-'YAVj It II_]" [e_Va!m_
REC/ERASE/PLAY?
ERASE THIS MSG.?
1.CLEAR 2.EXIT )
( REC/ERASE/PLAY? ,)
Printing Fax Information in a Memory Box
To check the fax information you have stored previously in the memory boxes, you can print your
fax information.
8. Press PLAY in the step 8 in the
above procedure.
The machine will print your fax
information stored in memory box 14.
The machine status will return to step 5
above.
(REC/ERASE/PLAY? ]
(PRINTING ]
(FAX NO.:_
i2-9 .... _:-- ::Z_Z ..ZLZ :iZ'..:. 1...1..._ 1:..." .':. ::LZ i__-ACZ.i ..... _'L.:_mls- -ZZ:_ __ : _,ul.0!:!%.:_m_
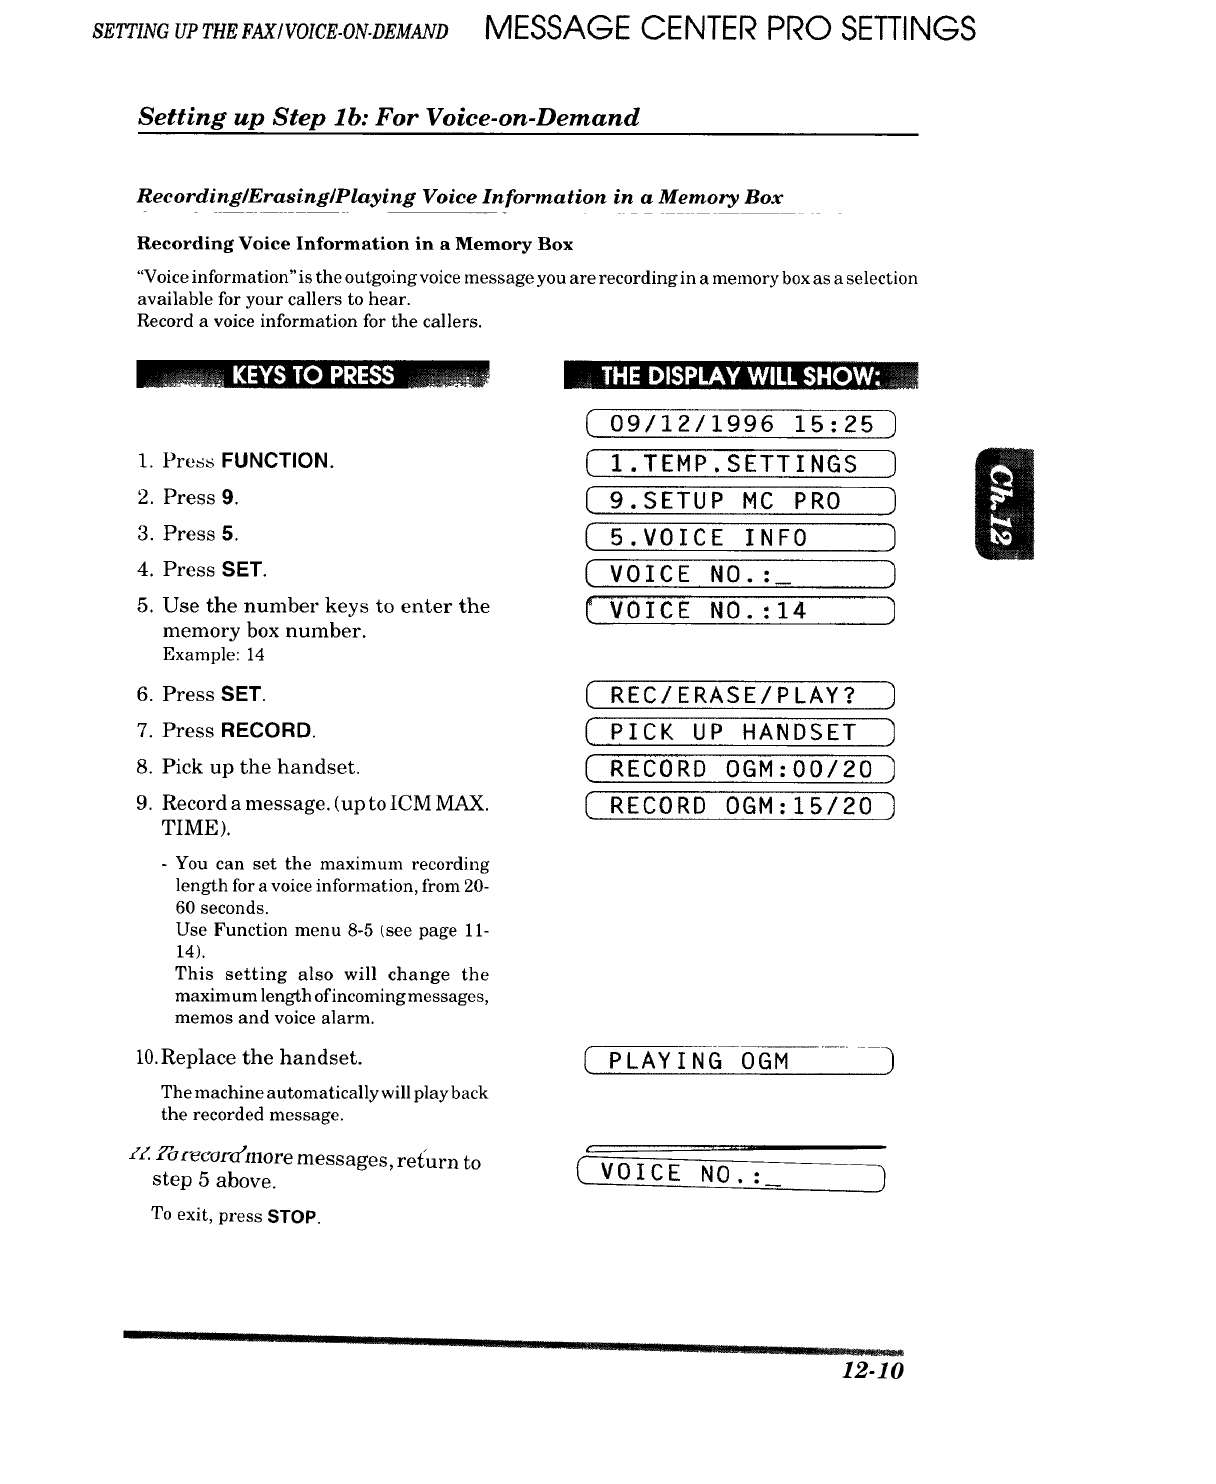
8ETTINGUPTHEFAXIVOICE-ON-DEMANDMESSAGE CENTER PRO SETTINGS
Setting up Step lb: For Voice-on-Demand
Recording/Erasing/Playing Voice Information in a Memory Box
Recording Voice Information in a Memory Box
"Voice information" is the outgoing voice message you are recording in a memory box as a selection
available for your callers to hear.
Record a voice infornmtion for the callers.
_ ,'4_'/,'ll (el "J,q,_ _ n |" 1:11.] [,']_11,_YA':III Hi,1•[olf, v_
(09/12/1996 15:25
I. Press FUNCTION. (1 .TEMP. SETTINGS ]
2. Pressg. ( 9.SETUP MC PRO )
3. Press5. ( 5.VOICE INFO ]
4. Press SET. (VO I C E N0. :_ )
5. Use the number keys to enter the [ V01 C E N0. : 14 ]
memory box number.
Example: 14
6. PressSET. _ REC/ERASE/PLAY? ]
7. PressBECOBD. (, PICK UP HANDSET ]
8. Pick up the handset. ( R EC 0R D 0GM :00 /20 ]
9. Record a message. (up to ICM MAX. ( RECORD 0GM :15/20 ]
TIME).
- You can set the maximum recording
length for a voice information, from 20-
60 seconds.
Use Function menu 8-5 (see page 11-
14).
This setting also will change the
maximum length of incoming messages,
memos and voice alarm.
lO.Replace the handset.
The machine automatically will play back
the recorded message.
/--<Y'_Fecora'more messages, return to
step 5 above.
To exit, press STOP.
(PLAYING OGM
(VOICE NO. :_
I......... I_][II
12-10

MESSAGE CENTER PRO SETTINGS SErrINGVPr_r._IVOm_-ON-D_MaN_
Erasing Voice Information in a Memory Box
You can erase the voice information you have previously recorded in the memory boxes.
°
.
Press ERASE in the step 8 m the
above procedure.
Press 1 then the machine will erase
the voice information you recorded
in memory box 14.
The machine status will return to step 6
above.
I_l i "-I =11@[."l"Jtlr'-¥'A'A'lItltK_:']"-[o]h'J
(
(
REC/ERASE/PLAY?
ERASE OGM?
I.CLEAR 2.EXIT ))
)
REC/ERASE/PLAY?
Playing Voice Information in a Memory Box
To check the outgoing voice messages you have recorded previously in the menmry boxes you can
play back your voice information.
( REC/ERASE/PLAY? )
8. Prcs_PLAY. ( PLAYING OGM )
The machine wall play back your voice
information stored in menmry box 14.
The machine status will return to step 4
above. (VOICE NO.:
12-11
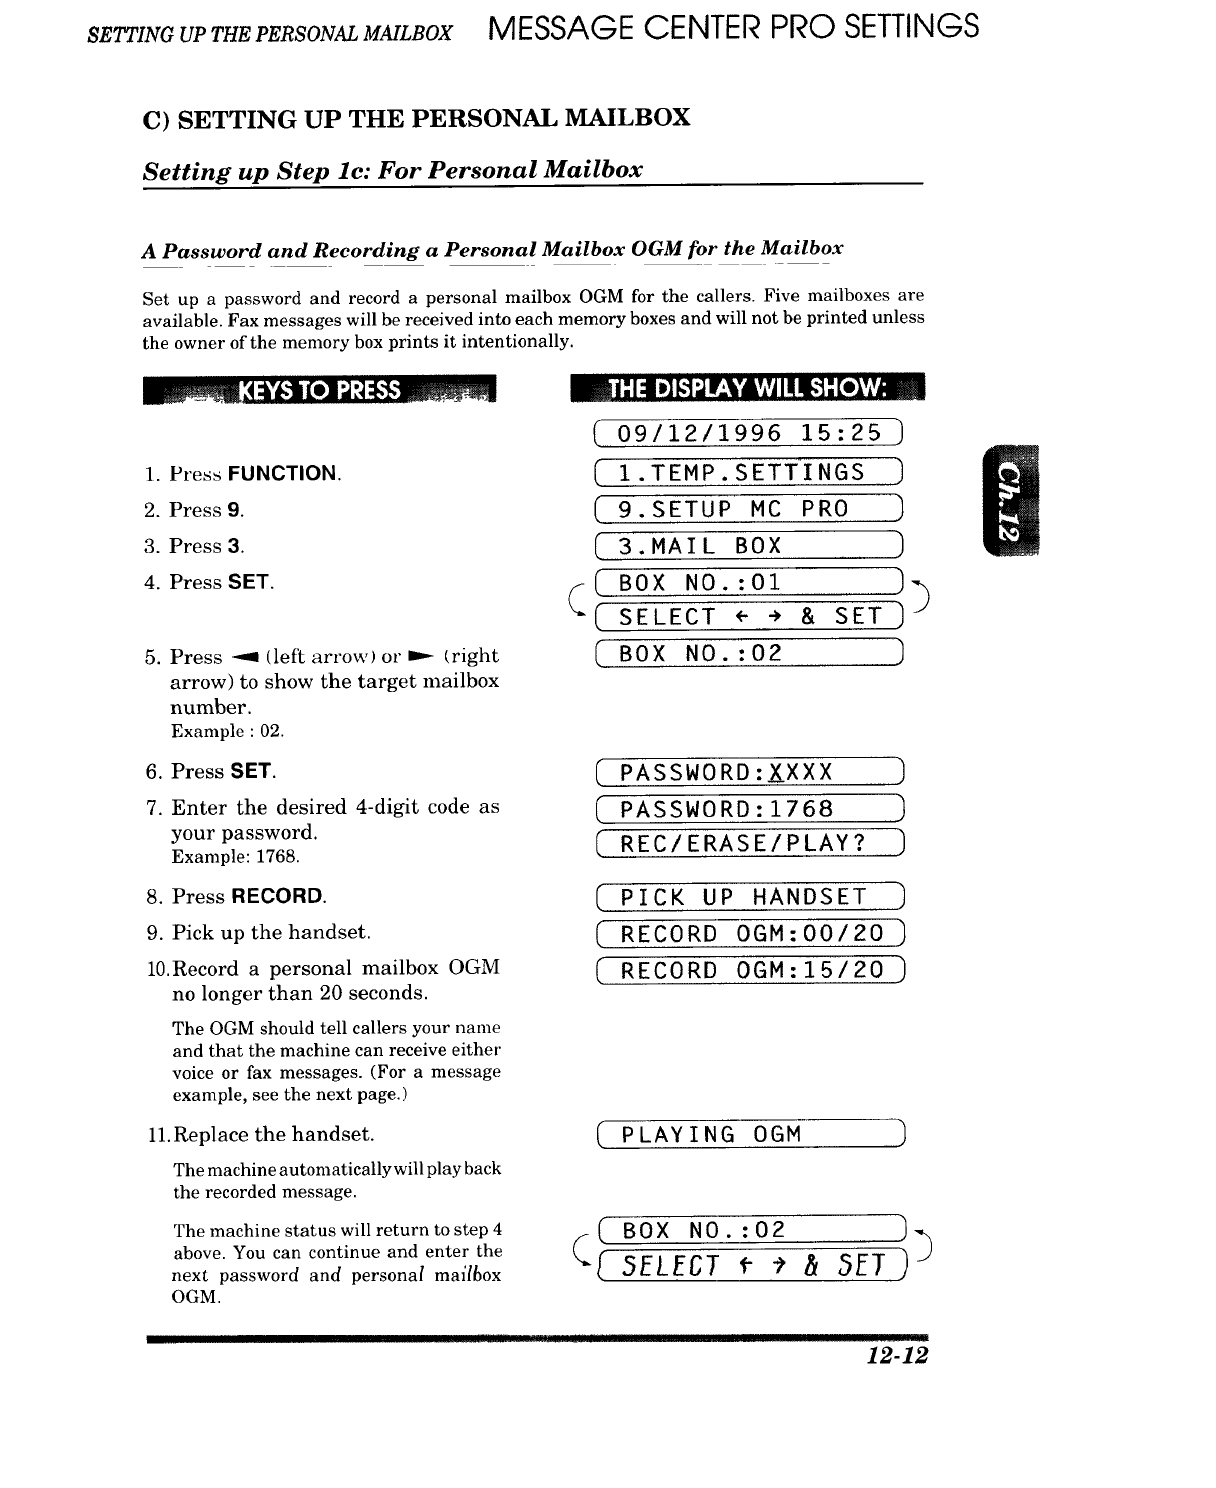
SETTING UP THE PERSONAl, MAILBOX MESSAGE CENTER PRO SETTINGS
C) SETTING UP THE PERSONAL MAILBOX
Setting up Step lc: For Personal Mailbox
A Password and Recording a Personal Mailbox OGM for the Mailbox
Set up a password and record a personal mailbox OGM for the callers. Five mailboxes are
available. Fax messages will be received into each memory boxes and will not be printed unless
the owner of the memory box prints it intentionally.
1. Pres_ FUNCTION.
2. Press 9.
3. Press 3.
4. Press SET.
.Press -I= (left arrow) or _ (right
arrow) to show the target mailbox
number.
Example : 02.
6. Press SET.
7. Enter the desired 4-digit code as
your password.
Example: 1768.
8. Press RECORD.
9. Pick up the handset.
10.Record a personal mailbox OGM
no longer than 20 seconds.
The OGM should tell callers your name
and that the machine can receive either
voice or fax messages. (For a message
example, see the next page.)
11. Replace the handset.
The machine automatically will play back
the recorded message.
The machine status will return to step 4
above. You can continue and enter the
next password and personal mail_ox
OGM.
_ 1"1:11D]_']"JF:V&v,vJII _']" [o_V_W
(09/12/1996 15:25 ]
[ I .TEMP. SETTINGS ]
( 9.SETUP MC PRO
( 3..A_L BOX )
(BOXNO.:01 ]_
(SELECT <- -) & SET 1 J
[BOXNO.:02 ]
( PASSWORD:XXXX ]
(PASSWORD: 1768 )
I REC/ERASE/PLAY? )
[
(
C
PICK UP HANDSET ]
RECORD OGM:O0/20 ]
RECORD 0GM:15/20 )
(PLAYING OGM
(¢ BoxNO.:o2
(5ELEGT f "_ _ SET )_
I!lll!! I !1!1!11 lit 11 12:12

MESSAGE CENTER PRO SETTINGS SETTING UP THE PERSONAL MAILBOX
Message Example
For Personal Mailbox assigned to John Baker:
Hi. This is John Baker. If you have a confidential message for me, please record it
after the beep. If you wish to send a fax, press the start button after the beep. Thank
you.
Setting up Step 2: Recording/Erasing/Playing the 2nd Level
OGM for each Fax-on-Demand, Voice-on-Demand, and Personal
Mailbox
The 2nd Level OGM is the second outgoing message your callers will hear after they have chosen
either fax-on-demand, voice-on-demand, or personal mailbox. It must list the access numbers and
identifying name of each compartment within that group (for example, within the fax-on-demand
group).
It also must tell callers that he/she can retrieve several fax/voice-on-demand information at once
on the same line by entering the two-digit box number continuously with *at the end of the
commands.
Recording an OGM
Have you stored or recorded the messages you want for your callers? If you have, then, record a
2nd level OGM for each of those fax-on-demand, voice-on-demand, or personal mailbox information
messages you have already set up.
_,_ ,'4:fl,']l Io] "J:_,,_ ..... m i ."i :! *][.']_llr,_VAv:jII!I_']"-[o]V_
(09/12/1996 15:25
1. Press FUNCTION. (1.TEMP. SETTINGS ]
2. Press9. ( 9. SETUP MC PRO
3. Press 2. ( 2,0GM )
( MSG CTR PRO ])
#
"( SELECT <- ÷& SET)
4. Press -9 (left ar,'ow) or..-- _right (MAIL BOX )
arrow) key to show the target (( FAX ON DEMAND ])
memory box.
Example:mailbox. (( VOICE ON DEMAND ))
Pressing the b-- key will cycle forward
through "MAILBOX", "FAX ON
DEMAND", and'WOICE ON DEMAND."
The -4 key cycles backward.
(Do not select "MSG CTR PRO" here,
since it is for a 1st level OGM described
in Setting up Step 3.)
.- ":.................. :U: _L .........
12-13
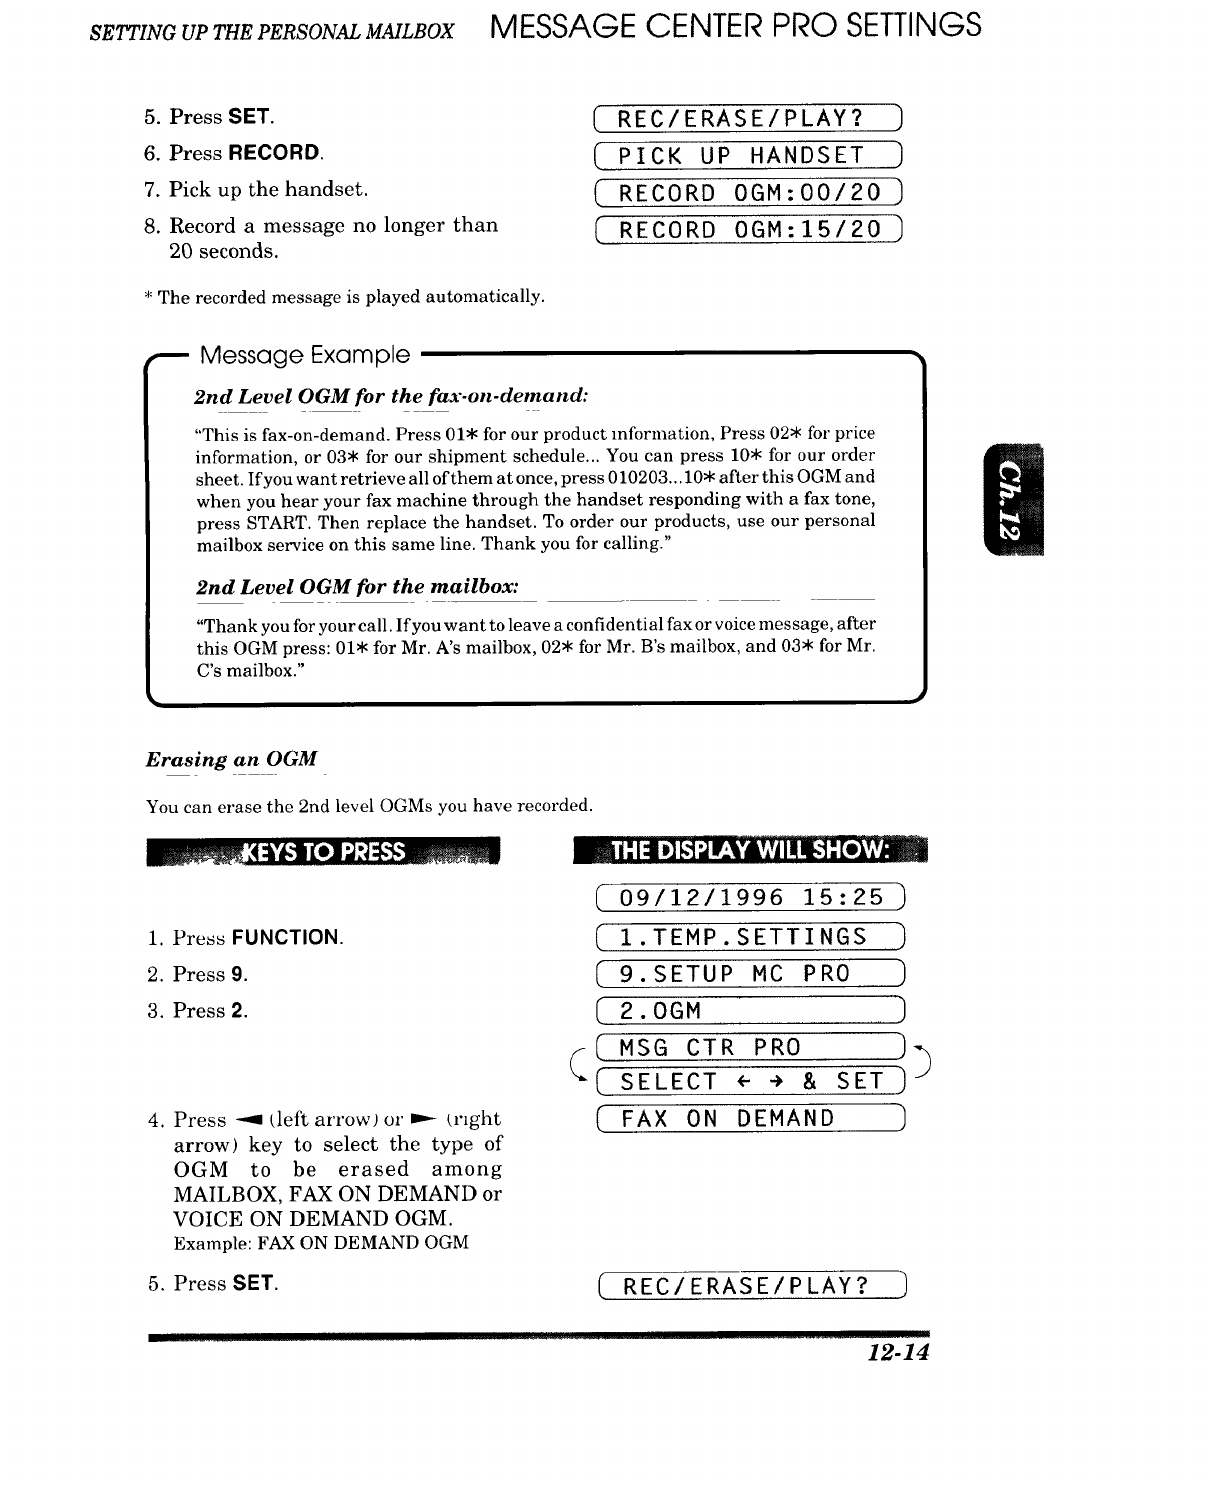
SETTING UP THE PERSONAL MAILBOX MESSAGE CENTER PRO SETTINGS
5. Press SET.
6. Press RECORD.
7. Pick up the handset.
8. Record a message no longer than
20 seconds.
* The recorded message is played automatically.
(REC/ERASE/PLAY? ]
( PICK UP HANDSET ,)
( RECORD OGM:O0/20 ]
( RECORD 0GM:15/20 ]
_- Message Example
2nd Level OGM for the fax-on-demand:
"This is fax-on-demand. Press 01. for our product reformation, Press 02_< for price
information, or 03* for our shipment schedule... You can press 10. for our order
sheet. If you want retrieve all of them at once, press 010203... 10. after this OGM and
when you hear your fax machine through the handset responding with a fax tone,
press START. Then replace the handset. To order our products, use our personal
mailbox service on this same line. Thank you for calling."
2nd Level OGM for the mailbox:
"Thank you for your call. Ifyou want to leave a confidential fax or voice message, after
this OGM press: 01. for Mr. A's mailbox, 02* for Mr. B's mailbox, and 03* for Mr.
C's mailbox."
Erasing an OGM
You can erase the 2nd level OGMs you have recorded.
:4:L'_,l[e] "J,'J:1,__
1. Press FUNCTION.
2. Press 9.
3. Press 2.
,
.
Press --_ £left arrow) or m,- (rzght
arrow) key to select the type of
OGM to be erased among
MAILBOX, FAX ON DEMAND or
VOICE ON DEMAND OGM.
Example: FAX ON DEMAND OGM
Press SET.
nl _..................... B ..............
_i _[4D][-'l;,1r_'_Av,v_iI IL!, [e_,,v_
(09/12/1996 15:25 )
( 1.TEMP.SETTINGS)
( 9.SETUP MC PRO )
(2.0GM ]
( MSG CTR PRO )_
Q(SELECT ÷ _ & SET ] J
( FAxONDEMA.D )
(REC/ERASE/PLAY?
L5:::[!I ........ 12.14
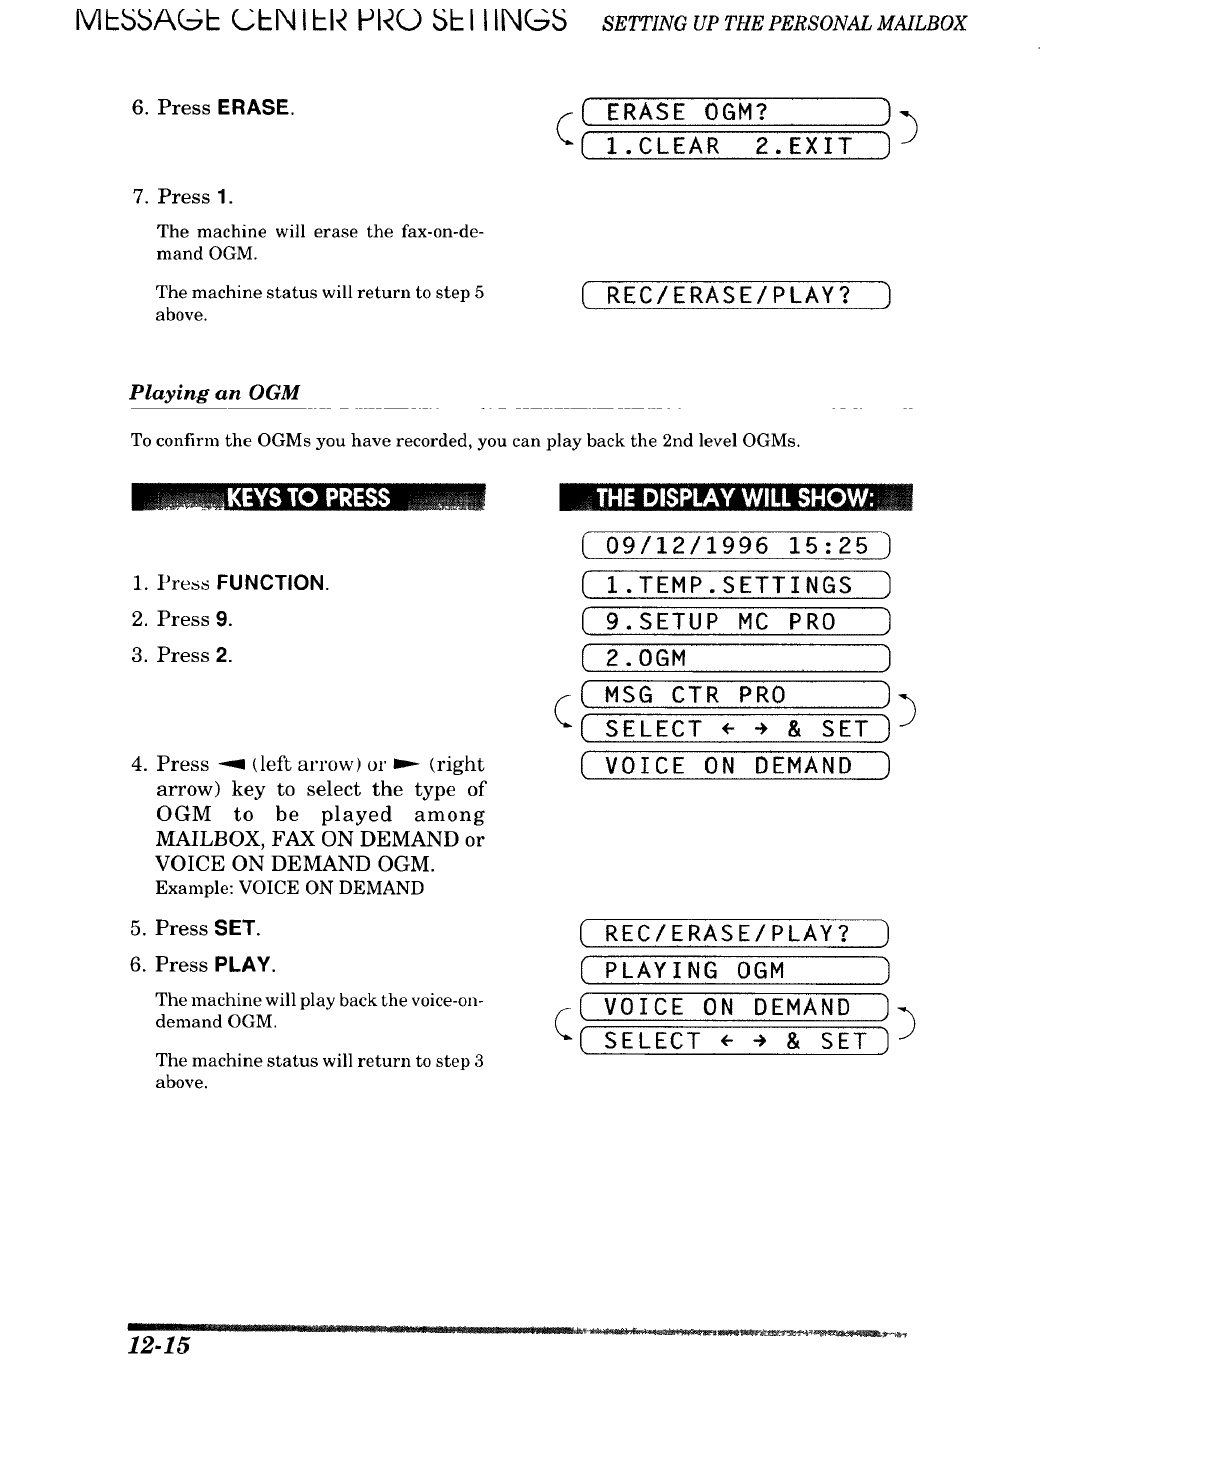
MJ-55A_- CkN IFI_ PI_(D 5h IIIN(55 SETTINGUPTHEPERSONALMAILBOX
6. Press ERASE.
7. Press 1.
The machine will erase the fax-on-de-
mand OGM.
The machine status will return to step 5
above.
(ERASEOG.? ))
(( I.CLEAR2.EXIT)
REC/ERASE/PLAY? ]
Playing an OGM
To confirm the OGMs you have recorded, you can play back the 2nd level OGMs.
1. Press FUNCTION.
2. Press 9.
3. Press 2.
.
.
6.
Press --9 (left arrow) or .--- (right
arrow) key to select the type of
OGM to be played among
MAILBOX, FAX ON DEMAND or
VOICE ON DEMAND OGM.
Example: VOICE ON DEMAND
Press SET.
Press PLAY.
The machine will play back the voice-ono
demand OGM.
The machine status will return to step 3
above.
(
o9/12/1996 i_:2s)
( 1.TEMP.SETTINGS ]
( 9.SETUP MC PRO )
(2.0GM )
( MSG CTR PRO ]_
( SELECT ÷ ÷ &SET] J
(VOICE ONDEMAND)
(REC/ERASE/PLAY?
(PLAYING OGM )
( VOICE ON DEMAND ]_
( SELECT <- -> &SET ] J
12-15
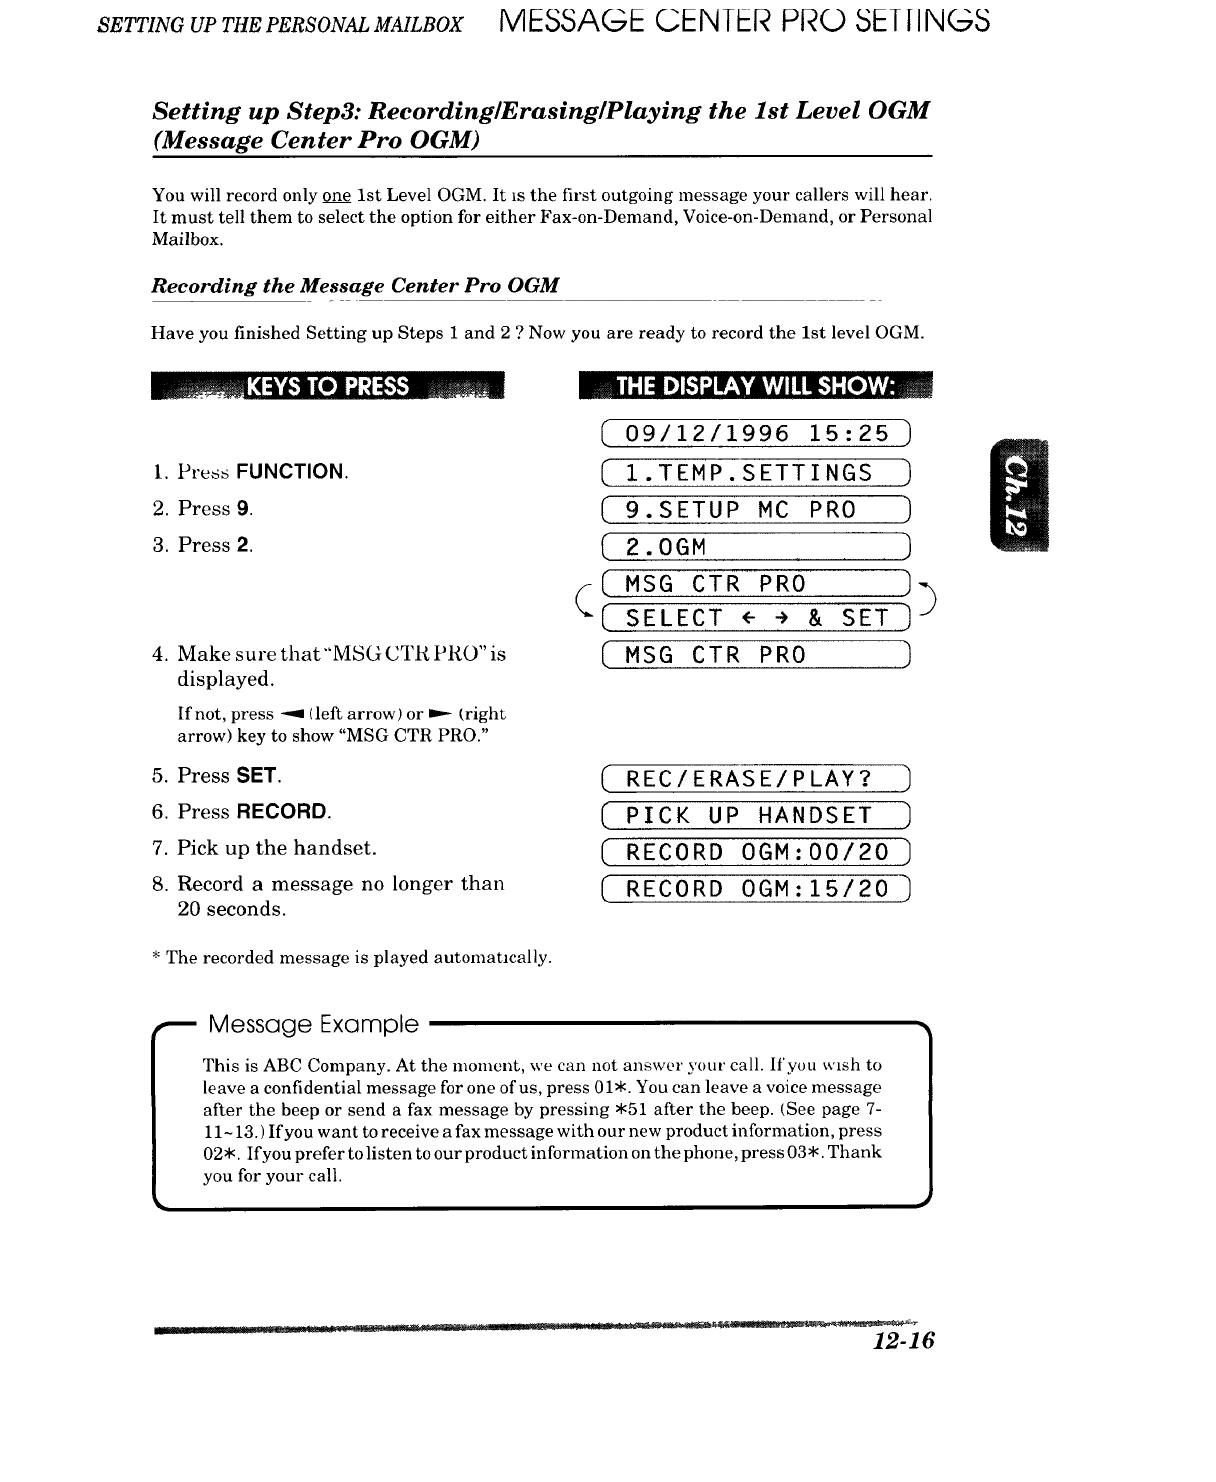
SETTINGUPTHEPERSONALMAILBOX MESSAGE CI--NIER PRO SEIIINGS
Setting up Step3: Recording/Erasing/Playing the 1st Level OGM
(Message Center Pro OGM)
You will record only one 1st Level OGM. It is the first outgoing message your callers will hear.
It must tell them to select the option for either Fax-on-Demand, Voice-on-Demand, or Personal
Mailbox.
Recording the Message Center Pro OGM
Have you finished Setting up Steps 1 and 2 ? Now you are ready to record the 1st level OGM.
1. Press FUNCTION.
2. Press 9.
3. Press 2.
4. Make sure that"MSG CTR PRO" is
displayed.
If not, press --_ (left arrow) or ,.-- (right
arrow) key to show "MSG CTR PRO."
5. Press SET.
6. Press RECORD.
7. Pick up the handset.
8. Record a message no longer than
20 seconds.
[
(
(
(
(
(
09/12/1996 15:25 )
1.TEMP.SETTINGS )
9.SETUP MCPRO )
2.0GM )
MSG CTR PRO ]
SELECT ÷ ÷ & SET,]
MSG CTR PRO )
REC/ERASE/PLAY?
CPiCK UP HANDSET]
RECORD 0GM:00/20 ]
(RECORD 0GM:15/20 ]
* The recorded message is played automancally.
Message Example
This is ABC Company. At the moment, we can not answer your call. If'you wish to
leave a confidential message for one of us, press 01.. You can leave a voice message
after the beep or send a fax message by pressing "51 after the beep. (See page 7-
11-13. ) If you want to receive a fax message with our new product information, press
02*. If you prefer to listen to our product information on the phone, press 03*. Thank
you for your call.
12-16
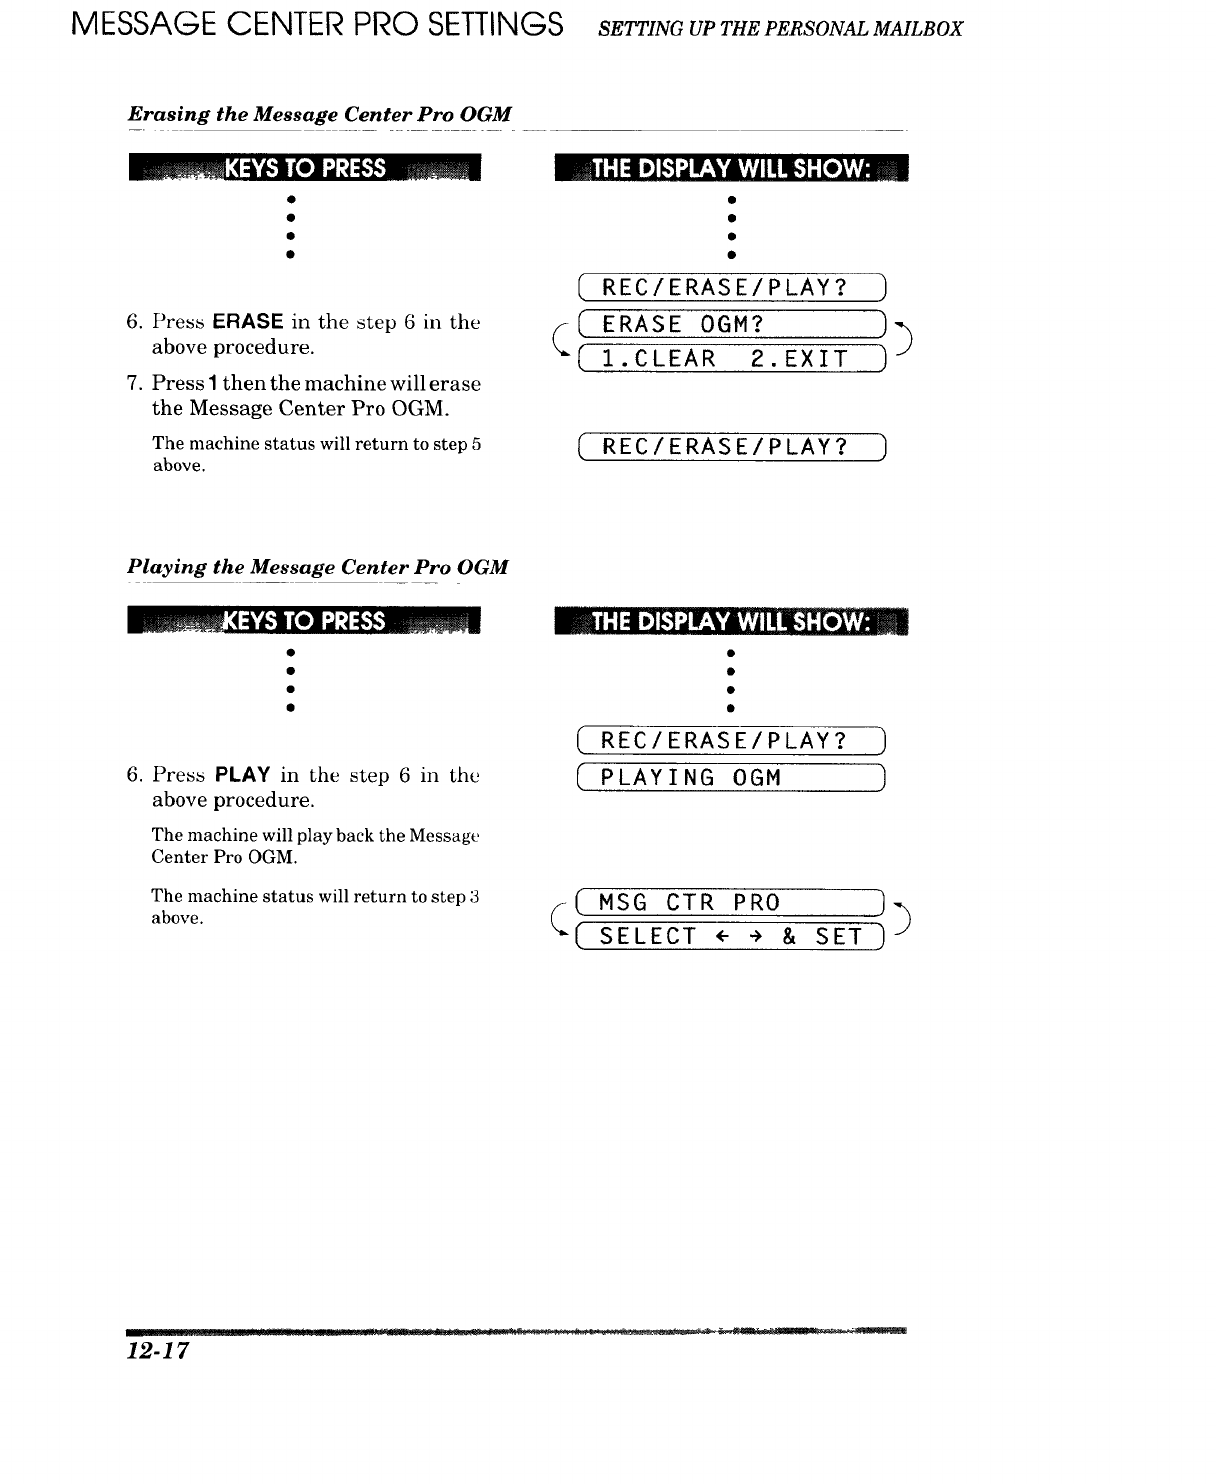
MESSAGE CENTER PRO SETTINGS SETTINGUPTHEPERSONALMAILBOX
Erasing the Message Center Pro OGM
6. Press ERASE in the step 6 in the
above procedure.
7. Press Ithen the machine will erase
the Message Center Pro OGM.
The machine status will return to step 5
above.
[
[
REC/ERASE/PLAY?
ERASE OGM?
1.CLEAR 2.EXIT
)
)
REC/ERASE/PLAY? )
Playing the Message Center Pro OGM
6. Press PLAY in the step 6 in the
above procedure.
The machine will play back the Message
Center Pro OGM.
The machine status will return to step 3
above.
REC/ERASE/PLAY?
PLAYING OGM )
(MSG CTR PRO ___
(SELECT <'-"> & SET
12-17
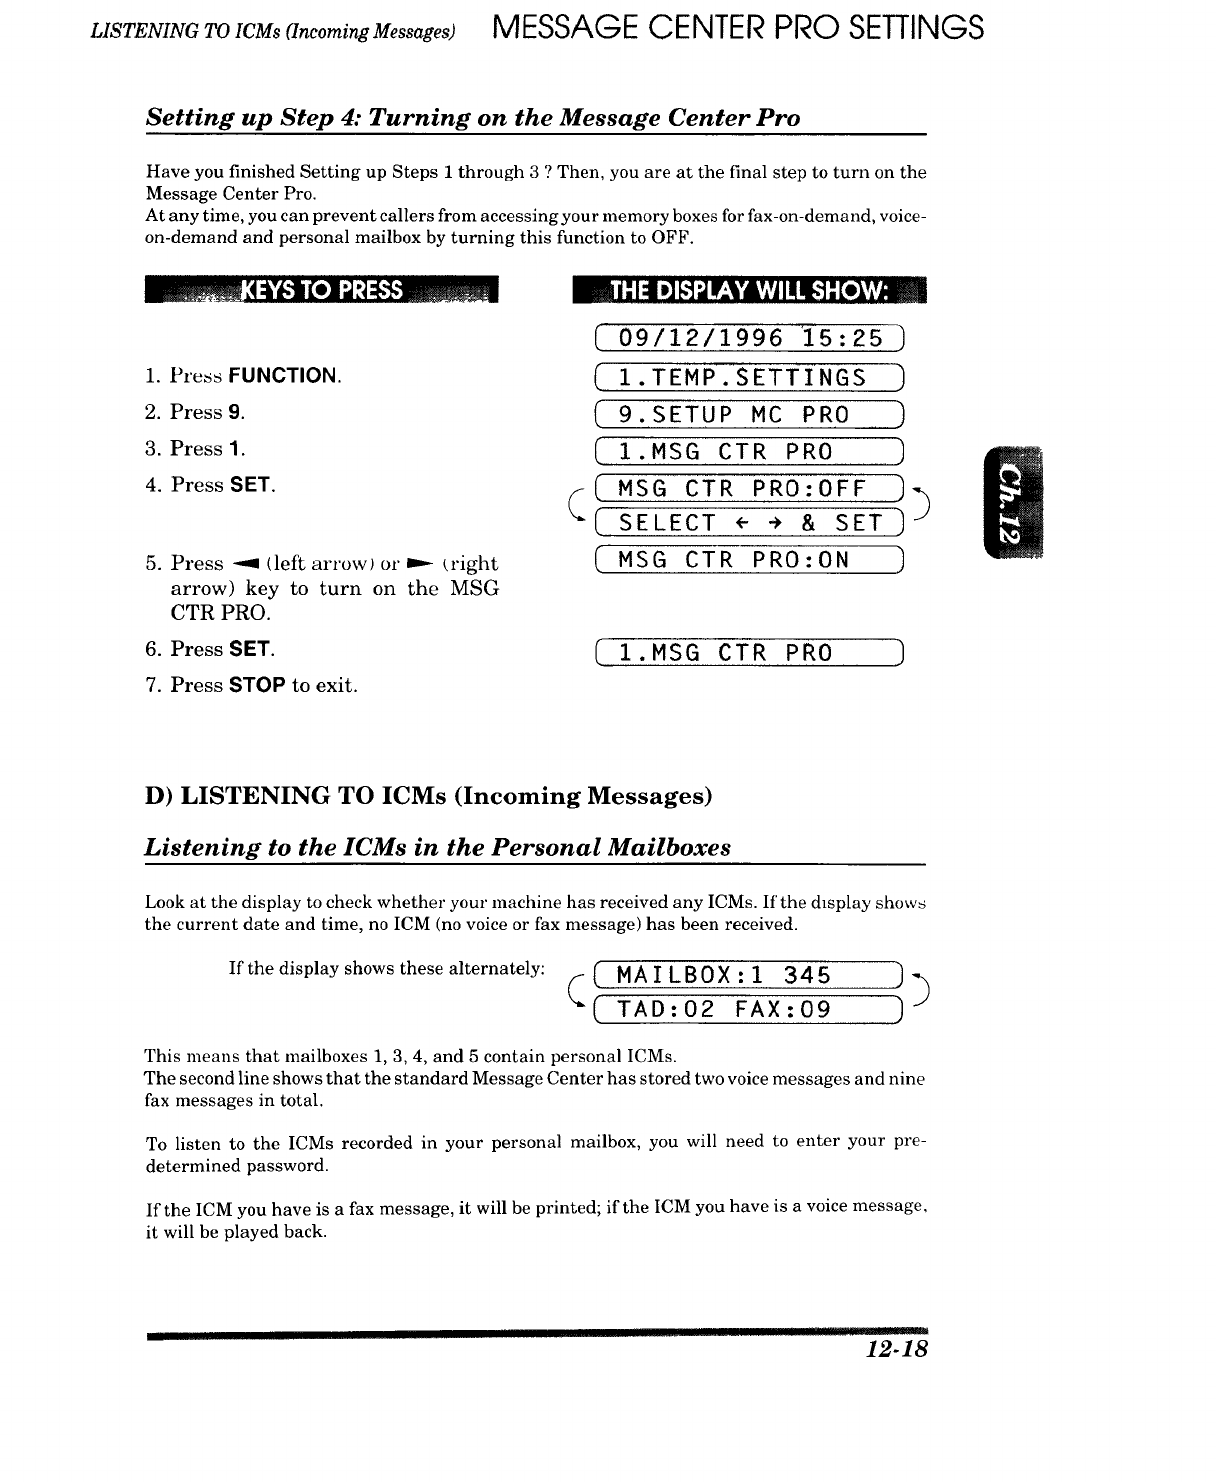
LISTENING TO ICMs (Incoming Messages) MESSAGE CENTER PRO SETTINGS
Setting up Step 4: Turning on the Message Center Pro
Have you finished Setting up Steps 1 through 3 ? Then, you are at the final step to turn on the
Message Center Pro.
At any time, you can prevent callers from accessingyour memory boxes for fax-on-demand, voice-
on-demand and personal mailbox by turning this function to OFF.
_i,l:ll_, • _, ,• • ,
1. Press FUNCTION.
2. Press 9.
3. Press 1.
4. Press SET.
5. Press --_ (left arrow) or ...- (right
arrow) key to turn on the MSG
CTR PRO.
6. Press SET.
7. Press STOP to exit.
( 09/12/1996 'i5:25 ]
{ Z.TEMP.SETTINGS )
(9.SETUP MC PRO
(I.MSG CTR PRO ]
_.( MSG CTR PRO:OFF ]_
[ SELECT <- -> & SET ]
( MSG CTR PRO:ON ,]
1.MSG CTR PRO ]
D) LISTENING TO ICMs (Incoming Messages)
Listening to the ICMs in the Personal Mailboxes
Look at the display to check whether your lnachine has received any ICMs. If the dzsplay shows
the current date and time, no ICM (no voice or fax message) has been received.
( MAILBOX:I 345 )_
If the display shows these alternately: ( ( T A D : 02 F A X : 09 ]
This means that mailboxes 1, 3, 4, and 5 contain personal ICMs.
The second line shows that the standard Message Center has stored two voice messages and nine
fax messages in total.
To listen to the ICMs recorded in your personal mailbox, you will need to enter your pre-
determined password.
If the ICM you have is a fax message, it will be printed; if the ICM you have is a voice message,
it will be played back.
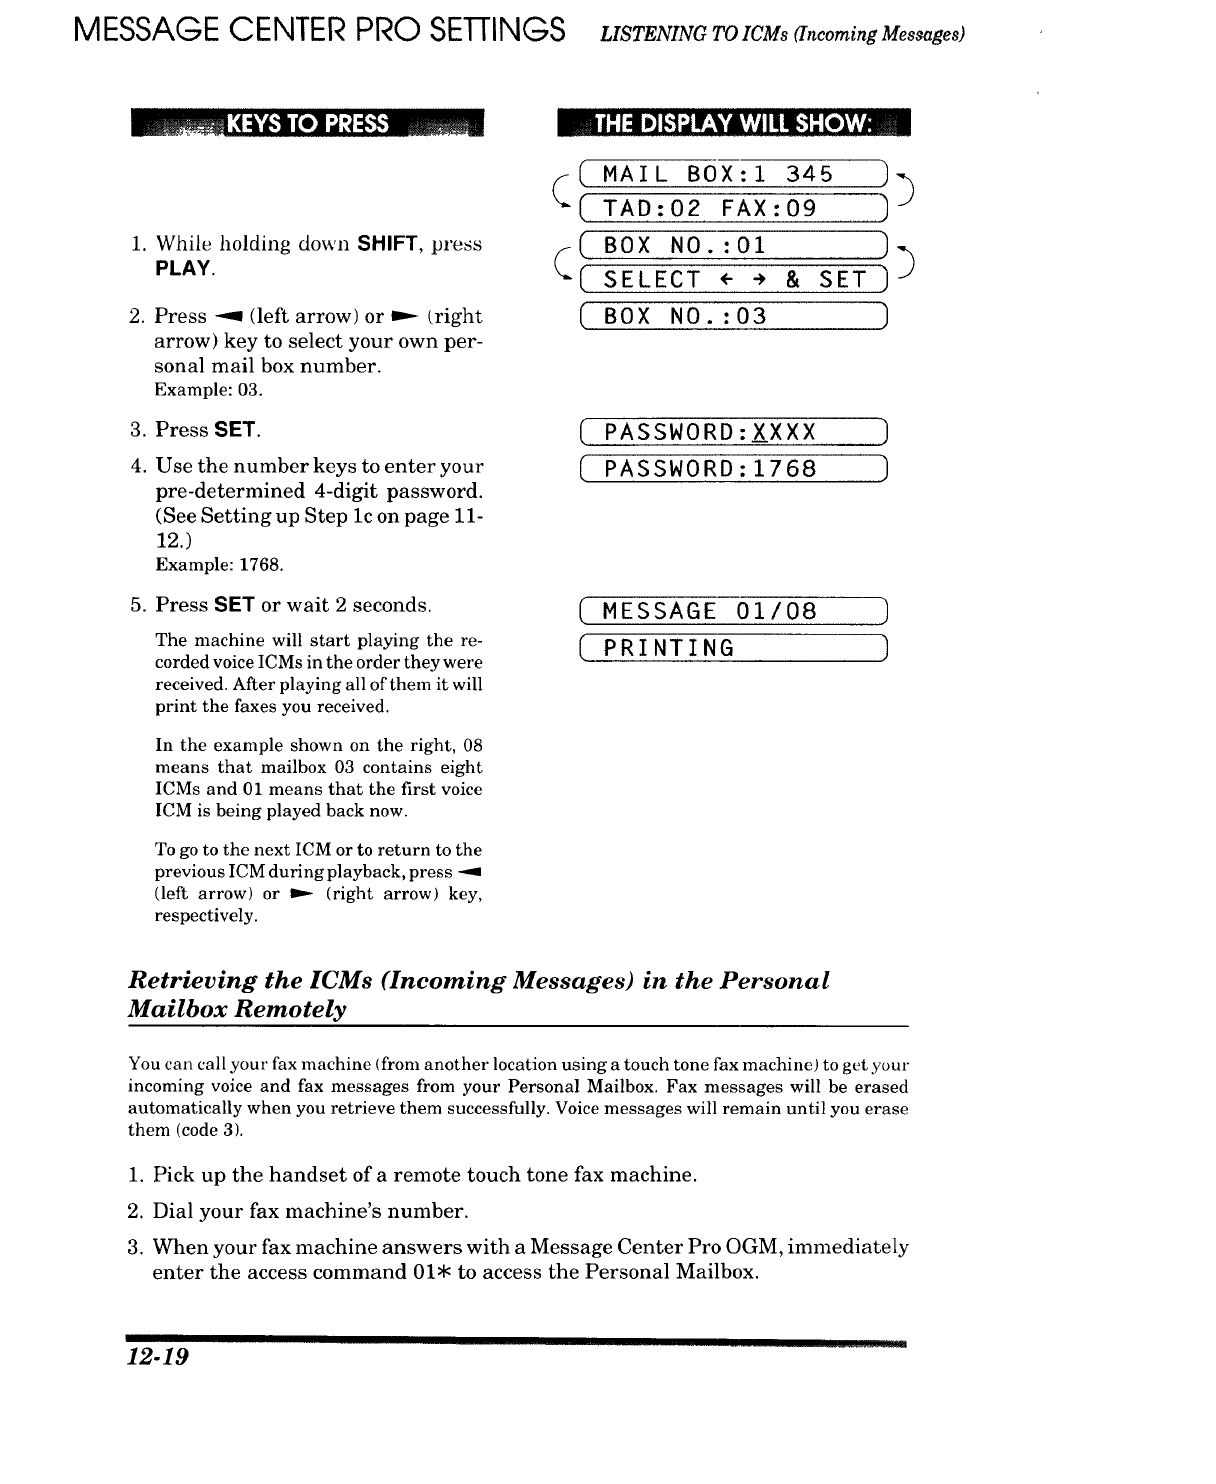
MESSAGE CENTER PRO SETTINGS USTENIYGTOICMs(Incoming Messages)
_ I: 1:! _[,1;,iIr_.VdlhvjII1I_']: [e]hv_
°
,
,
4.
While holding down SHIFT, press
PLAY.
Press --_ (left arrow) or _ /right
arrow) key to select your own per-
sonal mail box number.
Example: 03.
Press SET.
Use the number keys to enter your
pre-determined 4-digit password.
(See Setting up Step lc on page 11-
12.)
Example: 1768.
5. Press SET or wait 2 seconds.
The machine will start playing the re-
corded voice ICMs in the order they were
received. After playing all of them it will
print the faxes you received.
In the example shown on the right, 08
means that mailbox 03 contains eight
ICMs and 01 means that the first voice
ICM is being played back now.
To go to the next ICM or to return to the
previous ICM during playback, press -_
(left arrow) or ...-- (right arrow) key,
respectively.
_( MAIL BOX:I 345 )_
(TAD:02 FAX:09 ]
(( BoxNO.:01 ,]
[SELECT<--, SETJ--
CBox NO.:O3
( PASSWORD:X_XXX )
(" PASSWORD: 1768
(MESSAGE 01/08 "_
PRINTING
Retrieving the ICMs (Incoming Messages) in the Personal
Mailbox Remotely
You can call your fax machine (from another location using a touch tone fax machine) to get your
incoming voice and fax messages from your Personal Mailbox. Fax messages will be erased
automatically when you retrieve them successfully. Voice messages will remain until you erase
them (code 3).
1. Pick up the handset of a remote touch tone fax machine.
2. Dial your fax machine's number.
3. When your fax machine answers with a Message Center Pro OGM, immediately
enter the access command 01. to access the Personal Mailbox.
12-19
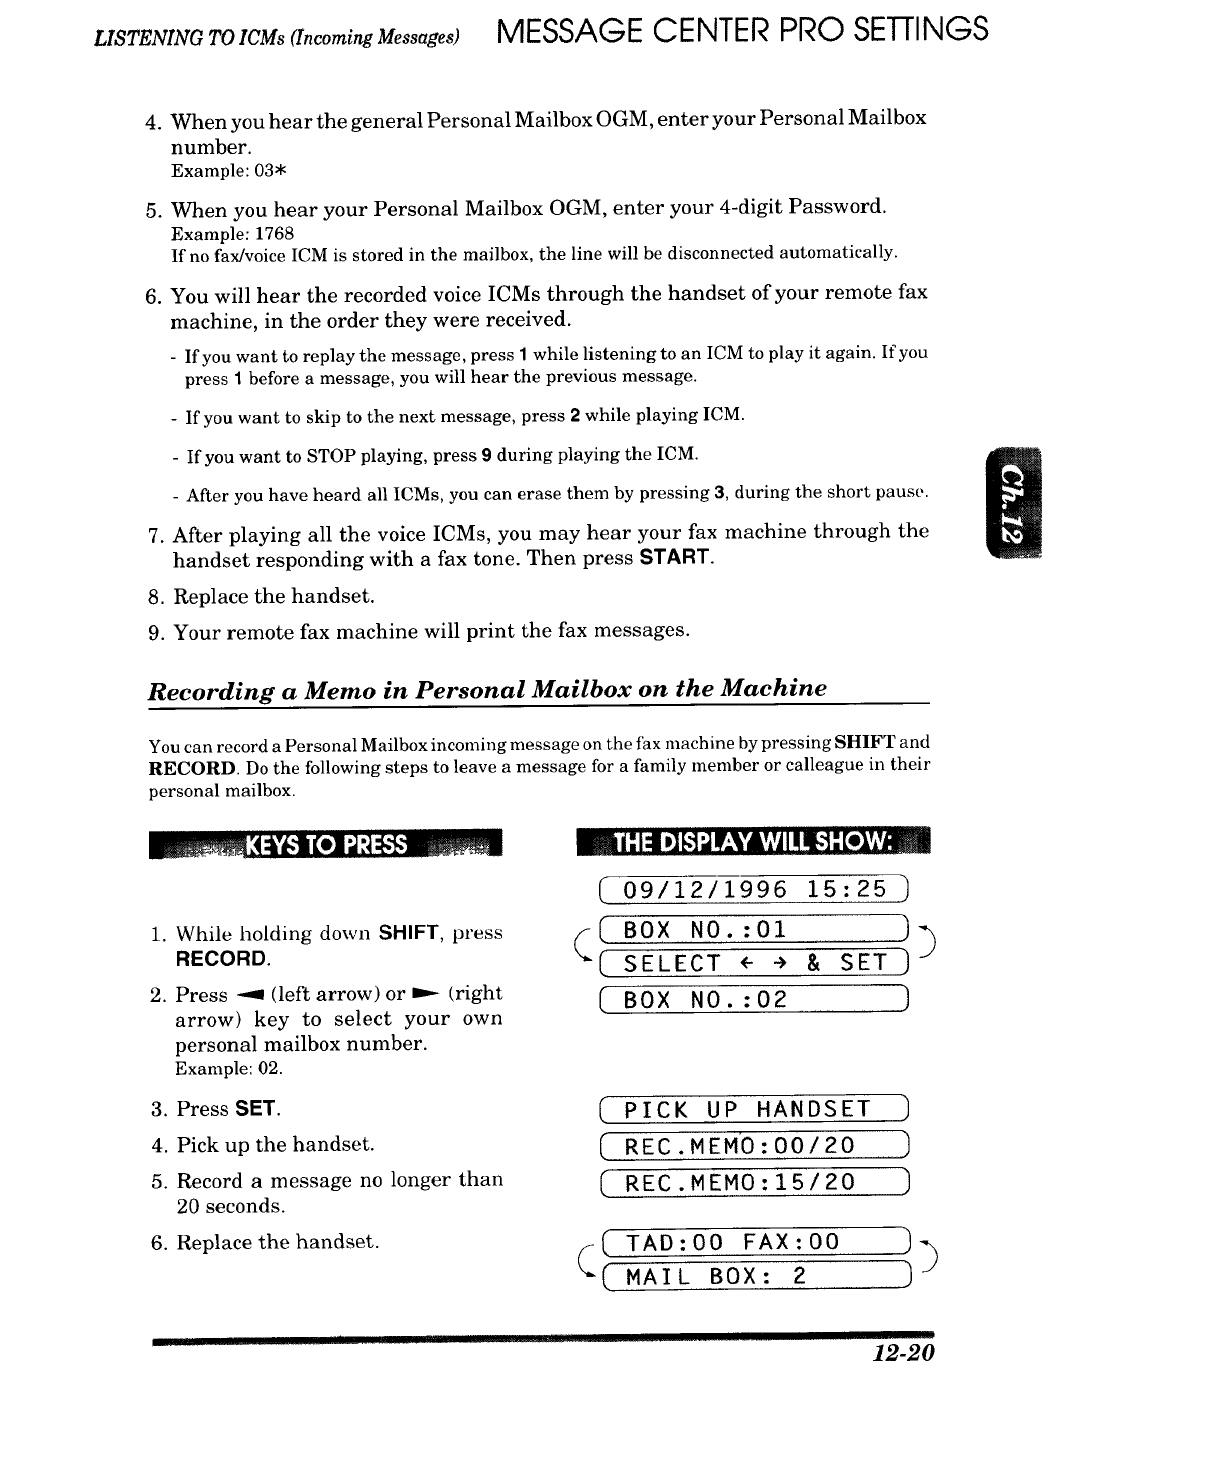
LISTENING TO IOMs [Incoming Messages] MESSAGE CENTER PRO SETTINGS
4. When you hear the general Personal Mailbox OGM, enter your Personal Mailbox
number.
Example: 03$
5. When you hear your Personal Mailbox OGM, enter your 4-digit Password.
Example: 1768
If no fax/voice ICM is stored in the mailbox, the line will be disconnected automatically.
6. You will hear the recorded voice ICMs through the handset of your remote fax
machine, in the order they were received.
- If you want to replay the message, press 1 while listening to an ICM to play it again. If you
press 1 before a message, you will hear the previous message.
- If you want to skip to the next message, press 2 while playing ICM.
- If you want to STOP playing, press 9 during playing the ICM.
- After you have heard all ICMs, you can erase them by pressing 3, during the short pause.
7. After playing all the voice ICMs, you may hear your fax machine through the
handset responding with a fax tone. Then press START.
8. Replace the handset.
9. Your remote fax machine will print the fax messages.
Recording a Memo in Personal Mailbox on the Machine
You can record a Personal Mailbox incoming message on the fax machine by pressing SHIFT and
RECORD. Do the following steps to leave a message for a family member or calleague in their
personal mailbox.
.
.
,
4.
5.
While holding down SHIFT, press
RECORD.
Press -_I (left arrow) or m-- (right
arrow) key to select your own
personal mailbox number.
Example: 02.
Press SET.
Pick up the handset.
Record a message no longer than
20 seconds.
6. Replace the handset.
i:141_ [,'t_lF=¥lkv,vlIIIII_']:[o),Y_
(09/12/1996 15:25 ]
( BOXNO.:01 ))(
"_( SELECT <" ÷ & SET)
[ Box No.:o2 ]
( PICK UP HANDSET ]
[ REC.MEMO:O0/20 ]
( REC.MEMO:15/20 ]
(I TAD:O0 FAX:O0 ]_
MAIL BOX: 2 )
.... I ..... I 12-20
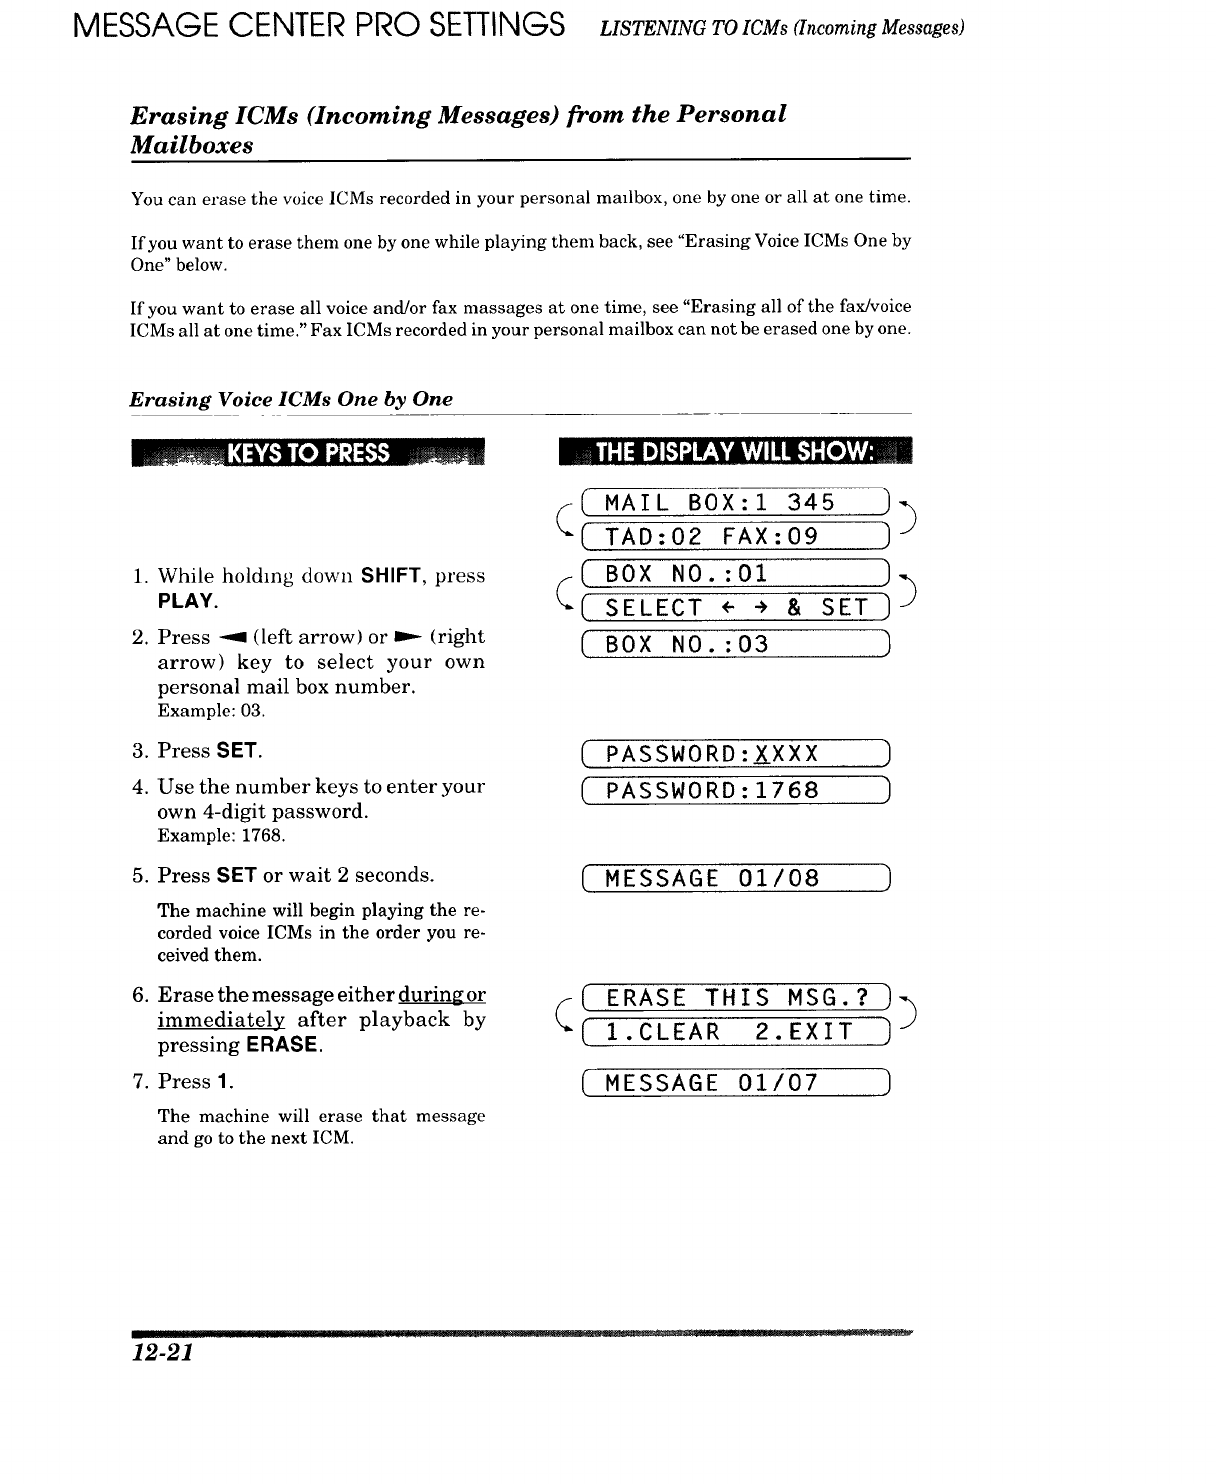
MESSAGE CENTER PRO SETTINGS LISTENING TO ICMs (Incoming Messages)
Erasing ICMs (Incoming Messages) from the Personal
Mailboxes
You can erase the voice ICMs recorded in your personal mmlbox, one by one or all at one time.
If you want to erase them one by one while playing them back, see "Erasing Voice ICMs One by
One" below.
If you want to erase all voice and/or fax massages at one time, see "Erasing all of the fax/voice
ICMs all at one time." Fax ICMs recorded in your personal mailbox can not be erased one by one.
Erasing Voice ICMs One by One
.
,
.
4.
While holding down SHIFT, press
PLAY.
Press --9 (left arrow) or =,-- (right
arrow) key to select your own
personal mail box number.
Example: 03.
Press SET.
Use the number keys to enter your
own 4-digit password.
Example: 1768.
5. Press SET or wait 2 seconds.
,
The machine will begin playing the re-
corded voice ICMs in the order you re-
ceived them.
Erase the message either during or
immediately after playback by
pressing ERASE.
7. Press 1.
The machine will erase that message
and go to the next ICM.
m!: 1:11e]_.'t_IF_'VAv,v!III_']: [e_,v,'J_m
(( .AT,.OX:l34s ))
(. TAD:02 FAX:09 )
([ BoxNo.:oi )3
CSELECT<-* a SET)-"
BOX NO.: 03 )
( PASSWORD:XXXX )
( PASSWORD: 1768 )
MESSAGE 01/08 )
(ERASE THIS MSG.? )_
([ I.C,EAR2.EXIT)
( MESSAGE01,'07 )
12-21
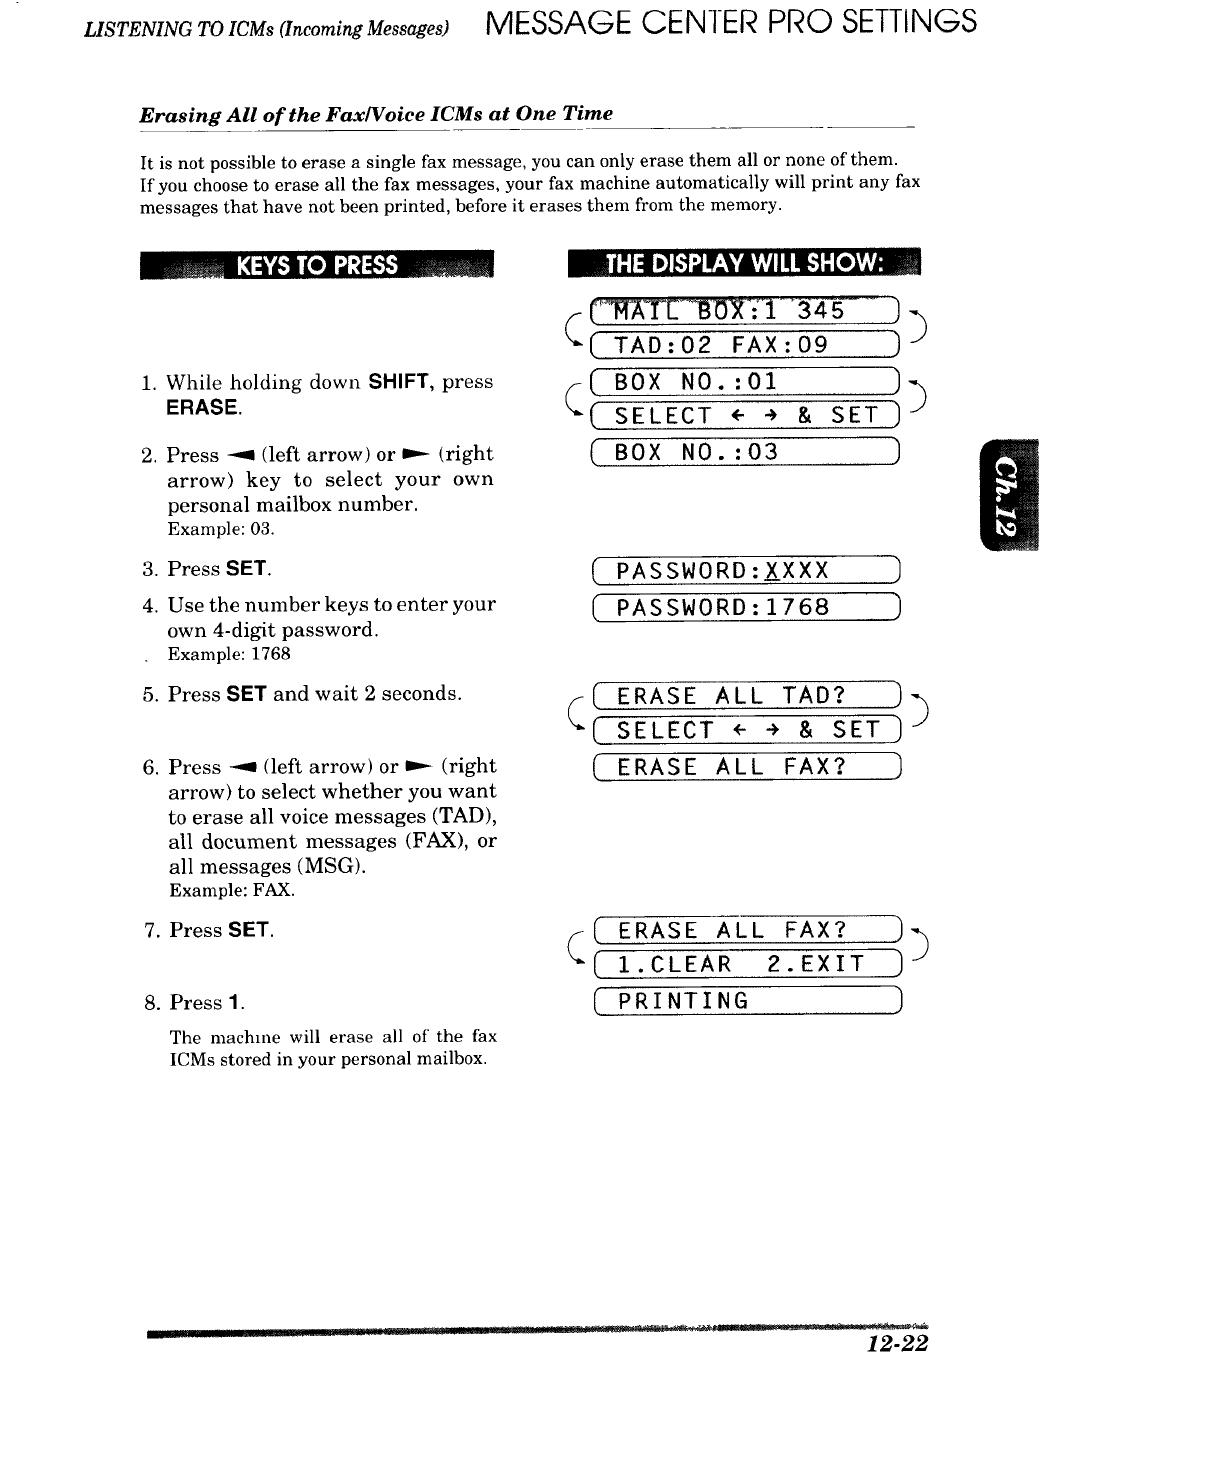
LISTENING TO ICMs (Incoming Messages) MESSAGE CENTER PRO SETTINGS
Erasing All of the Fax/Voice ICMs at One Time
It is not possible to erase a single fax message, you can only erase them all or none of them.
If you choose to erase all the fax messages, your fax machine automatically will print any fax
messages that have not been printed, before it erases them from the memory.
iI'I_ !_[,,']d]V;'VL17Alqii[,.',]],_ev]hT_I
.
.
.
4.
While holding down SHIFT, press
ERASE.
Press -9 (left arrow) or P-- (right
arrow) key to select your own
personal mailbox number.
Example: 03.
Press SET.
Use the number keys to enter your
own 4-digit password.
Example: 1768
5. Press SET and wait 2 seconds.
.Press _ (left arrow) or D._ (right
arrow) to select whether you want
to erase all voice messages (TAD),
all document messages (FAX), or
all messages (MSG).
Example: FAX.
7. Press SET.
8. Press 1.
The machine will erase all of the fax
ICMs stored in your personal mailbox.
(
"( TAD:02 FAX:09 )
(( BOXNO.:OZ ))
SELECT <- ÷ & SET )
( BOX NO.:03 )
(PASSWORD:XXXX ]
(PASSWORD:1168)
(( ERASE ALL TAD? )
( SELECT <" ") & SET ]
(ERASE ALL FAX? )
( ERASE ALL FAX? _
(( 1.CLEAR 2.EXIT )
[PRINTING )
12-22
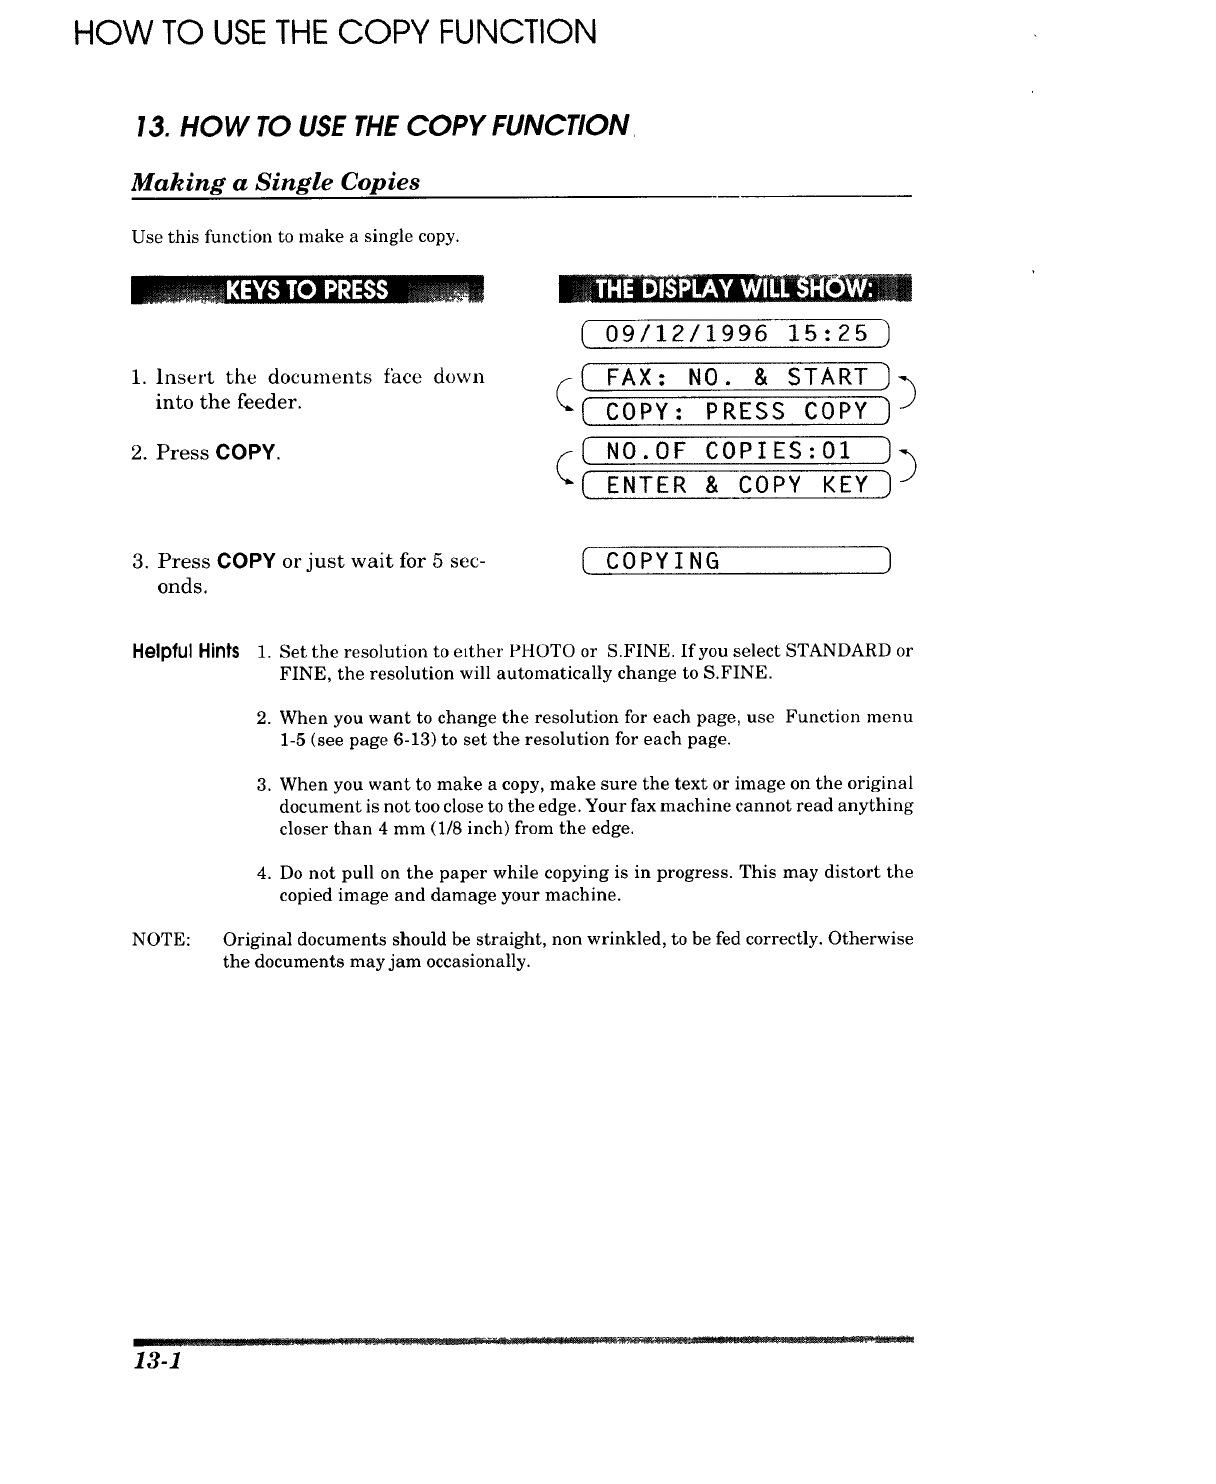
HOW TO USE THE COPY FUNCTION
13. HOW TO USE THE COPY FUNCTION
Making a Single Copies
Use this function to make a single copy.
1. lnsert the documents fhce down
into the feeder.
2. Press COPY.
(09/12/1996 15:25 ,I
_( FAX: NO. & START I)
( COPY: PRESS COPY 1
NO.OF COPIES:01 ]_
f
L[ ENTER & COPY KEY ] J
3. Press COPY or just wait for 5 sec-
onds.
COPYING
Helpful Hints
NOTE:
1. Set the resolution to e_ther PHOTO or S.FINE. If you select STANDARD or
FINE, the resolution will automatically change to S.FINE.
2. When you want to change the resolution for each page, use Function menu
1-5 (see page 6-13) to set the resolution for each page.
3. When you want to make a copy, make sure the text or image on the original
document is not too close to the edge. Your fax machine cannot read anything
closer than 4 mm (1/8 inch) from the edge.
4. Do not pull on the paper while copying is in progress. This may distort the
copied image and damage your machine.
Original documents should be straight, non wrinkled, to be fed correctly. Otherwise
the documents may jam occasionally.
13-1
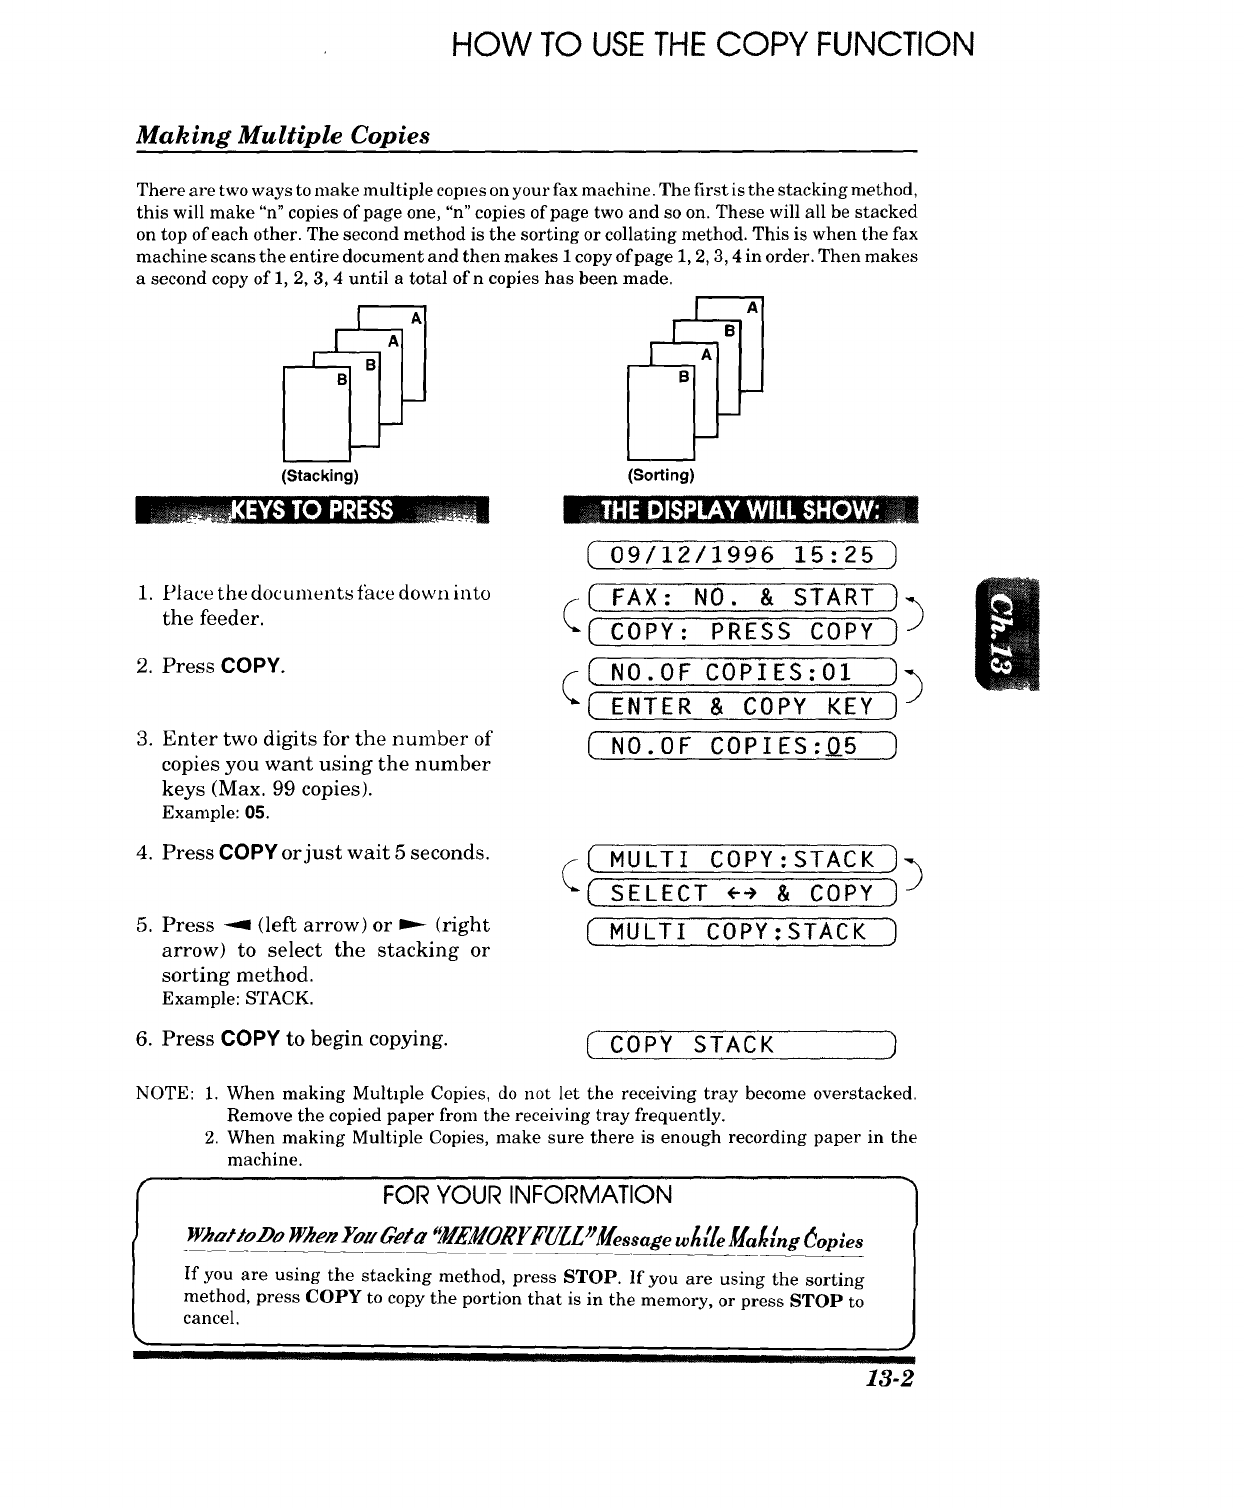
HOW TO USETHE COPY FUNCTION
Making Multiple Copies
There are two ways to make multiple copies on your fax machine. The first is the stacking method,
this will make "n" copies of page one, "n" copies of page two and so on. These will all be stacked
on top of each other. The second method is the sorting or collating method. This is when the fax
machine scans the entire document and then makes i copy of page 1, 2, 3, 4 in order. Then makes
a second copy of 1, 2, 3, 4 until a total ofn copies has been made.
(Stacking)
IIII III iii i ii ii i iiii ii
1. Place the documents thce down into
the feeder.
2. Press COPY.
3. Enter two digits for the nmnber of
copies you want using the number
keys (Max. 99 copies).
Example: 05.
(Sorting)
( o9/ 2/1996 )
(FAX: NO. & START )_
{( COPY: PRESS COPY
[ .oo coPiEs:ol ))
{( ENTER & COPY KEY )
NO.OF COP I ES :_0_5 )
4. Press COPY or just wait 5 seconds.
5. Press --_ (left arrow) or ,,,-- (right
arrow) to select the stacking or
sorting method.
Example: STACK.
(MULTI COPY: STACK )-%
(SELECT <--÷ & COPY _W
MULTI COPY: STACK
6. Press COPY to begin copying. COPY STACK
NOTE: 1. When making Mulhple Copies, do not let the receiving tray become overstacked.
Remove the copied paper from the receiving tray frequently.
2. When making Multiple Copies, make sure there is enough recording paper in the
machine.
rFOR YOUR INFORMATION "
If you are using the stacking method, press STOP. If you are using the sorting
method, press COPY to copy the portion that is in the memory, or press STOP to
cancel.
I!!!!!! I __ ]I ........... _[_!_ .......
13-2
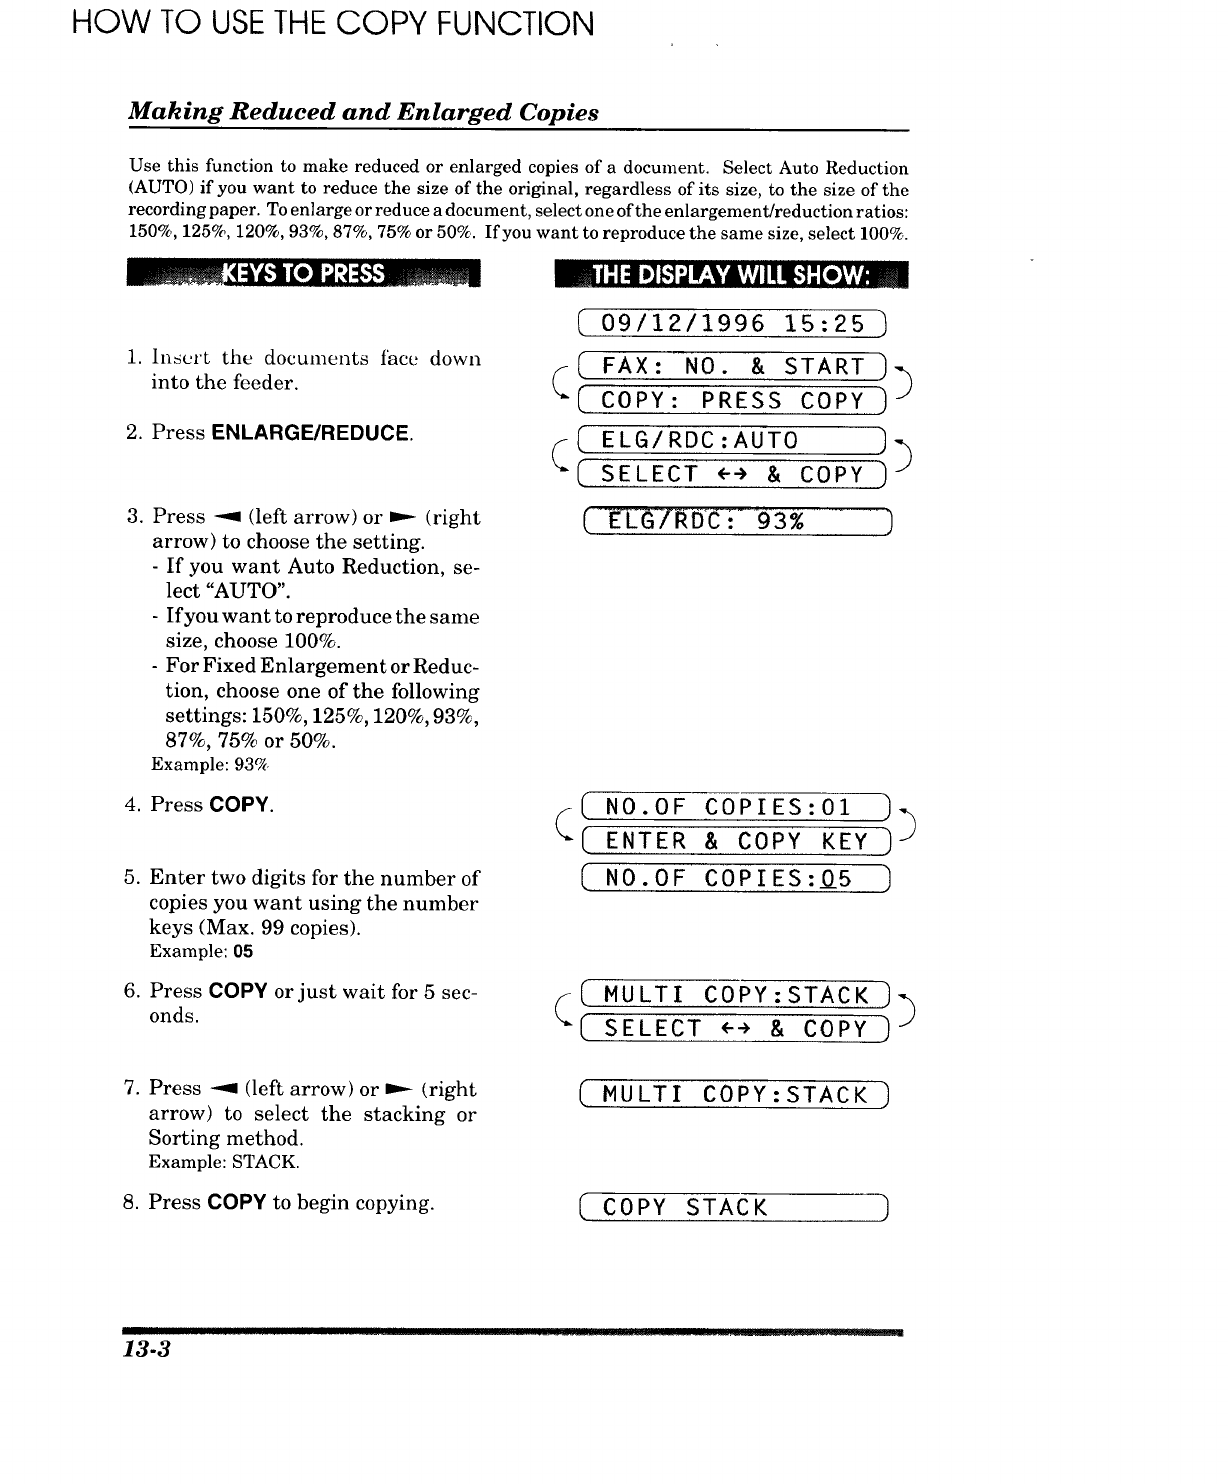
HOW TO USE THE COPY FUNCTION
Making Reduced and Enlarged Copies
Use this function to make reduced or enlarged copies of a document. Select Auto Reduction
(AUTO) if you want to reduce the size of the original, regardless of its size, to the size of the
recording paper. To enlarge or reduce a document, select one of the enlargement/reduction ratios:
150%, 125%, 120%, 93%, 87%, 75% or 50%. If you want to reproduce the same size, select 100%.
mmmmmmm[4_'+I _e] :j"_:b_ ml|:l:il_m_
1. Insert the documents fhce down
into the feeder.
2. Press ENLARGE/REDUCE.
(09/12/1996 15:25
I FAX: NO. & START ])
(( COPY: PRESS COPY )
(ELGIRDC :AUTO ]_
(C SELECT++ & COPY
3. Press -9 (left arrow) or _ (right
arrow) to choose the setting.
- If you want Auto Reduction, se-
lect "AUTO".
- Ifyouwant to reproduce the same
size, choose 100%.
- For Fixed Enlargement or Reduc-
tion, choose one of the following
settings: 150%, 125%, 120%, 93%,
87%, 75% or 50%.
Example: 93%
4. Press COPY.
5. Enter two digits for the number of
copies you want using the number
keys (Max. 99 copies).
Example: 05
_( NO.OF COPIES:01
C ENTER & COPY KEY +)_"
( NO.OF COPIES:05 ]
6. Press COPY or just wait for 5 sec-
onds. ( MULTI COPY:STACK ]]
(( SELECT <-->& COPY ]
7. Press --9 (left arrow) or ,_ (right
arrow) to select the stacking or
Sorting method.
Example: STACK.
8. Press COPY to begin copying.
( MULTI COPY:STACK ]
(COPY STACK
13-3 ........... I! ! nr11 .................................................

HOW TO USETHE COPY FUNCTION
will be cut off.
The selection you made under Function menu 5-6 (see page 7-6) will not affect
enlargements, but it will affect reductions, as follows: If the recording paper is
letter size, you can select a reduction ratio of 93%, 87%, or 75_. If it is A4 size, you
can select a reduction ratio of 93% or 87%, and if it is legal size, you can select 93%
only. (See page 7-6-8.)
13-4
PRINTING REPORTS AND LISTS
14. PRINTING REPORTSAND LISTS
You can print the following lists and reports under function item 3. PRINT REI'OR'I'S.
Level one Level two
function function Content Page
3. PRINTREPORTS
1. ACT.REPORT
2. ALLDIAL
The Activity Report lets you know
whether transmissions and incoming
faxes were received.
m. _
This is a list of the names and numbers
that are stored in One-Touch and Speed-
Dial memory, printed in One-Touch and
Speed-Dial number order.
The same as the All Dial list printed in
alphabetical order.
14-3
14-3,4
3. TEL.INDEX
This allows you to check the Cover 6-14
4. COVERPAGE Page format.
5. CALLBACKMSG 6-19
Used to check the Call Back message
format.
6. USEROPTIONS
The settings for FUNCTION 5 to 9
(USER OPTIONS, TEL OPTIONS,
SETUP SYSTEM, SETUP MSG CTR,
REMOTE FAX OPT and SETUP MC
PRO) are printed here.
You can choose whether the
Transmission Verification Report will
be printed after all faxes you send.
ON/OFF
The addressee and the amount of
occupied memory for items stored in
the memory are printed here.
7. XMITREPORT
8 MEMORYSTATUS
14-5
14-6
You can review calls you received by
9. CALLERID checking this list. 7-22
Other Reports
The following reports are printed automatically, for your information.
Help List (By pressing HELP on the control paneL) [See page 3-8.)
Polled Report
Delayed Transmission Report
Broadcast Report
Sequential Polling Report
Transmission Verification Report
14-1
HI_'II_I INq7 I_EP'UI_ Ib AND Llblb
All the reports and lists may be printed as follows:
•D • ._ ,"]'[olVIm.._
1. Press FUNCTION.
2. Press 3.
3. Press the number of the level two
function you wish to print.
Example: 1.ACT.REPORT.
4. Press START.
Activity Report Interval
( 09/12/1996 15:25 )
( I.TEMP.SETTINGS ]
( 3.PRINT REPORTS )
( 1.ACT.REPORT ]
(PRESS START KEY ]
(PRINTING
An Activity Report can be printed at certain intervals that you specify. You can set the journal
period to "OFF", "6 hours", "12 hours", "24 hours", "2 days". "4 days" or "7 days". The Activity
Report will list all outgoing and incoming faxes (only the last 30) during that period. The factory
default setting is OFF.
After the Activity Report has printed at the preset interval, the information will be deleted and
can not be recovered. However, at any time between these scheduled reports, you can manually
print the Activity Report and the information will remain.
NOTE: Ifyour Activity Report is not listing all your transactions, select a shorter interval period.
1. Press FUNCTION.
2. Press 7.
3. Press 3.
4. Press -9 (left arrowl or m,- [right
arrow) to choose the setting.
Example: 12 HOURS.
If you select seven days, you should choose
the base day of the week.
5. Press SET.
6. Enter the time to print in 24-hour
format using the number keys.
Example: 19:45_7:45P._.t.
7. Wait for two seconds.
8. Press STOP to exit.
I I
B j: 14 J,][.']_Ir:V&vivjIIII_']: [el';_,,_
(09/12/1996 15:25 ]
( I.TEMP.SETTINGS ,)
( 7.SETUP SYSTEM )
( 3.INTERVAL )
( ACT.RPT.:OFF )}
(SELECT ÷ ÷ & SET )
( EVERY 12 HOURS )
(START AT:_O:O0 )
( START AT:19:45 ,]
( 3.1NTERVAL ]
l I!l l I III lll_lllB 14-9
PRINTING REPORTS AND LISTS
ACTIVITY REPORT 1
TIME : 09/12/1996 19:45
NAME : BROTHER
FAX : 4155554444
TEL : 4155554445
DATE TIME FAX NO./NAME DURATION PAGE(S) RESULT COMMENT
09/12 10:00 BROTHER BOSTON 04:23 20 CV CA OK TX
09/12:10:10 NJ OFFICE O0 O0 BUSY TX
09/12 14:53 BROTHER BOSTON 48 01CV CA OK TX
BUSY
NG
CV
CA
POL
RET
: BUSY/NO RESPONSE
: POOR LINE CONDITION
: COVERPAGE
: CALL BACK MSG
: POLLING
: RETRIEVAL
Note : "TX" means Transmit, "RX" means Receive.
Printing the All Dial List
You can print a list of all One-Touch numbers and Speed-Dial numbers.
I ALL DIAL LIST ]
r
TIME : 09/12/I_D 15:a5
NAME : BROTHER
FAX : 4155554444
TEL : 4155554445
)NE-TOUCH DIAL
NUMBER
*01
*02
*03
*04
*O5
*30
FAX/TEL NUMBER
61-2018285881
234-5678
334-5566
14155551212
DESTINATION
FAX I AUSTRIAN OFFICE
TEL I ABC COMPANY
FAX HEAD OFFICE
FAX NJ OFFICE
GROUP
@:CHAIN
-14-3 |il! !11
PRINTING REPORTS AND LISTS
r
I ALL DIAL LIST I
TIME
NAME
FAX
TEL
: 09/12/1996 15:25
: BROTHER
: 4155554444
: 4155554445
SPEED DIAL
NUMBER
#01
I#o2@
._
FAX/TEL NUMBER DESTINATION
5892786 F/T BROWNEM.
1234567 I I W. COMPANY
03-256-1121 FAX TOKYO OFFICE
5555151 MANCHESTER
@:CHAIN
GROUP
(ALL DIAL LIST of FAX 1550MC)
Transmission Verification (Xmit) Report
The Transmission Verification Report can be used as proof that you sent a fax. It lists the name
or fax number of the receiving party, the time and date of transmission, and whether the
transmission was successful. The factory default setting is OFF.
OFF:
ON:
The report will be printed automatically only if an error occurs during transmission. If the
report says "Result: NG" then send all the pages again. If the report says "Result: Check
readability of transmitted page(s) 02, 05" then send only pages 2 and 5 again.
A report will be printed automatically. It is important to read the result of each report to
check that the transmission was successful.
1. Press FUNCTION.
2. Press 3.
3. Press 7.
4. Press --9 (left arrow_ el" .,,-- (right
arrow) to choose the setting.
Example: ON.
5. Press SET.
m i:I:IIm]Iz]_ IF;.,'&','JI!I,']:[e]_','_
I 09/12/1996 15:25 ]
( 1.TEMP.SETTINGS )
(3.PRINT REPORTS ]
(7.XMIT REPORT ]
[XMIT REPORT:OFF ])(-
"'[ SELECT <- ÷ & SET ]
( XMIT REPORT:ON ]
(7.XMIT REPORT ]
6. Press STOP to exit.
! I I!! !!!!l IIII P! lit I ._ !1!1..... i........ ,,_r'ql"_+
14.4
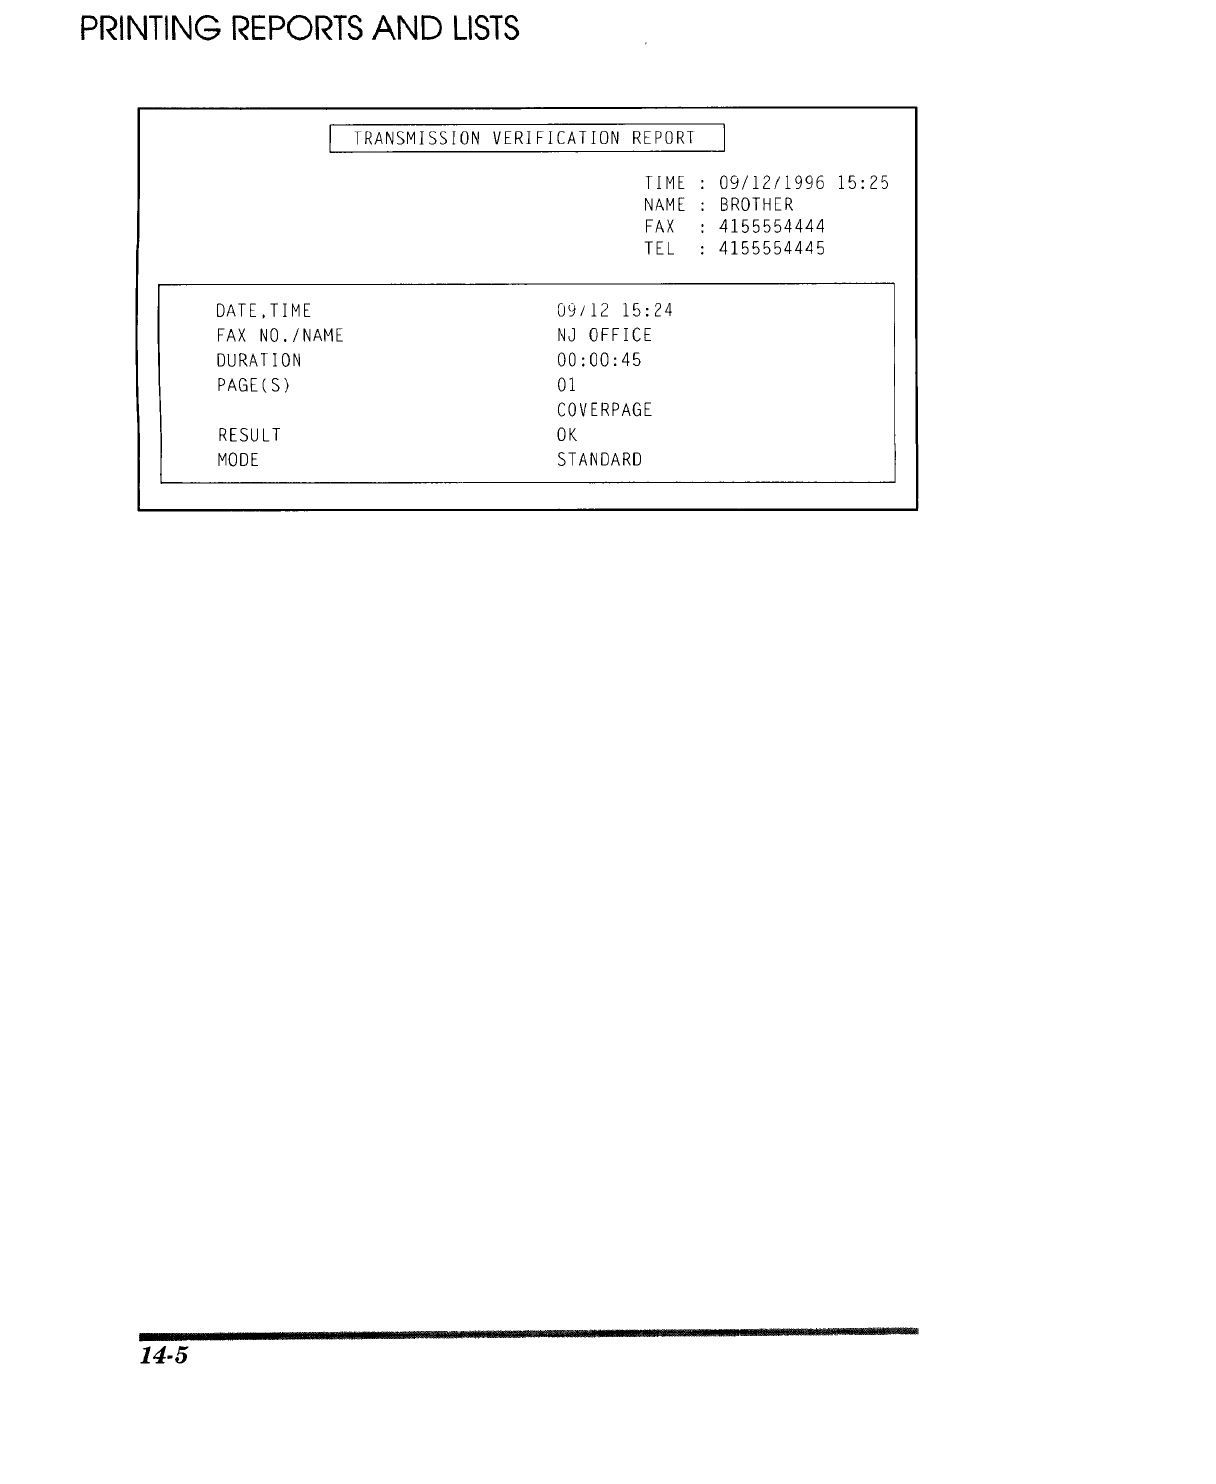
PRINTING REPORTS AND LISTS
ITRANSMISSION VERIFICATION REPORT I
TIME : 09/12/1996 15:25
NAME : BROTHER
FAX : 4155554444
TEL : 4155554445
DATE,TIME 09/12 15:24
FAX NO./NAME NJ OFFICE
DURATION 00:00:45
PAGE(S) 01
COVERPAGE
RESULT OK
MODE STANDARD
llllr
14-5
I Ir!lI r........ I if_l ir!llrll ,,, !, _, _p_r-, ..................... r! !i .. "............
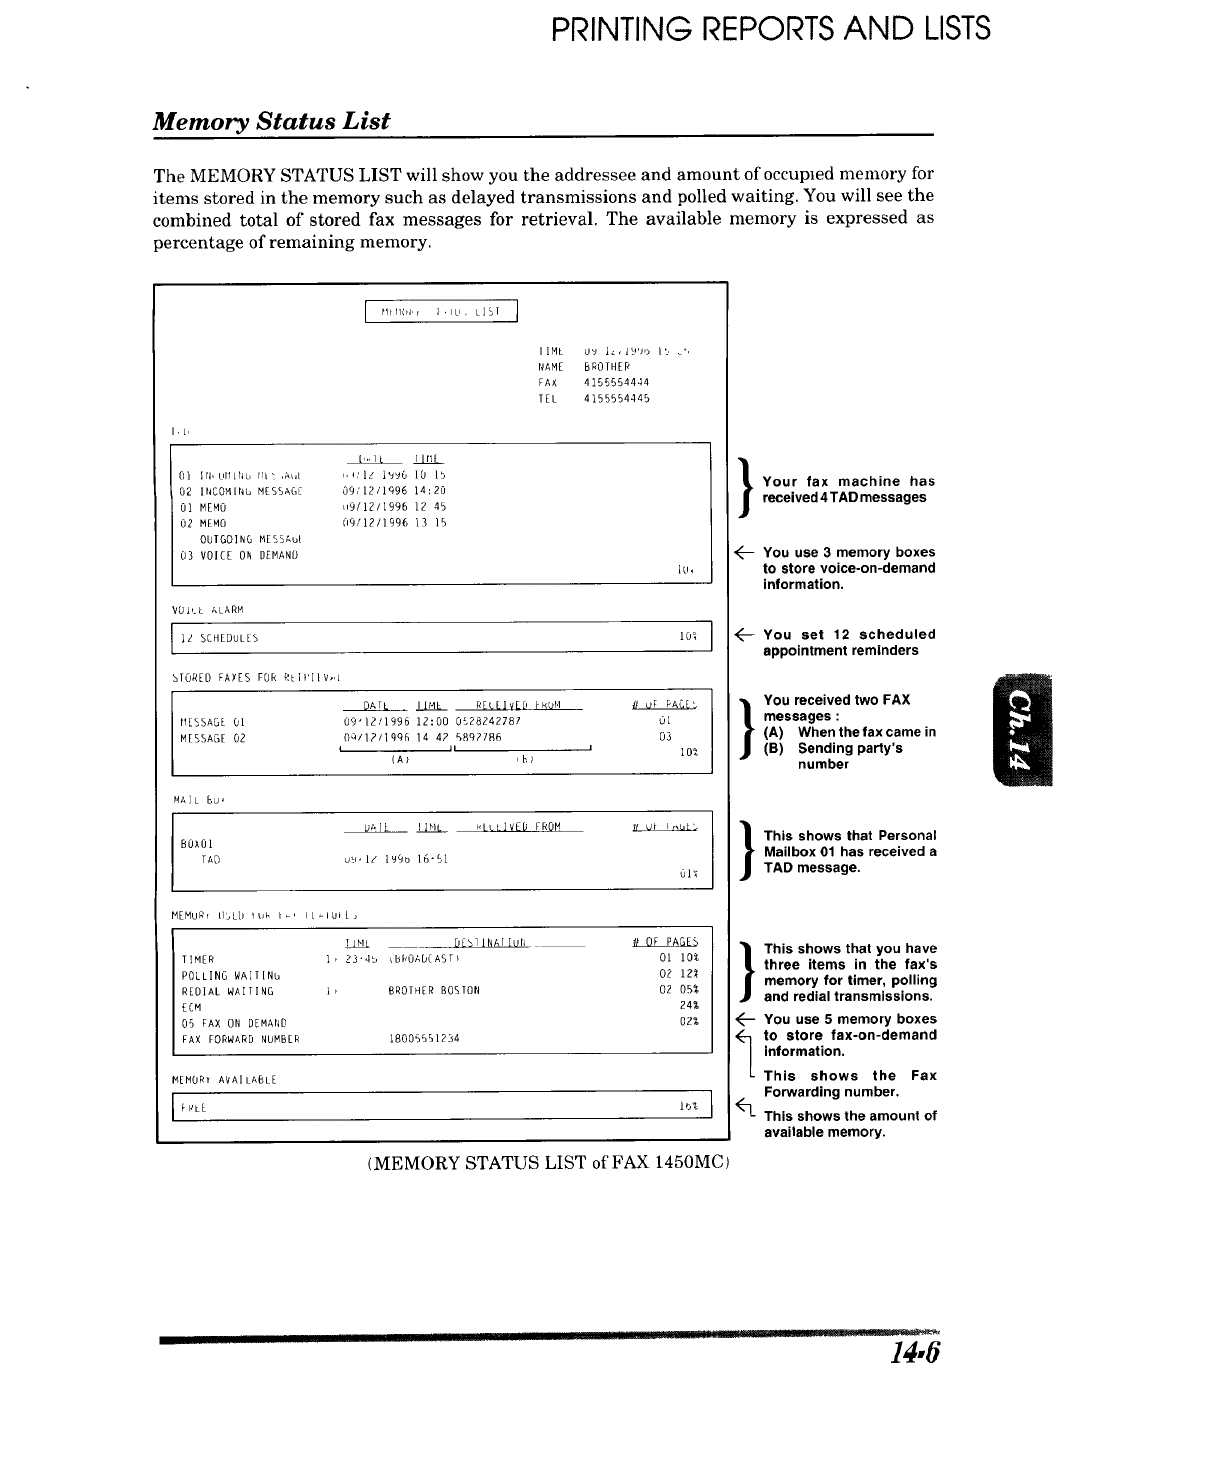
PRINTING REPORTS AND LISTS
Memory Status List
The MEMORY STATUS LIST will show you the addressee and amount of occupied memory for
items stored in the memory such as delayed transmissions and polled waiting. You will see the
combined total of stored fax messages for retrieval. The available memory is expressed as
percentage of remaining memory.
rllrl(u,r ],IU, L]B[ J
IIML Uv ]_lg'sr) it, _',
NAME BROTHER
FAX 4155554444
FEL 4155554445
l,L,
I,,,] LOI IR, UIIIrIL, rli_ ,A_d ,,i,'lz i_0 IO lb
02 INGOM[NL_ MESSAGE 09,'12/Iq96 14:20
01 MEMO LP9/1211996 12 45
02 MEMO 09/12/1996 13 15
OUIGO] NG ME SS,_bl
03 VOICE ON DEMAND
_u_
VOJLL ALARM
I iZ SCHEDULES 1O_ ]
310RED FAYES FOR _t_lrIIV,,L
IIHE RELEIVED FkOM
IIESSAGE Ol 09'12/1996 12:00 0B28242787 01
MESSAGE 02 OQ/I?/199R 14 42 5_92186 03
I l, JI0_,
CA1 ,B;
MAIL Bu,
l _ _ _LLLIVED FROM
BOXOl
TAD u_,IZ 199b 16"51
MEHuR_ tlbLO ltJ_, I_, IL-IbiL_
TIMER I, 23'4b tBROADCAST} 01 10%
POLLING WAIT[Nb 02 12t
REDIAL WAITING I_ BROTHER BOSTON 02 05%
ECM 24%
05 FAX ON DEMAND 02%
FAX FORWARD NUMBER 18006551234
MEMORY AVAILABLE
I_LE 1b% I
(MEMORY STATUS LIST of FAX 1450MC)
Your fax machine has
received 4TAD messages
You use 3 memory boxes
to store voice-on-demand
information.
<--- You set 12 scheduled
appointment reminders
You received two FAX
messages :
(A) When the fax came in
(B) Sending party's
number
This shows that Personal
Mailbox 01 has received a
TAD message.
This shows that you have
three items in the fax's
memory for timer, polling
and redial transmissions.
<--- You use 5 memory boxes
_. o store fax-on-demand
information.
This shows the Fax
Forwarding number.
L
_- This shows the amount of
available memory.
!1II] ir llln .__.]rl[! "" T-_ :: ":........ :_
14,fi
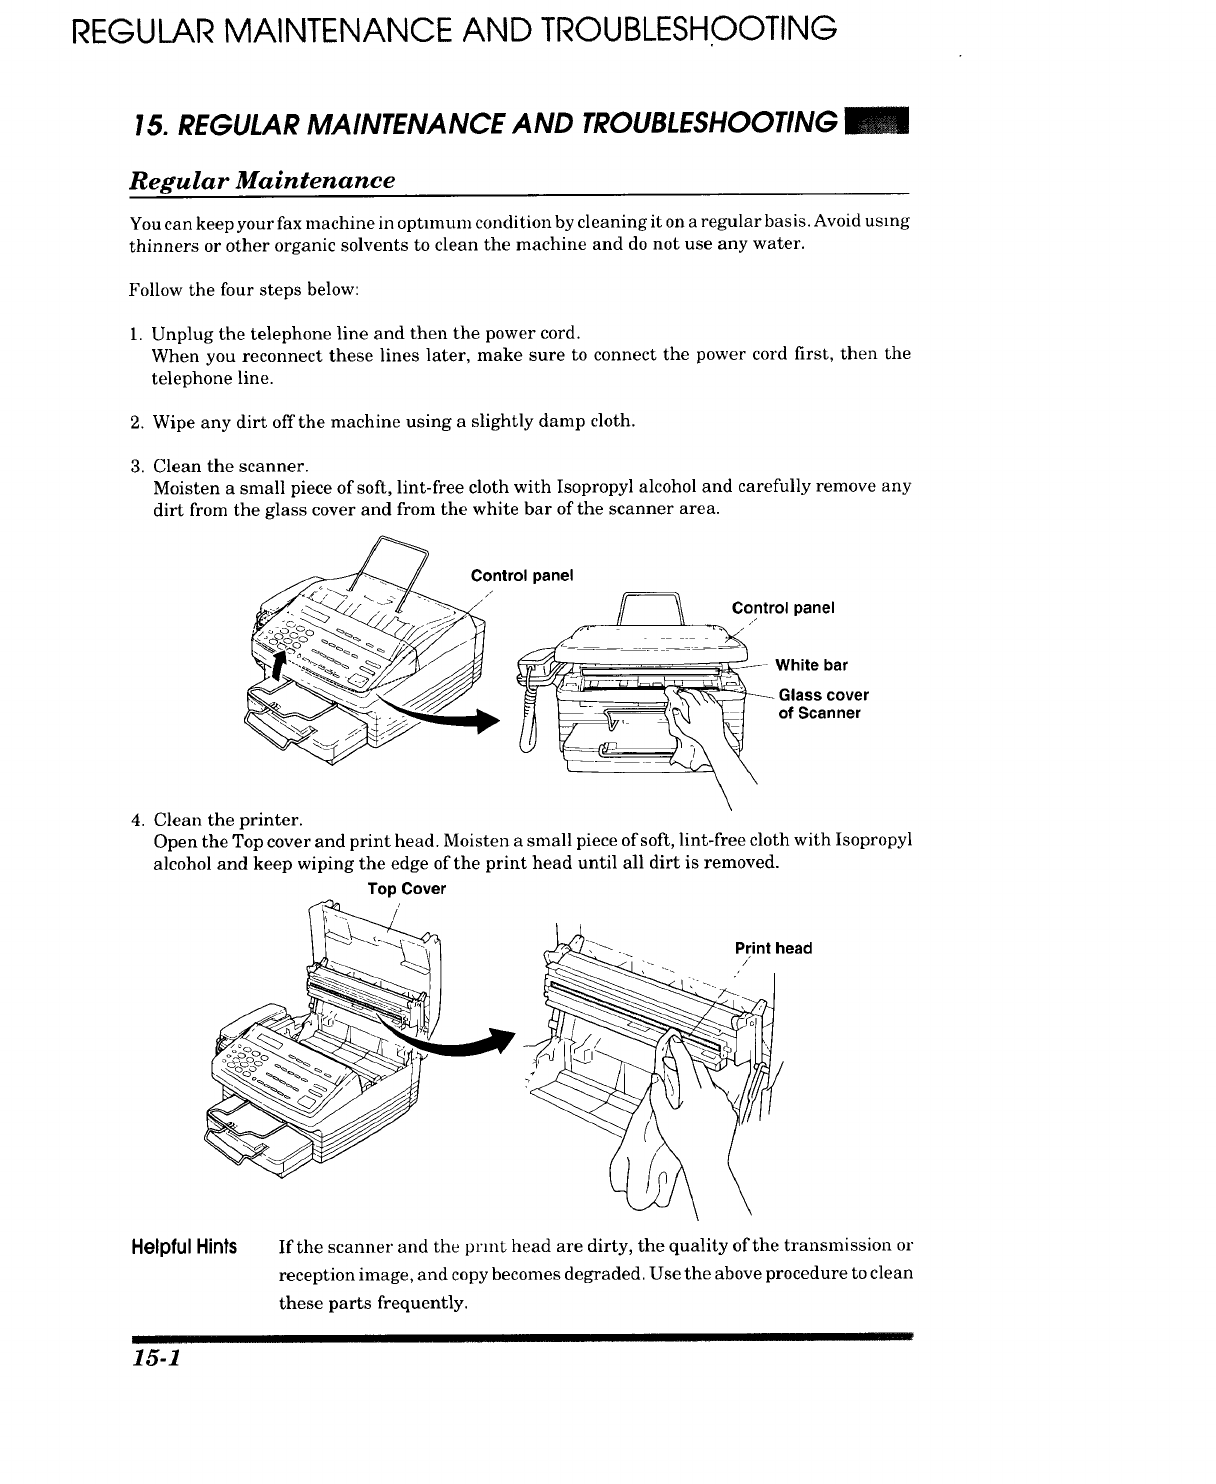
REGULAR MAINTENANCE AND TROUBLESHOOTING
15. REGULAR MAINTENANCE AND TROUBLESHOOTING
Regular Maintenance
You can keep your fax machine in optlmunl condition by cleaning it on a regular basis. Avoid using
thinners or other organic solvents to clean the machine and do not use any water.
Follow the four steps below:
1. Unplug the telephone line and then the power cord.
When you reconnect these lines later, make sure to connect the power cord first, then the
telephone line.
2. Wipe any dirt offthe machine using a slightly damp cloth.
3. Clean the scanner.
Moisten a small piece of soft, lint-free cloth with Isopropyl alcohol and carefully remove any
dirt from the glass cover and from the white bar of the scanner area.
Control panel
/_ Control panel
,/
_ _'_- White bar
_-_ _ °Gfl_SSaCn°: rer
4. Clean the printer.
Open the Top cover and print head. Moisten a small piece of soft, lint-free cloth with Isopropyl
alcohol and keep wiping the edge of the print head until all dirt is removed.
Top Cover
/'
Helpful Hints If the scanner and the print head are dirty, the quality of the transmission or
reception image, and copy becomes degraded. Use the above procedure to clean
these parts frequently.
-15-1
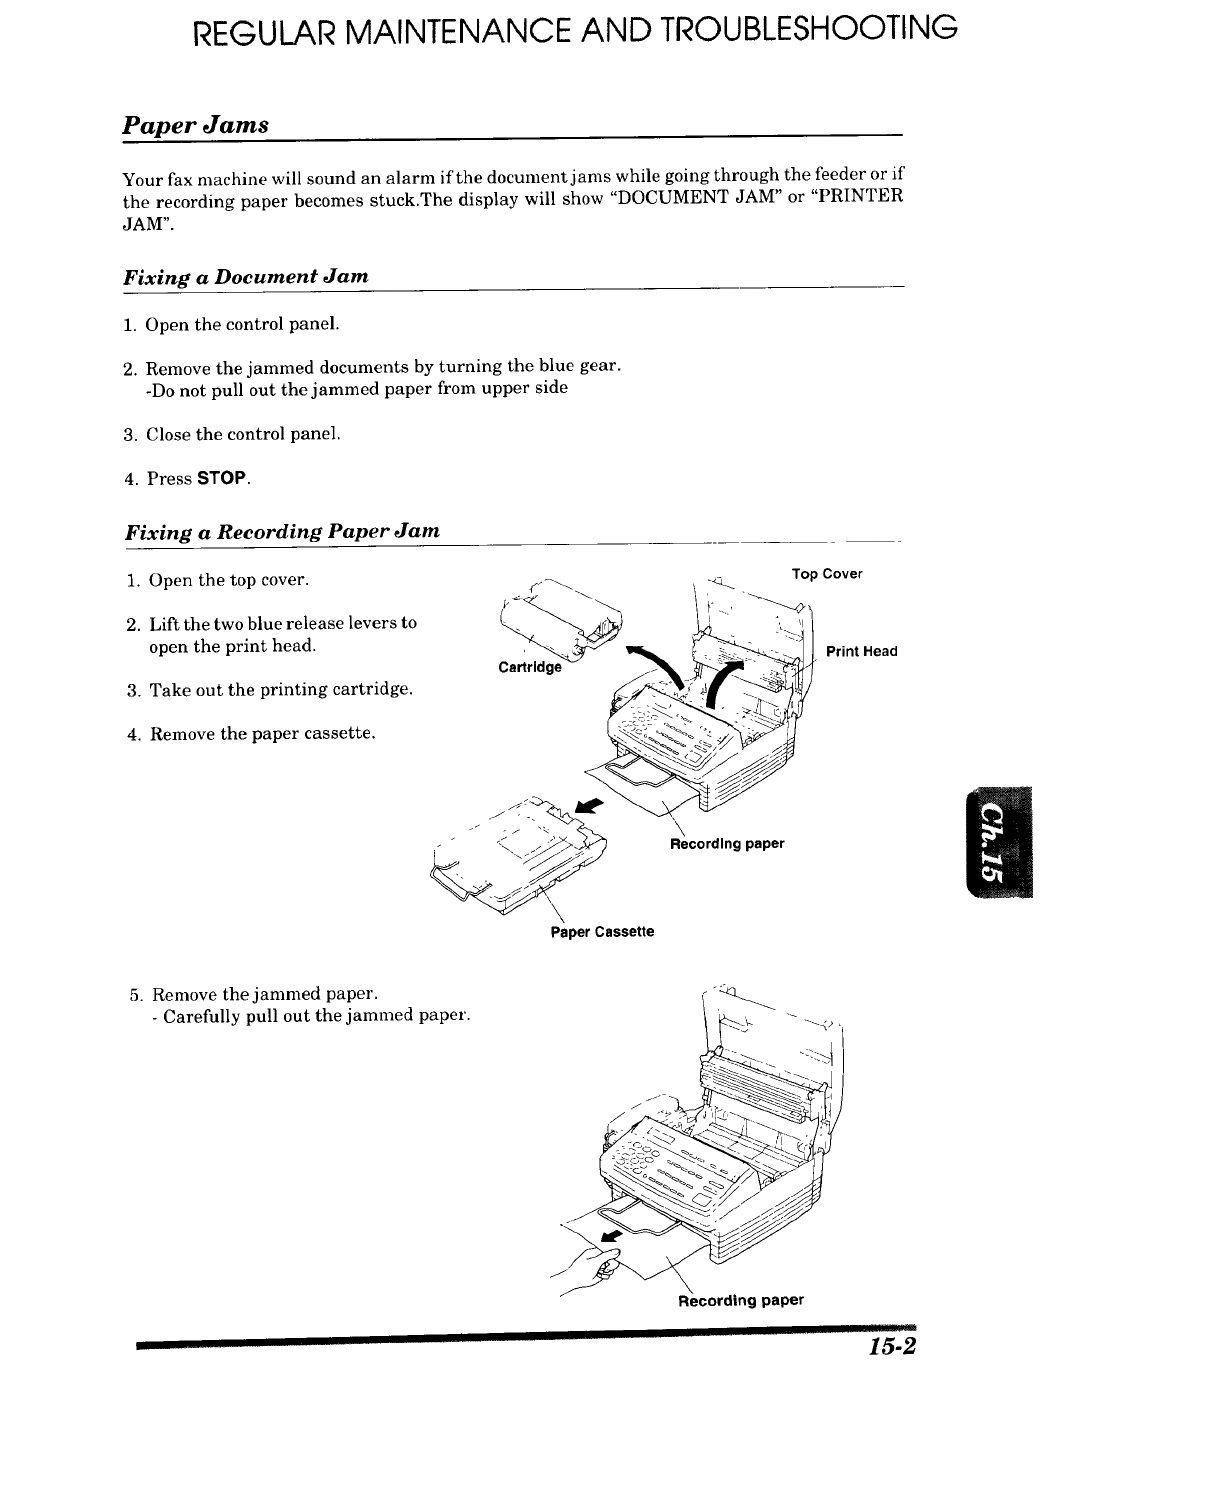
REGULAR MAINTENANCE AND TROUBLESHOOTING
Paper Jams
Your fax machine will sound an alarm if the document jams while going through the feeder or if
the recording paper becomes stuck.The display will show "DOCUMENT JAM" or "PRINTER
JAM".
Fixing a Document Jam
1. Open the control panel.
2. Remove the jammed documents by turning the blue gear.
-Do not pull out the jammed paper from upper side
3. Close the control panel.
4. Press STOP.
Fixing a Recording Paper Jam
1. Open the top cover.
2. Lift the two blue release levers to
open the print head.
3. Take out the printing cartridge.
4. Remove the paper cassette.
Top Cover
Print Head
5. Remove the jammed paper.
- Carefully pull out the jammed paper.
Recording paper
-I5-2
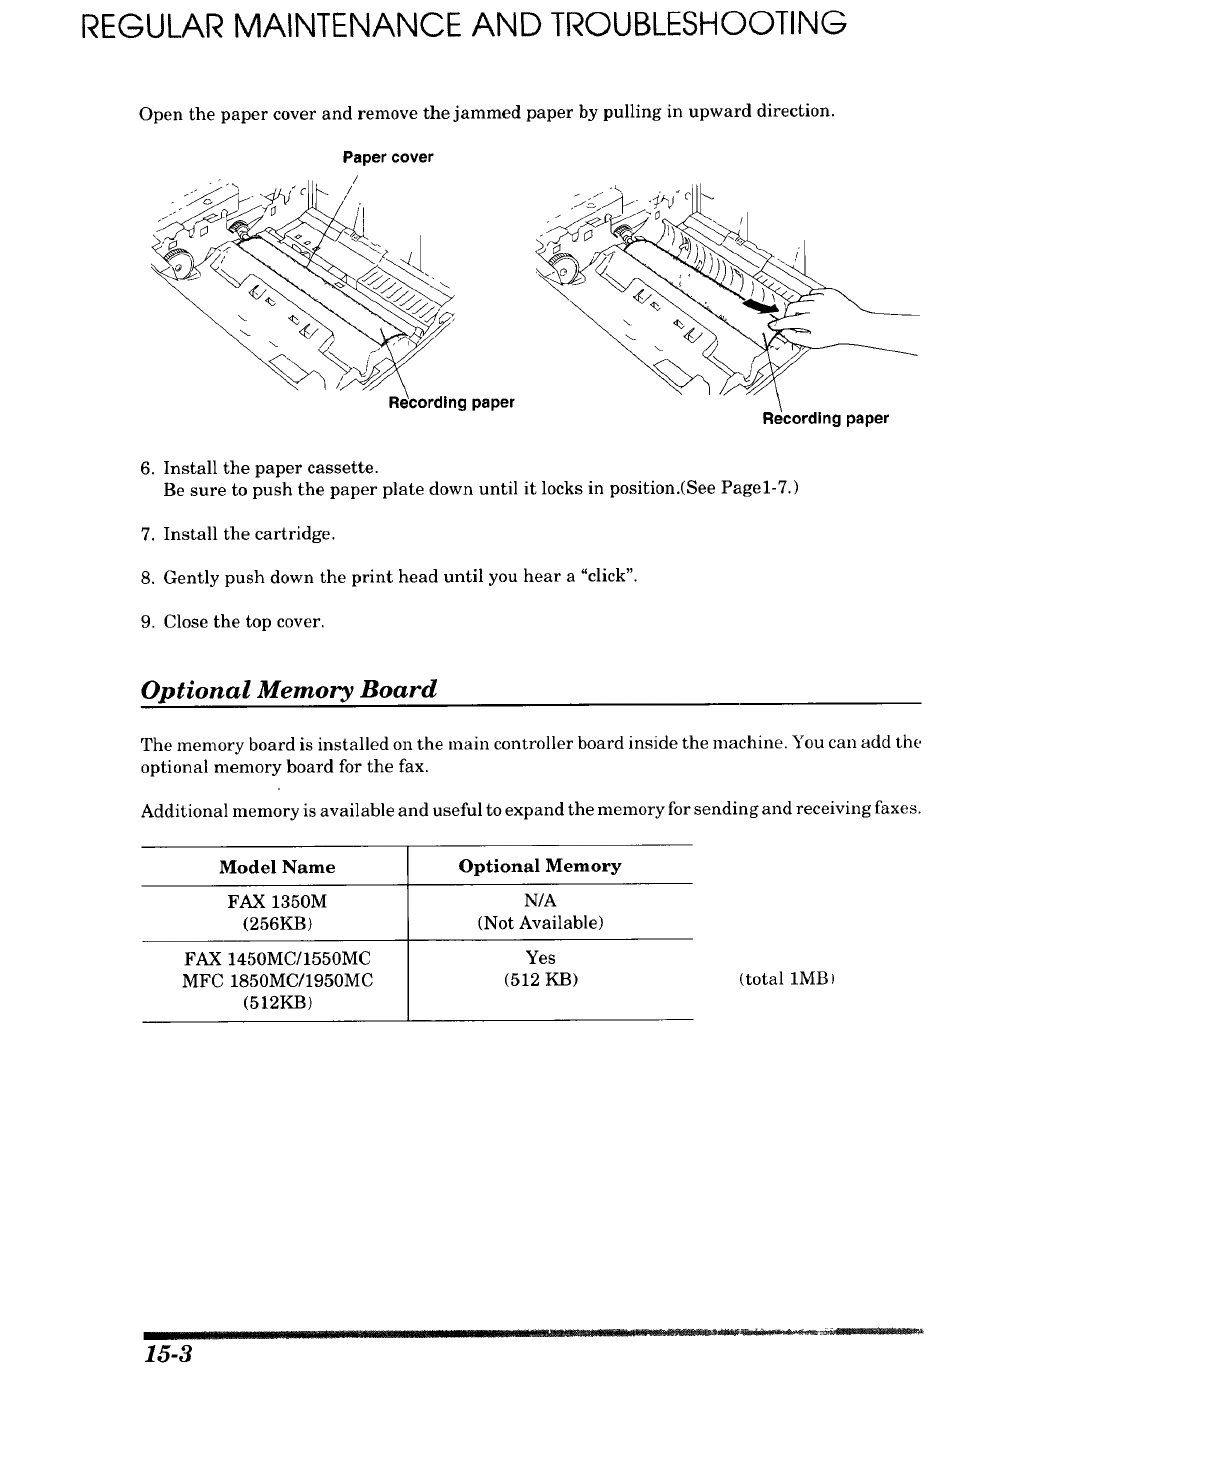
REGULAR MAINTENANCE AND TROUBLESHOOTING
Open the paper cover and remove the jammed paper by pulling in upward direction.
Paper cover
/
/
paper ig paper
6. Install the paper cassette.
Be sure to push the paper plate down until it locks in position.(See Page1-7.)
7. Install the cartridge.
8. Gently push down the print head until you hear a "click".
9. Close the top cover.
Optional Memory Board
The memory board is installed o11the main controller board inside the machine. You can add the
optional memory board for the fax.
Additional memory is available and useful to expand the memory for sending and receiving faxes.
Model Name Optional Memory
FAX 1350M N/A
(256KB) (Not Available)
FAX 1450MC/1550MC Yes
MFC 1850MC/1950MC (512 KB)
(512KB)
(total 1MB)
!1
15-3
! II[I !' I_P
REGULAR MAINTENANCE AND TROUBLESHOOTING
Troubleshooting
You may occasionally encounter a problem with your fax machine or telephone line. If this
happens, your fax machine often identifies the problem and displays an error message. Refer to
the following list when you see an error message on the display. If additional help is needed,
please contact the following Customer Service numbers :
U.S.A 1-800-284-4FAX (4329)
1-908-356-8880 (Extension 7920)
Canada 1-800-853-6660 (CallingfromwithinCanada,8:00AM-8:0OPME.S.T.)
Error Messages
Error messages are listed below in alphabetical order.
_] (CHANGE CARTRIDGE]
(CLEAN UP SCANNER1
(COMM. ERROR
(CONNECTION FAIL
The printing cartridge has run out. Replace the
used cartridge with a new one. (See page 1-6.)
The scanner is dirty. Clean the scanner. (See
page 15-1.)
You encountered a communications error that
resulted from a poor quality phone line. Try the
call again.
You requested the polling function even though
the machine you called does not have the polling
feature.
(COVER OPEN
[-_ (DISCONNECTED ]
(DOCUMENT JAM )
(MACHINE ERROR XX)
[_] _(PRESS STOP KEY ] _
The top cover or print head cover was not com-
pletely closed. Please check them.
The telephone line was disconnected by the other
party during the communication. Try calling the
other party to see what happened.
Your documents were not inserted properly, or
the documents were not fed properly, or the
documents were too long.
Open the control panel and remove the docu-
ments. (See page 15-2) Then close the control
panel, press STOP and insert the documents
again, adjusting the guides on either side of the
document, and try sending the fax again.
Original documents should be straight and non-
wrinkled, to be fed correctly. Otherwise, the
documents may jam occasionally.
Cut the power off. Then contact the Customer
Service number listed on page 15-5.
,,mm, ! ! !! .... !!!! III!1 ..._.__LL ..... ._AL_L_
15-4
REGULAR MAINTENANCE AND TROUBLESHOOTING
(NO RESPONSE/BUSY1
_NOT REGISTERED ]
The number you called does not answer or is busy.
You also may have reached a number that is not
connected to a fax machine. Check the number
and try again.
Check that you have the correct number and
dialed it correctly. Try to call the number from a
regular telephone to make sure it is in service.
The One-Touch key or Speed-Dial number you
pressed has no number assigned to it. You need to
program a phone number. (See page 4-6~8)
[_ [PAPER EMPTY ]
(PRINTER JAM )
Other Problems
There is no more paper. It is also possible that the
paper cassette is not properly installed. Refill the
paper or correct the position of the paper cassette.
The recording paper is jammed in the printing
area. Make sure your fax machine is on a surface.
That is flat, level and stable.
Remove the jammed paper. (See page 15-2-3)
Condensed Print and Horizontal Streaks Cut Off Top and Bottom of Sentences
This is usually caused by a bad connection, interference or static on the phone line. Make a copy.
If the copy is fine, the machine is OK. Try to receive from other parties and try your machine on
another phone line. Have the phone line checked by the telephone company.
Cover Page Comment Always Prints "Please Call"
The Cover Page report is only a sample of the format and always prints "Please Call". The
comment you programmed will be generated at the receiving machine.
Dialing Does Not Work
Check for a dial tone. Change TONE/PULSE setting. Check all telephone line connections:
telephone line from wall jack to LINE jack on fax machine and make sure curled handset cord is
not in EXTjack. Check power cord connection. Send a manual fax (press HOOK or lift handset),
wait to hear fax receiving tones and press START.
Fax Machine Does Not Answer When Called
Make sure the fax machine is not in MANUAL mode (AUTO and Ffr lights out). Check it is in
the correct receiving mode for your setup (either AUTO, Ffr or TAD/Message Center). Check for
a dial tone. If possible, call your fax machine to hear what is happening.
No Dial Tone on the Handset
Press HOOK. If no dial tone, check telephone line connections at fax machine and wall jack.
Connect a regular telephone into the wall jack to see if the phone line is working.
Poor Transmitting Quality
Iffaxes you send are hard to read at the receiving machine, try changing your resolution to FINE
or SUPERFINE. Also, chean your scanner glass cover and white pressure bar.
Vertical Black Lines When Receiving
The print head on your machine may be dirty or the sender's scanner may be dirty. Make a copy,
if it is the same, clean your print head with isopropyl alcohol and a lint-free cloth. The print head
is about 9 X 1/2 inches and is gold in color with triangular markings. (See page 15-1.)
15-5
REGULAR MAINTENANCE AND TROUBLESHOOTING
Vertical Black Lines When Sending
Make a copy. If the copy is the same, the scanner area is dirty. Lift the control panel and look in
the front of the machine in the document path. Use isopropyl alcohol and a lint-free cloth. Clean
the glass cover (about 9 X 1/2 inches) below and the white metal pressure bar (same size) found
inside the cover above it. (See page 15-1.)
lU
15-6
IMPORTANT INFORMATION
16. IMPORTANT INFORMATION
Standard Telephone and FCC Notices (Applies only to 120V model)
These notices are in effect on models sold and used in the U.S.A.
This equipment is hearing-aid compatible.
When programming emergency numbers and/or making test calls to emergency numbers:
• Remain on the line and briefly explain to the dispatcher the reason for the call
before hanging up.
• Perform such activities in the off-peak hours, such as early morning or late evening.
This equipment complies with Part 68 of FCC Rules. On the rear panel of this equipment is a label
that contains, among other information, the FCC Registration Number and Ringer equivalence
Number (REN) for this equipment. You must, upon request, provide this information to your
telephone company.
You may safely connect this equipment to the telephone network by means of a standard modular
jack, USOC RJllC.
An FCC compliant telephone cord and modular plug is provided with this equipment. This
equipment is designed to be connected to the telephone network or premises wiring using a
compatible modular jack which is Part 68 compliant.
See 1-10 for details.
The REN is useful to determine the quantity of devices you may connect to your telephone line
and still have those devices ring when your telephone number is called. In most, but not all areas,
the sum of the RENs of all devices connected to one line should not exceed five (5). To be certain
of the number of devices you may connect to your line, as determined by the REN, you should
contact your local telephone company to determine the maximum REN for your calling area.
If your IntelliFAX1350M/1450MC/1550MC and MFC1850MC/1950MC damages the telephone
network, the telephone company may discontinue your service temporarily. If possible, they will
notify you in advance. But if advanced notice is not practical, you will be notified as soon as
possible. You will be informed of your right to file a complaint with the FCC.
Your telephone company may make changes to its facilities, equipment, operations or procedures
that could affect the proper functioning of your equipment. If they do, you will be notified in
advance to give you an opportunity to maintain uninterrupted telephone service.
If you experience trouble with this IntelliFAX1350M/1450MC/1550MC and MFC1850MC/
1950MC, please contact the manufacturer's authorized service agency for information on
obtaining service or repair. The telephone company may ask that you disconnect this equipment
from the network until the problem has been corrected or until you are sure that the equipment
is not malfunctioning.
If you are not able to solve a problem with your fax machine, contact Brother service personnel
at 1-800-284-4FAX (U.S.A. Only).
1-800-284-4329 (U.S.A. Only)
1-800-853-6660 (CANADA Only)
16-1
IMPORTANT INFORMATION
Warning
For protection against the risk of electrical shock, always disconnect all cables from the wall outlet
before servicing, modifying or installing the equipment.
This equipment may not be used on coin service lines provided by the telephone company nor
connected to party lines.
This equipment has been tested and found to comply with the limits for a Class B digital device,
pursuant to Part 15 of the FCC Rules. These limits are designed to provide reasonable protection
against harmful interference in a residential installation. This equipment generates, uses, and
can radiate radio frequency energy and, if not installed and used in accordance with the
instructions, may cause harmful interference to radio communications. However, there is no
guarantee that interference will not occur in a particular installation. If this equipment does
cause harmful interference to radio or television reception, which can be determined by turning
the equipment offand on, the user is encouraged to try to correct the interference by one or more
of the following measures:
• Re-orient or relocate the receiving antenna.
•Increase the separation between the fax equipment and the receiver.
• Connect the fax equipment on a separate circuit.
• Consult the dealer or an experienced radiofrV technician for help.
Caution
Use of controls, adjustments or performance of procedures other than those specified in ttus
manual may result in hazardous invisible radiation exposure.
Brother cannot accept any financial or other responsibilities that may be the result of
your use of this information, including direct, special or consequential damages.
There are no warranties extended or granted by this document.
The serial number may be found on the label affixed to the back of the unit. For your convenience,
note the number below and retain this owner's manual to serve as a permanent record of your
purchase, in the event of a theft or fire, or for future reference.
MODEL NO. IntelliFAX1350M/1450MC/1550MC
and MFC 1850MC/1950MC SERIAL NO.
NAME OF DEALER
DATE OF PURCHASE
- -- 16-2
IIViHUN I/kiN I IIXII-UI, IVIAI ION
Important Safety Instructions
1. Read all of these instructions.
2. Save them for later reference.
3. Follow all warnings and instructions marked on the product.
4. Unplug this product from the wall outlet before cleaning. Do not use liquid or aerosol cleaners.
Use a damp cloth for cleaning.
5. Do not use this product near water.
6. Do not place this product on an unsuitable cart, stand, or table. The product may fall, causing
serious damage to the product.
7. Slots and openings in the cabinet and the back or bottom are provided of ventilation; to ensure
reliable operation of the product and to protect it from overheating, these openings must not
be blocked or covered. The openings should never be blocked by placing the product on a bed,
sofa, rug, or other similar surface. This product should never be placed near or over a radiator
or heater. This product should not be placed in a built-in installation unless proper
ventilation is provided.
8. This product should be operated from the type of power source indicated on the label. If you
are not sure of the type of power available, consult your dealer or local power company.
9. This product is equipped with a 3-wire grounding type plug, a plug having a third (grounding)
pin. This plug will only fit into a grounding-type power outlet. This is a safety feature. If you
are unable to insert the plug into the outlet, contact your electrician to replace your obsolete
outlet. Do not defeat the purpose of the grounding-type plug.
10. Do not allow anything to rest on the power cord. Do not locate this product where persons will
walk on the cord.
11. If an extension cord is used (See page 1-10.) with this product, make sure that the total
ampere ratings on the products plugged into the extension cord do not exceed the extension
cord ampere rating. Also, make sure that the total of all products plugged into the wall outlet
does not exceed 15 amperes (U.S.A. only).
12. Never push objects of any kind into this product through cabinet slots as they may touch
dangerous voltage points or short out parts resulting in a risk of fire or electric shock. Never
spill liquid of any kind on the product.
13. Do not attempt to service this product yourself, as opening or removing covers may expose
you to dangerous voltage points or other risks. Refer all servicing to service personal at 1-800-
284-4FAX (4329) (USA), 1-800-853-6660 (CANADA).
14. Unplug this product from the wall outlet and refer servicing to qualified service personnel
under the following conditions:
A. When the power cord or plug is damaged or frayed.
B. If liquid has been spilled into the product.
C. If the product has been exposed to rain or water.
D. If the product does not operate normally when the operating instructions are followed.
Adjust only those controls that are covered by the operating instructions since improper
adjustment of other controls may result in damage and will often require extensive work
by a qualified technician to restore the product to normal operation.
E. If the product has been dropped or the cabinet has been damaged.
F. If the product exhibits a distinct change in performance, indicating a need for service.
16-3
IMPORTANT INFORMATION
Important-About the Interface Cable
This machine has been certified to comply with FCC standards,which are applied to the U.S.A.
only. A shielded interface cable should be used according to FCC 15.27(C). In addition, a grounded
plug be plugged into a grounded AC outlet after checking the rating of the local power supply for
the printer to operate properly and safely.
- CAUTION
Changes or modifications not expressly approved by Brother Industries, Ltd. could void
the user's authority to operate the equipment.
ATTENTION:
The product that you have purchased contains a rechargeable battery. The battery is
recyclable. At the end of it's useful life, under various state and local laws, it may be illegal
to dispose of this battery into the municipal waste stream. Check with your local solid waste
officia],s for details in your area for recycling options or proper disposal.
If you have any problem, contact Brother service personnel at 1-800-284-4FAX(USAOnly).
1-800-284-4329 (USA Only)
1-800-853-6660
(CANADA Only)
(Only for FAX 1450MC/1550MC, MFC 1850MC/1950MC)
IIIIII P I[llnllII! I ........................... ,,=.,, "..... 116-4
INDEX
17. INDE)
A
Activity Report ................................... 14- 1-3
ADF ........................................................... 6-2
All Dial List...................................... 14-I, 3, 4
Answer Mode .................................. 2-4, 7-I
Automatic Transmission ......................... 6-4
Auto Mode ........................................... 7- 1-2
B
Back-up Printing .................................. 11 - 10
Battery (See Memory Storage) .............. 4-8
Beeper ...................................................... 4- I
Broadcasting ........................................... 6-8
C
Call Back Message ...................... 6-19, 14-I
Call Reservation .............................. 6-18, 19
Canceling .............................................. 6-11
Cartridge .............................................. I-5, 6
Cassette ........................................... I-5, 7, 8
Chain Dialing ........................................... 4-6
Cleaning ................................................ 15-I
Connecting ........................... 1-8, 7-I I, 7-14
Contrast .................................................... 6-3
Control Panel Keys .............................. 2-1-5
Copy ........................................... 2-3, 13- 1-4
Cover Open ........................................... 15-4
Cover Page ........................... 6-14~18, 14-I
D
Daily Timer ........................................... 6-7, 8
Date and Time ......................................... 4-2
Delayed Transmission ............................. 6-7
Delayed Polling ....................................... 8-5
Distinctive Ringing ........................... 7-16-19
Document ............................................ 6-I, 2
E
ECM ........................................................ 6-20
Enlarged Copies ................................ 13-3,4
Erasing .... 11-12, 13, 12-8, 10, 13, 16, 20, 21
Error Re-Transmission ............................ 6-20
ExternalTelephone .........................7-II,12
ExtensionTelephone ............................7-11
F
Fax Forwarding .............................. 11 - 16, 19
Fax-on-demand ........................ 12- I, 2, 4-8
FCC Notices ....................................... 16- 1-4
Fine ........................................................... 6-2
Frl"Mode ...................................... 7-I, 7-3-5
Frr Out Going Message ......................... 7-4
Frr Ring Time ............................................ 7-5
Function ....................................... 2-4, 3-I-7
G
Group ................................................... 4-8~9
H
HELP .............................................. 2-4, 3-8, 9
Hook ................................................. 2-2, 5-I
Hold .................................................. 2-2, 5-I
I
ICM (Incomming Message)
...................................... 11-14, 12-17~21
Interrupting ............................................ 6-10
J
Jacks .............................................. I-9, 7-I I
Jam ..................................................... 15-2, 3
L
Level OGM ........................... 12-6, 13, 15, 16
M
Mail Box ................. 12-2, 3, 4, 1I~14, 17~20
Manual Dialing ........................................ 5-I
Manual Mode .................................. 7-I, 7-2
Maximum Time .............................. 11-14, 25
Memo ................................................... 1I- 16
Memory .................................................... 4-8
Memory Board ...................................... 15-3
17-1
INDEX
Memory Status List
... 10-7 (for FAX 1350M), 11-23 (for FAX
1450M/1550M, MFC 1850MC/
1950MC), 14- I, 14-6
Memory Strage ....................................... 4-8
Memory Transmission ....................... 6-6~ 12
MEMORY FULL.......................................... 6-6
Message Center Mode .................... 1 I-I ~7
Message Storage .................................. 11-7
MSG CTR OGM ................................ 11-8, 13
MSG CTR PRO .................................. 12-I~21
Multiple Copies ..................................... 13-2
Multiple Resolution Transmission ......... 6-13
N
Next-FAX Reservation .......................... 6-21
Number Groups .................................. 4-8, 9
O
One-touch Dial
............................. 2-3, 4-4, 5, 8, 5-I, 6-4
On-Screen Programming ....................... 3-I
On Hook Dial ........................................... 5-I
Overseas Mode ..................................... 6-12
P
Packing List.............................................. 1-5
Paging ............................................ 11-16~18
Paper ........................................................ 1-8
Paper Empty .......................................... 15-5
Paper Jam ............................................. 15-5
Password ............................................... 9-1,2
Pause ......................................... 2-2, 4-5, 5-I
PBXs ................................................ I-I I, 4-8
Photo .............................................. 6-2, 6-13
Playing ......................... 11-10, 12-10, 14, 16
Polling ................................................... 8- I ~6
Power ......................................... I-8, 9, 18-I
Printing ................................................... 12-8
R
Recording ................ 11- 15, 12-9, 12, 15, 19
Recording mode ................................. 11-15
Recording Paper size .............................. 7-6
Redial ............................................... 2-2, 6-5
Reduced Copies ............................... 13-3, 4
Reduction ............................................ 7-7, 8
Remote Access/Retrieval
... 10-5~8 (for FAX 1350M), 11- 19~23 (for
FAX 1450M/1550M, MFC 1850MC/
1950MC)
Remote Access Code
10-5, 6 (for FAX 1350M), 11-20, 21 (for FAX
1450M/I 550M, MFC 1850MC/I 950MC)
Remote Activation .......................... 7-1 I, 12
Remote Code .................................. 7-1 I, 12
Remote Control Commands
... 10-7 (for FAX 1350M), 11-22 (for FAX
1450M/1550M, MFC 1850MC/
1950MC)
Remote Deactivation ..................... 7-1 I, 12
Reports ............................................... 14-I ~5
Resolution ............................... 2-4, 5-2, 6-13
Ring Delay ............................................... 7-2
Ring Time .................................................. 7-5
Ring Volume ............................................ 7-9
S
Safety Instructions ............................. 16-3~4
Secure Polling ...................................... 8-3, 4
Sequential Polling ................................... 8-6
Setting Up ............................................. 1-4~9
SHIFT.................................................. 2-3, 4-4
Smoothing ................................................ 7-5
Speaker Volume ..................................... 7-9
Specifications ........................................ 18- I
Speed Dial ......... 2-2, 3-3, 4-6, 7, 8, 5-I, 6-4
Station ID .............................................. 4-3, 4
Standard Mode ............................. 6-2, 6-13
Super Dark Mode .................................... 6-3
Super fine Mode ............................ 6-2, 6-13
Super Light Mode .................................... 6-3
Super Quick Scan ............................. 6-6~ 10
T
TAD Mode ................................ 7-I, 7-14~15
II ...... I I! !IIIII !I !I ..I I III llnl II !!! 111
17-2

INDEX
Telephone Index ..................................... 5-2
TransmissionVerification Report
....................................... 14-I, 14-4, 14-5
TollSaver .............................................. 11-14
Tone/Pulse ............................................... 4- I
Troubleshooting................................. 15-4-5
V
Voice Alarm ...................... 11-24, 25, 26, 27
Voice-on-demand ......... 12-I, 2, 4, 5, 9, 10
17-3
!11
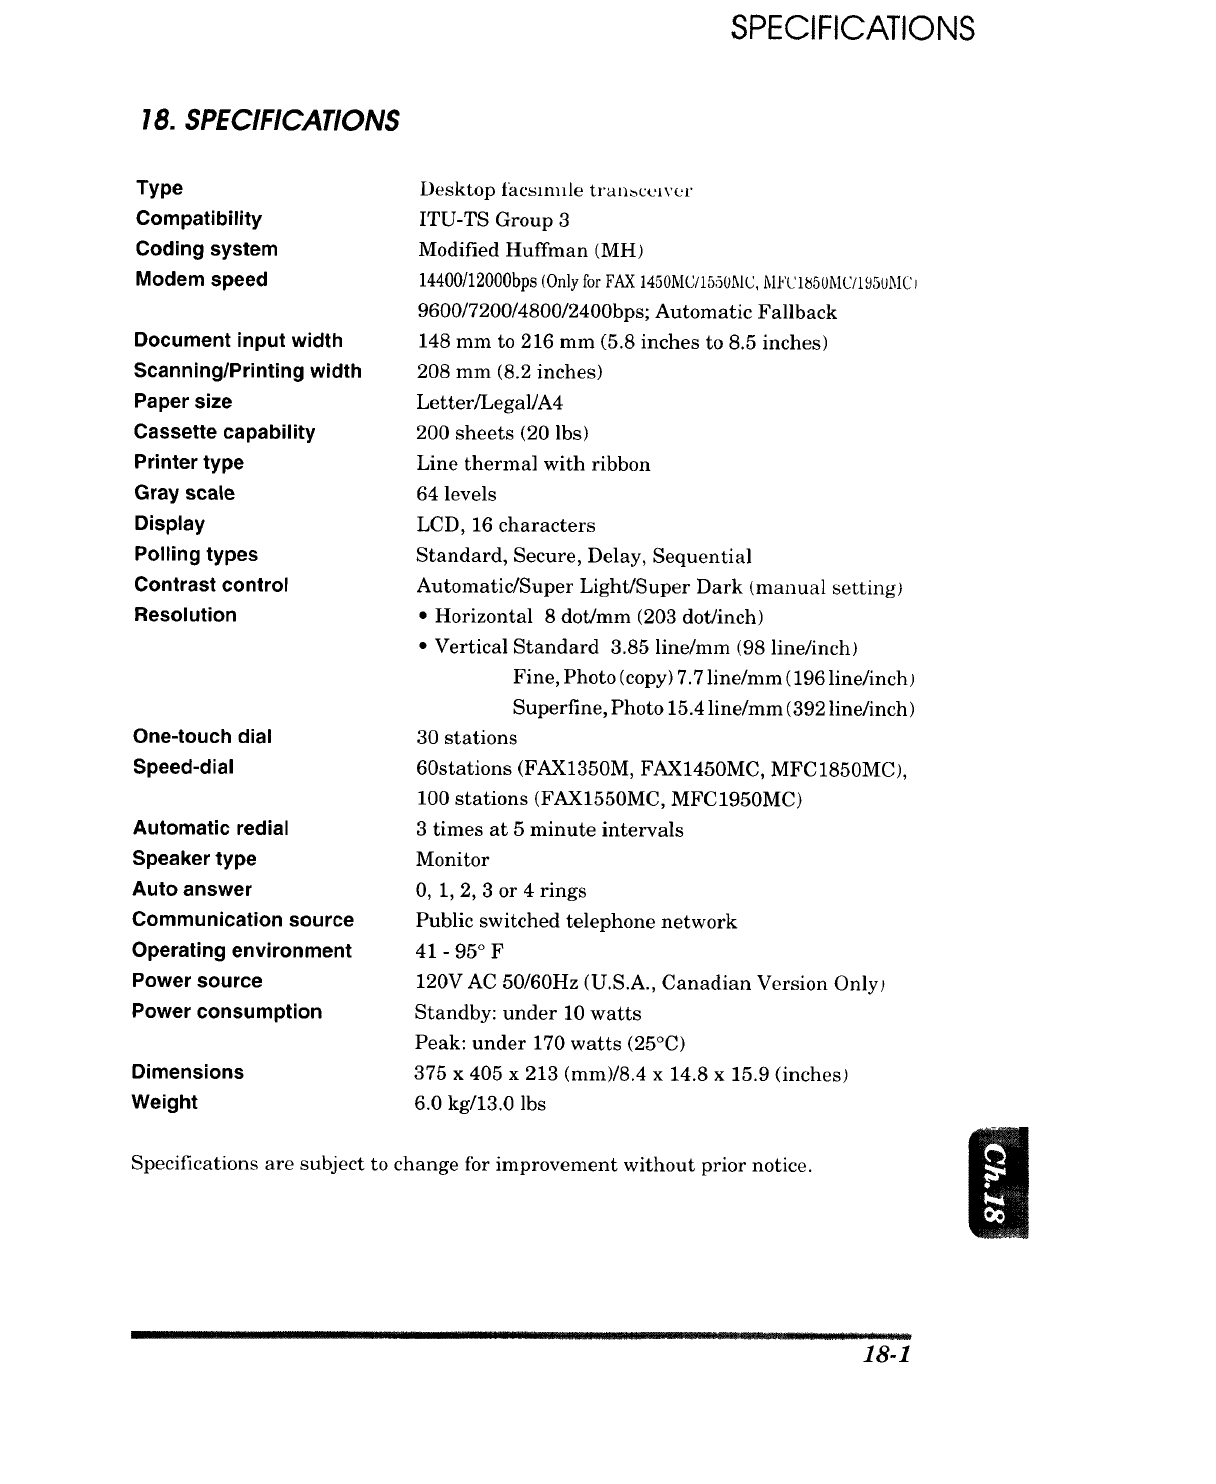
SPECIFICATIONS
18. SPECIFICATIONS
Type
Compatibility
Coding system
Modem speed
Document input width
Scanning/Printing width
Paper size
Cassette capability
Printer type
Gray scale
Display
Polling types
Contrast control
Resolution
One-touch dial
Speed-dial
Automatic redial
Speaker type
Auto answer
Communication source
Operating environment
Power source
Power consumption
Dimensions
Weight
Desktop facsm_fle tran_ccl\'_,r
ITU-TS Group 3
Modified Huffman (MH)
14400/12000bps(OnlyforFAX1450MC/15501_1C,MJ?L'l_50MC/1950MCJ
9600/7200/4800/2400bps; Automatic Fallback
148 mm to 216 mm (5.8 inches to 8.5 inches)
208 mm (8.2 inches)
Letter/Legal/A4
200 sheets (20 lbs)
Line thermal with ribbon
64 levels
LCD, 16 characters
Standard, Secure, Delay, Sequential
Automatic/Super Light/Super Dark (manual setting)
• Horizontal 8 dot/mm (203 dot/inch)
• Vertical Standard 3.85 line/mm (98 line/inch)
Fine, Photo (copy) 7.7 line/ram (196 line/inch)
Superfine, Photo 15.4 line/mm (392 line/inch)
30 stations
60stations (FAX1350M, FAX1450MC, MFC1850MC),
100 stations (FAX1550MC, MFC1950MC)
3 times at 5 minute intervals
Monitor
0, 1, 2, 3 or 4 rings
Public switched telephone network
41 - 95 ° F
120V AC 50/60Hz (U.S.A., Canadian Version Only)
Standby: under 10 watts
Peak: under 170 watts (25°C)
375 x 405 x 213 (mm)/8.4 x 14.8 x 15.9 (inches)
6.0 kg/13.0 lbs
Specifications are subject to change for improvement without prior notice.
18-1

These machines are made for use in the USA only. We can not recommend using
them overseas because it may violate the Telecommunications Regulations of
that country and the power requirements of your fax machine may not be
compatible with the power available in foreign countries. Using USA models
overseas is at your own risk and will void your warranty.

Brother International Corporation
200 Cottontail Lane,
Somerset, NJ 08875-6714, U.S.A.
Brother International Corporation (Canada) Ltd.
1 rue H6tel de Ville,
Dollard-des-Ormeaux, QC, CANADA H9B 3H6
Manufactured by Brother Industries Ltd. whose quality system
is registered by BSl and JQA.
BSI Certificate of registration No. FM27214 UF6210001
JQA Certificate of registration No. JQA-0367 Printed in Japan
