BROTHER Word Processor Manual 98070355
User Manual: BROTHER BROTHER Word Processor Manual BROTHER Word Processor Owner's Manual, BROTHER Word Processor installation guides
Open the PDF directly: View PDF ![]() .
.
Page Count: 258 [warning: Documents this large are best viewed by clicking the View PDF Link!]
NB-80C
2
Word Processing, Spreadsheet, Drawing,
Scrapbook, Addressbook, Planner
Book Reader, Text File Editor, Games &
Glossary
_GEOS ® US ENGLISH
€
AbOut this Manual
In this manual, Book 2, look for information on these desktop publishing,
personal planning, and electronic accessory programs:
•Word Processing. Creates,edits, ,and prints documents, such as
memos, letters, and reports.
• Spreadsheet. Creates and edits Spreadsheet documents, performs
calculations, and creates charts.
• Drawing. Creates graphics by drawing and painting, or by importing
and editing.
•Scrapbook. Stores a graphic or piece of text for placing in a Word
Processing, Spreadsheet, or Drawing document. Also allows you to
place' clip art, which is supplied on diskette.
• Addressbook. Stores names and addresses and other information for
reference, including email addresses.
•Planner. Schedules appointments on a perpetual calendar.
•Book Reader. Opens books on screen.
• Text File Editor. Creates and edits DOS text files. This program is on
diskette
i Games. Solitaire and Turnabout are on diskette.
This manual assumes you are familiar with the basics of using programs such
as opening and saving documents and working with menus. If not, see
Getting Started in Book 1 for basic information.
In Book 1you will also find instructions on using File Manager to organize
your documents; sending email; browsing the World Wide Web; and using
the Function Key accessories: Calculator, World Clock, and To Do List.

[ Model Number: [ Serial Number: [
Geoworks® application software and GEOS® operating system software copyright ©1990-1997
Geoworks. All fights reserved. United States Patent 5,327,529.
Part of the software in this product is ©copyright STNC Enterprises 1994-1997. All rights reserved.
Hardware and software floating point math library copyright ©1984-1991 Dimensions Research, Inc.
Portions of this work are derived from The Standard C Library copyright ©1992 by P.J. Plaguer, published
by Prentice-Hall, and are used with permission.
ROM-DOS operating system software copyright ©1989-1997 Datalight, Inc.
CardTrick flash file system software copyright ©1989-1997 Datalight, Inc.
Word for Word import export software copyright ©1986-1993, Mastersoft, Inc. All rights reserved.
The American Heritage Dictionary licensed from Inso Corporation © 1989 by Inso Corporation. All rights
reserved. Reproduction or disassembly of embodied programs or database prohibited. Based upon The
American Heritage Dictionary, Office Edition.
English Hyphenator licensed from Inso Corporation ©1991 by Inso Corporation. All rights reserved.
Reproduction or disassembly of embodied algorithms or database prohibited.
Elecu'onic Thesaurus licensed from Inso Corporation. ©1987 by Inso Corporation. All rights reserved.
Thesaurus U.S. Pat. No. 4,724,523. Reproduction or disassembly of embodied programs or database
prohibited. Based upon Roget'slI: TbeNew Thesaurus ©1980 by Houghton Mifflin Company.
International CorrectSpell _" English spelling correction system © 1994 by Inso Corporation. All rights
reserved. Reproduction or disassembly "of embodied_gorithms or database prohibited.
Portions of BIOS software provided by Phoenix ©1997 by Phoenix. All rights reserved.
Portions of software provided by Brother International. ©1997 by Brother International Corporation.
The GEOS software in this device contains Nimbus Q from Digital Typeface Corp. and typefaces from
URW, GmbH, URW Roman©, URW Sans©, and URW Mono© are registered trademarks of URW GmbH.
Geoworks® and GEOS®, are registered trademarks of Geoworks, and Scrapbook TM is a trademark of
Geoworks in the United States of America and other countries.
Mastersoft is a registered trademark of Mastersoft, Inc. in the U.S.A.-
Copyright© 1997 by Brother International Corporation. All rights reserved.
Black & white clip art images in this product are licensed from Media Graphics International and are
protected by U.S. and worldwide copyright laws.
Portions of color clip art images in this product are provided by Express Software, Inc.© Copyright
Express Software, Inc. Portions of color clip art images in this product are provided by Studio Advertising
Art, Inc. © Copyright Studio Advertising Art, Inc.
All-other brand and product names are trademarks or registered trademarks of their respective holders.
Keep this manual in a safe place for future reference. We recommend that you write the unit's model
number and serial number (from the rear panel of the keyboard/printer unit) in the blank spaces at the
top of the previous page.
FCC NOTICE
This equipment has been tested and found to comply with the limits for a Class B digital device, pursuant
to Part 15 of the FCC Rules. These limits are designed to provide reasonable protection against harmful
interference in a residential installation. This equipment generates, uses, and can radiate radio frequency
energy and, if not installed and used in accordance with the instructions, may cause harmful interference
to radio or television reception. However, there is no guarantee that interference will not occur in a
particular installation. If this equipment does cause intereference, which can be determined by turning the
equipment off and on, the user is encouraged to try to correct the interference by one or more of the
following measures:
•Reorient or relocate the receiving antenna or increase the separation between the equipment and
receiver
• Connect the equipment to an outlet on a circuit different from that to which the receiver is connected
• Consult the dealer or an experienced radio/television technician for help (changes or modifications
not expressly approved by Brother International Corporation could void the warranty)
This product uses RJllC/W jacks and is designed to connect to the telephone network or premises wiring
using a compatible modular jack that is Part 68 compliant.
If this telephone equipment causes harm to the telephone network, the telephone company will notify
you in advance that temporary discontinuance of service may be required. If advance notice is not
practical, the telephone company will notify you as soon as possible. Also, you will be advised of your
right to file a complaint with the FCC if you believe it is necessary.
The telephone company may make changes in its facilities, equipment, operations, or procedures that
could affect the operation of the equipment. If this happens, the telephone company will provide advance
notice for you to make necessary modifications to maintain uninterrupted service.
Do- not connect dai_e'-@ipment to pat_-_,-lines -" _ _ ;
_.or coin'-x3"perated telephone lines.
The FCC Registration number on this product shows compliance with Federal Communications
Commission Part 68 Rules. To ensure product compliance, use the AC adapter that comes with this
product. Do not substitute adapters.
If trouble is experienced with this equipment, for repair or warranty information, please contact Brother
International Corporation, 3131 Appling Road, Bartlett, TN 38133, (901) 373-8500. If the equipment is
causing harm to the telephone network, the telephone company may request that you disconnect the
equipment until the problem is solved.
DOC NOTICE
This Class B digital apparatus meets all the requirements of the Canadian Interference-Causing Equipment
Regulations. Le proem appareil num6rique d6 la classe B respecte toutes les exigences du R6glement sur
le materiel brouilleur du Canada.
WARNING -FOR YOUR IIFALTH
To avoid repetitive motion injuri.es When using this keyboard, we recommend the
following steps: maintain a comfortable, straight wrist position when typing, take breaks,
at least every hour, to stretch hands and arms, and report any pain or other symptoms
to your physician.

Table of Contents
THE BASICS
1 Word Processing
Word Processing 13ps ................................................................. 1
Starting Word Processing ............................................................. 2
Opening a Document ................................................................ 2
Using the Tool Bars .................................................................. 3
The Basic Functions Tool Bar ....................................................... 3
The Advanced Functions Tool Bar ................................................... 4
The Graphic Bar .................................................................. 4
The Drawing and Bitmap Tool Bars .................................................. 5
Saving On-screen Settings (Configuration) ............................................. 5
Beginning aDocument ............................................................... 6
Setting Up Your Page .............................................................. 6
Working with Text ................................................................... 7
Entering Text ..................................................................... 7
Deleting Text .................................................................... 10
Cutting, Copying, Pasting, and Replacing Text ....................................... 10
Dragging and Dropping Text ...................................................... 11
Usihg-U_do_to Reverse-Your Last..Acfi_,_,..: .... :........................... ._..... 12
Using Special Characters and S_nbols .............................................. 12
Changing Text Font, Size, Style, and Alignment ...................................... 12
Using Tone in Text ............................................................... 15
Finding and Replacing Text ....................................................... 17
Formatting Documents .............................................................. 19
Setting Line Spacing .............................................................. 20
Using Indentations, Tabs, and Rulers ............................................... 21
Adding Borders .................................................................. 25
Setting Hyphenation ................................... .......................... 26
Using Headers and Footers ........................................................ 27
Creating a Title Page ............................................................. 2_
Using Page Breaks ............................................................... 29
Managing Columns .............................................................. 29
Using Text Style Sheets .................. -.. ...................................... 31
Using Master Pages to Design Documents ........................................... 36
Using Graphics in a Document ....................................................... 38
Using Frames for Graphics and Text ................................................ 39
Using Grids ..................................................................... 41
Using Clip Art in Documents ...................................................... 42
Contents i
Wrapping Text ................................................................... 44
Inserting, Appending, and Deleting Graphic Layouts ................................. 45
Finishing Your Document ........................................................... 46
Using Footnotes ................................................................. 46
Creating a Table of Contents ....................................................... 48
Creating a Bibliography ....................... ..................................... 48
Proofing Your Document ............................................................ 49
Checking Your Spelling ........................................................... 49
Creating a User Dictionary ........................................................ 51
Using the Thesaurus .............................................................. 51
Printing or Faxing Your Document ................................................... 52
Merging Information from Other Programs ........................................... 53
Setting up the Merge Fields ....................................................... 54
Merging Addressbook Information ................................................. 55
Merging Spreadsheet Information .................................................. 56
Printing aMerge Document ....................................................... 57
Spedal Effects ...................................................................... 58
Displaying Invisible Characters .................................................... 58
Displaying Counts ............................................................... 58
Using Abbreviated Phrases ........................................................ 59
Inserting Special Characters ....................................................... 60
Importing and Exporting Documents ................................................. 64
2 Spreadsheet......................... ._ ,.................. 65
Starting Spreadsheet .............. _.......... ,...................................... 65
Opening a Document ............................................................... 66
Using the Tool Bars .................................................................. 67
The Basic Functions Tool Bar ...................................................... 67
The Advanced Functions Tool Bar .................................................. 68
Graphic Bar, Drawing Tools, and Bitmap Tools ....................................... 68
Moving around in a Spreadsheet ..................................................... 69
Selecting Cells and Ranges ........................................................... 69
Working with Values and Labels ...................................................... 72
Entering Values and Labels ........................... '............................. 72
Notes on Entering Labels ......................................................... 73
Notes on Entering Values ......................................................... 73
Changing the Number Format for Values ............................................ 74
Entering and Changing Dates and 1imes ............................................ 75
Format Formulas ................................................................ 77
Formatting Spreadsheets ............................................................. 78
Showing Grid Lines .............................................................. 78
Showing Cell Borders ............................................................. 78
Using Headers and Footers ........................................................ 79
Using Tones ..................................................................... 80
Contents ii
Creating Notes .................................................................. 81
Changing the Appearance of a Spreadsheet ............................................ 82
Adjusting Column Width and Row Height .......................................... "82
Changing Alignment ............................................................. 83
Using Different Text Styles ........................................................ 84
Working with Formulas .............................................................. 85
Entering Formulas ..................... :......................................... 85
Using References in Formulas ..................................................... 86
Using Operators in Formulas ...................................................... 88
' Using Built-in Functions in Formulas ............................................... 88
Spreadsheet's Built-in Functions ................................................... 91
Editing the Spreadsheet ............................................................. 93
Editing the Contents of a Cell ...................................................... 93
Copying and Moving Information .................................................. 94
Inserting and Deleting Rows and Columns .......................................... 96
Filling aRange of Cells with Incremental Values ..................................... 97
Options for Spreadsheet Formulas ................................................... 98
Showing and Hiding Formulas .................................................... 98
Naming Cells and Ranges ......................................................... 98
Controlling Automatic Recalculation .............................................. 100
Using Iteration and Circular References ............................................ 101
Charting in Spreadsheet .. ; ......................................................... 102
What Is a Chart? ................................................................ 102
Types of Charts ................................................................. 103
Creating-Charts ..................... .._.. .... ........................................ 108
Changing the Type Of Chart .......... "_ " 108
Manipulating Charts ............................................................ 109
Resizing and Moving a Chart ..................................................... 109
Changing Chart Properties and Attributes .......................................... 110
Deleting a Chart ................................................................ 110
Using a Chart in Another Program ................................................ 110
Adding Titles and a Legend ...................................................... 111
Changing Markings ............................................................. 112
Changing Marker Shapes ........................................................ 114
Using Additional Spreadsheet Features ..................... ......................... 114
Sorting ........................................................................ 11.4
Creating Number and Date Formats ............................................... 116
Using Rulers ................................................................... 117
Adding Graphics ...................... ...: ...................................... 117
Locking Titles .................................................................. 118
Using Spreadsheet with Other Programs ........................................... 118
Printing and Faxing ................................................................ 119
Setting Page Setup Options ....................................................... 119
Printing and Faxing Spreadsheets and Charts ....................................... 120
Contents iii
Exporting and Importing Spreadsheets ................................................ 121
Spreadsheet Error Codes ............................................................ 124
3 Drawing .......................................... 125
Starting Drawing .................................................................. 125
Opening a Document .............................................................. 126
Using the Tools .................................................................... 126
Drawing Tools .................................................................. 126
Bitmap Tools ................................................................... 127
Pointers ....................................................................... 128
Creating and Editing Simple Objects ................................................ 129
Selecting Objects ................................................................ 131
Resizing Objects ................................................................ 132
Deleting Objects ................................................................ 132
Changing the On-screen View ...................................................... 133
Advanced Work with Objects ....................................................... 134
Drawing Objects, Arcs, and Straight Lines .......................................... 134
Setting Attributes ............................................................... 136
Transforming Objects .............................................................. 141
Flipping Objects ................................................................ 141
Rotating Objects ................................................................ 142
Skewing Objects ................................................................ 143
Untransforming Objects ......................................................... 143
Duplicating Objects ............................................................. 143
tirtg't_ phi '" _ _ _-Conver a Gra c.................. ........ . ................................... ,. 145
Arranging Objects _.146
Moving Objects to the Front or Back ............................................... 146
Moving Objects ................................................................. 146
Grouping and Ungrouping Objects ................................................ 148
Pasting Inside .................................................................. 149
Using Rulers ................................................................... 150
Using Grids .................................................................... 151
Using Text in Drawings ............................................................ 152
Changing Text Style, Size ........................................................ 154
Aligning Text ................................................................... 155
Adding Tone to Text ............................................................. 155
Working with Bitmap Objects ...................................................... 156
Creating a Bitmap Frame ......................................................... 157
Drawing Bitmap Shapes ..................... . - .................................. 158
Editing Bitmap Objects .......................................................... 160
Using Tone or Fill Pattern in aSelected Area ........................................ 161
Erasing in the Bitmap Frame ..................................................... 161
Using the Pixel View Tool ........................................................ 161
Changing the Bitmap Color and Resolution ......................................... 163
Contents iv
Printing or Faxing Drawing Documents .............................................. 163
Importing and Exporting Graphics .................................................. 165
4 Scrapbook ........................................ 167
Starting Scrapbook ................................................................ 167
Using 'Scrapbook Documents ....................................................... 168
Placing and Deleting Clip Art and Other Scraps ..................................... 168
Navigating Through Scraps ...................................................... 169
: Naming a Page of Scraps ......................................................... 170
Creating a New Scrapbook Document ............................................... 171
Importing a Scrap from a DOS Program .............................................. 171
PERSONAL PLANNING
5 Addressbook ...................................... 173
Starting Addressbook .............................................................. 173
Working with Cards ............................................................... 174
Creating and Adding New Cards ................................................. 174
Adding and Changing Phone Types ............................................... 176
Flipping through Cards .......................................................... 176
Editing Cards .................................................................. 177
Copying Cards ................................................................. 177
Deleti rds .................. .... __--_..... :. .... .'. .......................... _:.... 178
Adding Notes to Cards ...... _.................................................... 178
Searching through Cards ......................................................... 179
Making New Addressbooks ......................................................... 180
Printing and Faxing an Addressbook ................................................ 180
Importing a Document ............................................................. 182
Exporting an Addressbook Document ............................................... 183
6Planner ........................................... 185
Starting Planner ................................................................... 185
Viewing the Calendar .............................................................. 18.6,
Selecting and Viewing Events ....................................................... 187
Switching between the Calendar Window and the Events Window .................... 188
Selecting a Range of Days and Viewing Their Events ................................. 189
Scheduling Events ................................................................. 190
Scheduling an Event ............................................................. 190
Changing a Scheduled Event ..................................................... 191
Removing a Scheduled Event ..................................................... 191
Adding Events between Two Scheduled Events ..................................... 191
Adding an Event at a Particular Time .............................................. 192
Contents v
Copying Event Descriptions ...................................................... 192
Scheduling Repeating Events ..................................................... 193 •
Changing a Repeating Event ..................................................... 196
Removing a Repeating Event from the Calendar .................................... 196
Finding Specific Events .......................................................... 196
Printing or Faxing Planner Documents ............................................... 197
Creating New Calendars ........................................................... 200
ELECTRONIC ACCESSORIES
7 Book Reader ...................................... 201
Starting Book Reader .............................................................. 201
Using Information and Text ......................................................... 202
Printing from Book Reader ......................................................... 204
8 Text File Editor 205
Starting Text File Editor ............................................................ 205
What Text File Editor Can and Cannot Do ............................................ 206
Word Wrap and Line Endings ....................................................... 206
Changing the Text Size ............................................................. 206
Printing a DOS Text File ............................................................ 207
Naming a DQ__.Text File ................. ._....... _..... _............................. 208
9 Games ............................................ 209
Turnabout ...... , .................................................................. 209
Capturing Pieces 209
Sequence of Play ................................................................. 209
Setting User Options ............................................................ 210
Solitaire .......................................................................... 210
Starting Solitaire ................................................................ 211
Playing the Game .................................. :............................ 211
Finishing aGame 212
Setting the Playing Level ......................................................... 212
Changing the Scoring ............................................................ 213
Changing the Number of Cards Drawn ............................................ 214
Changing Other Options ......................................................... 214
Contents vi

APPENDIX
Spreadsheet Built-in Functions ........................ 215
Argument Rules ................................................................... 215
Fina_idal Functions ................................................................ 216
Information Functions .............................................................. 217
Logical Functions .................................................................. 220
Mathematical Functions ............................................................ 222
Print Functions .................................................................... 223
Statistical Functions ................................................................ 223
String Functions ................................................................... 224
Time and Date Functions ........................................................... 226
Trigonometric Functions ............................................................ 227
Glossary ............................................ 229
Index ............................................... 237
Contents vii

Contentsviii
1Word Processing
Before starting, review
these basic procedures
from the Getting Started
chapter in Book 1:
•Working with Documents
•Saving Documents
• Working with Menus
•Working with Dialog Boxes
This chapter explains how to create almost any type of document. It also
explains how to write a form letter and merge it with names and addresses
from Addressbook or Spreadsheet.
Word Processing Tips
To select (or dick on)
an item, p/ace the
on-screen pointer on
the item; then clickon
the Select button or
tap once on the
glidepad.
Glidepad
surface
Selectbutton(left
buttononamouse)
Dragbutton(right
buttononamouse)
For word wrap to work properly, press ENTER only at the end of a
paragraph, never at the end of every line. If you press ENTER at the
end of every line, and later change something, the words will not
wrap smoothly.
•Use TAB rather than the SPACEBAR to align text. If you use TAB to
set the spacing between text, then you can Simply change the
measurement of the tab space to change the location of a column.
•Type only one space after a period or colon. When using a
typewriter,_you enter two spaces after a period or colon because of
--the spacing-o'_e typ_ewdtet:characters. _°
Use italic style text rather than underline for book tides. Typewriters
do not have italic font style available, so your only option is to
underline book tides. Word Processing provides italic and bold type
styles and other typographical features of typeset printing.
• Since an en dash (-) and em dash (--) are available on the symbols
keyboard, use them rather than multiple hyphens. (See Using Special
Characters and Symbols on page 12.)
•Use bullets for denoting lists such as this list of tips. (See Using
Special Characters and Symbols on page 12.)
•You can undo almost anything. The most important thing to
remember about undoing a mistake is that you can undo only the
last action.
Word Processing 1
Starting Word Processing
•To create a new document:
By default, the Word
Processingicon is
automaticallysel_cted
(outlinedin dotted white
line) whenyou turn on
your machine or any
time you go 1othe Main
Menu.
1. Click on Word Processing from the Main Menu. The New/Open dia/og box
appears.
2. Click on New. A new Word Pr_essing document appears.
Opening a Document_
Templates allow you
to create standard
documents, such as
envelopes, quicldy.
See Using Templates
in Getting Started
(Book 1).
•To open an existing document or template:
1. Insert the diskette that contains the document or template into the disk
drive,
2.
3.
Select New/Open from the File menu. The New/Open dialog box appears.
Double-click on the name of the folder and file you want to open. The
document appears in the Word Processing window and replaces the empty
default document.
Word Processing 2
Using the Tool Bars
The tool bars provide quick access to menu functions. In Word Processing,
you can open five different tool bars: Basic Functions, Advanced Functions,
Graphic Bar, Drawing Tools, and Bitmap Tools.
•To open a tool bar:
1. Select Show Tools from the Options menu. A submenu appears.
2. Select the tool bar. The tool bar appears on the screen.
•To use a tool on the tool bar:
1. Select the text or graphics whose characteristics you want to change.
2. Click on the tool button. The characteristics change.
The Basic Functions Tool Bar
To remove tool bars, click
again on the name of the
tool bar in the Show Tools
submenu of the Options
menu.
The Basic Functions tool bar appears when you open Word Processing. Use it
for functions like copying or changing the font size of selected text.
Open
Close
Textstyles:plain;bold,
italic,andundedined
Save
I
Print
Previouspage
Go to page or
current page
ISpell check
I
1_12 I@1[] Iol_l_l_mixl lun"Rom-,=l1,2=111;I
Next page t , :t,:
Copy
Font size:
increase and Redraw
Click to see a list decrease / screen
of fonts and sizes. [
I [-- 1 [I
ITITIZI_I_!]
Paste
Word Processing 3
The Advanced Functions Tool Bar
When opened, the Advanced Functions tool bar appears above the Basic
Functions tool bar.
Findandreplace Styleinuse
I st°reStyle I
iR_cal,Style Hyphenation
I
I1_1 kZ!l'_l.o,m.,"1 []
°.."0n..
I-I=1=1-1
Zoomin
Zoom
Scale ol t
tofit
Alignment Linespacing View
The Graphic Bar
Use the Graphic bar for editing graphic objects created in or imported to
Word Processing. For example, use the Duplicate button to make a copy of a
graphic object, or use the Area Fill tool to fill a graphic object.
AreaPattern LineShading ,
LineStyle .PasteInside
AreaFill ILine Tone [ I TextShading
- AreaShadin_ "_-I- -1 -._---. ,. -l-_Te'x'_Tone'( Ungroup
I]I L'"e'T'°"_/ II Gr_upI
BreakOutPasteInside
Bringto Front
Sendto Back
[ PullForward
IIPt_sh Back
Duplicate I I
FlipLeftto Right
FlipTopto Bottom
Word Processing 4

The Drawing and Bitmap Tool Bars
Pointer tool
I-beamtool I'_
In Word Processing, the Drawing tool bar appears on the left of the window
When you are working with this tool bar in Word Processing, remember the
following:
• To select a graphic.in Word Processing, use the Pointer tool.
Text tool
In Drawing, the
Drawing and Bitmap
tool bars are in
different locations
than they are in Word
Processing, but they
stillcontain the same
tools.
• To select text in Word Processing, use the I-beam tool.
• To create text in a graphic frame, use the Text tool.
You can also use the Bitmap tool bar to create bitmap graphics or to edit
bitmap graphics imported into Word Processing.
The Drawing tools, Bitmaps, and the Bitmap tool bar are explained in detail
in the Drawing chapter, which starts on page 125.
Saving On-screen Settings (Configuration)
Saving the configuration allows you to save the settings from the Options
menu. For example, if you want the Advanced Functions tool bar to be
visible every time you open Word Processing, select Show Tools from the
Options menu; then click on Advanced Tools. Save the configuration, and the
tool bar will appear every time you open Word Processing.
I!_To save the configuration:
For information on
rulers, see page 24
in this chapter.
With your settings (tool bars and rulers) on the screen the way you want
them, select Save Configuration from the Options menu.
Word Processing 5
Beginning a Document
Before typing, first define the type of document you are creating by setting
your page size and page setup options.
Setting uP Your Page
You can create a
document larger than
the printing area.
When you print a
large page, you are
asked if you want to
scale the document or
pffnt it actua/ size.
Select Print Actual
Size; then insert as
many sheets of paper
as required. When
finished, tape the
pages together.
To change your view of
the document select
Zoom In or Zoom Out
from the View menu.
To change the margins
on an individual page in
your document,
reduce your document
to Scale to Fit from the
View menu and use the
pointer from the
Drawing tools to select
and resize header,
footer, or main body
region.
To select the page size:
1. Open a new document.
2. Select Page Size from the File menu. A dialog box appears.
3. Select either Paper, Envelope, Label, or the width and height of your
document if it is not a standard size.
4. Select Page Layout, either portrait (vertical) or landscape (horizontal).
5. Click on Apply; then click on Close. The dialog box closes, andyour
document outline will be represented by a rectangle with dotted borders.
2.
3.
set up the page:
Select the document for which you want to change the page setup. (Place
the insertion point anywhere in that document.)
Select Page Setup from the File menu. A dialog box appears.
Fill in the dialog box, making the selections you want:
• Starting Page Numlmr. You can start your document on a page
other than 1: If you_have several sections in the same document, you
can save them separately and still have consecutive page numbering.
• Columms. Select the number of columns in the document. See
Mana_ng Columns on page 29.
•Spacing. If you have more than one column, select the distance
between columns. Spacing is the same between all columns. By
default, this setting is 0.125 inches.
• Rule Width. If you have more than one column, you may want to
draw a vertical line (rule) in between and then select the width of
that line. By default, this setting is 0 points,or no rule.
.
• Master Pages. Select your layout: either a single page (one) or facing
pages (two). By default, this setting is one master page. See Using
Master Pages to Design Documents on page 36.
• Margim_. By default, the margins are 1 inch. You can change the
margins for an individual page in your document (see side note).
Click on Apply; then click on Close.
Word Processing 6
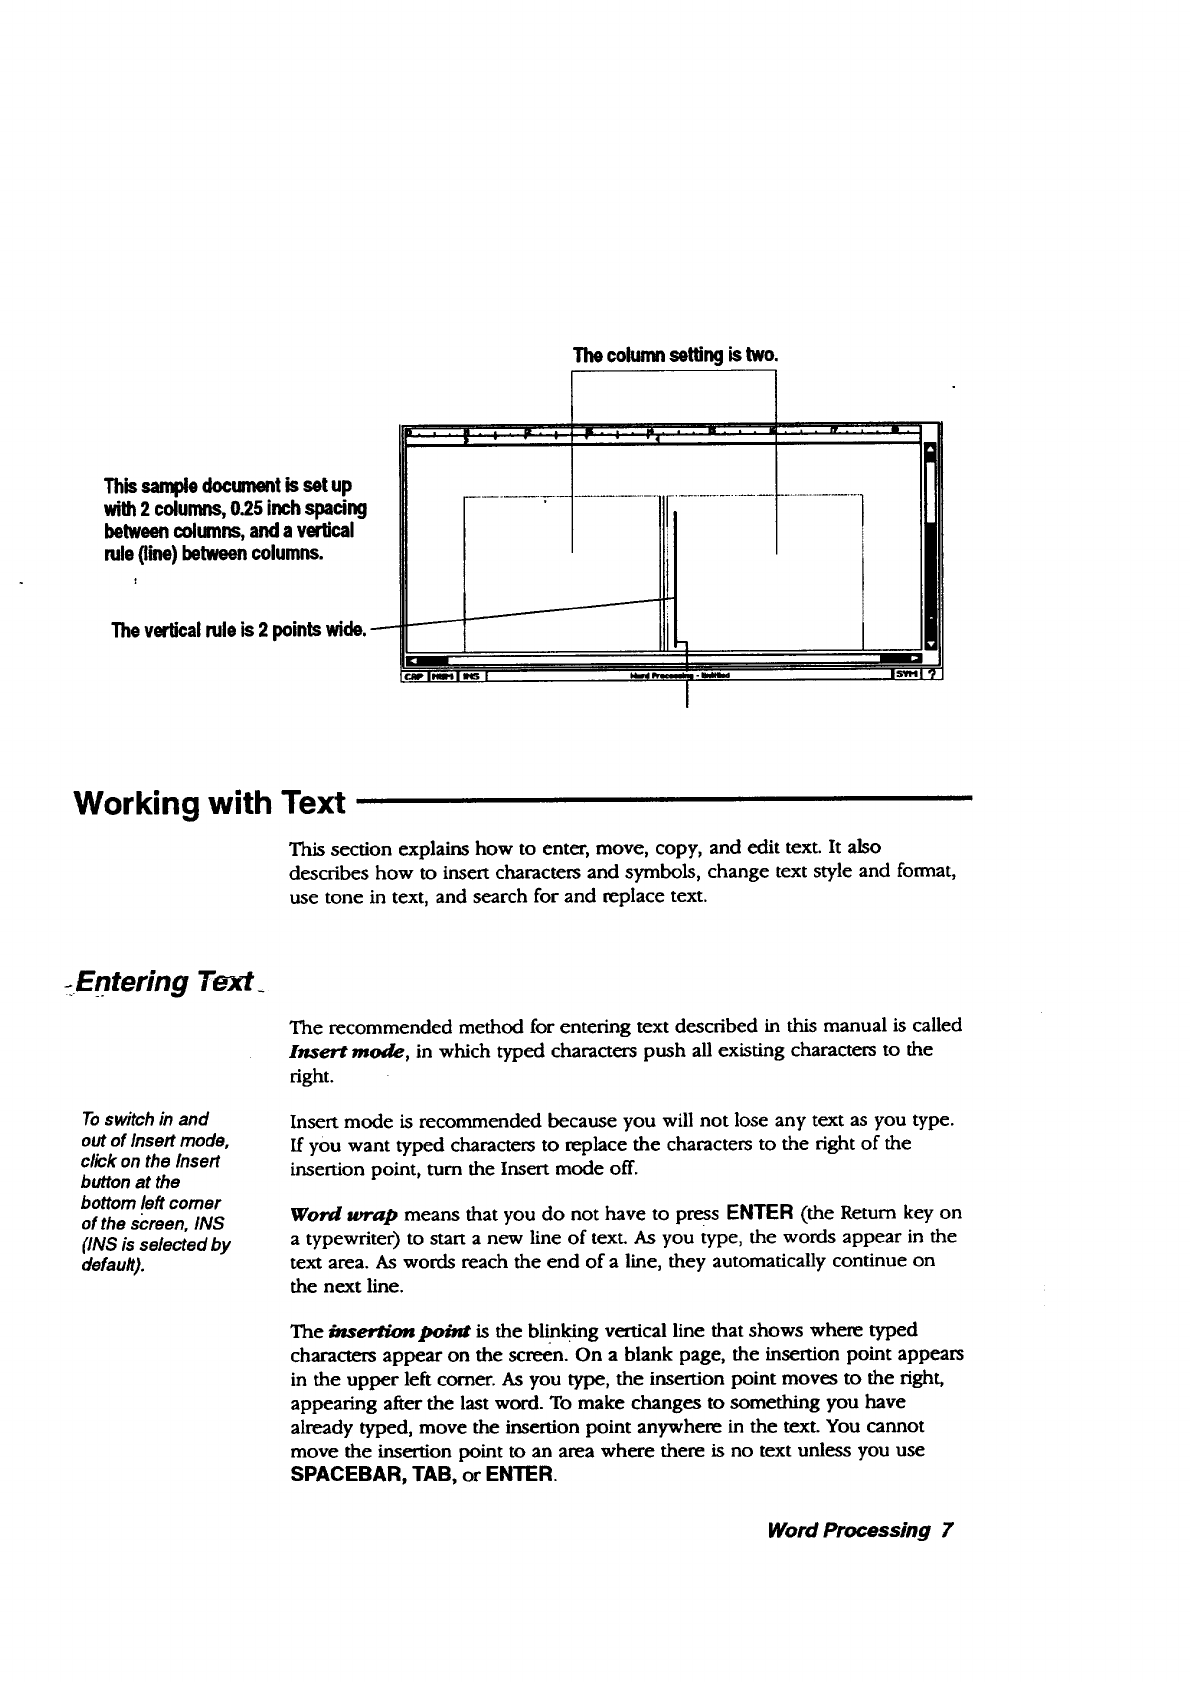
Thecolumnsettingistwo.
Thissampledocumentis setup
with2 columns,0.25inch spacing
betweencolumns,anda vertical
rule(line)betweencolumns.
Theverticalrule is 2
Working with Text
This section explains how to enter, move, copy, and edit text. It also
describes how to insert characters and symbols, change text style and format,
use tone in text, and search for and replace text.
-Entering Text.
Toswitch in and
out of Insert mode,
click on the Insert
button at the
bottom left comer
of the screen, INS
(INS is selected by
default).
The recommended method for entering text described in this manual is called
Insert mode, in which typed characters push all existing characters to the
right.
Insert mode is recommended because you will not lose any text as you type.
If you want typed characters to replace the characters to the right of the
insertion point, turn the Insert mode off.
Word wrap means that you do not have to press ENTER (the Return key on
a typewriter) to start a new line of text. As you type, the words appear in the
text area. As words reach the end of a line, they automatically continue on
the next line.
The in.,erti.on poim is the b"linking vertical line that shows where typed
characters appear on the screen. On a blank page, the insertion point appears
in the upper left comer. As you type, the insertion point moves to the right,
appearing after the last word. To make changes to something you have
already typed, move the insertion point anywhere in the text. You cannot
move the insertion point to an area where there is no text unless you use
SPACEBAR, TAB, or ENTER.
Word Processing 7
!l_To go to another page:
You can also select a
page to go to from the
Basic Functions tool
bar.
Select Go to Page from the View menu. If your document has more than one
page, tbe page you select appears, lf your document begins on apage other
than I (you can set it up this way in Page Setup), Go to Page will still see the
first page as page 1.
Tosplit an existing
paragraph into two,
place the insertion
point where you
want the split and
press ENTER.
l_ To correct as you type:
Press BACKSPACE to erase characters to the lej_ of the insertion point.
OR
Press DELETE to erase characters to the right of the insertion point.
To start a new paragraph:
Press ENTER. The insertion point moves to the lej_ margin of the next line.
To place the insertion point M the text:
Position the insertion point in the text and press the Select button. You can
type in the text.
._, To select text:
-1. Move _inserti_-p-6in'_o the beginning of the word, line, or paragraph
you want to select.
2. Hold the Select button and drag across the text until what you want is
selected; then release the button.
OR
Click the Select button at the beginning of the text, hold down SHIFT,
and click at the end of the text.
Use these methods for selecting text: . o
This Does This
2 clicks Selects a word (but not the space after the word)
3clicks Selects a line
To select additional words, lines, or paragraphs, on the last click, hold down
the Select button as you drag.
Word Processing 8
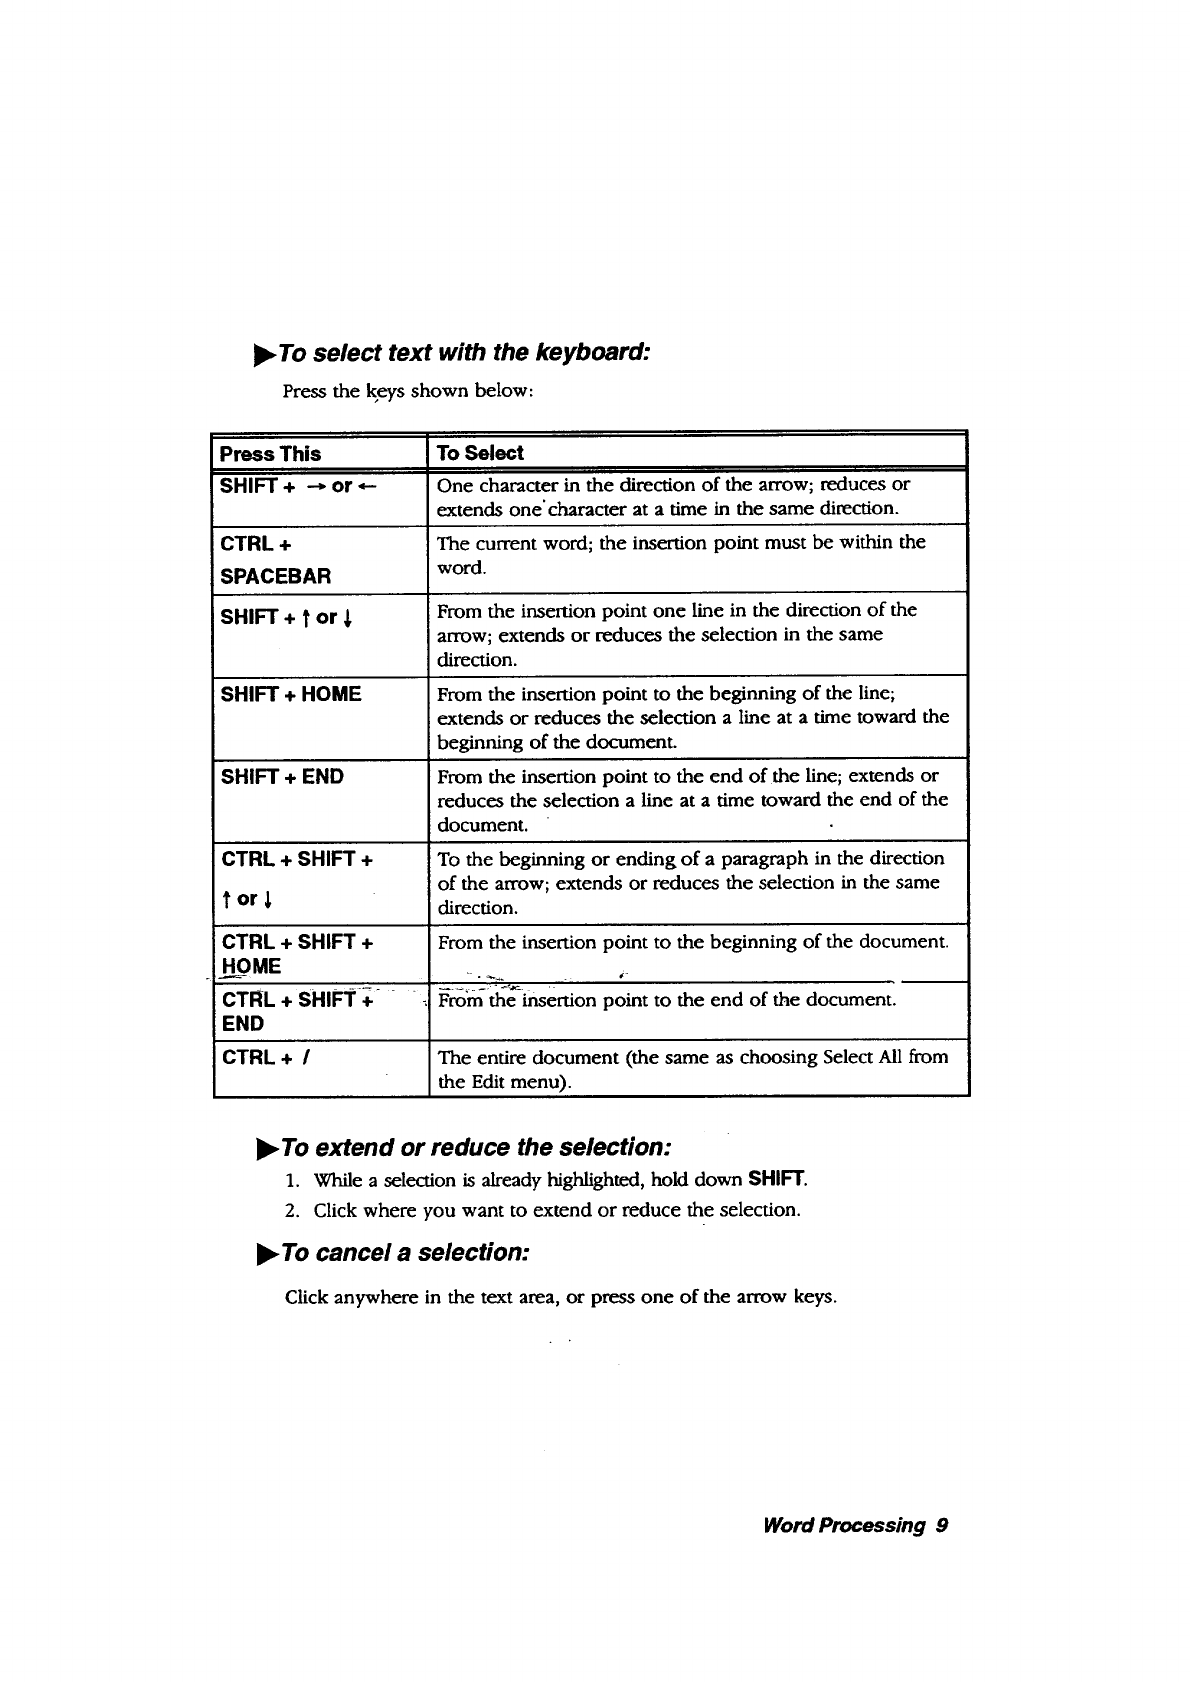
•To select text with the keyboard:
Press the keys shown below:
Press This To Select
SHIFT + --* or _- One character in the direction of the arrow; reduces or
extends one' character at a time in the same direction.
CTRL + The current word; the insertion point must be within the
SPACEBAR word.
SHIFT + t or, From the insertion point one line in the direction of the
arrow; extends or reduces the selection in the same
direction.
SHIFT + HOME From the insertion point to the beginning of the line;
extends or reduces the selection a line at a time toward the
beginning of the document.
SHIFT + END From the insertion point to the end of the line; extends or
reduces the selection a line at a time toward the end of the
document.
CTRL + SHIFT + To the beginning or ending of a paragraph in the direction
of the arrow; extends or reduces the selection in the same
t or _direction.
CTRL + SHIFT + From the insertion point to the beginning of the document.
HOME
CTRL + SHIFT + _From the insertion point to the end of the document.
END
CTRL + /The entire document (the same as choosing Select All from
the Edit menu).
•To extend or reduce the selection:
1. While a selection is already highlighted, hold down SHIFT.
2. Click where you want to extend or reduce the selection.
•To cancel a selection:
Click anywhere in the text area, or press one of the arrow keys.
Word Processing 9

Deleting Text
When you cut a
selection, it is placed
on the cl_board.
You can paste the
selection from the
clipboard to another
location as long as
you have not cut or
copied another item.
•To delete text:
1. Select the text you want to delete.
2. Press CUT.
•To delete text using the keyboard:
With no text is selected, use the following keystrokes to delete text:
•BACKSPACE. Deletes the character to the left,
•CTRL +BACKSPACE. Deletes from insertion point to beginning of
word.
•CTRL +DELETE. Deletes from insertion point to end of word.
•SHIFT +CTRL +BACKSPACE. Deletes from insertion point to
beginning of line.
•SHIFT +CTRL +DELETE. Deletes from insertion point to end of
line,
Cutting, Copying, Pasting, and Replacing Text
When you select text, you can cut it and move it elsewhere or copy it to
another place. The selection you cut or Copy is placed on the clipboard, an
- electi-ofii_liOlding s_a_ce_ WSen you press PASTE, the contents of the
clipboard are pasted into the document at the insertion point.
When you move a
selection, you
remove or cut it from
its oaginal location
and paste it into
another location.
Cut, Copy, Delete,
and Paste also
appear in the Edit
menu and on the
Basic Functions tool
b_r.
•To move a selection:
1. Select the item or text you want to move.
2. Press CUT. The item is removed from your document andplaced on the
clipboard, replacing any item already in the clipboard.
3. Move the insertion point to the new location.
4. Press PASTE. The contents of the clipboard are inserted into the
document, and tbe pasted text appears at the insertion point.
Word Processing 10
Whenyou paste an
item intoa
document,itremains
onthe _lipboard
unlessyou replace
it. So you can
continueto paste it.
To copy a selection:
1. Select the item or text you want to copy.
2. Press COPY. The item remains in your document and aLso goes to the
clipboard, replacing any other item in the clipboard.
3. Move the insertion point to the location where you want the item to
appear.
4. Press PASTE. The contents of the clipboard are inserted into the
document.
I_ To replace text:
1. Select the word or words you want to replace.
2. Type the replacement text. The new text replaces the original text.
_, To replace one block of text with another:
1. Select the block of text you want to replace the existing text with.
2. Press COPY or CUT. The text is placed in the clipboard.
3. Select the block of text you want to replace and press PASTE. The
selection is replaced by the contents of the clipboard.
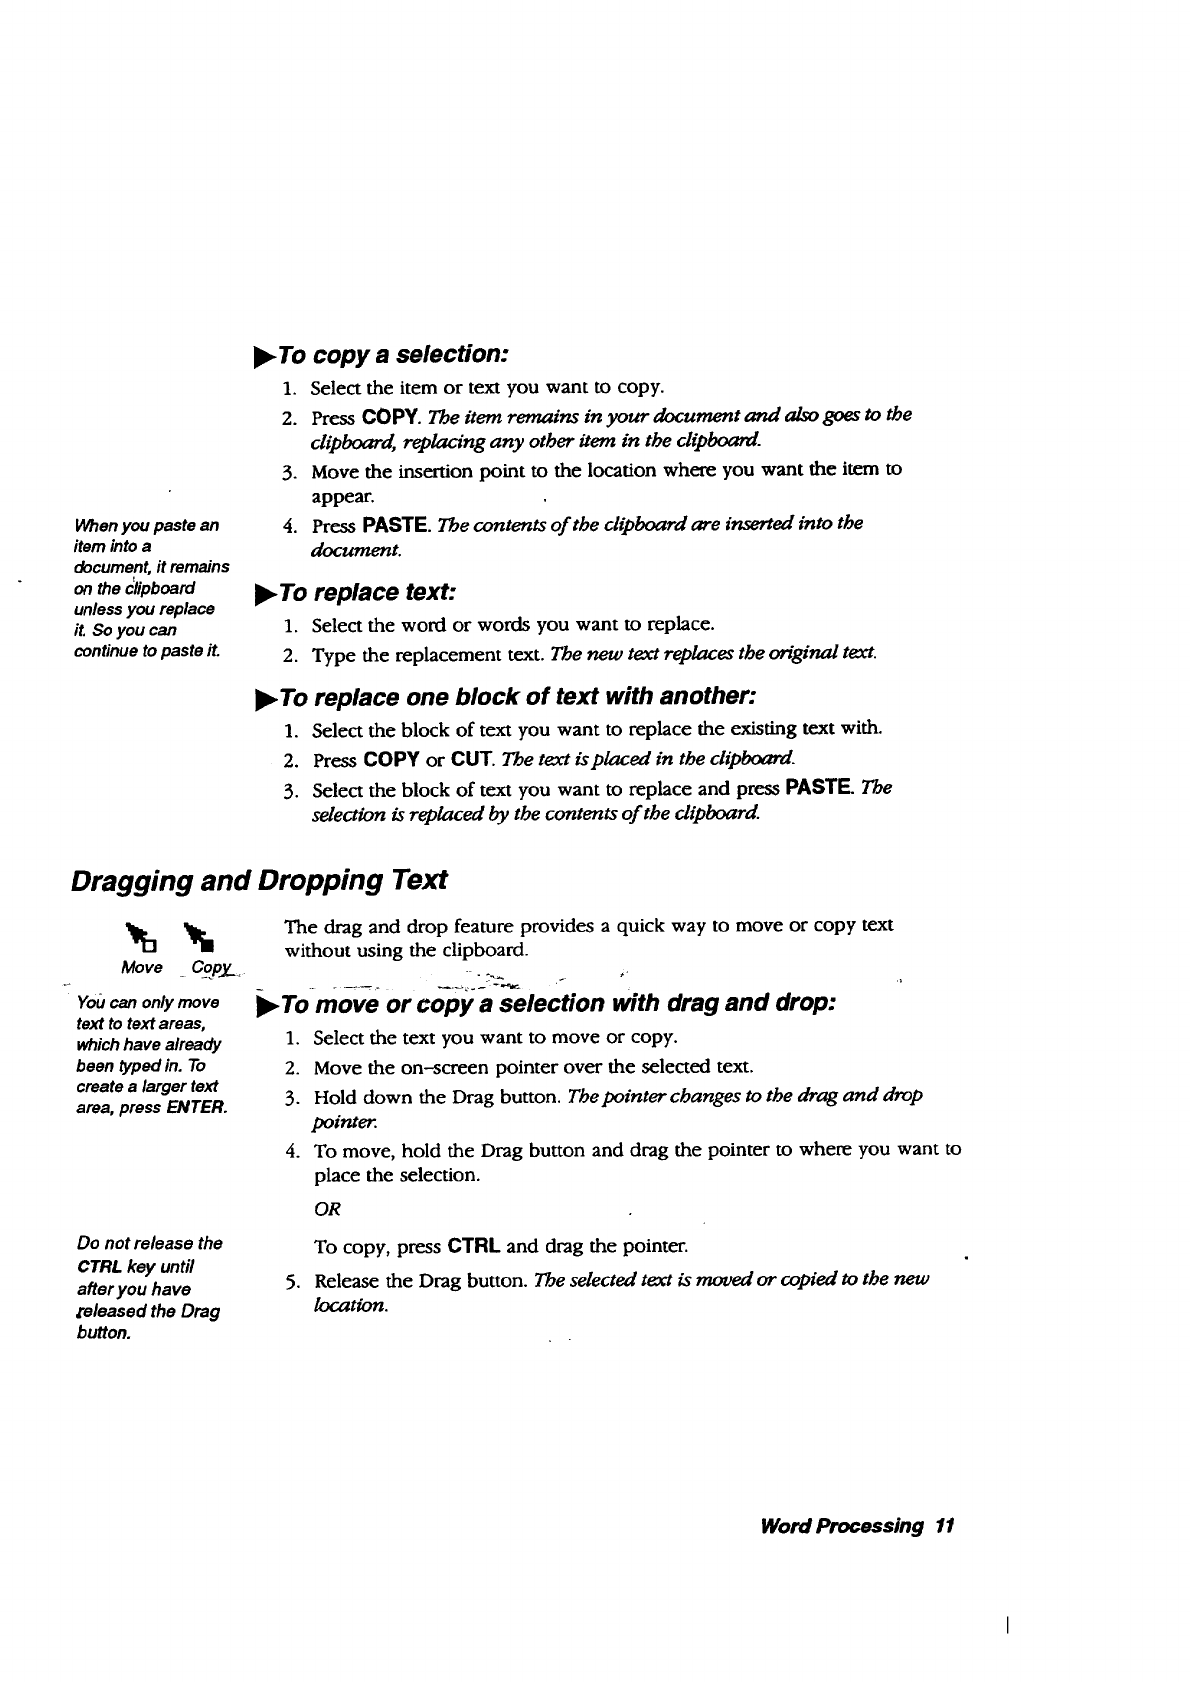
Dragging and Dropping Text
Move _CopJ[__
Youcan onlymove
text to text areas,
whichhave already
been typed in. To
create a larger text
area, press ENTER.
The drag and drop feature provides a quick way to move or copy text
without using the clipboard.
Tomove or copy"-a-selection with drag and drop:
1. Select the text you want to move or copy.
2. Move the on-screen pointer over the selected text.
3. Hold down the Drag button. Thepointer changes to the drag anddrop
pointer.
4. To move, hold the Drag button and drag the pointer to where you want to
place the selection.
OR
Do not release the
CTRL key until
after you have
[eleased the Drag
button.
.
To copy, press CTRL and drag the pointer.
Release the Drag button. The selected text is moved or copied to the new
/ocat_on.
Word Processing 11
Using Undo to Reverse Your Last Action
CUTreplaces the Sometimes you may delete some text or change the way it looks and
contents of the clipboard immediately decide that it was not what you wanted. If you have not done
so that even Undo wi/I anything else, select Undo from the Edit menu to restore the text. Once you
notbringit back.You
can undoyourlastcut, select Undo, its name on the Edit menu changes to Redo.
butnottheonebeforeit.
l_ To undo your last editing operation:
Not allpragrams include Select Undo from the Edit menu. The text you are working on reverts to the
Undo,andnotall original.
operations can be
undone. I_ To undo the last thing you typed:
PressCTRL + BACKSPACE.
Using Special Characters and Symbols
l_ To find and insert special characters and symbols:
Forinternationalormath
symbols clickonthe
Symbolsmenu.Tosee
allavailablecharacters,
seethe Appendix. -"=_-
Once you open the
Keyboard, it will stay
open until you close it.
1. Click on the SYM button in the lower fight hand comer of the screen. The
Symbols On-screen Keyboard appears for tbe font you are using.
2. Click on the Symbols menu to see other choices for the font you are
using. --,._ _ ,-
3. Click on the symbol or character that you want to appear in your
document. The symbol or character appears on the screen.
4. Click on the window close button in the top left hand comer.
Changing Text Font, Size, Style, and Alignment
How a character looks on the screen and when it is printed is determined by
its font, size, style, alignment, and other attributes.
You can apply character attributes in two ways:
• Select the text to change;, then select the attribute you want.
• Select the attributes you want; then type new text. Word Processing
applies the current attribute settings to any teat you type.
I_ To change character attributes:
1. Select the text to change.
2. Select Character Attributes from the Character menu. A dialog box appears.
Word Processing 12

.Fill in the dialog box:
• Character Weight (%). Select the weight of the characters. Select
any weight from 75 to 125.
• Character Width (%). Select the width of the characters. Select any
width from 25 to 200.
• Character Spacing. Select the spacing between characters. Select
any spacing from -150 to 500.
4. Click on Apply.
5. Click on Close.
Changing fonts
Fonts are different typefaces that define how each character appears on
screen and when printed. Each character has a unique design that varies from
font to font.
Word Processing contains sereral different fonts. The URW Mono font is most
like a typewriter font. It is mootospaced: every character uses the same
amount of space. The other fonts are proportionally spaced., the space
taken by a character is relative to the character's width. For example, the letter
i uses less space than w.
l_ To change the font:
To see a sample of the
font, select Fonts from the
Charactermenu; then
select Font Viewer.
Youcan also select
fontsfrom the Fonts
submenuin the
Character menu.
1. Select the text to change.
2. Click-on theFon_ iC_YrYon _e Basic Functions tool bar. A drop-douPa
menu of fonts appears.
3. Select the font. The selected text appears in the font you selected.
Changing text sizes
Ifyou use a large font
3ize, above 72points,
you may need to
increase the line
spacing. Select Line
Spacing fromthe
Paragraph menu.
Text size determines how tall and wide a character is and is usually
measured in points, a measurement used in the printing industry. A point is
approximately 1/72 of an inch. Therefore, 72 point text is one inch tall. Most
books and magazines are written with 10 or 12 point text.
You can select from standard point sizes (9 through 72 points) or create a
custom text size.
Word Processing 13
If all thehighlighted
text is thesame size,
the currentsize is
identifiedby a filled
radio buttonin the
Sizes menu. If the
highlightedtext
contains_rfferent
sizes, none of the point
sizes is marked.
Youcan also change
text size from the
Sizes submenu of the
Character menu.
•To change the text size:
1. Select the text to change.
2. Select Sizes from the Character menu. A submenu appears.
3. Select one of the sizes from the list. Word Processing applies the size you
selected to the highlighted text.
•To change the text size incrementally:
1. Click on the Increase or Decrease Font Size buttons on the Basic
Functions tool bar. The text appears in the next smaller or next larger size.
•To set a custom text size:
1. Select the text to change.
2. Select Sizes from the Character menu. A submenu appears.
3. Select Custom Size from the submenu. A dialog box appears.
4. Select the custom point size you want (between 4 and 792).
5. Click on Apply.
6. Click on Close.
Changing text styles
Use text styles to add emphasis to words and phrases in your document. The
following styles are available:
Youcan also change
text stylesfrom _he
Basic Functionstoolbar.
• _Plain
•Bold
•Italic
• Underline
• Strikethru
•Superscript (e.g. ax + b 2= cz)
•Subscript (e.g. H20)
• Boxed (with a box around i0
• Button (to resemble a button that you press)
•To change the style of text:
1. Select the text to change.
2. Select a style from the Styles submenu in the Character menu. The selected
text sty/e appears.
Word Processing 14
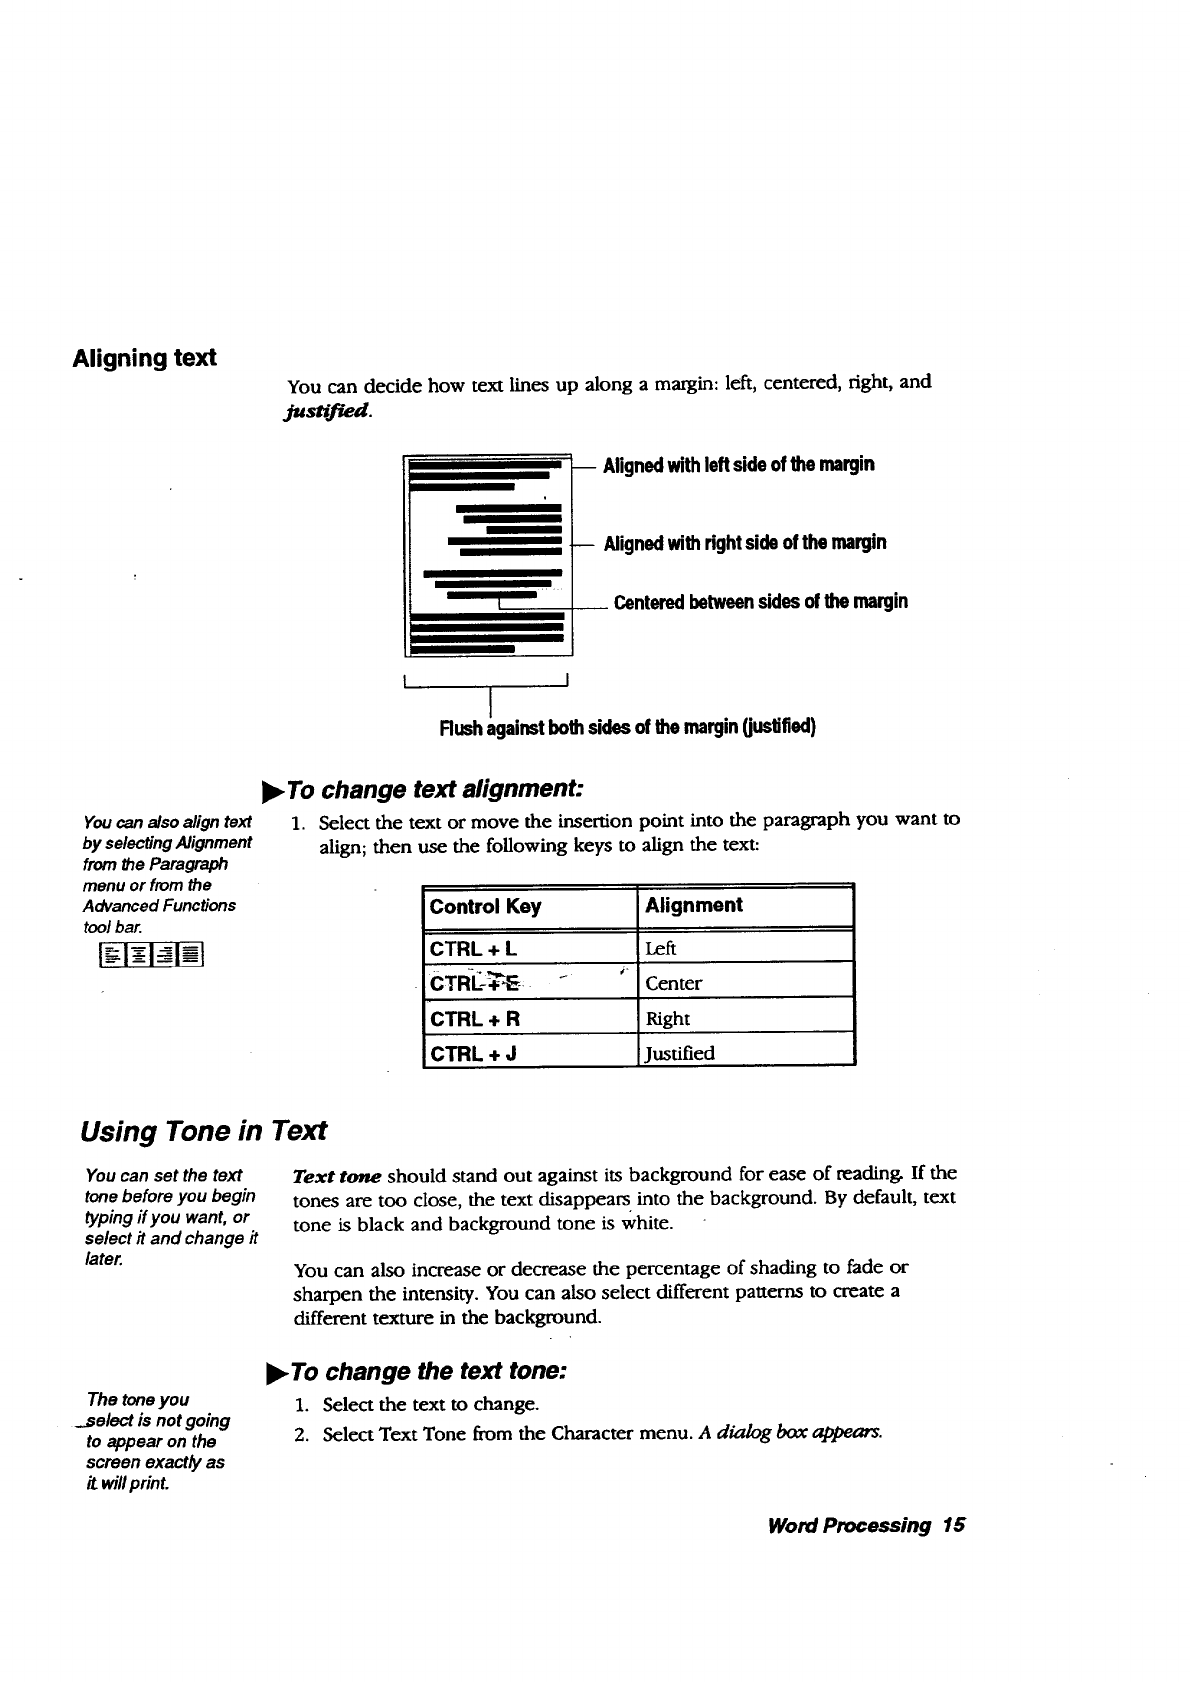
Aligning text
You can decide how text lines up along a margin: left, centered, right, and
iususqear.
I
-- Alignedwithleftsideof the margin
-- Alignedwithrightsideofthe margin
Centeredbetweensidesofthe margin
I
I
Rushagainstbothsidesof the margin(justified)
Youcanalsoalign text
byselectingAlignment
from_e Paragraph
menuorfromthe
AdvancedFunctions
tool bar.
_To change text alignment:
1. Select the text or move the insertion point into the paragraph you want to
align; then use the following keys to align the text:
Control Key Alignment
CTRL + L Left
CTRE-_",_--_ _ _ Center
CTRL + R Right
CTRL + J Justified
Using Tone in Text
You can set the text
tone before you begin
O/ping if you want, or
select it and change it
later.
Text tone should stand out against its background for ease of reading. If the
tones are too close, the text disappears into the background. By default, text
tone is black and background tone is white.
You can also increase or decrease the percentage of shading to fade or
sharpen the intensity. You can also select different patterns to create a
different texture in the background.
The toneyou
_select is not going
to appear on the
screen exactly as
it willprint.
l_ To change the text tone:
1. Select the text to change.
2. Select Text Tone from the Character menu. A d_/og box appears.
Word Processing 15
.Fill in the dialog box:
• % Shade_ Select the percent shading for the text tone. The lower
the number, the more faded the tone. A setting of zero (0) causes the
text to disappear. By default, this setting is 100.
* Tone Tools. Select the text tone.
4. Click on Apply. (Continue to make changes as desired until you are
satisfied with how the text looks.)
5. Click on Close; then deselect the text by clicking somewhere else on the
page. Tbe text appears in the tone you chose.
•To change the text background tone:
1. Select the text to change.
2. Select Text Background Tone from the Character menu. A dialog box
appears.
3. Fill in the dialog box:
• Frilled or Unfilled. Select Filled to set other options in this dialog
box. By default, the background is unfilled.
•%Shaded. Select the percent shading for the text background tone.
The lower the number, the more faded the tone. A setting of zero (0)
causes the background to disappear. By default, this setting is 100.
• Tone Tools. Select the text background tone or shade of gray from
the palette.
4.
5.
•Pattern. Sel.e_ct_tl3e-_attern for the text background. By default, this
setting is solid. A transparent pattern is also available on this palette.
Click on Apply. (You can continue to make changes as desired until you
are satisfied with how the text looks.)
Click on Close; then click somewhere on the page to deselect text and see
the new text tone.
Word Processing 16
Finding and Replacing Text
Use Find and Replace to quickly find a word or phrase in your document
and, ff you like, to replace it with a different word or phrase. You can also
replace all occurrences of a word or phrase in a document.
Searching for text
Find and Replace also
appears in the Ec_t
menu and on the
Advanced FuncOons
toolbar.
Type exactly what you
want to find without any
extra spaces or
characters.
You can search for any sequence of numbers, letters, spaces, and other
printable characters (such as punctuation marks).
)_ To search for text:
1. Press CTRL + F. A dialog box appears.
2. Type the text you want to search for.
3. Click on either Find Next or Find Previous. Word Processing starts the
search from the insertion point forward or backward.
•If Word Processing finds a match, it highlights the text in the
document. Stop the search here or click on Find Next or Find
Previous to resume the search for another match.
.
•For forward searches, if Word Processing reaches the end of the
document, it starts searching from the beginning. For backward
searches, if Word Processing reaches the beginning of the document,
it starts searching from the end. If Word Processing cannot find the
search text in the document, a message appears. Click on OK to close
.... •,his message_-7_: "
Click on Close.
Replacing text
You can replace any search text with different text.
To replace text:
1. Press CTRL + F. a dialog box appears.
2. Type the text you want to search for.
3. Enter the text that will replace the search text.
4. Click on Find Next or Find Previous. Word Processing starts the search
from the insertion point fommwd or backward. If Word Processing finds a
match, it highlights the text in the document. You have the folloua'ng
cboices:
• Replace one occurrence of the selected text. To do this, click on
Replace. Stop the search here or click on Find Next to continue
searching.
Word Processing 1;

Replace all occurrences of the search text with the replacement text.
To do this, click on Replace All. Adialog box appears asking if you
want to rep/ace a/! occurrences. Click on Yes to continue or No to
quit.
Replace in Selection is the same as Replace All, except that it replaces
all occurrences only within selected text.
5. Click on Close.
Using wildcards and special characters
You can use two wildcards and all special formatting characters when you
search and replace text. A wadcard is a symbol that substitutes for a single
character (?.)or a series of characters (*).
For example, to f'md any word that begins with the word math, use the
Multiple Characters wildcard in your search text (math*).
You can also search and replace special eAMme_$ in your document:
graphics, special text, tabs, carriage returns, and page breaks.
)_ To use wildcards and special characters:
1. Press CTRL + F. The Find and Replace dialog box appears.
2. Click on Special Characters. A drop-down list appears:
_Find..It
I_pla¢o _ _'rm
_ciuJ Characters m] FI!gnore Case/P.ccents [] Hatch Portiol biot'sts
[R- Hatch AnyCharacter
- Graphic or Special Text
•_1- Tob
QI- Cardoge Return
O- _oo Brt_t
3. Select the wildcard(s) and special character(s) you want to search for:
• Match Multiple Characters. Matches text where the beginning or
end of the text might vary (such as professor and professional).
•Match/my Character. Matches text where one or more characters
might vary (such as arise and arose).
Word Processing 18
•Graphic or Special Text. Adds a character to search for any graphic
object or any special text character (dates, times, numbers, and so on)
to the Find text.
• Tab. Adds a tab character to the Find or Replace With text.
• Carriage Return. Adds a carriage return character to the Find or
Replace With text.
•Page Break. Adds a page break character to the Find or Replace
With text.
For special characters, you can set the following options:
.
Ignore Case/Accents. Instructs Word Processing to f'md every
occurrence of the search text, ignoring uppercase, lowercase, and
accent marks. For example, if the search string is Dog, Word
Processing could find matches for Dog and dog.
•Match Partial Words. Instructs Word Processing to search for a
portion of aword. For example, if the search string is print, Word
Processing could find matches on print, sprinter, reprint, and so on.
Click on Find Next or Fred Previous to search the document for the search
text, and click on Replace or Replace All to replace the search text with
the replacement text.
5. Click on Close.
Formatting Documents
This section describes how to use the following document formatting
features:
•Line and paragraph spacing
•Indentations, tabs, and rulers
•Borders
•Hyphenation
•Headers and footers
•Title pages
• Page break
• Columns
• Style sheets
•Master pages
Word Processing 19

Setting Line Spacing
Line spacing is the space between lines in a paragraph, also called geadmg.
Linespacingis the spacebetween
linesina paragraph.
) . . n._.12 .n.E._. 14 . = . B._. I; . +. 17 . n. IB .
]r .......... 4
]
-I' !
! i
To add more space between the lines of text in a paragraph, select from the
following line spacing settings:
• Single. This is considered normal spacing. There is no extra line
space between each row of text.
•One and aHalf. A half line space is between each row of text.
• Double. A whole line space is between each row of text.
•Triple. Two whole lines are between each row of text.
• Custom. Set custom line spacing up to 12.
specify line spaciog: ,.
Select the text or move the insertion point into the paragraph you want to
change.
2. Select Line Spacing from the Paragraph menu. Asubmenu appears.
3. Select one of the line-spacing options from the submenu.
•To specify custom line spacing:
1. Select Line Spacing from the Paragraph menu.
2. Select Custom Spacing. A dialog box appears.
3. Select the line spacing option:
• Line Spacing. If Automatic is selected, select the line spacing you
want.
• Manual Leading. If Manual is selected, select the manual line
spacing you want.
4. Click on Apply.
5. Click on Close.
Word Processing 20
•To change spacing between paragraphs:
1. Select one or more paragraphs to change.
2. Select Paragraph Spacing from the Paragraph menu. A dialog box appears.
3. Fill in the dialog box, selecting the options you want:
• Space On Top. Select the spacing above aparagraph.
.
5.
• Space On Bottom. Select the spacing below a paragraph.
Click on Apply.
Click on Close.
Using Indentations, Tabs, and Rulers
Setting indentations
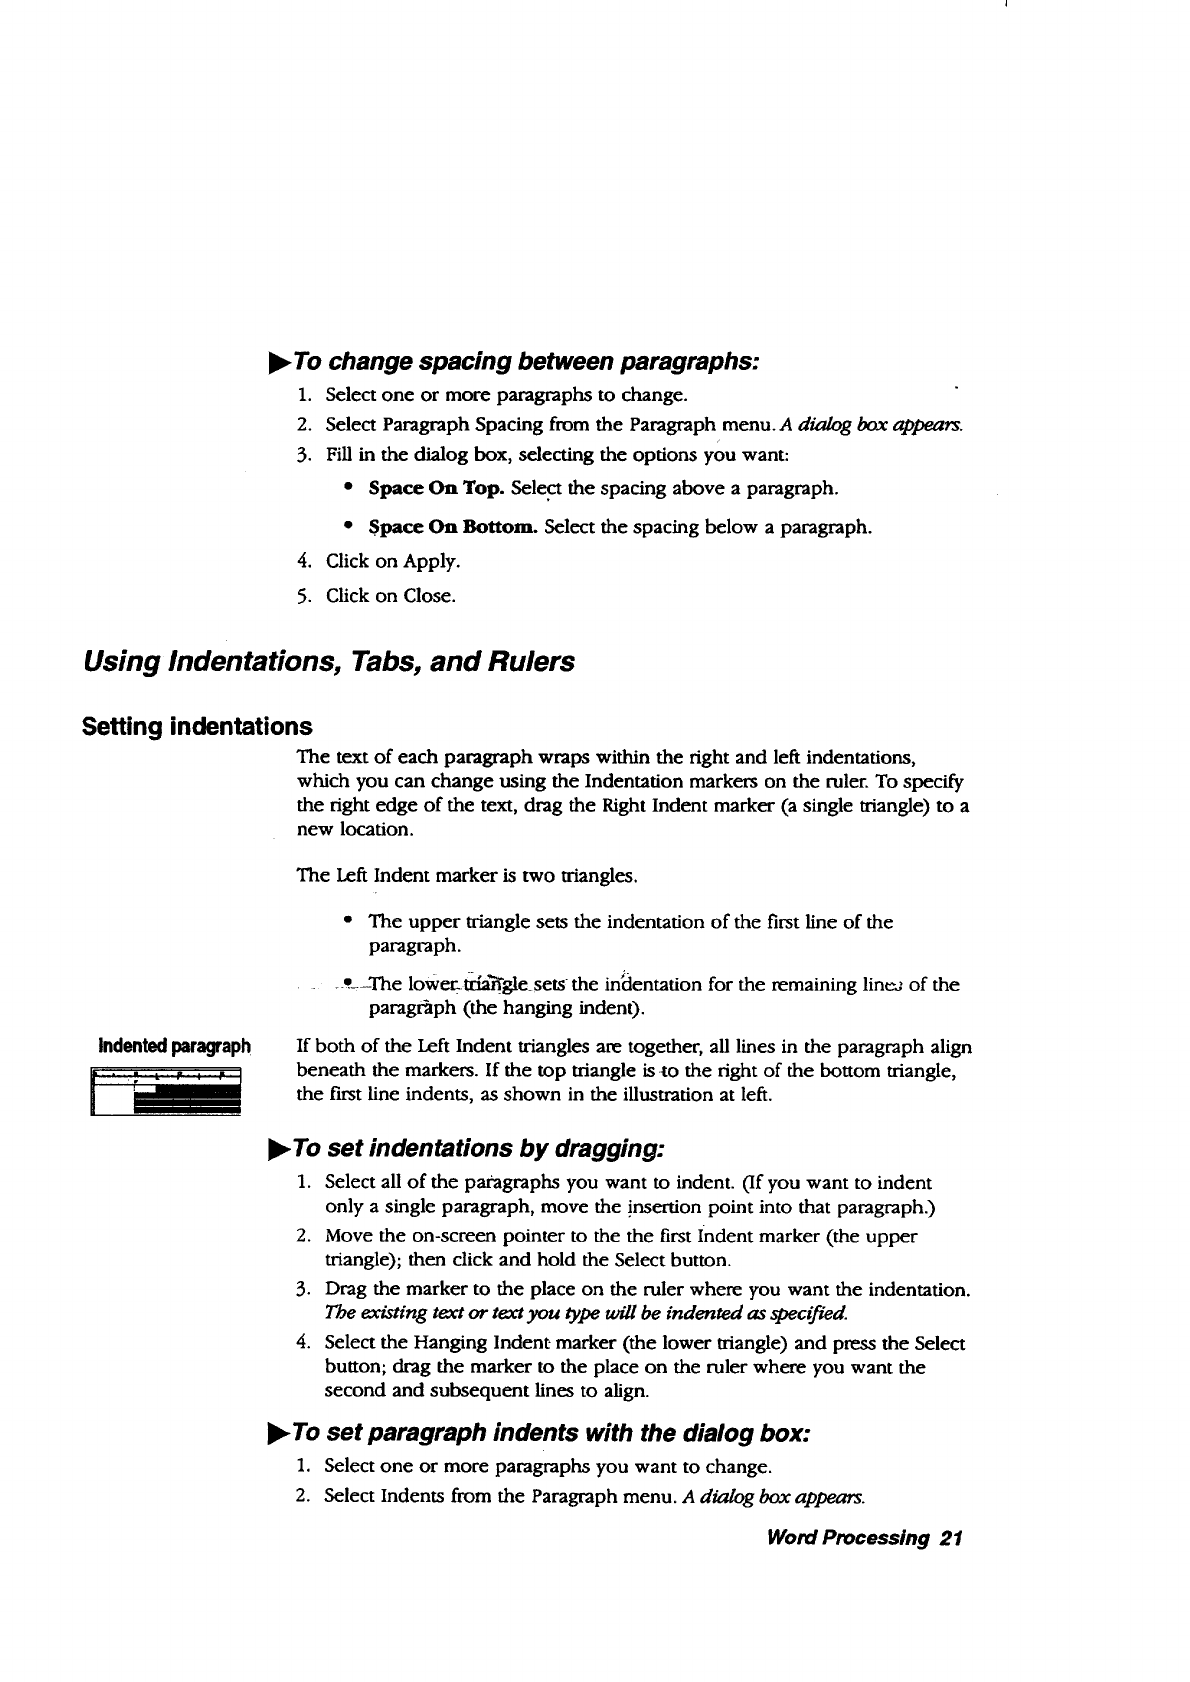
The text of each paragraph wraps within the right and left indentations,
which you can change using the Indentation markers on the ruler. To specify
the right edge of the text, drag the Right Indent marker (a single triangle) to a
new location.
Indentedparagraph
The Left Indent marker is two triangles.
• The upper triangle sets the indentation of the first line of the
paragraph.
_-*.--The loWe_ tiSa_gle_sets: the " _ "
mdentauon for the remaining lin_ of the
paragraph (the hanging indent).
If both of the Left Indent triangles are together, all lines in the paragraph align
beneath the markers. If the top triangle is to the right of the bottom triangle,
the first line indents, as shown in the illustration at left.
•To set indentations by dragging:
1. Select all of the paragraphs you want to indent. (If you want to indent
only a single paragraph, move the insertion point into that paragraph.)
2. Move the on-screen pointer to the the first Indent marker (the upper
triangle); then click and hold the Select button.
3. Drag the marker to the place on the ruler where you want the indentation.
The existing t_ct or t_ct you type will be indented as specified.
4. Select the Hanging Indent marker (the lower triangle) and press the Select
button; drag the marker to the place on the ruler where you want the
second and subsequent lines to align.
•To set paragraph indents with the dialog box:
1. Select one or more paragraphs you want to change.
2. Select Indents from the Paragraph menu. A dialog box appears.
Word Processing 21
Hangingindent
3. Fill in the dialog box, selecting the options you want:
•Left Indent of Fu'st Line. Select the distance of the first line from
the left margin of the page.
•Hanging Left Indent. Select the distance of the text from the left
margin of the page.
• Right Indent. Select the distance of the text from the right margin.
4. Click on Apply.
5. Click on Close.
Setting tabs
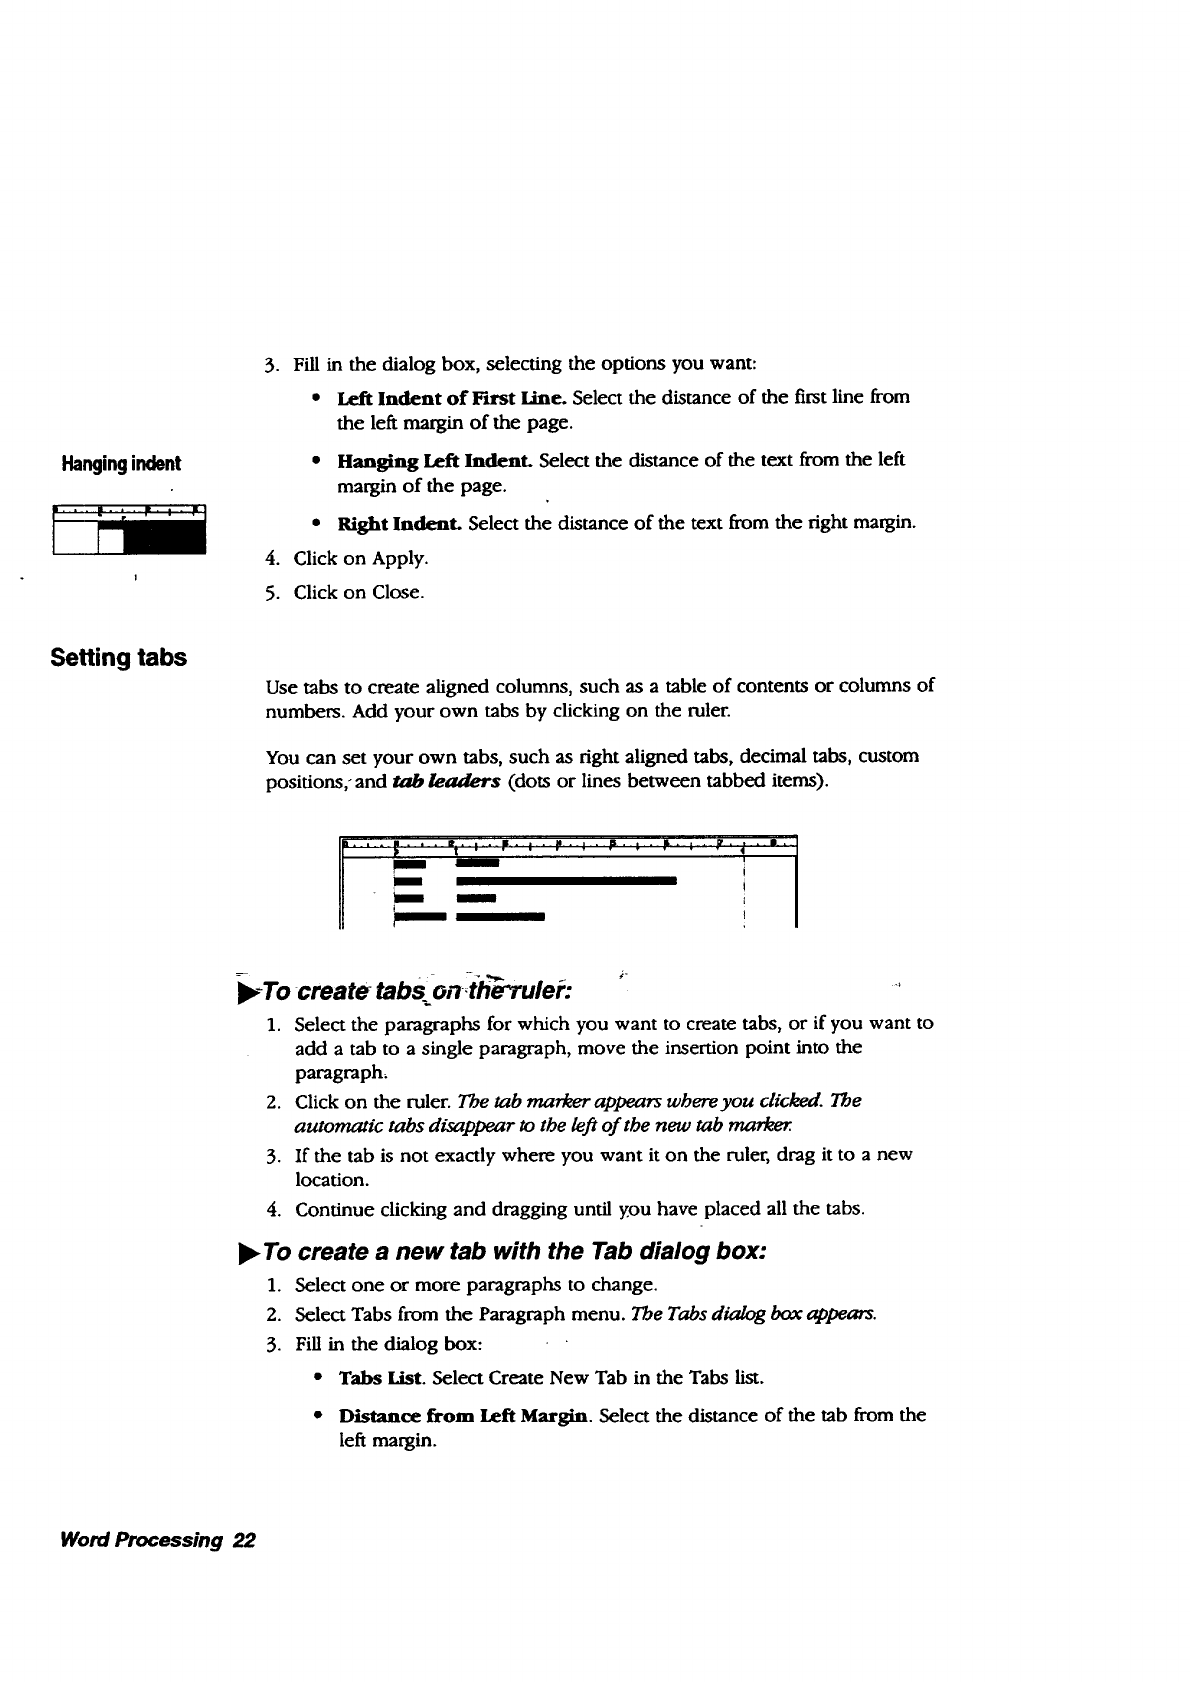
Use tabs to create aligned columns, such as a table of contents or columns of
numbers. Add your own tabs by clicking on the ruler.
You can set your own tabs, such as right aligned tabs, decimal tabs, custom
positions,- and tab/eader$ (dots or lines between tabbed items).
B -----
),-To create tabs on€he*ruleR _
1. Select the paragraphs for which you want to create tabs, or if you want to
add a tab to a single paragraph, move the insertion point into the
paragraph,
2. Click on the ruler. The tab marker appears wbere you clicked. The
automatic tabs disappear to the lej_ of the new tab
3. If the tab is not exactly where you want it on the ruler, drag it to a new
location.
4. Continue clicking and dragging until you have placed all the tabs.
)_ To create a new tab with the Tab dialog box:
1. Select one or more paragraphs to change.
2. Select Tabs from the Paragraph menu. The Tabs dialog box appears.
3. Fill in the dialog box:
• Tabs List. Select Create New Tab in the Tabs list.
•Distance from Left Margin. Select the distance of the tab from the
left margin.
Word Processing 22
.
5.
• Tab Type. Select the alignment of the text at the tab setting (Left,
Center, Right, or Decimal). For example, use a decimal tab to align.
columns of numbers along the decimal point.
Tab Leader. Select the character that precedes the tab setting (None,
Dot, Line, or Bullet).
Vertical Line. This bption puts a vertical line at the tab position that
spans the height of the paragraph. You can set the shading, line
width, and line spacing.
Click on Apply. The tab is applied to selected paragrapbs.
Click on Close.
•To change a tab:
1. Select one or more paragraphs you want to change.
2. Select Tabs from the Paragraph menu. The Tabs dialog box appears.
3. Select the tab you want to change in the Tabs list.
4. Fill in the rest of the dialog box, selecting the options you want.
5. Click on Apply.
6. Click on Close.
•To delete a tab:
1. Select Tabs from the Paragraph menu. The Tabs dialog box appears.
_ 2. Select the_ tab-you _ant to-delete m the Tabs list. ,,,
3. Click on Delete Tab or drag it off the ruler. Word Processing deletes the tab
and shifts the text to the next tab.
OR
Click on Delete Every Tab. Word Processing deletes all tabs, restores the
default tabs for selected paragraphs, and a_'usts the text if necessary.
•To set the default tabs:
1. Select one or more paragraphs you want tO change.
2. Select Default Tabs from the Paragraph menu. A dialog box appears.
3. Select a default tab (None, Centimeter, Half Inch, or One Inch).
OR
Set a custom default tab.
4. Click on Apply.
5. Click on Close.
Word Processing 23
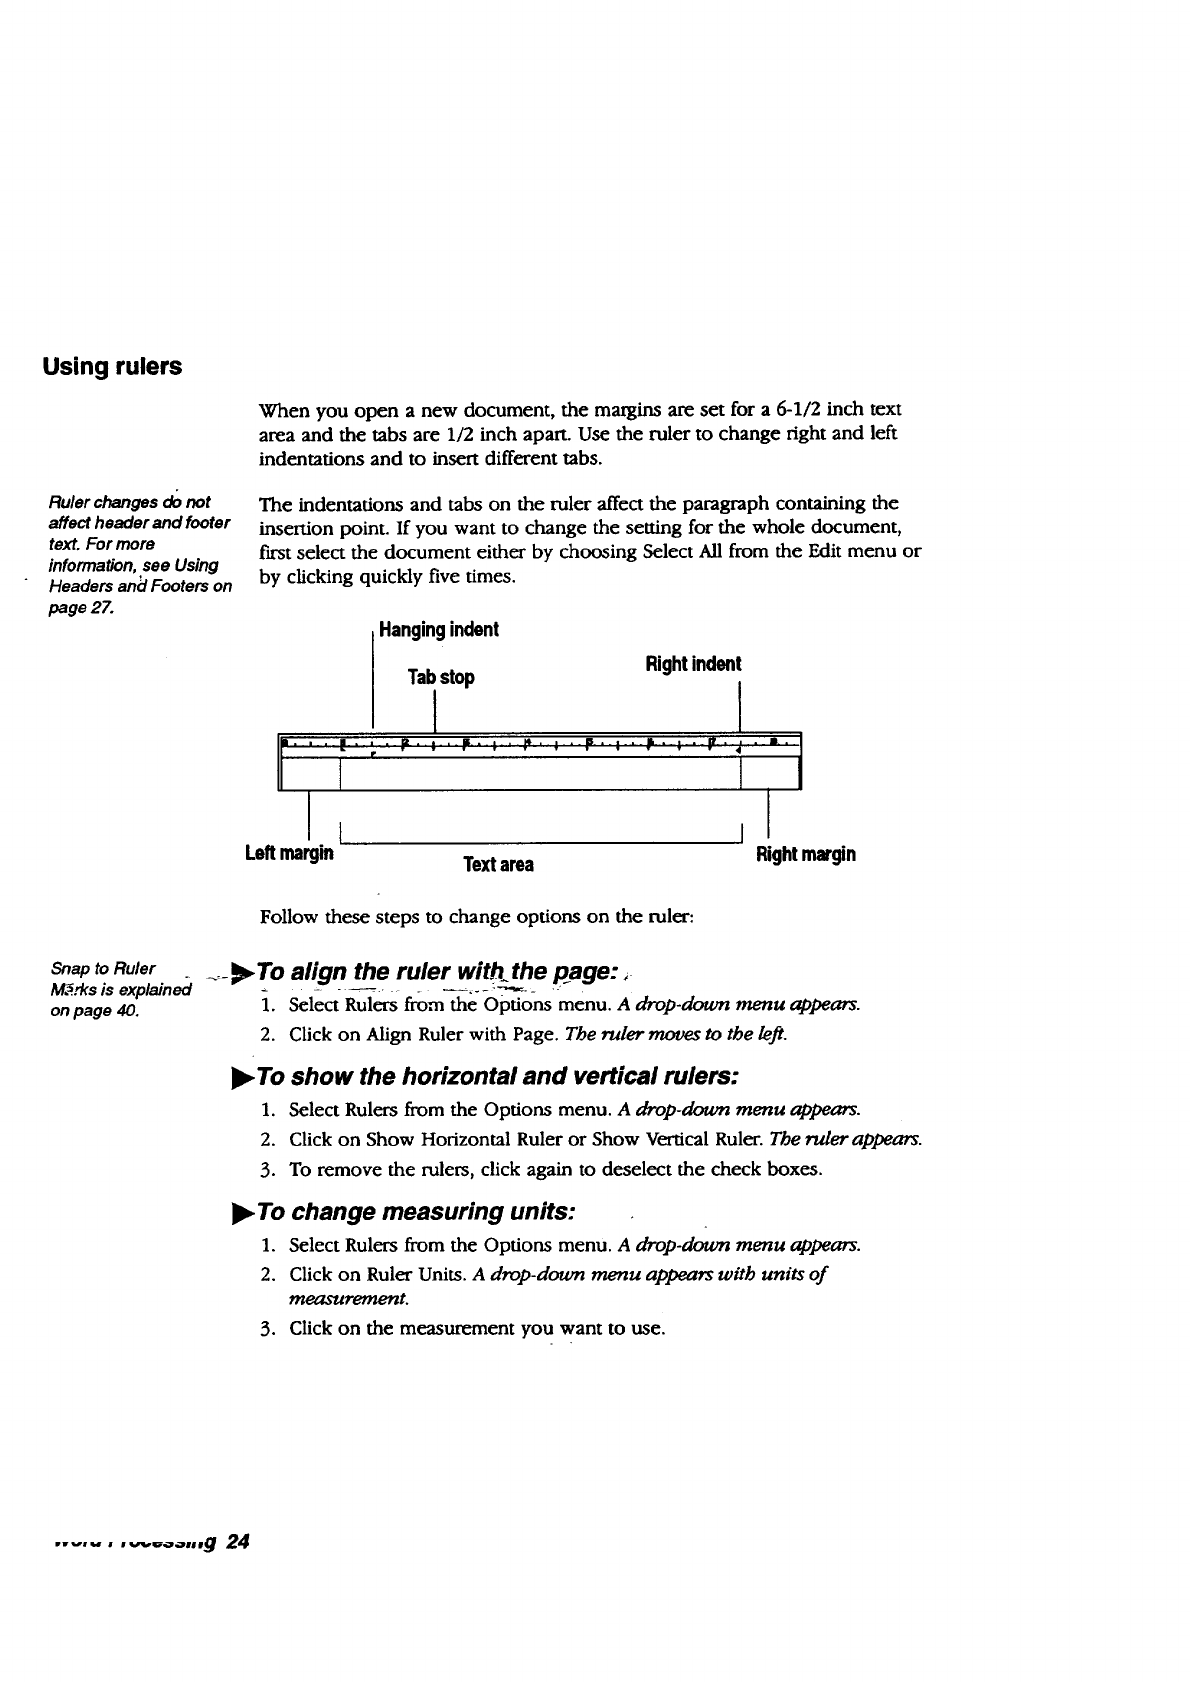
Using rulers
Ruler changes donot
affect header and footer
text. For more
information,see Using
Headers an_lFooters on
page 27.
When you open anew document, the margins are set for a 6-1/2 inch text
area and the tabs are 1/2 inch apart. Use the ruler to change right and left
indentations and to insert different tabs.
The indentations and tabs on the ruler affect the paragraph containing the
insertion point. If you want to change the setting for the whole document,
first select the document either by choosing Select All from the Edit menu or
by clicking quickly five times.
Hangingindent
Tab stop Right indent
iI
i-. , • • . ; . F. : • p. : • ,N. ; - r. : • p. ; • F. , - "- t
Loft margin Text area Right margin
Snap to Ruler .
M,_..,ksis explained
on page 40.
Follow these steps to change options on the ruler:
_-• To align the ruler with the page:,
1. Select Rulers from the Options menu. A drop-down menu appears.
2. Click on Align Ruler with Page. The ruler moves to the le_.
•To show the horizontal and vertical rulers:
1. Select Rulers from the Options menu. A drop-doura menu appears.
2. Click on Show Horizontal Ruler or Show Vertical Ruler. The ruler appears.
3. To remove the rulers, click again to deselect the check boxes.
•To change measuring units:
1. Select Rulers from the Options menu. A drop-down menu appears.
2. Click on Ruler Units. A drop-doum menu appears with units of
measurement.
3. Click on the measurement you want to use.
.............. g 24
Adding Borders
You can place aborder (lines or a box) around a paragraph to add emphas_.
The border extends to the edge of the left and right indentation marker. You
can also set the border tone to set it apart from other text.
•To make a simple border:
1. Select one or more paragraphs to border.
2. Select Borders from the Paragraph menu. A submenu appears.
3. Select the border option you want (None, Thin, Thick, Double-l_dne, or
Shadowed).
•To make a custom border:
1. Select one or more paragraphs to border.
2. Select Borders from the Paragraph menu. A submenu appears.
3. Select Custom Border. A dialog box appears.
4. Fill in the dialog box, selecting the options you want:
• Sides to Border. Select this to set the sides of the border (Left, Top,
Right, and Bottom). Select all four sides to put a box around the text.
Select Draw Inner Lines to draw between lines of text.
o Border Width (points). Sets width of the border in points.
•Border Spacing (points). Sets border spacing in points.
•-Border Type.SLrts type of border (Normal, Shadow, or Double Line).
•Shadow Anchor. If a shadow border is selected, select the anchor
for the light source that creates the shadow (Top Left, Top Right,
Bottom Left, or Bottom Right).
• Shadow Width (Points). If a shadow border is selected, select the
width of the shadow in points.
• Width Between Double Lines (Points). If a double line border type
is selected, select the space between the double lines in points.
5. Click on Apply.
6. Click on Close.
•To change the border tone:
1. Select one or more paragraphs to border.
2. Select Borders from the Paragraph menu. A submenu appears.
3. Select Border Tone. A dia/og box appears.
Word Processing 25

4. Fill in the dialog box, selecting the options you want:
•%Shaded. Select the percent shading for the border tone. The lower
the number, the more faded the tone. A setting of zero (0) causes the
border to disappear. By default, this setting is 100.
•Tone Tools. Select the border tone from the tone palette.
•Pattern. Select the pattet:n for the border tone. By default, this
setting is solid. A transparent pattern is also available on this palette.
5. Click on Apply. (Continue to make changes as desired until you are
satisfied with the borde_.)
6. Click on Close.
Setting Hyphenation
Word Processing
hyphenates only b_ose
words that appear in its
dictiona_
If hyphenation is active (by default, it is not active), a word extending
beyond the right margin is split between syllables. Word Processing inserts a
hyphen (-) and line break and wraps the rest of the word to the next line.
Word Processing provides hyphenation settings that you can change. Note
that some hyphenation can make a document easier to read, while too much
hyphenation can make words harder to recognize and make the page look
cluttered.
I_ To change hyphenation:
_---- 1. Select one or more paragraphs with the hyphenation you want to change.
2. Select Hy----phenation_fi_m'_e Paragraph menu. A dk_gog box appears.
3. Fill in the dialog box:
•On or Off. Select On to allow automatic hyphenation and to set
other options on the dialog box (Off is the default selection).
• Maximum consecutive lines to hyphenate. Restricts the total
number of lines that can be hyphenated.
•Shortest word to hyphenate. Limits the hyphenation to words of a
certain length.
• Shortest prefix. Sets the length of the shortest prefLx to hyphenate,
such as pre in prefix.
• Shortest suffix. Sets the length of the shortest sufftx to hyphenate,
such as ing in hyphenating.
4. Click on Apply.
5. Click on Close.
Word Processing 26

Using Headers and Footers
Aheader contains anything (text, graphics, or both) that you want to appear
at the top of every page. Likewise, a.footer contains anything you want to
appear at the bottom. Here are some of the things you can put in headers
and footers:
• Page numbering
• Date the document was created or printed
• Tide or file name of the document
•Your name or the name of your department, business, or school
• Chapter or section title
• Graphics, such as a logo or design
Whenyou import a
document the
headers and
footersfrom the
source document
donot appear in
the Word
Processing
documenL
Header and footer information is optional and can contain text formatting
(such as bold tex 0 and multiple lines of text.
•To set up a header or a footer:
1. Select Edit Header from the Layout menu. A page appears with the
insertion point in the upper-left corner of the header area.
OR
Select Edit Footer-frOm the+Layout menu. Apage appears with the :nsertion
point in the-upper-left corner of the footer area.
Insertionpointfora header __
_t2_ [at _k_ Dtk._ la_ut irtl_l_ tm't,lra_ _er_"ktr _
]U Bl:::d+ I_I+ lal I_ !+lO_mlxl l,,.-,,----i l,z-IZltl ITl'rlTl_l Im
_, m,.m,m,rI I u_,m,,1'_"mer,,jI l;Ioo',,,., mo,:m,_ I I€::,.__I
.p, ; rt ; ,+ ce_. ;s;. ;N; + _ ts;, _ 1.: . ;rap;. ;B i
ii J
t...........................................................
t
+
!
i
t
!
i
Page numbering
__.comes from the
staaJng page
number you entered
jn the Page Setup
dialog box.
2o Enter the header or footer information. Or use the following buttons to
insert standard information that gets updated automatically:
•Page Number. Click to put the page number at the insertion point.
Word Processing 27
Pointertool J-_
To delete a 'header or
footer, select Edit
Header or Edit Footer
from the Layout
menu. Select the text
and press delete; then
click on Close.
.
• Date of Printing. Click to put the date of printing at the insertion
point.
Crick on Close. The document page reappeews with the beader or footer you
created.
l_ To change the size of a header, footer, or body text region:
1. Select Edit Header or Edit Footer from the Layout menu.
2. From the Drawing tool bar, select the pointer tool and then select the text
region (header, footer, or body text) you want to resize.
3. Point to any handle, hold down the Select button, and drag the handle
until the text region becomes the size you want.
Creating a Title Page
The tiaepage is typically the cover page of a document, which usually
contains descriptive information such as the title of the document. The tide
page is numbered 0, but the number will not print.
The title page appears
v_th a page break line
below the insertion
point. To move the
insertion point down
the page, press
F_J_TER.
2.
.
.
add a title page_to_a document:
Seiect Title-Page f-_t_-__Layout menu. Asubmenu appears.
Select Create Tide Page from the submenu. A dialog box appears asking if
you want to continue.
Click on Yes to create the tide page. Word Proce_ing creates a new Title
Page at the beginning of the document. An empty title page appears, with
the insertion point in the upper-lej_ corner of tbe text area. (If your
document has headers or footers, they will not appear on the tide page.)
Fill in your title page.
5. Return to the body of your document by scrolling downward or clicking
on the Next Page button on the Basic Functions tool bar. (You can resume
editing anywhere in the document.)
l_ To go to the title page:
1. Select Tide Page from the Layout menu. A submenu appears.
2. Select Go to Title Page from the submenu. The titlepage appeam.
Word Processing 28

I_ To delete the title page:
1. Select Title Page from the Layout menu. A submenu appears.
2. Select Delete Tide Page from the submenu. A dialog box appears asking if
you are sure you want to delete the title page.
3. Click on Yes to delete the title page. Word ProcesMng deletes the titlepage.
If the insertion point was on the title page, Word Processing moves it to the
first page; othertzqse, the insertion point remains in the same location.
Using Page Breaks
ffyou have multiple
columns inyour
document, a page
break is the same as
a column break.
Page Break also
appears in the Insert
Special submenuof
the Editmenu.
Word Processing treats the text in a document as one continuous flow of
information. Whenever you insert or delete text or graphics in a document,
Word Processing automatically calculates the location of page breaks and
column breaks and inserts them accordingly. Automatic page breaks are
called softpage breaks because their location changes depending on the
amount of information in a documenL You can force a page break manually
by inserting a bardpage break. Do this whenever you want to start a new
page in a specific location.
ll_To insert a hard page break:
1. Place the insertion point where you want the hard page break.
2. Press CTRL +ENTER. Word Processing inserts thepage break.
To delete a page break:
1: Select Show Invislbl_._ from the Options menu (if not already selected).
The page-break markers ¢*)become viable.
1. Double-click on the page break marker you want to delete.
2. Press DELETE. Word Processing removes the page break, recalculates
pagination, and redraws the screen.
Managing Columns
You can have multiple columns of text in a document, just like those you see
in a newspaper or a magazine. By default, a document has just one column
of text. When you specify multiple columns, text flows from the bottom of
one column to the top of the next.
Word Processing 29
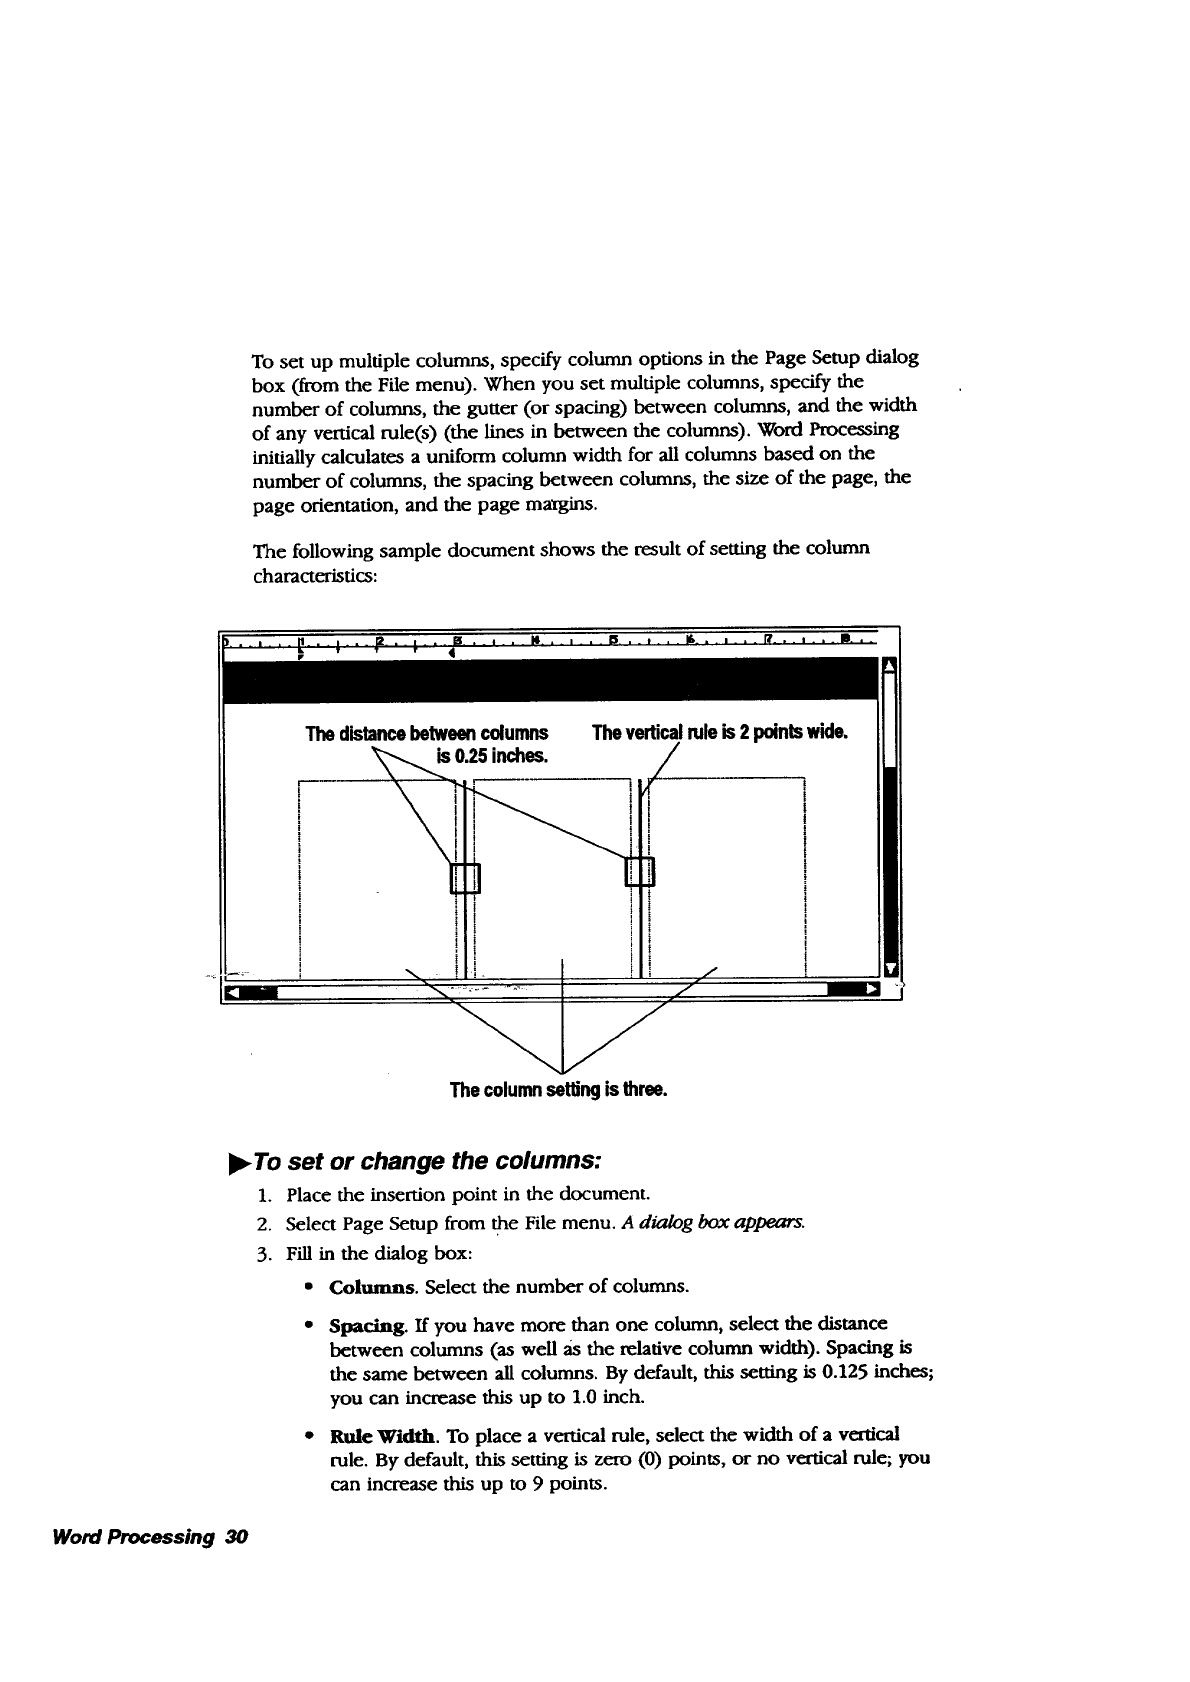
To set up multiple columns, specify column options in the Page Setup dialog
box (from the File menu). When you set multiple columns, specify the
number of columns, the gutter (or spacing) between columns, and the width
of any vertical rule(s) (the lines in between the columns). Word Processing
initially calculates a uniform column width for all columns based on the
number of columns, the spacing between columns, the size of the page, the
page orientation, and the page margins.
The following sample document shows the result of setting the column
characteristics:
Thedistancebetweencolumns
is 0.25 inches. Theverticalruleis 2 pointswide.
The columnsettingis Ihres.
l_ To set or change the columns:
1. Place the insertion point in the document.
2. Select Page Setup from the File menu. A dialog box appears.
3. Fill in the dialog box:
• Columns. Select the number of columns.
Spacing. If you have more than one column, select the distance
between columns (as well as the relative column width). Spacing is
the same between all columns. By default, this setting is 0.125 inches;
you can increase this up to 1.0 inch.
Rule Width. To place avertical rule, select the width of avertical
rule. By default, this setting is zero (0) points, or no vertical rule; you
can increase this up to 9 points.
Word Processing 30
4. Click on Apply.
5. Click on Close.
Using column breaks
To force Word Processing to move text to the top of the next column, press
CTRL + ENTER to insert a hard page break and create a new column.
Using Text Style Sheets
Astyle is a collection of text and paragraph formats under a common name.
Atext style sheet is the set of all the named text styles used in a document.
Styles help ensure a
consistentlook to
your text. They also
make it easier to
changea document
because changing a
styleautomaUcally
updates all the
paragraphs withthat
style.
You can record the following attributes in a text style:
•Text attributes, including character font, text size, text style, text tone,
and character width and height.
•Paragraph attributes, including alignment, spacing, line spacing,
indentations, tabs, and paragraph spacing.
Styles allow you to apply a group of attributes to text all at once. For
example, if you want the headings in your document to be centered and
bold, create a style to automatically center and bold them; then apply that
style to heading text. Without a style, you would have to manually center and
bold each heading .....
Using default styles
Word Processing provides three styles. Use them as is or as a starting point
for creating your own custom styles:
• Normal. The base style for text that comes with Word Processing.
• Header. A standard style for the header of a document.
•Footer. A standard style for the footer of a document.
Applying a style
_-
_s_le
_ert _ _ S'kjk
Jri_ imS_io _osL.
_mlm_
_St_
Change the format of a paragraph by applying a style from the style sheet.
I)" To apply a style to a paragraph:
1. Select one or more paragraphs to change.
2. Select Text Style Sheets from the Paragraph menu. A submenu ap_.
3. Click on Apply Style from the submenu. A so'o//li, t ap_.
Word Processing 31
4. Select the style, scrolling the list if necessary. Word Processing applies the
style formatting to selected paragrapbs.
5. Click on the window control button in the top left comer to close the
dialog box.
Storing and recalling text attributes tempor=;rily
You can temporarily store the text and paragraph attributes from one
,paragraph and then apply them to another without first creating a named
style. To do so, use Store Style. While named styles are saved with your
document, graphic styles that you record with Store Style are not saved when
you exit Word Processing.
•To store the text attributes:
1. Select a paragraph with the attributes you want to store.
2. Select Text Style Sheets from the Paragraph menu. Asubmenu appears.
3. Select Store Style from the submenu. Word Processing remembers the
attributes of the selected paragraph.
•To recall the text attributes:
1. Select one or more paragraphs that you want to apply the stored
attributes.
2. Select Text Style Shee_ from the Paragraph menu. A submenu appears.
-3. Select R-ecall Style-_m-th-_ submenu. Word Processing applies the saved
attn'butes to the selected text.
Defining a new style
You can add a new style to the style sheet by giving it a name and defining
its attributes. A base sty/e is a style on which other styles depend; these
styles are variations on the base style. If you change an attribute in the base
style, all dependent styles will change except those that define the attribute
uniquely.
For example, suppose you define a style called Head Level 2 using another
style, Head Level 1, as its base style. If you add bold to Head Level 1, the text
in Head Level 2 becomes bold. Word Processing updates all text in either
style with the new attributes.
Alternatively, you can define a style so that its unique attributes change
relative to changes in the base style. For example, if you set margins in Indent
Level 2 relative to Indent Level 1 its base style, and you increase the left
margin in Indent Level 1 by 0.25 inches, Word Processing increases the left
margin in Indent Level 2 by 0.25 inches as well.
Word Processing 32

You can also define
a new style without
using a base style.
Word Processing
uses _e default
attributes or the
attributes of.
selected text as the
staring point.
Once you have defined
a style to appear on the
Basic Functions tool bar,
use this button to apply
a style to selected text.
[ Normal ==1
Changing styles
l_ To define a new style:
1. Select a paragraph for which you would like to change the style. Word
Processing uses the attn'butes in the selected (or base) style to define the
initial attn'butes of the new style. (You can also start out with no text
selected, using the default text and paragraph attributes.)
2. Change the format of the paragraph to your desired style.
3. Select Text Style Sheets from the Paragraph menu. A submenu appears.
4. Select Define New Style from the submenu. A dialog box appears.
• Description. Shows a description of the selected style, which
changes when you define text and character attributes. The base style
appears first, then any changes you have made to character and
paragraph formatting.
Display in Tool Bar Pop-Down List. Select whether the style
appears in the Tool Bar Pop-down list on the Basic Functions tool
bar. By default, this option is selected.
Apply to Selection Only (Character Style). Select whether you
want to apply the style attributes to selected text only or to the entire
paragraph.
Point Size Relative. Select to make the point size relative to the
point size of the base style. Changing the point size in the base style
changes the point size in the current style by the same amount.
Margins Relative. Select to make the margins relative to the margins
of the base styleT.Changing the' margins in the base style changes the
margins_in the current style by the same amount.
Leading Relative. Select to make the leading (or line spacing)
relative to the leading of the base style. Changing the leading in the
base style changes the leading in the current style by the same
amount.
• Name. Type a new style name. You can use letters, numbers, and
spaces. For example, you could call a style Chapter Name.
5. Click on Define New Style. Word Processing applies the new style to the
selected text or paragrapb.
6. Click on Close.
You can change a style two ways: by changing its attributes (text size,
paragraph spacing, and so on) or by changing the attributes of its base style
(point size relative, margins relative, and so on). If the style serves as the base
style for other styles, changes can affect those dependent styles as well.
Word Processing 33
•To update a style:
1. Select a paragraph in the style you want to change.
2. Set any character and paragraph attributes you want for this style.
3. Select Text Style Sheets from the Paragraph menu. Asubmenu appears.
4. Select Redefine Style from the submenu. Word Processing updates the style
with the formatting in the selected paragraph.
•To modify an existing style:
1. Select Text Style Sheets from the Paragraph menu. Asubmenu appears.
2. Select Manage Styles from the submenu. A dialog box appears.
3. Find the style you want to change, scrolling the list ff necessary, and then
select it. The text in the Description box changes to show the style you have
selected.
4. Click on Modify. A dialog box appears.
You can change Ihe
base style if you want
by selecting it in _e
list. If you do not want
a base sOde, select
<<No Base Style>>.
Hod_uSt_o
Sttjb l'Jnlr_, _ormal
•_u bI_ Bar PopOawn I.ist
nRi)plg to selection Onbj (Character StLjle)
[] Point Size Relatioo
I-I Hlergin¢ Relatlue
[] Leading I_JaUue
•;rltlo Base SIvle )>
Normal
Bleeder
Footer
i- ID
5. Fill in the dialog box, selecting the options you want.
6. Click on Modify to change the style definition. The Modify Styles dialog
box disappears.
7. Click on Apply. Word Processing app!ies your changes to the selected text.
8. Click on Close.
Deleting a style
you no longer need
eliminates clutter in
the style sheet.
Once you delete a
style, you cannot
recover it.
•To delete a style:
1. Select Text Style Sheets from the Paragraph menu. A submenu appears.
2. Select Manage Styles from the submenu. A dialog box appears.
3. Select the style you want to delete from the list. If the selected style basa
base style, the name of the base style appears in the style description box.
Word Processing 34

.Click on Delete. Word Processing deletes the selected style. Word Processing
attaches the base style to any paragraphs in the style you just deleted.
Houmm_, Word Processing does not apply the attributes of those paragrapbs
with the attributes in the base style.
OR
Click on Delete and Revert." Word Processing deletes the selected style,
attaches tbe base style to any paragraphs in the style you just deleted, and
overrid_ the current attributes of those paragraphs with tbe attributes in
the base style.
5. Click on Close.
•To revert to the base style:
1. Select the text you want to change.
2. Select Text Style Sheets from the Paragraph menu. A submenu appears.
3. Select Revert to Base Style. Word Processing applies the base style,
overriding the current attributes of the selected text.
Using style sheets from other documents
You can copy style sheets from another document or template into a
document you are working on. That way, you do not need to def'me the
same styles all over again.
..... •To get-styles from_ar, other document:
1. Select Text Style Sheets from the Paragraph menu. A submenu appears.
2. Select Bring In Style Sheet from the submenu. A dialog box appears.
3. Select a document or template from the list.
4. Click on Load Style Sheet. Word Processing imports the styles from the
template you selected. If a style with the same name appears in the template
and the document, Word Processing uses the template style instead.
5. Click on Close.
Word Processing 35
Using Master Pages to Design Documents
Header.................................region
!i
! !
! !
! !
iBodyi_gio_ !
_contabing_ colun_m
!
!
!
!
!
iFooterreqion ]
Use master pages to specify information that repeats on each page of a
document. For example, you might want a logo to appear on every page.
The maatarpage is a prototype of how text and graphics appear on every
page. The master page defines the header and footer, the area where the
body text appears on a page, and graphics (such as a logo) that repeat on
every page. The illustration at the left shows a typical master page designed
with three columns.
When you add a page, Word Processing uses the layout and information in
the master page to create the new page. Once created, you can change the
document to suit your needs without affecting the master page.
If you specify two pages in Page Setup (left and right), the document will
have two master pages: one for the left and one for the right.
Editing the master page
To change the format
of an individual page
in your document, do
not use a master
page. Instead, reduce
yourdocumentto _I_ TO edit the master page:
Scale to Fit in the ......
View menu; use the
pointer from the
Drawing tools; and
select and resize
header, footer, or
main body region.
This can be useful
when you want the
margins of a
particular page to be
different from the rest
of the documenL
When you edit the master page, Word Processing updates every page in the
document with any changes you have made. For example, if you change the
footer, Word Processing applies that change on every page.
-1. Select Edit Master Page-_ffom _e Layout menu. The masterpage appears:
Page Ntmaber. Click on this button to put the page number at the
insertion point.
Date of Printing. Click on this button to put the date of printing at
the insertion point.
Word Processing 36
•Redraw I)ooanent. Click on this button to refresh the screen and
implement any changes you have made.
2. Make your changes to the master page. The changesyou can make
include:
• Adding any text or graphics you want to the header or the footer.
• Resizing or moving the text region for the header, footer, or body text
(including columns).
3. When you are finished, click on Close. Word Processing updates all
affected pages with any changes you have made.
Changing text regions on the master page
The text region defines where text flows on the page. You can move and
resize the text region for the header, footer, and body text on a master page.
You might want to do this, for example, to set a custom width for columns
on a page. When you set the number of columns in Page Setup, Word
Processing calculates the column width for you. To adjust the width or
position of these columns, edit the master page.
•To select a text region:
- Pointertool _
iIi i
' I
L__L__.J__i
Handk, show that
"thetext region is
selected. Once se-
lected, you can
move or resize iL
1. Select Scale to Fit from the View menu. Tbepage is scaled doum.
2. Open the Drawing tool bar from the Show Tools submenu of the Options
menu, This tooL bai:_'_pears on the left of the screen. ,,
3. Select the Pointer tool./'be insem'onpoint becomes an arrow.
4. Point the tip of the arrow to a border of the text region (header, footer, or
body text), and click the Select button. Handles appear along the border of
the text region to indicate that it is selected.
•To deselect a text region:
Point anywhere outside or inside the border of the text region and click. The
handles disappear
•To change the size of a text region:
1. Select the text region you want to resize.
2. Point to any handle, hold down the Select button, and drag the handle
until the text region becomes the size you want.
3. Release the Select button.
Word Processing 37
You can also select
Copy, Paste, and
Delete from the Edit
menu or from their
buttons on the Basic
Func_ons tool bar
(see page 3).
•To move a text region:
1. Select the text region you want to move.
2. Point to the move handle in the center, hold clown the Drag button, and
drag the text region to where you want it to appear.
3. Release the Drag button.
•To copy a text region:
1. Select the text region you want to copy.
2. Press COPY. Word Processing copies the text region to the clipboard.
3. Place the insertion point to where you want to paste the text region.
4. Press PASTE. Word Processing pastes the text region in the document.
•To delete a text re#on:
1. Select the text region you want to delete.
2. Press DELETE.
Using Graphics in a Document
This section explains how to use graphics in a Word Processing document.
The drawing and graphics features are very similar in Word Processing and
Drawing. Complete information about drawing and graphics is included in
the chapter on Drawing.
Graphics,especially You can use any _Paphic image that you can paste from the clipboard. For
large ones, take up more example, you could draw a logo in Drawing, copy it to the clipboard, and
memory than text Ifyou-
use large graphics, you --paste it directly into your letterhead in Word Processing.
may need to break up
your document and save
the pages with graphics
separately.
You can create a graphic image within Word Processing using the tools on
the Drawing, Bitmap, or Graphics tool bar. That way, you can create a
drawing without leaving your document. When creating graphics in Word
Processing, select Show Tools from the Options menu; then click on Drawing
Tools.
You can add a graphic frame (a rectangle with a simple border around it)
anywhere on a page. You can paste graphics into a graphic frame, change its
appearance, and control how it fits in the text. You can also paste graphics
into a document without using a graphic frame.
Word Processing 38
Using Frames for Graphics and Text
Agraphic frame is a rectangle that frames text or graphics. You can fill a
graphic frame with tone and paRems, change the tone and thickness of its
border, and make text wrap around it, wrap inside it, or even flow right
through it. You can also resize, move, and delete a graphic frame.
)_ To create a graphic frame:
1. Select Create Graphic Frame from the Layout menu. The Drawing tool bar
appears on the left of the screen.
2. Point to where you want to anchor the upper-left comer of the graphic
frame.
3. Press the Select button and drag down and to the fight until the graphic
frame becomes the size you wanL An outline shows the borders of the
graphic frame as you drag it.
4. Release the Select button. The graphic frame appears with bandies along
its borders, as sboura in the foUoun'ng illustration:
Toresizeaframe,
pressthe Selectbut-
tonand drag a hen-
die.
|
i
lira
Tomovethe flame,
pressthe Dragbuttonand
dragthemove handle.
Word Processing 39

Texttool
l-Beam _
To return to the' textin
your document, select
the I-Beam tool.
Whenyou'use a frame
for text,you can move
the frame or create a
borderaround it.
Frames withtext are
also useful for
footnotes (see page
47).
Pointertool
•To create a graphic frame for text:
1. If the Drawing tool bar is not open, select it from the Show Tools
submenu of the Options menu.
2. Select the Text tool from the Drawing tool bar.
,Place the insertion point in the document and drag to size the frame. An
outline shows the frame.
4. Begin typing. The text appears in the frame.
•To select or deselect a graphic frame:
1. Select the Pointer tool from the Drawing tool bar.
,Point the tip of the Arrow pointer to a border of the graphic frame and
click on the Select button. Handles appear along its border to show that it
is se/ected.
OR
To deselect, point anywhere outside or inside the border of the graphic
frame and click.
•To change the_size-o_Fa g_aphic frame:
1. Select the graphic frame you want to resize.
" 2. Point to any handle, hold down the Select button, and drag the handle
until the graphic frame becomes the size you want.
3. Release the Select button.
Youcan alsodisplaya•TO line up a graphic frame to a ruler (snap):
grid for aligning
graphics. See page 42. 1. Select Rulers from the Options menu.
2. Select Snap to Ruler Marks. Word Processing aligns graphics to the nearest
ruler measurement mark.
•To move a graphic frame:
1. Select the graphic frame you want to move.
2. Point to the move handle in the center, hold down the Drag button, and
drag the graphic frame to where you want it to appear.
3. Release the Drag button.
Word Processing 40
,To delete a graphic frame:
1. Select the graphic frame you want to delete.
2. Press DELETE.
To_na graphicfrarno.,To set area attributes for a frame:
set the area attributes.
To a_ust the border of
a frame, set He line
attributes.
1. Select the graphic frame.
2. Select Area Attributes from the Graphics menu. A dia/og box appears.
3. If Filled is not selected, click on it; then select the Area Attributes you
want.
4. Click on Apply; then click on Close.
,To set line attributes for a frame:
1. Select the graphic frame.
2. Select Line Attributes from the Graphics menu. A dialog box appears.
3. If Filled is not selected, click on it; then select the line attributes you want.
4. Click on Apply; then click on Close.
Using Grids
You can position graphics using the grids, snapping objects into place for you
automatically. The grid is a pattern of evenly-spaced vertical and horizontal
lines that help you a!ign and size objects. You can also change the spacing of
the grids-
You can also automatically snap (or position) objects along grid lines when
you create them. Snapping objects to the grid is often faster and more
accurate than positioning them manually.
,To show or hide the grid:
1. Select Grids from the Layout menu. A dialog box appears. If Snap to Grid
is selected in this dialog box, Word Processing aligns objects to the grid.
2. Select Show Grid to show the grid.
OR
Deselect Show Grid to hide the grid.
3. Click on Apply.
4. Click on Close.
Word Processing 41

l!_To set the grid spacing:
When you change the
units of measure for the
grid, you vwIIfind it
helpful to change the
units on the ruler also.
See page 24.
1. Select Grids from the Layout menu. Ad_gg box appears.
2. Select the units of measure (Inches, Centimeters, Points, or Picas). By
default, the units of measure are the same as the ruler setting.
3. Select the distance between grid lines.
4. Click on Apply.
5. Click on Close.
I_ To snap graphics to the grid:
1. Select Grids from the Layout menu. Adk_2og box appears.
2. Select Snap to Grids.
3. Click on Apply.
4. Click on Close.
Using Clip Art in Documents
Pasting graphics into a document
You can paste any graphic from another program into a Word Processing
document. Paste it into a graphic frame in the graphic layer or directly into
the text.
To select and copy more
thanone graphicobject __
at atime, press and hold
CTRL whileselecting
objects.
_--:_ To copy.and paste_graphic object: _,
1. In the program you are using to draw the graphic (Drawing, Spreadsheet,
or even Word Processing), select the graphic object you want to copy.
2. Press COPY.
Youcan also select
Copy and Paste from lhe
Edit menu orfrom their
buttonson the Basic
Functionstool bar.
3. Open the Word Processing document into which you want to paste the
graphic object or objects.
4. Place the insertion point on the page on which you want the graphic
object or objects to appear.
5. Press PASTE, You are asked if you want the grapbic object on the text
layer or graphics layer. On the text layer;, the graphic will move or flow with
tbe text. On the grapbic kzyet;, it will stay wbere it is on tbe page no matter
what changes are made to the text.
6. Select the layer by clicking on the button. The graphic appears on the
page.
7. Resize or move the graphic objects as desired.
Word Processing 42
Youcan also
change Ihe size by
selecD'ngTransform
from the Graphics
menu and clicking
on Scale.
I_ To change the size of a graphic object:
1. Select one or more graphic objects you want to resize.
2. Point to any handle, press and hold down the Select button, and drag the
handle until the graphic object becomes the size you want.
3. Release the Select button.
l!_To move a graphic object:
1. Select one or more graphic objects to move.
2. Point to the move handle (in the middle), press and hold down the Drag
button, and drag the selected graphic objects to where you want it to
appear.
3. Release the Drag button.
Pasting clip art into a document
Scrapbook converts
the clip ad image to a
format_at Word
Processing
understands.
To paste clip art into your document, first open Scrapbook, retrieve a dip art
image from a diskette, and store it in your scrapbook. Then, copy the graphic
image from your scrapbook into your Word Processing document.
To copy and paste a piece of clip art:
1. Open a scrapbook. If you do not want to place the clip art in your Default
Scrapbook, create another scrapbook. (See Scrapbook, page 167.)
• If you have never created your Default Scrapbook, a message appears
_telling you to__e_e it by clicking on New. (See Scrapbook, pPge
167.)
If for some reason you have a scrapbook, but it is not labeled as
Default Scrapbook, the program tells you that it cannot find your
Default Scrapbook. Click on Cancel to open a New/Open Scrapbook
dialog box. Then select your scrapbook name and click on open.
ff He fileis very large, it
"couldtake several
minutes toirnporL You
cannotinterrupt#Tis
process.
2. Locate the page in your scrapbook that will follow the clip art to be
imported. The imported graphic image will be inserted in front of the
scrapbook page that appears on the screen.
3. Insert the diskette labeled Clip Art.
4. Select Import Scrap from the File menu. The Import Scrap dialog box
appears and lists file names.
5. Select the name of the File you want to import, and dick on Import. It
may take several seconds for the graphic to be i_ and placed in the
scrapbeo&
6. Press COPY; then press EXIT. So'apbook c/oses. Scrapbook gives you the
option to save the scrapbook or discard it.
7. Open the Word Processing document to paste the clip art into.
8. Place the insertion point where the clip art is to be inserted.
Word Processing 43
9. Press PASTE. You are asked if you want the graphic on the text layer or
graphics lays.
Wrapping Text
Wrapping text means that text'can go outside or inside the borders of a
graphic object. The following illustration shows examples:
This text is wrapped
tight .
Thistextis wrapped
aroundthe graphics
frame.
This text is not
wrapped.
Thistextis wrapped
insidetheobjecL
•To set text wrapping:
2.
3.
Select the graphic frame you want to use.
Select Wrap Type from the Graphics menu. A submenu appears.
Select one of the following options:
•Wrap Tightly. This wraps text tighdy around the borders of selected
graphic objects.
•Wrap Around Rectangle. This wraps text around a rectangular area
that completely encloses the selected graphic objects.
• Wrap Inside Object. This wraps text inside the border of selected
graphic objects.
•Don't Wrap. This suppresses text wrapping. The text goes right
through the object.
Word Processing 44
Inserting, Appending, and Deleting Graphic Layouts
To keep graphics and text together on the same page, use Insert, Append,
and Delete. These functions allow you to insert or delete pages in between
existing pages without changing the layout of the graphics and text on the
existing pages.
When deleting the
*graphic layout for a
page, you v_ll not lose
the text, just the
graphic layouL
)_To insert or append a graphic layout:
1. Place the insertion point on a page in the document where you would
like to add a graphic layout.
2. Select Graphic Layouts from the Layout menu.
3. If you want to insert a graphic layout before the currem page, select Insert
(Before This One) and click on Yes when the message box appears.
•Ifyou have graphics on thispage that are not in the masterpage, they
will be pushed to the next page.
If you have graphics on the last page that are not on the master page,
a message box appears. Click on Delete Grapbics ifyou want to delete
the graphics on the last page. Click on Move Graphics to keep the
graphics on the last page. Click on Cancel Delete to create a new page
that contains just the graphics from the last page.
OR
If you want to insert a graphic layout after the current page, select Append
(After This One) and click on Yes when the message box appears.
--;--_ifybuba'_rap'_ds on thefolloua'ngpage that are not in the master
page, they will be pushed to the page following the next page.
If you have grapbics on the last page that are not on the master page,
a message box appears. Click on Delete Graphics ifyou want to delete
the graphics on the last page. Click on Move Graphics to keep the
grapbics on the last page. Click on Cancel Delete to create a new page
that contains just the graphics from the last page.
I_ To delete the graphic layout for a page:
1. Place the insertion point on the page to delete.
2. Select Graphic Layouts from the Layout menu.
3. Select Delete. A message appears asking if you want to delete the current
page.
4. Click on Yes. Any graphic_ On the current page not contained in the
master page are removed.
Word Processing 45
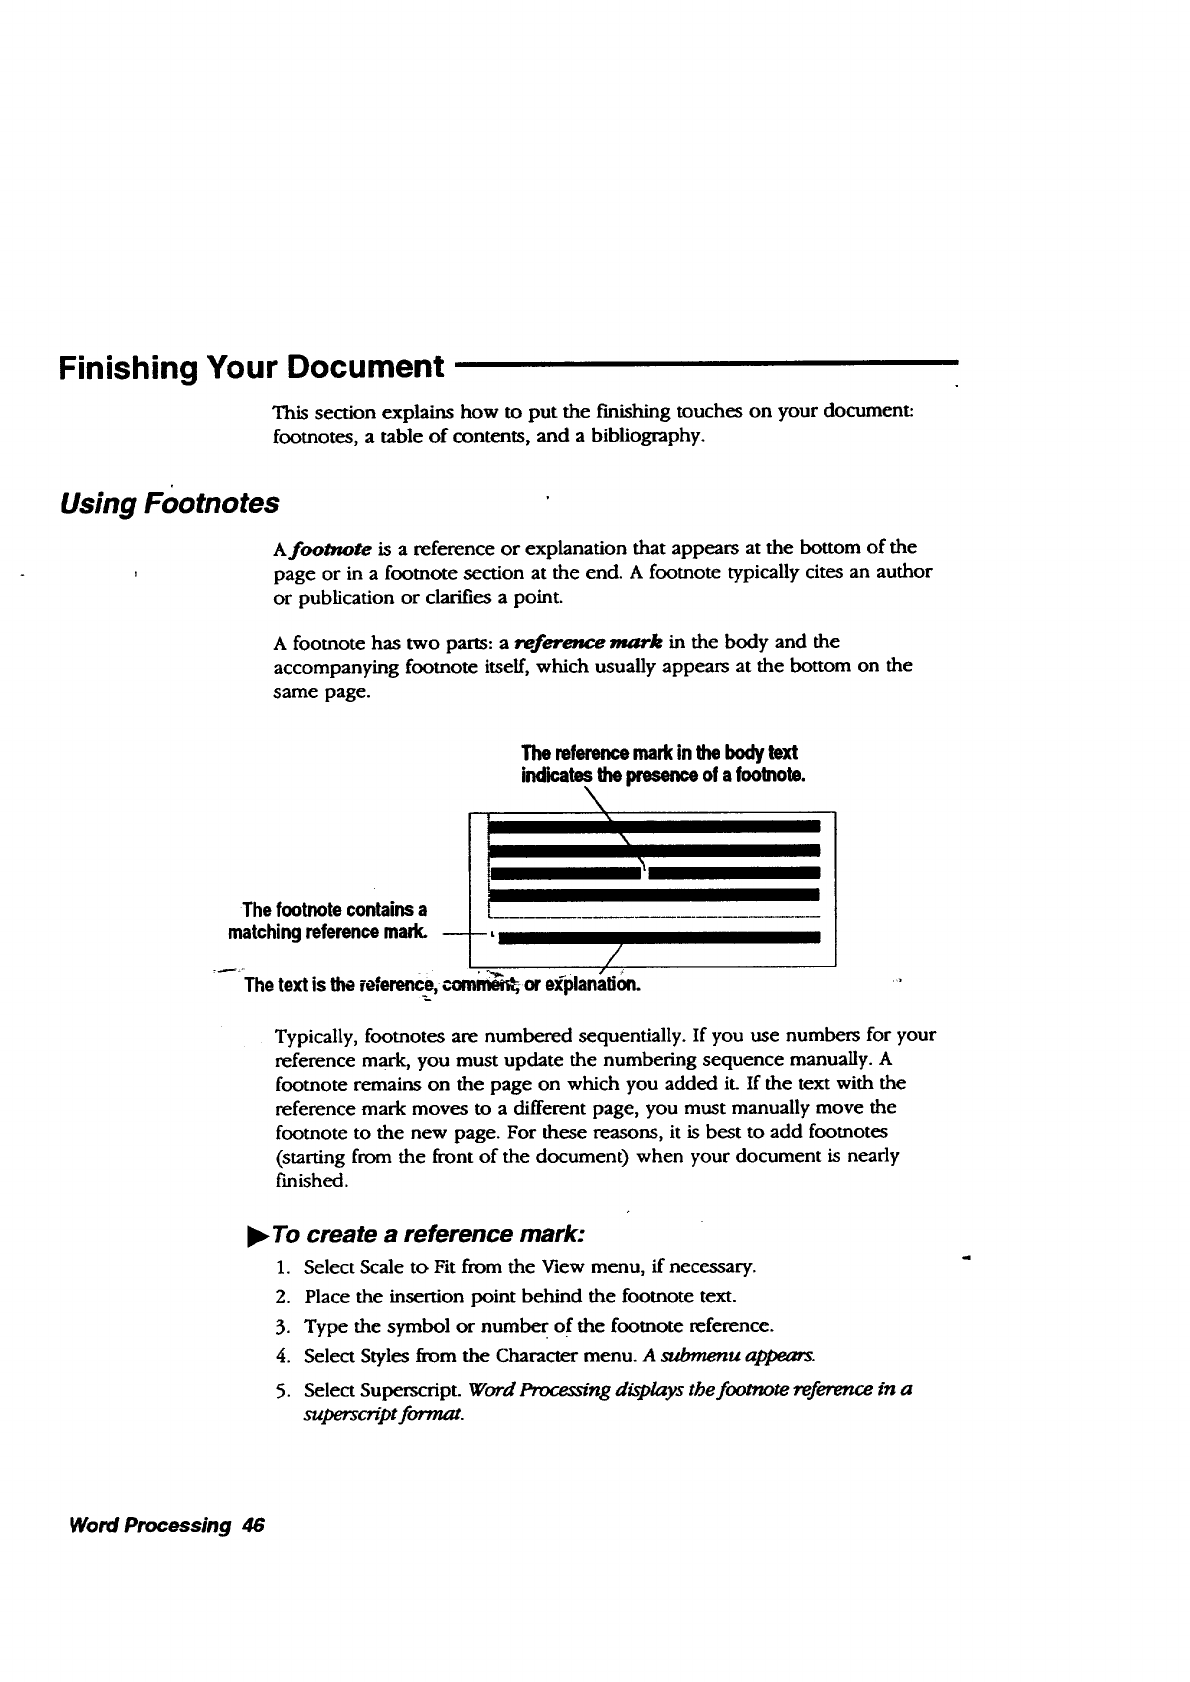
Finishing Your Document
This section explains how to put the finishing touches on your document:
footnotes, a table of contents, and a bibliography.
usingFootnotes
Afootnote is a reference or explanation that appears at the bottom of the
, page or in a footnote section at the end. A footnote typically cites an author
or publication or clarifies a point.
A footnote has two parts: areference mark in the body and the
accompanying footnote itself, which usually appears at the bottom on the
same page.
Thereferencemarkinthe bodytext
indicatesthepresenceof afootnote.
The footnote contains a L___............
matching reference mark. -- -, /
The text is the referent, com_ or explanaUon.
Typically, footnotes are numbered sequentially. If you use numbers for your
reference mark, you must update the numbering sequence manually. A
footnote remains on the page on which you added iL If the text with the
reference mark moves to a different page, you must manually move the
footnote to the new page. For these reasons, it is best to add footnotes
(starting from the front of the documen 0 when your document is nearly
finished.
I_ To create a reference mark:
1. Select Scale to Fit from the View menu, if necessary.
2. Place the insertion point behind the footnote text.
3. Type the symbol or number of the footnote reference.
4. Select Styles from the Character menu. A submenu appears.
5. Select Superscript. Word Processing displays the footnote reference in a
superscript format.
Word Processing 46

Texttool
l_ To create a footnote at the bottom of a page:
1. Select Show Tools from the Options menu; then select Drawing Tools. The
Drawing tool bar appears on the left of the screen.
2. Select the Text tool from the Drawing tool bar.
3. Point to where you want to anchor the upper-left comer of the text frame
(usually near the bottom of the page), along the left margin and above the
footer.
ff you have a footer
already, and you need
more room for the
footnote, reduce your
document to Scale to Fit
in the View menu. Use the
pointer from the Drawing
tools and select and
resize header, footer, or
main body region.
4. Hold down the Select button; then drag down and to the right until the
text frame becomes the size you want (usually along the right margin and
as tall as needed for any footnote(s). An outline shows the borders of the
text frame as you drag it.
5. Release the Select button. The text frame appears with the insertion point
in the frame:
Insertionpoint
I
!
I
1
I
I-beamtool
6. Type and format the reference marker.
-OR_
Copy the reference marker from the body text to the clipboard; then paste
it here.
7. Type the footnote text.
8. Click on the I-beam tool to resume editing your text.
Word Processing 47

Creating a Table of Contents
Style sheets can help you create a table of contents for a document, which
typically looks like this:
Dottab leader
Righttab type
t._11 . t_. R ..t •S. t • )6 .t • IS . , . ••t •ff •
p*it
iTabl_oJ'C¢_t4ram
ii PEt 1 Frtedomof Corm:t_nce m<lExpro_oct. ........................................3I
iPartH JualctdPower mdEei_eltyUMettheC_,sUtu_on. 9 i
ie,.ut R_ht,of_,'_t_ ..............................................................isl
"_"_ Part P/ Rigl_ofthlA0cueed ............................................................. 2B t
P_t V (_vtm'_01heNefloo. ......................................................................... 39
Part Vl The C_ttltutltm • Put, ProNto, md Future..................................62
_ ..................................................................................... 7a
JhoM_ .................................................................................... 80
For example, for each heading level in your document, create a style with the
following characteristics:
•Right tab type with a dot leader
To apply a style, select •Indented paragraphs for each heading level
the text and select a style
from the Basic Functions Once you have created the styles, enter the heading text, press TAB, enter
tool bar. - -_-'-_- the page number and theja_._aapply_the style for the heading level. See page 31
lel_l_]] Norrr_ --1 for more information on creating and applying styles.
Creating a Bibliography
Style sheets can also help you quickly create a bibliography for a document.
A typical bibliography looks like this:
I• tl . ,.. 12 ., , B . , . HI . _. IS . ,., 16. J.. ft. , .
"€!; •4
i
J_'_cen"Ber Ammcie_on So¢_es_OuFLJbcwfe_ Chicago: NE_APretm, lg"/8.Text of)
.. . I t mt_ior go_rrdng docurrmn_ lind dedm'edJorm drights tmch _t,s Magrm Cwta trod I
hanging _us. c=,w,=,=._ J,',',,_rv,_
indentations-_ _oer, F_o_. MbyJu_.lbeTranMom'la_l_ol_lmF_ J
_ Cembrkige: HaJ_tordUnlver_y Press, 19"/7. An hl=ltwkml [
) ( exet'nlnttlon ofth uses and ebum dJudldal power by en advoc_le d_eCmlnt )
Biloli_m_yentries
Word Processing 48
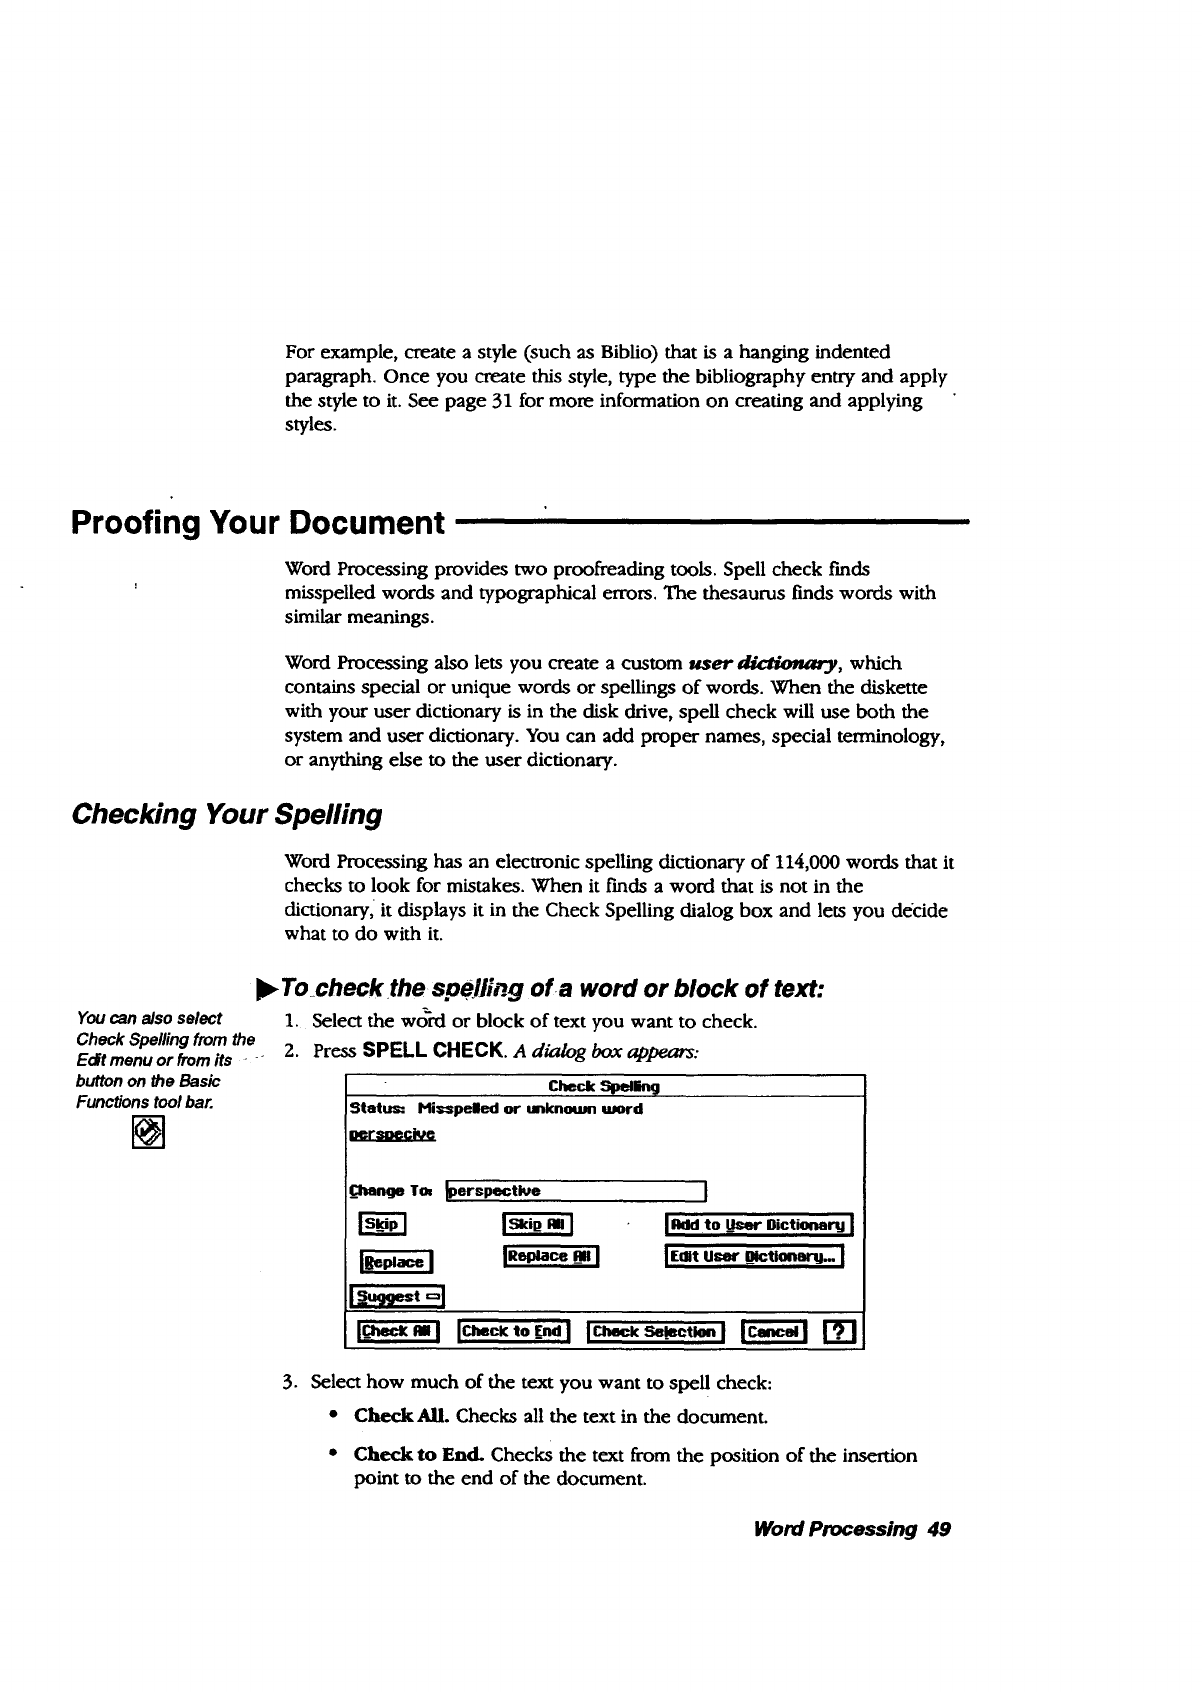
For example, create a style (such as Biblio) that is a hanging indented
paragraph. Once you create this style, type the bibliography entry and apply
the style to it. See page 31 for more information on creating and applying
styles.
Proofing Your Document
Word Processing provides two proofreading tools. Spell check finds
' misspelled words and typographical errors. The thesaurus finds words with
similar meanings.
Word Processing also lets you create a custom user diaiotm¢3,, which
contains special or unique words or spellings of words. When the diskette
with your user dictionary is in the disk drive, spell check will use both the
system and user dictionary. You can add proper names, special terminology,
or anything else to the user dictionary.
Checking Your Spelling
Word Processing has an electronic spelling dictionary of 114,000 words that it
checks to look for mistakes. When it finds a word that is not in the
dictionary, it displays it in the Check Spelling dialog box and lets you decide
what to do with it.
l_ Tocheck the s.oe!ilng of a word or block of text:
Youcan also select
Check Spellingfrom the
Eo_tmenu or from its -
buttonon the Basic
Functionstoolbar.
N
.
2.
Select the word or block of text you want to check.
Press SPELL CHECK. A dialog box appears:
Statu=== Mi_peled or unknown ttmrd
Ber_ci_e
_OlmntjeTot
1-4_jest ==1
I'_Ck=_at I
_erspectlue ]
[Ikld to _UmwOict_n=nj I
IR_'_°__1 ]trotu=,,-_t,..=_.. [
I ek,o_ l [r._.kSe_ctte. I _I'q'l
.Select how much of the text you want to spell check:
• Check AlL Checks all the text in the document.
• Check to End. Checks the text from the position of the insertion
point to the end of the document.
Word Processing 49
• Check Selection. Checks only selected text.
The first misspelled word (or word that is not in the dictionary) appears in the
Change To box.
4. Select the action you want to take on this word:
•Skip. Click on this button to ignore this spelling.
•Skip All. Click on this button to ignore all occurrences of the
spelling.
•Replace. Type the word correctly; then click on this button to
replace the misspelled word.
• Replace All. Type the word correctly; then click on this button to
replace all occurrences of the misspelled word.
Suggest. Click on this button to display a list of possible spellings.
When the suggestions appear, select the spelling you want and then
click on Replace. If no suggestion is correct, type the word correctly
in the Change To box; then click on Replace.
Add to User Dictionary. Click on this button to add the word to the
user dictionary stored on diskette. If you do not have a user
dictionary yet, you will automatically create one when you add your
letrst word to it (be sure you have a diskette to save this on). From
this point forward, spell check will accept this spelling in this and
other documents.
-* .E_tUser IMcfiOn_eg. Click on this button to edit the user
dictionaryT-For instructions, see the next procedure.
o5. When you are finished checking the spelling, a message window appears.
Click on OK.
Word Processing 50
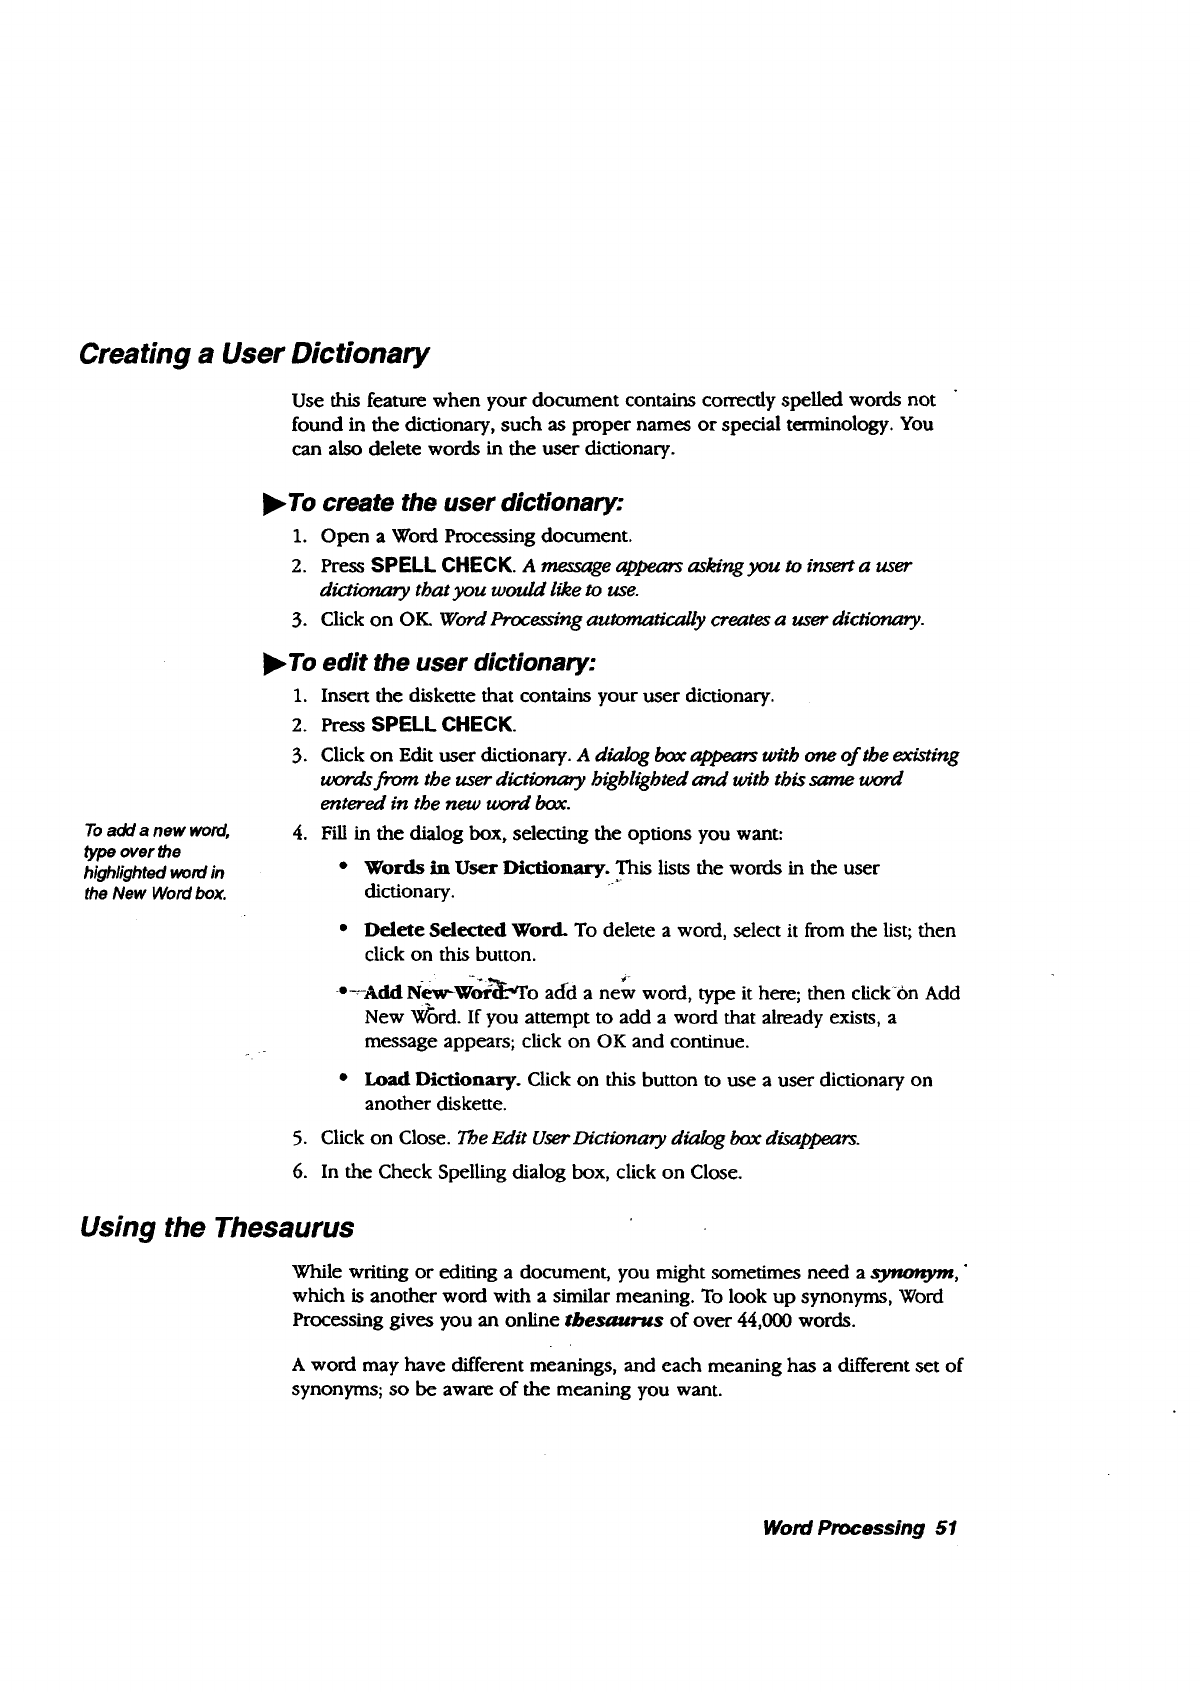
Creating a User Dictionary
Use this feature when your document contains correctly spelled words not
found in the dictionary, such as proper names or special terminology. You
can also delete words in the user dictionary.
To add anew word,
type over the
highlighted word in
the New Word box.
l_ To create the user dictionary:
I. Open a Word Processing document.
2. Press SPELL CHECK. A_ge appears asking you to insert a user
dictionary tbat you would like to use.
3. Click on OK. Word Processing automatically creates a user dictionary.
II_ To edit the user dictionary:
I. Insert the diskette that contains your user dictionary.
2. Press SPELL CHECK.
3. Click on Edit user dictionary. A dialog box ap_ with one of the existing
words from the user dictionary highlighted and with this same word
entered in the new word box.
4. Fill in the dialog box, selecting the options you want:
•Words in User Dictionary. This lists the words in the user
dictionary.
•Delete Selected Word. To delete a word, select it from the list; then
click on this button.
"--Adkl N-ew-W_'_-_To add a new word, type it here; then clickbn Add
New _ord. If you attempt to add a word that already exists, a
message appears; click on OK and continue.
• Load Dictionary. Click on this button to use a user dictionary on
another diskette.
5. Click on Close. The Edit User Dictionary dialog box disappears.
6. In the Check Spelling dialog box, click on Close.
Using the Thesaurus
While writing or editing a document, you might sometimes need a synonym,"
which is another word with a similar meaning. To look up synonyms, Word
Processing gives you an online thesaurus of over 44,000 words.
A word may have different meanings, and each meaning has a different set of
synonyms; so be aware of the meaning you want.
Word Processing 51

I_ To use the Thesaurus:
1. Select Thesaurus from the Edit menu. A dialog box appears.
2. If you select a word in your text, its definition and synonym will
automatically appear.
OR
.
,
Type the word and click on Lookup.
If more than one definition for the current word appears in the Definitions
For box, select the definition you want. This list contains possible
definitions for the current word, including the part of speech (noun, verb,
adjective, and so on) and first part of the definition text. When you select a
different definition, the list of synonyms in the Synonyms for This
Definition box changes. The text in the Full Text of Definition box changes
as well.
Select the synonym in the Synonyms for This Definition box. The synonym
you selected becomes the current umrd and appears in the current word
box.
OR
Type a different word in the current word box.
5. To look UP a definition and synonym for the current word, click on
Lookup.
6. To go back to a previous word, click on Back and select the previous
word you want. It appears in tbe current word box.
-7. Click on- Replace:W_['Proce_sing replaces the text.
8. Click on Close.
Printing or Faxing Your Document
Once you create and save adocument, you are ready to print it or fax it.
If you have not printed a document before, see Setting Printer Options in
Getting Started (Book 1) to set up the printer. AIs0, check Page Size and Page
Setup from the File menu to be sure your margins and other options are set
the way you want them (see page 6).
If you have not sent a fax before, review the Fax and Data Modem chapter in
Book 1.
b_To print:
1. Press PRINT from the function key row. A dialog box appears.
2. Select the print options and click on Print.
Word Processing 52
•To fax:
1. Select Send from the File menu. A subraenu appears.
2. Select Fax.A dialog box appears.
3. Select the Fax options and click on Fax.
Merging Information from Other Programs
When you print a Word Processing document, you can merge (combine)
information from other programs. Merging allows you to print form letters,
envelopes, mailing labels, reports, and other types of documents using
information you have already entered instead of typing it again in Word
Processing.
For example, you can send the same document to different people by
merging the different names and addresses into Word Processing.
Merging involves two documents: the data document and the merge
document. The data document is an Addressbook or Spreadsheet document
that contains data (names and addresses) stored in a consistent format. For
example, an Addressbook document might contain the names and addresses
of your friends. The information in the data document gets inserted into
various places (merge fields) in the merge document.
A merge document is a Word Processing document that contains text,
grap_,layouL a_.nd-.fo,z.'2m_atting.It also contains mergefie/ds that m._rk
where Word Processing places the information from the data document.
The easiest way to use the merge feature is to follow this general sequence of
tasks:
•To get ready for merging:
1. Create the data document (with names, addresses, etc.) in Addressbook or
Spreadsheet.
2. Create the Word Processing merge document with merge fields for names,
addresses, etc. (See page 54).
3. Copy the information you want to merge from the Addressbook or
Spreadsheet data document to the clipboard. (See pages 55 and 56).
After following the above steps, you are ready to print the merge document.
Word Processing 53

Setting up the Merge Fields
ff appmpKate, consider
using these field
names in Spreadsheet.
That way, you can copy
merge data easily
between both
programs.
The merge document is created in Word Processing, and it contains text,
graphics, formatting, and page layout. It also contains merge fields (for
names, addresses, etc.) that correspond to the information in the data
document. The merge fields have field names, which must match exactly the
field names used in the source data document. These fields are case-sensitive,
meaning they must match uppercase and lowercase exactly. For example, a
merge field with the name Home.Address will not match homeAddress.
Addressbook requires that you use the following field names exactly as they
appear in the merge field (including underscores):
Field Name
Index Field
Addr Field
Note Field
Home
Office
Car
'Fax
- iP.hone5
Phone 6
w
Phone __7
Description
Name of person, company, or other sorted information.
Address information.
Notes box.
Home phone number.
Office phone number.
Car phone number.
Fax phone number.
Addition_ phone number.
._d_tonalphone number.
Additional phone number.
To add merge fields in a Word Processing document:
1. Place the insertion point where you want the merge field to appear. (It can
appear on a line by itself or embedded in other text.)
2. Press CTRL + MENU + kA double-left bracket appears (<<).
(This identifies the start of the merge field.)
3. Type the field name exactly as it appears in the list on page 54.
4. Press CTRL + MENU + SHIFT + _A double-right bracket appears (>>).
(This identifies the end of the merge field.)
5. If you want, select the character formatting (such as style, size, tone, and
so on) for the field.
Word Processing 54
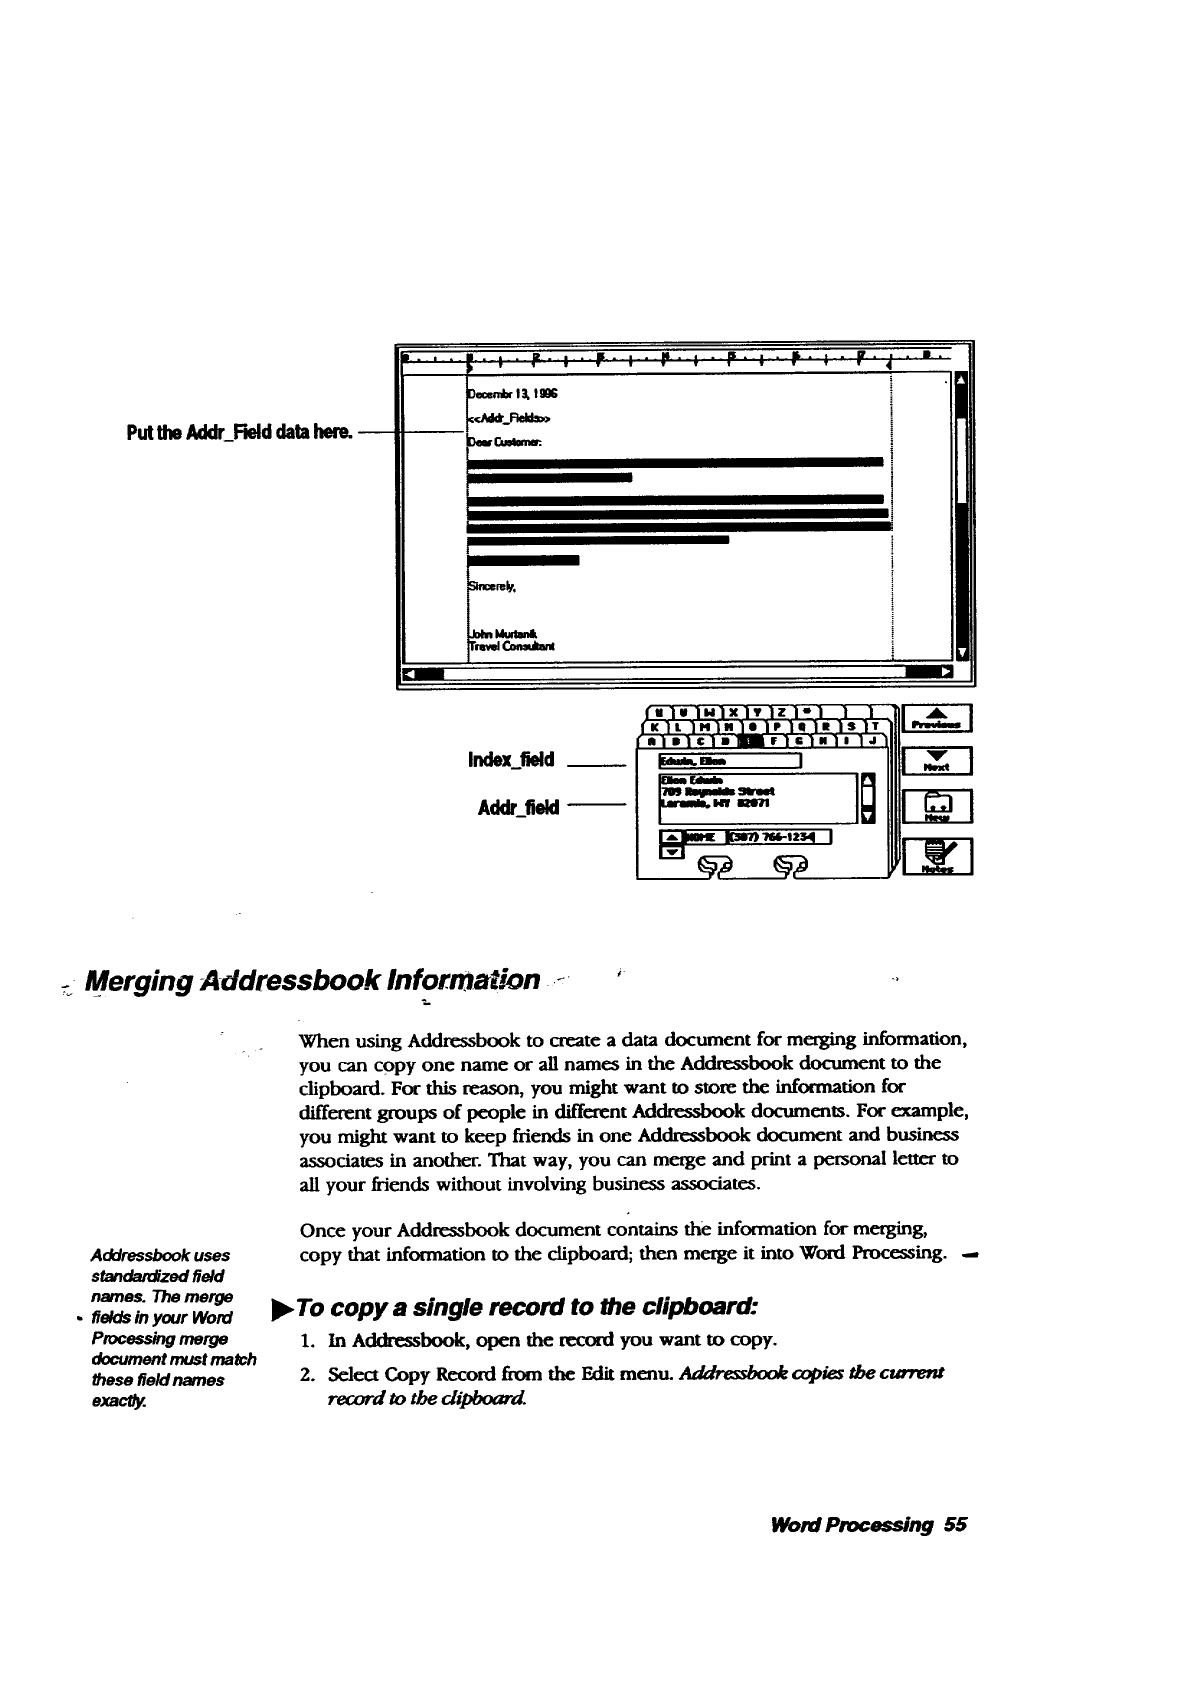
Putthe_d data
.... =" : • ,=.... =" : "" .... P" " " P" : • F'_ " I"
13.li
I
t
iI
fv !. il.)X Iv Iz !=_-lllI_-_l
fx IL IMI"I" lP le 1_) S_lip ""_" _
laiIl¢lII.lalI, 1I I a/Ill
I- ']°IN
Index_f_dAddufi_d IIIll I
_i_ _,-12_ I
_Merging Addressbook Information ._
When using Addressbook to create a data document for merging information,
you can copy one name or an names in the Addmssbook document to the
clipboard. For this reason, you might want to store the information for
different groups of people in different Addressbook documents. For example,
you might want to keep friends in one Addressbook document and business
associates in another. That way, you can merge and print a personal letter to
an your friends without involving business associates.
Addressbookuses
standardized field
names. The merge
.fieldsin your Word
Processingmerge
documentmust rnaP..h
thesefield names
exam.
Once your Addressbook document contains the information for merging,
copy that information to the clipboard; then merge it into Word Processing. -,
•To copy a single record to the clipboard:
1. In Addressbook, open the record you want to copy.
2. Select Copy Record from the Edit menu. addressbooh copies the current
record to the clipboard.
Word Processing 55
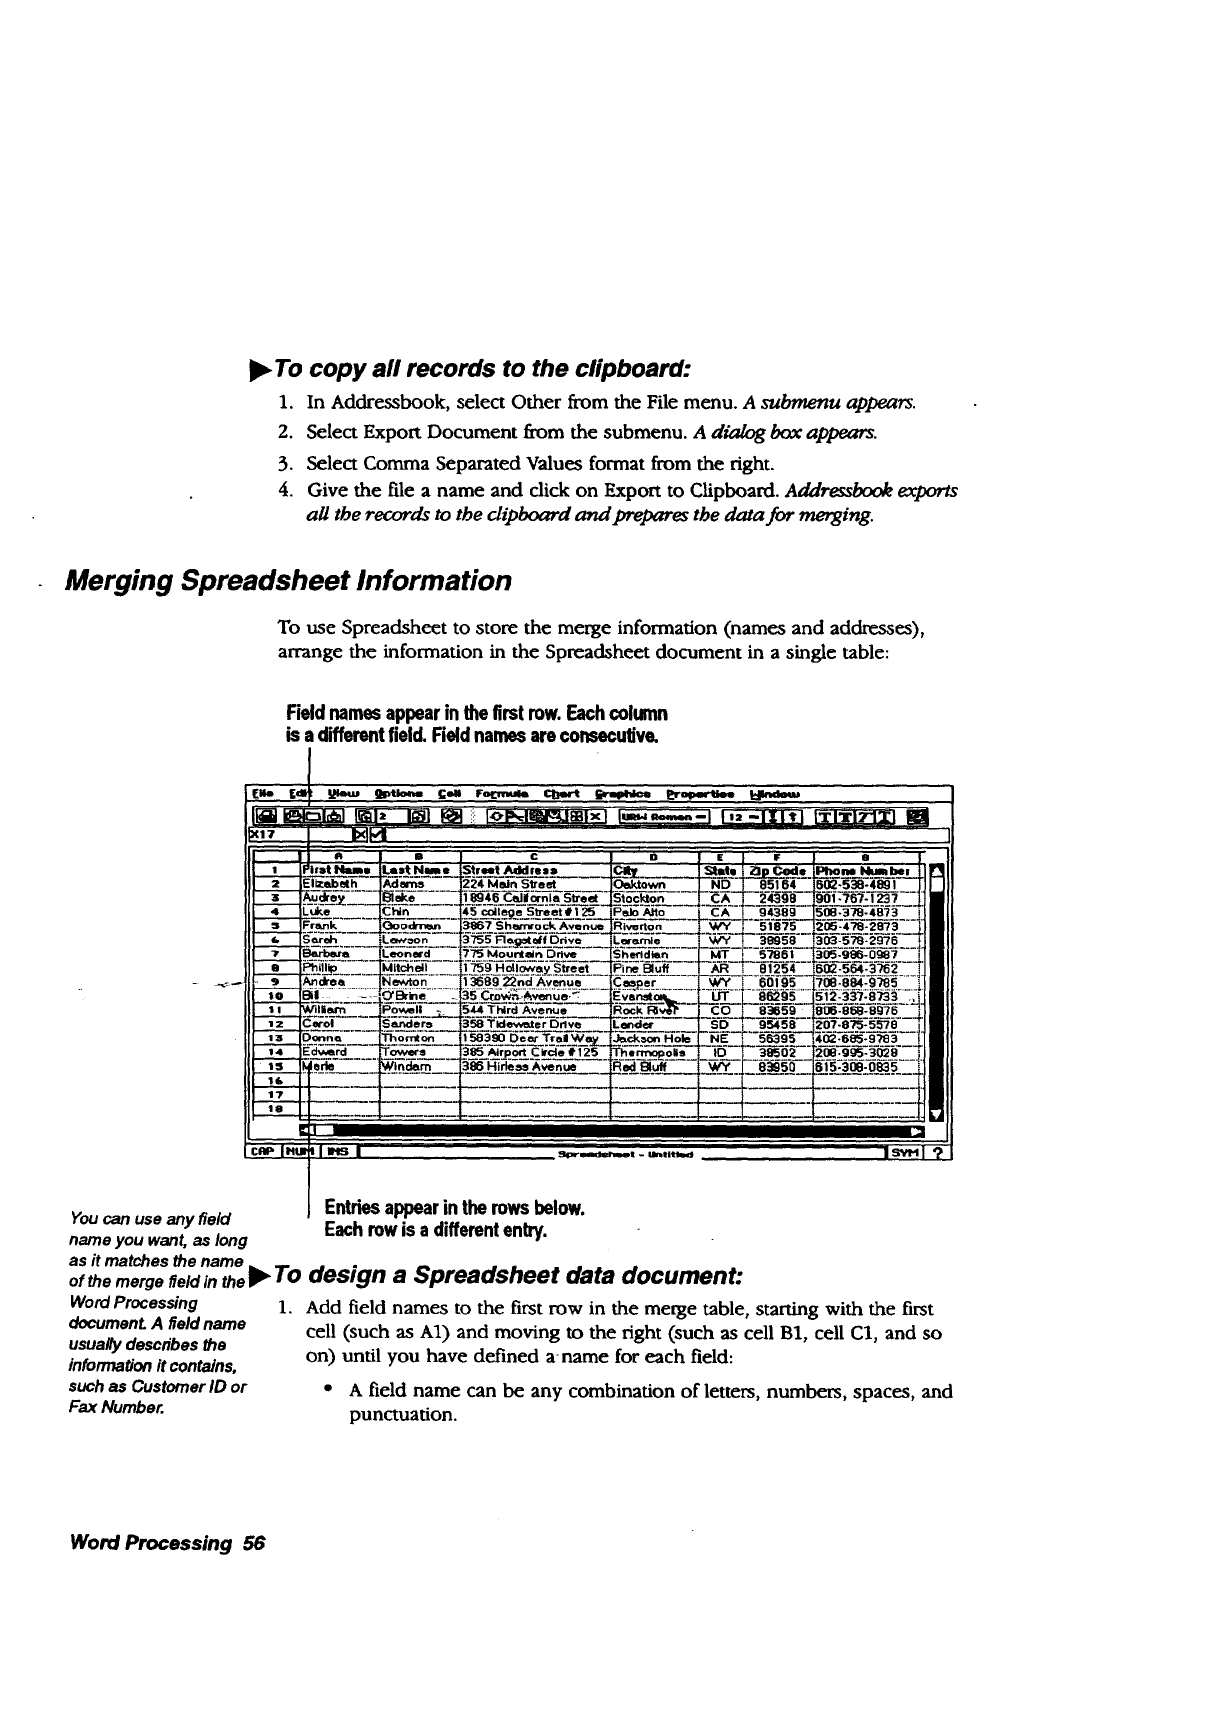
I!_To copy all records to the clipboard:
1. In Addressbook, select Other from the File menu. A submenu appears.
2. Select Export Document from the submenu. A dialog box appears.
3. Select Comma Separated Values format from the right.
4. Give the file a name and click on Export to Clipboard. Addr_s/xx_ mc/x_s
all the records to the clipboard and prepares the data for merging.
Merging Spreadsheet Information
To use Spreadsheet to store the merge information (names and addresses),
arrange the information in the Spreadsheet document in a single table:
Fieldnames appearinthe firstrow.Eachcolumn
is adifferentfield. Reid namesareconsecufive.
I
[ue [dl _gmUom. Gem ro,um_ C!_rt _ _'_ ldtndmu
:!7 J IxH j
/AI =' c I n p tI F I o
[L_....el2__.h_l_Ad_e_-__. i224 m_n Slroet lOe,ktown F--I_--_B'_'--S0e:_'_:_,-_i-- |JJ
• :,,k,, ._.ic_,, 45,:,wt._.s.,,t,. 25...LP_A.o C.___K':'_-_3-tig-_,_--_i:__-" JR
e"-_--']_-_illko TI;iitchel| 1759 Hol,ow_y Street .--[_P:ineBluff -T-A-I_- |_r2-.*_--'iB_---_.:_'_'-_ii
zz C_ro_l._ iSander_ 358 Tldewe.terDrlve L__"_I'_ ..... S-D---_ 9_,-58"-" 2_'-8_-5-_8---'|1
:-: .ILl
_,I :3
cap I"u_ I="s I t_13r_l- Ulrttitllld ISW_l?
Entriesappearinthe rowsbelow.
Youcanuseanyfield Eachrowis a differententry.
name you want, as long
as it matches the name __
ofthe mergefieldin the!_ I 0 design aSpreadsheet data document:
Word Processing
documenL A field name
usuagy descnbas the
inforrnaUon it contains,
such as Customer ID or
Fax Number.
,Add field names to the first row in the merge table, starting with the first
cell (such as A1) and moving to the right (such as cell B1, cell C1, and so
on) until you have defined a name for each field:
•A field name can be any combination of letters, numbers, spaces, and
punctuation.
Word Processing 56

Do not look the _lles
before merging.
2.
• Field names must be contiguous. (You cannot have an empty cell
between field names.)
Fill in the rows beneath the field names. (Each row will be used one at a
time to create individual documents when merging.)
l_ To copy the Spreadsheet merge data to the clipboard:
1. Change the order of the rows so that the rows at the top are the ones you
want to merge.
2. Select the first row (with field names) and any subsequent rows you want
to merge.
3. Press COPY. Spreadsheet copies the field names and entries to the
clipboard and prepares them for merging.
Printing a Merge Document
Once you have set up your Word Processing merge document, you are ready
to print it. Be sure you have created the data document in Addressbook or
Spreadsheet, added merge fields to the Word Processing document, and
copied the merge information (from the Addressbook or Spreadsheet data
documen 0 to the clipboard.
If you see <<field>>
on a printed .....
documen_ check to
see that you
selected either
Merge One or Merge
All. Next, make sure
that the name of the
field in the data
dooument match es
the name of the
merge field in the
merge document.
!_ To print a merge document:
1. _In y_Or Wo_Proces_g merge document, press PRINT. A dialog tmx
appears.
2. In the Print dialog box, select a merge option:
• NO Merge. Select this to prevent merging. If you pdnt a merge
document without merging, Word Processing prints the merge fields
instead.
.
•Merge One. Select this to merge only the first entry in the clipboard.
• Merge All. Select this to merge all merge entries in the clipboard.
Click on Print. Word Processing merges one or all of the entn'es in the
clipboard with the Word Processing merge document.
For each merge entry, Word Processing merges the fields and prints a copy of
the document. If a field appears.in the clipboard but not in the merge
document, Word Processing skips it. If a field appears in the document but
not in the clipboard, the empty merge field (<<field>>) will appear in your
document.
Word Processing 57

Special Effects
Displaying Invisible Characters
Youcan_day invisJ_le
characters to see and
e(ft whatyouhave
typed Forexample,you
mightwant!olmowff
youhaveunwanted
extraspacesinyour
document
Imgsib_ c/_ur_ are characters that you type but do not normally see
on-screen, such as spaces, tabs, paragraph marks (carriage returns), page and
column break marks, and section break marks.
This table shows the on-screen symbols that represent invisible characters:
Symbol Character Represented
¶i Paragraph Mark (carriage return)
--, Tab
Space
_: Page Break
l_ To display invisible characters:
Select Show Invisibles from the Options menu. Word _ng displays the
invisib/e characters.
Displaying Counts
You can make changes -Word Processing counts the number of characters, words, lines, and
to the text while the
dialogbox is visible;
thenrecalculate the
countsifyou want to
see the impact of a
change to the
document
paragraphs in a document. Use this feature when your document needs to be
a minimum or maximum size, such as a report that must be 250 to 300 words.
),To view document counts:
1. Select Counts from the Edit menu. The Counts dialog box appears, listing
the number of characters, words, lines,, and paragraphs.
2. ff you want to recalculate the document counts, click on Count Again.
3. Click on Close.
Word Processing 58
Using Abbreviated Phrases
Thephrase cannot
be longer than 64
characters.
Use Abbreviated Phrase to quickly insert long phrases into your Woed
Processing documents. For example, if you commonly use the phrase Chief
Executive Officer, put it in the abbreviated phrase list with the abbreviation
ceo. Then, whenever you want to inse_ the long phrase in the document, just
type ceo, press CTRL + X, and Chief Executive Officer will appear. Note: if
you capitalize the abbreviation in the Abbreviated Phrase dialog box, you
must also capitalize it when you type it in the document.
ll_ To create, add to, or edit the abbreviated phrase list:
1. Select Abbreviated Phrase from the Character menu. The Abbretdated
Phrase dia/og box _.
2. Click on Add. The Add Abbreuiatk_ dia/og box appears.
3. Type the abbreviation in the Abbreviation box (example:. cc_).
4. Type the phrase in the Phrase box (example: chief executive officer).
5. Click on Apply. Your abbreviated phrase appears in the Abbreviated
Phrase dialog box.
6. To edit any abbreviated phrase or abbreviation, select it and dick on Edit.
7. Make your changes in the Edit Abbreviation dialog box and dick on
Apply.
8. To save your abbreviated phrase list, click on Save. Your//st is
automatically saved as ABBREV.
),.To use an abbrevia_d phrase:
1. In your document, type the abbreviation that you entered in the
Abbreviated Phrase dialog box.
2. Press CTRL + X to automatically enter the long phrase.
l_ To delete an abbreviation:
1. Select Abbreviated Phrase from the Character menu. The Abbreviated
Phrase dia/og box appears.
2. Select the abbreviated phrase to delete and click on Delete. Then click on
Close.
OR
To delete all, click on Delete All. Them dick on Close.
Word Processing 59
Inserting Special Characters
You can insert special characters in a document that display dates, times, and
numbers. Special characters are useful because they save you from typing and
calculating information. For example, if you want the current date in a letter
template to be updated each day, use a special character instead of retyping
the date.
A page break is another kind of special character. For more information, see
Page Breaks on page 29. You can also search a document for these special
characters. See Finding and Replacing Text on page 17.
Inserting the current date
You might insert the current date so it will print at the top of a letter or memo
in one of two formats: longhand or numeric. You can also insert special date
characters to add the current date in a different format. For more information,
see Inserting special dates on page 61.
),To insert the current date:
Word Processing Mserts
the current date in the
format you selected. The
date is entered just asJf_-_
y_u had typed it yourself -
and is automatically
updated.
1. Place the insertion point where you want to insert the current date.
2. Select Insert Special from the Edit menu. A submenu appears.
3. Select the date format you want from the submenu:
•Longhand Date. This option inserts the current date in a longhand
format.
• Numeric Date. This option inserts the current date in a numeric
format.
Inserting the current time
You can insert the current time in a document. The time appears in the
HH:MM:SS format (hours: minutes: seconds). You can also insert special time
characters to add the current time in a different format.
l_ To insert the current time:
1. Place the insertion point where you want to insert the current time.
2. Select Insert Special from the Edit menu. A submenu appears.
3. Select Current Time from the submenu. Word _ng inserts the current
time in the HH:MM:SS format (sucb as 12:45:59 PM). The time is entered
just as if you bad typed it yourself and is automatically updated.
Word Processing 60
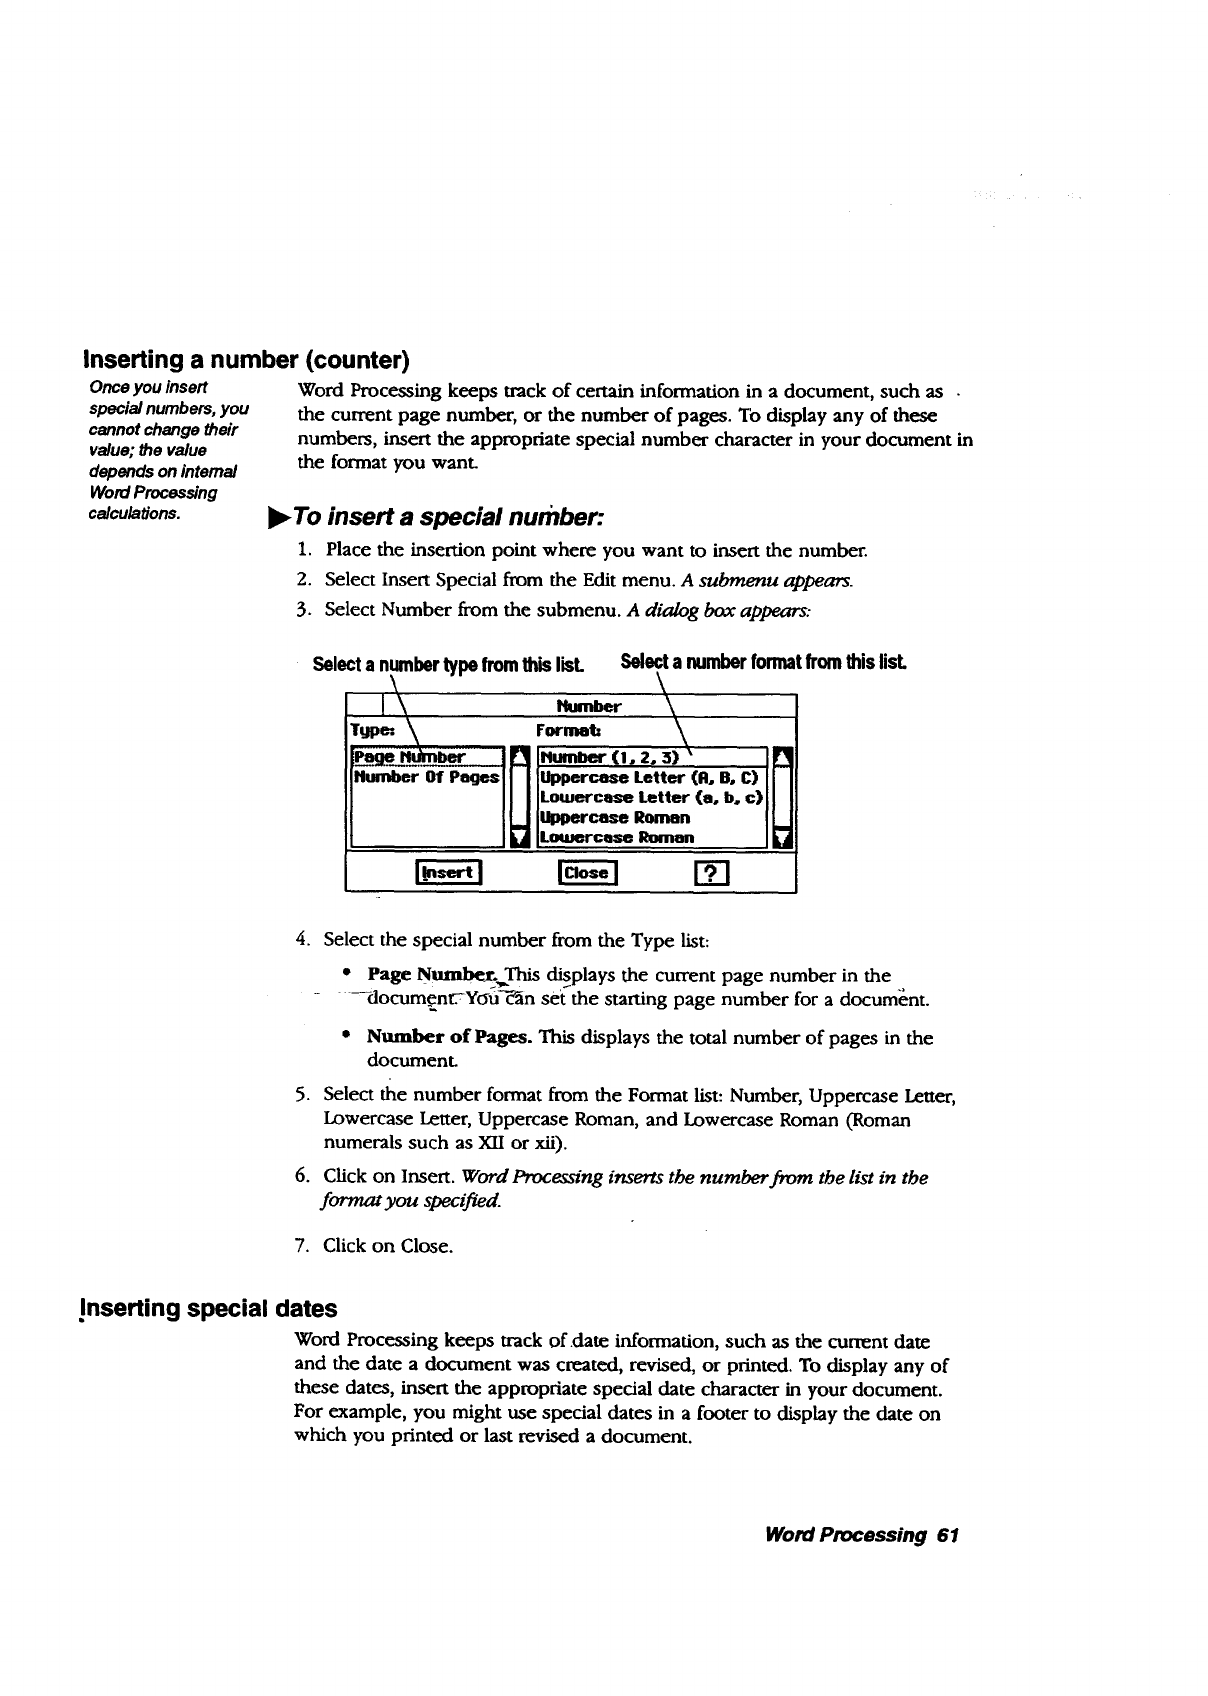
Inserting a number (counter)
Once you insert
specialnumbers,you
cannot change their
value; the value
dependson internal
WordProcessing
calculations.
Word Processing keeps track of certain information in a document, such as •
the current page number, or the number of pages. "[b display any of these
numbers, insert the appropriate special number character in your document in
the format you want.
l_ To insert a special numben
1. Place the insertion point where you want to insert the number.
2. Select Insert Special from the Edit menu. A submenu appears.
3. Select Number from the submenu. A dialog box appears:
Humber Of Pages
Select a number type from this list. \
F_r_h
Uppercase Letter (R. SoC)
LotuercLse Letter (a, b, c)
Uppercase Roman
Lom_cnse Romon
Selecta numberformatfromthislist.
4. Select the special number from the Type list:
" Page Number: This displays the current page number in the
- --documen .tsYo-u--U_nset the starting page number for a document.
•Number of Pages. This displays the total number of pages in the
document.
5. Select the number format from the Format list: Number, Uppercase Letter,
Lowercase Letter, Uppercase Roman, and Lowercase Roman (Roman
numerals such as XII or xii).
6. Click on Insert. Word Processing inserts the number from the list in the
format you specified.
7. Click on Close.
Inserting special dates
Word Processing keeps track of date information, such as the current date
and the date a document was created, revised, or printed. To display any of
these dates, insert the appropriate special date character in your document.
For example, you might use special dates in a footer to display the date on
which you printed or last revised a document.
Word Processing 61
Once you insort
special datesyou
cannolchange their
value; bSevalue
dependson internal
WordProcessing
calcu_tJons.
J_ To insert a special date:
1. Place the insertion point where you want to insert the date.
2. Select InsertSpecial from the Edit menu. A submenu appear_
3. Select Special Date from the submenu. Adia/og box appears.
4. Select the special date from the Type list. The choices include the
following:
•Today's Date (Won't Change). This date is the date that you insert
the character. It does not change.
Date Doom_ent Created. This date shows when the document was
created.
Date of Last Revision. This date shows when the document was last
saved.
Date of Printing. This date shows when the document was last
printed. Word Processing inserts the date even if you have not yet
printed the document.
5. Select the date format from the Format list: Longhand, Abbreviated,
Numeric, and so on. A sample of the selected date format appears.
6. Click on Insert. Word Processing inserts the special date from the list in the
format you specified.
7. Crick on Close.
Word Processing 62
Inserting special times
Word Processing keeps track of time information, such as the current time
and the time a document was created, revised, or printed. To display any of
these times, insert the appropriate special time character in your document, in
the format you want. For example, you might use special times in a footer to
display when you printed or .Last saved a document.
Once you insert
special times, you
cannot 'ch_e their
value; the value
depends on internal
Word Processing
calculations.
However, you can
change the value
when you _nsert the
current time.
l_ To insert a special time:
1. Place the insertion point where you want to insert the time.
2. Select Insert Special from the Edit menu. A submenu appears.
3. Select Special Time from the Insert Special menu. A dialog box appears.
4. Select the special time from the Type list. The choices include the
following:
• Now (Won't Change). This time shows the system time when you
inserted the character. It does not change if the system time changes.
• qFtme Document Created. This time shows when the document was
created.
•Time of Last Revision. This time shows when the document was
last saved.
.
6.
• Tune of Printing. This time shows when the document was last
printed.
Select the time format from the Format list. A sample of the selected time
format appears.
Click on Insert. Word Processing inserts the time from the list in tbe format
you specified.
Word Processing 03

Importing and Exporting Documents
You can open documents created with other word processing programs by
importing them into Word Processing. Likewise, you can export a document
from Word Processing to another word processing program. You can import
from and export to the following word processing programs:
Import and Export Programs
ASCII or plain text
Microsoft Word 3.0, 4.0, 5.0 &5.5
WordPerfect 5.0 &5.1
WordPerfect for Windows 5.1
WordStar 3.45 or below
WordStar 4.0, 5.0, 5.5, 6.0 & 7.0
If you are importing a
document and do notJ__
E.,_owthe program it
was created in, select 4.
No Idea and Word
Processing _1/ analyze
the document to see if 5.
•To import a document from another word processing
program:
1. Insert the diskette containing the document you want to open.
2. Select New/Open from the File menu. The New/Open dialog box appears.
3. In the New/Open dialog box, click on Import. The Import Document
dialog_box appear_,i__ _ _ "-
Select the program it was created in from the fight and select the
document from the left.
Click on Import.
it can beimported. •To export a document:
1. Open the document you want to export.
2. Select Other from the File menu. A submenu appears.
3. Click on Export Document. A dialog box appears.
4. Select the format from the right and tlae folder to save it in from the left.
5. Give the document a name and select Export.
Word Processing 64
2Spreadsheet
Before starting, review
these basic procedures
from the Getting StaRed
chapter in Book 1:
• Working with Documents
•Saving Documents
•Working with Menus
• Working with Dialog Boxes
Spr_beet makes calculations quickly and efficiently. You can use
spreadsheets for keeping track of a budget or for creating presentations with
charts.
Starting Spreadsheet
l_ To start Spreadsheet:
Ifyou receive error codes Click on Spreadsheet from the Main Menu. Spreadsheet opens and sbows tbe
or messages, refer to New/_ dialog bo_. Select New. An empty Spreadsheetdocument appexzrs:
page 124in thischapter.
Editbar. Columnheaders.
Showstheinformation Clickontheseheadersto
Activecell.Thehighlightedcelltoenterinformation, intheactivecell.
Inthisexample,thecelladdressisA1.Thisaddress /selectjanentirecolumn.
appearsintheEdit bar. _,_/. /
Cells. _"' _ ..... ' !
Eachcell canholda sepa-
ratepieceofinformation,
suchastext,numbers,or
formulas.Eachcellhasan
address;forexample,this
cell'saddressisA8.
•Rowheaders.
Clickontheseheadersto
selectanentirerow.
2s_.Jl., =' 1 • © • ( eI • 1.=
: i I i 1 i, -
III
one II'=HI mIap'u_h=_ - ==,m_l t/ISW'q ?
/
Spreadsheetgrid. Enternumbers,text,
andformulasintothe individualcellsinthegrid.
Spreadsheet 65
Edit Bar
Activecelladdress.
•\•
Thecelladdressoftheacbvecell. candickheretoenterthecontents
\ _ oftheEditareaintotheactivecell.
let, _ Ilxg._ca 4-D7 - E8 -1t" Editarea. ,
• '_ ="f-'=--'=" _ This,showsthecontentsoftheactive
Restorebutton.._.._ / ' cell.
Clickheretocancelthe changesyouare
currentlyenteringinthe Editarea.
Opening a Document
For more information
about usingthe
New/Open dialog box,
see All About
Documents in Getting
Started (Book 1).
Spreadsheet templates
are available. See Using
Templates in Getting
Started (Book 1). -_
I_ To open a new spreadsheet document:
Click on Spreadsheet from the Main Menu. Spreadsheet opensan erupt2
Spreadsheet document.
I_ To open an existing document or template:
1. Select New/Open from the File menu. The New/Open dialog box appears.
2. Select the drive; if the document is on diskette, insert it in the disk drive.
3. Then select the document or template by name and click on Open.
-Spreadsheet o_-g)io_file. ' _
Spreadsheet 66
Using the Tool Bars
The tool bars in Spreadsheet provide quick access to menu functions. Like
Word Processing, Spreadsheet contains five tool bars: Basic Functions,
Advanced Functions, Graphic Bar, Drawing Tools, and Bitmap Tools.
I_ To open a tool bar:
1. Select Show Tools from the Options menu. A submenu appears.
2. Select the tool bar. The too/bar appem_ on the screen.
The Basic Functions Tool Bar
Openanotherdocument
Close
Save
I
Print.
Pop-up
Pop_p fontslist
I URHSans '=i
_int size list Add column
LargerpoJntl J J i leter°w
ISmaller point Add row Redraw
I Delete column
I
1,2=lII;I ITITITI_TII¢-I.'JH&I :
Sort cells forward and _.,
sort cells backward
Button Tool Name Description
Insert Row Adds one row above the current row. If you have selected multiple rows,
Insert Row adds the same number of rows above the selection.
Delete Row Deletes the current row. If you have selected multiple rows, Delete Row
deletes the rows containing the selected cells.
Insert Adds one column left of the current column. If you have selected multiple
columns, Insert same number columns to the of
Column Column adds the of left
the selection.
[_] Delete Deletes the current column. If you have selected multiple columns, Delete
-Column Column deletes the columns containing the selected cells.
[_ Sort Forward Sorts the selected cells in alphabetic or numeric order.
Sort Sorts the selected cells in reverse alphabetic or numeric order.
Backward
Recalculation If you have specified manual calculation using Calculate on the Options
.. _-_ menu, you can click on this button to make Spreadsheet calculate all
formulas in the spreadsheet.
Spreadsheet 67
The Advanced Functions Tool Bar
Use the Advanced Functions tool bar for more advanced menu functions like
creating charts from spreadsheet data.
Textalignment Zoomout
Rnd andReplace ]CenteredRight ]Zoomin
N°rmalsize I{I IFull
I(100%)
Icdum. IHigh_owC Delete
Bar lIIPie ,
I%:,nt I
Charttypes
Button
[]
[]
[]
[]
iTool Name
Column
Bar
Line
Area
Description
A column chart plots each category as a series of vertical bars. The
height of the bar corresponds to the value of the category.
A bar chart is like a column chart except that the bars are horizontal
rather than vertical.. ,.,, ,_
Aline chart is-a plot of values connected by straight lines.
An area chart is a line chart in which the area below the line is filled
:with a pattern.
Point IA point chart is a plot of points.
Pie A pie chart is a circular chart where each slice represents a part of the
whole, chart showing stock market data: high, low, and close.
High/Low A high/low chart is useful for tracking pairs of data that mark a high
and low or a start and end value, such as the price of stocks or the
day's temperature range.
Graphic Bar, Drawing Tools, and Bitmap Tools
Use the Graphic Bar, Drawing tools, and Bitmap tools for creating and editing
graphic objects in Spreadsheet. For more information on creating and editing
graphic objects, see the chapter on Drawing, which begins on page 125.
Spreadsheet 68
Moving around in a Spreadsheet
You can scroll through a spreadsheet by clicking on the scroll bars at the
right of the screen or by using the keyboard.
I_ To scroll using the keYboard:
Use any of the following keystrokes to scroll through a spreadsheet:
• PAGE UP. Scrolls the screen up.
•PAGE DOWN. Scrolls the screen down.
•CTRL + PAGE UP. Scrolls the screen left.
•CTRL + PAGE DOWN. Scrolls the screen right.
Selecting Cells and Ranges
When you select a
range of cells, all
selected cells appear
highlighted. One cell
within the range is the
active cell, appearing
with a border
around it.
Toselect (or click on
a cell or otheritem):
place the on-screen
pointer in a cell; then
clickon the Select
buttonor tap once on
the glidepad.
Selec_button(left
buttononamouse)
Dragbutton(right
buttononamouso)
To enter information in a cell or make changes to it, first select it to make it
the active cell. The active cell appears highlighted with a heavy black border
around it, as shown in the illustration below.
When you want to work with a group of cells, first select the entire group or
range of cells. For example, to copy a group of cells from one part of a
spreadsheet to another, first select the range that includes all the cells you
want tO copy, as shown_h_the following illustration.
I
.1
2
3
4
5
6
7
e
9
IO
!!
12
13
14
i15
aI s I c I o I E
; ; ; ;
t 't tt
l 1 t l
Activecell I
Selectedrange
Spreadsheet 69
Like individual cells, ranges have addresses. A range address consists of the
address of the upper left cell, followed by a colon (:), followed by the
address of the lower right cell. In the illustration on the previous page,
the address for the selected range is B3:D13.
Todeselectacell,
selectsomethingelse.
Whenan area is locked
with the L'ockTittes
command (rows or
columns),you cannot
change any information
or formatof the cellsin
the locked area. See
page 118in this chapter.
•To select a single cell:
Click on the cell you want to select.
OR
Double-click on the cell address that appears in the Edit bar, type the address
of the cell you want to select, and then press ENTER.
OR
Select Go to Cell from the View menu, type the address of the cell you want
to select, and then click on Go To.
•To select a range of cells:
Drag from the first cell to the last cell of the range you want to select.
OR
If you attempt to
enter the locked
area via the View/Go_
1_ Cell menu item,
the following
message appears:
The selected cell is
located in the locked
area. Unlock the
titles and try the
operation again.
Select Go to Cell from the View menu, type the address of the cells you want
to select (for example, AI:H10), and then click on Go To.
•To select an entire row or column:
Click on the row or column header.
•To select multiple rows or columns:
Drag from the first row or column header to the last row or column header.
Spreadsheet highlights the rows or columns as you drag.
Spreadsheet 70
•To select a cell using the keyboard:
Use any of the following keystrokes to select a cell:
•ARROW KEYS (t x _ x _ x ---). Selects the next cell in the direction
of the arrow.
•HOME. Selects the f'_t cell in the current row.
• CTRL + HOME. Selects the first cell in the spreadsheet (A1).
•END. Selects the last filled cell in the current row.
•CTRL + END. Selects the last filled cell in the spreadsheet's active
area.
•CTRL +_. Selects the last filled cell to the right in the current row,
or the first filled cell to the right, or if no more filled cells to the right,
the last unfilled cell in the row.
CTRL + _. Selects the last filled cell to the left in the current row,
or the fn'st Idled cell to the left, or if no more filled cells to the left,
the first unfilled cell in the row.
CTRL + 1'. Selects the last filled cell above the active cell in the
current column, or the first filled cell to the right, or if there are no
more f'dled cells above the active cell, the first unfilled cell in the
column.
CTRL + _. Selects the last filled cell below the active cell in the
current column, or the first Idled cell to the right, or if no filled cells
appear below the active cell, the last unfilled cell in the column.
•To select.a range of cells using the keyboard:
Hold down SHIFT while using one of the keystrokes shown above. This
selects the range from the active cell to the destination for the keystroke you
use. For example, if C23 is the active cell, you can press SHIFT + CTRL +
HOME to select the entire range A1:C23.
Spreadsheet 71

Working with Values and Labels
Build a spreadsheet by entering values, labels, andformu/as.
Values. Values are numbers, for example, sales figures for the past four
quarters.
Dates can be entered
as labels or as formulas,
depending on how you
want to us'ethem. See
Entering and Changing
Dates onpage 75.
/abe/.,. Labels are text; they are the titles or descriptive text that describe the
contents of rows and columns, for example, First Quarter, Second Quarter,
Third Quarter, and Fourth Quarter.
Formu/as. Formulas perform calculations, like averaging a list of values.
Spreadsheet contains prewritten formulas called Built-_ Functions; for
example, a built-in function called SUM totals values, such as the sales for all
four quarters.
This section explains how to enter values and labels in a spreadsheet. For
more information about formulas, see Working with Formulas on page 85.
Entering Values and Labels
If you have selected a
range of cells, press
ENTER to move down
columns and press
TAB to move across
rOWS.
I_ To enter values or labels:
1. Select the cell in which you want the entry to appear.
2. Type the entry (numbers or words) in the cell. If you are using the
numeric keypad to enter numbers, besure the NUM LOCK key is on. To
turn it-one click on_theNUM button in the lower left comer of the screen
or press NOM I_OCK. If you make a typing mistake, press BACKSPACE
to erase characters to the left of the insertion point in the Edit Area.
3. Press one of the following keys to complete the entry:
•ENTER. Moves the highlighting down one cell.
• SHIFT + ENTER. Moves the highlighting up one cell.
•TAB. Moves the highlighting to the right one cell.
•SHIFT + TAB. Moves the highlighting to the left one cell.
•(t X _ X _-- X-*). Moves the highlighting one cell in the direction of
the arrow.
•CTRL + ENTER. Keeps the highlighting in the current cell; the active
cell does not change.
You can also complete your entry by clicking on Enter in the Edit bar. In this
case, the highlighting does not move.
Spreadsheet 72
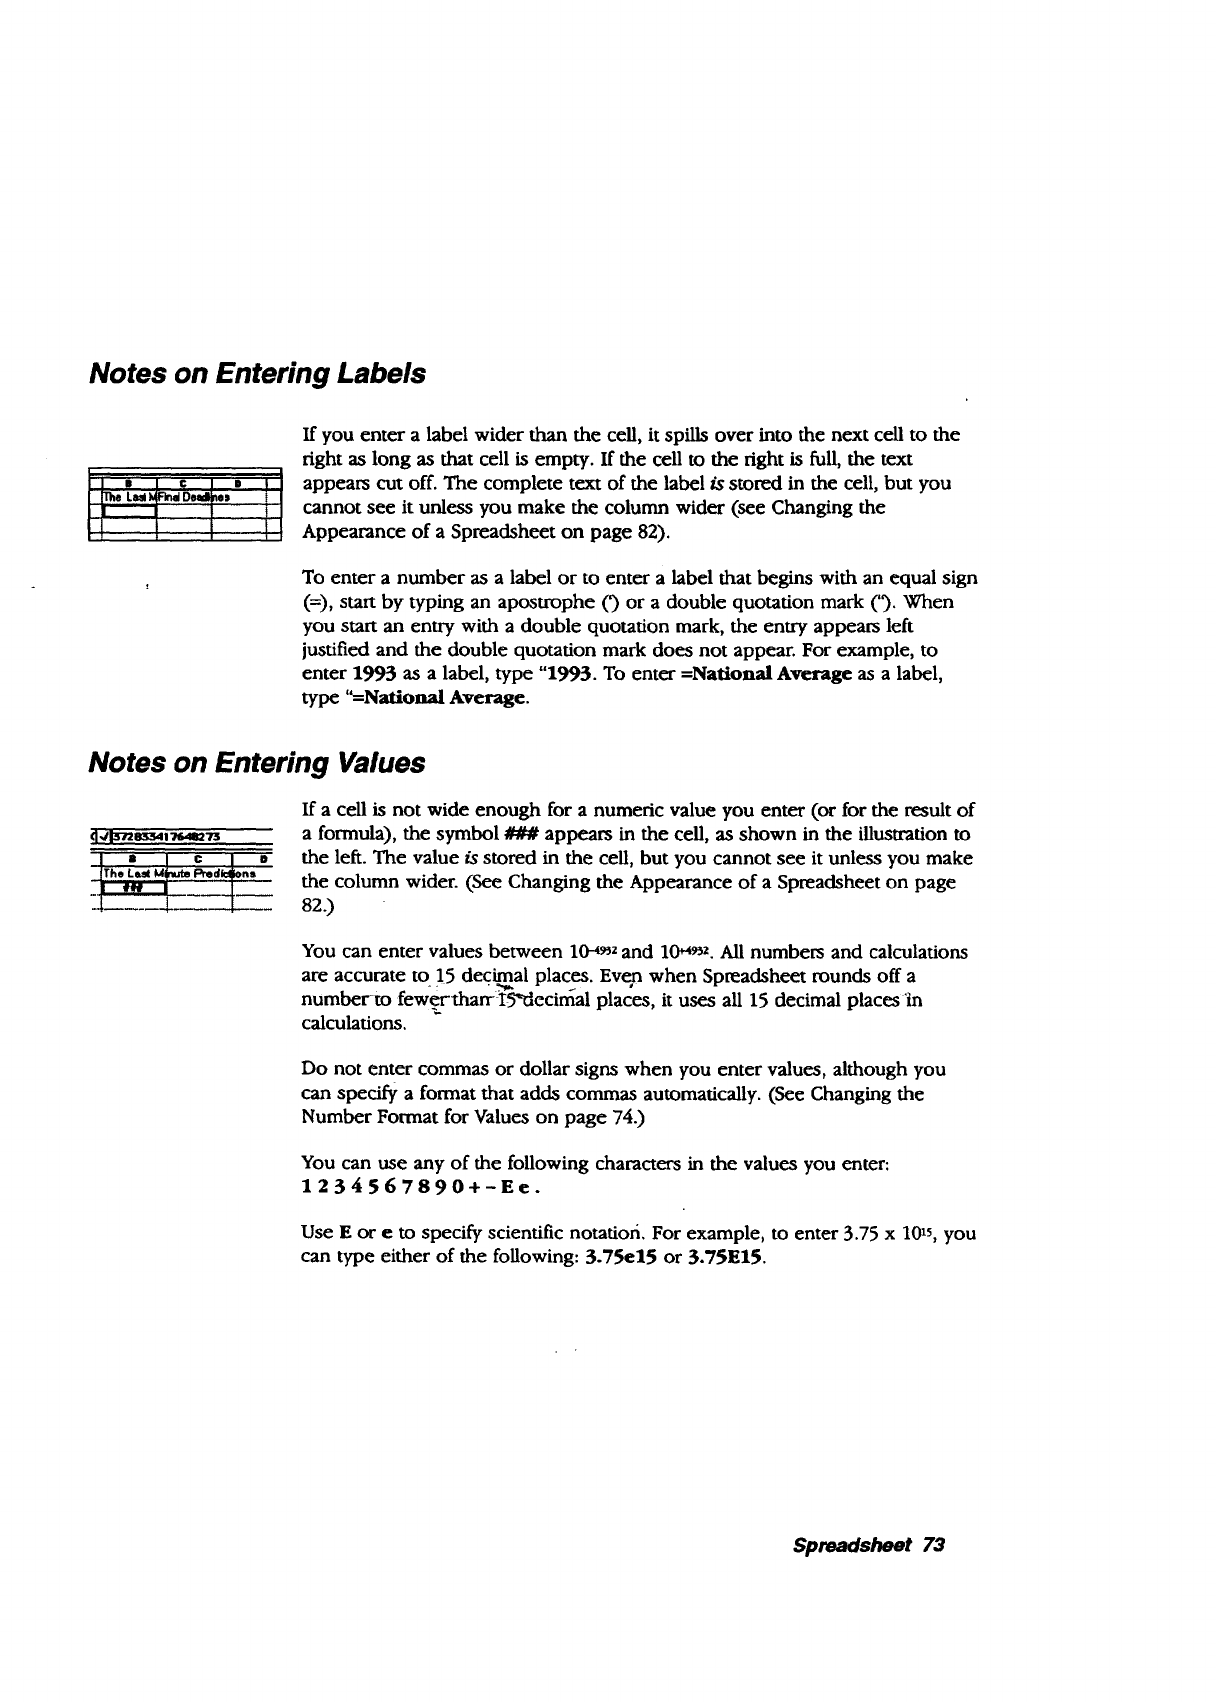
Notes on Entering Labels
If you enter a label wider than the cell, it spills over into the next cell to the
right as long as that cell is empty. If the cell to the right is full, the text
appears cut off. The complete text of the label is stored in the cell, but you
cannot see it unless you make the column wider (see Changing the
Appearance of a Spreadsheet on page 82).
To enter a number as a label or to enter a label that begins with an equal sign
(=), start by typing an apostrophe () or a double quotation mark ('). When
you start an entry with a double quotation mark, the entry appears left
justified and the double quotation mark does not appear. For example, to
enter 1993 as alabel, type "1993. To enter =National Average as a label,
type "=National Average.
Notes on Entering Values
1The Lat._Ml_maeLdk:Jlontt °
If a cell is not wide enough for a numeric value you enter (or for the result of
a formula), the symbol ### appears in the cell, as shown in the illustration to
the left. The value is stored in the cell, but you cannot see it unless you make
the column wider. (See Changing the Appearance of a Spreadsheet on page
82.)
You can enter values between lOqS, zand 10_s,2. All numbers and calculations
are accurate to 15 decimal places. Even when Spreadsheet rounds off a
number-to few er-tharr I5_ecimal places, it uses all 15 decimal places'in
calculations.
Do not enter commas or dollar signs when you enter values, although you
can specify a format that adds commas automatically. (See Changing the
Number Format for Values on page 74.)
You can use any of the following characters in the values you enter:
1234567890+-Ee.
Use E or e to specify scientific notatiofi. For example, to enter 3.75 x 10zs, you
can type either of the following: 3.75e15 or 3.75E15.
Spreadsheet 73

Changing the Number Format for Values
When you enter a value, Spreadsheet automatically shows it in a standard
format; however, you can change the format to suit your needs. The
following table shows the available formats for values:
Format
General
Fixed (2 decimal places)
Fixed with Commas
Fixed Integer (rounded to a
whole number)
Currency
Currency with Commas
]Currency Integer (rounded to
nearest dollar)
iPercentage (times 100)
Percentage Integer (times 100,
irounded to whole percent)
Thousan-ds- (divided-by 1000 and _
irounded)
Millions (divided by one million
iand rounded)
Scientific
You Type...
1234567
123.4567
1234.567
1234.567
1234.567
1234.56
1234.567
.085
.4275
1234567
Spreadsheet
Displays
1234567
123.46
1,234.57
1235
$1234.57
$1,234.57
$1235
8.50%
43%
1234.57
123456789 123.46
1234.5678 1.23E+03
Spreadsheet 74
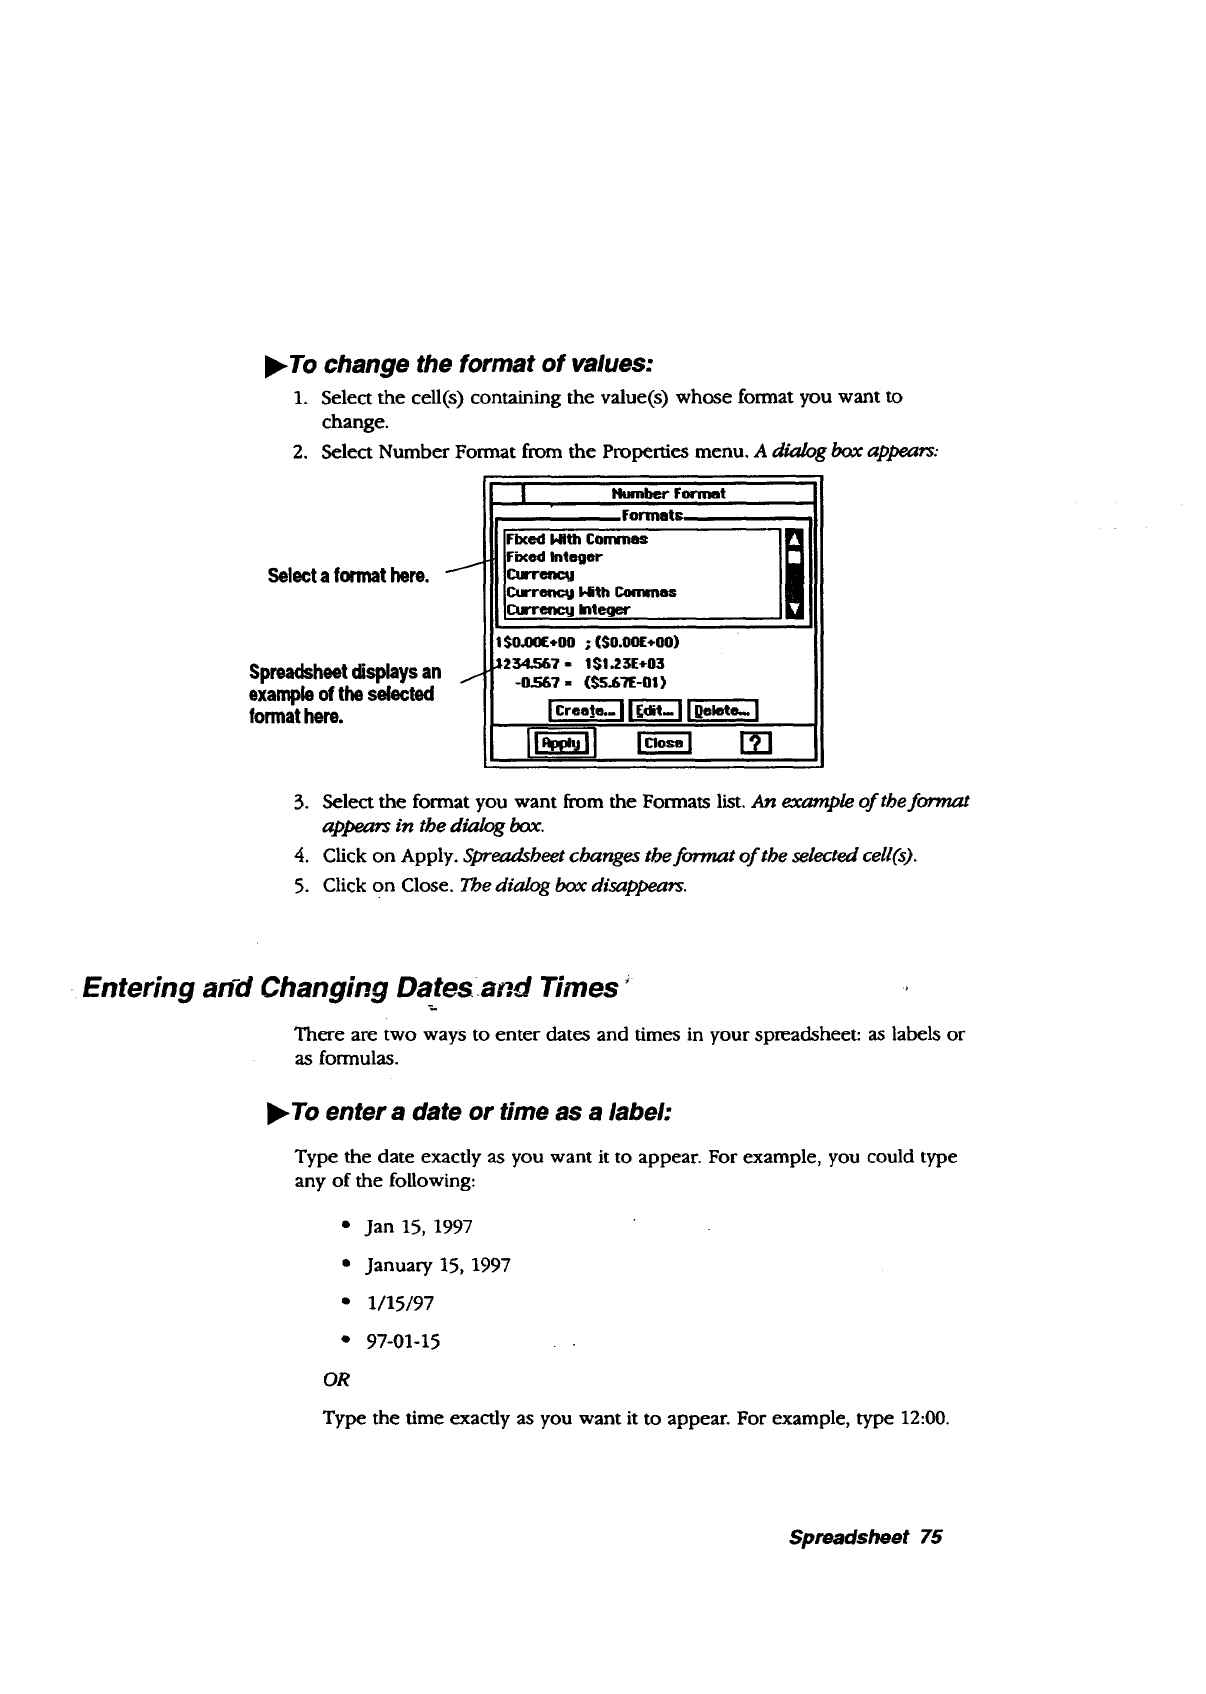
•To change the format of values:
1. Select the cell(s) containing the value(s) whose format you want to
change.
2, Select Number Format from the Properties menu, A dialog box appears:
Sel_taformathem.
Spreadsheetdisplaysan
exampleof theselected
formathere.
NumdberFormat
3. Select the format you want from the Formats list, An example of tbe format
appears in the dialog box.
4. Click on Apply. Spreadsheet changes the format of the selected cell(s).
5. Click on Close. The dialog box disappears.
•Entering and Changing Datesand Times _
There are two ways to enter dates and times in your spreadsheet: as labels or
as formulas.
Q
OR
•To enter a date or time as a label:
Type the date exactly as you want it to appear. For example, you could type
any of the following:
• Jan 15, 1997
• January 15, 1997
1/15/97
97-01-15
Type the time exactly as you want it to appear. For example, type 12:00.
Spreadsheet 75

Entering dates and times as formulas
Dates entered as formulas are stored as serial numbers representing the
number of days since January 1, 1900. For example, January 1, 1993 would be
stored as the number 33969.
When a date is stored as a serial number, you can use Spreadsheet to change
its format automatically. You can also use the date in formulas. For example,
you can change Jan 15, 1993 to 1/15/93 without retyping. And you can
subtract May 3, 1990 from June 15, 1991 to determine the number of days
between the two dates (408). To take advantage of these features, first enter
your date as a formula using the built-in DATE function.
Times entered as formulas are also stored as serial numbers. For example, if
you enter =TIME (12,34,23) and press ENTER, Spreadsheet returns 0.523877,
the serial number format of 12:34 and 23 seconds. You can change the format
of the cell to show the time in normal format (12:34:23).
Unless you want the
date or time to appear
inyour spreadsheet as
a serial number,
change the date or
time format. The next
section explains how
to do this.
•To enter a date or time as a formula:
1. Select the cell in which you want to enter a date.
2. Type =DATE. The characters appear in the Edit Area.
OR
.
Type =TIME. The characters appear in the Edit Area.
Type an open parenthesis, followed b,y numbers representing the year,
m6nthT-_rid da_ _t'tlae i_e y6_ want to enter. Then, type a close "_
parenthesis. Be sure to type the year, month, and day in that order.
OR
Type an open parenthesis, followed by numbers representing the time.
Then type a close parenthesis. Type the hour, minute, and second in that
order.
4. Press ENTER. The serial number for the date or time appears in the cell.
Spreadsheet 76

Format Formulas
When you enter a date or time value as a formula, Spreadsheet initially
displays a number;, however, you can change the format to suit your needs.
The following table shows the available date and time formats:
Use the same
procedure to
change date and
time formats that
you use to
change number
formats.
Format
Date : Long
Date
Date
Date : Long,
Date : Long,
Date : Long,
Weekday
Date : Short
Date : Short, Zero Padded
Date : Long, Month & Day
Date : Long, Month & Day,
No Weekday
: Short, Month & Day
: Long, Month & Year
Condensed
No Weekday
Condensed, No
iExample
23456 =Saturday, March 21st,
1964
23456 =Sat, March 21st, 1964
23456 =March 21st, 1964
23456 = Mar 21st, 1964
23456 =3/21/64
23456 =03/21/64
23456 =Saturday, March 21st
23456 = March 21st
23456 = 3/21
23456 =March 1964
Date :Short, Month & Year
Date : Year _"
Date : Month
Date : Day
Date : Weekday
Time : Hour MiD Sec
Time : Hour MiD
Time : Hour
Time : MiD Sec
23456 =3/64
23456 = 1964
23456 = March
23456 =21st
23456 =Saturday
1234.567 = 2:36:29PM
1234.567 = 2:36PM
1234,567 = 2 PM
1234.567 = 36:29
)_ To change the format for dates or times:
1. Select the cell(s) containing the value(s) whose format you want to
change.
2. Select Number Format from the Properties menu. The Number Format
dialog box appears.
3.
.
5.
Select the format you want from the Formats list. An example of the format
appears in the dialog box.
Click on Apply. Spreadsheet changes the format of the selected cell(s).
Click on Close. The dialog box disappears.
Spreadsheet 77
Formatting Spreadsheets
Formatting options do not affect calculations; instead, they allow you to change
the appearance of aspreadsheet. This section describes how to do the
following:
* Show and prim grid line_
• Display cell borders
• Create headers and footers
• Add tone, shades of gray, or various patterns
• Create notes
Showing Grid Lines
Agrid is the matrix of horizontal or vertical lines dividing the spreadsheet
into rows and columns. Each individual line is a grid lkte. You can show
grid lines on screen and print your spreadsheet with or without them. The
default setting for grid lines is to display them.
Youcanp,intgddlines!_ To show or hide grid lines:
whether they are
visible on screen or
not. Use Page Setup
hum the File menu to_;-
specify pdnUng gdd
lines.
1. Select Other Settings from the Options menu.
2. Select Draw Grid Lines to show the grid lines.
-OR
Deselect Draw Grid Lines to hide the grid lines.
Showing Cell Borders
To create an interesting visual display of your numeric information you can
display cell borders.
l_ To display cell borders:
1. Select the cells to border.
2. Select Cell Borders from the Properties menu. The Cell Borders dialog box
appears.
3. Select the borders you want. The Outline option displays a border around
the selection and deselects Lej_, Top, Right, and Bottom.
4. Click on Apply. The dialog box remains on the screen until you close it, so
tbat you cam make changes.
5. Click on Close.
Spreadsheet 78

Using Headers and Footers
Enter header and
footer text in cells
that are not part of
the main information
inyour spreadsheet.
Then, when you
print, select a print
range that excludes
the cells containing
the header and
footertext. Ifyou
includethe cell
containingrthe
header or footer in
the printrange of
cells, then the
header or footer will
print twice. See page
120 forprintingyour
spreadsheeL
Headers and footers are the text that pdnts at the top or bottom of each
page. They can be as simple as the page number, or they can include more
descriptive information, such as the following:
To create pa£1e
numbers that
automatically number
themselves, type the
page number function
formula. See page
223. Be sure to type =
to start your page
formula.
• Date the document Was created or printed
• Page number
• Name of the document
• Your name or the name of your department, business, or school
• Graphics such as a logo or drawing
Header text size cannot exceed 24 points.
,To create a header or footer:
1. Enter the header or footer text in a cell or range of cells that is not part of
the main information. (See the sidenote on the left.)
2. Select the cell or range.
3. Select Header/Footer from the Cell menu. A submenu appears.
4. Select-either Set Header or Set Footer from the submenu. The selected
information will print at the top or bottom of the page, as you have
indicated.
-,To -_- -"_ _"_"
number _ges consecutively:
1. Select the footer cell that you created above.
2. Select Insert Function from the Formula menu.
3. Select Print from the box on the left, and Page from the box on the right.
4. Select Paste. The formula is pasted in the text entry box.
5. Press ENTER. Yourpages will be automatically numbered.
6. Click on Close. Th£_ exits you from tbe footer Edit ba_.
Spreadsheet 79
Using Tones
To add interest to your spreadsheet presentation, use tones or shades of gray
for the following elements in a spreadsheet:
• Text
• Background
• Cell borders
•To change the text tones:
1. Select the cells that contain the text to which you want to apply different
tones.
2. Select Text Tone from the Properties menu. A dialog box appears.
3. Fill in the dialog box:
• % Shaded. Select the percent shading for the text tone. The lower
the number, the more faded the tone. By default, this setting is 100. If
Unfdled is selected, this attribute is set to zero (0).
.
• Tone Tools. Select the text tone from the tone palette.
Click Apply. The dialog box remains on the screen until you close it so that
you can change the tone of different text selections.
Thebackgroundis •To change the tone of the background:
the cellitself. Ifyou
set the backgrot£nd .... 1. Select the cells for whida____r__ouwant to, change the background tone.
tone to white and the 2. Select Text Background Tone from the Properties menu. A dialog box ....
text tone to black,
the cell enMes will
appear as black text
on a white
background.
.
appears.
Fill in the dialog box:
•Filled or Unfilled. Select Filled to set other options in this dialog
box. By default, the text background tone is unfilled.
.
• % Shaded. Select the percent shading for the text background tone.
The lower the number, the more faded the tone. A setting of zero (0)
causes the text to disappear. By default, this setting is 100.
• Tone Tools. Select the text background tone from the tone palette.
Click on Apply. The dialog box remains on the screen unta you close it so
that you can change the background tone of different cell selections.
•To change the tone of cell borders:
If you have added cell borders, you can change the tone of those borders.
1. Select the cells for which you want borders.
2. Select Border Tone from the Properties menu. A dialog box appears.
Spreadsheet 80
Creating Notes
ISe,-,_DM I _t:z'l"l
/
Note Indicatod
3. Fill in the dialog box:
.
• % Shaded. Select the percent shading for the text tone. The lower
the number, the more faded the tone. By default, this setting is 100. If
Unfdled is selected, this attribute is set to zero (0).
•Tone Tools. Select the text tone from the tone palette.
Click on Apply. The dialog box remains on the screen until you close it, so
that you can change the tone of different cell borders.
Notes provide additional information about the contents of your spreadsheet.
They can be a reminder to check a reference or a message to a reviewer of
the spreadsheet information.
When you attach anote to acell, a Note Indicator appears (see example on
the left).
The note does not appear in the document; instead, it appears in a special
box that you can print with the spreadsheet, if you want.
l_ To attach a note:
1. Select the cell to which you want to attach a note.
2. Select Notes from the Cell menu. The Notes dialog box appears.
3. Type_the note_inlth_x-ljalog-box.
4. Click on AplSly. A Note Indicator,, a small square, appears to indicate that
a note is attached.
5. Click on Close.
_To show or hide the Note Indicators:
1. Select Other Settings from the Options menu. A submenu appears.
2. Select Show Notes to display the Note Indicators in cells that have
attached notes.
OR
Deselect Show Notes to hide them.
l_ To print notes:
1. Press PRINT. The Pm'nt dialog box appears:
2. Select Print Cell Notes.
3. Click on Print. Spreadsheet prints the spreadsheet with the notes attached.
Spreadsheet 81
Changing the Appearance of a Spreadsheet
You may want to change the appearance of a spreadsheet to improve its
presentation. For example, you might want to emphasize certain aspects with
a different text style or alignment.
This section explains how to do the following:
• Adjust the width of columns and the height of rows
• Change the alignment of information in cells
• Change the text style of information in cells
Adjusting Column Width and Row Height
Sometimes when you enter information, it appears truncated or as ###
because the column is not wide enough. You can change the column width
by dragging the on-screen pointer or by selecting from the Cell menu.
•To change the column width by dragging:
1. Move the pointer to the header area at the top of the spreadsheet. When
tbe pointer is over the divider that separates the column letters, it changes to
a double arrow, as sboum in the illustration at lej_.
2. Press and hold the Select button and drag the column divider on the right
side of the column until the column is the width you want.
OR
With the Select button, double-click on the column divider on the right
side of the column to set the column width just wider than the longest
entry in the column. This is the same effect you get if you select Best Fit
from the Cell menu.
Using the menu, you
can adjust column
width and row height
when titles are
locked. However, you
cannot do this for
emire rows or
columns that are
locked.
•To change the column width using the Cell menu:
1. Select a cell anywhere in the column whose width you want to change.
2. Select one of the following from the Cell menu;
• Narrower makes the column 8 points narrower. The default width is
64 points.
• Wider makes the column 8points wider. The default width is 64
points. .
•Best Fit makes the column wide enough to fit the widest entry it
contains.
Spreadsheet 82
I_ To set a column width exactly:
1. Select the column for which you want to set the width. To do so, you can'
either click on the column header or select a cell in the column.
A standard columnis
64 pointswide. A point
is nearly 1/72 of an
inch.
2. Select Column Width from the Cell menu. A dialog box appears.
3. Enter the number of points you want to use for the column width.
4. Click on Apply. The dialog'box remains on the screen until you close it, so
that you can keep adjusting the width.
5. Click on Close.
each row adjusts
automaffcally to
accommodate the text
size you use. However,
you can manually
change the row heighL
Normally the height of _I_To set a row height manually:
1. Select the row for which you want to set the height. You can either click
the row header or select a cell in the row.
2. Select Row Height from the Cell menu. A dialog box appears.
3. Click on the Automatic check box to turn it off, and click inside the
Height value selector.
4. Enter the number of points you want to use for the row height.
5. Click on Apply. The dialog box remains on the screen until you close it, so
that you can keep adjusting the height.
6. Click on Close.
Changing A ignment
When you enter_labels in a cell, Spreadsheet aligns it at the left edge. When
you enter values, Spreadsheet aligns it at the right. And if you enter a
formula, the result of the formula appears right-aligned.
You can also select
Alignment from the
Properties menu or
from the Advanced
Funcffons tool bar
(see page 68).
I_ To change the alignment of cells:
Select the cells you want to align; then use the following control keys:
Control Key
CTRL + L
CTRL + E
CTRL + R
CTRL + J
A!ignment
Left
Center
Right
Justified
Spreadsheet 83
Using Different Text Styles
Youcan apply more
than one style to your
text, such as bold
Italic.
Se/ec_dngeither
superscript or
subscript affects b_e
entire cell. You cannot
makea potlionofthe
cell'scontents
superscript or
subsctfpL
Plain,Bold,Italic,and
Underline canalsobe
selectedfromthe
BasicFunctionstool
bar.
The-current font
appears on the Basic
Functions tool bar's
Pop-upfontslist.
Using different text styles can highlight important information and improve
the overall appearance of a spreadsheet. You can change the text style for
any cell or range of cells in your spreadsheet, whether they contain labels,
values, or formulas.
I_ To change the style of text:
1. Select the cell or range of cells you want to change.
2. Select Styles from the Properties menu.
• Plain (the text style without bold, italic, or underline)
• Bold
•Italic
•Underline
•
•Sur_pt (e.g. a2 + b2 = c2)
• Subscapt (e.g. H20)
)_To change the font:
1. Select the cell or range of cells you want to change.
2. Click on the Pop-up fonts list from the Basic Functions tool bar. A ItS*of
-avaiie_.fontsa_l_d_s.7 -_--
3. Select the font that you want. ?'be text in the selected cell(s) changes to the
new font.
URI,I Sons =]
Spreadsheet 84
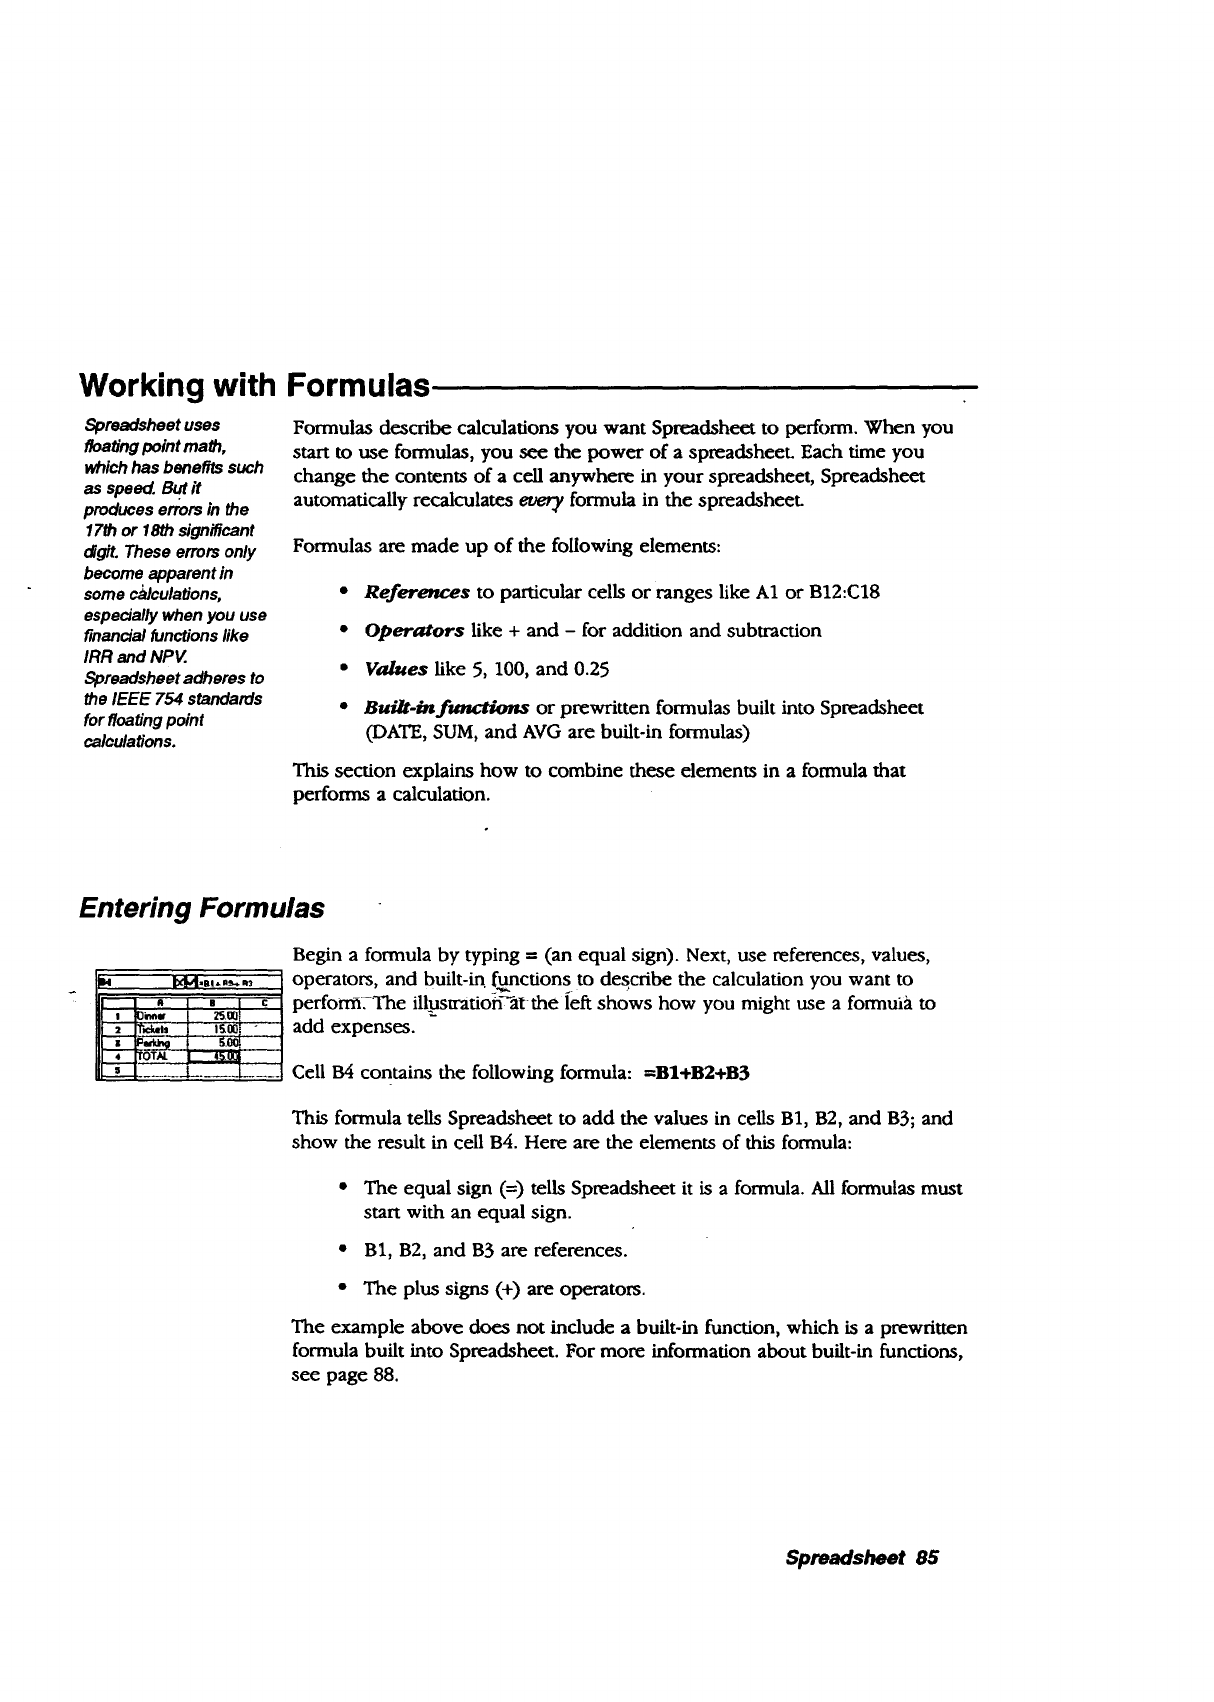
Working with Formulas
Spreadsheet uses
floating point math,
which has benefits such
as speed. But it
produces errors in the
17th or 18th significant
digit. These errors only
become apparent in
some cldculations,
especially when you use
financial functions like
IRR and NPV
Spreadsheet adheres to
the IEEE 754 standards
for floating point
calculations.
Formulas describe calculations you want Spreadsheet to perform. When you
start to use formulas, you see the power of a spreadsheeL Each time you
change the contents of a cell anywhere in your spreadsheet, Spreadsheet
automatically recalculates every formula in the spreadsheet-
Formulas are made up of the following elements:
•References to particular cells or ranges like A1 or B12:C18
• Operators like +and -for addition and subtraction
• Values like 5, 100, and 0.25
•Built-in functions or prewritten formulas built into Spreadsheet
(DATE, SUM, and AVG are built-in formulas)
This section explains how to combine these elements in a formula that
performs a calculation.
Entering Formulas
A I '! c
!Din,e_ I 25.00
rOTAL 4_oJ
_. l........
Begin a formula by typing =(an equal sign). Next, use references, values,
operators, and built-in functions to describe the calculation you want to
perfomWThe il_stration_at the left shows how you might use a formula to
add expenses.
Cell B4 contains the following formula: --BI+B2+B3
This formula tells Spreadsheet to add the values in cells B1, B2, and B3; and
show the result in cell B4. Here are the elements of this formula:
•The equal sign (=) mils Spreadsheet it is a formula. All formulas must
start with an equal sign.
•B1, B2, and B3 are references.
•The plus signs (+) are operators.
The example above does not include a built-in function, which is a prewritten
formula built into Spreadsheet. For more information about built-in functions,
see page 88.
Spreadsheet 85
)_ To enter a formula:
1. Select the cell in which you want to enter the formula.
2. Type - to begin the formula. The equal sign appears in the Edit Area_
3. Click on the first cell you want to use in the calculation. Tbe cell address
appears in the Edit Area.
4. Type the mathematical operator you want to use. For example, type * for
multiplication (see page 88 for a list of operators).
5. Click on the second cell you want to use. The cell address appears in the
Edit Area.
6. Continue clicking and typing operators until the formula in the Edit Bar
appears as you want it.
7. Click on the Enter button next to the Edit Area. The resu/t of the formula
appears in the cell.
Using References in Formulas
Most formulas
include at least one
reference.
Areference tells Spreadsheet where to look to find the values you want to
use in a formula.
You can use-two types of references in the formulas you create: relative
references and absolute references. Your choice depends on how you
want Spreadsheet to treat the references when you copy or move the formula
from one cell to another:
Relative references
Arelative reference tells Spreadsheet how to find a particular cell starting
from the cell containing the formula, such as: go two rows up and one
column to the right. It is like telling someone how to get to your house from
theirs: go three blocks east and then four blocks south.
Relative references
are cell addresses;
for example, B4,
D8_ and A 1.
When you copy a formula that contains relative references from one location
to another, Spreadsheet adjusts the references in the formula relative to the
new position of the formula. For example, in an annual budget spreadsheet,
you could use a formula with relative references to add the numbers in the
January column; then, when you copy the formula to the columns for
February through December, Spreadsheet adjusts the relative references so
that each formula totals the numbers for the column in which it appears.
Spreadsheet 86
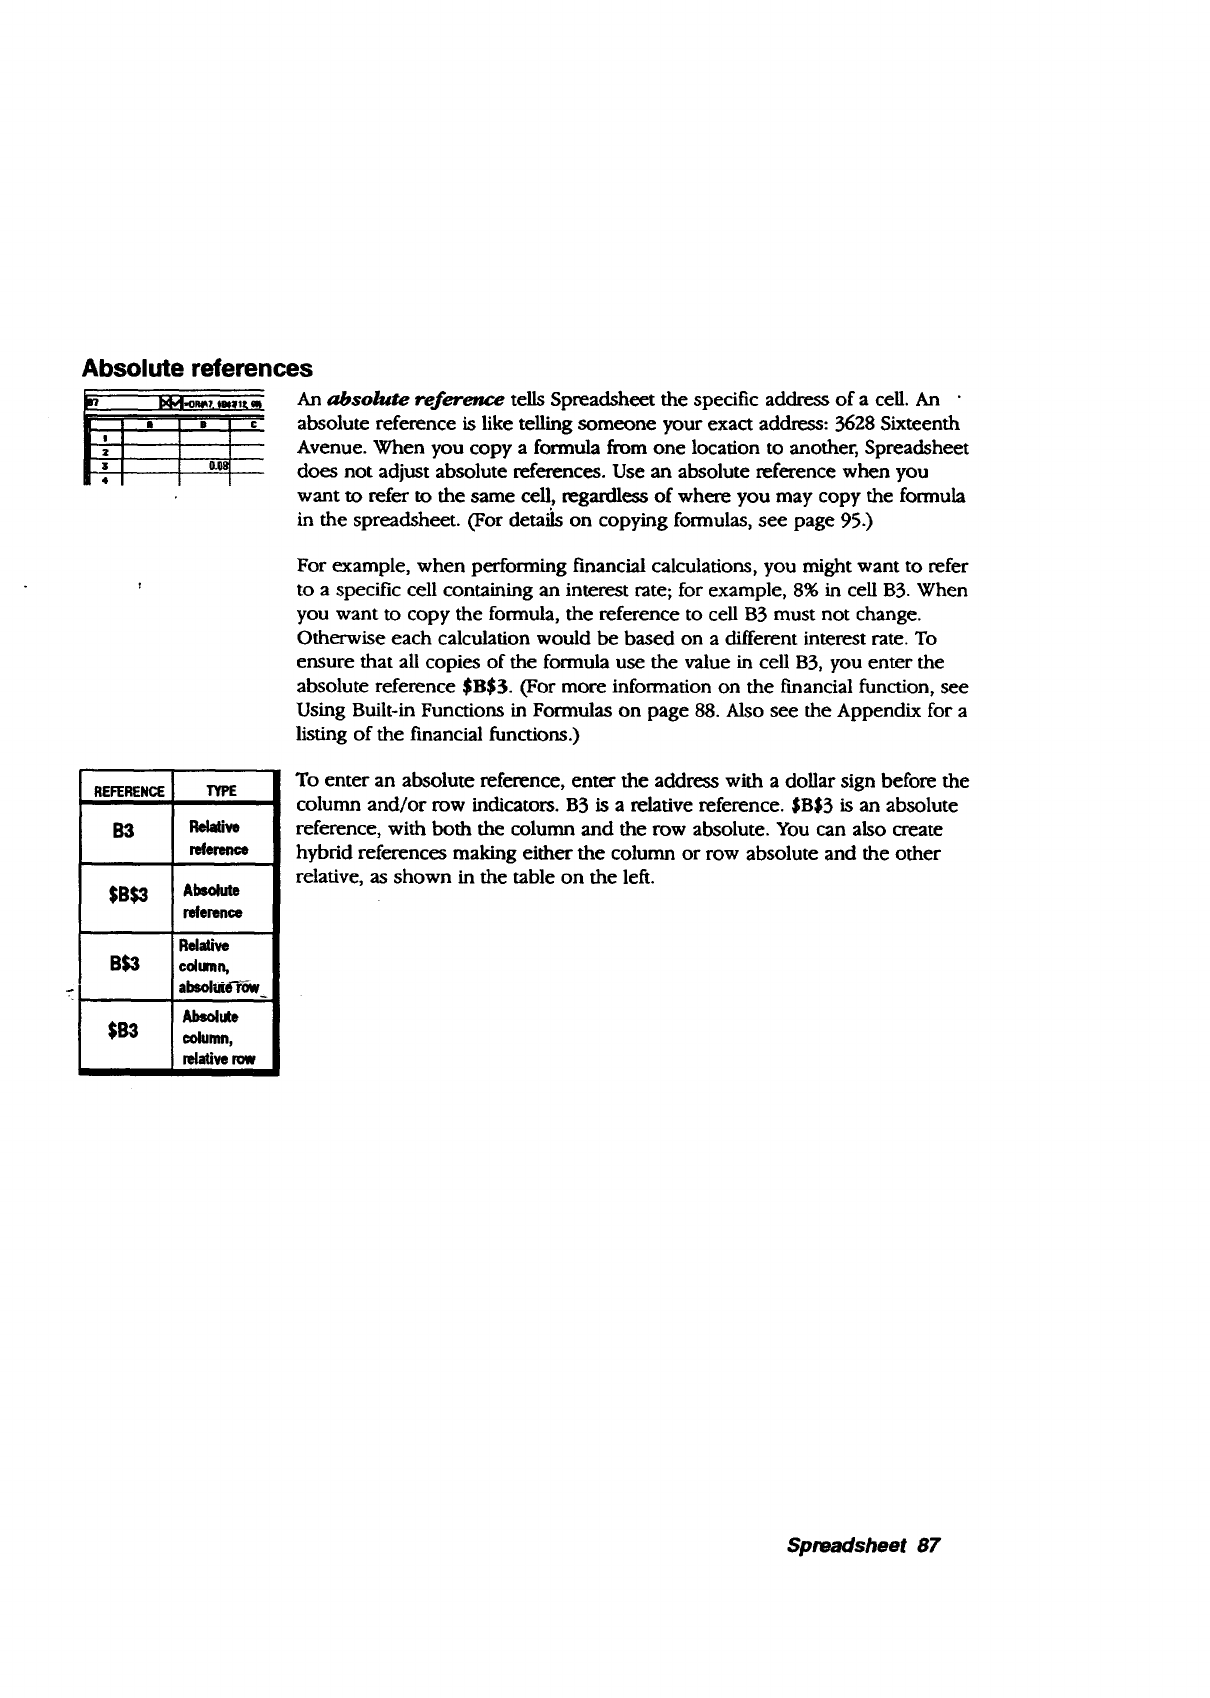
Absolute references
II B r
I'
IsO.OS
An absolute reference tells Spreadsheet the specific address of a ceg. An
absolute reference is like telling someone your exact address: 3628 Sixteenth
Avenue. When you copy a formula from one location to another, Spreadsheet
does not adjust absolute references. Use an absolute reference when you
want to refer to the same cell, regardless of where you may copy the formula
in the spreadsheet. (For detaiis on copying formulas, see page 95.)
For example, when performing financial calculations, you might want to refer
to a specific cell containing an interest rate; for example, 8% in cell B3. When
you want to copy the formula, the reference to cell B3 must not change.
Otherwise each calculation would be based on a different interest rate. To
ensure that all copies of the formula use the value in cell B3, you enter the
absolute reference $1153. (For more information on the financial function, see
Using Built-in Functions in Formulas on page 88. Also see the Appendix for a
listing of the financial functions.)
REFERENCE TYPE
B3 Relative
reference
$B_ A_,aut,
reference
Relative
B$3 column,
absolUte-r_w
Absolute
$83 €olumn,
R,4ativerow
To enter an absolute reference, enter the address with a dollar sign before the
column and/or row indicators. B3 is a relative reference. $B$3 is an absolute
reference, with both the column and the row absolute. You can also create
hybrid references making either the column or row absolute and the other
relative, as shown in the table on the left.
Spreadsheet 87
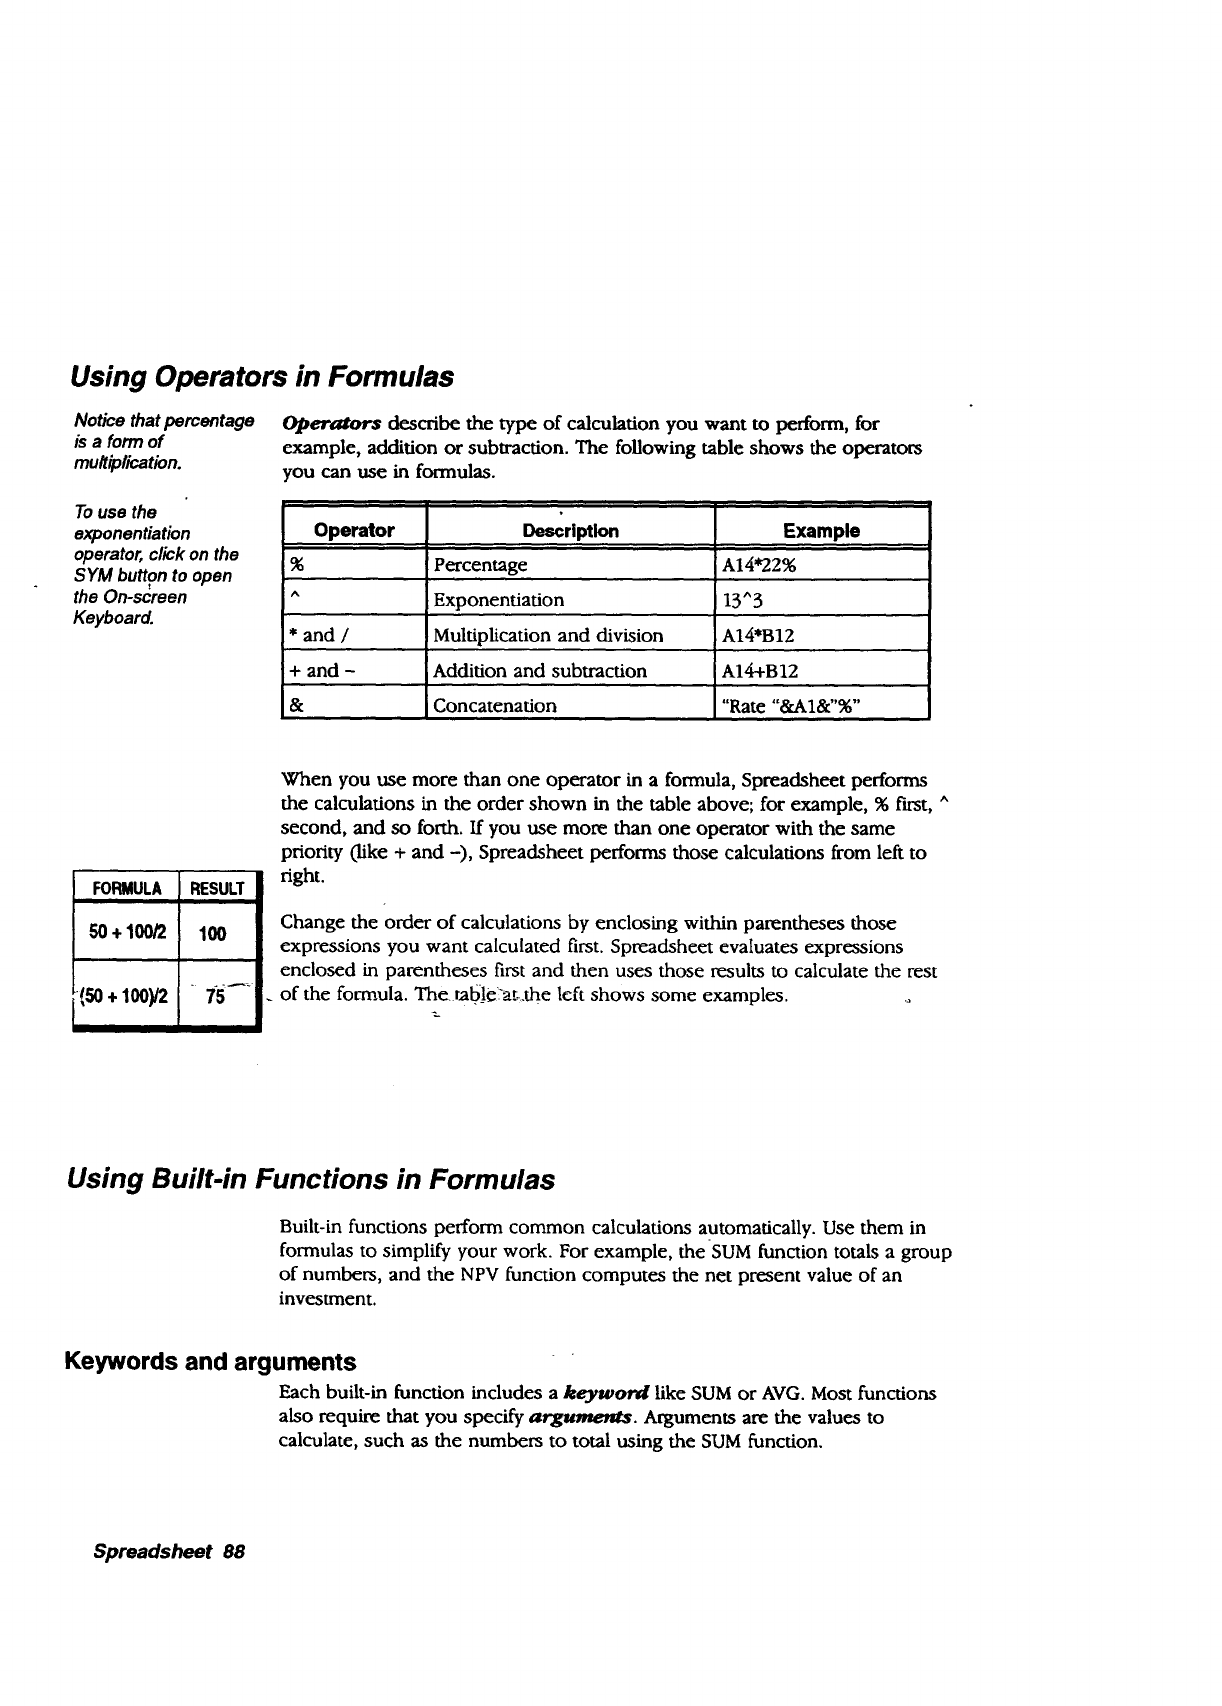
Using Operators in Formulas
Notice that percentage Operators describe the type of calculation you want to perform, for
is a form of example, addition or subtraction. The following table shows the operators
muttip/ication, you can use in formulas.
Touse the
exponentiation
operator, click on the
SYM button to open
the On-screen
Keyboard.
Operator Description Example
%Percentage A14*22%
" Exponentiation 13"3
* and /Multiplication and division A14*B12
+and -Addition and subtraction A14+B12
& Concatenation "Rate "&AI&"%"
FORMULA RESULT
50+100/2 100
(50 + 100)/2 75
When you use more than one operator in a formula, Spreadsheet performs
the calculations in the order shown in the table above; for example, % t'mst, ^
second, and so forth. If you use more than one operator with the same
priority (like +and -), Spreadsheet performs those calculations from left to
right.
Change the order of calculations by enclosing within parentheses those
expressions you want calculated first. Spreadsheet evaluates expressions
enclosed in parentheses first and then uses those results to calculate the rest
of the formula. The rab.le:at-.the left shows some examples.
Using Built-in Functions in Formulas
Built-in functions perform common calculations automatically. Use them in
formulas to simplify your work. For example, the SUM function totals a group
of numbers, and the NPV function computes the net present value of an
investment.
Keywords and arguments
Each built-in function includes a korword like SUM or AVG. Most functions
also require that you specify argument,. Arguments are the values to
calculate, such as the numbers to total using the SUM function.
Spreadsheet 88
To specify arguments, use a list of values, separated by commas and enclosed
in parentheses. If the values are in cells, you can list those cells as the
arguments. For example, to sum the numbers 2, 3, 5, and 6 enter
SUM(2,3,5,6). Or if those numbers are in cells A1, 3_2, A3, and A4, you can
enter one of the following:
SUM(A1,A2,A3,A4) or SUM(AX-A4)
Placeholder arguments
z
When you insert a built-in functionin a cell, you can automatically insert
placeholders for the arguments. These placeholders appear with the function
in the Edit Area. Since each function has different arguments, the
placeholders can help you remember what arguments to enter for a particular
function. After inserting the function, replace the placeholders with the actual
arguments you want to use.
For example, you can insert the AVG function with place.hoMers inside the
parentheses to remind you to enter the values to be averaged. If you insert
the AVG function with placeholders, the following appears in the Edit Area:
=AVG(value 1, value 2, ...)
To use the AVG function to average the'values, for example, in cells A1, A2,
A3, A4, and AS, replace the placeholders with addresses of cells that contain
the values, as in the example below.
_ - _,_. _ _"
=AVG(A1, A2, A3, A4, A5) or =AVG(AI-,_,5)
You may also enter the numbers themselves instead of the cell addresses.
For some functions, such as the financial functions, it is important to enter the
arguments in the order shown in the dialog box and in Appendix A of this
manual. Inserting placeholders will help you remember the order.
Entering built-in functions
To include a built-in function in a formula, either insert the function using
Insert Function from the Formula menu or type the function and all of its
arguments. When you use Insert Function, you have the additional option ot
inserting placeholder arguments.
I_ To insert a function using the Formula menu:
1. Select the cell where you want the result of the calculation to appear.
2. Select Insert Function from the Formula menu. A dialog box appears.
Spreadsheet 89

Spreadsheet's built-in
function types are
listed on page 91.
More information
about each function
and argument is in bSe
Appendix, beginning
on page 215.
You can embed one
function within
another. For
example, to sum a
range of values and
get its integer value,
you could type
=INT(SUM(A3:Ag)).
3. Select the function from the Functions list on the fight. You can select a
function type from the list on the left so that the Functions list shows only
functions of the type you select.
4, Select Paste Arguments (the default) ff you want to insert placeholder
arguments with the function.
Click on Paste. The function appears in the Edit Area with p[acebolders.
Click on Close.
.
6.
7.
8.
In the Edit Area, double-click on the first argument to select it.
Type the text, value, formula or cell reference you want to use for the
argument. Make sure you type it correctly. Your entry replaces the
p/acebo/der argument.
9. Continue replacing arguments as needed.
10. Press ENTER.
11. When the calculation is complete, the result appears in the spreadsheet. If
the calculated re.sult is not what you expect, be sure that you typed the
formula correctly.
12. Click on Close.
I_ To insert a function by typing:
1. Select the cell where you want the result of the calculation to appear.
2. Type =to begin the formula. The equal sign appears in the Edit Area.
3. Type the function name (for example, --SUM).
4. Type the arguments, enclosed in parentheses. Be sure to include commas
- betwed-ff argumenrs-(for_Lamp|e, =SUM(A1,A2)). "
5. Press ENTER. When the calculation is complete, the result appears in the
spreadsheet.
To use a function within a function:
1. Insert the first function.
2. In the Edit Area, select the argument you want to replace with a function.
3. Insert the second function.
4. Continue in this manner until the formula is complete.
5. Press ENTER.
Spreadsheet 90

Spreadsheet's Built.in Functions
Spreadsheet provides the following built-in function types:
•Financial
•Information
• Logical
• Math
• Print
• Statistical
•String
• Time and Date
• Trigonometric
When you select Insert Function from the Formula menu, adialog box
appears with a list of these function types on the left and the built-in
functions on the fight. For example, when you select MATH from the left, the
corresponding math functions appear on the fight. If you select ALL from the
left, all of Spreadsheet's functions appear on the fight in alphabetical order.
This section gives general descriptions of the function types. More detailed
information is in the Appendix, beginning on page 215.
Financial functions
Financial functions provide formulas for common financial calculations. For
example, the FV (Future Value) function calculates the future value of a
stream of regularly invested payments.
The arguments for financial functions are either values or addresses of cells
that contain values. When the argument is the interest rate, express it as its
actual value (.07 rather than 7 to indicate 7%). Be sure to specify the same
units for the term and the interest. If the interest is monthly, the term is also
monthly.
Information functions
The information functions return information about a cell or range of cells.
For example, the COUNT function counts the number of items in a list.
Spreadsheet 91

Logical functions
The logical functions evaluate relationships and return true or false results.
For example, the IF function looks at a condition, such as whether the
contents of B13 =500, and returns a true or false answer (true=l, false=0).
Mathematical functions
Mathematical functions provide common mathematical formulas. For
example, INT (Integer) truncates a value to the nearest whole number. The
arguments for mathematical functions are either values or addresses of cells
that contain values.
Print functions
The print functions retum the name of the current file, the current page, and
the number of pages. For example, PAGE returns the current page number
and can be inserted in headers and footers for numbering pages.
Statistical functions
Statistical functions provide formulas for common statistical calculations. For
example, MAX returns the largest value in a list. The arguments for statistical
functions consist of either values or addresses of cells that contain values.
String functions
- A string _s a series of characters. Stnng funcuons extract text (including -_
numbers) or retutrh values based on the text. At least one argument in each
string function is a text string.
Time and date functions
The time and date functions allow you to enter times and dates in serial form,
which is a form that Spreadsheet can understand. For example, you can use
the DATEVALUE function to create the appropriate serialized date such as
33988 for January 20, 1993. These functions are most useful in formulas
where the time and date are calculated r',ither than entered as a constant.
Trigonometric functions
"Trigonometric functions provide formulas for common trigonometric
calculations. The arguments for-trigonometric functions are either values or
addresses of cells that contain values.
Spreadsheet 92

Editing the Spreadsheet
After you have created aspreadsheet, you may want to make some changes.
This section describes how to do the following:
* Edit the contents of a cell
• Copy and move information in a spreadsheet
•Insert and remove rows and columns
•Fill arange with a series of incremental values
Editing the Contents of a Cell
Change entries to correct an error or to update the spreadsheet to reflect new
information. If it is a simple change, select the cell to make it active and then
type the new entry. If you want to make a change in a complex entry, you
may want to work in the Edit Bar.
To begin eoVting _e
selected cell, press
CTRL + SPACEBAR.
_To edit the contents of a cell:
1. Select the cell you want to change.
2. In the Edit Area, select the information you want to change, or click
where you want to insert new information.
3. Make the corrections you want.
4. To confirm your changes, press ENTER.
OR _-
To cancel the changes, click on the Restore button (see page 66) or press
ESt.
Spreadsheet 93

You may want to
delete information
using Cut from the
Edit menu; that way, if
you accidentally cut
the wrong information,
you can paste if back
in place.
l_ To delete the contents of cells:
1. Select the cell or range of cells whose contents you want to delete.
2. Press DELETE. The coments of the cell or range are permanently deleted.
OR
Press CUT. The contents of the cell or range are trartsferred to the
clipboard; you can use the Paste choice on the Edit menu to copy the cell or
range to another location.
Copying and Moving Information
Cut, Copy,and Paste
also appear in the Edit
menu.
As you work with Spreadsheet, you may find k convenient to copy and move
information. There are two ways to do so:
•Use the Fill choices on the Cell menu to copy the contents of the
active cell across a row or down a column.
•Use the CUT, COPY, and PASTE keys to copy or move information
to any other location in a spreadsheet.
When you copy or move values and labels from one location to another, they
appear the same in both locations. When you copy or move formulas,
however, Spreadsheet automatically adjusts relative references for the new
position of the formula,- You can override this automatic adjustment by using
absolute geirerence_._o[" i-fiiSi"einformation, see Using References in Formulas
on page 86.
Spreadsheet 94

Copying to adjacent cells
Fill Right and Fill Down provide a handy shortcut when you want to copy the
contents of the active cell across a row or down a column. This is useful
when you want to copy formulas.
When copying formulas, Spreadsheet automatically adjusts the relative
references.
•To copy a formula to adjacent cells:
1. Select a range of cells starting with the cell containing the formula to copy.
2. Select Fill Down from the Cell menu to copy the formula to the selected
cells beneath it.
OR
Select Fill Right from the Cell menu to copy the formula to the selected
cells right of the original.
The formula appears in the new locations:
Using Cut, Copy, and Paste
Copied formulas
I'[
You Can-copyor mov-e:-a_ginglecell or a range of cells to any other 16_ation in
a spreadsheet. Cut, Copy, and Paste work the same way in Spreadsheet as
they do in other programs. Cut and Copy places the selected cells on the
clipboard; paste retrieves any previously cut or copied information from the
clipboard.
Youcan also click on
the Cut, Copy,and
Paste buttonsfrom
the Advanced
Functionstool bar
(see page 68).
•To copy or move information:
1. Select the cell, range, row(s), or column(s) you want to copy or move.
2. To copy the selection, press COPYI to move it, press CUT.
3. Select the first cell where you want to copy or move the information.
4. Press PASTE. The values arwl fot_ulas appear in the new location with
the first cell of the copied selection appean'ng in the destination cell.
Spreadsheet 95

You can over, de the
default drag and drop by
holding down CTRL if
you want to copy within
a document or the
MENU key if yotJ want to
move text from one
document to another.
Using Drag and Drop
Use drag and drop to move or copy cells in your spreadsheet. Drag and drop
works the same way in Spreadsheet as it does in other programs. If you drag
and drop within'the same document, the default behavior is to move the
information: If you drag and drop from one document to another, the default
behavior is to copy.
ll_ To drag and drop information from one location to another:
1. Select the cell, range, row(s), or column(s) to move or copy.
2. Move the pointer over the selected range; then press and hold down the
Drag button. The drag and drop pointer appears.
3. Drag the pointer so that it is over the first cell where you want to move or
copy the information.
4. Release the Drag button. 1"be information is moved or copied, depending
on whether you dragged within the same document or from one document
to another.
Inserting and Deleting Rows and Columns
After you have created a spreadsheet, you may need to add a row or column
to make room for additional information. When information becomes
obsolete, you will want to delete a row or column.
InsertRow tool
_.__ To quickly insert a row or column:
"1. Select a cell where you want to insert a row or column.
2. Click on the Insert Row tool on the Basic Functions tool bar.
OR
Youcannotinsert and
delete rows, columns,
and cellswithina
locked area (see page
718).
DeleteRowtool
InsertRow/Column or
Delete Row/Column also
appear in the Editmenu.
Click on the Insert Column tool on the Basic Functions tool bar.
I_ To quickly delete a row or column:
1. Select a cell in the row or column you want to delete.
2. Click on the Delete Row tool on the Basic Functions tool bar.
OR
Click on the Delete Column tool on the Basic Functions tool bar.
Spreadsheet 96

Filling a Range of Cells with Incremental Values
Using Fill Series from the Cell menu, you can automatically fill a range of ceils
with aseries of incremental values. Select the range of cells and specify the
starting value and the increment. Spreadsheet does the rest.
If the first cell in a series contains a 1, the next cell will be 2, the following 3,
and so on. If the first cell contains a date, Fill Sedes increments the date;
Monday increments to Tuesday, Wednesday, Thursday, and so on. Time
increments from 1:00 to 2:00, 3:00, and so on.
),To _l a range with incremental values:
1. Enter the value or date you want to increment.
2. Select the range of cells you want to fill, starting with the cell you filled in
containing the value or date you want to increment.
3. Select Fill Series from the Cell menu. A dialog box appears.
4. Fill in the dialog box, specifying the fill options you want:
Fill By. Select whether to fill rows or columns.
ffyou select Day, Weekday,
Month, or Year in the Fill
Series dalog box, and
entered the date as a label,
Spreadsheet creates
additionalda_s asJabels.
Ifyou entered thedate as a
serialnumber, Spreadsheet
creates additionaldates as
serialnumbers; however,
thecell must have a date
format. Tofilldate
informationas text (suchas
Sunday orJanuary), fillin 5.
the first value as text but do 6.
not abbreviate the month.
For numbers such as a
year value, to fill in a
progressiveseries of years,
enter the year as a label
('1990), not a number. For
"moreinformation,see
Entering and Changing
Dates on page 75.
Units. Select the type of units for the flU: number, day, weekday, month,
or year. _-
Progression. Select the progression you want Spreadsheet to use: Linear
or Geometric. A linear series progresses one step at a time, for example, 1,
2, 3, 4, 5. A geometric series progresses by a specific multiplier at each
step,_for examp!ej i_,_, 9, 27, 81, 243.
Step. For a linear progression of numbers, enter the increment you want
between each value. For a geometric progression of numbers, enter the
multiplier you want to use between each value. For a progression of
dates, enter the number of units (days, weekdays, months, or years) you
want between each value.
Click on Fill. The range is sFdledas you specified.
Click on Close.
Spreadsheet 97

Options for Spreadsheet Formulas
This section describes how to do the following:
• Show and hide formulas
• Assign names to cells for'formulas
• Turn automatic recalculation on and off
t• Use circular references and iteration in calculations
Showing and Hiding Formulas
To see a formula for a single cell, select the cell and look at the formula in
the Edit Bar. If you want, you can display all of the formulas in the
spreadsheet cells. This can be helpful if you have entered several formulas
and want to see them all at once.
When you show all formulas, they appear in cells as ff they were labels. That
is, if aformula is too long for acell, it may spill over into the next cell if that
cell is empty. If the adjacent cell is not empty, the formula appears cut off.
I_ To show or hide all formulas:
l. Select Other Settings from the Options menu. A submenu appears.
2. Select Show Formulas to. show all formulas.
OR _"
De.select Show Formulas to hide all formulas.
Naming Cells and Ranges
When you create a formula, you must include references to the cell or cells
that contain the numbers to calculate. You can refer to cells by their
addresses, or you can name them and then use the name in formulas.
Naming cells can make your formulas easier to read. The second formula in
the following example is much easier to understand than the First.
B4=B2+B3 or INCOME_AIARY+TIPS
Cell names can be up to 40 characters long and can include alphanumeric
characters and the underscore (._) symbol. Cell names cannot contain
numbers, spaces, or other characters. If you type a space, Spreadsheet inserts
an underscore. Cell names are not case sensitive; for example, to Spreadsheet,
the name Expenses is the same as EXPENSES and expenses.
Spreadsheet 98

Define a name that refers to a specific cell or range. For example, you might
define RATE as A3; then, when entering formulas, you can type RATE instead
of typing A3.
To define a name:
1. Select Define Name from,the Formula menu. A dialog box appears with a
list of any names you bare previously defined.
2. Click on New. Another dialog box appears:
Add a _Llaw_.
.ar_ [
I
Derenitioe_ ,
m
I
1
You call use
absolute and relative
references when
defining a name for
cells. An absolute
reference tells
Spreadsheet the
specific addres_o'Ta
cell. A relative
reference tells
Spreadsheet how to
find a pa_'cular cell
starting from the cell
cont_'ning the
formula. For more
informa_on,see
page 86.
3. Fill in the dialog box, specifying the name and reference you want to use:
•Name. Enter the name (example, Cost).
•Definition. Enter the cell address or the addresses for the range of
cells. Use absolute references (example, $B$1) unless you want the
named cells to be relative (see page 86 for information on absolute
and relative references).
4. Click-on OK.-The na,_._ appears i_t-tbe list in the Define Name dialog box.
5. Click on Close.
Spreadsheet 99

Once you have
defined aname,
you can usa it in
any formulas you
create. To do so,
type the name in
the formula. If you
prefer, you can also
select the name
from a list in a
dialog box.,
l_ To insert a name in a formula:
1. Select a cell and begin entering a formula.
2. When the insertion point in the Edit Bar is in the position for the name
you want to use, select Insert Name from the Formula menu. The Insert
Name dialog box appears, with the names you have created.
3. Select the name you want to insert.
4. Click on Paste./'be name appears in the Edit Bar.
5. Click on Close.
ff you change the
definition of a name,
the reference
changes in exfsting
formulas that contain
that name. For
example, if you have
a range called _ __
_penses that
includes B5:B17 and
you extend the range
to B5:B24, all
formulas using the
name Expenses will
be recalculated
automatically to
include the seven
additional cells in the
range. But if you
delete the name, all
formulas using that
name will be wrong.
I_ To change the name of a cell or range:
1. Select Define Name from the Formula menu. A dialog box appears.
2. Select the name you want to change.
3. Click on Change. A dialog box appears.
4. Type the new name in the Name box.
5. Click on OK. All formulas referring to the old name are updated to the new
name.
6. Click on Close.
!_ To change the definition of aname:
1. Select Define Name from the Formula menu. A dialog box lists existing
names.
2. Select the name for which you want to change the definition.
3. Click on Change.. _,. ,_
-4. Change the cell,or range specification to suit your needs. Use absolute'ceU
addresses unless you want the named range to reflect a relative position.
5. Click on OK. Spreadsheet updates all formulas to reflect the change.
6. Click on Close.
l_ To delete a name:
1. Select Define Name from the Formula menu. A dialog box appears.
2. Select the name you want to delete.
3. Click on Delete. You are asked if you want to delete the name.
4. Click on Yes to delete the name. Spreadsheet deletes the name.
Controlling Automatic Recalculation
Spreadsheet normally recalculates every formula in your spreadsheet when
you make a change. If your spreadsheet is large or contains many complex
formulas, this recalculation can be time consuming. In that case, you may
want to turn automatic recalculation off and recalculate the spreadsheet
manually whenever you want to.
Spreadsheet 100

Youcan also
recalculateby
clickingon the
calculatebutton
fromthe Basic
Functionstoolbar.
N
l_ To turn automatic recalculation on or off:
1. Select Calculation from the Options menu. A dialog box appears.
2. Select Automatic or Manual to specify the type of calculation you want.
3. Click on OK.
4. Click on Close.
!_ To recalculate manually:
Select Calculate Now from the Options menu.
Using Iteration and Circular References
Occasionally, you may want to create a formula in which the calculation uses
the result of the calculation. This is called a arcular referem_. For
example, to calculate gross profit, subtract expenses from income. If one of
the expenses is based on a percentage of the profit, for example, commission
payments, the formula has to rely on the outcome of the calculation.
If you calculate this formula more than once, each successive calculation
results in a smaller value. Thisis called/let-at/on. Iteration is the process of
recalc_l_iting a_cifculffr-_ference repeatedly, until the values converge', which
means that the difference in the result of each successive calculation is no
longer significant.
Before using circular references, turn on iteration using Calculation from the
Options menu. If you enter a formula with a circular reference but do not
specify iteration, #CIRC# appears in the cell.
_To use iteration:
m mm_ _
1. Select Calculation from the Options menu. The dialog box at the left
appears.
2. Fill in the dialog box, specifying the options you want.
•Allow Iterations. Select the Allow Iteration option ff you are going
to use iteration in your.spreadsheet.
•• Maximum Iterations. Enter the maximum number of iterations you
want.
• Maximum Change. Enter the maximum change you want to allow.
If you enter zero, iteration will not stop until it converges or reaches
the maximum number of iterations.
Spreadsheet 101

.
4.
5.
Click on OK.
Click on Close.
Create the formula with a circular reference. Spreadsbeet recalculates the
formula the specified number of times or stops when the stated value for
maximum change is calculated.
Charting in Spreadsheet
Spreadsheet lets you create a variety of charts that represent numeric trends
or results. You can include a chart as a part of your spreadsheet. Or, after
creating a chart, you can copy it to the clipboard and use it in other programs
like Drawing or Word Processing.
This section begins by describing the types of charts you can create.
Information on creating and modifying charts begins on page 108. Information
on printing charts begins on page 121.
What Is aChart?
D_ not pIot rnorethan 12
itemsper chart.
Achart is a graphic representation of numeric data. For example, you can
create a chart to show the value of the consumer price index over a period of
years, the total revenue for a company broken down by region, or the
average student test grade through the school year.
Charts show the relationships-between a sem'es of va/u_s broken down into
categories. For example, in a chart of monthly expenses, the series would
include January, February, March, and so forth; the categories would include
items like Rent, Food, and Utilities; and the values would be the actual
expenditure incurred.
To create a chart, f'n'st select the data you want to create a chart from. You can
select a portion of an existing spreadsheet, or cream a new spreadsheet and
enter the data to chart.
The following illustration shows the genet:al format for data on which you
base a chart:
R
t Chart Tide
2C_egory Nm_iya_,
3CategoryNeme vahe
C_eoo._N_ivn_..,,,
6 i
7 !
I e t: I o '_ I
iSeries Name Series Name !Series Name series Name i
tvabe vabe Iva/ue i
i,,_, " i,,a,a i_ i
....i,_, ivan. ],_t_ i
Iv_ ivatua ivnt_ i
I I i !
i i i i-
Spreadsheet 102

Ifyou mustuse a
number for the chart
title, sedes name, or
categoryname, place
a quotemark (')
before the number so
Spreadsheet
interpretsit as text.
Chart Tide. The tide of the chart. This label is optional. If you do not place
any text in this cell, the chart will not be tided. You can tide it later using the-
Titles and Legends choice on the Chart menu.
Series Name. The series names are the labels of the spreadsheet columns.
Category Name. The category names are the labels of the spreadsheet rows.
Spreadsheet uses these labels to create legends (see Adding Tides and a
Legend on page 111).
Value. The numeric data values that Spreadsheet charts. Each category you
want to chart should have at least one value for each series. Empty cells in
your spreadsheet will be interpreted as zeros in your chart.
Types of Charts
Spreadsheet lets you create the following types of charts:
• Column
•Bar
•Line
• X-Y Plot
•Pie
• High/low
Column chart
Aco/tram obart (or a vertical bar chart) plots each category in aseries as a
vertical bar. The height of the bar corresponds to the value of that category_
The illustration at the left shows a typical column chart.
Variations on the standard column chart include the following:
•Overlapped. The columns within each category overlap each other
slightly.
•Stacked. The columns within each category are stacked vertically on
top of each other. The height of the stacked column is the sum of the
values in the category.
Spreadsheet 103

Bar chart
f!
I ' •!
i I
°1 ' ,I
Stacked Percentage. The columns in each category are stacked so
that the total height represents 100%. The height of each value is
shown as that value's percentage of the whole category. This is like a
vertical pie chart.
One Tone With Values. Columns all have the same tone and are
labeled with their numcric values.
One Tone With No Space Between Categories. Columns all have
the same tone, and the last column in category 1 touches the first
column in category 2 with no space between them.
Abar chart is like a column chart with the bars plotted horizontally rather
than vertically.
The same variations are available for bar charts and column charts.
Line chart
A/.ine dbart plots a point indicator for each value on one axis in relation to
the text label on the other axis, and connects the points in each series with
straight lines. This type of chart ks useful for showing how a value changes
over time. The illustrations below show a typical line chart The chart on the
left shows the result when the data ks entered horizontally (in rows). The one
, on the right shows the lms_.tt when the data is entered vertically (in col,J,nns).
2.
6O
4O
30
2O
Marker
II I
!
i49t 54_ 51t STt ....._"_:_;-
r.--..-3.._=.--.--3-gt--,g_r--_-X _. ""-5_'_
5"/j 431
:!
Variations on the standard line chart include the following:
* Liues Only. Draws only the lines connecting the points in each
series; does not draw the markers for each point.
Spreadsheet 104

Matkea-s Only. Draws only the markers for each point; does not
connect the markers with lines.
Drop Lines. Draws the markers for each point, and then connects
the points in each category with avertical line; does not draw lines
connecting the values.
Area chart
An area chart is a line chart in which the area below the line is filled with a
pattern or solid tone. The illustrations below show a typical line chart The
chart on the left shows the result when the data is entered horizontally. The
one on the right shows the resuk when the data is entered vertically.
]00
........._.............._............. _...............__.
49E 54i 51i 57i
.... a4i agta7i,
........•"............ : ............';7 .... ":
2_0
150
10D
o
........ _............ _..
4gl 341
....... 4, .............. _-.,
54_ 391
51 37j
.......4,................4,,,°
571 43i
Variations on the standard area chart include the following:
Stacked Percentage. Like the column chart's stacked percentage
chart, this area chart shows the areas for each category stacked to a
constant height representing 100%, and the values are shown as
percentages.
Drop Lines. Draws a vertical line to connect the points in each
category.
Series Name. Draws the name of each series in the center of its f'dled
area.
Spreadsheet 105

X-Y Plot chart
41
i 511 s71
i" .... ,,oi.,3i,
An X-Ypiot chart, sometimes called ascauerp/ot, looks similar to a line
chart, but there is a significant difference between the two. Une charts plot a
value against a label (see the line chart on page 104), whereas X-Y plot charts
plot one value against another. X-Y plot charts are unique in that they take
categories two rows at a time and plot them against each othec
Another difference between Xoy plot charts and line charts is that on an X-Y
plot chart, the rick marks along each axis (X is the horizontal axis, Y the
vertical) are spaced according to their value, which may not always be at
regular intervals because of the potentially random nature of the data. On a
line chart, one axis always contains text labels which are usually evenly
spaced for visual clarity.
Variations on the standard K-Y plot chart include the following:
Lines Only. Draws only the lines connecting the points in each
series; does not draw the markers for each point.
Markers Only. Draws only the markers for each point; does not
connect the markers with lines. This choice makes an X-Y plot that
looks like a traditional scatter plot. Scatter plots are primarily used to
see how different data is grouped.
Pie chart
_ A pi_ chart is a round_charx in which the size of each slice is proportional to
the whole. Pie charts are unique in that they only draw one category of data.
The illustration on the left shows a typical pie chart.
Variations on the standard pie chart are:
•Category Titles. Inserts the category rifles into the chart.
• One Tone with Category Titles. Shows all the wedges of the pie in
one tone, with category rides.
• Ftrst Wedge Exploded. Pulls the wedge that starts near the
12-o'clock position out slighdy from the rest of the pie.
•All Exploded. Pulis all the wedges apart slighdy.
• With Percentages. Shows the percentage of the whole pie that each
wedge represents.
Spreadsheet 106

High/Low chart
[1l
14 :.: :
3311 3"11 38i41i
Ahigh/low chart is useful for tracking pairs of data that mark a high and
low or a start and end value, such as the price of stocks or the day's
temperature range. Each pair of data points is plotted as a single vertical line.
You can also show a third or fourth relative value along with each pair, such
as the stock's daily closing priCe or the average temperature.
High/low charts require two categories of data and may show up to four
categories. The third category places tick marks to the left; the fourth category
places tick marks to the righL
There are no variations available for high/low charts.
Spreadsheet 107

Creating Charts
Once your labels and _1_TO create _1chart-
data are inplace on the
spreadsheet, you can 1. From aspreadsheet, select the cells that contain the data you want to
create charts using
either the ChWts menu
or the chading buttons
on the Advanced
Functions tool bar (see
page 68):
.
chart.
Open the Chart menu and select a chart type from the Create submenu.
The chart appears as a graphic object in the lower right corner of the
Spreadsheet window. (For more information about charts as graphic
objects, see the section Manipulating Charts on page 109.)
Toopen the Advanced
Functionstool bar,
select Show Tools
from the Options
menu; then clickon
Advanced Functions.
Changing the Type of Chart
By selecting Change
Type from the Chart
menu, not only can
you change a chart
from one type to
another, but you can
also choose a
To select a different type of chart for a different view of your information,
click on the appropriate chart button from the Advanced Functions tool bar.
(See page 68.)
For example, once you have created a pie chart, change it to a column chart
by clicking on the Column tool button from the Advanced Functions tool bar
-variaOonon _e _ -or by selecting Change Type from the Chart menu.
existing chart, such "-
as Stacked
Percentage. _D_To change the type of chart:
Columntool
1. Select Change Type from the Chart menu. A dialog box appears.
2. Select the type of chart or variation you want.
3. Click on Apply; then click on Close. Spreadsheet changes the chart.
Spreadsheet 108

Manipulating Charts
The procedures in this
section explain how to
perform basic
operations with graphic
objects. For more
informa_on about
working with graphic
objects, see the
Drawing'chapter.
When you create a chart, it appears with small black boxes around the
perimeter and a diamond-shaped spot in the center. These band/_s indicate
the chart is the currently selected object.
Use the handles to manipulate 'your chart. The diamond-shaped handle in the
center alows you to move the chart, and the other handles allow you to
resize it.
Resizing and Moving a Chart
Hold down SHIFT
while dragging to
maintain the chart's
proportions.
•To resize a chart:
Place the on-screen pointer over one of the handles that surrounds the chart,
click and hold the Select button, and drag. Dragging toward the center of the
chart reduces it, while dragging away from the center enlarges it.
•To move a chart:
1. If the chart is not selected, click on the edge of the chart to select it.
Handles appear around the char*frame and the move handle appears in
the center.
Resize ha!_iie_,_, -
(the handles around the edges)
J\
If you move a chart or
graphic image into a
/ocked area, the chart or
image will become locked
ff the move handle is
within the locked area. To
move the chart or image,
unlock the area, move the
chart or image, and then
lock the area again.
You can move the
.chart to any IocaUon in
your spreadsheeL
Movehandle
(the handleinthe center)
2. Place the pointer over the move handle in the center of the chart. When
the pointer changes to a pair of crossed arrows, hold down the Select
button to grab the chart.
3. Holding the Select button, drag to move the chart to the position you
want.
4. Release the Select button. The chart appears in the new position.
Spreadsheet 109

Changing Chart Properties and Attributes
Attributes are visual elements such as tone, line thickness, and fill pattern. If
you select a chart and then click one part of it, such as a wedge of a pie
chart, you can change the attributes of that part of the chart.
To select multiple
text items,press
CTRL as you dick.
Youcannot move
any labels that the
chart has generated.
Whgeyou can change
!_ To change text properties in a chart:
1. Select the chart by clicking on it. Handles appear around the chart.
2. Select the text item within the chart that you want to change by clicking
on it. Handles appear on that item to indicate it is selected.
3. Select the text property to change, such as font, style, size, or tone, from
the Properties menu or the Basic Functions tool bar. Spreadsheet applies
the change to the selected text.
thetextproperliesofa_I_To change an attribute of an element in a chart:
legend,you cannot
change the label itself
from thecharL Legend
labels must be
changedin the
spreadsheet'scells.
For more informadion
onlegends, see page
112.
1. Select the chart by cricking on it. Hand/es appear around the chart.
2. Select the object within the chart that you want to change by clicking on
it. Handles appear on that object to indicate it is selected. You cannot
move the component parts of the chart or any labels that the chart has
generated, but you can edit text labels using the Text tool.
3. Choose the attribute you want to change from the Graphics menu.
4. Click on Apply.
5. Click on Close.
Deleting a Chart
Dele_,asoappears I_ To delete a chart:
in the Edit menu. 1. If the chart is not selected, click the edge of the chart. Hand/es appear
around the chart frame, and the move handle appears in the center.
2. Press DELETE.
Using a Chart in Another Program
You can place Spreadsheet charts in other programs. For example, you can
use a chart in a report you have created in Word Processing, or in an
illustration you have created in Drawing.
I_ To copy a chart to anothe r program:
1. Select the chart you want to copy by clicking on it. Handles appear
around the chart.
2. Press COPY.
3. Close Spreadsheet. The chart ispasted onto the clipboard.
4. Open the other program and press PASTE. The chart appears.
Spreadsheet 110

Adding Titles and a Legend
•To add titles and legend to a chart:
.
2.
3.
Select the chart.
Select Titles & Legend from. the Chart menu. A dialog box appears.
Fill in the dialog box, selecting the options you want:
•Chart Title. Select this option to add a title to the cha_. Spreadsheet
looks for title text in the upper left of the selected chart range. If
Spreadsheet cannot find any text, a text object with the words "Chart
Title" appears at the top of your chart. You can change the title later.
• X-Axis Title. Select this option to add a title to the chart along the
X-Axis.
•Y-Axis Title. Select this option to add a tide to the chart along the
Y-Axis,
If you want to use a
number in the first
position of one of these
labels such as the year,
1996, you must convert
the first numedc
character to a
non-numetfc character.
Do this by first typing an
apostrophe (') and then
the nume/ic characters.
.
• Legend. Select this option if your chart shows more than one
category and you want to define the tones or patterns to differentiate
between categories. You can also select its position on the chart:
Horizontal (below chart) and Vertical (at right of chart).
Click on Apply. Spreadsheet adds tbe items you selected to your chart, as
shown in tbe following example:
Y-axis
• _ _ . Chartlille
ISALI_
Legend
5. Click on Close.
•To change text in the chart title or axis titles:
To open the Draw-
ing _ol b_, select
Show Tools from
the Options menu;
then click on
Drawing Tools.
1. Select the Text tool from the Drawing tool bar. Tbepoimer becomes a
crossed 1-beam when you move it over tbe chart.
2. Click on the text object you want to change. The teal object is outlined, the
pointer becomes a angle I-beam, and a vem'cal bar indicates the insert
point for text.
3. Press BACKSPACE and DELETE to remove text you do not want, or
highlight the unwanted text and press DELETE.
Spreadsheet 111

Pointertool
Open the Drawing tool bar
from the Show Tools
submenu of the Options
menu.
.
5.
Enter the new text.
When you are finished with the Text tool, select the Pointer tool from the
Drawing tool bar and click on an empty area of the chart to remove the
outline around the text (so that other changes are not accidentally made
to the text).
About legends
7
Spreadsheet generates legend labels from the category names in the column
left of the data (usually column A). If you do not have legend labels in these
cells, and you select Legend from Titles & Legend in the Chart menu,
Spreadsheet will generate generic labels for the legends.
I_ To add legend labels:
1. Enter your legend labels in the left column (category names).
2. Select the cells that contain the data you want to chart, including the left
column with the category names.
3. Select the chart type from the Chart menu or from the Advanced Functions
tool bar. A_er a few seconds the chart appears.
4. If the legends are not present, select the chart; then select Titles & Legends
from the Chart menu and dick on Legend.
5. Click on Apply; then click on Close. The Legends appear on the chart.
TO edit legend la_-lS i_
1. Select the cell in the left column that contains the legend label.
2. Press CTRL + SPACEBAR The cursor appears inside the Edit Area.
3. Press BACKSPACE to remove text you do not want, and enter the new
label.
4. Press ENTER. After a few seconds, the legend cbanges to sbow tbe new
text.
Changing Markings
7"hereare three
different types of chart
markings you can
change: axis markings,
grid marldngs, and the
marker shapes that
indicate values on a
chart.
Axis markings and grid markings are visual aids that can help people
understand your chart. Axis markings are the tick marks that divide the axis
lines. Grid markings are vertical and horizontal lines that can cover the chart
area between the axes.
Spreadsheet 112

•To add axis markings to a chart:
1. With the chart selected, choose Axis from the Chart menu. The Axis dialog.
box appears.
2. Select the type of axis markings you want and click on Apply. The
markings appear in your chart. The following illustration shows a chart
with tick marks along the X Axis:
59
49
44 1i¢kmarks
3. Click on Close.
•To addgrid lines to a chart:
1. With the chart selected, choose Grid Lines from the Chart menu. The Grid
_'nes dialog box appears:
.
!::i::iiii:J Grid Lines
X Axis= [] Draw Grid Line_ at Ha jot Ticks
[] Dram Grid Lines at Minor Ticks
Y Axis= [] Dram Grid Lines at Ivlajor Tick=
"_Gri(J'-Lines at Hlinor Ticks
._. _..-.._ [] Oram
Select the axis from which you want the grid lines to originate, and click
on Apply. The grid lines appear in your chart.
3. Click on Close.
I_ s9
54
49
44
Gdd line
SALES 1
''1_
Spreadsheet 113

Changing Marker Shapes
Marker Markers show the data points on a chart. They are found only on X-Y plot
and line charts. Changing the shape of the markers can help make the chart
easier to read.
I_ To change the marker shape:
1. Select the markers you want to change by clicking on one of them in your
chart. The markers in that category are surrounded by outlines to indicate
they are selected.
2. Select Marker Shape from the Charts menu. A drip, box containing
marker shapes appears.
3. Click on the marker shape you want and click on Apply. The selected
markers change shape.
4. Click on Close.
Using Additional Spreadsheet Features
Spreadsheet has many additional features to help you create accurate and
attractive spreadsheets. This section describes how to do the following:
_-o- -S6-rt t-owl; tfr-eolu2fi'-ns of reformation
•Create custom number and date formats
• Add graphics to a spreadsheet
Sorting
Save your work before
sorting. Then, if the
results are not what
you expected, select
Other from the File
menu and click on
f_scard Changes.
Ony data in the
unlockedareas is
sorted when usingthe
-_rt feature. Data in
the locked titles is not
sorted.
..
You can sort information in a row, column, or range of cells in either
alphabetical (A-Z) or numeric (1-9) order. In addition, you can sort in either
ascending (A-Z and 1-9) or descending (Z-A and 9-1) order. A range is
sorted by the row or column containing the active cell.
)_ To sort information in a spreadsheet:
1. Select the cells containing the information you want to sort. Be sure to
select all the cells you want to sort.
2. If the active cell is not in the row or column you want to sort, move it
with one of the following keystrokes:
•ENTER. Moves the active cell down one row.
Spreadsheet 114

Spreadsheet sorts all
selected cellsby the
row or column
containingtheactive
cell.
.
4.
*SHIFT + ENTER. Moves the active cell up one row.
• TAB. Moves the active cell fight one column.
•SHIFT + TAB. Moves the active cell left one column.
Select Sort from the Edit menu. A dim_g box appem's.
Fill in the dialog box:
•Sort By. You can sort either rows or columns.
•Sort Order. You can sort in either ascending or descending order:
for example, A, B, C, D or Z, Y, X, W.
• Sort Options. Select from the following:
Ignore Case/A_ You can have the sort ignore any
differences in uppercase and lowercase and ignore accents on
letters in alphabetical sorts.
.
Ignore Spao_/_ You can have the sort ignore
spaces between words and punctuation marks in alphabetical
sorts.
Click on Sort. Spmadsbeet _the selected cells.
I_ To perform a simple sort more quickly:
1. Select the range of cells you want to sort.
2. Click on the Son Forward tool on the Basic Functions tool bar to sort the
rows in ascending order.
OR
Click on the Sort Backward tool on the Basic Functions tool bar to sort the
rows in descending order.
Spreadsheet sorts the range in the order you selected.
Spreadsheet 115

Creating Number and Date Formats
While Spreadsheet offers a wide variety of standard number and date formats,
you can create additional number and date formats to suit your needs. For
example, if you want to show values with six decimal places, you can create
a special format.
New formats appear at
the end of the list in the
dialog box.
)_ To create a number or date format:
1. Select Number Format from the Properties menu. A dialog box appears.
2. Select a format on which you can base the new format. For example, if
you want to create a format for displaying numbers with six decimal
places, you might pick Fixed and specify six decimal places.
3. Click on Create. The Define Format dialog box appears.
4. Fill in the dialog box, selecting the options you want. Refer to the
examples in the dialog box as you make your selections.
•Name of Format. Enter a name for the new format.
• Places. Enter the number of decimal places.
• Offset. Enter the number of offset places. Negative numbers move
the decimal point to the left, and positive numbers move it to the
right.
• Options. Select format options from the drop-down list: commas,
percent sign, leading and trailing zeros, and the position of the sign
(+ or -) relative t.o.the leader or trailer. For example, if the sign
foll6ws _e_:iea'der,-Tth-en a negative dollar amount would be
formatted like this: $-100 rather than -$100.
•Fixed/Scientific. Select either fixed notation or scientific notation.
Leading. Enter the numbers or characters you want to appear in
front of each value you enter, like a prefLX. YOU can specify a prefix
for Positive, Negative, or All Numbers. For example, if you enter DM
in the All box, every value using this format will begin with DM; then
if you enter 345, it will appear as DM345 in the active cell.
Trailing. Enter the numbers or characters you want to appear at the
end of each value you enter, like a suffix. For example, if you enter
DM in the All box, DM will appear at the end of every value using
this format; then if you enter 345, it will appear as 345DM in the
active cell.
5. Click on OK. The new fomru, t is saved with the spreadsheet.
Spreadsheet 116

•To delete a number or date format that you created:
1. Select Number Format from the Properties menu. A dialog box appears.
2. Select the format to delete and click on Delete. You are asked if you really
want to delete the format. Select Yes, and the format is deleted.
Using Rulers
The spreadsheet rulers are normally the row numbers and column letters. You
can turn off the row and column headers or select altemate rulers.
In Spreadsheet, you can choose the same types of rulers that are available in
other programs: Inches, Centimeters, Points, and Picas. After you choose one
of these rulers, you will see it instead of the spreadsheet column and row
headers. This is especially useful if you want to see where a page breaks or
when you are working with graphics.
•To specify a different ruler:
1. Select Rulers from the Options menu.
2. Select the type of ruler you want from the submenu. The new ruler
appears in place of the column and row headers.
-Adding Gia-phics-
Formore information
onfillpattems, see --
the chapteron
Drawing, which
begins onpage 125.
In addition to charts, you can include drawings in the spreadsheets you
create. Use the Drawing tool bar and the Graphic tool bar to create drawings
in your spreadsheet. If you prefer, you can create drawings in Drawing and
then paste them into a Spreadsheet document.
When you add graphics to a Spreadsheet document, they appear on a
transparent drawing layer on top of the spreadsheet. If you fill objects with
transparent fill patterns, you can see the spreadsheet information through the
objects.
Spreadsheet 117

Locking Titles
Lock Tides in the View menu locks specific rows or columns of a page
on-screen as tides. When you scroll the page, the tides remain fixed
on-screen while the rows below (or to the right) scroll as usual.
•To lock titles on-screen:
When moving ei_er a
chart or a graphic image
into a locked area, the
locked rows will not be
automatical¥ redrawn.
The unlocked areas
automatical¥ refresh as
you move the chart or
graphic. For the locked
areas, click on the
Redraw button to see
what it looks like after the
move.
1. Scroll the spreadsheet so the column(s) or row(s) wanted as tides are
visible in the upper left comer of the window. You cannot adjust the
position of the titles after they are locked.
2. Select the appropriate cell location.
• To lock rows, sdect the row (or a single row of horizontal ceils)
below the last row to be locked.
.
•To lock columns, select the column (or a single column of vertical
cells) to the right of the last column to be locked.
•To lock rows and columns at the same time, select the top left cell of
the area you want to remain scrollable.
Select Lock Titles from the View menu.
• If only rows are to be locked, a black horizontal line is drawn below
the last locked row.
Once titles are locked,
select Unlock Tales to
release any locked
-rows_ and/or colurt_s..--
_-÷
• If only columns are to be locked, a black vertical line is drawn to the
right of the last locked column.
•- If-both rows-arid-"eolumns are locked, two black lines are draw,:% one
in each 6f the positions described above. Locked tides appear above
and to the left of black lines drawn on the cell borders.
•To unlock titles on-screen:
Follow the same steps for locking tides, but select Unlock Tides from the
View menu.
Using Spreadsheet with Other Programs
You can use information from your spreadsheet in other programs. For
example, you can copy a range of cells to a Word Processing document.
Once you have pasted your information, you can add borders and other
visual enhancements with the tools.
Spreadsheet 118

Information you paste into other programs is not automatically updated.
Therefore, if you change the spreadsheet, you must recopy it into the Word
Processing document if you want to keep the information in both documents"
the same.
•To use spreadsheet data in another program:
1. Create the spreadsheet data you want to use.
2. Select the range that you want to paste into another program.
3. Press COPY.
4. Save your document and close Spreadsheet.
5. Open the program and document into which you want to paste the
information.
6. Move the insertion point to the location where you want to paste the
spreadsheet information.
7. Press PASTE. The information appears in your document with tabs
inserted between the columns and with each mw stam'ng a new line.
Printing and Faxing
Printing and faxing a Spreadsheet document is much like printing and faxing
any other document. First, set up your page; then print or fax the Spreadsheet
document. You can also print or fax a chart from your Spreadsheet documenL
-Setting Pa_ _Setup Opti'ons--_:--_-=- ,_
Before you print, use Page Setup from the File menu to select your page
-- ° layout options.
Refer to page 92 for
using built4n
functions.
•To set Page Setup options for printing:
1. Select Page Setup from the File menu. A dialog box appears.
2. Fill in the dialog box:
• Starting Page Number. The de fauh starting number is 1, but you
can specify a different starting number for your spreadsheet. Either
click on the up and down arrows or type a new number. The page
number appears when you insert the built-in function called PAGE 0
in a cell and designate that cell as a header or footer. This option
does not affect the number of pages printed.
• Print Sideways. Normally, the spreadsheet is printed as a standard
upright page. Select this option ff you want to print it sideways
(landscape).
Spreadsheet 119

Scale to Fit on One Page. Select this option if you want to reduce
your spreadsheet to fit on a single page. If your spreadsheet is too
large, it may be reduced so much that you cannot read it.
Continuous Printing. Use this option ff you want your spreadsheet
printed as one long continuous page. If you print on single sheets,
you can tape the sheets together.
Center Horizontally. Use this option to center the printed
spreadsheet on the page.
Center Vertically. Use this option to center the printed spreadsheet
on the page•
Print Grid Lines. Select this option if you want grid lines to appear
on your printed spreadsheet. (To get an idea of how the spreadsheet
looks, select Other Settings from the Options menu; then click on
Draw Grid Lines. Grid lines are on by default.)
If you specify aheader or
footer and do not check
these print options, your
printed spreadsheet v_ll not
have headers and footers.
*Print Row & Column Titles. Use this option ff you want the row
and column references to print on each page of your spreadsheet.
*Print Header. Use this option if you want to have headers printed
on the pages of your spreadsheet. You can specify headers using
Header/Footer from the Cell menu.
•Print Footer. Use this option if you want to have footers printed on
the pages of your spreadsheet. You can specify footers using
Header/Footer from the Cell menu.
• Click-on-Apply'
Click on Close.
Printing and Faxing Spreadsheets and Charts
ff you have
specified manual
calculation (see
page 101), select
Calculate Now from
the Options menu
to recalculate your
spreadsheet before
ptfnting it.
A_so,be sure to
saveyour
documentbefore
printing or faxing it.
Before printing for the first time, you must select basic printer settings. See
Setting Printer Options in Getting Started (Book 1).
If you have not sent a fax before, review the Fax and Data Modem chapter in
Book 1.
II_ To print:
1. Press PRINT. A submenu appears.
2. Select Print. Adialog box appears.
3. Fill in the box and click on Print. Your spreadsbeet prints. If you have
created a chart and selected Pn'nt Graphics, the chart prints as part of the
spreadsheet, just as you see it on the screen.
Spreadsheet 120

ffyou want both the
chart and the
Spreadsheet data to
prin_ enter the cells
containingthe chart
and data (insteadof
the cellscontelning
the chart onOt)in the
Print Range box.
•To fax:
1. Press PRINT. A submenu appears.
2. Select Fax. The Fax Document dt2dog box appears.
3. Select your fax options and click on Fax.
•To print a chart:
1. Make a note of the cells that the chart either completely or partially covers
(you will use this note in step 5).
2. Press PRINT. Asubmenu appears.
3. Select Print. Adialog box appears.
4. Select your printing options.
5. In the Print Range box, enter the cell numbers you wrote down in step 1
and click on Print Graphics.
••To fax a chart:
1. Make a note of the cells that the chart either completely or partially covers
(you will use this note in step 4).
2. Press PRINT. Asubmenu appears.
3. Select Fax. The Fax Document dialog box appears.
4. In the Print Range box, enter the cell numbers you wrote down in step 1.
Select from the other fax options and click on Print Graphics.
-Exporting-and ImportingSp eadsheets
Exporting allows you to use a document created with Spreadsheet in another
--- Spreadsheet program, such as Lotus 1-2-3. Importing allows you to use
documents created in another Spreadsheet program. You can export to or
import from Lotus 1-2-3, Comma Separated Values (CSV), or dBase IV. These
formats are recognized by many programs.
When exporting to CSV or dBase IV, you can change or map the order of
information that will appear in the exported document. For example, when
exporting a document that contains names and addresses in which last names
are shown first, you can change that order and show last names second in
the exported document.
•To export a spreadsheet: .
1. Create and save the Spreadsheet document.
2. Select Other from the File menu.
3. Select Export Document from the Other submenu. A dialog box appears.
4. Select the program for export.
Spreadsheet 121

For more information
aboutDOS file
names, see Naming a
DOS File in Getting
Staaed(Book1).
Whenyou export in
CSV or dBase IV
format,Spreadsheet
creates fieldnames
(Field1, FTeld2,
Field& etc.), which
correspondto the
spreadsheet
columns.Mapping
allowsyou to change
the order of those
fields.
5. Select the folder where you want to save the exported f'tle; then enter a
name for the exported tile. The correct extension already appears in this
box, so you do not need to enter it. Be sure to enter a standard DOS file
name no more than eight characters long.
6. Click on Export. Spreadsheet creaes and saves the e_oorted f!le to diskette.
l_ To change the order of columns when exporting:
1. Create and save the spreadsheet.
2. Select Other from the File menu.
3. Select Export Document from the Other submenu. A dia/og box appears.
4. Select the Comma Separated Value or dBase IV format.
5. Select the folder where you want to save the exported tile; then enter a
name for the exported file. The correct extension already appears in this
box, so you do not need to enter it. Be sure to enter a standard DOS file
name no more than eight characters long.
6. Click on Map Export Fields. Adiak)g box a_ with Column A, Column
B, and so on listed in the Source List box; the columns that appear here
corr_xrnd to the occupied columns in the _eet. The Destination
List consists of field names (Field 1, Field 2, Field 3, etc.) equal to the
number of occupied columns in the spreadsheet.
Hap Export Fields
Source List: Destination List: Map List:
Column B .....
Column C _-
Field I
Fiek.l-2
Field 3
i
7. Click on Field 1 in the Destination List.
8. Click on the column in the Source List that you want to be Field 1 in the
exported document. The selected name will be the field name associated
with Field 1.
9. Click on Map. Tbefie/dpair _in the Map List. (to break the link
between a mapped pair of fields, select the pair in the Map list and then
click on Unmap.) Continue designating pairs until you have specified all
the fields you want to map. If you leave any source field unpaired, that
field will not be exported.
Spreadsheet 122

10. Click on Done. The dialog box disappeam. 1"beExport Document dialog
box remains.
11. Click on Export.
12. Name the document and press ENTER. After a few seconds, the
information mcpom.
!
IfyouareknportJnga
documentanddonot
knowtheprogramit
wascreatedin,select
NoIdea,and
Spreadsheet will
analyzethe document
to sea if it can be
imported.
ff the #sts in the dialog box
am emp_, make sure-you
selected a file in step 4.
l_ To import a Spreadsheet document from Lotus 1-2-3 or
Comma Separated Value forrnat:
1. Select New/Open from the File menu. 1"beNew/Open dialog box appears.
2. Insert the diskette that contains the file to import and click on Import. A
dialog box appears.
3. From the left column, select the file you want to import.
4. From the right column, select the file format of the file you are importing
and click on Import. Tim file format appears as an extension in the File
Maskbox.
5. In the File Mask box, enter a name for the file; then click on Import.
l)_To change the order of columns when importing:
1. Select New/Open from the File menu. The New/Open dialog box appears.
2. Insert the diskette that contains the file to import and click on Import. A
dialog box appears.
3. From the left column, select the file you want to import.
4. From the right column, select the format (Comma Separated Format or
dBase IV). . _ _-
5. Clicff-ori Map.Imp6_ Fieldsl Tbe Map Import fields dialog box appea_.
In this dialog box, tbe Source List shows tbe field names of the incoming
file. The Destination List shows the names of the fields (Column1,
Column2, Column3, and so forth).
6. Click on Field 1 in the Source List.
7. Click on the column you want for Field 1 in the Destination List.
8. Click on Map. Tbe field pair appears in the Map List. (You can select a field
pair in the Map List and click on Unmap to break the link between
mapped pairs.)
9. Continue designating pairs until you have specified all the fields you want
to map. If you leave any source field unpaired, it will not be imported
from the database.
10. Click on Import. The inf_ from the imIxrrt file appears in a
Spreadsheet window.
11. Click on Done.
Spreadsheet 123

Spreadsheet Error Codes
The following describes the error codes in Spreadsheet. These appear inside a
cell when an error occurs.
Error Codes
#OVRFLW#
###
#TYPE#
#VALUE#
#COUNT#
#ClRC#
Explanation
Formula has a division by zero or division by an empty
cell. Correct formula entries.
Cell too narrow to accommodate entry or formula
results. Refer to page 82 in this chapter.
One or more of the cells referenced in a formula
contain an alphanumeric entry. Rewrite the formula to
include only cell addresses containing numbers.
Formula is incorrect. Verify format of formula to ensure
proper data is given. Example: =DATE(96,08,23)
Incorrect formula entered. Verify correct format is
entered. Example: =IF(B2>20,40,20,10)
Formula contains a circular reference and iteration is
not selected. Refer to page 101 in this chapter.
Spreadsheet 124

3Drawing
Before starting, review Drawing allows you to cream many types of designs, pictures, and
these basic procedures illustrations. After you create a.drawing, you can copy it into a Word
from the Getting Started Processing or Spreadsheet document. You can also import and export
chapter in Book 1: Drawing files.
• Workingwith Documents
•SavingDocuments
•Workingwith Menus
•WorkingwithDialog Boxes
Starting Drawing
•To open Drawing:
Click on the Drawing icon from the Main Menu. The New/Otx'n dialog box
appears. Select New. A new document appears:
Drawing tool bar
/[] _ I_I_,IOJAI\IOIOIO!_I
Print, Open, Close, and " ' " ''''=....... " ' " " ' " _
Save buttons _The area outside the dotted lines will not print.
Attributes tool bar -_
(see page 136)
To select (or click on)
an item, place the
on-screen pointer on
the item; then click on
the Select button or
tap once on the
glidepad.
Undo,Cut, Copy,Paste,SelectAll, andDelete
[]
Theareawithinthe marginswill prinL
0rmsa_ -th,.t,-4
Bitmap
tool bar
saectbutton_tt
buttononamouse)
Drag button (right
buttononamouse)
Drawing 125

Opening a Document
Forinformationon
templates, see Using
Templatesin Getting
Started (Book 1).
•To open an existing drawing document:
1. Click on Drawing from the Main Menu. 1"beNew/Open dialog box appears.
2. Click on Open: Open an existing document. The Open dt2dog box appears.
3. Select the document and click on Open. Drawing opens your jWe.
Using the Tools
Forinforma_on on the
AtMbutes toolbar, see
page 136.
Selecting a tool from a tool bar is like picking up a pencil or pen. Select a
drawing tool by clicking on it. When you move the on-screen pointer into the
drawing area, the pointer changes to indicate the type of tool you are using.
The Drawing tool bar is also available in Word Processing and Spreadsheet,
where it appears on the left of the document window.
Drawing Tools
Pointer tool Selects, moves, and re.sizes objects. The arrow
pointer is automatically selected when you start Drawing.
Rotate tool. Allows you to rotate objects.
Zoom-tool. Enlarges your work area so that you can see more
detail.
Text tool. Adds text to your drawing. You have complete control
over the font, style, and size of the text in your drawing. Text
objects are discussed later in this chapter.
@
Drawing 126
Line tool. Draws straight lines. You can change the tone and the
thickness of the line.
Rectangle tools. Creates rectangles and squares with
perpendicular or curved comers.
Ellipse tool. Draws ellipses and circles.
Arc tool. Creates an angle and a curved arc.
Undo tool. Undoes your latest change.

Bitmap Tools
Cut tooL Cuts a selected object from your drawing.
Copy tool. Copies an object to the clipboard.
Paste tool. Pastes the contents of the clipboard at the insertion
point.
Select All tool. Selects all graphics and text in a documenL Black
handles appear around all items.
Delete tool. Removes selected graphics or text.
Frame tool. Creates a frame into which you can place bitmap
drawings.
Selection tool. Selects all or part of an object to copy, cut, or
paste. .-
Brush tool. Allows you to draw lines.
Eraser tooL Removes lines and drawings.
_] Bitmap Line tool. Draws a straight line in a bitmap. A bitmap
uses tiny dots to form an object.
@
Bitmap Rectangle tool. Draws a bitmap rectangle.
Bitmap Ellipse tool. Draws an bitmap ellipse.
Fill tool. Fills an area with a tone.
@Pixd View tool. Allows you to view individual pixels. You can
use the other bitmap tools above. For example, to change the
tone of individual pixels, select a line tone, the brush tool, and
click on pixels you want to change.
Drawing 127

Pointers
Select adrawing tool by clicking on it in the tool bar. When you move the
on-screen pointer into the drawing area, it changes shape. This shape
depends on the tool you are using and the location of the pointer.
÷
I¢
+
I
Q
Pointer. If you are using the pointer tool, it remains active until
you select an item in the drawing area. The pointer will change to
crossed arrows when you move or size a selected object.
Vertical/horizontal crossed arrows. This pointer appears when
you move an object in the drawing area.
Diagonal crossed arrows. This pointer is used to size objects.
Crosslmirs. If you select the Line, Rectangle, or Ellipse drawing
tool, the pointer changes to crosshairs when you move it over the
drawing area. The center of the crosshairs shows where the shape
will begin as you draw.
Crossed I-beams. If you select the Text tool, and move the
pointer into the drawing area, the pointer changes to crossed
I-beams. (If you move the pointer over a text object, the pointer
becomes a regular I-beam pointer.) The intersection of the
I,beams shows where text will begin ff you click in the drawing
area and then type.
l-beara. The crossed I-beam changes to a single I-beam inside of
__a.text box_wherL,text is-select6d
Rotate.- This pointer shows that you are rotating an object.
Zoom. With this pointer you can click on the screen and zoom in
on your artwork.
Drawing 128

Creating and Editing Simple Objects
With Drawing, you can create objects from shapes or lines. Once created, you
can select, edit, and manipulate individual objects. You can also change the
(tone or pattern) or the _ (outline).
Drawing offers two ways to create objects: with the drawing tools or from the
Create submenu in the Edit menu (see page 134 on using the Create
submenu).
l_ To draw a rectangle or ellipse with the drawing tools:
1. Move the on-screen pointer to the tool bar and dick either the rectangle
or ellipse. These tools function similarly. The tool button is selected.
2. Move the on-screen pointer to the drawing area. Tbe pointer changes to
crossbairs.
3. Move the crosshairs to where you want your shape to start. (You do not
have to move it exactly to the right place now; you can rearrange it later.)
4. Hold down the Select button, and drag diagonally until the shape is the
size you want, as indicated by the outlines that appear in the drawing
area.
5. Release the Select button. The object appears as a solid shape.
After you create an object, resize handles appear around the outside, and a
move handle appears in the center. Use these handles to move and resize the
object. Handles also indicate that an object is selected. _
I_ To move or resize a rectangle or ellipse:
1. Click on the rectangle or ellipse to select it.
2. Place the on-screen pointer over one of the resize handles, hold down the
Select button, and drag. The object changes size.
OR
.
Place the on-screen pointer over the move handle, hold down the Drag
button, and drag the object to a new location. The object moves.
Click somewhere else in the drawing area that is not occupied by an
object to remove the handles from the object.
l_ To create a perfect square or circle:
Hold down SHIFT while drawing either a rectangle or an ellipse. The object
will maintain a perfect shape no matter what size you draw it.
Drawing 129

ll_To create an unfilled object:
Pressing CTRL as you
draw creates an unfilled
object when the defaultis
set to filled,and it creates
a filled object when the
defaultis set to unfilled.
Tochange the default,
selectArea Attributes
fromthe Attributes menu,
clickon Filled or Unfilled,
and clickon Apply.
Press CTRL while you hold the Select button and drag to create a shape.
When you release the Select button, the unfilled object appears:
Unfilledobject
II
Filledobject
Hold down SHIFT while
drawing aline to make it
exact/horizontal,
vertical, or 45 degrees.
II_To draw a line:
1. Select the Line tool from the Drawing tool bar. Thepointer changes to
crossbairs when you move it into the drawing area.
2. Move the crosshairs to where you want to start your line. (You do not
have to move it exacdy to the right place now; you can change it later.)
3. Press the Select button, and while holding it down, drag until the line is as
long and in the direction you want.
Release-the SelecL b_it_,,A straight line appears, with a handle at ea.rb
end and a mode handle in the center:
-" _4.
°
To change the size of a line:
1. Select the line.
2. Select the pointer tool from the Drawing tool bar and click on one end of
the line.
3. Hold the Select button and drag toward the center to make the line
smaller, or away from the center to make it longer,
I_ To move a line:
1. Select the line.
2. Select the pointer tool and dick on the middle handle of the line. The
pointer changes to crossed arrows.
Drawing 130

3. Hold the Drag button and drag the line to a new location.
I_ To add an arrowhead at the end of a line:
Press CTRL while drawing a line. An arrowhead appears at tbepoint where
you ended the line.
OR
1. Select Line Attributes from the Attributes menu. The Line Attributes dialog
box appears.
2. Click on the Arrowhead style.
3. Click on the Arrowhead at End check box and click on Close. An
arrowhead appears at the poim wbere you ended the line.
Selecting Objects
You can select objects by clicking on them with any of the drawing tools.
When you select an object, handles appear around it.
Toselect an unfilled
objec_ you must click
on alineor curve on
theobjecL
To select or deselect an object:
Using one of the drawing tools, click on the object you want to select.
Handles tippeaar around the object.
OR
TO des_I_cL click'-ln-'any-"_art of the drawing area where there is no object.
Handles in the dra_ng d_apl_a_.
_--il_ To select several objects:
Selectingseveral I." Click on the pointer tool.
objects is useful when
you want to move or
change the tone of
several objects that are
next to each other.
2. Move the pointer above and to one side of the objects you want to select.
Hold down the Select button and drag across the area you want to select.
As you move the pointeg, a box with a dotted outline appears.
3. Continue to drag and stretch this box over the objects you want to select;
then release the Select button. As you enclose objects, their bandles appear
_To select several objects that are not next to each other:
. Todeselectindvidual 1. Using any of the drawing tools, place the on-screen pointer on the first
objects in the group, hold object you want to select. Hold down CTRL and click the Select button.
down CIRL and click on Handles appear around the object.
them a_n. 2. Continue to hold down CTR1 while clicking on each of the other objects
you want to select, one by one. Handles appear around each object.
Drawing 131

To select all but a
couple of objectsin
your drav#ng,choose
Select All from the Edit
menu, then press
CTRL, and clickon
only those objectsyou
want to deselect.
•To select all objects:
PressCTRL + I. Hand/esappeararound a!/the objects.
Resizing Objects
You can enlarge and reduce objects by dragging the resize handles.
Dragging toward the
center of the object
reduces Rwhile
draggingaway from the
center enlarges it.As
you drag, an outline
shows the changing size
of the object.
•To change the size of an object:
1. Select the object you want to resize. Resize handles appear around the
object.
2. Hold the Select button and drag one of the resize handles (but not the
move handle in the center of the object).
• To resize the object around its center point, hold down the Ckey or
the comma [,] key while dragging.
Toresize an object to
scale (instead of
stretchingit), see page
141.
• To proportionally resize an object, hold down SHIFT while you drag
one of the comer handles.
3.
•To proportionally size around the center point, hold down both the
Ckey and SHl_hi!e you drag-a comer handle ....
When the obje_ is the size you want, release the Select button.
Deleting Objects
•To delete objects:
For information on 1. Select the object(s) you want to delete. Handles appear around the
duplicatingan object, see object(s).
page 144. 2. Press DELETE.
OR
Press BACKSPACE. The object disappears.
Drawing 132

Changing the On-screen View
You may find it easier to draw by adjusting the on-screen view. For example,
you can enlarge the view of an object (zoom in) to focus on free details. You
can also hide scroll bars or redraw the screen to clean it up.
!_ To zoom in on an object:
1. Select the Zoom tool from the tool bar. The pointer changes to a
magnifying glass when you move it onto the drawing area.
2. Place the Zoom pointer on the area you want to examine, and then click.
You can click several times to move closer.
l_ To zoom out:
Hold down SHIFT and click with the Zoom tool to zoom ouL
_To zoom by percentage:
I ] _ _t ] 1. Select View % from the View menu. A dialog box appears.
(_}. [T_']I_'] [ 2. Set the Scale % you want. To reduce a drawing, use a percentage from 12
_ I_]] to 99. TO enlarge a drawing, use a percentage from 101 to 400.
I_ To return to normal size:
In the View menu, click on Normal Size. The drawing is shown at 100% scale.
Ip To show the-.ntire drawing in the window:
---" In the View menu, click on Scale to Fit. The drawing fits into the window.
I!_To show or hide scroll bars:
In the View menu, click on Show Horizontal Scroll Bar or Show Vertical Scroll
Bar to bring up the scroll bars in the window. To turn off the scroll bars, click
on the check box.
Redrawis especially
useful if you have _1_ To clean up your drawing:
created and deleted a
number of objects.
Sometimes pieces of
deleted objects
remain in the dra_dng
area when you have
performed several
operations.
Select Redraw from the View menu. All objects are redraum to replace missing
fragments and erase leftover bits of deleted objects.
Drawing 133

Advanced Work with Objects
In Drawing, you can change the appearance of objects in many ways. You
can:
• draw lines, arcs, and complex objects with the Create submenu; and
• set attributes to change the appearance of each object.
•I
Drawmg Objects, Arcs, and Straight Lines
To create simple shapes like triangles or more complex shapes like polygons
with up to 100 sides, use Create from the Edit menu. The following
illustration shows some examples of objects, polygons, and stars:
og,
!_ To draw simple objects, arcs, and lines with the Create
submenu: .
1. Select Create from the Edit menu.
2. Click on the name of the object you would like to create. The object
appears on the screen.
3. With the object still selected, you can select attributes such as tone (see
page 136) or scale it with the Transform. menu. Scaling allows you to
resize the object proportionally, without stretclaing it in one direction.
Drawing 134

•To create a polygon:
1. Select Create from the Edit menu.
2. Select Polygons from the Create submenu. A dialog box appears:
-I
IPOItJIgOn_l_st:flg_.IlOept IIIP_II_I IlOOpt I[l_'_
The radii for a polygon
represent the
horizontaland vertical
radii of an ellipse in
which the polygoncan
be inscribed.
.
.
5.
Fill in the dialog box:
•Number of Polygon Sides. The defauk is 5 sides.
•Polygon Radius. Select the polygon's horizontal radius and vertical
radius. The default is 100 (about 1.4 inches); the minimum size is 1
point (1/72 of an inch), and the maximum size is 576 points (8
inches).
Click on Create Polygon. Drawing places the polygon in the drawing area.
Click on Close.
•To create a star:
1.
2.
Select Create from the Edit mentt
Select Stars from the Create submenu. A dialog box appears:
I struts
_uterl_dius= ItOOpt ill_l_ IlOOpt ][f_'_l
Znmrhd_s, I_pt ilq_l_ i_Pt I11_1
lcr.t, s,arI m
The outerradiusis 3.
measured frompoint to
poinL The inner radiusis the
centersection of the star.
Remember that radiusis the
distance fromthe center to
the edge.
Fill in the dialog box.
•Number of Star Points. Select the number of points you want your
star to have. The default is 5 points; the maximum number is 100.
Outer Radius. The outer radii of the star represent the radii of an
ellipse that touches each of the star's points. The star's horizontal
radius (left box) and vertical radius (right box) are measured in point
increments. The default is 500 (about 1.4 inches); the minimum size is
5 point (5/72 of an inch); and the maximum size is 288 points (4
inches).
Drawing 135

.
5.
• Inner Radius. The inner radii of the star represent the radii of an
ellipse that touches each of the star's inverted angles. The left box
specifies the horizontal measure, and the right box specifies the
vertical measure, in point increments. The default is 40 points (about
0.56 inches); the minimum size is 1 point (about 1/72 of an inch);
and the maximum size is 288 points (4 inches).
Click on Create Star. Drawingplaces the star in the drawing area.
Click on Close.
Setting Attributes
This section describes how to set the attributes for a graphic object, such as a
line, rectangle, rounded rectangle, ellipse, arc, or star.
Area attributes are qualities such as the fill tone, shading, flu
pattern, and drawing mode.
Line attributes are qualities such as the tone, line pattern, thickness,
style, and arrowheads.
Text attributes control items such as the font, size, tone, line
spacing, paragraph spacing, indents, tabs, and borders.
Background tone used with area attributes can be used to create
custom tones.
Tone and patterns can add emphasis and appeal to a graphic object. You can
-define tonesand pattem_'fOr_an object's area attributes (the fill area in¢ide
an object) and its/_e attributes (the border of an object, or a line object).
.
Using the Attributes tool bar -
The Attributes tool bar is along the left-hand side of your window.
Ill'-"
,--,
m
IN,.--t I
=__N=!
i
i
IIT=I
Area Fill tool
Area Shading tool
Area Pattern tool
Line Tone tool
Line Shading tool
Line Width tool
Text Tone tool
Text Shading tool
Drawing 136

Use these tools to change the attributes of selected objects. If no object is
selected, use the tools to set the attributes of future objects you draw.
Setting area attributes
Area attributes apply to the area inside ellipses, rectangles, rounded
rectangles, and arcs. You can set any of the following area aRributes:
• Fill tone
• Tone shading
• Pattern
You can set all of these attributes using Area Attributes from the Attribute_
menu or using the tools on the Attribute tool bar.
Shading is like a screen. It
can be very light (10-20%)
and allow the background
color to show through, or
very dense, (80-90%) and
allow very little of the _. - -
background to show
through.
!_ To set area attributes for a graphic object:
1. Select one or more graphic objects you want to change.
2. Select Area Attributes from the Attributes menu. A dialog box appears.
3. Fill in the dialog box:
•Filled or Unfilled. Select Filled to fill the enclosed area of the
graphic object and to set other options in this dialog box. By default,
area is unfilled.
• % Shaded. Select the percent shading for the fill tone. The lower the
number, the more transparent the tone. By default, this setting is 100.
o-If-Unfilled isls_eted, tiffs attrilaute is set to zero (0). "
• Tone Tools. Select the area fill tone from the tone palette.
•Pattern. Select the fill pattern. By default, this setting is solid.
4. Click on Apply. Continue to make changes as desired.
5. Click on Close.
Changing the tone of objects
and their background
I_ To change the tone of an object with the Area Fill tool'.
1. Select one or more graphic objects to Fill.
2. Click on the Area Fill tool. A bon'zontalpop-up menu appears.
3. Select the tone you want. Drawing applies the tone.
Drawing 137

•To shade an object:
1. Select one or more graphic objects to shade.
2. Click on the Area Shading tool. A horizontalpop-up menu appears. The
option fim'tbest to the lej_ is 100% shading while the option farthest to the
night is 0%, the same as an unfilled object.
3. Select the shading you want. ,Drawing applies the area shading.
•To fill an object with a pattern:
1. Select one or more graphic objects to fill with a pattern,
2. Click on the Area Pattern tool. A hon'zomalpop-up menu appears.
3. Select the pattern you want. Drawing applies the area pattern.
•To change an object's tone or pattern using the Attributes
menu:
1. Select the object(s). Handles appear around the object(s).
2. Select Area Attributes from the Attributes menu. Adiedog box appears.
3. Select the tone or pattern, from the palette in the dialog box.
4. Click on Apply.
5. Click on Close.
Use background tone •TO use a background tone:
when youwant to use
tone under your pattern
or shaded tone. It will
show through. -_'_-
r--- 5.
1. Click on the objea. Handles appear around tbegrapbic.
2. Select Background Tone from the Attributes menu. A dialog box appears.
- 3. Select-the toneorthe background.
4. Click on Draw Background.
Click on Apply. The background cbamges tone and will show underneath
the area attn'bute shade or pattern.
Drawing 138

Changing arc attributes
To create an arc, use the An arc is a portion of a circle (ellipse). Since afull ellipse is 360 degrees
am tool from the Dra_ng around, a 90 degree arc is exactly one quarter of an ellipse; a 180 degree arc
too/bat, is half of an ellipse.
All angles are measured
fromb_isGpodilion:[_
You can set the precise size (in degrees) of the starting angle and ending
angle of any arc. You can also.specify whether you would like your arc's end
points connected by radii or by a chord. The following illustration shows
angle conventions used in Drawing and what radii and chord connected arcs
look like.
Connectedby radii Connectedby chord
I
r_-I [-_-i r',rl
I b
mch!rd
•To change arc attributes:
1. Select one or more arcs to change.
2. Select Arcs from the Atuibutes menu. The dialog box on the left appaccrs.
3. Fill in the dialog box, changing the options you want:
* Starting Angle. Select the starfin" g angle. You can specify from zero
- -(0) to 360-degi:e_induSive. '+
• Endimtg_mgle. Select the ending angle. You can specify from zero
(0) to 360 degrees, inclusive.
_. • End Points Cotanccted. Select whether you want the end points
connected by a chord or two radii.
4. Click on Apply.
5. Click on Close.
Modifying a line
You can use the tools on the Attributes tool bar to set or change the line
tone, shading, and thickness of a line or border of a graphic object, or you
can use the Line Attributes dialog box.
•To add Tone to a line:
1. Select one or more lines or graphic objects.
2. Click on the Line Tone tool. A horizontalpop-up menu appears.
3. Select the tone you wanL Drawing applies the line tone.
Drawing 139

[I\=J
To quicldy set line
affributes, use the
tools from the
Attributes tool bar. But
the Line Attributes
dialog box offers a
few more options,
such as selecting a
custom thickness.
To shade a line:
1. Select one or more lines or graphic objects.
2. Click on the Line Shading tool. A borizonta/pop-up menu appe¢_. The
option farthest to the left is 100% sbading_ while the option farthest to the
right is 0%.
3. Select the shading you want. Drawing applies the line shading.
To change line width:
1. Select one or more lines or graphic objects,
2. Click on the Line Width tool. Abon'zontalpop-up menu appears.
3. Select the width you want. Drawing applies the line width.
)_To modify a line using the Line Attributes dialog box:
1. Select one or more lines to change.
2. Select Line Attributes from the Attributes menu. A dialog box appears.
3. Fill in the dialog box:
•Filled or Unfilled. Select Filled to fill the line or border of the
graphic object (which makes it visible). Select Unfilled if you want
the line or border to be invisible. By default, the line is Filled.
• % Shaded. Select the percent shading for the line tone. The lower
the number, the mote transparent the tone. By default, this setting is
100. A zero (0) setting is the same as an unfilled line or border.
Tone Tools. Select the line tonefrom the tone palette.
Width. S_lect the thickness of the border line using a set of standard
widths. By default, this setting is one point. You can also fine tune
the width by selecting a custom thickness; a setting of zero (0) is the
same as a haidine width, which makes it the thinnest line that can
appear on your display or that your printer can print.
•Style. Select the style of the border line. By default, this setting is a
solid line.
.
5.
• Arrowhead. You can add arrowheads to your lines. By default, no
arrowhead style is selected. You can alsoselect an arrowhead
location (at the start or the end of the line).
Click on Apply.
Click on Close.
Drawing 140

Transforming Objects
You can transform an object to give it special visual effects such as flipping,
scaling, rotating, and skewing (slanting). You can also undo any
transformation.
Flipping Objects
Youcan also use
keyboard shortcuts
to flipobjectswhen
the Transformmenu
is pulled down.
Press L (as in
Left-to-right)to flip
the selected object
left-to-right.Press T
(as in Top-to-bottom)
to flip /t
top-to-bottom.
Use the Transform menu to flip objects left-to-right or top-to-bottom. This is
useful for creating interesting effects with text objects and for building
complex designs out of component objects. The following illustration shows
an object that has been flipped:
Rippedleftto fight
Rippedtoptobottom
Scaling an object
changes its size
pmpoaionally. Using
the Scale submenu,
you can make
objects larger by
entering a value
greater than 100°/o,
or make them
smaller by entering a
lower value than
100%.
m
Youcan scale ver_cal 4.
and horizontaldimensions
independentlyortogether. 5.
Youcan use scaling to
elongate or shortena text
o-bjecL
.... • To flip an object:._ _ _.
1. Select the object(s) to flip. Handles appear around the object(s).
2. From the Transform menu, select Flip. A submenu appears..
3. Select Flip Left to Right or Flip Top to Bottom. The objects flip in the
direction you select.
•To scale objects:
1. Select the object.
2. Select Scale from the Transform menu.
3. To scale objects precisel_ horizontally and vertically, use the Scale
submenu. Click on the up and down arrows until the percentage of
increase or decrease shows in the value box, or enter in a value up to
1000 percent.
Click on Scale. Drawing redraws selected objects using the custom scale
settings specified.
Click on Close.
Drawing 141

Rotating Objects
To rotate an object, use the Rotate tool or select Rotate from the Transform
menu, where you can select the exact degree of rotation.
The selected object rotates around its center point You can also select
multiple objects, and they will rotate around their respective center points. If
you want multiple objects to rotate around a common center point, you must
fhst group them (see page 148).
)_ To rotate an object with the Rotate tool:
To rotate the selected
object in 45 °increments,
hold the SHIFT key
down while dragging the
object.
You can also use
keyboard shortcutsto
rotate objects. Torotate
the selected object
counter-clockwise15°,
press[. Torotate it
counter-clockwise1°
press SHIFT+ [.
1. Select the object you want to rotate. Handles appear around the object.
2. Select the Rotate tool on the Drawing tool bar. Thepointer changes to a
cunmd arrow when you move it over the drawing area.
3. Place the tip of the arrow on one of the handles surrounding the selected
object. The pointer changes to crossed arrows.
4. Grab the handle by clicking and holding down the Select button. The
handles disappear.
5. While holding down the Select button, drag clockwise or
counter-clockwise until the object is in the position you want. A dotted
outline shows the position of the object as you rotate it.
6. Release the Select button. The o_ect appears in its new position with
handles around it.
-_--]):Torotate an object/'-i__th the menu:
7o rotateit clockwise .....
150,press ]. To rotate it 1. Select the objeh(s) you want to rotate.
clockvdse 1°,press _ 2. Select Rotate from the Transform menu.
SHIFT+ ]. -3. Enter the amount of rotation you want from -359 ° to +359 °.
4. Click on Rotate. The selected object rotates around its cent_point. If you
selected multiple objects, Drawing mates each around its center point.
Drawing 142

Skewing Objects
You can skew an object to make it slant horizontally or vertically at a precise
angle.
] Skew
14- nn
j -Tm
1.
2.
3.
.
Select one or more objects that you want to skew.
Select Skew from the Transform menu. The dialog box at the left appears.
Select the skew angle you want. Drawing skews selected objects using the
skew angle you chose.
•Horizontal. A positive value skews the object to the left, and a
negative value skews it to the right. You can set skew angles from
-89 to 89 degrees.
•Vertical A positive value skews the object upwards, and a negative
value skews it downwards. You can set skew angles from -89 to 89
degrees.
Click on Skew. Drawing redraws the selected objects as specified. You can
continue to click on Skew to apply the skewing repeatedly until you
achieve the result you want.
5. Click on Close.
Untransforming Objects
You can remove any skewing, scaling, or rotations you have made to an
object, reverting to the original drawing. You might want to do this, for
example_if you we_, cxp¢rimenting With different transformations and
wanted to reverse everything you have done.
Untransforming removes all transformations you have applied to an object. To
undo one transformation, select Undo from the Edit menu or transform the
object in reverse.
I!_To untransform an object:
1. Select one or more objects that you want to untransform.
2. Select Untransform from the Transform menu. Drawing redraws selected
objects removing all transformations.
Duplicating Objects
It is often useful to duplicate an object instead of recreating it. You can also
perform custom duplications that will rotate, move, scale, or skew the
duplicate.
Drawing 143

Shortcut: Press D to
duplicate the selected
object(s); press Pto
duplicate the selected
object(s) in place.
I_ To duplicate an object:
1. Select the object you want to duplicate. Handles appear around the object.
2. Select Duplicate from the Edit menu. The copo_d object appears with
bandies around it. You can use the move bandle on the duplicate to move
tbe object.
)_To custom duplicate an object:
1. Select one or more objects that you want to custom duplicate.
2. Select Duplicate from the Edit menu. A d_/og box appeam:
I_te
_PIm_
,.mr.,,_,_,t_:IT-'-II_ r_ lop, i_-3
_Rtd'_
rr --7 El]
-3.
.
5.
Fill in-the dialog box-?
• # of Duplicates. Select the number of duplicates.
*Rotate. Select the number of degrees to incrementally rotate each
duplicate.
•Scale. Select the scale percentage to incrementally resize each
duplicate.
•Move. Select the vertical and horizontal distance to incrementally
move each duplicate.
• Skew. Select the number of left/right and upward/downward degrees
to skew each duplicate.
Click on Duplicate. Drawing duplicates the selected objects using the
options you specified.
Click on Close.
Drawing 144

Converting to a Graphic
Youcan also group
graphicobjectsand
transformthem.
Converting to aGraphic is helpful when you want to manipulate text or a
graphic to create special visual effects. For example, you could convert a text
object with numbers to a graphic; then resize and skew the text, as shown in
the following illustration:
You can also use this feature to save any transformations (skewing, rotating,
scaling, and so on) for a single object. That way, you can protect against
losing these transformations should you later untransform the object. For
more information, see Untransforming Objects on page 143.
DItTo convert object sto a graphic object:
- 1. -Sele-d-0ne ....... .--w--
or more oblects to convert.
27 Select Convert from the Transform menu. A submenu appears.
3. Select Convert to Graphic. Drawing converts selected o_ects to a single
object.
Converting from a
graphic breaks a single
graphic object down to
its component parts so
that you can edit them
indvidual_.
!_ To convert from a graphic:
1. Select one or more graphic objects to convert from a graphic.
2. Select Convert from the Transform menu. A submenu appears.
3. Select Convert From Graphic. Drawing converts the selected graphic to its
component objects.
Drawing 145

Arranging Objects
The Arrange menu provides several ways of controlling placement of objects
in your drawing.
Moving objects to the Front or Back
Whenever two or more objects ovedap, you can place one of the objects
, behind the others or you can place it in front.
I_ To move an object to the front or back:
1.
Moving an objectone 2.
layer is useful when
you cannot see objects
in the layers of a stack _b. To
of objects.Select an
object that is visible 1.
and move it back one 2.
layer at aO'metosee
the objectthat is
immediatelybehind it
Select the object you want to move to the front or back.
Select either Bring to Front or Send to Back from the Arrange menu. The
objects are rearranged accordingly.
pull an object forward or push it back one layer:
Select the object you want to pull forward or push back.
Select either Pull Forward or Push Back from the Arrange menu. The object
is moved accordingly.
Moving Objects.
Objects that you place
outside the print
border (the dotted line
near the perimeter of
the drawing area) will
not appear when you
print.
When you create objects, you can move them around your drawing as you
--like., This section describes how to move objects in a drawing.
To help you gauge the position of your objects relative to the total drawing
area, use the rulers along the top and left side of the drawing.
You can also move objects vertically and horizontally using exact distances.
I_ To move an object:
1. Select the object to move. Handles appear around the object.
2. Move the pointer over the diamond shaped move handle in the center of
the object. When the pointer changes to a pair of crossed arrows, hold
down the Select button to grab the object.
3. Drag the object to the position you want. Asyou drag, an outline of tbe
object follows your motion, indicating where the object will be placed when
you release the Select button.
4. Release the Select button. The object appears in its new position.
Drawing 146

Movingone object
moves all the selected
objects.As you drag, an
outlineof the objects
followsyour motion,
indcating where the
object willbe placed
whenyou release the
Drag button.
!_ To move several objects:
1. Select the Pointer tool from the Drawing tool bar.
2. Place the on-screen arrow near the objects, hold the Select button, and
drag across the screen to make a box around the objects. Handles appear
around the obj_ts.
3. Move the on-screen pointer over the move handle for one of the objects,
hold down the Drag button, and drag the on-screen pointer. A/! se/ected
objects mow.
4. Move the on-screen pointer where you want the objects to be placed.
5. Release the Select button. The o_'ects appear in the new location.
_To custom move objects:
1. Select one or more objects to move.
2. Select Move from the Arrange menu. A submenu appears.
3. Select Custom Move from the submenu. A dia/og box appears:
.
.
6.
]Custtmn
0Centimeters
_lO pt ]OPoints
OP_Os
Fin -n-the -
•Horizontal. Select the horizontal distance you want to move. A
negative number moves selected objects to the left, while a positive
number moves selected objects to the right.
• Vertical. Select the vertical distance you want to move. A negative
number moves selected objects upward, while a positive number
moves selected objects downward.
• Units. Select the measurement units you want to use (Inches,
Centimeters, Points, or Picas).
Click on Move.
Click on Close.
Drawing 147

Nudge means to
move a small
amount. To nudge
object(s) using the
keyboard, press
and hold SHIFT
while pressing an
arrow key that
points the direction
you want to move.
To nudge objects:
1. Select the object or objects.
2. Select Move from the Arrange menu. A submenu appears.
3. Select Nudge Left, Nudge Right, Nudge Up, or Nudge Down. The object
moves one pixel in the direction you select.
Grouping and Ungrouping Objects
Grouping objects allows you to work with them as if they were a single
object. For example, after grouping three rectangles, you could do any of the
following:
•Change the fill tone for all three rectangles all at once.
• Rotate them around a common center.
A group can contain
any object,induo_ng
another group.
• Move them as a group without changing their positions relative to
one another.
• Resize them as'a group while maintaining their relative scale.
.After you have made changes to a group, you can ungroup it to make each
component a separate object again.
I_ To group objects:
1. Select the graphic objects to group. A set of bandies appears around each
object.
2. Select Group from the Arrange menu. A single set of bandies appears
around the group.
I_ To ungroup objects:
1. Select the group you want to ungroup.
2. Select Ungroup from the Arrange menu. Handles appear around the
individual objects.
Drawing 148

Pasting Inside
When you paste an object inside another object, Drawing combines them into
a single object that you can manipulate as you would any other Drawing
object.
The boundaries of the outside object become the boundaries of the inside
object. Once you have pasted an object inside another, you can free tune the
position of the inside object by moving it one pixel at a time.
You can also break the object into its component objects using the Break Out
Paste Inside command.
The following example shows how to paste one object inside another.
To paste inside:
ff _e twoobjectsdo not 1. Place the inside object over the outside object. Position the inside object
ovedap, you cannot where you want it in the outside object, as shown in the following
paste inside, example:
Be sure to position the..
interior object as close as
possible to where you
want iL You can fine tune
it later, nudging it one
pixel at a time.
2. Select the inside object.
3. Press CUT. Drawing places the object on the clipboard.
4. Select the outside object.
5. Select Paste Inside from the Edit menu. A submenu appears.
6. Select Paste Inside. Drawing pastes the inside object in the outside object:
Drawing 149

Using Rulers
.-N
Ol_ch_
o_r.enUmeter*
O_eo_ts
Or,k:_
•Shorn iJ_rlzontM iuler_
II _tJertictiIitders
•To nudge inside:
1. Select the object that contains the object or objects you want to nudge
inside,
2. Select Paste Inside from the Edit menu. A submenu appears.
3. Select Nudge Inside. A submenu appears.
4. Select Nudge Left, Right, Up, or Down. Drawing nudges the inside object
one pixel in the direction you select.
•To break out paste reside:
1. Select the object you want to break out.
2. Select Paste Inside from the Edit menu. Asubmenu appears.
3. Select Break Out Paste Inside. Drawing splits the objects into separate
objects.
The ru/ers help you measure vertical or horizontal distances. Rulers help you
position, align, and resize objects. You can show rulers along the left and top
borders of the drawing area.
By default, Drawing shows rulers. You can hide the vertical ruler, the
horizontal ruler, or both to increase drawing space.
•To show or hide rulers__or change ruler units:
._,_
-1, Select Rfilers fro m-the-O]Stions menu"/be submenu at the lej_ appears."
2, Select the ruler you want to show (vertical or horizontal).
OR
De.select the ruler by clicking on its button.
OR
Select the ruler units you want.
Drawing 150

Using Grids
Drawing can position objects using the grids, snapping objects into place for
you automatically. The grid is a pattern of evenly-spaced vertical and
horizontal lines that help you align and size objects in a drawing. You can
also change the spacing of the grid.
You can also automatically snap (or position) objects along grid lines when
you create them. Snapping objects to the grid is often faster and more
accurate than positioning them manually with the on-screen pointer.
•.,IIt .i.12 . , . B .t.14 .,.B.J . m .i . u . ,
l l!li1iIIiill/iN
Drawing can
align objects to
the grid even if
the grid is
hidden.
_l_ To show or hide the grid:
1. Select Grids from the Options menu. A dialog box appears. If Snap to Gn'd
is selected in this dialog box, Drawing aligns o_'ects to the grid.
2. Select Show Grid to show the grid.
OR
Deselect Show Grid to hide the grid.
3. Click on Apply.
4. Click on Close.
I_ To set the grid spacing:
1. Select Grids from the Optiom menu. A dialog box appears.
Whenyou change the
unitsof measure for the
grid,you v_llfindit
helpfulto change the
unitson the ruler also.
See page 150.
2. Select the units of measure (Inches, Centimeters, Points, or Picas) ff you
want. By default, the units of measure are the same as the ruler se_'ng.
3. Select the distance between grid lines.
4. Click on Apply.
5. Click on Close.
Drawing 151

PressX orperiod (.)
to turngrid snapping
on or off onlyfor the
next create, move, or
resize operation.
l_ To snap objects to the grid:
1. Select Grids from the Options menu. A dialog box appears.
2. Select Snap to Grids.
3. Click on Apply. While Snap to Gn'ds is selected, Drawing will snap corners
to grids when you draw, move, or resize an o_'ect.
4. Click on Close.
I
Using Text in Drawings
In Drawing, create text objects for entering text. Each text object can contain
as little or as much text as you like.
You can move, delete, and resize text objects just as you would any other
object (a line, rectangle, or ellipse). You can also change the attributes of text
at any time, evets after you have rotated or flipped a text object. You can
change the following text attributes:
• Font
Text tool _--_
To quicklycreate a
standard-size text
object,select the Text
tool; then clickwhere
you want to begin
entering text. Drawing
automaticallycreates a
text object 6 inches
across and I line high.
As you type, the text
object automatically
grows verticallyto
accommodate new
lines of text. Youcan
•resize the object later.
•Size
•Style
*Tone
*Alignment
_To create a text object:
1. Select the Text tool from the tool bar. Thepointer changes to crossed
1-beams when you move it over the drawing area.
2. Place the I-beams where you want your text to begin; hold the Select
button and drag diagonally to outline the area for the text to appear in. A
dotted line shows the borders of the text object.
3. Release the Select button. The border of the text object appears with a
blin_'ng vertical line, the insertion point, showing where you can begin
typing. The default font is 12 point Roman.
4. Begin typing. As you type, text wraps within the text object, and the object
automatically grows vertically to accommodate new lines of text. Do not
press ENTER unless you want to begin a new paragraph. If you later resize
your text object, word wrap will automatically adjust the line endings for
you, unless you press ENTER at the end of eacb line.
Drawing 152

•To enter and edit text in a text object:
Use the basic text editing techniques available in all programs, including
BACKSPACE and DELETE keys, and Undo, Cut, Copy, and Paste from the
Edit menu.
Ifyou cannot see the
textyou entered, dick
onthe Optionsmenu;
then be sure that
Draw OutlinesOnly is
not selected (it is
selected when the
buttonis darkened).
If you create a text
object without entering
any text, an eropt_t_ext
7object will remain. This _
object becomes invisible
when not selected and
can obscure portions of..
other objects.
To undo a deletion that
you just did, select Undo
Delete from the Edit
menu. Undo from the
Edit menu only affects
the last action.
•To create text in different sizes:
Select the Text tool.1.
2.
3.
,
5.
Place the crossed I-beam pointer where you want to begin typing.
Hold down CTRL; then hold the Select button and drag the on-screen
pointer diagonally to create your text object. The size of your type will be
the size of the object you create.
Release the Select button. The blinking insertion point shows the size of
capital letters.
Begin typing If your characters are too large for the words to fit in the
object you defined, Drawing extends the o_'ect depth, but not its width. To
resize a text object, see the procedure below.
•To move, resize, or delete a text object:
Use the Pointer tool to move, resize, or delete a text object just as you would
any rectangular object.
•To delete empty text objects:
1. Select the Pointer tool.
2. Click"-6ri the tex-Ubbj_'_Han_dles appear around the object.
OR
.
Hold the Select button and drag the on-screen pointer to create a large
rectangle. Handles appear around all the objects inside the rectangle.
Press DELETE or BAC KSPACE. All selected objects disappear.
Drawing 153

Changin_ Text Style, Size
Text sty/e refers to the way the type in each font appears:
Youcan combinestyles to
create
Undedined. Bold
Underlined./taiic
Underlined.Bold Italic, and
Bold Italic Underlined. and
you can applyStrike Thru,
SuperscriptorSubscriptto
any of thosestyles. The
default styleis Plain Text.
• Plain Text
,•Bold
•Italic
•Underlined
Subscript (e.g. H20_
Superscript(e.g. a2+ b z= ca)
Box (appears with a box around the text)
Button (resembles a push-button)
Type size refers to the height of the type measured in points. There are 72
•points to an inch, so 72 point text is one inch high. The default type size is 12
points.
Use the Size submenu from the Text menu to change the size of selected text,
or text in selected objects. The point sizes available are: 9, 10, 12, 14, 18, 24,
36, 54, and 72. You can also select Custom Size from this same submenu.
Ifyou changetextso
that it is verylarge or
very small, Drawing
a_usts the heightof
the text object,but not
the v_dth.
•To change the font, style, or size of text in a drawing:
1. To change text within a text object, use the Text tool to select the text you
want to change.
OR
To change all the text in a text object, use the pointer to select the text
object you want to change.
2. From the Text menu, select the font, style, or size you want to apply to
the |elected text or text object. The selected text is changed accordingly.
•To use the Text Shading tool:
1. To change text within a text object, use the Text tool to select the text.
OR
To change all the text in a text object, use the Pointer tool to select one or
more text objects.
Drawing 154

2. Click on the Text Shading tool. A hcrdzontalpop-up menu appears. The
•option farthest to the lej_ is 100% soading, while the option farthest to the
right is 0%.
3. Select the shading you want. Drawing applies the shading to the selected
text or text objects.
Aligning Text \
Text alignment refers to how the text lines up With the left and right edges of
a text object. You can align text at the left, center, or right of a text object.
You can also justify text (aligned left and right). When you create a text
object, the default setting is left, but you can change it.
•To change text alignment:
1. Use the Pointer tool to select the text object to change.
2. Select Paragraph from the Text menu; then select an alignment. The text in
the selected object changes alignm_t.
Adding Tone to Text
You can add tone to some or all of the text in a text object by selecting Text
Tone from the Text menu or by using the Text Tone tool from the Attributes
tool bar.
To change text tone
using the Attributes
tool bat;, select the
text; then click on the
Text Tone tool. Select
a tone from the list
that appears. You
cannot select percent
shaded using this
tool.
•To change text tone:
1. To change text within a text object, use the Text tool to select the text.
OR
To change all the text in a text object, use the Pointer tool to select the
text object to change.
2. Select Text Tone from the Text menu. A dialog box appears.
3. Select the tone you want to use by clicking on it; then select a Percent
Shaded if you want.
4. Click on Apply. The dialog box remains open so you can change the tone
again, or change additional text.
5. WhFn you have finished changing text tone, click on Close.
Drawing 155

Working with Bitmap Objects ,, ,
In Drawing, you can use three types of objects to compose a drawing: text
objects, graphic objects, and bitmap objects.
• A text objea is an object you create using the Text tool on the
Attributes tool bar.
Becausebitmap drawings
usealot of memory:
*Limit the size ofyour
bitmap drawing to an area
smaller than the size of
the window, scaled at
100% normal size.
.Save your document
frequen@
.Limit the number of
bitrnapdrawingsper
document
•Agraphic object is any line, rectangle, ellipse, arc, star, or other
object you cream using any of the other tools (besides text) on the
Attributes tool bar or the Cream option on the Edit menu.
•AbCtmap object is any object you create using any of the tools on
the Bitmap tool bar.
Abitmap is an object made up of pixels, which are individual dots that make
up an object, like the dots on a television screen. Bitmaps allow you to create
freehand objects. Because bitmaps have special properties, Drawing provides
a set of tools for manipulating pixels.
The Bitmap tools appear on the right side of the horizontal tool bar:
I =lr-1 I==ili'- l l l
I"-=" I'--" I"_ I"'_" I 41 "''1 "="" I".It I"'_1
_Like their- counterparts.-0n:the Drawing t0ol bar, the bitmap Line, Rectangle,
and Ellipse tools draw geometric shapes. However, the Bitmap tools paint
pixels in a bitmap, while the Drawing tools create distinct graphic objects.
' You can change the pixels of a bitmap object using the Bitmap tools.
Drawing 156

Creating a Bitmap Frame
Abitmapframe defines the outer bounds of a bitmap. Create a bitmap
frame using the Frame tool or by drawing abitmap shape using other bitmap
tools. Use the Bitmap tools to change pixels in the object and manipulate the
bitmap by moving, resizing, or transforming it as desired.
If you know the size of the bitmap you want to create, or if you just want to
block out an area of the drawing for the bitmap, use the Frame tool to create
a rectangular bitmap frame.
Any bitmap operations you perform in the frame are bounded by the frame
and become part of it. The frame acts much like a draw object that you can
stretch, move, and rotate. You cannot, however, move or resize individual
bitmap items you place in the bitmap frame. Once you place a bitmap item
into a frame, it permanendy becomes part of that frame, unless you select
Undo from the Edit menu.
l_ To draw a bitmap frame:
_--_ 1. Select the Frame tool from the Bitmap tools. Thepointer changes tocrosshairs when you move it over the drawine, area.
2. Move the on-screen pointer to where you want to anchor the first point of
the frame; then hold the Select button and drag the frame until it becomes
the size you want.
3. Release the Select button. A frame with a wbite fill appears with selection
handles: -" _ .- _-
mma
m m
RI III IR
Drawing a bitmap frame creates the bitmap. You can now change pixels
inside the bitmap frame. You can also draw other Drawing objects on top of
the bitmap; however, they remain separate objects, distinct from the bitmap.
Drawing 157

You can also create a bitmap frame by using the Bitmap tools to draw a
bitmap shape (straight line, freehand symbol, rectangle, or ellipse) in a blank
part of the drawing area. When you do this, Drawing creates a rectangular
bitmap frame around the object along its outermost points; the boundaries of
the frame become the boundaries of the bitmap.
-.o_.-..-o
10
I |
! |
I 1
! I
| $
| $
Drawing Bitmap Shapes
Unlike other Drawing
objects, a bitmap is
always opaque and never
transparent (unfilled). As
a result, if you place a
bib'nap on top of other
objects, you cannot see
the objects underneath.
Use the Bitmap tools to draw the following bitmap shapes:
• Straight lines
• Rectangles
• Ellipses
• Freehand shapes
Once you draw a bitmap shape, it becomes part of the bitmap frame. You
cannot change a bitma_ghape asyou Would a draw object. For example, you
cannot move or r_size a bitmap ellipse directly; you can only draw another
ellipse in the new location or size you want. For this reason, it is helpful to
select Undo from the Edit menu to correct any mistakes you make.
Select the attributes of a bitmap shape before you draw it, including the tone,
shading, line weight, and so on. You can change these attributes after you
have drawn the shape.
The default background tone for a bitmap is white. Change the background
tone by drawing a bitmap shape in a different tone using one of the Bitmap
tools. The Attribute tools do not apply to bitmaps.
Drawing 158

•To draw a straight line:
Hold downSHIFT while
drawing a line tomake it
exactlyhoHzontal,
vertical,or45 degrees.
1. Select Line Attributes from the Attributes menu. A dialog box appears.
2. Select the line tone, shading, and width you want.
3. Select the Bitmap Line tool from the tool bar. Thepointer changes to
crosshairs when you move it over the drawing area.
4. Move the on-screen pointer to where you want to anchor the first point of
the line; then hold the Select button and drag the line to where you want
it to end.
.Release the Select button. A straight line appears with the attn'butes you
selected.
Pressing SHIFT
while drawing a
rectangle creates a
square.
•To draw a rectangle:
1. Select Area Attributes from the Attributes menu. A dialog box appears.
2. Select the area fill tone, shading, and pattern you want.
3. Select the Bitmap Rectangle tool. Thepointer changes to crosshairs when
you move it over the draudng area.
4. Move the on-screen pointer to where you want to anchor one comer of
the rectangle; then hold the Select button and drag until the rectangle is
the size you want.
5. Release the Select button. A rectangle appears with the attn'butes you
selected.
•To draw an ellipse (circle):
PressingSHIFT__ilo__
-dravdng an ellipse
creates a circle.
1. Select Area Attributes, from the Attributes menu.
2. selectdae area fill tone, shading, and pattern.
3. Select the Bitmap Ellipse tool from the Bitmap tools. The pointer changes
to crosshairs when you move it over the drawing area.
4. Move the on-screen pointer to where you want to start the ellipse; then
hold the Select button and drag until the ellipse is the shape and size you
want.
5. Release the Select button. An ellipse appears with the attn'butes you
selected.
•To draw a freehand shape:
1. Select the line tone, shading, and width you want by selecting Line
Attributes from the Attributes menu.
2. Select the Brush tool from the Bitmap tools. Thepointer changes to
crosshairs when you move it over the drawing area.
3. Click once to change one pixel.
OR
Move the on-screen pointer to where you want to start the freehand
shape, hold the Select button and drag the pointer to draw the shape you
want; then release the Select button.
Drawing 159

Editing Bitmap Objects
Once you create a bitmap, you can use the Bitmap tools to change pixels in
the object, erase portions of it, and select all or part of the object to cut, copy,
and paste.
Whenever you use a bitmap tool in a bitmap object, the bitmap object
becomes the selected object. A frame appears around it to sbow you that it is
the selected object:
Q
m
II
m M
IIIIIIIIIIIIIIIIIIIIIIIIII-
I Im
You can use the Selection tool to select a rectangular region within abitmap
so that you can perform copy, cut, and paste operations usin.g the pixels in
the region. You can select all or part of the object.
I_ To select a region within a bitmap object:
_ 1. Click on the Bitmap Selection tool. Tbepointer changes to crossbairs when
you move it over the drawing area.
you can cut or ¢opy_ 2. Move the pointer to v,there you want to anchor one comer of the
the selected region to selection; therLhold the Select button and drag until the selected regton is
the clipboard and the size you want.
paste it in a different
location in the bitraap. _ -- 3. Release the Select button. A rectangular selection region appears.
I)'To select all the pixels in a bitmap:
1. Select the Bitmap Selection tool from the Bitmap tools. Click inside the
bitmap. A dotted outline appears indicating that the bitmap is selected.
2. Press CTRL +/.
Drawing 160

Using Tone or Fill Pattern in a Selected Area
It is a good idea to
save your drawings
after everyfill
operaOon.
You can change the tone of a contiguous group of pixels using the Bitmap
Fill tool. Unlike the Fill tool for graphic objects, which fills the entire interior
of a graphic object, the Bitmap Fill tool fills an enclosed area with the current
area fill tone. The enclosed area is bounded by pixels of a different tone.
l_ To change the pixels in an enclosed area:
1. Select the Bitmap Fill tool from the Bitmap tools. Thepointer changes to a
paint can when you move it over the drawing area.
2. Select the fill tone and the pattern you want. You can use the Area Fill
tone tool or select Area Attributes from the Attributes menu.
3. Click anywhere in the enclosed area. Drawing changes aUpixels in the
enclosed area with the current area fill tone.
Erasing in the Bitmap Frame
To erase a rectangular
region, use the Selec_on
tool and Cut or Delete
from the Edit menu.
When you use the Eraser tool, Drawing changes the tone of affected pixels to
white. It has the same effect of painting pixels white using adifferent Bitmap
tool (such as the Rectangle tool).
i_ To erase pixels in a bitmap frame:
1. Select the Eraser tool from the Bitmap tools. Thepointer changes to a
square when you move it over the drawing area.
..... - 2. Move-the pointer to-w_ere yofi want to start erasing, and then click or
drag the pointer over the parts of the object you want to erase.
Using the Pixei View Tool
To change individual pixels in the Pixel View, use the Pixel View tool (on the
far right). This tool enlarges your drawing and displays a grid of pixels that
you can change individually.
Once an object appears in the Pixel View, you can use any of the bitmap
tools to make subtle changes to it, such as smoothing out a rough edge or
comer. For example, to change the tone of individual pixels, select a line
tone, select the Brush tool, and then click on the pixels you want to change.
Similarly, to change a rectangular region of pixels, select a fill tone, select the
Rectangle tool, and then draw a rectangle over the region of pixels you want
to change.
Drawing 161

•To display the Pixel View:
--_ 1. Select the Pixel View tool from the Bitmap tool bar. Thepointer changes to"
a magnifying glass when you move it over the drawing area.
2. Move the on-screen pointer to where you want to change pixels; then
click the Select button. The Pixel View appeam.
3. Select the bitmap tool you want to use to change pixels.
4. In the Pixel View window, use any of the Bitmap tools to change pixels
individually or in groups.
•To change the Pixel View area:
With the magnifying glass tool, click on a pixel in the Pixel View window.
This pixel becomes centered in the Pixel View window.
OR
Click in the bitmap object outside the Pixel View window.
Drawing 162

Changing the Bitmap Color and Resolution
CAUTION:
Increasing the
resolution of the
bitmap or the
You can change the color format (monochrome or color) and resolution
(the number of dots, or pixels, per inch) of a bitmap.
For example, if you want to reduce the storage and memory size of the
object, change a 16-color object.to a monochrome object. Similarly, to add
color, change a monochrome object to a 16-color object.
You can also change the resolution of a bitmap. For example, to reduce the
storage and memory size of the object, reduce the resolution from 300 dpi to
72 dpi. Similarly, to edit the pixels at a f'mer level of detail, increase the
resolution from 72 dpi to 300 dpi.
number of colors L. :'n change the format of a bitmap:
in the bitmap may i-- i u
overload memory.
If this happens,
you may lose your
work and have to
restart the
system.
1. Select the bitmap to format.
2. Select Bitmap Format from the Attributes menu. A dialog box appears.
3. Fill in the dialog box:
• Monochrome or 16-color. Select the bitmap format you want.
• Resolution. Select the resolution you want (72 dpi, 300 dpi, or
Custom from 1-2400 dpi).
4. Click on Apply.
5. Click on Close.
Printing or Faxing Drawing Documents
Before printing a Drawing document for the In'st time, review Setting Printer
Options in Getting Started (Book 1). Also select page size options to reflect
the actual size, layout, and margins that you want to print.
Before faxing for the first time, set up your fax information and create a cover
sheet; see the Fax and Data Modem chapter in Book 1.
J_ To select the page size:
Select Page Size from the File menu and set the page size options the way
you want them.
You can print a document larger than the printing area. When you print a
large page, you are asked whether you want to scale the document or print it
actual size. Select Print Actual Size; then insert as many sheets of paper as
required. When finished, tape the pages together.
Drawing 163

•To print a document:
1. Save your document; then press PRINT. A submenu appears.
2. Select Print. The Print d_/og box appears.
3. Select your print options; then click on Print.
•To fax:
1. Save your document; then press PRINT. A submenu appears.
2. Select Fax. The Fax dialog box appeam.
3. Select your fax options; then click on fax.
Drawing 164

Importing and Exporting Graphics
Whenyou import a
biffnap graphic,
Drawing places it in
the center of the
window. The object
willnot respond like
a graphicbbject,but
rather like a bitmap
objecL Withbitrnap
objects, the pixels
enlarge and shank
asyou resize, and
you must editthem
withthe Bitmap
tools(see page
156).
You can import graphics into Drawing that were created with other drawing
programs or are stored in other file formats. You can also export drawings
you have created in Drawing.
Graphics files are usually stored as biatmaps, which consist of a series of dots
(pixels) that together make up a graphic object. With Drawing, you can
import and export graphics in the following bitmap formats:
Bitmap (BMP). This is the standard bitmap format that many
Windows and OS/2 programs can create.
CompuServe@ Graphics Interchange Format (GIF). This is a
format designed to minimize transfer time over telephone lines.
PC Paintbrush (PCX). This is a popular format for exchanging
bitmap graphics between programs.
Tag Image File Format (TIFF). This is a standard format for storing
bitmap graphic objects. TIFF files can be used by programs on many
different kinds of computers.
l_ To import a graphics file:
1.
Iryou are importinga -2.
drawing and do not
know the format,select
No Idea, and Drawing .... 3.
willanalyze the
drawing to see if it can 4.
be imported.
Open the Drawing document into which you want to import a graphics
t'fle.
Insert the diskette containing the drawing to import; then select Import
Graphic from the File menu. The Import Graphic dialog box appears.
Select the file you want to import and the format of the file (clip art is
TIFF forma0.
Click on Import.
To export graphics:
When you export from
Drawing, you can either
export the entire drawing
or only selected objects.
1. Open the Drawing document to export.
2. Select all or part of the drawing. Handles appear around any selected
objects.
3. Select Export Graphic from the File menu. A dialog box appears.
4. From the fight, select a file format.
5. Fill in the remainder of the dialog box, changing the options you want:
•Formats. Select 1 bit/pixel for black-and-white objects and 4
bit/pixel or 16 bit/pixel for tone objects.
•BMP Format. These options appear only when you select BMP from
the Formats list. Specify the format that you are exporting to so the
exported file will be readable. Select from the following options:
Drawing 165

.
7.
Select 0S/2 Device Independent Bitmap if you plan to use the
exported file in an OS/2 program.
Select Windows 2.x Device Dependent Bitmap if you plan to use
the exported file in a Windows program with a version of
Microsoft Windows earlier than 3.0.
Select Windows 3.x'D1B if you plan to use the exported file in a
program running with Microsoft Windows 3.0 or higher.
Select Windows 3.x DIB R/_ Compressed if you plan to use the
exported file with Microsoft Windows 3.0 or higher and you want
the file to be Run-Length-Encoded (RLE) compressed.
Compression. These options appear only when you select TIFF
from the Formats list. Select Uncompressed to export without
compression. Select Auto-Compress to export with compression.
•Export Entire Document. Select this option to export the entire fde.
• Export Selected Objects. Select this option to export only the
objects you have selected in the drawing. This is the default
selection.
From the left, select a folder to save the drawing to; then enter a name for
the drawing.
Click on Export.
Drawing 166

4Scrapbook
Before starting, review
thesebasic procedures
fromthe Getting Started
chapterin Book 1:
• WorkingwithDocuments
• Saving Documents
• Workingwi_ Menus
• WorkingwithDialog Boxes
Scrapbook is a place to store graphic objects and bits of text so that they are
available for pasting into documents. It also allows you to place the clip art
that is supplied on diskette in a" Scrapbook document to place in other
documents.
Starting Scrapbook
When you first start Scrapbook, the Default document opens. If you have not
copied any scraps into this document, it is empty. If you have already entered
scraps, the contents of the first page appear in the View box.
After placing the f_t scrap in the Default Scrapbook, save it without renaming
it if you want the Default Scrapbook to open each time you open Scrapbook.
Or you can create and save a new Scrapbook document to open when needed
(see page 171).
l_ To start Scrapbook:
_Click on Sc_pbook flo..-_ Main Memi i The Scrapbook window appea_:
t-_ gtm
I
I
I
Thisareais the Viewbox.It showspagesinthescrapbook.
t:mI_1
The name of the page appears here.
i tumid:Sorq_m_
I_J Isml ?
Crickhereto
page in the scrapbook.
Click here to go to the previ-
ous or the next page in the
scrapbook.
Scrapbook 167

Using Scrapbook Documents
Scrapbook is aplace to store graphic objects and bits of text so that they are
available for pasting into documents. You can also delete graphic objects and
text from your default scrapbook or any other scrapbook document.
You can also navigate through a scrapbook document and name a page of
scraps, so you can find items easily.
Placing and Deleting Clip Art and Other Scraps
You can place dip art, scraps of text, or other graphics into a Scrapbook
document. The clip art is provided on diskette.
Clip art is in T1Fformat.
To place clip art:
I. Insert the diskette containing the clip art
2. Select Import Scrap from the File menu. The Import Scrap dialog box
appears.
3. From the left, select the name of the file you want to import, and from the
right, select the format, either No Idea or TIE
4. Click on Import.
CopyandPaste_so_ I_To €opy f=rom another program to Scrapbook:
_ppear in the Edit ---.'- .....
menu. ,
When you paste an item- °_2.
from another program
into your scrapbook, 3.
you automatically add a 4.
new page to the
scrapbook.
ff you want to insert
the scrap on another
page, clickon
Previousor Next.
Within a progdam, select the item and press COPY. It is now temporarily
stored on the clipboard.
Close the program.
Open Scrapbook.
Press PASTE. The scrap appears on a new page in front of the current page.
This pushes all subsequent scraps back one page.
OR
Select Paste at End from the Edit menu. Thescrap ispastedon the lastpage
of the scrapbook.
Scrapbook 168

II_ To copy from Scrapbook to other programs:
1. Go to the scrapbook page that has the scrap you want to cut or copy.
2. Press CUT or COPY from the function keys.
3. Exit Scrapbook by pressing EXIT.
4. Open the document in the program to which you are copying the scrap.
5. Place the insertion point where you want to paste the scrap on the page.
6. Press PASTE. The scrap ispasted into the document.
Nawgating Through Scraps
You can flip through the pages of a scrapbook to scan its contents, or you can
go directly to a specific page.
I_e_ I_ext I
!_ To move to the next page:
Click on Next to go to the next page. If you are on the last page, the Next
button takes you to the fLrst page.
l_ To move to the previous page:
Click on Previous to go to the previous page. If you are on the fhst page, the
Previous button takes you to the last page.
...... I_ _ To go to a specific !_age: j.
1. Click-(mGo to. Ira-g67 A--_lialog box appears. '
2. Double-dick on the page number or page name to show the page in the
Scrapbook window.
3. Click on Close. (You can also drag the dialog box to the comer of the
screen so you can refer to it later.)
CUT places the
scrap on the
clipboardand
deletes it from the
scrapbook. COPY
copies the scrap to
the clipboardand
leaves a copyin the
scrapbook.
I_ To delete a page from a scrapbook:
1. Go to the page that you want to delete.
2. Press DELETE. The page is deleted from the scrapbook.
Scrapbook 169

Retrieving adeleted
page restores the
document to the
way it was when
you last saved it. All
changes made
during the current
work session are
deleted. For this
reason, you should
onty do this ifitis
very importantto
retrievethe deleted
page.
!_ To retrieve a deleted page:
1. Select Other from the File menu. A submenu appears.
2. Select Discard Changes from the submenu. A_appe_zrs.
3. Click on Yes. The scrapbook is restored to tbe pretdouMy saved version.
Naming a Page of Scraps
Page names describe the type of scrap stored on the page and can be helpful
when you want to locate particular items in a large scrapbook. Page names are
shown in the Name box at the bottom of the Scrapbook window; the names
are also listed in the Go to Page dialog box. Names may be up to 32
characters long.
_,To name a page:
__ 1. Go to the page that_y?_ uwant to name.
- 2. Click i-nthe Name--tlb_t_nd type a descriptive name for the page.
You can also create new Scrapbook documents for storing graphics and bits of
-text.
Scrapbook 170

Creating a New Scrapbook Document
Before you create a
new scrapbook
documen_ you must
firstsave and close
thecurrent one.
l_ To create a new scrapbook document:
1. If you have a Scrapbook document open, select Close from the File menu.
If you have unsaved changes in the current scrapbook document, you are
asked if you wish to save or discard them. TheNew/Open dialog box
appears.
2. Click on New. A new scrapbook document appears.
3. Add a scrap to the new scrapbook document. You must add one or more
scraps to the new scrapbook document before you can save it and give it a
name.
4. Press SAVE. A dialog box appears.
5. To select a folder for saving the new document in, click on the icon of the
folder.
6. Type a name in the New Name area; then click on Save. You are returned
to Scrapbook with that document open.
)_To save a scrapbook document:
Press SAVE.
Importinga Scrap from a DOS Program
Whenyou import
from WordPeffect5.0
into Scrapbook, the ....
font size changes
from 12 point to 8
poinL
You can import text and graphics from DOS programs, in the following text
and graphic formats:
Word Processing Formats Graphic Formats
ASCII BMP
Lotus 1-2-3 as text PCX
Microsoft Word (3.0, 4.0, 5.0, 5.5) TIFF
Word for Windows (1.0, 2.0) GIF
WordPerfect (5.0, 5.1)
WordPerfect for Windows (5.1)
WordStar (3.45 or below, 4.0, 5.0, 5.5,
6.0, 7.0)
Scrapbook 171

If you do not know the
format of the file you are
impo_'ng, select No Idea,
and Scrapbook will
analyze it to see if it can
be imported.
•To import graphics or text from another program:
1. Open the scrapbook in which you want to place the image.
2. Insert the diskette containing the scrap (graphic or text) that you want to
import.
3. Go to the page that you want to follow the imported page.
4. Select Import Scrap from the'File menu, The Import Scrap dialog box
appears.
5. Select the name of the f'de you want to import and select the format.
6. Click on Import.
Scrapbook 172

5 Addressbook
Bo[om startir_, rmaew Addressbook is your electronic address and telephone directory. Use it to
these bask: pmcE_uros store addresses and telephone numbers, as well as notes and email addresses.
from the Getting Started You can also create multiple Ad_-essbook documents, for example, one for
chapterin Book 1:
•WorkingwithDocuments business and one for personal.
•SavingDocuments
•WorkingwithMenus
• WorkingwithDialog Boxes
Starting Addressbook
When you open Addressbook, the default document called First Addressbook
appears. After adding names and addresses, save First Addressbook without
renaming it if you want the Default document to open each time you open
Addressbook. You can also create new Addressbook documents (see page
180).
To open First Addressbook:
Click on Addressbook from the Main Menu. Your address cards
open:
I I
I
LxJ
Addressbook 173

Working with Cards
Addressbook documents are referred to as Addr_ssbooks, which contain a
series of cards, or records, much like the cards in a real card file. Each card
contains the name, address, phone numbers, and notes you enter for each
person. Once you fill in the blanks, the program stores the card as a record in
your Addressbook file.
The first time you use Addressbook, it creates a default document called First
Addressbook, in which you can start entering names, addresses, and phone
numbers into different boxes. Each box is a_e/d of information.
Creating and Adding New Cards
To create new cards and add them to your Addressbook, start with a blank
card and then type information into three fields: the index field, address field,
and phone number field. The following illustration shows these fields.
Rip to cards,byletter(indextabs).
Flipto cardsthatarenot groupedundera letter.
Indexfield
Addressfield
Useto scroll
phonenumbers
Phonetypefield,includes
Home,Office,Fax,Email,
andAlias(foremil)
I
I
Phonenumberfield
) to anothercard,
Next
_;:__ Rlecurrentcardandcreate
a newblankcard,
Addressbook 174

CTRL + TAB moves the
cursorfrom field to field.
I_ To add cards to your Addressbook:
1. Click on New. Addressbook shows a blank card with the insertion point in"
the index field.
2. If you are adding a card for a person, type the person's name in the index
field in last name, first name order. Addressbook uses the index field to
sort cards in alphabetical order. Be sure to type a comma after the last
name.
Ignoreany highlighted
letter tabs whileyou
are entering a new
card. The new card v_ll
appear under the
appropriate letter.
Forusing the email and
alias categories, see the
Intemet and Email
chapterin Book 1.
OR
If you are adding a card for a company, type the company name as you
want it to appear in an alphabetical list. For example, type The ABC
Corporation or ABC Corporation, depending on whether you want to
store the card under T or A.
3. Press ENTER. The name you typed in the index field copies to the first line
of the address field automatically, and the insem'on point appears aj_er the
last character. If you typed a last name and first name separated by a
comma in the index field, then the two names switch places as they are
copied.
4. If you want to change the name as it appears in the address field and not
in the index field, press BACKSPACE to delete the incorrect text; then
enter the revised name.
5. Press ENTER again and type the address information. Press ENTER at the
end of each line of the address. The address field scrolls to accommodate
long addresses.
6, Click in "'_ "
the phone number field.
7. Enter a home phone number if you want. Addressbook also provides a
place for you to record several different phone numbers for each name in
your Addressbook.
8. Press ENTER or click on the arrows to see other phone number
categories: OFFICE, CAR, FAX, EMAIL, and ALIAS. In the EMAIL category,
enter an email address, and in the ALIAS category, enter an alias or shorter
nickname to use with the email address.
9. To save this card and create a new one, click on New. Addressbook stores
the card you just created alphabetically behind the appropriate index tab.
Names that do not begin with letters, such as 3 Star Plumbing, are stored
behind the index tab labeled with an asterisk (*).
Addressbook 175

Adding and Changing Phone Types
Each address card can have up to seven phone numbers in six standard
categories: HOME, OFFICE, CAR, FAX, EMAIL, and ALIAS. Each card also
contains a blank field so you can add one phone type.
)_To add a phone type in the empty category:
I. Click on the up and down arrows next to the phone type field until you
see an empty field.
2. Click in this empty phone type field. The insertion point appears.
3. Type a name for the phone type. For example, you could type 800 to
represent an 800 phone number or you could type HOME 2 to identify a
second home phone number.
4. Press TAB or click in the phone number field. The insertion point appears
in tbe pbone number field.
5. Type the phone number. The new phone numb, rand type are now apart
of the card.
I_ To change a phone type on the current card:
3.
4.
1. Click on the up and down arrows next to the phone field until you see
the entry you want to change.
2. Click in the phone type field you want to change. The insertion point
appears.
Edit the existing phon_e. You can press DELETE or BACKSPACE
repeate-_5; and th'_e th-e new name for this entry.
Press TAB or click in the phone number field.
Type the phone number. The phone number and type are now apart of
the card.
Flipping through Cards
Flip through the cards in your Addressbook using the Next and Previous
buttons. To move to a particular letter, click on the appropriate index tab. The
cards are indexed alphabetically, with other entries stored under the asterisk
(*) tab.
Start flipping through cards from any point; or click on an index tab if you
want to start with a particular letter. At the end of the cards, click on Next to
continue from the beginning, and at the beginning, click on Previous to
continue from the end.
Addressbook 176

Editing Cards
•To make changes in cards:
1. To make changes in cards, locate the card you want to change by clicking
on the appropriate index tab; then clicking on Next until the card you
want appears.
2. Select the text and replace it with new text, the same way you would
change text in any program.
3. Undo a change by choosing Undo on the Edit menu before you do any
other task. Addressbook undoes the last change entered.
Copying Cards
Youcan alsocopy a
block of textfrom one
card and paste it onto
another. This is handy,
for example, whenyou
are entering a series of
names all in the same
city.
Copy cards when you want to store several different names at the same
address, or when a person has more than one address that you want to keep
track of, such as a home and a business address. Save yourself some typing
time by selecting Copy Record from the Edit menu to copy the card with the
basic information; then edit the copy.
•To copy a card:
1. Flip through your Addressbook until the card you want to copy is shown.
2. Select Copy Record from the Edit menu.
3. Click on New to show a blank card.
_ 4. Select Paste RecordLirom the-Edit menu. The information from the etd
card ispasted to the new card. Use the usual text editing techniques to
change the duplicate card, if necessary.
•To copy part of a card:
1. Select the text you want to copy.
2. Select Copy (not Copy Record) from the Edit menu.
3. Click on New to create a new card, and then enter any new information
you want.
4. When you come to the place where you want to place your duplicate text,
select Paste (not Paste Record) from the Edit menu. The information is
pasted where you want on the new card.
Addressbook 177

Deleting Cards
From time to time, you may want to clean up your Addressbooks by deleting
cards you no longer need.
•To delete a card from your Addressbook:
1. Flip through your cards until you find the card you want to delete.
2. Select Delete Record from the Edit menu./'be card is removed from your
Addressbook.
3. Undo a delete by selecting Undo from the Edit menu right after you
delete.
Adding Notes to Cards
Notes can be useful for keeping track of birthdays, special interests, and any
other information.
•To add notes to a card:
1. Select the card to attach the note to; then click on Notes. A sma/l window
appears in which you can tYpe the note.
2. Type any information.
3. Click on Close. The note is attached to the current card.
_• To review the notes for a card: ,
When you want to'view or edit your notes for the current card, click on
Notes.
Addressbook 178

Searching through Cards
Addressbook allows you to search all the cards. For example, you can search
the cards to fred those containing aspedfic address.
l_ To search for information on the cards:
1. Select Find from the Utilities menu. Adia/og box appez_:
Selector deselectthese [ ] Find
optionsto specifyfieldsin I[ind: [e(Jmin
whichthe searchwill occur._ [Search Index Field And: I"11kldresses 0Ilotes nPhone Humbers
Removeallthreecheck [
marksto searchonlythe
indexfield.
By tuming off some of
thecheck boxes in
the Finddalog box,
you can disable
searchingin one or
more fields. The index
fieldcannot be
disabled.
2. Fill in the dialog box, typing the text you want to search for in the Find
field, and choosing the options you want.
3. Click on Find Next. Addre.mbook shows tbe first card containing the
specified text. The text is selected in the displayed card. If the text was
found in the Notes box, the Notes box opens and the text is highlighted. If
there is no match for the specified text, Addressbook informs you that no
match was found.
4, Click,_oO Find Nextkag_'m if you wafit to search for more matching entries.
Then click on Close.
OR
Click on Find Previous to perform the search backwards.
Addressbook 179

Making New Addressbooks
You may want to create other Addressbooks. For instance, you may find it
easier to keep business contacts in one Addressbook and keep friends and
family in another.
Beforeyou create a
new Addressbook,
press SAVE to
save and close the
currentone.
II_To create a new Addressbook document:
1. If you have an Addressbook document open, select Close from the File
menu. If you make changes in the current Addressbook, you are asked if
you want to saoe or discard them.
2. When the New/Open dialog box appears, click on New. A new
Addressbook appears.
3. You must add one or more cards to the new Addressbook before you can
save it and give it a name.
4. After adding a card, select Save from the File menu. A dialog box appears.
5. Select the folder in which you would like to save the new document.
6. Type a name for the document in the New Name area; then click on Save.
The new document is saved with the name you provided. You are returned
to Addressbook with that document open.
Printing and Faxing an Addressbook
When you print with Addressbook, you print just the information in your
Addressbook, not the card design that appears in the window. Addressbook
-allows you to print the information that is currendy shown on screen as a
card, a list of either addresses and phone numbers, or just phone numbers.
You can also print envelopes or labels.
If you have not printed before, review Setting Printer Options in Getting
Started (Book 1). If you have not sent a fax before, review the Fax and Data
Modem chapter in Book 1.
Youcan also select
Pant fromthe File menu.
l_ To print:
1. Open the Addressbook you want to print.
2. Press PRINT. a submenu afOpears.
3. Select Print. A dt2dog box appears.
4. Select Printer Options and Document Options in the dialog box.
5. Fill in the Addressbook Options in the dialog box:
• Current record. This option prints the information shown on
SCt'O_n.
Addressbook 180

Curreat record -Address only. This option prints the address
currently on screen for labels and envelopes.
When you select
envelope, the paper size
and feed options change
to correspond to the type
of envelope your printer
can prinL
All records - Addresses and phone numbers. This option prints a
list of the index fields, addresses, and phone numbers from all cards
in your Addressbook.
All records -Address_ only. This option prints the addresses from
all cards in your Addressbook for labels and envelopes.
All records - Phone numbers only. This option prints a list of only
the index fields and phone numbers from all cards in your
Addressbook.
.
•Print Notes. When checked, this option prints the notes associated
with your cards. The notes are insetted between the addresses and
phone numbers in the printed list.
Click on Print. If you are lrn'nting either with the All records -Addresses
and pbone numbers option, or with the All records. Phone numbers only
option, a list of the items you specified prints. Notes are inserted in the list if
you are printing with the Print Notes option.
OR
If you are tra'nting with the Current record option, the information from
the card currently on screen prints.
•To print envelopes and labels:
- I. Open the Addrec_book_you Want to print.
2. Select Send from the File menu, A submenu appears.
3. Select Print. The Print dialog box appears.
4. Select Options. The Options dialog box appears_
5. Select envelope or label from Type of Paper; then select the size from Size
of Paper.
6. Click on OK. If you click on Save Options, the printer is set to print on
this paper type and size until you come back and change the settings. The
Options dialog box closes.
7. In the Print dialog box, click on Current record, Address only (for
labels/envelopes) or All records, Addresses only (for labels/envelopes). If
you select All records to print envelopes, Addressbook prints the first
envelope, then prompts you to insert paper (an envelope) between Fa'ming
each record.
•To fax an Addressbook document:
1. Open the Addressbook you want to fax.
2. Select Send from the File menu. Asubmenu appears.
3. Select Fax. A dialog box appears.
Addressbook 181

4. Select fax options and click on Fax.
Importing a Document
You can import documents, such as mailing lists, from some database and
Spreadsheet programs and turn them into Addressbooks. You can import the
following:
•CSV (Comma Separated Values)
•Lotus 1-2-3
• dBase IV
If you are importing a
document and do not
know the format, select
No idea, and
Addressbook will
analyze it to see flit
can be imported.
Whenyou import or
exportin CSV or
dBase IV format,
Addressbook
creates fieldnames
(Field1, Field2,
Field& etc.), which
correspondto the
Addressbookfields.
Mappingallowsyou
to change the order
of those fields.
•To import an address file:
1. Insert the diskette containing the file to import.
2. Save and close the current Addressbook. The New/Open dialog box
appearr&
3. Select Import. A dia/og box appears.
4. Select the file format from the right. Thefile aa'tension appears in the File
Mask box, and only documents with that extension are displayed in the file
selector.
5. Select the drive and document to import from the left.
6. Click on Import. . -_-
•To change the-order of information when importing:
.... 1. Insert the diskette containing the file to import.
2. Save and close the current Addressbook. The New/Open dialog box
appears.
3. Select Import. A dialog box appears.
4. Select Comma Separated Values or dBase IV from the formats list and
select the document to import; then click on Map Import Fields. The Map
Import Fields dialog box appears:
Addressbook 182

Inthe SourceList,clickon a
fieldnameto mapfroma file.
_ce List=
Inthe DestinationList,clickonthe Addressbook
nameto whichyouwantto map.
Thislistshowsthepairsof
fieldsyouhavemapped.
IIC,ckhereiryoumakean stake.
Clickhereforeachfieldsyouhaveselectedto map.
5. Select one field in the Source List and one corresponding field in the
Destination List and click on Map. The corre/at_n is added to the Map List.
For example, you can map Field 3 in the Source List to the Addressbook
AddrField (address field) in the Destination List.
6. Repeat step 4 until you have mapped all the fields you want. Select from
the Map List and_ch'ck_oo_ Unmap to change any map pairs you have.°
designated inoorrectly.
7. When you have mapped all the fields you want, click on Done. The
Import dialog box reappoum.
8. Click on Import. A message appears telling you that the import is in
progress. If the file is very large, it could take several minutes to import. You
cannot interrupt this process.
Exporting an Addressbook Document
You can export Addressbook information to other programs. Some word
processors that support mail merge can use address information exported in
the CSV (comma separated value) format. You can export to the following
formats:
•CSV (Comma Separated Values)
•Lotus 1-2-3
• dBase IV
Addressbook 183

Mapping allows you to
change the order of
information as you export.
For example, if you want
the Address field to be the
first field in the exported
documen_ select
Addr_Field from the
Source List and Field 1
from the Destination Ust.
i_ To export an Addressbook:
1. With the Addressbook document open, select Other from the File menu. A•
submenu appears.
2. Select Export Document from the submenu. Adialog box appears.
3. Select the format for export. The file _xtension appears in the File Mask
box, and only documents with that extension are displayed in the file
selector.
4. Select a folder to save the document to; then name the document.
5. Click on Export.
i_ To change the order of information when exporting:
1. Select Other from the File menu. A submenu appears.
2. Select Export Document. A dudog box appears.
3. Select Comma Separated Values or dBase IV from the formats list.
4. Select the document to export; then click on Map Export Fields. The Map
Extxxn Fields dialog box appears:
Sourco Limb
lndax_Field
Rddr_ReJd
Not o.JF'ield
Nome
Office
Car
Fox
Phmte_6
Phone_7
F¢1
5. Select one field in the Source List and one corresponding field in the
Destination List to correlate the field information from the Addressbook to
the new fde format. For example, you can map the Addressbook address
field to Field 3.
6. Click on Map.
7. Repeat steps 4 and 5 until you have mapped all the fields you want. Select
from the Map List and click on Unmap to change any map pairs you have
designated incorrectly.
8. When you have mapped all the fields you want, click on Done. The
dialog box reappears.
9. Click on Export. A message appears telling you that the export is in
progress. If the file is very k_rge, it could take several minutes to export. You
cannot interrupt this process.
Addressbook 184

6Planner
Before starting, review
these basic procedures
from the Getting Started
chapter in Book 1:
• Working with Documents
•Saving Documents
• Working with Menus
•Working with Dialog Boxes
Planner is an automated appointment book that combines a yearly calendar
and scheduler in one program. You can create multiple Planner documents,
for example, one to keep track of business appointments and another to keep
track of personal appointments.
Starting Planner
When you open Planner, the default document called My Schedule appears.
After entering appointments, save My Schedule without renaming it ff you
want the Default document to open each time you open Planner. You can also
create new Planner documents (see page 200).
•To start Planner:
Click on Planner from the Main Menu. _ Planner window appears:
[tilt _ _,uk_lt Utllt_*.._, •
121U i_;[--_---_
I_ Ib88 lu, t
Ib3o m
M 1 _ !" fs_IIH
5 S_Om
II1_1 m,t
18m,1
4b7 IO !ldBll
12d811 Iq'l
I1 12 13 14 IS 16 17 12_ IF_
h88 Pit4
I_0 Iq_
IB 19 _O _1 !Z t3 _4 |I00
2.110
5d)O PM
5**LqOIPI_
26 _7 2B _ 10 4,00
4,5om
is,_m •
6,oo iq4
_' I'_ Im I P,*,_r-,',Vsmm,* Isml
r_
Planner 185

Viewing the Calendar
The Calendar window always contains a whole year, January through
December. Normally you see only one month at a time, which is the single
month view. You can scroll the window to see the other months in the year,
and you can change the year over which you are scrolling, but you never see
more than one month at a time, The current day of the month is highlighted.
)_ To switch to the full year view:
1. Select Full Year from the View menu. The ca/endar shrinks so that more
than one month can appear in the window.
2. Use the scroll bars to view any additional months that do not fit in your
window.
l_ To switch back to the single month view:
Select Single Month from the View menu. The calendar for a single month
appears.
Planner 186

Selecting and Viewing Events
Like an appointment book, Planner keeps track of weekly meetings, importam
appointments, and special dates. All of these are called events. Use events in
Planner to track important dates in your daily schedule and to schedule dates
far in advance, like birthdays and vacations. You can also schedule repeating
events.
Toseedifferentyears,clickonthe upanddown
arrows.Or double-clicktheyear andeditiL.
Clickona dayin the cal-
endarwindowto selectit
andviewitsevents.
Calendar
window.
Today'sdatehasa thick
blackborder.
I
$
I
'12
19
26 -
Toseedifferentmonths,
clickonthe scrollbar.......
Scrollleftfor previous
monthsandscrollrigMfor
futuremonths.
Selectedday:this day's events
appearinthe Eventwindow.
ThesmallMangleindicatesthat thereare
eventsscheduledforthis day.
Events
window.
Planner 187

Switching between the Calendar Window and the Events Window
On the View menu,
when both windows
are showing, the
Both choice is on
(darkened). When
only one window is
showing. Both is off.
J_I_ t3, 1996 F_
You can view the Calendar window and the Events window side-by-side or
one at a time. Showing only one window at a time lets you work with either
one without taking up space for both.
•To show only one window:
Select Both from the View menu. The Both button changes to off and one of the
windows disappears. To return to viewing both windows, select Both from the
View menu again. Both windows appear
You can view events for any. day by using the Calendar window or by
selecting from menu items.
•To select a day and view its events:
1. If the Calendar window is not showing, select Calendar from the View
menu. The Calendar window appears.
2. Click on a day in the Calendar window. The day/.€ highlighted.
3. The events for the selected day appear in the Events window.
•To view events on the next or previous day:
In the Events window, click on the up or down arrows at the top right side of
the Events window. Click on up for the previous day and down for the next
day. As the selected day changes, events for that day appear in the Events
window.
•To view events for today:
-You can also view-€-_- - Press CTRL+ T,-TZod_'_comes tbe selected day, and its events appear i_t the
events for todayor Euems window.
thosefor a specific
date using the Quick -_1_TO view events on a specific date:
menu. 1. Press CTRL +G. A dialog box appears:
If the Events window is
not showing, select
Events from the View
menu.
2. In the dialog box, type a date. If them is already a date in the dialog box,
you can press BACKSPACE to erase it. The date you type must be in the
format Month/Day/Year. For example, to view the events for February 23,
1997 you would type 2/23/1997.
3. Click on Go To Date or press ENTER. The date you typed becomes the
selected day, and its events appear in the Events window.
4. If you want to see events for a different day, click in the text box and
repeat steps 2 and 3.
5. Click on Close.
Planner 188

Selecting a Range of Days and Viewing Their Events
You can view a summary of events over a range of days. The following
illustration shows an example:
Thesearethedatesoverwhich.
events are beingsummadzed.
_b41
Oec_m_,_r 1996
E M T bl T
345&7
10
17 18 19 ZO/ Zl
!
24 Z5 ;_6 7ZO
P
31
lW " i
,.,.., [r_-l rt'z
FS
| J
16
Z2 Z3
Z9 50
Clickto seeevents inthe
previousandnext rangeof days.
Oec II. 1996 - Oe¢ IS. 1996
Hon. Igloo I I. 1995
12dglo IPlq _eneetlin O - Dr, [drain
Ttm, Dec 12, 1996
1CWQ RI'I Grocerg store tour
1,4ed. Dec 13. 1996
1o:o0 m Planning meeting
3d)0 PM Cd I_'. gumn8
6e00 PH BJrthdmj per_ 81 cgmrch
Thu. Dec 14. 1996
2=00 PPI Rrronge cunfereeuce
2:30 PH Long range plumd_j
f'rL Dec 15. 19915
5cl_ PM Prepare for Christmos
Planner -, _Sc_hedul_ •']sv,,,I?
Therangeof d;_t_ is highlighted
inthe Calendarwindow. A summaryof eventsovertheselected
rangeappearsinthe Eventswindow.
In the Events window,
onlythosedayswhich
haveeventsscheduled
areshowninthe
,___
summary, ff there are no
events in the range, the
Events window shows
Nc)'Events.
)_To view a summary of events over a range of days:
1. Drag to select a range of days in the Calendarwindow. If you drag outside
of the Calendar window, the window scrolls and you can extend the
selection to adjacent months.
OR
Select one of the following from the Quick menu:
* This Week. Selects all days in this week.
•This Weekend. Selects current or upcoming Saturday and Sunday.
• This Month. Selects all days in this month.
Planner 189

• This Quarter. Selects all days in this calendar quarter. The quaffers
run January through March, April through June, July through
September, and October through December.
• This Year. Selects all days in this year.
The selected range is bighh'gbted in the Calendar window, and its events
appear in the Events window.
Scheduling Events
To schedule events, select the day, select a time in the Events window, and
then type a description of the event. Once you have scheduled an event, you
can change it or remove it. The Events window provides a list of times called
the day template Normally the day template shows times from 8:00 AM tO
6:00 PM in 30-minute intervals.
Scheduling an Event
Theoasiest_y to I_ To schedule an event by selecting from the day template:
schedulean event is to
select a day, and then 1. Select the day on which you want to schedule an event.
select a time from the 2. In the Events window, select atime from those provided in the day
day template, template. A border appears around the event, divided into a time area and
a description area.
tz,eem H I
.2=3ePH
TiL of event Desc!plJon area
3. Click inside the description area, and then type a description of the
appointment, meeting, or date. If you type more than one line, words wrap
at the edge of the Events window. Press ENTER in the description area to
start a new parageaph. The appointment description is added to your
schedule.
4. When you next view the Calendar window, a triangle appears in the date
box for the date to which you added the event, like in the example on the
left.
Planner 190

Changing a Scheduled Event
You can change the scheduled time for an event or the details in its
description.
When you change the I_ To change a scheduled event:
time of a scheduled
event, it does oot
change its place
among the other
times in the Event
window until you view
events for another
day, For instance, ff
you change a 9:00
appointment to 11:00,
the event remains in
its original slot
between 8:00 and
10:00 until you view
events for another
day. The next time
you view these
events, the 11:00
event will be properly
sorted.
1. In the Events window, locate the event you want to change.
2. If you want to change the time, click in the time area. Delete the existing
time and type a new time in HH:MM formal Use AM or PM to specify AM
or PM,For example, you can type 8:15 AM for a new time.
3. If you want to change the description, select the text in the description
area, and then type the new information.
4. If at any point you realize that you made a change you wish you had not,
select Undo from the Edit menu before you do any other task.
Removing a Scheduled Event
_ - _--_To remove a schedD!ed event: _-
Ifyou accidentally I. In the Events window, click on the event you want to remove.
delete the wrong
event, select Undo ...... 2. Select Delete Event from the Edit menu. The event is removed from the
from the Edit menu Events window. If there are no more events scheduled for that day, tbe
before you do any mangle is removed from the Calendar window.
other task.
Adding Events between Two Scheduled Events
There may be times when you need to squeeze in one more appointment
between two existing ones. For example," if you have meetings scheduled for
11:00 and 11:30, you can schedule another meeting for 11:15 even though
there is no 11:15 slot currently shown.
_To add an event between two scheduled events:
1. In the Events window, select a time slot after which you want to fit another
event.
2. Select New Event from the Edit menu. The new event appears with its time
highlighted. Planner picks a time halfway between tbe preceding event and
the next one.
Planner 191

3. Edit the time if the one shown is not correct. Be sure the time you type is
in the HH:MM format. For example, type 8:15 _a_for anew time.
4. Press TAB or click in the description area, and then type adescription.
Adding an Event at a Particular Time
You may want to schedule an event at atime that does not appear on the day
template, such as an early morning or late evening appointment. You can also
schedule an event with no specific time.
Theneweventwiltnot _TO add an event at a particular time:
appear in its proper
sortedplace among
othertimesin the Event
windowuntilyou first
view another day's
events. Whenyou view
another day's events,
and then come back,
the events appear
chronologically;events
which do not have a
time appear at the top of
the list.
1, Select the day on which you want to schedule an event.
2. Select New Event from the Edit menu. The new event appears in the Events
window and its time highlighted.
3. Edit the time if the one shown is not correct. The time must be in the
HH:MM format. For example, you can type 11:50 Pr_for a new time.
OR
If you want to schedule an event with no specific time, delete the text in
the time area.
4. Press TAB or click in the description area; then type a description.
Copying Event Descriptions
You can copy a block of text from one event and paste it onto another. This is
" "?'ll_
- handy when you arc sehed'ttling ihe same sort of event on many differe,t
days.
Copy and Paste also
appear in the Edit
menu.
To copy part of an event description:
1. Select the text you want to copy.
2. Press COPY.
3. Locate the area where you want to place the copied text. This can be any
event on the same or different day. You can even create a new event.
4. When you come to the place where you want to place your duplicate text,
click to place the insertion point; then press PASTE. The information is
pasted at the insertion point.
Planner 192

Scheduling Repeating Events
You might have events that happen regularly, such as ameeting every
Thursday at 4:00. In Planner, you can schedule the event once. Planner then
remembers to schedule these meetings for you every Thursday at 4:00. You
can schedule an event that repeats in one of the following ways:
Weekly. A week/y event occurs on the same day every week, such as
every Wednesday.
Monthly by date. A monthly by date event occurs every month on
the same numbered day, such as the fL,'stor the fifteenth of every
month.
A weekly event
occurs on the same
day every week, stich
as every Wednesday.
"Yearly by date. A yearly by date event occurs once a year on the
same date, such as abirthday or a holiday.
• Monthly by day. A mombly by day event occurs every month on the
same day of a particular week, such as every third Sunday.
•Yearly by day. A yearly by day event occurs once a year on the same
day of a particular week in a particular month, such as the first
Sunday in March.
When you schedule a repeating event, it appears in the Events window on the
days for which it applies. You can also edit an individual occurrence of a
repeating event, changing its text description or time. Once you edit the event,
that particular occurrence is no longer considered a repeating event, but is
_ now just_one of the reg2alajc,events for that day. All other occurrences of, the
repeating event are unaffected.
....If*To schedule aweekly repeating event:
1. Select Repeating Events from the Utilities menu. A dialog box appears:
I R_Umj Euents
SlX.Cshlessons ff
Planner 193

2. Click on New. Another dialog box appears:
[requenctj,
s_pec_ry t_,
Chun_ aepeeU. 0 Ewt
Type of [_ent-
•Neekkj @HunUdy OVeeritj
@nero @omj of _ek
Event 141flOccur
Select _Detj(s)_ nSun •Plon nTuns •Ned [] Thu 0Frl 17Set
DOLlof [_onth: _LaSt • Date: [] _ Month: _
Day of I_k: IFirst J_'-_ _ _ Time=. I ]
General Information.
_l_Foreuer OFrolrnt I ITmL J
m
A monthly by date
event occurs every
month on the same
day, such as the first or
the fifteenth of every
month. A yearly by
date event occurs
otace a year on the
same date, such as a
birthday or a holiday.
3. Select Weekly. •.......
4. Select the check boxes for the day or days that your weekly event occurs.
5. If you want to give the .event a specific time, type the time in the Tune
box. Use the HH:MM format and type AM or PM.
6. Type a brief description of the event in the Event box.
7. Select Forever if your event should repeat indefinitely.
OR °_"_ ._ "_,
Select From if'your event is of limited duration and should repeat only over
a specific time period. Edit the start and end dates.
8. Click on OK. The original dialog box appears.
9. Click on Close. The weekly repeating event appears in the Events window at
the time and day you selected.
)_ To schedule a monthly or a yearly event by date:
1. Select Repeating Events from the Utilities menu. A dialog box appears.
2. Click on New. Another dialog box appears.
3. Select Monthly if you are scheduling a monthly event by date.
OR
Select Yearly if you are scheduling a yeady event by date.
4. Select Date.
5. Select Last if your event occurs on the last day of the month.
OR
Select Date, and then type the date of your event. You can also use the up
or down arrows to change the date.
Planner 194

6. If you are scheduling a yearly event, use the up or down arrows to select
the month your event occurs. (Skip this step if you are scheduling a
monthly event.)
7. If you know the time of the event, type it in the Time box. Use the HH:MM
format and type AM or PM.
8. Type a brief description of the event in the Event box.
9. Select Forever if your event'should repeat indefinitely.
OR
Select From ff your event is of limited duration and should only repeat over
a specific time period. Edit the start and end dates as appropriate.
10. Click on OK. The original dialog box appears.
11. Click on Close. The monthly or yearly event appears in the Events window
at the time and day you specified.
A monthlyby day
eventoccurs every
month on the same
dayof a particular
week, such as every
third Sunday.A yearly
by day event occurs
once a year on the
same day of a
fiarticular weel_in_a_
particular month,
such as the first
Sunday in March.
!_ To schedule a monthly or a yearly event by day of the week:
1. Select Repeating Events from the Utilities menu. A dialog box appears.
2. Click on New. Another dialog box appears.
3. Select Monthly if you are scheduling a monthly event by day of the week.
OR
Select Yeady if you are scheduling a yeady event by day of the week.
4. Select Day of Week.
5. if you are scheduling a yeady event, use the up or down arrows to select
the month your event occurs. (Skip this step if you are scheduling a
monthly event.)
6. Click on the up or down arrow in the Day of Week box to select the day of
the week that your event occurs. For example, you can select the second
day of the week here.
7. If you know the time of the event, type it in the Time box. Use the HH:MM
format and type AM or PM.
8. Type a description of the event in the Event box.
9. Select Forever if your event should repeat indefinitely.
OR -"
Select From if your event is of limited duration and should only repeat over
a specific time period. Edit the start and end dates.
10. Click on OK. The on'g/had dialog box appears.
11. Click on Close. The monthly or yexarly event appears in the FJmnts window
at the time and day you specified.
Planner 195

Changing a Repeating Event
If your scheduled repeating event changes at any time, you can modify the
event to reflect the new changes.
Only unaltered
occurrences of the
repeating event are
changed in the
schedule. Individual
occurrences which you
have edited remain
intacL
•To change a scheduled repeating event:
Select Repeating Events from the Utilities menu. A dialog box appears.
.
2.
,
Select the event you want to change from the list, and then click on
Change. Another dialog box appears.
Make the necessary changes in the dialog box. For details, refer to the
previous procedures in this section.
4. Click on OK. The original dialog box appears.
5. Click on Close./'be changes are reflected in the Events window.
Removing a Repeating Event from the Calendar
If your repeating event is no longer part of your schedule, you can remove the
event.
•To remove a repeating event:
1. Select Repeating Events from the Utilities menu.
2. Se_lect thename of__e_e_,_nt you want to remove from the list, and Lben
click on Delet_
3. Click on Close. The event is removed from your scbedule.
Finding Specific Events
Searching for specific events can be useful ff you want to see alist of meetings
you have scheduled with a particular person. For example, if you want to see
all meetings with Ms. Jones, you can search for Jones.
•To search for specific events:
1. Select Find from the Utilities menu. A dialog box appears:
. ..
IEEl I
Planner 196

2. Type the text for which you are searching.
3. Click on Find Next. The search starts on the current day and goes forward. •
If no matches are found, you are asked if you want to search past events.
4. Click on OK. The first event that matcbes the search text appears highlighted
in the Events window. If there is no match for the specified text, then
Planner informs you that ray match was found.
5. Click on Find Next if you want to find more events that match the search
text.
OR
Click on Close if you are finished searching.
Printing or Faxing Planner Documents
You can print or fax a Planner document containing a monthly calendar; a
yeady calendar, or your scheduled events. You can print a full page calendar
for any month. You can also include the fhst few lines of events for each day.
If you have not printed before, review Setting Printer Options in Getting
Started (Book 1). If you have not sent a fax before, review the chapter tided
Fax and Data Modem in Book 1.
Selecting thep_age size
"_ -- Before you pnnt o r-f_Lx, use the Page Size dialog box to specify the
dimensions of your calendar. Normally, Planner prints its documents at 8.5 x
11 inches. You can change the page size, for instance, to print a poster-sized
calendar across multiple sheets of paper, which you can tape together. Page
Size refers to the size and layout of the t'mal document. It does not have to
correspond to the actual paper in your printer.
For example, to print a poster that measures 20 x 40 inches with paper that is
8.5 x 11 inches, specify a page size of 20 x 40 inches in the Page Size dialog
box. Then in the Print dialog box, click on Options and specify 8.5 x 11
inches. Planner calculates the number of pages required to print your document
and prints it over several pages, which you can assemble into a poster.
If you select a page size that is smaller than the paper in your printer, Planner
prints pages at the size you specify centered on the paper, which you can cut
down to size.
Planner 197

•To change Page Size options:
1. Select Page Size from the File menu. A dialog box appears:
2. Fill in the dialog box:
•Type. Select paper, envelope, or label.
• Size. Select the page size from the lisL
•Page Layout. Select portrait or landscape.
• Width. Select the width of the paper. You can also enter a custom
page width here.
•Height. Select the height. You can also enter a custom page height
here.
3. Click on Apply. The current sem'ngs are applied, but the Page Size dialog
box remains open.
4. If these are the settings you want to use, click on Close.
•To print a Calendar document:
1. Press PRINT. A submenu appears.
2. Select Print. A dialog box appears.
3. Under Planner Options, click on the button next to the word Content. A
drop-down list appears.
4. From the drop-down list, select Month; then click on the up or down arrow
to select a month.
OR ......... ..- i'_..... -
Select Year; then click on the up or down arrow to select a year. You can
also edit the number in the Year box.
OR
.
Select Events window.
When the Content is set to Month, select Include Events if you want to
print the first few lines of events for each day.
OR
If you want to print a blank calendar, make sure the Include Events option
is off.
6. Click on Print when you are finished.
•To fax a Calendar document:
1. Open the calendar you want to fax.
2. Press PRINT. a submenu appears.
3. Select Fax. A dialog box appears.
4. In the Planner Options of the dialog box, click on the button next to the
word Content. A drop-down list appears.
Planner 198

.
.
From the drop-down list, select Month; then click on the up or down arrow
to select a month.
OR
Select Year;, then click on the up or down arrow to select a year. You can
also edit the number in the Year box.
OR
Select Events window.
When the Content is set to Month, select Include Events ff you want to fax
the first few lines of events for each day.
OR
If you want to fax a blank calendar, make sure the Include Events option is
off.
7. Click on Fax when you are f'mished.
Planner 199

Creating New Calendars
Planner provides a standard document called My Schedule. Whenever you start
Planner, this document opens, making it easy to keep all of your appointments
in one place. If you keep just one calendar, you should use this document. You
can create other calendars. For example, you may f'md it easier to keep business
contacts in one calendar and friends and family in another.
Before you create a
new calendar, press
SAVE to save the
current one.
II_ To create a new Calendar document:
1. Select Close from the File menu. The New/Open dialog box appears. If you
have unsaved changes in the current calendar, you are asked if you wish to
save or discard them.
2. Click on New. A new calendar appears.
3. You must add one or more events to the new calendar before you can save
it and give it a name. An easy way to do this is to select New Event from
the Edit menu.
4. After adding an event, select Save As from the File menu. A dialog box
appegtr$.
5. Select the folder in which you would like to save the new document.
6. Type a name for the document in the New Name area; then click on Save.
The new Calendar document is saved with the name you provided. You are
returned to Planner with this document open.
Planner _1_

7Book Reader
Before starting, review
these basic procedures
from the Getting Started
chapter in Book 1:
•Working with Menus
° Working with Dialog
Boxes'
With Book Reader, you can open books supplied on diskette, such as
directories of zip codes and area codes.
When you open a book on diskette, you can scroll through it and move from
topic to topic using a byper/im_, a highlighted word that takes you to a new
topic.
Starting Book Reader
•To open a book:
1. Insert Diskette 1 (the diskette containing books).
2. Click on Book Reader from the Main Menu. The Book Reader dialog box
appears: _"
Book Reader
Plee_ select ebook 1o open.
Iletu Disk
Tool availabilRy is
based on _e book you
have open. Tools
appear gray when not
available.
.Select a book from the list. When you open a book, you are given a set of
tools, as follows:
Back. When using a hyperlink to jump to information in different
parts of the book, Back takes you back to the previous page. If Book
Reader is showing the first page, the Back tool is not usable. "
Begin. This tool opens the Table of Contents, or if there is not one,
the first page of the book.
Revisit. This opens a dialog box containing a list of pages you have
read.
•Turn Page. This tool takes you to the previous page or the next
page in sequence. If you are reading the last page of a book, this tool
is not active.
Book Reader 201

Send. This tool opens a dialog box allowing you to send selected
text to the clipboard or to the printer.
lF'mdLThis tool OlXmSa dialog box with options about the information
you want to find and how you want to find it.
I_ To close a book:
Select Exit from the Book menu. Book Reader closes.
Using Information and Text
You can also choose
book-reading options
from the Nmn'gate
menu.
You can copy information from your book on diskette to paste into a
document. For example, you could copy a page of zip codes for your city
and indude it as a part of a document you are creating in Word Processing.
ff a book has a Table
of Contents page,
Book Reader shows
it to you when you
start. If it does not,
the first page of the
book appears.
To read a book:
To.
Start
Move the page up and down
Turn_thepage /"-"
Jump to a hypedink
Return to a pi,evious page
Return to the fLrst page
Do this:
Click on the Begin icon at the bottom of
the screen.
Click on the scroll bars on the right of the
page.
Click o/_ the Turn Page icon at the bottom
of the screen.
Click on underlined words or hotspots.
Select Back from the tools.
Press CTRL + B.
Book Reader 202

•To find information in a book:
1. Click on the Find icon at the bottom of the screen. The Find dfi2/og box
appears:
r- lrl I
III
2. Enter the search term.
3. Click on Find Next, Find Previous, Close, or Help.
•To find information with hyperlinks or hot spots:
1. Move the cursor until a text hyperlink (hotspot) is located. Tbe_ can _xf.st
anywhere in a book. When the on-screen pointer rrax_ ouer one, it
changes to a cursor question mari_
2. Click on the spot. The area flashes; then Book Reader motes to the
information on that topic.
.. •To copytext or other content from the book:
You can paste the text 1. Place the insertion point in the text; then hold the Select button and move
in Word Processing or your finger across the glidepad surface until the text is highlighted.
rDrawing. - 2. Click-6n the _d't¢0h'_t the bottom of the screen. The Send dialog box
..appears:
Send
Send a copg of the ctrrent page to=
ICTipboard
0 Prater
3. Click on Clipboard; then click on Send.
Book Reader 203

Printing from Book Reader
The Print option is in the Send dialog box. You can send selected text to the
clipboard or printer. Selecting the print option prints the selected text or the
current page if no text is selected. Be sure you have set up your printer (see
Setting Printer Options in the Getting Started chapter of Book 1).
•To print selected text from a book:
1. Select the content to print.
2. Click on the Send icon at the bottom of the screen. The Send dialog box
opens.
3. Click on Printer; then click on Send.
•To print the current page:
With the page you want to print displayed in the Book Reader window, click
on the Send icon.
Book Reader 204

8Text File Editor
DOS is Disk Operating
System.
Text File Editor is a simple editing program that allows you to create, read,
write, and edit DOS text files, also called ASCII text fries. Text File Editor is
supplied on diskette.
Starting Text File Editor
Before starting, review Text File Editor is not a full-featured word processing program, but a program
these basic procedures you can use to write notes and save them as ASCII text files, which can be
from the Gelling Started read by almost any word processing program. ASC/I textj_es contain plain
chapte_ in Book 1: text without special formatting like boldfacing, adjustable tabs, and page
• Worltingwith Documents
• Saving Documents breaks. You can also import ASCII text files into Word Processing or export
•WorkingwithMenus from Word Processing to ASCII (see page 64).
•WorkingwithDialog
Boxes _To start Text File Editor:
1. Insert the diskette labelled Text File Editor..
2. Click on File Manager from the Main Menu.
3. Click on the drive A icon at the bottom of the screen. The contents of the
diskette appear.
4. Click on the Text File,,Fa:litor icon.
5. To open a new document, select New. A new document appears.
OR
To open an existing document, select Open from the File menu. A dialog
box appears, alloun'ng you to select an e_cisting file.
Text File Editor 205

What Text File Editor Can and Cannot Do
Word Processing
can perfom all of
the tasks listed in
this table, even
those that Text File
Editor cannot do.
For more l
information, see
the chapter on
Word Processing
The following table lists the tasks that Text File Editor can and cannot perform.
Text File Editor shares basic capabilities with Word Processing, such as spell
check.
Text File EdRor Can Do This:
Edit using CUT, COPY, PASTE, DELETE
Create and save a document
Copy, rename, or backup afile
Undo your latest change
Check spelling
Search and Replace
Use W'dd Cards and Special Characters
Print
RCannot Do this:
I Adjust left and right margins
!Adjust tabs
Change text styles and fonts
Vary alignment
Modify line spacing
Create page breaks
Adjust rulers
Create graphics
Word Wrap and Line Endings
When your text reaches the right edge of the window, it wraps automatically
to the next line. This feature is called word wrap. Word wrap means that you
do not have to press ENTER (the Return key on a typewriter) to start a new
-line of text. When),oware'ready to begin a new paragraph, press ENTEiq. If
you .want to set lin_ endings, press ENTER at the end of each line. If there is
more text than can fit in the window, use the scroll bar to see different parts
of the document.
Changing the Text Size
You can change the text size displayed in any Text File Editor document.
Select from three sizes of text: 9, 12, and 14 point. Text File Editor displays all
the text in a document at the same size. If you select a different size, all the
text in the document changes to the size you select. The size setting stays in
effect even ff you dose one document and open another.
•To change the text size:
Select a new size from the Sizes menu. A//text in the document changes to tbe
new size.
Text File Editor 206

Printing or Faxing a DOS Text File
Before printing a Drawing document for the first time, review Setting Printer
Options in Getting Started (Book 1). Also select page size options to reflect the
actual size, layout, and _ that you want to prinL
Before faxing for the first time, set up your fax information and create a cover
sheet; see the Fax and Data Modem chapter in Book 1.
To print or fax in Text File Editor, select Print or Fax from the Send menu.
Note the following two differences when printing Text File Editor documents:
Line Length. The length of a line in the printed document is not
always the same as the length of the same line shown in the Text File
Editor window. In the Text Fie Editor window, text wraps at the right
edge of the window. When you print, however, text wraps at the right
edge of the page. (However, if you end aline by pressing ENTER,
this line ending is preserved when you print the document.)
Text Size. The printed text size may be different from the text size
shown in the Text File Editor window. Regardless of the text size you
select from the Sizes menu, Text File Editor always prints in a uniform
size.
Text File Editor 207

Naming a DOS Text File,
DOS File Names. All documents created in Text File Editor are DOS text files.
Give them names that follow the DOS rules for naming files: up to eight
characters long, no spaces, followed by a period and three more characters.
Use TXT following the period to indicate your file is a text file. For more
information, see Naming a DOS File in Getting Started (Book 1).
Text File Editor 208

9Games
Before starting, review Two games are available: Turnabout, a game of strategy, and Solitaire, a
these basic procedures popular international card game for one player. Games are supplied on
fromthe Ge_ng Started diskette.
chapterin Book 1:
• WorkingwithMenus
•WorkingwithDialog Boxes
Turnabout
Turnabout is a strategy game where you try to gain control of the board by
capturing pieces from your opponent. The game ends when no one can
make any more moves. The person with the most pieces on the board wins.
Capturing Pieces
To capture, place your pieces on both sides of a single piece or at both ends
• of a row of your opponent's pieces. Capture in any direction: vertically,
horizontally, or diagonally. You may have to capture the same piece more
than once in the course of the game.
Sequenc Play
You can play Turnabout against another person or against the system. Either
_ay, the game play sequence is the same:
Ifyou are not sure
.where to make your
next move, select Hint
from the Game menu.
!_ To play Turnabout:
1. Insert the diskette labelled Tumabout in the disk drive.
2.
3.
4.
.
Click on File Manager from the Main Menu. File manager appears.
Click on the drive A icon. The contents of the diskette appear.
Locate the Turnabout icon and double-click On it. A game board appears
with four pieces.
Move the on-screen pointer to the square where you want to put your
next piece and click with the Select button. Remember, this move must
result in the capture of an enemy piece. The system places your piece in the
square and then changes the color of all the pieces that were captured to
your co/or You can only put your piece in a square where it will capture
one or more of your opponent's pieces. If you try to put your piece
anywhere else, the computer beeps and waits for you to select a different
square.
Games 209

6. The system then places its next piece. Watch the board carefully because
the action moves very quickly.
7. It is your turn again to place your next piece.
Play continues until no more of the pieces can be capture_ The system keeps
a running score of how many pieces each player has during the game. The
player that has the most pieces on the board at the end of the game wins.
Setting User Options
The commands from the Options menu help you tailor Turnabout to your
personal tastes.
OPTION
Two Players
Play First
Play Second
Machine vs.
Machine
Obstacles_
Board Size
RESULT
Allows you to play against another person. To begin play,
select Start New Game.
Allows you to play against the system and make the first
move. To begin play, select Start New Game.
Allows you to play against the system without making the
first move. To begin play, select Start New Game.
Allows you to watch the system play itself. To stop the
game, select any of the other player options. Selecting Ma-
chine vs. Machine automatically starts a new game.
Allow_g__OU_to put barriers in some of the squares on the
falaying board. Selecting Obstacles starts a new game.
iAllows you to change the size of the playing board. Sizes
range from a 6 X 6 square grid to an 18 × 18 square grid.
ISelecting Board Size starts a new game.
Solitaire
S01itaire
This version of Solitaire looks and plays the same as the game with real cards.
With this version of the game, however, the system shuffles and deals the
cards for you. All you have to do is play the game.
Solitaire has three playing levels. For more information about the playing
levels in this game, see page 212. For the rules of Solitaire, see any standard
book on card games, or try playing Solitaire at the beginner level.
Games 210

Starting Solitaire
1. Insert the diskette labelled Solitaire in the disk drive.
2. Click on File Manager from the Main Menu. File Manager appears.
3. Click on the drive A icon at the bottom of the screen. The contents of the
diskette appear
4. Locate the Solitaire icon and double-click on it./'he Solitaire window
appears:
Clickhereto seethenextcard
(Thisalsostartsthe game.)
I= ,,_:
Youcanalsostart lhegamebydrag-
gingany card to a newlocation.
Yourscoreshowshereif you
are playinga scoringgame.
r_mm llmms
Score: 0
me Ira.lira I
I
L
Time: 0-.41
I _*,-- I?
Your elapsed time shows here if
you are playing a timed game.
Playing the Game
Drag cards to move them from stack to stack, and click on face-down cards to
flip them over.
,To start a new game:
Select Re-Deal from the Game menu or click on the New Game button in the
lower right-hand comer.
Double-click a
card in one of the
seven lower
"stacks to send it
to one of the four
upper stacks, ff it
is a legal move.
,To move a card to a new location:
Drag the card to a new location. If you have made a legal move, the card
appears in its new location; otbena_, it returns to its original location.
,To flip a card:
Click once on the card.lf it is in one of tbe setmn lowerstac_, a single card
flips. If you click the deck, either one, two, or three cards flip, depending on
bow you set your options.
Games 211

_To undo a mistake:
Select Undo from the Game menu. The card returns to its original iocmion.
Finishing a Game
You win Solitaire when you have flipped over all of the face-down cards, and
played all of the cards in the deck. When this happens, the Auto Finish
button changes from gray to black. At this point, manually move all the cards
into the upper four piles or click on the Auto Finish button.
Setting the Playing Level
Setting aplaying level determines how much assistance you get as you play
the game. You receive progressively less assistance as you move from the
beginning level to the most advanced level. Solitaire has the following three
playing levels:
*Beginner Level. This level guides you when you drag cards to a
new location. If you click a card, possible locations for that card
appear highlighted. You can move cards back from the four upper
stacks to the seven lower stacks (something you cannot do at higher
levels). You can also move parts of a face-up stack to another stack.
For example, if you have a sequence of six cards on a particular pile,
you can move the last three face-up cards to a new location.
; ih-_e_inedia_-i_e_. At_'s level you do not get help with possible
moves. Also you cannot move cards back from the four upper stacks
to the seven lower stacks, though you can still move parts of a
face-up stack to another stack.
•Advanced Level. Standard Solitaire with no help.
ll_To change the playing leveh
Select Level of Play from the Options menu; then select a level from the
submenu. When you change the playing l&,el during a game, you are asked if
you want to start a new game.
Games 212

Changing the Scoring
Solitaire has the following scoring options:
Standard ('rimed) and Standard (LMtimed). In Standard (Timed),
you lose points for the time you spend deciding where to move a
card. In Standard (Untimed), you are not penalized for taking time to
make decisions. Standard (Timed) and Standard (Untimed) games are
scored as shown in the following table:
IF YOU ... YOU GET...
Let 10 seconds pass.
Move a card to one of the
four upper stacks.
Flip a card in the lower
stacks.
Move a card from the dis-
card deck to one of the low-
er stacks.
Start through the discard
deck again (one-card draw).
Start through the discard
deck again (two-card draw).
Startth,"ou_-'-_tV.ediscard
deck_again (three-card
draw).
-1 point
+10 points
+5 points
+5 points
-30 the first two times; -60, -90,
and so on, each time thereafter
-20 the first three times; -40, -60,
and so on, each time thereafter
-10 the first four times; -20, -30,
land so on, each time thereafter
Vegas. Your game starts when you choose Re-Deal from the Game
menu. You start each Vegas game already 52 points in the hole, and
for each re-deal you lose another 52 points. For each card you
successfully move to an upper stack, you receive five points. Points
are cumulative from game to game. You are also limited to how many
times you can go through the discard deck: only once with one-card
draw; twice with two-card draw; and three times with three-card
draw.
Countdown. You play against the clock. Your goal is to score as
many points as possible in 7 minutes. You can change the allotted
time using the Set Countdown Time option in the Options menu. For
more information about changing your Solitaire options, see page
214, Changing Other Options.
No Scoring. You play the game until you win or are ready to stop.
You do not receive any points, nor are you penalized any points. In
addition, elapsed time is not shown when you choose No Scoring.
Games 213

I_ To change the scoring:
1. Select Scoring from the Options menu. A submenu appears.
2. Select an option from the Scoring submenu.
Changing the Number of Cards Drawn
You can draw either one, two, Or three dards at.a time from the deck. The
choice you make affects your scoring if you are using Standard scoring, and
affects how many times you can go through the deck if you are using Vegas
scoring. For more information, see Changing the Scoring on page 213.
W To change the number of cards drawn:
1. Select Draw How Many Cards? from the Options menu. A submenu
appears.
2. Select an option from the submenu.
Changing Other Options
In addition to choosing a playing level and a scoring method, you can also
set other playing options. These options appear in the Options menu and are
summarized in the following table:
IF YOU...
Change Card Backs
YOU SEE...
A dialog box where you can select differ-
ent artwork for the backs of the playing
cards.
Set Countdown A dialog box that lets you specify the
Time number of minutes and seconds allowed
for Countdown scoring.
Outline Dragging The outline of the card as you drag it.
Full Card Dragging The full card as you drag it.
Fade Cards Cards that fade as they are dealt. When
you turn off Fade Cards, the cards appear.
If you are playing a timed game, you may
want to leave this option off since it slows
down the game.
Games 214

. Appendix: '
, •
Spreadsheet Built-in Functions
Spreadsheet uses
floating point math,
which has benefits such
as speed But floating
point math produces
errors in the 17th or 18th
significant o_git. While
this is often not
detectable, the errors
become apparent in
some calculations,
especially when you use
financial functions like
IRR and NPV.
Spreadsheet adheres to
the IEEE 754 standards
for floating point
calculations.
Bui/t-kzfunaions are prewritten formulas that take a value, perform a
mathematical operation, and _turn a result. For example, you can use a
built-in function to total a grotlp of fiumbers.
You can also use built-in functions to insert information in Spreadsheet; for
example, use the Time & Date functions to insert the current date and time.
Functions are represented by a keyword followed by arguments enclosed in
parentheses. The function returns a value based on the arguments you enter.
For example, in the expression SQRT(144), SQRT is the keyword for the
square root function, and 144 is the argument. This function returns 12, the
square root of 144. ',
Argument Rules
The following rules apply to using arguments in functions:
• You can use numbers, cell addresses, or cell ranges in Spreadsheet as
values.
t
You must enclose text string arguments in quotation marks.
You must specify interest rates as decimal values, and they must
correspond to the same time unit as the term. For example, payments
that are monthly require a monthly interest rate.
You must express trigonometric angle arguments in radians. If you
want to convert degrees to radians, use the RADIANS0 function.
Some trigonometric functions return radians. If you need the returned
value expressed in degrees, use the DEGREES 0 function.
Appendix 215

Financial Functions
The arguments for financial functions are either numbers or addresses of cells
that contain numbers. When the argument is the interest rate, enter its actual
value (for example, enter .07 or 7% rather than 7). Be sure to specify the
same units for the term and the interest. If the interest is monthly, the term is
also monthly. Enter all values without spaces.
7"
Function
C_RI_ (interest, future
value, present value)
DDB (cost, salvage, life,
period)
FV _ayments, interest,
term)
IRR (guess, range)
NPV (interest, range).
PiT _rincipal, interest,
term)
PV (payments, interest,
term)
RATE (future value,
present value, term)
Descdption
Number of compounding terms or periods required for an investment to grow
to a future value. Interest is the interest rate for the calculation. Future value is
the proposed value of the asset. Present value is the current value of the asset.
For example, CTERM(.05,1000,500) returns 14.2 periods.
DoubleMledining balance depredation of an asset using the double-declining
balance method. Cost is the original cost of the asset. Salvage is the ending
value of the asset. Life is the duration of the depreciation, using the same units
as Per_d. Period is the time period for which the depredation calculation
occurs. Not a cumulative calculation.
Returns the future value of a stream of regularly invested payments. Payments is
the payment made each period. Interest is the interest rate for the same time
period as payments. Term is the total number of payments that are made. Be
careful to enter the interest rate for the same time pen'od as the payments.
Internal rate of return of series of irregular payments at regular intervals, k
returns the interest rate when you know the initial investment and know you
will get regular payments of varying amounts. Guess is the number you guess is
approximately the-in_x'_st:rate.,-Range fs the address defining the range for,the
cash flow tabl_.
Net present value is the amount of money (in today's dollars) to be spent in the
future. Interest is the interest rate for the calculation. Range is the cells
containing the cash flow information.
Calculates the constant payment required to repay a loan at aspecified interest
rate over a given period of time. Pm'ncipal is the amount of the loan. Interest is
the interest rate for the same time period as the term. Term is the interval at
which the payments are made. Be careful to enter the interest ratefor the same
time period as the terms. For example, to determine the monthly payment for a
20 year loan of $75,000, at 5% annual interest.
=PMT(75000,.05/12,240) returns $494.97.
Returns the present value of an investment. Payments is the payment made
each period. Interest is the interest rate for the same time period as payments.
Term is the total number of payments that are made. Be careful to enter tbe
interest rate for the same time.period as tbe payments.
Required interest rate to reach afuture value. Future value is the value of the
annuity at the end of the investment period. Present value is the value of the
annuity today. Term is the time periods for the investment.
Appendix 216

Function Description
SIN (cost;salvage,h'fe)
SYD (cost, salvage, h'fe,
perfod)
TERM (payments,
interesg future value)
Straight-line depreciation. Cost is the initial cost of the asset. Sa/vaooe is the
value of the asset at the end of the time period. Life is the useful life of the asset,
the number of time periods the asset is being depreciated.
Accelerated depredation of an asset, using the sum of yem"s digits method.
Cost is the initial cost of the asset. Salt_oe is the value of the asset at the end of
the time period. Iafe is the useful life of the asset, the number of time periods
the asset is being depreciated. Penbd is the period to analyze.
Required number of terms or payment periods to reach a future value.
Payments are made at the end of each term and earn a constant interest rate.
Payments is the amount of the periodic payments. Interest is the interest rate for
the investment per time period. Future_value is the value of the annuity at the
end of the investment period. Be careful to enter the interest rate for the same
time pen'od as the term.
Information Functions
The information functions return information about a cell or a range of cells.
Function
cI oosE
_valuel, value2,._.)
Descd_ion
Returns the n th value in the list of arguments, where the first value is 0 and index
indicate&_ the nth valu_:_Valt_e carrbe flor_ 0to n-1. You can use as many v_tues as
you want. lnde:_ and values can be numbers, cell references, defined names,
formulas, functions, or text. For example, if the values are the months of the year and
the index is 5, then CHOOSE returns May. This function returns an error if your
index is less than zero or greater than the number of values.
COLS (range) Returns the number of columms in arange.
COUNT (valuel, The number of arguments, that is, the number of nonblank cells in a range. Values
value2,...) can be numbers, null, logical values, and dates. The arguments can only be a
comma-separated list.
ERR 0 Causes the formula to return the #ERROR# message. Particularly useful with IF
functions to say: if the condition is false, then return #ERROR#. You must include the
empty parentheses.
Appendix 217

Function
HLOOKI_ (value,
range, offset)
Description
Returns a value from ahorizontal lookup table, allowing you to use a spreadsheet
table like adatabase. HLOOKUPextracts from the horizontal rows, and VLOOKUP
extracts information from verticalcolumns. HI.OOKUPassumes the entries in the Fast
row are sorted in ascending order.This function returns the entry corresponding to
the nearest ascending value that is not greaterthan va/ue. Useful when you have
several alternatives to look up, such as tax rates, commissions, or discounts. Va/ue is
the value to be found in the lust row of the table. Va/ue can be a number, address,
or text string. Range is the address of the range that defines the table. Offset defines
which row contains the information. The offset of the top row is zero. See the
example on page 219.
INDEX (range, Returns the value of the cell at the intersegtion of a row and column. The top row
column offset, row is 0,0. Range is the address defining the range. Co/Utah offset defines the column
offset) offset in the specified range. Row offset defines the row offset in the specified range.
ISERR (t_/ue) Retm-ns1 if an expression is an error or 0 ffit is not. This function is particularly
useful in IF statements.
ISNUMBER (m/ue) Returns 1if an expression is a tt_ or 0 if it is not. Useful in IF statements.
IS,STRING (value) Returns1if an expression is a string or 0 if it is not. Useful in IF statements.
3I (range) Returnsthe value flora the first cell in a range if that cell contains a number, time,
or date. If the cell contains text, the function returns 0 (zero).
NA0
ROWS (range)
VLOOKUP (m/ue,
range, offset)
÷
Returns the number of rows in a range.
Stops the evaluation of a formula and generates #N/A# in the formula cell. NA is the
iabbreviation for Not Av "rulable. This function is useful ff you are creating a
spreadsheet-and do not h_'_'_all the required-values. If aformula refers to ace_,
containing #N/A#, R'retums #N/A# so that you do not inadvertently forget to
complete the spreadsheeL You can type #N/A# directly into the cell. You must
include the empty parentheses.
Returnsavalue from avertical loolmp table, allowing you to use a spreadsheet like
a database. VLOOKUP extracts information from verticalcolumns in the same way as
HLOOKUPextracts from the horizontal rows. VLOOKUP assumes the entries in the
fast column are sorted in ascending order. This function returnsthe entry
corresponding to the nearest ascending value,that is not greaterthan va/ue. Va!ue is
the value to be found in the first column of the table, and it can be a number,
address, or text string. Range is the address of the range that defines the table. Offset
defines which column contains the information.The offset of the first column is zero.
Appendix 218

Information Function example: HLOOKUP
HLOOKUP and VLOOKUP allow you to search for a value that is within a
range of values.
The table below is an example of a simple lookup table. This table tracks a
discount rate, which is based on the number of units sold. If you want to
look up a discount rate for 1257 units sold, use HLOOKUP to extract values
horizontally.
When using
HLOOKUP or
VLOOKUP, the table
entdes must be
sorted in ascending
order.
I
2
3
4
5
5
7
RI e Ic In
i i !
i°il®i5ooi
i i i
IEI r isl
i i ! !
|; ; ;
,i i
t,0®iI_®0
i i i i
! i i i
i i i
i ! i i
HLOOKUP(B1,B3:F4,1) = 10%,
In this example, HLOOKUP(B1,B3:F4,1) returns 10%. B1 contains the value,
1257 units. BI:F4 is the table range. The offset is 1, which defines the row
containing information to search. In this case the offset is the row with the
discount rates. The offset of the f'n-st row of data is 0.
HLOOKUP returns 10%_because it is the discount rate for 1,000 to 9,999 units
. .. u--_--_< ....J
s0ld. --- _.
Appendix 219

Logical Functions,
The logical functions evaluate relationships and return true or false results.
True=1(or nonzero values) and false = 0.
A logical function uses a conditional statement; for example, if this is true
then do that. An example of a lo[_ical function would be this conditional
statement: if the value in B12 is larger than 10,000, then display 50 in this cell.
Description True = 1(or nonzero), False = 0
Function
AND (logicall,
IogicatZ,...)
FALSE ( )
IF (tog/ca/,true
value, faise value)
OR (logicaH , _:
logical2,...)
TRUE()
Logical AND. Returns 1 if all arguments are true or 0 if any is false. Useful with IF
statements. Logical can be either logical values, arrays or references to cells that
contain logical values. Text is ignored. If the argument does not contain a logical
value, AND returns the #TYPE# error. See also OR. You can have as many/ogical
arguments as you want.
Returns O. You can use FALSE in acalculation or enter it directly into a cell where it
is interpreted as a logical value. You must include the empty parentheses. See also
TRUE. .
Evaluates acondition, returning one specified value if true and another if it is
false. Logical is any expression or value that can be evaluated as true or false. True
value is the value returned if the logical expression is true. False value is the value
returned if the logical expression is false.
Returns 1 if at least one of the arguments is true or 0 if all of the arguments are
false.The arguments can be-'3,-d.luesor-cells. You can have as many logical arguments
as you want. OR ignores text. If an argument does not contain a logical value, OR
returns the #'rYPE# error. OR is particularly useful with IF expressions. See also AND.
Returns 1. You can use TRUE in a calculation or enter it directly into a cell where it
is interpreted as a logical value. You must include the empty parentheses. See also
FALSE.
Logical Function example: IF statements
IF statements consist of the following:
• The condition you want to test
• The result you want if the condition is true
• The result you want if the condition is false
For example, you might calculate escalating bonuses for a sales team based
on a percentage of the sales, located in cell C4. For sales under $10,000, the
bonus is 2%.
Appendix 220

IBONUS = .04*SALES
BONUS= Sr_0.00
t
IBONUS: .02*SALES
BONUS= $150.00
BONUS= IF(SALES<IOOOO,.O2*SALES,.O4*SALES)I
For sales over $10,000, the bonus is 4%. The formula for such an IF statement
shown in the box above is =IF(C4<10,000, 0.2 * C4, .04"C4) where the sales
figure is located in cell C4.
In this example, SALES<10000 is the condition you want to test, .0Z*SALF_ is
the result you want ff the condition is true, and .04*SALESis the result you
want if the condition is false. Therefore, if the SALES figure is $15,000 then
the IF statement returns false, and Spreadsheet computes the formula as in
the box at the left.
If, on the other hand, the SALES figure is $7,500, then the IF statement returns
true, and Spreadsheet computes the formula as in the box at the left.
Logical Function example: combining functions
By combining IF with the AND and OR functions, you can create even more
complex conditional statements. Consider the following examples:
=IF(AND(AI>100,BI>100,Cl>IOO),5,0)
The result of this formula is 5only if the values in A1, B1, and C1 are all
greater than 100. Otherwise the result is 0. You can apply the same principle
using the OR function,:_ shown in the following example:
:!IF-(OR(A1> 100,B1> 100),50,O)
The result of this formula is 50 if either A1 or B1 is greater than 100;
otherwise, the result is 0.
Using Logical operators in Logical Functions
You can also use conditional operators that result in a value of 0 if false or 1
if true. These operators are used with IF functions.
SYMBOL
>
<
(CTRL+ MENU + >)
(CTRL + MENU + <)
(CTRL + MENU + =)
OPERATION
iGreater than
Less than
Greater than or equal to
Less than or equal to
Not equal
EXAMPLE
A14>B12
A14<B12
A14_.B12
A14_B12
A14#B12
Appendix 221

Mathematical Functions
The arguments for mathematical functions are either numbers or addresses of
cells that contain numbers. The results of these calculations are always
numbers.
Function
ABS (value)
£XP (mluO
Description
Absolute value of a number. Value can be a cell. For example, ABS(-12) returns 12.
Value of e(the mathematical constant) raised to the power of yaks. Vahw is a
positive integer. If va/ue has a fractional portion, FACT calculates the factorial for the
integer portion of value. For example, EXP(2) retmaxs 7. 389506 or e z.
FACT (value) Factorial of anumber (value). For example, FACT(4) returns 24.
INT (value) Value rounded to the next lowest integer. Vahae can be a positive or negative
number, or a reference to a cell that contains a number.
LN (vahte) Natural logarithm of value, using the constant eas a base. LN is the inverse of EXP.
Value must be a positive number. For example, LN(2) returns 0.693147.
LOG (value) Base 10 logarithm of va/ue. Value must be a positive number. For example,
LOG(100) returns 2.
MOD (value, divisor) Modulus, the remainder of the division of value by divisor. If you attempt to divide
.... _ MOD returns an_ er_o_..-_ - _ by zero, _
PRODUCT (valuel, Product of multiplication of a list of numbers (values). You can have as many
value2,...) .arguments as you want. Value can be numbers or references.
ROUND (valu_ value rounded to the specified number of decimal places. For example,
p/aces) ROUND(12.2376) returns 12.24.
SQRT (value) Square root of ava/ue, va/ue must be apositive number.
SUM (valuel, Total of a list of va/ues. You can use as many arguments as you want.
value2,...)
TRUNC (value) The integer portion (without rounding) of avalue. For example, TRUNC(23.66)
returns 23.
Appendix 222

Print Functions
The print functions returnthe name of the file, the current page, and the
number of pages with headers and footers when printing documents.
Function Description
FII.ENAME ( ) Returns the mename of the current file for inclusion in a Spreadsheet header or
'footer. You must include the empty parentheses.
PAGE ( )Returnsthe current page number for use in a header or footer. Must include the
empty parentheses. If you use PAGEoutside of a Spreadsheet header or footer, PAGE
is calculated when you print.
PAGES ( ) Returnsthe total number of pages in a document for use in a header or footer.
You must include the empty parentheses. If you use PAGESoutside of a header or
footer, PAGESis calculated when you print.
Statistical Functions
The arguments for statistical functions consist of either numbers or addresses
of cells that contain numbers. The results of these calculations are always
numbers.
Function
AVG (valuel,
value2,...)
Description
Average of the values in a list. You can useas many arguments as you want. AVG
treats empty cells as zero values. You cannot average cells containing text.
MAX (valuel, Largest number in a list. Listcan include values or addresses, separated by commas.
value2,...) MAXignores empty cells and treatstext as a zero.
MIN (valuel, Smallest amber value in alist. Listcan include values or addresses, separated by
value2,...) commas. MIN ignores empty cells and treats text as a zero.
RANDOM ( ) Random number between 0 and 1. RANDOMreturns a new random number with
every recalculation. RANDOM0 returns a decimal value.
II
_MN (value) Ramdom number betweea Oand t,akm_l, a number you specify. RANDOMN
:returns a new random number with every recalculation. Forexample,
RANDOMN(100)returns a number between 0 and 99.
--.STD (valuel,
value2,_) Standard deviation of the values in a list. You can use as many va/ues as you want.
Appendix 223

Function
STDP (valuel,
value2,..)
VAR (valuel,
value2,..)
VARP (valuel,
value'2.-)
Description
Standard deviation of a population. You can use as many t_dues as you want.
Simple variance of asample population. You can use as many arguments as you
want.
Population variance of the values in a list. You can use as many arguments as you
want.
String Functions , , ,
Astring is a series of characters. The string functions extract text (including
numbers) or return numbers based on text.
To enter a string as an argument, enclose it in double quotation marks. If the
text string itself contains quotation marks, use single quotation marks inside
the string; for example, "Enter the word 'vanilla' in the second blank." Stags
can be up to 255 characters long (including quotation marks). If you want to
specify a string with no characters, enter .... to specify empty text.
Function
r-
cHAR (value)
CLEAN (string)
CODE (string)
EXACT (stringl,
FIND (substring,
-w string, start)
Description
Converts a code ammimr to a- character. Each text character is represented by a
code number. The CHAR string function converts code numbers to characters. You
can use values between 1 and 255. The function of CHAR 0 is the opposite of
CODE 0. If the value is out of the 32-255 range, CHAR returns a #VALUE# error. For
example, CHAR(65) returns A.
Strips unprintable characters from a string. Useful for removing nonprintable
characters fTom imported text. For example, CLEAN(CHAR(13)&"text') returns text.
Converts a character to its code number. Each text character is represented by a
code number. The CODE string function converts characters to code numbers. For
example, CODEC'A" ) returns 65.
Compares two strings for an exact match. EXACT is case sensitive, meaning that
April and april are not considered an exact match. Ifstn'ngl and string2 match,
EXACT returns 1; ffthey do not match, EXACT returns 0. lts action is similar to the
equal sign except the equal sign is not case-sensitive. This is particularly useful with
IF statements.
Starches within a string for a specific string. Returns the numeric position of the
first character of the substn'ng. You can specif7the numeric position of the starting
character for the search with the start argument. The first character in the string is in
position 0.
Appendix 224

Function
LEFT (string,hum)
Description
Returns the characters in the leftmost position in a string. Num is the number of
characters to return. The first character in the string is in position O. A reference to
cells containing values produces an error. The RIGHT function extracts characters
beginning with the rightmost character, while LEFT extracts beginning with the
leftmost character, and MID extracts from an internal position. See the descriptions of
the RIGHT and MID functions.
LENGTH (string) Returns the number of characters in astring including characters, punctuation
,marks, and spaces enclosed in quotation marks.
Converts uppercase characters to lowercase.
LOWER (sUing)
MID (s_ng, start,
ttum)
PROPER (string)
REPEAT (string,
tzum)
REPLACE (original,
start, hum, l_eplace)
RIGHT (string,hum)
Returns the number of characters (hum) in the middle of astring, beginning at
the position you indicate (start). The first character in the string is in position 0. A
reference to cells containing values produces an error. The RIGHT function extracts
characters beginning with the rightmost character, LEFT extracts beginning with the
:leftmost character, and MID extracts from an internal position. For more information,
] see the descriptions of the LEFT and RIGHT functions.
CapitaliT_es the first letter of every word and the first letter following any nonletter
character. PROPER converts all other characters to lowercase.
Repeats a string a specified number of times. If nton is zero, REPEAT returns an
empty string. For example, REPEAT("HA",6) returns HaHaHaHaHaHa.
Replaces matching characters in a string with a specified string. On_ina/is the text
string in which you want to replace chara_ers. Start is the first character in the
original-string that.-you_c'a%xt- to replace. The first character in the string is 0. ?rum is
the number of characters in the original string that you want to replace. Replace is the
replacement string. You can use more or fewer replacement characters than are
replaced, in the original string.
Returns the characters in the rightmost position in a string. RIGHT returns to the
right that number of leftmost characters. The first character in the string is in position
0. A reference to cells containing values produces an error. While RIGHT extracts
characters beginning with the rightmost character, LEFT extracts beginning with the
leftmost character, and MID extracts from an internal position. For more information,
see the descriptions of the LEFT and MID functions.
STRING (value, N) Converts values to a string using Ndecimal places. Ncan be a number from 0
through 15. For example, STRING(245.356,1) returns 245.4.
TRIM (string) Removes extra spaces before and after words and between lines of text in a string.
UPPER (string) Converts a string to uppercase..
VALUE (string) Converts a number in string form to a value
Appendix 225

Time and Date Functions
Spreadsheet uses serial numbers to represent times and dates. The serial
numbers begin with 1 = January 1, 1900. The DATE and DATEVALUE
functions return the serial number for a given date.
Function
DATE (year, month,
day)
DATEVALUE
(string)
DAY (date value)
HOUR (time value)
MINUTE (time
value) _ _
MONTH (date
value)
NOW( )
SECOND (time
value)
b
Description
Converts a numeric date (day, month, year) to the serial number format. Year
can be from 1900 to 2078. For the years 1900 to 1999, you can enter just the last two
digits, for example 96 rather than 1996. Month can be 1-12. Day can be a value from
1-31, depending on the number of days in month. If you useyear, month, or day
values that are out of range, DATE returns #VALUE#.
Converts adate (in text form) to the serial number format
Extracts the day from the serial number format. Date va/ue must be aserial
number. Use DATEVALUEto convert dates entered as labels.
Returns the hour of the day from time va/ue serial number. You can use
TIMEVALUE to convert text time. The hour is an integer from 0 to 23. Time serial
numbers are decimal fractions and can be part of a date/time combination. If there is
no fractiona| part, the time is midnight.
Extracts the minute from the time value serial number. The minute is an integer
from 0 to 59. Time seri!!, numbers are decimal fractions and can be part of a
date/dme-combinationyJf_-_ is nO fractional part, the time is midnight. You .can
use TIMEVALUE t@convert text time.
Extracts the month from the date va/ue serial number. Month is an integer from
1 to 12. Timeserial numbers are decimal fractions and can be part of adate/time
combination. If there is no fractionalpart,the time is midnight. Use DATEVALUEto
convert dates entered as labels.
Returns the current date (month, day, and year) and time (hour, minute, and
second). You must enter the empty parentheses. The whole number represents the
date as aserial number starting January 1, 1900. The decimal fraction portion of the
number represents the time, beginning at midnight =0. You must include the empty
parentheses.
Extracts the second from the time va/ue serial number. The second is an integer
from 0 to 59. Time serial numbers are decimal fractions and can be part of a
date/time combination, ff there is no fractional part, the time is midnight. You can
use TIMEVALUE to convert text time:
TIME (hour, minute, Converts a numerical time (hour, minute, and second) to the serial number
second) format
TIMEVALUE Converts a time (in text format) to the serial number format
Appendix 226

Function
TODAYO
WEEKDAY (date
value) •
Description
Returns the current date (month, day, and year) in the serial number format
Returns the number for the dayfrom the serial number format for date va/ue. The
WEEKDAY returns a number representing the day of the week: 1 for Sunday, 2for
Monday, etc. Date value must be a serial number. Use DATEVALUE to convert dates
entered as labels.
YEAR (date value) Returns the current year from the serial number format for the date value. Date
value must be a serial number. Use DATE'VALUE to convert dates entered as labels.
Trigonometric Functions
The arguments for trigonometric functions are either numbers or addresses of
cells that contain numbers. The results of these calculations are always
numbers.
Function Description
ACOS (value) " Returns the angle that is the arc cosine of a value from -1 to 1. Value can be a cell
or range of cells.
lACOSH (valWe') °- .Returns the angle that-is_ehyperbolic arc cosine of a value. The inverse.
- hy_perboli--€- c0sin¢ _e-num-imr for which the hyperbolic cosine is value. Value must
ibe equal to or greater than 1.
ASlN (value) --
ASINH (value)
ATAN (value)
ATANH (value)
ATAN2 (value)
Returns the angle that is the arc sine of a value. The arcsine is the angle which is the
sine of value. The angle is between lt2 and -7t2 radians. Value must be from -1 to 1.
lReturns the angle that is the hyperbolic arc sine of a value. The inverse hyperbolic
sine is the number which is the hyperbolic cosine of value.
: Returns the angle that is the arc tangent of a number. The arctangent is the angle
(in indians) for which the tangent equals value. Value is the tangent of the angle you
want.
Returns the angle that is the hyperbolic arc tangent of a value. Value must be
between (but not including) -1 and 1. The inverse hyperbolic tangent is the number
which is the hyperbolic tangent of va/ue.
Returns the arc tangent of the angle determined by the coordinates (x,y). The
arctangent is the angle formed by the x-axis and a line passing through the origin
(0,0) and the specified x,y coordinate. The coordinates x,y can be in any quadrant.
The angle is returned in radians from a2 to -7t2. Apositive result indicates a
counterclockwise angle from the x-axis. You cannot use the origin for the x,y
argument. If you use 0,0 for x,y, the #VALUE# error appears in the cell.
Appendix 227

Function
COS (angle)
COSH (value)
DEGREES
PI() :
RADIANS
SIN (any/e)
SINE[ (ang/e)
TAN (angle)
TANIt (angle)
Description
Returns the cosine of an angle, expressed in radians. If you know an angle in
degrees, you can use the RADIANS function to convert it to radians.
Returns the hyperix_lic cosine of a value.
Converts radials to degrees.
Value of Tt (3.141592653589795). You must include the empty parentheses.
Converts degrees to radians.
Returns the sine of an angle expressed in radians. If you know an angle in degrees,
you can use the RADIANS function to convert it to radians.
Returns the hyperbolic sine of an angle, expressed in radians.
Returns the tangent of an angle. You must express angle in radians. If you know an
angle in degrees, you can use the RADIANS function to convert it to radians.
Returns the hyperbolic tangent of an angle. You must express angle in radians. If
you know an angle in degrees, you can use the RADIANS function to convert it to
radians.
Appendix 228

Glossary
absolute reference - in Spreadsheet, a reference to a cen address based on its column and row
number
argument - in Spreadsheet, a piece of information you enter into a formula
ASCH - American Standard Code for Information Interchange, a common exchange format
between computer applications
auto_matic pagination - a method for creating and numbering pages automatically
bar chart - a horizontal chart in which values are represented by filled rectangles of varying
widths (as opposed to a vertical bar chart)
base style - a text style from which other text styles are created
baud rate - the speed at which a modem sends and receives information.
bibliography - an alphabetical list of books given in order of the authors' last names
binary file - a type of file that uses an arithmetic system using a base of 2
bitcount - number of bits (pieces of information)
bitmap (BMP)- a group of pixels that form an image
border - a line or box around text or graphics
byte - a unit of information consisting of 8bits, used to show memory capacity.
card view - in Addressbook, to be able to view one address card at a time
carriage _- the_'_me.chanical u_that cat!i.e_s-Lh_kjet cartridge back and forth across the pa_e
case - either upper (E) or lower (e)
cell - the box irva-spreadsheet in which you enter data
cell address - the location of a-cell, shown by its row and column. For example, A1 is column A,
row 1.
character keys - the keyboard keys used for typing text and numbers
chart - a graphic representation of numeric data
check box choice - a type of menu choice that has a box next to it. Clicking on the box or name
turns it on and off.
circular reference - a formula in which the calculation uses the result of the same calculation
clipboard - a temporary holding place for one image or block of text. Placing an item in the
clipboard erases any previous clipboard content.
column chart - a vertical bar chart
column headers - the letters that label columns
compression - the process of making a file smaller (using less disk space for storage)
configuration - the set of choices that you make about how an application appears or operates
Glossary 229

continuous printing - a Spreadsheet printing option that allows you to print a spreadsheet as
one continuous page
control keys - the keyboard keys that modify the effect of the other keys. CODE, MENU &
SHIFT are control keys.
-Comma Separated Values format used in database and spreadsheet programs
data bits - the smallest piece of information that a computer can process
data file - a file created by an application
defaialt setting - a system setting that is automatically applied unless you change it. For example,
you may want to change the defauk setting of 10 point text to 24 point.
directory - a folder
disk drive - the slot on the side of the unit in which diskettes are inserted
diskette - a 3.5" square disk. Diskettes can be used to run programs or store documents and data.
Diskettes must be formatted unless you purchase them pre-formatted.
document - also called a file, is a holding place for information, containing text and/or graphics.
A document is stored as a file and has its own icon consisting of the application icon over
three blank sheets of paper.
DOS - Disk Operating System, computer software that controls the basic functions of a computer
do-not pointer - one of the shapes of the pointer. It indicates that the pointer is not in an area of
the screen where you can take any action.
Drag button - the bottom button on a glidepad or right button on a mouse used to move an item
on the screen. For example, to move tex_o a new location, select the text, hold down the
Drag button, and move the on-scneen pointer to the new location
dragging - moving the on-screen pointer across the screen. With a mouse, drag by moving the
mouse; on a-glidepad, drag by sliding your finger or top of your.fingernail across the glidepad
surface
draw mode - a screen display option for the Drawing application
dual documents - working in two documents at the same time
duplex - when using a modem, the ability to send and receive data at the same time
emulate - to act like; to resemble
executable file - a type of file that allows you to execute or start a program
extension - the three letters that follow the name of a file in DOS format, describing the file
format
modlem - communicates with other fax or data modems and fax machines
field - a place for entering a certain type of information, for example, a blank within a dialog box
or a cell within a Spreadsheet document.
file - a saved document
_.file mask - a way to see only the Ides of a certain type, filtering out files of other types
Glossary 230

file selector -the New Disk button and the scrolling list in dialog boxes for selecting afile,
folder, or diskette
fixed notation - a format option for numbers in which you set the number of decimal places that
you want to appear, such as two decimal places: 10.99
floating point math - a quick method for calculating numbers with a mantissa, which is the
nurnbers the follow a decimal point. For example, in 3.256789888, the mantissa is
0.256789888. Floating point math closely estimates a mantissa, which makes calculations
involving a lengthy mantissa faster. The estimation produces errors in the 17th or 18th number
,after the decimal; however, this level of error is negligible and adheres to the industry
standard.
folder - a container for files, also known as a directory
font - a typeface
footer - a page element that appears at the bottom of each page, containing items such as a page
number
footnote - a note at the bottom of apage that gives more information about some item
mentioned in the body text on that page
formatting a diskette - preparing an unformatted diskette to receive information (some are
formatted when you buy them). Use only MF-2DD
(double-sided/double-density/double-track) and MF-2HD (double-sided/high
density/double-track).
formula - performs a calculation, like totaling numbers
function k e]rs_- the top row keys that activate functions such as copy, paste, etc.
functions, Basic iool bar - contain,%b--ut-t'6ias-t:'oor performing tasks such as save, copy, etc.
functions, Advanced tool bar - contains buttons for performing tasks such as zooming in
geometric progression - a series of numbers such as 3, 9, 27 that increases by a specific
multiplier (called a step value) such as 3
gildepad -a built-in pointing device used to select options on the screen.
graphic frame - a rectangle that you can place around text or graphics
grid - in Spreadsheet, the layout of rows and columns, forming rectangular cells for entering data.
In Drawing and Word Processing, the pattern of evenly spaced horizontal and vertical lines
that help you size and align objects.
grid line - the horizontal and vertical lines that make up the Spreadsheet grid. In Drawing, the
lines that help you to size and align objects.
handles - the small black squares that appear around a graphic when you select it
hard page break - a type of page break that you set intentionally as opposed to a soft page
break, which occurs automatically
-- hanging indent - a first line extending farther left than the rest of aparagraph, hanging out in
the margin
Glossary 231

header - a page element that appears at the top of each page. See footer.
highlight - to select text or graphics to be able to work with that chosen item. Highlighted text
has a black background, and highlighted graphics have square handles around them.
high/low chart - a chart for representing a starting and ending value
home page - The beginning document (Web page) in your Intemet Web browser
host - The Intemet Service Provider who sends outgoing emails and receives and stores incoming
emails
hour'glass pointer - pointer (insertion poin 0 indicating that the system is busy and you must
wait.
hyperlink - a feature that allows you to skip around in a document (Web page or Bookreader)
I-beam pointer - on-screen pointer indicating that you can type or edit text or select and place
text.
icon - a picture symbol on the screen used to represent a program, task, or tool bar button
import/export function - allows you to use documents with other programs
indentation -the space between the margin and the text
Information bar - at the top of the File Manager screen that describes information (such as size)
about a diskette or folder
insert mode - a mode for entering text in which new text pushes existing text to the right
insertion point - the blinking vertical line on the screen that shows you where your next text
will be plac._=_ --. _-_ __
interact - Not cap]talizecl, any collection of computers connected to share information
Internet - Capitalized, the world-wide network of computers accessed through an Intemet
Service Provider
Internet Service Provider- A company connected to the Intemet who acts as your gateway to
the Intemet
inverse mode - a drawing mode that displays the top object as the inverse color of the
background color, and, where they overlap, combines the colors of overlapping objects to
make a third color
invisible characters - characters that do not appear when you print,such as a section break
mark
iteration - process in which the desired result is approached through repeated cycles of
"successively better approximations.
justified - paragraph alignment in which all right edges of text align exactly on the right margin
keyboard layout - the types of keys and their arrangement on the keyboard
--labels - in Spreadsheet, the descriptive titles for rows and columns
landscape layout - a type of page layout in which the page is wider than it is tall
-'leading - the space between lines of text in a paragraph
Glossary 232

legend- the part of a graph that uses text for explanation
llne chart - a chart that represents values with points on an x-y axis, connecting the values with •
straight lines
line status - in Communication, the quality of the phone connection
linear progression - a progression of numbers that is increased by a certain amount, the step
value
logical function - a mathematical formula that includes an If statement
logical operator - a mathematical symbol used in logical functions (> <_>< ;_)
lookup functions -in Spreadsheet, functions used to create a table in a spreadsheet that acts like
a database
Main Menu - the first screen you see when you turn on the machine, containing icons for the
programs
map - to change the order of fields when importing or exporting database or spreadsheet
information (Spreadsheet and Addressbook programs)
markers - the points in a line on an x-y plot chart
master page - the prototype page that determines the format of each page in a document
maximize/restore awindow - to enlarge a window from icon-size to full-screen size
menu - a list of choices
menu bar - contains all the pull-down menus for the application
merge ,_to_combine data from one applicafig, n with data from another
minimize awindow - to reduce a window to the size of an icon
modem - a deyice for connecting to a telephone line for the electronic transfer of information
monitor - a CRT (Cathode Ray Tube) screen and its housing
monospacing - each letter takes up the same amount of space. Typewriters use monospacing.
See proportional spacing.
mouse - a hand-held pointing device used to select items on the screen
New/Open dialog box - a dialog box that asks you to choose a document or template to open
On-line Help -a source of quick information accessed through the HELP function key
operators - symbols that show a mathematical operation, such as +
parent folder -a folder that contains the current folder
parity- a modem feature that checks electronic information to make sure it will transmit
accurately
patlmame - a DOS name that shows how you got into the file or folder you are currendy using
PCX - Paintbrush format, a popular bitmap exchange format for using graphics in different
programs
Glossary 233

pica - 1/6 of an inch or 12 points
pie chart - around chart that represents values as pieces of a pie
pinning amenu - keeping a pull-down menu on the screen
pixd - the smallest dot on the monitor screen
pixd view tool - a bitmap tool that allows you to see and change individual pixels
place holder text -text that appeam in templates showing you what kind of information to put into
your doctunent
t
pointer - the arrow appearing on the screen that is moved with the mouse
point - a measurement used in the printing industry equal to 1/72 of an inch
polygon - a figure with at least 3 sides
portrm't layout - a page layout in which the page is taller than it is wide. Also called vertical
layout.
proportional spacing - each letter takes up an amount of space proportional to the size of the
letter
protocol - a set of rules
radio button - a type of menu button that allows for only one choice to be turned on at a time
radius - half of the diameter of a circle or ellipse; the distance from the center to the edge of a
circle
RAM - (random access memory) stores information for the on-screen display and for routine tasks
such as opening a submenu -- -_ _ _
range - a group of cells in a spreadsheet
read-only - a type of file or diskette that can be opened, but not changed
redraw - for recreating or updating the image on the screen so that all of the text and graphics
are accurate
reference mark - the character, usually a number, used to match the text reference with its
footnote
relative reference - a reference to a cell address based on its location relative to the cell
containing a formula
release - an edition of an application designated by a number such as 5.1 or 5.2
resolution - the sharpness of an image measured in dpi (dots per inch) on printed matter or ppi
(pixels per inch) on a monitor screen
row header - the numbers that label each row in a spreadsheet
scale to fit - an option that allows you to see the whole page in the application window
script - in Communication, a fde you create to perform a task such as dialing a phone number
scientific notation - a way of expressing large numbers by using powers of 10, such as 3 x 10³
•scroll bar - a bar containing arrows and a sliding marker, allowing you to scroll through your document
Glossary 234

scrolling list - a box listing various items used in conjunction with a scroll bar such that you are
able to see all the selections from which to choose
select - to highlight an item using the on-screen pointer or keyboard. Selected items will darken
Select button - the top button on a glidepad or left button on a mouse used to select an item on
the screen. For example, to draw a box in Drawing, select the Box tool, hold the Select
butt6n, and drag the on-screen pointer.
shading - using only a percentage of the full color value
snap objects - to cause objects to be pulled toward the lines in a grid, making the placement of
the objects easier and more consistent
soft page break - a type of page break that occurs automatically by the program as text flows
from one page to another
Special Characters keylmard - allows you to choose special character keys and symbols
spreadsheet - a document containing cells for entering data, allowing you to make automatic
calculations
smmup doeumem - opens when you open Addressbook, Planner, or Scrapbook
stop bits - a modem setting that acts as a traffic controller, telling when to send or receive a
character
string - a series of characters used in spreadsheet formulas
style - a collection of text and paragraph format options grouped under a common name. See
text style sheet.
Style tool bar_ contains tools for changing te2ct style (size, font, etc.) and for checking spelling
_abmenu - a secondary menu that is_reveal_l_hen a menu or another submenu is selected
tab leaders - dots or lines inserted between tabs
tabs - designated points on the page that you can move the insertion point to, handy for making
columns
template - a ready-made document with layout work already done for you
text region - the area where text will appear on the page
text style shoets -the set of all named text styles used in a document
thesaurus - a source for finding synonyms (words similar in meaning)
TIFF - Tag Image File Format, a standard format for storing bitmap graphic images
. title bar - an area at the bottom of the window showing you the name of the document you are
currendy working in
title page - the first page in a document usually containing the title, author's name, and date
tool bar - a collection of tools arranged on a horizontal or vertical bar at the top or side of the
--- application window
trailing - a format option that allows you to add a suffix to the values you enter in a spreadsheet
Glossary 235

transform - a submenu item that contains the options flip, rotate, skew, and scale
tmformatted diskette - adiskette that has not been prepared for saving documents.
uniform resource locator (url) - the address of a document (web page) on the Intemet's World
Wide Web
user dictiottary - a special dictionary that you create with terms not found in a dictionary
valu_ - numbers entered in a spreadsheet
vertical scroll bar - allows you to easily move up and down the display window by using the
pointer to drag the box in the scroll bar or click on the arrow controls
view at % - allows you to see your document at a selected percentage of its normal size
web page - a document on the Wodd Wide Web
wildcal'd - a symbol (* or ?) that substitutes for an unknown character when searching for a
word. Wildcards make certain word searches more efficient.
window - a boxed-in area of the screen in which you are creating or editing a document.
Windows have a title bar and menu bar across the top.
word wrap - a feature allowing words that cannot fit on one line of text to automatically be
placed on the next line
wrapping text - a feature that allows you to place text around graphic objects in several ways
XMODEM - a protocol (set of rules or standards) used in data transmissions that controls data to
be sent or received, and resends a file if a problem occurs while sending
x-y plot chart - a type of chart that evaluates one number against another, sometimes called a
e_ po_T_
scatt *_ _
zooming in/out - to change your pe_'spective so that you can either see your work in greater
detail or see.more of the page
Glossary 236

Index
A
abbreviatiotis for long phrases,
59
ABS(value) mathematical
function, 222
absolute references,
Spreadsheet, 87
ACOS(value) trigonometric
function, 227
ACOSH(value) trigonometric
function, 227
address records, 174
Addressbook
email address, 175
exporting, 183
importing, 182
merging with Word
Processing, 55
phone numbers, type, 176
printing, 180 _
aligning text
Drawing, 155
Spreadsheet, 83 ---
tips, Word Processing, 1
Word Processing, 15
AND function
logicall, logical2 ..... 220
spreadsheet, 221
arc
changing, drawing, 139
tool, drawing, 126
arguments
. built-in functions, 88
in functions, 215
ASIN(value) trigonometric
function, 227
..ASINH(value) trigonometric
function, 227
ATAN(value) trigonometric
function, 227
ATAN2(x,y) trigonometric
function, 227
ATANH(value) trigonometric
function,227
AVG(value 1,value2,...)
statistical function, 223
B
bibliography, creating, 48
bitmap
color, 161
ellipse, 159
erase, 161
formats, tag image formats
(TIF), 165
frame, creating, 157
freehand, 159
images, editing, 160
line, 159
objects, Drawing, 156
pixel view tool, 161
rectanglejq_9.- _ ,
resolution, 163
selection region, 160
shapes, Drawing, 158
tool
ellipse, 127
line, 127
rectangle, 127
bitmap (BMP) format, 165
bold text
changing to, 14
spreadsheet, 84
tool bar button, 3
book reader, 201
close, 202
copy, 203
find, 203
open, 201
print, 204
border
color, 25
customizing, 25
paragraphs, 25
shadow width, 25
spacing, 25
types, 25
width, 25
brush tool, drawing, 127
built-in, functions,formulas,
85
bulletcharacter, I
C
calculation, Spreadsheet, I00
calendar, viewing, 186
calendars, creating, Planner,
200
cell (Spreadsheet)
active, 66
address, 65
borders, 78
description, 65 _,
centering text, 15, 83
changing
Addressbook records, 177
bitmap images, 160
bitmap memory size, 163
column width (Spreadsheet),
82
fonts, 13, 84
graphic layouts, 45
margins, Word Processing, 6
ruler units, Drawing, 150
scheduled events in Planner,"
191
spacing
between lines, 20
between paragraphs, 21
style sheets, 34
tabs, 23
text alignment
Spreadsheet, 83
Index 237

Word Processing, 15
text appearance, 12
text size, 13
user dictionary, 51
CHAR(value) string function,
224
character
spacing, 12
weight,, 12
width, 12
Charts, legend, changing, 112
charts
area, 105
axis markings, changing, 112
bar, 104
chart titles, 111
column, 103
copying, another program,
110
creating, 102
deleting, 110
description, 102
elements, 102
changing, 110
grid markings
_- a_dding, 113 -_- _
changing, 112
high/low, 107
line, 104 --.--
maintaining aspect ratio, 109
markers, changing, 114
moving, 109
pie, 106
resizing, 109
scatter plot, 106
text properties, changing,
110
titles, changing, 111
tools for creating, 68
$-y plot, 106
CHOOSE(index,valuel,vahie2
....) information function,
217
CLEAN(string) function, 224
clip art, using, 42, 168
clipboard, 10, 55
Index 238
CODE, function (string), 224
color
background of text, 16
bitmap, 161
Drawing, 136, 138
spreadsheet, 80
text
Drawing, 155
Word Processing, 15
COLS(range) function, 217
column
breaks, Word Processing, 29
changing,Word Processing,
30
creating, WordProcessing, 6
inserting breaks, Word
Processing, 31
width, Spreadsheet, 82
compression, 166
continuous printing,
Spreadsheet, 120
Converting text, graphic, 145
copy, book reader, 203
Copy tool, drawing, 127 ,
copying
Addressbook records, 177
charts, to another program,
110
event descriptions, Planner,
192
Spreadsheet
cells, 95
formulas, 95
text, 11
dragging and dropping, 11
correcting asyou type, 8
COS(angle) function, 228
COSH(value) function, 228
COUNT(valuel,value2,...)
function, 217
counting words, Word
Processing, 58 .
creating
a master page, 36
Addressbook records, 174
arcs, lines, objects, 134
bibliography, 48
bitmap lines and shapes, 158
chart legends, Spreadsheet,
112
chart titles, Spreadsheet, 111
charts, Spreadsheet, 102
documents
in Drawing, 126
in Scrapbook, 171
in Spreadsheet, 65
in Word Processing, 2
Drawing objects, 129
email address, 175
graphic frames, 39
headers and footers, 27
Spreadsheet, 79
new addressbooks, 180
new calendars in Planner,
200
polygon, 135
star, 135
style sheets, 31
table of contents, 48
user dictionary, 51
crossed arrows
diagonal, drawing, 128
vertical/horizontal, drawing,
128
crossed I-beams tool,
drawing, 128
crosshairs tool, drawing, 128
€'I'ERM(int erest,future_value
,present_value) function,
216
current time, inserting, 60
cut tool, drawing, 127
D
date
format, Spreadsheet, 116
functions (list), 226

inserting, 61
longhand format, 60
numeric format, 60
DATEVALUE(string)
function, 226
DAY(date-value) function,
226
DDB(cost,salvage,life,period)
function, 216
default document
Addressbook, 173, 185
Planner, 185
Scrapbook, 167
delete, tool, drawing,127
Delete key, 10
deleting
Addressbook records, 178
cell contents, Spreadsheet,
94
charts, Spreadsheet, 110
from Scrapbook, 169
graphicframes, Word
Processing,41
graphiclayout, 45
text files, 205
drag and drop, 11
Drag button, 1, 69, 125
definition, 230
dragging, definition, 230
Drawing
arcs, 134
arrange objects, 146
front to back, 146
moving, 146
arrowhead, 131
attributes, 136
bitmap, 156
shapes, 158
circle, 129
converting text to graphic,
145
creating, 129
deleting objects, 132
duplicating objects, 143
e._liting, 129
ellipse, 129
exporting graphics, 165
grids, 151
line, 130
_- headers or footers, Word ..... obj¢ct__,t34.__ ._-
.... Processing,28 on-screen view, 133
objects in Drawing, 132 " open, 125
page breaks,29 _--- pasting inside, 149
scheduled events in Planner, polygon, 135
191 printing, 163
styles, Word Processing, 34 rectangle, 129
text, Word Processing, 10 redrawing the screen, 133
dictionaly resizing objects, 132
user, editing, 51 ruler units, 150
Word Processing, 49 rulers, 150
selecting objects, 131
diskette, type, 231 square, 129
document star, 135
. creating, 2 straight lines, 134
exporting, 64 text
formatting, 19 align, 155
opening, 2 color, 155
from another program, 64 style and size, 154
" -'DOS text usage, 152
file names, text file editor, tools, 126
208 arc, 126
bitmap
ellipse,127
line, 127
rectangle, 127
brush, 127
copy, 127
crossed arrows
diagonal, 128
horizontal/vertical, 128
crossed I-beams, 128
crosshairs, 128
cut, 127
delete, 127
ellipse, 126
eraser, 127
fill, 127
frame, 127
I-b_ams, 128
line, 126
paste, 127
pixel view, 127
pointer, 126, 128
rectangle, 126
rotate, 128
select all, 127
selection, 127
text, 126
turn, 126
undo, 126
zoom, 126, 128
unfilled object, 130
duplicating objects, Drawing,
143
E
ellipse tool, drawing, 126
em dash, 1
email address, in
Addressbook, 175
entering text
Spreadsheet, 72
Word Processing, 7
envelope, page size for, 6
eraser tool, drawing, 127
Index 239

ERR() function, 217
error, Spreadsheet, 124
EXACT(stringl,string2)
function, 224
EXP(value) f_ction, 222
exporting
Addressbook, 183
graphics
bitcoimt option, 165
BMP format, 165
compression options, 166
from Drawing documents,
165
selected object, 166
whole document, 166
Lotus format, 121
Spreadsheet, 121
changing column order,
122
F
FACr(value) function, 222
FALSE() functio_ 220
field, definition, 230
file, definition, 230
FILENAME 0 function, 223
fill, tool, drawing, 127
financial, functions, list, 216
financial functions,
Spreadsheet, 91
find
and replace text, 17
book reader, 203
FIND(substring,string,start)
" function, 224
flipping objects, Drawing, 141
floating point math, definition,
231
fonts
changing size, 13
changing style, 14
proportional, Word
Processing, 1
style and size, 154
footers
creating
Spreadsheet, 79"
Word Processing, 27
printing Spreadsheet, 120
footnotes, description, 46
formulas
absolute references, 87
arguments, 88
built-in functions, 85, 88
inserting, 89
copying to adjacent cells, 95
description, 72
elements, 85
entering, 85, 86
function within a function,
90
inserting, names, 100
moving, 94
naming ranges, 98
operators, 85
references, 85
_-- _relative, 86 --.__ ._
relative references, 94
show/hide, 98
_spreadsheet, 85
values, 85
frame tool, drawing, 127
functions, 215
arguments, 215
date OisO, 226
keyword, 215
logical (list), 220
mathematical (list), 222
print (list), 223
time (list), 226
trigonomeetric (list)_ 227
FV(payments,interest,term)
function, 216
G
games
Solitaire, 210
Turnabout, 209
GIF format, 165
graphic
adding, Spreadsheet, 117
attn_outes, Drawing, 136
copying, from Scrapbook,
168
create in Drawing, 129
editinDrawing,129
editing layout, 45
flames
align to ruler, 40
area attributes, 41
changing size, 40
deleting, 41
description,39
deselect, 40
line attributes, 41
moving, 40
grouping, Drawing, 148
located in documents, 38
objects
moving, 43 _
pasting, 42, 43
resizing, 43
wrapping text, 44
grid
definition, 231
Drawing, 151
show/hide lines, 78
Word Processing, 41
grid lines, printing
Spreadsheet, 120
H
handles, text regions, 37
headers
creating
Spreadsheet, 79
Word Processing, 27
Index 240

printing Spreadsheet, 120
HLOOKUP(value,range,offset
) function, 218
HOUR(time_value) function,
226
hyphenatioia
maximumlines, 26
prefix, shortest,26
shortestword, 26
suffix,shortest, 26
I-beam tool, drawing, 128
IF function
(logical, true value, false
value), 220
spreadsheet, 220
importing
Addressbook, 182
graphics
bitmap (BMP) format, 165
GIF format, 165
in a Drawing document,
165 .... _ .......
PC paintbrush (PCX), 165
Scrapbook, 171
tag image (TIF) f6rmat,
165
Spreadsheet, 121
changing column order,
123
incremental values,
Spreadsheet, 97
indent
first line, 21
paragraphs, 21
INDEX(range,column._offset,r
ow_offset) function, 218
information, functions, list,
217
.information functions,
Spreadsheet, 91
insert, row/column,
spreadsheet, 96
inserting, graphic layout, 45
insertion point, Word
Processing, 7
INT(value) function, 222
invisible characters, displaying,
Word Processing, 58
IRR(guess,range) function,
216
ISERR(value) function, 218
ISNUMBER(value) function,
218
ISSTRING(value) function,
218
italic text
changing to, 14
spreadsheet, 84
tips for using, 1
tool bar button, 3
iteration, Spreadsheet, 101
key combinations, selecting
spreadsheet cells, 71
L
LEFT(string,num) function,
225
LENGTH(string) function,
225
line
modifying, Drawing, 139
tool, drawing, 126
line spacing, WordProcessing,
2O
lines and borders, Drawing
object, 136
locking rows/columns,
Spreadsheet, 118
logical
functions, list, 220
operators, spreadsheet, 221
logical functions, Spreadsheet,
92
LOWER(string) function, 225
M
margins
relative, style sheets, 33
setting, Word Processing, 6
master pages
changing, 6, 36
columns, 37
headers and footers, 37
text regions, 37
mathematical, functions, list,
222
mathematical functions,
Spreadsheet, 92
MAX(valuel,value2,...)
function, 223
memory size, bitmap, 163
merging
adding fields, 54
Addressbook, 55
clipboard, 57
data document, 53
field names, 54
merge document, 53
merge fields, 53
printing, 57
sequence for, 53
Spreadsheet, 56
MID(string_tart,num)
function, 225
MIN(valuel,value2,...)
function, 223
MINUTE(timevalue)
function, 226
Index 241

MOD(value,divisor) function,
222
MONTH(date_.value)
function, 226
move, objects, 146
front to back, 146
moving, text, 10, 11
N
N(range) function, 218
NA 0 function, 218
name option, style sheets, 33
notes
Addressbook,178
printing, Spreadsheet, 81
Spreadsheet, 81
show/bide, 81
NOW() function, 226
NPV(interest, range) _nction,
216
number, pages, displaying, 61
o
÷
operators
formulas, 85
Spreadsheet, 88
OR(logicall,logical2,...)
function, 220
P
page
setup, Word Processing, 6
size, Word Processing, 6
page break
deleting, 29
d_playing marks, 58
inserting, 29
page numbers
automatic, 27
inserting
Spreadsheet, 79
Word Processing, 27, 61
viewing current, 61
viewing total number, 61
PAGE() function, 223
PAGES() function, 223
paste
inside, Drawing, 149
tool, drawing, 127
PASTE command, 10
pasting, text, 11
pattern, Drawing object, 136
PC paintbrush (PC'X) format,
165
_
phone number records, 174
PI 0 function, 228
pixel
defined, 156
view tool
bitmap, 161
plain text
changing to, 14
spreadsheet, 84
tool bar button, 3
Planner
creating new calendars, 200
printing
calendar, 197
page size changing, 197
repeating events, 193
scheduled events
adding, 191
removing, 191
scheduling events, !90
particular time, 192
searching events, 196
viewing calendar, switching,
186
viewing events, 187
PMT(prineipal,interest,term)
function, 216
point size relative, style sheets,
33
pointer, tool, drawing, 126,
128
polygon radius option, 135
paragraph
borders, 25
displaying marks, 58
indents, 21
new, 8
spacing, 21
splitting into two, 8
using style sheets to format,
31
print, book reader, 204
print functions, 223
Spreadsheet, 92
printing
Addressbook, 180
Book reader, 204
calendar, planner, 197
Drawing, 163
merge documents, 57 _.
sideways, Spreadsheet, 119
Spreadsheet, 120
Spreadsheet options
center horizontally, 120
center vertically, 120
continuous printing, 120
footers, 120
print grid lines, 120
print headers, 120
print row/column titles,
120
scale to fit, 120
starting page number, 119
Text File Editor, 207
PRODUCT(valuel,value2,...)
function, 222
PROPER(string) function, 225
PV(payments,interest,term)
function, 216
Index 242

R
RANDOM() function, 223
RANDOMN(value) function,
223
RATE(futfirevalue,present_v
flue,term) function, 216
read, book reader, 202
recalc_ation, Spreadsheet,
100
rectangle, tool, drawing, 126
redo, 12
references
absolute, Spreadsheet, 86
formulas, 85
relative, Spreadsheet, 86
Spreadsheet, 86
relative, references,
spreadsheet, 94
REPEAT(string,num)
function, 225 .-
replace, all option, 18
z. REPLACE(°d_nal'start'n_um ....
replace) functiori, 225
replacing text, 11 ÷
resolution, bitmap_-i63
reversing an action, 12
RIGHT(string,hum) function,
225
rotate tool, drawing, 128
rotating objects, Drawing, 142
ROUND(value ,places)
function, 222
row/column rifles, printing
Spreadsheet, 120
ROWS(range) function, 218
rulers
_ Drawing, 150
Spreadsheet, 117
Word Processing, 24
S
scale to fit, Spreadsheet, 120
scheduling, repeating events,
Planner, 193
scheduling events_ Planner,
190
scientific notation,
Spreadsheet, 73
copying, from Scrapbook, 169
Scrapbook
copying to other
applications, 169
retrieving a deleted page,
170
scrolling, Spreadsheet, 69
searching
Addressbook records, 179
events in Planner, 196
searching text, 18
SECOND(time_value)
function, 226
Select button, 1, 69, 125
definitio_/-35
x.
selecting
all tool, drawing, 127
text
canceling a selection, 9
extending a selection, 9
keyboard, 9
reducing a selection, 9
tool, drawing, 127
shortcut keys
redo, 12
undo, 12
SIN(angle ) function, 228
SINH(angle) function, 228
skewing objects, Drawing, 143
SLN(cost, salvage,life)
function, 217
Solitaire, games, 210
sorting, Spreadsheet, 114
spaces, displaying marks, 58
special
character, 12
bullet, 1
em dash, 1
searching for, 18
times, document creation, 63
spell checking, 49
Spreadsheet
apostrophe, 73
automatic recalculation, 100
cell
address, 65
description, 65
charts, 102
color, 80
cell borders, 80
column width, 82
changing by dragging, 82
changing with Cell menu,
82
standard, 83
comma, 73
copying
adjacent cells, 95
cell contents, 94, 95
formula to adjace_nt cells,
95
date
entered as formula, 76
format, 116
functions, 92
defining
cell name, 99
range name, 99
deleting, cell contents, 94
description, 65
editing contents, 93
entering
labels, 72
text, 72
values, 73
error codes, 124
floating point math, 85, 215
format for dates, 77
format for times, 77
format for numbers, 74
formatting, 78
Index 243

formulas, 72
grid
description, 65
show/hide, 78
header, 65
headers and footers, 79
incremental'values, 97
inserting row or column, 96
labels, 72
locking rows/columns, 118
moving, cell contents, 94, 95
moving around, 72
open existing, 66
operators, 88
page numbering, 79
print options, 119
printing, 119
quotation marks, 73
row height, 82
setting avalue, 83
scientific notation, 73
scrolling, 69
selecting
cell with keyboar d, 71
cells, 69
entire row/column, 70
multiple rows/columns, 70
-range of cells, 70 -
range of cells with
keyboard, 71_.._.
single cells, 70
sorting, 114
text alignment, 83
text style, changing, 84
time, entered as formula, 76
values, 72
spreadsheet, OR function, 221
SQRT(value) function, 222
statistical functions
listing, 223
Spreadsheet, 92
STD(value 1,value2,...)
function, 223
STDP(value 1,value2,...)
-- function, 224
string functions, Spreadsheet,
92
STRING(value,N) function,
225
style sheets
applying, 31
changing format, 33
defining new, 32
deleting, 34
header and footer, 31
normal, 31
reverting to base, 35
storing temporarily, 32
using from other documents,
35
SUM(value 1,value2,...)
function, 222
SYD(cost, salvage,life,period)
function, 217
symbols, 12
T
table of contents, creating, 48
tabs
changing, 23
.... creating;_=_., -
deleting, 23
displaying marks, 58
key, Word Processing, 1
leader option, 23
list option, 22
position option, 22
setting default stops, 23
types, 23
vertical line option, 23
tag image file (TIF) format,
165, 166
TAN(angie) function, 228
TANH(angie) function, 228
template, opening, 2
TERM, function,
(payments,interest,future
value), 217
text
appearance, 12, 84, 154
copying,10
cutting, 10
fonts, 13
in drawings, 152
moving, 10
pasting, 10
style sheets, 31
tool, drawing,126
wrapping, 44
Text File Editor
capabilities, 206
DOS text fries, 205
naming, 208
file names, 208
limitations, 206
line endings, 206
printing, 207
TXT extension, 208
window, 205
text formatting
borders, 25
character weight, spacing,
and width, 12
line spacing, 20
size, 14
thesaurus, 51 .)
time, inserting into a
document, 63
time and date functions,
Spreadsheet, 92
time functions, list, 226
TIME(hour,minute,second)
function, 226
TIMEVALUE(string)
function, 226
tips, Word Processing, 1
rifle, page, 28
TODAY() function, 227
tool bar
Advanced Functions, Word
Processing, 4
Attributes, Drawing, 136
Basic Functions, Word
Processing, 3
Index 244

basic functions, Spreadsheet,
67
Bitmap, 156
Graphics, Word Processing,
4
transforming objects, Drawing,
141
trigonometric functions
listing,227
Spreadsheet, 92
TRIM(string) function, 225
TRUE() function, 220
TRUNC(value) function, 222
turn tool, drawing, 126
Turnabout, Games, 209
TXT extension, text file
editor, 208
U
underlined text
changing to, 14
spreadsheet, 84---
_ tool bar button, 3
undo, 12
objects, Drawing:-143
Scrapbook, retrieving a
deleted page, 170
tool, drawing, 126
ungroup graphic, Drawing, 148
untransforming objects,
Drawing, 143
UPPER(string) function, 225
user dictionary, 51
V
VALUE(string) function, 225
malues
entering, 73
formulas, 85
VAR(valuel,value2,...)
function, 224
VARP(valuel,value2,...)
function, 224
VLOOKUP(value,range,
offset) function, 218
W
WEEKDAY(date_value)
function, 227
wild cards, searching with, 18
Word Processing
aligning text, 1
bibliography, 48
changing columns, 30
color, 15
counting words, 58
deleting text, 10
dictionary editing, 51
em dash, 1
finding and replacing text,
17
fonts, proportional, 1
foo_otes;__4_ ._ i-
graphic frames, 39
graphic layouts, editing, 45
headers and footers, 27
insert mode, 7
invisible characters, 58
master pages, 36
merging information, 53
overstrike mode, 7
page, numbering, 27
page layout, master page, 36
page setup, 6, 36
page size, 6
pagination, 29
paragraphs, new, 8
rulers, 24
saving settings
(configuration),5
spellchecking,49
style sheets, 31
table of contents, 48
tabs, 22
text appearance, 12
thesaurus, 51
title page, 28, 58
tool bars, 3, 5
word wrap, 1, 7
Y
YEAR(datevalue) function,
227
Z
zoom, tool, drawing, 126, 128
Index 245

___he_®
Printed in USA
Part Number US3475001
