BROTHER Electronic Sewing Manual L0801164
User Manual: BROTHER BROTHER Electronic Sewing Manual BROTHER Electronic Sewing Owner's Manual, BROTHER Electronic Sewing installation guides
Open the PDF directly: View PDF ![]() .
.
Page Count: 321 [warning: Documents this large are best viewed by clicking the View PDF Link!]

IMPORTANT SAFETY INSTRUCTIONS
When using this machine, basi( safety pre(autions should always be taken,
including the following:
Read all instructions before using.
DANGER - To reduce the risk of electric shock:
1. The machine should never be left unattended while plugged in. Always unplug the machine
from the electrical outlet immediately after using and before (:leaning.
2. Always unplug before changing the light bulb. Replace bulb with same type rated 12V 5 watts.
WARN I_"-'l_ - To reduce the risk of burns, fire, electric shock, or injury to persons:
1. Do not allow this machine to be used as a toy. Close attention is necessary when the machine
is used by or near children.
2. Use this machine only for its intended use as described in this manual. Use only accessories
recommended by the manufacturer as contained in this manual.
3. Never operate this machine if it has a damaged cord or plug, if it is not working properly, if it
has been dropped or damaged, or dropped into water. Return the machine to the nearest
authorized dealer or service (:enter for examination, repair, electrical or mechanical adjust-
ment.
4. Never operate the machine with any air openings blocked. Keep ventilation openings of the
machine and foot control free from the accumulation of lint, dust, and loose cloth.
5. Never drop or insert any object into any opening.
6. Do not use outdoors.
7. Do not operate where aerosol (spray) products are being used or where oxygen is being admin-
istered.
8. To disconnect, turn the main switch to the symbol "0" position which represents off, then
remove plug from outlet.
9. Do not unplug by pulling on cord. To unplug, grasp the plug, not the cord.
10.Keep fingers away from all moving parts. Special care is required around the machine needle.
11. Always use the proper needle plate. The wrong plate can cause the needle to break.
12.Do not use bent needles.
13.Do not pull or push fabric while stitching. It may deflect the needle causing it to break.
14.Switch the machine to the symbol "0" position when making any adjustments in the needle
area, such as threading needle, changing needle, threading bobbin, or (:hanging presser foot,
and the like.
15.Always unplug the machine from the electrical outlet when removing covers, lubricating, or
when making any other user servicing adjustments mentioned in the instruction manual.
16.This sewing machine is not intended for use by young children or infirm persons without
supervision.
17.Young children should be supervised to ensure that they do not play with this machine.
SAVE THESE INSTRUCTIONS
This machine is intended for household use.

FOR USERS IN THE UK, EIRE, MALTA
AND CYPRUS ONLY
If this ma(hine is fitted with a three-lain non-rewireable BS plug then please read tile following.
IMPORTANT
If the available socket outlet is not suitable for the plug supplied with this equipment, it should be
cut off and an appropriate three-pin plug fitted. With alternative plugs an approved fuse must be
fitted in the plug.
NOTE
The plug served from the main lead must be destroyed as a plug with bared flexible cords is
hazardous if engaged in a live socket outlet. In the event of replacing the plug fuse, use a fuse
.... _ mark, rating as marked on plug.
approved by ASTA to BS 1i_62, i e carrying the
Always replace the fuse cover, never use plugs with the fuse cover omitted.
WARNING
DO NOT CONNECT EITHER WIRE TO THE EARTH TERMINAL WHICH IS MARKED WITH THE
LETTER'E', BY THE EARTH SYMBOL _ OR COLOURED GREEN OR GREEN AND YELLOW,
The wires in this main lead are coloured in accordance with the following code:
Blue Neutral
Brown Live
As the colours of the wiring in the main lead of this appliance may not correspond with the
coloured markings identifying the terminals in your plug, proceed as follows.
The wire which is coloured blue must be connected to the terminal which is marked with the letter
'N' or coloured black or blue.
The wire which is coloured brown must be connected to the terminal which is marked with the
letter 'L' or coloured red or brown.
CONGRATULATIONS ON CHOOSING
OUR MACHINE
Your machine is tile most advanced computerized household sewing machine.
To fully enjoy ai] the features incorporated, we suggest that you study the manual.
PLEASE READ BEFORE USING THIS MACHINE
For safe operation
1. Be sure to keep your eye on the needle while sewing. Do not touch the pulley, thread take-up,
needle, or other moving parts.
2. Remember to turn off the power switch and unplug the cord when:
• Operation is completed
• Replacing or removing the needle or any other parts
• A power failure occurs during use
• Maintaining the machine
• Leaving the machine unattended.
_. Do not store anything on the foot controller.
4. Plug the machine directly into the wall. Do not use extension cords.
For a longer service life
1. When storing this machine, avoid direct sunlight and high humidity locations. Do not use or
store the machine near a space heater, iron, halogen lamp, or other hot objects.
2. Use only neutral soaps or detergents to clean the case. Benzene, thinner, and scouring pow-
ders can damage the case and machine, and should never be used.
_. Do not drop or hit the machine.
4. Always consult the operation manual when replacing or installing any assemblies, the presser
feet, needle, or other parts to assure correct installation.
For repair or adjustment
In the event a malfunction occurs or adjustment is required, first follow the troubleshooting table
in the back of the operation manual to inspect and adjust the machine yourself. If the problem
persists, please consult your local authorized Brother dealer.
For additional product information and updates, visit our web site at www.brotherocom
Special Features
On screen sewing advisor gives advice about sewing an(] general machine use, in addition to
illustrated step-by-step instructions on the large LCD display.
Machine setsthread tension automatically - no more bothersome trial sewing.
Prepare the bobbin thread for sewing with one touch - no need to pull the bobbin thread up
through the needle plate.
Attach the knee lifter to raise and lower the presser foot without using your hands - convenient
for quilting and patchwork.
Wind the bobbin easily, even while the machine is embroidering.
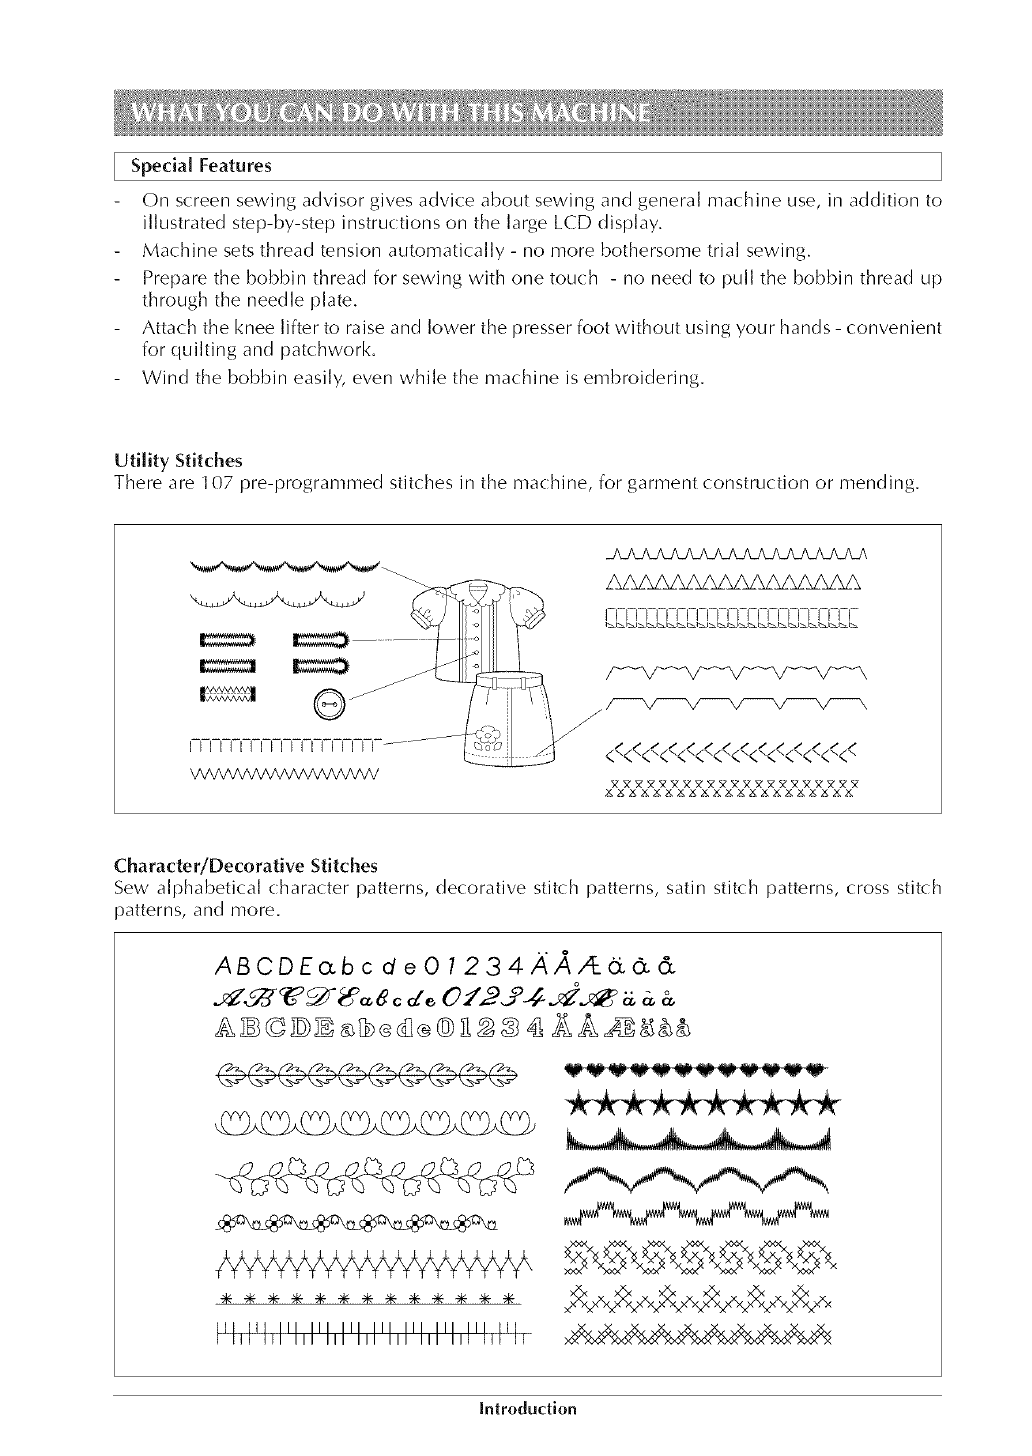
Utility Stitches
There are 107 pre-programmed stitches in the machine, for garment construction or mending.
.........fill:
V_A/VVVVVVvVVVVVVVVVV
C[-rCI-CN-N-N-CrI-[-I-N-CN-N-[-
j_
/ / / / / / / / /
/../</\/<A/</-./-./vv</</v-.
NN NNN2_2_ N 2_NNNN _NN2_N N _N
Character/Decorative Stitches
Sew alphabetical character patterns, decorative stitch patterns, satin stitch patterns, (:ross stitch
)atterns, and more.
ABCDEocbc de 01234A/_,4:d.O_&
©©©©©©©©©©
÷÷÷÷÷÷÷÷÷÷÷÷÷
Ill [11 III III III III III III III Ill
I Ill III III III III III III III I1[ [I
Introduction
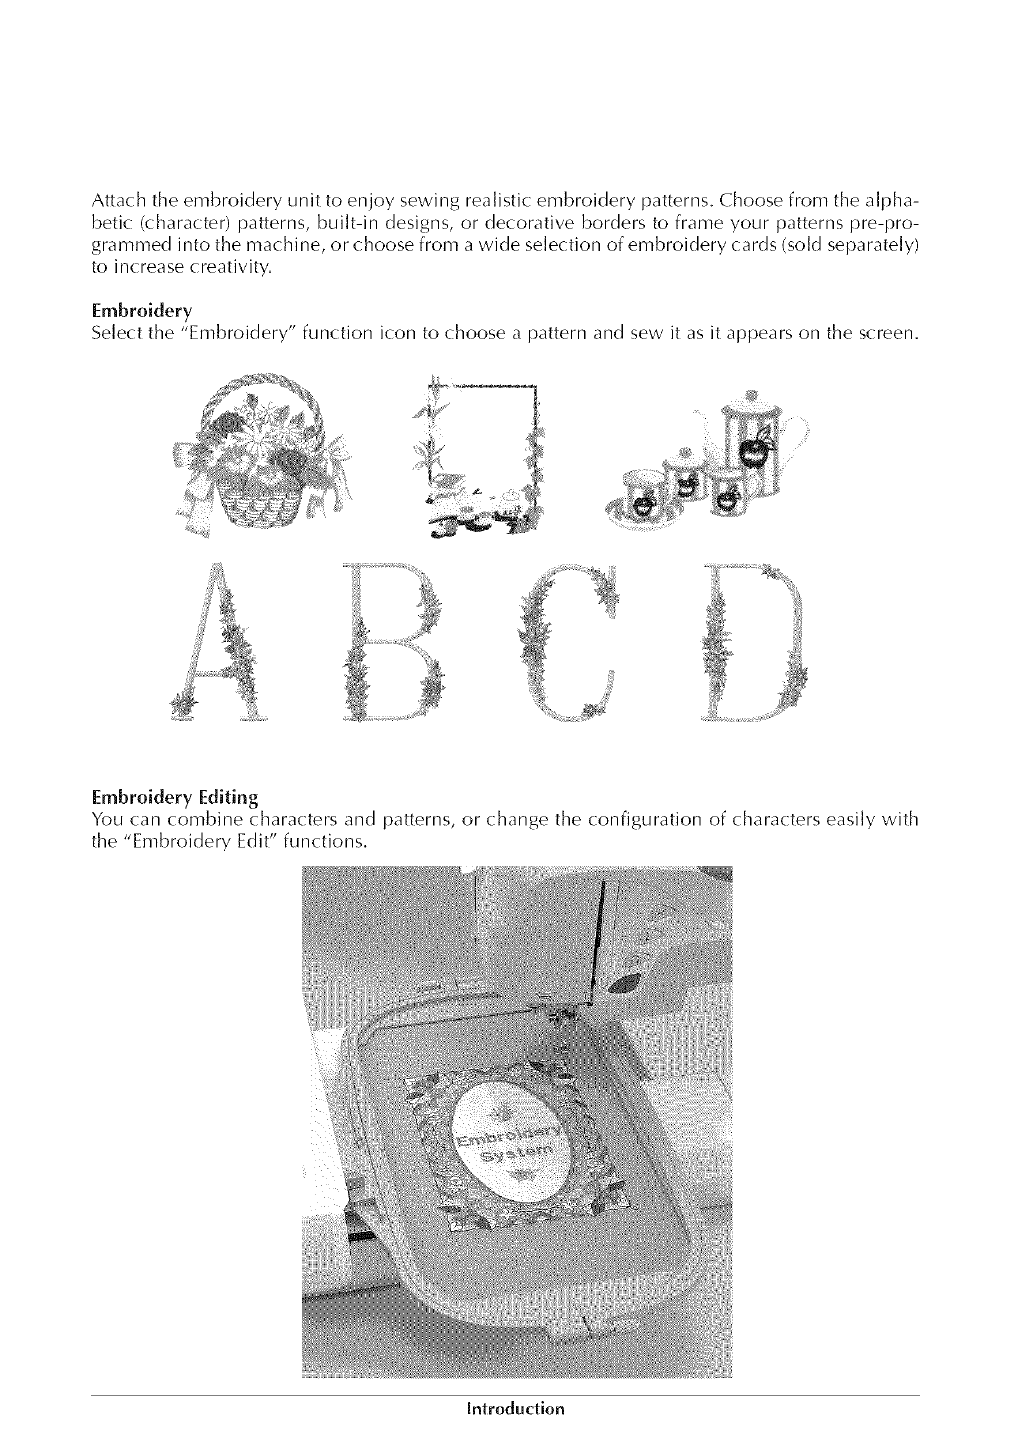
Attach the embroidery unit to enjoy sewing realistic embroidery patterns. Choose from the alpha-
betic (character) patterns, built-in designs, or decorative borders to frame your patterns pre-pro-
grammed into the machine, or choose from a wide selection of embroidery cards (sold separately)
to increase creativity.
Embroidery
Select the "Embroidery" function icon to choose a pattern and sew it as it appears on the screen,
_y
Embroidery Editing
You can combine characters and patterns, or change the configuration of characters easily with
the "Embroidery Edit" functions.
Introduction
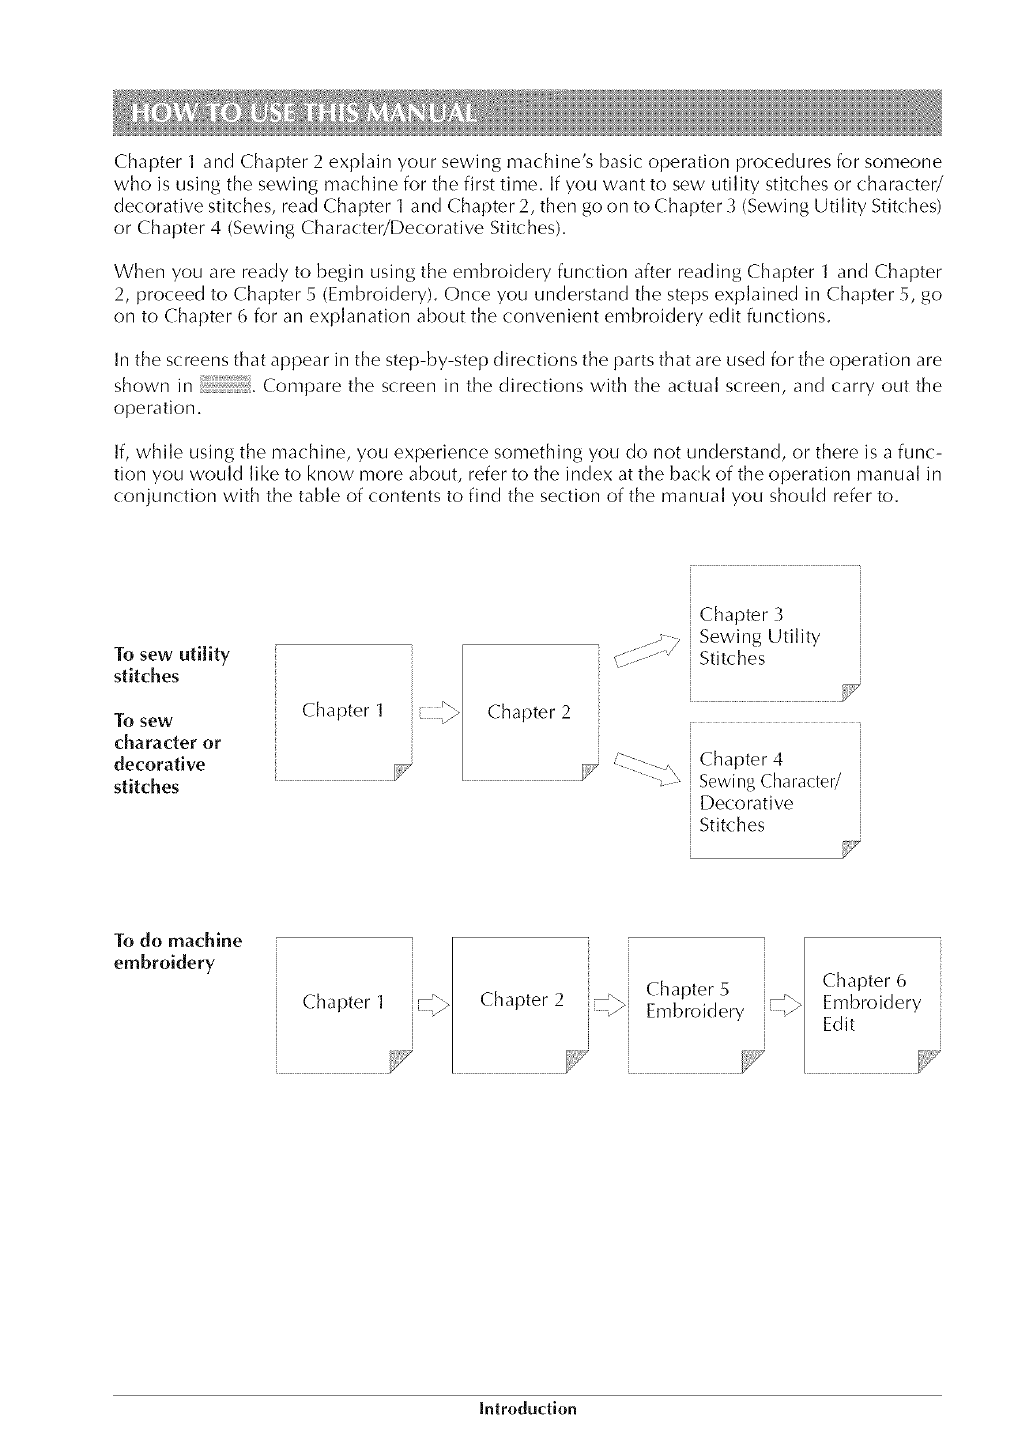
Chapter 1 and Chapter 2 explain your sewing machine's basic operation procedures for someone
who is using the sewing machine for the first time. If you want to sew utility stitches or character/
decorative stitches, read Chapter 1 and Chapter 2, then go on to Chapter _ (Sewing Utility Stitches)
or Chapter 4 (Sewing Character/Decorative Stitches).
When you are ready to begin using the embroidery function after reading Chapter 1 and Chapter
2, proceed to Chapter 5 (Embroidery). Once you understand the steps explained in Chapter 5, go
on to Chapter 6 for an explanation about the convenient embroidery edit functions.
In the screens that appear in the step-by-step directions the parts that are used for the operation are
shown in Compare the screen in the directions with the actua] screen, and carry out the
operation.
If, while using the machine, you experience something you do not understand, or there is a func-
tion you would like to know more about, refer to the index at the back of the operation manual in
conjunction with the table of contents to find the section of the manual you should refer to.
Tosew utility
stitches
To sew
character or
decorative
stitches
v.........
"-?:L:-(\
Chapter 3
Sewing Utility
Stitches
Chapter 4
Sewing Character/
Decorative
Stitches
To do machine
embroidery , .. r., . _ _- i Cha_)ter _ i [ Chapter 6
Chapter1l Em, ro deryEE r° dery
Introduction
CONTENTS
Special Features
Chapter 1 Setting Up
Principal Parts ....................................... 1-1
[] Embroidery Unit ............................. 1-2
[] Hard Case ...................................... 1-2
[] Embroidery Unit Carrying Case ...... 1-2
[] Operation Buttons .......................... 1-2
[] Balance Wheel ............................... 1-4
[] Presser Foot Lever .......................... 1-5
[] Sewing Speed Controller ................ 1-5
[] Bobbin Winder Button .................... 1-5
[] Top Cover ....................................... 1-5
[] Supplemental Spool Pin ................. 1-6
[] Flat Bed Attachment!Free Arm ........ 1-6
[] Feed Dog Position Switch ............... 1-6
[] Presser Foot Dial ............................ 1-6
[] Knee Lifter ...................................... 1-7
[] Foot Controller ............................... 1-7
Included Accessories ............................. 1-8
Options ............................................... 1-10
[] When Using the Multi-thread Stand 1-10
Connecting the Power ......................... 1-12
Viewing the LCD Display .................... 1-13
[] Key Functions ............................... 1-14
Using the LCD Display ........................ 1-16
Adjusting Screen Brightness ................ 1-16
Choosing the Display Language .......... 1-18
Checking the Application .................... 1-19
Using the Machine Settings Key .......... 1-20
Using the Machine Operations Key ..... 1-21
[] Contents of Other Categories ........ 1-23
Using the Pattern Explanation Key ....... 1-24
Bobbin Windin'_Lower Threading ...... 1-25
[] Winding the Bobbin During Sewing1-29
Setting the Bobbin ............................... 1-31
Upper Threading ................................. 1-32
[] Using the Spool Net ..................... 1-37
[] Vertical Spool Pin ......................... 1-37
Pulling Up the Bobbin Thread ............. 1-38
Changing the Presser Foot ................... 1-39
[] Removing the Presser Foot ........... 1-39
[] Attaching the Presser Foot ............ 1-39
[] Attaching the Walking Foot .......... 1-40
[] Reattaching the Presser Foot Holder ._ 1-42
Changing the Needle .......................... 1-43
[] About the Needle ......................... 1-45
[] FabricJThread/Needle Combinations .. 1-45
Chapter 2 Getting Ready to Sew
Basic Sewing ......................................... 2-1
Sewing Reinforcement Stitches .............. 2-3
Changing Sewing Direction ................... 2-3
Sewing Curves ...................................... 2-3
Sewing Heavyweight Fabrics ................. 2-4
Sewing Lightweight Fabrics ................... 2-4
Using the Twin Needle Mode ................ 2-5
Setting Stitch Width for Zigzag Stitch
Patterns ................................................. 2-8
Setting the Stitch Length ........................ 2-9
[] Stitch Pattern Width/
Stitch Length Settings Table .......... 2-10
Setting the Thread Tension .................. 2-13
[] Proper Thread Tension .................. 2-13
Automatic Reinforcement Stitching ..... 2-14
Using the Automatic: Thread Cutter ..... 2-15
Locking the Screen .............................. 2-16
Chapter 3Sewing Utility
Stitches
Selecting a Stitch Pattern ....................... 3-9
[] Stitch Selection Screens ................ 3-10
[] Using the Mirror Image Key ........... 3-11
[] Saving Your Preferred Stitch Settings 3-12
Using the Sewing Type Selection Key .. 3-1 3
Straight Stitches ................................... 3-16
[] Changing the Needle Position
(Left Needle Position Patterns Only),., 3-18
[] NeedlePlateMarkings.................3-18
Basting................................................3-19
ZigzagStitches....................................3-20
[] Overcasting(UsingaZigzagStitch)3-20
[] Appliqu_(UsingaZigzagStitch)..3-21
[] Patchwork(forCrazyQuilt)..........3-21
[] SewingCurves
(UsingaZigzagStitch)...................3-21
ElasticZigzagStitches.........................3-22
[] TapeAttaching.............................3-22
[] Overcasting..................................3-22
Overcasting.........................................3-23
[] OvercastingUsingPresserFoot"G"3-23
[] OvercastingUsingPresserFoot"J"3-24
[] OvercastingUsingtheSideCutter3-25
Quilting..............................................3-28
[] Piecing.........................................3-29
[] Quilting........................................3-30
@Appliqu_......................................3-31
[] QuiltingwithSatinStitches..........3-33
BlindHemStitches..............................3-35
[] IftheNeedleDoesnotCatchthe
Fold...............................................3-36
[] IftheNeedleCatchesTooMuch
of theFold....................................3-36
Appliqu_.............................................3-37
[] SewingSharpCurves....................3-38
ShelhuckStitches................................3-39
ScallopStitches...................................3-41
PatchworkStitches..............................3-42
SmockingStitches...............................3-44
Fagoting..............................................3-46
TapeorElastic:Attaching.....................3-47
Heirloom............................................%49
[] Hemstitching(1)(Daisystitch)......3-49
[] Hemstitching(2)(Drawnwork)....%50
[] Hemstitching(3)...........................3-52
Buttonholes.........................................3-53
[] SewingStretchFabrics..................3-56
[] OddShapedButtons/Buttonsthatdo
notFitintotheButtonHolderPlate.. 3-56
Darning ............................................... 3-57
Bar Tacks ............................................ 3-59
Button Sewing ..................................... 3-61
[] Attaching 4 Hole Buttons ............. 3-62
[]Attaching a Shank to the Button ... 3-63
Eyelet .................................................. 3-63
Multi-directional Sewing
(Straight Stitch and Zigzag Stitch) ........ 3-65
Zil:)pe r Insertion ................................... 3-67
[] Centered Zipper ........................... 3-67
[] Inserting a Side Zipper .................. %68
Chapter 4 Sewing Character/
Decorative Stitches
Decorative Stitch Patterns ..................... 4-2
7mm Decorative Stitch Patterns ............ 4-3
Satin Stitch Patterns ............................... 4-3
7mm Satin Stitch Patterns ...................... 4-4
Cross Stitch ........................................... 4-4
Utility Decorative Stitch Patterns ........... 4-5
Alphabetical Characters ........................ 4-6
[] If You Make a Mistake Selecting the
Character ....................................... 4-7
Sewing Attractive Finishes ..................... 4-8
Basic Sewing of Character/
Decorative Stitches ............................... 4-9
Making Stitch Pattern Adjustments ....... 4-11
[] Key Functions ............................... 4-14
Changing the Size of the Stitch Patterns. 4-15
Changing the Stitch Pattern Length
(for 7mm Satin Stitch Patterns Only) .... 4-16
Creating a Vertical Mirror Image ......... 4-16
Creating a Horizontal Mirror Image ..... 4-16
Sewing Pattern Continuously ............... 4-17
Changing Thread Density
(Only for Satin Stitch Patterns) ............. 4-17
Before Combining Stitch Patterns ........ 4-18
Combining Decorative Stitch and
Character Stitch Patterns ..................... 4-18
Combining Large and Small Stitch
Patterns ............................................... 4-20
Combining Horizontal Mirror Image
Stitch Patterns ..................................... 4-21
Combining Stitch Patterns of Different
Lengths ............................................... 4-22
Making Step Stitch Patterns
(for 7mm Satin Stitch Patterns Only) .... 4-23
[] More Examples ............................. 4-25
Checking Combined Stitch Patterns ..... 4-26
SavingStitchPatterns..........................4-27
[] IfYouCanNotSavetheStitchPattern4-28
RetrievingSavedStitchPatterns...........4-31
Chapter 5 Embroidery
Before Beginning ................................... 5-1
[] Copyright Information .................... 5-1
[] About the Embroidery Unit ............. 5-1
[] About Embroidery Cards
(Sold Separately) ............................. 5-1
[] About Floppy Disks ........................ 5-2
Attaching Embroidery Foot "Q". ............ 5-4
Attaching the Embroidery Unit .............. 5-5
[] Removing the Embroidery Unit ...... 5-7
One Point Patterns ................................ 5-9
Character Patterns ................................ 5-11
Floral Alphabet Patterns ...................... 5-13
Frame Patterns .................................... 5-15
Selecting Patterns from an Embroidery
Card .................................................... 5-17
Selecting a Pattern from a F(oppy Disk
(Only for Machines with Floppy Disk Drives) .. 5-18
Attaching a Stabilizer Material to the
Fabric .................................................. 5-20
Setting the Fabric in the Embroidery
Frame .................................................. 5-21
[] Inserting the Fabric ....................... 5-22
[] Using the Embroidery Sheet ......... 5-23
Attaching the Embroidery Frame ......... 5-24
[] Removing the Embroidery Frame ,, 5-25
Changing the Pattern Position ............. 5-26
Checking the Pattern's Position ........... 5-27
Previewing the Completed Pattern ...... 5-28
Sewing Attractive Finishes ................... 5-29
[] Needle Plate Cover ...................... 5-29
Basic: Embroidery Method ................... 5-30
[] Embroidering Order for Pattern Parts.. 5-32
Sewing Embroidery Patterns Which Use
Appliqu_ ............................................. 5-33
[] Directions for Appliqu_ ................ 5-33
The Bobbin Runs Out of Thread .......... 5-35
The Thread Breaks During Sewing ...... 5-36
Sewing Again from the Beginning ....... 5-38
Continuing Embroidery After Turning off
the Power ............................................ 5-39
Adjusting Thread Tension .................... 5-40
[] Correct Thread Tension ................ 5-40
[] If the Upper Thread Tension is Too
Strong ........................................... 5-40
[] If the Upper Thread Tension is Too
Weak ............................................ 5-41
Adjusting the Embroidery Speed .......... 5-41
Changing the Thread Color Display .... 5-42
Creating Custom Thread Number ........ 5-43
[] Creating a Custom Thread
Numbering Set ............................. 5-43
Changing the Embroidery Frame
Display ............................................... 5-45
[] Key Functions ............................... 5-46
Changing the Size of the Pattern .......... 5-47
Rotating the Pattern ............................. 5-48
Creating a Horizontal Mirror Image ..... 5-48
Changing the Density of a Pattern
(Character and Border Patterns Only) .. 5-49
Changing the Colors of Character
Patterns ............................................... 5-50
Saving Embroidery Patterns ................. 5-51
[] Saving a Pattern ............................ 5-51
[] If You Can Not Save the Pattern .... 5-52
Retrieving Patterns from Memory ........ 5-55
Aligning the Left Side of a Pattern and
Sewing ................................................ 5-57
Connecting Characters ........................ 5-58
Embroidering an Outline of a Pattern ,, 5-60
Using a Frame Pattern to Make
Appliqu6 (1) ........................................ 5-61
Using a Frame Pattern to Make
Appliqu6 (2) ........................................ 5-62
Embroidering Small Fabrics or Fabric
Edges .................................................. 5-64
Chapter 6 Embroidery Edit
Functions
Selecting Character Patterns .................. 6-5
[] Key Functions ................................. 6-8
Moving the Pattern ................................ 6-9
Rotating the Pattern ............................. 6-10
Changing the Size of the Pattern ........... 6-11
Deleting the Pattern ............................ 6-12
Changing the Thread Color ................. 6-13
Changing the Configuration of Character
Patterns ............................................... 6-15
Changing Character Spacing ............... 6-16
Changing the Color of Each Character
in a Pattern .......................................... 6-17
Saving Edited Patterns ......................... 6-32
[] Saving a Pattern ............................ 6-32
[] If You Can Not Save the Pattern .... 6-33
Retrieving Saved Patterns .................... 6-36
Chapter 7MY CUSTOM STITCH
Creating Stitch Data .............................. 7-3
Editing Stitch Data ................................. 7-6
[] Moving a Point ............................... 7-7
[] Moving Part or All of the Design ..... 7-8
[] Inserting New Points ...................... 7-9
Storing the custom design .................... 7-11
[] If the Stitch Pattern Cannot Be
Saved ........................................... 7-12
Retrieving a Stitch Design That Has Been
Saved .................................................. 7-13
Chapter 8 Care and Maintenance
[] Cleaning the LCD Screen ............... 8-2
[] Cleaning the Machine Casing ......... 8-2
[] Cleaning the Race and Shuttle ........ 8-2
Chapter 9 Troubleshooting
[] Alarm Sounds ............................... 9-15
Appendix
_ndex
Chapter 1Setting Up
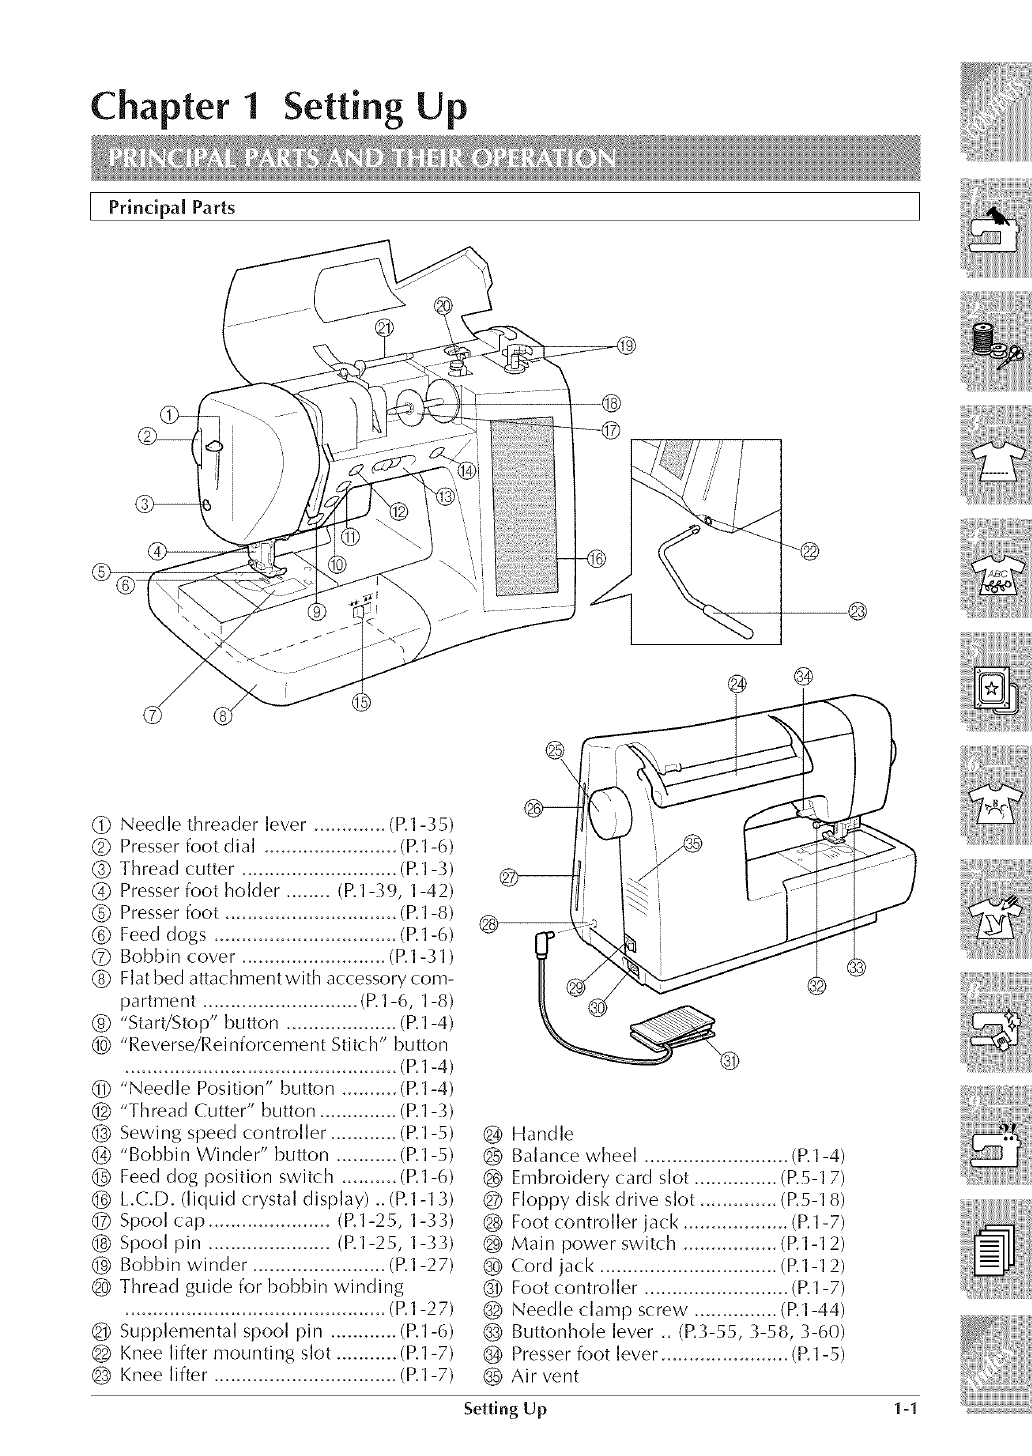
Principal Parts
@ ®
(_ Needle threader lever ............. (R1-35)
Q Presserfoot dial ........................ (R1-6)
(_ Thread cutter ............................ (R1-{)
G Presserfoot holder ........ (R1-{9, 1-42)
(_ Presserfoot ............................... (R]-8)
O Feed dogs ................................. (R1-6)
O Bobbin cover .......................... (R1-_1)
(_ Flatbed attachmentwith accessory com-
partment ............................ (R1-6, 1-8)
(_ "Start/Stop" button .................... (R1-4)
_) "Reverse/Reinforcement Stitch" button
................................................. (R1-4)
(_ "Needle Position" button .......... (R1-4)
(_ "Thread Cutter" button .............. (R1-_)
Sewing speed controller ............ (R1-5)
O "Bobbin Winder" button ........... (R1-5)
Feed dog position switch .......... (R1-6)
(_) L.C.D. (liquid crystal display).. (R1-1 {)
(_) Spool cap ...................... (R1-25, 1-_:;)
(D Spool pin ...................... (R1-25, 1-{_)
(D Bobbin winder ........................ (R1-27)
Thread guide for bobbin winding
............................................... (R1-27)
(_ Supplemental spool pin ............ (R1-6)
Knee lifter mounting slot ........... (R1-7)
(_ Knee lifter ................................. (R1-7)
@
(_ Handle
@ Balance wheel .......................... (R1-4)
(_ Embroidery card slot ............... (R5-17)
Floppy disk drive slot .............. (R5-18)
Foot controller jack ................... (R1-7)
(_ Main power switch ................. (R1-12)
Q Cord jack ................................ (R1-12)
(_ Foot controller .......................... (R1-7)
Q Needle clamp screw ............... (R1-44)
Buttonhole lever .. (R%55, %58, %60)
Presserfoot lever ....................... (R1-5)
Air vent
Setting Up 1-1
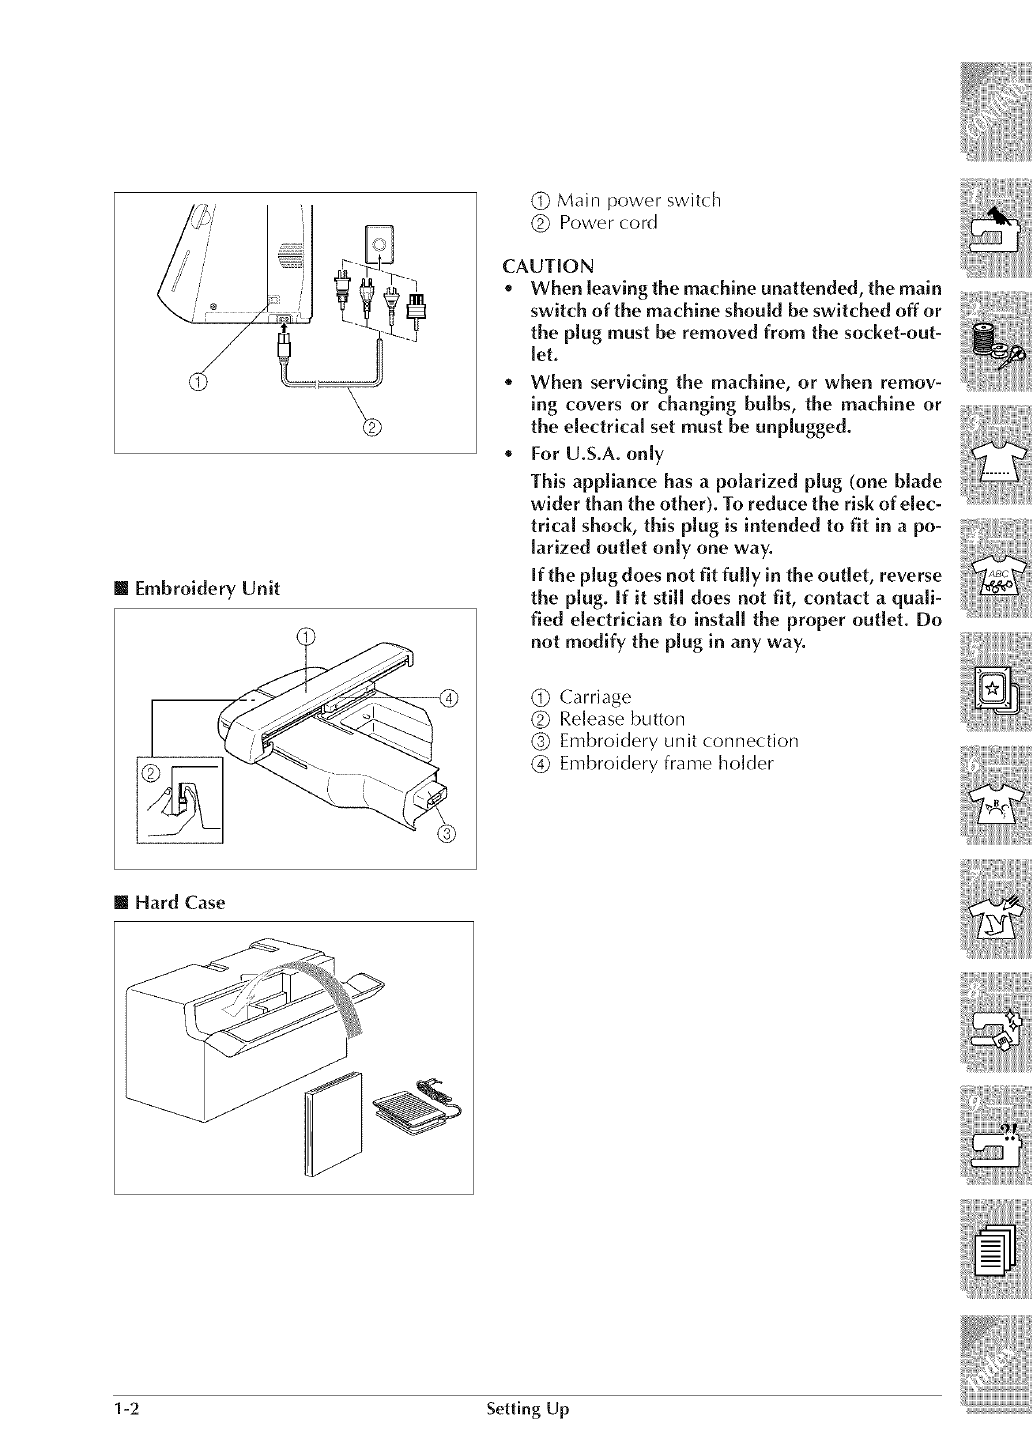
[] Embroidery Unit
(_ Main power switch
Q Power cord
CAUTION
o When leaving the machine unattended, the main
switch of the machine should be switched off or
the plug must be removed from the socket-out-
let.
* When servicing the machine, or when remov-
ing covers or changing bulbs, the machine or
the electrical set must be unplugged.
*For U.S.A. only
This appliance has a polarized plug (one blade
wider than the other). To reduce the risk of elec-
trical shock, this plug is intended to fit in a po-
larized outlet only one way.
If the plug does not fit fully in the outlet, reverse
the plug. If it still does not fit, contact a quali-
fied electrician to instal[ the proper outlet. Do
not modify the plug in any way.
(_ Carriage
(_ Release button
(_) Embroidery unit connection
(_ Embroidery frame holder
[] Hard Case
1-2 Setting Up
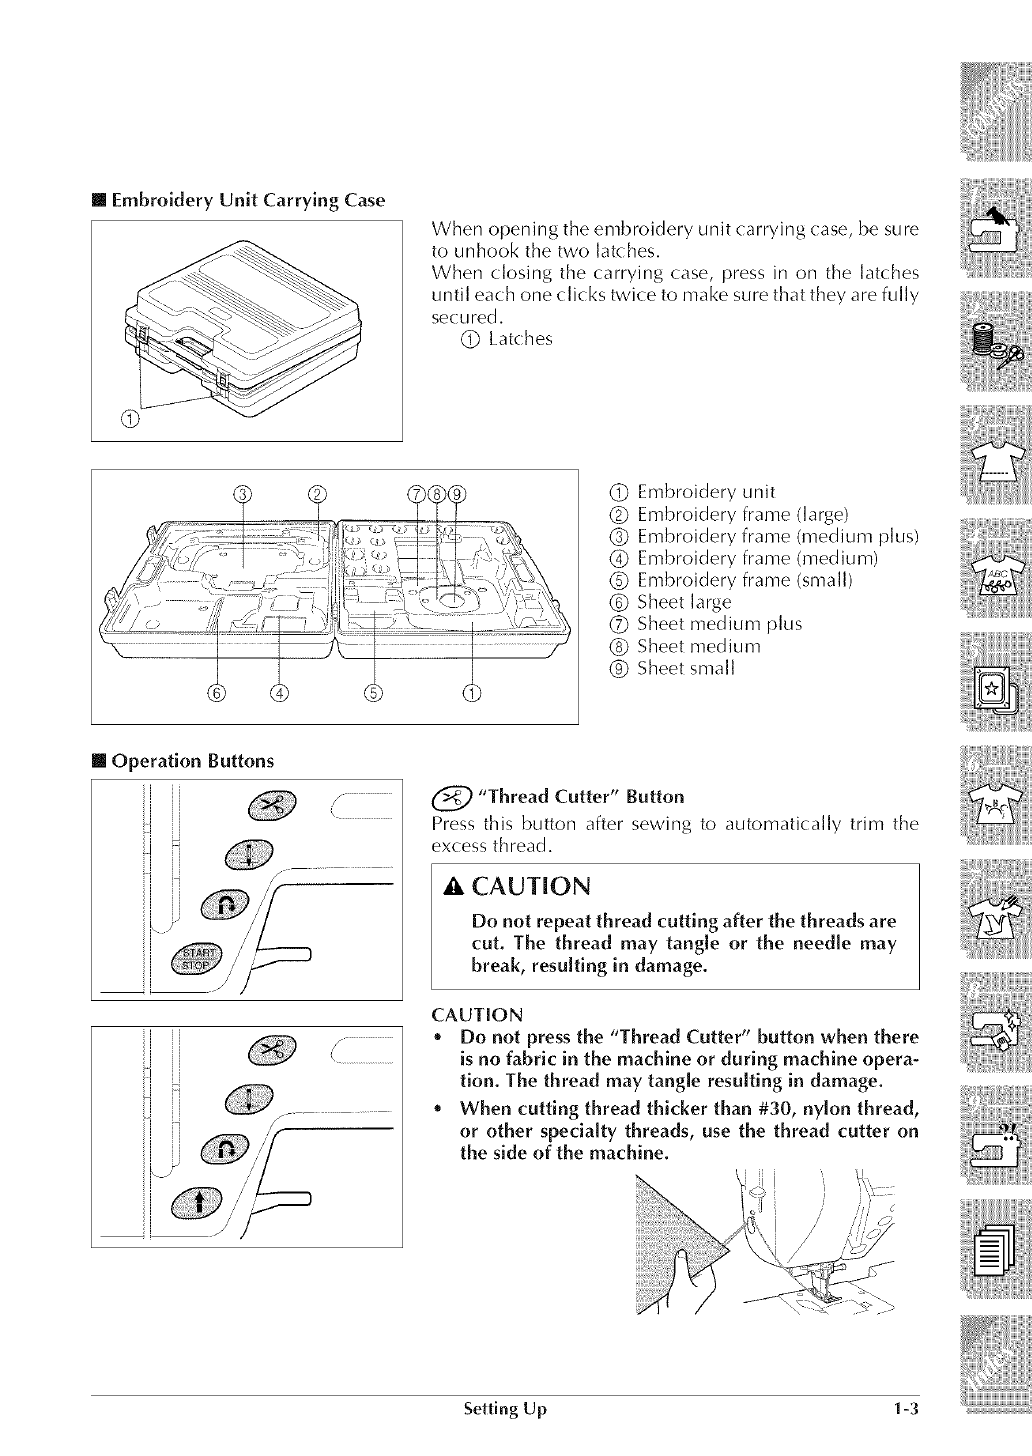
[] Embroidery Unit Carrying Case
When opening the embroidery unit carrying case, be sure
to unhook the two latches,
When closing the carrying case, press in on the latches
until each one (:licks twice to make sure that they are fully
secured,
(_ Latches
(_ Embroidery unit
(_ Embroidery frame (large)
(_ Embroidery frame (medium plus)
(_) Embroidery frame (medium)
C) Embroidery frame (small)
(_) Sheet large
(L) Sheet medium plus
(_ Sheet medium
(_ Sheet small
[] Operation Buttons
J
\ ..............................
('_ "Thread Cutter" Button
Press this button after sewing to automatically trim the
excess thread.
A, CAUTION
Do not repeat thread cutting after the threads are
cut. The thread may tangle or the needle may
break, resulting in damage.
CAUTION
o Do not press the "Thread Cutter" button when there
is no fabric in the machine or during machine opera-
tion. The thread may tangle resulting in damage.
.When cutting thread thicker than #30, nylon thread,
or other specialty threads, use the thread cutter on
the side of the machine.
Setting Up 1-3
[] Balance Wheel
O "Needle Position" Button (Needle up/Needle down)
Use this button when changing sewing direction or for
detailed sewing in small areas. Press this button to raise or
lower the needle position. Press the button twice to sew a
sing[e stitch.
(_) "Reverse/Reinforcement Stitch" Button
Use this button to sew reinforcement stitches at the begin-
ning and end of sewing. Press this button, and the ma-
chine sews 3 stitches in the same spot and stops automati-
cally. For straight and zigzag stitch patterns that take re-
verse stitches, the machine wii[ sew reverse stitches at low
speed only while holding down the "Reverse/Reinforce-
ment Stitch" button (the stitches are sewn in the opposite
direction from the main seam). (See page 2-_L)
_(_) "Start/Stop" Button
Press this button and the machine will sew a few stitches
at a slow speed, then begin sewing at the speed set by the
sewing speed controller. Press the button again to stop the
machine. Hold the button down to sew at the machine's
slowest speed. The button changes color according to the
machine's operation mode.
Green : the machine is ready to sew or is sewing.
Red : the machine (:an not sew.
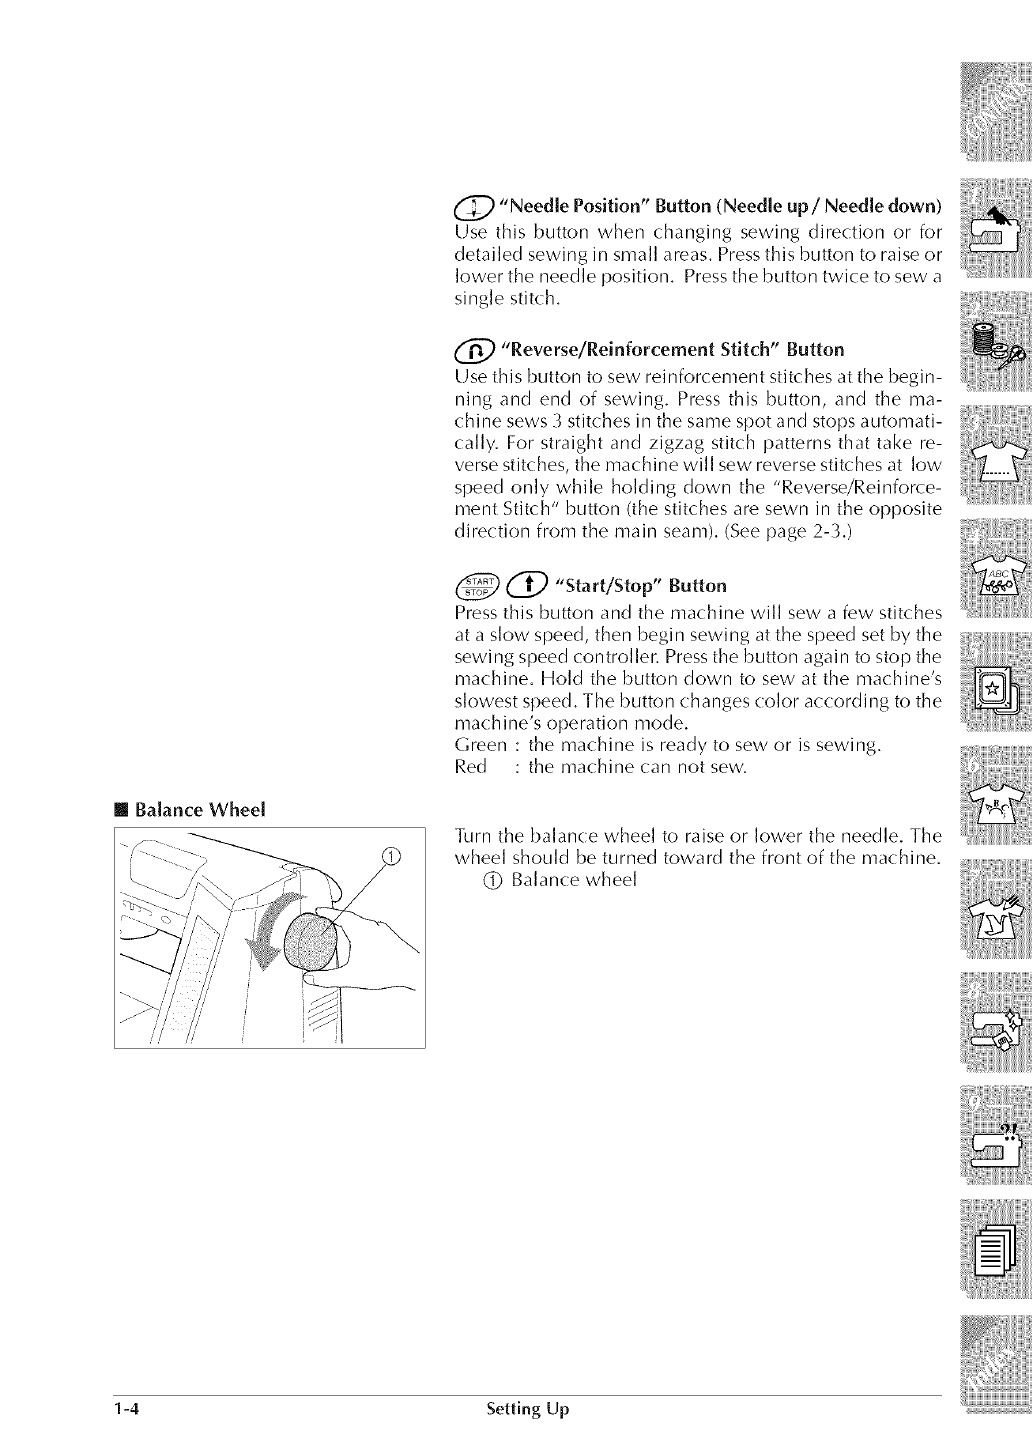
Turn the balance wheel to raise or lower the needle. The
wheel should be turned toward the front of the machine,
(_ Balance wheel
1-4 Setting Up
[] Presser Foot Lever
\
[] Sewing Speed Controller
[] Bobbin Winder Button
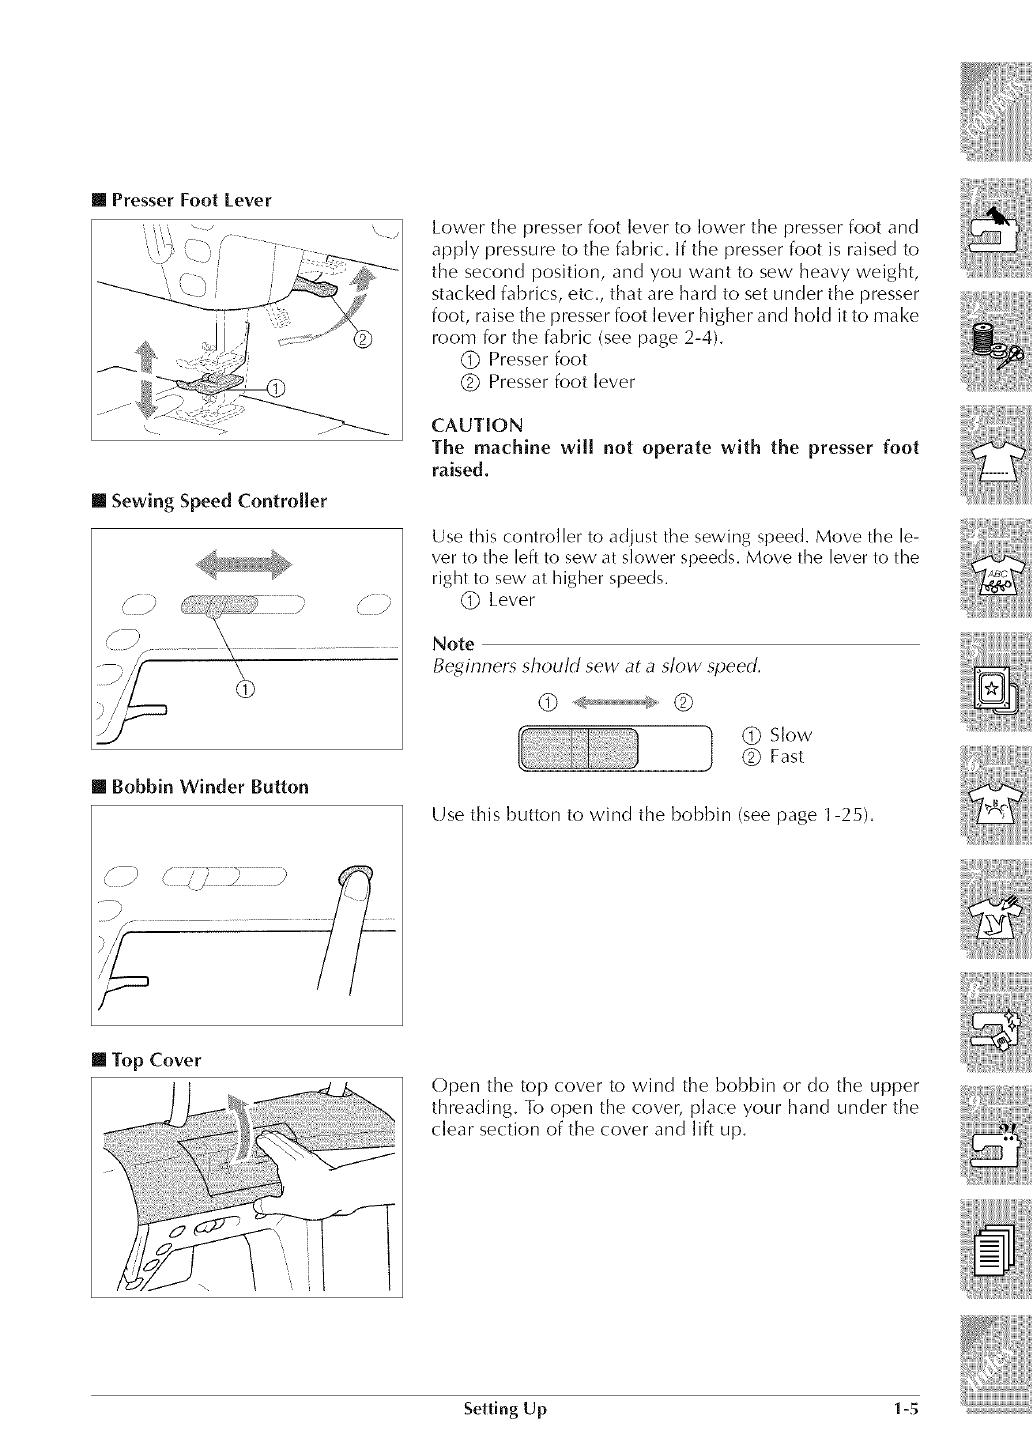
Lower the presser foot lever to lower the presser foot and
apply pressure to the fabric. If the presser foot is raised to
the second position, and you want to sew heavy weight,
stacked fabrics, etc., that are hard to set under the presser
foot, raise the presser foot lever higher and hold it to make
room for the fabric (see page 2-4).
Q Presser foot
Q Presser foot lever
CAUTION
The machine will not operate with the presser foot
raised.
Use this controller to adjust the sewing speed. Move the le-
ver to the left to sew at slower speeds. Move the lever to the
right to sew at higher speeds.
Q_)Lever
Note
Beginners should sew at a slow speed,
Q]) Slow
(_ Fast
Use this button to wind the bobbin (see page 1-25).
[] Top Cover
Open the top cover to wind the bobbin or do the upper
threading. To open the cover, place your hand under the
clear section of the cover and lift up.
Setting Up 1-5
[] Supplemental Spool Pin
[] Fiat Bed Attachment/Free Arm
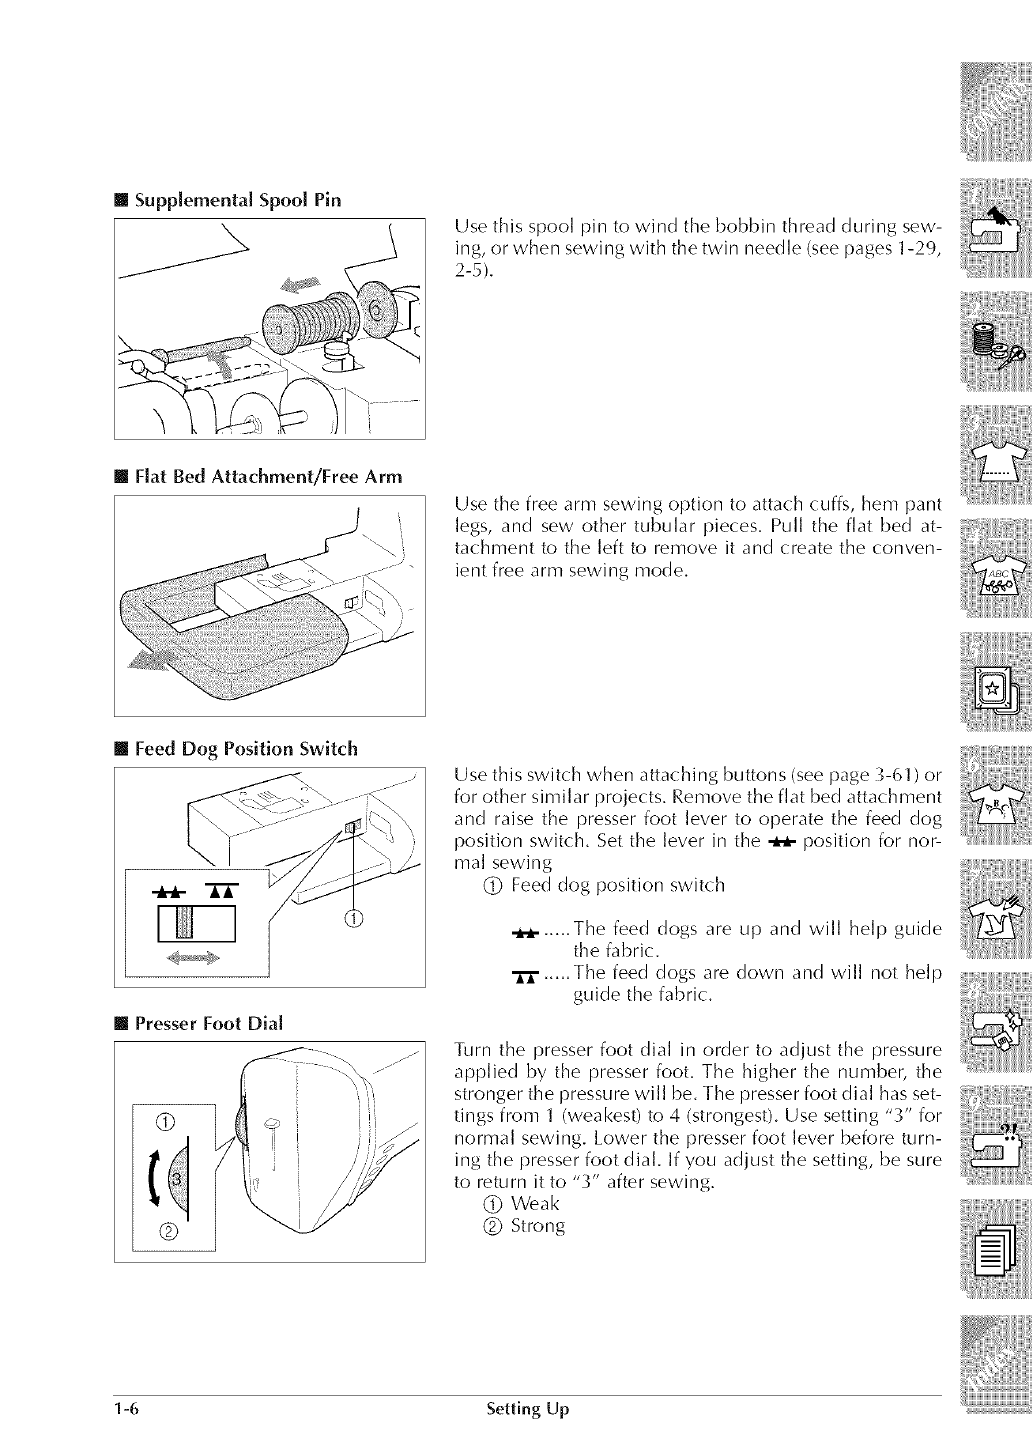
Use this spool pin to wind the bobbin thread during sew-
ing, or when sewing with the twin needle (seepages 1-29,
2-5).
Use the free arm sewing option to attach cuffs, hem pant
legs, and sew other tubular pieces. Pull the flat bed at-
tachment to the left to remove it and create the conven-
ient free arm sewing mode.
[] Feed Dog Position Switch
[] Presser Foot Dial
Use this switch when attaching buttons (see page 3-61 ) or
for other similar projects. Remove the flat bed attachment
and raise the presser foot lever to operate the feed dog
position switch. Set the lever in the _ position for nor-
mal sewing
(_) Feed dog position switch
-_- ..... The feed dogs are up and will help guide
the fabric.
..... The feed dogs are down and will not help
guide the fabric:.
Turn the presser foot dial in order to adjust the pressure
applied by the presser foot. The higher the number, the
stronger the pressure will be. The presser foot dial has set-
tings from 1 (weakest) to 4 (strongest). Use setting "3" for
normal sewing. Lower the presser foot lever before turn-
ing the presser foot dial. If you adjust the setting, be sure
to return it to "3" after sewing.
(_ VVeak
(_ Strong
1-6 Setting Up
[] Knee Lifter
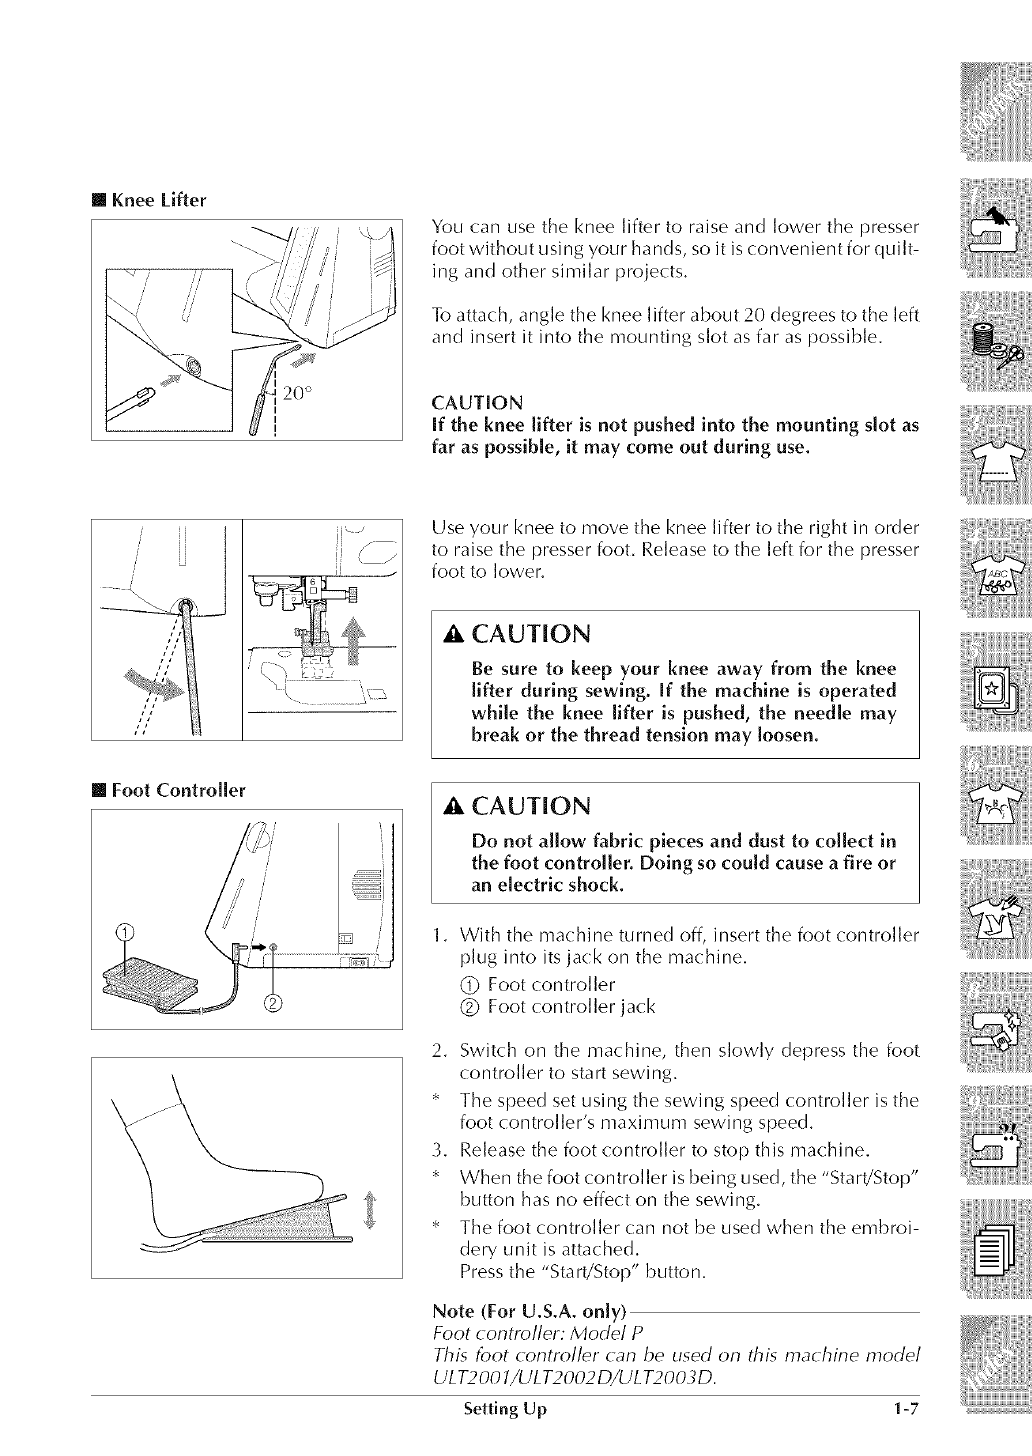
You can use the knee lifter to raise and lower the presser
foot without using your hands, so it is convenient for quilt-
ing and other similar projects.
To attach, angle the knee lifter about 20 degrees to the left
and insert it into the mounting slot as far as possible.
CAUTION
If the knee lifter is not pushed into the mounting slot as
far as possible, it may come out during use.
ij _- J
ii jr
ii I
Use your knee to move the knee lifter to the right in order
to raise the presser foot. Release to the left for the presser
foot to lower.
• , CAUTION
Be sure to keep your knee away from the knee
lifter during sewing. If the machine is operated
while the knee lifter is pushed, the needle may
break or the thread tension may loosen.
[] Foot Controller _, CAUTION
Do not allow fabric pieces and dust to collect in
the foot controller. Doing so could cause a fire or
an electric shock.
1. With the machine turned off, insert the foot controller
plug into its jack on the machine.
(_ Foot controller
(_ Foot controller jack
2. Switch on the machine, then slowly depress the foot
controller to start sewing.
* The speed set using the sewing speed controller is the
foot controller's maximunl sewing speed.
3. Release the foot controller to stop this machine.
* When the foot controller is being used, the "Start!Stop"
button has no effect on the sewing.
* The foot controller can not be used when the embroi-
dery unit is attached.
Press the "Start/Stop" button.
Note (For U.S.A. only)
Foot controller: Model P
This foot controller (an be used on tins machine model
ULT200 I/ULT2002D/ULT2003D.
Setting Up 1-7
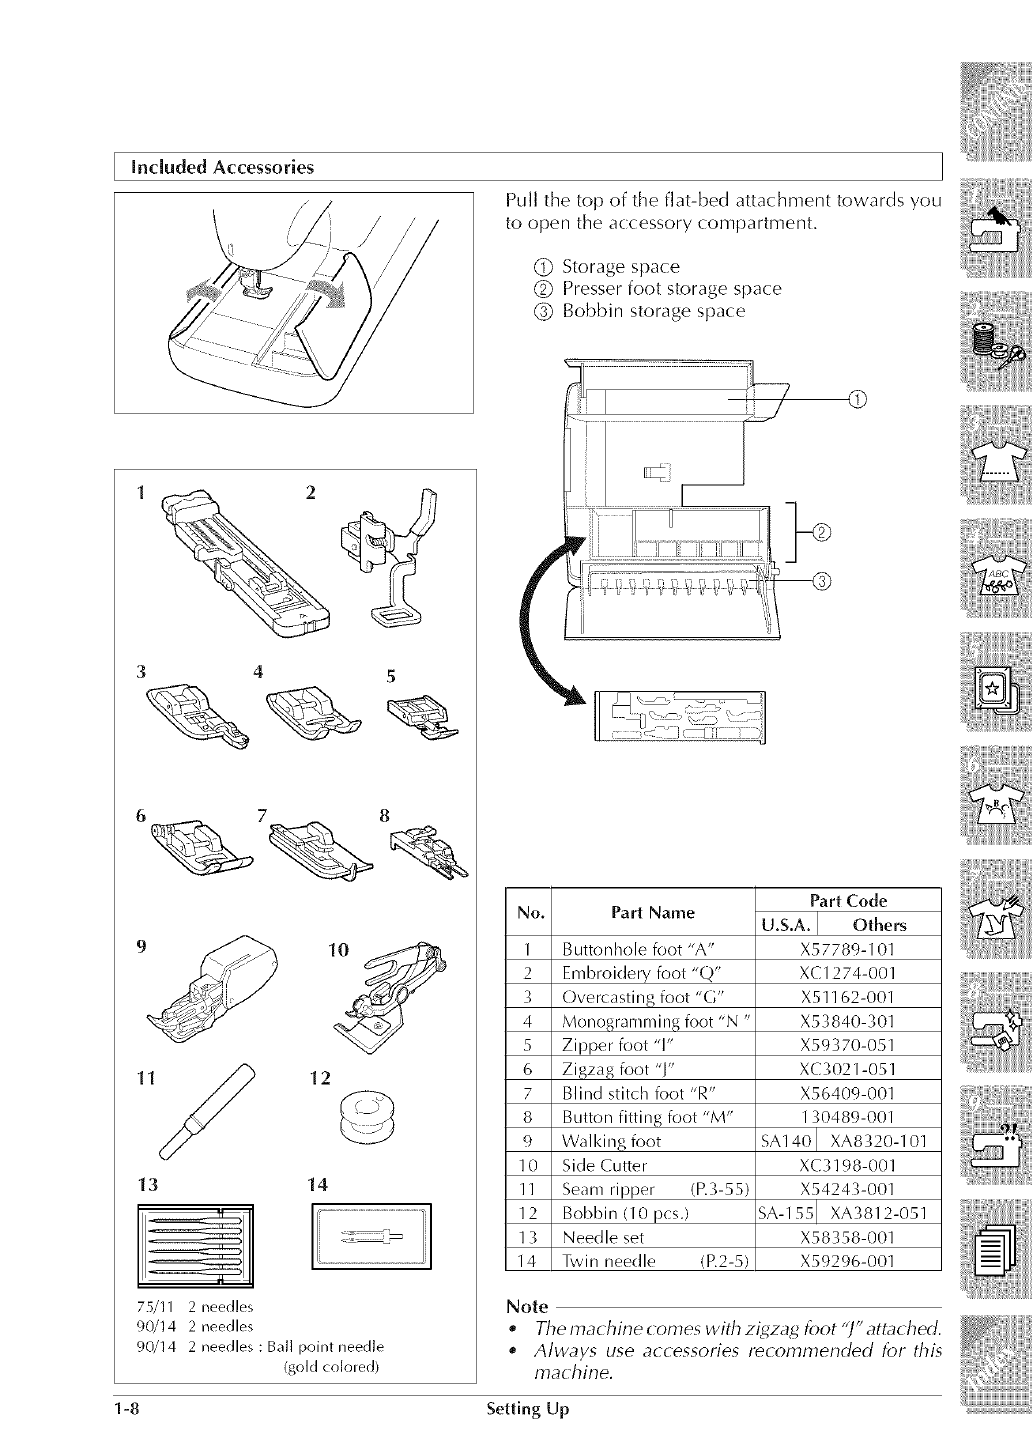
IncludedAccessories
3 4 5
13 14
75/II 2 needles
90/14 2 needles
90/14 2 needles : Ball point needle
(gold colored)
1-8
Pull the top of the flat-bed attachment towards you
to open the accessory compartment.
(_ Storage space
(_ Presser foot storage space
(_) Bobbin storage space
No. Part Name
1 Buttonhole foot "A"
2 Embroidery foot "Q"
"g Overcasting foot "G"
4 Monogramming foot "N "
5 Zipper foot "1"
6 Zigzag foot "!"
7 Blind stitch foot "R"
8 Button fitting foot "M"
9 Wall<ing foot
10 Side Cutter
11 Seam ripper (R%55)
12 Bobbin (10 pcs.)
1 _ Needle set
14 Twin needle (R2-5)
Part Code
U,S,A,[ Others
X57789-101
XC1274-001
X51162-001
X53840-301
X59370-051
XC3021-051
X56409-001
130489-001
SA1401 XA8320-101
XC3198-001
X54243-001
SA-155[ XA3812-051
X58358-001
X59296-001
Note
.Thema hine omeswithzi za att che ,
"Always use accessories recommended for this
ma( hine. i _:_
Setting Up
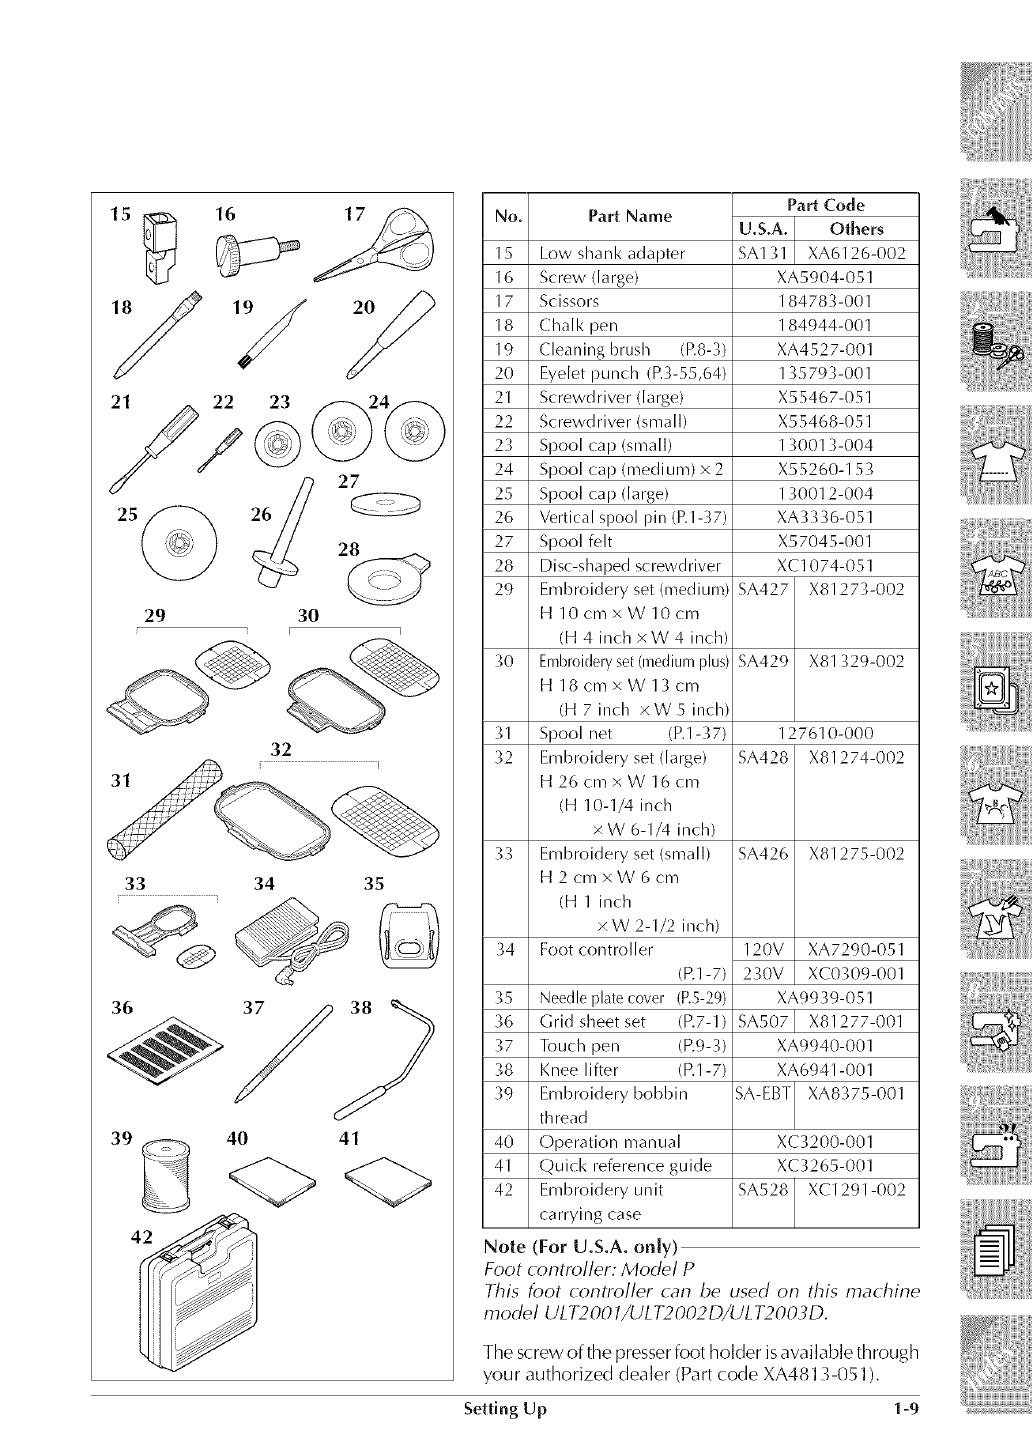
15
21
16 17
22 23
2O
27
28
31
33
36 /38
34 35©
39 _40
41
No. Part Name
15 Low shank adapter
16 Screw (large)
17 Scissors
18 Chalk pen
19 Cleaning brush (P.8-3)
20 Eyelet punch (P.3-55,64)
21 Screwdriver (large)
22 Screwdriver (small)
23 Spool cap (small)
24 Spool cap (medi urn) x 2
25 Spool cap (large)
26 Vertical spool pill (El-37)
27 Spool felt
28 Disc-shaped screwdriver
29 Embroidery set (medium)
H 10cmxW10cm
(H 4 inch xW 4 inch
30 Embroidery set (medium plus)
H 18cmxW13cm
(H 7 inch x W 5 inch
"gl Spool net (El-'g7)
"g2 Embroidery set (large)
H 26 cmx W 16 cm
(H 10-1/4 inch
×W 6-1/4 inch)
3_ Embroidery set (small)
H 2 cm x W 6 cm
(H 1 inch
×W 2-1/2 inch)
34 Foot controller
(R1-7)
_;5 Needle plate cover (R5-29)
_6 (_;rid sheet set (R7-1)
_;7 Touch pen (R9-3)
_;8 Knee lifter (R1-7)
_;9 Embroidery bobbin
th read
40 Operation manual
41 Quick reference guide
42 Embroidery unit
carrying case
Note (For U.S.A. only)
Foot (ontroller: Model P
Part Code
U.S.A. Others
SA131 XA6126-002
XA5904-051
18478%001
184944-001
XA4527-001
135793-001
X55467-051
X55468-051
130013-004
X55260-153
130012-004
XA3_;36-051
X57045-001
XC1074-051
SA427 X81273-002
SA429 X81329-002
127610-000
SA428 X81274-002
SA426 X81275-002
120V XA7290-051
230V XC0309-001
XA9939-051
SA507[ X81277-001
XA9940-001
XA6941-001
SA-EBT XA8375-001
XC3200-001
XC3265-001
SA528 XC1291-002
This foot controller can be used on this machine
model ULT2001/ULT2OO2D/ULT2OO3D.
The screw of the presser foot holder isavailable th rough
your authorized dea]er (Part (:ode XA4813-051 ).
Setting Up 1-9
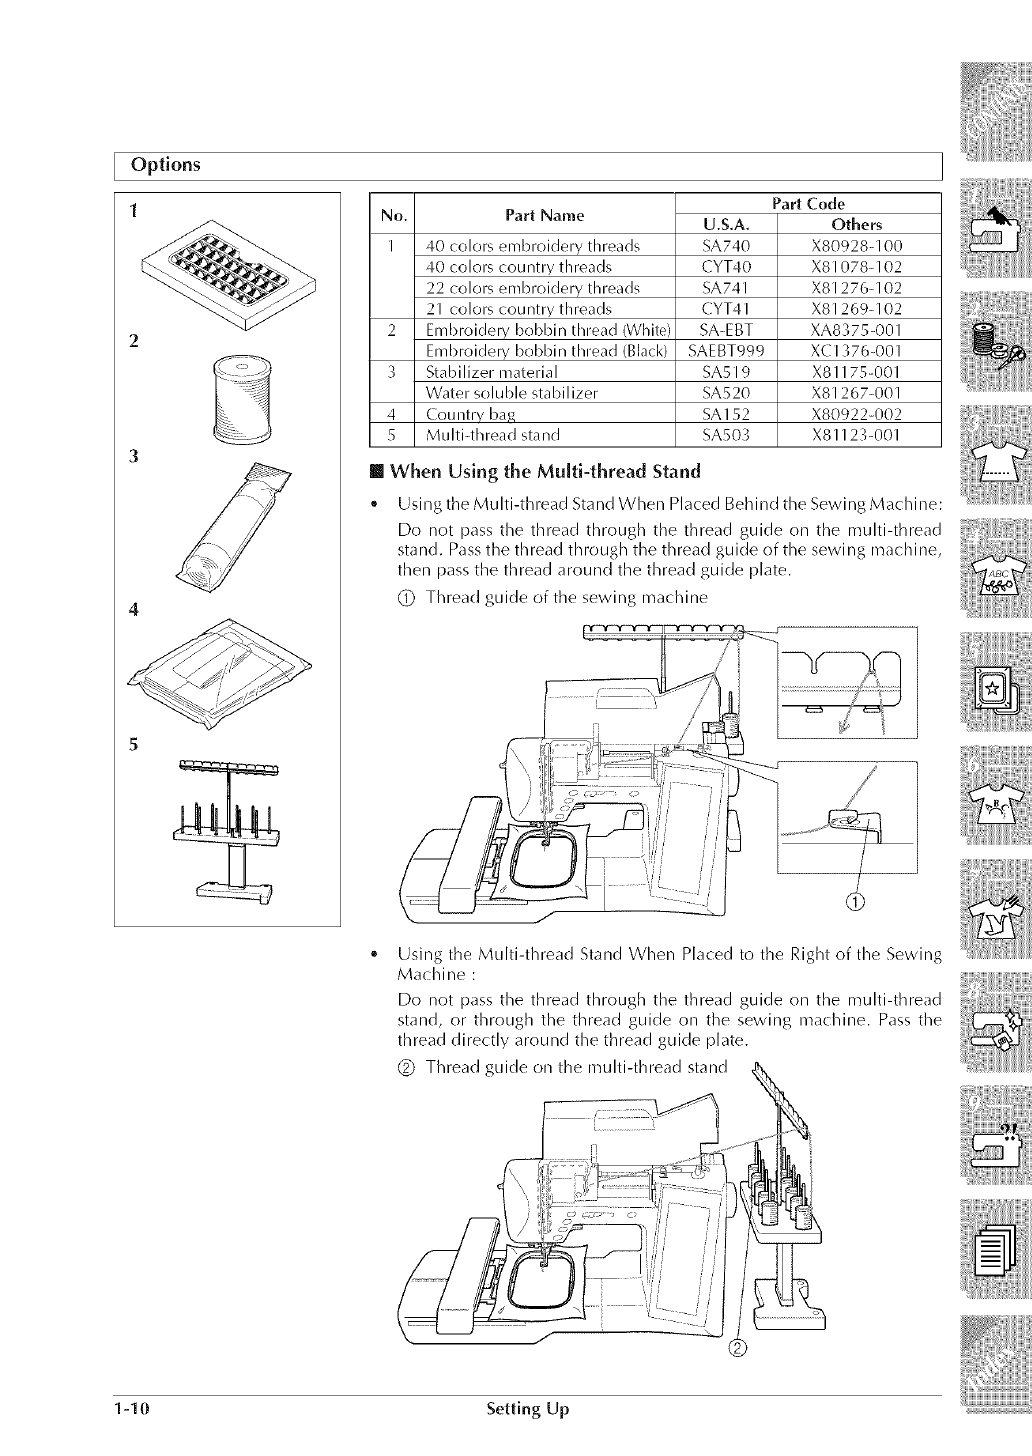
Options
1
2
No.
I 40 colors embroidery threads
40 colors country threads
22 colors embroidery threads
21 colors country threads
2 Embroidery bobbin thread (White)
Embroidery bobbin thread (Black)
"_ Stabilizer material
Water soluble stabilizer
4 Country bag
5Multi-thread stand
Part Name U.S,A,
SA740
CYT40
SA741
CYT41
SA-EBT
SAEBT999
SA519
SA520
SA152
SA503
Part Code
Others
X80928-100
X81078-102
X81276-102
X81269-102
XA8375-001
XCI376-001
X81175@01
X81267-001
X80922-002
X81123-001
[] When Using the Multi-thread Stand
Using the Multi-thread Stand When Placed Behind the Sewing Machine:
Do not pass the thread through the thread guide on the multi-thread
stand. Pass the thread through the thread guide of the sewing machine,
then pass the thread around the thread guide plate.
(_) Thread guide of the sewing machine
Using the Multi-thread Stand When Placed to the Right of the Sewing
Machine :
Do not pass the thread through the thread guide on the multi-thread
stand, or through the thread guide on the sewing machine. Pass the
thread directly around the thread guide plate.
(_ Thread guide on the multi-thread stand
J
1-10 Setting Up
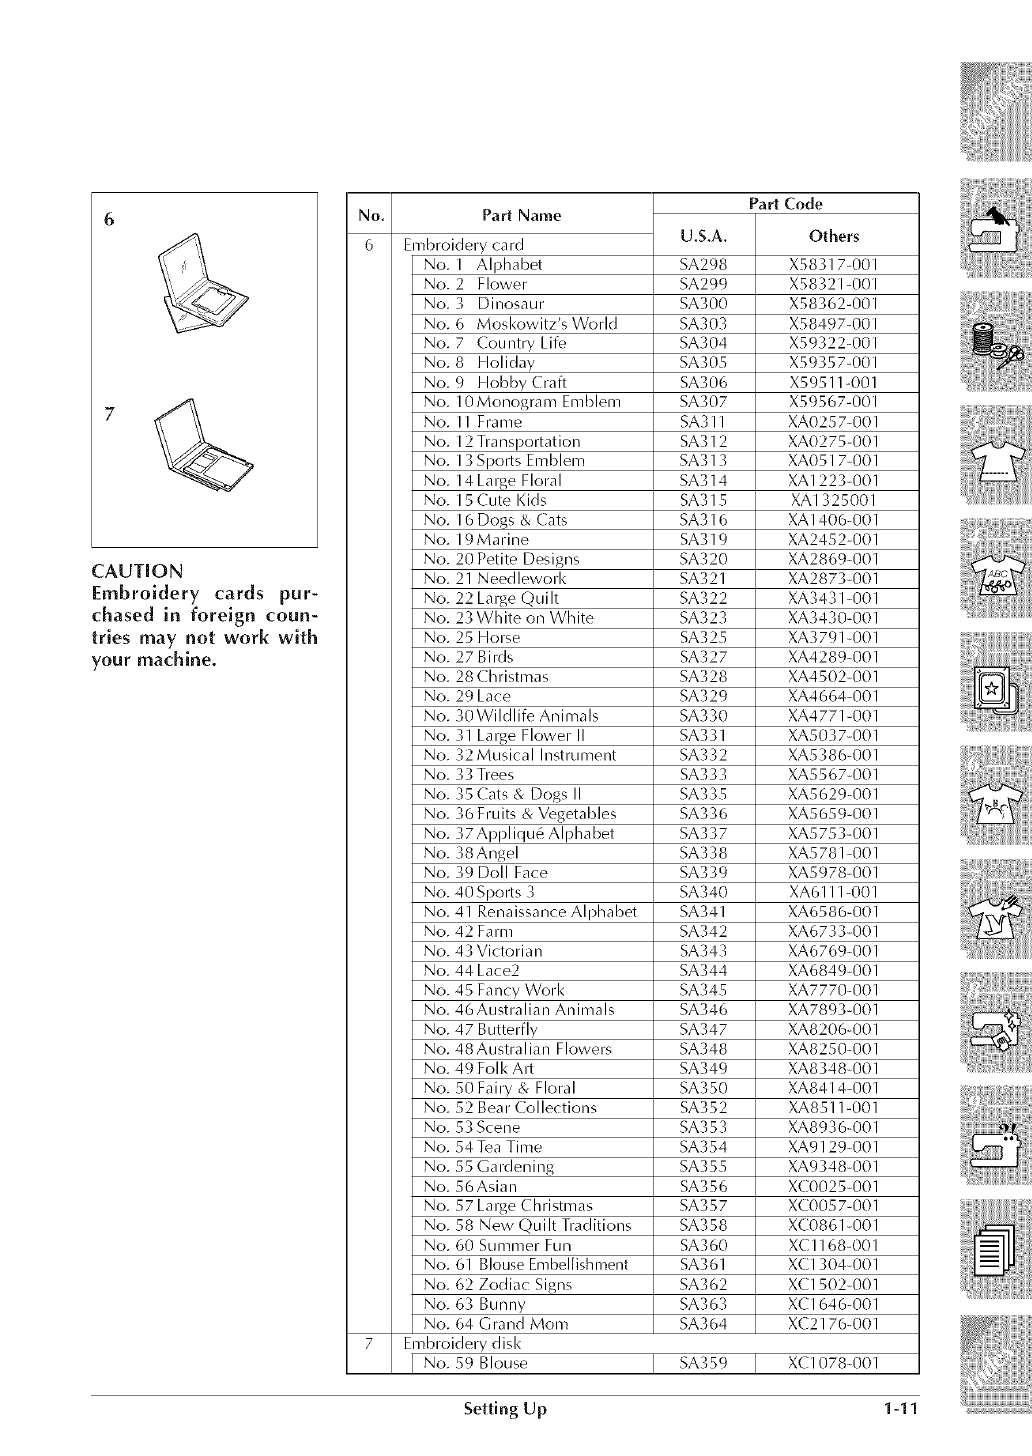
6
CAUTION
Embroidery cards pur-
chased in foreign coun-
tries may not work with
your machine.
No.
6
Part Name
Embroidery card
No. I Alphabet
No. 2 Flower
No. 3 Dinosaur
No. 6 Mosl<owitz's World
No. 7Country Life
No. 8 Holiday
No. 9 Hobby Craft
No. I0 Monogram Emblenl
No. II Frame
No. 12 Transportation
No. 13 Sports Emblem
No. 14 Lalge Floral
No. 15 Cute Kids
No. 16 Dogs & Cats
No. 19Marine
No. 20 Petite Designs
No. 21 Needleworl<
No. 22 LaIT1eQuilt
No. 23 White on White
No. 25 Horse
No. 27 Birds
No. 28 Christmas
No. 29 Lace
No. "X}Wi ldl ife Animals
No. _tl Lmge Flower II
No. 32 Musical Instrument
No. _3 Trees
No. 35 Cats & Dogs II
No. _6 Fruits & Vegetables
No. "WAppliqu6_ Alphabet
No. _8 Angel
No. _9 Doll Face
No. 40 Sports 3
No. 41 Renaissance Alphabet
No. 42 Farm
No. 43 Victorian
No. 44 Lace2
No. 45 Fancy Worl<
No. 46Australian Animals
No. 47 Butterfly
No. 48Australian Flowers
No. 49 Folk Ait
No. 50 Fairy & Floral
No. 52 Bear Lollections
No. 53 Scene
No. 54Tea Time
No. 55 Gardening
No. 56Asian
No. 57 Lalge Christmas
No. 58 New Quilt Traditions
No. 60 Summer Fun
No. 61 Blouse EmbelJishment
No. 62 Zodiac Signs
No. 63 Bunny
No. 64 Grand Morn
Embroidery disk
[No. 59 Blouse
U.S.A.
SA298
SA299
SA300
SA303
SA304
SA305
SA306
SA307
SA311
SA312
SA313
SA314
SA315
SA316
SA319
SA320
SA321
SA322
SA323
SA325
SA327
SA328
SA329
SA330
SA331
SA332
SA333
SA335
SA336
SA337
SA338
SA339
SA340
SA341
SA342
SA343
SA344
SA345
SA346
SA347
SA348
SA349
SA350
SA352
SA353
SA354
SA355
SA356
SA357
SA358
SA360
SA361
SA362
SA363
SA364
SA359
Part Code
Others
X58317-001
X58321-001
X58362-001
X58497-001
X59322-001
X59357-001
X59511-001
X59567-001
XA0257-001
XA0275-001
XA0517-001
XAI223-001
XAI325001
XAI40&001
XA2452-001
XA2869-001
XA2873-001
XA3431-001
XA3430-001
XA3791-001
XA4289-001
XA4502-001
XA4664-001
XA4771-001
XA5037-001
XA538&001
XA5567-001
XA5629-001
XA5659-001
XA5753-001
XA5781-001
XA5978-001
XA6111-001
XA658&001
XA6733-001
XA6769-001
XA6849-001
XA7770-001
XA7893-001
XA820&001
XA8250-001
XA8348-001
XA8414-001
XA8511-001
XA893&001
XA9129-001
XA9348-001
XC0025-001
XC0057-001
XC0861-001
XC1168-001
XCl304-001
XCl502-001
XC164&001
XC217&001
XCl078-001
Setting Up 1-11
Connecting the Power
A WARNING
®
®
Use only regular household electricity for the power source. Using other power sources
may result in fire, electric shock, or damage to the machine.
Turn off the main power and remove the plug in the following circumstances:
When you are away from the machine
After using the machine
When the power fails during use
When the machine does not operate correctly due to a bad connection or a dis-
connection
During electrical storms
A CAUTION
*Do not use extension cords or multi-plug adapters with many other appliances plugged
in to them. Fire or electric shock may result.
.Do not touch the plug with wet hands. Electric shock may result.
o When unplugging the machine, always turn off the main power first. Always grasp the
plug to remove it from the outlet. Pulling on the cord may damage the cord, or lead to
fire or electric shock.
o Do not allow the power cord to be cut, damaged, modified, forcefully bent, pulled,
twisted, or bundled. Do not place heavy objects on the cord. Do not subiect the cord
to heat. These things may damage the cord and cause fire or electric shock. If the
cord or plug is damaged, take the machine to your authorized dealer for repairs be-
fore continuing use.
*Unplug the power cord if the machine is not to be used for a long period of time.
Otherwise a fire may result.
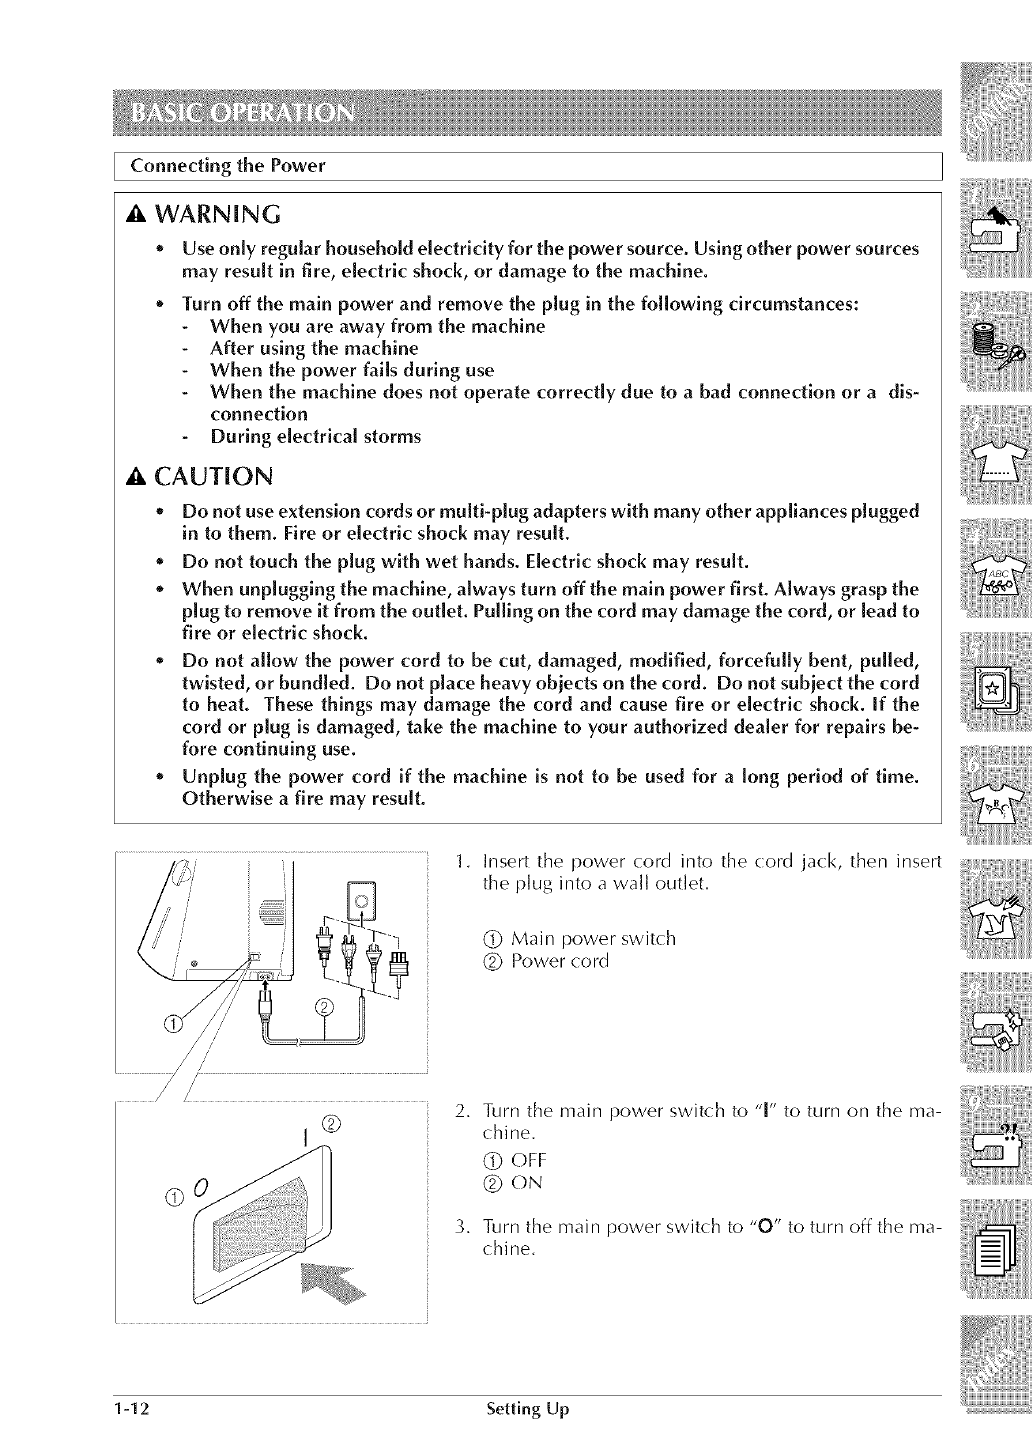
1. Insert the power cord into the cord jack, then insert
the plug into a wall outlet.
(_ Main power switch
(_ Power cord
/ /
//2. Turn the main power switch to "1" to turn on the ma-
chine.
(_) OFF
Q ON
3. Turn the main power switch to "0" to turn off the ma-
chine.
1-12 Setting Up
Viewing the [CD Display
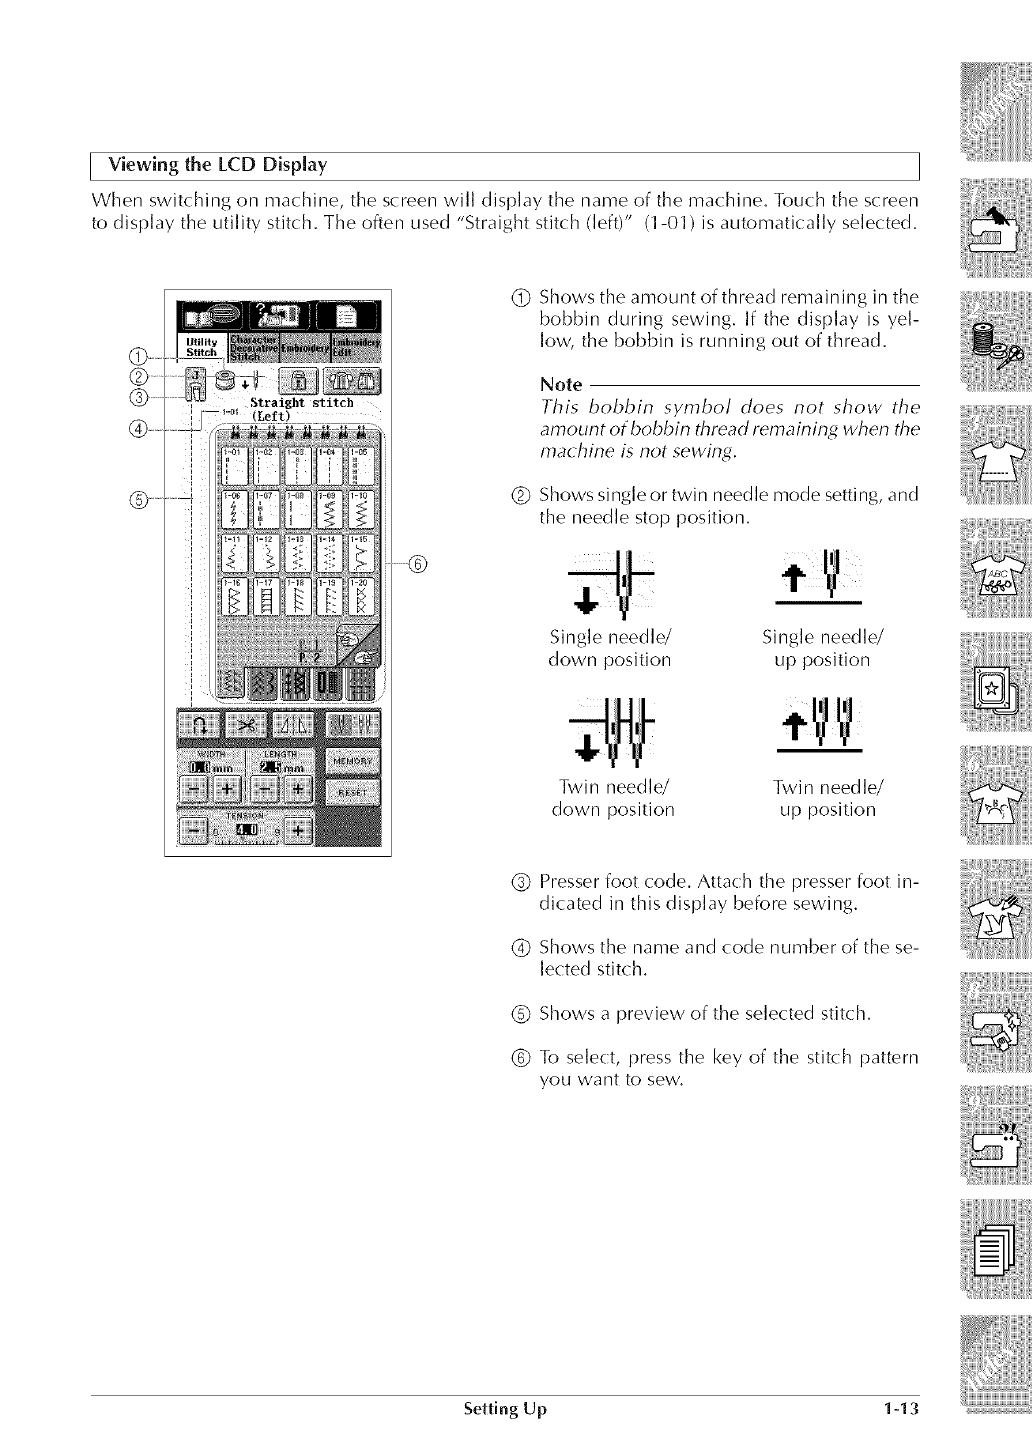
When switching on machine, the screen will display the name of the machine, Touch the screen
to display the utility stitch, The often used "Straight stitch (lefO" (1-01) is automatic all_ selected,
©
®
Shows the amount of thread remaining in the
bobbin during sewing. If the display is yel-
low, the bobbin is running out of thread.
Note
This bobbin symbol does not show the
amount of bobbin thread remaining when the
machine is not sewing.
Shows single or twin needle mode setting, and
the needle stop position.
Single needle/
down position Single needle/
up position
Twin needle/ Twin needle/
down position up position
(_) Presser foot code. Attach the presser foot in-
dicated in this display before sewing.
(_) Shows the name and code number of the se-
lected stitch.
C) Shows a preview of the selected stitch.
(_ To select, press the key of the stitch pattern
you want to sew.
Setting Up 1-13
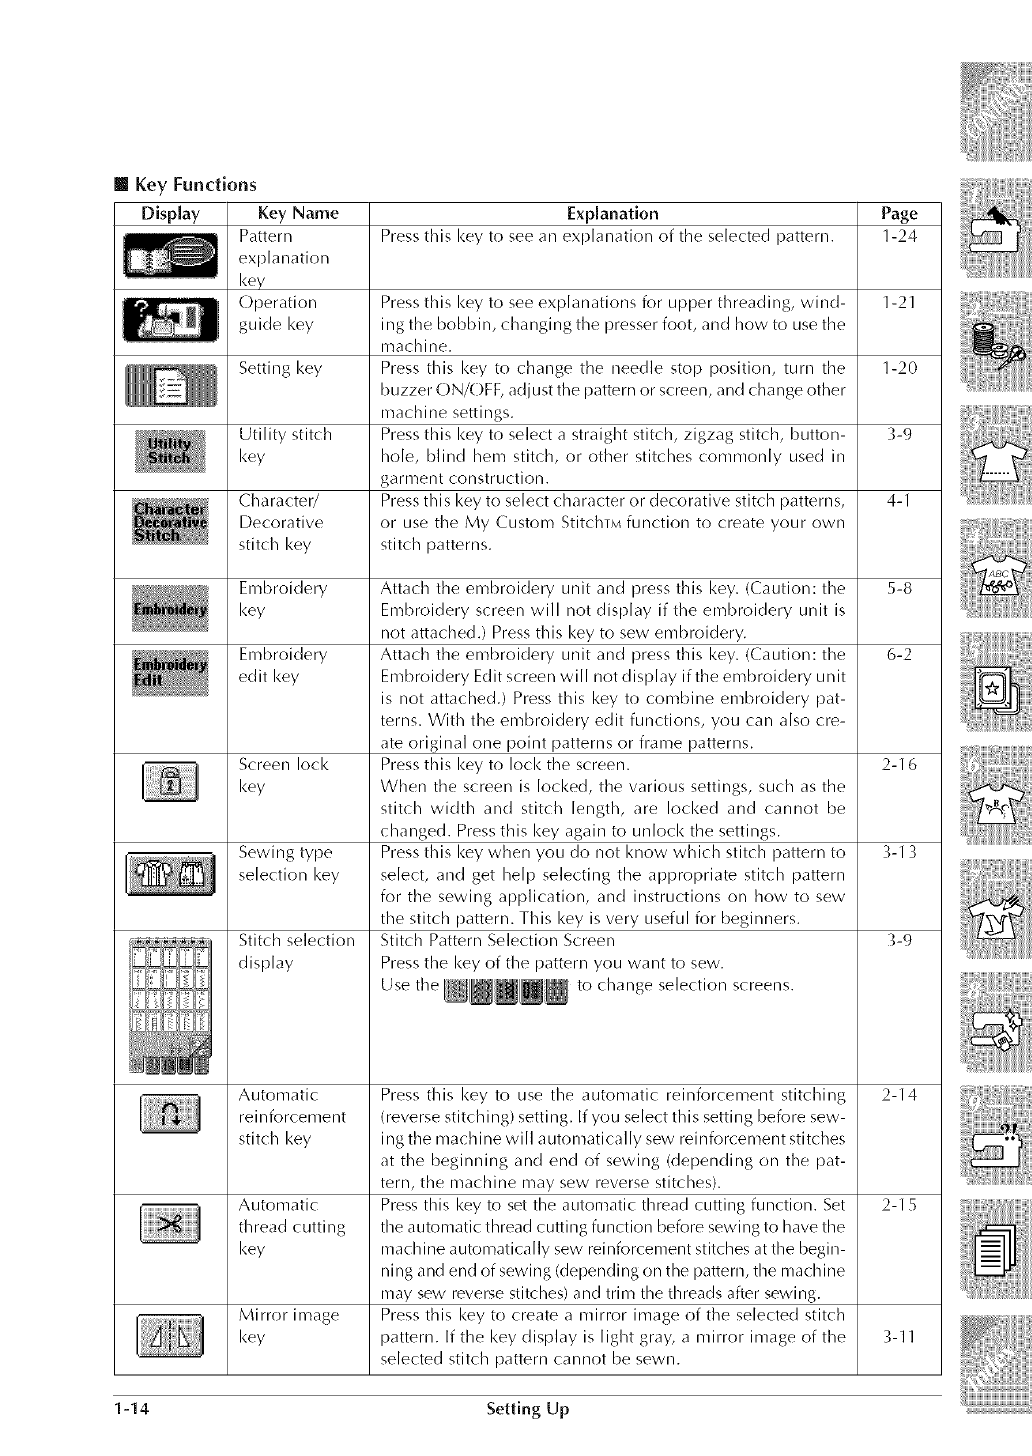
[] KeyFunctions
Display KeyName Explanation Page
Pattern Pressthiskeytoseeanexplanationoftheselectedpattern. 1-24
explanation
key
Operation Pressthiskeytoseeexplanationsforupperthreading,wind- 1-21
guidekey ingthebobbin,changingthepresserfoot,andhowtousethe
machine.
Settingkey Pressthiskeytochangetheneedlestopposition,turnthe 1-20
buzzer(_)N/OFF,adjustthepatternorscreen,andchangeother
machinesettings.
Utilitystitch Pressthiskeytoselectastraightstitch,zigzagstitch,button- 3-9
key hole,blindhemstitch,orotherstitchescommonlyusedin
garmentconstruction.
Character/ Pressthiskeytoselectcharacterordecorativestitchpatterns, 4-1
Decorative orusetheMyCustomStitchTMfunctiontocreateyourown
stitchkey stitchpatterns.
Embroidery 5-8
key
Embroidery 6-2
editkey
Screenlock 2-16
key
Sewingtype 3-13
selectionkey
Stitch selection
display
Attach the embroidery unit and press this key. (Caution: the
Embroidery screen will not display if the embroidery unit is
not attached.) Press this key to sew embroidery.
Attach the embroidery unit and press this key. (Caution: the
Embroidery Edit screen will not display if the embroidery unit
is not attached.) Press this key to combine embroidery pat-
terns. With the embroidery edit functions, you can also cre-
ate original one point patterns or frame patterns.
Press this key to lock the screen.
When the screen is locked, the various settings, such as the
stitch width and stitch length, are locked and cannot be
changed. Press this key again to unlock the settings.
Press this key when you do not know which stitch pattern to
select, and get help selecting the appropriate stitch pattern
for the sewing application, and instructions on how to sew
the stitch pattern. This key is very useful for beginners.
Stitch Pattern Selection Screen
Press the key of the pattern you want to sew.
Use the _[_@@i@ to __hange sele__tion screens.
3-9
Automatic Press this key to use the automatic reinforcement stitching 2-14
reinforcement (reverse stitching) setting. If you select this setting before sew-
stitch key ing the machine will automatically sew reinforcement stitches
at the beginning and end of sewing (depending on the pat-
tern, the machine may sew reverse stitches).
Automatic Press this key to set the automatic thread cutting function. Set 2-15
thread cutting the automatic thread cutting function before sewing to have the
key machine automatically sew reinforcement stitches at the begin-
ning and end of sewing (depending on the pattern, the machine
may sew reverse stitches) and trim the threads after sewing.
Mirror image Press this key to create a mirror image of the selected stitch
key pattern. If the key display is light gray, a mirror image of the 3-11
selected stitch pattern cannot be sewn.
1-14 Setting Up
Display Page
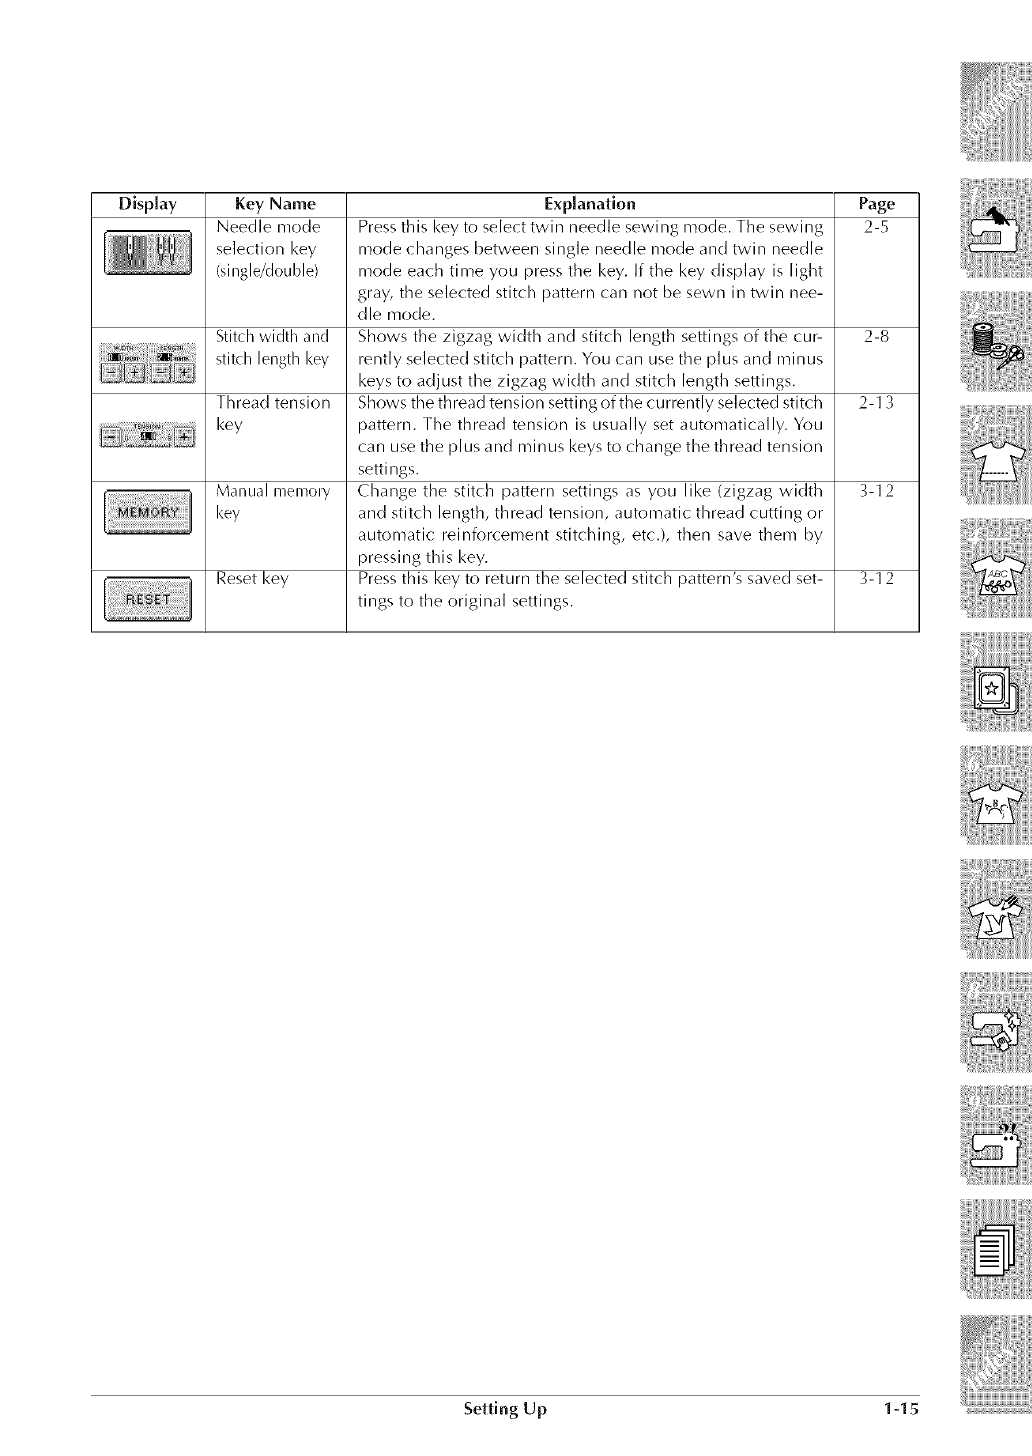
2-5
Key Name
Needle mode
selection key
(single/double)
Stitch width and 2-8
stitch length key
Thread tension 2-1 3
key
Manual memory 3-12
key
Resetkey
Explanation
Press this key to select twin needle sewing mode. The sewing
mode changes between single needle mode and twin needle
mode each time you press the key. If the key display is light
gray, the selected stitch pattern can not be sewn in twin nee-
die mode.
Shows the zigzag width and stitch length settings of the cur-
rently selected stitch pattern. You can use the plus and minus
keys to adjust the zigzag width and stitch length settings.
Shows the thread tension setting of the currently selected stitch
pattern. The thread tension is usually set automatically. You
can use the plus and minus keys to change the thread tension
settings.
Change the stitch pattern settings as you like (zigzag width
and stitch length, thread tension, automatic thread cutting or
automatic reinforcement stitching, etc.), then save them by
pressing this key.
Press this key to return the selected stitch pattern's saved set-
tings to the original settings.
3-12
Setting Up 1-15
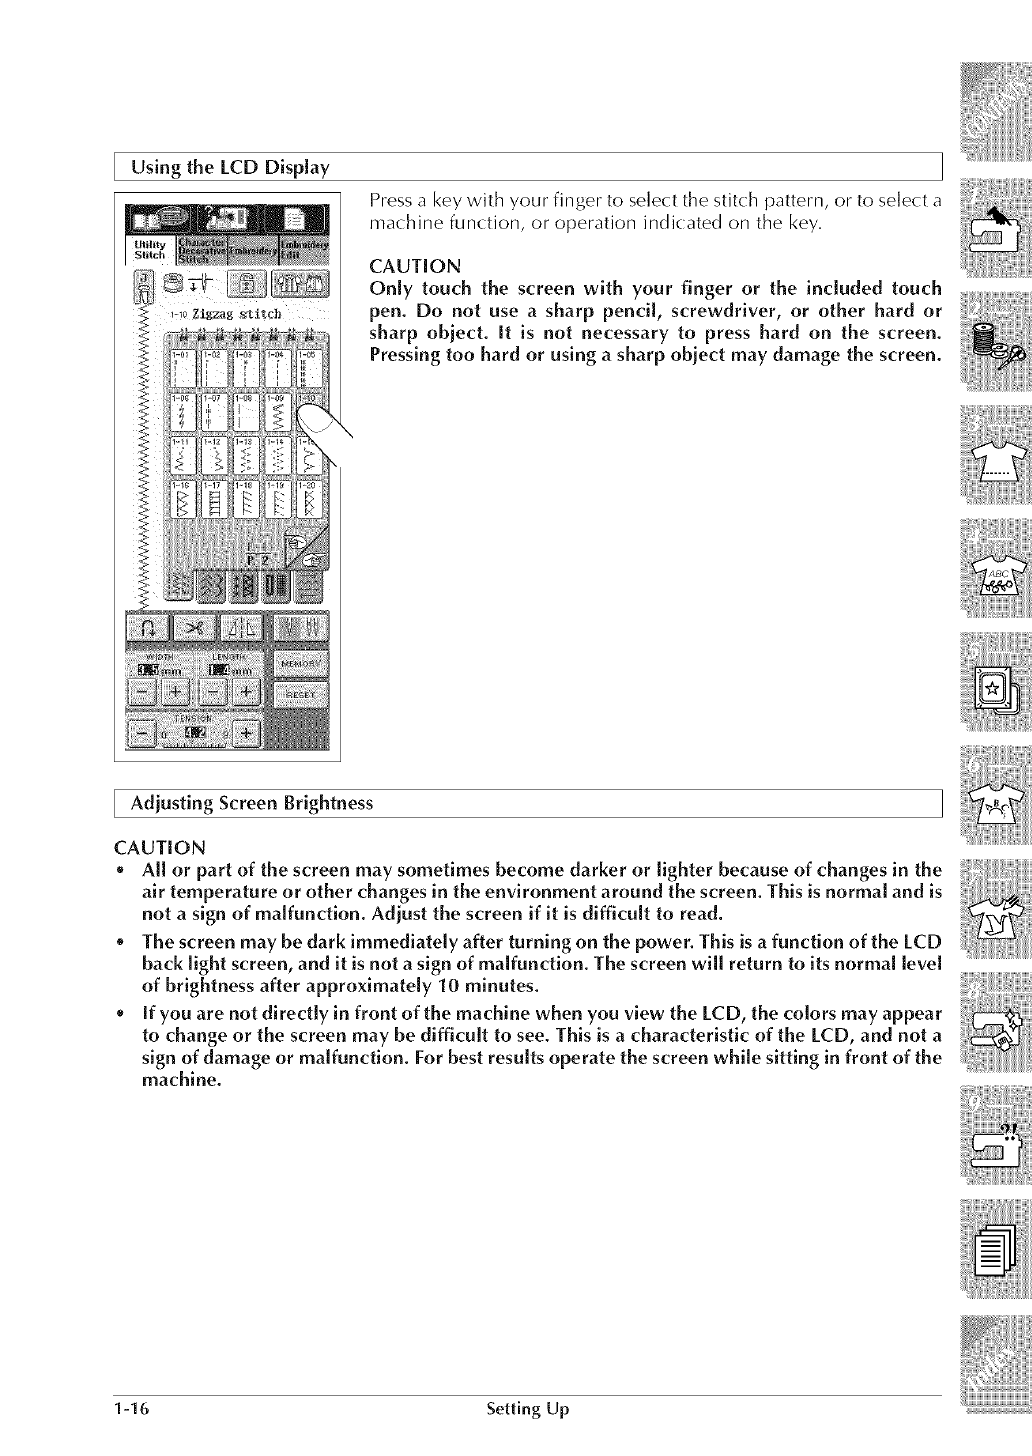
Using the LCD Display
Press a key with your finger to select the stitch pattern, or to select a
machine function, or operation indicated on the key,
CAUTION
Only touch the screen with your finger or the included touch
pen. Do not use a sharp pencil, screwdriver, or other hard or
sharp obiect. It is not necessary to press hard on the screen.
Pressing too hard or using a sharp obiect may damage the screen.
Adiusting Screen Brightness
CAUTION
*All or part of the screen may sometimes become darker or lighter because of changes in the
air temperature or other changes in the environment around the screen. This is normal and is
not a sign of malfunction. Adiust the screen if it is difficult to read.
o The screen may be dark immediately after turning on the power. This is a function of the LCD
back light screen, and it is not a sign of malfunction. The screen will return to its normal level
of brightness after approximately 10 minutes.
oif you are not directly in front of the machine when you view the LC D, the colors may appear
to change or the screen may be difficult to see. This is a characteristic of the LCD, and not a
sign of damage or malfunction. For best results operate the screen while sitting in front of the
machine.
1-16 Setting Up
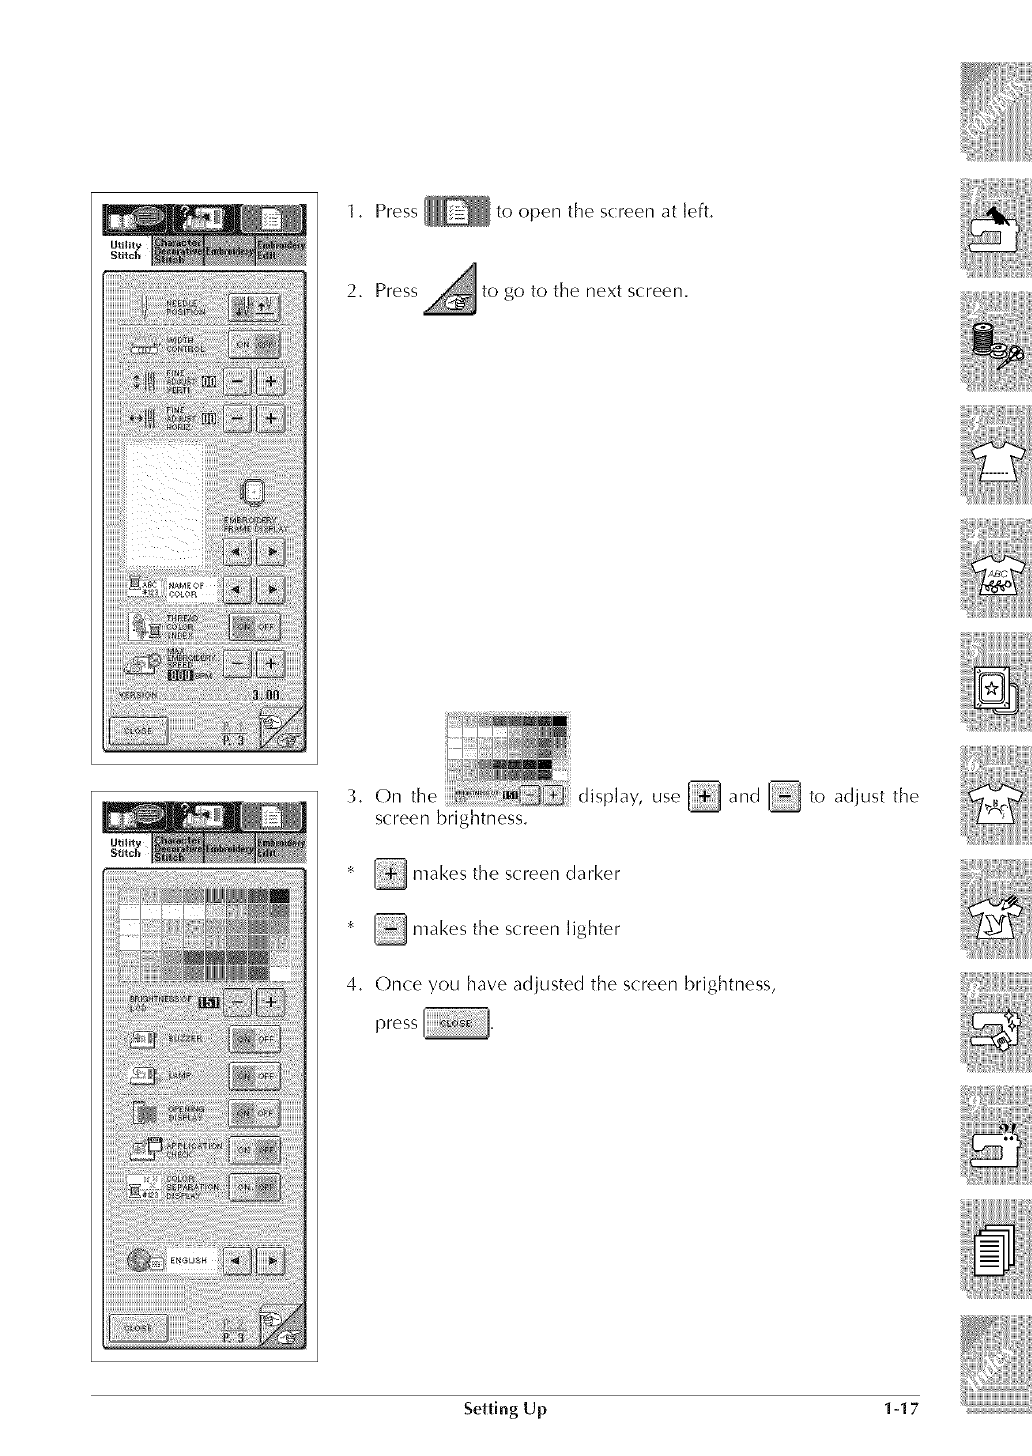
1. Press _ to open the screen at ]eft,
2. Press to go to the next screen.
iiiiig_i_i_i__ZZ_¸:_!i_i_:_!i!_
3. On the display, use _ and _ to adjust the
screen brightness.
* _ makes the screen darker
* _ makes the screen lighter
4. Once you have adjusted the screen brightness,
Setting Up 1-17
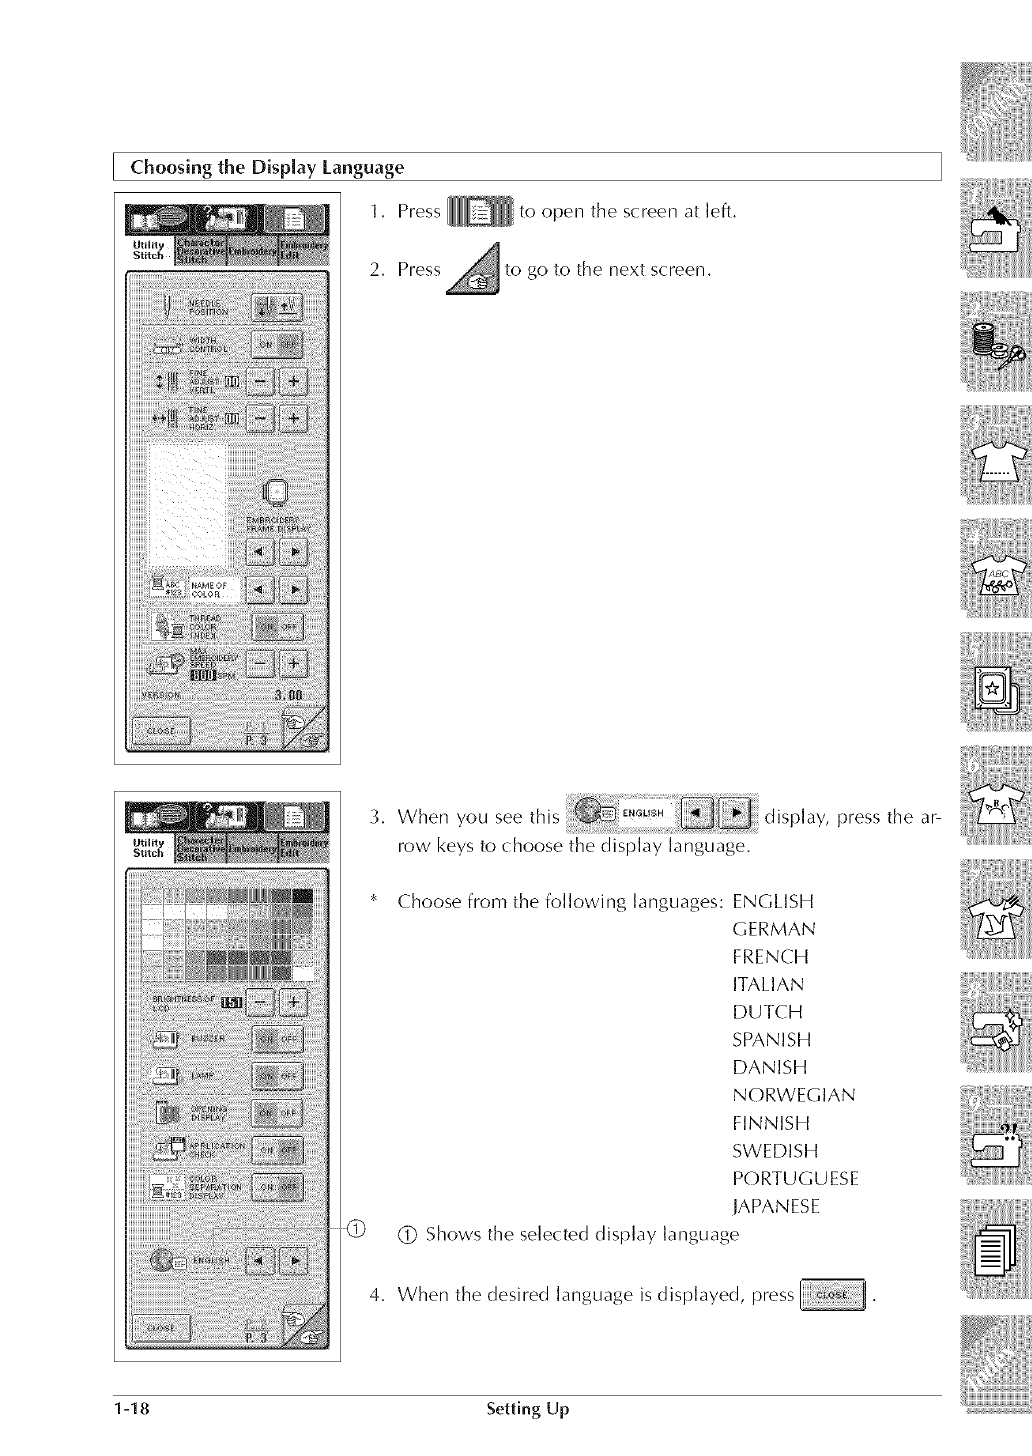
Choosing the Display Language
. Press _ to open tile screen at1 left.
2. Press to go to the next screen.
L When you see this display, press the ar-
row keys to choose the display language.
Choose from the following languages: ENGLISH
GERMAN
FRENCH
ITALIAN
DUTCH
SPANISH
DANISH
NORWEGIAN
FINNISH
SWEDISH
PORTUGUESE
JAPANESE
(]) Shows the selected display language
4. When the desired language is displayed, press
1-18 Setting Up
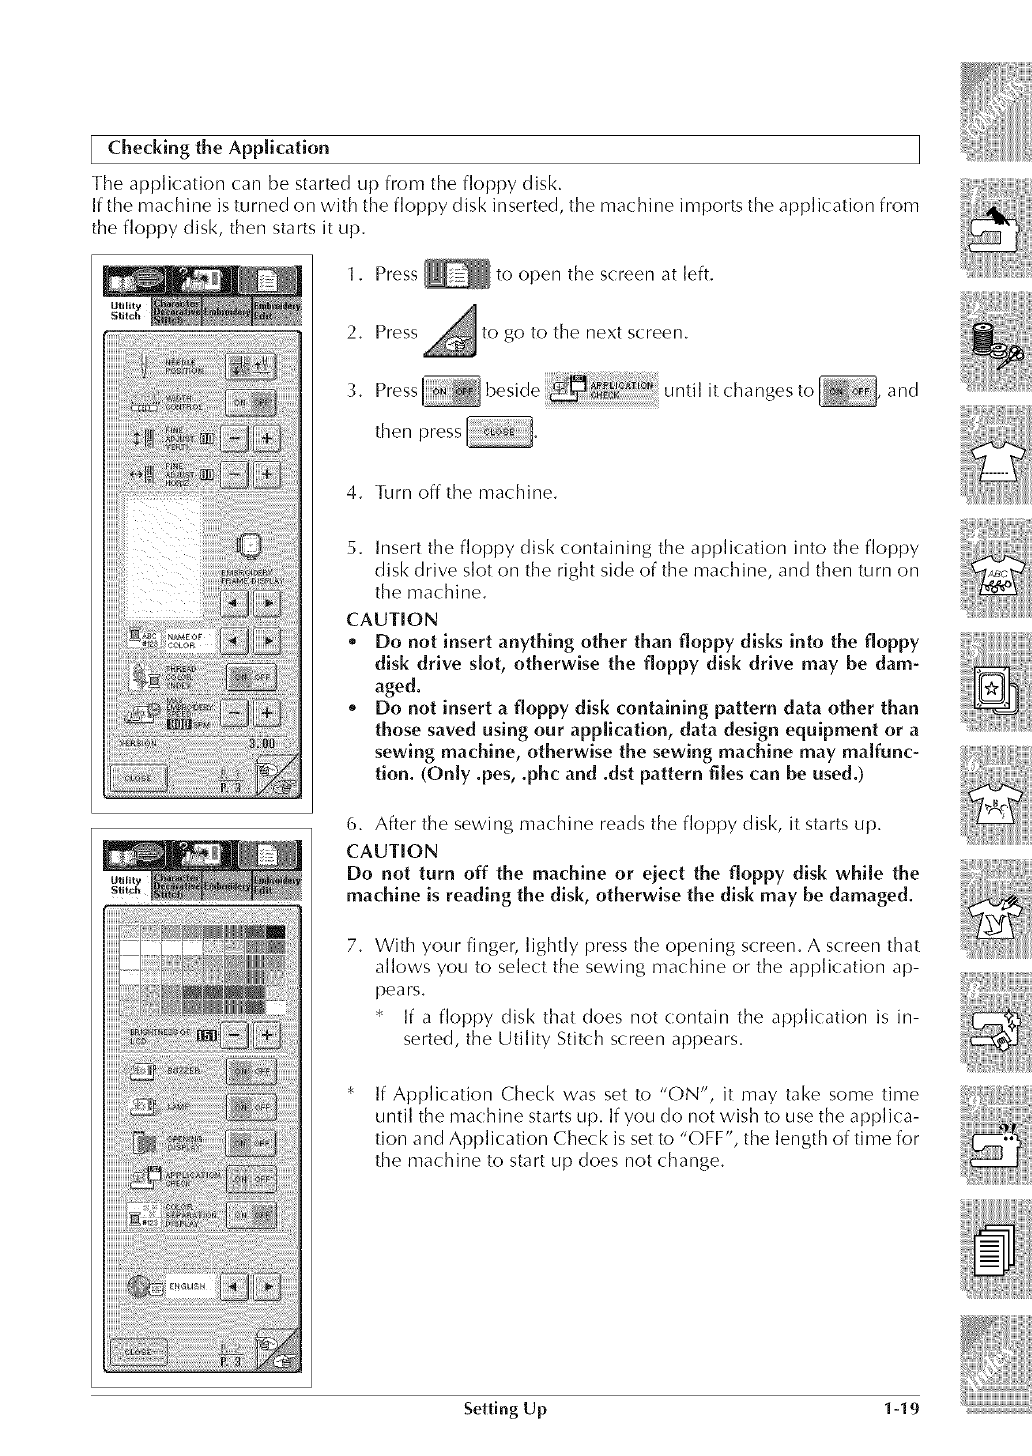
[ Checking the Application
The application can be started up from the floppy disk.
If the machine is turned on with the floppy disk inserted, the machine imports the application from
the floppy disk, then starts it up.
1. Press _ to open the screen at left.
2. Press to go to the next screen.
to , and
3. Press it changes
then press
4. Turn off the machine.
5. Insert the floppy disk containing the application into the floppy
disk drive slot on the right side of the machine, and then turn on
the machine.
CAUTION
,, Do not insert anything other than floppy disks into the floppy
disk drive slot, otherwise the floppy disk drive may be dam-
aged.
o Do not insert a floppy disk containing pattern data other than
those saved using our application, data design equipment or a
sewing machine, otherwise the sewing machine may malfunc-
tion. (Only .pes, .phc and .dst pattern files can be used.)
6. After the sewing machine reads the floppy disk, it starts up.
CAUTION
Do not turn off the machine or eject the floppy disk while the
machine is reading the disk, otherwise the disk may be damaged.
7. With your finger, lightly press the opening screen. A screen that
allows you to select the sewing machine or the application ap-
pears.
If a floppy disk that does not contain the application is in-
serted, the Utility Stitch screen appears.
If Application Check was set to "ON", it may take some time
until the machine starts up. If you do not wish to use the applica-
tion and Application Check is set to "OFF", the length of time for
the machine to start up does not change.
Setting Up 1-19
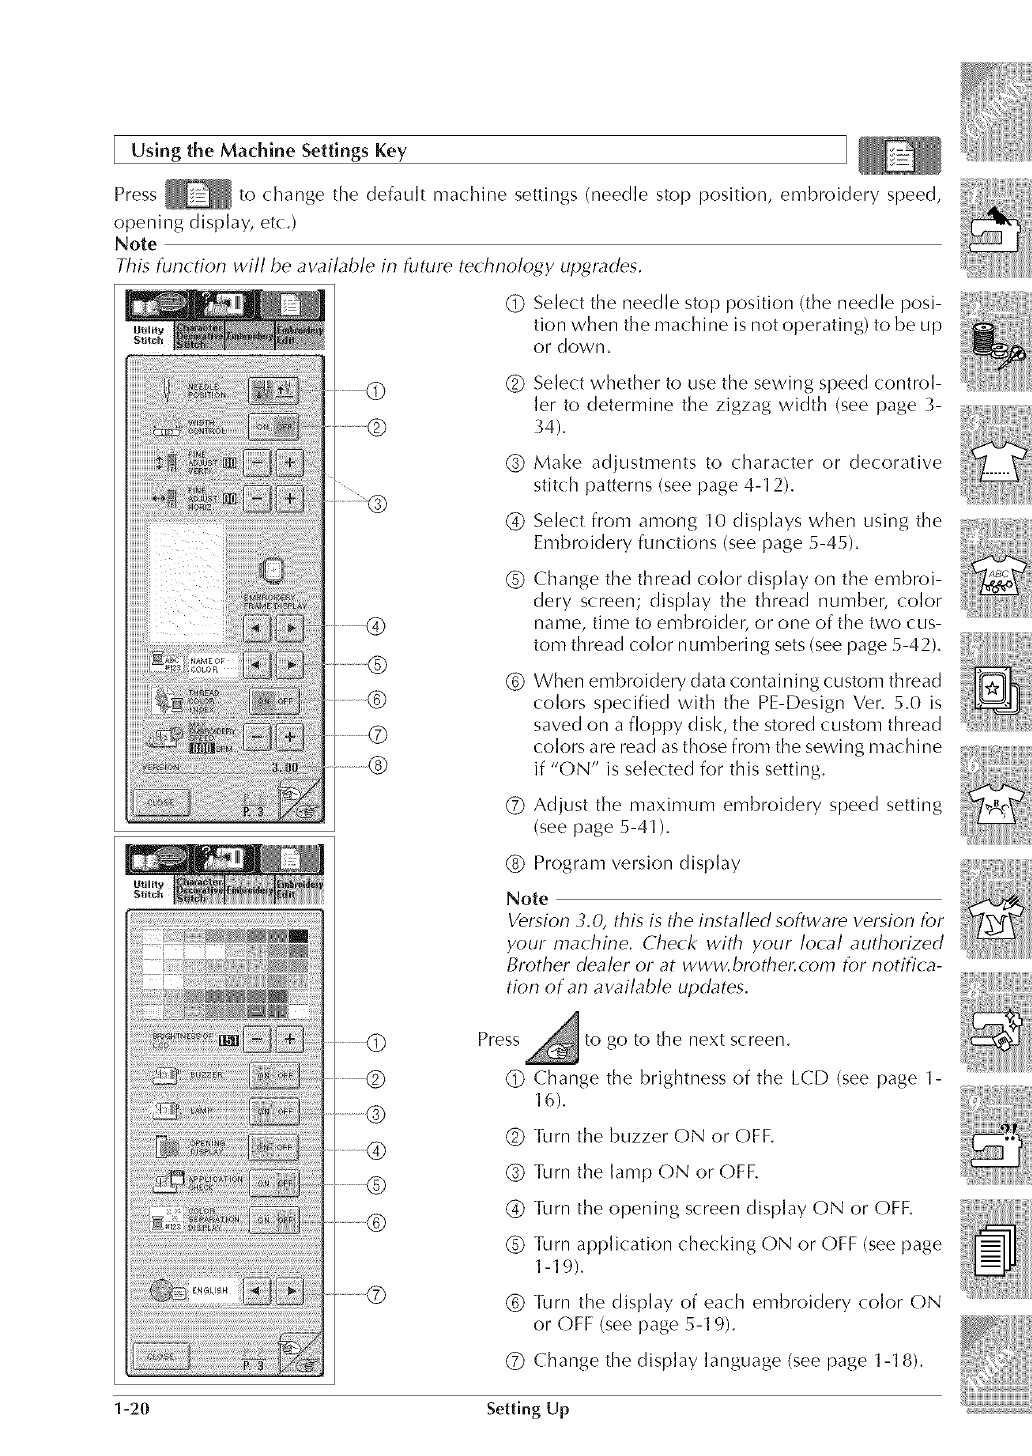
Using the Machine Settings Key
to change the default machine settings (needle stop position, embroidery speed,
Press
opening display, etc.)
Note
This function will be available in future technology upg/_des.
dO
®
@
®
®
®
®
®
Select the needle stop position (the needle posi-
tion when the machine is not operating) to be up
or down.
Select whether to use the sewing speed control-
ler to determine the zigzag width (see page 3-
34).
Make adjustments to character or decorative
stitch patterns (see page 4-12).
Select from among 10 displays when using the
Embroidery functions (see page 5-45).
Change the thread color display on the embroi-
dery screen; display the thread number, color
name, time to embroider, or one of the two cus-
tom thread color numbering sets(see page 5-42).
When embroidery data containing custom thread
colors specified with the PE-Design Ver. 5.0 is
saved on a floppy disk, the stored custom thread
colors are read as those from the sewing machine
if "ON" is selected for this setting.
Adjust the maximum embroidery speed setting
(see page 5-41 ).
Program version display
Note
Version 3.0, this is the installed soflware version for
your machine. Check with your local authorized
Brother dealer or at www.brothel:( om for notifica-
tion of an available updates.
Press to go to the next screen.
dO Change the brightness of the LCD (see page 1-
16).
(_ Turn the buzzer ON or OFF.
(_ Turn the lamp ON or OFF.
(_) Turn the opening screen display ON or OFF.
® Turn application checking ON or OFF (see page
1-1%
® Turn the display of each embroidery color ON
or OFF (see page 5-1 9).
(Z) Change the display language (see page 1-18).
1-20 Setiing Up

Press to go to the next screen.
(]_) Thread color numbers can be customized (see
page 5-43).
Using the Machine Operations Key
Press to open the screen shown below. Five categories are displayed at the top of the
screen. Press a key to see more information about that category.
@L_R,,C,P*.LPAP.TS) information about
displays
the main parts of the machine and their func-
tions. This is the first screen displayed when
you press
(_) [BAs,co_E_*T,o,)displays information about
threading the machine, changing _resser feet,
etc.
(_ [_A_,_B_b_yo.) displays information about
attaching the embroidery unit, preparing fab-
ric: for embroidering, etc.
j displays information about deal-
ing with minor difficulties.
@LMA'"TEN " Ej displays informationabout
changing the lamp, cleaning the machine, etc.
Setting Up 1-21
JL
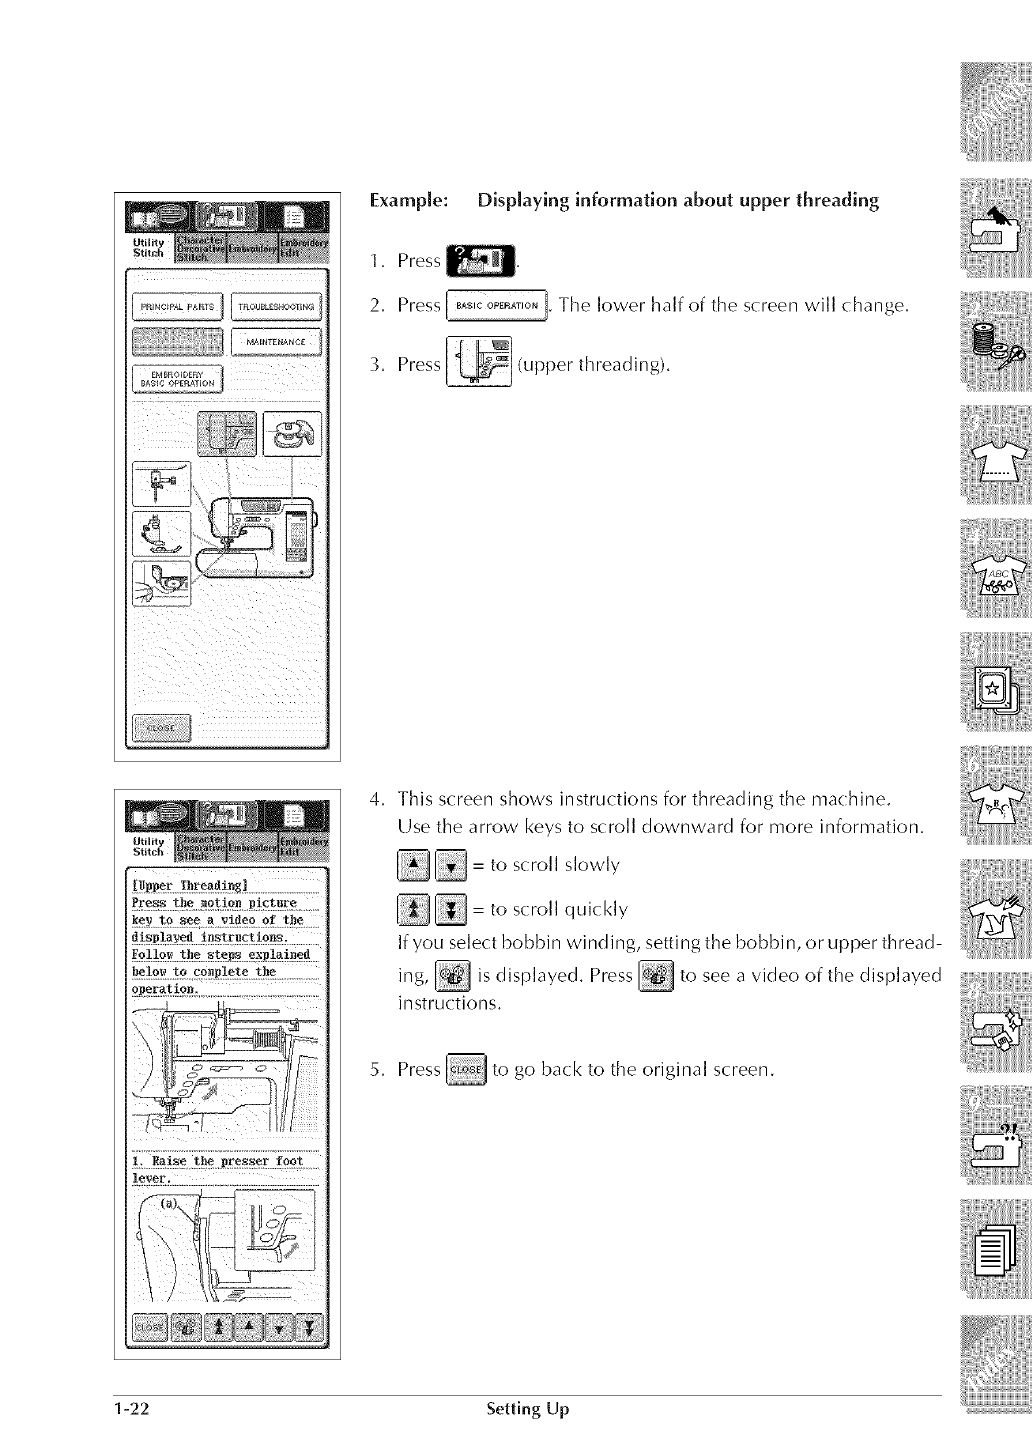
Example: Displaying information about upper threading
1. Press
2. Press I _Aslc_m_T,O"I" The lower half of the screen will change.
3. Press _ (upper threading).
ke_t? seea_i_eoof She.....
d_sPla_eai_st:_n_ .............
Follos the steps explained
belo_ to complete the
eDeratieS.
lever.
4, This screen shows instructions for threading the machine.
Use the arrow keys to scroll downward for more information.
_ = to scroll slowly
_ = to scroll quickly
If you select bobbin wind ing, setting the bobbi n, o r upper th read-
is displayed. Press _ to see a video of theing, displayed
instructions.
5. Press _ to go back to the original screen.
1-22 Setting Up
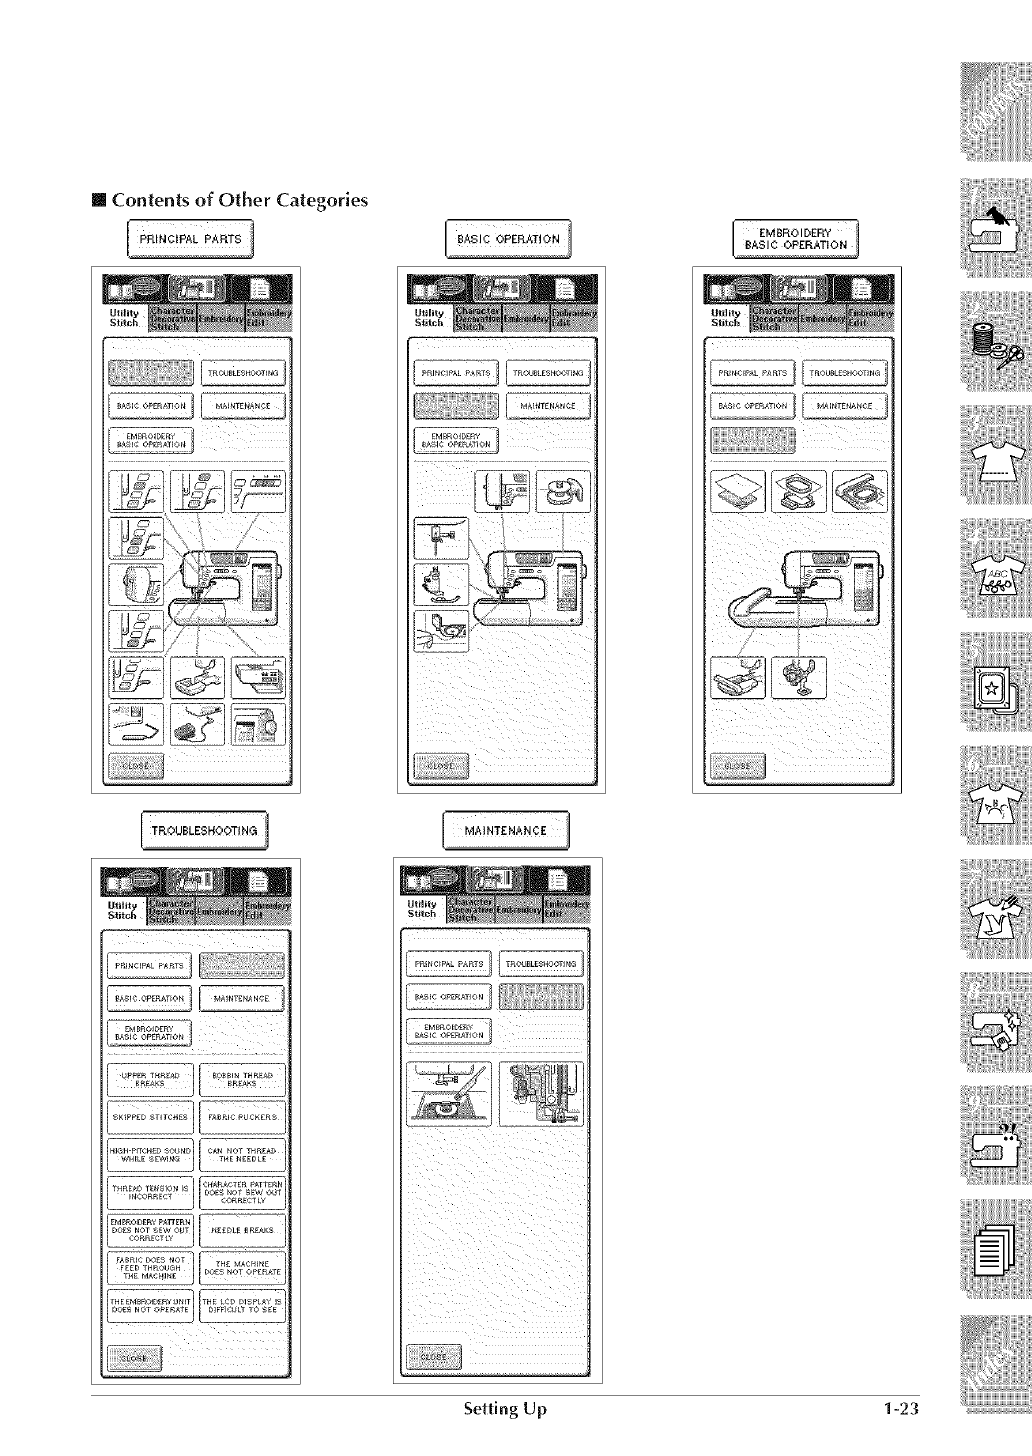
[] Contents of Other Categories
EMBROIDERY
L BA$1¢ OPERATION I
[ TROVBLESHO_T_NG
_JNTENAN#E
EM_ROI_EF_f
I TROUBLEsH<)OT'N_ I M_'NTEN_NCE1
WH_LE_WlN_ T_E NEEDLE
.................,][
DC,E_NOT SEW O!JT NE_L_ _m_AK_
¢OmF_ECTL¥
_DO_S NOT
ill i i ii
Setdng Up 1-23
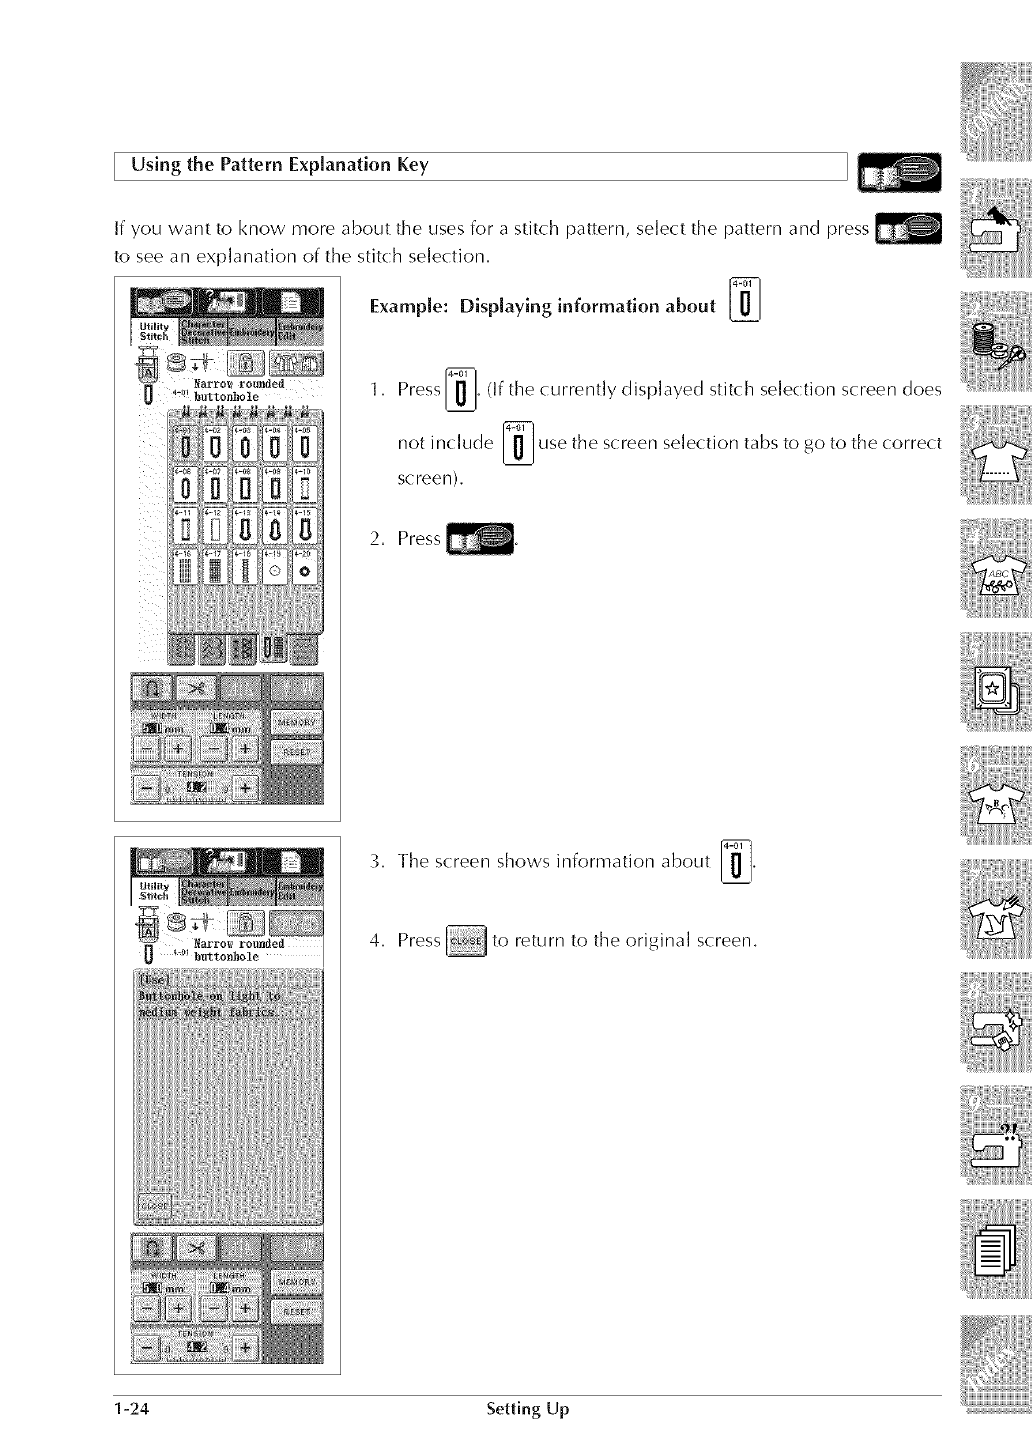
Using the Pattern Explanation Key
If you want to know more about the uses for a stitch pattern, select the pattern and press
to see an explanation of the stitch selection.
Example: Displaying information about I_U_.I
' _!arro_ rounded
ii 4:_! buttonhole 1. Press II]1. (If the currently displayed stitch selection screen does
not include /_ use the screen selection tabs to go to the correct
screen).
2. Press
3, The screen shows information about _,
4, Press_ to return to the original screen,
1-24 Setting Up
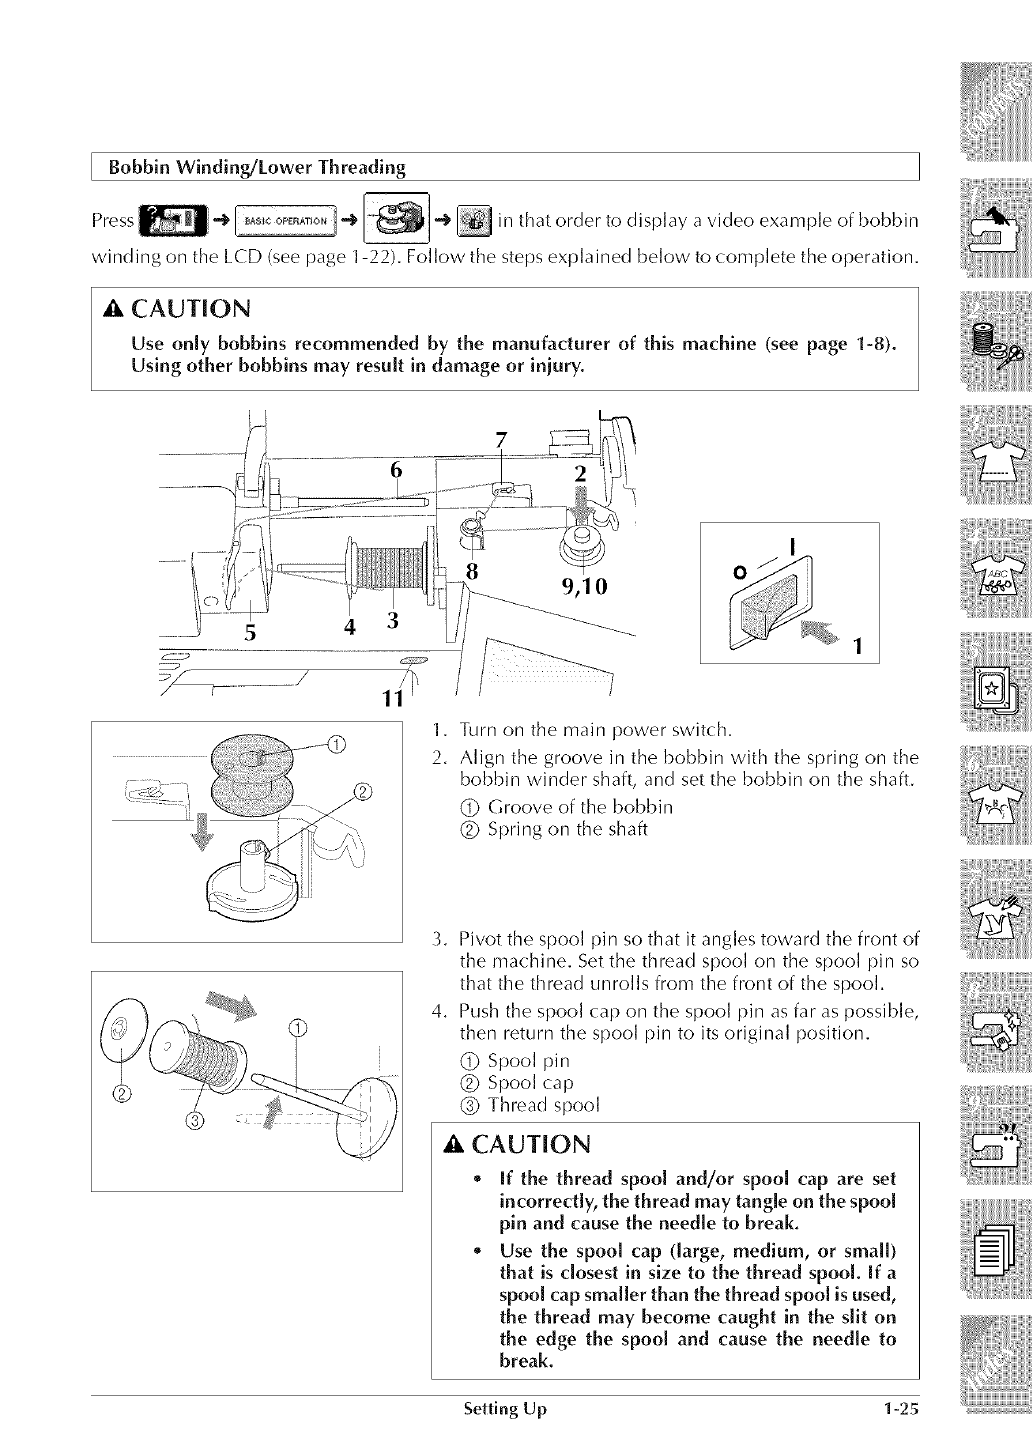
[ Bobbin Winding/Lower Threading
Press "_[2_;I__tt]l_ t-_ [--_J* _ in thatorder to dispb,y avideo exampleof bobbin
winding on the LCD (see page 1-22). Follow the steps explained below to complete the operaUon.
_, CAUTION
Use only bobbins recommended by the manufacturer of this machine (see page 1-8).
Using other bobbins may result in damage or injury.
'!
7
6
9,10
1. Turn on the main power switch.
2. Align the groove in the bobbin with the spring on the
bobbin winder shaft, and set the bobbin on the shaft.
(_ Groove of the bobbin
(_ Spring on the shaft
3,
4.
Pivot the spool pin so that it angles toward the front of
the machine. Set the thread spool on the spool pin so
that the thread unrolls from the front of the spool.
Push the spool cap on the spool pin as far as possible,
then return the spool pin to its original position.
(_ Spool pin
(_ Spool cap
(_) Thread spool
A CAUTION
If the thread spool and/or spool cap are set
incorrectly, the thread may tangle on the spool
pin and cause the needle to break.
Use the spool cap (large, medium, or small)
that is closest in size to the thread spool. If a
spool cap smaller than the thread spool is used,
the thread may become caught in the slit on
the edge the spool and cause the needle to
break.
Setting Up 1-25
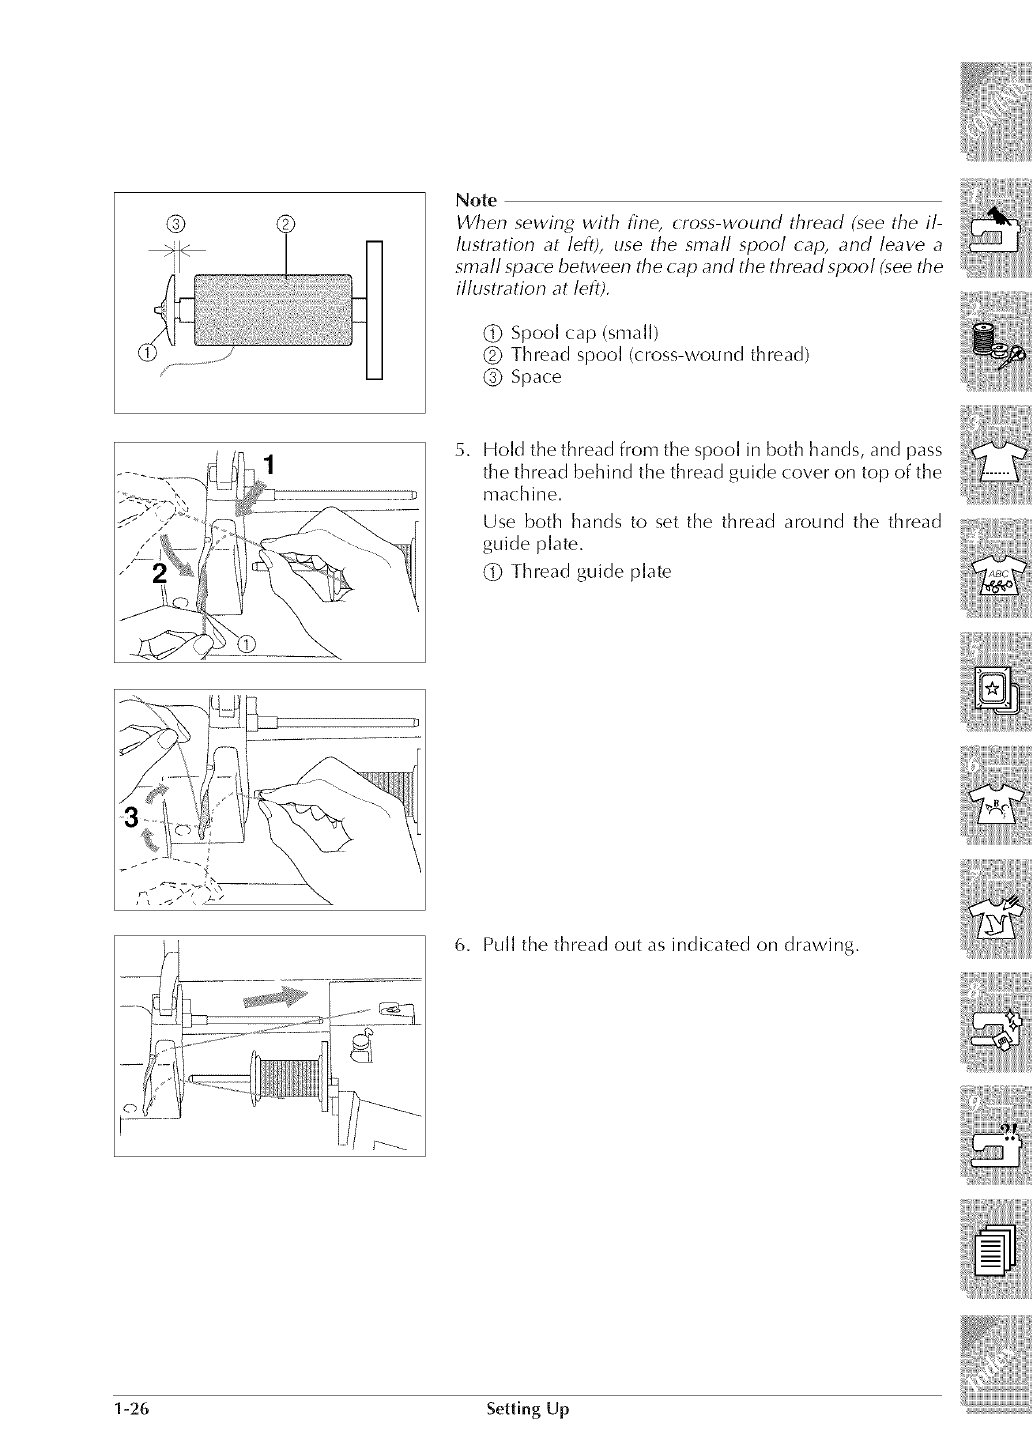
® ® Note
When sewing with fine, cross-wound thread (see the il-
lustration at left), use the small spool cap, and leave a
small space between the cap and the thread spool (see the
illustration at left).
(_ Spool cap (small)
(_ Thread spool (cross-wound thread)
(_) Space
Hold the thread from the spool in both hands, and pass
the thread behind the thread guide (:over on top of the
machine.
Use both hands to set the thread around the thread
guide plate.
(]) Thread guide plate
6. Pull the thread out as indicated on drawing.
1-26 Setting Up
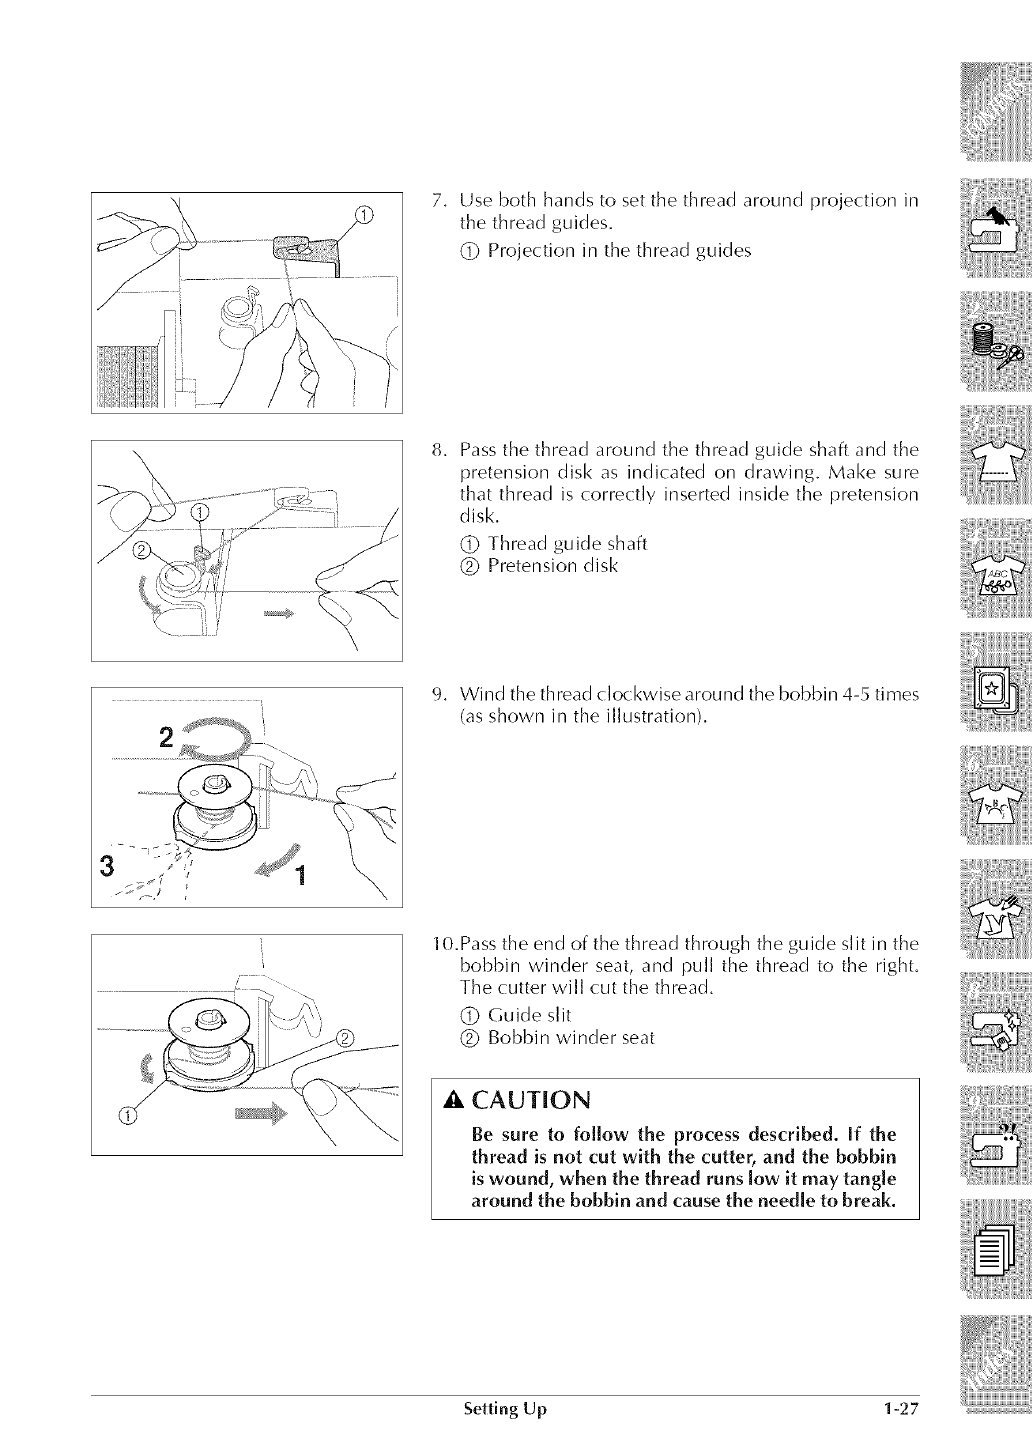
7, Use both hands to set the thread around projection in
the thread guides,
(_ Projection in the thread guides
8, Passthe thread around the thread guide shaft and the
pretension disk as indicated on drawing. Make sure
that thread is correctly inserted inside the pretension
disk,
(_ Thread guide shaft
(_ Pretension disk
2
9, Wind the thread clockwise around the bobbin 4-5 times
(as shown in the illustration),
/.....
lO,Pass the end of the thread through the guide slit in the
bobbin winder seat, and pull the thread to the right,
The cutter will cut the thread,
Q Guide slit
(_ Bobbin winder seat
A CAUTION
Be sure to follow the process described. If the
thread is not cut with the cutter, and the bobbin
is wound, when the thread runs low it may tangle
around the bobbin and cause the needle to break.
Setting Up 1-27
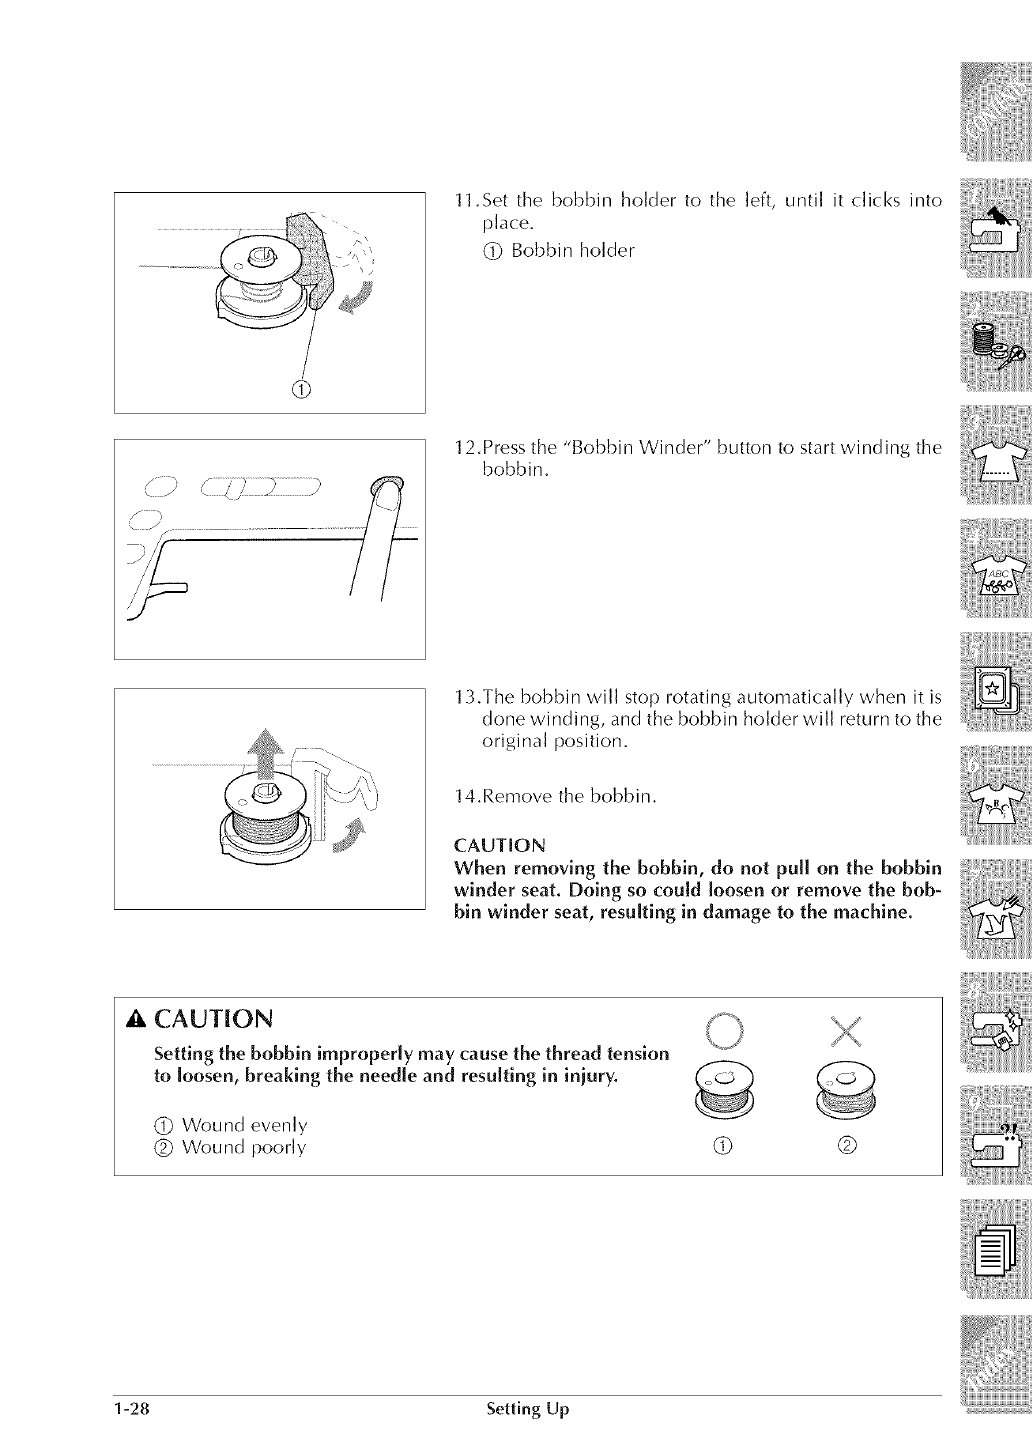
ll.Set the bobbin holder to the left, until it clicks into
place,
(_ Bobbin holder
12.Press the "Bobbin Winder" button to start winding the
bobbin.
13.The bobbin will stop rotating automatically when it is
done winding, and the bobbin holder will return to the
original position.
14.Remove the bobbin.
CAUTION
When removing the bobbin, do not pull on the bobbin
winder seat. Doing so could loosen or remove the bob-
bin winder seat, resulting in damage to the machine.
• , CAUTION
Setting the bobbin improperly may cause the thread tension
to loosen, breaking the needle and resulting in iniury.
(_ Wound evenly
(_ Wound poorly @
1-28 Setting Up
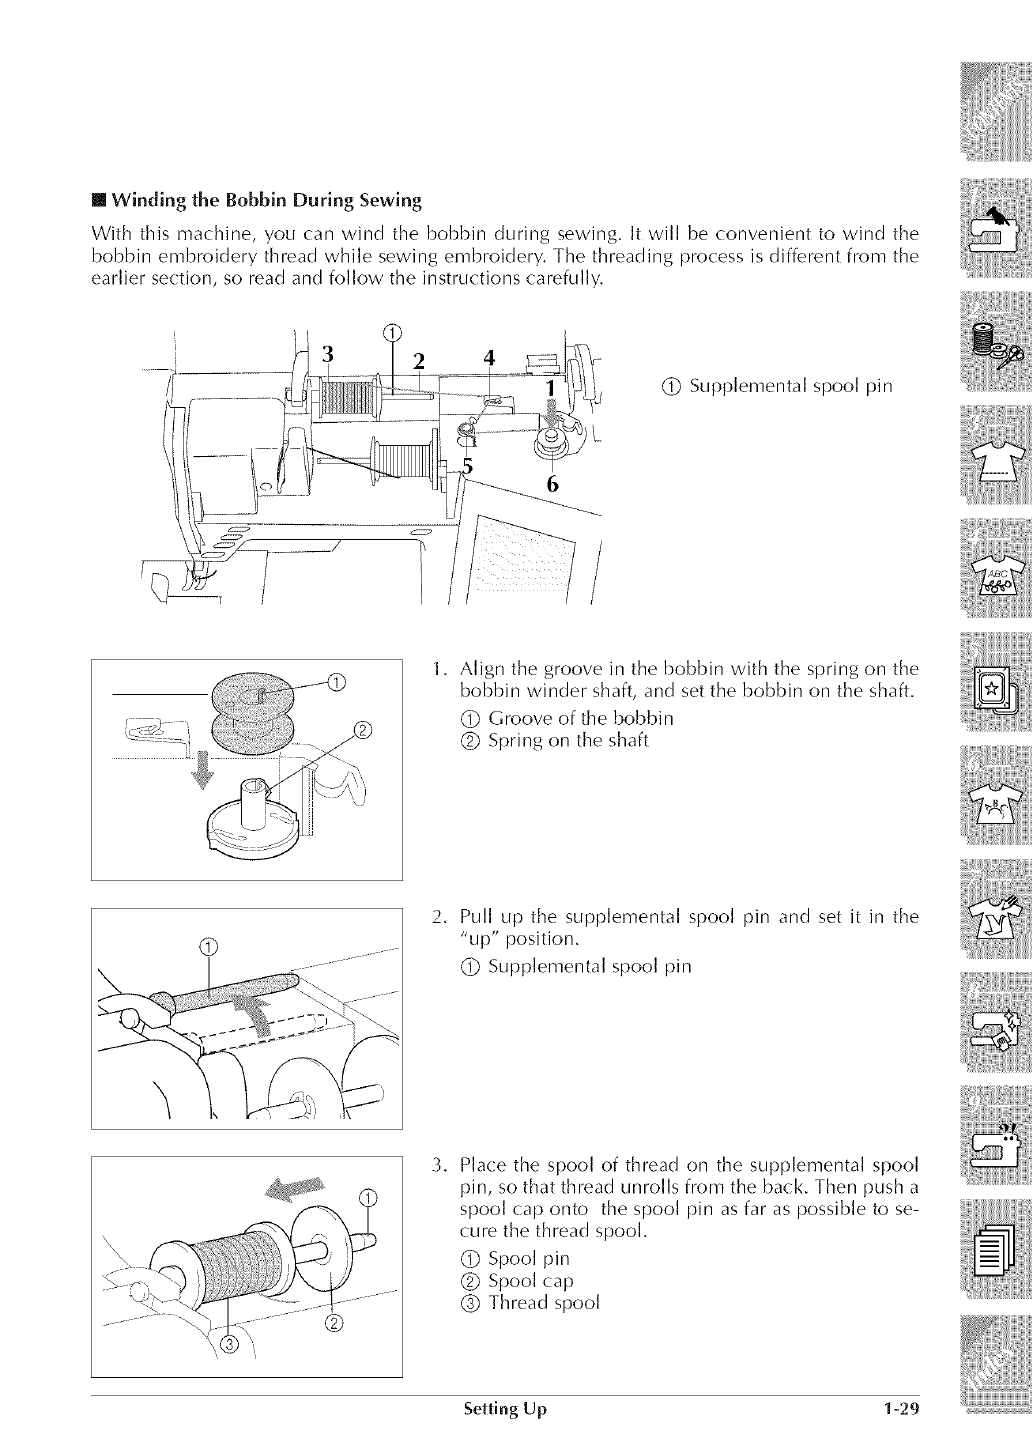
[] Winding the Bobbin During Sewing
With this machin_ you can wind the bobbin during sewing. It will be convenient to wind the
bobbin embroider thread while sewing embroidery. The threading process is different from the
earlier section, so read and follow the instructions carefully.
3 2 4
6
(_ Supplemental spool pin
1. Align the groove in the bobbin with the spring on the
bobbin winder shaft, and set the bobbin on the shaft.
(_ Groove of the bobbin
(]_)Spring on the shaft
©
2. Pull up the supplemental spool pin and set it in the
"up" position.
..................... (_ Supplemental spool pin
®
3. Place the spool of thread on the supplemental spool
pin, so that thread unrolls from the back. Then push a
spool cap onto the spool pin as far as possible to se-
cure the thread spool.
(_ Spool pin
(]_)Spool cap
(_ Thread spool
Setting Up 1-29
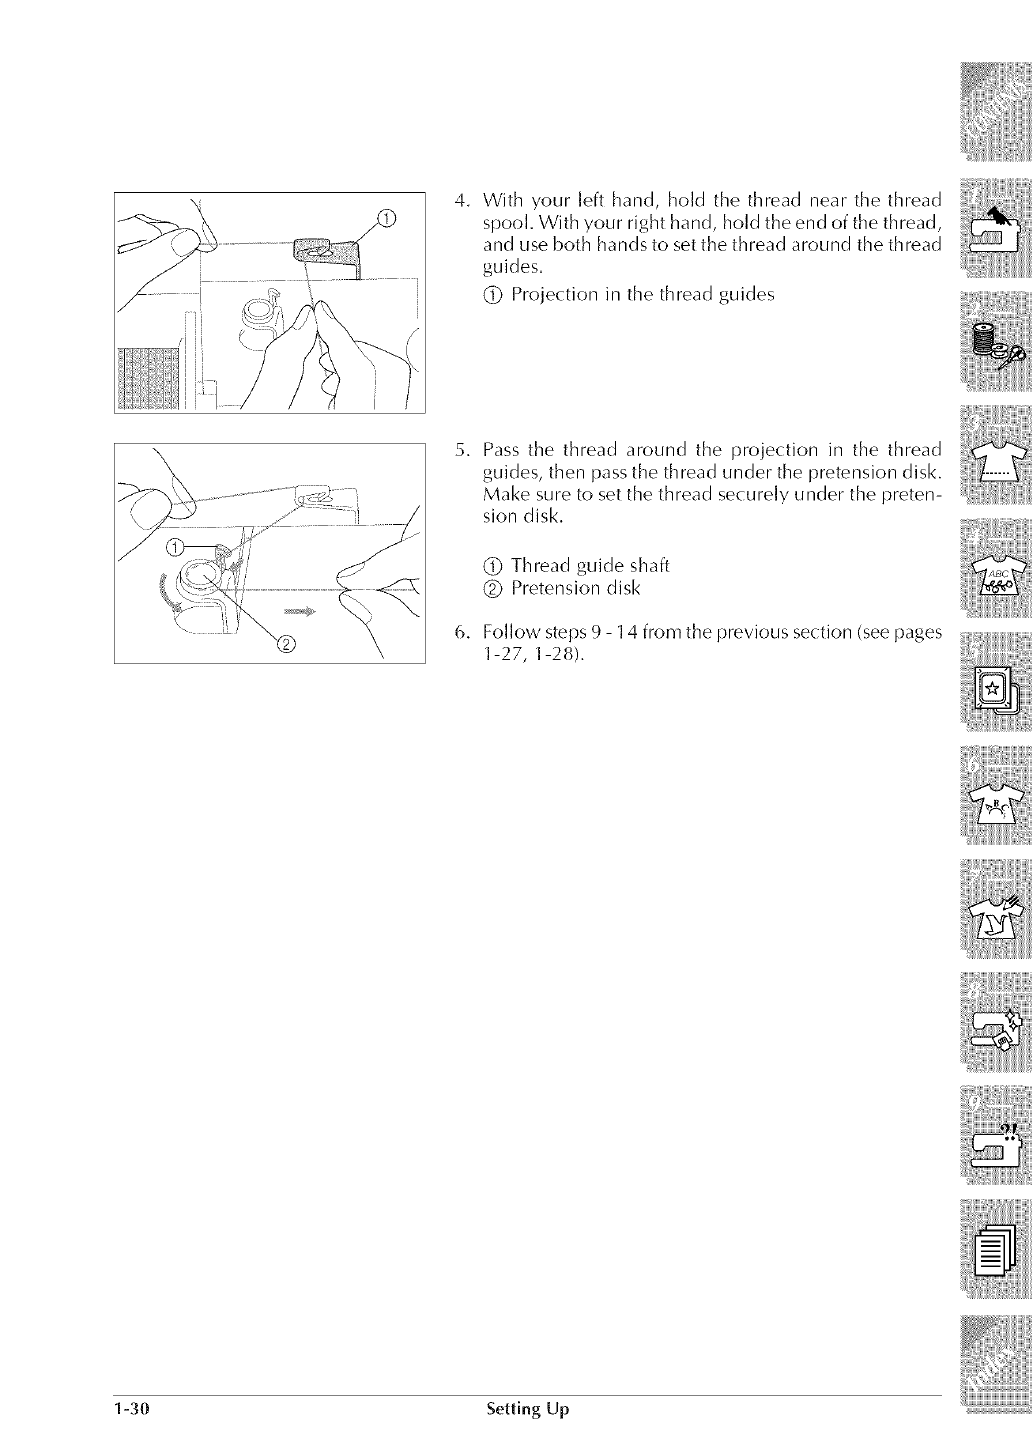
4. With your left hand, hold the thread near the thread
spool. With your right hand, hold the end of the thread,
and use both hands to set the thread around the thread
guides.
(_DProjection in the thread guides
2,
6,
Pass the thread around the projection in the thread
guides, then passthe thread under the pretension disk.
Make sure to set the thread securely under the preten-
sion disk.
CDThread guide shaft
(_) Pretension disk
Follow steps 9 - 14 from the previous section (see pages
1-27, 1-28),
1-30 Setting Up
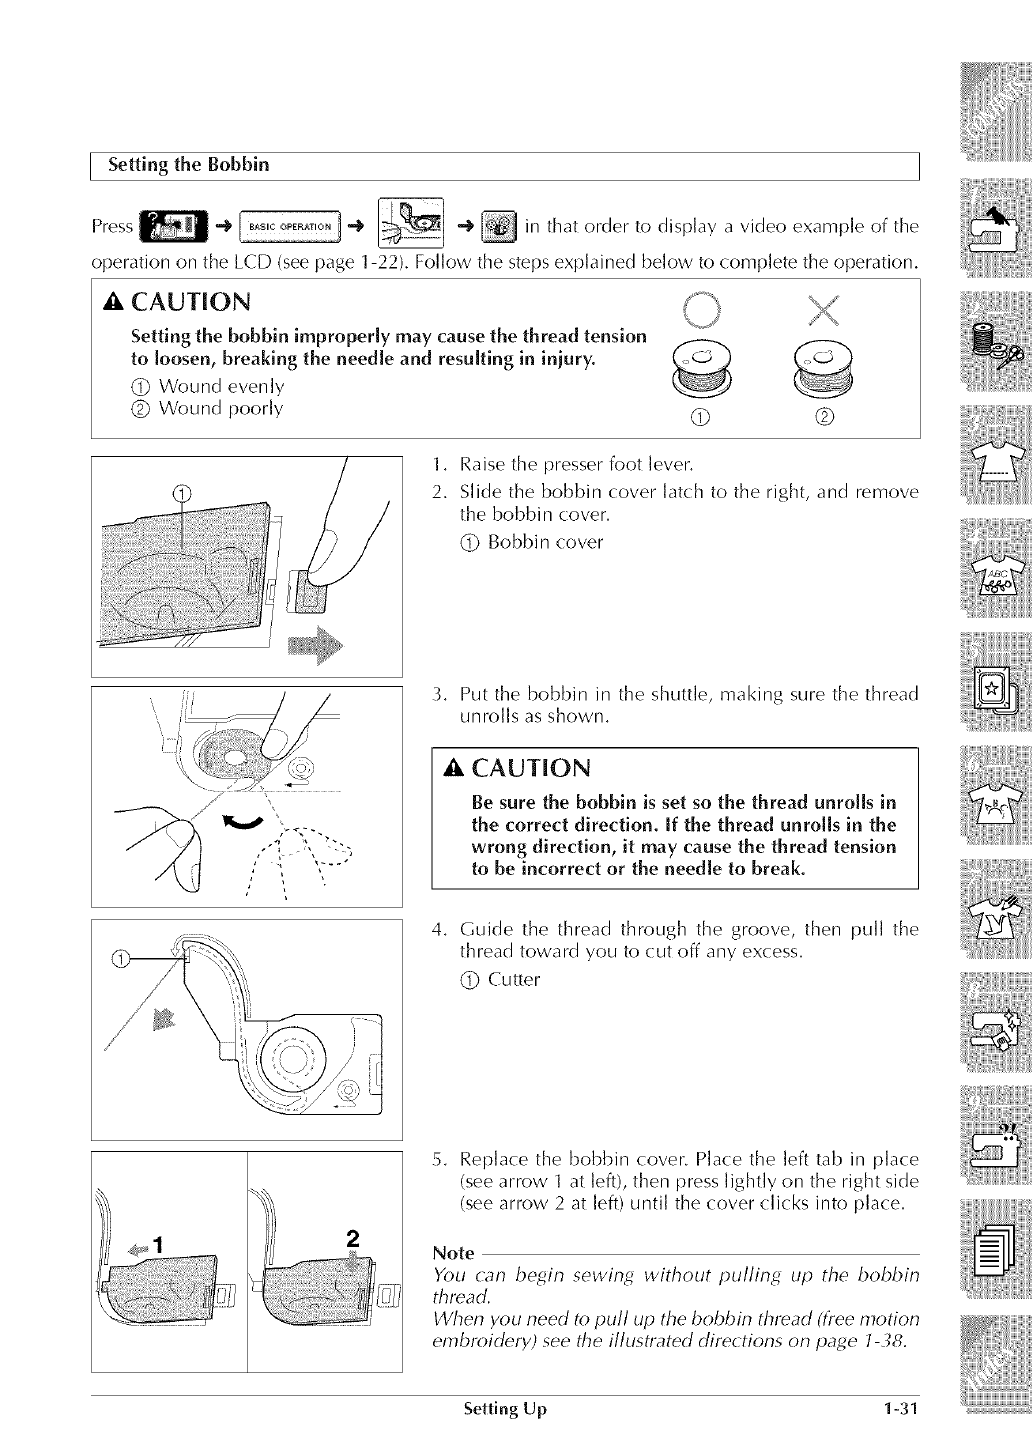
Setting the Bobbin
Press -_-_ _-_ _ in that order to display a video example of the
operation on the LCD (see page 1-22). Follow the steps explained below to complete the operation.
CAUTION
Setting the bobbin improperly may cause the thread tension
to loosen, breaking the needle and resulting in injury. _c.._ _
(]) Wound evenly
(_ Wound poorly (_ @
1. Raise the presser foot lever.
2. Slide the bobbin cover latch to the right, and remove
the bobbin cover.
(_ Bobbin cover
t x _,
-_ 4 _
3. Put the bobbin in the shuttle, making sure the thread
unrolls as shown.
A CAUTION
Be sure the bobbin is set so the thread unrolls in
the correct direction, ff the thread unrolls in the
wrong direction, it may cause the thread tension
to be incorrect or the needle to break.
4. Guide the thread through the groove, then pull the
thread toward you to cut off any excess.
(_ Cutter
5. Replace the bobbin cover. Place the left tab in place
(see arrow 1 at left), then press lightly on the right side
(see arrow 2 at left) until the cover clicks into place.
Note
You can begin sewing without pulling up the bobbin
thread.
When you need to pull up the bobbin thread (free motion
embroidery) see the illustrated directions on page 1-38.
Setting Up 1-31
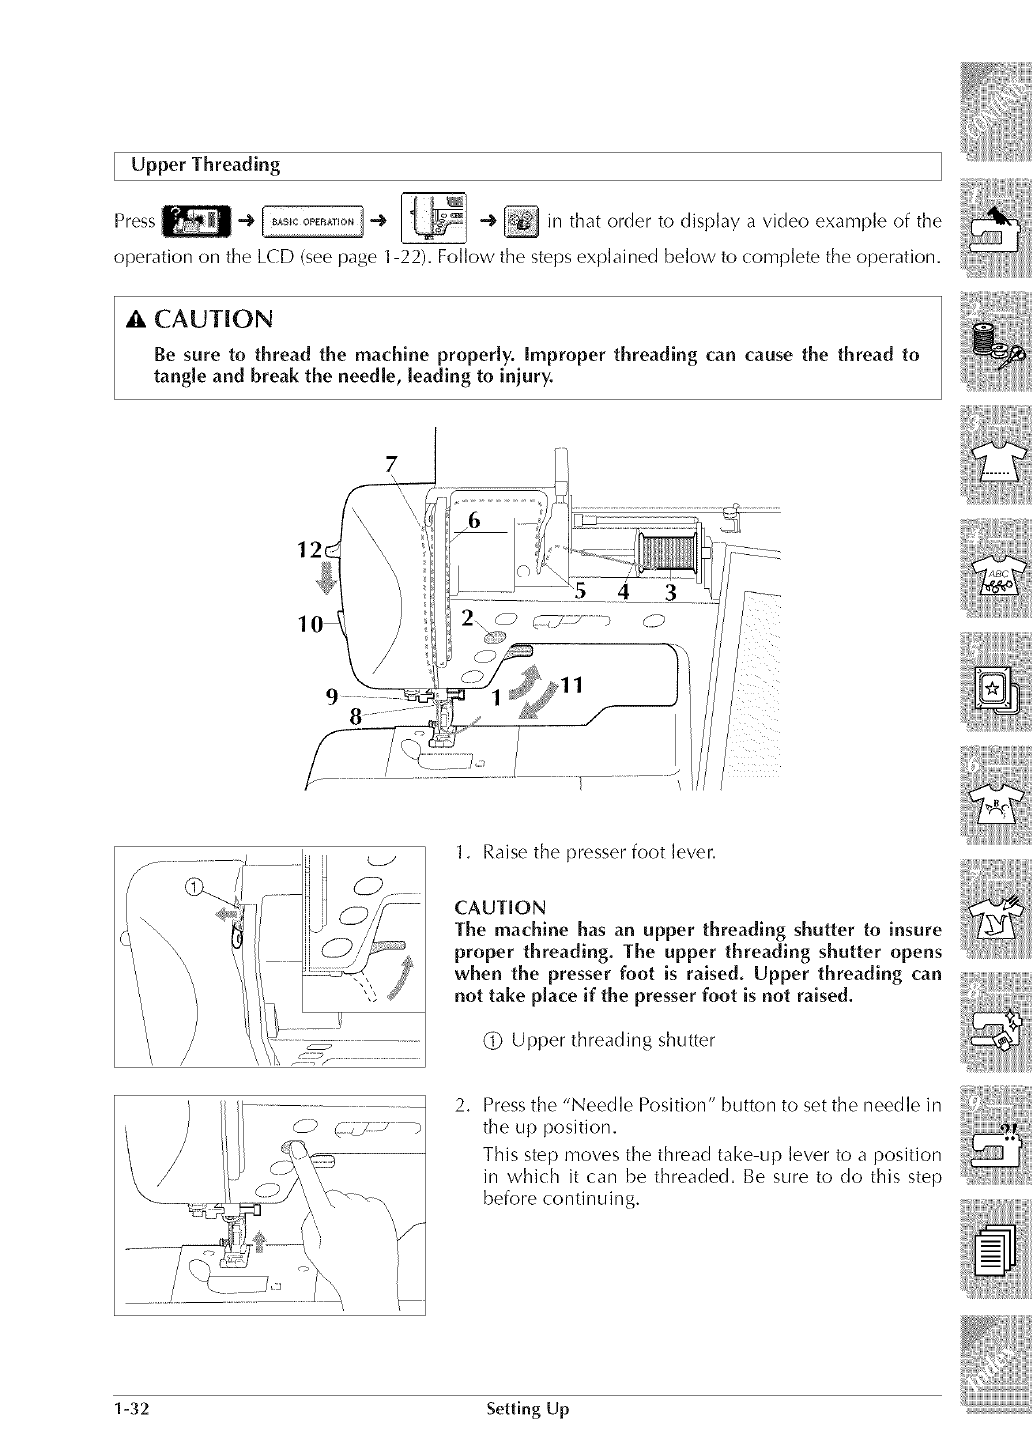
[ Upper Threading
Press _ iiiiii!_i_l_l_/__@o4 ___ _nthatordertod_sp_ayav_deoexampleofthe
operation on the LCD (see page 1-22). Follow the steps explained below to complete the operation.
A CAUTION
Be sure to thread the machine properly. Improper threading can cause the thread to
tangle and break the needle, leading to iniury.
1. Raise the presser foot lever.
CAUTION
The machine has an upper threading shutter to insure
proper threading. The upper threading shutter opens
when the presser foot is raised. Upper threading can
not take place if the presser foot is not raised.
(_ Upper threading shutter
2. Press the "Needle Position" button to set the needle in
the up position.
This step moves the thread take-up lever to a position
in which it can be threaded. Be sure to do this step
before continuing.
1-:}2 Setting Up
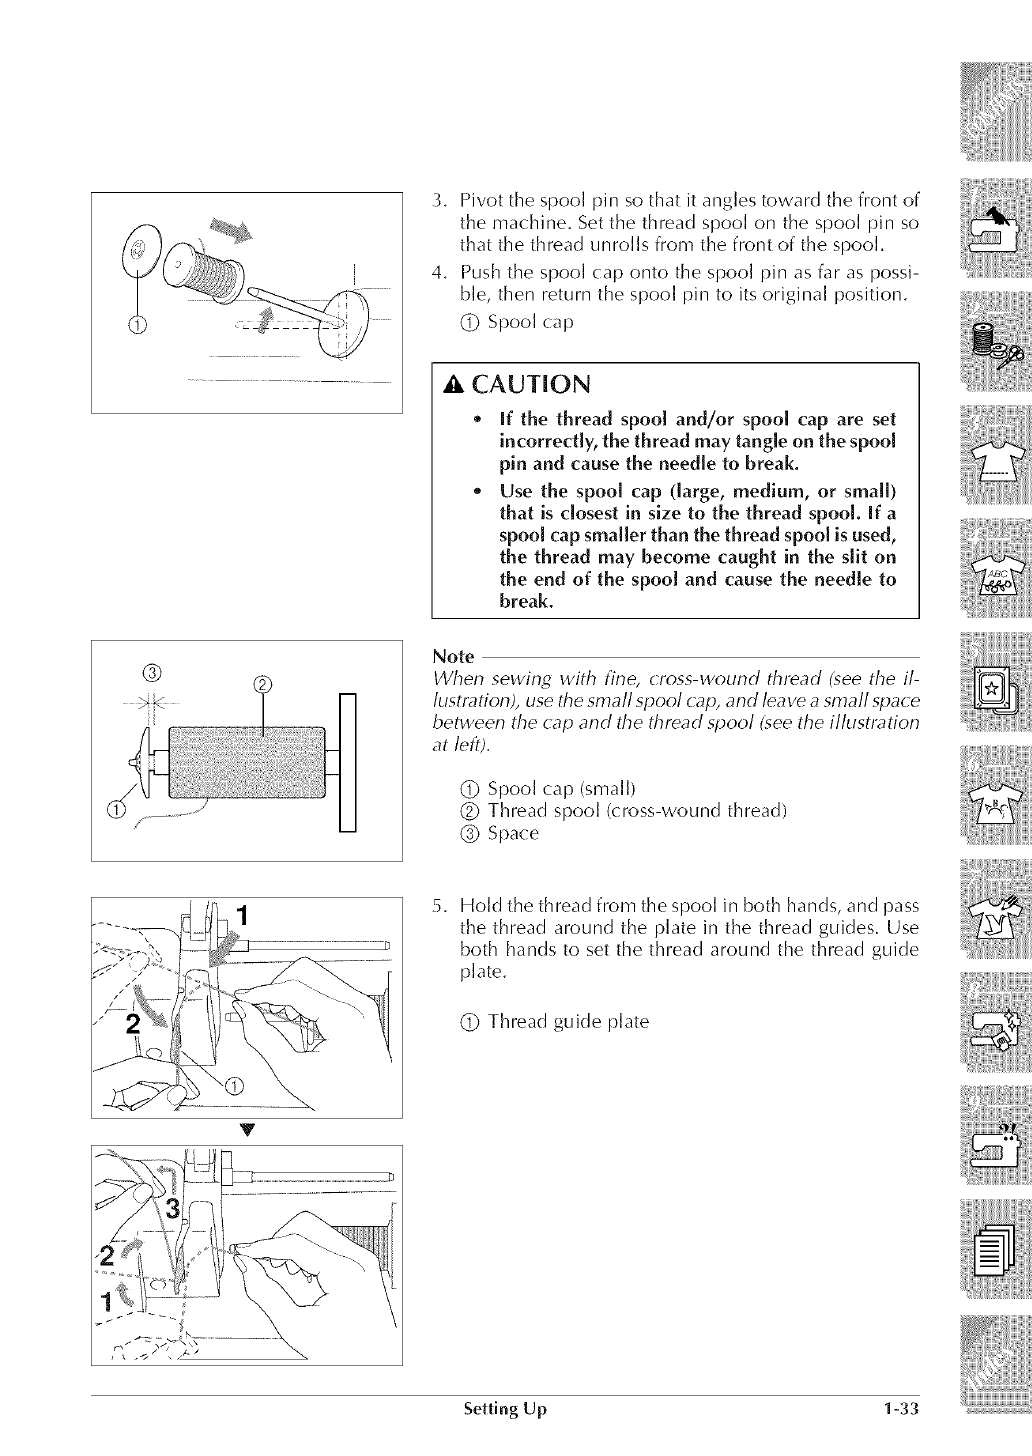
3. Pivot the spool pin so that it angles toward the front of
the machine. Set the thread spool on the spool pin so
that the thread unrolls from the front of the spool.
4. Push the spool cap onto the spool pin as far as possi-
ble, then return the spool pin to its original position.
(_ Spool cap
CAUTION
If the thread spool and/or spool cap are set
incorrectly, the thread may tangle on the spool
pin and cause the needle to break.
Use the spool cap (large, medium, or small)
that is closest in size to the thread spool. If a
spool cap smaller than the thread spool is used,
the thread may become caught in the slit on
the end of the spool and cause the needle to
break.
@Note
When sewing with fine, (ross-wound thread (see the il-
lustration), use the small spool cap, and leave a small spa( e
between the cap and the thread spool (see the illustl_tion
at left).
(_ Spool cap (small)
@ Thread spool (cross-wound thread)
@ Space
2. Hold the thread from the spool in both hands, and pass
the thread around the plate in the thread guides. Use
both hands to set the thread around the thread guide
plate.
(_ Thread guide plate
Y
Setting Up 1-33
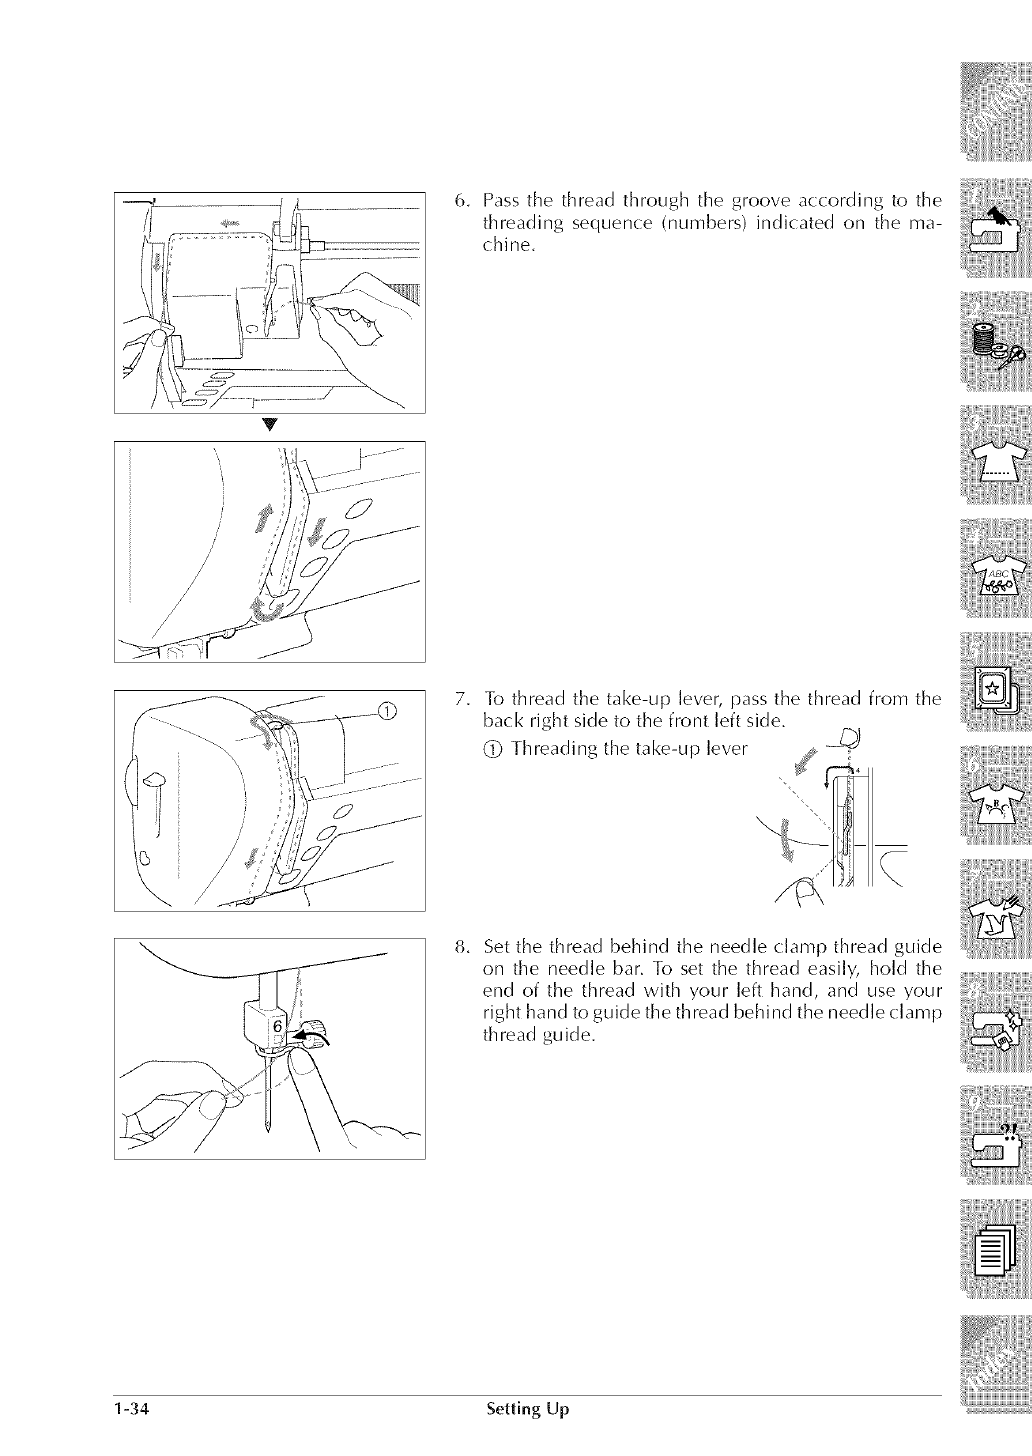
6. Pass the thread through the groove according to the
threading sequence (numbers) indicated on the ma-
chine.
Y
7. To thread the take-up lever, pass the thread from the
back right side to the front left side.
(_ Threading the take-up lever
8, Set the thread behind the needle clamp thread guide
on the needle bar. To set the thread easily, hold the
end of the thread with your [eft hand, and use your
right hand to guide the thread behind the needle (:lamp
thread guide.
1-34 Setting Up
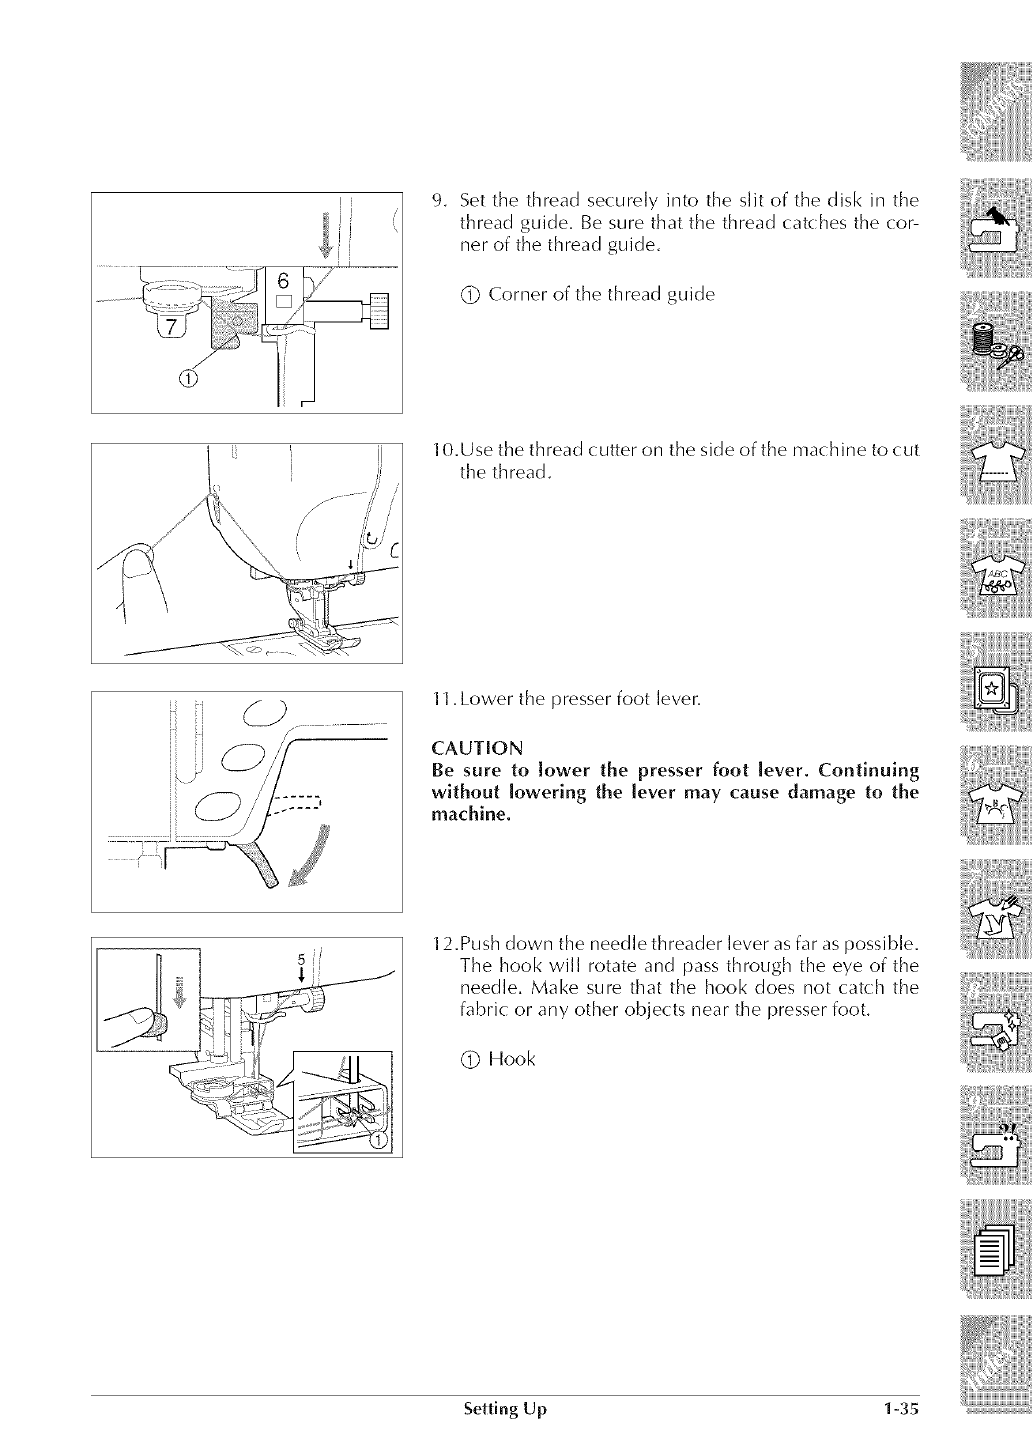
9. Set the thread securely into the slit of the disk in the
thread guide. Be sure that the thread catches the cor-
ner of the thread guide.
(_ Corner of the thread guide
10.Use the thread cutter on the side of the machine to cut
the thread.
11. Lower the presser foot lever.
CAUTION
Be sure to lower the presser foot lever. Continuing
without lowering the lever may cause damage to the
machine.
5fi 12.Push down the needle threader lever as far as possibJe.
The hook will rotate and pass through the eye of the
needle. Make sure that the hook does not catch the
fabric or any other objects near the presser foot.
(_ Hook
Setting Up 1-35
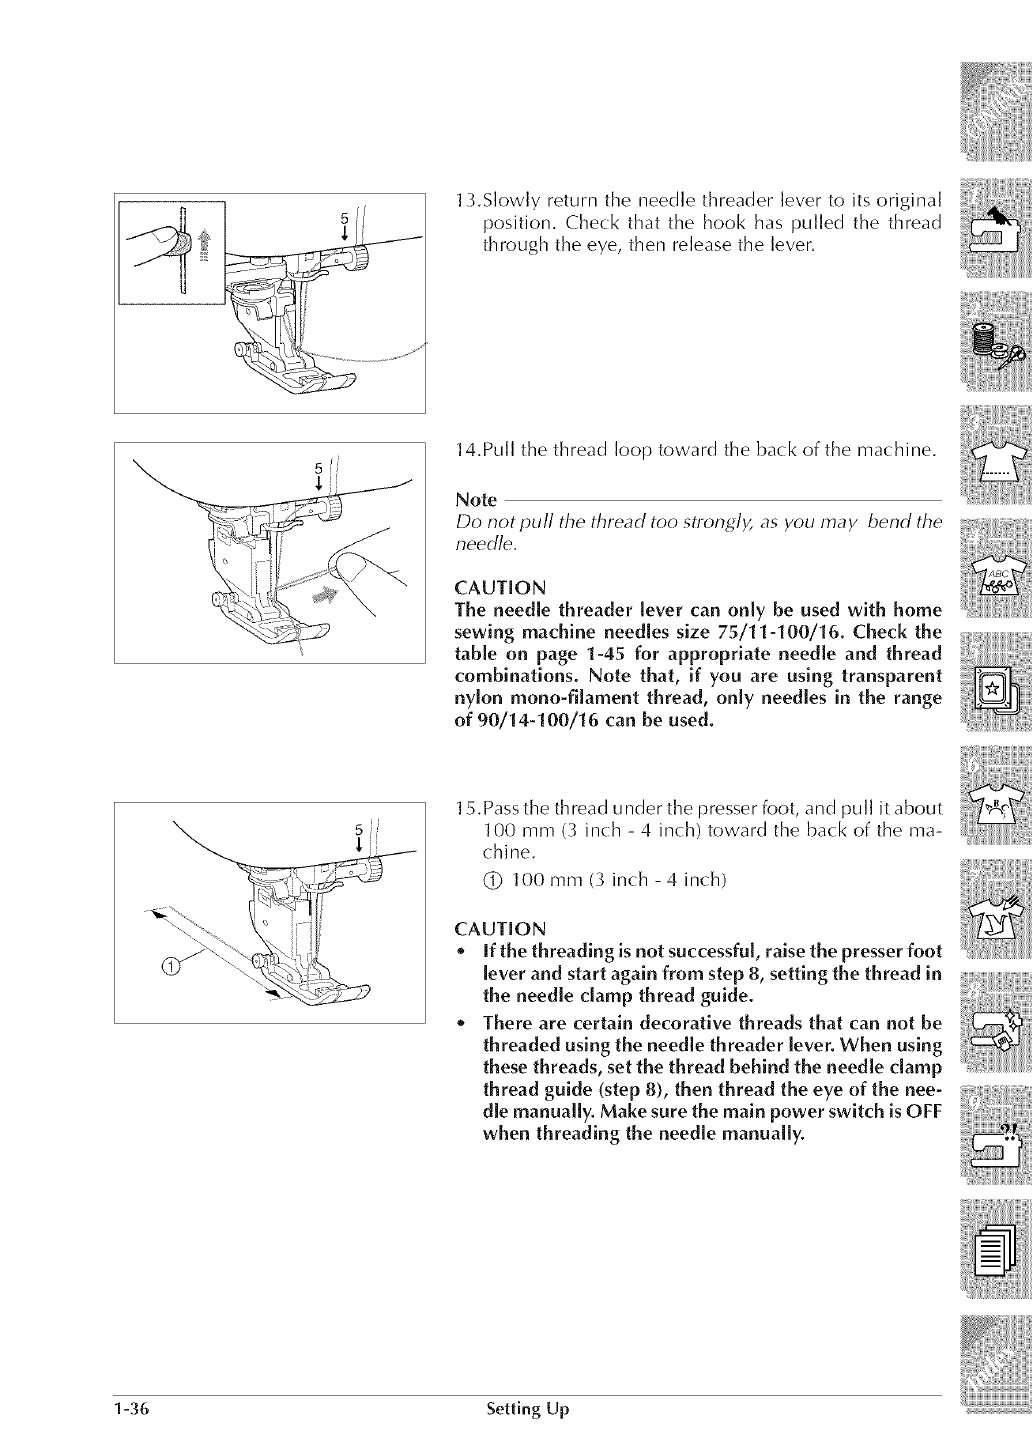
13.Slowly return the needle threader lever to its original
position. Check that the hook has pulled the thread
through the eye, then release the lever.
14.Pull the thread loop toward the back of the machine.
Note
Do not pull the thread too strongly, as you may bend the
nee(lie.
CAUTION
The needle threader lever can only be used with home
sewing machine needles size 75/11-100/16. Check the
table on page 1-45 for appropriate needle and thread
combinations. Note that, if you are using transparent
nylon mono-filament thread, only needles in the range
of 90/14-100/16 can be used.
15.Passthe thread under the presser foot, and pull it about
100 mm (3 inch - 4 inch) toward the back of the ma-
chine.
(_ 100ram (3 inch -4 inch)
CAUTION
o [f the threading is not successful, raise the presser foot
lever and start again from step 8, setting the thread in
the needle clamp thread guide.
*There are certain decorative threads that can not be
threaded using the needle threader lever. When using
these threads, set the thread behind the needle clamp
thread guide (step 8), then thread the eye of the nee-
dle manually. Make sure the main power switch is OFF
when threading the needle manually.
1-36 Setting Up
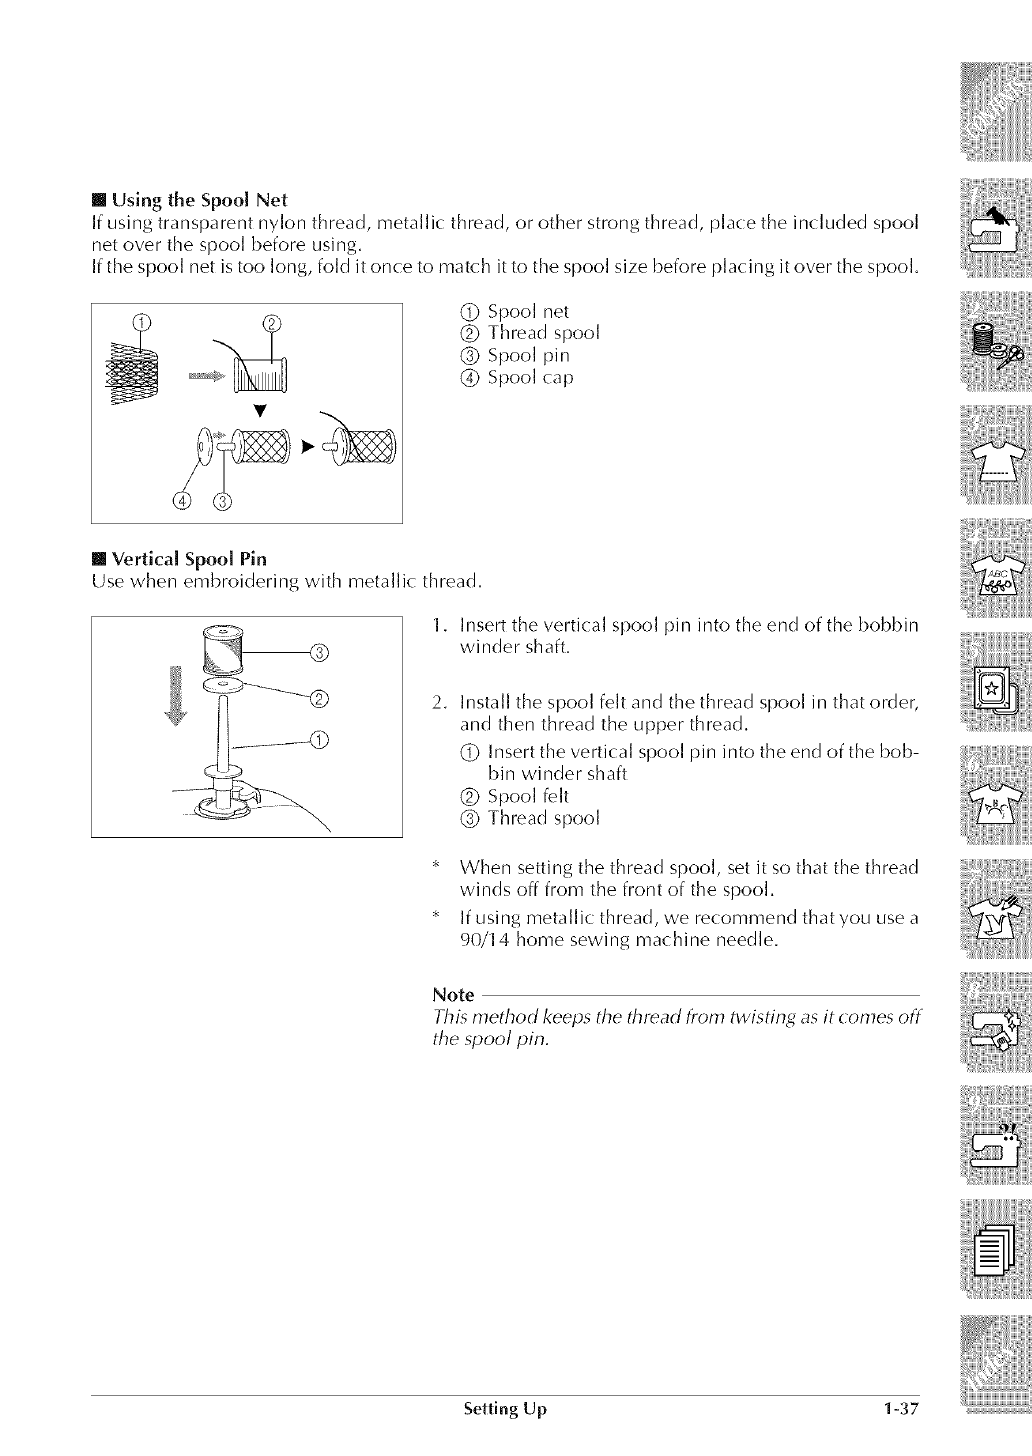
[] Using the Spool Net
If using transparent nylon thread, metallic thread, or other strong thread, place the included spool
net over the spool before using.
If the spool net is too long, fold it once to match it to the spool size before placing it over the spool.
¥
(_ Spool net
Q Thread spool
Q Spool pin
(_9 Spool cap
[] Vertical Spool Pin
Use when embroidering with metallic thread.
2.
Insert the vertical spool pin into the end of the bobbin
winder shaft.
Install the spool felt and the thread spool in that order,
and then thread the upper thread.
(_9 Insert the vertical spool pin into the end of the bob-
bin winder shaft
@Spool felt
{_9Thread spool
* When setting the thread spool, set it so that the thread
winds off from the front of the spool.
* If using metallic thread, we recommend thatyou use a
%/14 home sewing machine needle.
Note
Thb method keeps the thread _om twisting as it comes off
the spool pin.
Setting Up 1-37
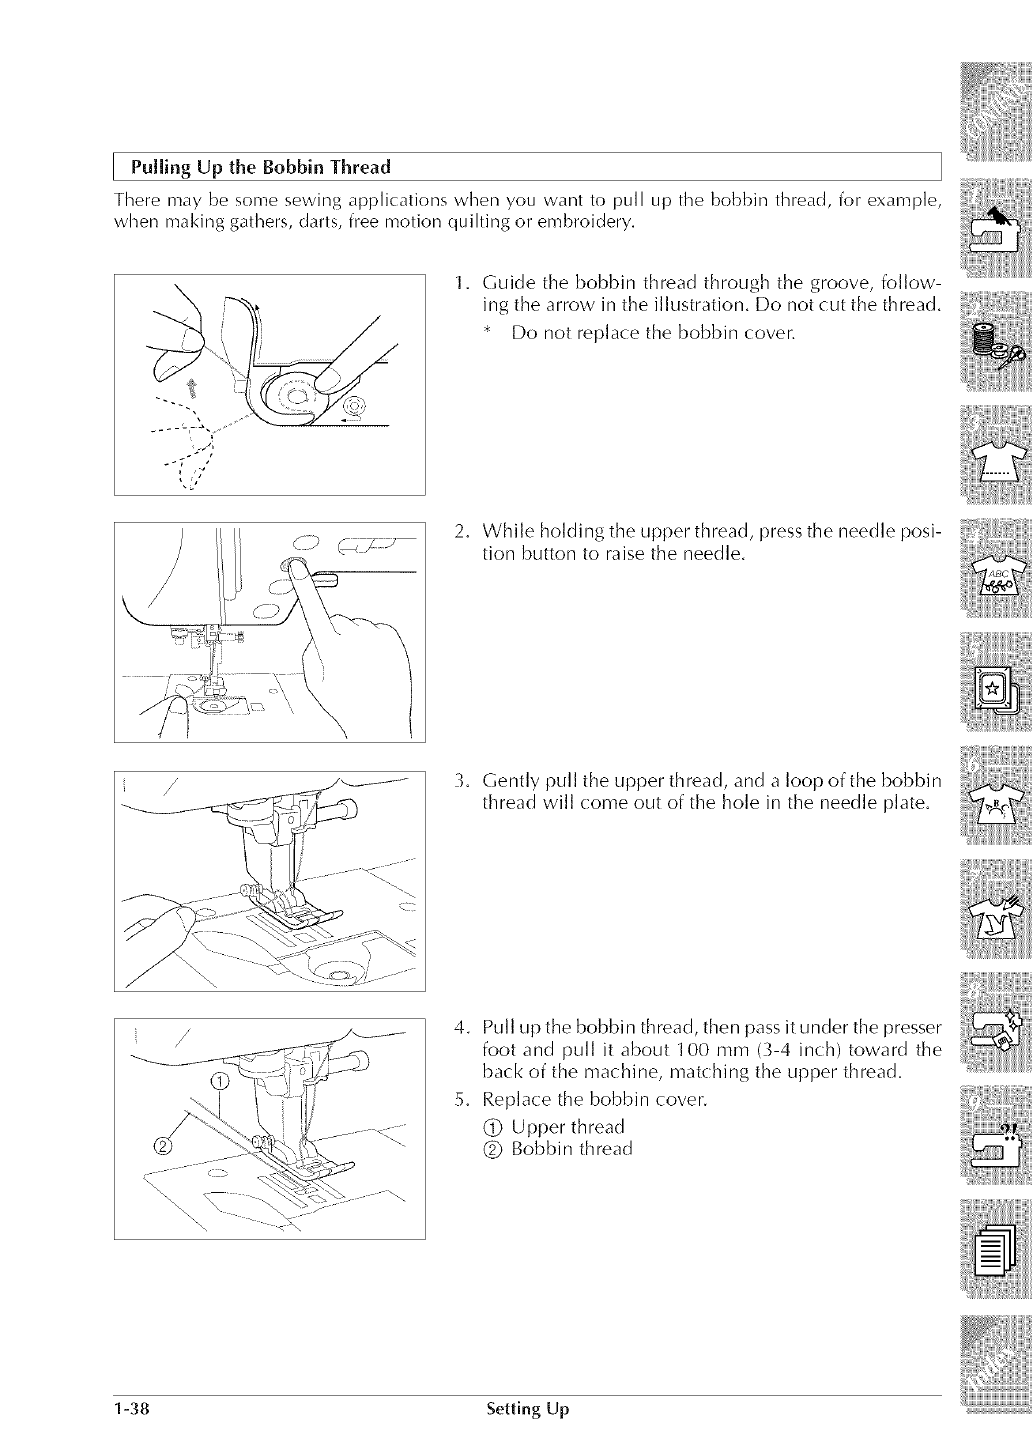
Pulling Up the Bobbin Thread
There may be some sewing applications when you want to pull up the bd)bin thread, for example,
when making gathers, darts, free motion quilting or embroidery.
1. Guide the bobbin thread through the groove, follow-
ing the arrow in the illustra%n. Do not cut the thread.
* Do not replace the bobbin cover.
2. While holding the upper thread, press the needle pod-
tion button to raise the needle.
/
/
/
CD
3. Gently pull the upper thread, and a loop of the bobbin
thread will come out of the hole in the needle plate.
4. Pull up the bobbin thread, then passit under the presser
foot and pull it about 100 mm (3-4 inch) toward the
back of the machine, matching the upper thread.
5. Replace the bobbin cover.
CD Upper thread
(_ Bobbin thread
1-38 Setting Up
Changing the Presser Foot
CAUTION
* Always turn off the power before changing the presser foot. if the power is on and the
"Start/Stop" button or another button is pressed, the machine will start and may cause
iniury.
.Always use the correct presser foot for the selected stitch pattern. [f the wrong presser
foot is used, the needle may strike the presser foot and bend or break, and may cause
iniury.
*OnUy use presser feet for this machine. Using other presser feet may lead to accident
o.
or injury.
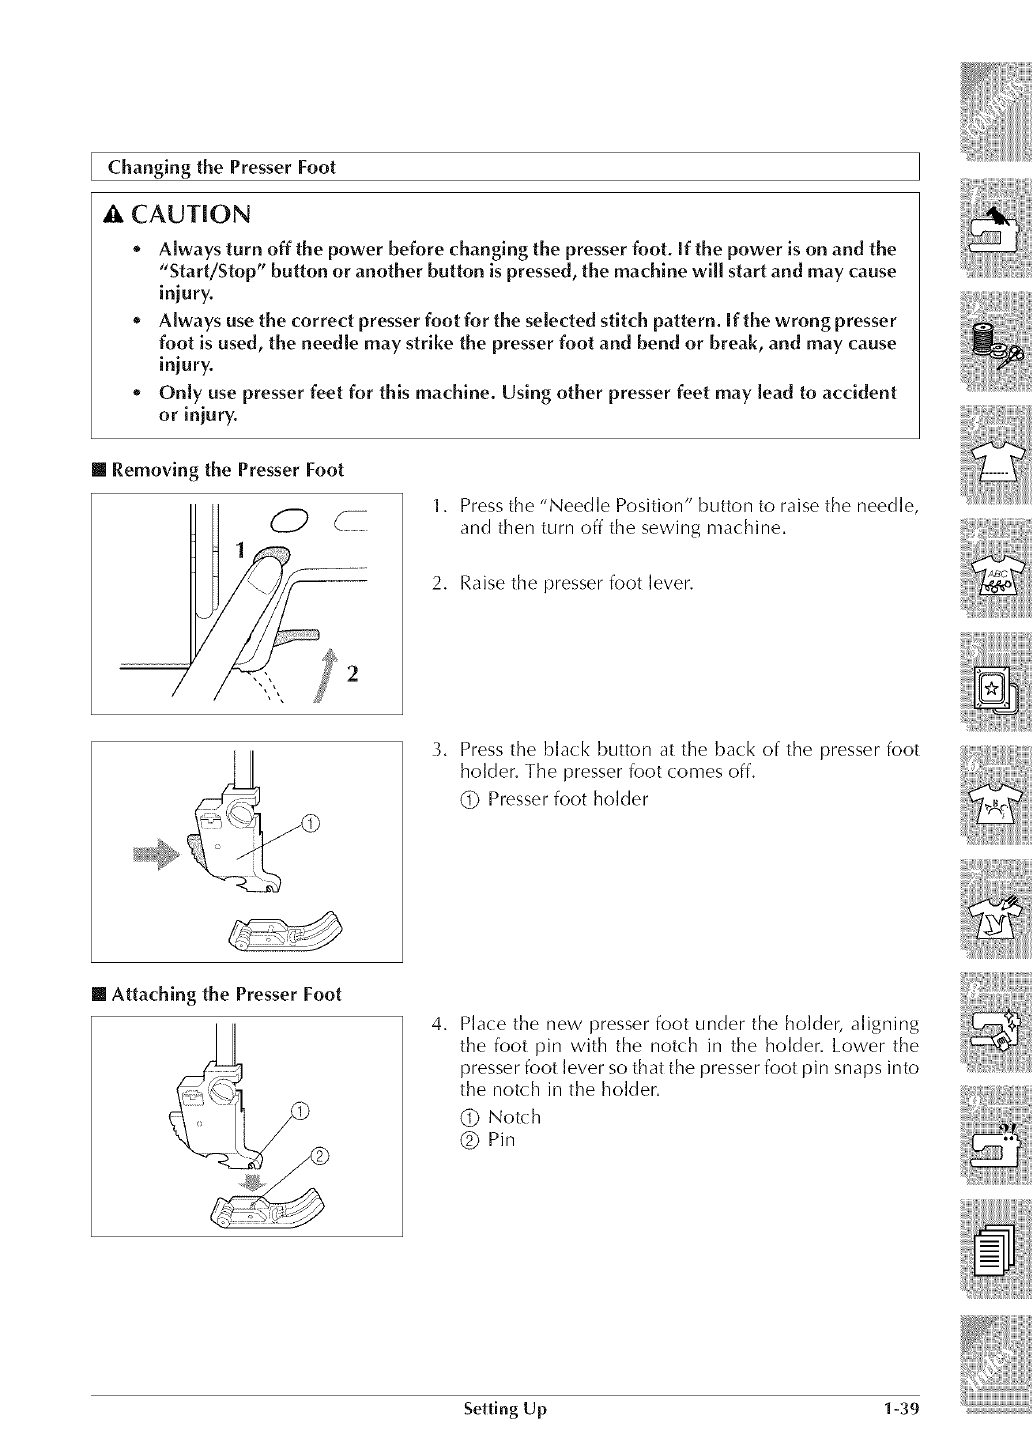
[] Removing the Presser Foot
dZ)
/
7
Press the "Needle Position" button to raise the needle,
and then turn off the sewing machine.
2. Raise the presser foot lever.
3. Pressthe black button at the back of the presser foot
holder. The presser foot comes off.
(_ Presserfoot holder
[] Attaching the Presser Foot
4. Place the new presser foot under the holder, aligning
the foot pin with the notch in the holder. Lower the
presser foot lever so that the presser foot pin snaps into
the notch in the holder.
(_ Notch
(_ Pin
Setting Up 1-39
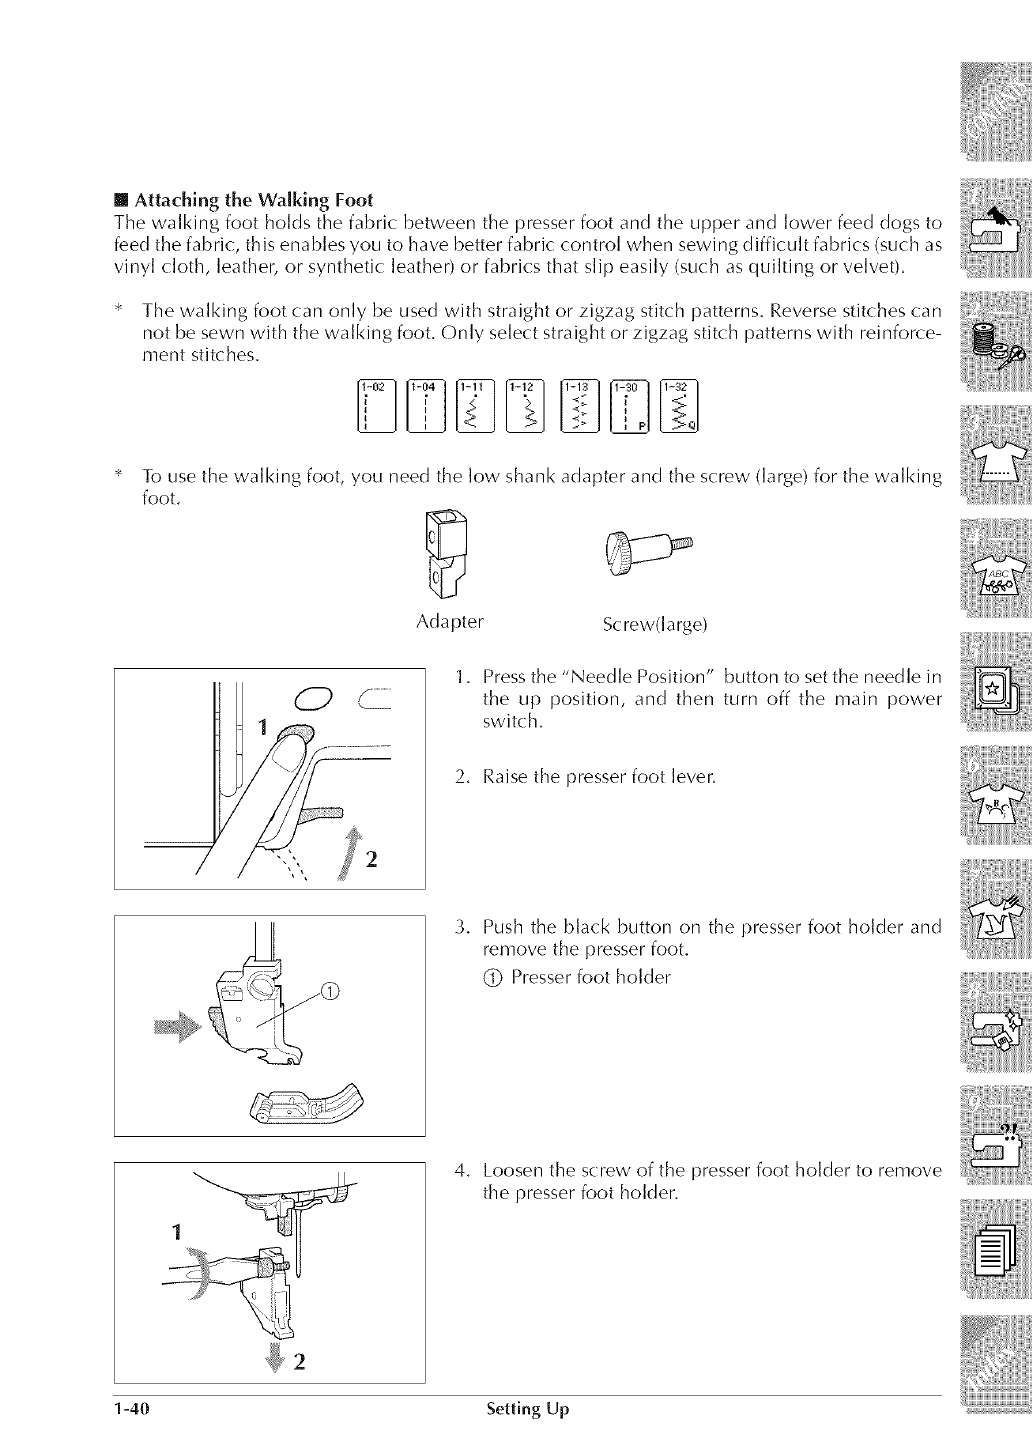
[] Attaching the Walking Foot
The walking foot holds the fabric between the presser foot and the upper and lower feed dogs to
feed the fabric, this enables you to have better fabric control when sewing difficult fabrics (such as
vinyl cloth, leather, or synthetic leather) or fabrics that slip easily (such as quilting or velvet).
The walking foot (:an only be used with straight or zigzag stitch patterns. Reverse stitches (:an
not be sewn with the walking foot. Only select straight or zigzag stitch patterns with reinforce-
ment stitches.
To use the walking foot, you need the low shank adapter and the screw (large) for the walking
foot.
Adapter Screw(large)
/
Press the "Needle Position" button to set the needle in
the up position, and then turn off the main power
switch.
2. Raise the presser foot lever.
7
3, Push the black button on the presser foot holder and
remove the presser foot.
(_ Presser foot holder
4. Loosen the screw of the presser foot holder to remove
the presser foot holder.
_2
1-40 Setting Up
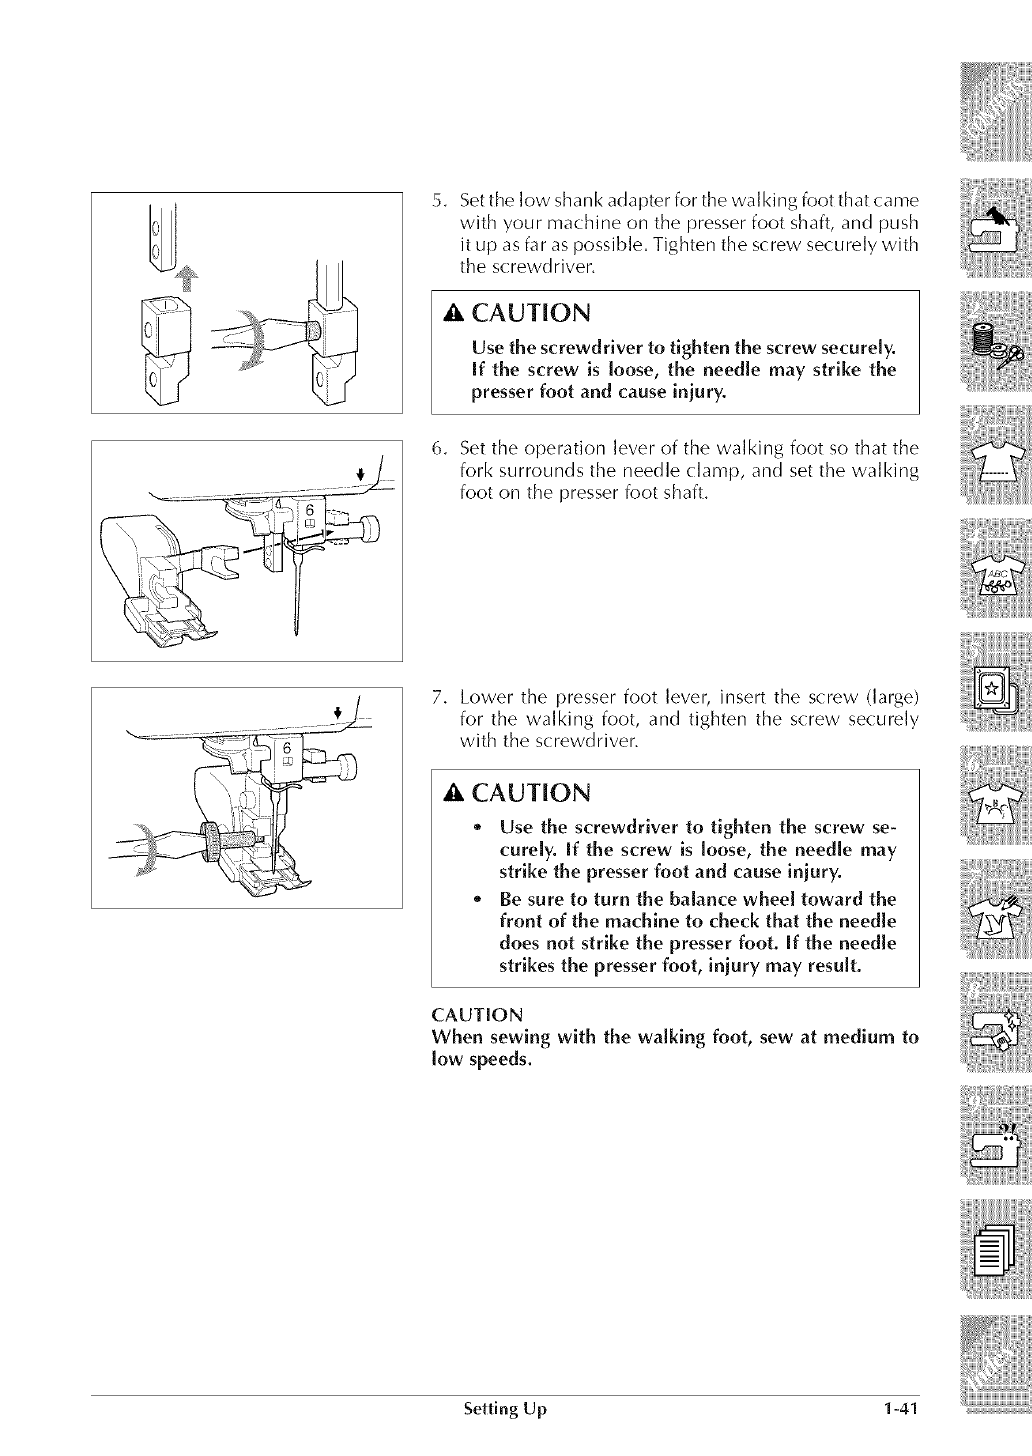
5. Set the low shank adapter for the wal king foot that came
with your machine on the presser foot shaft, and push
it up as far as possible. Tighten the screw securely with
the screwdriver.
CAUTION
Use the screwdriver to tighten the screw securely.
If the screw is loose, the needle may strike the
presser foot and cause iniury.
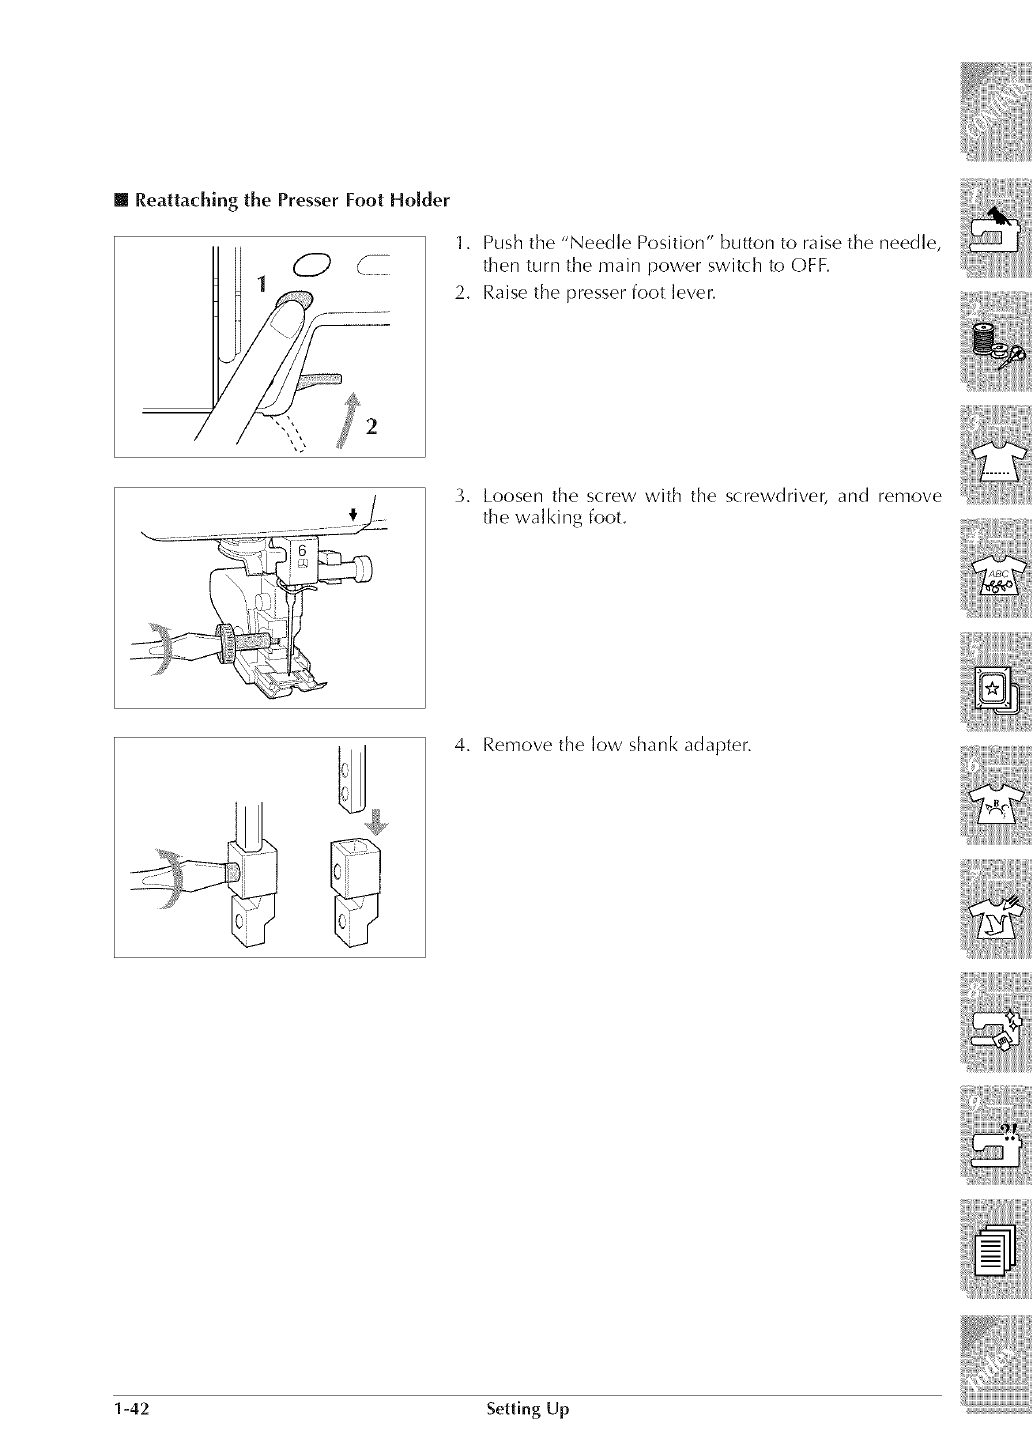
6. Set the operation lever of the walking foot so that the
fork surrounds the needle clamp, and set the walking
foot on the presser foot shaft.
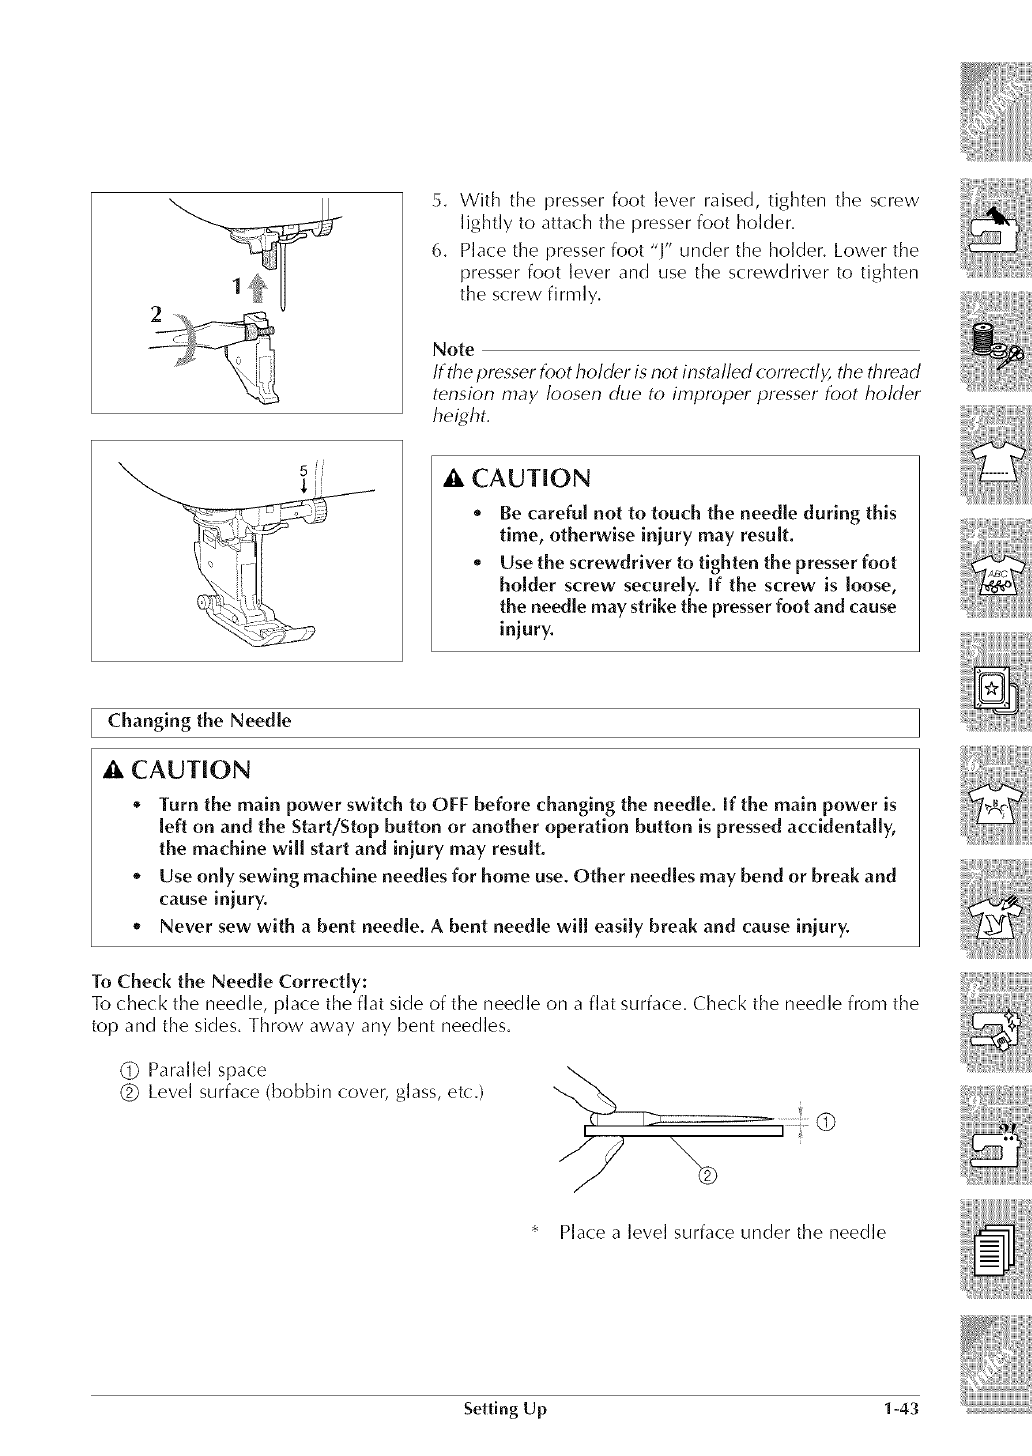
7. Lower the presser foot lever, insert the screw (large)
for the walking foot, and tighten the screw securely
with the screwdriver.
• , CAUTION
•Use the screwdriver to tighten the screw se-
curely. If the screw is loose, the needle may
strike the presser foot and cause iniury.
oBe sure to turn the balance wheel toward the
front of the machine to check that the needle
does not strike the presser foot. If the needle
strikes the presser foot, iniury may result.
CAUTION
When sewing with the walking foot, sew at medium to
low speeds.
Setting Up 1-41
[] Reattaching the Presser Foot Holder
7
O
",7
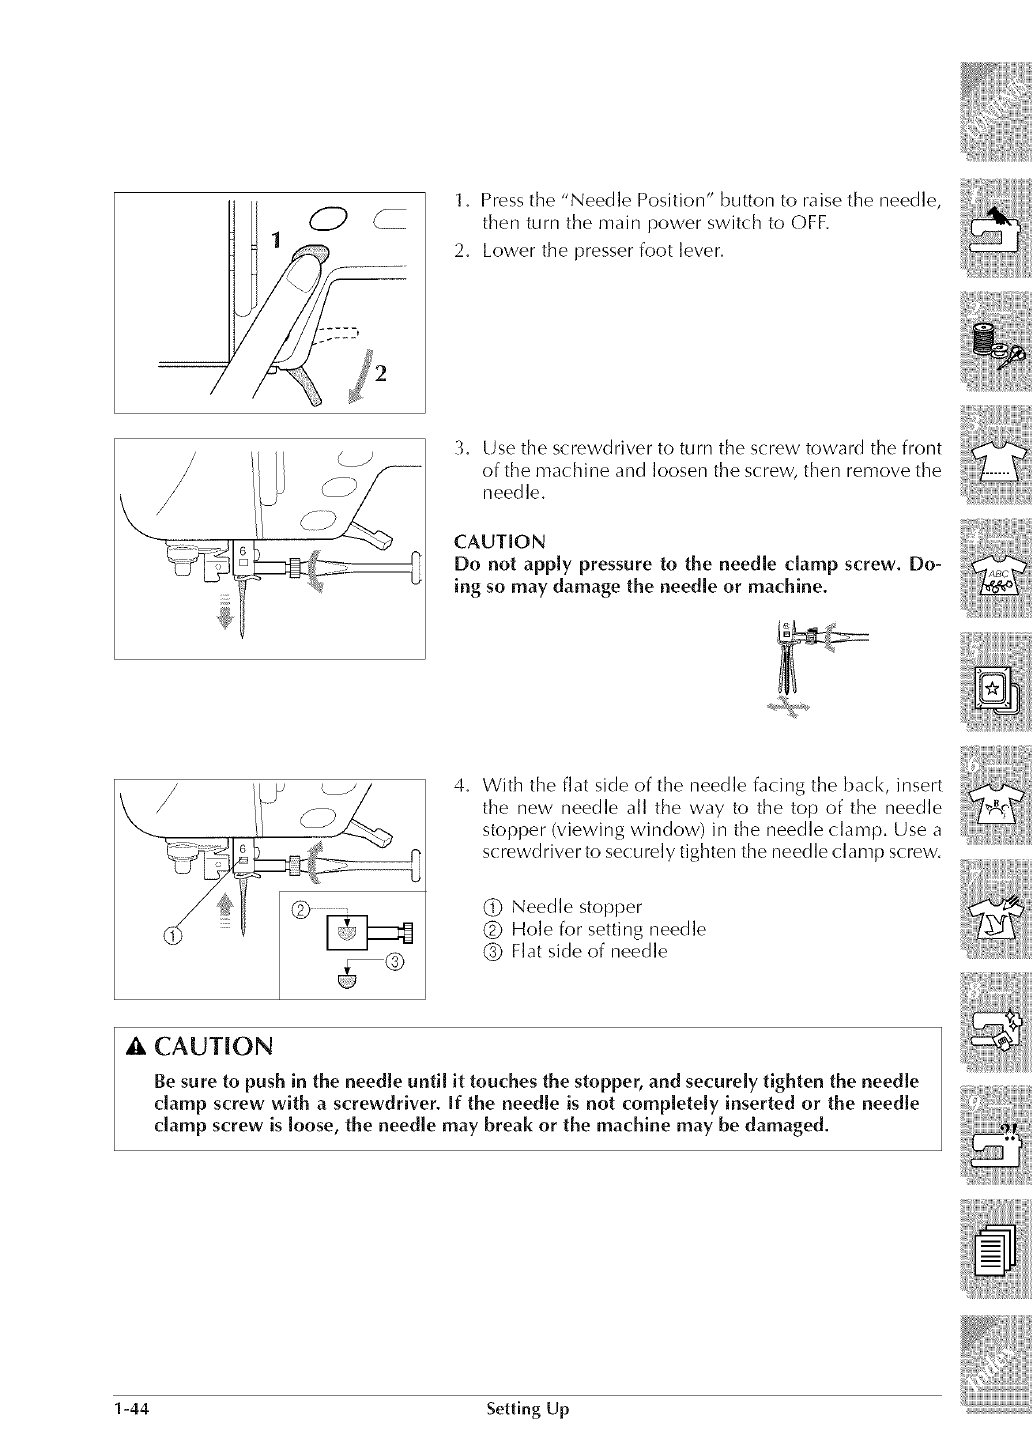
1. Push the "Needle Position" button to raise the needle,
then turn the main power switch to OFF.
2. Raise the presser foot lever.
Loosen the screw with the screwdriver, and remove
the walking foot.
4. Remove the low shank adapter.
1-42 Setting Up
5, With the presser foot lever raised, tighten the screw
lightly to attach the presser foot holder,
6, Place the presser foot "l" under the holder, Lower the
presser foot lever and use the screwdriver to tighten
the screw firmly,
Note
If the presser foot holder is not installed correctly, the thread
tension may loosen due to improper presser foot holder
height.
• , CAUTION
o
o
Be careful not to touch the needle during this
time, otherwise iniury may result.
Use the screwdriver to tighten the presser foot
holder screw securely. If the screw is loose,
the needle may strike the presser foot and cause
iniury.
Changing the Needle
• , CAUTION
oTurn the main power switch to OFF before changing the needle. If the main power is
left on and the Start/Stop button or another operation button is pressed accidentally,
the machine will start and injury may result.
o Use only sewing machine needles for home use. Other needles may bend or break and
cause iniury.
*Never sew with a bent needle. A bent needle will easily break and cause iniury.
To Check the Needle Correctly:
To check the needle, place the flat side of the needle on a flat surface, Check the needle from the
top and the sides, Throw away any bent needles,
(_ Parallel space
(_) Level surface (bobbin cover, glass, etc.)
* Place a level surface under the needle
Setting Up 1-43
7
1
/
O
P
f ..........
1. Press the "Needle Position" button to raise the needle,
then turn the main power switch to OFF.
2. Lower the presser foot lever,
3, Use the screwdriver to turn the screw toward the front
of the machine and loosen the screw, then remove the
needle,
CAUTION
Do not apply pressure to the needle clamp screw. Do-
ing so may damage the needle or machine.
4, With the flat side of the needle facing the back, insert
the new needle all the way to the top of the needle
stopper (viewing window) in the needle clamp, Use a
screwdriver to securely tighten the needle clamp screw.
(_ Needle stopper
(_ Hole for setting needle
(_ Flat side of needle
CAUTION
Be sure to push in the needle until it touches the stopper, and securely tighten the needle
clamp screw with a screwdriver. If the needle is not completely inserted or the needle
clamp screw is loose, the needle may break or the machine may be damaged.
1-44 Setting Up
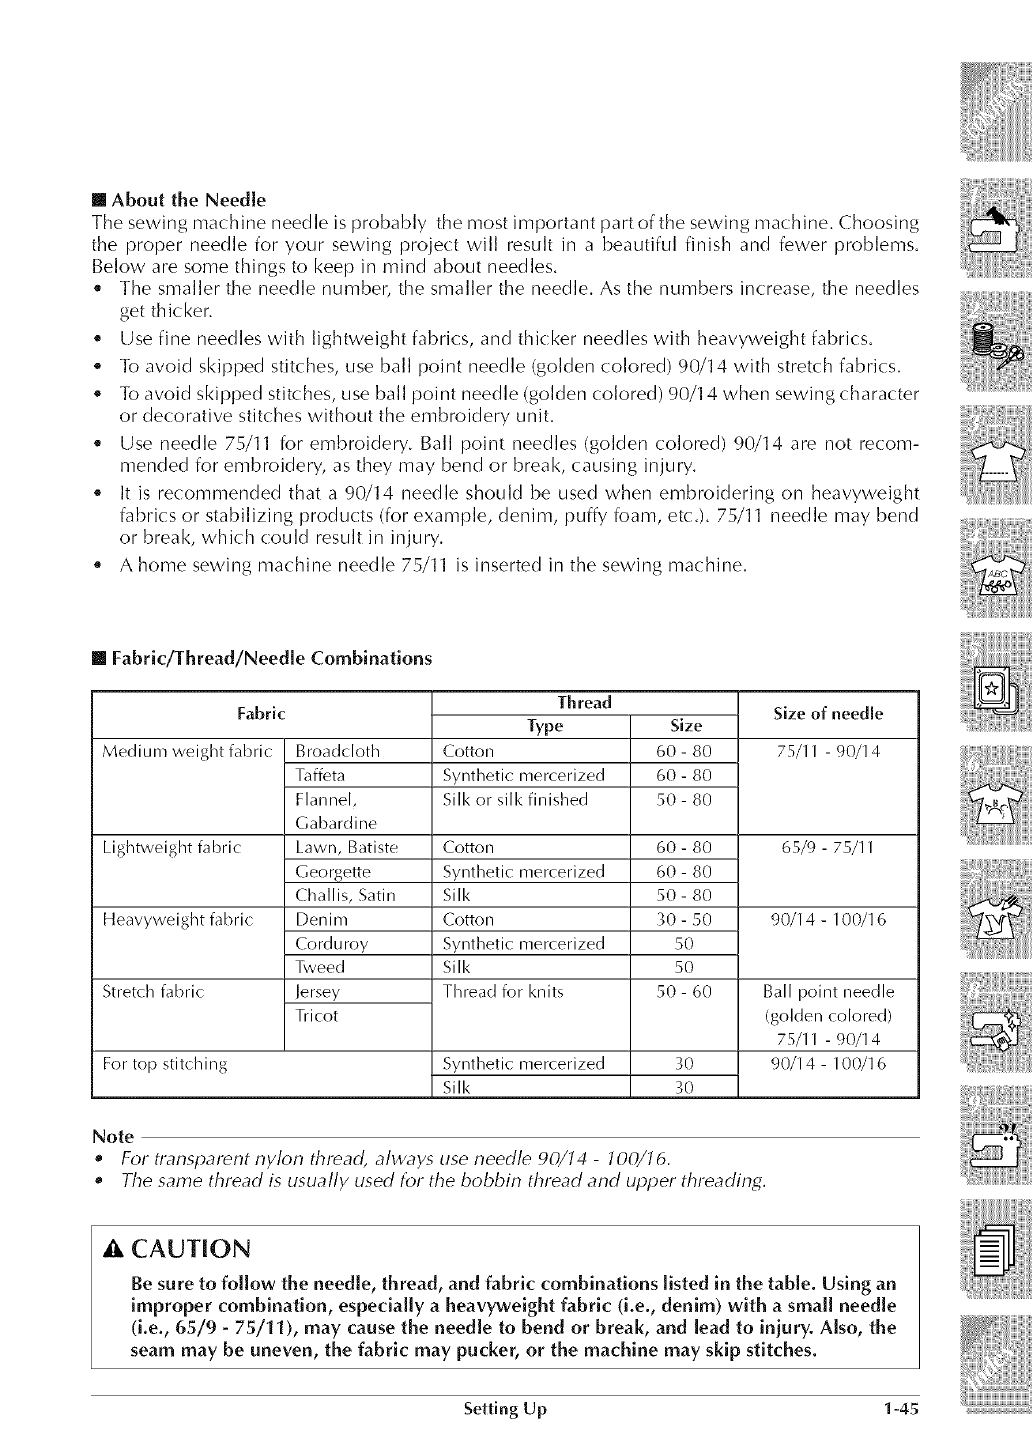
[] About the Needle
The sewing machine needle is probably the most important part of the sewing machine. Choosing
the proper needle for your sewing project will result in a beautiful finish and fewer problems.
Below are some things to keep in mind about needles.
• The smaller the needle number, the smaller the needle. As the numbers increase, the needles
get thicker.
• Use fine needles with lightweight fabrics, and thicker needles with heavyweight fabrics.
• To avoid skipped stitches, use ball point needle (golden colored) 90/14 with stretch fabrics.
• To avoid skipped stitches, use ball point needle (golden colored) 90/14 when sewing character
or decorative stitches without the embroidery unit.
• Use needle 75/11 for embroidery. Ball point needles (golden colored) 9(-)/14 are not recom-
mended for embroidery, as they may bend or break, causing injury.
• It is recommended that a 9(-)/14 needle should be used when embroidering on heavyweight
fabrics or stabilizing products (for example, denim, puffy foam, etc.). 75/11 needle may bend
or break, which could result in injury.
• A home sewing machine needle 75/11 is inserted in the sewing machine.
[] Fabric/Thread/Needle Combinations
Fabric
Medium weight fabric
Lightweight fabric
Heavyweight fabric
Stretch fabric
Broadcloth
Taffeta
Flannel,
Gabardine
Lawn, Batiste
Georgette
Challis, Satin
Denim
Co rd u roy
Tweed
Jersey
Tricot
Thread
Type
Cotton
Synthetic mercerized
Sill<or sill<finished
Cotton
Synthetic mercerized
Sill<
Cotton
Synthetic mercerized
Sill<
Thread for knits
Size
60 - 80
60 - 80
50 - 80
60 - 80
60 - 80
50 - 80
30 - 50
50
50
50 - 60
For top stitching Synthetic mercerized 30
Sill< 30
Note
•For transparent nylon thread, always use needle 90/14 -100/16.
•The same thread is usually used for the bobbin thread and upper threading.
_, CAUTION
Size of needle
75/11 - 90/14
65/9- 75/11
90/14 - 100/l 6
Ball point needle
(golden colored)
75/11 - 90/14
90/14 - 100/16
Be sure to follow the needle, thread, and fabric combinations listed in the table. Using an
improper combination, especially a heavyweight fabric (i.e., denim) with a small needle
(i.e., 65/9 - 75/11), may cause the needle to bend or break, and lead to injury. Also, the
seam may be uneven, the fabric may pucker, or the machine may skip stitches.
Setting Up 1-45
1-46 Setting Up
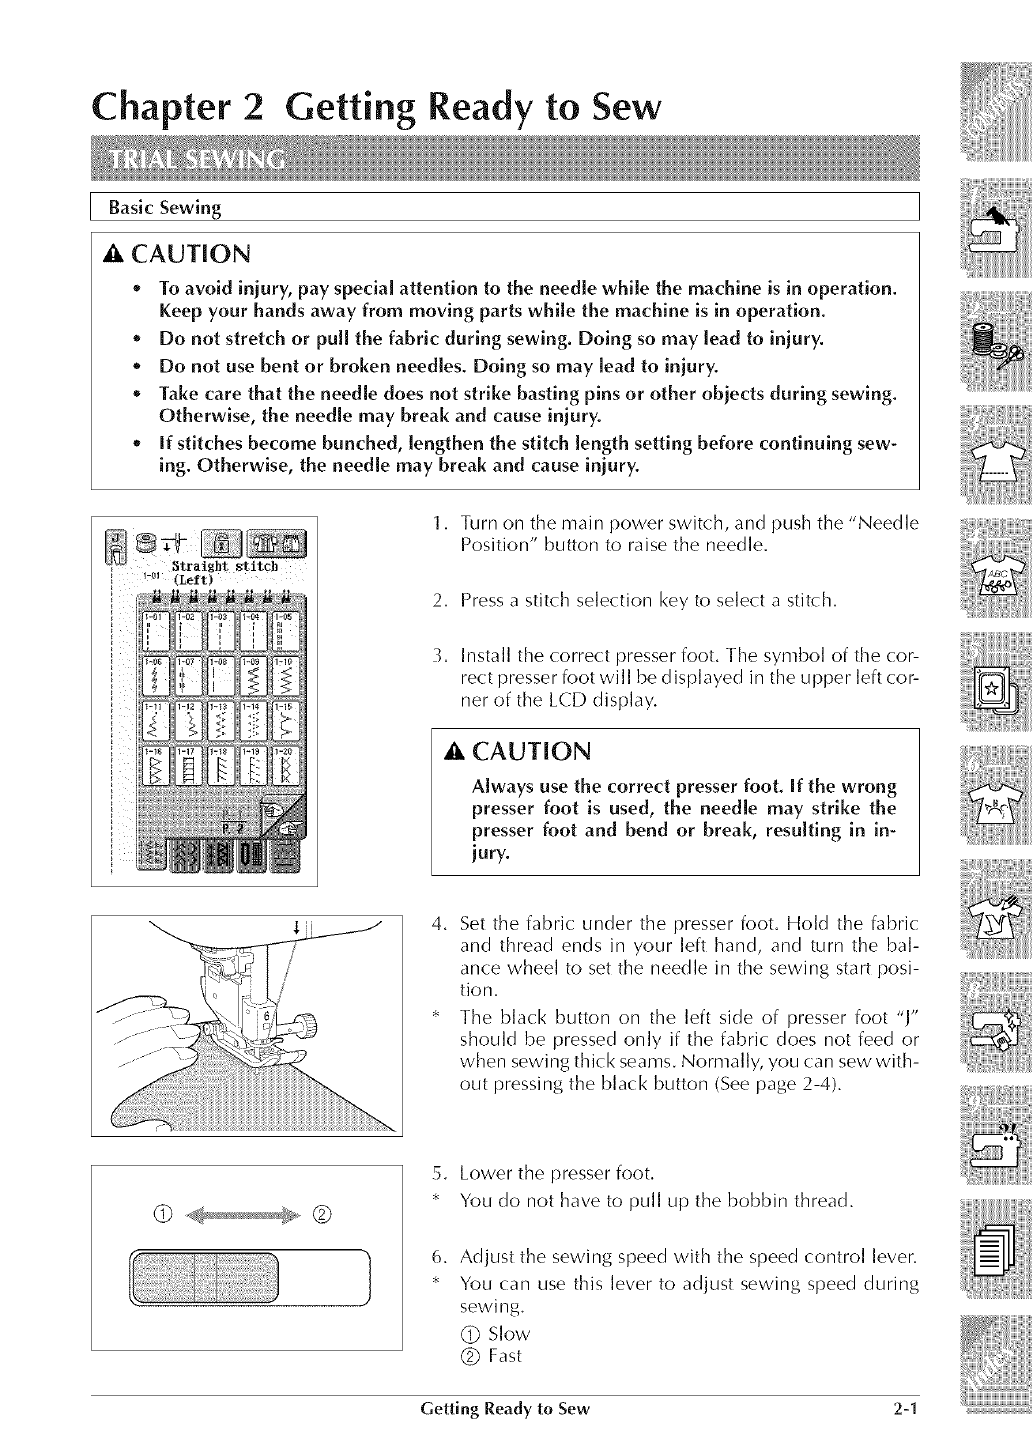
Chapter 2 Getting Ready to Sew
Basic Sewing
_k CAUTION
*To avoid iniury , pay special attention to the needle while the machine is in operation.
Keep your hands away from moving parts while the machine is in operation.
.Do not stretch or pull the fabric during sewing. Doing so may lead to injury.
.Do not use bent or broken needles. Doing so may lead to injury.
.Take care that the needle does not strike basting pins or other objects during sewing.
Otherwise, the needle may break and cause injury.
.If stitches become bunched, lengthen the stitch length setting before continuing sew-
ing. Otherwise, the needle may break and cause injury.
1, Turn on the main power switch, and push the "Needle
Position" button to raise the needle.
2. Press a stitch selection key to select a stitch.
3. Install the correct presser foot. The symbol of the cor-
rect presser foot will be displayed in the upper left cor-
ner of the LCD display.
_t, CAUTION
Always use the correct presser foot. If the wrong
presser foot is used, the needle may strike the
presser foot and bend or break, resulting in in-
iury.
4. Set the fabric under the presser foot. Hold the fabric
and thread ends in your left hand, and turn the bal-
ance wheel to set the needle in the sewing start posi-
tion.
* The black button on the left side of presser foot "1"
should be pressed only if the fabric does not feed or
when sewing thick seams. Normally, you can sew with-
out pressing the black button (See page 2-4).
(_ _ (_
5. Lower the presser foot.
* You do not have to pull up the bobbin thread.
6. Adjust the sewing speed with the speed control lever.
You can use this lever to adjust sewing speed during
sewing.
(_ Slow
(_ Fast
Getting Ready to Sew 2-I
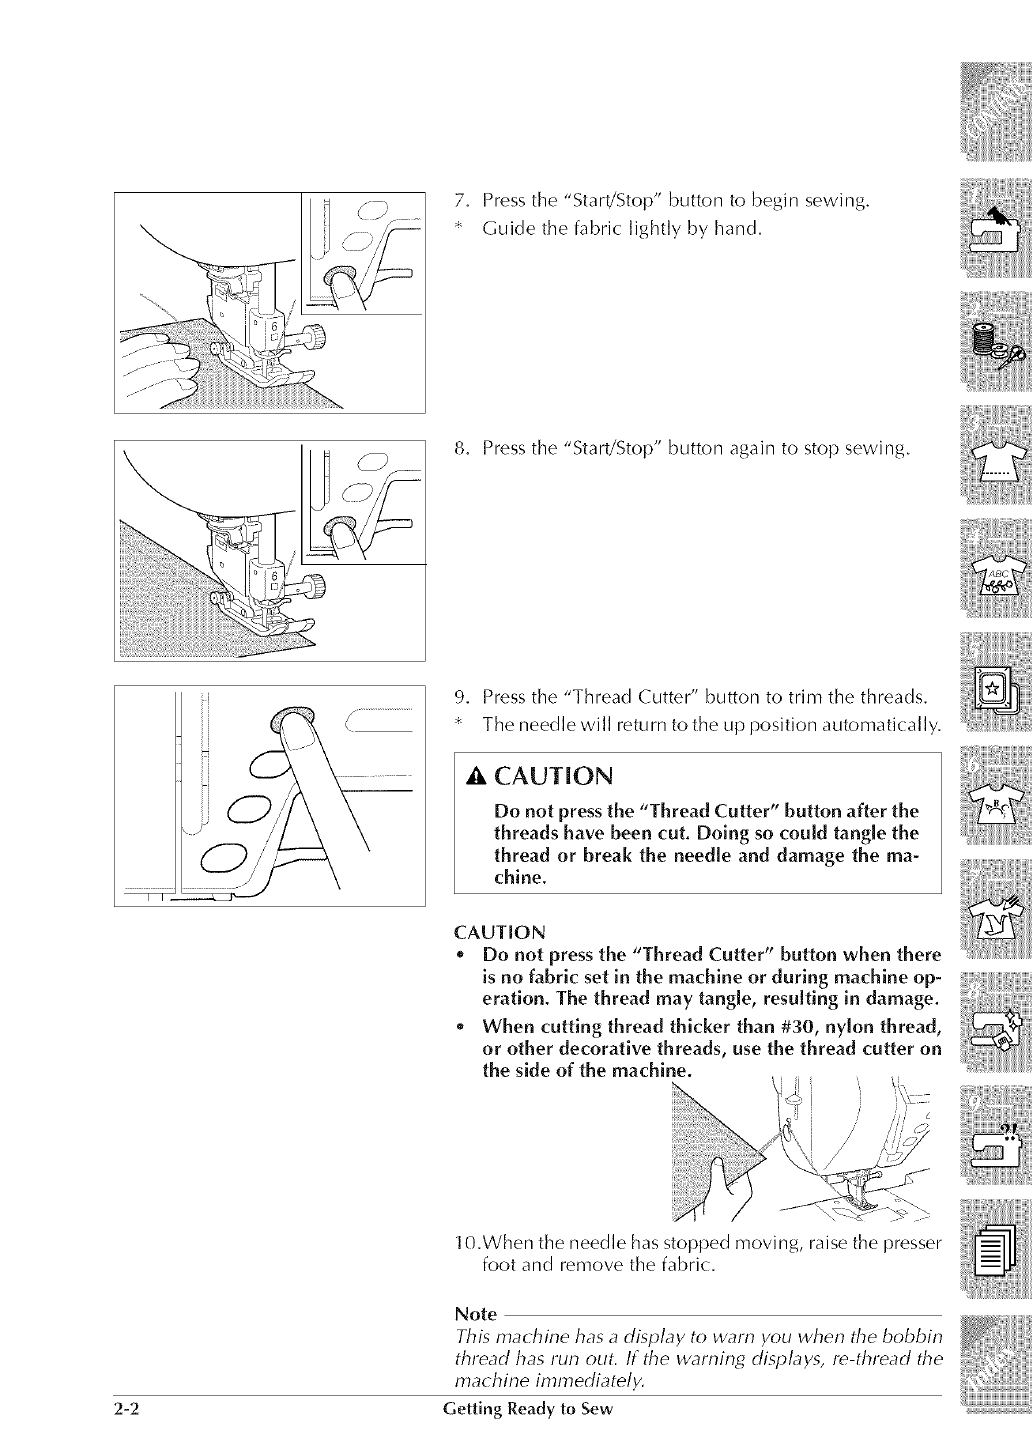
7, Pressthe "Start!Stop" button to begin sewing.
* Guide the fabric lightly by hand.
8. Press the "Start/Stop" button again to stop sewing.
ii_ ___ sZJ \
9. Press the "Thread Cutter" button to trim the threads.
* The needle will return to the up position automatically.
CAUTION
Do not press the "Thread Cutter" button after the
threads have been cut. Doing so could tangle the
thread or break the needle and damage the ma-
chine.
CAUTION
o Do not pressthe "Thread Cutter" button when there
is no fabric set in the machine or during machine op-
eration. The thread may tangle, resulting in damage.
*When cutting thread thicker than #30, nylon thread,
or other decorative threads, use the thread cutter on
the side of the machine.
2-2
10.When the needle has stopped moving, raise the presser
foot and remove the fabric.
Note
thread has run out. If the warning displays, re-thread the
ma, hine immediately, i_ i_
Oe,ting Ready ,o Sew ................................................::::
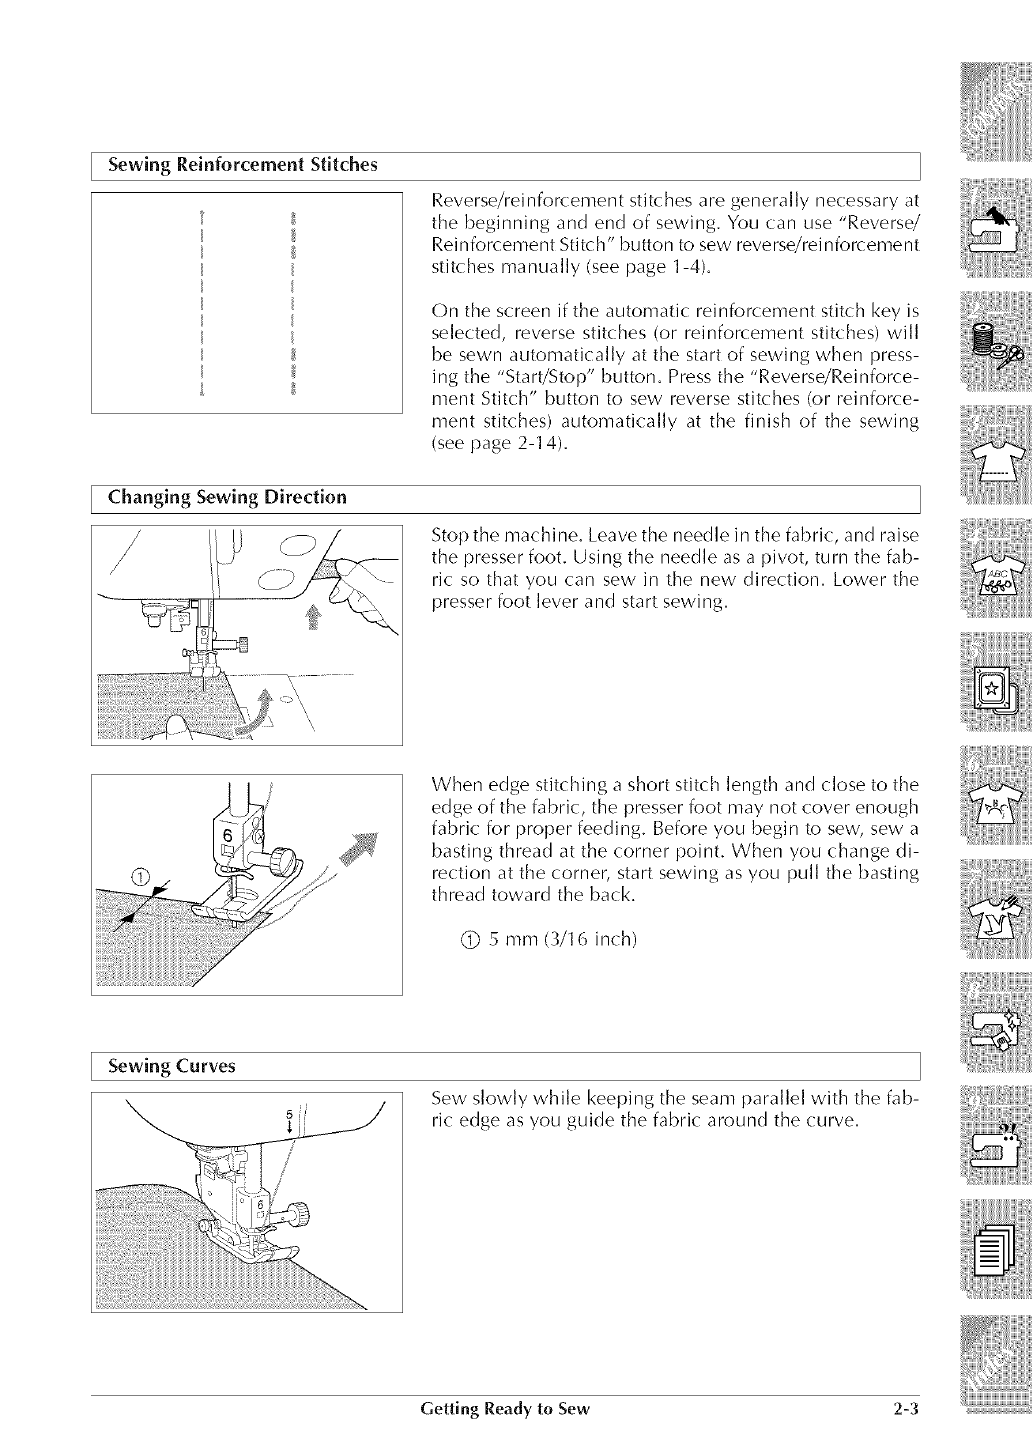
Sewing Reinforcement Stitches
Reverse/reinforcement stitches are generally necessary at
the beginning and end of sewing. You can use "Reverse/
Reinforcement Stitch" button to sew reverse/reinforcement
stitches manually (see page 1-4).
On the screen if the automatic: reinforcement stitch key is
selected, reverse stitches (or reinforcement stitches) will
be sewn automatically at the start of sewing when press-
ing the "Start/Stop" button. Press the "Reverse/Reinforce-
ment Stitch" button to sew reverse stitches (or reinforce-
ment stitches) automatically at the finish of the sewing
(see page 2-14).
Changing Sewing Direction
Stop the machine. Leave the needle in the fabric:, and raise
the presser foot. Using the needle as a pivot, turn the fab-
ric so that you can sew in the new direction. Lower the
presser foot lever and start sewing.
When edge stitching a short stitch length and close to the
edge of the fabric, the presser foot may not cover enough
fabric for proper feeding. Before you begin to sew, sew a
basting thread at the corner point. When you change di-
rection at the corner, start sewing as you pull the basting
thread toward the back.
(_ 5 mm (3/16 inch)
Sewing Curves
Sew slowly while keeping the seam parallel with the fab-
ric edge as you guide the fabric around the curve.
Getting Ready to Sew 2-3
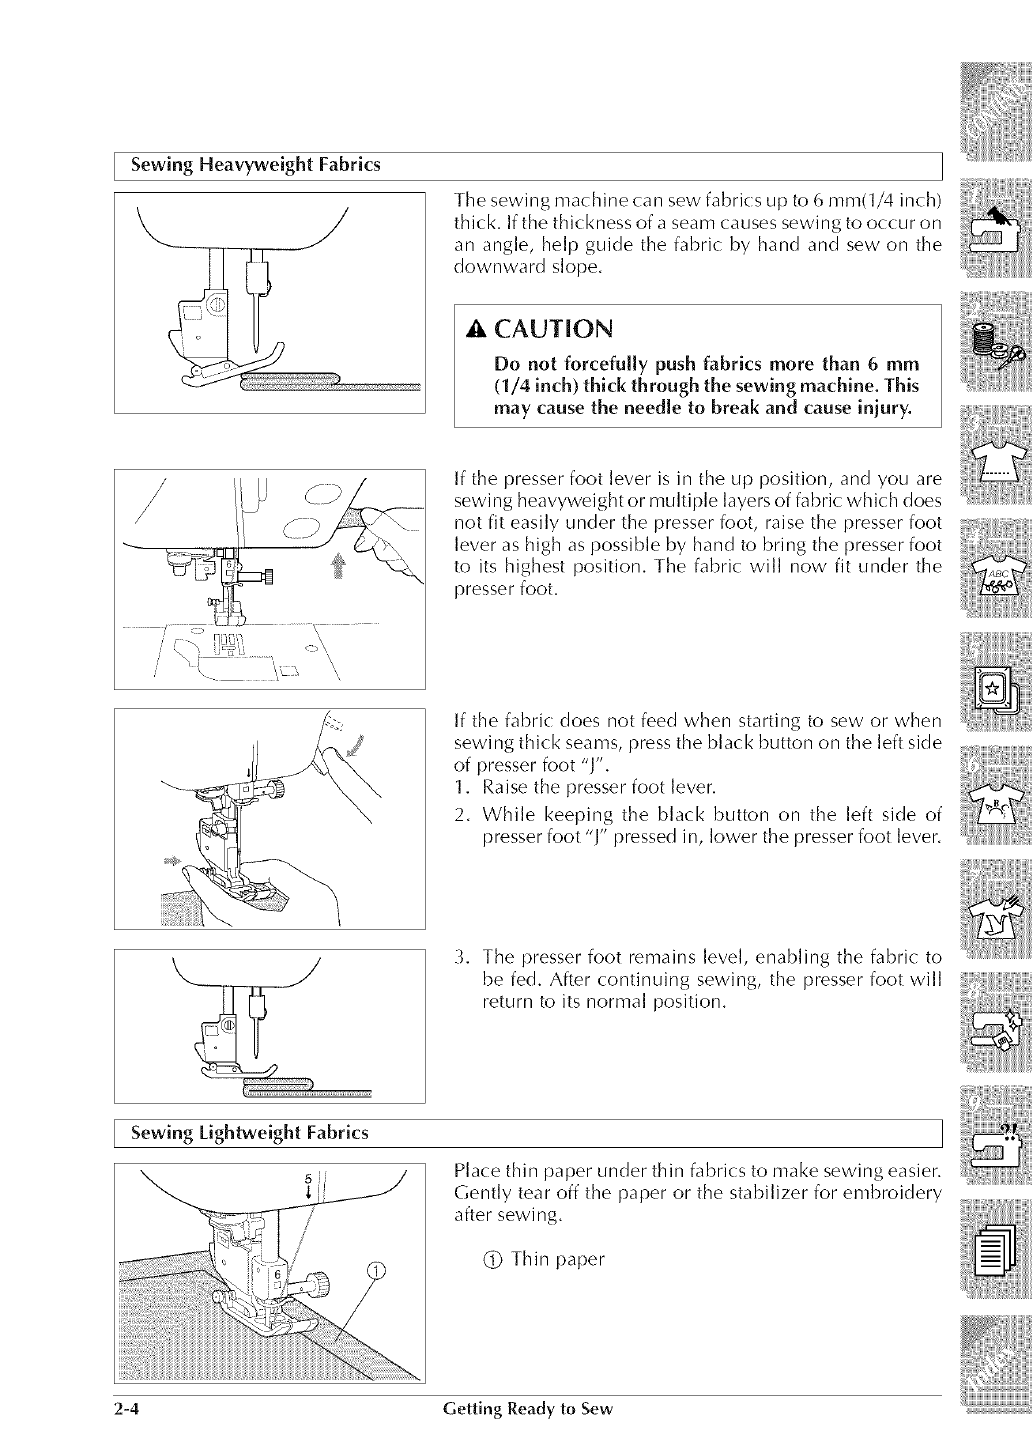
Sewing Heavyweight Fabrics
The sewing machine can sew fabrics up to 6 mm(1/4 inch)
thick. If the thickness of a seam causes sewing to occur on
an angle, help guide the fabric by hand and sew on the
downward slope,
CAUT[ON
Do not forcefully push fabrics more than 6 mm
(1/4 inch) thick through the sewing machine. This
may cause the needle to break and cause iniuryo
If the presser foot lever is in the up position, and you are
sewing heavyweight or multiple layers of fabric which does
not fit easily under the presser foot, raise the presser foot
lever as high as possible by hand to bring the presser foot
to its highest position, The fabric will now fit under the
presser foot,
If the fabric does not feed when starting t() sew or when
sewing thick seams, press the black button on the left side
of presser foot "J",
1, Raise the presser foot lever.
2. While keeping the black button on the left side of
presser foot "J" pressed in, lower the presser foot lever.
3. The presser foot remains level, enabling the fabric to
be fed. After continuing sewing, the presser foot will
return to its normal position,
Sewing Lightweight Fabrics
Place thin paper under thin fabrics to make sewing easier,
Gently tear off the paper or the stabi]izer for embroidery
after sewing,
(_ Thin paper
2-4 Getting Ready to Sew
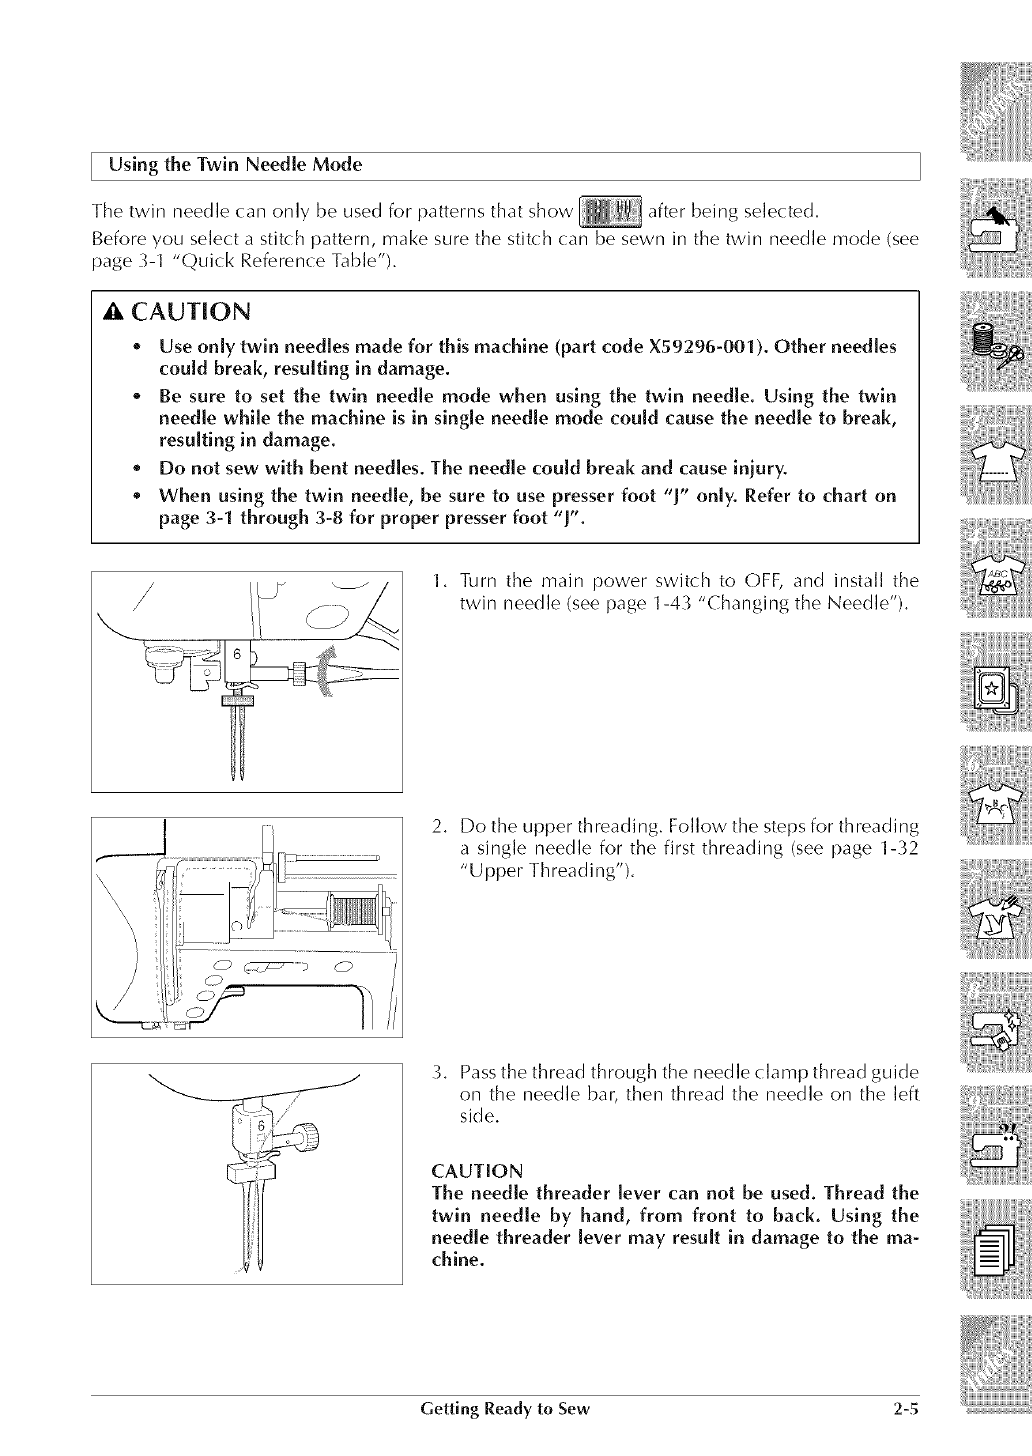
[ Using the Twin Needle Mode
The twin needle (:an only be used for patterns that show after being selected.
Before you select a stitch pattern, make sure the stitch can be sewn in the twin needle mode (see
page 3-1 "Quick Reference Table").
_, CAUTION
• Use only twin needJes made for this machine (part code X59296-001). Other needles
could break, resulting in damage.
Be sure to set the twin needJe mode when using the twin needle. Using the twin
needle while the machine is in single needle mode could cause the needle to break,
resulting in damage.
• Do not sew with bent needles. The needle could break and cause iniury.
• When using the twin needle, be sure to use presser foot "J" only. Refer to chart on
page 3-1 through 3-8 for proper presser foot "J'.
/
/1. Turn the main power switch to OFF, and install the
twin needle (see page 1-43 "Changing the Needle").
J
2. Do the upper threading. Follow the steps for threading
a single needle for the first threading (see page 1-_2
"Upper Threading").
3. Pass the thread through the needle clamp thread guide
on the needle bar, then thread the needle on the [eft
side.
CAUTION
The needle threader lever can not be used. Thread the
twin needle by hand, from front to back. Using the
needle threader lever may result in damage to the ma-
chine.
Getting Ready to Sew 2-5
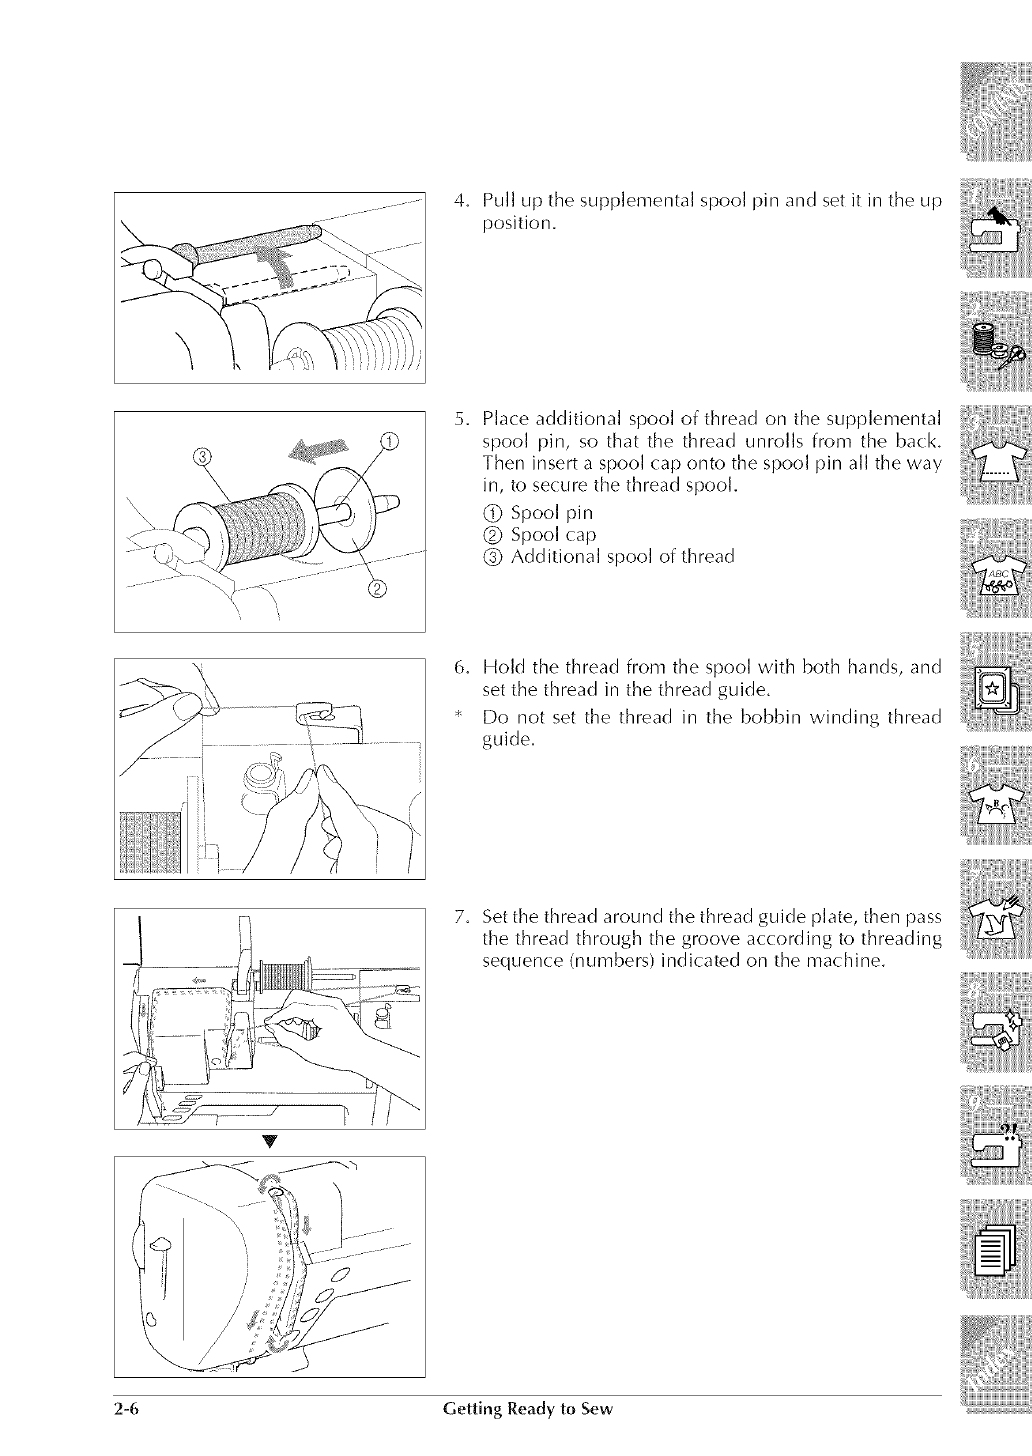
................ 4. Pull up the supplemental spool pin and set it in the up
position.
5. Place additional spool of thread on the supplemental
spool pin, so that the thread unrolls from the back.
Then insert a spool cap onto the spool pin all the way
in, to secure the thread spool.
(_ Spool pin
(_) Spool cap
Q Additional spool of thread
6. Hold the thread from the spool with both hands, and
set the thread in the thread guide.
* Do not set the thread in the bobbin winding thread
guide.
7. Set the thread around the thread guide plate, then pass
the thread through the groove according to threading
sequence (numbers) indicated on the machine.
2-6 Getting Ready to Sew
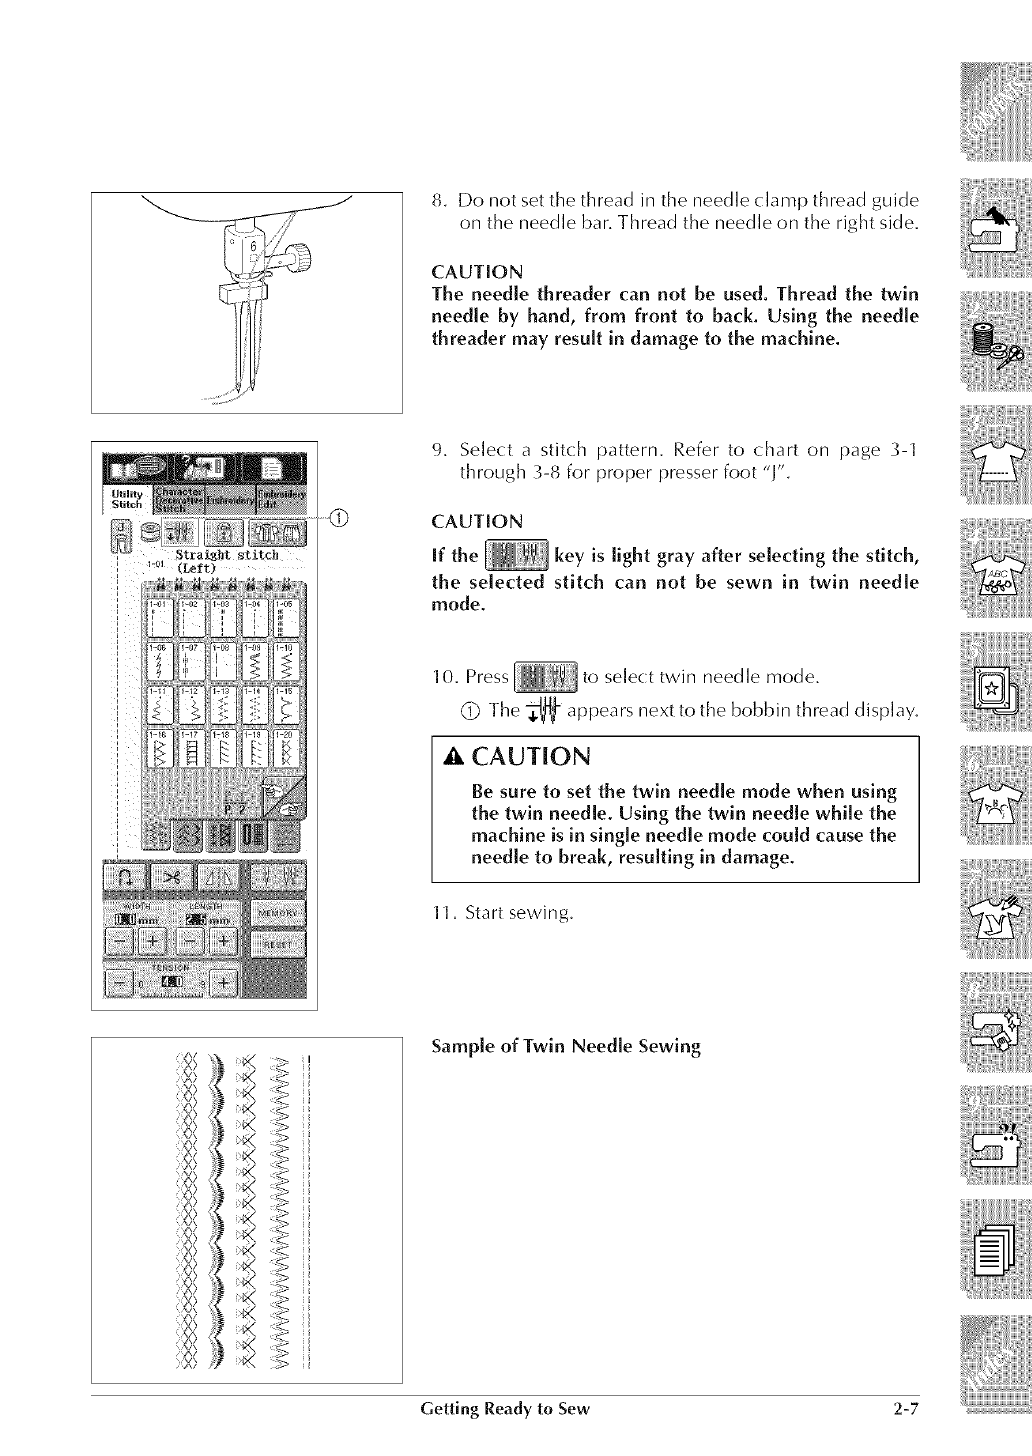
8. Do not set the thread in the needle clamp thread guide
on the needle bar. Thread the needle on the right side.
CAUTION
The needle threader can not be used. Thread the twin
needle by hand, from front to back. Using the needle
threader may result in damage to the machine.
9, Select a stitch pattern, Refer to chart on page 3-1
through 3-8 for proper presser foot '1".
CAUTION
If the key is light gray after selecting the stitch,
the selected stitch can not be sewn in twin needle
mode.
10. Press to select twin needle mode,
(_ The _- appears next to the bobbin thread display.
CAUTION
Be sure to set the twin needle mode when using
the twin needle. Using the twin needle while the
machine is in single needle mode could cause the
needle to break, resulting in damage.
11. Start sewing.
Sample of Twin Needle Sewing
Getting Ready to Sew 2-7
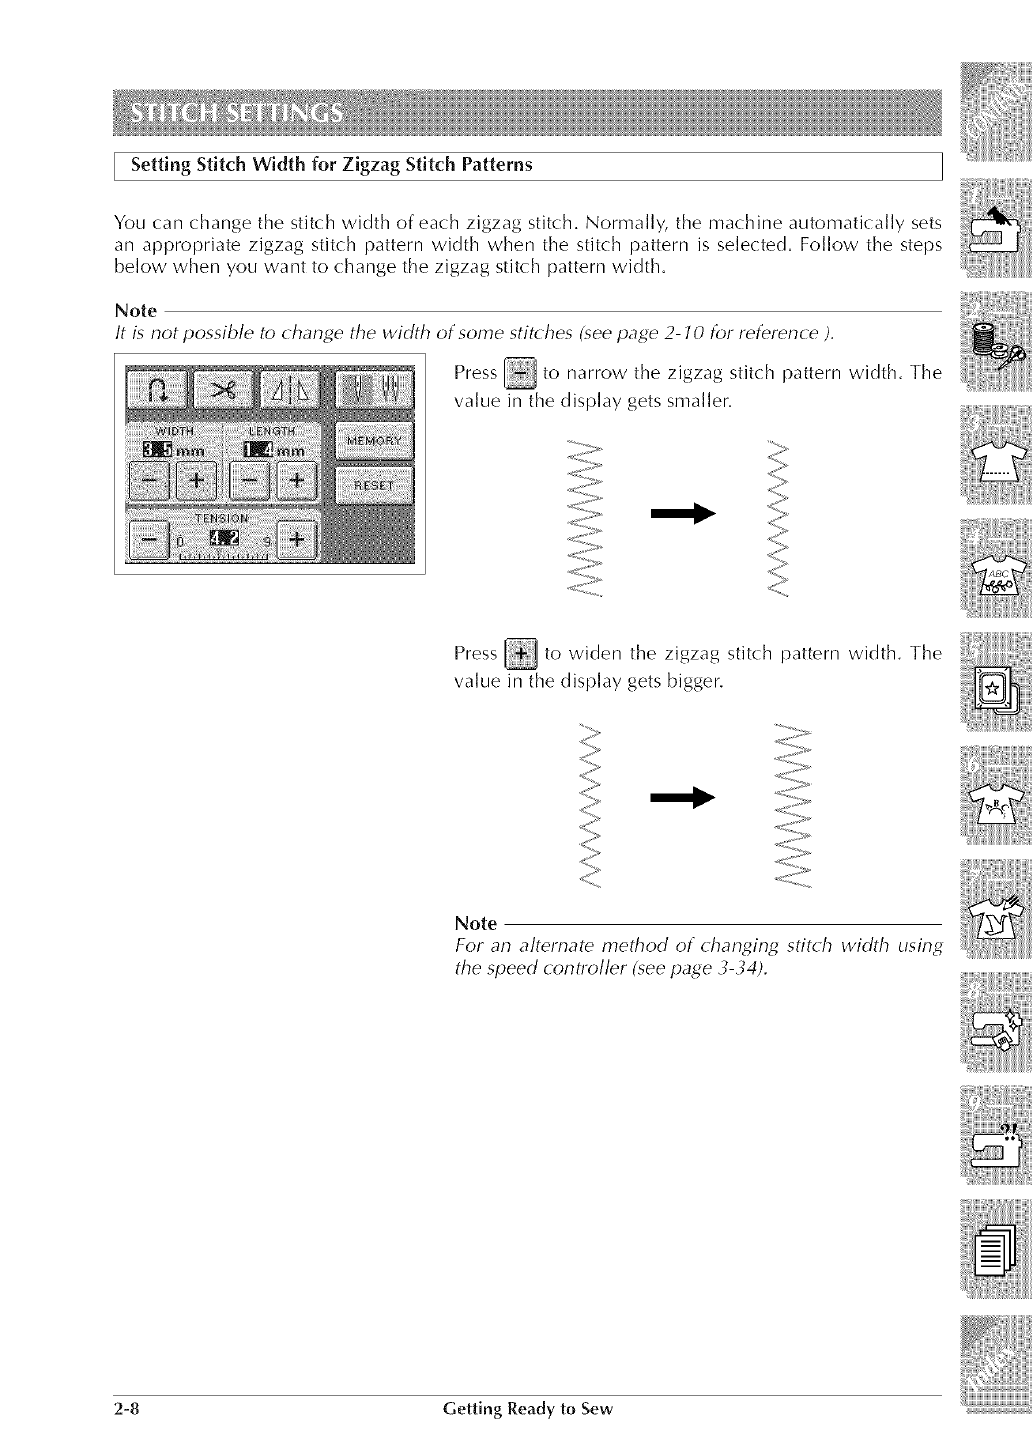
Setting Stitch Width for Zigzag Stitch Patterns
You can change the stitch width of each zigzag stitch. Norma]]y, the machine automatica]]y sets
an appropriate zigzag stitch pattern width when the stitch pattern is selected. Follow the steps
below when you want to change the zigzag stitch pattern width.
Note
It is not possible to change the width of some stitches (see page 2-10 R)r reference ).
Press _ to narrow the zigzag stitch pattern width. The
value in the display gets smaller.
Press _ to widen the zigzag stitch pattern width. The
value in the display gets bigger.
Note
For an alternate method of (:hanging stitch width using
the speed controller (.seepage 3-34).
2-8 Getting Ready to Sew
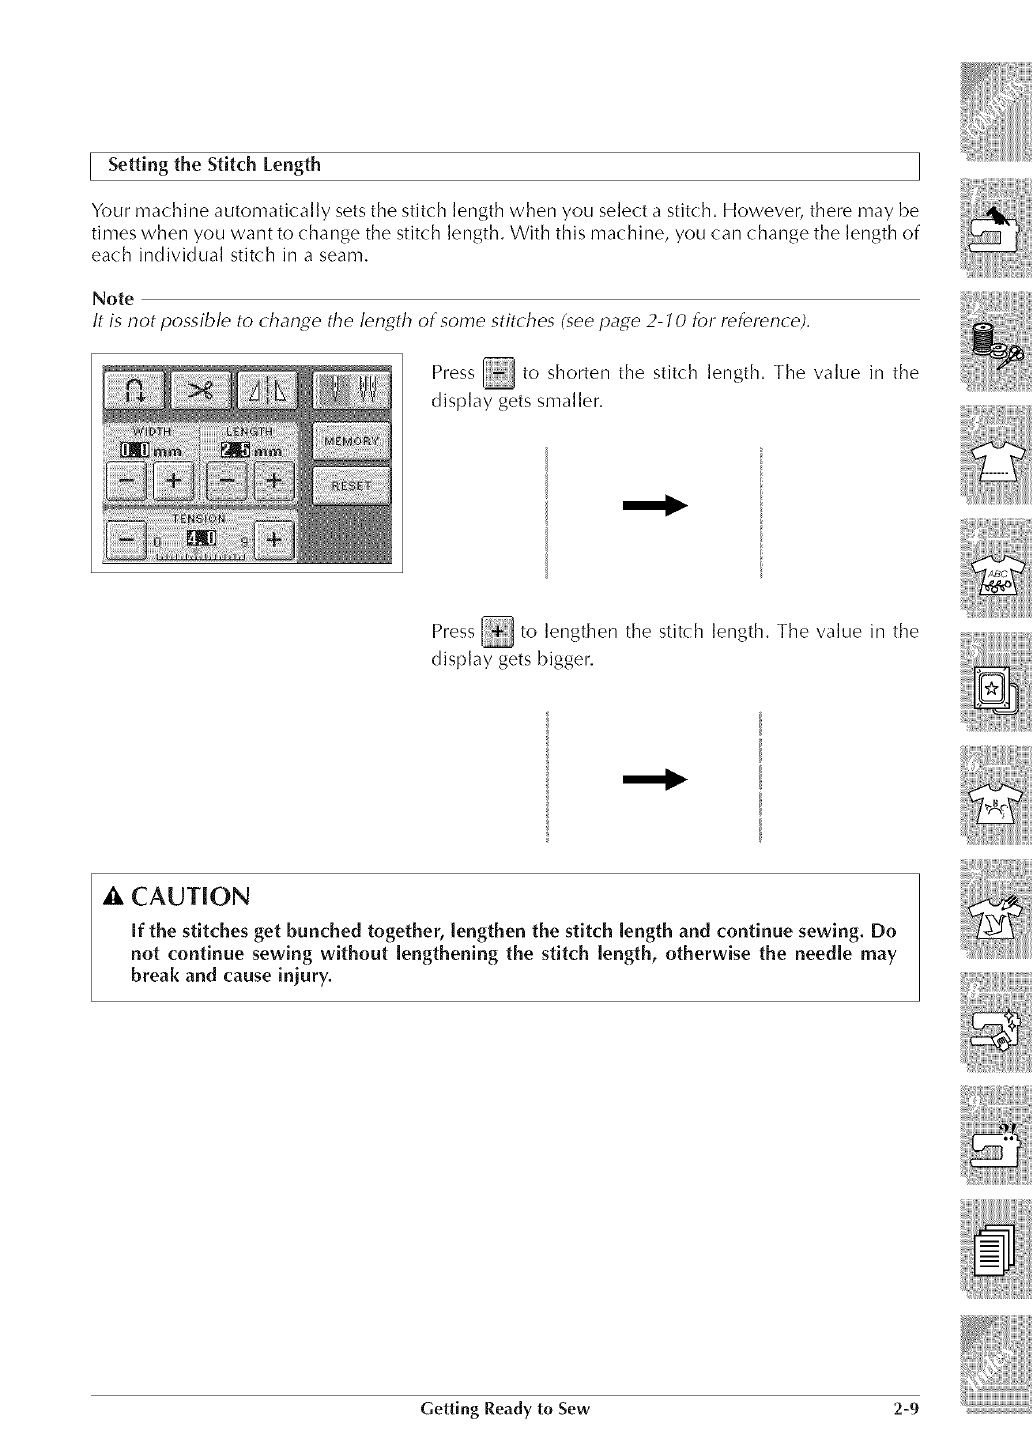
Setting the Stitch Length
Your ma_ hine automatically sets tile stitch length when you select a stit_ h. However, there may be
times when you want to change tile stit_ h length. With this machine, you can change tile length of
each individual stikh in a seam,
Note
It is not possible to change the length of some stitches (see page 2-/0 for reference).
Press _ to shorten the stitch length, The value in the
display gets smaller,
Press _ to lengthen the stitch length, The value in the
display gets bigger,
_, CAUTION
if the stitches get bunched together, lengthen the stitch length and continue sewing, Do
not continue sewing without lengthening the stitch length, otherwise the needle may
break and cause iniury.
Getting Ready to Sew 2-9
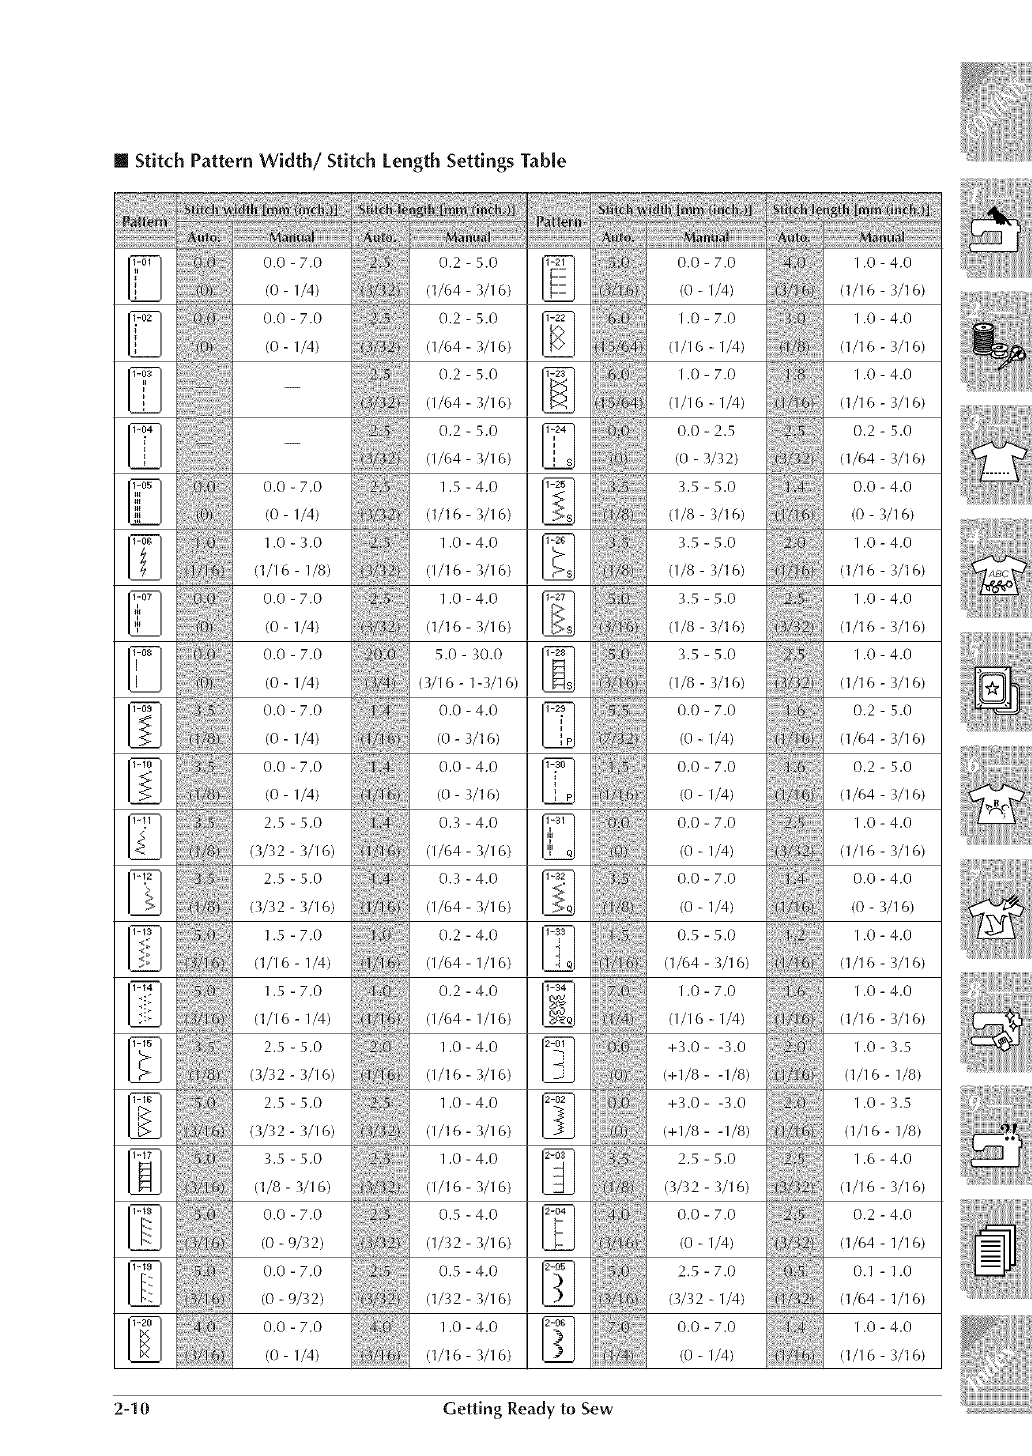
[] Stitch Pattern Width/Stitch length Settings Table
iiiiiiiiiiiiii Tii i Tii ii! ii! !iii!i Tii!i!ii !i!i!! ii
151
i!i!i!ilil
0.0 - 7.0
(0 - I/4)
0.0 - 7.0
(0 - I/4)
0.0 - 7.0
(0 - I/4)
1.0 - 3.0
(1/16- 1/8)
0.0 - 7.0
(0 - I/4)
0.0 - 7.0
(0 - I/4)
0.0 - 7.0
(0 - I/4)
0.0 - 7.0
(0 - I/4)
2.5 - 5.0
(3/32 - 3/I 6)
2.5 - 5.0
(3/32 - 3/I 6)
1.5 - 7.0
(1/16 - 1/4)
1.5 - 7.0
(1/16- 1/4)
2.5 - 5.0
(3/32 - 3/I 6)
2.5 - 5.0
(3/32 - 3/I 6)
3.5 - 5.0
(1/8 - 3/16)
0.0 - 7.0
(0 - 9/32)
0.0 - 7.0
(0 - 9/32)
0.0 - 7.0
(0 - I/4)
0.2 - 5.0
(1/64 - 3/16)
0.2 - 5.0
(1/64 - 3/I 6)
0.2 - 5.0
(I/64 - 3/I 6)
0.2 - 5.0 C
(I/64 - 3/I 6)
1.5 -4.0 1-25
(1/16- 3/16)
1.0 -4.0
d/16 -3/I 6)
1.0 -4.0
(i/16 - 3/I 6)
5.0 - 30.0
(3/I 6 -1-3/16)
0.0 - 4.0 I-2_
(0 - 3/I 6)
0.0 - 4.0 C
(0 - 3/16)
0.3 -4.o C
(I/64 - 3/I 6)
0.3 - 4.0
(I/64 - 3/I 6)
0.2 -4.0 I-_3
(I/64 - I/16)
0.2 -4.0
(I/64 - I/I 6)
1.0 - 4.0
(I/16 - 3/I 6)
1.0 - 4.0
(I/16 - 3/I 6)
1.0 - 4.0
d/16 - 3/I 6)
0.5 - 4.0
(1/32 - 3/I 6)
0.5 - 4.0
(1/32 - 3/16)
1.0 - 4.0 _]
(1/16 - 3/I 6)
iiiiTiT Tili!i! ii!i!i!
iiiiiiiiiiiili#;iiii!_iTi:i:i771!
0.0 - 7.0
(0 - I/4)
1.0 - 7.0
(I/16 - I/4)
1.0 - 7.0
(I/16 - I/4)
0.0 - 2.5
(0 - 3/32)
3.5 - 5.0
(I/8 - 3/I 6)
3.5 - 5.0
(I/8 - 3/16)
3.5 - 5.0
(I/8 - 3/I 6)
3.5 - 5.0
(118 - 3/"16)
0.0 - 7.0
(0 - I/4)
0.0 - 7.0
(0 - I/4)
0.0 - 7.0
(0 - 1/4)
0.0 - 7.0
(0 - 1/4)
0.5 - 5.0
(1/64 - 3/16)
1.0 - 7.0
(I/16 - I/4)
+3.0 - -3.0
(+1/8 - -I/8)
+3.0 - -3.0
(+1/8 - -I/8)
2.5 - 5.0
(3/32 - 3/16)
0.0 - 7.0
(0 - I/4)
2.5 - 7.0
(3/32 - I/4)
0.0 - 7.0
(0 - I/4)
3317
illl
li7#77{{7;{7
i77fTf
1.0 - 4.0
(1/I 6 - 3/16)
1.0 -4.0
(1/16 - 3/16)
1.0 - 4.0
(1/16 - 3/i 6)
0.2 - 5.0
(1/64 - 3/I 6)
0.0 - 4.0
(o - 3/16)
1.0 - 4.0
(1/16 - 3/16)
1.0 - 4.0
(1/16 - 3/16)
1.0 - 4.0
(1/16 - 3/i 6)
0.2 - 5.0
(1/64 -3/16)
0.2 - 5.0
(1/64 - 3/I 6)
1.0 -4.0
(1/I 6 - 3/16)
0.0 - 4.0
(0 - 3/16)
1.0 - 4.0
(1/16 - 3/I 6)
1.0 - 4.0
(1/16 - 3/16)
1.0 -3.5
(1/16- 1/8)
1.0 -3.5
(1/16- 1/8)
1.6 - 4.0
(1/16 - 3/16)
0.2 - 4.0
(1/64 - 1/16)
0.1 - 1.0
(1/64 - 1/16)
1.0 -4.0
(1/I 6 - 3/I 6) i:i:i
2-10 Getting Ready to Sew
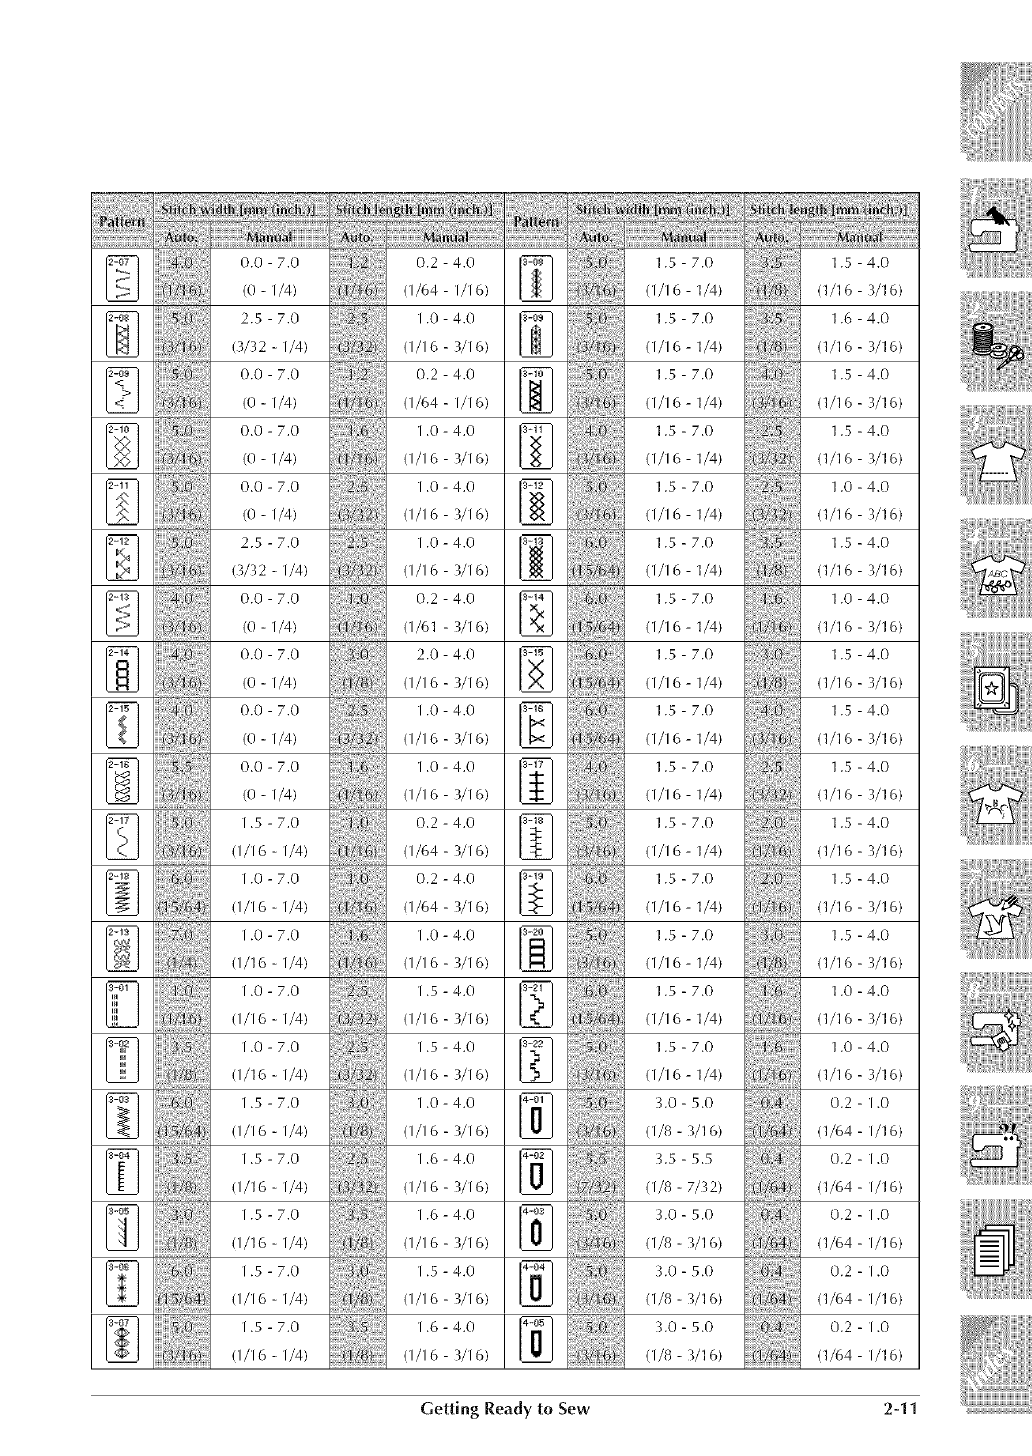
iiiii!!i!!i!!i!!71ili_i!_iiiii_i!_iiiii_i!_ii!71
0.0 - 7.0
(0 - I/4)
2.5 - 7.0
(3/32 - I/4)
0.0 - 7.0
(0 - I/4)
0.0 - 7.0
(0 - I/4)
0.0 - 7.0
(0 - I/4)
2.5 - 7.0
(3/32 - I/4)
0.0 - 7.0
(0 - I/4)
0.0 - 7.0
(0 - I/4)
0.0 - 7.0
(0 - I/4)
0.0 - 7.0
(0 - I/4)
1.5 - 7.0
(I/I 6 - I/4)
1.0 - 7.0
(I/16 - I/4)
1.0 - 7.0
(I/16 - I/4)
1.0 - 7.0
(I/16 - I/4)
1.0 - 7.0
(I/16 - I/4)
1.5 - 7.0
(I/16 - I/4)
1.5 - 7.0
(I/16 -I/4)
1.5 - 7.0
(I/16 -I/4)
1.5 - 7.0
(I/16 - I/4)
1.5 - 7.0
(I/16 - I/4)
0.2 - 4.0
(I/64 - I/I 6)
1.0 - 4.0
(I/16 - 3/16)
0.2 - 4.0
(I/64 - I/I 6)
1.0 - 4.0
(I/16 - 3/16)
1.0 - 4.0
(I/16 - 3/16)
1.0 - 4.0
(I/16 - 3/16)
0.2 - 4.0
(I/61 - 3/16)
2.0 - 4.0
(I/16 - 3/16)
1.0 - 4.0
(I/16 - 3/16)
1.0 - 4.0
(ill6 - 3/16)
0.2 - 4.0
(i/64 - 3/i 6)
0.2 - 4.0
(i/64 - 3/i 6)
1.0 - 4.0
(ill6 - 3/16)
i .5 - 4.0
(i/16 - 3/16)
i .5 - 4.0
(i/16 - 3/16)
1.0 - 4.0
(ill6 - 3/16)
i .6 - 4.0
(i/16 - 3/16)
i .6 - 4.0
(i/16 - 3/16)
i .5 - 4.0
(i/16 - 3/16)
i .6 - 4.0
(i/16 - 3/16)
g
iiiTi_:i:ii!:ili_i!iii_TiTi!i!iiTili
iiiii iT ! !i 7!!i!i7
1.5 - 7.0
(ill6- 1/4)
1.5 - 7.0
(I/16 - ]/4)
1.5 - 7.0
(I/16 - 1/4)
1.5 - 7.0
(I/16 - ]/4)
1.5 - 7.0
(I/16 - 1/4)
1.5 - 7.0
(ill6- 1/4)
1.5 - 7.0
(I/16 - ]/4)
1.5 - 7.0
(I/16 - 1/4)
1.5 - 7.0
(ill6- 1/4)
1.5 - 7.0
(I/16 - 1/4)
1.5 - 7.0
(I/16 - 1/4)
1.5 - 7.0
(ill6- 1/4)
1.5 - 7.0
(I/16 - 1/4)
1.5 - 7.0
(ill6- 1/4)
1.5 - 7.0
(I/16 - 1/4)
3.0 - 5.0
(1/8 - 3/16)
7.5 - 5.5
(I/8 - 7/72)
3.0 - 5.0
(118 - 3/16)
3.0 - 5.0
(1/8 - 3/_ 6)
7.0 - 5.0
(1/8 - 3/_ 6)
1.5 - 4.0
(1/16 - 3/16)
1.6 - 4.0
(1/16 - 3/16)
1.5 - 4.0
(1/16- 3/16)
1.5 - 4.0
(1/16 - 3/16)
1.0 - 4.0
(1/16 - 3/16)
1.5 - 4.0
(1/16 - 3/16)
1.0 - 4.0
(1/16 - 3/16)
1.5 - 4.0
(1/16 - 3/16)
1.5 - 4.0
(1/16 - 3/16)
1.5 - 4.0
(1/16- 3/16)
1.5 - 4.0
(1/16 - 3/16)
1.5 - 4.0
(1/16 - 3/16)
1.5 - 4.0
(1/16- 3/16)
1.0 - 4.0
(1/16 - 3/16)
1.0 - 4.0
(1/16 - 3/16)
0.2 - i .0
(1/64 - 1/16)
0.2 - 1.0
(1/64 - 1/16)
0.2 - 1.0
(1/64 - 1/16)
0.2 - 1.0
(1/64 - 1/16)
0.2 - 1.0
(1/64 - 1/16)
Getting Ready to Sew 2-11
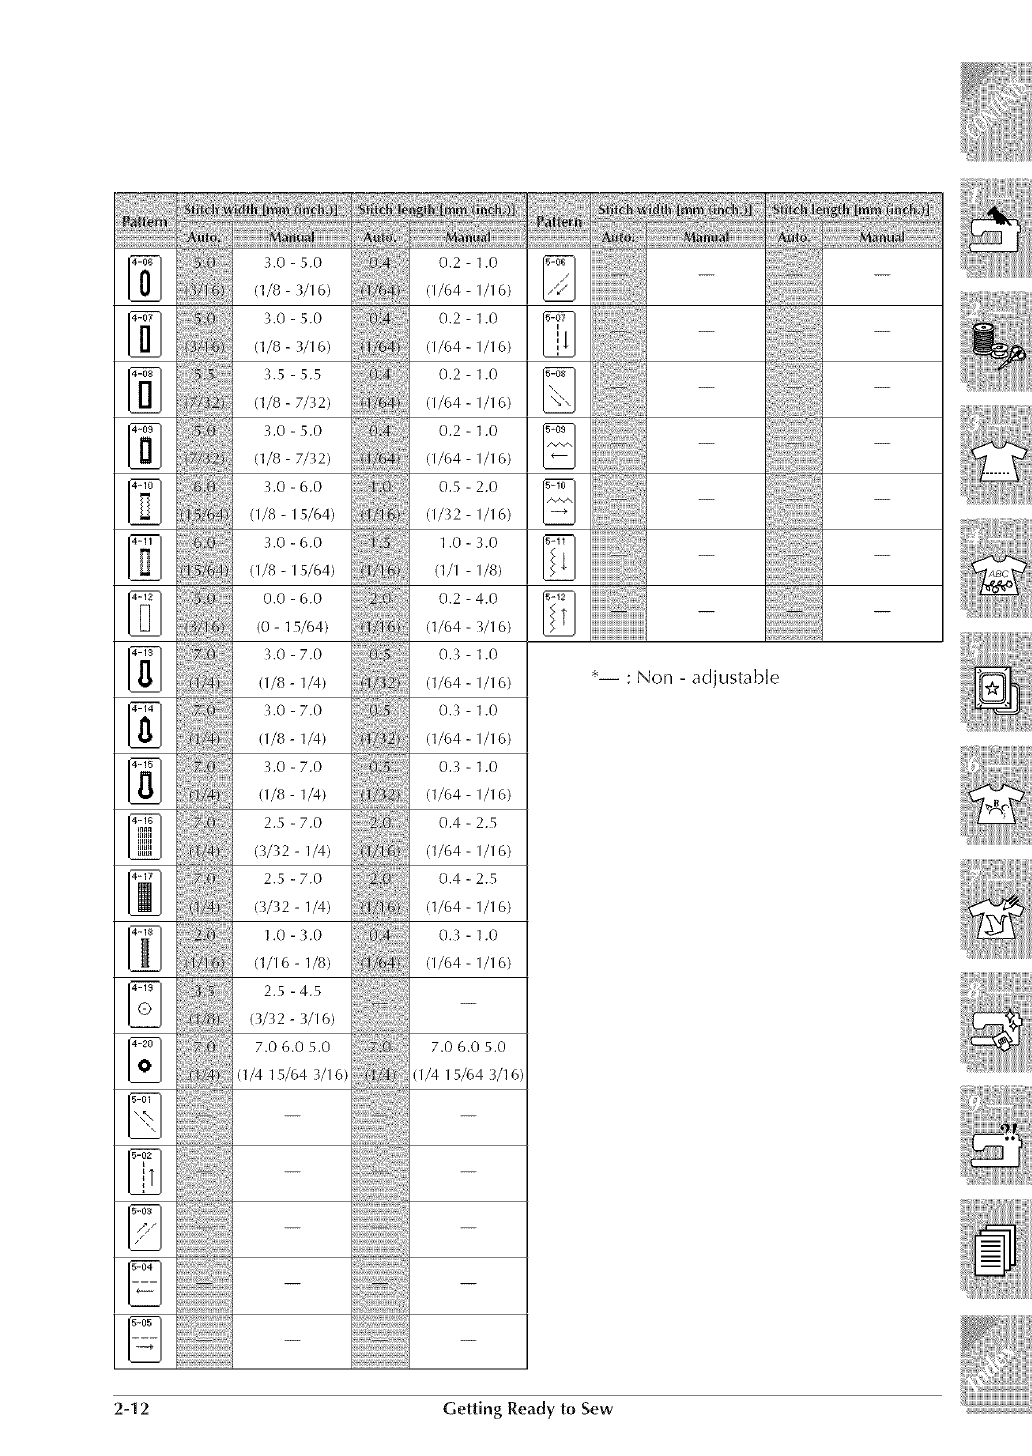
3.0 - 5.0
(1/8 - 3/16)
_.0 - 5.0
(1/8 - 3/16)
3.5 - 5.5
('1/8 - 7/32)
3.0 - 5.0
(1/8 - 7/32)
:J.0 - 6.0
(I/8 - 15/64)
3.0 - 6.0
(I/8 - 15/64)
0.0 - 6.0
(0 - 15/64)
3.0 - 7.0
(I/8 - 1/4)
:J.0 - 7.0
(1/8 - 1/4)
3.0 - 7.0
(1/8 - 1/4)
2.5 - 7.0
(3/32 - 1/4)
2.5 - 7.0
(3/32 - 1/4)
1.0 - :J.0
(1/16 - 1/8)
2.5 - 4.5
(3/32 - 3/16)
7.0 6.0 5.0
(1/4 15/64 3/16)
0.2 - 1.0
(I/64 - I/I 6)
0.2 - 1.0
(I/64 - I/I 6)
0.2 - 1.0
(I/64 - I/16)
0.2 - 1.0
(I/64 - I/I 6)
0.5 - 2.0
(1/_2 - Ill 6)
1.0 - 3.0
(1/i - i/8)
0.2 -4.0
(1/64 - 3/16)
0.:J - 1.0
(1/64 - I/I 6)
0.:J - 1.0
(1/64 1/16)
0.:J - 1.0
(1/64 - Ill6)
0.4 - 2.5
(1/64 - I/I 6)
0.4 - 2.5
(1/64 - I/I 6)
0.:J - 1.0
(I/64 - I/16)
7.0 6.0 5.0
(I/4 15/64 _/16)
iiiiiiiiiiiiiiiiiiiiiiiiii,'_'_:'
iiii7i7i7i7i7i7i7i7i7i7i7i7511
i@iiii_iiii_ii_iiiiiiiiiiiTil
iiiiii i ii i!i!i i!i!i i!i!i i!i!i i!i!i i!i!i i!i!i i!i!i i!i!i i!i!i !i i!i!
iiii17@717111@_ii!i!_ii!i!_iii
7i7!:!71@::!@i_
)7)7)7)7)7)7)7)7)7)7)7)7)7)>
*-- : Non - adjustable
2-1 2 Gelting Ready 1o Sew
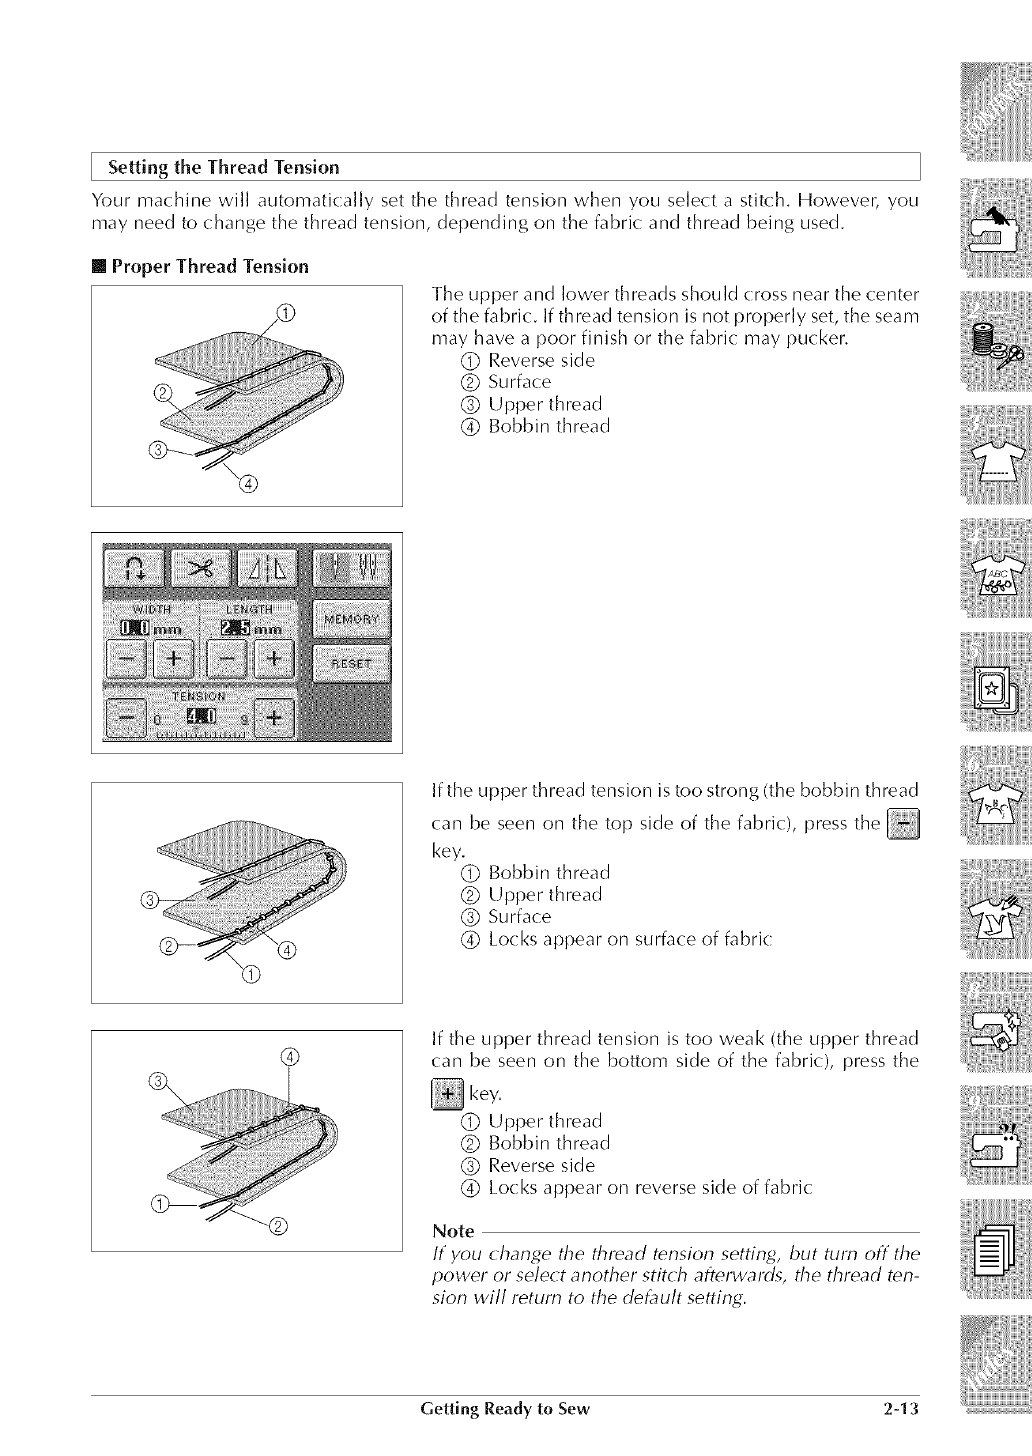
the Thread TensionSetting
Your machine wi]] automatically set the thread tension when you se]ect a stitch. However, you
may need to change the thread tension, depending on the fabric and thread being used.
[] Proper Thread Tension
The upper and lower threads should (:ross near the center
of the fabric. If thread tension is not proper]y set, the seam
may have a poor finish or the fabric may pucker.
(_ Reverse side
(_ Surface
(_ Upper thread
(_) Bobbin thread
t0
If the upper thread tension is too strong (the bobbin thread
can be seen on the top side of the fabric), press the
key.
(_ Bobbin thread
(_ Upper thread
(_ Surface
Locks appear on surface of fabric
@If the upper thread tension is too weak (the upper thread
can be seen on the bottom side of the fabric:), press the
_key.
(_ Upper thread
(_ Bobbin thread
(_ Reverse side
@ Locks appear on reverse side of fabric
Note
If you change the thread tension setting, but turn off the
power o1 select another stitch afterwards, the thread ten-
sion will return to the detroit setting.
Getting Ready to Sew 2-13
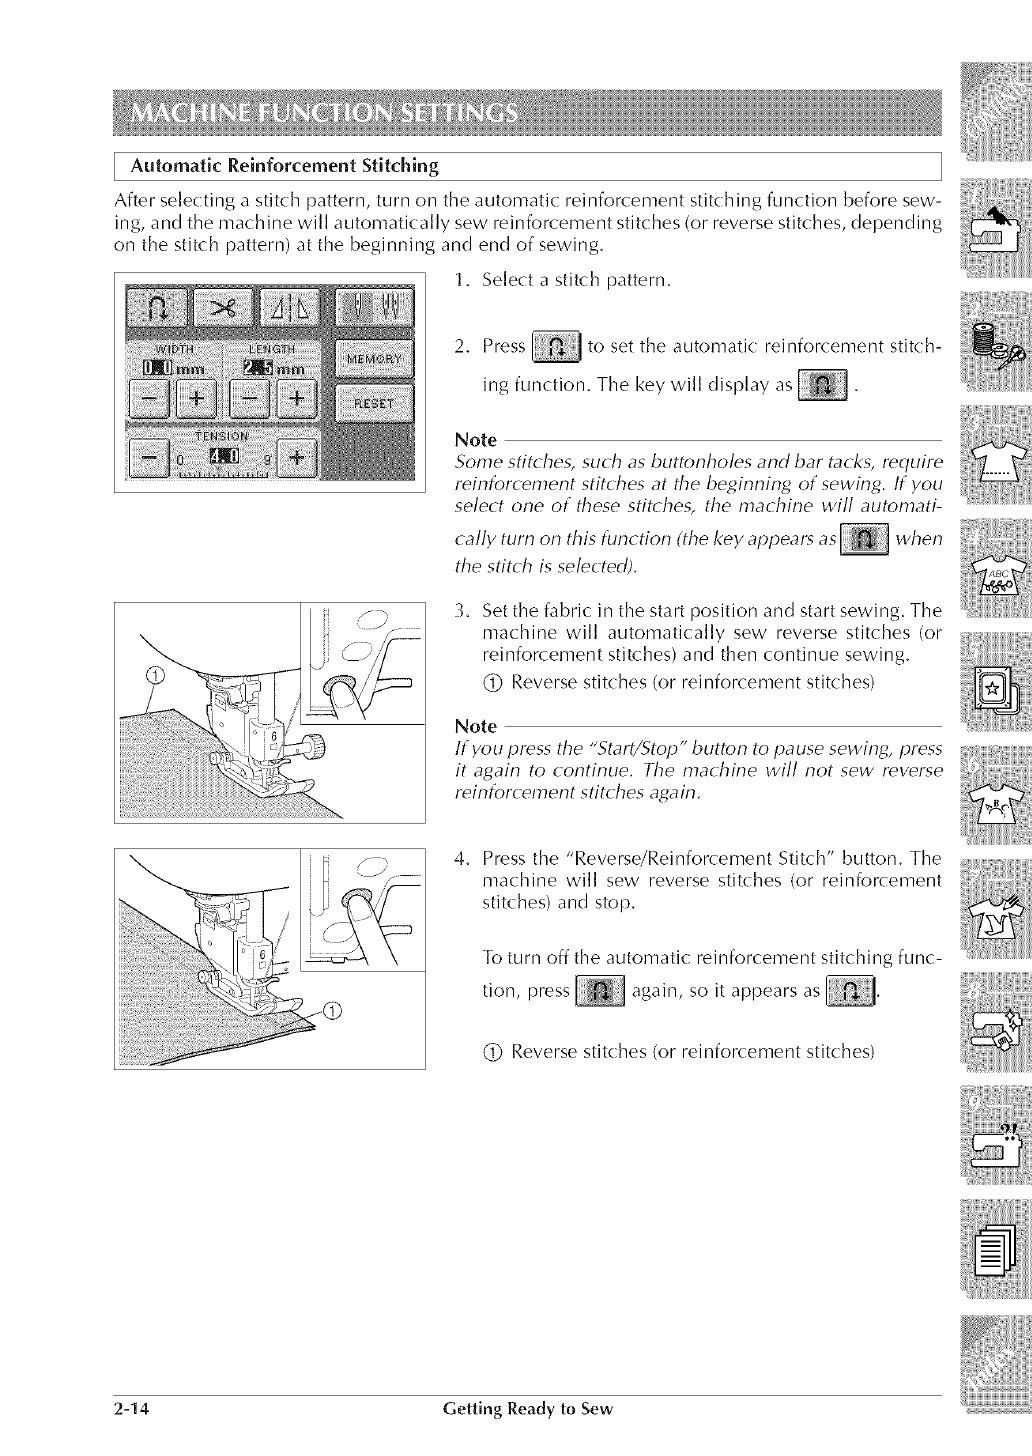
Automatic Reinforcement Stitching
After selecting a stitch pattern, turn on the automatic: reinforcement stitching function before sew-
ing, and the machine will automatically sew reinforcement stitches (or reverse stitches, depending
on the stitch pattern) at the beginning and end of sewing.
1. Select a stitch pattern.
2. Press to set the automatic: reinforcement stitch-
ing function. The key will display as
Note
Some stitches, such as buttonholes and bar tacks, require
reinforcement stitches at the beginning of sewing. If you
select one of these stitches, the machine will automati-
c:ally turn on this function (the key appealt_ as when
the stitch is selected).
3. Set the fabric in the start position and start sewing. The
machine will automatically sew reverse stitches (or
reinforcement stitches) and then continue sewing.
(]:) Reverse stitches (or reinforcement stitches)
Note
If you press the "Start/StOl_" button to pause sewing, press
it again to continue. The machine will not sew reverse
reinforcement stitches a_cain.
4. Press the "Reverse/Reinforcement Stitch" button. The
machine will sew reverse stitches (or reinforcement
stitches) and stop.
To turn off the automatic: reinforcement stitching func-
tion, press again, so it appears as .
(_ Reverse stitches (or reinforcement stitches)
2-14 Getting Ready to Sew
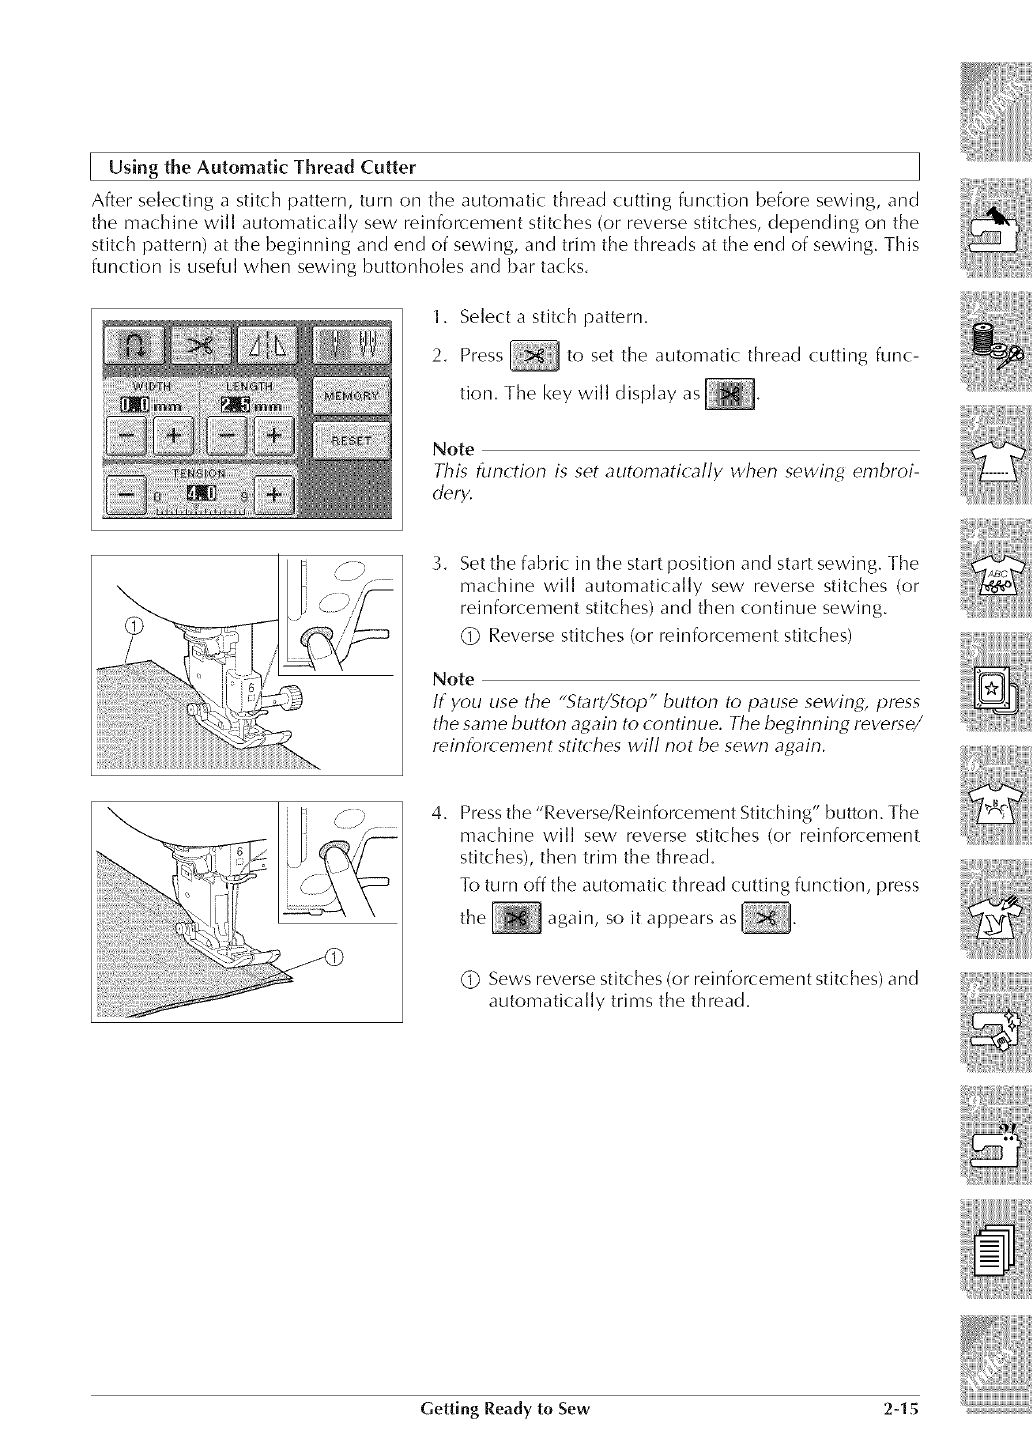
Using the Automatic Thread Cutter
After selecting a stitch pattern, turn on the automatic thread cutting function before sewing, and
the machine will automatically sew reinforcement stitches (or reverse stitches, depending on the
stitch pattern) at the beginning and end of sewing, and trim the threads at the end of sewing. This
function is useful when sewing buttonholes and bar tacks.
1. Select a stitch pattern.
2. Press to set the automatic thread cutting func-
tion. The key will display as
Note
This function is set automatically when sewing embroi-
dery.
3. Set the fabric in the start position and start sewing. The
machine will automatically sew reverse stitches (or
reinforcement stitches) and then continue sewing.
(_ Reverse stitches (or reinforcement stitches)
Note
If you use the "Start/Stop" button to pause sewing, press
the same button again to continue. The beginning revelt_e/
reinforcement stitches will not be sewn at4ain.
4, Press the "Reverse/Rei nforcement Stitching" button. The
machine will sew reverse stitches (or reinforcement
stitches), then trim the thread.
To turn off the automatic: thread cutting function, press
the again, so it appears
(_ Sews reverse stitches (or reinforcement stitches) and
automatically trims the thread.
Getting Ready to Sew 2-15
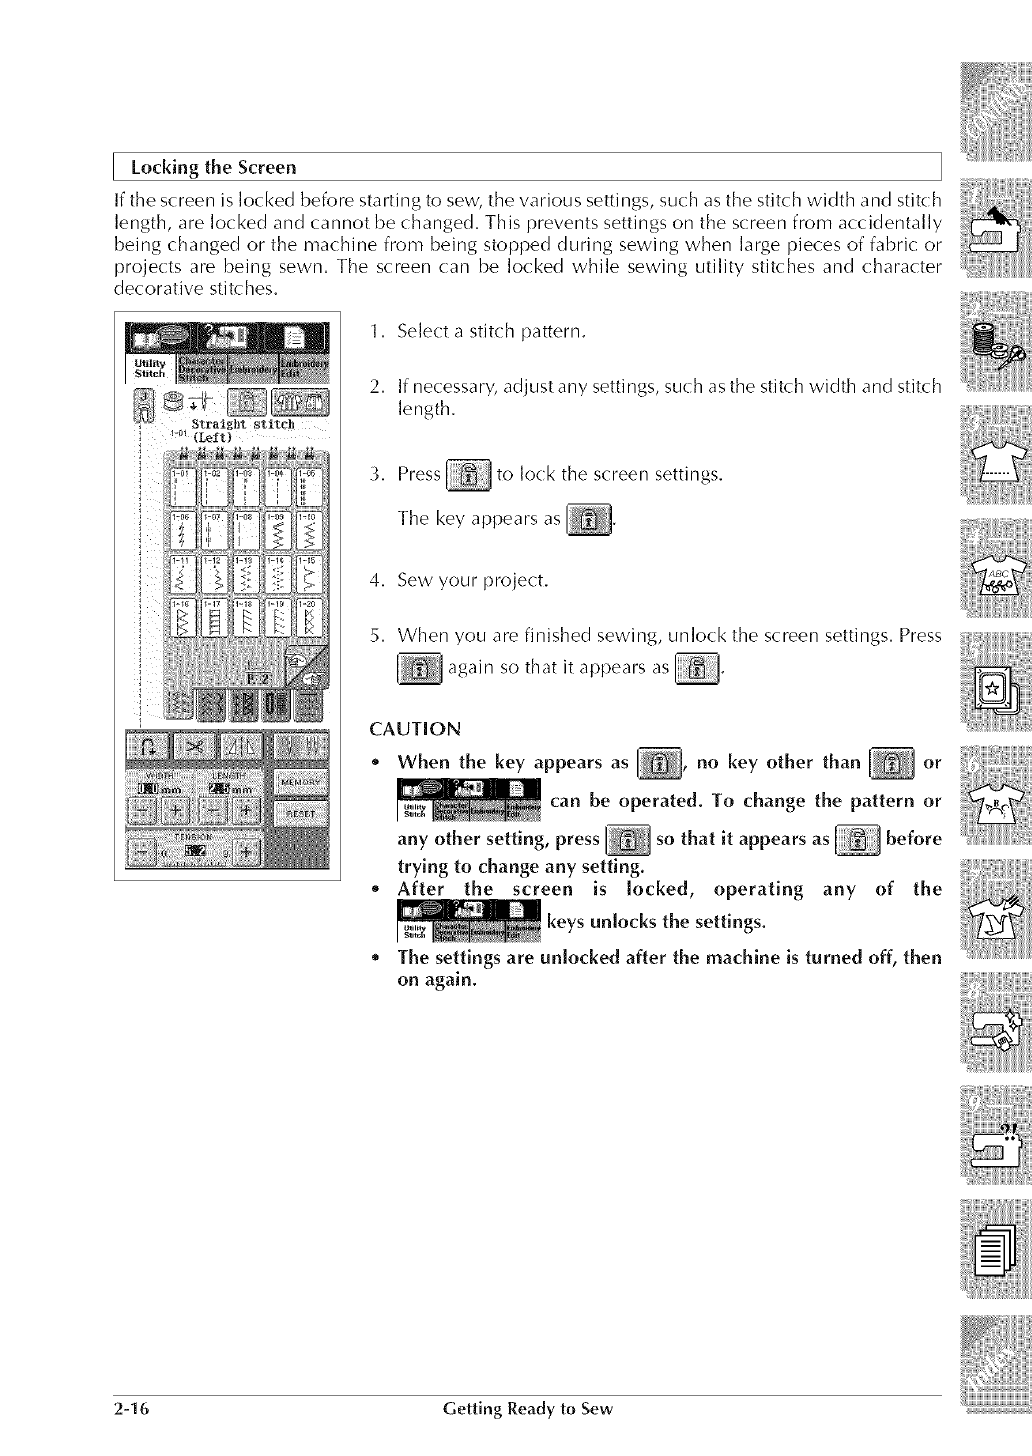
[ Locking the Screen
If the screen is locked before starting to sew, the various settings, such as the stitch width and stitch
length, are locked and cannot be changed. This prevents settings on the screen from accidentally
being changed or the machine from being stopped during sewing when large pieces of fabric or
projects are being sewn. The screen (:an be locked while sewing utility stitches and character
decorative stitches.
1. Select a stitch pattern.
2. If necessary, adjust any settings, such as the stitch width and stitch
length.
3. Press_ to lock the screen settings.
The key appears as _.
4, Sew your project.
5. When you are finished sewing, unlock the screen settings. Press
_ again so that it as
appears
CAUTION
o When the key appears as _, no key other than or
can be operated. To change the pattern or
any other setting, press _ so that it appears as before
trying to change any setting.
* After the screen is locked, operating any of the
keys unlocks the settings.
* The settings are unlocked after the machine is turned off, then
on again.
2-16 Getting Ready to Sew
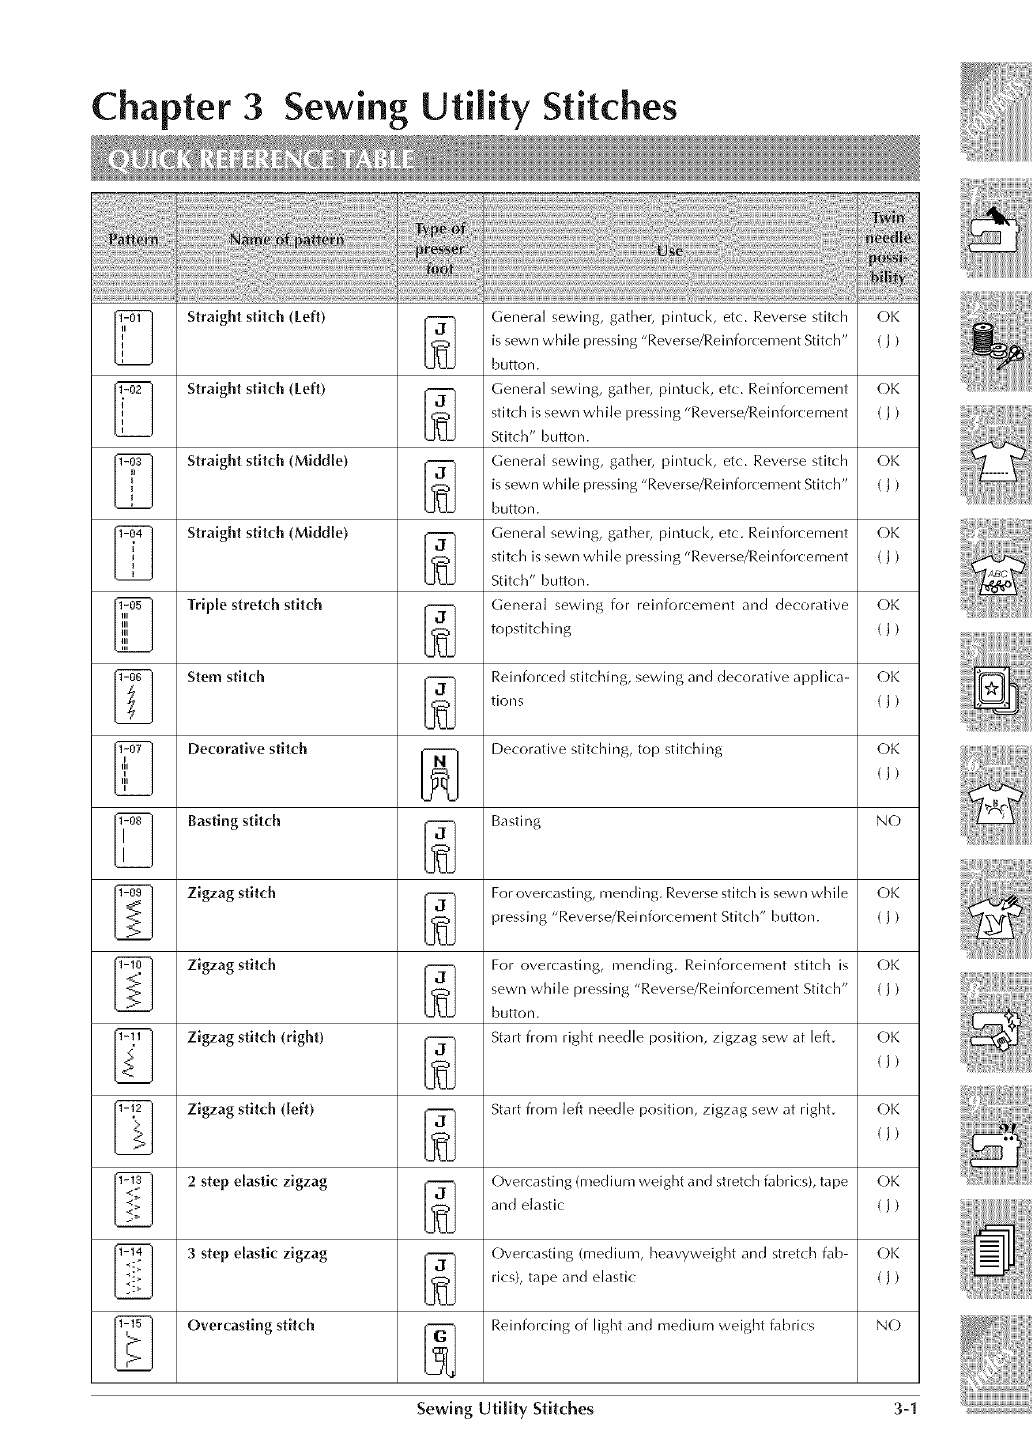
Chapter 3 Sewing Utility Stitches
iiiiiiiiiiii!i_!ii_!!ii!!i!ii_i_ii__i__i!_!____ii!ii_i_i_i_ii_i_iiii!_!i!__!_i_ii!i!i_i_!ii_ii_i_i!__ii!_i!i_i_i!_i
Straight stitch (Left) General sewing, gather, pintucl<, etc. Reverse stitch
is sewn while pressing "Reverse/Reinforcement Stitch"
button.
General sewing, gather, pintucl<, etc. Reinforcement
stitch is sewn while pressing "Reverse/Reinforc:er_lent
Stitch" button.
General sewing, gather, pintuck, etc. Reverse stitch
is sewn while pressing "Reverse/Reinforcement Stitch"
button.
General sewing, gather, pintucl<, etc. Reinforcement
stitch is sewn while pressing "Reverse/Reinforcement
Stitch" button.
Genera] sewing for reinforcenlent and decorative
topstitcbing
OK
(l)
Straight stitch (Left) (-)K
(I)
Straight stitch (Middle) OK
Straight stitch (Middle) (-)K
(I)
Triple stretch stitch OK
(J)
Stem stitch Reinforc:ed stitching, sewing and decorative applic:a- (-)K
tions ( j )
Decorative stitch Decorative stitching, to[) stitching OK
(l)
Basting stitch Basti ng N(-)
Zigzag stitch For overcasting, nlending. Reverse stitch is sewn while OK
pressing "Reverse/Reinforcement Stitch" button. ( j)
Zigzag stitch For overc:asting, mending. Reinforcement stitch is (-)K
sewn while pressing "Reverse/Reinforc:ement Stitch" ( j)
button.
Zigzag stitch (right) Start fronl right needle position, zigzag sew at left. OK
(l)
Zigzag stitch ([eft) Start from left needle position, zigzag sew at right. (-)K
(i)
2 step elastic: zigzag Overcasting (mediunl weight and stretch fabric:s), tape OK
and elastic ( j)
3 step elastic: zigzag (-)verc:asting (medium, heavyweight and stretch fab- (-)K
rics), tape arld elastic ( j)
Overcasting stitch Reinforcing of light and medium weigbt fabrics N(-)
Sewing Utility Stitches 3-1
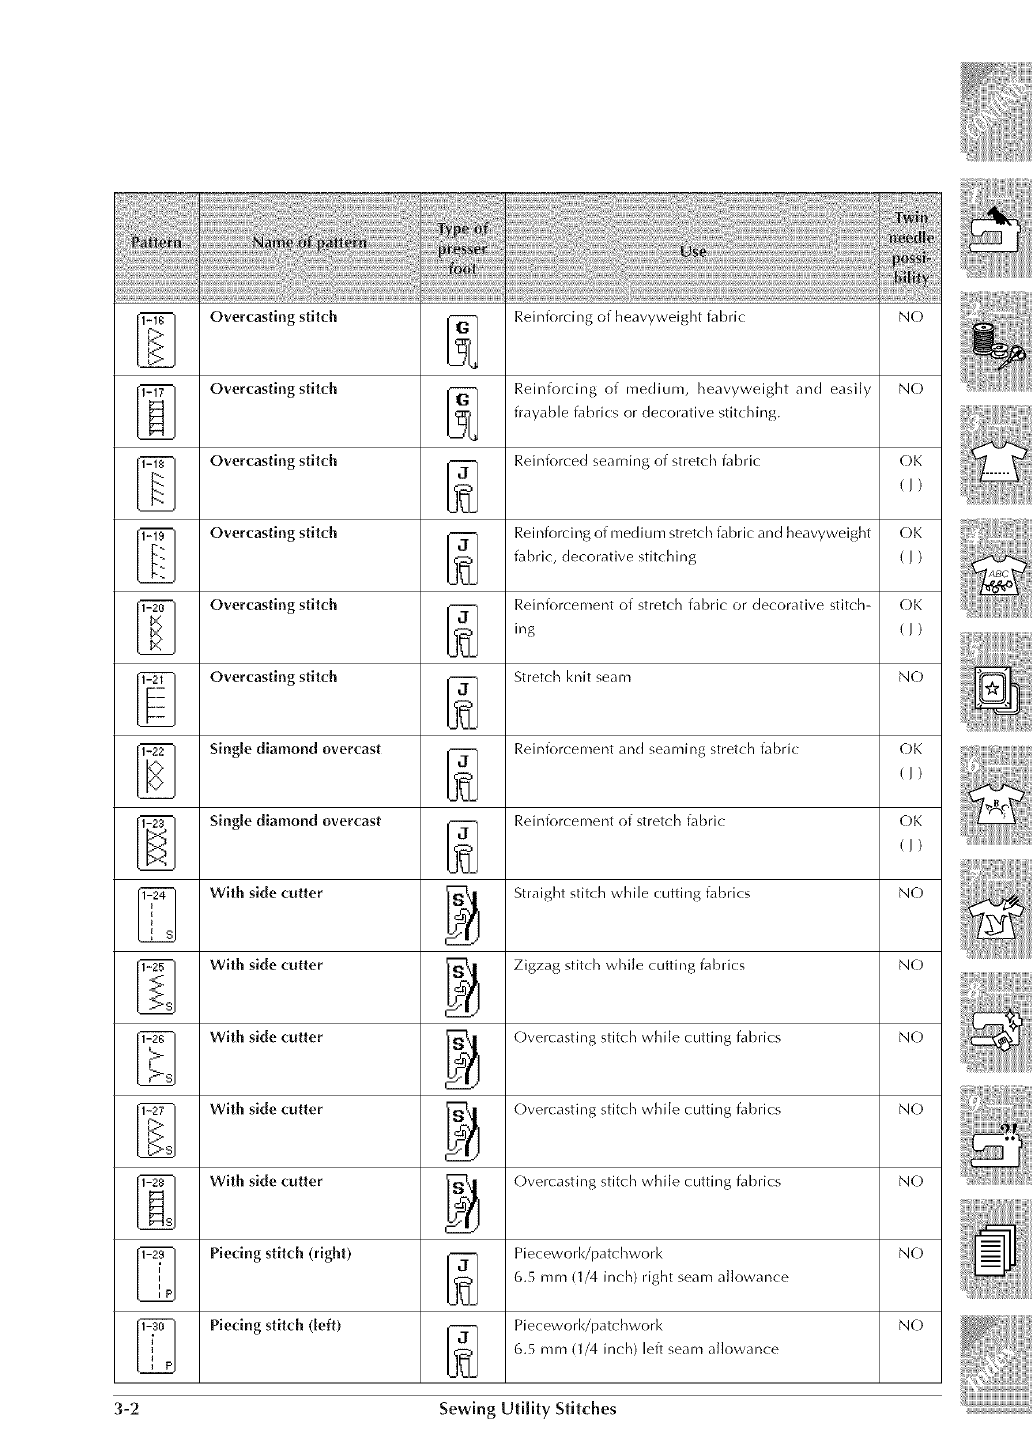
Overcasting stitch
ili!i!ii!!!ii!i!i!iiiilliiii!!iiiii!!!
iiii!!iiii_i!iii!ii!ii!ii!iii!ilil¸i!iiii!i!i_!i_i_:_i::_!_:!_i:!_i_i:!_i_i:_i_i!_i_!_i_!i:i_i_i_i_i_i3_i_!_!iiiiii_!:!i_i!_i_i!_i_i!_i_i!_i_:!iii!_!_!_:_Ji_!!z_i_i_i_!i:i_i!i!_i!i:_i!i:_!_!_!_!i_i_!i_i_!i_i_!i_i_!i_:_!_!_i_!_!_!_i_i_i!i!ii_!iii!iii!ii!iii!iii!i!i_i_i_!i_i_i_i_i_
Reinforcing of heavyweight fabric N(-)
Overcastlngstitch Reinforcing of mediunl, heavyweight and easily N(-)
frayable fabrics or dec:orative stitching.
Overcasting stitch Reinforc:ed seaming of stretch fabric OK
(I)
Overcasting stitch Reinforcing of medium stretch fabric and heavyweight (-)K
fabric, decorative stitching ( l )
Overcasting stitch Reinforcement of stretch fabric or decorative stitch- OK
ing ( J )
Overcasting stitch Stretch knit seam NO
Single diamond overcast Reinforc:ecnent and seaming stretch fabric OK
(I)
Single diamond overcast Reinforcement of stretch fabric (-)K
(I)
With side cutter Straight stitch while cutting fabrics N(-)
With side cutter Zigzag stitch while cutting fabrics N(-)
With side cutter Overcasting stitch while cutting fabrics N(-)
With side cutter (-)vercastirlg stitch white cutting fabrics N(-)
With side cutter Overcasting stitch while cutting fabrics N(-)
Piecing stitch (right) Piecework/patchwork N(-)
6.5 mm (1/4 inch)right seam allowance
Piecing stitch (Left) Piecework/l_atchwork
6.5 nlm (1/4 inch) left seam allowance
3-2 Sewing Utility Stitches

i!iiliiili!!!!!
_1771'17111z_717,_',71!_,_',71!_,_',71!_,_',71!_,_',_
Hand-look quilling Quilting stitch made to look like hand quilting stitch N(-)
Quilting appliqu6 zigzag Zigzag stitch for quilting and sewing on appliqu# NO
stitch quilt pieces
Quiltiugappliflu_ slilch Quilting stitch for invisible appliquc_ or attaching N(-)
binding
Quiltlug stippling Background quilting NO
Blind hem stitch [[_ Hemming woven fabrics NO
L"'Iitg
Blind hem stitch stretch [[_ Hemming stretch fabric N(-)
L'-4tJ
Blanket slilch _ Appliqu6s, decorative blan!<et stitch OK
(I)
Shell luck edge 1-_ Shell tuck edge finish on fabrics (-)K
(I)
Satiu scallop slilch 1'--_1 Decorating collar of blouse, edge of hand!<erchief C)K
L tl (I)
Scallop slilch | Decorating collar of blouse, edge of handkerchief N(-)
t.f_d
Palchwork join slitch _ Patchwork stitches, decorative sstitching_ C)K
(])
Palchwurk double over[ock _ Patchwork stitches, decorative s_titching• (-)K
stitch [j_J ( l )
Couching slilch _ Decorative stitching, attaching cord and couchirlg C)K
(I)
Smocklug stitch _ Smocking, decorative s_titching• (-)K
(1)
Feather slilch _ Fagoting, decorative stitching OK
(J)
Sewing Utility Stitches 3-3

D
Fagoting cross stitch Fagoting, bridging arid decorative stitching OK
(J)
Tape attaching Attaching tape to seam in stretch fabric (-)K
(I)
ladder stitch Decorative stitching N(-)
Rick-rack stitch Decorative top stitching (-)K
(I)
Decorative stitch Decorative stitching OK
(I)
Serpentine stitch Decorative stitching and attaching elastic: (-)K
(l)
Decorative stitch Decorative stitching and appliqu@ OK
(l)
Decorative stippling stitch Decorative stitching N(-)
Hemstitching Decorative hems, triple straight at Jeff OK
(l)
Hemstitching Decorative hems, triple straight at center (-)K
(I)
Hemstitching zigzag Decorative hems, top stitching OK
(l)
Hemstitching Decorative hems, lace attaching pin stitch N(-)
Hemstitching Decorative henls N(-)
Hemstitching Decorative hems daisy stitch N(-)
Hemstitching Heirloom, decorative hems N(-)
3-4 Sewing Utility Stitches
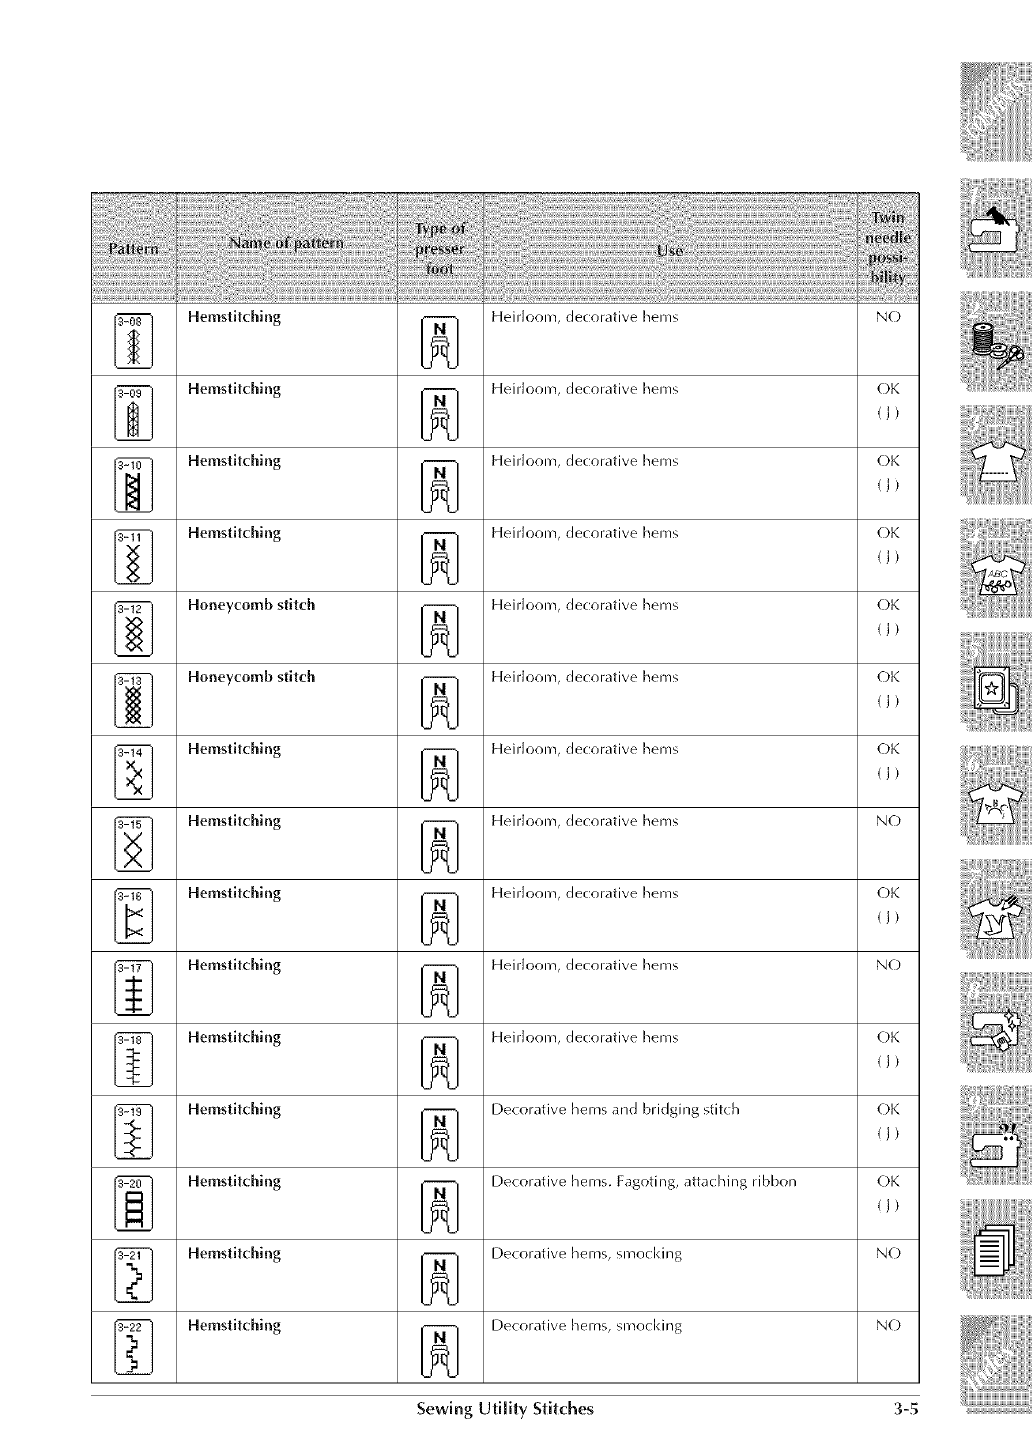
i ilii
ii:iiiiiiiiiiiii:ii:z_ii:ii!_I:II!_I:II!_I:II!_I:II!_
Hemstitching
ii_!!i_ii_!:!_i!!_!i!:ii_ii_ii_ii_(i_ii_!_!_!_!_!_!_!_i_i_!i_i_i_i_i_i_ii_iii_iii_!_!Ji!_!Ji!_!Ji!_!Ji!_!_!ii_!i_!i_i_i!i_i_i!i_i_i!i!!_!_i_i_i_i¸i_i_i_!_i_!_!_i_!_!_i_!_!i_!_!i_i_!ii_!_!ii_!_!ii_!_!ii_i_iiiiii_ii_i_i_!_!i!_i!i!i:i_
Heirloom, decorative hems N(-)
Hemstitching Heirloom, decorative hems (-)K
(i)
Hemstitching Heirloom, decorative hems OK
(])
Hemstitching Heirloom, decorative hems (-)K
(1)
Honeycomb stitc:h Heirloom, decorative hems OK
(J)
Honeycomb stitch Heirloom, decorative hems (-)K
(i)
Hemstitching Heirloom, decorative henls OK
(J)
Hemstitching Heirloom, decorative hems N(-)
Hemstitching Heirloom, decorative henls OK
(1)
Hemstitching Heirloom, decorative hems N(-)
Hemstitching Heirloom, decorative henls OK
(])
Hemstitching Decorative hems and bridging stitch (-)K
(i)
Hemstitching Decorative hems. Fagoting, attaching ribbon OK
(])
Hemstitching Decorative hems, smocking N(-)
Hemstitching Decorative hems, sr_ockirlg N(-)
Sewing Utility Stitches 3-5
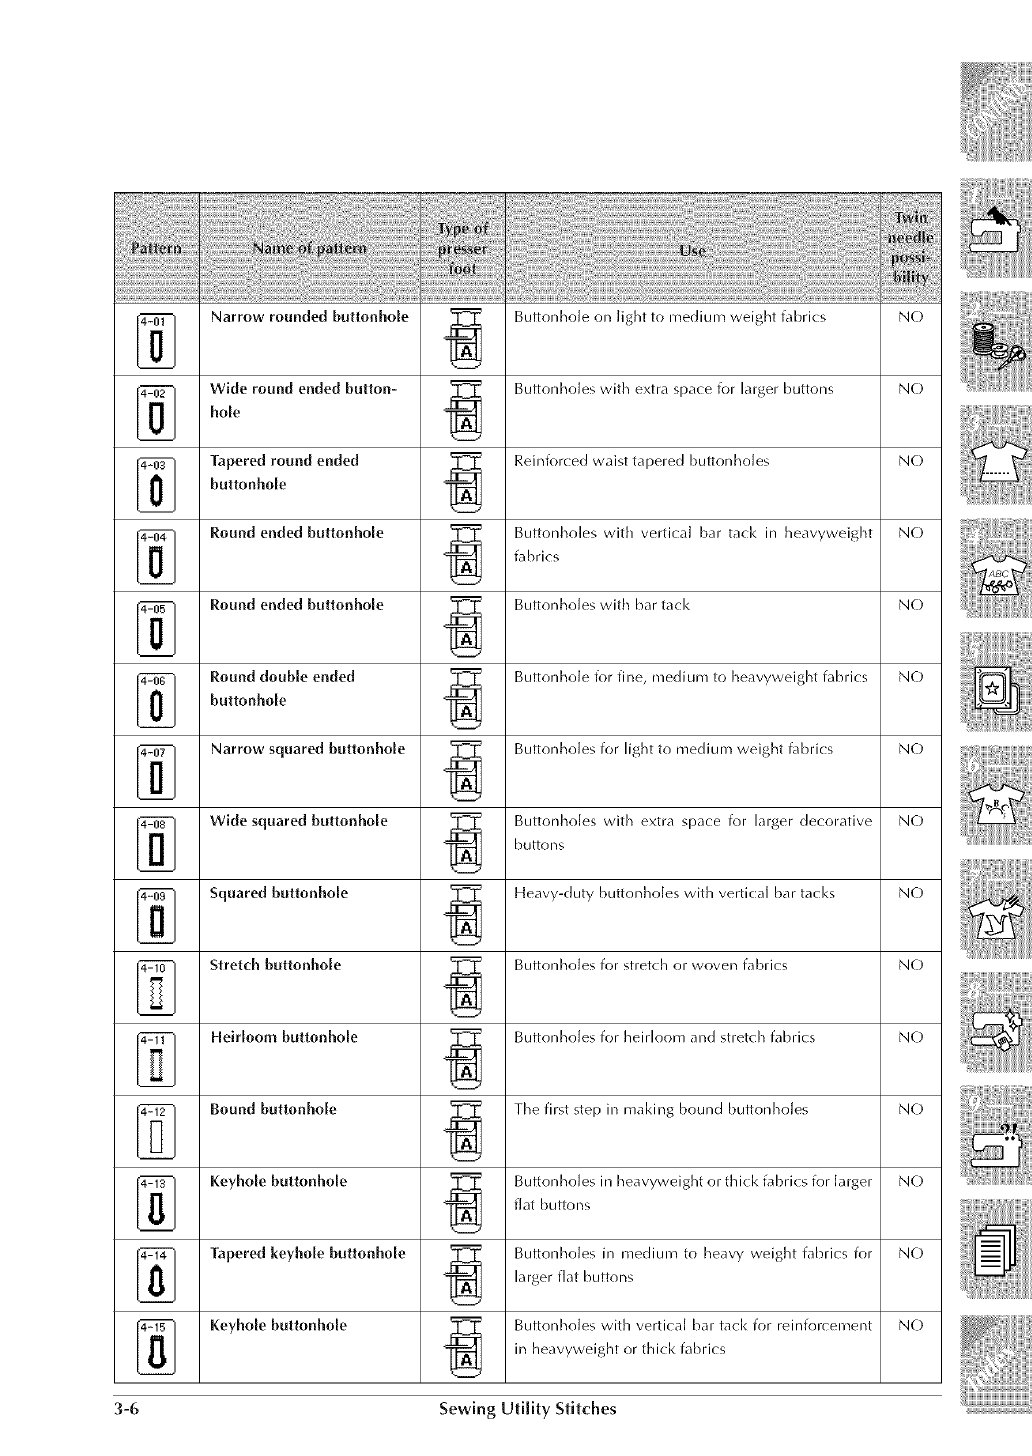
.......i_!li_!li_!li_!li_!li_!li_!li_!li_!li_!li_!li_!li_!li_!li_!li_!li_!li_!li_!li_!li_!li_!_
Narrow rounded buttonhole Buttonbole on light to medium weight fabrics N(-)
Wide round ended button- Buttonholes witb extra space for larger buttons N(-)
hole
Tapered round ended Reinforced waist tapered buttonboies N(-)
buttonhole
Round ended buttonhole Buttonholes with vertical bar tack in heavyweight N(-)
fabrics
Round ended bultonhole Buttonboies witb bar tack N(-)
Round double ended Buttonhole for fine, nlediunl to heavyweight fabrics N(-)
buttonhole
Narrow squared boltonho[e Buttonboles for light to medium weigbt fabrics N(-)
Wlde squared buttonhole Buttonholes with extra space for larger decorative N(-)
buttons
Squared buttonhole Heavy-duty buttonholes with vertical bar tacks N(-)
Stretch buttonhole Buttonholes for stretch or woven fabrics N(-)
Heirloom buttonhole Buttonboies for heMoom and stretch fabrics N(-)
Bound buttonhole The first step irl makirlg bound buttonboies N(-)
Keyhole buttonhole Buttonboies irl heavyweight or thick fabrics for larger N(-)
flat buttons
Tapered keyhole boltonho[e Buttordloles in rTledium to heavy weight fabrics for N(-)
larger flat buttons
Keyhole buttonhole Buttonholes with vertical bar tack for reinforcement
in heavyweight or thick fabrics
3-6 Sewing Utility Stitches
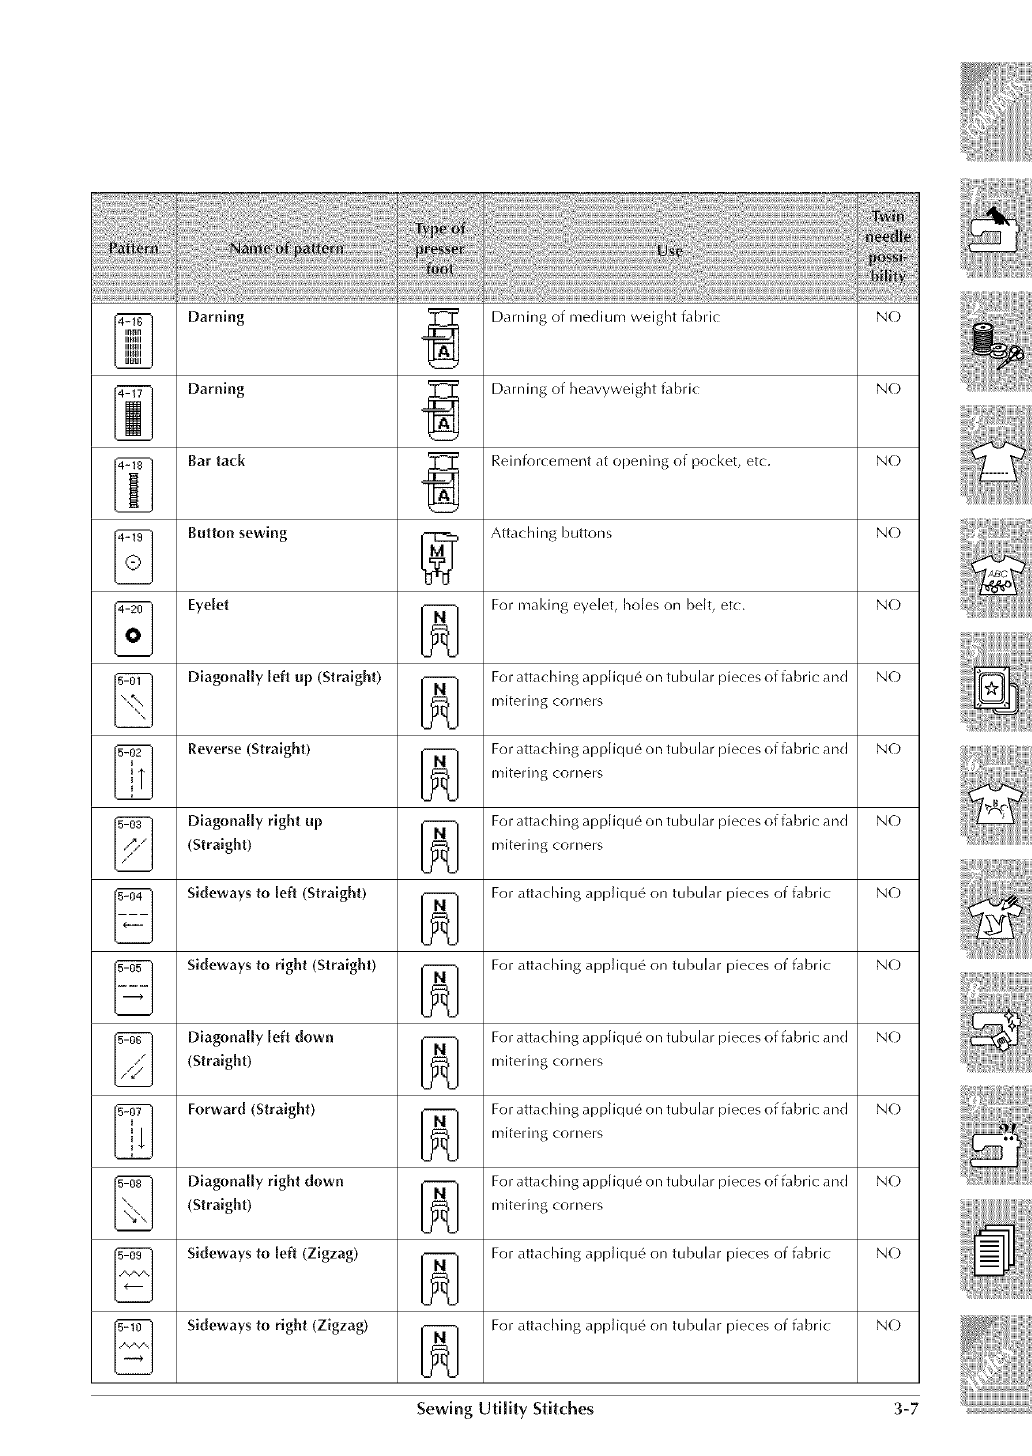
i!iiliiili!!!!!
i_i::i;;:i;;:i;;:i;;:i_;_il;z_;;_:;i!_;:;I!_;:;I!_;:;I!_;:;I!_
Darning
N(-)
Darning _ Darning of heavyweight fabric N(-)
Bar tack _ Reinforcemerlt at openirlg of pocket, etc. N(-)
Button sewing [-_ Attaching buttons N(-)
Eyelet _ For maldng eyelet, holes on belt, etc. N(-)
U"U
Diagonally left up (Straight) _ For attaching appliqu6 on tubular pieces of fabric and N(-)
UqJ
mitering corners
Reverse (Straight) _ For attacbirlg appiiqu6 on tubular pieces of fabric arid N(-)
U tlmitering corners
Diagonally right up _ For attaching appliqu6 on tubular pieces of fabric: and N(-)
(Straight) L_'_I_.I miterirlg corners
Sideways to left (Straight) _ For attaching appliqu# on tubular pieces of fabric N(-)
U"U
Sideways to right (Straight) _ For attaching appliqu# on tubular pieces of fabric N(-)
Lr_J
Diagonally [eft down _ For attacbirlg appiiquc_ on tubular pieces of fabric arid N(-)
(Straight) L_'_t:d mitering corners
Forward (Straight) _ For attaching appliquc_ on tubular pieces of fabric: and N(-)
mitering corners
Diagonally right down _ For attacbirlg appliquc_ on tubular pieces of fabric arid N(-)
(Straight) L_'_qj mitering corners
Sideways to left (Zigzag) _ For attaching appliqu_ on tubular pieces of fabric N(-)
Lr_J
Sideways to right (Zigzag) _ For attaching appliqu# on tubular pieces of fabric N(-)
Sewing Utility Stitches 3-7
Darning of medium weight fabric
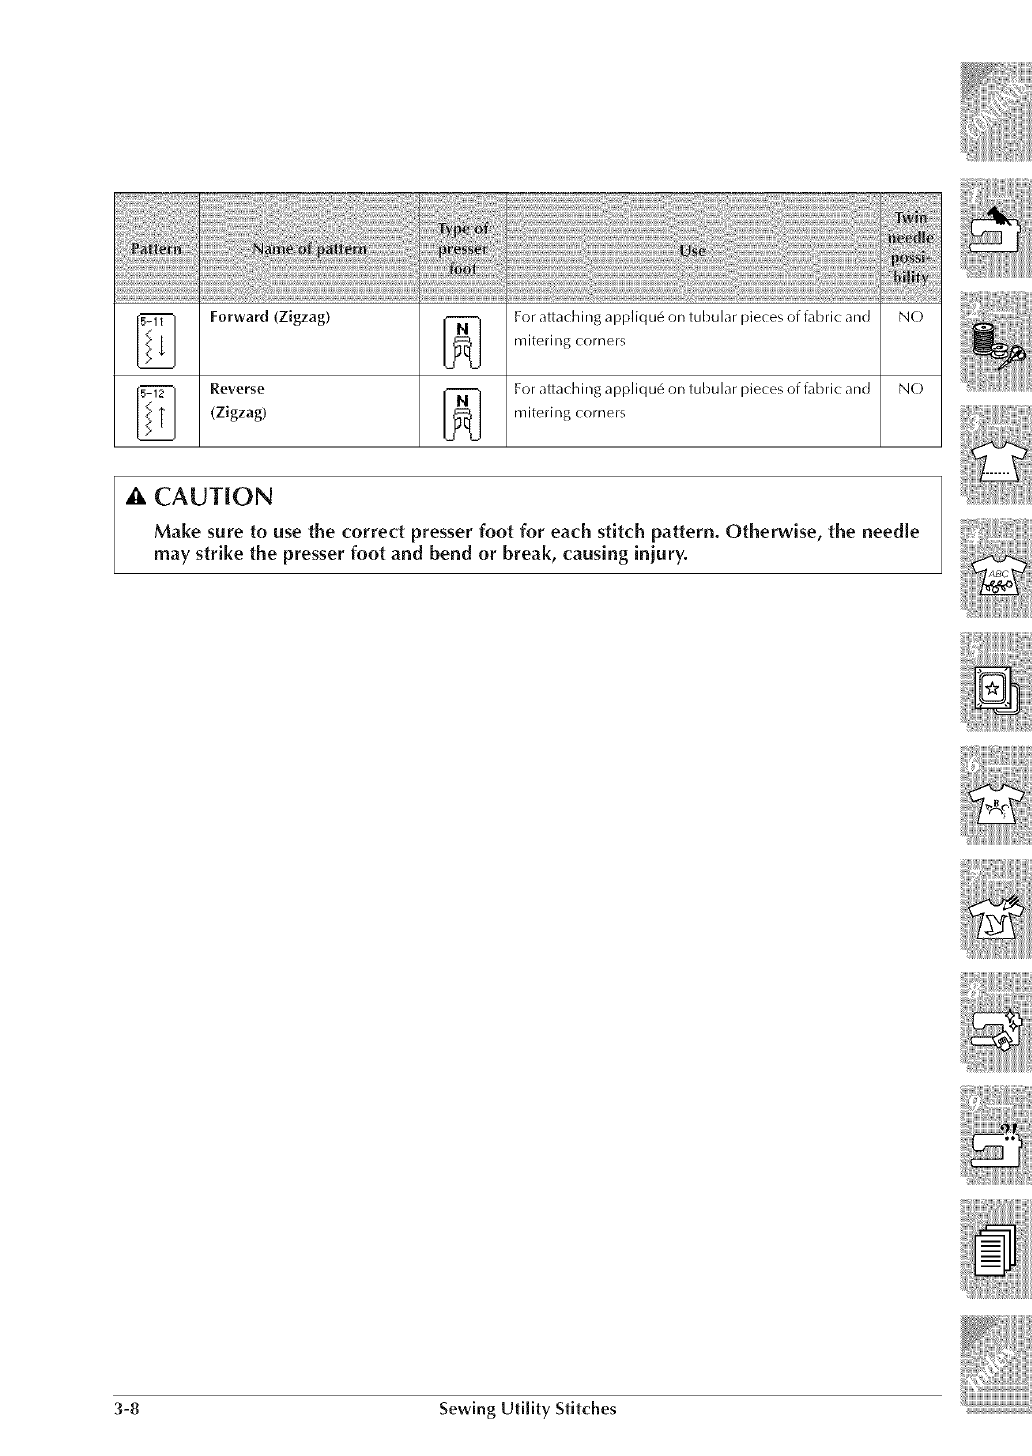
Forward (Zigzag) For attaching appliqu6 on tubular pieces of fabric and
mitering corners
_ N(-)
5-12 Reverse I_ For attaching appliqu6 on tubular pieces of fabric and N(-)(Zigzag) mitering corners
CAUTION
Make sure to use the correct presser foot for each stitch pattern. Otherwise, the needle
may strike the presser foot and bend or break, causing injury.
3-8 Sewing Utility Stitches
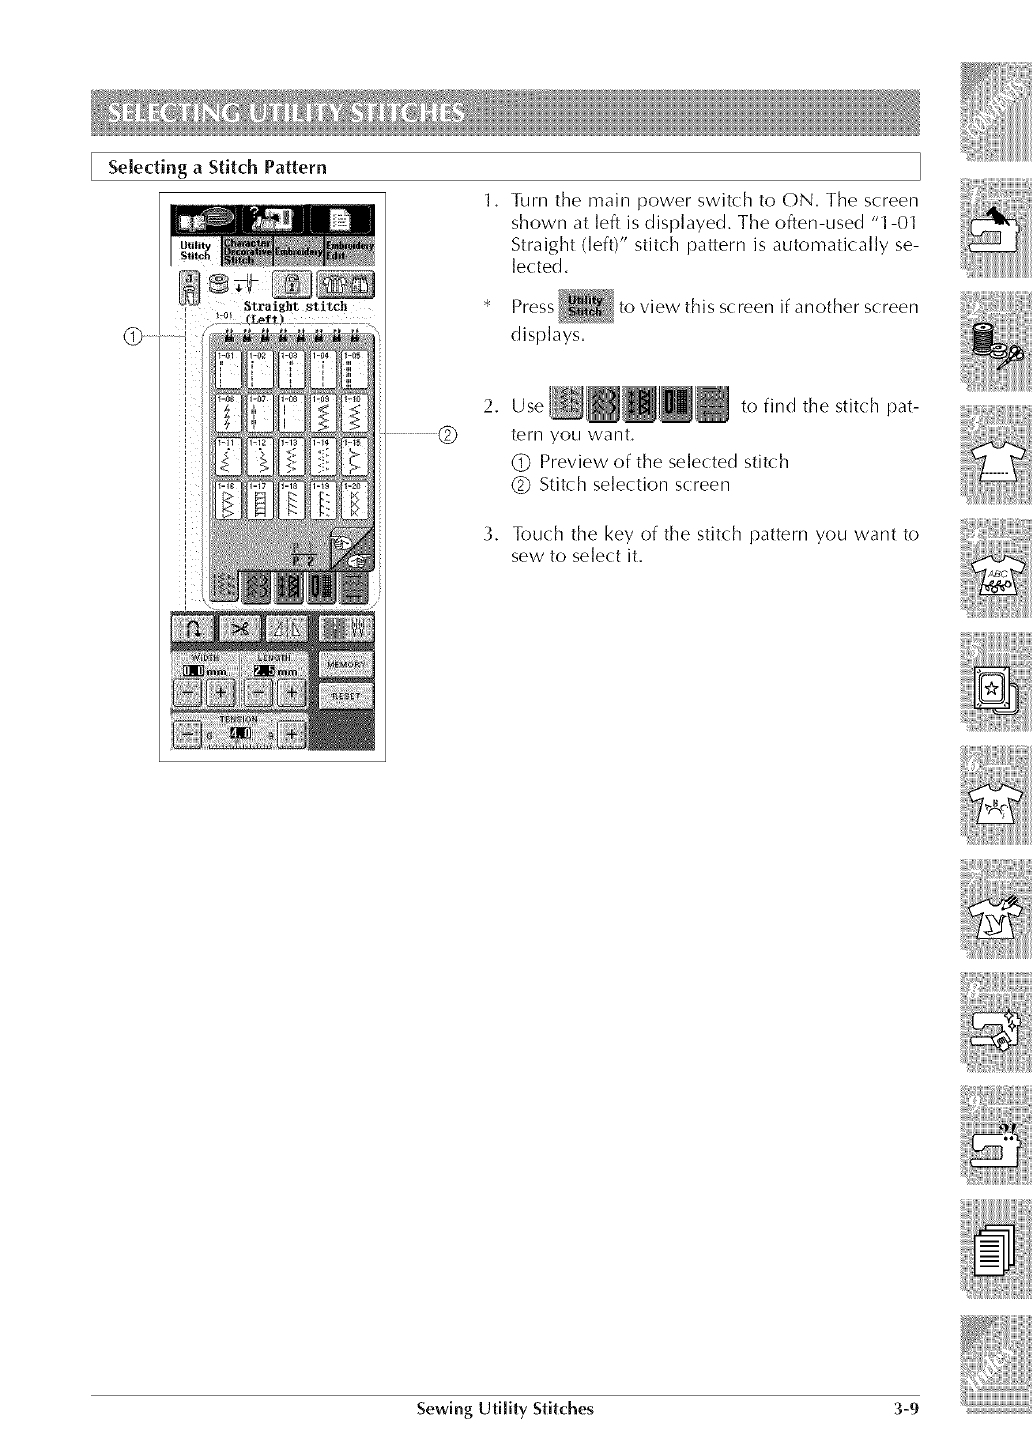
Selecting aStitch Pattern
2,
3,
Turn the main power switch to ON, The screen
shown at left is displayed, The often-used "1-01
Straight (left)" stitch pattern is automatically se-
lected.
Press to view this screen if another screen
displays.
Use !'
@
tern you want.
to find the stitch pat-
(_ Preview of the selected stitch
(_ Stitch selection screen
Touch the key of the stitch pattern you want to
sew to select it.
Sewing Utility Stitches 3-9
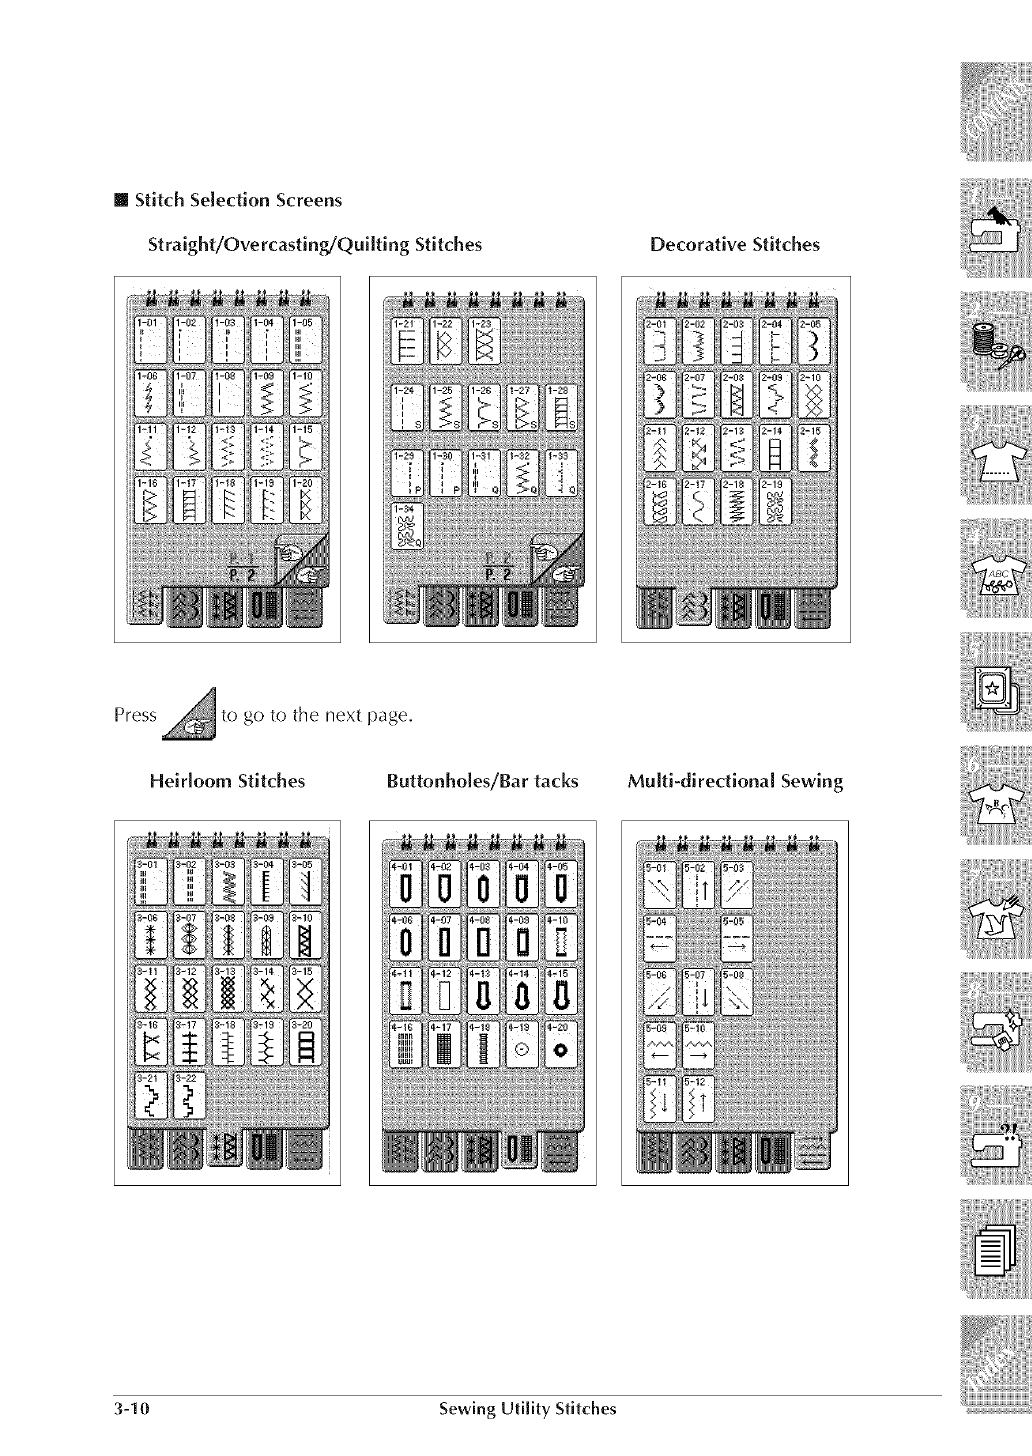
[] Stitch Selection Screens
Straight/Overcasting/Quilting Stitches Decorative Stitches
Press to go to the next page.
Heirloom Stitches Buttonholes/Bar tacks Multi-directional Sewing
3-10 Sewing Utility Stitches
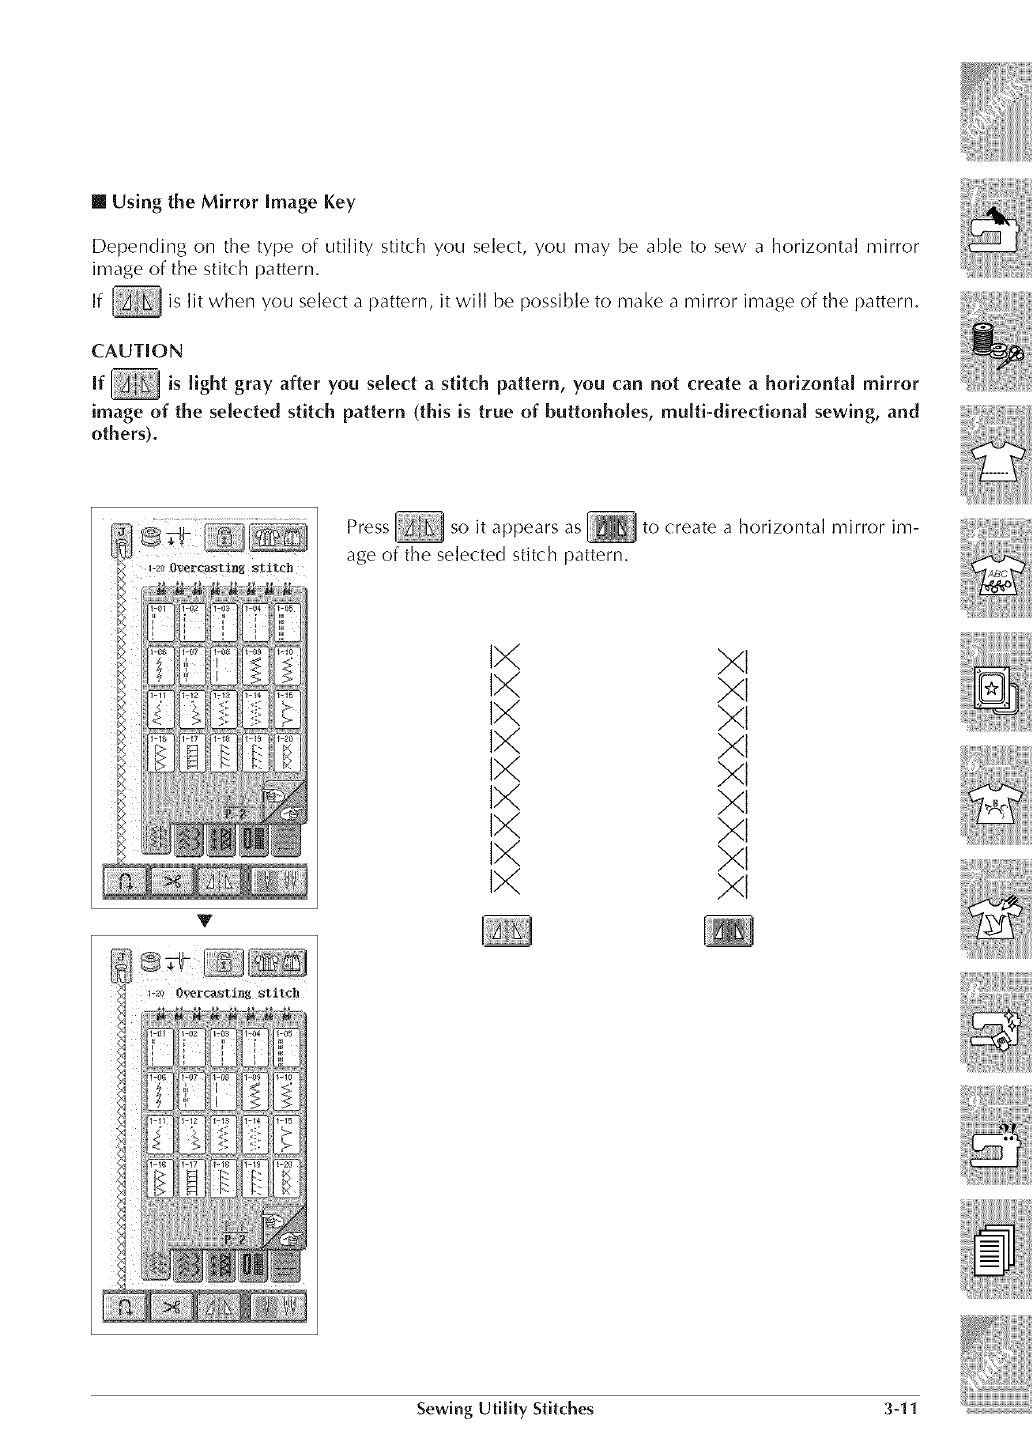
[] Using the Mirror image Key
Depending on the type of utility stitch you select, you may be able to sew a horizontal mirror
image of the stitch pattern.
If is lit when you select a pattern, it will be possible to make a mirror image of the pattern.
CAUTION
If is light gray after you select a stitch pattern, you can not create a horizontal mirror
image of the selected stitch pattern (this is true of buttonholes, multi-directional sewing, and
others).
T
Press so it appears as [_ to create a horizontal mirror im-
age of the selected stitch pattern.
IX
IX
IX
IX
IX
IX
IX
IX
IX
Xi
Xi
Xi
Xl
Xl
Xi
Xl
Xi
Xl
Sewing Utility Stitches 3-11
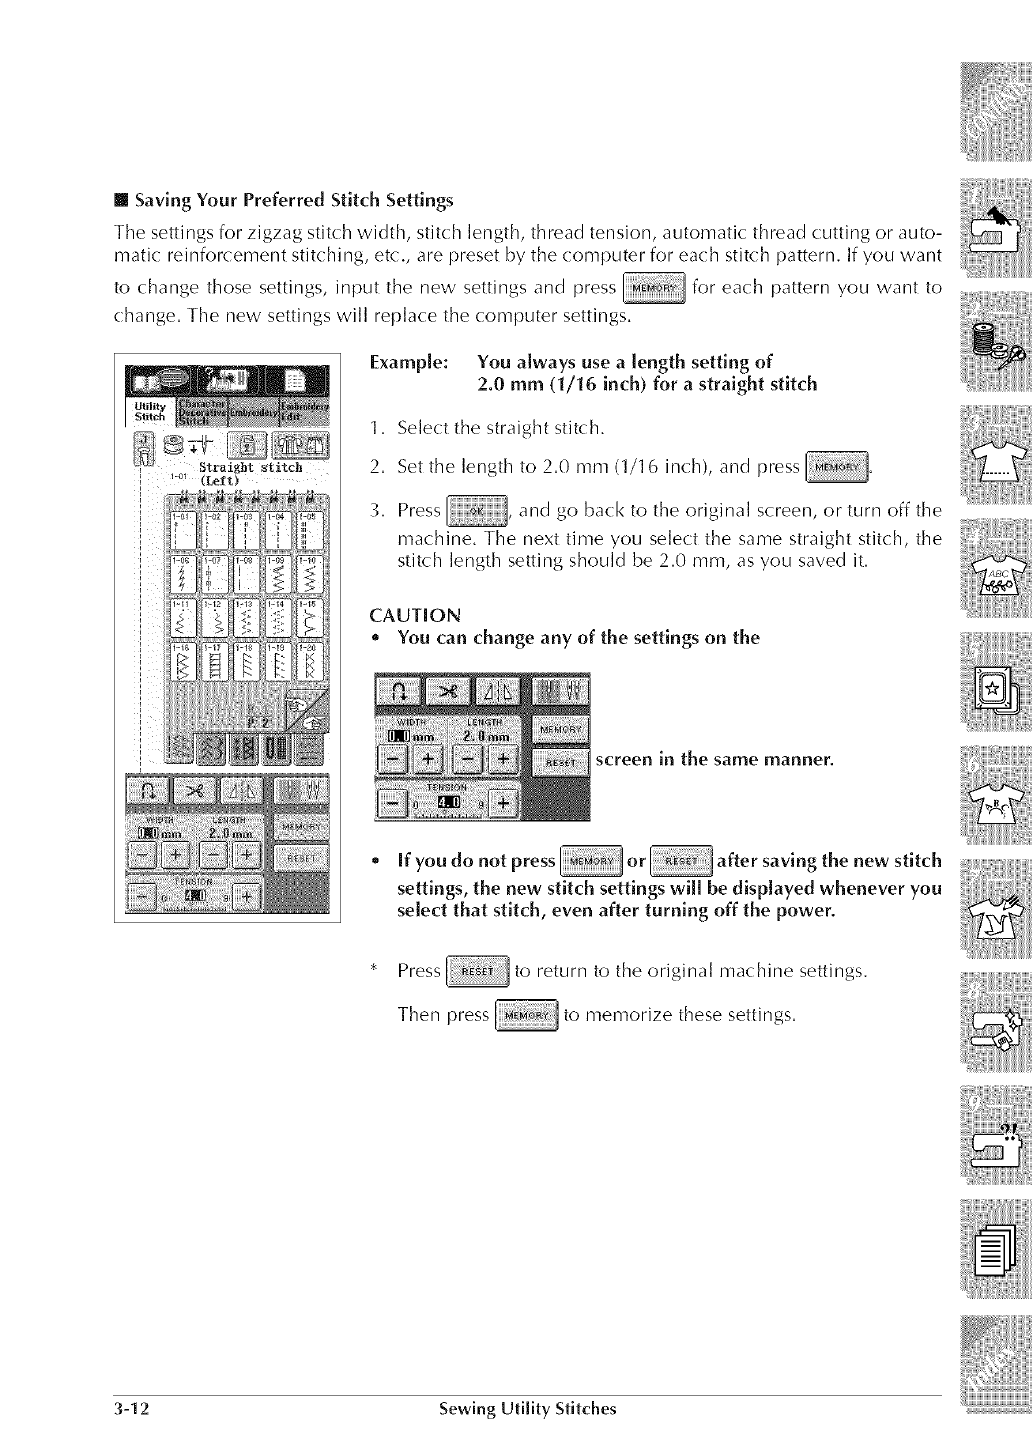
[] Saving Your Preferred Stitch Settings
The settings for zigzag stitch width, stitch length, thread tension, automatic thread cutting or auto-
matic reinforcement stitching, etc,, are preset by the computer for each stitch pattern, If you want
to change those settings, input the new settings and press for each pattern you want to
change, The new settings wi]] rep]ace the computer settings,
Examp[e: You a[ways use a [ength setting of
2.0 mm (1/16 inch) for a straight stitch
1. Select the straight stitch.
2. Set the length to 2.0 mm (1/16 inch), and press
3. Press ,and go back to the original screen, or turn off the
machine. The next time you select the same straight stitch, the
stitch length setting should be 2.0 mm, as you saved it.
CAUTION
• You can change any of the settings on the
screen in the same manner.
•If you do not press or after saving the new stitch
settings, the new stitch settings will be displayed whenever you
select that stitch, even after turning off the power.
* Press to return to the original machine settings.
Then press to memorize these settings.
3-12 Sewing U_tiiity Stitches
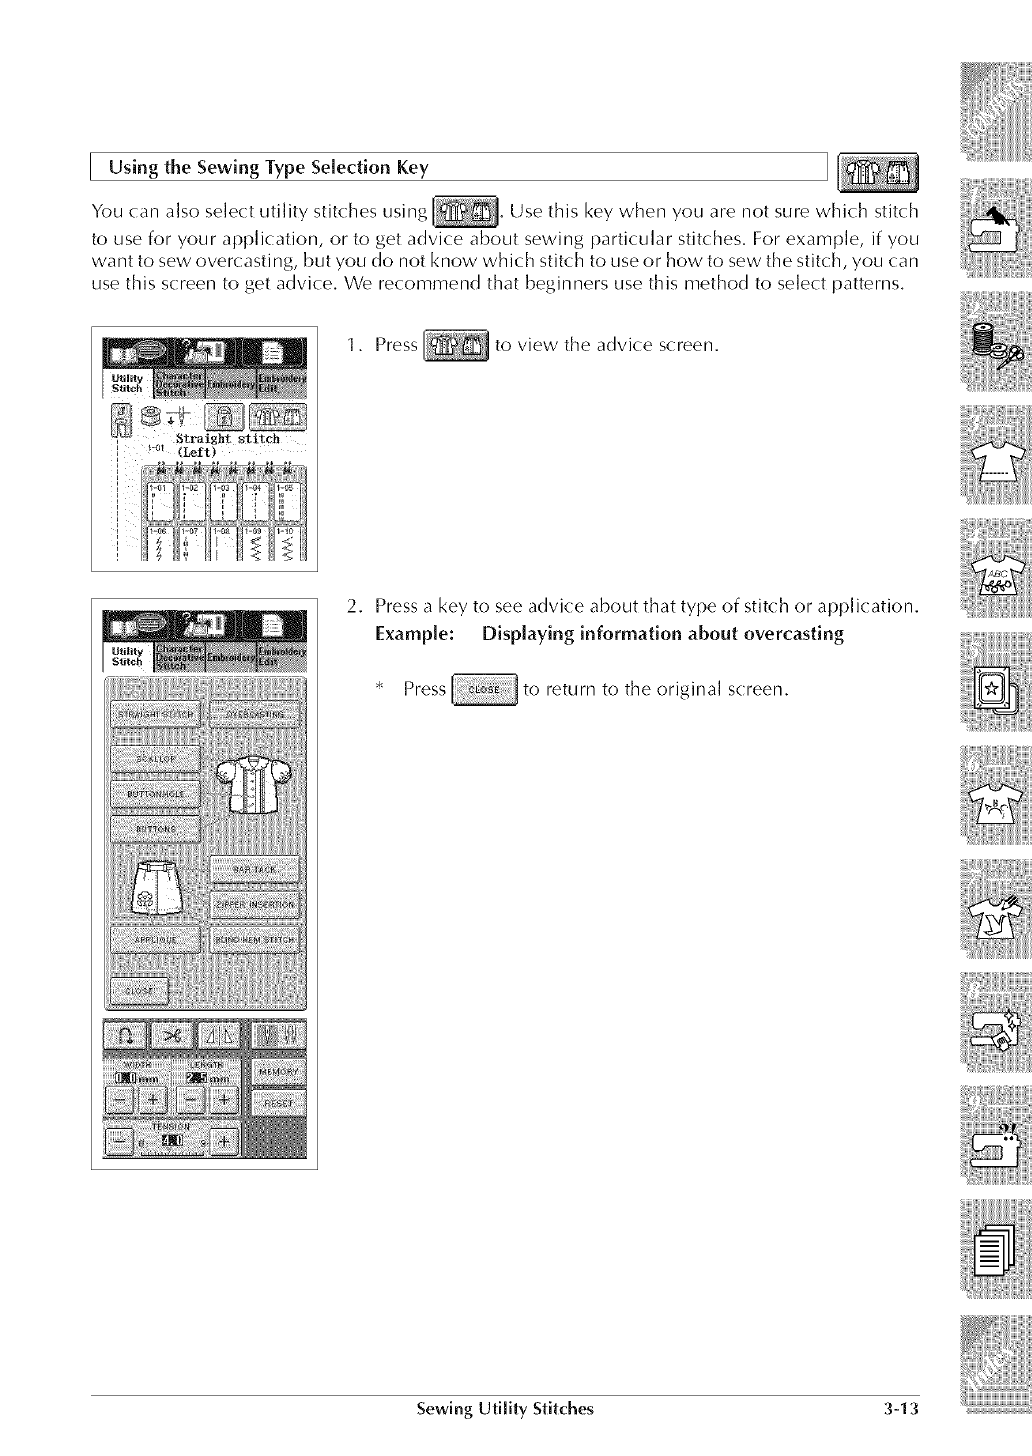
[ Using the Sewing Type Selection Key
You can also select utility stitches using , Use this key when you are not sure which stitch
to use for your application, or to get advice about sewing particular stitches, For example, if you
want to sew overcasting, but you do not know which stitch to use or how to sew the stitch, you can
use this screen to get advice, We recommend that beginners use this method to select patterns,
1, Press to view the advice screen,
2, Press a key to see advice about that type of stitch or application,
Example: Displaying information about overcasting
* Press to return to the original screen,
Sewing Utility Stitches 3-13
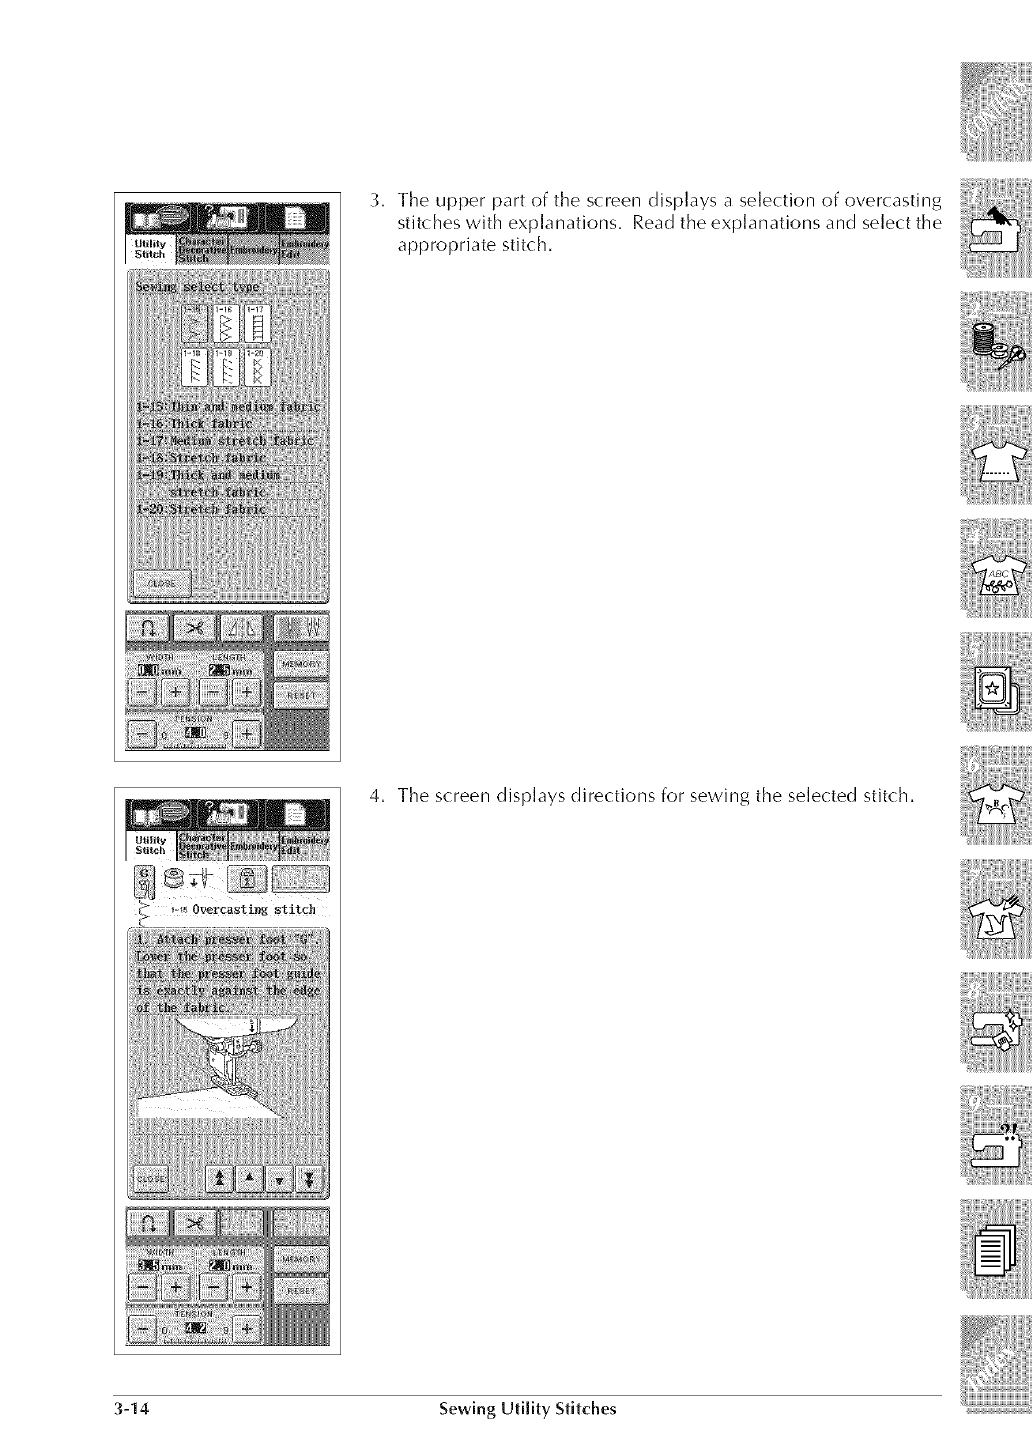
3. The upper part of the screen displays a selection of overcasting
stitches with explanations. Read the explanations and select the
appropriate stitch.
,:!_ Overcasting stitch
_n
i ]
4. The screen displays directions for sewing the selected stitch,
3-14 Sewing Utility Stitches
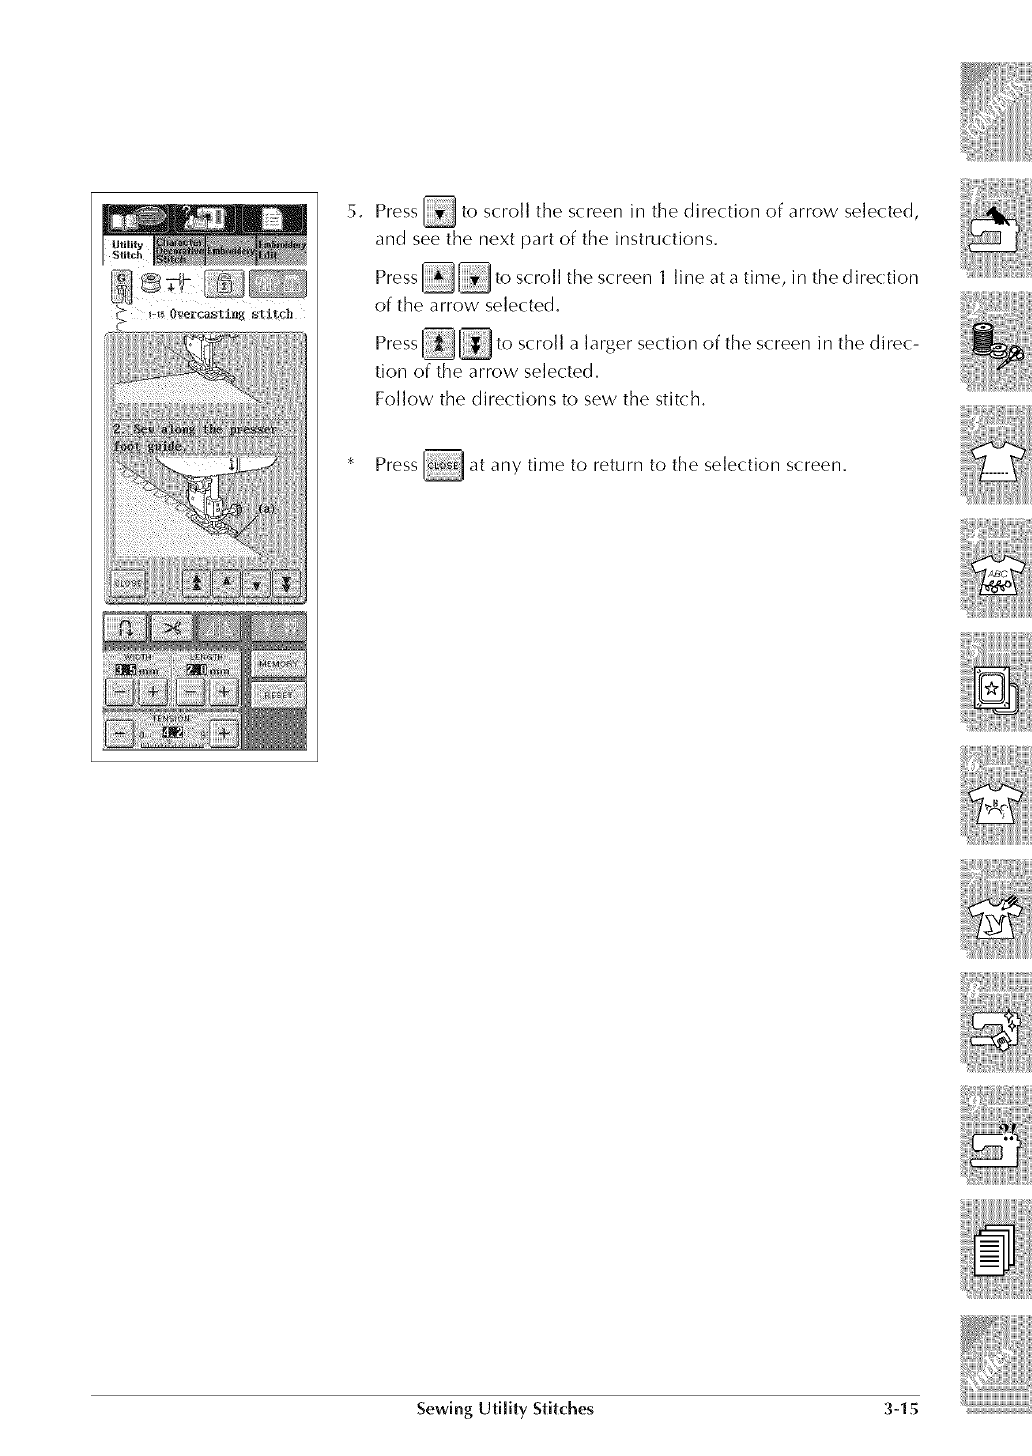
5, Press _ to scroll the screen in the direction of arrow selected,
and see the next part of the instructions,
Press _to scroll the screen 1 line at a time, in the direction
of the arrow selected,
Press _to scroll a larger section of the screen in the direc-
tion of the arrow selected.
Follow the directions to sew the stitch,
* Press _ at any time to return to the selection screen,
Sewing Utility Stitches 3-15
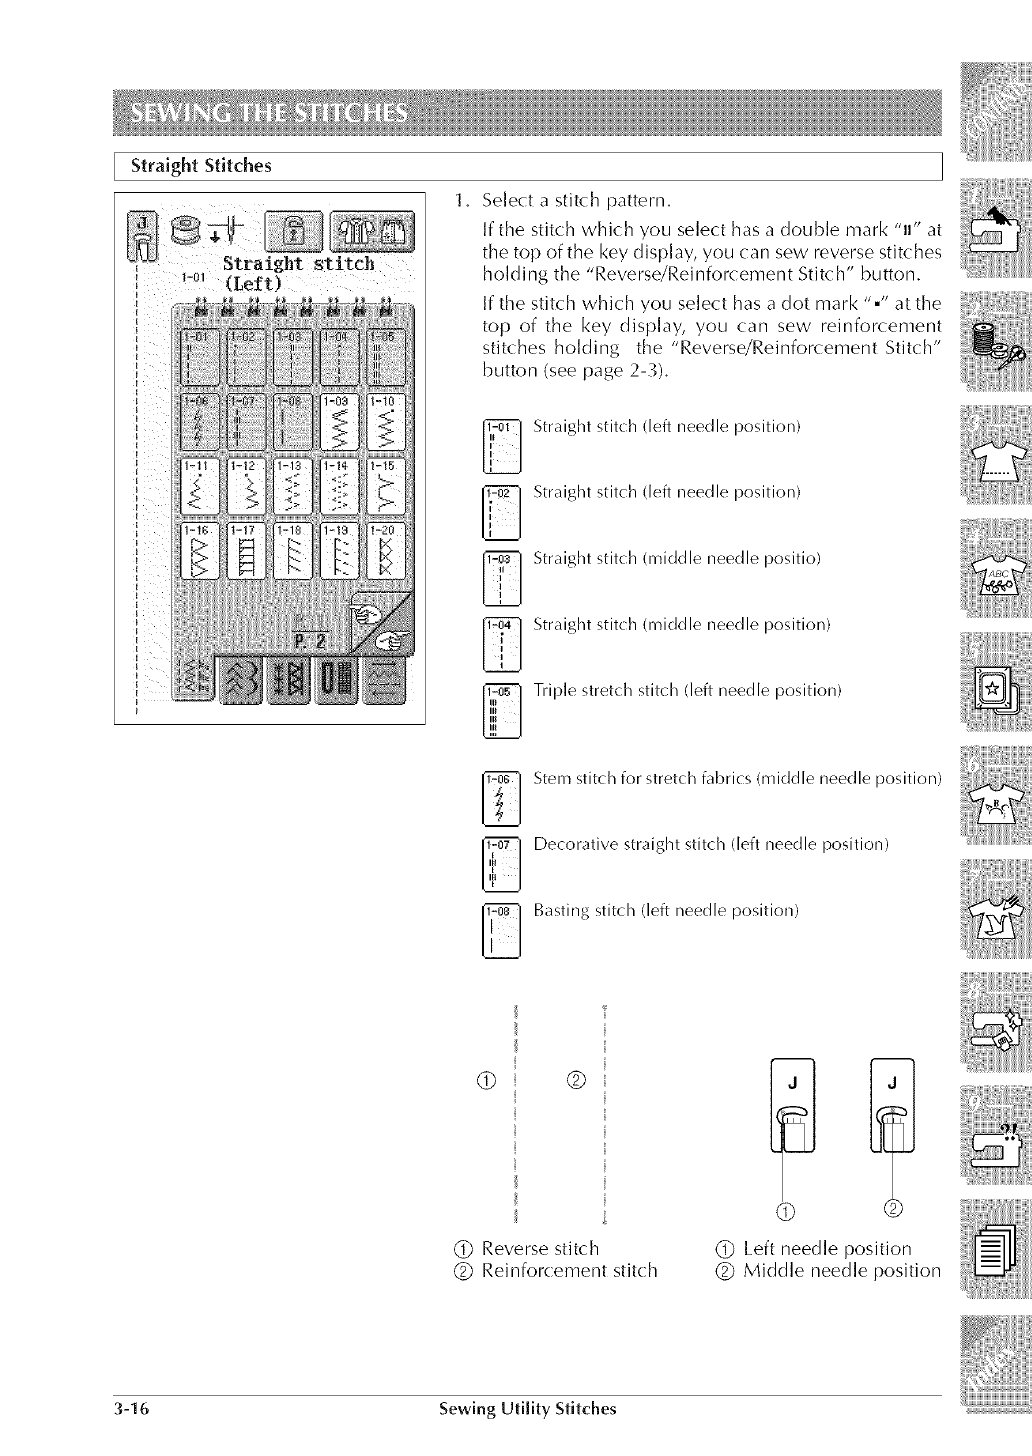
], Select a stitch pattern.
If the stitch which you select has a double mark "u" at
the top of the key display, you can sew reverse stitches
holding the "Reverse/Reinforcement Stitch" button.
If the stitch which you select has a dot mark "." at the
top of the key display, you can sew reinforcement
stitches holding the "Reverse/Reinforcement Stitch"
button (see page 2-3).
Straight stitch (left needle position)
Straight stitch (left needle position)
Straight stitch (middle needle positio)
Straight stitch (middle needle position)
Triple stretch stitch (left needle position)
Stem stitch for stretch fabrics (middle needle position)
Decorative straight stitch (left needle position)
Basting stitch (left needle position)
© ®
@Reverse stitch
@Reinforcement stitch
©
@Left needle position
@Middle needle position
3-I 6 Sewing Utility Stitches
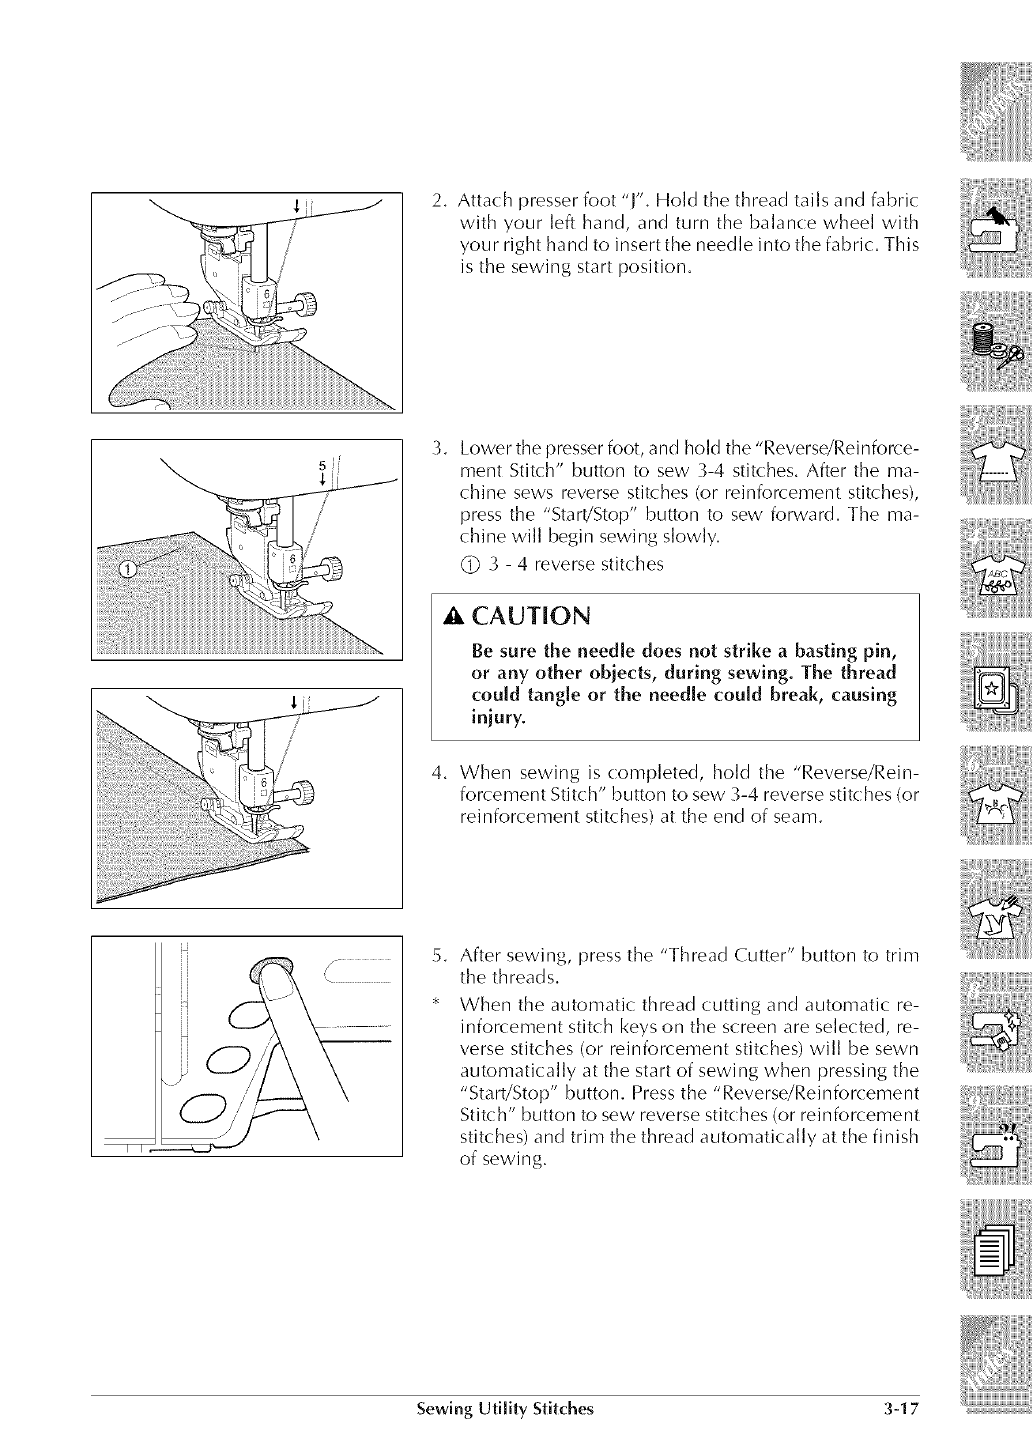
2. Attach presser foot "J". Hold the thread tails and fabric
with your left hand, and turn the balance wheel with
your right hand to insert the needle into the fabric. This
is the sewing start position,
3. Lower the presser foot, and hold the "Reverse/Reinforce-
ment Stitch" button to sew 3-4 stitches. After the ma-
chine sews reverse stitches (or reinforcement stitches),
press the "Start!Stop" button to sew forward. The ma-
chine will begin sewing slowly.
(_ _ - 4 reverse stitches
A CAUTION
Be sure the needle does not strike a basting pin,
or any other objects, during sewing, The thread
could tangle or the needle could break, causing
injury.
4. When sewing is completed, hold the "Reverse/Rein-
forcement Stitch" button to sew 3-4 reverse stitches (or
reinforcement stitches) at the end of seam.
2.
_B
After sewing, press the "Thread Cutter" button to trim
the threads.
When the automatic thread cutting and automatic re-
inforcement stitch keys on the screen are selected, re-
verse stitches (or reinforcement stitches) will be sewn
automatically at the start of sewing when pressing the
"Start/Stop" button. Press the "Reverse/Reinforcement
Stitch" button to sew reverse stitches (or reinforcement
stitches) and trim the thread automatically at the finish
of sewing.
Sewing Utility Stitches 3-17
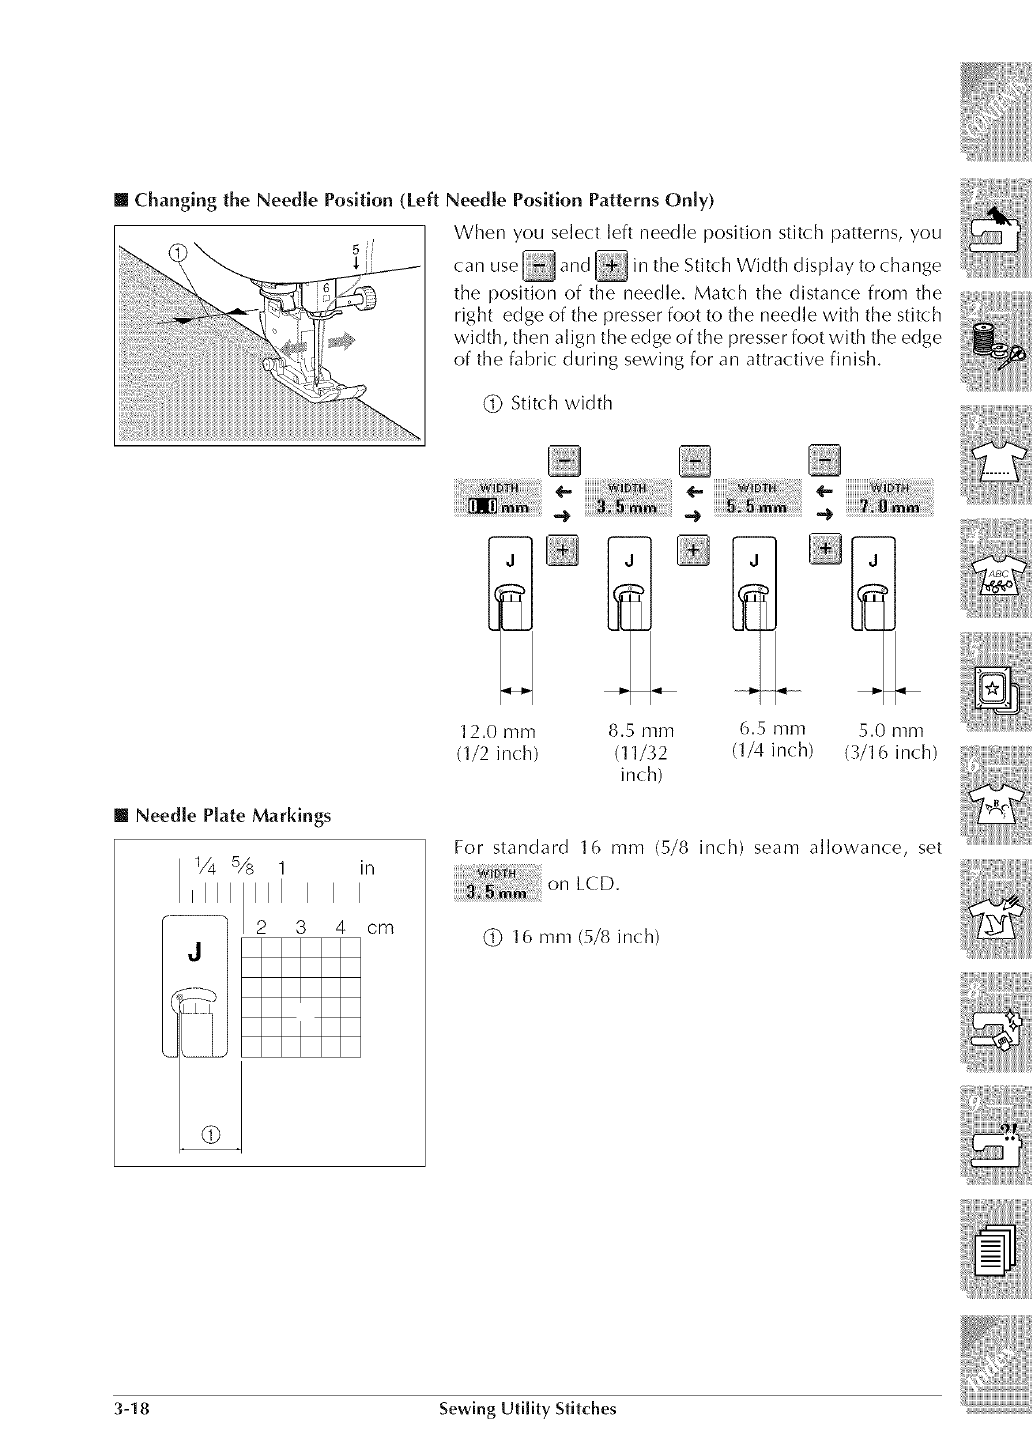
[] Changing the Needle Position (Left Needle Position Patterns Only)
When you select left needle position stitch patterns, you
5'
can use_ and _in the Stitch Width display to change
the position of the needle. Match the distance from the
right edge of the presser foot to the needle with the stitch
width, then align the edge of the presserfoot with the edge
of the fabric during sewing for an attractive finish.
(_ Stitch width
12.0 mm 8.5 mm 6.5 mm 5.0 mm
(1/2 inch) (11/32 (1/4 inch) (3/16 inch)
inch)
[] Needle Plate Markings
1/4% 1 in
iIII III
2 3 4 cm
J
i
For standard 16 mm (5/8 inch) seam allowance, set
on LCD.
(_ 16 mm (5/8 inch)
3-18 Sewing Utility Stitches
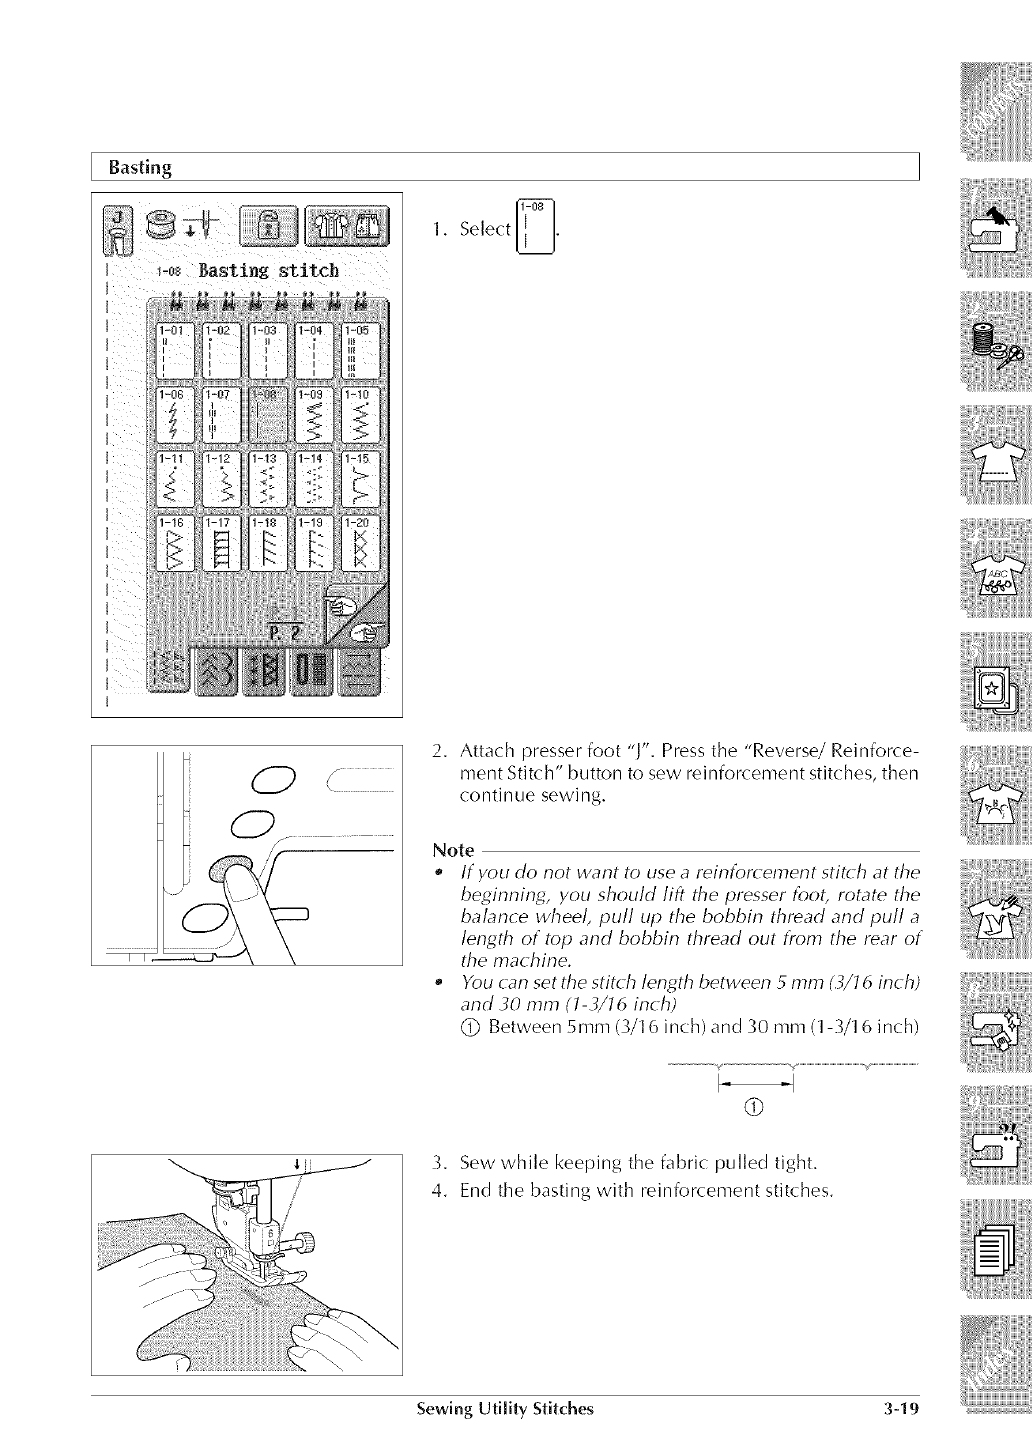
Basting
1. Select _.
2. Attach presser foot "J". Press the "Reverse/Reinforce-
ment Stitch" button to sew reinforcement stitches, then
continue sewing.
Note
eIf you do not want to use a reinforcement stitch at the
beginning, you should lift the presser foot, rotate the
balance wheel, pull Lip the bobbin thread and pull a
length of top and bobbin thread out from the rear of
the machine.
•You can set the stitch length between 5 mm (3/16 inch)
and 30 mm (1-3/16 inch)
(_ Between 5mm (3/16 inch) and 30 mm (1-3/16 inch)
©
3. Sew while keeping the fabric pulled tight,
4. End the basting with reinforcement stitches.
Sewing U_ti[ity Stitches 3-19
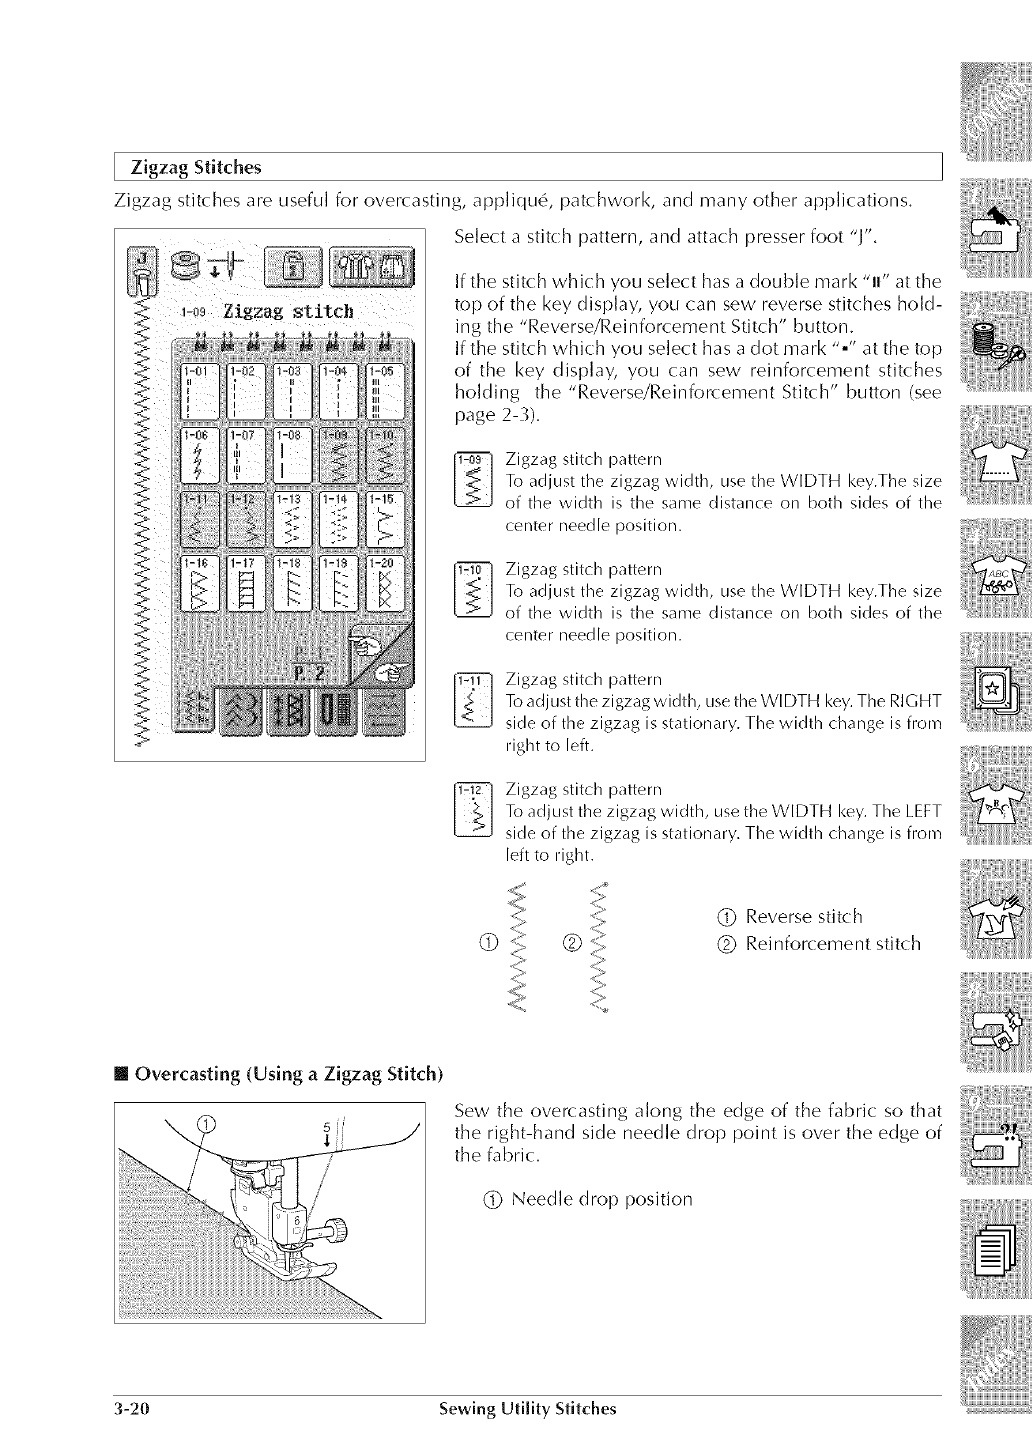
Zigzag Stitches
Zigzag stitches are useful for overcasting, applique, patchwork, and many other applications,
Select a stitch pattern, and attach presser foot "J",
If the stitch which you select has a double mark "u" at the
top of the key display, you can sew reverse stitches hold-
ing the "Reverse/Reinforcement Stitch" button,
If the stitch which you select has adot mark "." at the top
of the key display, you can sew reinforcement stitches
holding the "Reverse/Reinforcement Stitch" button (see
page 2-3),
1_-] Zigzag stitch pattern
To adjust the zigzag width, use the WIDTH key.The size
of the width is the same distance on both sides of the
center needle position.
Zigzag stitch pattern
To adjust the zigzag width, use the WIDTH key.The size
of the width is the same distance on both sides of the
center needle position.
_1 Zigzag stitch pattern
To adjust the zigzag width, use the WIDTH key. The RIGHT
side of the zigzag is stationary. The width change is from
right to left.
Zigzag stitch pattern
To adjust the zigzag width, use the WIDTH key. The LEFT
side of the zigzag is stationary. The width change is from
left to right.
©®(_ Reverse stitch
(_ Reinforcement stitch
[] Overcasting (Using a Zigzag Stitch)
Sew the overcasting along the edge of the fabric so that
the right-hand side needle drop point is over the edge of
the fabric.
(_ Needle drop position
3-20 Sewing Utility Stitches
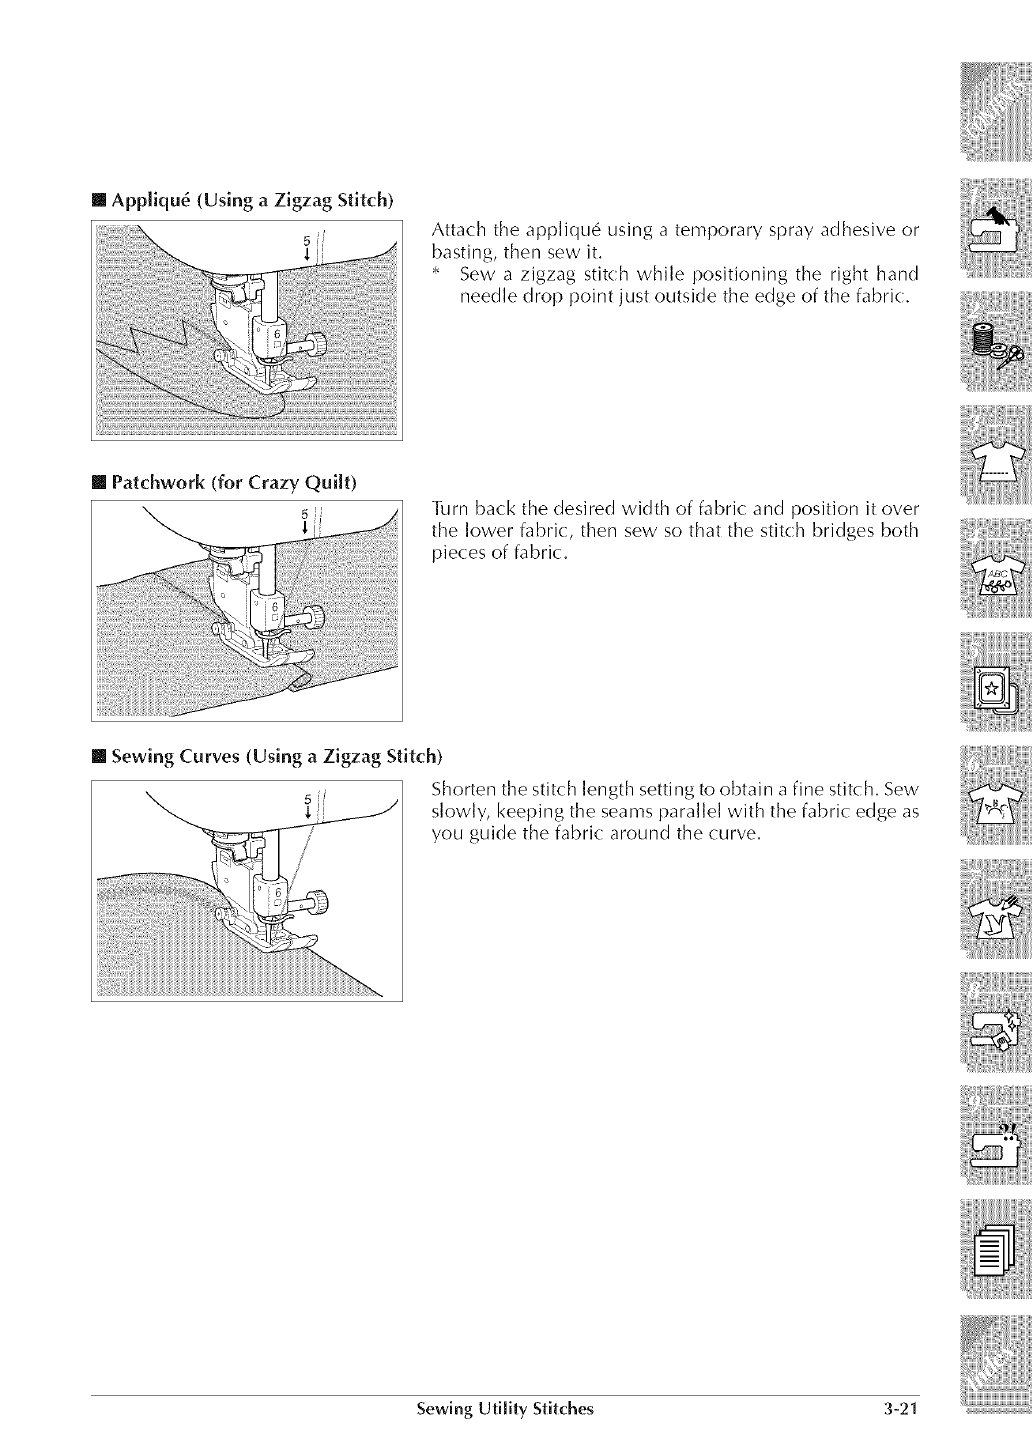
Attach the appliqu6 using a temporary spray adhesive or
basting, then sew it,
* Sew a zigzag stitch while positioning the right hand
needle drop point just outside the edge of the fabric:,
[] Patchwork (for Crazy Quilt)
5Turn back the desired width of fabric and position it over
the lower fabric, then sew so that the stitch bridges both
pieces of fabric.
[] Sewing Curves (Using a Zigzag Stitch)
Shorten tile stitch length setting to obtain afine stitch, Sew
slowly, keeping the seams parallel with the fabric: edge as
you guide the fabric: around the curve.
Sewing Utility Stitches 3-21
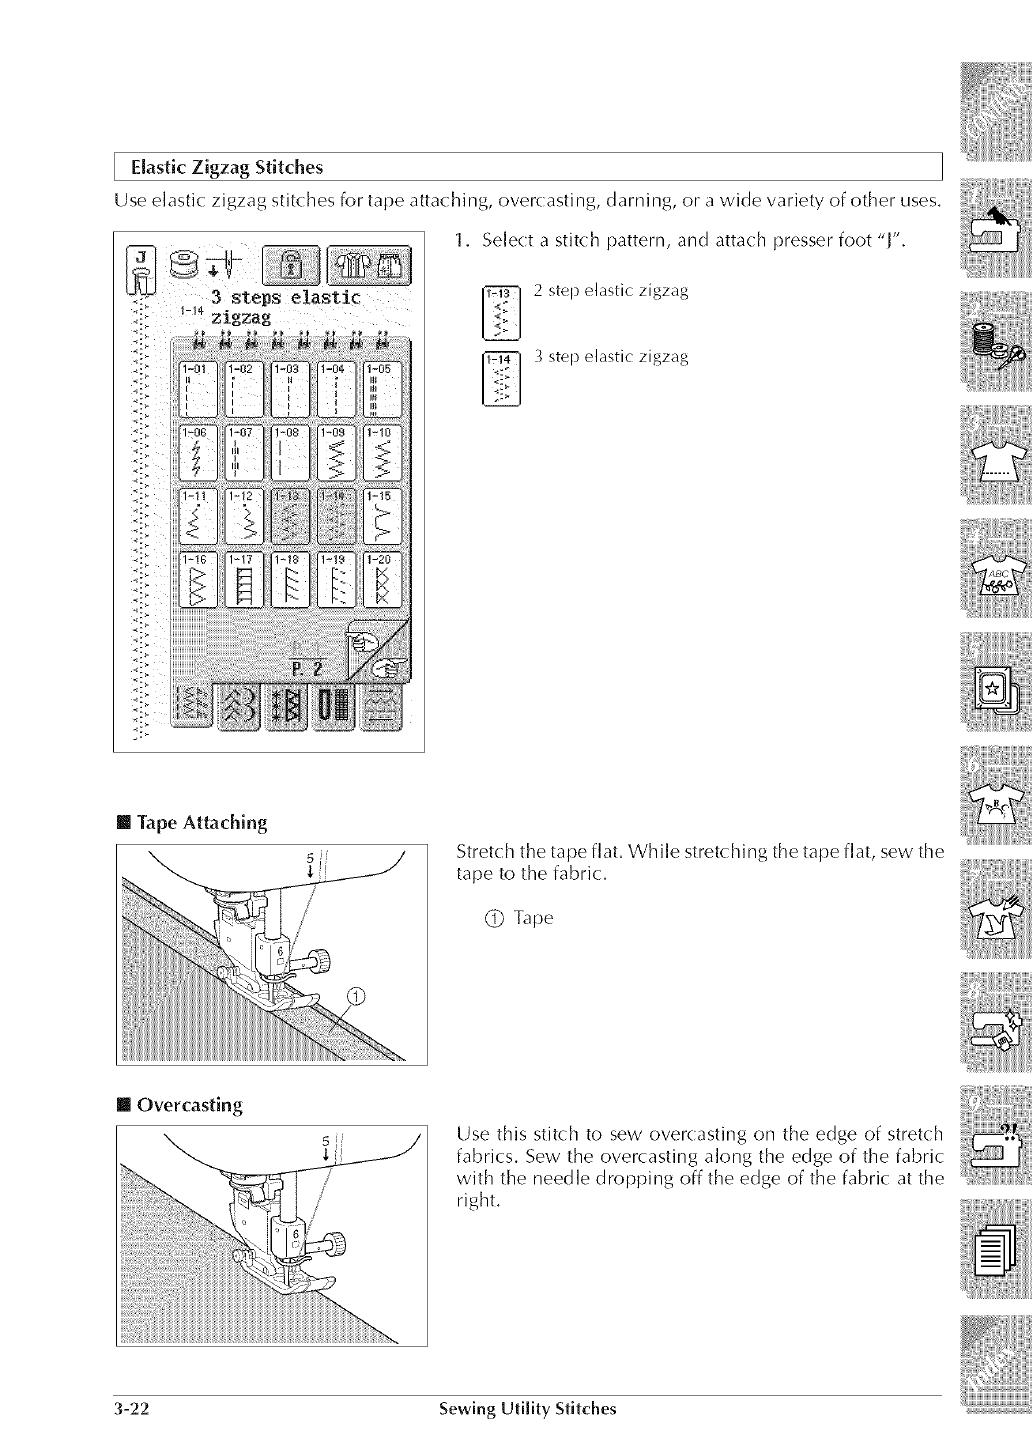
Elastic Zigzag Stitches
Use elastic zigzag stitches for tape attaching, overcasting, darning, or a wide variety of other uses.
1. Select a stitch pattern, and attach presser foot "J".
3steps elastic
zigzag .........................................
1-1_ 2 step elastic zigzag
3 step elastic zigzag
[] Tape Attaching
Stretch the tape flat. While stretching the tape flat, sew the
tape to the fabric.
(_DTape
[] Overcasting
Use this stitch to sew overcasting on the edge of stretch
fabrics. Sew the overcasting along the edge of the fabric
with the needle dropping off the edge of the fabric: at the
right.
3-22 Sewing UtiJity Stitches
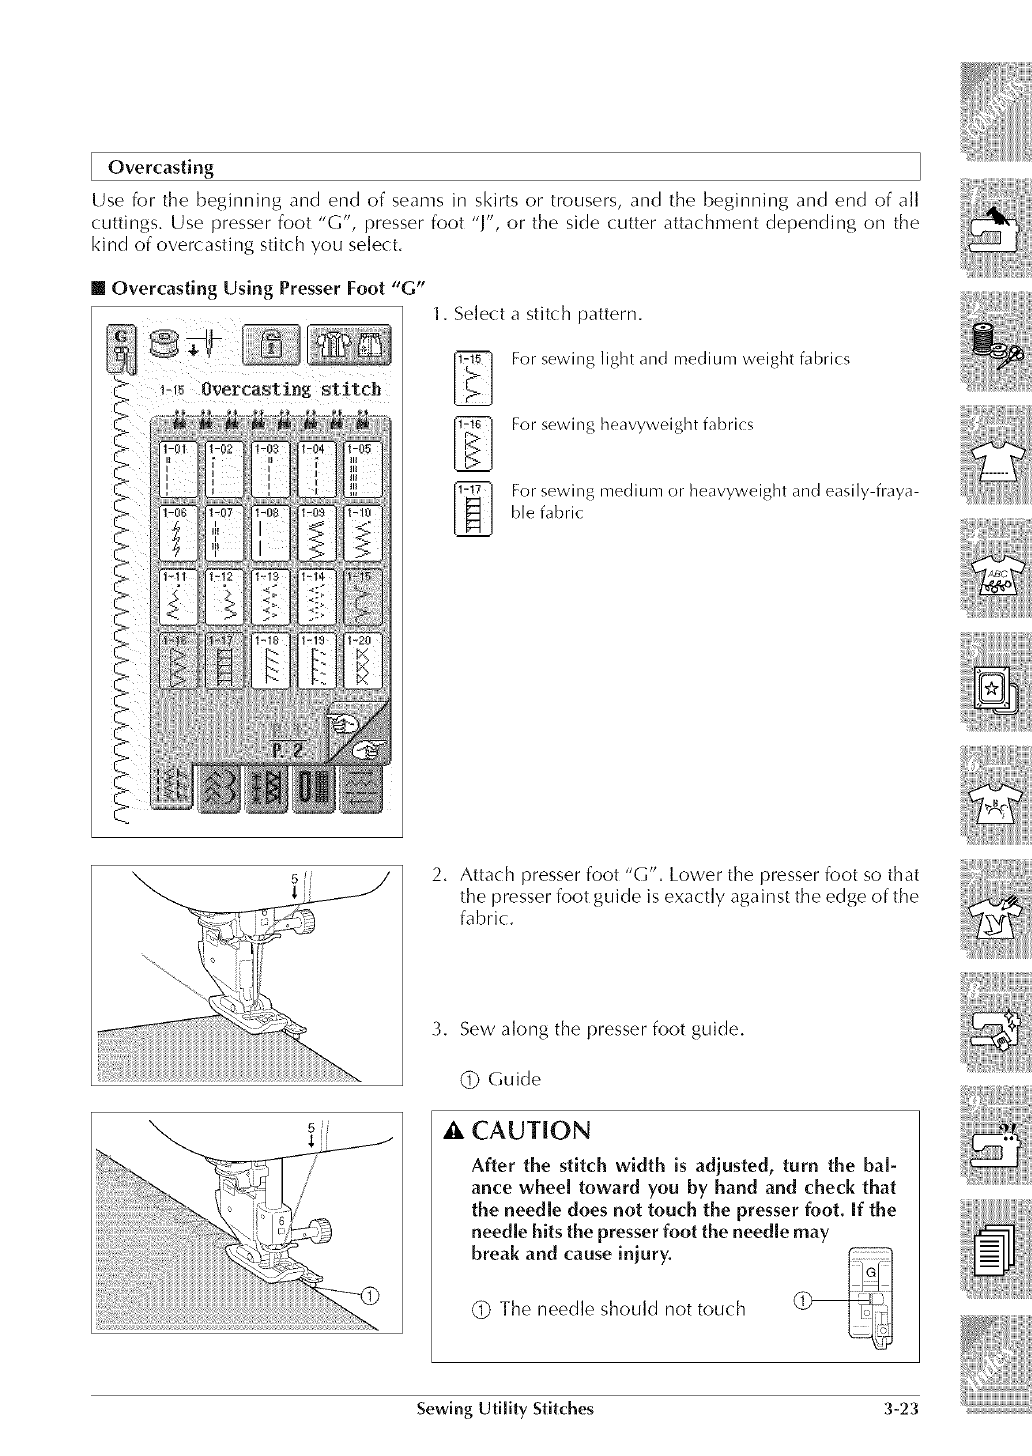
Overcasting
Use for the beginning and end of seams in skirts or trousers, and the beginning and end of all
cuttings. Use presser foot "G", presser foot "J", or the side (:utter attachment depending on the
kind of overcasting stitch you select.
[] Overcasting Using Presser Foot "G"
l + Select a stitch pattern.
I_'T'_ or sewing light and medium weight fabrics
For sewing heavyweight fabrics
[T:'_- I For sewing medium or heavyweight and easily-fraya-
ble fabric
2+ Attach presser foot "G"+ Lower the presser foot so that
the presser foot guide is exactly against the edge of the
fabric.
3. Sew along the presser foot guide.
(_ Guide
CAUTION
After the stitch width is adjusted, turn the bal-
ance wheel toward you by hand and check that
the needle does not touch the presser foot. If the
needle hits the presser foot the needle may
break and cause iniury.
(_) The needle should not touch
Sewing Utility Stitches 3-23

[] Overcasting Using Presser Foot " r_
1, Select a stitch pattern,
For sewing stretch fabrics
For sewing medium stretch fabrics and heavyweight
fabrics
1 For sewing stretch fabrics
For sewing knit stretch fabrics
_-1 For sewing stretch fabrics
For sewing stretch fabrics
2. Attach presser foot "J". Sew with the needle dropping
slightly off the edge of the fabric.
(_ Needle drop position
iiiii_iiiii_iiiiiiiiiiiiiiiiii_i!__i_i!i_i__!_i___!i!___iii_i_i_i!i!__i_i__ii_!!i_i_
3-24 Sewing Utility Stitches
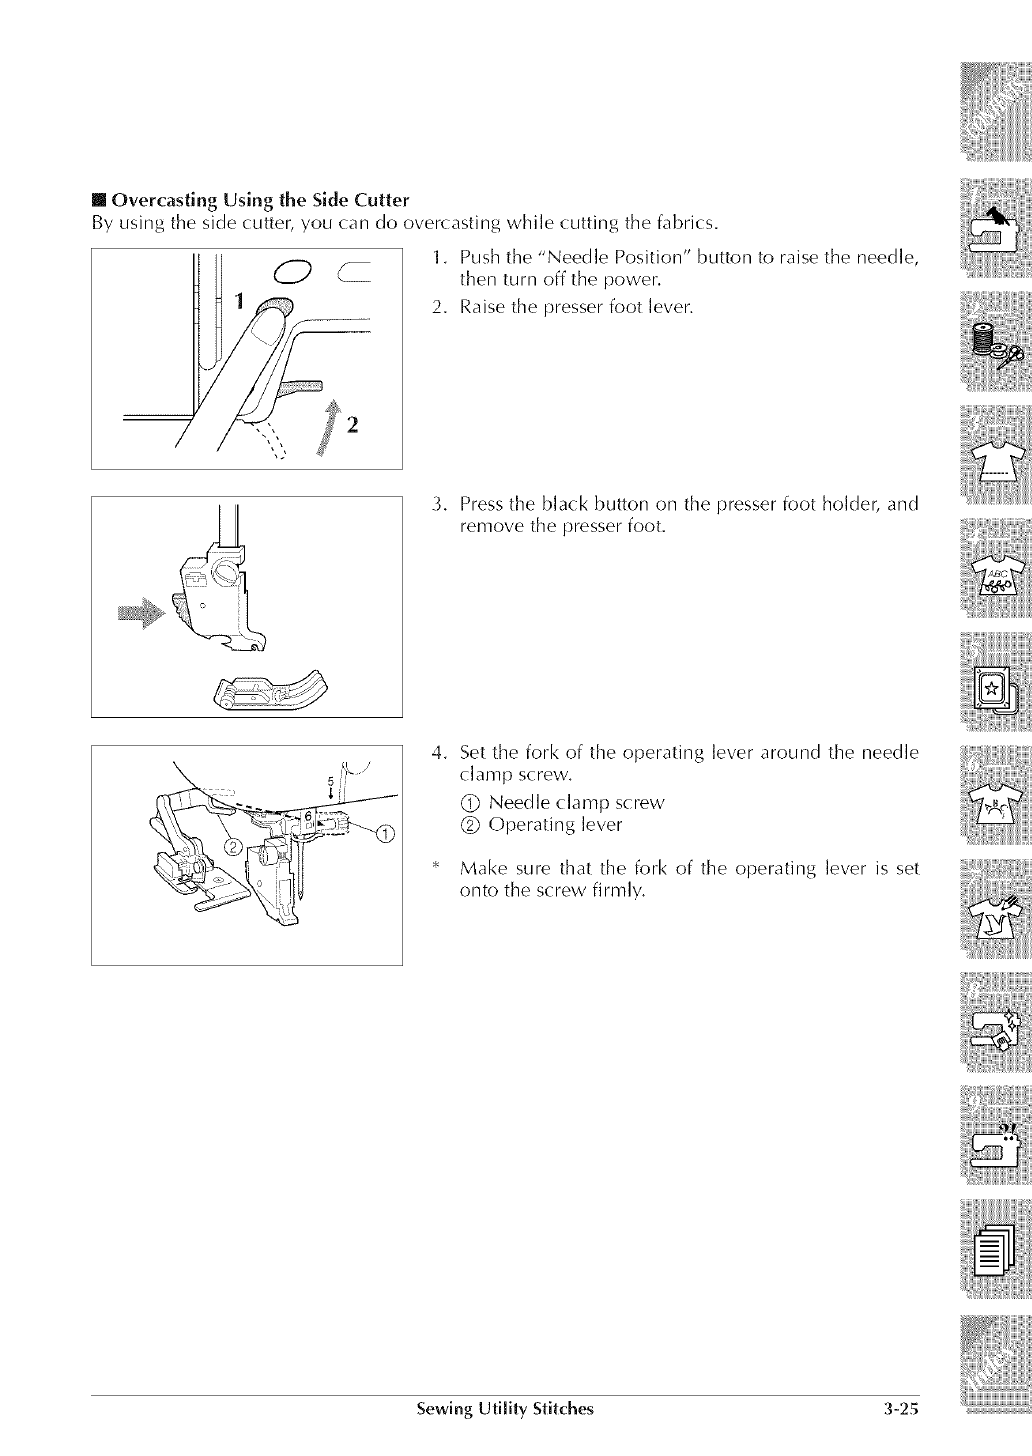
[] Overcasting Using the Side Cutter
By using the side cutter, you (:an do overcasting while cutting the fabrics,
/
1. Push the "Needle Position" button to raise the needle,
then turn off the power.
2. Raise the presser foot lever.
LIj_
3. Press the black button on the presser foot holder, and
remove the presser foot.
4. Set the fork of the operating lever around the needle
(:lamp screw.
(_ Needle clamp screw
(_ Operating lever
* Make sure that the fork of the operating lever is set
onto the screw firmly.
Sewing Utility Stitches 3-25
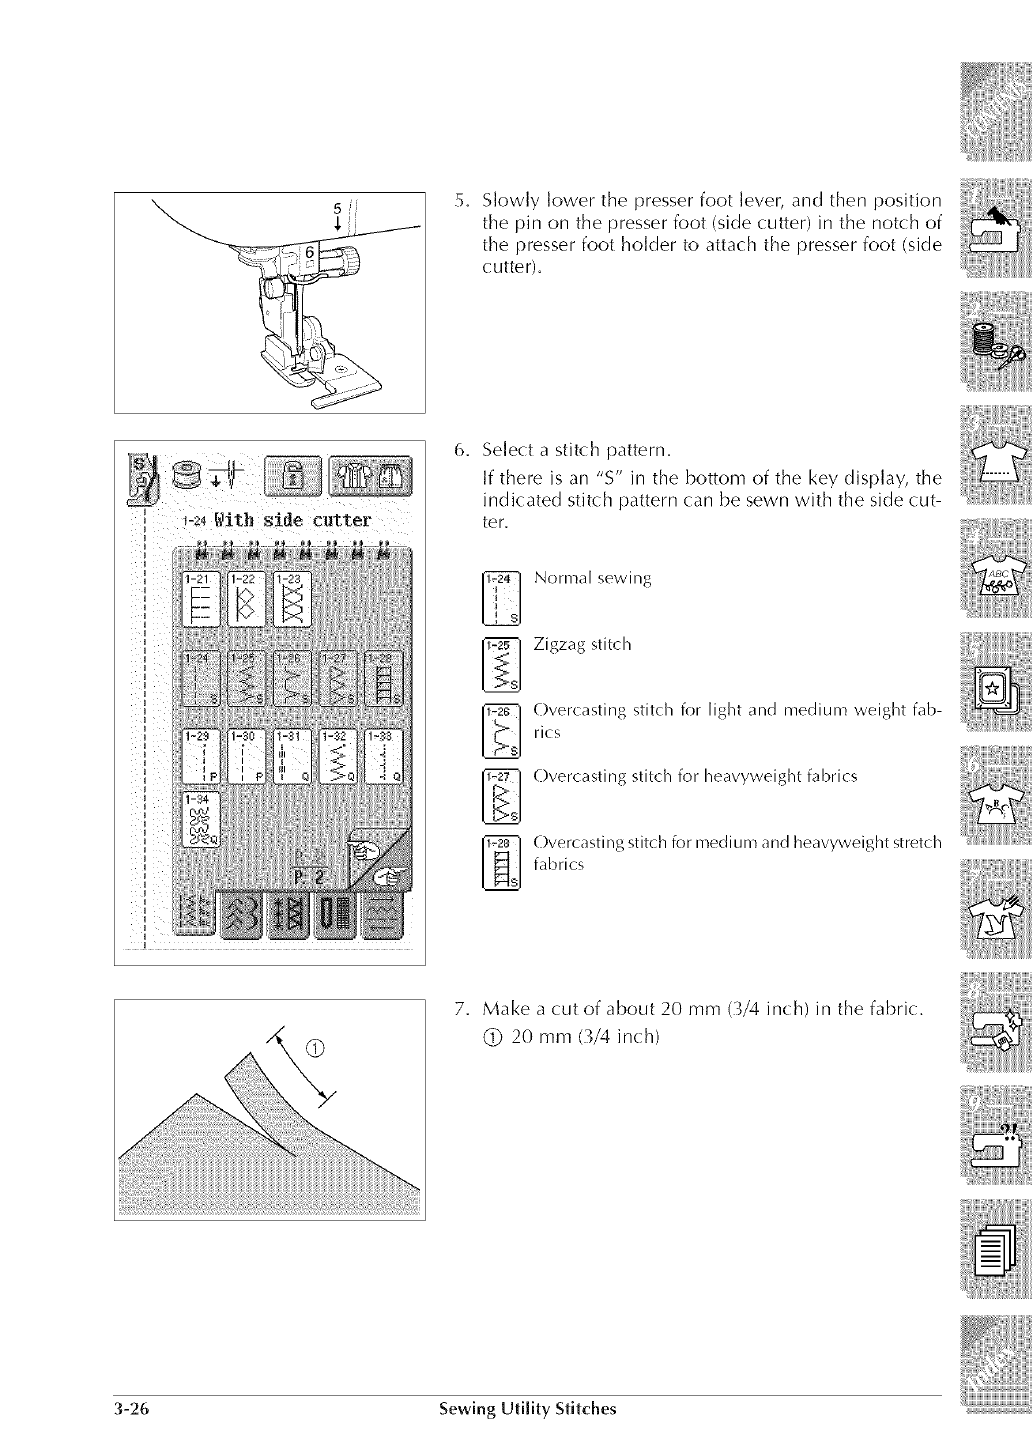
5. Slowly lower the presser foot lever, and then position
the pin on the presser foot (side cutter) in the notch of
the presser foot holder to attach the presser foot (side
cutter).
I
6, Select a stitch pattern.
If there is an "S" in the bottom of the key display, the
indicated stitch pattern can be sewn with the side (:ut-
ter.
Normal sewing
Zigzag stitch
Overcasting stitch for light and medium weight fab-
dcs
(-)vercasting stitch for heavyweight fabrics
Overcasting stitch for medium and heavyweight stretch
fabrics
7. Make a cut of about 20 mm (3/4 inch) in the fabric.
(_) 20 mm G/4 inch)
3-26 Sewing Utility Stitches
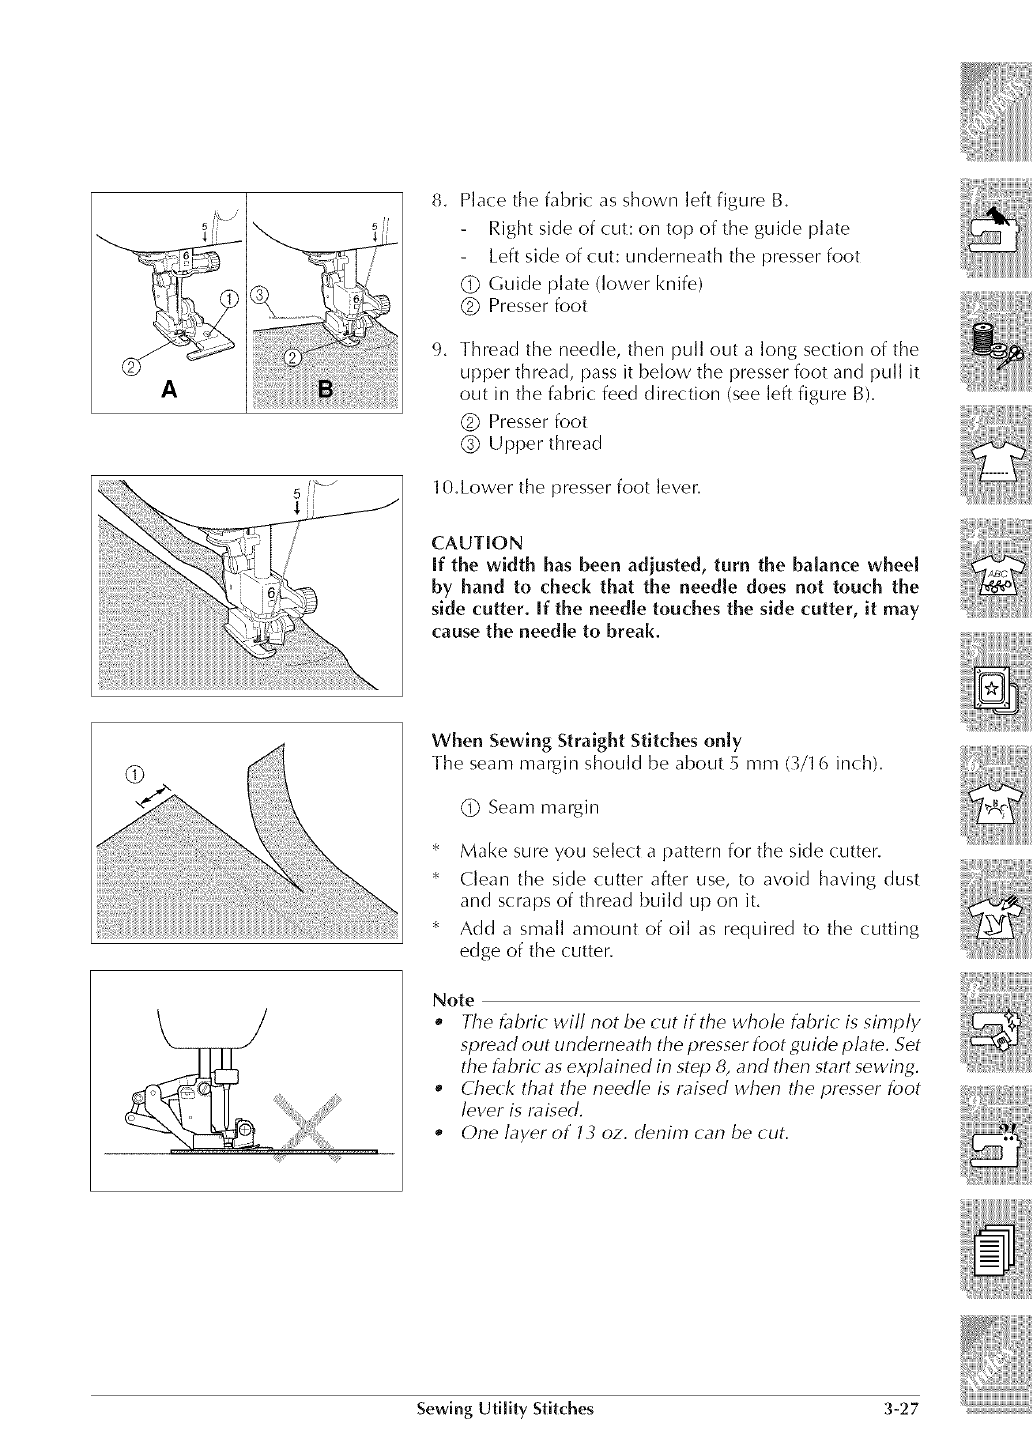
A
5
8. Place the fabric as shown left figure B.
Right side of cut: on top of the guide plate
Left side of cut: underneath the presser foot
(_ Guide plate (lower knife)
(_ Presser foot
9. Thread the needle, then pull out a long section of the
upper thread, pass it below the presser foot and pull it
out in the fabric feed direction (see left figure B).
(_ Presser foot
(_) Upper thread
10.Lower the presser foot lever.
CAUTION
If the width has been adiusted, turn the balance wheel
by hand to check that the needle does not touch the
side cutter. If the needle touches the side cutter, it may
cause the needle to break.
When Sewing Straight Stitchesonly
The seam margin should be about 5 mm (3/1 6 inch).
(_ Seam margin
* Make sure you select a pattern for the side cutter.
* C]ean the side cutter after use, to avoid having dust
and scraps of thread bui]d up on it.
* Add a small amount of oil as required to the cutting
edge of the (:utter.
Note
eThe _bric will not be cut if the whole fabric is simply
spread out underneath the presser foot guide plate. Set
the _bric as explained in step 8, and then start sewing.
•Check that the needle is raised when the presser foot
lever is raised.
oOne layer of 13 oz. denim (:an be cut.
Sewing Utility Stitches 3-27
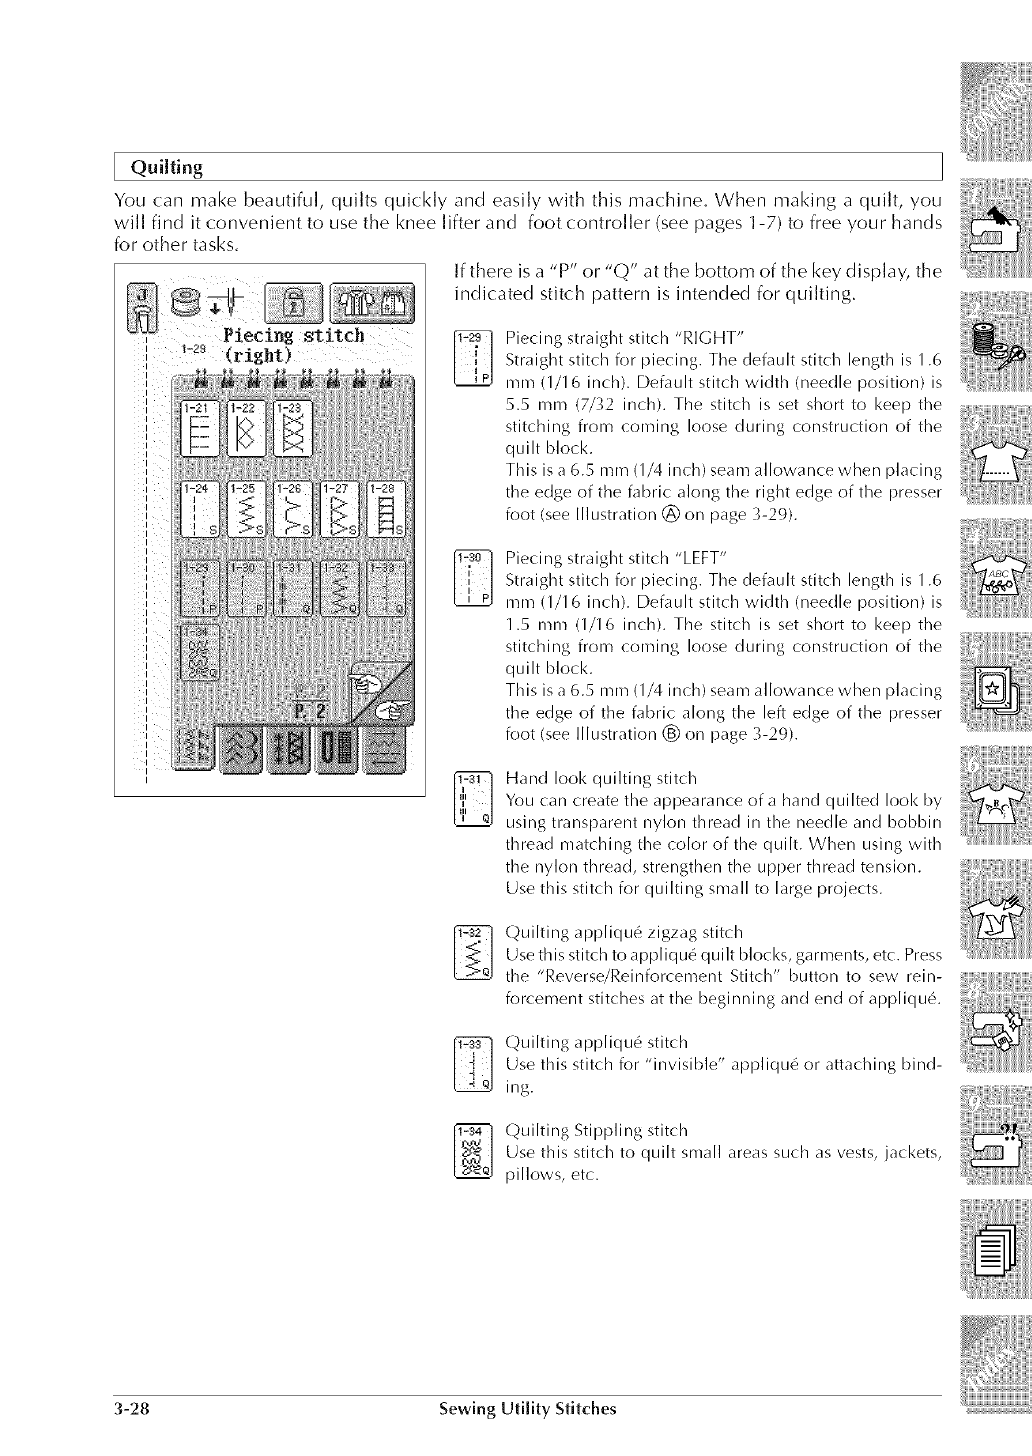
[ Quilting
You can make beautiful, quilts quickly and easily with this machine. When making a quilt, you
wi]] find it convenient to use the knee ]ifter and foot control]er (see pages 1-7) to free your hands
for other tasks.
If there is a "P" or "Q" at the bottom of the key display, the
indicated stitch pattern is intended for qui]ting.
I
Piecing stitch
I 1-29 , '
I (right)
Piecing straight stitch "RIGHT"
Straight stitch for piecing. The default stitch length is 1.6
mm (1/16 inch). Default stitch width (needle position) is
5.5 mrn (7/_¢2 inch). The stitch is set short to keep the
stitching from coming loose during construction of the
quilt block.
This is a 6.5 mm (1/4 inch) seam allowance when placing
the edge of the fabric along the right edge of the presser
foot (see Illustration _) on page %29).
Piecing straight stitch "LEFT"
Straight stitch for piecing. The default stitch length is 1.6
mm (1/16 inch). Default stitch width (needle position) is
1.5 mm (1/16 inch). The stitch is set short to keep the
stitching from coming loose during construction of the
quilt block.
This is a 6.5 mrn (1/4 inch) seam allowance when placing
the edge of the fabric along the left edge of the presser
foot (see Illustration _) on page %29).
Hand look quilting stitch
You can create the appearance of a hand quilted look by
using transparent nylon thread in the needle and bobbin
thread matching the color of the quilt. When using with
the nylon thread, strengthen the upper thread tension.
Use this stitch for quilting small to large projects.
Quilting appliqu6 zigzag stitch
Use this stitch to appliqu6 quilt blocks, garments, etc. Press
J' S '"
the Rever e/Remtorcement Stitch" button to sew rein-
forcement stitches at the beginning and end of appliqu6.
Quilting appliqu_ stitch
Use this stitch for "invisible" appliqu_ or attaching bind-
ing.
Quilting Stippling stitch
Use this stitch to quilt small areas such as vests, jackets,
pillows, etc.
3-28 Sewing Utility Stitches
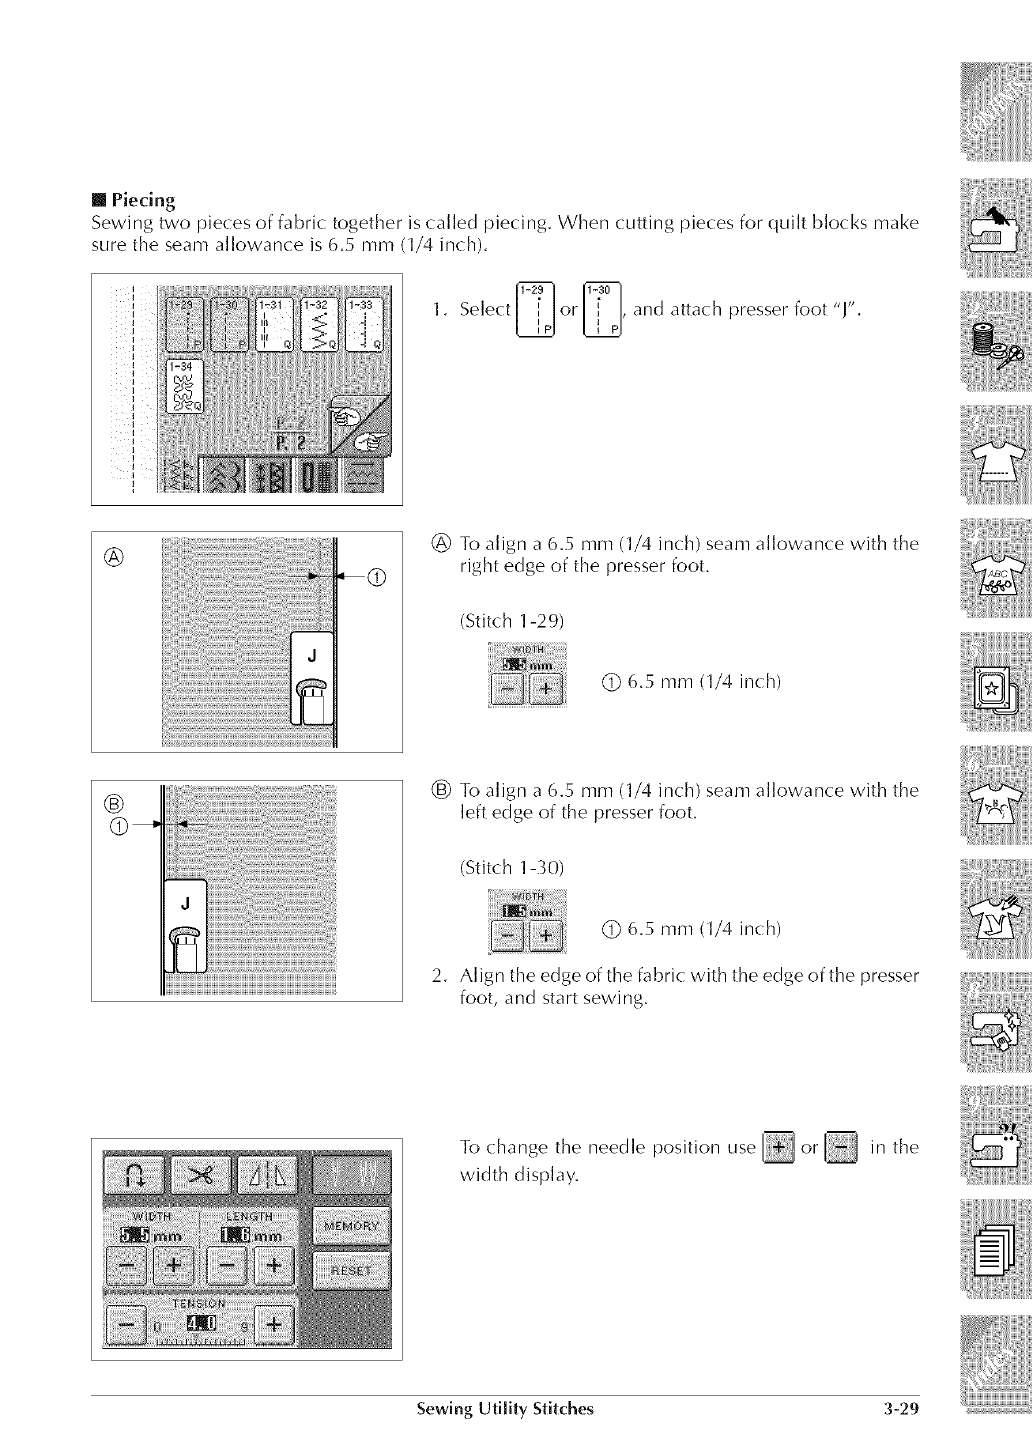
[] Piecing
Sewing two pieces of fabric together is called piecing. When cutting pieces for quilt blocks make
sure the seam allowance is 6.5 mm (1/4 inch).
1-291. Select _ or , and attach presser foot "J".
®® To align a 6.5 mm (1/4 inch) seam allowance with the
right edge of the presser foot.
(Stitch 1-29)
(_ 6.5 mm (1/4 inch)
®® To align a 6.5 mm (1/4 inch) seam allowance with the
left edge of the presser foot.
(Stitch 1-30)
(_ 6.5 mm (1/4 inch)
2. Align the edge of the fabric with the edge of the presser
foot, and start sewing.
To change the needle position use _ or _ in the
width display.
Sewing Utility Stitches 3-29

[] Quilting
Sewing together the quilt front, batting, and backing is called quilting. You (:an sew the quilt with
the walking foot to keep the quilt front, batting, and backing from sliding. Your walking foot has a
set of feed dogs that match the reaction of the feed dogs that rise above the surface of the needle
plate as you sew.
1. Attach the walking foot (see page 1-40).
2. Select _ or _.
3. Place one hand on each side of the presser foot to hold
the fabric securely. Sew while holding the fabric.
Note
,Sew in slow to medium speed.
,Do not sew in reverse or use stitches that require sidle
ways o1 revel:se feeding Always check to be sure that
your quilting surface is securely basted before begin-
ning to sew. Ma(hine quilt spe(ialized needles and
threads are also available for ma(hine quilting.
3-30 Sewing Utility Stitches
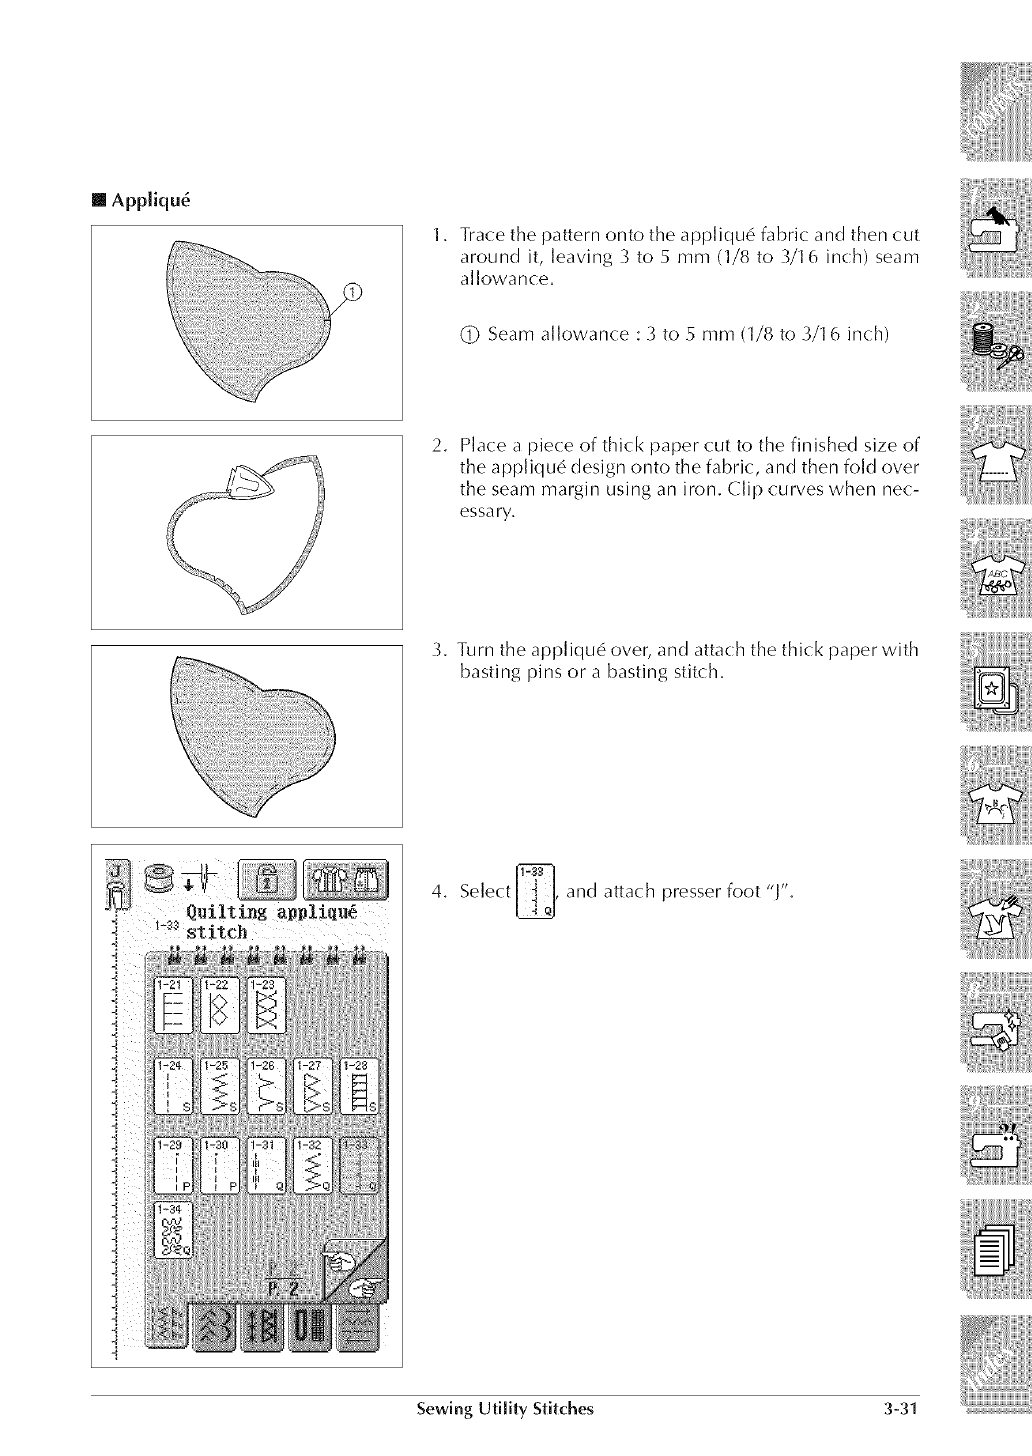
[]AppJiqu6
1. Trace the pattern onto the appliqu(_ fabric and then cut
around it, leaving 3 to 5 mm (1/8 to _/1 6 inch) seam
allowance.
(_ Seam allowance : 3 to 5 mm (1/8 to 3/1 6 inch)
2. Place a piece of thick paper cut to the finished size of
the appliqu6 design onto the fabric, and then fold over
the seam margin using an iron. Clip curves when nec-
essary.
_;_!_!i_z_iiii_i_i_!_i!!i_i_iii_!!i!!i_z!_!!_i_iiii_!i!i_i!i_!_i_!i_!_
3. Turn the appliqu_ over, and attach the thick paper with
basting pins or a basting stitch.
4. Select _, and attach presser foot "J".
Sewing Utility Stitches 3-31
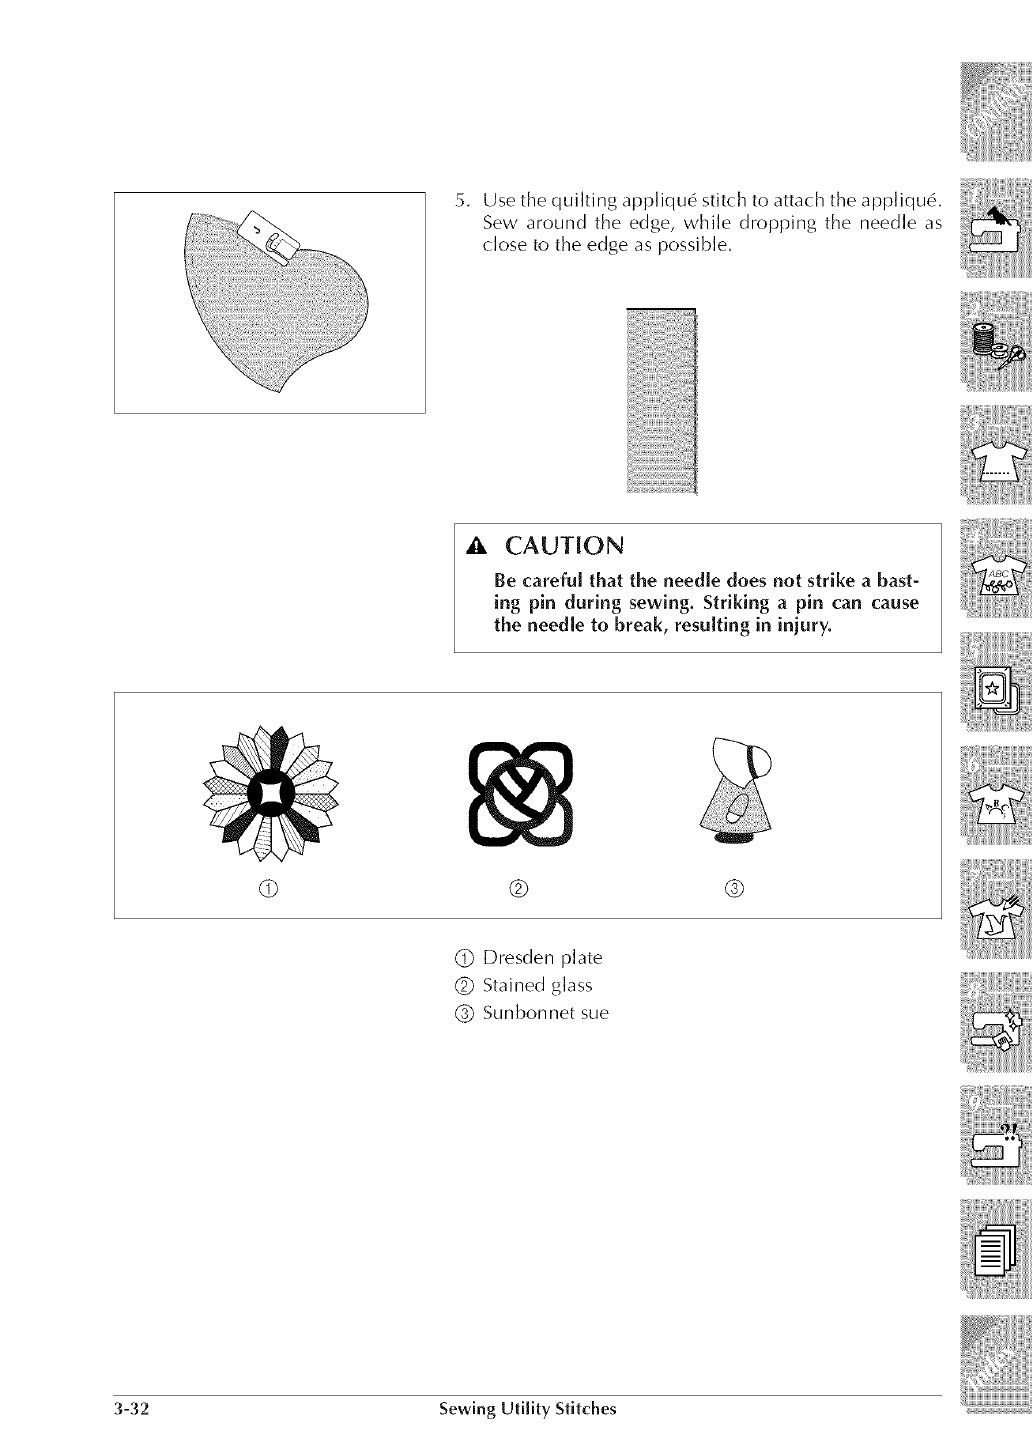
_!_i!i_i_i_i_i!{_i_!i_ii!i!_i_!i!_i:i_i_z_i:i_!ii!_!i!!i_i:_@_@_.........
_:_i_!_i!!_!_!i!i_i!iiJi!i_i!i@_!_i_!i_!_ii_!i!_!_i_i_i_i_i_ii_!_i_i_i!_i_!_!_i_i_i_ii_i_i!i_!ii_ii_i_!i_i_!_!_!_i_i_i!i_!_ii!i!ii_i_i_!i_iii_i!:@_ii_:_
_iiii!{iiii_iil
2, Use the quilting appliqud stitch to attach the appliqud.
Sew around the edse, while dropping the needle as
close to the edge as possible.
A CAUTION
Be careful that the needle does not strike a bast-
ing pin during sewing. Striking apin can cause
the needle to break, resulting in injury.
@ ® @
{D Dresden plate
(_ Stained glass
(_) Sunbonnet sue
3-32 Sewing Utility Stitches
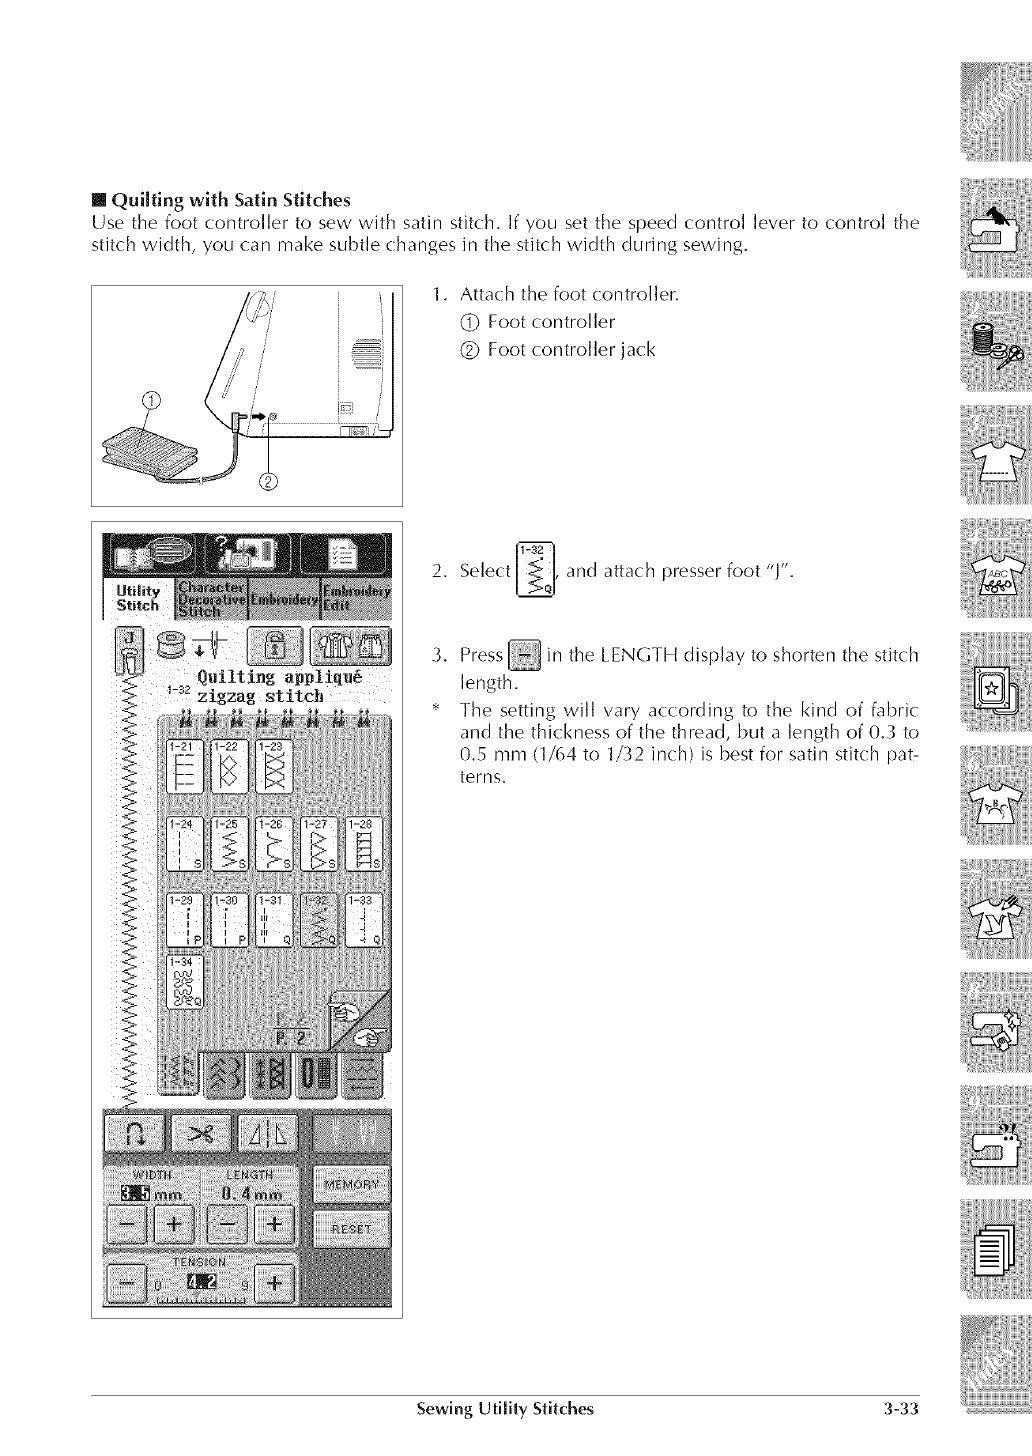
[] Quilting with Satin Stitches
Use the foot controller to sew with satin stitch. If you set the speed control lever to control the
stitch width, you can make subtle changes in the stitch width during sewing.
1. Attach the foot controller.
(_ Foot controller
(_) Foot controller jack
Quilting appliqu_
stitch
2. Select _, and attach presser foot "J".
3, Press_ in the LENGTH display to shorten the stitch
length.
The setting will vary according to the kind of fabric
and the thickness of the thread, but a length of 0._ to
0.5 mm (1/64 to 1/32 inch) is best for satin stitch pat-
terns.
Sewing Utility Stitches 3-33
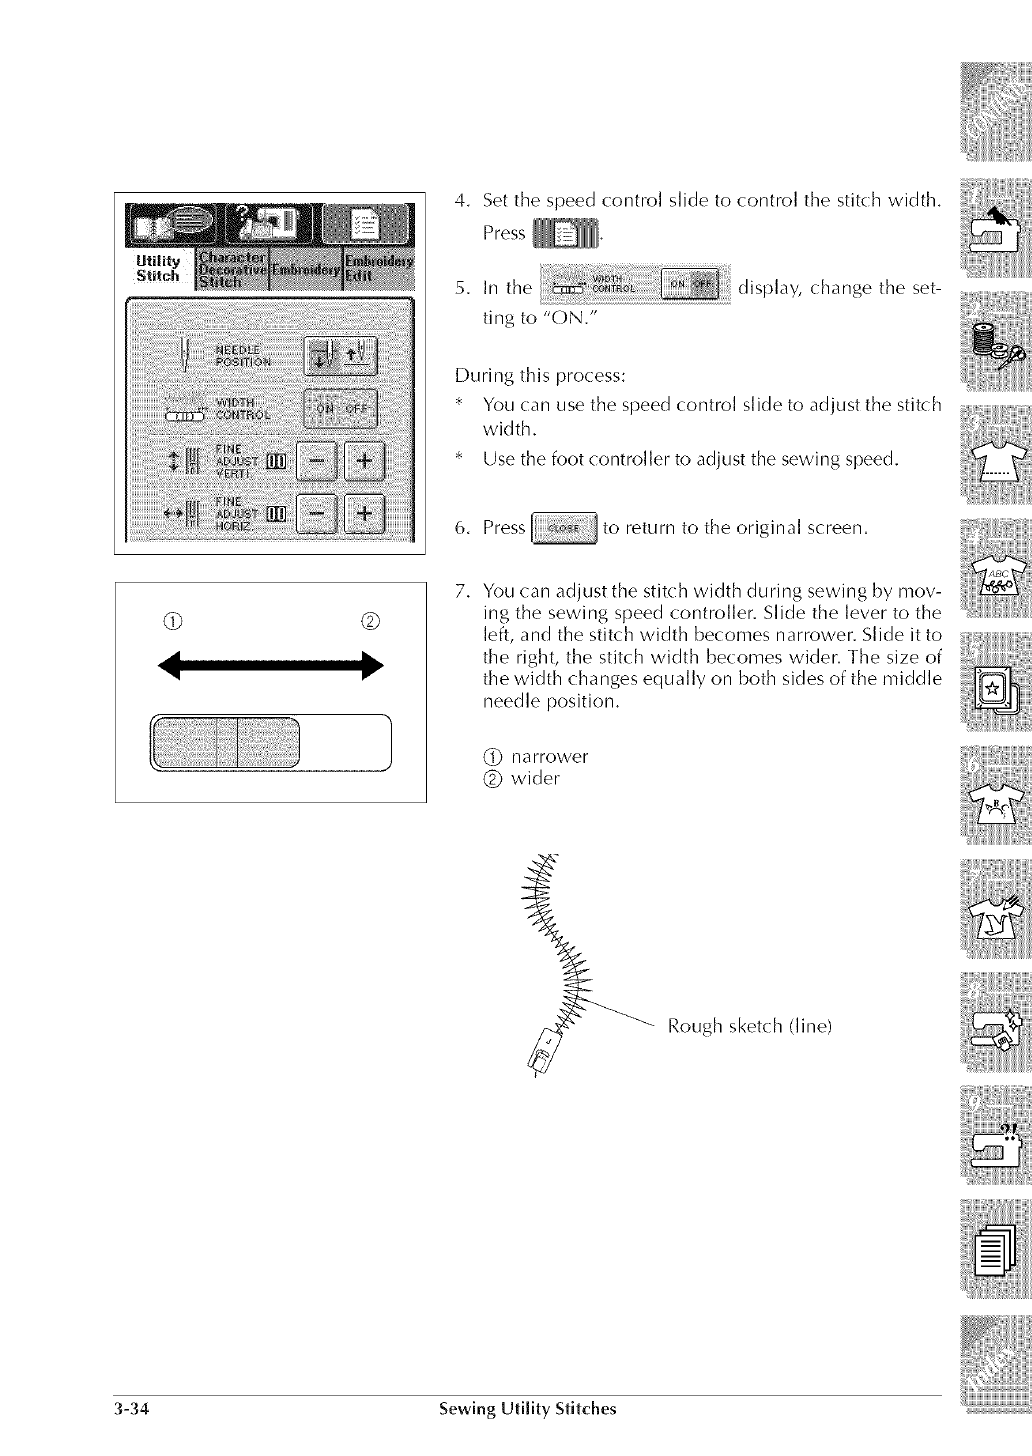
4. Set the speed control s]ide to control the stitch width.
Press _.
display, change the set-
During this process:
* You can use the speed control slide to adjust the stitch
width.
* Use the foot controller to adjust the sewing speed.
6. Press to return to the origina] screen.
(9 ®
L.
Iv
7, You can adjust the stitch width during sewing by mov-
ing the sewing speed controller. Slide the lever to the
left, and the stitch width becomes narrower. Slide it to
the right, the stitch width becomes wider. The size of
the width changes equally on both sides of the middle
needle position.
(_ narrower
(_ wider
Rough sketch (line)
3-34 Sewing Utility Stitches
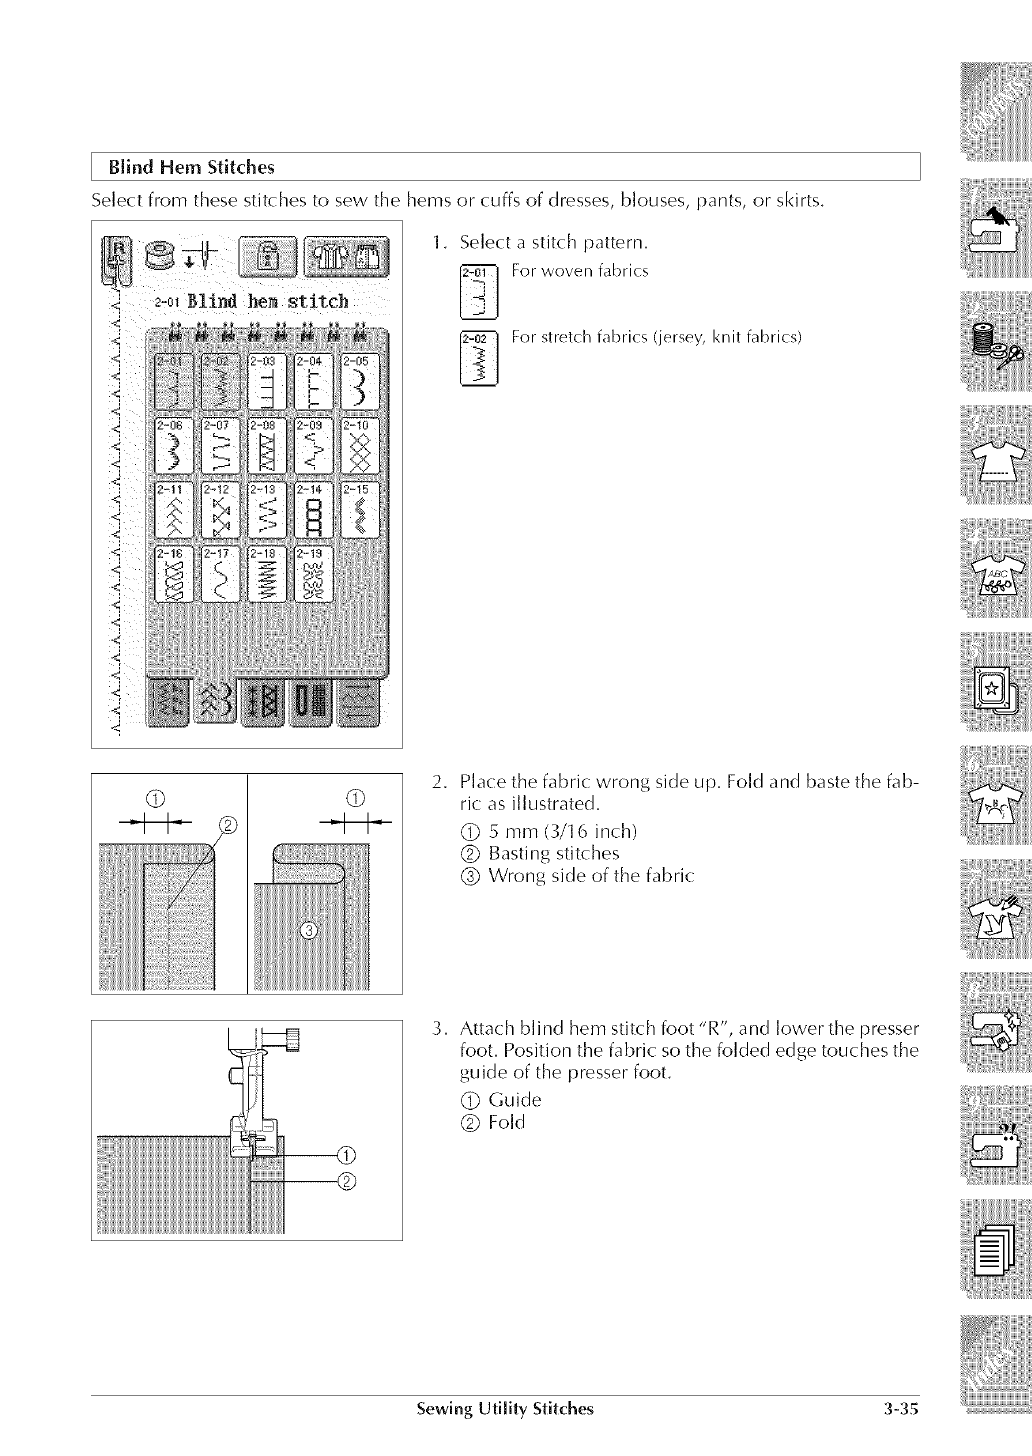
Blind Hem Stitches
Select from these stitches to sew the hems or cuffs of dresses, blouses, pants, or skirts,
Select a stitch pattern.
For woven fabrics
For stretch fabrics (jersey, knit fabrics)
(9 2, Place the fabric wrong side up. Fold and baste the fab-
ric as illustrated.
(_ 5 mm (3/16 inch)
(_ Basting stitches
(_) Wrong side of the fabric:
3. Attach blind hem stitch foot "R", and lower the presser
foot. Position the fabric so the folded edge touches the
guide of the presser foot.
(_ Guide
(_ Fold
Sewing Utility Stitches 3-35
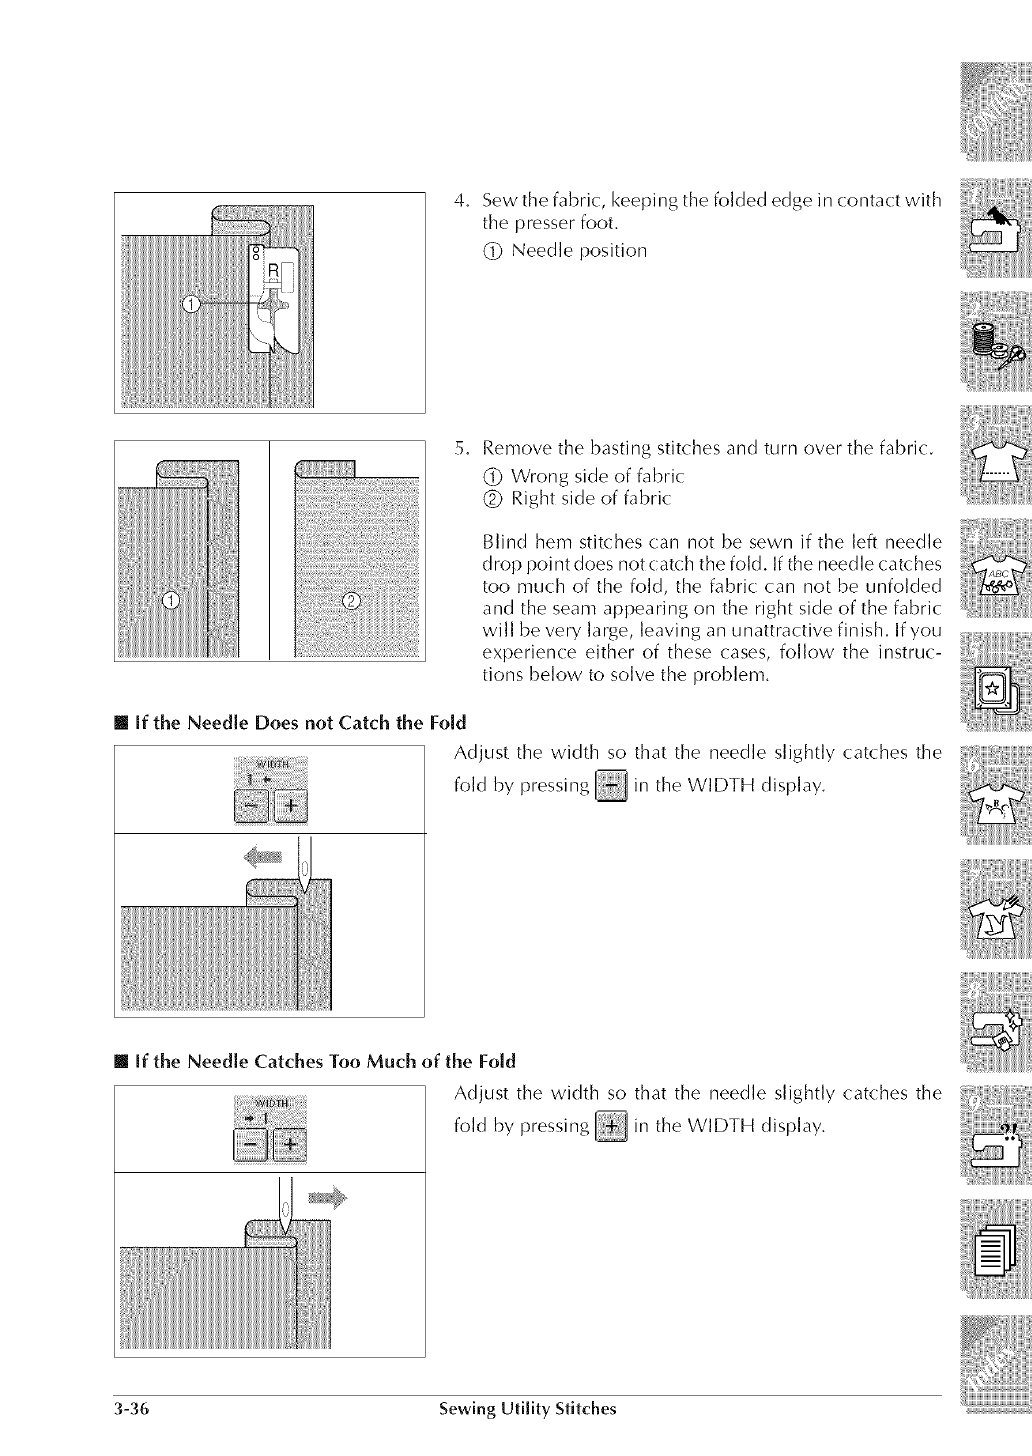
4. Sew the fabric, keeping the folded edge in contact with
the presser foot,
(_ Needle position
5, Remove the basting stitches and turn over the fabric.
(_ Wrong side of fabric
(_) Right side of fabric:
Blind hem stitches can not be sewn if the left needle
drop point does not catch the fold, If the needle catches
too much of the fold, the fabric can not be unfolded
and the seam appearing on the right side of the fabric:
will be very large, leaving an unattractive finish, If you
experience either of these cases, fo]]ow the instruc-
tions below to solve the problem,
[] If the Needle Does not Catch the Fold
Adjust the width so that the needle slightly catches the
_ fold by pressing _ in the WIDTH display.
[] If the Needle Catches Too Much of the Fold
Adjust the width so that the needle slightly catches the
fold by pressing _ in the WIDTH display,
3-36 Sewing Utility Stitches

Appliqu_
Use a temoprary spray adhesive, fabric glue or a bast-
ing stitch to attach the appliqu_ to the fabric, This will
keep the fabric from moving during sewing,
@ Appliqu_
@ Fabric glue
* Adjust the stitch length and width to correspond to the
app]iqu6 shape, size, and quality of materia] (see pages
2-8, 2-9).
3. Attach presser foot "J". Check that the needle drops
slightly off the edge of the applique, then begin sew-
ing.
@ Appliqu6 material
Sewing Utility Stitches 3-37
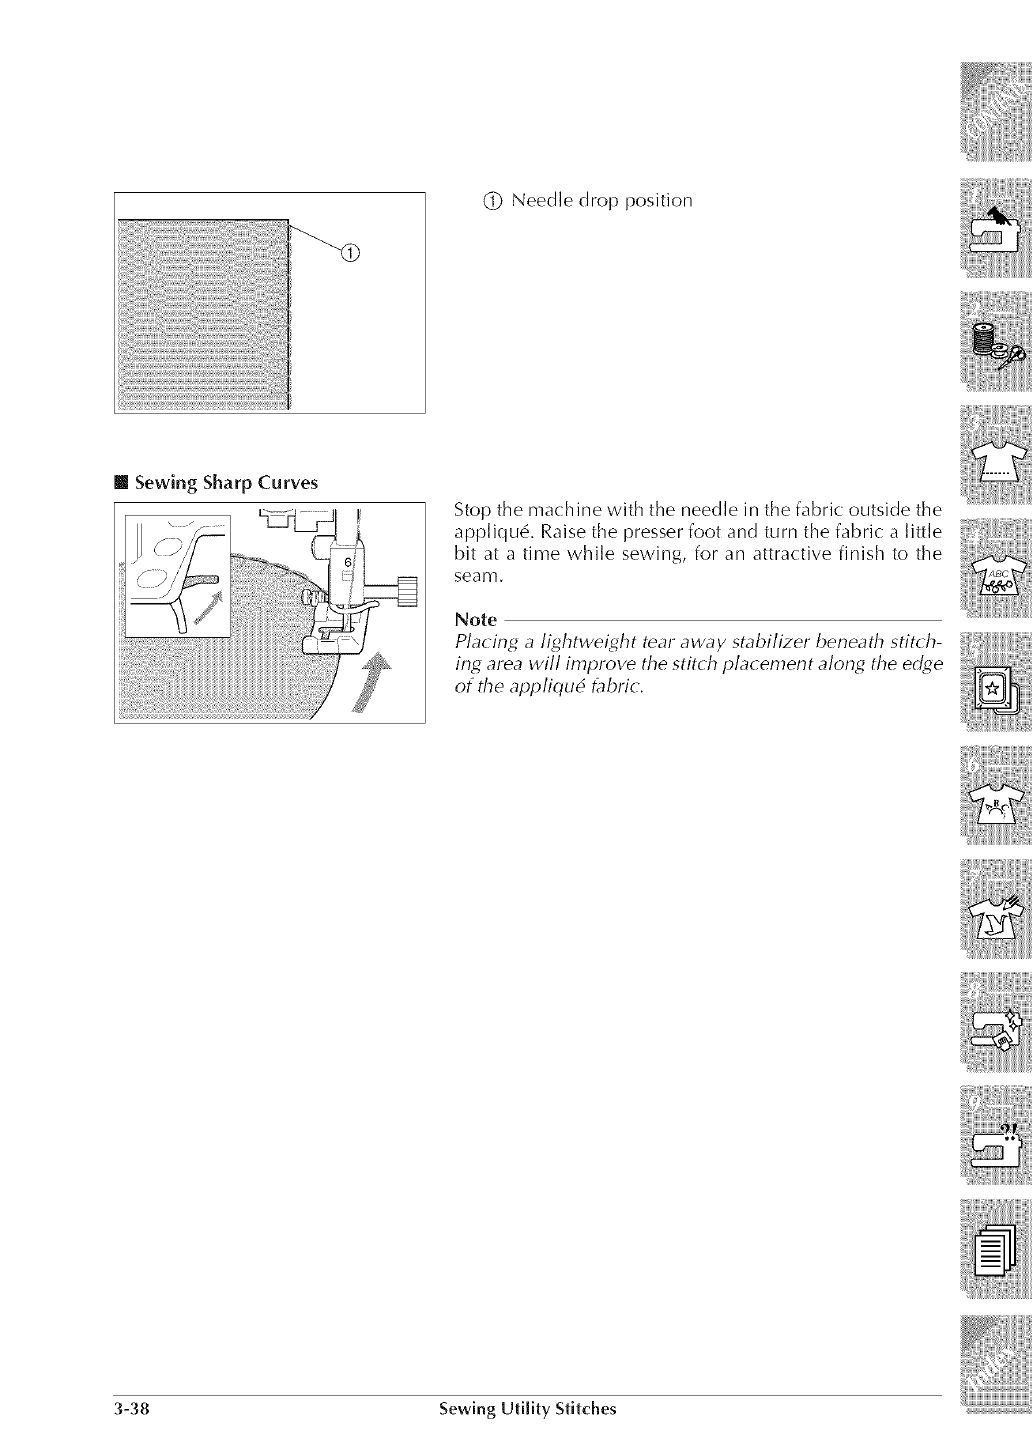
(_ Needle drop position
[] Sewing Sharp Curves
Stop the machine with the needle in the fabric outside the
applique. Raise the presser foot and turn the fabric a little
bit at a time while sewing, for an attractive finish to the
seam.
Note
Placin_ a ]it4htweit4ht tear away st_bi]izer beneath stitch-
in_ area will improve the stitch placement alon8 the ec_qe
of the appliqu_ t_bric.
3-38 Sewing Utility Stitches
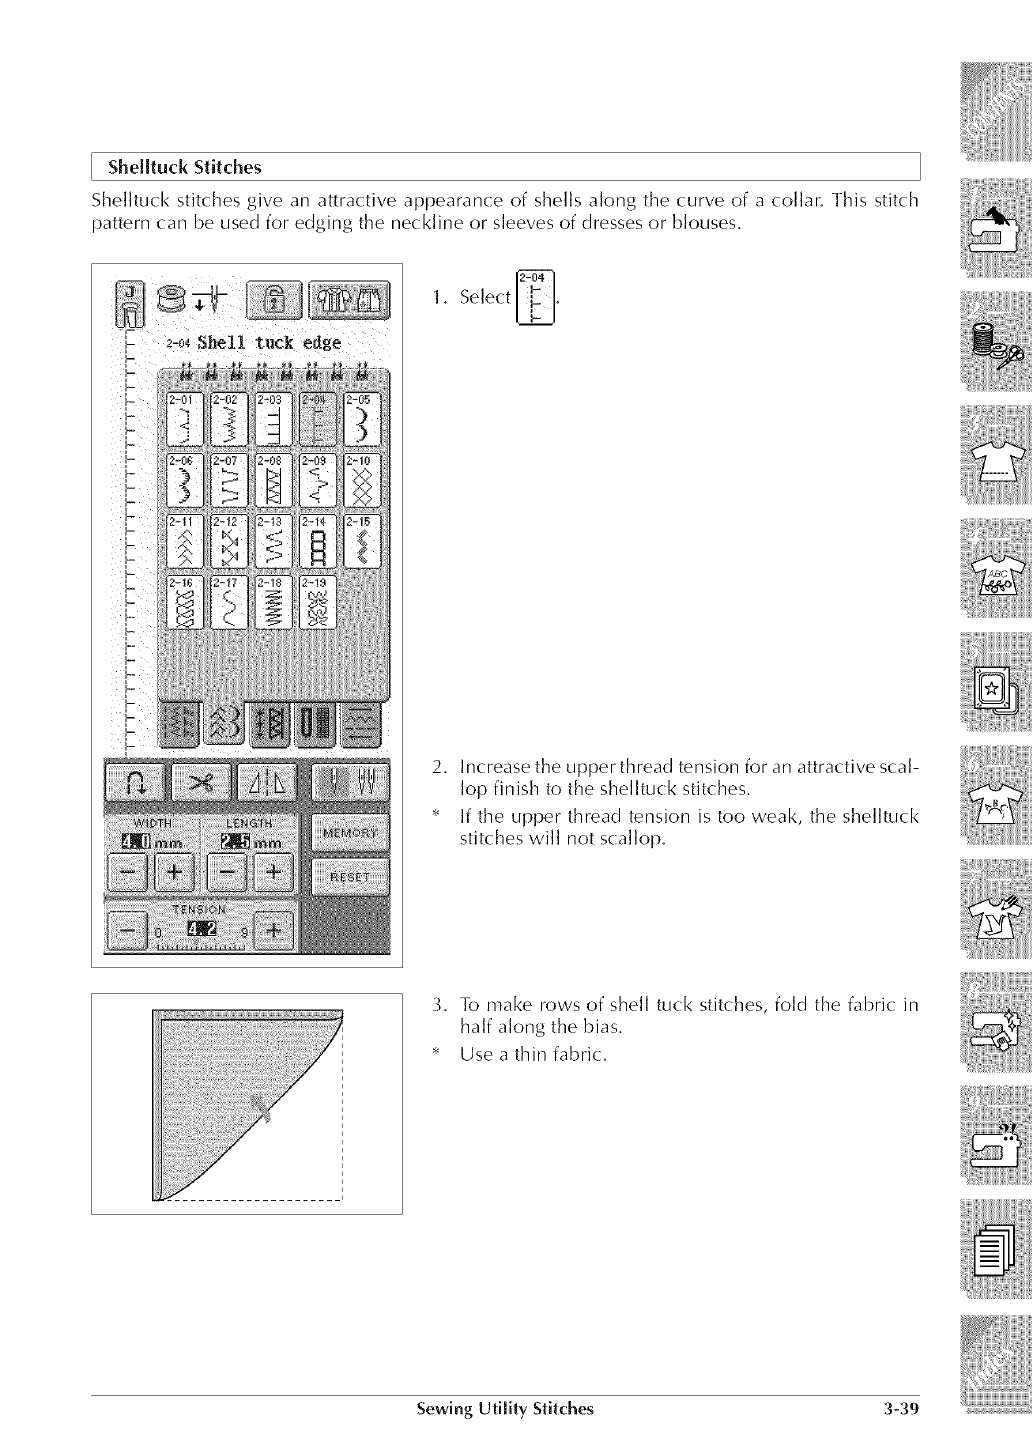
Shelltuck Stitches
Shelltuck stitches give an attractive appearance of shells along the curve of a collar. This stitch
pattern can be used for edging the neckline or sleeves of dresses or blouses.
1. Select _.
2. Increase the upper thread tension for an attractive scal-
lop finish to the shelltuck stitches.
* If the upper thread tension is too weak, the shelltuck
stitches will not scallop.
3. To make rows of shell tuck stitches, fold the fabric: in
half along the bias.
* Use a thin fabric:.
Sewing Utility Stitches 3-39
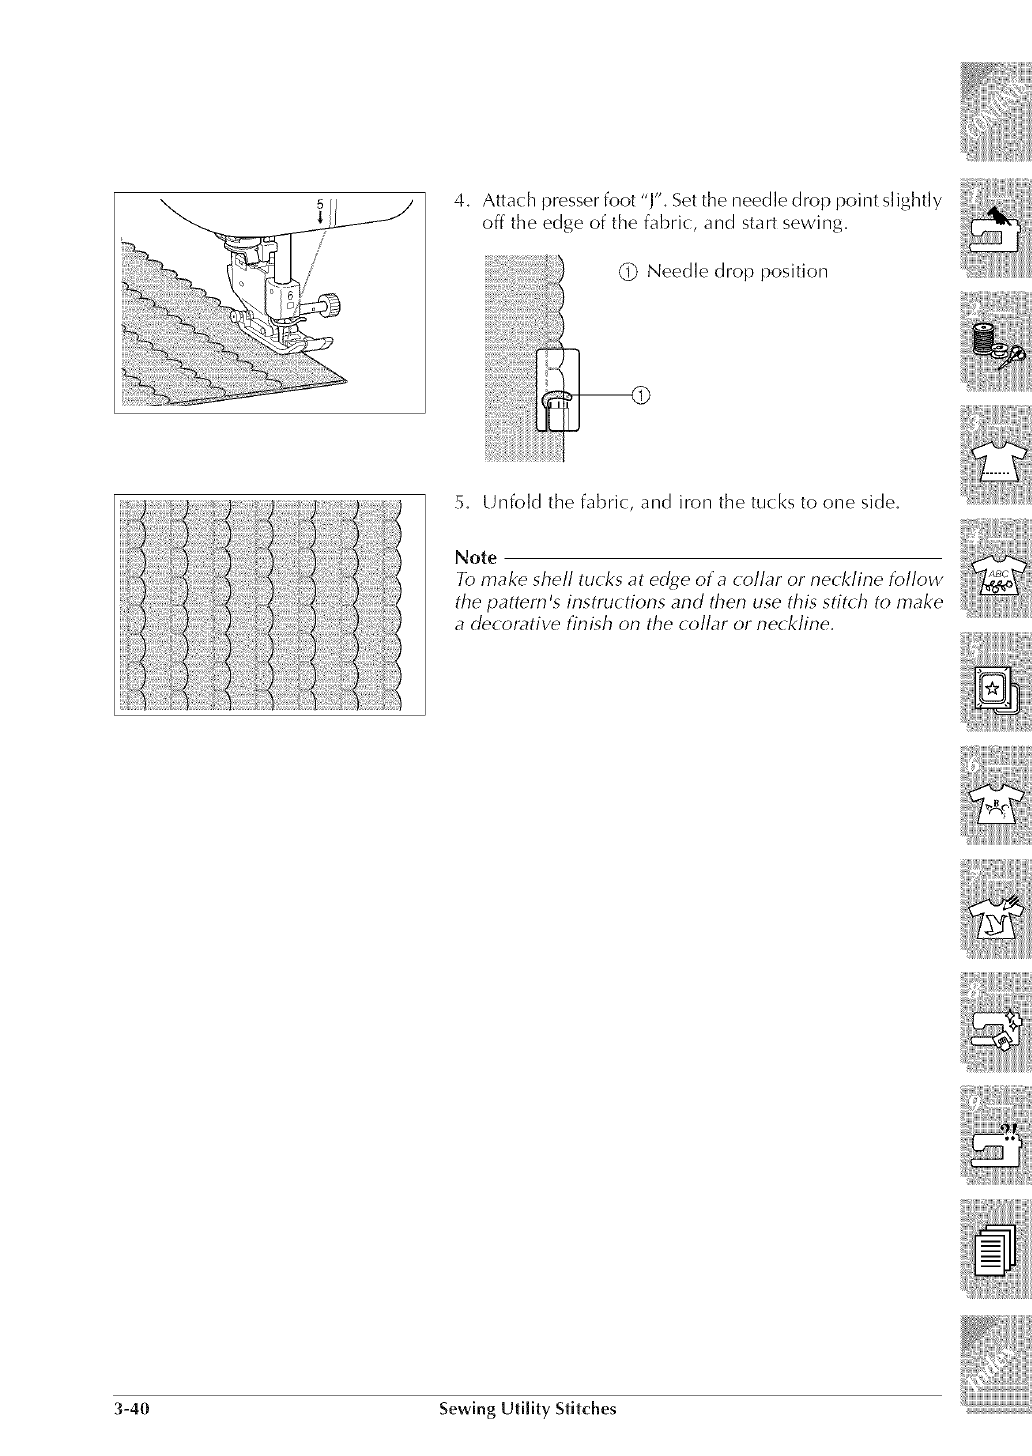
5
/
4. Attach presserfoot "l". Setthe needle drop point slightly
off the edge of the fabric, and start sewing.
(_ Needle drop position
5. Unfold the fabric, and iron the tucks to one side.
Note
To make shell tucks at e_;e of a collar o1neckline follow
the pattern's instructions and then use this stitch to make
a decol_tive finish on the collar o1 neckline.
3-40 Sewing Utility Stitches
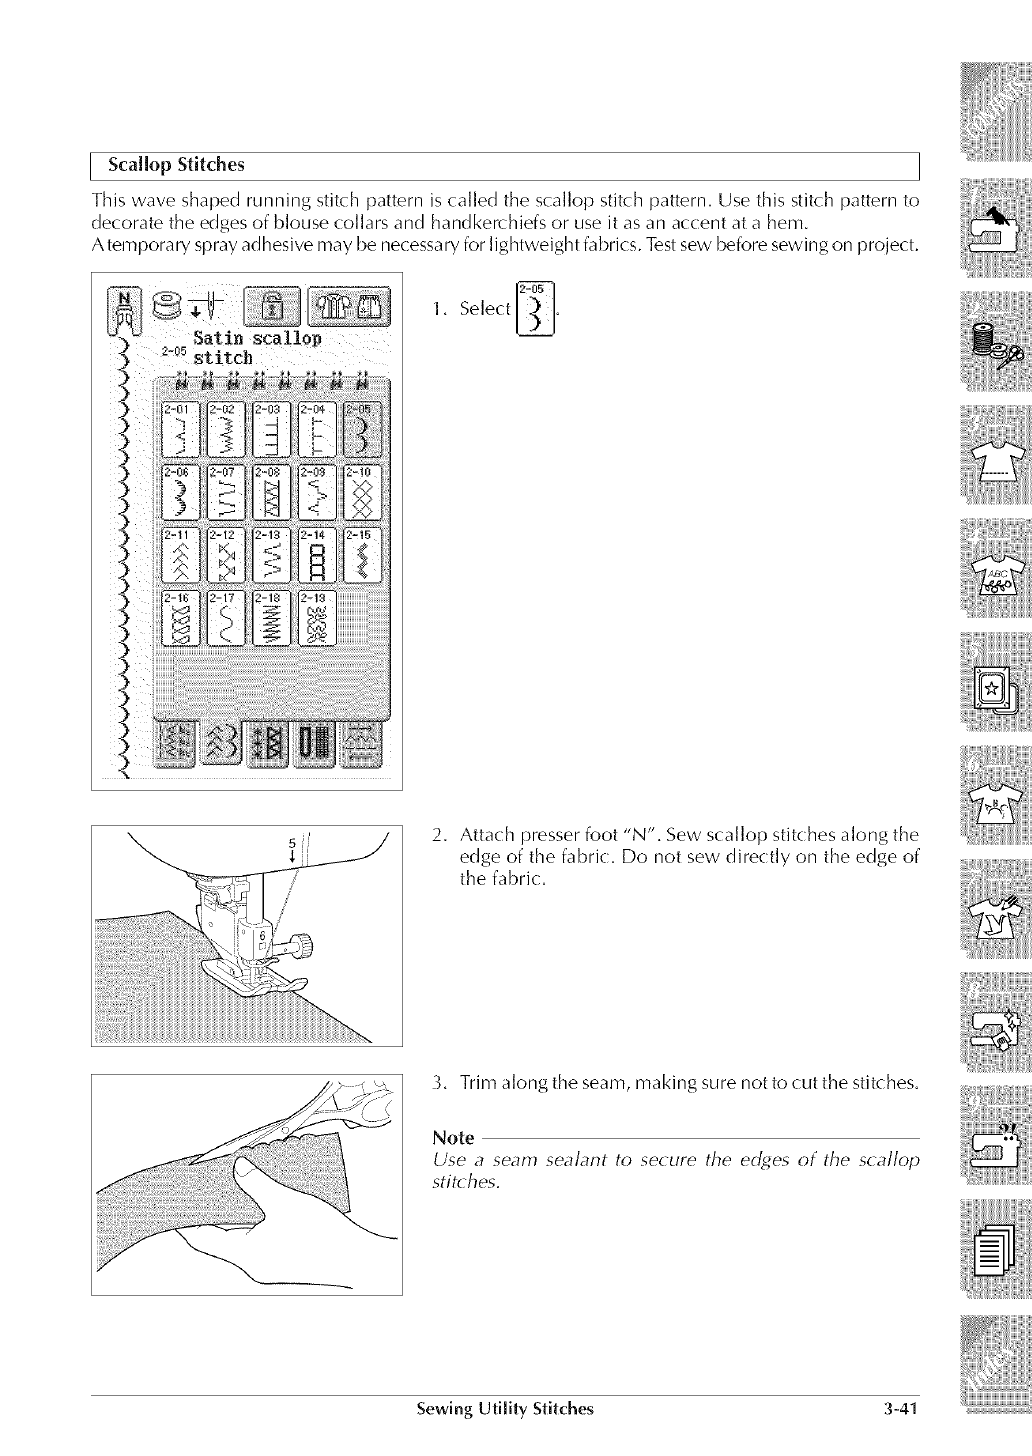
Scallop Stitches
This wave shaped running stitch pattern is called the scallop stitch pattern. Use this stitch pattern to
decorate the edges of blouse collars and handkerchiefs or use it as an accent at a hem.
A temporary spray adhesive may be necessary for lightweight fabrics. Test sew before sewing on project.
1. Select _.
2. Attach presser foot "N". Sew scallop stitches along the
edge of the fabric. Do not sew directly on the edge of
the fabric.
3. Trim along the seam, making sure notto cutthe stitches.
Note
Use a seam sealant to secure the edges of the scallop
stitches.
Sewing Ut[[ity Stitches 3-41
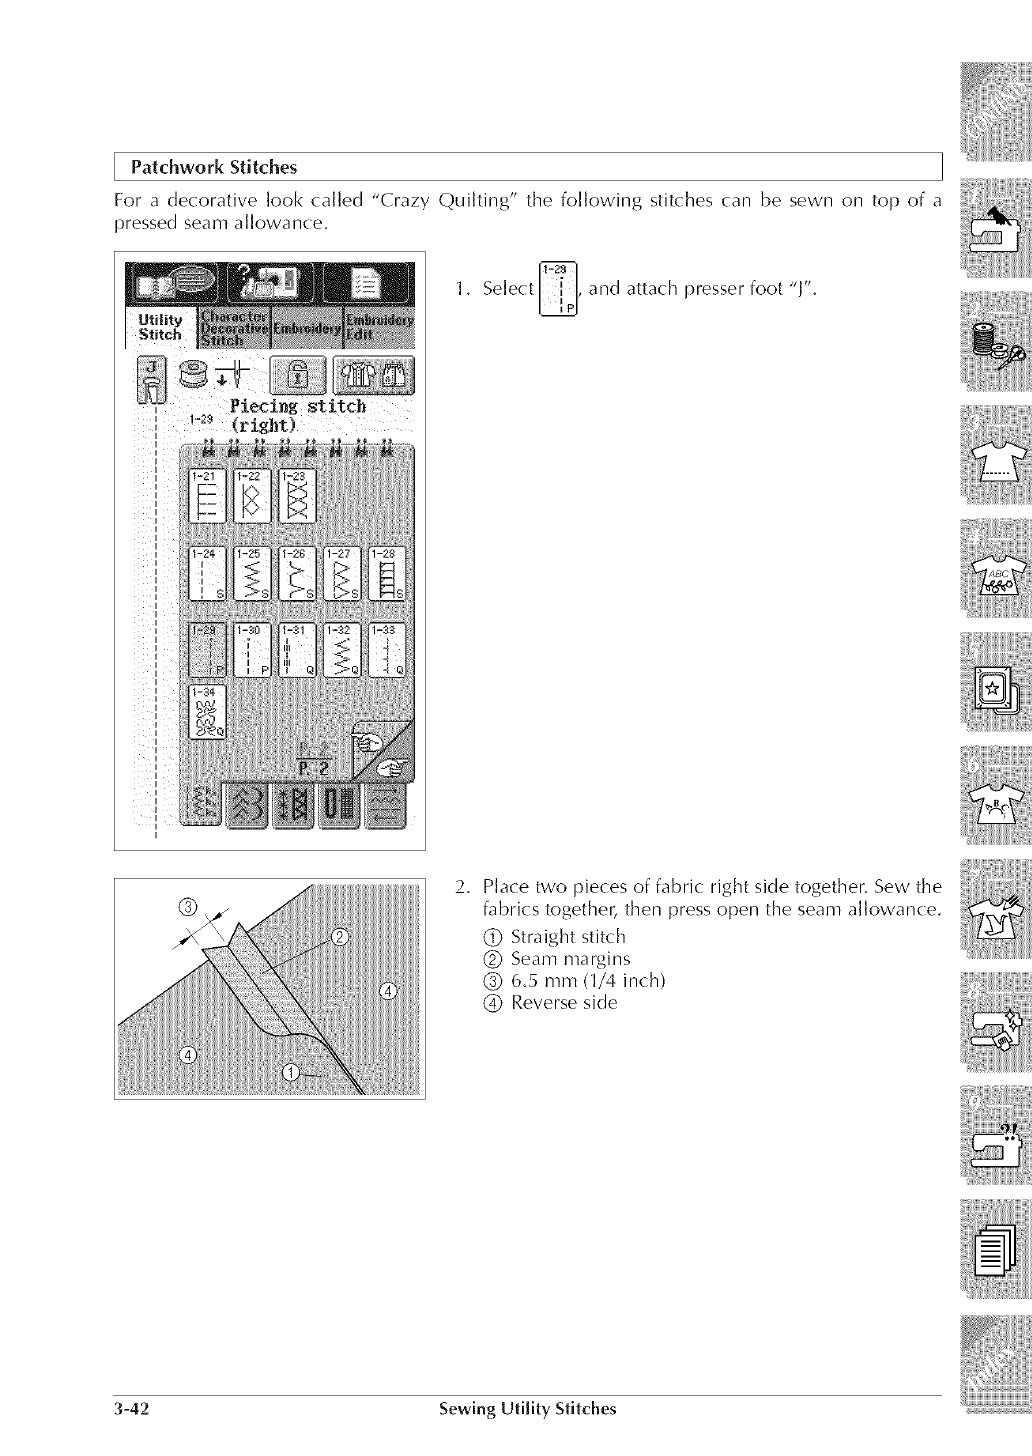
Patchwork Stitches
For a decorative look called "Crazy Quilting" the following stitches (;an be sewn on top of a
pressed seam allowance.
1. Select _, and attach presser foot "J".
I
@2, Place two pieces of fabric right side together. Sew the
fabrics together, then press open the seam allowance.
(_ Straight stitch
(_) Seam margins
(_ 6,5 mm (1/4 inch)
(_ Reverse side
3-42 Sewing Utility Stitches
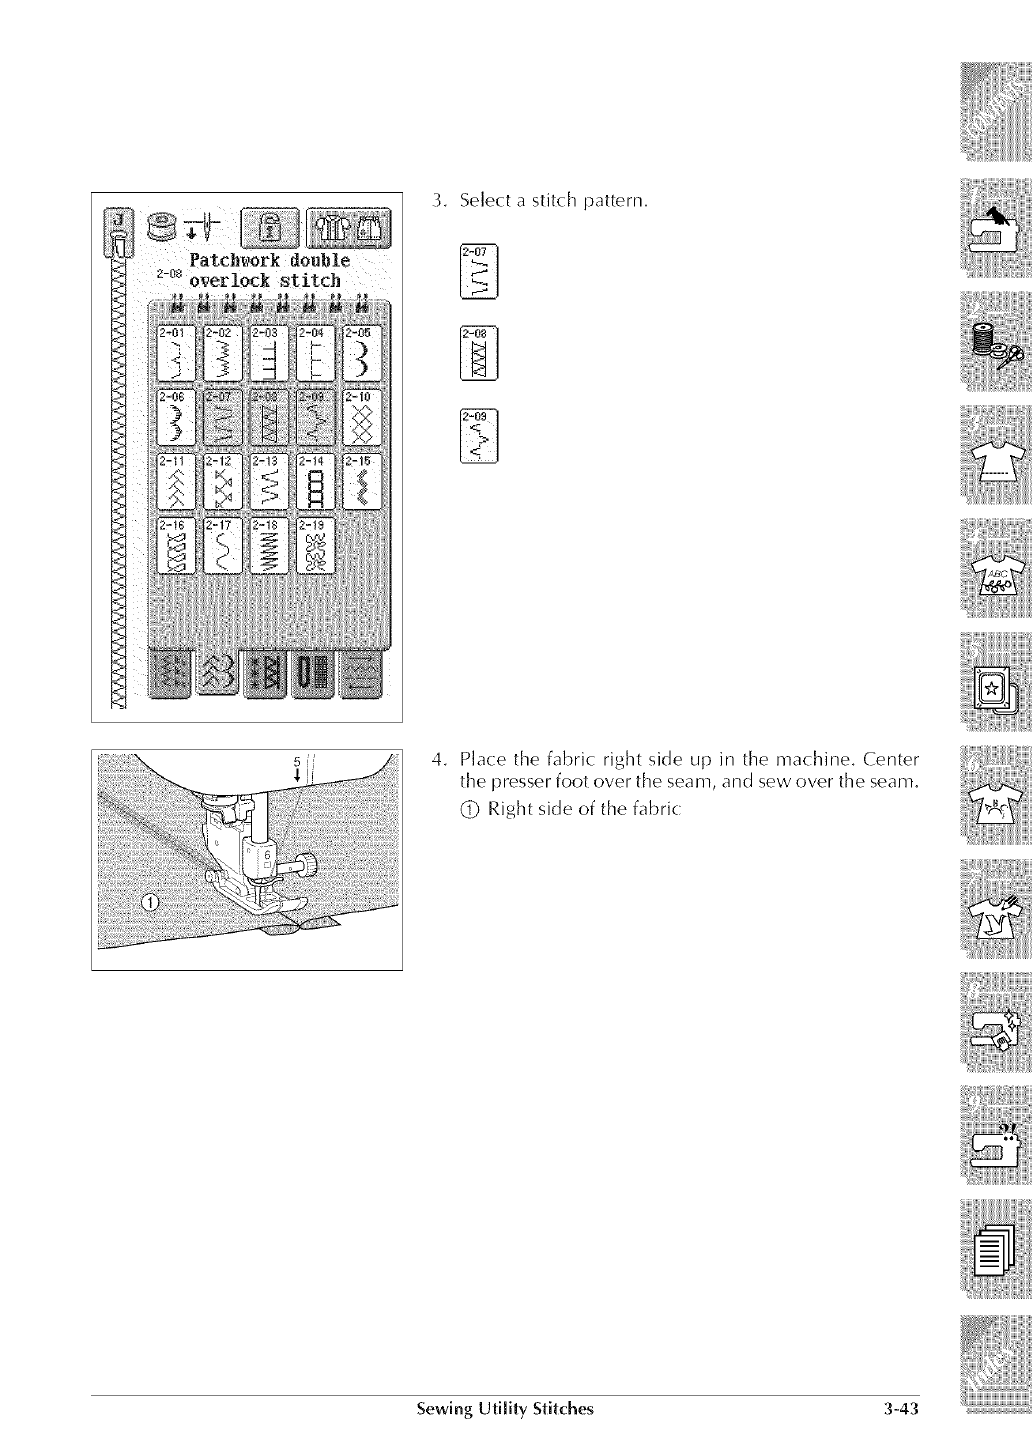
3. Select a stitch pattern.
5
i!_iii_!ii_i!ii!!i_!i_!_!_i!ii!ii_i_i!i_iii!ii!ilili_ !i!:i!ili
_i_iii!iiii_!ii_ii:i!i!ii_iiiiii_i:!i_i_i_i i:ii
iiiii_i::ii_i!i:i!ili_iliiii_ii_!ii!ii_!i_iii_i(ii_i_ i_i_i!_i
i!i!i!i i i! ili iiiiii!iii iii i! !iiii!i!iii i ii ili i!i!!!!i
4. Place the fabric right side up in the machine. Center
the presser foot over the seam, and sew over the seam.
(_ Right side of the fabric
Sewing Utility Stitches 3-43
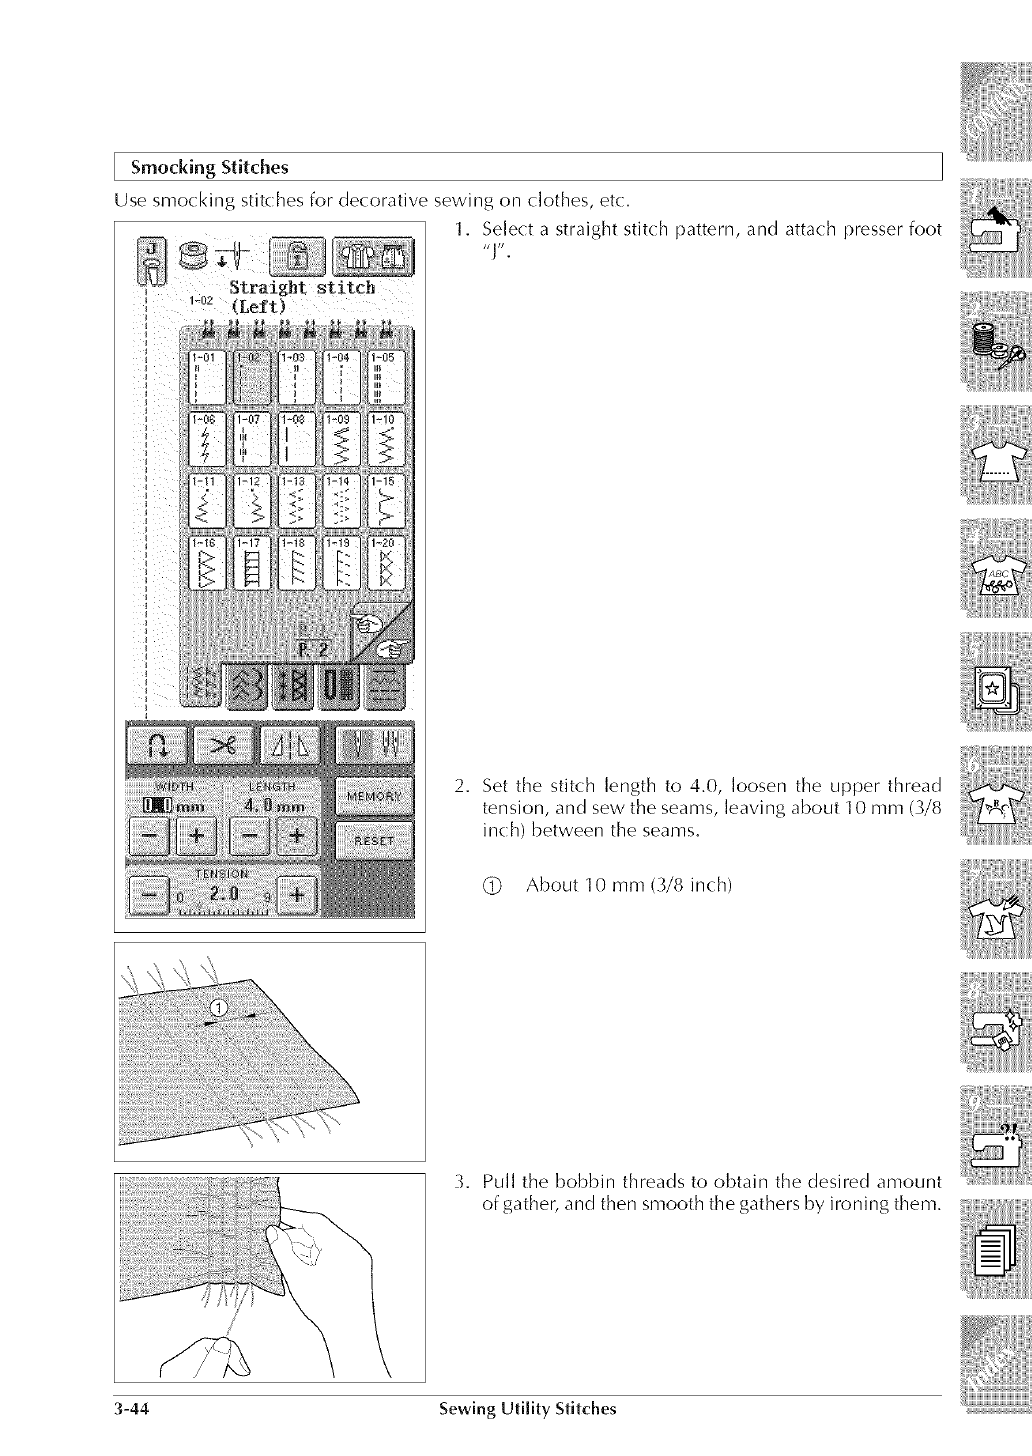
Smocking Stitches
Use smocking stitches for decorative sewing on clothes, etc.
1. Select a straight stitch pattern, and attach presser foot
2. Set the stitch length to 4.0, loosen the upper thread
tension, and sew the seams, leaving about 10 mm (3/8
inch) between the seams.
(_ About 10 mm (3/8 inch)
3. Pull the bobbin threads to obtain the desired amount
of gather, and then smooth the gathers by ironing them.
3-44 Sewing Utility Stitches

4. Select or .
5, Sew the spaces between the straight seams.
6, Pull out the straight stitch threads.
Sewing Utility Stitches 3-45
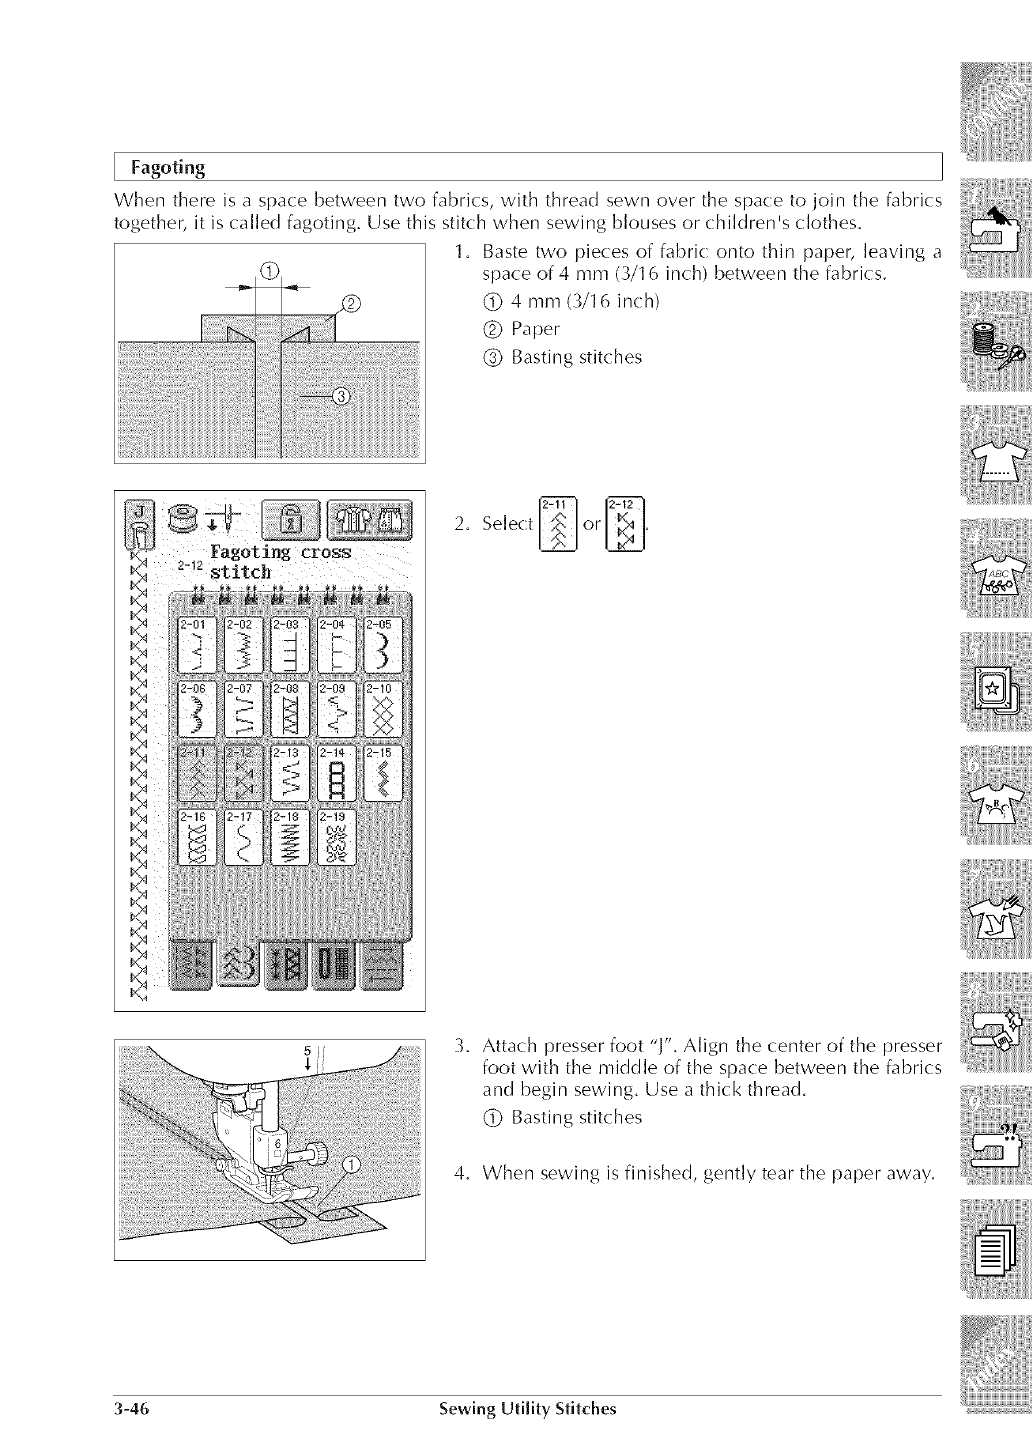
Fagoting
When there is a space between two fabrics, with thread sewn over the space to join the fabrics
together, it is called fagoting. Use this stitch when sewing blouses or children's clothes.
1. Baste two pieces of fabric onto thin paper, leaving a
C space of 4 mm (3/16 inch) between the fabrics.
(_ 4 mm (3/16 inch)
(_ Paper
(_) Basting stitches
3. Attach presser foot "J". Align the center of the presser
foot with the middle of the space between the fabrics
and begin sewing. Use a thick thread.
(_ Basting stitches
4. When sewing is finished, gently tear the paper away.
3-46 Sewing Utility Stitches
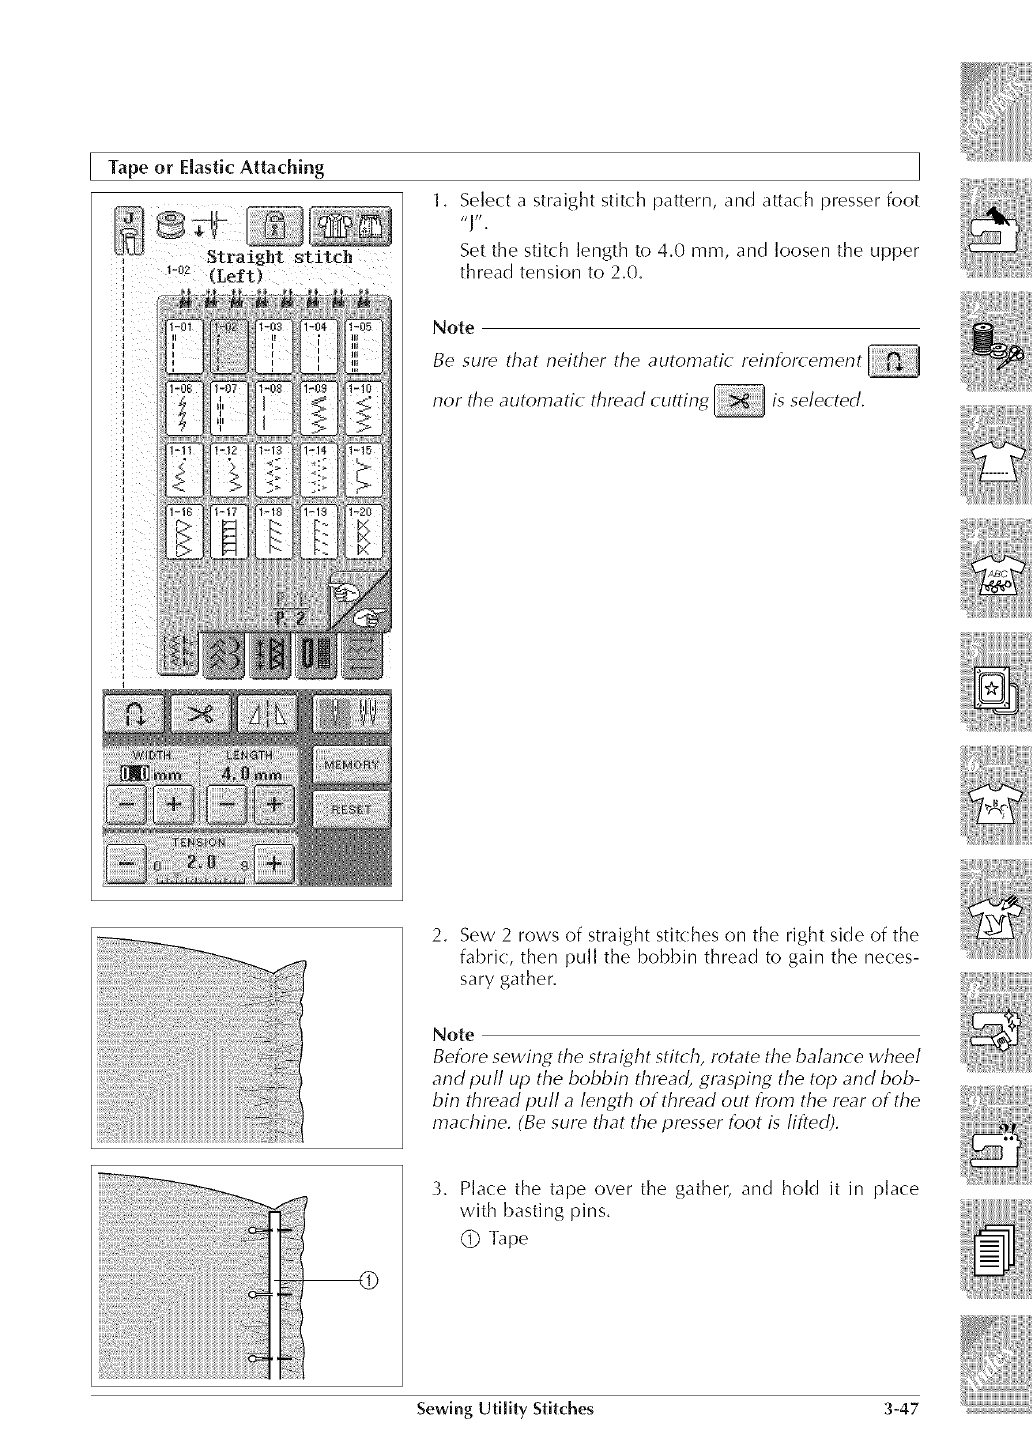
Tape or Elastic Attaching
1, Select a straight stitch pattern, and attach presser foot
Set the stitch length to 4,0 mm, and loosen the upper
thread tension to 2,0,
II
I
1-06
1-16 [
Note
Be sure that neither the automatic reinforcement
nor the automatic thread cutting is selected.
2, Sew 2 rows of straight stitches on the right side of the
fabric, then pull the bobbin thread to gain the neces-
sary gather,
Note
Before sewing the straight stitch, rotate the balance wheel
and pufl up the bobbin thread, gl_sping the top and bob-
bin thread puff a length of thread out from the rear of the
machine. (Be sure that the presser foot is lifted).
3, Place the tape over the gather, and hold it in place
with basting pins,
(_ Tape
Sewing UtiJity Stitches 3-47
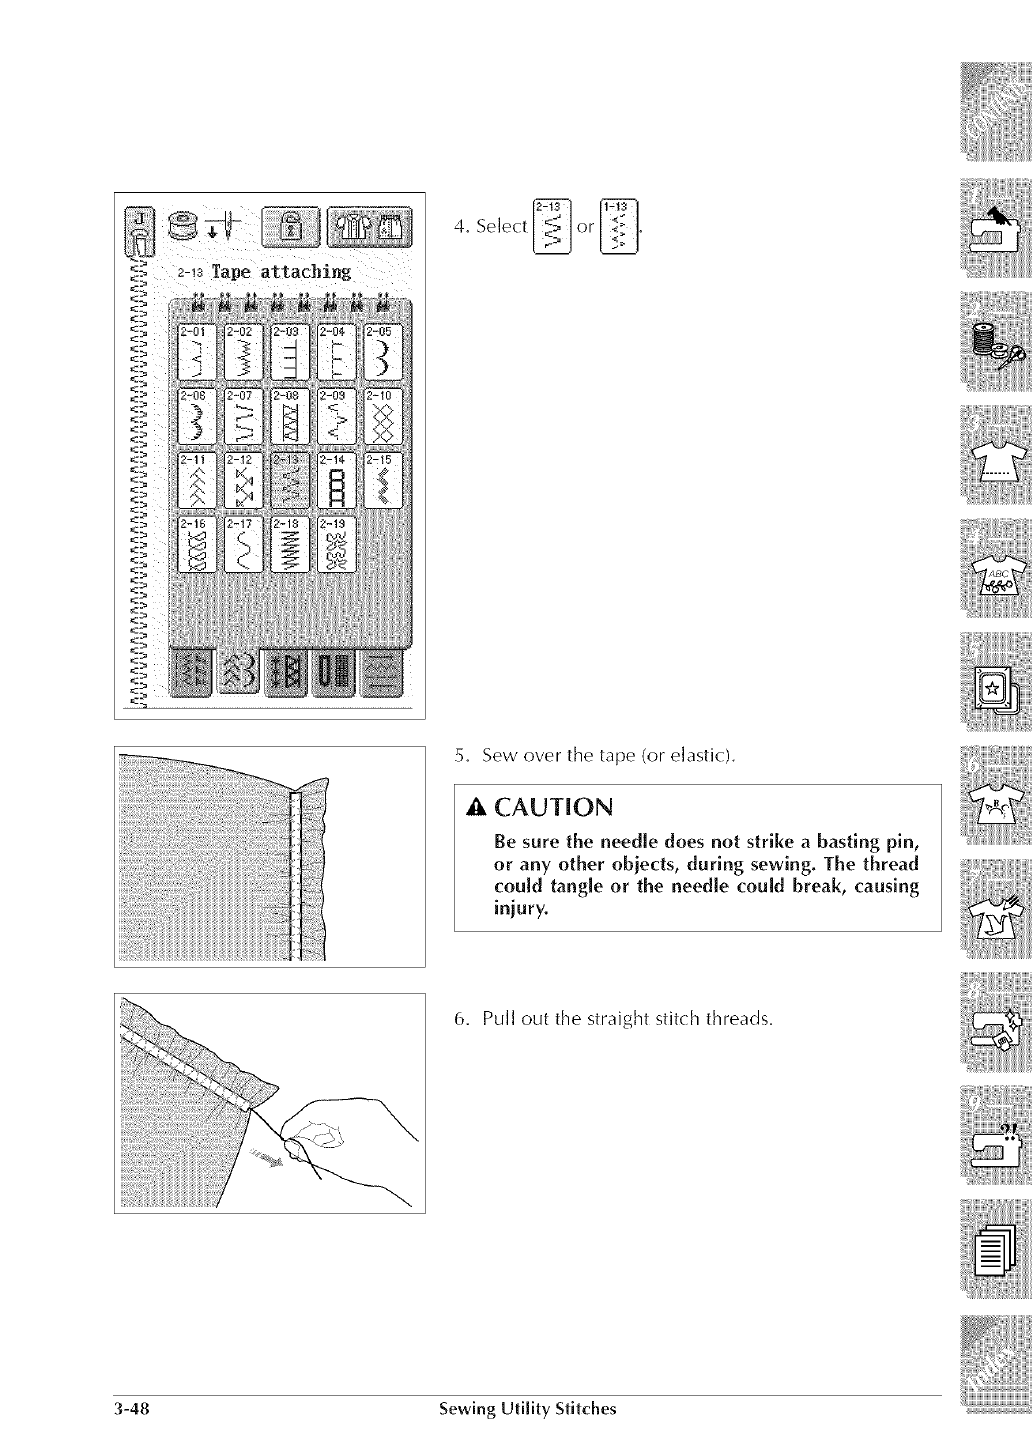
2-_sTape atSaehing
5, Sew over the tape (or elastic),
CAUTION
Be sure the needle does not strike a hasting pin,
or any other obiects , during sewing. The thread
could tangle or the needle could break, causing
iniury.
6. Pull out the straight stitch threads.
3-48 Sewing Utility Stitches
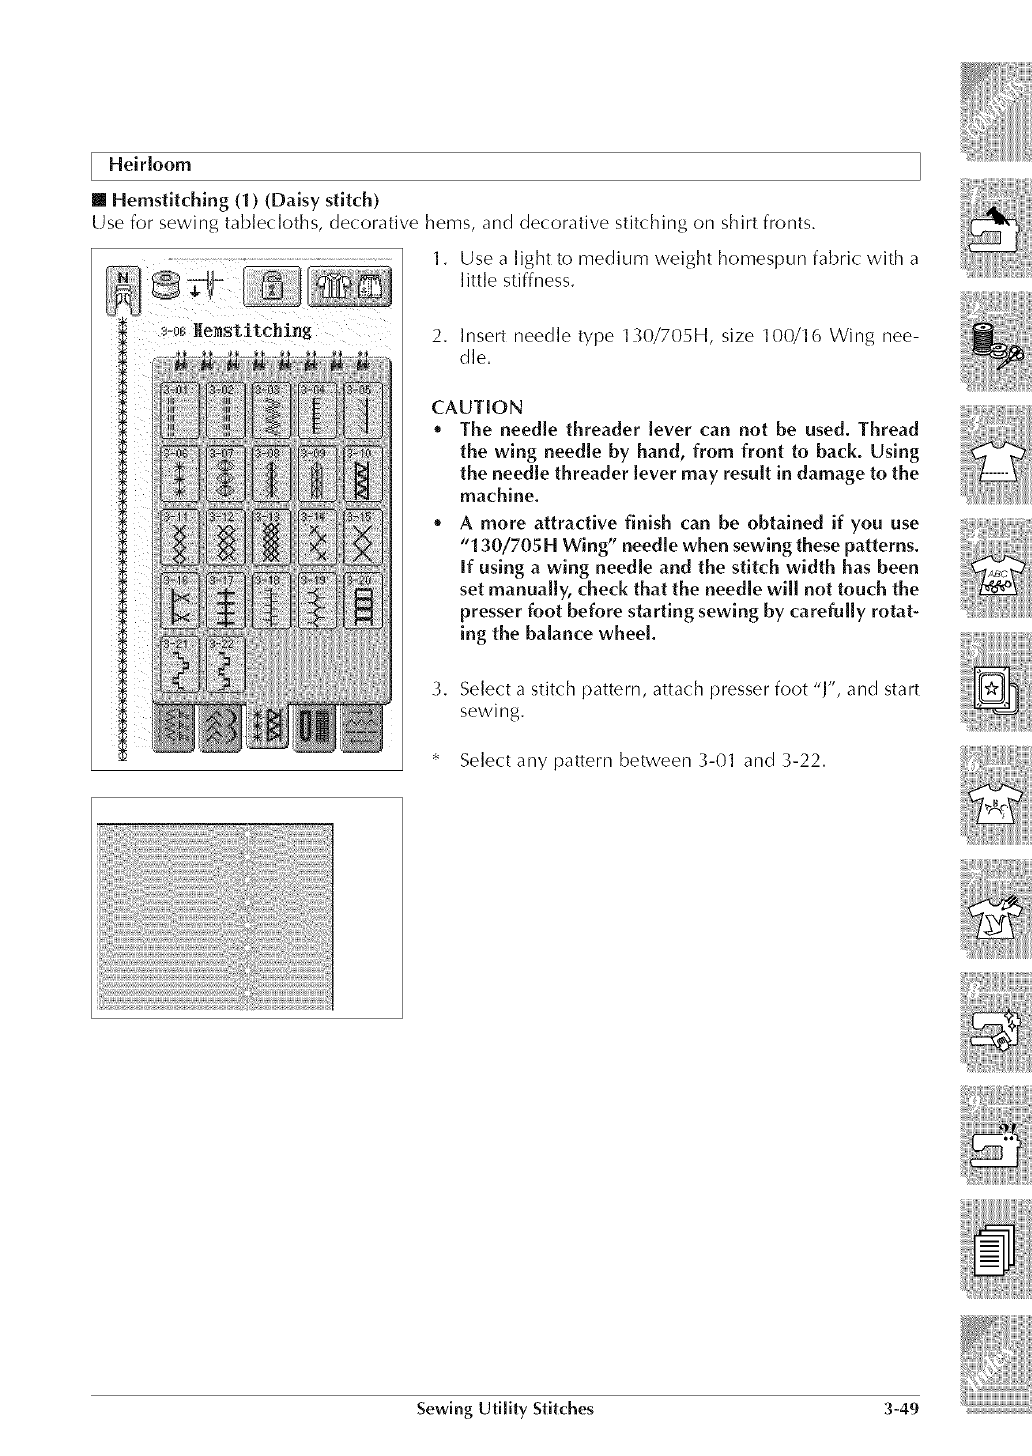
[Heirloom
[] Hemstitching (1) (Daisy stitch)
Use for sewing tablecloths, decorative hems, and decorative stir( hing on shirt fronts.
1. Use a light to medium weight homespun fabric with a
little stiffness.
2. Insert needle type 130/705H, size 100/16 Wing nee-
dle.
CAUTION
*The needle threader lever can not be used. Thread
the wing needle by hand, from front to back. Using
the needle threader lever may result in damage to the
machine.
* A more attractive finish can be obtained if you use
"130/705 H Wing" needle when sewing these patterns.
if using a wing needle and the stitch width has been
set manually, check that the needle will not touch the
presser foot before starting sewing by carefully rotat-
ing the balance wheel.
3. Select a stitch pattern, attach presser foot "J", and start
sewing.
* Select any pattern between 3-01 and 3-22.
Sewing Utility Stitches 3-49
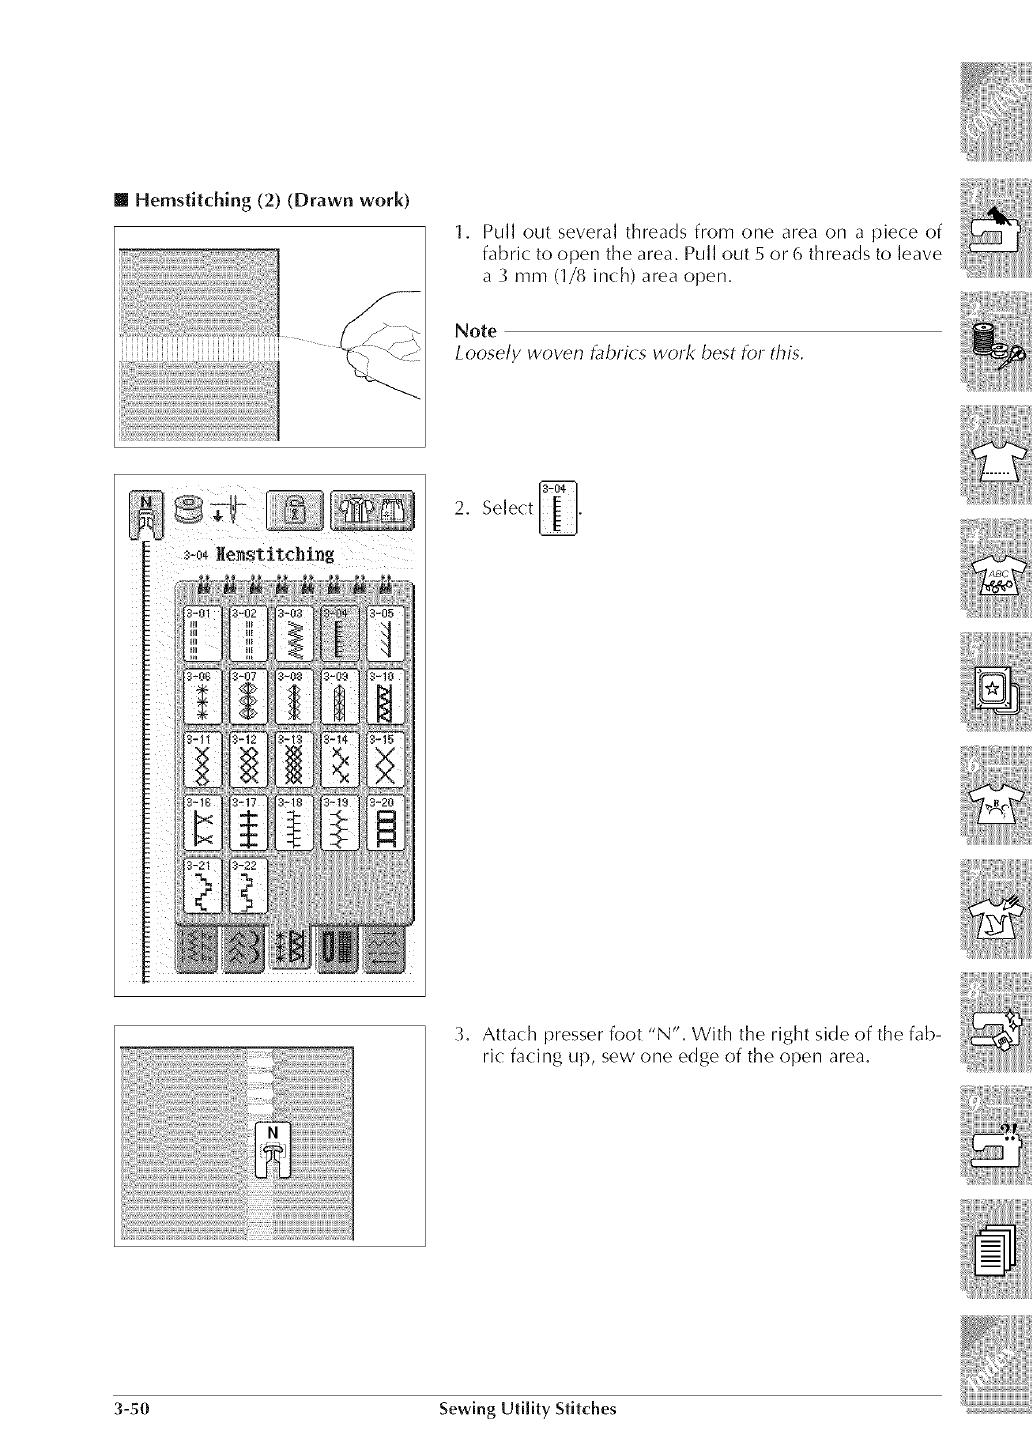
[] Hemstitching (2) (Drawn work)
1. Pull out several threads from one area on a piece of
fabric to open the area, Pu]] out 5 or 6 threads to leave
a 3 mm (1/8 inch) area open,
Note
Loosely woven _bri_ s work best for this,
3, Attach presser foot "N", With the right side of the fab-
ric facing up, sew one edge of the open area,
3-50 Sewing Utility Stitches
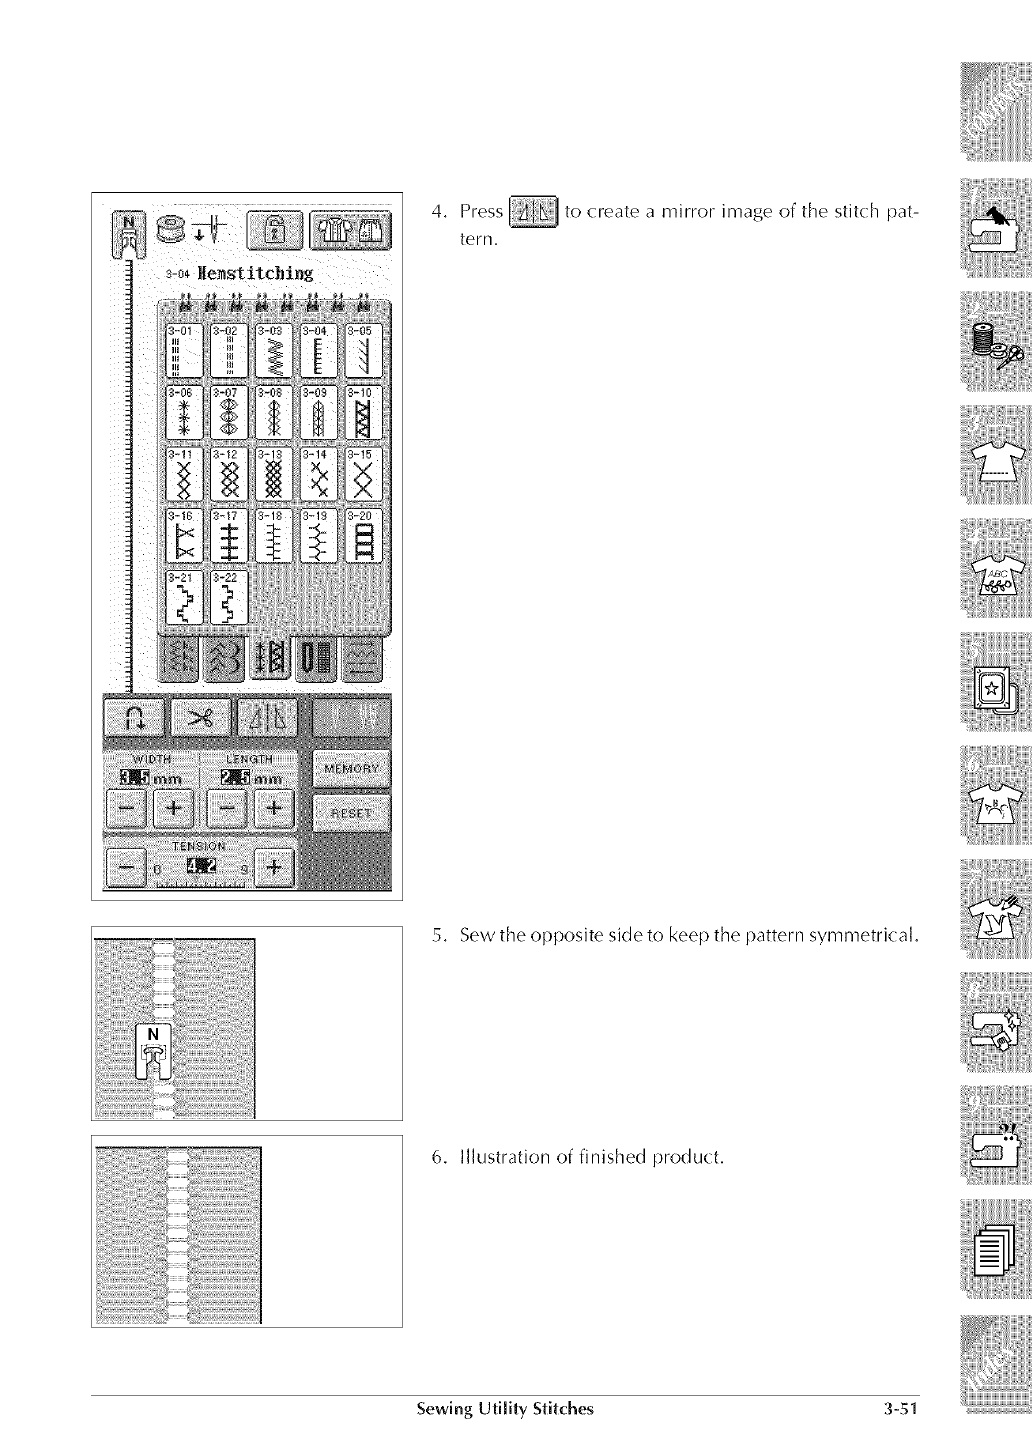
4, Press tocreateamirrorimageofthestitchpat-
tern.
5, Sewtheoppositesidetokeepthepatternsymmetrical,
6. Illustrationoffinishedproduct.
Sewing Utility Stitches 3-51
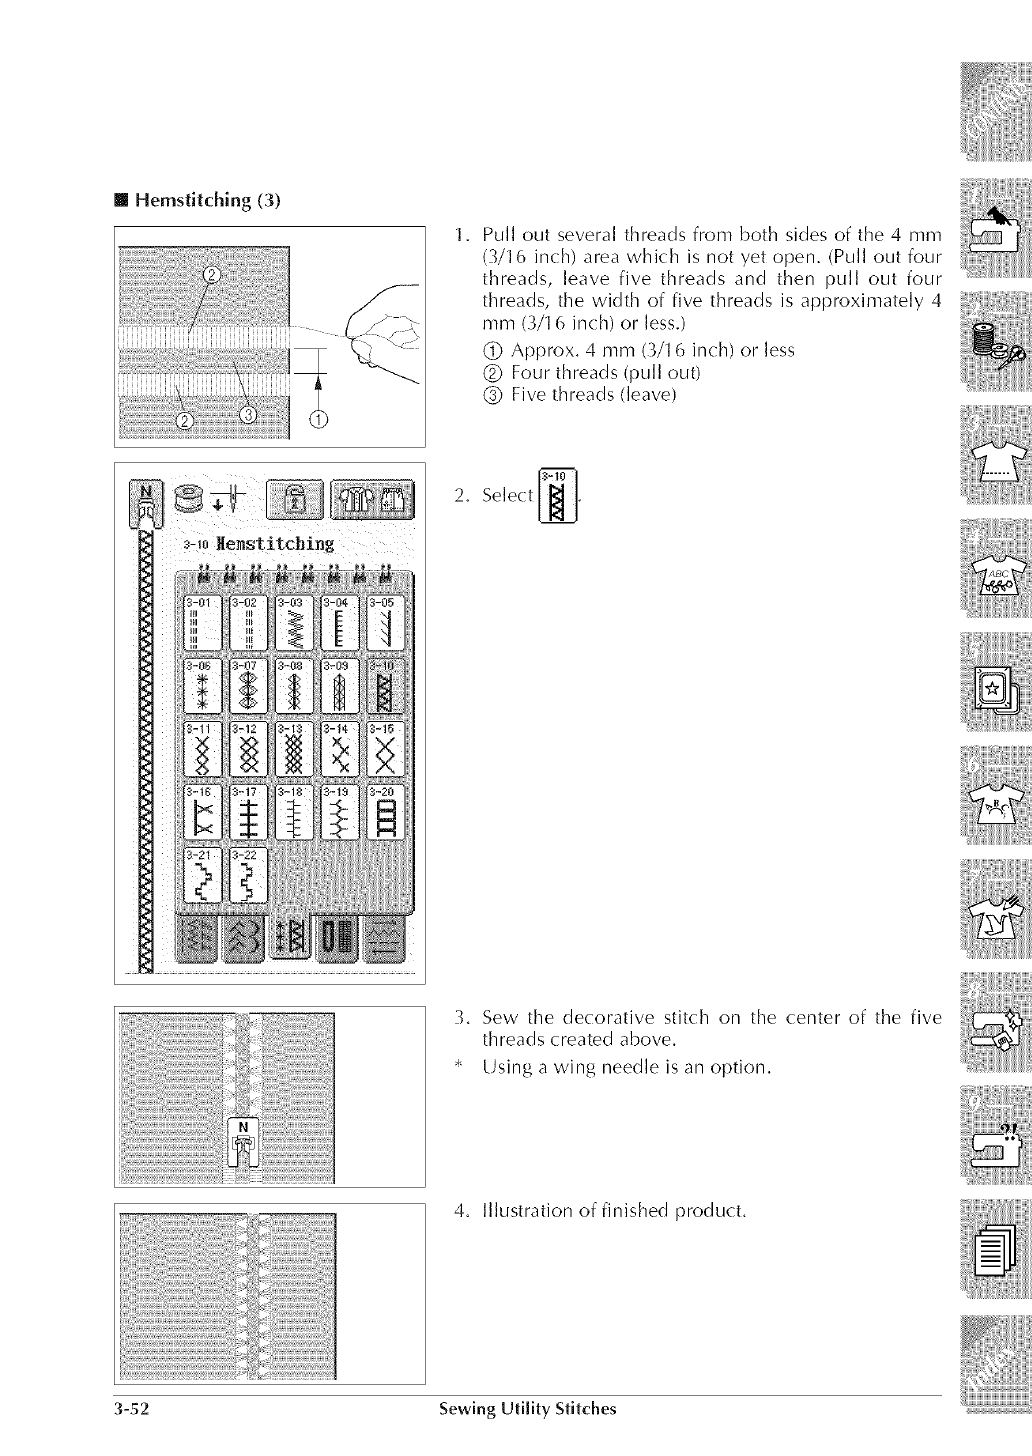
[] Hemstitching (3)
]. Pull out several threads from both sides of the 4 mm
(_/16 inch) area which is not yet open. (Pull out four
threads, leave five threads and then pull out four
threads, the width of five threads is approximately 4
mm G/1 6 inch) or less.)
(_ Approx. 4 mm (_/1 6 inch) or less
Q Four threads (pull out)
(_ Five threads (leave)
2, Select _.
3, Sew the decorative stitch on the center of the five
threads created above.
* Usin[4 a wing needle is an option.
4, Illustration of finished product.
3-52 Sewing Utility Stitches
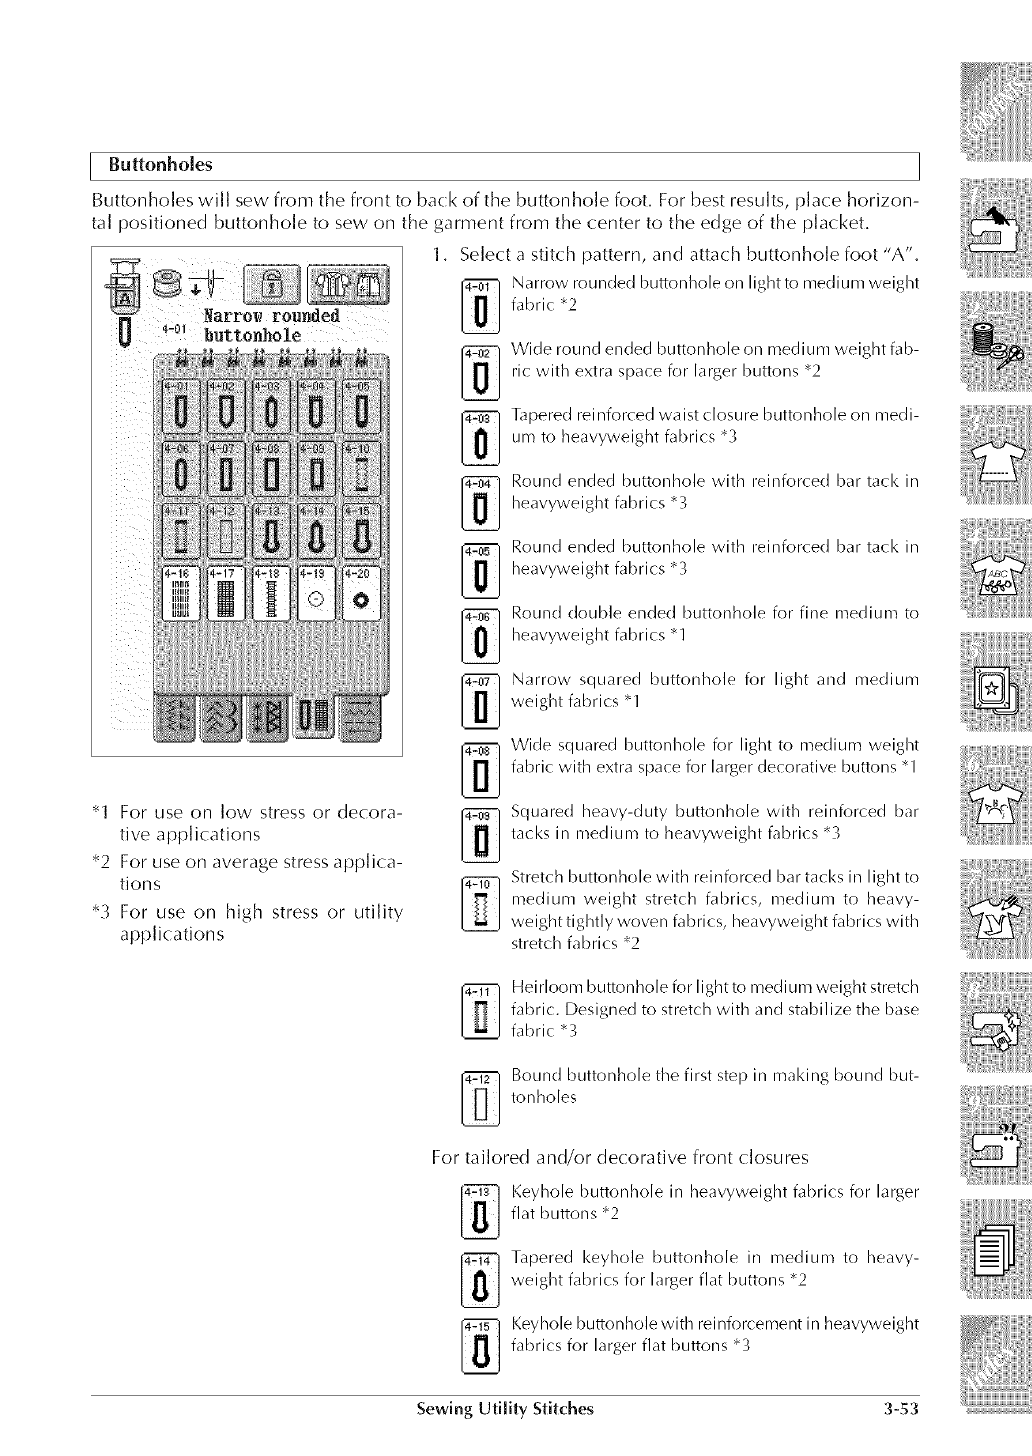
Buttonholes
Buttonholes will sew from the front to back of the buttonhole foot. For best results, place horizon-
ta] positioned buttonho]e to sew on the garment from the center to the edge of the placket.
1. Select a stitch pattern, and attach buttonhole foot "A'.
1_ arrow rounded buttonhole on light to medium weight
fabric "2
"1 For use on low stress or decora-
tive applications
*2 For use on average stress applica-
tions
*3 For use on high stress or utility
applications
Wide round ended buttonhole on medium weight fab-
ric v,!ith extra space for larger buttons $2
Tapered reinforced waist closure buttonhole on medi-
um to heavyweight fabrics *';
Round ended buttonhole v,!ith reinforced bar tack in
heavyweight fabrics *3
Round ended buttonhole with reinforced bar tack in
heavyweight fabrics *3
Round double ended buttonhole for fine medium to
heavyweight fabrics "1
Narrow squared buttonhole for light and medium
weight fabrics "1
Wide squared buttonhole for light to medium weight
fabric v,!ith extra space for larger decorative buttons "1
Squared heavy-duty buttonhole with reinforced bar
tacks in medium to heavyweight fabrics *';
Stretch buttonhole with reinforced bar tacks in light to
medium weight stretch fabrics, medium to heavy-
weight tightly woven fabrics, heavyweight fabrics with
stretch fabrics "2
Heirloom buttonhole for light to medium weight stretch
fabric. Designed to stretch with and stabilize the base
fabric *3
1_ ound buttonhole the first step in mal<ing bound but-
tonholes
For tailored and/or decorative front closures
Keyhole buttonhole in heavyweight fabrics for larger
flat buttons "2
Tapered keyhole buttonhole in medium to heavy-
v,!eight fabrics for larger flat buttons "2
Keyhole buttonhole with reinforcement in heavyweight
fabrics for larger flat buttons "3
Sewing Utility Stitches 3-53
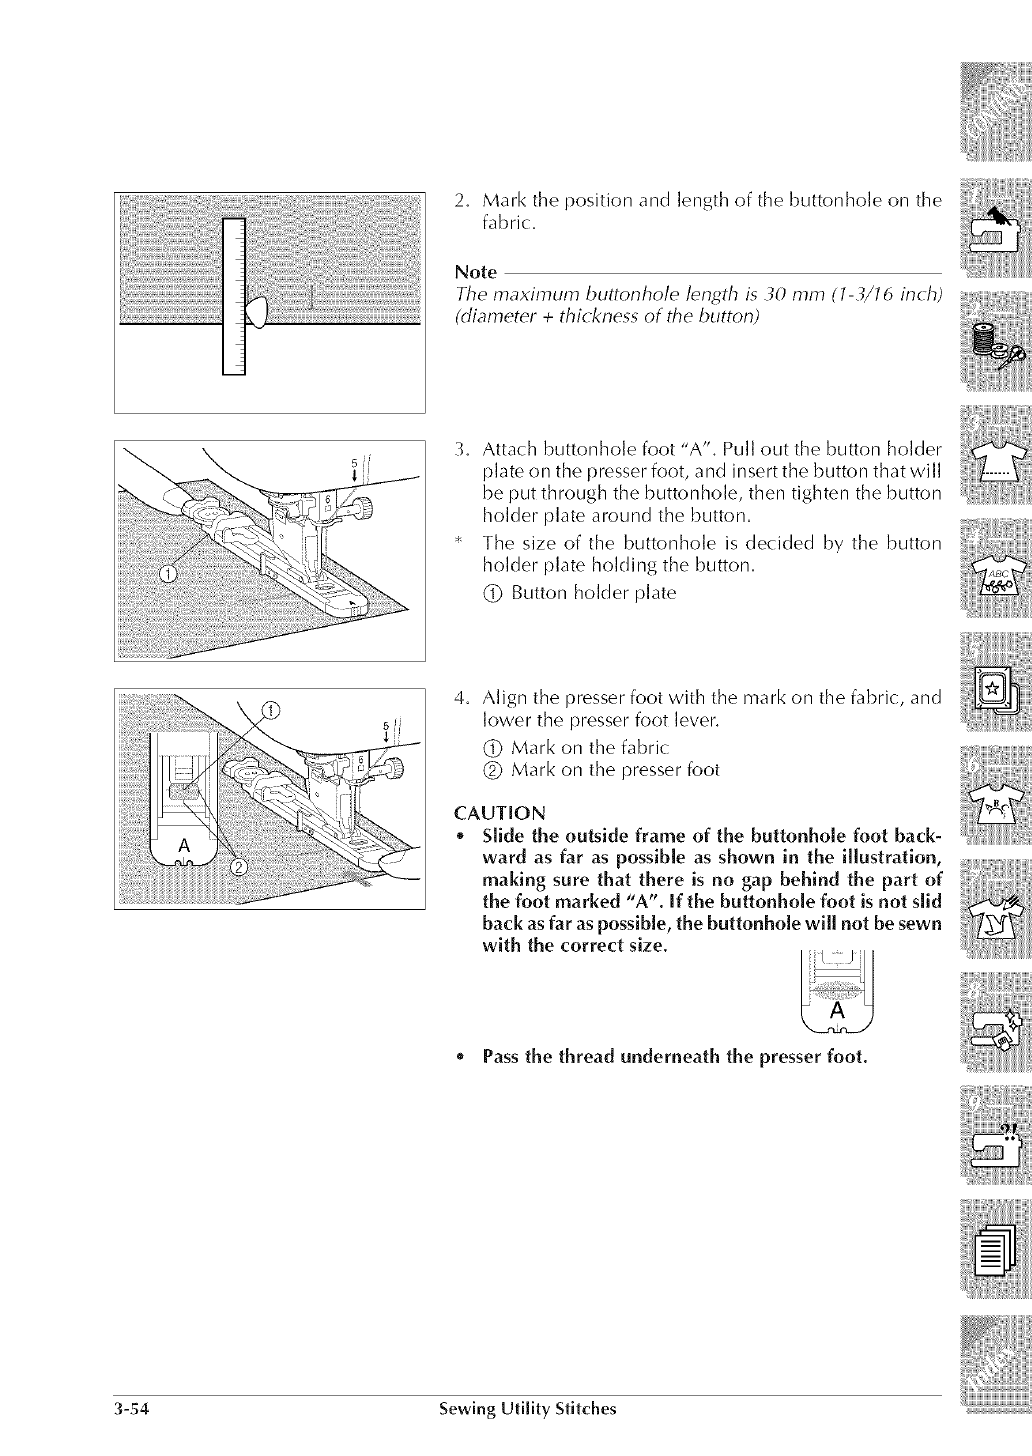
2. Mark the position and length of the buttonhole on the
fabric:.
Note
The maximum buttonhole length b 30 mm (1-3/16 inch)
(diameter +thickness of the button)
3. Attach buttonhole foot "A". Pull out the button holder
plate on the presser foot, and insert the button that will
be put through the buttonhole, then tighten the button
holder plate around the button.
* The size of the buttonhole is decided by the button
holder plate holding the button.
(_ Button holder plate
4. Align the presser foot with the mark on the fabric, and
lower the presser foot lever.
(_ Mark on the fabric
(_) Mark on the presser foot
CAUTION
.Slide the outside frame of the buttonhole foot back-
ward as far as possible as shown in the illustration,
making sure that there is no gap behind the part of
the foot marked "A'. If the buttonhole foot is not slid
back as far as possible, the buttonhole will not be sewn
with the correct size.
*Pass the thread underneath the presser foot.
3-54 Sewing Utility Stitches
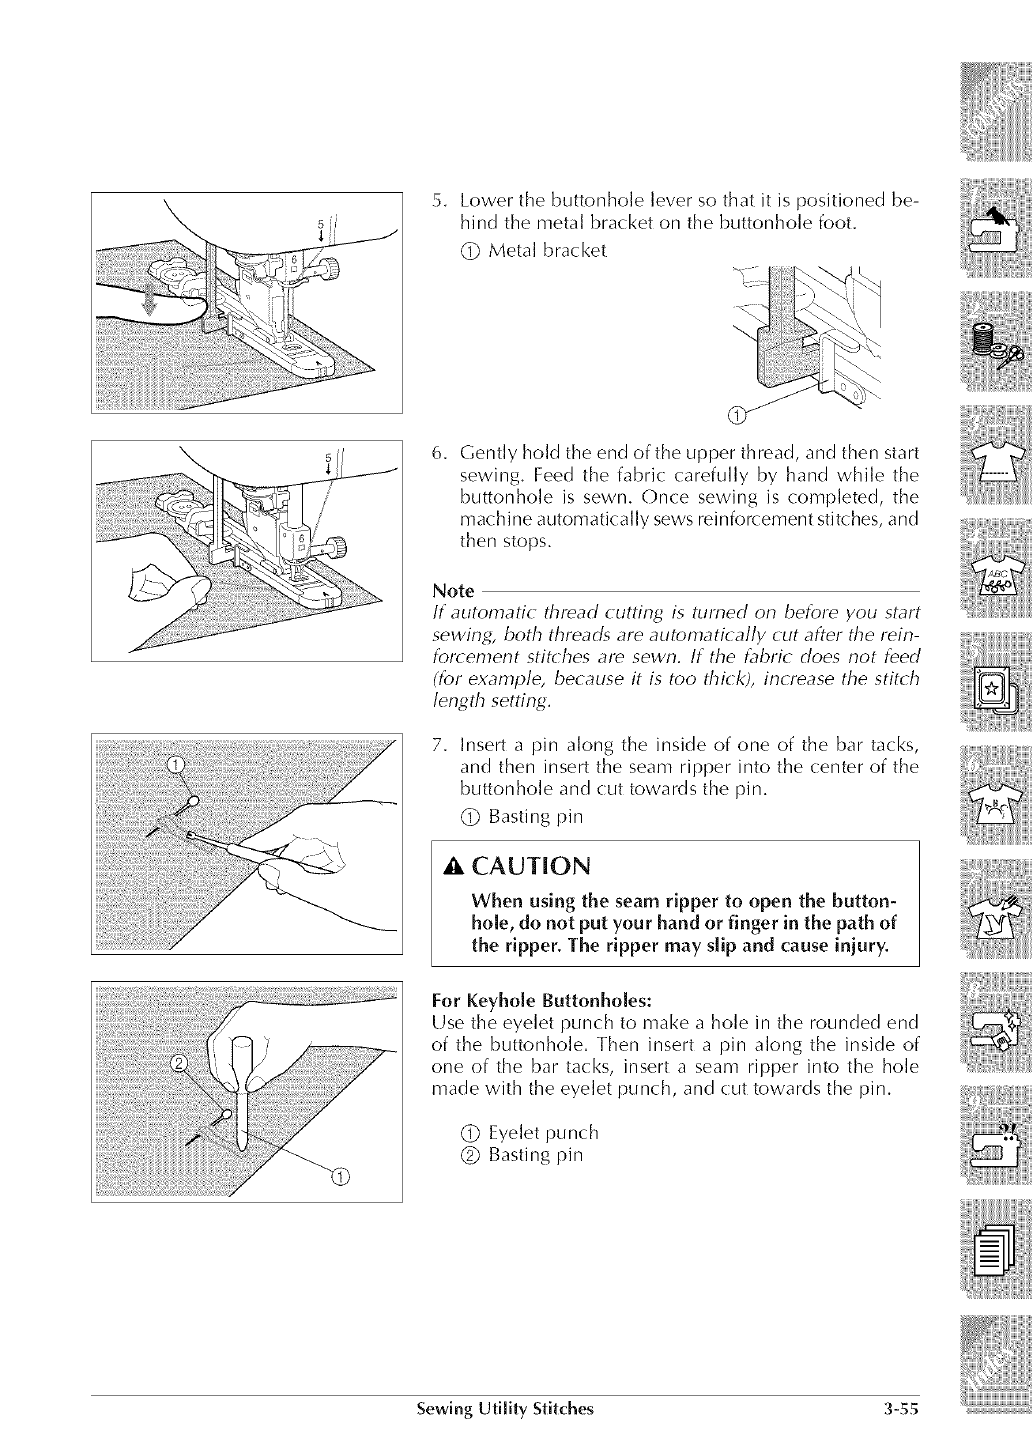
5. Lower the buttonhole lever so that it is positioned be-
hind the metal bracket on the buttonhole foot.
(_DMetal bracket
6. Gently hold the end of the upper thread, and then start
sewing. Feed the fabric carefully by hand while the
buttonhole is sewn. Once sewing is completed, the
machine automatically sews reinforcement stitches, and
then stops.
Note
If automatic thread cutting is turned on before you start
sewing, both threads are automatically cut after the rein-
forcement stitches are sewn. If the fabric does not feed
(for example, because it is too thick), increase the stitch
length setting.
7, Insert a pin along the inside of one of the bar tacks,
and then insert the seam ripper into the (:enter of the
buttonhole and cut towards the pin.
(_DBasting pin
• , CAUTION
When using the seam ripper to open the button-
hole, do not put your hand or finger in the path of
the ripper. The ripper may slip and cause iniury.
For Keyhole Buttonholes:
Use the eyelet punch to make a hole in the rounded end
of the buttonhole. Then insert a pin along the inside of
one of the bar tacks, insert a seam ripper into the hole
made with the eyelet punch, and cut towards the pin.
(_DEyelet punch
(_ Basting pin
Sewing Utility Stitches 3-55
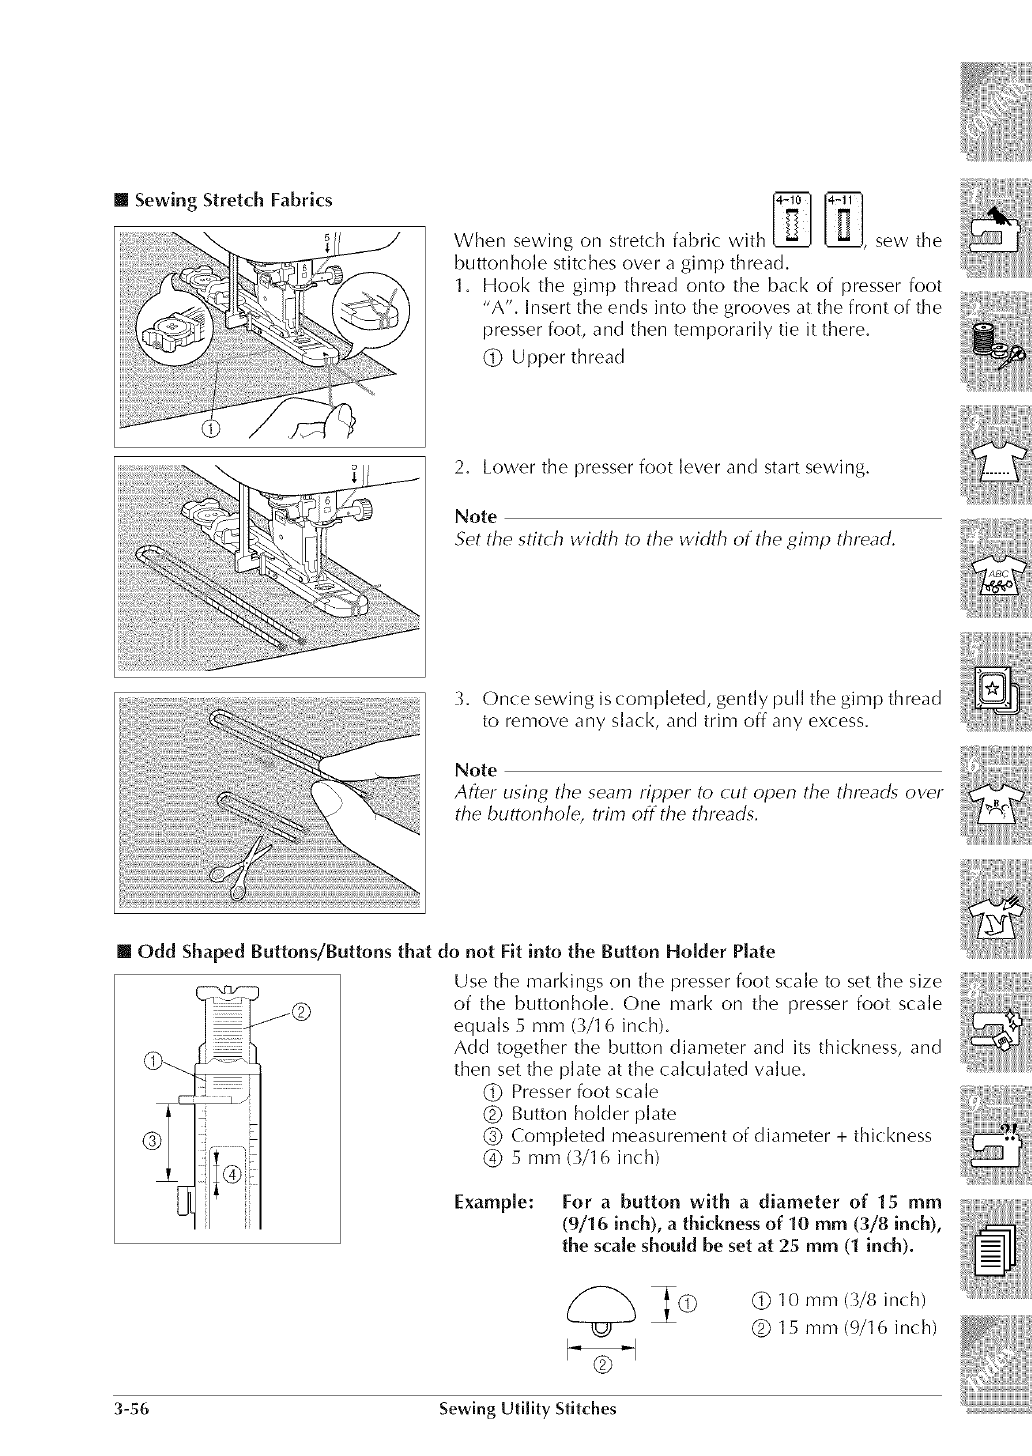
[] Sewing Stretch Fabrics
When sewing on stretch fabric with I_J I _j, sew the
buttonhole stitches over a gimp thread.
1. Hook the gimp thread onto the back of presser foot ......................................................
"A'. Insert the ends into the grooves at the front of the
presser foot, and then temporarily tie it there.
(_ Upper thread
2. Lower the presser foot lever and start sewing.
Note
Set the stitch width to the width of the gimp thread.
3. Once sewing is completed, gently pull the gimp thread
to remove any slack, and trim off any excess.
Note
After using the seam ripper to cut ()pen the threads over
the buttonhole, trim off the threads.
[] Odd Shaped Buttons/Buttons that do not Fit into the Button Holder Plate
Use the markings on the presser foot scale to set the size
of the buttonhole. One mark on the presser foot scale
equals 5 mm (3/16 inch).
Add together the button diameter and its thickness, and
then set the plate at the calculated value.
(_ Presser foot scale
(_ Button holder plate
(_ Completed measurement of diameter + thickness
(_ 5 mm (3/16 inch)
Example: For a button with a diameter of 115 mm
(9/1!6 inch), a thickness of 110mm (3/8 inch),
the scale should be set at 25 mm (1 inch).
(_ 10 mm (3/8 inch)
(_ 15 mm (9/16 inch)
3-56 Sewing Utility Stitches
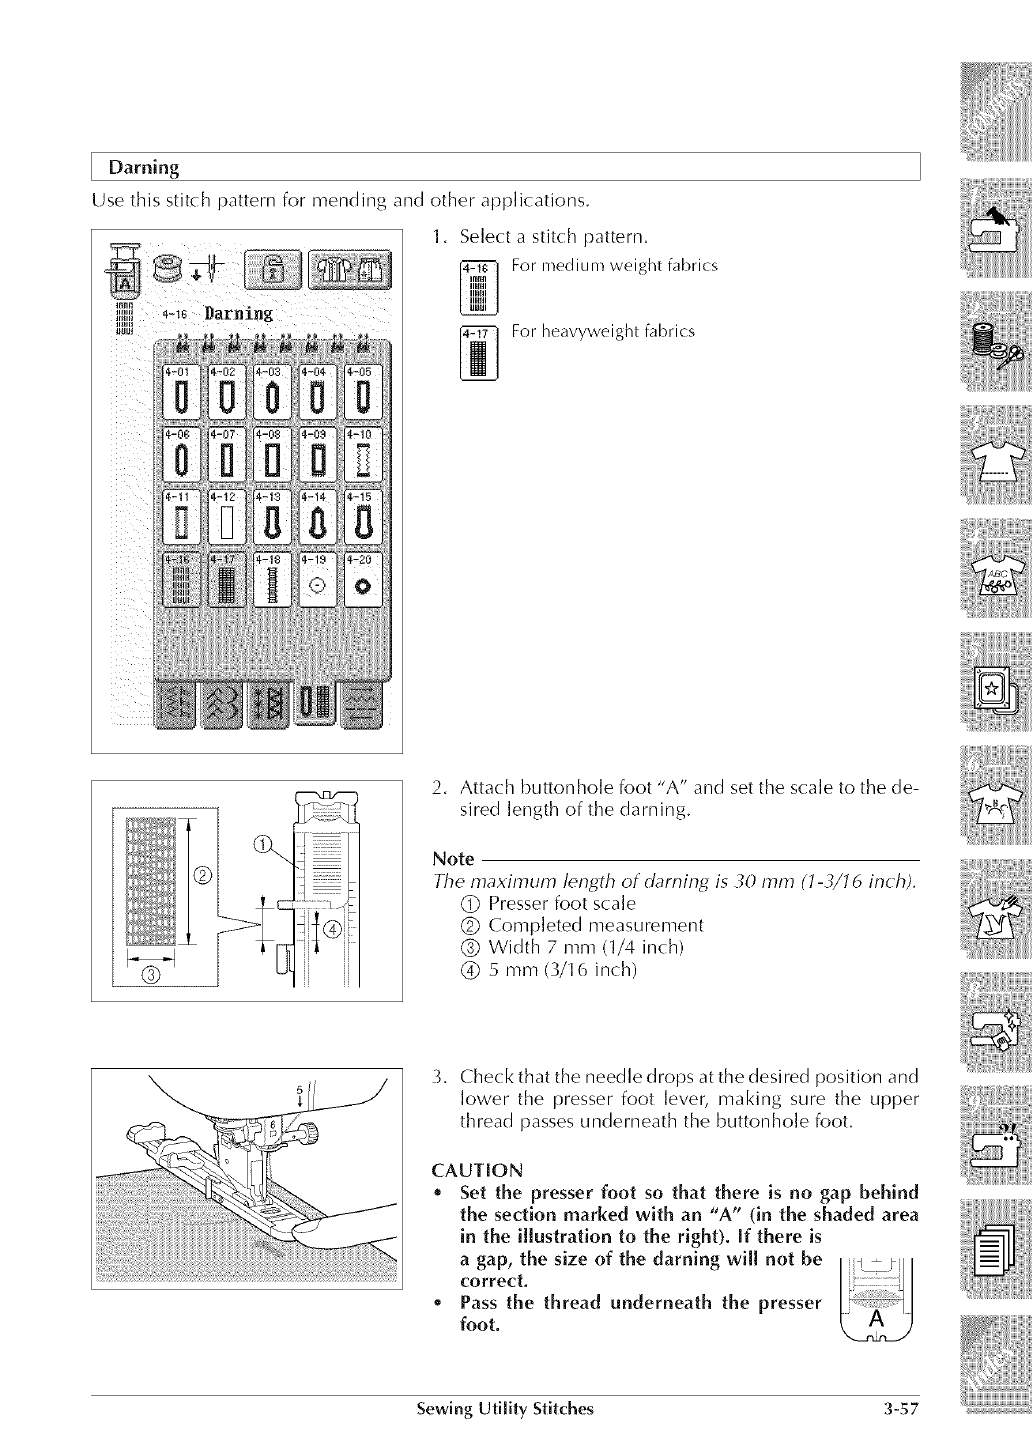
[ Darning
Use this stitch pattern for mending and other applications.
1, Select a stitch pattern.
For medium weight fabrics
For heavyweight fabrics
2, Attach buttonhole foot "A" and set the sca]e to the de-
sired length of the darning.
Note
The maximum length of darning is 30 mm (1-3/16 inch).
(_ Presser foot scale
(_ Completed measurement
(_) Width 7 mm (1/4 inch)
(_) 5 mm (3/16 inch)
3. Check that the needle drops at the desired position and
[ower the presser foot lever, making sure the upper
thread passes underneath the buttonhole foot.
CAUTION
* Set the presser foot so that there is no gap behind
the section marked with an "A" (in the shaded area
in the illustration to the right). If there is
a gap, the size of the darning will not be
correct.
* Pass the thread underneath the presser
foot.
Sewing Utility Stitches 3-57

4. Lower the buttonhole lever so that it is positioned be-
hind the metal bracket on the buttonhole foot.
@ Metal bracket
5. Cently hold the end of the upper thread, and then press
the "Start!Stop" button to start the machine. Once sew-
ing is completed, the machine automatically sews re-
inforcement stitches, and then stops.
Note
If automatic thread cuttin_ is turned on before you start
sewint¢, both threads are automatically cut after the rein-
forcement stitches are sewn. If the fabric does not feed
(for example, because it is too thick), increase the stitch
lensth settin G.
Darning Stitch Cycle
@Cycle of reinforcement stitches
3-58 Sewing Utility Stitches
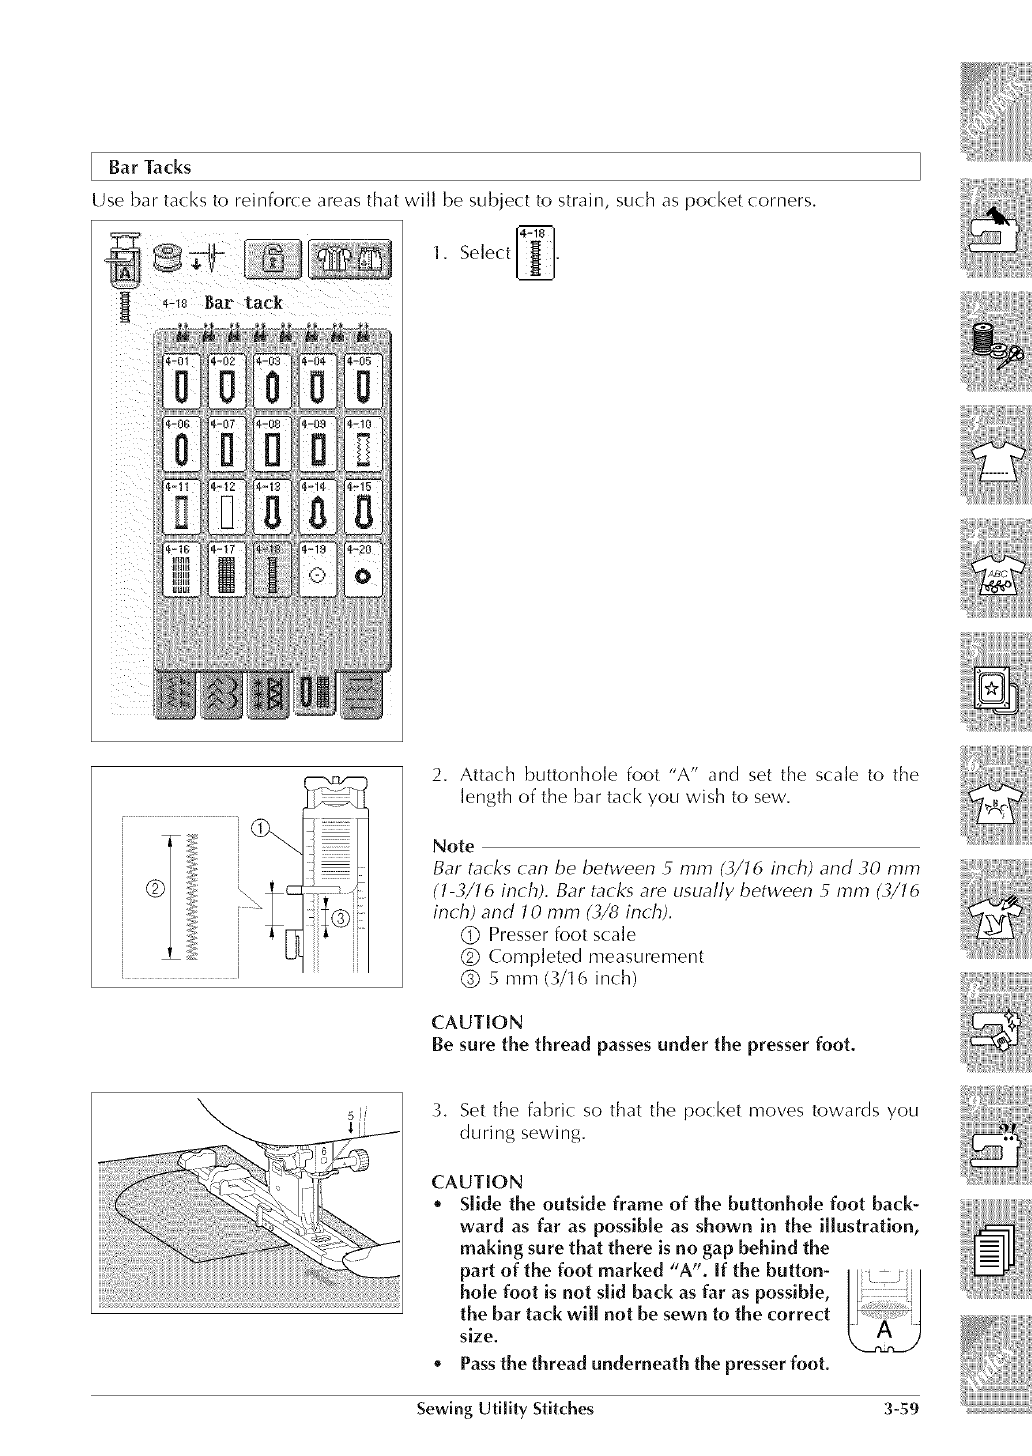
Bar Tacks
Use bar tacks to reinforce areas that will be subject to strain, such as pocket corners.
1, Select _.
i;
U Iil ¢,_ II qd_I
2, Attach buttonhole foot "A" and set the sca]e to the
length of the bar tack you wish to sew.
Note
Bar t_(:ks (:an be between 5 mm (,3/16 inch) and ,30 mm
(1-,3/16 inch). Bar t,_cl<sare usually between 5 mm (3/16
inch) and 10 mm (,3/8 inch).
(_) Presser foot scale
(_) Completed measurement
(_) 5 mm (3/16 inch)
CAUTION
Be sure the thread passes under the presser foot,
3. Set the fabric so that the pocket moves towards you
during sewing.
CAUTION
', Slide the outside frame of the buttonhole foot back-
ward as far as possible as shown in the illustration
making sure that there is no gap behind the
part of the foot marked "A'. if the button-
hole foot is not slid back as far as possible,
the bar tack will not be sewn to the correct
size,
o Pass the thread underneath the presser foot.
Sewing Utility Stitches 3-59
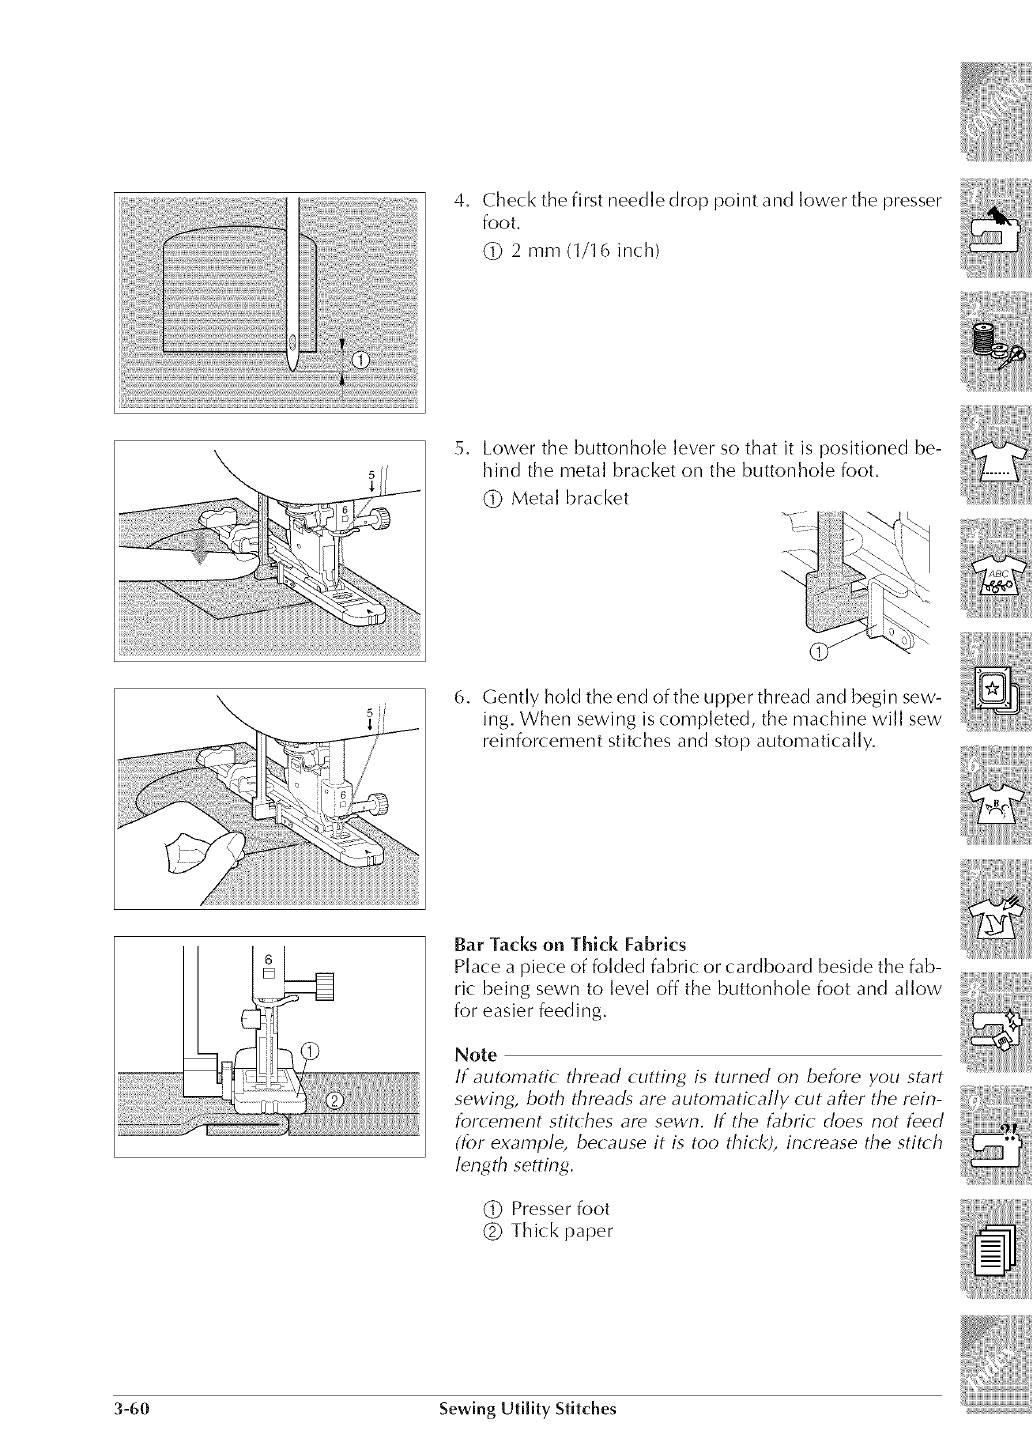
4. Check the first needle drop point and lower the presser
foot.
(_ 2 mm (1/16 inch)
5. Lower the buttonhole lever so that it is positioned be-
hind the metal bracket on the buttonhole foot.
(_ Metal bracket
5'6. Gently hold the end of the upper thread and begin sew-
ing. When sewing is completed, the machine will sew
reinforcement stitches and stop automatically.
Bar Tacks on Thick Fabrics
Place a piece of folded fabric or cardboard beside the fab-
ric being sewn to level off the buttonhole foot and allow
for easier feeding.
Note
If automatic thread cutting is turned on before you stall
sewing, both threads are automatically cut after the rein-
forcement stitches are sewn. If the fabric does not feed
(for example, because it is too thick), increase the stitch
length setting.
(_ Presserfoot
(_ Thick paper
3-60 Sewing Utility Stitches
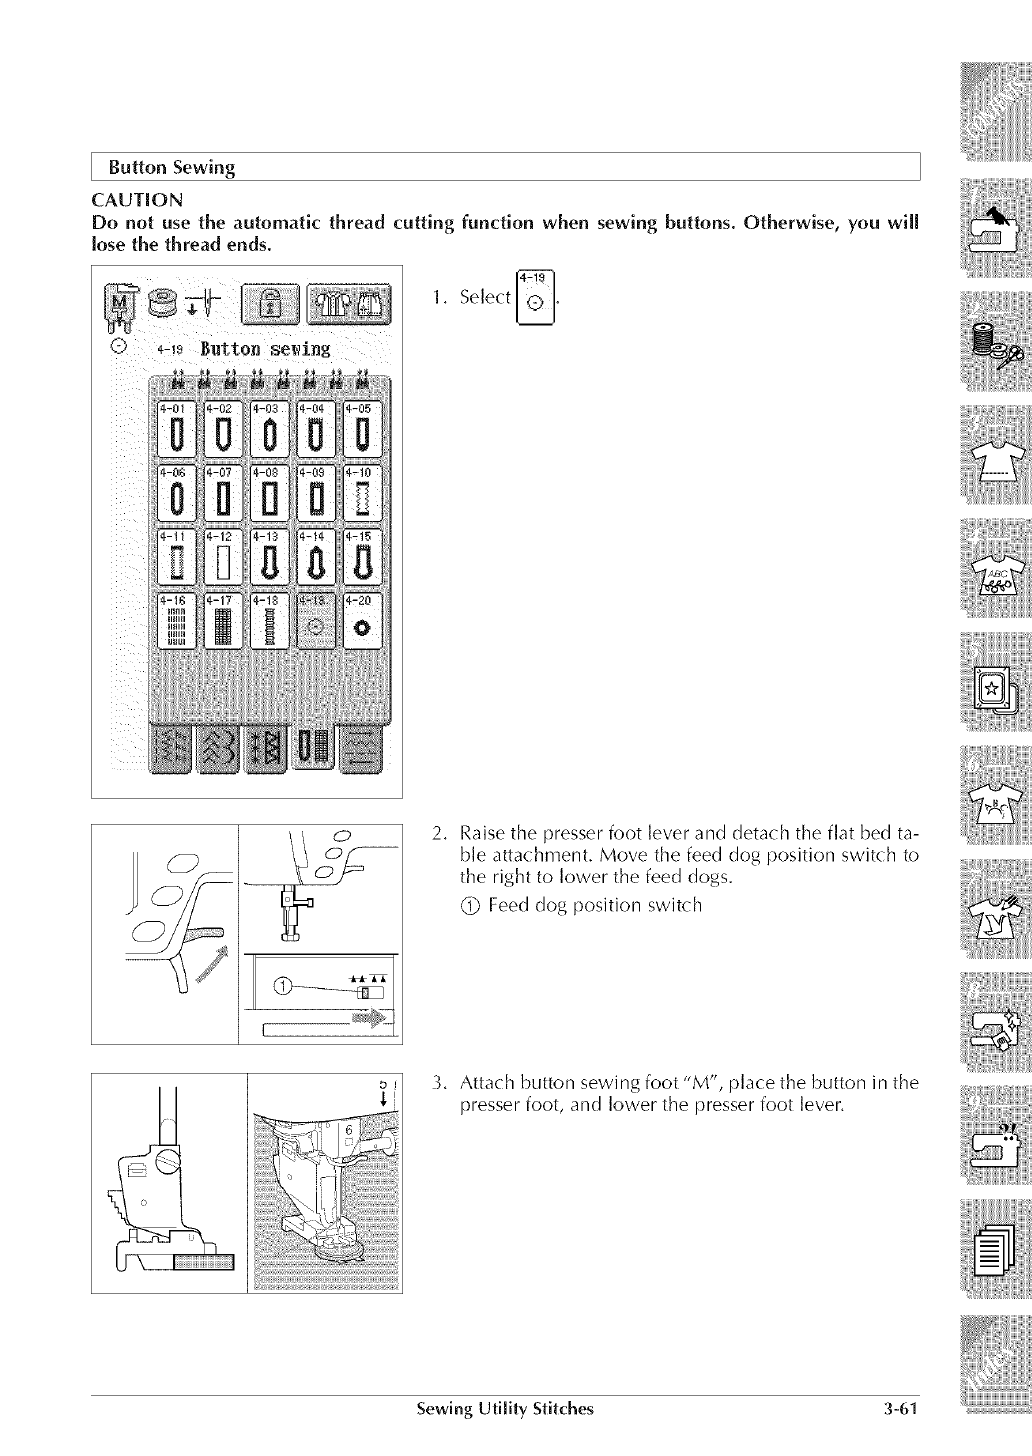
Button Sewing
CAUTION
Do not use the automatic thread cutting function when sewing buttons. Otherwise, you will
lose the thread ends.
1, Select _,
2, Raise the presser foot lever and detach the flat bed ta-
ble attachment, Move the feed dog position switch to
the right to lower the feed dogs,
(_ Feed dog position switch
b
iiiiiiiiiiiiii!i: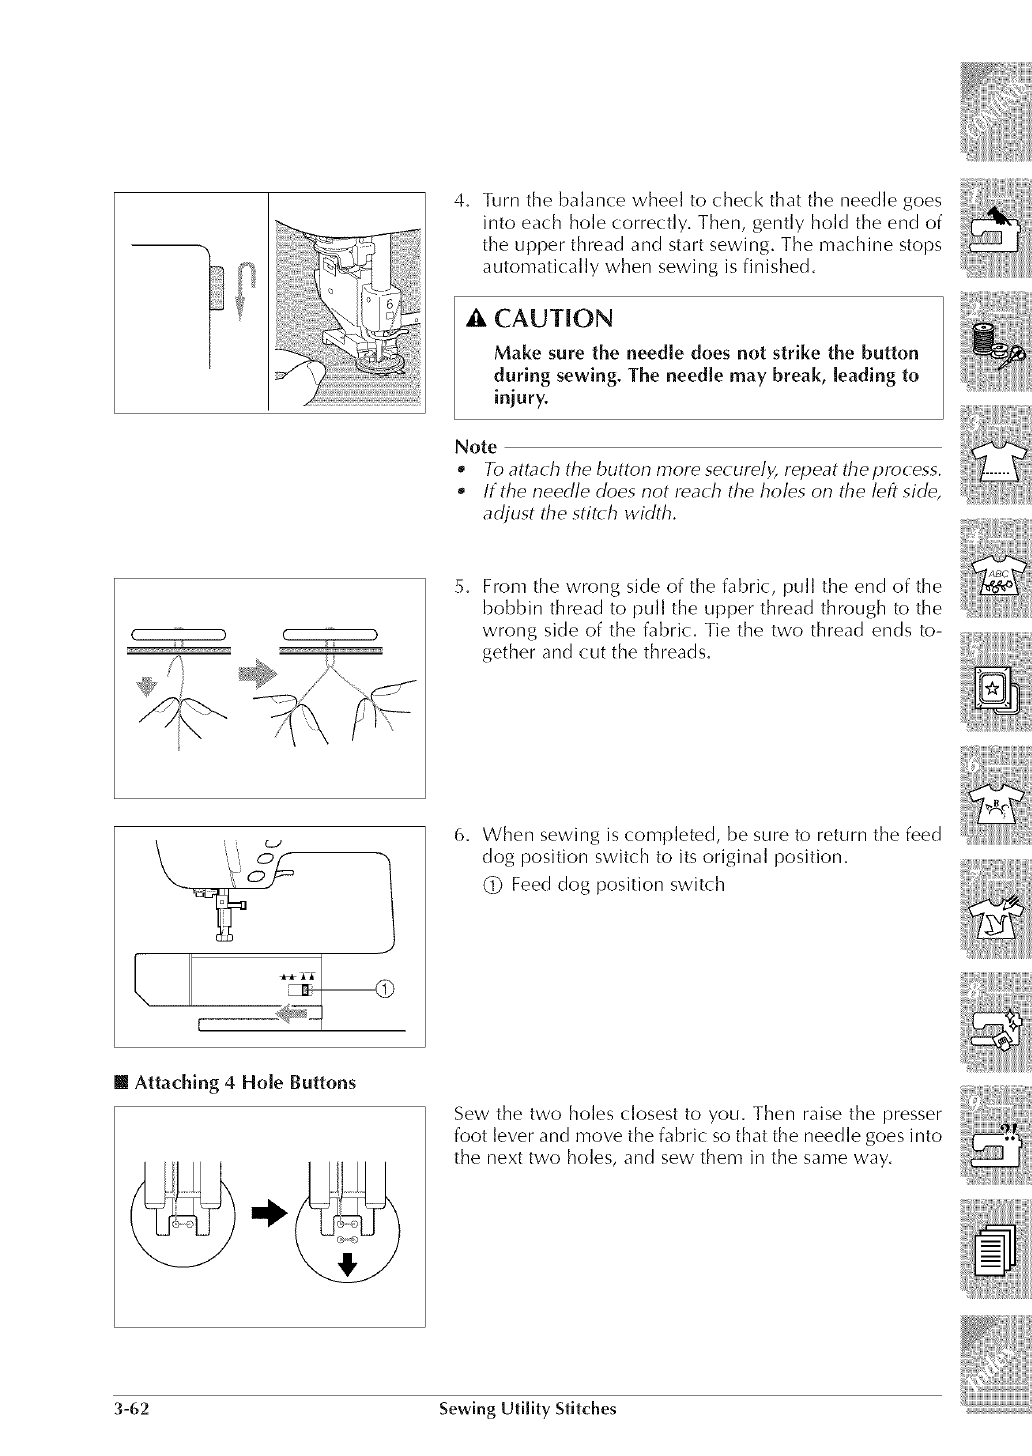
4. Turn the balance wheel to check that the needle goes
into each hole correctly. Then, gently hold the end of
the upper thread and start sewing. The machine stops
automatically when sewing is finished.
CAUT[ON
Make sure the needle does not strike the button
during sewing. The needle may break, leading to
injury.
Note
•To attach the button more securely, repeat &e process.
•If the needle does not reach the holes on &e left side,
adjust &e stitch width.
From the wrong side of the fabric, pull the end of the
bobbin thread to pull the upper thread through to the
wrong side of the fabric. Tie the two thread ends to-
gether and cut the threads.
k
6. When sewing is completed, be sure to return the feed
dog position switch to its original position.
(_9 Feed dog position switch
[] Attaching 4 Hole Buttons
Sew the two holes closest to you. Then raise the presser
foot lever and move the fabric so that the needle goes into
the next two holes, and sew them in the same way.
3-62 Sewing Utility Stitches
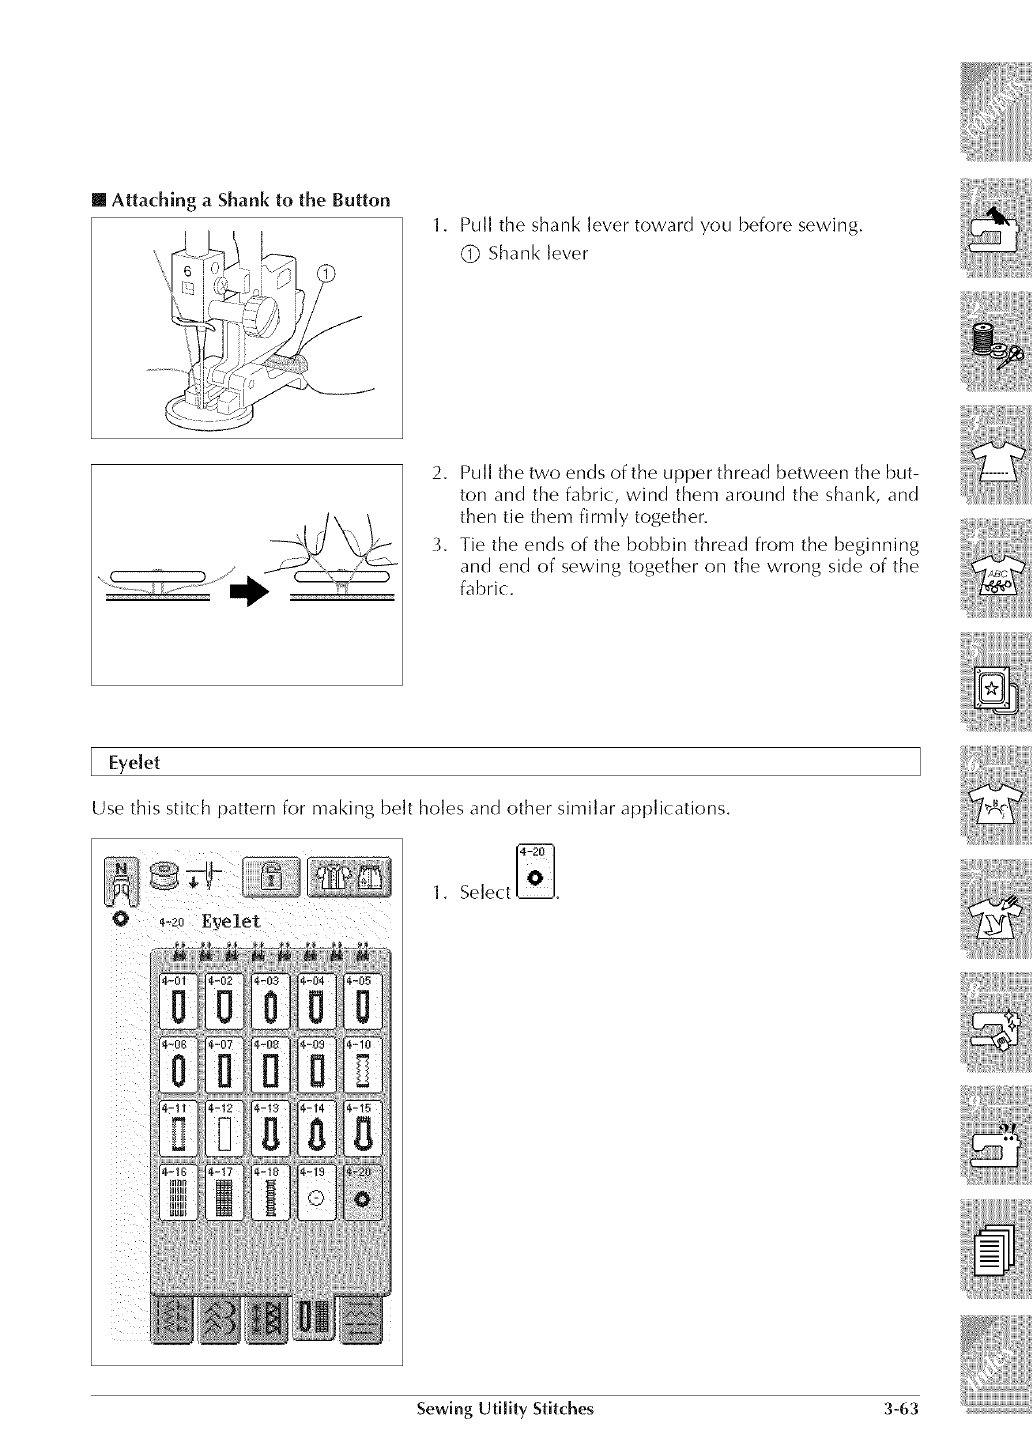
[] Attaching aShankto the Button
1. Pull the shank lever toward you before sewing.
(_ Shank lever
2. Pull the two ends of the upper thread between the but-
ton and the fabric, wind them around the shank, and
then tie them firmly together.
_. Tie the ends of the bobbin thread from the beginning
and end of sewing together on the wrong side of the
fabric.
Eyelet
Use this stitch pattern for making belt holes and other similar applications.
1. Select _O[_J.
Sewing Utility Stitches 3-63
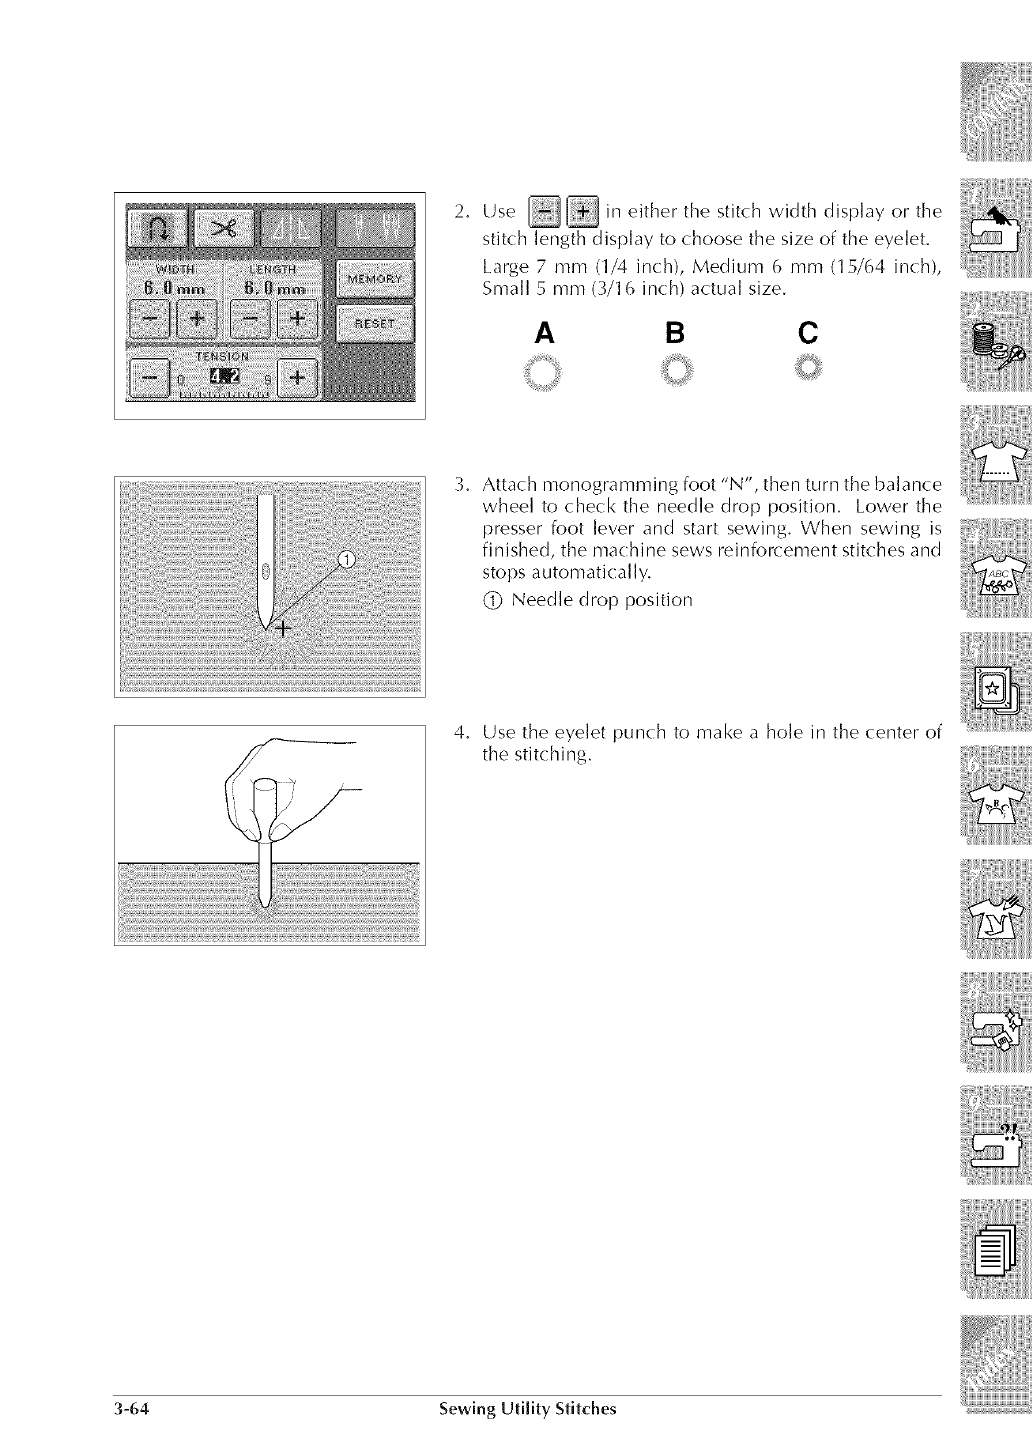
2. Use _ in either the stitch width display or the
stitch length display to choose the size of the eyelet.
Large 7 mm (1/4 inch), Medium 6 mm (15/64 inch),
Small 5 mm (V16 inch) actual size.
ABC
3. Attach monogramming foot "N", then turn the balance
wheel to check the needle drop position. Lower the
presser foot lever and start sewing. When sewing is
finished, the machine sews reinforcement stitches and
stops automatically.
(_ Needle drop position
4. Use the eyelet punch to make a hole in the center of
the stitching.
3-64 Sewing Utility Stitches
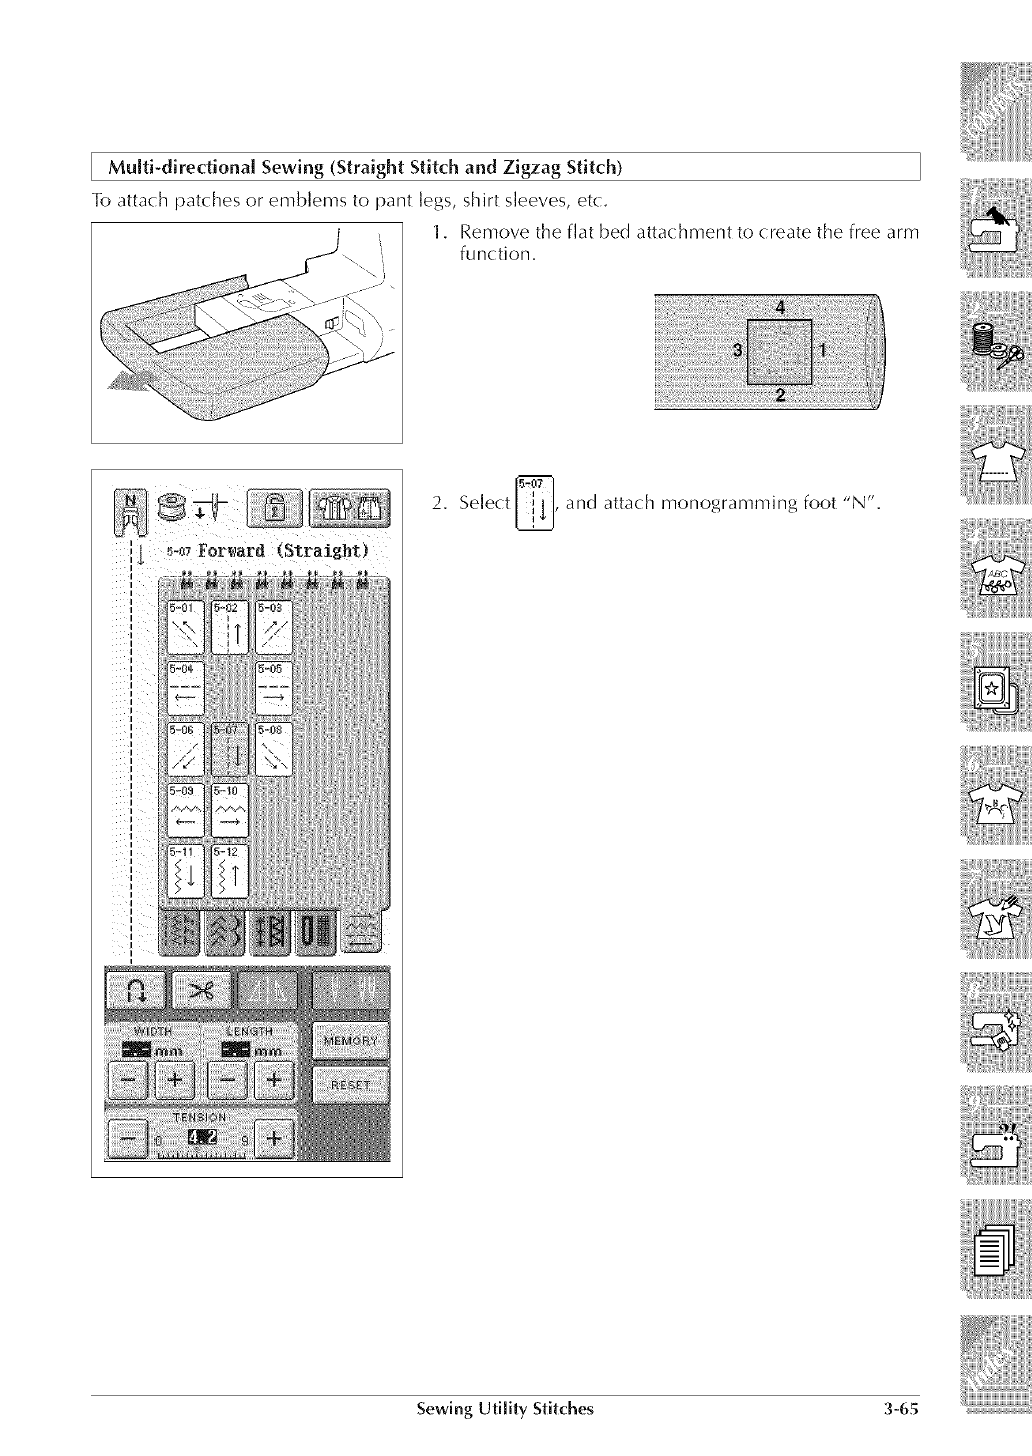
[ Multi-directional Sewing (Straight Stitch and Zigzag Stitch)
To attach patches or emblems to pant legs, shirt sleeves, etc.
1. Remove the flat bed attachment to create the free arm
function.
2, Select _, and attach monogramming foot "N",
Sewing Ut[[hy Stitches 3-6S
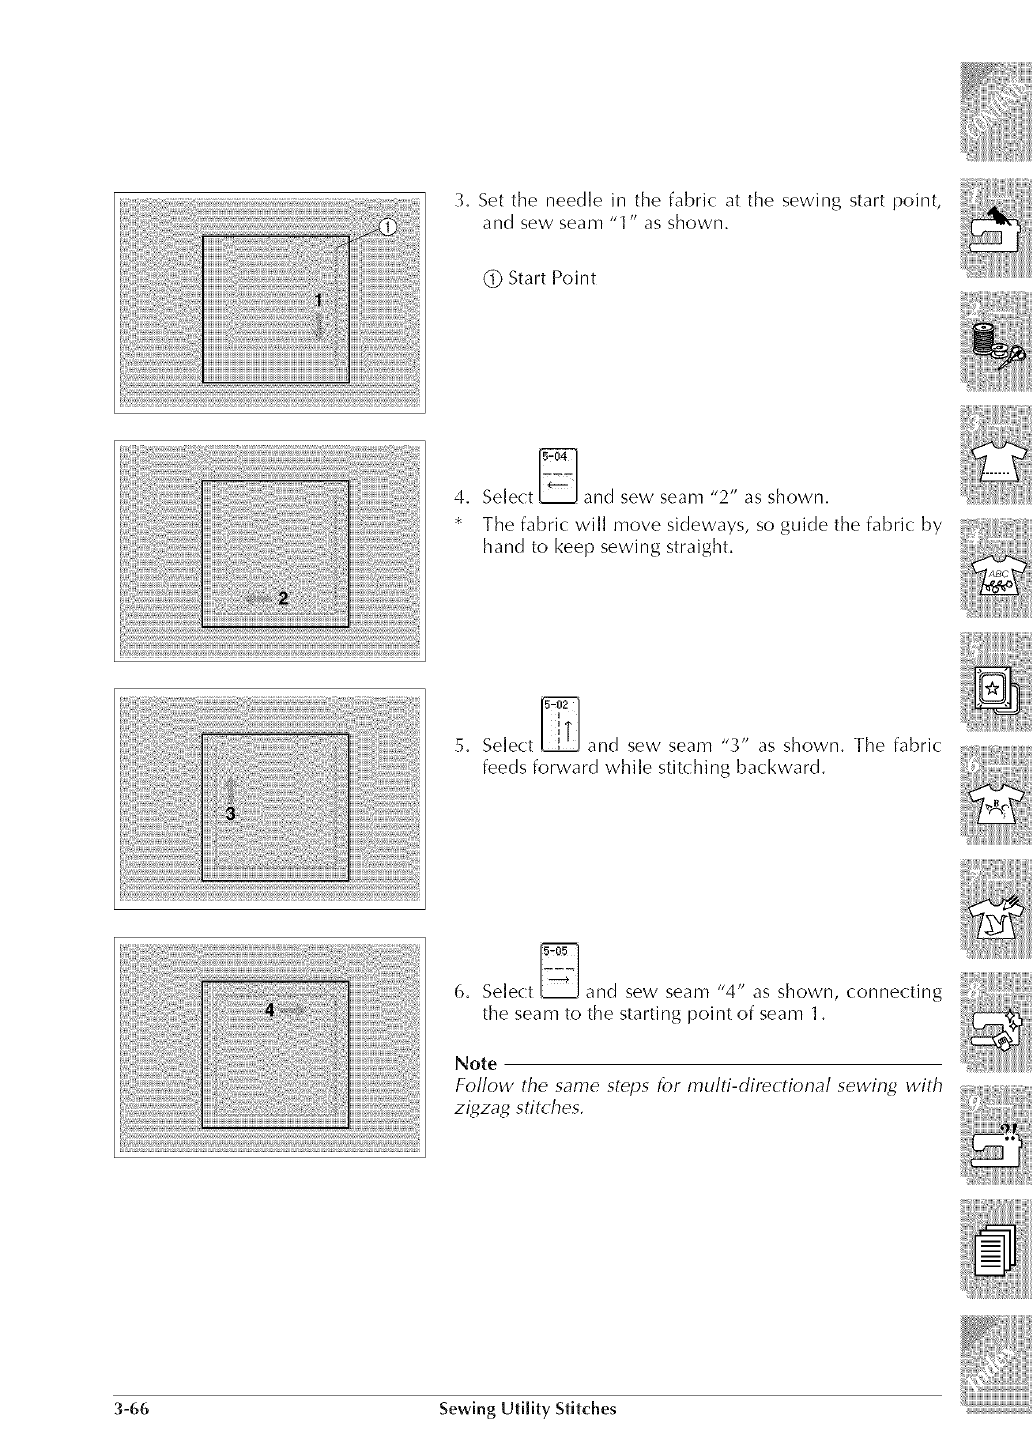
3. Set the needle in the fabric: at the sewing start point,
an(] sew seam "l"as shown,
(_ Start Point
4. Select _ and sew seam "2" as shown.
* The fabric will move sideways, so guide the fabric by
hand to keep sewing straight.
5, Select _ and sew seam "3" as shown, The fabric:
feeds forward while stitching backward,
6, Select _ and sew seam "4" as shown, connecting
the seam to the starting point of seam 1,
Note
Follow the same steps for multi-directional sewing with
zigzag stitches.
3-66 Sewing Ud[ity Stitches
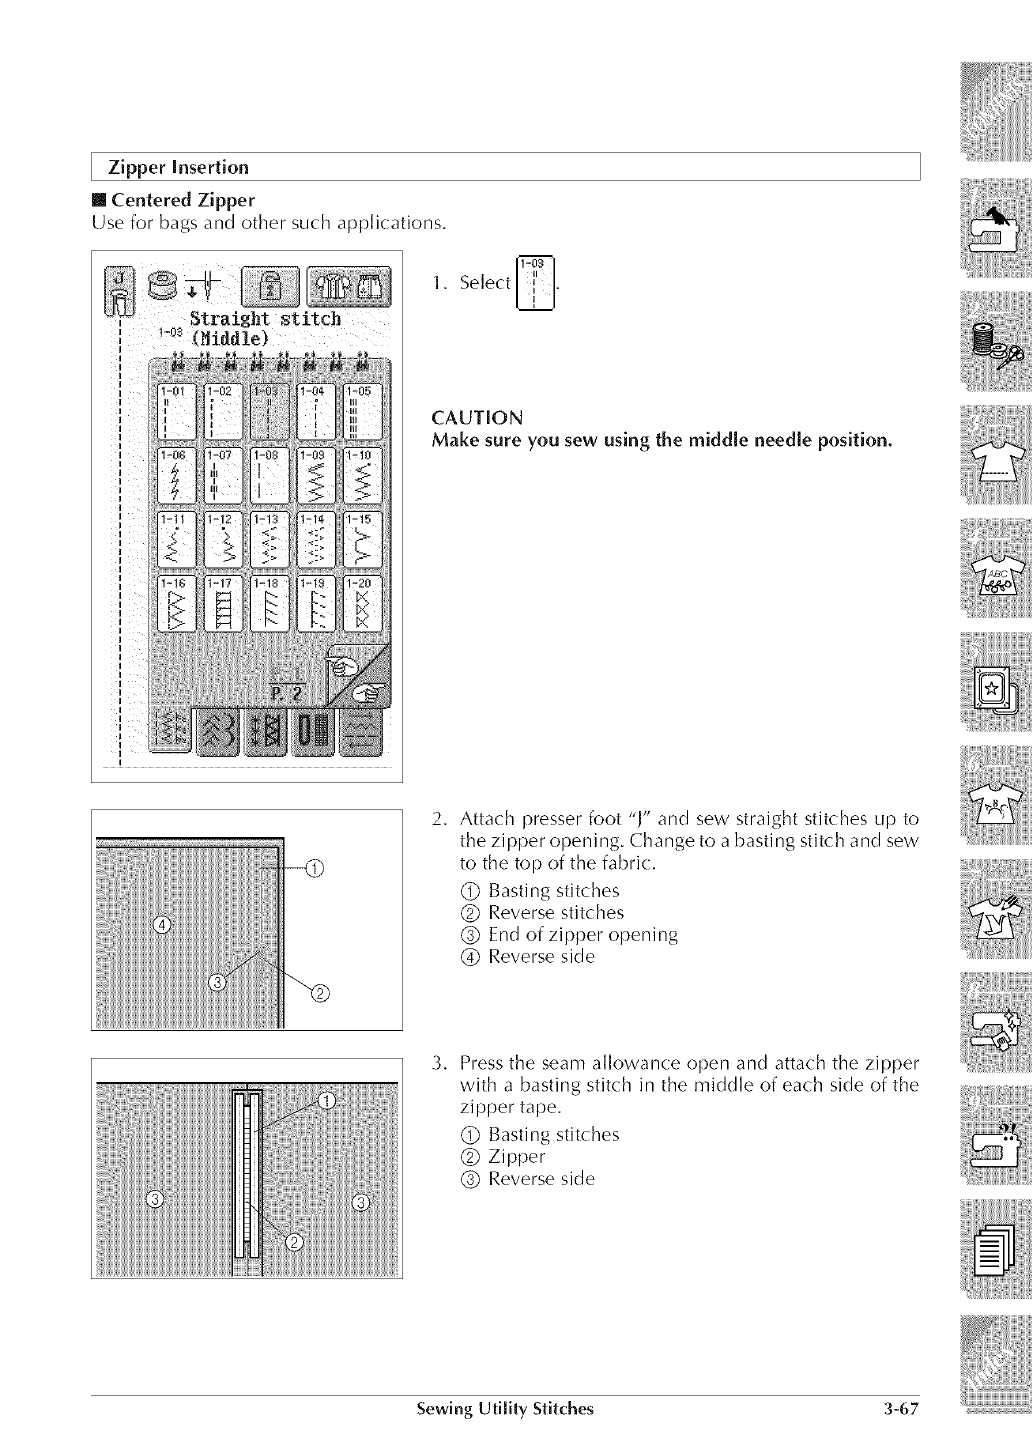
Zipper Insertion
[] Centered Zipper
Use for bags and other such applications.
I
1, Select _,
CAUTION
Make sure you sew using the middle needle position.
2, Attach presser foot "F' and sew straight stitches up to
the zipper opening. Change to a basting stitch and sew
to the top of the fabric:,
(_) Basting stitches
(_) Reverse stitches
(_ End of zipper opening
(_) Reverse side
3, Press the seam allowance open and attach the zipper
with a basting stitch in the middle of each side of the
zipper tape.
(_ Basting stitches
(_ Zipper
(_) Reverse side
Sewing Utility Stitches 3-67
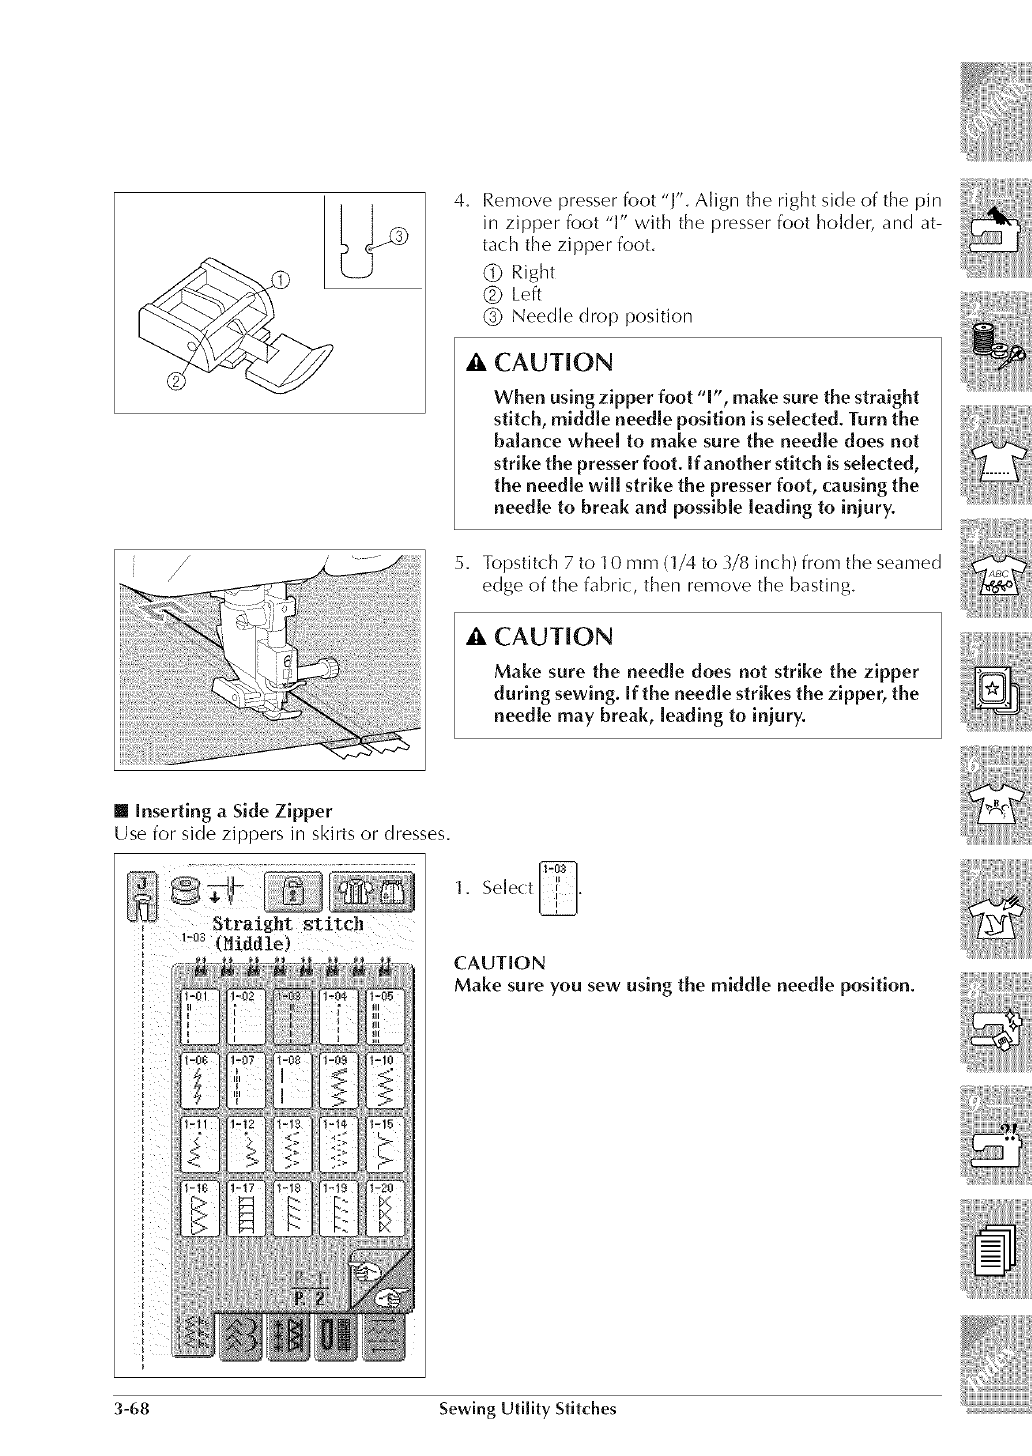
4. Remove presser foot "l". Align the right side of the pin
in zipper foot "1" with the presser foot holder, _md at-
tach the zipper foot.
(_ Right
@ Left
@ Needle drop position
• , CAUTION
When using zipper foot "1", make sure the straight
stitch, middle needle position is selected, Turn the
balance wheel to make sure the needle does not
strike the presser foot, [f another stitch is sdeded,
the needle will strike the presser foot, causing the
needle to break and possible leading to injury,
/
/5. Topstitch 7 to 10 mm (1/4 to 3/8 inch) from the seamed
edge of the fabric, then remove the basting.
CAUTION
Make sure the needle does not strike the zipper
during sewing, ffthe needle strikes the zipper, the
needle may break, leading to injury,
[] Inserting a Side Zipper
Use for side zippers in skirts or dresses.
1, Select _,
CAUTION
Make sure you sew using the middle needle position,
3-68 Sewing Utility Stitches
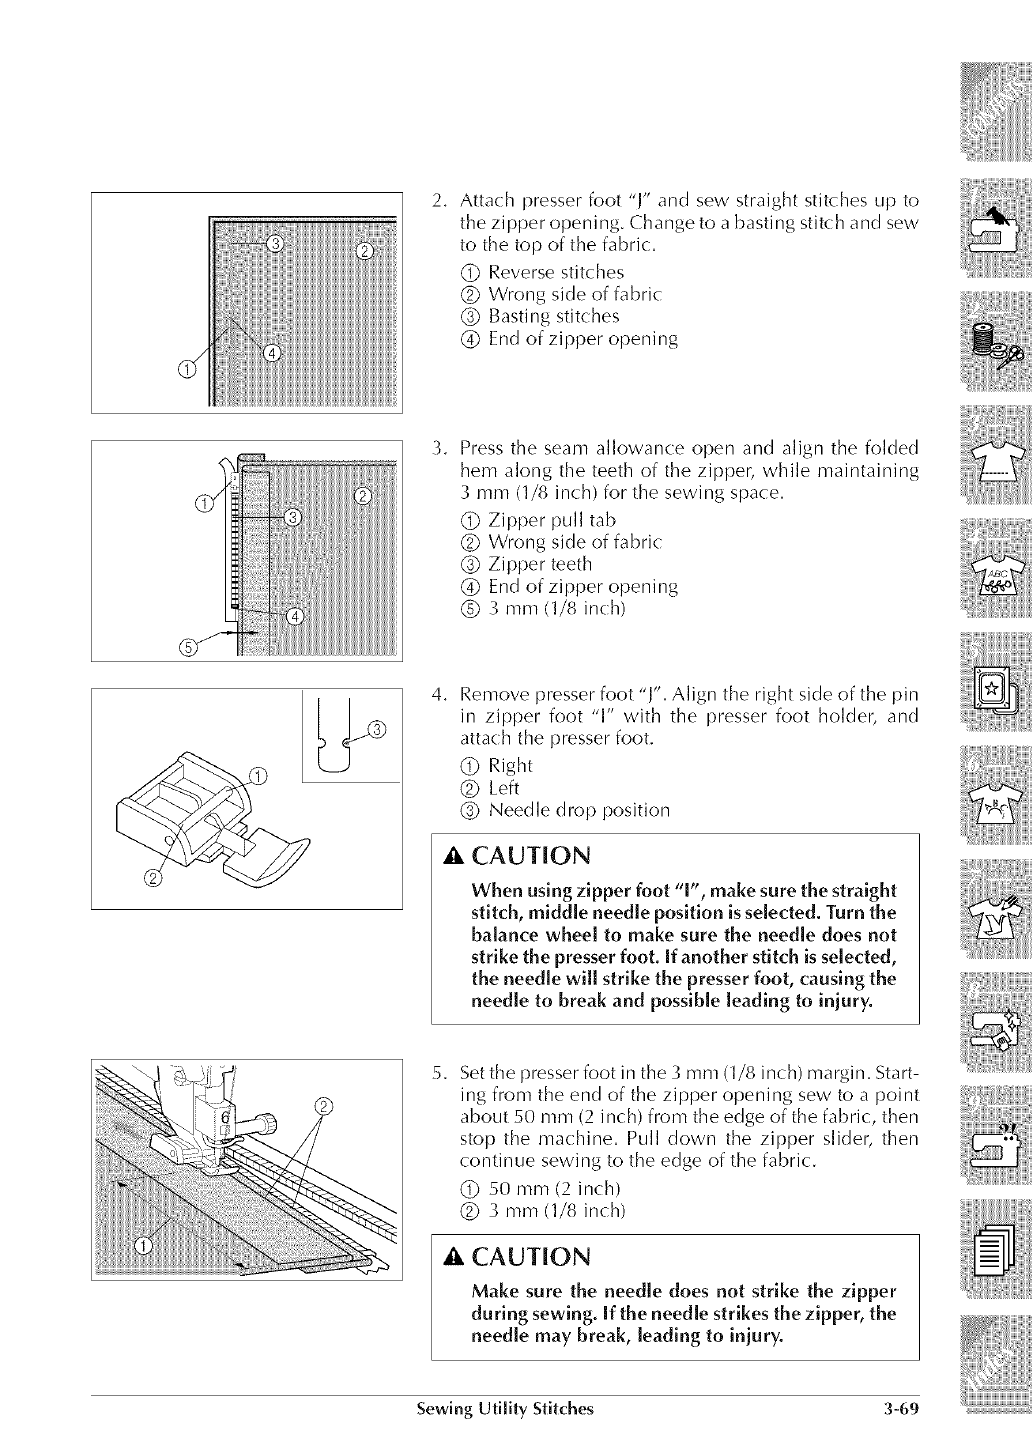
2. Attachpresserfoot"J"andsewstraightstitchesupto
thezipperopening.Changetoabastingstitchandsew
to thetopofthefabric.
(_ Reversestitches
Q Wrongsideoffabric
(_ Bastingstitches
(_)Endof zipperopening
@,
3.
4,
Press the seam allowance open and align the folded
hem along the teeth of the zipper, while maintaining
3 mm (1/8 inch) for the sewing space.
(_ Zipper pull tab
(_ Wrong side of fabric
(_ Zipper teeth
(_) End of zipper opening
(_ 3 mm (1/8 inch)
Remove presser foot "J". Align the right side of the pin
in zipper foot 'T' with the presser foot holder, and
attach the presser foot.
Q Right
(_ Left
(_) Needle drop position
CAUTION
When using zipper foot "l', make sure the straight
stitch, middle needle position is selected. Turn the
balance wheel to make sure the needle does not
strike the presser foot. If another stitch is selected,
the needle will strike the presser foot, causing the
needle to break and possible leading to injury.
2. Set the presser foot in the 3 mm (1/8 inch) margin. Start-
ing from the end of the zipper opening sew to a point
about 50 mm (2 inch) from the edge of the fabric, then
stop the machine. Pull down the zipper slider, then
continue sewing to the edge of the fabric.
(_ 50 mm (2 inch)
(_ 3 mm (1/8 inch)
CAUTION
Make sure the needle does not strike the zipper
during sewing. If the needle strikes the zipper, the
needle may break, leading to injury.
Sewing Utility Stitches 3-69
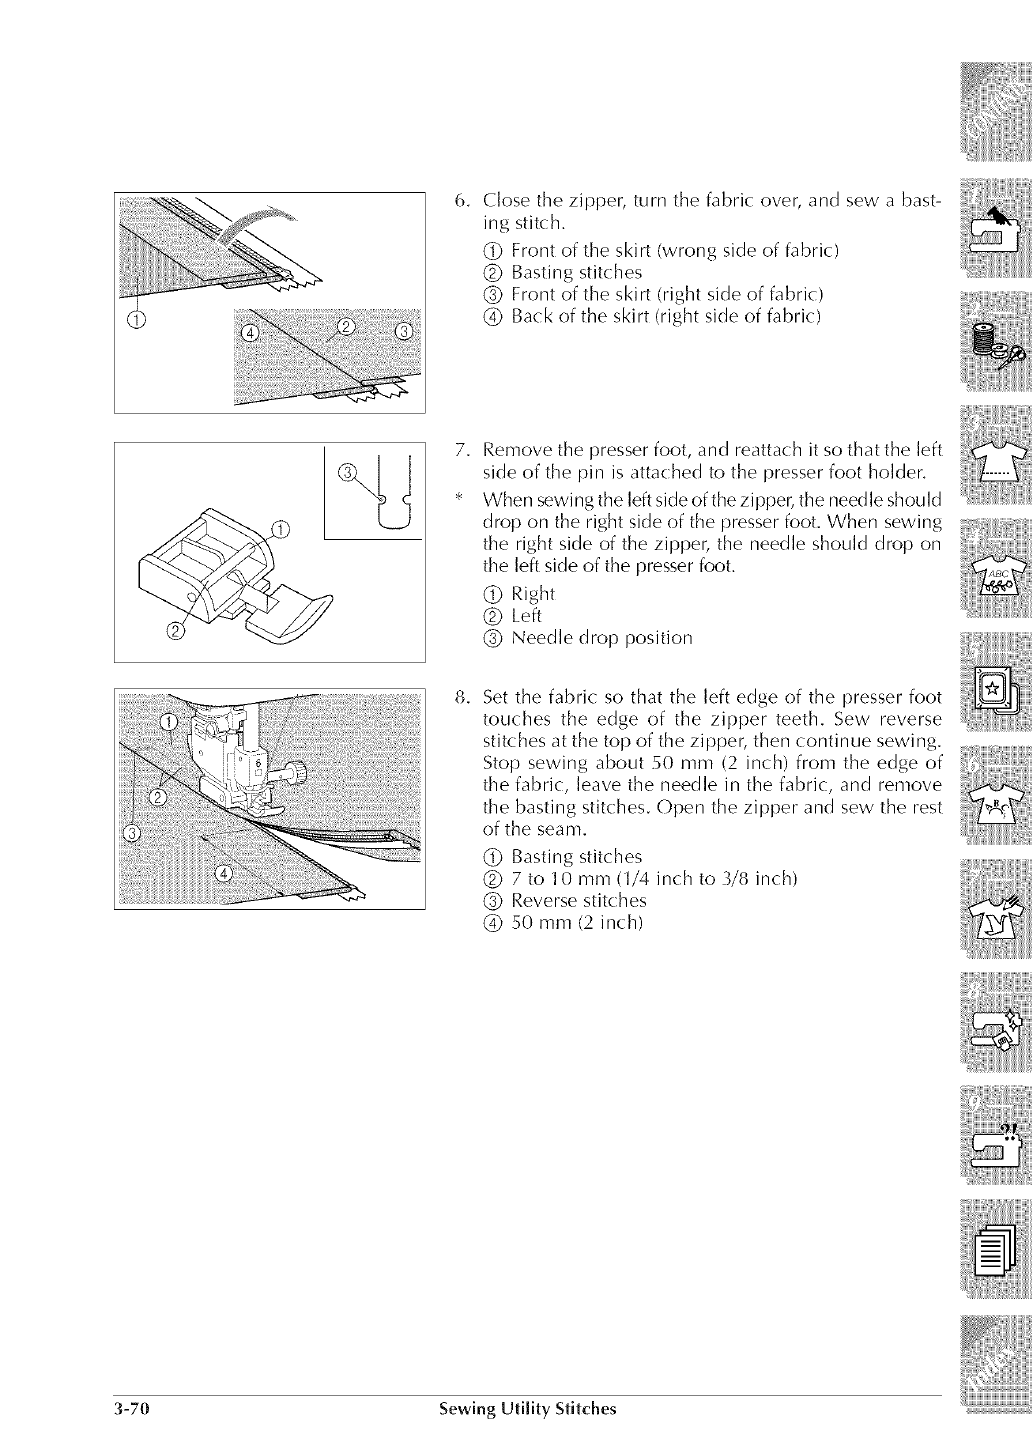
%
6. Close the zipper, turn the fabric: over, and sew a bast-
ing stitch.
(_ Front of the skirt (wrong side of fabric:)
(_ Basting stitches
(_ Front of the skirt (right side of fabric)
(_ Back of the skirt (right side of fabric:)
7,
_B
Remove the presser foot, and reattach it so that the left
side of the pin is attached to the presser foot holder.
When sewing the left side of the zipper, the needle should
drop on the right side of the presserfoot. When sewing
the right side of the zipper, the needle should drop on
the left side of the presser foot.
(_ Right
(_ Left
(_ Needle drop position
8, Set the fabric: so that the left edge of the presser foot
touches the edge of the zipper teeth. Sew reverse
stitches at the top of the zipper, then continue sewing.
Stop sewing about 50 mm (2 inch) from the edge of
the fabric, leave the needle in the fabric, and remove
the basting stitches. Open the zipper and sew the rest
of the seam.
(_ Basting stitches
(_ 7 to 10 mm (1/4 inch to 3/8 inch)
(_ Reverse stitches
(_ 50 mm (2 inch)
3-70 Sewing Utility Stitches
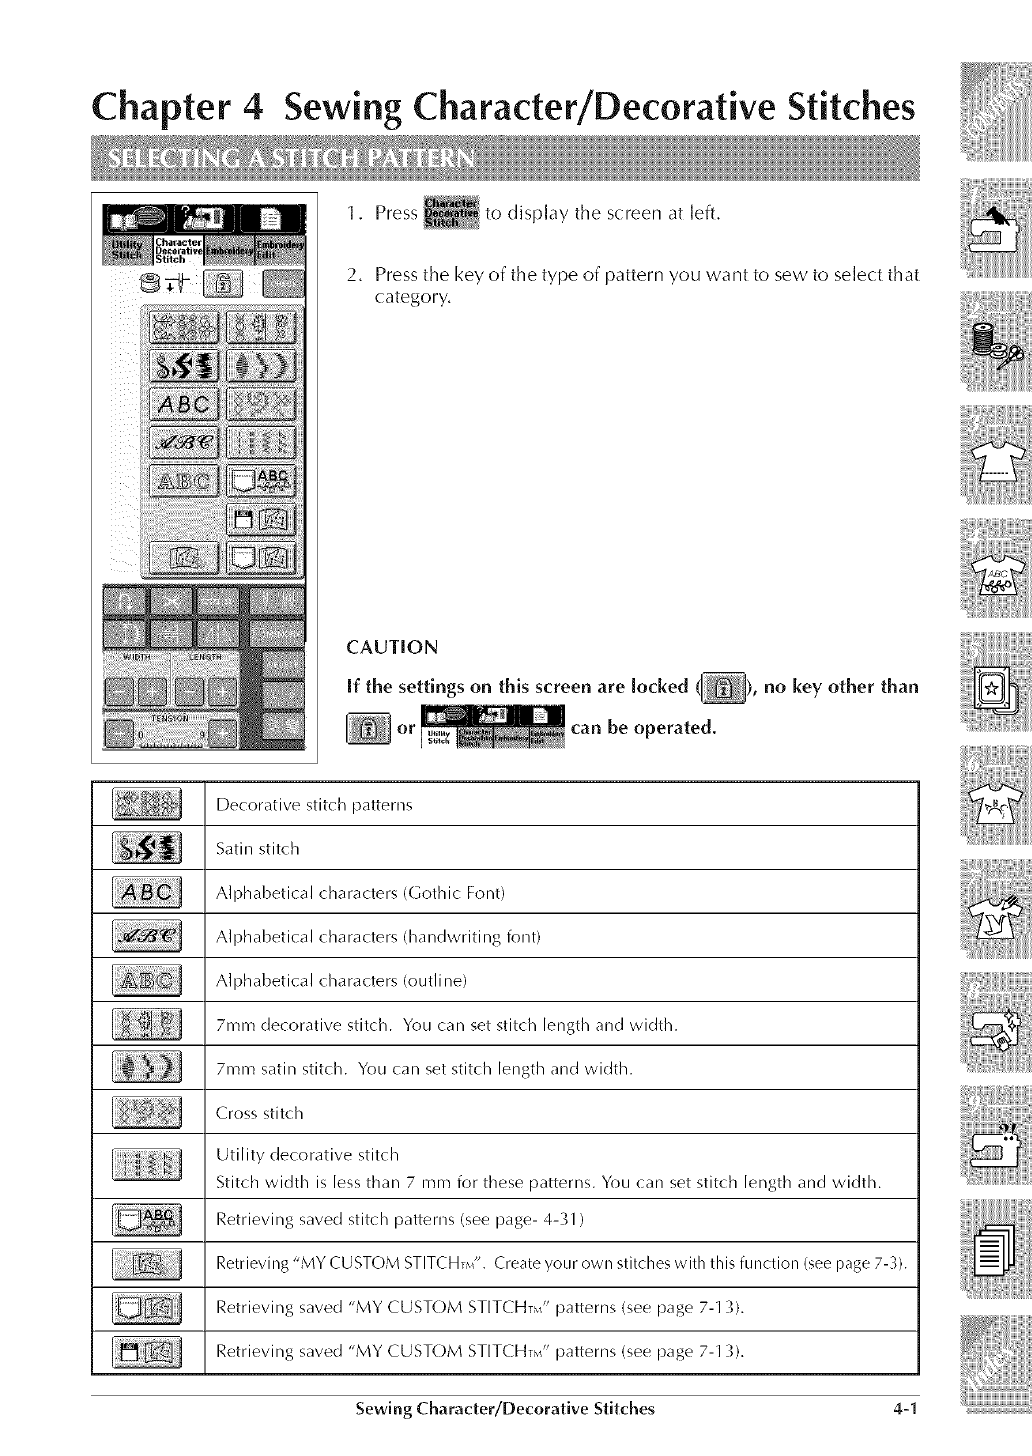
Chapter 4SewingCharacter/Decorative Stitches
1. Press to display the screen at left,
2, Press the key of the type of pattern you want to sew to select that
category,
CAUTION
If the settings on this screen are locked (_), no key other than
or can be operated.
Decorative stitch patterns
Satin stitch
Alphabetical characters (Cothic Font)
Alphabetical characters (handwriting font)
Alphabetical characters (outline)
7ram decorative stitch. You can set stitch length and width.
7ram satin stitch. You can set stitch length and width.
Cross stitch
Utility decorative stitch
Stitch width is less than 7 mm for these patterns. You can set stitch length and width.
Retrieving saved stitch patterns (see page- 4-_;1)
Retrieving "MY CUSTOM STITCHT_¢. Create your own stitches with this function (see page 7-'g).
Retrieving saved "MY CUSTOM STITCHT_" patterns (see page 7-1 _g).
Retrieving saved "MY CUSTOM STITCHT_" patterns (see page 7-1 _g).
Sewing Character/Decorative Stitches 4-I
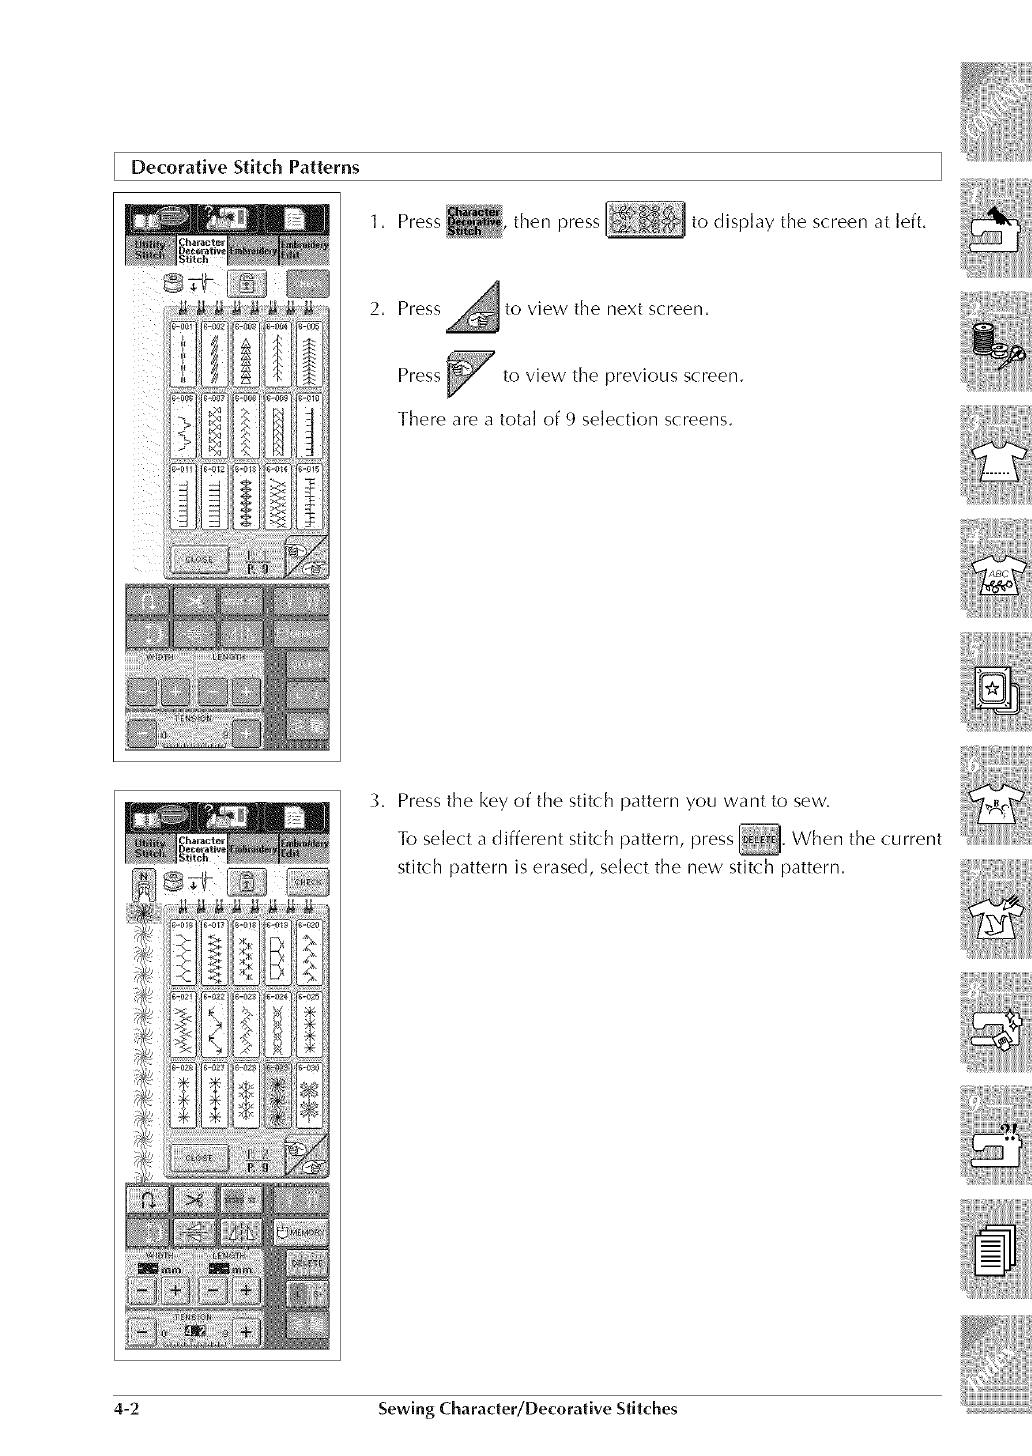
Decorative Stitch Patterns
1. Press , then press to display the screen at left.
2. Press to view the next screen.
to view the previous screen.
There are a total of 9 selection screens.
3. Press the key of the stitch pattern you want to sew.
To select a different stitch pattern, press _. When the current
stitch pattern is erased, select the new stitch pattern.
4-2 Sewing Charader/Decorative Stitches
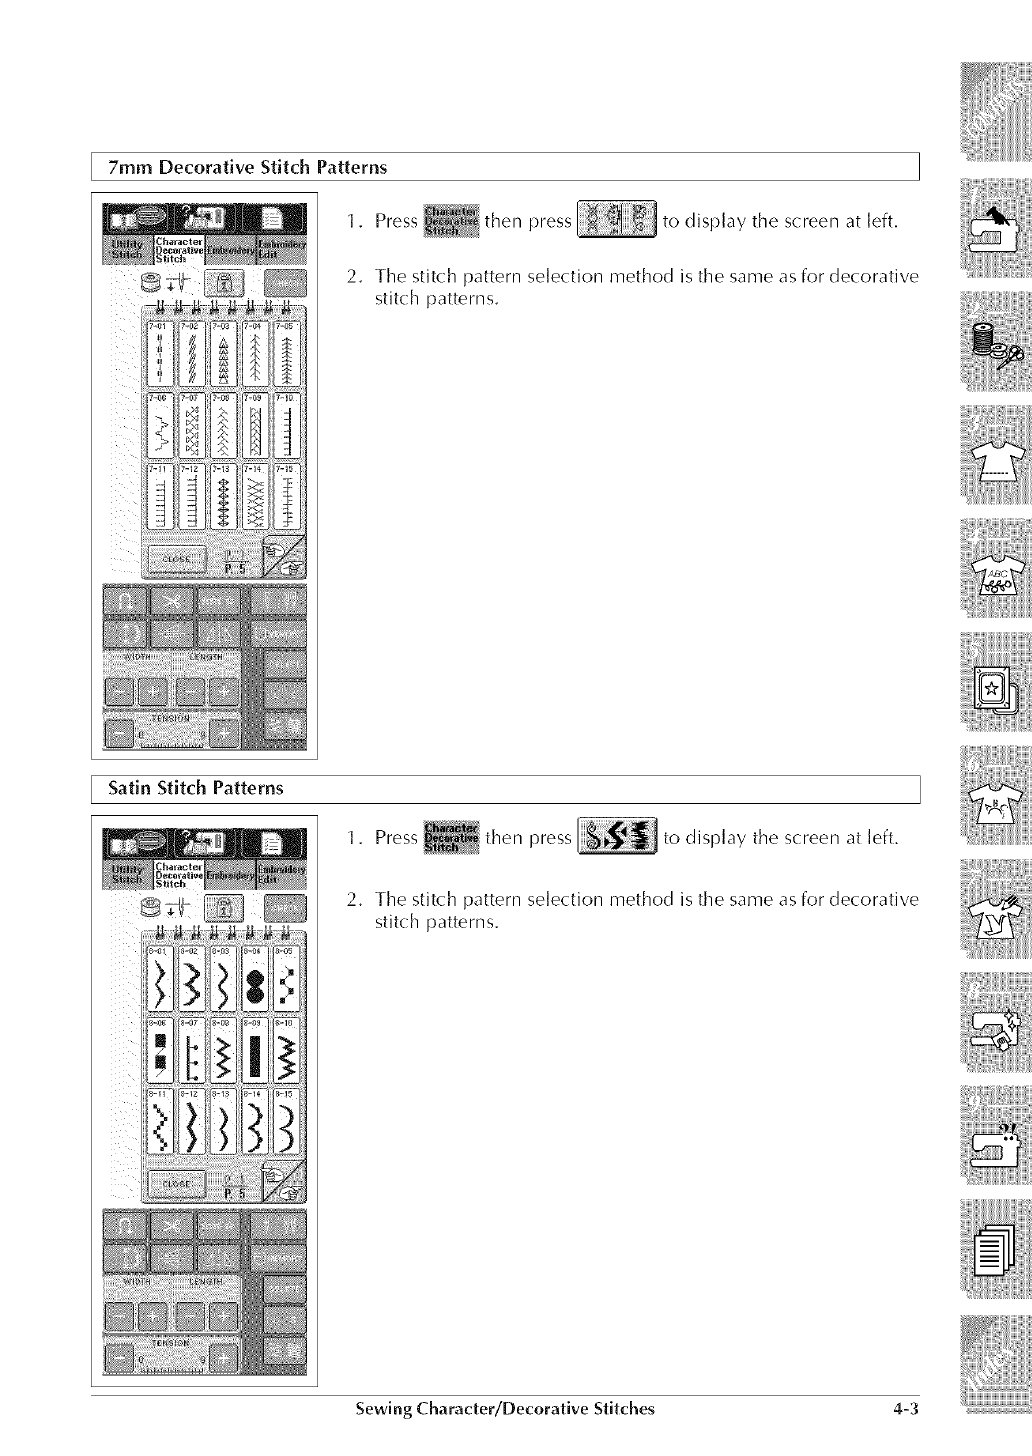
7ram Decorative Stitch Patterns
1, Press then press to display the screen at left,
2. The stitch pattern selection method is the same as for decorative
stitch patterns.
Satin Stitch Patterns
1. Press _ then press to display the screen at left.
2. The stitch pattern selection method is the same as for decorative
stitch patterns.
Sewing Character/Decorative Stitches 4-3
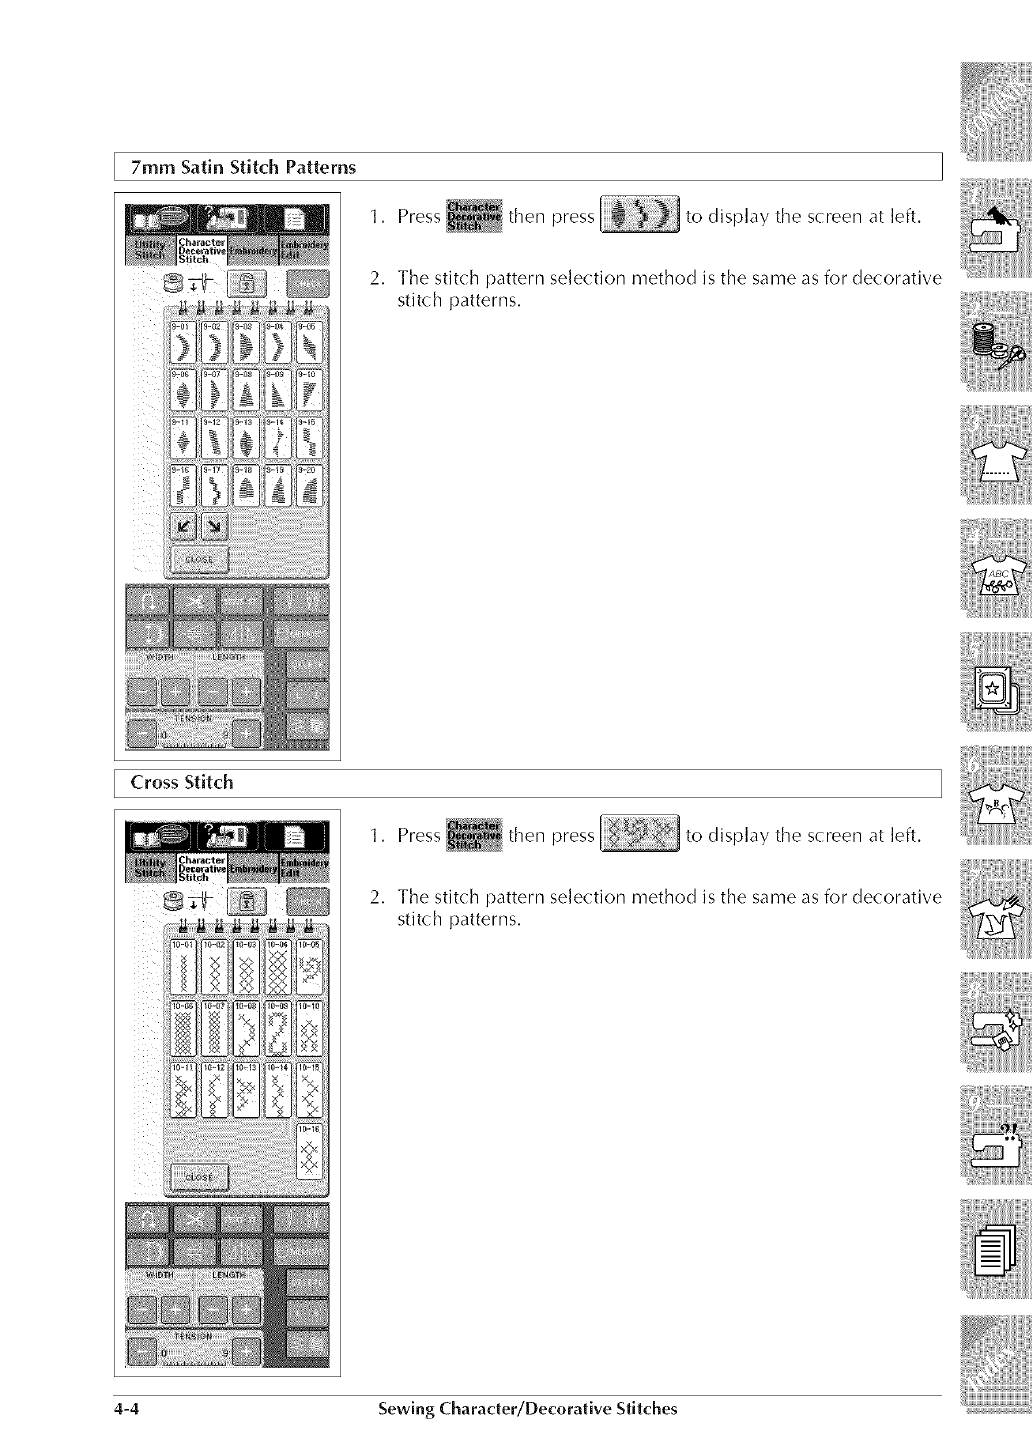
7ram Satin Stitch Patterns
1. Press then press to display the screen at left,
2, The stitch pattern selection method is the same as for decorative
stitch patterns,
Cross Stitch
1. Press then press to display the screen at left,
2. The stitch pattern selection method is the same as for decorative
stitch patterns,
4-4 Sewing Charader/Decorative Stitches
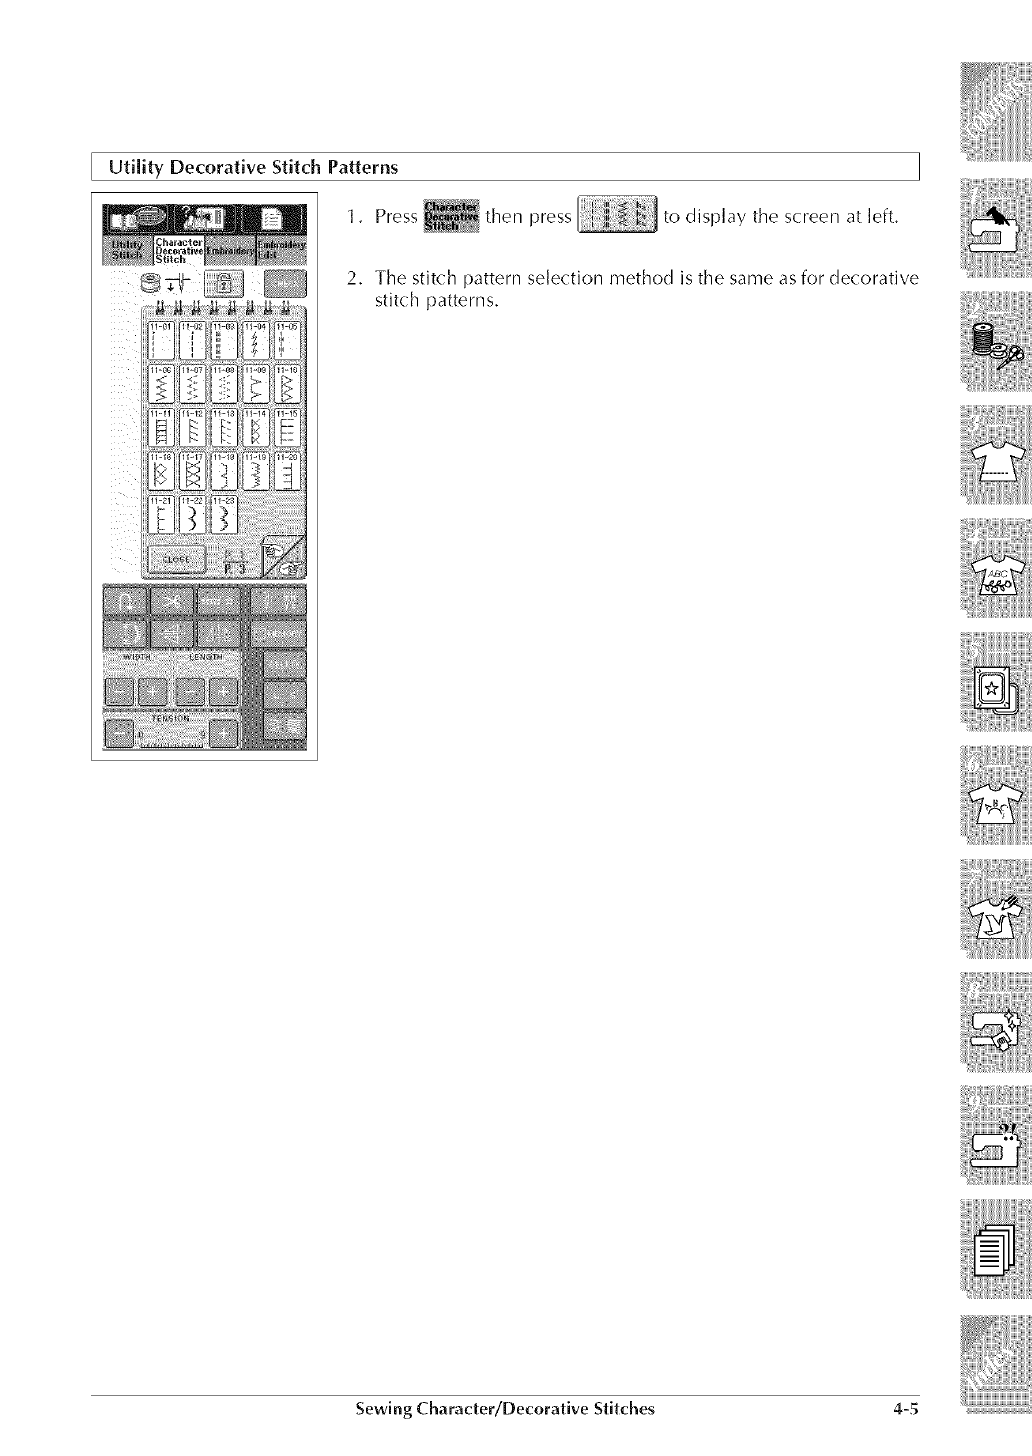
Utility Decorative Stitch Patterns
1, Press then press to display tile screen at left,
2. The stitch pattern selection method is the same as for decorative
stitch patterns.
Sewing Character/Decorative Stitches 4-5
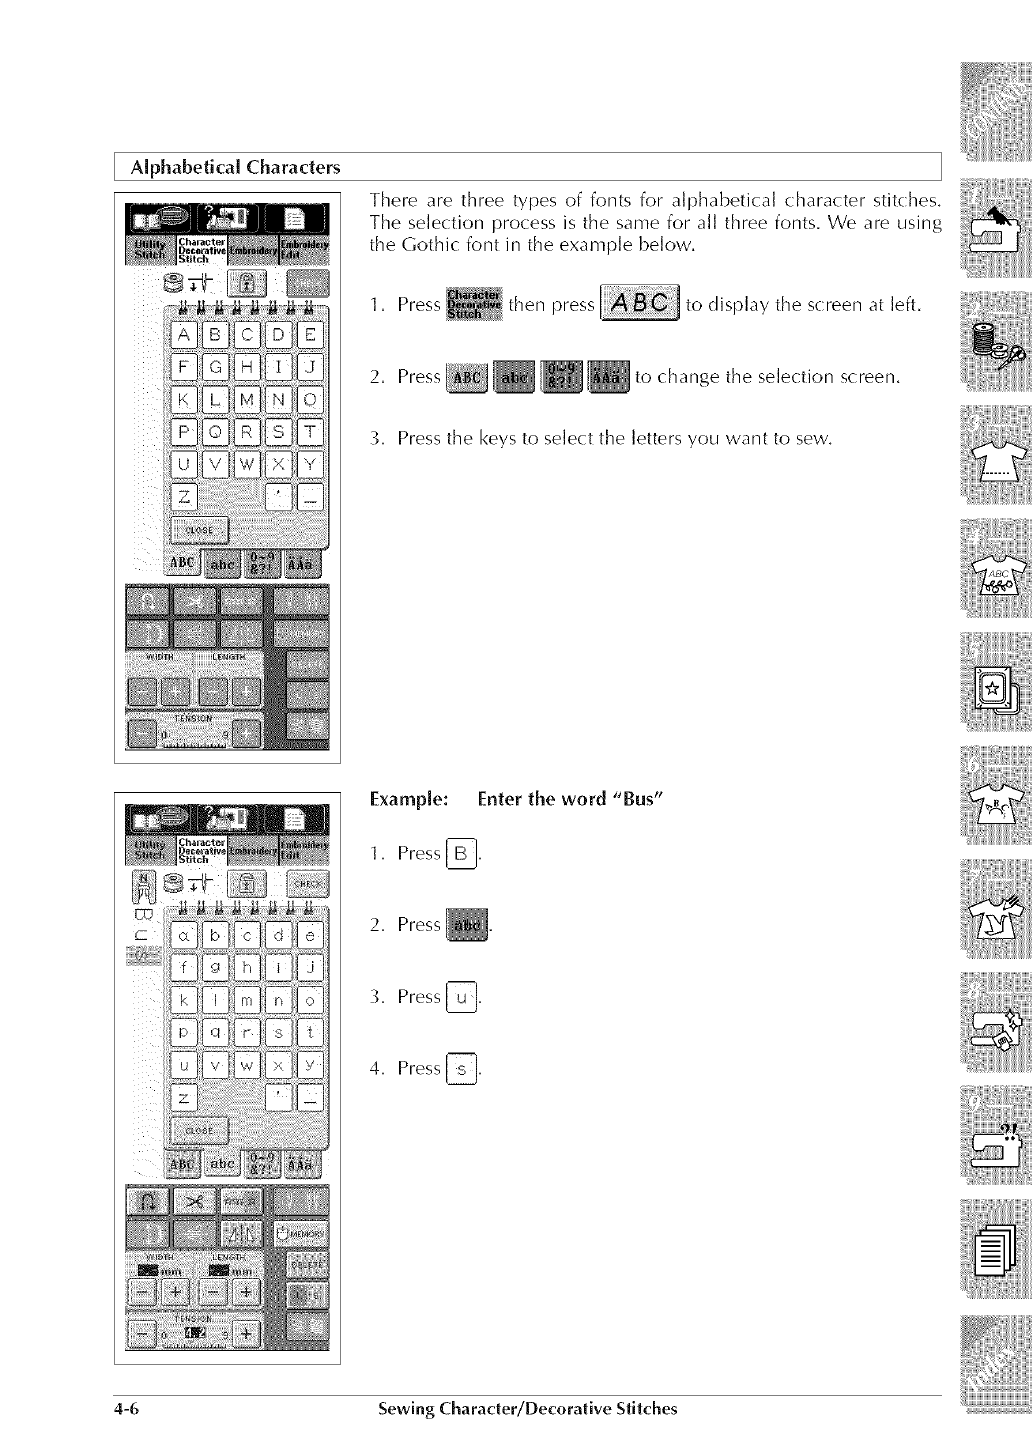
Alphabetical Characters
There are three types of fonts for alphabetical character stitches,
The selection process is the same for all three fonts, We are using
the Gothic font in the example below,
1, Press then press to display the screen at left,
2, .. _ the selectionPress I!_ ;_i_ _to (hange s( reen,
3, Press the keys to select the letters you want to sew,
Example: Enter the word "Bus"
1, Press [B-l,
2, Press _,
_. Press _.
4, Press _,
4-6 Sewing Character/Decorative Stitches
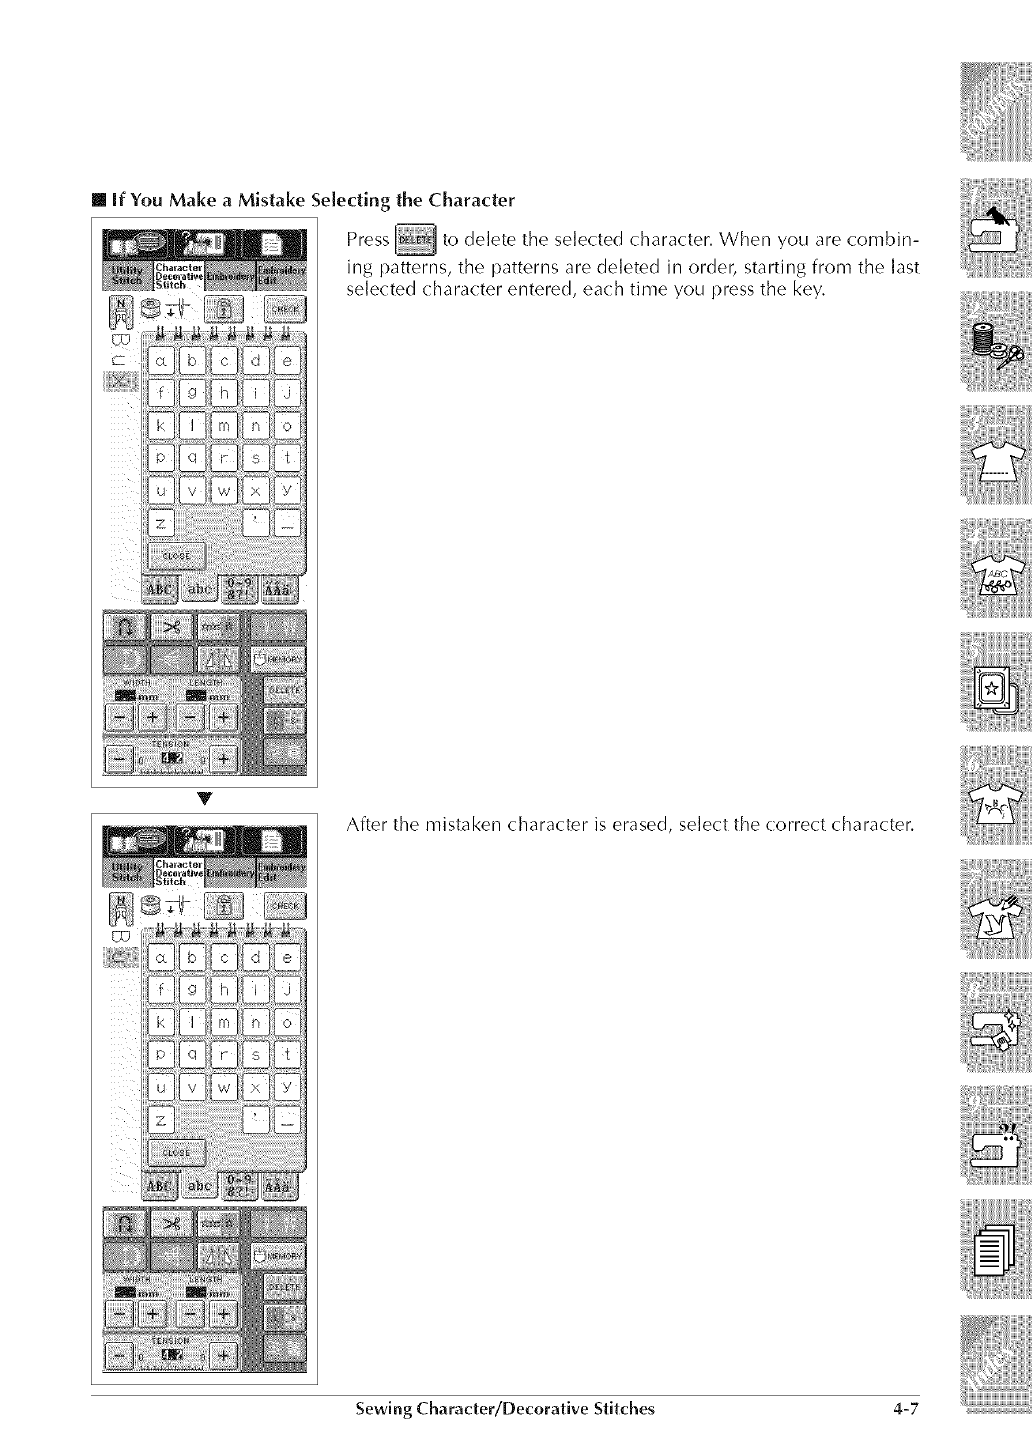
[] if You Make aMistake Selecting the Character
Press _ to delete the selected character, When you are combin-
ing patterns, the patterns are de]eted in order, starting from the ]ast
selected character entered, each time you press the key,
T
After the mistaken character is erased, select the correct character,
Sewing Character/Decorative Stitches 4-7
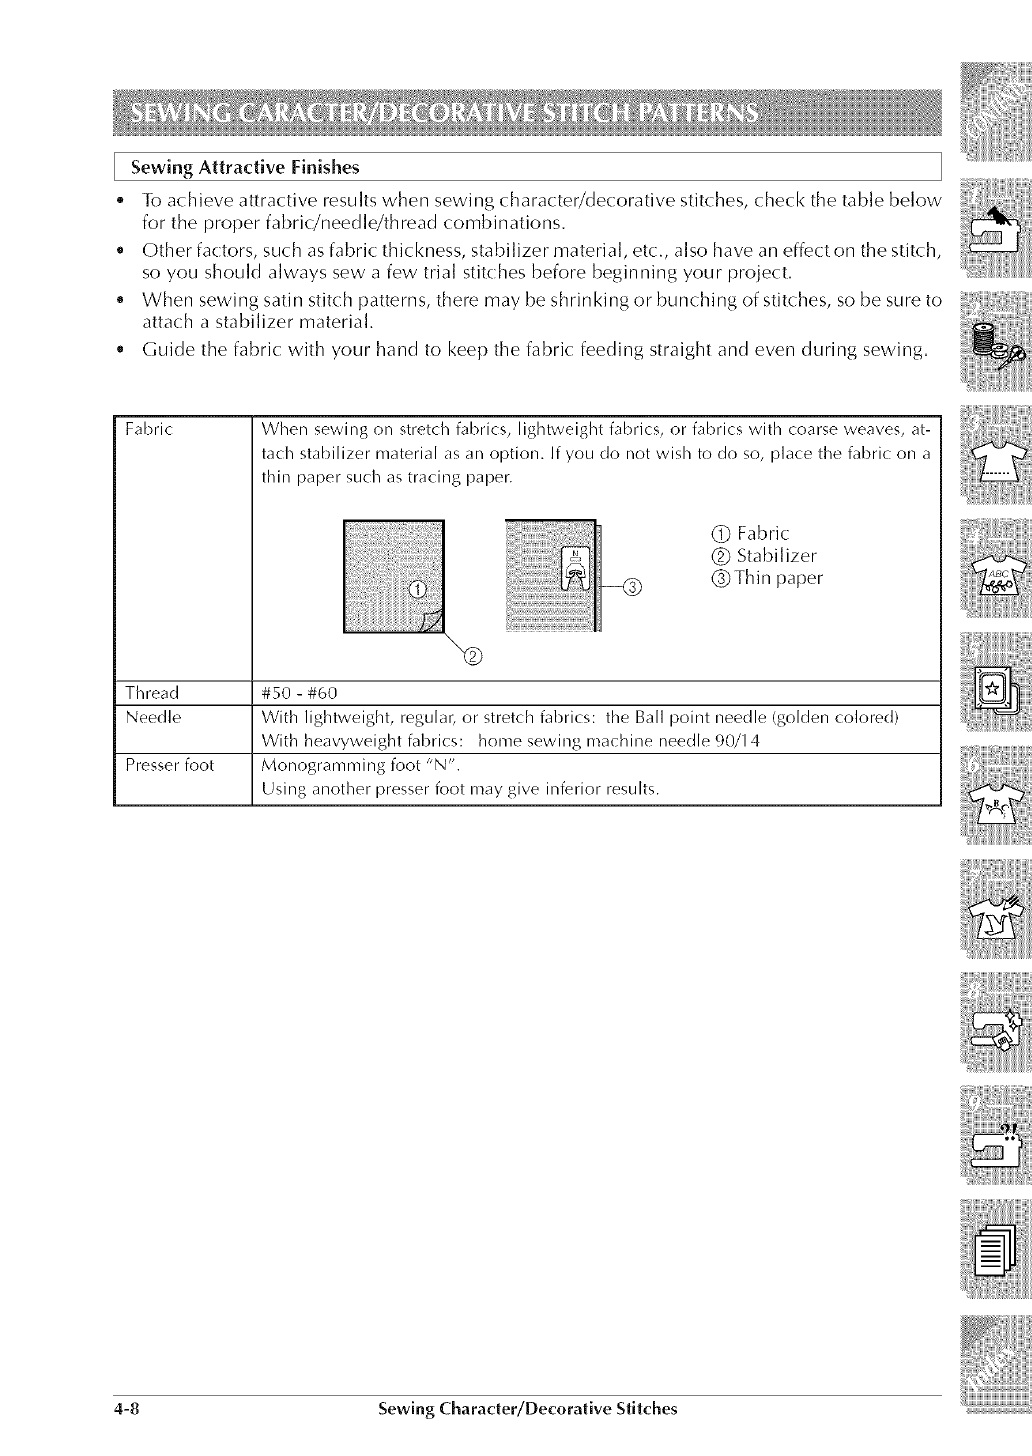
Attractive FinishesSewing
• To achieve attractive results when sewing character/decorative stitches, check the table below
for the proper fabric/needle/thread combinations.
• Other factors, such as fabric thickness, stabilizer material, etc., also have an effect on the stitch,
so you should always sew a few trial stitches before beginning your project.
• When sewing satin stitch patterns, there may be shrinking or bunching of stitches, so be sure to
attach a stabilizer material.
• Guide the fabric with your hand to keep the fabric feeding straight and even during sewing.
Fabric When sewing on stretch fabrics, lightweight fabrics, or fabrics with coarse weaves, at-
tach stabilizer material as an option. If you do not wish to do so, place the fabric on a
thin paper such as tracing paper.
iiiilii!iii!ii!i_,_i!i_,_i!i_,_i!i_,_i!i_iiiiii,i_iii!iiiiFii!i_i!:!ii!i!!i!iii!ilili_'
iiiiiiiiiiiiiiiiiiiiiiiiiiiiiiiiiiiiilili! i,li! i,ii ijii iiii!i
(_ Fabric
(_ Stabilizer
(_Thin paper
Thread #50 - #60
Needle With lightweight, regular, or stretch fabrics: the Ball point needle (golden colored)
With heavyweight fabrics: home sewing machine needle 90/14
Presser foot Monogramming foot "N".
Using another presser foot may give inferior results.
4-8 Sewing Character/Decorative Stitches
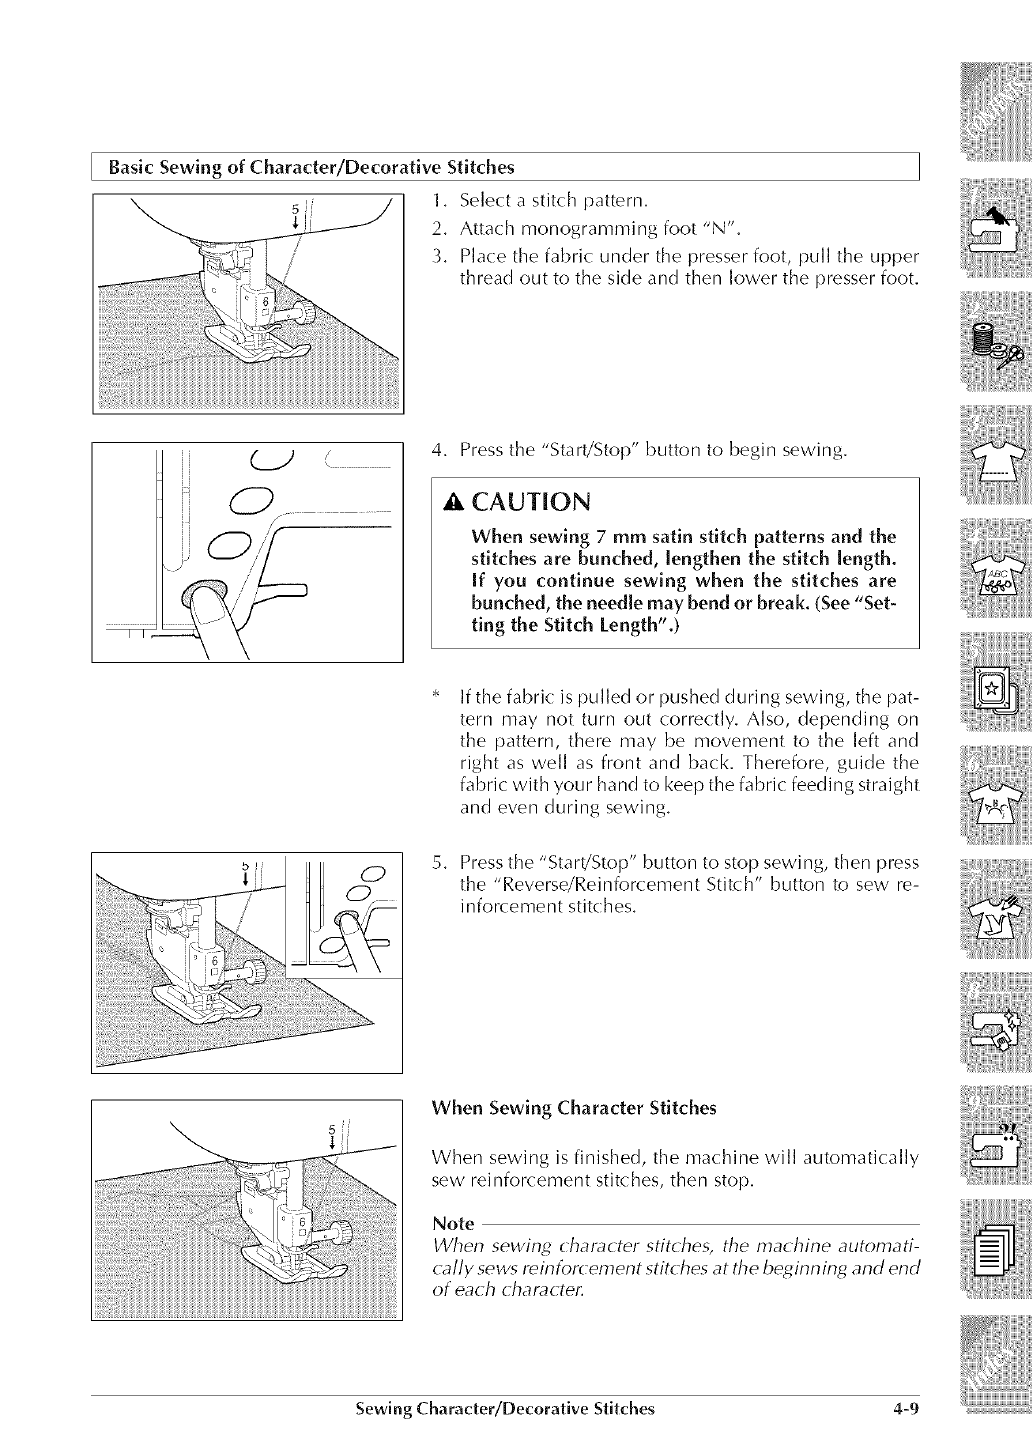
Basic Sewing of Character/Decorative Stitches
5/1. Selectastitch pattern.
i 2. Attach monogramming foot "N".
3. Place the fabric: under the presser foot, pull the upper
thread out to the side and then lower the presser foot.
4. Press the "Start/Stop" button to begin sewing.
ACAUTION
When sewing 7mm satin stitch patterns and the
stitches are bunched, lengthen the stitch length.
if you continue sewing when the stitches are
bunched, the needle may bend or break. _See"Set-
ting the Stitch length".)
If the fabric: is pulled or pushed during sewing, the pat-
tern may not turn out correctly. Also, depending on
the pattern, there may be movement to the left and
right as well as front and back. Therefore, guide the
fabric with your hand to keep the fabric: feeding straight
and even during sewing.
5. Press the "Start!Stop" button to stop sewing, then press
the "Reverse/Reinforcement Stitch" button to sew re-
inforcement stitches.
When Sewing Character Stitches
When sewing is finished, the machine will automatically
sew reinforcement stitches, then stop,
Note
When sewing (hamcter stit(hes, the ma(hine automati-
cally sews reinfor( ement stit( hes at the beginning and end
of ea( h (hal_( tel:
Sewing Character/Decerative Stitches 4-9
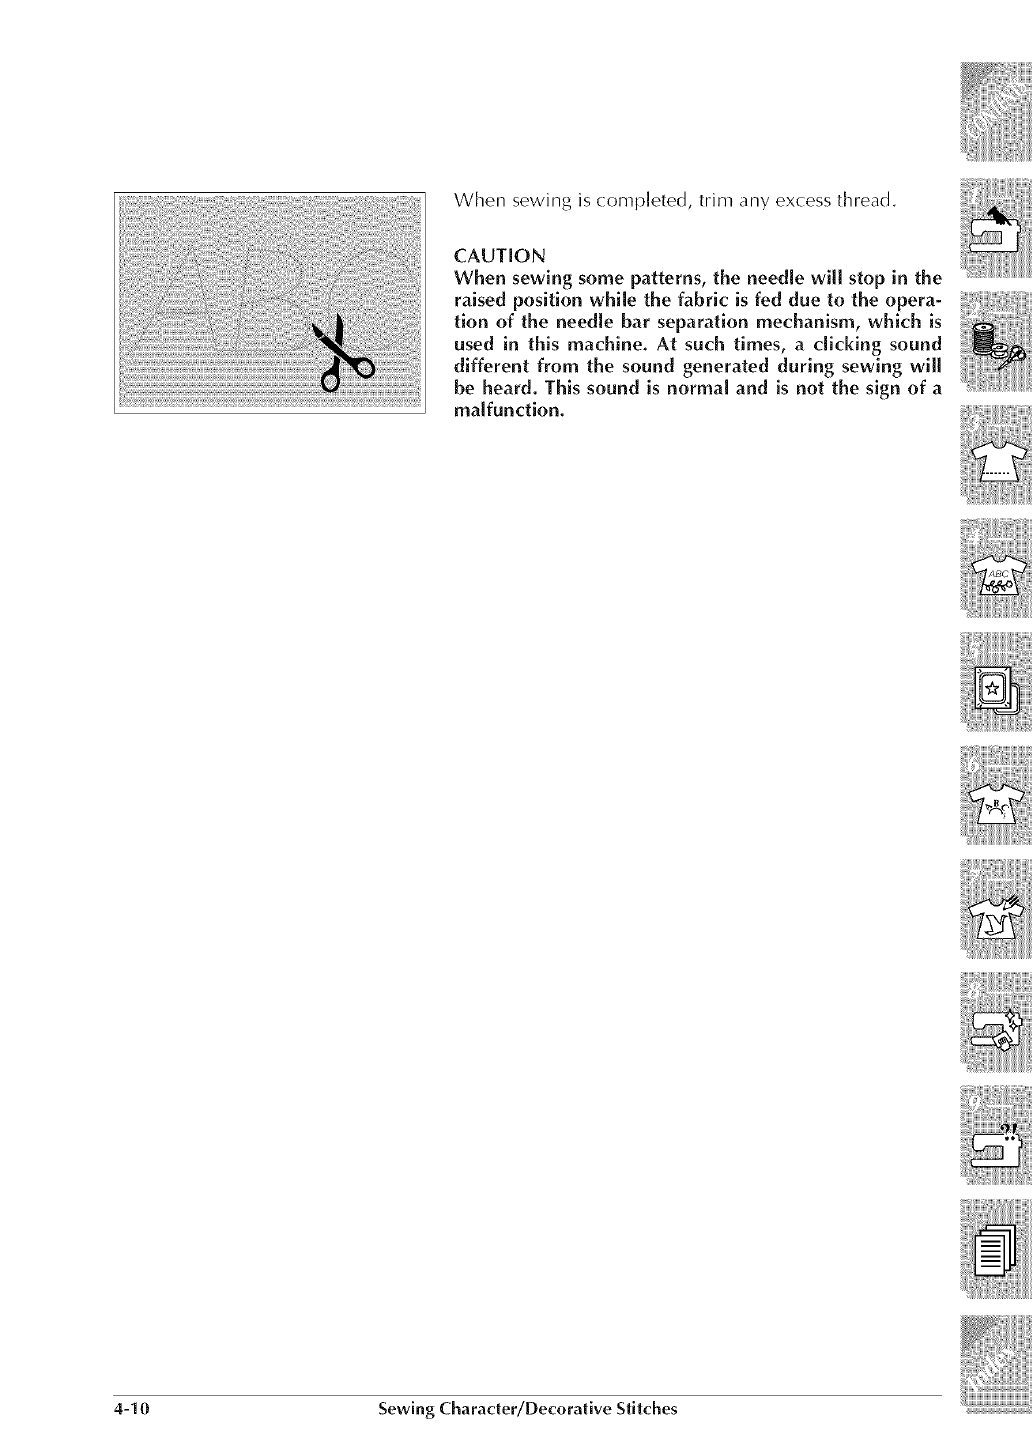
When sewing is completed, trim any excess thread,
CAUTION
When sewing some patterns, the needle will stop in the
raised position while the fabric is fed due to the opera-
tion of the needle bar separation mechanism, which is
used in this machine. At such times, a clicking sound
different from the sound generated during sewing will
be heard. This sound is normal and is not the sign of a
malfunction.
4-10 Sewing Character/Decorative Stitches
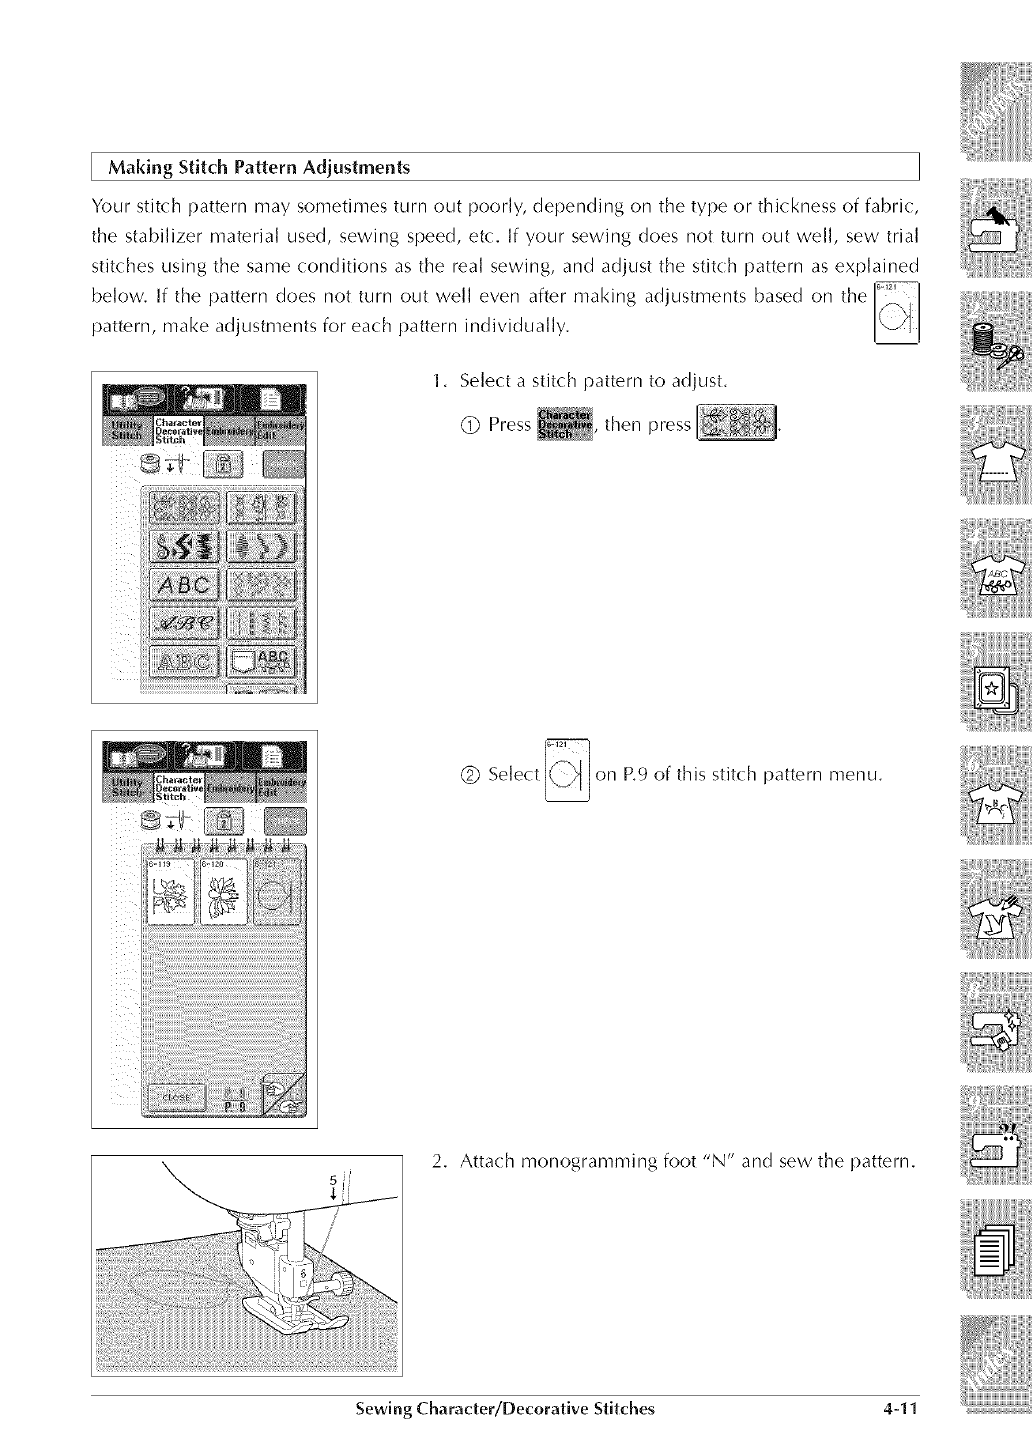
Making Stitch Pattern Adjustments
Your stitch pattern may sometimes turn out poorly, depending on the type or thickness of fabric
the stabilizer material used, sewing speed, etc. If your sewing does not turn out well, sew trial
stitches using the same conditions as the real sewing, and adjust the stitch pattern as explained
below. If the pattern does not turn out well even after making adjustments based on the
)attern, make adjustments for each pattern individually.
1, Select a stitch pattern to adjust,
@ Press ,then press
(_) Select _ on P.9 of this stitch pattern menu.
2. Attach monogramming foot "N" and sew the pattern.
Sewing Character/Decorative Stitches 4-11
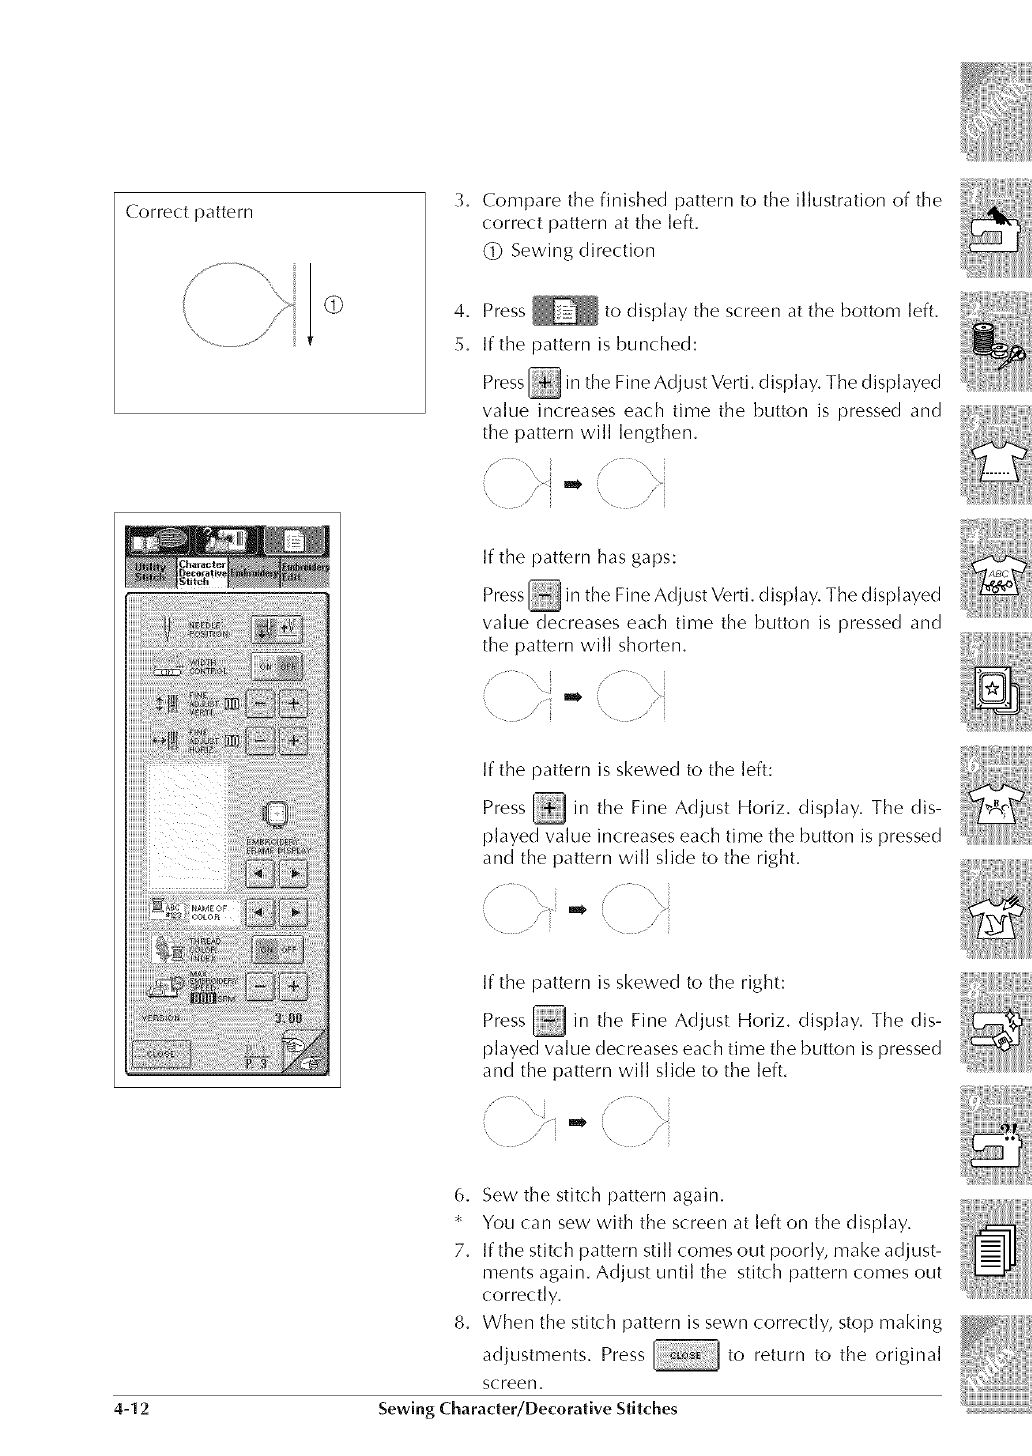
Correct pattern
(9
3.
4.
5.
Compare the finished pattern to the illustration of the
correct pattern at the ]eft.
(_ Sewing direction
Press _ to display the screen at the bottom left.
If the pattern is bunched:
Press _ in the Fine Adjust Verti. display. The displayed
value increases each time the button is pressed and
the pattern will lengthen.
.............\ ........
..... l, i i>i
If the pattern has gaps:
Press _ in the Fine Adjust Verti. display. The displayed
value decreases each time the button is pressed and
the pattern will shorten.
J ...... •\ i /....... •\ i
If the pattern is skewed to the ]eft:
Press _ in the Fine Adjust Horiz. display. The dis-
played value increases each time the button is pressed
and the pattern will slide to the right.
/_ •\ i
"/ii'i
If the pattern is skewed to the right:
Press _ in the Fine Adjust Horiz. display. The dis-
played value decreases each time the button is pressed
and the pattern will slide to the left.
............\i ...............\i
"i)i _' (
4-12
6. Sew the stitch pattern again.
* You can sew with the screen at left on the display.
7. If the stitch pattern still comes out poorly, make adjust-
ments again. Adjust until the stitch pattern comes out
correctly.
8. When the stitch pattern is sewn correctly, stop making
adjustments. Press to return to the original
screen.
Sewing Character/Decorative Stitches

Youcancreatejustthefinishyouwantusingtheeditingfunctions.Makepatternslargerorsmaller,
makemirrorimages,etc.
(_ Usethiskeyto checklargecombinationpat-
terns.
(_ Stitcheditingkeys:
Usethepinkkeystoeditthepatternwhenyou
selectit.
Usethegreenkeystomakeadjustmentswhen
sewing.
CAUTION
Some editing functions can not be used with
certain stitch patterns. If the key display is light
gray, that function can not be used with the se-
lected stitch pattern.
Sewing Character/Decorative Stitches 4-13
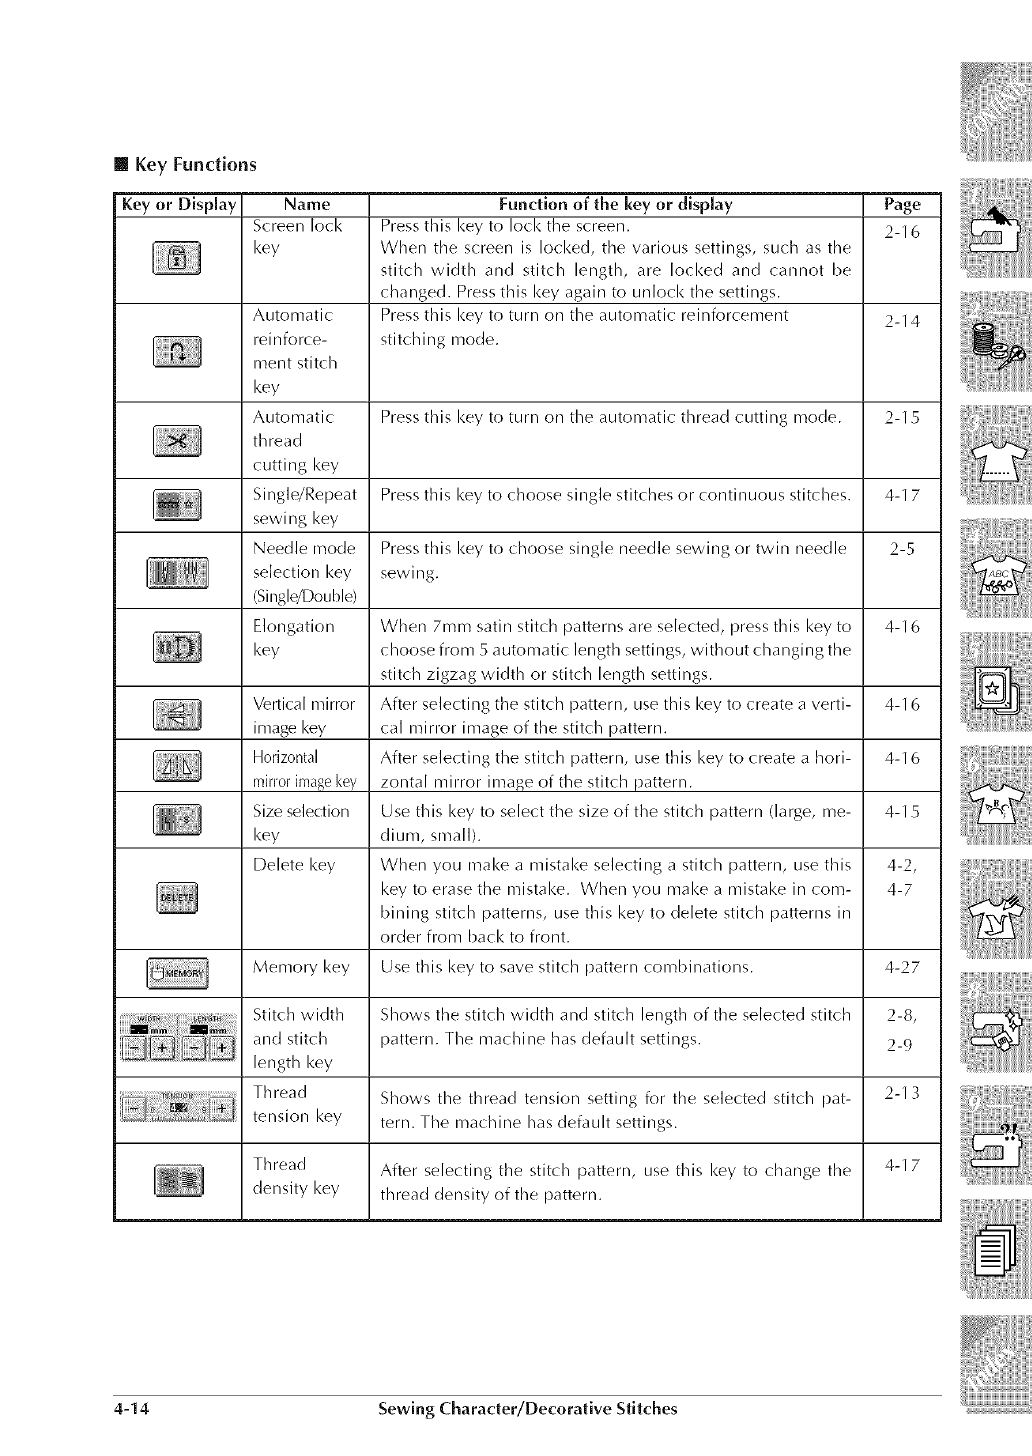
[] Key Functions
i Key or Display Name
Screen loci<
key
Automatic
reinforce-
ment stitch
key
Automatic
thread
cutting key
Single/Repeat
sewing key
Needle mode
sdection key
(Single/Double)
Elongation
key
Vertical mirror
image key
Horizontal
mh'r0r imagekey
Size selection
key
Delete key
Functien of the key er display Page
Press this key to lock the screen. 2-16
When the screen is locked, the various settings, such as the
stitch width and stitch length, are locked and cannot be
changed. Press this key again to unlock the settings.
Press this key to turn on the automatic reinforcement 2-14
stitching mode.
Press this key to turn on the automatic thread cutting mode. 2-15
Press this key to choose single stitches or continuous stitches.
Press this key to choose single needle sewing or twin needle
sewing.
4-17
2-5
When 7ram satin stitch patterns are selected, press this key to 4-16
choose from 5 automatic length settings, without changing the
stitch zigzag width or stitch length settings.
After selecting the stitch pattern, use this key to create a verti- 4-16
cal mirror image of the stitch pattern.
After selecting the stitch pattern, use this key to create a hori- 4-16
zontal mirror image of the stitch pattern.
Use this key to select the size of the stitch pattern (large, me- 4-15
dium, small).
When you make a mistake selecting a stitch pattern, use this 4-2,
key to erase the mistake. When you make a mistake in corn- 4-7
binin 8 stitch patterns, use this key to delete stitch patterns in
order from back to front.
Use this key to save stitch pattern combinations.Memory key 4-27
Stitch width Shows the stitch width and stitch length of the selected stitch 2-8,
and stitch pattern. The machine has defauh settings. 2-9
length key
Thread Shows the thread tension setting for the selected stitch pat- 2-13
tension key tern. The machine has defauh settings.
Thread After selecting the stitch pattern, use this key to change the 4-1 7
density key thread density of the pattern.
4-14 Sewing Character/Decorative Stitches
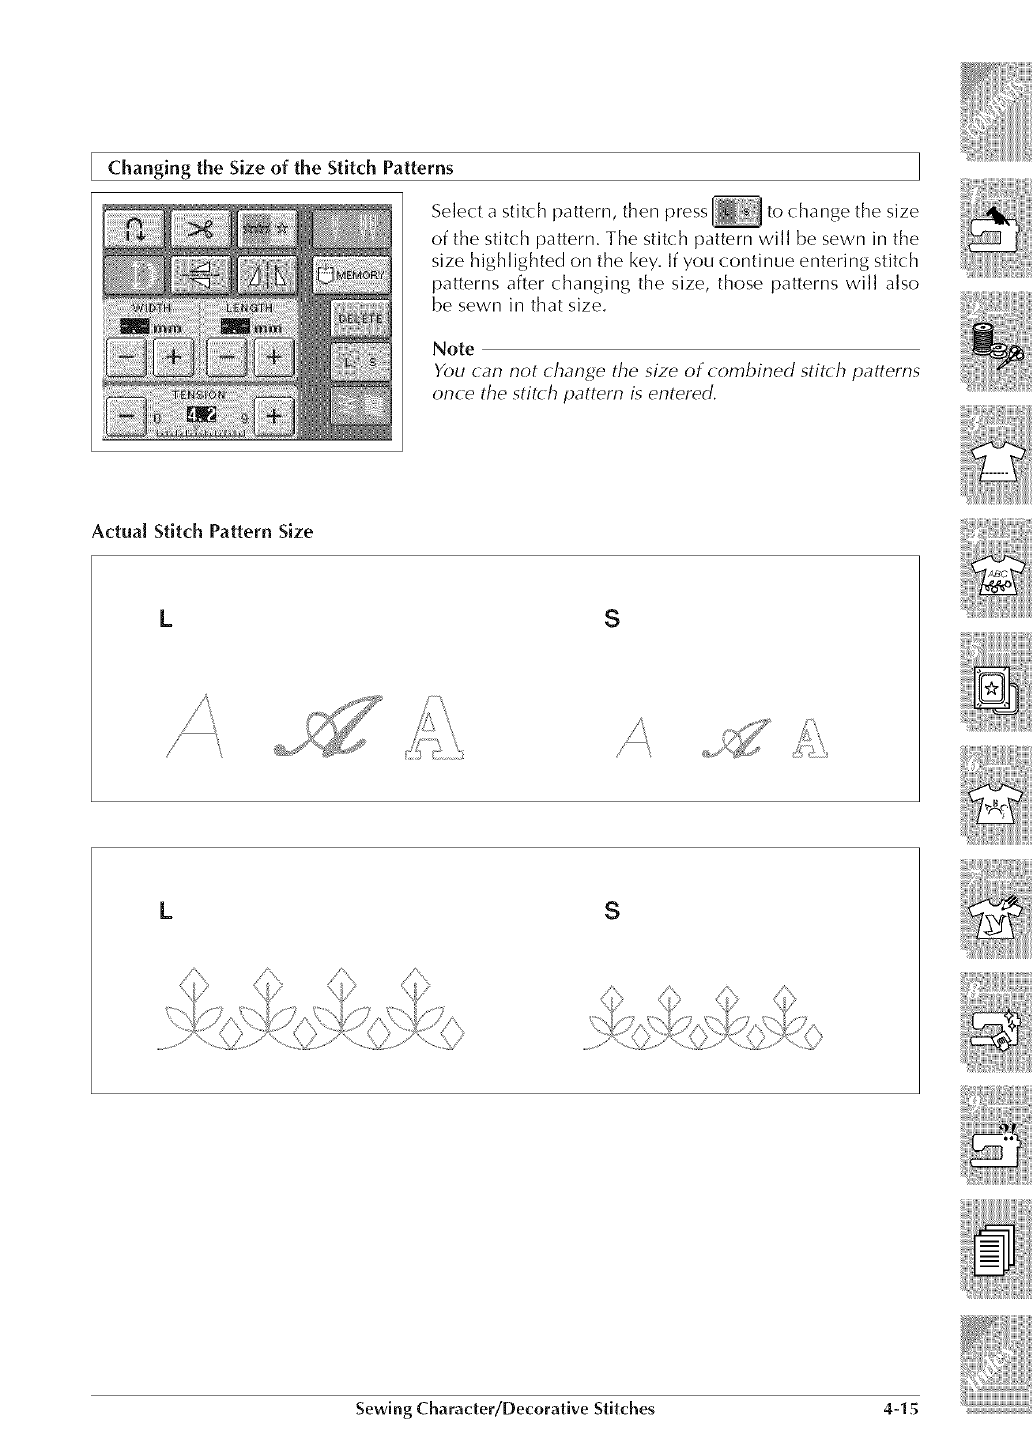
Changing the Size of the Stitch Patterns
Select a stitch pattern, then press to change the size
of the stitch %ttern. The stitch pattern will be sewn in the
size highlighted on the key. If you continue entering stitch
patterns after changing the size, those patterns will also
be sewn in that size.
Note
You can not change the size of combined stitch patterns
once the stitch pattern is entered.
Actual Stitch Pattern Size
L$
L$
Sewing Character/Decorative Stitches 4-15
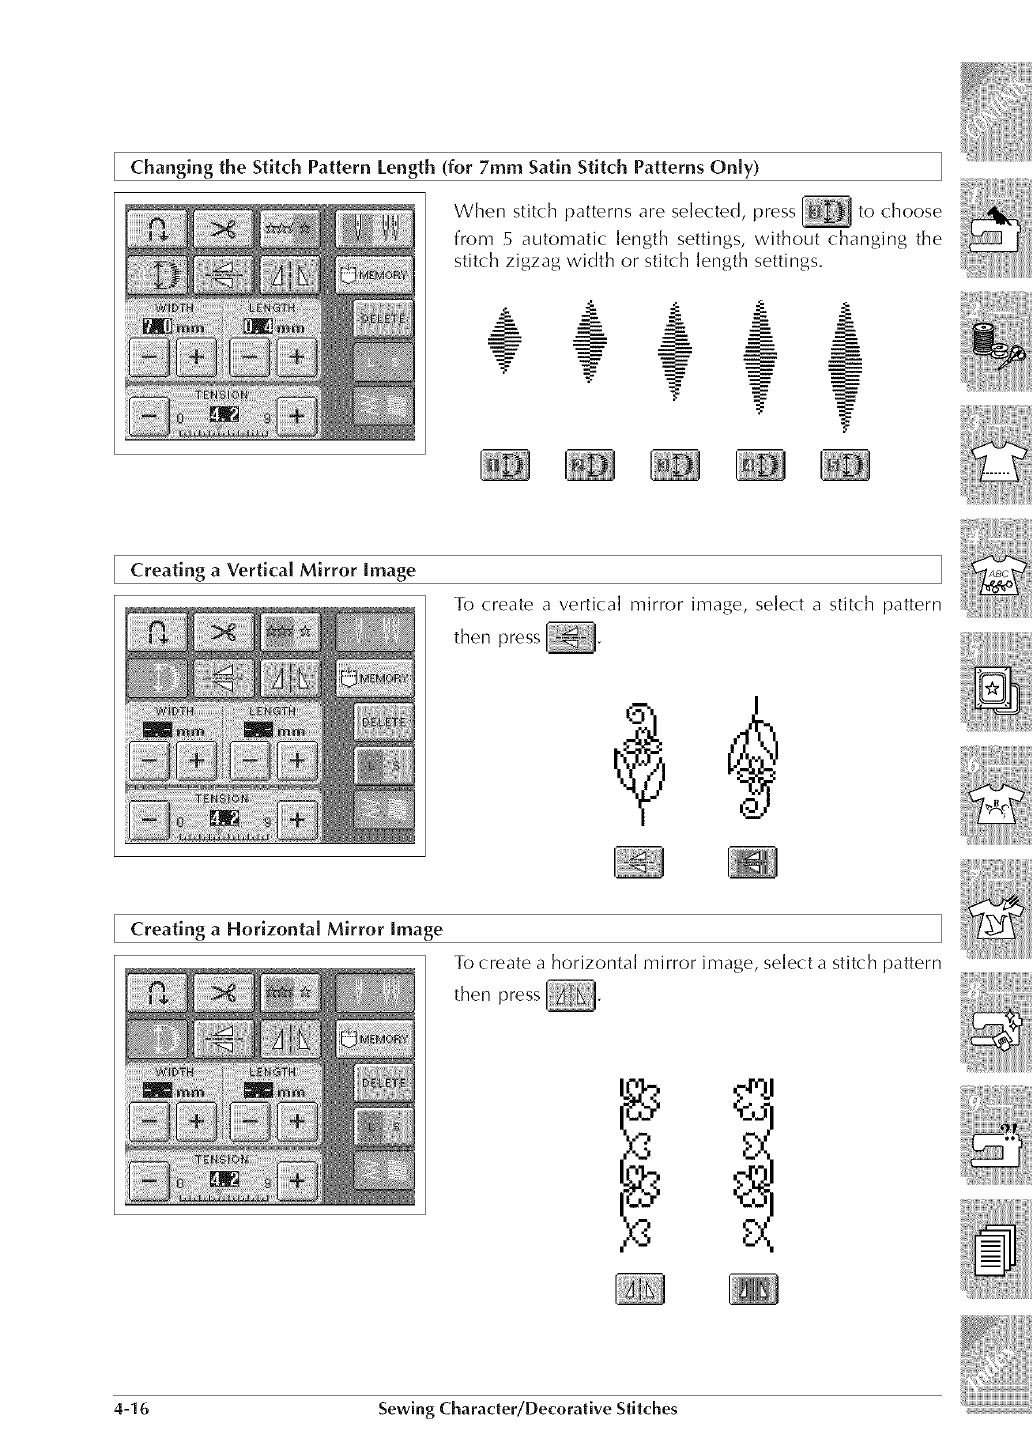
Changing the StRch Pattern Length (for 7mm Satin Stitch Patterns Only)
When stitch patterns are selected, press to choose
from 5 automatic length settings, without changing the
stitch zigzag width or stitch length settings.
Creating a Vertical Mirror image
To create a vertical mirror image, se]ect a stitch pattern
then press
Creating a Horizontal Mirror Image
To create a horizonta] mirror image, select a stitch pattern
then press
4-I 6 Sewing Character/Decorative Stitches
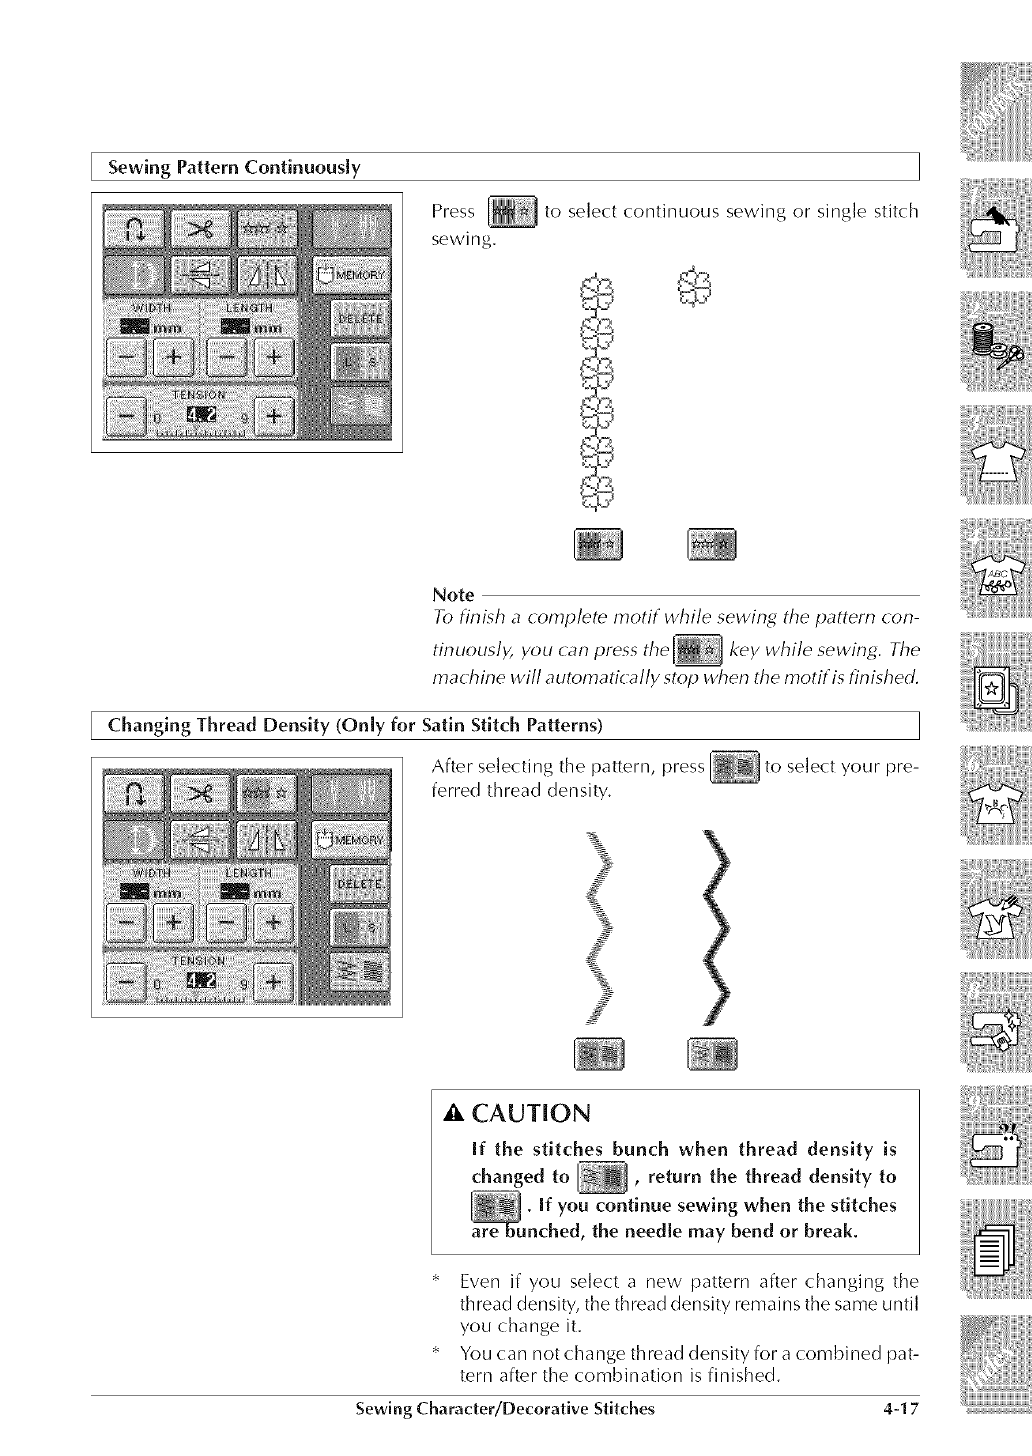
Sewing Pattern Continuously
Press to select continuous sewing or single stitch
sewing,
Note
To finish a (omplete motif while sewing the pattern ( on-
tinuously, you can press the key while sewing. The
ma( hine will automati( ally stop when the motif is finished.
Changing Thread Density (On[y for Satin Stitch Patterns)
After se]ecting the pattern, press to se]ect your pre-
ferred thread density,
• , CAUTION
[f the stitches bunch when thread density is
changed to , return the thread density to
. [f you continue sewing when the stitches
nched, the need[e may bend or break.
* Even if you select a new pattern after changing the
thread density, the thread density remains the same until
you change it,
* You can not change th read density for a combined pat-
tern after the combination is finished,
Sewing Character/Decorative Stitches 4-17
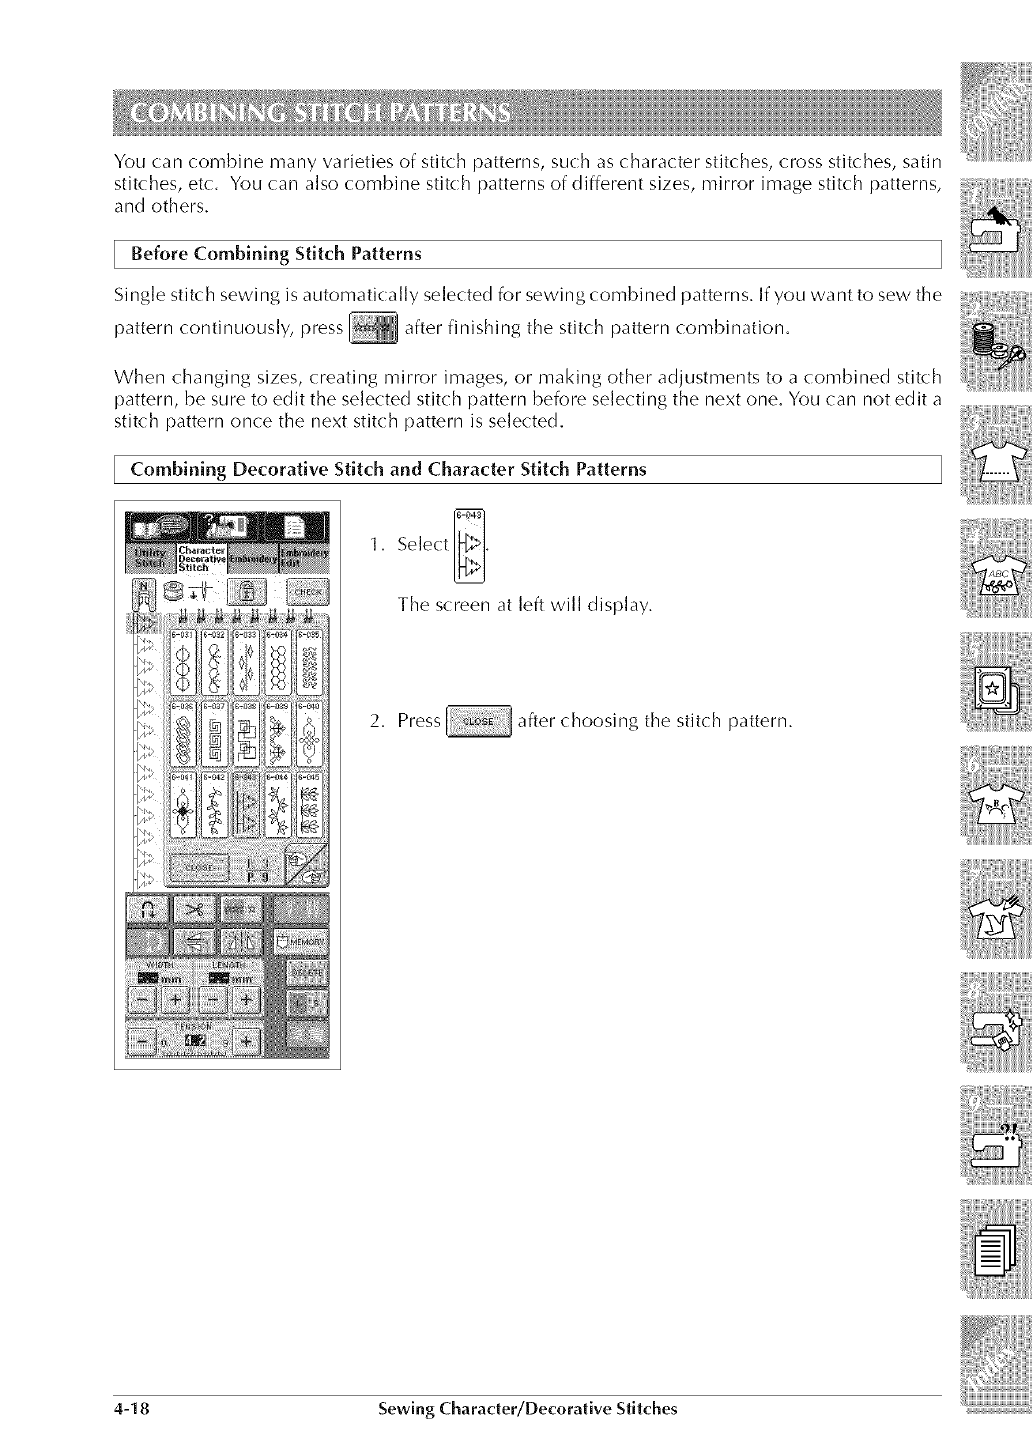
You can combine many varieties of stitch patterns, such as character stitches, cross stitches, satin
stitches, etc, You (;an also combine stitch patterns of different sizes, mirror image stitch patterns,
and others,
Before Combining Stitch Patterns
Single stitch sewing is automatica]]y selected for sewing combined patterns, If you want to sew the
pattern continuously, press after finishing the stitch pattern combination,
When changing sizes, creating mirror images, or making other adjustments to a combined stitch
pattern, be sure to edit the selected stitch pattern before selecting the next one, You can not edit a
stitch pattern once the next stitch pattern is selected,
Combining Decorative Stitch and Character Stitch Patterns
1, Select I_>>],
The screen at left will display,
2, Press after choosing the stitch pattern,
4-18 Sewing Character/Decorative Stitches
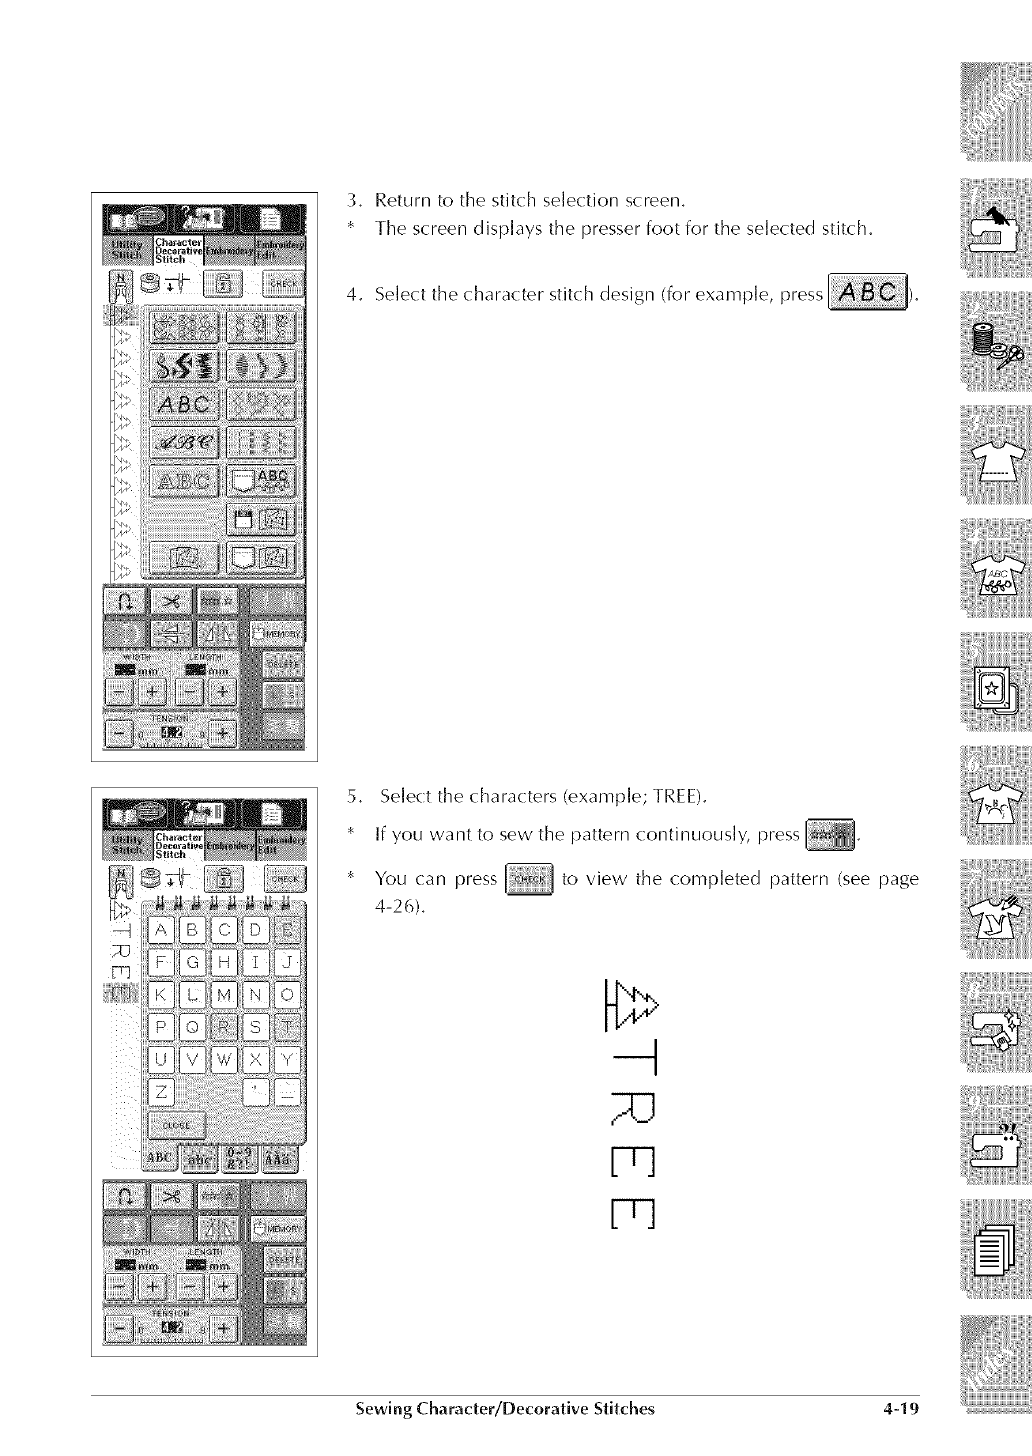
3. Return to the stitch selection screen.
* The screen displays the presser foot for the selected stitch.
4. Select the character stitch design (for example, press
5. Select the characters (example; TREE).
*If you want to sew the pattern continuously, press
* You (:an press _ to view the completed pattern (see page
4-26).
--t
IT]
Sewing Character/Decorative Stitches 4-19
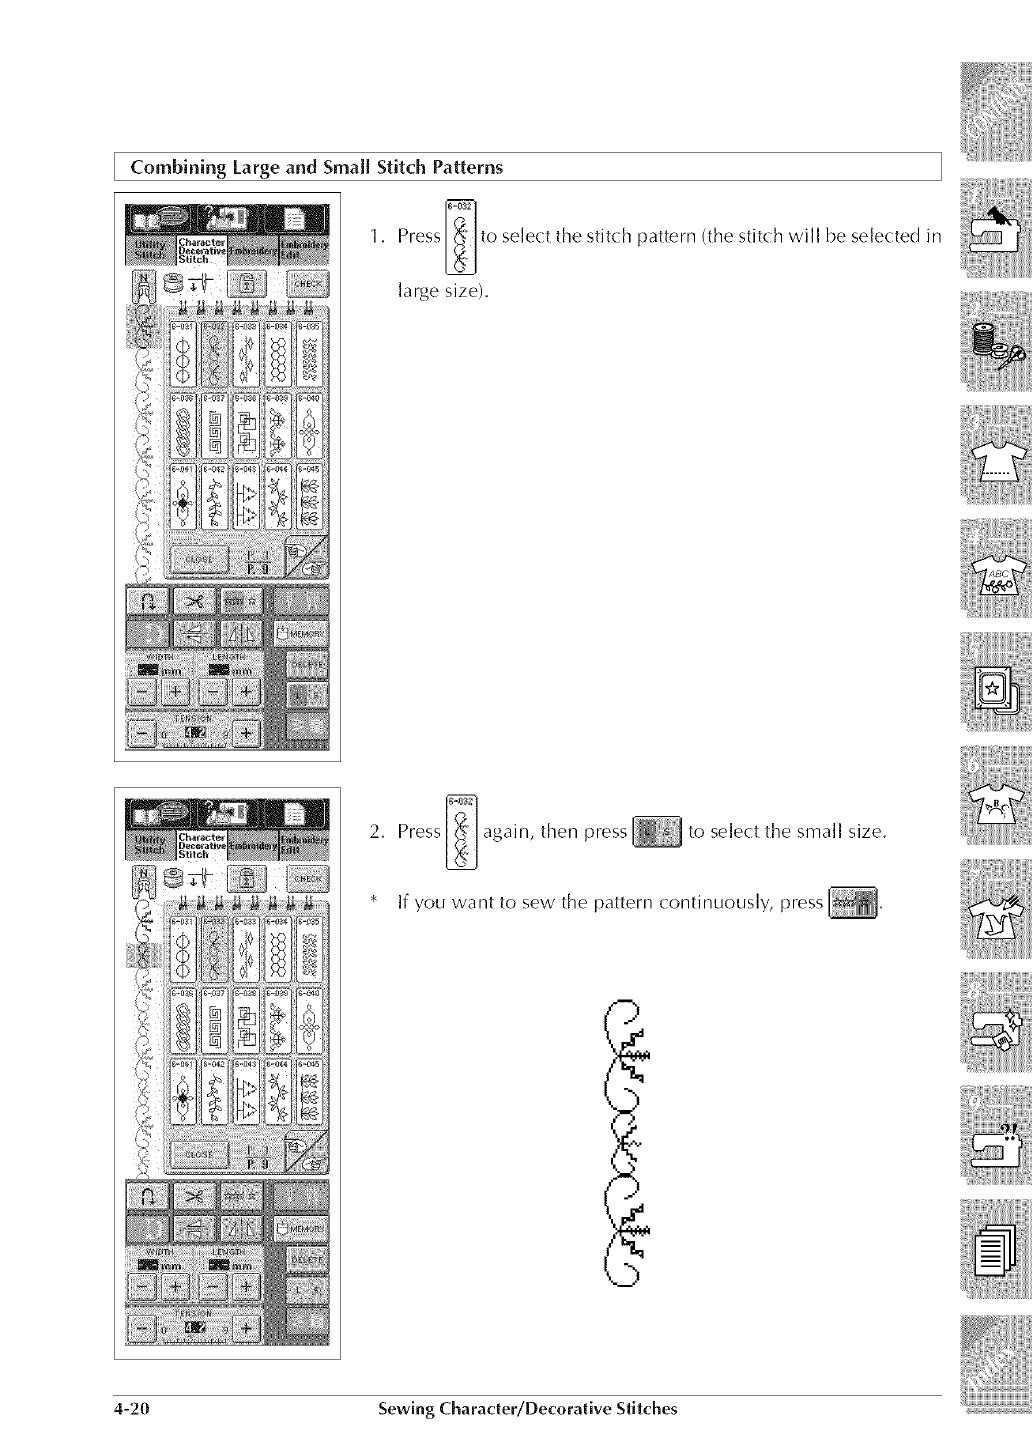
Combining Large and Small Stitch Patterns
1, Press rill to select the stitch pattern (the stitch will be selected in
large size),
2. Pressl_ilagain, then press to select the small size,
if you want to sew the pattern continuously, press
0
4-20 Sewing Charader/Decorative Stitches
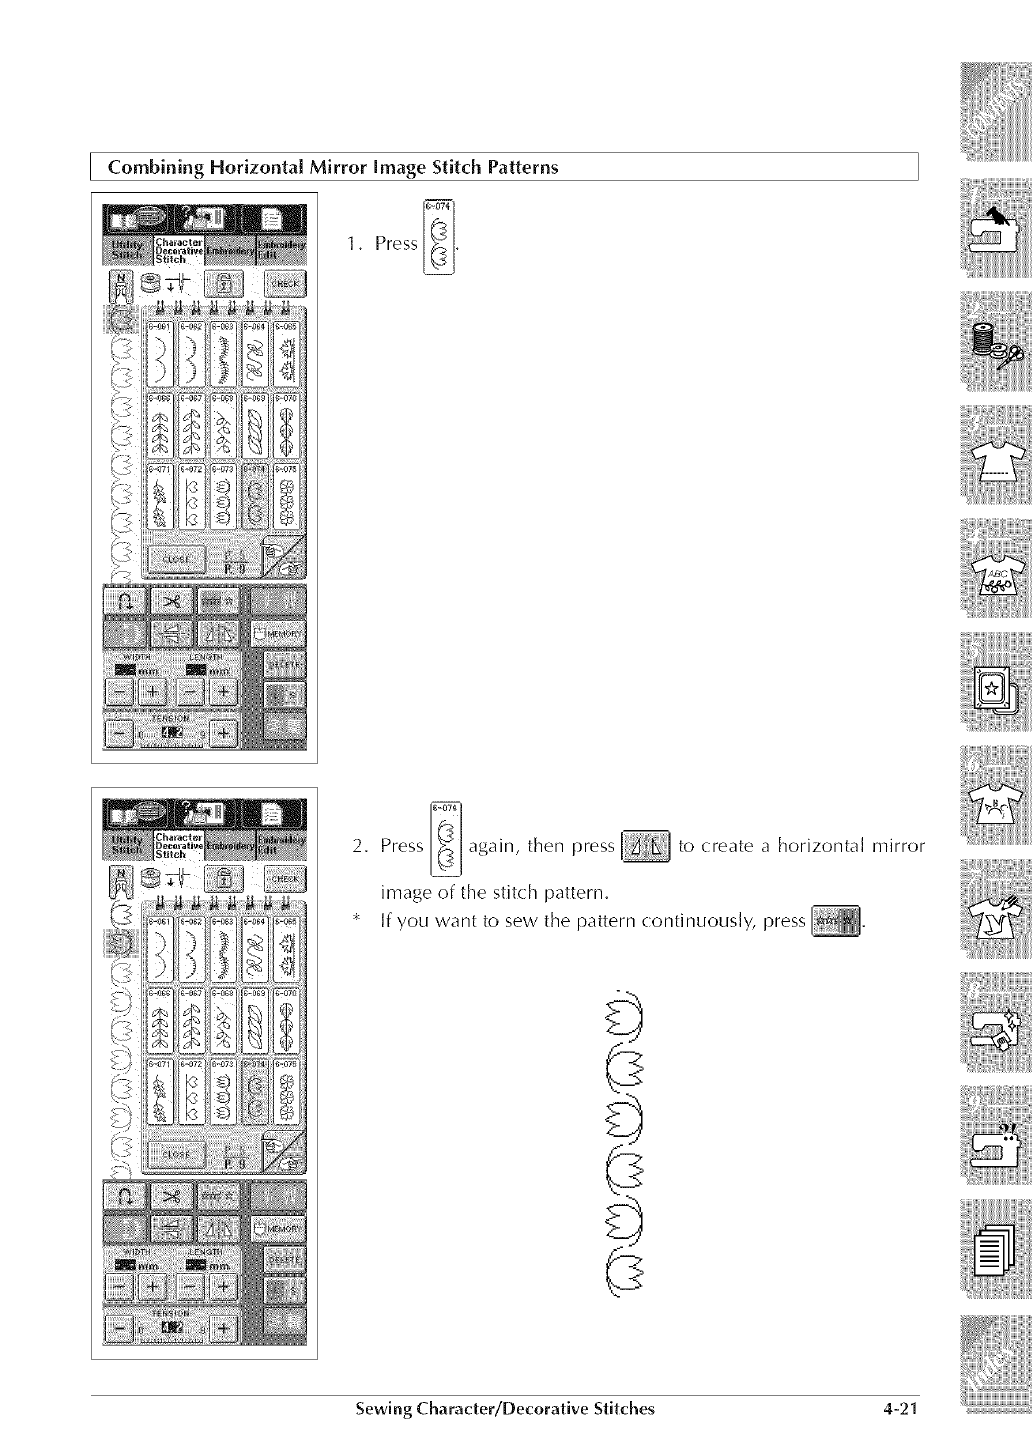
CombMMg HorizontM Mirror Image Stitch Patterns
_-OT4
1, Press _,
2, Press I_1 again, then press to create a horizonta] mirror
image of the stitch pattern,
* if you want to sew the pattern continuously, press
0
Sewing Character/Decorative Stitches 4-21
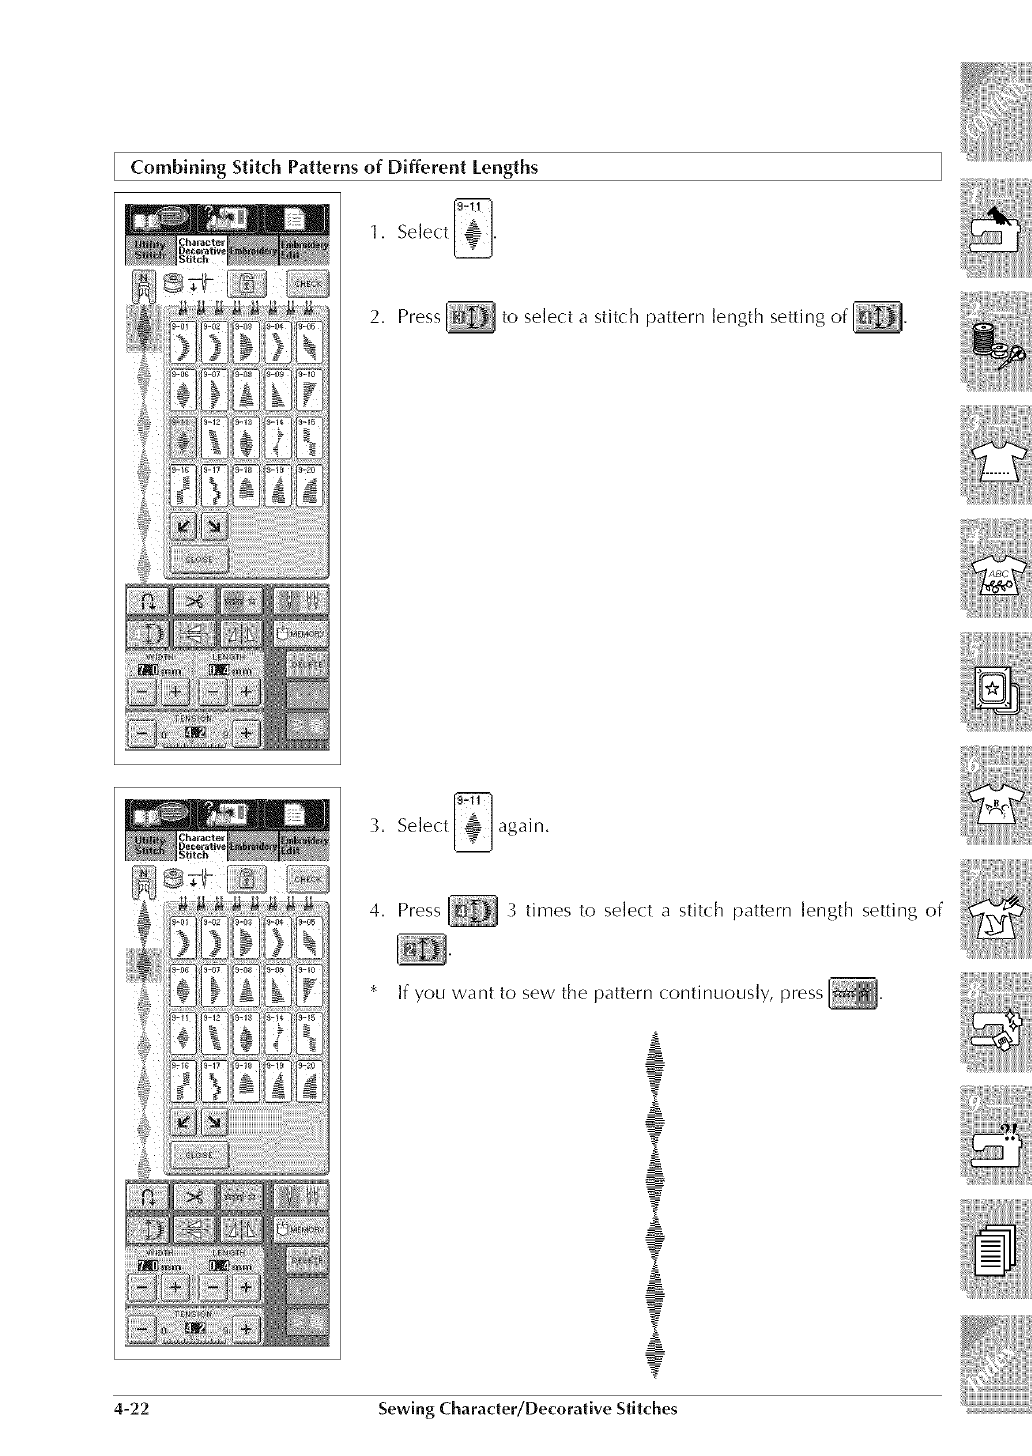
2, Press to select a stitch pattern length setting of ,
3, Select _ again,
4, Press 3 times to select a stitch pattern length setting of
If you want to sew the pattern continuously, press
4-22 Sewing Charader/Decorative Stitches
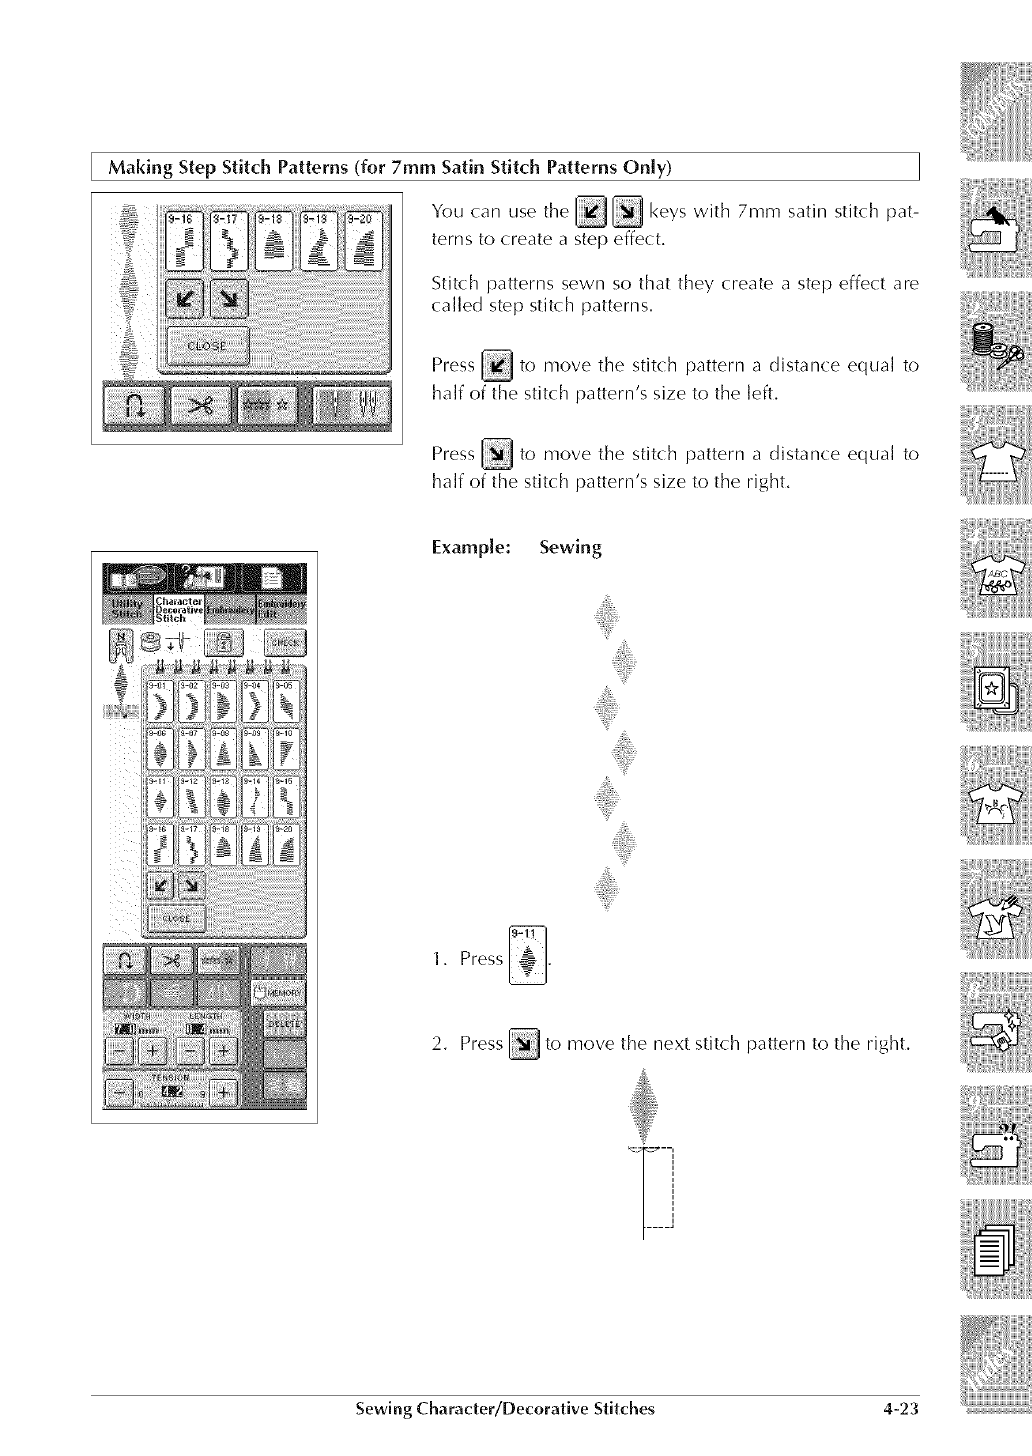
Making Step Stitch Patterns (for 7mm Satin Stitch Patterns Only)
You can use the _ _ keys with 7mm satin stitch pat-
terns to create a step effect,
Stitch patterns sewn so that they create a step effect are
(:ailed step stitch patterns.
Press _ to move the stitch pattern a distance equal to
a
half of the stitch p_ttern s s ze to the left,
Press to move the stitch pattern a distance equal to
a
half of the stitch p_ttern s s ze to the right,
Example: Sewing
2. Press _ to move the next stitch pattern to the right.
Sewing Character/Decorative Stitches 4-23
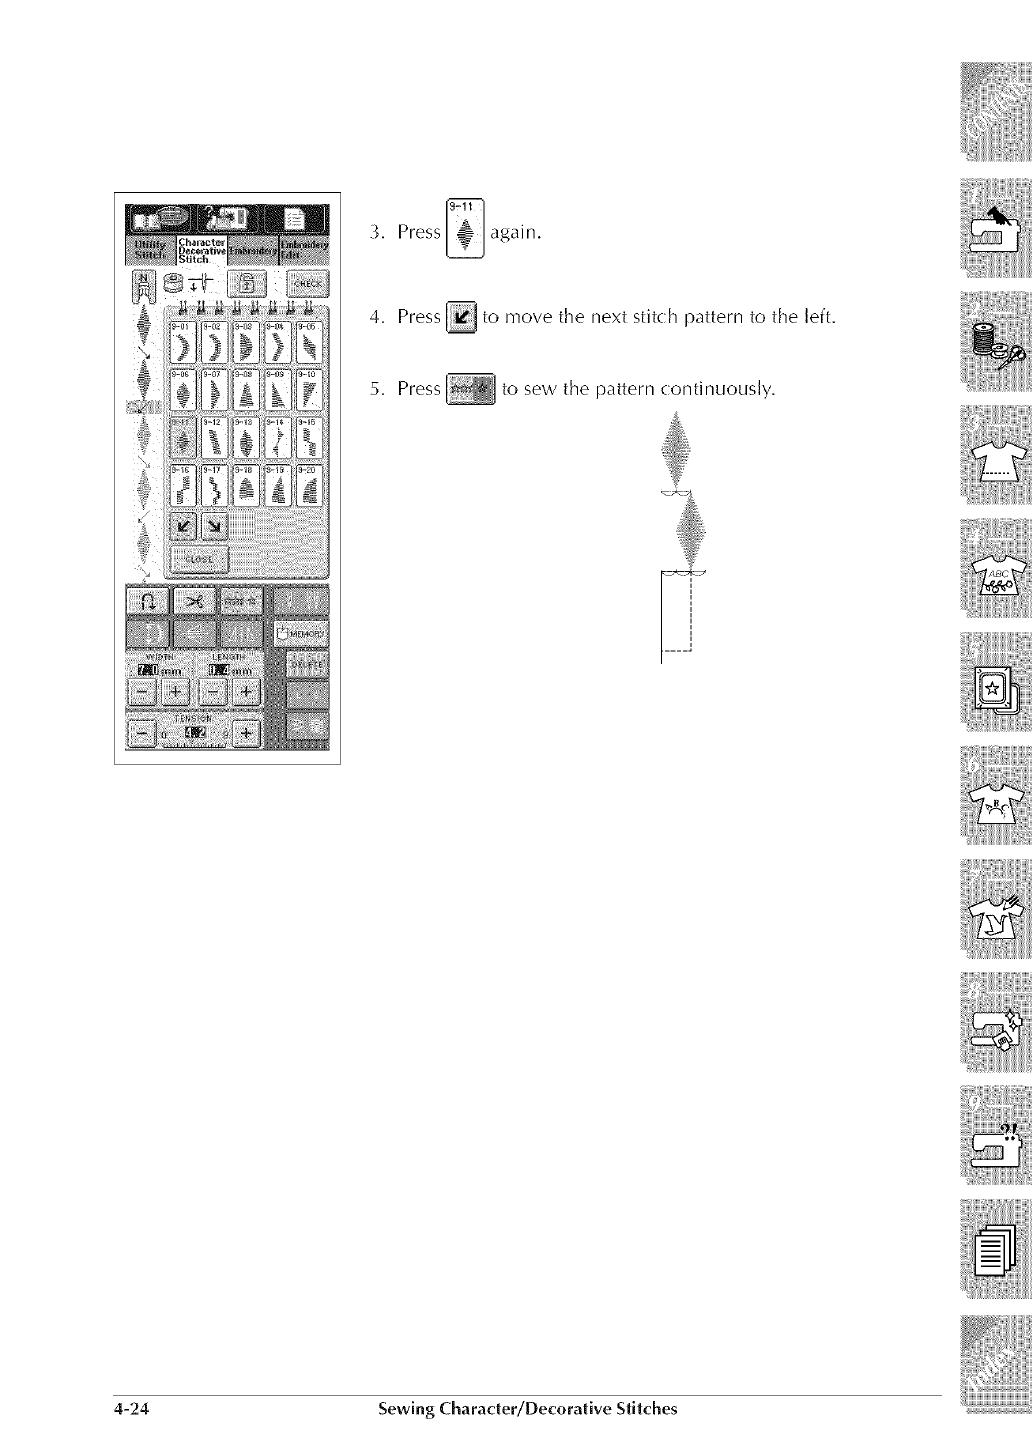
3. Press _ again,
4. Press _ to move the next stitch pattern to the ]eft.
5, Press to sew the pattern continuously.
4-24 Sewing Character/Decorative Stitches
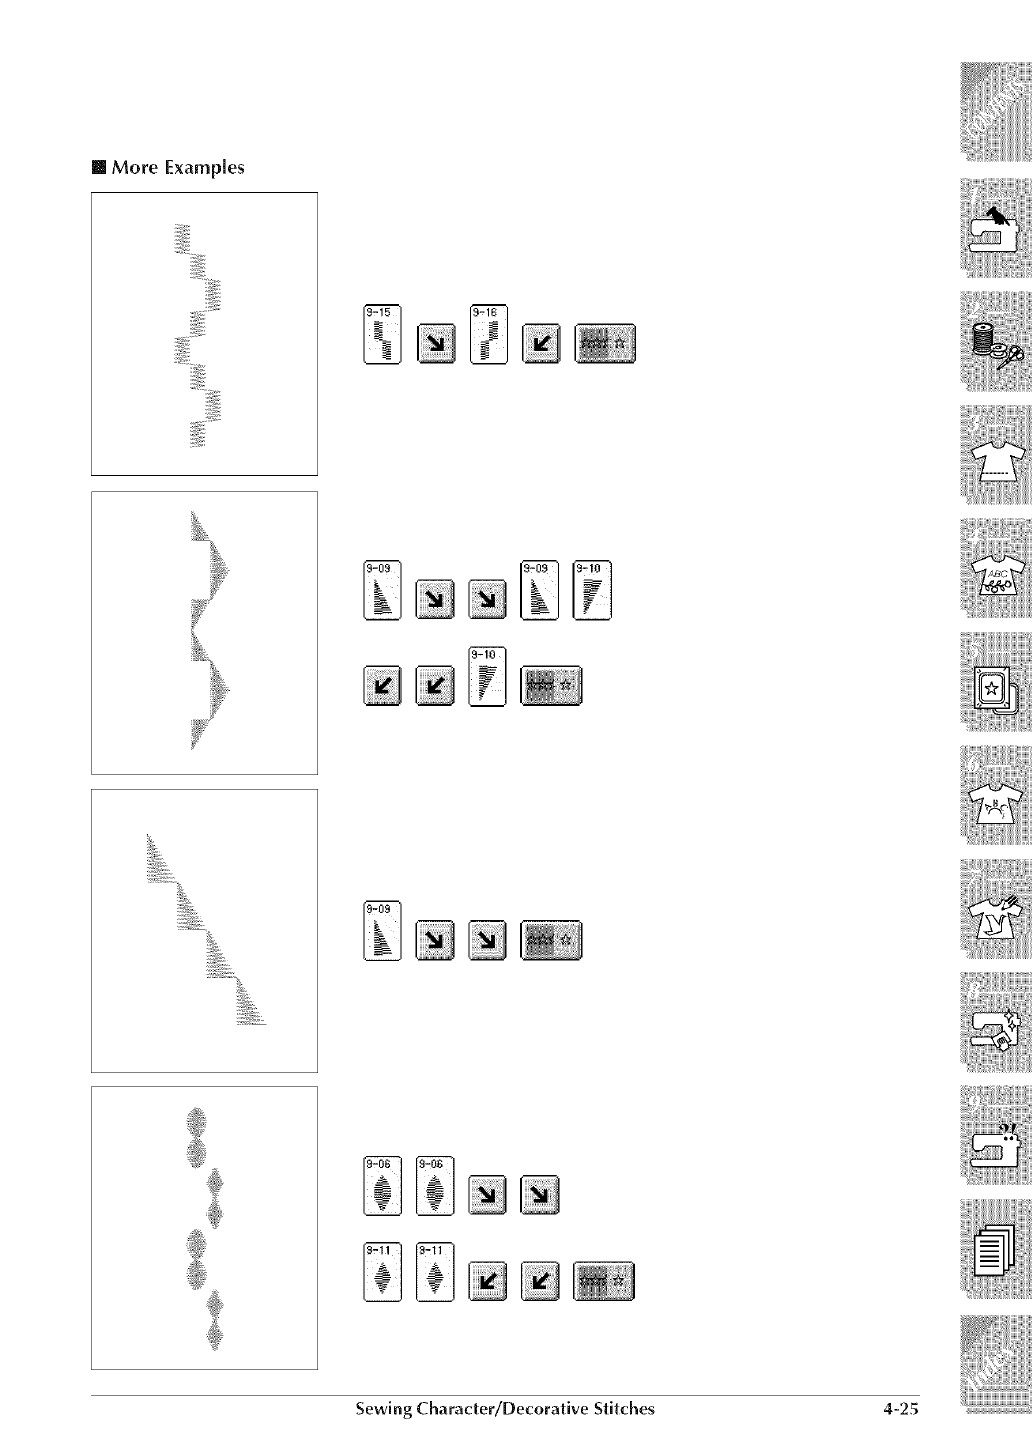
[] More Examples
Sewing Character/Decorative Stitches 4-25
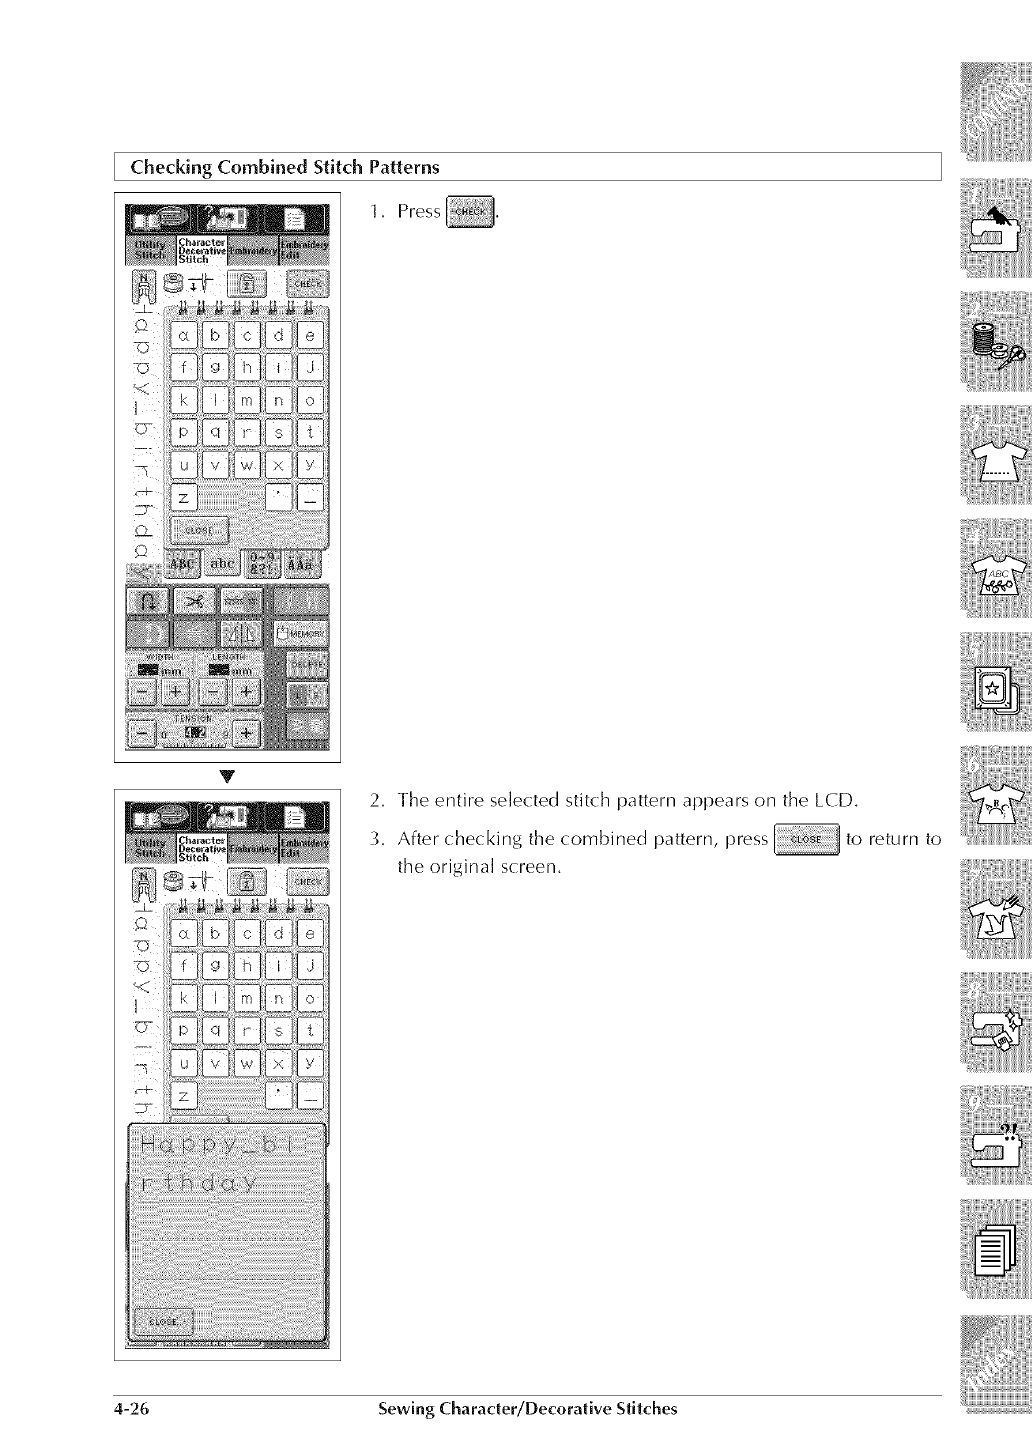
T
-5
c_
ii!i !i!i!i!i!i!i!i!i!i!i_!_!_!_i_i_i_i_i_i_i_iiiiiiiii_ii!i_!i_!_!i_!i_!i_!i_!i_!i_!i_!i_!i_!i_i__i_!!i_i_!!i_i_!!i_i_!i!_
2, The entire selected stitch pattern appears on the LCD,
_, After checking the combined pattern, press to return to
the original screen,
4-26 Sewing Character/Decorative Stitches
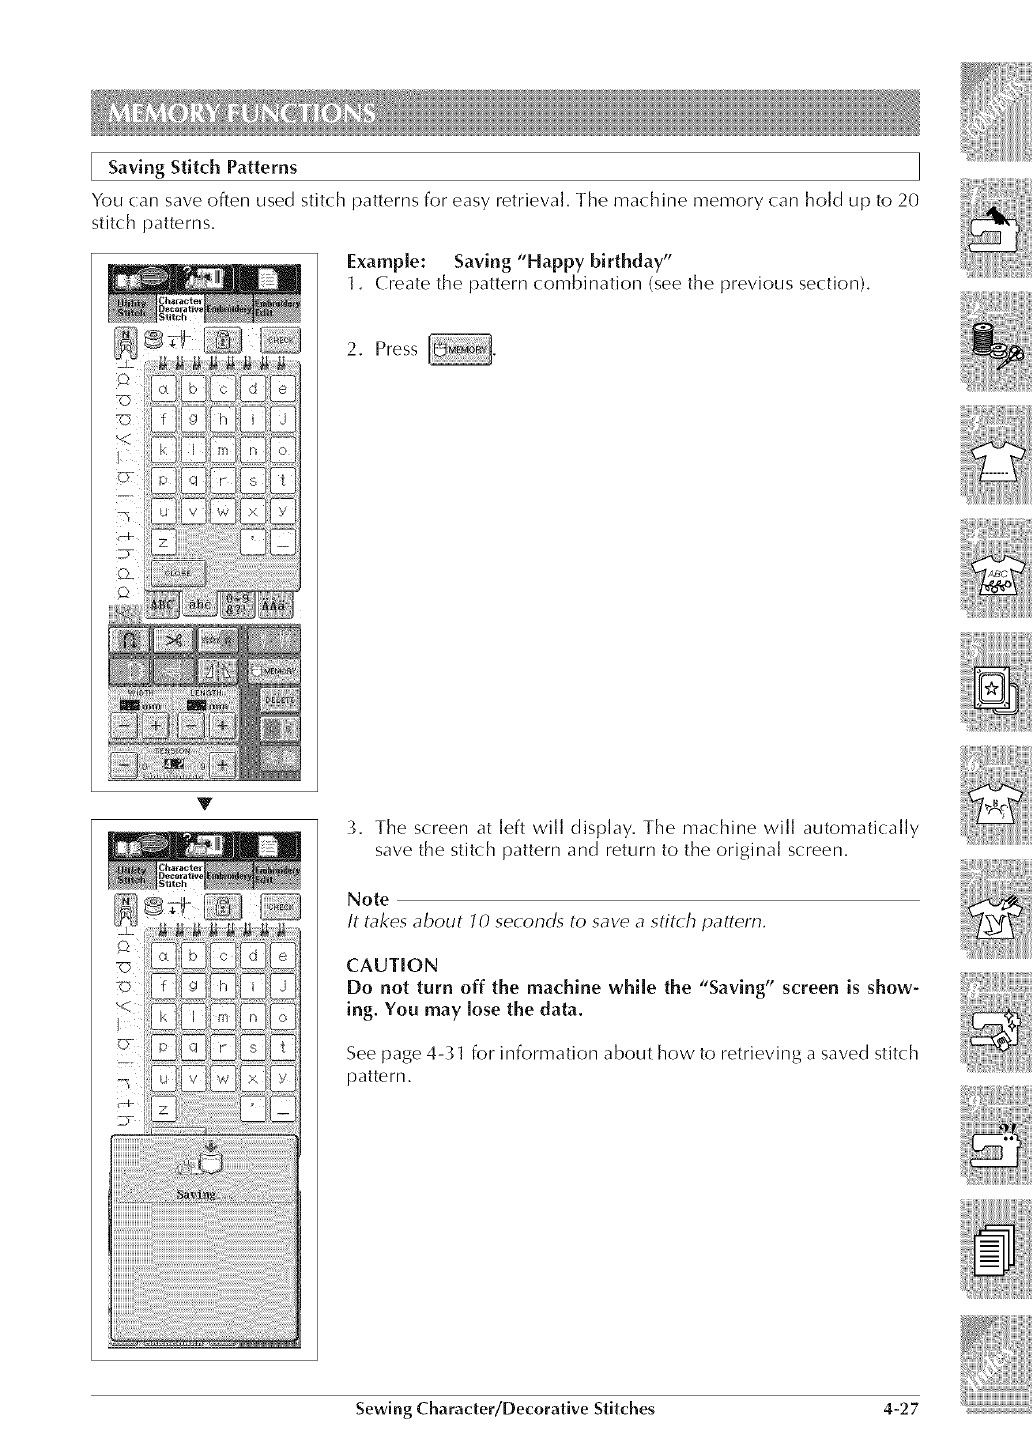
Saving Stitch Patterns
You (:an save often used stitch patterns for easy retrieval The machine memory (:an hold up to 20
stitch patterns,
Example: Saving "Happy birthday"
1. Create the pattern combination (see the previous section).
2. Press
Y
3. The screen at left will display. The machine will automatically
save the stitch pattern and return to the original screen.
Note
It takes about 10 seconds to save astitch pattern.
CAUTION
Do not turn off the machine while the "Saving" screen is show-
ing. You may lose the data.
See page 4-31 for information about how to retrieving a saved stitch
pattern.
Sewing Character/Decorative Stitches 4-27
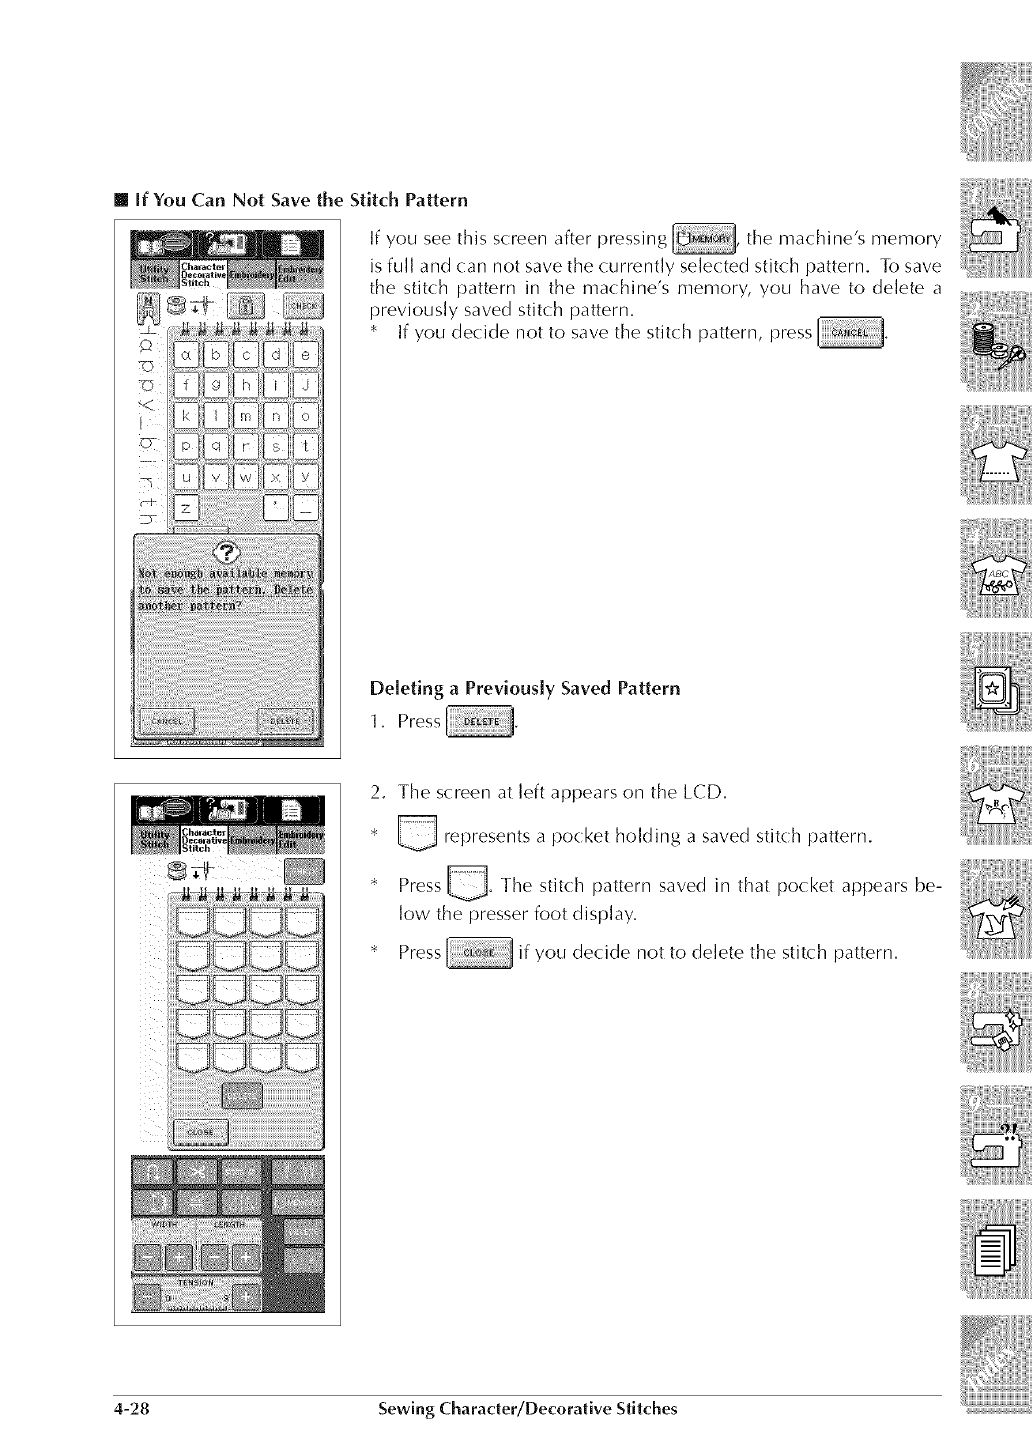
[] if You Can Not Save the Stitch Pattern
If you see this screen after pressing , the machine's memory
is full and can not save the currently selected stitch pattern. To save
the stitch pattern in the mac hne s memory, you have to delete a
previously saved stitch pattern.
* If you decide not to save the stitch pattern, press
Deleting a Previously Saved Pattern
1. Press
2. The screen at left appears on the LCD.
* _ represents a pocket holding a saved stitch pattern.
* Press _. The stitch pattern saved in that pocket appears be-
]ow the presser foot display.
* Press if you decide not to delete the stitch pattern.
4-28 Sewing Character/Decorative Stitches
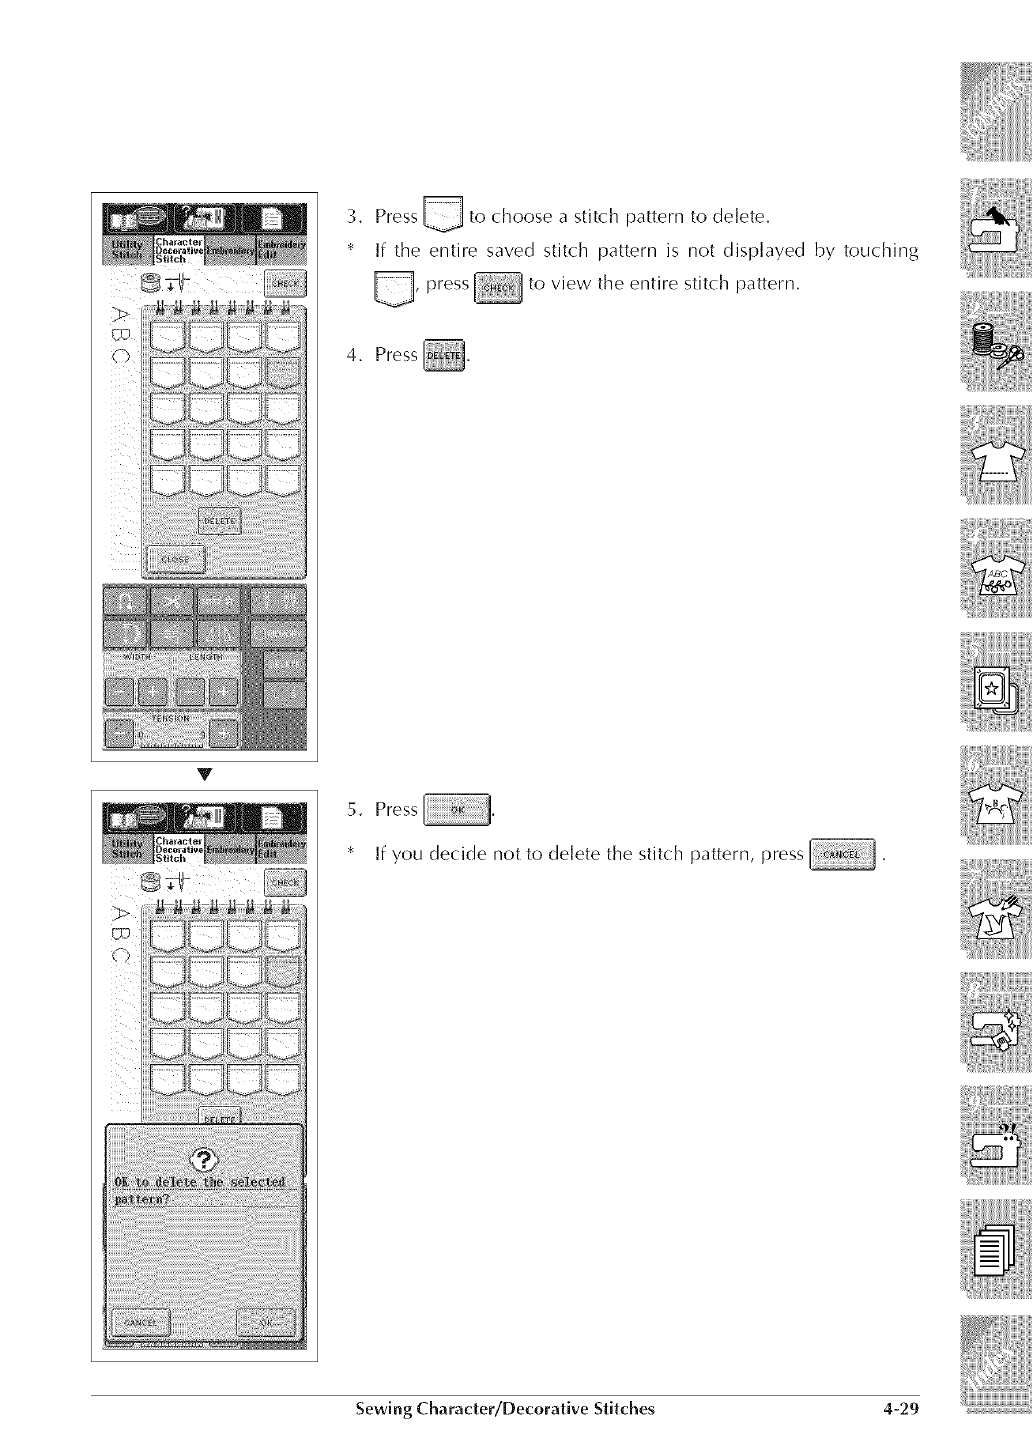
3. Press _ to choose a stitch pattern to delete.
If the entire saved stitch pattern is not displayed by touchin 8
, press _ to view the entire stitch pattern.
4. Press _.
T
5. Press
If you decide not to delete the stitch pattern, press
Sewing Character/Decorative Stitches 4-29
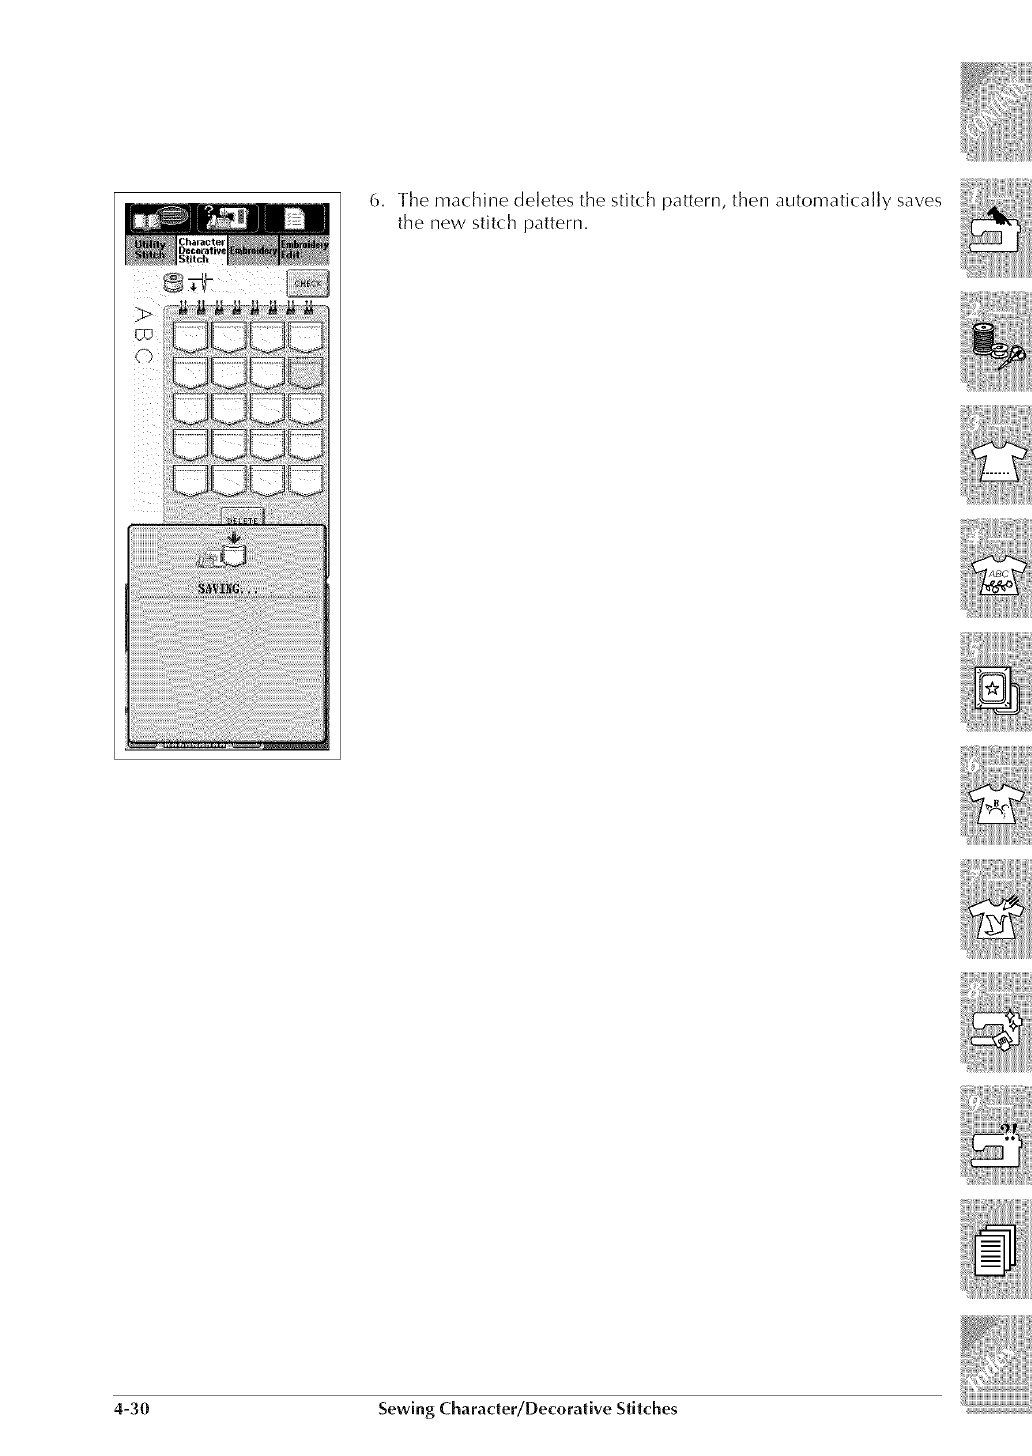
6, The machine deletes the stitch pattern, then automatically saves
the new stitch pattern.
4-30 Sewing Character/Decorative Stitches
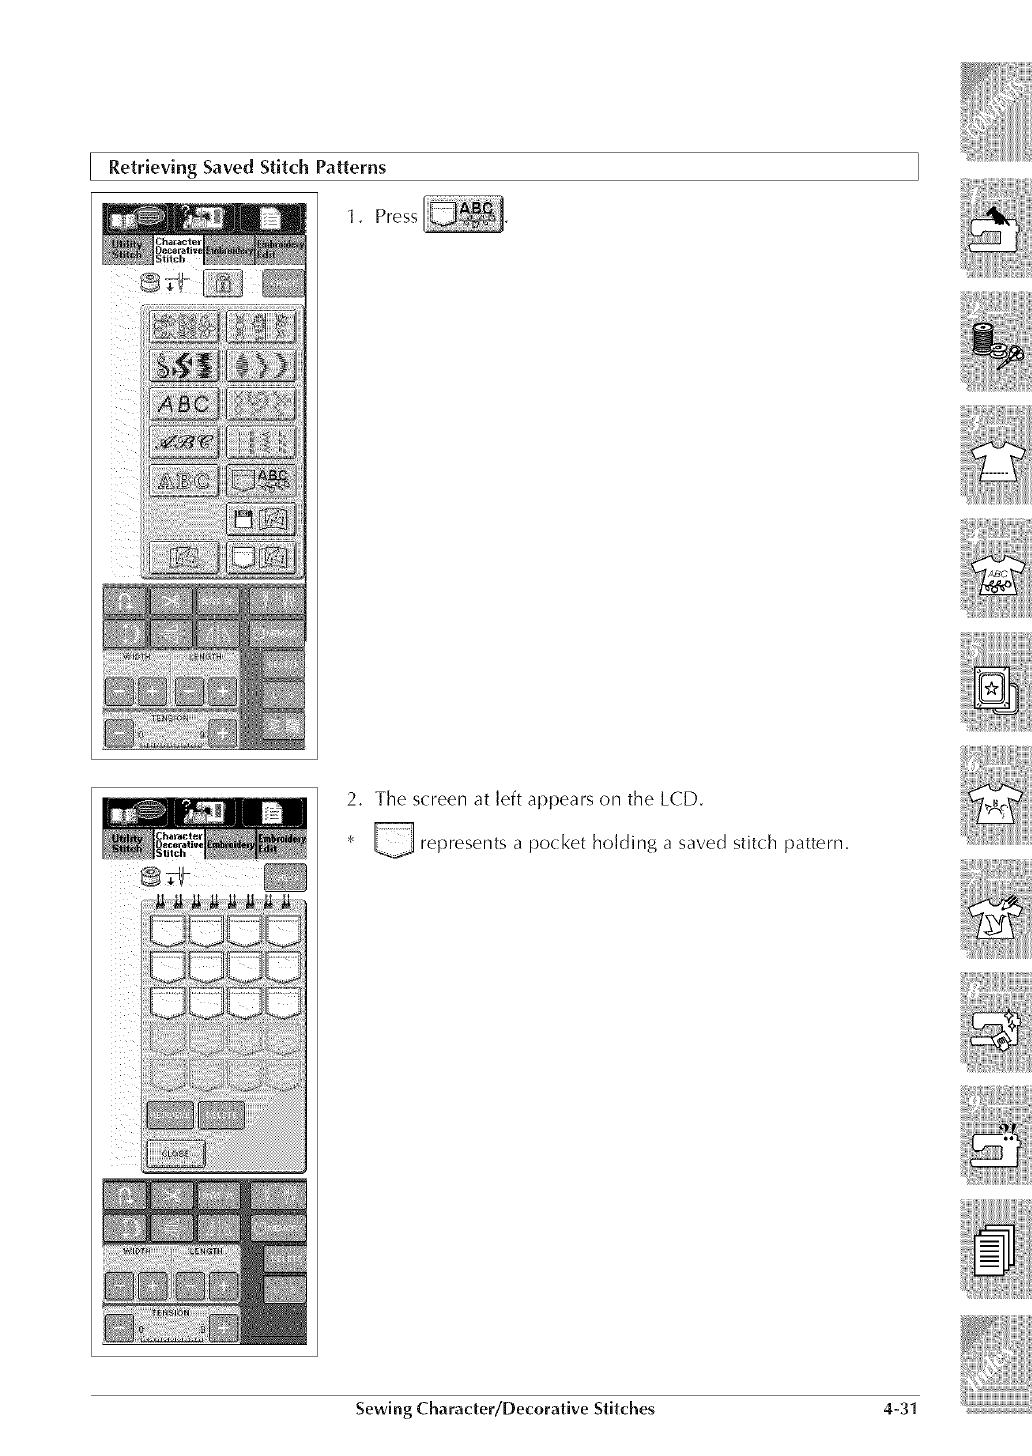
Retrieving Saved Stitch Patterns
1. Press
2. The screen at left appears on the LCD.
represents a pocket holding a saved stitch pattern.
Sewing Character/Decorative Stitches 4-31
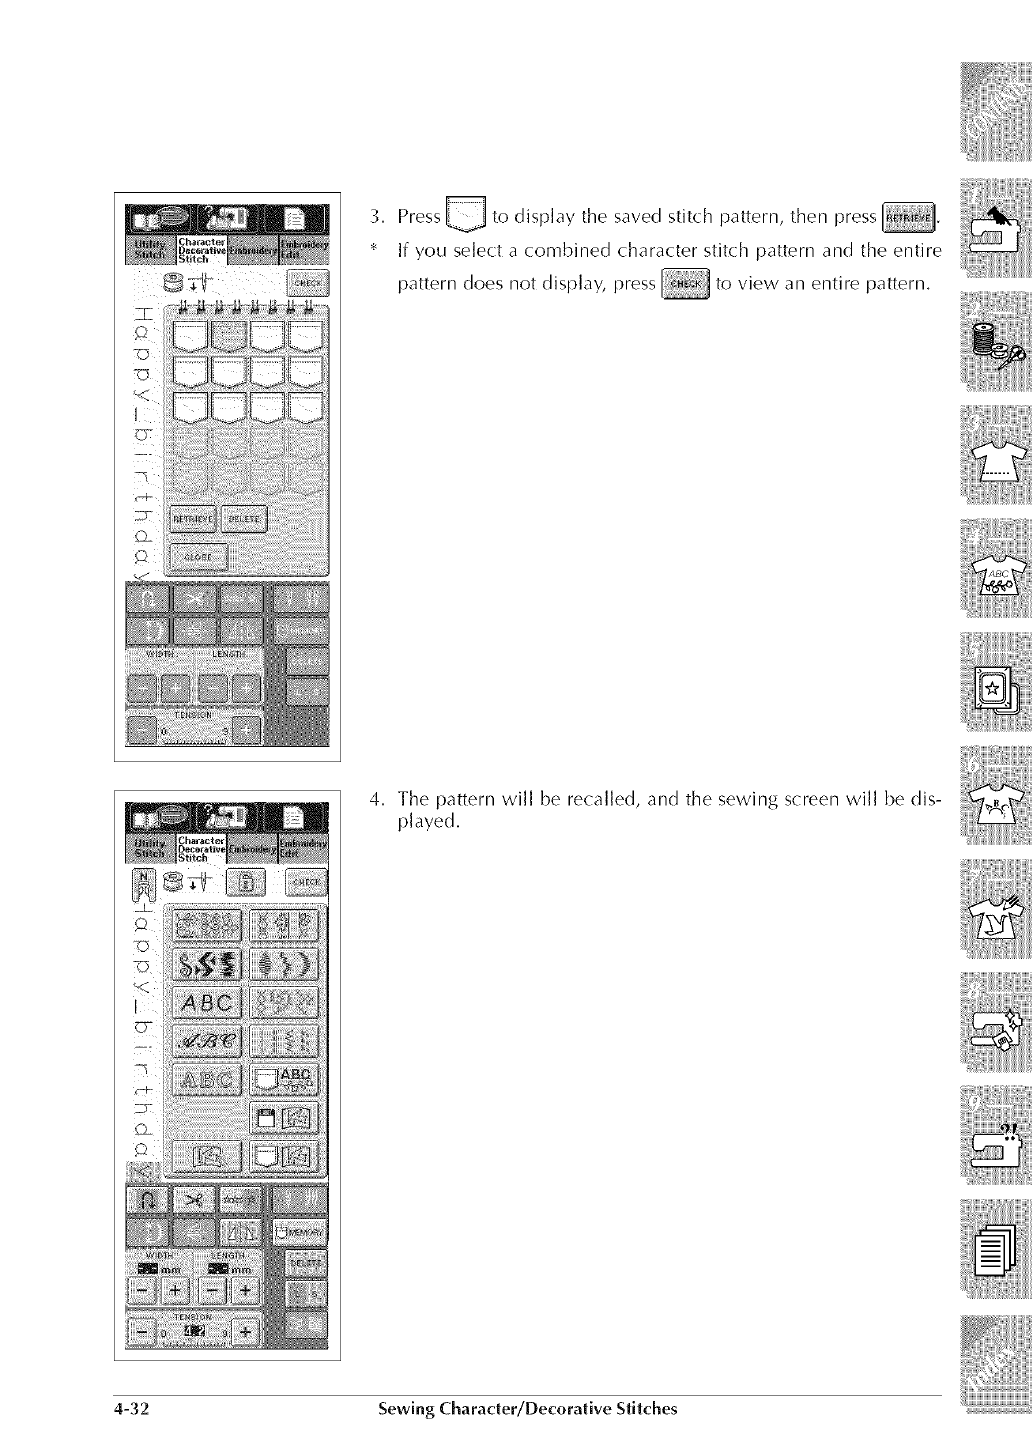
3, Press U to display the saved stitch pattern, then press
* If you select a combined character stitch pattern and the entire
pattern does not display, press to view an entire pattern,
4, The pattern will be recalled, and the sewing screen will be dis-
played.
4-32 Sewing Character/Decorative Stitches
Chapter 5 Embroidery
[Before Beginning
[] Copyright Information
The patterns stored in the sewing machine and embroidery cards are intended for private use only.
Any public: or commercial use of copylighted patterns is an infringement of copyright law and is
strictly prohibited.
[] About the Embroidery Unit
A CAUTION
*Do not move the machine with the embroidery unit attached. The embroidery unit
could fall off and cause iniury.
* Keep your hands and foreign obiects away from the embroidery carriage and frame
when the machine is embroidering. Otherwise, iniury may result.
CAUTION
o Do not touch the inner connector of the embroidery unit. The pins on the embroidery unit
connection may be damaged.
o Do not apply strong force to the embroidery unit carriage, or pick up the unit by the carriage.
Otherwise, the embroidery unit may be damaged.
o Store the embroidery unit in the proper storage case.
[] About Embroidery Cards (Sold Separately)
• Use only embroidery cards manufactured for this machine. Using unauthorized cards may
cause your machine to operate incorrectly.
• Embroidery cards sold in foreign countries can not be used with this machine.
Only insert or remove embroidery cards when
power is off (see page 5-1 7).
• Store embroidery cards in the hard case.
is displayed, or when the main
Embroidery 5-1
[] About FJoppy Disks
• If your machine did not come furnished with a built-in floppy disk drive, you can receive an
upgrade service for your machine, so that it can use floppy disks at your authorized dealer.
• If floppy disks containing data other than those created for this machine, or patterns saved
from your machine, are inserted into your machine, the machine may not operate correctly.
(Only .pes, .phc and .dst pattern files (:an be used.)
Only insert or remove floppy disks while or is displayed, or when
prompted to change disks by the screen (see page 5-18).
• Data saved on floppy disks may be lost or sometimes corrupted. Always make a backup of
any important data saved on floppy disks.
• If the head of the floppy disk becomes dirty, the data can not be read normally. Use a
cleaning disk for floppy disks regularly to avoid problems (see page 8-4). Be sure to follow
the drive cleaning instructions on the package.
• Do not leave floppy disks where bits of thread or lint are likely to collect. These things may
damage the disks. Put the disks in the hard case when storing.
• Do not leave floppy disks near the TV, magnets, or other objects with magnetic properties.
Otherwise, the data on the disk may become unreadable.
• Floppy disks are 2HD type. Be sure to use formatted disks.
• Move the write protect switch on the floppy disk to the unprotected position before using
the disk.
• Only use letters and numbers for the file names of the embroidery data. Using special
symbols may prevent the data from being saved.
• Do not create folders on the floppy disks. If a folder is created and a pattern is stored in the
folder, the machine will not be able to display the pattern.
• PES files made with the embroidery design software system from this company that do not
fit in the design page, or PES files that go over the limit for number of stitches or colors can
not be displayed. Edit the data with the embroidery design software system so the pattern is
within the regulations noted above, and then use the pattern.
• Regarding the Tajima file (.dst):
The file name will be displayed on the pattern selection screen.
Up to 8 alphanumeric characters will be displayed for the file name.
In the Tajima format (.dst), there is no color information for the pattern, so the pattern will
be displayed with this company's color order settings. If you want to check the finished
pattern on the screen, change the colors on the display to your preferred colors.
5-2 Embroidery
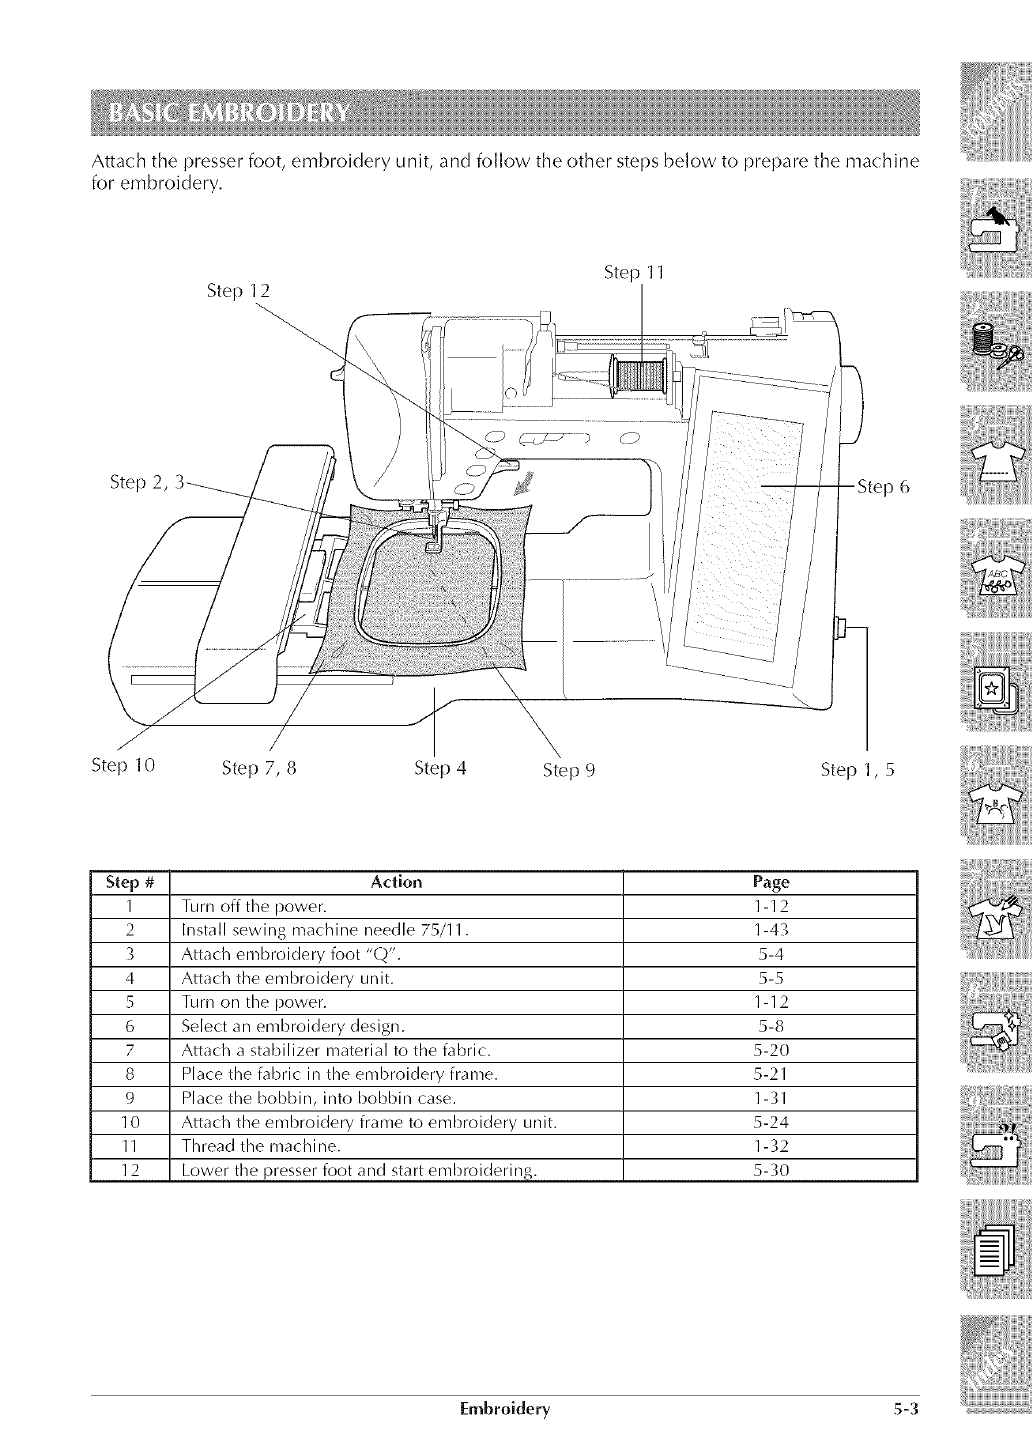
Attach the presser foot, embroidery unit, and follow the other steps below to prepare the machine
for embroidery.
Step 12 Step 11
Step 2,
Step 10 Step 7, 8 Step 4 Step 9 Step 1,5
Step # Action Page
1 Turn off the power. 1-12
2 Install sewing machine needle 75/1 l. 1-4_;
_; Attach embroidery foot "Q". 5-4
4 Attach the embroidery unit. 5-5
5 Turn on the power. 1-12
6 Select an embroidery design. 5-8
7 Attach a stabilizer material to the fabric. 5-20
8 Place the fabric in the embroidery frame. 5-21
9 Place the bobbin, into bobbin case. 1-31
10 Attach the embroidery frame to embroidery unit. 5-24
11 Thread the machine. 1-32
12 Lower the presser foot and start embroidering. 5-30
Embroidery 5-3
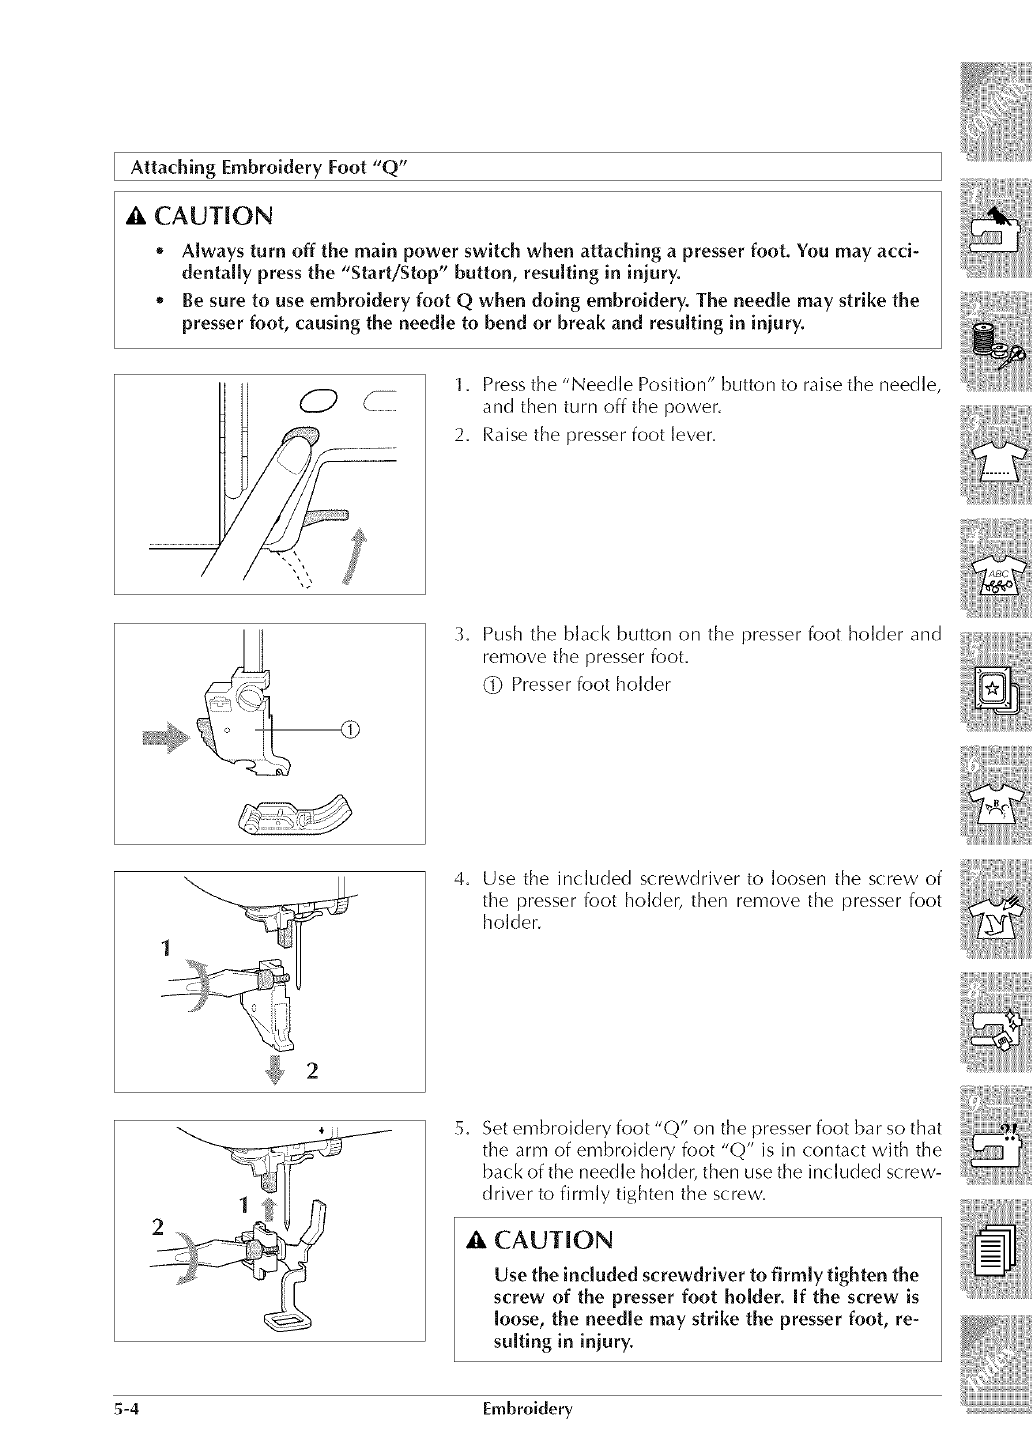
Attaching Embroidery Foot "Q"
A CAUTION
* Always turn off the main power switch when attaching a presser foot. You may acci-
dentally press the "Start/Stop" button, resulting in iniury.
* Be sure to use embroidery foot Q when doing embroidery. The needle may strike the
presser foot, causing the needle to bend or break and resulting in injury.
7
1. Press the "Needle Position" button to raise the needle
and then turn off the power.
2. Raise the presser foot lever.
3. Push the black button on the presser foot holder and
remove the presser foot.
@ Presserfoot holder
4. Use the included screwdriver to loosen the screw of
the presser foot holder, then remove the presser foot
holder.
5. Set embroidery foot "Q" on the presser foot bar so that
the arm of embroidery foot "Q" is in contact with the
back of the needle holder, then use the included screw-
driver to firmly tighten the screw.
CAUTION
Use the included screwdriver to firmly tighten the
screw of the presser foot holder. If the screw is
loose, the needle may strike the presser foot, re-
suiting in iniury.
5-4 Embroidery
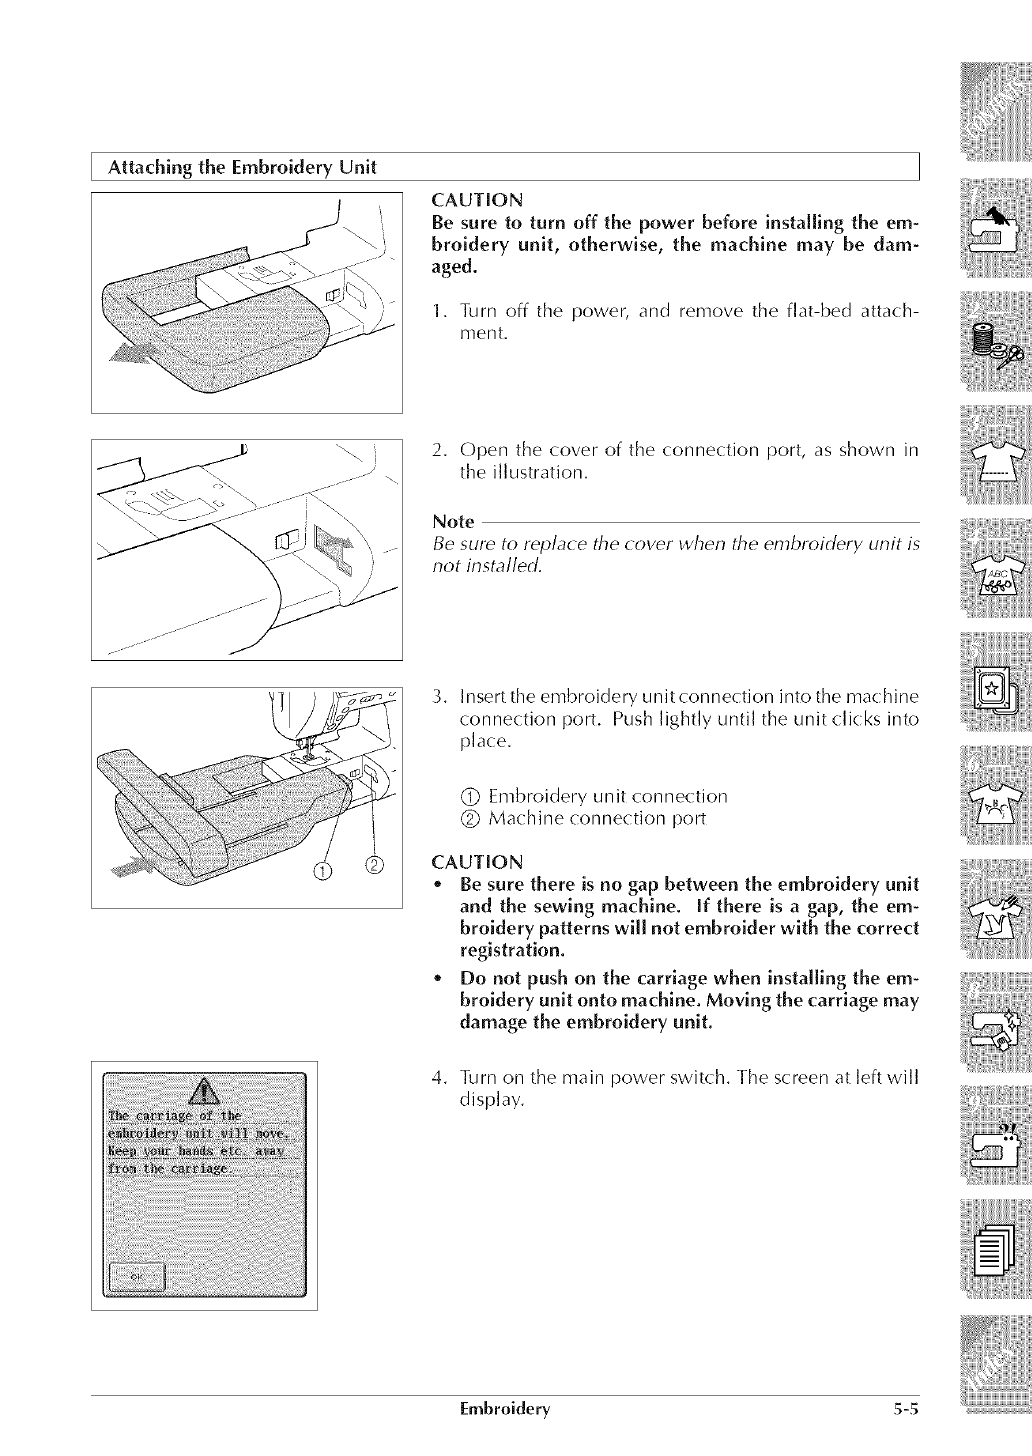
Attaching the Embroidery Unit
CAUTION
Be sure to turn off the power before installing the em-
broidery unit, otherwise, the machine may be dam-
aged.
1. Turn off the power, and remove the fiat-bed attach-
ment.
2. Open the cover of the connection port, as shown in
the illustration.
Note
Be sure to replace the cover when the embroidery unit is
not installed.
3. Insert the embroidery unit connection into the machine
connection port. Push lightly until the unit clicks into
place.
(_ Embroidery unit connection
(_) Machine connection port
CAUTION
oBe sure there is no gap between the embroidery unit
and the sewing machine. If there is a gap, the em-
broidery patterns will not embroider with the correct
registration.
*Do not push on the carriage when installing the em-
broidery unit onto machine. Moving the carriage may
damage the embroidery unit.
4. Turn on the main power switch. The screen at left will
display.
Embroidery 5-5
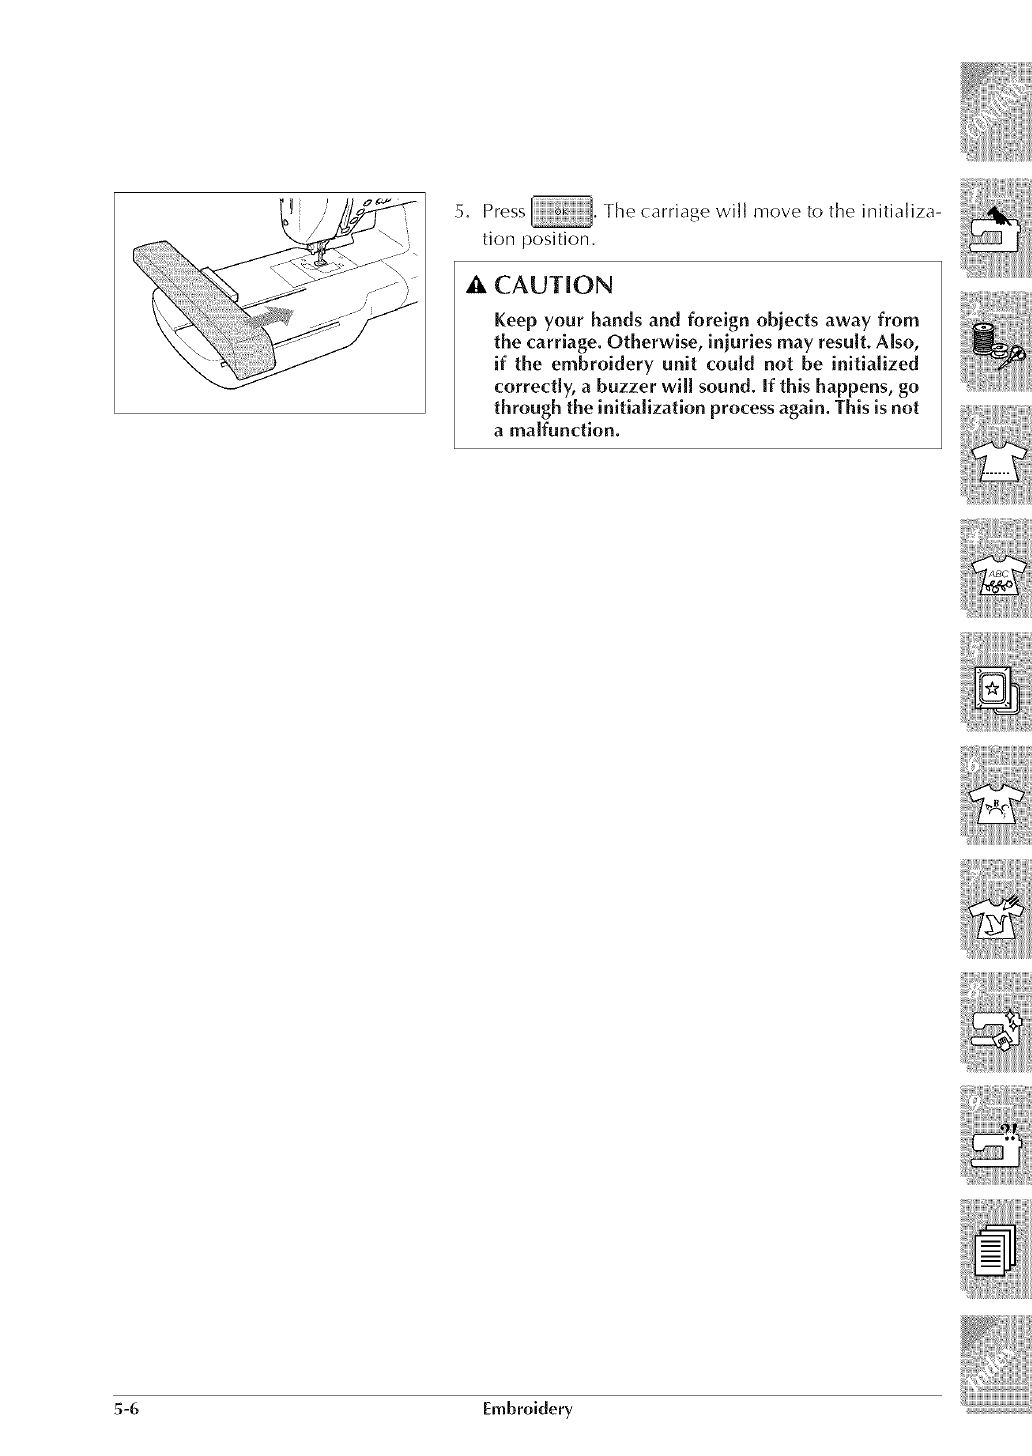
5, Press , The carriage wi]] move to the initia]iza-
tion position.
CAUTION
Keep your hands and foreign obiects away from
the carriage. Otherwise, iniuries may result. Also,
if the embroidery unit could not be initialized
correctly, a buzzer wi[[ sound. If this happens, go
through the initialization process again. This is not
a malfunction.
5-6 Embroidery
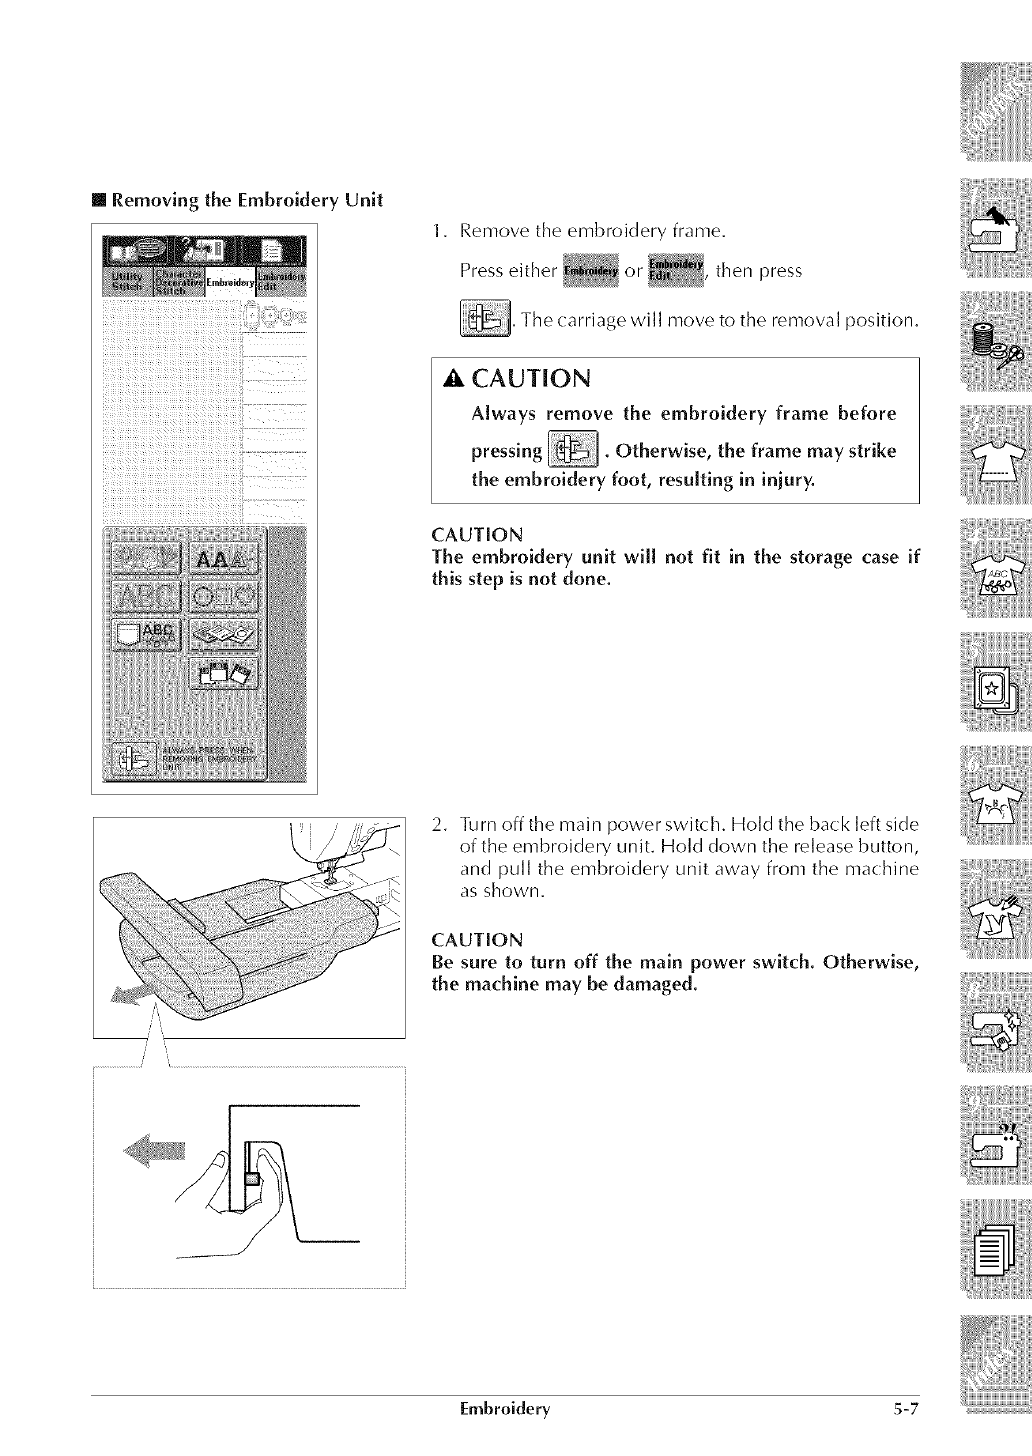
[] Removing the Embroidery Unit
Remove the embroidery frame.
Press either or , then press
_. The carriage will move to the removal position.
CAUTION
Always remove the embroidery frame before
pressing _. Otherwise, the frame may strike
the embroidery foot, resulting in iniury.
CAUTION
The embroidery unit will not fit in the storage case if
this step is not done.
2. Turn offthe main power switch. Hold the back left side
of the embroidery unit. Hold down the release button,
and pull the embroidery unit away from the machine
as shown.
CAUTION
Be sure to turn off the main power switch. Otherwise,
the machine may be damaged.
Embroidery 5-7
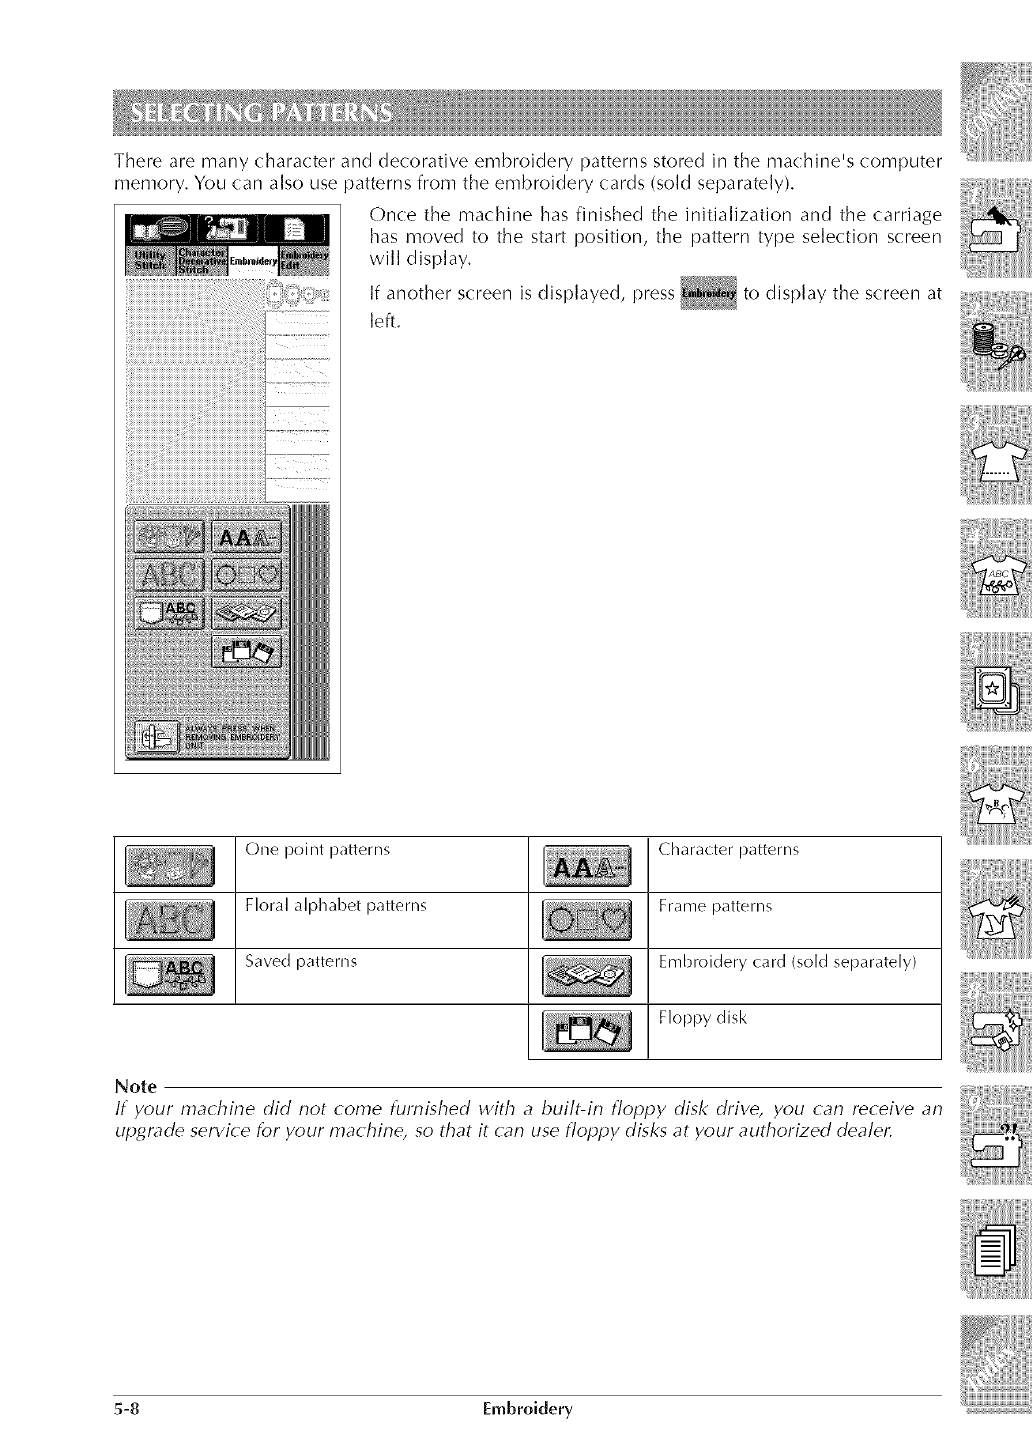
There are many character and decorative embroidery patterns stored in the machine's computer
memory. You (:an also use :)atterns from the embroidery cards (sold separately).
Once the machine has finished the initialization and the carriage
has moved to the start position, the pattern type selection screen
will display.
If another screen is displayed, press to display the screen at
le_
One point patterns
Floral alphabet patterns
Saved patterns
Character patterns
Frame patterns
Embroidery card (sold separately)
Floppy disk
Note
If your machine did not come furnished with abuilt-in floppy disk drive, you (:an receive an
up,claude service for your machine, so that it (an use floppy dbl<s at your authorized dealel:
5-8 Embroidery
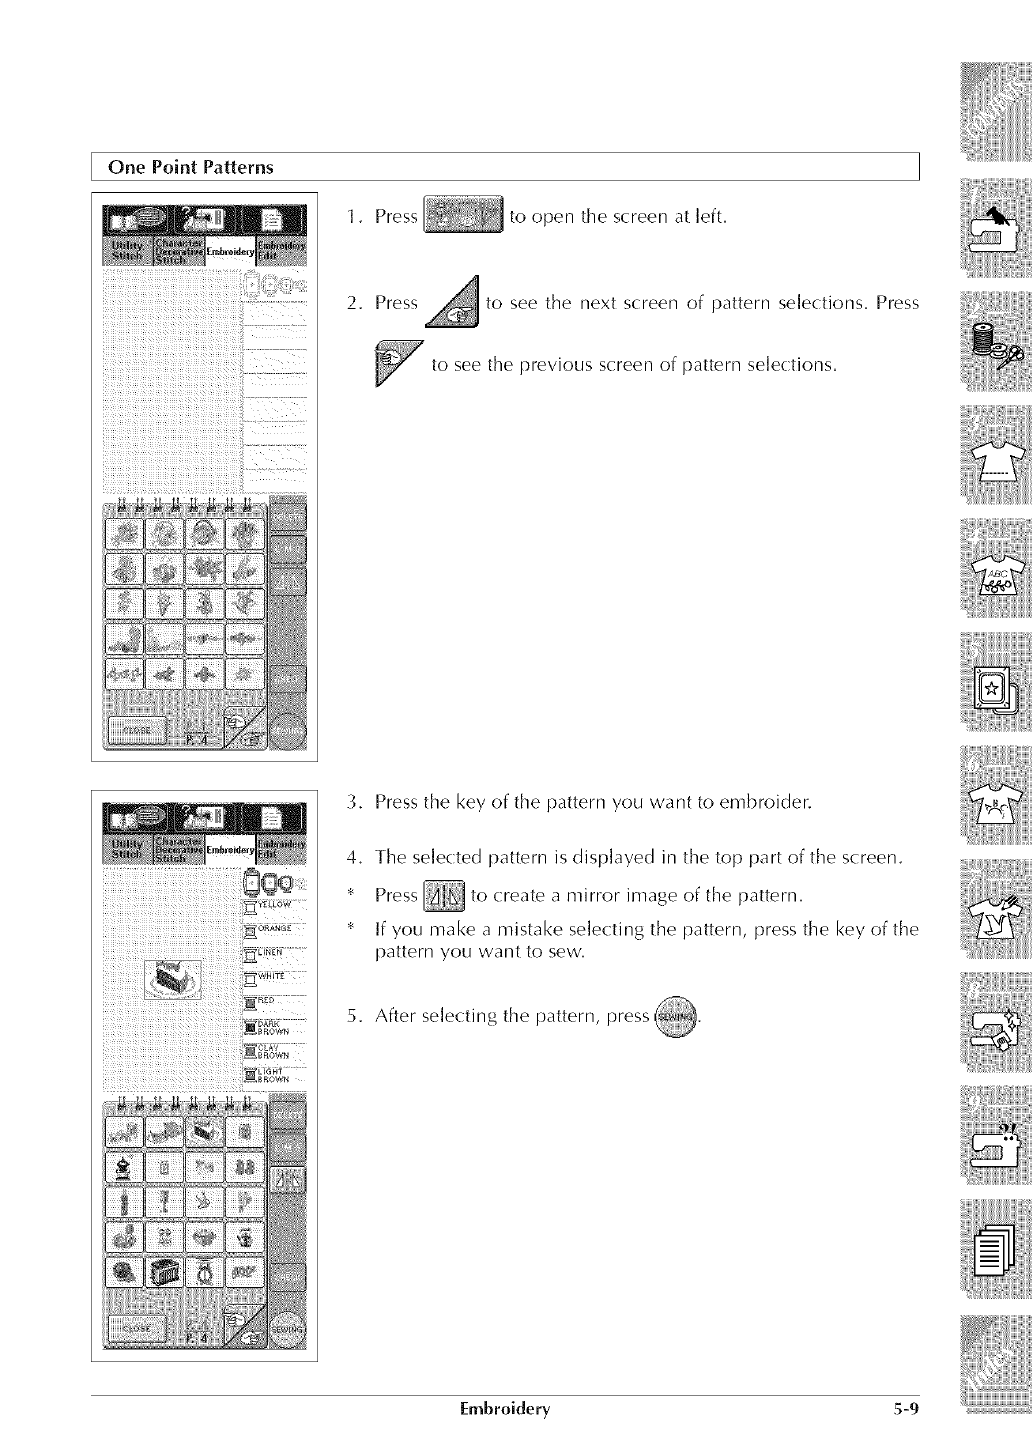
One Point Patterns
1. Press
2. Press
to open the screen at left.
to see the next screen of pattern selections. Press
i'!!'! iii!ii!_
iTii iT ! ¸ii i!i iii
iii_ _iii ......
_._
to see the previous screen of pattern selections.
3. Press the key of the pattern you want to embroider.
4. The selected pattern is displayed in the top part of the screen.
Press _ to create a mirror image of the pattern.
If you make a mistake selecting the pattern, press the key of the
pattern you want to sew.
5. After selectin_ the pattern, press @.
Embroidery 5-9
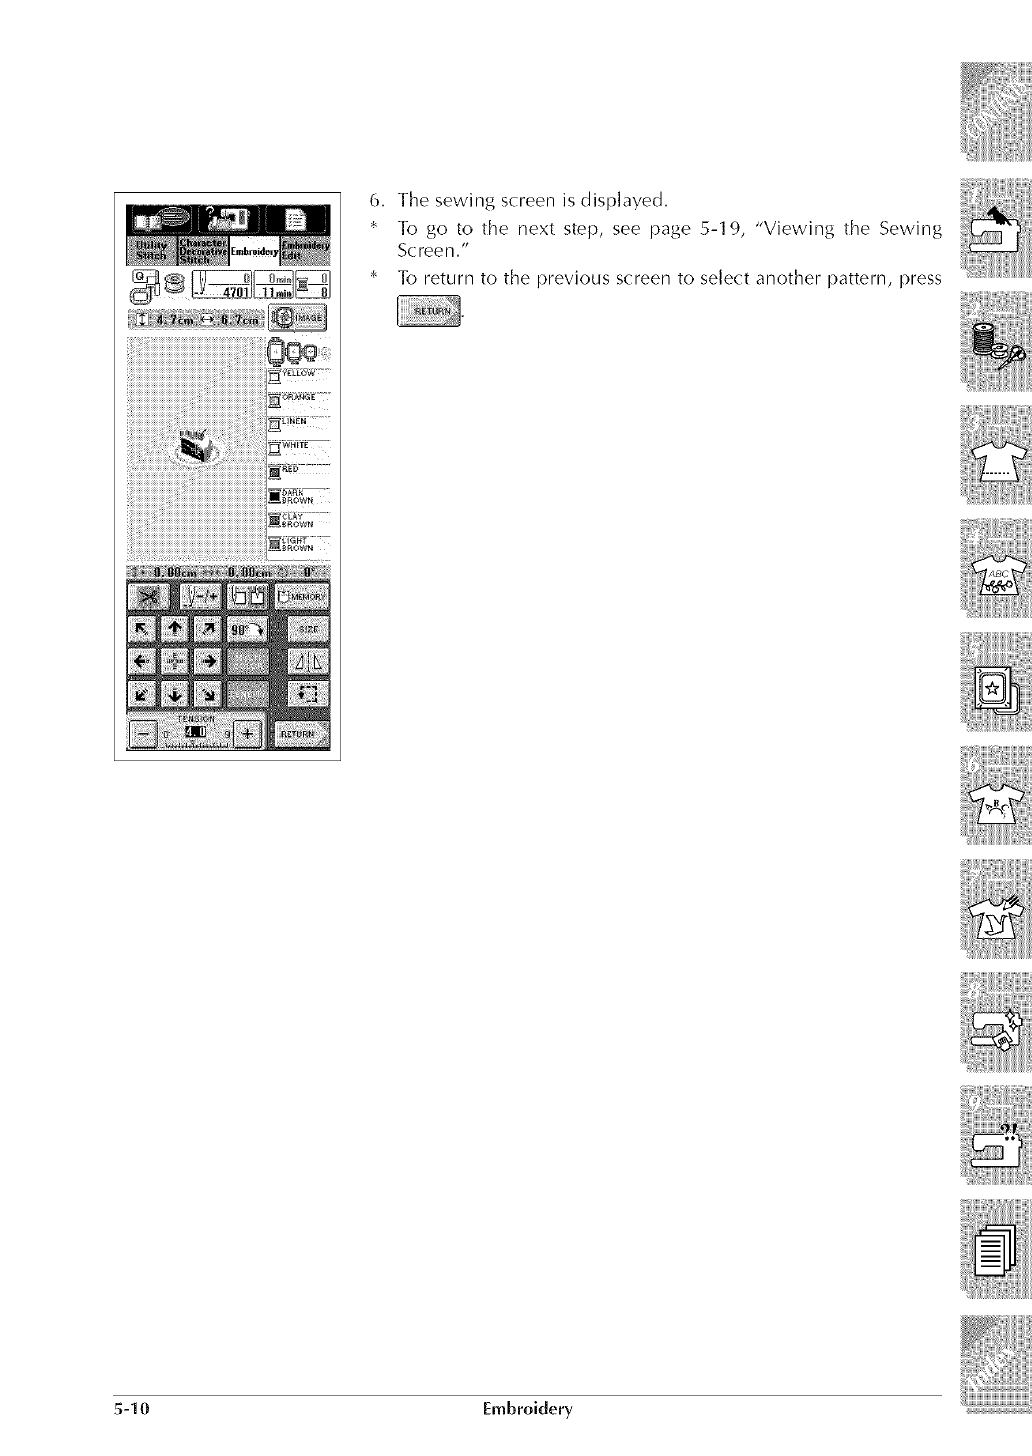
6. The sewing screen is displayed.
* To go to the next step, see page 5-1 9, "Viewing the Sewing
Scree n."
* To return to the previous screen to select another pattern, press
5-10 Embroidery
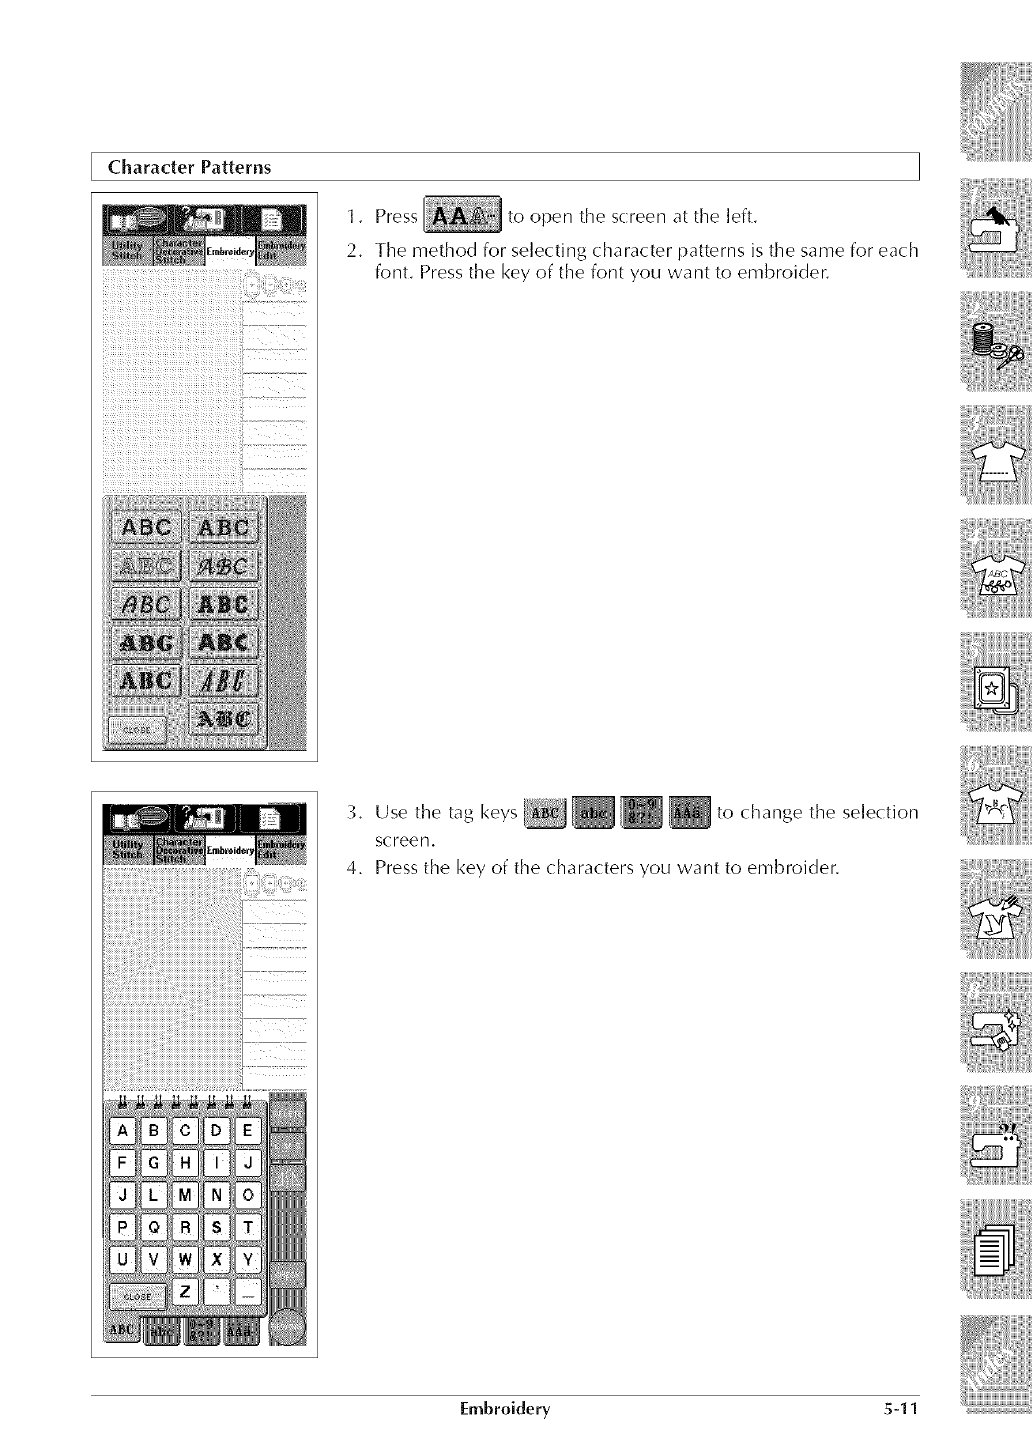
Character Patterns
1, Press to open the screen at the left.
2. The method for selecting character patterns is the same for each
font. Press the key of the font you want to embroider.
_to the selection3, Use the tag keys _ change
screen,
4, Press the key of the characters you want to embroider.
EmBroidery 5-11
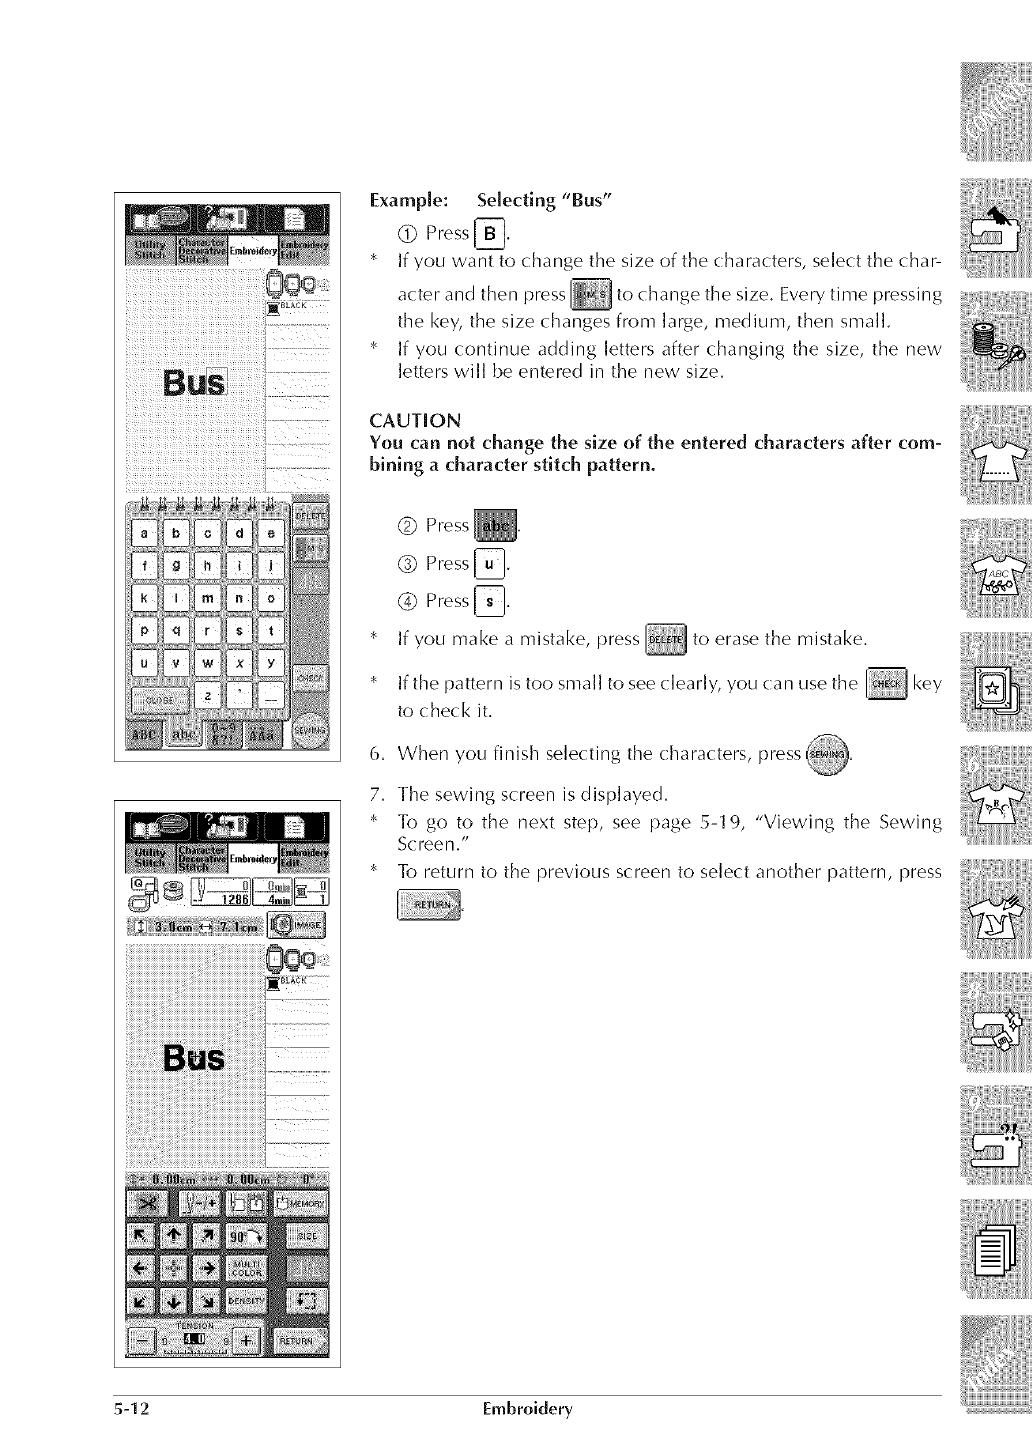
¸
[i i !
in o 1 i
ix •
Example: Selecting "Bus"
(_) Press [_,
* If you want to change the size of the characters, select the char-
acter and then press _ to change the size, Every time pressing
the key, the size changes from large, medium, then small,
If you continue adding letters after changing the size, the new
letters will be entered in the new size,
CAUTION
You can not change the size of the entered characters after com-
bining a character stitch pattern.
(_) Press _,
(_) Press _,
(_ Press _,
* If you make a mistake, press _ to erase the mistake,
pattern is too small to see clearly, you can use the _ key
If tile
to check it.
6. When you finish selecting the characters, press _.
7. The sewing screen is displayed.
* To go to the next step, see page 5-1 9, "Viewing the Sewing
Scree n."
* To return to the previous screen to select another pattern, press
5-12 Embroidery
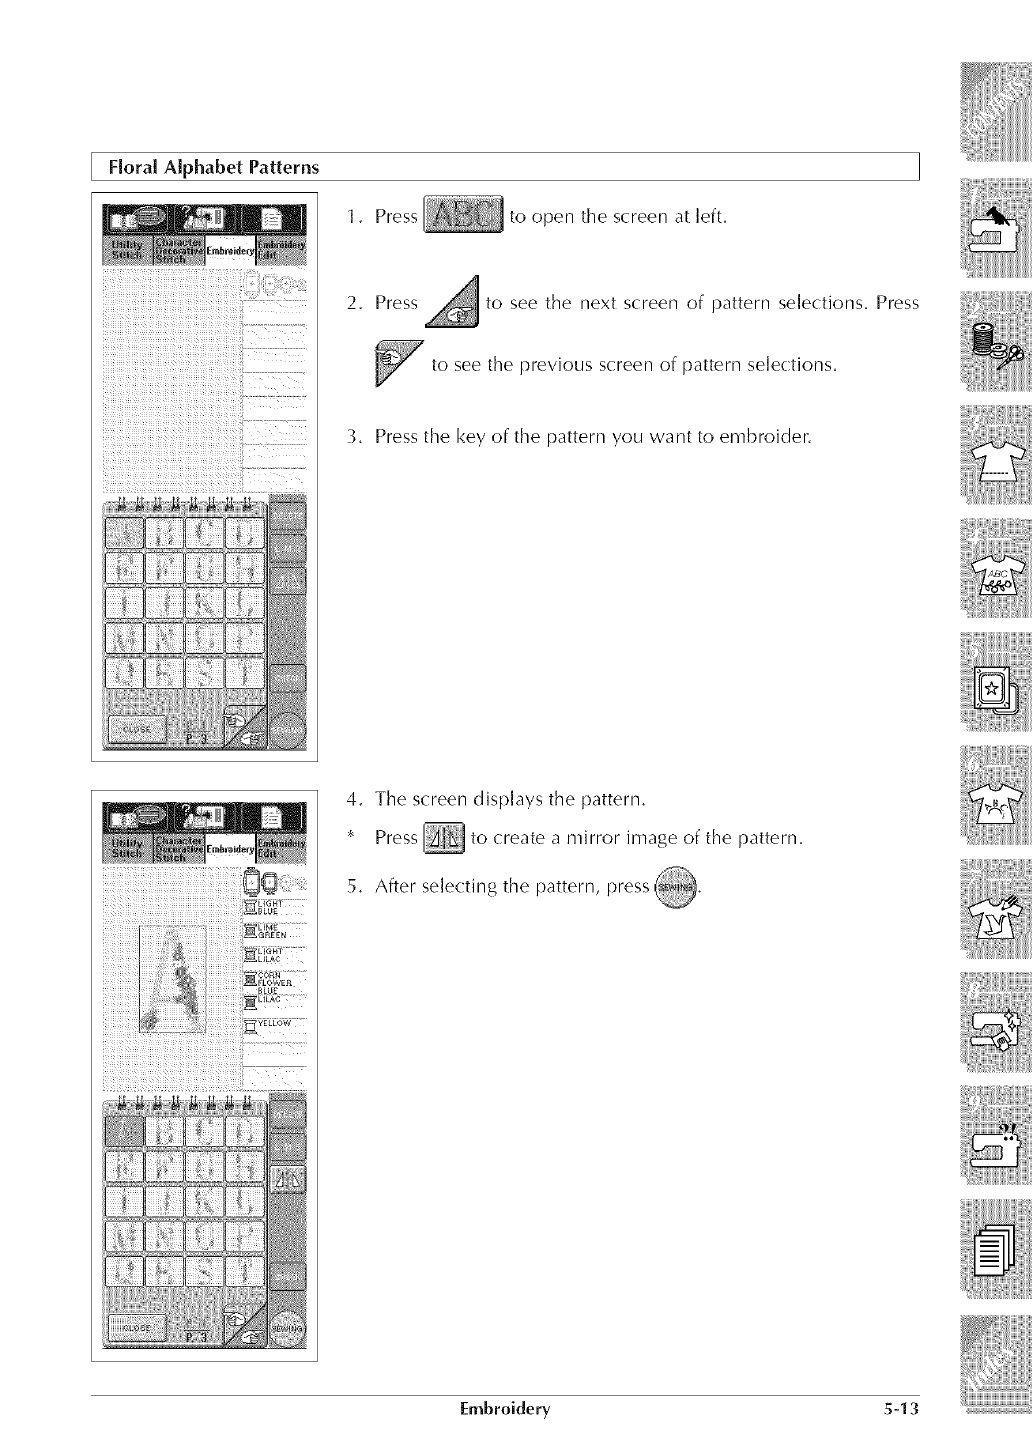
Flora] Alphabet Patterns
1. Press to open the screen at left.
2. Press to see the next screen of pattern selections. Press
to see the previous screen of pattern selections.
3. Press the key of the pattern you want to embroider.
4. The screen displays the pattern.
to create a mirror image of the pattern.
Press
5. After selectin,q the pattern, press _.
Embroidery 5-13
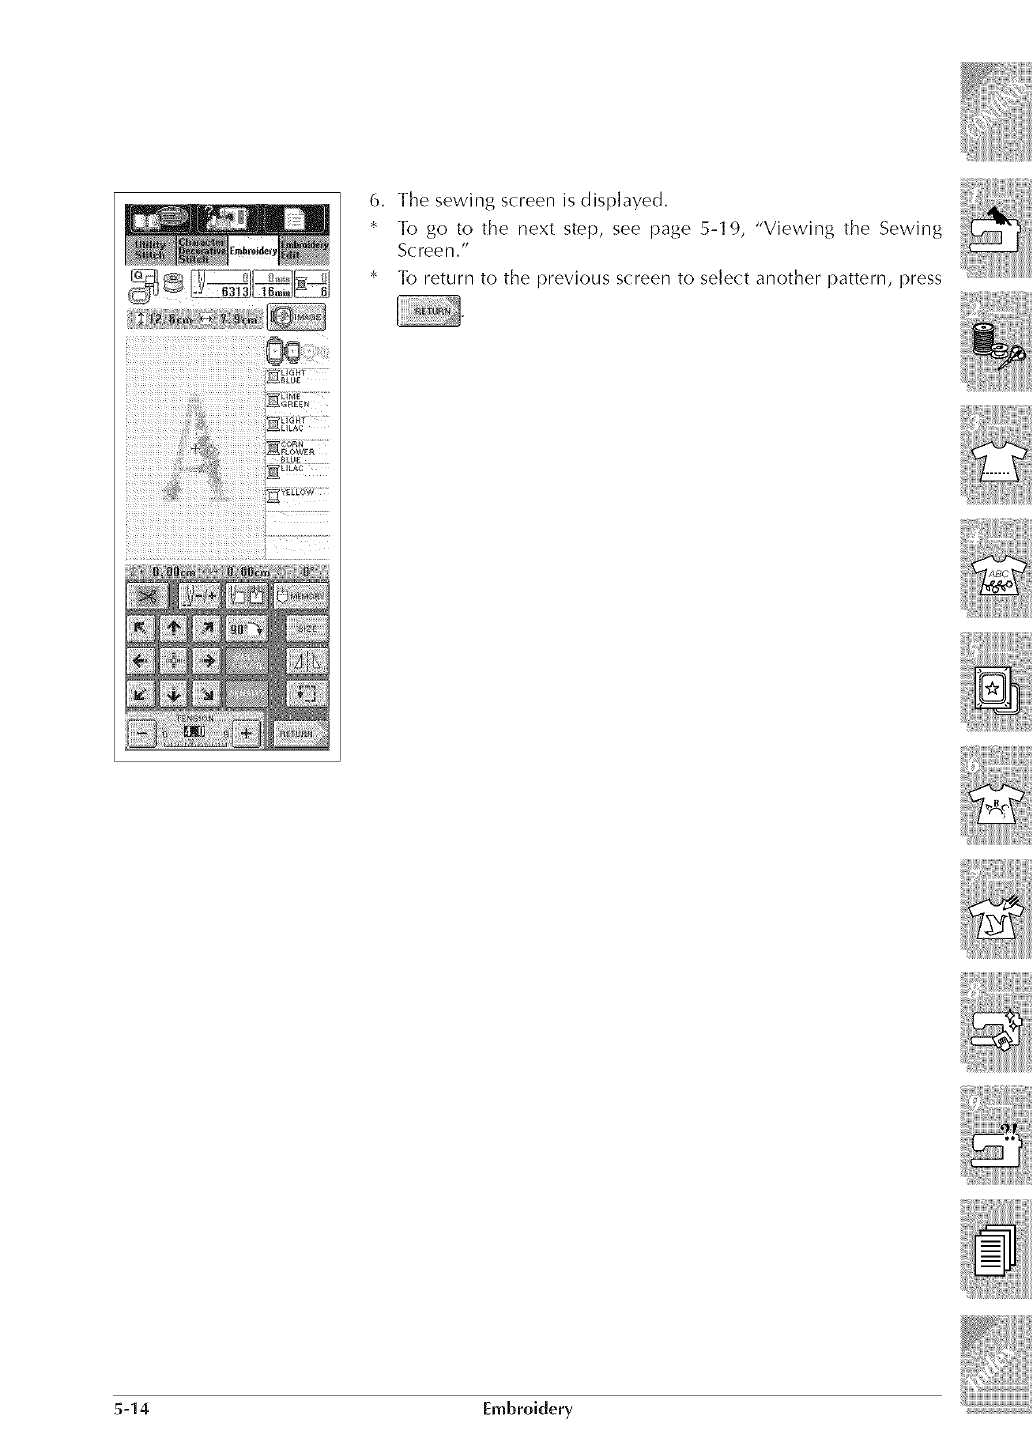
6. The sewing screen is displayed.
* To go to the next step, see page 5-1 9, "Viewing the Sewing
Scree n."
* To return to the previous screen to select another pattern, press
5-14 Embroidery
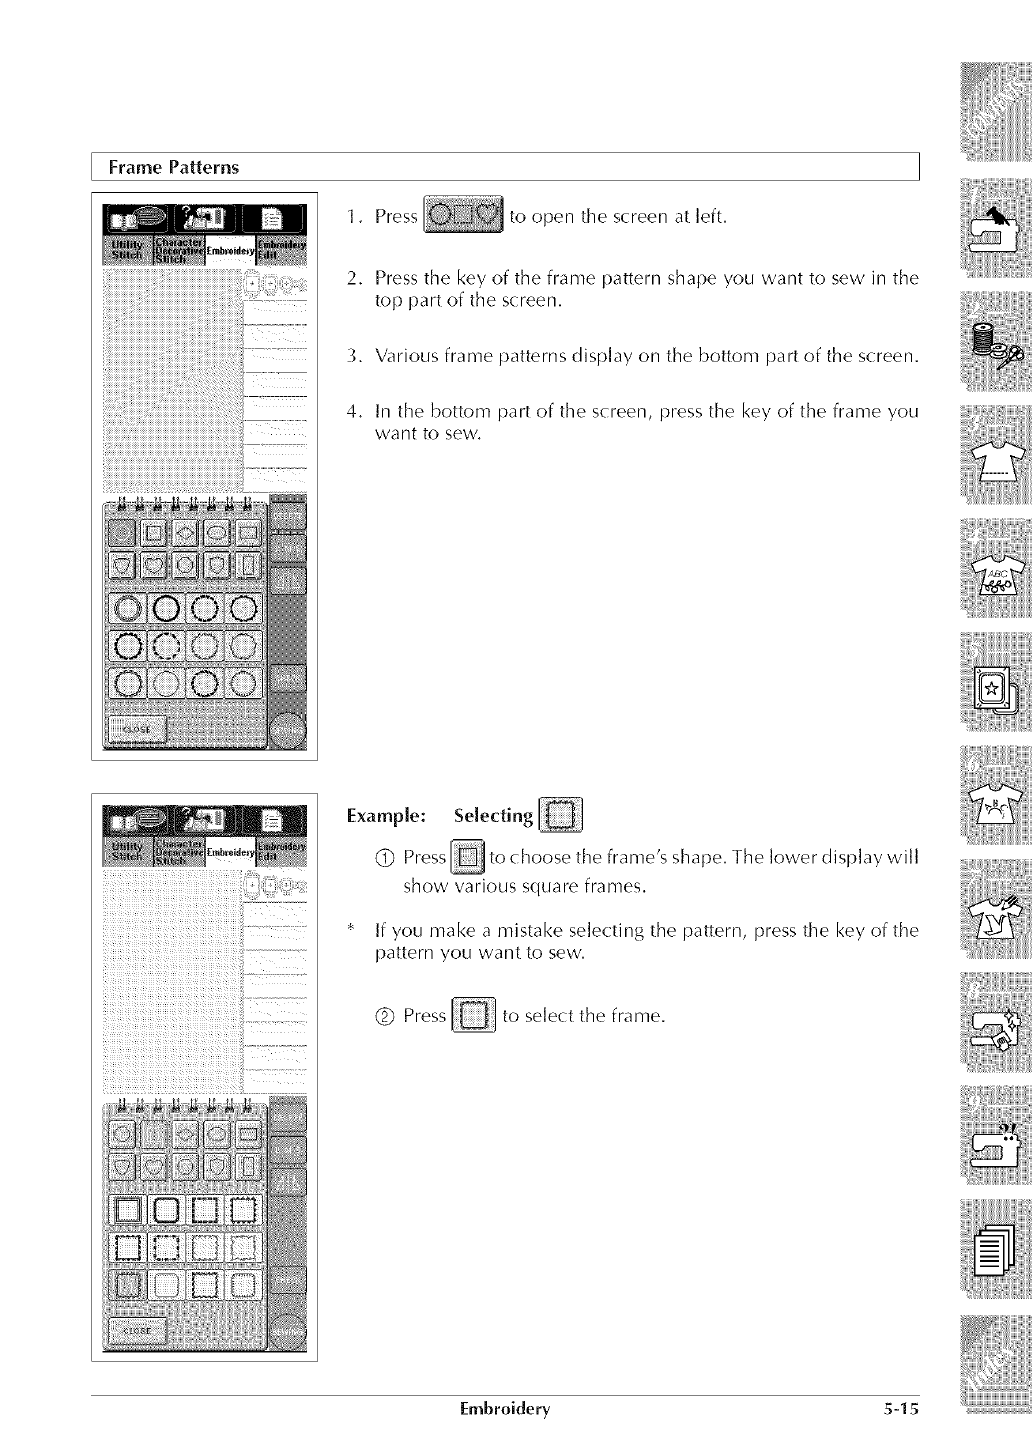
Frame Patterns
1. Press to open the screen at left.
2. Press the key of the frame pattern shape you want to sew in the
top part of the screen.
_. Various frame patterns display on the bottom part of the screen.
4. In the bottom part of the screen, press the key of the frame you
want to sew.
Example: Selecting
Q . _ .... lower display willPress to choose the frame's shape The
show various square frames.
If you make a mistake selectin',4 the pattern, press the key of the
pattern you want to sew.
(_) Press to select the frame.
Embroidery 5-1.5
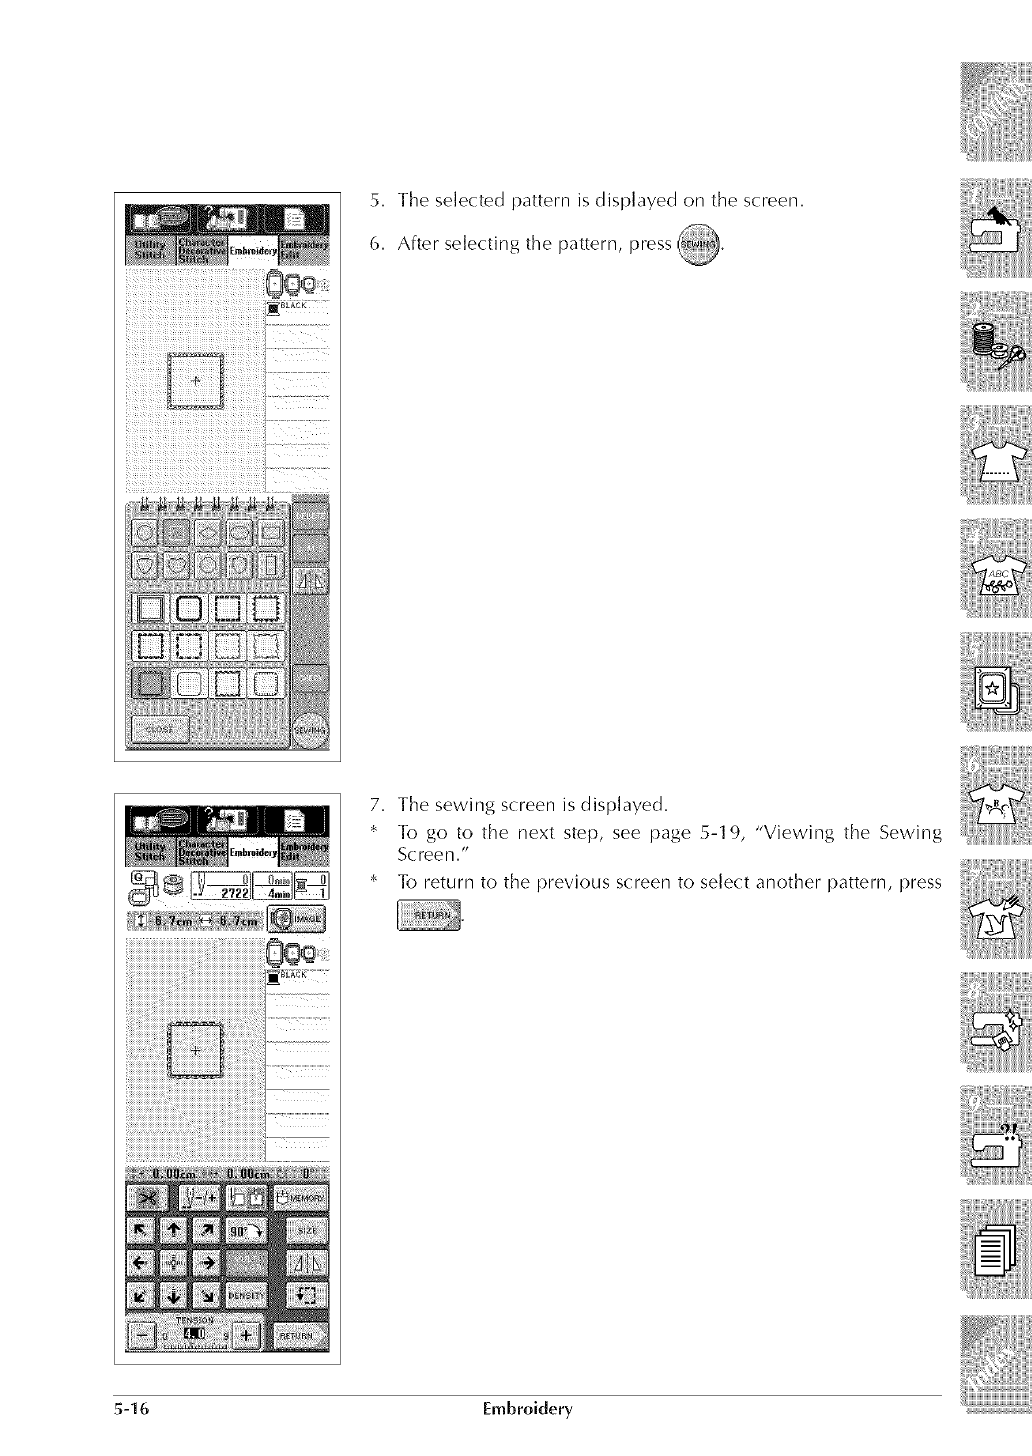
5. The selected pattern is displayed on the screen.
6. After selecting the pattern, press _.
7. The sewing screen is displayed.
* To go to the next step, see page 5-1 9, "Viewing the Sewing
Scree n."
* To return to the previous screen to select another pattern, press
5-16 EmBroidery
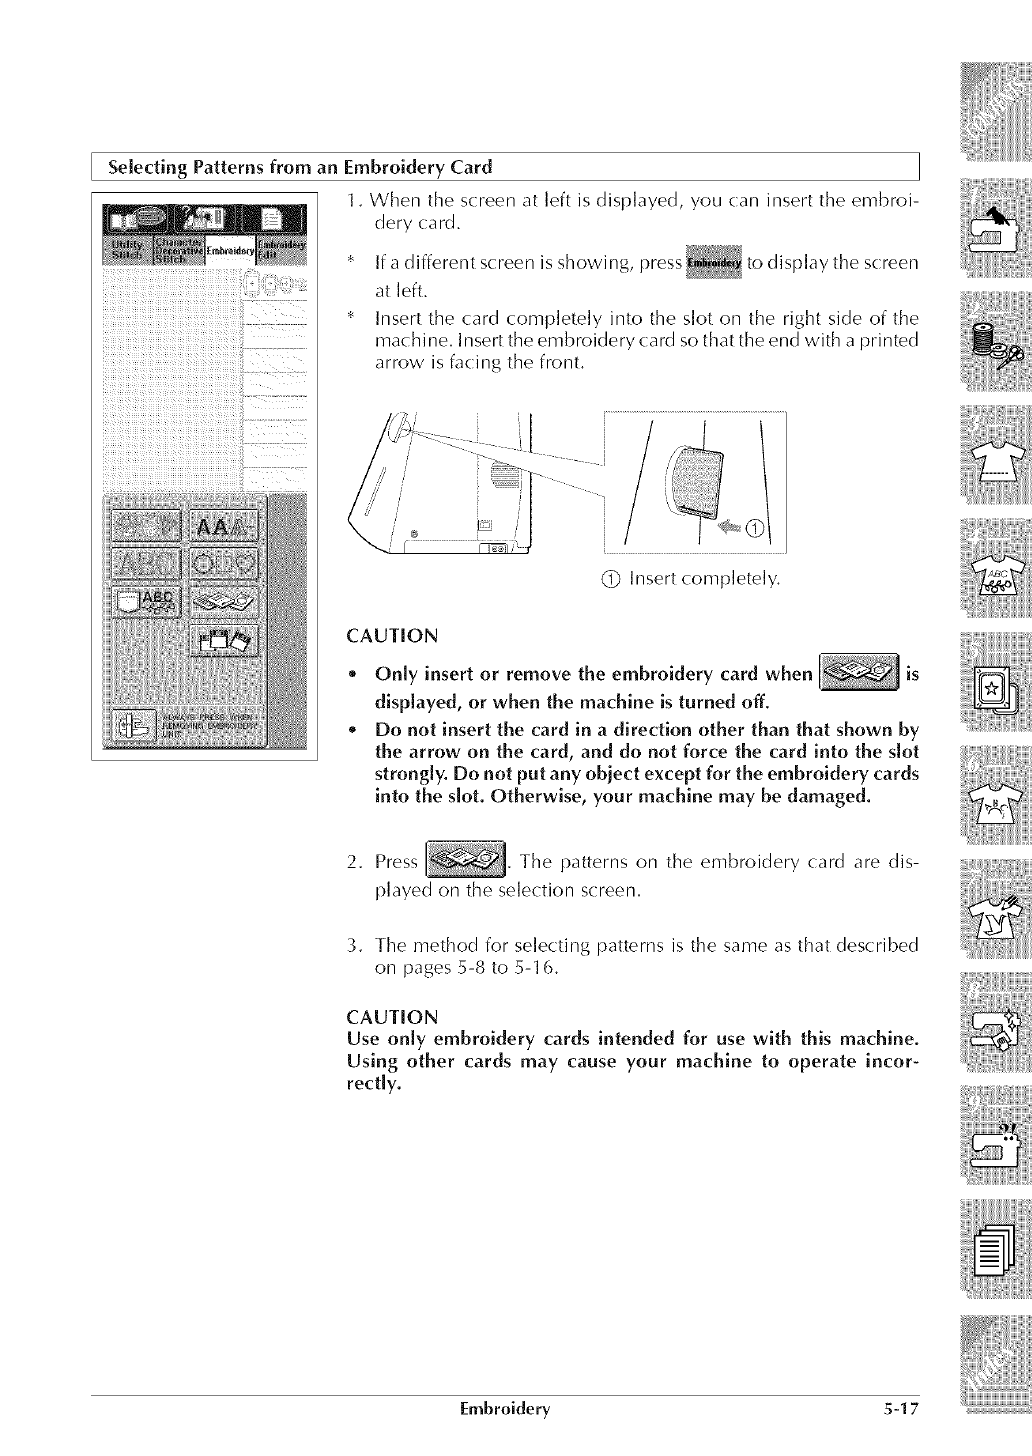
Selecting Patterns from an Embroidery Card
1. When the screen at left is displayed, you can insert the embroi-
dery card.
* If a different screen is showing, press to display the screen
at left.
Insert the card completely into the slot on the right side of the
machi no. Insert the embroidery card so that the end with a printed
arrow is facing the front.
CAUTION
®
o
Only insert or remove the embroidery card when is
displayed, or when the machine is turned off.
Do not insert the card in a direction other than that shown by
the arrow on the card, and do not force the card into the slot
strongly. Do not put any obiect except for the embroidery cards
into the slot. Otherwise, your machine may be damaged.
2. Press The patterns on the embroidery card are dis-
played on the selection screen.
3. The method for selecting patterns is the same as that described
on pages 5-8 to 5-16.
CAUTION
Use only embroidery cards intended for use with this machine.
Using other cards may cause your machine to operate incor-
rectly.
Embroidery 5-17

Selecting aPattern from a Floppy Disk (Only for Machines with Floppy Disk Drives)
1. VVhen the screen at left is displayed, you can insert tile floppy
disk,
* If a different screen is showing, press to display the screen
at left.
* Insert the floppy disk completely into the s]oton the right side of
the machine.
(_ Insert completely.
CAUTION
*Only insert or remove floppy disks while
is displayed, or when prompted to change disks by the screen.
o Do not insert anything other than floppy disks into the floppy disk
drive slot, otherwise the floppy disk drive may be damaged.
2. Press
The patterns on the floppy disk are displayed on the selection
screen.
The time for loading from the floppy disk depends on a number
of patterns. For example, it takes around 30 seconds for 20 pat-
terns to display.
3. The method for selecting patterns is the same as that described
on pages 5-8 to 5-16.
CAUTION
Only use floppy disks containing data created by the sewing ma-
chine, or equipment intended for this machine. Otherwise, the
machine may not operate correctly. (Only .pes, .phs and .dst pat-
tern files can be used.)
5-18 Embroidery
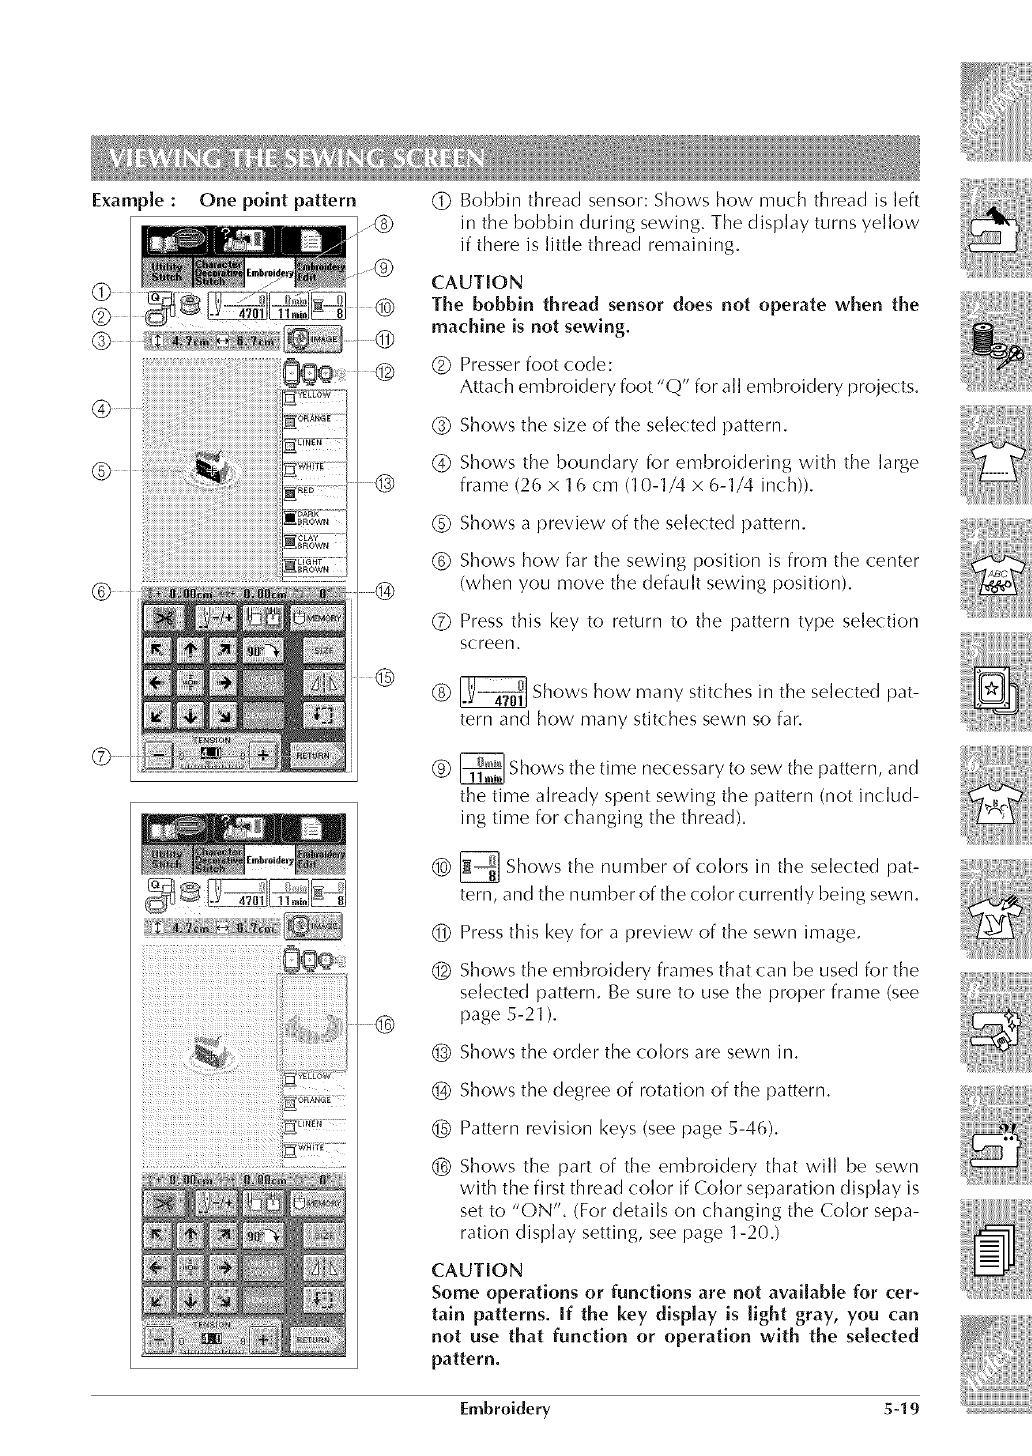
Exam_[e : One point pattern
®
@ Bobbin thread sensor: Shows how much thread is left
in the bobbin during sewing. The display turns yellow
if there is little thread remaining.
®
@
CAUTION
The bobbin thread sensor does not operate when the
machine is not sewing.
® Presser foot code:
Attach embroidery foot "Q" for all embroidery projects.
®Shows the size of the selected pattern.
(_ Shows the boundary for embroidering with the large
.......@ frame (26 x 16 cm (10-1/4 x 6-1/4 inch)).
®Shows a preview of the selected pattern.
® Shows how far the sewing position is from the center
(when you move the default sewing position).
(_ Press this key to return to the pattern type selection
screen.
®I._[ Shows how many stitches in the selected pat-
tern and how many stitches sewn so far.
® _ Shows the time necessary to sew the pattern, and
the time already spent sewing the pattern (not includ-
ing time for changing the thread).
®
®
@
@
@
O
_ Shows the number of colors in the selected pat-
tern, and the number of the color currently being sewn.
Press this key for a preview of the sewn image.
Shows the embroidery frames that can be used for the
selected pattern. Be sure to use the proper frame (see
page 5-21 ).
Shows the order the colors are sewn in.
Shows the degree of rotation of the pattern.
Pattern revision keys (see page 5-46).
Shows the part of the embroidery that will be sewn
with the first thread color if Color separation display is
set to "ON". (For details on changing the Color sepa-
ration display setting, see page 1-20.)
CAUTION
Some operations or functions are not available for cer-
tain patterns. If the key display is light gray, you can
not use that function or operation with the selected
pattern.
Embroidery 5-19
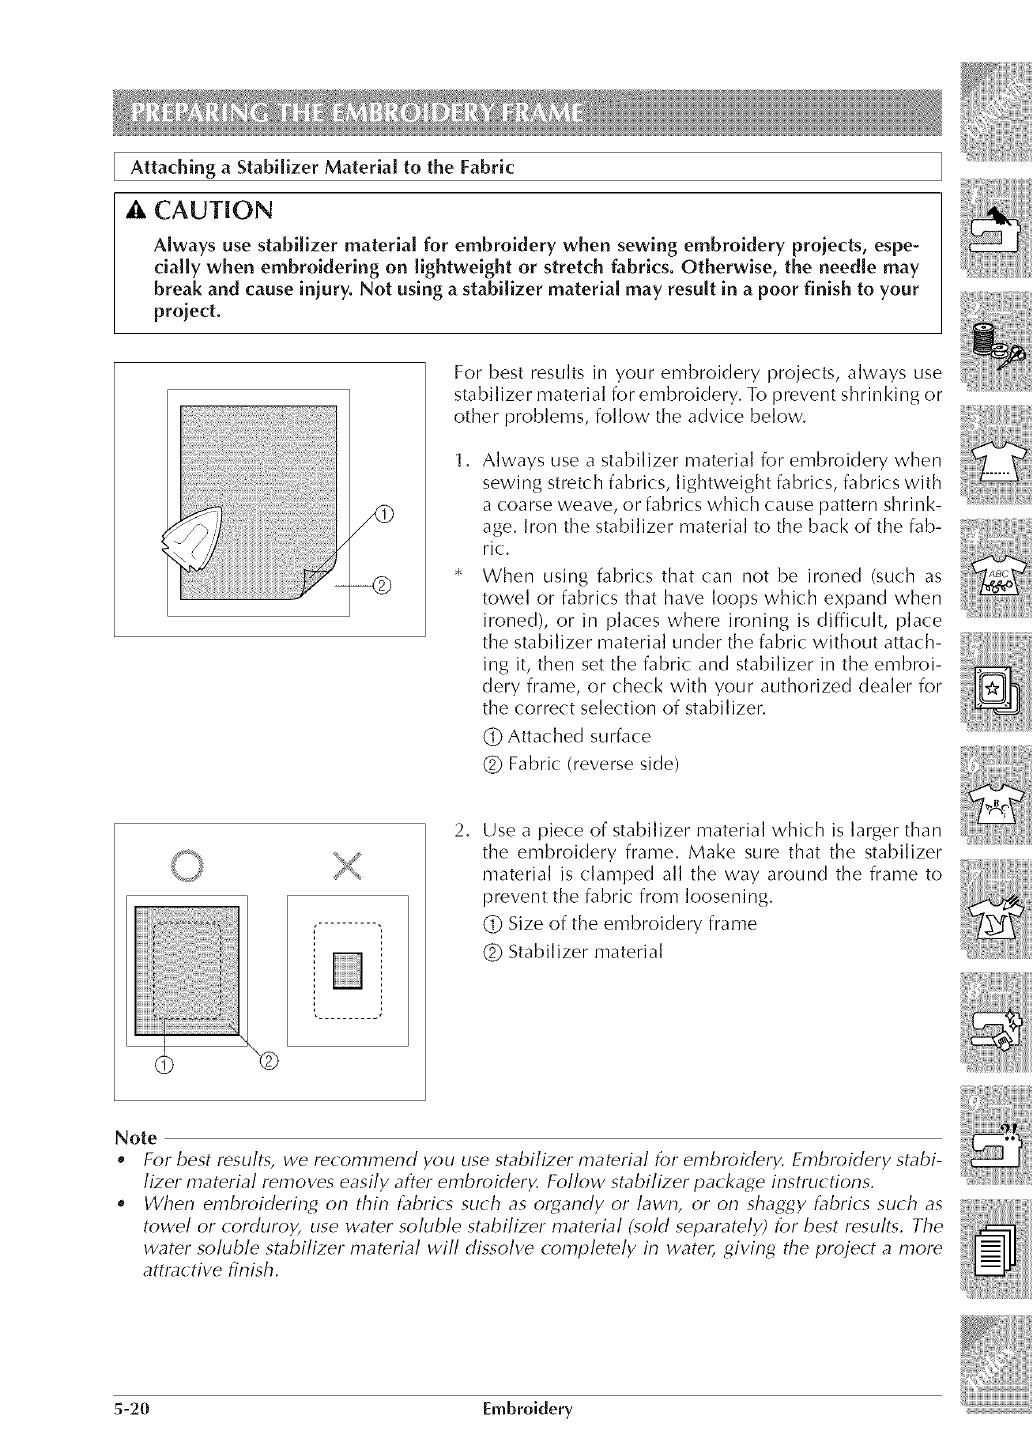
Attaching aStabilizer Material to the Fabric
CAUT[ON
Always use stabilizer material for embroidery when sewing embroidery proiects , espe-
cially when embroidering on lightweight or stretch fabrics. Otherwise, the needle may
break and cause iniury. Not using a stabilizer material may result in a poor finish to your
proiect.
For best results in your embroidery projects, always use
stabilizer material for embroidery. To prevent shrinking or
other problems, follow the advice below.
1, Always use a stabilizer material for embroidery when
sewing stretch fabrics, lightweight fabrics, fabrics with
a coarse weave, or fabrics which cause pattern shrink-
age. Iron the stabilizer material to the back of the fab-
ric.
When using fabrics that can not be ironed (such as
towel or fabrics that have loops which expand when
ironed), or in places where ironing is difficult, place
the stabilizer material under the fabric without attach-
ing it, then set the fabric and stabilizer in the embroi-
dery frame, or check with your authorized dealer for
the correct selection of stabilizer.
(_ Attached surface
(_ Fabric (reverse side)
2, Use a piece of stabilizer material which is larger than
the embroidery frame. Make sure that the stabilizer
material is clamped ai[ the way around the frame to
prevent the fabric from loosening.
(_ Size of the embroidery frame
(_ Stabilizer material
Note
•For best results, we recommend you use stabilizer material for embroidery. Embroidery stabi-
lizer material removes easily after embroidery. Follow stabilizer package instructions.
•When embroidering on thin t_brics such as organdy or lawn, or on shaggy fabrics such as
towel or corduroy, use water soluble stabilizer material (sold separately) for best results. The
water soluble stabilizer material will dissolve completely in watel, giving the project a more
attractive finish.
5-20 Embroidery
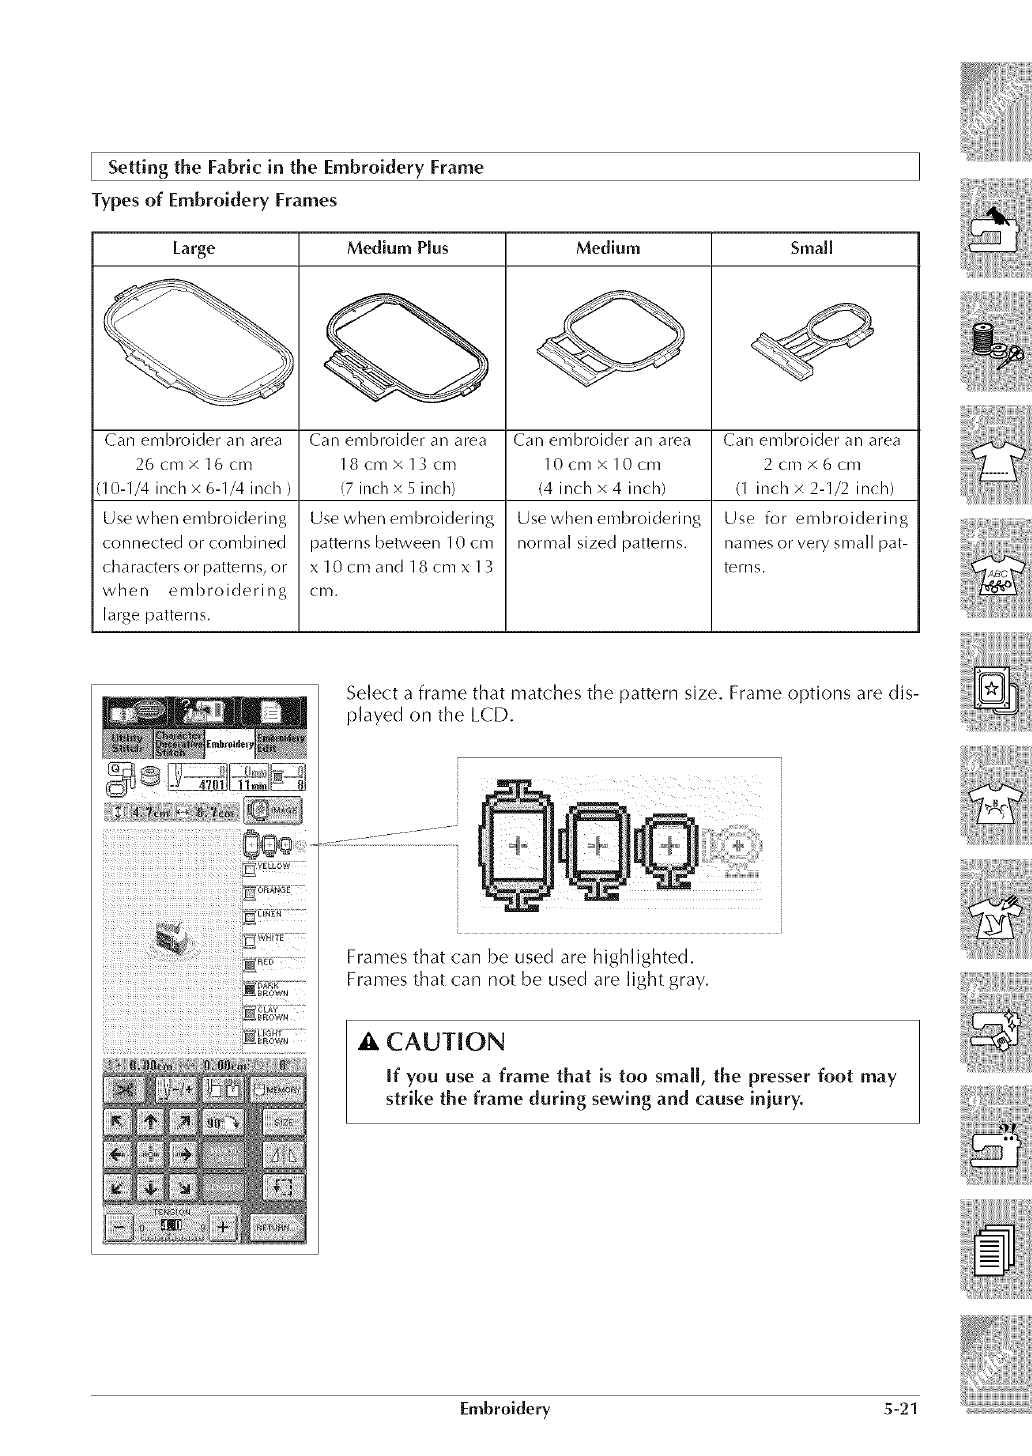
the Fabric in theSetting Embroidery Frame
Types of Embroidery Frames
Medium Plus Medium Small
I[_arge
Can embroider an area
26 cmx 16 cm
(10-1/4 inch x 6-1/4 inch )
Use when embroidering
connected or combined
characters or patterns, or
when embroidering
large patterns.
Can embroider an area
18 cm x 13 cm
(7 inch x 5 inch)
Use when embroidering
patterns between 10 cm
x 10 cm and 18 cmx 13
C Ill.
Can embroider an area
10cm x 10cm
(4 inch x 4 inch)
Use when embroidering
normal sized patterns.
Can embroider an area
2 crn × 6 cm
(1 inch × 2-1/2 inch)
Use for embroidering
names or very small pat-
terns.
Select a frame that matches the pattern size. Frame options are dis-
played on the LCD.
Frames that can be used are highlighted,
Frames that can not be used are light gray.
_k CAUTION
If you use a frame that is too sma[[, the presser foot may
strike the frame during sewing and cause iniury.
Embroidery 5-21
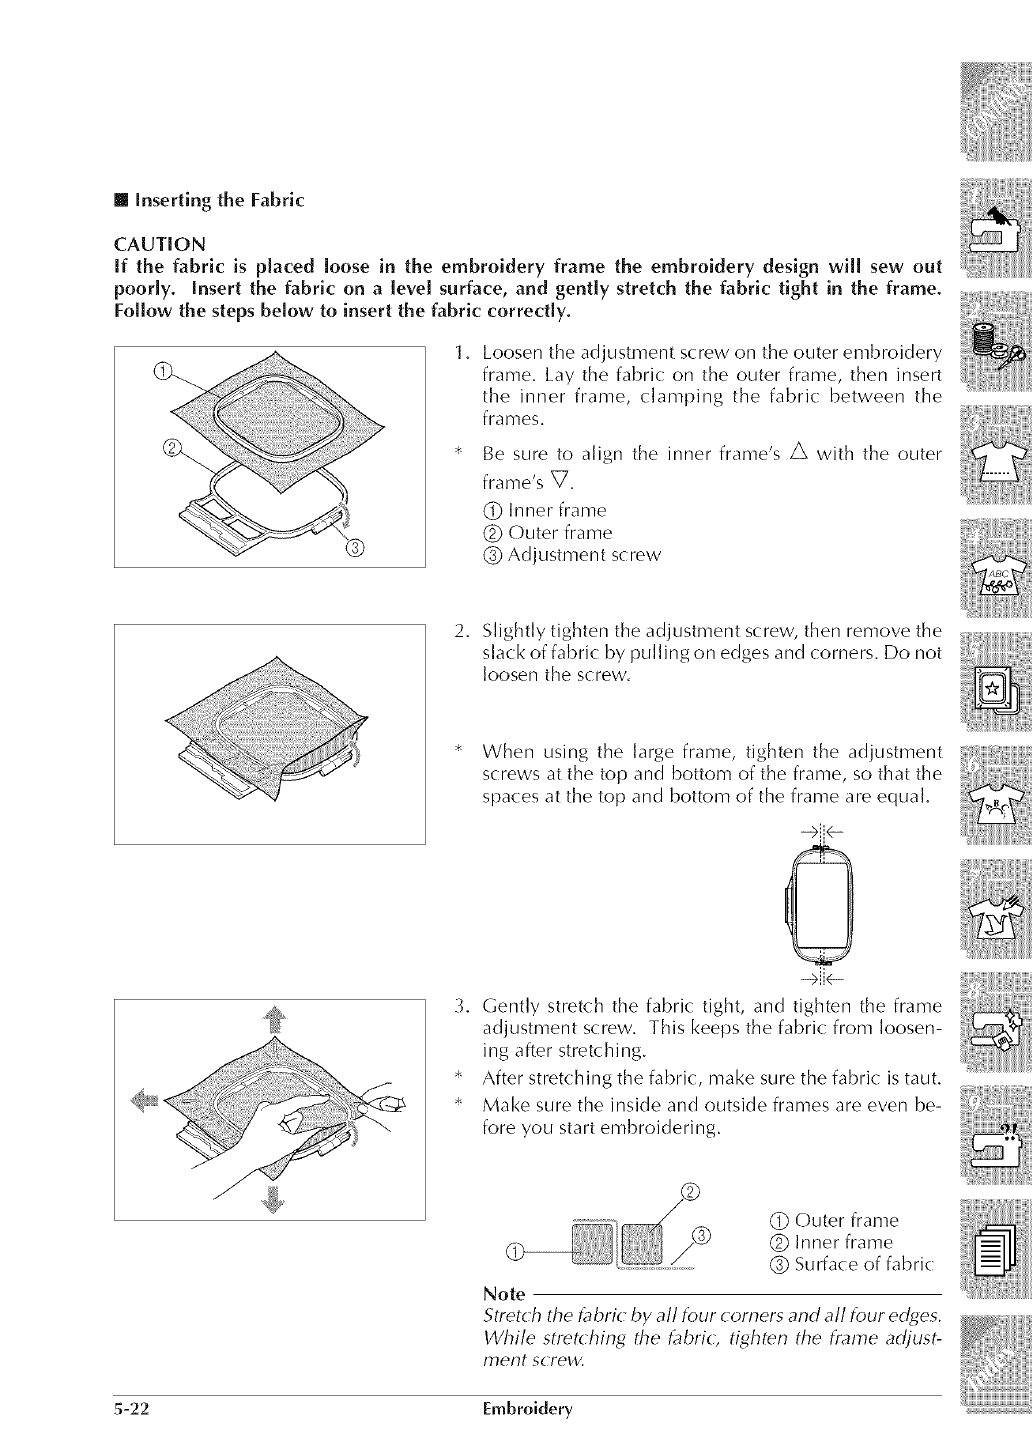
[] inserting the Fabric
CAUTION
If the fabric is placed loose in the embroidery frame the embroidery design will sew out
poorly. Insert the fabric on a level surface, and gently stretch the fabric tight in the frame.
Follow the steps below to insert the fabric correctly.
1. Loosen the adjustment screw on the outer embroidery
frame. Lay the fabric: on the outer frame, then insert
the inner frame, clamping the fabric: between the
frames,
Be sure to align the inner frame's A with the outer
frame's V,
(_ Inner frame
(_ Outer frame
(_ Adjustment screw
2. Slightly tighten the adjustment screw, then remove the
slack of fabric: by pulling on edges and corners. Do not
loosen the screw.
* When using the large frame, tighten the adjustment
screws at the top and bottom of the frame, so that the
spaces at the top and bottom of the frame are equa].
0
->ii<-
3. Gently stretch the fabric tight, and tighten the frame
adjustment screw. This keeps the fabric: from loosen-
ing after stretching.
* After stretching the fabric, make sure the fabric is taut.
* Make sure the inside and outside frames are even be-
fore you start embroidering.
(_ Outer frame
f(_ (_ Inner frame
(_) Surface of fabric
Note
Stretch the _bri_ by all four corners and all four edges.
While stretching the t;_bri(; tighten the frame adjust-
ment screw.
5-22 Embroidery
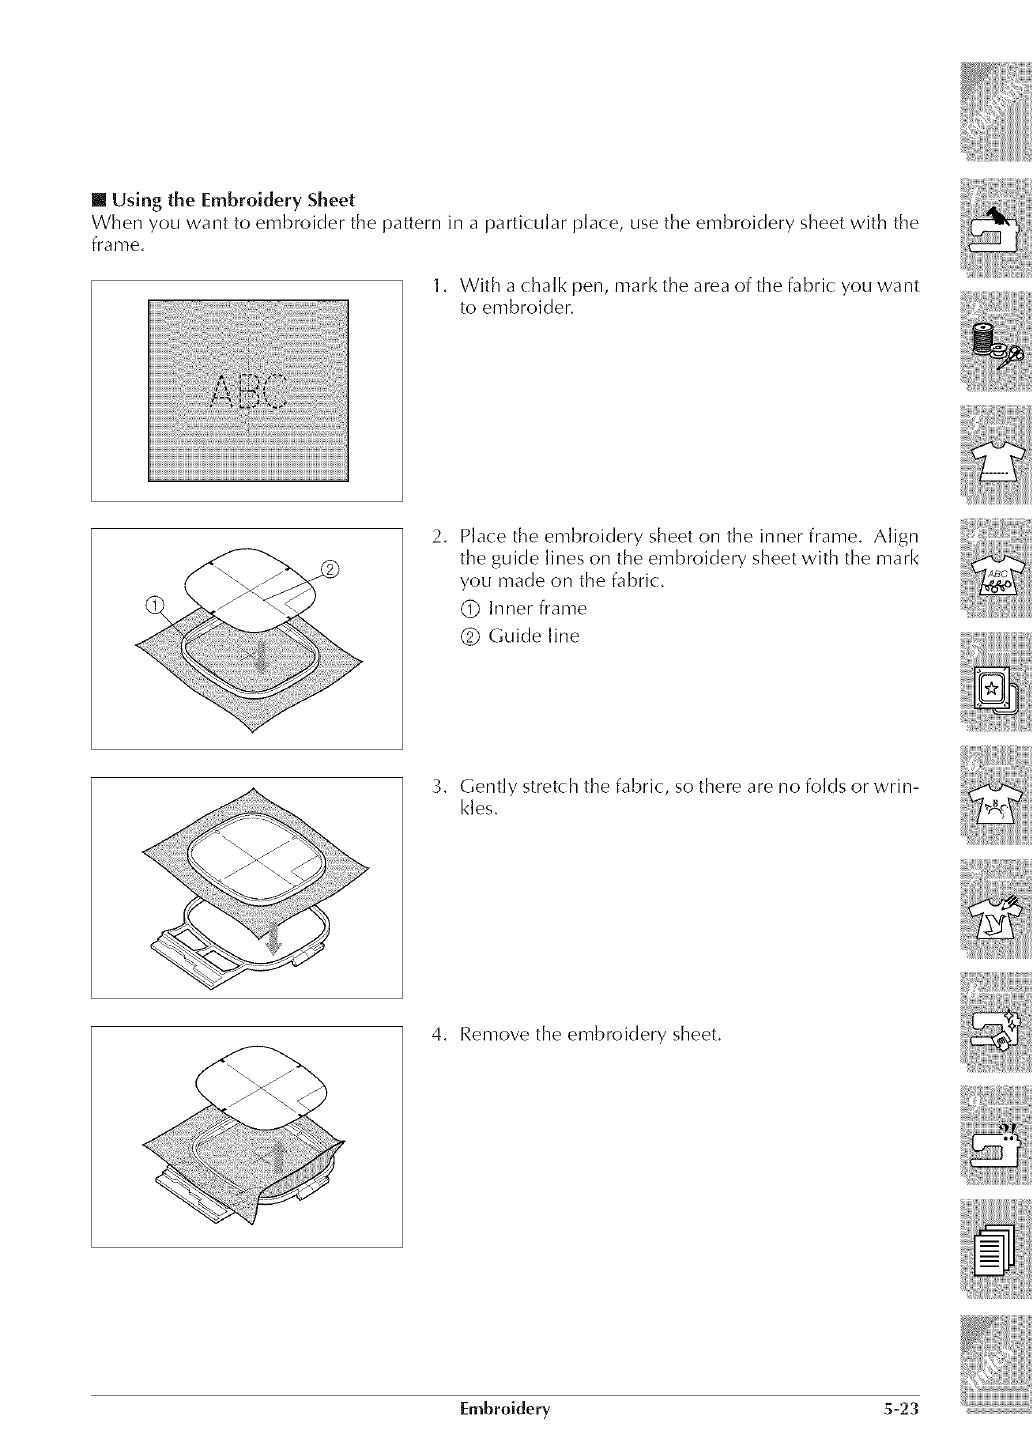
[] Using the Embroidery Sheet
When you want to embroider the pattern in a particular place, use the embroidery sheet with the
frame.
1. With a chalk pen, mark the area of the fabric: you want
to embroider.
2. Place the embroidery sheet on the inner frame. Align
the guide lines on the embroidery sheet with the mark
you made on the fabric:.
(_) Inner frame
(_ Guide line
3. Gently stretch the fabric, so there are no folds or wrin-
kles.
4. Remove the embroidery sheet.
Embroidery 5-23
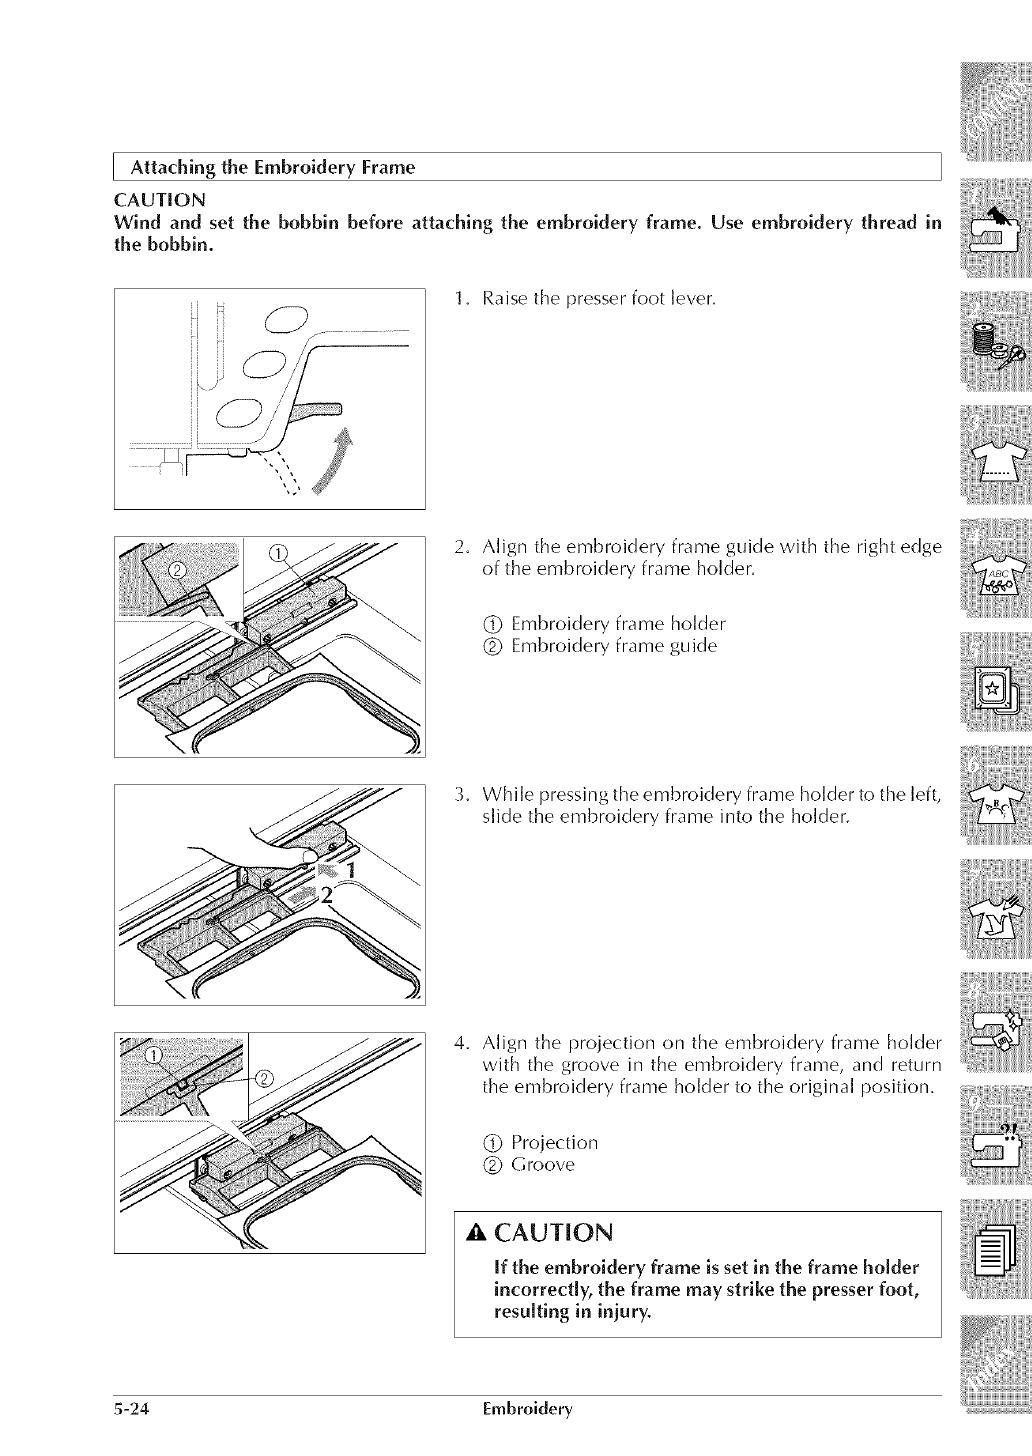
Attaching the Embroidery Frame
CAUTION
Wind and set the bobbin before attaching the embroidery frame. Use embroidery thread in
the bobbin.
1. Raise the presser foot lever.
2. Align the embroidery frame guide with the right edge
of the embroidery frame holder.
(_ Embroidery frame holder
(_ Embroidery frame guide
3. While pressing the embroidery frame holder to the left,
slide the embroidery frame into the holder.
4. Align the projection on the embroidery frame holder
with the groove in the embroidery frame, and return
the embroidery frame holder to the original position.
(_ Projection
(_ Groove
,i_ CAUTION
If the embroidery flame is set in the frame bolder
incorrectly, the frame may strike the presser foot,
resulting in iniury.
5-24 Embroidery
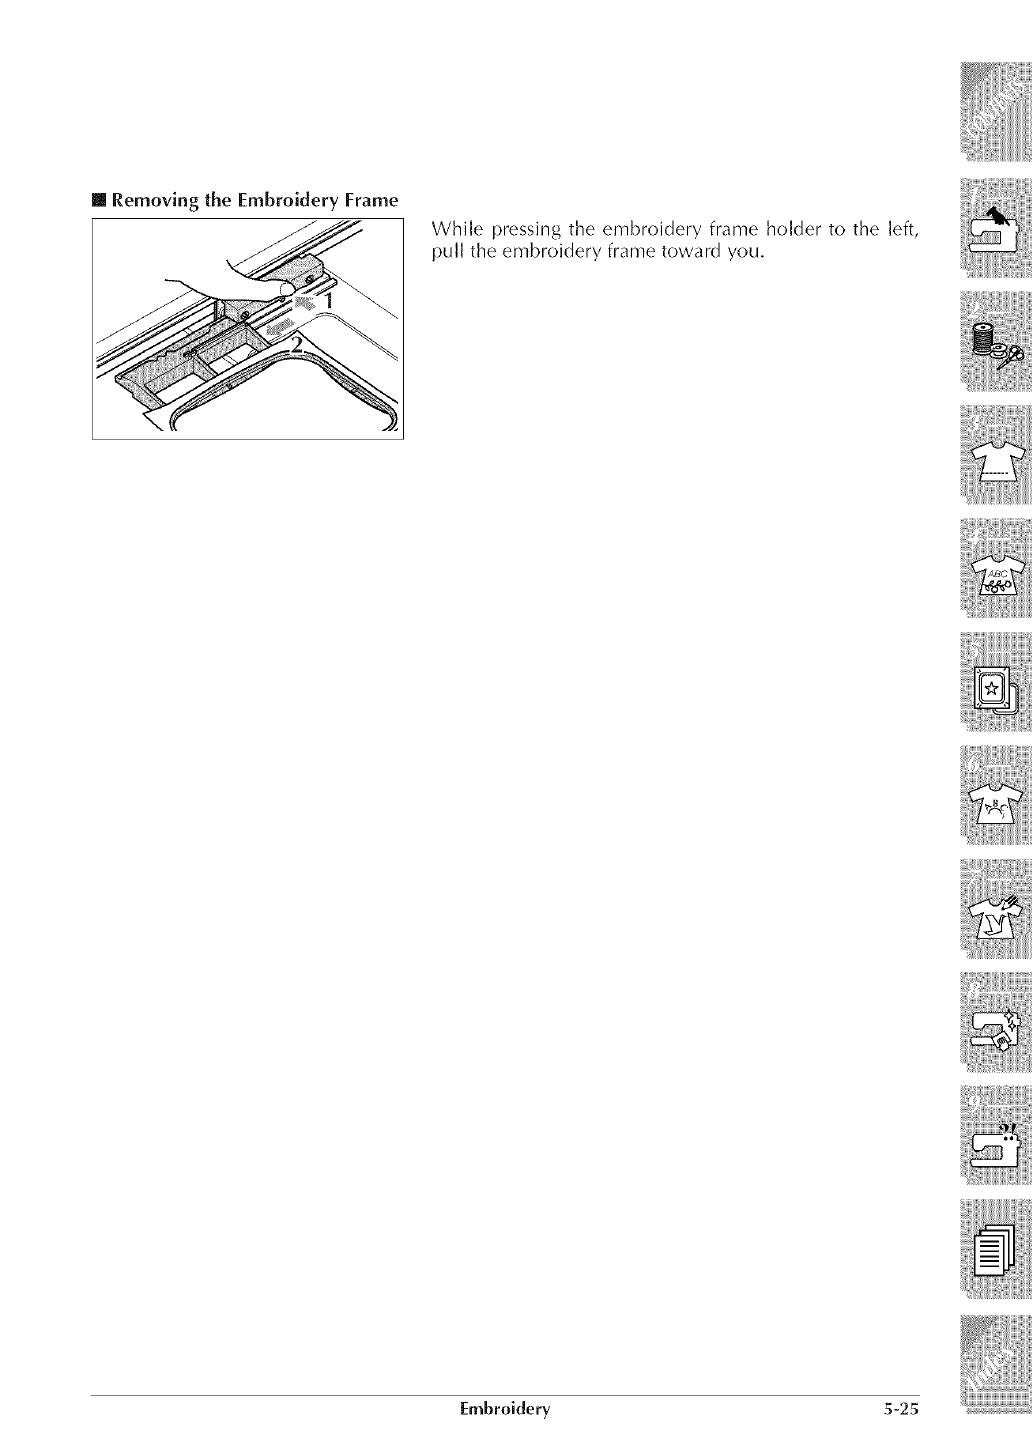
[] Removing the Embroidery Frame
While pressing the embroidery frame holder to the left,
pull the embroidery frame toward you.
[mbroidery 5-25
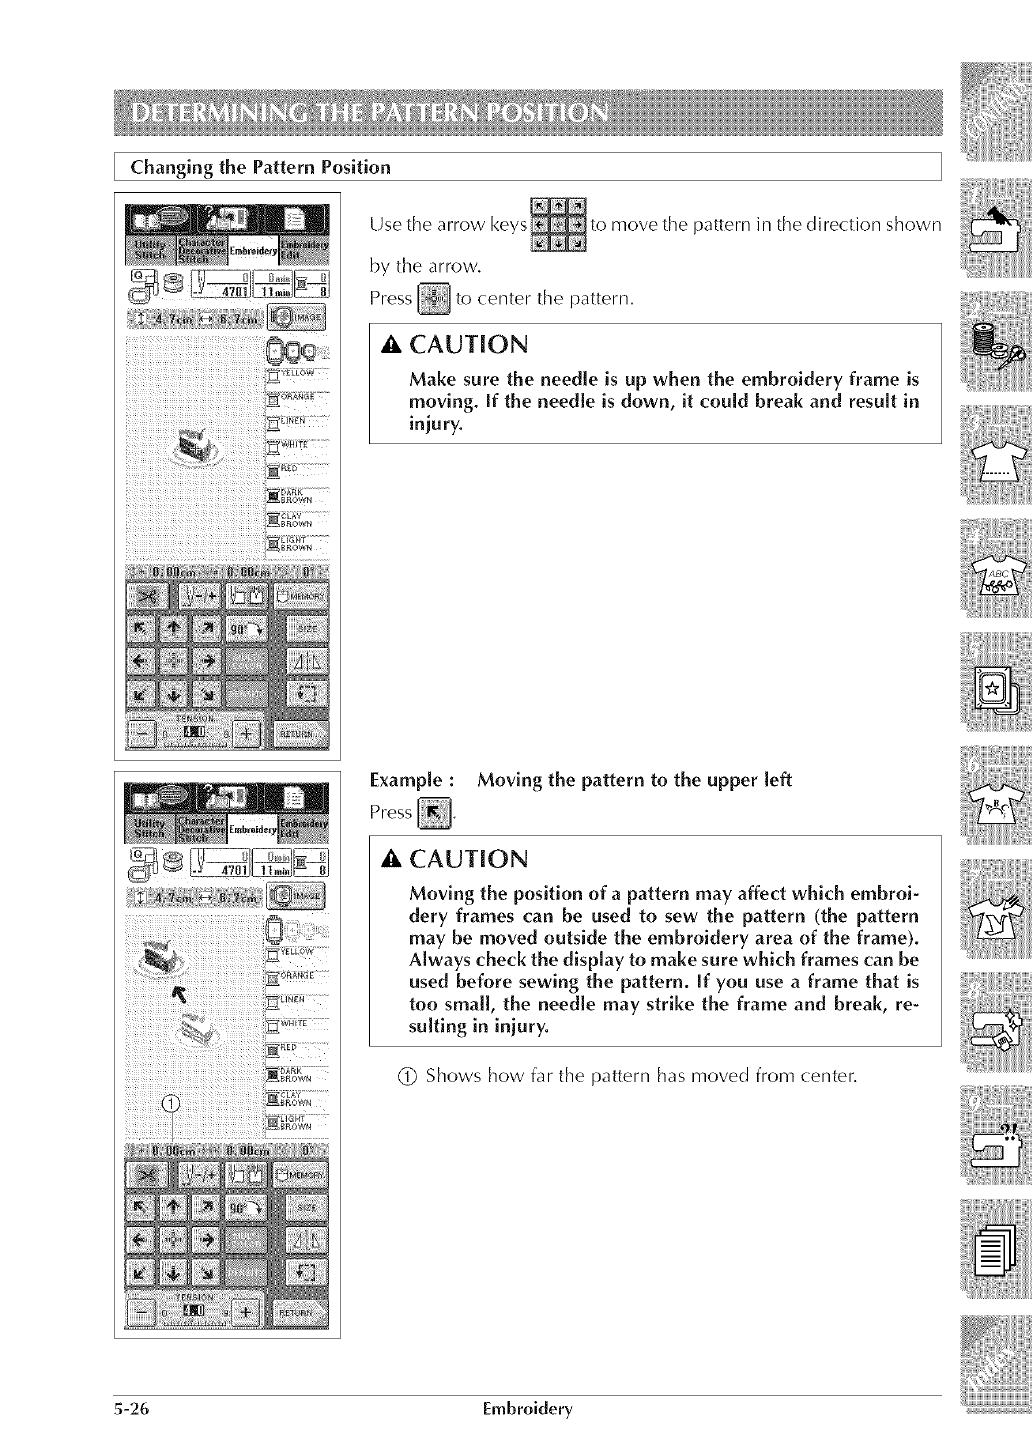
Changing the Pattern Position
Use the arrow keys to move the pattern in the direction shown
by the arrow,
Press _ to center the pattern.
_t, CAUTION
Make sure the needle is up when the embroidery frame is
moving. If the needle is down, it could break and result in
iniury.
Example :Moving the pattern to the upper [eft
_k CAUTION
Moving the position of a pattern may affect which embroi-
dery frames can be used to sew the pattern (the pattern
may be moved outside the embroidery area of the frame).
Always check the display to make sure which frames can be
used before sewing the pattern. If you use a frame that is
too small, the needle may strike the frame and break, re-
suiting in iniury.
(_) Shows how far the pattern has moved from center.
5-26 Embroidery

Checking the Pattern's Position
:_ORANGE
LIGHT
_BROWN
Press . The embroidery frame moves to check the
sewing position.
The embroidery frame moves and shows the boundaries
of the embroidery. Watch the frame closely to make sure
the pattern will be sewn in the right place.
_. CAUTION
Make sure the needle is up when the embroidery
frame is moving. If the needle is down, it could
break and result in injury.
Embroidery 5-27
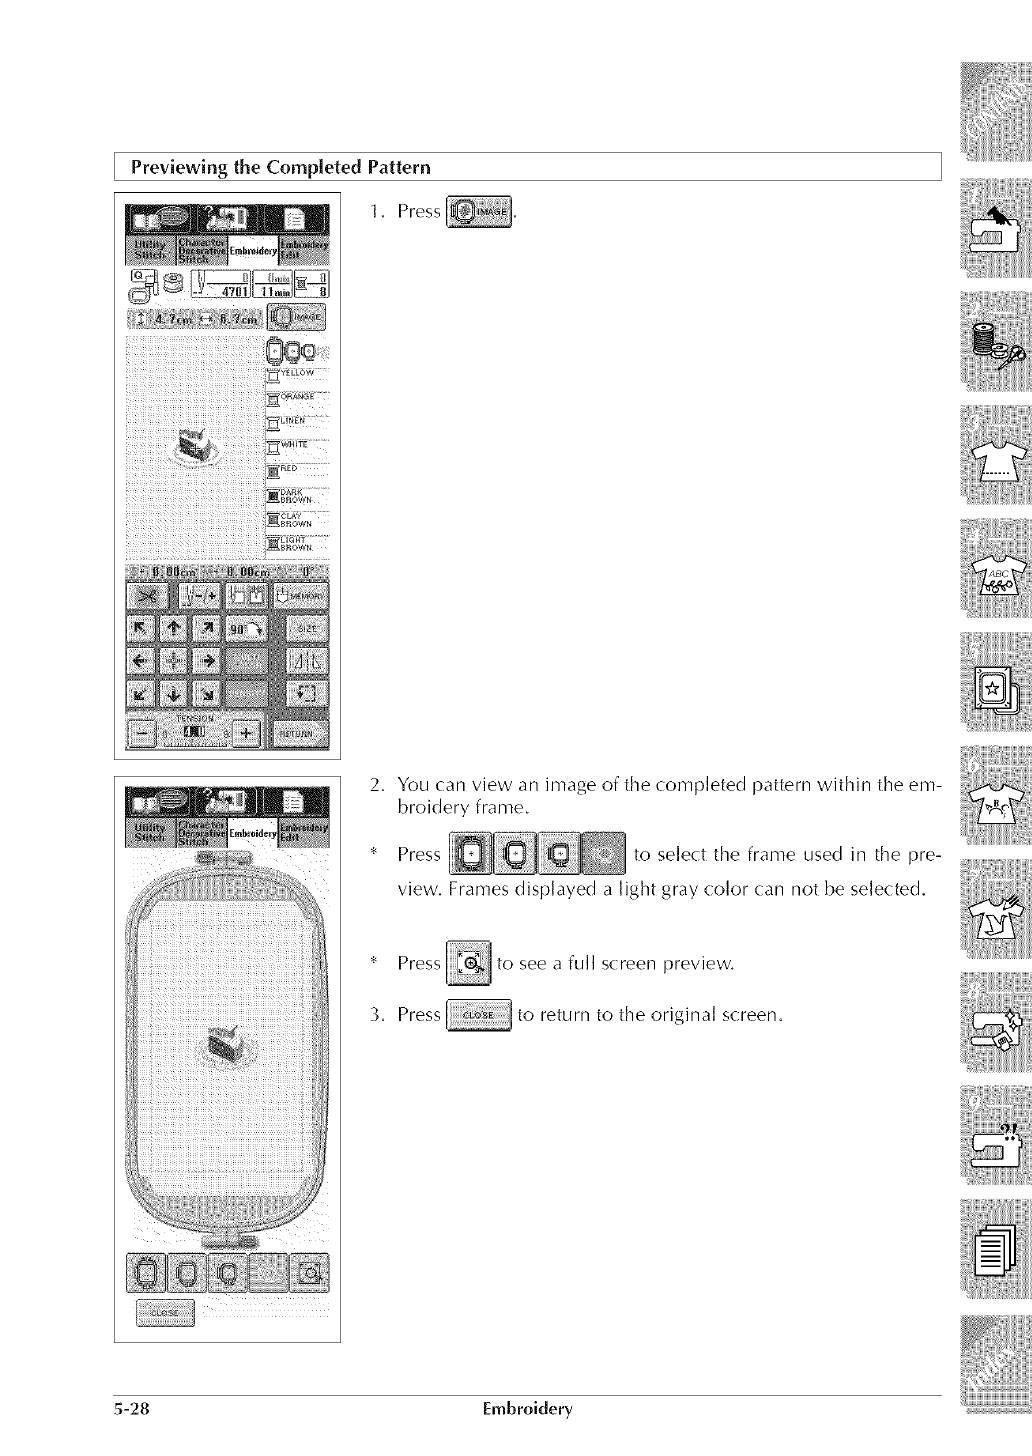
Previewing the Completed Pattern
1, Press
2, You (:an view an image of the completed pattern within the em-
broidery frame.
* Press to select the frame used in the pre-
view. Frames displayed a light gray color can not be selected.
* a full screen preview.
3. Press to return to the original screen.
5-28 Embroidery
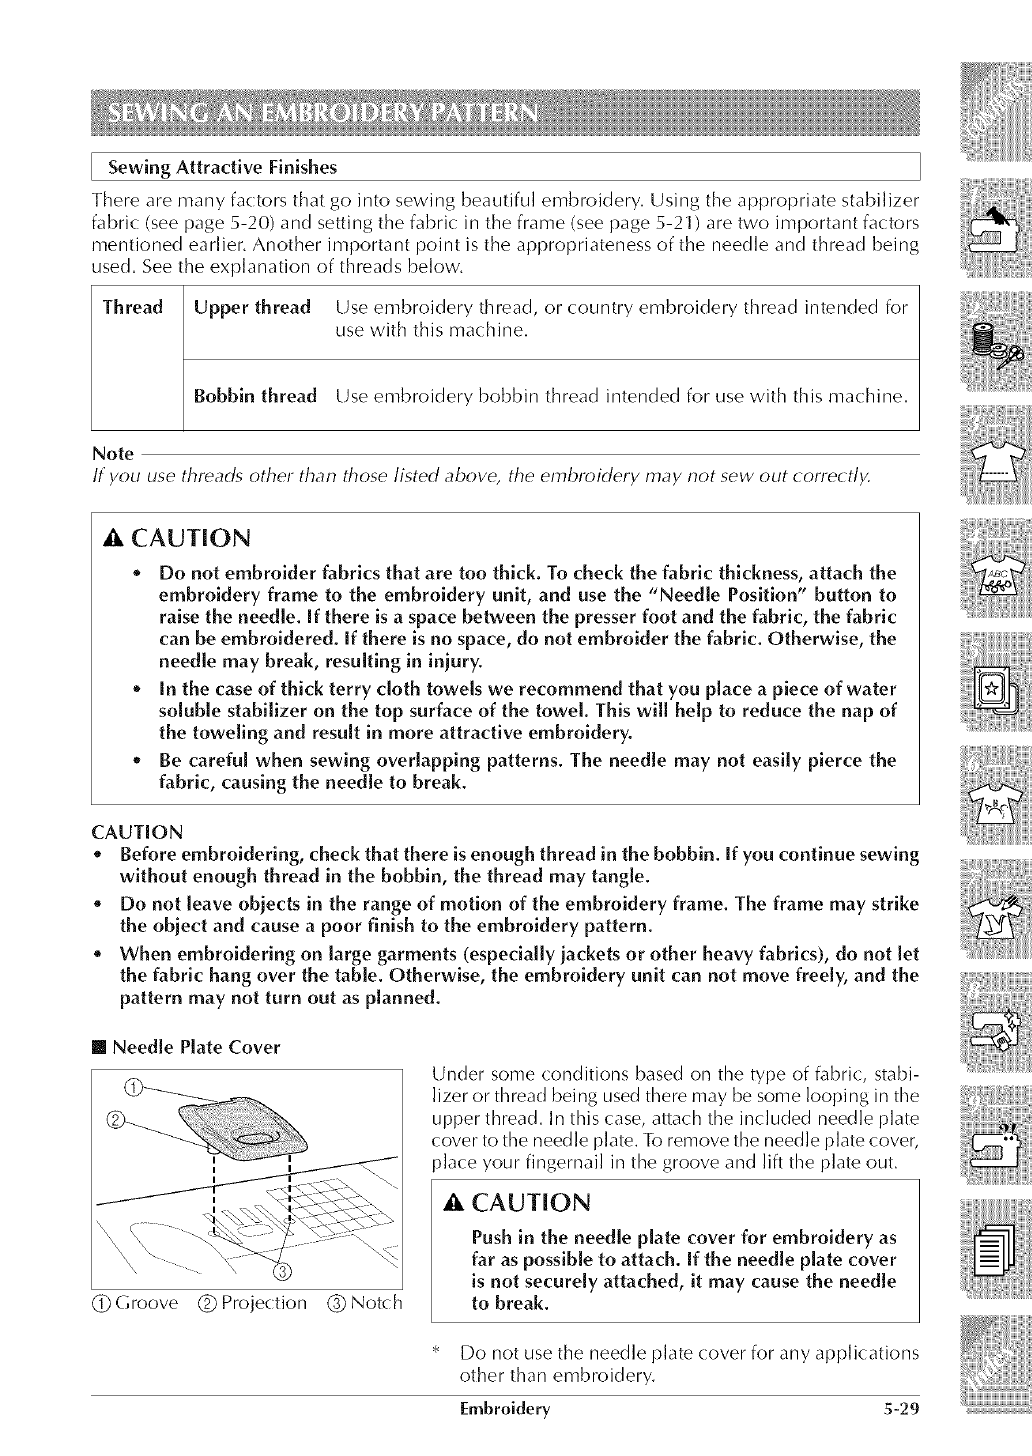
I Attractive FinishesSewing
There are many factors that go into sewing beautiful embroidery. Using the appropriate stabilizer
fabric (see page 5-20) and setting the fabric in the frame (see page 5-21 ) are two important factors
mentioned earlier. Another important point is the appropriateness of the needle and thread being
used. See the explanation of threads below.
Thread Upper thread Use embroidery thread, or country embroidery thread intended for
use with this machine.
Bobbin thread Use embroidery bobbin thread intended for use with this machine.
Note
If you use threads other than those listed above, the embroidery may not sew out correctly.
CAUTION
* Do not embroider fabrics that are too thick. To check the fabric thickness, attach the
embroidery frame to the embroidery unit, and use the "Needle Position" button to
raise the needle. If there is a space between the presser foot and the fabric, the fabric
can be embroidered. If there is no space, do not embroider the fabric. Otherwise, the
needle may break, resulting in iniury.
*in the case of thick terry cloth towels we recommend that you place a piece of water
soluble stabilizer on the top surface of the towel. This will help to reduce the nap of
the toweling and result in more attractive embroidery.
*Be careful when sewing overlapping patterns. The needle may not easily pierce the
fabric, causing the needle to break.
CAUTION
o Before embroidering, check that there is enough thread in the bobbin, if you continue sewing
without enough thread in the bobbin, the thread may tangle.
* Do not leave obiects in the range of motion of the embroidery frame. The frame may strike
the obiect and cause a poor finish to the embroidery pattern.
*When embroidering on large garments (especially iackets or other heavy fabrics), do not let
the fabric hang over the table. Otherwise, the embroidery unit can not move freely, and the
pattern may not turn out as planned.
[] Needle Plate Cover
-....
(_Groove (2OProjection (_Notch
Under some conditions based on the type of fabric, stabi-
lizer or thread being used there may be some looping in the
upper thread. In this case, attach the included needle plate
cover to the needle plate. To remove the needle plate cover,
place your fingernail in the groove and lift the plate out.
_, CAUTION
Push in the needle plate cover for embroidery as
far as possible to attach, if the needle plate cover
is not securely attached, it may cause the needle
to break.
* Do not use the needle plate (:over for any applications
other than embroidery.
Embroidery 5-29

[Basic Embroidery Method
_iiiiiiiiiiiiiiiiiiiiiiiiiiiiiiiiiiiiiiiiiiiiiiiiiiiiiiiiiiiiiiiiiiiiiiiiiiiiiiiiiiiiiiiiiiiiiiiiiiiiiiiii
i_i!i!i!!iii_i!ii!!i!ii!!i!iii_i!Jiii!_!i_l!!!ii_i!_i!ii!!!_!!!!!!_i!!_!_!!!iiii!_ii!_!_!iii!iiii
E×amp[e: Embroidering
(_ Embroidery color order display,
This display shows the sewing order of the thread
colors.
The colors will be sewn in the following order:
yellow -->orange -->linen -->etc.
1, Thread the machine with the first color, and pass the
end of the thread through the hole in embroidery foot
2, Grasp the end of the thread that is passed under the
embroidery foot gently in your ]eft hand, Be sure you
]eave enough s]ack in the thread,
_, CAUTION
Pulling the thread too strongly may bend or break
the needle, and lead to injury.
5-30 Embroidery
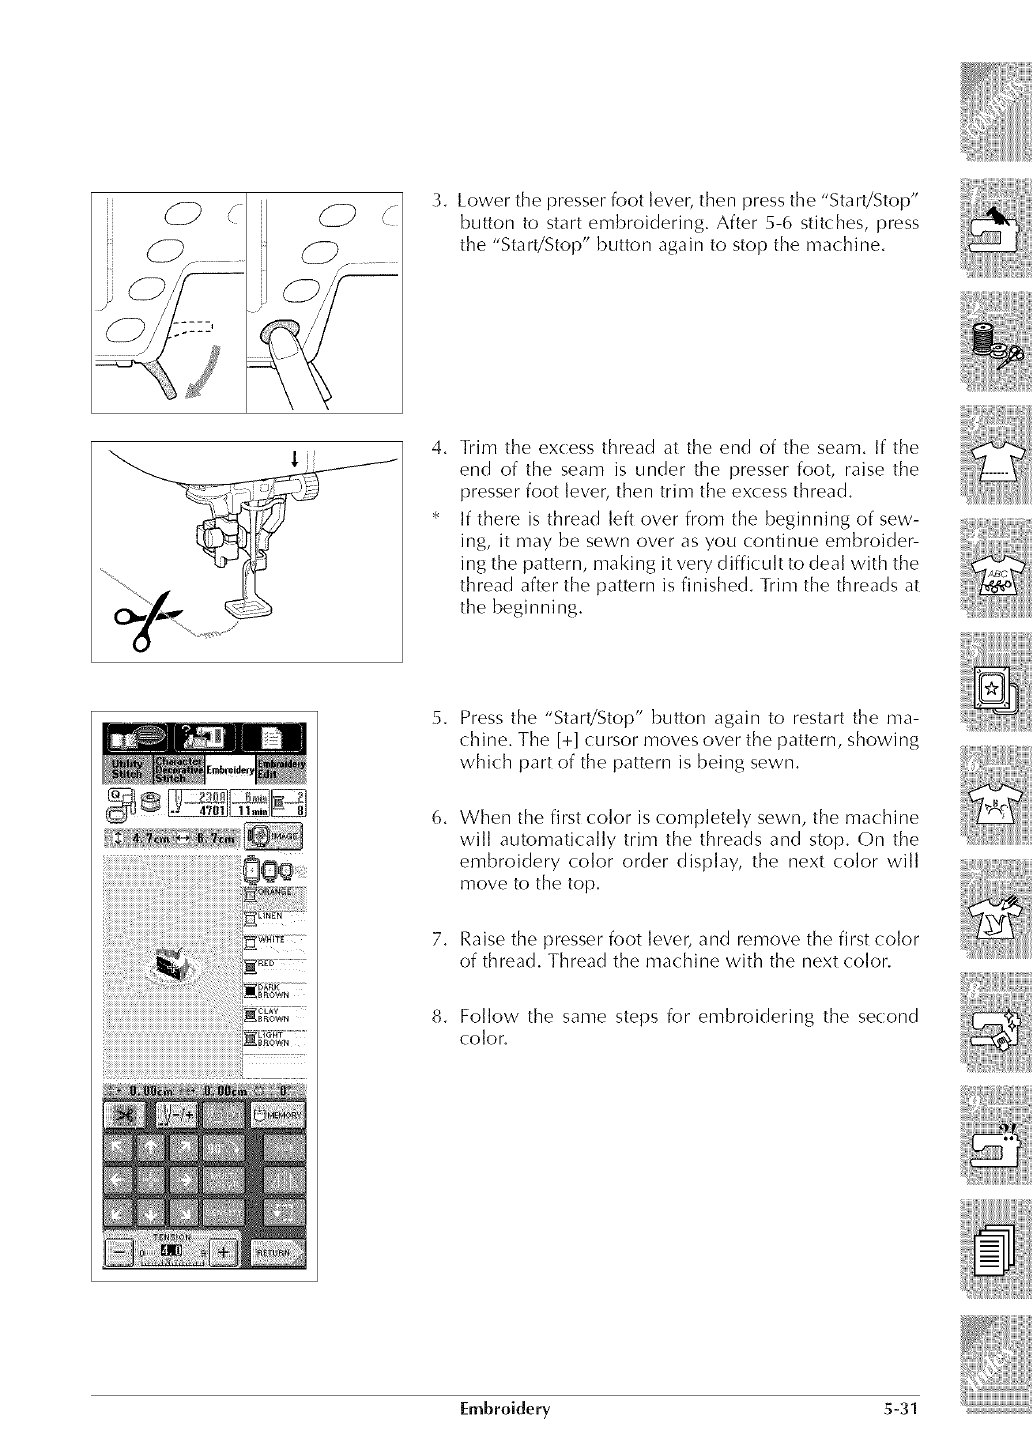
3, Lower the presser foot lever, then press the "Start/Stop"
button to start embroidering. After 5-6 stitches, press
the "Start/Stop" button again to stop the machine.
4, Trim the excess thread at the end of the seam, If the
end of the seam is under the presser foot, raise the
presser foot lever, then trim the excess thread,
* If there is thread left over from the beginning of sew-
ing, it may be sewn over as you continue embroider-
ing the pattern, making it very difficult to deal with the
thread after the pattern is finished. Trim the threads at
the beginning.
5, Press the "Start/Stop" button again to restart the ma-
chine, The [+] cursor moves over the pattern, showing
which part of the pattern is being sewn,
6, When the first color is completely sewn, the machine
will automatically trim the threads and stop, On the
embroidery color order display, the next color will
move to the top,
7. Raise the presser foot lever, and remove the first color
of thread, Thread the machine with the next color.
8, Follow the same steps for embroidering the second
color,
Embroidery 5-31
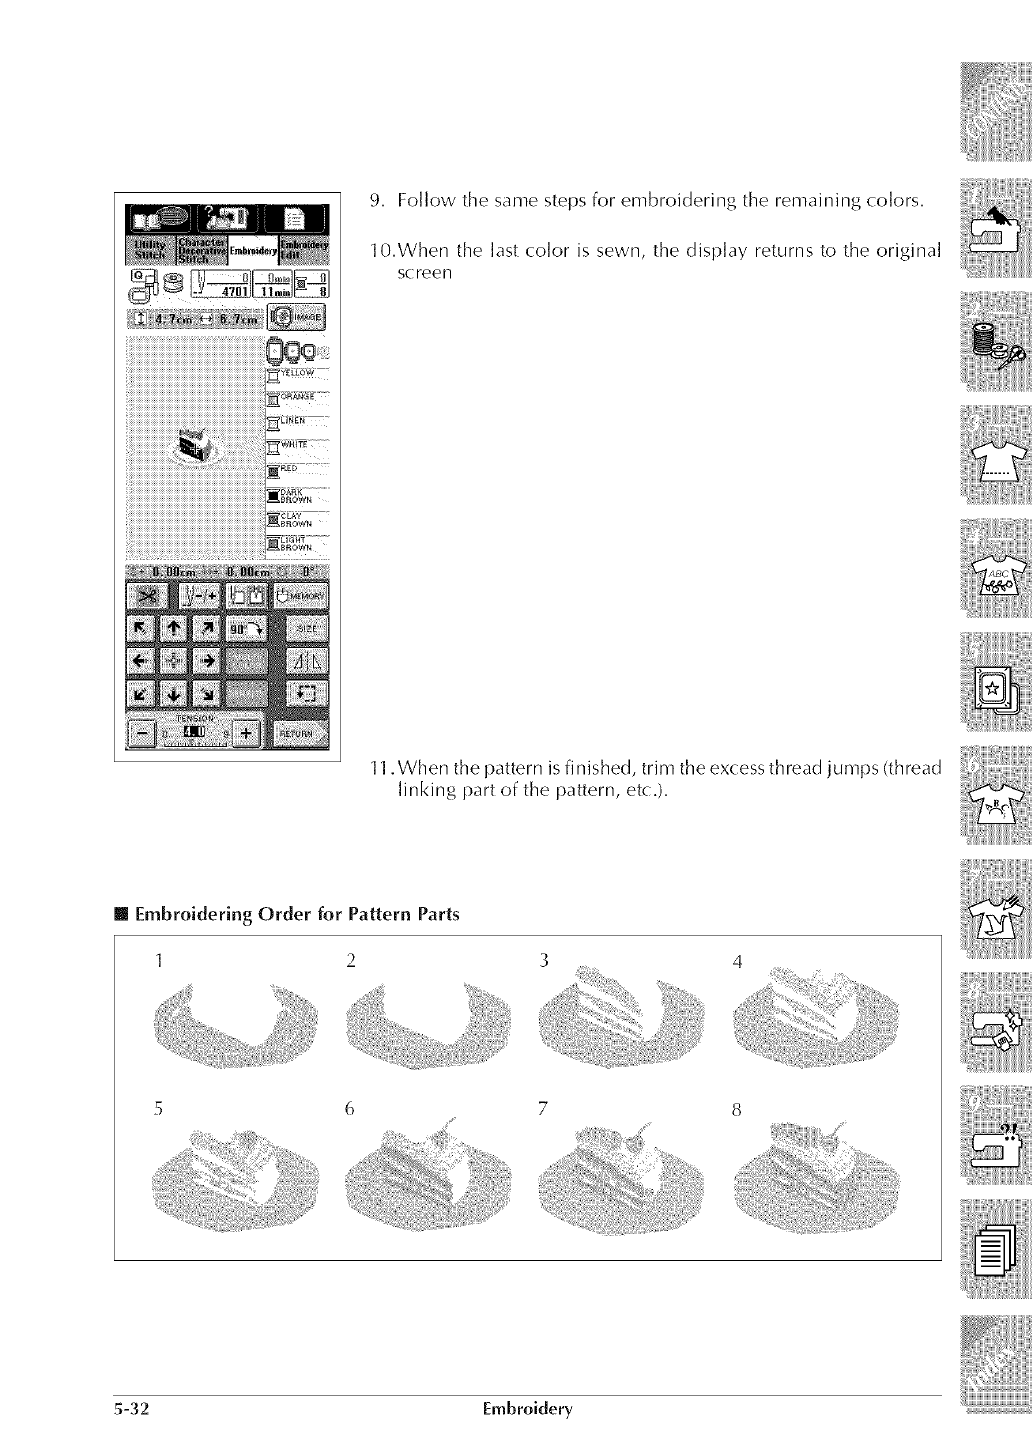
9. Follow the same steps for embroidering the remaining colors.
lO.When the last color is sewn, the display returns to the original
screen
11.When the pattern is finished, trim the excess thread jumps (thread
linking part of the pattern, etc.).
[] Embroidering Order for Pattern Parts
1 2
5 6
_,:ii!;i_!!_ii_!{!_iii!iii_ii{_i{{!!!ill_i,_!i,'_i_H._
}
_ili_{i!b_i¸
5-32 Embroidery
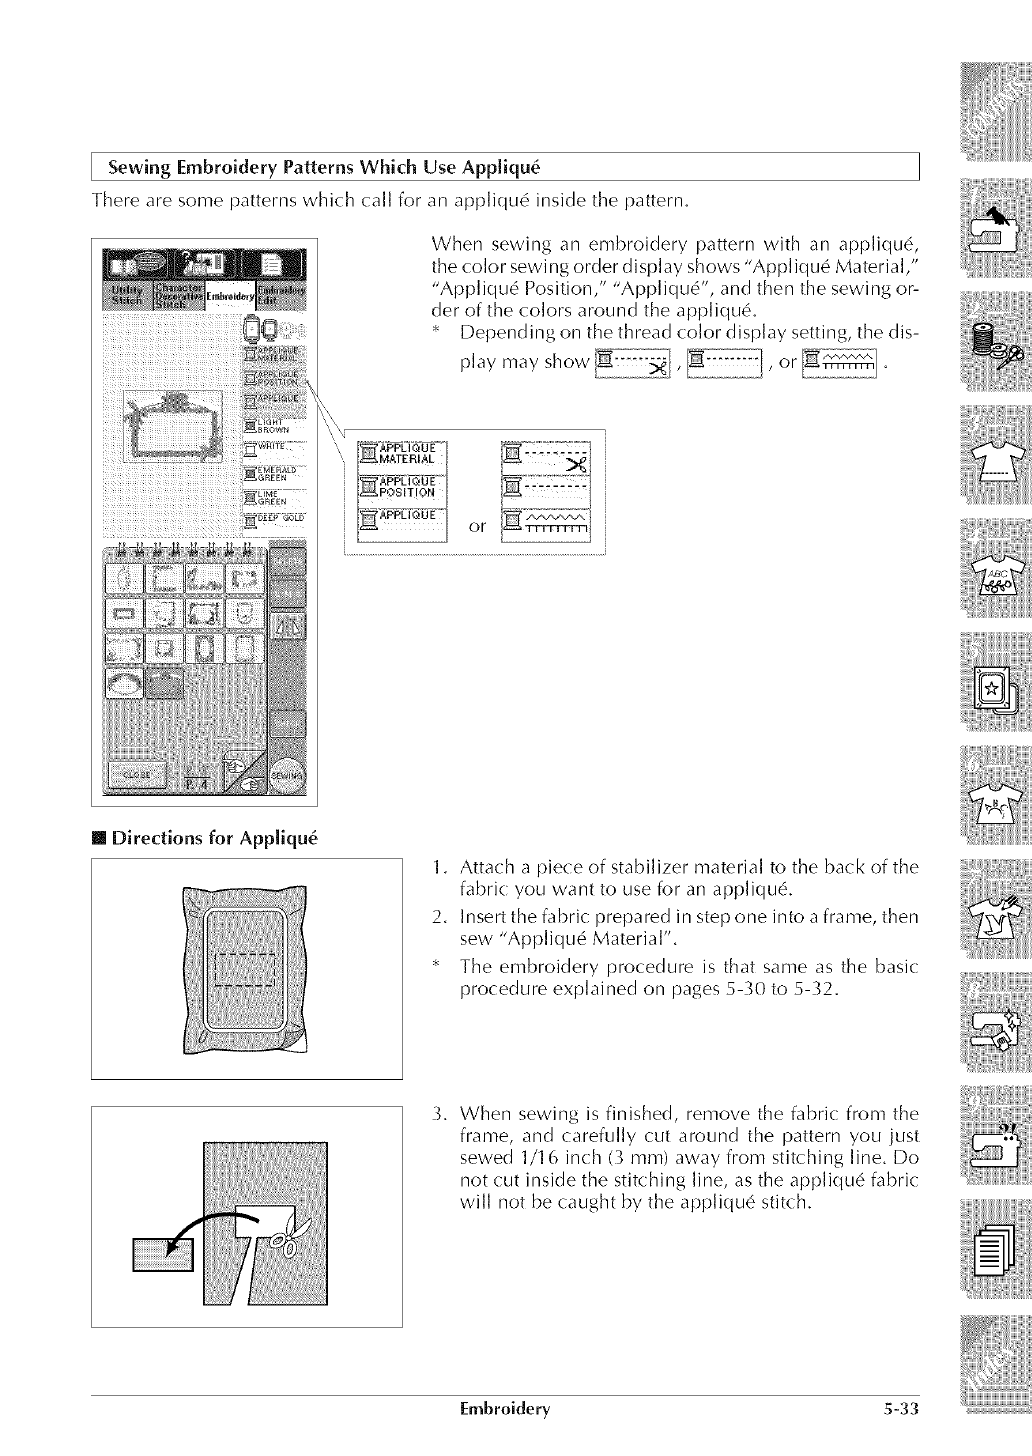
[ Sewing Embroidery Patterns Which Use App[iqu_
There are some patterns which (:all for an appliqu_ inside the pattern.
When sewing an embroidery pattern with an applique,
the color sewing order display shows "Appliqu_ Material,"
"Appliqu6 Position," "Appliqu6", and then the sewing or-
der of the colors around the applique.
* Depending on the thread color display setting, the dis-
play may show , , or .
[] Directions for Appiiqu_
1. Attach a piece of stabilizer materia] to the back of the
fabric: you want to use for an applique.
2. Insert the fabric prepared in step one into a frame, then
sew "Appliqu_ Material".
* The embroidery procedure is that same as the basic:
procedure explained on pages 5-30 to 5-32.
3. When sewing is finished, remove the fabric: from the
frame, and carefully cut around the pattern you just
sewed 1/1 6 inch (3 mm) away from stitching line. Do
not cut inside the stitching line, as the appliqu6 fabric
will not be caught by the appliqu6 stitch.
Embroidery 5-33
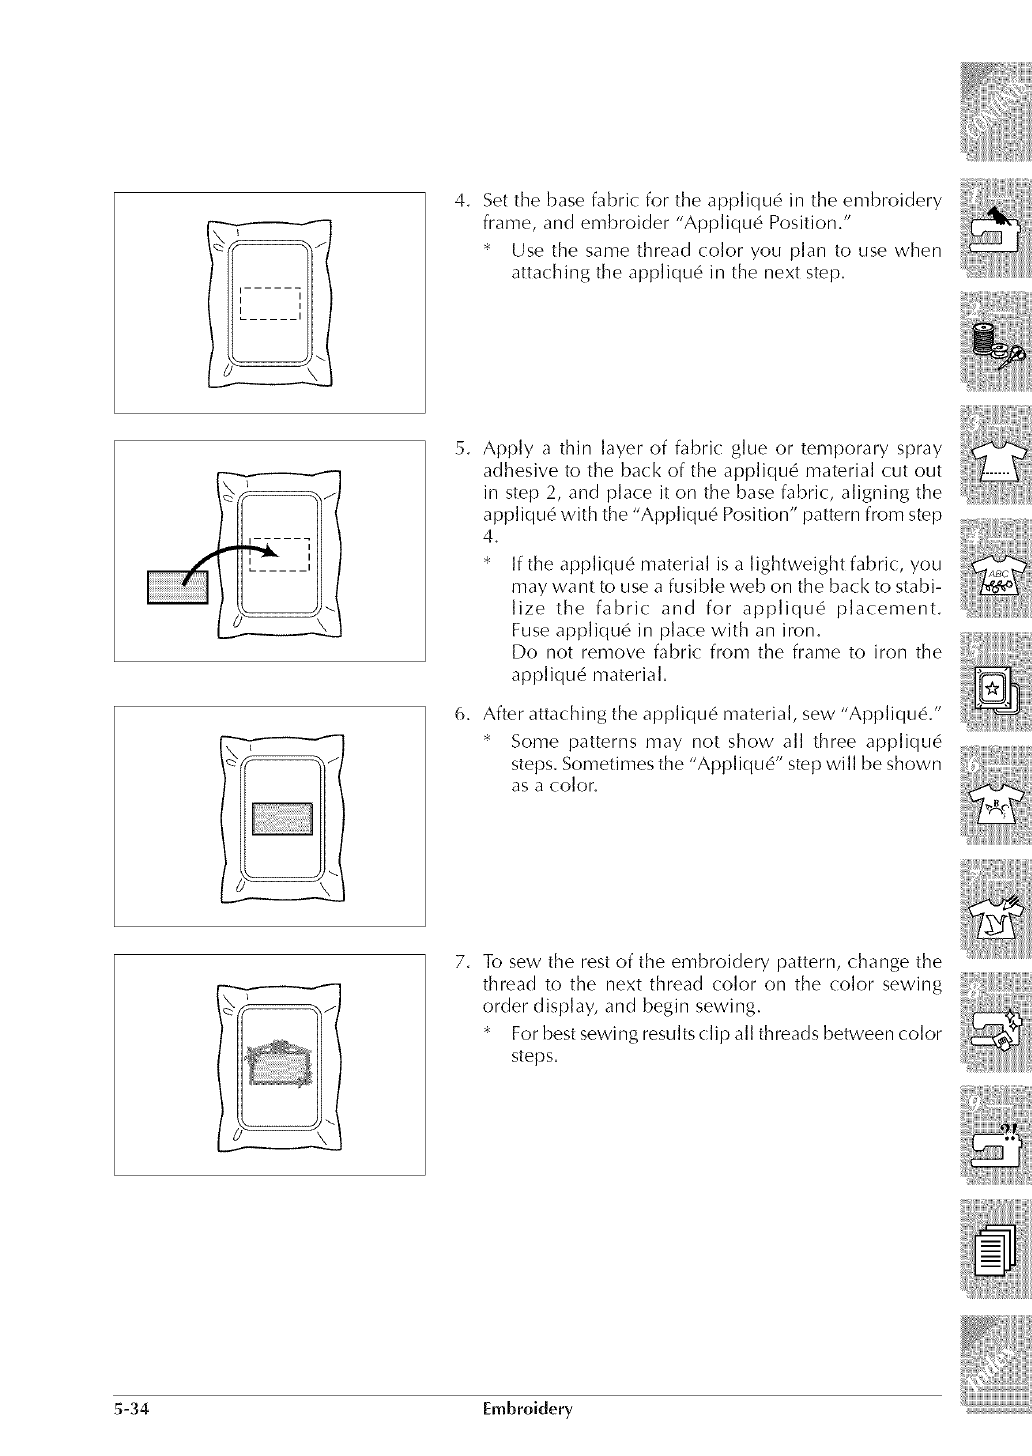
i
4. Set the base fabric for the appliqu_ in the embroidery
frame, and embroider "Appliqu_ Position,"
* Use the same thread color you plan to use when
attaching the appliqu6 in the next step,
\
5. Apply a thin layer of fabric glue or temporary spray
adhesive to the back of the app]iqu6 material cut out
in step 2, and place it on the base fabric, aligning the
appliqu_ with the "Appliqu_ Position" pattern from step
4,
* If the appliqu_ material is a lightweight fabric, you
may want to use a fusible web on the back to stabi-
lize the fabric and for appliqu6 placement,
Fuse appliqu_ in place with an iron,
Do not remove fabric from the frame to iron the
appliqu_ material,
6, After attaching the appliqu6 material, sew "Applique."
* Some patterns may not show all three appliqu_
steps. Sometimes the "Appliqu6" step will be shown
as a co[or,
7, To sew the rest of the embroidery pattern, change the
thread to the next thread color on the color sewing
order display, and begin sewing.
* For best sewing results (:lip all threads between color
steps,
5-34 Embroidery
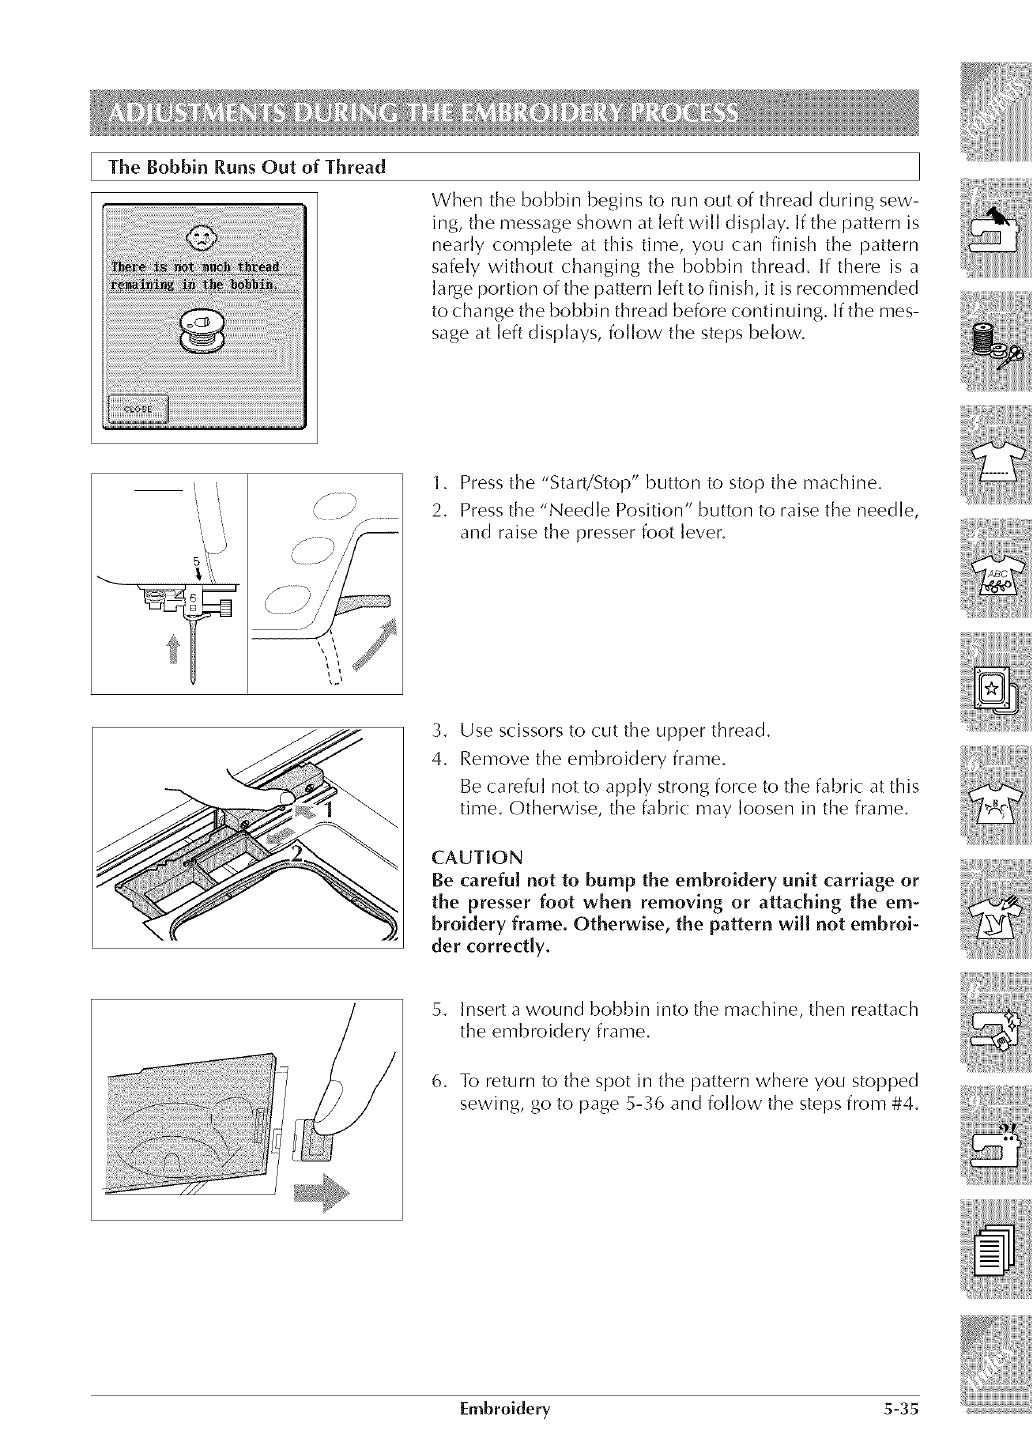
The Bobbin Runs Out of Thread
When the bobbin begins to run out of thread during sew-
ing, the message shown at left will display. If the pattern is
nearly complete at this time, you can finish the pattern
safely without changing the bobbin thread. If there is a
large portion of the pattern left to finish, it is recommended
to change the bobbin thread before continuing. If the mes-
sage at left displays, follow the steps below.
1. Press the "Start/Stop" button to stop the machine.
2. Press the "Needle Position" button to raise the needle,
and raise the presser foot lever.
3.
4.
Use scissors to cut the upper thread.
Remove the embroidery frame.
Be careful not to apply strong force to the fabric at this
time. Otherwise, the fabric: may loosen in the frame.
CAUTION
Be careful not to bump the embroidery unit carriage or
the presser foot when removing or attaching the em-
broidery frame. Otherwise, the pattern will not embroi-
der correctly.
5. Insert a wound bobbin into the machine, then reattach
the embroidery frame.
6. To return to the spot in the pattern where you stopped
sewing, go to page 5-_6 and follow the steps from #4.
[mbroidery 5-35
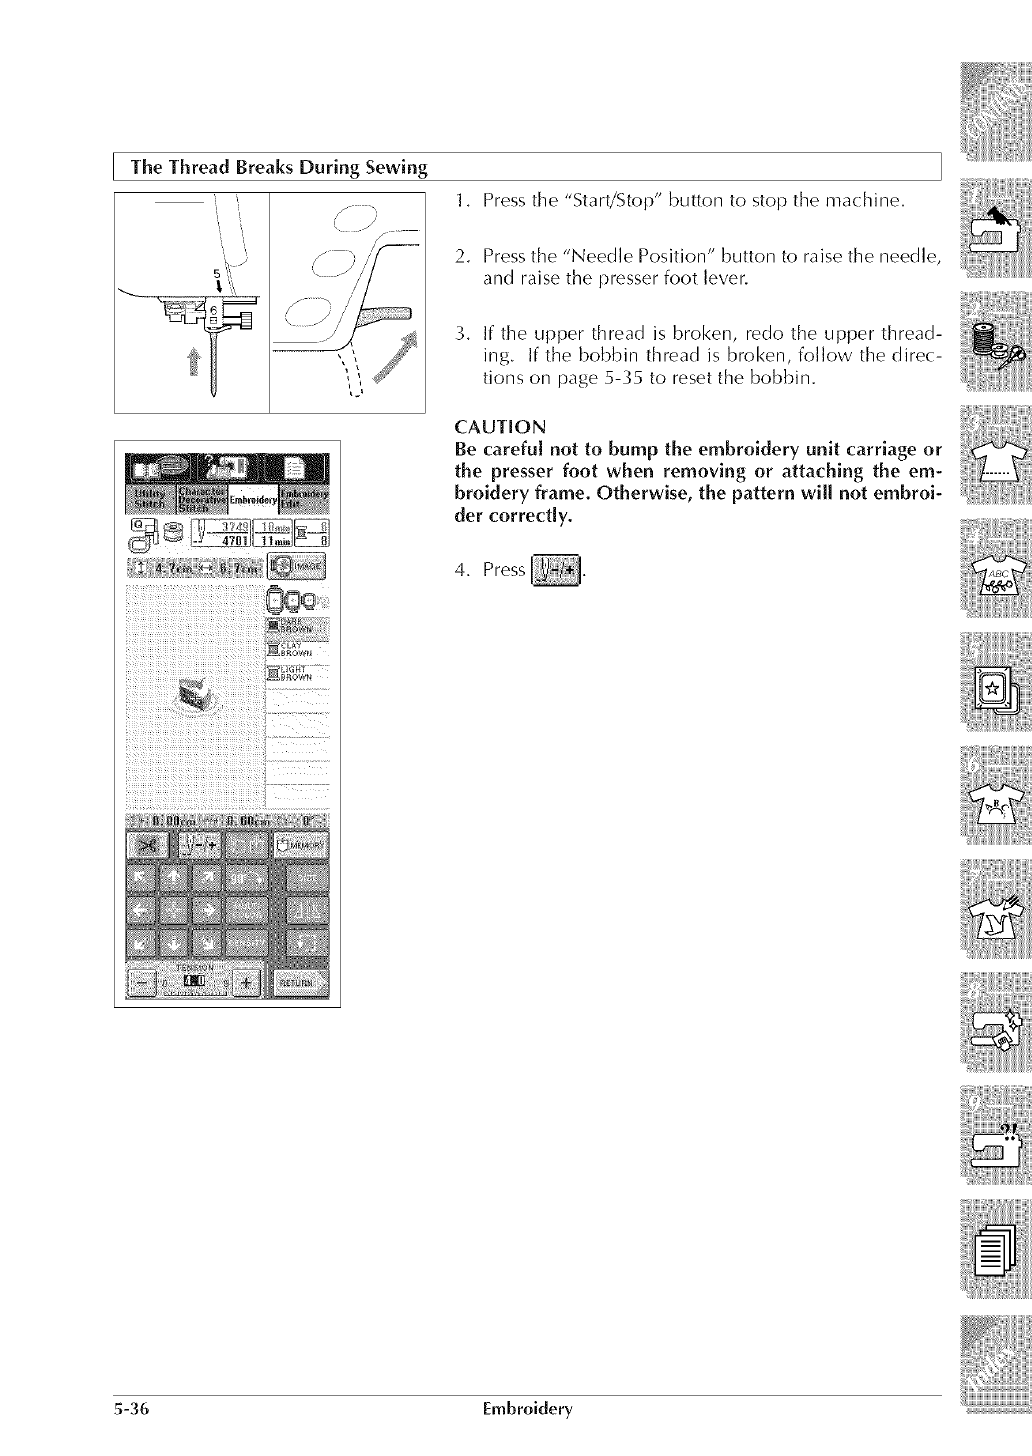
The Thread Breaks During Sewing
],
2.
3,
Press the "Start/Stop" button to stop the machine.
Press the "Needle Position" button to raise the needle
and raise the presser foot lever.
If the upper thread is broken, redo the upper thread-
ing. If the bobbin thread is broken, follow the direc-
tions on page 5-_5 to reset the bobbin.
CAUTION
Be careful not to bump the embroidery unit carriage or
the presser foot when removing or attaching the em-
broidery frame. Otherwise, the pattern will not embroi-
der correctly.
4. Press
iii! ¸ /n l iiiiiiii i ¸!i ¸f:_ _
5-36 Embroidery
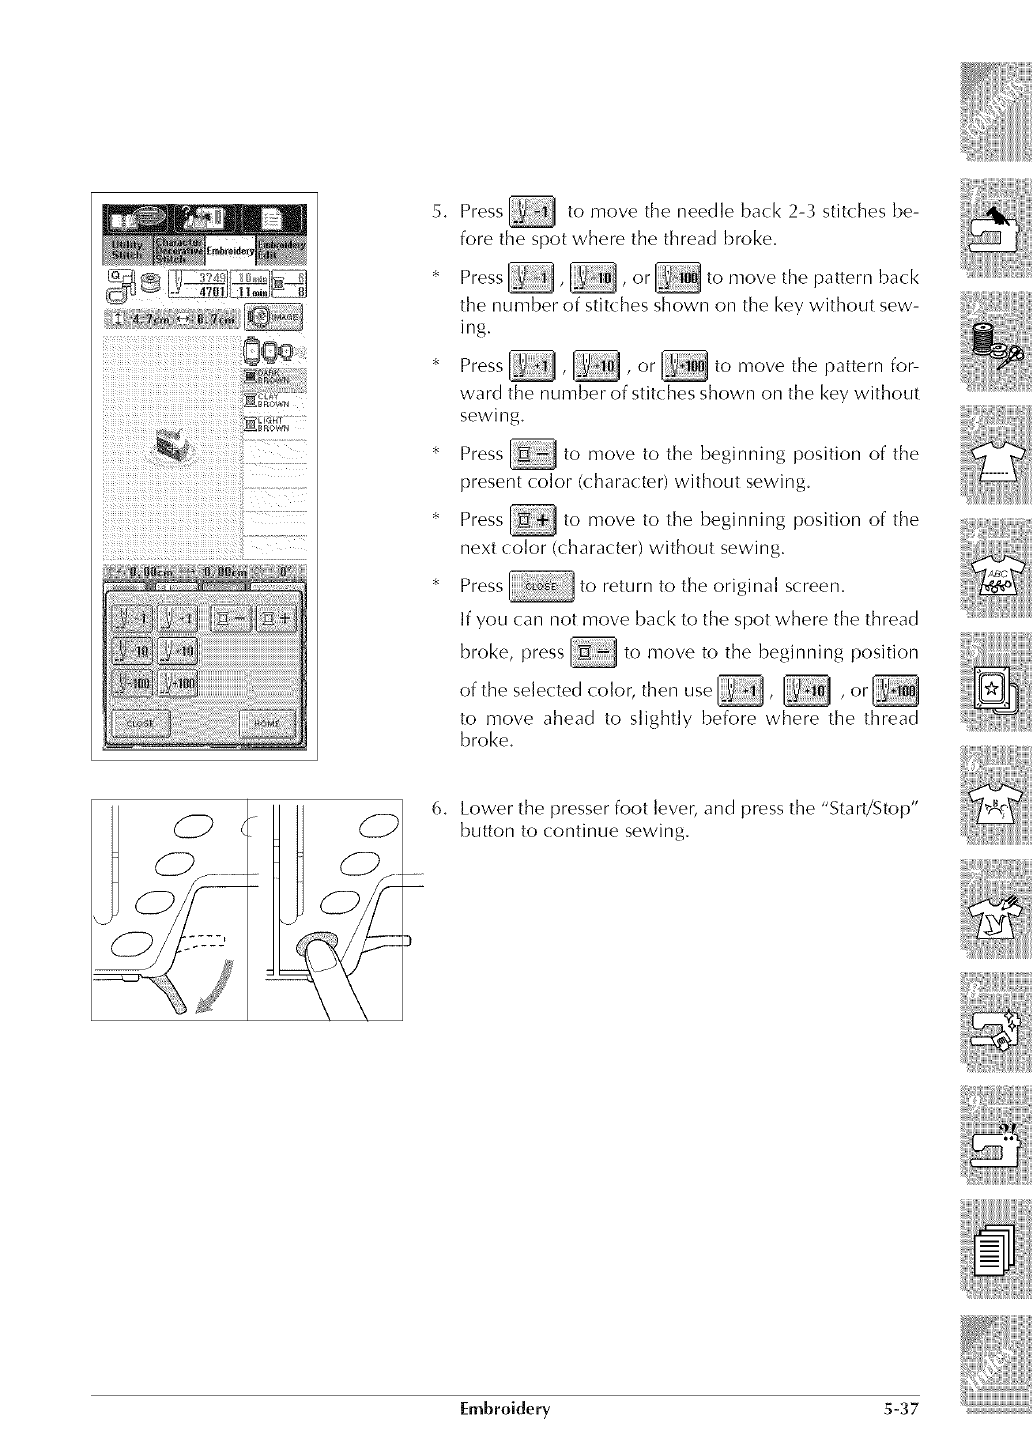
5, Press _ to move the needle back 2-3 stitches be-
fore the spot where the thread broke,
* Press _ , _ , or _ to move the pattern back
the number of stitches shown on the key without sew-
ing.
* Press_,_,or_tomovethepatternfor-
ward the number of stitches shown on the key without
sewing.
to move to the beginning position
_B Press of tile
present color (character) without sewing.
Press _ to move to the beginning position of the
next color (character) without sewing.
Press to return to the original screen.
If you can not move back to the spot where the thread
broke, press _ to move to the beginning position
of the selected color, then use_, _ ,or_
to move ahead to slightly before where the thread
broke.
6. Lower the presser foot lever, and press the "Start/Stop"
button to continue sewing.
Embroidery S-37
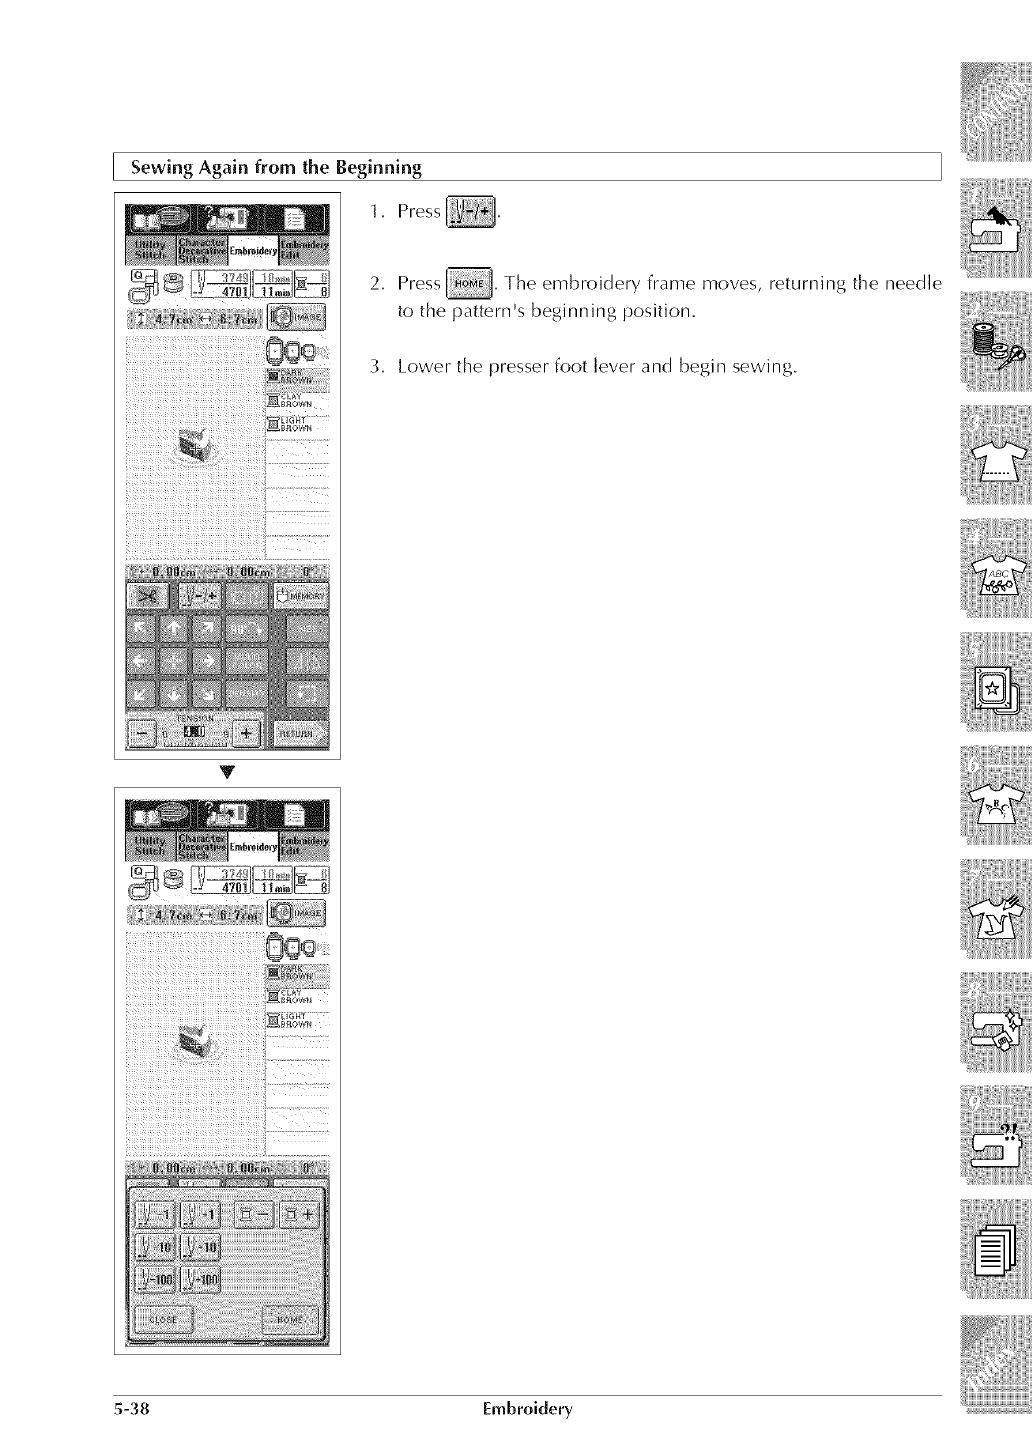
Sewing Again from the Beginning
1, Press
2, Press _, The embroidery frame moves, returning the needle
to the a '
p_ttern s beginning position,
3, Lower the presser foot lever and begin sewing,
T
5-38 Embroidery
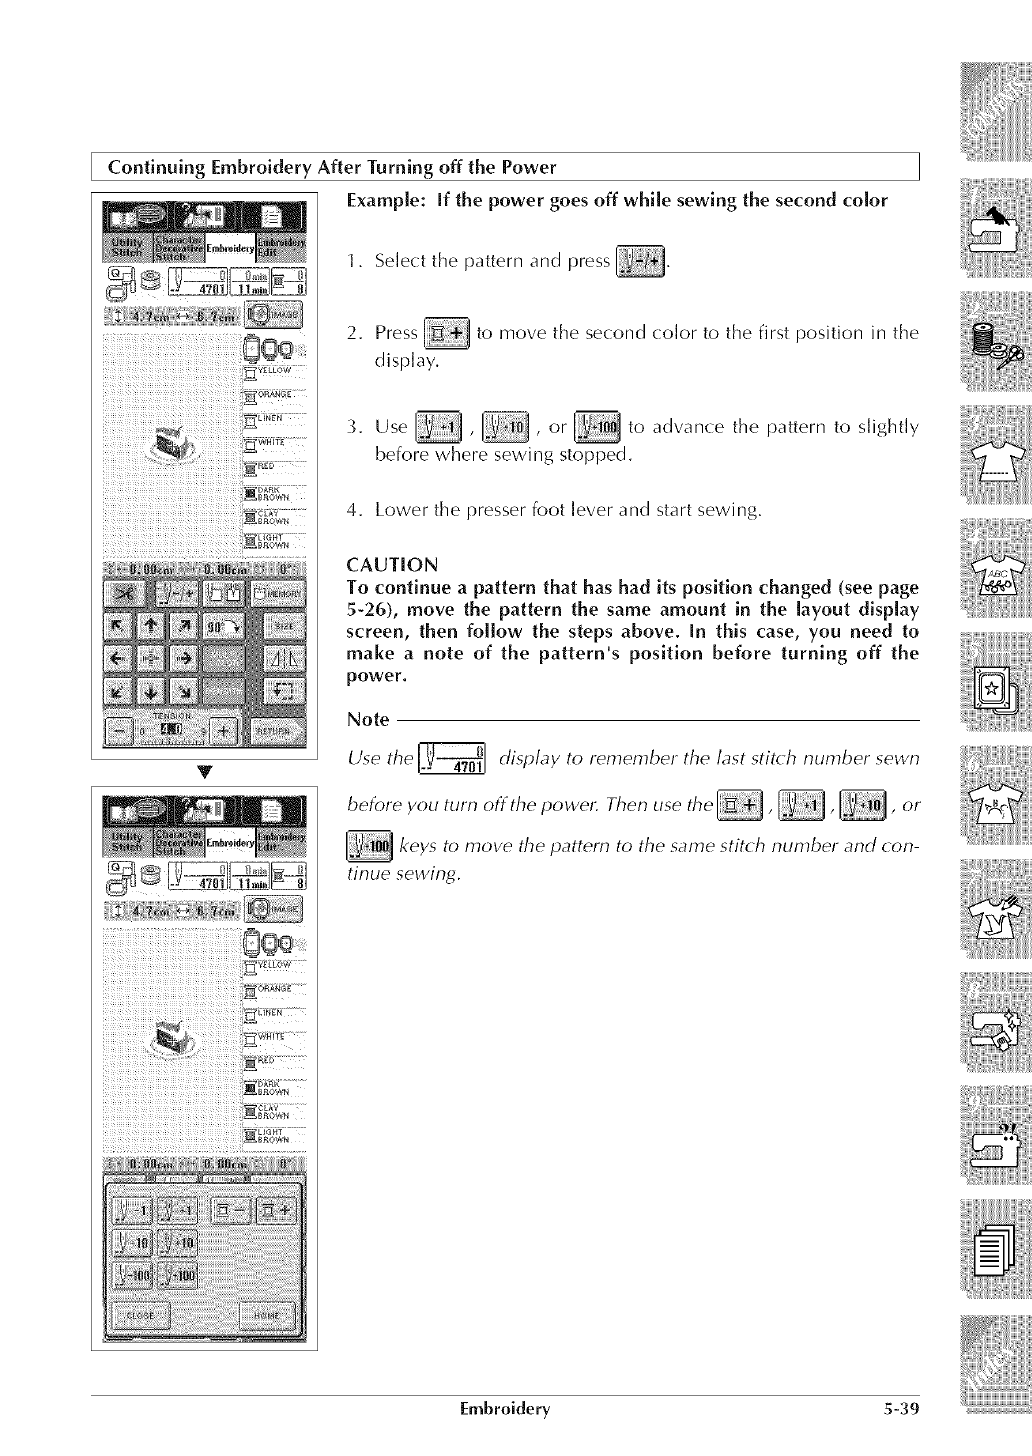
Continuing Embroidery After Turning off the Power
Example: [f the power goes off while sewing the second color
WH E
T
1. Select the pattern and press
2. Press _ to move the second color to the first position in the
display.
3. Use , , or _ to advance the pattern to slightly
before where sewing stopped.
4. Lower the presser foot lever and start sewing.
CAUTION
To continue a pattern that has had its position changed (see page
5-26), move the pattern the same amount in the layout display
screen, then follow the steps above. In this case, you need to
make a note of the pattern's position before turning off the
power.
Note
Use the _display to remember the last stit(h number sewn
before you turn off the powe,: Then use the _,_, _, or
_keys to move the pattern to the same stit(h number and ( on-
tinue sewing.
Embroidery 5-39
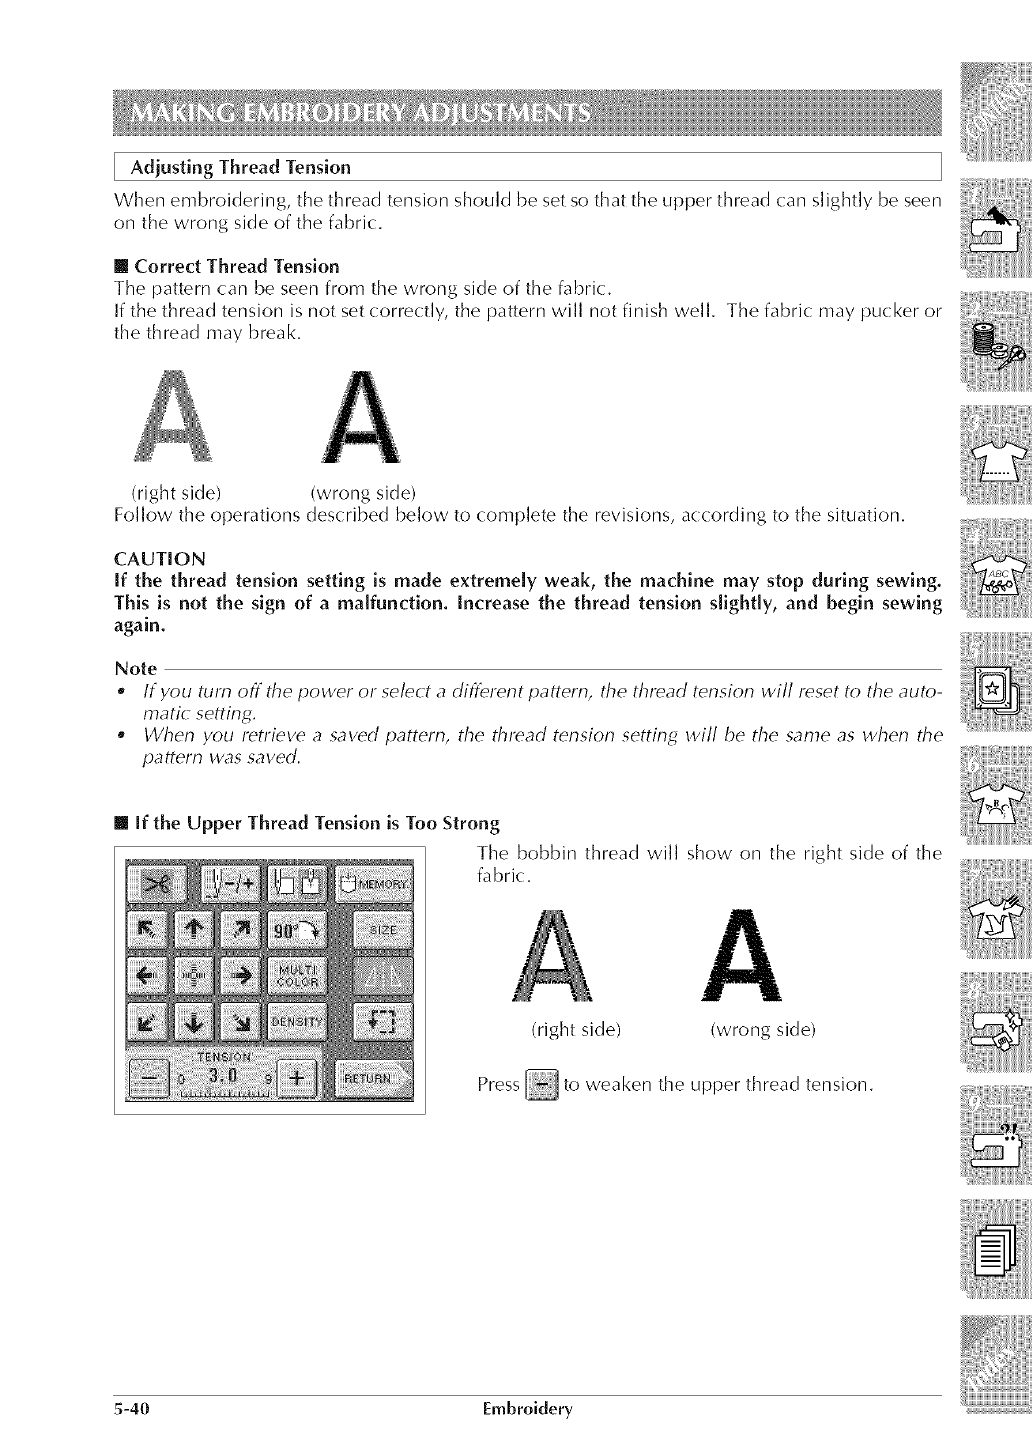
[ Adjusting Thread Tension
When embroidering, the thread tension should be set so that the upper thread can slightly be seen
on the wrong side of the fabric.
[] Correct Thread Tension
The pattern can be seen from the wrong side of the fabric.
If the thread tension is not set correctly, the pattern will not finish well. The fabric may pucker or
the thread may break.
(right side) (wrong side)
Follow the operations described below to complete the revisions, according to the situation,
CAUTION
If the thread tension setting is made extremely weak, the machine may stop during sewing.
This is not the sign of a malfunction. Increase the thread tension slightly, and begin sewing
again.
Note
oIf you turn off the power o1 select a different pattern, the thread tension will reset to the auto-
matic setting.
,When you retrieve a saved pattern, the thread tension setting will be the same as when the
pattern was saved.
[] If the Upper Thread Tension is Too Strong
The bobbin thread will show on the right side of the
fabric. A
(right side) (wrong side)
Press _ to weaken the upper thread tension.
5-40 Embroidery
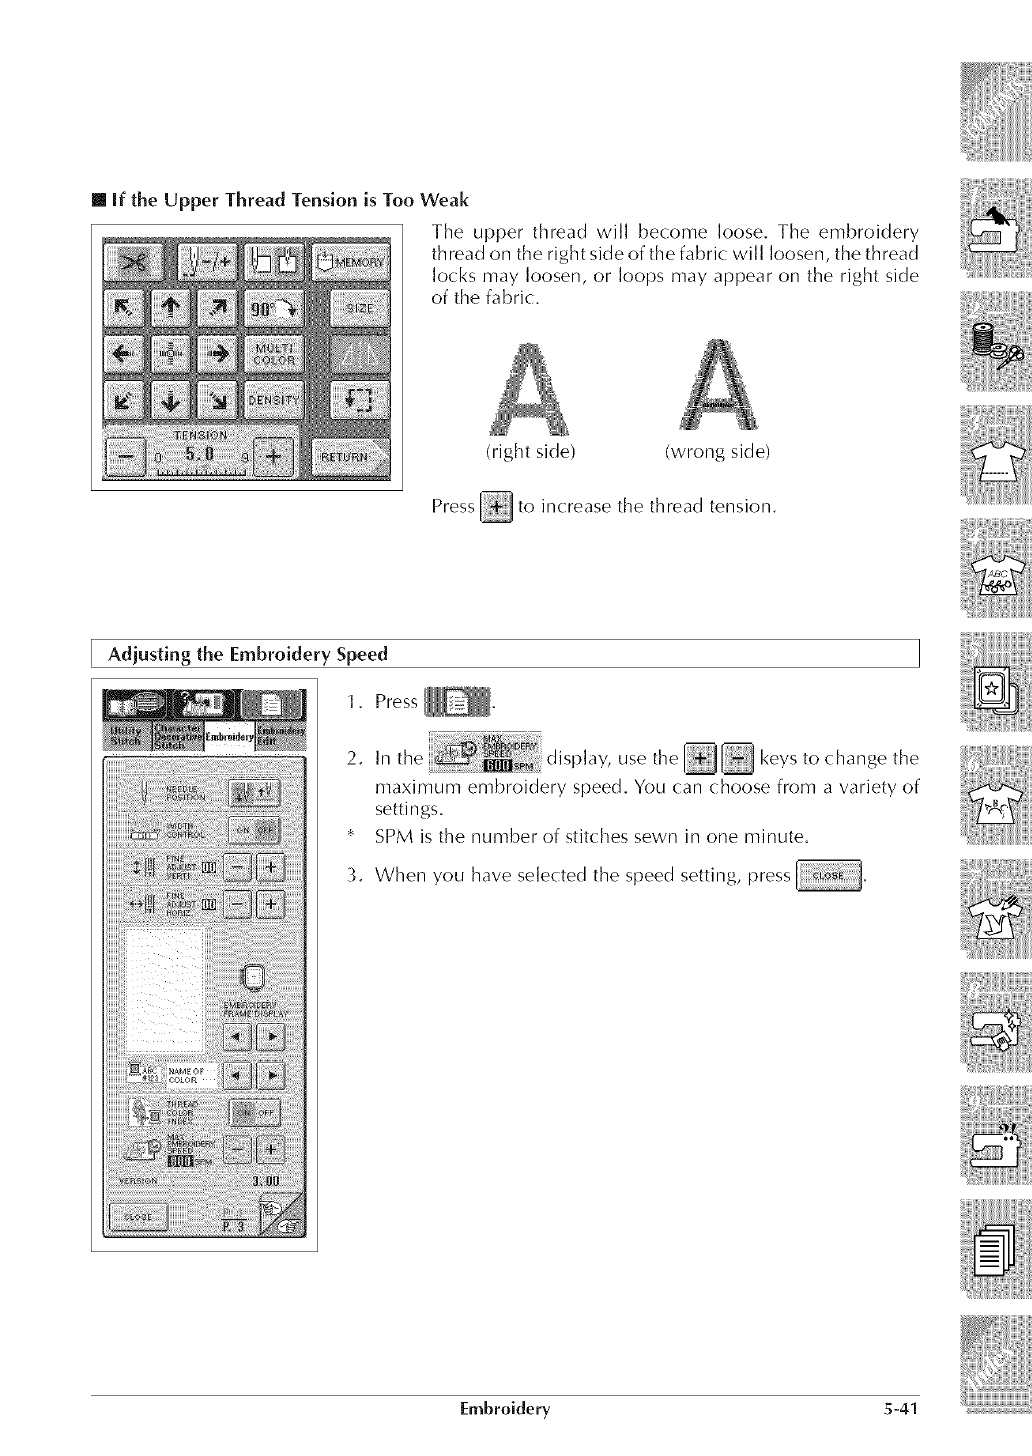
[] If the Upper Thread Tension is Too Weak
The upper thread will become loose. The embroidery
th read on the right side of the fabric will loosen, the thread
locks may loosen, or loops may appear on the right side
of the fabric.
(right side) (wrong side)
Press _ to increase the thread tension.
Adiusting the Embroidery Speed
1. Press _.
2. In the )lay, use the_ keys to change the
maximum embroidery speed. You can choose from a variety of
settings.
* SPM is the number of stitches sewn in one minute.
_. When you have selected the speed setting, press
Embroidery 5-41
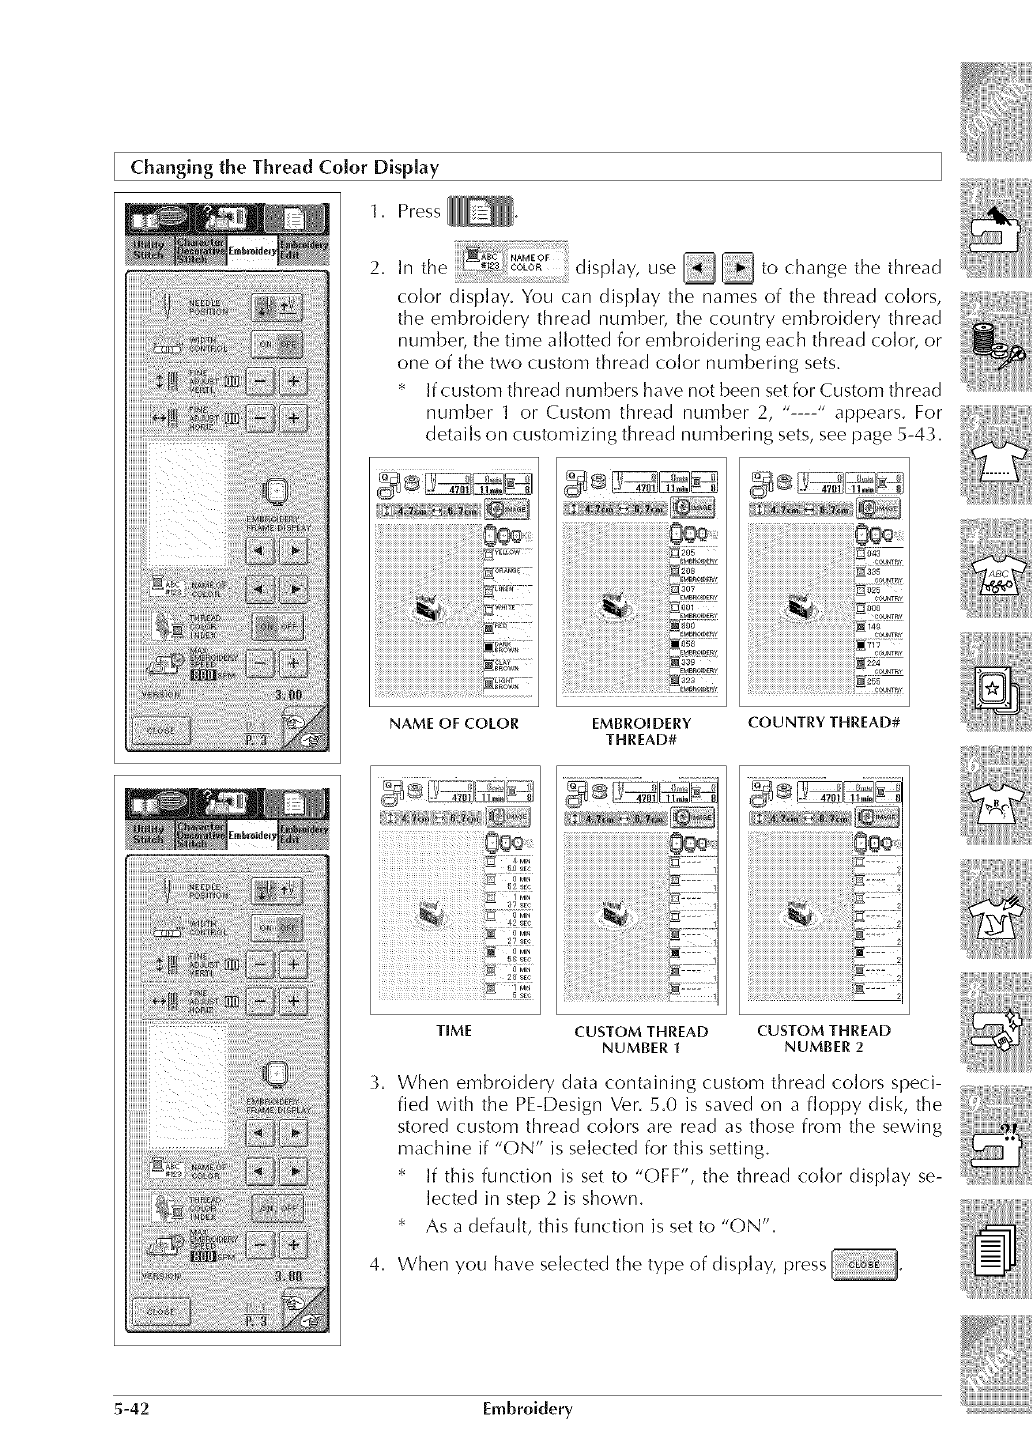
Changing the Thread Color Display
1. Press _.
_iTi_?w_: ¸-!_ ¸W_tr %_?
2. In the _. ,_0oLo_ G s a ,..... p y use to change the thread
color display. You can display the names of the thread colors,
the embroidery thread number, the country embroidery thread
number, the time allotted for embroidering each thread color, or
one of the two custom thread color numbering sets.
If custom thread numbers have not been set for Custom thread
number 1 or Custom thread number 2, "----" appears. For
details on customizing thread numbering sets, see page 5-43.
NAME OF COLOR EMBROIDERY
THREAD#
COUNTRY THREAD#
O0e
_0 ,_Ee
_Mii;
_2sE¢
Mil4
2_SE_
j 5 SE¢
TIME CUSTOM THREAD CUSTOM THREAD
NUMBER 1 NUMBER 2
3. When embroidery data containing custom thread colors speci-
fied with the PE-Design Ver. 5.0 is saved on a floppy disk, the
stored custom thread colors are read as those from the sewing
machine if "ON" is selected for this setting.
If this function is set to "OFF", the thread color display se-
lected in step 2 is shown.
As a default, this function is set to "ON".
4. When you have selected the type of display, press
5-42 Embroidery
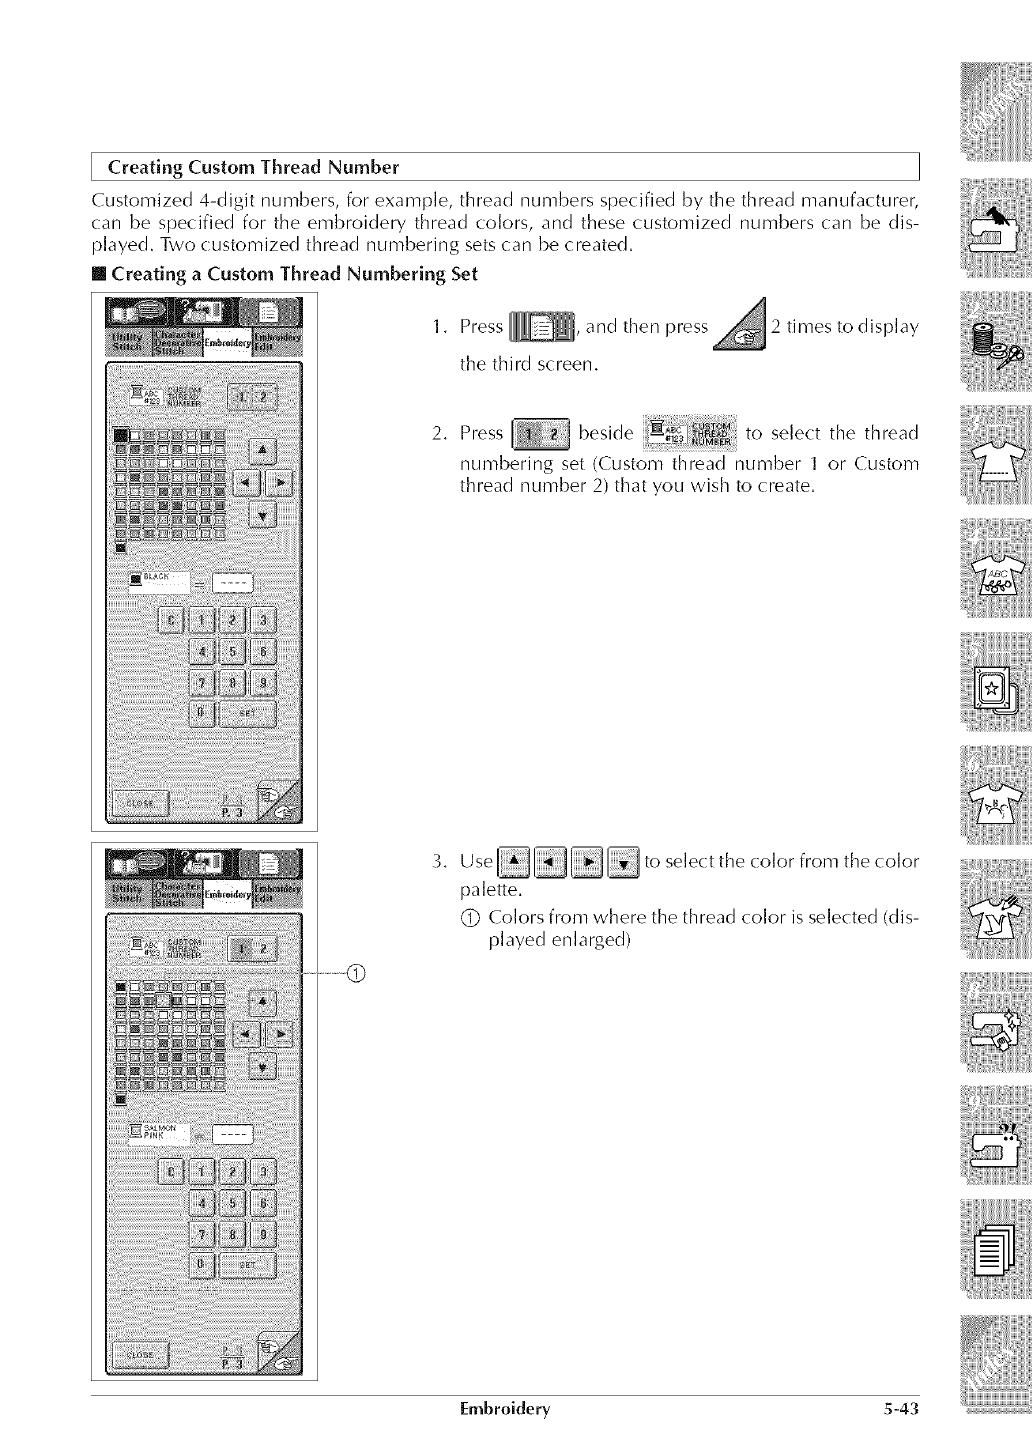
Creating Custom Thread Number
Customized 4-digit numbers, for example, thread numbers specified by the thread manufacturer,
can be specified for the embroidery thread colors, and these customized numbers can be dis-
played. Two customized thread numbering sets can be created.
[] Creating aCustom Thread Numbering Set
1. PressI_' and then press
the third screen.
2 times to display
2, Press beside to select the thread
numbering set (Custom thread number 1 or Custom
thread number 2) that you wish to create.
3, Use __ to select the (olor from the (olor
palette,
Q Colors from where the thread color is selected (dis-
played enlarged)
Embroidery S-43
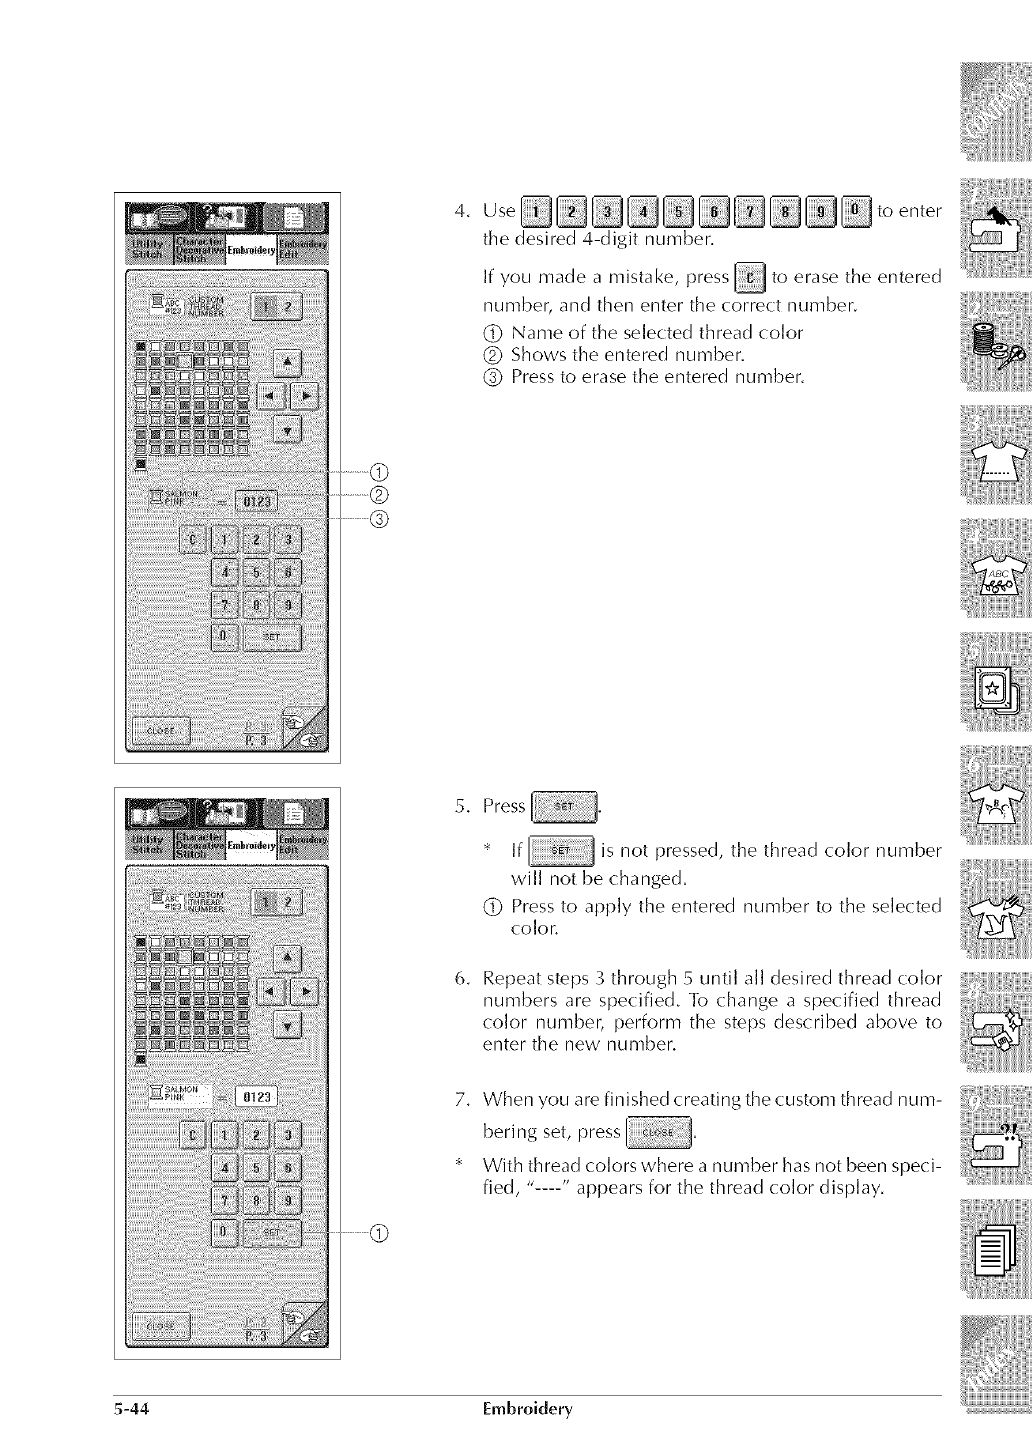
4. /Jse @ toenter
the desired 4-digit number.
If you made a mistake, press _ to erase the entered
number, and then enter the correct number.
(_ Name of the selected thread color
(_) Shows the entered number.
(_ Press to erase the entered number.
2.
6.
Press
If is not pressed, the thread color number
will not be (:hanged.
(_ Press to apply the entered number to the selected
co[or,
Repeat steps 3 through 5 until all desired thread color
numbers are specified. To change a specified thread
color number, perform the steps described above to
enter the new number.
7. When you arefinished creating the custom thread num-
bering set, press
With thread colors where a number has not been speci-
fied, "----" appears for the thread color display.
5-44 Embroidery
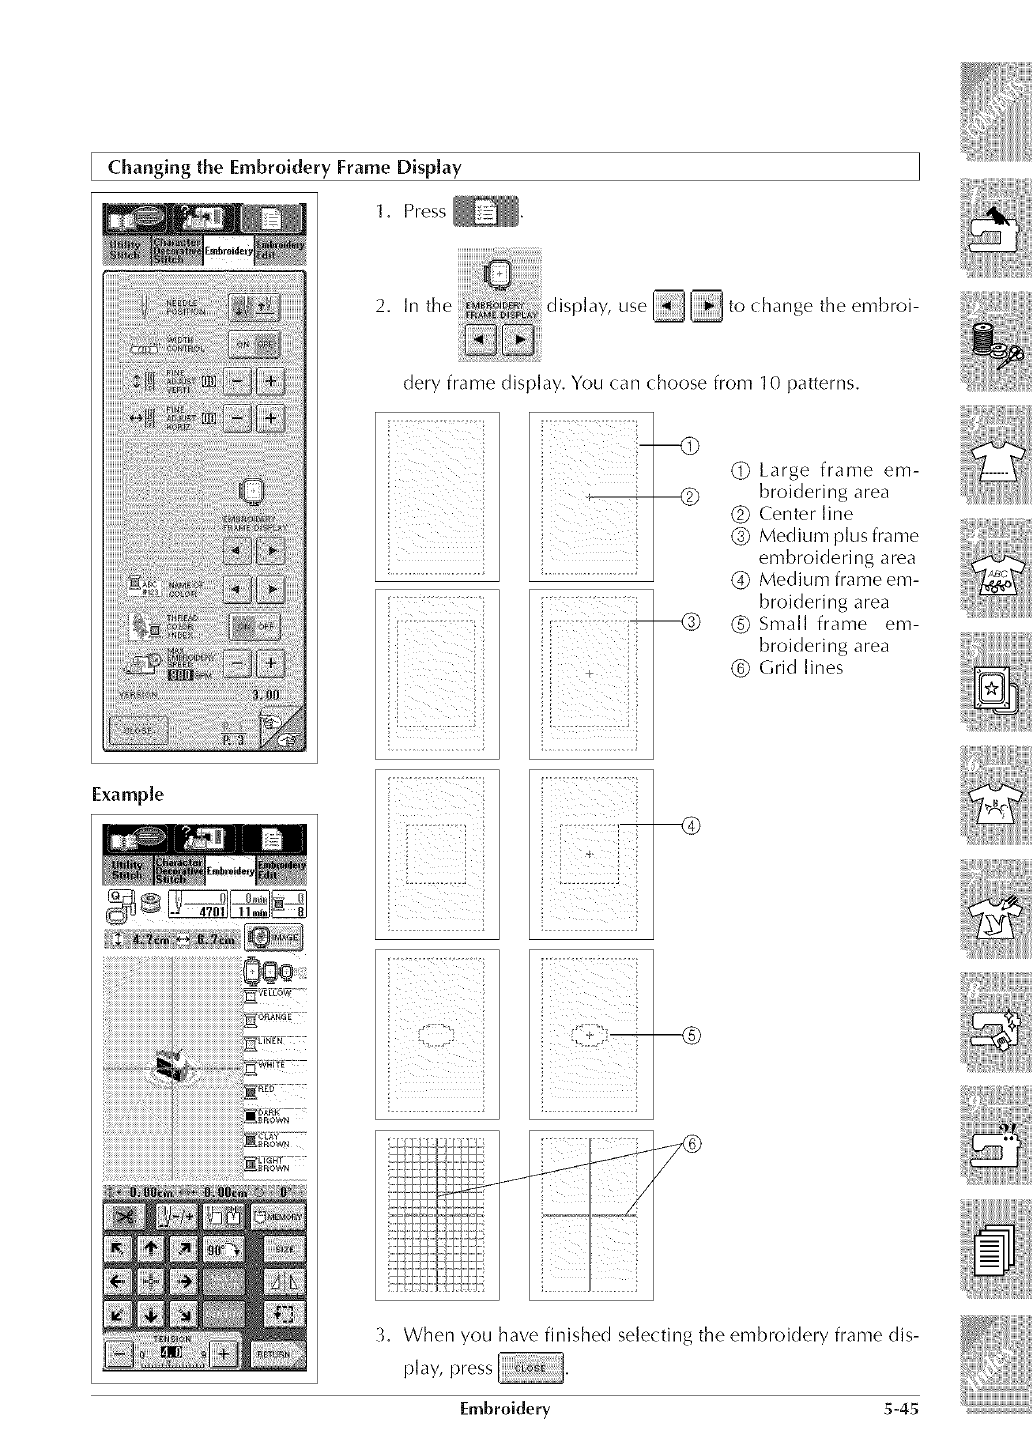
Changing the Embroidery Frame Display
1, Press _.
2. In the use _ _ to change the embroi-
dery frame display, You can choose from 10 patterns,
i ¸ i
ifi iil'
®
:r
(_ Large frame em-
broidering area
(_ Center line
Q Medium plus frame
embroidering area
(_) Medium frame em-
broidering area
C) Small frame em-
broidering area
(_ Grid lines
Example
5
---
3. When you have finished selecting the embroidery frame dis-
play, press
Embroidery 5-45
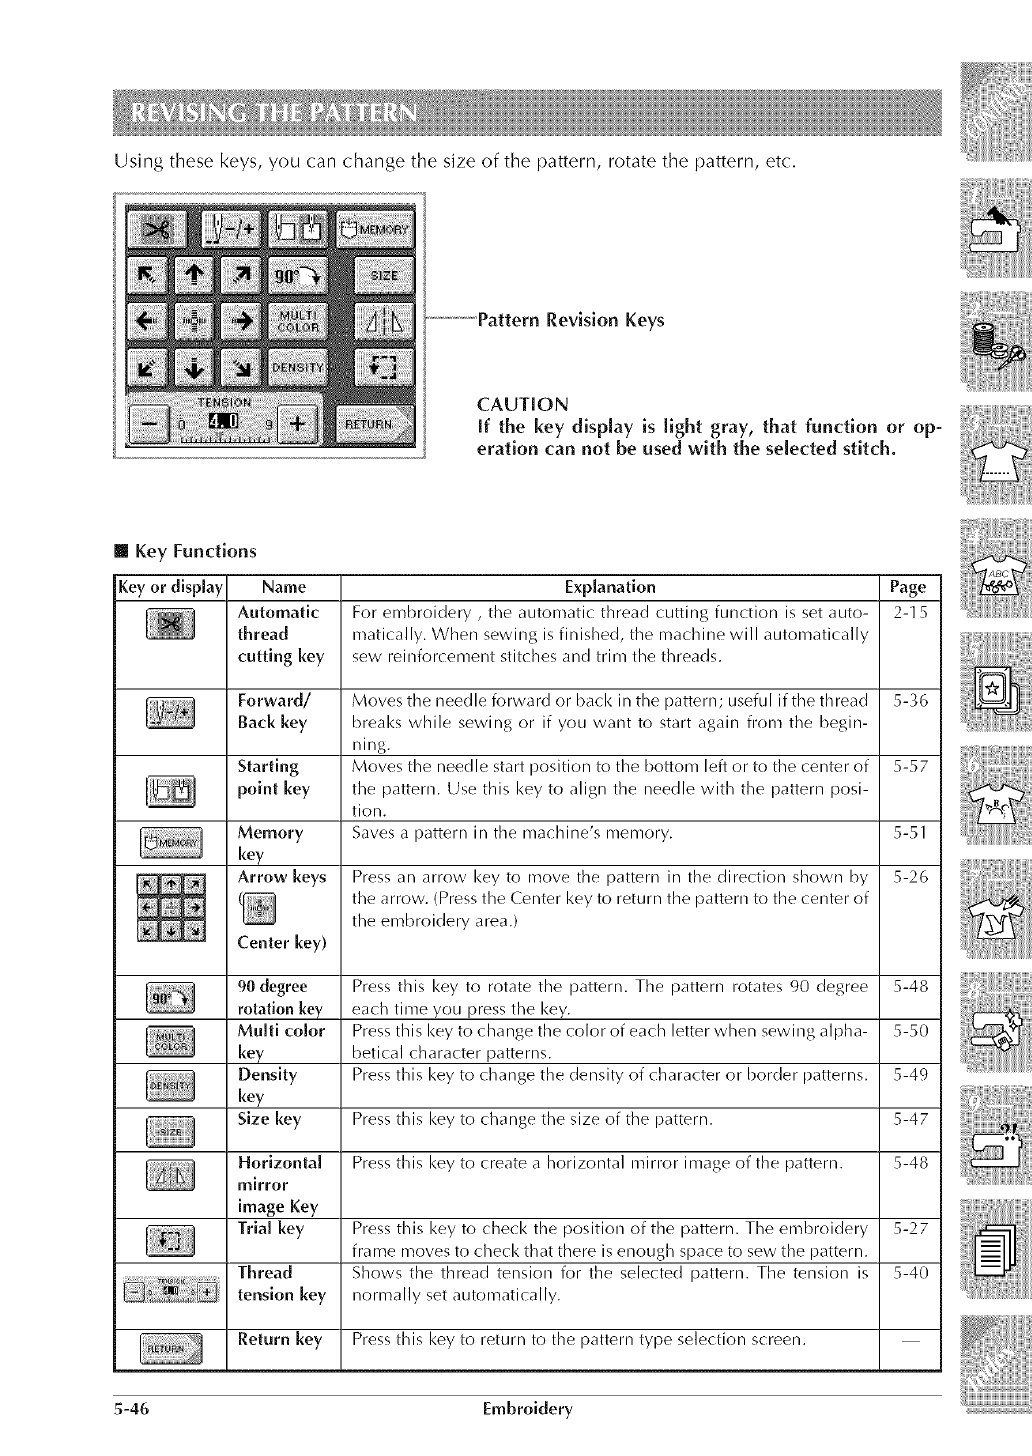
Usingthesekeys,youcanchangethesizeofthepattern,rotatethepattern,etc,
Revision Keys
CAUTION
if the key display is light gray, that function or op-
eration can not be used with the selected stitch.
[] Key Functions
Key or display Name
Automatic
thread
cutting key
Forward/
Back key
Memory
key
Arrow keys
Center key)
90 degree
rotation key
Multi color
key
Density
key
Size key
Explanation
For embroidery, the automatic thread cutting function is set auto-
matically. When sewing is finished, the machine will automatically
sew reinforcement stitches and trim the threads.
Page
2-15
Moves the needle forward or back in the pattern; useful if the thread 5-36
breaks while sewing or if you want to start again from the begin-
ning.
Moves the needle start position to the bottom left or to the center of 5-57
the pattern. Use this key to align the needle with the pattern posi-
tion.
Saves a pattern in the machine's memory.
Press an arrow key to move the pattern in the direction shown by
the arrow. (Press the Center key to return the pattern to the center of
the embroidery area.)
Press this key to rotate the pattern. The pattern rotates 90 degree
each time you press the key.
Press this key to change the color of each letter when sewing alpha-
betical character patterns.
Press this key to change the density of character or border patterns.
Press this key to change the size of the pattern.
Horizonta[ Press this key to create a horizontal mirror image of the pattern.
mirror
image Key
Trial key Press this key to check the position of the pattern. The embroidery
frame moves to check that there is enough space to sew the pattern.
Thread Shows the thread tension for the selected pattern. The tension is
tension key normally set automatically.
Return key Press this key to return to the pattern type selection screen.
5-46 Embroidery
5-51
5-26
5-48
5-50
5-49
5-47
5-48
5-27
5-40
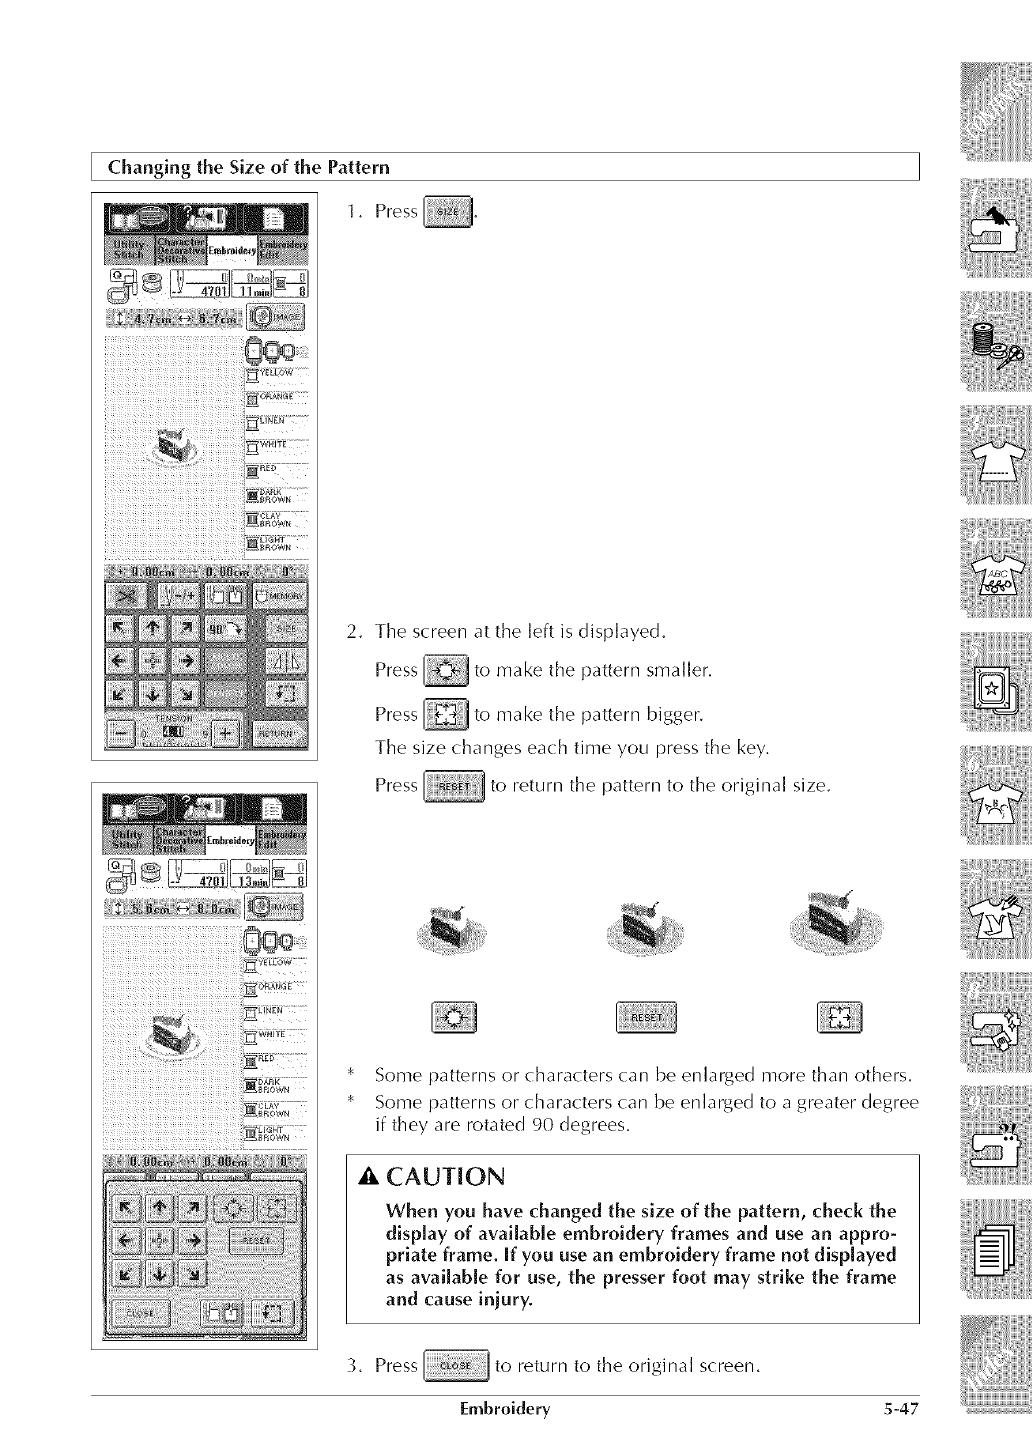
Changing the Size of the Pattern
1, Press
2. The screen at the left is displayed.
Press _ to make the pattern smaller,
Press _ to make the pattern bigger.
The size changes each time you press the key,
Press to return the pattern to the original size.
* Some patterns or characters can be enlarged more than others,
* Some patterns or characters can be enlarged to a greater degree
if they are rotated 90 degrees.
g, CAUTION
When you have changed the size of the pattern, check the
display of available embroidery frames and use an appro-
priate frame. [f you use an embroidery frame not displayed
as available for use, the presser foot may strike the frame
and cause iniury.
3. Press to return to the original screen.
Embroidery 5-47
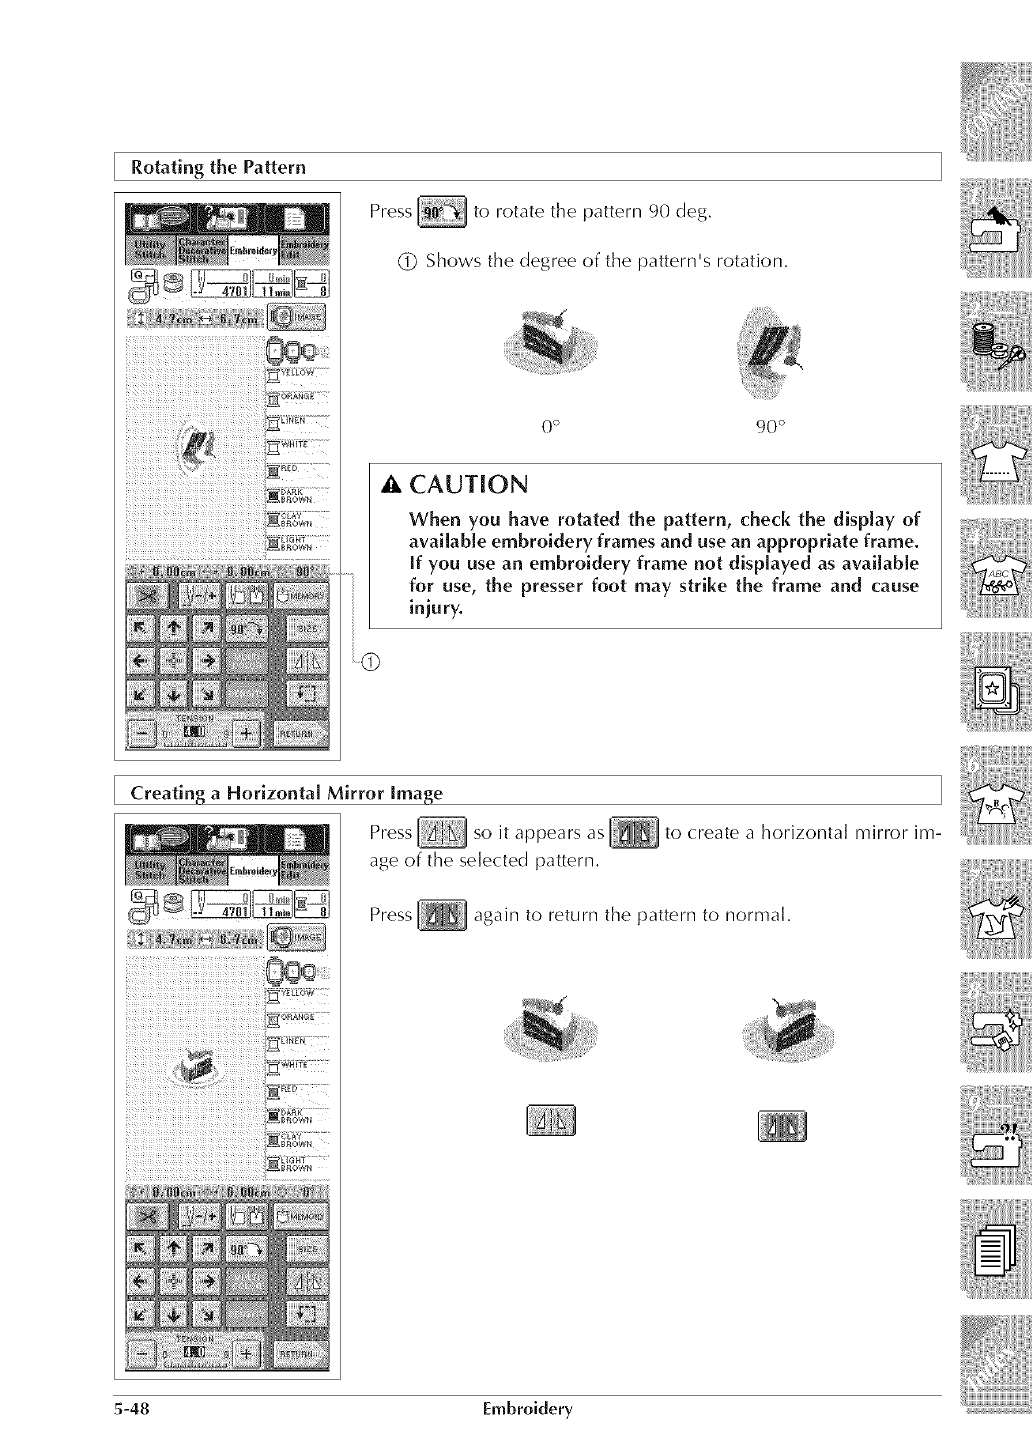
Rotating the Pattern
Press to rotate the pattern 90 deg.
(_ Shows the degree of the pattern's rotation.
0 o 90 °
ACAUTION
When you have rotated the pattern, check the display of
available embroidery frames and use an appropriate frame.
If you use an embroidery frame not displayed as available
for use, the presser foot may strike the frame and cause
iniury.
Creating a Horizontal Mirror Image
Press so it appears as[i_ to create a horizontal mirror im-
age of the selected pattern.
Press again to return the pattern to normal.
eGY ....
5-48 Embroidery
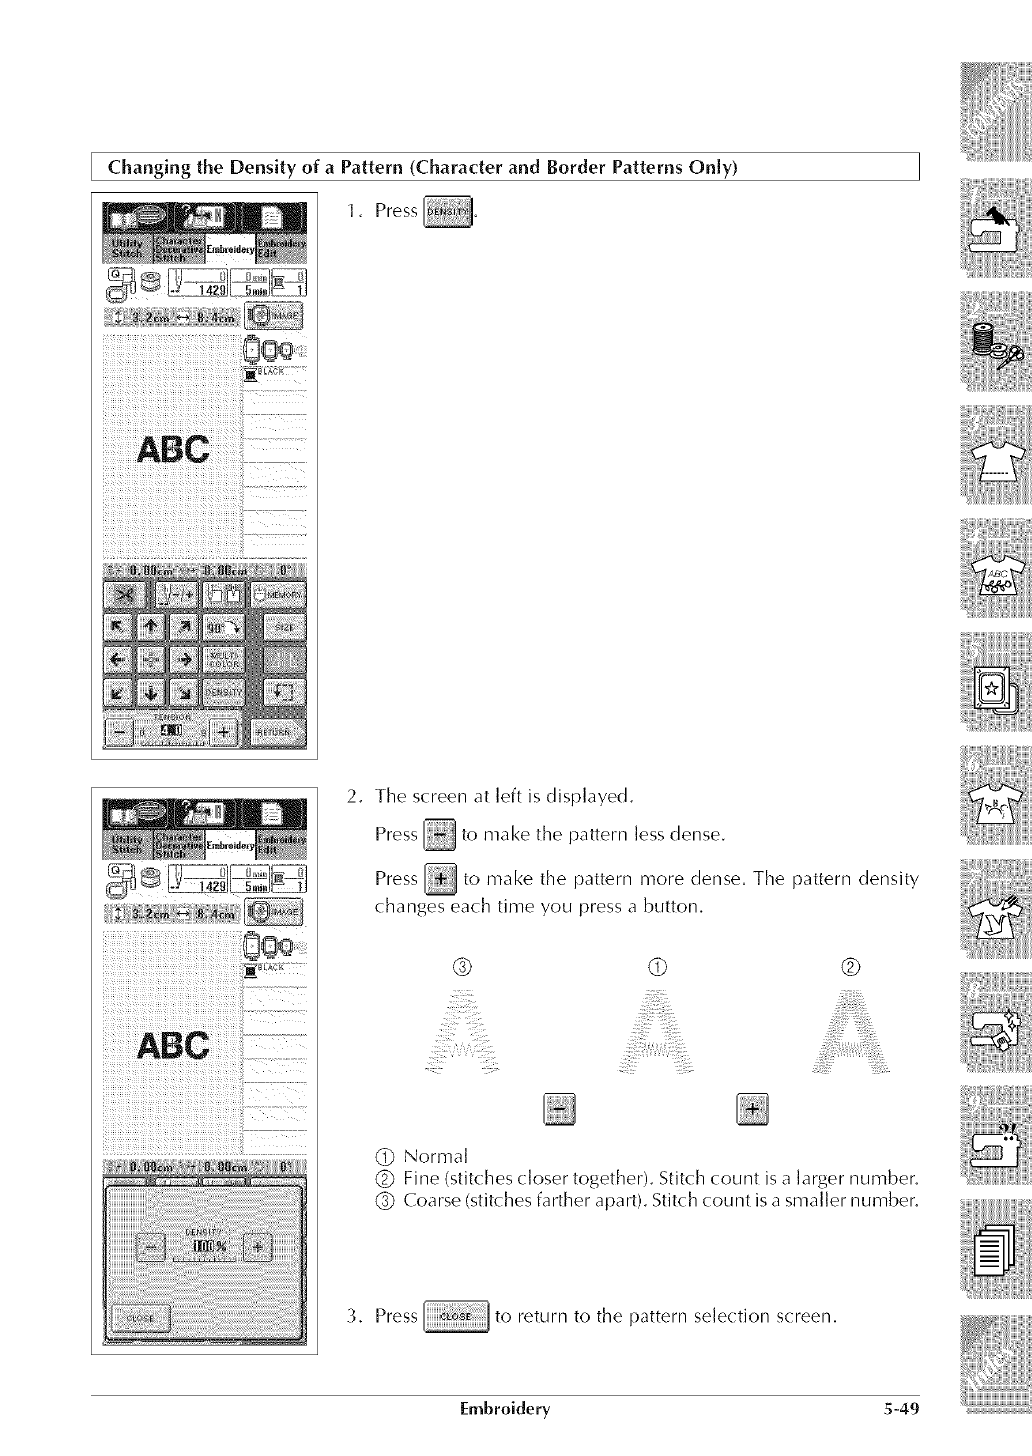
2. The screen at left is displayed.
Press _ to make the pattern less dense.
Press _ to make the pattern more dense. The pattern density
changes each time you press a button,
@ CD ®
@ Normal
@ Fine (stitches closer together). Stitch count is a larger number.
@ Coarse (stitches farther apart). Stitch count is a smaller number.
3. Press to return to the pattern selection screen.
Embroidery 5-49
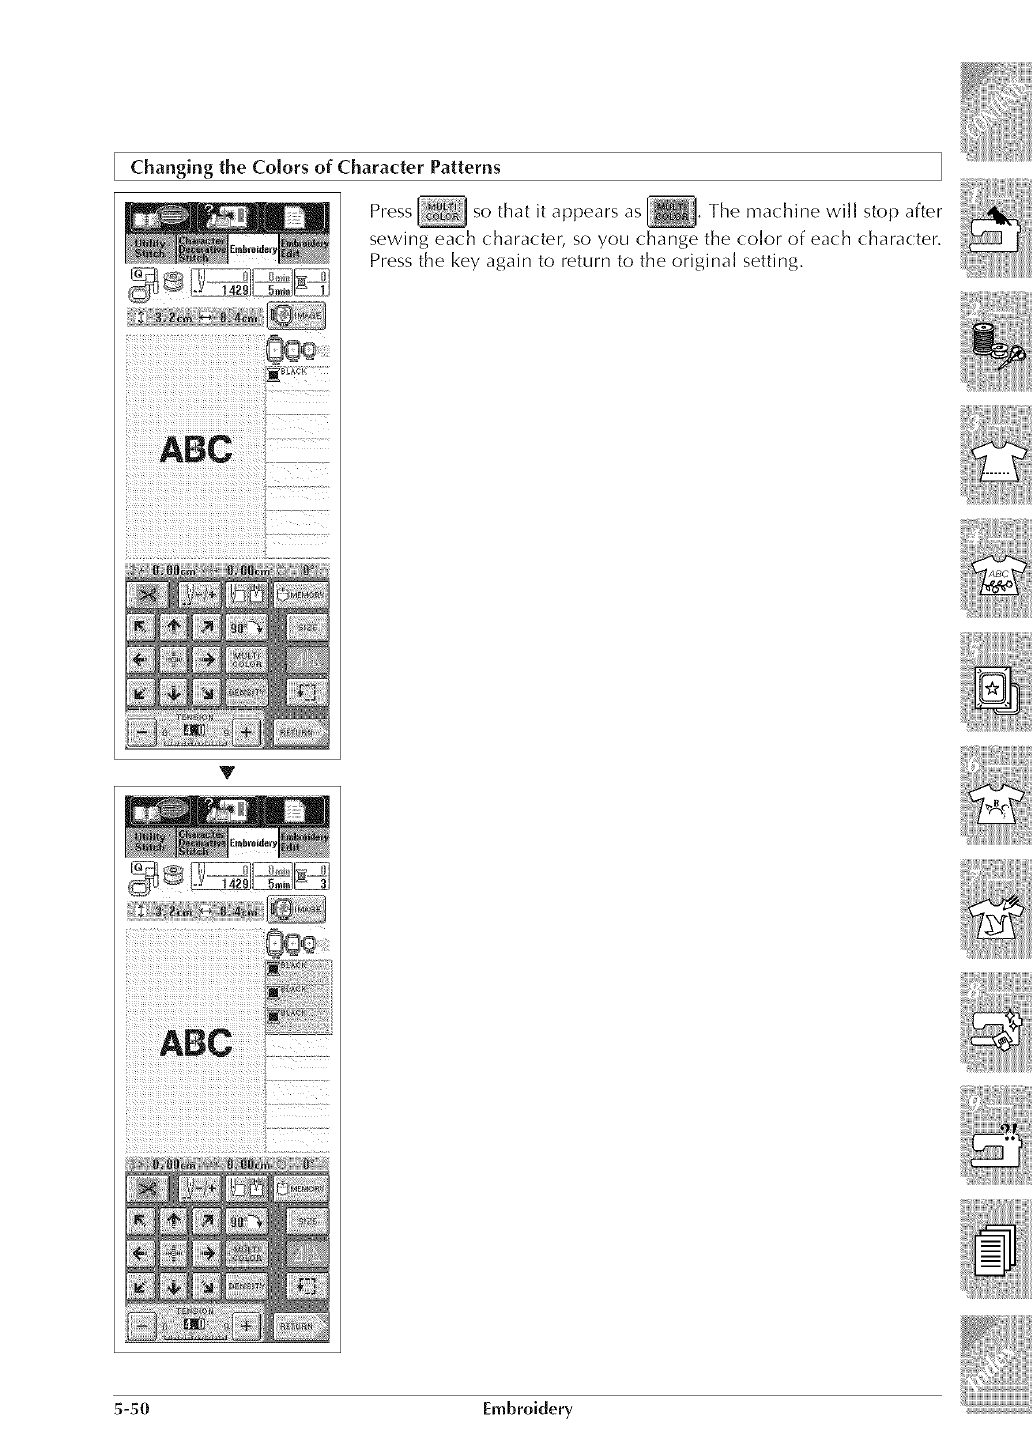
Changing the Colors of Character Patterns
Press so that it appears as , Tile ma(hine wi]] stop after
sewing each character, so you change the color of each character,
Press the key again to return to the origina] setting,
ABe
Y
5-50 Embroidery
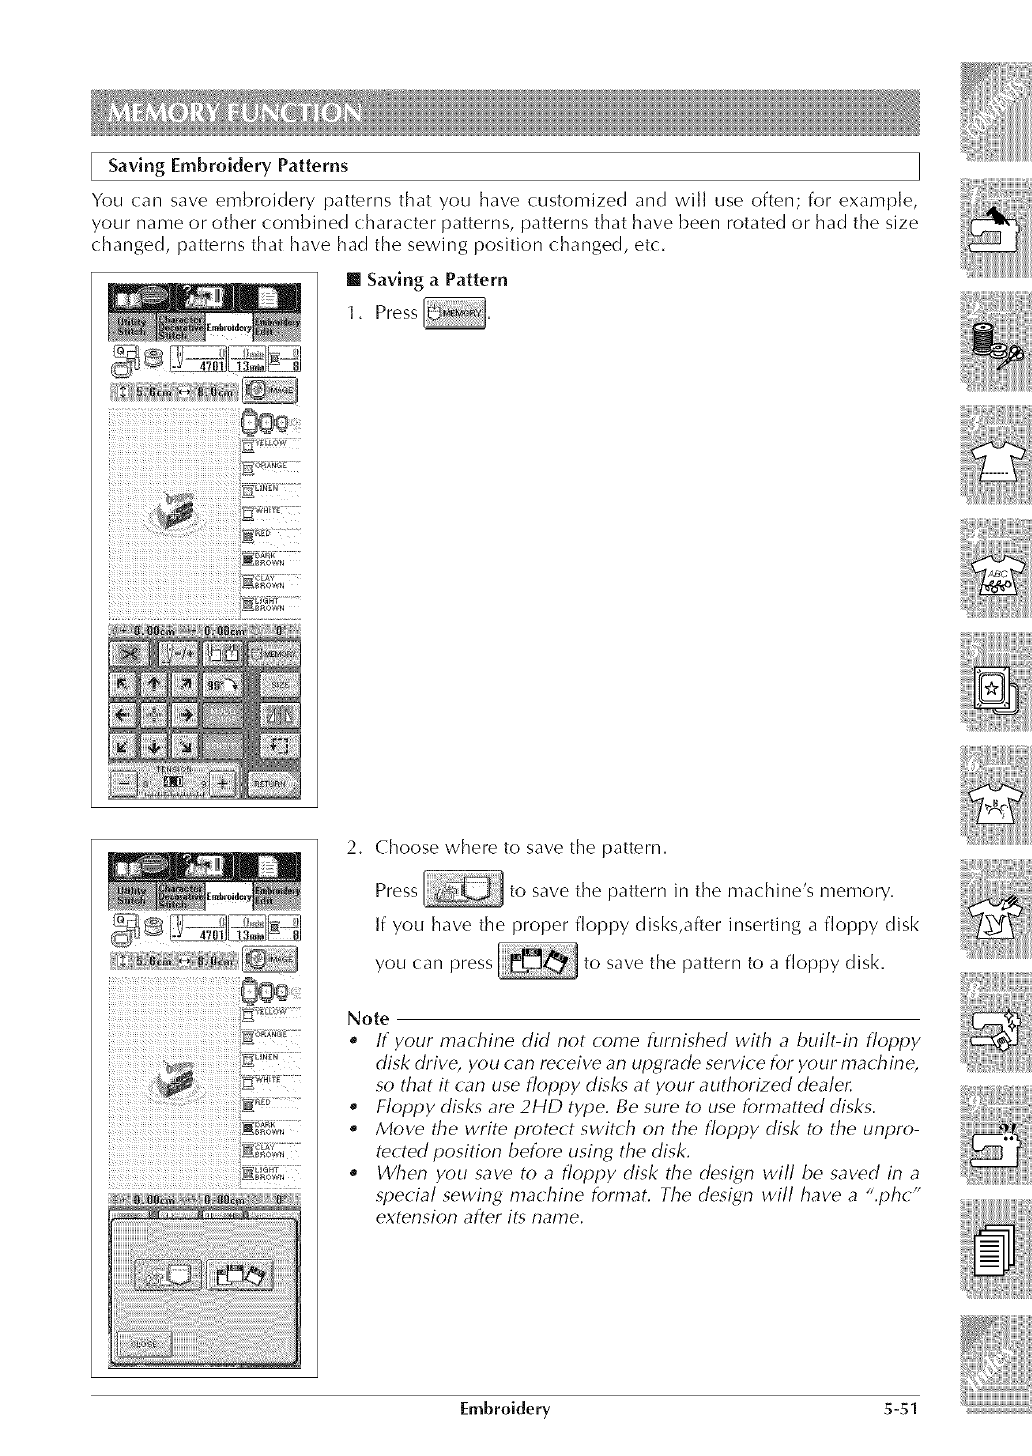
Saving EmBroidery Patterns
You (:an save embroidery patterns that you have customized and will use often; for example,
your name or other combined character patterns, patterns that have been rotated or had the size
changed, patterns that have had the sewing position changed, etc.
[] Saving aPattern
1. Press
2. Choose where to save the pattern.
Press to save the pattern in the m_a(h ne s memory.
If you have the proper floppy disks,after inserting a floppy disk
you (:an press to save the pattern to a floppy disk.
Note
eIf your machine did not come furnished with a built-in floppy
disk drive, you (:an receive an upgrade service for your machine,
so that it can use floppy dbks at your authorized dealel:
•Noppy disks are 2HD type. Be sure to use formatted disks.
•Move the write protect switch on the floppy disk to the unpro-
tected position before using the disk.
,When you save to a floppy disk the design will be saved in a
special sewing machine format. The design will have a ".phc"
extension after i6 name.
Embroidery 5-51

3. The "Saving" screen displays. When the pattern is saved, the
display returns to the original screen automatically.
CAUTION
Do not turn off the power while the "Saving" screen is displayed.
You will lose the pattern you are saving. Also, do not remove the
floppy disk while the pattern is being saved. The disk may be-
come unreadable.
Note
It takes about 10 seconds to save a pattern to the machine9 memory.
See page 5-55 for information on retrieving a saved pattern.
[] If You Can Not Save the Pattern
If the screen at left displays, the maximum number of patterns have
been saved, or the pattern you want to save takes a lot of memory,
and the machine can not save it. If you delete a previously saved
pattern, you can save the current pattern.
* If you decide not to save the current pattern, press
Deleting a Previously Saved Pattern
1, Press
2. The machine displays the patterns currently saved.
5-52 Embroidery
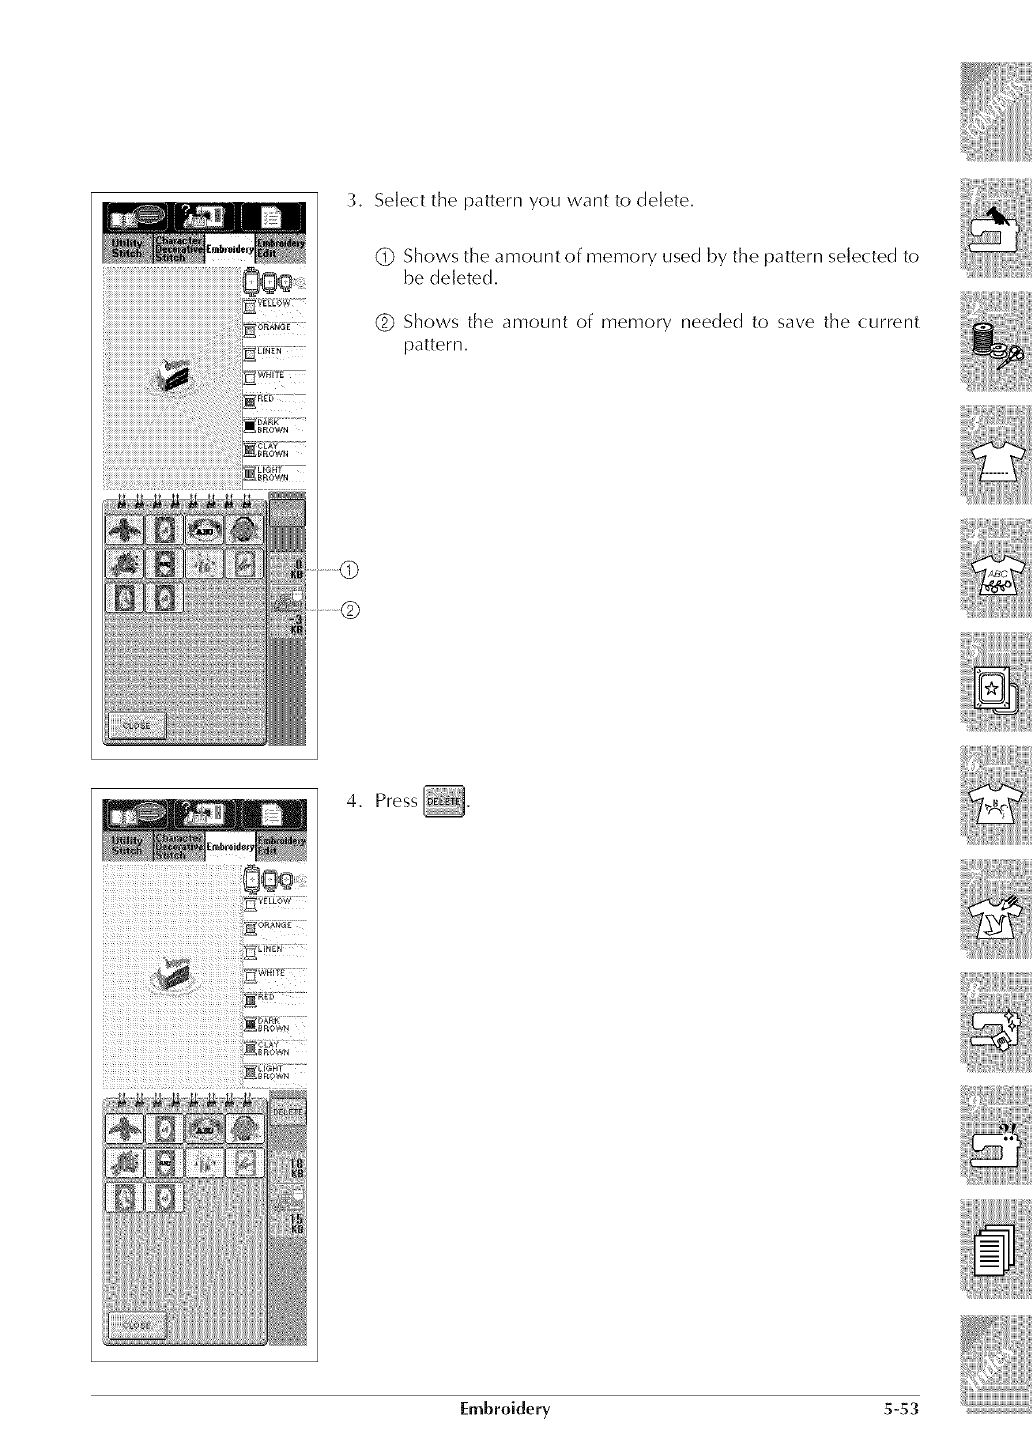
3. Select the pattern you want to delete,
(_ Shows the amount of memory used by the pattern selected to
be deleted.
(_ Shows the amount of memory needed to save the current
pattern.
4. Press_.
Embroidery S-S3
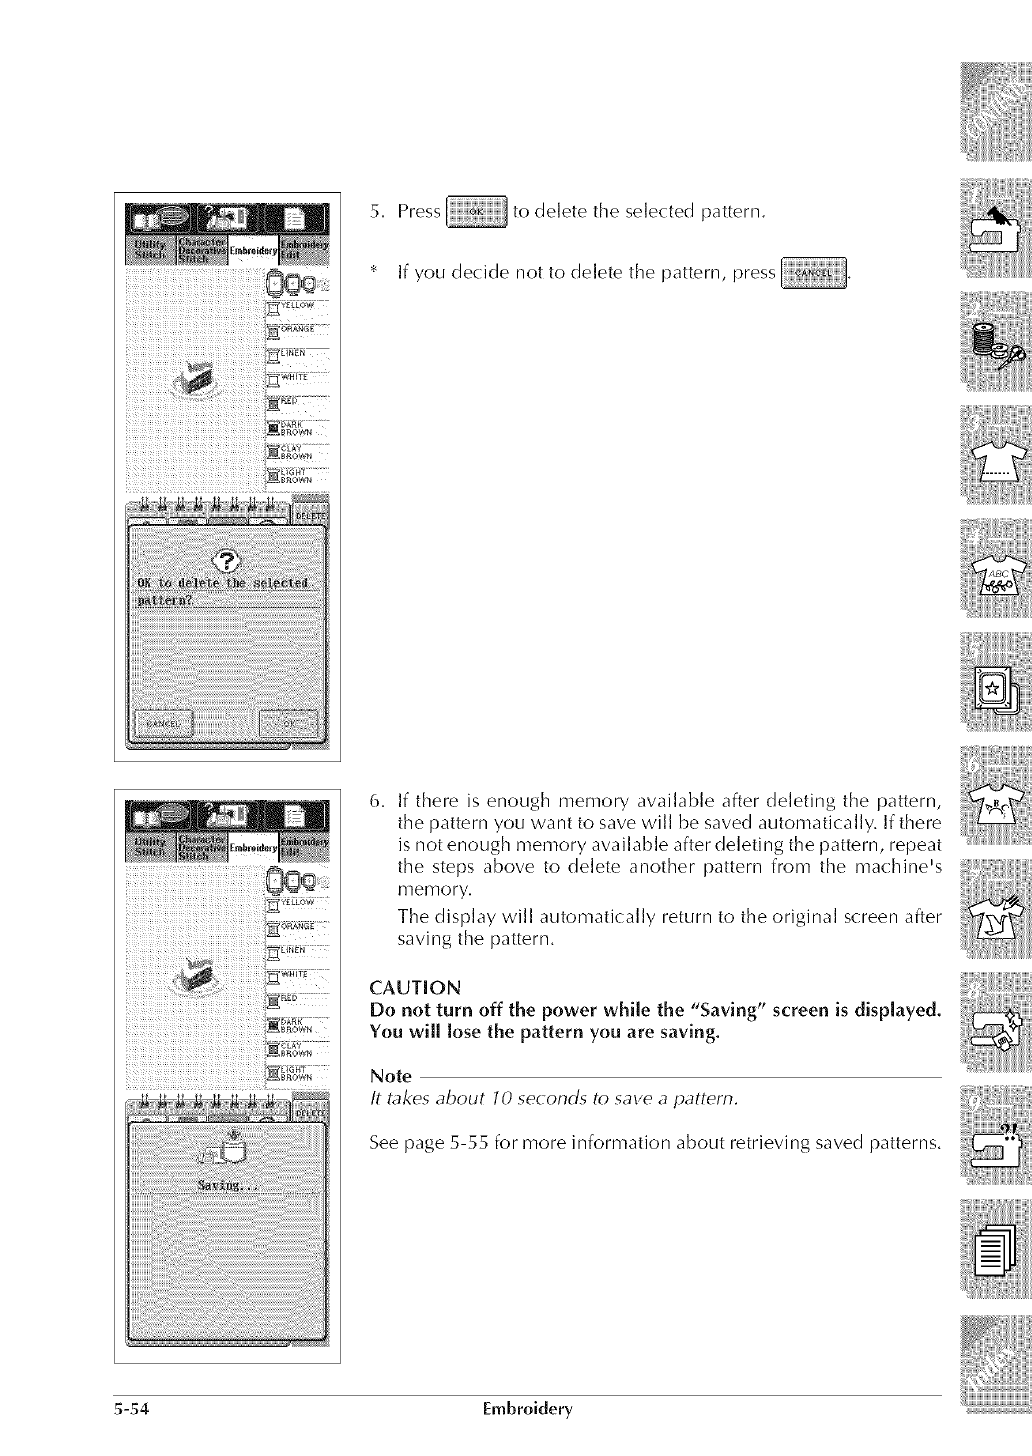
5. Press todeletetheselectedpattern.
* Ifyoudecidenottodeletethepattern,press
6. Ifthereisenoughmemoryavailableafterdeletingthepattern,
thepatternyouwanttosavewill besavedautomatically.Ifthere
isnotenoughmemoryavailableafterdeletingthepattern,repeat
thestepsaboveto deleteanotherpatternfromthemachine's
memory.
Thedisplaywill automaticallyreturnto theoriginalscreenafter
savingthepattern.
CAUTION
Donotturnoff thepowerwhilethe"Saving"screenisdisplayed.
Youwill losethepattern you are saving.
Note
It takes about 10 seconds to save a pattern.
See page 5-55 for more information about retrieving saved patterns.
5-54 Embroidery
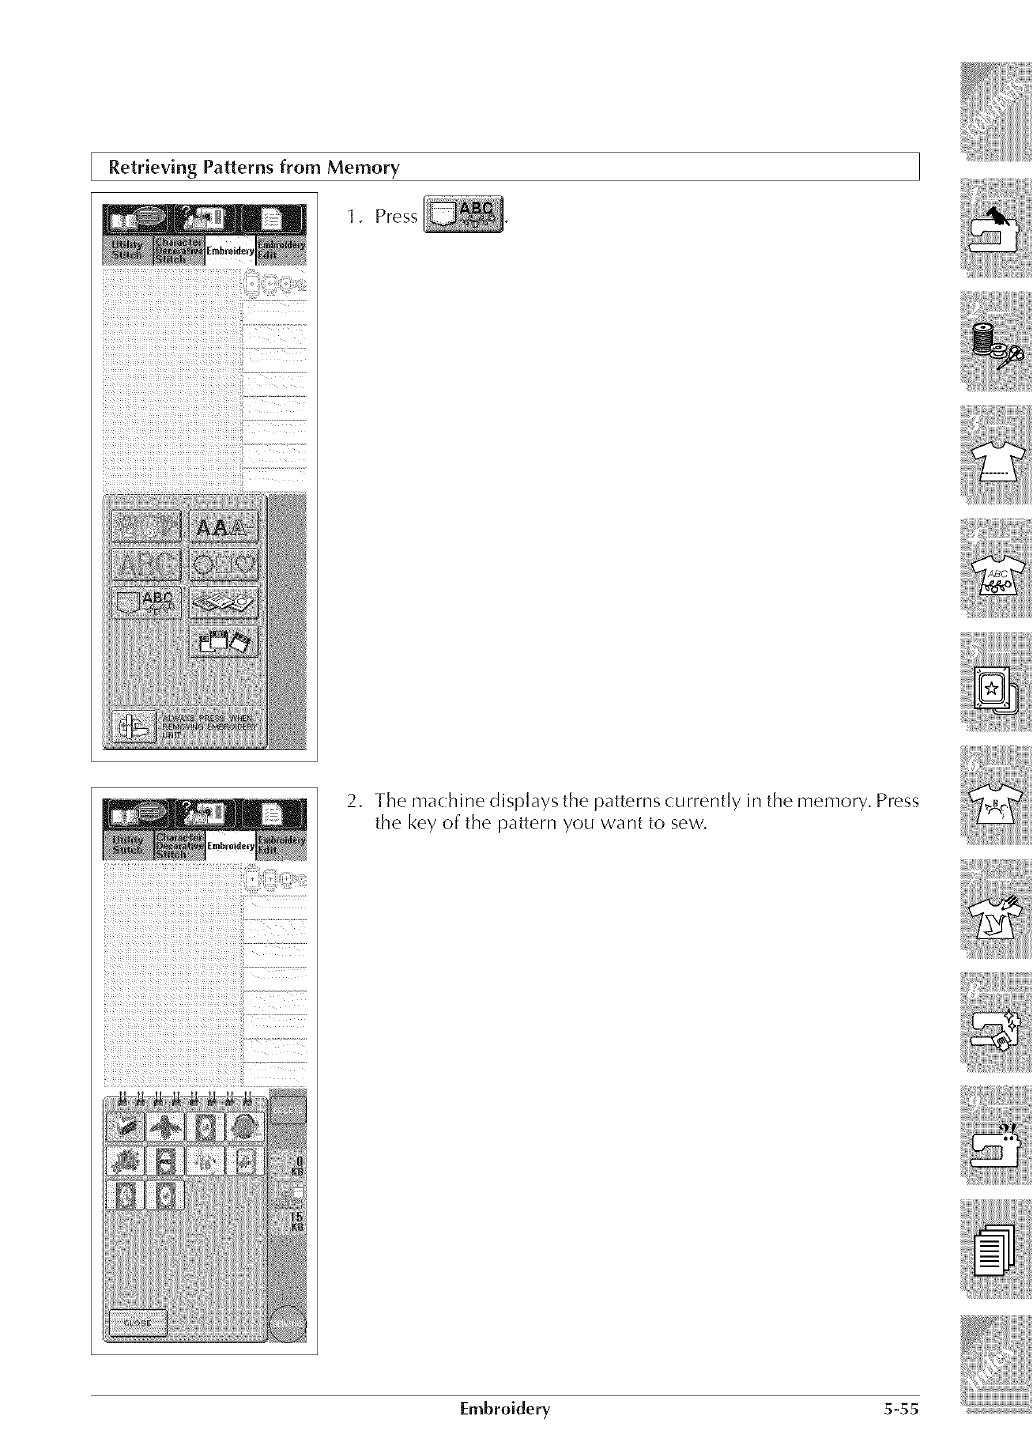
Retrieving Patterns from Memory
1. Press
iiiii_!_!:_!ii!ii!!_iiiii:i!:i:ii!i!_!i_ii_i!ii!_iiiii_ii_!!!ii!i77 !!!
2. The machine displays the patterns currently in the memory, Press
the key of the pattern you want to sew,
Embroidery 5-55
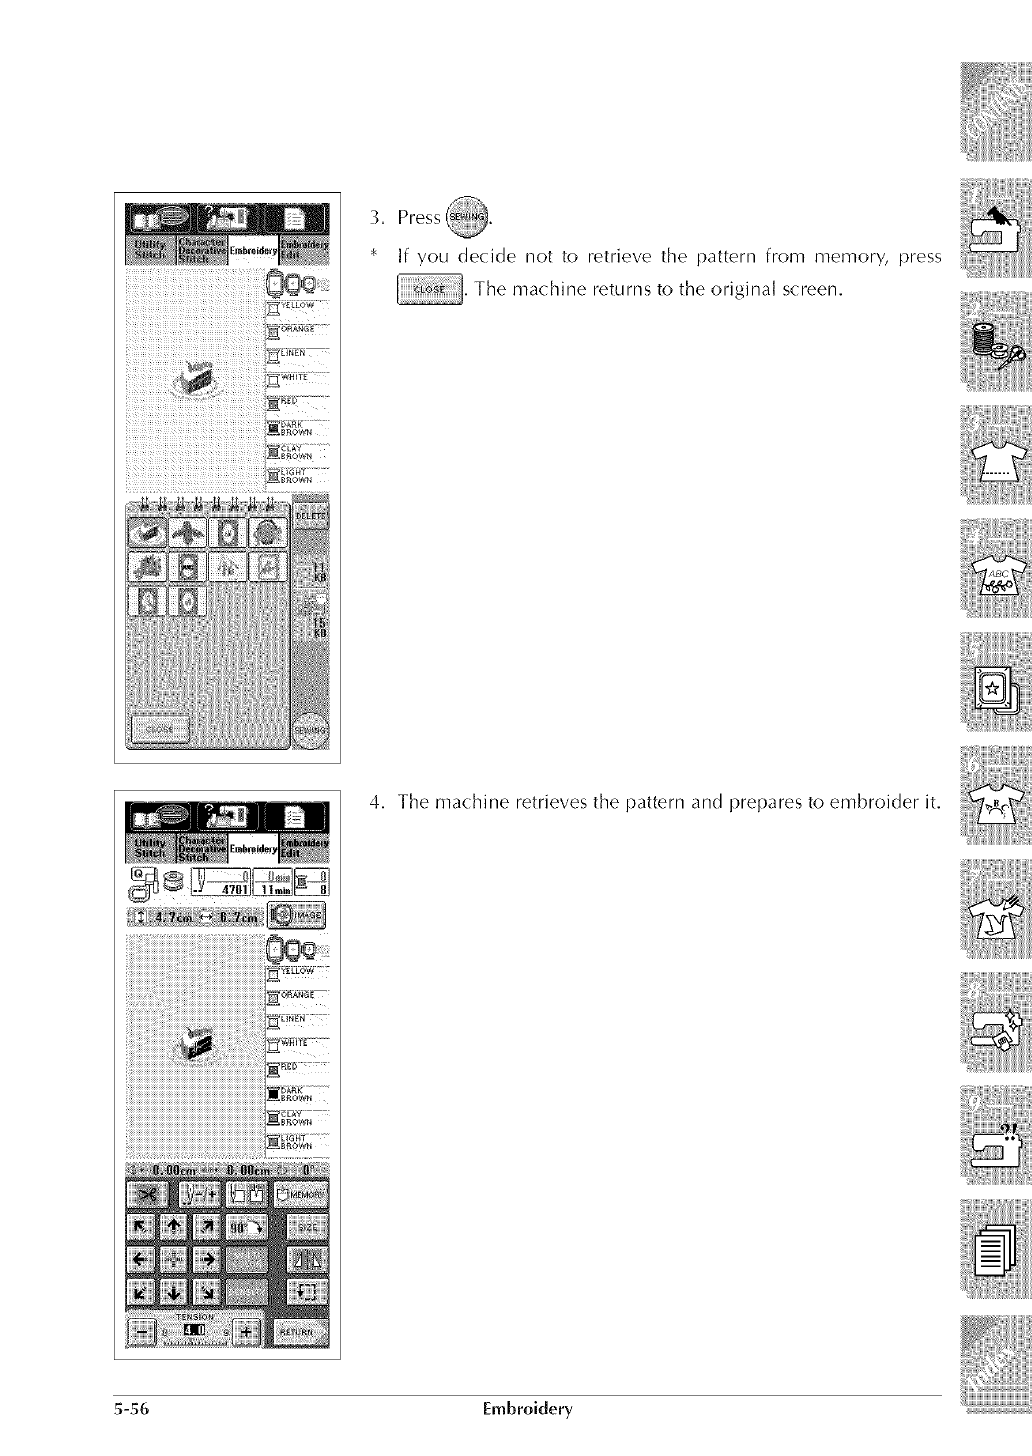
3. Press
If you decide not to retrieve the pattern from memory, press
.The machine returns to the original screen.
4. The machine retrieves the pattern and prepares to embroider it.
5-56 Embroidery
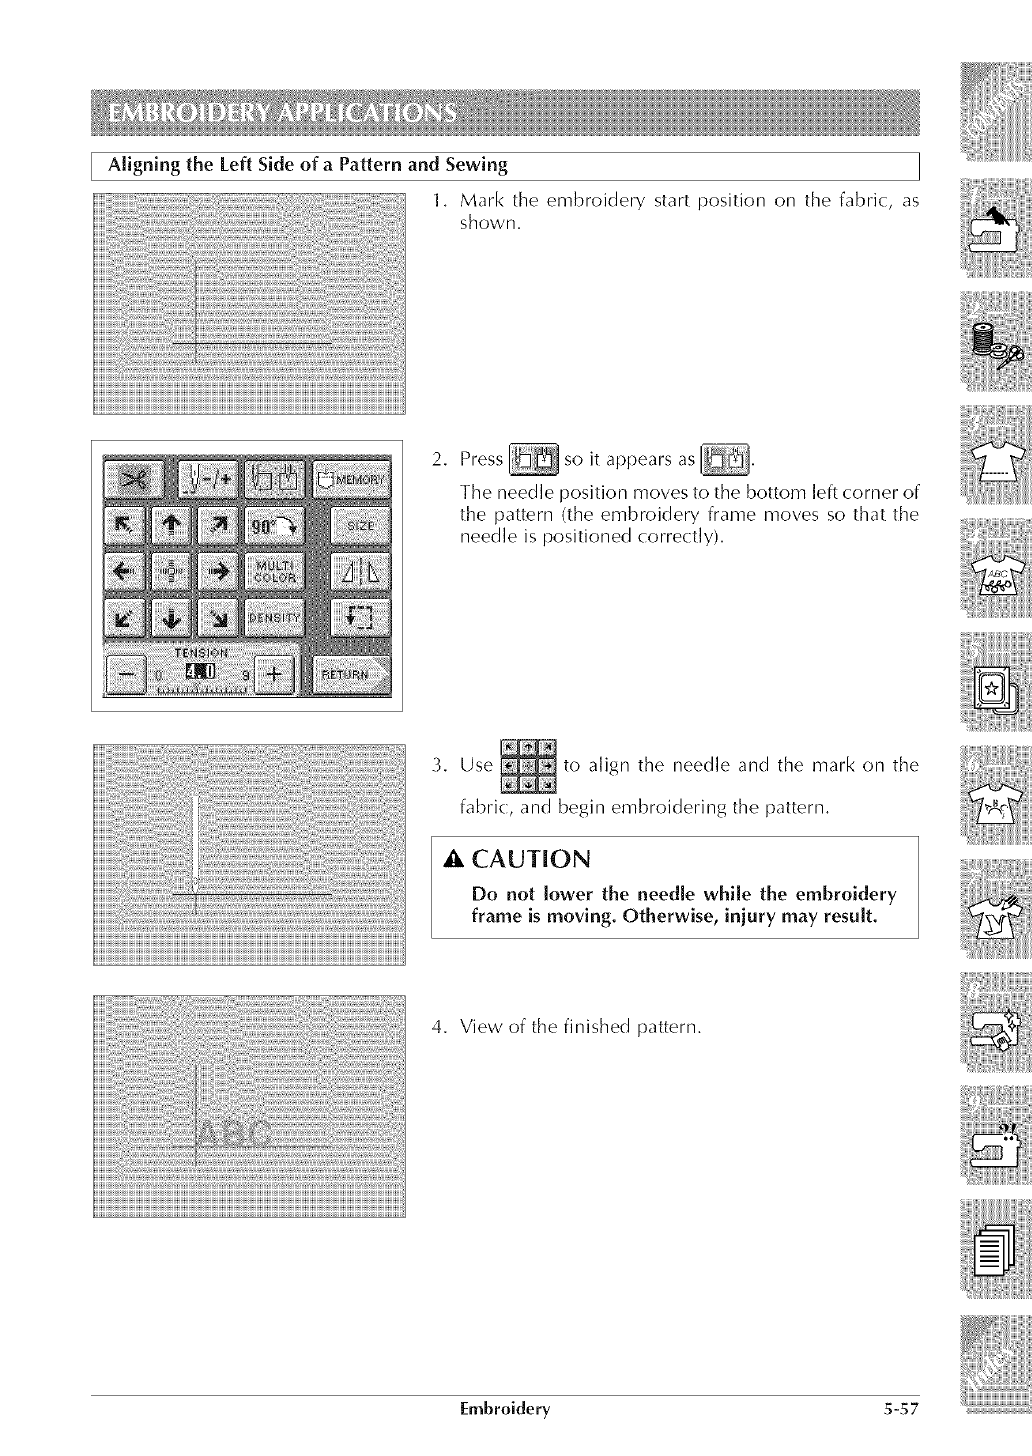
Aligning the Left Side of a Pattern and Sewing
1. Mark the embroidery start position on the fabric:, as
shown.
2, Press so it appears
The needle position moves to the bottom left corner of
the pattern (the embroidery frame moves so that the
needle is positioned correctly).
3. Use to align the needle and the mark on the
fabric, and begin embroidering the pattern.
CAUTION
Do not lower the needle while the embroidery
frame is moving. Otherwise, iniury may result.
4. View of the finished pattern.
Embroidery 5-57
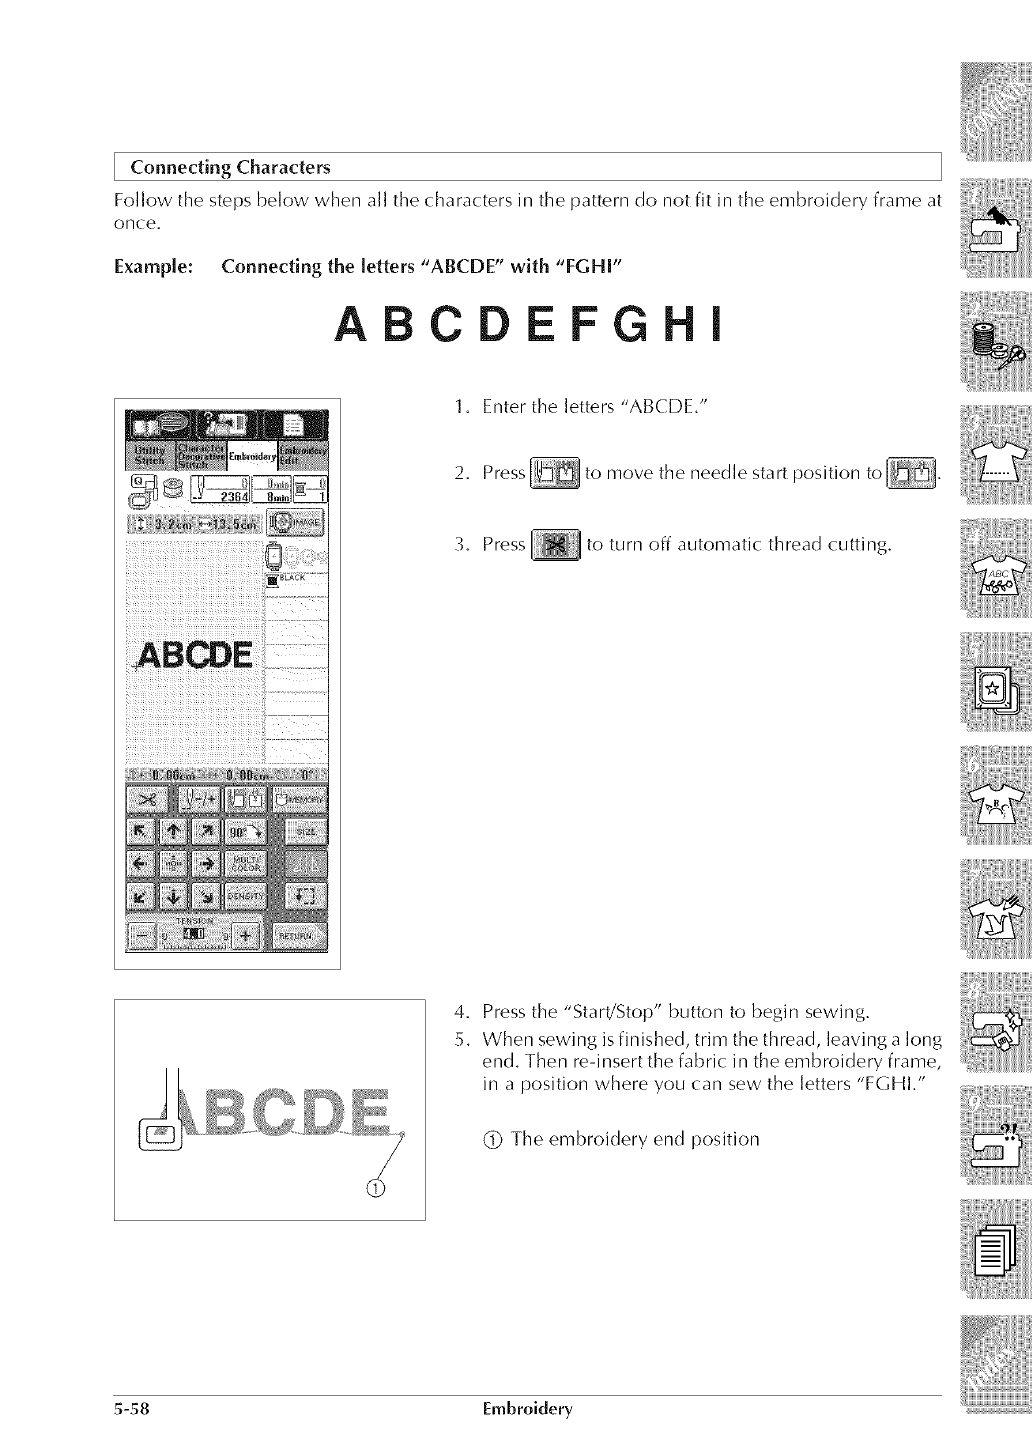
Connecting Characters
Follow the steps below when all the characters in the pattern do not fit in the embroidery frame at
once.
E×ampJe: Connecting the Jetters "ABCDE" with "FGHI"
AC EFG I
1. Enter the letters "ABCDE."
2. Press to move the needle start position to .
_. Press to turn off automatic thread cutting.
4. Press the "Start!Stop" button to begin sewing.
5. When sewing is finished, trim the thread, leaving a long
end. Then re-insert the fabric in the embroidery frame,
in a position where you (:an sew the letters "FGHI."
(_ The embroidery end position
5-58 Embroidery
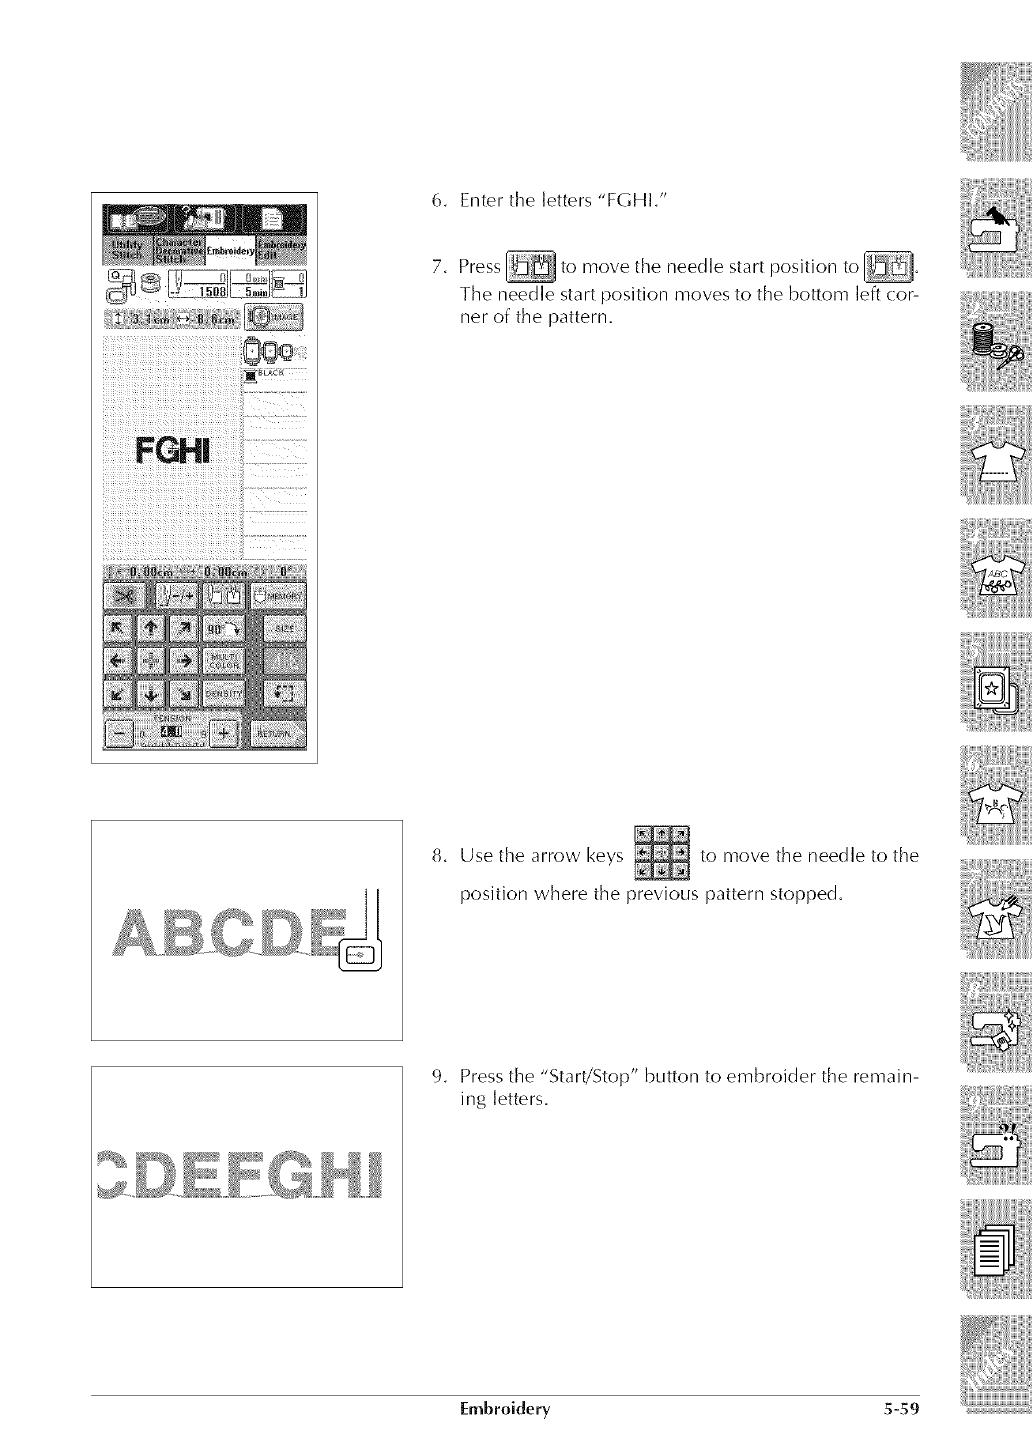
FGH!
6. Enter the letters "FGHI."
7. Press to move the needle start position to .
The needle start position moves to the bottom left cor-
ner of the pattern.
8, Use the arrow keys to move the needle to the
position where the previous pattern stopped,
9, Press the "Start!Stop" button to embroider the remain-
ing letters.
EmBroidery 5-59
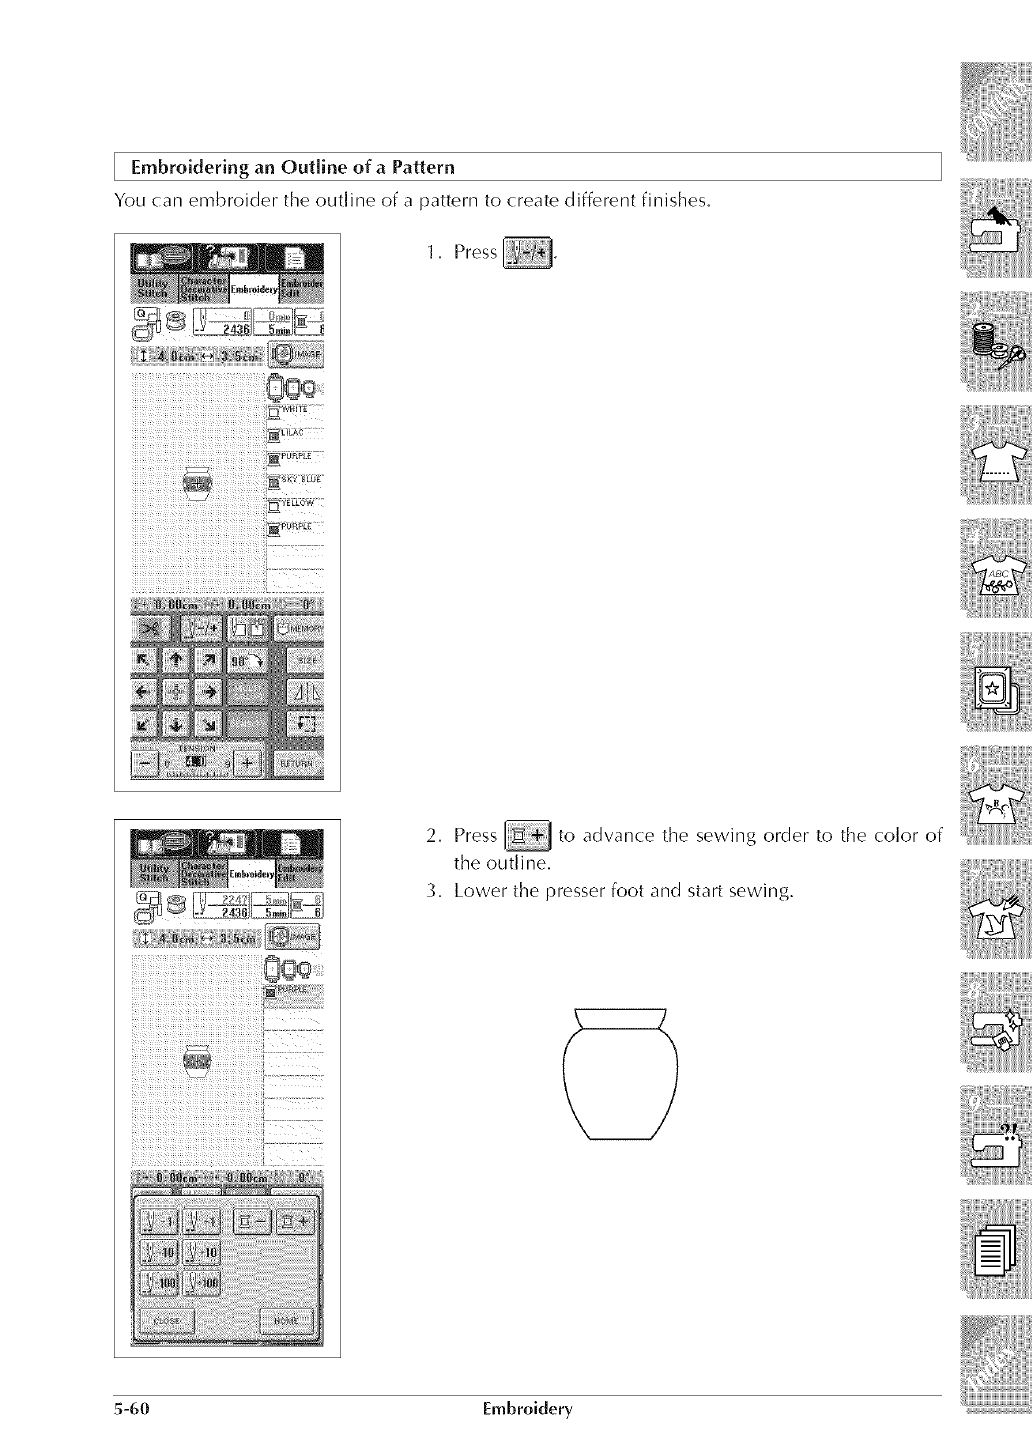
2, Press _ to advance the sewing order to the color of
the outline,
_, Lower the presser foot and start sewing.
5-60 Embroidery
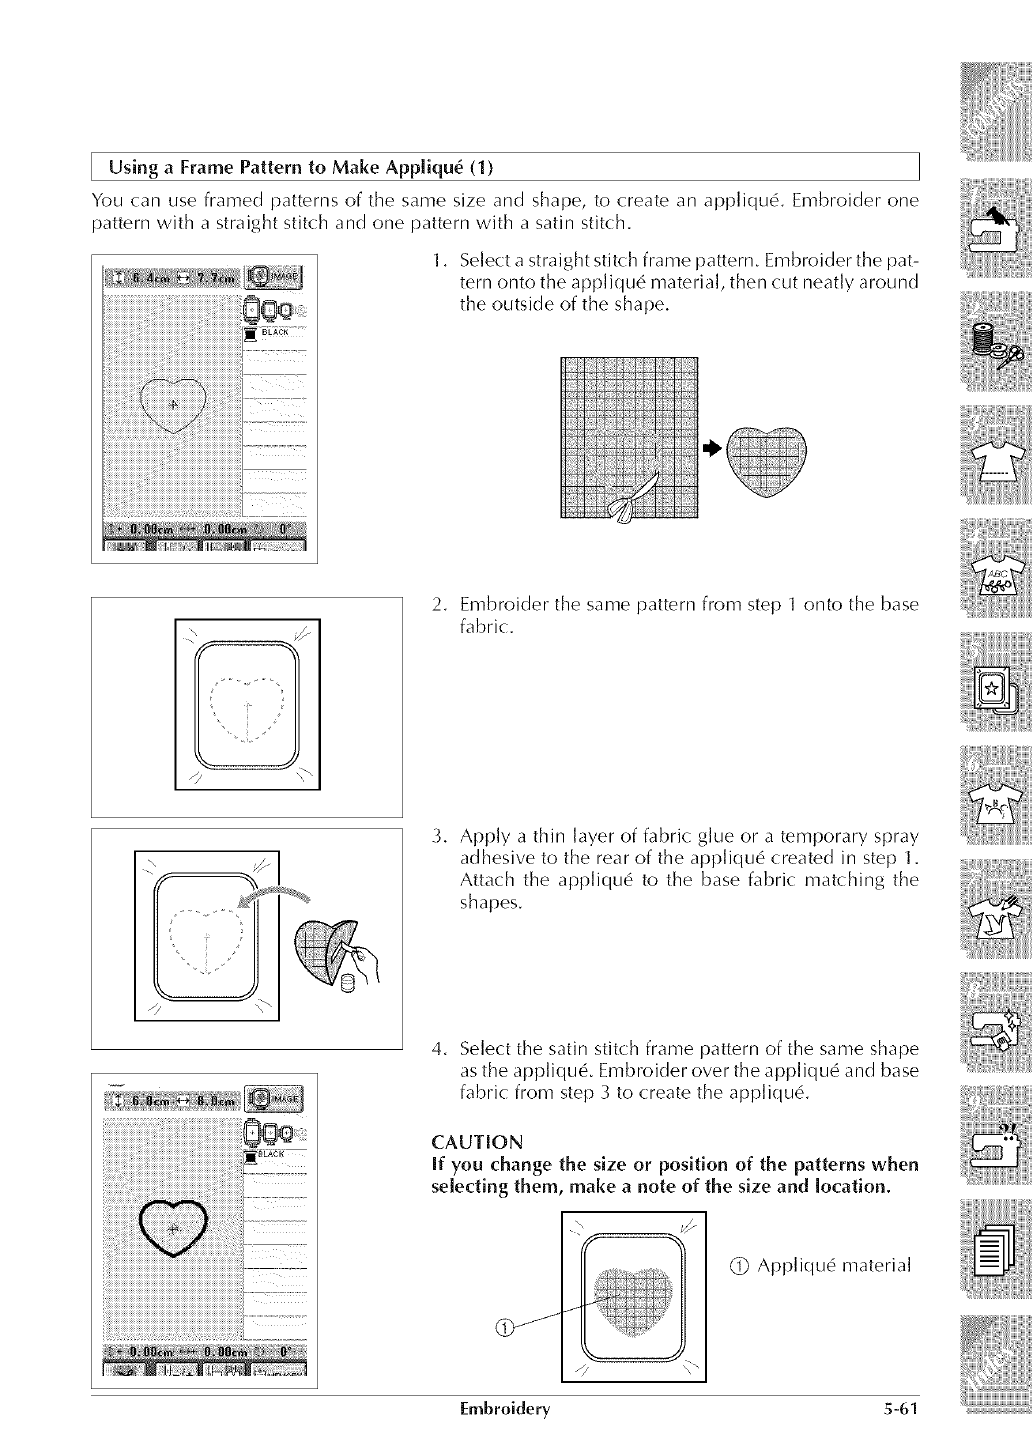
UsingaFramePatternto Make Appliqu_ (1)
You can use framed patterns of the same size and shape, to create an applique. Embroider one
pattern with a straight stitch and one pattern with a satin stitch.
1. Select a straight stitch frame pattern. Embroider the pat-
tern onto the appliqu_ material, then cut neatly around
the outside of the shape.
2. Embroider the same pattern from step 1 onto the base
fabric.
\¢-
//
3. Apply a thin layer of fabric glue or a temporary spray
adhesive to the rear of the appliqu_ created in step 1.
Attach the appliqu6 to the base fabric matching the
shapes.
4. Select the satin stitch frame pattern of the same shape
as the applique. Embroider over the appiiqu6 and base
fabric from step _ to create the appJiqu6.
CAUTION
If you change the size or position of the patterns when
selecting them, make a note of the size and location.
(!) Appliqu6 material
Embroidery 5-61
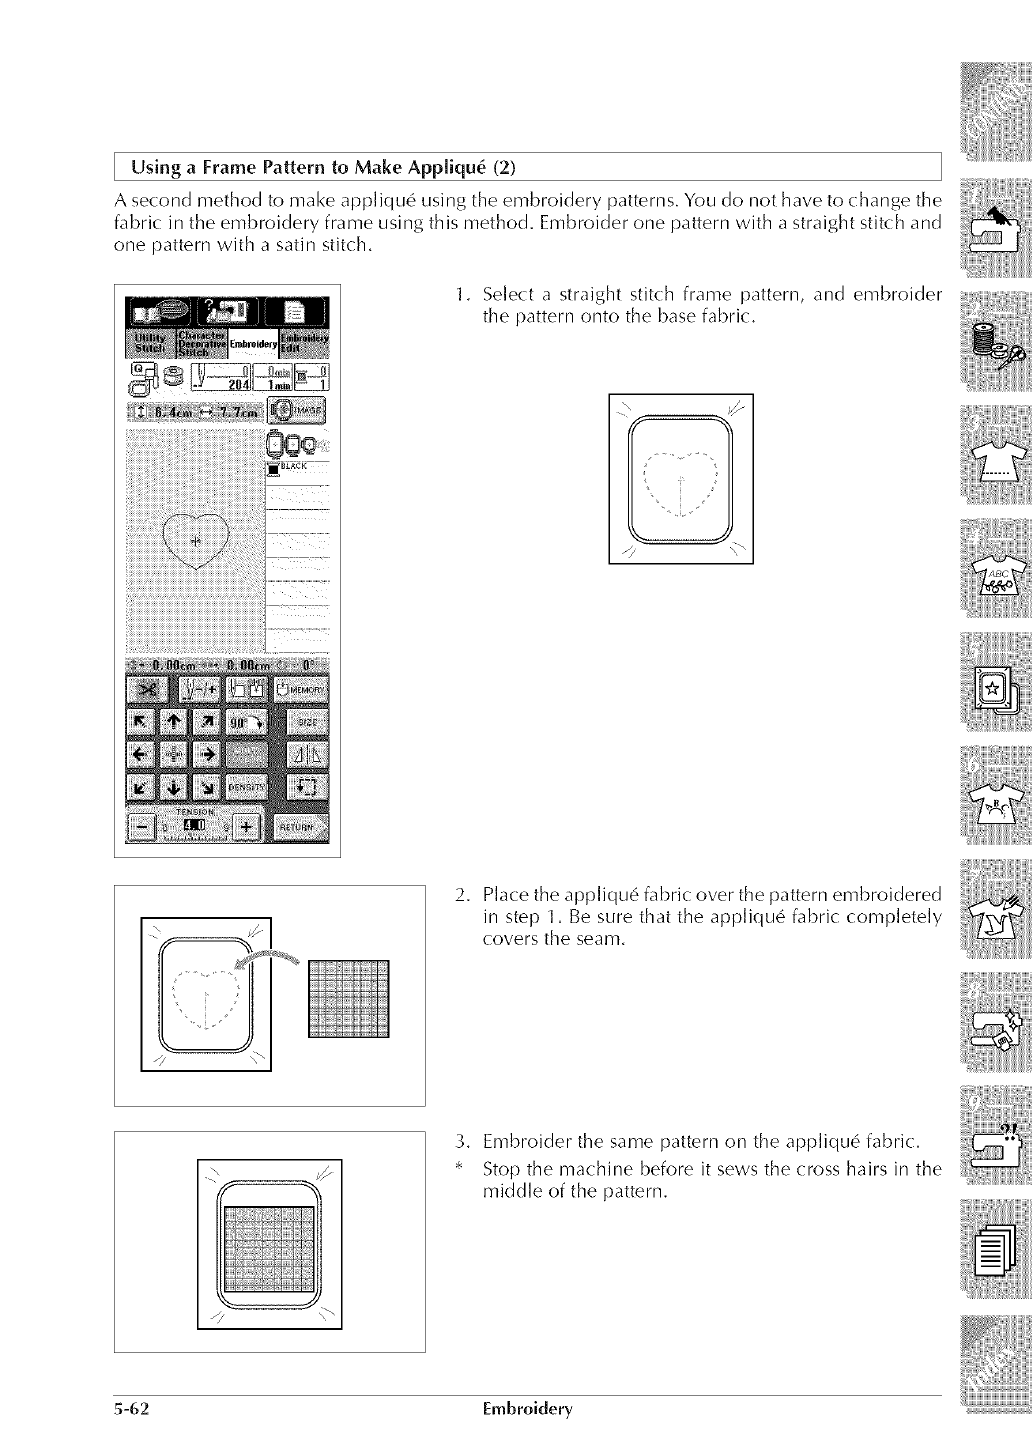
Using a Frame Pattern to Make Appliqu_ (2)
A second method to make appliqu_ using the embroidery patterns. You do not have to change the
fabric in the embroidery frame using this method. Embroider one pattern with a straight stitch and
one pattern with a satin stitch.
1. Select a straight stitch frame pattern, and embroider
the pattern onto the base fabric.
2. Place the appliqu_ fabric over the pattern embroidered
in step 1. Be sure that the appliqu6 fabric completely
covers tile seam.
3. Embroider the same pattern on the appliqu_ fabric:.
* Stop the machine before it sews the cross hairs in the
middle of the pattern.
5-62 Embroidery
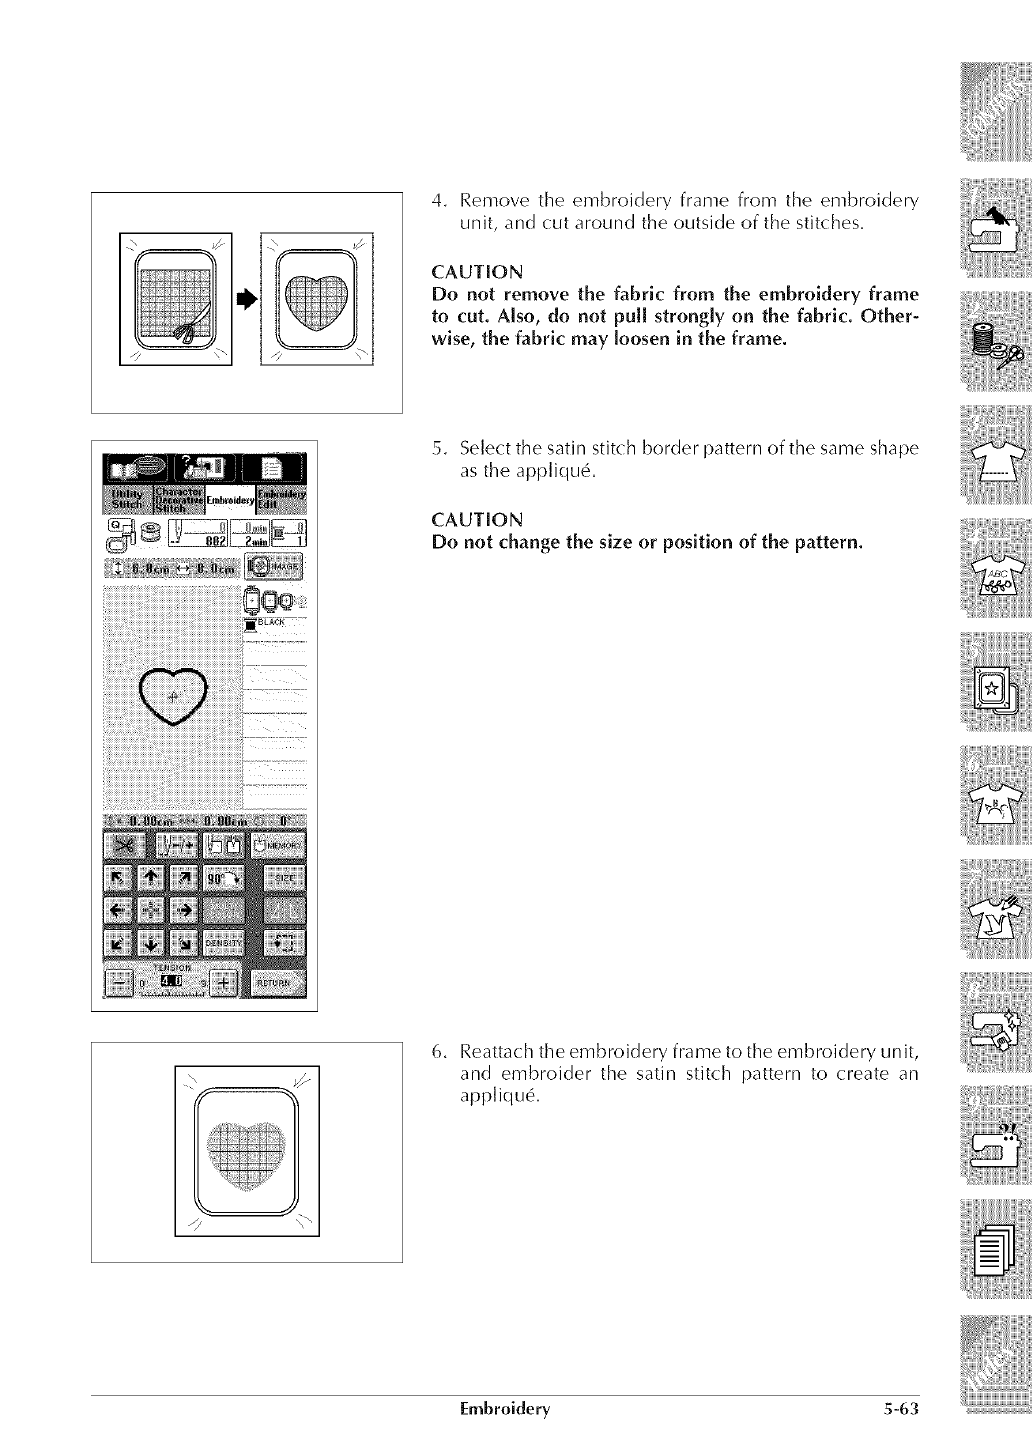
4. Remove the embroidery frame from the embroidery
unit, and cut around the outside of the stitches.
CAUTION
Do not remove the fabric from the embroidery frame
to cut. Also, do not pull strongly on the fabric. Other-
wise, the fabric may loosen in the frame.
5. Select the satin stitch border pattern of the same shape
as the appliqu6.
CAUTION
Do not change the size or position of the pattern.
//
6. Reattach the embroidery frame to the embroidery unit,
and embroider the satin stitch pattern to create an
appliqu6,
Embroidery 5-63
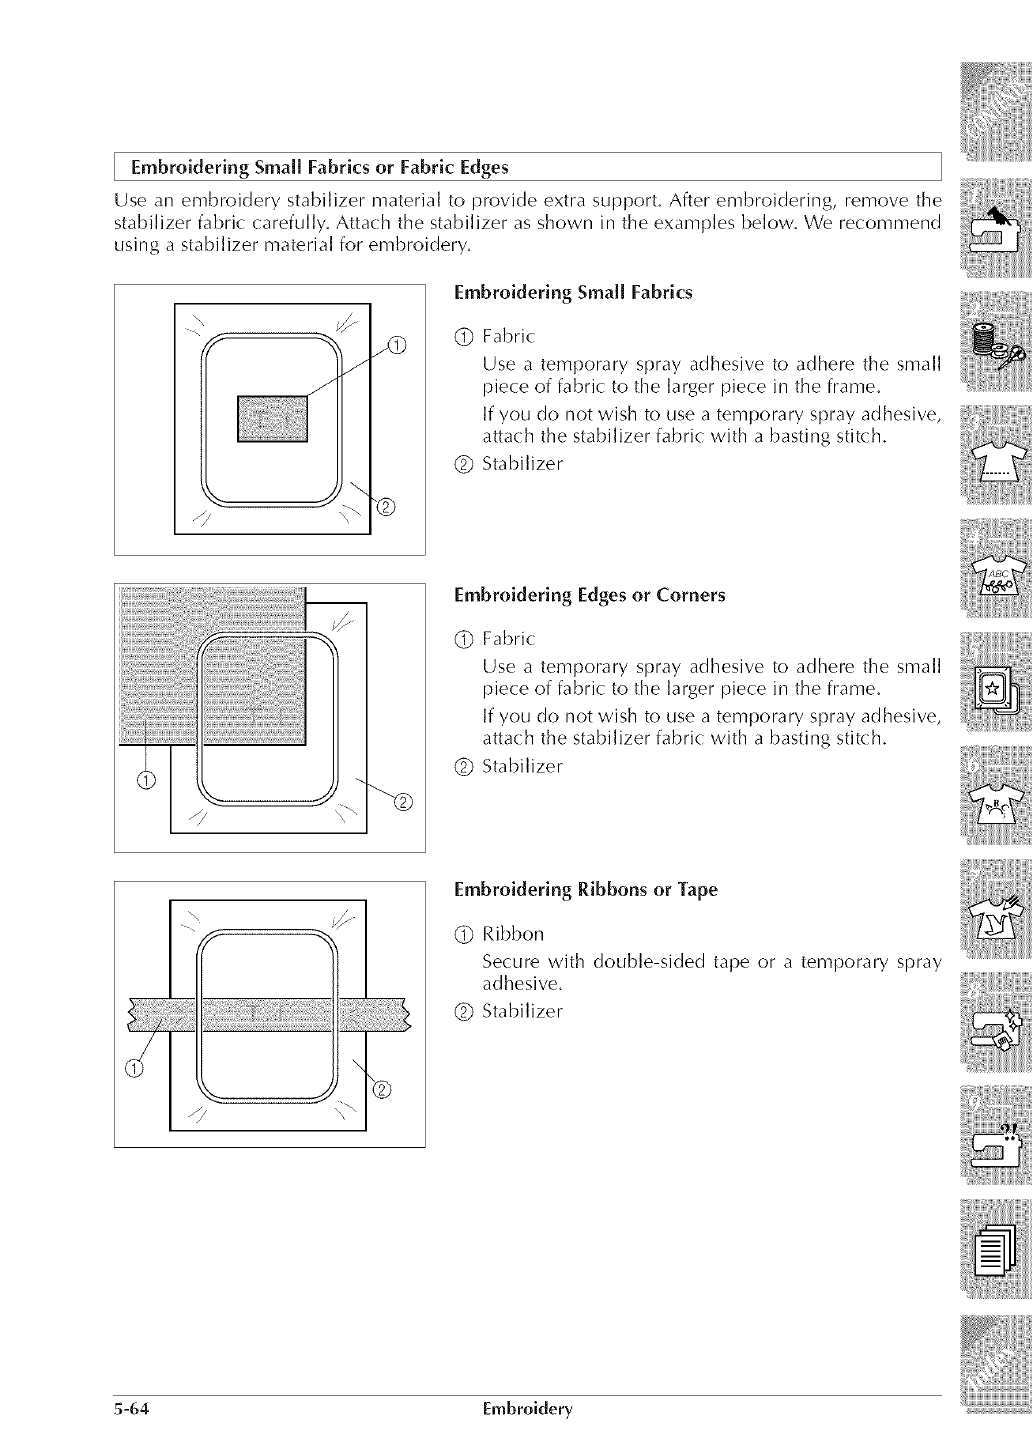
[ Embroidering Small Fabrics or Fabric Edges
Use an embroidery stabilizer material to provide extra support. After embroidering, remove the
stabilizer fabric carefully. Attach the stabilizer as shown in the examples below. We recommend
using a stabilizer material for embroidery.
\
Embroidering SmaJJFabrics
(_ Fabric
Use a temporary spray adhesive to adhere the small
piece of fabric to the larger piece in the frame,
If you do not wish to use a temporary spray adhesive,
attach the stabilizer fabric with a basting stitch,
Q_) Stabilizer
Embroidering Edges or Corners
(_ Fabric:
Use a temporary spray adhesive to adhere the small
piece of fabric to the larger piece in the frame,
If you do not wish to use a temporary spray adhesive,
attach the stabilizer fabric with a basting stitch,
Q_) Stabilizer
"o
Embroidering Ribbons or Tape
(_ Ribbon
Secure with double-sided tape or a temporary spray
adhesive.
Q_)Stabilizer
5-64 Embroidery
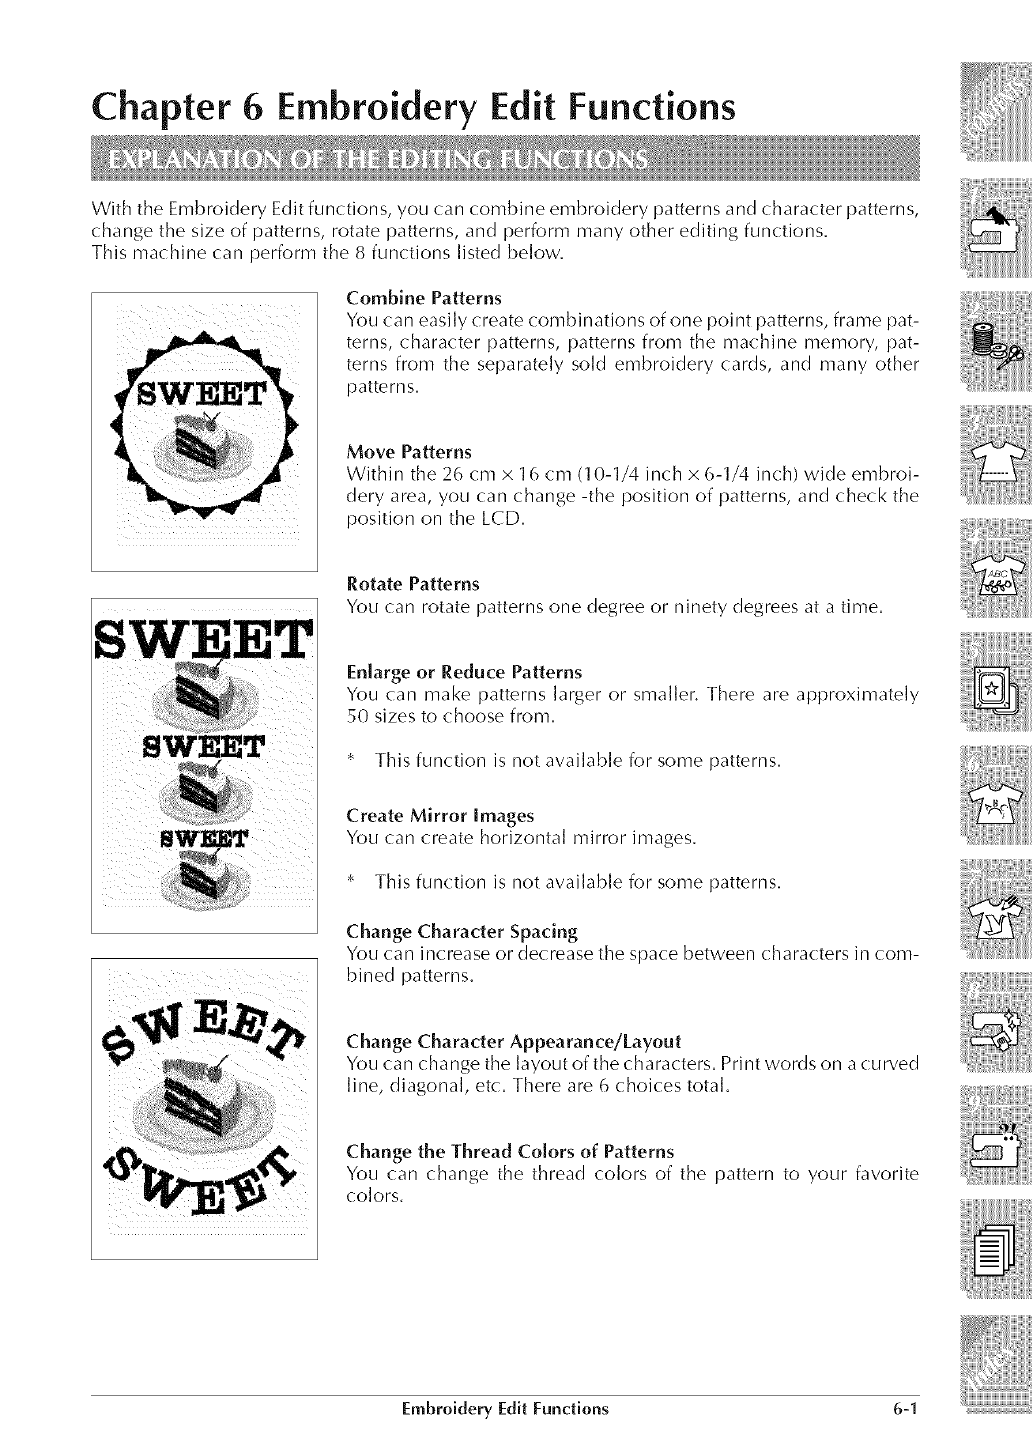
Chapter 6Embroidery Edit Functions
With the Embroidery Edit functions, you (:an combine embroidery patterns and character patterns,
change the size of patterns, rotate patterns, and perform many other editing functions.
This machine (:an perform the 8 functions listed below.
Combine Patterns
You can easily create combinations of one point patterns, frame pat-
terns, character patterns, patterns from the machine memory, pat-
terns from the separately sold embroidery cards, and many other
patterns.
Move Patterns
Within the 26 cm x 16 cm (10-1/4 inch x 6-1/4 inch) wide embroi-
dery area, you can change -the position of patterns, and check the
position on the LCD.
Rotate Patterns
You can rotate patterns one degree or ninety degrees at a time.
Enlarge or Reduce Patterns
You can make patterns larger or smaller. There are approximately
50 sizes to choose from.
This function is not available for some patterns.
Create Mirror Images
You (:an create horizontal mirror images.
This function is not available for some patterns.
Change Character Spacing
You can increase or decrease the space between characters in com-
bined patterns.
Change Character Appearance/Layout
You can change the layout of the characters. Print words on a curved
line, diagonal, etc. There are 6 choices total.
Change the Thread Colors of Patterns
You can change the thread colors of the pattern to your favorite
colors,
Embroidery Edit Functions 6-1

1. Attach the embroidery unit, and prepare the machine
for embroidery (see page 5-5).
2. Press to call the screen at the ]eft,
Key Display Pattern Type
One point pattern
Floral alphabet pattern
Pattern saved in the machine's memory
Character pattern
Frame pattern
Pattern from an embroidery card (sold sepa-
rately)
Pattern from a floppy disk
Note
If your ma(hine did not (ome furnished with a built-in
floppy dbk drive, you can receive an upgrade service for
your ma(hine, so that it (an use floppy disk at your au-
thorized dealel:
6-2 Embroidery Edit Functions
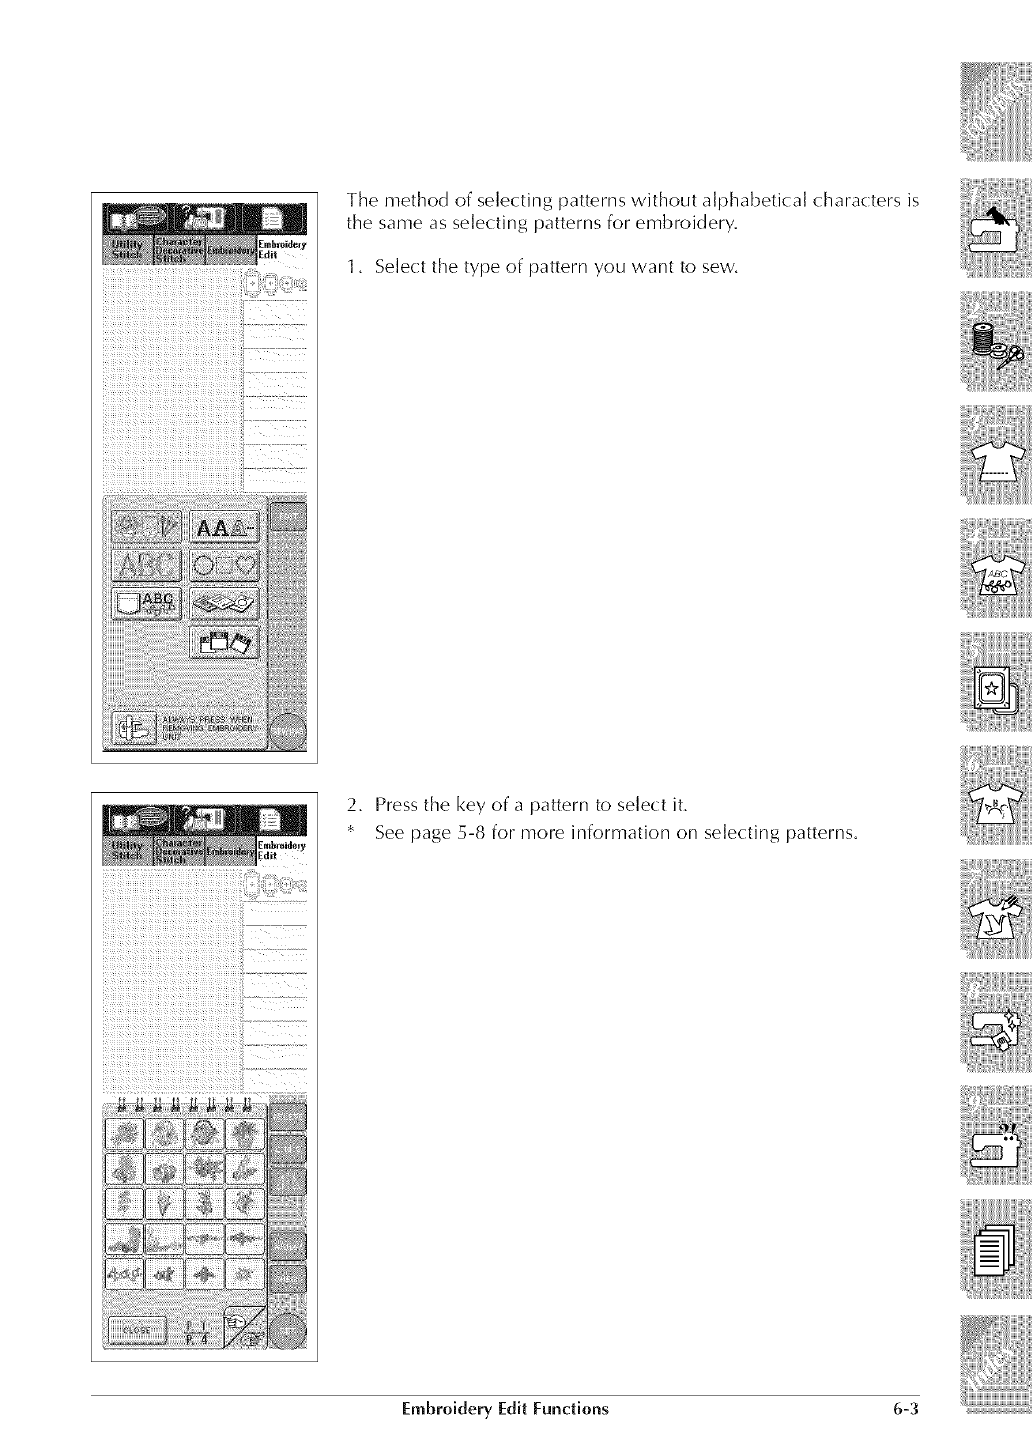
The method of selecting patterns without alphabetical characters is
the same as selecting patterns for embroidery,
1, Select the type of pattern you want to sew,
2, Press the key of a pattern to select it,
See page 5-8 for more information on selecting patterns,
Embroidery Edit Functions 6-3
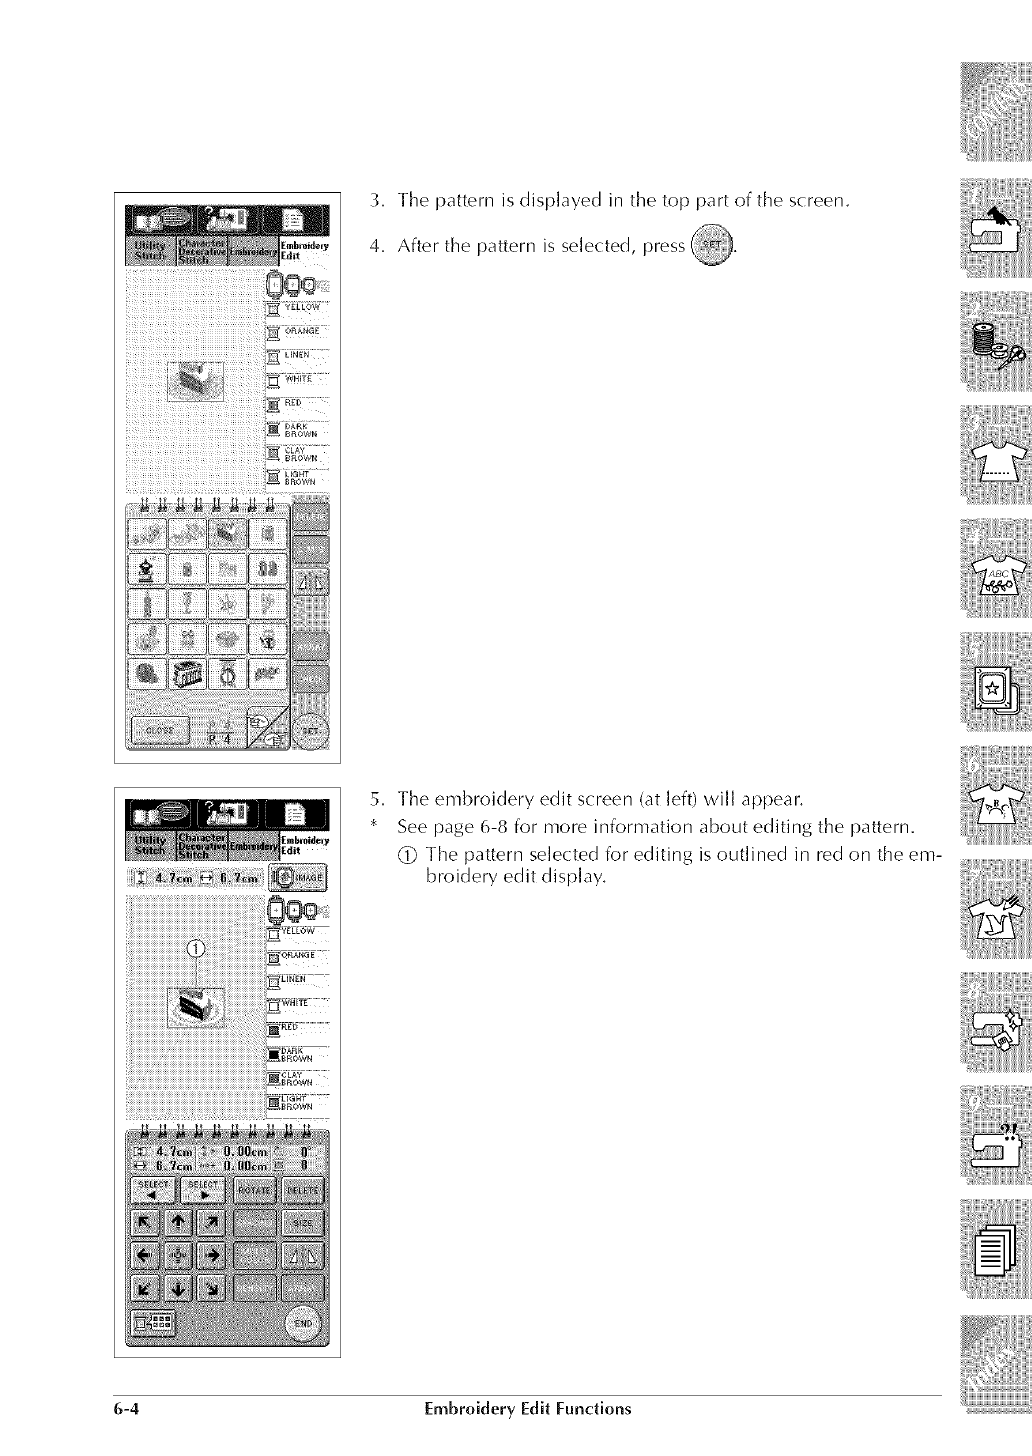
i!i!!i!ili!iiiillii_iiiiiiiiiiii!,
3. The pattern is displayed in the top part of the screen.
4. After the pattern is selected, press _.
ii,,i_i_i_iiiiii_ii_ii_ii'iiii,,...........
:iiiiiiiiiiiiiiiiiiiiiiiiiiiiiiiiiiiiiiiiiiiiiiiiiiiiiiiiiiiiiiiiiiiiiiiiiiiiiiiiiiiiiiiiiiiiiiiiiiiiiiiiiiiiiiiiiiii_aowN
5. The embroidery edit screen (at left) will appear.
See page 6-8 for more information about editing the pattern.
(_ The pattern selected for editing is outlined in red on the em-
broidery edit display.
6-4 Embroidery Edit Functions
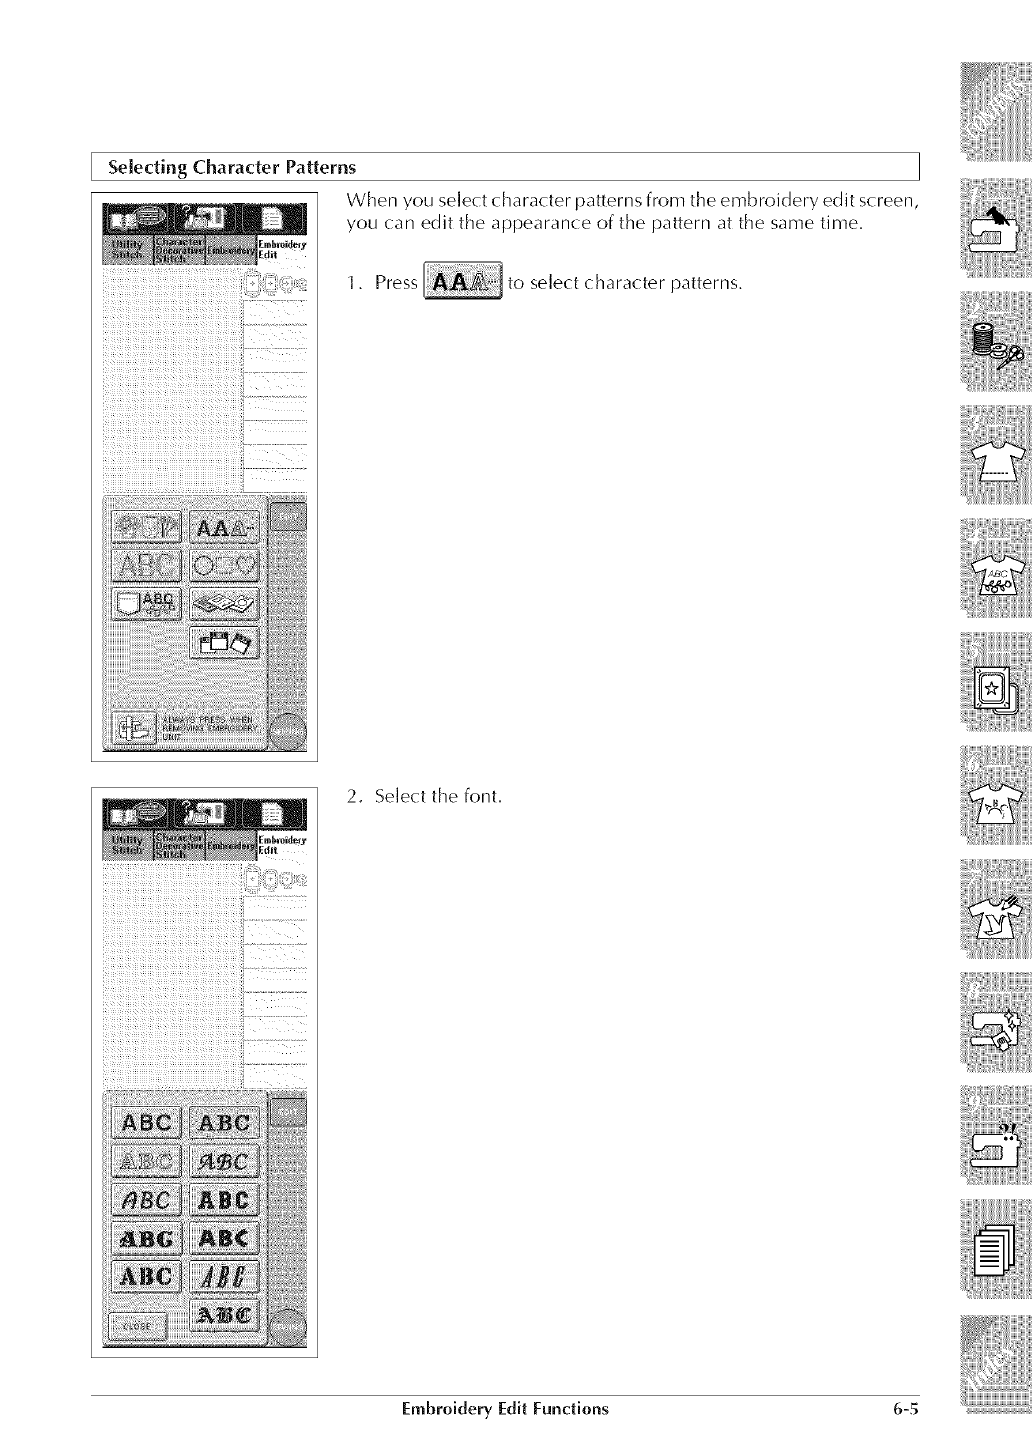
Selecting Character Patterns
When you select character patterns from the embroidery edit screen,
you can edit the appearance of the pattern at the same time.
1. Press to select character patterns.
2. Select the font.
Embroidery Edit Functiens 6-5
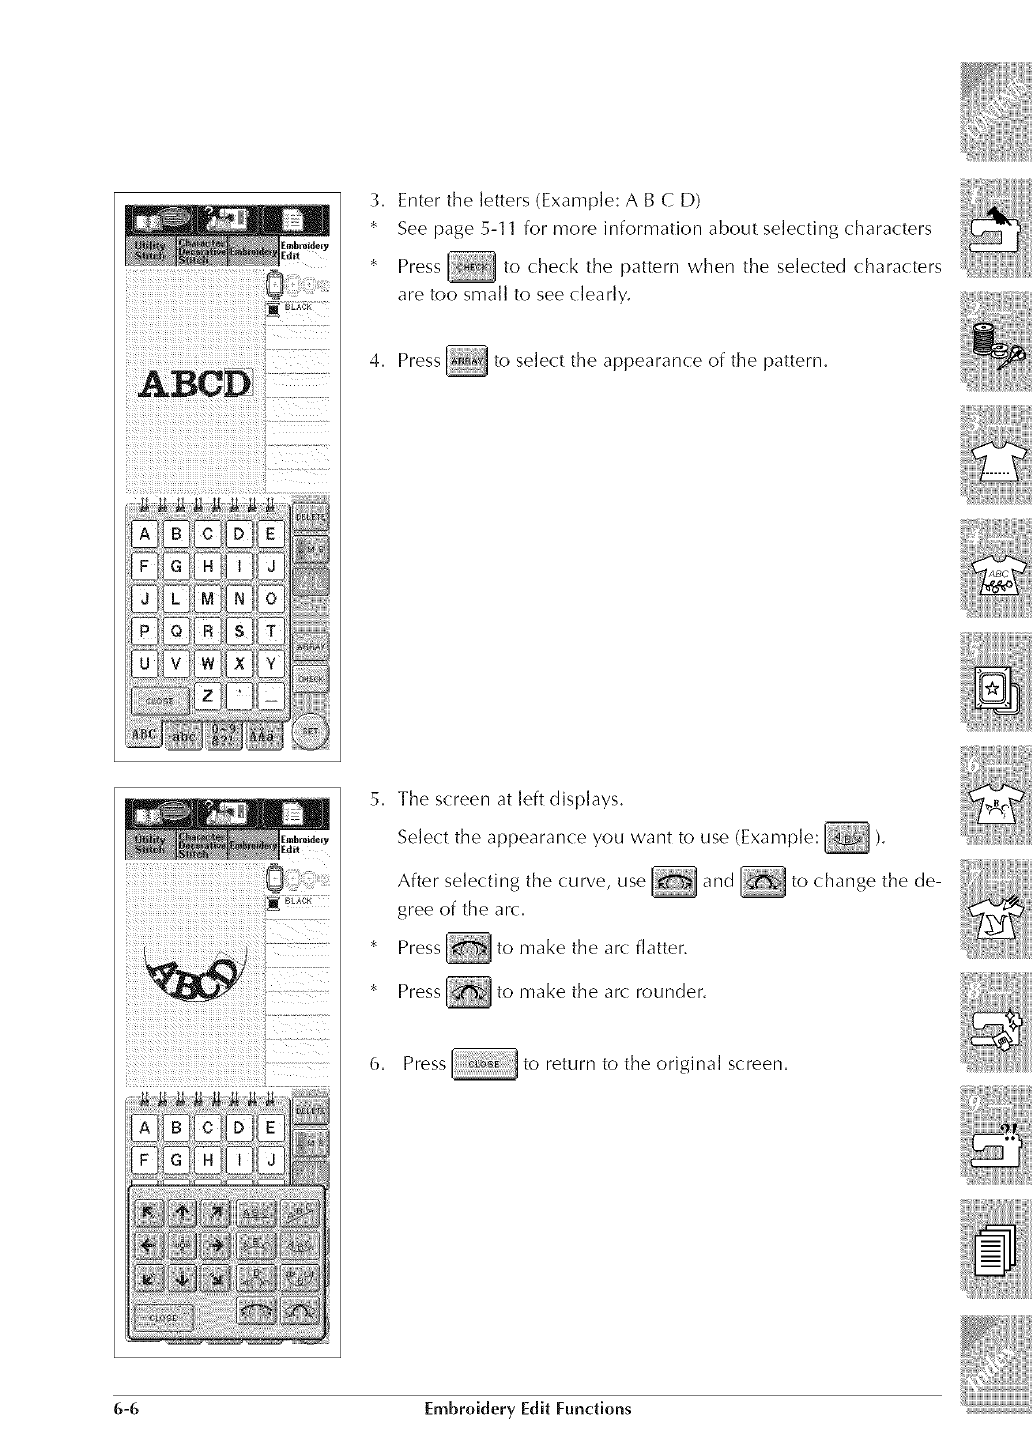
ABCD
0
3. Enter the letters (Example: A B C D)
* See page 5-11 for more information about selecting characters
* Press _ to check the pattern when the selected characters
are too small to see clearly.
4. Press _ to select the appearance of the pattern.
5. The screen at left displays.
Select the appearance you want to use (Example: _ ).
After selecting the curve, use _ and _ to change the de-
gree of the arc.
* Press _ to make the arc flatter.
* Press _ to make the arc rounder.
6. Press to return to the original screen.
6-6 Embroidery Edit Functions
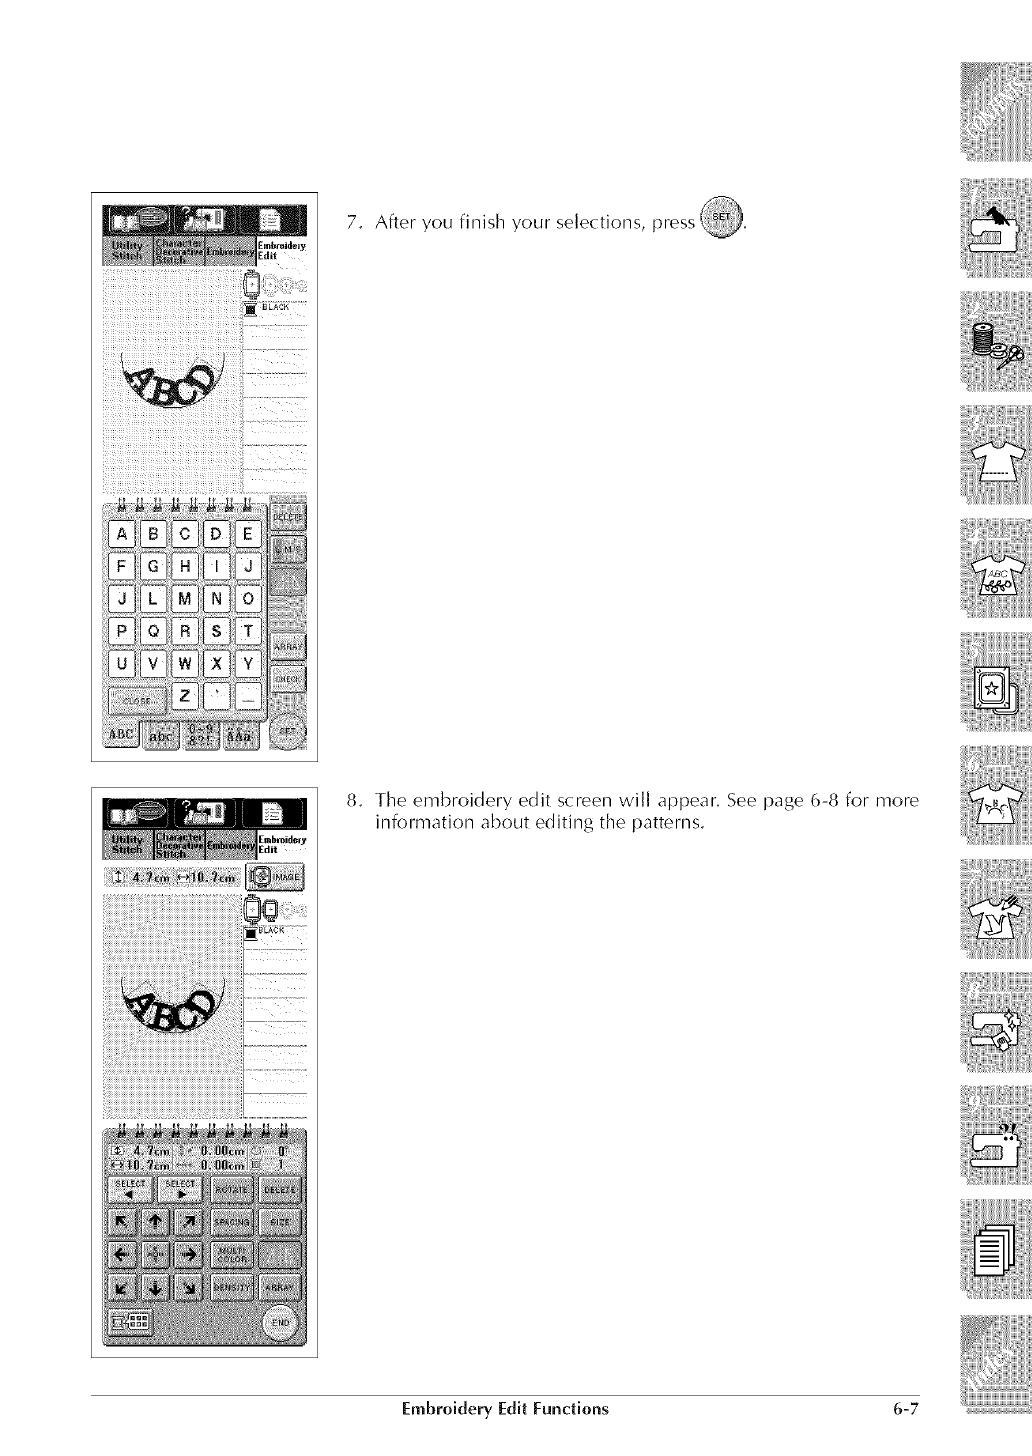
7. After you finish your selections, press@.
i!_iiiiiiiiiiiiiiiiiiiiiiiiiiiiiiiiiiiiiiiiiiiiiiiiiiiiiiiiiiiiiiiiiiiiiiiiiiiiiiiiiiiiiiiiiiiiiiiiiiiiiiiiiiiiiiiiiii
_i_!iii_iiiiiiiiiiiiiiiiiiiiiiiiiiiiiiiiiiiiiiiiiiiiiiiiiiiiiiiiiiiiiiiiiiiiiiiiiiiiiiiiiiiiiiiiiiiiiiiiiiiiiiiiiiiiiiii
8. The embroidery edit screen will appear. See page 6-8 for more
information about editing the patterns.
Embroidery Edit IFundiens 6-7'
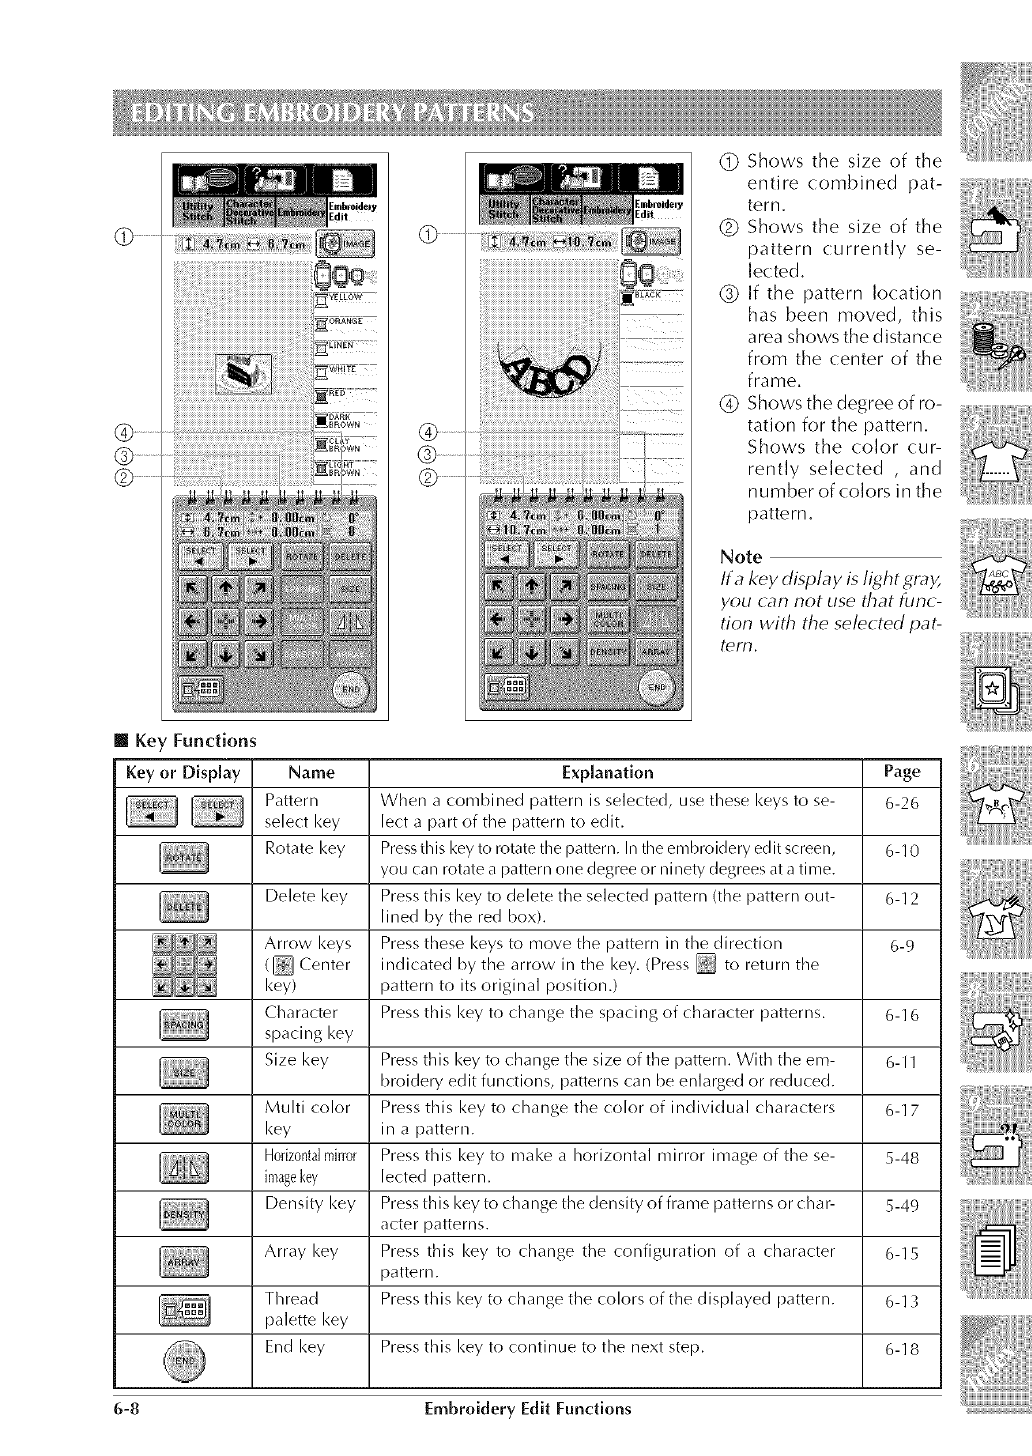
[] Key Functions
Q Shows the size of the
entire combined pat-
tern.
(_ Shows the size of the
pattern currently se-
lected.
(_ If the pattern location
has been moved, this
area shows the distance
from the center of the
frame.
(_) Shows the degree of ro-
tation for the pattern.
Shows the color cur-
rently selected ,and
number of colors in the
pattern.
Note
If a key display is light gray,
you can not use that tunc-
tion with the selected pat-
tern.
Name
Pattern
select key
Rotate key
Delete key
Arrow keys
( _ Center
key)
Character
spacing key
Size key
Explanation
When a combined pattern is selected, use these keys to se-
lect a part of the pattern to edit.
Press this key to rotate the pattern. In the embroidery edit screen,
you can rotate a pattern one degree or ninety degrees at a time.
Press this key to delete the selected pattern (the pattern out-
lined by the red box).
Press these keys to move the pattern in the direction
indicated by the arrow in the key. (Press _ to return the
pattern to its original position.)
Press this key to change the spacing of character patterns.
Page
6-26
6-10
6-12
6-9
6-16
Press this key to change the size of the pattern. With the era- 6-11
broidery edit functions, patterns can be enlarge(] or reduce(].
Multi color Press this key to change the color of individual characters 6-17
key in a pattern.
Horizontalmirror Press this key to make a horizontal mirror image of the so- 5-48
imagekey lected pattern.
Density key Press this key to change the density of frame patterns or char- 5-49
acter patterns.
Array key Press this key to change the configuration of a character 6-15
pattern.
Thread Press this key to change the colors of the displayed pattern. 6-13
palette key
End key Press this key to continue to the next step. 6-18
6-8 Embroidery Edit Functions
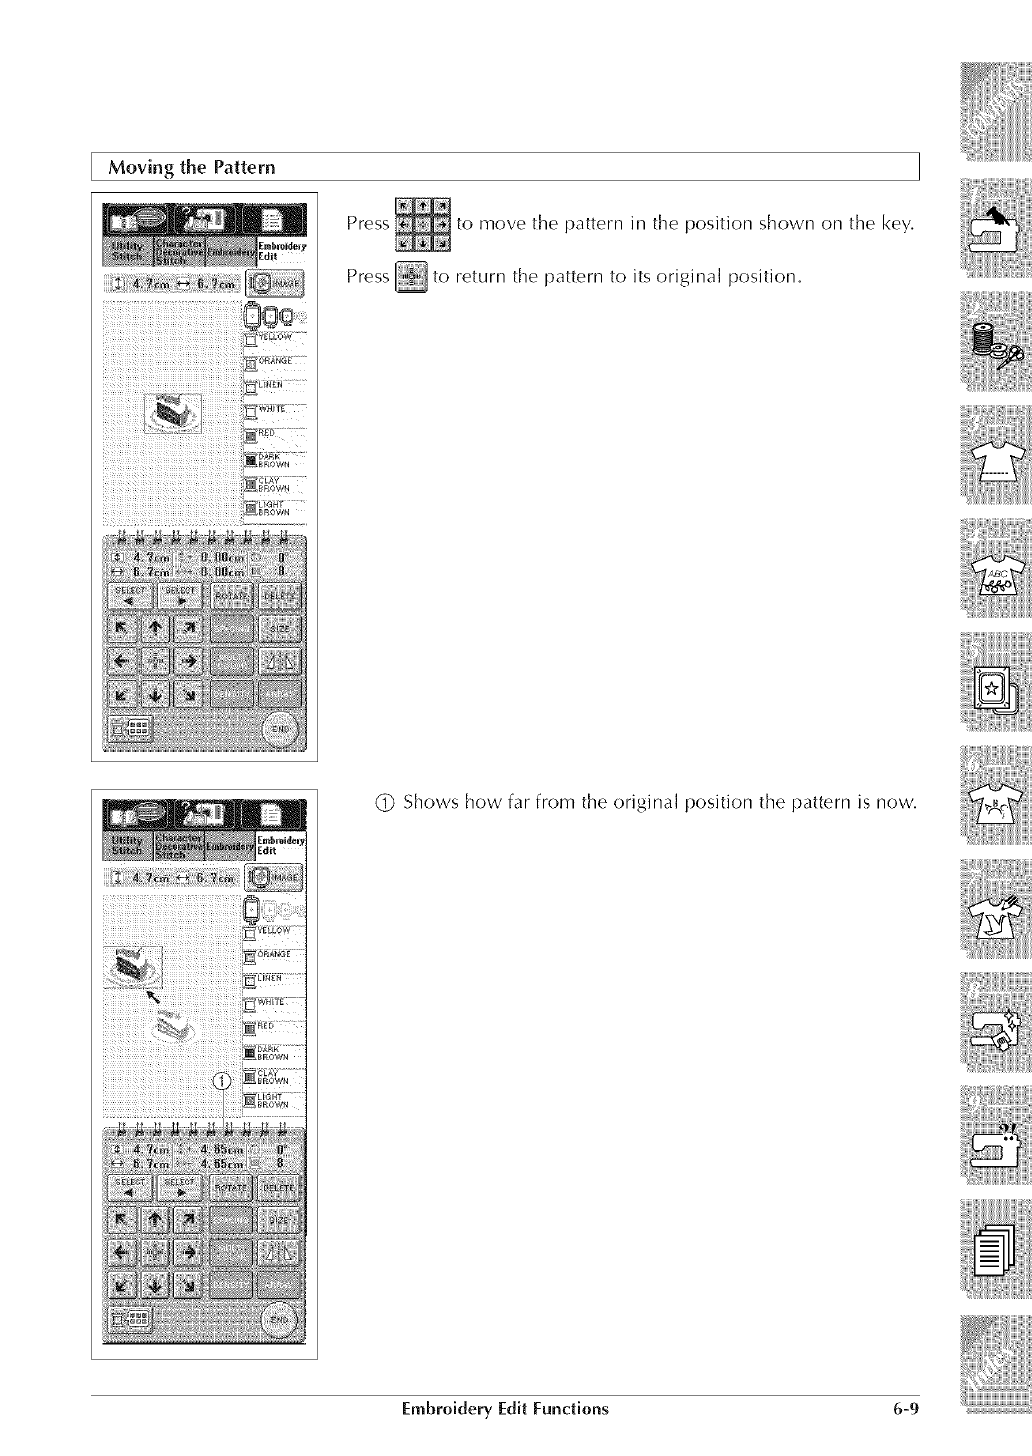
Moving the Pattern
to move the pattern in the position shown on the key.
Press _ to return the pattern to its original position.
(_ Shows how far from the original position the pattern is now.
Embroidery Edit Functions 6-9
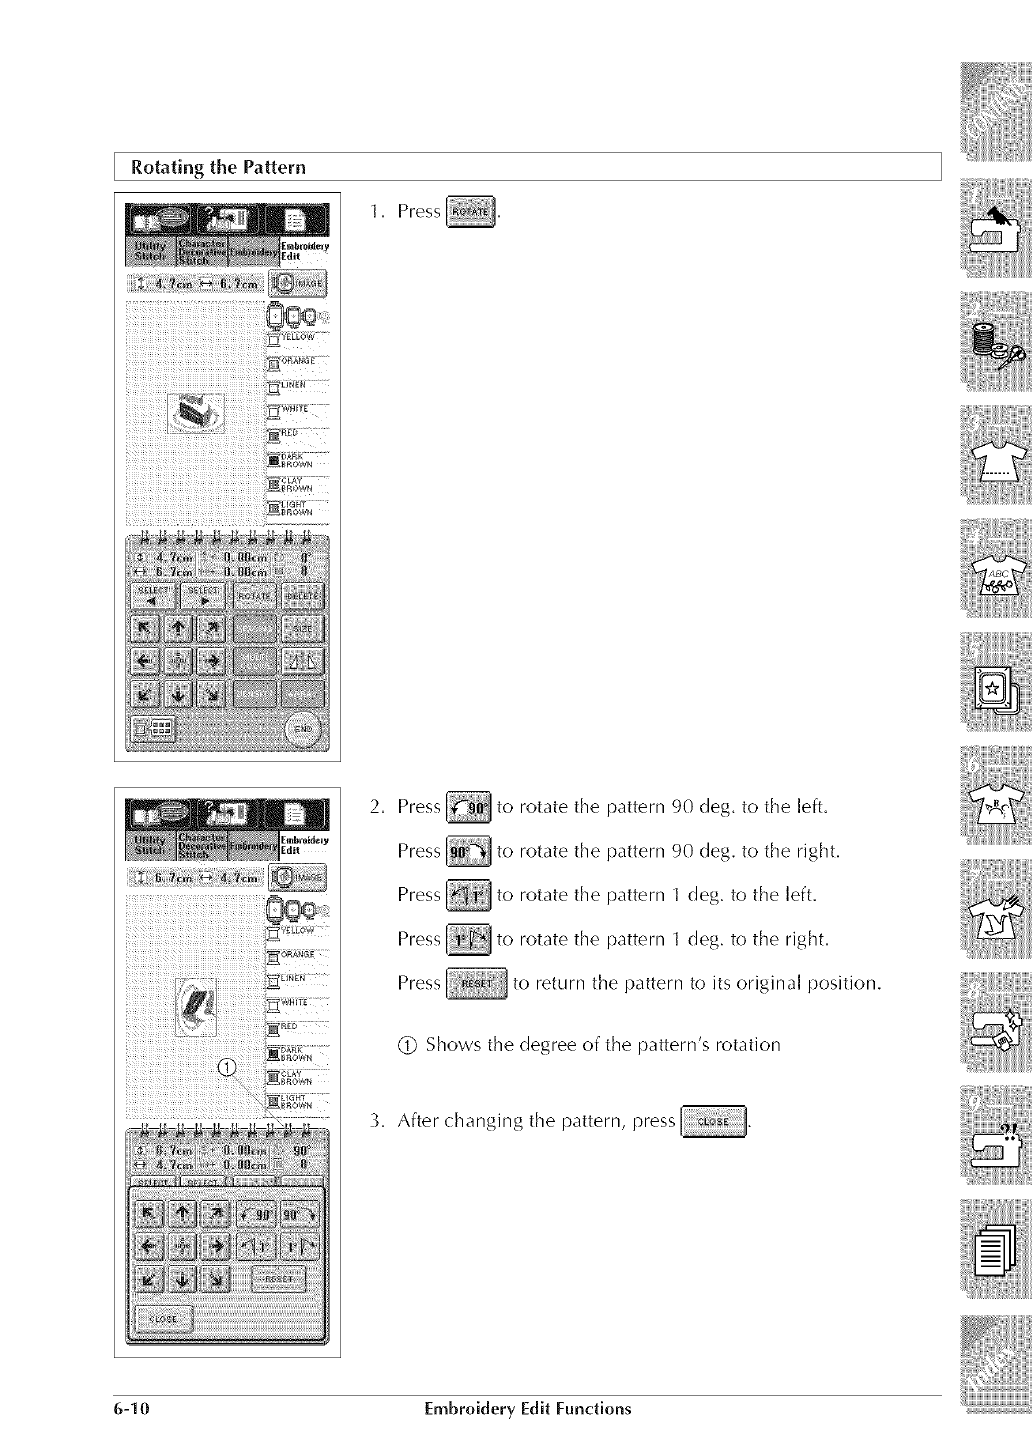
Rotating the Pattern
_LINE_
_WHITE
CLAY
_g_OWr
LIGHT
_ROW_
1, Press
2, Press_to rotate the
Press_to rotate the
Press_to rotate the
Press_to rotate the
Press to return the pa_erntoits original position,
:)attern 90 dog. to the left.
:)attern 90 dog. to the right.
:)attern 1 dog. to the left.
gattern 1 dog. to the right.
a i
(_ Shows the degree of the p_ tterns rotation
3. After (:hanging the pattern, press
6-10 Embroidery Edit Functions
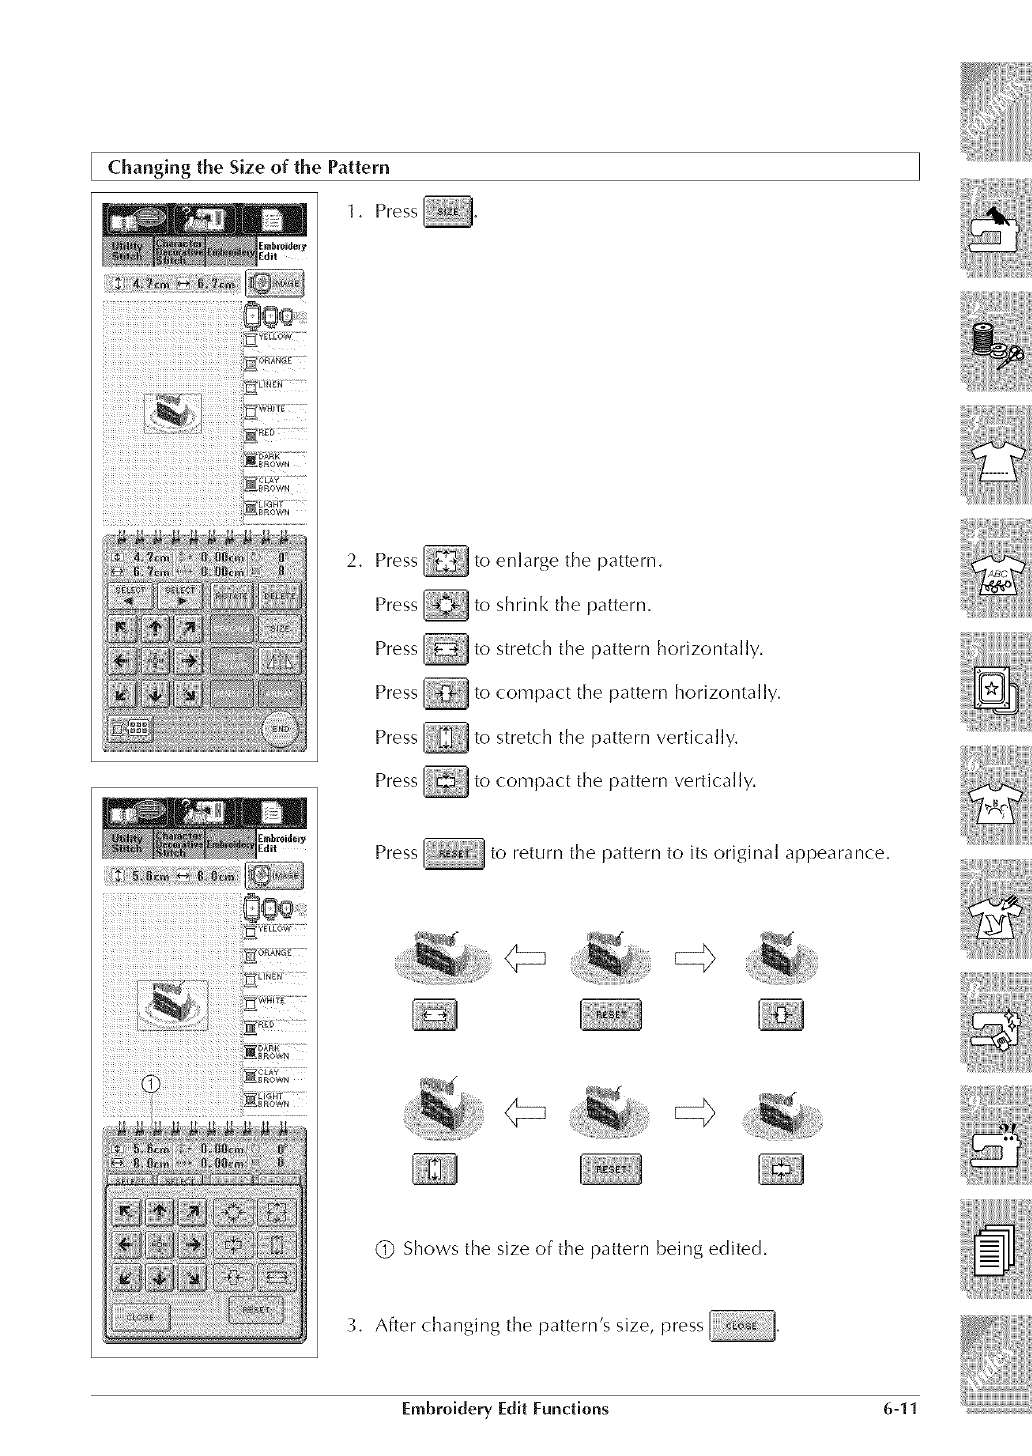
Changing the Size of the Pattern
1, Press
2, Press _ to enlarge the pattern,
Press _ to shrink the pattern.
Press _ to stretch the pattern horizontally.
Press _ to compact the pattern horizontally.
Press _ to stretch the pattern vertically.
Press _ to compact the pattern vertically.
Press to return the pattern to its original appearance.
(_ Shows the size of the pattern being edited.
3, After (:hanging the pattern's size, press
Embroidery Edit Functions 6-11
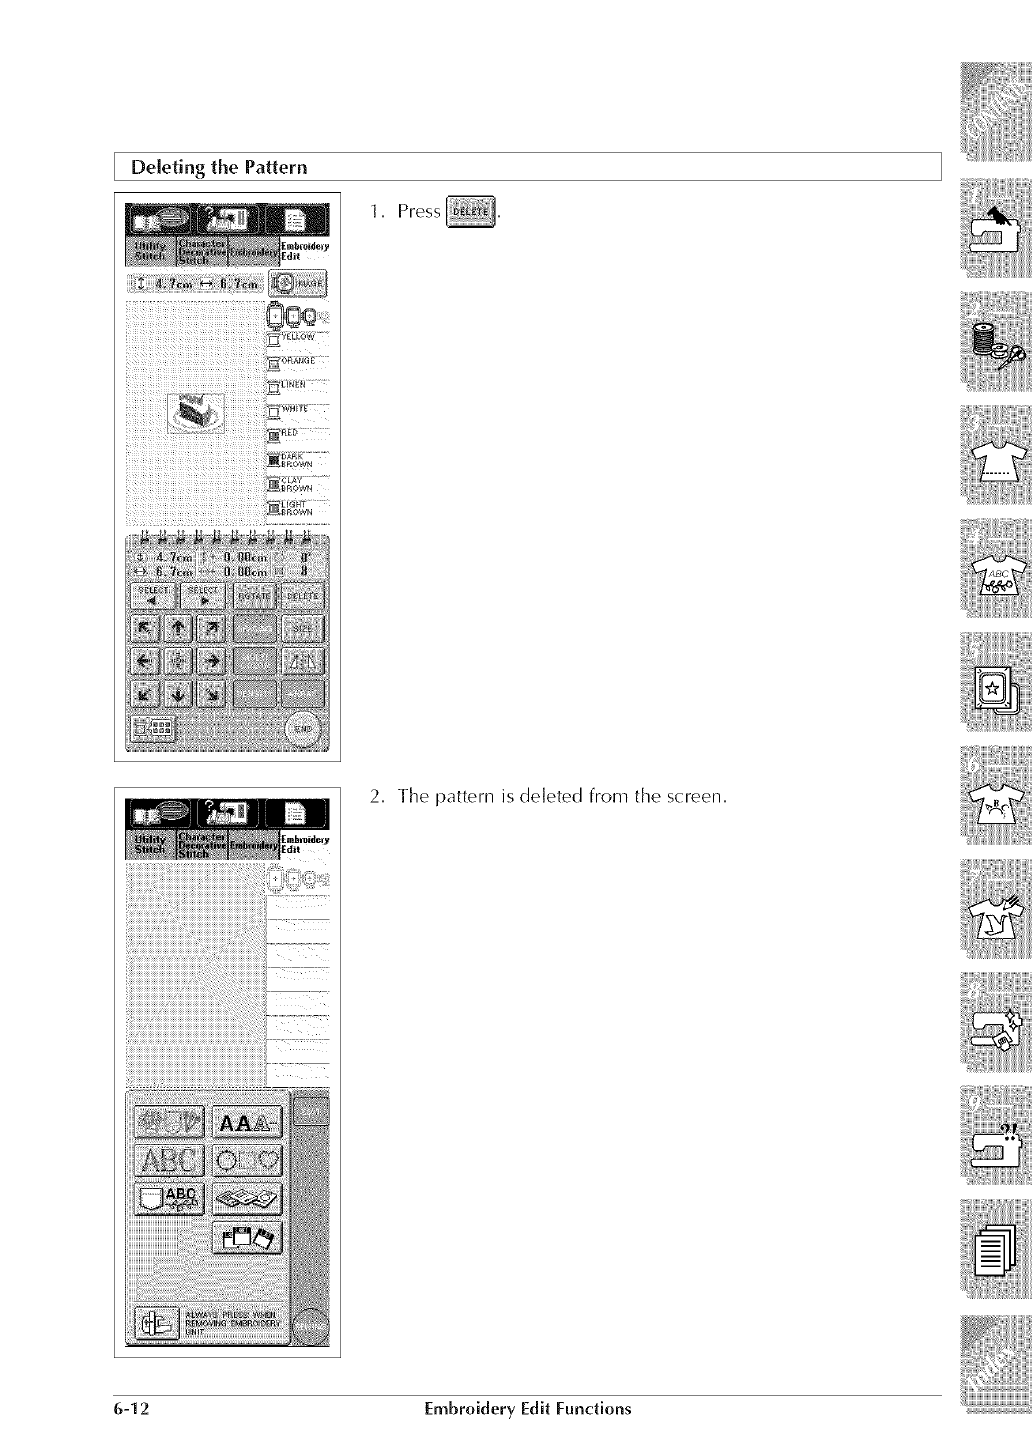
Deleting the Pattern
1. Press
2, The pattern is deleted from the screen,
6-12 Embroidery Edit Functions
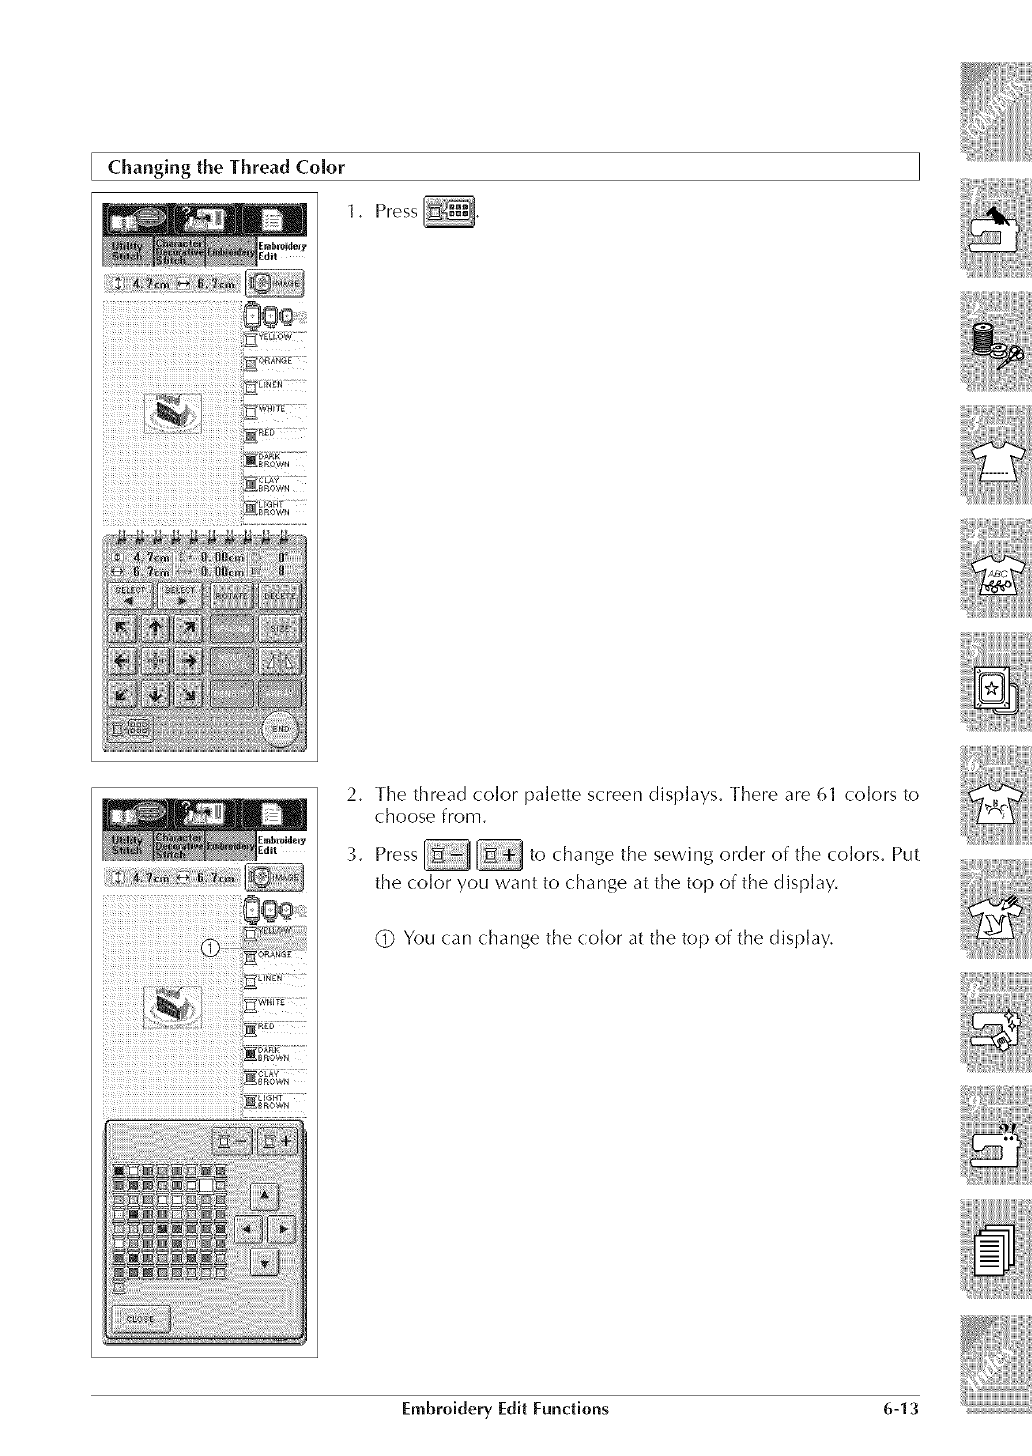
Changing the Thread Color
1, Press
2, The thread color palette screen displays. There are 61 colors to
choose from.
"]. Press _ @ to change the sewing order of the colors. Put
the color you want to change at the top of the display.
(Z) You can change the color at the top of the display,
Embroidery Edit Functions 6-13
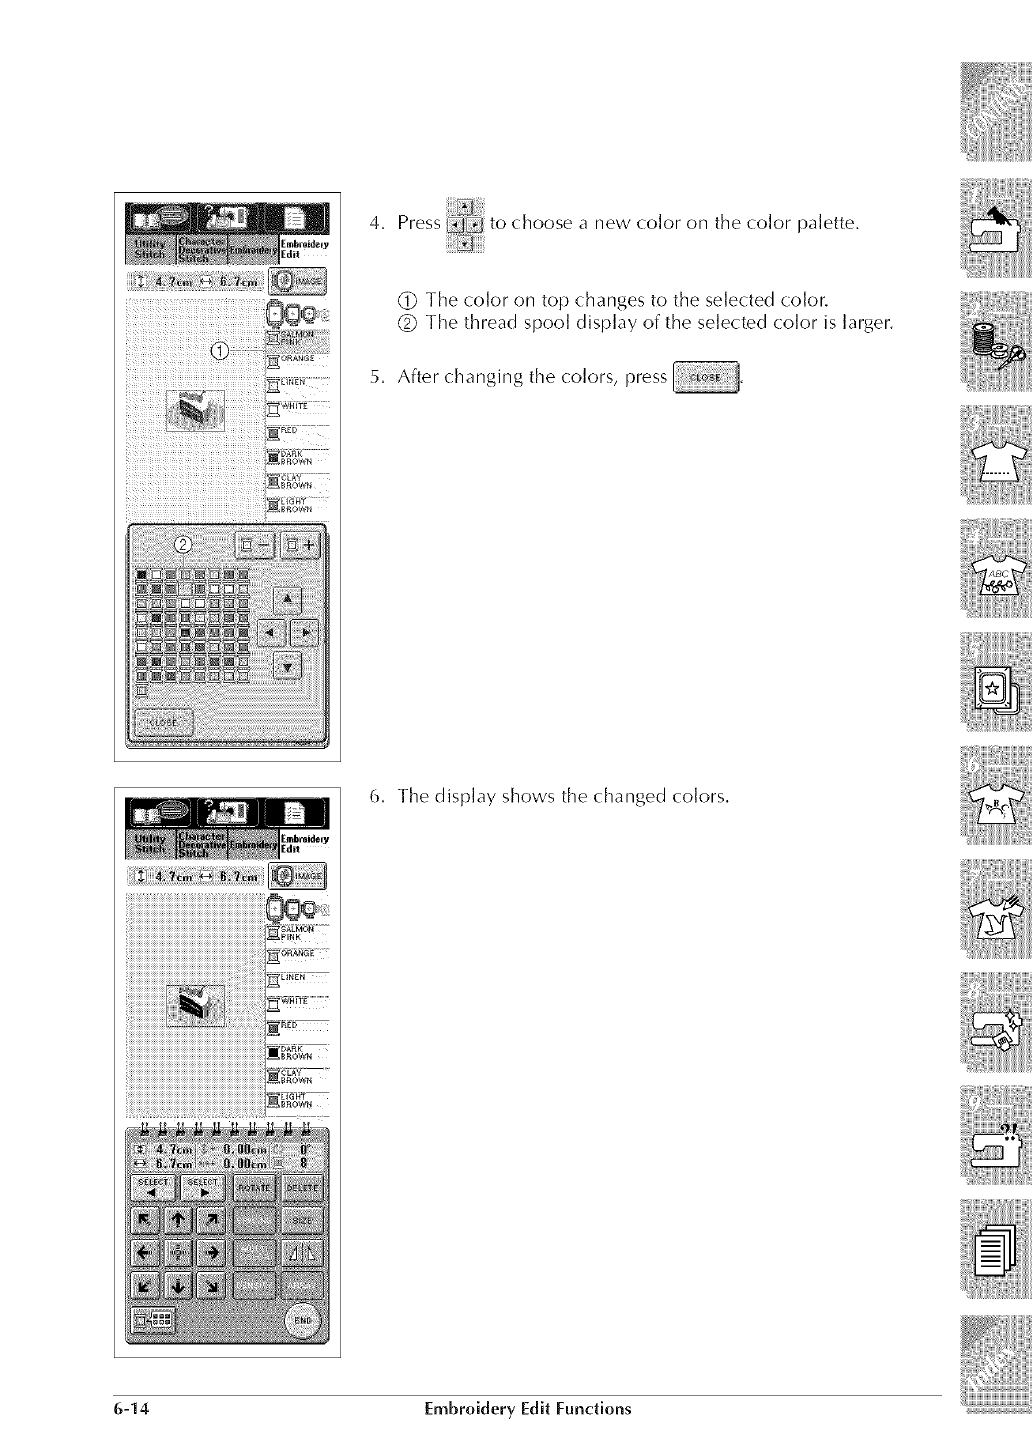
4. Press to choose a new color on the color palette.
(_ The color on top changes to the selected color,
(_ The thread spool display of the selected color is larger.
5. After changing the colors, press
6. The display shows the (:hanged colors,
6-14 Embroidery Edit Functions
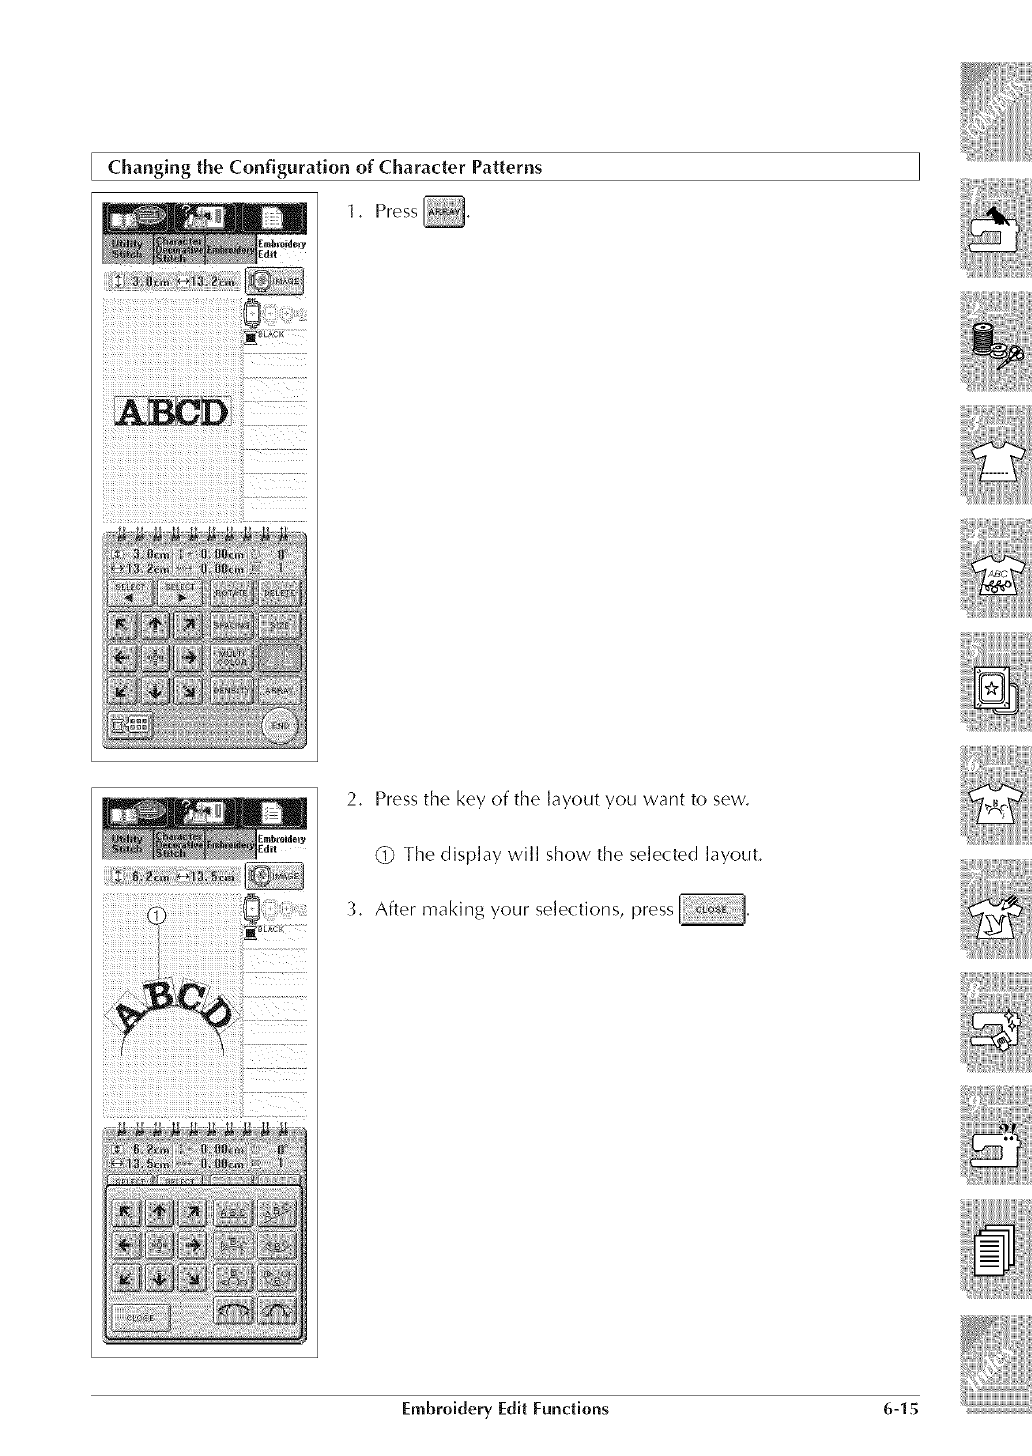
2, Press the key of the layout you want to sew,
The display will show the selected layout,
3, After making your selections, press
Embroidery Edit Functions 6-15
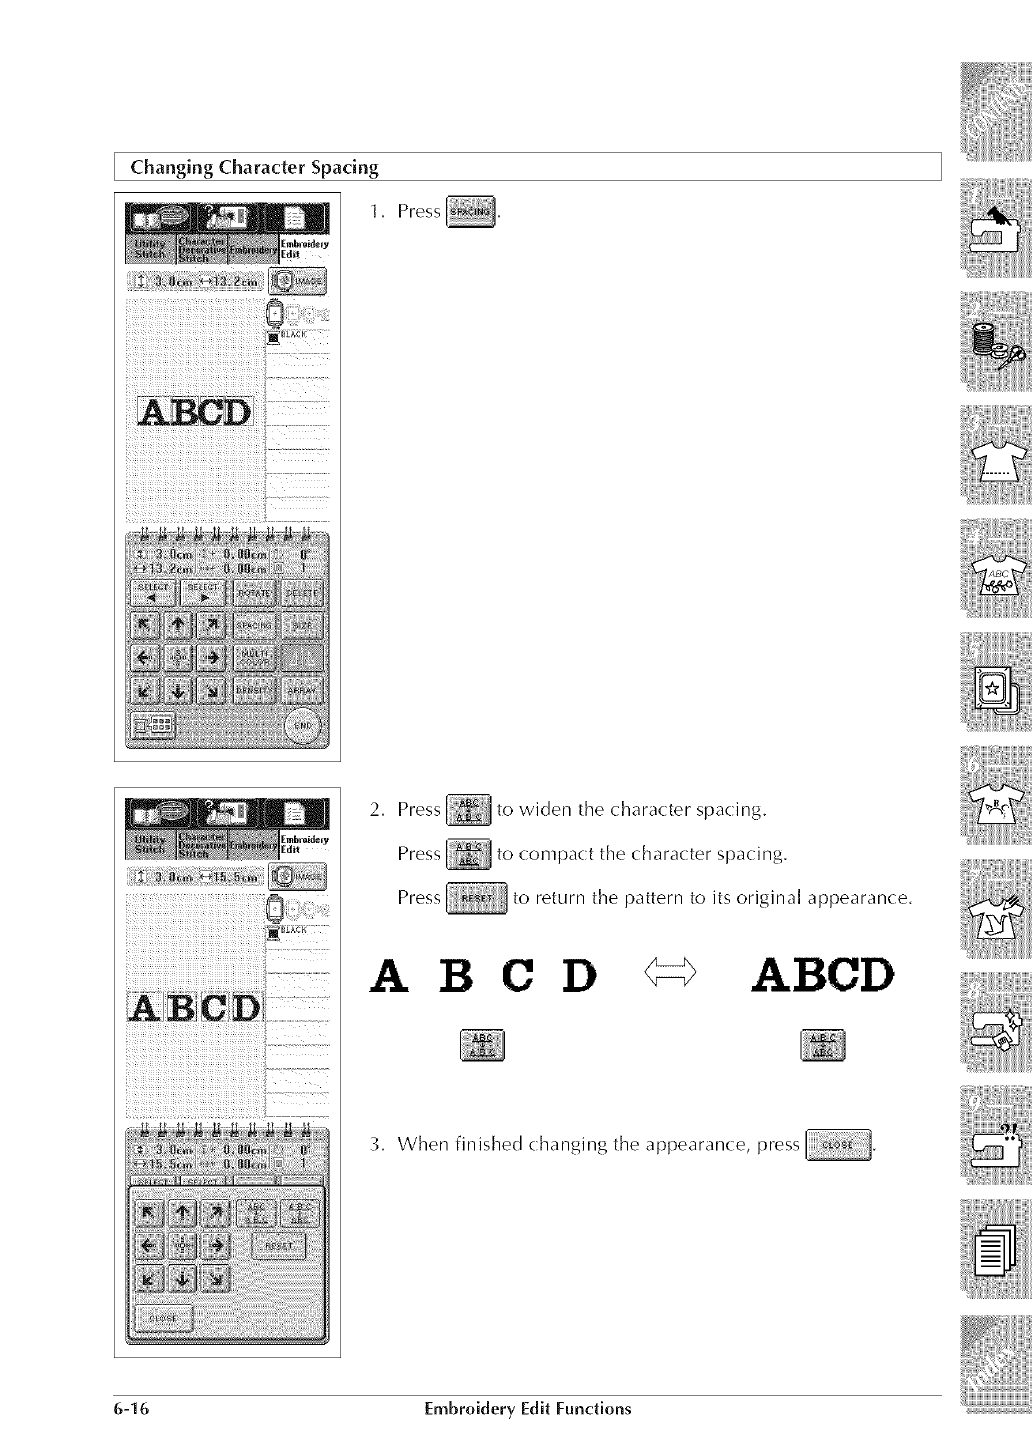
Changing Character Spacing
1. Press
2. Press_to widen the character spacing.
Press _ to compact the character spacing.
Press to return the pattern to its original appearance.
A B C D _ABCD
3. When finished changing the appearance, press
6-16 Embroidery Edit Functions
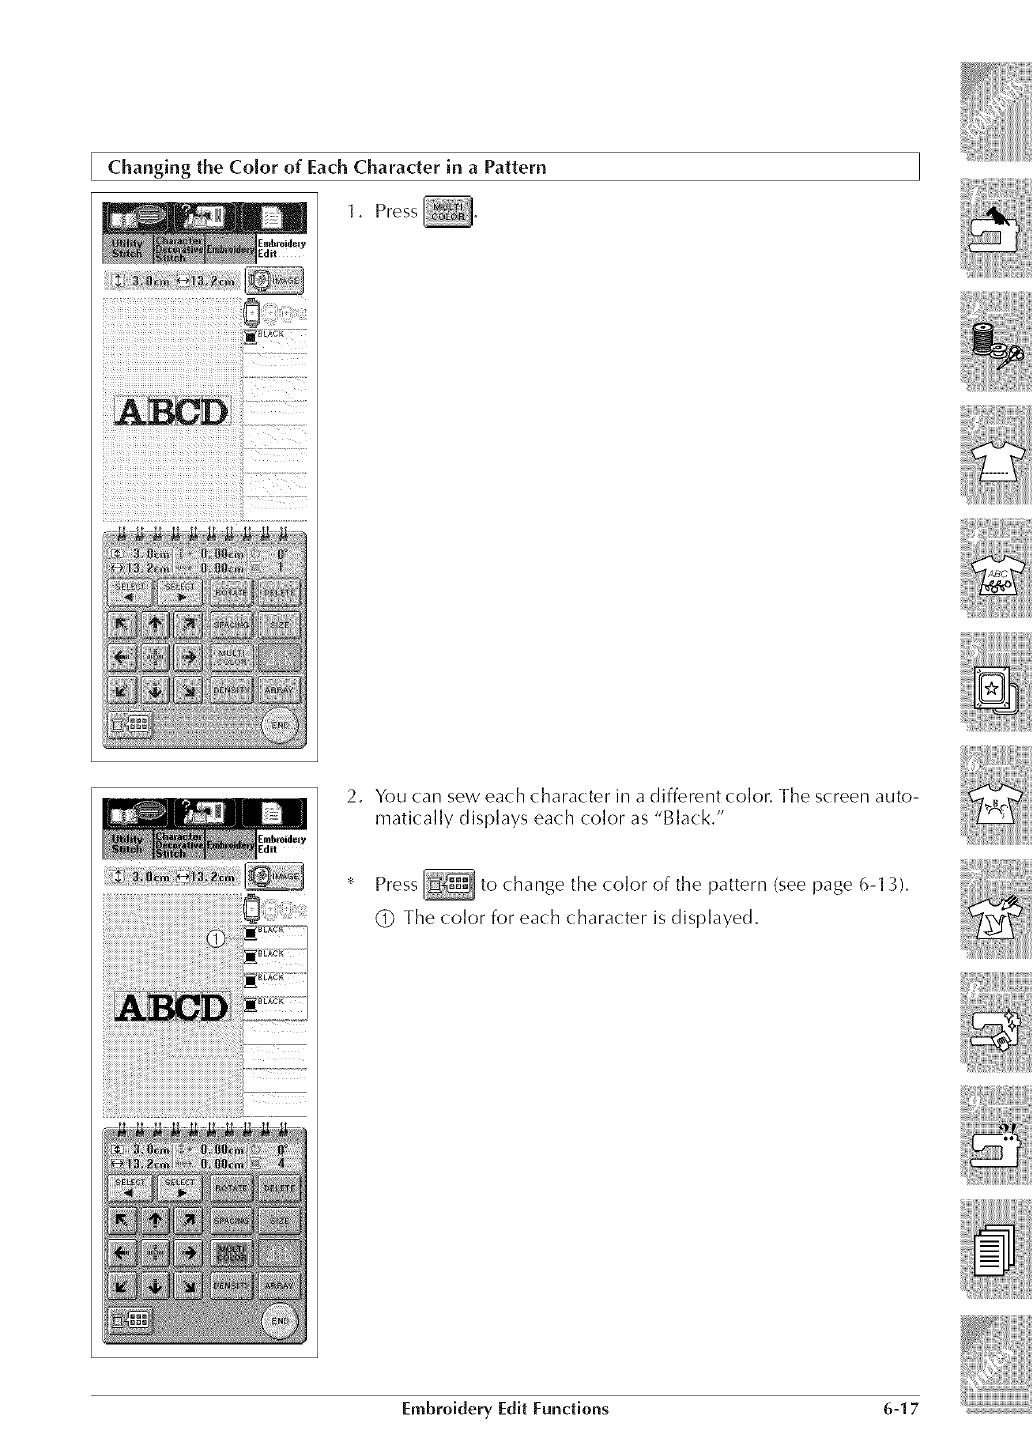
Changing the Color of Each Character in a Pattern
1, Press
2. You can sew each character in a different color. The screen auto-
matically displays each color as "Black."
* Press to change the color of the pattern (see page 6-13),
(_ The color for each character is displayed.
Embroidery Edit Fundions 6-17
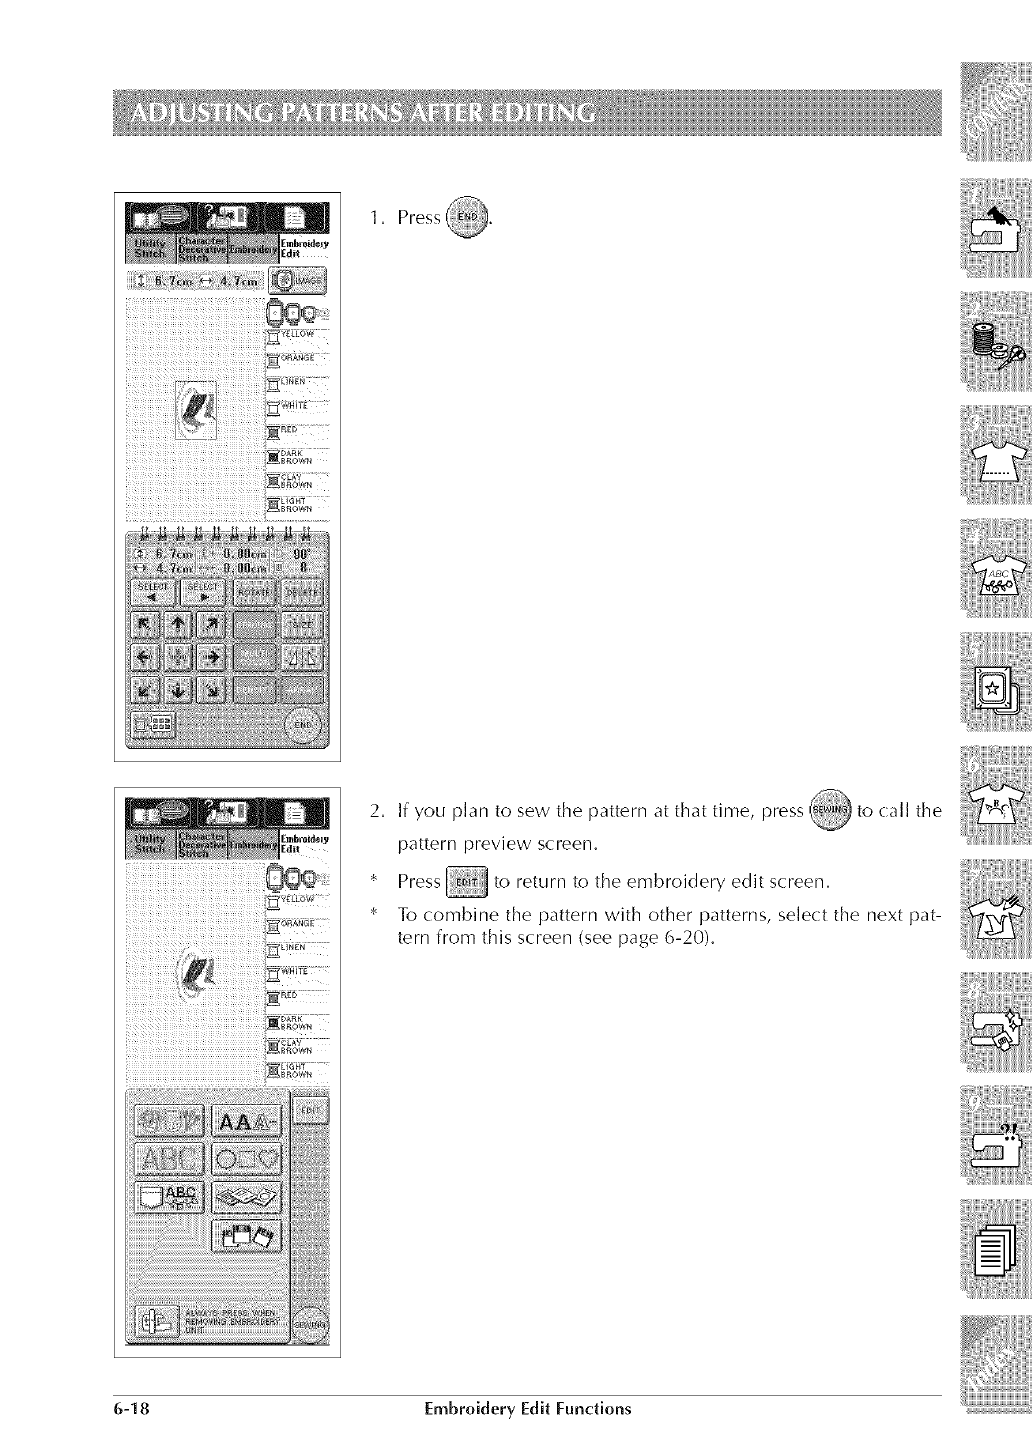
!ii!il!!iiliii!!Vi:iii:!!:iiiiiii!iiiiii!ii!_!_ _, -.:
_BROWN
;_ROWN
1, Press
2. If you plan to sew the pattern at that time, press _ to (:all tile
pattern preview screen.
*Press _ to return to the embroidery edit screen.
*To combine the pattern with other patterns, select the next pat-
tern from this screen (see page 6-20).
6-18 Embroidery Edit Functions

..v 4701[[ 11._iaH 8
3, See page 5-29 for more information about sewing the patterns,
* When you want to revise edited patterns, see page 6-30,
Embroidery Edit Functions 6-19

Example
1. Attach the embroidery unit, and prepare the machine
for embroidery (see page 5-3).
2. Press to call the screen at left.
3. Select a border.
(_ Press
6-20 Embroidery Edit Functions
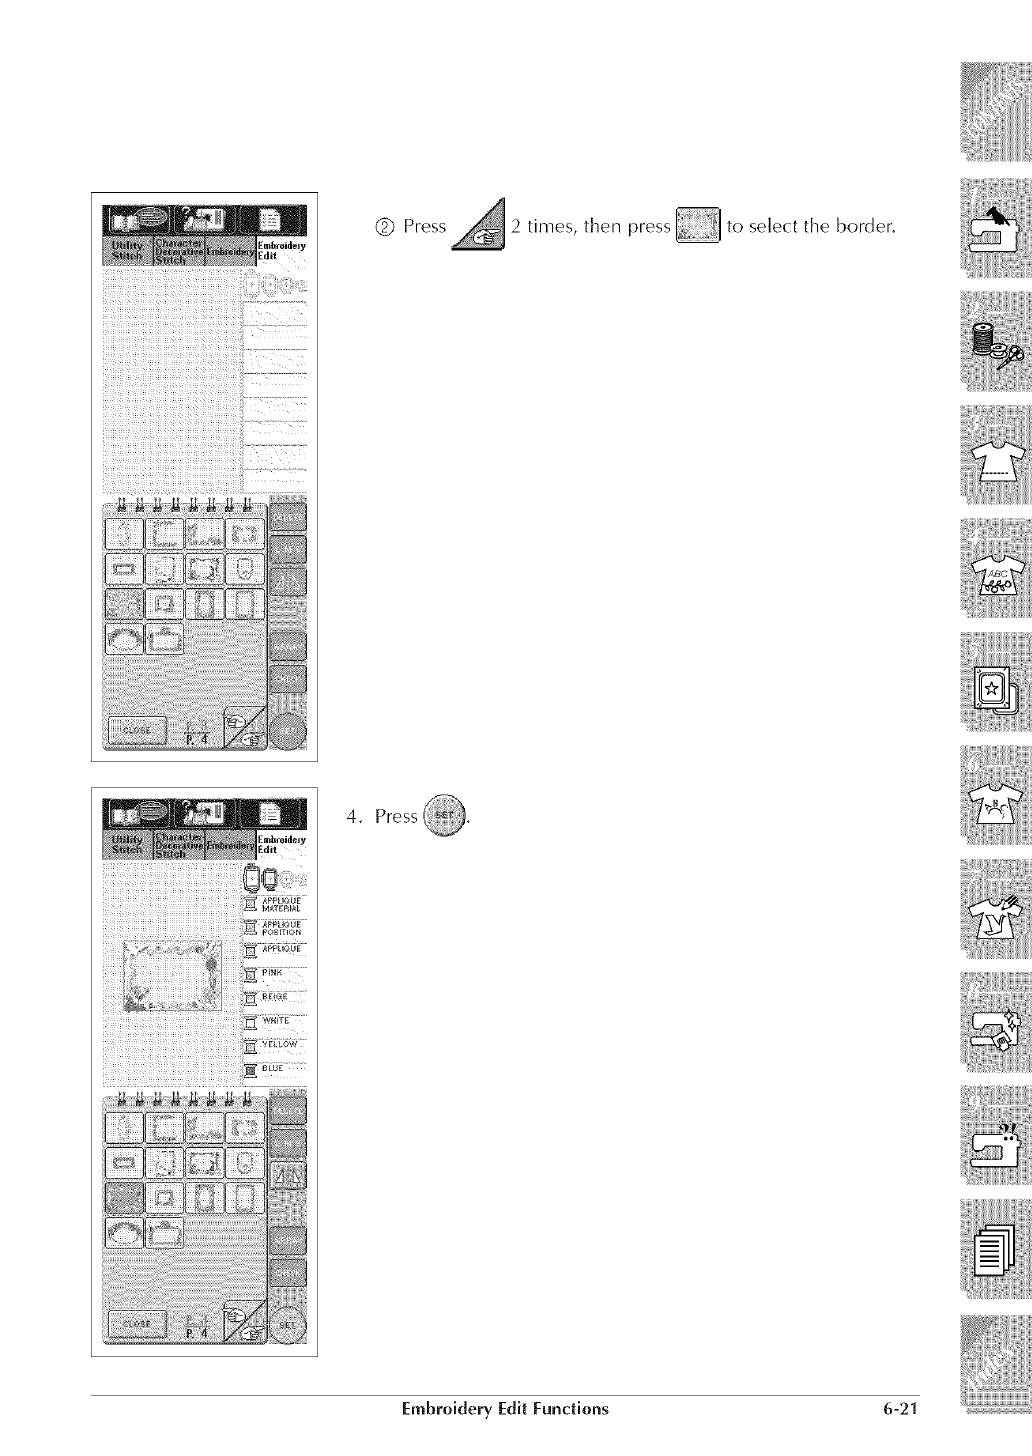
{]_ Press 2 times, then press _ to select the border,
4. Press _.
Embroidery Edit Functions 6-21
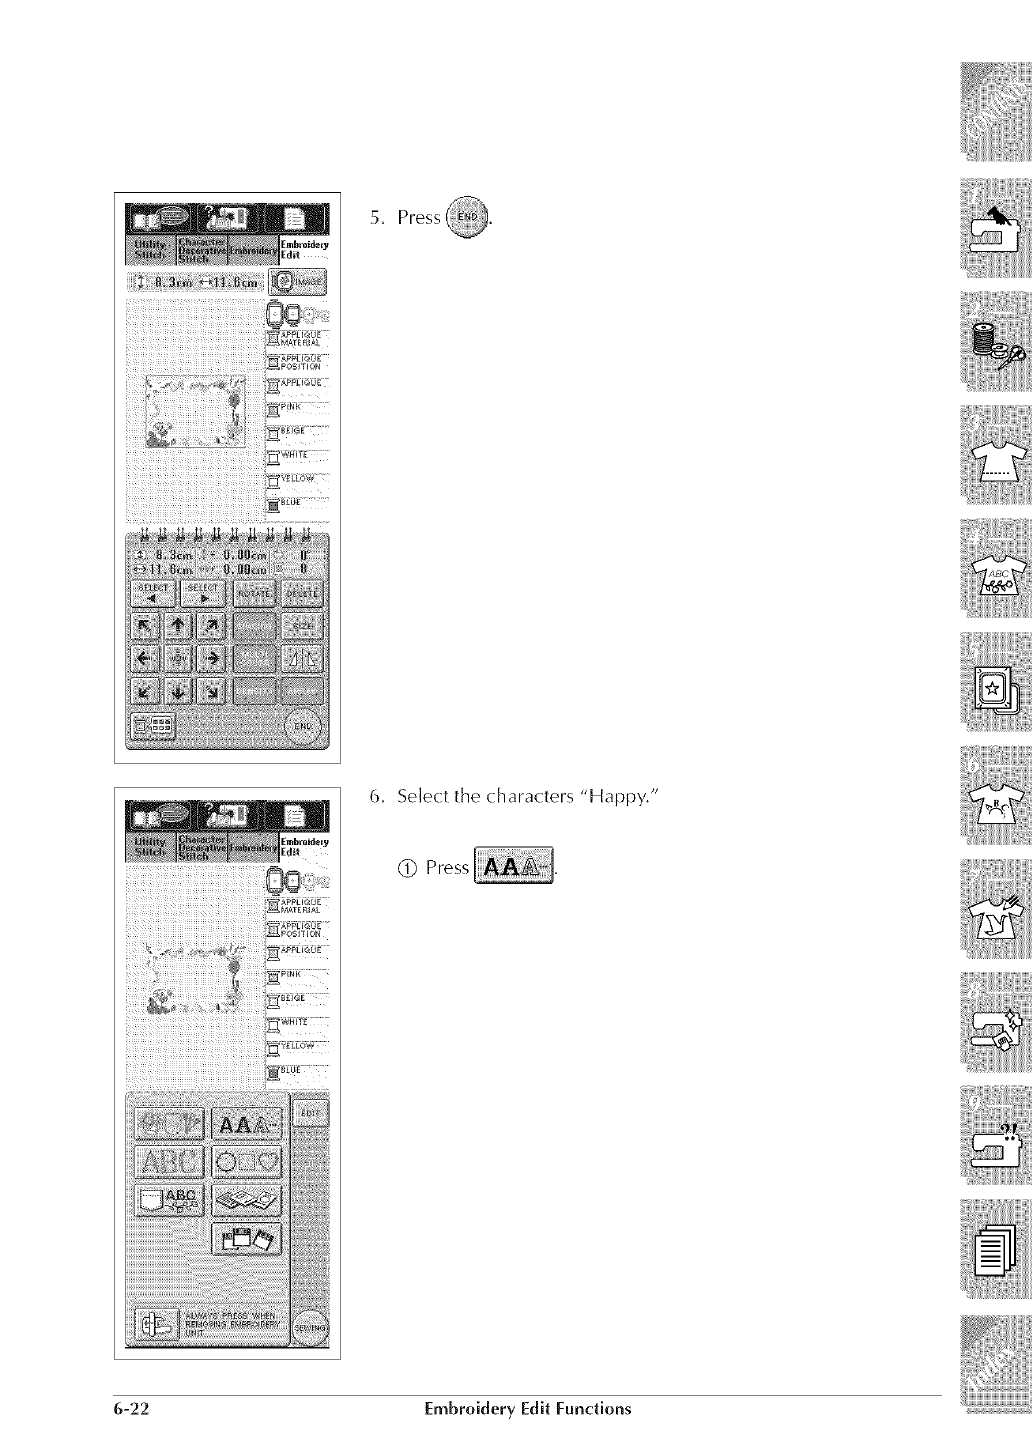
5. Press
6, Select the characters "Happy,"
(_ Press
6-22 Embroidery Edit Functions
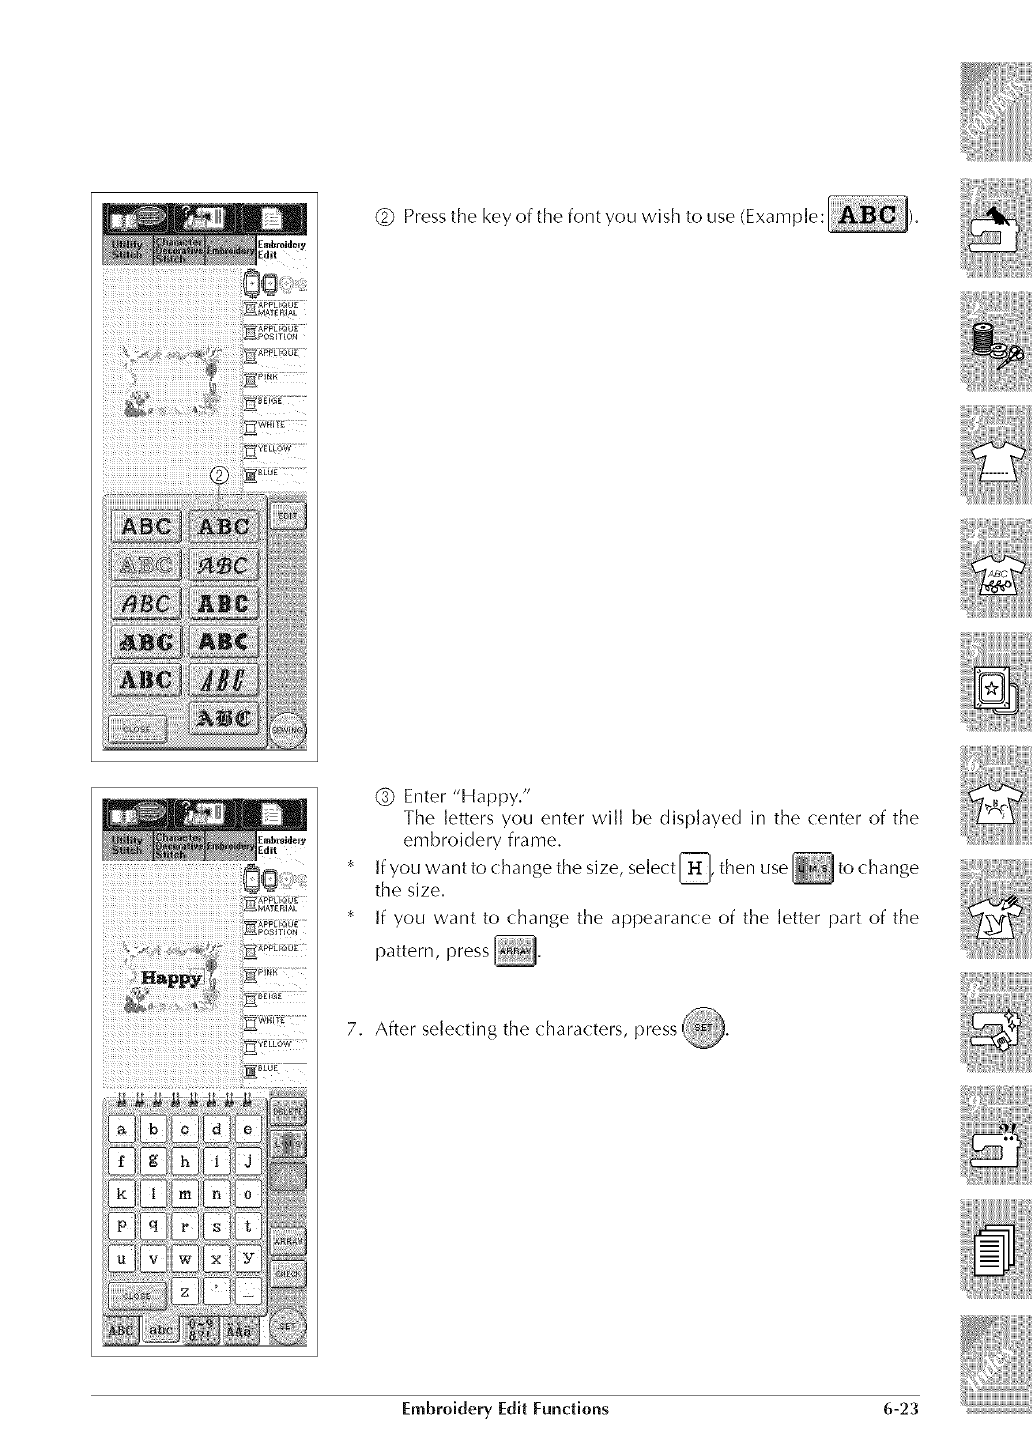
(_ Pressthe key of the font you wish to use (Example: ).
_g
_g
(_ Enter "Happy."
The letters you enter will be displayed in the center of the
embroidery frame.
If you want to change the size, select IHI, then use _ to change
the size.
If you want to change the appearance of the letter part of the
pattern, press ½.
7. After selecting the characters, press @.
Embroidery Edit Functions 6-23
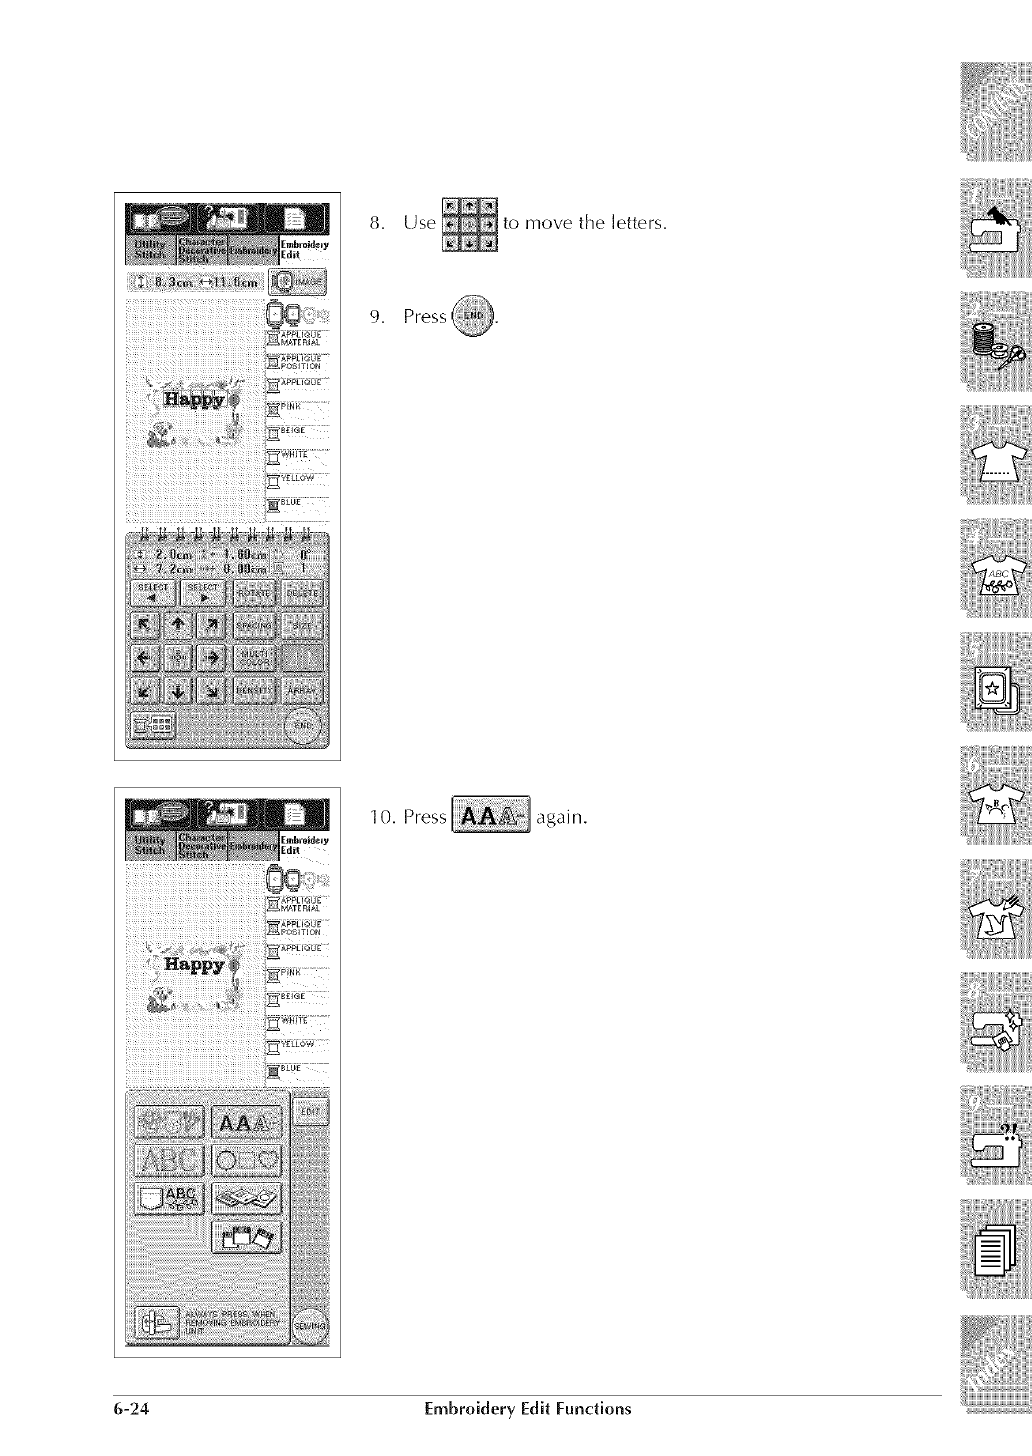
8, Use to move the letters,
9. Press @.
10. Press again.
6-24 Embroidery Edit Functions
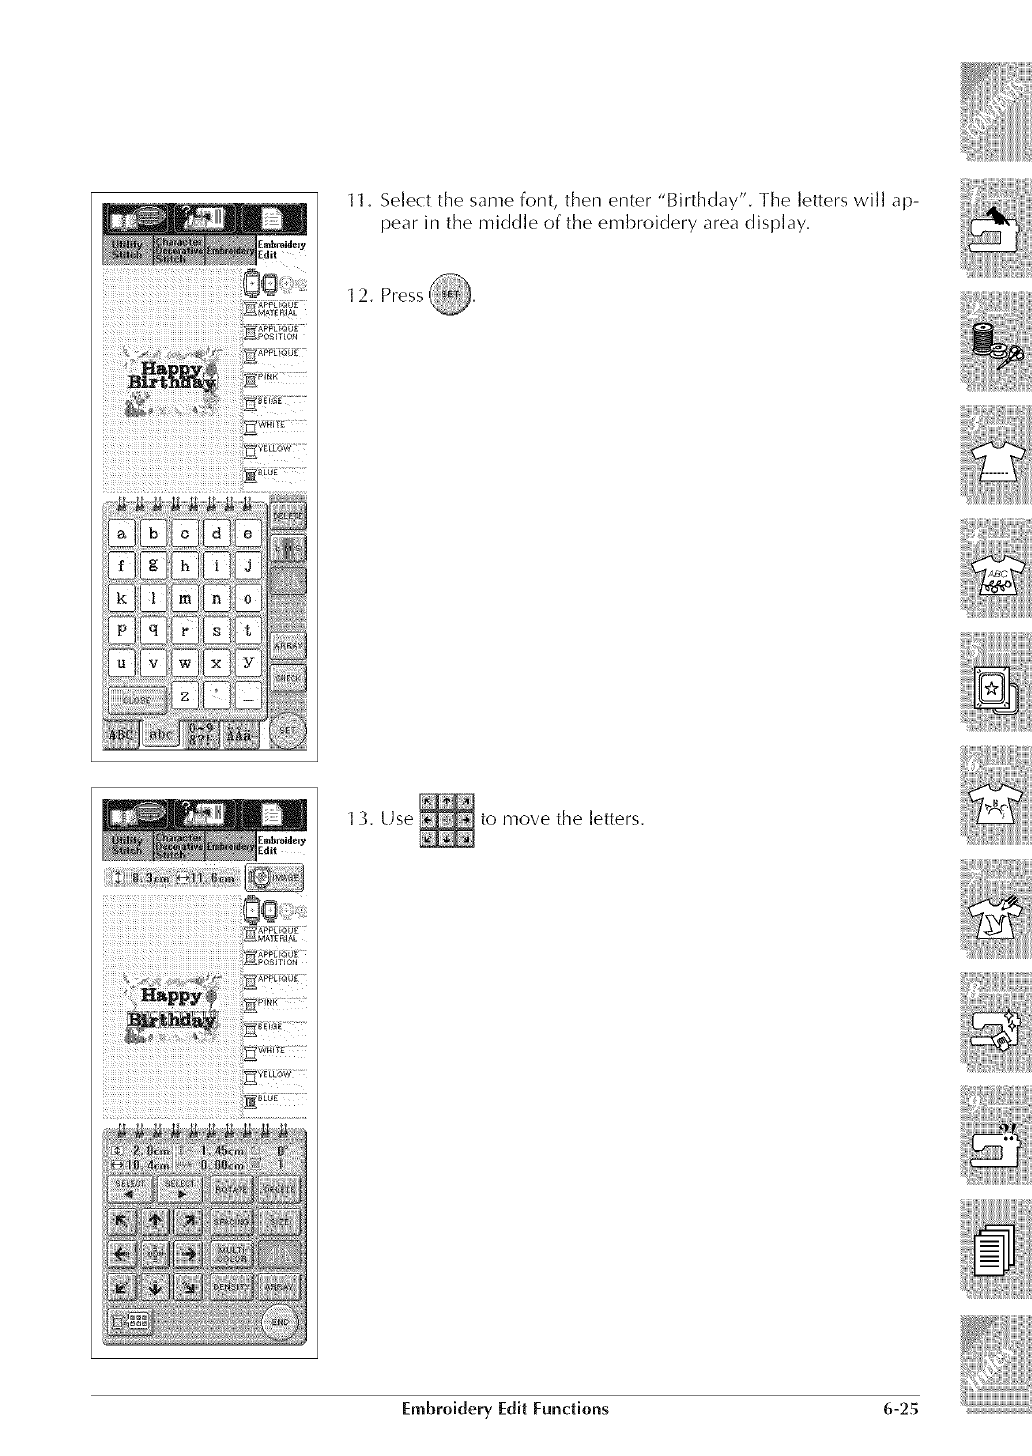
11. Select the same font, then enter "Birthday". The letters will ap-
pear in the middle of the embroidery area display.
1 2. Press
1 3, Use l to move the letters,
Embroidery Edit Functions 6-25
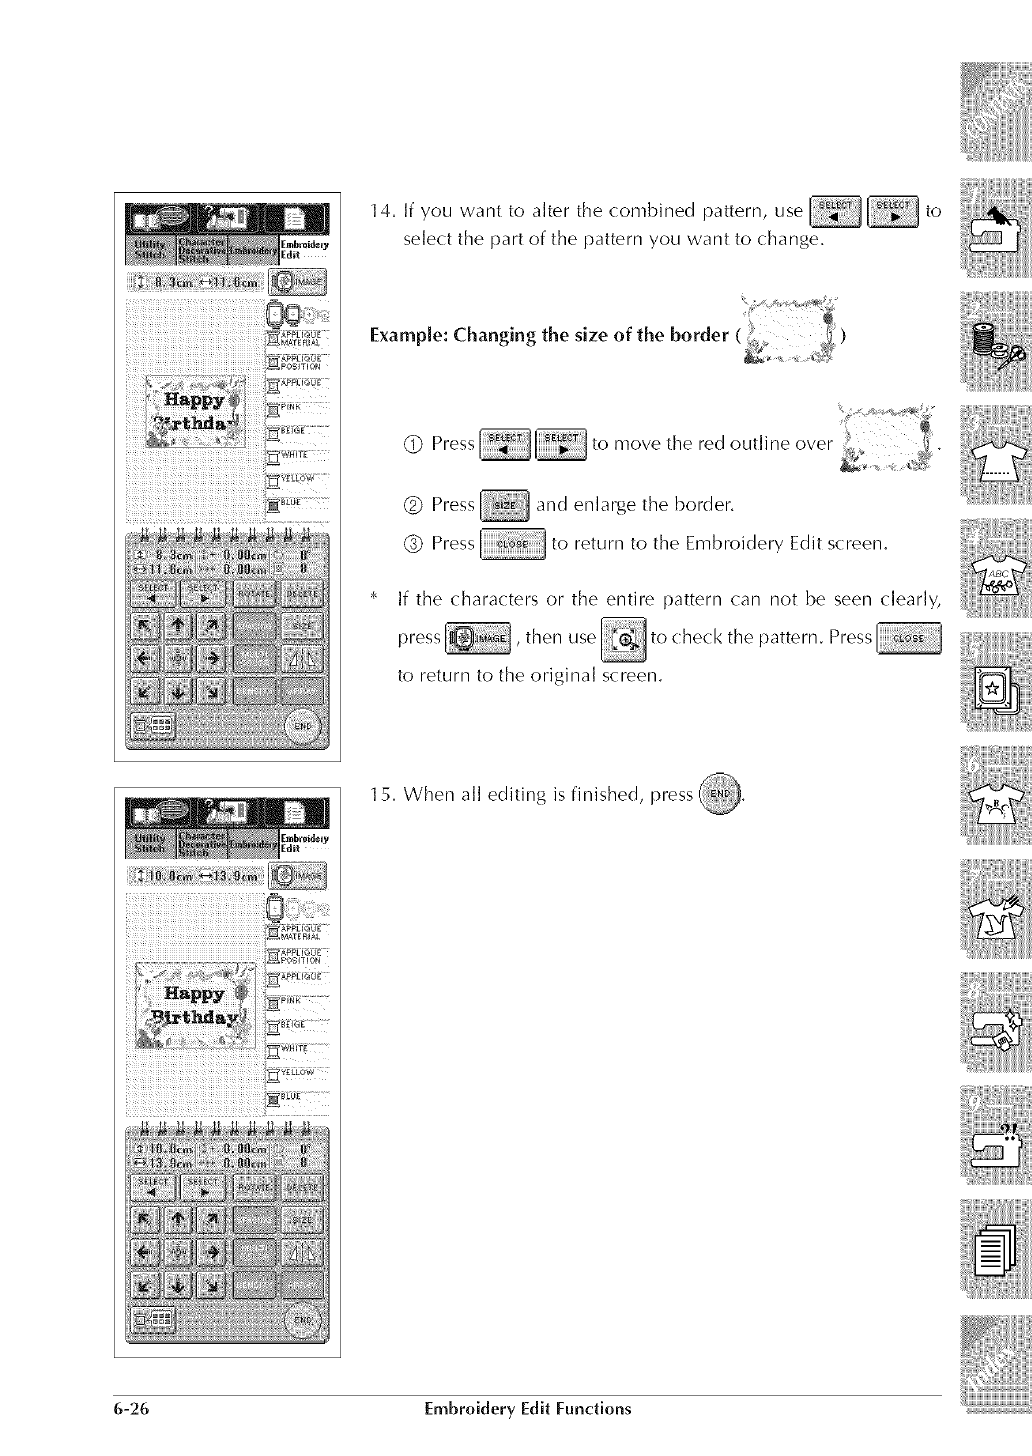
14. If you want to alter the combined pattern, use to
select the part of the pattern you want to change.
(_ Press to move the red outline over
(_ Press and enlarge the border.
(_ Press to return to the Embroidery Edit screen.
If the characters or the entire pattern (:an not be seen clearly,
then use _ to check the pattern. Press
to return to the original screen.
15. When all editing is finished, press(
6-26 Embroidery Edit Functions
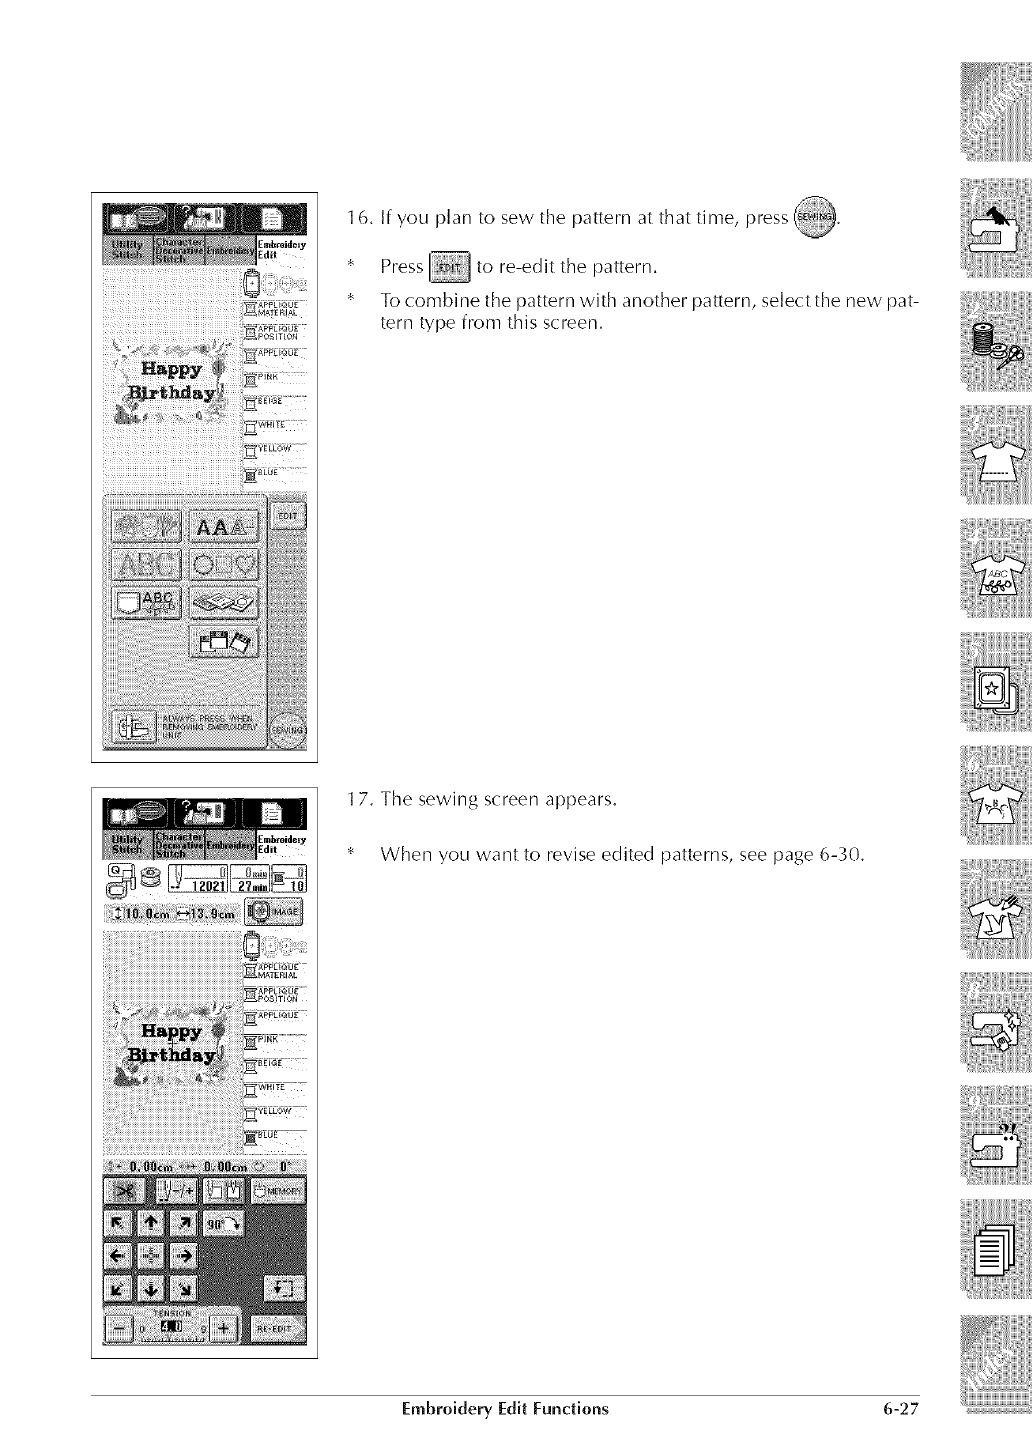
,477-,_
1 6. If yOU plan to sew the pattern at that time, press _.
Press _ to re-edit the pattern.
To combine the pattern with another pattern, select the new pat-
tern type from this screen.
17. The sewing screen appears.
When you want to revise edited patterns, see page 6-30.
Embroidery EditFunctions 6-27
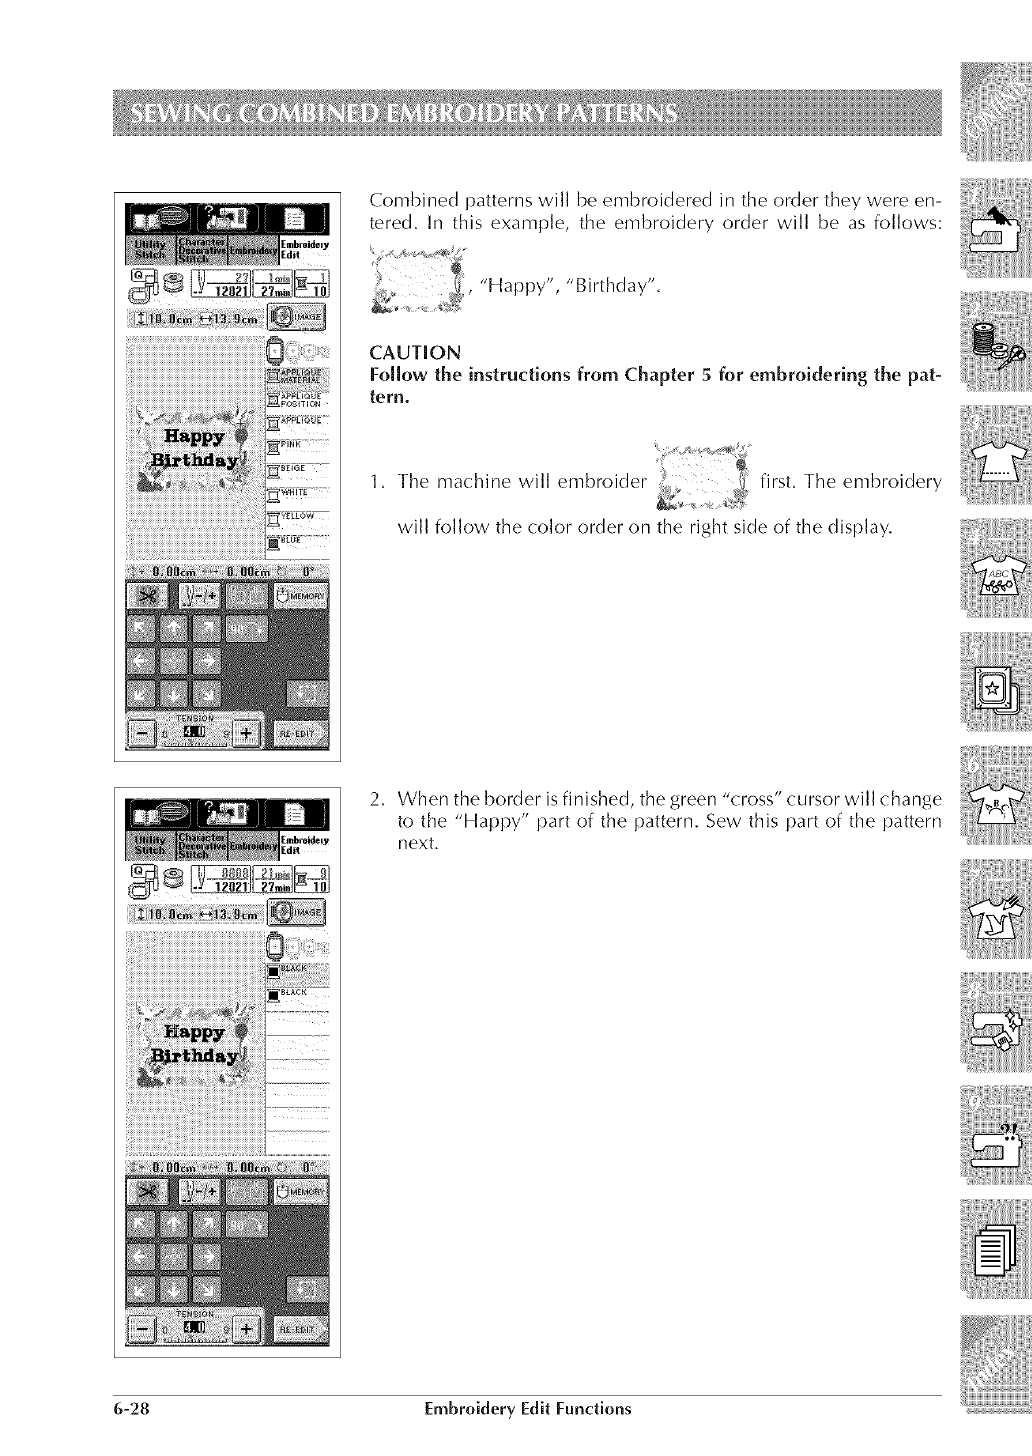
i¸!iiiiiii¸iiiiii¸iiiiiii¸iiiii¸iiiiii¸iiiiiiiiiiii¸ii¸_i0::iiii_,:_i_,_,
_!!!!!!!!!!!!!!!!!!!!!!!!!!!!!!!!!!!!!!!!!!!!!!!!!!!!!!!!!!!!!!!!!!!!!!!!!!!!!!!!!!!!!!!!!!!!!!!!!!!!!!!!!!!!!!!!_ _
_i_i!iiiiiiiiji!_!i!_!iii!iii!iiiiiiiii!i!i!i!iiii!iiiiiiiii_i!iiii!i!i!i!iijiiiiiji!_!ii_!iiii_°_?/_
Combined patterns will be embroidered in the order they were en-
tered. In this example, the embroidery order will be as follows:
"Happy", "Birthday".
CAUTION
Follow the instructions from Chapter 5for embroidering the pat-
tern.
1. The machine will embroider first. The embroidery
will follow the color order on the right side of the display.
2. When the border is finished, the green cross cursor will change
to the "Happy" part of the pattern. Sew this part of the pattern
next.
6-28 Embroidery Edit Functions
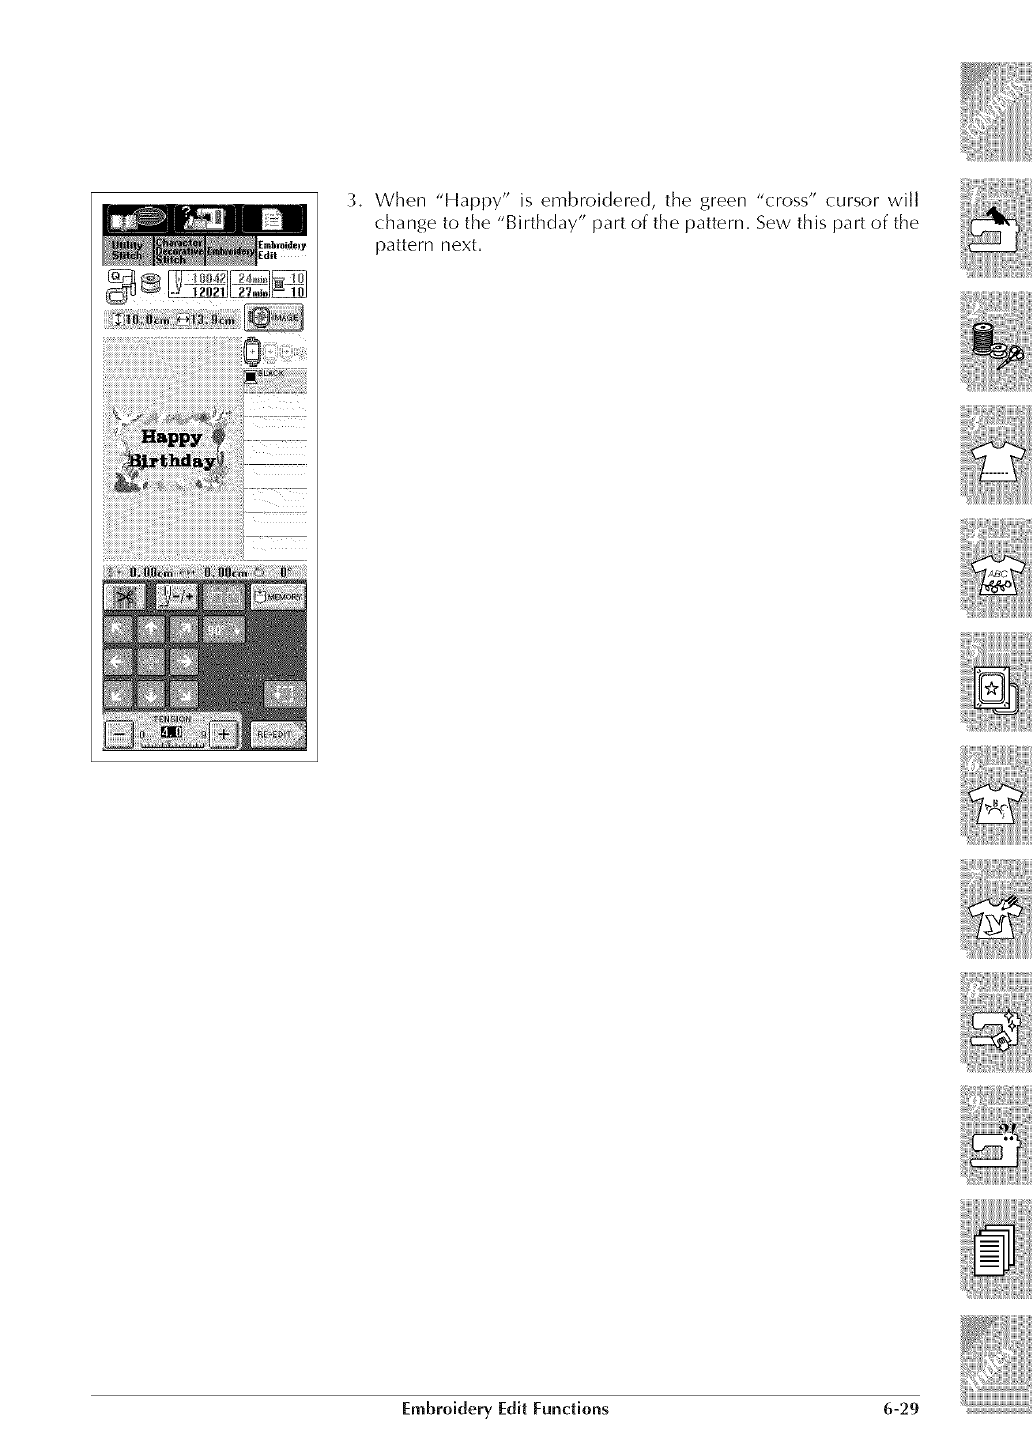
3, When "Happy" is embroidered, the green "cross" cursor will
change to the "Birthday" part of the pattern, Sew this part of the
pattern next,
Embroidery Edit Fundiens 6-29
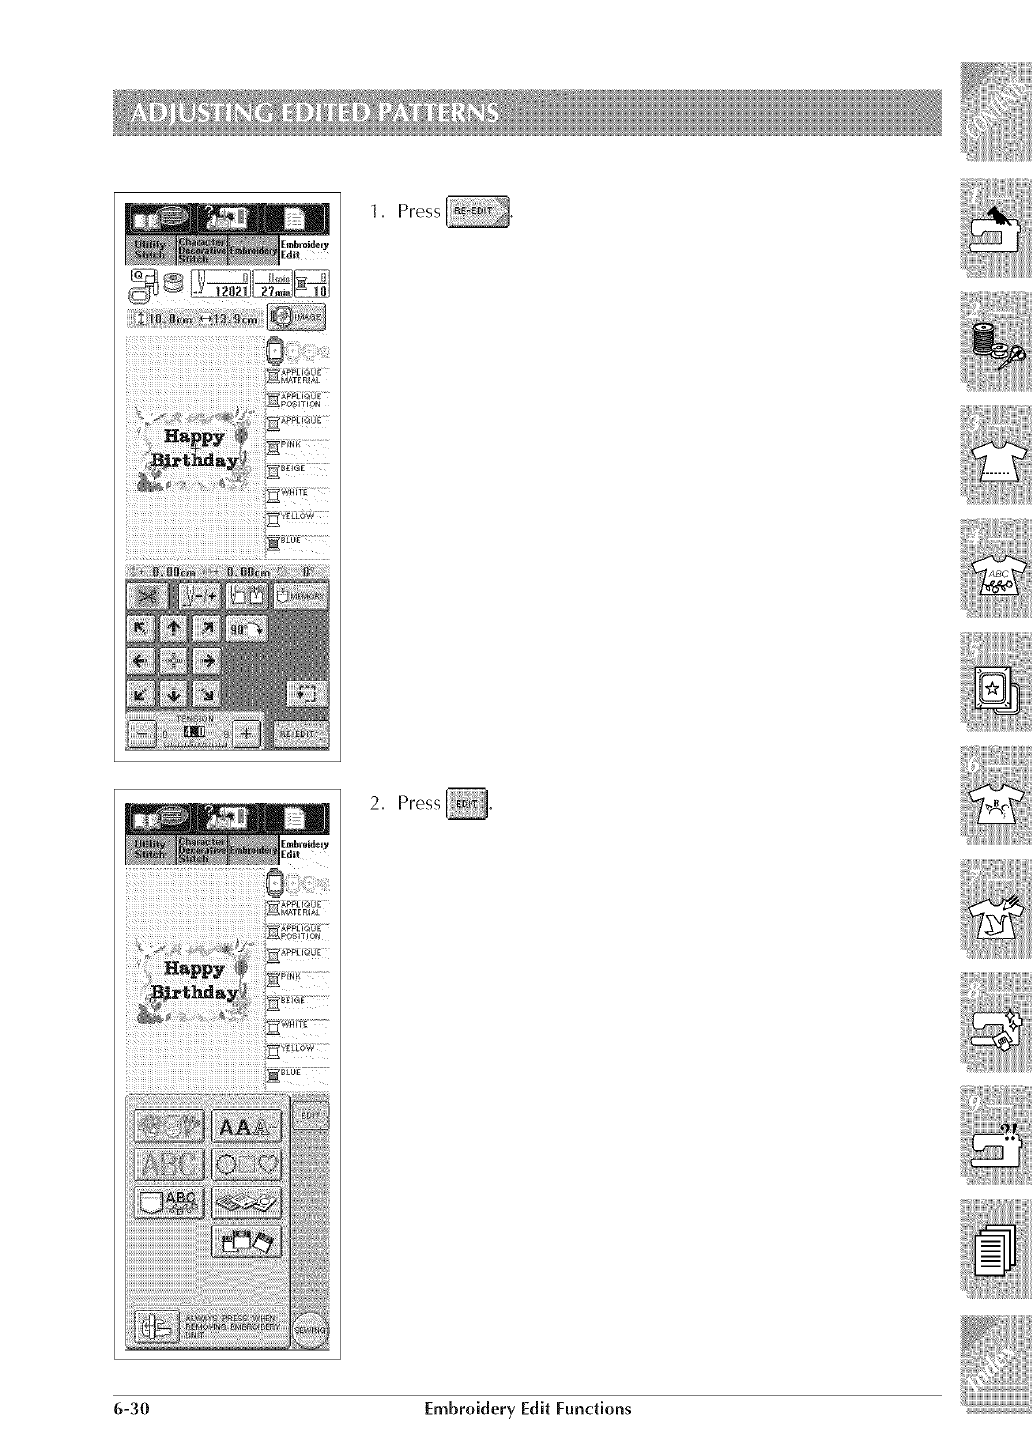
1. Press
2, Press _.
6-30 Embroidery Edit Functions
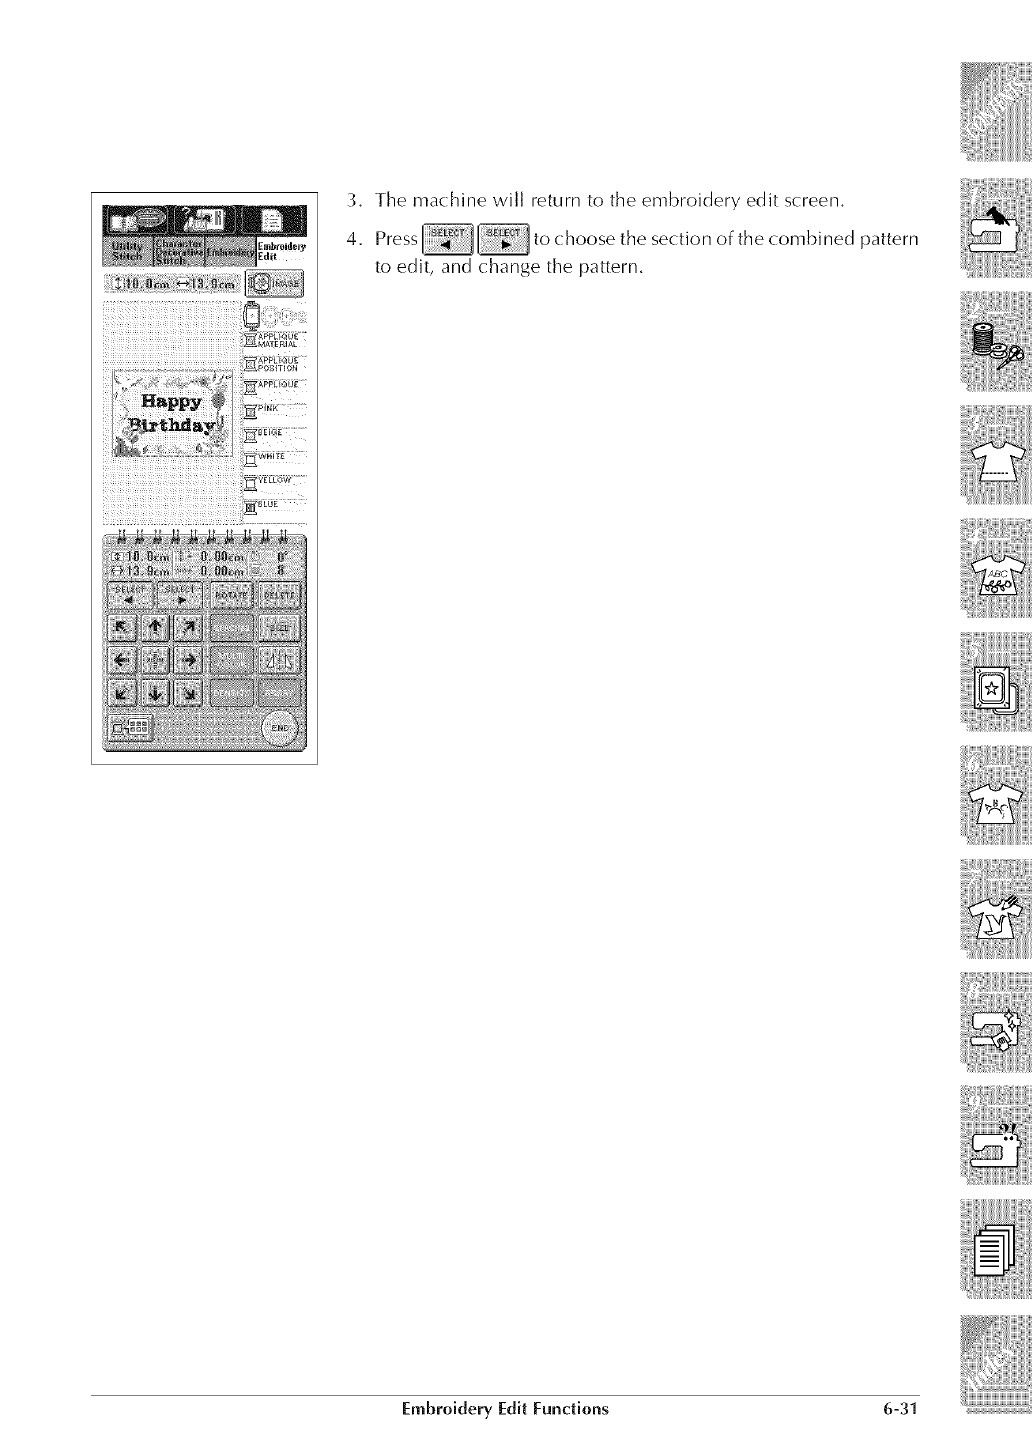
3. The machine will return to the embroidery edit screen.
Embroidery Edit Functions 6-31
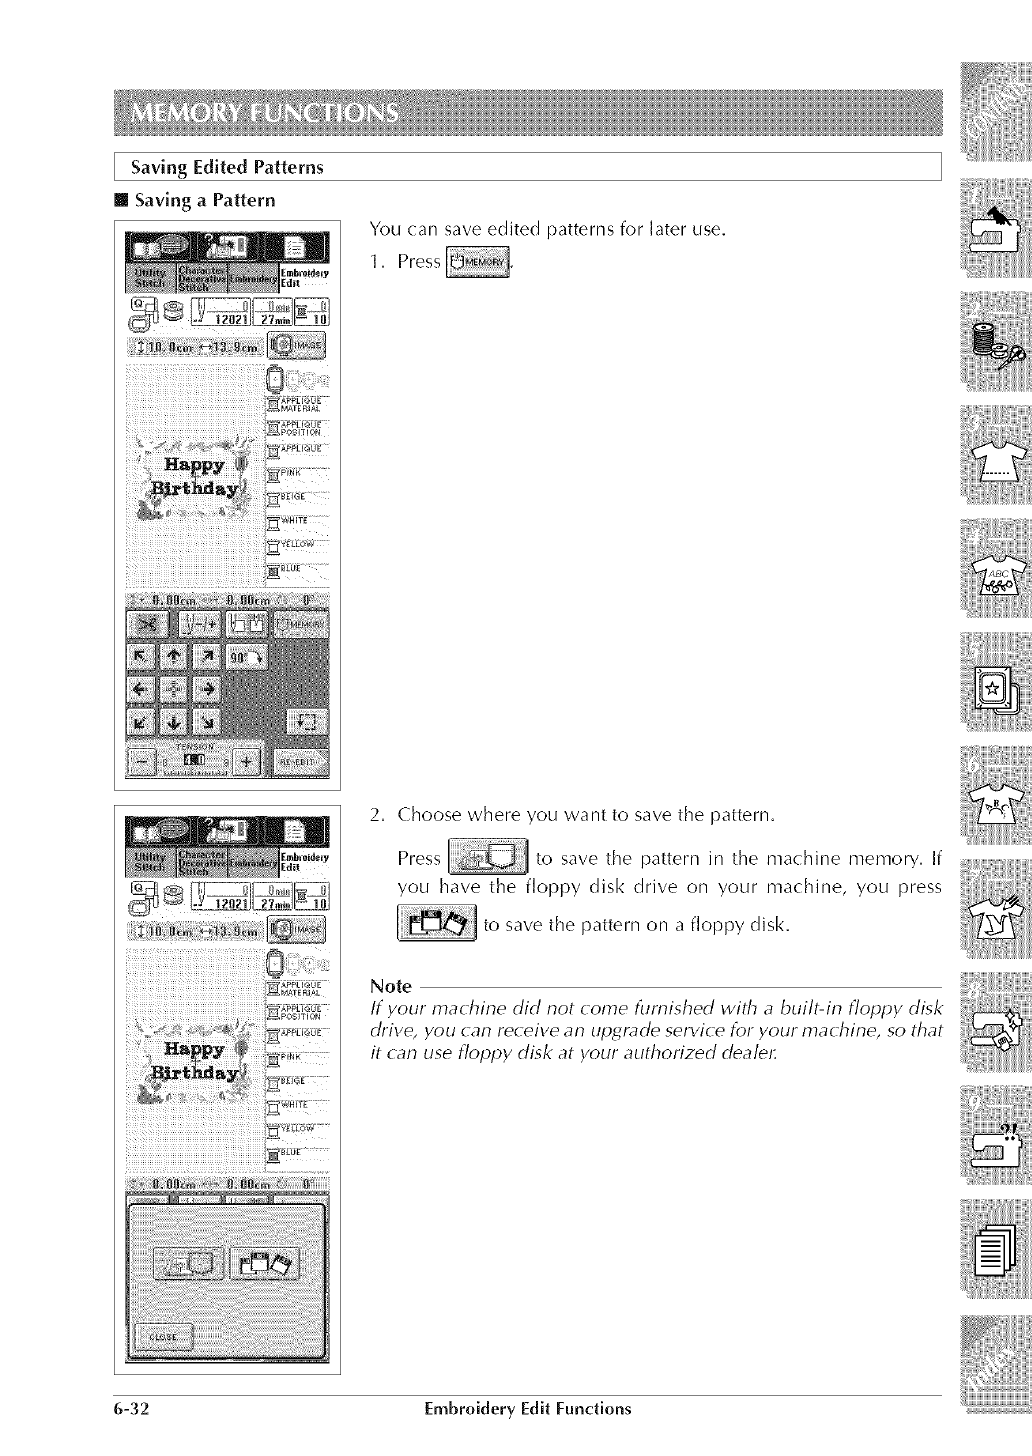
Saving Edited Patterns
[] Saving aPattern
You can save edited patterns for later use.
1. Press
2. Choose where you want to save the pattern.
Press to save the pattern in the machine memory. If
you have the floppy disk drive on your machine, you press
to save the pattern on a floppy disk.
Note
If your machine did not come furnished with a built-in floppy disk
drive, you (:an receive an upt4mde service for your machine, so that
it (an use floppy dbk at your authorized dealel:
6-32 Embroidery Edit Functions
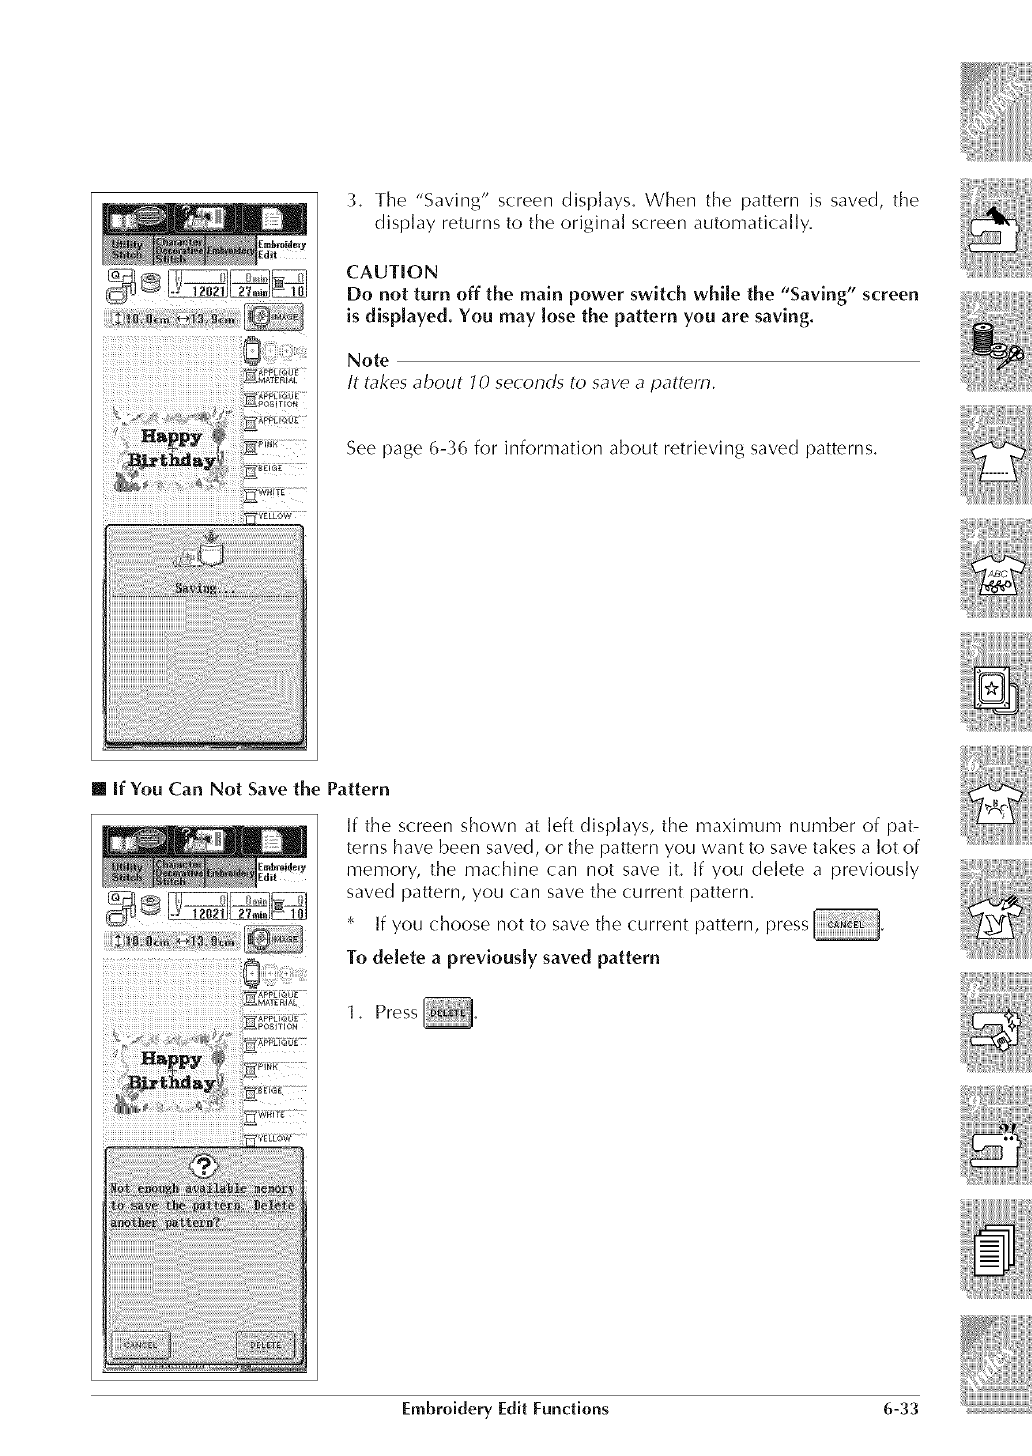
3. The "Saving" screen displays. When the pattern is saved, the
display returns to the original screen automatically.
CAUTION
Do not turn off the main power switch while the "Saving" screen
is displayed. You may lose the pattern you are saving.
Note
It takes about 10 seconds to save a pattern.
See page 6-36 for information about retrieving saved patterns.
[] [f You Can Not Save the Pattern
If the screen shown at left displays, the maximum number of pat-
terns have been saved, or the pattern you want to save takes a lot of
memory, the machine can not save it. If you delete a previously
saved pattern, you can save the current pattern.
* If you choose not to save the current pattern, press
To delete a previously saved pattern
1. Press
Embroidery Edit Functions 6-33
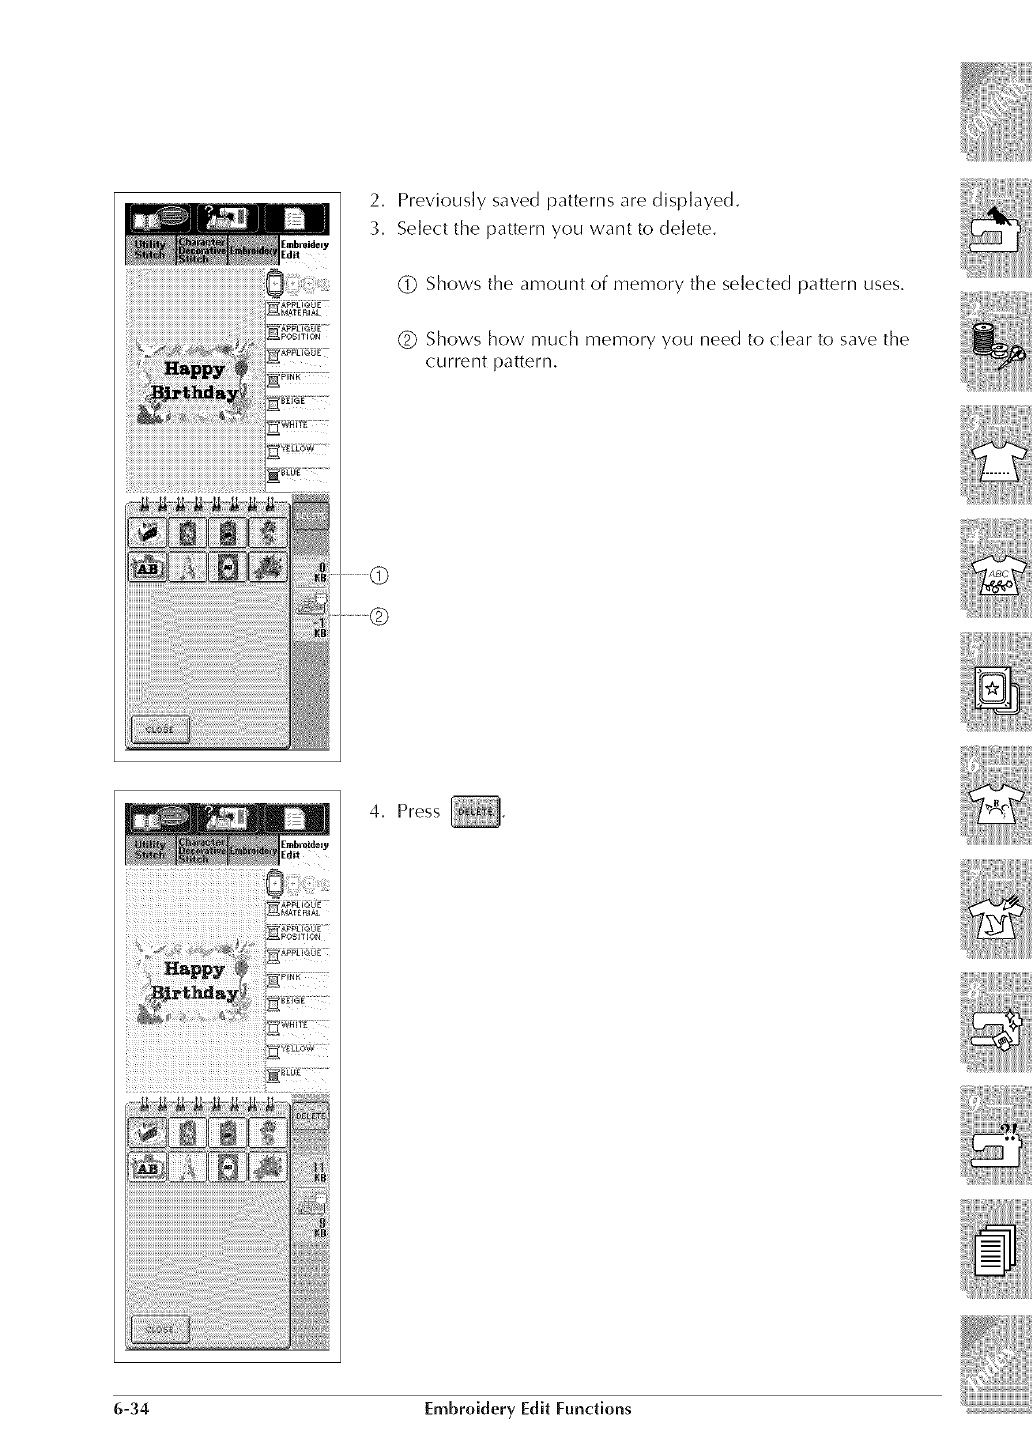
_TE RIAL
,SITION
_ CL6N'"
_g ......
2, Previously saved patterns are displayed.
3, Select the pattern you want to delete.
(_ Shows the amount of memory the selected pattern uses,
(_ Shows how much memory you need to (:lear to save the
current pattern,
4. Press
6-34 Embroidery Edit Functions
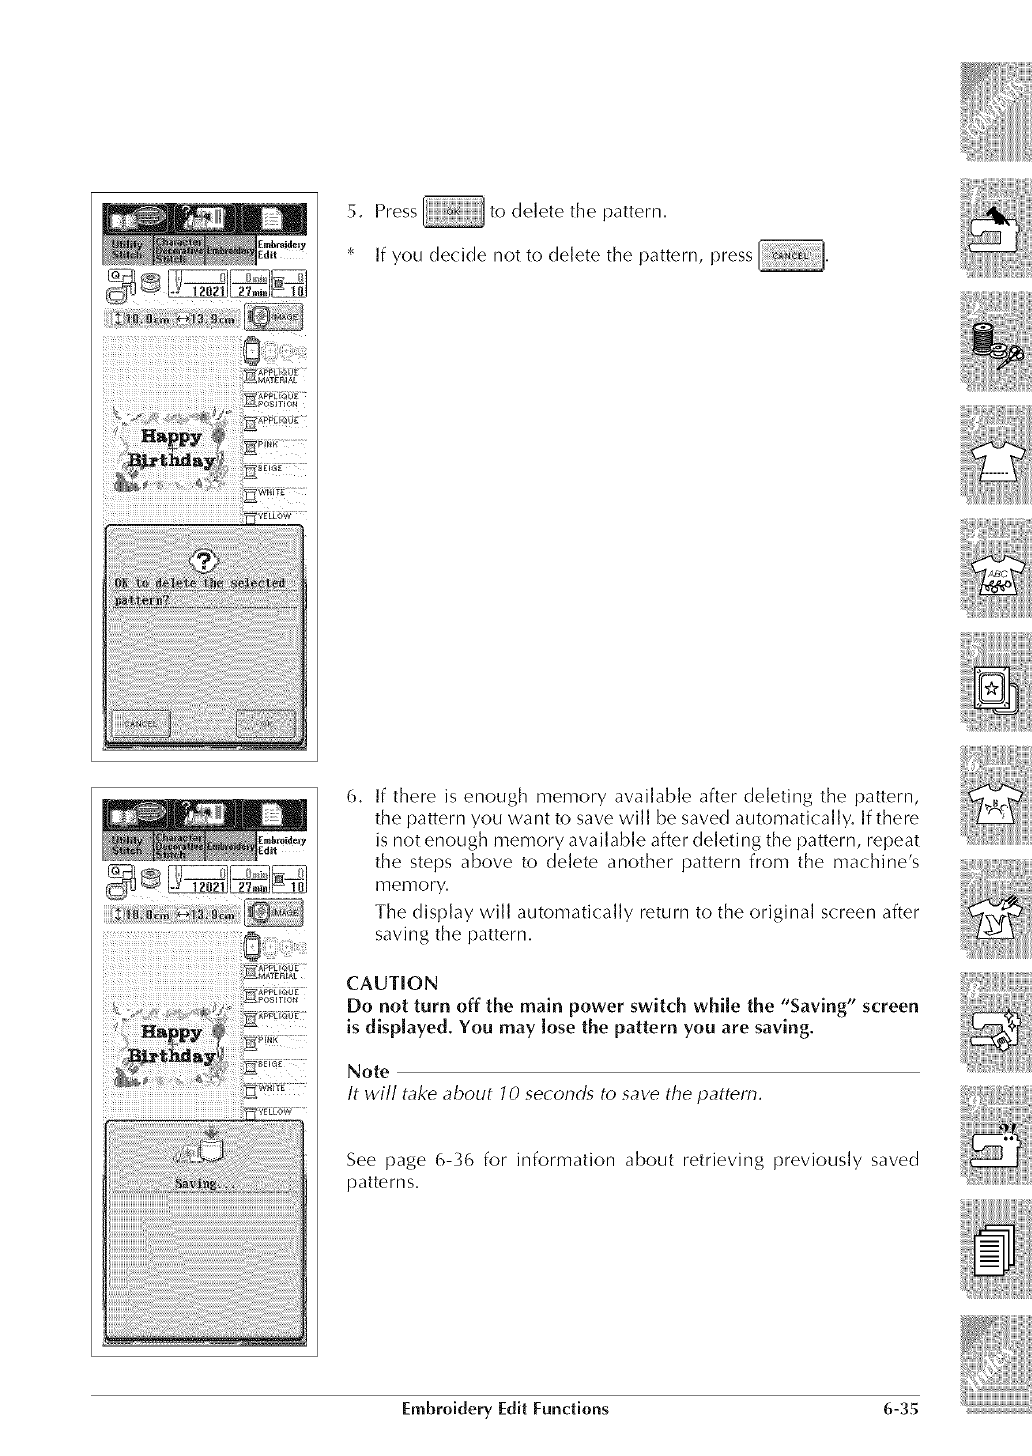
5. Press to delete the pattern.
* If you decide not to delete the pattern, press
6. If there is enough memory available after deleting the pattern,
the pattern you want to save will be saved automatically. If there
is not enough memory available after deleting the pattern, repeat
the steps above to delete another pattern from the machine's
memory.
The display will automatically return to the original screen after
saving the pattern.
CAUTION
Do not turn off the main power switch while the "Saving" screen
is displayed. You may lose the pattern you are saving.
Note
It will take about 10 seconds to save the pattern.
See page 6-_6 for information about retrieving previously saved
patterns.
Embroidery Edit Functiens 6-35
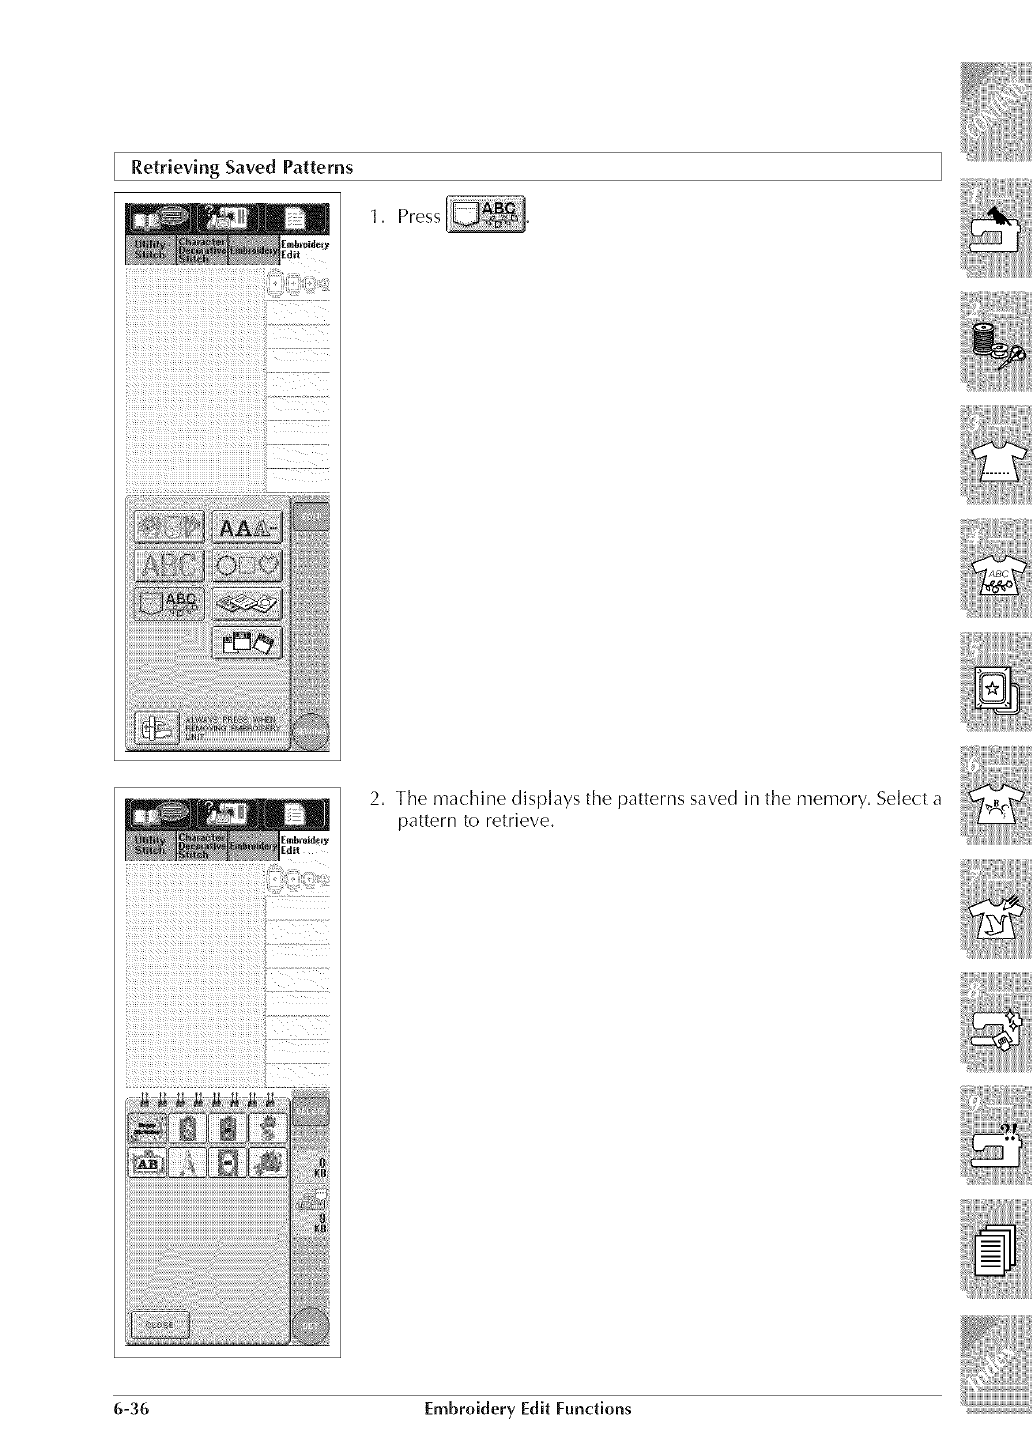
Retrieving Saved Patterns
_i_ i: _i_i_il:ii_i!ilii¸¸¸¸¸¸_i::ii_¸_¸¸_¸':_':::
1, Press
2, The machine displays the patterns saved in the memory, Select a
pattern to retrieve,
6-36 Embroidery Edit Functions
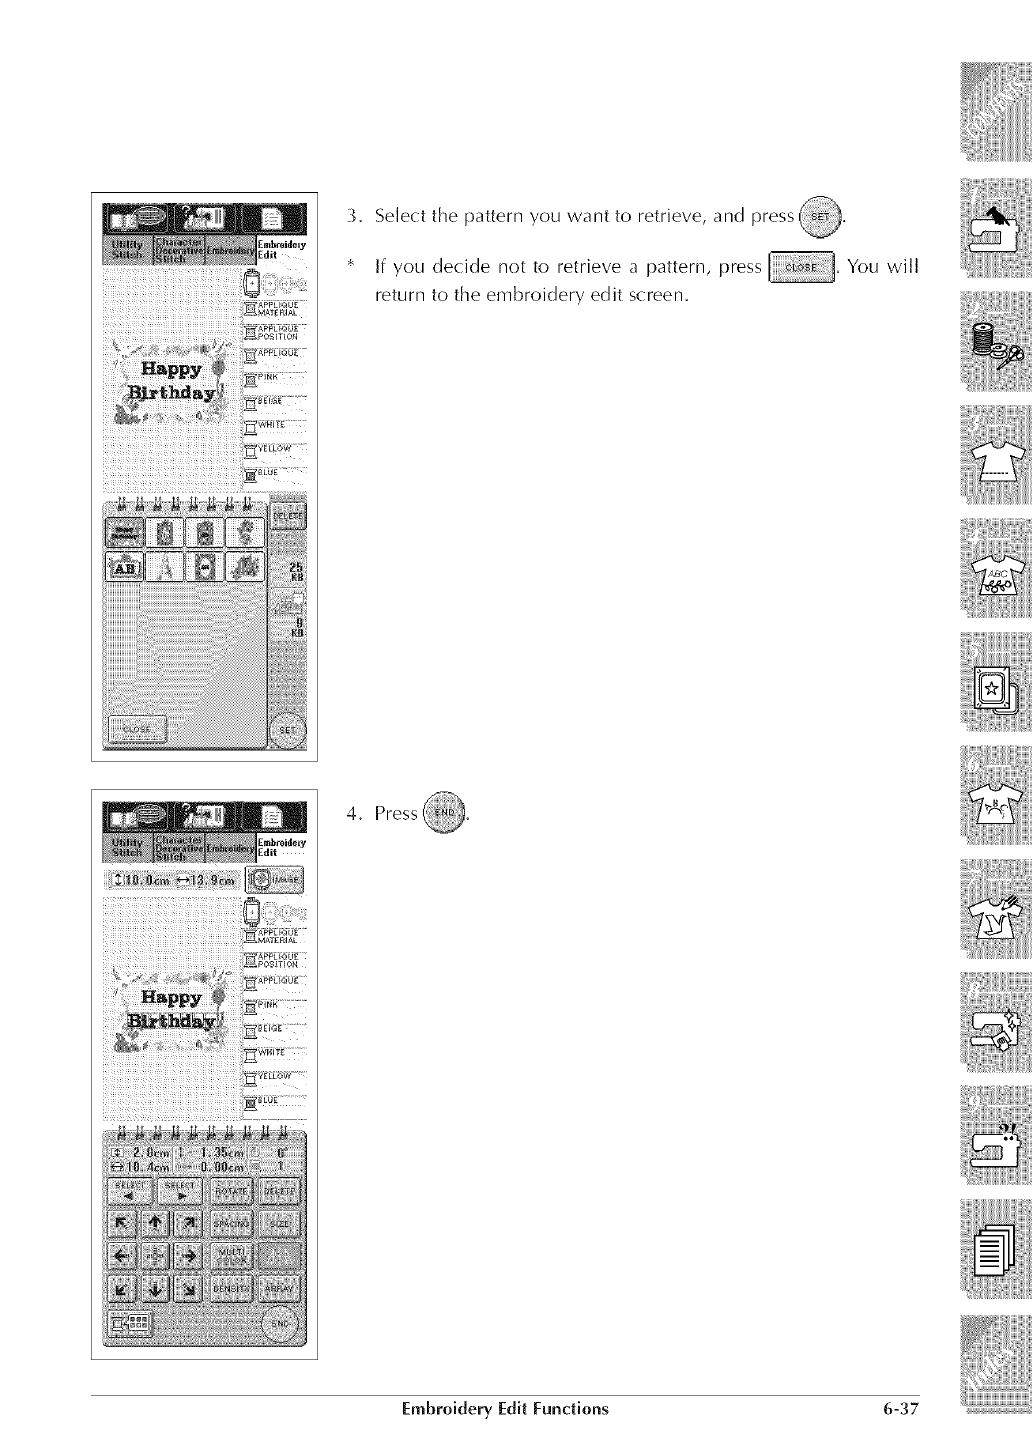
3. Select the pattern you want to retrieve, and press _.
If you decide not to retrieve a pattern, press .You will
return to the embroidery edit screen.
4. Press @.
Embroidery Edit Functions 6-37
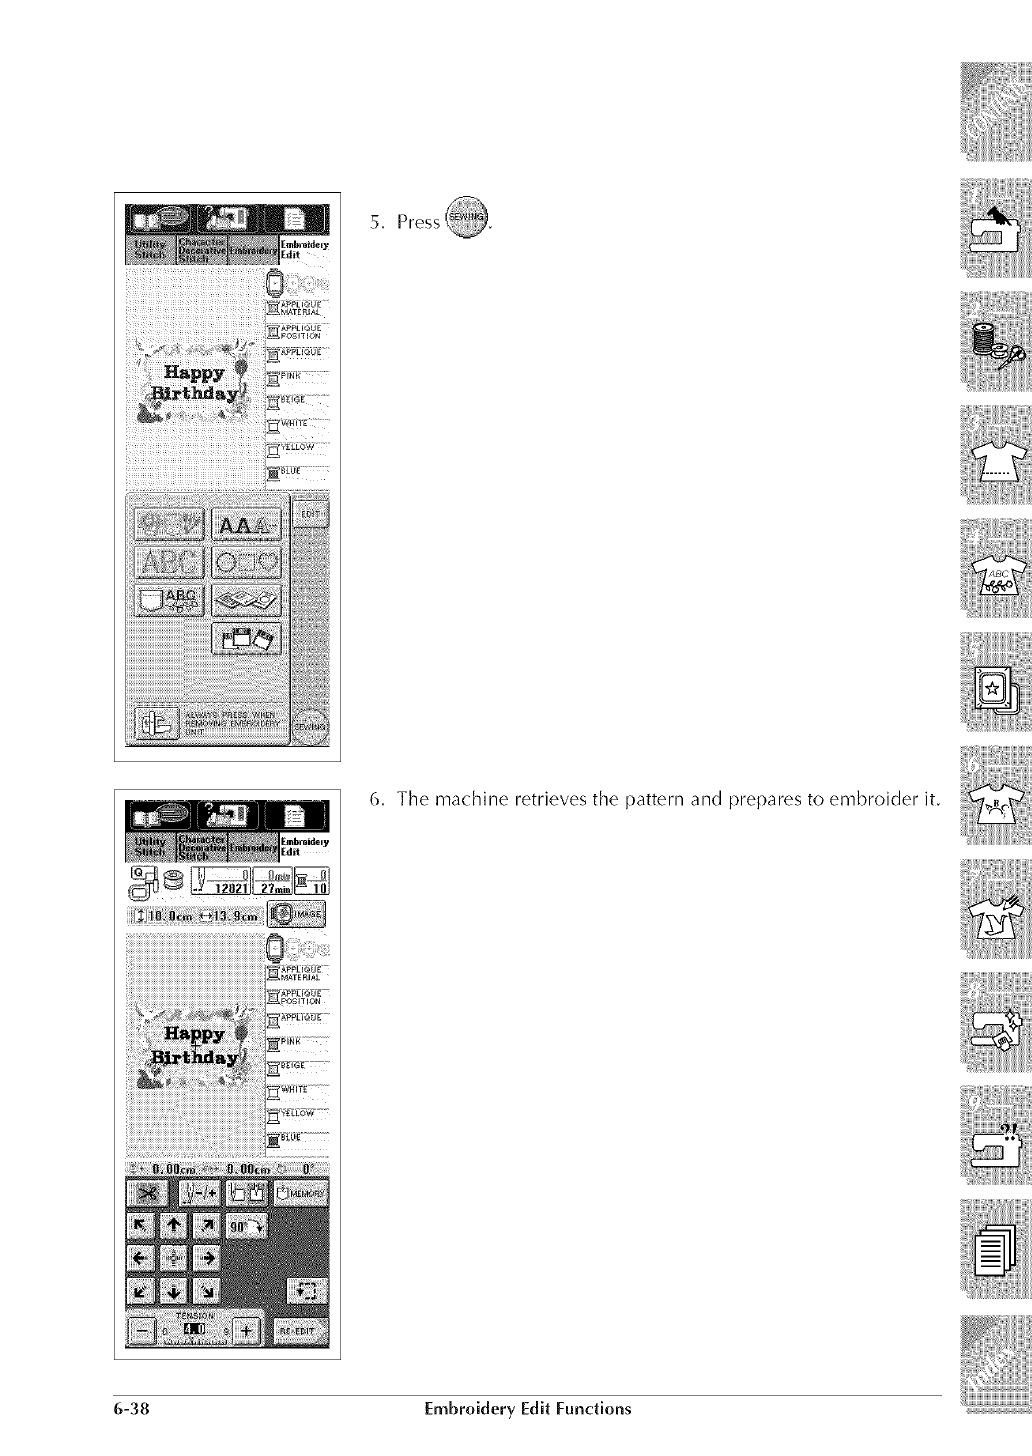
5. Press @.
6. The machine retrieves the pattern and prepares to embroider it.
6-38 Embroidery Edit Functions
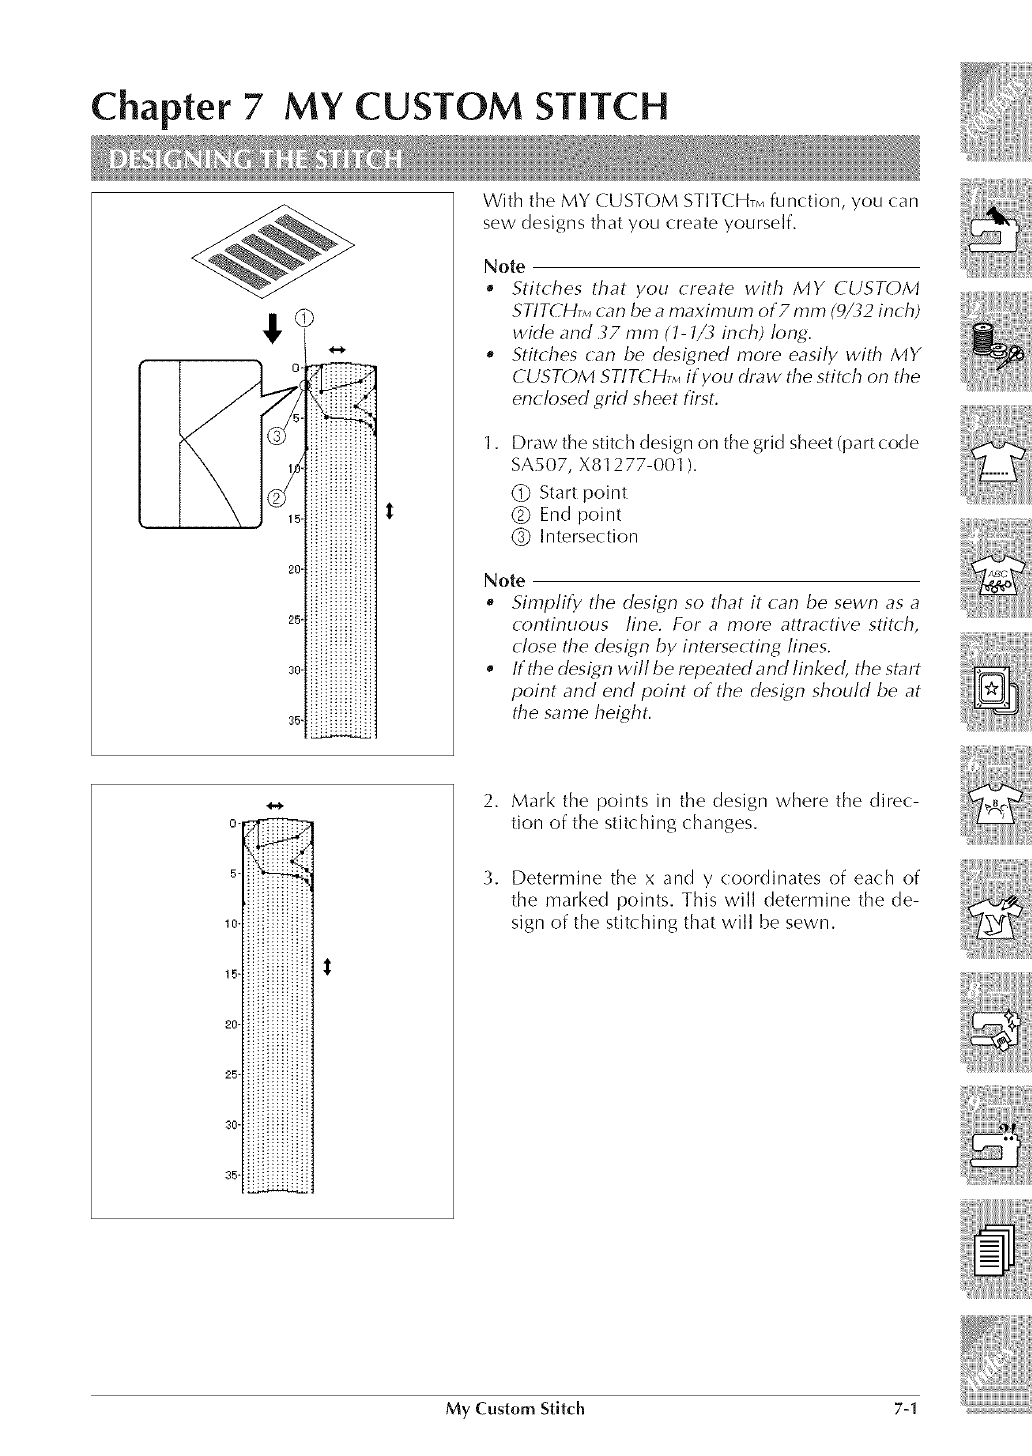
Chapter 7MY CUSTOM STITCH
,i:
J
20-
26-
30-
35_
"'i
With the MY CUSTOM STITCHTMfunction, you (:an
sew designs that you create yourself,
Note
•Stitches that you create with MY CUSTOM
STITCHTM can be a maximum of 7 mm (9/32 inch)
wide and .37 mm (1-1/3 inch) long.
oStitches can be designed more easily with MY
CUSTOM STITCHTM if you draw the stitch on the
enclosed grid sheet first.
Draw the stitch design on the grid sheet (part code
SA507, X81277-001 ).
(_ Start point
(_ End point
(_ Intersection
Note
oSimplify the design so that it can be sewn as a
continuous line. For a more attractive stitch,
close the design by intersecting lines.
•If the design will be repeated and linked, the start
point and end point of the design should be at
the same height.
o.
5-
10"
15"
20-
26-
30-
35-
2,
3,
Mark the points in the design where the direc-
tion of the stitching changes,
Determine the x and y coordinates of each of
the marked points, This will determine the de-
sign of the stitching that will be sewn,
My Custom Stitch 7-1
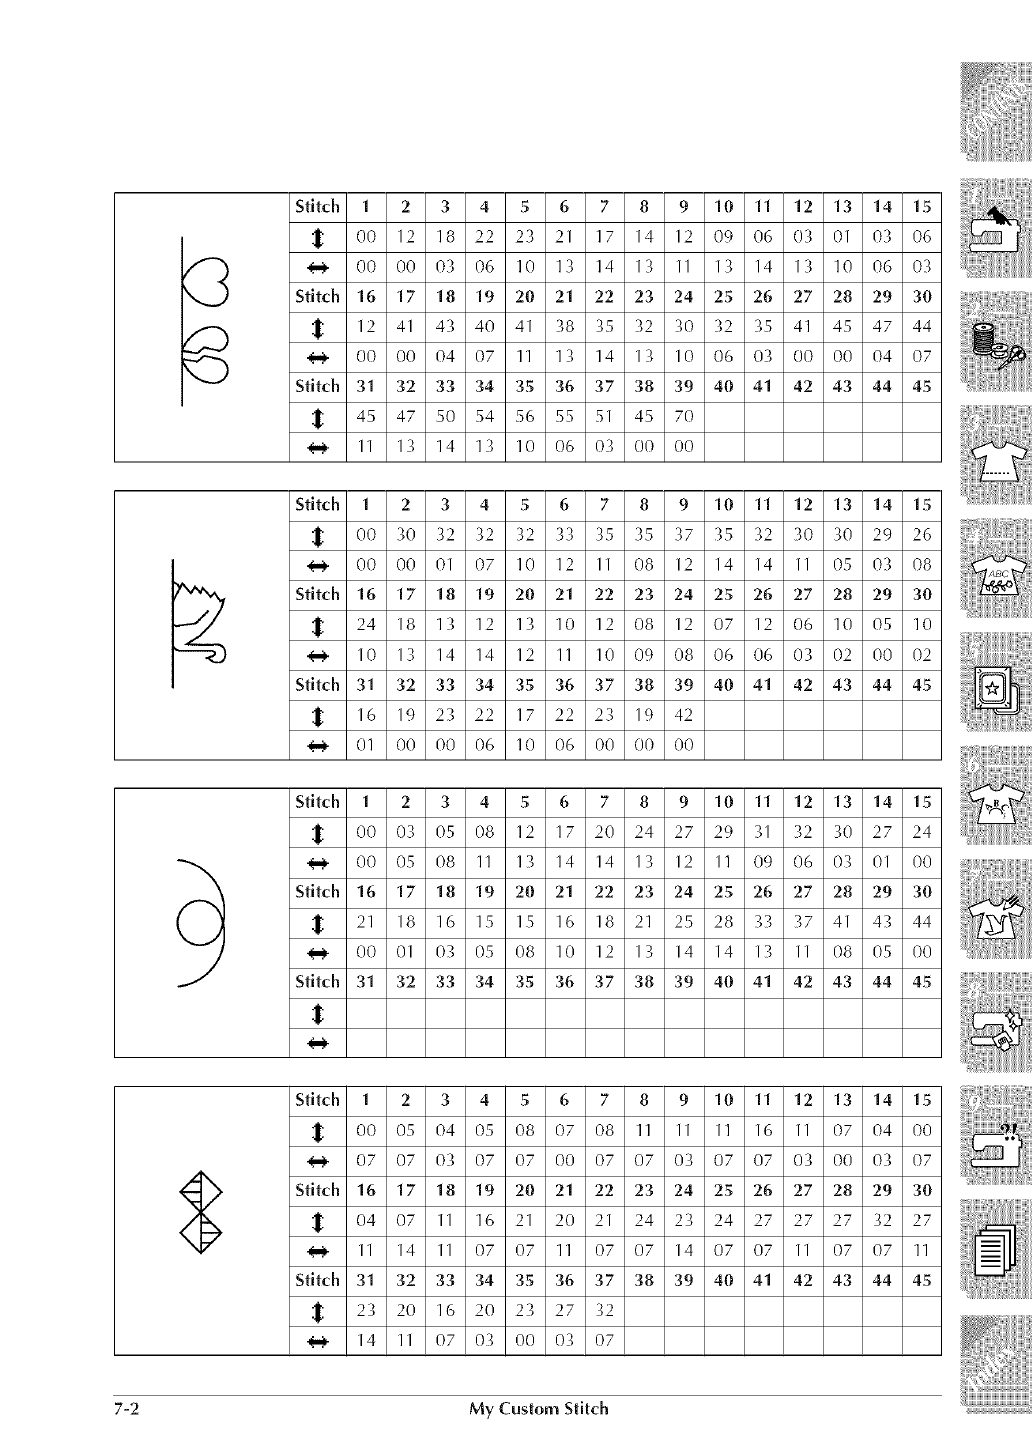
Stitch 1 2 3456 7 8 910 11 12 13 14 15
O0 12 18 22 2_ 21 17 14 12 09 06 03 01 0_ 06
O0 O0 03 06 10 13 14 13 11 13 14 13 10 06 03
Stitch 16 17 18 19 20 21 22 23 24 25 26 27 28 29 30
12 41 4"{ 40 41 38 35 "{2 %0 "{2 "{5 41 45 47 44
O0 O0 04 07 11 13 14 13 10 06 03 O0 O0 04 07
Stitch 31 32 33 34 35 36 37 38 39 40 41 42 43 44 45
45 47 50 54 56 55 51 45 70
11 13 14 13 10 06 03 (}0 O0
Stitch 1 2 345678 9 10 11 12 13 14 15
O0 %0 32 32 32 3_ 35 %5 %7 %5 %2 _0 30 29 26
4_, O0 O0 01 07 10 12 11 08 12 14 14 11 05 03 08
Stitch 16 17 18 19 20 21 22 23 24 25 26 27 28 29 30
24 18 ]% ]2 ]% ]0 ]2 08 12 07 12 06 ]0 05 ]0
10 "1_; 14 14 12 11 10 09 08 06 06 03 02 O0 02
Stitch 31 32 33 34 35 36 37 38 39 40 41 42 43 44 45
16 19 23 22 17 22 23 19 42
<-_ (}1 O0 O0 06 10 06 O0 (}0 O0
->
©
J
Stitch 1 2 34 5 6 7 8 9 10 11 12 13 14 15
:_ O0 03 05 08 12 17 20 24 27 29 31 32 30 27 24
O0 05 08 11 13 14 14 13 12 1] 09 06 03 01 O0
Stitch 16 17 18 19 20 21 22 23 24 25 26 27 28 29 30
:_ 21 18 16 15 15 16 18 21 25 28 33 37 41 43 44
_, O0 01 0% 05 08 10 12 13 14 14 13 11 08 05 O0
Stitch 31 32 33 34 35 36 37 38 39 40 41 42 43 44 45
t
Stitch 1 2 34 5 6 7 8 9 10 11 12 13 14 15
O0 05 04 05 08 07 08 11 11 1] 16 11 07 04 O0
07 07 03 07 07 O0 07 07 03 07 07 03 O0 03 07
Stitch 16 17 18 19 20 21 22 23 24 25 26 27 28 29 30
04 07 11 16 21 20 21 24 23 24 27 27 27 32 27
11 14 11 07 07 11 07 07 14 07 07 11 07 07 11
Stitch 31 32 33 34 35 36 37 38 39 40 41 42 43 44 45
23 20 16 20 23 27 32
14 11 07 03 O0 03 07
7-2 My Custom Stitch
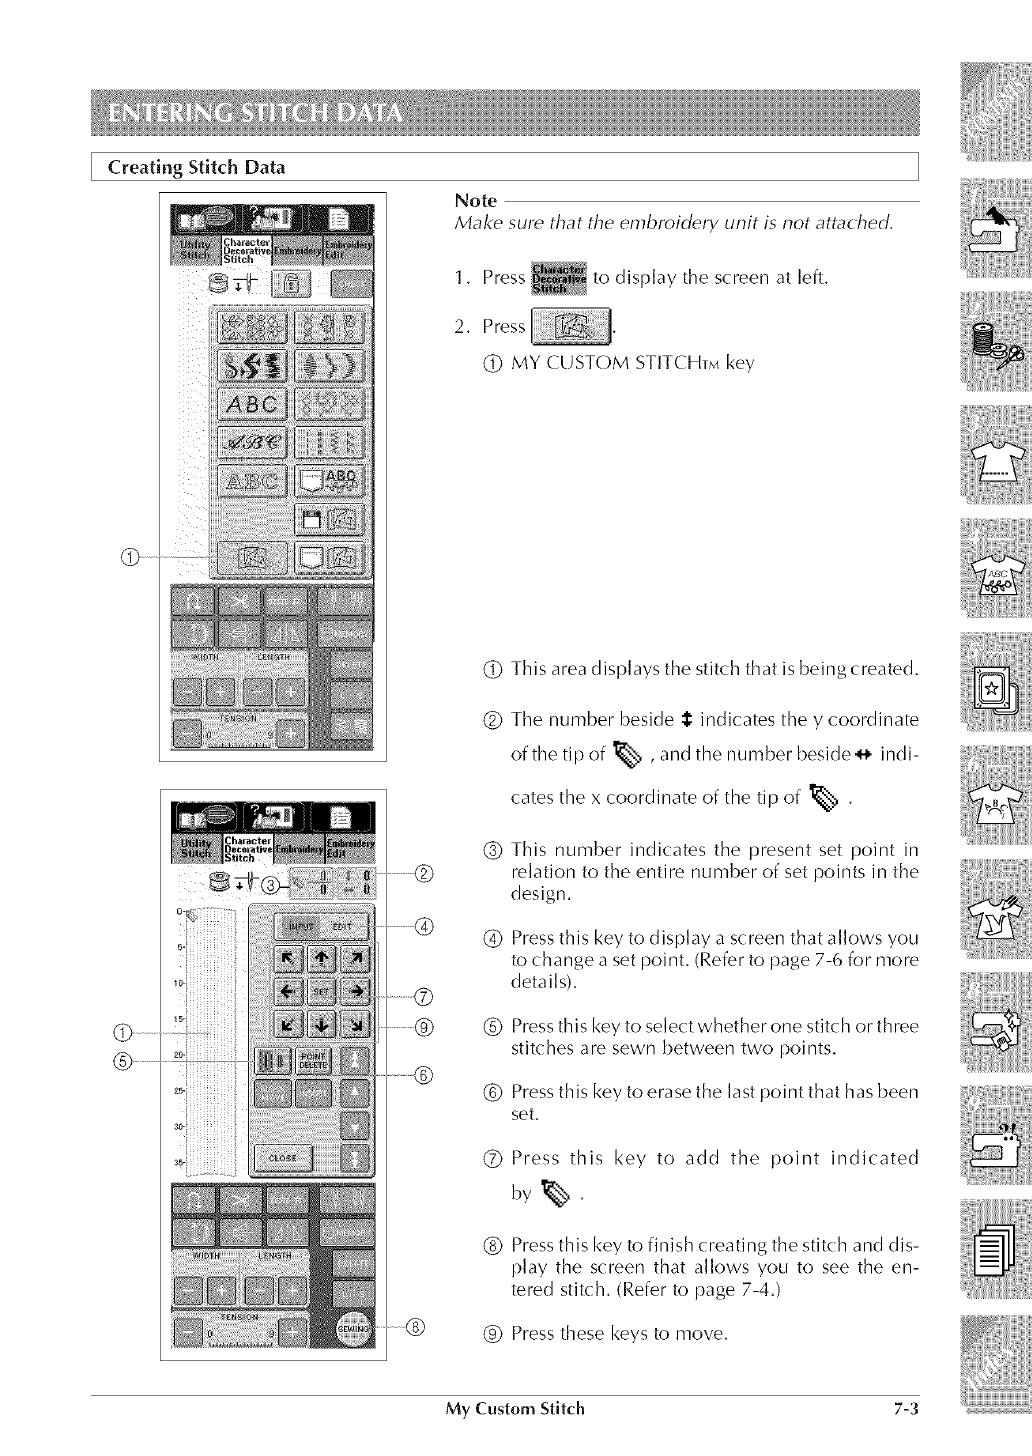
Creating Stitch Data
Note
Make sure that the embroidery unit is not attached.
1. Press to display the screen at left.
2. Press
(_) MY CUSTOM STITCHTM key
(i)
®
@
®
®
®
®
®
This area displays the stitch that is being created.
The number beside _ indicates the y coordinate
ofthetipof _ ,and the number beside_ indi-
cates the x coordinate of the tip of _ .
This number indicates the present set point in
relation to the entire number of set points in the
design.
Press this key to display a screen that allows you
to change a set point. (Refer to page 7-6 for more
details).
Press this key to select whether one stitch or three
stitches are sewn between two points.
Press this key to erase the last point that has been
set.
Press this key to add the point indicated
Press this key to finish creating the stitch and dis-
play the screen that allows you to see the en-
tered stitch. (Refer to page 7-4.)
(_) Press these keys to move.
My Custom Stitch 7-3
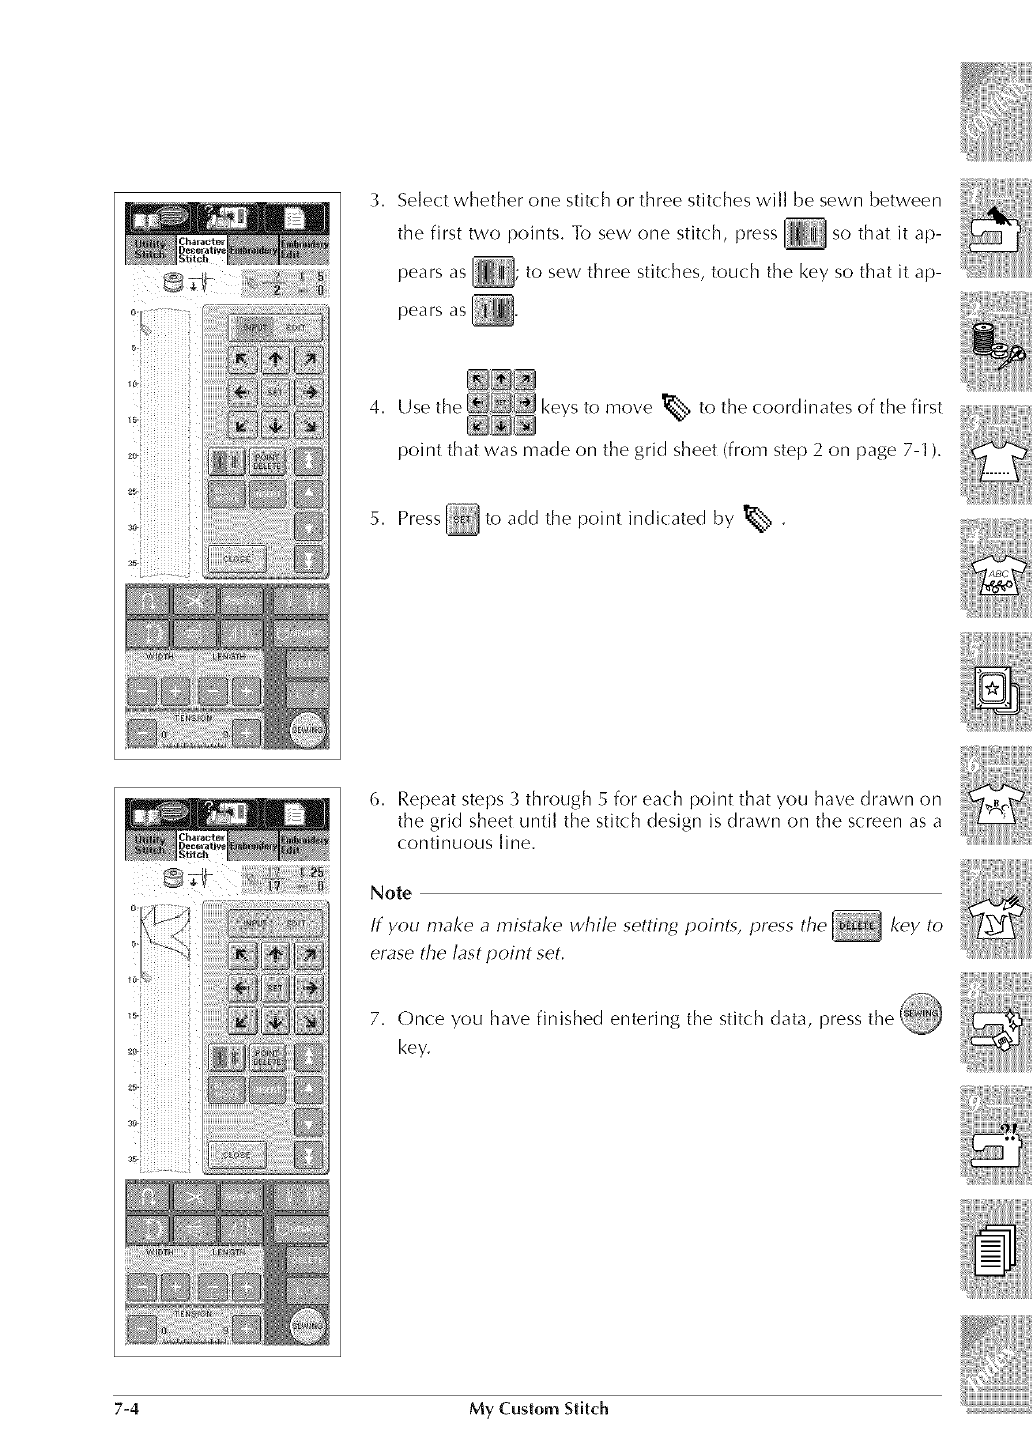
o-
0_i!i!ii!iiiiiiiiii{:
!i!iliiiiiiiii_i_i
iiiilx!iiiiii!!{_
i;i_!i;!iiiiiiiii_
ikili!iiiiiiiii_i_
iiiiii_iiiiiiiiii{i
...............iiiili;iii!i!@ii@i!!i@!
¸ iit
i @ii l
i !i!ii@il
!!@iiii!!i!ii@l
3. Select whether one stitch or three stitches will be sewn between
the first two points. To sew one stitch, press _ so that it ap-
pears as _; to sew three stitches, touch the key so that it ap-
pears as _.
4. Use the keys to move % to the coordinates of the first
point that was made on the grid sheet (from step 2 on page 7-1 ).
5. Press_ to add the point indicated by _;, .
6. Repeat steps 3 through 5 for each point that you have drawn on
the grid sheet unti] the stitch design is drawn on the screen as a
continuous ]ine.
Note
If you make a mistake while setting points, press the key to
erase the last point set.
7. Once you have finished entering the stitch data, press the
key.
7-4 My Custom Stitch
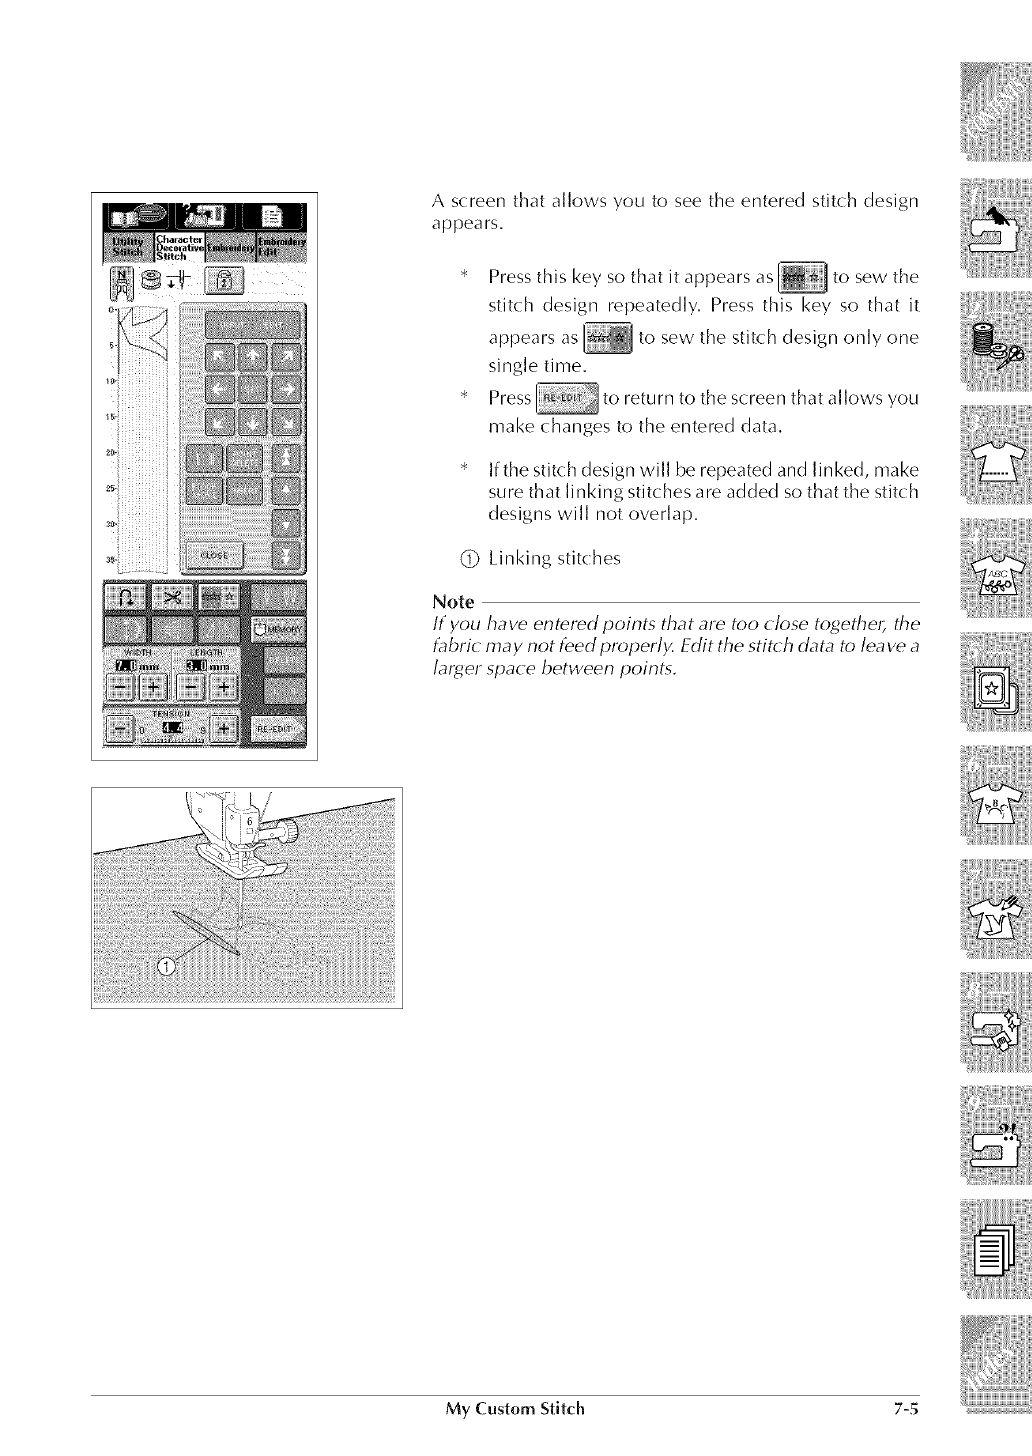
A screen that allows you to see the entered stitch design
appears,
* Press this key so that it appears as to sew the
stitch design repeatedly, Press this key so that it
appears as to sew the stitch design only one
single time,
* Press to return to the screen that allows you
make changes to the entered data,
* If the stitch design will be repeated and linked, make
sure that linking stitches are added so that the stitch
designs will not overlap,
(_ Linking stitches
Note
If you have entered points that are too (:lose to,gethel; the
L_bri(: may not feed properly. Edit the stitch data to lea vea
lar_cer space between points.
My Custom Stitch 7-,5
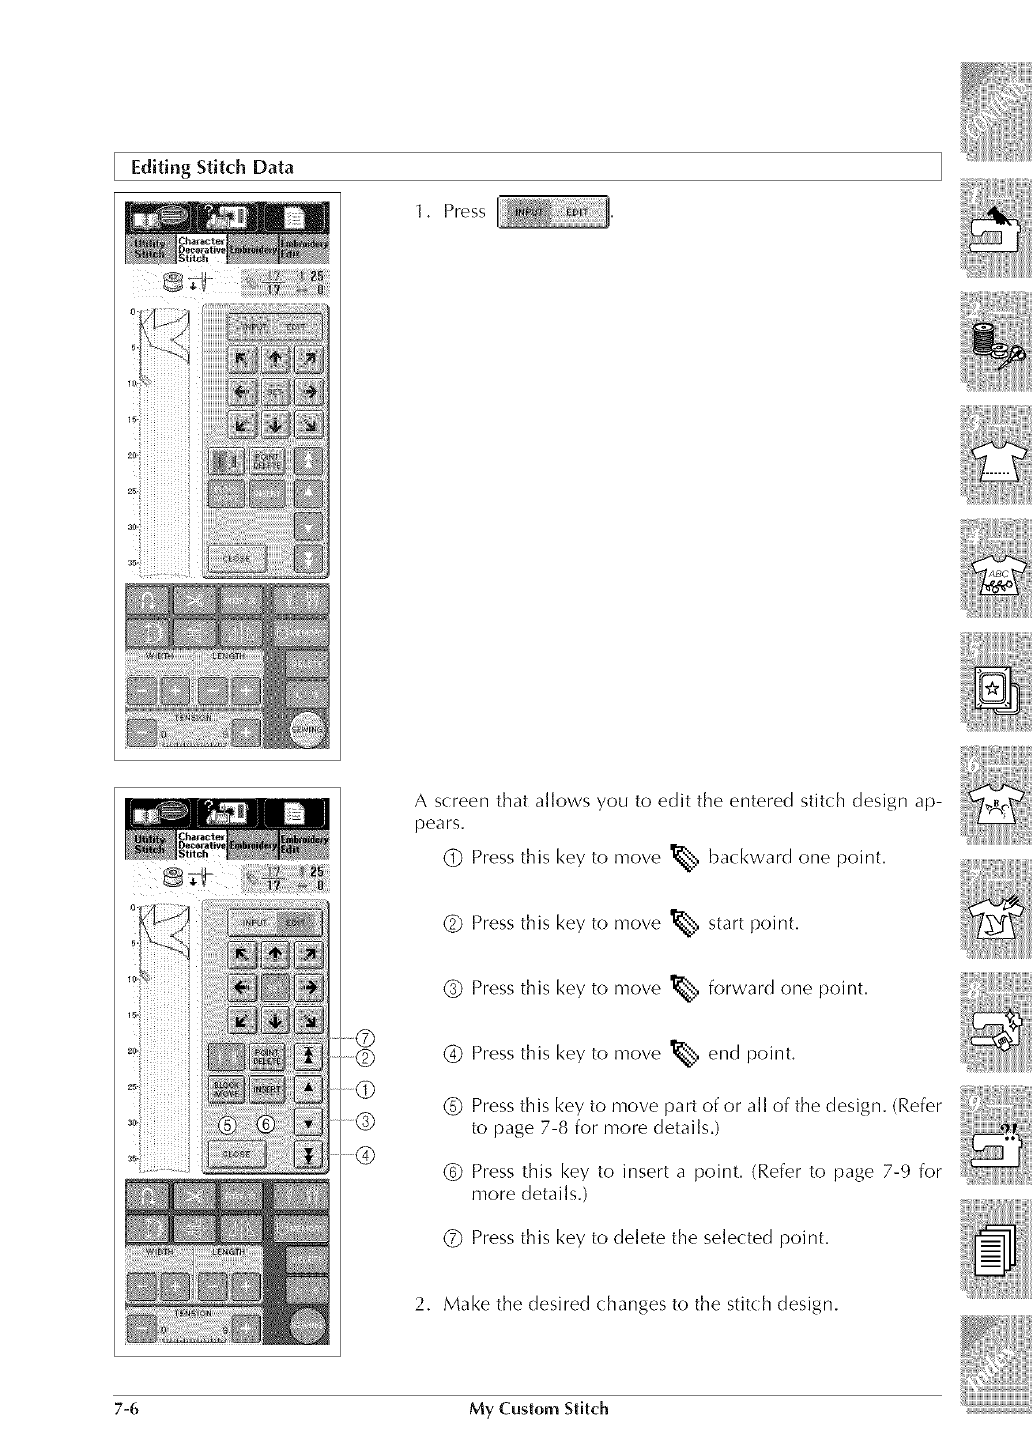
Editing Stitch Data
i
1. PressI
A screen that allows you to edit the entered stitch design ap-
pears.
(_ Press this key to move _'_ backward one point.
(_ Press this key to move % start point.
(_ Press this key to move _ forward one point.
(_) Press this key to move %, end point.
C) Press this key to move part of or all of the design. (Refer
to page 7-8 for more details.)
(_9 Press this key to insert a point. (Refer to page 7-9 for
more details.)
(_ Press this key to delete the selected point.
2. Make the desired changes to the stitch design.
7-6 My Custom Stitch
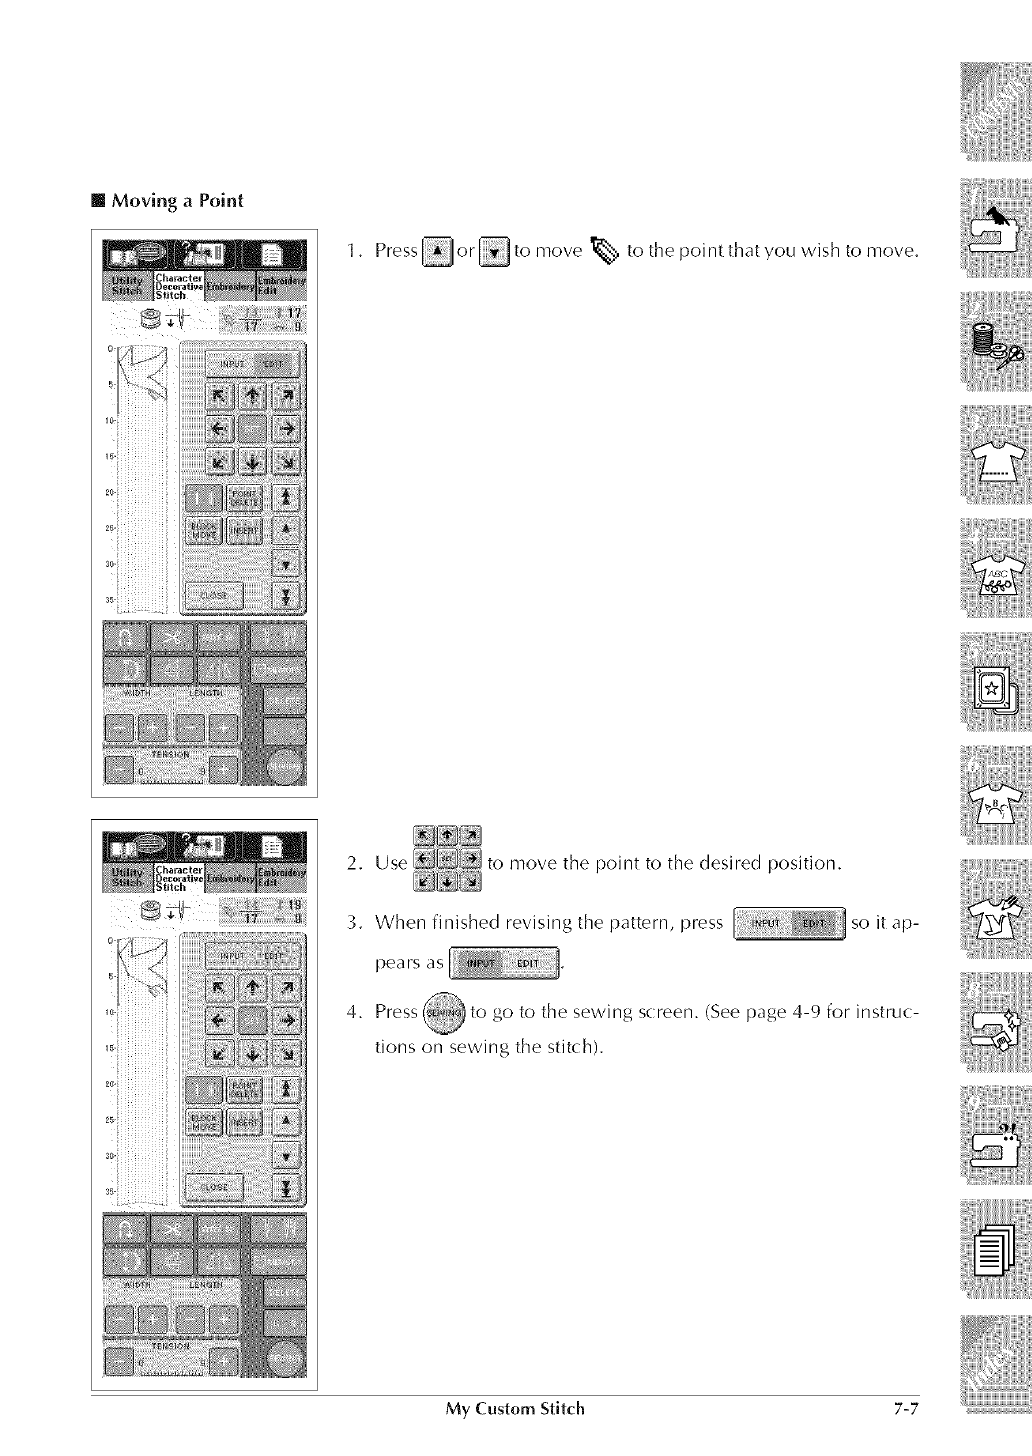
[] Moving aPoint
1. Press_or_tomove % tothepointthatyouwishtomove.
2. Use to move the point to the desired position.
revising the pattern, press } so it ap-
3. When finished
pe rs
4. Press _ to go to the sewing screen. (See page 4-9 for instruc-
tions on sewing the stitch).
My Custern Stitch 7-7
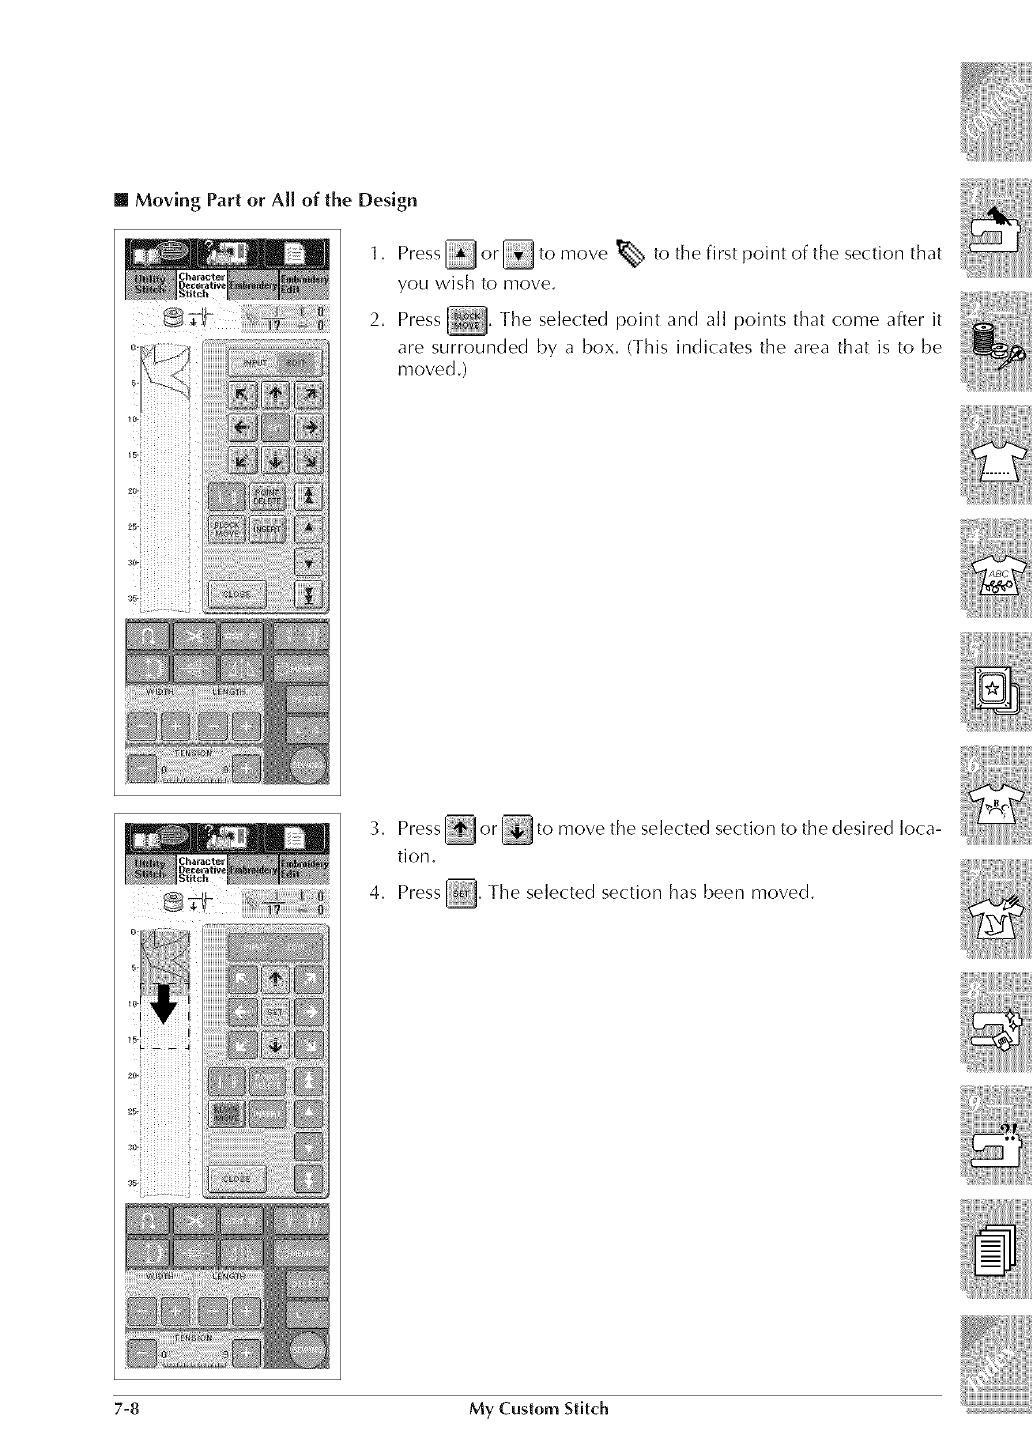
[] Moving Part or All of the Design
1, Press _ or _ to move _:_ to the first point of the section that
you wish to move.
point points2. Press _, The selected and all that come after it
are surrounded by a box, (This indicates the area that is to be
moved.)
_. Press _ or _ to move the selected section to the desi red loca-
tion,
4, Press _, The selected section has been moved.
7-8 My Custom Stitch
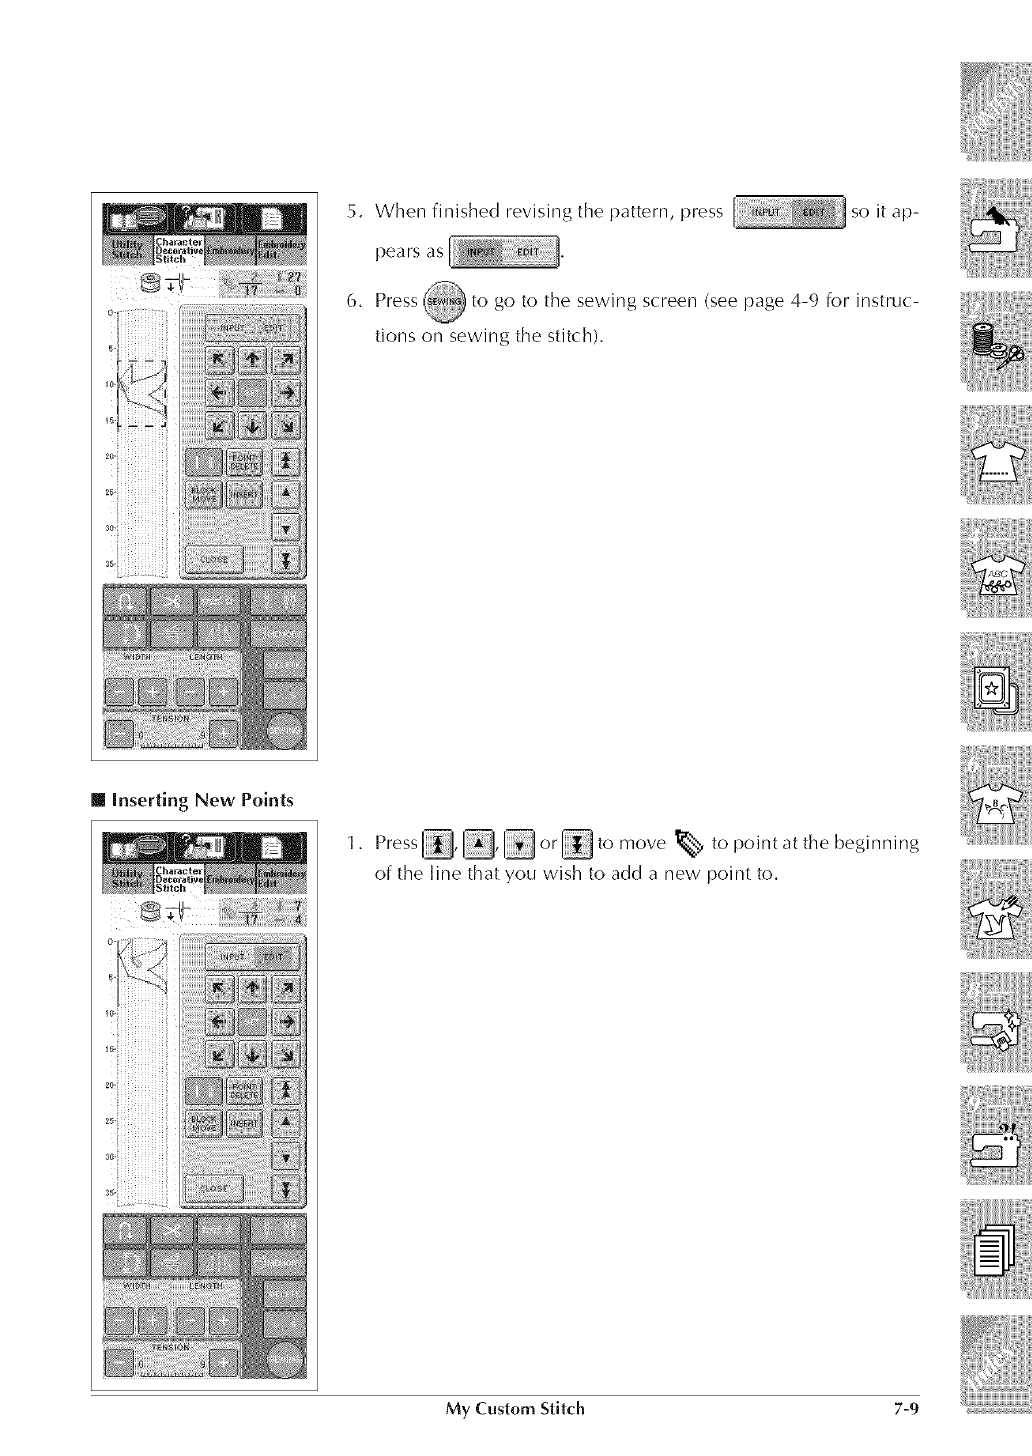
5. When finished revising the pattern, press so it ap-
pears as
6. Press, to go to the sewing screen (see page 4-9 for instruc-
tions on sewing the stitch).
[] inserting New Points
®4,1-
1. Press_,_,_or_tomove _ to point at the beginning
of the line that you wish to add a new point to.
My Custem Stitch 7-9
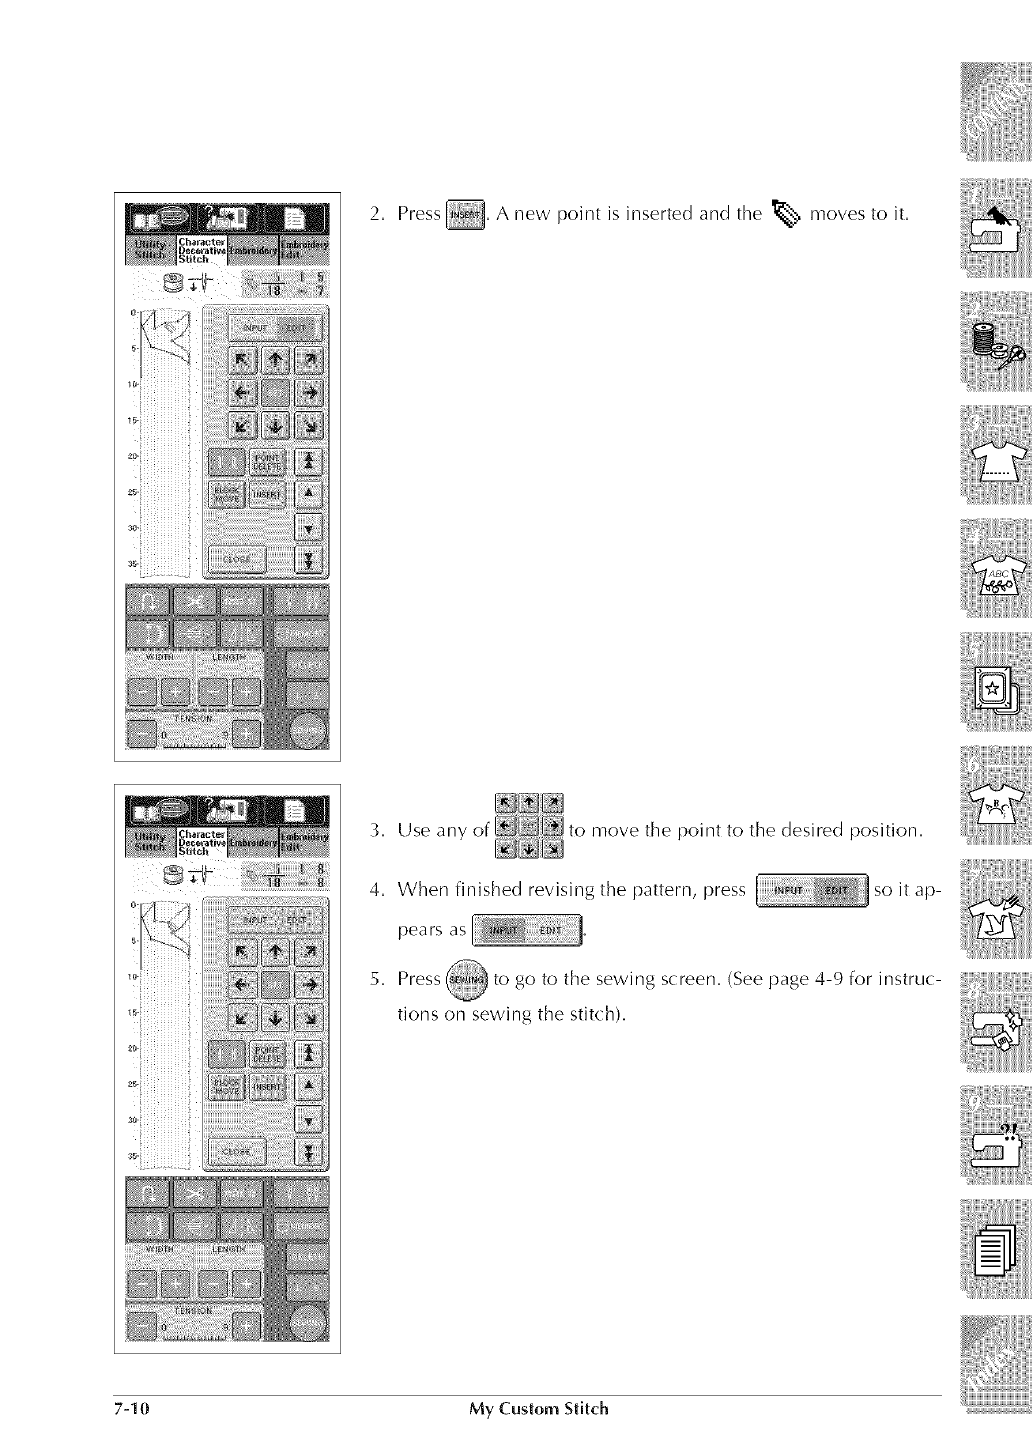
2. Press_, A new point is inserted and the % moves to it.
E ;;;@_i@_¸¸_¸¸.i¸l_!iiiiiiiii_!# i_ i_!
3. Use any of move the point to the desired position.
iiiiiiiiiii! i !!! _)jjjjjjiji¸ _ _iii
4. When finished revising the pattern, press [ _ } so it ap-
pears
5. Press @ to go to the sewing screen. (See page 4-9 for instruc-
tions on sewing the stitch).
7-10 My Custom Stitch
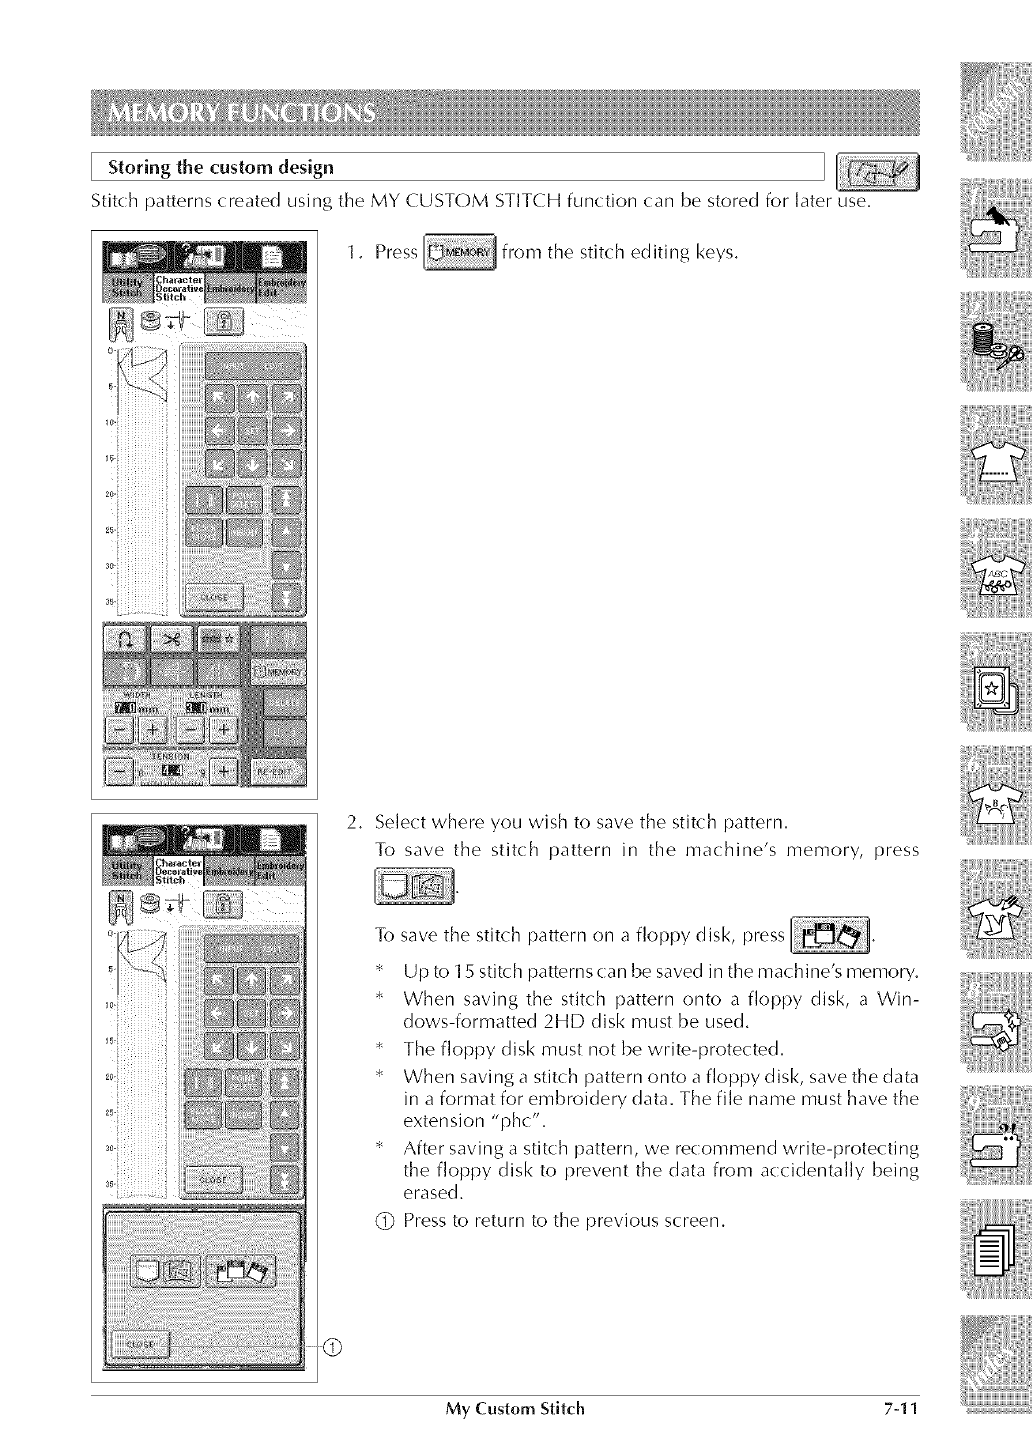
Storing the custom design
Stitch patterns created using the MY CUSTOM STITCH function (:an be stored for later use,
1, Press from the stitch editing keys,
2. Select where you wish to save the stitch pattern.
To save the stitch pattern in the machnes memory, press
To
_B
_B
save the stitch pattern on a floppy disk, press
Up to 15 stitch patterns can be saved in the machine's memory,
When saving the stitch pattern onto a floppy disk, a Win-
dows-formatted 2HD disk must be used,
The floppy disk must not be write-protected,
When savi ng a stitch pattern onto a floppy d isk, save the data
in a format for embroidery data. The file name must have the
extension "phc",
After saving a stitch pattern, we recommend write-protecting
the floppy disk to prevent the data from accidentally being
erased,
(_ Press to return to the previous screen.
My Custom Stitch 7-11
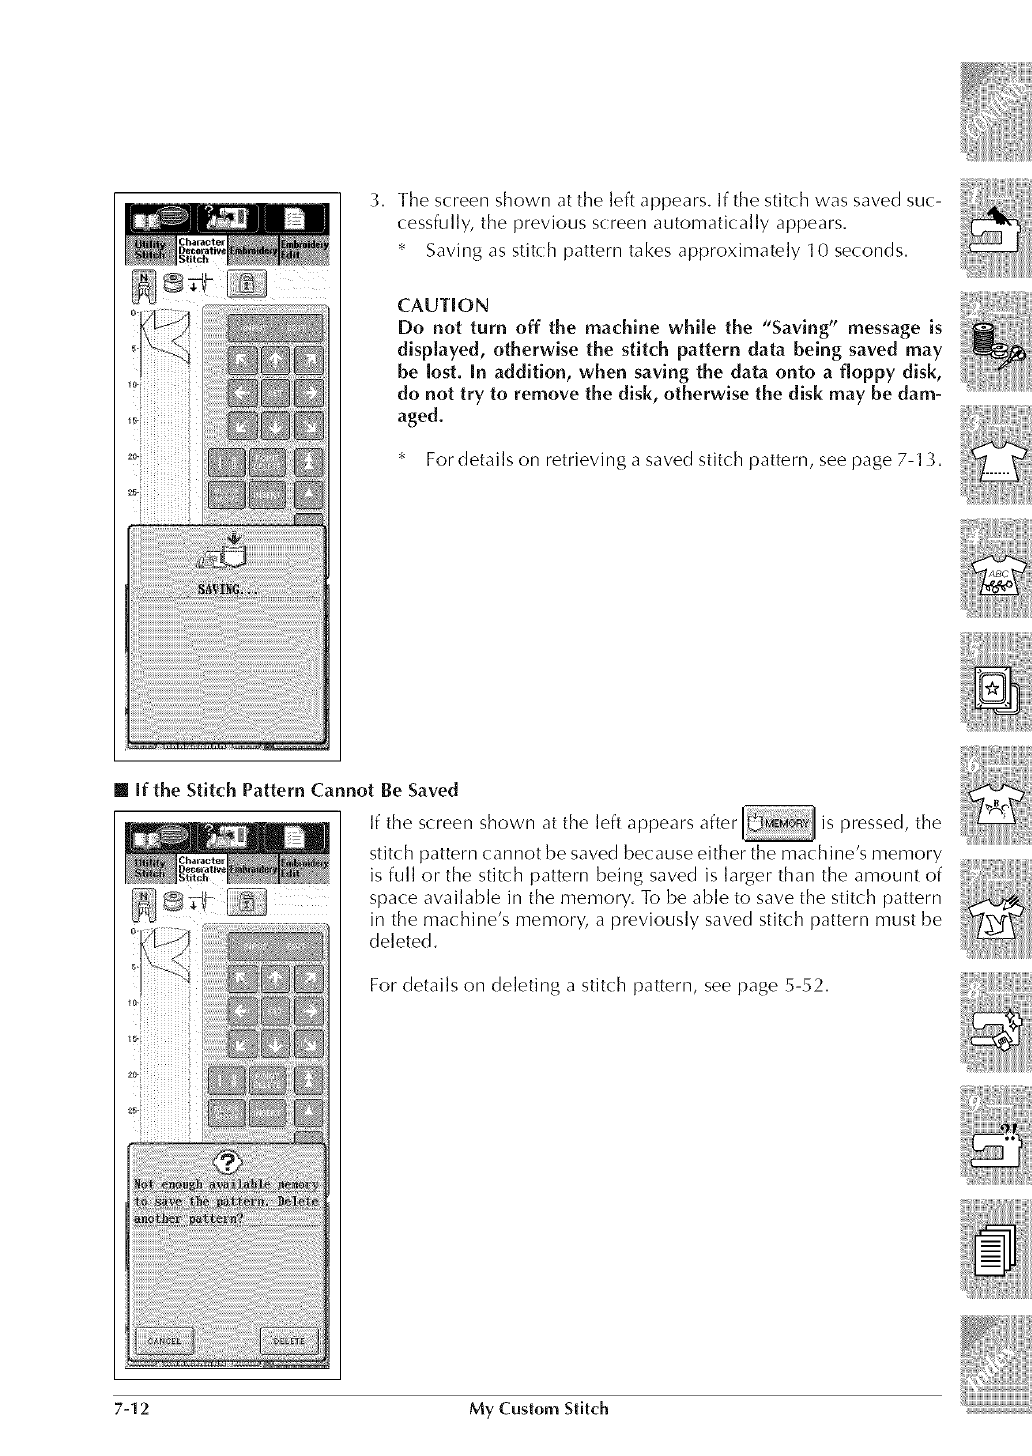
3. The screen shown at the left appears. If the stitch was saved suc-
cessfully, the previous screen automatically appears.
* Saving as stitch pattern takes approximately 10 seconds.
CAUTION
Do not turn off the machine whiJe the "Saving" message is
displayed, otherwise the stitch pattern data being saved may
be Josto[n addition, when saving the data onto a fJoppy disk,
do not try to remove the disk, otherwise the disk may be dam-
aged.
* For details on retrieving a saved stitch pattern, see page 7-13.
[] if the Stitch Pattern Cannot Be Saved
If the screen shown at the left . is pressed, the
appears after _M_MC,RY
stitch pattern cannot be saved because either the machine's memory
is full or the stitch pattern being saved is larger than the amount of
space available in the memory. To be able to save the stir( h pattern
n the machne s memory, a previously saved stitch pattern must be
deleted.
For details on deleting a stitch pattern, see page 5-52.
7-12 My Custom Stitch
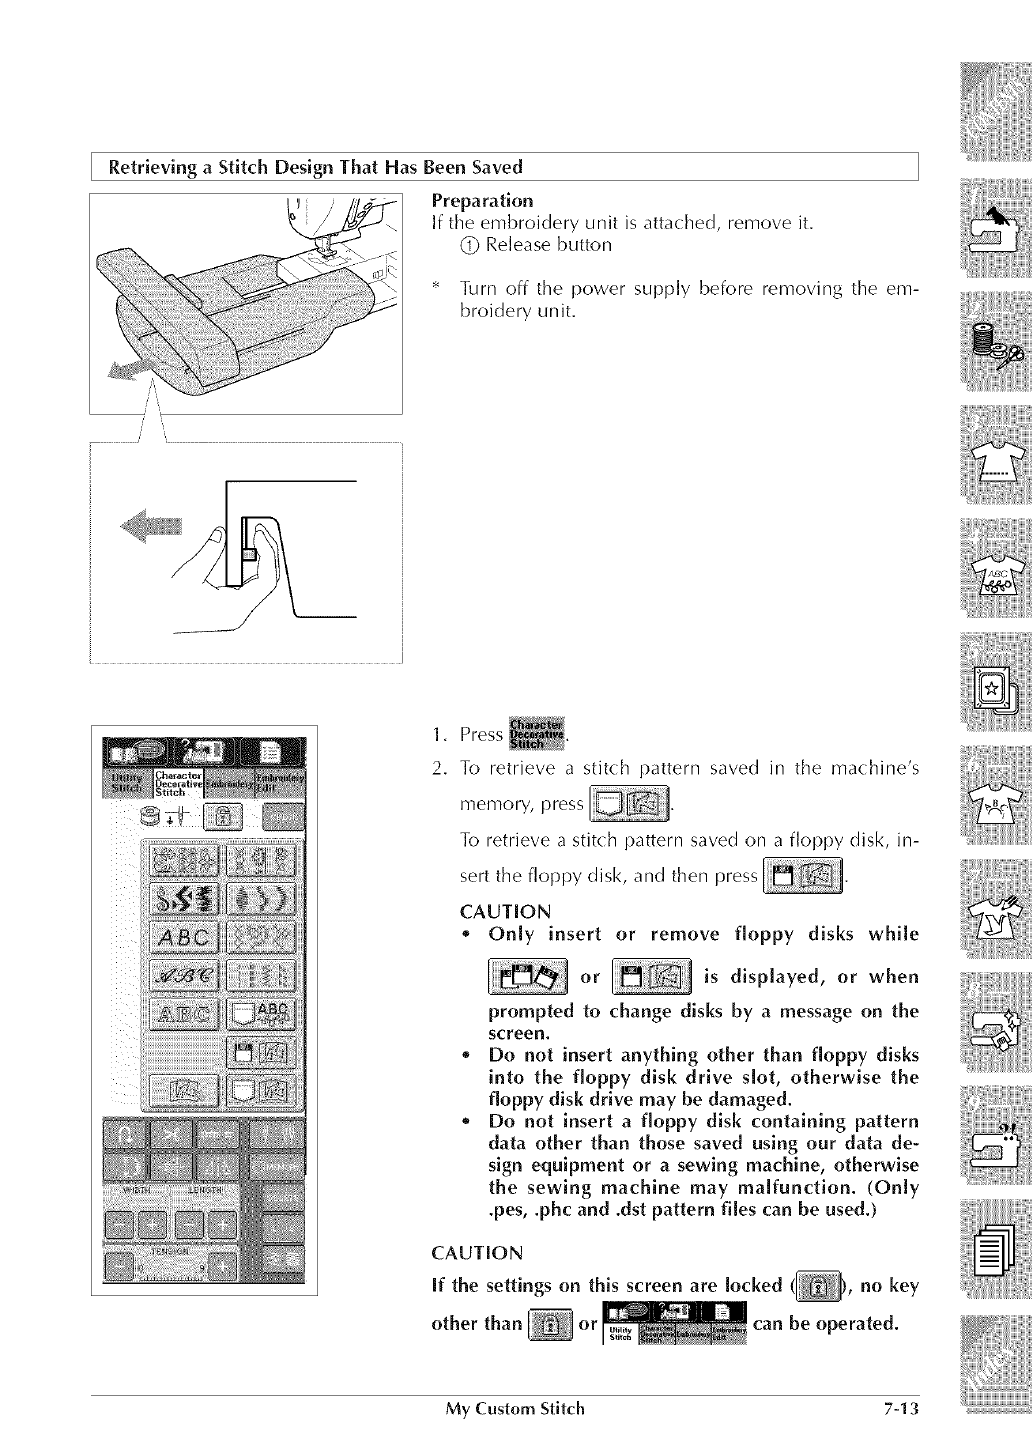
Retrieving aStitch Design That Has Been Saved
Preparation
If the embroidery unit is attached, remove it.
(_) Release button
* Turn off the power supply before removing the em-
broidery unit.
/',
1. Press
2. To retrieve a stitch pattern saved in the machine's
memory, press
To retrieve a stitch pattern saved on a floppy disk, in-
sert the floppy disk, and then press
CAUTION
* Only insert or remove floppy disks while
or is displayed, or when
prompted to change disks by a message on the
screen.
Do not insert anything other than floppy disks
into the floppy disk drive slot, otherwise the
floppy disk drive may be damaged.
Do not insert a floppy disk containing pattern
data other than those saved using our data de-
sign equipment or a sewing machine, otherwise
the sewing machine may malfunction. (Only
.pes, .phc and .dst pattern files can be used.)
CAUTION
If the settings on this screen are locked ( , no key
other than _ or can be operated.
My Custom Stitch 7-13
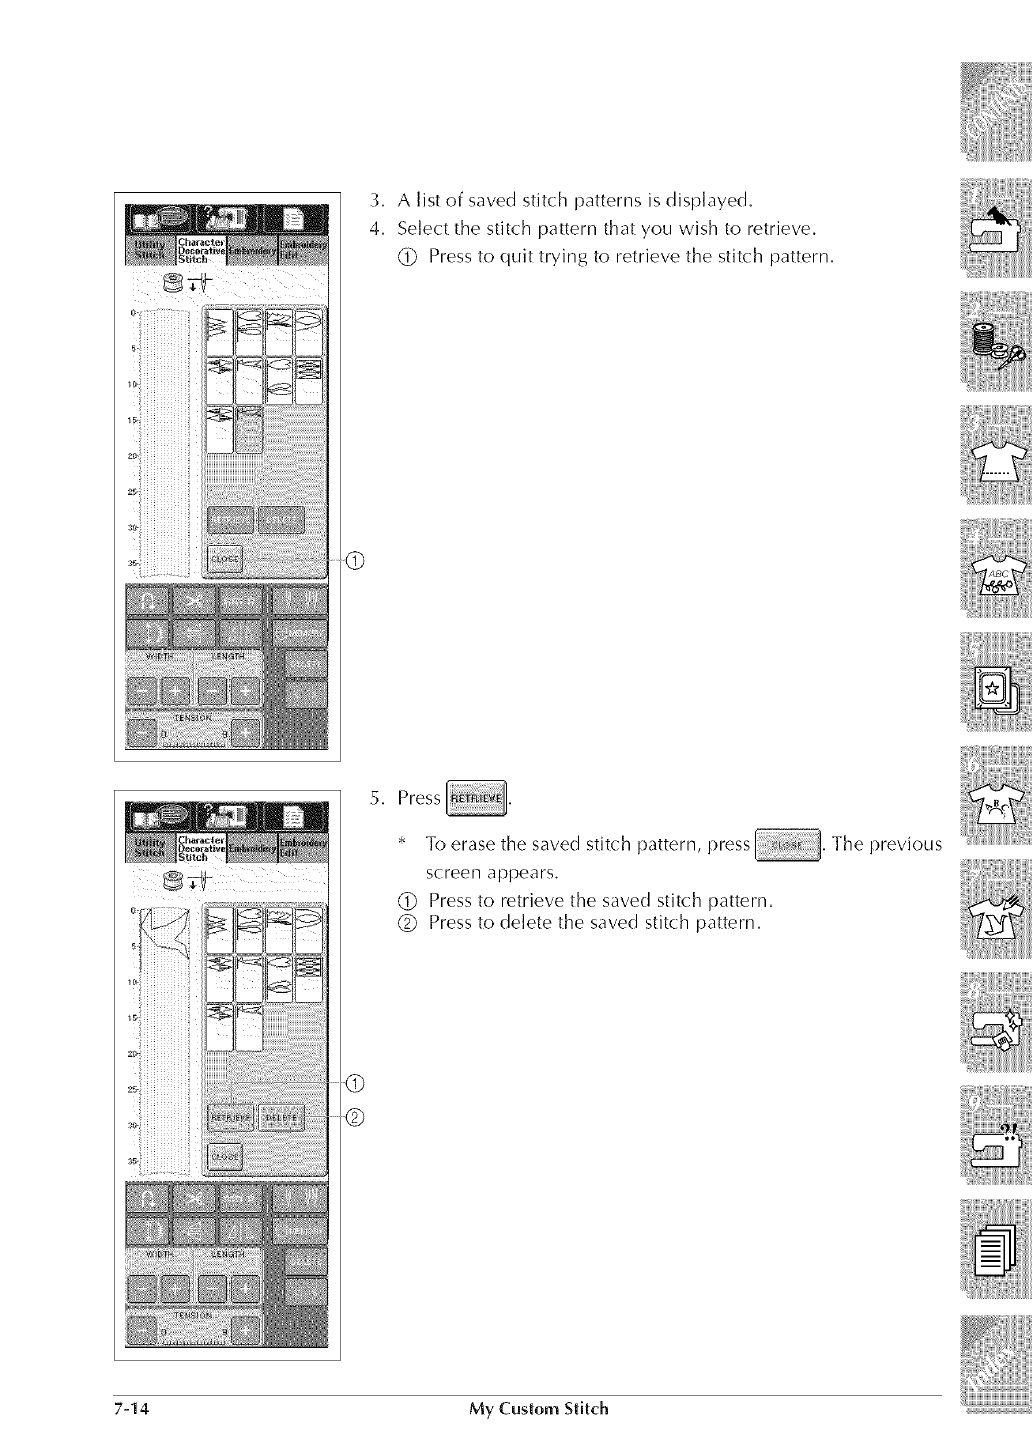
3, A list of saved stitch patterns is displayed,
4, Select the stitch pattern that you wish to retrieve,
(_ Pressto quit trying to retrieve the stitch pattern,
5, Press
* To erase the saved stitch pattern, The previous
press
screen appears,
1_ Press to retrieve the saved stitch pattern,
(]_ Press to delete the saved stitch pattern,
7-14 My Custom Stitch

6. The sewing screen for that stitch will then be displayed.
My Custern Stitch 7-15
7-16 My Custom Stitch
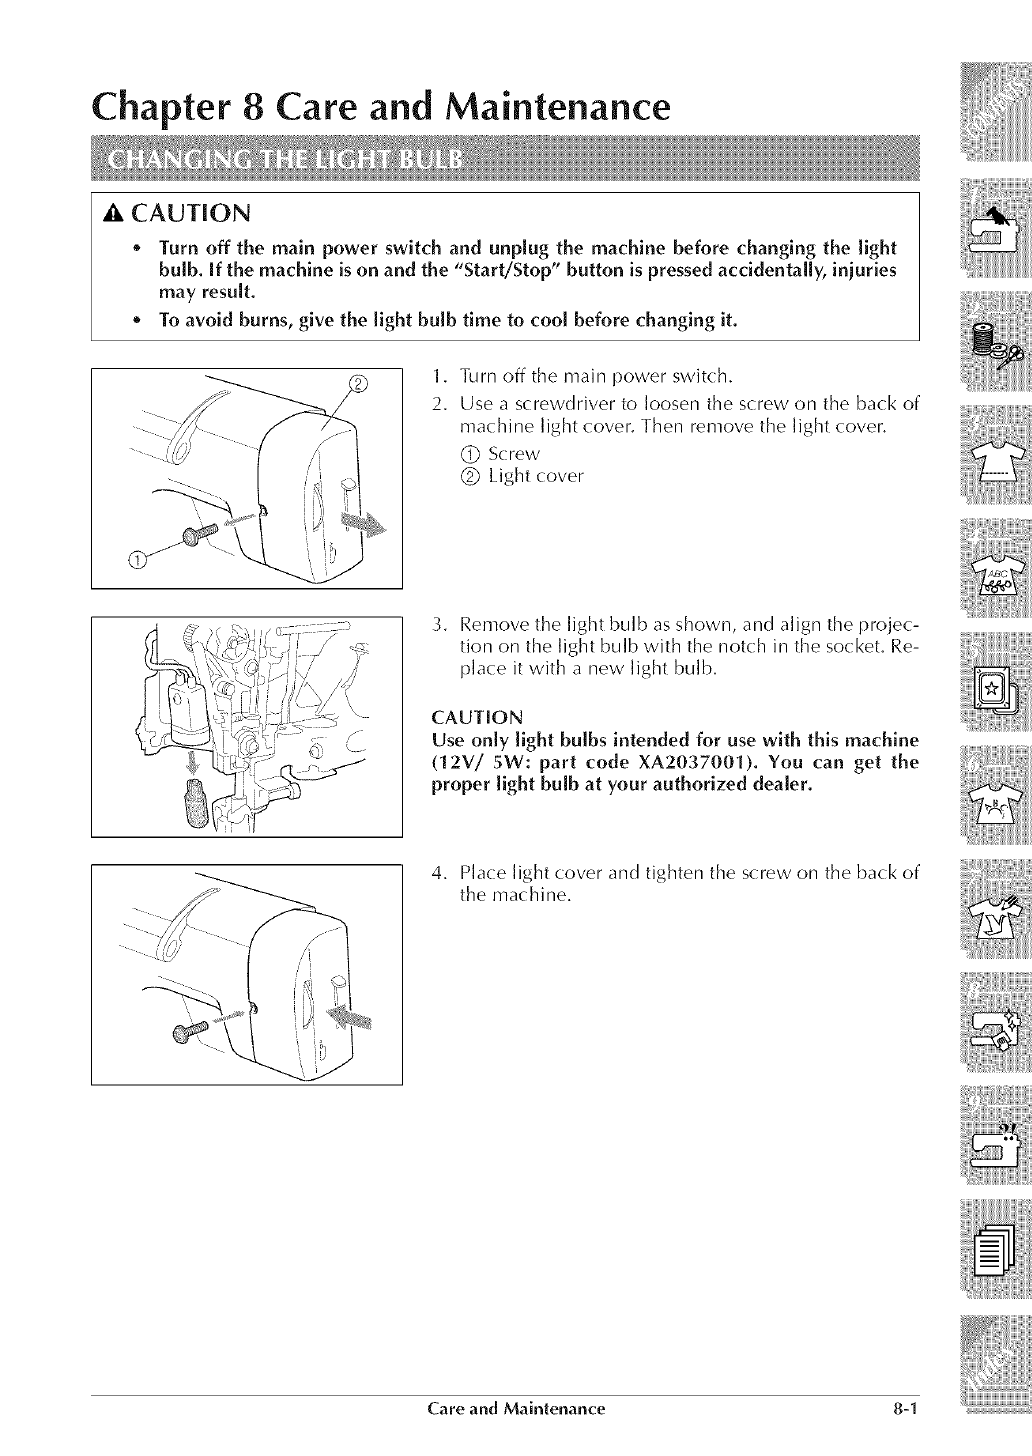
Chapter 8 Care and Maintenance
CAUTION
*Turn off the main power switch and unplug the machine before changing the light
bulb. If the machine is on and the "Start/Stop" button is pressed accidentally, iniuries
may result.
*To avoid burns, give the light bulb time to cool before changing it.
1. Turn off the main power switch.
2. Use a screwdriver to loosen the screw on the back of
machine light cover. Then remove the light cover.
(_ Screw
(_ Light cover
3. Remove the light bulb as shown, and align the projec-
tion on the light bulb with the notch in the socket. Re-
place it with a new light bulb.
CAUTION
Use only light bulbs intended for use with this machine
(12V/ 5W: part code XA2037001). You can get the
proper light bulb at your authorized dealer.
4, Place light cover and tighten the screw on the back of
the machine.
Care and Maintenance 8-I
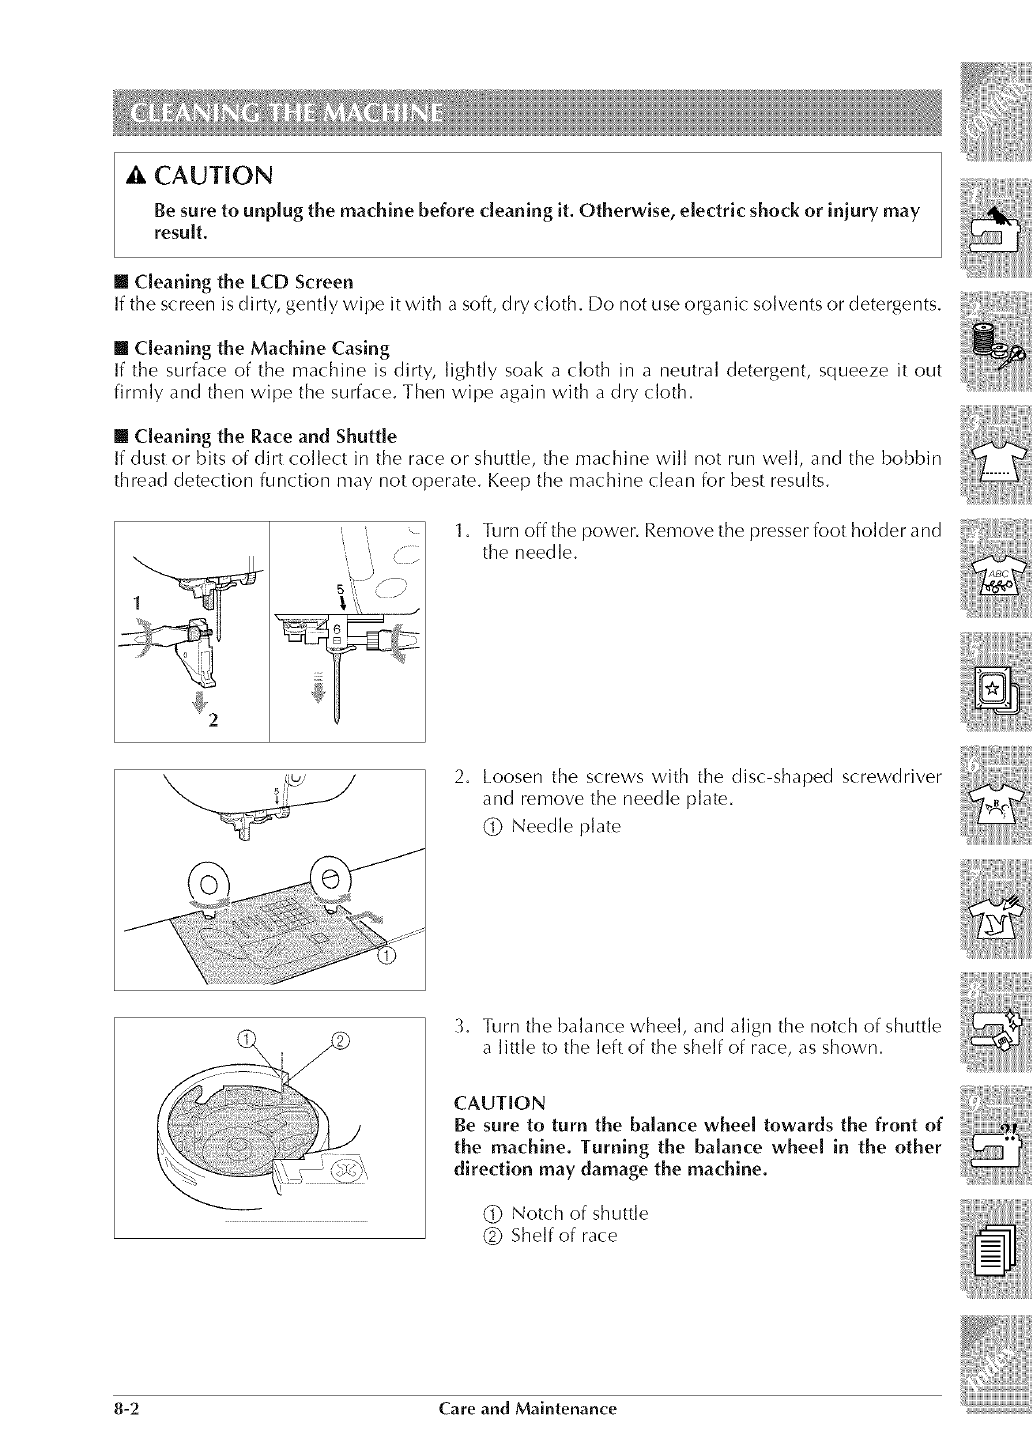
A CAUTION
Be sure to unplug the machine before cleaning it. Otherwise, electric shock or iniury may
result.
[] Cleaning the LCD Screen
If the screen is dirty, gently wipe it with a soft, dry cloth. Do not use organic solvents or detergents.
[] Cleaning the Machine Casing
If the surface of the machine is dirty, lightly soak a cloth in a neutral detergent, squeeze it out
firmly and then wipe the surface. Then wipe again with a dry cloth.
[] Cleaning the Race and Shuttle
If dust or bits of dirt collect in the race or shuttle, the machine will not run well, and the bobbin
thread detection function may not operate. Keep the machine clean for best results.
1. Turn offthe power. Remove the presser foot holder and
the needle.
J2. Loosen the screws with the disc-shaped screwdriver
and remove the needle plate.
(_ Needle plate
3. Turn the balance wheel, and align the notch of shuttle
a little to the left of the shelf of race, as shown.
CAUTION
Be sure to turn the balance wheel towards the front of
the machine, Turning the balance wheel in the other
direction may damage the machine.
(_ Notch of shuttle
(_ Shelf of race
8-2 Care and Maintenance
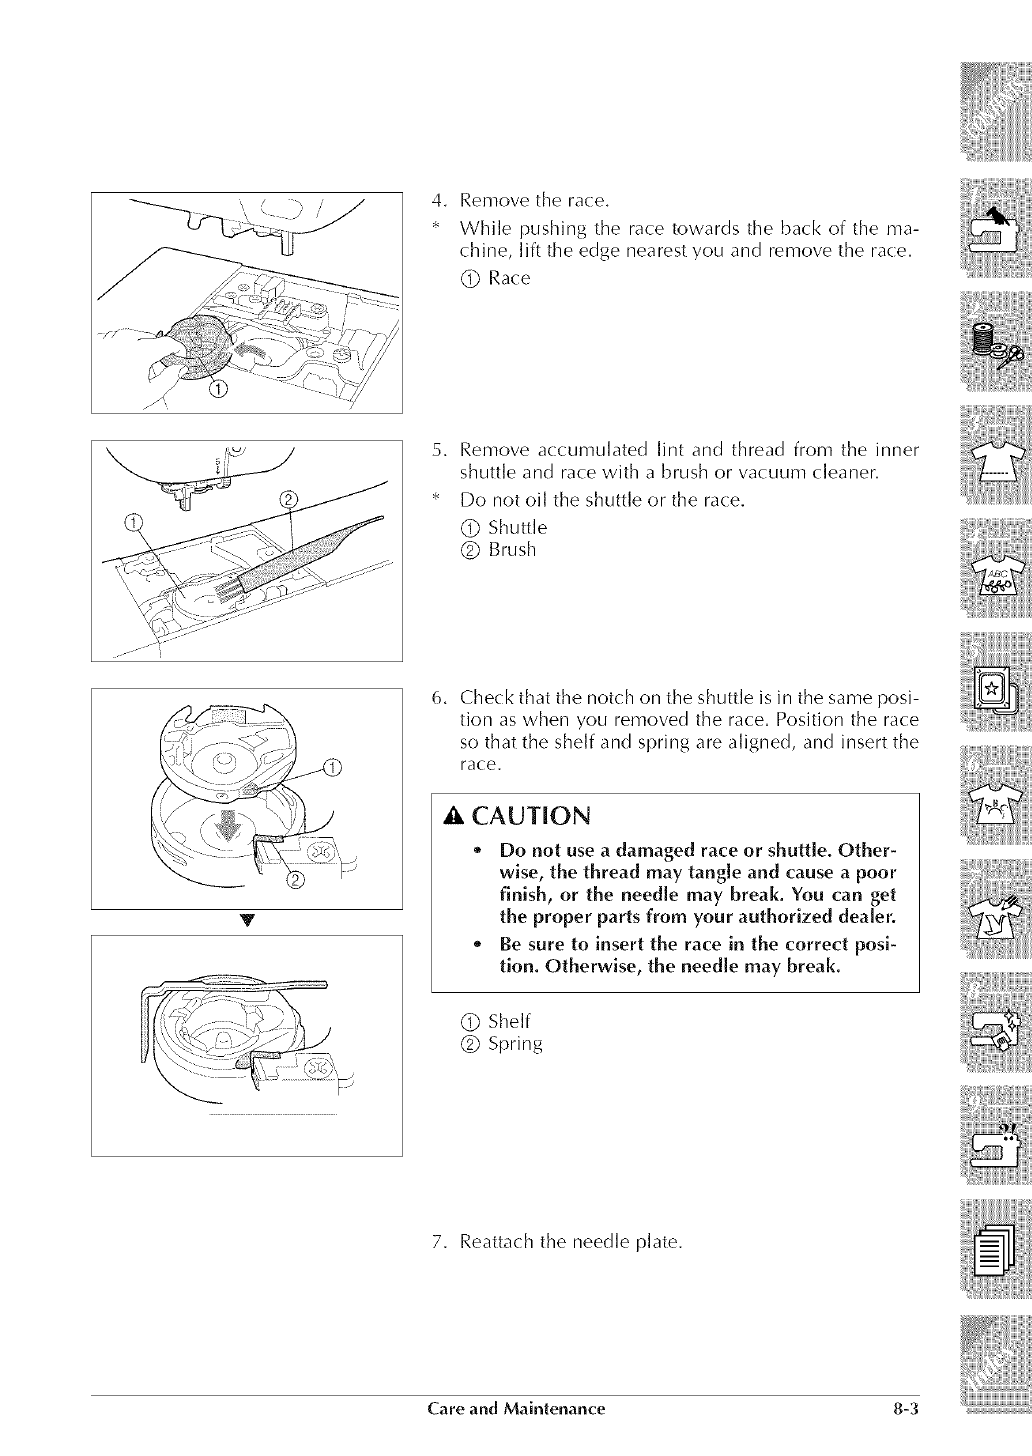
...... \\ \ j' /
4. Remove the race,
While pushing the race towards the back of the ma-
chine, lift the edge nearest you and remove the race,
(_) Race
Y
Remove accumulated lint and thread from the inner
shuttle and race with a brush or vacuum (:leaner.
Do not oil the shuttle or the race.
(_ Shuttle
(_) Brush
6. Check that the notch on the shuttle is in the same posi-
tion as when you removed the race. Position the race
so that the shelf and spring are aligned, and insert the
race.
• , CAUTION
o Do not use a damaged race or shuttle. Other-
wise, the thread may tangle and cause a poor
finish, or the needle may break. You can get
the proper parts from your authorized dealer.
o Be sure to insert the race in the correct posi-
tion. Otherwise, the needle may break.
(_ Shelf
(_ Spring
7. Reattach the needle plate.
Care and Maintenance 8-3
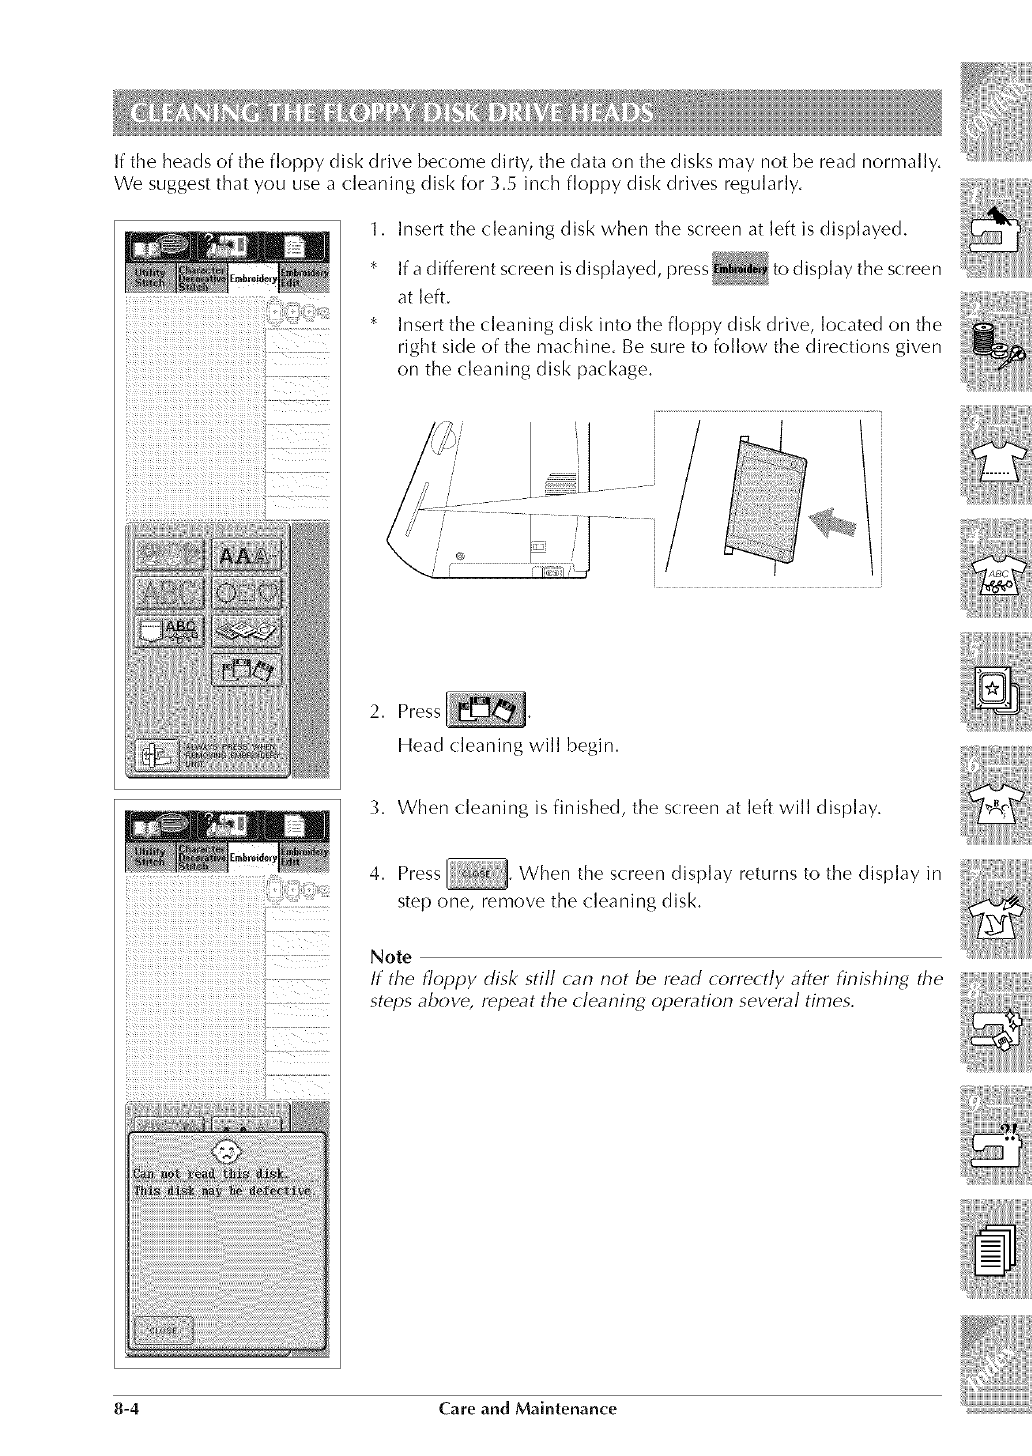
If the heads of the floppy disk drive become dirty, the data on the disks may not be read normally.
We suggest that you use a cleaning disk for 3.5 inch floppy disk drives regularly.
1. Insert the cleaning disk when the screen at left is displayed.
* If a different screen is displayed, press to display the screen
at left.
* Insert the (:leaning disk into the floppy disk drive, located on the
right side of the machine. Be sure to follow the directions given
on the cleaning disk package.
2. Press
Head (:leaning will begin.
3. When (:leaning is finished, the screen at left will display.
4. Press When the screen display returns to the display in
step one, remove the (:leaning disk.
Note
If the floppy disk still (:an not be read correctly after finishing the
steps above, repeat the (:leaning opel_tion sevel_l times.
8-4 Care and Maintenance
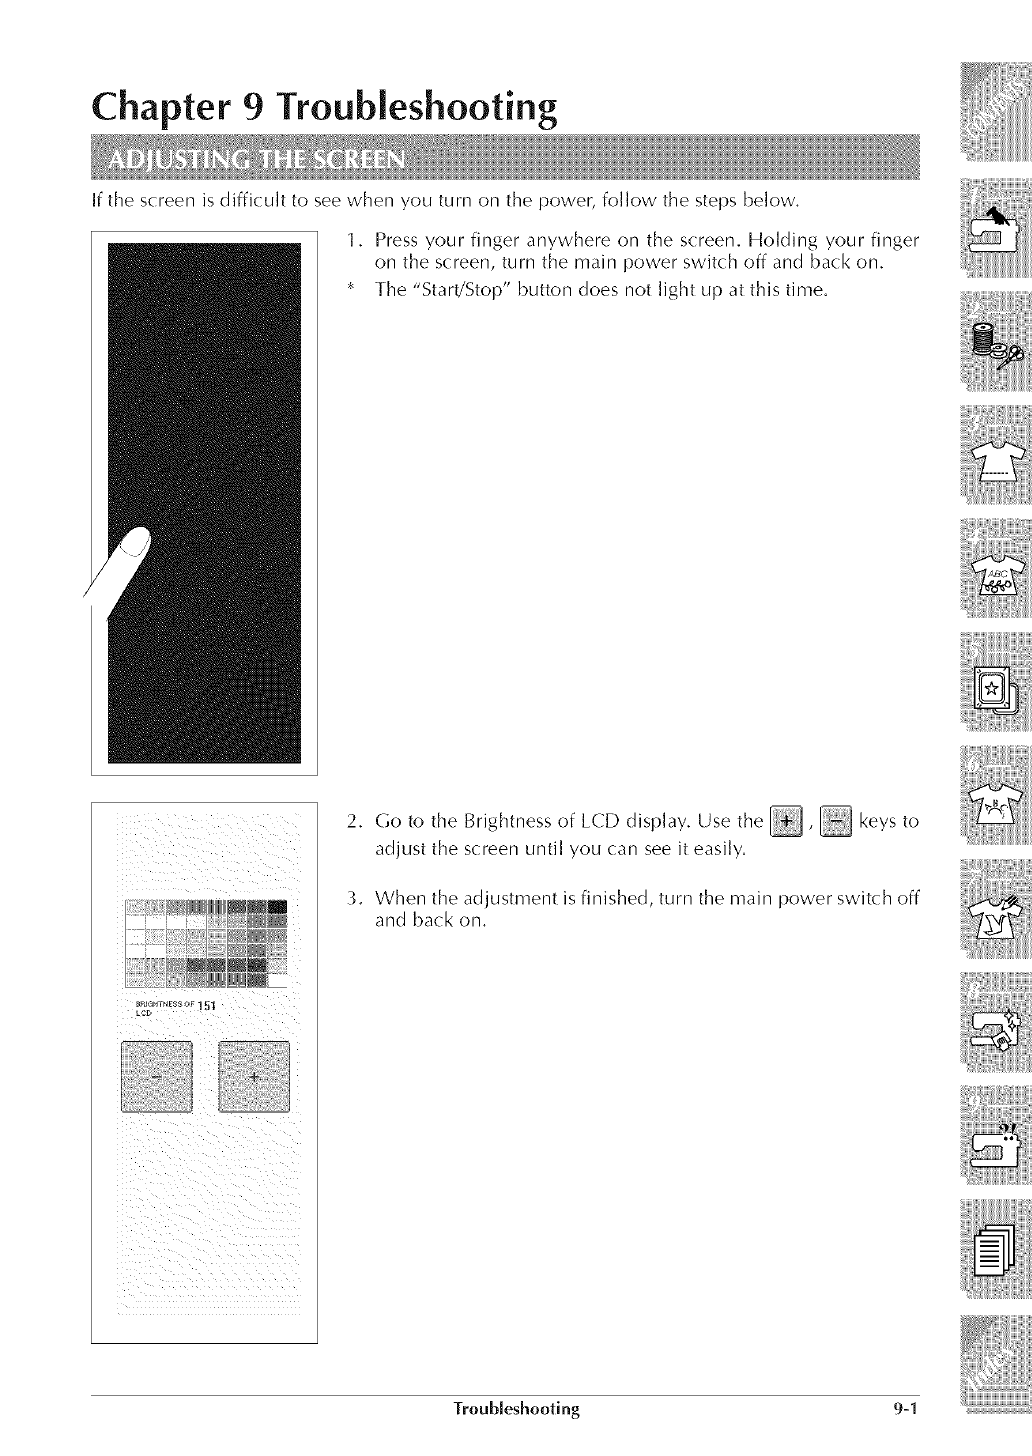
Chapter 9 Troubleshooting
If the screen is difficult to see when you turn on the power, follow the steps below.
1. Press your finger anywhere on the screen. Holding your finger
on the screen, turn the main power switch off and back on.
* The "Start!Stop" button does not light up at this time.
2. Co to the Brightness of LCD display. Use the _, keys to
adjust the screen until you can see it easily.
3. When the adjustment is finished, turn the main power switch off
and back on.
TroubJesheoting 9-1
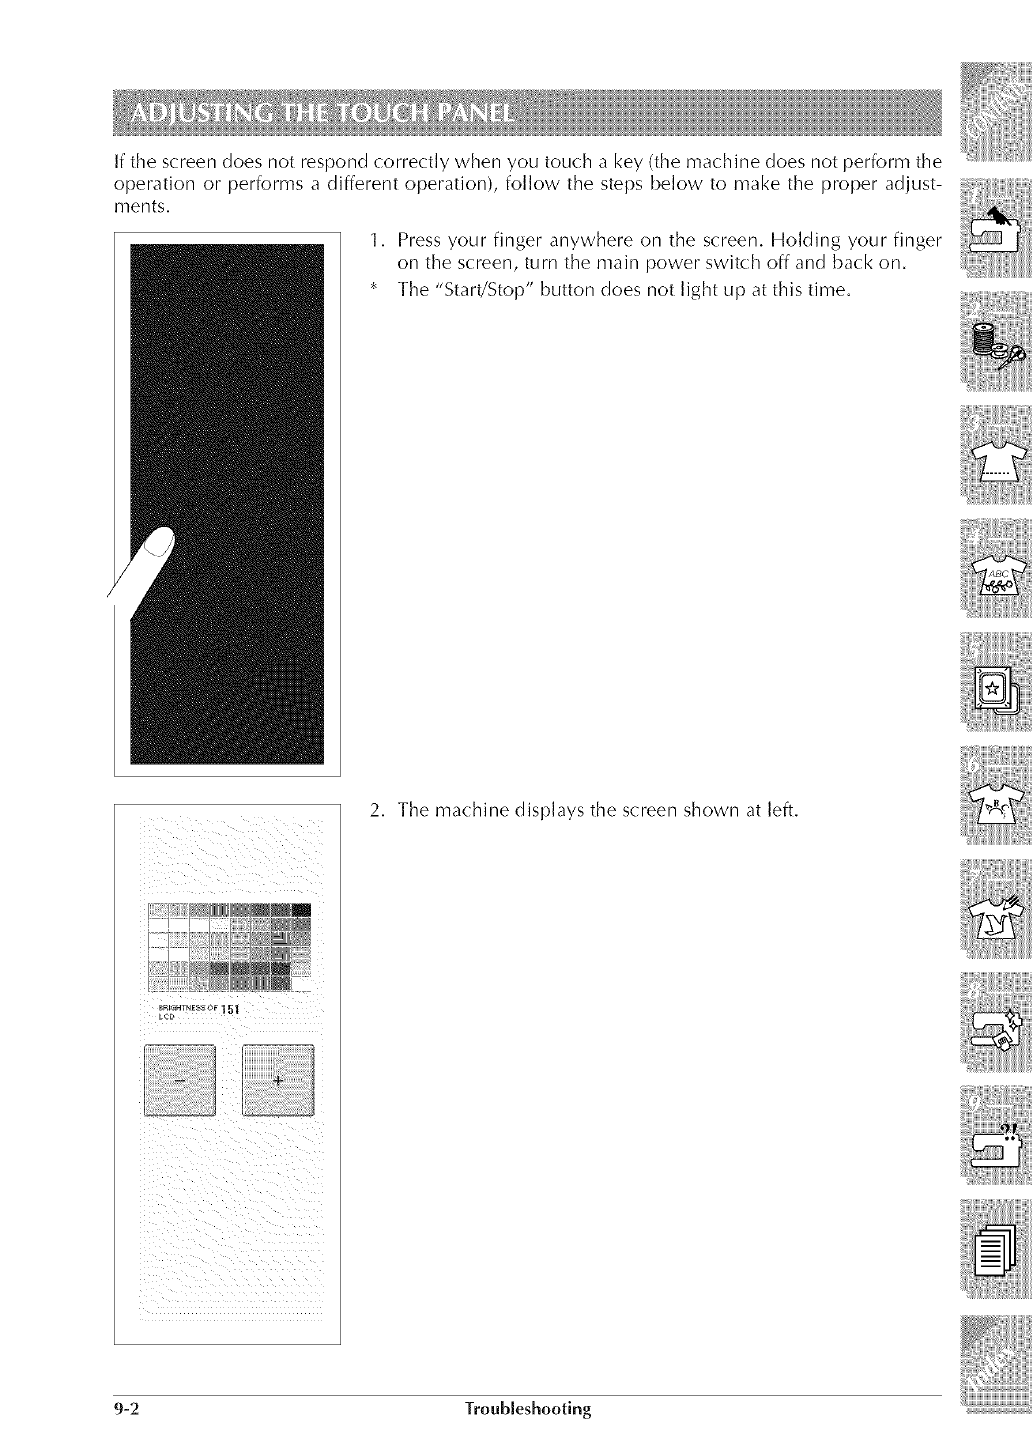
If the screen does not respond correctly when you touch a key (the machine does not perform the
operation or performs a different operation), follow the steps below to make the proper adjust-
ments,
1. Press your finger anywhere on the screen. Holding your finger
on the screen, turn the main power switch off and back on.
* The "Start!Stop" button does not light up at this time.
2, The machine displays the screen shown at left.
9-2 Troubleshooting
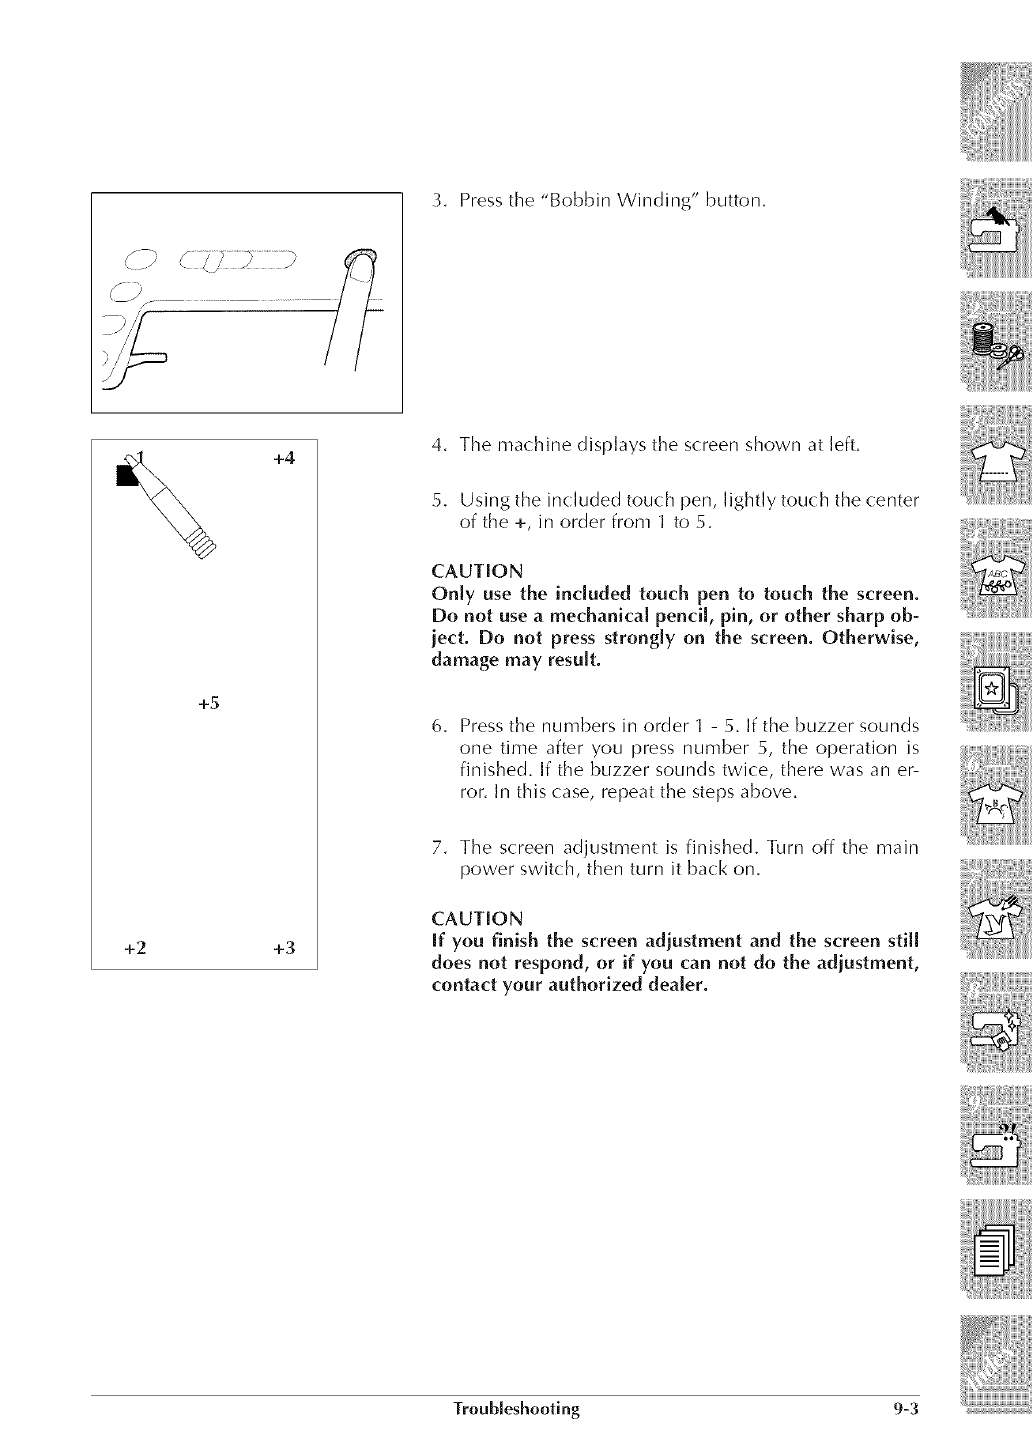
3. Pressthe "Bobbin Winding" button,
+5
+2 +3
4. The machine displays the screen shown at left.
5. Using the included touch pen, lightly touch the center
of the +, in order from 1 to 5.
CAUTION
Only use the included touch pen to touch the screen.
Do not use a mechanical pencil, pin, or other sharp ob-
ject. Do not press strongly on the screen. Otherwise,
damage may result.
6. Press the numbers in order I - 5. If the buzzer sounds
one time after you press number 5, the operation is
finished. If the buzzer sounds twice, there was an er-
ror. In this case, repeat the steps above.
7. The screen adjustment is finished. Turn off the main
power switch, then turn it back on.
CAUTION
if you finish the screen adjustment and the screen still
does not respond, or if you can not do the adjustment,
contact your authorized dealer.
Troubleshooting 9-3
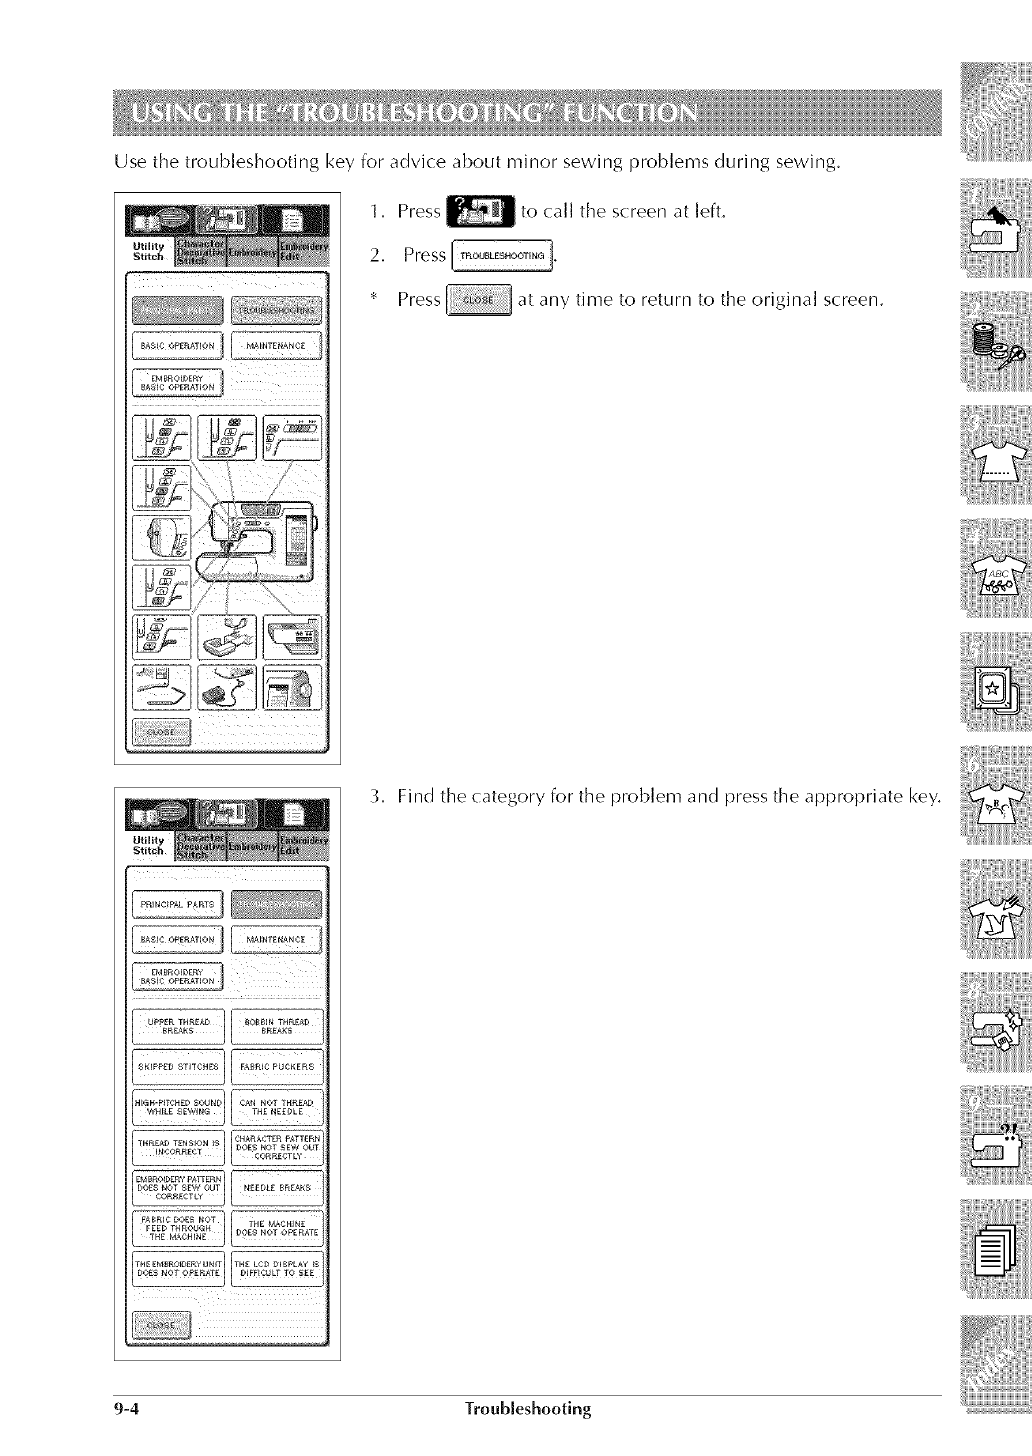
Use the troubleshooting key for advice about minor sewing problems during sewing.
1. Press to call the screen at ]eft,
* Press at any time to return to the original screen.
EM_F_OIpEe_
3. Find the category for the problem and press the appropriate key.
sHPPE?_i!T_HESr_¢P,_cPuckErs
THREAD TENSION ig] CHARACTE F_ PATTERB
!_!CO_R_CT j DOESCO_ECTLy_OTSEWou_
THE _AACHI_E
9-4 TroubJeshooting
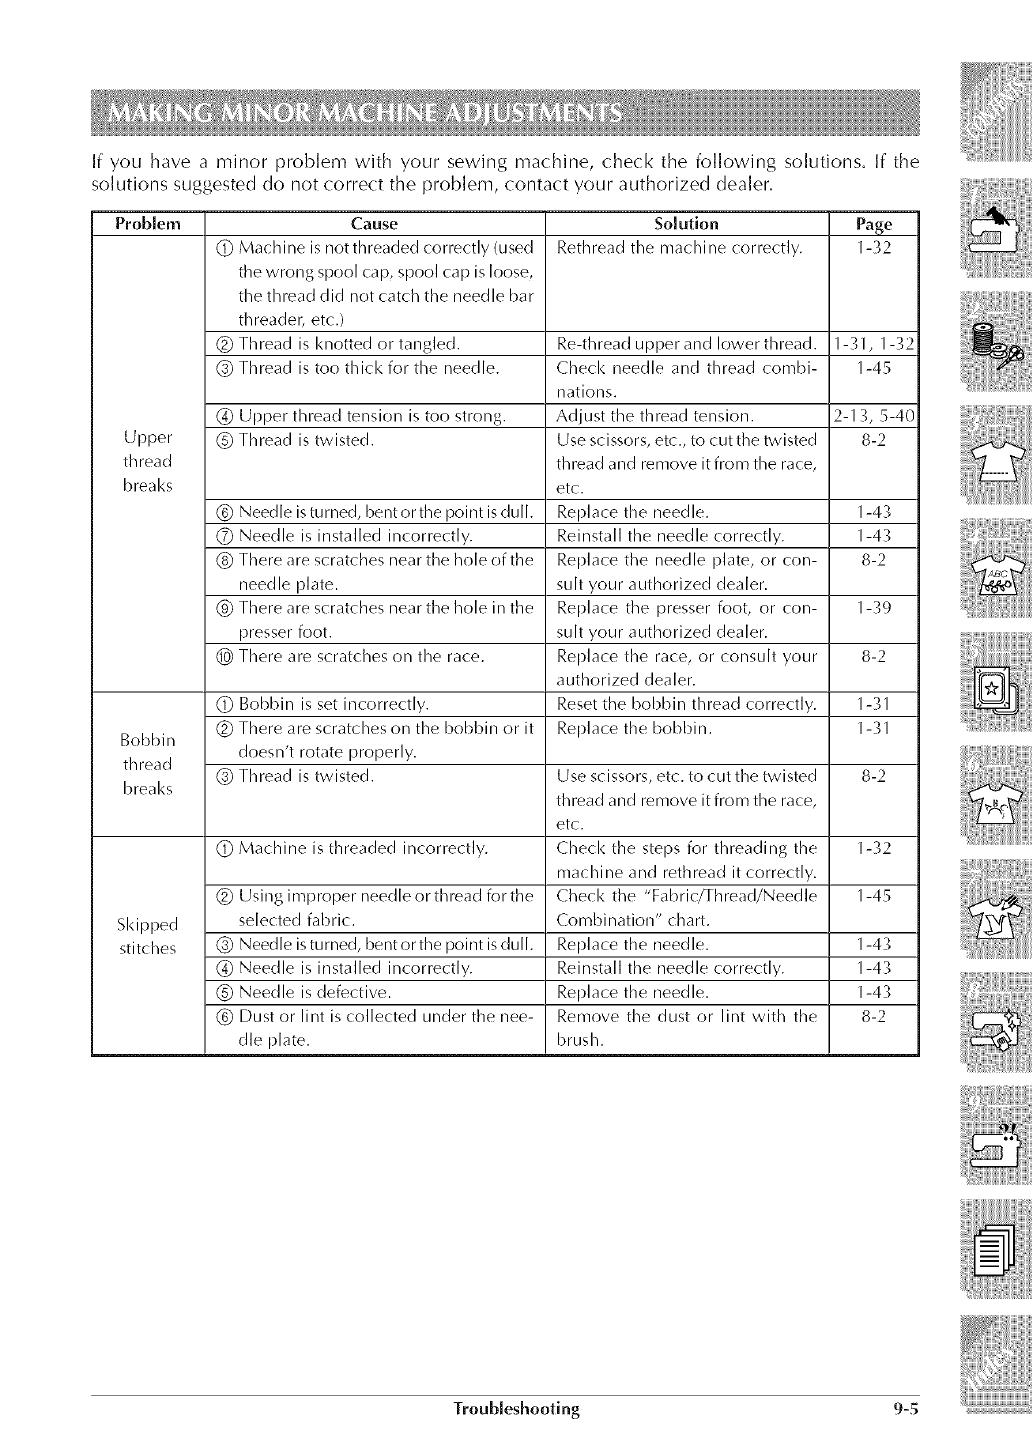
If you have a minor problem with your sewing machine, check the following solutions. If the
solutions suggested do not correct the problem, contact your authorized dealer.
Problem Cause Solution Page
(_) Machine is not threaded correctly (used Rethread the machine correctly. 1-32
the wrong spool cap, spool cap is loose,
the thread did not catch the needle bar
threader, etc.)
(_ Thread is knotted or tangled. Re-thread upper and Iov,!er thread. 1-_;1, 1-32
(_) Thread is too thick for the needle. Check needle and thread combi- 1-45
nations.
(_) Upper thread tension is too strong. Adjust the thread tension. 2-1 _¢,5-40
Upper 0 Thread is twisted. Use scissors, etc., to cut the twisted 8-2
thread thread and remove it from the race,
breaks etc.
(_) Needle is turned, bent or the point is dull. Replace the needle. 1-4_;
(_ Needle is installed incorrectly. Reinstall the needle correctly. 1-4_;
(_) There are scratches near the hole of the Replace the needle plate, or con- 8-2
needle plate, suh your authorized dealer.
(_) There are scratches near the hole in the Replace the presser foot, or con- 1-_;9
presser foot. suh your authorized dealer.
(_ There are scratches on the race. Replace the race, or consult your 8-2
authorized dealer.
(_) Bobbin is set incorrectly. Reset the bobbin thread correctly. 1-_1
Bobbin (_ There are scratches on the bobbin or it Replace the bobbin. 1-_1
doesn't rotate properly.
thread
breaks (_) Thread is twisted. Use scissors, etc. to cut the twisted 8-2
thread and remove it from the race,
etc.
(_) Machine is threaded incorrectly. Check the steps for threading the 1-_;2
machine and rethread it correctly.
(_ Using improper needle orthread forthe Check the "Fabric/Thread/Needle 1-45
Skipped selected fabric. Combination" chart.
stitches (_) Needle is turned, bent or the point is dull. Replace the needle. 1-4_¢
(_) Needle is installed incorrectly. Reinstall the needle correctly. 1-4_;
0 Needle is defective. Replace the needle. 1-4 _,
(_) Dust or lint is collected under the nee- Remove the dust or lint v,!ith the 8-2
die plate, brush.
Troubleshooting 9-5
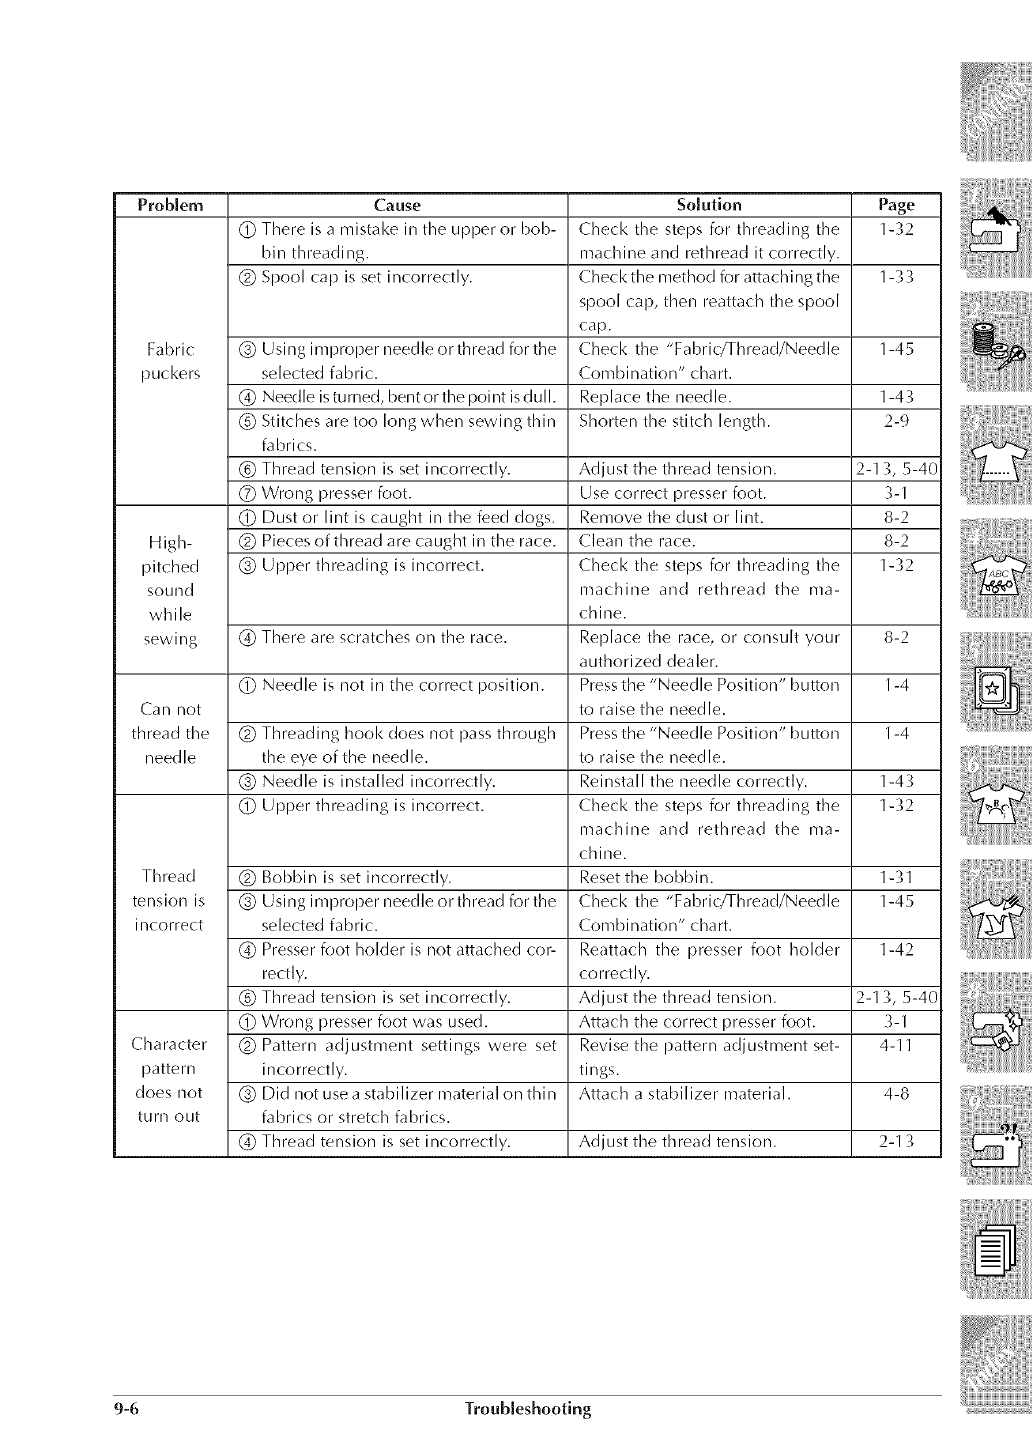
Problem Cause Solution Page
(_ There is a mistake in the upper or bob- Check the steps for threading the 1-32
bin threading, machine and rethread it correctly.
(_ Spool cap is set incorrectly. Checkthe method for aKachingthe 1-33
spool cap, then reattach the spool
cap.
Fabric (_ Using improper needle orthread for the Check the "Fabric/Thread/Needle 1-45
puckers selected fabric. Corrlbination" chart.
(_) Needle is turned, bent or the point is dull. Replace the needle. 1-43
(_) Stitches are too long when sewing thin Shorten the stitch length. 2-9
fabrics.
(_) Thread tension is set incorrectly. Adjust the thread tension. 2-13, 5-40
(_ Wrong presser foot. Use correct presser foot. ";-1
(!) Dust or lint is caught in the feed dogs. Remove the dust or lint. 8-2
High- (_ Pieces of thread are caught in the race. Clean the race. 8-2
pitched (_ Upper threading is incorrect. Check the steps for threading the 1-';2
sound machine and rethread the ma-
while chine.
sewing (_ There are scratches on the race. Replace the race, or consult your 8-2
authorized dealer.
(Z) Needle is not in the correct position. Press the "Needle Position" button 1-4
Can not to raise the needle.
thread the (_ Threading hook does not pass through Press the "Needle Position" button 1-4
needle the eye of the needle, to raise the needle.
(_ Needle is installed incorrectly. Reinstall the needle correctly. 1-43
(_) Upper threading is incorrect. Check the steps for threading the 1-';2
machine and rethread the ma-
chine.
Thread (_ Bobbin is set incorrectly. Reset the bobbin. 1-';1
tension is (_ Usingimproperneedleorthreadforthe Check the "Fabric/Thread/Needle 1-45
incorrect selected fabric. Combination" chart.
(_ Presser foot holder is not attached cor- Reattach the presser foot holder 1-42
rectly, correctly.
(_) Thread tension is set incorrectly. Adjust the thread tension. 2-13, 5-40
(Z) Wrong presser foot was used. Attach the correct presser foot. ";-1
Character (_) Pattern adjustment settings were set Revise the pattern adjustment set- 4-11
pattern incorrectly, tings.
does not (_ Did not use a stabilizer material on thin Attach a stabilizer materiah 4-8
turn out fabrics or stretch fabrics.
(_) Thread tension is set incorrectly. Adjust the thread tension. 2-13
9-6 Troubleshooting
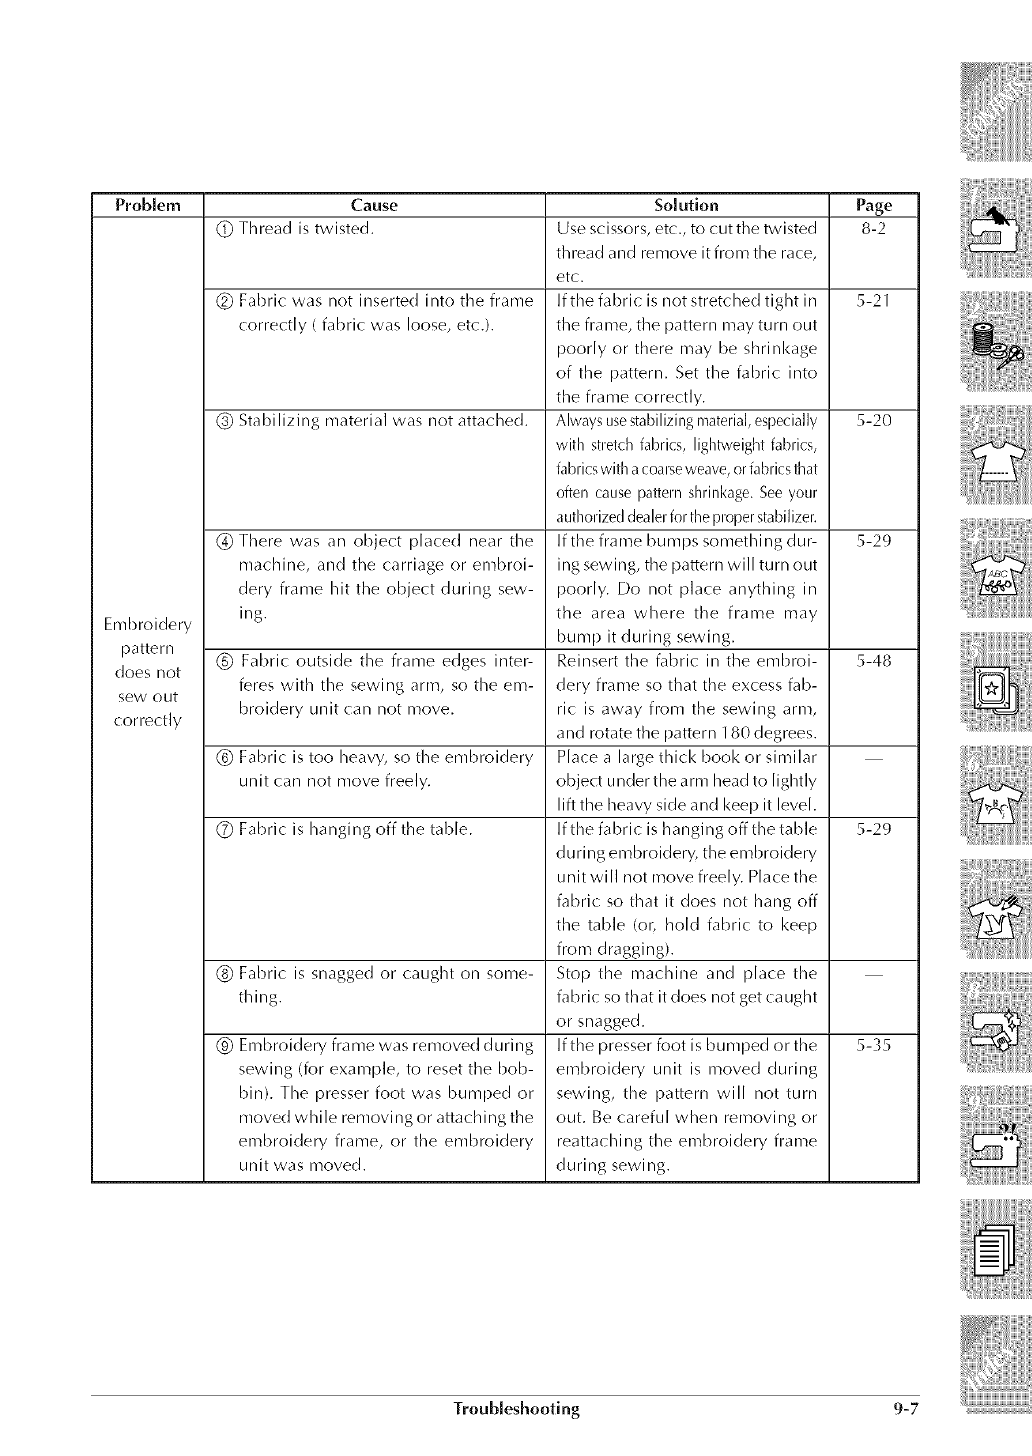
Problem
Embroidery
pattern
does not
sew out
correctly
Cause
(_) Thread is twisted.
(_ Fabric was not inserted into the frame
correctly ( fabric was loose, etc.).
(#) Stabilizing material was not attached.
(_) There was an object placed near the
machine, and the carriage or embroi-
dery frame hit the object during sew-
ing.
Page
8-2
5-21
5-20
Solution
Use scissors, etc., to cut the twisted
thread and remove it from the race,
etc.
If the fabric is not stretched tight in
the frame, the pattern may turn out
poorly or there may be shrinkage
of the pattern. Set the fabric into
the frame correctly.
Always usestabilizing material, especially
with stretch fabrics, lightweight fabrics,
fabrics with a coarse weave, or fabrics that
often cause pattern shrinkage. See your
authorized dealer for the proper stabilizel:
If the frame bumps something dur-
ing sewing, the pattern will turn out
poorly. Do not place anything in
the area where the frame may
bump it during sewing.
Reinsert the fabric in the embroi-
dery frame so that the excess fab-
ric is away from the sewing arm,
and rotate the pattern 180 degrees.
Place a large thick book or similar
object under the arm head to lightly
lift the heavy side and keep it level.
If the fabric is hanging off the table
during embroidery, the embroidery
u nit will not move freely. Place the
fabric so that it does not hang off
the table (or, hold fabric to keep
from dragging).
Stop the machine and place the
fabric so that it does not get caught
or snagged.
If the presser foot is bumped or the
embroidery unit is moved (luring
sewing, the pattern will not turn
out. Be careful when removing or
reattaching the embroidery frame
during sewing.
5-29
(_) Fabric outside the frame edges inter- 5-48
feres with the sewing arm, so the em-
broidery unit can not move.
(_) Fabric is too heavy, so the embroidery
unit can not move freely.
(_) Fabric is hanging off the table. 5-29
(_) Fabric is snagged or caught on some-
thing.
5-35
0 Embroidery frame was removed during
sewing (for example, to reset the bob-
bin). The presser foot was bumped or
moved while removing or attaching the
embroidery frame, or the embroidery
unit was moved.
Troubleshooting 9-7
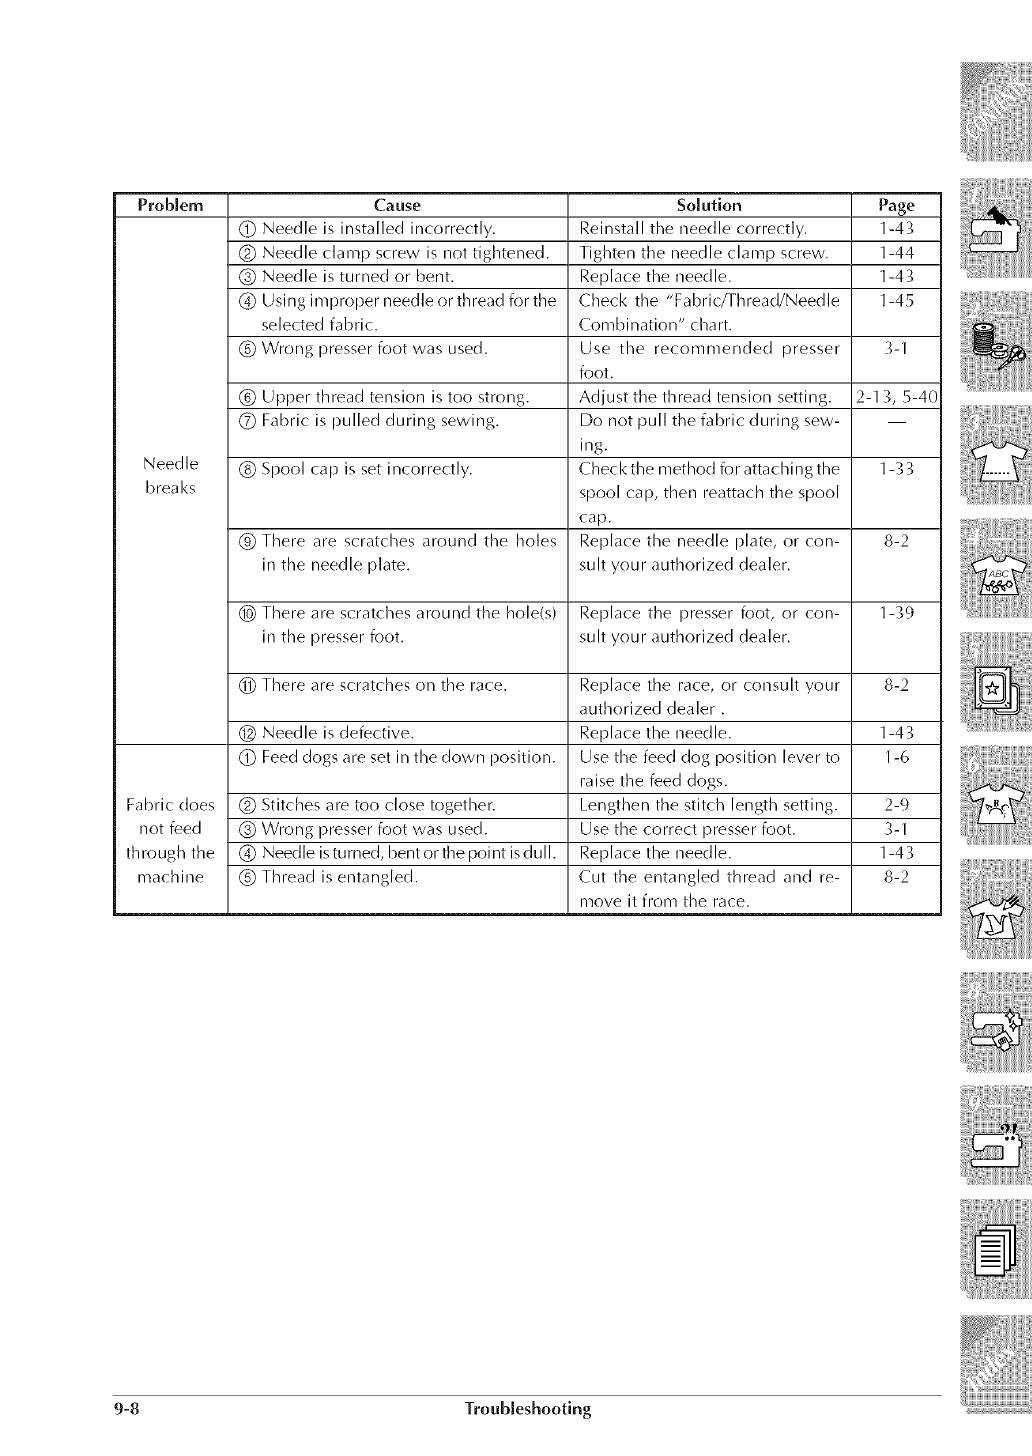
Problem Cause Solution Page
(_) Needle is installed incorrectly. Reinstall the needle correctly. 1-43
(_) Needle clamp screw is not tightened. Tighten the needle clamp screw. 1-44
(_) Needle is turned or bent. Replace the needle. 1-43
(_) Using improper needle or thread for the Check the "Fabric/Thread/Needle 1-45
selected fabric. Combination" chart.
(_) Wrong presser foot was used. Use the recommended presser 3-1
foot.
(_ Upper thread tension is too strong. Adjust the thread tension setting. 2-13, 5-40
(_ Fabric is pulled during sewing. Do not pull the fabric during sew-
ing.
Needle (_ Spool cap is set incorrectly. Checkthe method for attaching the 1-'¢3
breal<s spool cap, then reattach the spool
cap.
1_ There are scratches around the holes Replace the needle plate, or con- 8-2
in the needle plate, suit your authorized dealer.
_) There are scratches around the hole(s) Replace the presser foot, or con- 1-';9
in the presser foot. suit your authorized dealer.
(_) There are scratches on the race. Replace the race, or consult your 8-2
authorized dealer.
Needle is defective. Replace the needle. 1-43
(_) Feed dogs are set in the down position. Use the feed dog position lever to 1-6
raise the feed dogs.
Fabric does (_ Stitches are too close together. Lengthen the stitch length setting. 2-9
not feed 1_ Wrong presser foot was used. Use the correct presser foot. ";-1
through the (_ Needle isturned, bentorthepoint isdull. Replace the needle. 1-43
machine (_) Thread is entangled. Cut the entangled thread and re- 8-2
move it from the race.
9-8 Troubleshooting
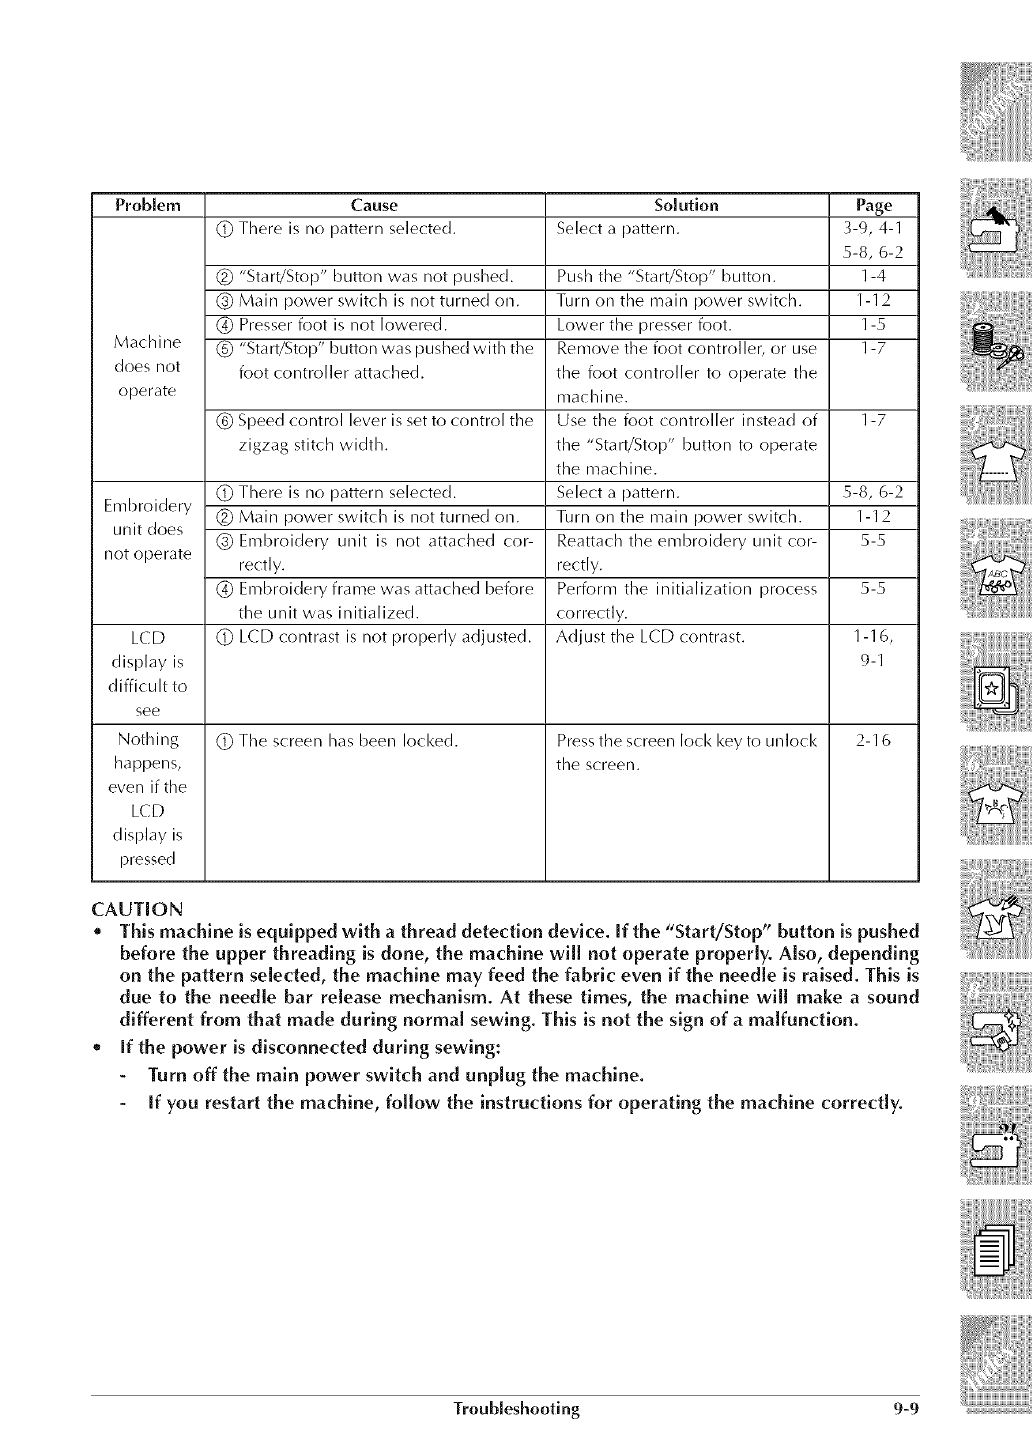
Problem Cause Solution Page
(_) There is no pattern selected. Select a pattern. 3-9, 4-1
5-8, 6-2
(_ "Start!Stop" button was not pushed. Push the , tart/Stop button. 1-4
(#) Main power switch is not turned on. Turn on the main power switch. 1-12
(_) Presser foot is not lowered. Lower the presser foot. 1-5
Machine (_) "Start/Stop" button was pushed with the Remove the foot controller, or use 1-7
does not foot controller attached, the foot controller to operate the
operate machine.
(_) Speed control lever is set to control the Use the foot controller instead of 1-7
zigzag stitch width, the "Start/Stop" button to operate
the machine.
(_) There is no pattern selected. Select a pattern. 5-8, 6-2
Embroidery (_ Main power switch is not turned on. Turn on the main power switch. 1-12
unit does (3) Embroidery unit is not attached cor- Reattach the embroidery unit cor- 5-5
not operate rectly, rectly.
(_) Embroidery frame was attached before Perform the initialization process 5-5
the unit was initialized, correctly.
(_) LCD contrast is not properly adjusted. Adjust the LCD contrast. 1-16,
9-1
(_) The screen has been locked. 2-16
LCD
display is
difficult to
see
Noth ing
happens,
even if the
LCD
display is
pressed
Press the screen lock key to unlock
the screen.
CAUTION
oThis machine is equipped with athread detection device. [f the "Start/Stop" button is pushed
before the upper threading is done, the machine will not operate properly. Also, depending
on the pattern selected, the machine may feed the fabric even if the needle is raised. This is
due to the needle bar release mechanism. At these times, the machine will make a sound
different from that made during normal sewing. This is not the sign of a malfunction.
*If the power is disconnected during sewing:
Turn off the main power switch and unplug the machine.
If you restart the machine, follow the instructions for operating the machine correctly.
Troubleshooting 9-9

If the roach ine is not properly set and the "Start!Stop" button or the "Reverse/Rei nforcement Stitch"
button is pressed, or if the operation procedure is incorrect, the machine does not start. An alarm
sounds and an error message is displayed on the LCD. If an error message displays, follow the
instructions in the message.
Below is an explanation of 49 error messages. Refer to these when necessary (if you press
or do the operation correctly while the error message is displayed, the message disappears).
1,
This message is dis-
played when the motor
locks due to tangled
thread or for other
reasons relate to thread
delivery.
2a.
This message is dis-
played when the presser
foot is raised and the
"Start/Stop" button,
"Reverse/Reinforcement
Stitch" button, or
"Thread Cutter" button
pushed.
2 b.
This message is dis-
played when the
embroidery unit
initialization is started
with the presser foot
lever down.
CAUTION
Be sure to rethread the machine. If you
press the "Start/Stop" Button without
rethreading the machine, the thread
tension may be wrong or the needle may
break and cause iniuryo
3,
This message is dis-
played when the upper
thread is broken or not
threaded correctly, and
the "Start/Stop" button
or the "Reverse/
Reinforcement Stitch"
button is pressed.
4,
This message is dis-
played when the
is touched
without an embroidery
card inserted.
5,
This message is dis-
played if the is
touched when an
unusable embroidery
card is inserted.
6,
This message is dis-
played when there is no
stitch or embroidery
pattern selected and the
"Start!Stop" button, the
"Reverse/Reinforcement
Stitch" button, or
is pressed.
9-10 Troubleshooting

7.
This message is dis-
played when the
embroidery unit is
attached, and the
"Reverse/Rei nforcement
Stitch" button is
pressed.
8.
This message is
displayed when the
embroidery unit is
attached, and or
_is pressed.
9.
This message is dis-
played when you try to
combine more than 71
patterns.
10.
This message is dis-
played when or
is pressed while
the machine is in utility
stitch mode.
11.
This message is dis-
played when the
patterns you are editing
take up too much
memory, or if you are
editing too many
patterns for the memory.
12.
This message is dis-
played when the "Start!
Stop" button is pushed
while the foot controller
is installed.
13.
This message is dis-
played when the "Start/
Stop" button is pushed
while the machine is in
embroidery edit mode
and a pattern is being
edited.
14.
This message is dis-
played when a key on
the LCD display is
touched while the
needle is in the down
position.
15.
This message is dis-
played when the
buttonhole lever is
down, a stitch other
than a buttonhole is
selected, and the "Start/
Stop" button or the
"Reverse/Rei nforcement
Stitch" button is pushed.
16.
This message is dis-
played when the
embroidery unit is
attached and the power
is turned on with the
needle in the down
position.
Troubleshooting 9-11
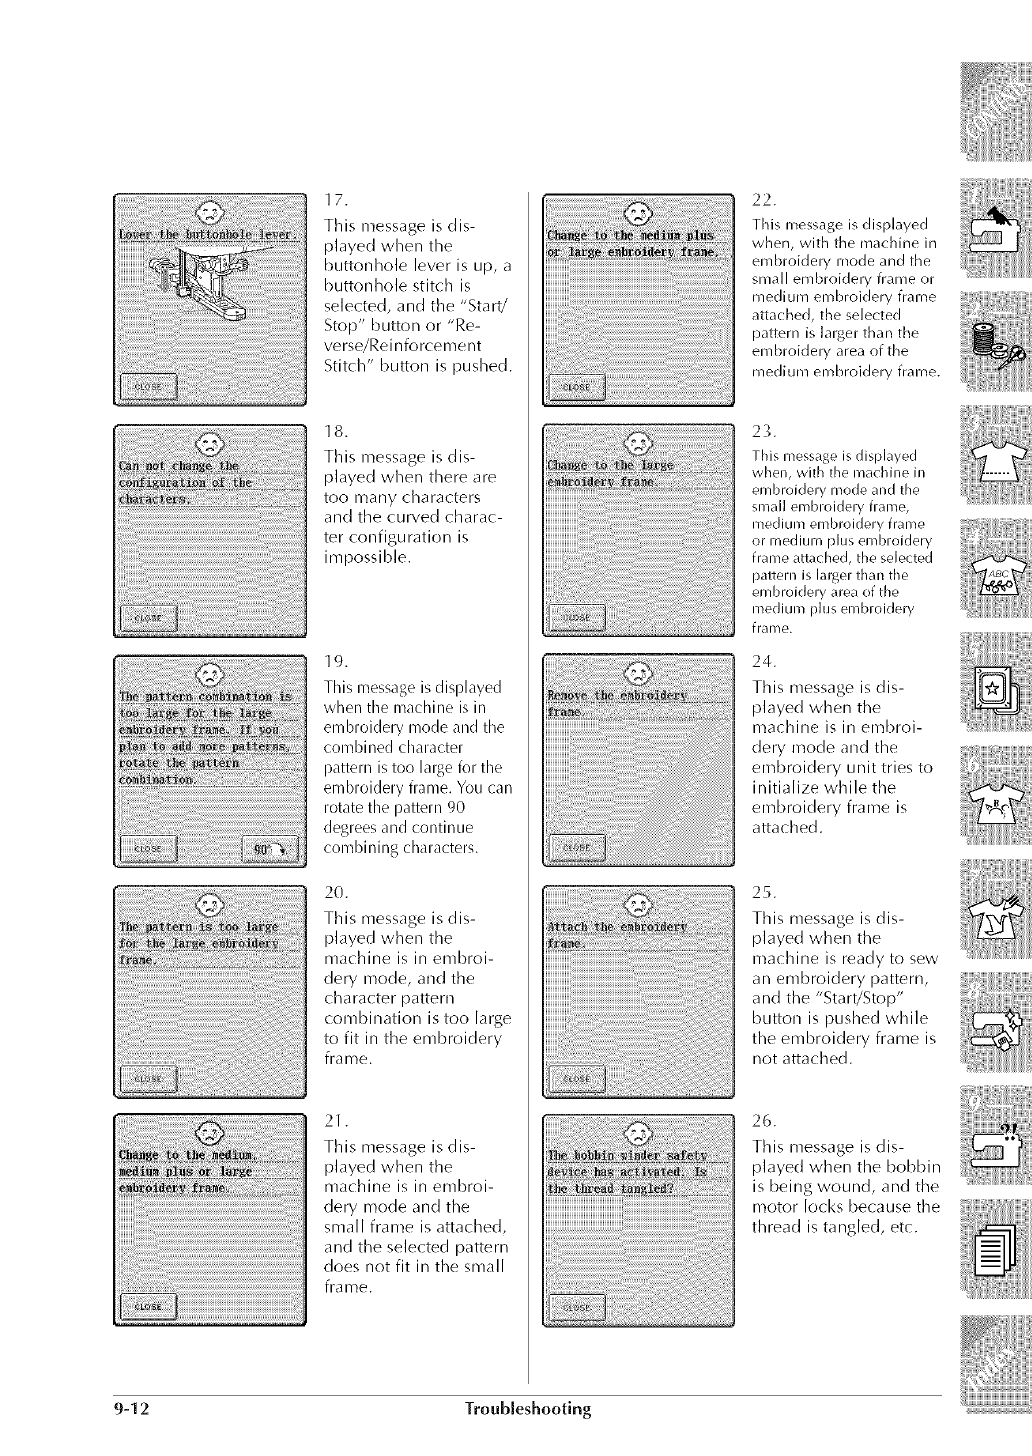
ii!iiiiiiii:ii!!!!!!!C¸iiiiiiiiiiiiiiii!!':""_"iiil]_iiiiiii:i!iiii!¸iiiii:i
_ii_i_u_id_e:_!_i_i_i_!!i::i_:iiiiZi:!_ii_i!iii_i!_lliiiiiiliii_ii!iiiiiiiii_!Iii!ii_iiiii;iii!iii_iii_!_tj i_iiliil iiiiii::i:i:i_iiiiiiii_iiiiiiiii_::ilii!!
_l_ii_;_i_i_il_i_i_i_i_i_i:_!_i_i_iiIl_i_i_ii_if_z_:iii_!;;:i!!_!_i_i_i_i_i_i_i:::::_i_i_iii!_l
iiiiii_!!iiiiiiiiiiiiiiiiiiiiiiiiiiiiiiiiiiiiiiiiiiiiiiiiiiiiiiiiiiii_i_i_i_i_i_i_i_i_i_i_i_i_i_i_i_i_i_i_i_i_i_i_i_i_i_i_i_i_i_i_i_i_i_i_i_ii_ii_ii_ii_ii_ii_ii_ii_ii_ii_ii_ii_ii_ii_iiiii_iiiiiiiiiiiiiiiiiiiiiiiii_i_i_i!i_il_ii_ii_ii_i
Ii!:i:iiiiiiiiiiiili!ii!ii!ii!ii!ii!ii!ii!ii!ii!ii!ii!ii!ii!ii!ii!i!i!i!i!i!i!i!i!i!i!i!i!i!i!i!i!i!i!i!i!i!i!i!i!i!i!i!i!i!i!i!i!i!i!iI_!_!_!_!_!_!_!_!_!_!_!_!_!_!_!i_!_!!:_i_i_
iiillllllllllllililililili_lililililililililililililililililili_lilliiiilililililililiiiiiiiiiiii_iiiiiiiiii
i_iiiiiiiiiii_i!_!_!_!_!_!_!_!_!_!_!_!_!_!_!_!_!_!_!_!_!_!_!_!_!_!_!_!_!_!_!_!_!_!_!_!_!_!_!_!_!_!_!_!_!_i.ii:::::::::i_i_i_ii:ii:iiiiiii_@iiiilililiiiiii_!i_i
ii:i:ii i:i:i:i:l l l ! ! ! ! !i!i!i!Iiiiiiiiii i i i i i i i i i i i i i ! ii iiiiii i i i i i l l l l liii::i:lll l i i i i liiiili
|_i!i iililiiiiiiiiiiiiiiiiiiiiiiiiiii/iiiiiiiiiiiiiiiiiii!iiiiiii]i]iiiii!iiiiiiiiiiiii_]
_i! ililililililili'ii_i:iiiiiiiiiiiiiiiiiiii!!!!!!!!!!!!!!!!!!!!!!!!!!!!!ii!_i!i!!!iiiiiiii!iiiiiiiiii!iii
iii_.iiiiiiiiiii!._iiiitiliiiiiiiiii!iiiiiiiiiii__iiiiiiii_ii_iii_ii_ii_iiiiiiiii!
l_ill%lllllllll_i_il_i_illlli_lllllll_ii;_il_i_i_i_i_i!i!i!i!_i_i_i_i_i_i_!i!i!i!i!iiiiii!i)!_
i__i__i__i__i__i__i!_i__i!_i!ii!_i!_i!_i!i__!__i__i__i__i__i__i__i__i__i___i__i__i__i__i__i__i__i__i__i_ii_ii_!i_ii_ii_ii_ii_ii_i_i_i_i_i_i_i_i_i_i_i_i_i_i_i_i_i_i_iiiiiiiii_iiiiiiiiiiiiiiiiiiiiiiiiiiiii!_i!!!_!_!_!_i_!_i_!i_!i_i___ii__i__i_
i!_:_i_i_!i_!i_i!_i_i_!_!i_!i_!i_!i_!i_i_i_i_i_i_i_i_i_i_!_i!i_i_i_i_i_i_i_i_i_i_i_i_i_i_i_i_i_i_i_i_i_i_i_i_ii_ii_ii_ii_ii_ii_ii_ii_i_i_iii_ii_iiiiiiiiiiiiiii_iiiiiiiiiiiiiiii_iiiiiiiiiiiiiiii_iiiiiiiiiiiiiii_i_!_!_i
!iiiii!iiiiiiiiiiiiiiiiiiiiiiiiiiiiiiiiiiiiiiiiiiiiiiiiiiiii_iiiiiiiiiiiiiiiiiiiiiiiiiiiiiiiiiiiiiii_
ii_i_iiiiiiiii!iill_i_!!iill_i_i_i!ii!_iiii_i_ii_iIIIIIII_I_I_I_I_I_I_I_IIIIIii_!iiiiiiiiiiiii_iiiilliiiii!i_ii_i/iiiiiiii_!i_i_ii_ili_iiiiiii_i_iiiiii_!_!i_iii_i
i_i i_iiiiiiiiiililiiiiiiiiiiiiii!i_ii_iiiiiiiiiiiiiiiiiiiiiiiiiiiiiiiiiii_
ill !_!_iiii!i_ii!!ii_!iiiiiiiiii_i!iiiiiiii_i!iiiii!_iiiii_i!iiiiiiiii_i!iiiiiiiii_i!iiiiiiiii_i!iiiiiiiii_i!iiiiiiiii_iiii_ii!;ii
_! _i_
ii_i_ii!'!!iiii!!!!!!!!iiii'!!!!!!!!!!iiiiiiiiilliii:iiiiiiiiiiiiiiiiiiiiiiiiiiii!ii!.
li_@@_i_ !_ili!_!__ __i!ii_i_:i!l!i;i%ili_iil
i ]]
[iiiiiiiiiiiiiii_iiiiiiiiiiiiiiiiiiiiiiiiiiiiiiiiiiiiiii !!!!
|
lii
| ]:iiiiiiiiii
]
l ....................
17.
This message is dis-
played when the
buttonhole lever is up, a
buttonhole stitch is
selected, and the "Start!
Stop" button or "Re-
verse/Reinforcement
Stitch" button is pushed.
18.
This message is dis-
played when there are
too many characters
and the.curve.d d!arac-
ter configuration is
impossible.
19.
This message is displayed
when the machine is in
embroidery mode and the
combined character
pattern is too large for the
embroidery fl'ame. You can
rotate the pattern 90
degrees and continne
combining characters.
20.
This message is dis-
played when the
machine is in entbroi-
dory mode, and the
character pattern
combination is too large
to fit in the embroidery
frame.
21.
This message is dis-
played when the
machine is in embroi-
dery mode and the
small frame is attached,
and the selected pattern
does not fit in the small
frame.
22.
This message is displayed
when, v,!ith the machine in
embroidery mode and the
small embroidery frame or
medium embroidery frame
attached, the selected
pattern is larger than the
embroidery area of the
nlediunl erobroidery frame.
23.
This messageis displayed
when, with the machine in
embroidery nlode and the
small embroidery frame,
medium enlbroidery frame
or n]ediurn plus enlbroidery
l:ranleattached, the selected
pattern is larger than tile
embroidery area of the
medium plus embroidery
i¢l-ame.
24.
This message is dis-
played when the
machine is in embroi-
dery mode and the
embroidery unit tries to
initialize while the
embroidery frame is
attached.
25.
This message is dis-
played when the
machine is ready to sew
an embroidery pattern,
and the "Start/Stop"
button is pushed while
the embroidery frame is
not attached.
26.
This message is dis-
played when the bobbin
is being wound, and the
motor locks because the
thread is tangled, etc.
9-12 Troubleshooting
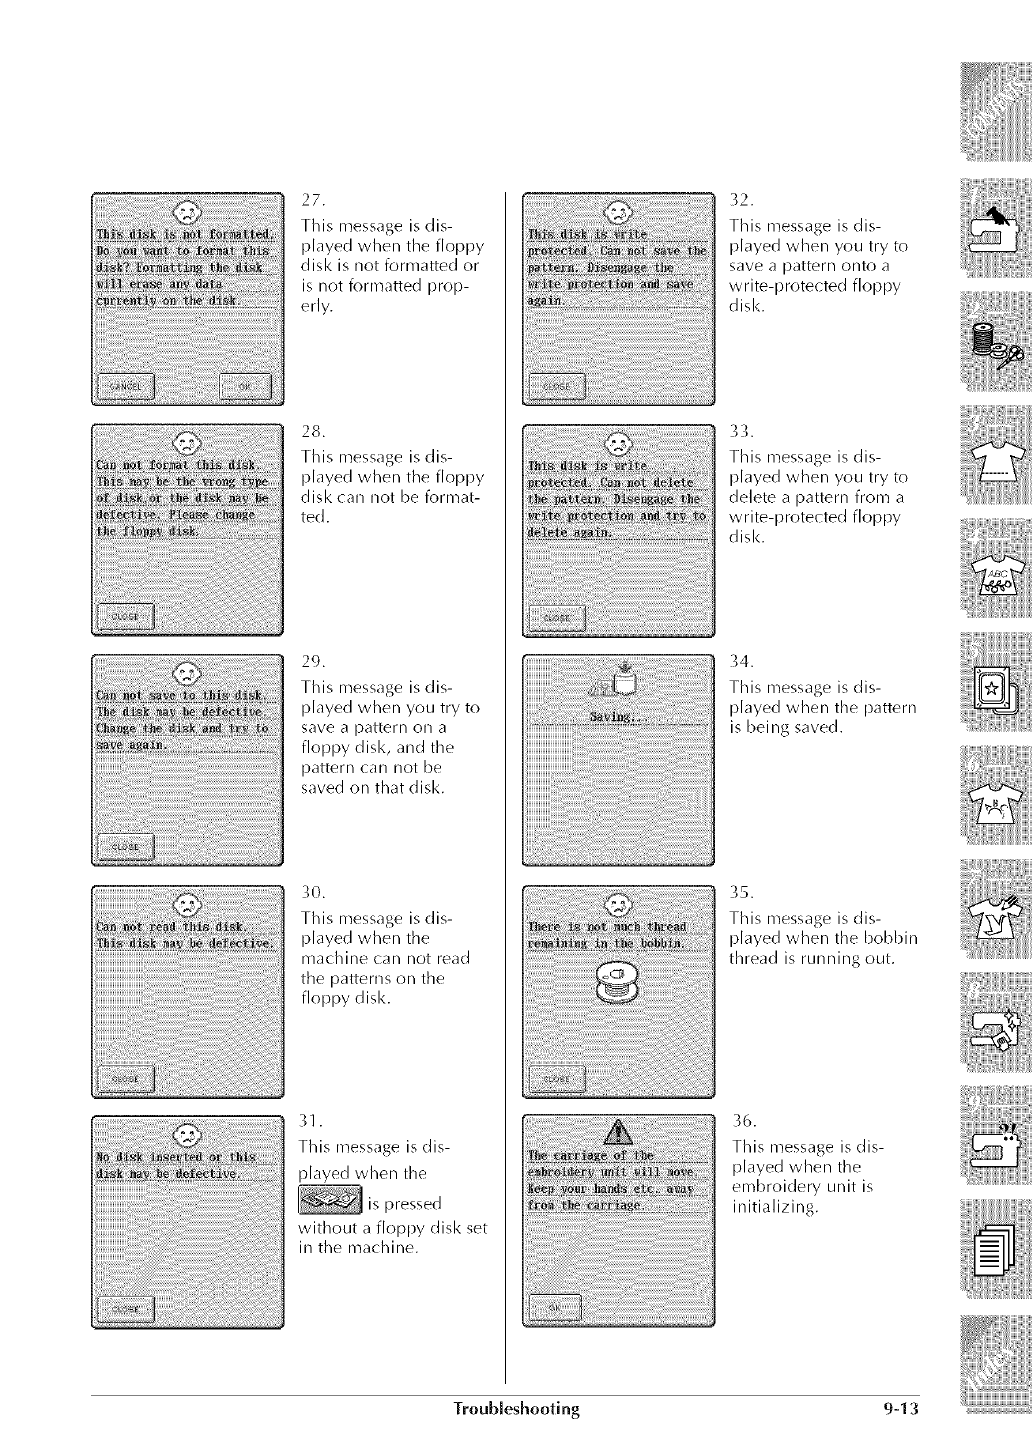
27.
This message is dis-
played when the floppy
disk is not formatted or
is not formatted prop-
erly.
28.
This message is dis-
played when the floppy
disk can not be format-
ted.
29.
This message is dis-
played when you try to
save a pattern on a
floppy disk, and the
pattern can not be
saved on that disk.
30.
This message is dis-
played when the
machine can not read
the patterns on the
floppy disk.
31
[ i Th is message is d is-
played when the
is pressed
without a floppy disk set
in the machine.
32.
This message is dis-
played when you try to
save a pattern onto a
write-protected floppy
disk.
33.
This message is dis-
played when you try to
delete a pattern from a
write-protected floppy
disk.
34.
This message is dis-
played when the pattern
is being saved.
35.
This message is dis-
played when the bobbin
thread is running out.
36.
This message is dis-
played when the
embroidery unit is
initializing.
Troubleshooting 9-13
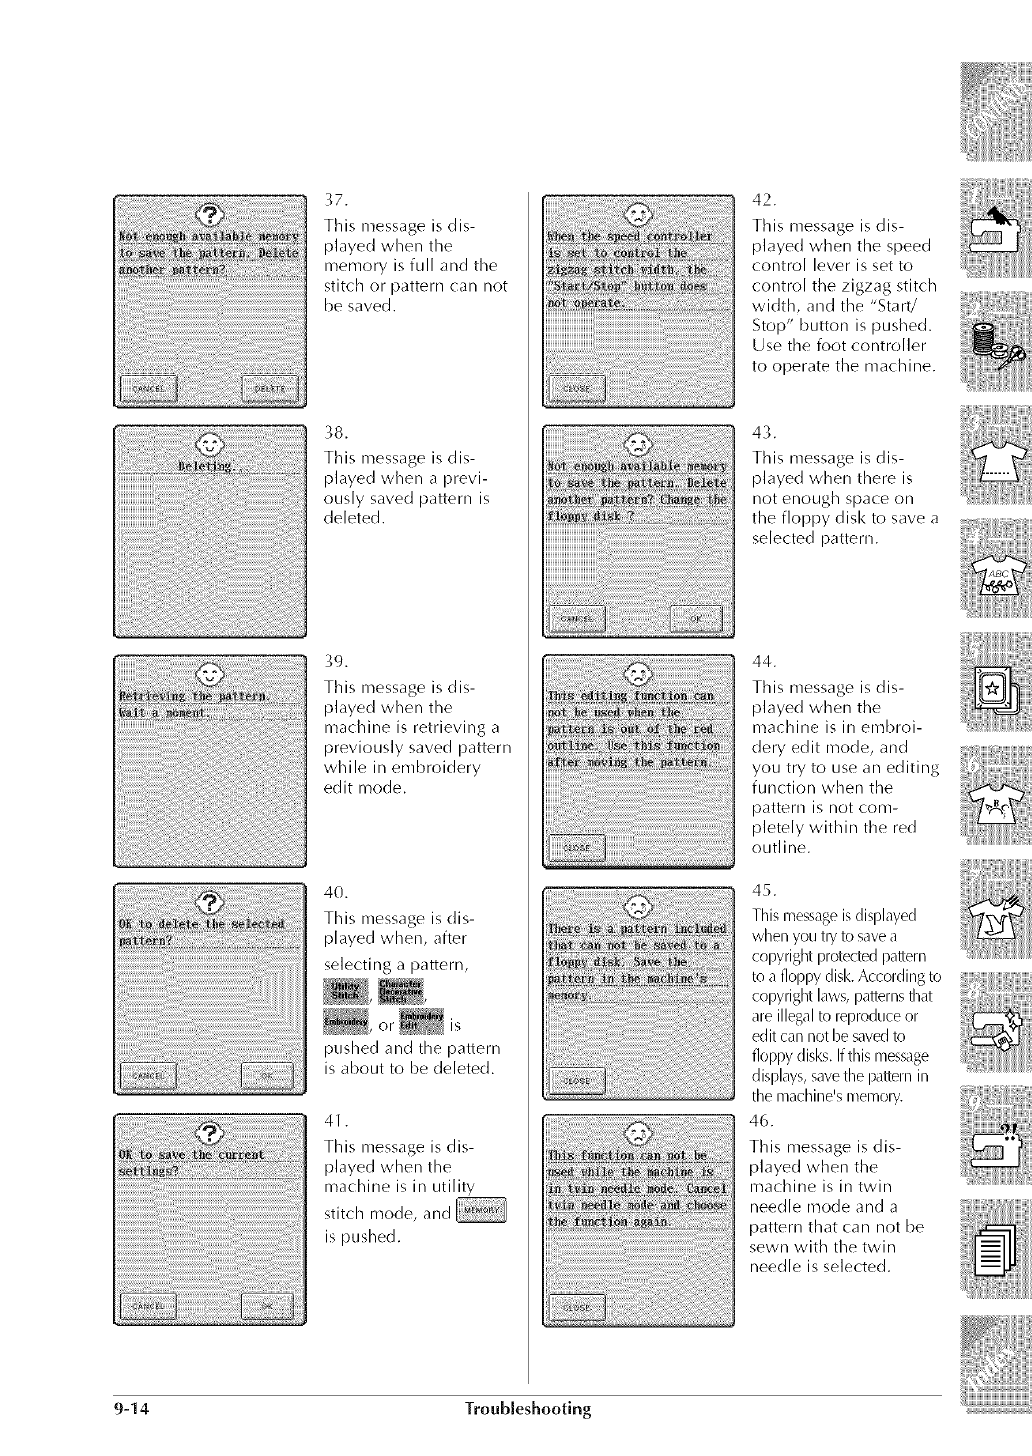
37.
Thismessageisdis-
playedwhenthe
memoryisfullandthe
stitchorpatterncannot
besaved.
38.
Thismessageisdis-
playedwhenaprevi-
ouslysavedpatternis
deleted.
39.
Thismessageisdis-
playedwhenthe
machineisretrievinga
previouslysavedpattern
whileinembroidery
edit mode.
40.
Thismessageisdis-
playedwhen,after
selectingapattern,
,or is
pushed and the pattern
is about to be deleted.
41.
This message is dis-
played when the
machine is in utility
stitch mode, and
is pushed.
42.
This message is dis-
played when the speed
control lever is set to
control the zigzag stitch
width, and the "Start/
Stop" button is pushed.
Use the foot controller
to operate the machine.
43.
This message is dis-
played when there is
not enough space on
the floppy disk to save a
selected pattern.
44.
This message is dis-
played when the
machine is in embroi-
dery edit mode, and
you try to use an editing
function when the
pattern is not com-
pletely within the red
outline.
45.
This message is displayed
when you tl_/to save a
copyright proteded pattern
to a floppy disk. According to
copyright laws, patternsthat
are illegal to reproduce or
edit can not besaved to
floppy disks. If this message
displays, save the pattern ill
the machine's memory.
46.
This message is dis-
played when the
machine is in twin
needle mode and a
pattern that can not be
sewn with the twin
needle is selected.
9-14 Troubleshooting
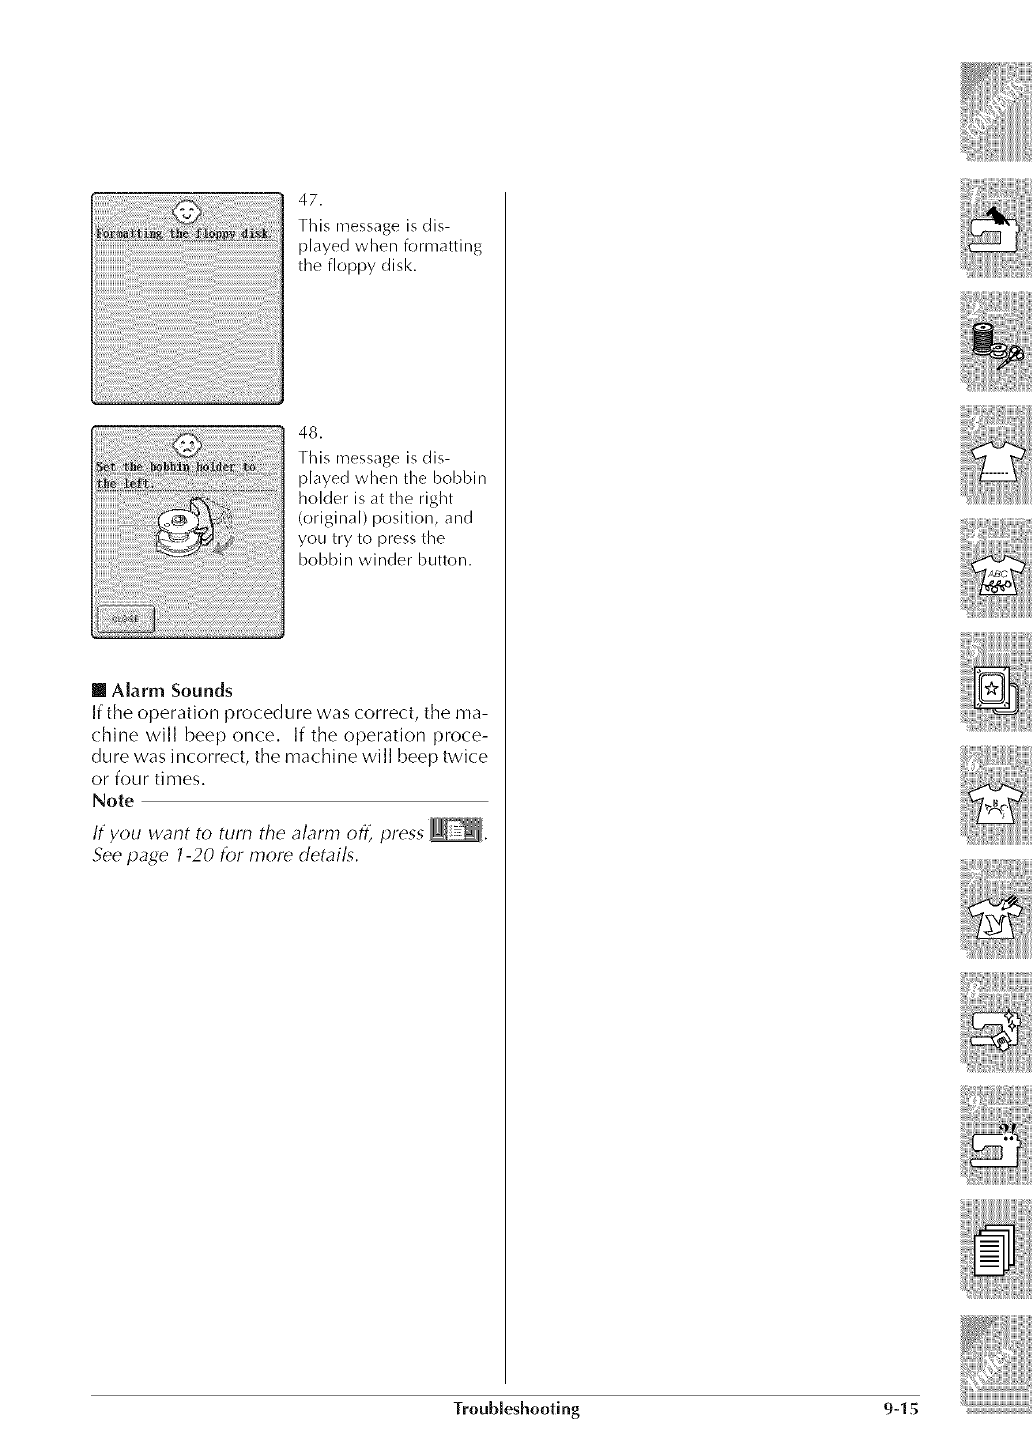
47.
This message is dis-
played when formatting
the floppy disl<.
48.
This message is dis-
played when the bobbin
holder is at the right
(original) position, and
you try to press the
bobbin winder button.
[] Alarm Sounds
If the operation procedure was correct, the ma-
chine will beep once, If the operation proce-
dure was incorrect, the machine will beep twice
or four times,
Note
If you want to turn the alarm oft press _.
See page 1-20 for more details.
Troubleshooting 9-15
9-16 Troubleshooting
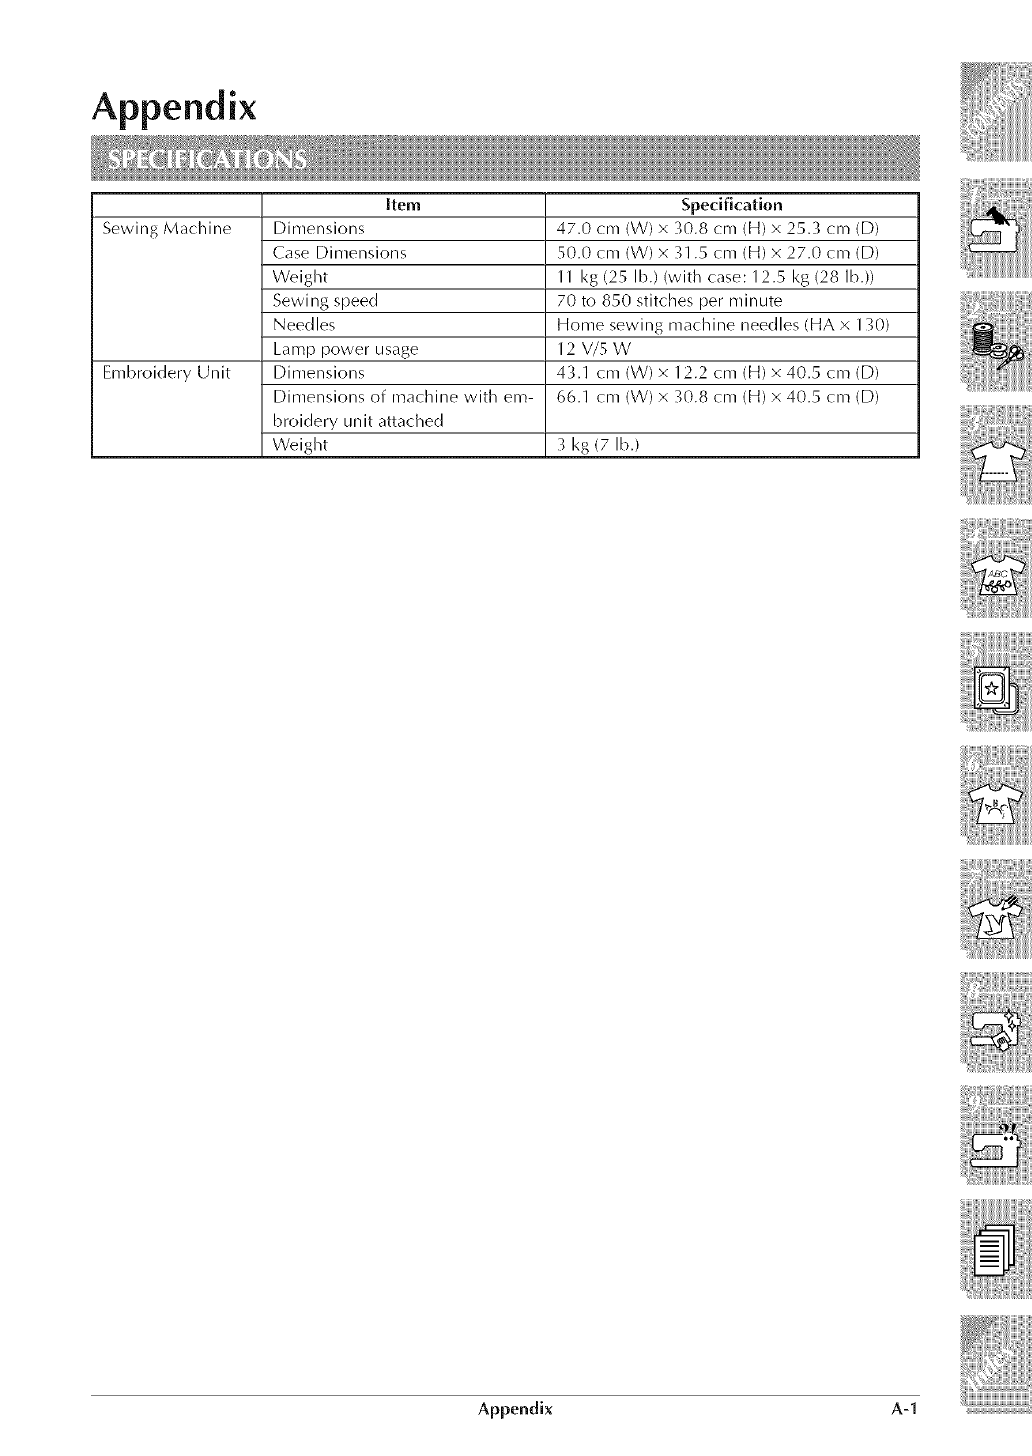
Appendix
Item Specification
Sewing Machine Dimensions 47.0 cm (W) x 30.8 cm (H) x 25.3 cm (D)
Case Dimensions 50.0 cm (W) x _¢1.5 cm (H) x 27.0 cm (D)
Weight 11 I<g (25 lb.)(with case: 12.5 I<g (28 lb.))
Sewing speed 70 to 850 stitches per minute
Needles Home sewing machine needles (HA x l _0)
Lamp power usage 12 V/5 W
Embroidery Unit Dimensions 43.1 cm (W) x 12.2 cm (H) x 40.5 cm (D)
Dimensions of machine with era- 66.1 cm (W) x _¢0.8 cm (H) x 40.5 cm (D)
broidery unit attached
Weight "_I<g (7 lb.)
Appendix A-1
A-2 Appendix
4-hole buttons 3-62
7mm decorative stitch patterns 4-3
7mm satin stitch patterns 4-4
(:hanging length 4-16
90 degree rotation key 5-46, 5-48
Accessories 1-8
Adjusting
character/decorative stitch patterns 4-11
edited patterns 6-30
embroidery patterns after editing 6-18
embroidery speed setting 5-41
minor machine adjustments 9-5
screen brightness 1-16, 9-1
thread tension 2-13, 5-40
touch panel 9-2
Alarm 1-20, 9-15
Aligning the left side 5-57
Alphabetical characters 4-6
character/decorative stitches 4-6
embroidery 5-11
embroidery edit 6-5
Application checking 1-19
Appliqu_ 3-37
embroidery frame patterns 5-61,5-62
embroidery patterns 5-33
quilts %31
zigzag stitch 3-21
Array key 6-6, 6-8, 6-15
Arrow keys
for embroidery edit functions 6-8, 6-9
for embroidery functions 5-26, 5-46
Automatic reinforcement stitching 1-14, 2-14,
4-14
Automatic thread cutting 1-14, 2-15, 4-14,
5-46
Balance wheel 1-4
Ball point needle 1-45
Bar tacks 3-59
Basic embroidery method 5-30
Basic operation key 1-21, 1-23
Basic sewing
character/decorative stitches 4-9
utility stitches 2-1
Basting 3-19
Blind hem stitches 3-35
Bobbin
pulling up bobbin thread 1-38
runs out of thread 5-35
setting 1-31
winding 1-25,1-29
Bobbin thread sensor 1-13, 5-19
Bobbin winder button 1-5
Button holder plate 3-54
Buttonholes 3-53
Button sewing 3-61
Buzzer 1-20
Centered zippers 3-67
Character/Decorative stitches 4-1
adjusting patterns 1-20
checking combined patterns 4-26
combining 4-18
deleting 4-28
retrieving 4-31
saving 4-27
selecting 4-2
sewing 4-9
Character/Decorative stitches key 1-14, 4-1
Character patterns 5-11
changing color 5-50, 6-17
(:hanging configurations 6-15
(:hanging spacing 6-16
connecting characters 5-58
selecting for editing 6-5
Character spacing key 6-8, 6-16
Checking
combined character/decorative stitch
patterns 4-26
position of embroidery patterns 5-27
Cleaning
floppy disk drive heads 8-4
LCD 8-2
machine casing 8-2
race and shuttle 8-2
Color
changing color in character patterns 5-50,
6-17
changing thread color 6-13
Combining patterns
character/decorative stitch patterns 4-18
with embroidery edit functions 6-20
Connecting characters in embroidery 5-58
Index
Connecting the Power 1-12
Continuous sewing 4-17
Copyright information 5-1
Crazy quilt 3-21
Cross stitch 4-4
Custom Thread Numbering 5-43
Daisy stitch 3-49
Darning 3-57
Decorative stitch patterns 4-2
Delete key 4-2, 4-7, 4-14, 6-8, 6-12
Deleting
embroidery edit 6-12
mistakes 4-2, 4-7
previously saved pattern 4-28, 5-52, 6-33
Density
changing density ofapattern 4-17,5-49
Density key 5-46, 5-49, 6-8
Display language 1-18
Drawn work %50
Editing
character/decorative stitches 4-13
embroidery 5-46
embroidery edit 6-8
MY CUSTOM STITCHTM 7-6
Elastic attaching see Tape attaching
Elastic zigzag stitches 3-22
Elongation key 4-14, 4-16, 4-22
Embroidery
aligning the left side 5-57
applications 5-57
basic method 5-30
basic steps 5-3
color order display 5-30
connecting characters 5-58
combined patterns 6-28
edges or corners 5-64
maximum speed setting 5-41
pattern's outline 5-60
revising patterns 5-46
ribbons or tape 5-64
selecting patterns 5-8
small fabrics 5-64
using a frame pattern to make appliqu_ 5-61,
5-62
Embroidery basic operation key 1-21, 1-23
Embroidery card 1-11,5-1,5-17
Embroidery color order display 5-30
Embroidery edit functions 6-1
changing the pattern's size 6-11
changing the thread color 6-1 _
deleting the pattern 6-12
embroidery edit screen key functions 6-8
moving the pattern 6-9
rotating the pattern 1-8, 6-10
Embroidery edit key 1-14, 6-2
Embroidery foot Q 1-8
attaching 5-4
Embroidery frame
attaching to the embroidery unit 5-24
display of available frames 5-19, 5-21
removing 5-25
setting fabric: in 5-22
types 1-9, 5-21
Embroidery frame display 1-20, 5-45
Embroidery key 1-14, 5-8
Embroidery patterns
adjusting edited patterns 6-_0
editing 6-8
changing a pattern's position 5-26
changing a pattern's size 5-47
checking the pattern's position 5-27
combining patterns 6-20, 6-28
patterns that useappliqu6 5-33
previewing the pattern 5-28
revising 5-46
retrieving saved patterns 5-55, 6-36
saving edited patterns 6-_2
selecting 5-8
selecting for editing 6-2
types 5-8
Embroidery sheet 5-23
Embroidery unit 1-2,5-1
attaching 5-5
carrying case 1-3
removing 5-7
End key 6-8, 6-18
Error messages 9-10
Eyelet 3-63
sizes %64
Fabric
needle/fabric/thread combinations 1-45
setting in an embroidery frame 5-22
index
Fagoting 3-46
Feed dog position switch 1-6
Feed dogs 1-1
Flat bed attachment 1-6
Floppy disks 5-2, 5-18, 5-51,6-32
cleaning 8-4
Floral alphabet patterns 5-13
Foot controller 1-7
Frame patterns 5-15, 5-61,5-62
Free arm 1-6
Forward/Back key 5-36, 5-38, 5-46
Gimpthread 3-56
Hard case 1-2
Heavyweight fabrics 1-45, 2-4
Heirloom 3-49
Hemstitching 3-49
Horizontal mirror image key
character/decorative stitches 4-14, 4-16
embroidery 5-46, 5-48
embroidery edit 6-8
utility stitches 3-11
Included accessories 1-8
Key functions 1-14
editing character/decorative stitches 4-14
embroidery edit functions 6-8
embroidery pattern revision 5-46
Knee lifter 1-7
Lamp 1-20
LCD 1-16
adjusting 1-16, 9-1
choosing display language 1-18
viewing 1-13, 5-19
Light bulb 8-1
Lightweight fabrics 1-45, 2-4
Locking the screen 1-14, 2-16
Lower threading see Bobbin winding
Low shank adapter 1-9, 1-40
Machine operations key 1-21
Machine settings key 1-20
Main power switch 1-12
Maintenance key 1-21,1-23
Manual memory key 1-15, 3-12
Memory key 4-14, 4-27, 5-46, 5-51,6-32
Mirror image key 1-14, 3-11,4-14, 4-16,
4-21,5-46, 5-48, 6-8
Moving a pattern 5-26, 6-9
Multi color key 5-46, 5-50, 6-8
Multi-directional sewing 3-65
Muhi-threadstand 1-10
MY CUSTOM STITCHTM 7-1
Needle 1-45
changing 1-43
changing position 3-18
checking 1-43
needle/fabric/thread combinations 1-45
mode display 1-13
twin needle 2-5
Needle clamp screw 1-44
Needle clamp thread guide 1-34
Needle mode selection key 1-15, 2-5, 4-14
Needle plate cover 5-29
"Needle Position" button 1-4, 1-20
Needle stopper 1-44
Needle stop position 1-20
Needle threader lever 1-35
One point patterns 5-9
Opening screen display 1-20
Operation buttons 1-3
Operation guide key 1-21
Optional accessories 1-10
Overcasting 3-23
elastic zigzag stitches 3-22
zigzag stitches 3-20
Patchwork stitches 3-21,3-42
Pattern explanation key 1-14, 1-24
Pattern position
(:hanging 5-26
checking 5-27
Index
Pattern select key 6-8, 6-26
Piecing 3-29
Power cord 1-12
Presser foot
(:hanging 1-39
code display 1-1 _, 5-19
types 1-8
Presser foot dial 1-6
Presser foot holder 1-42
Presser foot lever 1-5
Previewing the completed pattern 5-28
Principal parts 1-1
principal parts key 1-21,1-23
Quilting 3-28
Quilting with satin stitches 3-33
Race 8-2
Reset key 1-15, 3-12
Retrieving from memory
character/decorative stitch patterns 4-31
edited patterns 6-36
embroidery patterns 5-55
MY CUSTOM STITCHTM designs 7-13
Return key 5-46
"Reverse/Reinforcement Stitch" button 1-4, 2-3
Revising embroidery patterns 5-46
colors of character 5-50
density 5-49
horizontal mirror image 5-48
rotating 5-48
size 5-47
Rotate key 5-46, 5-48, 6-8, 6-10
Rotating patterns
1 degree rotation 6-10
90 degree rotation 5-48, 6-10
Satin stitch patterns 4-3
Saving
character/decorative stitch patterns 4-27
embroidery edited patterns 6-32
embroidery patterns 5-51
MY CUSTOM STITCHTM designs 7-11
utility stitch settings 3-12
Scallop stitches 3-41
Screen see LCD
Selecting
character/decorative stitches 4-1
embroidery patterns 5-8, 5-17
embroidery patterns to edit 6-2
utility stitches 3-9, 3-1 3
Setting key 1-14, 1-20
Sewing
basic sewing 2-1
buttons 3-61
(:hanging direction 2-3
character/decorative stitches 4-8
continuously 4-1 7
curves 2-3, 3-21
embroidery patterns 5-29
lightweight fabrics 2-4
heavyweight fabrics 2-4
reinforcement stitches 2-3
single stitches 4-17
zippers %67, 3-68
Sewing screen (embroidery) 5-19
Sewing speed controller 1-5, 1-20, 3-34
Sewing type selection key 1-14, 3-13
Shelltuck stitches 3-39
Shuttle 8-2
Side (:utter 1-8, 3-25
Side zippers 3-68
Single/repeat sewing key 4-14, 4-17
Size key 5-46, 5-47, 6-8, 6-11
Size selection key 4-14, 4-15, 4-20
Smocking stitches 3-44
Specifications A-1
Spool cap 1-9, 1-25, 1-29, 1-33
Spool net 1-9, 1-37
Stabilizer material 1-1 O, 5-20
"Start/Stop" button 1-4, 2-2
Starting point key 5-46, 5-57
Step stitch patterns 4-23
Stitch selection display 1-14, 3-10
Stitch settings
automatic reinforcement stitching 2-14
automatic thread cutting 2-15
saving 3-12
stitch length 1-15, 2-9
stitch width 1-15, 1-20, 2-8, 3-_4
stitch width/length settings table 2-10
thread tension 2-13
Stitch width and stitch length key 1-15, 2-8,
2-9, 4-14
Straight stitches 3-16, 3-65
Supplemental spool pin 1-6, 1-29, 2-6
Index

Take-uplever1-34
Tapeattaching3-22,3-47
Thread
character/decorativestitches4-8
(:hart1-45
embroidery5-29
Threadcolor(:hanging6-13
Threadcolordisplay5-42
Threadcutter1-3,2-2
"ThreadCutter"button2-15
Threaddensitykey4-14
Threadpalettekey 6-8,6-13
Threadtension
embroidery5-40
utilitystitches2-13
Threadtensionkey 1-15,2-13,4-14,5-40,
5-46
Top(:over1-5
Trialkey5-27,5-46
Troubleshooting9-1,9-4,9-5
Troubleshootingkey 1-21,1-23
Twinneedle2-5
Uppercase/lowercase4-6
Upperthreading1-32
Utilitydecorativestitchpatterns4-5
Utilitystitches
mirrorimage3-11
quickreferencetable3-1
selecting3-9,%13
stitchwidth/lengthsettingstable2-10
Utilitystitchkey 1-14,3-9
Verticalmirrorimagekey4-14,4-16
Walking foot 1-8, 1-40
Zigzag stitches 3-20, 3-65
Zipper insertion 3-67, 3-68
Index

ENGLISH
114-230
XC3200-001
0205
Printed in Japan
