BUFFALO 000000009 AirStation User Manual WZR 1750DHP
BUFFALO INC. AirStation WZR 1750DHP
UserManual.wiki
>
BUFFALO
>
000000009 User Manual
>
User manual
Contents
1.
User manual
2.
User manual-1
3.
User manual-2
User manual
Navigation menu
Upload a User Manual
Namespaces
Wiki Guide
HTML
PDF
Info
Views
User Manual
Discussion / Help
Navigation

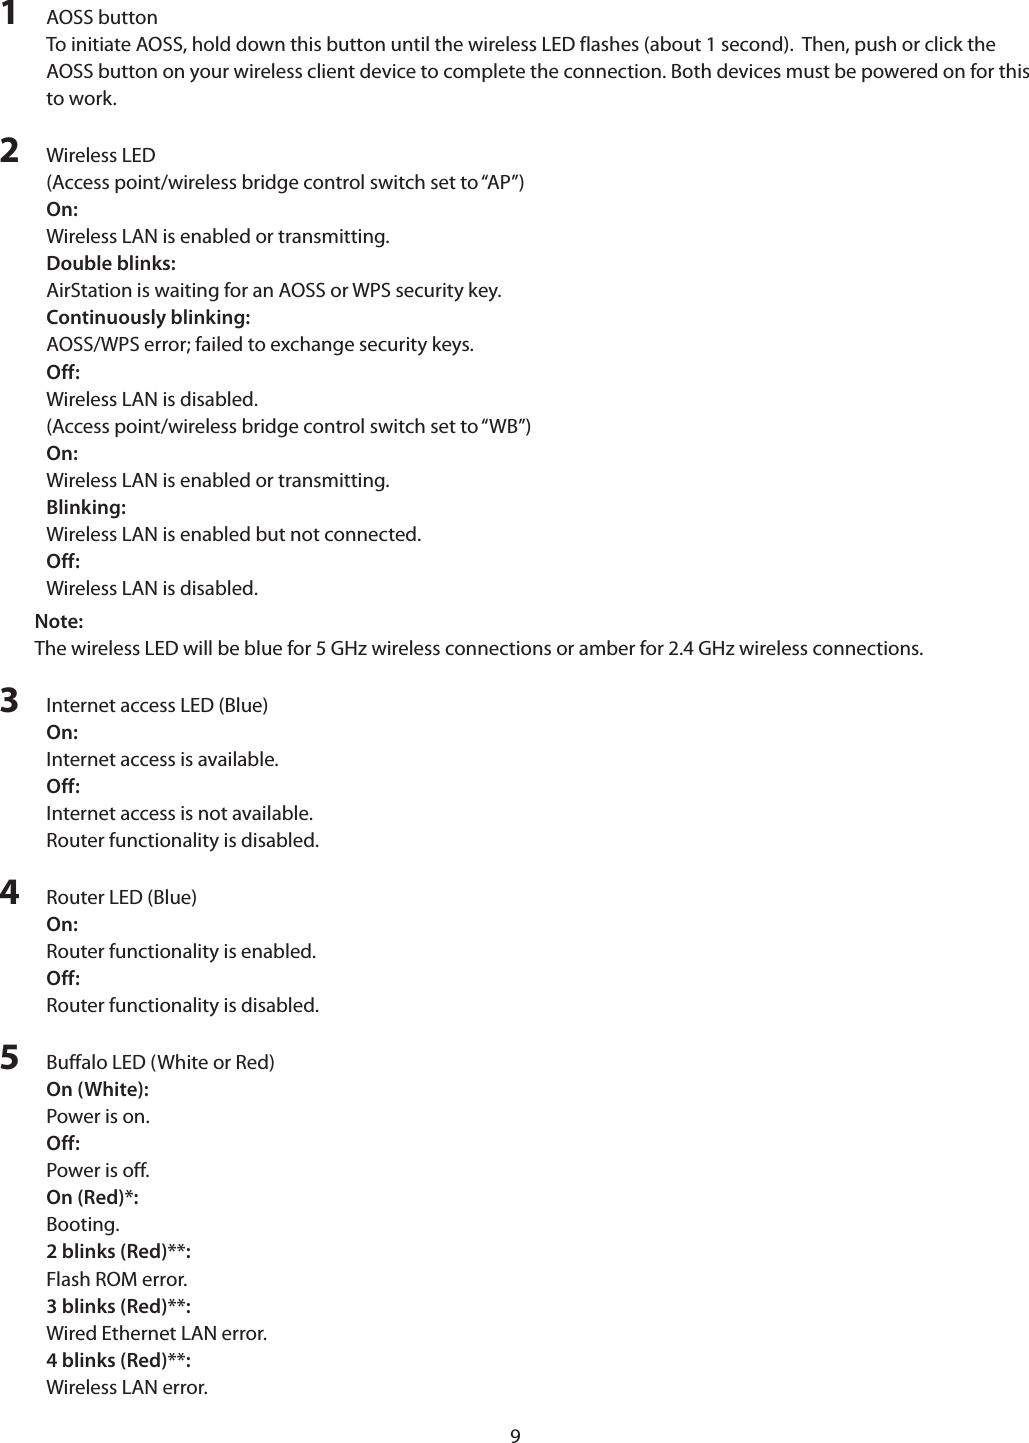
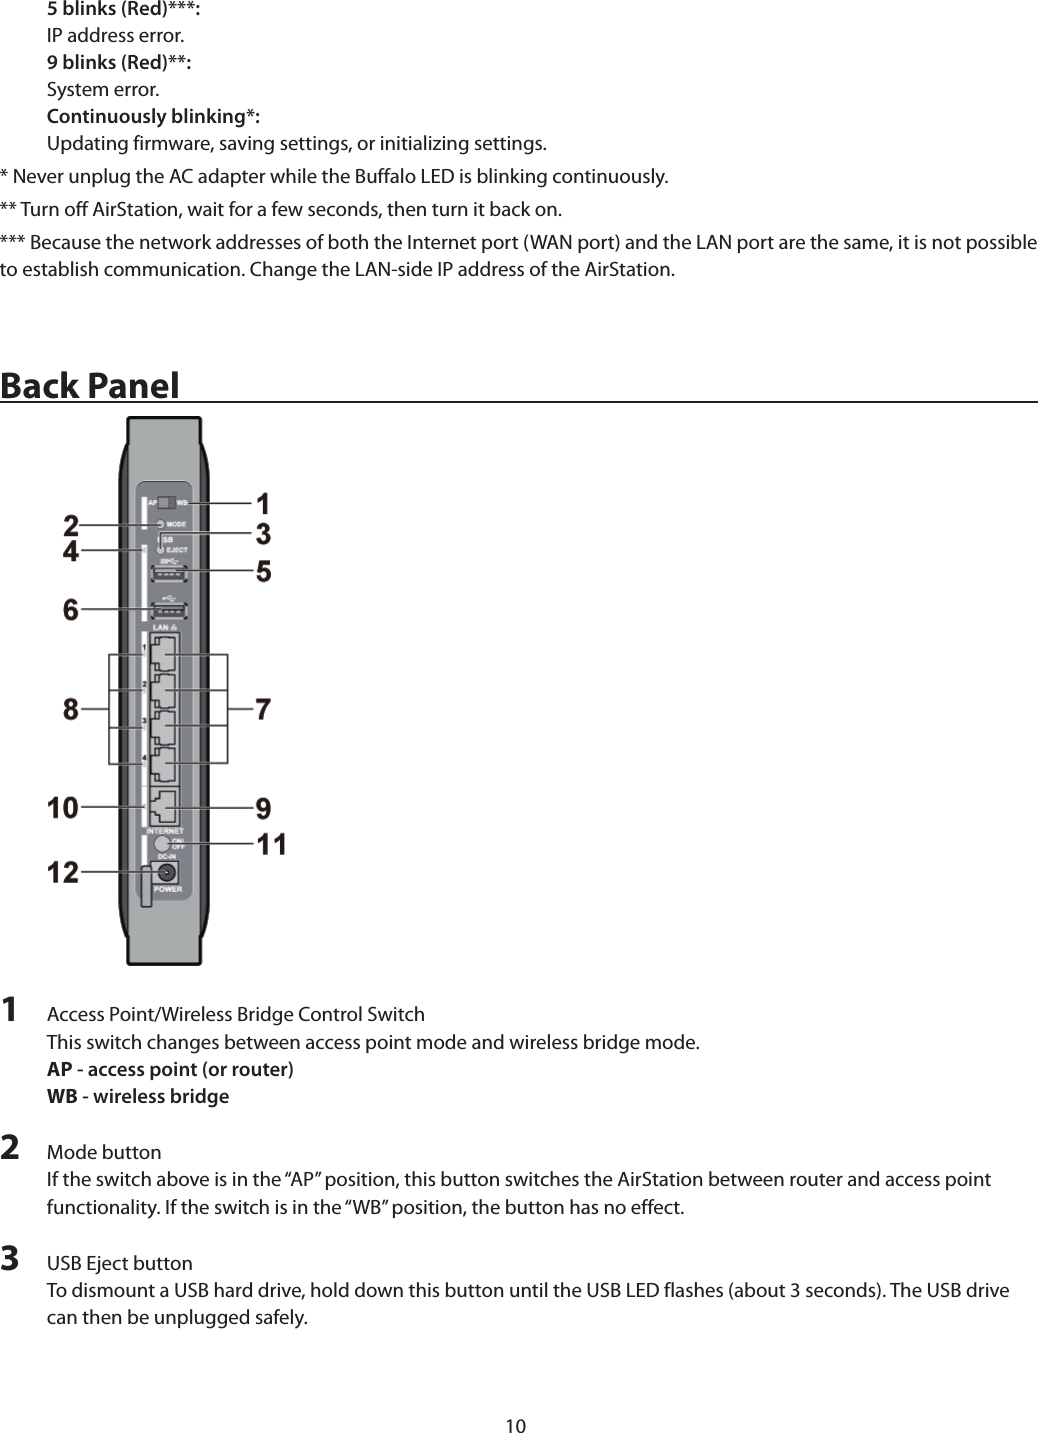
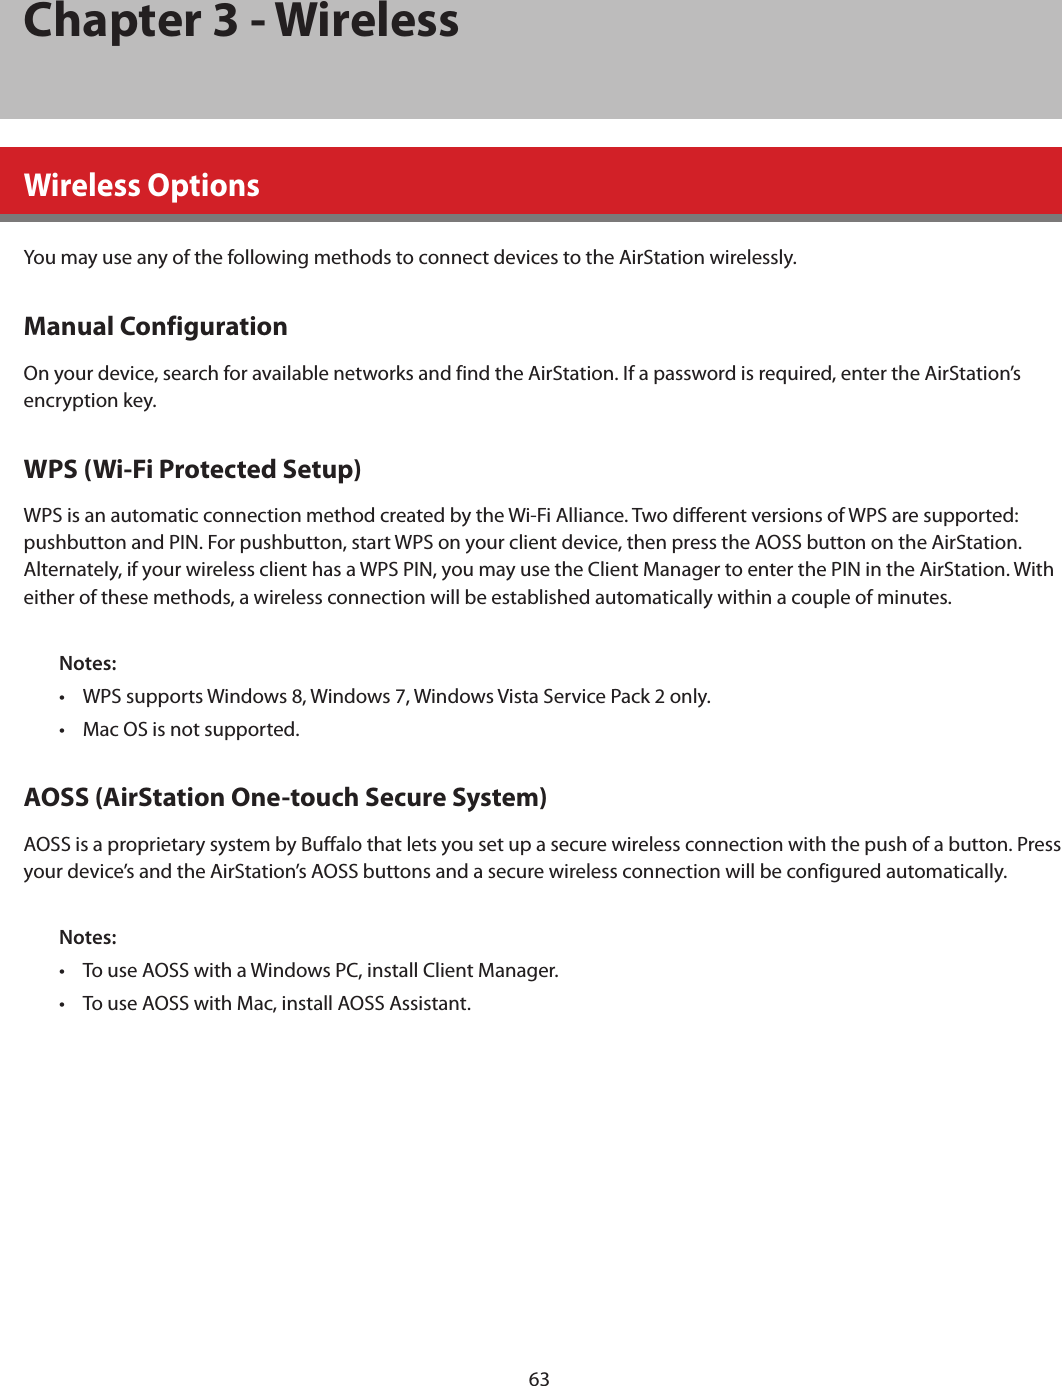
![177 Launch a web browser. If the home screen is displayed, setup is complete.If username and password fields are displayed, enter “admin” for the username and “password” for the password, then click [Log In]. Step through the wizard to complete setup.You’ve completed the initial setup of your AirStation.Opening SettingsTo configure the AirStation, log in to Settings as shown below.1 Launch a web browser.2 Enter the AirStation’s LAN-side IP address in the address field and press the Enter key.Note:• The AirStation’s default LAN-side IP address depends on the mode.• In router mode: 192.168.11.1• In access point mode: 192.168.11.100• In Wireless bridge mode: 192.168.11.100• If you changed the IP address of the AirStation, then use the new IP address.3 Enter “admin” for the username and “password”for the password, then click [Log In].Note:If you forget your password, hold down the reset button to initialize all settings. Note that all other settings will also revert to their default values.](https://usermanual.wiki/BUFFALO/000000009.User-manual/User-Guide-1966638-Page-17.png)

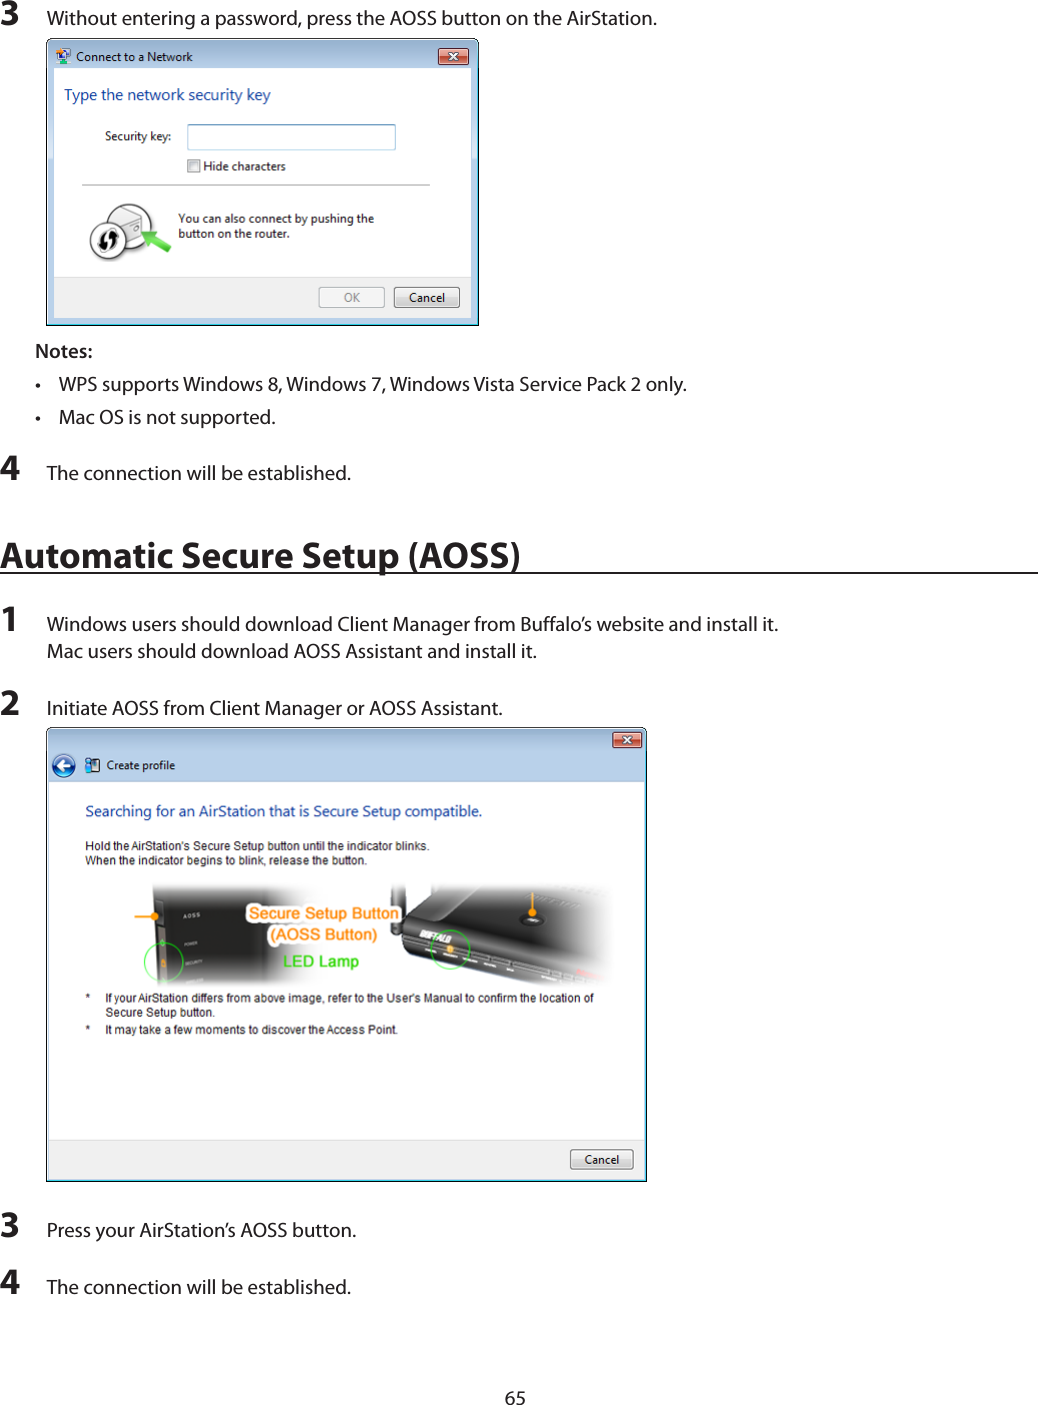
![20WirelessConfigure basic wireless settings. This mode is available in router and access point mode only.Parameter Meaning2.4 GHz (11n/g/b)5 GHz (11ac/n/a)You may enable or disable either wireless frequency range independently. If both wireless radios are disabled, the AirStation will not communicate wirelessly.SSID 1 Each SSID may contain up to 32 alphanumeric characters.EncryptionThe following types of encryption are available:WPA2-PSK AESWPA2 authentication with AES encryption is the best system available. Highly recommended if all your wireless clients support it.WPA-PSK AESWPA authentication with AES encryption is an older system, but still secure.WPA/WPA2-mixed PSK TKIP+AESFor maximum compatibility, this system allows any combination of WPA, WPA2, TKIP, and AES. This encryption system works with most older clients but is not very secure.No EncryptionNo encryption means that anyone can log in to your wireless network, snoop on your wireless traffic, and use your bandwidth. Not recommended for most users.Encryption KeyThe encryption key is like the “password” for your wireless network. It may contain 8 to 63 case-sensitive alphanumeric characters (ASCII) or 64 hexadecimal characters (0-9 and a-f, not case-sensitive).Channel For best results, select [Auto Channel]. The AirStation will seek and use the clearest channel automatically. Alternately, you may choose a wireless channel manually.BandwidthIn rural areas with little wireless traffic, a larger bandwidth setting may improve wireless performance significantly. However, if you are in an urban area with much wireless traffic and interference, the default bandwidth is recommended.](https://usermanual.wiki/BUFFALO/000000009.User-manual/User-Guide-1966638-Page-20.png)
![21AOSS/WPSThe following window appears when you click the panel. Click [OK] to start AOSS/WPS.USB StorageConfigure USB storage settings.Parameter MeaningAttached Drive The names of USB devices connected to this product.File Sharing Enable or disable file sharing.BitTorrent Enable or disable BitTorrent.DLNA Enable or disable the media server.WebAccess Enable or disable WebAccess.BuffaloNAS.com Name This name may contain 3 to 20 alphanumeric characters, hyphens (-) and underscores (_). The AirStation will be registered by this name at BuffaloNAS.com.BuffaloNAS.com Status If the status shows [Registration failure], check your BuffaloNAS.com settings.Username The WebAccess username may contain up to 20 alphanumeric characters, hyphens (-), underscores (_) and periods (.). Don’t use a symbol as the first character.PasswordThe WebAccess password may contain up to 20 alphanumeric characters, hyphens (-), underscores (_) and periods (.). It should not be blank. Don’t use a symbol as the first character.](https://usermanual.wiki/BUFFALO/000000009.User-manual/User-Guide-1966638-Page-21.png)
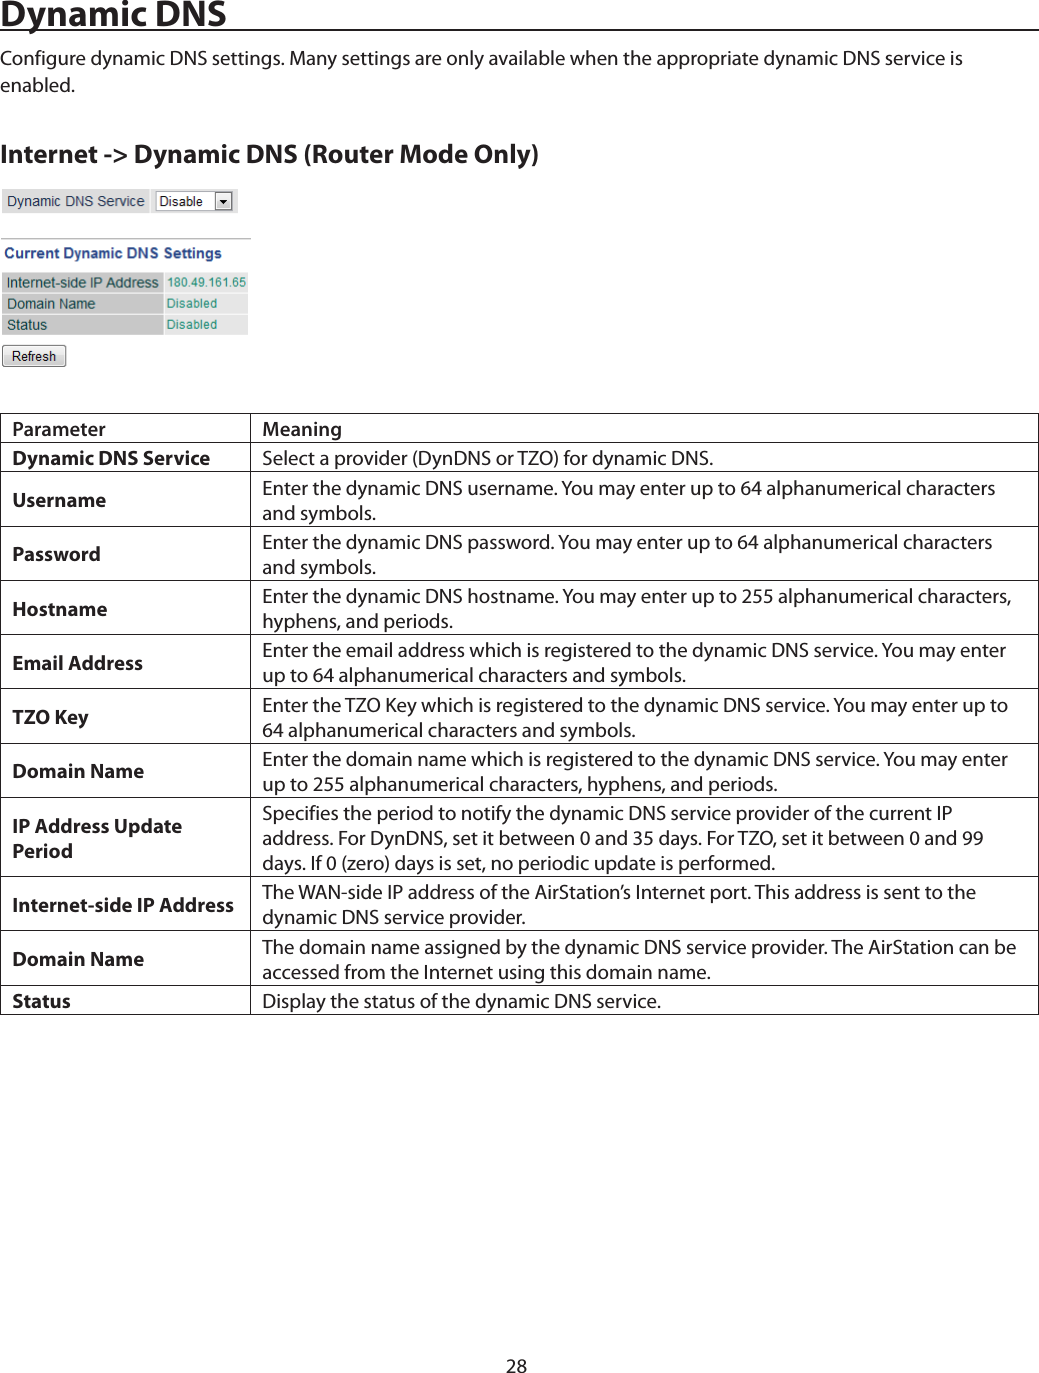
![26PPPoEConfigure PPPoE settings.Internet -> PPPoE (Router Mode Only)Parameter MeaningDefault PPPoE ConnectionIf you have registered multiple connection destinations in the [PPPoE Connection List], connection destinations selected here have priority.IP Unnumbered PPPoE ConnectionSelect the destination from the [PPPoE Connection List] which is used when [Use IP Unnumbered] is chosen for the method of acquiring IP address.PPPoE Connection List Edit PPPoE destination. You can register up to 5 sessions.Edit Connection List Click this button to edit destination settings.](https://usermanual.wiki/BUFFALO/000000009.User-manual/User-Guide-1966638-Page-26.png)
![27PPPoE ConnectionThis is displayed when [Edit Connection List] is clicked.Name of ConnectionEnter the name to identify the connected destination. You may enter up to 32 alphanumerical characters and symbols.UsernameEnter the username specified by your ISP for PPPoE certification. You may enter up to 64 alphanumerical characters and symbols.PasswordEnter the password specified by your ISP for PPPoE certification. You may enter up to 64 alphanumerical characters and symbols.Service NameFill in this field only if your ISP specifies a service name. Leave blank otherwise. You may enter up to 64 alphanumerical characters and symbols.Connection TypeSpecifies the timing for the AirStation to connect to your provider.Automatic DisconnectionSet time to disconnect after communication is stopped when the connection method is set to [Connection on Demand] or [Manual]. You can enter up to 1440 minutes.AuthenticationConfigure an authentication method with a provider.MTU SizeConfigure the MTU size for PPPoE. Values of 578 to 1492 bytes may be entered.MRU SizeConfigure MRU (maximum receive unit) for PPPoE. Values of 578 to 1492 may be entered.KeepaliveIf keepalive is enabled, the AirStation will issue an LCP echo request once a minute in order to maintain the connection with the PPPoE. If the server does not respond for more than 6 minutes, the line is recognized as disconnected and the AirStation will terminate the connection. Disabled by default.Preferred Connections Displays information you have set regarding to the connection destination route.Edit Preferred Connections Click to edit the connection destination route settings.Preferred PPPoE ConnectionClick [Edit Preferred Connections] to display.NameThe destination to connect by PPPoE if [Destination Address] and [Source Address] match. Select the destination registered to the PPPoE Connection List.Destination AddressWhen communicating to this address, the AirStation will communicate with [Name].Source AddressWhen communicating from this address, the AirStation will communicate with [Name].](https://usermanual.wiki/BUFFALO/000000009.User-manual/User-Guide-1966638-Page-27.png)
![29PPTPConfigure the VPN server.Internet -> PPTP (Router Mode Only)Parameter MeaningPPTP Server Enable to use a PPTP server.Authentication Type Select the authentication method for PPTP connection.Server IP Address Select the server IP address.Client IP Address Select the IP address range.DNS Server IP Address Choose the IP address for the DNS server.WINS Server IP Address Choose the IP address for the WINS server.MTU/MRU Value Configure MTU (maximum transmission unit) / MRU (maximum receive unit) between 578 and 1500 which is used during transmission on PPTP.Edit PPTP User List Click to edit user information.Add New userAdvanced SettingsClick [Edit PPTP User List] to display.UsernameEnter the username to connect to the PPTP server. You may enter up to 16 alphanumerical characters and symbols.PasswordEnter the password to connect to the PPTP server. You may enter up to 16 alphanumerical characters and symbols.Method of Acquiring IP AddressSelect the method to be used to assign the IP address is assigned to the PPTP client.PPTP User List Displays the PPTP connection user information.](https://usermanual.wiki/BUFFALO/000000009.User-manual/User-Guide-1966638-Page-29.png)
![30NATConfigure network address translation settings. This enables LAN-side devices to communicate with the Internet.Internet -> NAT (Router Mode Only)Parameter MeaningAddress Translation Enable to use network address translation.LANConfigure LAN-side and DHCP server settings.LAN -> LANParameter MeaningLAN-side IP Address By default, the LAN-side IP address is 192.168.11.1 with subnet mask 255.255.255.0. You may change it here.DHCP Server Enable or disable the DHCP server, which assigns LAN-side IP addresses automatically.DHCP IP Address Pool Configure the range of IP addresses to be assigned by the DHCP server and IP addresses to be excluded from that range. Values from 1-256 may be entered.LAN-side IP Address (For IP Unnumbered)Set an IP unnumbered LAN-side IP address.Note:A PC with a normal LAN-side IP address and a PC with an IP unnumbered IP address cannot communicate each other.Advanced Settings Check [Display] to display DHCP server advanced settings options.Lease Period Set the effective period of an IP address assigned by the DHCP server. Up to 999 hours may be entered.](https://usermanual.wiki/BUFFALO/000000009.User-manual/User-Guide-1966638-Page-30.png)
![31Parameter MeaningDefault Gateway Set the default gateway IP address for the DHCP server to issue to clients.DNS Servers Set the DNS server IP address for the DHCP server to issue to clients. WINS Server Set the WINS server IP address for the DHCP server to issue to clients. Domain Name Set the domain name for the DHCP server to issue to clients. You may enter up to 127 alphanumerical characters, hyphens, and periods.DHCP LeaseConfigure DHCP exceptions.LAN -> DHCP Lease (Router Mode Only)Parameter MeaningCurrent DHCP Clients Displays information for current leases. An IP address which is leased automatically can be changed to manual leasing by clicking [Add Client].RoutingConfigure the AirStation’s IP communication route.LAN -> RoutingParameter MeaningRouting Manual entries will appear here after being added.](https://usermanual.wiki/BUFFALO/000000009.User-manual/User-Guide-1966638-Page-31.png)
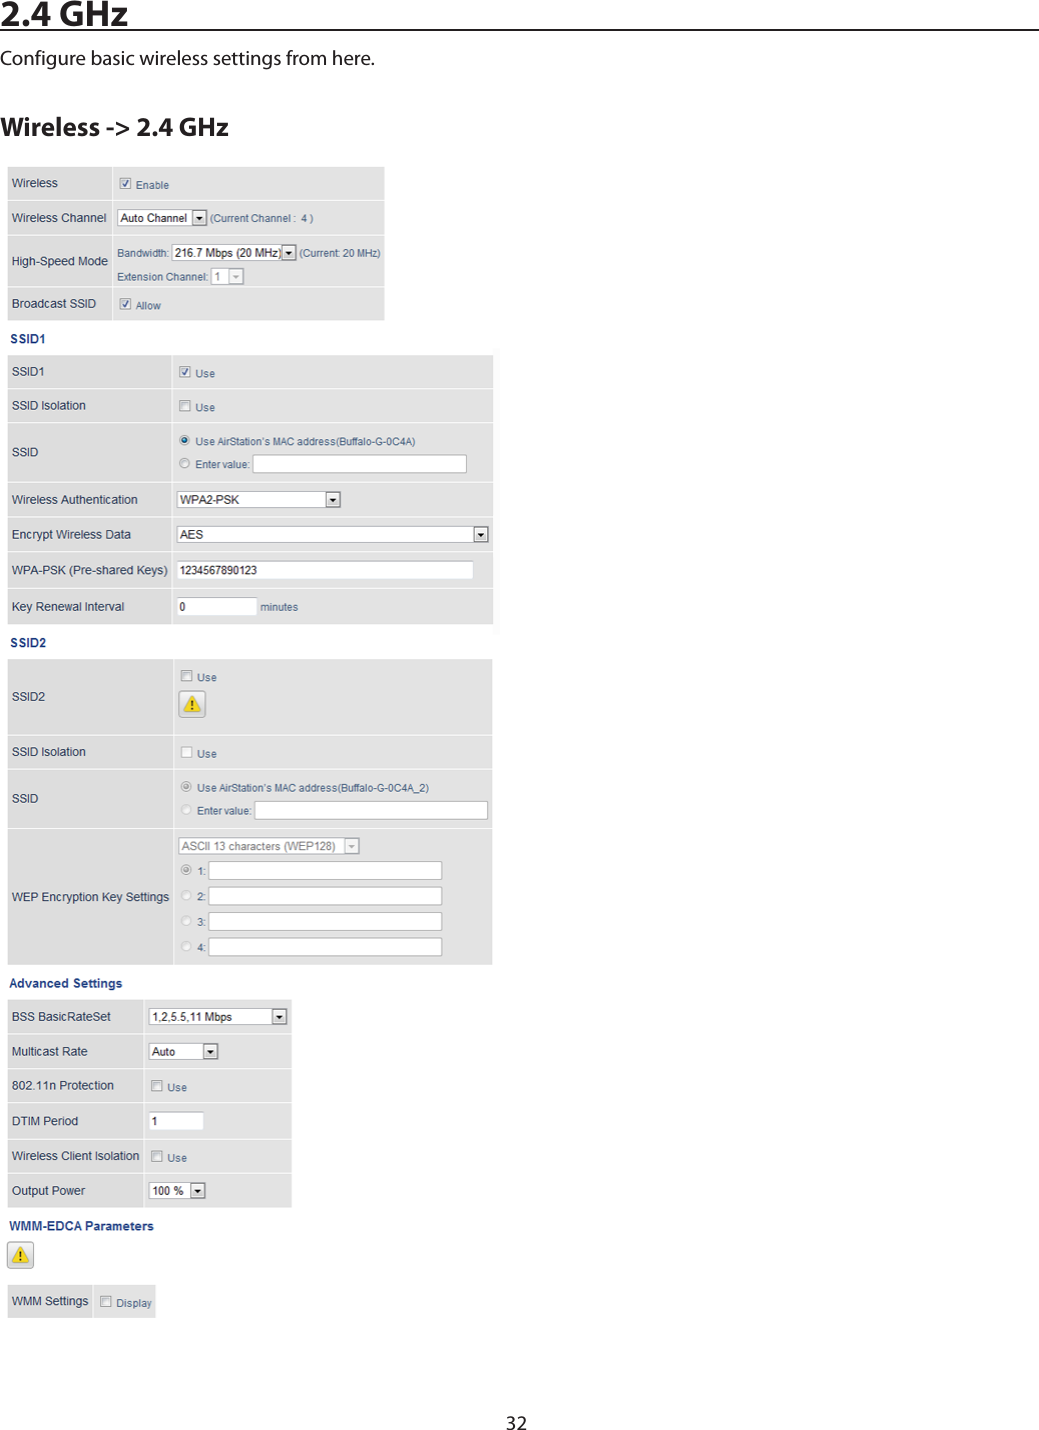
![33Parameter MeaningWireless Determines whether to allow wireless communication. If this is unchecked, then no wireless connections will be allowed.Wireless Channel Sets a channel (a range of frequencies) for wireless connections. With [Auto Channel] selected, the AirStation will automatically use the best available channel.High-Speed Mode Configure the bandwidth for wireless communication. To increase communication rate, set the bandwidth to 450 Mbps (40 MHz) and configure extension channel.Broadcast SSIDIf [Allow] is checked, then the AirStation will respond to SSID searches from wireless devices by broadcasting its SSID. If [Allow] is unchecked, then the AirStation ignores SSID searches from wireless devices. SSID 1SSID 2 Enable or disable the main SSID (SSID 1) and sub SSID (SSID 2). SSID Isolation Enable to make wireless devices connected to the specified SSID be able to communicate only with the Internet-side.Wireless AuthenticationSelect an authentication method for SSID 1 from below:WPA/WPA2-mixed mode PSKAllows the authentication compatible with WPA-PSK and WPA2-PSK at the same time.WPA2-PSKAllows the authentication compatible with WPA2 (IEEE 802.11i).WPA-PSKAllows the authentication compatible with WPA (Wi-Fi Protected Access).No AuthenticationConnect to wireless clients without any authentication method.Encrypt Wireless DataYou may use any of the following types of encryption:TKIP/AES mixed mode[TKIP/AES mixed mode] allows both TKIP and AES authentication and communication. This is no more secure than TKIP alone, but more convenient for some users. [TKIP/AES mixed mode] can be selected only when [WPA/WPA2 mixed mode - PSK] is selected for wireless authentication.AESAES is more secure than TKIP, and faster. Use a pre-shared key to communicate with a wireless device. AES can be selected only when WPA-PSK or WPA2-PSK is selected for wireless authentication.No EncryptionData is transmitted without encryption. With this setting, anyone within range can connect to your wireless network and might be able to access data on the network. Not recommended for anyone with private data that needs to be kept secure. [No Encryption] can be selected only when [No Authentication] is selected for wireless authentication.WPA-PSK (Pre-Shared Keys)A pre-shared key or passphrase is the password for your wireless connections. There are two different formats for a pre-shared key. Use 8 to 63 alphanumeric characters (case-sensitive) for an ASCII passphrase, or use 64 alphanumeric characters (0 to 9 and a to f, not case-sensitive) for a hexadecimal passphrase.Key Renewal Interval Set the update interval for the encryption key between 0 and 1440 (minutes).WEP Encryption Key SettingsA WEP encryption key (passphrase) may have any of four different formats. An ASCII passphrase may use either 5 or 13 alphanumeric characters (case-sensitive). A hexadecimal passphrase may use either 10 or 26 alphanumeric characters (0 to 9 and a to f, not case-sensitive).BSS BasicRateSet BSS (basic service set) configures the transmission rate of control communication frames for a wireless client. Setup choices may vary with different wireless clients.](https://usermanual.wiki/BUFFALO/000000009.User-manual/User-Guide-1966638-Page-33.png)
![34Parameter MeaningMulticast Rate Set the communication speed of multicast packets.802.11n Protection Enable to use 802.11n protection. 802.11n protection gives priority to 802.11n devices in mixed mode (11b/g or 11a) networks.DTIM PeriodSet the beacon responding interval (1 -255) for which the AirStation responds to a wireless device. This setting is effective only when power management is enabled for the wireless device.Wireless Client IsolationIf enabled, the Wireless Client Isolation blocks communication between wireless devices connected to the AirStation. Wireless devices will be able to connect to the Internet but not with each other. Devices that are connected to the AirStation with wired connections will still be able to connect to wireless devices normally.Output PowerThis sets the output of the wireless signal. Because the wireless transmission output and signal distance range are nearly proportional, when the wireless transmission output is reduced, the signal distance range also becomes shorter.WMM Settings Check [Display] to set priorities only for a specific communication.WMM-EDCA ParametersYou don’t usually need to change these settings. Using the default settings is recommended.PriorityThe following priorities may be applied to individual transmission packets: (Highest) 8, (High) 4, (Normal) 2, and (Low) 1. From the queue, these packets are processed in order of priority.CWmin, CWmaxThe maximum and minimum value of the contention window. The contention window is used in the frame collision avoidance structure performed in IEEE802.11, and generally, the smaller the value in the window, the higher the probability that the queue obtains the right to send.AIFSNThe interval to send frames. The unit of the AIFSN is a slot, just as the window defined by CWmin and CWmax is. The smaller the interval of sending frames, the faster the algorithm can restart. As a result, the priority of the queue is higher.TXOP LimitThe period of time that the queue can use after obtaining the right to send. The unit is 32 ms. The longer this time, the more frames can be sent per right to send. However, the queue may interfere with other packet transmissions. If [TXOP Limit] is set to 0 (zero), only one frame can be sent per right to send.Admission ControlRestricts new frames from interfering with a previous queue. New packets are prioritized lower until a queue of them is collected. As the new queue accumulates more packets, its priority increases.5 GHzConfigure basic wireless settings from here.](https://usermanual.wiki/BUFFALO/000000009.User-manual/User-Guide-1966638-Page-34.png)
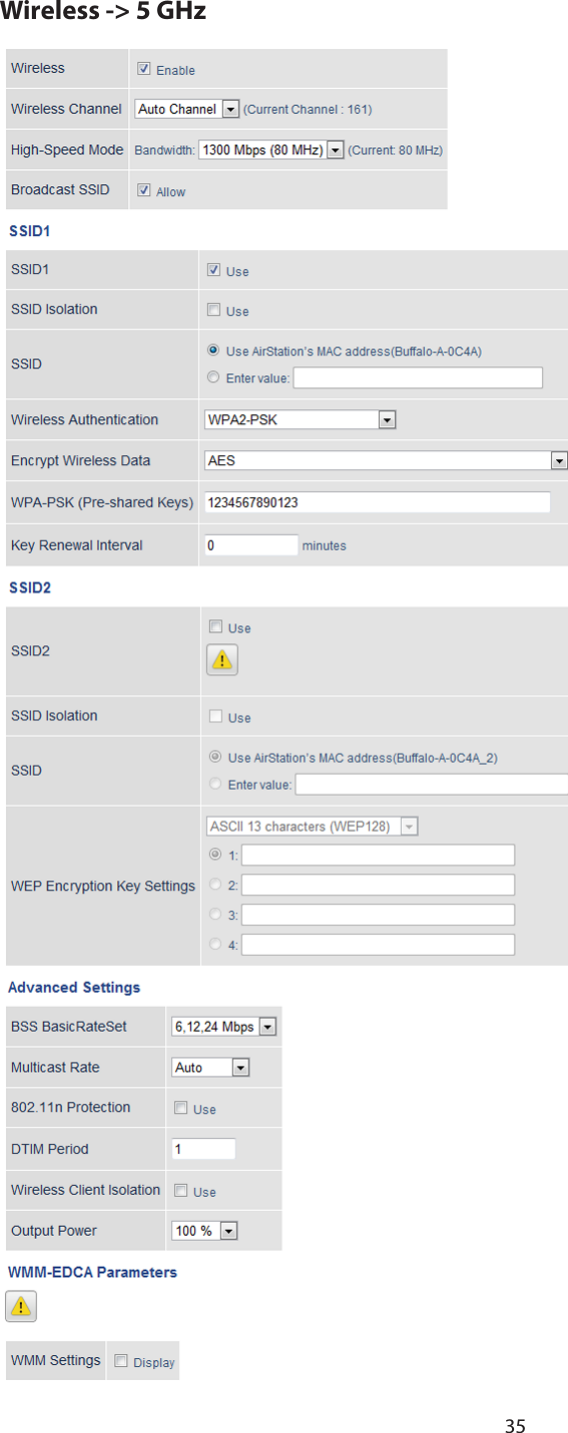
![36Parameter MeaningWireless Determines whether to allow wireless communication. If this is unchecked, then no wireless connections will be allowed.Wireless ChannelSets a channel (a range of frequencies) for wireless connections. With [Auto Channel] selected, the AirStation will automatically use the best available channel. If a channel compatible with DFS is selected, the channel will be changed automatically when a weather radar is detected.High-Speed Mode Configure the bandwidth for wireless communication. To increase communication rate, set the bandwidth to 1300 Mbps (80 MHz) and configure extension channel.Broadcast SSIDIf [Allow] is checked, then the AirStation will respond to SSID searches from wireless devices by broadcasting its SSID. If [Allow] is unchecked, then the AirStation ignores SSID searches from wireless devices. SSID 1SSID 2 Enable or disable the main SSID (SSID 1) and sub SSID (SSID 2). SSID Isolation Enable to make wireless devices connected to the specified SSID be able to communicate only with the WAN-side.Wireless AuthenticationSelect an authentication method for SSID 1 from below:WPA/WPA2-mixed mode PSKAllows the authentication compatible with WPA-PSK and WPA2-PSK at the same time.WPA2-PSKAllows the authentication compatible with WPA2 (IEEE 802.11i).WPA-PSKAllows the authentication compatible with WPA (Wi-Fi Protected Access).No AuthenticationConnect to wireless clients without any authentication method.Encrypt Wireless DataYou may use any of the following types of encryption:TKIP/AES mixed mode[TKIP/AES mixed mode] allows both TKIP and AES authentication and communication. This is no more secure than TKIP alone, but more convenient for some users. [TKIP/AES mixed mode] can be selected only when [WPA/WPA2 mixed mode - PSK] is selected for wireless authentication.AESAES is more secure than TKIP, and faster. Use a pre-shared key to communicate with a wireless device. AES can be selected only when WPA-PSK or WPA2-PSK is selected for wireless authentication.No EncryptionData is transmitted without encryption. With this setting, anyone within range can connect to your wireless network and might be able to access data on the network. Not recommended for anyone with private data that needs to be kept secure. [No Encryption] can be selected only when [No Authentication] is selected for wireless authentication.WPA-PSK (Pre-Shared Keys)A pre-shared key or passphrase is the password for your wireless connections. There are two different formats for a pre-shared key. Use 8 to 63 alphanumeric characters (case-sensitive) for an ASCII passphrase, or use 64 alphanumeric characters (0 to 9 and a to f, not case-sensitive) for a hexadecimal passphrase.Key Renewal Interval Set the update interval for the encryption key between 0 and 1440 (minutes).](https://usermanual.wiki/BUFFALO/000000009.User-manual/User-Guide-1966638-Page-36.png)
![37Parameter MeaningWEP Encryption Key SettingsA WEP encryption key (passphrase) may have any of four different formats. An ASCII passphrase may use either 5 or 13 alphanumeric characters (case-sensitive). A hexadecimal passphrase may use either 10 or 26 alphanumeric characters (0 to 9 and a to f, not case-sensitive).BSS BasicRateSet BSS (basic service set) configures the transmission rate of control communication frames for a wireless client. Setup choices may vary with different wireless clients.Multicast Rate Set the communication speed of multicast packets.802.11n Protection Enable to use 802.11n protection. 802.11n protection gives priority to 802.11n devices in mixed mode (11b/g or 11a) networks.DTIM PeriodSet the beacon responding interval (1 -255) for which the AirStation responds to a wireless device. This setting is effective only when power management is enabled for the wireless device.Wireless Client IsolationIf enabled, the Wireless Client Isolation blocks communication between wireless devices connected to the AirStation. Wireless devices will be able to connect to the Internet but not with each other. Devices that are connected to the AirStation with wired connections will still be able to connect to wireless devices normally.Output PowerThis sets the output of the wireless signal. Because the wireless transmission output and signal distance range are nearly proportional, when the wireless transmission output is reduced, the signal distance range also becomes shorter.WMM Settings Check [Display] to set priorities only for a specific communication.WMM-EDCA ParametersYou don’t usually need to change these settings. Using the default settings is recommended.PriorityThe following priorities may be applied to individual transmission packets: (Highest) 8, (High) 4, (Normal) 2, and (Low) 1. From the queue, these packets are processed in order of priority.CWmin, CWmaxThe maximum and minimum value of the contention window. The contention window is used in the frame collision avoidance structure performed in IEEE802.11, and generally, the smaller the value in the window, the higher the probability that the queue obtains the right to send.AIFSNThe interval to send frames. The unit of the AIFSN is a slot, just as the window defined by CWmin and CWmax is. The smaller the interval of sending frames, the faster the algorithm can restart. As a result, the priority of the queue is higher.TXOP LimitThe period of time that the queue can use after obtaining the right to send. The unit is 32 ms. The longer this time, the more frames can be sent per right to send. However, the queue may interfere with other packet transmissions. If [TXOP Limit] is set to 0 (zero), only one frame can be sent per right to send.Admission ControlRestricts new frames from interfering with a previous queue. New packets are prioritized lower until a queue of them is collected. As the new queue accumulates more packets, its priority increases.](https://usermanual.wiki/BUFFALO/000000009.User-manual/User-Guide-1966638-Page-37.png)
![38WPSWPS status and settings.Wireless -> WPS (Router and Access Point Mode Only)Parameter MeaningWPS Enable to use WPS automatic configuration.External RegistrarEnable to accept configure requests from other WPS devices.Note:Configure requests will not be accepted if AOSS is in use.AirStation PIN Displays the PIN code of the AirStation. Clicking [Generate PIN] will generate a new PIN code. This code can be entered into other wireless devices that support WPS.Enrollee PIN Enter the PIN code for the other wireless device and click [OK].WPS Status Displays [configured] if all available wireless bands are configured. Displays [unconfigured] if at least one wireless band is unconfigured.](https://usermanual.wiki/BUFFALO/000000009.User-manual/User-Guide-1966638-Page-38.png)
![39AOSSAOSS status and settings.Wireless -> AOSS (Router and Access Point Mode Only)Parameter MeaningAOSS Status Displays current AOSS status. Click to disconnect AOSS connection when it is enabled.(SSID and encryption key will return to the previous setting.)Allow WEP for Game Consoles Only This allows game consoles which only support WEP to connect to the network.AOSS Button on The AirStation Unit If [Enable] is unchecked, only WPS runs when you press the button.AOSS Client InformationDisplays the information of the clients connected to this product via AOSS and communicating with this product wirelessly.NameDisplays the name of the clients.MAC AddressDisplays the MAC address of the clients.Encryption TypeDisplays the encryption type the clients can use.WirelessDisplays current wireless method.](https://usermanual.wiki/BUFFALO/000000009.User-manual/User-Guide-1966638-Page-39.png)
![40MAC FilteringRestrict access to specific wireless devices.Wireless -> MAC FilteringParameter MeaningEnforce MAC Filtering Enable to restrict wireless connections to devices with registered MAC addresses.Registration List Displays the MAC addresses of registered devices which are permitted to connect wirelessly.Edit Registration List Adds a wireless device to the list of permitted devices.Enter MAC Addresses Enter a MAC address of a wireless device to permit to connect to the AirStation. Click [Register] to add that MAC address to the list.Connected Client’s List Display the list of all MAC addresses of wireless devices connected to the AirStation.Multicast ControlConfigure restrictions on unnecessary multicast packets sent to the wireless LAN port.Wireless -> Multicast ControlParameter MeaningSnooping If enabled, snooping supervises multicast administrative packets such as IGMP and restricts unnecessary multicast transfers to wired or wireless ports.Multicast Aging Time Set the time to hold the data from multicast snooping in the range of 1 to 3600 (seconds). Enter a value bigger than the IGMP/MLD query interval.](https://usermanual.wiki/BUFFALO/000000009.User-manual/User-Guide-1966638-Page-40.png)
![42Wireless BridgeConfigure the AirStation’s wireless bridge.Wireless -> Wireless Bridge (Wireless Bridge Mode Only)Parameter MeaningWireless Bridge Status Displays wireless bridge status.SSID Displays the master’s SSID.Security Displays the type of security used by connection with the master.Select 5 GHz or 2.4 GHz Set the priority for the connection with the master.Wireless LAN Master Settings When checked, the AirStation will use the wireless settings of the master device.Main unit-side AOSS Button Uncheck [Enable] to disable AOSS and WPS.Manual Settings Click to search master devices. Select a master device and enter the encryption key.PIN Code MethodClick [Start WPS by PIN] to issue PIN code and search master devices. Select a master device and click [Run PIN] to start WPS. Register PIN code to the destination master device within 2 minutes.Pushbutton Method Click [Start WPS by pushbutton] to start WPS. Press master device’s AOSS/WPS button within 2 minutes.Execute AOSS Click to start AOSS. Press master device’s AOSS/WPS button within 2 minutes.](https://usermanual.wiki/BUFFALO/000000009.User-manual/User-Guide-1966638-Page-42.png)
![43FirewallConfigure the AirStation’s firewall.Security -> Firewall (Router Mode Only)Parameter MeaningBasic RulesEnable to use any of the quick filters. Preconfigured quick filters include:Prohibit NBT and Microsoft-DS routingEnabling this blocks communication using these protocols from the WAN side to the LAN side or from the LAN side to the Internet. You can configure this with PPPoE if you select [Use PPPoE client] or [Use IP Unnumbered] for the method of acquiring IP Address, or if Easy Setup identified a PPPoE connection during setup.Reject ident requestsEnabling this option will answer ident requests from the Internet side with corresponding rejection packets. Enable this option if you experienced slow transfer speeds for network applications such as mail, ftp or web browsing. If you have configured transfer of ident requests to the LAN-side computer in the address translation settings (DMZ or TCP port 113), then that setting has higher priority, and overrides this setting.Block ping from InternetIf this is enabled, the AirStation will not respond to pings from the Internet side. You can configure this with PPPoE if you select [Use PPPoE client] or [Use IP Unnumbered] for the method of acquiring an IP address, or if Easy Setup identified a PPPoE connection during setup.](https://usermanual.wiki/BUFFALO/000000009.User-manual/User-Guide-1966638-Page-43.png)
![45Port ForwardingConfigure port translation.Security -> Port Forwarding (Router Mode Only)Parameter MeaningGroupSpecify a group name for a new rule to belong to. Select [New Group] and enter the new group name in the Group Name field to create a new group. A group name can include up to 16 alphanumeric characters.Internet-side IP Address Enter the Internet-side IP address (before translation) for the port translation table entry.Protocol Select the Internet-side protocol (before translation) for the port translation table entry.LAN-side IP Address Enter the LAN-side IP address (after translation) for the port translation table entry.LAN-side Port Select the LAN-side (after translation) port number (1 - 65535) for the port translation table entry.Forwarded Ports Shows current entries in the port translation table.](https://usermanual.wiki/BUFFALO/000000009.User-manual/User-Guide-1966638-Page-45.png)
![47Web Filtering and Parental ControlsSecurity -> Web Filtering and Parental Controls (Router Mode Only)Norton ConnectSafe must be activated by customer. Use of Norton ConnectSafe is subject to the Terms of Service found at https://dns.norton.com/dnsweb/terms.do .Parameter MeaningWeb Filtering and Parental Controls Enable or disable content filter functionality.Filter Level Select filter level. Level 3 is selected by default.Websites Excluded from FilterSpecify a list of websites that will be unaffected by the web filtering and parental controls. Click [Add] and enter any website (up to 20 are allowed). You can edit or delete entered entries.](https://usermanual.wiki/BUFFALO/000000009.User-manual/User-Guide-1966638-Page-47.png)
![48Parameter MeaningComputers Excluded from FilterSet a list of computers on the network that will be unaffected by the web filtering and Parental Controls. Click [Add] and enter a computer’s MAC address (up to 20 are allowed). You can edit or delete entered entries.Access ControlSelect the computers on the network that will be subjected to the web filtering and parental controls. Under target computer, enter the computer’s MAC address and click [Add] to save it to the access control list.Disk ManagementView the status of and configure attached USB drives.Applications -> Disk ManagementParameter MeaningAutomatic USB Drive Assignment Enable or disable automatic USB drive assignment.Advanced Check [Display] to display the advanced functionality.Character Code for FAT Specify the file name character code used for FAT-formatting.Sleep Mode Enable or disable sleep mode.Sleep Mode Interval When the device is not used until the specified time frame, the device power will be off. You can specify the time frame from 1 to 300 minutes.Device Displays the manufacturer, product name and unit name of the connected USB devices.Disk Assignment Select a number of the drive or [Do not assign].Partition Information Displays partition information.Refresh USB Devices Refreshes USB devices.Modify Shared Folder Displays when you select a partition and click [Setting Changes]. Restricts the access to the USB devices.Shared Folder NameThe shared folder name may contain up to one-byte 18 alphanumeric characters, each region’s characters, hyphens (-) and underscores (_). Do not use a symbol as the first character.](https://usermanual.wiki/BUFFALO/000000009.User-manual/User-Guide-1966638-Page-48.png)
![49Parameter MeaningShared Folder DescriptionThe shared folder description may contain up to one-byte 75 alphanumeric characters, each region’s characters, hyphens (-) and underscores (_).Drive Partition Area Displays [Select], [Drive Partition Area], [Format] and [Used/Available] of devices and partitions.Disclosed to Select the functions used by registered shared folder.Access Restrictions Configure access restriction settings by username.WebAccessIf checked, WebAccess users will have the same permission via WebAccess that they do locally.If unchecked, WebAccess users will have the permission as read-only.Current Users Displays the registered user information.Add Click it to register new user.UsernameEnter an username to access the shared folder. You can enter 1 to 20 alphanumeric characters, hyphens (-), underscores (_) and periods (.). Do not use a symbol as the first character.PasswordEnter the password to access the shared folder. You can enter 1 to 20 alphanumeric characters, hyphens (-), underscores (_) and periods (.). Do not use a symbol as the first character.User Description The user description may contain up to one-byte 75 alphanumeric characters, each region’s characters, one-byte spaces, hyphens (-) and underscores (_).](https://usermanual.wiki/BUFFALO/000000009.User-manual/User-Guide-1966638-Page-49.png)
![51WebAccessConfigure WebAccess.Applications -> WebAccessParameter MeaningWebAccess Check [Enable] to use WebAccess.Language Set the language to be used with WebAccess.HTTPS/SSL Encryption Check [Enable] to use SSL encryption for protected data transfer.WebAccess External PortAutomatically sets the external port used for WebAccess. To select the port manually, select [Manual].DNS Service HostnameSets the DNS service hostname when WebAccess is activated. Select [Use BuffaloNAS.com registration] to use WebAccess easily. You’ll have to configure a [BuffaloNAS.com name] and [BuffaloNAS.com key] to use BuffaloNAS.com. 3 - 20 alphanumeric characters, spaces, hyphens (-), underscores (_) and period (.), may be used in the BuffaloNAS.com name. 3 - 20 alphanumeric characters, spaces, hyphens (-), underscores (_) and period (.), may be used in the BuffaloNAS.com key.Note:The registered name is deleted from the server if the AirStation is disconnected from power, even for a moment.WebAccess Displays the status of WebAccess.External Port Status Displays the status of the external port.BuffaloNAS.com Displays the status of BuffaloNAS.com.](https://usermanual.wiki/BUFFALO/000000009.User-manual/User-Guide-1966638-Page-51.png)
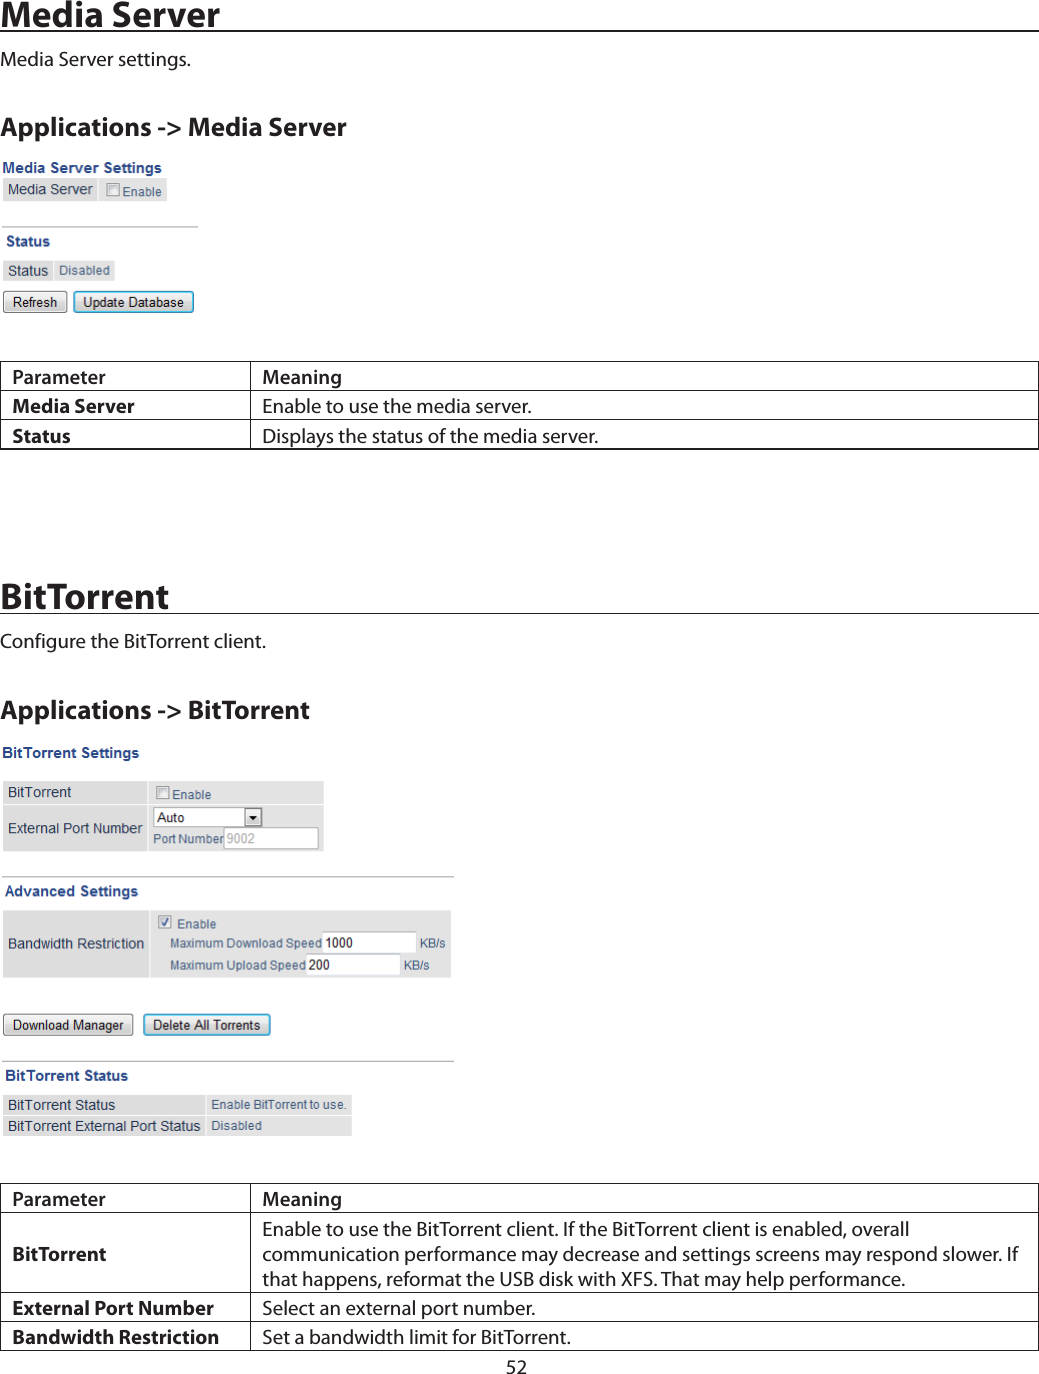
![53Parameter MeaningDownload Manager Displays the BitTorrent download manager screen. Add a torrent, then click [Add] to download the file(s).Delete All Torrents Deletes all files, including the torrent files and files which are currently downloading. Downloaded files are not deleted.BitTorrent Status Displays the status of the BitTorrent client.BitTorrent External Port Status Display the external port status of the BitTorrent client.You can download the latest Windows BitTorrent client from www.bittorrent.com.QoSConfigure priority control QoS settings and check the status.Applications -> QoS (Router Mode Only)Parameter MeaningPriority Control QoS Enable or disable QoS.Optimize for Select a policy for communication.Manual These settings will be used when [Manual] is selected from the [Optimize for] field above.Manual Entry Displays manually registered rule information.Add Click to register new user. You can register up to 20 users.Name Enter the name of the setting.Priority Select a priority for the setting.Protocol Select a target protocol.Remote Settings Specify the WAN-side server setting.Local Settings Specify the LAN-side device.](https://usermanual.wiki/BUFFALO/000000009.User-manual/User-Guide-1966638-Page-53.png)
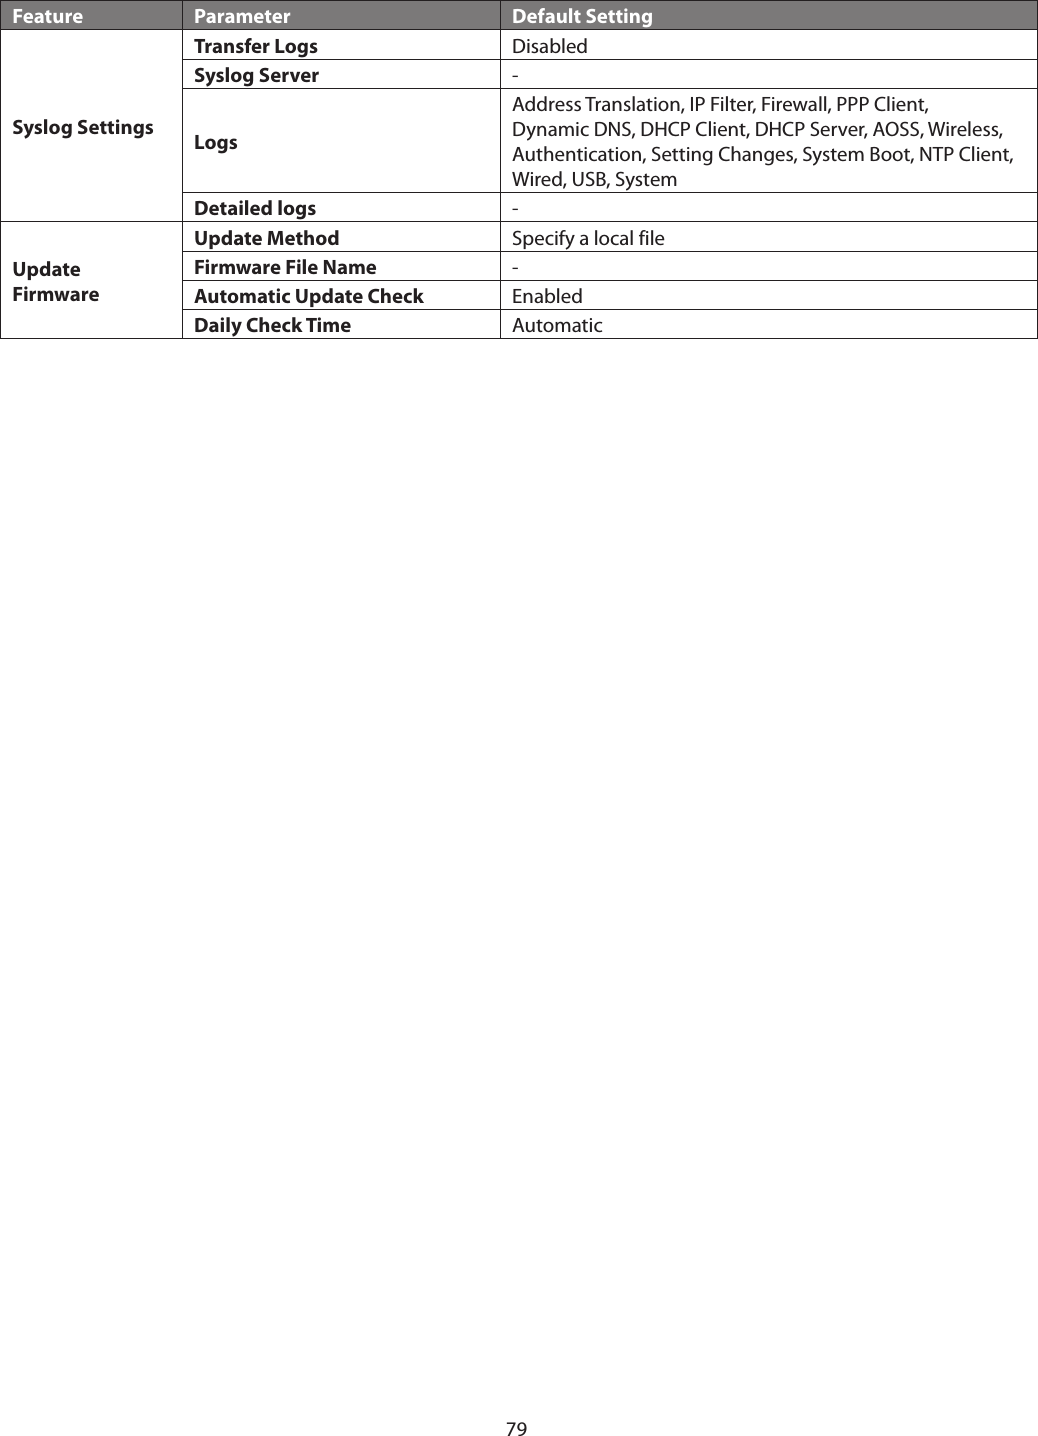
![57Parameter MeaningPermitted IP address Displayed only if Internet-side configuration is enabled. Enter the IP address of a device that is permitted to configure the AirStation remotely from the WAN (Internet) side.Permitted Port Displayed only if Internet-side configuration is enabled. Set a port number (1 - 65535) to configure the AirStation from the WAN (Internet) side.NTP Functionality Enable to use an NTP server.NTP ServerEnter the name of the NTP server as a hostname, hostname with domain name, or IP address. Up to 255 alphanumeric characters, hyphens (-), and underscores (_) may be used. The default is [time.nist.gov].Update Interval How often will the AirStation check the NTP server for the correct time? Intervals of 1 - 24 hours may be set. The default is 24 hours.Local Date You may manually set the date of the AirStation’s internal clock.Local Time You may manually set the time of the AirStation’s internal clock.Time Zone Specify the time zone (offset of greenwich mean time) of the AirStation’s internal clock.DST (Daylight Saving Time)You may configure the AirStation to automatically use DST (daylight saving time). If selected, the AirStation will automatically adjust the time at the beginning and end of DST.Syslog SettingsTransfer the AirStation’s logs to a syslog server.Admin -> Syslog SettingsParameter MeaningTransfer Logs Enable to send logs to a syslog server.Syslog Server Identify the syslog server by hostname, hostname with domain name, or IP address. You may enter up to 255 alphanumeric characters and hyphens (-).Logs Choose which logs will be transferred to the syslog server.Detailed logs Choose which detailed logs will be transferred to the syslog server.](https://usermanual.wiki/BUFFALO/000000009.User-manual/User-Guide-1966638-Page-57.png)
![58Reset / RebootSave and restore this product’s settings, and also initialize and restart this product.Admin -> Reset / RebootParameter MeaningOperationSelect an operation.Save settingsSave this product’s settings to a file. Click [Execute]. You can encrypt the setting file by checking [Use Password] and clicking [Execute].Restore settingsRestore this product’s settings from the setting file. Click [Browse...] and specify a setting file, then click [Execute]. If the setting file is encrypted, check [Use Password] and click [Execute].Initialize AirStationInitialize and restart this product. Click [Execute].Restart Click it to restart this product.](https://usermanual.wiki/BUFFALO/000000009.User-manual/User-Guide-1966638-Page-58.png)
![59UpdateUpdate the AirStation’s firmware.Admin -> UpdateParameter MeaningFirmware Version Displays the current firmware version of the AirStation.Update Method [Specify a local file] updates from a firmware file stored on your computer. [Automatic update] updates to the latest firmware automatically.Firmware File NameClick [Browse...] to navigate to the firmware file on your computer if [Specify a local file] is selected. You don’t need to specify the firmware location if you’re using [Automatic update]. Click [Update Firmware] to update the firmware.Automatic Update Check If enabled, you’ll be notified in Settings when a new firmware is available.Daily Check Time This sets the interval for checking whether a new firmware version has been released.](https://usermanual.wiki/BUFFALO/000000009.User-manual/User-Guide-1966638-Page-59.png)
![62PacketsView packet transfer information.Status -> PacketsParameter MeaningSent Displays the number of packets sent to the WAN, the LAN, and the wireless LAN.Received Displays the number of packets received from the WAN, the LAN, and the wireless LAN.PingA ping test checks whether the AirStation can communicate with a specific network device.Status -> PingParameter MeaningDestination Address Enter the IP address or hostname of the device that you are testing communication with, then click [Execute]. The result will be displayed below.](https://usermanual.wiki/BUFFALO/000000009.User-manual/User-Guide-1966638-Page-62.png)

![66Adding an AirStation to an Existing Wireless Network as a ClientIn a network that already has a wireless access point, the AirStation can serve as a wireless client. It can connect wirelessly to the existing wireless network and other devices can be connected to its Ethernet ports.To configure the AirStation as a wireless client, navigate to [Wireless] > [Wireless Bridge] in Settings.Under “Manual Connection”, click [Configure].Select your access point from the list of detected wireless devices. Select settings for “Wireless Authentication” and “Encryption” to match the AP’s settings, then click [OK]. The AirStation is now connected as a wireless client, and Ethernet devices connected to it can use the AP’s Internet connection.](https://usermanual.wiki/BUFFALO/000000009.User-manual/User-Guide-1966638-Page-66.png)
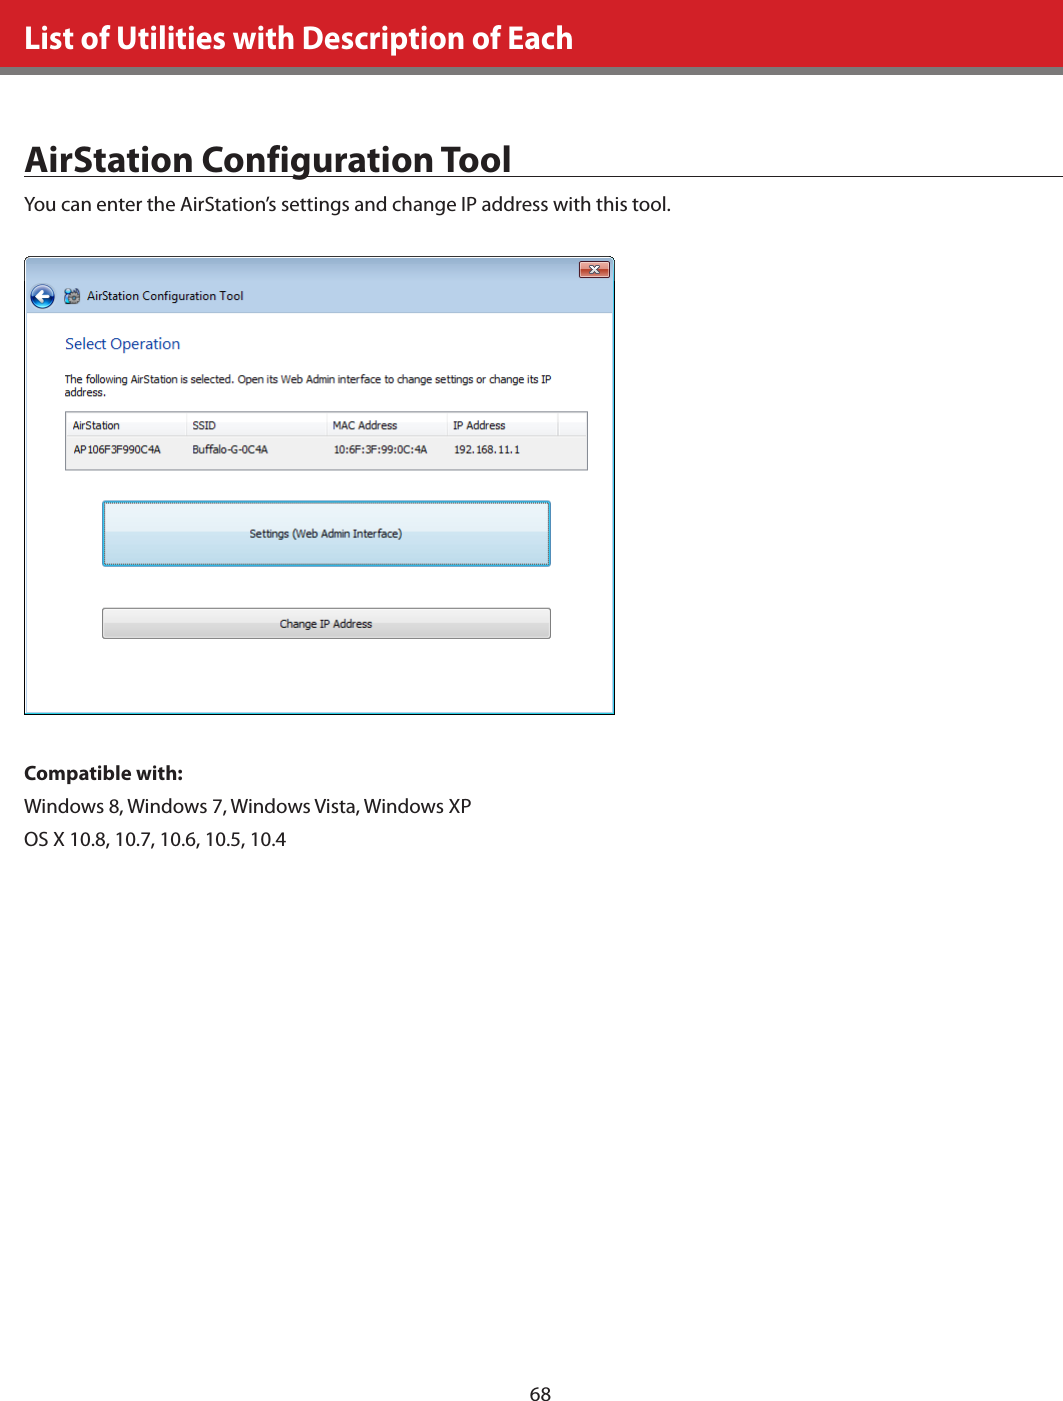

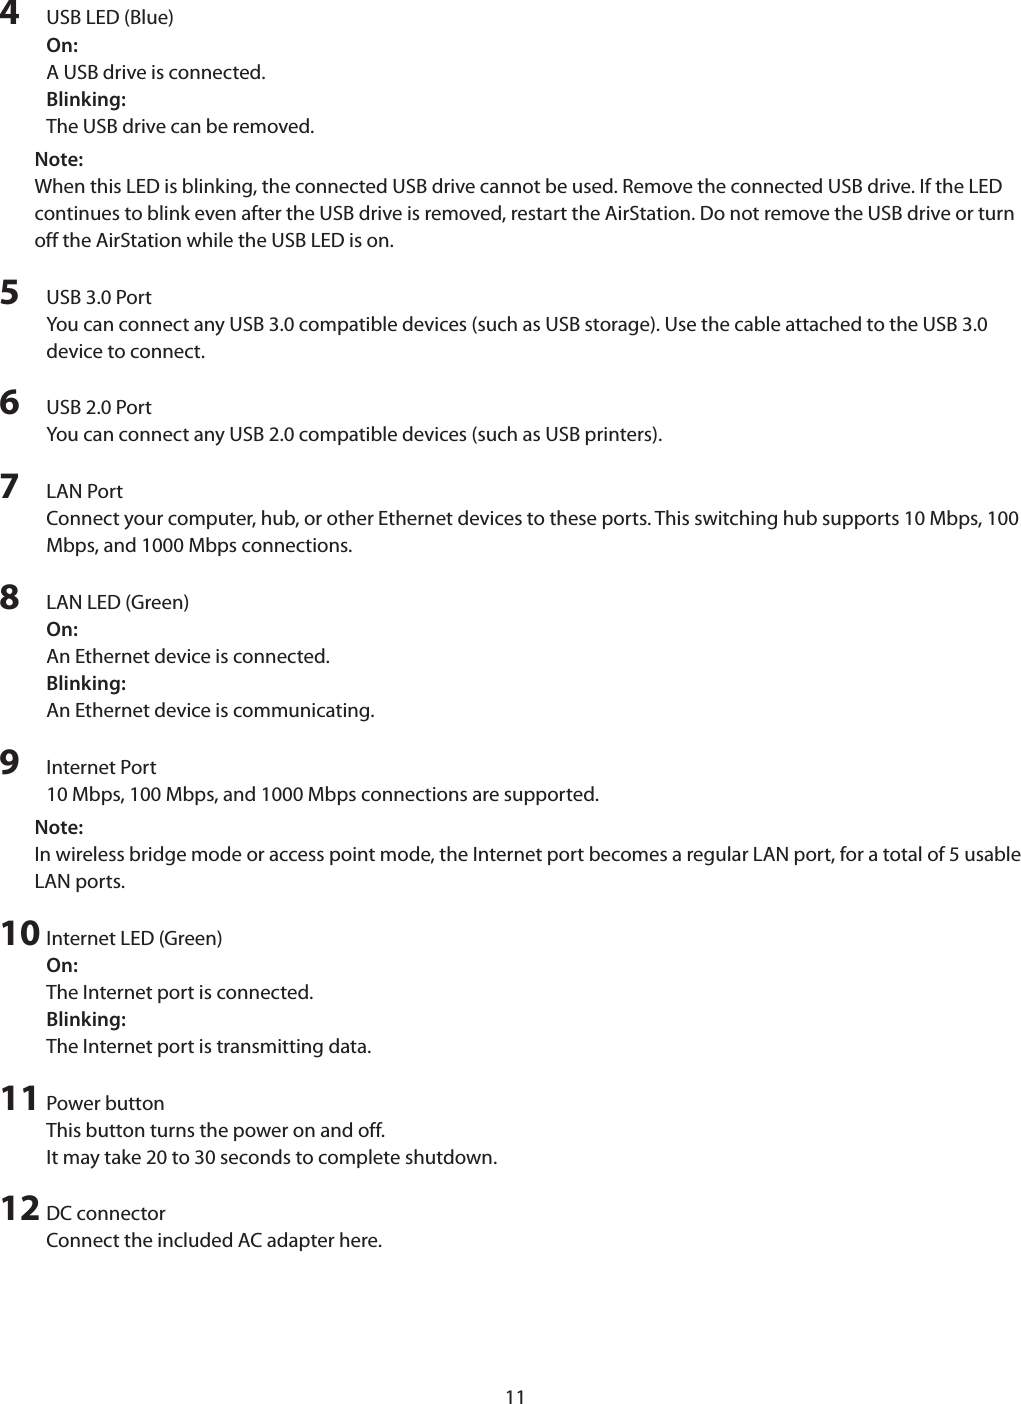
![72Chapter 5 - TroubleshootingFinding Your AirStation on the NetworkBy default, your AirStation is accessible on your local network at the IP address 192.168.11.1 with subnet mask 255.255.255.0. If this address has been changed and you don’t know the new address, you can reset the AirStation to its default settings by holding down the reset button for 3 seconds.You can also find your AirStation on the network with the AirStation Configuration Tool. This software will detect AirStations on your network and give you the IP address and MAC address of each.Eliminating Dead Spots in Wireless Coverage If there are spots in your house with poor wireless coverage, try moving your AirStation. Sometimes even moving it a few feet can eliminate dead spots in the area. Also, in Settings, make sure that the wireless output power of the AirStation is set to 100% for maximum range.If Your Wireless Connection Is Not StableMany household devices such as microwaves and cordless phones can interfere with some channels of the spectrum available for the AirStation. If your wireless connection is unstable, change the wireless channel setting to [auto channel] for both the AirStation and your wireless client device. The AirStation will then choose the clearest channel automatically.Make sure that the 5 GHz band is enabled. The WZR-1750DHP is a dual band router, and either band will work well, but the 5 GHz band will usually have less interference.Basic Router TroubleshootingIf your router is not behaving normally, begin by using the resetting all settings. With the unit connected to power, hold down the reset button for 3 seconds. This will reset all settings to their defaults. The local IP address of the router will now be 192.168.11.1 with a 255.255.255.0 subnet mask.Connect your PC to one of the Ethernet ports on the router. Give the computer a manual (fixed) IP address on the same subnet as the router such as 192.168.11.2. Set the subnet mask to 255.255.255.0.](https://usermanual.wiki/BUFFALO/000000009.User-manual/User-Guide-1966638-Page-72.png)
![73Open a browser (such as Firefox) on your computer and type 192.168.11.1 into the URL window. Click [Go]. The router’s settings page should open.Enter the router’s username and password (“admin” and “password” by default).You should now be able to reconfigure your settings and change your password for the router.Basic Router Troubleshooting from a MacIf your router is not behaving normally, begin by using the resetting all settings. With the unit connected to power, hold down the reset button for 3 seconds. This will reset all settings to their defaults. The local IP address of the router will now be 192.168.11.1 with a 255.255.255.0 subnet mask.Connect your Mac to one of the Ethernet ports on the router. In System Preferences - Network - Ethernet, give the computer a manual (fixed) IP address on the same subnet as the router such as 192.168.11.2. Set the subnet mask to 255.255.255.0.If your Mac doesn’t have an Ethernet port, connect it to the AirStation wirelessly instead. The AirStation’s default SSID and passphrase are printed on the setup card in the bottom of the router. Use this information to connect wirelessly. Then, give the computer a fixed IP address on the same subnet as the router such as 192.168.11.2 and set the subnet mask to 255.255.255.0.Open a browser (such as Safari) on your computer and type 192.168.11.1 into the URL window. Click [Go]. The router’s settings page should open.Enter the router’s username and password (“admin” and “password” by default).You should now be able to reconfigure your settings and change your password for the router.](https://usermanual.wiki/BUFFALO/000000009.User-manual/User-Guide-1966638-Page-73.png)
![82Shared Folders and USB PortsThere are several restrictions on using the AirStation’s USB port:• When using two-byte characters (such as Japanese), keep folder and file names within 80 characters. You may not be able to copy a folder or a file whose name length is more than 80 characters.• You cannot set attributes (hidden or read-only) for folders or files on the AirStation.• When using access restrictions, you can register up to 16 users for the AirStation.• Please note that you are not allowed to use any of the following words as a user or group name: adm, administrator, all, bin, daemon, disk, ftp, guest, halt, hdusers, kmen, lp, mail, man, news, nobody, nogroup, none, operator, root, shadow, shutdown, sshd, sync, sys, ttyusers, utmp, uucp, www.• Please note that you are not allowed to use any of the following words as a shared folder name: global, homes, printers, bittorrent, disk1_pt1, disk1_pt2, disk1_pt3, disk1_pt4, disk2_pt1, disk2_pt2, disk2_pt3, disk2_pt4, disk3_pt1, disk3_pt2, disk3_pt3, disk3_pt4, disk4_pt1, disk4_pt2, disk4_pt3, disk4_pt4. • If a file created on a Mac contains any of the following characters, it will not be displayed correctly under Windows. Also, you cannot copy or properly display a file when connecting via SMB from Mac OS if it contains any of these characters:? [ ] / ¥ = + < > ; : “ , | * • Cancelling or aborting a file copy may leave the file incomplete, and you may no longer be able to delete the incomplete file. This can also happen during a power outage or if the LAN cable is suddenly disconnected. If it happens, restart the AirStation, delete the file, and try copying the file again.• Use the same username and password for the AirStation as the user’s Windows login. If they are different, the user may not be able to access shared folders with access restrictions on the AirStation.• Date and time stamps stored on the USB hard drive may be updated by the OS accessing the AirStation. File creation or access dates may not be maintained.• If you view the size of a hard drives on the browser, it shows a bigger value than when you see it in Windows’ drive properties. This is because the browser shows the size of the drive in gigabytes but Windows shows it in gibibytes.• If you have logged in using a “guest” account from Windows 8, Windows 7, Windows Vista, Windows XP, or Windows 2000, access restrictions may not work properly. A (different) guest account already exists on the AirStation.• If you access a shared folder from a Mac, additional Mac OS information files may be automatically generated. Do not delete these files from a Windows computer. Otherwise, you may no longer be able to access folders from a Mac.• Device types that can be connected to the AirStation’s USB connector are USB hard drives, USB memory sticks, USB printer, or USB card readers. Card readers with 5 or more slots are not supported. USB devices such as a digital cameras, CD/DVD drives, mice, or keyboards are not supported.• Encrypted USB hard drives are not supported.• If your hard drive has an auto power mode switch, move the switch to [manual] or [on]. Leaving the switch set to [auto] may result in unpredictable behavior.• Up to 4 partitions can be recognized on a USB hard drive.• Available file systems for USB hard drives are FAT12, FAT16, FAT32, and XFS.](https://usermanual.wiki/BUFFALO/000000009.User-manual/User-Guide-1966638-Page-82.png)

![85Sharing a PrinterA USB printer attached to the AirStation can be made available to the network for wireless printing. You will need to download and install the Network-USB Navigator application from the Buffalo website.Before proceeding, make sure the printer is installed on your PC with the correct printer drivers/software. If the PC does not have the required drivers, even if Network-USB Navigator detects the printer you will not be able to print to the device.Enabling Network USB on the AirStation1 Open the AirStation’s settings and click [Advanced Settings].2 Navigate to [Applications] > [Network USB].3 Enable [Network USB]. If the printer has multiple functions (e.g. scanning), enable multi-function as well.Installing and Using Network-USB Navigator1 Download the Network-USB Navigator software from the Buffalo website.2 Open the application and install it on your PC, following the directions on the screen.3 Connect the USB printer to the AirStation. Make sure the printer is powered on.4 Open Network-USB Navigator. The printer should appear as a network device.5 Select the printer and click [Connect].The printer should now be connected and available for wireless printing.](https://usermanual.wiki/BUFFALO/000000009.User-manual/User-Guide-1966638-Page-85.png)
![86Configuring Parental ControlsYou can apply website content filters and control access to computers on your network. You can access parental control settings by the clicking [Advanced Settings], then navigating to [Security] > [Web Filtering and Parental Controls]. You must first accept the Symantec terms of use before you can use Parental Controls.Content FilterYou can enable the content filter to block objectionable websites. You can select a filter level to set what kind of sites are blocked by the AirStation.To configure the content filter:1 On the parental control page, click [Enable] next to “Web Filtering and Parental Controls”.2 Select the filter level.3 Click [Apply].Websites Excluded from FilterExcluded websites can be accessed regardless of the content filter in place. You can register up to 20 excluded sites. To add a website:1 On the Parental Controls page, click [Add] under “Websites Excluded from Filter” to open “Exclude Websites” page.2 Enter a website URL (e.g. www.google.com).3 Click [Add].You will be returned to the Parental Controls page and the site will be displayed under “Websites Excluded from Filter”. You can click [Edit] to make any changes, or [Delete] to remove the entry.](https://usermanual.wiki/BUFFALO/000000009.User-manual/User-Guide-1966638-Page-86.png)
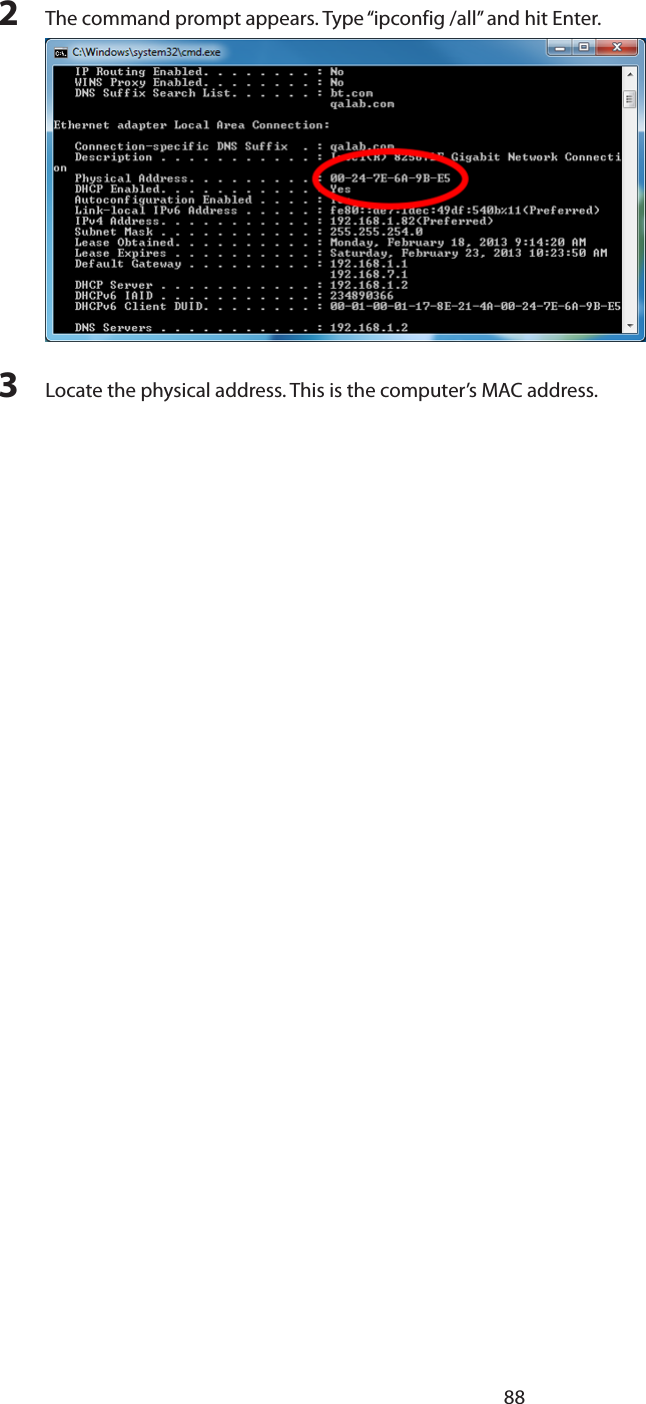
![87Computers Excluded from FilterExcluded computers can access any website without being affected by the content filter. You can register up to 20 excluded computers. To add a computer:1 On “Parental Controls” page, click [Add] under “Computers Excluded from Filter” to open “Exclude Computers” page.2 Enter a computer’s MAC address. If you need help locating a computer’s MAC address, consult the computer’s manual.3 Click [Add].You will be returned to the Parental Controls page and the computer will be displayed under “Computers Excluded from Filter”. You can click [Edit] to make any changes, or [Delete] to remove the entry.Finding a Computer’s MAC AddressUse the following steps to locate a computer’s MAC address.1 On your PC desktop, click Start and type “cmd” into the search bar.](https://usermanual.wiki/BUFFALO/000000009.User-manual/User-Guide-1966638-Page-87.png)
![89Access ControlAccess control lets you set up a schedule that dictates when a target computer on the network can (or cannot) access the Internet. You can have up to 20 network computers under access control.1 On the parental control page, click [Add] to open “Access Control” page.2 Under “Target Computer”, enter the computer’s MAC address.3 For the added computer, select [Internet Access] or [No Internet Access].4 Set the “Start Time”, “End Time”, and “Day”(s) for the computer’s “Permitted Access Time”. “0” refers to midnight. For example, if you set Computer A to have “Internet Access” from 7:00-10:00 on Thursday and Saturday, then Computer A can only access the Internet during those times and would not be able to get online during other times.5 Click [Edit Permitted Access Time] to save the change.6 You can make additional changes to the schedule if needed by repeating steps 3-5.](https://usermanual.wiki/BUFFALO/000000009.User-manual/User-Guide-1966638-Page-89.png)
![907 Click [Add].You will be returned to the Parental Controls page and the computer will be displayed under the “Access Control List”. You can click [Edit] to modify the permitted access time or other settings, or [Delete] to remove the entry.Port Forwarding BasicsPort forwarding is a way of configuring the AirStation so that incoming data is automatically directed to specific IP addresses on the network based on the data type.Common UsesPort forwarding allows computers outside your network to access computers on your LAN.Some applications require port forwarding. For example, if you set up a game server, people outside the network will need to join your server to play the game with you. But the AirStation will automatically block all outside attempts to connect to your LAN. By setting a port number (the port receiving all the connection requests) and the IP address of your game server, the AirStation can then automatically direct the connection requests to the game server, allowing others to join and play.You will need to know specific ports and corresponding protocols to successfully configure port forwarding. Most network applications and services will have the required ports and protocols in their user documentation.SecurityThe risk of having a port “open” to the Internet depends entirely on the application using the open port. If no application is currently connected to the port, all communications to the port will be ignored. Enabling a firewall or other security application will help reduce security risk.UPnPFor the most part, manually configuring port forwarding rules is unnecessary with the advent of UPnP (universal plug and play). UPnP is a protocol that allows a connecting application or device to automatically request and configure a port for you.Many applications require that UPnP be enabled both in the application’s configuration and on the router. You can enable UPnP on this AirStation by opening “Advanced Settings”, then navigating to [Security] > [UPnP].](https://usermanual.wiki/BUFFALO/000000009.User-manual/User-Guide-1966638-Page-90.png)
![91Setting Up Port Forwarding RulesIf UPnP is enabled, most programs will configure this for you automatically. Otherwise, you can manually set rules for port forwarding. You can access port forwarding options by opening “Advanced Settings” and then navigating to [Security] > [Port Forwarding].Creating Port Forwarding RulesThe AirStation can register up to 32 rules. Rules can be managed using the group feature. Once a group has been created, you can add additional port forwarding rules to that group. You can also turn the group of rules on or off as needed, or select a group of port forwarding rules to be disabled.1 Create a new group name or add to an existing group.2 Specify the WAN-side IP address the AirStation will forward ports from. Using the AirStation’s Internet IP address is highly recommended, but you can manually enter an IP address.3 Select a protocol and its corresponding port from the dropdown menu. For example, selecting HTTP will automatically select TCP port 80. If you select any other protocol, you must select a valid port (from 1-65535) as well. The default is TCP/UDP, along with a list of common protocols. If selected, the protocols will use a corresponding port. You can also select “Manual” to manually enter a protocol and its corresponding port.4 Enter the LAN–side IP address of the network computer to receive the forwarded data.5 Enter the LAN-side port. This port will almost always be the same as the port set under “Protocol”. If the port is different, this port will be used to route traffic on the LAN rather than the WAN port. As before, you can select a port from 1-65535.Once the rule has been added, it will be displayed under the “Forwarded Ports” section.](https://usermanual.wiki/BUFFALO/000000009.User-manual/User-Guide-1966638-Page-91.png)
![92Managing Port Forwarding RulesIndividual rules cannot be turned off. Only a rule group can be shut off. You can click [Edit] to make any changes to individual rules, or [Delete] to remove the rule entry.Configuring a USB Drive as a NASYou can use a USB drive as a network-attached storage (NAS) device by plugging it into the AirStation. The files on the device can then be accessed from anywhere on the network.Note: Not all USB drives are compatible with the AirStation.Setting Up the NASMake sure the USB drive is powered on.1 Connect the USB drive to the AirStation.2 On a computer, open Settings and enter “Advanced Settings”.3 Navigate to [Applications] > [Disk Management].4 Enable “Automatic USB Disk Assignment”.](https://usermanual.wiki/BUFFALO/000000009.User-manual/User-Guide-1966638-Page-92.png)
![93Formatting the Drive1 On the disk management page, click “Partition1”.2 AirStation does not support ext3 or NTFS format drives. If the USB drive is in one of those formats, click [Format] to open “Format Disk” page.3 Select a format type and click [Execute format] to format the drive. Formatting will erase all data on the drive, so back up any important data beforehand.User AccessSet user access restrictions for the drive.1 On the disk management page, click “Partition1”.](https://usermanual.wiki/BUFFALO/000000009.User-manual/User-Guide-1966638-Page-93.png)
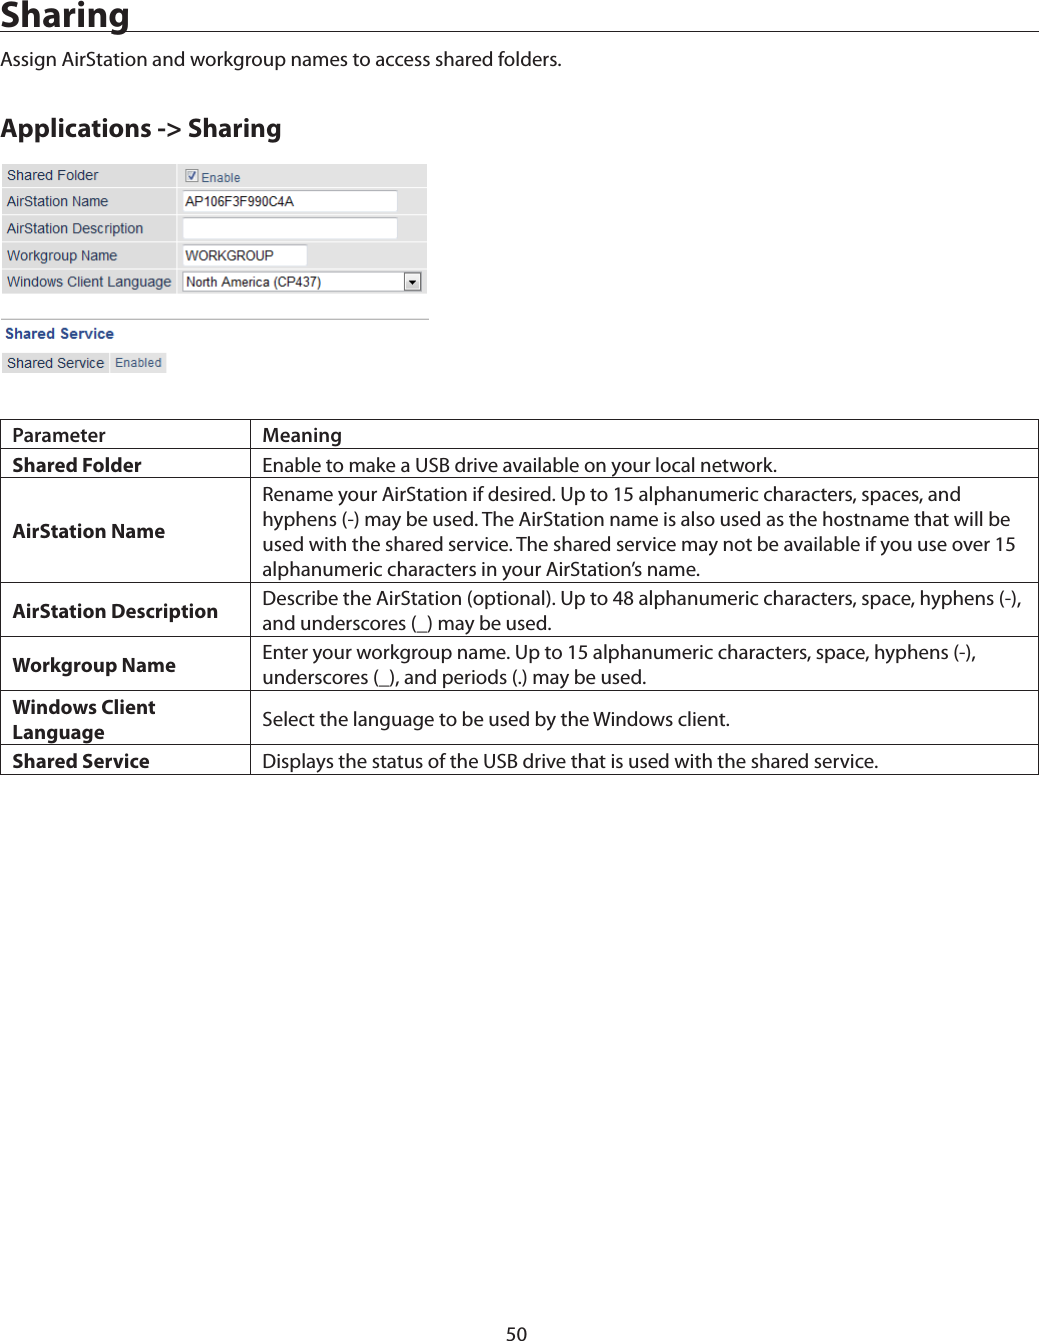
![942 Click [Setting Changes].3 Select the type of access to be given to users and click [Save].To create new users, click [Add] from the disk management page.Enable SharingEnable sharing so the drive is accessible by other users on the network.1 Navigate to [Applications] > [Sharing].2 Enable “Shared Folder” for the NAS. 3 Set the Workgroup name and click [Apply].](https://usermanual.wiki/BUFFALO/000000009.User-manual/User-Guide-1966638-Page-94.png)
![95 Adding a Second AirStation as a Wireless Client If you have an existing wireless network, you can add the AirStation as a wireless client. It will be able to wirelessly connect to the access point. Other devices can then connect to the AirStation’s Ethernet ports to use the access point’s Internet connection. Setting up the AirStation 1 Set the mode switch on the back of the AirStation to “WB”. 2 Connect the AirStation to a computer on the network with an Ethernet cable and power on the AirStation. 3 Open a web browser and enter the AirStation’s IP address. 4 Enter the administrator password and log in. 5 Go to “Advanced Settings” and navigate to [Wireless] > [Wireless Bridge].](https://usermanual.wiki/BUFFALO/000000009.User-manual/User-Guide-1966638-Page-95.png)
![966 Click [Manual Settings] to open the manual configuration page.7 Select the access point from the available list of detected wireless devices. If nothing is displayed, click [Search Again] to refresh the list.8 Set the wireless authentication and encryption to match that of the access point.9 Click [OK].The AirStation should now be connected as a wireless client. You can disconnect the Ethernet cable and move the AirStation to another location that is within range of the access point. Other devices can now be connected to use the access point’s Internet.](https://usermanual.wiki/BUFFALO/000000009.User-manual/User-Guide-1966638-Page-96.png)
![97Saving and Restoring SettingsOnce you have finished configuring your AirStation to your needs, you can save the current configuration to a backup file. This file can be used to restore the AirStation’s settings when needed. For example, the AirStation will initialize its settings after a hard reset. Instead of re-configuring the unit, simply use the backup file to restore its previous settings.The backup file is not automatically updated when you make further AirStation configuration changes.Save Settings to a Backup FileYou can access save settings by clicking “Advanced Settings”, then navigating to [Admin] > [Reset/Reboot]. 1 On the save/restore settings page, check “Save settings”.2 Check “Use Password” if you want to encrypt the backup file with a password. If you do, the system will ask for the password when restoring settings with the backup file. The password may include up to 8 single-byte alphanumeric characters and underscores (_).3 Click [Execute]. The Save As dialog appears.](https://usermanual.wiki/BUFFALO/000000009.User-manual/User-Guide-1966638-Page-97.png)
![984 Click [OK].Once the file has been saved to your system, do not rename the backup file. If needed, you can put the file into another folder.Restoring Settings with a Backup FileRestore settings can be found on the same tab.1 On the save/restore settings page, check “Restore settings”.2 The Browse field appears. Click [Browse...] to locate the backup file on the system.3 Click [Execute]. The Restore dialog appears.4 Enter the password if prompted. The password will be the one set when the backup file was created.Please wait as the saved settings are restored to the AirStation. When settings are restored, all values (e.g. IP address, wireless encryption key, login, etc.) are changed to the ones saved in the backup file.Note:The AirStation will not be able to restore settings if:• The backup file was created with a different version of the AirStation firmware.• The backup file was created by a different product.Replacing the AirStationIf an AirStation is no longer functional, you can replace it with another unit of the same model and use a saved backup file to automatically populate settings on the new unit. The firmware on the new unit must be the same version as the old unit when the backup file was created. If need be, downgrade the current firmware version to the previous one before using the backup file.](https://usermanual.wiki/BUFFALO/000000009.User-manual/User-Guide-1966638-Page-98.png)
![99Setting Up WebAccessWebAccess is a cloud service provided by Buffalo that allows you to access your NAS remotely over the Internet. You can share content with everyone or with specified users. You can set up WebAccess through the settings page of your NAS, or enable the service on your AirStation.If you have a BuffaloNAS.com account, you can use its login to use WebAccess. You can also use your DDNS hostname or an external IP address along with the port used for WebAccess.WebAccess Settings1 Make sure the NAS is connected and available, and that the AirStation is powered on and connected.2 Open “Advanced Settings” and navigate to [Security] > [UPnP].3 Enable “UPnP” and click [Apply].4 Navigate to [Applications] > [Disk Management].5 Click [Setting Changes].6 Check “Access Restrictions” and click [Save].7 If you need to create a new user for WebAccess, create one on the disk management page, under “Current Users”.8 Click [Applications] > [WebAccess].9 Check “Enable” for WebAccess.10 Leave the WebAccess External Port option as “Auto” so that UPnP will automatically configure a port for you.](https://usermanual.wiki/BUFFALO/000000009.User-manual/User-Guide-1966638-Page-99.png)
![10011 Select the DNS Service hostname used to access the service. If you have a BuffaloNAS.com account, select “Use BuffaloNAS.com Registration” and enter your BuffaloNAS.com username and password. You can also use an existing hostname, such as your dynamic DNS hostname.12 Click [Apply] at the bottom of the page.Connecting Wireless Devices Using AOSSYou can use the physical AOSS button on your AirStation to easily connect wireless devices that support AOSS or WPS. Consult your wireless device’s documentation for the location of its AOSS or WPS button.If you already have a wireless network that was configured without using AOSS or WPS, connecting a new device with AOSS will change its settings, disconnecting any previously connected wireless devices.Push Button ConfigurationEasily connect other wireless devices using the physical AOSS button.1 Power on the AirStation.2 Hold the physical AOSS button down for two seconds, then release it.3 For the next 2 minutes, the AOSS LED will flash and the AirStation will automatically search for a nearby AOSS/WPS device. The AirStation will automatically return to normal if a device isn’t found after 2 minutes.4 Push the AOSS/WPS button on the wireless device. It should be automatically connected within 2 minutes.You can repeat this for all AOSS/WPS devices you are attempt to connect with. If setup doesn’t work, open Settings and ensure that the AOSS physical button is enabled.Setting Up a VPN ServerYou can configure a PPTP (VPN) server with either a dynamic DNS hostname or a static IP address. Currently the AirStation supports both DynDNS and TZO. If you have a DynDNS or TZO account, you can enter the login and hostname information under [Advanced Settings] > [Internet] > [Dynamic DNS].PPTP Settings on the AirStationYour computer should be directly connected to the AirStation.1 Open Settings.](https://usermanual.wiki/BUFFALO/000000009.User-manual/User-Guide-1966638-Page-100.png)
![1012 Click [Advanced Settings] and navigate to [Internet] > [PPTP].3 Check “Enable PPTP Server”.4 Select the VPN authentication type. If you are unsure which one to use, leave it on the default selection.5 You can leave the Server IP Address on “Auto”. If you are using a static IP address, click [Manual] and enter it into the field.6 You can leave the client IP address on “Auto”. If client computers are within a specific IP address range, click [Manual] and enter the range into the field.7 If you have a WINS server on the network, you can enter its IP address into the field.8 Leave the MTU value on its default setting.Editing UsersYou can create and edit users that will access your PPTP server.1 Click [Edit PPTP User List] to open the edit users page.2 Enter a username and password for a new user.3 Select a method of acquiring IP address.](https://usermanual.wiki/BUFFALO/000000009.User-manual/User-Guide-1966638-Page-101.png)
![1024 Click [Add].The user will appear under the “PPTP User List” section. You can click [Edit] to modify the user or click [Delete] to remove the entry.Using AirStations with 2Wire Residential GatewaysAT&T Internet services (U-verse or ADSL) will often assign a 2Wire residential gateway device that serves as both the modem and the router. To add an AirStation to this network, it is best to add the unit as a client device. This way the AirStation will not conflict with the existing residential gateway settings such as the firewall or port forwarding.For detailed instructions on how to connect the AirStation to the network as a client, refer to the “Connecting AirStation as Client” section.If you would like to set the 2Wire access point as the client device, or you need more information on its settings, contact AT&T technical support.How to Use QoSQoS (quality of service) is a feature that allows the AirStation to prioritize traffic by type. QoS applies to both upstream and downstream data flow, and ensures consistent performance when using certain high-traffic applications, such as video streaming.The higher the priority, the higher the allocated bandwidth will be. For example, if “Video” is selected, streaming video will be given the highest bandwidth priority.Setting a QoS Priority PolicyWhen setting a custom policy, select the type of traffic to be given the highest priority and lower the priority of other traffic types accordingly.1 Open Settings and click [Advanced Settings].2 Navigate to [Applications] > [QoS].3 Enable “Priority Control QoS”.](https://usermanual.wiki/BUFFALO/000000009.User-manual/User-Guide-1966638-Page-102.png)
![1034 Choose an “Optimize for” selection.Video: Prioritizes streaming video traffic.Voice: Prioritizes voice chats and VoIP traffic.Gaming: Prioritizes online gaming traffic.Manual: Select this option to customize QoS priority for a selected operation.5 To set a manual policy, select the operation to be prioritized and lower the priority for others. For example, if you set “Video” as “Ultra Premium - High Bandwidth”, the bandwidth priority of other operations should be lowered accordingly.6 Click [Apply].Manual EntryClick [Manual Entry] to open the manual entry page, where you can create custom QoS priority settings for individual applications.1 Enter a name for the new manual entry.2 Select a value from the dropdown menu to define the priority level for incoming packets.3 Select a protocol for the application’s incoming packets. For example, most VoIP and multimedia applications use UDP, while the Internet and emails use TCP.](https://usermanual.wiki/BUFFALO/000000009.User-manual/User-Guide-1966638-Page-103.png)
![1044 Set the WAN-side server and port number under “Remote Settings”.5 If you need to use a specific port, most network applications and services will have their required protocols and ports listed in their documentation.6 Enter the IP address or MAC address of the network device for QoS priority.7 Click [Add].Once an entry has been saved, you can click [Edit] to change it or [Delete] to remove the entry. Click [Delete All] to remove all saved entries.How to configure TCP/IPWindows 8To configure TCP/IP in Windows 8, follow the procedure below.1 Open Control Panel.2 Click [Network and Internet].3 Click [Network and Sharing Center].4 Click [Change Adapter Settings] on the left side menu.5 Right-click the network adapter, then click [Properties].6 If the User Account Control screen opens, click [Yes] or [Continue].7 Select [Internet Protocol Version 4 (TCP/IPv4)] then click [Properties].8 To have DHCP set your IP address settings automatically, check “Obtain an IP address automatically” and “Obtain DNS server address automatically”.Alternately, you can configure the settings manually. Example:If the router’s IP address is 192.168.11.1,IP address: 192.168.11.80Subnet mask: 255.255.255.0Default gateway: 192.168.11.1Preferred DNS server: 192.168.11.1Alternate DNS server: blank9 Click [OK].](https://usermanual.wiki/BUFFALO/000000009.User-manual/User-Guide-1966638-Page-104.png)
![105Windows 7To configure TCP/IP in Windows 7, follow the procedure below.1 Open Control Panel.2 Click [Network and Sharing Center].3 Click [Change Adapter Settings] on the left side menu.4 Right-click the network adapter, then click [Properties].5 If the “User Account Control” screen opens, click [Yes] or [Continue].6 Select “Internet Protocol Version 4 (TCP/IPv4)” then click [Properties].7 To have DHCP set your IP address settings automatically, check “Obtain an IP address automatically” and “Obtain DNS server address automatically”.Alternately, you can configure the settings manually. Example:If the router’s IP address is 192.168.11.1,IP address: 192.168.11.80Subnet mask: 255.255.255.0Default gateway: 192.168.11.1Preferred DNS server: 192.168.11.1Alternate DNS server: blank8 Click [OK].Windows VistaTo configure TCP/IP in Windows Vista, follow the procedure below.1 Open Control Panel.2 Click [Network and Sharing Center].3 Click [Manage network connections] on the left side menu.4 Right-click the network adapter, then click [Properties].5 If the “User Account Control” screen opens, click [Yes] or [Continue].6 Select “Internet Protocol Version 4 (TCP/IPv4)” then click [Properties].](https://usermanual.wiki/BUFFALO/000000009.User-manual/User-Guide-1966638-Page-105.png)
![1067 To have DHCP set your IP address settings automatically, check “Obtain an IP address automatically” and “Obtain DNS server address automatically”.Alternately, you can configure the settings manually. Example:If the router’s IP address is 192.168.11.1,IP address: 192.168.11.80Subnet mask: 255.255.255.0Default gateway: 192.168.11.1Preferred DNS server: 192.168.11.1Alternate DNS server: blank8 Click [OK].Windows XPTo configure TCP/IP in Windows XP, follow the procedure below.1 Open Control Panel.2 Double-click [Network].3 Right-click the network adapter, then click [Properties].4 Select “Internet Protocol (TCP/IP)” then click [Properties].5 To have DHCP set your IP address settings automatically, check “Obtain an IP address automatically” and “Obtain DNS server address automatically”.Alternately, you can configure the settings manually. Example:If the router’s IP address is 192.168.11.1,IP address: 192.168.11.80Subnet mask: 255.255.255.0Default gateway: 192.168.11.1Preferred DNS server: 192.168.11.1Alternate DNS server: blank6 Click [OK].](https://usermanual.wiki/BUFFALO/000000009.User-manual/User-Guide-1966638-Page-106.png)
![107Mac OSTo configure TCP/IP in Mac OS, follow the procedure below.1 Click [Apple menu] > [System Preferences…].2 Click [Network].3 Click the network adapter.4 To have DHCP set your IP address settings automatically, select “Using DHCP” in the “Configure IPv4” field.Alternately, you can configure the settings manually. Example:If the router’s IP address is 192.168.11.1,IP address: 192.168.11.80Subnet mask: 255.255.255.0Default gateway: 192.168.11.1Preferred DNS server: 192.168.11.1Alternate DNS server: blank5 Click [Apply].](https://usermanual.wiki/BUFFALO/000000009.User-manual/User-Guide-1966638-Page-107.png)