BUFFALO 000000017 AirStation User Manual WI U2 433DM WI U2 300D
BUFFALO INC. AirStation WI U2 433DM WI U2 300D
BUFFALO >
Contents
- 1. User Manual.pdf
- 2. User manual (statement) rev
- 3. User Manual (Statement)_rev.pdf
- 4. User Manual_rev.pdf
User Manual_rev.pdf
![5Chapter 2 InstallationInstalling Wireless DriversFollow the instruction below to install drivers. Do not connect the AirStation to your computer yet.1 Boot your computer and insert the AirStation Driver CD.The setup menu will launch automatically. If not, open the CD and click “Launcher.exe”.2 Click [Install Driver].3 Click [Next].](https://usermanual.wiki/BUFFALO/000000017.User-Manual-rev-pdf/User-Guide-2781392-Page-6.png)
![64 Read the license agreement, select [Agree], then click [Next].5 Check “Always trust software from “BUFFALO INC.”, and click [Install].6 When the screen below is displayed, attach the AirStation to your computer.Drivers will be installed automatically.](https://usermanual.wiki/BUFFALO/000000017.User-Manual-rev-pdf/User-Guide-2781392-Page-7.png)
![77 After the drivers are installed, the screen below will be displayed. Click [Finish].Drivers are now installed.](https://usermanual.wiki/BUFFALO/000000017.User-Manual-rev-pdf/User-Guide-2781392-Page-8.png)
![8Chapter 3 Connect to a Wireless NetworkWindows 8 (WLAN AutoConfig)With Windows 8, use WLAN AutoConfig to connect to the AirStation.1 Switch Windows 8 to desktop mode.2 Click on the network icon in the system tray.3 Select the target AirStation’s name and click [Connect]. If you will be connecting to this device again, check [Connect automatically].4 Enter the encryption key and click [Next].](https://usermanual.wiki/BUFFALO/000000017.User-Manual-rev-pdf/User-Guide-2781392-Page-9.png)
![95 Click [No, don’t turn on sharing or connect to devices]. Windows 7 (WLAN AutoConfig)With Windows 7, use WLAN AutoConfig to connect to the AirStation.1 Click on the network icon in the system tray.2 Select the target AirStation’s name and click [Connect]. If you will be connecting to this device again, check [Connect automatically].](https://usermanual.wiki/BUFFALO/000000017.User-Manual-rev-pdf/User-Guide-2781392-Page-10.png)
![103 Enter the encryption key and click [OK].](https://usermanual.wiki/BUFFALO/000000017.User-Manual-rev-pdf/User-Guide-2781392-Page-11.png)
![11Windows Vista (WLAN AutoConfig)You can use WLAN AutoConfig to connect to a wireless access point:1 Right-click on the wireless network icon in the system tray.2 Click [Connect to a network].3 Select your wireless network and click [Connect].If the screen below is displayed, click [I want to enter the network key or passphrase instead]. Go to step 4.](https://usermanual.wiki/BUFFALO/000000017.User-Manual-rev-pdf/User-Guide-2781392-Page-12.png)
![124 Enter the encryption key and click [Connect].Step through the wizard to complete configuration. If the “Set Network Location” screen is displayed, select “Home”, “Work”, or “Public location” depending where you’re using the AirStation.](https://usermanual.wiki/BUFFALO/000000017.User-Manual-rev-pdf/User-Guide-2781392-Page-13.png)
![13Windows XP (Wireless Zero Configuration)Windows XP includes a built-in utility to connect to your wireless Access Point.Note:If Client Manager 3 is installed on your computer, then Wireless Zero Configuration is disabled. Uninstall Client Manager 3 to use Wireless Zero Configuration, or just use Client Manager 3 to connect to the AirStation.1 Right-click on the wireless network icon in the system tray.2 Click [View Available Wireless Networks].3 Select a wireless network, then click [Connect].4 Enter the encryption key (passphrase) twice, then click [Connect].When the connection is complete, the word “Connected” will be displayed to the right of the network’s SSID. Click the “X” in the top right corner of the window to close the utility.](https://usermanual.wiki/BUFFALO/000000017.User-Manual-rev-pdf/User-Guide-2781392-Page-14.png)
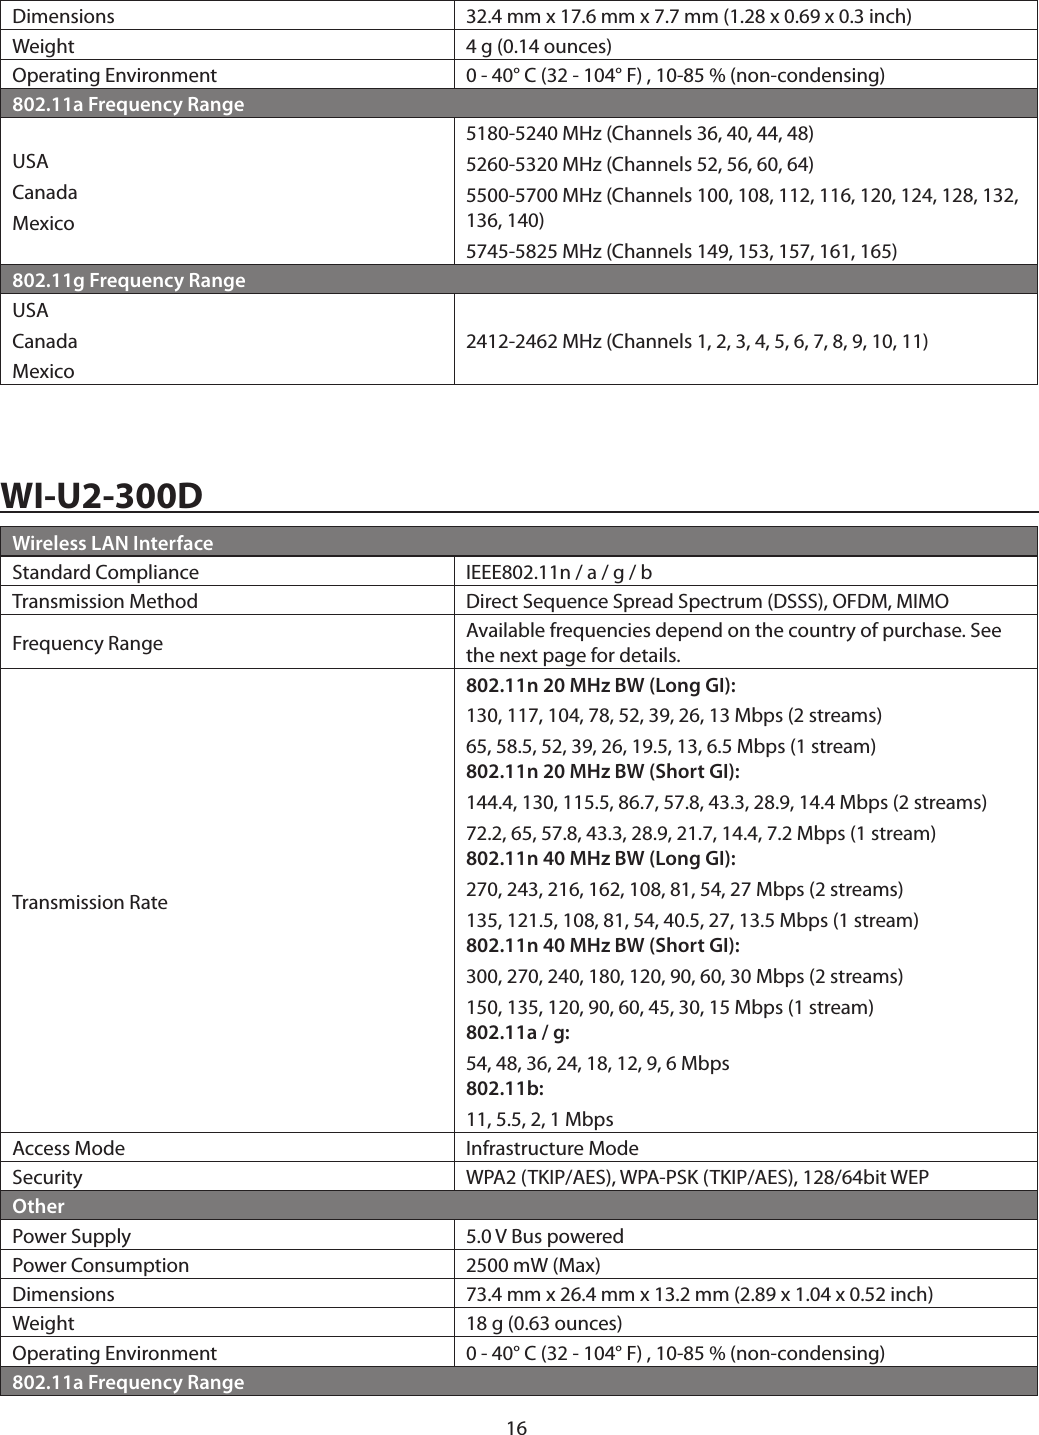
![17USACanadaMexico5180-5240 MHz (Channels 36, 40, 44, 48)5260-5320 MHz (Channels 52, 56, 60, 64)5500-5700 MHz (Channels 100, 108, 112, 116, 120, 124, 128, 132, 136, 140) 5745-5825 MHz (Channels 149, 153, 157, 161, 165)EU5180-5240 MHz (Channels 36, 40, 44, 48)5260-5320 MHz (Channels 52, 56, 60, 64)5500-5700 MHz (Channels 100, 108, 112, 116, 120, 124, 128, 132, 136, 140)802.11g Frequency RangeUSACanadaMexico2412-2462 MHz (Channels 1, 2, 3, 4, 5, 6, 7, 8, 9, 10, 11)EU 2412-2472 MHz (Channels 1, 2, 3, 4, 5, 6, 7, 8, 9, 10, 11, 12, 13)Uninstalling the DriversTo remove the AirStation wireless client drivers, follow the procedure described below.(1) Insert AirStation Driver CD.(2) The setup menu will launch automatically. If not, open the CD and click “Launcher.exe”.(3) Click [Uninstall].(4) Follow the instructions on the screen to remove drivers.](https://usermanual.wiki/BUFFALO/000000017.User-Manual-rev-pdf/User-Guide-2781392-Page-18.png)
![18TCP/IP SettingsWindows 8To configure TCP/IP in Windows 8, follow the procedure below.1 Open [Control Panel].2 Click [Network and Internet].3 Click [Network and Sharing Center].4 Click [Change adapter settings] on the left side menu.5 Right-click on the network adapter, then click [Properties].6 If the User Account Control screen opens, click [Yes] or [Continue].7 Select [Internet Protocol Version 4 (TCP/IPv4)] then click [Properties].8 To have DHCP set your IP address settings automatically, check [Obtain an IP address automatically] and [Obtain DNS server address automatically].Alternately, you can configure the settings manually. Example:If the router’s IP address is 192.168.11.1,IP address 192.168.11.80Subnet mask 255.255.255.0Default gateway 192.168.11.1Preferred DNS server 192.168.11.1Alternate DNS server blank9 Click [OK].](https://usermanual.wiki/BUFFALO/000000017.User-Manual-rev-pdf/User-Guide-2781392-Page-19.png)
![19Windows 7To configure TCP/IP in Windows 7, follow the procedure below.1 Open [Control Panel].2 Click [Network and Sharing Center].3 Click [Change Adapter Settings] on the left side menu.4 Right-click on the network adapter, then click [Properties].5 If the User Account Control screen opens, click [Yes] or [Continue].6 Select [Internet Protocol Version 4 (TCP/IPv4)] then click [Properties].7 To have DHCP set your IP address settings automatically, check [Obtain an IP address automatically] and [Obtain DNS server address automatically].Alternately, you can configure the settings manually. Example:If the router’s IP address is 192.168.11.1,IP address 192.168.11.80Subnet mask 255.255.255.0Default gateway 192.168.11.1Preferred DNS server 192.168.11.1Alternate DNS server blank8 Click [OK].](https://usermanual.wiki/BUFFALO/000000017.User-Manual-rev-pdf/User-Guide-2781392-Page-20.png)
![20Windows VistaTo configure TCP/IP in Windows Vista, follow the procedure below.1 Open [Control Panel].2 Click [Network and Sharing Center].3 Click [Manage network connections] on the left side menu.4 Right-click on the network adapter, then click [Properties].5 If the User Account Control screen opens, click [Yes] or [Continue].6 Select [Internet Protocol Version 4 (TCP/IPv4)] then click [Properties].7 To have DHCP set your IP address settings automatically, check [Obtain an IP address automatically] and [Obtain DNS server address automatically].Alternately, you can configure the settings manually. Example:If the router’s IP address is 192.168.11.1,IP address 192.168.11.80Subnet mask 255.255.255.0Default gateway 192.168.11.1Preferred DNS server 192.168.11.1Alternate DNS server blank8 Click [Close].](https://usermanual.wiki/BUFFALO/000000017.User-Manual-rev-pdf/User-Guide-2781392-Page-21.png)
![21Windows XPTo configure TCP/IP in Windows XP, follow the procedure below.1 Open [Control Panel].2 Double-click [Network].3 Right-click on the network adapter, then click [Properties].4 Select [Internet Protocol (TCP/IP)] then click [Properties].5 To have DHCP set your IP address settings automatically, check [Obtain an IP address automatically] and [Obtain DNS server address automatically].Alternately, you can configure the settings manually. Example:If the router’s IP address is 192.168.11.1,IP address 192.168.11.80Subnet mask 255.255.255.0Default gateway 192.168.11.1Preferred DNS server 192.168.11.1Alternate DNS server blank6 Click [Close].](https://usermanual.wiki/BUFFALO/000000017.User-Manual-rev-pdf/User-Guide-2781392-Page-22.png)