User manual

AirStation
WMR-433 User Manual
www.buffalotech.com
35020438-01
2014-04

2
Contents
Chapter 1 - Product Overview ..........................................4
Package Contents .................................................................................4
Diagrams and Layout ...........................................................................4
Chapter 2 - Installation ......................................................6
Initial Setup ..........................................................................................6
Chapter 3 - Configuration .................................................7
Accessing Settings ...............................................................................7
Setup Wizard ........................................................................................8
Update Firmware ..................................................................................9
Status ....................................................................................................9
Change AirStation’s Settings .............................................................10
Notice for 2.4 GHz Bandwidth ...........................................................13
Chapter 4 - Troubleshooting ...........................................14
Cannot Access Settings ......................................................................14
Cannot Connect to the Network Wirelessly .....................................14
Cannot Connect to the Network with 5 GHz ....................................14
Forgot AirStation’s SSID, Encryption Key, or Password ...................15
How to Configure TCP/IP ...................................................................15

3
Windows 8.1/Windows 8 ..............................................................................15
Windows 7 .....................................................................................................16
Windows Vista ...............................................................................................17
Windows XP ...................................................................................................18
Mac OS ...........................................................................................................18
Other Tips ...........................................................................................19
Appendix A - Supplemental Information ......................20
Default Configuration Settings .........................................................20
Technical Specifications ....................................................................20
Environmental Information ..............................................................22
GPL Information .................................................................................22
Appendix B - Regulatory Compliance Information .......23
Company Information .......................................................................23
FCC Statement ....................................................................................23
IC statement (IC déclaration) .............................................................24
4
Chapter 1 - Product Overview
Package Contents
The following items are included in your AirStation package. If any of the items are missing, please contact your vender.
AirStation.................................................1
USB cable.................................................1
Setup card................................................1
Quick setup guide................................1
Warranty statement.............................1
Diagrams and Layout
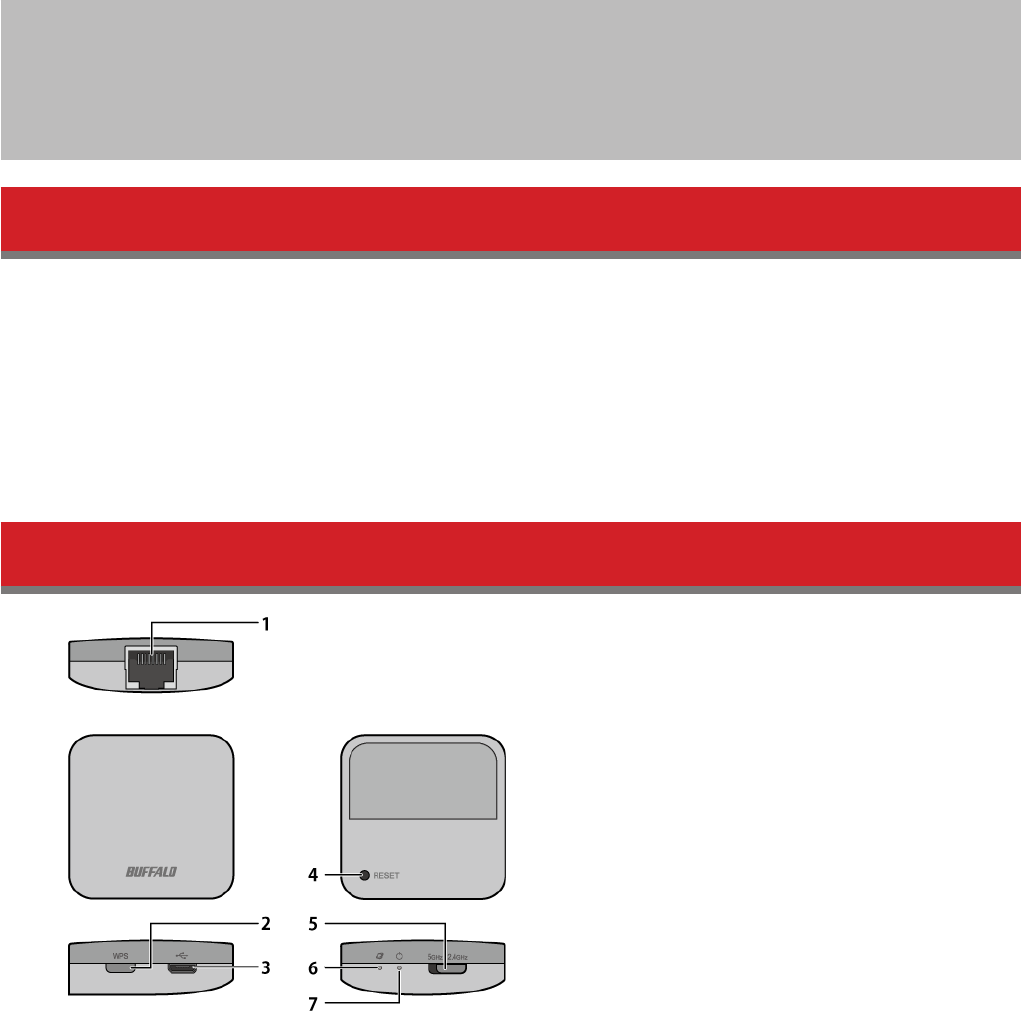
1 Internet Port
10 Mbps and 100 Mbps connections are supported. Do not connect Ethernet cable from here to your PC.
2 WPS Button
To initiate WPS, hold down this button until The power LED flashes red (about 3 seconds). Then, push or click the
WPS button on your wireless client device to complete the connection. Both devices must be powered on for this
to work.
3 USB Port
Connect the attached USB cable to AC adapter or PC’s USB port to supply power.
4 Reset Button
5
To restart the AirStation, hold down this button until the power LED glows red (2–5 seconds). To initialize all
AirStation settings to factory defaults, hold down this button until the LED blinks red (about 6 seconds). The power
must be on for this to work.
5 5 GHz/2.4 GHz Selector Switch
5 GHz:
Enables 5 GHz bandwidth (802.11ac/n/a).
2.4 GHz:
Enables 2.4 GHz bandwidth (802.11n/g/b).
6 Link/Active LED (Green)
On:
Internet side is linked.
Blinking:
Transmitting data on the Internet side.
Off:
Internet side is not linked.
7 Power LED (Green or Red)
On (Green):
Power is on.
Blinking (Green):
Transmitting data on the LAN side.
Blinking (Red):
AirStation is waiting for a WPS security key or initializing.
Note: Do not disconnect the USB cable while the power LED is blinking red or the AirStation is updating firmware.
6
Chapter 2 - Installation
Initial Setup
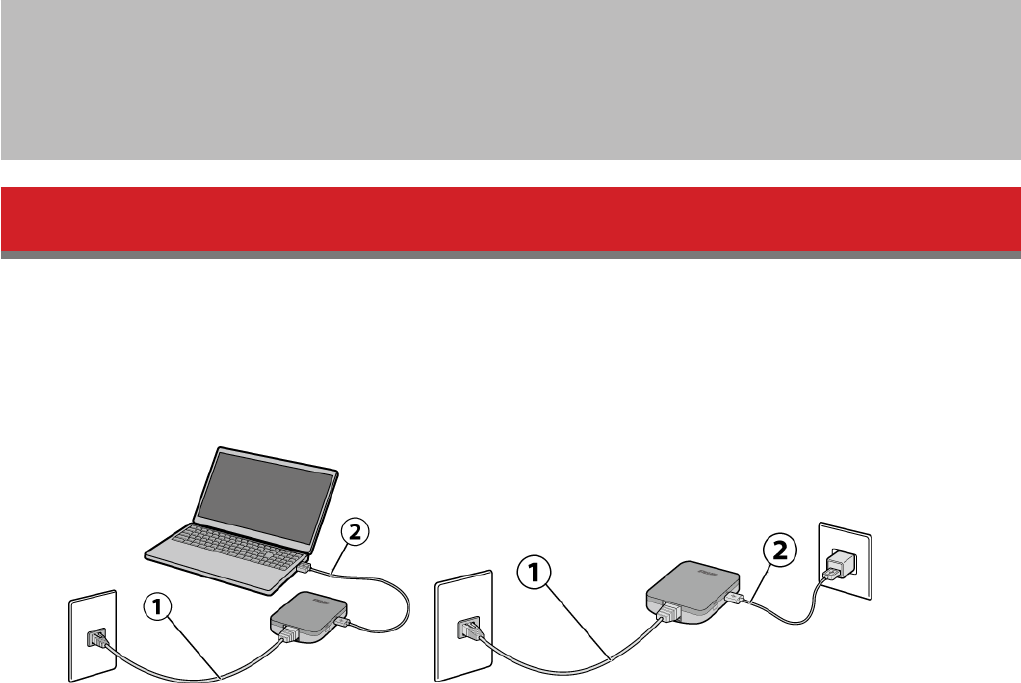
To configure your AirStation, follow the procedure below.
1 Connect the AirStation to a LAN port with an Ethernet cable.
2 Turn on the power. Power for the AirStation can come from a USB port on your PC or from an outlet with a USB
power adapter.
3 Connect your PC or mobile device to the AirStation wirelessly to use the Internet.
4 Open a web browser.
Note: You may need to register information to connect to the Internet depending on the hotel. For more
information, please contact hotel staff.
7
Chapter 3 - Configuration
Configuration of the AirStation is done from Settings, the web-based configuration GUI.
Accessing Settings
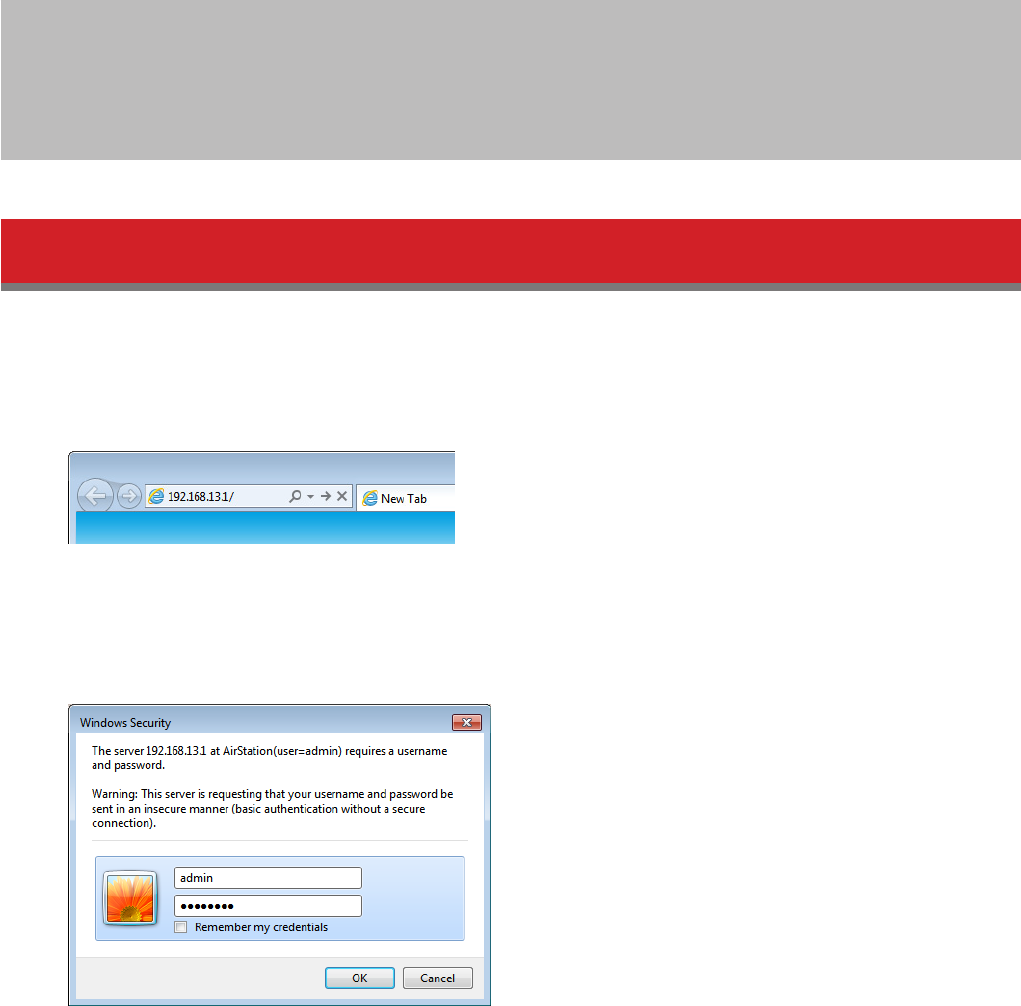
To configure the AirStation’s settings manually, log in to Settings as shown below.
1 Open a browser.
2 Enter the AirStation’s LAN-side IP address in the address field and press the enter key.
Notes:
• The AirStation’s default LAN-side IP address is 192.168.13.1.
• If you changed the IP address of the AirStation, use the new IP address.
3 Enter “admin” for the username and the encryption key for the password, then click OK.
Note: Refer to the product’s label or setup card for the password.
8
4 This is Settings, where most AirStation settings can be configured.
Note: If you cannot access Settings using the procedure above, enter “buffalo.setup“ in the address field and press
the enter key. If you still cannot access Settings, refer to the “Cannot Access Settings“ section in chapter 4.
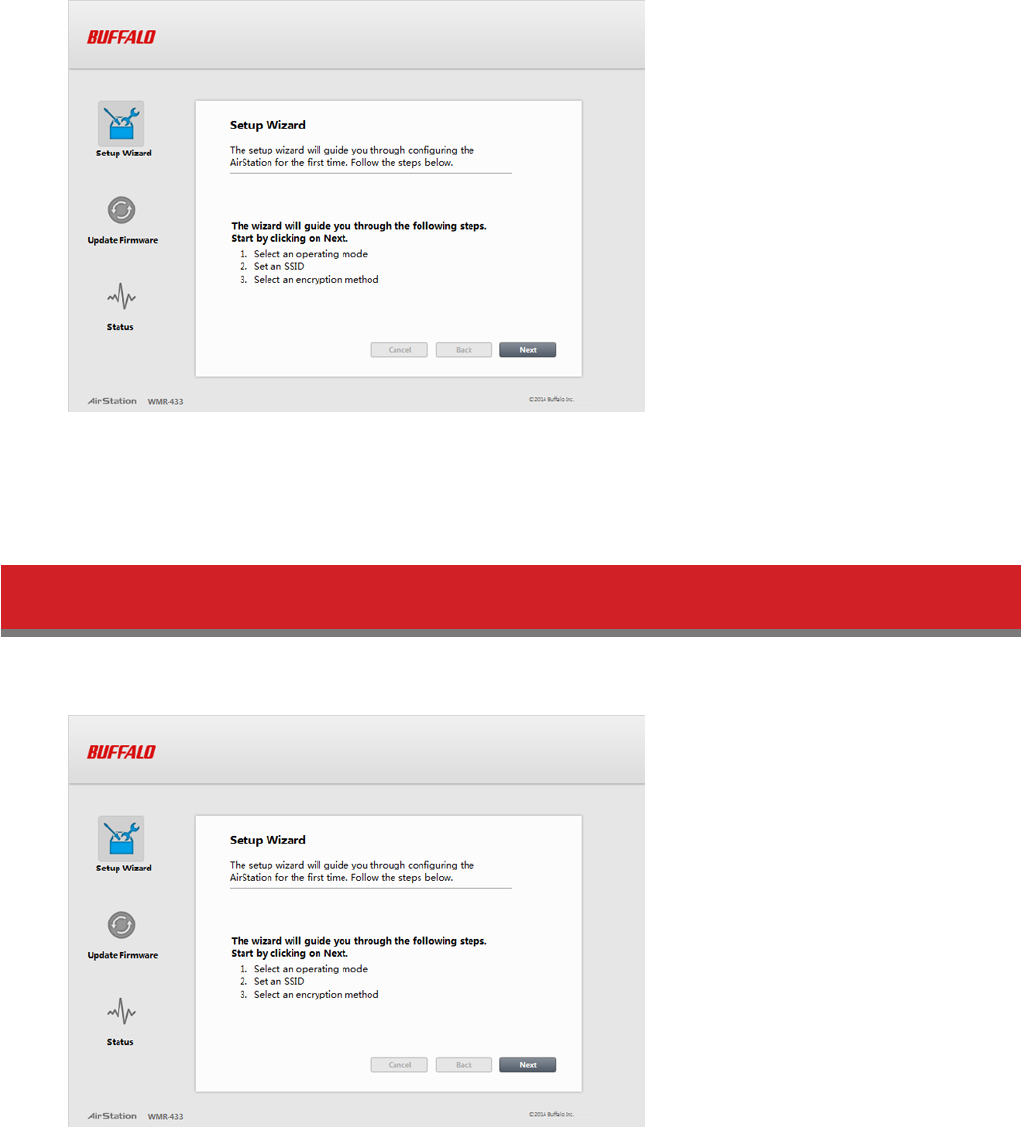
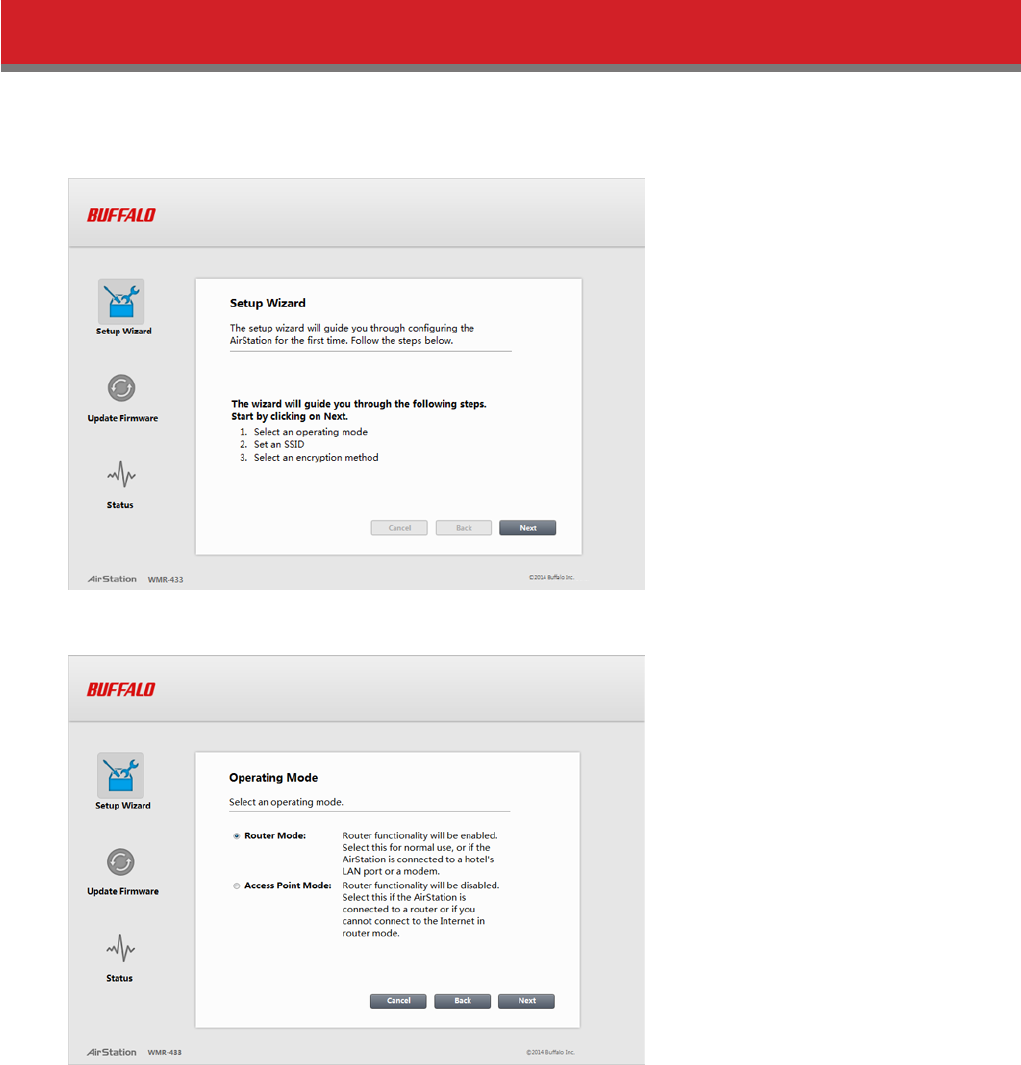
Setup Wizard
Setup wizard is the guide to configure the AirStation for the first time. You can configure the operating mode, SSID, and
encryption method here.
To use the setup wizard, refer to the “Change AirStation’s Settings” section.
9
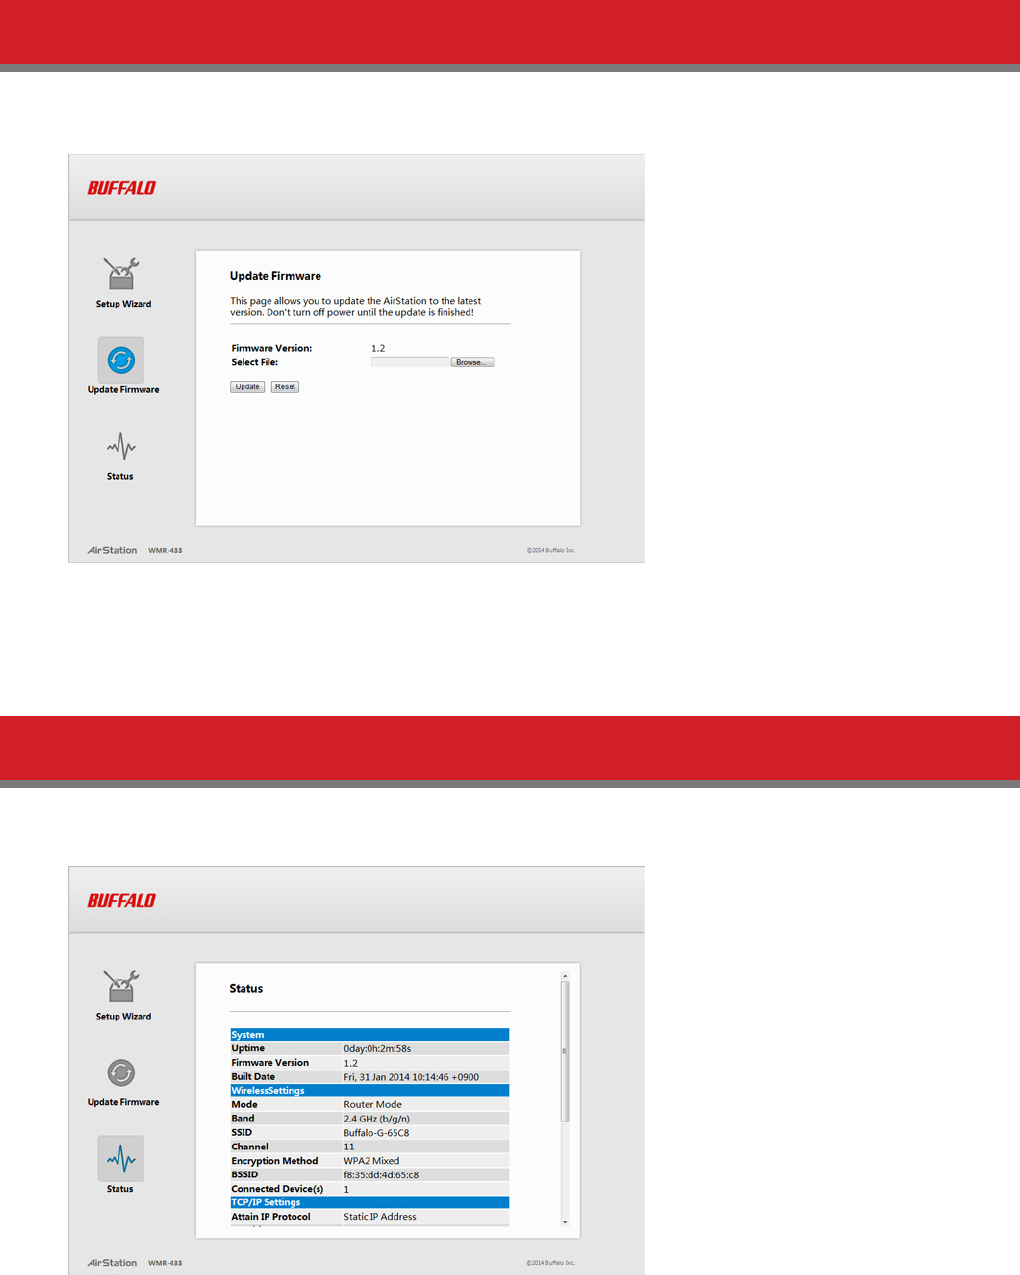
Update Firmware
Update AirStation’s firmware here. Before updating, make sure you have downloaded the latest firmware file onto your
computer.
Click Browse... and select the firmware file. Click Update to start updating.
Note: If the firmware file is invalid, the screen may crash during the update. If this occurs, reboot the AirStation and
try updating again with a valid firmware file.
Status
Check AirStation’s status here. You can confirm the AirStation’s system information, wireless settings, TCP/IP settings, and
WAN configuration.
10
Change AirStation’s Settings
You can change the AirStation’s settings with the setup wizard. Refer to the following to use the wizard.
1 Click Next.
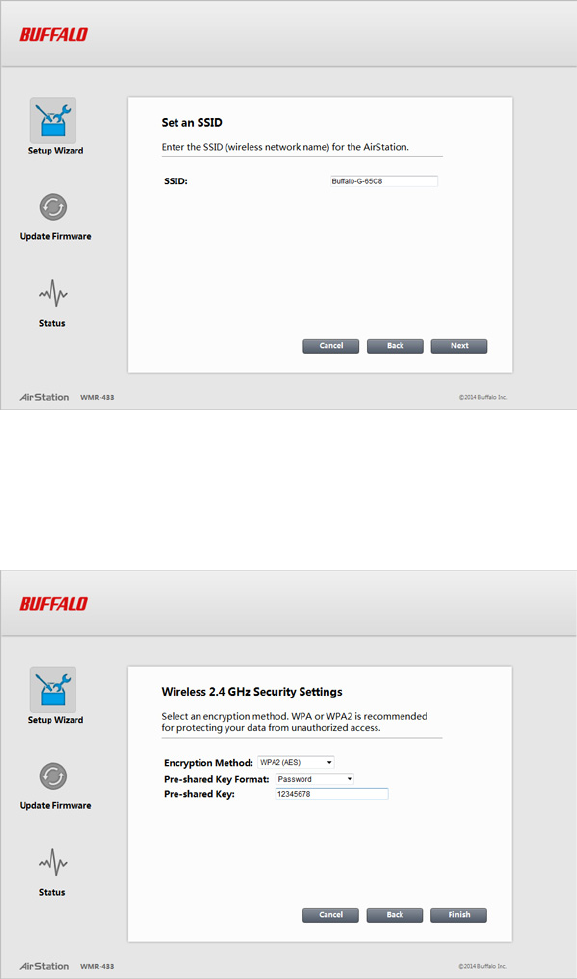
2 Select an operating mode and click Next.
3 Enter an SSID and click Next.
11
Notes:
• If SSID field is left blank, the SSID will not change.
• Use only alphanumeric characters for the SSID.
4 Configure the encryption method and click Finish.
Notes:
• You can use “No encryption”, “WEP”, “WPA (AES)”, “WPA2 (AES)”, or “WPA2 mixed mode “ for the encryption method.
• When using WEP, WPA (AES), or WPA2 (AES), select the key format before entering the key. Refer to the chart be-
low on entry rules. Use only alphanumeric characters.
12
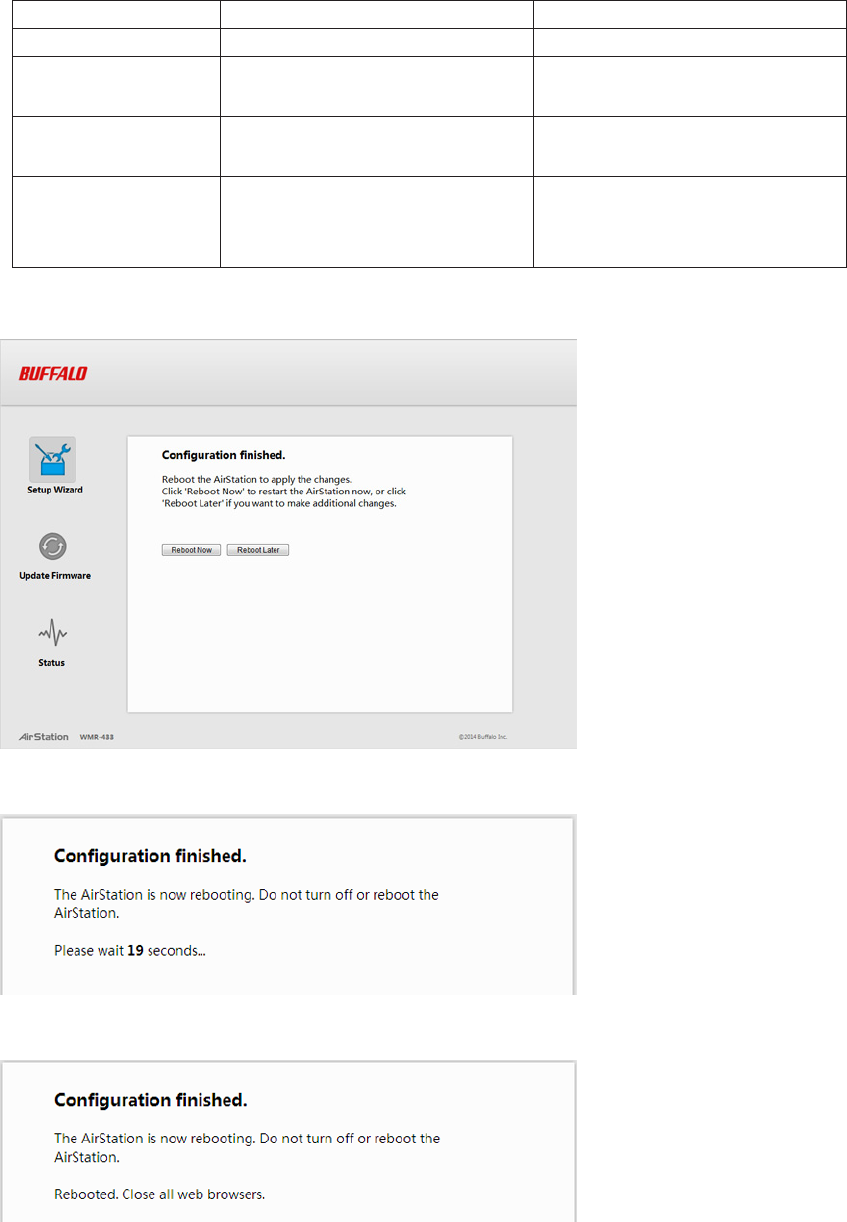
ASCII Hex
No encryption - -
WEP (64-bit) 5 characters (case-sensitive) 10 digits
0-9, a-f (not case-sensitive)
WEP (128-bit) 13 characters (case-sensitive) 26 digits
0-9, a-f (not case-sensitive)
WPA (AES)
WPA2 (AES)
WPA2 mixed mode
8-63 characters (case-sensitive) 64 digits
0-9, a-f (not case-sensitive)
5 Click Reboot Now.
6 The AirStation will reboot, which will take about 1 minute.
7 When “Rebooted.” is displayed, the AirStation is ready to use.
If you changed the SSID and/or encryption method, reconnect to the AirStation with the new SSID and encryption
method.

13
Notice for 2.4 GHz Bandwidth
By default, the 2.4 GHz maximum baud rate is 72.2 Mbps (20 MHz bandwidth). After configuration with the setup wizard,
its maximum baud rate changes to 150 Mbps (40 MHz bandwidth). For 5 GHz, the maximum baud rate is 433.3 Mbps (80
MHz bandwidth) by default.

14
Chapter 4 - Troubleshooting
Cannot Access Settings
• See chapter 3 for instructions to open Settings.
• Enter the correct username and password to log in to Settings. If you are using AirStation with factory default
settings, refer to the setup card.
• Verify that your web browser is not set to use proxies.
• Make sure that your PC is configured to “obtain an IP address automatically from DHCP”.
• Restart your AirStation.
• If the AirStation is in bridge mode, follow the procedure below to access Settings.
(1) Disconnect the Ethernet cable from the AirStation.
(2) Disconnect the USB cable from the AirStation and connect it to the AirStation again.
(3) Refer to “How to Configure TCP/IP“ section to configure your PC’s IP address as “192.168.13.xxx”.
(4) Open a web browser and enter “192.168.13.1“ in the address field.
(5) Enter “admin” for the username and the encryption key for the password, then click OK.
(6) Settings is displayed.
Cannot Connect to the Network Wirelessly
• Configure your wireless client with the same SSID, encryption type, and encryption key as set on the AirStation.
The factory defaults are:
SSID (11n/g/b) - Buffalo-G-XXXX (where “XXXX” is the last 4 digits of the AirStation’s MAC address)
SSID (11ac/a/n) - Buffalo-A-XXXX (where “XXXX” is the last 4 digits of the AirStation’s MAC address)
Encryption Type - WPA2 (AES)
Encryption Key - Printed on the setup card
• Place your AirStation and wireless devices 2 - 10 feet apart.
• Restart your AirStation.
Cannot Connect to the Network with 5 GHz
• Move the 5 GHz/2.4 GHz selector switch to 5 GHz.
• Confirm that your PC is compatible with 5 GHz bandwidth.

15
Forgot AirStation’s SSID, Encryption Key, or Password
Hold down the reset button on the base of your AirStation for about 7 seconds to initialize its settings. All settings,
including your password, SSID, and encryption key will be initialized to their defaults.
Hold down this button for 2-5 seconds to reboot the AirStation without initializing.
How to Configure TCP/IP
Windows 8.1/Windows 8
To configure TCP/IP in Windows 8.1 or Windows 8, follow the procedure below.
1 Open Control Panel.
2 Click Network and Internet.
3 Click Network and Sharing Center.
4 Click Change Adapter Settings on the left side menu.
5 Right-click the network adapter, then click Properties.
6 If the “User Account Control” screen opens, click Yes or Continue.
7 Select Internet Protocol Version 4 (TCP/IPv4) then click Properties.
8 To have DHCP set your IP address settings automatically, check Obtain an IP address automatically and Obtain DNS
server address automatically.
Alternately, you can configure the settings manually. Example:
If the router’s IP address is 192.168.13.1,
IP address: 192.168.13.80
Subnet mask: 255.255.255.0
Default gateway: 192.168.13.1
Preferred DNS server: 192.168.13.1
Alternate DNS server: blank
9 Click OK.

16
Windows 7
To configure TCP/IP in Windows 7, follow the procedure below.
1 Open Control Panel.
2 Click Network and Sharing Center.
3 Click Change Adapter Settings on the left side menu.
4 Right-click the network adapter, then click Properties.
5 If the “User Account Control” screen opens, click Yes or Continue.
6 Select Internet Protocol Version 4 (TCP/IPv4) then click Properties.
7 To have DHCP set your IP address settings automatically, check Obtain an IP address automatically and Obtain DNS
server address automatically.
Alternately, you can configure the settings manually. Example:
If the router’s IP address is 192.168.13.1,
IP address: 192.168.13.80
Subnet mask: 255.255.255.0
Default gateway: 192.168.13.1
Preferred DNS server: 192.168.13.1
Alternate DNS server: blank
8 Click OK.

17
Windows Vista
To configure TCP/IP in Windows Vista, follow the procedure below.
1 Open Control Panel.
2 Click Network and Sharing Center.
3 Click Manage network connections on the left side menu.
4 Right-click the network adapter, then click Properties.
5 If the “User Account Control” screen opens, click Yes or Continue.
6 Select Internet Protocol Version 4 (TCP/IPv4) then click Properties.
7 To have DHCP set your IP address settings automatically, check Obtain an IP address automatically and Obtain DNS
server address automatically.
Alternately, you can configure the settings manually. Example:
If the router’s IP address is 192.168.13.1,
IP address: 192.168.13.80
Subnet mask: 255.255.255.0
Default gateway: 192.168.13.1
Preferred DNS server: 192.168.13.1
Alternate DNS server: blank
8 Click OK.

18
Windows XP
To configure TCP/IP in Windows XP, follow the procedure below.
1 Open Control Panel.
2 Double-click Network.
3 Right-click the network adapter, then click Properties.
4 Select Internet Protocol (TCP/IP) then click Properties.
5 To have DHCP set your IP address settings automatically, check Obtain an IP address automatically and Obtain DNS
server address automatically.
Alternately, you can configure the settings manually. Example:
If the router’s IP address is 192.168.13.1,
IP address: 192.168.13.80
Subnet mask: 255.255.255.0
Default gateway: 192.168.13.1
Preferred DNS server: 192.168.13.1
Alternate DNS server: blank
6 Click OK.
Mac OS
To configure TCP/IP in Mac OS, follow the procedure below.
1 Click Apple menu > System Preferences….
2 Click Network.
3 Click the network adapter.
4 To have DHCP set your IP address settings automatically, select Using DHCP in the “Configure IPv4” field.
Alternately, you can configure the settings manually. Example:
If the router’s IP address is 192.168.13.1,
IP address: 192.168.13.80
Subnet mask: 255.255.255.0
Default gateway: 192.168.13.1
Preferred DNS server: 192.168.13.1
Alternate DNS server: blank
5 Click Apply.

19
Other Tips
Issue:
I reset my AirStation to factory default settings and forgot how to log in to Settings.
Answer:
Open your browser, enter 192.168.13.1 as the browser address, and hit the enter key. You will be prompted to log in.
Enter “admin” for the username and “password” for the password. Click OK to log in.
Issue:
How do I enable or modify security encryption settings on the AirStation?
Answer:
Log in to Settings and navigate to Setup Wizard - Wireless 2.4 GHz Security Settings or Setup Wizard - Wireless 5 GHz
Security Settings. Buffalo recommends using WPA2-PSK AES for wireless encryption. The passphrase or key should be at
least 8 characters in length.
Issue:
How do I change my AirStation’s SSID?
Answer:
Log in to Settings and navigate to Setup Wizard - Set an SSID. Enter a new name for your network and click Next. Once the
AirStation has rebooted, you will need to reconnect any wireless clients to the AirStation using the new network name.
The encryption key will still be the same.
Issue:
Though I am able to successfully make a connection with my AirStation, I am unable to access the Internet with my web
browser.
Answer:
First, confirm that the Ethernet cable is correctly connected to the Internet port. If there is no problem with the Ethernet
cable, reboot the AirStation. If you still cannot access the Internet, check the settings of the router that the AirStation is
connected to. If you are using the AirStation in a hotel, call hotel staff to check the connection.
Issue:
Where can I download the latest drivers, firmware, and instructions for my Buffalo wireless products?
Answer:
The latest drivers and firmware are available online at www.buffalotech.com.
20
Appendix A - Supplemental Information
Default Configuration Settings
Feature Parameter Default Setting
LAN Settings
IP Address 192.168.13.1 (fixed)
DHCP Server Enabled
DHCP IP Address Pool 192.168.13.2 to 192.168.13.65 (fixed)
Wireless Settings
SSID
2.4 GHz: Buffalo-G-XXXX
5 GHz: Buffalo-A-XXXX
(where “XXXX” is the last 4 digits of the AirStation’s MAC
address)
Encryption Method WPA2 (AES)
Pre-shared Key Format Password
Pre-shared Key The 8-digit random number printed on the setup card.
Wireless Channel Auto (fixed)
Bandwidth 2.4 GHz: 20 MHz (40 MHz after setup wizard is finished)
5 GHz: 80 MHz (fixed)
Administration Username admin (fixed)
Password The 8-digit random number printed on the setup card.
Note: The LAN-side IP address will automatically change to avoid duplicating the Internet-side IP address. For
example, If the Internet-side IP address is “192.168.13.xxx“, the LAN-side IP address will change to “192.168.12.1“.
Technical Specifications
Wireless LAN Interface
Standard Compliance IEEE 802.11ac / IEEE 802.11n / IEEE 802.11a / IEEE 802.11g / IEEE 802.11b
Transmission Method Direct sequence spread spectrum (DSSS), OFDM, SISO
Frequency Range Available frequencies depend on the country of purchase.

21
Transmission Rate
802.11ac
IEEE 802.11ac 20 MHz BW <Long GI>:
78/65/58.5/52/39/26/19.5/13/6.5 Mbps (1 stream)
IEEE 802.11ac 20 MHz BW <Short GI>:
86.7/72.2/65/57.8/43.3/28.9/21.7/14.4/7.2 Mbps (1 stream)
IEEE 802.11ac 40 MHz BW <Long GI>:
180/162/135/121.5/108/81/54/40.5/27/13.5 Mbps (1 stream)
IEEE 802.11ac 40 MHz BW <Short GI>:
200/180/150/135/120/90/60/45/30/15 Mbps (1 stream)
IEEE 802.11ac 80 MHz BW <Long GI>:
390/351/292.5/263.3/234/175.5/117/87.8/58.5/29.3 Mbps (1 stream)
IEEE 802.11ac 80 MHz BW <Short GI>:
433.3/390/325/292.5/260/195/130/97.5/65/32.5 Mbps (1 stream)
Transmission Rate
802.11n/a/g/b
IEEE 802.11n 20 MHz BW <Long GI>:
65/58.5/52/39/26/19.5/13/6.5 Mbps (1 stream)
IEEE 802.11n 20 MHz BW <Short GI>:
72.2/65/57.8/43.3/28.9/21.7/14.4/7.2 Mbps (1 stream)
IEEE 802.11n 40 MHz BW <Long GI>:
135/121.5/108/81/54/40.5/27/13.5 Mbps (1 stream)
IEEE 802.11n 40 MHz BW <Short GI>:
150/135/120/90/60/45/30/15 Mbps (1 stream)
IEEE 802.11a / IEEE 802.11g:
54/48/36/24/18/12/9/6 Mbps
IEEE 802.11b:
11/5.5/2/1 Mbps
Access Mode Infrastructure Mode
Security WPA2-PSK (AES), WPA-PSK (AES), WPA2 mixed PSK (AES), WEP (128 bit/64-bit)
Wired Interface
Standard Compliance IEEE 802.3u (100BASE-TX) / IEEE 802.3 (10BASE-T)
Transmission Rate 10 / 100 Mbps
Transmission Encoding 100BASE-TX 4B5B/MLT-3, 10BASE-T Manchester Coding
Access Method CSMA/CD
Speed and Flow Control 10 / 100 Mbps, Auto Sensing, Auto MDIX
USB Interface
Number/Type of Port 1 Micro USB port
Other
Power Supply 5V
Power Consumption About 2.5 W (Max)
Dimensions 45 x 45 x 15 mm (1.77 x 1.77 x 0.59 in.)
Weight 19 g (0.7 oz.)
Operating Environment 0 - 40° C (32 - 104° F), 10 - 85% (non-condensing)

22
Environmental Information
• The equipment that you have purchased has required the extraction and use of natural resources for its production.
• The equipment may contain hazardous substances that could impact health and the environment.
• In order to avoid the dissemination of those substances in our environment and to diminish the pressure on the
natural resources, we encourage you to use the appropriate take-back systems.
• The take-back systems will reuse or recycle most of the materials of your end life equipment in a sound way.
• The crossed-out wheeled bin symbol invites you to use those systems.
• If you need more information on collection, reuse, and recycling systems, please contact your local or regional waste
administration.
GPL Information
The source code for Buffalo products that use GPL code is available at http://opensource.buffalo.jp/ .

23
Appendix B - Regulatory Compliance
Information
The information below is only for US and Canada region.
Only use the cables and accessories that are included in the package. Don’t use other accessories or cables unless
specifically instructed to in the documentation.
Company Information
Buffalo Americas, Inc.
11100 Metric Boulevard suite 750 Austin Texas 78758
+1-512-349-1500
FCC Statement
This equipment has been tested and found to comply with the limits for a Class B digital device, pursuant to Part 15 of
the FCC Rules. These limits are designed to provide reasonable protection against harmful interference in a residential
installation. This equipment generates, uses and can radiate radio frequency energy and, if not installed and used
in accordance with the instructions, may cause harmful interference to radio communications. However, there is no
guarantee that interference will not occur in a particular installation. If this equipment does cause harmful interference
to radio or television reception, which can be determined by turning the equipment off and on, the user is encouraged
to try to correct the interference by one of the following measures:
• Reorient or relocate the receiving antenna.
• Increase the separation between the equipment and receiver.
• Connect the equipment into an outlet on a circuit different from that to which the receiver is connected.
• Consult the dealer or an experienced radio/TV technician for help.
Any changes or modifications not expressly approved by the party responsible for compliance could void the user’s
authority to operate this equipment.
This device complies with Part 15 of the FCC Rules. Operation is subject to the following two conditions: (1) This device
may not cause harmful interference, and (2) this device must accept any interference received, including interference
that may cause undesired operation.
This equipment complies with FCC radiation exposure limits set forth for an uncontrolled environment. End-users must
follow the specific operating instructions for satisfying RF exposure compliance. This equipment should be installed and
operated with minimum distance 1.5 cm between the radiator & your body. This transmitter must not be co-located or
operating in conjunction with any other antenna or transmitter.

24
IC statement (IC déclaration)
This device complies with RSS-210 of the Industry Canada Rules. Operation is subject to the following two conditions:
(1) This device may not cause harmful interference, and
(2) this device must accept any interference received, including interference that may cause undesired operation.
Ce dispositif est conforme à la norme CNR-210 d’Industrie Canada applicable aux appareils radio exempts de licence.
Son fonctionnement est sujet aux deux conditions suivantes:
(1) le dispositif ne doit pas produire de brouillage préjudiciable, et
(2) ce dispositif doit accepter tout brouillage reçu, y compris un brouillage susceptible de provoquer un fonctionnement
indésirable.
(i) The device for the band 5150-5250 MHz is only for indoor usage to reduce potential for harmful interference to co-
channel mobile satellite systems.
(ii) The maximum antenna gain permitted for devices in the band 5725-5825 MHz shall comply with the e.i.r.p. limits
specified for point-to-point and non point-to-point operation as appropriate.
High-power radars are allocated as primary users (i.e., priority users) of the bands 5250–5350 MHz and 5650–5850 MHz
and that these radars could cause interference and/or damage to LE-LAN devices.
(i) Le dispositif fonctionnant dans la bande 5150-5250 MHz est réservé uniquement pour une utilisation à l’intérieur afin
de réduire les risques de brouillage préjudiciable aux systèmes de satellites mobiles utilisant les mêmes canaux.
(ii) le gain maximal d’antenne permis (pour les dispositifs utilisant la bande 5 725-5 825 MHz) doit se conformer à la
limite de p.i.r.e. spécifiée pour l’exploitation point à point et non point à point, selon le cas.
De plus, les utilisateurs devraient aussi être avisés que les utilisateurs de radars de haute puissance sont désignés
utilisateurs principaux (c.-à.d., qu’ils ont la priorité) pour les bandes 5250–5350 MHz et 5650–5850 MHz et que ces radars
pourraient causer du brouillage et/ou des dommages aux dispositifs LAN-EL.
This equipment complies with IC radiation exposure limits set forth for an uncontrolled environment. End-users must
follow the specific operating instructions for satisfying RF exposure compliance. This equipment should be installed and
operated with minimum distance 1.5 cm between the radiator & your body.
This transmitter must not be co-located or operating in conjunction with any other antenna or transmitter.
Under Industry Canada regulations, this radio transmitter may only operate using an
antenna of a type and maximum (or lesser) gain approved for the transmitter by Industry
Canada. To reduce potential radio interference to other users, the antenna type and its gain should be so chosen that
the equivalent isotropically radiated power (e.i.r.p.) is not more than that necessary for successful communication.
Cet équipement est conforme aux limites d’exposition aux rayonnements IC établies pour un environnement non
contrôlé. Cet équipement doit être installé et utilisé avec un minimum de 1.5 cm de distance entre la source de
rayonnement et votre corps.
L’antenne utilisée pour ce transmetteur ne doit pas être co-localisés en conjonction avec toute autre antenne ou
25
transmetteur.
Conformément à la réglementation d’Industrie Canada, le présent émetteur radio peut fonctionner avec une antenne
d’un type et d’un gain maximal (ou inférieur) approuvé pour l’émetteur par Industrie Canada. Dans le but de réduire
les risques de brouillage radioélectrique à l’intention des autres utilisateurs, il faut choisir le type d’antenne et son gain
de sorte que la puissance isotrope rayonnée équivalente (p.i.r.e.) ne dépasse pas l’intensité nécessaire à l’établissement
d’une communication satisfaisante.