BUFFALO 09101793-0 11 Mbps USB1.1 Port Adapter User Manual WLI USB B11 QSG indd
BUFFALO INC. 11 Mbps USB1.1 Port Adapter WLI USB B11 QSG indd
BUFFALO >
Contents
- 1. user manual part 1
- 2. user manual part 2
- 3. user manual part 3
user manual part 2
4
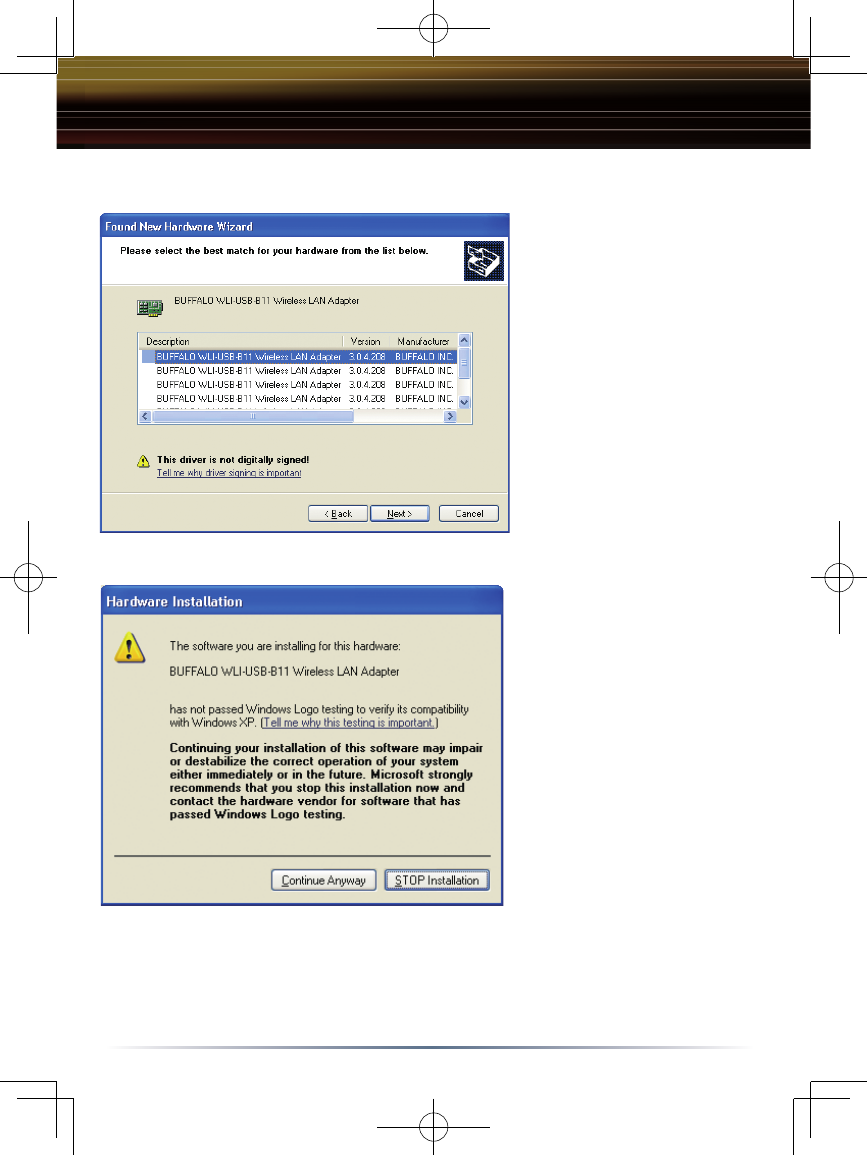
◗ Select the driver you
want to install. If multiple
drivers are listed, select
the most recent driver
version. Click the Next
button.
◗ If a window opens,
stating that your driver
does not pass Windows
Logo testing, click the
Continue Anyway button.
When the Wireless USB
Adapter is successfully
installed, click the Finish
button. Restart your
computer if prompted.
5
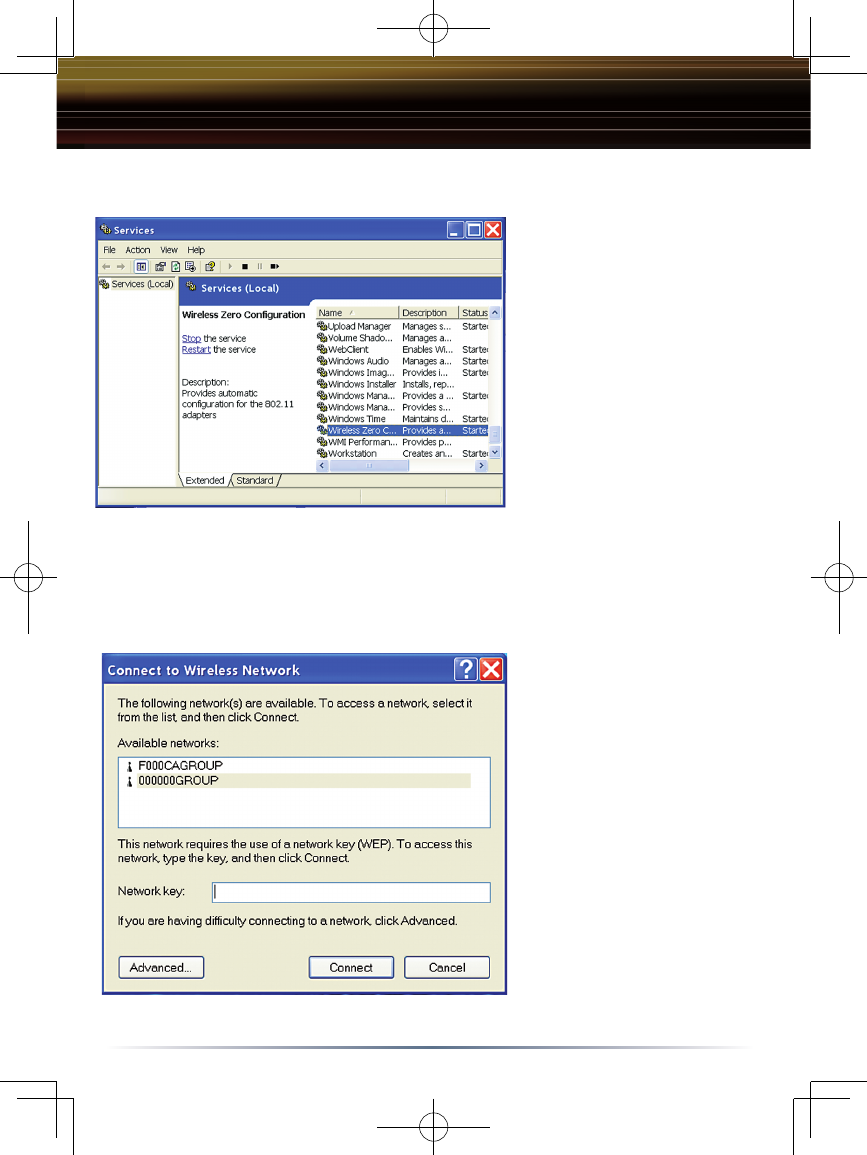
Step 3 Configuring Wireless Zero Configuration Service
◗ If the Wireless Zero
Configuration Service is
activated, Windows will scan
for available wireless access
points once the Wireless
USB Adapter is properly
installed. If Windows detects
one or more access points,
a networking icon appears
in the taskbar. One or more
wireless networks are
available appears as a caption
accompanying the icon.
◗ Right click the networking
icon in the taskbar and
select View Available
Wireless Networks to
display a list of available
wireless networks. See
step 2C if you need to
enter an SSID network
name or WEP/WPA
encryption key. Select
an access point network
name or SSID and click
the Connect button to
establish a connection.
■ Note: If the Wireless Zero Configuration Service is not functioning, select Start »
Control Panel » Administrative » Tools » Services. Select Automatic in the Startup
type field to enable the Wireless Zero Configuration Service. The default value is
Automatic.
6
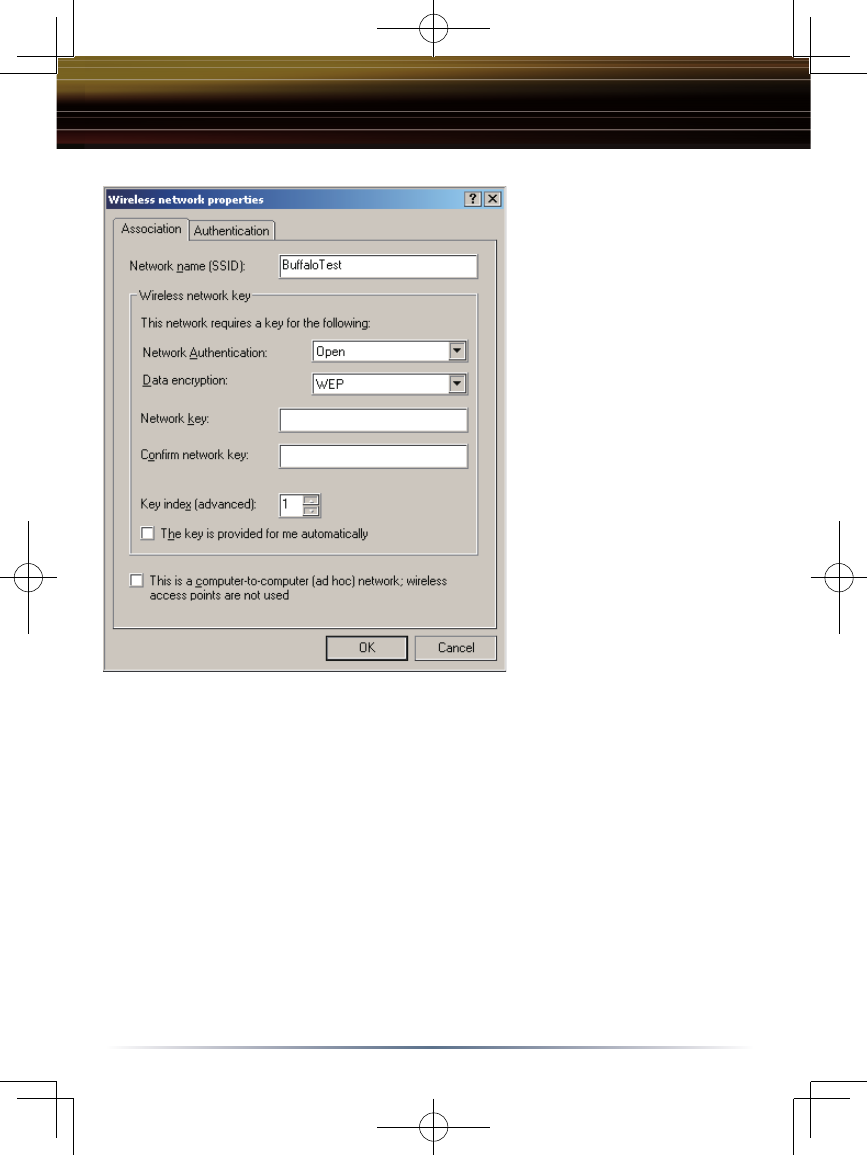
◗ Select a network name or
access point and click the
Advanced button to enter an
SSID network name or WEP/
WPA encryption key, if either
is necessary. The 'Network
Authentication' and 'Data
Encryption' pull down menus
will allow you to select the
different kinds of wireless
securities available.
You have finished installing
your 11 Mbps Wireless
USB Adapter. See Installing
Client Manager to install
Client Manager on your
computer. Client Manager will
not function properly if the
Wireless Zero Configuration
Service is activated. For more
information about configuring
and operating your 11 Mbps
Wireless USB Adapter and Client Manager, refer to the AirStation 11 Mbps Wireless
USB Adapter Manual, located on the Air Navigator CD.
■ Note: Buffalo Technology recommends that users of the Wireless Zero
Configuration Service upgrade to the latest version freely available at www.
microsoft.com.
7
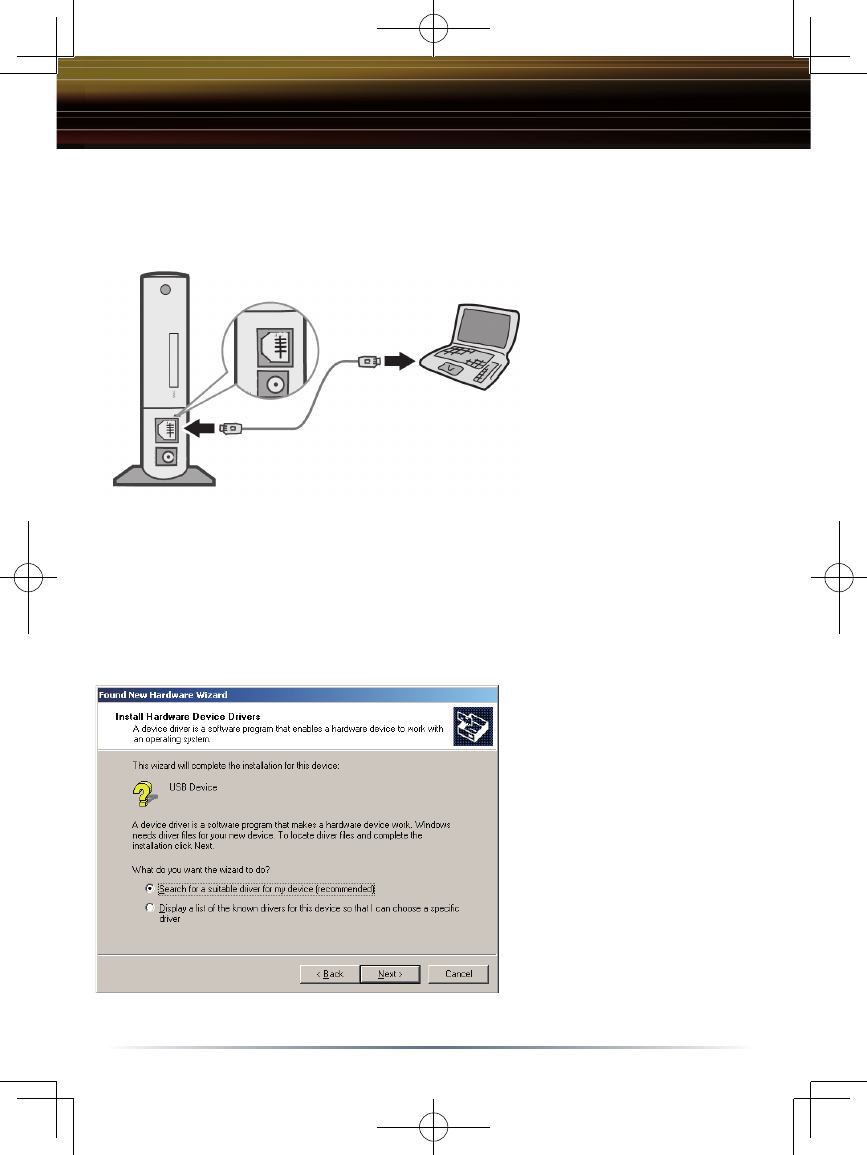
Step 2 Installing the 11 Mbps Wireless USB Adapter
◗ Power on the notebook
PC and let it boot into
Windows. Plug the
Wireless USB Adapter into
an available USB port on
your PC. Depending on
the type of computer that
the Wireless USB Adapter
is being installed on, the
USB ports can be located
in different areas of the
case. Check with the PC
manufacturer if the USB ports can not be located. Once the Wireless USB Adapter
is plugged in correctly, the Found New Hardware Wizard will launch automatically.
If the Found New Hardware Wizard does not launch, remove the Wireless USB
Adapter and restart the notebook. Reinsert the Wireless USB Adapter once the
notebook has rebooted.
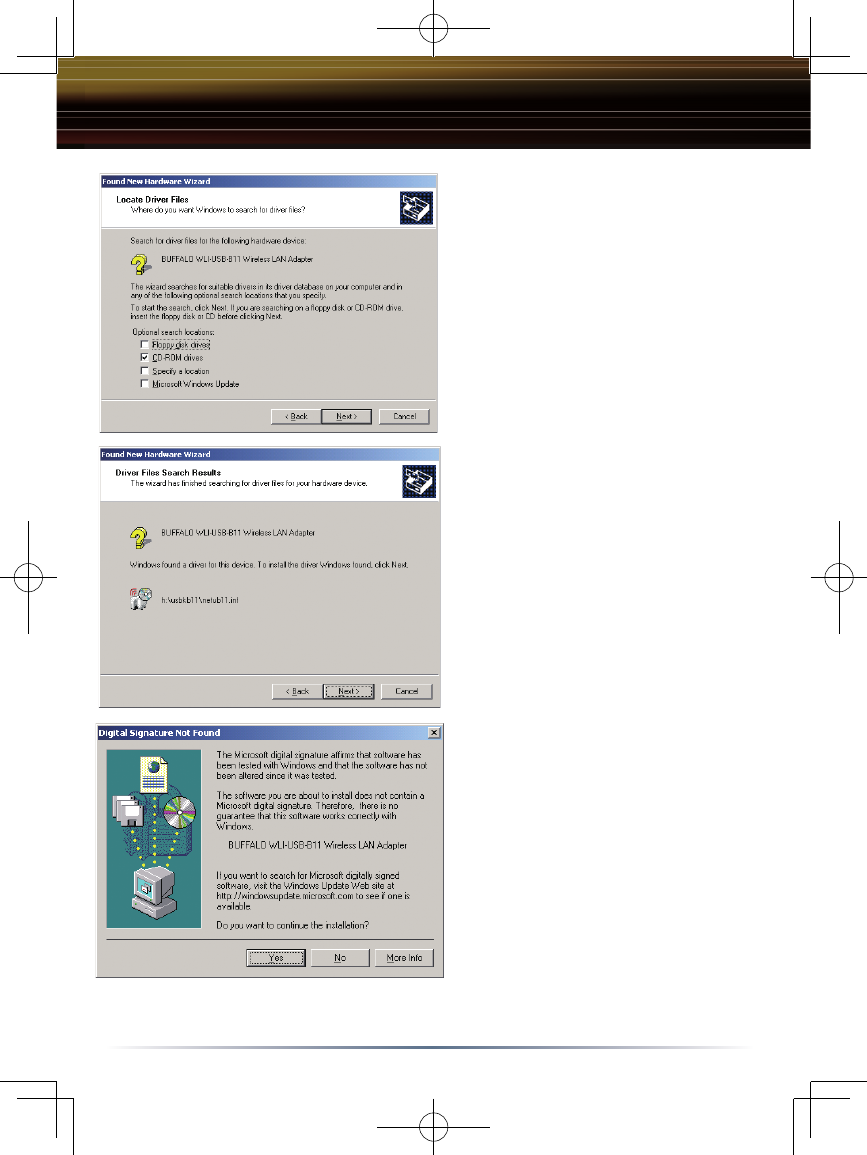
◗ Select Search for a suitable
driver for my device. Click the
Next button to continue to the
Locate Driver Files page.
Windows 98/ME/2000 Installation & Configuration
8
◗ Verify that no Optional search
locations are selected. Clear any
checkboxes that are selected. Click
the Next button to continue to the
Driver Files Search Results page.
◗ Windows will display a driver you
can use with the Wireless USB
Adapter. Click the Next button to
continue the installation process.
◗ Windows 2000: If the Digital
Signature Not Found page opens,
informing you that no digital
signature exists for the driver
you are installing, click the Yes
button to continue the installation
process. When the Wireless USB
Adapter is successfully installed,
click the Finish button. Restart
your computer if prompted.
You have finished installing your
11 Mbps Wireless USB Adapter. See Installing Client Manager to install Client
Manager on your computer.
9
Installing and Connecting with
Client Manager
■ Note: Running the Client Manager install on Windows XP will disable Windows
XP Wireless Zero Configuration Services.
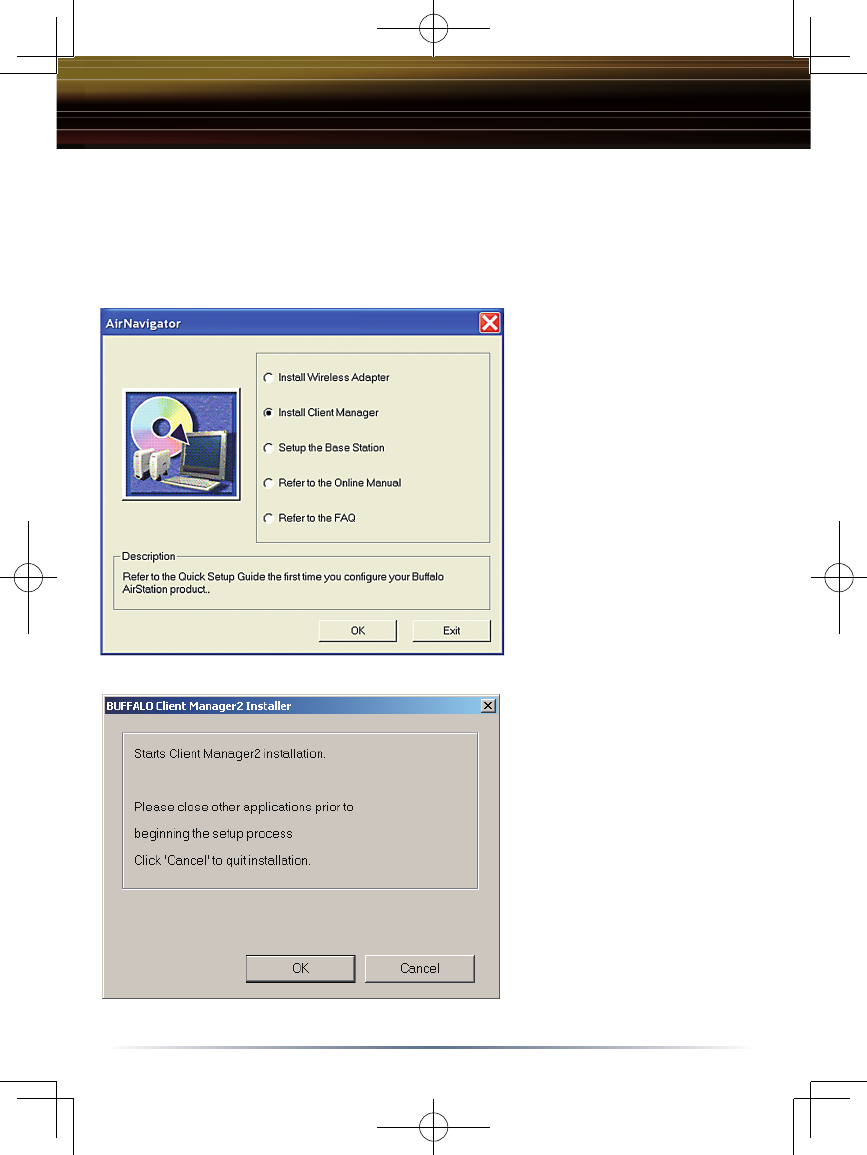
◗ The AirNavigator dialog
box will open automatically.
If the AirNavigator dialog box
does not open automatically,
select Start»Run and enter
D:\Setup.exe in the Open
field to open the dialog box
manually. D: represents the
letter assigned to the CD-
ROM drive. If another letter
is assigned to the CD-ROM
drive, your command should
reflect that difference. Click
the OK button. Select Install
Client Manager to launch the
InstallShield Wizard.
◗ Close other open
applications and click 'OK' to
continue.

10
◗ Click 'Agree' on the
License screen to continue
installation.
◗ Click 'Next' to accept the
default installation directory
or hit browse and select
another location.
◗ You will receive a
message instructing you to
wait while Client Manager
installation completes.
◗ When you receive a
message indicating that
installation is complete, Click
'OK'.
This completes Client Manager Installation.
11
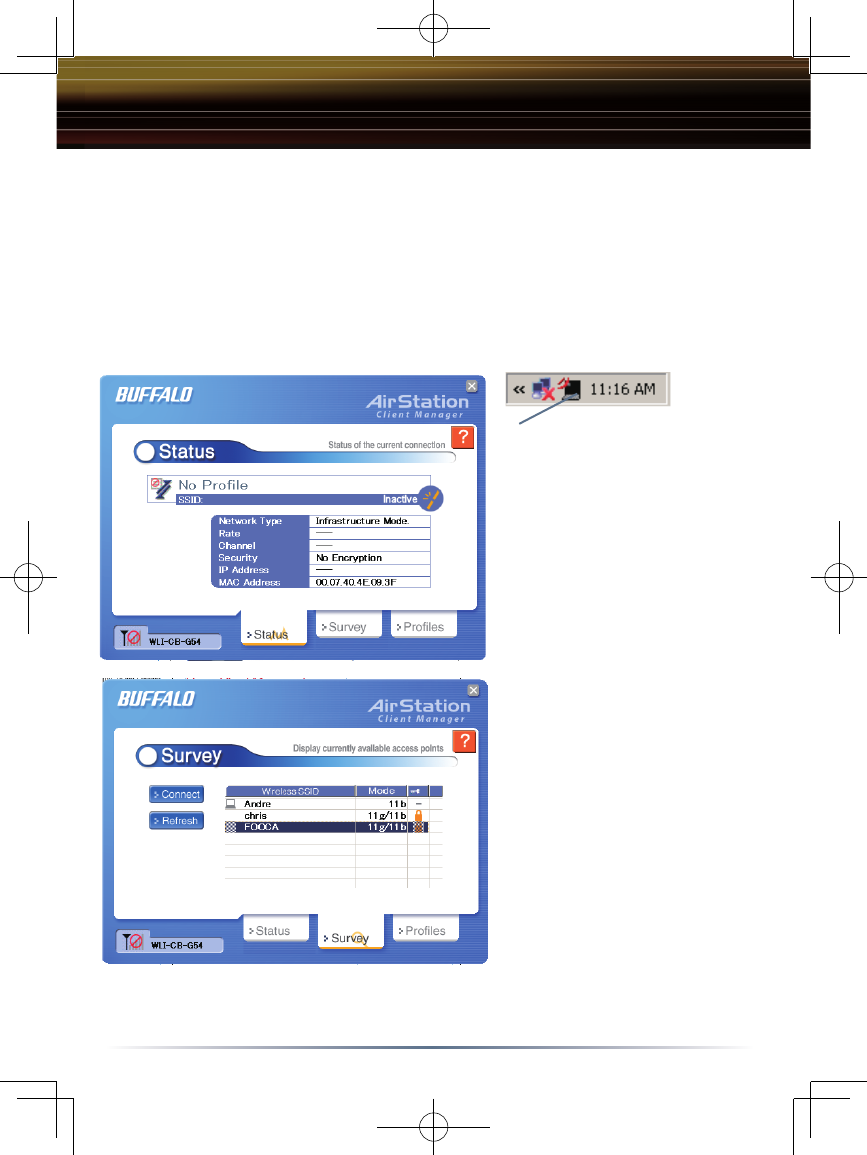
◗ Access Client Manager by
double clicking on the Icon
in your computers 'Tray', or
by launching Programs =>
Buffalo =>AirStation Utility
=> Client Manager2
◗ The Main Status Screen
will display.
◗ Select the Survey Tab and
the main survey screen will
appear. If you do not see
your access point listed, click
'Refresh' and wait several
seconds.
◗ Highlight the appropriated
Access Point and click on
'Connect'.
Connecting to your Wireless LAN using Client Manager
(Not using AOSS).
■ Note: If your client device and Access Point are both AOSS enabled and you
intend on using AOSS to automatically configure your connection, please refer
to the supplement guide 'Connecting to your Wireless LAN using AOSS (Client
Manager)' included with your device.