BUFFALO 09102034-1 AirStation Wireless-N NFINITI HighPower Keychain USB 2.0 Adapter User Manual Part 1
BUFFALO INC. AirStation Wireless-N NFINITI HighPower Keychain USB 2.0 Adapter Part 1
BUFFALO >
Contents
- 1. User Manual Part 1
- 2. User Manual Part 2
User Manual Part 1

WLI-UC-G300HP / WLI-UC-G300HP-V1 User Manual 1
Contents
Chapter 1 - Product Overview .........................................4
Features .................................................................................. 4
300 Mbps High Speed Mode ................................................... 4
System Requirements ............................................................. 5
Package Contents ................................................................... 5
Hardware Overview ................................................................. 5
Chapter 2 - Installation .....................................................6
Installing Wireless Drivers ....................................................... 6
Installing Utility ........................................................................ 10
Chapter 3 - Connect to a Wireless Network ...................13
Automatic Secure Setup (AOSS/WPS (PBC) ) ....................... 13
Windows 7/Vista (Client Manager V) ............................................. 14
Windows XP/2000 (Client Manager 3) ........................................... 15
Automatic Secure Setup (WPS (PIN) ) ................................... 16
Windows 7/Vista (Client Manager V) ............................................. 16
Windows XP (Client Manager 3) .................................................... 20
Manual Setup (Client Manager) .............................................. 22
Windows 7/Vista (Client Manager V) ............................................. 22
Windows XP/2000 (Client Manager 3) ........................................... 25
Windows Vista (WLAN AutoCong) ............................................... 27
Windows XP (Wireless Zero Conguration) ................................... 30

WLI-UC-G300HP / WLI-UC-G300HP-V1 User Manual 2
Chapter 4 - Client Manager ..............................................31
Software Overview .................................................................. 31
Using Client Manager V for Windows 7/Vista ......................... 31
Opening and Closing Client Manager ............................................ 31
Main Screen ................................................................................... 32
Automatic Secure Setup and Advanced Setup .............................. 33
SSID / WPS-PIN selection ............................................................. 34
Searching Wireless Access Points ................................................. 35
Wireless Network Information ........................................................ 36
WPS-PBC / AOSS selection .......................................................... 37
Wireless Status .............................................................................. 38
Wireless LAN Diagnostic ............................................................... 40
Prole List ...................................................................................... 41
Wireless Properties ........................................................................ 42
Network Properties ........................................................................ 43
Browser Properties ........................................................................ 44
Printer Properties ........................................................................... 45
Using Client Manager 3 with Windows XP / 2000 ................... 46
Status ............................................................................................. 47
Scan ............................................................................................... 49
Connect .......................................................................................... 50
Proles ........................................................................................... 51
Prole Information (Basic) .............................................................. 52
Prole Information (Network) ......................................................... 54
Prole Information (Browser) ......................................................... 55
Prole Information (Printers) .......................................................... 56
System Tray Menu ......................................................................... 57
Option Menu .................................................................................. 58

WLI-UC-G300HP / WLI-UC-G300HP-V1 User Manual 3
Chapter 5 - Trouble Shooting ..........................................60
The Computer does not recognize the WLI-UC-G300HP Wireless
Adapter. ................................................................................... 60
Cannot connect to the network wirelessly. .............................. 60
You forgot the AP's SSID, Encryption KEY, or Password. ....... 60
The link speed is slower than 300 Mbps (Maximum link speed is
only 144Mbps). ........................................................................ 61
Other Tips ................................................................................ 61
Appendix .....................................................................64
300 Mbps Mode settings ......................................................... 64
Specications .......................................................................... 65
Removing the device from the computer ................................ 66
Windows Vista/XP .......................................................................... 66
Windows 2000 ............................................................................... 66
Uninstalling the Software ........................................................ 66
Uninstalling the Drivers ........................................................... 66
TCP/IP Settings in Windows ................................................... 67
Windows 7 ..................................................................................... 67
Windows Vista ............................................................................... 68
Windows XP ................................................................................... 69
Antenna Information ................................................................ 70
FCC / CE / R&TTE Information ............................................... 71
Environmental Information ...................................................... 76
Warranty Information ............................................................... 77
Contact Information (USA / Canada) ....................................... 78
Contact Information (Europe) .................................................. 79

WLI-UC-G300HP / WLI-UC-G300HP-V1 User Manual 4
Chapter 1 - Product Overview
Features
With support for current Wireless-N, Wireless-G, and Wireless-B standards, the AirStation can transfer
data to and from all standard 2.4 GHz wireless network devices.
AOSS (AirStation One-touch Secure System) and WPA (Wi-Fi Protected Setup) make connection with
wireless devices easier.
AirStation is equipped with following security features.
• WPA-PSK (TKIP/AES)
• WPA2-PSK (TKIP/AES)
• WEP (128/64bit)
Thanks to a movable antenna, you can enjoy a comfortable radio environment without moving your
laptop computer.
You can verify the reception at 3 levels with LED display.
300 Mbps High Speed Mode
300 Mbps is the link speed when using 2 channel Wireless-N mode. It represents actual wireless
data speeds, including overhead. Because the overhead is not available for user data transfer, usable
wireless throughput will be substantially slower.

HighPower
1 2
Chapter 1 Product Overview
WLI-UC-G300HP / WLI-UC-G300HP-V1 User Manual 5
Package Contents
The following items are included with your AirStation. If any of the items are missing, please contact
your vender.
• WLI-UC-G300HP ........................................................................................................................... 1
• USB cable ........................................................................................................................................ 1
• Air Navigator CD ........................................................................................................................... 1
• Quick Setup Guide....................................................................................................................... 1
System Requirements
Computer should be IBM/PC compatible (OADG specication) with a USB 2.0 port and a CD-ROM drive. *
*This product does not support computers equipped with dual processors (computers with two
physical CPUs). Computers with Dual core CPU's are supported.
*AirStation does not support Windows Vista (32 bit) Standby mode.
Compatible OS
Windows 7 (32 bit / 64 bit) / Vista (32 bit) / XP / 2000
*Service Pack 2 or later is required for Windows XP.
*Service Pack 4 and Internet Explorer 5.5 or later are required for Windows 2000.
Hardware Overview
1 Signal LED (Green) You can check the strength of reception of this unit by looking at the
number of LED lights lit. (Maximum of 3 lights illuminated)
2 ACT LED (Blue) Flashes when sending/receiving data.
WLI-UC-G300HP / WLI-UC-G300HP-V1 User Manual 6
Chapter 2 - Installation
Installing Wireless Drivers
Follow the instruction below to install drivers. Do not connect the unit to your computer yet.
1
2
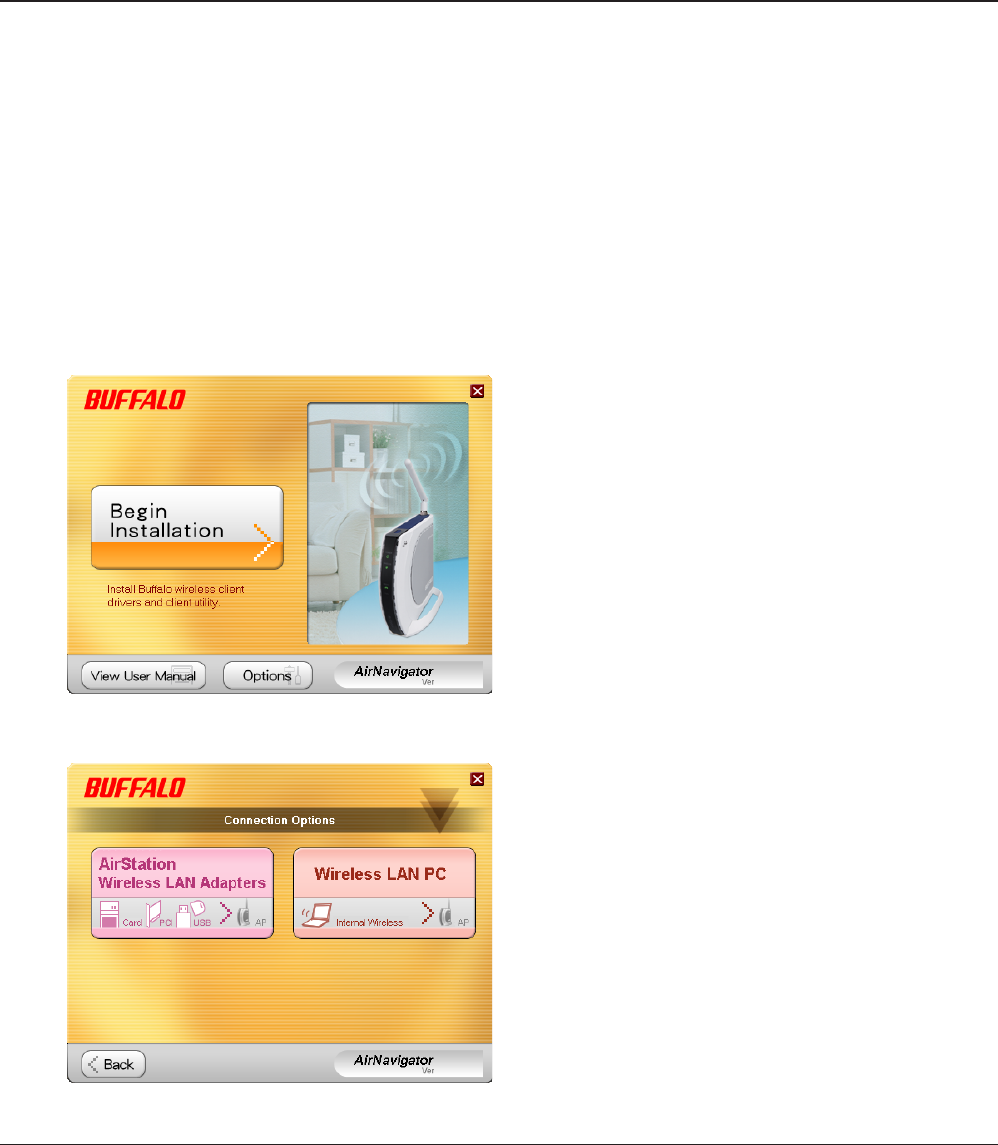
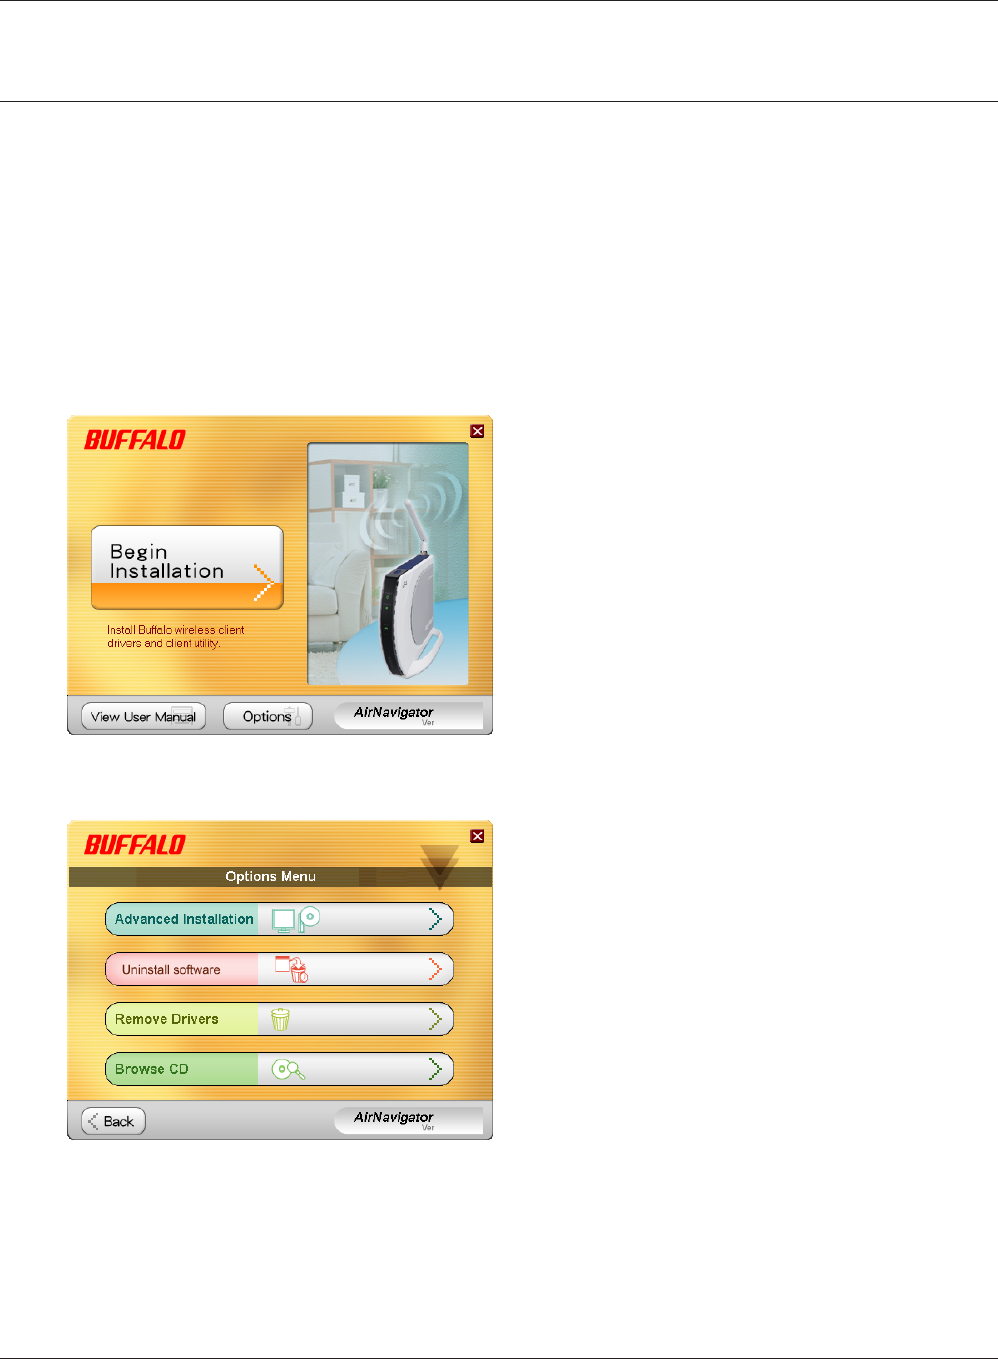
Boot your computer and insert AirNavigator CD. The AirNavigator Setup Wizard will launch
automatically.
Note: If the AirNavigator Setup Wizard doesn’t launch, double click [My Computer] > CD-ROM drive icon >
[AirNavi.exe] to launch manually.
Click [Begin Installation].
3Click [AirStation Wireless LAN Adapters].
Chapter 2 Installation
WLI-UC-G300HP / WLI-UC-G300HP-V1 User Manual 7
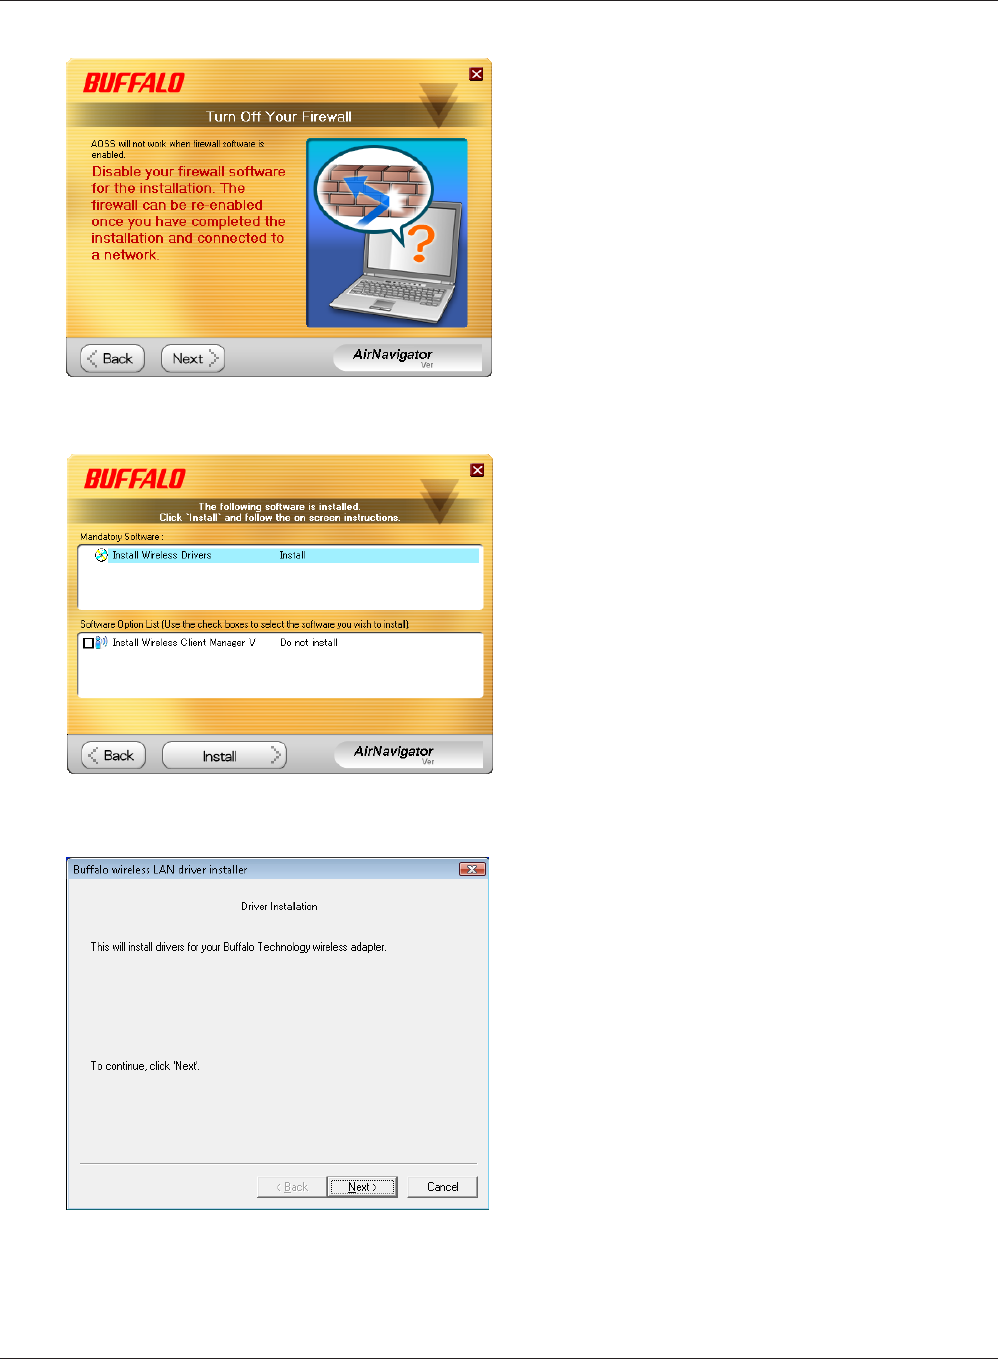
4Disable any rewalls, and click [Next].
5Click [Install].
Note: • If you insert the check mark into the check
box for Install Wireless Client Manager, you
can install Client Manager as well as drivers.
• Refer to the instructions on page 11 to install
Client Manager after installing drivers.
6Click [Next].
WLI-UC-G300HP / WLI-UC-G300HP-V1 User Manual 8
Chapter 2 Installation
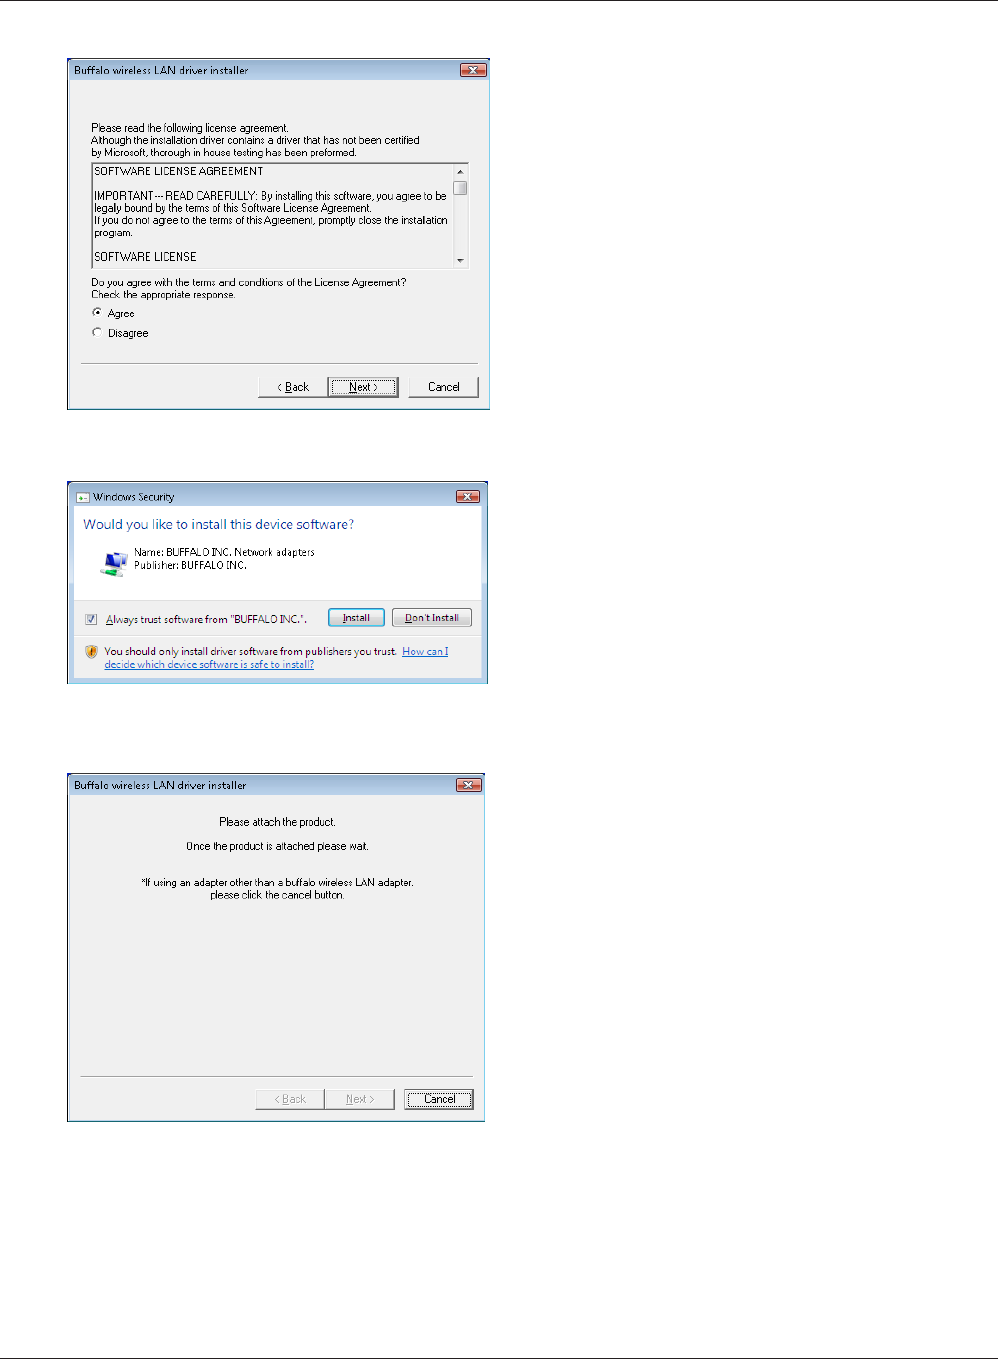
7Read the license agreement, select [Agree],
then click [Next].
8When the screen to the left is displayed, put
a check mark next to “Always trust software
from BUFFALO INC.", and click [Install].
9When the screen to the left is displayed, attach
the AirStation to your computer. Drivers will
be installed automatically.
Chapter 2 Installation
WLI-UC-G300HP / WLI-UC-G300HP-V1 User Manual 9
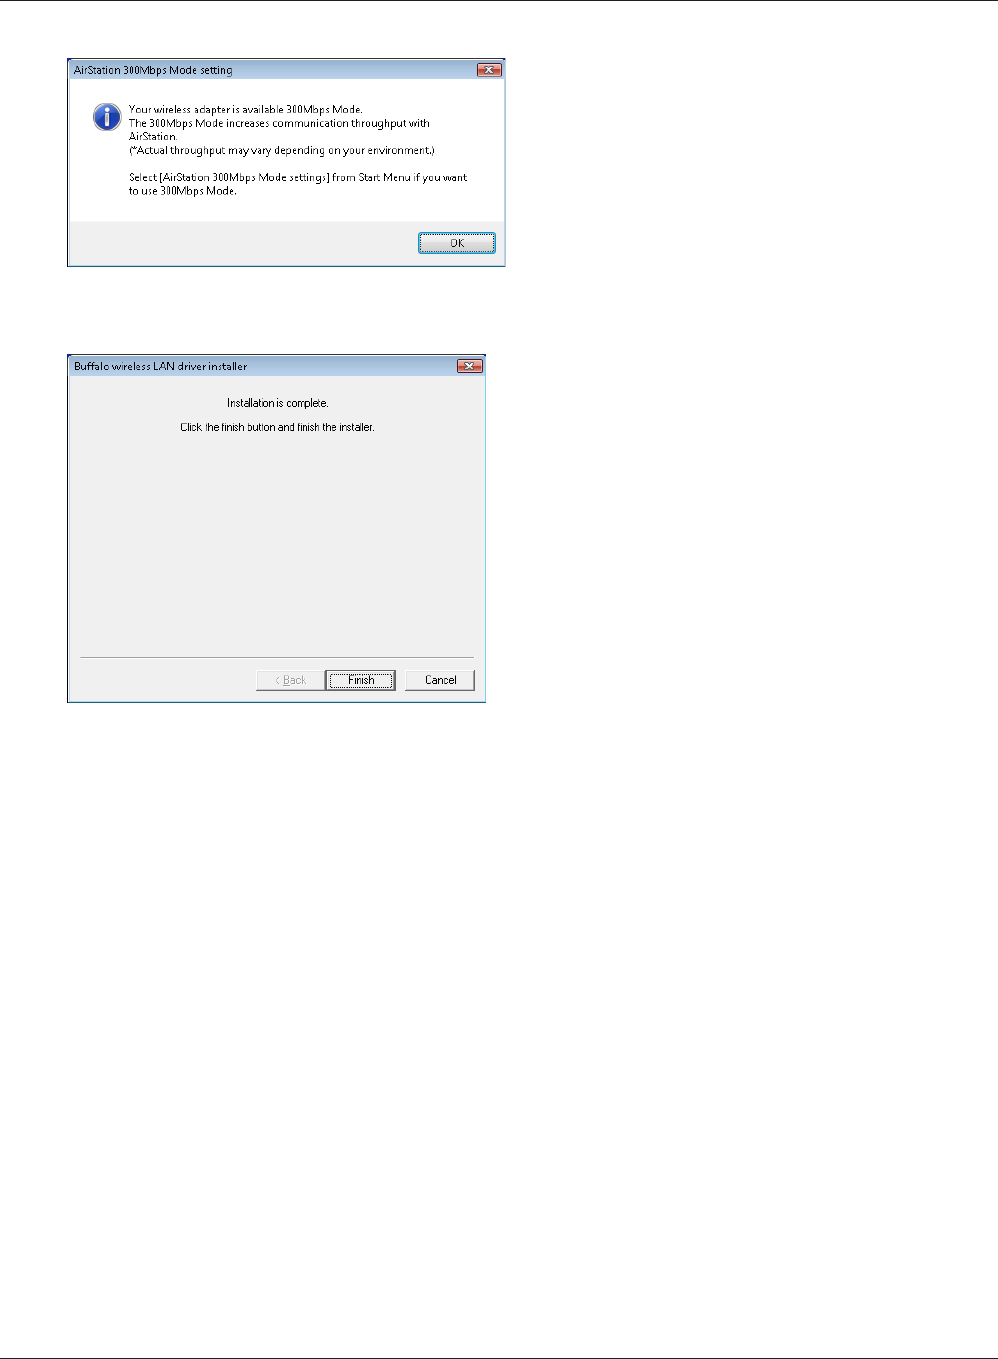
10 Click [OK].
11 After the drivers are installed, the screen at
left will be displayed. Click [Finish].
Note: If you checked the box to Install Wireless Client
Manager (page 8), then the installation screen
for Client Manager will be displayed after this
screen. Follow the instructions on the screen to
install Client Manager.
Drivers are now installed.
WLI-UC-G300HP / WLI-UC-G300HP-V1 User Manual 10
Chapter 2 Installation
Installing Utility
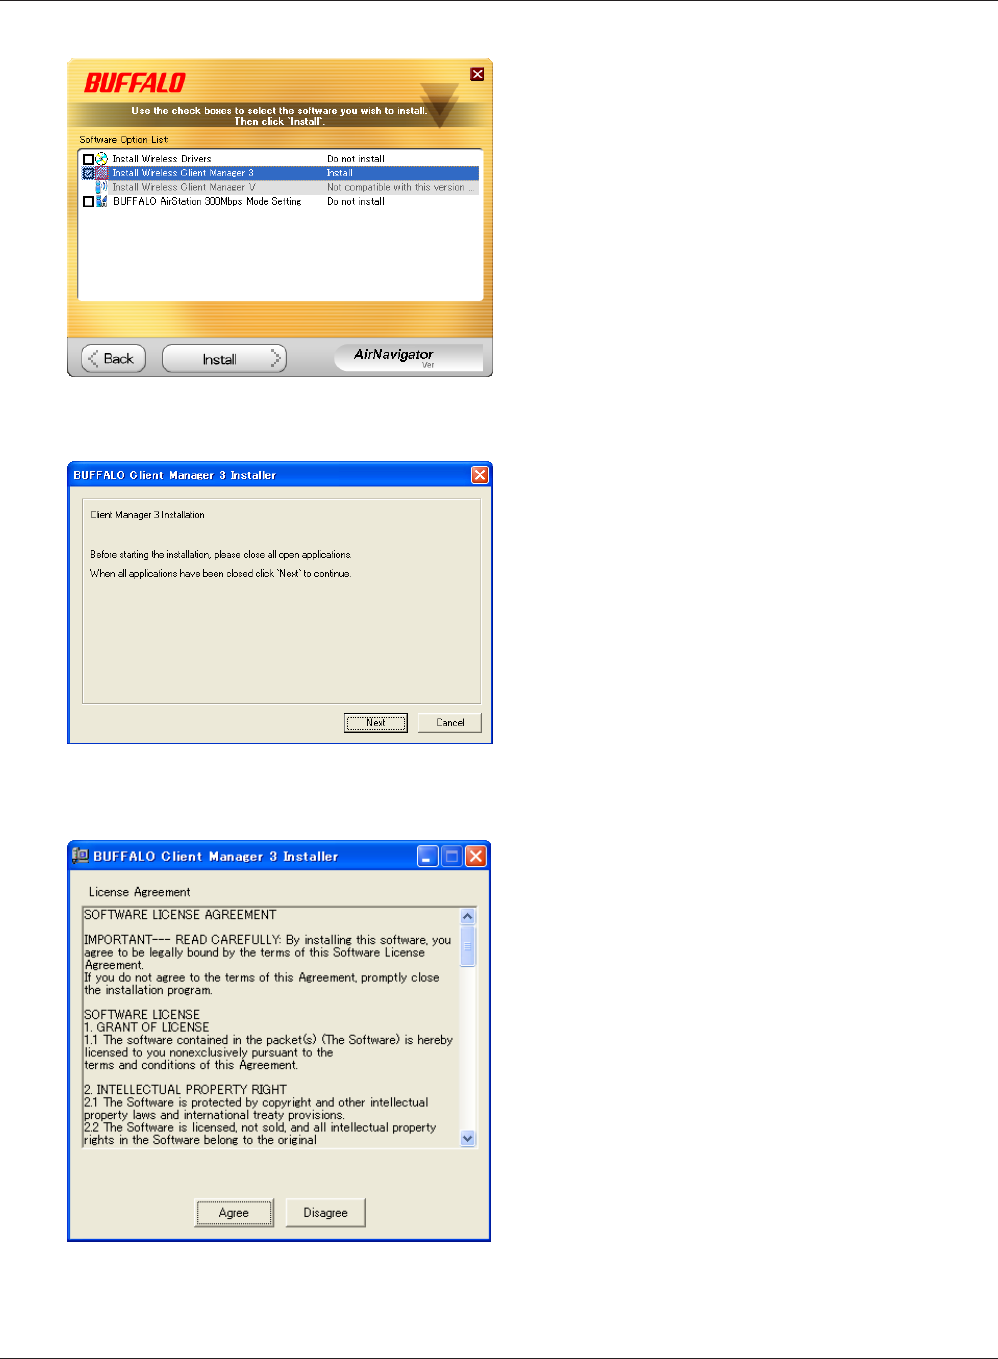
Follow the procedure below to install Client Manager.
1Boot your computer and insert the AirNavigator CD. The AirNavigator Setup Wizard will
launch automatically.
Note: If AirNavigator Setup Wizard is not displayed, double click [My Computer] icon > CD-ROM drive icon >
[AirNavi.exe].
Click [Options].
Click [Advanced Installation].
2
3
Chapter 2 Installation
WLI-UC-G300HP / WLI-UC-G300HP-V1 User Manual 11
4Check the box for [Install Wireless Client
Manager] and click [Install].
Note: Use Client Manager V with Windows Vista or
Client Manager 3 with Windows XP/2000.
5Click [Next].
6Read the license agreement and select [Agree].
WLI-UC-G300HP / WLI-UC-G300HP-V1 User Manual 12
Chapter 2 Installation
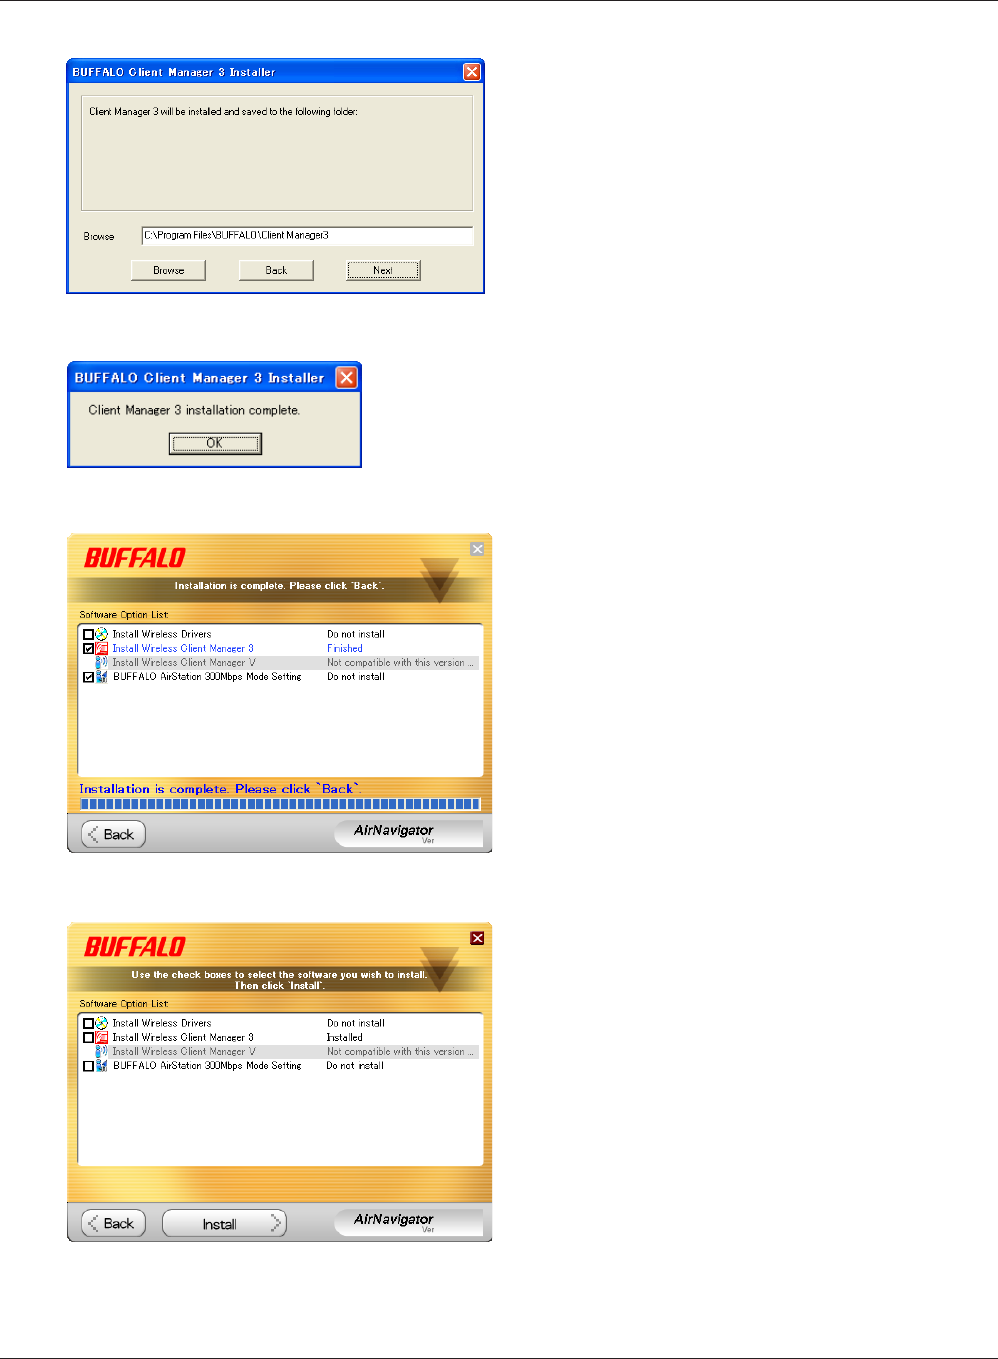
7
8
9
Click [Next].
Click [OK].
Click [Back].
10 Click [X] at the top right corner of the window
to close it.
Client Manager is now installed.
WLI-UC-G300HP / WLI-UC-G300HP-V1 User Manual 13
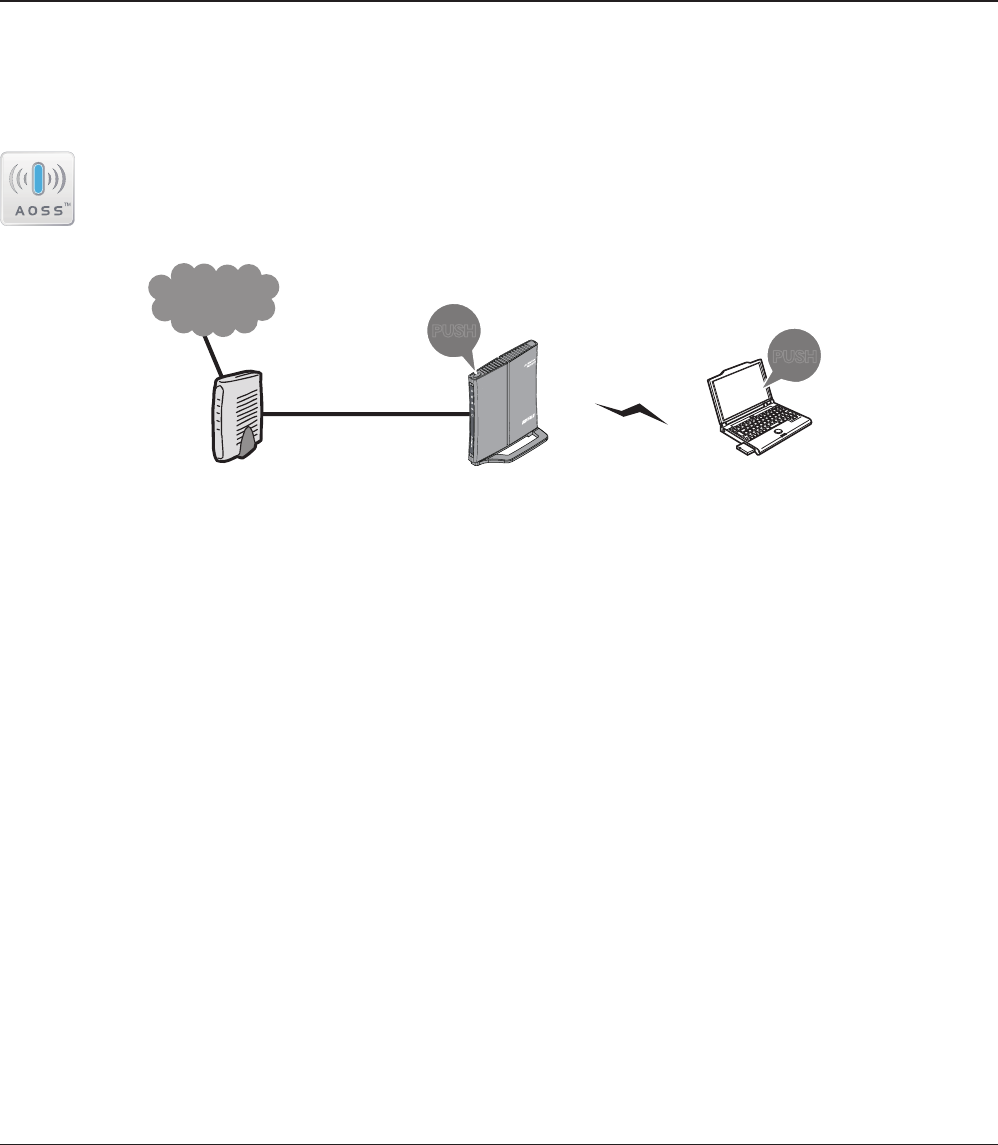
Automatic Secure Setup (AOSS/WPS (PBC) )
AOSS and WPS are systems which enables you to automatically congure wireless LAN settings. Just
pressing the buttons will connect wireless devices and complete security settings. Utilize this system
to connect to wireless devices, computers, or game machines which support AOSS or WPS.
AOSS (AirStation One-Touch Secure System) is technology developed by BUFFALO. WPS was
created by the Wi-Fi Alliance.
Chapter 3 - Connect to a Wireless Network
ÐÏ×ÅÒ
ÓÅÃÕÒÉÔÙ
×ÅÉÒÅÌÅÓÓ
ÒÏÕÔÅÒ
ÄÉÁÇ
őŖŔʼn
őŖŔʼn
Modem
Internet
AirStation PC or
Game console
(AOSS Devices)
You need to have Client Manager V and Client Manager 3 installed from the CD attached to this unit
in advance to connect using AOSS/WPS (PBC). (page 11)
WLI-UC-G300HP / WLI-UC-G300HP-V1 User Manual 14
Chapter 3 Connect to a Wireless Network
1
2
Click [Start] > [All Programs] > [BUFFALO] > [AirStation Utility] > [Client Manager V].
Windows 7/Vista (Client Manager V)
If you are using Windows 7/Vista, use the included Client Manager V software to connect wirelessly
with AOSS/WPS(PBC).
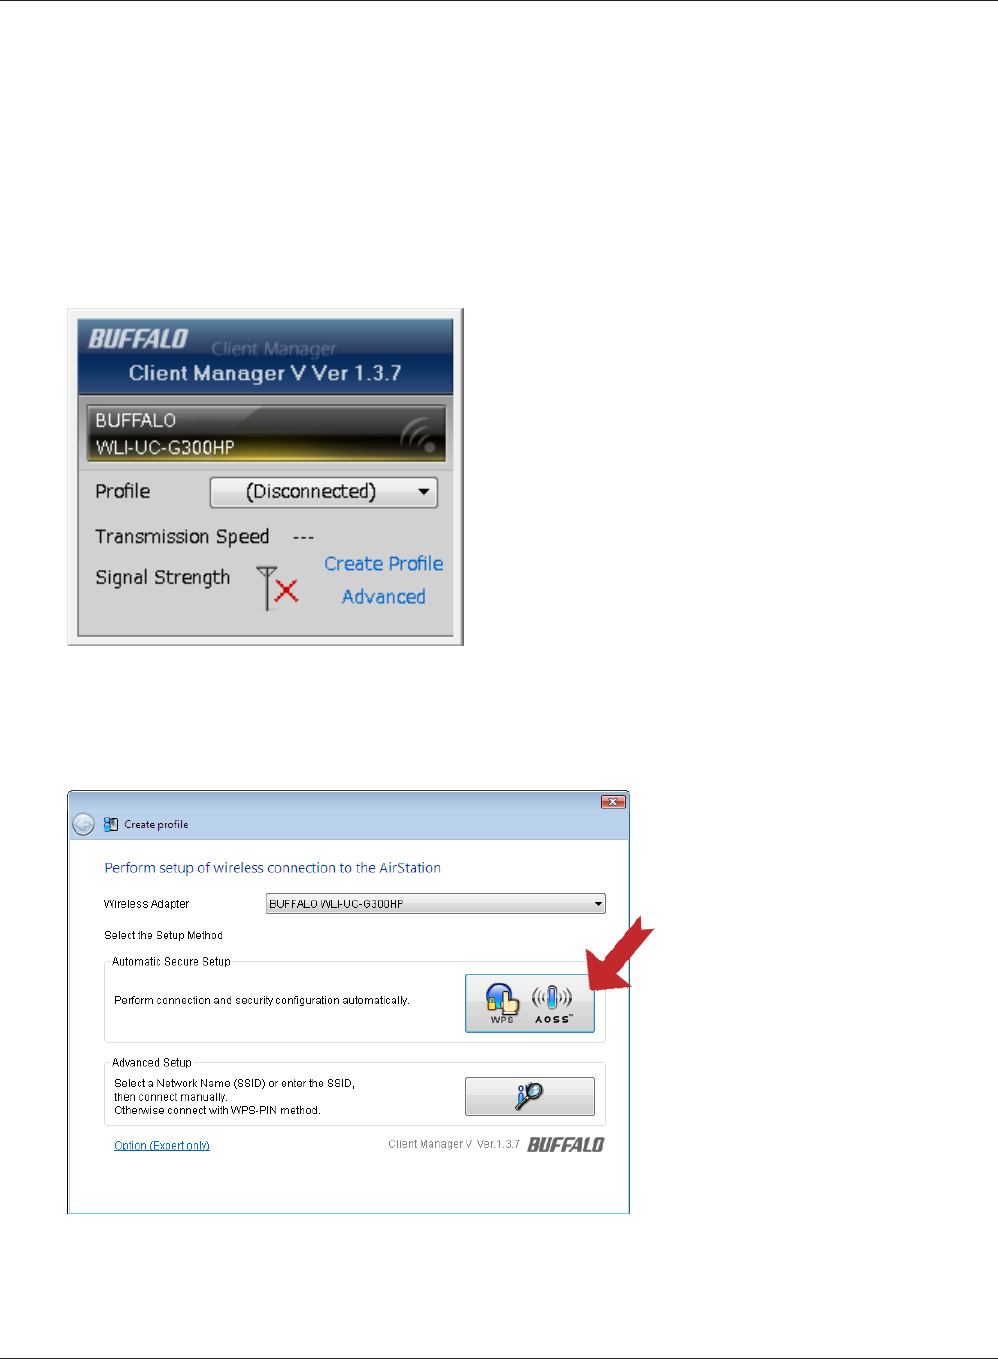
When the screen at left is displayed, click [Create
Prole].
3When the message “A Program needs your permission to continue” appears, click [Continue].
4When the screen shown at left is
displayed, click the [WPS AOSS]
button.
Chapter 3 Connect to a Wireless Network
WLI-UC-G300HP / WLI-UC-G300HP-V1 User Manual 15
Follow the instructions displayed on the screen.
After you congured and if the message "Connection has been Completed" is displayed on Client
Manager V, then you have completed the connection by AOSS/WPS (PBC).
(If “Set Network Location” screen is displayed, select “Home”, “Work”, or “Public location” depending
on the environment in which the AirStation will be used.
2
Windows XP/2000 (Client Manager 3)
If you are using Windows XP, use the included Client Manager 3 software to connect wirelessly with
AOSS/WPS.
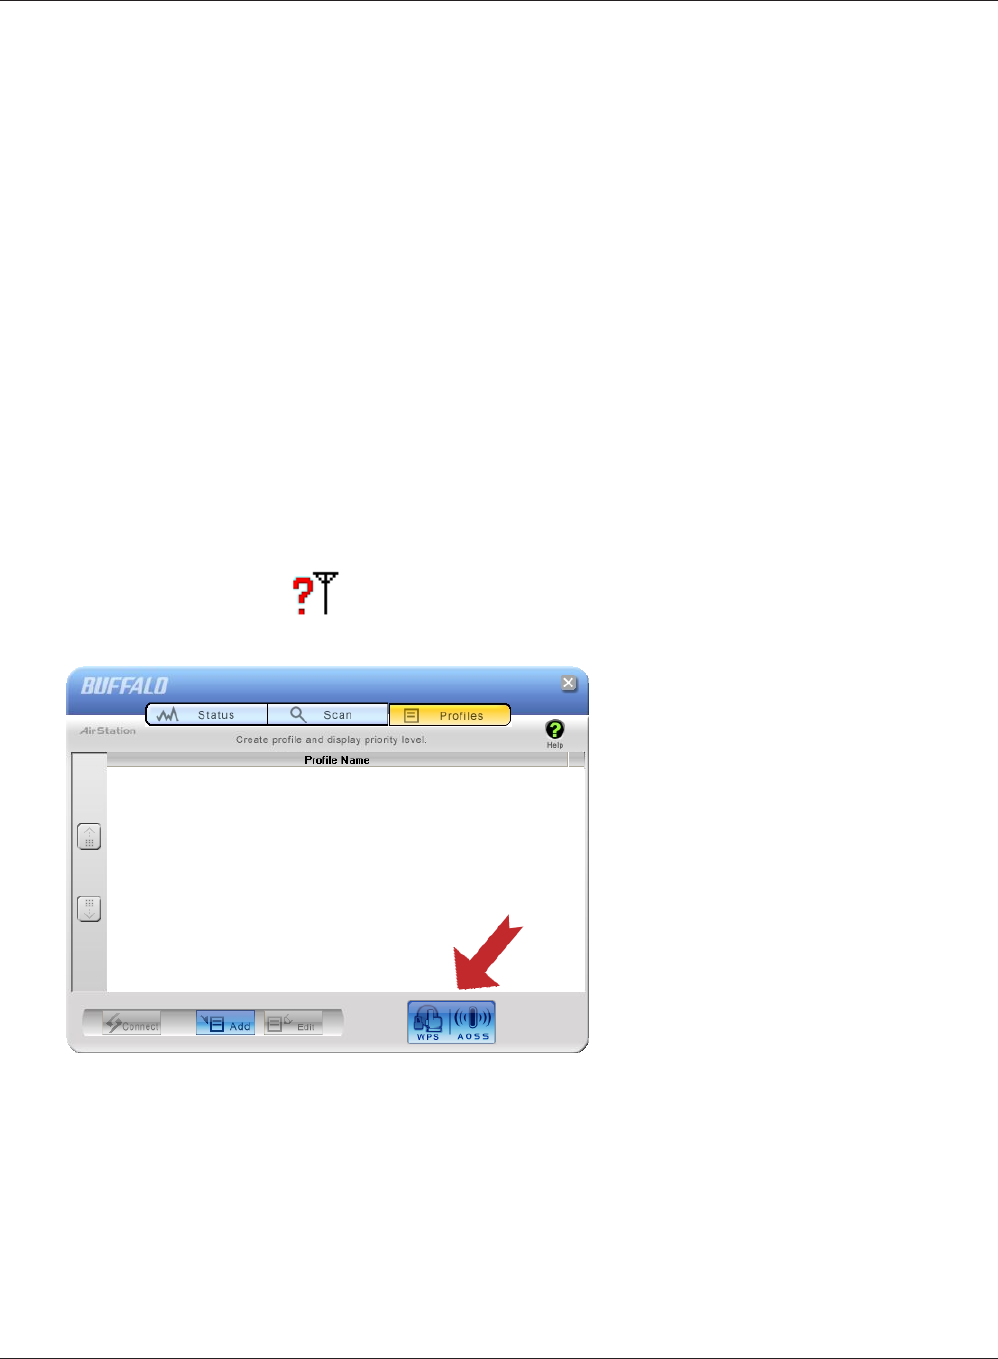
1Right click on the icon in the system tray, and select [Prole].
When the screen shown at left is dis-
played, click [WPS AOSS] button.
Follow the instructions displayed on the screen.
You have completed the AOSS/WPS (PBC) connection when the message "Security setup and con-
nection have been Completed" is displayed in Client Manager 3.
Note: Windows 2000 does not support wireless connection using WPS (PBC). (It uses AOSS wireless connection in-
stead).
WLI-UC-G300HP / WLI-UC-G300HP-V1 User Manual 16
Chapter 3 Connect to a Wireless Network
Automatic Secure Setup (WPS (PIN) )
WPS (Personal Identication Number) uses the mechanism which register the unique number gen-
erated by the utility program (Client Manager) included with this product to an access point and
connect wirelessly.Use this feature when connecting to an access point which supports WPS (PIN).
You need to have Client Manager V and Client Manager 3 installed from the CD attached to this unit
in advance in order to connect wirelessly using WPS (PIN). (page 11)
Windows 7/Vista (Client Manager V)
If you are using Windows 7/Vista, use Client Manager which comes with this package and follow the
procedure below to connect wirelessly with WPS (PIN).
1
2
Click [Start] > [All Programs] > [BUFFALO] > [AirStation Utility] > [Client Manager V].
When the screen on the left is displayed, click
[Create Prole] button.
3When the message "A Program needs your permission to continue", click [Continue].

Chapter 3 Connect to a Wireless Network
WLI-UC-G300HP / WLI-UC-G300HP-V1 User Manual 17
4
When the screen which looks
like the illustration on the left
displayed, click [Advanced Setup]
button.
5
When the screen which looks
like the illustration on the left
displayed, click [WPS-PIN] button.
WLI-UC-G300HP / WLI-UC-G300HP-V1 User Manual 18
Chapter 3 Connect to a Wireless Network
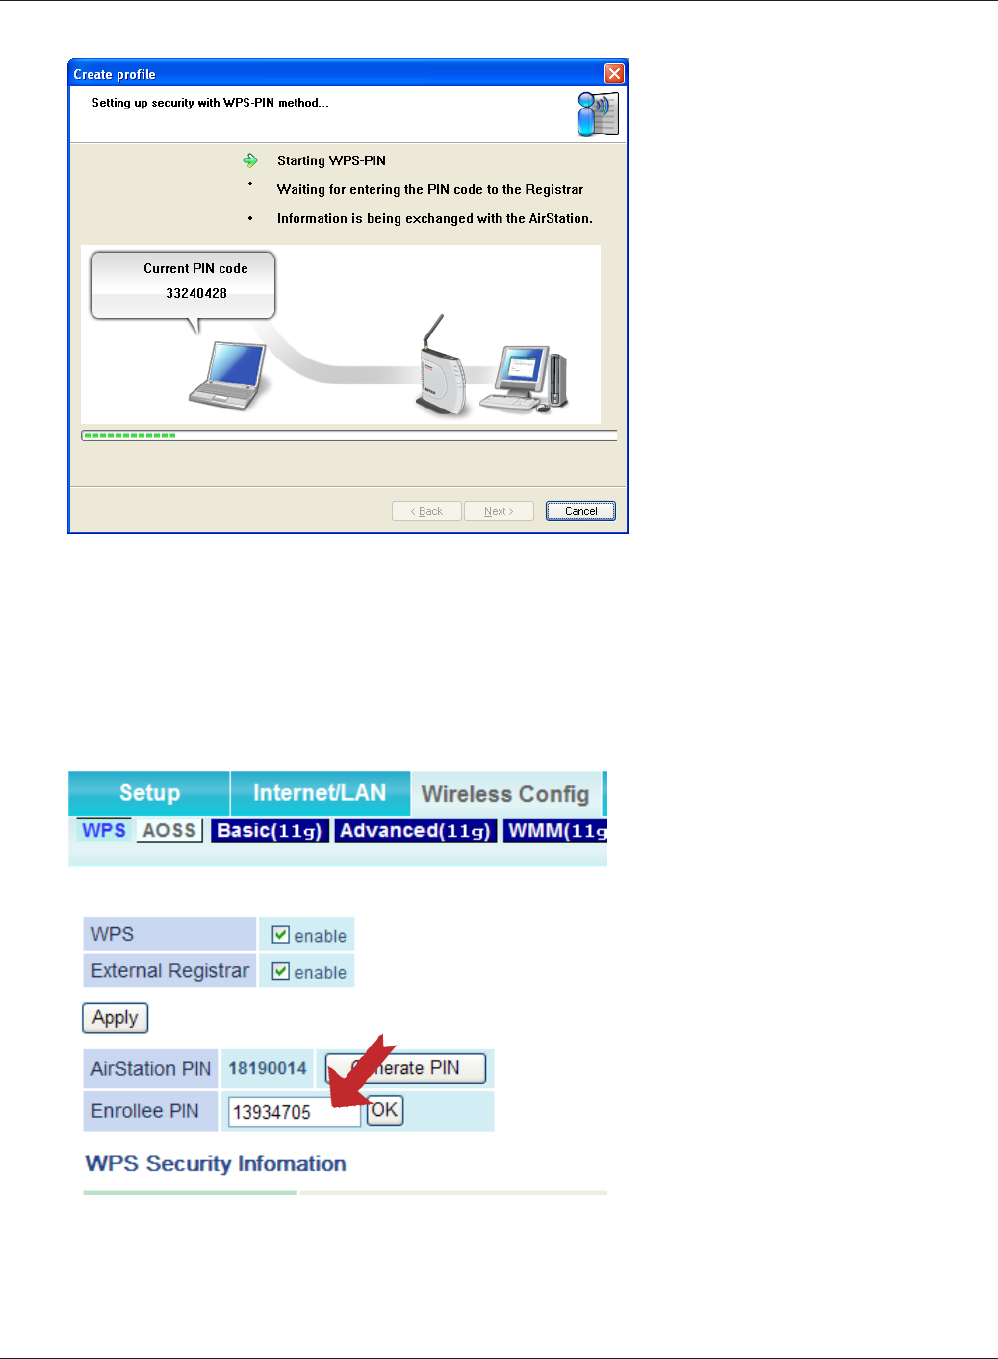
6
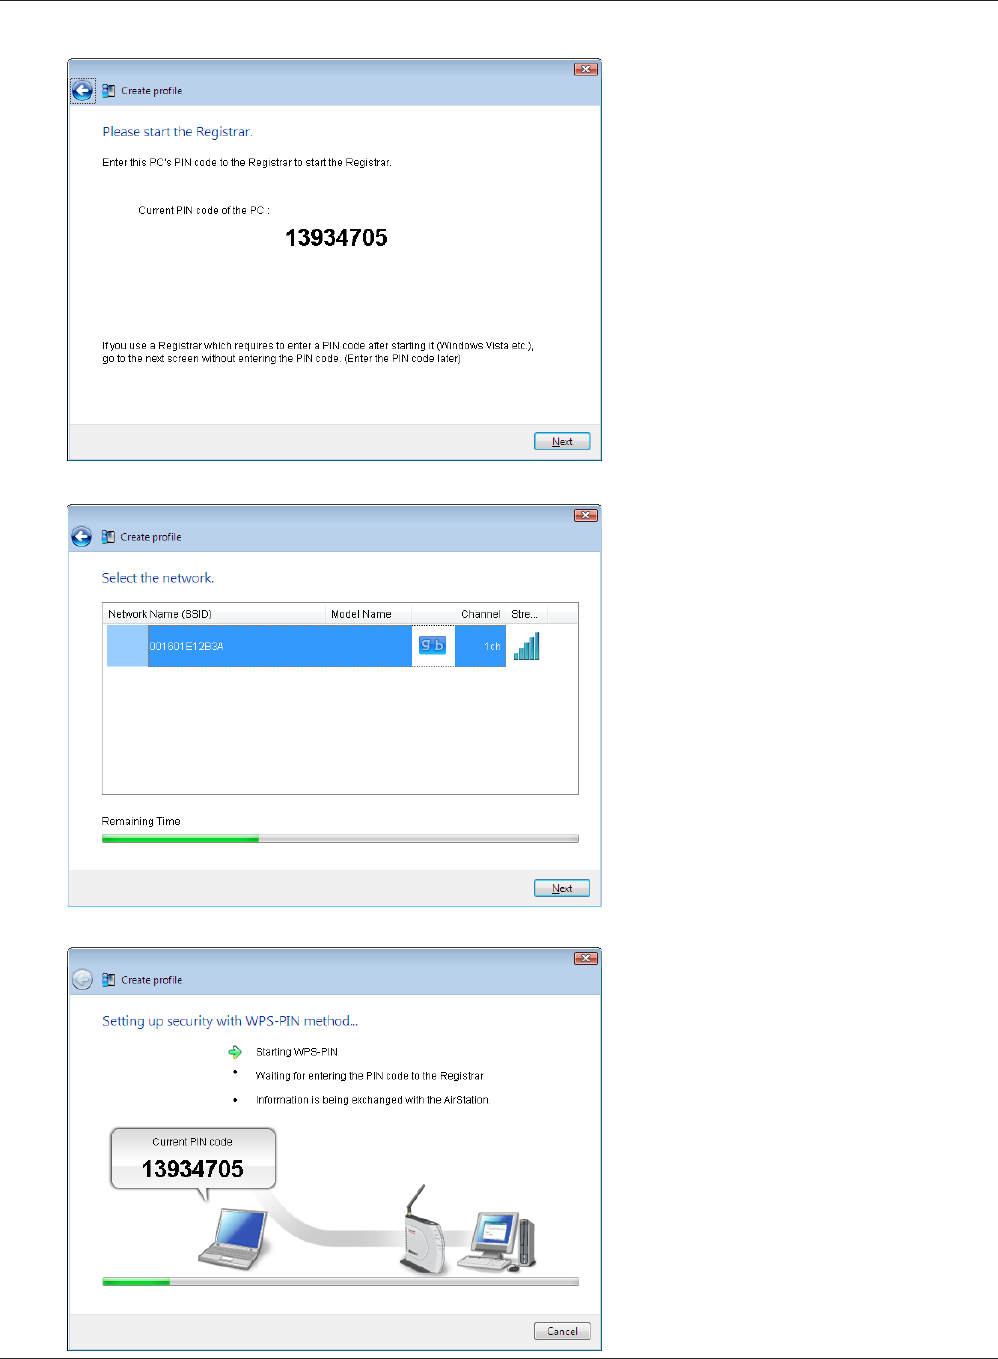
When the PIN code is displayed,
write it down.
After you write the PIN code down
on a piece of paper, click [Next].
7
Select the access point you are
going to connect, and click [Next].
This screen will be displayed.
Chapter 3 Connect to a Wireless Network
WLI-UC-G300HP / WLI-UC-G300HP-V1 User Manual 19
8Use an administrative computer which is connected to an access point with a wire in order to
login to that access point. The screen to enter the PIN code will be displayed.
Note: If the access point you are trying to connect is the AirStation, click [Wireless Cong]> [WPS] on the TOP
of the conguration screen. The screen to enter the PIN code will be displayed.
9On the conguration screen of
the access point, enter the PIN
code you write down in step 6.
Follow the instructions displayed on the screen to congure.
You have completed the connection with WPS (PIN) after you congured and when the message
"Connection has been Completed" is displayed in Client Manager V.
(If “Set Network Location” screen is displayed, select “Home”, “Work”, or “Public location” depending
on the environment in which the AirStation will be used.)
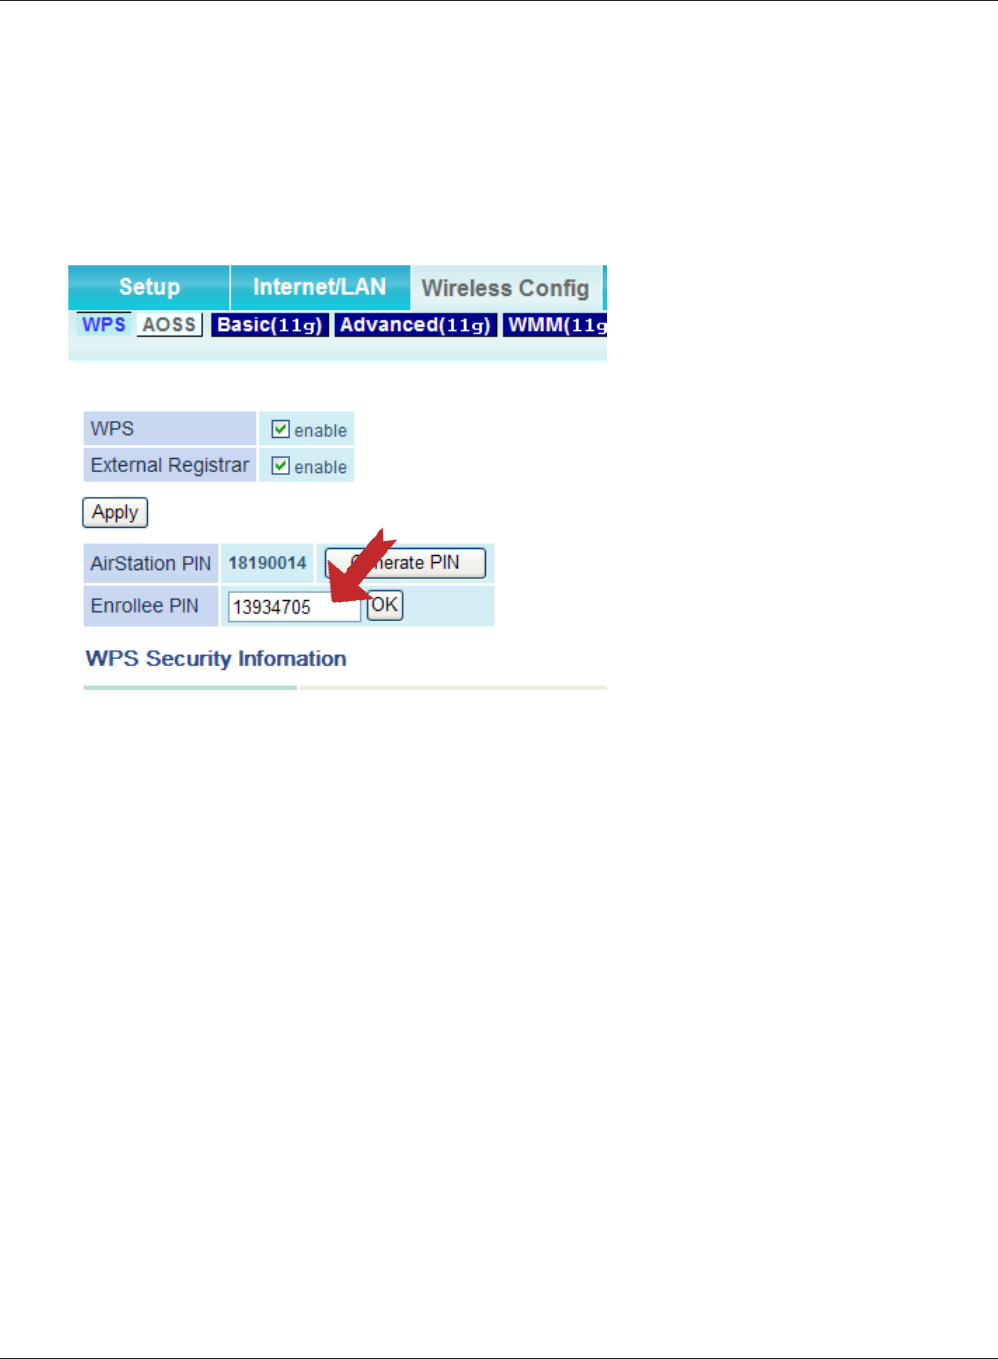
Note: If the access point you are trying
to connect is the AirStation,
enter the PIN code in [Enrollee
PIN] and click [OK].

WLI-UC-G300HP / WLI-UC-G300HP-V1 User Manual 20
Chapter 3 Connect to a Wireless Network
Windows XP (Client Manager 3)
If you are using Windows XP, use Client Manager 3 which comes with this package and follow the
procedure below to connect wirelessly with WPS (PIN).
Note: Windows 2000 does not support WPS (PIN).
1Right click on the icon displayed in the system tray, and select [Easy Connection] > [WPS
PIN Code type].
2
When the PIN code is displayed,
write it down. Then, click [Next].
3
Select the access point you are
going to connect, and click [Next].
Chapter 3 Connect to a Wireless Network
WLI-UC-G300HP / WLI-UC-G300HP-V1 User Manual 21
This screen will be displayed.
4Use a computer with a wired Ethernet connection to log in to the access point. The screen to
enter the PIN code will be displayed.
Note: If the access point you are trying to connect is a Bualo AirStation, click [Wireless Cong] > [WPS] on
the TOP of the conguration screen. The screen to enter the PIN code will be displayed.
5On the conguration screen of
the access point, enter the PIN
code you wrote down in step 2.
Follow the instructions displayed on the screen to congure. When "Connection has been
completed" is displayed, you are connected.
Note: If the access point you are
trying to connect is a Bualo
AirStation, enter the PIN code in
[Enrollee PIN] and click [OK].
WLI-UC-G300HP / WLI-UC-G300HP-V1 User Manual 22
Chapter 3 Connect to a Wireless Network
Manual Setup (Client Manager)
You may also connect to an Access point manually, without using AOSS/WPS. The procedure varies
depending on the version of Windows used.
First, install Client Manager from the included CD. (page 11)
Windows 7/Vista (Client Manager V)
With Windows 7/Vista, use Client Manager V to connect wirelessly.
1
2
Click [Start] > [All Programs] > [BUFFALO] > [AirStation Utility] > [Client Manager V].
When this screen is displayed, click [Create Prole].
3When the message "A Program needs your permission to continue", click [Continue].
Chapter 3 Connect to a Wireless Network
WLI-UC-G300HP / WLI-UC-G300HP-V1 User Manual 23
4
Click [Advanced Setup].
5Click [Connect Manually].

WLI-UC-G300HP / WLI-UC-G300HP-V1 User Manual 24
Chapter 3 Connect to a Wireless Network
6
Select your access point, and click
[Next].
7
Enter your [Encryption Key]
(passphrase) and click [Connect].
Follow the instructions in the wizard to connect. When "Connection Complete" is displayed, setup is
completed. If “Set Network Location” is displayed, then select “Home”, “Work”, or “Public location” de-
pending on the environment in which the AirStation will be used.
Chapter 3 Connect to a Wireless Network
WLI-UC-G300HP / WLI-UC-G300HP-V1 User Manual 25
Windows XP/2000 (Client Manager 3)
Client Manager 3 is a wireless connection utility for Windows XP/2000.
2
1Right click on the icon in the system tray, and select [Scan].
Select the access point that you are
going to connect to and click [Next].
3
Choose your [Encryption Method]
and enter an [Encryption Key]. Click
[Connect].
Follow the instructions on the screen to connect.
WLI-UC-G300HP / WLI-UC-G300HP-V1 User Manual 26
Chapter 3 Connect to a Wireless Network
Manual Setup (Windows Utility)
You can connect to an access point without installing or using Client Manager. Windows includes a
built-in wireless utility. The procedure varies depending on the version of Windows used.
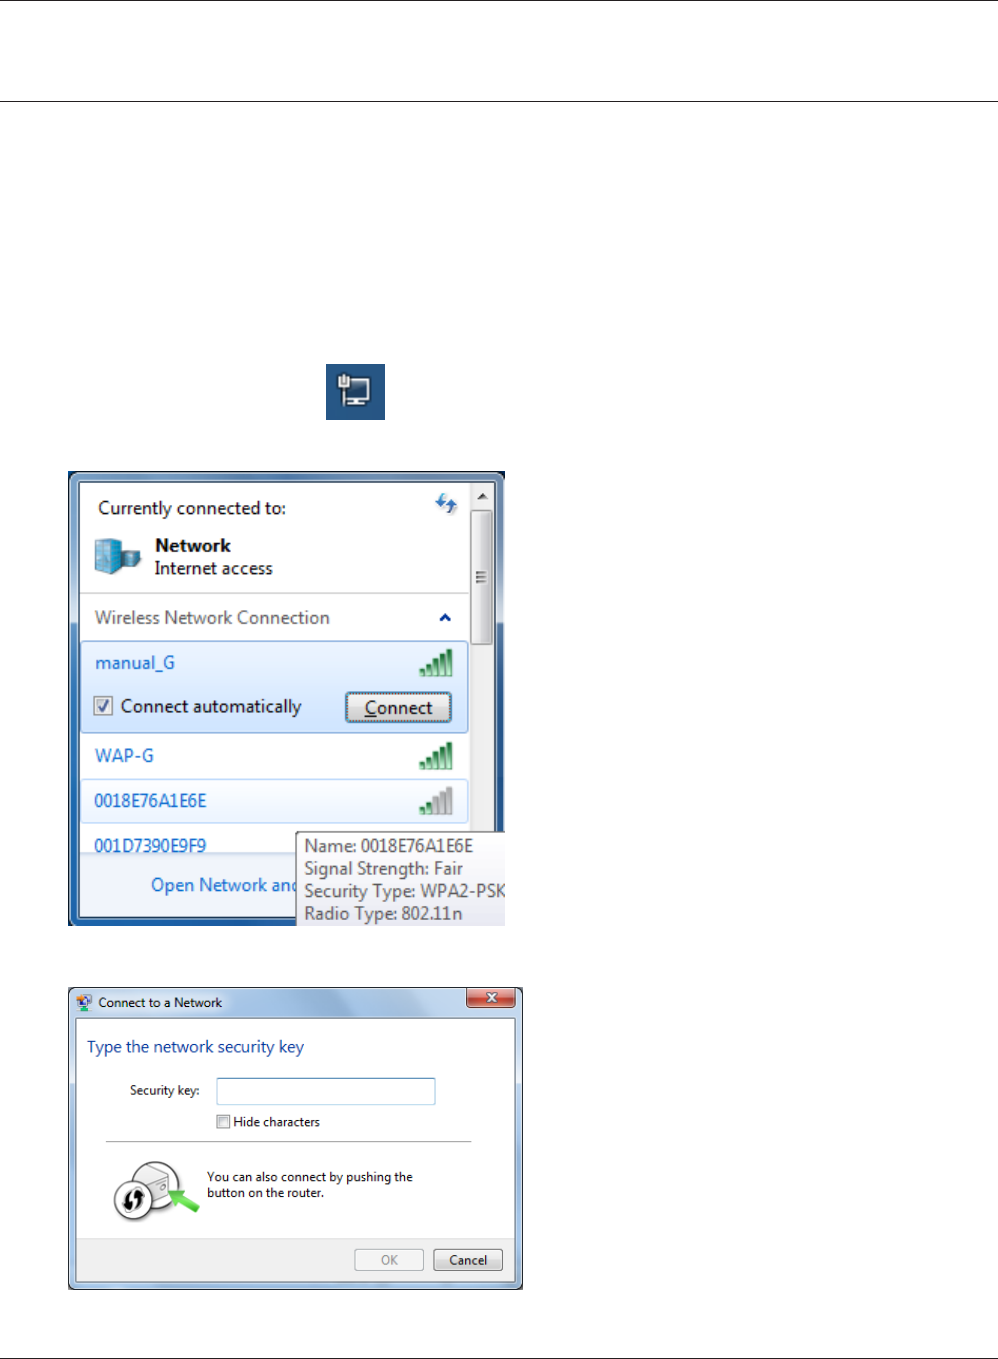
Windows 7 (WLAN AutoCong)
With Windows 7, use WLAN AutoCong to connect to the AirStation.
1Click on the network icon in the system tray.
2Select the target AirStation’s name and click
[Connect]. If you will be connecting to this
device in the future, checking [Connect
automatically] is recommended.
3Enter the encryption key and click [OK].
Follow the instructions on the screen to connect.
Chapter 3 Connect to a Wireless Network
WLI-UC-G300HP / WLI-UC-G300HP-V1 User Manual 27
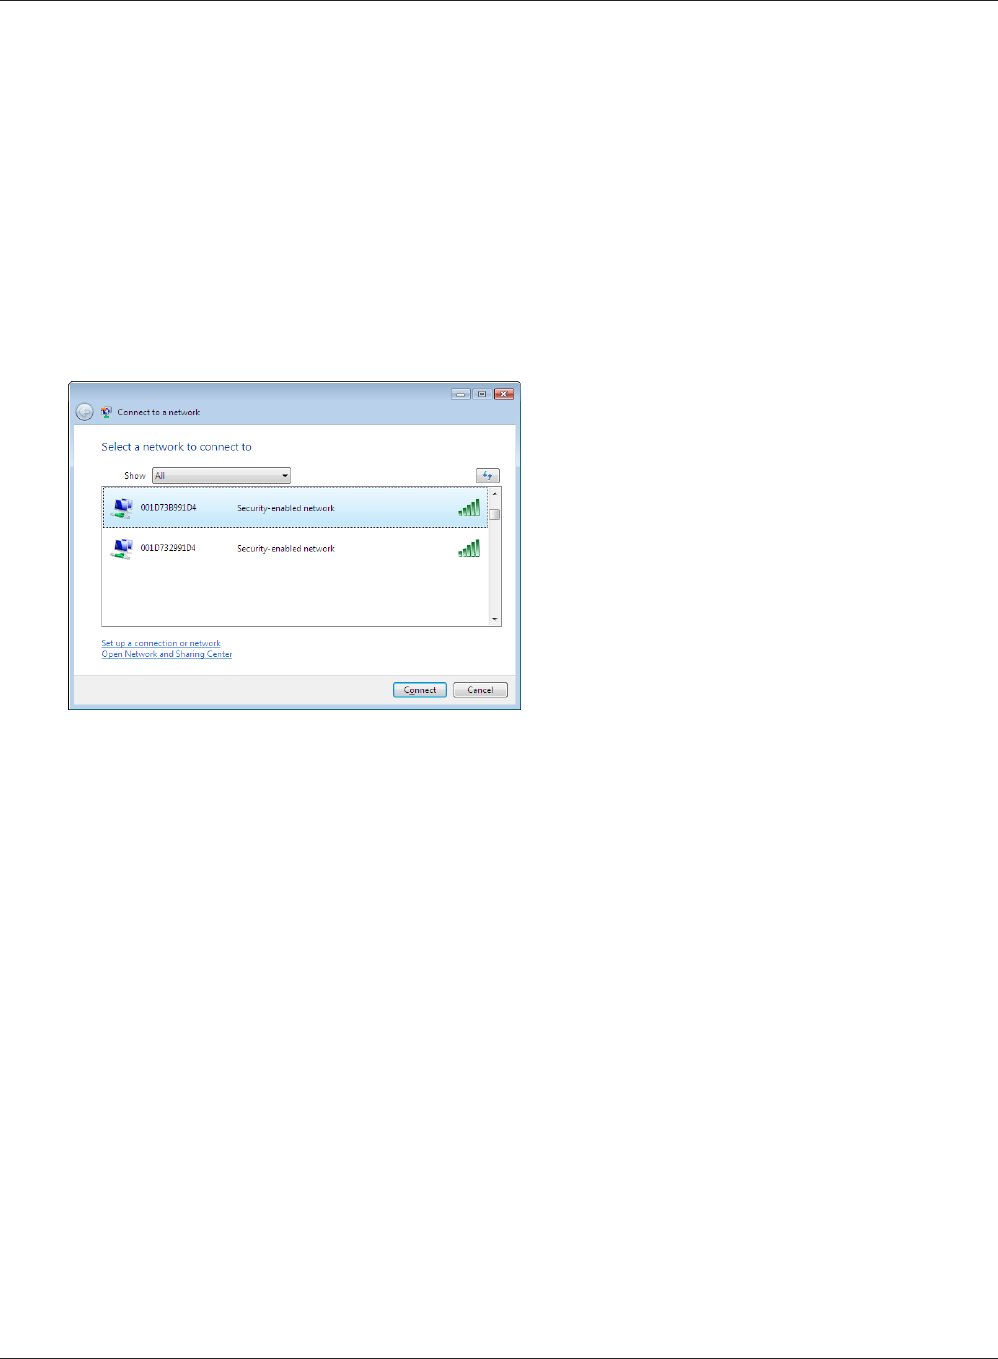
1Right click on the wireless network icon in the system tray.
2Click [Connect to a network].
Select your wireless network and click
[Connect].
3
Windows Vista (WLAN AutoCong)
You can use WLAN AutoCong to connect to a wireless Access Point:

WLI-UC-G300HP / WLI-UC-G300HP-V1 User Manual 28
Chapter 3 Connect to a Wireless Network
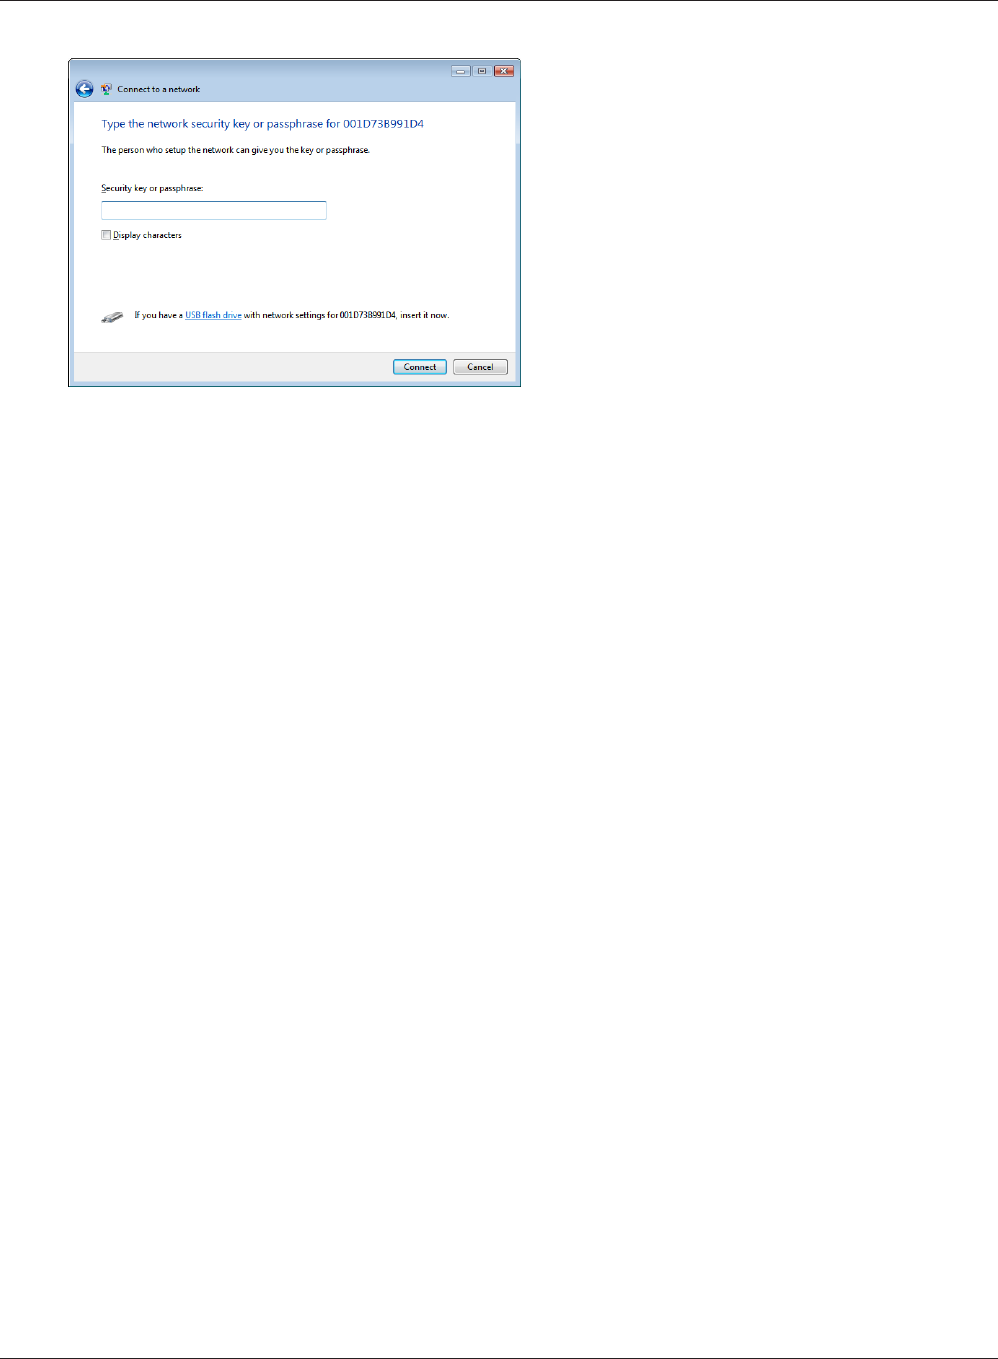
If the screen below is displayed, click “I want to enter the network key or passphrase instead”.
(Otherwise, go to step 4)
Chapter 3 Connect to a Wireless Network
WLI-UC-G300HP / WLI-UC-G300HP-V1 User Manual 29
Enter the encryption key and click [Connect].
4
Follow the instructions displayed on the screen to nish conguration. If the “Set Network Location”
screen is displayed, select “Home”, “Work”, or “Public location“ depending where you’re using the
AirStation.
WLI-UC-G300HP / WLI-UC-G300HP-V1 User Manual 30
Chapter 3 Connect to a Wireless Network
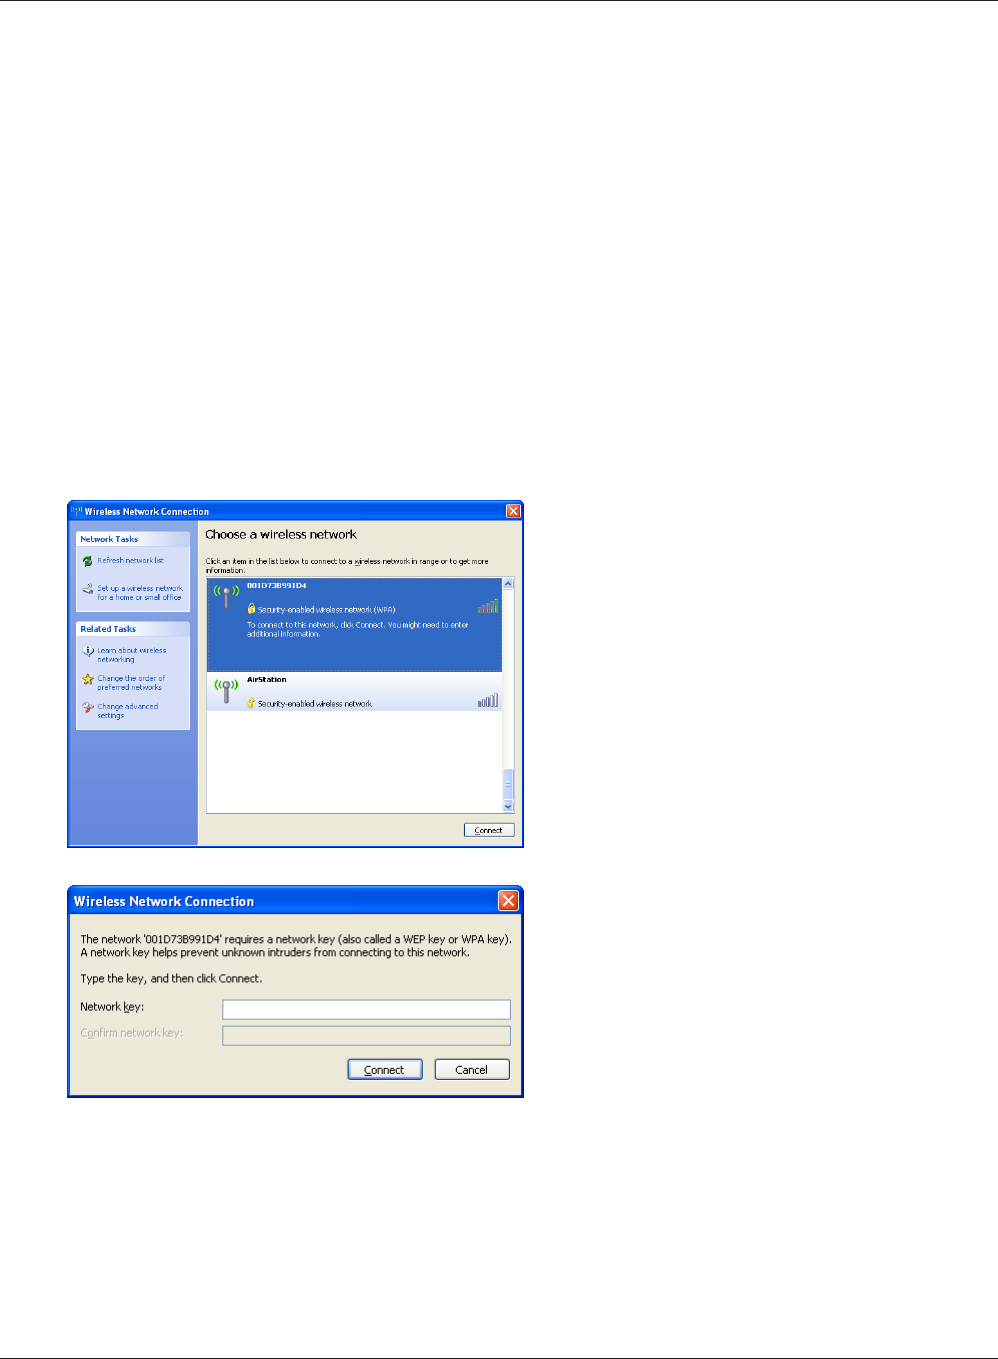
Windows XP (Wireless Zero Conguration)
Windows XP includes a built-in utility to connect to your wireless Access Point.
Note: If Client Manager 3 is installed on your computer, then Windows Zero Cong is disabled. Uninstall Client
Manager 3 to use Windows Zero Cong, or just use Client Manager 3 to connect to the AirStation.
1Right click on the wireless network icon in the system tray.
2Click [View Available Wireless Networks].
Select a wireless network to connect to and
click [Connect].
3
Enter the encryption key (passphrase) and
click [Connect].
4
Follow the instructions on the screen to connect.

WLI-UC-G300HP / WLI-UC-G300HP-V1 User Manual 31
Chapter 4 - Client Manager
Software Overview
Client Manager is utility software used to connect to an access point on the network or to verify the
connection between an access point and your computer. It is included with this device.
Note: There are two versions of Client Manager with this unit, "V" and "3".
Client Manager V supports Windows 7/Vista.
Client Manager 3 supports Windows XP/2000.
Using Client Manager V for Windows 7/Vista
Opening and Closing Client Manager
• When you install Client Manager, it will be added to your Startup folder and will automatically
launch with Windows. If Client Manager does not launch automatically, click [Start] > [All
Programs] > [BUFFALO] > [AirStation Utility] > [ClientManager V] .
• Right click on the icon of Client Manager in the system tray and click [Exit] to close Client Manager.
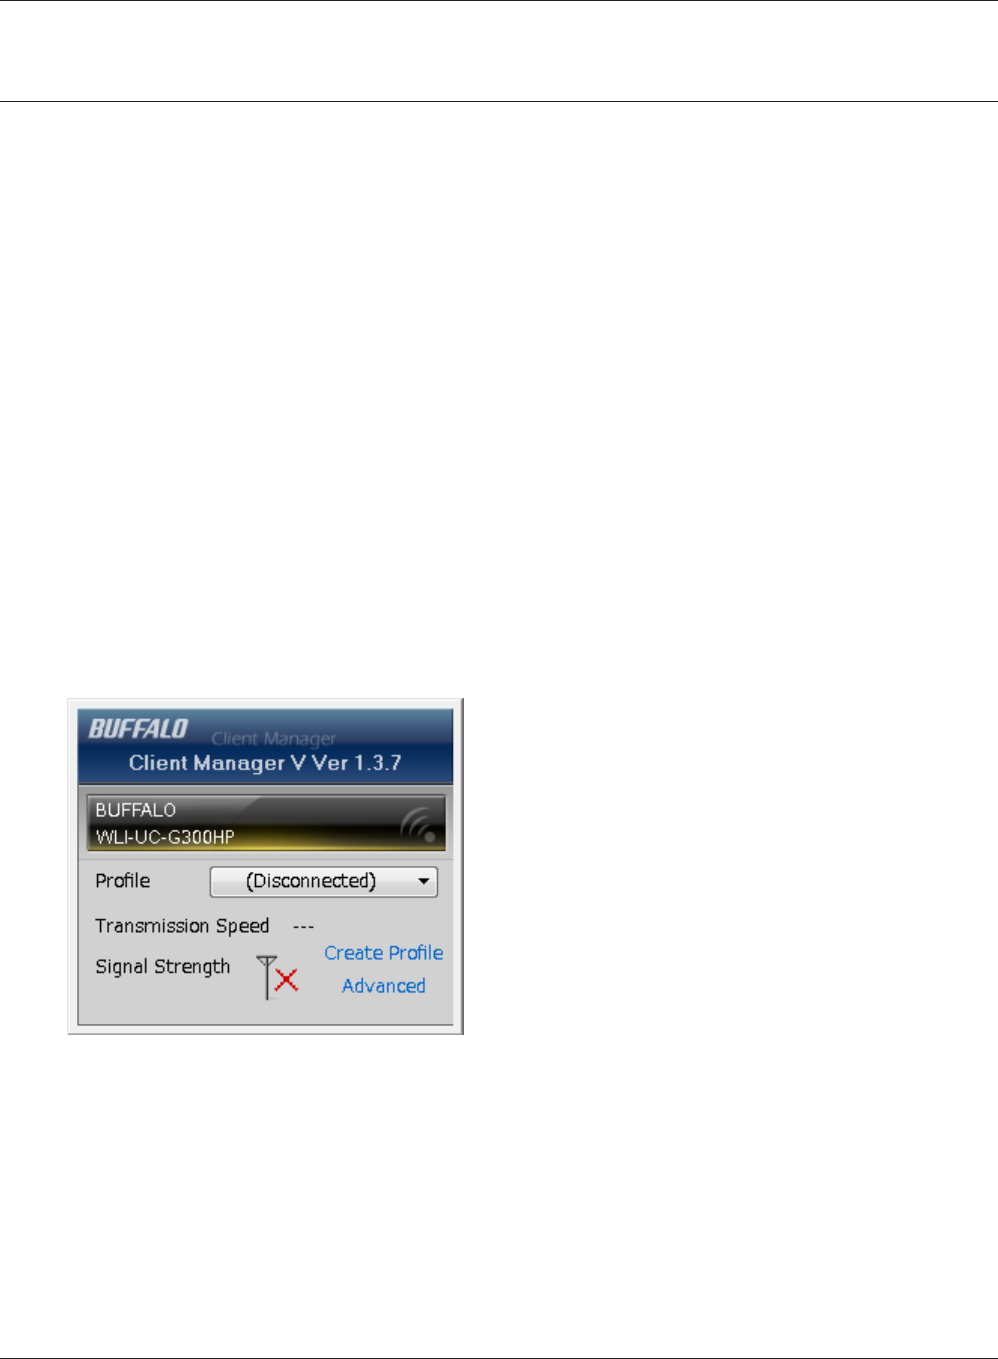
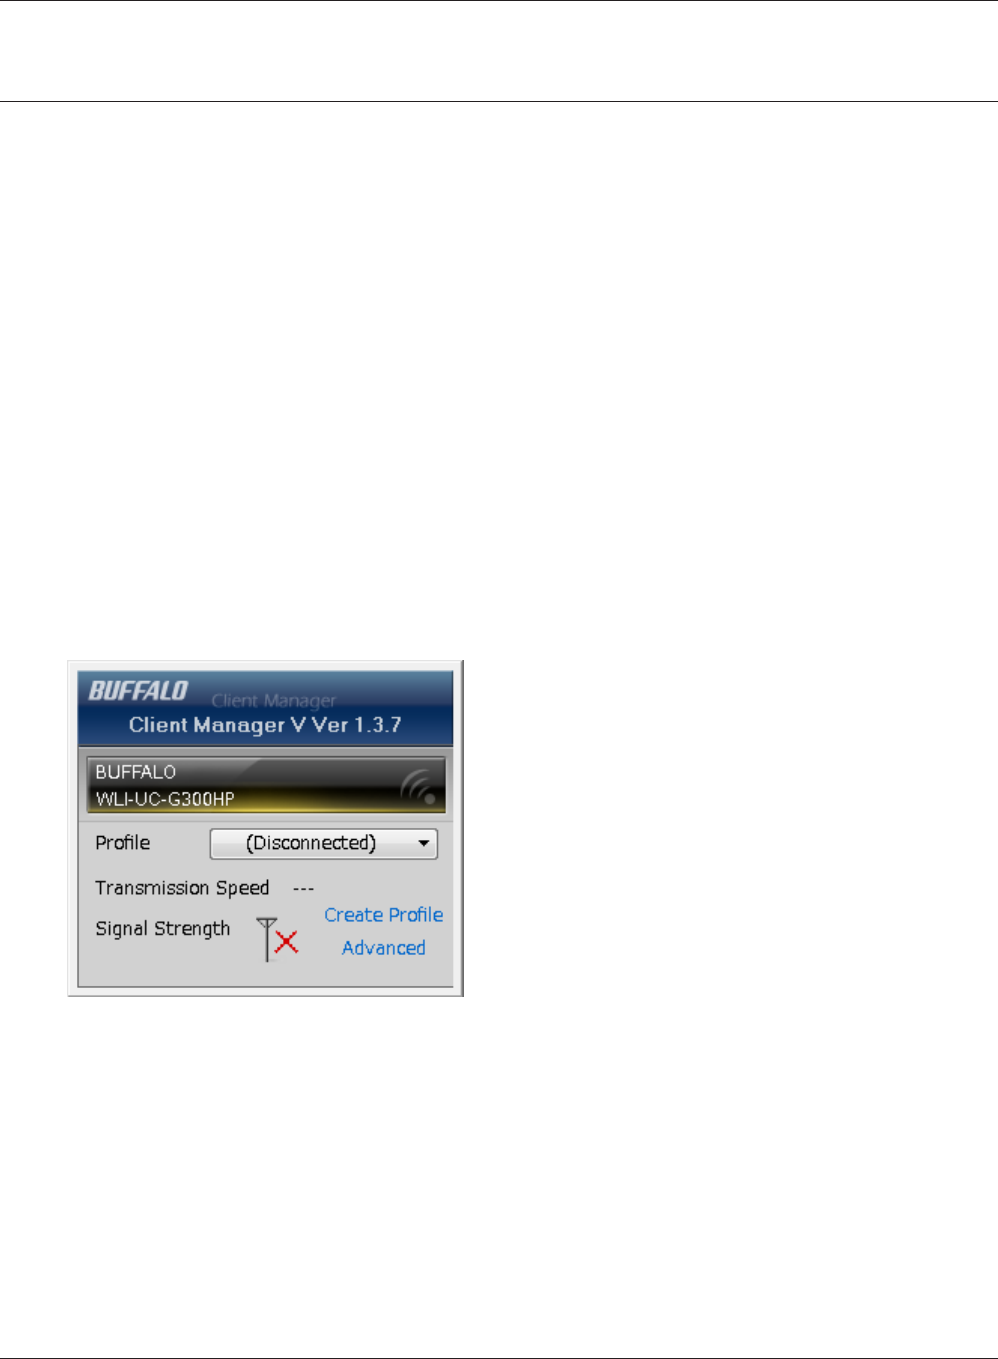
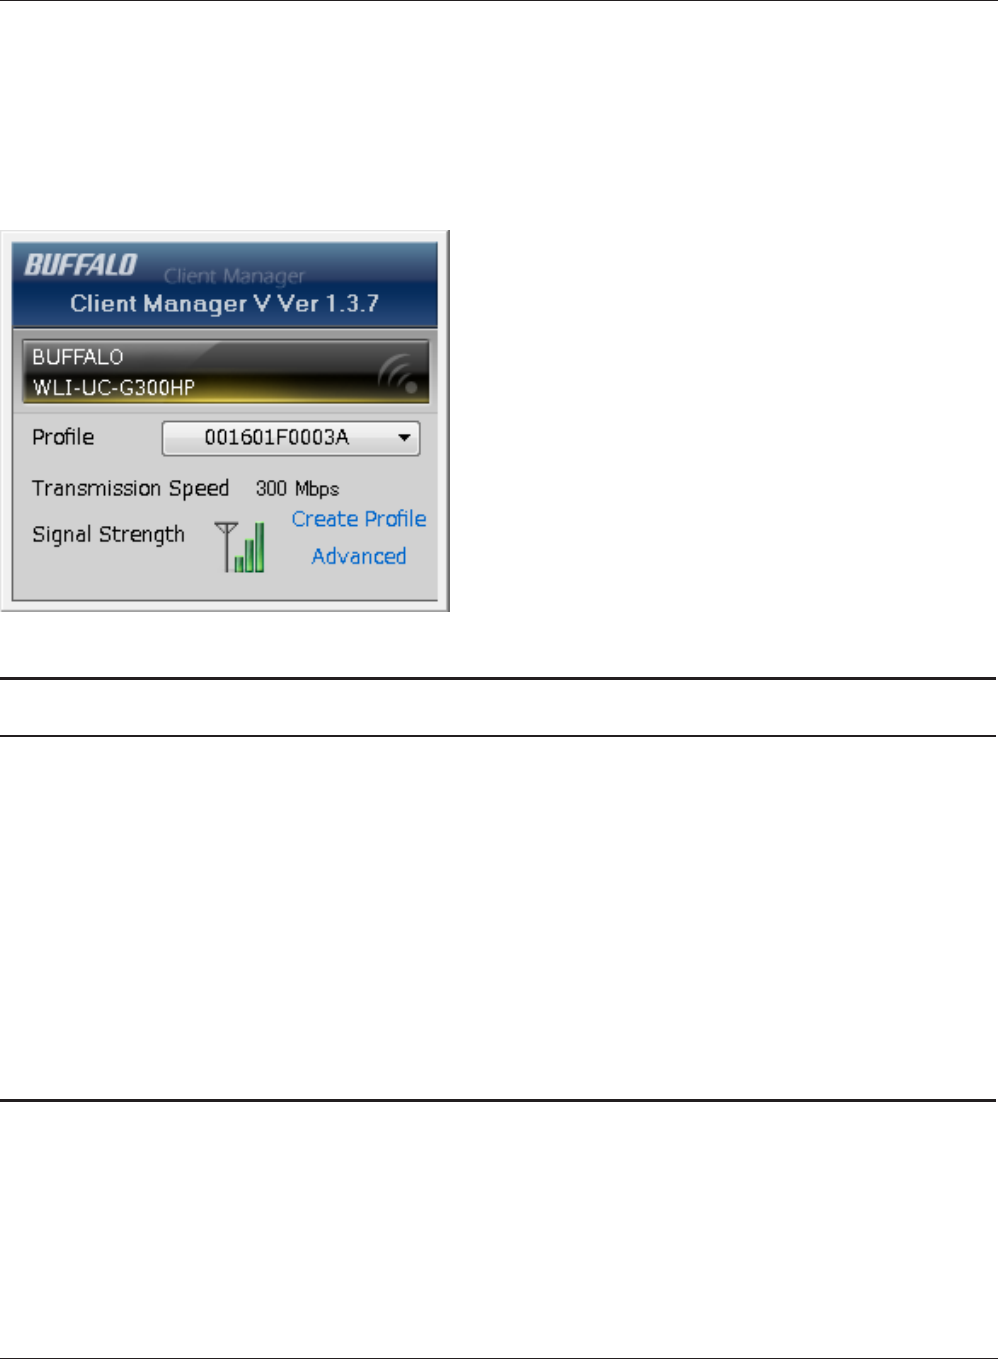
The appearance of Client Manager according to its connection status:
: No wireless connection.
Communicating via an access point.
WLI-UC-G300HP / WLI-UC-G300HP-V1 User Manual 32
Chapter 4 Client Manager
Parameter Meaning
Prole Displays information about the current connection points.
If you have multiple connection points, you can switch among
them.
Transmission Speed Displays the current connection speed.
Signal Strength Displays the current signal strength.
Create Prole Click this to display the Automatic Secure Setup and Advanced
Setup screen (page 33).
Advanced Click this to display the Wireless Status screen.
Main Screen
The Main screen displays the current connection status. You can perform the following operations
from this screen.
Chapter 4 Client Manager
WLI-UC-G300HP / WLI-UC-G300HP-V1 User Manual 33
Parameter Meaning
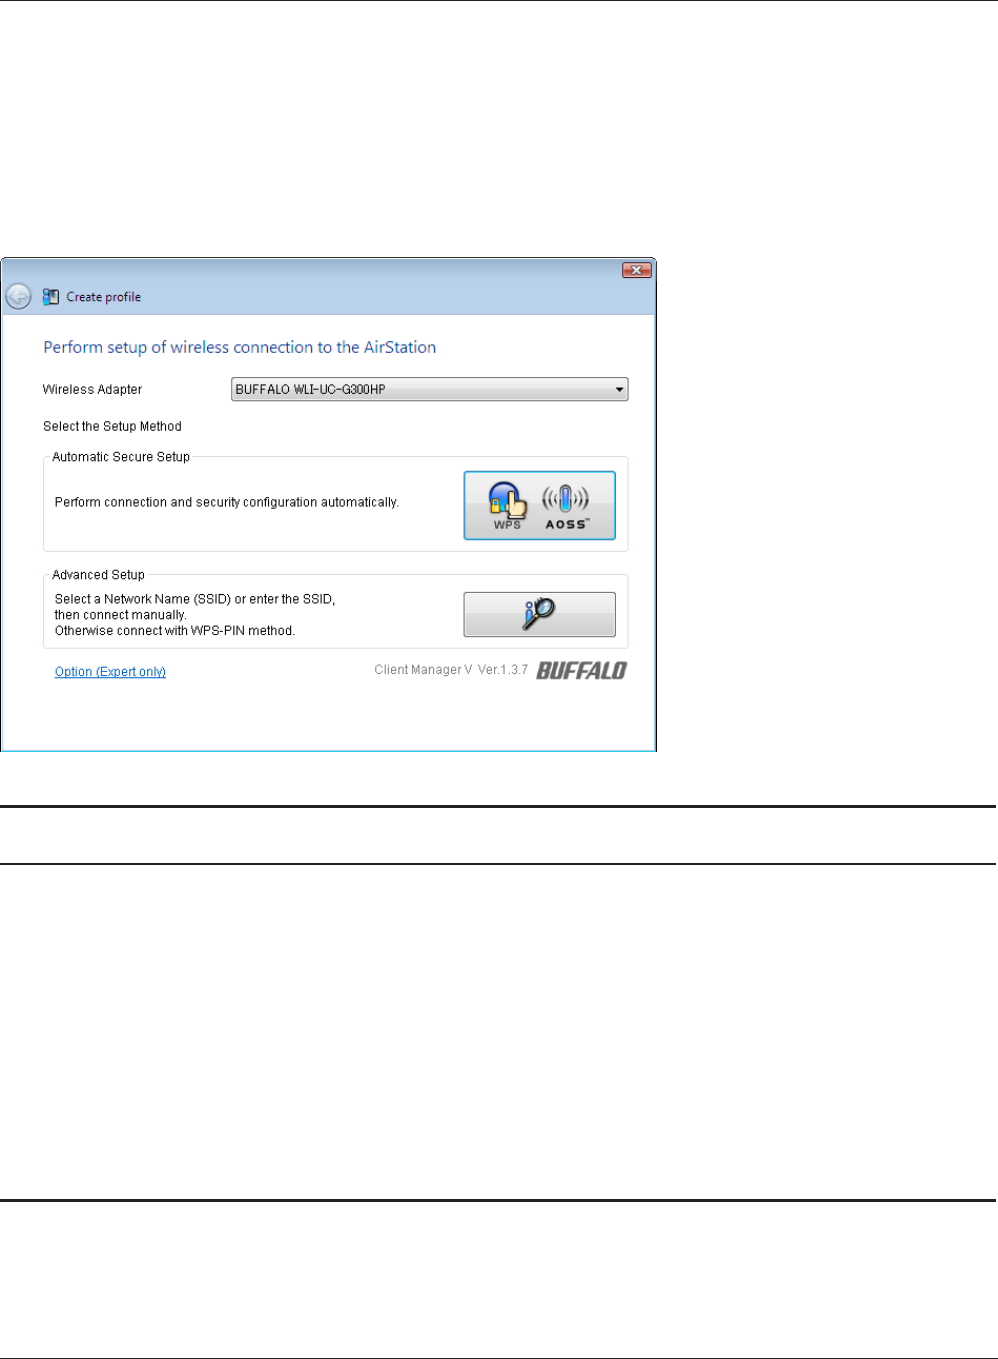
Wireless Adapter Displays names of currently used wireless devices.
Automatic Secure Setup Clicking this will search for an AOSS or WPS compatable access
point to connect to automatically.
Advanced Setup Click this to congure your wireless settings manually. It will
display the SSID/WPS-PIN selection screen (page 34).
Option (Expert only) Click this to specify whether you use AOSS or WPS (PBC) for
connection in Automatic Secure Setup. It displays the WPS-PBC/
AOSS selection screen (page 37).
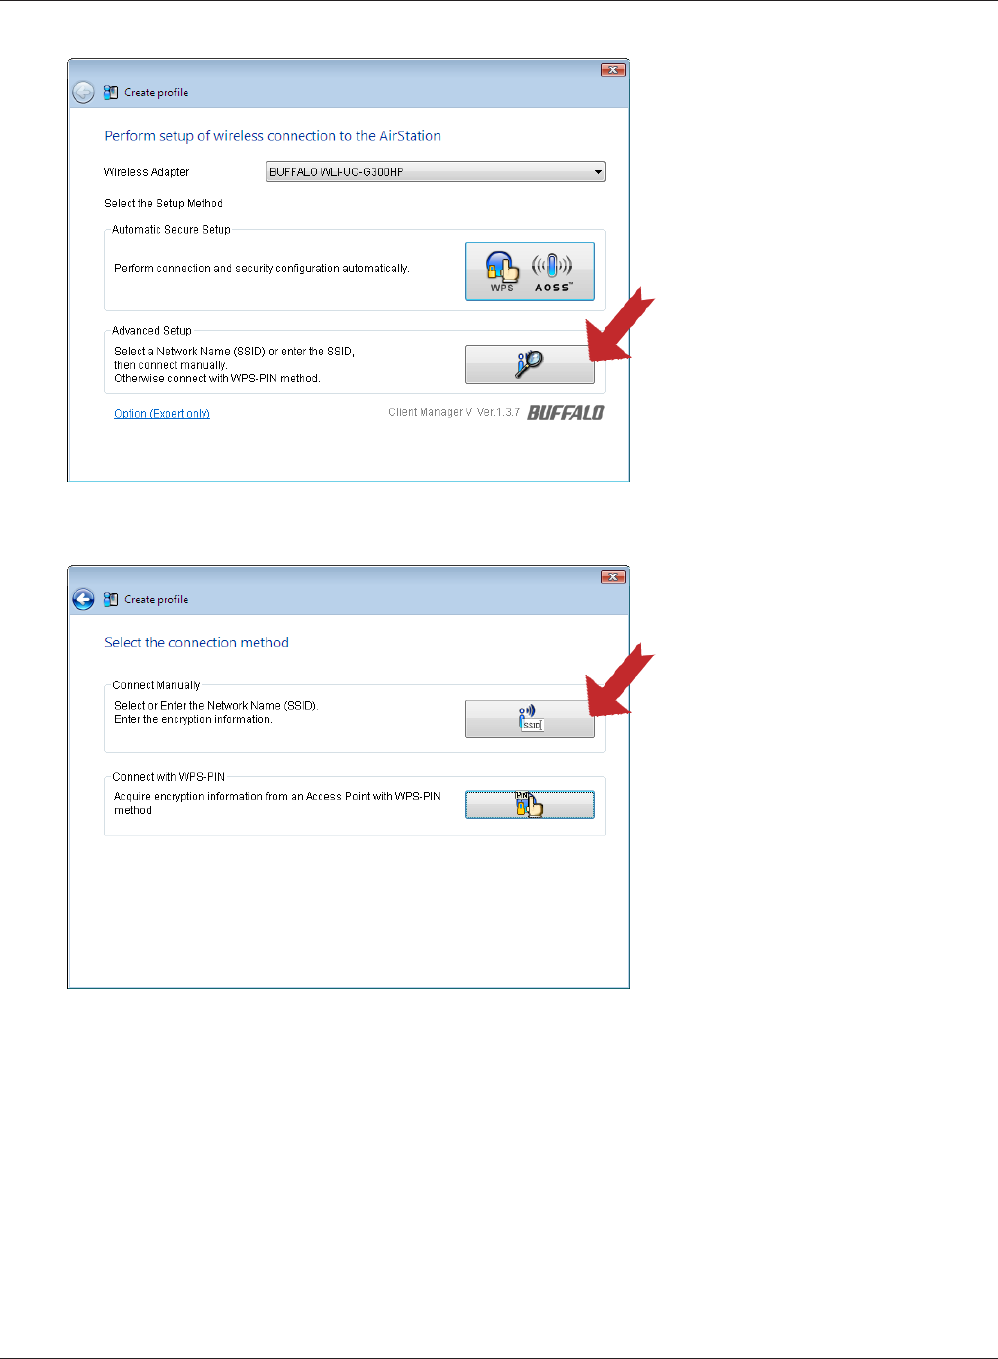
Automatic Secure Setup and Advanced Setup
There are two ways to connect to an access point: automatic or manual. In the following wizard,
automatic setup will be reered to as “AOSS/WPS” and manual setup will be referred to as “Advanced
Setup”.
WLI-UC-G300HP / WLI-UC-G300HP-V1 User Manual 34
Chapter 4 Client Manager
Parameter Meaning
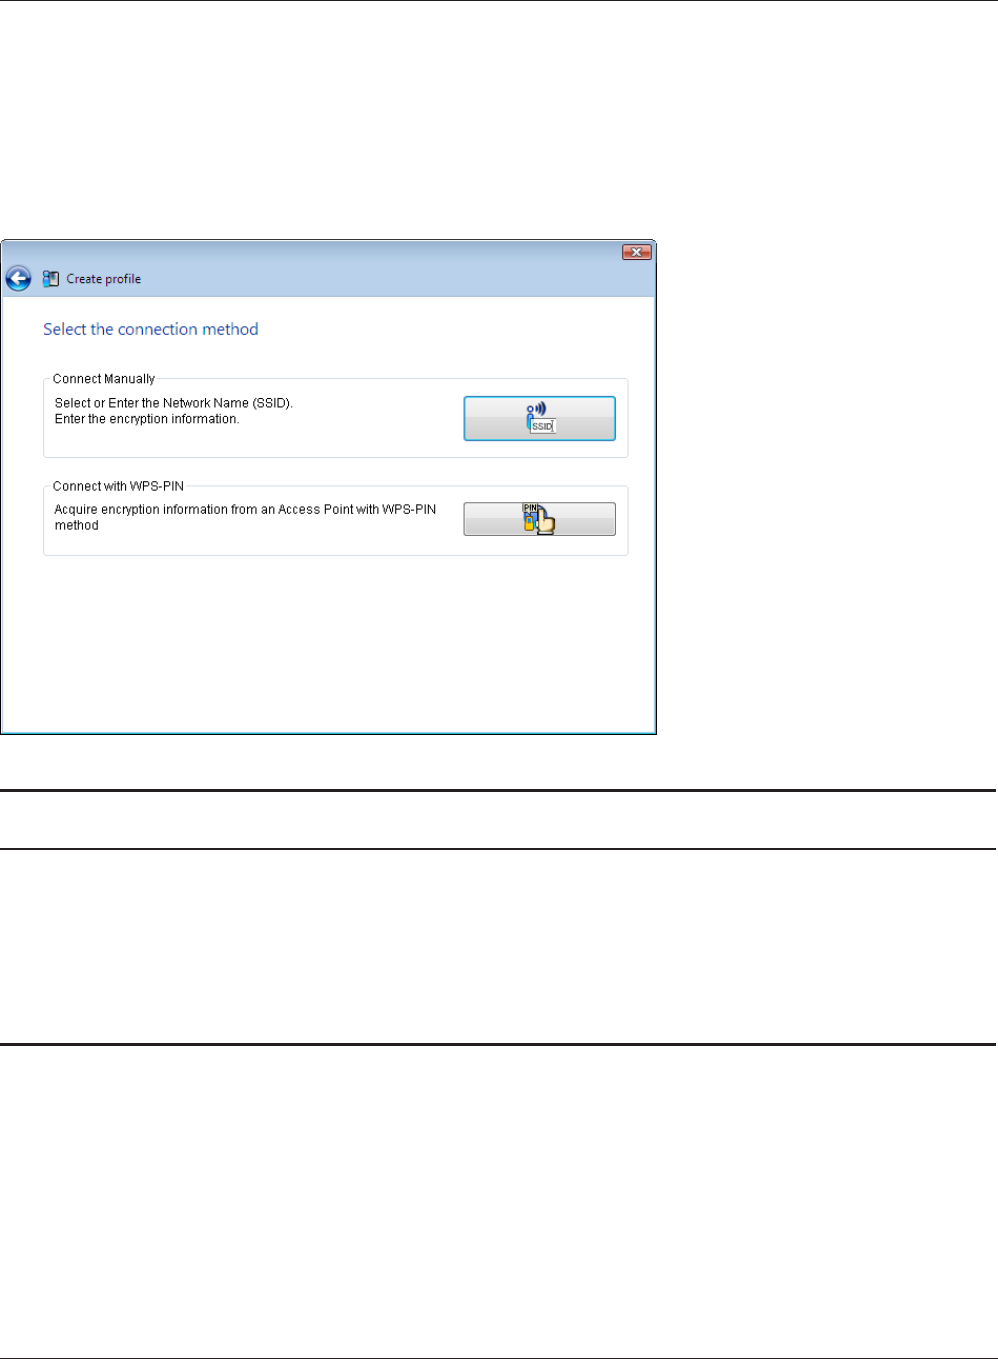
Connect Manually Specify SSID of an access point and congure connection settings.
Click here to display the Searching Wireless Access Points screen
(page 35).
Connect with WPS-PIN Click this to connect to a wireless access point by entering its WPS
PIN.
SSID / WPS-PIN selection
This screen lets you select whether to connect to an access point by specifying the SSID or by enter-
ring a WPS PIN.
Chapter 4 Client Manager
WLI-UC-G300HP / WLI-UC-G300HP-V1 User Manual 35
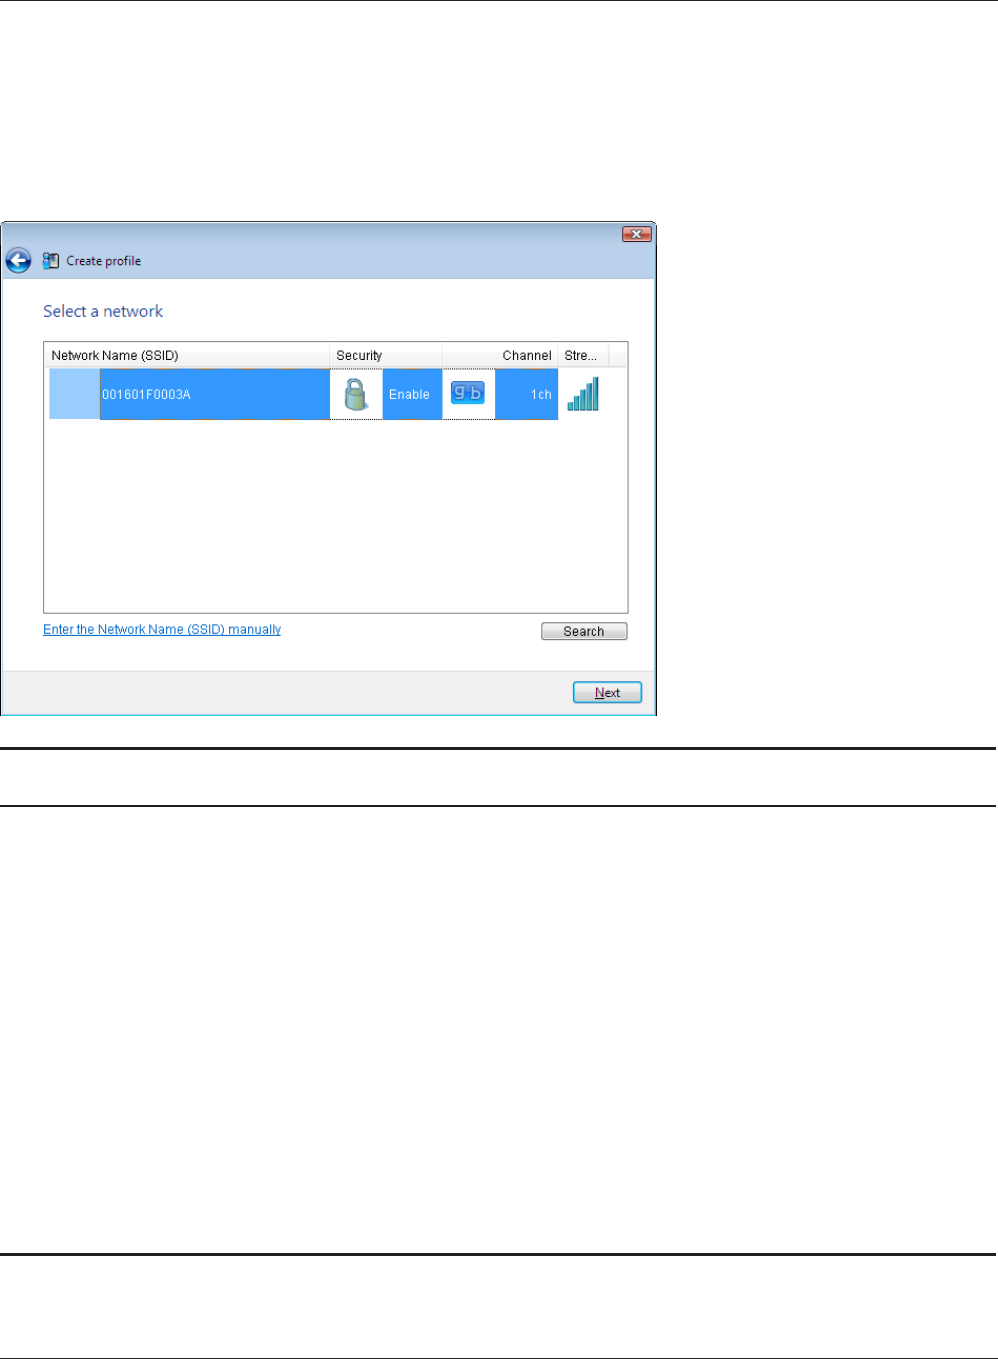
Parameter Meaning
Network Name (SSID) Displays the SSID of each available access point.
Security Displays whether or not the access point uses encryption.
Channel Displays the wireless channel used by an access point.
Strength Displays the signal strength of an access point.
Enter the Network Name (SSID)
manually
Click this to enter an SSID manually and display the Wireless
Network Information screen (page 36).
Search Click here to search for available access points again.
Next Click this to display the Wireless Network Information screen (page
36).
Searching Wireless Access Points
The screen to list available wireless access points in your area. You can select an access point and
enter network information manually to connect.
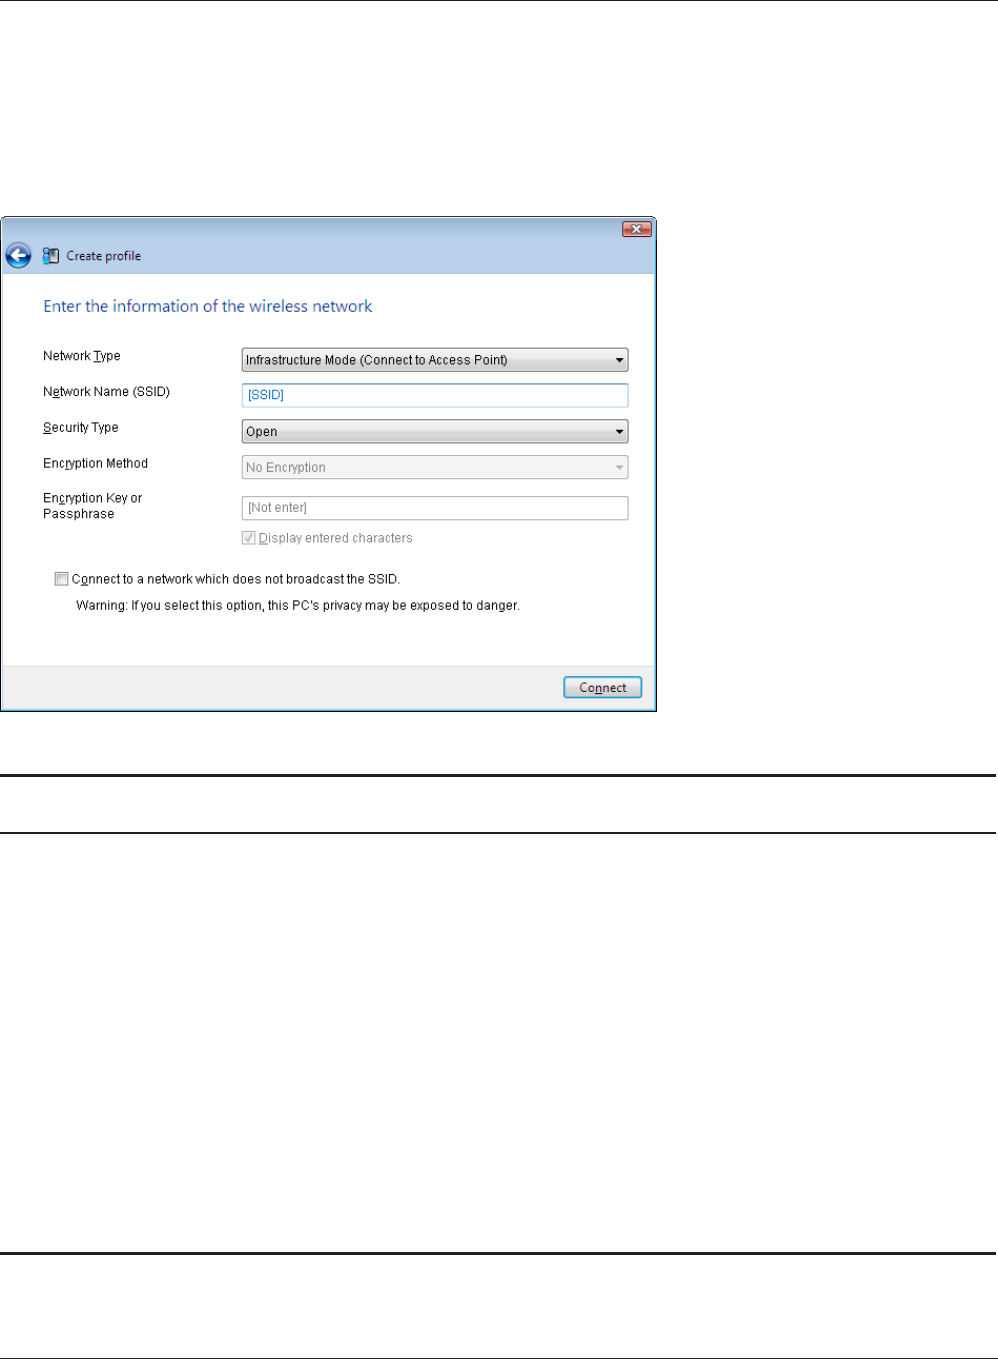
WLI-UC-G300HP / WLI-UC-G300HP-V1 User Manual 36
Chapter 4 Client Manager
Parameter Meaning
Network Type Select a type of connection.
Network Name (SSID) Enter the SSID of an access point.
Security Type Select the security type of the selected access point.
Encryption Method Select the encryption method of the selected access point.
Encryption Key or Passphrase Enter the encryption key for the access point.
Connect to a network which does not
broadcast the SSID
Check this box to connect to a hidden SSID that is not broadcast.
Connect Connect to the access point.
Wireless Network Information
Congure wireless connection settings.
Chapter 4 Client Manager
WLI-UC-G300HP / WLI-UC-G300HP-V1 User Manual 37
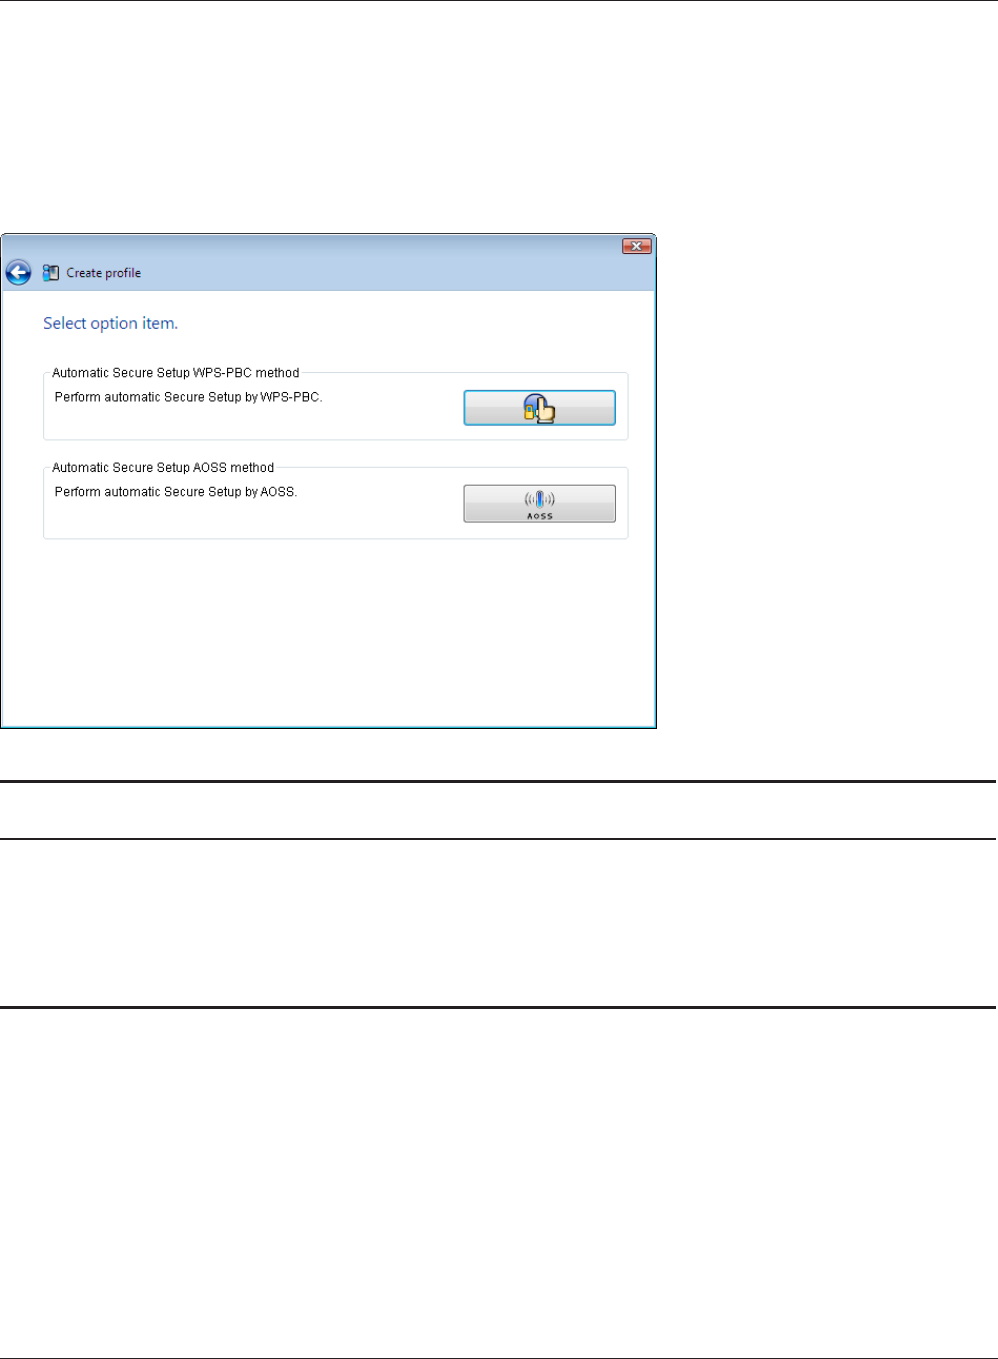
Parameter Meaning
Automatic Secure Setup WPS-PBC
method
Click this to automatically connect to an access point that supports
WPS (PBC).
Automatic Secure Setup AOSS
method
Click this to automatically connect to an access point that supports
AOSS.
WPS-PBC / AOSS selection
You may automatically connect to an access point by WPS (PBC) or AOSS.
WLI-UC-G300HP / WLI-UC-G300HP-V1 User Manual 38
Chapter 4 Client Manager
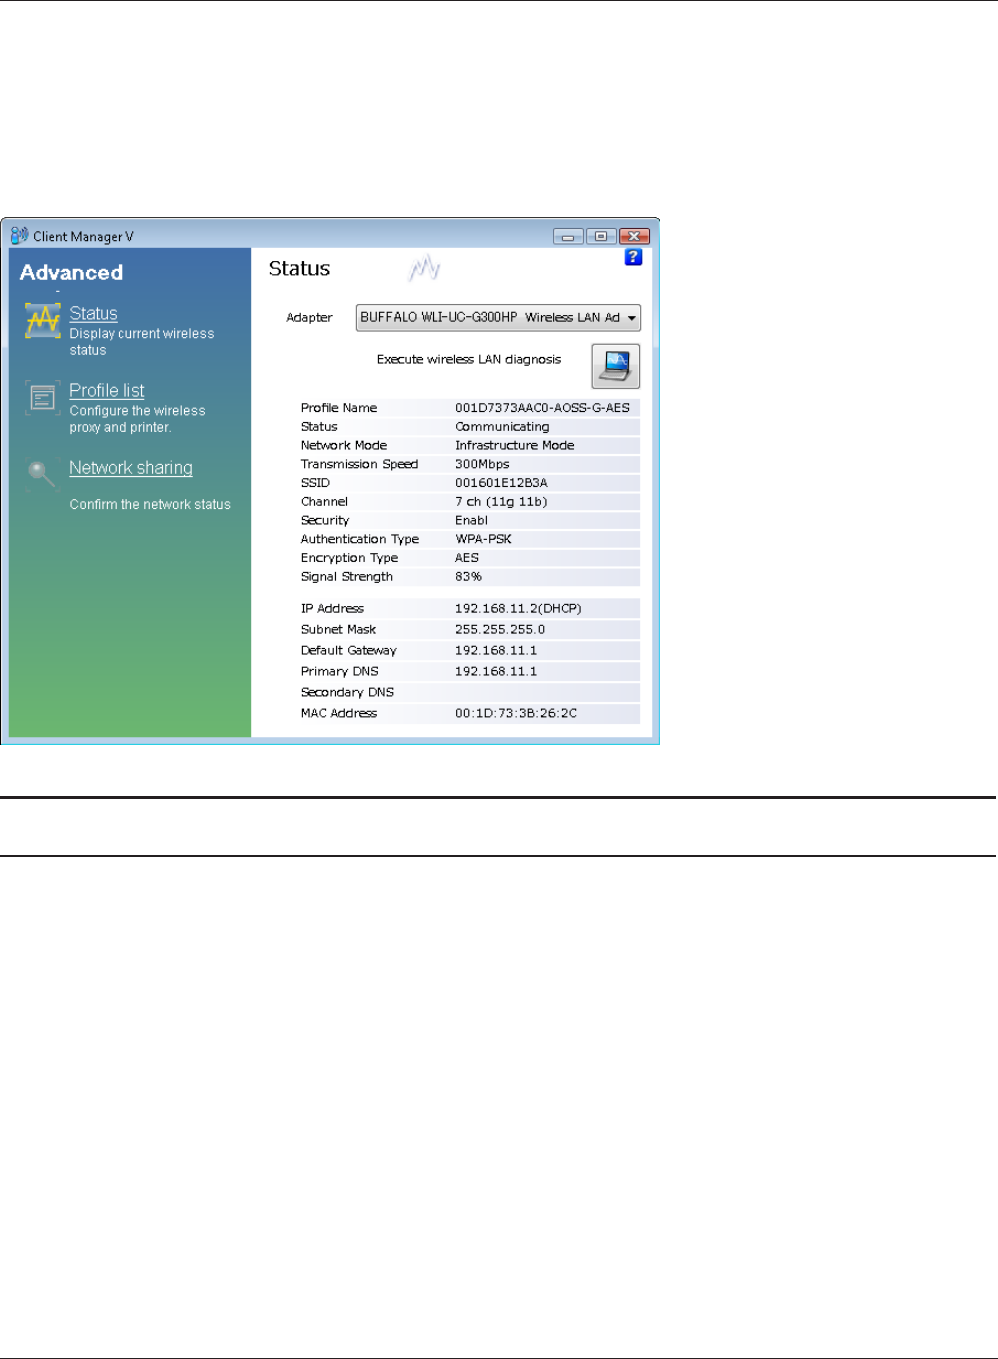
Parameter Meaning
Adapter Displays the name of the current wireless client.
Execute wireless LAN diagnostics Opens the Wireless LAN Diagnoses wizard (page 40).
Prole Name Displays the current prole name.
Status Displays the current transmission status.
Network Mode Displays the current network mode.
Transmission Speed Displays the current transmission speed.
SSID Displays SSID of the currently connected access point.
Channel Displays the wireless channel currently used.
Wireless Status
This screen displays the current connection status.

Chapter 4 Client Manager
WLI-UC-G300HP / WLI-UC-G300HP-V1 User Manual 39
Parameter Meaning
Security Displays whether encryption is currently enabled or not.
Authentication Type Displays the type of authenticaltion currently used.
Encryption Type Displays the type of encryption currently used.
Signal Strength Displays the current signal strength.
IP Address Displays the IP address assigned to your wireless client.
Subnet Mask Displays the subnet mask assigned to your wireless client.
Default Gateway Displays the default gateway address.
Primary DNS Displays the primary DNS address.
Secondary DNS Displays the secondary DNS address.
MAC Address Displays the MAC address of your wireless client.
WLI-UC-G300HP / WLI-UC-G300HP-V1 User Manual 40
Chapter 4 Client Manager
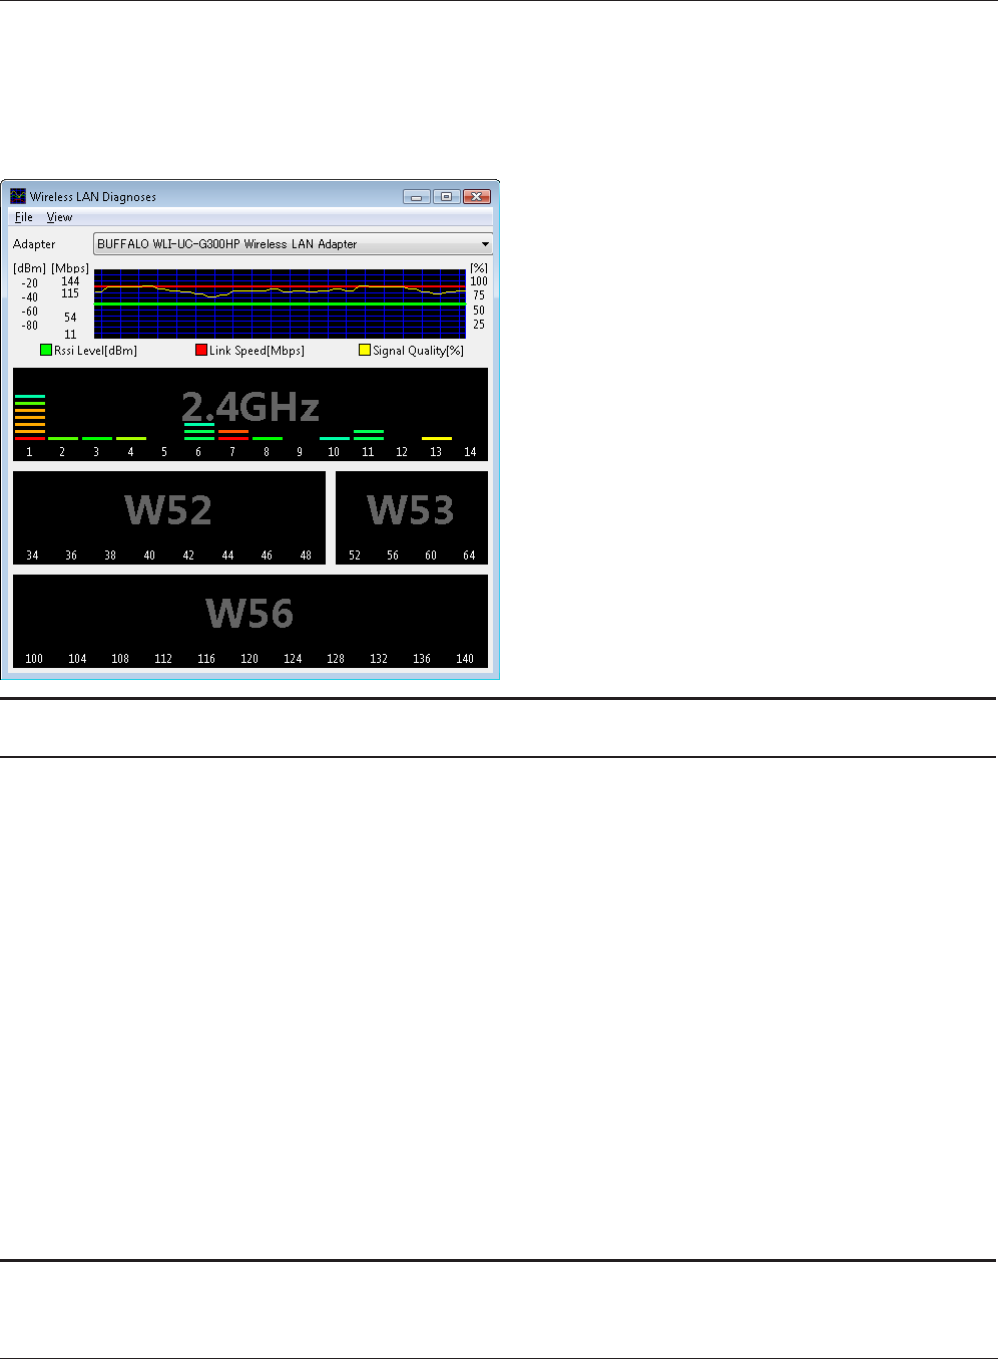
Wireless LAN Diagnostic
On the Wireless LAN Diagnostic screen, you can check signal strength and quality.
Parameter Meaning
Adapter Displays the name of the wireless client currently in use.
Connection status Displays signal strength (dBm), link rate (Mbps), and signal quality
(%) in 1 minute intervals.
There are the following restrictions.
• Some items may not be displayed depending on your wireless
device.
• Signal strength and quality displays may vary depending on
wireless devices.
These graphs should not be used to compare dierent wireless
devices. Use this information to check wireless status for the
same wireless device.
Usage of each channel The 11b/11g displays usage of each channel on 2.4 GHz.
This unit does not display 11a usage (does not support 5 GHz).
The color expresses the signal strength of an access point. Closer to
red means stronger signal, and closer to blue means weaker signal.
Chapter 4 Client Manager
WLI-UC-G300HP / WLI-UC-G300HP-V1 User Manual 41
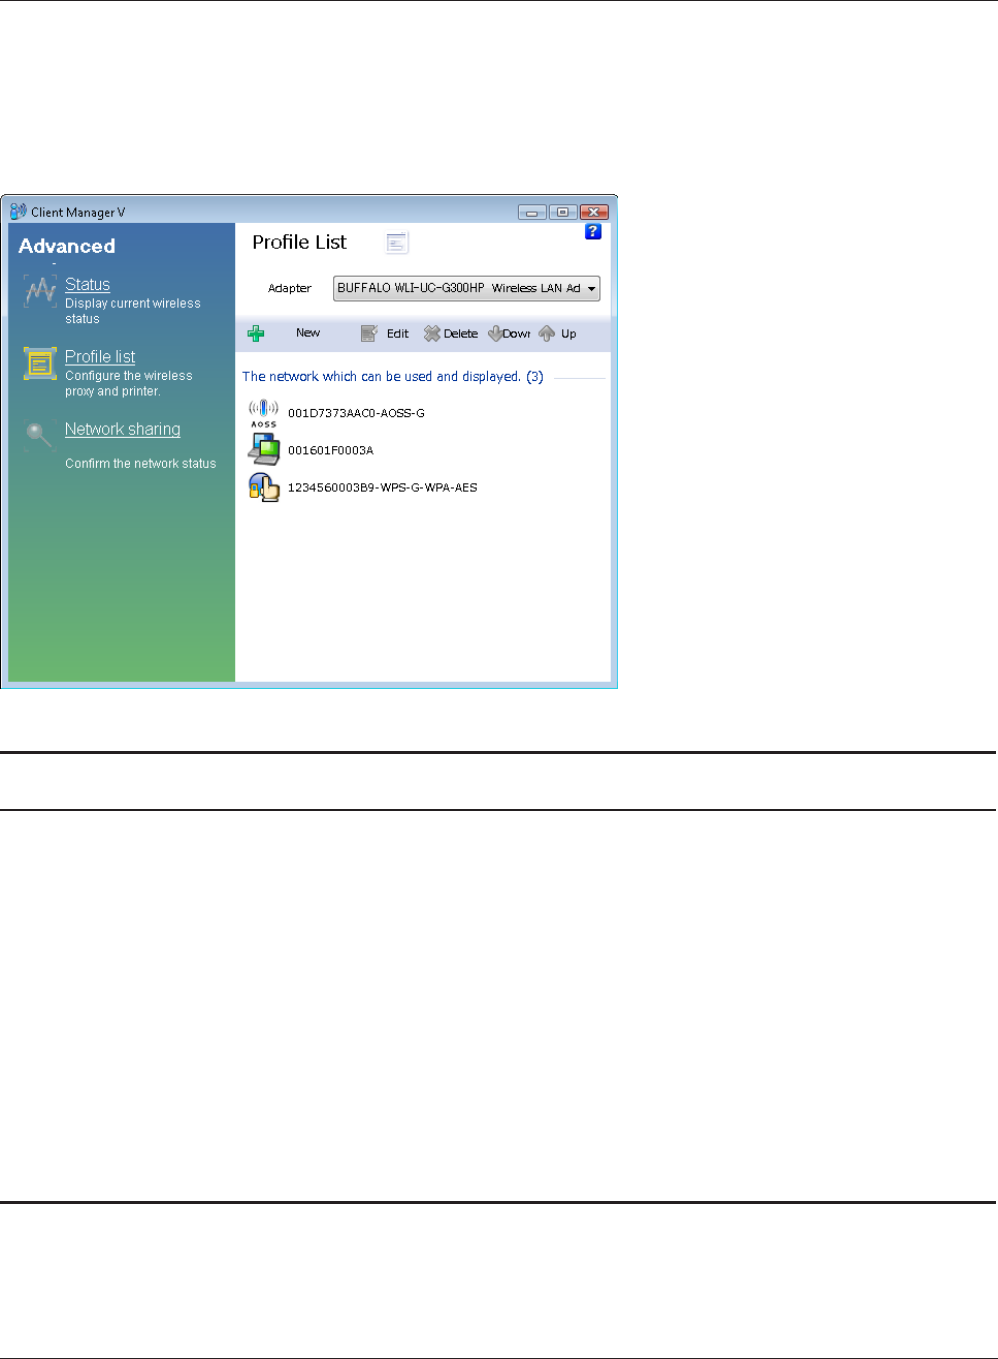
Prole List
Create a new prole or edit an existing prole.
Parameter Meaning
Adapter Displays the name of the wireless client which is currently used.
New Create a new prole. Click this to display the Automatic Secure
Setup and Advanced Setup screen (page 33).
Edit Edit the selected prole. Click this to display the Extended
properties (Wireless) screen (page 42).
Delete Delete the selected prole.
Down Lower the priority of the selected prole.
Up Raise the priority of the selected prole.
WLI-UC-G300HP / WLI-UC-G300HP-V1 User Manual 42
Chapter 4 Client Manager
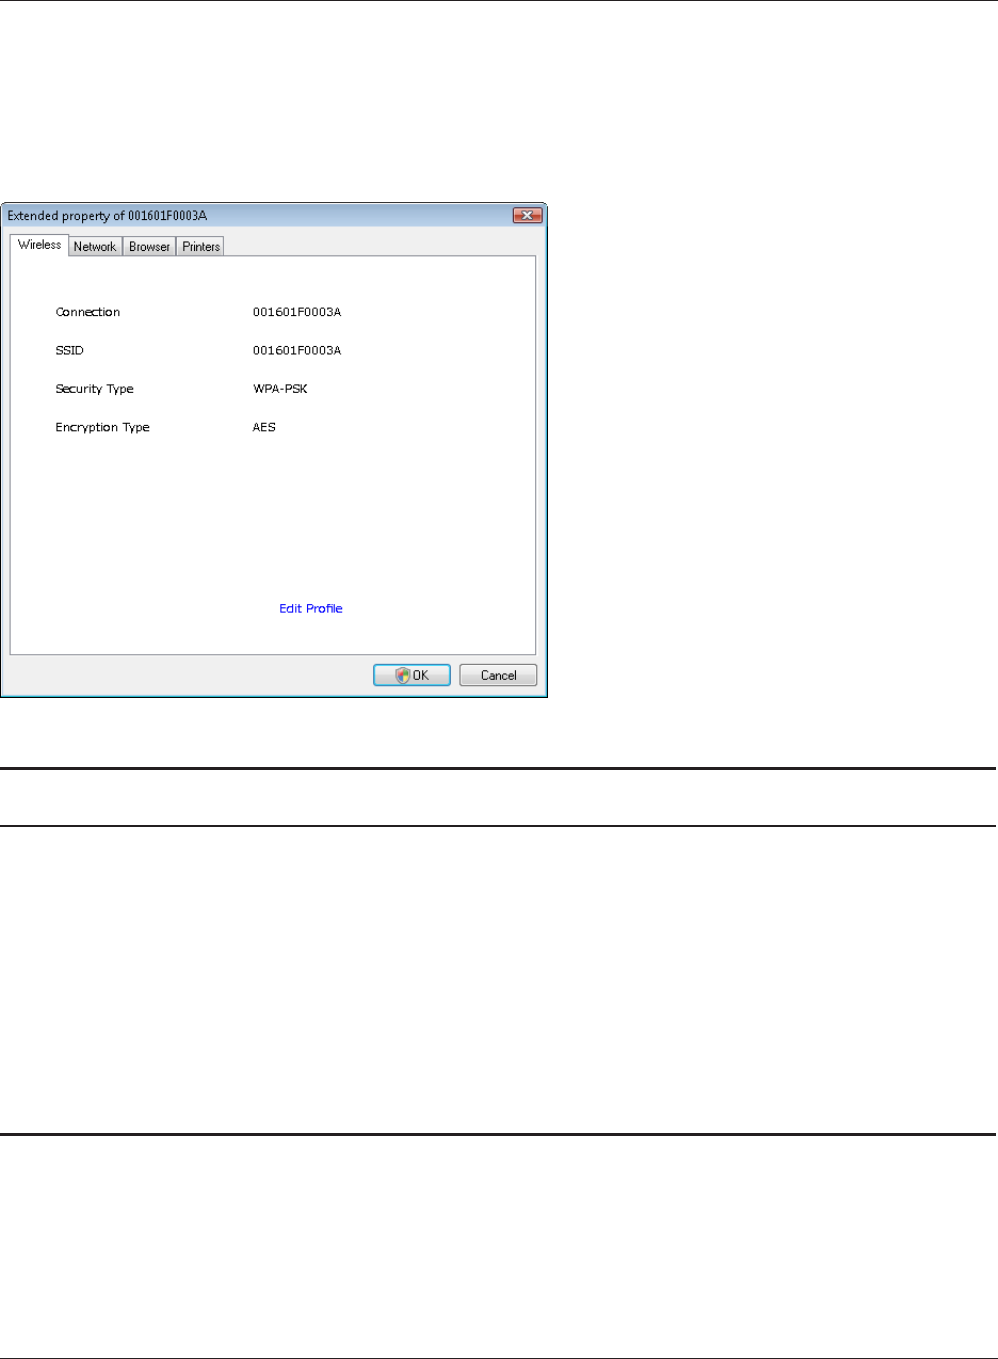
Wireless Properties
Current wireless settings.
Parameter Meaning
Connection Displays the current prole name.
SSID Displays the SSID of the current connection.
Security Type Displays the security type you are using for the current connection.
Encryption Type Displays the encryption type you are using for the current
connection.
Edit Prole Click this to edit the wireless settings.
Chapter 4 Client Manager
WLI-UC-G300HP / WLI-UC-G300HP-V1 User Manual 43
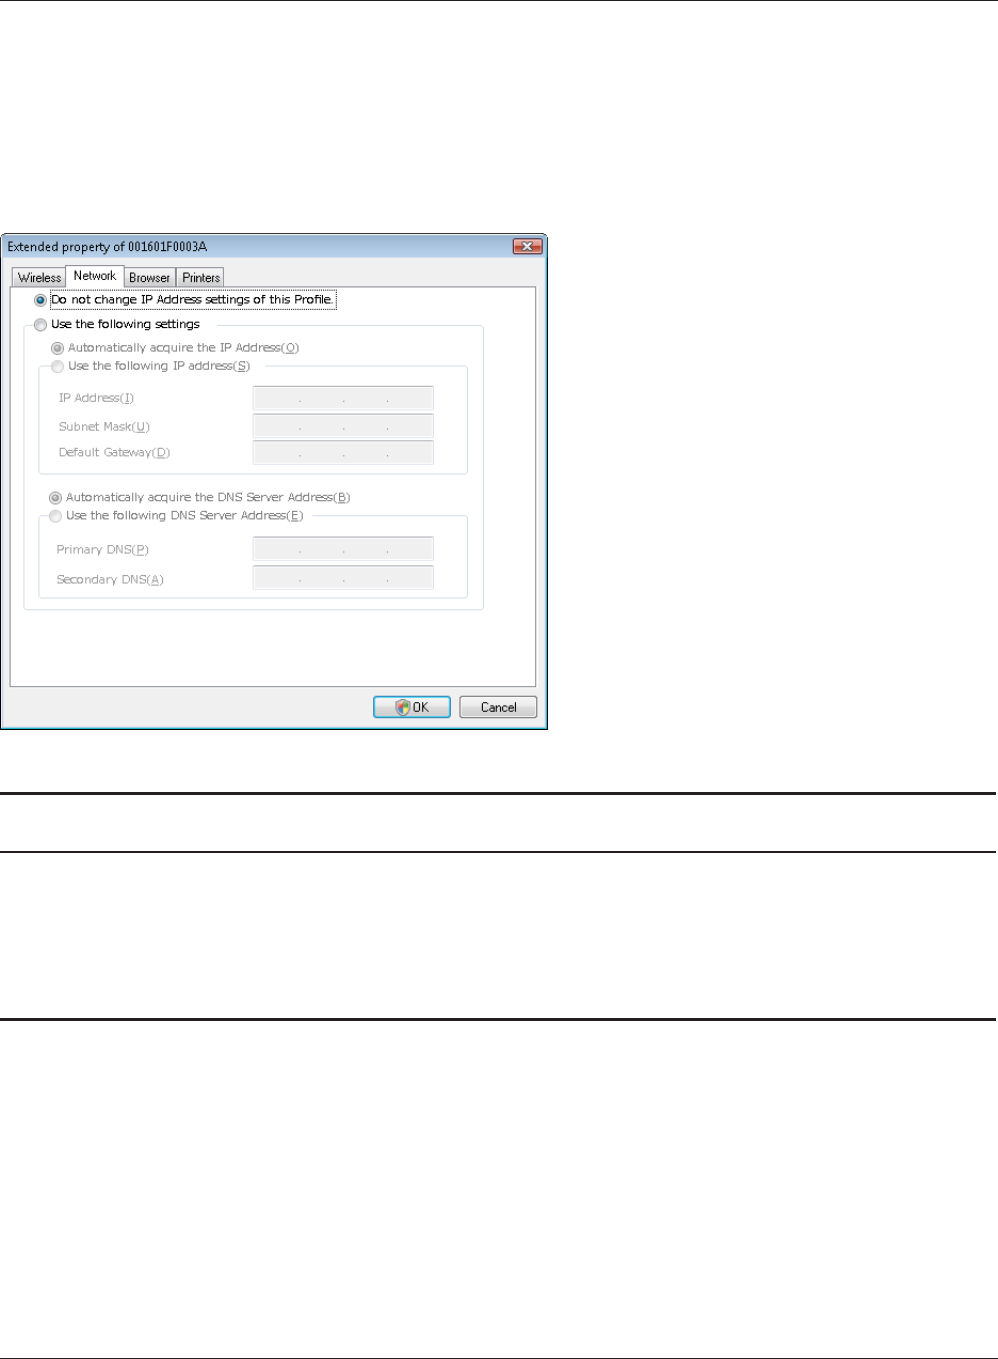
Network Properties
By default, your client’s IP address is set automatically by DHCP. You may congure it manually from
this screen.
Parameter Meaning
Do not change IP Address settings of
this Prole
Select to keep your current TCP/IP network setting without any
changes. This is the recommended setting.
Use the following settings Select this option to change your TCP/IP network settings. For
expert users only.
WLI-UC-G300HP / WLI-UC-G300HP-V1 User Manual 44
Chapter 4 Client Manager
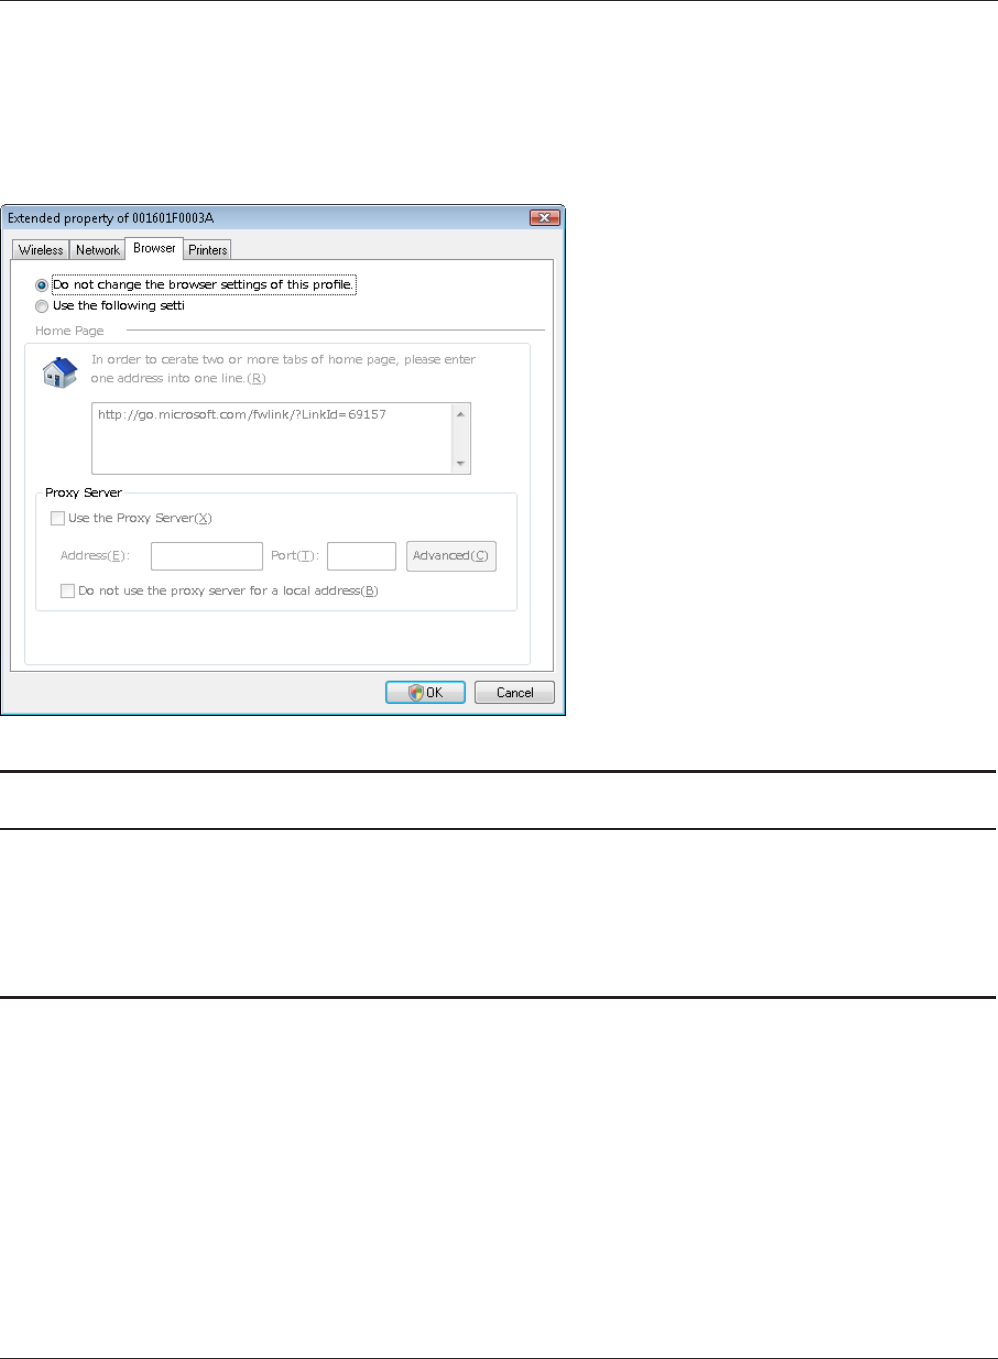
Browser Properties
Congure Internet Explorer settings for wireless connections.
Parameter Meaning
Do not change the browser settings
of this Prole
Select to keep the current Internet Explorer settings.
Use the following settings Select this option to configure the Internet Explorer Home Page
and Proxy Server settings while connected wirelessly.
Chapter 4 Client Manager
WLI-UC-G300HP / WLI-UC-G300HP-V1 User Manual 45
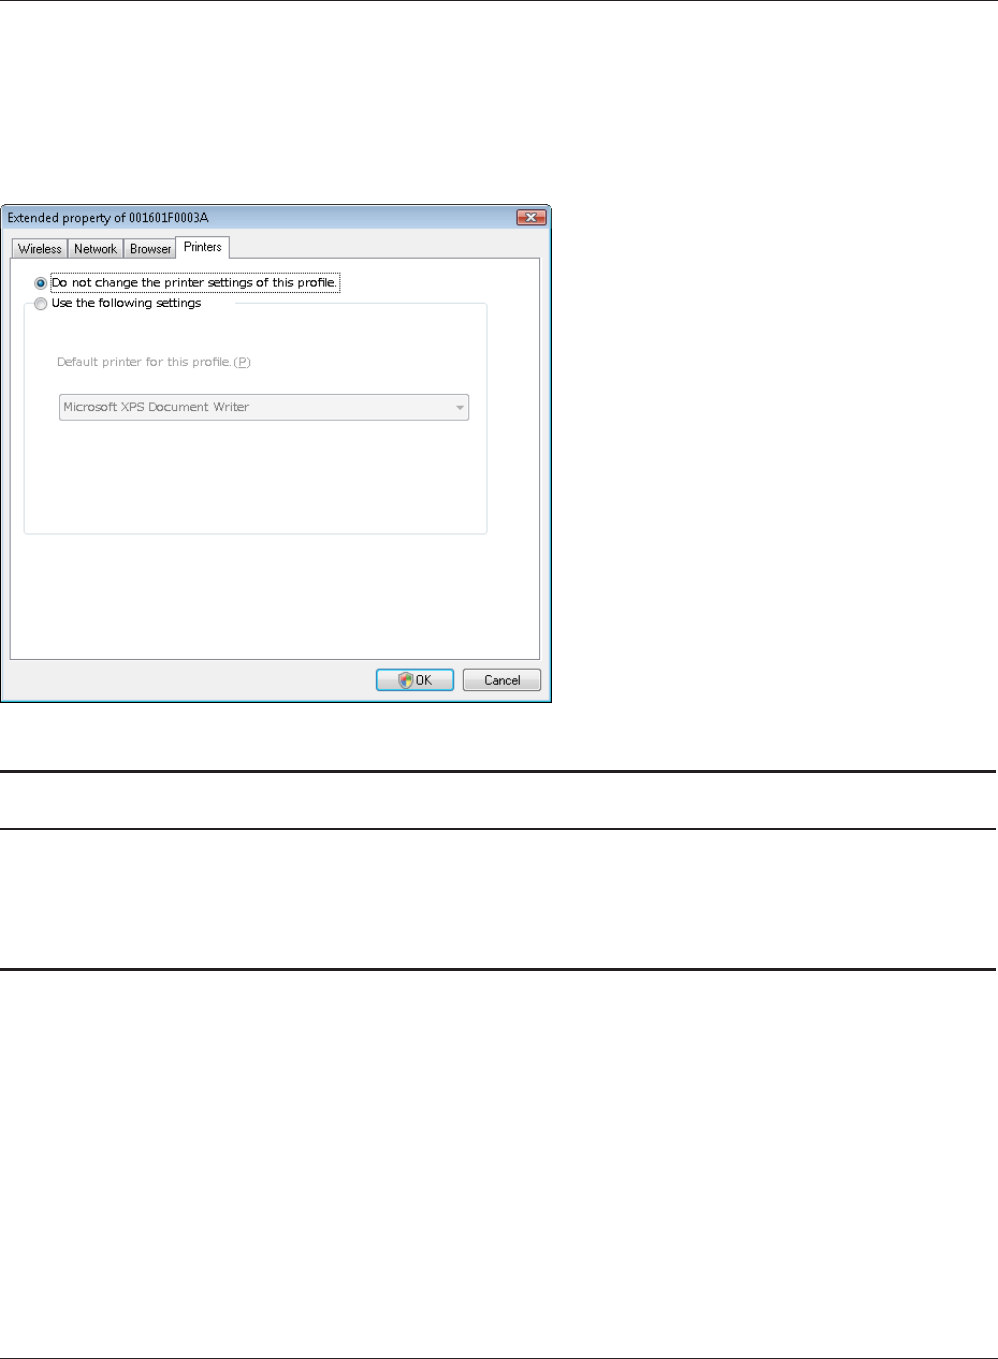
Printer Properties
Congure the printer used while connected to an access point wirelessly.
Parameter Meaning
Do not change the printer settings of
this Prole
Select to keep your current printer settings.
Use the following settings Select to use a dierent default printer while connected wirelessly.

WLI-UC-G300HP / WLI-UC-G300HP-V1 User Manual 46
Chapter 4 Client Manager
Using Client Manager 3 with Windows XP / 2000
• When you install Client Manager, it will be added to your Startup folder and will automatically start
with Windows. To launch Client Manager manually, click [Start] > [All Programs] > [BUFFALO] >
[AirStation Utility] > [ClientManager 3] .
• Right click on the Client Manager icon in the system tray and click [Exit] to close Client Manager.
The Client Manager icon will change appearance according to its connection status:
: No wireless client installed
: Not connected to an access point
: Transmitting to an access point with TKIP/AES encryption
: Transmitting to an access point with WEP, or not encrypted
: Transmitting in ad-hoc mode (not supported with this wireless client)
: Authenticating
Chapter 4 Client Manager
WLI-UC-G300HP / WLI-UC-G300HP-V1 User Manual 47
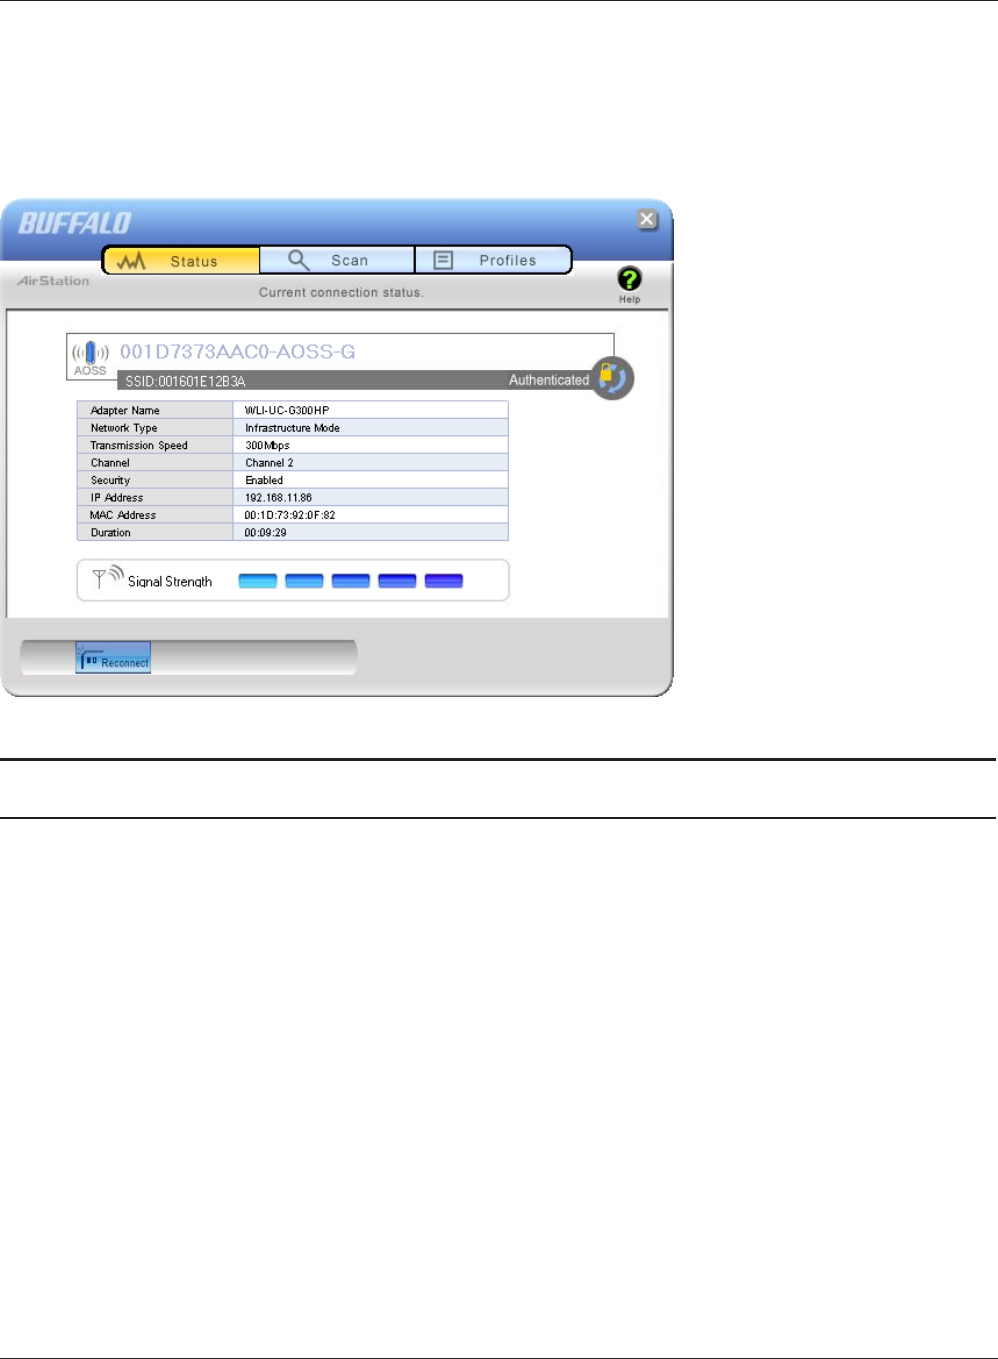
Status
The Status screen displays the current connection status.
Parameter Meaning
Prole Current connection prole name.
SSID SSID of the currently connected access point.
Adapter Name Name ame of the wireless client currently in use.
Network Type Current network mode.
Transmission Speed Current transmission speed.
Channel Current wireless channel.
Security Displays whether security is currently enabled or not.
IP Address The IP address assigned to this unit.

WLI-UC-G300HP / WLI-UC-G300HP-V1 User Manual 48
Chapter 4 Client Manager
Parameter Meaning
MAC Address MAC address of this unit.
Duration Elapsed duration of the current wireless connection.
Signal Strength Current signal strength.
Reconnect Click to reconnect the most recent connection.
Chapter 4 Client Manager
WLI-UC-G300HP / WLI-UC-G300HP-V1 User Manual 49
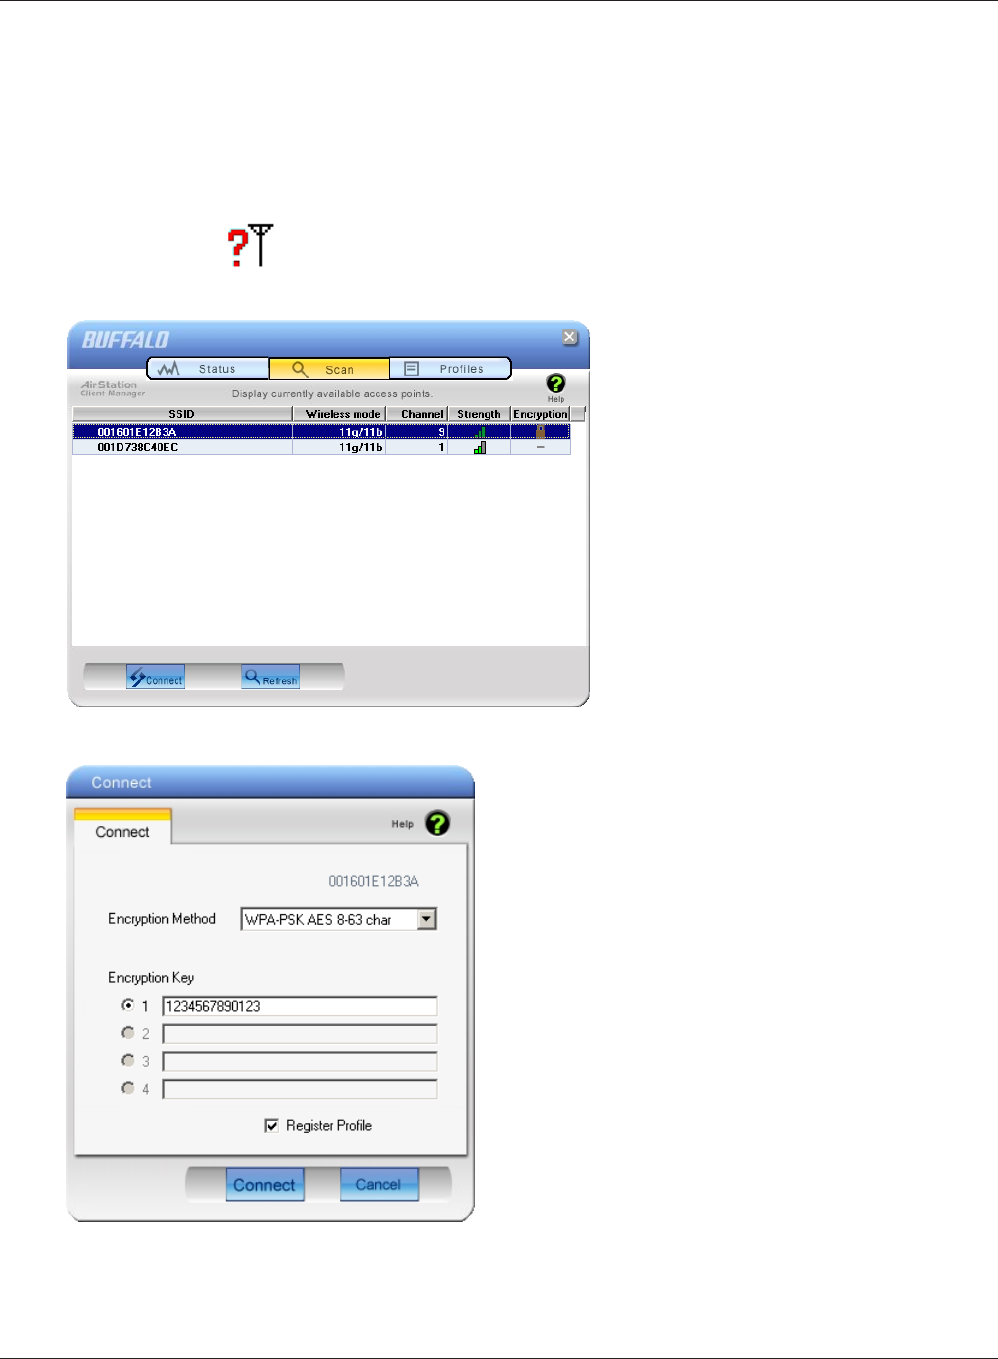
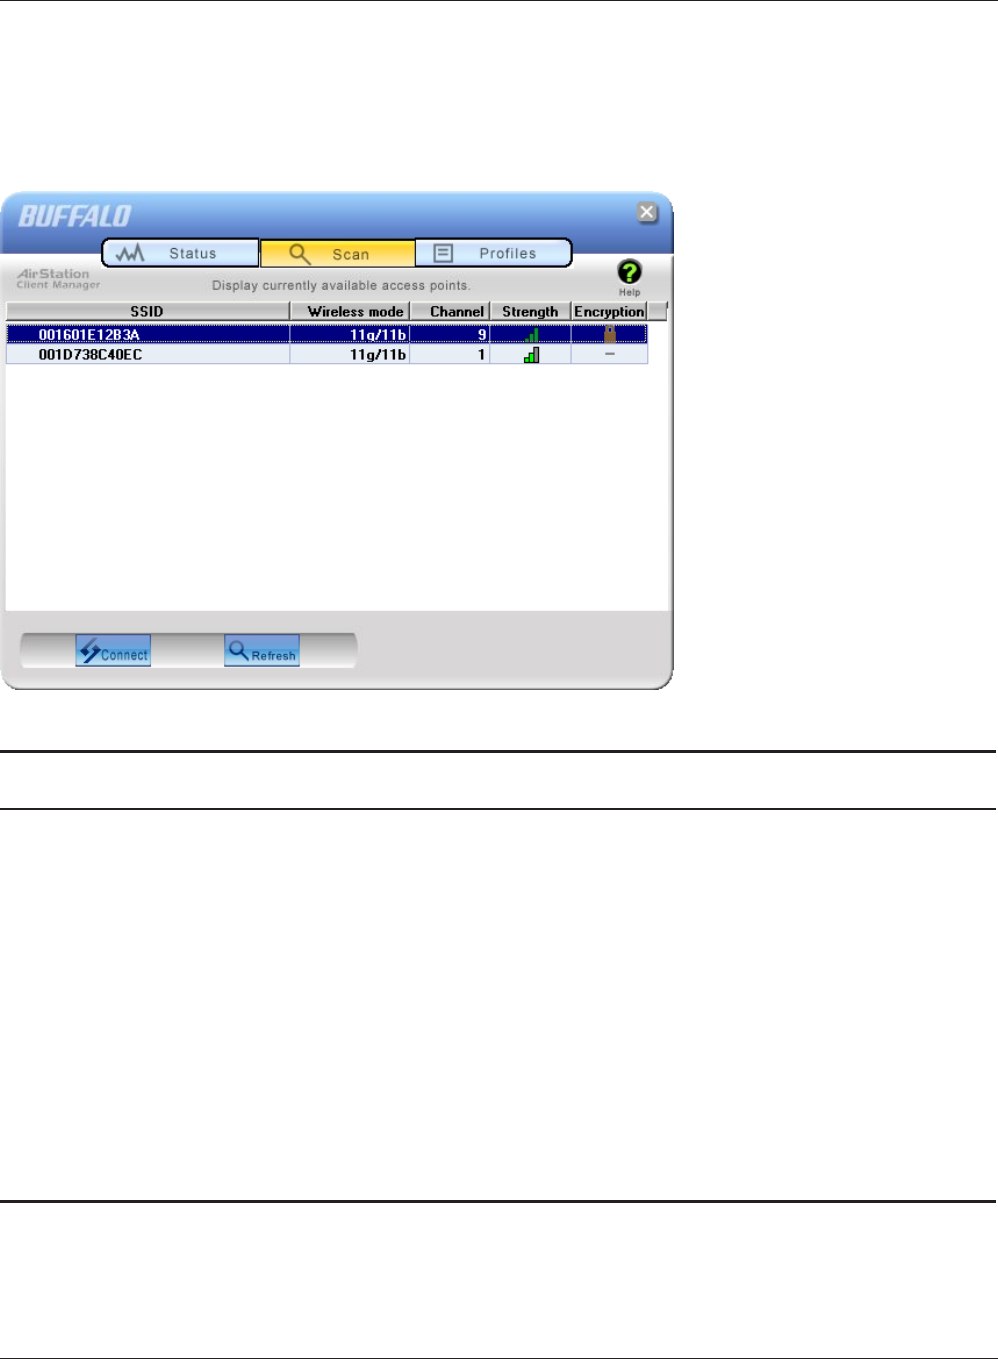
Scan
Scan and display nearby access points.
Parameter Meaning
SSID SSID of access point.
Wireless mode Wireless type (such as 11a and 11g) of the access point.
Channel Wireless channel of the access point.
Strength Reception strength of each access point.
Encryption Displays if security is used by the access point.
Connect Click this to display the Connect screen (page 50).
Refresh Click here to search for available access points again.
WLI-UC-G300HP / WLI-UC-G300HP-V1 User Manual 50
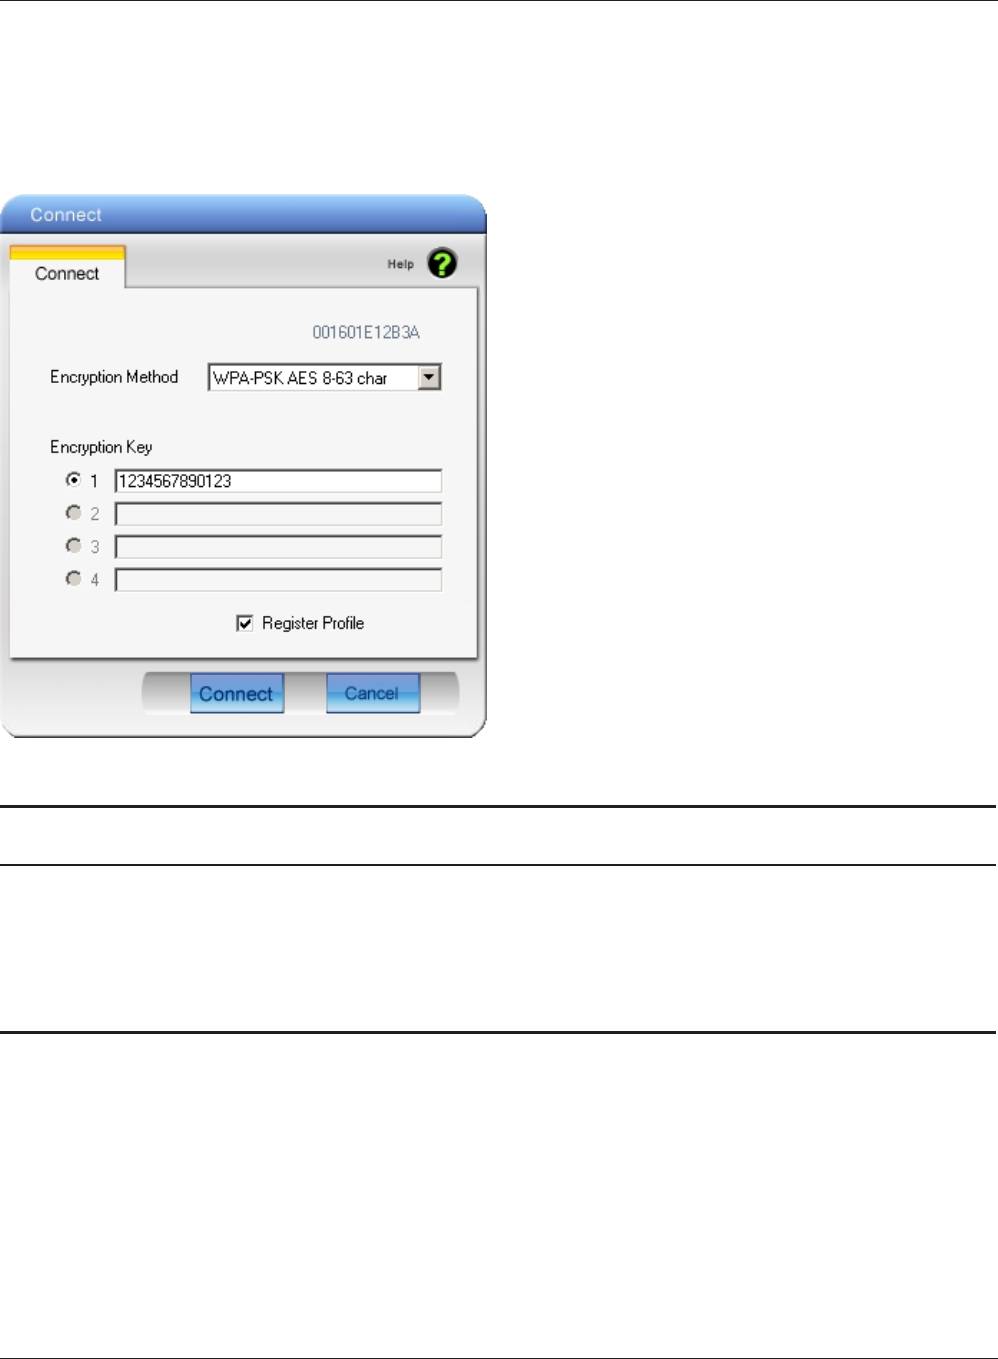
Chapter 4 Client Manager
Connect
Congure connection to an access point.
Parameter Meaning
Encryption Method Type of encryption used by the access point.
Encryption Key Enter the access point’s encryption key (passphrase).
Register Prole Check to register this connection as a prole.