BUFFALO 09102074-0 AirStation Wireless-N NFINITI Ethernet Converter User Manual Manual
BUFFALO INC. AirStation Wireless-N NFINITI Ethernet Converter Manual
BUFFALO >
Manual
User Manual
Wireless Ethernet Converter
WLI-TX4-AG300N
www.buffalotech.com
V0.1

2
Table of Contents
Introduction . . . . . . . . . . . . . . . . . . . . . . . . . . . 3
AOSS Installation . . . . . . . . . . . . . . . . . . . . . . . . . . . 4
Manual Configuration . . . . . . . . . . . . . . . . . . . . . . . . . . . 5
Ethernet Converter Manager . . . . . . . . . . . . . . . . . . . . . . . . 6
CongurationwithoutSoftware...........................10
Web-based Conguration . . . . . . . . . . . . . . . . . . . . . . . . . . . 12
Advanced Conguration . . . . . . . . . . . . . . . . . . . . . . . . . . . 16
Wireless Settings. . . . . . . . . . . . . . . . . . 17
NetworkSettings...........................19
Management . . . . . . . . . . . . . . . . . . . . . . . . . . . 20
Troubleshooting . . . . . . . . . . . . . . . . . . . . . . . . 23
WarrantyInformation..................................25
Contact Information . . . . . . . . . . . . . . . . . . . . . . . . . . . 26

3
Congratulationsonyourpurchase!YournewWirelessEthernetConverterallowsyouto
connectanydevicewithanEthernetporttoawirelessnetwork.AOSSmakesforeffortlesssetup.
Contents
•WirelessEthernetConverter
•EthernetConverterUtilityCD-ROM
•.5mEthernetCable
•ACAdapter
•QuickSetupGuide
•WarrantyStatement
Ifanyitemsaremissing,pleasecontacttheresellerfromwhomyoupurchasedthis
product.
System Requirements
•DesktoporNotebookcomputerwithanEthernet(RJ-45)port(forconguration
purposes)
•WebBrowser(Safari2.0orlater,Netscape6.0orlater,orIE6.0orlater)
•802.11b,802.11g,802.11aordraft802.11naccesspoint(InfrastructureMode)

4
IfyourWirelessRouter/AccessPointsupportsAOSS,thenyoumayletAOSScongure
yourwirelessnetworkforyou.
•PlugtheEthernetConverter'sACAdapterintothepowerconnectorandtoawall
outlet.Itwilltakeabout30secondstopowerup.Makesurethatthewirelessrouter/
accesspointispoweredonaswell.
•HoldintheAOSSbuttononthewirelessrouter/accesspointfor3seconds.
•HoldintheAOSSbuttonontheEthernetadaptorfor3seconds.
AOSSwilltakeaboutaminutetocongureyourwirelessnetwork.
Whennished,theAOSSLEDsonboththerouterandthe
EthernetConverterwillbelit.FormoreinformationonAOSS,see
your AOSS supplement.
NOTE:IfAOSSdoesnotnishproperly.Powercycleboth
the router and the ethernet converter and attempt the AOSS
process again. It is recommended to move the Ethernet Con-
verterclosertoyourwirelessaccesspointorwirelessrouter.
AOSS Installation
Power
Connector
AOSS button

5
Ifyourwirelessrouter/accesspointdoesn'tsupportAOSS,you'llneedtocongure
theaccesspointmanually.Therearetwowaystodothis:youcanusetheEthernet
ConverterManagersoftwareifyouhaveaWindowsPConthenetwork(98/ME/2000/
XP/Vistaonly),oryoumayuseawebbrowser.Webbrowsercongurationmaybe
donewithanycomputerrunningarecentwebbrowser,includingMacintoshandLinux
machines.
Manual Conguration

6
IfyouhaveaWindows98/ME/2000/XP/VistamachinewithaCD-ROMdriveavailable
onyourcomputernetwork,theEthernetConverterManagermakesitsimpletocongure
theEthernetConverter.Thefollowingstepswillguideyouthroughconguringthe
Ethernet Converter via the Ethernet Converter Manager.
ConnectoneoftheEthernetConverter'sLANportstoanopenportonyournetwork's
router,switchorhubwiththeincludednetworkpatchcable.Iftherearenoports
available, you can temporarily remove a computer or other connected device and plug
the Ethernet Converter to that port. You can plug the Ethernet Converter directly to the
conguringcomputer,butwillhavetoconguresettingsmanuallyasdescribedonpage
10.
Oncethenetworkcablehasbeenpluggedin,plugtheEthernetConverter'sACAdapter
intoanavailablepoweroutlet.Thenattachthepowerconnectortothebackofthe
EthernetConverter.Thebootupprocesstakes30secondsandiscompletewhenboth
theWirelessandEthernetLEDsarelit.
ReturntothePCdesignatedforcongurationandinserttheincludedEthernetConverter
CD-ROMintothePC'sCD-ROMdrive.
TheEthernetConverterUtilityshouldlaunchautomatically.Ifitdoesnot,browseyour
CD-ROMdriveinWindowsandrunthesetup.exe program.
Conguration with Ethernet Converter Manager

7
ClickonEthernet Converter Manager.
TheEthernetConverterManagersoftwarewill
run.PleasepresstheRefresh button.
NOTE: Depending on Windows conguration, the
search may automatically begin, if this is the case
then the last step is not required.
8
TheEthernetConverterManagerwillsearchforall
BuffaloEthernetConvertersonyournetwork.The
processusuallytakeslessthanoneminute.Once
completed, the Search Resultswindowwillappear.
Search ResultswilllistallBuffaloEthernetConverters
onthenetwork.IfthereismorethanoneEthernet
Converter in the list, then select the Ethernet Converter
youwouldliketocongure.PresstheSelect button to
continueconguration.
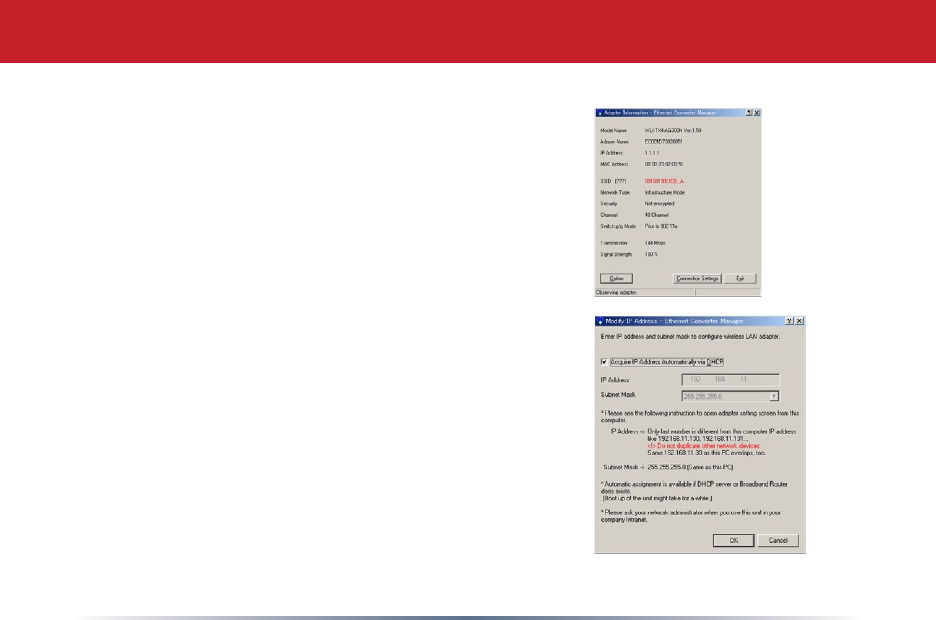
Select the Modify IP Address option from the Option
dropdownmenu.
ChecktheAcquire IP Address Automatically via DHCP
checkboxandpresstheOK button. The Ethernet
Converterwillreboot;thisprocesstakes15seconds.
TheEthernetConverterManagerwillthenre-scanthe
networkforEthernetConverters.
9
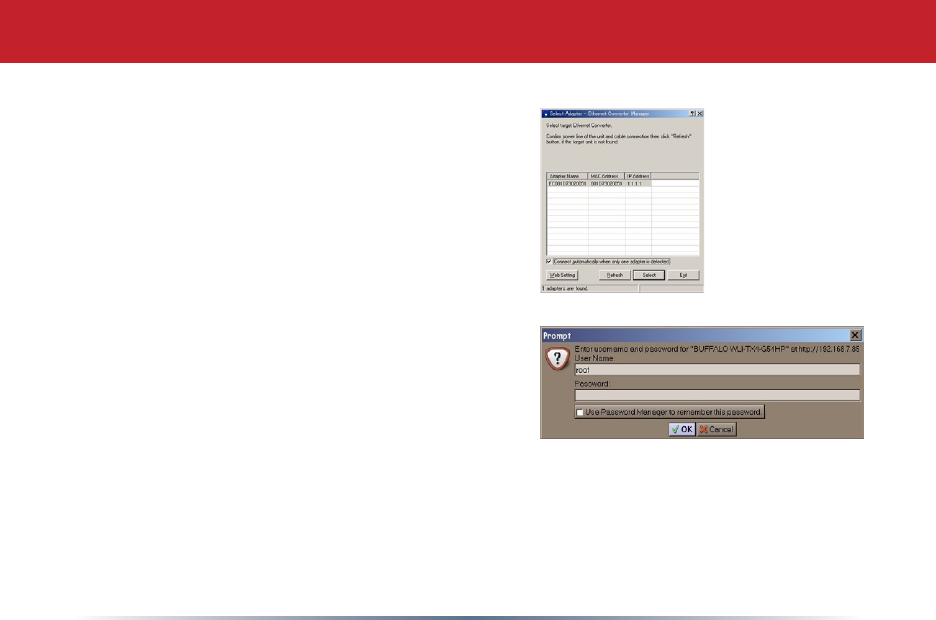
Search Resultswillappear.Ifmorethanone
Ethernet Converter is present, select the proper
Ethernet Converter from the list. Then press the
Select button.
Select the Open Web Setting Screen option from the
Optiondropdownmenu.
TheEthernetConverterManagerwillconnect
youtotheEthernetConverter'swebbased
congurationtool.Youwillbepromptedfora
usernameandpassword.
Bydefault,theusernameis root and there is no
password.
After entering the user name, press the OK button.
Pleaseskiptopage 12tocontinueconguration.

10
YoumayalsoentertheWeb-basedCongurationToolwithoutusingthesoftware.This
maybenecessarytoconguretheconverterwithouttheuseofaWindowsPC.Usethis
methodwithLinux,Macintosh,otherothernon-WindowsPCstoaccesstheWeb-based
CongurationTool.
RefertoyouroperatingsystemdocumentationonhowtocongureaStaticIPAddress.
TheEthernetConverterhasanIPAddressof1.1.1.1bydefault.You'llneedtocongure
thecomputertobeonthesamesubnet;anIPaddressof1.1.1.2isrecommendedforthe
computer.
Withtheincludednetworkpatchcable,plugtheEthernetConverter'sLANportintoan
openportonyournetwork'srouter,orononeofyournetworkswitchesorhubs.Ifthere
are no ports available, you can temporarily remove a computer or other connected device
and plug the Ethernet Converter to that port. You can plug the Ethernet Converter
directlytotheconguringcomputer.
Oncethenetworkcablehasbeenpluggedin,plugtheEthernetConverter'sACAdapter
intoanavailablepoweroutlet.Thenattachthepowerconnectortothebackofthe
EthernetConverter.Thebootupprocesstakeslessthanaminuteandiscompleted
whenboththeWirelessandEthernetlightsarelit.
Configuration without PC Software
11
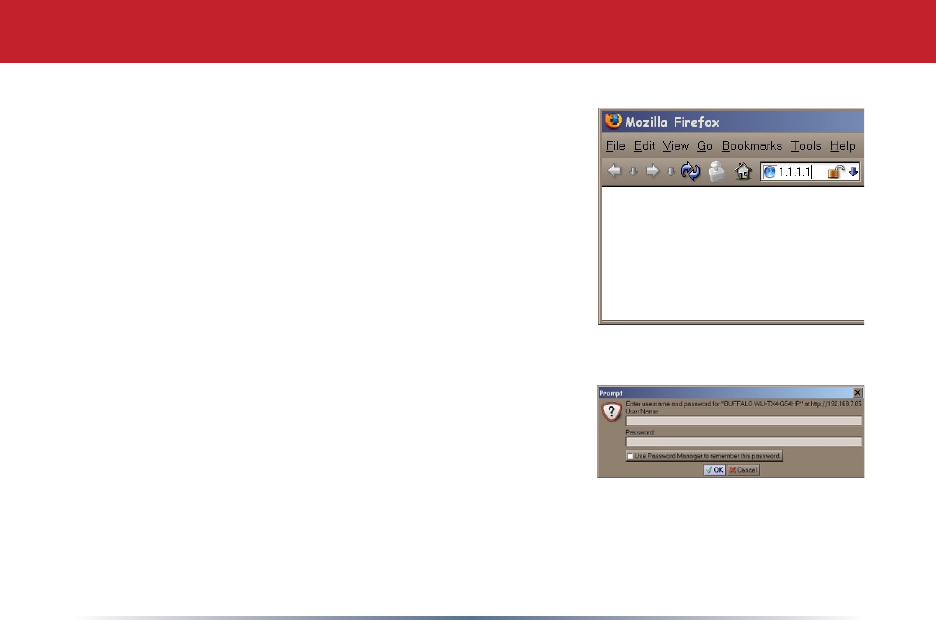
OnceyourcomputerhasaStaticIPAddressof1.1.1.2,
openyourwebbrowserandaccessthewebpage
http://1.1.1.1bytypingitintothe'Address'eldand
pressingenter(asshowntotheright).
Youwillbepromptedforausernameandpassword.
Bydefault,theusernameisroot and there is no
password.
After entering the user name, press the OK button.
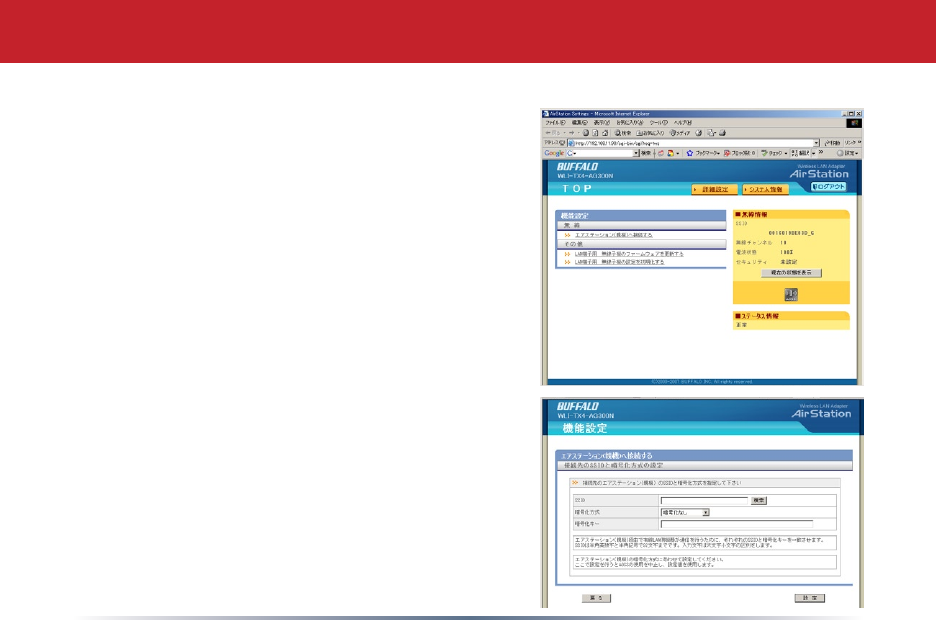
12
TheWebBasedCongurationiswherechanges
totheEthernetConvertertakeplace.Through
theWebBasedCongurationyoucanchange
thewirelessnetworktheEthernetConverteris
associatedwith,theIPAddressoftheEthernet
Converter, and other important settings.
Afterlogginginonthepreviouspages,youwill
begreetedbythemaincongurationpage.
Thispagequicklyshowsyouwhatnetworkthe
EthernetConverterisconnectedtooaswellas
allowingyoutosearchforavailablenetworks.
TherststepintheWebBasedConguration
shouldbetosearchforanavailablewireless
network.Todothis,presstheSearch button in
the'SSID(NetworkName)'table.
After pressing the Search button, the Search for
SSIDprogramwillrun.Selecttheappropriate
wirelessnetworkthatyouwouldliketoconnect
to and press the Select button. If encryption is
enabledonthewirelessnetwork,youwillneedto
entertheencryptionkeyonafuturestep.
Web-Based Configuration
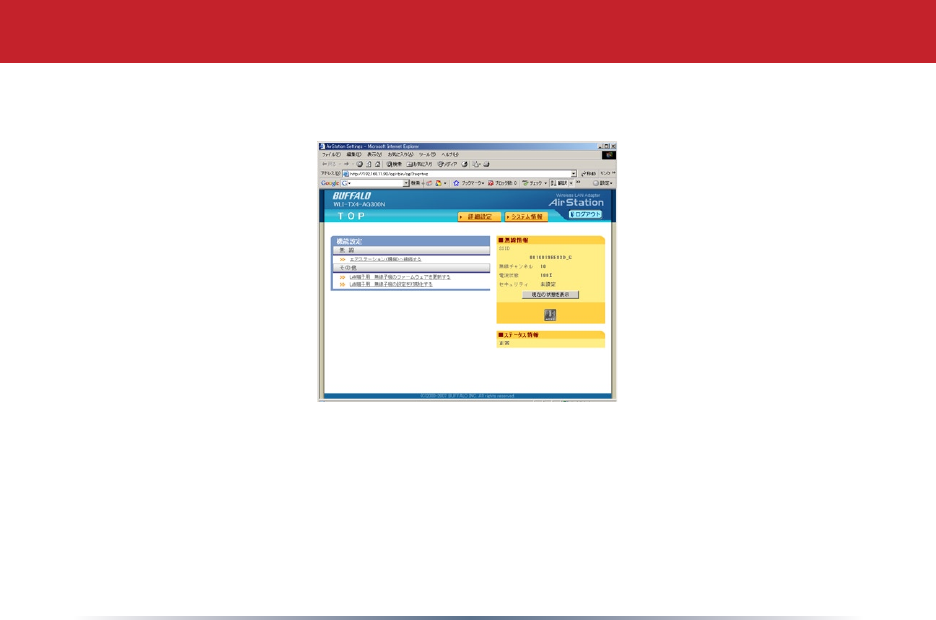
13
Afterselectingawirelessnetworktoconnectto,youwillbereturnedtothemainWeb
BasedCongurationpage.
IfthewirelessnetworkyouareattemptingtoconnecttoisnotbroadcastingitsSSID,
thenyouwillberequiredtomanuallyentertheSSIDintotheSSIDeld.Aftertheeldis
populatedwiththeproperSSID,thenpresstheApply Settings button.

14
TheSSIDinthetablewillbepopulatednow.
Dependingonwhetherornotthewirelessnetwork
isusingWEPEncryptionornot,theEncryptionKey
option may be set to Encrypt or No Encryption. If it is
set to No Encryption then you are already connected
tothewirelessnetwork,andyoumayskiptothelast
steponthispage.IftheEncryptionKeyoptionisset
to'Encrypt'thenyouwillneedtoenterthecorrect
encryptiontypeandkeyandpresstheApply Settings
button.Thedropdownmenureferencesthetypeof
encryptionkeyused,eitherWEP,TKIP,orAES.Itis
importantthatyouknownotonlyyourencryption
keybutalsothetypeofkey.Pleaseconsultyour
Router/AcessPoint'swirelesssettingsanddocumentationforfurtherinformation.Once
the encryption information has been completed, press the Apply Settings button.
The'FinalizeConnecting'pagewillappear.PresstheBacklink.
ThemainWebBasedCongurationpagewillnowlisttheconnectioninformationinthe
Wireless Connection Status table.

15
TheEthernetConvertercongurationiscomplete.Tocontinueconguringadvancedset-
tings,pleaseskiptothenextpage.
DisconnecttheEthernetConverterfromthenetworkconnectionandpoweradapter,and
move it to the desired location.
PlugtheEthernetConverter'sLANportintothewireddevicethatrequiresthewireless
EthernetConverter(devicescouldbeanXBox,PS2,HomeTheaterMediaAdapter,switch,
hub,oranothercomputersystem).PlugtheACAdapterintoanearbypoweroutletand
connectthepowerconnectortotheEthernetConverter.Powercycleanydevicesthatare
connected to the Ethernet Converter.
IfyousetastaticIPaddressonyourcomputeronpage 8, then reference the operating
systemdocumentationtorestoretheIPsettingstoobtainanIPAddressautomatically.

16
To access Advanced settings, press the blue Advanced
buttoninthebottomrightcorneroftheHomepage.
This is the advanced page. On the left, you may choose from
WirelessSettings,NetworkSettings,orManagement.When
thepagerstopens,it'satWirelessSettings.Changeson
advanced pages are not applied until the Apply button is
pressed.
Advanced Configuration

17
• Multiple Client Support-allowsthebuilt-in4portswitch
tobeconnectedtomultipleclients.Disablingthislimits
theEthernetConvertertousewithonlyoneclientdeviceat
a time.
• SSID-TheSSIDisthenameofthewirelessnetworkthe
EthernetConverteristoconnectto.UsethesameSSIDas
yourrouter/accesspoint.Itcanbetypedinmanuallyorit
canbesearchedforbypressingthe'Search'button.
• Wireless Network Type-Infrastructure(AccessPoint
based).
•
Wireless Channel-Thechannelwillbeautomatically
selectedinInfrastructurenetworks.ForAd-hocnetworks,bothclientsmustbeset
on the same channel.
• Encryption Key-TheEthernetConvertersupportsWEPencryption(64and128bit)
andWPA-PSK(TKIPandAES).Inputtheproperencryptiontypeandkeyintothe
providedelds.ForWEP,selectHEXorASCIIkeytypefromthedropdownmenu.
IfmorethanoneWEPkeyisentered,pleaseplaceabulletnexttothekeythatthe
AccessPoint/Routerisusing.
Wireless Settings

18
• Wireless Mode-ThewirelessmodeonlyappliestoAd-hocconnections.Ifthe
EthernetConverterismakinganAd-hocconnectionwithan802.11bclient,thenselect
'802.11b'fromthedropdownmenu.Ifan802.11gclientisconnectingtotheEthernet
Converterthenselectthe'Auto-802.11g/802.11b'option.
• Basic Rates - The basic rate set only applies to Ad-hoc connections. Select the proper
rate set for the Ad-hoc client the Ethernet Converter is going to associate to. If you are
unsure,itisrecommendedtoleavethissettingsetto'Auto'.
• Frame Bursting-FrameBurstingtechnologyallowsforquickerwirelessthroughput
speedsbyshorteningtheoverheadineachwirelesspacket.Enabling125*High-
SpeedModeallowsfortheEthernetConvertertocommunicationusingBuffalo's125*
High-SpeedModetechnology.125*High-SpeedModerequiresacompatibleBuffalo
TechnologyWirelessAccessPointorRouter,ifoneisnotavailablethenthedevicewill
operateasastandard802.11gdevice.
• Wireless Output Power-Thewirelessoutputpowersettingchangesthepowerof
theEthernetConverter'sinternalradio.Reducingtheoutputpowercanoftenreduce
interferencewithotherdevices.Itisrecommendedtoleavetheoutputpowersetat
100%unlessinterferencewithothernetworksor2.4GHzdevicesisapparent.
• Data Encryption-ThedataencryptiontableallowsyoutoenterthenecessaryWEP
orWPAsettingsintotheEthernetConverter.ThisEthernetConvertersupportsWEP
64,WEP128,TKIP,andAES.IfWEPisselected,thenaWEPkeyorseriesofWEPkeys
mustbeenteredintotheWEPkeyeld(s).PleaseselectwhetherthespecickeyisASCII
orHEXfromthepulldownlistnexttothekeyelds.IfTKIPorAESisused,thenenter
thepre-sharedkeyintheWPA-PSKeld.
Wireless Settings

19
• Automatic IP Assignment-Thissettingspecies
theEthernetConvertertoobtainitsIPAddressfrom
aDHCPserveronthenetwork.Consultwithyour
networkadministratorregardingwhetherthisdevice
shouldobtainitsIPAddressfromaDHCPServer.
• Manual Assignment-Thissettingspeciesthe
EthernetConvertertooperateonaspecicIPAddress.
ThisisoftenreferredtoasaStaticIPAddress.Ifa
manualassignmentispreferred,thenyouwillberequiredtoenteranappropriateIP
AddressandSubnetMaskfortheEthernetConverter.
NOTE: TheIPAddressisrequiredforconguringtheEthernetConverter.Becareful
whenchangingitsaddress,asitmaycauseundesiredoperation.Also,please
documentanychangesandupdateanybrowserbookmarksthatmaybereferencing
theEthernetConverterWebBasedConguration.
•TheEthernetConverterManagermaybeusedtosettheIPAddressintheeventof
changingtheIPAddressinappropriately.
•TheIPAddressdoesnotneedtobeintherangeoftheDHCPserver'sscopeto
successfullypassDHCPrequeststonetworkclientsbehindtheEthernetConverter.
Network Settings
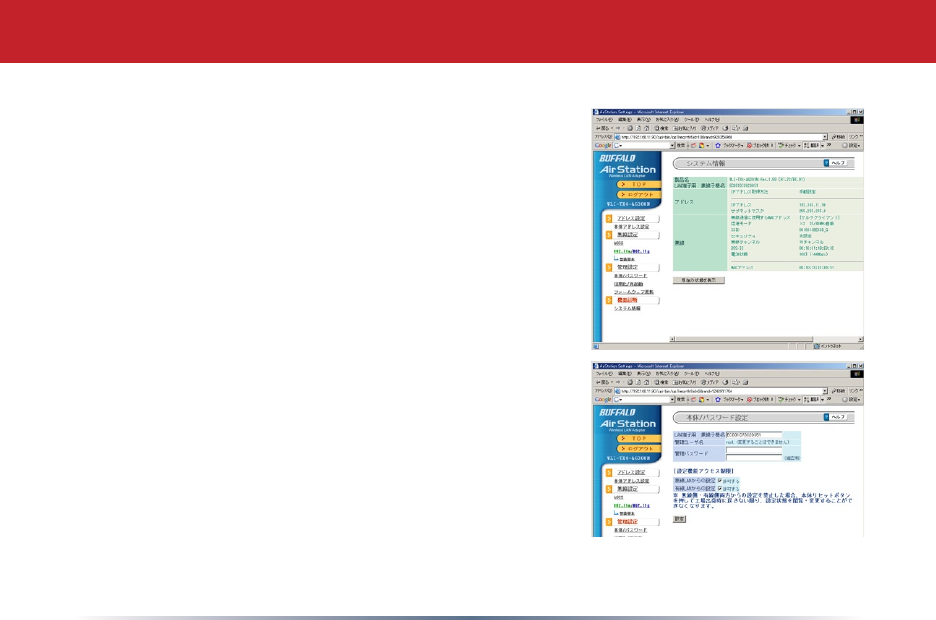
20
• System Information - This page contains a summary
oftheEthernetConverter'ssettings.Settingscannot
be changed from this page. If the Ethernet Converter
isobtainingitsIPAddressfromaDHCPserver,thena
releaseandrenewbuttonwillbepresentatthebottom
ofthepage.ReleasingtheIPAddresswillmakethe
EthernetConverterimpossibletocongurewithoutre-
initializingthedeviceorusingtheEthernetConverter
Manager.
• Name and Password - This page contains settings
thataffectthenamingandpasswordprotectionofthe
Ethernet Converter.
• Ethernet Converter Name - The Ethernet Converter
nameisaquickreferencenamefortheEthernet
Converter.ItisrecognizedbytheEthernetConverter
Manager.
• Administrator Password-Theadministratorpassword
isusedtoprotecttheEthernetConverterfromunwanted
congurationchanges.Settingthepasswordprotects
congurationchangesfrombothweb-basedconguration
and the Ethernet Converter Manager.
Management

21
• Conguration Limitations-ThecongurationlimitationsoftheEthernetConverter
specifywhattypesofclientscanconguretheEthernetConverterthroughtheWebBased
Conguration.Prohibitingcongurationfromeitherwirelessorwiredclientscanhavenegative
effectsonyourabilitytoaccesstheWebBasedConguration.Pleasebecertainofyoursetting
changes.Prohibitingcongurationfromwirelessclientscreatesarulethatsaysanyclientthat
isconnectedtotheEthernetConverterwirelesslycannotaccessitsWebBasedConguration.
Prohibitingcongurationfromwiredclientscreatesarulethatsaysanyclientthatishardwired
intotheEthernetConverter'sLANportscannotaccessitsWebBasedConguration.Prohibiting
bothcongurationsmakesallWebBasedCongurationattemptsimpossible.TheEthernet
Convertermustthenbere-initializedtorestorecongurationcapabilities.
• Initialization and Reboot - This page contains settings that
restartandre-initializetheEthernetConverter.
• Initialize-InitializingtheEthernetConverterrestoresthe
EthernetConverter'ssettingstothedefaultsettings.Thiswill
eraseallcongurationchangesmade,andthesetupwillhave
toberestartedasiftheproductwasbrandnew.Thiswillerase
anypasswordsaswell.YoumayalsoinitializetheEthernet
converterwiththeINITbutton;seepage 23.
• Restart-RestartingtheEthernetConverterperformsasimplerestartsimilartowhatwould
occurifthepowerwascycledontheEthernetConverter.Nosettingsarelostinthiscase.The
restartprocesstakesabout30secondsandiscompletewhenthewirelessLEDislit.
Management

22
Firmware Update - This page contains settings that up-
datetheEthernetConverter'sFirmware.
•UpdatingtheEthernetConverter'srmwareisapro-
cedurewhereauserdownloadsanewerrmwarefrom
theBuffaloTechnologyWebSiteandappliesittothe
EthernetConverter.Newrmwarelescontainnew
softwarecodethataddsbugxes,additionalfeatures,
increased performance, and revised interfaces.
•Toupdatethermware,presstheBrowsebuttonandsearchforthedownloadedrm-
warele.Whencomplete,presstheFirmware Updatebutton.Thermwareupdate
processtakesabout90seconds.Afterthermwareupdateiscompleteanyprevious
congurationchangeswillremainunchanged.
Pleasevisithttp://www.buffalotech.com,selectyourregionandvisitthesupportsec-
tiontocheckforproductupdates.
Management
23
Troubleshooting
Troubleshooting-Belowaresomecommontroubleshootingtips:
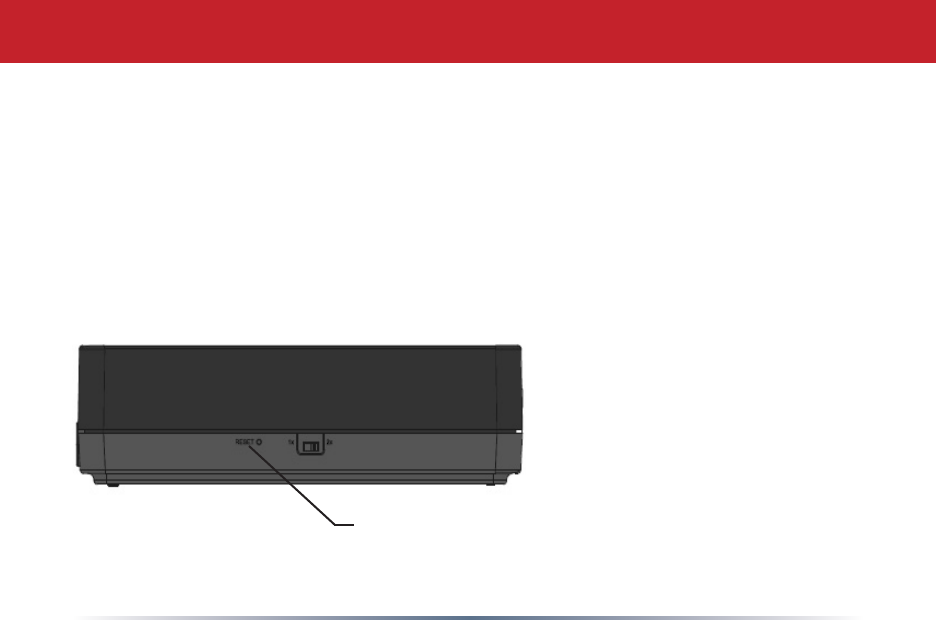
Re-initializing the Ethernet Converter-Re-initializingtheEthernetConverterreturns
ittodefaultsettings.Thisprocessisusedifyoucannotaccesscongurationanymore,
havelostthepasswordtotheEthernetConverter,ordesiretoreturnthesettingstothe
factory settings.
Tore-initializethedevice,simplypresstheblackINIT button on the side of the Ethernet
Converterfor5secondsoruntiltheDIAGlightbecomesred.Allowaminuteforthe
processtocomplete.Afterwards,refertotheQuickSetupGuideorthebeginningofthis
UserManualtorestartcongurationoftheEthernetConverter.
INIT button

24
ThisequipmenthasbeentestedandfoundtocomplywiththelimitsforaClassBdigi-
taldevice,pursuanttoPart15oftheFCCRules.Theselimitsaredesignedtoprovide
reasonable protection against harmful interference in a residential installation. This
equipment generates, uses and can radiate radio frequency energy and, if not installed
andusedinaccordancewiththeinstructions,maycauseharmfulinterferencetoradio
communications.However,thereisnoguaranteethatinterferencewillnotoccurina
particular installation. If this equipment does cause harmful interference to radio or tele-
visionreception,whichcanbedeterminedbyturningtheequipmentoffandon,theuser
isencouragedtotrytocorrecttheinterferencebyoneofthefollowingmeasures:
•Reorientorrelocatethereceivingantenna.
•Increasetheseparationbetweentheequipmentandreceiver.
•Connecttheequipmentintoanoutletonacircuitdifferentfromthattowhichthere-
ceiver is connected.
•Consultthedealeroranexperiencedradio/TVtechnicianforhelp.
FCCCaution:Anychangesormodicationsnotexpresslyapprovedbythepartyrespon-
sibleforcompliancecouldvoidtheuser'sauthoritytooperatethisequipment.
Foroperationwithin5.15~5.25GHzfrequencyrange,itisrestrictedtoindoorenviron-
ment.
ThisdevicecomplieswithPart15oftheFCCRules.Operationissubjecttothefollowing
Federal Communication Commission Interference Statement

25
twoconditions:(1)Thisdevicemaynotcauseharmfulinterference,and(2)thisdevice
must accept any interference received, including interference that may cause undesired
operation.
IMPORTANT NOTE:
Radiation Exposure Statement:
ThisequipmentcomplieswithFCCradiationexposurelimitssetforthforanuncontrolled
environment.Thisequipmentshouldbeinstalledandoperatedwithminimumdistance
20cmbetweentheradiator&yourbody.
Thistransmittermustnotbeco-locatedoroperatinginconjunctionwithanyotheran-
tenna or transmitter.
Theavailabilityofsomespecicchannelsand/oroperationalfrequencybandsarecoun-
trydependentandarermwareprogrammedatthefactorytomatchtheintendeddesti-
nation.Thermwaresettingisnotaccessiblebytheenduser.
WLI-TX4-AG300NwithMonopoletypeantennaandmax.antennagainis5.17dBiin5G
and 4.66dBiin2.4G.
Industry Canada statement
ThisdevicecomplieswithRSS-210oftheIndustryCanadaRules.Operationissubjectto
thefollowingtwoconditions:(1)Thisdevicemaynotcauseharmfulinterference,and(2)
this device must accept any interference received, including interference that may cause
Federal Communication Commission Interference Statement

26
undesired operation.
IMPORTANT NOTE:
IC Radiation Exposure Statement:
ThisequipmentcomplieswithICradiationexposurelimitssetforthforanuncontrolled
environment.Thisequipmentshouldbeinstalledandoperatedwithminimumdistance
20cmbetweentheradiatorandyourbody.
Industry Canada Interference Statement
Thedevicefortheband5150-5250MHzisonlyforindoorusagetoreducepotentialfor
harmfulinterferencetoco-channelmobilesatellitesystems;
Themaximumantennagain4.32dBipermitted(fordevicesinthebands5250-5350MHz
and5470-5725MHz)tocomplywiththee.i.r.p.limit;and
Themaximumantennagain5.17dBipermitted(fordevicesintheband5725-5825MHz)
tocomplywiththee.i.r.p.limitsspeciedforpoint-to-pointandnonpoint-to-pointopera-
tionasappropriate,asstatedinsectionA9.2(3).
Inaddition,usersshouldalsobecautionedtotakenotethathigh-powerradarsareal-
locatedasprimaryusers(meaningtheyhavepriority)ofthebands5250-5350MHzand
5650-5850MHzandtheseradarscouldcauseinterferenceand/ordamagetoLE-LAN
devices.
Note: The WLI-TX4-AG300N has disabled the 5600-5650M band by S/W to avoid
5600-5650M band for IC certication.
Federal Communication Commission Interference Statement

27
Europe – EU Declaration of Conformity
ThisdevicecomplieswiththeessentialrequirementsoftheR&TTEDirective1999/5/EC.
Thefollowingtestmethodshavebeenappliedinordertoprovepresumptionofconformity
withtheessentialrequirementsoftheR&TTEDirective1999/5/EC:
•EN60950-1:2001A11:2004
Safety of Information Technology Equipment
•EN50385:(2002-08)
Productstandardtodemonstratethecomplianceofradiobasestationsandxedterminal
stationsforwirelesstelecommunicationsystemswiththebasicrestrictionsortherefer-
encelevelsrelatedtohumanexposuretoradiofrequencyelectromagneticelds(110MHz
-40GHz)-Generalpublic
•EN300328V1.7.1:(2006-10)
ElectromagneticcompatibilityandRadiospectrumMatters(ERM);WidebandTransmis-
sionsystems;Datatransmissionequipmentoperatinginthe2,4GHzISMbandandus-
ingspreadspectrummodulationtechniques;HarmonizedENcoveringessentialrequire-
mentsunderarticle3.2oftheR&TTEDirective
•EN301893V1.4.1:(2007-07)
BroadbandRadioAccessNetworks(BRAN);5GHzhighperformanceRLAN;Harmonized
ENcoveringessentialrequirementsofarticle3.2oftheR&TTEDirective

28
•EN301489-1V1.6.1:(2005-09)
ElectromagneticcompatibilityandRadioSpectrumMatters(ERM);ElectroMagneticCom-
patibility(EMC)standardforradioequipmentandservices;Part1:Commontechnical
requirements
•EN301489-17V1.2.1(2002-08)
ElectromagneticcompatibilityandRadiospectrumMatters(ERM);ElectroMagneticCom-
patibility(EMC)standardforradioequipmentandservices;Part17:Specicconditions
for2,4GHzwidebandtransmissionsystemsand5GHzhighperformanceRLANequip-
ment
Thisdeviceisa2.4GHzwidebandtransmissionsystem(transceiver),intendedforusein
allEUmemberstatesandEFTAcountries,exceptinFranceandItalywhererestrictive
use applies.
In Italy the end-user should apply for a license at the national spectrum authorities in
ordertoobtainauthorizationtousethedeviceforsettingupoutdoorradiolinksand/or
forsupplyingpublicaccesstotelecommunicationsand/ornetworkservices.
ThisdevicemaynotbeusedforsettingupoutdoorradiolinksinFranceandinsome
areastheRFoutputpowermaybelimitedto10mWEIRPinthefrequencyrangeof2454
–2483.5MHz.Fordetailedinformationtheend-usershouldcontactthenationalspec-
trumauthorityinFrance.
Europe – EU Declaration of Conformity

29
Europe – EU Declaration of Conformity
Česky
[Czech]
[Jménovýrobce]tímtoprohlašuje,žetento[typzařízení]jeveshoděse
základnímipožadavkyadalšímipříslušnýmiustanovenímisměrnice
1999/5/ES.
Dansk
[Danish]
Undertegnede[fabrikantensnavn]erklærerherved,atfølgendeudstyr
[udstyretstypebetegnelse]overholderdevæsentligekravogøvrigerelevante
kravidirektiv1999/5/EF.
Deutsch
[German]
Hiermiterklärt[NamedesHerstellers],dasssichdasGerät[Gerätetyp]in
Übereinstimmung mit den grundlegenden Anforderungen und den übrigen
einschlägigenBestimmungenderRichtlinie1999/5/EGbendet.
Eesti
[Estonian]
Käesolevagakinnitab[tootjanimi=nameofmanufacturer]seadme[sead-
metüüp=typeofequipment]vastavustdirektiivi1999/5/EÜpõhinõuetele
janimetatuddirektiivisttulenevateleteisteleasjakohastelesätetele.
English Hereby,[nameofmanufacturer],declaresthatthis[typeofequipment]isin
compliancewiththeessentialrequirementsandotherrelevantprovisions
ofDirective1999/5/EC.
Español
[Spanish]
Pormediodelapresente[nombredelfabricante]declaraqueel[clasede
equipo]cumpleconlosrequisitosesencialesycualesquieraotrasdisposi-
cionesaplicablesoexigiblesdelaDirectiva1999/5/CE.
Ελληνική
[Greek]
ΜΕΤΗΝΠΑΡΟΥΣΑ[nameofmanufacturer]ΔΗΛΩΝΕΙΟΤΙ[typeofequip-
ment]ΣΥΜΜΟΡΦΩΝΕΤΑΙΠΡΟΣΤΙΣΟΥΣΙΩΔΕΙΣΑΠΑΙΤΗΣΕΙΣΚΑΙΤΙΣ
ΛΟΙΠΕΣΣΧΕΤΙΚΕΣΔΙΑΤΑΞΕΙΣΤΗΣΟΔΗΓΙΑΣ1999/5/ΕΚ.

30
Europe – EU Declaration of Conformity
Français
[French]
Parlaprésente[nomdufabricant]déclarequel'appareil[typed'appareil]
estconformeauxexigencesessentiellesetauxautresdispositionsperti-
nentesdeladirective1999/5/CE.
Italiano
[Italian]
Conlapresente[nomedelcostruttore]dichiarachequesto[tipodiapparec-
chio]èconformeairequisitiessenzialiedallealtredisposizionipertinenti
stabilitedalladirettiva1999/5/CE.
Latviski
[Latvian]
Aršo[nameofmanufacturer/izgatavotājanosaukums]deklarē,ka[type
ofequipment/iekārtastips]atbilstDirektīvas1999/5/EKbūtiskajām
prasībāmuncitiemartosaistītajiemnoteikumiem.
Lietuvių
[Lithuanian]
Šiuo[manufacturername]deklaruoja,kadšis[equipmenttype]atitinka
esminiusreikalavimusirkitas1999/5/EBDirektyvosnuostatas.
Nederlands
[Dutch]
Hierbijverklaart[naamvandefabrikant]dathettoestel[typevantoestel]
in overeenstemming is met de essentiële eisen en de andere relevante be-
palingenvanrichtlijn1999/5/EG.
Malti
[Maltese]
Hawnhekk,[isemtal-manifattur],jiddikjaralidan[il-mudeltal-prodott]
jikkonformamal-ħtiġijietessenzjaliumaprovvedimentioħrajnrelevantili
hemmd-Dirrettiva1999/5/EC.
Magyar
[Hungarian]
Alulírott,[gyártóneve]nyilatkozom,hogya[...típus]megfelelavonatkozó
alapvetõkövetelményeknekésaz1999/5/ECirányelvegyébelõírásainak.
Polski
[Polish]
Niniejszym[nazwaproducenta]oświadcza,że[nazwawyrobu]jestzgodny
zzasadniczymiwymogamiorazpozostałymistosownymipostanowieniami
Dyrektywy1999/5/EC.

31
Europe – EU Declaration of Conformity
Português
[Portuguese]
[Nomedofabricante]declaraqueeste[tipodeequipamento]estáconforme
comosrequisitosessenciaiseoutrasdisposiçõesdaDirectiva1999/5/CE.
Slovensko
[Slovenian]
[Imeproizvajalca]izjavlja,dajeta[tipopreme]vskladuzbistvenimi
zahtevamiinostalimirelevantnimidoločilidirektive1999/5/ES.
Slovensky
[Slovak]
[Menovýrobcu]týmtovyhlasuje,že[typzariadenia]spĺňazákladné
požiadavkyavšetkypríslušnéustanoveniaSmernice1999/5/ES.
Suomi
[Finnish]
[Valmistaja=manufacturer]vakuuttaatätenettä[typeofequipment=lait-
teentyyppimerkintä]tyyppinenlaiteondirektiivin1999/5/EYoleellisten
vaatimustenjasitäkoskeviendirektiivinmuidenehtojenmukainen.
Svenska
[Swedish]
Härmedintygar[företag]attdenna[utrustningstyp]stårIöverensstäm-
melsemeddeväsentligaegenskapskravochövrigarelevantabestämmelser
somframgåravdirektiv1999/5/EG.

32
Warranty Information
Buffalowirelessproductscomewitha2-yearlimitedwarrantyfromthedateofpurchase.
BuffaloTechnologywarrantsproductsingoodoperatingconditionforthewarranty
period.Thiswarrantydoesnotincludenon-BuffaloTechnologyinstalledcomponents.If
theBuffaloproductmalfunctionsduringthewarrantyperiod,BuffaloTechnologywill,
at its discretion, repair or replace the product at no charge, provided the product has
notbeensubjectedtomisuse,abuseornon-BuffaloTechnologyauthorizedalterations,
modications,orrepairs.Whenreturningaproduct,includeyouroriginalproofof
purchase.Returnrequestscannotbeprocessedwithoutproofofpurchase.Shipment
ofreturnedproducttoBuffaloTechnologyistheresponsibilityofthepurchaser.All
expressedandimpliedwarrantiesfortheBuffaloproductlineincluding,butnotlimited
to,thewarrantiesofmerchantabilityandtnessforaparticularpurpose,arelimitedin
duration to the above period.
UndernocircumstancesshallBuffaloTechnologybeliableinanywaytotheuserfor
damages,includinganylostprots,lostsavingsorotherincidentalorconsequential
damagesarisingoutoftheuseof,orinabilitytouse,theBuffaloproducts.
BuffaloTechnologyreservestherighttoreviseorupdateitsproducts,software,or
documentationwithoutobligationtonotifyanyindividualorentity.
Pleasehaveyourproofofpurchasereceipttogetwarrantysupport.Alldefectiveproducts
shallbereturnedwithacopyofproofofpurchase.
InnoeventshallBuffaloTechnology’sliabilityexceedthepricepaidfortheproductfrom
direct, indirect, special, incidental, or consequential damages resulting from the use of
theproduct,itsaccompanyingsoftware,oritsdocumentation.BuffaloTechnologydoes
not offer refunds for any product.

33
Contact Information - North America
BuffaloTechnology(USA),Inc.
11100MetricBlvd,Suite750
Austin,TX78758-4018
GENERAL INQUIRIES
MondaythroughFriday
8:30am-5:30pmCST
Direct:512-794-8533|Toll-free:800-456-9799|Fax:512-794-8520|Email:
sales@buffalotech.com
TECHNICAL SUPPORT
NorthAmericanTechnicalSupportbyphoneisavailable24hoursaday,7daysaweek.
(USAandCanada).
Toll-free: (866)752-6210|Email: info@buffalotech.com

34
BuffaloTechnologyUKLtd.
2BracknellBeeches,OldBracknellLane,
BracknellBerkshire,RG127BW
UnitedKingdom
GENERAL INQUIRIES
Email:sales@buffalo-technology.com
TECHNICAL SUPPORT
TechnicalSupportinEuropeisavailablebetweenthehoursof9am-6pm(GMT)Monday
toThursdayand9am-4:30pm(GMT)Fridayforthisproduct.CustomersinEuropecan
obtainTechnicalSupportusingthefollowinginformation:
E-mail:helpdesk@buffalo-technology.ie|Web:www.buffalo-technology.com
Contact Information - Europe

* 300 Mbps is the IEEE 802.11n draft 2.0 standard theoretical maximum data transfer rate. Actual wireless network
throughput is limited by environmental and system factors and will be less.
Copyright © 2004 Buffalo Technology, Inc. All Rights Reserved.
Buffalo Technology (USA) Inc., is part of Buffalo Inc. (JAPAN), the global manufacturers of IT peripherals, including
memory, networking, and multimedia products, inside many of the world's computers. All trademarks are property of
their respective owners.
35