Badger Meter 2010H ORION SE HANDHELD User Manual Exhibit D Users Manual per 2 1033 b3
Badger Meter Inc ORION SE HANDHELD Exhibit D Users Manual per 2 1033 b3
Exhibit D Users Manual per 2 1033 b3

Search for "you" and rewrite
ORION® SE
Trimble® Ranger™
Handheld
Installation & Operation
ORI-IOM-52 (1/14/11 10:56 am)
62014-105 Rev 4 (need ER for Rev 5)
IMPORTANT:
This manual contains important information.
READ AND KEEP FOR REFERENCE.

Trimble® Ranger™
Page ii 1-11

CONTENTS
Introduction ............................................................................................................................................ 7
About This Manual.................................................................................................................................. 7
LICENSE REQUIREMENTS ....................................................................................................................... 7
Manual Organization ............................................................................................................................. 9
GLOSSARY .............................................................................................................................................. 10
THE MAKEUP OF THE TRIMBLE RANGER .............................................................................................. 12
Unit Setup .............................................................................................................................................. 13
Charge the PowerBoot Module .......................................................................................................................................... 13
Attach the PowerBoot Module ........................................................................................................................................... 13
Attach the hand strap .......................................................................................................................................................... 13
Applying and Removing Power .......................................................................................................................................... 14
Password – Lock (Optional) ................................................................................................................................................. 14
Battery Conservation .......................................................................................................................................................... 14
PowerBoot Module .............................................................................................................................................................. 15
Battery life ...............................................................................................................................................................15
Charging the PowerBoot: ...................................................................................................................................... 15
Swapping the PowerBoot Module ........................................................................................................................16
Using the stylus .................................................................................................................................................................... 16
Touch and hold ....................................................................................................................................................... 16
Drag .........................................................................................................................................................................16
Storage Memory .................................................................................................................................................................. 16
Accessing Storage Memory using File Explorer ................................................................................................................ 17
The Start menu (for customers running Badger reading software without admin access) ........................................... 17
Date & Time Setting ............................................................................................................................................................. 18
Touchscreen Care ................................................................................................................................................................. 18
Installation & Operation Manual
Page iii
11-11

Detailed Operations ............................................................................................................................... 19
The Reading Cycle ................................................................................................................................................................ 19
Restarting the Unit .............................................................................................................................................................. 19
Starting the ReadCenter Field Application Software ....................................................................................................... 19
Copyright Screen ...................................................................................................................................................20
Trademarks screen ................................................................................................................................................21
Device ID/Name screen ..........................................................................................................................................22
ReadCenter Main Menu .......................................................................................................................... 23
Communications with the Badger Reading Data Management Software ......................................... 23
Route Info screen ................................................................................................................................................................. 24
Meter Reading ........................................................................................................................................ 25
Log In screen ........................................................................................................................................................................ 25
The Read Screen .................................................................................................................................................................. 26
Navigation ............................................................................................................................................................................ 27
Reading Meters .................................................................................................................................................................... 28
Gathering Meter Readings .................................................................................................................................................. 29
Reading Badger ORION Meters .......................................................................................................................................... 29
Processing the ORION Meter Reading ................................................................................................................................ 30
Processing Tamper Reports ................................................................................................................................................ 30
Clearing a Tamper ................................................................................................................................................................ 31
Processing Encoder Errors .................................................................................................................................................. 31
Switching to Manual Mode Meter Reading ....................................................................................................................... 32
Starting the Reading Process for a Manual Meter ............................................................................................................ 33
Manual Meter Reading ........................................................................................................................................................ 33
Manual Meter Reading Direction ....................................................................................................................................... 33
High and Low Limits for Manual Meter Readings ............................................................................................................. 34
Trimble® Ranger™
Page iv 1-11

Advancing the Display ........................................................................................................................................................ 36
Error Conditions – Stopped Meters and Reverse Flow ...................................................................................................... 36
Other Reading functions – The Reading Menu .................................................................................................................. 39
Search ................................................................................................................................................................................... 41
Trouble Codes and Reader Codes ....................................................................................................................................... 43
Bookmark ............................................................................................................................................................................. 47
Skip ....................................................................................................................................................................................... 47
Search by Route ................................................................................................................................................................... 49
Text Messages ...................................................................................................................................................................... 50
Viewing High and Low Audit Values ................................................................................................................................... 51
Utilities ................................................................................................................................................................................. 52
Progress ................................................................................................................................................................................ 52
Date/Time ............................................................................................................................................................................. 54
Battery Info .......................................................................................................................................................................... 54
Settings ................................................................................................................................................................................. 54
High/Low Options Settings Screen .................................................................................................................................... 57
Displayable Field Settings Screen ...................................................................................................................................... 57
Customizations Settings screens (1 to 3) ........................................................................................................................... 58
Entering New Accounts ....................................................................................................................................................... 59
Route Operations ................................................................................................................................................................. 60
Searching for a Route .......................................................................................................................................................... 61
Progress Reporting by Route .............................................................................................................................................. 62
Route Completion Messages .............................................................................................................................................. 63
Summary of the Meter Reading Process ............................................................................................................................ 63
PROGRAMMING METERS USING THE TRIMBLE RANGER ..................................................................... 64
Programming Badger Meter ORION® Transmitters ........................................................................................................... 64
Installation & Operation Manual
Page v
11-11

Reading the Transmitter Through the Optical Port........................................................................................................... 66
Starting the Badger Meter ORION® Transmitter without the Programmer .................................................................... 66
Using the Programmer to start a Transmitter ................................................................................................................... 67
Stopping a Transmitter ........................................................................................................................................................ 67
Changing the Odometer setting ......................................................................................................................................... 68
Example: Changing the Odometer .................................................................................................................................... 68
QUICK READ ............................................................................................................................................ 69
Badger Meter ORION® Quick Reads .................................................................................................................................... 70
WHAT IF THINGS GO WRONG ................................................................................................................. 76
Restarting Windows® ........................................................................................................................................................... 76
Questions ............................................................................................................................................................................. 76
When You Call the Technical Support Hotline ................................................................................................................... 76
What To Report To Technical Support ................................................................................................................................ 76
Faxing the Technical Support Group .................................................................................................................................. 77
E-Mailing the Technical Support Group ............................................................................................................................. 77
Trimble® Ranger™
Page vi 1-11

Page 7
1-11
Installation & Operation Manual
Introduction
The Trimble® Ranger™ handheld computer is a flexible and easy-to-use tool, which can be used with various meter reading
technologies. It provides utilities with a handheld interrogator that can be operated with a customized keypad for data entry.
The Trimble handheld can gather and accept:
• Meter readings from meters equipped with Badger Meter ORION® and Badger Meter GALAXY® endpoints.
• Meter readings that are visually read and manually entered.
• Meter readings from the VersaProbe™ universal probe for touch read meters and registers.
About This Manual
The Installation and Operation Manual is designed to help you learn how to use the Trimble handheld effectively.
IMPORTANT: To provide the best solution for our customers, Badger Meter continually improves software applications and
updates this Installation and Operation Manual on a periodic basis to reflect upgrades. Therefore, you may notice discrepan-
cies between your installed application and this manual.
LICENSE REQUIREMENTS
This device complies with Part 15 of FCC Rules. Operation of this device is subject to the following conditions: (1) This device
may not cause harmful interference, and (2) this device must accept any interference received, including interference that
may cause undesired operation. No FCC license is required by a utility to operate a Badger Meter ORION® meter reading
system.
Any changes made, but not approved by Badger Meter, can void the user’s authority to operate the equipment.

Page 8 1-11
Trimble® Ranger™
The following Hot Keys can be pressed to make finding and bookmarking of accounts easier for the operator:
Read Screen
Key Assoc. Hot Key On-screen usage Assoc. Hot Key (double/single-tap)
A -- Auto-mode
B BOOKMARK -- Toggle Bookmark
C -- Next Bookmark
D RD DIRECT Toggle route reading direction.
E RESEQ Resequence (unimplemented)
F RTSTART Route Start
G --
H HI/LO View High/Low reads for current account.
I --
J -- Encoder Error processing
K SETTINGS Settings Screen
L --
M MAN RD Manual Read entry
N MESSAGE Next Account
O -- Read extended comment from CONNECT
P -- Previous Account
Q PROGRESS Progress
R RD CD Reader Code
S SEARCH Search
T TRBL CODE Trouble Code
U UNREAD Next Unread
W NXT SKIP Next Skipped
X -- Tamper Processing
Y -- Zero or Rvrs Flow processing
Z SKIP Toggle Skipped

Page 9
1-11
Installation & Operation Manual
Manual Organization
The manual is divided into these sections:
• Introduction
• Glossary
• The Makeup of the Trimble Ranger
• Detailed Operations
• What If Things Go Wrong
The Glossary section will provide definitions of the terminology for automatic meter reading.
The “Makeup of the Trimble Ranger” section describes all pertinent features.
The “Detailed Operations” describes Trimble Ranger functions.
The “What If Things Go Wrong” section details the steps needed to troubleshoot problem instances.

Page 10 1-11
Trimble® Ranger™
GLOSSARY
The following is common Trimble Ranger terminology.
TERM DEFINITION
BadgerTouch® Badger Meter’s touch product.
Comment code
A comment code is a message from the office to the meter reader that is displayed
as soon as the meter is displayed on the read screen. The possible messages are
defined and maintained by the user in Badger Meter Reading Data Management
Software and chosen from the defined list.
Encoder Error
An Encoder Error is a reading (ORION radio or touch read) in which one or more of
the number wheels in the mechanical encoder can’t be read. There are two com-
mon causes of encoder errors. The first is based on an improper alignment of the
number wheels in the encoder and the second is a component failure inside the en-
coder. If the error is caused by a misalignment of the number wheels, the error can
be cleared by running consumption and changing the reading value of the number
wheel causing the error. If the encoder error occurs at the same account over two
or more continuous reading cycles, the encoder has most likely failed and should be
replaced. When an encoder error is reported by ORION, you have the option of log-
ging a trouble code, performing a manual read, skip this meter, or accepting the last
correct reading stored by the ORION endpoint. Since a touch read module does not
store readings, when a touch encoder error occurs, your options are to log a trouble
code, skip this meter, or perform a manual read.
Field A piece of information in the Trimble Ranger, such as the service address or the me-
ter serial number, that resides on the screen.
Final read A meter reading that is taken as a customer moves from one location to another in
order to send the customer their final bill.
Main menu The screen in the Trimble Ranger that is displayed immediately after the display of
the Copyright screen.
Module
In general, an electronic product used to report a meter’s reading. For example,
the Badger Meter ORION® electronics which is needed to perform a radio read, is an
example of a module.
Programming menu A specific menu within the Badger Meter AMR Software that allows programming of
modules.
Quick read
A feature that allows the operator to capture a reading for a specific module. The
quick read function is available for touch modules or Badger Meter ORION end-
points. When quick reading Badger Meter ORION endpoints, you can also display
the readings from up to 50 of the endpoints in range of your Badger Meter ORION
receiver, not just one endpoint.
Potential leak A status reported by an ORION endpoint showing that the meter has registered
continuous flow and may have a potential leak.
Reader Codes
Reader codes consist of up to three messages to the utility office for each meter to
be read. The possible messages are defined in Badger Meter Reading Data Manage-
ment Software and chosen by the meter reader from the defined list.
Reading menu The Trimble Ranger screen holding the list of different functions that you can per-
form when reading meters
Route A list of meters to read.
Route management software The software product or system that loads route information into the computer, and
accepts completed meter readings from the handheld computer.
Route progress The function that displays the number of meters read in the current route, along
with other related information.

Page 11
1-11
Installation & Operation Manual
TERM DEFINITION
Send readings The function that prepares gathered meter readings and transfers them to the Bad-
ger Meter Reading Data Management Software.
Service The type of utility being measured by the meter, for example Water, Gas or Electric.
Settings The values that can be changed by the user to control behavior to certain functions.
Tamper A status reported by a Badger Meter ORION endpoint showing that the lead line
between the register and the endpoint is cut or shorted.
Text message A message entered by the meter reader to be sent to the utility office via the Badger
Meter Reading Data Management Software.
Trouble code A message that is chosen by the meter reader from a list stored in the Trimble
Ranger and sent to the utility office describing a condition or status at the meter.
VersaProbe™ A meter reading wand that can be used with the Trimble Ranger to read touch mod-
ules.
Page 12 1-11
Trimble® Ranger™
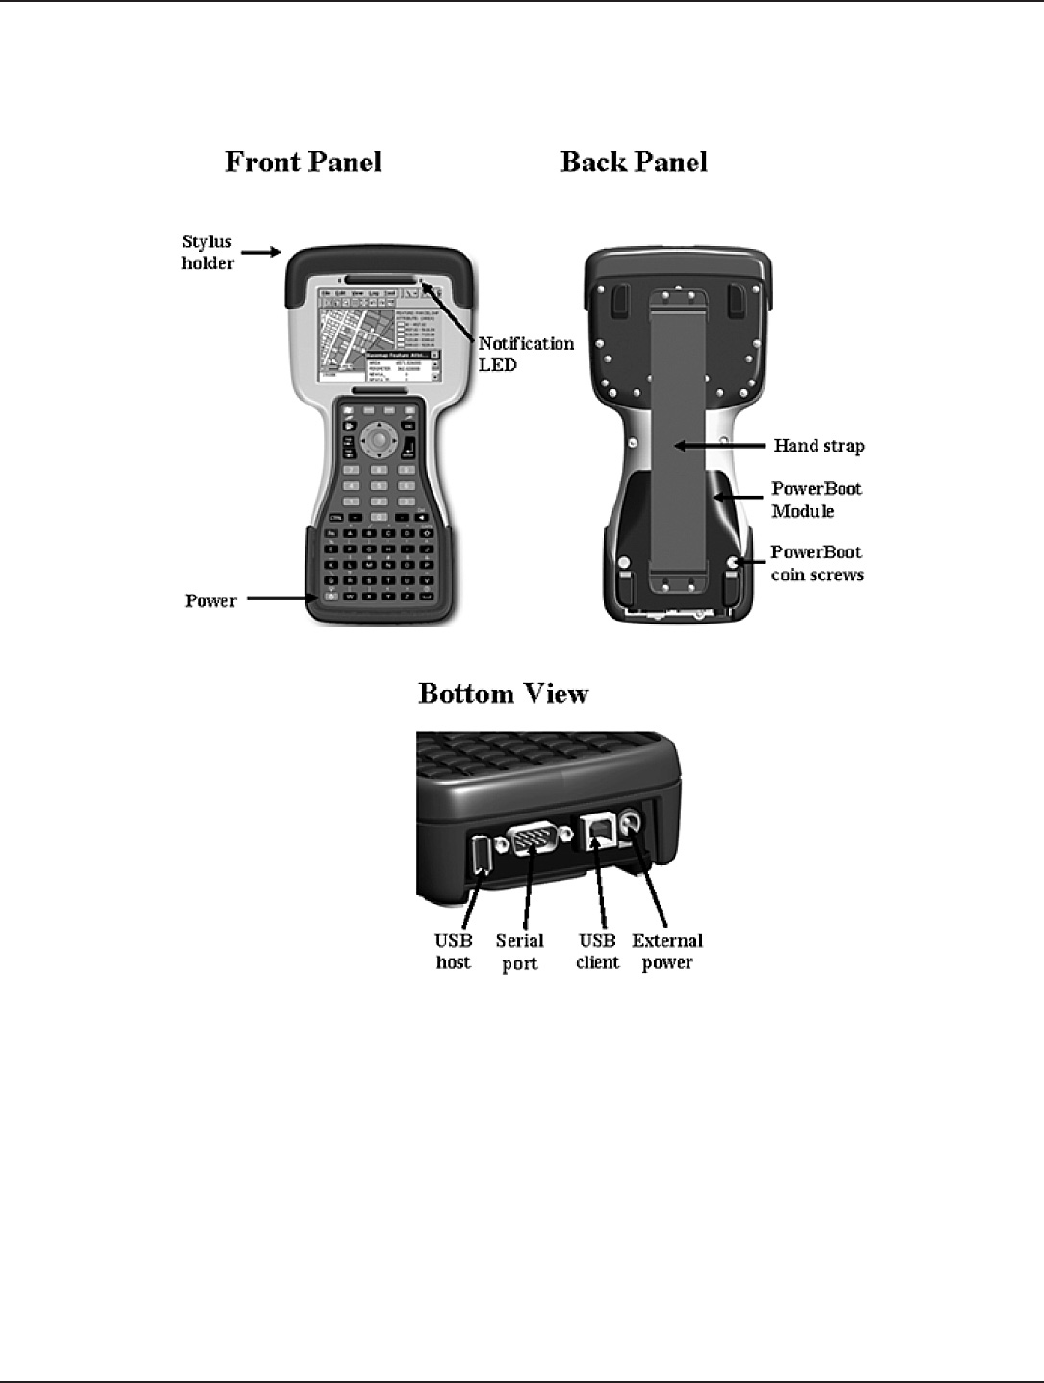
THE MAKEUP OF THE TRIMBLE RANGER
The Trimble Ranger is made up of a number of functions that all work together to perform meter reading quickly and easily.
Review the following section to familiarize yourself with the hardware that makes up the Trimble Ranger..

Page 13
1-11
Installation & Operation Manual
Unit Setup
Charge the PowerBoot Module
The PowerBoot Module™ that contains the batteries is shipped detached from the unit. Before operating the Trimble Ranger,
the PowerBoot should be charged. The AC charger that ships with your unit has adapters to fit most electrical outlets. Connect
the appropriate outlet adapter to the AC charger. Plug the charger into an electrical outlet and plug the barrel end of the char-
ger into the PowerBoot. Charge the PowerBoot Module for approximately 4.5 hours.
Be sure to always use the charger included with your unit. Use of other chargers will void warranty.
Attach the PowerBoot Module
Align the PowerBoot Module with the unit, with the contacts facing down. Insert the top end of the PowerBoot Module first
as shown, and then drop the PowerBoot Module into the unit. Secure by firmly tightening the two screws with a coin or a
screwdriver.
Attach the hand strap
Insert one end of the hand strap onto the two small bolts located on the back of the unit.
Stretch the strap and insert the other end onto the two bolts located near the bottom of the PowerBoot Module.

Page 14 1-11
Trimble® Ranger™
Applying and Removing Power
To turn the unit on, press and release the green Power key on the lower left hand corner of the keypad. To turn the unit off,
press and release the Power key again.
One of the most convenient features of the unit is “instant on” and “instant off” (also known as “suspend/resume”). There is no
waiting for the unit to boot up every time it is turned on. “Instant on” does not occur on the first boot-up. When the unit first
turns on, the message “Tap the screen to set up your Windows Mobile-based device” will appear.
Password – Lock (Optional)
A password is not needed unless concerns arrise about unauthorized use. To eliminate using a password, tap Skip. Badger
Meter recommends not assigning passwords to prevent the loss of reading data. See the warning on the next page that de-
scribes factory-default settings.
If you opt for password protection, the password must be entered every time you turn the unit on, or use the Power key to
resume operation.
BE CERTAIN TO REMEMBER THE PASSWORD.
The only way to recover from a forgotten or lost password is to call the technical support group. Please refer to the section
“What If Things Go Wrong” for assistance in case of a forgotten or lost password.
Battery Conservation
The Trimble Ranger conserves battery power by turning itself off when not in use. The Off function on the main menu also re-
moves power. Pressing any key on the keypad for a few seconds will turn the unit back on and the will show the same screen
that was displayed when the unit turned off.
Note that when the Trimble Ranger is on the Read screen or the Quick Read screen, it will NOT turn off automatically, because
the Badger Meter ORION Reading functions are active. If you wish to conserve the battery, be sure to return to the main
menu.

Page 15
1-11
Installation & Operation Manual
PowerBoot Module
The PowerBoot includes the batteries to power the unit, the power port used to charge the unit, and the I/O ports that are
used to communicate with other devices using a USB or serial cable.
Battery life
The Trimble Ranger has been designed to operate with the internal BlueTooth® and 802.11 wireless communication features
and will automatically turn them off when not in use. Do not turn these wireless features on unless instructed. Leaving these
wireless options on will reduce battery life.
Tips for extending the battery life:
- Use the backlight only when necessary. Use the Fn + Power keys to toggle the backlight on and off. Tap Start /
Settings / System / Backlight to minimize the amount of time the backlight stays on when the unit is idle. Also, a
brighter backlight uses more power than a dim setting.
- When working in cold temperatures, keep the unit as warm as possible.
Charging the PowerBoot:
The PowerBoot can be charged when installed or separately from the main unit. Connect the appropriate outlet adapter to
the AC charger. Plug the charger into an electrical outlet and plug the barrel end of the charger into the PowerBoot.
The unit will be fully charged in approximately 4.5 hours. The acceptable temperature range for charging the battery is be-
tween +5°C and +35°C (+41°F and +95°F).
The PowerBoot Module also has an LED that provides an indication of charging status.
The LED states are shown in the following table.
Normal usage:
Off No charger present or it is unplugged
Fast blink Fast charge
Slow blink Topoff charge
On Charging complete
Error conditions:
1 - 2 short flashes * Temperature out of range for charging
3 short flashes Wrong charger
Note: If the fully-charged unit is still connected to the charger, the status found in Settings / System / Power will report
the battery power remaining as if the unit were still on battery power.

Page 16 1-11
Trimble® Ranger™
Swapping the PowerBoot Module
The PowerBoot is designed to be quickly swapped in the field (if you have purchased additional PowerBoot Modules). If the
current PowerBoot Module runs low, replace it and continue with your w ork.
The unit saves enough power that if you swap the PowerBoot within a couple of minutes, it will not trigger a reset. If the saved
power runs out before the new PowerBoot is connected, the unit will reset. This will not impact saved data, programs or con-
figuration, however unsaved data will be lost and the time will need to be reset.
To change a PowerBoot Module, perform the following steps:
1. Remove the hand strap from the PowerBoot.
2. Ensure the unit is turned on. (The unit will automatically turn itself o when you loosen the screws in the next step.)
3. Use a screwdriver or a coin to unlock the two screws on the PowerBoot Module by turning them counter-clockwise
until the PowerBoot can be removed. Unscrewing the screws turns the unit o and puts it in a special state that pre-
vents it from turning on for alarms and notications.
4. Remove the PowerBoot Module by taking it out of the unit. Be careful to not press the Power key while the Power-
Boot is detached.
5. Quickly insert the new PowerBoot onto the unit.
6. Fasten the PowerBoot securely into place by turning the two screws clockwise.
7. Replace the hand strap.
8. Turn the unit ON to resume operation.
Note: The screws MUST be tightened securely before turning the unit on or it will not turn on.
Using the stylus
The touch screen on your unit works like a mouse on a PC. Use the stylus to navigate and select objects on the screen. Tap: Tap
the screen with the stylus to select or open an item.
Tapping is equivalent to clicking the left mouse button on your PC
Touch and hold
When you touch and hold, a circle of dots appears around the stylus to indicate that a pop-up menu will soon appear. Touch-
ing and holding is equivalent to clicking the right button on the PC mouse.
Drag
Hold the stylus on the screen and drag across the screen to select text and images. Drag in a list to select multiple items.
Storage Memory
Unlike many handheld computers which can lose data if they lose power, all your data is stored in non-volatile memory. Los-
ing power will not impact saved data or configurations other than the real time clock. If the battery is removed for 30 seconds
or more, the user will be prompted to enter a current time and date. This must be done prior to operating the READCENTER®
Field Applications.
Page 17
1-11
Installation & Operation Manual
Accessing Storage Memory using File Explorer
File Explorer (Start / Programs / File Explorer) allows browsing of the contents of folders on your unit. To easily delete, rename,
or copy an item, touch and hold the item.
NOTE: Unlike desktop PCs, Windows Mobile® 5.0 does not support a Recycle Bin. Once a file is deleted, it cannot be recovered.
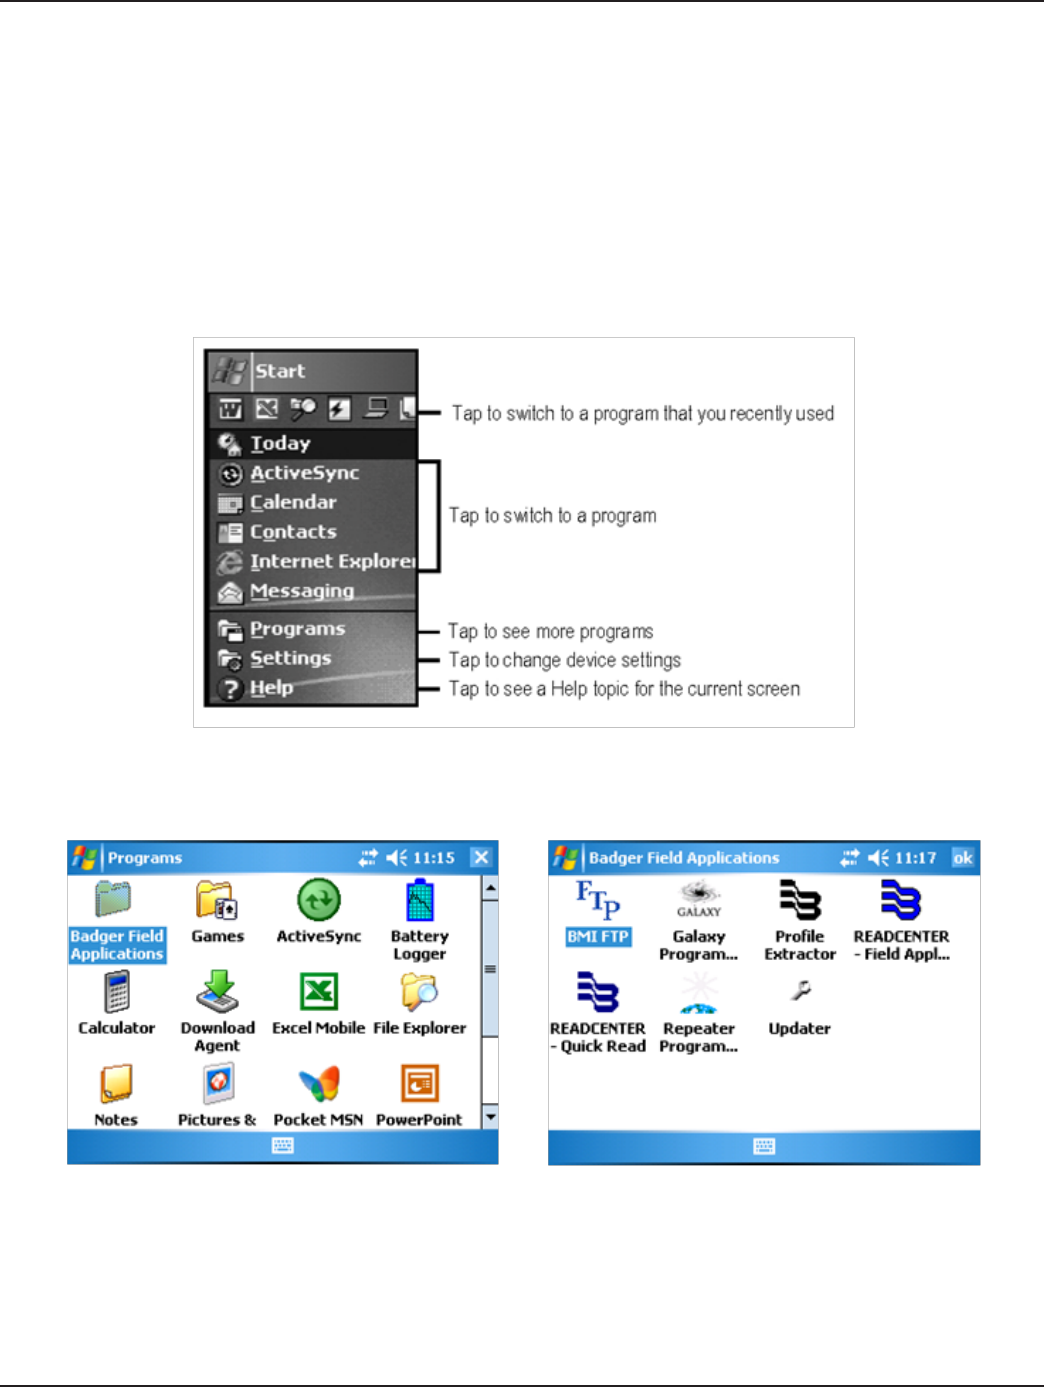
The Start menu (for customers running Badger Meter reading software without admin access)
From the Start menu, select Programs, Settings, and Help topics.
To display the Start Menu, from the top of any screen, tap Start.
Note: This screen represents Trimble Ranger without the Admin Access Software.
The (left) screen shows the folder holding all Badger Meter applications. Tap on the folder with the stylus.
The next screen shows the different Badger Meter applications.
Note: This screen represents Trimble Ranger without the Admin Access Software.

Page 18 1-11
Trimble® Ranger™
Date & Time Setting
During training, the Trimble Ranger will be started and the initial settings will be completed by your trainer. These initial set-
tings include setting the time, the date, the time zone, and the unit’s name. Each Trimble Ranger will have a unique name to
make loading and unloading easier.
To update the time or date, use the Date function in Windows Mobile, accessed by clicking Start / Settings / Clocks and
Alarms.
Touchscreen Care
Use the screen protectors included with the unit to keep the touch screen clean and protected. To apply a screen protector,
first clean the display thoroughly. Peel the backing from the screen protector. Align the edge, and then drop the remainder
onto the display. Use a credit card, if necessary, to squeeze the air from underneath the screen protector.
Use only the included stylus or other devices designed specifically for use with touch screens. The use of ballpoint pens, nails,
or other sharp objects to operate the touch screen will scratch and/or damage the unit. Do not apply any cleaner directly to
the display. Do not use any abrasive cleaners. Abrasives may scratch touch screens. Keep the touch screen clean by
gently wiping the display, using a soft cloth dampened by either clean water or glass cleaner.
Page 19
1-11
Installation & Operation Manual
Detailed Operations
The Reading Cycle
Using the Trimble Ranger for meter reading is easy. The reading cycle consists of these steps:
1. From Badger Meter Reading Data Management Software, use the Load Collector function to send the meter informa-
tion.
2. From the Main Menu of the Trimble Ranger press the “R” key to begin the meter reading.
3. From the Copyright Screen of the Trimble Ranger, insert a USB memory stick into the Trimble Ranger and then press
the “L” key to unload your meter readings to the memory stick.
4. STEP 4 – Plug the USB memory stick into the computer running the Badger Meter Reading Data Management Soft-
ware and use that program’s functionality to read in the meter readings from the memory stick.
Restarting the Unit
There may be cases when you need to reboot, or restart the Trimble Ranger. To perform a restart, press and hold the green
power key. For users with Admin Access Software, the screen will repeatedly flash, and then go blank. Continue holding the
power key down. The unit will automatically restart. Readings will not be lost if the handheld is restarted using the above-
mentioned steps.
If the restart process above does not clear the condition you are experiencing, please call Badger Meter Meter Technical Sup-
port for assistance. Please see the chapter “What If Things Go Wrong” for more information.
Starting the ReadCenter Field Application Software
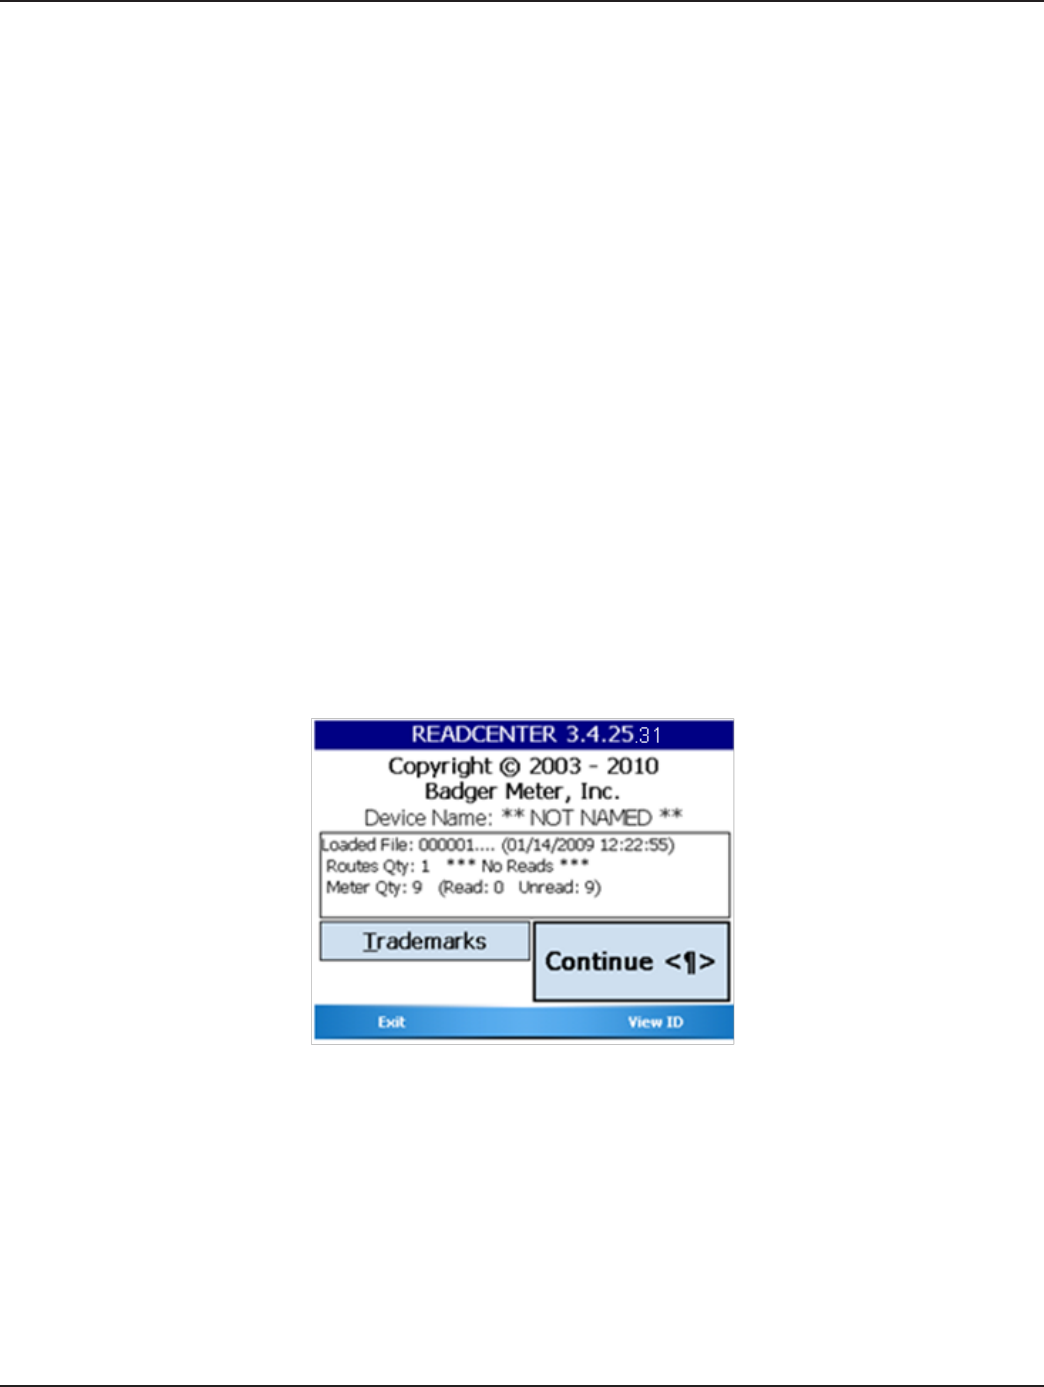
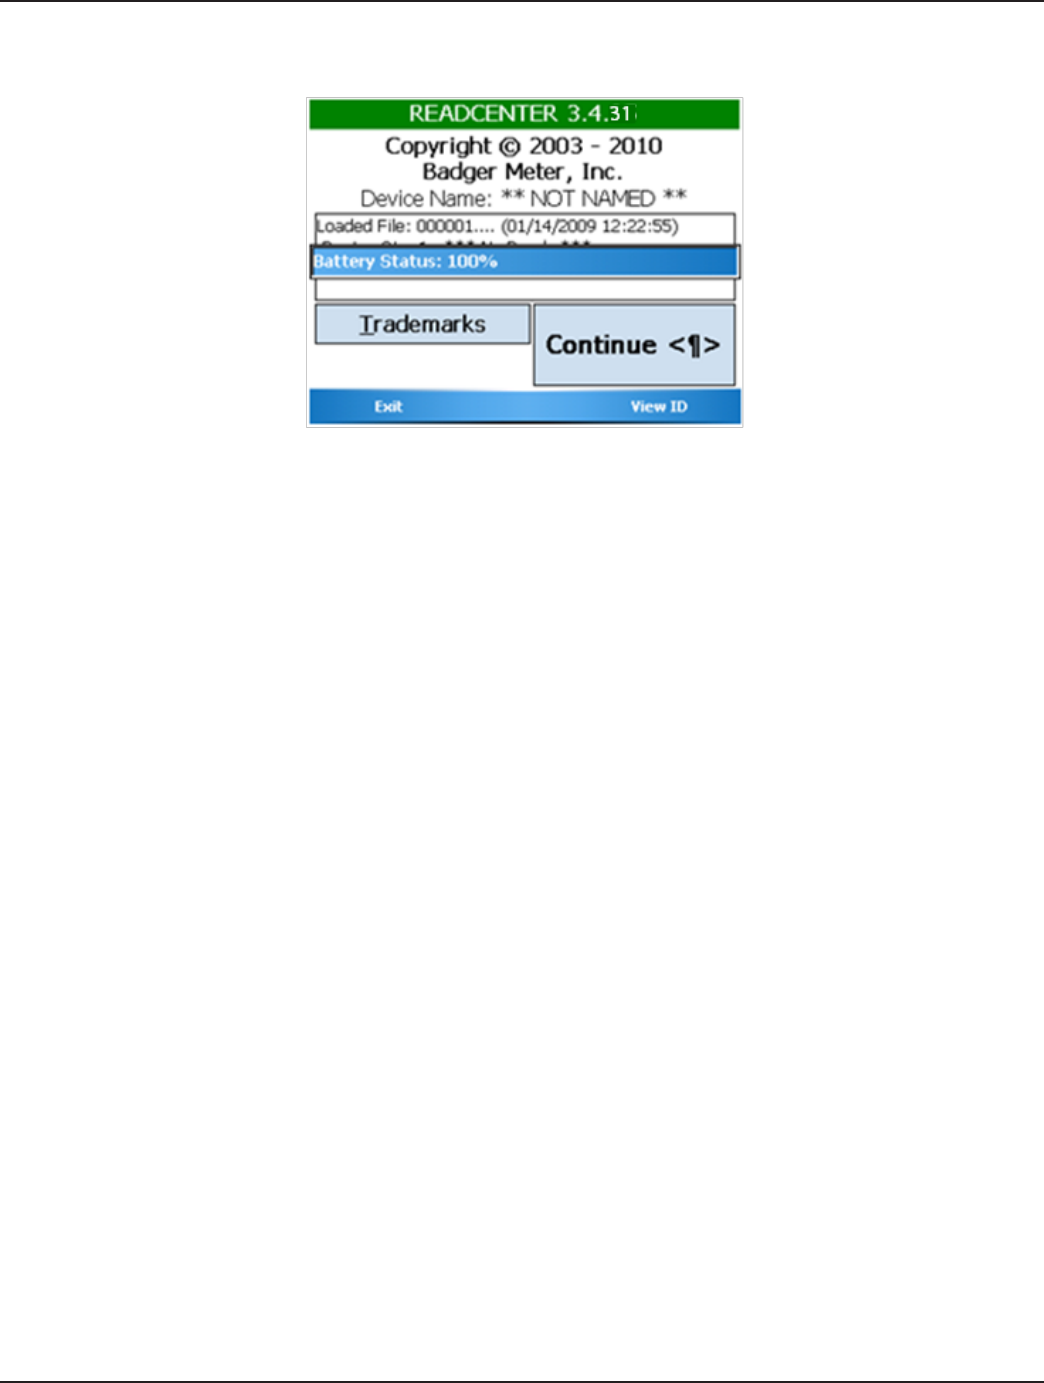
The Readcenter Field Application software begins its processing by displaying the copyright screen.
The color of the title bar shows the battery status:
• >70% charged, the color is green
• Between 40% and 70% charged, the color is yellow
• Less than 40% charged, the color is red
• If your Trimble Ranger is recharging, the color is blue
Page 20 1-11
Trimble® Ranger™
You may also tap on any colored title bar at any time and see a temporary popup information bar detailing the current bat-
tery status:
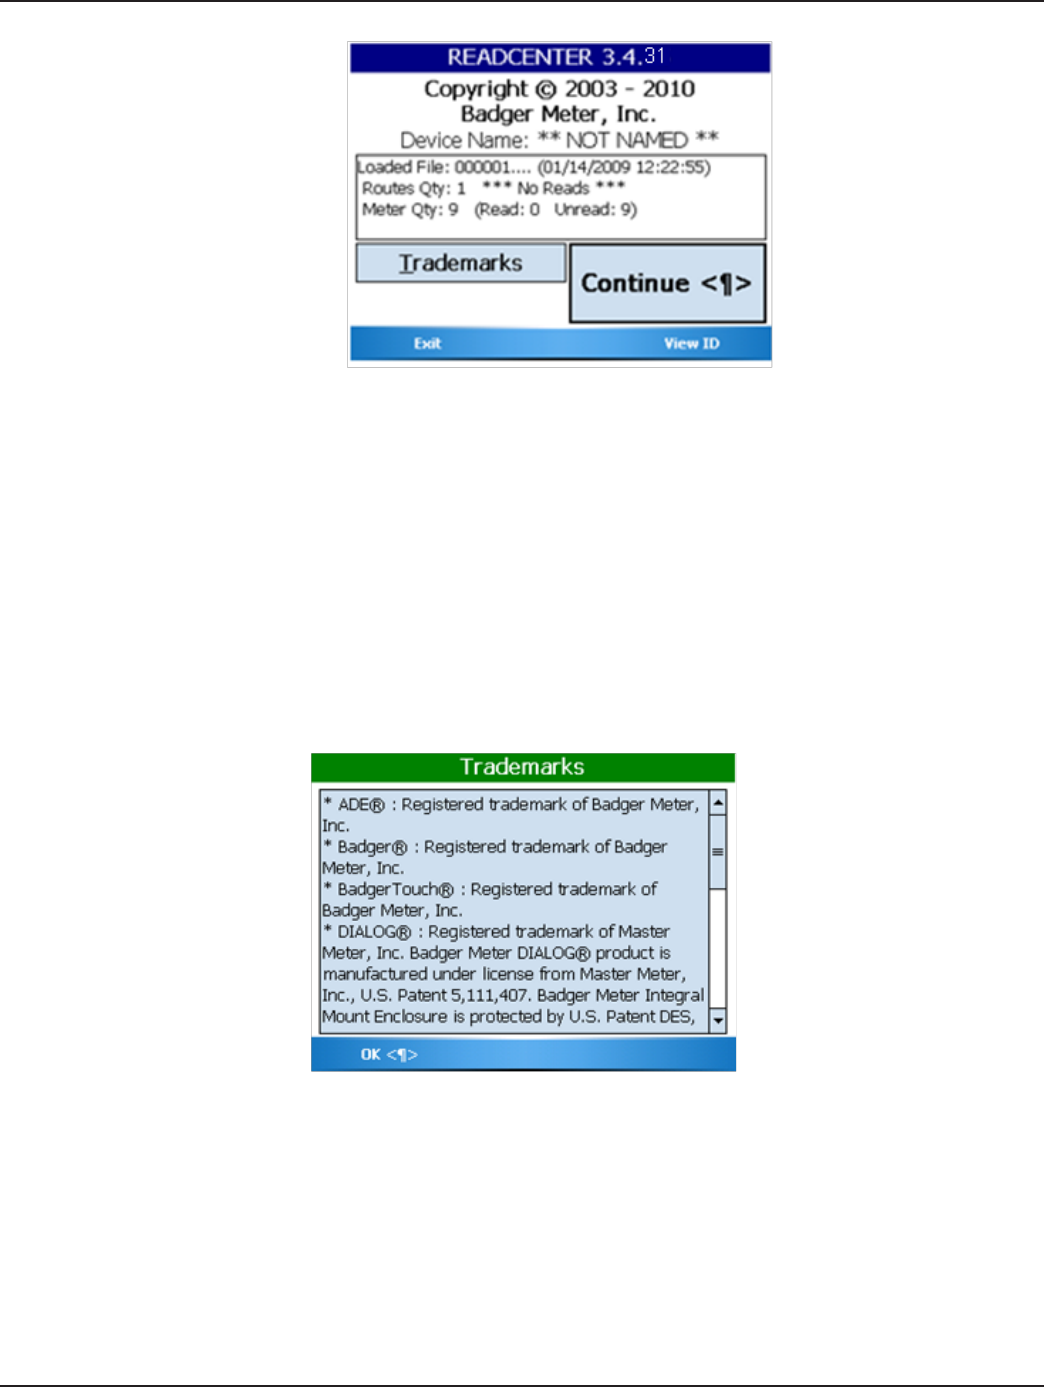
Copyright Screen
The Copyright screen is the starting point for the route reading program. From here, you can:
• View the route reading program name, version, and copyright information
• View the Trimble Ranger’s “Friendly Name”
- Every Trimble Ranger is assigned a globally unique name (GUID) consisting of an excessive number of characters.
This GUID is not duplicated anywhere in the world, however using the GUID is unreasonable due to the number
of characters used. As a result, each Trimble Ranger also has a “Friendly Name.” The “Friendly Name” is a user as-
signed name that allows the user to differentiate between other Trimble handhelds. It is very important that you
assign unique names to each, especially in the case you own more than one Trimble.
• View information about the reading data currently loaded on the Trimble Ranger
• View Trademarks used by the program.
• Continue to the route reading program.
• Exit the program
• View the GUID and change the Trimble Ranger’s ”Friendly Name”
Page 21
1-11
Installation & Operation Manual
• Trademarks “T” button : Will display the list of Trademarks referenced in this program.
• Continue “ENTER” button : Pressing the Continue button or pressing the ENTER key on your Trimble Ranger keyboard
brings you to the Main Menu.
• “Exit” LEFT Soft Menu key : Exits the program.
• “View ID” RIGHT Soft Menu key : takes you to the Device “Friendly Name” editing screen, where you can also view the
Trimble Ranger’s GUID.
Trademarks screen
From the Copyright screen, tapping the “Trademarks” button or pressing the “T” key on your Trimble Ranger’s keyboard will
display the Trademarks screen:
Use the Trimble Ranger’s Up/Down cursor to scroll the screen up or down, or use the scroll bar on the screen.
Press the ENTER key to dismiss this screen; alternatively, press the “OK” LEFT Soft Menu key.
Page 22 1-11
Trimble® Ranger™
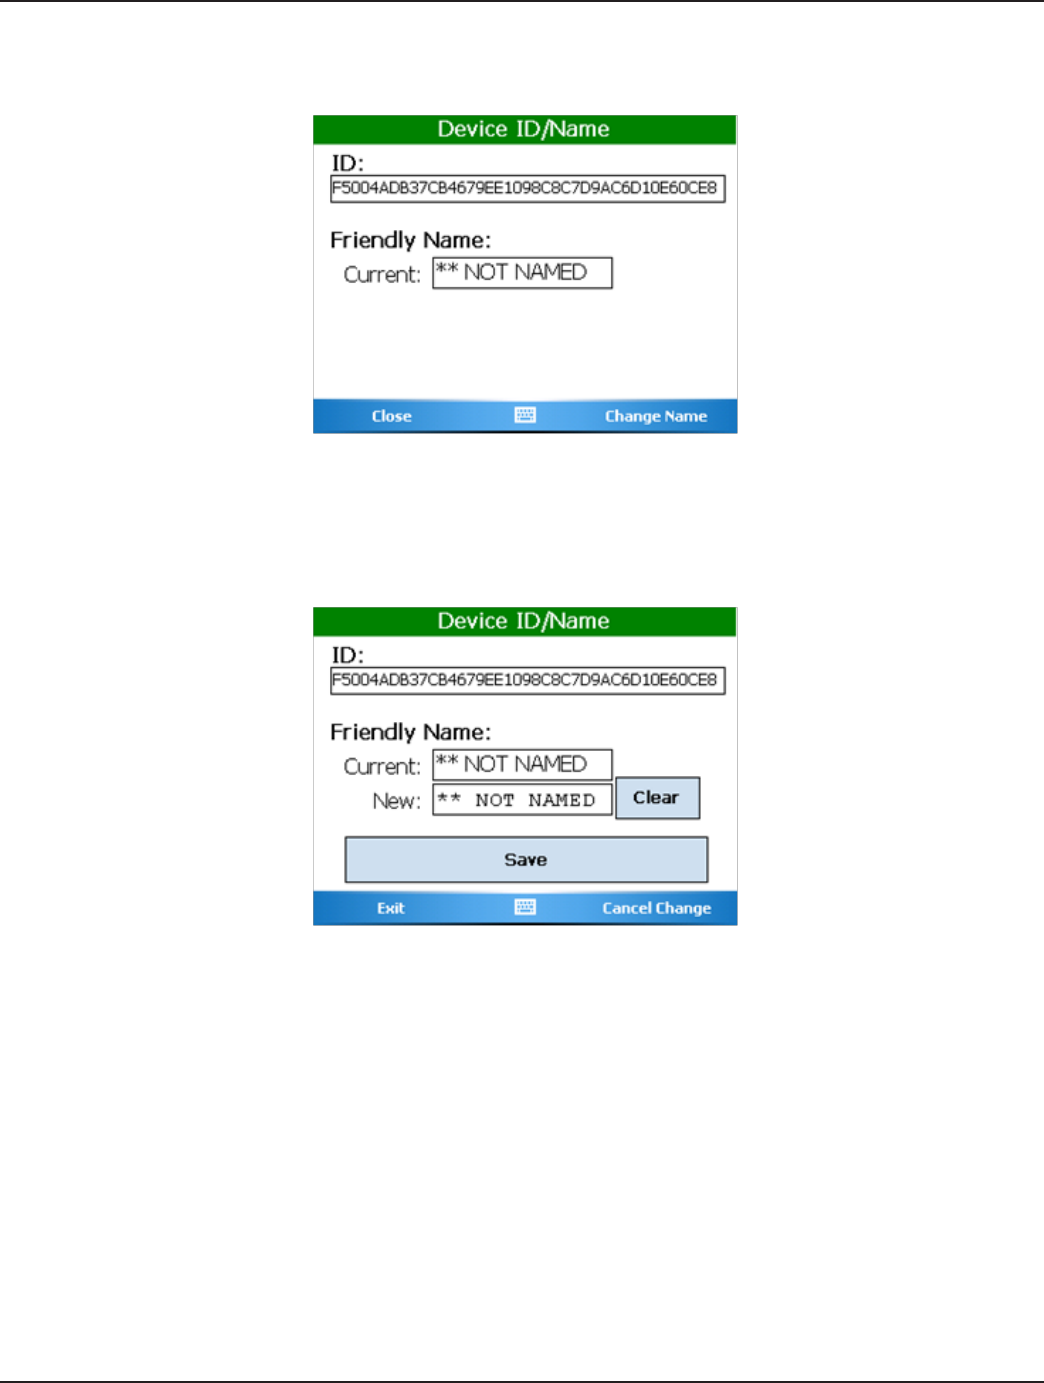
Device ID/Name screen
From the Copyright screen, press the “View ID” RIGHT Soft Menu key to display the Device ID/Name screen:
• “Close” LEFT Soft Menu key : closes this screen
• “Change Name” RIGHT Soft Menu key : allows you to edit/change your Trimble Ranger’s “Friendly Name”
Select the “Change Name” RIGHT Soft Menu key, the screen changes to look like this:
• Clear button : tapping the Clear button will erase all characters in the “New” “Friendly Name” field.
• Save button : when you are satisfied with the new “Friendly Name” you have entered, this button saves your changes.
• “Exit” LEFT Soft Menu key : Leaves this screen. If you have not Saved your changes, they will be lost.
• “Cancel Change” RIGHT Soft Menu key : Cancels any changes you have made, but this screen is not dismissed.
Page 23
1-11
Installation & Operation Manual
ReadCenter Main Menu
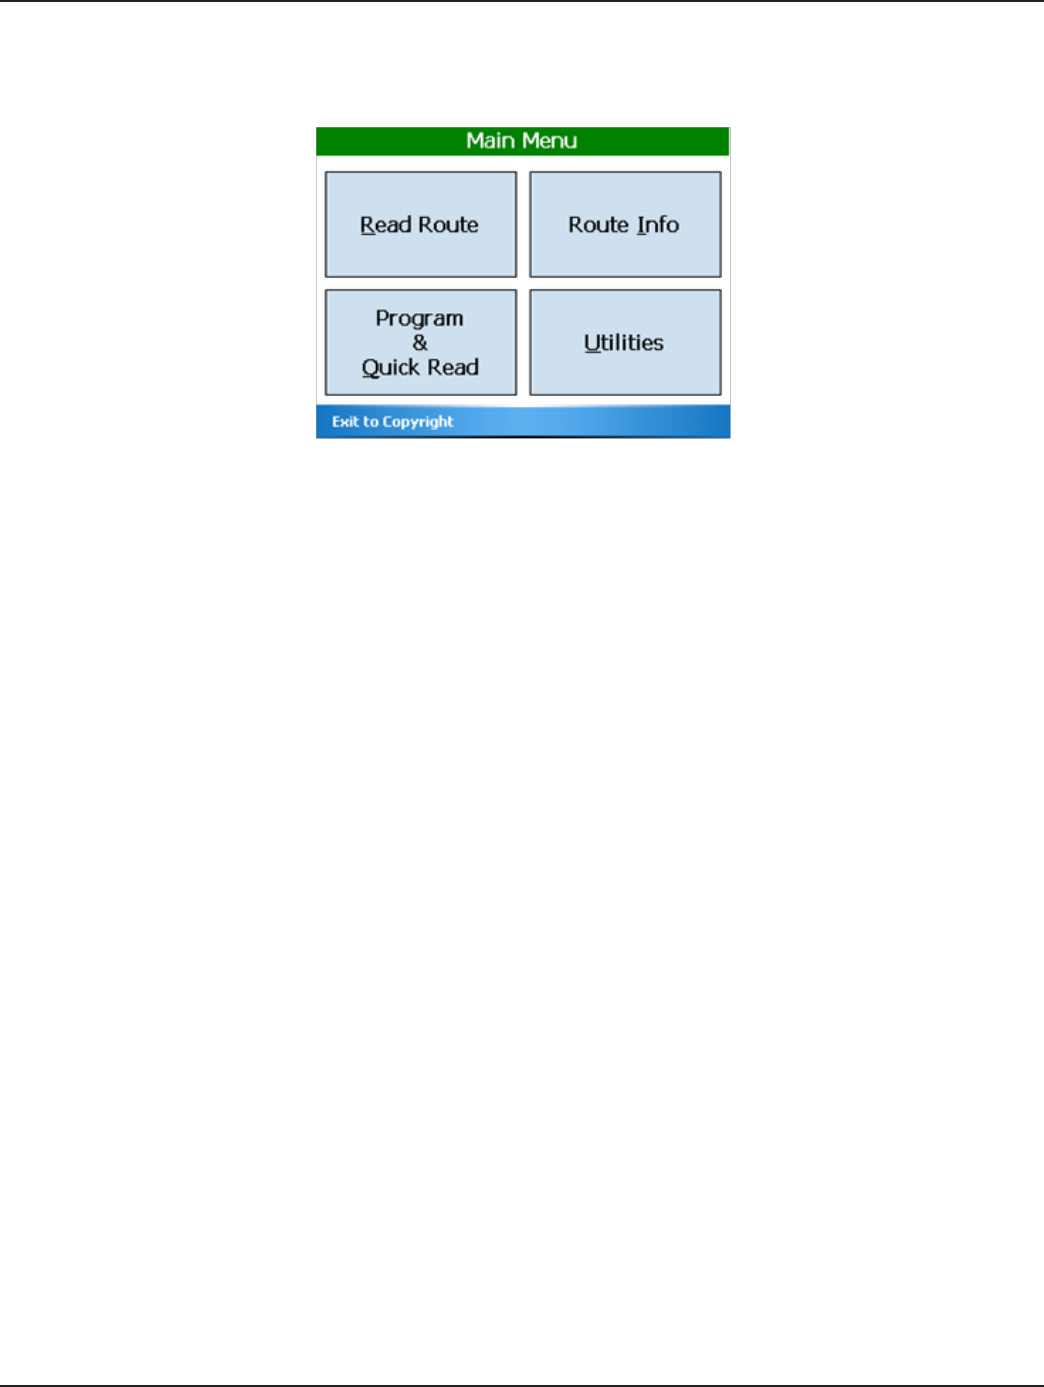
Press the Continue button on the Copyright screen to see the Main Menu.
There are five functions on the main menu to choose from. These options can be selected by using the Stylus to tap the box
containing the desired function or by pressing the appropriate underlined alpha character on the keyboard:
• Read Route “R” – Begin reading meters
• Program and Quick Read “Q” – Use the Trimble Ranger to read meters when you do not have any loaded (i.e., for
checking a Badger Meter ORION endpoint, for obtaining final reads, troubleshooting, etc.) and program Badger Me-
ter ORION endpoints to set an odometer, clear a tamper, or stop/start a endpoint
• Route Info “I” – Displays information about the meters and routes currently loaded into the handheld. See example of
Route Information below.
• Utilities “U” – Display the Utilities Menu screen
• ”Exit to Copyright” LEFT Soft Menu key– Go back to the Copyright Screen to Unload/Load the Trimble Ranger or Exit
the program.
Pressing any of the above buttons begins that function’s operation. Other pressed buttons are ignored.
Communications with the Badger Meter Reading Data Management Software
The Trimble Ranger communicates with the Badger Meter Reading Data Management Software through the use of a USB
memory stick or Wireless File Transfer Protocol. Using the Load Collector function in Reading Data Management Software, the
route information for the Trimble Ranger is stored on the memory stick. Inserting the memory stick while in the Copyright
Screen will cause this processing to occur.
• If a route currently resides in the Trimble Ranger, it is unloaded onto the memory stick.
• Once the route is unloaded, the new route that resides on the stick is loaded.
When the processing is done, you are now ready to begin reading the next route.
Page 24 1-11
Trimble® Ranger™
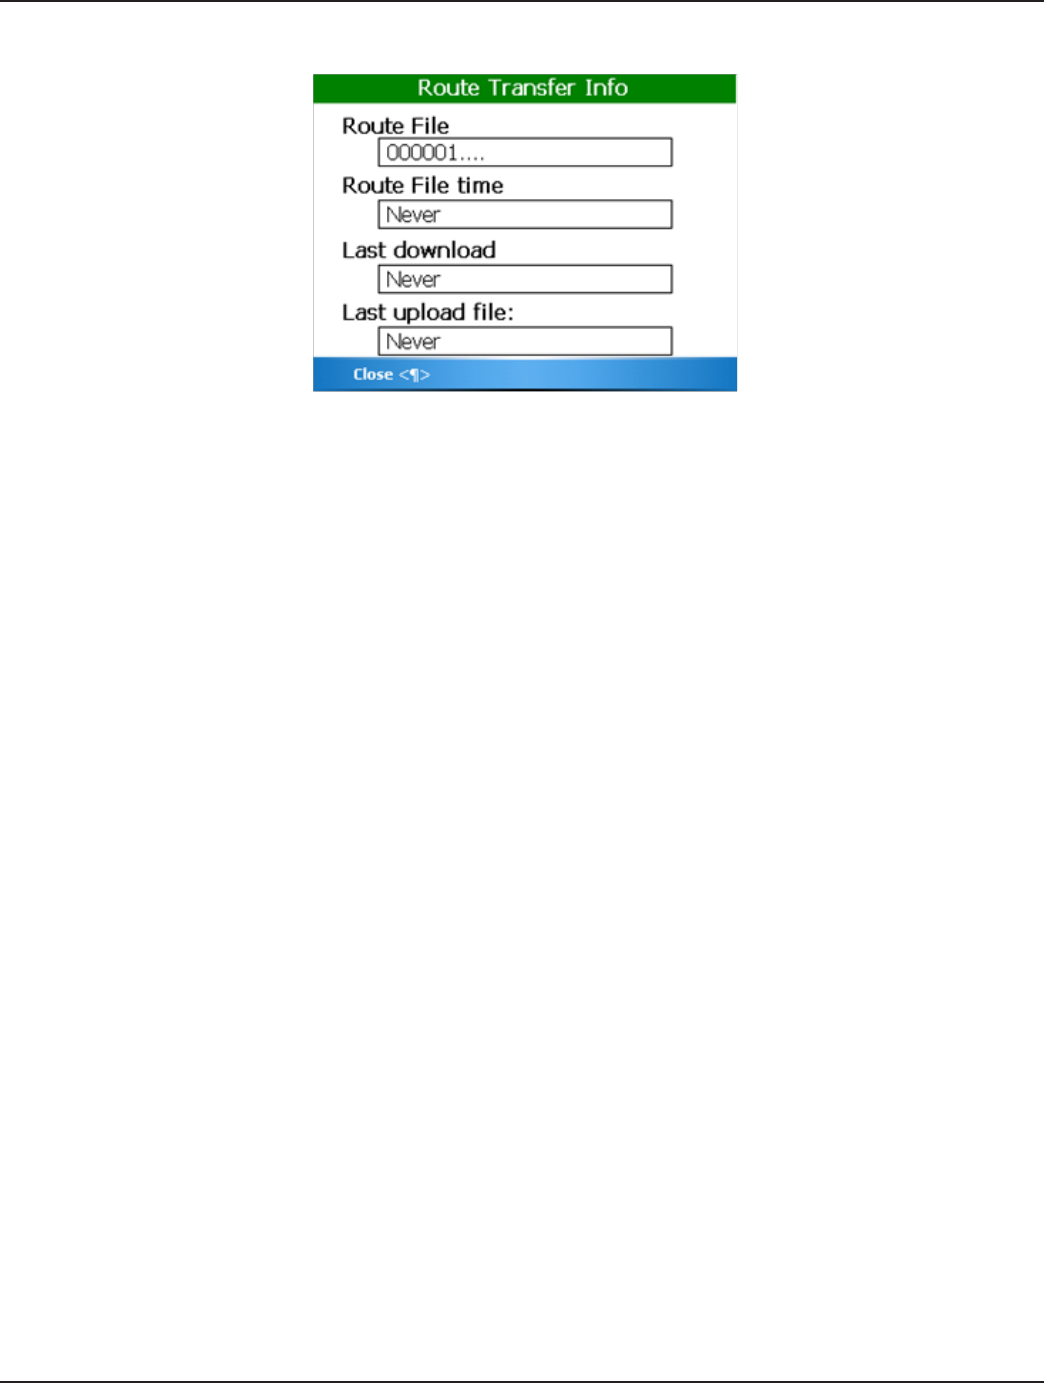
Route Info screen
• Route File– The name/number of the route
• Route File Time – The time of the last captured reading
• Last download – The time when this route was transferred from the PC
• Last upload file – The time the previous route was transferred to the PC
For more details, see the Route Operations portion of the Details section. To return to the Route Transfer screen, select the
“Close” LEFT Soft Menu key, or press your Trimble Ranger’s ENTER key.
Page 25
1-11
Installation & Operation Manual
Meter Reading
Log In screen
The bottom of the screen shows the function of the two application-specific soft keys in the top row of
the keypad (just under the screen). Their function conforms to the needs of the program that is currently running.
The Log In screen accepts your 3 to 5 character personal ID (PIN). Your PIN can be your name, your initials, an ID number, etc.
When PIN is entered, the screen looks like this.
Next, select the “OK RIGHT Soft Menu key or press the Trimble Ranger’s ENTER key.
Page 26 1-11
Trimble® Ranger™
If a valid PIN is entered, the Trimble Ranger displays the Main Menu. If the PIN is not valid, the Trimble Ranger will indicate.
Select the “Retry” LEFT Soft Menu key or press your Trimble Ranger’s ENTER key and reenter your PIN correctly to display the
Main Menu.
If you select the “Cancel” RIGHT Soft Menu key or press the “C” key on your Trimble Ranger, you will return to the Copyright
screen.
The Read Screen
After successfully entering your Log In information, meter reading begins.
If you are reading meters with ORION AMR, the reading automatically begins in the background.
When you display the first meter, you may have already captured some ORION endpoint readings. When reading with Badger
Meter ORION, the Trimble Ranger displays the next unread account.
The Read screen looks like this.
The reading screen display shows customer information in the top section of the screen, and three functions along the bot-
tom of the screen. The first two of the bottom functions allow you to browse through the meters. When you press the “P”
for Previous Account, the Trimble Ranger will display the meter just before the current one. When you press the “N” for Next
Account, the screen will display the next meter. The status of the ORION receiver is shown on the left side (green shows the
receiver is working, red shows the receiver is not working). The battery status is shown on the right side using the same color
scheme as the title bar.
Page 27
1-11
Installation & Operation Manual
Navigation
If the current meter is the first one in the route and you press the Previous Account button, the READCENTER® Software will
ask you if you want to stay at the beginning of the route or if you wish to go to the end of the route.
• Selecting the “No Stay” RIGHT Soft Menu key or pressing “N” key will keep you at the first meter in the route.
• Selecting the “Yes Last” LEFT Soft Menu key or pressing the ENTER key will take you to the last meter in the route.
Similarly, if you press the Next Account button, the screen will display the next meter in the route. If you are viewing the last
meter in the route, you will be asked you if you want to stay at the end of the route or if you want to display the first meter in
the route.
• Selecting the “No Stay” RIGHT Soft Menu key or pressing “N” key will keep you at the last meter in the route.
• Selecting the “Yes First” LEFT Soft Menu key or pressing the ENTER key will take you to the first meter in the route.

Page 28 1-11
Trimble® Ranger™
Reading Meters
The Read Screen shows specific information about the meter to be read including:
• Meter information appears on the first five lines of the display. This information can be customized by the user
through Badger Meter Reading Data Management Software. See the Badger Meter Reading Data Management Soft-
ware manual for information on setting the account information loaded to the Trimble Ranger.
• The sixth line will display user-customizable information.
• The type of meter reading technology in use for this meter (ORION, MANUAL, TOUCH) is shown on the seventh line
to the right of the reading entry box.
• The service that this meter is measuring (Water, Gas, Electric, Reclaim, etc.) is also shown on the seventh line to the
right of the reading entry box.
• The current meter reading (after the reading has been gathered or the previous reading depending on the informa-
tion parsed by the billing software and READCENTER software setup) is shown on the seventh line.
In this example, the information chosen for the first five lines are the
1. Customer’s name
2. Customer’s address
3. Meter location code
4. ORION Serial Number
5. Route Name/Sequence Number
The customer’s name is John Smith, located at 111 Smith Lane, the meter serial number is 163777887 and the route name is
51.
NOTE: When displaying a name, the Badger Meter Reading Data Management Software determines the display order. If
Badger Meter Reading Data Management Software downloads the last name first, the handheld will display the name in
that manner.

Page 29
1-11
Installation & Operation Manual
Gathering Meter Readings
The Trimble Ranger performs meter readings both automatically and manually. When in automatic mode, the handheld will
accept Badger Meter ORION meter readings and store them in the proper account. The screen will display the next unread
meter, or the meter that was last displayed on the screen. If a reading is received for the meter shown on the screen, the
screen is updated with the next unread meter.
The mode of the screen is shown vertically on the far left side of the read screen. “MANUAL” denotes manual reading mode
and “AUTO” denotes automatic reading mode.
To change the mode of the reading screen, either from manual to auto or from auto to manual, press the “A” key on the left
hand side. The screen will change to show the new mode on the far left hand side of the screen..
Reading Badger Meter ORION Meters
Each Badger Meter Meter ORION meter reading is received from the ORION receiver, which is located inside the Trimble
Ranger. If a meter reading is received and the meter has not yet been read, the reading is stored. If the meter has already
been read, the reading is discarded.
When in auto mode, the Trimble Ranger screen always shows the next unread meter. If the reading for that meter is received,
the screen is updated to show the next unread meter. If the reading is received for a meter that is not the next unread meter,
the reading will be stored. Using this method, the Trimble Ranger display always shows the next unread meter according to
the reading sequence downloaded to the data collector.
A number of possible results can occur when a Badger Meter ORION endpoint sends a reading.
• The Badger Meter ORION receiver receives the transmission and the reading is stored. If the meter was displayed on
the screen, the next unread meter is then displayed. If the meter was not displayed on the screen when the transmis-
sion was received, the reading is stored and the account is removed from the unread list. Once an account is read, it
will not be displayed as an unread meter in auto mode.
• The Badger Meter ORION receiver receives the transmission that reports either a tamper condition, an encoder error,
a potential leak, stuck meter, or reverse flow condition. The Trimble Ranger stores the reading and logs the condi-
tion. If the meter was displayed on the screen, the user will be prompted to process the condition before displaying
the next unread meter. More information about these conditions is on the next page.
• The Badger Meter ORION receiver receives a transmission but not all of the transmission is received. The transmis-
sion is ignored and no meters are updated.
• No transmission is received from the meter. To increase your chances of a successful read, change your position in
regard to the endpoint. If you choose to skip this meter, press the “N” (NEXT) button. Here are some reasons for not
receiving the transmission.
- The Trimble Ranger is too far away from the endpoint.
- There may be something obstructing the line-of-sight between the Trimble Ranger and the endpoint.
In any of these cases, getting closer to the endpoint or improving the line-of-sight may result in receiving the meter reading.
Note that if you decide to skip the meter, press the “A” button to switch from AUTO to MANUAL mode, and press the “N” (NEXT)
button to move to the next unread meter. If the next meter is an ORION meter, be sure to place the route back into automatic
mode by pressing the “A” key. If the next meter is a manual or a touch-type meter, you can read that meter in its normal way.
Keep in mind that an ORION endpoint’s radio transmissions can be affected by many variables. As a result, a endpoint’s
response may be received from slightly different locations each reading cycle. Keep this in mind when trouble shooting a
endpoint.
Page 30 1-11
Trimble® Ranger™
Processing the ORION Meter Reading
Once the Trimble Ranger has received a meter reading from a Badger Meter ORION endpoint, it processes the information in a
number of steps:
• Determines if the message from the endpoint was received correctly
• Determines the tamper status, non-usage, reverse flow (ADE only), and potential leak status of the endpoint
• Determines the reading value reported by the endpoint
• Evaluates the reading value against the high and low audit values to determine if the reading is high or low
The Trimble Ranger first analyzes the meter reading to determine if the communication was completed without errors. If an
error is found, the transmission is discarded. If no error is found, the data is examined to determine if a tamper, no-usage,
reverse flow, or potential leak status was reported. If the endpoint reports an alarm, status is reported, the account is flagged
for reporting purposes. Next, the reading is compared to the high and low audit values that were sent from the Badger Meter
Meter Reading Data Management Software. If the reading values is greater than the high audit value or lower than the low
audit value, the account is flagged for reporting purposes either the High or Low Reading status. If the reading is within the
audit values, the Trimble Ranger assigns a Good Reading status.
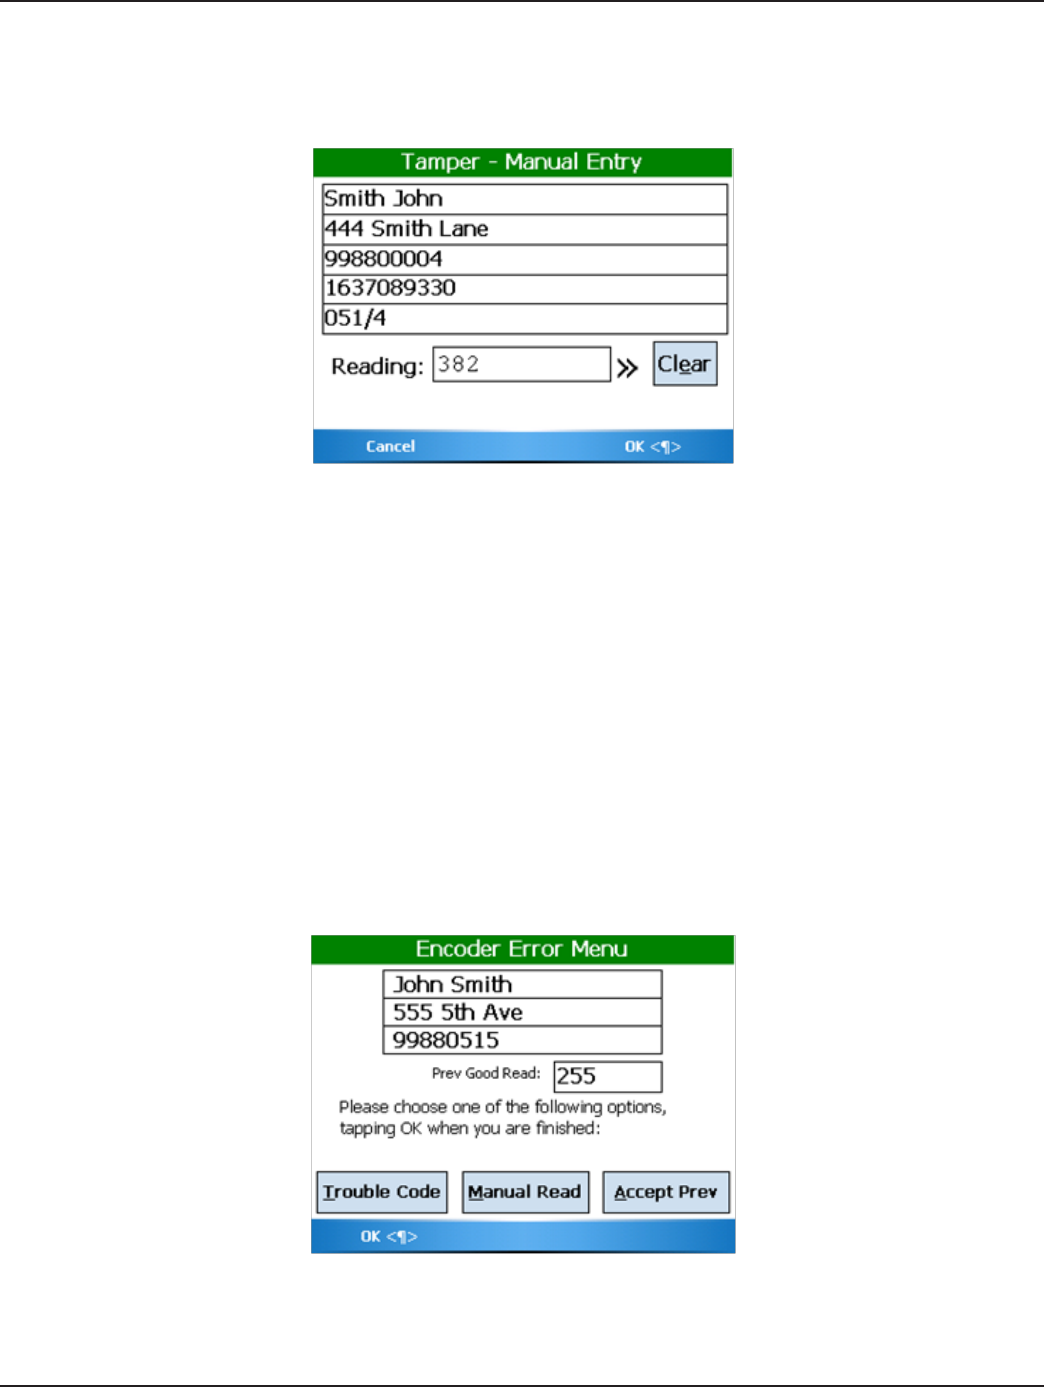
Processing Tamper Reports
If the meter being displayed reports a tamper, the Trimble Ranger will sound the special tamper audio signal. the tamper
processing screen appears:
Choose one of these options by pressing the corresponding button or by using the Stylus to tap the correct option on the
screen.
• “T” (Trouble Code) – Using this option you can enter a trouble code to report the status of the meter to the office.
See the Trouble Code section for more details.
• “M” (Manual Read) – This option allows the user to input a manual read using the Trimble Ranger keypad. This is
handy if the meter is in a pit, but less helpful if the meter is inside (unless you can access the meter).
• ”OK” LEFT Soft Menu – Dismisses the Tamper Processing screen after any/all of the above steps have been taken, or
no steps have been taken at all—you can skip this meter and go on to the next one. This is a handy option if some-
one will come back later to troubleshoot the meter or the endpoint.
Page 31
1-11
Installation & Operation Manual
If you choose Trouble Code, the Trimble Ranger will return to the Tamper Menu screen once the code is entered and stored so
that you can also enter a manual reading.
If you choose to enter a Manual Read, you’ll see this screen:
Enter the reading and press the “Enter” button or select the “OK” RIGHT Soft Menu key. If you wish to skip the manual read,
select the “Cancel” LEFT Soft Menu key.
When you have completed entries for this meter, press the ”OK” LEFT Soft Menu key. The handheld will be returned to the
read screen in automatic mode.
Clearing a Tamper
If a Badger Meter Meter ORION® endpoint reports a tamper condition, you must perform maintenance on the unit to clear the
tamper condition. Once the condition that caused the tamper is cleared, the unit must be reprogrammed if it is connected to
a Badger Meter Recordall Endpoint Register (RTR) using the ORION programming tool. If the Badger Meter ORION endpoint
is connected to a position-based encoder like Badger Meter’s Absolute Digital Encoder (ADE®), no programming is required.
Successfully resetting the odometer value will clear the tamper report. Please refer to the Badger Meter ORION PROGRAM-
MING section for more information.
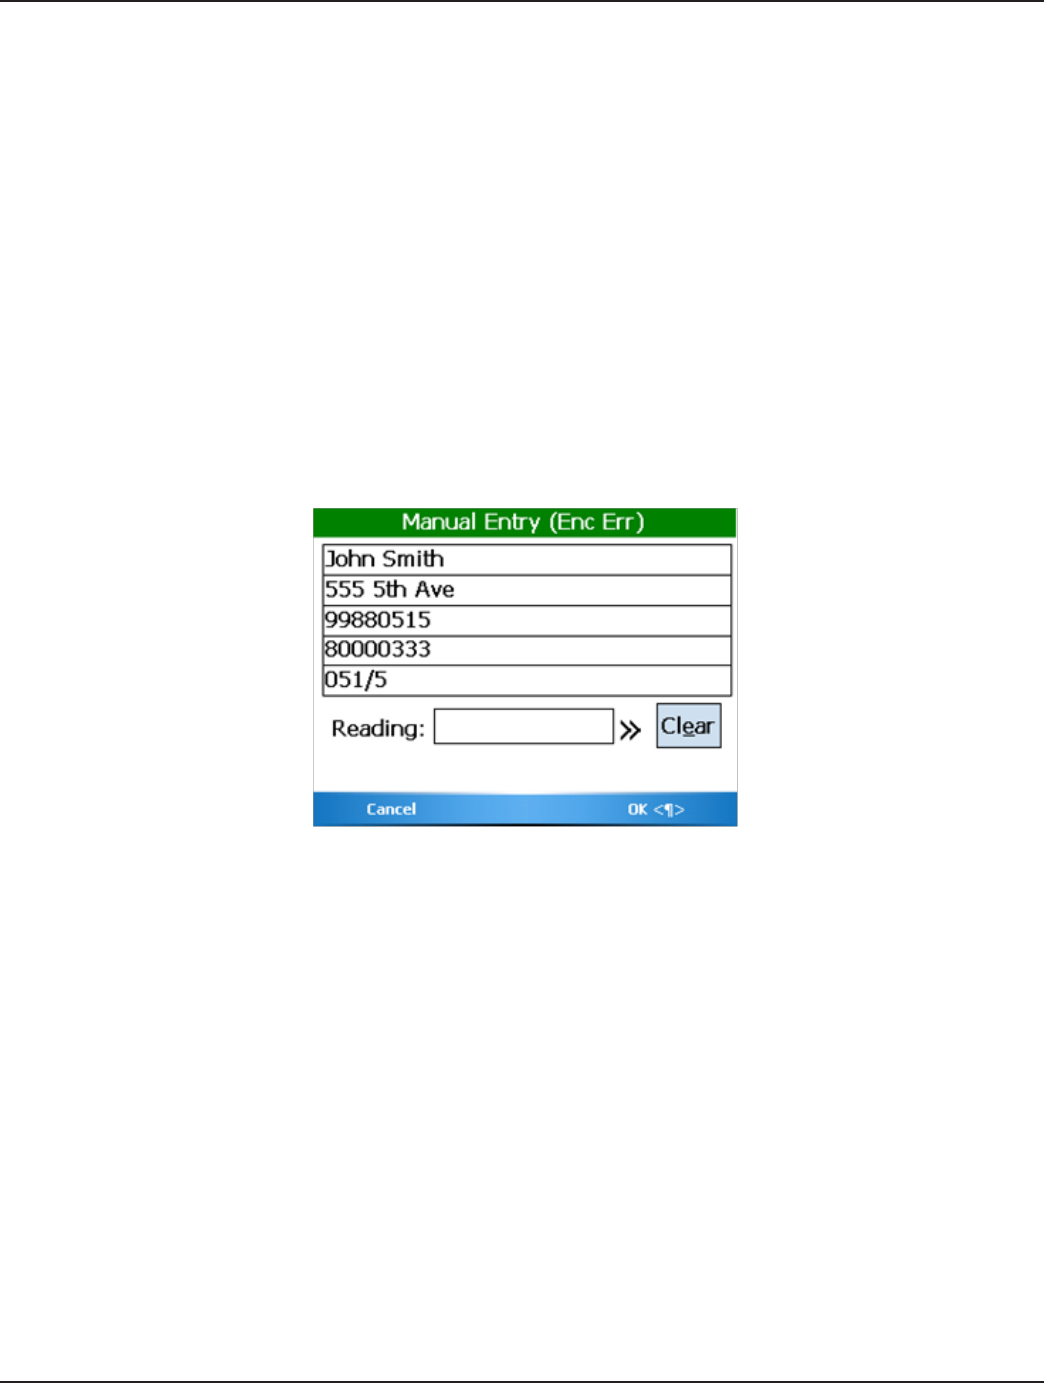
Processing Encoder Errors
If the meter being displayed reports an encoder error, you will hear a special sound and see the following screen:
Page 32 1-11
Trimble® Ranger™
The previous screen is an Encoder Error reported by an ORION endpoint while the second picture is one reported by a Touch
read. To process an Encoder Error, choose one of these options by pressing the corresponding button or by using the Stylus
to tap the correct option on the screen.
• “T” (Trouble Code) – Using this option you can enter a trouble code to report the status of the meter to the office.
See the Trouble Code section for more details.
• “M” (Manual Read) – This option allows the user to input a manual read using the Trimble Ranger keypad. This is
handy if the meter is in a pit, but less helpful if the meter is inside (unless you can access the meter). “A” (Accept Prev)
– Using this option you can accept the last successful reading that was captured by the ORION endpoint. (Note that
this option is not available for processing encoder errors when reading touch meters.)
• ”OK” LEFT Soft Menu key – Dismisses the Encoder Error Processing screen after any/all of the above steps have been
taken, or no steps have been taken at all—you can skip this meter and go on to the next one. This option allows a
user to come back later to troubleshoot the meter or the endpoint.
If you choose Trouble Code, the Trimble Ranger will return to the Encoder Error Menu screen once the code is entered and
stored so that you can also enter a manual reading.
If you choose to enter a manual read, you’ll see this screen:
Enter the reading and press the “Enter” button or select the “OK” RIGHT Soft Menu key. If you wish to skip the manual read,
select the “Cancel” LEFT Soft Menu key.
When you have completed entries for this meter, press the ”OK” LEFT Soft Menu key. The handheld will be returned to the
read screen in automatic mode.
Switching to Manual Mode Meter Reading
The Trimble Ranger switches from automatic to manual mode when the “A” key is pressed or an action by the meter reader is
required. For example:
• The handheld will switch to manual mode when the meter reader uses a hotkey function on the keypad, such as a
search, or to enter a trouble code or comment code.
• The handheld will automatically switch to manual mode when the next unread meter is a manually read meter or a
touch-type meter.
Page 33
1-11
Installation & Operation Manual
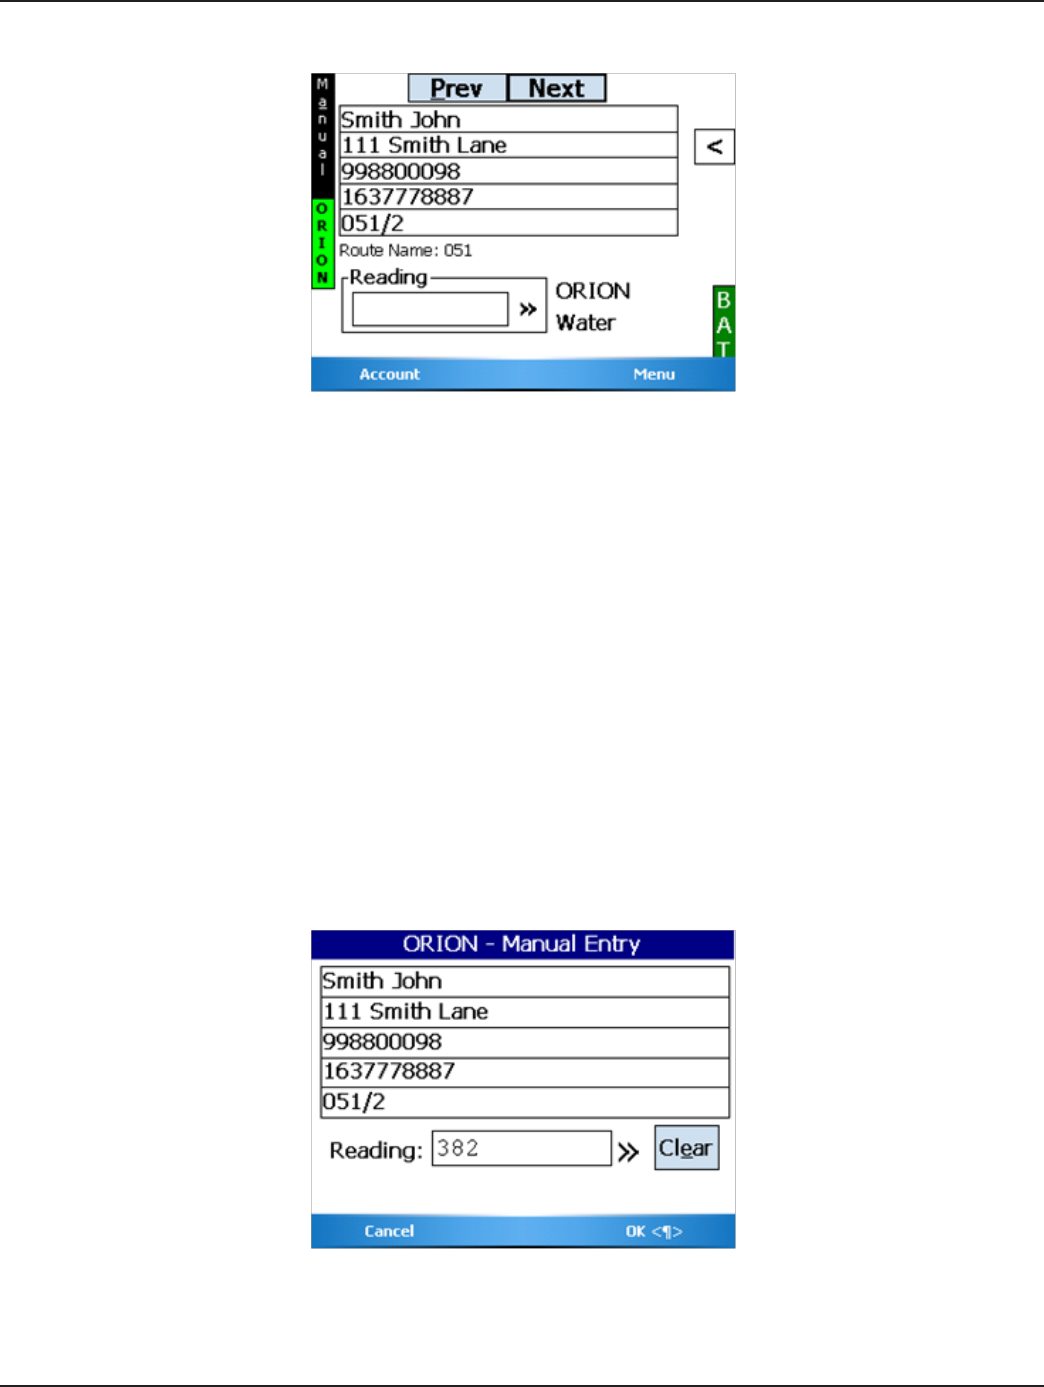
The read screen for manual mode looks like this:
When in manual mode, the meter reader can enter readings for manually read meters or perform any other Trimble Ranger
function such as searching for a particular meter or viewing progress. When the manual and touch-type meters have been
read and the next meter to read is a Badger Meter ORION® endpoint, you can return to automatic mode by pressing the “A”
key. This action will return the handheld to automatic meter reading.
Starting the Reading Process for a Manual Meter
To gather a reading for a manual meter, enter the meter reading on the keyboard.
Manual Meter Reading
To enter a manual meter reading once the numeric keypad is displayed, view the meter’s register and note the reading. Next,
enter the reading using the numeric keyboard buttons.
Manual Meter Reading Direction
Water meters are typically read from left to right, while electric meters are typically read right to left. The Trimble Ranger can
handle meter readings gathered in either direction.
For example, if you entered the reading as 382 going from left to right, you’d see this screen:
Page 34 1-11
Trimble® Ranger™
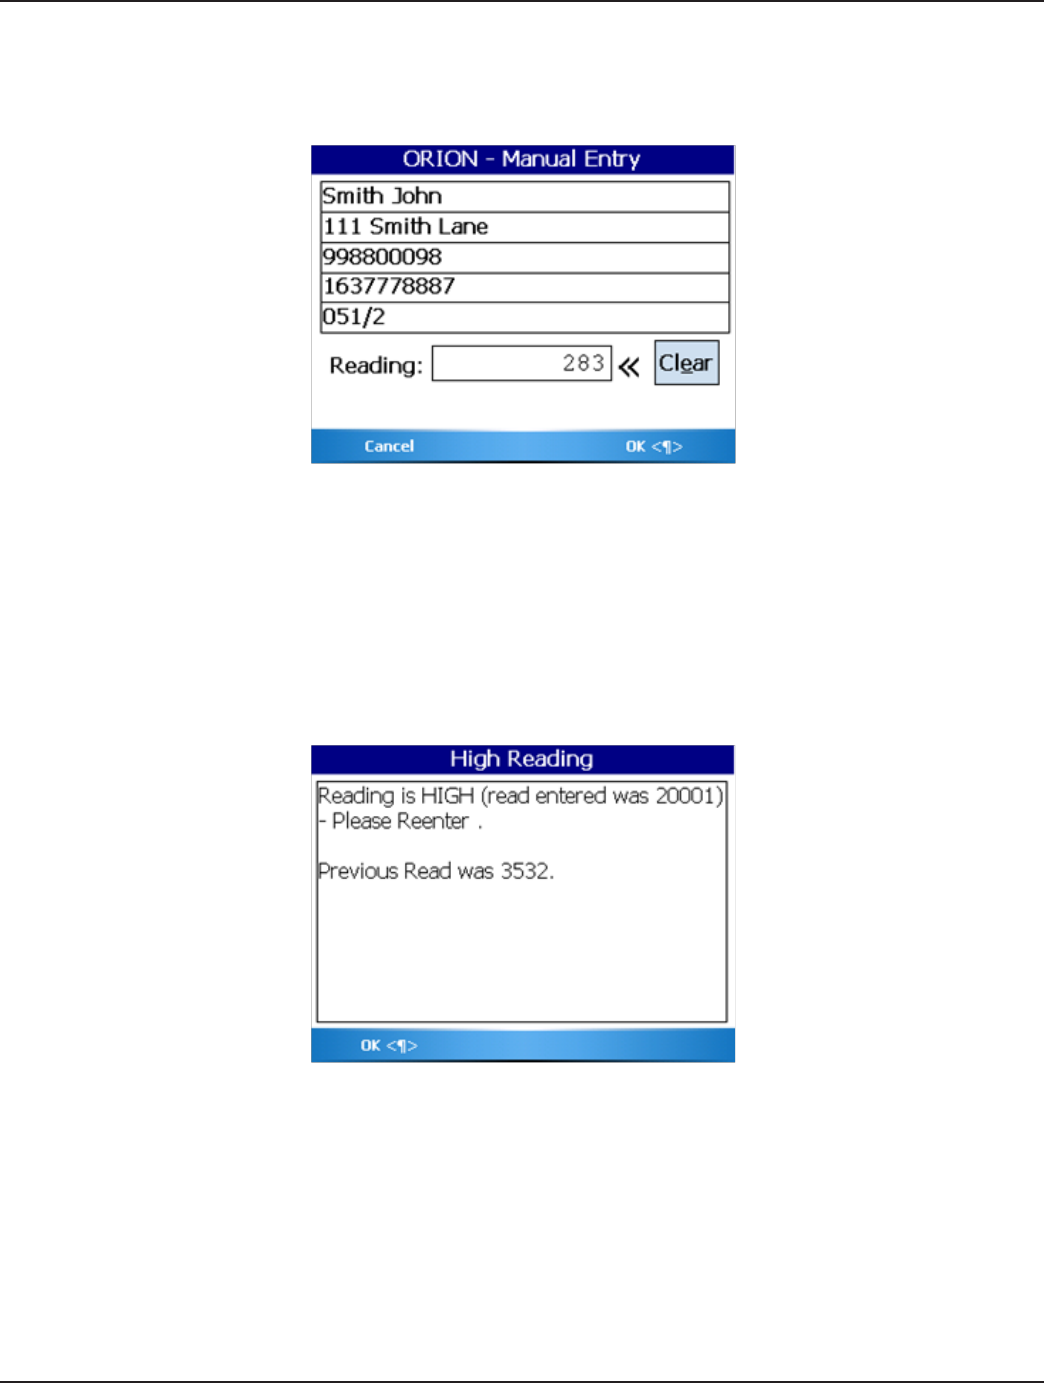
To change the direction of the meter reading, tap on the direction arrows (“>>”). The screen will display the direction of the
reading by showing an arrow pointing to the left next to the reading field. When you enter a meter reading now, the reading
will be shown on the display from right to left. Using the same example, if you entered 382 going from right to left (the arrow
pointing to the left), you’d see this screen:
In either case, when the meter reading is completely entered, select the “OK” RIGHT Soft Menu key. To cancel the entry, select
the “Cancel” LEFT Soft Menu key. To switch back to Left to Right manual reads, tap on the direction arrows (“<<”) again.
High and Low Limits for Manual Meter Readings
If the reading is within the high and low limits, the handheld will record the meter reading and advance the display to the
next meter. If the reading is above the high limit or below the low limit, the handheld will beep twice for high and three times
for low and tell you that the entered meter reading was high or low. It will ask you to re-enter the reading. This is what you
will see if you enter a reading that is above the high limit.
Page 35
1-11
Installation & Operation Manual
Here is what you will see if you enter a reading below the low limit.
Select the “OK” LEFT Soft Menu key and the Trimble Ranger will display the read screen again. Re-enter the meter reading and
press Enter.
If the second meter reading matches the first meter reading, the Trimble Ranger records the reading and displays the next
meter. If the meter readings do not match, the Trimble Ranger will alert you that the two readings are different and will return
to the read screen for this meter as if nothing happened.
In this case, the meter reading process begins again for this meter.
The method used to verify a high or low manual meter reading is controlled by one of the settings: ”High/Low Entry Disposi-
tion.” If ”Accept/Reject” is selected in the combo box, the above method of re-entering a manual meter reading is used to
verify the high or low reading value. If the box is not checked, the handheld will display the reading entered and ask if it is the
correct reading.
Page 36 1-11
Trimble® Ranger™
If you’ve entered a low reading, you might see this screen:
If the value shown is the correct value, select the “Yes” LEFT Soft Menu key. The reading will be accepted and stored. It will
then advance to the next meter. If the value shown does not match the reading for this meter, press the No button on the
screen. The handheld will return to the reading screen for this meter. Begin the meter reading process can then begin again.
Advancing the Display
In the case of a high or low reading, the operator can control the advance of the display through the settings. If there are
tasks to perform when a meter reading is high or low (such as dropping off a brochure on finding leaks when a high meter
reading is received or checking the meter itself on a low reading or a tamper), not advancing the display allows you to per-
form the necessary tasks and report information via codes and messages. Once the steps are performed and any necessary
codes or messages are entered, you can press the Next button on the display and continue reading.
Error Conditions – Stopped Meters and Reverse Flow
The Trimble Ranger can optionally check for two possible problem cases: stopped meters and meters with a reverse flow.
When either of the settings is set, the captured reading is compared with the previous reading. If the current reading matches
the previous reading, a message alerting the reader to a possible stopped meter. If the current reading is less than the previ-
ous reading, a message alerting the reader to possible reverse flow is displayed. The most common cause of this is a meter
change-out that has not been recorded in the billing system.
If the previous reading is zero for all meters, the stopped meter and reverse flow will not be performed regardless of the status
of the settings.
Zero Previous readings for all meters is an indication that the billing system has not sent the previous reading values.
In order for stopped meters and reverse flow to be set, two things must occur:
1. The billing system must send the previous reading to Badger Meter Reading Data Management Software.
2. The settings that control these features must be turned on.
Page 37
1-11
Installation & Operation Manual
When no consumption has occurred at a meter with an ADE, the ORION endpoint reports the condition and you’ll see a
screen like this:
You can enter a manual read or a trouble code. When you are finished with the entries for this meter, select the “OK” LEFT Soft
Menu key. The read screen will look like this:
The no usage indicator is at the bottom right corner of the screen. In this case, the “(O)” indicates that the “No Usage” status
was set by an ORION AMR rather than by calculating no usage from a Previous read.

Page 38 1-11
Trimble® Ranger™
The settings to control these options are stored in the Utility Settings off of the Read Menu or Main Menu.
• Pressing the “U” key or tapping in the box will turn the No usage check on and off.
• Pressing the “R” key or tapping in the box will turn the Reverse Flow check on and off.
If the No Usage check is turned on, and the manual reading for a meter is the same as the previous reading, you’ll see a screen
like this.
Because the reading may be in error, you will be asked to verify the reading.
• If the ”Hi/Low Entry Disposition” is set to “Reentry Required” or “Reentry w/Cancel,” you will be asked to enter the
reading again.
• If ”Accept/Reject” is selected, you will be asked if the reading is correct.
Touch read meters and radio read meters will also show an alert message but will not require you to verify the reading.
Page 39
1-11
Installation & Operation Manual
If the Reverse Flow check is turned on, and the manual reading for a meter is lower than the previous reading, you’ll see a
screen like this.
Because the reading may be in error, you will be asked to verify the reading.
• If the ”Hi/Low Entry Disposition” is set to “Reentry Required” or “Reentry w/Cancel,” you will be asked to enter the
reading again.
• If ”Accept/Reject” is selected, you will be asked if the reading is correct.
Touch read meters and radio read meters will also show an alert message but will not require you to verify the reading.
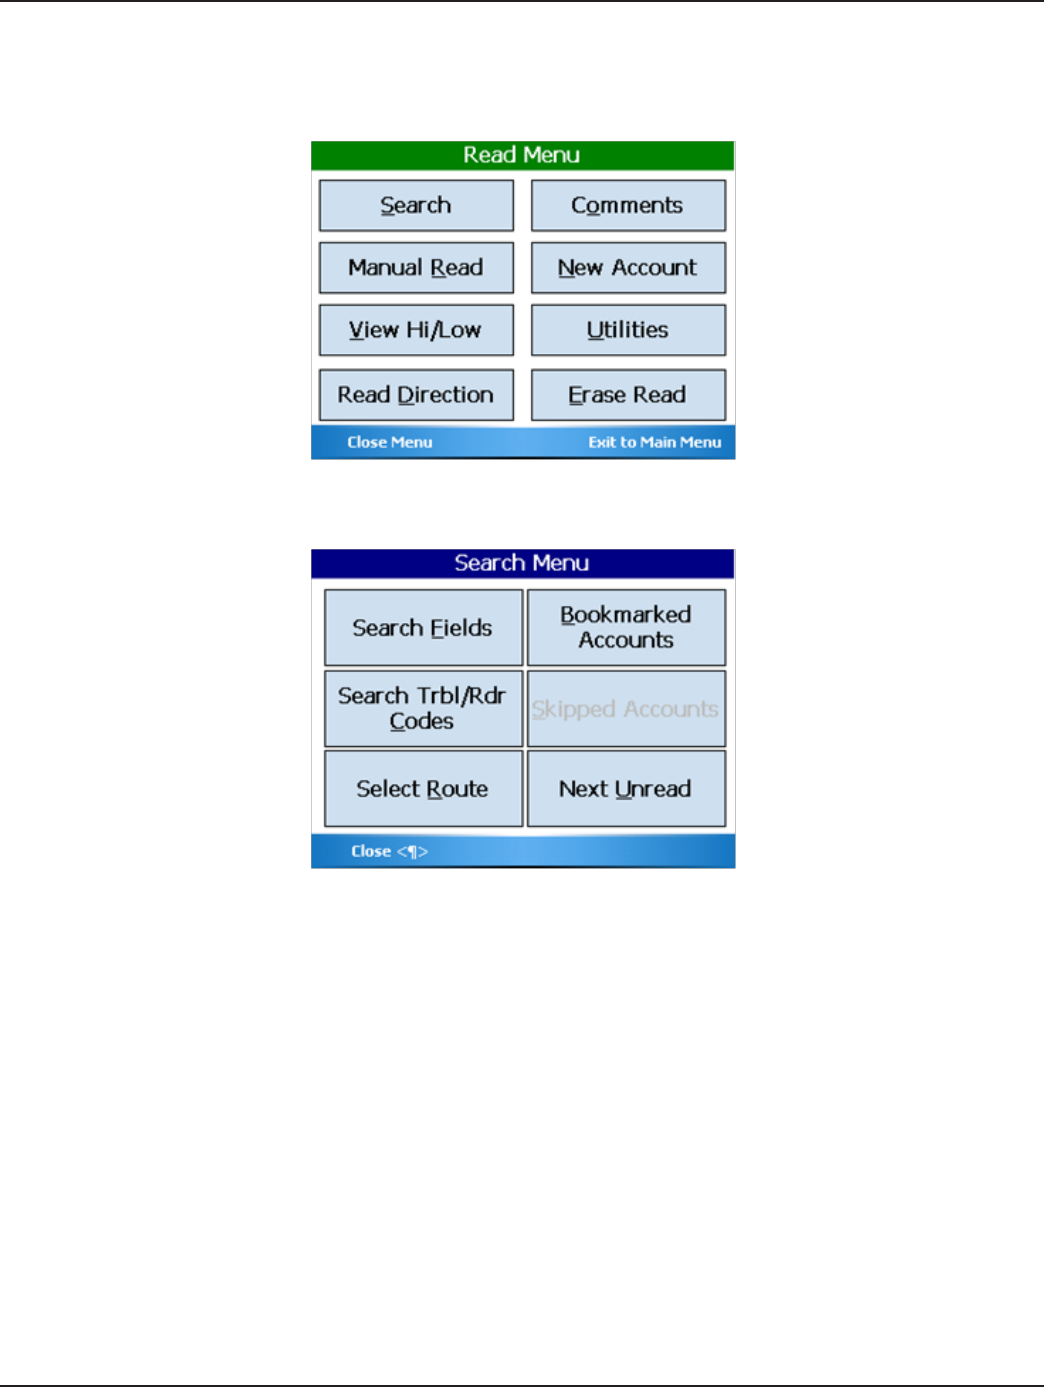
Other Reading functions – The Reading Menu
Selecting the “Menu” RIGHT Soft Menu key from the Read screen will show you the other reading functions that can be per-
formed.
• Search “S”. Allows you to search for Accounts using various criteria.
• Manual Read “R”. Allows you to enter a manual read for the current account.
• View Hi/Low “V”. Shows you the current account’s Previous read, and Low/High threshold read values (if appropriate
permissions are set).
• Read Direction “D”. Reverse reading direction in the route (instead of first to last, direction is last to first). To go back

Page 40 1-11
Trimble® Ranger™
to the original reading direction, choose this function again—it toggles between the two.
• Comments “O”. Allows you to select Reader Codes, Trouble Codes, and to enter Text Message.
• New Account “N”. New account creation.
• Utilities “U”. Takes you to the Utilities menu, where you can view route reading progress, current battery state, and
settings.
• Erase Read “E”. Erases the current Account’s reading.
When you are on the Read screen, you are able to use shortcuts to various functionalities without having to leave the screen.
Read Screen
Key Assoc. Hot Key On-screen usage Assoc. Hot Key (double/
single-tap)
A -- Auto-mode
B BOOKMARK -- Toggle Bookmark
C -- Next Bookmark
D RD DIRECT Toggle route reading direc-
tion.
E RESEQ Resequence (unimplement-
ed)
F RTSTART Route Start
G --
H HI/LO View High/Low reads for cur-
rent account.
I --
J -- Encoder Error processing
K SETTINGS Settings Screen
L --
M MAN RD Manual Read entry
N MESSAGE Next Account
O -- Read extended comment
from CONNECT
P -- Previous Account
Q PROGRESS Progress
R RD CD Reader Code
S SEARCH Search
T TRBL CODE Trouble Code
U UNREAD Next Unread
W NXT SKIP Next Skipped
X -- Tamper Processing
Y -- Zero or Rvrs Flow processing
Z SKIP Toggle Skipped
Page 41
1-11
Installation & Operation Manual
Search
In addition to the “Hot Keys”, meter readers can also find a specific account through the Search Menu. When you are display-
ing a meter to read, press the menu button to display the Read Menu screen.
From the reading menu, press “S” key or tap the box on the screen labeled “Search”. The screen will display the Search Menu.
There are different ways to search for a particular meter. These searches can be started by tapping on the screen using the ap-
propriate alpha key to begin the search.
• “F” – Find a meter that has a particular value in one of the five read screen fields
• “T” – Search for a particular Trouble or Reader Code
• “R” – Select a route to search (see the Route Operations section for more details)
• “B” – View a list of all Bookmarked Accounts
• “S” – View a list of all Skipped Accounts (if Skipped processing is enabled in settings)
• “U” – Go to the next unread meter in the current route
If you wish to find a meter that has a particular name or is at a particular address, press the Search Fields “F” button. The
Search Fields screen will allow the reader to specify the information.

Page 42 1-11
Trimble® Ranger™
In our example, the five fields being used are name, address, meter number, AMR serial number, and route/sequence number.
In addition, the account number and the AMR module number can also be searched.
Click on the up arrow button to move the highlight field up and the down arrow button to move the field down. Next, enter
the text via the keyboard for which you want to search in the Search Text field.
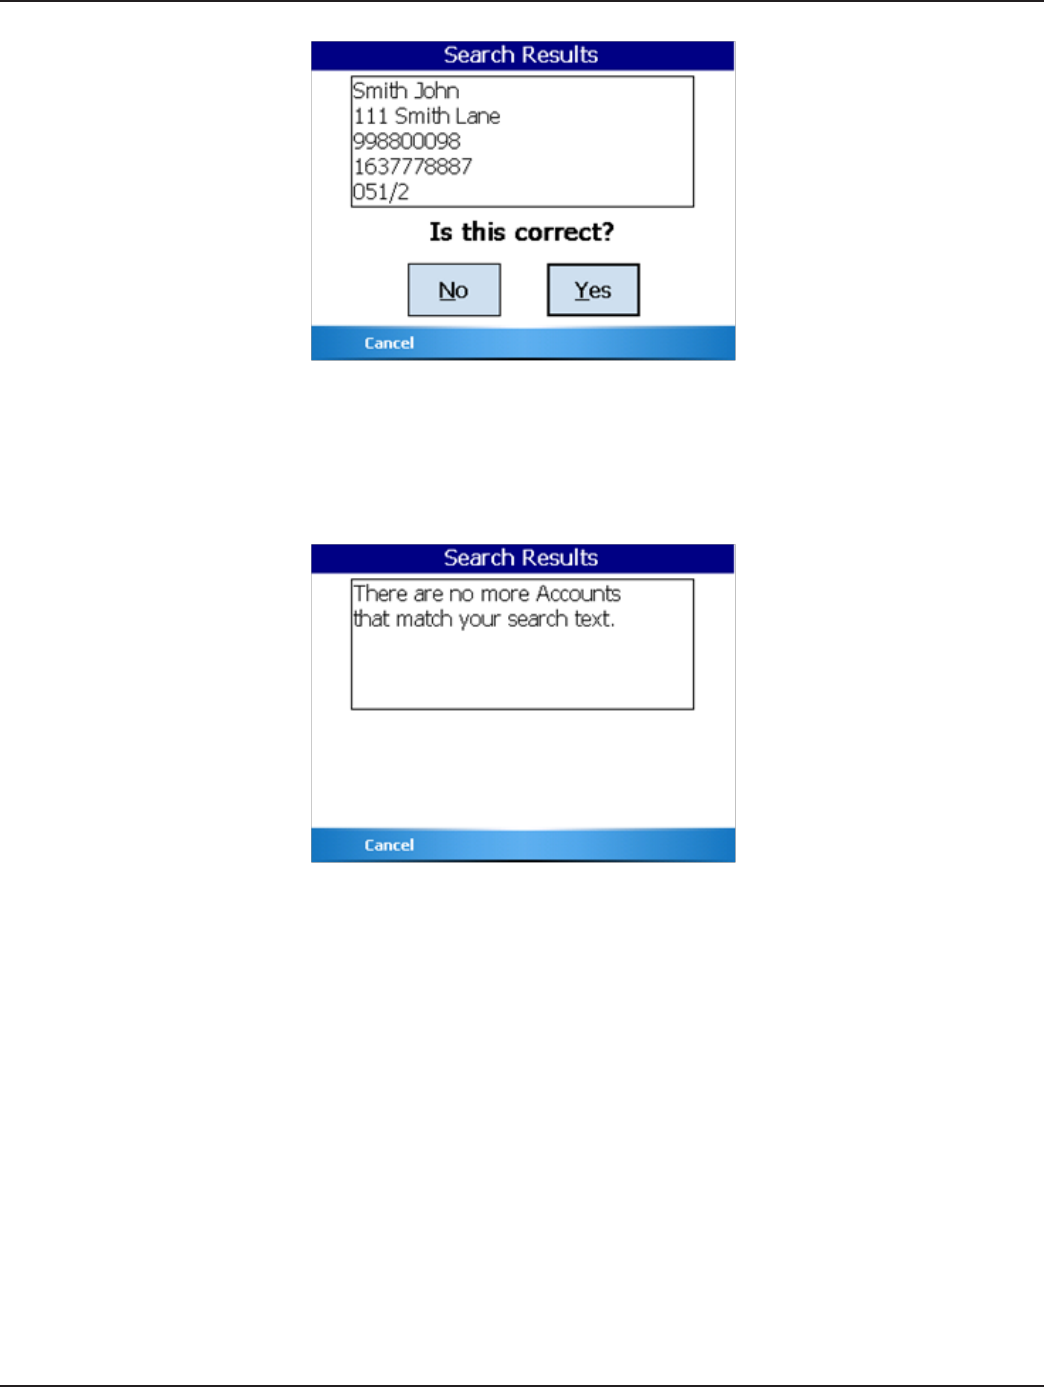
In our example, we will search for a particular name. After highlighting the appropriate field by tapping the or the
boxes on the screen to highlight it, enter the text you wish to search for. For example, if you entered “john” in the
Text field, the Trimble Ranger will display this screen.
Selecting the “Search” RIGHT Soft Menu key will start the search. When searching and the correct meter in the route is found,
it will be displayed like this.
Page 43
1-11
Installation & Operation Manual
If this is the meter you are looking for, tap the “Yes” button on the screen. If this is not the meter you are looking for, tap the
“No” button on the screen and the search will continue. If you wish to stop the search, select the “Cancel” LEFT Soft Menu key
and the reader will return to the Search Menu.
If the meter cannot be found, you’ll see this screen.
Searching for accounts using the other fields on the read screen works in exactly the same manner.
Trouble Codes and Reader Codes
The Trouble Code and Reader Codes are messages you can send to the utility office. The Badger Meter Reading Data Manage-
ment Software allows you to define up to 99 different messages each to use for Trouble and Reader codes. The Trouble Code
is usually used to specify a problem. The Reader Codes are usually used to provide additional information about the meter or
the process of reading it. For example, you might enter a Trouble Code that would indicate that the meter needs repair, while
the Reader Codes might indicate information about accessing the meter, such as a problem dog.
Trouble codes, reader codes and text messages are ways for the meter reader to communicate information back to the office.
Page 44 1-11
Trimble® Ranger™
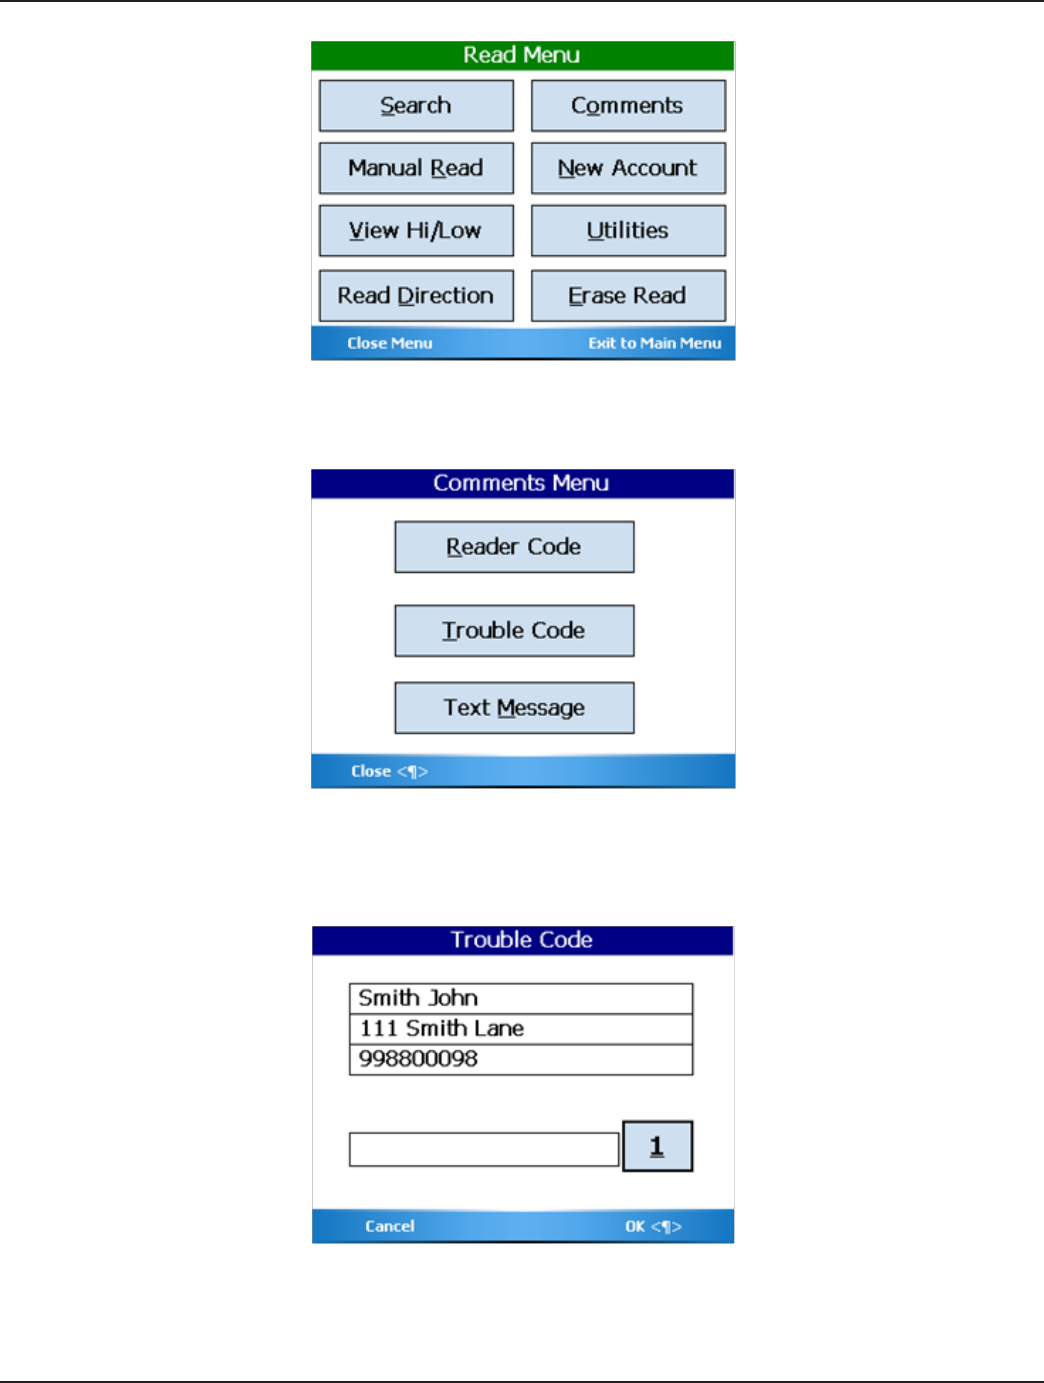
To log a Trouble Code or one or more Reader Codes, touch the Comments button “O” or tap the Comments button on the
screen using the Stylus from the Reading Menu. The Comments Menu will be displayed.
From there you can choose the Trouble Code button “T” or the Reader Code button “R”, depending on which code you wish
to use. In addition, the Trouble Code or Reader Code can be selected by tapping the appropriate box on the screen with the
Stylus. If you choose Trouble Code, you’ll see this screen.
Pressing the “1” key on the screen or the keypad shows the different trouble code messages from which to choose.
Page 45
1-11
Installation & Operation Manual
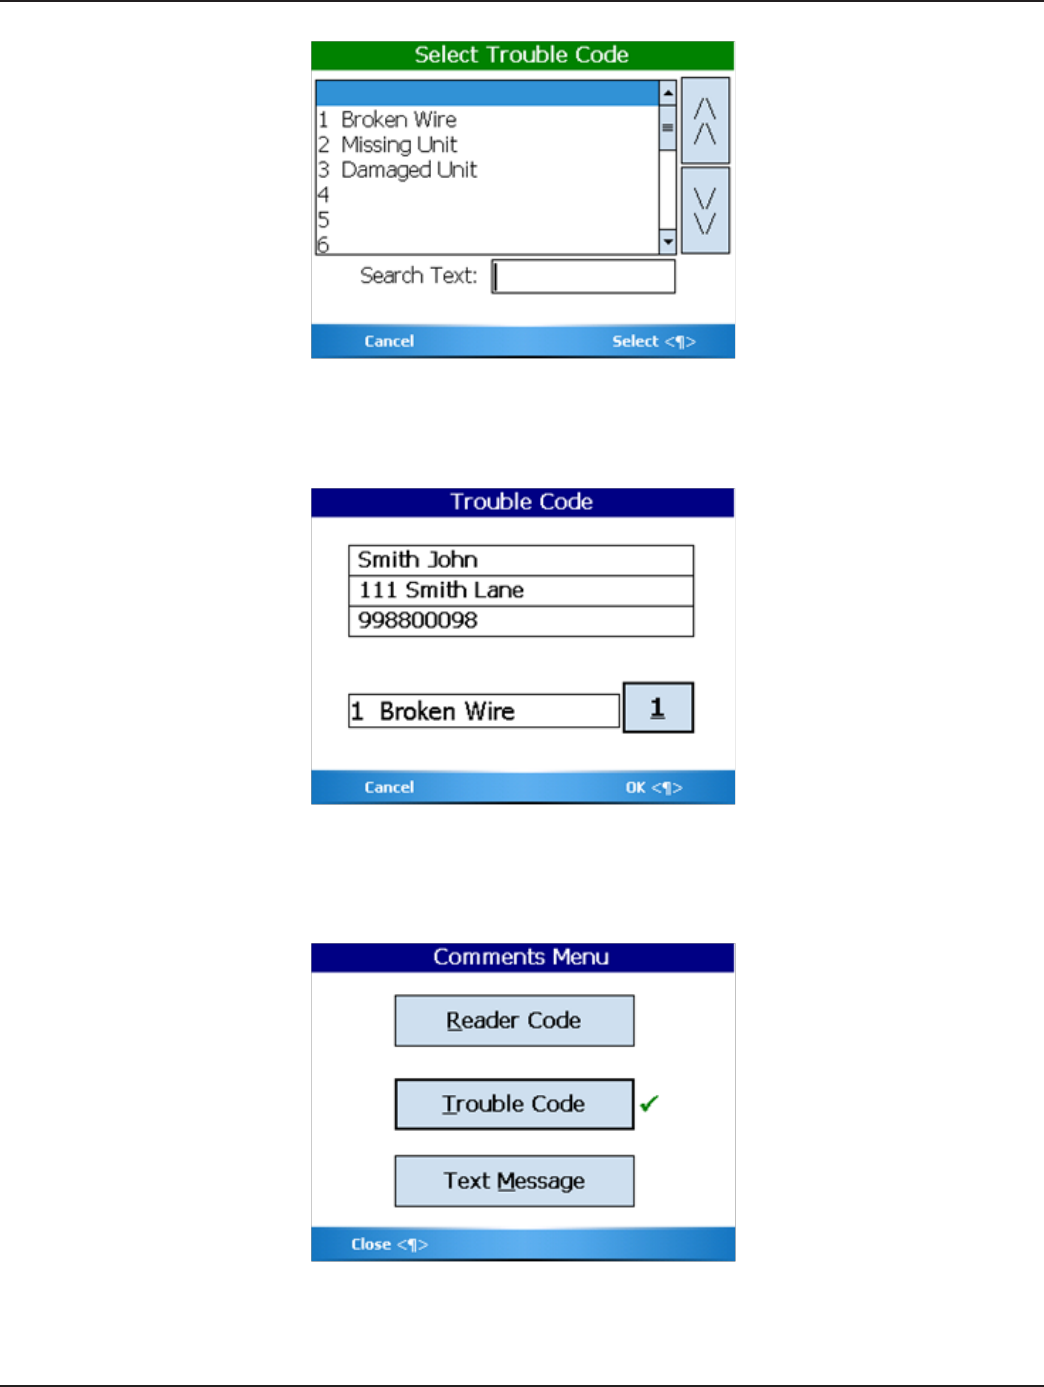
If the code you need is not on the screen, move the slider bar on the right up and down until you see the code, then touch the
code to highlight it. Finally, select the “Select” RIGHT Soft Menu key to choose that code for the current meter. The screen will
look like this.
Select the “OK” RIGHT Soft Menu key to store the chosen trouble code and return to the Comment menu, or select the “Cancel”
LEFT Soft Menu key to cancel any entry of a trouble code. If you wish to reenter the message, press the Trouble Code button
“1” again. When a Trouble code exists for a meter, it is shown on the Comment Menu screen like this.
The process for entering one or more Reader Codes is exactly the same as entering a Trouble code. Pressing the Reader Code
button “R” will bring up this menu.
Page 46 1-11
Trimble® Ranger™
To enter a Reader Code, select the number of the code (either 1, 2, or 3 on the keypad or by tapping the appropriate box on
the screen) to display the choices for that code. You can select the “Cancel” LEFT Soft Menu key to cancel the entry of a reader
code.
Again, if you choose to clear a Reader Code entry, choose the blank line at the top of the list and press the “Enter” key.
If you have chosen a message, you might see a screen like this.
As was with the Trouble Codes, selecting the “Cancel” LEFT Soft Menu key cancels any changes you made, while selecting the
“OK” RIGHT Soft Menu key on the bottom right of the screen will accept the changes.
When the readings are unloaded, Badger Meter Reading Data Management Software will store and display the Reader Codes
and Trouble codes in the Customer Record for that meter.
You can use the Standard Reports to see any and all of the Reader Codes and Trouble Codes that were entered when reading
the meters.
Page 47
1-11
Installation & Operation Manual
Bookmark
The bookmark function allows you to mark a particular meter in the route as one you might wish to revisit later.
One common use of the bookmark function occurs when you come upon a flooded meter pit, and your pump is back in the
truck. You can set a bookmark at this meter and continue reading. Later, once you have the pump, you can search for the
meter(s) that is/are bookmarked, and return to them to continue your work.
To set the bookmark for the meter on the screen, press the function (Fn) key followed by the B key. You can also use the “B”
key or a double “B” key (“BB”) depending on the settings you have chosen. You’ll see the Bookmark flag in the upper left side
of the screen.
To clear a bookmark for the meter on the screen, press those same two keys again. The screen returns to the original state.
On the Read screen, you can press the “C” quick read key (or double-press it, depending on settings) to move from one book-
marked account to the next.
Skip
The skip function—if enabled in settings—is used to mark a meter as one at which a reading cannot be obtained at this time.
When a meter is marked as skipped, it is removed from the Unread Meter list. A route is considered completed once all me-
ters are read or skipped.
When you set a meter as skipped, the system will display either the Trouble Code or a Reader Code screens allowing you to
choose one of the conditions showing that the meter was skipped. When the route information is sent back to the Reading
System, the skipped code (either the Trouble Code or the Reader Code) will be processed.
To skip the meter showing on the screen, press the function (Fn) key followed by the “Z” key. You can also use the “Z” key or
a double “Z” key (“ZZ”) depending on the settings you have chosen. This will bring up either the Trouble Code screen or the
Reader Code screen (depending on how Skips are configured in your system). Choose the code for the appropriate skip rea-
son and press the Enter key. The meter will be marked as skipped, and the next meter to read will be displayed on the screen.
A skipped meter is shown on the screen like this.
Page 48 1-11
Trimble® Ranger™
If a meter has a reading, you cannot enter a skip code. You will see this error screen.
Similarly, if the meter is skipped, you cannot enter a reading without first clearing the skip code.
Because the skip code is either a Trouble code or a Reader code, the search function can be used to find a specific skip code.
This screen shows the case where a Skip codes are defined as a Trouble code.
Page 49
1-11
Installation & Operation Manual
To return the meter’s status to unread, press the “Z” or “ZZ” keys again while the skipped meter is displayed on the screen.
Search by Route
When searching, you can search for a particular route. When you tap Search, then Select route, you will see a screen similar to
this:
If a route is not completely read, you can mark it as completed by tapping the Mark as Complete button. If the route is already
marked as completed, you can remove the mark by tapping the Remove button.
Page 50 1-11
Trimble® Ranger™
Text Messages
To enter a text message, press the text message “M” button. If no Text Message currently exists, you will automatically be
taken to the Text Message screen in editing mode—you can begin typing immediately.
To create a new text message for this meter, simply begin typing. To cancel the message, select the “Cancel” LEFT Soft Menu
key. You will be taken out of editing mode, and see the following screen:
To go back into editing mode, tap the “Create” button or press the keyboard’s “E” key.
Use the alpha-numeric keypad below the screen to enter your message.
Page 51
1-11
Installation & Operation Manual
When the message is entered, select the “Save” RIGHT Soft Menu key to complete the message.
Viewing High and Low Audit Values
If you wish to see the high and low audit values, the account number, or the previous reading, from the Read Menu press the
View Hi/Lo button “V”. The screen will display the account number for the meter being read, and the high, low, and previous
reading values for the meter (if passed from billing software).
To return to the Read screen, select the “Close” LEFT Soft Menu key.
Page 52 1-11
Trimble® Ranger™
In some cases, the high, low, or previous readings may not be displayed. On the Settings screen in the Utilities section, there
are two choices that control the display of this screen. The high and low audit values will be displayed if you have chosen the
Show High / Low setting. The previous reading will be displayed if you have chosen the Show Previous Reading setting and
if the previous reading is passed from the billing software. If these settings are not chosen or if the billing software does not
support those features, you will not be able to view the associated information on the View High/Low screen.
Utilities
The Trimble Ranger may be set up to operate in a customized fashion to support the needs of the meter reading group. To
view or change the settings, tap the Menu button on the bottom of the account screen, then tap the Utilities button on the
screen from the Read Menu.
To access the function of the Utilities Menu, tap the appropriate button on the screen or press the corresponding letter key on
the keyboard. The functions of the Utilities Menu are:
• Progress “P” – a display of meter reading statistics to help you determine how far along you are in the route
• Battery Info “B” – this screen shows information being reported by the processor within the battery pack that might
be useful when investigating a problem
• Settings “S” – which displays the settings currently being used by the Trimble Ranger
• ”Close” LEFT Soft Menu key – this function returns you to the Read Menu
Progress
Keeps records on the total number of meters, the number of meters read, the number of meters that failed to report, the num-
ber of tamper reports received, etc. If you wish to view this information, press the Utilities “U” button from the Read Menu
followed by the Progress “P” button from the Utilities Menu.
The Progress screen displays these statistics:
• Total number of meters stored
• Current number of meters read/processed meters
• The total number of unread/unprocessed meters
• The total number of tampers
• The number of encoder errors
Page 53
1-11
Installation & Operation Manual
• The number of unexpected manual reads (AMR accounts with a manual read instead of an automated read)
• The number of Tampers that have not yet been processed
• The number of Encoder Errors that have not yet been processed
• The number of Meter Popup Comments that have not yet been viewed
• The number of Skipped meters
The screen looks like this.
On the left side, the status for meters with a reading are shown and on the right side, the status of unread meters is shown. If
Skipped meters are being used, they will be placed in the middle.
If a letter is underlined on a word (i.e., “Unprocessed Tampers”), then you may press that key to view all meters that are in-
cluded in the count.
If there are more than one thousand meters loaded into the handheld, it may take 10 to 15 seconds to see the numbers dis-
played on this screen. This is because the Trimble Ranger is examining each meter in the database in order to build the values
for this screen.
If you’d like to see the progress of individual routes, press the “R” key or tap the Route Progress button on the screen. You’ll see
a screen like this for each route.
Again, if a letter is underlined on a word (i.e., “Unviewed Comments”), then you may press that key to view all meters that are
included in the count.
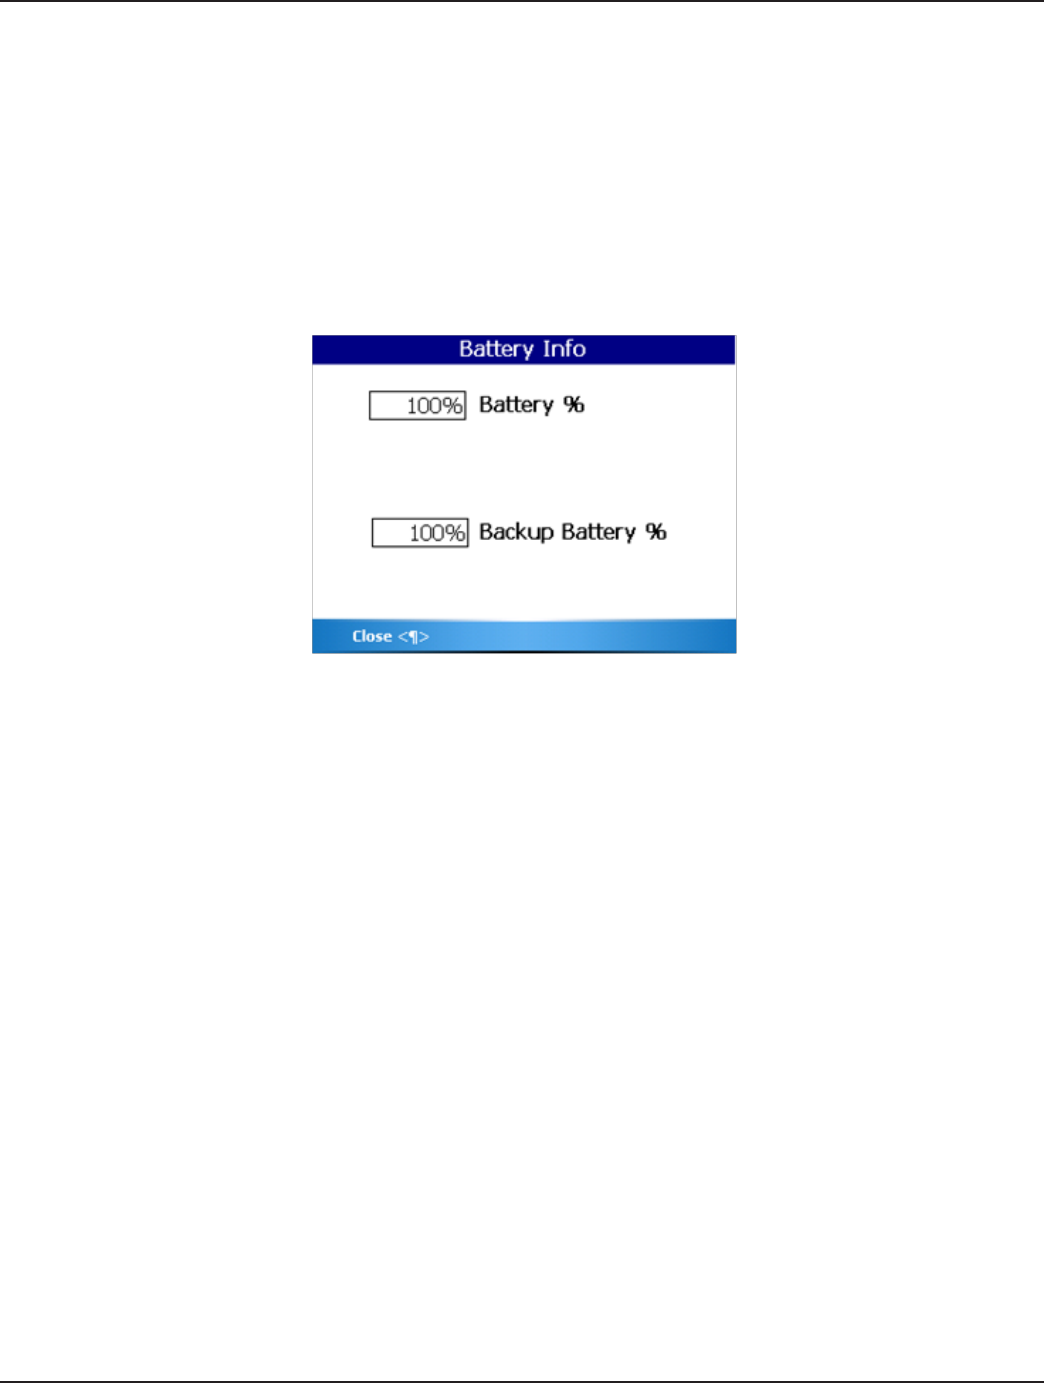
Page 54 1-11
Trimble® Ranger™
When you have finished examining the statistics and information, select the “Close” LEFT Soft Menu key to return to the Utili-
ties menu screen.
Date/Time
To change the date, use the Windows® function for date and time, which is accessed through the Change Date/Time program
on the desktop.
Battery Info
If you need additional information regarding the change status of the battery, press the Battery Info “B” button from the Utili-
ties menu. The current status of the battery charge is displayed:
If the battery is removed for 30 seconds or more, the user will be prompted to enter a current time and date. This must be
done prior to operating the READCENTER® Field Applications.
Selecting the “Close” LEFT Soft Menu key will return you to the previous screen.
Settings
As mentioned earlier, the Trimble Ranger has the ability to change how it operates or what it displays based on your choices.
These choices are called Settings, and are accessed from the Settings button from the Utilities Menu. The Settings are dis-
played and changed in a series of screens. Each setting describes a behavior in the Trimble Ranger that you can control. If the
box has a “” in it, the Trimble Ranger will perform that function. If the box has no “” in it, the Trimble Ranger will not perform
the function.

Page 55
1-11
Installation & Operation Manual
The Settings are organized by topics. Here is the Settings Menu.
The Hardware Settings screen looks like this.
Clicking in the field will change the COM port value. To save your changes, select the “Save” RIGHT Soft Menu key. To cancel
your changes, select the “Cancel” LEFT Soft Menu key.
There are three Program Options Settings screens and they look like this.

Page 56 1-11
Trimble® Ranger™
The Settings for Program Operation control how the READCENTER® Field Application software reacts to different meter read-
ing conditions as follows:
• Show Account Comments – when checked and Comments exist for the meter, they are displayed automatically when
the meter is next to be read.
• Show No Usage – when checked and the meter reading matches the previous reading, the No Usage message is
displayed.
• Show Reverse Flow – when checked and the meter reading is lower than the previous reading, the Reverse Flow
message is displayed.
• Show Previous Read – when checked, the previous reading is displayed on the High and Low Limits screen and when
reentering a high or low manual meter reading.
• Find on Wrong – when checked and reading touch meters, the READCENTER Field Application software will search
for the correct meter if the touch meter just read does not match the next meter to be read.
• Allow Mark as Complete—when checked, allows the user to mark a Route as Complete even though 100% of the
meters have not yet been read/processed.
• Alert on Route Boundary – when checked, a message will be displayed showing that the next meter to be read is in a
new route.
• Read Direction – for the services being read, these settings specify if the manual meter reading will be entered from
left to right or from right to left.
• Enlargement Time – clicking this button changes the time that a field is enlarged on the screen if the field is too long
to be displayed; it also determines how long the battery status popup indicator stays on the screen when you tap on
a screen’s title bar. Pressing the “D” key enlarges the fields on the Read screen.
• Load/Unload Mechanism – this setting controls which method of loading and unloading routes is used.
• Single-/Double- Tap Button – choose how you want to access Quick Keys.
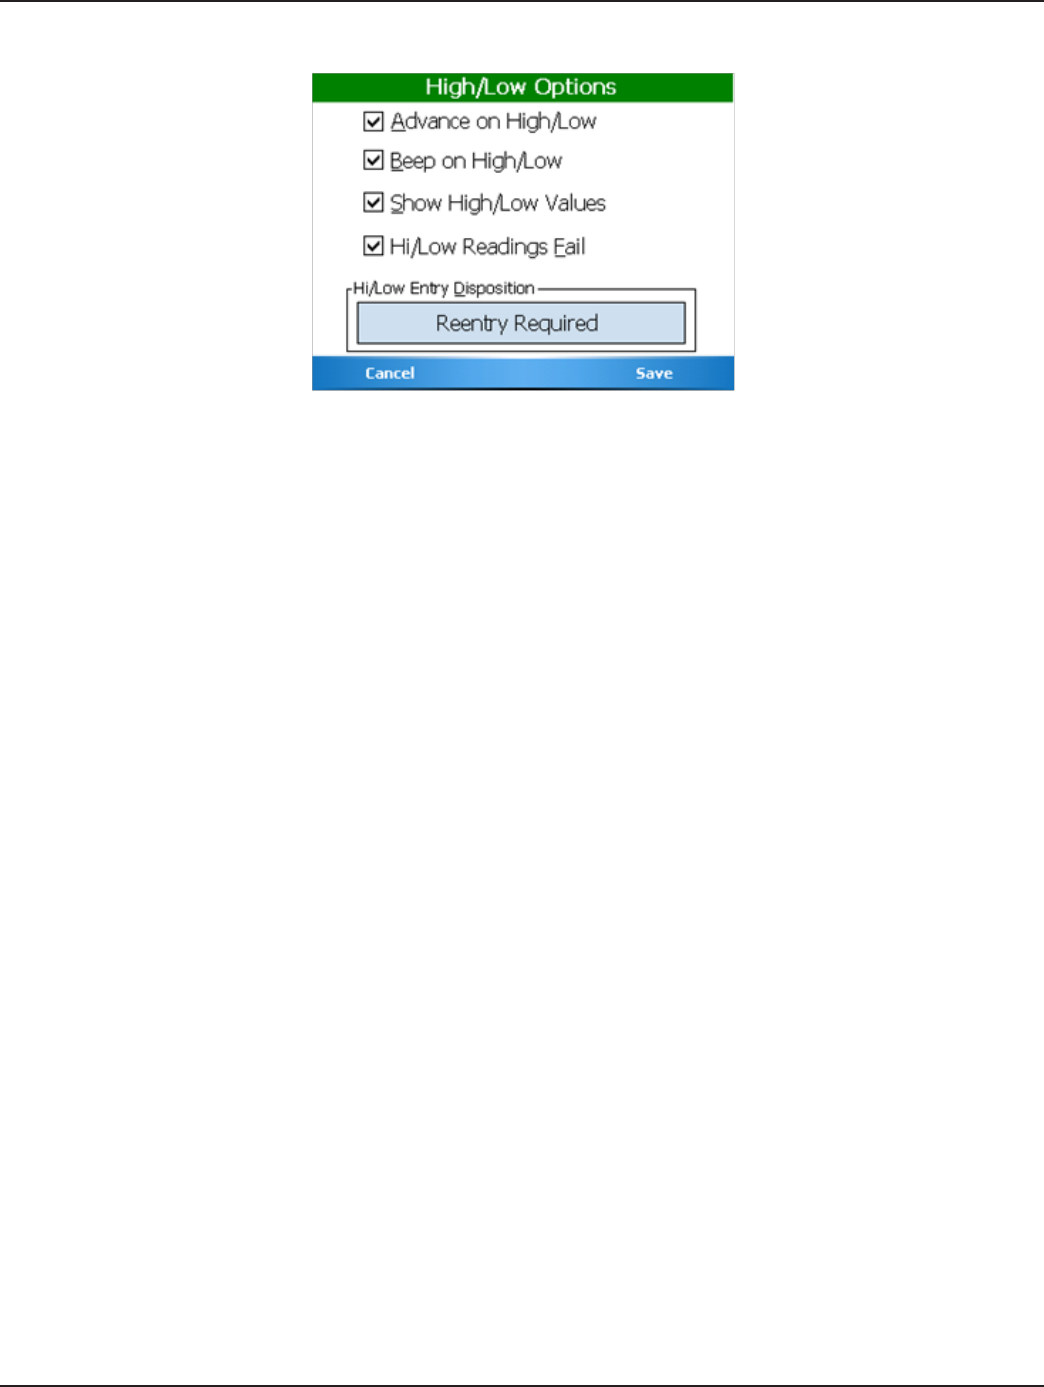
Page 57
1-11
Installation & Operation Manual
High/Low Options Settings Screen
• Advance on High/Low – when checked and a high or low reading as just been entered, the READCENTER Field Ap-
plication software will automatically display the next meter to be read.
• Beep on High/Low – when checked and a high reading has just been entered, the READCENTER software will sound
3 beeps to signify the high reading. Two beeps will denote a low reading.
• Show High/Low Values – when checked, the high and low limit values will be displayed on the High/Low limits
screen and when a high or low reading is entered.
• Hi/Low Readings Fail – when checked, a reading is considered high if the reading matches the high or low limit.
When unchecked, the reading must be higher than the high limit or lower than the low limit.
• Hi/Low Entry Disposition—the field, when tapped, toggles between “Accept/Reject,” “Reentry Required,” and “Reentry
w/Cancel.”
- Accept/Reject : When a low or high manual read is entered, the meter reader will be asked whether or not the
entered reading is correct.
- Reentry Required : When a low or high manual read is entered, the meter reader will be prompted to enter the
reading a second time to verify that the reading is low or high.
- Reentry w/Cancel : Same as “Reentry Required,” but there is a cancel button that cancels the initial read entry.
Displayable Field Settings Screen
This screen shows you the fields from the Badger Meter Reading Data Management Software that are shown on the read
screen. The sixth line on the main Reading screen displays customizable information. To change what is displayed on the
sixth line, press the “F” key or tap the “Custom Field” button on the screen to cycle through all possibilities.
The Customization screens allow you to control the behavior of various functions within the READCENTER® software. In these
cases, when you click on a button, the value displayed changes, toggling between predefined values.
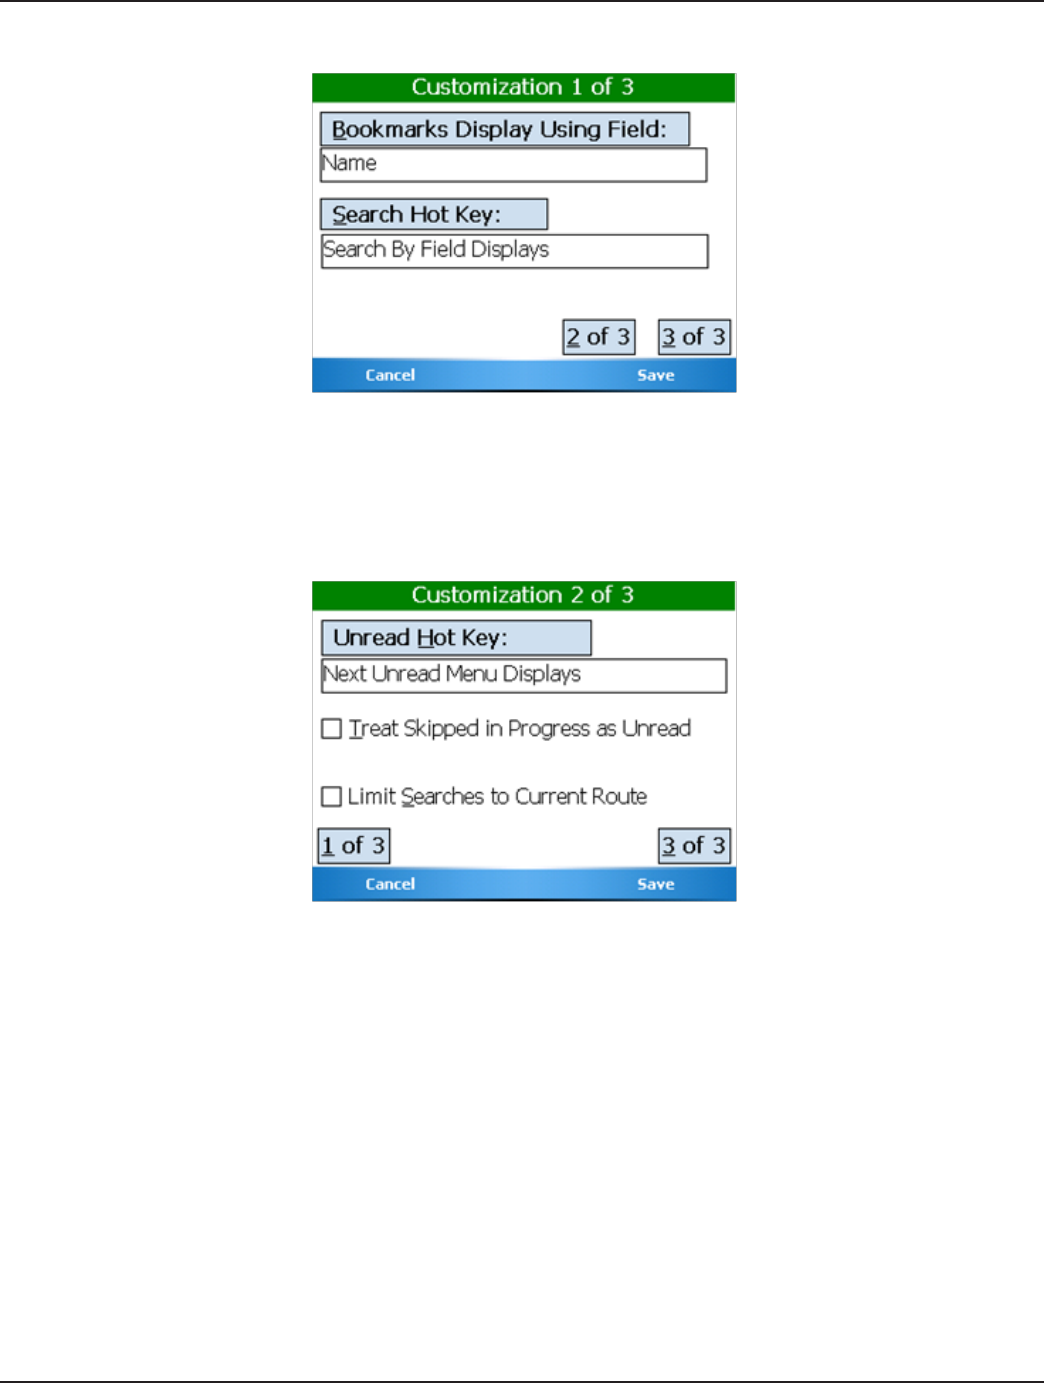
Page 58 1-11
Trimble® Ranger™
Customizations Settings screens (1 to 3)
• “Bookmarks Display Using Field” : The selected field will determine what data field is used to display a meter in a list
of meters. You cycle through all available field types by tapping on the button.
• “Search Hot Key” : The selection determines what happens when you utilize the Search hot key or quick key on the
Read screen.
• “Unread Hot Key” : The selection determines what happens when you utilize the Next Unread hot key or quick key on
the Read screen.
• “Treat Skipped in Progress as Unread” : When checked—if Skipped processing is allowed—all Skipped accounts are
considered Unread/Unprocessed.
• “Limit Searches to Current Route” : When checked, all Searches will be “pinned” to the current route, where multiple
routes are available.
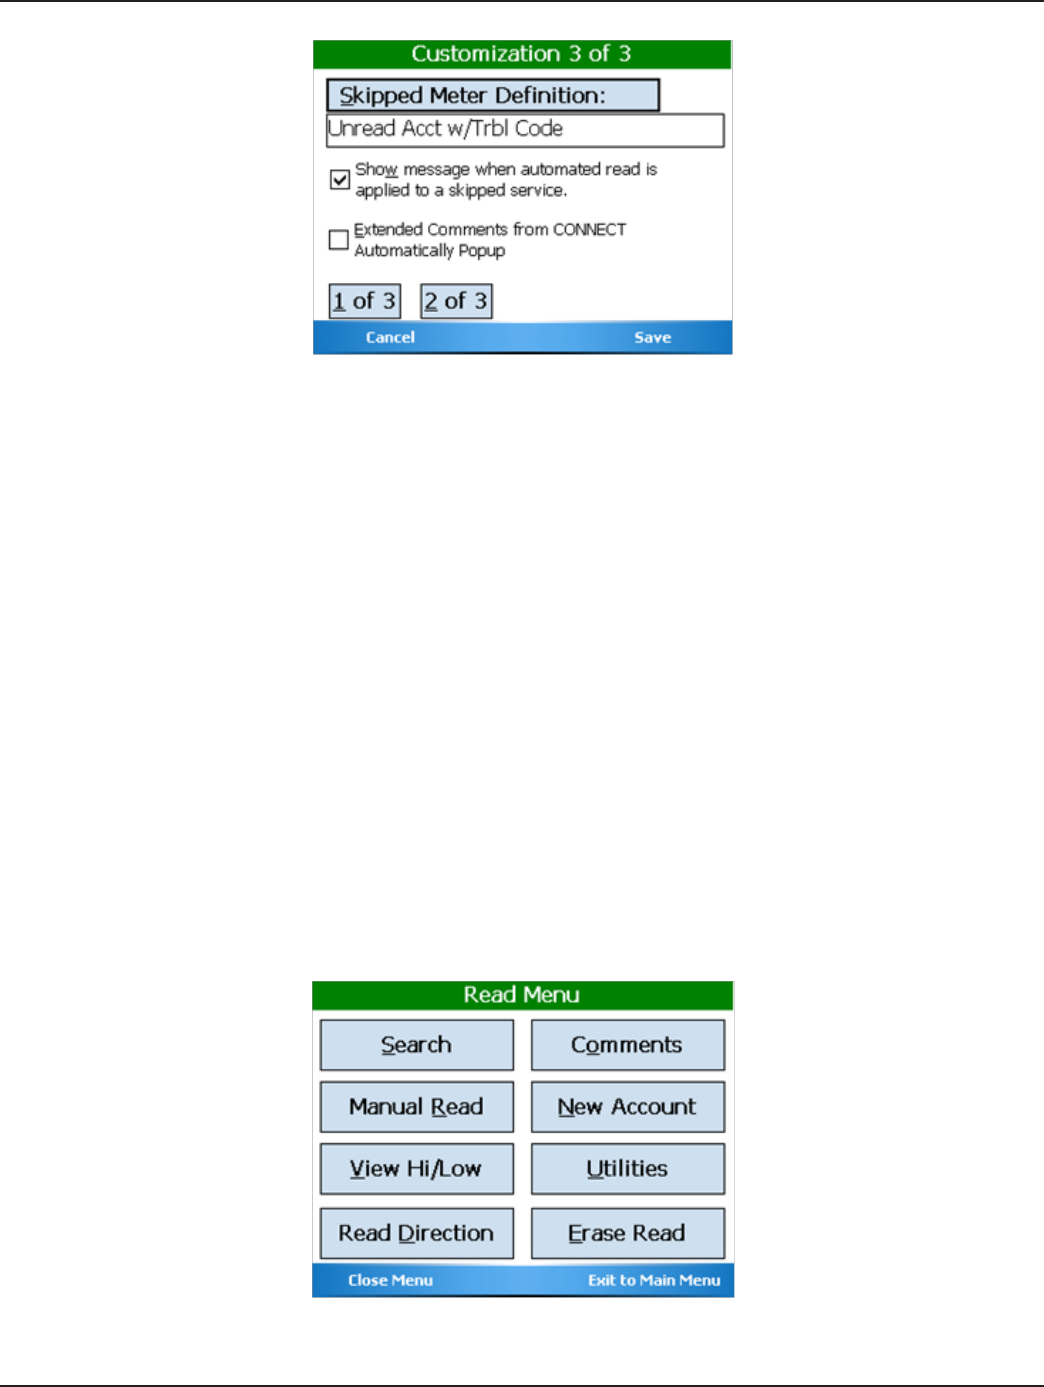
Page 59
1-11
Installation & Operation Manual
• “Skipped Meter Definition” : The selection determines what Comment codes (Trouble or Reader codes) are used to
indicate a Skipped Meter. You can also disable Skipped processing by selecting “Skip not used.”
• “Show message when automated read is applied to a skipped service” : When checked, the user will be notified when
a Skipped meter is read via an automated read.
• “Extended Comments from CONNECT Automatically Popup” : When checked, extended account textual messages are
automatically displayed when the account is reached in the Read screen.
Entering New Accounts
New accounts can be added to the list of stored accounts received from Badger Meter Reading Data Management Software.
Before you add a new account, be aware that the Badger Meter Reading Data Management Software can display the
accounts that you add but cannot permanently add them to its database. Information from accounts added can be
printed when the accounts are uploaded to Badger Meter Reading Data Management Software, but the accounts will not be
added to the Badger Meter Reading Data Management Software database. New accounts are added to Badger Meter Read-
ing Data Management Software when the list of meters to read is sent from the billing system, so new information needs to
be entered there.
Note that if you need to read a few meters for testing purposes, there is no need to create a new account. Instead, use the
Quick Read feature. See the Quick Read section of this manual for more information.
If you need to enter a new account into the Trimble Ranger, press the New Account “N” key or tap the “New Account” button
on the screen from the Read Menu.
Page 60 1-11
Trimble® Ranger™
Pressing the New Account button will bring up this screen.
You can tap on the box to the right of “Name”, “Addr” and “AMR S/N” buttons to place your editing cursor in those fields. Sim-
ply start typing the text you wish.
The “Name”, “Addr” and “AMR S/N” buttons open an on-screen keyboard to use for text entry.
The other buttons perform these actions:
• AMR Type “Fn-T” – Tap the box to choose the method by which the meter will be read: manual, touch, ORION RF
• Service “Fn -S” – Tap the box to choose the service that the meter is reading
• Clear “Fn -E” – Clear all textual entries you have made (AMR Type and Service Type are not reset)
• ”Cancel” LEFT Soft Menu key – Return to the Read Menu (if you have not saved the new account information, the
new account will not be added)
• “Save” RIGHT Soft Menu key – Saves the new account information, and clears the entries
Route Operations
The READCENTER® software performs a number of functions on a per route basis. They are:
• Searching for the first meter in a specific route,
• Reviewing the progress of meter reading on a per route basis,
• And, displaying a message showing completion of the route when the last unread meter of the route is read.
Page 61
1-11
Installation & Operation Manual
Searching for a Route
To search for the first meter in a route, press the “M” key from the reading screen to display the read menu. Then press the “S”
key to display the Searching menu. You’ll see this screen.
Choose the Select Route “R” key to display all of the routes that are currently loaded. You’ll see a screen similar to this.
Tap the up and down arrow keys on the screen to move the selector line up or down to choose the route you wish to display
and pick the “Select” RIGHT Soft Menu key. The screen will display the first meter in the selected route.
If you wish to cancel the search, select the “Close” LEFT Soft Menu key
This screen also allows you to Mark a Route as Complete, even though there are not 100% read/processed meters (this option
only is available if the settings allow it).
Page 62 1-11
Trimble® Ranger™
Progress Reporting by Route
To view the progress of meter reading, use the Progress function: from the read screen press “M” for the menu, “U” for Utilities,
and “P” for Progress. Either way, you’ll see a screen similar to this.
Select the “Route Progress” RIGHT Soft Menu key to display the progress for the first route. You’ll see a screen like this.
Use the “N” and “P” keys or the Next/Previous button on the screen to view the progress screens for the next and previous
routes loaded in the handheld. When you are done viewing the progress details, select the “Close” LEFT Soft Menu key to
close the Route Progress window.
Page 63
1-11
Installation & Operation Manual
Route Completion Messages
While you are reading meters, the READCENTER® software is monitoring progress for all of the meters loaded into the hand-
held. If the last meter in a route is read, you’ll see a message like this denoting that the route is completed.
Select the “OK” LEFT Soft Menu key to acknowledge that you have seen the alert message.
The Route Completion messages will also be displayed if you are entering the read screen after displaying the Copyright
screen. This is handy as a reminder of your progress when coming back from lunch, or resuming reading after a long break.
When all of the Routes have been read, you’ll see this message.
Summary of the Meter Reading Process
The process of meter reading using the Trimble Ranger is simple and easy to remember. Here’s a summary of the steps in the
meter reading process that includes the buttons you need to press to perform the functions.
• Choose the Account Group you wish to read in the Badger Meter Reading Data Management Software
- Use the Load Collector function in Badger Meter Reading Data Management Software to create the files and send
them to the Trimble Ranger
•

Page 64 1-11
Trimble® Ranger™
• Read the meters in the route or routes
- Read/Program Meters from the Trimble Ranger Main Menu
- Badger Meter ORION® meter readings will be gathered as they are received when the Trimble Ranger is in auto-
matic mode. The next unread meter will always be displayed
- Change to a different meter using the Next Meter and Previous Meter buttons in Manual Mode if you need to
- Press the Menu button to choose the different reading functions you might need to perform
• When finished, transfer the readings from the Trimble Ranger back to the Badger Meter Reading Data Management
Software
- Use the Unload Collector function in Badger Meter Reading Data Management Software to unload the readings,
view the readings to be sure they are correct, and store the readings
PROGRAMMING METERS USING THE TRIMBLE RANGER
Programming Badger Meter ORION® Endpoints
When READCENTER – Quick Read begins, you first see the Copyright screen:
• Trademarks button : allows you to view the Trademarks used by this program.
• User field: you must enter 3 to 5 characters; your user name for the program.
• “Cancel” LEFT Soft Menu key : exits the program.
• “OK” RIGHT Soft Menu key : begins the main Quick Read portion of the program.

Page 65
1-11
Installation & Operation Manual
To access the Badger Meter ORION Programming functions press the “P” key from the ORION Quick Read screen, and then
from the Copyright screen of the READCENTER-Quick Read program, enter your 3 to 5 character User name and select the
“OK” RIGHT Soft Menu key. You’ll see this screen:
Note that you must perform a Read function before you can perform any other function.
The IR Programming tab allows you to perform these functions:
• Read a endpoint’s information through the optical LED – select the “Read” RIGHT Soft Menu key or press your Trimble
Ranger’s ENTER key
• Start a endpoint’s radio – “S” key or “Start” button on the screen
• Stop a endpoint’s radio – “T” key or “Stop” button on the screen
• Enter an Odometer Reading to program to a endpoint – “O” key or “Odometer” button on the screen
• Program a endpoint’s odometer value to match the RTR® – “P” key or “Program” button on the screen
• Pause a endpoints radio until water flows through the meter – “U” key or “Pause” button the screen
• Select “D” to read the ORION and determine what Gas Drive circle it has been programmed for (only applicable if the
ORION is Gas ORION).
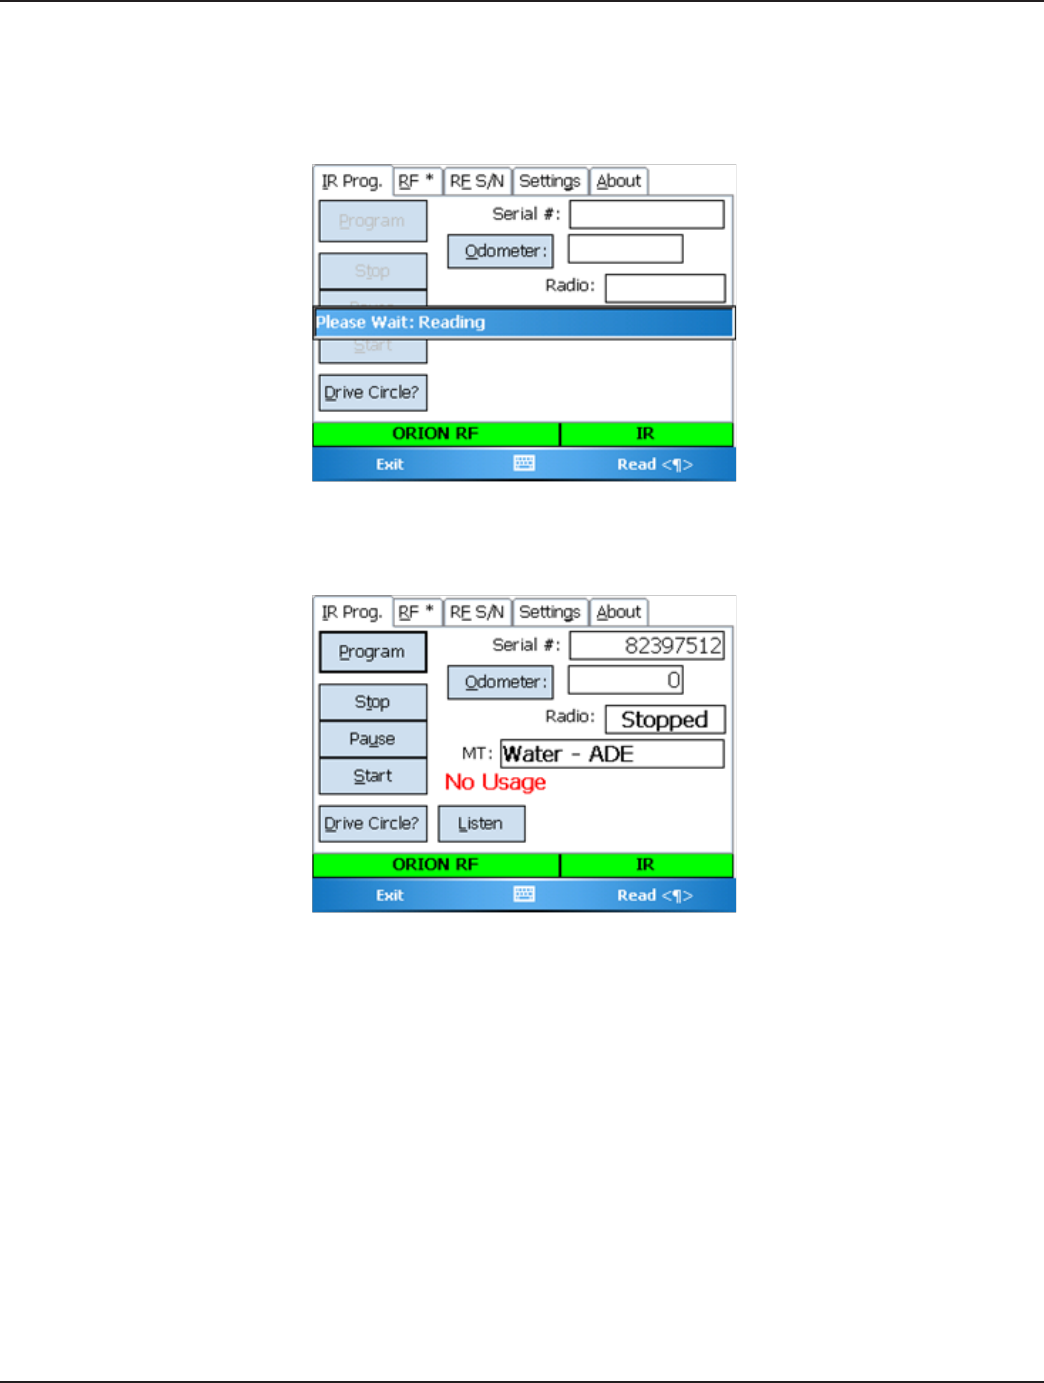
Page 66 1-11
Trimble® Ranger™
Reading the Endpoint Through the Optical Port
To use the Programmer to Read the endpoint’s meter reading information, align the optical port on the bottom of the hand-
held computer and the LED and select the “Read” RIGHT Soft Menu key. If the port and the LED are aligned, you’ll see this
message :
Once the endpoint information has been read, the other fields on the screen will be updated. Once all the information is
gathered, you’ll hear a beep and see this screen.
Starting the Badger Meter ORION® Endpoint without the Programmer
All Badger Meter ORION Endpoints are programmed at the factory to begin sending its meter reading as soon as the Encoder/
Register registers flow through the meter. As a result, you can install Badger Meter ORION endpoints on meters without hav-
ing to manually start the endpoint.
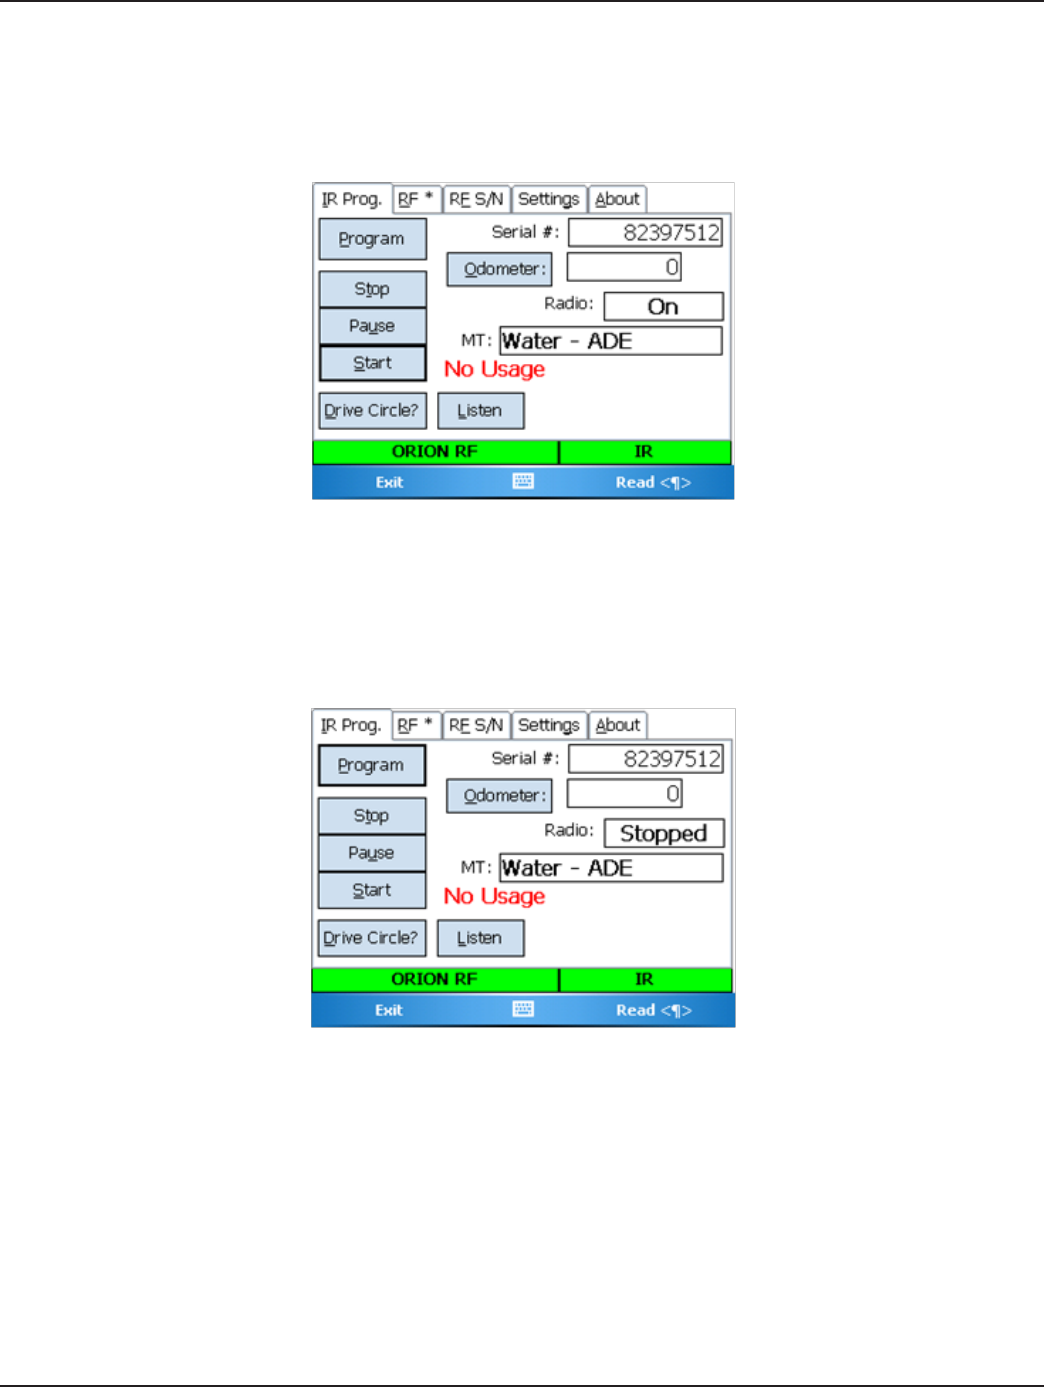
Page 67
1-11
Installation & Operation Manual
Using the Programmer to start a Endpoint
If a Badger Meter ORION Endpoint is required to start its meter reading broadcast prior to registering usage, align the optical
port and the LED and touch the “S” key or tap the “Start” button on the screen.
Here’s what you would see if you started endpoint # 82397512.
Stopping a Endpoint
• To use the Programmer to Stop the endpoint’s meter reading broadcast, align the optical port and the LED press “T”
key or tap the “Stop” button on the screen.
Here’s what you would see if you stopped endpoint # 82397512.

Page 68 1-11
Trimble® Ranger™
Changing the Odometer setting
The most common use of the SET ODOMETER function is to clear a Tamper condition reported by a Endpoint. Besides clear-
ing the tamper, the SET ODOMETER function will also allow you to change the meter reading stored in the endpoint.
Changing the odometer setting is performed in two steps:
• Perform a READ function
• Enter the new odometer value and perform the SET ODOMETER function
• Optionally, you can then perform a Read function to verify that the new reading is now being reported by the End-
point.
Note: If you attempt to program a new meter reading on a profiling ORION, you will be warned that doing so will invali-
date your profiled data. If you continue, you will need to reset the Profiling feature of that ORION endpoint.
The READ function is described above. Once the Badger Meter ORION® endpoint has been successfully read, you can con-
tinue with the SET ODOMETER function.
To use the Programmer to clear the tamper (the endpoint’s meter reading matches the odometer value), press the PROGRAM
“P” key or tap the “Program” button on the screen once the READ function has completed. The Programmer will clear the
tamper without changing the stored meter reading.
• To use the Programmer to change the endpoint’s stored meter odometer value, enter the odometer value you want
the endpoint to store into the odometer field as follows. First, use the delete key on the keyboard below the screen
(upper left corner, first press the Trimble Ranger key) to remove the current reading from the field. Next, enter the
desired reading by pressing the number keys on the keyboard. Finally, align the optical port and the LED and touch
the Set Odometer button “O”.
Note that if the endpoint’s radio is stopped, the odometer value will be stored but the endpoint will remain stopped. If the
radio is running, the odometer value will change and the radio will remain running.
Example: Changing the Odometer
Here’s an example to help you through the steps of setting an odometer value.
Let’s assume that you are installing a Badger Meter ORION® endpoint on an active meter with usage on the Badger Meter
RTR®. You need to follow these steps to insure that the value in the endpoint matches the current odometer value on the RTR
once the endpoint is connected to the RTR.
When programming Badger Meter ORION endpoints, you need to enter the six moveable odometer wheels plus the sweep
hand for all meter types (gallons, cubic feet, etc.) and all meter models.
For this example, we’ll assume that the odometer value (both black digits and white digits) is "001234". The Badger Meter RTR
odometer would look like this.
Let’s also assume that the sweep hand is pointing between the "5" and the "6". Because the sweep hand has not yet hit the
"6", use the value of "5" as the last digit of the meter reading. Therefore, the value to be entered into the Badger Meter ORION
Endpoint is "0012345".

Page 69
1-11
Installation & Operation Manual
Now we follow the steps for setting the Odometer value. First, we must place the optical port over the endpoint’s LED and
perform the READ function.
Next, we must update the odometer value on the display. Use the backspace key to delete the current odometer value from
the Read step, and enter the desired odometer reading (12345).
Now touch on the Set Odometer button. Once the messages show that the communications between the optical port and
the endpoint have completed successfully, the endpoint holds the new odometer value.
To check the odometer value, place the optical port over the LED and perform the READ function again. You should see the
new odometer value of "12345" in the Odometer # field.
QUICK READ
The Trimble Ranger can be used to perform a number of functions other than reading meters.
• Read a Badger Meter ORION® endpoint whose meter reading you need for a special use (such as testing and trouble-
shooting, gathering a final meter reading, etc.)
• Interrogate a BadgerTouch® module or other touch module using a VersaProbe™
Some of these functions may be performed at customer sites while others may be performed in the meter shop. But they all
use the Quick Read function.
The Quick Read function allows you to read one meter at a time without having meters loaded into the handheld. The Quick
Read function can be performed for Badger Meter ORION endpoints and touch modules. The Trimble Ranger gathers the me-
ter reading and displays the result on the screen. The Trimble Ranger does not store the reading information and cannot
send any Quick Reads back to the Badger Meter Reading Data Management Software.
The most common uses of the Quick Read feature are:
• Gathering a final reading from a meter
• Reading a endpoint or module when troubleshooting or testing at a customer’s site
• Reading one or more endpoints or modules that are about to be installed at customer sites, to verify that they are
working correctly
• Testing a newly installed endpoint
• Performing meter testing at the meter shop
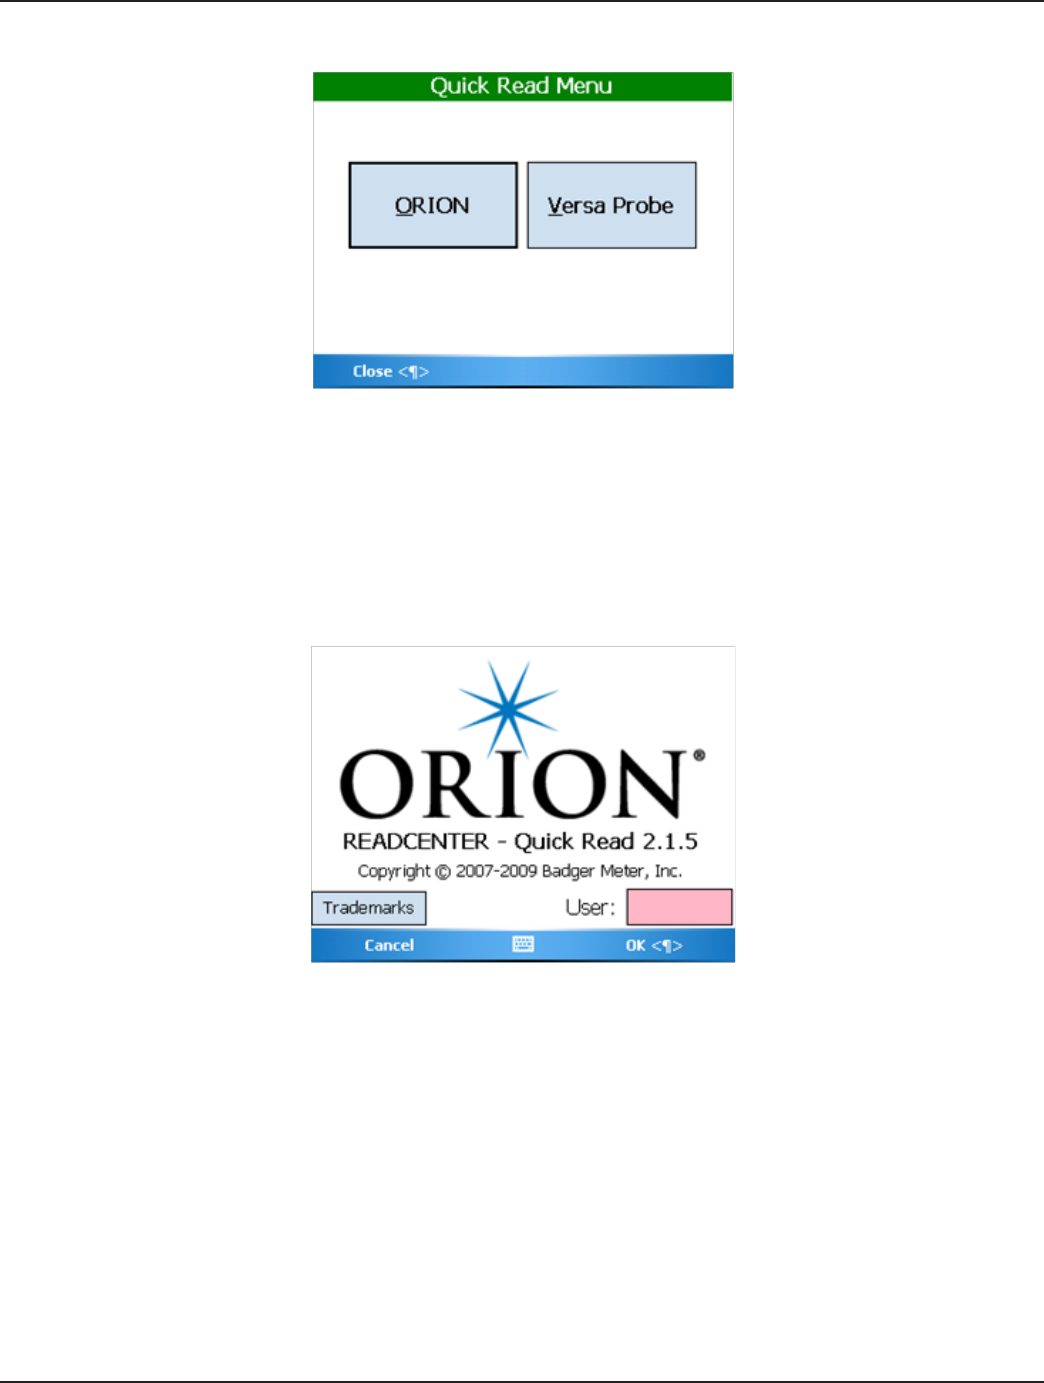
Page 70 1-11
Trimble® Ranger™
The Quick Read Menu is accessed from the Trimble Ranger Main Menu, and looks like this.
The Quick Read Choice screen allows you to perform quick reads for each type of reading technology you use by pressing the
button for that technology.
Badger Meter ORION® Quick Reads
Badger Meter ORION Quick Reads offer you great flexibility. Because the Badger Meter ORION Receiver will forward all Badger
Meter ORION readings it receives, you can view up to 50 readings received or you can request to view readings from a specific
Badger Meter ORION endpoint. Press the “O” key to display the ORION Quick Read screen.
Enter 3 to 5 character User name and select the “OK” RIGHT Soft Menu key. You will then see the main screen.
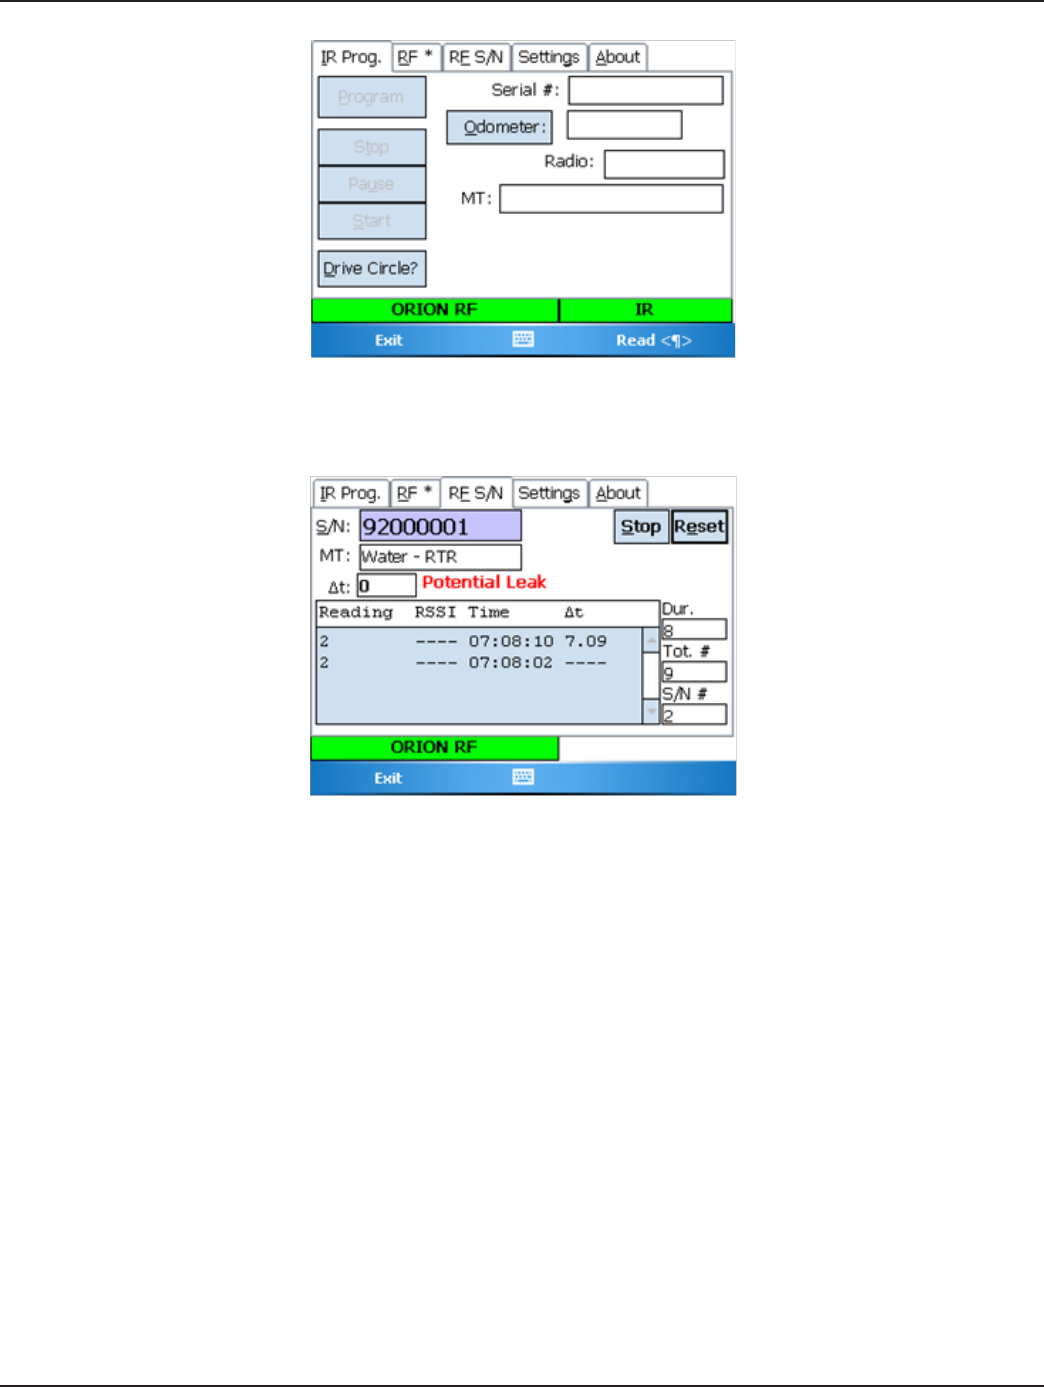
Page 71
1-11
Installation & Operation Manual
If you wish to look for a reading from a specific Badger Meter ORION receiver, use the RF S/N tab to choose and enter the de-
sired serial number. The RF* tab is used when you wish to monitor all of the ORION endpoints in the area.
• S/N field : The ORION Serial Number of interest. You can enter this number via the keypad on your Trimble Ranger.
• MT field : Displays the Meter Type of the Serial Number once it has been heard.
• Δt : The total number of seconds spent waiting for the next transmission from the specified S/N.
• Dur. : The total number of seconds listening for the specified S/N.
• Tot. # : Total number of transmissions heard, regardless of S/N (so the entered S/N was heard 2 times, but there were
9 total transmissions heard—the other 7 transmissions were from different S/Ns).
• S/N # : Total number of transmissions heard from the specified S/N.
• Stop “S” button : Will stop collecting readings.
• Reset “E” button : Will reset all fields except the S/N field.
Page 72 1-11
Trimble® Ranger™
The table shows you each transmission heard from the specified S/N, with the more recent reads at the top. The “Δt” column
shows the total number of seconds between reads.
This screen shows an example of a Badger Meter ORION Gas endpoint. Note that the table has “Index-Sub” instead of “Read-
ing.” This is necessary since a reading for an ORION Gas endpoint has both a main reading portion, and a sub count portion.
Clear DC “D” button : This button will clear out all Gas Drive Circle information for the ORION Gas endpoint (the Gas Drive
Circle is chosen by you).
When you receive the first transmission from an ORION Gas endpoint, you are asked to select a Gas Drive Circle:
Here, you can select the specific type of Gas meter that the ORION Gas endpoint is attached to, as well as the Pressure Com-
pensation factor.
Page 73
1-11
Installation & Operation Manual
Here are five examples of the Wildcard Radio Read screen (RF *):
A Badger Meter ORION Gas endpoint
A Badger Meter RTR with “Potential Leak” indicated
A Badger Meter All Digital Encoder with “No Usage” indicated
Page 74 1-11
Trimble® Ranger™
A Repeated Water
A Repeated Gas
• Reset “E” button: this will clear out all recorded reads and begins collecting reads anew.
• Unique S/Ns “U” checkbox: When checked only unique ORION S/Ns will be collected; otherwise, all S/Ns are collected,
even duplicates.
• Left/Right cursor on the Trimble Ranger keypad: Moves you forward and backward in the collected readings.
• “Next” RIGHT Soft Menu key: Same as Right cursor key. Moves you forward in the collected readings.
Page 75
1-11
Installation & Operation Manual
When you reach the end of the available reads and press the Right cursor to go beyond the last read, you will be informed of
the problem:
Also, if you attempt to press the Left cursor key to move beyond the first reading, you will be notified of that issue as well:
When you have completed your Quick Reads, press the Close “C” button.
When you have completed using the Quick Read tool, press the “Exit” LEFT Soft Menu key to exit the program and return to
your route reading software.

Page 76 1-11
Trimble® Ranger™
WHAT IF THINGS GO WRONG
In the unlikely event that you experience difficulty using the Trimble Ranger, we’d like you to take some steps to help us return
your Trimble Ranger to proper operation. This section gives you guidelines on how to respond if the Trimble Ranger reports a
problem.
Restarting Windows®
There are times that occur in which the Windows operating system receives conflicting information. In these cases, you might
see a function stop working that worked fine just a few minutes ago. When these types of cases occur, a restart of the hand-
held computer is necessary.
To restart the Trimble Ranger, press and hold the screen power button until the screen counts down to zero. Once the screen
clears, release the green power key. Windows will restart and the Trimble Ranger software will begin. In most cases, these
steps will clear the problem. If you perform a restart and the problem is not cleared, please call Badger Meter Technical Sup-
port.
Questions
If the Trimble Ranger displays something out of the ordinary, there is no need to panic. If you see information on the screen
that you do not understand, please record the information that you see and call the Badger Meter Technical Support tele-
phone number: 1-800-456-5023. The technical support specialist will help you gather any additional information, and will
assist you in restarting the Trimble Ranger if need be. Your telephone call will alert the Badger Meter software engineers to
your problem, and they will investigate to find the cause of the problem.
It is also very helpful for you to record the situation that led to the strange behavior. Record the steps you took, and the en-
tries you made, that brought about the display. This information will be very valuable in the investigation, and will help find
the solution more quickly.
When You Call the Technical Support Hotline
When you call the 800 technical support number, a support specialist will answer. Explain the situation, and go over the infor-
mation you recorded. This is where your notes on the display or the behavior and the steps you took will be very valuable. If
possible, give this information to the support specialist:
• The Trimble Ranger screen that was active
• The steps being performed at the time
• Any entries that were made on the screen
• Any error message displayed, including any error code or explanation that is shown
• The current state of the Trimble Ranger
Your support specialist may ask you to fax notes or other information to Badger Meter to assist in the resolution of the prob-
lem.
What To Report To Technical Support
It is important that you report all occurrences of errors to the Technical Support Group. It allows Badger Meter to improve
its products and improve your system at the same time. In some cases, the problem may have already been solved, and the
Specialist can send you a software upgrade to correct the problem. In other cases, the Specialist can direct you to perform a
function in a certain way so that the error does not occur.

Page 77
1-11
Installation & Operation Manual
In some cases, the Specialist will direct you to perform some steps if the problem happens again. This will gather very valu-
able information that will speed the investigation of the problem. If the problem does happen again, please follow those
steps and call the Hotline. The Specialist will gather the information for that particular problem, and direct you if further ac-
tion is needed.
Faxing the Technical Support Group
The Badger Meter Technical Support Group can also be reached by fax at 1-888-371-5982. This may be a convenient way to
follow up with your support specialist on particular steps. The number is available 24 hours per day, 7 days per week.
E-Mailing the Technical Support Group
The Badger Meter Technical Support Group is also available via electronic mail through the Internet. To send questions or
comments to the Technical Support group, address your e-mail to TechSupport@BadgerMeter.com. The Technical Support
Group can respond to your comments or questions via phone, fax, or e-mail. Just let us know in your message the type of
response you would prefer.

Page 78 1-11
Trimble® Ranger™
Intentional Blank Page

Page 79
1-11
Installation & Operation Manual
Intentional Blank Page

Due to continuous research, product improvements
and enhancements, Badger Meter reserves the right
to change product or system specications without
notice, except to the extent an outstanding contractual
obligation exists.
Badger Meter | P.O. Box 245036, Milwaukee, Wisconsin 53224-9536
800-876-3837 | infocentral@badgermeter.com | www.badgermeter.com
ORION® is a registered trademark of Badger Meter, Inc.
Other trademarks appearing in this document are the property of their respective
entities.
Copyright 2011 Badger Meter, Inc. All rights reserved.