Badger Meter 2011M ORION ME MOBILE User Manual Exhibit D Users Manual per 2 1033 b3
Badger Meter Inc ORION ME MOBILE Exhibit D Users Manual per 2 1033 b3
Exhibit D Users Manual per 2 1033 b3
ORION® Mobile Reading Software
Installation & Operation Manual
ORI-IOM-35 (1/14/11 10:52 am)
P/N 62014-043 Rev. 8
IMPORTANT:
This manual contains important information.
READ AND KEEP FOR REFERENCE.

ORION® Mobile Reading Software
Page ii 12-10

CONTENTS
About This Manual.................................................................................................................................. 7
Intended Audience .............................................................................................................................................................. 7
Reason for Reissue ............................................................................................................................................................... 7
Conventions Used in this Document .................................................................................................................................. 7
Naming Convention ...............................................................................................................................................7
Navigational Directions .........................................................................................................................................7
License Requirements ......................................................................................................................................................... 7
System Overview .................................................................................................................................... 7
ORS ........................................................................................................................................................................................ 7
How it Works......................................................................................................................................................................... 7
ORS Terminology ................................................................................................................................................................. 8
Overview of This Manual .................................................................................................................................................... 8
Getting Started ....................................................................................................................................... 8
System Components ............................................................................................................................................................ 9
Equipment Setup ................................................................................................................................................................. 9
Software Initialization ......................................................................................................................................................... 10
Splash Screen ......................................................................................................................................... 11
Main Screen ............................................................................................................................................ 13
Start .........................................................................................................................................................................13
Pause ......................................................................................................................................................................13
Done .......................................................................................................................................................................13
Settings ...................................................................................................................................................................14
Find ..........................................................................................................................................................................14
List View .................................................................................................................................................................. 14
Map View .................................................................................................................................................................14
Installation & Operation Manual
Page iii
12-10

Reports ...................................................................................................................................................................14
Alerts .......................................................................................................................................................................14
Help .........................................................................................................................................................................14
Load .........................................................................................................................................................................15
Start Reading .......................................................................................................................................................... 15
Unload .....................................................................................................................................................................15
Clear Route ............................................................................................................................................................15
Quick Read .............................................................................................................................................................15
Unarchive ................................................................................................................................................................ 15
Exit ...........................................................................................................................................................................15
Map Control .......................................................................................................................................................................... 16
Select Meter ............................................................................................................................................................16
Recenter .................................................................................................................................................................. 16
Zoom In ...................................................................................................................................................................16
Zoom Out ................................................................................................................................................................16
Zoom Default ..........................................................................................................................................................17
Legend ....................................................................................................................................................................17
Find Address ..........................................................................................................................................................17
Show All Services ..................................................................................................................................................17
Loading and Unloading a Route ............................................................................................................ 19
Out-of -Scope ....................................................................................................................................................................... 19
Load Example ....................................................................................................................................................................... 19
Reading Example ................................................................................................................................................................. 21
Unload Example .................................................................................................................................................................. 26
Quick Read............................................................................................................................................................................ 27
Details Summary .................................................................................................................................... 28
ORION® Mobile Reading Software
Page iv 12-10

Best Practice ......................................................................................................................................................................... 28
Splash Screen ....................................................................................................................................................................... 28
Read Meters .......................................................................................................................................................................... 28
Load ...................................................................................................................................................................................... 31
List View ................................................................................................................................................................................ 33
Map View .............................................................................................................................................................................. 34
Legend: ................................................................................................................................................................................ 35
Status Bar ............................................................................................................................................................................. 35
Split View .............................................................................................................................................................................. 36
Meter Details ........................................................................................................................................................................ 36
Current Reading .....................................................................................................................................................36
Current Reading ................................................................................................................................................................... 37
Enter/Edit Meter Reading ................................................................................................................................................... 40
Add/Edit Trouble Code ........................................................................................................................................................ 41
Add/Edit Reader Codes ....................................................................................................................................................... 42
Add/Edit Text Message ........................................................................................................................................................ 43
Find ....................................................................................................................................................................................... 44
Reports ................................................................................................................................................................................. 47
Supported Features: ............................................................................................................................................................ 47
Setup ....................................................................................................................................................... 52
General Tab........................................................................................................................................................................... 54
Alerts Tab .............................................................................................................................................................................. 55
Map Tab ................................................................................................................................................................................ 56
Communications Tab ........................................................................................................................................................... 58
User Interface Tab .............................................................................................................................................................. 59
Geocoding Meter Locations ................................................................................................................... 60
Installation & Operation Manual
Page v
12-10

Scenario ............................................................................................................................................................................... 60
Steps ..................................................................................................................................................................................... 60
Processing Meter Readings Not in the Route ....................................................................................... 62
Out-of-Route Reading Example: ......................................................................................................................................... 63
Unload ..................................................................................................................................................... 66
Unarchive ................................................................................................................................................ 67
Unarchive ............................................................................................................................................................................. 68
What If Things Go Wrong ....................................................................................................................... 69
Using Technical Support ........................................................................................................................ 69
What To Report To Customer Support ................................................................................................................................ 69
Faxing the Customer Support Group ................................................................................................................................. 69
E-Mailing the Customer Support Group ............................................................................................................................ 69
ORION® Mobile Reading Software
Page vi 12-10

Page 7
12-10
Installation & Operation Manual
About This Manual
This manual is accessible through the interactive Help section of the ORION® Reading Software (ORS) software. Help topics
provide direct access to specic information.
Intended Audience
This document is intended for eld technicians to collect accurate utility meter readings from homes and businesses using
the ORS software from the convenience of their vehicles.
Reason for Reissue
This document is being reissued to capture the changes associated with the ORS Mobile Read version 2.0 software used for
meter readings on laptops in conjunction with other Badger Meter equipment such as a magnetic antenna that is placed
over the vehicle and the ORION receiver that connects to the antenna at one end and the ORION laptop at the other end.
Conventions Used in this Document
The following conventions are used in this document:
Naming Convention
This document also refers to the ORION Reading Software for Mobile Reading, the Mobile Read Version 2.0. generically as
"software."
Navigational Directions
In lieu of mouse click and select options, the user must keep in mind that touch screen options are also available for menu
functions. Touching or tapping options can be used to navigate through the software.
License Requirements
This device complies with Part 15 of FCC Rules. Operation of this device is subject to the following conditions: (1) This device
may not cause harmful interference, and (2) this device must accept any interference received, including interference that
may cause undesired operation.
No FCC license is required by a utility to operate an ORION meter reading system.
Any changes made, but not approved by Badger Meter, can void the user’s authority to operate the equipment.
System Overview
The ORS is an automated meter reading system. This system incorporates a GPS system to display the location of the reading
vehicle on a map while reading meters.
ORS
ORS is also a Geographic Information System (GIS) based meter reading system. A GIS system displays meter reading
information. In addition to using a standard mouse or keyboard commands, the laptop running the software is also
equipped with a touch screen to facilitate icon and function selection and promote ease-of-use.
How it Works
The laptop connects to a radio frequency-controlled ORION receiver. The receiver captures meter readings from endpoints
installed on each meter. The meter information is then captured by the laptop system and displayed on the laptop screen.
Examples of displayed information are as follows:
• Meter serial number
• Meter and reading vehicle location
• Unread/uncaptured meter information
• Meter leakage and tampering

Page 8 12-10
ORION® Reading Mobile Software (ORS)
ORS Terminology
Terms used in this document are described in this section. The ORS terminology is alphabetically listed in the following
table:
Baud Rate The speed of communication from one electronic component to another, specically from the GPS
to the laptop and the Receiver to the laptop.
Field An individual data item on an ORS page.
GIS Geographic Information System
GPS Global Positioning System
List View This view shows a current list of meter readings.
Map view This view displays the location of the vehicle where the meter reading occurs and each meter is
depicted by an icon.
ORS ORION® Reading Software
ReadCenter Badger Meter Reading Data Management Software that supports BadgerTouch®, ORION, and
GALAXY® Fixed Network AMI Solutions
Receiver The receiver collects reading data transmitted from the meter and forwards it to the laptop
Split View Shows both the Map View and the List View on the laptop screen
Tab The top header of a page which identies the setting, or contents of that area.
Endpoint The endpoint is attached to the meter and transmits the meter reading to the ORS.
Overview of This Manual
The initial section of this manual provides an overview of the ORS start-up screens with brief descriptions of menu button
functions. The “Detailed Examples” section provides descriptions of buttons and associated menus.
Getting Started
The information contained in this section guides you through the steps of meter reading using the ORION® Reading
Software.

Page 9
12-10
Installation & Operation Manual
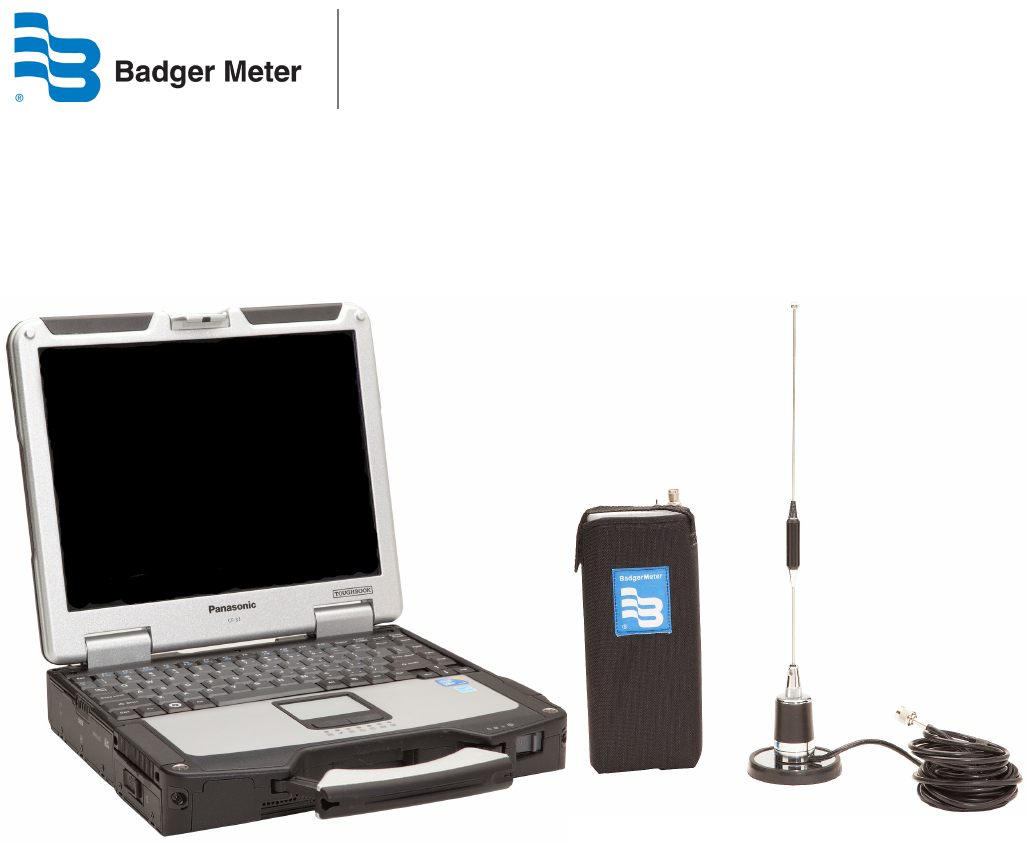
System Components
Figure 1: Components
The components of the system are:
1. Panasonic ToughBook™ laptop computer installed with the ORS software.
2. ORION mobile receiver
3. Magnetic antenna
4. GPS receiver
Equipment Setup
The instructions in this section allow you to set up the equipment in the vehicle:
1. Place the magnetic mount antenna on the roof of the vehicle. Ensure that the area around the base of the antenna
equals the height of the antenna.
Note: The antenna must be at least 2 feet away from the other antennas and the cable must be in good condition.
2. Connect the antenna to the ORION receiver.
3. Connect the ORION receiver to the laptop.
4. Switch ON the ORION receiver.
5. Switch ON the GPS antenna and place on the dashboard of the vehicle.
6. Plug the ORION receiver into the vehicle's interior DC power source (utility or cigarette lighter) if AC power is
unavailable.
7. Plug the laptop to the vehicle's DC power source (if another power source is available, otherwise use a Y-adaptor).
1
2
3
4
2
3
4

Page 10 12-10
ORION® Reading Mobile Software (ORS)
Software Initialization
1. Power up the laptop and enter "ORION" in the log in window.
Result: The windows desktop is displayed.
2. Double-click the ORION Reading Software desktop icon, which displays the ORION logo.
3. Alternatively, you can navigate to the desired destination: < Start/Program Files/ Badger Meter, Inc./ ReadCenter-
Mobile/ReadCenter-Mobile.exe.>
4. In the User Name window, enter your initials or any three digit numeral, for example, 123.
5. Click the Accept button.
6. Follow the software options to collect meter readings.
Page 11
12-10
Installation & Operation Manual
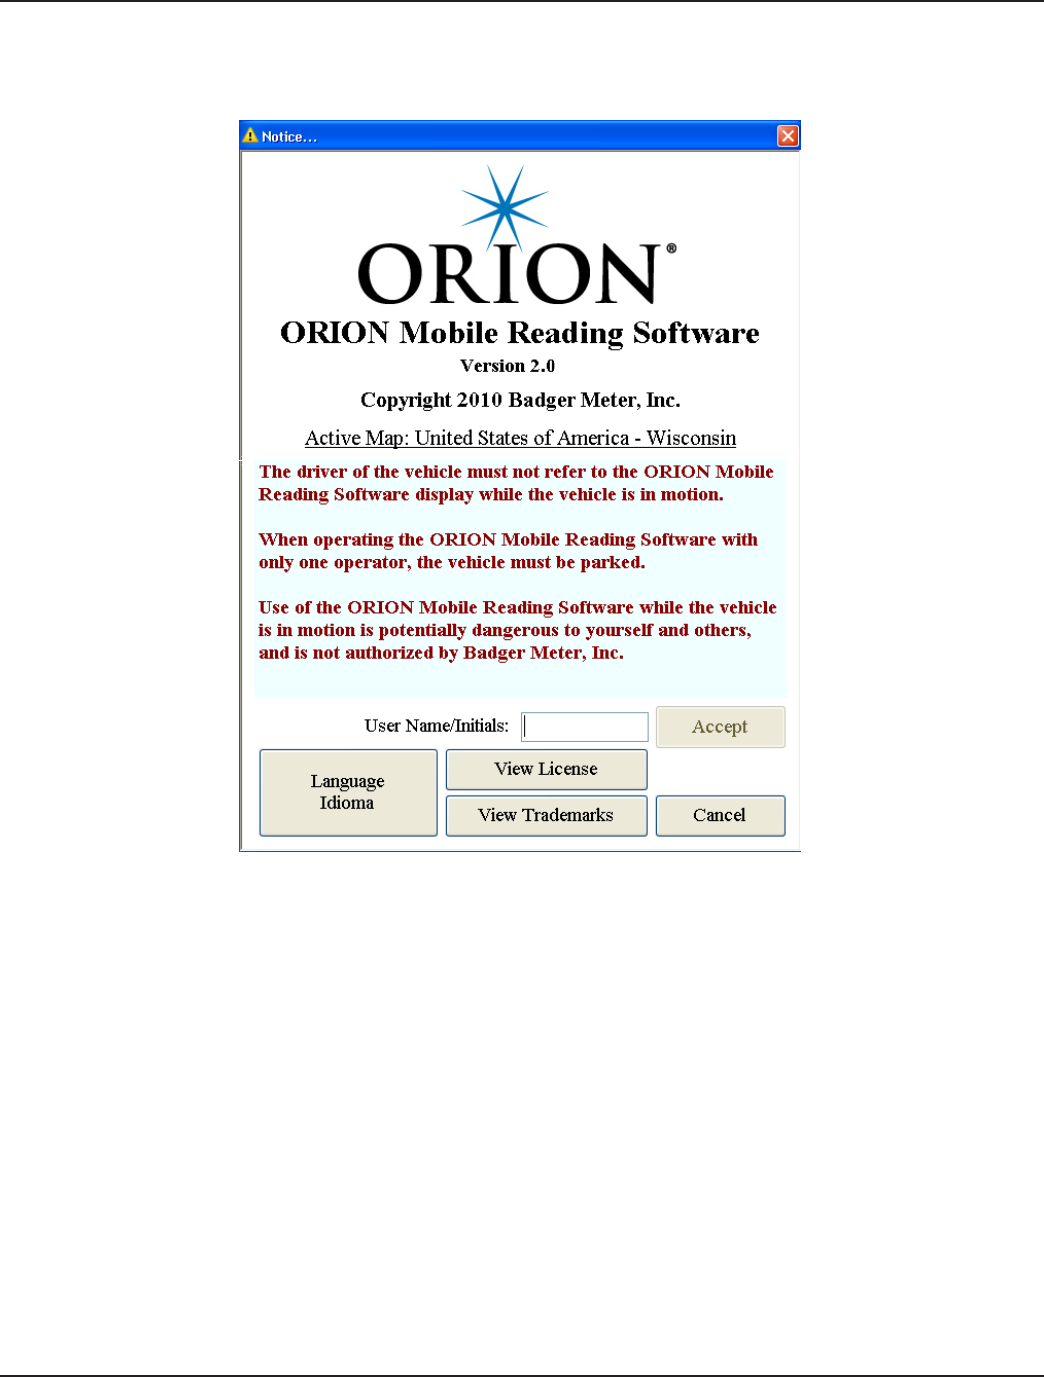
Splash Screen
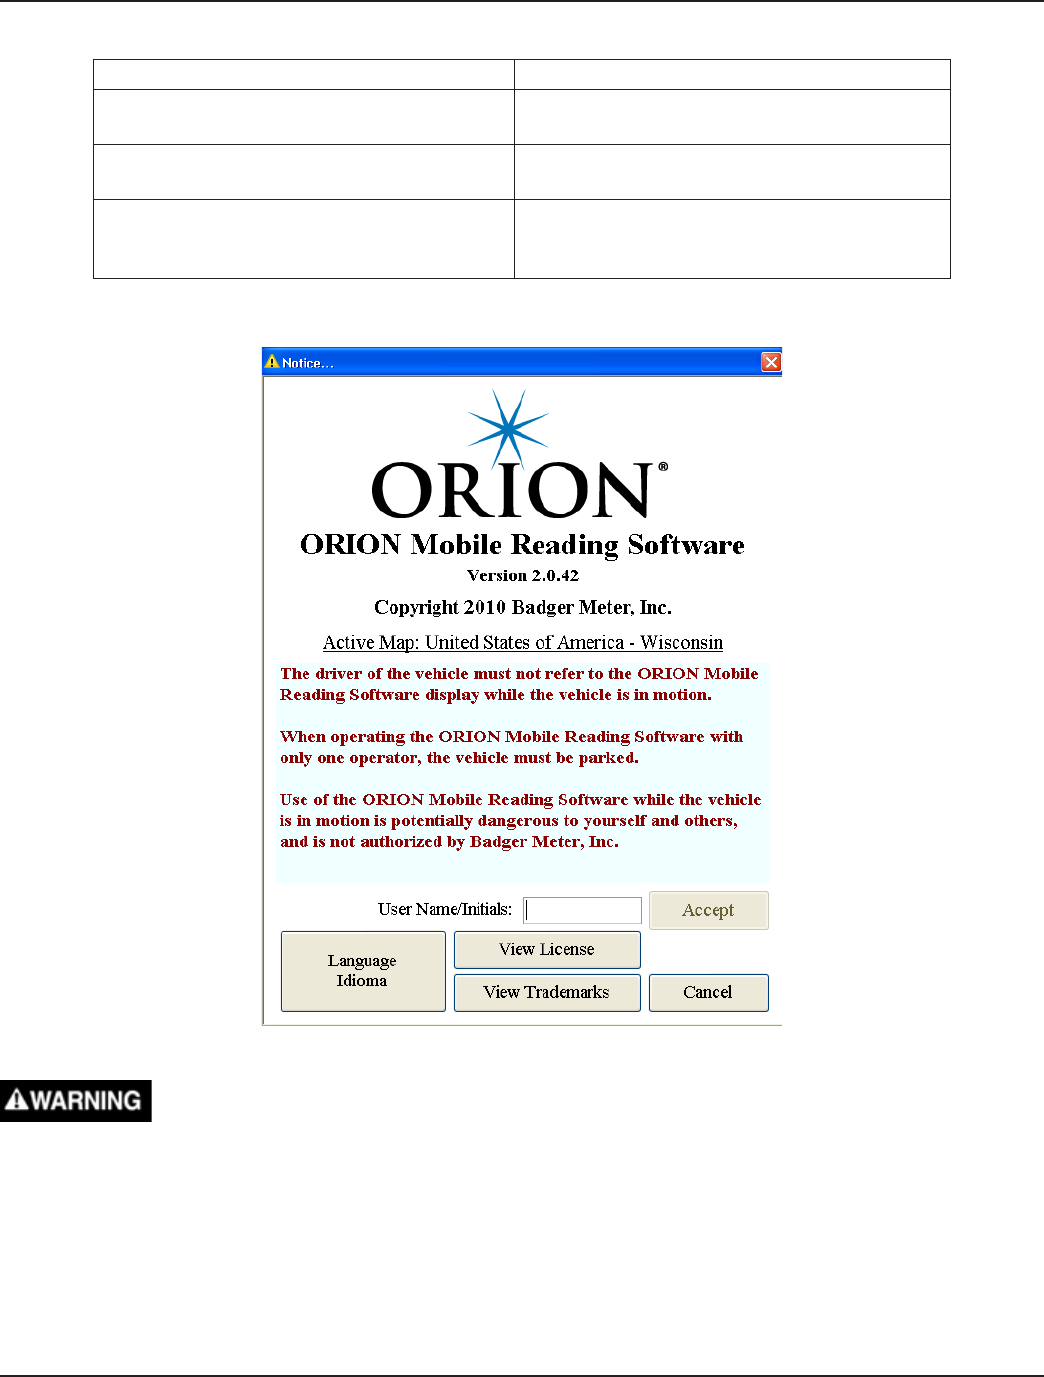
The Splash screen is the initial screen that is displayed when you log in to the ORS.
Figure 2: Splash Screen
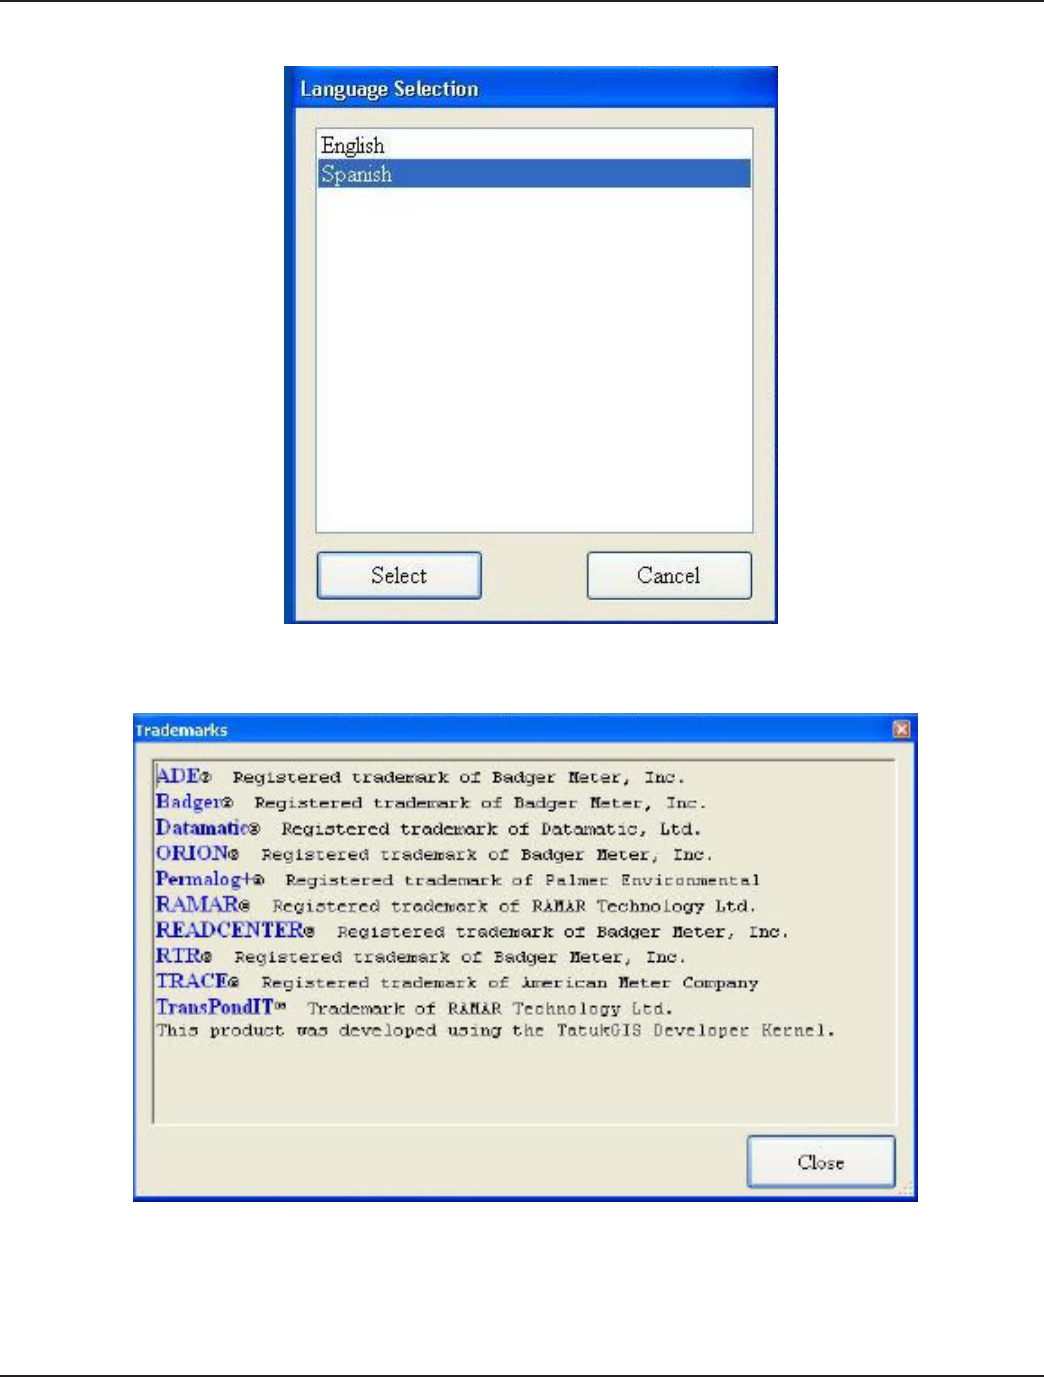
1. Select the appropriate language, if other than English. See Figure 3.
2. To view a list of all registered trademarks, click the Trademarks button. See Figure 4.
3. Type your User Name/Initials in to the blank eld.
4. Select Accept.
5. Select Cancel to exit the program.
Page 12 12-10
ORION® Reading Mobile Software (ORS)
Figure 3: Language Change Options
Figure 4: Trademark List
Page 13
12-10
Installation & Operation Manual
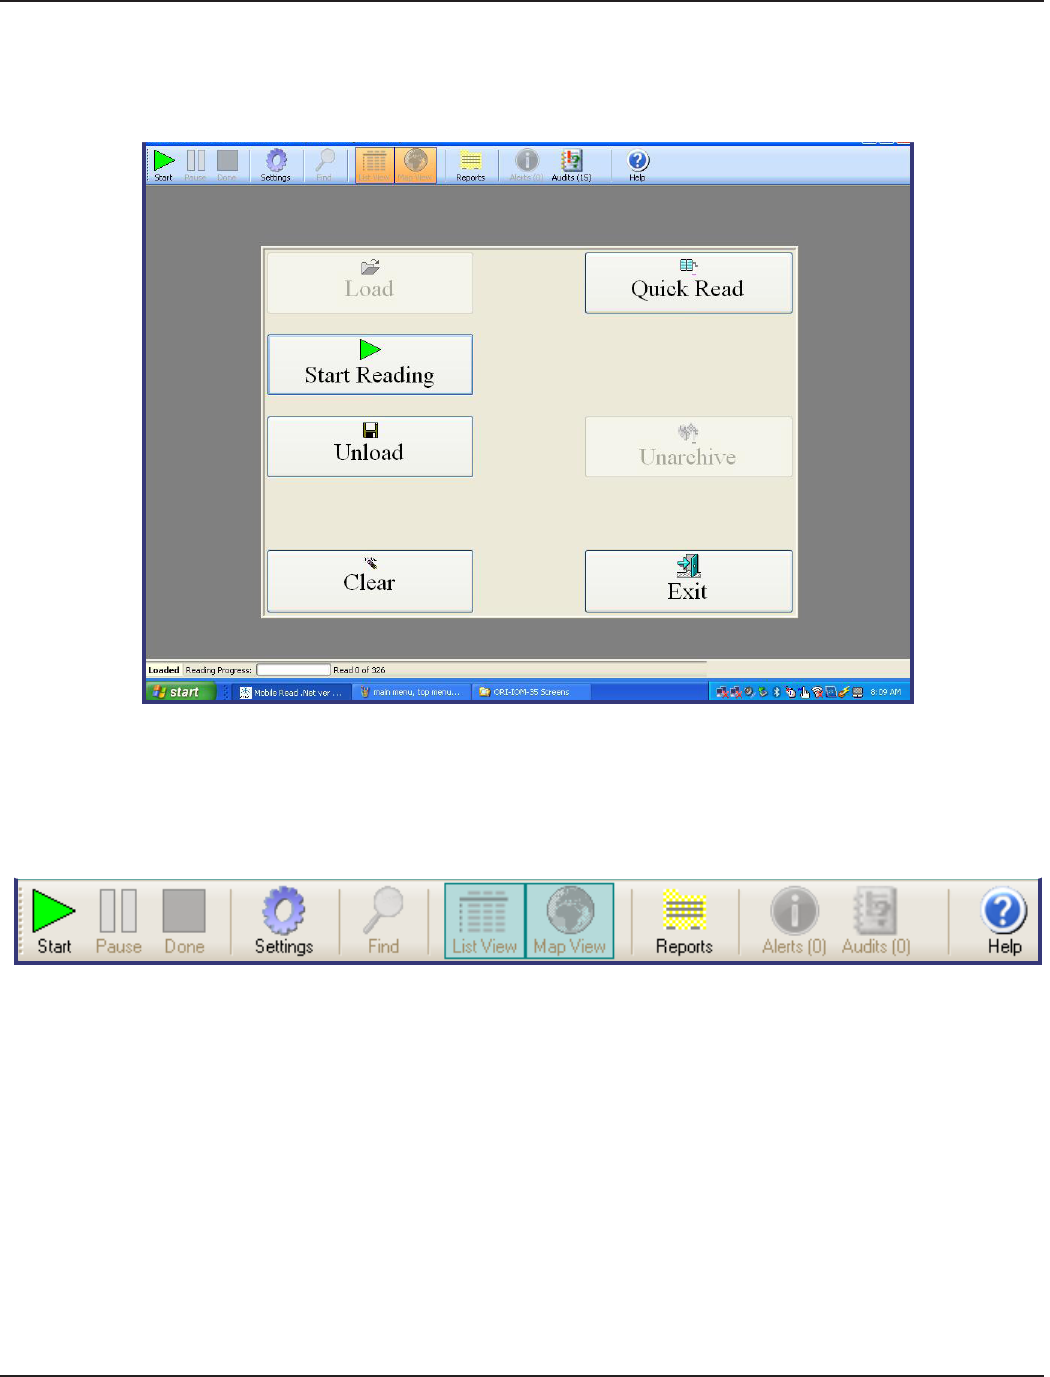
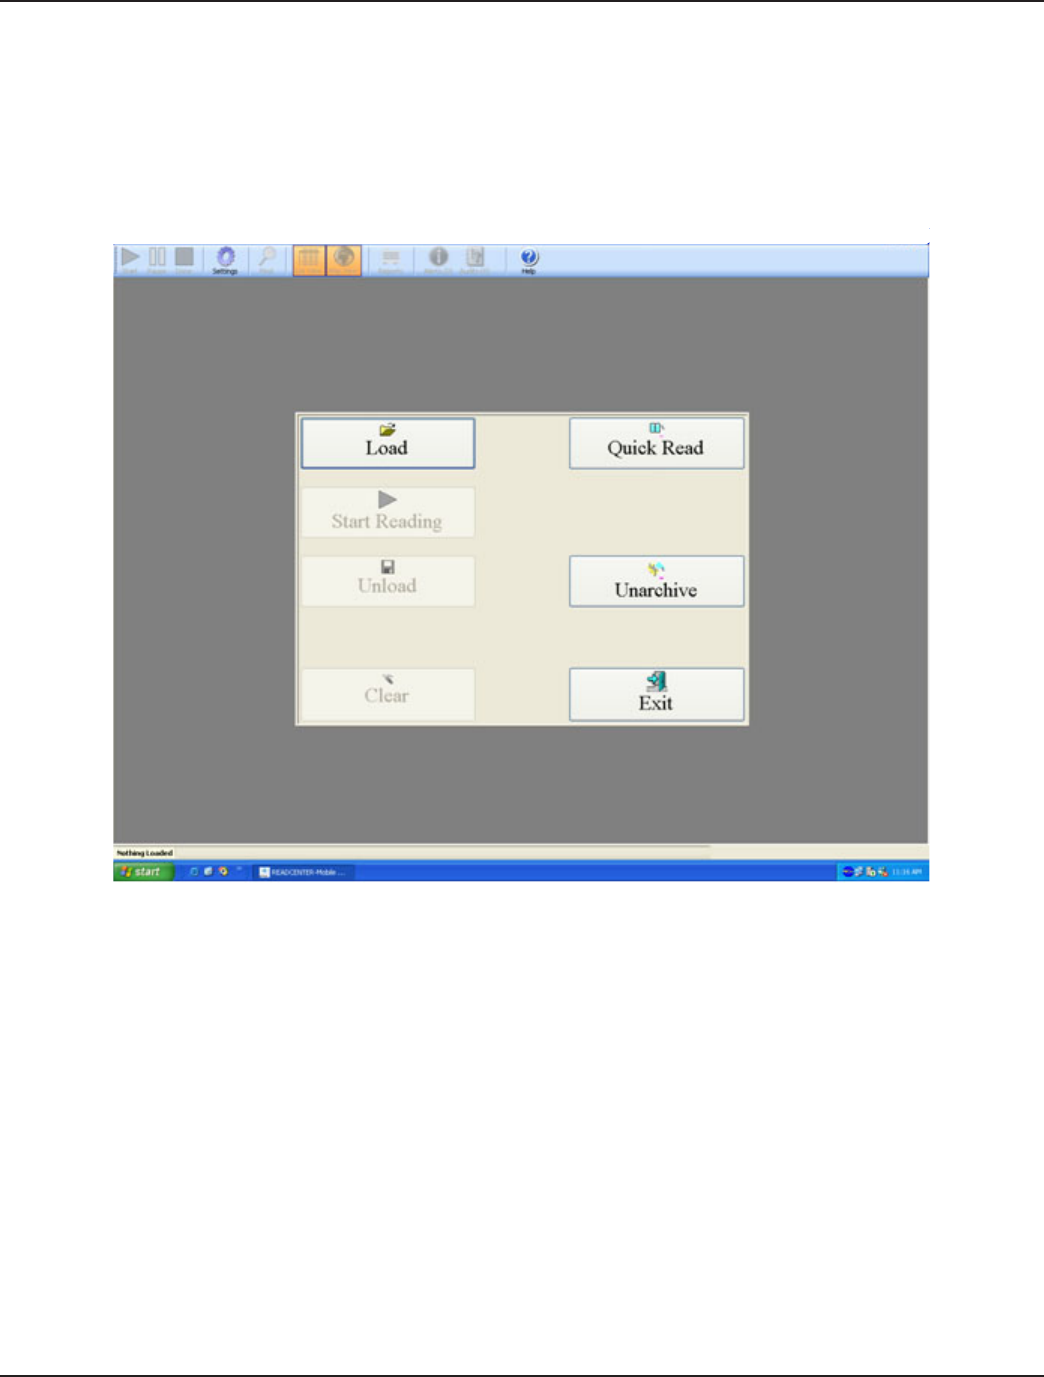
Main Screen
The after the Splash screen, the Tool Bar, Main Menu and Status Bar appear.
Figure 5: Main Screen
Tool Bar
The Tool Bar contains the dierent commands and conguration options that make up ORS.
Figure 6: Tool Bar
Start
The Start button begins or resumes the meter reading process. Select Start to navigate to the next screens including “List
View” or “Map View.”
Pause
The Pause button temporarily pauses the meter reading process. To resume the application, click Start. If you are nished
reading meters, click Done.
Done
The Done button completes the meter reading process and prepares the readings for transfer to Reading Management
Software. Click Done to navigate to the “Main Screen.”
Page 14 12-10
ORION® Reading Mobile Software (ORS)
Settings
The Settings button allows you to change the settings that control the behavior of the ORS software. It holds the information
that controls all of the subsystems including the ORION® Receiver and GPS connection information, and the map display
options.
Note: A password is needed when you click on Setup. If you do not set up a password for yourself in the Reading
Management Software, the default password is "ORION."
Find
The Find button allows you to search for meters using a number of dierent means.
List View
The List View button displays the unread meters in reading sequence order. It also allows you to display the detailed
information about each meter by selecting on the Meter Details button. This button also displays the Map Control buttons for
map zooming and other functions.
Map View
The Map View button displays the location of the meter reading vehicle and all meters with their current status on the area
map. It also allows you to display the detailed information about each meter by selecting on that meter’s icon. This button
also displays the Map Control buttons for map zooming and other functions.
Reports
The Reports button displays the dierent reports available. Selecting on one of the report names brings up that report.
Alerts
The Alert button appears grayed out on the Tool bar, but the Alerts tab is accessible from the Settings button. This option
allows users to set appropriate alerts for potential issues that can occur when meter reading is in progress, The system allows
the user to add warnings, alarms, leak cautions, error signals and so on. Each alert can be set to a desired sound option that a
user can select from a Sound Played list.
Audits
The Audits button is inaccessible with this version of the software.
Help
The Help button displays the ORS User Manual in a separate window to allows users to look up information about the
software functionality.
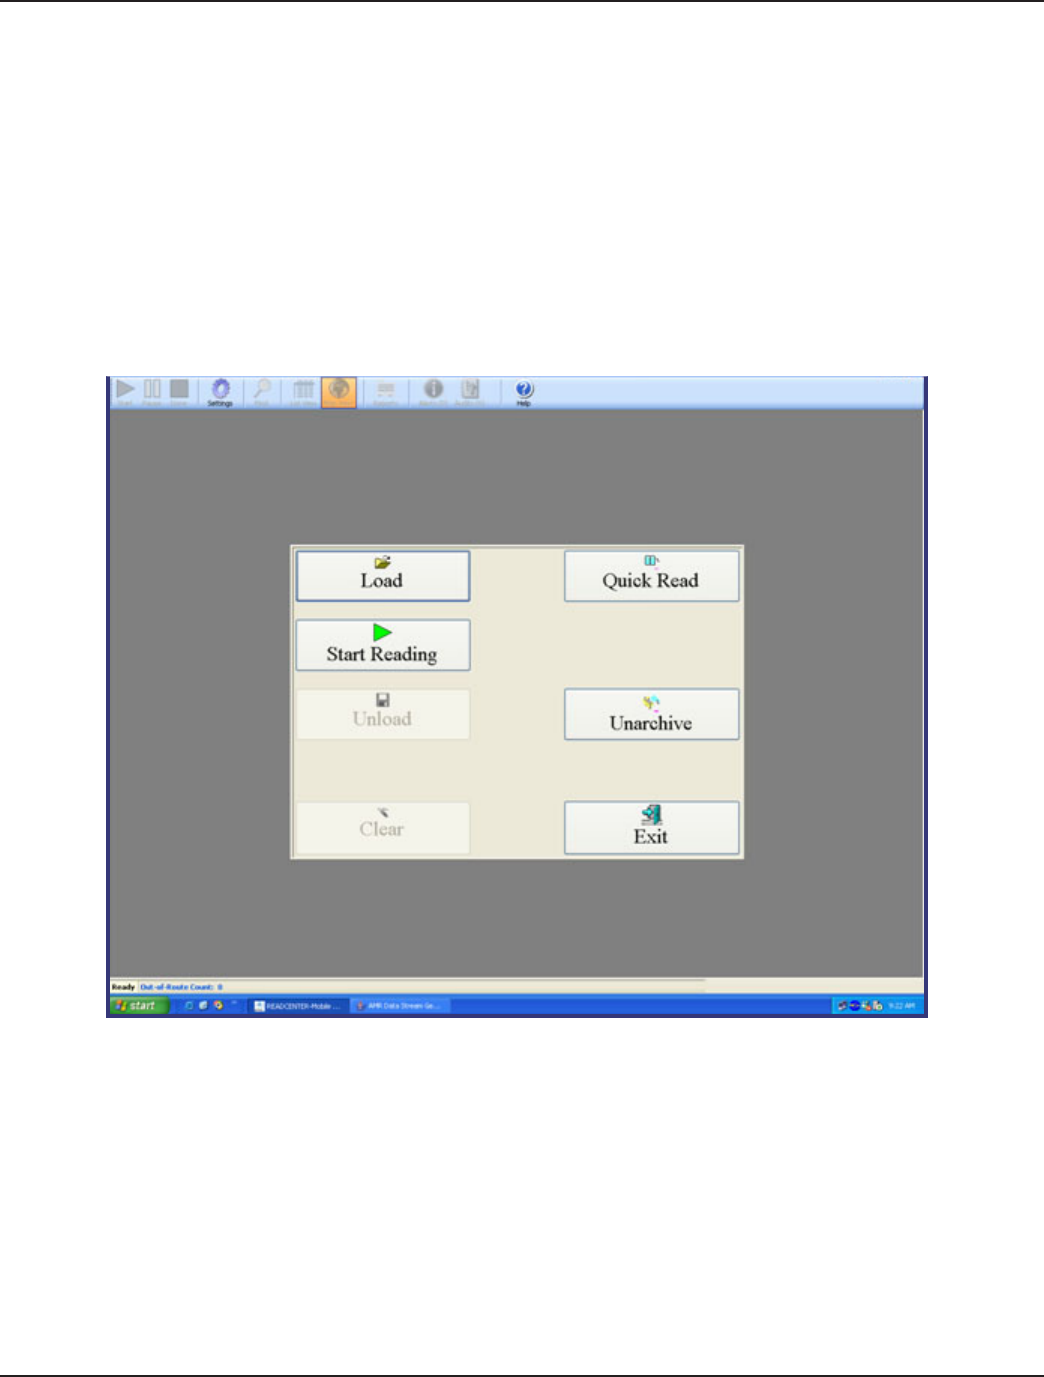
Main Menu
The Main Menu contains all general functions for gathering meter readings.
Figure 7: Main Menu
Page 15
12-10
Installation & Operation Manual
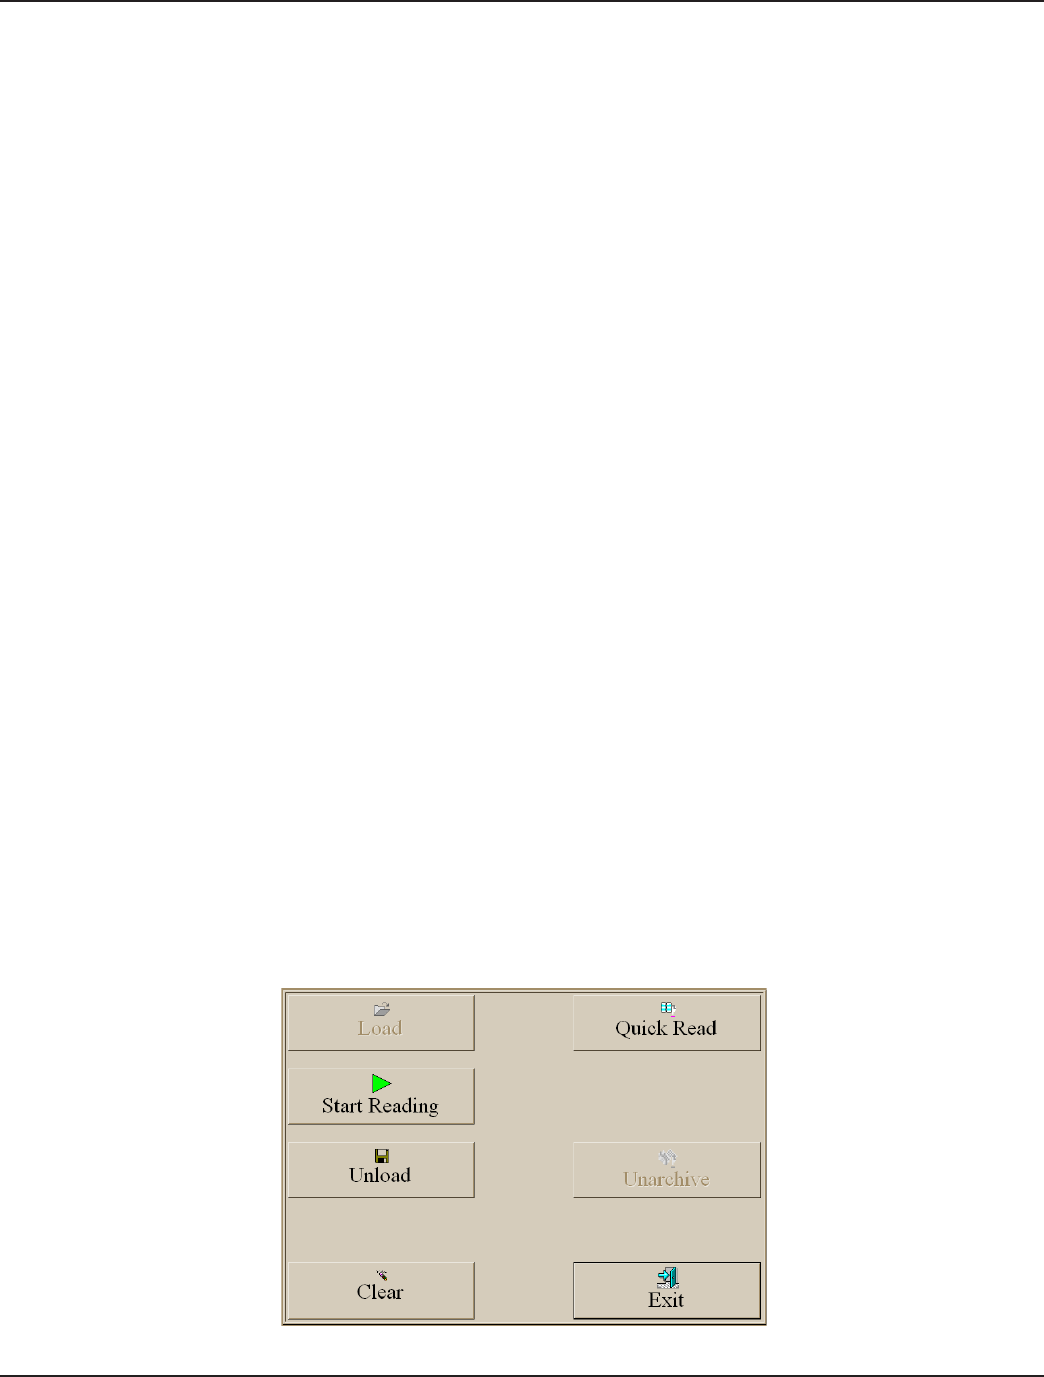
Load
The Load button loads the route from a specied location.
Note: If the button is inaccessible, it indicates that the route was already selected.
Start Reading
The Start Reading button activates the GPS and the receiver, and switches the view to your choice of the List and/or Map
Views.
Unload
When you have completed the meter readings, click the Unload button on the Main Menu to write the meter reading data to
a storage device, such as a memory stick. These readings will then be uploaded into the Reading Data Management Software.
Unloading the data will also archive the data in case the user needs to unload the route again.
Clear Route
The Clear button deletes all current meter reading information currently being processed.
Quick Read
Use the Quick Read button to read an ORION endpoint without the need to load a route. This is helpful for nal reads and to
verify that the endpoint is operating correctly.
Unarchive
The Unarchive button reloads a prior route of readings so that the user can save the data (unload) again.
Exit
The Exit button closes the application and returns you to Windows® desktop.
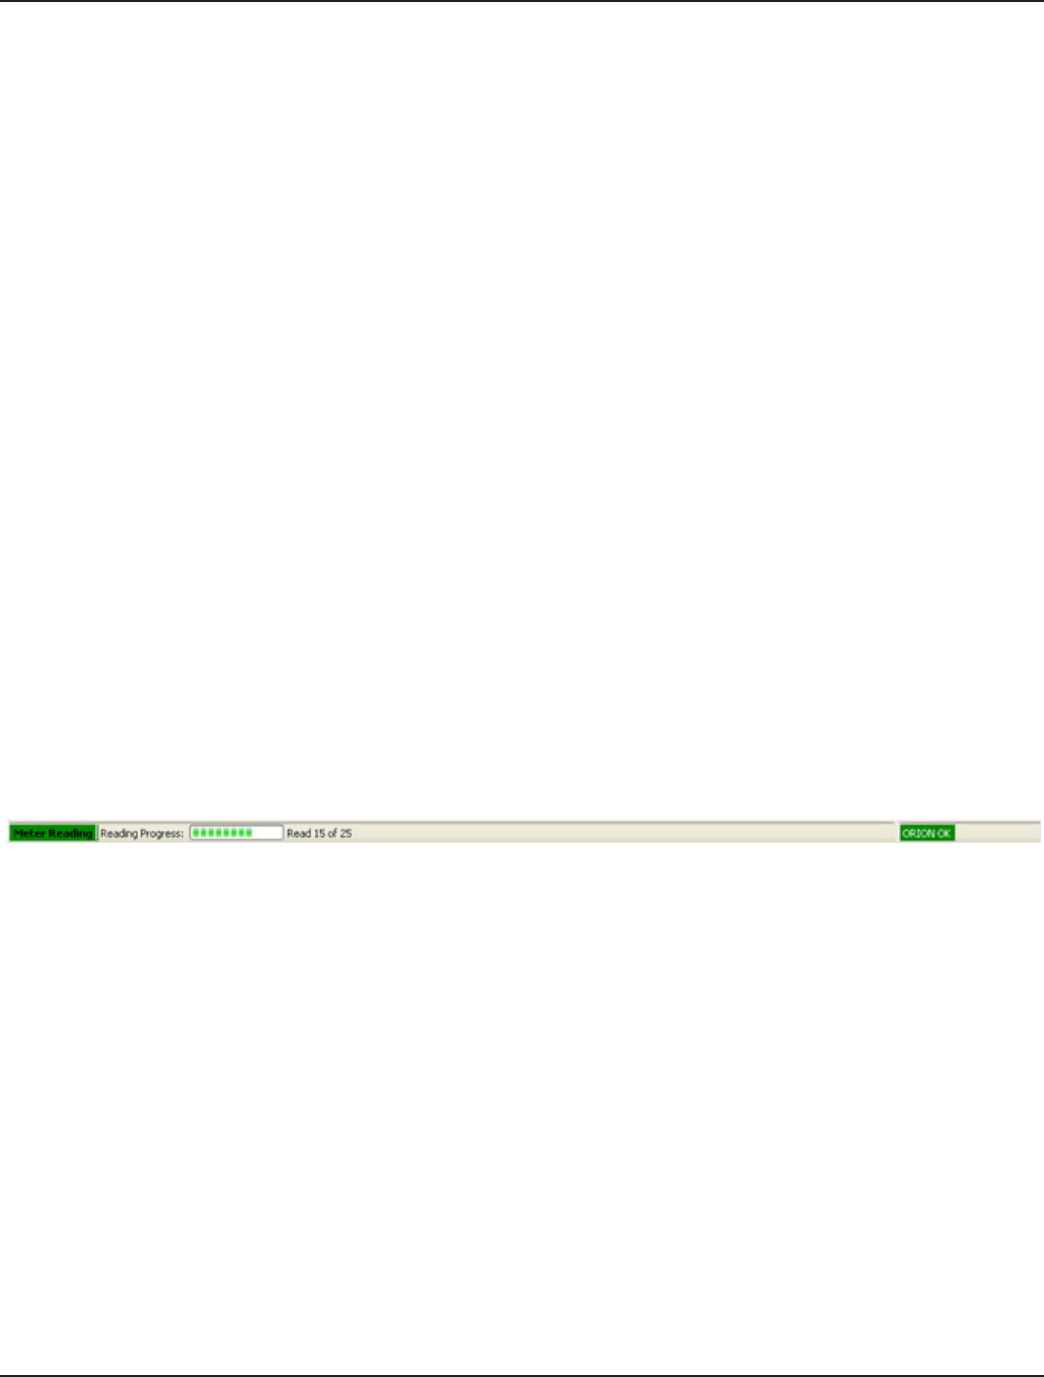
Status Bar
The Status Bar is located at the bottom of the screen. You can quickly view the number of meters left to read in the route, the
percent complete, and the number of routes and meters loaded.
Figure 8: Status Bar
Meter Reading Status – Yellow indicates that the reading is paused, green indicates that the reading is in progress.
Percent Complete - This bar indicates the progress of the reading application. As meters are read, the progress bar will
increase. Proper ratio of read meters to unread meters is displayed beside the progress bar.
Routes - This information provides the user with the number of routes loaded in the software, and the total number of
meters in all routes.
ORION OK – Shows the communications status with the receiver. Green indicates good communications while Red
indicates no communications.
Note: If the GPS is not selected, the following message is displayed at the start of your session:
Page 16 12-10
ORION® Reading Mobile Software (ORS)
Figure 9: No Signal Detection Message
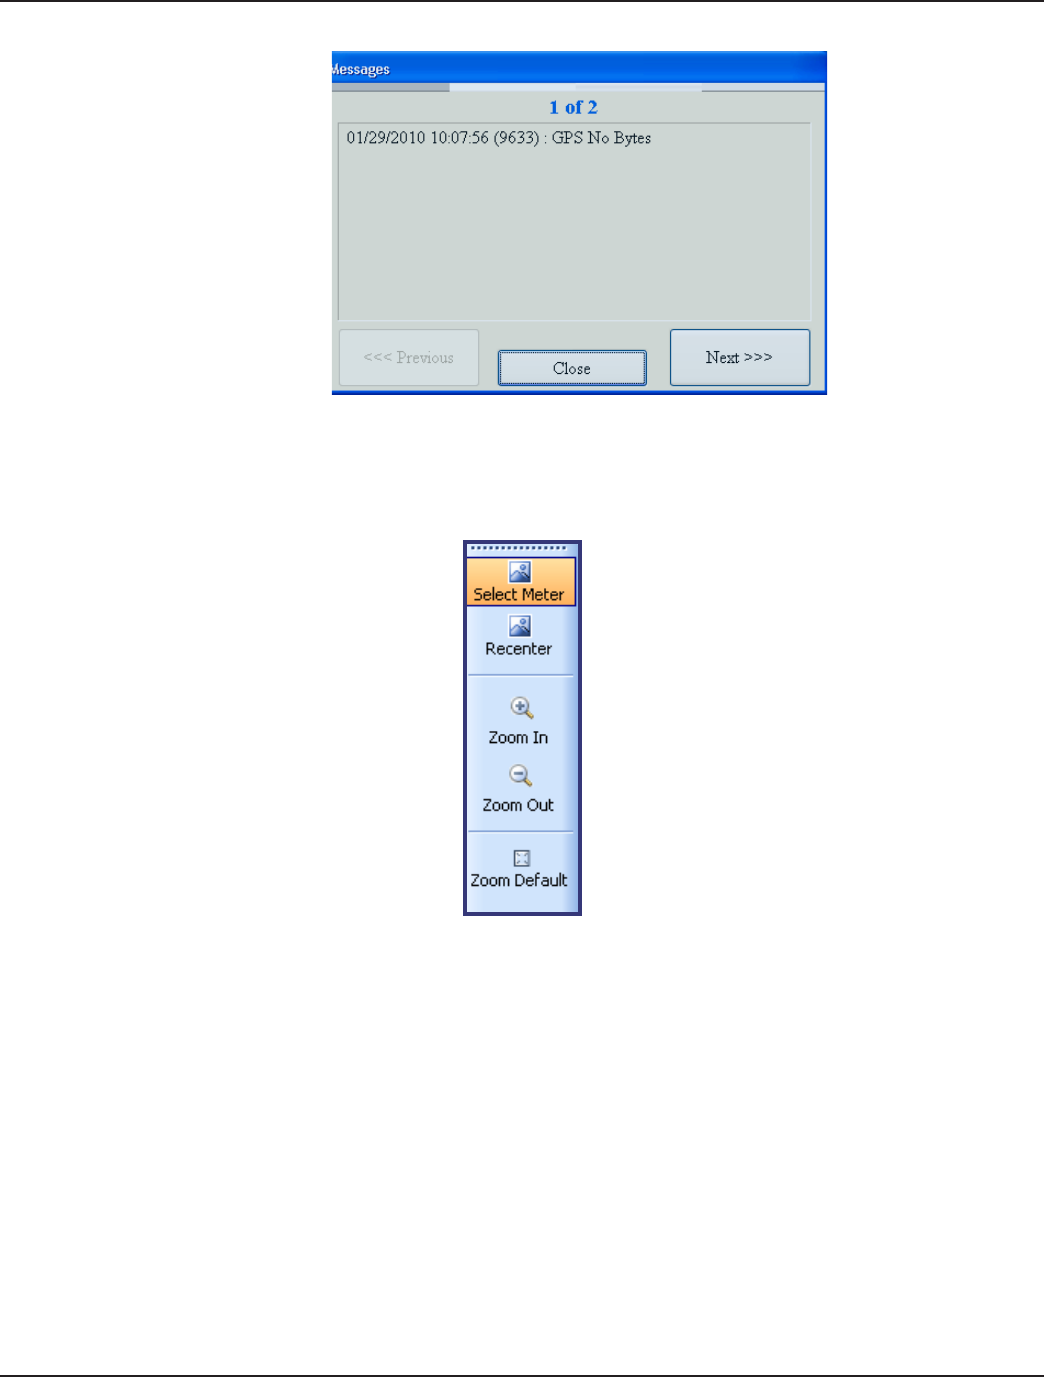
Map Control
The Map Control buttons are located on the right and left sides of the display when either List View or Map View buttons are
selected from the Menu Bar. These buttons perform the following map control functions:
Figure 10: Right Side Buttons
Select Meter
The select meter option allows you to select a meter icon to display the details of the meter. If two or more meters are in the
same place, a list containing all the available meters in that spot are displayed for you to choose a specic meter.
Recenter
The Recenter option allows you to move the map in any direction. Select hold and drag the map to the location you desire.
Zoom In
The zoom in feature allows you to draw a box around an area and zoom into it. If you click this button, you can zoom into the
map by centering the map on the spot that you selected.
Zoom Out
The zoom out feature facilitates zooming out the area. If you click this button, you can zoom out of the map using the select
point as the center of the map.

Page 17
12-10
Installation & Operation Manual
Zoom Default
Select this button to return to the default setting to view the map.
The left side buttons perform the control functions:
Figure 11: Left Side Buttons
Legend
Click this button to toggle between the distance legend and the icon legend.
Find Address
Click this button to enter a specic address. Select OK when nished entering the address and the map will center itself to the
address.
Show All Services
1. To display the location information of all available meters, click the Show All Services button.
Result: This button centers all of the meters with location information on the map.

Page 18 12-10
ORION® Reading Mobile Software (ORS)
Page 19
12-10
Installation & Operation Manual
Loading and Unloading a Route
This section describes detailed ORS screens and procedures that begin with loading the ORION Software and culminate with
the unloading process.
Out-of -Scope
The examples provided in this section do not include Reading Data Management Software procedures to create route
information to Load ORS, nor does it include Reading Data Management Software procedures to store the captured meter
information.
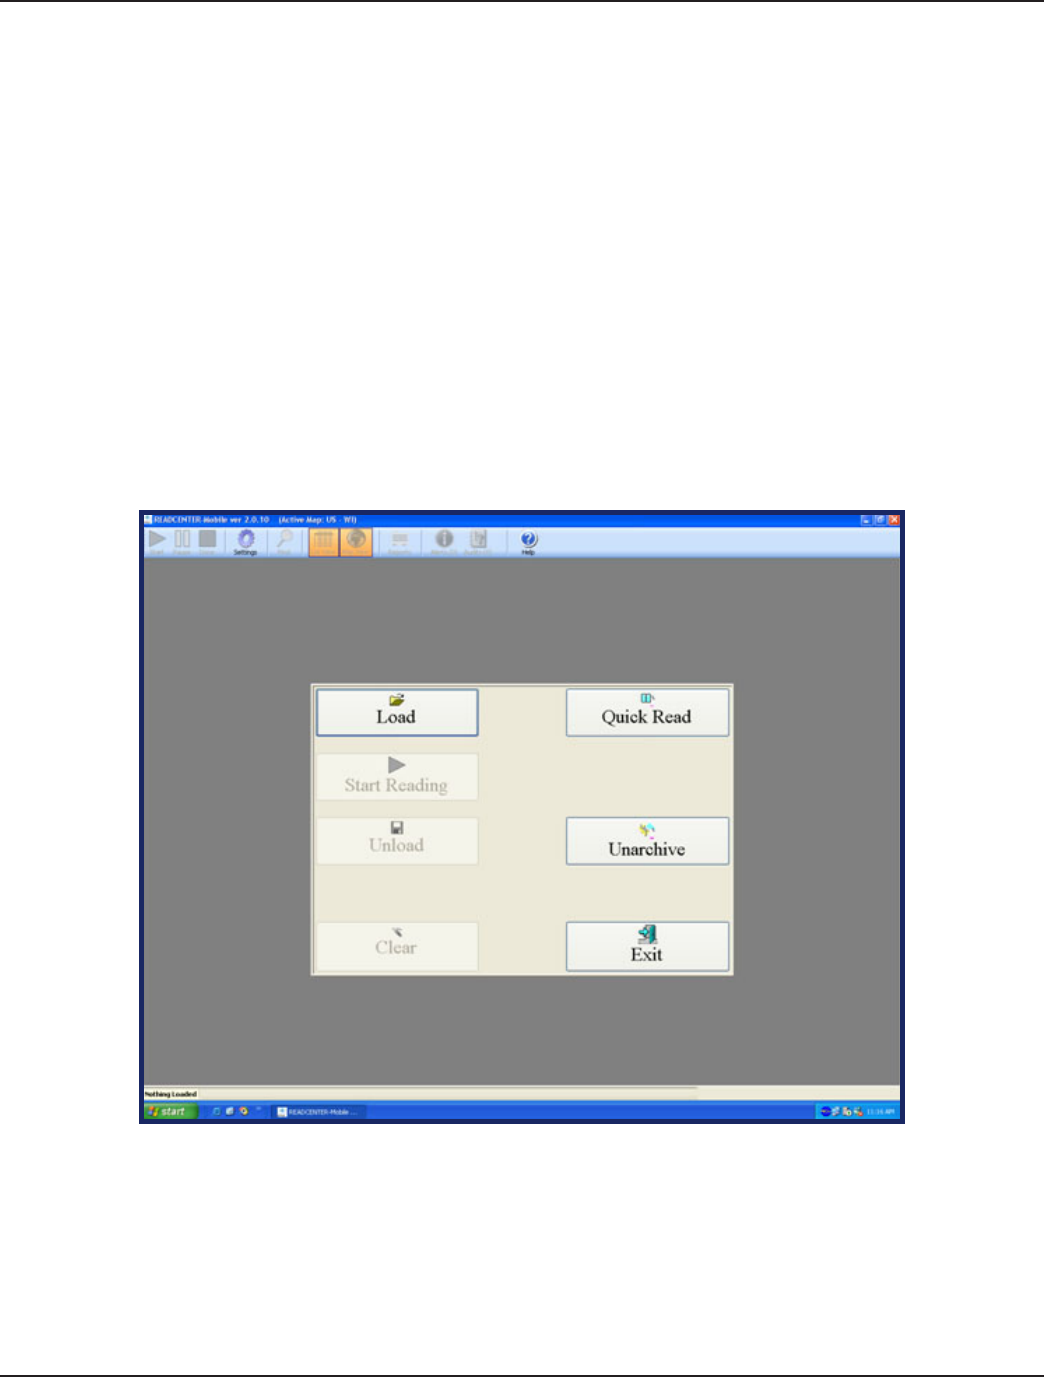
Load Example
1. Obtain a ash drive memory stick that contains les from the Reading Data Management Software route information
for the route you intend to read.
2. Insert the ash drive into the USB port of the ToughBook.
3. From the Windows desktop , double-click the ORION icon, enter your initials on the Splash Screen, and then select
Accept.
Result: The Main Menu is displayed.
Figure 12: Main Menu - Load ORION Software
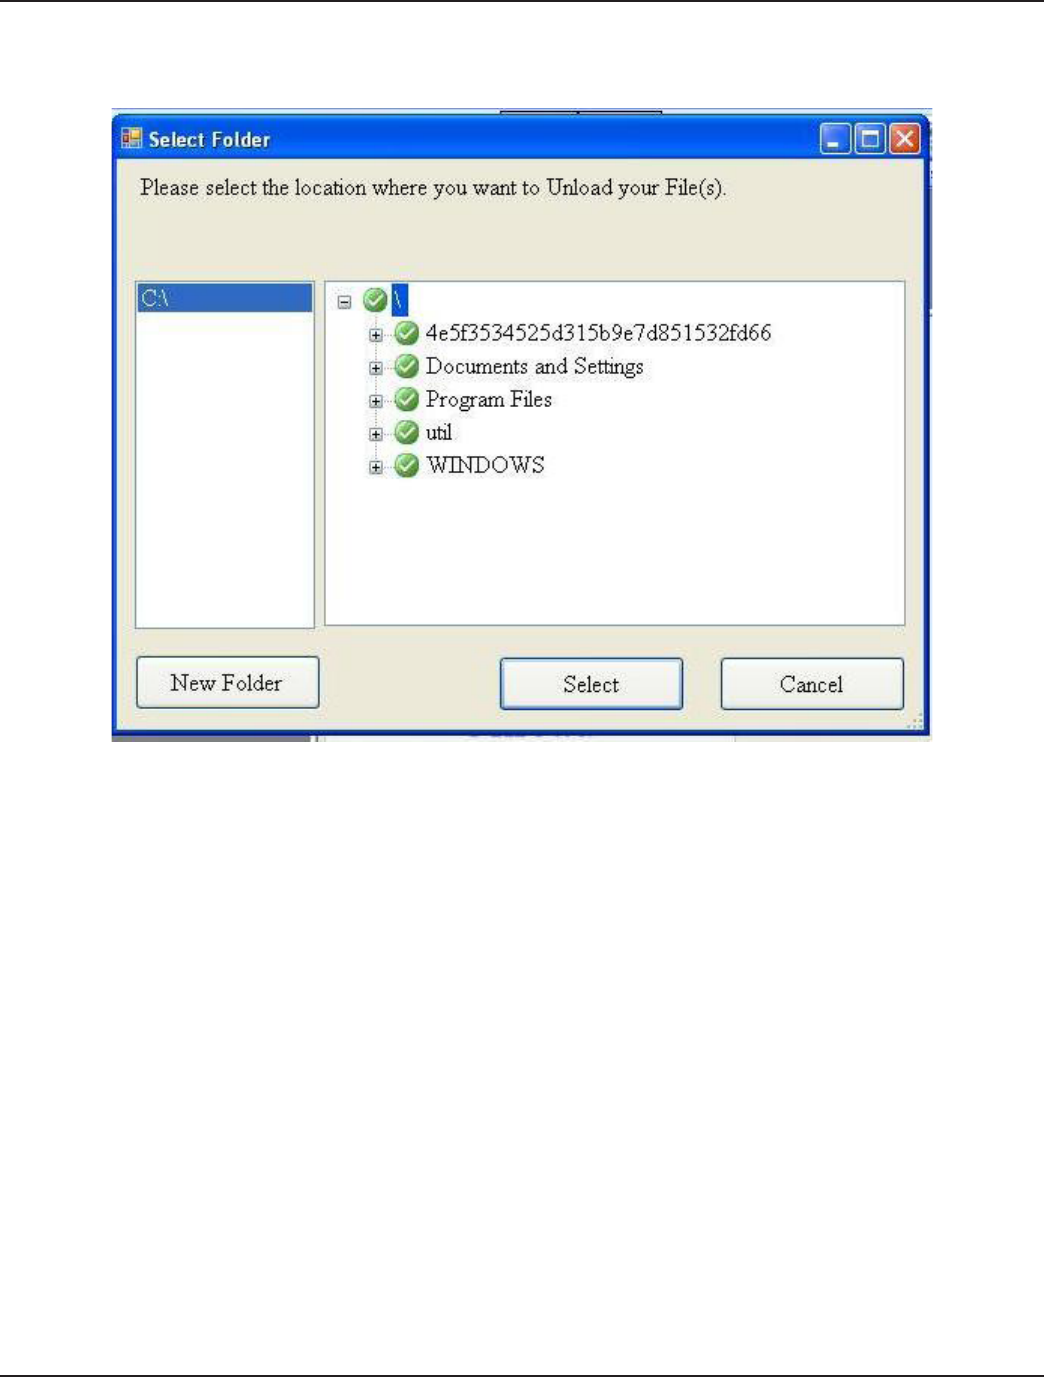
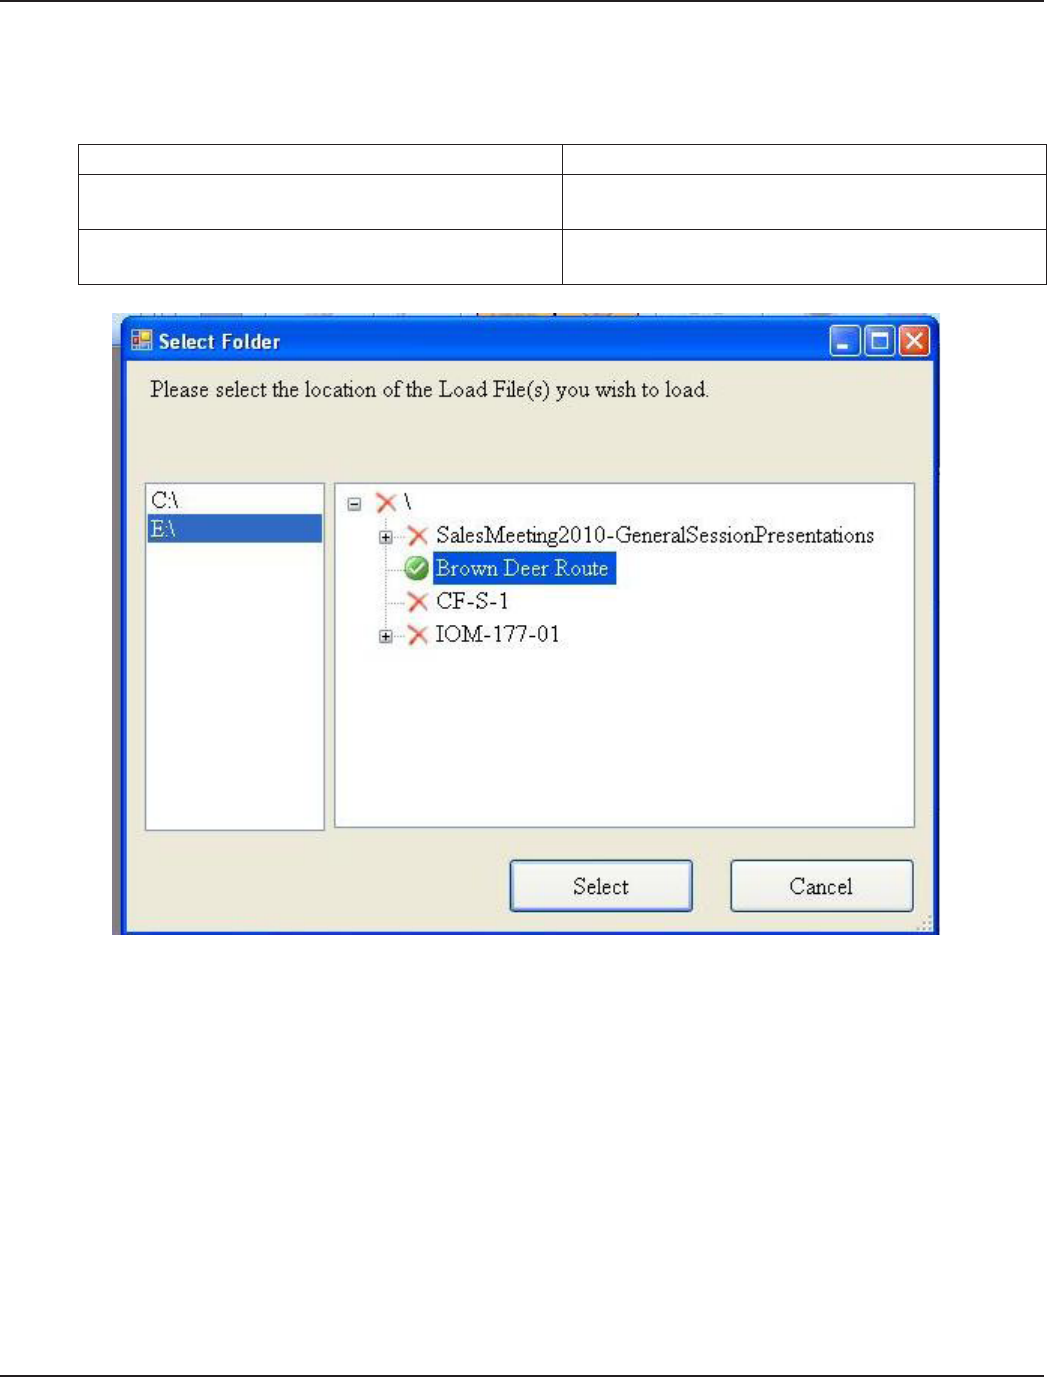
4. Click Load to load the route les.
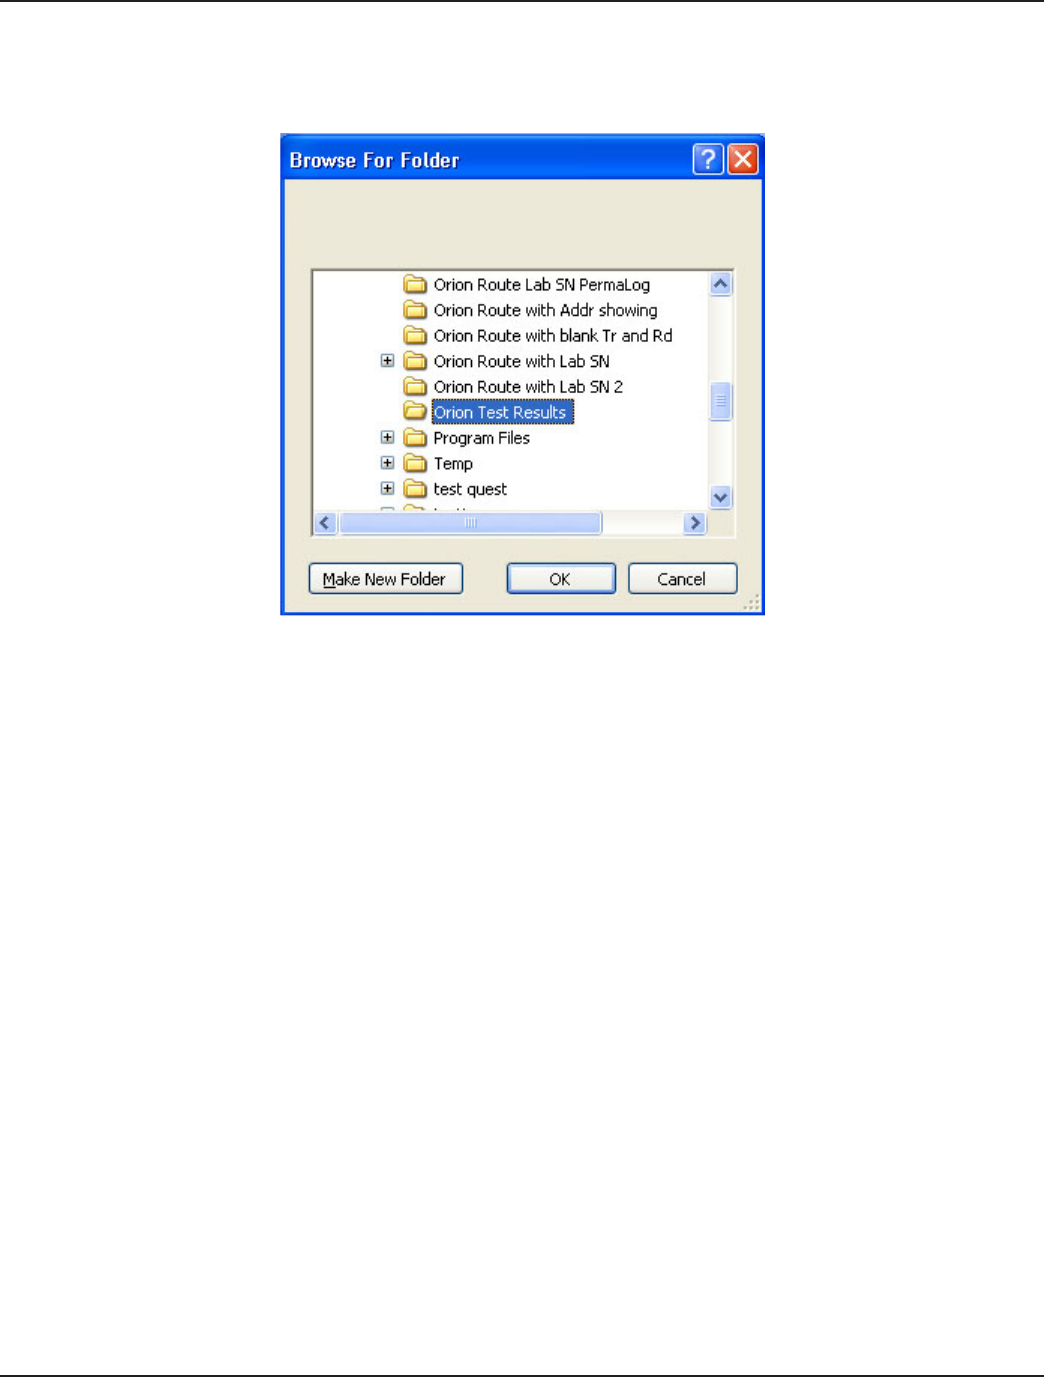
Result: The Select Folder screen is displayed:
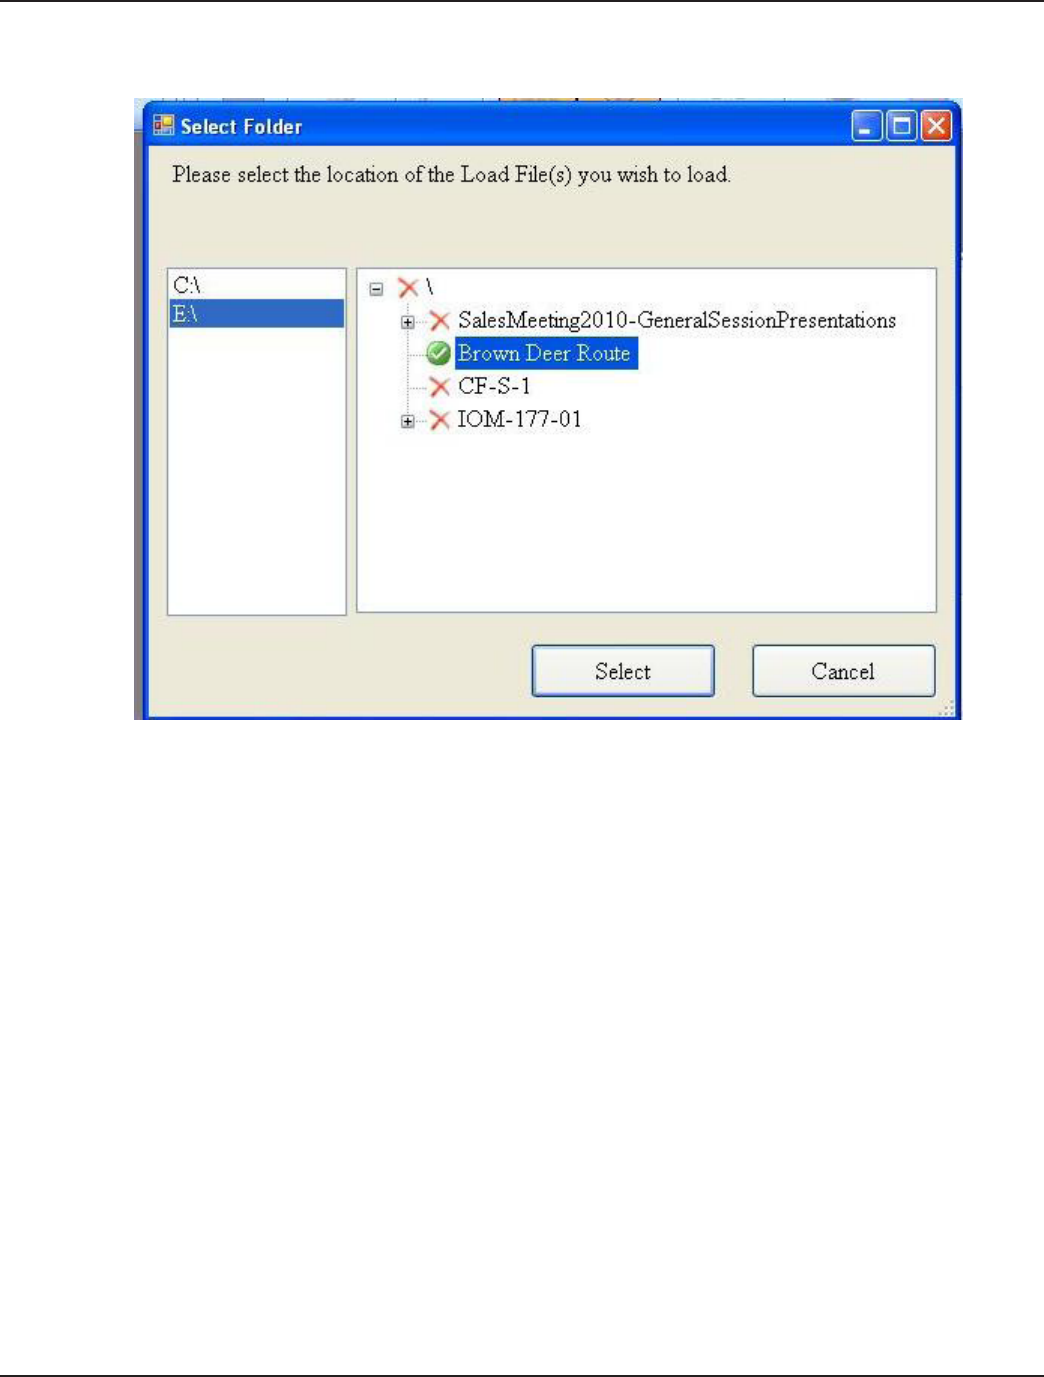
Page 20 12-10
ORION® Reading Mobile Software (ORS)
Figure 13: Route File Selection
5. In that screen, select the drive letter from the drive list of the ash drive.
6. From the folder options, select the folder containing the route data.
7. Click the small plus sign to open a folder and display its contents.
Result: When ORS identies the route les, a green check mark is displayed beside the folder containing the route
les.
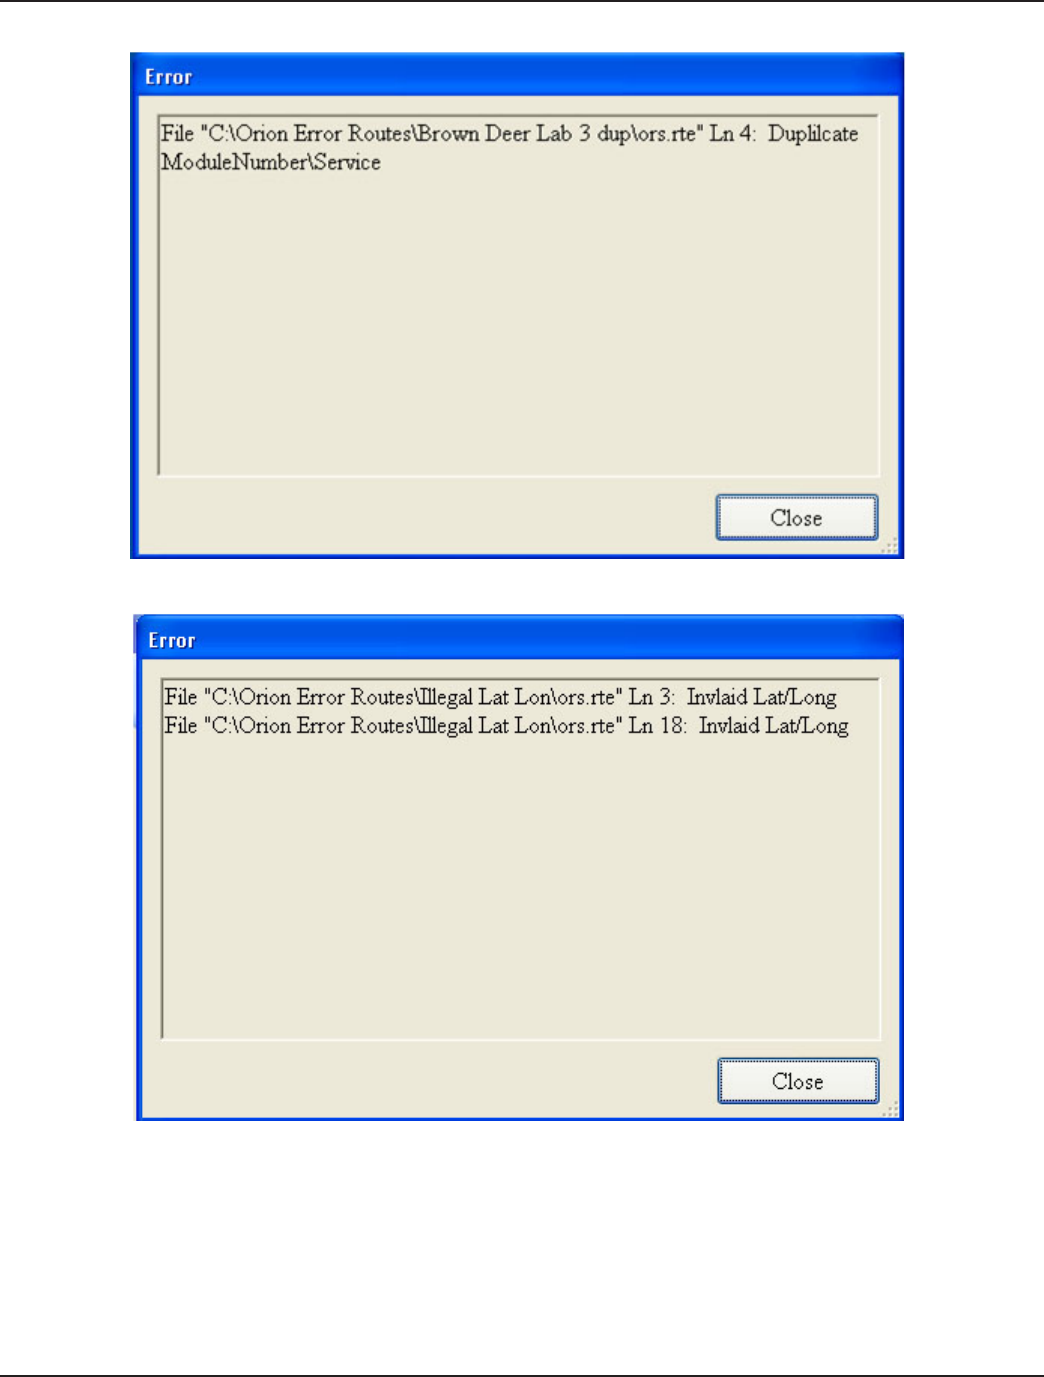
8. Click Select to begin loading the route le.
Result: If the ORS cannot read a le, an alert is displayed.
Page 21
12-10
Installation & Operation Manual
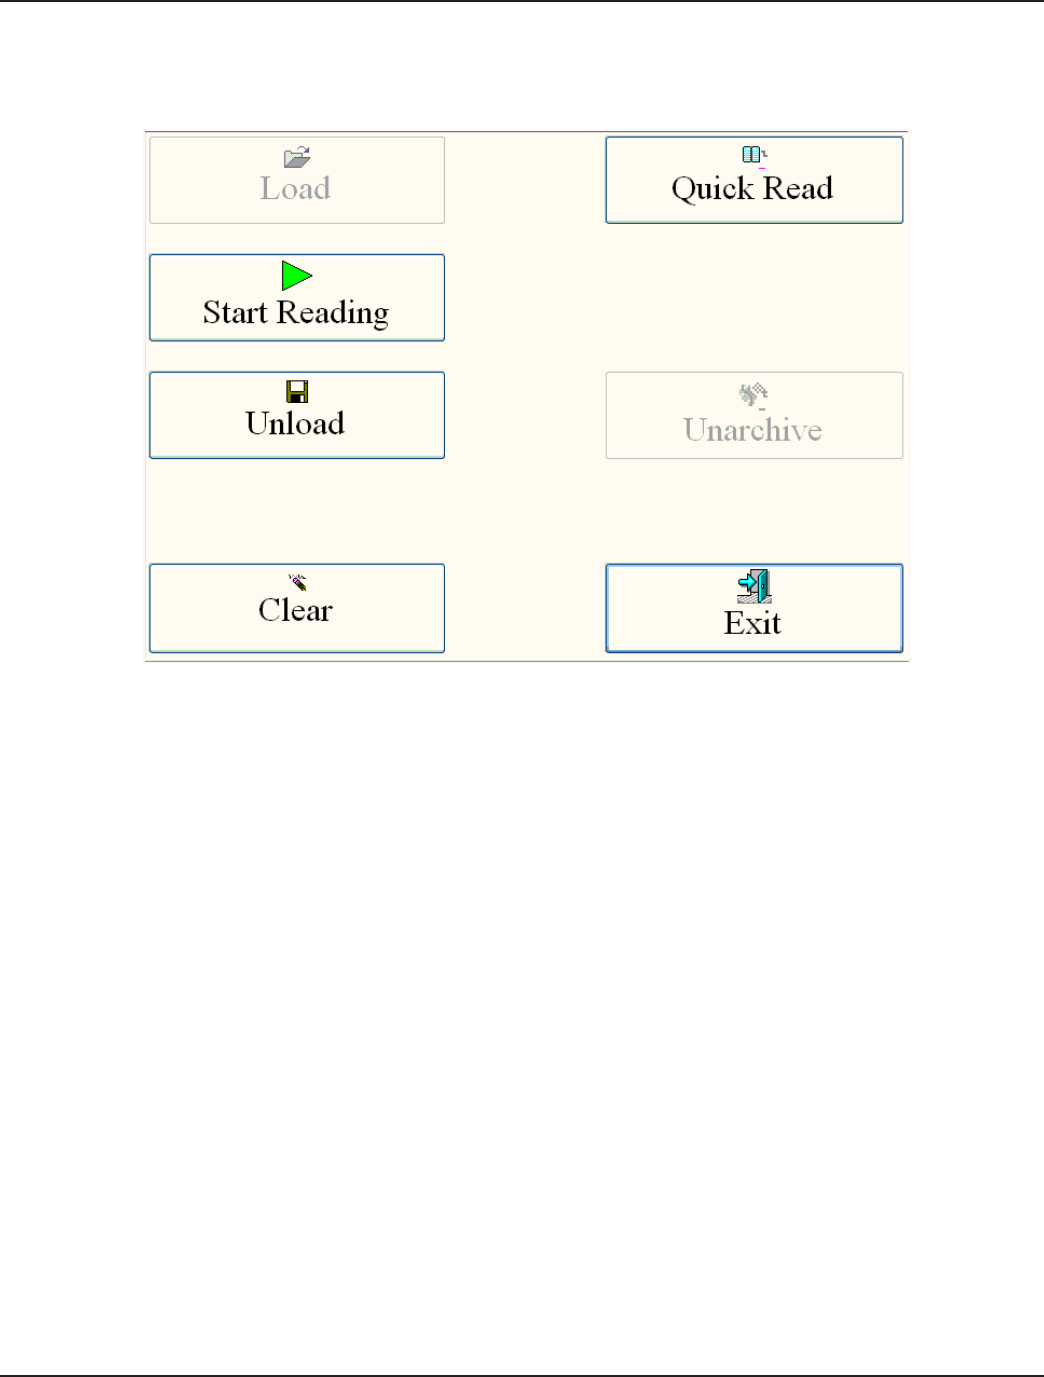
When the route les have been loaded, meters can be read. The Main Menu indicates the Load button as inaccessible and the
Start Reading button is accessible.
Figure 14: Main Menu - Start Reading
Reading Example
1. Click the Start Reading button. Refer to the Start Reading screen.
2. Select the List View button.

Page 22 12-10
ORION® Reading Mobile Software (ORS)
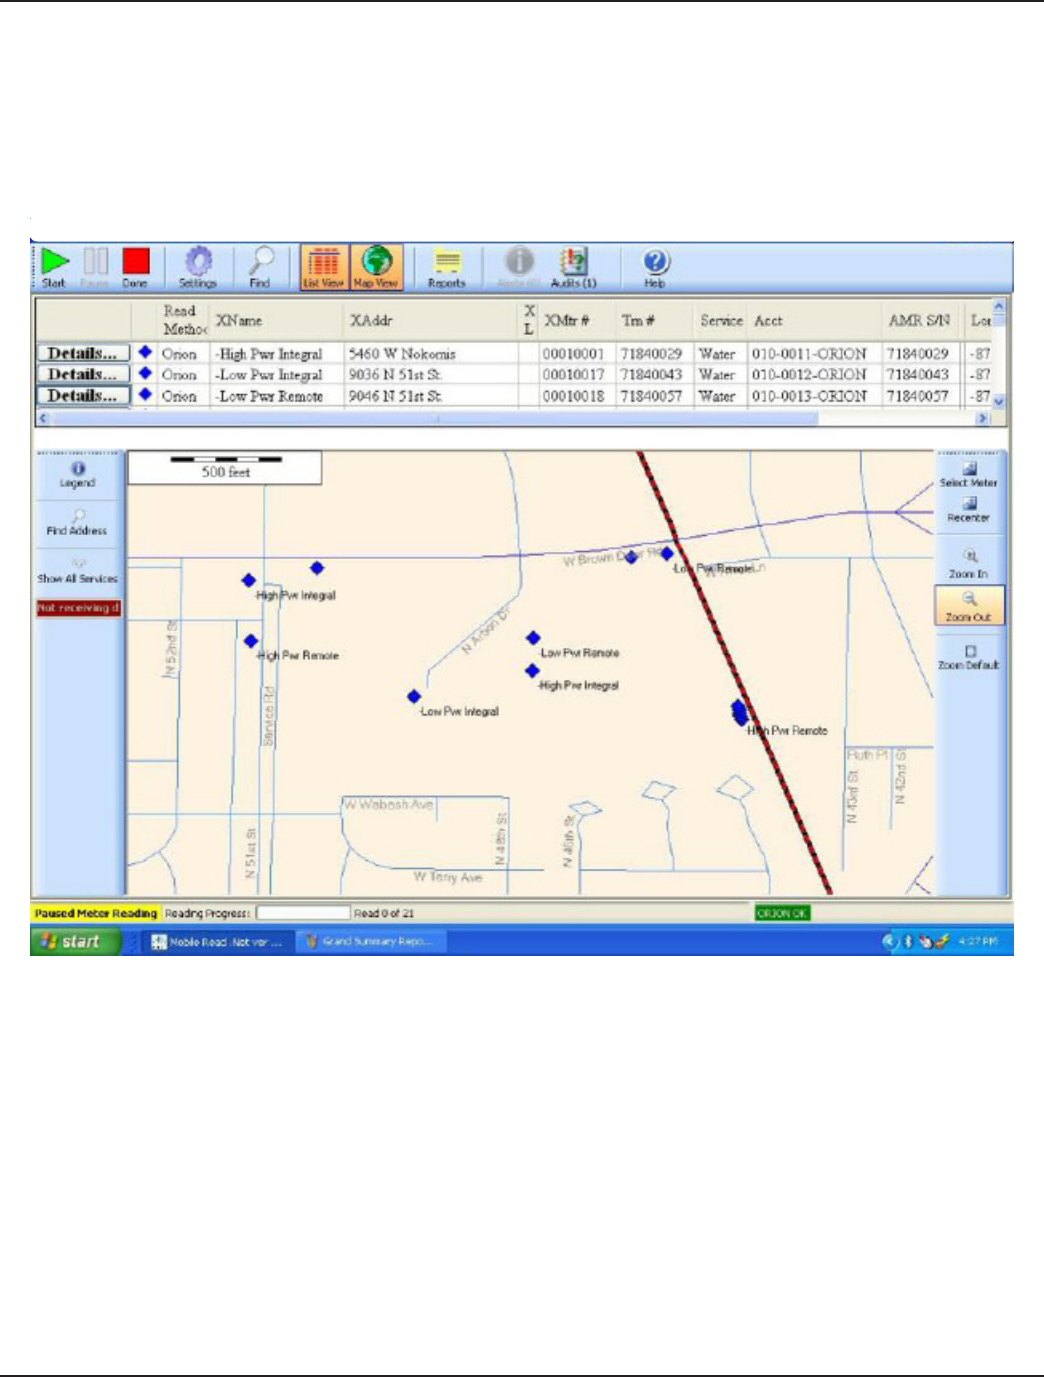
Figure 15: Tool Bar - List View Button
The List View displays details about each meter on the line to identify quickly a particular meter.
3. To view all the details about a specic meter, click the Meter Details button for that meter. The Service Details
window will open.
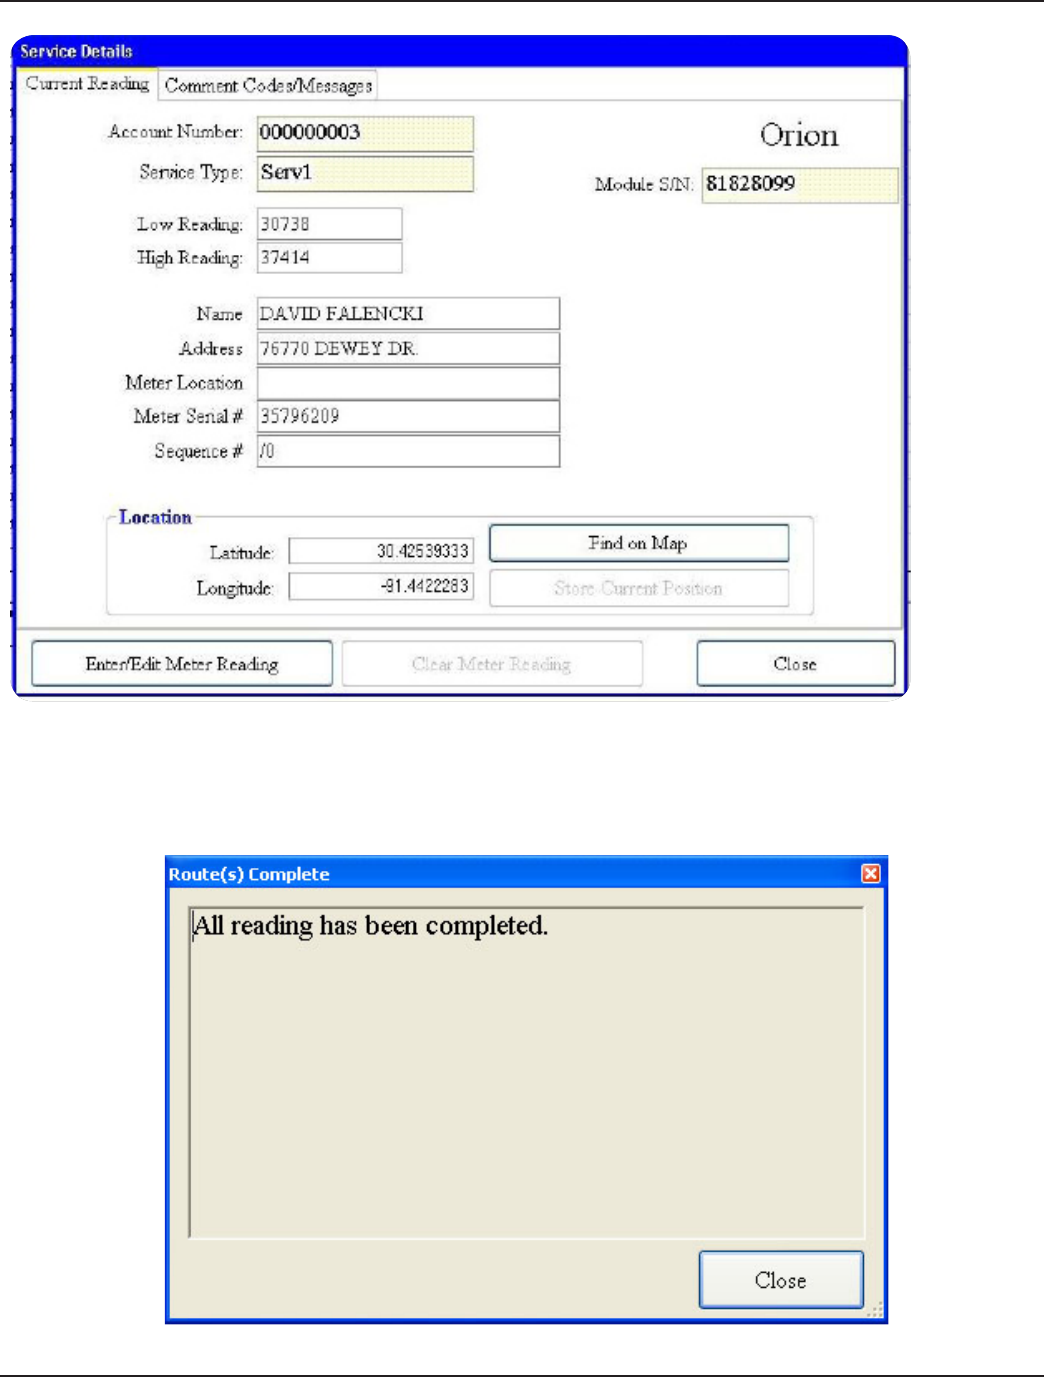
Page 23
12-10
Installation & Operation Manual
Figure 16: Service Details
As meter readings are received from the ORION Receiver, the line on the List View for that meter is removed from the list so
as to monitor the reading status and missed reads in real-time. When all the meters are read, the List view goes blank and the
following Audit message appears.
Figure 17: Meter Reading Completed
Page 24 12-10
ORION® Reading Mobile Software (ORS)
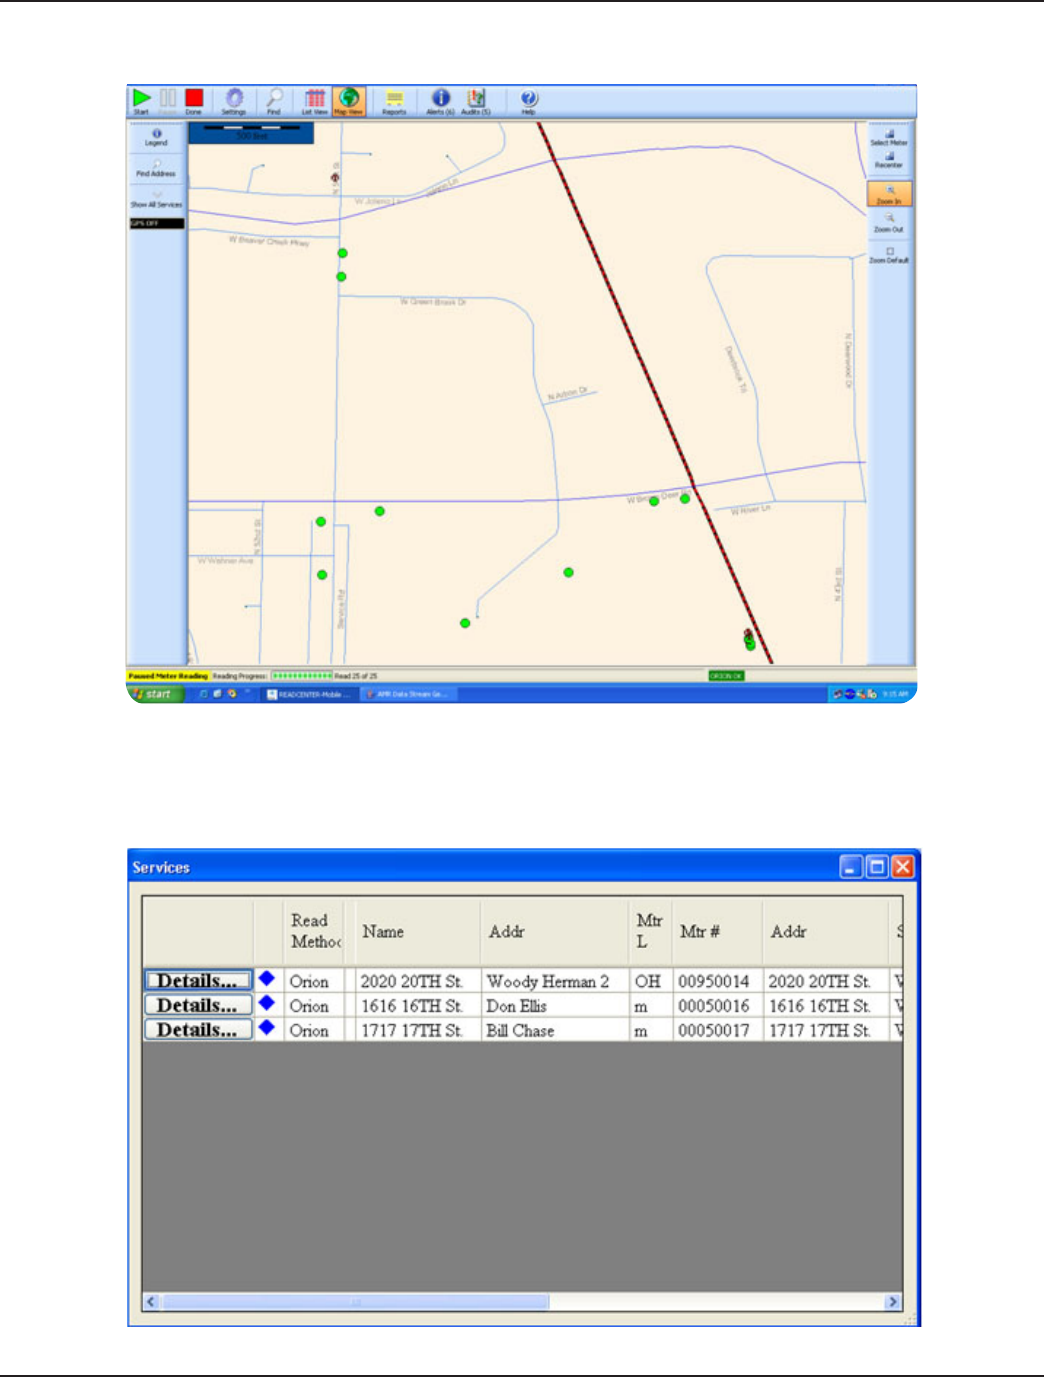
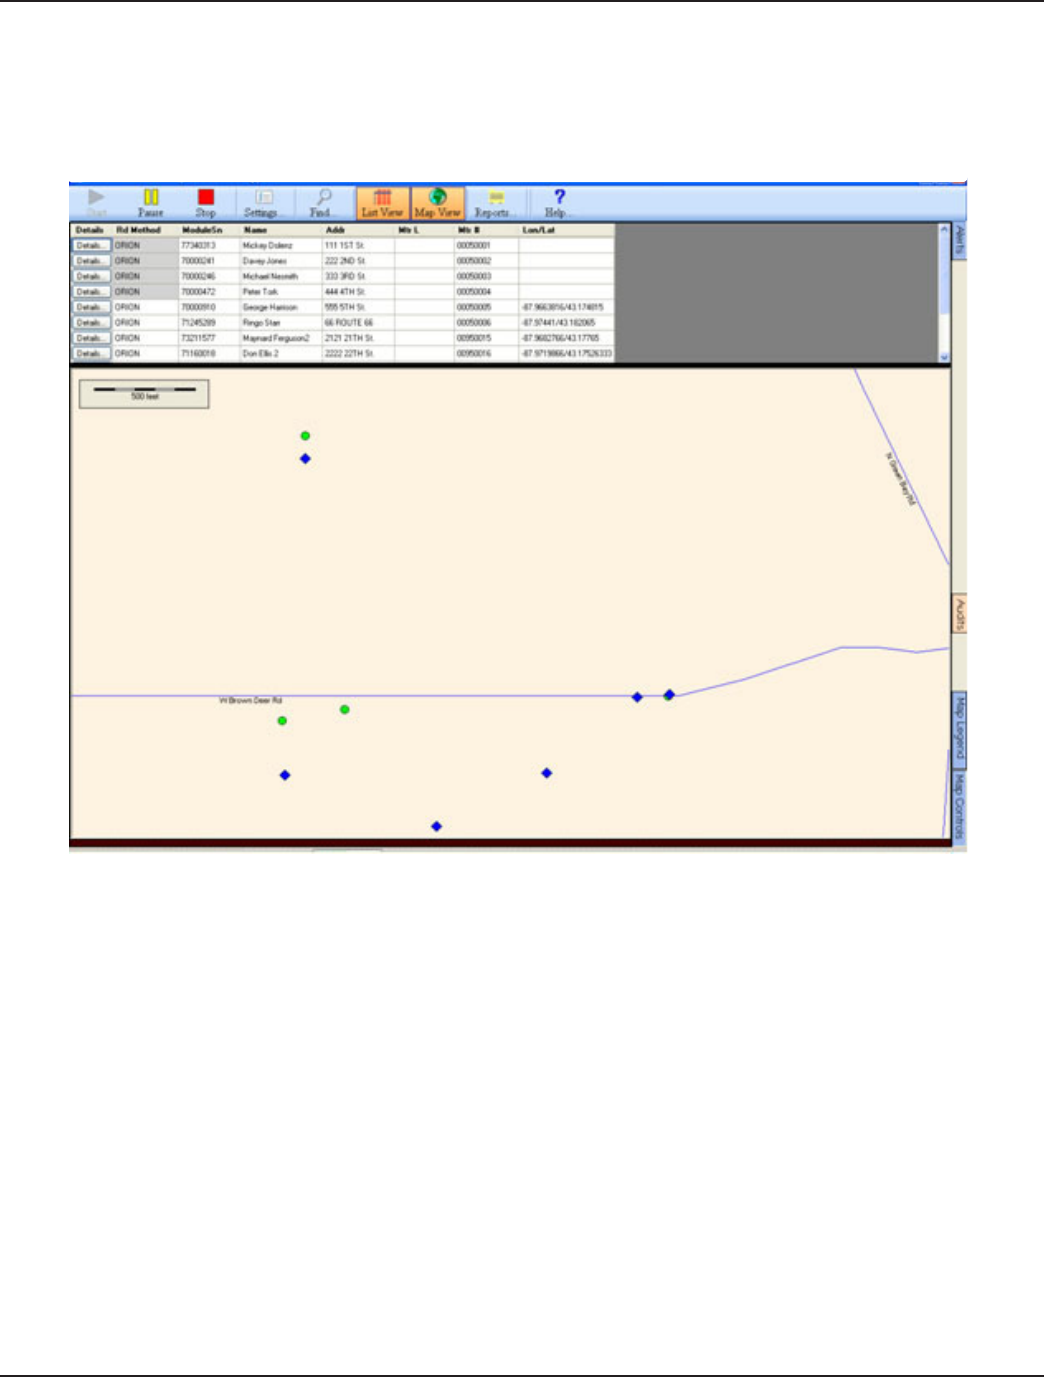
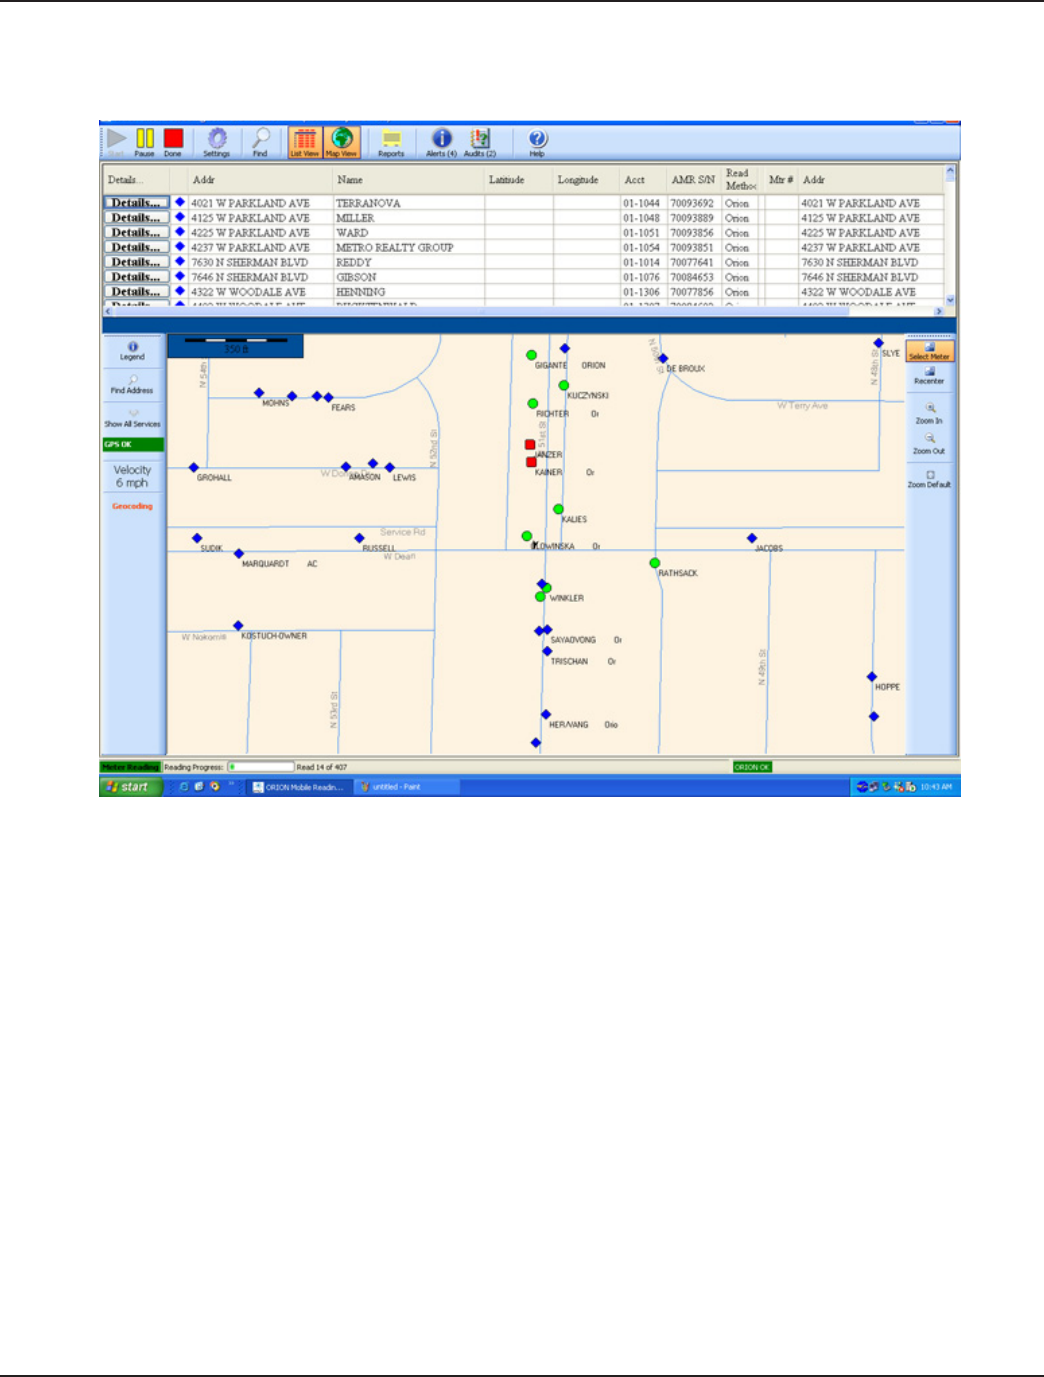
If you select the Map View on the Toolbar, the following screen is displayed:
Figure 18: Map View
1. To view the meter details, select one of the meter icons.
Note: If more than one meter is present in the reading area, ORS indicates a list of related meters from which
to select.
Figure 19: Meter Icons

Page 25
12-10
Installation & Operation Manual
In the Map View, when a meter reading is received, that meter’s icon changes to reect the status of the meter.
Successfully read meters are displayed by a green circle.
Meters with a tamper condition are displayed as a T inside a circle, and potential
water leaks are indicated by an asterisk (*).
Misread meters are displayed as a red square.
A blue diamond indicates an insucient proximity to a meter.
2. To remove successfully read meters from the screen, check a box on the Setup screen.
Result: This method removes green circles from the map when the meter reading is received, leaving the unread,
missed, leak, and tamper status meter icons.
3. Click Done on the tool bar to return to the Main Menu.
Page 26 12-10
ORION® Reading Mobile Software (ORS)
Unload Example
1. To Unload received readings, click the Unload Route button on the Main Menu.
Figure 20: Unload Readings
2. Highlight the folder Click to write the meter readings to the selected drive or folder to be transferred to the Reading
Data Management Software.
Page 27
12-10
Installation & Operation Manual
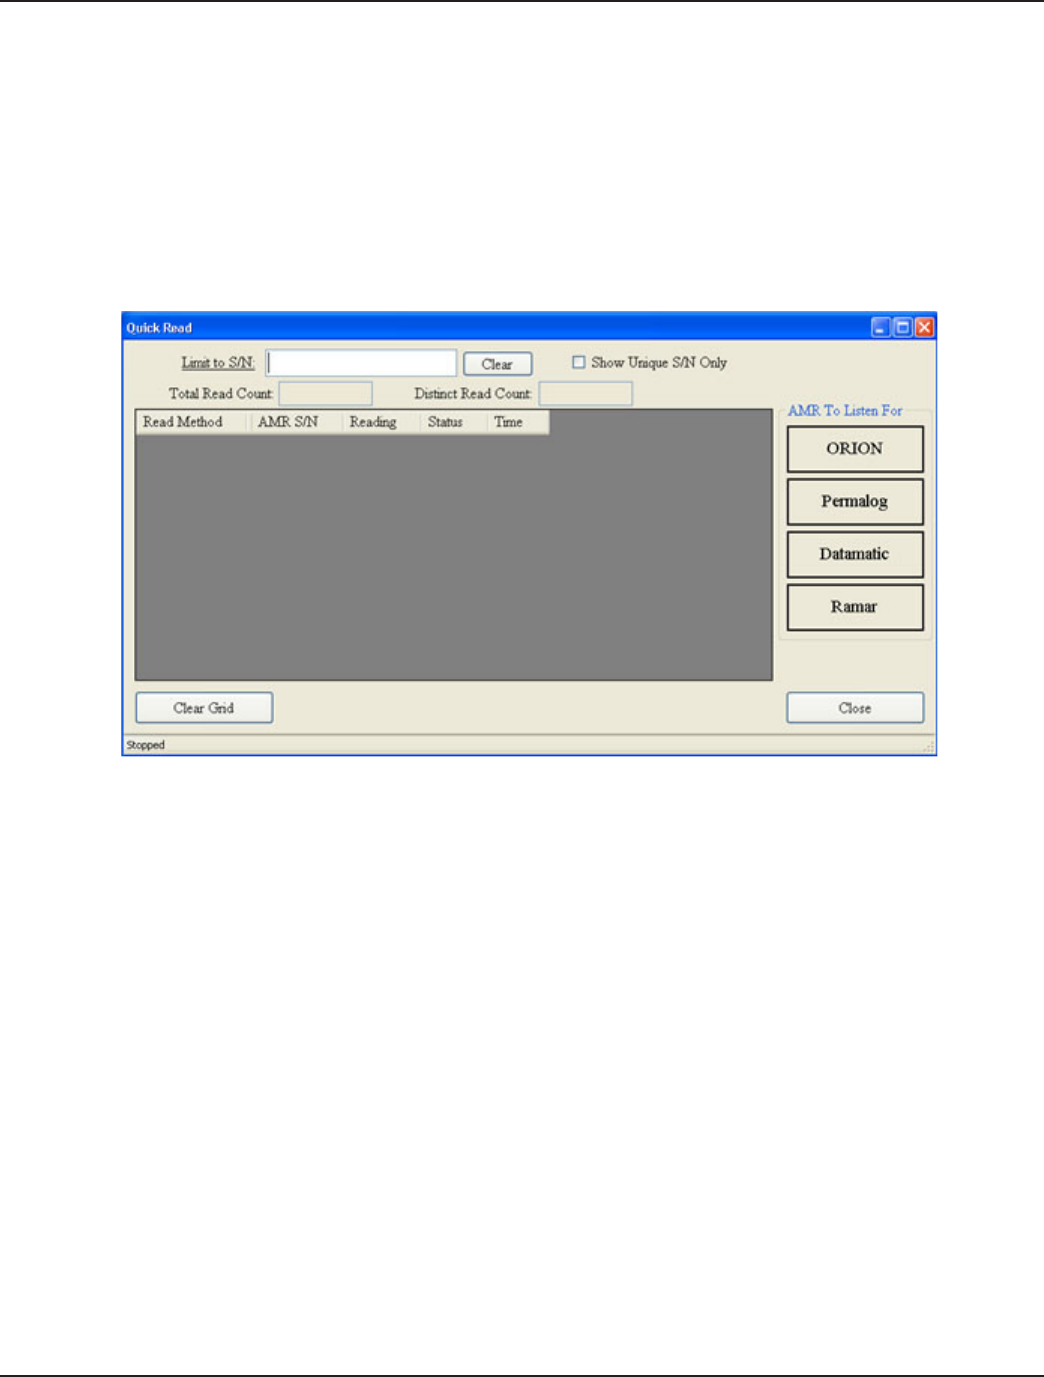
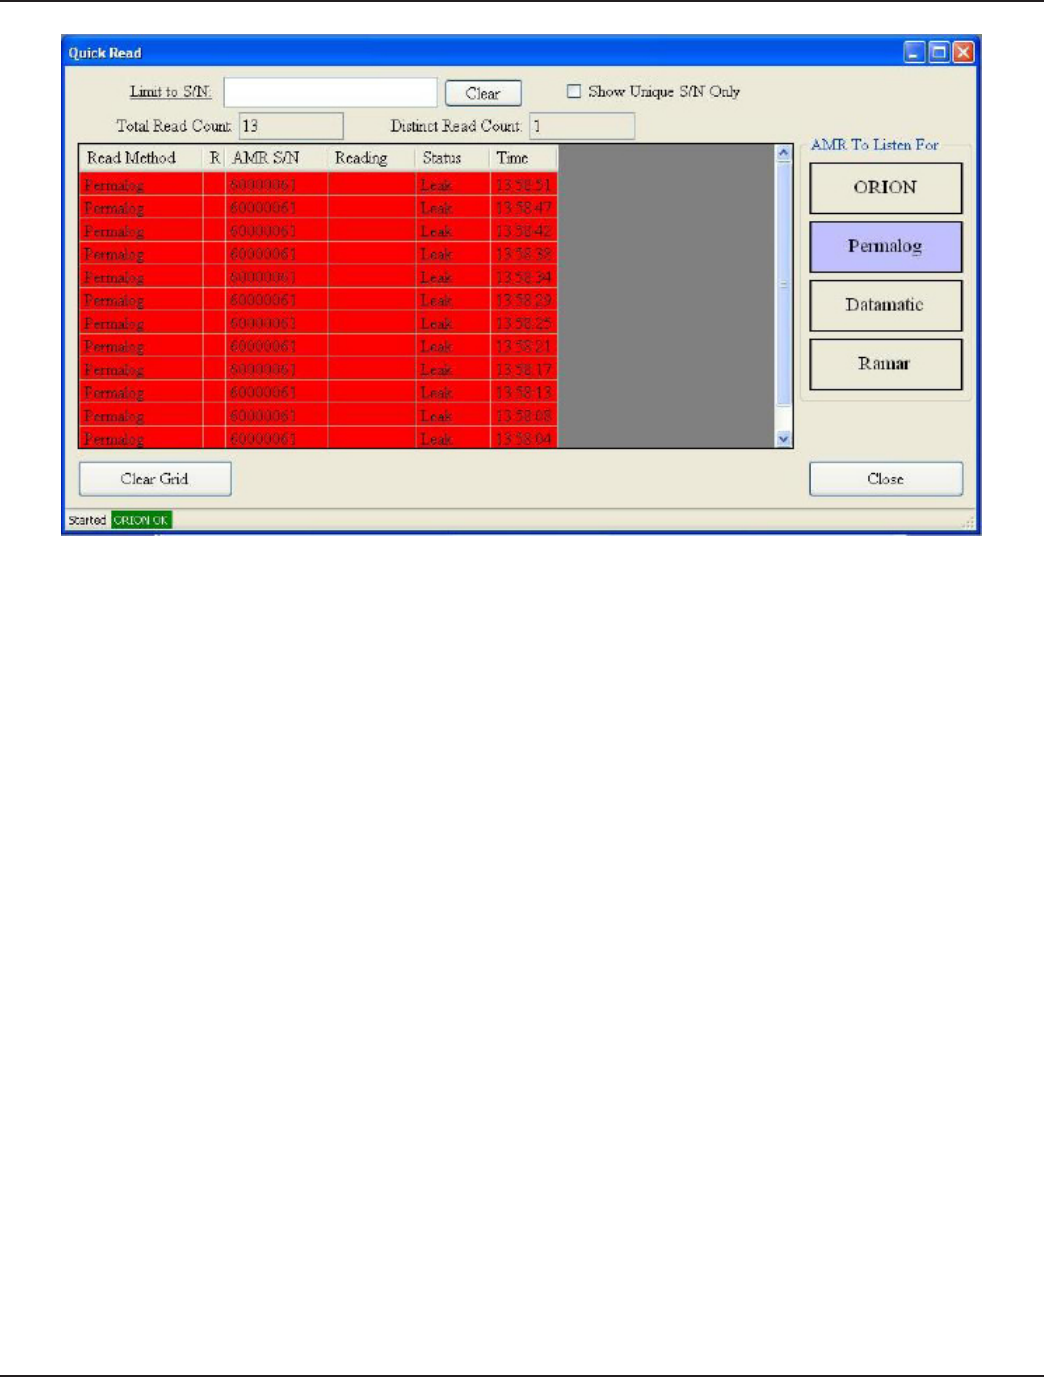
Quick Read
The Quick Read Feature allows you to read a ORION unit without having a route loaded. This is handy when you wish to verify
the installation of a unit, if you wish to verify that a unit is operating correctly, or if you wish to collect the reading and status
of a unit without loading a route.
The Quick Read screen displays each reading received from an individual ORION endpoint or within range of ORION
endpoints. This screen also veries proper ORION endpoint installation and can also be used to obtain nal meter reads.
1. Click the Quick Read button on the Main Menu, to view the following screen:
Note: These readings cannot be transferred to the Reading Data Management Software.
Figure 21: Quick Read
2. To begin reading, select the desired reading technology, such as ORION and/or Permalog.
Result: Readings from both types of devices are displayed.
- To view all of the readings, move the slider bar up or down.
Page 28 12-10
ORION® Reading Mobile Software (ORS)
Figure 22: Quick Read: Technology Selection and Serial Number Entry
- To read a particular ORION meter, enter the endpoint serial number in the “Limit to S/N” field.
Details Summary
This section provides a detailed description of screens and screen-buttons functions.
Best Practice
The recommended practice for meter reading is to engage a second person, not the driver, to monitor progress. If that is not
practical, you can also drive through an area without observing the screen and stop when convenient to view progress.
Splash Screen
The Splash Screen alerts you to the dangers of watching the ORS screen while driving.
The Splash Screen displays ve buttons:
• View License
• View Trademarks
• Language
• Accept
• Cancel
Read Meters
1. To read meters, click the Accept button.
2. If you click Cancel, the ORION Reading Software session ends.
Page 29
12-10
Installation & Operation Manual
If Then
the Trademarks button is selected, a list of Trademarks button references in ORS is
displayed
the Change Language button is selected, a list of languages that can be used with ORS is
displayed
the View License button is selected the ORS software license is displayed. The utility
must accept the software the rst time the
software is used.
Figure 23: ORS Start-up Screen
Do not use ORS while driving.
Page 30 12-10
ORION® Reading Mobile Software (ORS)
Main Screen
The Main Screen allows you to choose the ORS functions you wish to perform. The functions are divided into the following
three areas:
• The top button bar with Setup and Help functions.
• The left side buttons devoted to meter reading.
• The right side buttons for other ORS functions.
Figure 24: Main Menu
Page 31
12-10
Installation & Operation Manual
Load
The Load Route button loads the route from a specic drive and directory.
1. When ORS alerts you with a message reading: "Route Files Found", Click OK.
If Then
If the route les are not found in the selected folder or
drive...
the “No Route Data Available” message appears.
If the route le has corrupted information in the account
numbers or the endpoint serial numbers...
the ORS software generates error messages.
Figure 25: Select Folder
Page 32 12-10
ORION® Reading Mobile Software (ORS)
Figure 26: File Error
Figure 27: File Error
Verify and correct the corrupted data in the Reading Data Management Software and possibly the billing system, to read the
intended route correctly.
Page 33
12-10
Installation & Operation Manual
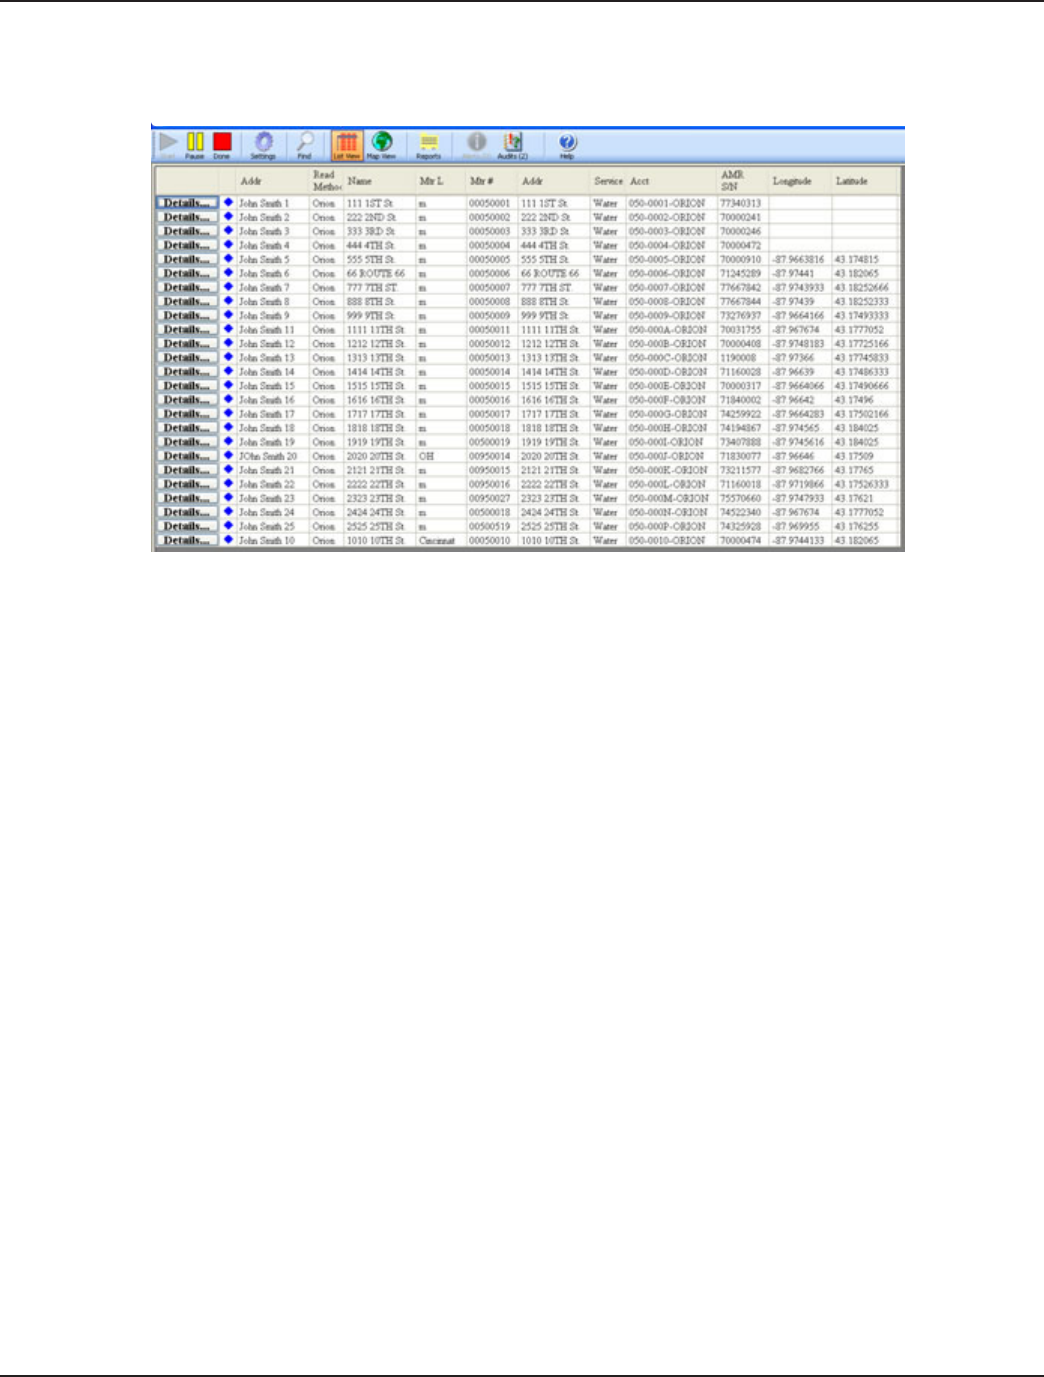
List View
List View presents a list of unread meters in reading sequence order. As meters are read, they are removed from this list.
Figure 28: List View
Details allow the user to view meter details, enter codes/messages and perform manual meter readings.
Page 34 12-10
ORION® Reading Mobile Software (ORS)
Map View
1. If you click the Map View, ORS displays the map of the area, with the reading location as the focal point.
2. If you click the Start Reading Meters button, the map centers at the starting location.
Once the GPS system determines the correct location from the satellites, the screen shows the map centered at the
vehicle’s location.
Figure 29: Map View
A meter icon identies each meter’s status and location. The placement on the map indicates the location, while the
color and shape of the icon indicates the status.
3. If you click the List View, a list of unread meters is displayed.
4. When both the Map View and List View are selected, a split screen displays both views.
Note: The Map Legend describes each of the icons present in the map.
Page 35
12-10
Installation & Operation Manual
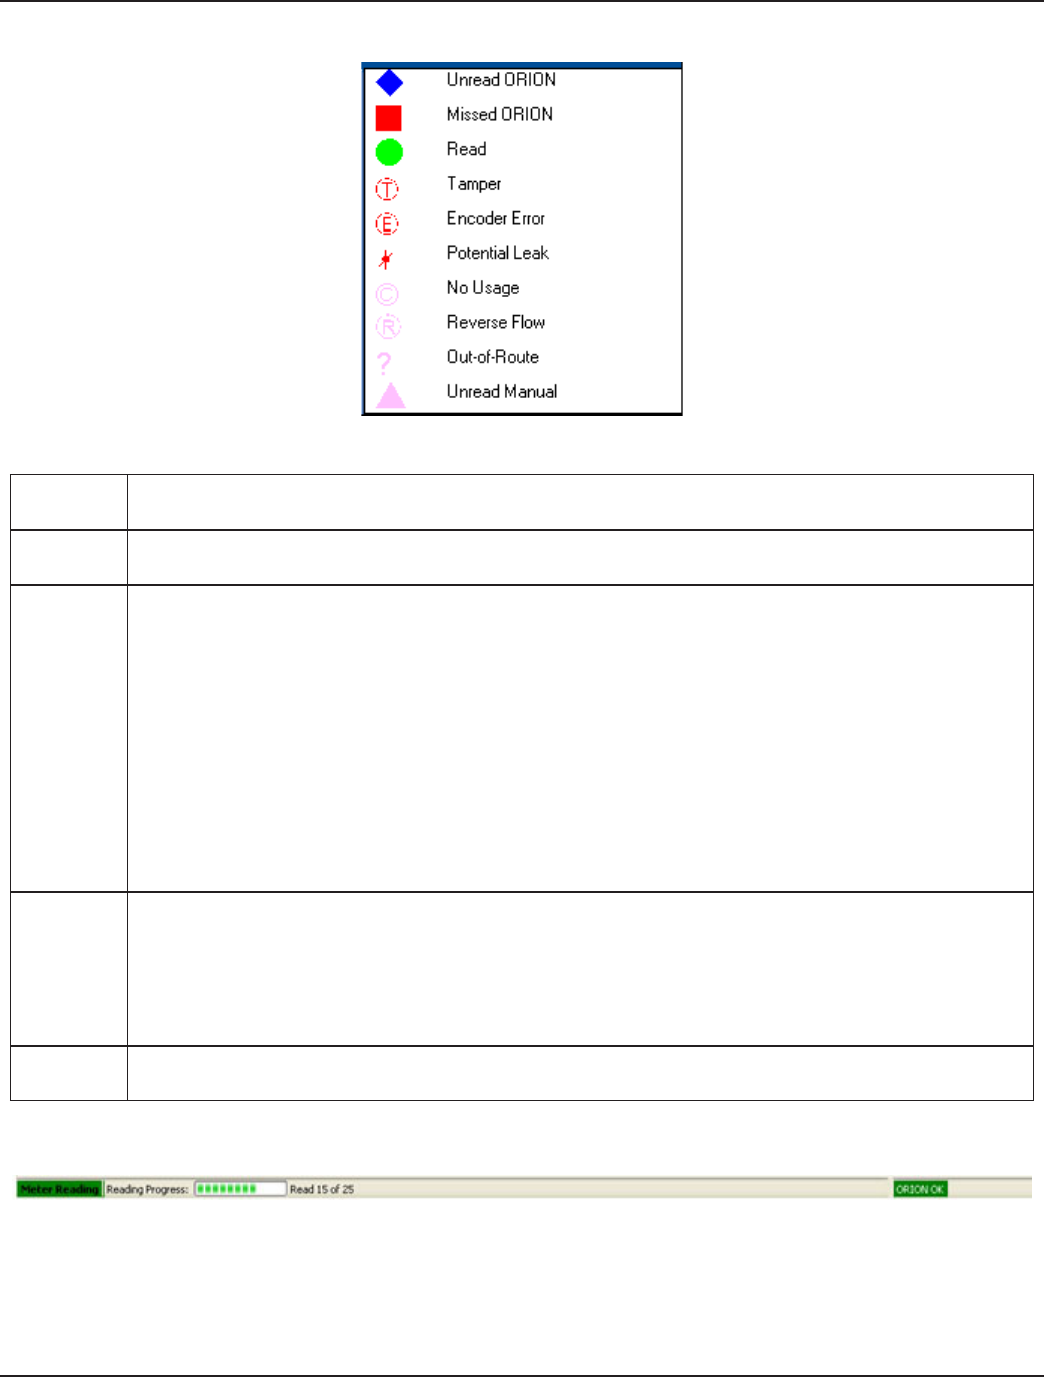
Legend:
Figure 30: Legend Icons
Read A green circle indicates a successful reading with no problems reported. A green circle that contains the
letter “L,” indicates a successful reading of an acoustic leak detection module (Permalog®).
Unread A blue diamond indicates an unread meter. A hollow diamond indicates a meter without an ORION®
endpoint. A blue triangle with a hollow “L” indicates an unread acoustic leak detection module.
Problems
• A red circle with a “T” in the center indicates an ORION endpoint tamper condition.
• A red circle with an “E” in the center indicates an encoder connected to the ORION endpoint is
reporting an error condition.
• A red asterisk “*” indicates an ORION endpoint is reporting a potential leak condition (water only).
• A red “L” with an asterisk indicates a leak condition by an acoustic leak detection module.
• A “C” with a circle around it indicates no usage on that meter since the last report.
• An “R” with a circle around it indicates a meter in which ow has reversed.
• A “?” on the map indicates a meter not in the route.
Missed
A missed meter is one that was in range to be read but the reading was not received, and is indicated by a
red square.
• If the square is solid, an ORION endpoint was missed.
• If the square is hollow, a non-ORION endpoint was missed. If the square contains an “L”, the
reading from an acoustic leak detection module was missed.
Unread
Manual Meters read manually are indicated by a pink triangle.
Status Bar
Figure 31: Status Bar
The status bar, located at the bottom of the screen allows you to view the progress of the meter reading and the status of the
receiver and the GPS systems. Green lettering in the route summary indicates that the system is operating normally, while red
indicates the system is not currently in operation.
Page 36 12-10
ORION® Reading Mobile Software (ORS)
Split View
If you select both Map View, and List View, the current listing of unread meters appear at the top as well as the current map
on the bottom. When using a mouse, height adjustment of each area is accomplished by placing the cursor on the line
between the two areas. When the cursor changes to an arrow, click and drag to adjust the height as preferred.
Figure 32: Split View
Meter Details
The Meter Details window displays all of the information that the ORS has regarding that meter. The information is displayed
on two tabs: Current Reading and Comment Codes/Messages.
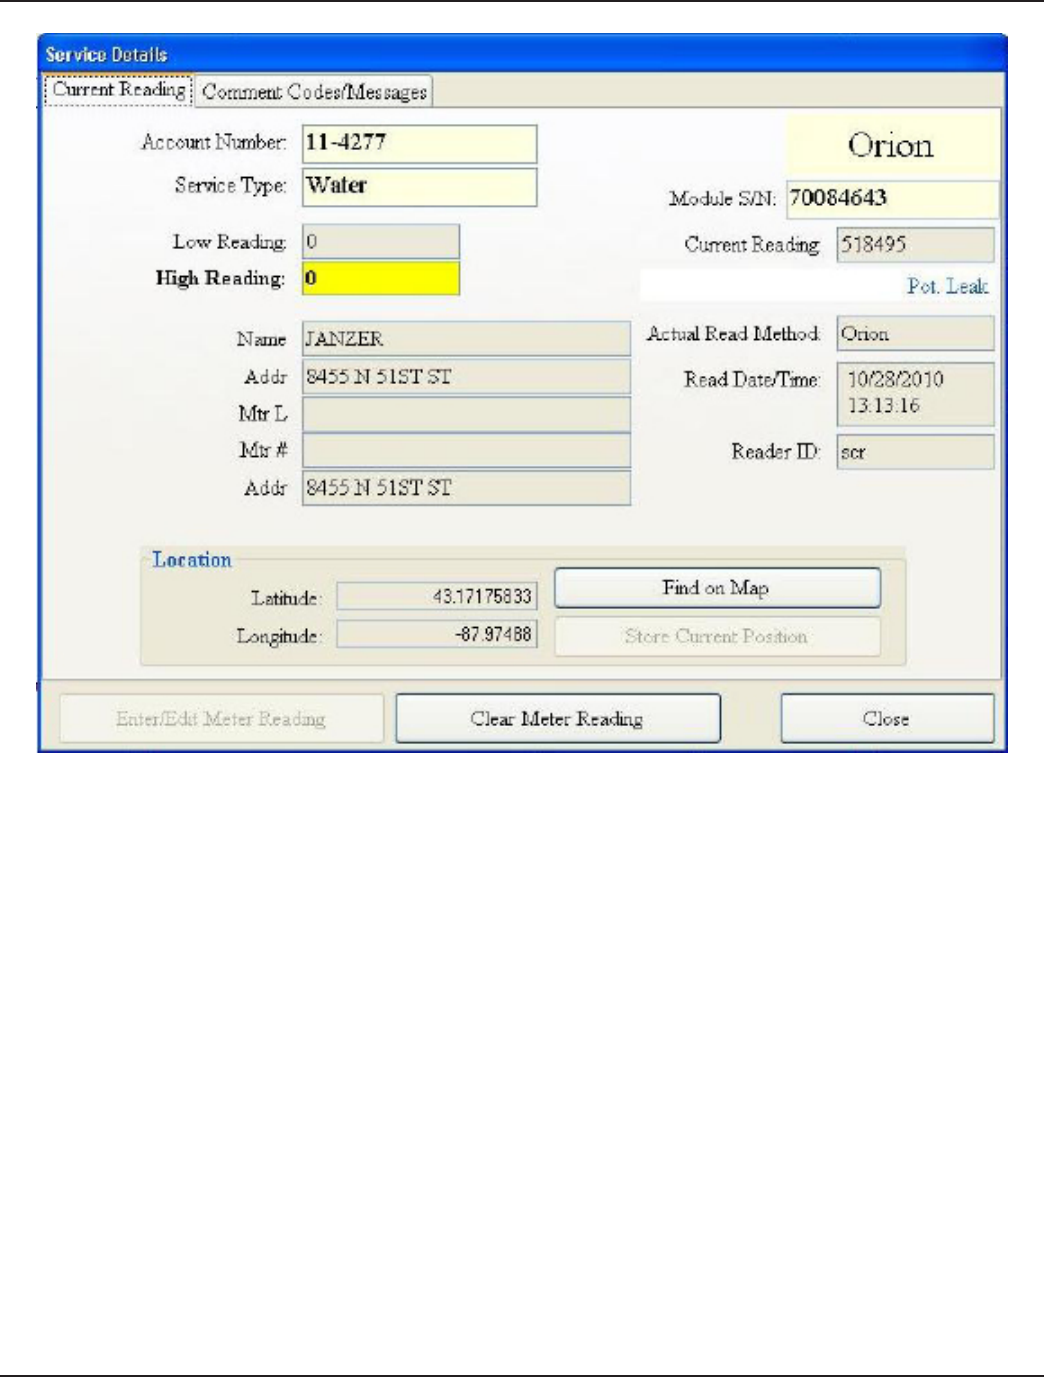
Current Reading
Current reading information is divided into these segments:
- Identification and current reading (upper left)
- Detailed information about the reading (right)
- Meter functions (bottom)
Page 37
12-10
Installation & Operation Manual
Figure 33: Current Reading Example
Current Reading
• Account Number - This field indicates the account number sent by Reading Data Management Software..
• Service Type - This field contains the description of the service being measured by the meter, such as Water, Electric,
Gas, etc.
• Module S/N - The serial number of the ORION endpoint mounted on the meter. The serial number allows ORS
to identify each meter uniquely. The serial number is sent from Reading Data Management Software and is not
editable.
• Current Reading- The current reading value is stored in this field. If the meter is a gas meter, the index value and not
the sub count appears. If the meter is unread, UNREAD appears in the reading field.
• Low Reading -If the current reading is lower than this value, it will be considered low.
• High Reading - If the current reading is higher than this value, it will be considered high.
• Potential Leak – If the ORION endpoint detects a potential leak, LEAK is displayed below the reading.
The subsequent four elds are selected in the Reading Data Management Software, and downloaded to the ORS.
Note: Refer to the Reading Data Management Software manual for more information. In this example, the ve
elds downloaded from Reading Data Management Software were (continued on next page):

Page 38 12-10
ORION® Reading Mobile Software (ORS)
• Name
• Addr
• Mtr L
• Mtr #
• Trn #
The last of the meter reading elds on the right side of the screen pertain specically to the meter reading that was gathered:
• Actual Read Method: This field indicates the type of technology used for reading, for example: ORION.
• Read Date / Time – This field contains the date the reading was taken.(-These fields are not present)
• Reader ID – This field displays the identification of the meter reader. This is typically the reader's initials.
• Location
- Longitude – This field holds the GPS longitude as a decimal number.
- Latitude – This field holds the GPS latitude as a decimal number.
• Find On Map – This button displays the meter on the map.
• Store Current Position – This button stores the current vehicle location as the location for the meter. The
coordinates of the meter become the location at which the meter can be read successfully.
• Enter/Edit Meter Reading – Click this button to enter meter readings manually.
• Clear Meter Reading – Click this button to clear current reading.
• Close – Click this button to exit the screen.
Page 39
12-10
Installation & Operation Manual
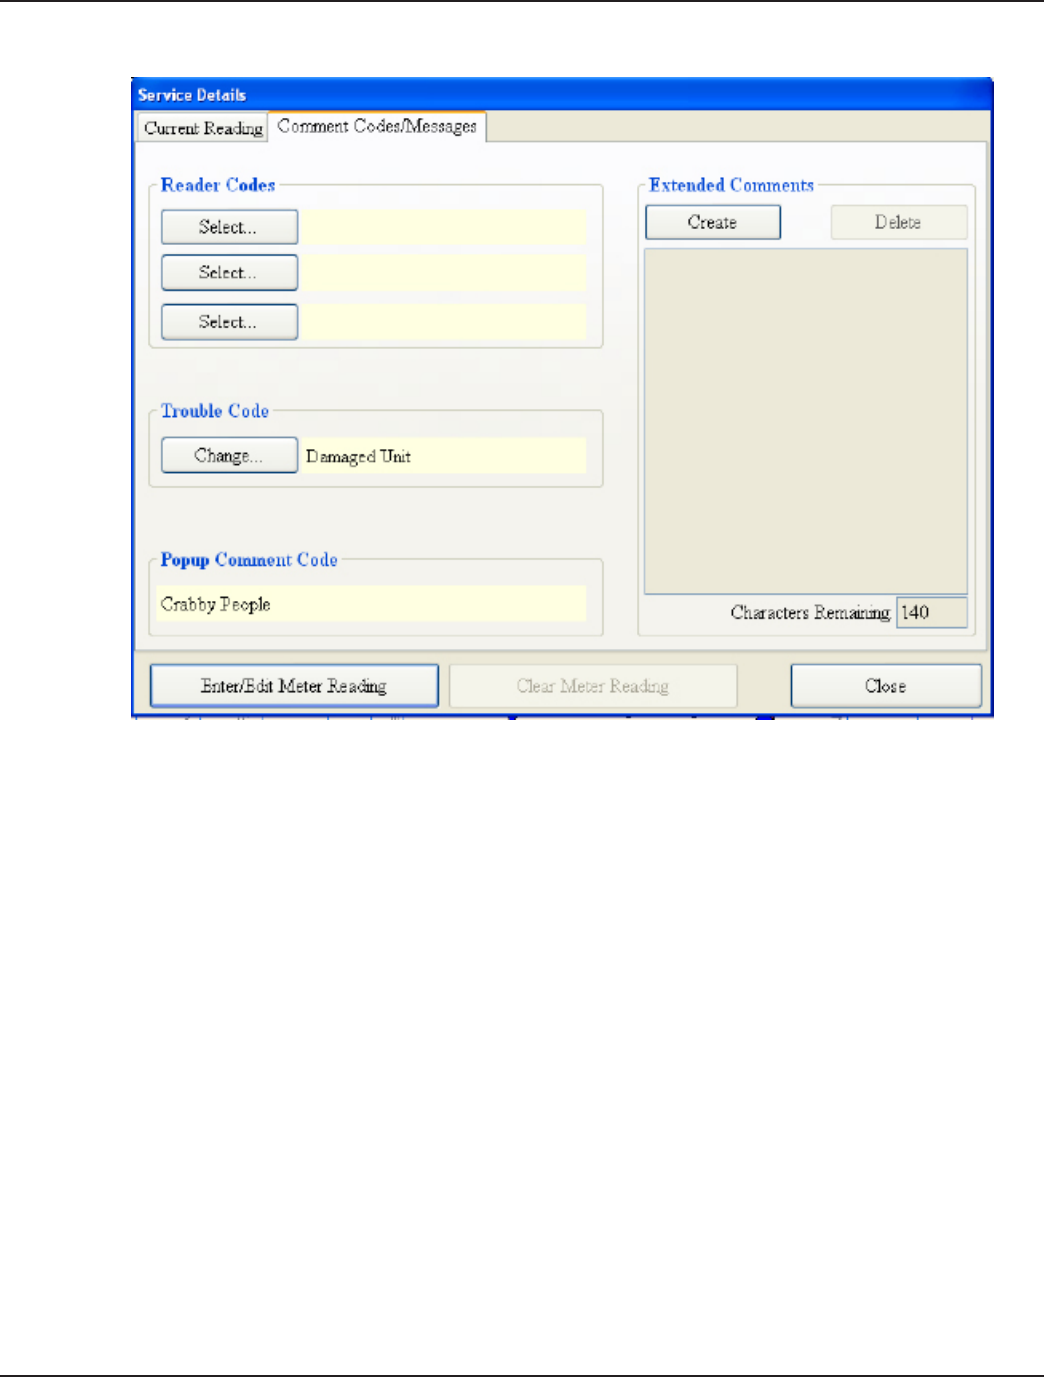
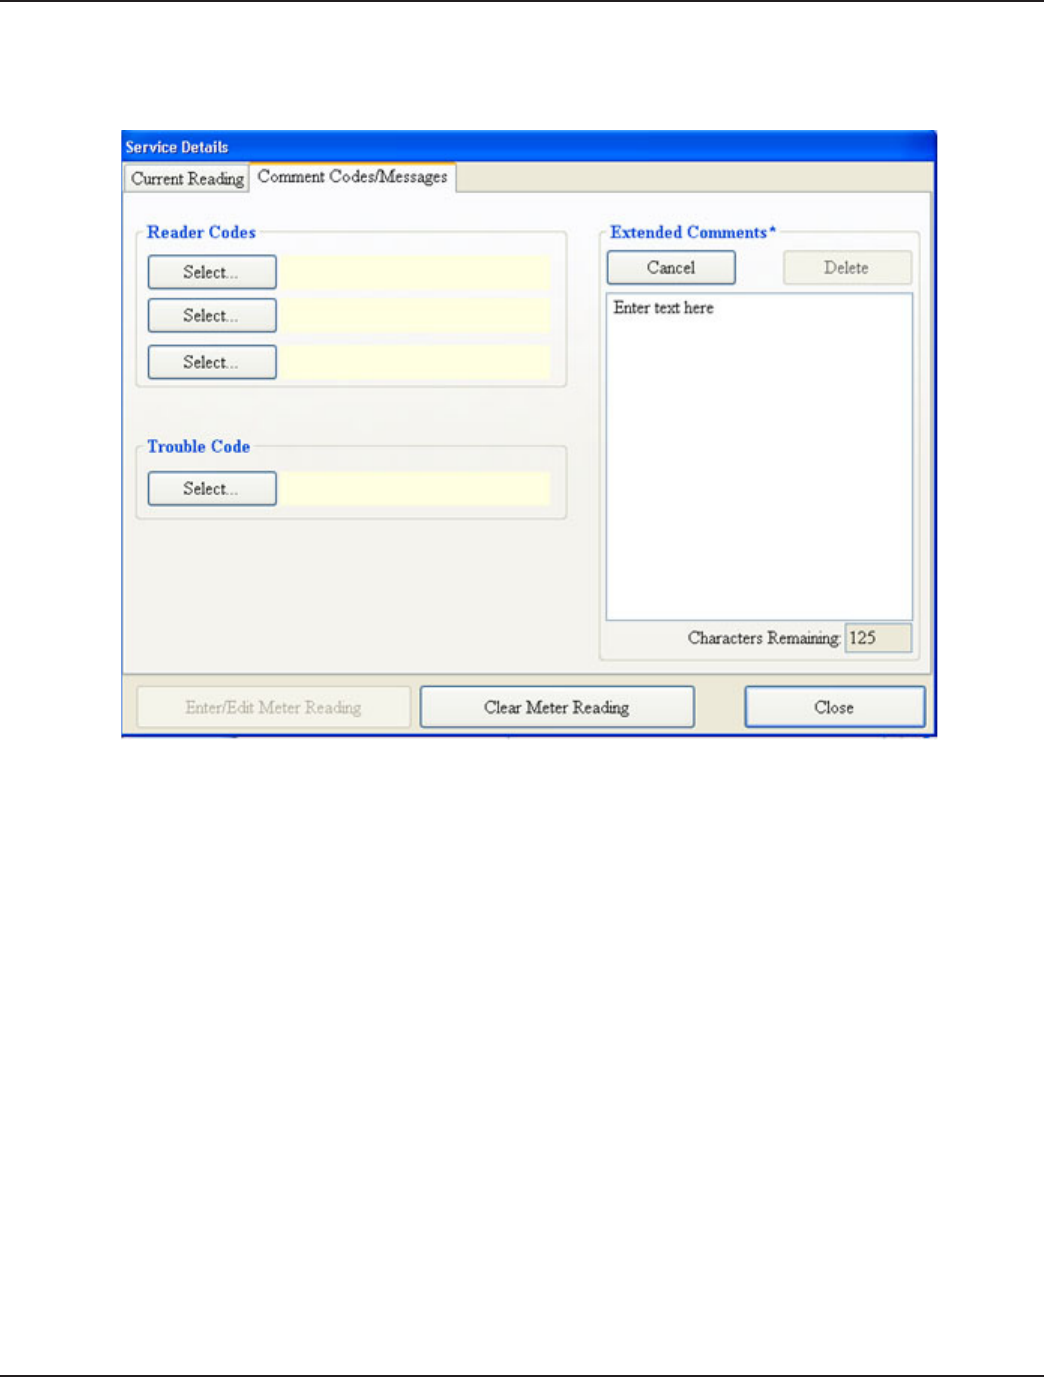
The Comment Codes/Messages tab is used to display any Codes /Messages relating to a meter.
Figure 34: Comment Codes/Messages
• Reader Codes - Reader codes are values that the reader can create about a specific meter. These values are
channelized into ORS by the Reading Data Management Software.
• Trouble Code -Trouble codes are values that the reader can create for problems related to a specific meter. These
values are passed into ORS by the Reading Data Management Software.
• Popup Comment Code - Comment codes are messages from the Reading Data Management Software that relay
information about a specific meter. An example could be ‘Beware of Dog’. These values are passed into ORS by the
Reading Data Management Software.
• Extended Comment – This field stores a text field in which the meter reader can insert a message to be sent back to
the office. The field contains Create and Delete buttons to add or delete a text comment. There is a limit to how
many characters can be entered in this field, displayed by an automated "Character Remaining" monitor.
• Clear Meter Reading - Removes the current meter reading.
• Close - Exit the screen.
Page 40 12-10
ORION® Reading Mobile Software (ORS)
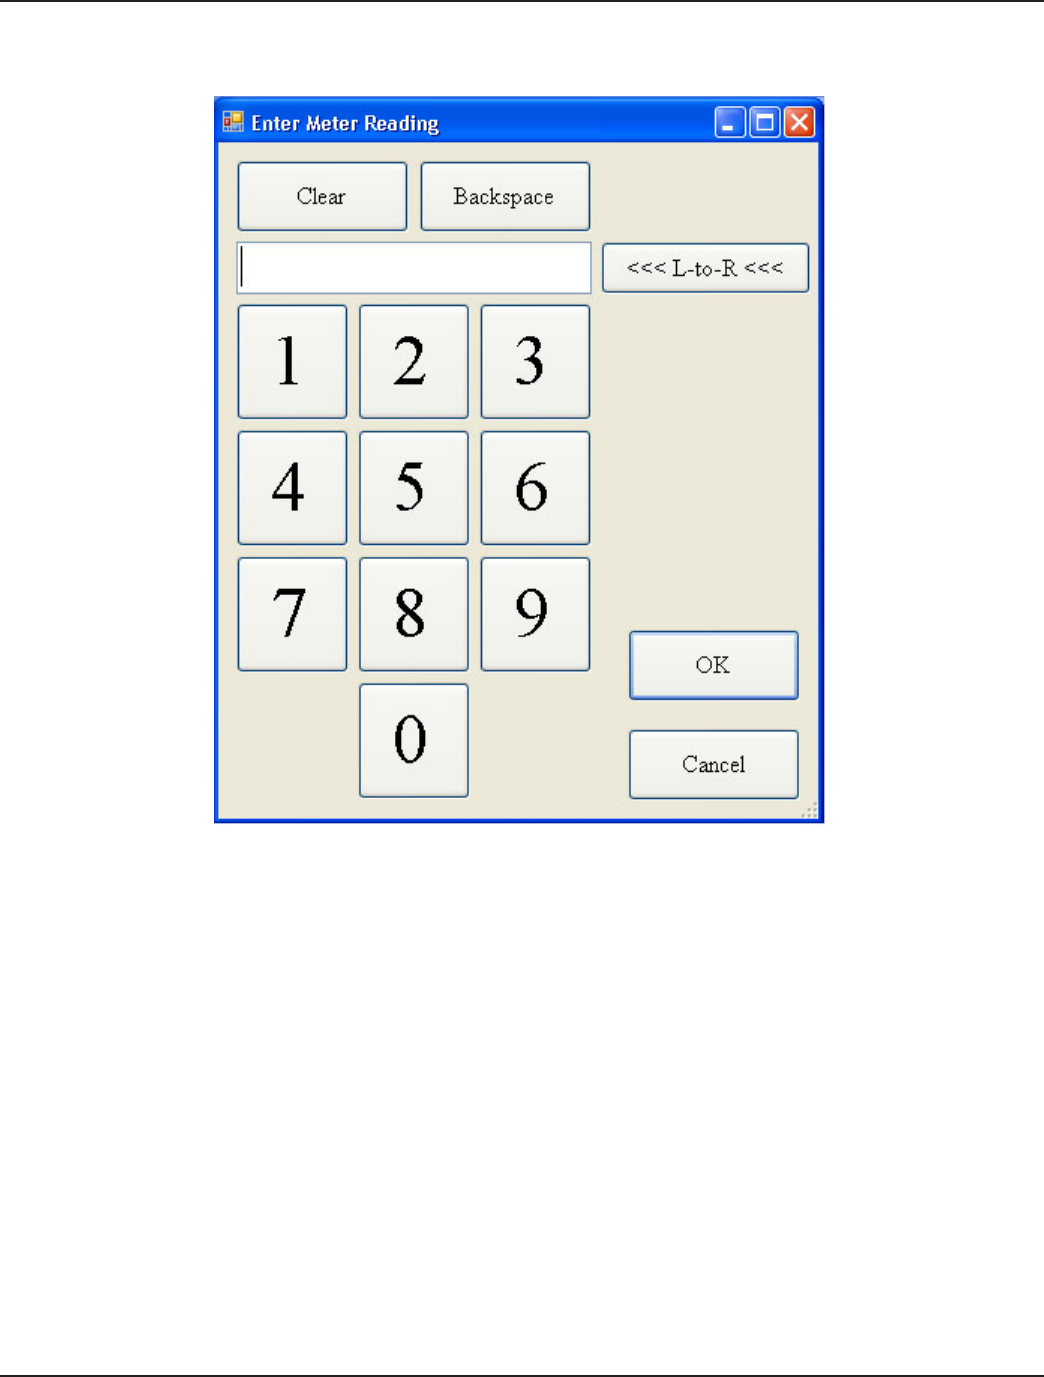
Enter/Edit Meter Reading
1. To enter a reading manually, select the Enter/Edit Meter Reading button. See Figure 34 on page 39.
Figure 35: Enter Meter Reading
Manually enter a meter reading on the touch screen or type the reading on the laptop keyboard. If the meter reading has
dials set from right to left, click the box to reset the option to "L-to-R."
Note: If a tamper report is received from a meter and a manual reading for that meter is entered, the reading
information relayed to the Reading Data Management Software will include both the manual reading and the
reported tamper condition.
Page 41
12-10
Installation & Operation Manual
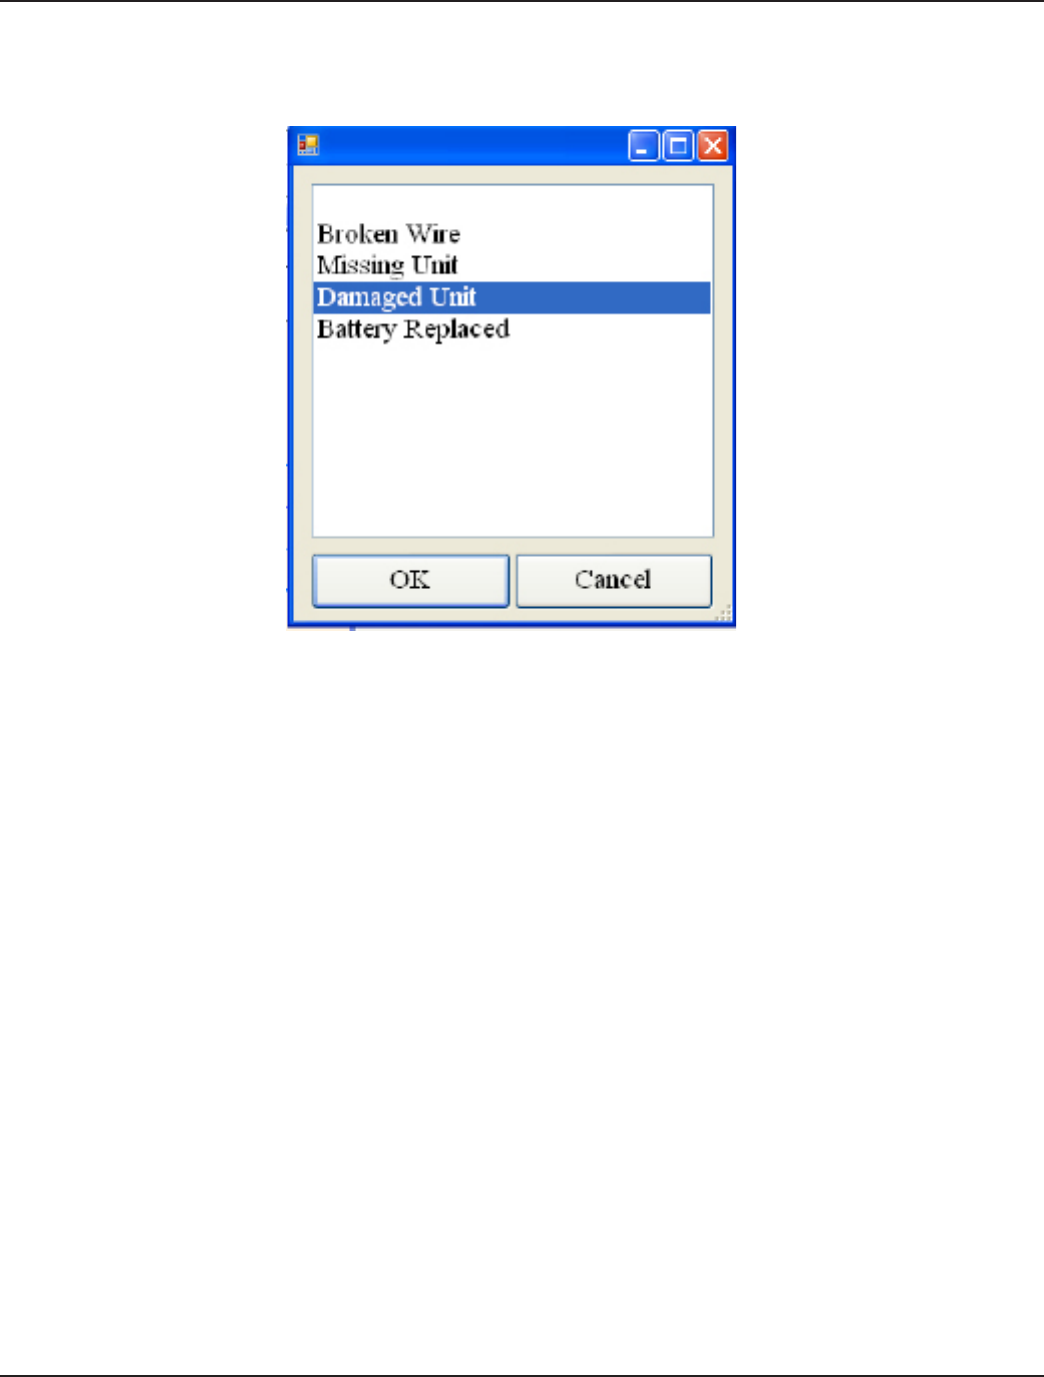
Add/Edit Trouble Code
1. To report a trouble condition at a meter, click the Select button in the Trouble Code area.
Figure 36: Trouble Codes
The Trouble Code screen allows you to send a trouble code (such as a broken wire, missing unit, or damaged unit) to the
utility. Note: The trouble codes are dened in Reading Data Management Software and sent to the ORS.
2. To select a trouble code, select the appropriate code from the list of codes available and click OK.
Result: Once the trouble code is selected and you click OK, the trouble code (Damaged Wire) is appended to the
Service Details screen.
3. Once a trouble code is entered, and you wish to change it, click Change in the Trouble Code Area and select the
required option from the list.
4. If no trouble code is required, select Cancel to return to the Service Details screen.
Page 42 12-10
ORION® Reading Mobile Software (ORS)
Add/Edit Reader Codes
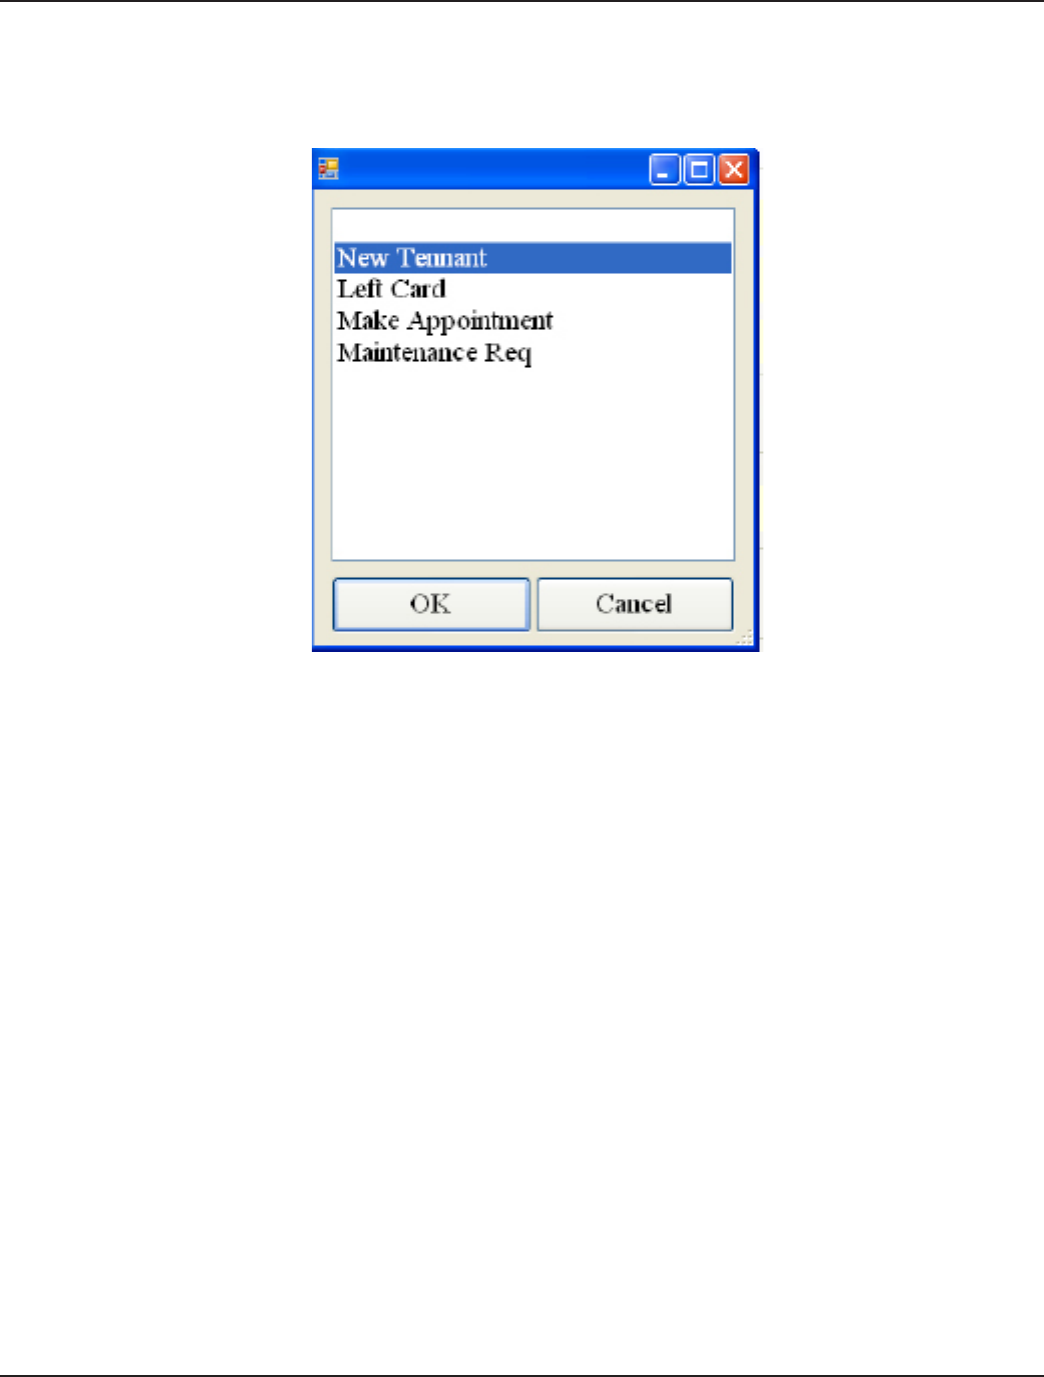
1. To report non-trouble information about a meter, click one of the Select buttons in the Reader Code area (see Figure
34 on page 39).
Figure 37: Select a Comment
Note: You can select up to three comments and send those comments back to the oce for a given meter.
Note: The Reader Codes are also dened in the Reading Data Management Software and sent to ORS.
2. To set a Reader Code, select the code and then select OK.
Note: When the readings are sent back to the Reading Data Management Software, reports of meters containing
these codes can be generated to help identify problem meters.
Page 43
12-10
Installation & Operation Manual
Add/Edit Text Message
This option allows users to record text messages or notes that can be utilized later when reporting issues to Technical
Support. For more information on Technical Support, refer to "Using Technical Support" at the end of the manual.
Figure 38: Adding or Editing Text
Note: Text messages up to a maximum length of 139 characters can also be sent back to the utility.
1. Click in the Extended Comments text box.
2. Type the message in on the laptop keyboard and select OK.
Page 44 12-10
ORION® Reading Mobile Software (ORS)
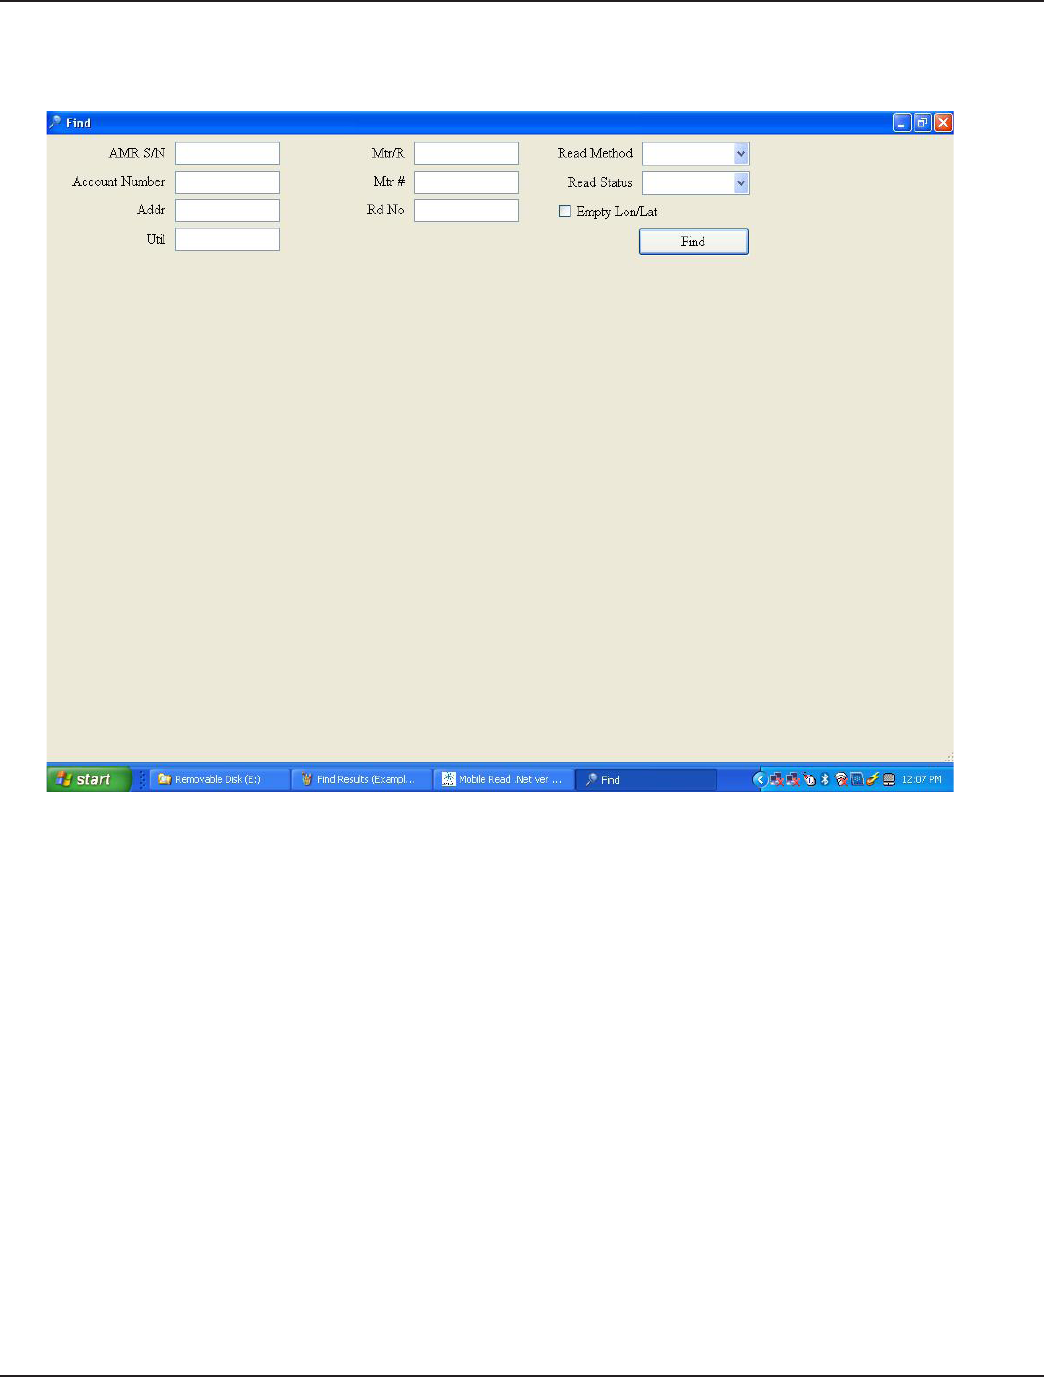
Find
The Find icon allows you to perform searches based on specic criteria.
Figure 39: Find Menu
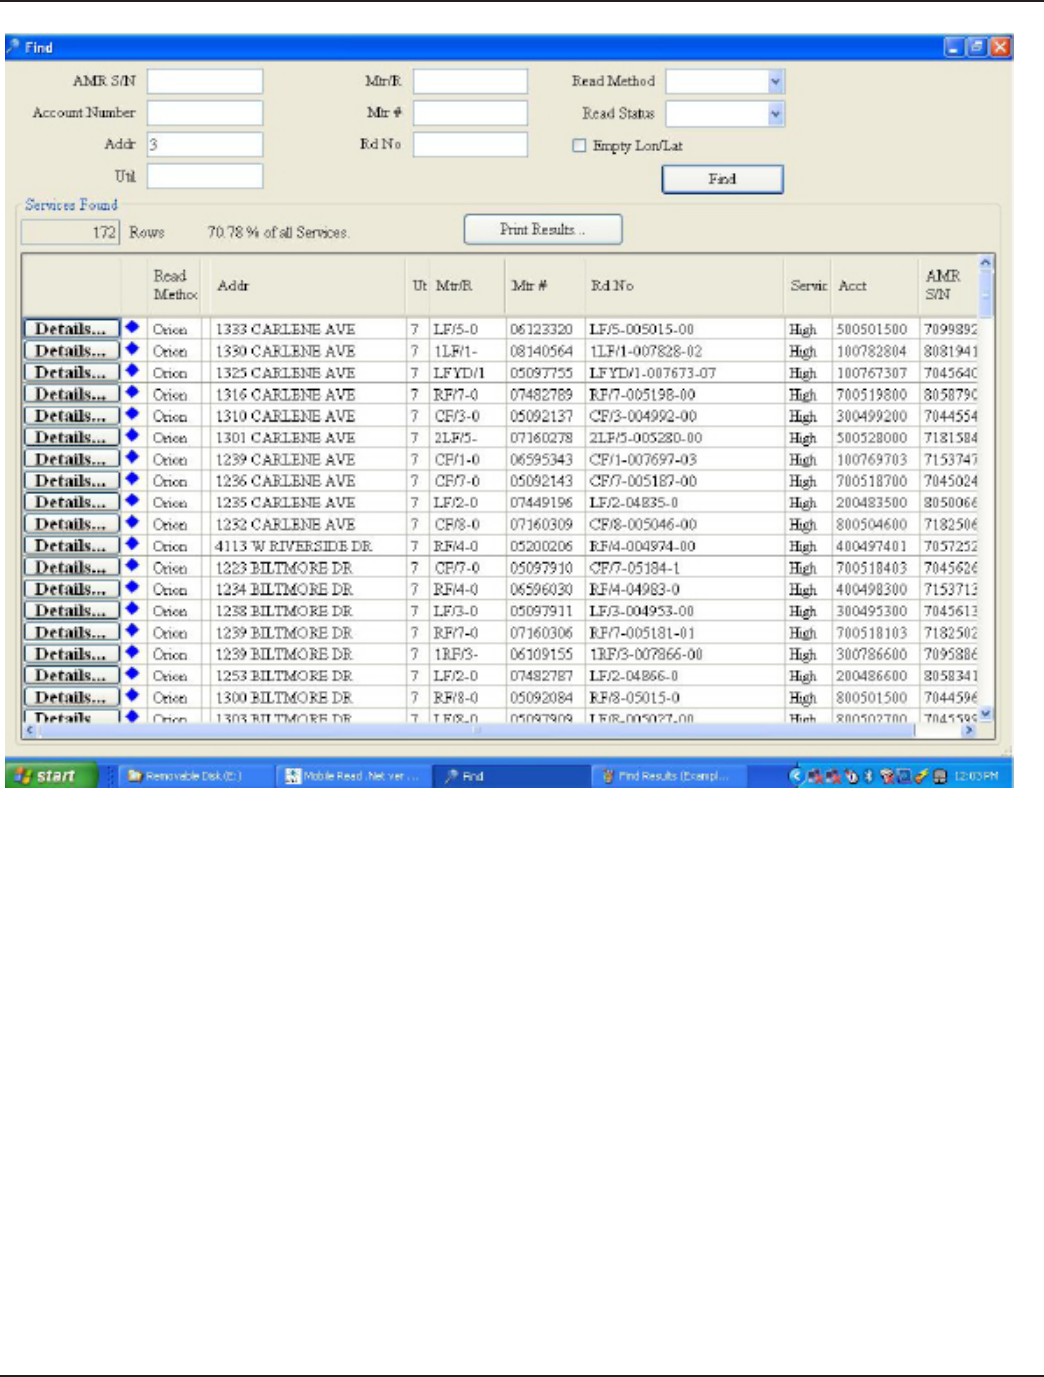
1. To search for a meter, enter information about the particular meter into one of the search elds. For example, if you
enter “3” to the Addr eld, the following result is generated:
Page 45
12-10
Installation & Operation Manual
Figure 40: Find Results (Example 1)
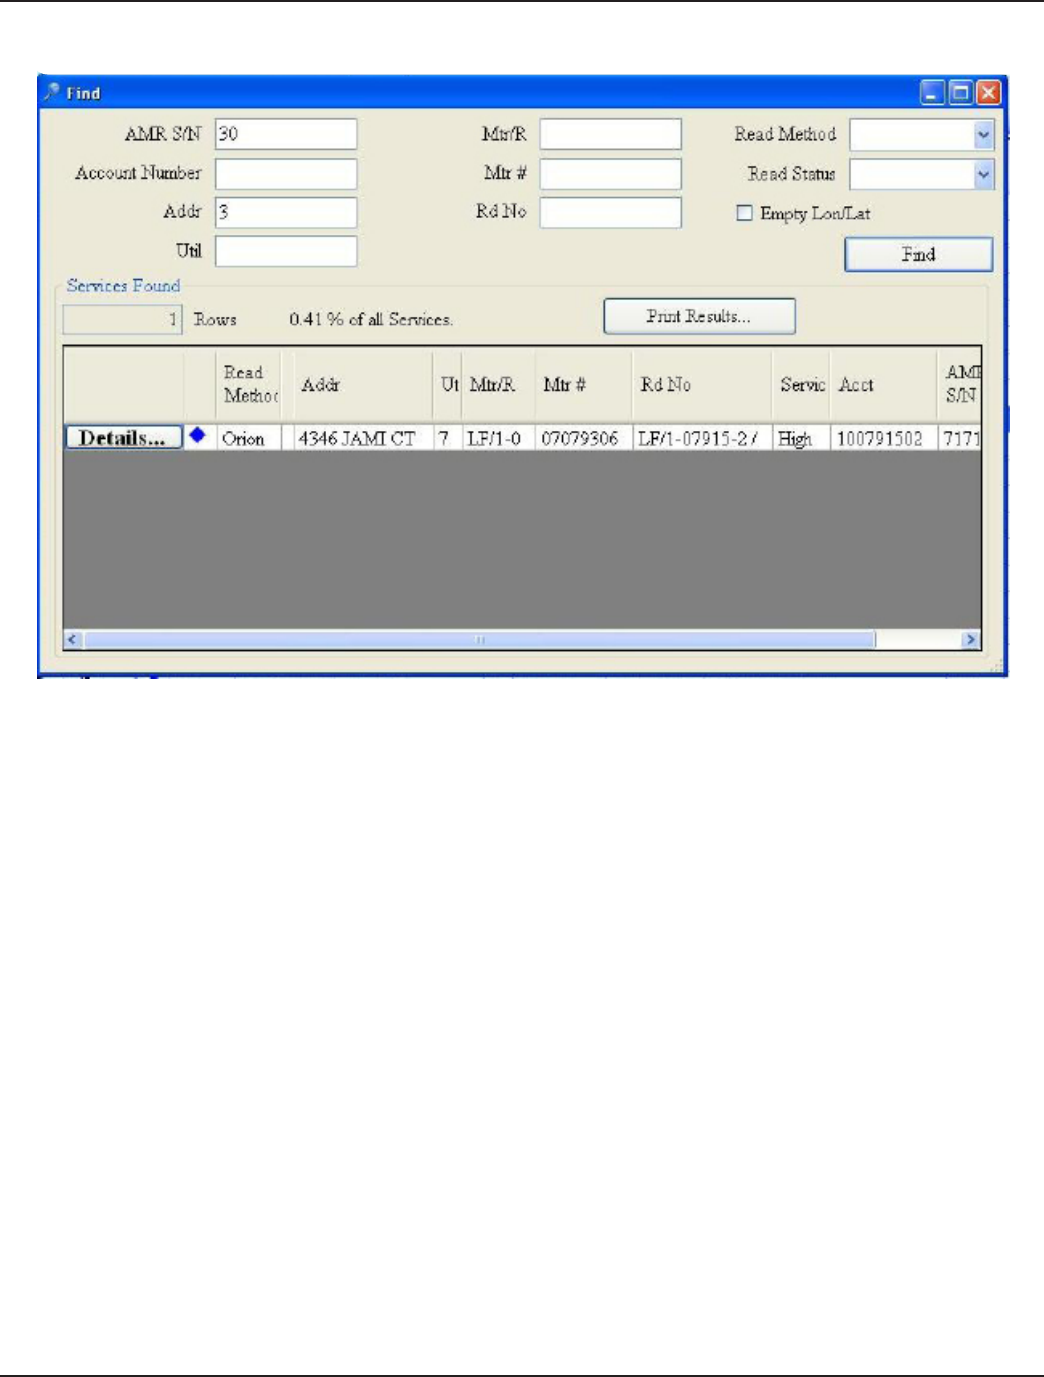
Result: In Example1, there are several meters that have the value of “3” in their address eld. If “30” was entered in the AMR
S/N eld, the search would be narrowed to the meters tting both criteria.
Page 46 12-10
ORION® Reading Mobile Software (ORS)
Figure 41: Find Results (Example 2)
In Example 2, there is only one meter in the system that has “3” in the Addr eld and “30” in the AMR S/N eld.
A search can also be performed by the following methods:
• Read Method
• Read Status
• Search by assigned latitude/longitude coordinates
As in the example above, if information is entered in more than one eld, ORS will search for meters meeting all search criteria.
To view the details of any meter found in the search, select on the Details button.

Page 47
12-10
Installation & Operation Manual
Reports
The Reports feature organizes meter reading information in a number of dierent ways to facilitate easy information
gathering. The screen is organized to accommodate report types, lters, and exceptional status lters.
• Special Reports:
-Summary: This report contains the current status of in-progress meter reading.
-Audit: The audit report shows all error conditions encountered in ORS according to time and date.
-Alert: The Alert report allows you to view each of the alert messages that have been displayed during meter
reading.
-Out-of-Route: The Out-of-Route report records endpoints that were received while driving the route, but are
not included in the loaded route.
• Read/Unread Filter
-Read Services Only: Tapping the Read Services button will display all meters in the loaded route that were
successfully read.
-Only Low/High Readings (check box associated with Read Services Only option): Checking the High/Low
box will restrict the Read Services list to only those meters with a high or low reading.
-Unread Services Only: Tapping the Unread Services Button will display all meters in the loaded route that were
not successfully read.
-Only Missed (check box associated with Unread Services Only): Checking the Only Missed box will restrict
the Unread Services list to only those meters that have been marked as missed.
• Exceptional Statuses Filter
-Tamper: Checking the Tamper box displays the list of endpoints that have reported a tamper condition.
-Reverse Flow: Checking the Reverse Flow box displays the list of endpoints that have reported a reverse flow
condition.
-Encoder Error: Checking the Encoder Error box displays the list of endpoints that have reported an Encoder
Error condition.
-No Usage: Checking the No Usage box displays the list of endpoints that have reported a No Usage condition.
-Potential Leak: Checking the Potential Leak box displays the list of endpoints that have reported a potential
leak condition.
Supported Features:
• Reports can be maximized to the full screen to see all of the details.
• Rows are color coded for the reading status: gray background for tampers and leaks, have a color background for
high and low readings, and have a white background for all other meters.
• Reports can be sorted by selecting a column header (similar to a spreadsheet).
• If you connect a printer to your laptop, you can print your report if you click Print Report.
Page 49
12-10
Installation & Operation Manual
Figure 43: Read Services Result
Note: For meter icons that indicate special conditions, refer to "Figure 30: Legend Icons" on page 35.
The check boxes beneath the “Exceptional Statuses Filter” allow user-selectable report criteria.
For example, to see only those meters that have been successfully read but are reporting a Potential Leak status:
1. Select the Read Services Only button.
2. Select the Potential Leak box.
3. As with the other reports, if you select the Details button, the Meter Details screen for that meter is displayed.
4. To report on all conditions, select the Clear Exceptional Statuses button.
- Unread Services Only – lists all unread meters
- Read Services – list the meters read successfully
- Tampered Report – lists meters reporting a tamper condition
Page 50 12-10
ORION® Reading Mobile Software (ORS)
Each of the Special Reports for the ORS application is described below. Each report is automatically updated as the meter
reader views the report and ORS gathers data.
Grand Summary Report – This report contains the current status of in-progress meter reading.
Figure 44: Summary Report
• Total Accounts – The number of accounts that were loaded in the route file.
• Total Services – The total number of services that were included in those accounts.
• Unread Services Only – The number of services/meters that were not read.
• Out-of-Route Services –The number of out of route services that were read.
• Time Spent Reading –The total amount of time (in minutes) ORS was in active reading mode.
• Time Spent Paused –The total amount of ORS was paused.
• Low Read – Exceptionally low readings meter readings.
• High Read – Exceptionally high meter readings.
• Tamper – The number of ORION endpoints reporting a tamper condition.
• Encoder Error – The number of ORION endpoints connected to encoders reporting an error condition.
Page 51
12-10
Installation & Operation Manual
• Potential Leak – The number of ORION water endpoints reporting a potential leak condition.
• Reverse Flow – The number of reverse flow meter readings that were recorded.
Audit Report - The audit report shows all error conditions encountered in ORS according to time and date. Here are the
dierent elds reported in the audit report:.
Figure 45: Audit Report
The audit report displays the following error alerts:
• GPS errors
• ORION receiver errors
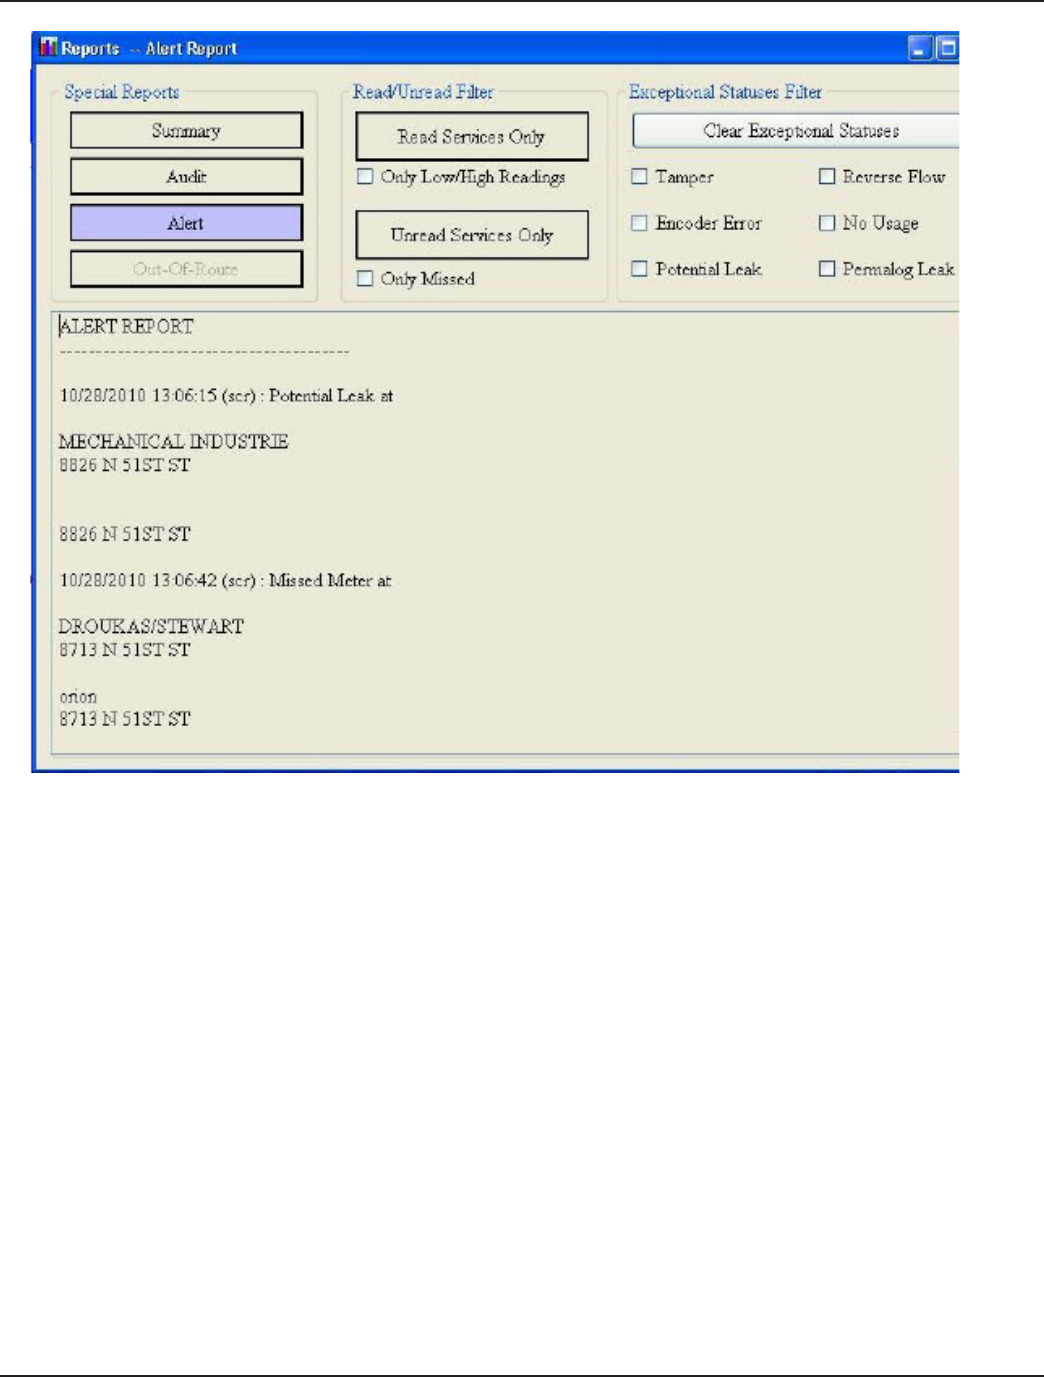
Alert Report – The Alert report allows you to view each of the alert messages that have been displayed during meter
reading.
These reports use the same format as List View.
Page 52 12-10
ORION® Reading Mobile Software (ORS)
Figure 46: Alert Report
This report indicates potential leaks that were sited and provides the addresses associated with those potential leaks.
It includes the time and date when the reading occurred.
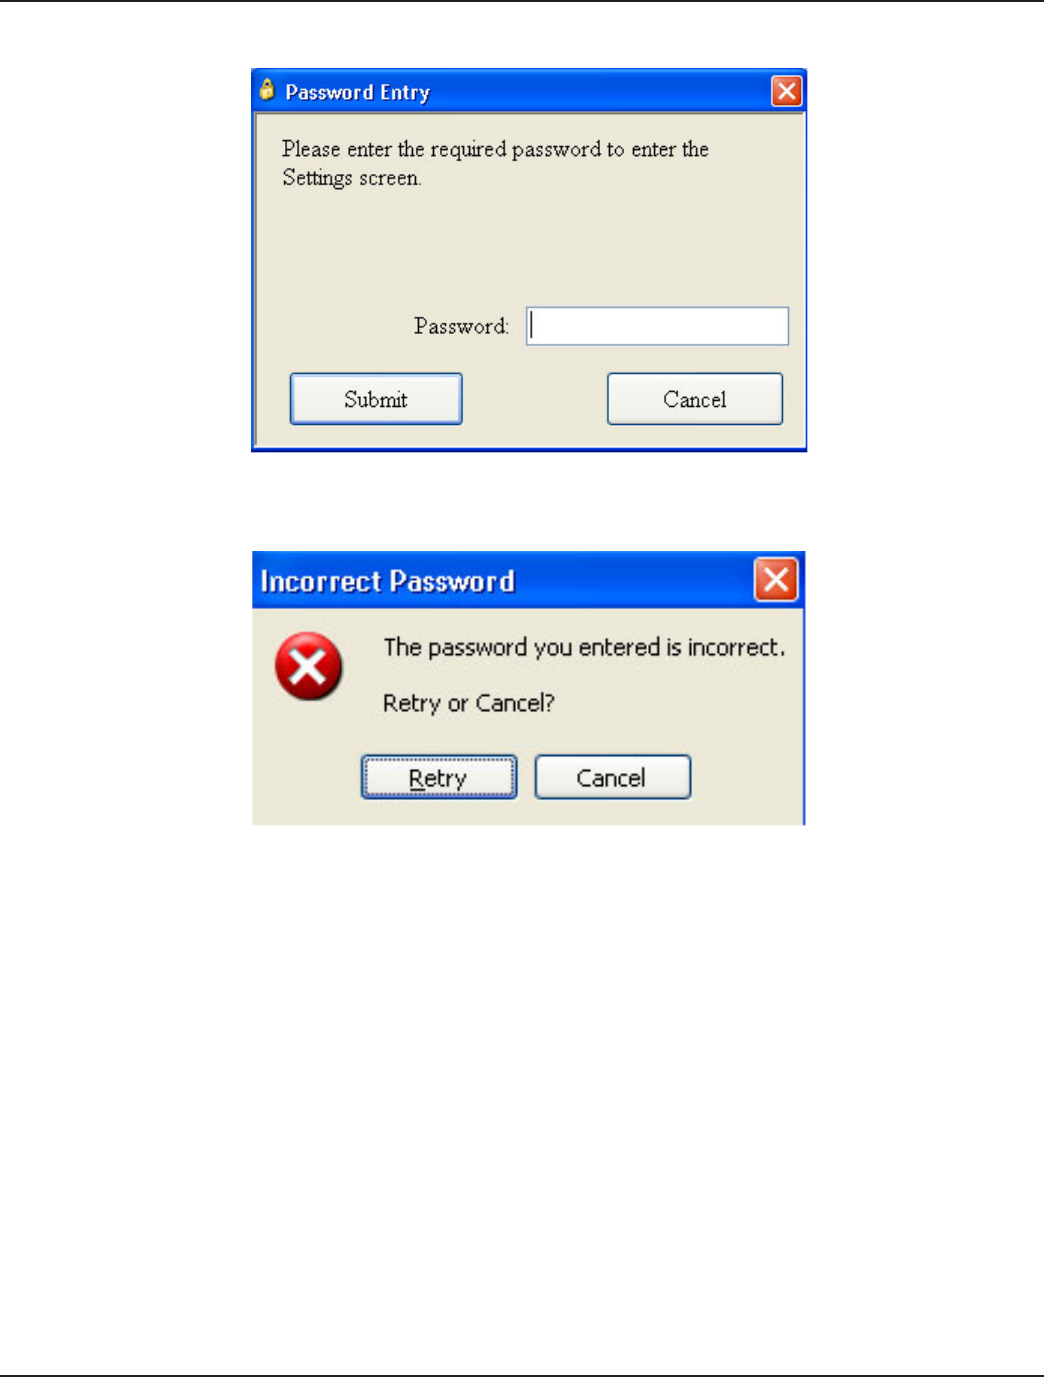
Setup
The Setup button allows you to change the settings being used by the software in its operations. The settings are stored on
the following ve tabs:
• General
• Alerts
• Map
• Communications
User Interface
A password is required to access and change any settings. If you make changes to any of the tabs and you wish to save, select
the OK button. If you wish to disregard the changes, select the Cancel button.
Note: If you did not change the password in the ORS, the initial password is “ORION.”
Page 53
12-10
Installation & Operation Manual
1. Select the Settings button on the Tool Bar to see the Password Entry screen.
Figure 47: Password Entry
If an incorrect password is entered, the following prompt is displayed:
Figure 48: Incorrect Password
Page 54 12-10
ORION® Reading Mobile Software (ORS)
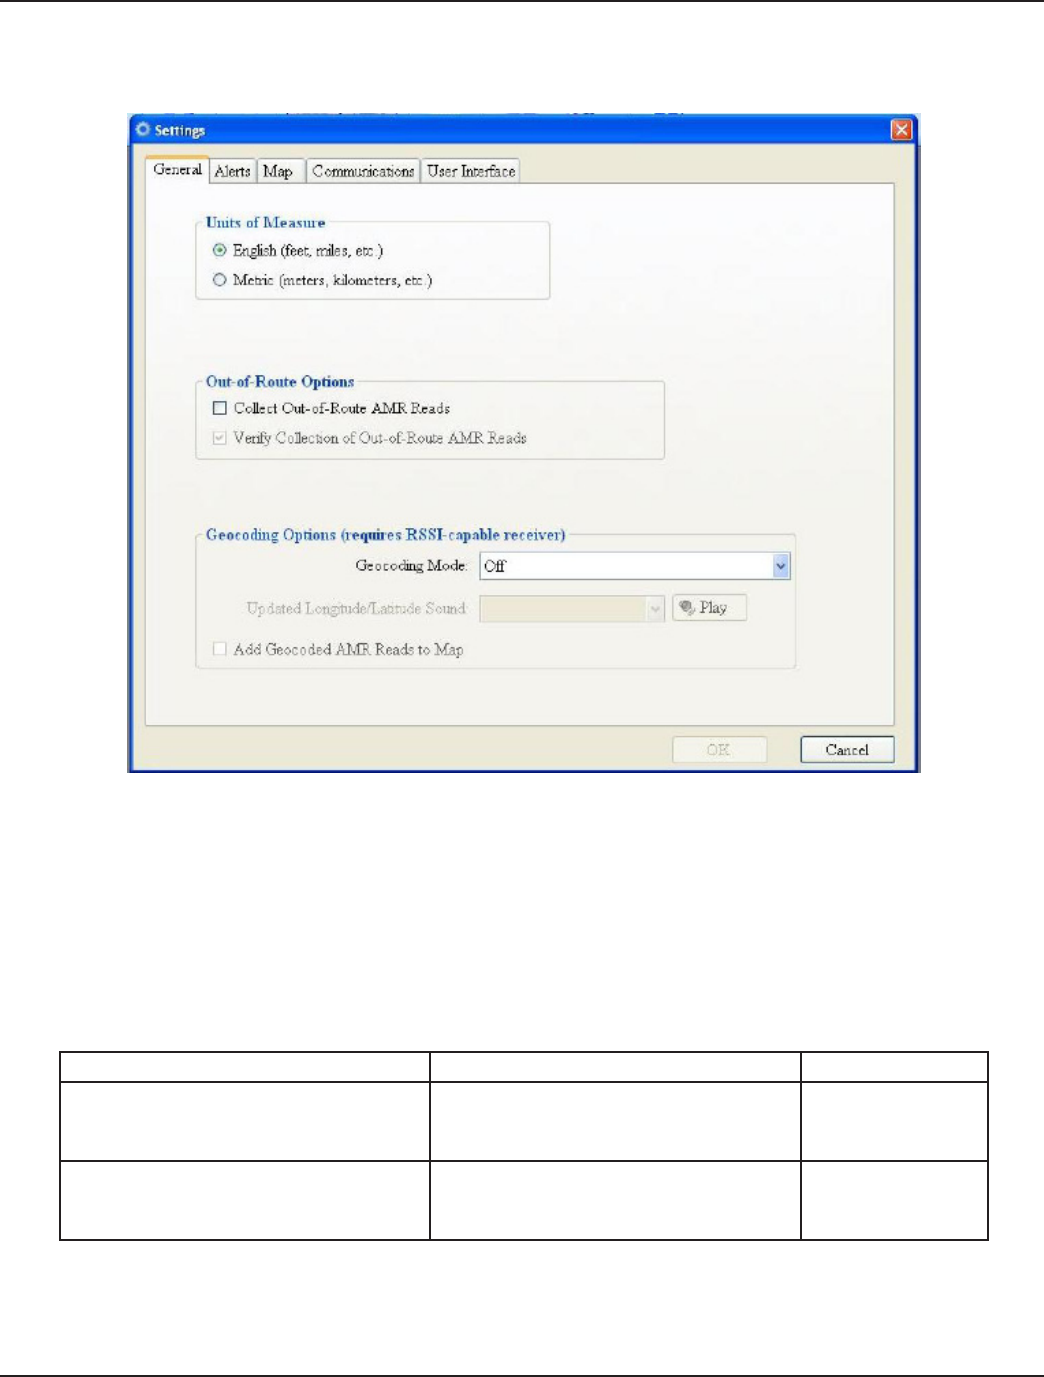
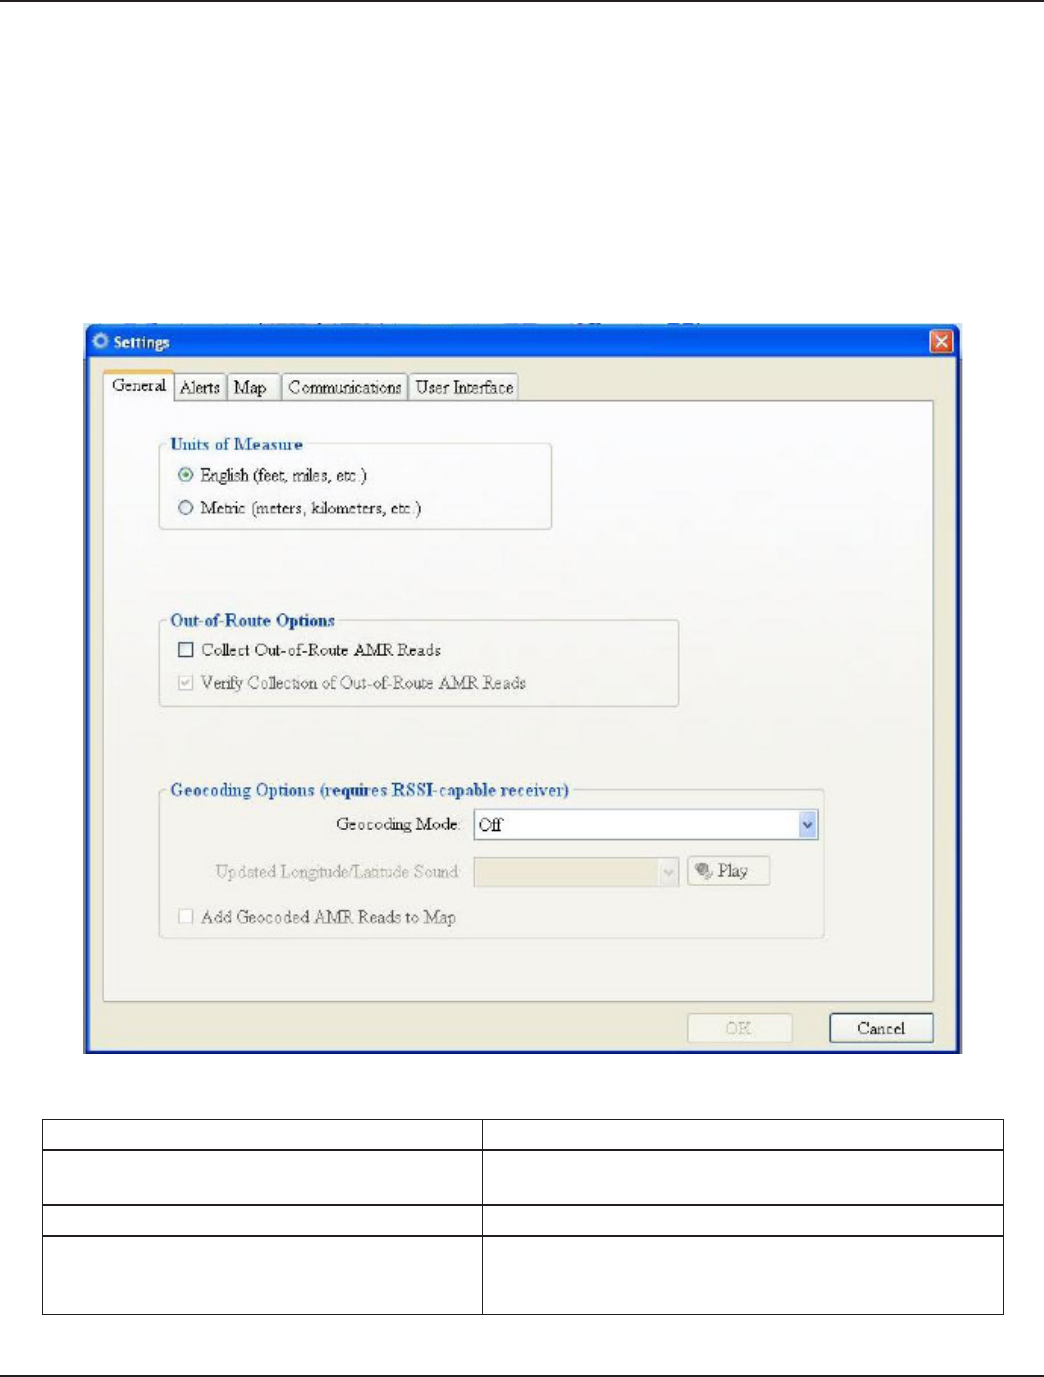
General Tab
The General Tab displays the Units of Measure, Out-of-Route Options, and Geocoding Options.
Figure 49: Settings - General Tab
• Units of Measure: Select English or Metric units
• Out-of-Route Options: If the Collect Out-of-Route AMR Reads box is checked, any readings received that are not in
the route are logged and included when the route is unloaded. If the box is not checked, the laptop only records the
readings for the meters in the route.
Note: When collecting out of route readings, the unload file can become large and may slow down the
performance of the laptop. Badger Meter does not recommend collecting out-of-route readings during regular
meter reading.
If Then Notes
the Verify Collection box is checked,
a software prompt that conrms your
intention to collect readings outside of
the route is displayed.
the Verify Collection box is not checked, this prompt is not displayed.
It is recommended
that the box is
checked.
• Geocoding Options: If the Geocoding Mode is ON (and you have an RSSI Receiver), the software will store the
vehicle latitude and longitude coordinates for the meter’s location when the meter read message with the strongest
signal is received. When geocoding, choose the type of audio alert for when meters are added to the map. Refer to
the Geocoding section of this manual.
Page 55
12-10
Installation & Operation Manual
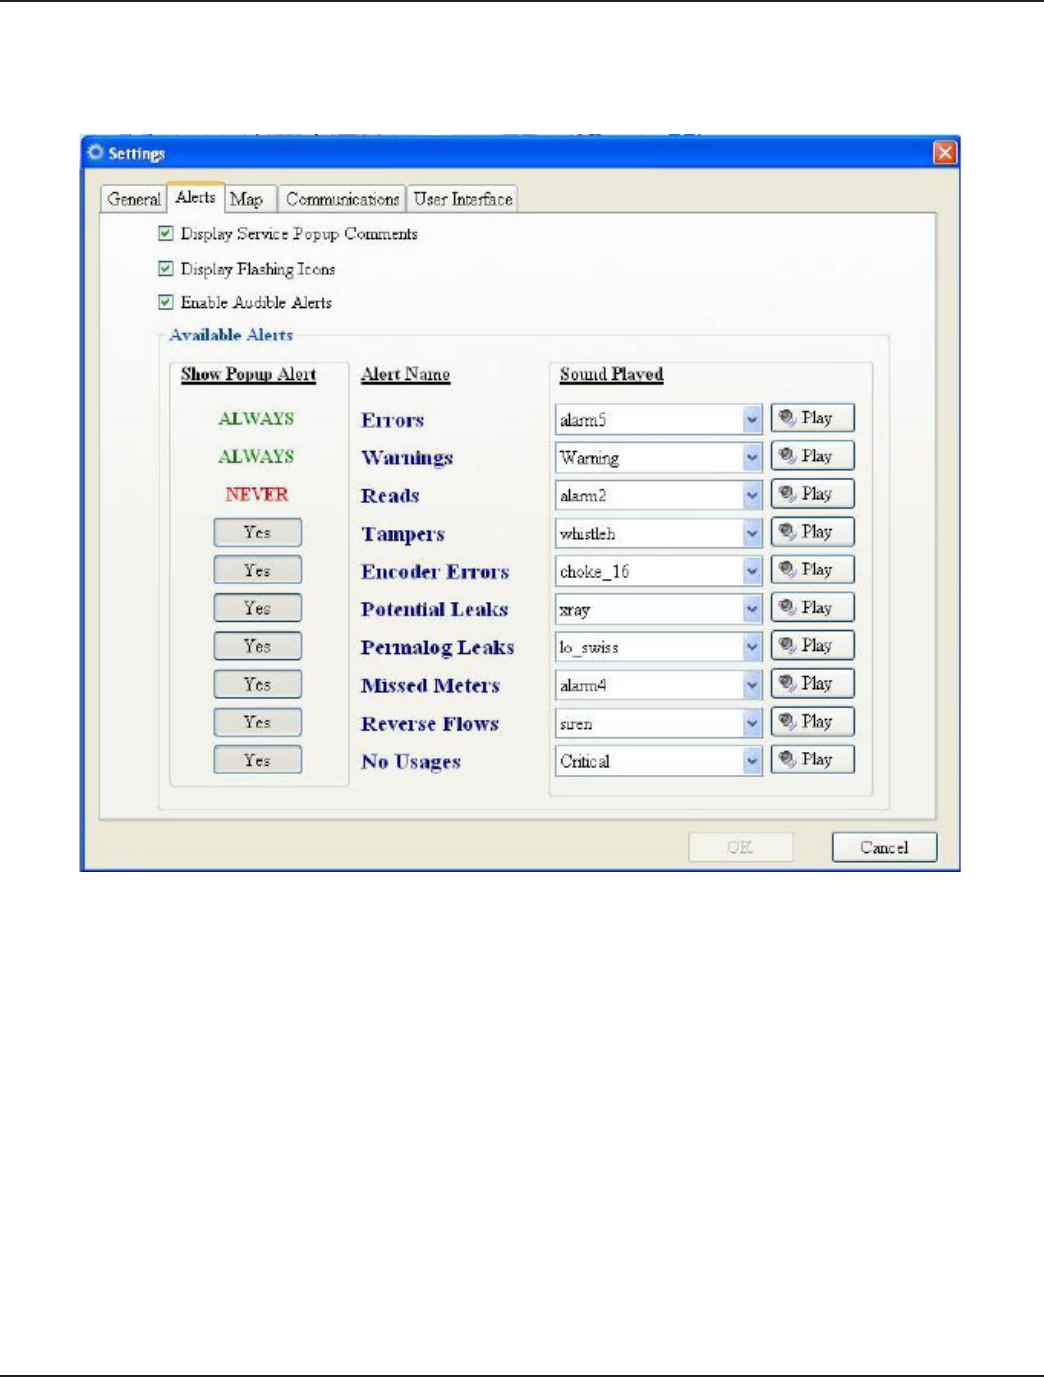
Alerts Tab
The Alerts Tab allows users to set alerts based on sound preferences. This option also allows the user to set pop up and
ashing icon options.
Figure 50: Settings - Alerts Tab
• Display Service Popup Comments: When the box is checked, any comments sent from the route management
system that are associated with a particular meter will be displayed as an Alert Message. If unchecked, the alert will
not appear.
• Display Flashing Icons: When this box is checked and the GPS or ORION Receiver is not communicating, the GPS
and Receiver icons will flash.
• Enable Audible Alerts: When not checked, NO alerts will sound for ANY alerts. When checked, the sound chosen
for each alert at the bottom of the screen will sound for that particular alert. Note that one of the options for an
individual alert is SILENCE, and that a sound can be reviewed by selecting the Play Sound button.
• Show Popup Alert: The following options are available: Always, Never, Yes and No to change option settings for
alert types as required.
• Alert Name: This option displays the alert names based on the type of the alerts, examples are Errors, Warnings,
Tampers, Leaks etc.
• Sound Played: The sound options provide a range of sounds. Based on user preference, a sound alert can be set for
each alert type.
Page 56 12-10
ORION® Reading Mobile Software (ORS)
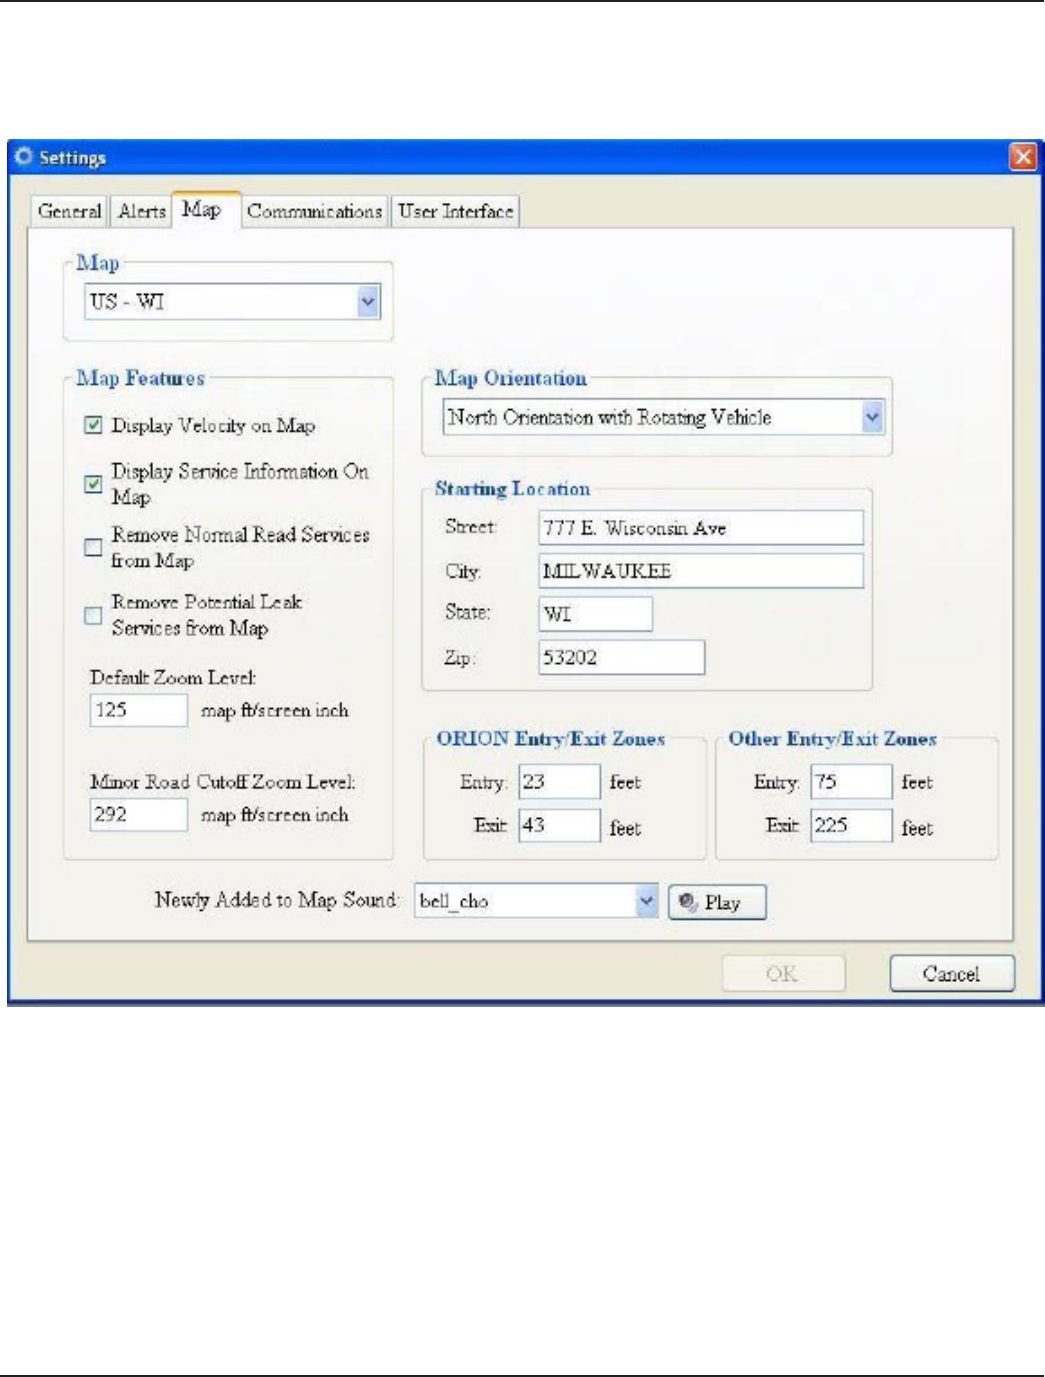
Map Tab
The Map Tab primarily displays the location, features, orientation and entry and exit zones for Maps. Users can customize the
Map display based on their preferences.
Figure 51: Settings - Map Tab
• Map: This field shows the state map that is currently loaded.
• Map Features: Select/deselect map information and detail:
-Display Velocity on Map: When checked, this box displays the speed of the vehicle on the map.
-Display Service Information on Map: When checked, the first field of information is displayed next to the
meter icon.
-Remove Normal Read Services from Map: When checked, the meter icon disappears when a successful
reading is received. If unchecked, the green circle will be displayed.
Note: When you change the value of this setting, you must exit the software and restart it.
-Remove Potential Leak Services from Map: When checked, the meter icon disappears when a potential leak is
received. If unchecked, the red asterisk is displayed.

Page 57
12-10
Installation & Operation Manual
Note: When you change the value of this setting, you must exit the software and restart it.
-Default Zoom Level: A value of 250 will show 250 feet as 1 inch on the screen.
-Minor Road Cutoff Zoom Level: When zooming out past this value, only the major roads are visible.
• Map Orientation: Choose how the map is displayed while reading meters:
-North Orientation and Rotating Pointer: The map shows north at the top of the screen and the pointer
representing the vehicle will point in the current driving direction (the most common choice).
-North Orientation: The map always shows north at the top of the screen.
-Rotating Map: The top of the screen indicated the current driving direction; the map rotates as the vehicle turns
corners.
• Starting Location: This address (or latitude / longitude coordinates) will show on the map when you Start Reading
meters, until the GPS antenna reports the current location of the vehicle. From then on, the map will center at the
location of the vehicle.
• ORION Entry/Exit Zones: These distances specify when a endpoint is within range of the receiver, and when it
has moved out of range. If a endpoint was within range, and moved out of range without receiving a reading, that
endpoint is marked as MISSED.
• Other Entry/Exit Zones: These zones are used for reading technologies other than ORION.
• Newly Added to Map Sound: When geocoding and a new meter is added to the map, you will hear the selected
sound.
Page 58 12-10
ORION® Reading Mobile Software (ORS)
Communications Tab
Figure 52: Settings - Communications Tab
• ORION/Permalog/Datamatic Receiver:
-Com Port: The COM port assigned to the receiver.
-No Data Received Timeout (ms): The time (in milliseconds) needed to determine that the GPS has stopped
operating.
-No Packets Received Timeout (ms): The time (in milliseconds) needed to determine that the receiver is
malfunctioning.
• TRACE Receiver: If reading Trace meters, you must set the COM port.
• GPS Receiver:
-Com Port:The COM port assigned to the GPS receiver.
-Allow GPS In List View Only Mode: Set Latitude / Longitude values even when in List Mode.
-No Data Received Timeout (ms): The time (in milliseconds) needed to determine that the GPS has stopped
operating.
-No Packets Received Timeout (ms): The time (in milliseconds) needed to determine that the receiver is
malfunctioning.
Page 59
12-10
Installation & Operation Manual
• RAMAR Receiver: Choose the COM port and the type of RAMAR receiver you are using.
-Type: Choose the type of RAMAR receiver you are using.
-No Data Received Timeout (ms): The time (in milliseconds) needed to determine that the GPS has stopped
operating.
-No Packets Received Timeout (ms): The time (in milliseconds) needed to determine that the receiver is
malfunctioning.
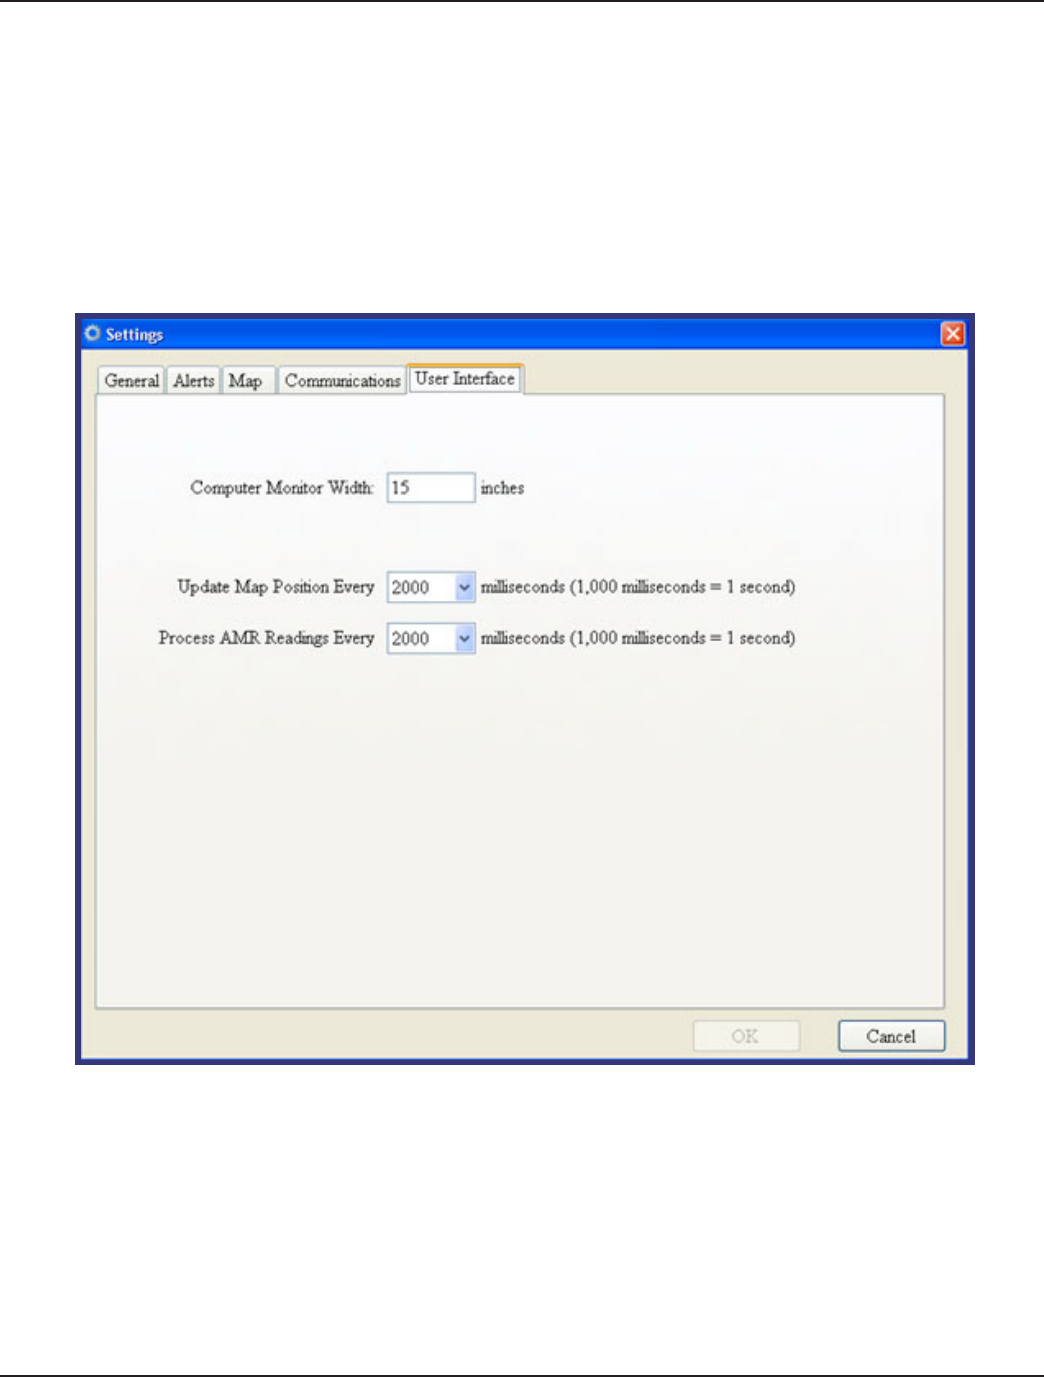
User Interface Tab
Figure 53: User Interface Tab
• Computer Monitor Width – For all Panasonic Toughbook computers, this field is set at the factory. If you are
running ORS on a different computer, or you have recently updated the software, measure the width of the screen
and enter it here.
• Update Map Position – This value (in milliseconds) specifies how often the map is updated for position.
• Process AMR Readings – This value (in milliseconds) specifies how often the acquired readings are processed.

Page 60 12-10
ORION® Reading Mobile Software (ORS)
Geocoding Meter Locations
To capture the approximate location of the meters automatically, the location coordinates (latitude and longitude) can be
gathered automatically. The GEOCODE feature of the ORS Software assigns the current location of the vehicle to the meter
when the meter reading transmission is received. Furthermore, to capture the closest location to the meter, the software
will also store the location of the meter reading that had the strongest signal strength. This is possible through the use
of the updated ORION Receiver, which reports the meter reading transmission information as well as the strength of the
transmission that was received.
Note: You must have an ORION receiver that has the Signal Strength capabilities built into it.
To check if your receiver has these capabilities, please contact the Badger Meter Technical Support group.
Scenario
As an example, let’s assume you are driving down a street with meters that require locations and the GEOCODE feature is
turned on. When the rst meter reading is received from a meter that requires a location, the software will store the reading,
place the green dot on the map at the current location of the vehicle to show that the meter has been read, and make a sound
indicating that the location is stored.
As you drive further down the road, you may receive more meter readings from that meter. If the signal strength from one
of the meter readings is greater than the one that was stored above, the location of the meter is updated but no changes are
made to the screen and no other sounds are heard.
Because the locations are updated whenever a meter reading with a stronger signal is received, the initial location of the
meter as it is placed on the map may not be the location that is stored once the route is completed. For example, you might
receive a meter reading from 52nd street while you are driving on 51st street. The icon will be added to the map on 51st
street when the rst meter reading is received. However, when driving on 52nd street, stronger meter readings will be
received and the location information will be updated in the database, resulting in a stored location on 52nd street.
Because the location information is updated whenever a stronger meter reading signal is received, it is important when using
this method to assign locations, that every street, alley, or access way be driven and that the slowest possible speed be used
when driving. These techniques will maximize the number of meter readings received for each meter, yielding better location
assignments.
Steps
The steps for setting the meter coordinates based on the signal strength are as follows:
1. Assemble the system and begin reading meters as usual.
2. When you arrive at the area where the latitude and longitude values are to be assigned, stop the vehicle
3. To begin geocoding, in the Settings, on the General tab, change the Geocoding Mode to one of these options:
- Add Only: Meters that do not have location data will be added to the map.
- Update only: Meters that already have location data will be updated, but no new meters will be added.
Note: If you wish to see an icon on the map for a new meter, be sure to check the box for Add Geocoded AMR reads to
map.
4. The display changes to show that you are geocoding. Drive the route slowly (between 5 and 10 mph).
As meter readings are received, the software logs the latitude and longitude values of each meter reading. The
location values for the strongest reading received for each meter are stored.
5. If you drive over 15 miles per hour, the speed display will turn red and you will hear the siren sound. Slow down.
6. When you have completed storing locations, change the GEOCODE status to OFF on the General tab or the Settings
screen. The display returns to the standard one.
7. When you unload the readings into Reading Data Management Software, the latitude and longitude values are
unloaded.
Page 61
12-10
Installation & Operation Manual
The following observations can be made audibly or visibly:
Figure 54: Geocoding
Once you click the GEOCODE button, you are slowly driving the route under 10 MPH, and a meter reading comes in that
requires a location, you will hear a sound and the map display will show a new green circle for the meter that was just read.
Each time you receive a meter reading from a meter that requires a location, you will hear the sound and see another green
circle. In the background, the software is ne-tuning the location information for meters that require locations when a
stronger meter reading transmission is received. However, you will not hear or see anything while that is happening. Once
you have driven every street where coordinates are needed, you can set the GEOCODE setting to OFF, which will turn o the
assignment of coordinates and return to normal operation.
Page 62 12-10
ORION® Reading Mobile Software (ORS)
Processing Meter Readings Not in the Route
There are times when it is convenient to read and store the readings of ALL the meters in an area, not just those meters
included in the route. For these occasions, the ORION Mobile Reading Software provides the Out of Route Processing feature.
When enabled, the features will log the readings of all meters it encounters as if they were in the route. The readings can also
be unloaded for use in billing.
The Out-of-Route Processing feature works as follows: When a reading is received, the software stores the reading in the
route and marks the meter as read. If the meter is not in the route, it is added to a table of Out of Route meters. If you wish
to view the meters that have been saved that are not in the route, you can display the Out of Route Report from the Reports
screen.
The Out-of-Route Processing is enabled on the “General” Settings screen.
Figure 55: Settings Tab
If Then
the Collect Out-of-Route Reads is not checked, the ORION Mobile Reading Software performs normal route
meter reading.
the Collect Out-of-Route Reads eld is checked, the other option becomes available.
the Verify Collection of Out-of-Route Reads eld is
checked,
a software prompt asks you whether or not you want to
read Out-of-Route meters when you press the Start Reading
Meters button.
Page 63
12-10
Installation & Operation Manual
This is handy in the event you are reading Out-of-Route meters on one day, and performing normal meter reading on the
next day. If you forget to turn o the Out-of-Route reading, you will be reminded to do so before you begin normal meter
reading.
Note: It is recommended that you always have this eld checked.
The second eld, Verify Collection of Out-of-Route AMR Read icons on Map, if checked, displays question marks on the
map display where an Out-of-Route reading was received.
Out-of-Route Reading Example:
Let’s assume that you have the Collect Out-of-Route Reads and Verify Collection of Out-of-Route Reads elds checked. On
the main menu, before loading a route, the Start Reading Meters button is available, allowing you to gather any readings
heard.
Figure 56: Main Menu
Page 64 12-10
ORION® Reading Mobile Software (ORS)
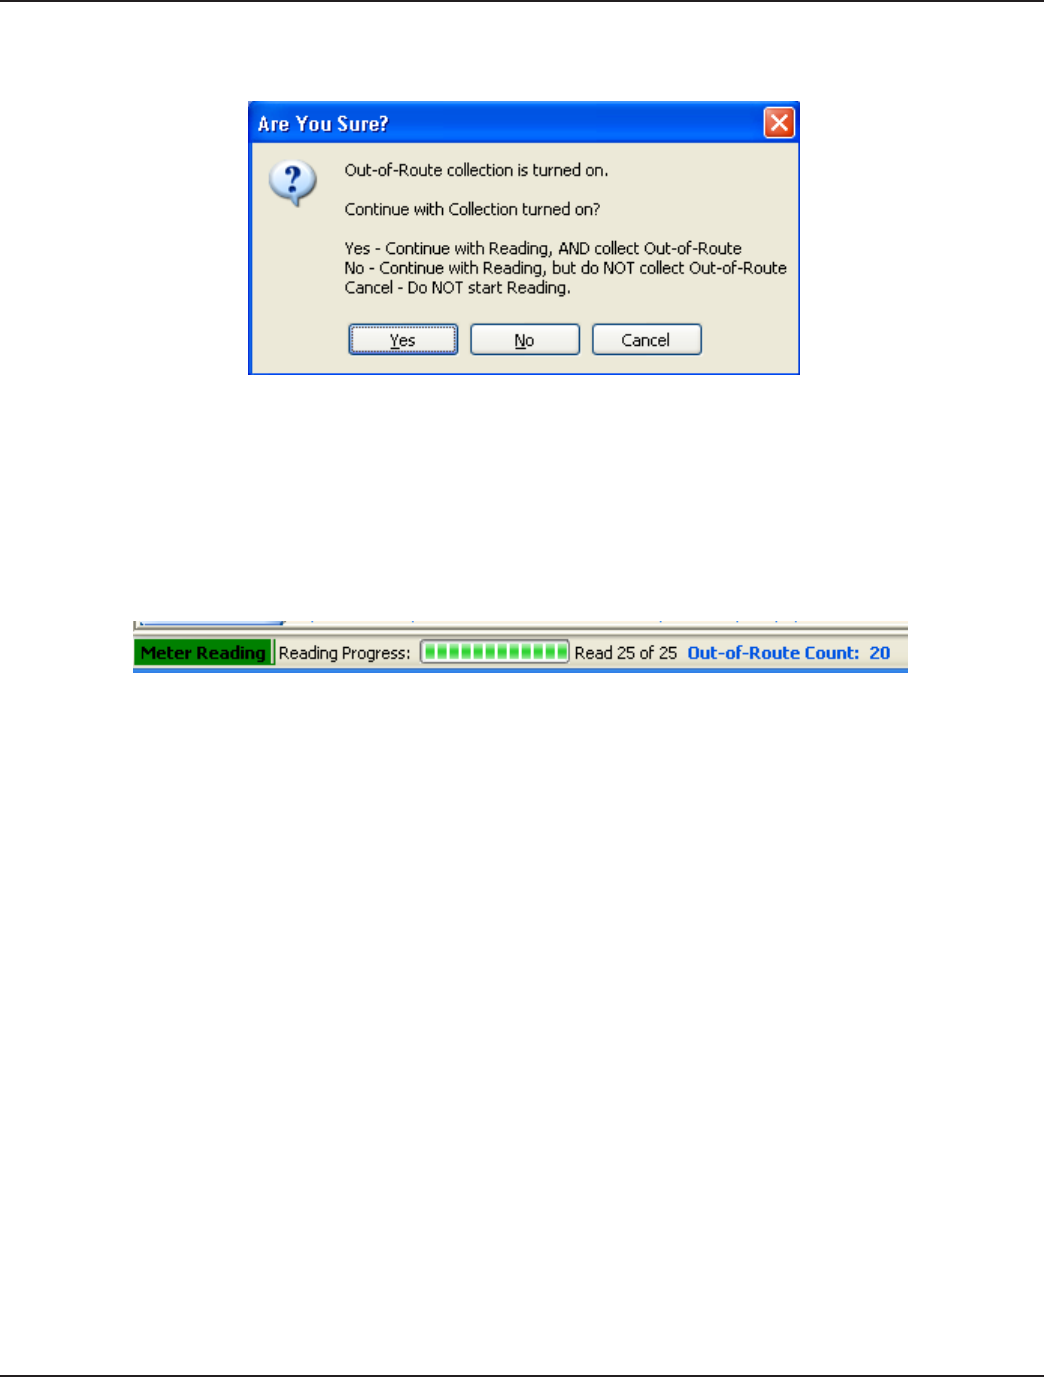
Once the route is loaded and you click Start Reading Meters, the following prompt is displayed to conrm your intention to
collect out-of-route meter readings.
Figure 57: Confirmation Prompt
8. If you wish to collect Out-of-Route Readings, click Yes.
9. If you click NO, the Out-of-Route processing is turned o automatically.
Note: You do not need to proceed to the Setup screen to turn o the Out-of-Route Reading feature.
Note: When reading Out-of-Route meters the status bar at the bottom shows the status of the route as
well as the number of meters read that were not in the route.
Figure 58: Status Bar
Page 65
12-10
Installation & Operation Manual
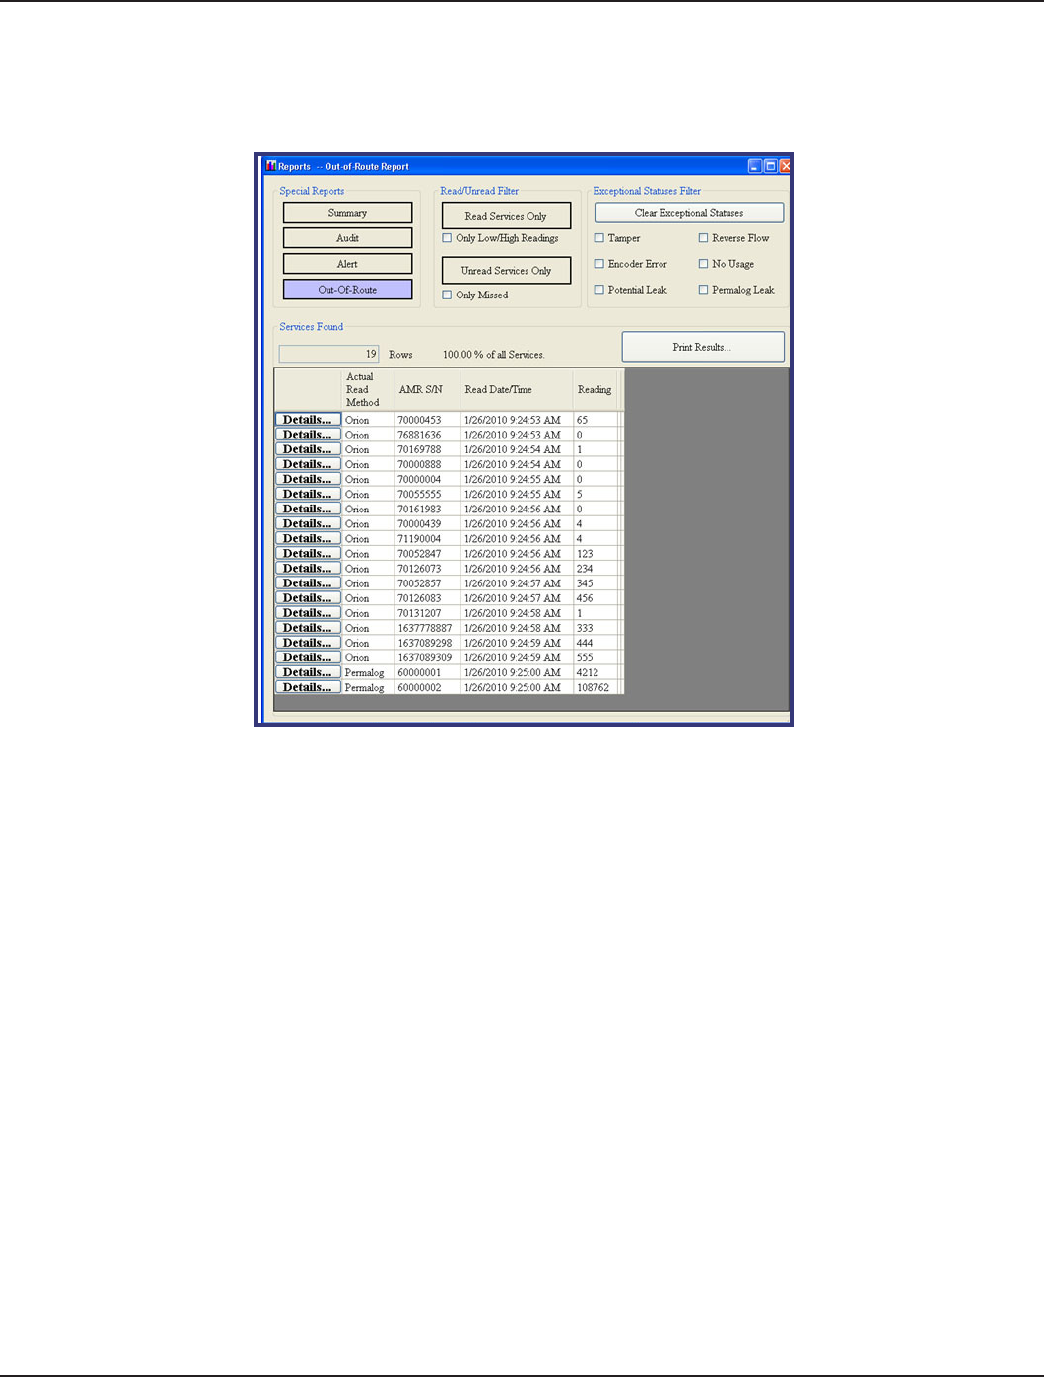
The Summary report shows the number of Out-of-Route meters read.
10. If you select the Out-of-Route Report button, the Out-of-Route Report is displayed.
Figure 59: Out-of-Route Report
When meter reading is completed and you unload the route, those meter readings that were not in the route will be added to
the unload le. The Reading Data Management Software will then include them in the Unload report, and store them if they
are in the database.
If you chose to display the Out-of-Route meters on the Map display, the ORION Mobile Reading Software will log the location
of the meter reading on the map with a question mark “?” icon.
Page 66 12-10
ORION® Reading Mobile Software (ORS)
Unload
Once you complete the meter readings, use the Unload Meter Readings button on the Main Screen to write the meter
reading data. The readings can then be uploaded into the Reading Data Management Software.
Figure 60: Unload Data
When you unload, the data gets automatically archived in case the disk is misplaced or destroyed before uploading to
Reading Data Management Software. Select the Unarchive button if you need to access meter readings from a prior reading
session.
Page 67
12-10
Installation & Operation Manual
Figure 61: Endpoint Reading
Note: You can use the slider bar to view all the readings.
11. When you are done with the Quick Read screen, click Close.
Unarchive
The Unarchive button loads back a prior route of readings so that the user can save the data (unload) to a disk.
12. Based on the time and date, select the reading session you want to restore and click OK.
Result: The readings will be restored and you will return to the main menu, allowing you to Unload the readings
again.
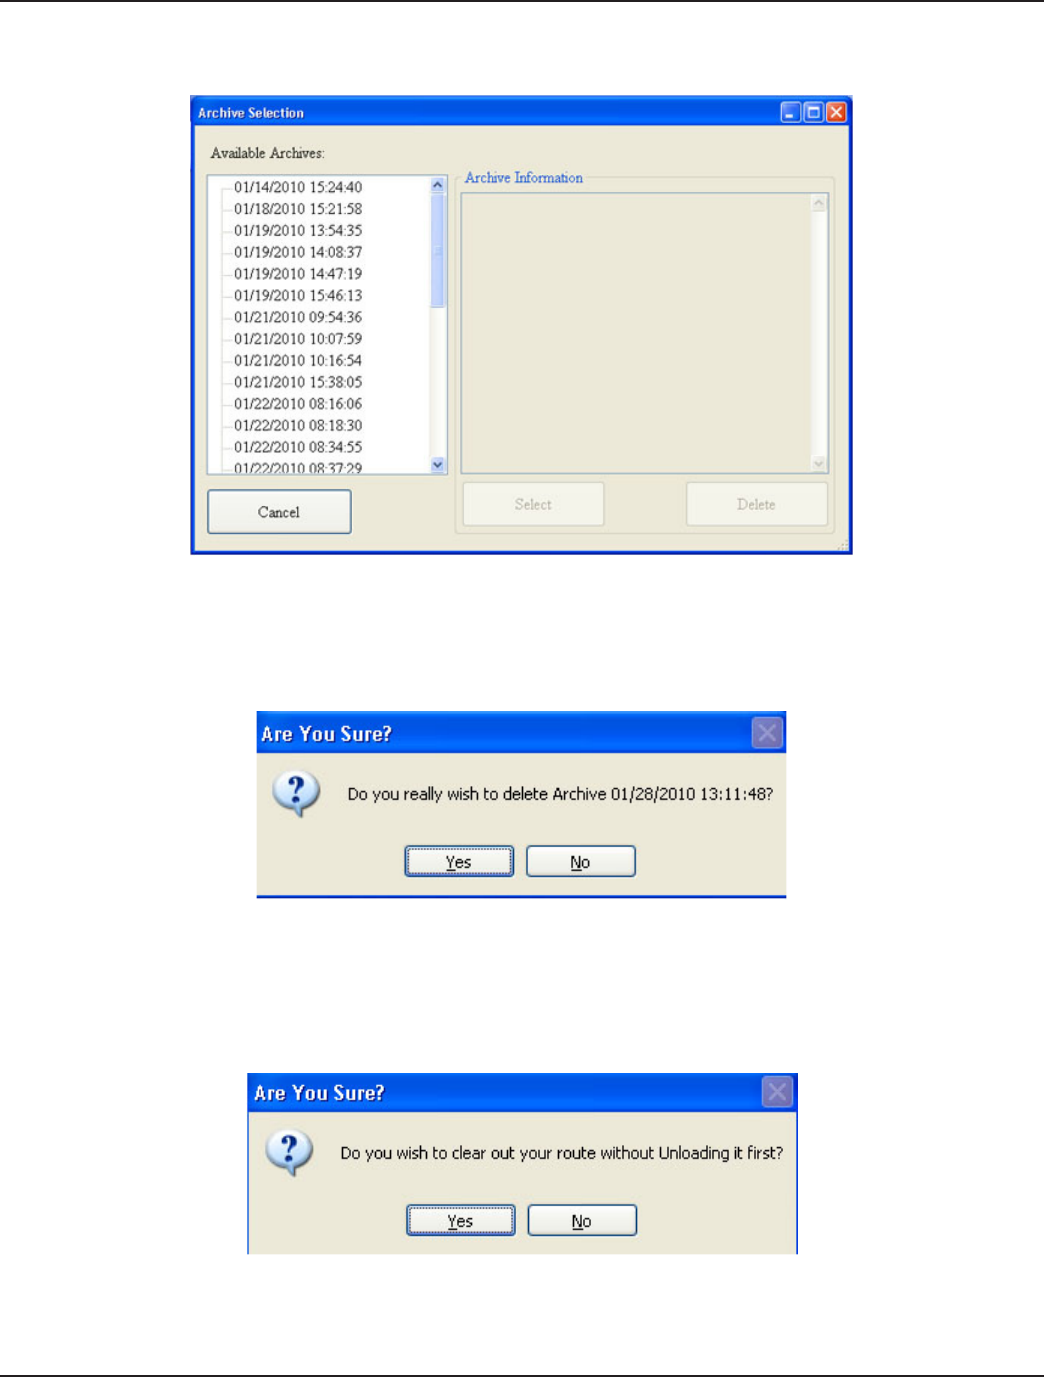
13. If you wish to remove a route from the Archives, select the route and then select the Delete button.
Result: The following ORS prompt is displayed to verify if you wish to remove the screen:
Page 68 12-10
ORION® Reading Mobile Software (ORS)
Unarchive
The Unarchive button loads back a prior route of readings so that the user can save the data (unload) to a disk.
1. Based on the time and date, select the reading session you want to restore and click OK.
Result: The readings will be restored and you will return to the main menu, allowing you to Unload the readings
again.
2. If you wish to remove a route from the Archives, click on the route and click Delete.
Result: A prompt appears asking if you really wish to delete the route?
3. Click Yes to delete the route from the Archive or No to return to the Main Menu.
Note: It is recommended that you do not delete any archived routes until after the following month’s meter reading
is completed.
Clear
The Clear Meter Sequence Data button deletes all current meter sequence data that is currently loaded. It will ask you if you
are sure you want to delete all of the meter reading information currently active in ORS.
4. If you answer Yes , all of the reading information will be cleared, and you will be able to load a new route. If you an-
swer No, you will return you to the Main Menu.

Page 69
12-10
Installation & Operation Manual
Exit
To end the software session, click Exit.
What If Things Go Wrong
During the normal course of operations, ORS may run into problems. These problems can occur in a number of dierent
areas:
• When ORS finds information in the data base that it was not expecting,
• When ORS does not find the expected information.
• When the data base inside ORS reports a problem
• When the operating system on the laptop reports a problem.
While errors do not occur normally, errors can occur in any software product. This section gives you guidelines on how to
respond to the times when ORS reports a problem.
Using Technical Support
When you call 1-800-456-5023, a Support Specialist will answer. Describe the issues that you are experiencing in the ORS
including the information you recorded.
Note: Use information from the recorded text and notes created in the trouble section of the software. Provide the following
information to the Support Specialist:
• The steps being performed on the screen
• Any entries that were made to the screen
• The message in the error window, including any error code and explanation that is shown
• The current state of the laptop
Your Support Specialist may ask you to fax notes or other information to Badger Meter to assist in the investigation.
What To Report To Customer Support
It is important that you report all occurrences of error windows to the Customer Support Hotline. It allows Badger Meter to
improve its products and improve your system at the same time. In some cases, the error may have already been resolved,
and the Support Specialist can send you a software upgrade to correct the problem. In other cases, the Support Specialist can
direct you to perform a function in a certain way so that the error does not occur.
In certain cases, the Support Specialist will direct you to perform some additional steps, if the problem recurs These are
valuable instructions that will speed up the investigation and restore your system to normalcy. If the problem does recur,
follow those steps and call the Hotline. The Support Specialist will gather the information for that particular problem, and
direct you accordingly, if further action is required.
Faxing the Customer Support Group
The Badger Meter Technical Support Group can also be reached by fax at 1-888-371-5982. This may be a convenient way to
follow up with your support specialist on particular steps. This number is in service 24 hours per day, 7 days per week.
E-Mailing the Customer Support Group
The Badger Meter Customer Support Group is also available via electronic mail through the Internet. To send questions or
comments to the Customer Support group, address your e-mail to TechSupport@BadgerMeter.com. The Customer
Support Group can respond to your comments or questions via phone, fax, or e-mail. Just let us know in your message the
type of response you would prefer.

Page 70 12-10
ORION® Reading Mobile Software (ORS)
Intentional Blank Page

Page 71
12-10
Installation & Operation Manual
Intentional Blank Page

Due to continuous research, product improvements
and enhancements, Badger Meter reserves the right
to change product or system specications without
notice, except to the extent an outstanding contractual
obligation exists.
Badger Meter | P.O. Box 245036, Milwaukee, Wisconsin 53224-9536
800-876-3837 | infocentral@badgermeter.com | www.badgermeter.com
ORION® is a registered trademarks of Badger Meter, Inc.
Other trademarks appearing in this document are the property of their respective
entities.
Copyright 2010, Badger Meter, Inc. All rights reserved.