Badger Meter RANG312 Orion ME Transceiver in Trimble Ranger 3 User Manual Exhibit D Users Manual per 2 1033 b3
Badger Meter Inc Orion ME Transceiver in Trimble Ranger 3 Exhibit D Users Manual per 2 1033 b3
Exhibit D Users Manual per 2 1033 b3

ORION®
Automated Meter Reading System for the Trimble® Ranger™ 3
Installation & Operation Manual
ORI-IOM-64-EN (1-12)
IMPORTANT:
This manual contains important information.
READ AND KEEP FOR REFERENCE.

ORION® Automated Meter Reading System for Trimble® Ranger™
Page ii 1-12

CONTENTS
Introduction ...................................................................................................................................5
Audience and Purpose ....................................................................................................................................... 5
System Overview ................................................................................................................................................ 5
Product Unpacking and Inspection .................................................................................................................. 6
License Requirements ........................................................................................................................................ 6
Glossary ..........................................................................................................................................7
Part I: Overall Operations
Trimble Ranger Handheld Overview..........................................................................................10
System Components .........................................................................................................................................10
Handheld Description ....................................................................................................................................... 11
Handheld Setup for Reading Both ORION ME and ORION CE Endpoints .....................................................12
Charging the Handheld Battery .......................................................................................................................13
Conserving the Battery .....................................................................................................................................13
Swapping the Battery Pack (Low Battery) .......................................................................................................14
Handheld Basic Operations ..............................................................................................................................15
Using the Touch Screen .....................................................................................................................................16
General Care of the Handheld ..........................................................................................................................17
Program Startup .......................................................................................................................... 18
Copyright Screen .........................................................................................................................20
Changing the Device Name ..............................................................................................................................20
Battery Status ...................................................................................................................................................20
Main Menu ................................................................................................................................... 21
Part II: User Guide
Reading a Route ...........................................................................................................................23
Read Route Login ..............................................................................................................................................23
Installation & Operation Manual
Page iii
1-12

Read Screen .......................................................................................................................................................24
Read Results ......................................................................................................................................................26
Manual Reads ....................................................................................................................................................26
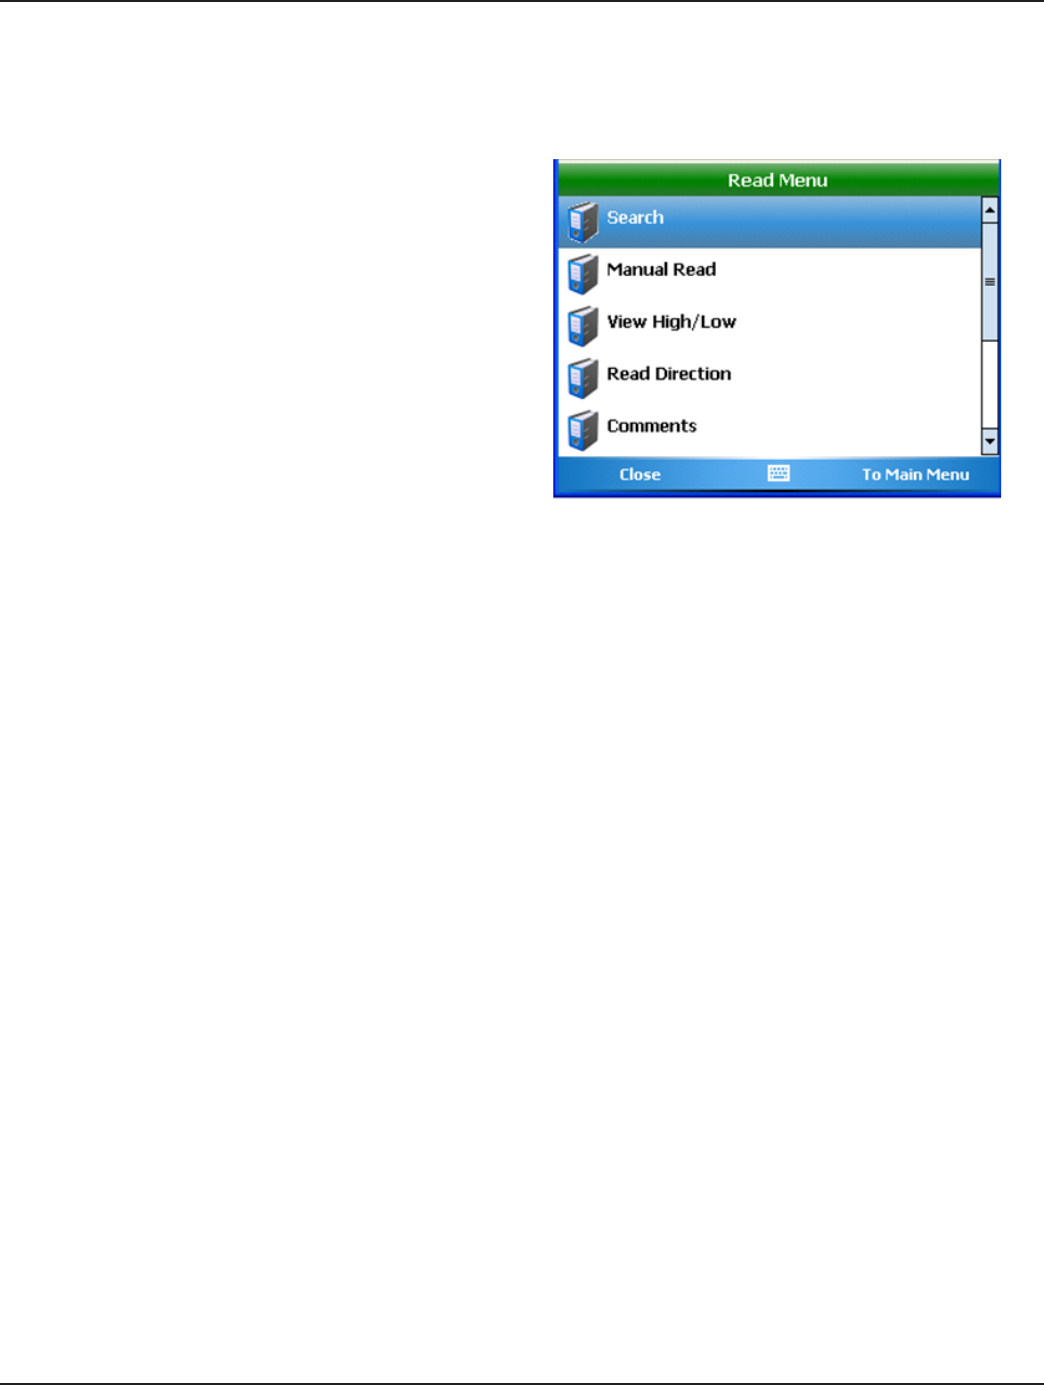
Read Menu ................................................................................................................................... 27
Search .................................................................................................................................................................28
Manual Read .....................................................................................................................................................30
View High/Low ...................................................................................................................................................30
Read Direction ................................................................................................................................................... 30
Comments ..........................................................................................................................................................31
Utilities ............................................................................................................................................................... 34
Route Info ..................................................................................................................................... 35
Program & Quick Read ................................................................................................................ 36
Accessing Program & Quick Read ....................................................................................................................36
ORION CE .....................................................................................................................................37
ORION ME/SE Utility ....................................................................................................................42
Utilities .........................................................................................................................................50
Progress ............................................................................................................................................................ 50
Battery Info ...................................................................................................................................................... 50
Settings ............................................................................................................................................................. 51
PROGRAMMING AN ORION GAS MODULE .................................................................................55
Changing the Drive Circle (Reprogramming) ................................................................................................ 58
Clearing Exceptions ......................................................................................................................................... 59
Appendix
Using the Handheld Keypad .......................................................................................................61
Hot Keys and Quick Keys .............................................................................................................62
Technical Support ........................................................................................................................ 63
ORION® Automated Meter Reading System for Trimble® Ranger™
Page iv 1-12

Page 5
1-12
Installation & Operation Manual
Introduction
The ORION® Automated Meter Reading System for the Trimble® Ranger™ 3 Installation and Operation Manual has two main
parts:
• Part I: Overall Operations
Part I includes basic information to help you understand the overall operation of the Trimble Ranger 3 handheld
and the ORION Field Application meter reading software. Part I includes equipment set up and program start up
instructions.
• Part II: User Guide
Part II is the technical reference and includes step-by-step procedures and process details.
Audience and Purpose
The ORION Automated Meter Reading System for the Trimble Ranger 3 Installation and Operation Manual is intended to be
used by field technicians for collecting accurate utility meter readings from homes and businesses using the handheld.
IMPORTANT:
To provide the best solution for our customers, Badger Meter continually improves software programs and updates this
Installation and Operation Manual on a periodic basis to reflect upgrades. Therefore, you may notice discrepancies between
your installed program and this manual.
System Overview
The Trimble Ranger handheld computer is a flexible and easy-to-use tool which can be used with various meter reading
technologies. It provides utilities with a handheld interrogator that can be operated with a customized keypad for data entry.
The handheld is compatible with ORION manual and touch read systems. An ORION equipped handheld can be used for
reading and programming endpoints and as a troubleshooting tool in the field.
• The ORION Smart Endpoint (SE) is a full functioning (2) two-way water endpoint for use in either mobile or fixed
network mode of operation. Once installed, ORION SE endpoints operate in mobile mode and will automatically
transition to fixed network mode of operation once ORION network gateway transceivers and ReadCenter software
are deployed. ORION SE endpoints may also transition back to mobile mode at any time via two-way command or
will automatically transition back to a backup mobile mode of operation if the network is disrupted for a period of
time.
• The ORION Migratable Endpoint (ME) is a full functioning (2) two-way water endpoint for mobile applications
with the capability of migrating to fixed network mode to support future utility growth. In addition to providing the
current reading, the ORION ME endpoint’s two-way functionality allows users to capture data profile information
wirelessly, without having to access the endpoint during the normal reading process.
• The ORION Classic Endpoint (CE) is a one-way endpoint designed for mobile meter reading. ORION CE endpoints
support data profile and may be transitioned to fixed network application through approved electric connectivity
partner solutions, or with strategic deployment of ORION gateway 4.0 and 2.0 receivers.
The handheld can be ordered with an internal ORION ME transceiver or ORION CE receiver, or a non-radio handheld can be
upgraded at a later date to meet the needs of the utility. For utilities deploying mixed ORION ME and CE systems, an external
mobile receiver or transceiver may be added. Refer to "Handheld Setup for Reading Both ORION ME and ORION CE
Endpoints" on page 11.

Page 6 1-12
ORION® Automated Meter Reading System for Trimble® Ranger™
Product Unpacking and Inspection
Upon opening the shipping container, visually inspect the product and applicable accessories for any physical damage such
as scratches, loose or broken parts, or any other sign of damage that may have occurred during shipment.
Note: If damage is found, request an inspection by the carrier’s agent within 48 hours of delivery and file a claim with the
carrier. A claim for equipment damage in transit is the sole responsibility of the purchaser.
License Requirements
ORION meter reading systems comply with Part 15 of FCC Rules. Operation of the ORS is subject to the following conditions:
(1) The ORION meter reading systems may not cause harmful interference, and (2) the ORION meter reading systems must
accept any interference received, including interference that may cause undesired operation.
In accordance with FCC Regulations, “Code of Federal Regulations” Title 47, Part 2, Subpart J, Section 1091, endpoints
(endpoints) pass the requirements pertaining to RF radiation exposure. However, to avoid public exposure in excess of limits
for general population (uncontrolled exposure), a 20 centimeter distance between the mobile device and the body of the
user must be maintained during testing.
No FCC license is required by a utility to operate an ORION meter reading system.
ORION meter reading systems comply with Industry Canada license-exempt RSS standard(s). Operation is subject to the
following two conditions: (1) they may not cause interference, and (2) they must accept any interference, including
interference that may cause undesired operation of the device.
Le présent appareil est conforme aux CNR d'Industrie Canada applicables aux appareils radio exempts de licence.
L'exploitation est autorisée aux deux conditions suivantes: (1) l'appareil ne doit pas produire de brouillage, et (2) l'utilisateur
de l'appareil doit accepter tout brouillage radioélectrique subi, même si le brouillage est susceptible d'en compromettre le
fonctionnement.
Any changes made, but not approved by Badger Meter, can void the user's authority to operate the equipment.

Page 7
1-12
Installation & Operation Manual
Glossary
TERM DESCRIPTION
ADE® The Absolute Digital Encoder (ADE) is a position-based encoder that senses the position of
each number wheel to determine the reading for touch and AMR/AMI systems.
AMI Advanced metering infrastructure (AMI).
AMR Automated meter reading (AMR) system that uses radio frequency technology to transmit
meter readings between an endpoint and a data collection device.
comment code A message from the utility oce to the meter reader that is displayed when the meter
information is displayed on the read screen. The messages are dened and maintained by the
utility and chosen from a dened list created in the Badger Meter reading data management
software.
encoder error A situation (ORION radio or touch read) in which one or more of the number wheels in the
mechanical encoder cannot be read. There are two common causes of encoder errors:
1. Improper alignment of the number wheels in the encoder
2. A component failure inside the encoder
If the error is caused by a misalignment of the number wheels, the error can be cleared by
running consumption and changing the reading value of the number wheel causing the
error. If the encoder error occurs at the same account over two or more continuous reading
cycles, the encoder has most likely failed and should be replaced.
endpoint A communication device located at the meter that encodes and communicates reading data
to a data collection device (handheld, mobile or gateway).
enlargement A feature on the Read screen that allows you tap on an information field to temporarily view
it enlarged. Choose the enlargement feature in Program Options on the Settings menu.
Refer to "Program Options" on page 35 for details.
eld A piece of information in the handheld, such as the service address or the meter serial
number, that resides on a screen.
nal read A meter reading taken as a customer moves from one location to another in order to send the
customer their nal bill.
GUID A globally unique name (GUID) consisting of a number of characters is assigned to every
handheld. The GUID is not duplicated anywhere in the world.
main menu The screen that provides access to the main functions of the handheld software.
mobile receiver A mobile one-way communication device that receives information from an endpoint via a
mobile data collection device (handheld or laptop computer).
mobile transceiver A mobile two-way communication device that receives and transmits information to and
from an endpoint via a mobile data collection device (handheld or laptop computer).
module In general, an electronic product used to report a meter’s reading. The Badger Meter ORION
electronics which are needed to perform a radio read is an example of a module.
ORION CE The ORION CE (classic endpoint) is a one-way local automated meter reading (AMR)
system which communicates with a mobile receiver designed to read ORION water and gas
endpoints. The receiver has Frequency Hopping Spread Spectrum (FHSS) technology to
minimize interference and eliminate FCC licensing.
ORION CE Utility The ORION CE endpoint programming and quick read software application.
ORION Field Application The ORION meter reading software application for the handheld.

Page 8 1-12
ORION® Automated Meter Reading System for Trimble® Ranger™
TERM DESCRIPTION
ORION ME and ORION SE The ORION ME (mobile endpoint) and ORION SE (smart endpoint) are two-way utility
management solutions. ORION ME and ORION SE (in mobile mode) endpoints communicate
with a mobile transceiver designed to receive signals from and send signals to ORION ME and
SE water and gas endpoints. The transceiver has Frequency Hopping Spread Spectrum (FHSS)
technology to minimize interference and eliminate FCC licensing.
ORION ME/SE Utility The ORION ME and SE endpoint programming and quick read software application.
programming menu A specic menu within the Badger Meter AMR software that allows module programming.
quick read A feature that allows the operator to capture a reading for a specic module. The quick read
function is available for touch modules or ORION endpoints. When quick reading ORION
endpoints, you can also display the readings from up to 50 of the endpoints in range of the
Badger Meter ORION receiver, not just one endpoint.
potential leak A status reported by an ORION endpoint showing that the meter has registered continuous
ow and may have a potential leak.
reading data
management software
Refers to ReadCenter® Analytics, Data + and Data software which acts as an interface
between the utility's billing software and the meter reading devices. The handheld software
will load and unload meter information to the reading data management software.
reading menu The handheld screen holding the list of dierent functions that can be performed when
reading meters.
RF Radio frequency.
route A list of meters to read.
route management
software
The software product or system that loads route information into the computer and accepts
completed meter readings from the handheld computer.
route progress The function that displays the number of meters read in the current route, along with other
related information.
RTR® The Badger Meter Recordall® Endpoint Register (RTR) is used in conjunction with Recordall
disc, turbo, compound and fire series water meters to measure totalized flow through the
meter and output a signal to Badger Meter meter reading products.
settings The values that can be changed by the user to control behavior to certain screen functions.
tamper A status reported by an ORION endpoint showing that the lead line between the register and
the endpoint is cut or shorted.
text message A message entered by the meter reader to be sent to the utility oce via the Badger Meter
reading data management software.
transceiver See "mobile transceiver."
trouble code A message that is chosen by the meter reader from a list stored in the handheld and sent to
the utility oce describing a condition or status at the meter.
VersaProbe™ A meter reading wand that can be used with the handheld to read touch modules.

Page 9
1-12
Installation & Operation Manual
Part I: Overall Operations
Page 10 1-12
ORION® Automated Meter Reading System for Trimble® Ranger™
Handheld in Charging Cradle
Trimble Ranger Handheld Overview
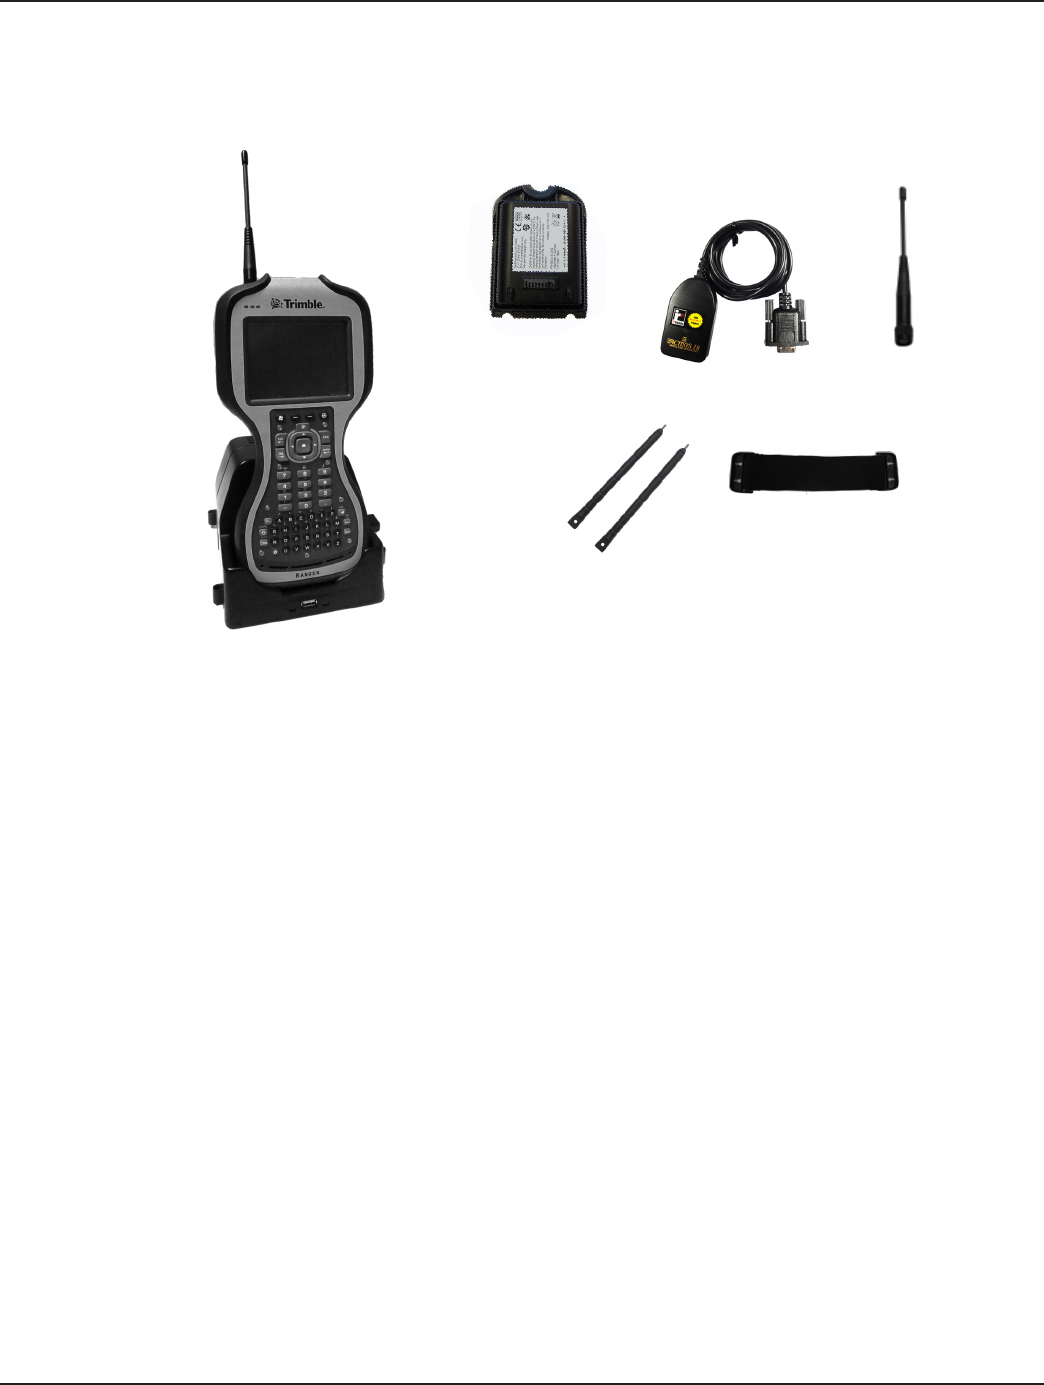
System Components
Figure 1: Handheld with Antenna, Charger and Components
The Trimble Ranger handheld system components include:
• Trimble Ranger 3 handheld with touch screen and custom keypad
• ORION Field Application meter reading software, pre-installed
• ORION ME/SE Utility, pre-installed
• ORION CE Utility, pre-installed
• ORION antenna (not included with a manual read handheld)
• Handheld charging cradle with power cord
• Multi-pack of screen protectors, one pre-applied (not shown)
• 2-pack stylus
• Hand strap
• Optical programming cable
• Battery pack
• AC charger and international electric outlet adapters (not shown)
Touch Screen
In addition to the keyboard, the handheld is equipped with a touch screen to facilitate function selection and promote ease
of use. To make a selection, touch the screen using the stylus tool provided with the handheld or simply tap the screen with
your finger. The touch screen is sensitive enough to allow selecting with a tap even if you are wearing gloves. For additional
information on the touch screen, refer to "Using the Touch Screen" on page 15.
Battery Pack ORION Antenna
Stylus
Optical Programming Cable
Hand Strap

Page 11
1-12
Installation & Operation Manual
Handheld Description
The Trimble Ranger is a handheld computer designed for fully automated data collection along a route for meters equipped
with ORION endpoints. The handheld can also accept manual reads to support utilities as they transition from manual read
to AMR technology.
The handheld also functions as a programming device for initial setup of endpoints in retrofit installations where matching
existing readings is required.
By entering a reading with the numeric keypad, the handheld can be used as a manual data collector. This reading is stored
as a normal record and transferred with route information.
The handheld can store up to 5000 accounts. Route file load and unload data is transferred between the handheld and the
reading data management software via a USB memory drive or wirelessly depending on the utility.
Configurations
The Trimble Ranger handheld is available in three configuration options:
• Handheld with an internal ORION ME transceiver
• Handheld with an internal ORION CE receiver
• Handheld for manual reads only (no radio)
Figure 2: Inside Battery
Compartment of Handheld
The FCC label is displayed on the inside of the battery compartment of the handheld as shown in Figure 2.
Note: Refer to "Handheld Setup for Reading Both ORION ME and ORION CE Endpoints" on page 11 for instructions
on how to set up a single handheld to read both ORION ME and CE endpoints.
Page 12 1-12
ORION® Automated Meter Reading System for Trimble® Ranger™
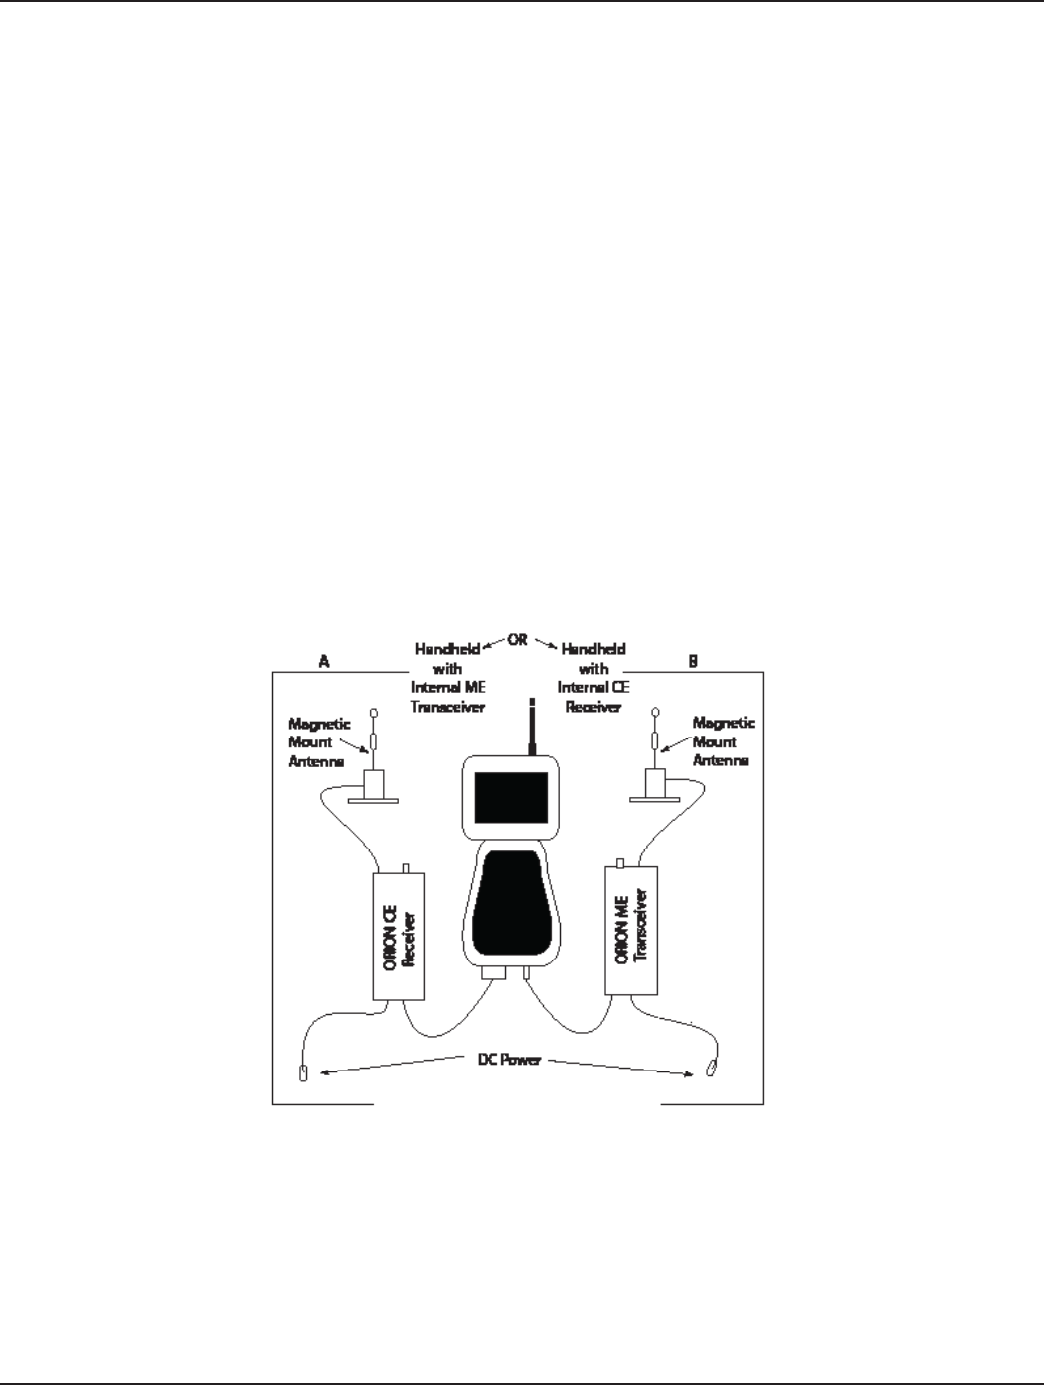
Handheld Setup for Reading Both ORION ME and ORION CE Endpoints
To read both ORION ME and CE endpoints, the handheld must be equipped with either an internal ORION ME transceiver or
an internal ORION CE receiver.
To set up the handheld for reading both ORION ME and ORION CE endpoints, follow these steps.
1. Connect the ORION antenna to the antenna base on the handheld and hand-tighten until snug.
2. Press the green key to power on the handheld.
3. If the handheld has an internal ORION ME transceiver, connect an ORION CE mobile receiver using the receiver's
communication cable. Plug the communication cable into the top of the ORION CE mobile receiver and the 9-pin
serial end into the serial port at the bottom of the handheld as shown in the A setup (left side) in Figure 3.
or
If the handheld has an internal ORION CE receiver, connect an ORION ME mobile transceiver using the
transceiver's communication cable. Plug the smaller end of the communication cable into the top of the ORION
ME mobile transceiver and the larger end into the USB port at the bottom of the handheld as shown in the B setup
(right side) in Figure 3.
4. Switch on the ORION CE (or ME) connected to the handheld.
5. Start the ORION Field Application software.
Note: Mobile transceiver and mobile receiver require DC power source to operate.
Figure 3: Setup for Reading ORION ME and CE Endpoints

Page 13
1-12
Installation & Operation Manual
Charging the Handheld Battery
The handheld should arrive fully charged. However, charging the battery before use is a good practice.
The battery pack assembly includes the batteries to power the unit, the power port used to charge the unit and the I/O ports
that are used to communicate with other devices using a USB or serial cable.
The AC charger that ships with the unit has adapters to fit almost every electrical outlet. Connect the appropriate outlet
adapter to the AC charger. Plug the charger into an electrical outlet. Make sure the handheld is fully seated in the charger
and the charging pin is fully engaged.
The handheld is fully charged in
approximately 4.5 hours. Acceptable
temperature range for charging the
battery is between +5° C and +35° C (+41°
F and +95° F).
The LED (light emitting diode) on the top
left corner of the handheld displays the
charging status as shown in this table.
Normal usage
O No charger present or unit is unplugged
Yellow Charging
Green Charging complete
Error conditions
1 - 2 short ashes * Temperature out of range for charging
3 short ashes Wrong charger
Note: If the fully-charged unit is still connected to the charger, Settings> System> Power status shows the battery
power remaining as if the unit were still on battery power.
Always use the charger included with your unit. Use of other chargers will void the warranty.
Conserving the Battery
The handheld conserves battery power by turning itself off when not in use.
Note: When the Read screen or Quick Read screen is in use, the handheld will NOT turn off automatically because the
ORION reading functions are active. If you wish to conserve the battery, be sure to return to the Main Menu so the
automatic off function is active.
Press and release the green power key on the keypad to turn the unit back on. The display shows the same screen that was
displayed when the unit turned off.
Battery Life
Wireless
The handheld has been designed to operate with the internal BlueTooth® and 802.11 wireless communication features and
will automatically turn them off when not in use. Do not turn on the wireless features unless instructed. Leaving the wireless
options on reduces battery life.
Charging Cradle
When using the handheld cradle to charge the battery pack, be sure the handheld is fully seated into the cradle. The cradle
is designed to be set up on a flat surface or mounted on a wall. Up to 10 cradles can be connected together and use a single
power cord.
To verify the unit is being charged, the top line of the screen will indicate (Batt: A/C). It may take a few minutes for the screen
to update from the rate of battery charge to the indication that it is being charged by A/C power. To immediately check the
battery pack charging status, exit the ORION Field Application and then restart. The top line of the screen shows the battery
charge status.

Page 14 1-12
ORION® Automated Meter Reading System for Trimble® Ranger™
Tips for extending the battery life
• Use the backlight only when necessary. Press the Fn + power keys to toggle the backlight on and off.
• Tap Start> Settings> System> Backlight to select the amount of time the backlight stays on when the unit is idle.
Also, a brighter backlight uses more power than a dim setting.
• When working in cold temperatures, keep the unit as warm as possible.
Swapping the Battery Pack (Low Battery)
If the battery is running low while the handheld is in use, a low battery message displays on the screen.
The battery pack is designed to be swapped out quickly in the field (if you purchased additional battery packs). If the battery
pack runs low, replace the battery pack and continue with your work.
The unit saves enough power that it will not trigger a reset if you swap the battery pack within a couple of minutes. If the
saved power runs out before the new battery pack is connected, the unit will reset. The reset does not impact saved data,
programs or configuration; however, unsaved data will be lost and the time will have to be reset.
To swap a battery pack, perform the following steps:
1. Remove the hand strap from the battery pack assembly.
2. Ensure the unit is turned on. (The unit will automatically turn o when you loosen the screws in the next step.)
3. Use a screwdriver or a coin to unlock the two screws on the battery pack assembly by turning them
counter-clockwise until the battery pack can be removed. Unscrewing the screws turns the unit o and puts it in a
special state that prevents it from turning on for alarms and notications.
4. Remove the battery pack assembly by taking it out of the unit. Be careful not to press the Power key while the
battery pack is detached.
5. Quickly insert the new battery pack onto the unit.
6. Fasten the battery pack securely into place by turning the screw clockwise.
7. Replace the hand strap.
8. Turn the unit on to resume operation.
Note: The handheld will not turn on unless the screws are tightened securely.

Page 15
1-12
Installation & Operation Manual
Handheld Basic Operations
The Trimble Ranger handheld is made up of a number of functions that all work together to perform meter reading quickly
and easily.
Turning the Handheld On (and Off)
• To turn on the handheld, press and hold the green power key until you see the Booting message. Release the power
key and the handheld boots up in a few seconds.
• To turn off (shutdown) the handheld, press and hold the green power key until you see the message "Release
power button to use menu." Release the power key and the Power Menu displays. Tap Shutdown to power off the
handheld.
When the handheld is in use, one of the most convenient features is “instant on” and “instant off” (also known as “suspend/
resume”). The handheld goes into "instant off" when it is not being used. Press and release the green power key to resume
use. The screen that was previously displayed will display again. There is no waiting for the unit to boot up every time it is
turned on.
Changing the Handheld Date and Time
IMPORTANT
The date and time on the Trimble Ranger handheld must be accurate to ensure communication with the ORION endpoints.
Check the date and time and adjust if necessary before reading a route.
If you need to change the time after swapping out the battery pack assembly or for any other reason, follow these steps:
1. Tap the Time icon on the screen.
2. Select Time in the top menu bar.
3. Tap the hour, minutes, seconds respectively and use the up/down arrows to make any necessary changes.
4. Once nished, tap ok at the top of the screen.
Result: A small window opens allowing you to save the changes.
5. Tap Ye s to save the changes or No to close the screen without saving the changes. Tap Cancel to return to Time
screen to make additional changes.
When you tap Yes, the changes are saved and the Time screen closes.
Restarting the Handheld
To perform a restart, press and hold the green power key. The screen will show a countdown timer. Continue holding the
power key until the countdown is completed. The unit will automatically restart. Readings will not be lost if the handheld is
restarted using these steps.
Setting the Password Lock (optional)
You do not need to set a handheld password unless you are concerned about unauthorized use. Badger Meter recommends
not assigning passwords to prevent the loss of reading data. If you opt for password protection, the password must be
entered every time you turn on the unit or use the green power key to resume operation.
IMPORTANT:
Record the password. A forgotten or lost password cannot be recovered and will require a factory reset.

Page 16 1-12
ORION® Automated Meter Reading System for Trimble® Ranger™
Using the Touch Screen
Note: The manual provides instructions for touch screen navigation and operation of the handheld. Refer to "Quick
Keys" on page 59 for keypad shortcuts.
Use the stylus to navigate and select objects on the touch screen. Tap the screen with the stylus to select or open an item.
Tapping is equivalent to clicking the left mouse button with a computer.
Touch and Hold
When you touch and hold a point on the screen, a circle of dots appears around the stylus to indicate that a pop-up menu will
soon appear. Touching and holding is equivalent to clicking the right mouse button.
Drag
Hold the stylus on the screen and drag it across the screen to select text and images. Drag in a list to select multiple items.
Storage Memory
Unlike many handheld computers which can lose data if they lose power, losing power will not impact saved data or
configurations other than the real time clock. All your data is stored in non-volatile memory. If the battery is removed for 30
seconds or more, the user will be prompted to enter a current time and date. This must be done prior to operating the ORION
Field Application software.
Accessing Storage Memory Using File Explorer
Browse the contents of folders on the handheld using File Explorer (Start > Programs > File Explorer). To easily delete,
rename or copy an item, touch and hold the item. Then select from the menu that displays.
Note: Unlike desktop computers, Windows Mobile® does not support a Recycle Bin. Once a file is deleted, it cannot be
recovered.

Page 17
1-12
Installation & Operation Manual
General Care of the Handheld
Use a mild detergent and a clean soft cloth to clean the body of the handheld. Do not use solvents, such as paint thinners.
Use only a lint free cloth to clean the infrared port. Do not use detergents or solvents to clean the infrared port or display
window.
The Trimble Ranger handheld has a wide operating range of –5 F to 140 F; however, it is important to protect the
handheld from extreme temperatures. Leaving the unit in a vehicle on the dashboard during a hot day or in a vehicle on a
cold night can affect the Liquid Crystal Display (LCD) screen as well as cause battery drainage.
Care of the Touch Screen
Only use the included stylus or other devices designed specifically for use with touch screens. The use of ballpoint pens,
nails or other sharp objects to operate the touch screen will scratch and/or damage the unit.
Do not apply any cleaner directly to the display. Do not use any abrasive cleaners. Abrasives may scratch touch screens.
Keep the touch screen clean by gently wiping the display, using a soft cloth dampened by clean water.
Use the screen protectors included with the unit to keep the touch screen clean and protected. To optimize the lifespan of
the handheld touch screen, a new screen protector should be applied every 30 days.
Screen Protector
The screen protector uses static to cling to the touch screen. The original screen protectors adhered to the screen with
adhesive.
To safely remove an adhesive screen protector without causing damage to the touch screen display:
1. Use adhesive tape to start the lift of the screen protector. Stick the tape to one corner of the screen protector to
start the lift. Do not apply the tape to the underlying touch screen.
2. Use your ngers to grasp the screen protector at the lifted corner and slowly peel back the protector to the
opposite corner until removal is complete.
To apply a new screen protector:
1. Clean the surface of the touch screen with water only if necessary.
2. Use a display cleaning cloth (included the screen protector kit) to clean and dry the touch screen before installing
a screen protector.
3. Align the edge of the new screen protector with the corner of the screen and then drop the remainder onto the
display. The screen protector uses static to adhere to the screen until it is removed and replaced.
IMPORTANT:
• Do not use sharp, metal or plastic objects to lift a screen protector. Micro-scratches can occur.
• Replace the screen protector every 30 days per the manufacturer’s recommendation.
Page 18 1-12
ORION® Automated Meter Reading System for Trimble® Ranger™
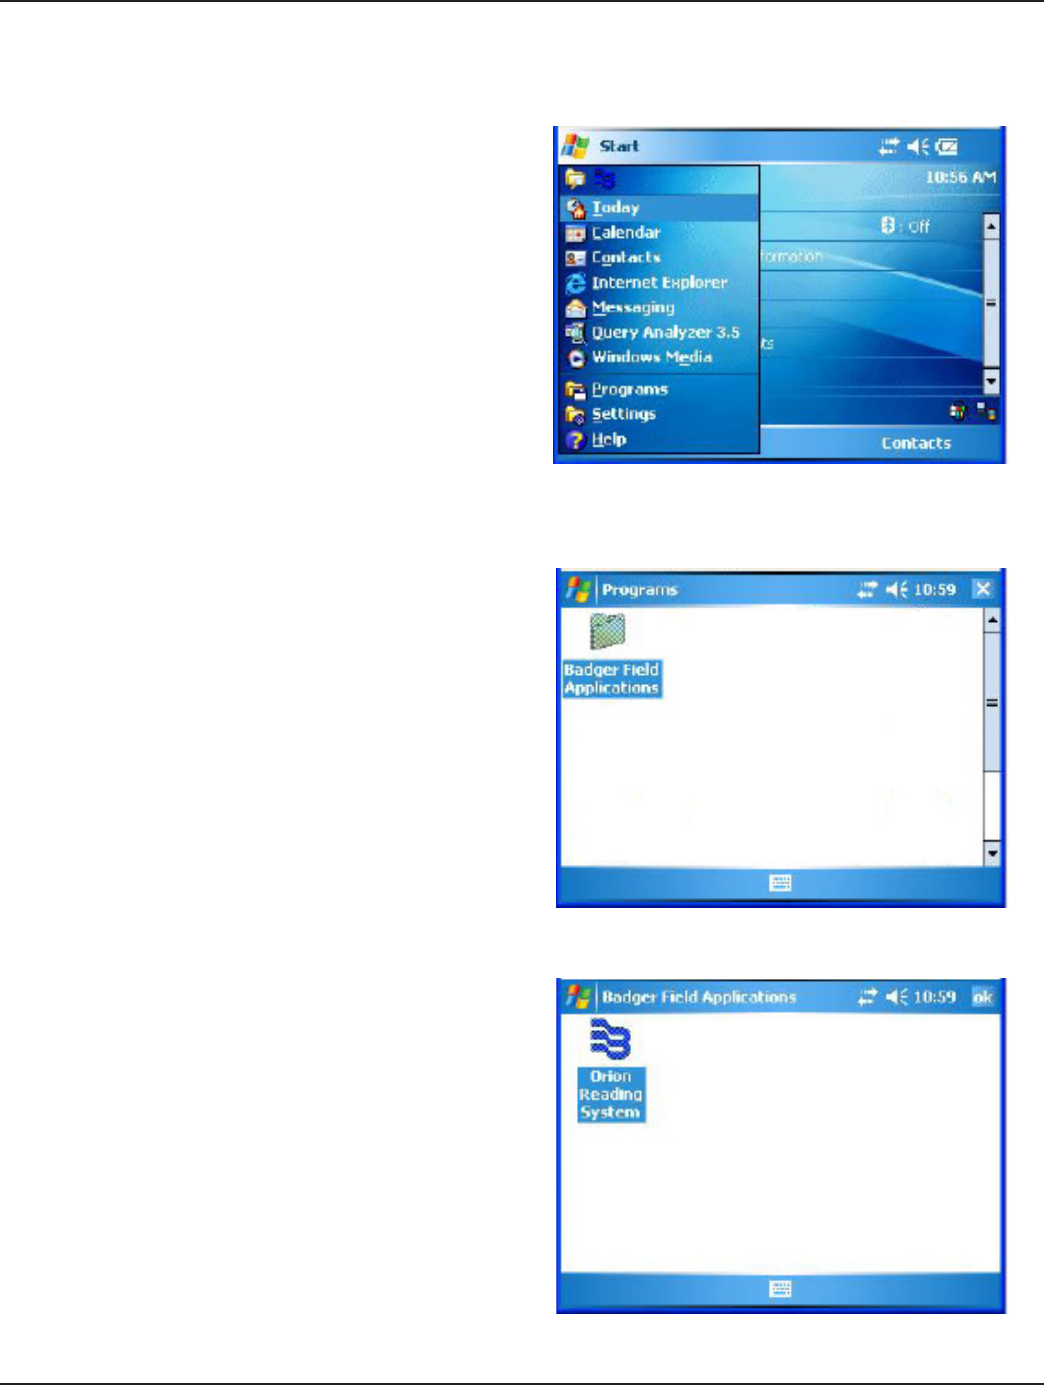
Program Startup
1. Press the green power key on the keypad to turn on the handheld.
2. At the top left of the Windows main screen, tap
Start.
Result: If the handheld is in Administrator mode, the
Start menu drop-down list displays. If the handheld is
in Kiosk mode, skip to step 4.
Figure 4: Start Menu
3. Tap Programs.
4. Tap the folder labeled Badger Field Applications.
Result: The Badger Field Applications folder opens and
displays the ORION Reading System icon (Figure 5).
There may be additional les in the folder, depending
on the programs loaded on the handheld.
Figure 5: Badger Field Applications Folder
5. Tap the ORION Reading System icon.
Result: The ORION Field Application screen opens with
the ORION Field Application selected (Figure 7). This
takes a few seconds
Figure 6: ORION Reading System
Page 19
1-12
Installation & Operation Manual
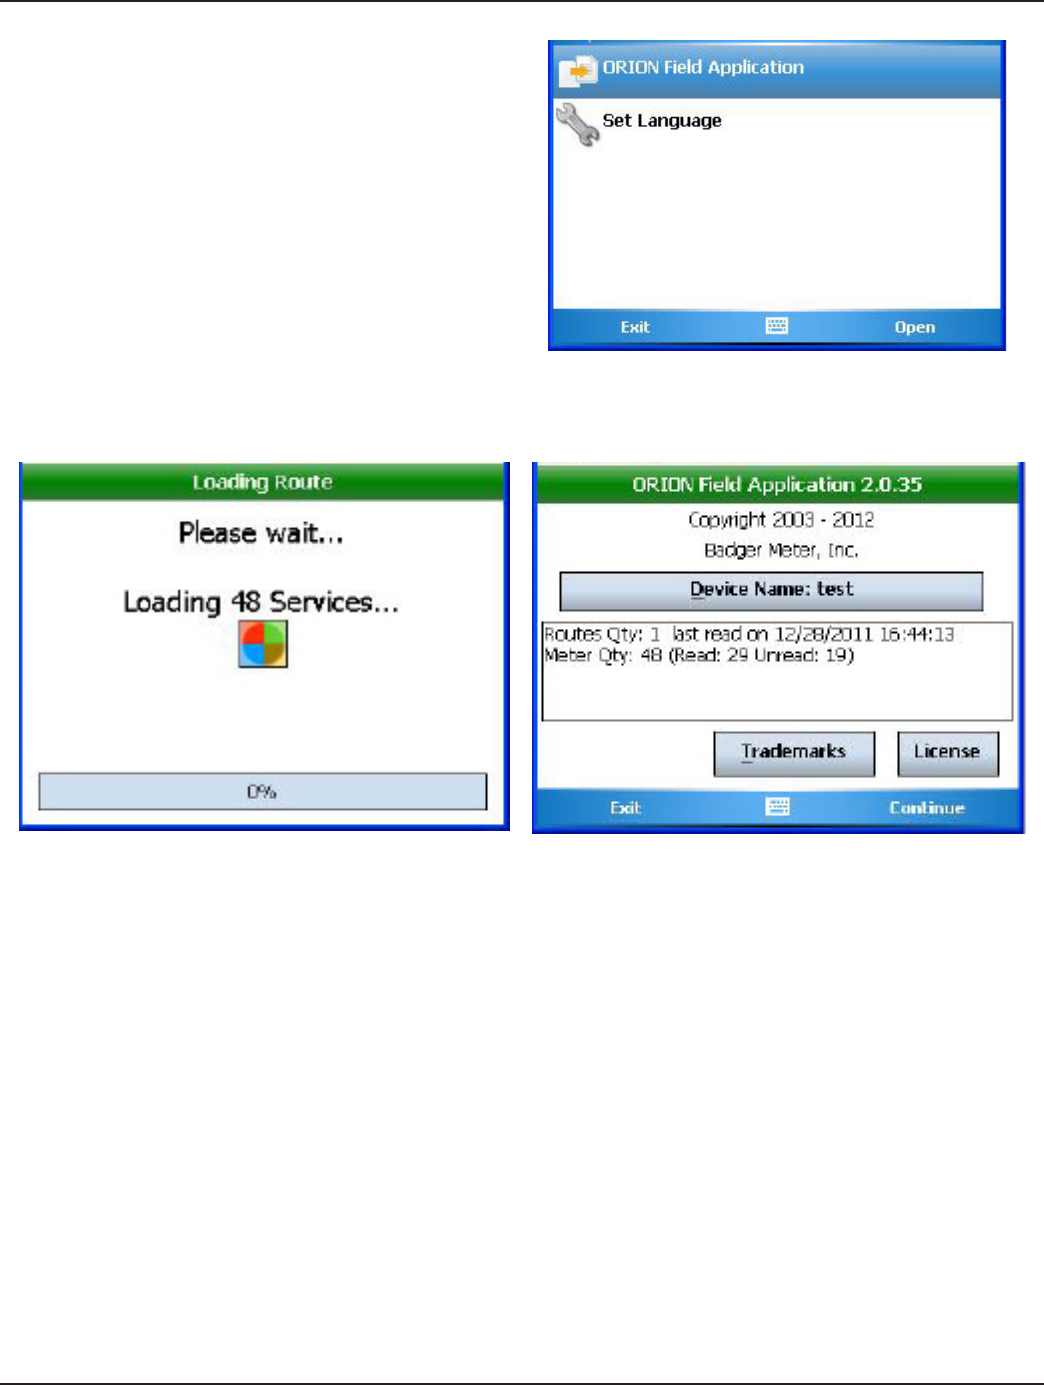
6. Tap ORION Field Application or press the Right
key on the keypad to start the application.
Result: The Loading Route screen displays briey and
closes automatically (Figure 8).
When the Loading Route screen closes, the Copyright
screen opens as shown in Figure 9.
Note: The first time the software is accessed, the
License Agreement screen opens automatically on
top of the Copyright screen.
Read the software license agreement and tap I
Accept. The License Agreement screen closes
automatically and the Copyright screen is shown.
Figure 7: ORION Field Application
Figure 8: Loading a Route Figure 9: Copyright Screen
Page 20 1-12
ORION® Automated Meter Reading System for Trimble® Ranger™
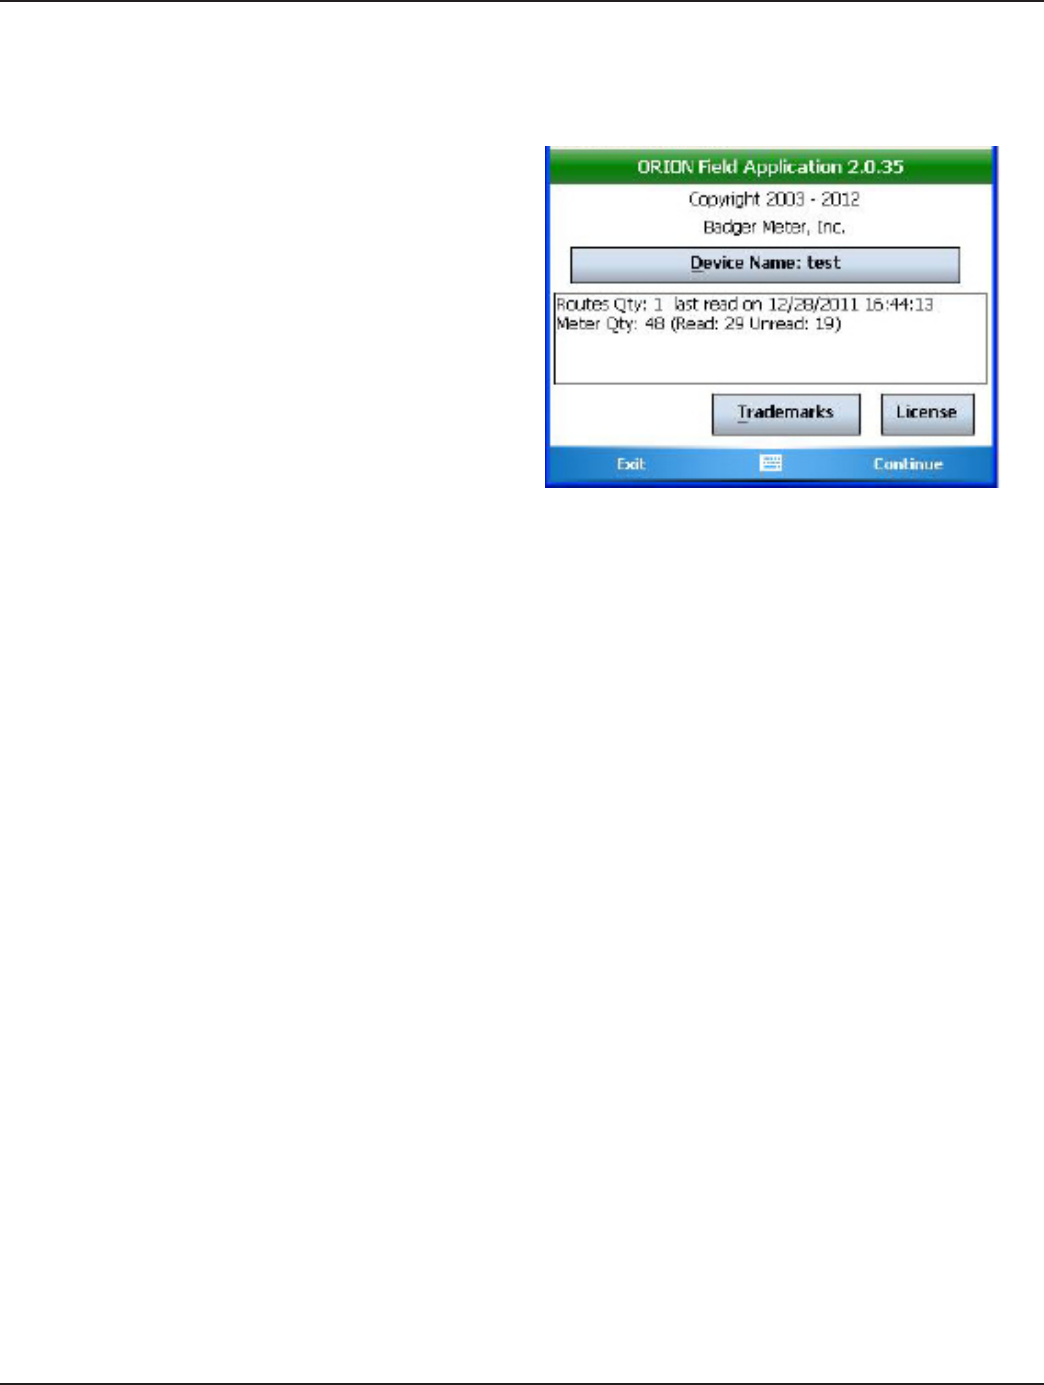
Copyright Screen
The Copyright screen displays the following information.
• Program name, software version and copyright
information
• Device Name (handheld Friendly Name)
• Number of routes currently loaded
• Number of read and unread meters
• Last read date
• Trademarks
• License information
Figure 10: Copyright Screen
Changing the Device Name
Every Trimble Ranger handheld is assigned a globally unique name (ID). This ID is not duplicated anywhere in the world
and cannot be changed. A device name, "friendly name", can be assigned to a handheld that allows the user to differentiate
between multiple handhelds.
1. Tap Device Name on the Copyright screen.
2. Tap Change Name.
3. Tap in the New box and type the name using the keypad.
4. Tap Save.
Result: The Name Saved screen displays stating the name was successfully saved.
5. Tap OK.
6. Conrm that the Friendly Name has been changed. Tap Done to return to Copyright screen.
Result: The Friendly Name displays in the Device Name eld.
Battery Status
The color of the Copyright screen title bar shows the battery status. Tap the title bar at any time and the current battery
status will display briefly in the title bar.
• Green = > 70% charged • Yellow = 40% and 70% charged
• Red = < 40% charged • Blue = handheld is recharging
The same colors are also used for the battery status indicator on the Read screen. Refer to "Read Screen" on page 24 for
additional information.
Accessing the Main Menu
Tap Continue or press the RIGHT key on the keypad to access the Main Menu.

Page 21
1-12
Installation & Operation Manual
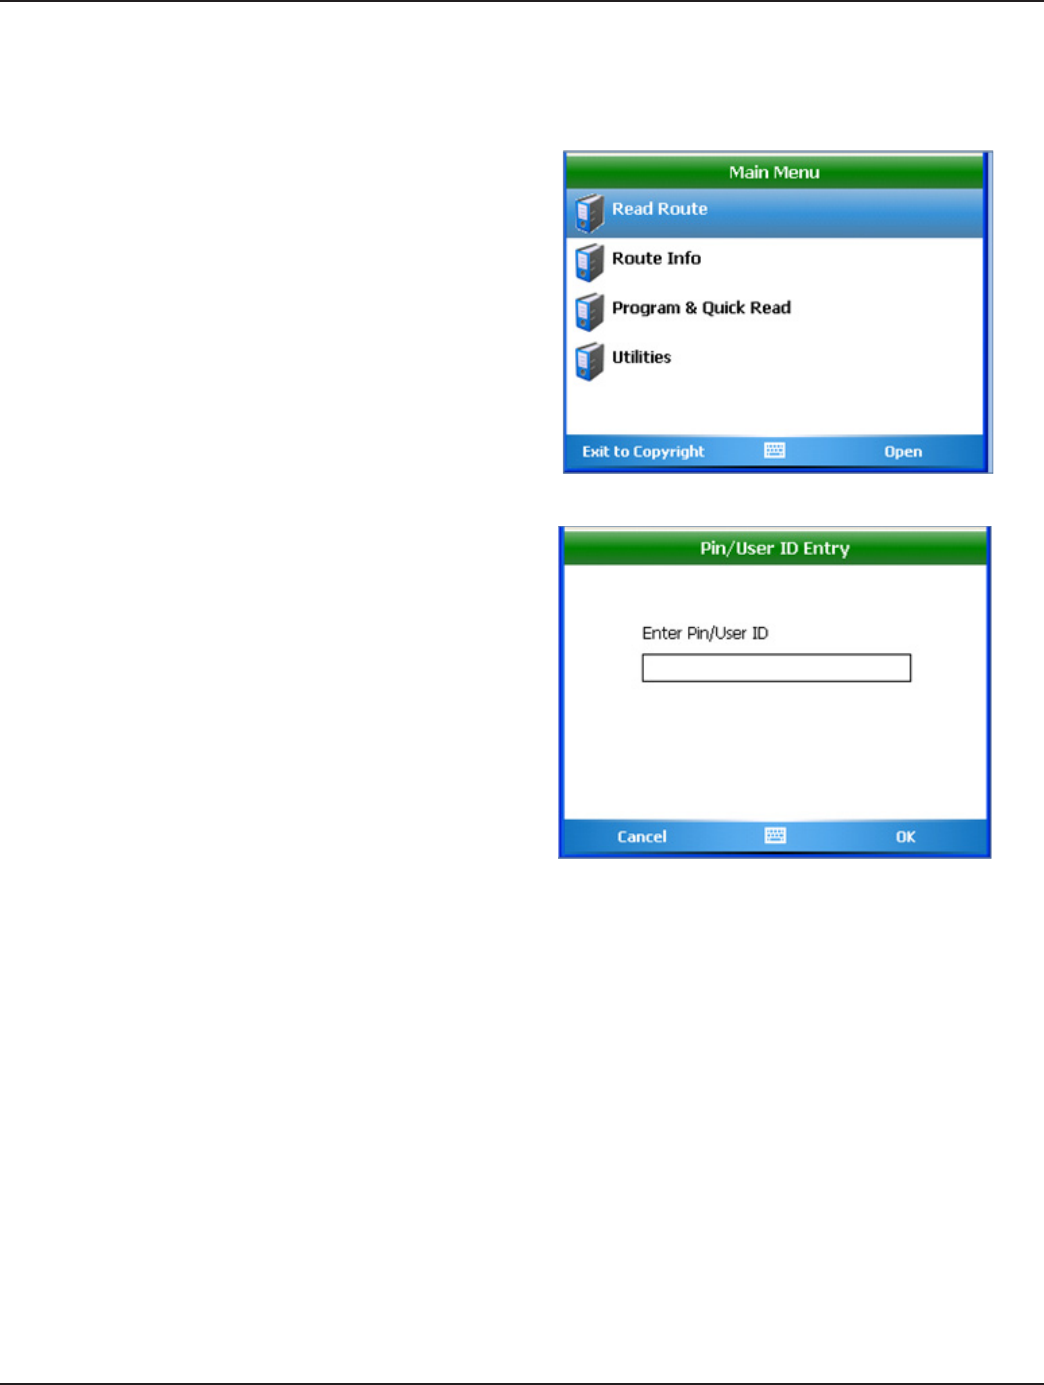
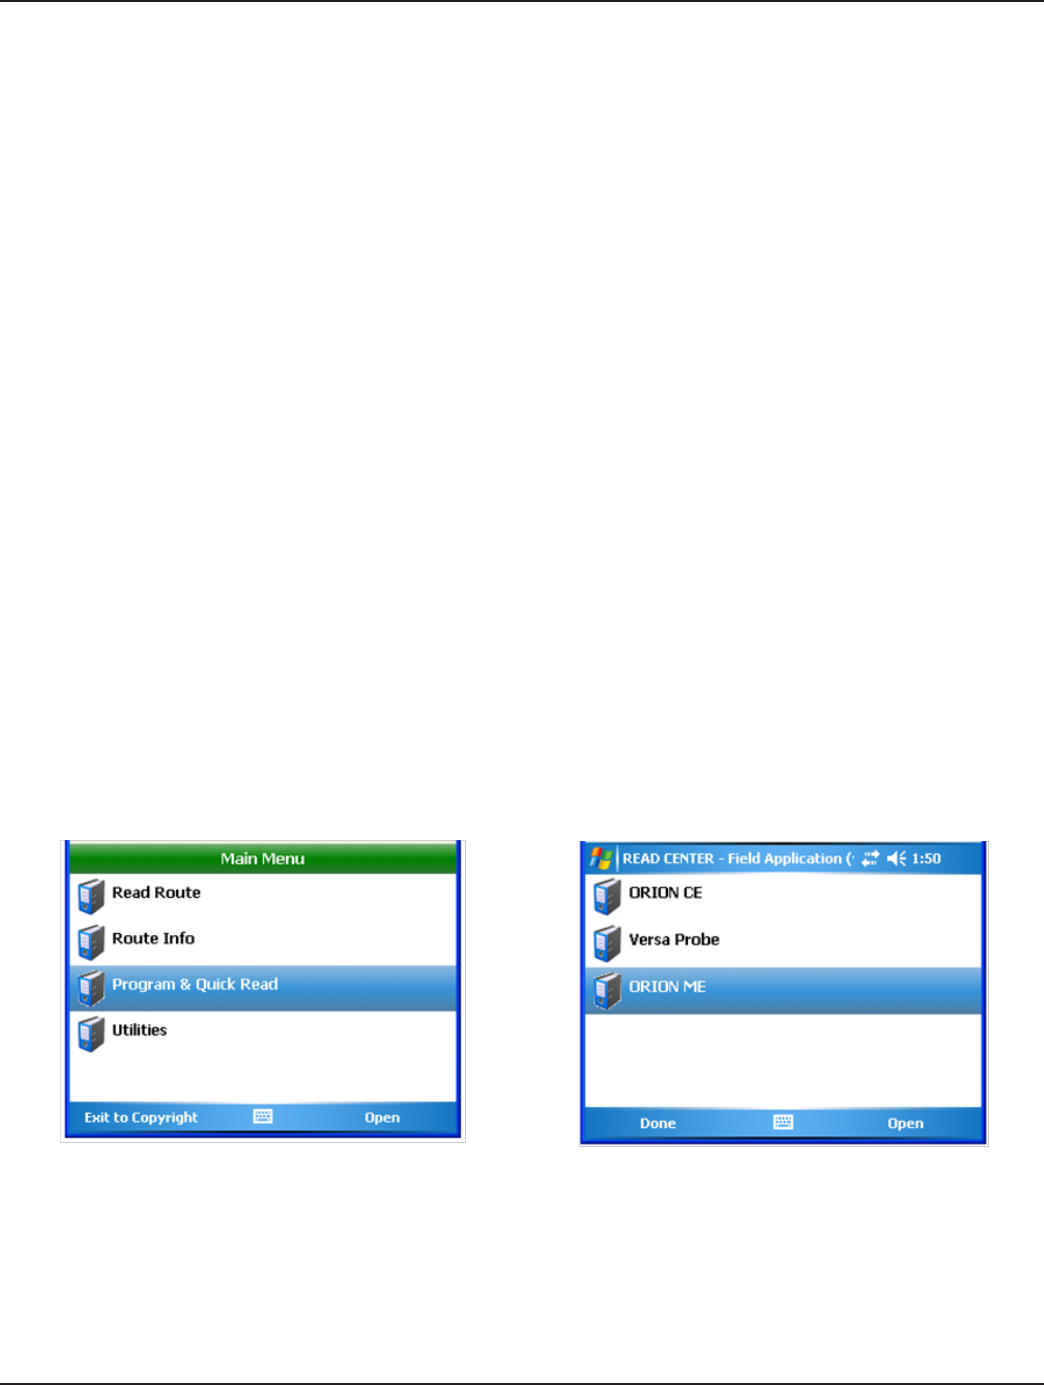
Main Menu
The Main Menu is the starting point for all meter reading operations. There are four options on the Main Menu to choose
from.
Figure 11: Main Menu
Tap and select an option.
Read Route Displays the login screen to begin reading meters.
Route Info Displays information about the meters and routes currently loaded into the handheld.
Program and Quick Read Displays the program for reading meters when a route is not loaded (e.g., checking an ORION
endpoint, obtaining final reads, troubleshooting, etc.) and programs ORION endpoints to set
an RTR odometer, clear a tamper or stop/start an endpoint.
Utilities Displays the Utilities Menu screen to access information on route progress, battery and
settings. The Utilities Menu can also be accessed from the Read Menu.

Page 22 1-12
ORION® Automated Meter Reading System for Trimble® Ranger™
Part II: User Guide
Page 23
1-12
Installation & Operation Manual
Reading a Route
Read Route Login
1. Tap Read Route on the Main Menu.
Result: The Pin/User ID Entry login screen displays.
2. Enter a 3 to 5 character personal identication
number (PIN) using the keypad. The PIN is user
dened and can be your name, your initials, an ID
number, etc.
Figure 12: Read Route on Main Menu
3. Tap OK or press ENTER on the keypad.
Result: If your PIN is not valid, an error message
displays: “You MUST enter 3 to 5 characters for your
PIN/ID."
Tap OK and re-enter the PIN.
Tap OK.
When a valid PIN is entered, the Read Screen with the
first account is displayed.
Figure 13: Login Screen

Page 24 1-12
ORION® Automated Meter Reading System for Trimble® Ranger™
Read Screen
Figure 14: Read Screen
Account Information Fields
Predefined Display
Fields
The first five fields display account information. These fields are determined by the reading data
management operator and cannot be changed using the handheld.
Custom Field The sixth field is a custom field, which is user defined in Settings > Displayable Field Settings >
Custom Fields. It can be set to display one of several options including the route name and the
percent of readings completed. For additional information, refer to "Displayable Field Settings"
on page 53.
Meter Information
Reading The meter reading displays in this field. In Manual mode, the field is blank until the meter reader
enters the reading. The field fills automatically in Auto mode. A green check mark displays next to
the field when the reading is received. A red X displays when there is no reading. The arrow to the
right of the field allows you to change the direction when typing the reading.
Reading Button This button displays just below the Reading field.
ORION ME Details This button displays only for ORION ME/SE endpoints. Tap to access the two-way communications
available with the ORION ME/SE.
Meter Type The meter type displays to the right of the read field. In Figure 14, the meter type is ORION ME.
Service The service number displays below the meter type. The number changes to designate more than
one meter for an account such as an apartment building with multiple meters.
Potential Problem Any potential problem such as a Tamper or No Usage display in the blank field below the service
number. If the field is blank as in Figure 14, no meter problems are detected.
Reading Mode Meters can be read in Manual or Auto (automatic) mode based on user preference. The selected
reading mode is displayed on the upper left side of the screen.
Reading Technology The available reading technology displays on the lower left side of the screen. In Figure 14, VP and
ME are displayed to indicate Versa Probe and ORION ME/SE technology are included in the route.
Battery Indicates handheld battery life. The indicator displays on the lower left side of the screen. Battery
status is indicated by the color of the background. For additional information about the color
indicator, refer to "Battery Status" on page 20.
Predened display elds
1. Customer name
2. Customer address
3. Type of meter
4. Meter number
5. Route sequence number
Customfield
Reading field
Reading mode
(Manual or Auto)
Reading technology
(ME, CE, VP) Meter type
Service number
Reading button
ORION ME Details Handheld battery indicator
Account popup menu Read Menu
Navigate to
previous account
Navigate to
next account
Potential problem
Changes read entry direction. Numbers
fill left-to-right or right-to-left.
Page 25
1-12
Installation & Operation Manual
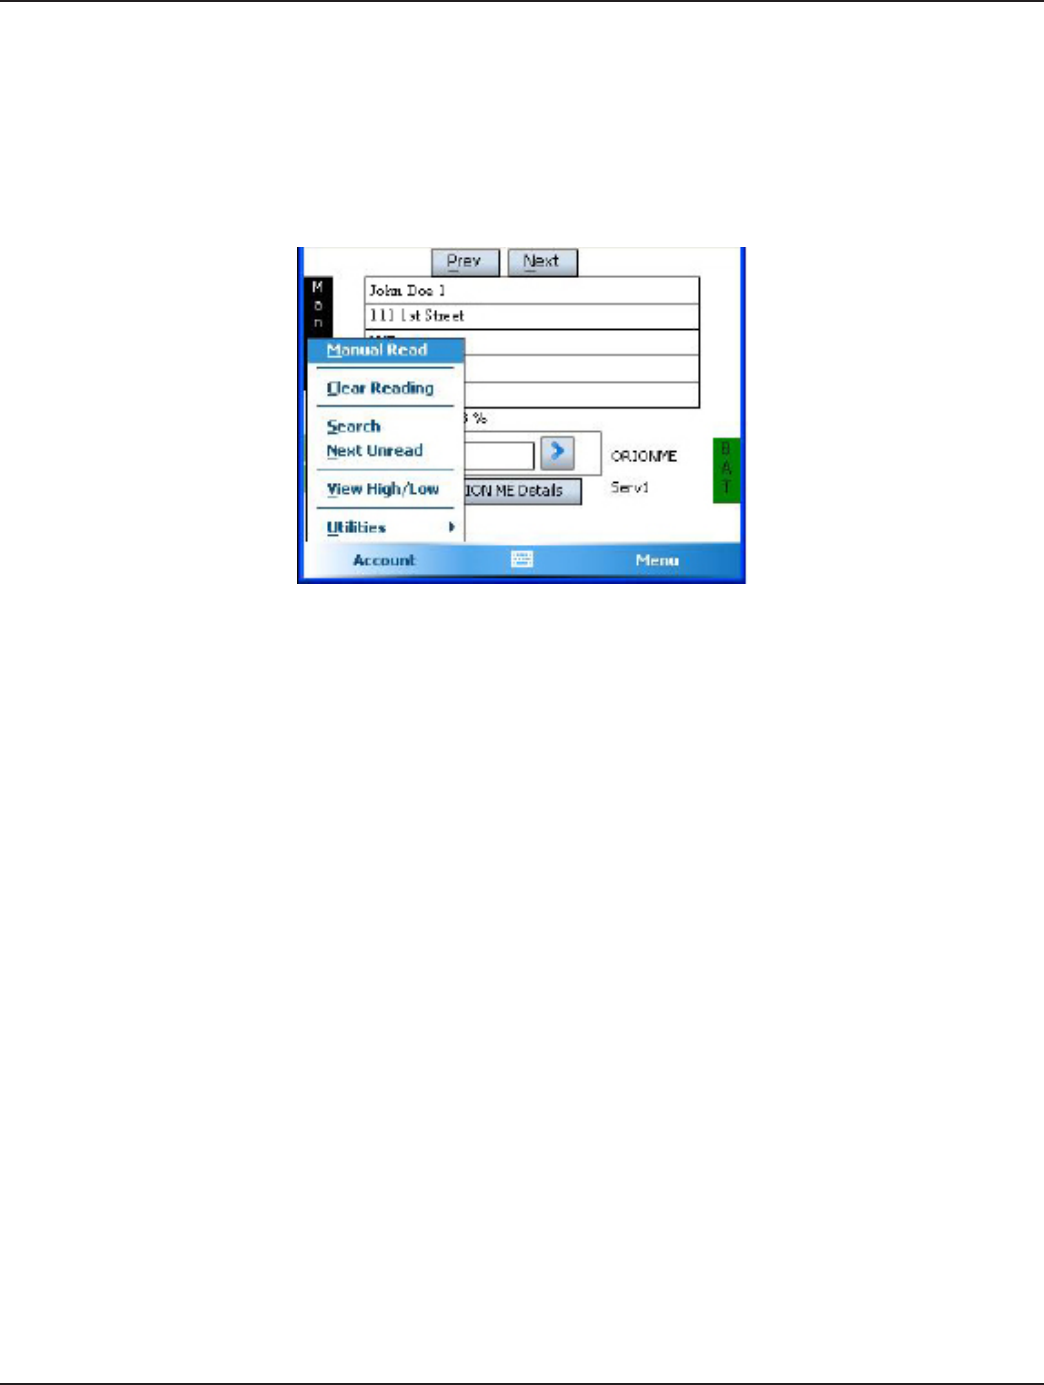
Navigation
Prev / Next Moves to the previous or next account. Navigation buttons display at the top of the screen in Manual
mode. These buttons do not display in Auto mode.
Account Displays a popup menu with options for the selected account (Figure 15). Some of the same options can
be accessed using the Hot Keys on the keyboard. Refer to "Hot Keys and Quick Keys" on page 62 for
additional information.
Menu Displays the Read Menu. For information on the Read Menu, refer to "Read Menu" on page 27.
Figure 15: Account Menu
Changing Read Mode
Choose Manual mode or Auto mode when reading routes with the handheld.
Manual Mode Auto Mode
• Advances to the next account in the reading order once a meter
reading is entered/received.
• Automatically advances to the next unread
account once a reading is received.
• The Prev and Next buttons are used to navigate through the
accounts.
• No manual navigation capabilities are
available.
• When an account comes up that already has an ORION reading
entered, the read is displayed and you must manually advance to
the next account.
To toggle between manual and automatic mode, follow these steps.
1. From an ORION account, press the A key on the keypad.
2. The word Auto will appear on the left side of the screen to indicate the handheld is now in the automatic mode. The
screen will no longer display the Prev and Next buttons.
3. To return to manual mode, press the A key again. The word Manual will appear on the left side of the screen and the
Prev and Next buttons display at the top of the screen.
Note: Auto mode cannot be selected if the account displayed is a manual read or touch account.
Regardless of which mode is active, reads will be applied to the appropriate accounts as they are received. The handheld will
accept the read, beep and store the read data.
Quick Keys and Hot Keys
Quick Keys and Hot Keys are keypad shortcuts for performing mobile read functions. Refer to "Hot Keys and Quick Keys" on
page 62 for details about using these keypad shortcuts.
Page 26 1-12
ORION® Automated Meter Reading System for Trimble® Ranger™
Read Results
The ORION Field Application software captures meter readings in one of three ways:
• ORION RF read
• VersaProbe touch pad read
• Manually keyed read
When an ORION endpoint sends a reading, several results can occur.
• The ORION transceiver/receiver receives the transmission. The handheld stores the reading. If the meter was
displayed on the screen, the display will advance to the next customer record.
• The ORION transceiver/receiver receives the transmission that reports either a tamper or a potential leak. The
handheld logs the condition and stores a read in the case of a potential leak. If a tamper is displayed on the screen,
the handheld will sound an audible alert and prompt you to process the tamper before advancing to the next
account.
• No transmission is received from the meter. Try moving closer to the meter or tap Next to skip the meter.
No Reading Received
These are the common reasons for not receiving a reading.
• Endpoint ID number is wrong. • Handheld is too far away from the endpoint.
• Endpoint has not been started. • The line of site between the handheld and the
endpoint is obstructed.
• Endpoint is not loaded into the handheld.
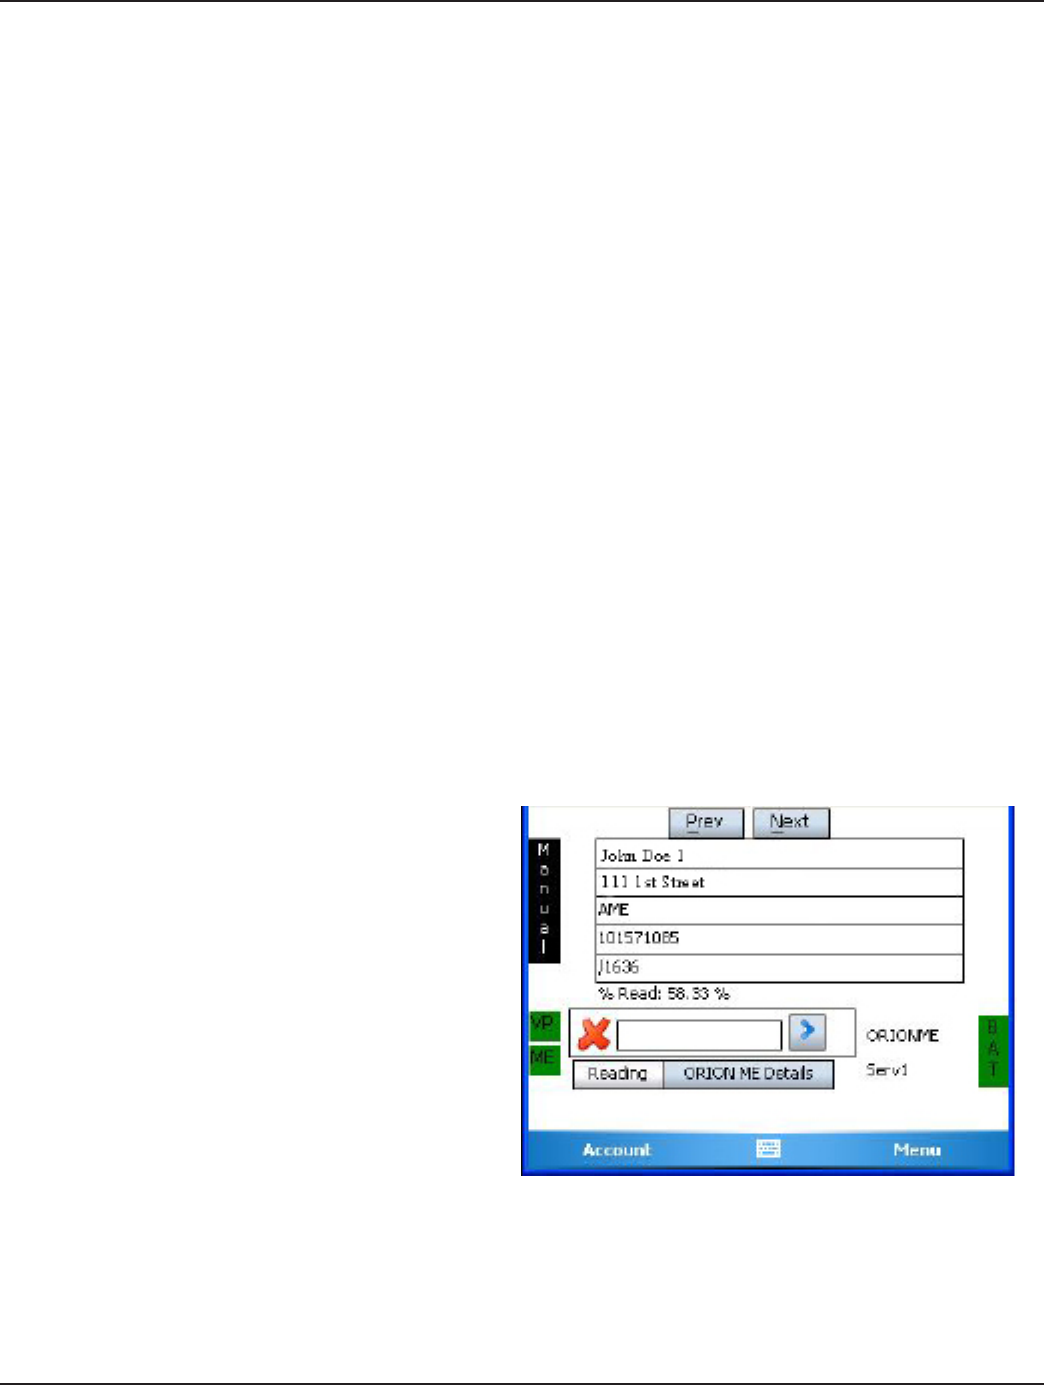
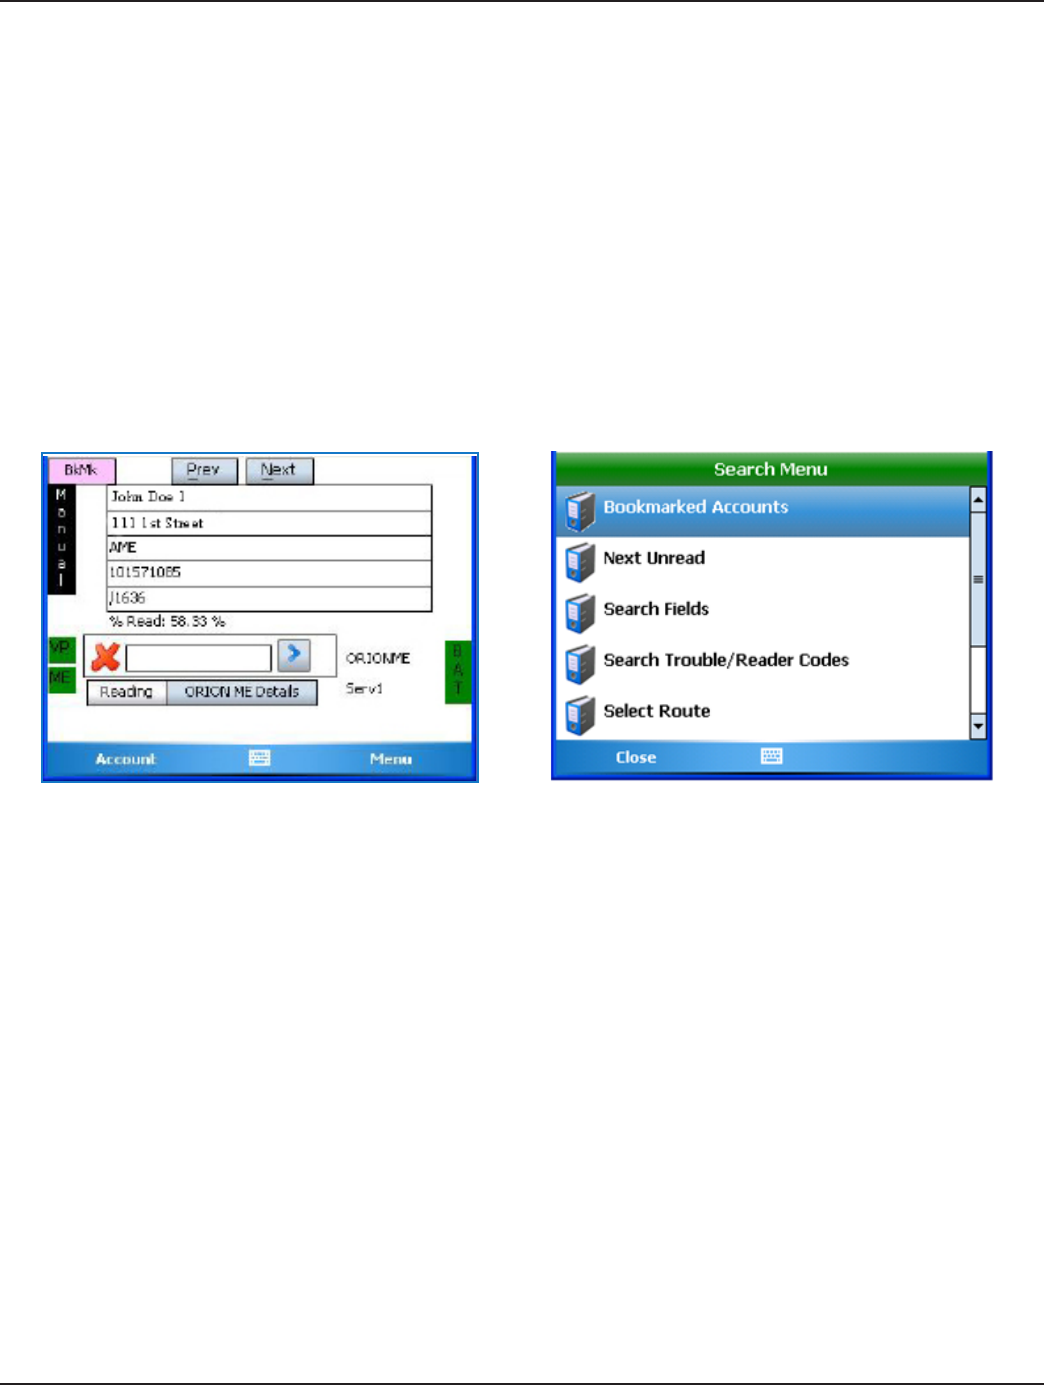
Manual Reads
The handheld can read touch pads, ORION endpoints and
collect manual reads. If the route contains a mix of meters,
the handheld will always stop at a manual account to allow
a manual meter reading. A red X displays on an account
without a reading as shown in Figure 16.
To enter a manual read
1. Tap in the reading eld to activate it.
2. Use the keypad to type the reading.
3. Press ENTER to store the reading.
Figure 16: Manual Read Screen
If the meter reading is high or low, the handheld sounds an alarm, displays the condition and may or may not request further
action depending on the settings. A manual read can always be entered.
Page 27
1-12
Installation & Operation Manual
Read Menu
To access the Read Menu, tap Menu on the Read screen. The Read Menu has several functions. The functions are associated
with the account that was last displayed. Scroll to see the entire list of functions.
Search Displays the Search Menu to find
accounts using various criteria.
Figure 17: Read Menu
Manual Read Enters a manual read for the current
account.
View Hi/Low Shows the current account’s previous
read and Low/High threshold read values
(if appropriate permissions are set).
Read Direction Toggles the route direction and allows
meter reader to read the route in reverse
direction. To go back to the original
reading direction, choose this function
again.
Comments Displays the Comments menu, which
includes Reader Code, Trouble Code and
Text Message.
Utilities Displays the Utilities menu, which includes route reading Progress, current Battery Info and Settings.
Erase Read Erases the reading for the current account. A window displays asking for confirmation before the
account reading is erased.
Navigation Keys
Navigate from the Read Menu using the keys at the bottom of the screen.
Close Closes the Read Menu and returns to the last account displayed.
To Main Menu Cancels out of reading the route and returns to the Main Menu.
Page 28 1-12
ORION® Automated Meter Reading System for Trimble® Ranger™
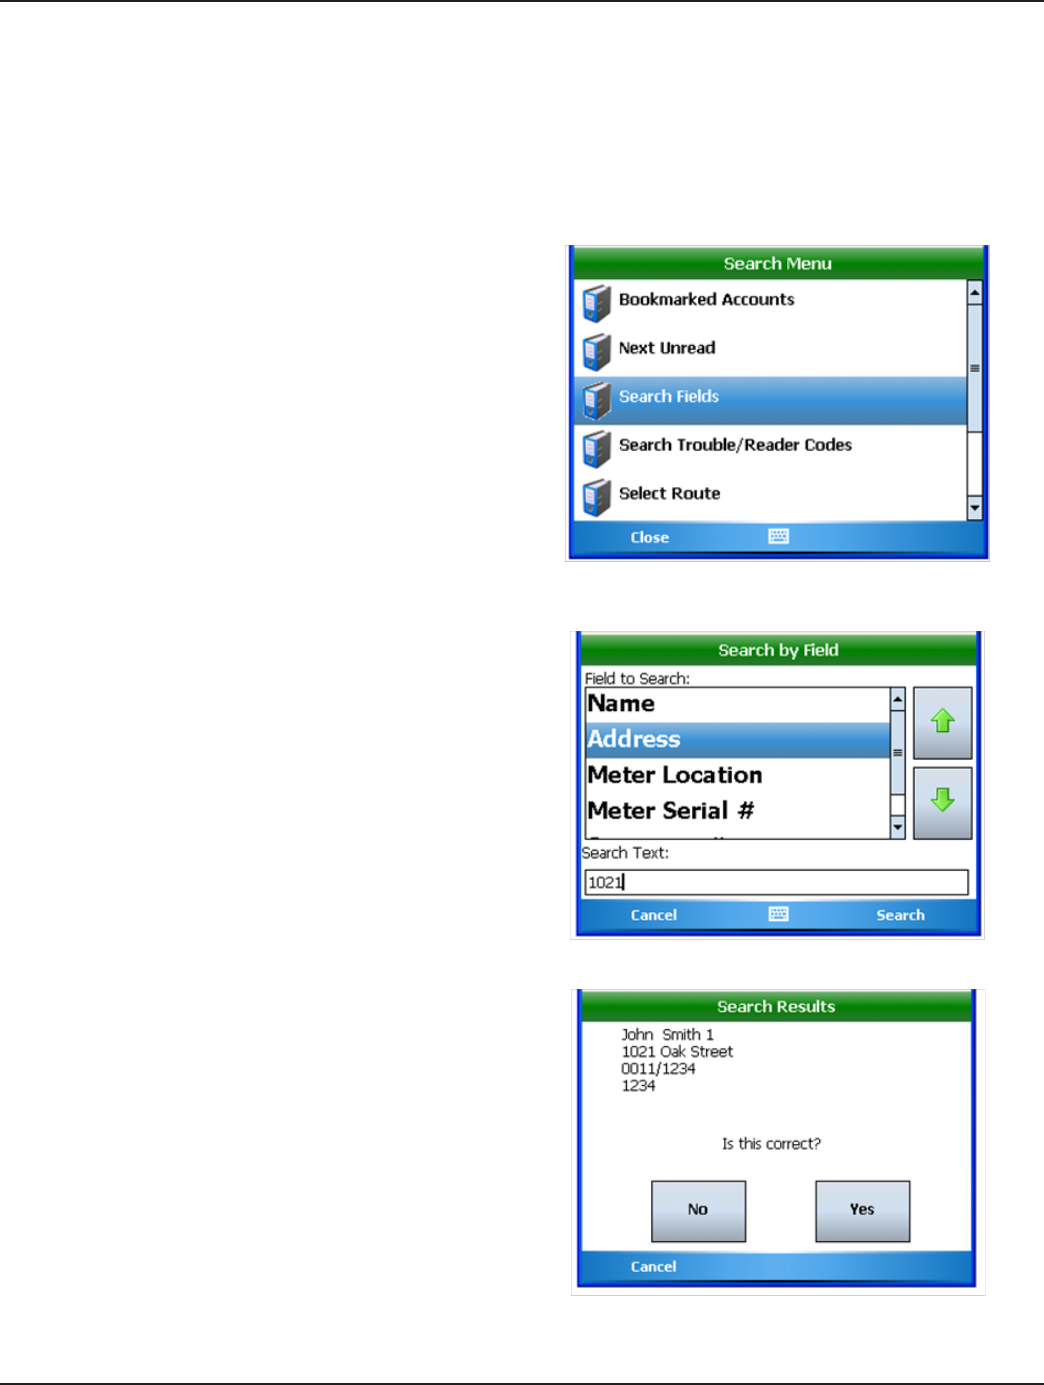
Search
There are multiple ways to search for a meter. To find a meter using the account information, use the Search Fields function.
Using Search Fields, the account name, address, meter location, meter serial number, meter model, account number and
AMR module number can be searched.
Search Fields
1. From the Read Menu, tap Search or press SS on
the keypad.
Result: The Search Menu displays as shown in
Figure 18.
2. Tap Search Fields.
Figure 18: Search Menu
3. Tap the up or down arrows to highlight/select the
search eld or just tap the correct eld.
When the correct eld is selected, use the keypad
to enter search text in the Search Text eld.
In Figure 19, Address is the selected search eld
and the address number is keyed into the eld.
4. Tap Search.
Figure 19: Search by Field
Result: Search Results displays the summarized
account data for an account that matches the search
criteria.
Note: The message "No accounts found that
match your search text" displays if the search is
unsuccessful.
5. Tap Ye s to view the account displayed. Tap No to
continue the search. You can search through all
accounts loaded on the handheld.
6. Tap Cancel to return to the Search by Field screen.
Figure 20: Search Results
Page 29
1-12
Installation & Operation Manual
More Search Options
Bookmarked Accounts Bookmarking accounts make them easier to find later. To bookmark an account press Fn + B
on the keypad while on the account read screen. A bookmark label displays at the top left of
the screen (Figure 21).
To search bookmarked accounts, follow these steps.
1. Tap Menu on the Reading screen to open the Read Menu.
2. Then tap Search> Bookmarked Accounts to open a search screen. All bookmarked
accounts are displayed. If there are multiple bookmarked accounts, scroll using the
up and down arrows, or search for the account by keying the name or part of the
name in the Search Text eld.
3. Tap the account you want to view. Then tap Select.
Result: The account Read screen opens.
Figure 21: Bookmarked Account Figure 22: Search Bookmarked Accounts
Next Unread Displays unread accounts one by one. Tap Ye s to see the Read screen for the account.
Tap No and the next unread account displays. Tap Cancel to return to the Search
Menu.
Search Trouble/Reader Codes Finds all accounts tagged with Trouble codes, Reader codes or both. This option allows
you to select and view information for accounts tagged with Trouble and Reader
codes. Tap Cancel to return to the Search Menu.
Select Route Allows you to go to the start of another route. You may also mark a route "complete"
using the buttons on the screen. Tap Close to return to the Search Menu.
To select a route, tap the selected route from the list of routes that displays. Then tap
Select to display the Read screen for the first account of the selected route.
Skipped Accounts Displays accounts that have been skipped, allowing the meter reader to return to
those meters and perform additional actions. Tap OK to return to the Search Menu.
To customize the definition for a skipped meter, go to Settings > Customizations > 3
of 3 > Skipped Meter Definitions.

Page 30 1-12
ORION® Automated Meter Reading System for Trimble® Ranger™
Manual Read
Manual Read allows you to edit a meter reading that is
already stored on the account which you were viewing prior
to choosing the Read Menu option.
1. From the customer account Read screen, tap Menu
to open the Read Menu screen.
2. Tap Manual Read.
Result: The Manual Entry screen opens for the
account.
3. Use the keypad to type the manual read value in
the Reading eld and tap OK to store the reading.
Or tap Cancel to return to the Read Menu.
Result: Tapping OK will automatically take you to the
next account in the sequence. Figure 23: Manual Read
View High/Low
1. Tap View High/Low on the Read Menu to see the
high and low values for the account that were
displayed before selecting the Read Menu.
Result: This screen displays the account number, the
high and low values set by the billing program and
the previous reading that was stored in the reading
data management software.
Note: This information can be blocked by the
reading data management operator.
2. Tap Close to return to the Read Menu.
Figure 24: High/Low Reads
Read Direction
The Read Direction option allows the meter reader to walk
the route in reverse of the order it was loaded into the
handheld.
1. Tap Read Direction on the Read Menu.
Result: The Reverse Direction screen displays with the
question “Read your route in Reverse direction?”
2. Tap Ye s to reverse the route direction or No to
return to the account screen.
Result: Selecting Yes displays the route in reverse
order. The screen will be black and the font will be
white as shown in Figure 25.
3. To revert to the "normal" route direction, repeat
steps 1 and 2. Figure 25: Reverse Direction
Page 31
1-12
Installation & Operation Manual
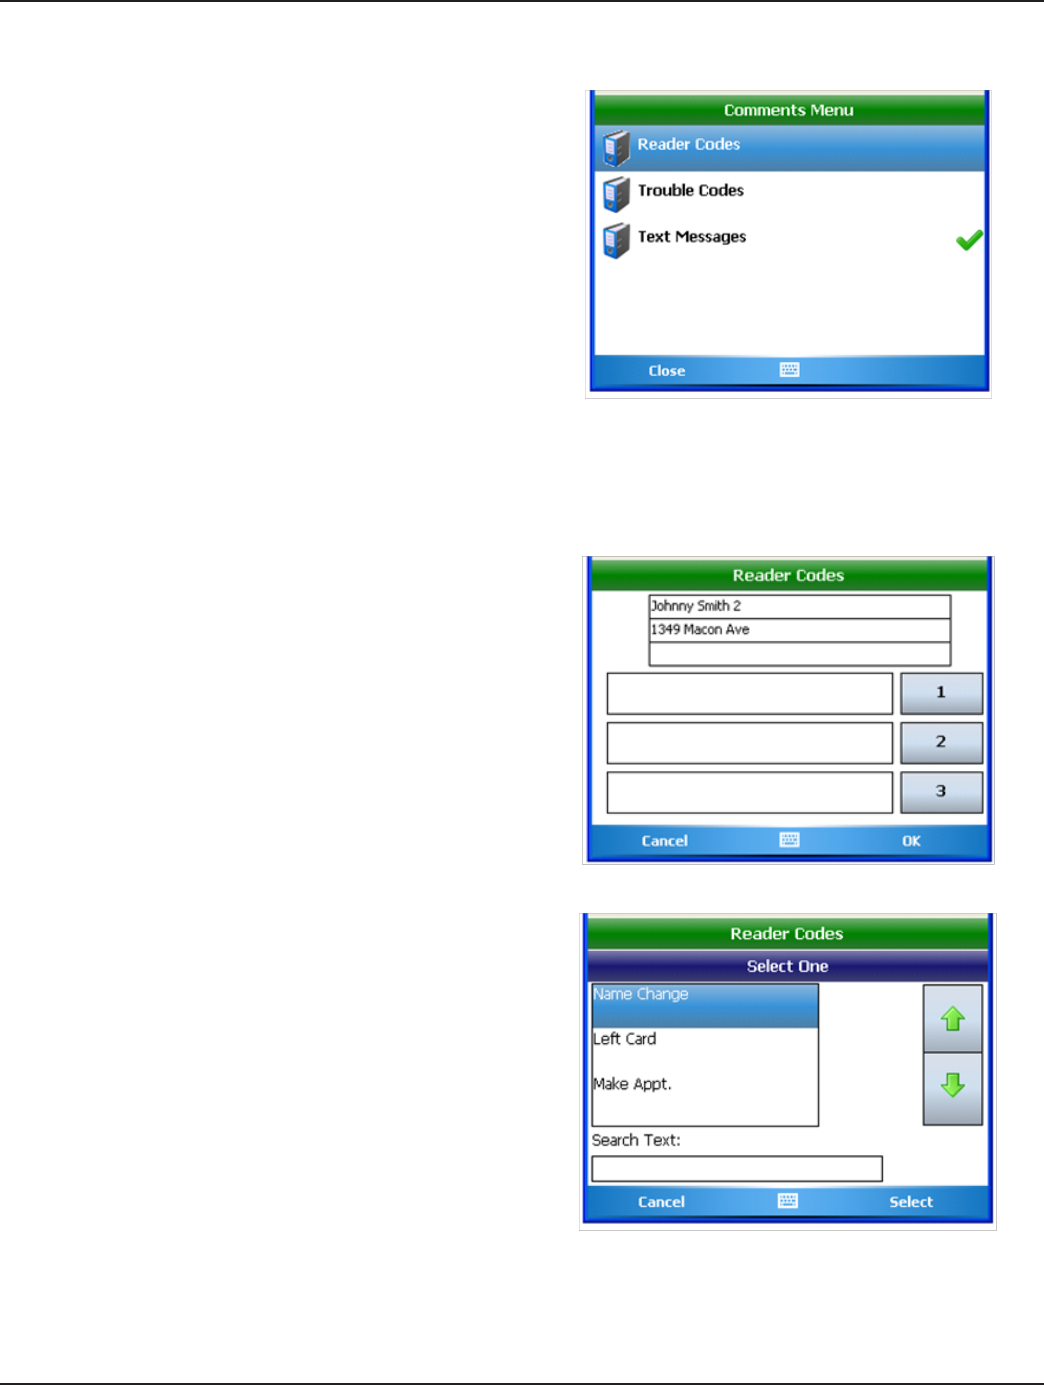
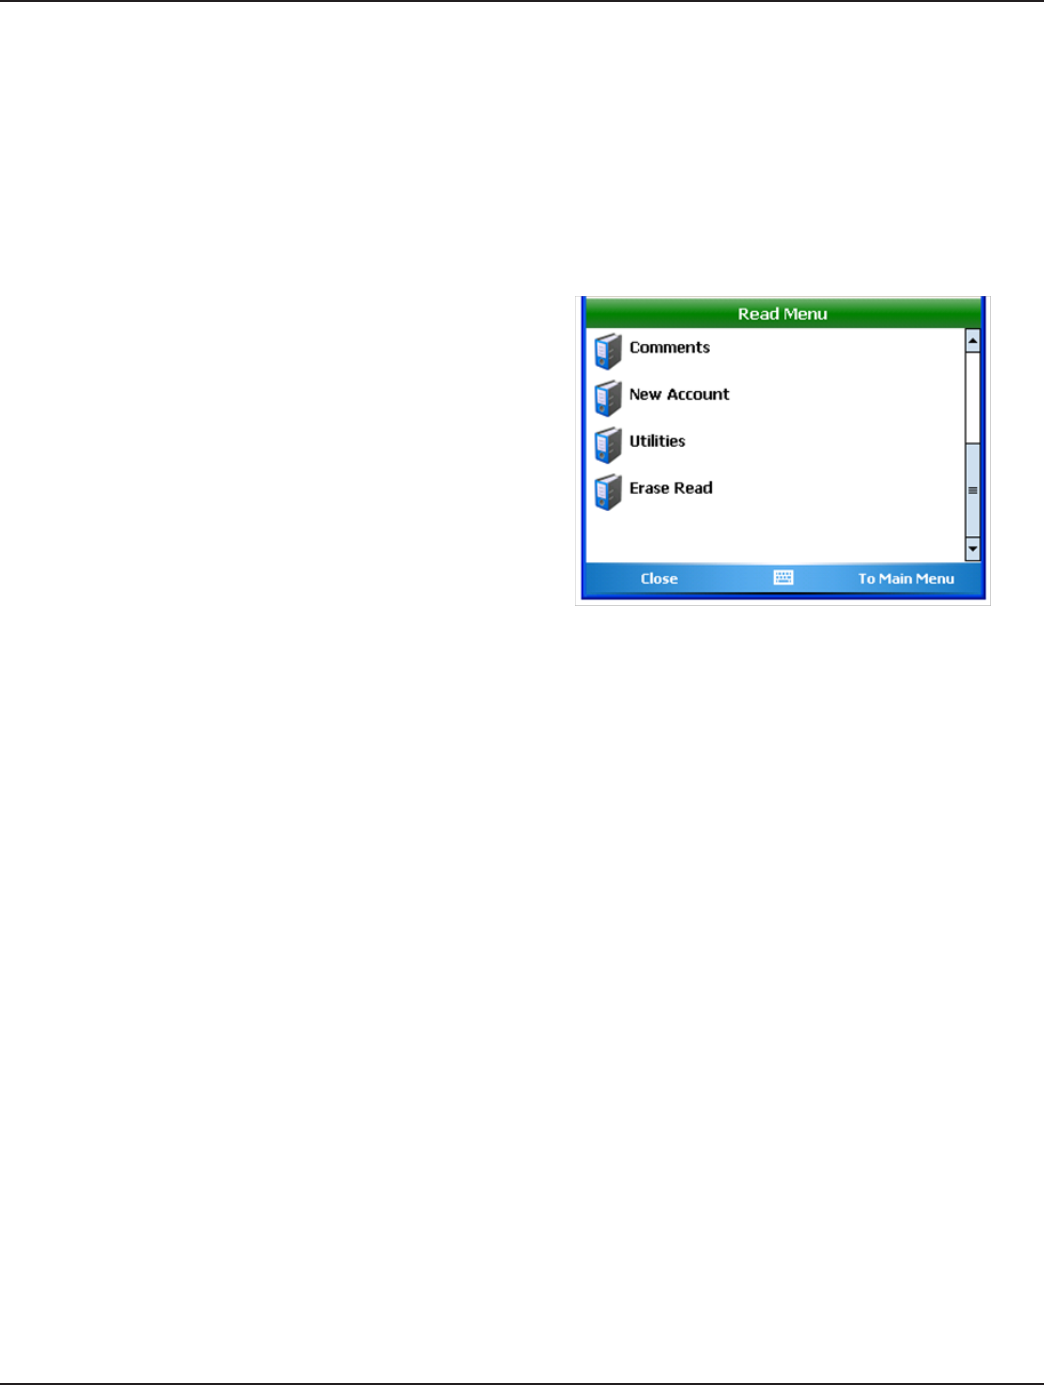
Comments
The ORION Field Application software has three different
ways to send information back to the utility office: Reader
Codes, Trouble Codes and Text Messages.
1. From the Read Menu, tap Comments.
Result: The Comments Menu displays with three
options. See Figure 26.
2. Tap to select Reader Codes, Trouble Codes or Text
Messages.
Result: After a code or message is saved on an
account, a green check mark as shown in Figure 26
indicates that a code or message has been entered.
The next section provides additional details about
codes and comments.
3. Tap Close to exit and return to the Read Menu.
Figure 26: Comments Menu
Reader Codes
Reader Codes are predefined by the reading data
management software operator. The codes describe
non-emergency information about an account.
You may attach up to three Reader Codes to an account.
1. Tap Reader Codes on the Comments Menu.
Result: The Reader Codes screen displays with the
customer name and address shown.
2. Tap 1, 2 or 3 to enter the 1st, 2nd and/or 3rd code,
respectively.
Result: A list of available codes display. This list is
generated by reading data management software
operator prior to loading a route.
3. Use the arrow keys to move up and down to
highlight the code you want.
4. Tap to select the code you want or use the optional
Search Text function to nd a code. There are 99
Reader Codes available.
5. When the desired code is highlighted, tap Select to
accept the code and return to Reader Codes.
6. Repeat steps 2-5 to attach another Reader Code
to the account or tap OK to accept the selected
code(s) and return to the Comments Menu. Tap
Cancel to return to the Comments Menu without
saving a code.
7. Tap Close on the Comments Menu to return to the
Read Menu. Tap Close on the Read Menu to return
to the account Read screen.
Figure 27: Reader Codes
Figure 28: Select Reader Code
Page 32 1-12
ORION® Automated Meter Reading System for Trimble® Ranger™
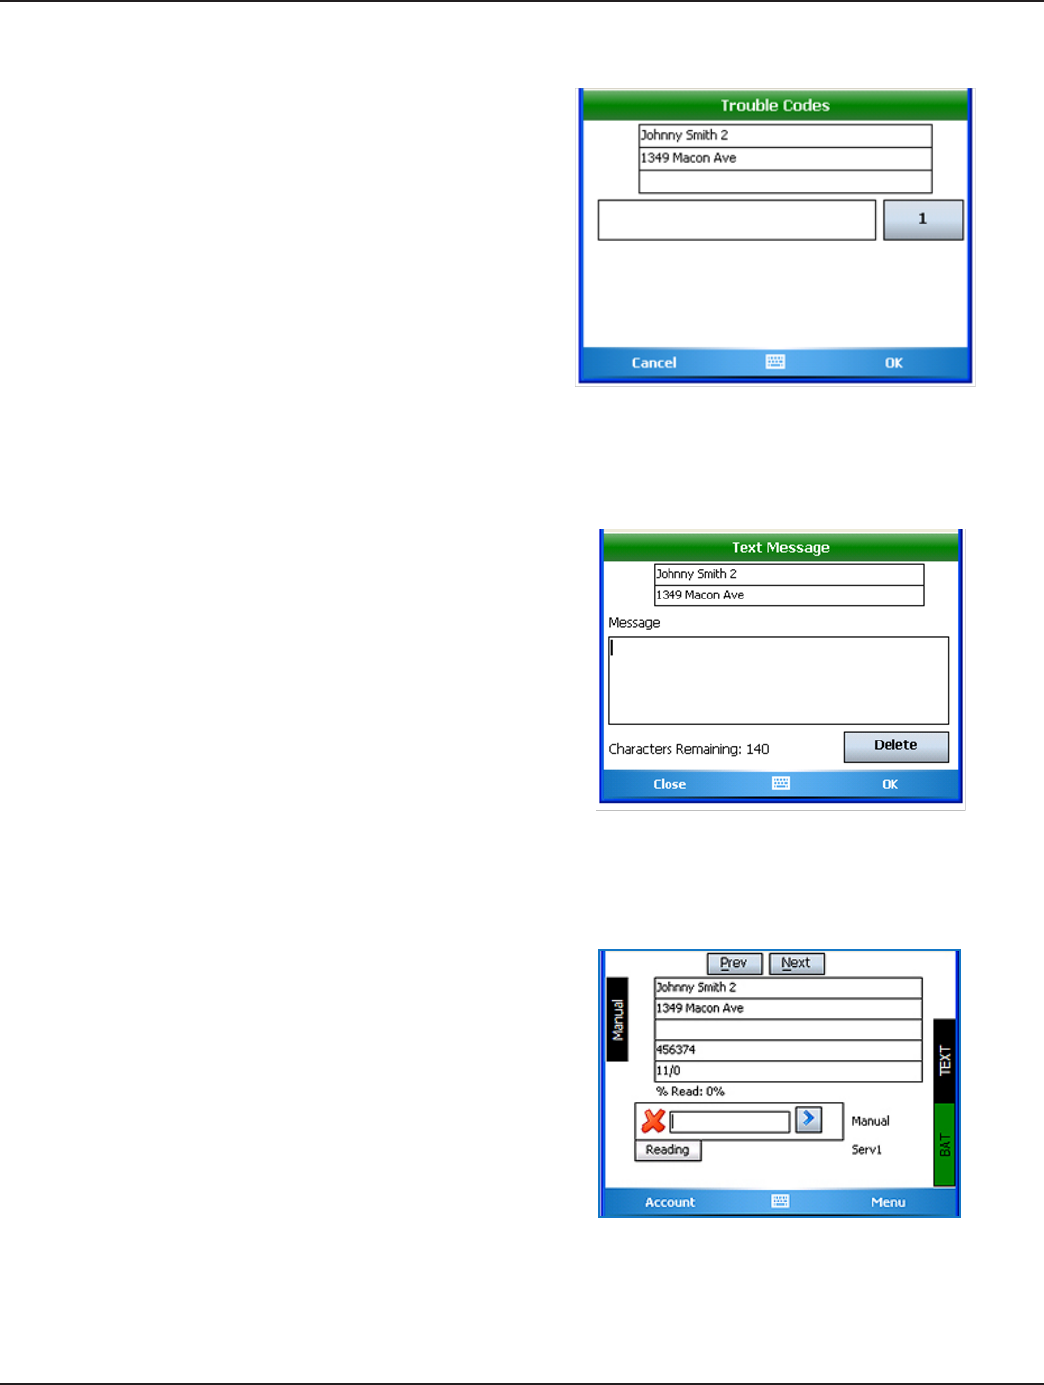
Trouble Codes
Use Trouble Codes when urgent attention is required. The
process to enter Trouble Codes is similar to Reader Codes,
however only one Trouble Code may be attached to an
account.
1. Tap Trouble Codes on the Comments Menu.
2. Tap 1.
Result: A list of available trouble codes displays.
3. Use the arrow keys to move up and down to
highlight the code you want. Then tap Select.
4. Tap OK to accept the code and return to the
Comments Menu. Tap Cancel to return to the
Comments Menu without saving a code. Figure 29: Trouble Codes
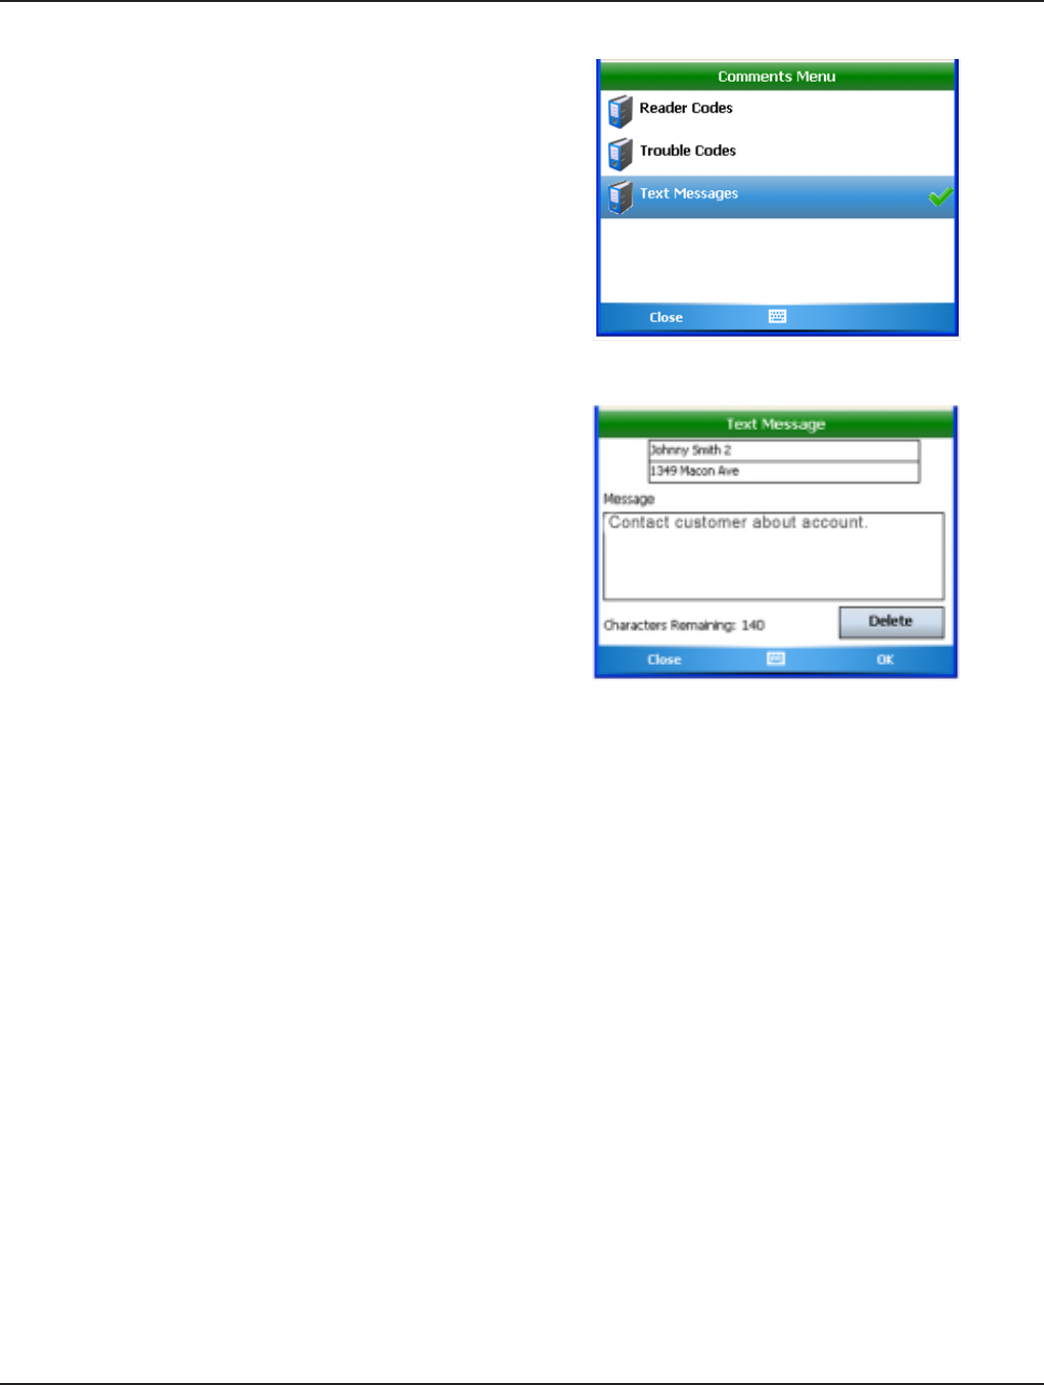
Text Messages
Text Messages can be created when an appropriate Trouble
Code or Reader Codes is not available. Text messages can be
alphanumeric with up to 140 characters for each message.
Create a Message
1. From the Comments Menu, tap Text Messages. You
may also press Fn+N keys on the keypad from an
account screen to open the Text Message screen.
Result: The Text Message screen opens with the
customer name and address shown in Figure 30.
2. Use the keypad to enter a message in the Message
eld using letters, numbers and spaces.
3. Tap OK to save the message to the account.
4. Tap Close to return to the Comments Menu.
Figure 30: Text Message Field
Note: After a message is created, the account
screen displays the word "TEXT" on the right
side of the screen as shown in Figure 31 and the
Comments Menu displays a green check mark next
to Text Messages (Figure 32).
Figure 31: Read Screen with Text Message
Page 33
1-12
Installation & Operation Manual
Edit a Message
1. From an account screen with a text message,
tap Menu > Comments > Text Messages. You
may also press Fn+N keys on the keypad from an
account screen to open the Text Message screen.
Note: An account with a text message displays a
green check mark next to Text Messages on the
Comments Menu as shown in Figure 32.
2. Tap in the Message eld to activate it. Drag across
the previous message to highlight it. Then use the
keypad to edit the message.
3. Tap OK to save the edited message to the account.
Delete a Message
1. From the Comments Menu, tap Text Messages.
Result: The Text Message screen opens with the
previously created message.
2. Tap Delete to remove the message for the account.
Result: The Clear? screen displays asking if you want
to clear the text you entered. If you select Yes, the
display returns to the Text Message screen and the
Message field is cleared.
Figure 32: Text Message Created
Figure 33: Account with Text Message
3. Tap OK to return to the Comments Menu when you are nished.
4. Tap Close to return to the account screen.
Result: The green check mark is removed and "TEXT" no longer displays on the account screen.
Page 34 1-12
ORION® Automated Meter Reading System for Trimble® Ranger™
Utilities
Utilities is part of the Read Menu and it can also be accessed from the Main Menu. The Utilities menu provides access to the
settings for the software screens and programs. It also provides information about route progress and battery life.
For complete details about the Utilities menu, refer to "Utilities" on page 50.
Erase Read
1. Tap Erase Read on the Read Menu.
Result: The Erase Reading? screen displays the current
account and asks for conrmation to erase the reading
and return the account record to an unread status.
2. Tap Ye s to erase the current reading.
Result: The customer account displays with a blank
reading eld.
Note: If a reading is not stored in the customer
record, the Erase Read option will not display on the
Read Menu.
Figure 34: Erase Read on Read Menu
Page 35
1-12
Installation & Operation Manual
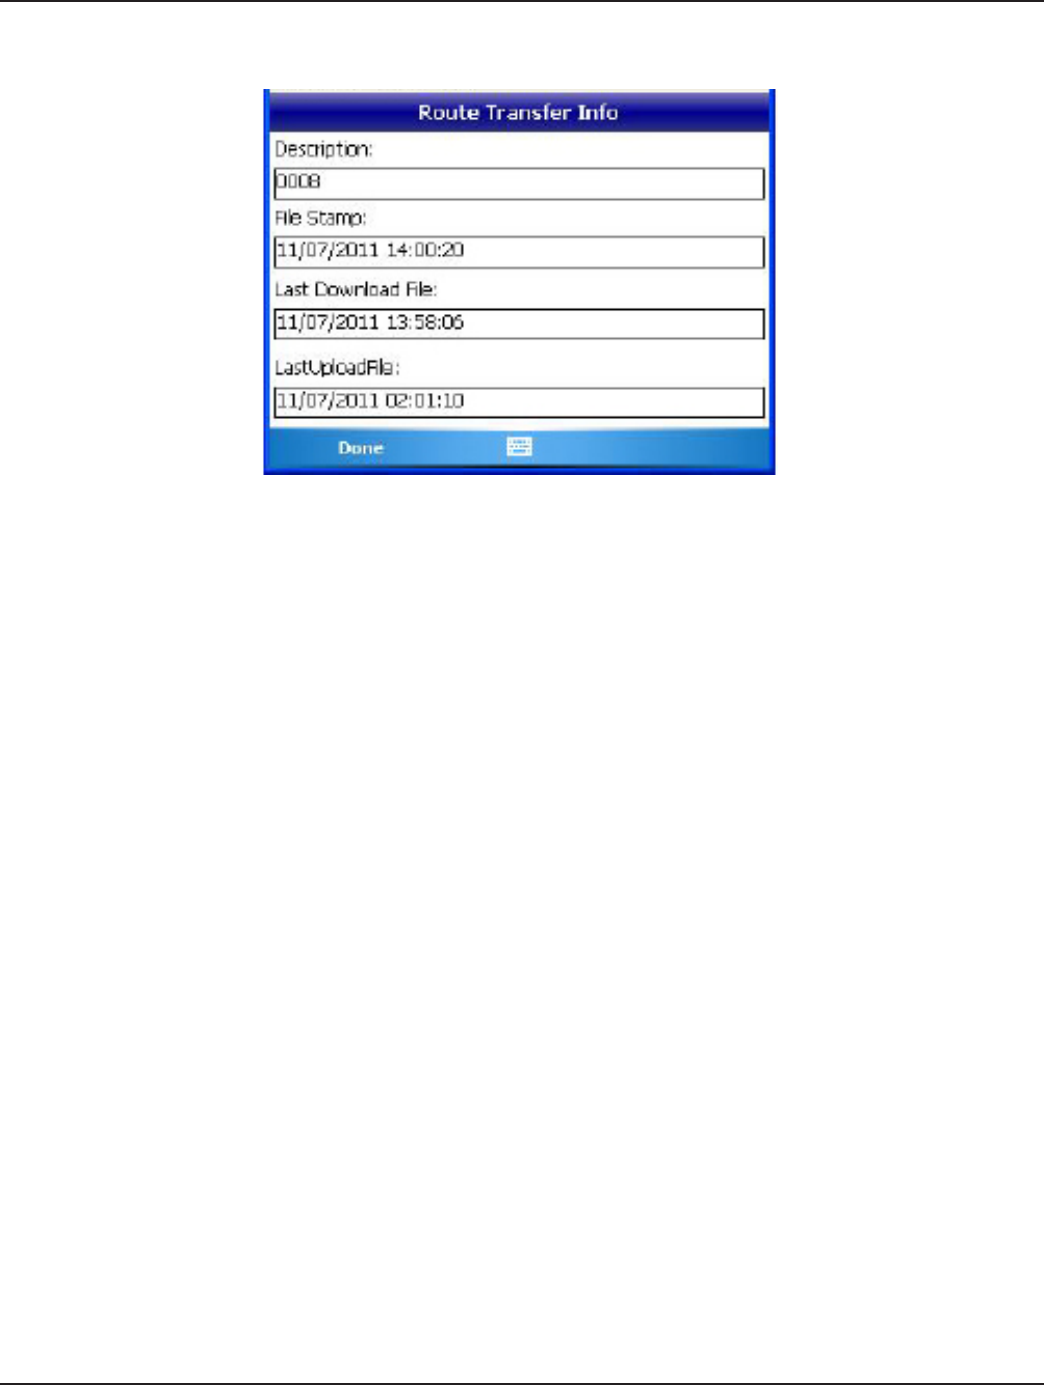
Route Info
Figure 35: Route Transfer Information
Select Route Info from the Main Menu to quickly see the Route Transfer Info screen which includes a summary of route
information. The screen includes the following information.
Description The description assigned to the route by the reading data management software operator.
File Stamp The date and time the route was loaded from the reading data management software.
Last Download File The date and time of the last downloaded file..
Last Upload File The date and time of the last uploaded file.
Tap Done to close the Route Transfer Info screen and return to the Main Menu.
Page 36 1-12
ORION® Automated Meter Reading System for Trimble® Ranger™
Program & Quick Read
Program & Quick Read is used to perform a number of functions on ORION endpoints and touch modules.
Quick Read allows you to read one meter at a time without having meters loaded into the handheld. The handheld gathers
the meter reading and displays the results on the screen.
The most common uses of the Quick Read feature are:
• Reading an endpoint or touch module when troubleshooting or testing at a customer site
• Reading one or more endpoints or touch modules that are to be installed at a customer site, to verify that they are
working correctly
• Testing a newly installed endpoint
• Performing meter testing at the meter shop
• Gathering a final reading from a meter
Note: The handheld does not store any Quick Read information and cannot send any Quick Reads back to the reading
data management software.
Quick Reads offer flexibility. You can view up to 50 readings received or you can request to view readings from a specific
ORION endpoint.
Accessing Program & Quick Read
1. Tap Program & Quick Read on the Main Menu.
Result: The available technologies are displayed.
2. Tap to choose the technology you want to quick read, then tap Open.
Result: The ORION Quick Read log in screen displays.
3. Enter your initials using the keypad and then tap OK.
Figure 36: Program & Quick Read Figure 37: Technology Selection Screen

Page 37
1-12
Installation & Operation Manual
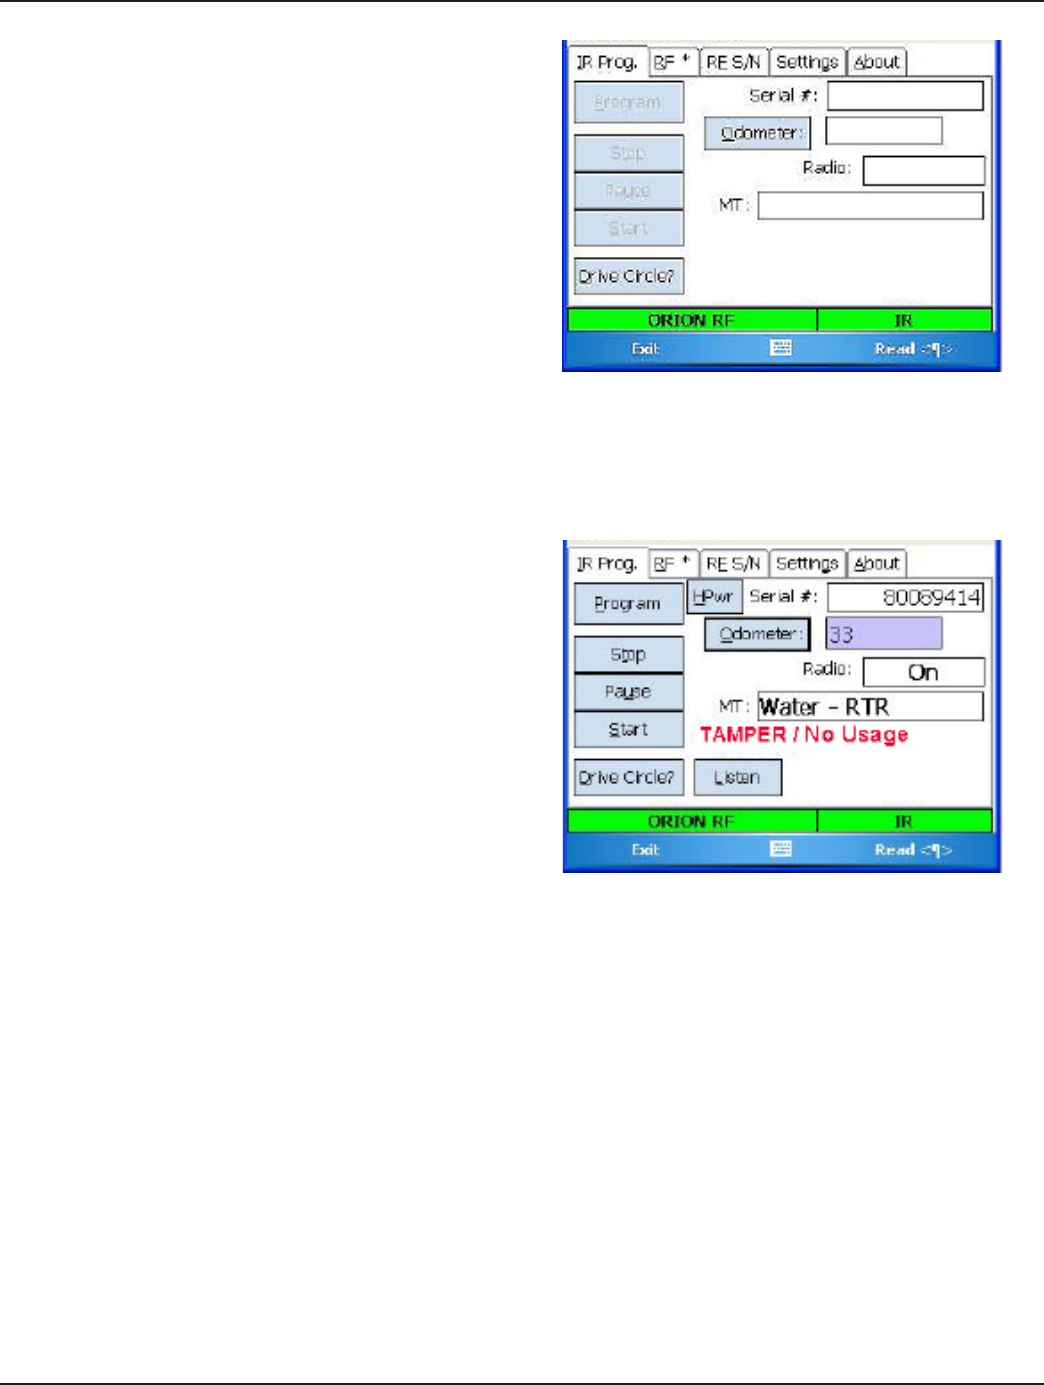
ORION CE
To access the Quick Read and Programming functions for ORION CE endpoints, tap ORION CE on the Program & Quick Read
main menu. The ORION CE Utility is divided into five tabs: IR Programming, RF, RF S/N, Settings and About.
IR Programming
Using the functions on the IR Programming tab, you can start, stop, pause and program ORION CE endpoints. An endpoint
connected to an RTR with a tamper (cut wires between the endpoint and the RTR) will need to be programmed after the
wires are repaired.
Note: An ORION endpoint connected to an ADE (or approved competitor encoder) does not require programming if the
wires are cut. The endpoint will update itself with the new encoder reading in the first hour after the wires have been
repaired.
Programming Functions
The Program screen includes these functions:
Read Exports data (read and status) from the endpoint through the optical LED.
Program Changes the odometer or clears a tamper.
HPwr Highpower forces a brief high powered signal so an endpoint will report to a gateway.
Odometer Registers the amount of water flowing through the meter.
Stop Stops the endpoint from sending a signal until it is programmed again.
Pause Stops the endpoint temporarily until a unit of water is registered. (Common practice of seasonal users.)
Start Starts the radio transmission on an endpoint.
Listen Switches to RF and "hears" the endpoint if it is active.
Drive Circle? Used for gas meters only.
ORION RF and IR COM Settings
At the bottom of all the Quick Read & Program screens for the ORION CE Utility, the reading technology,ORION RF and IR, are
displayed. If the background color is green, the correct COM (communication) ports have been set.
If the COM port is not set correctly, the field changes. For example, RF BAD COM with a clear background conveys the wrong
COM port is set for RF. To view and adjust the COM ports, select the Settings tab. For additional information, refer to "Settings
Tab" on page 41.
Start, Pause, Stop
All ORION endpoints are programmed at the factory to begin sending meter readings as soon as the register senses flow
through the meter. As a result, you can install ORION endpoints on meters without having to manually start the endpoint.
When water usage is registered on the meter, the endpoint sends a signal every four seconds.
To start an endpoint before installing the meter, use the Start function. Align the optical port and the LED and tap Start.
To pause the radio signal temporarily, use the Pause function.
To stop the endpoint from sending a signal until the Start function is used to turn the endpoint on again, use the Stop
function.
Note: Stopped radios must be reprogrammed to start the radio signal.
Page 38 1-12
ORION® Automated Meter Reading System for Trimble® Ranger™
Programming an ORION CE Endpoint
1. From the Program & Quick Read main menu, tap
ORION CE. Refer to "Program & Quick Read" on
page 36 if you need help.
2. Use the keypad to log in.
3. Tap the IR Programming tab to access the Program
screen.
4. Connect the IR sensor to the nine-pin serial port at
the bottom of the handheld.
Note: You must perform a Read function before you can
perform any other function.
5. Align the IR sensor with the endpoint LED and tap
Read.
Result: The screen lls with the endpoint serial number,
odometer value, radio status, meter type (MT) and any
alarms that are set.
Figure 38: IR Programming Tab
6. Tap Odometer to adjust the stored odometer value.
If necessary, use the DELETE key on the keypad
to remove each character. Tap at the end of the
odometer reading then press the DELETE key.
7. Type the meter reading to which you want to
program the endpoint in the Odometer eld.
It is not necessary to enter the leading zeros,
however adding the zeros may help to program
the endpoint correctly. Only seven digits (6 moving
dials and the sweep hand) can be entered when
programming an endpoint, regardless of meter size.
Figure 39: Programming
8. Align the handheld IR sensor with the LED of the endpoint and tap Program or press the P key.
Result: The handheld will beep when the new value is stored.
9. To verify the programming and splicing were successful, tap the RF* tab and perform a Quick Read on the endpoint.
If the endpoint still reports a tamper, check all the splices and repair as necessary.
Result: When the endpoint information has been successfully read, the elds on the screen will be updated.
10. Tap Exit to leave the ORION CE Utility and return to the Quick Read Menu.

Page 39
1-12
Installation & Operation Manual
Setting the Odometer
On the Program screen, you can set the odometer. Setting the odometer is performed in two steps:
1. Perform a Read function.
2. Enter the new odometer value.
You can perform a Read function to verify that the new reading is now being reported by the endpoint.
Note: If the endpoint’s radio is stopped, the odometer value will be stored but the endpoint will remain stopped. If the
radio is running, the odometer value will change and the radio will remain running.
The following example will help you through the steps of setting an odometer value.
Let’s assume that you are installing an ORION CE endpoint on an active meter with usage on the RTR. Follow these steps to
ensure that the value in the endpoint matches the current odometer value on the RTR once the endpoint is connected to the
RTR.
When programming ORION CE endpoints, enter the value of
the six moveable odometer wheels plus the sweep hand for
all meter types (gallons, cubic feet, etc.) and all meter models.
For this example, we’ll assume the odometer value (both
black digits and white digits) is "001234." The RTR odometer
would look like the example in Figure 40. Figure 40: Odometer Value
Let’s also assume that the sweep hand is pointing between the "5" and the "6." Because the sweep hand has not yet hit the
"6", use the value of "5" as the last digit of the meter reading. Therefore, the value to be entered into the ORION endpoint is
"0012345."
Now follow these steps for setting the Odometer value.
1. Align the optical port with the endpoint’s LED and tap Read.
2. Update the odometer value on the handheld on the Program screen. Tap behind the reading in the eld and use the
DELETE key on the keypad to delete the current odometer value.
3. Use the keypad to enter the desired odometer reading (0012345).
Note: Leading zeros are not required but on larger meters it may be helpful to enter them as placeholders. The handheld
only allows seven digits to be entered during this function.
4. Align the optical port over the endpoint's LED and tap Program.
Result: The handheld beeps when communication between the optical port and the endpoint has been completed and the
endpoint holds the new odometer value.
To check the odometer value, place the optical port over the LED and perform the Read function again. You should see the
new odometer value of "12345" in the Odometer field.
Page 40 1-12
ORION® Automated Meter Reading System for Trimble® Ranger™
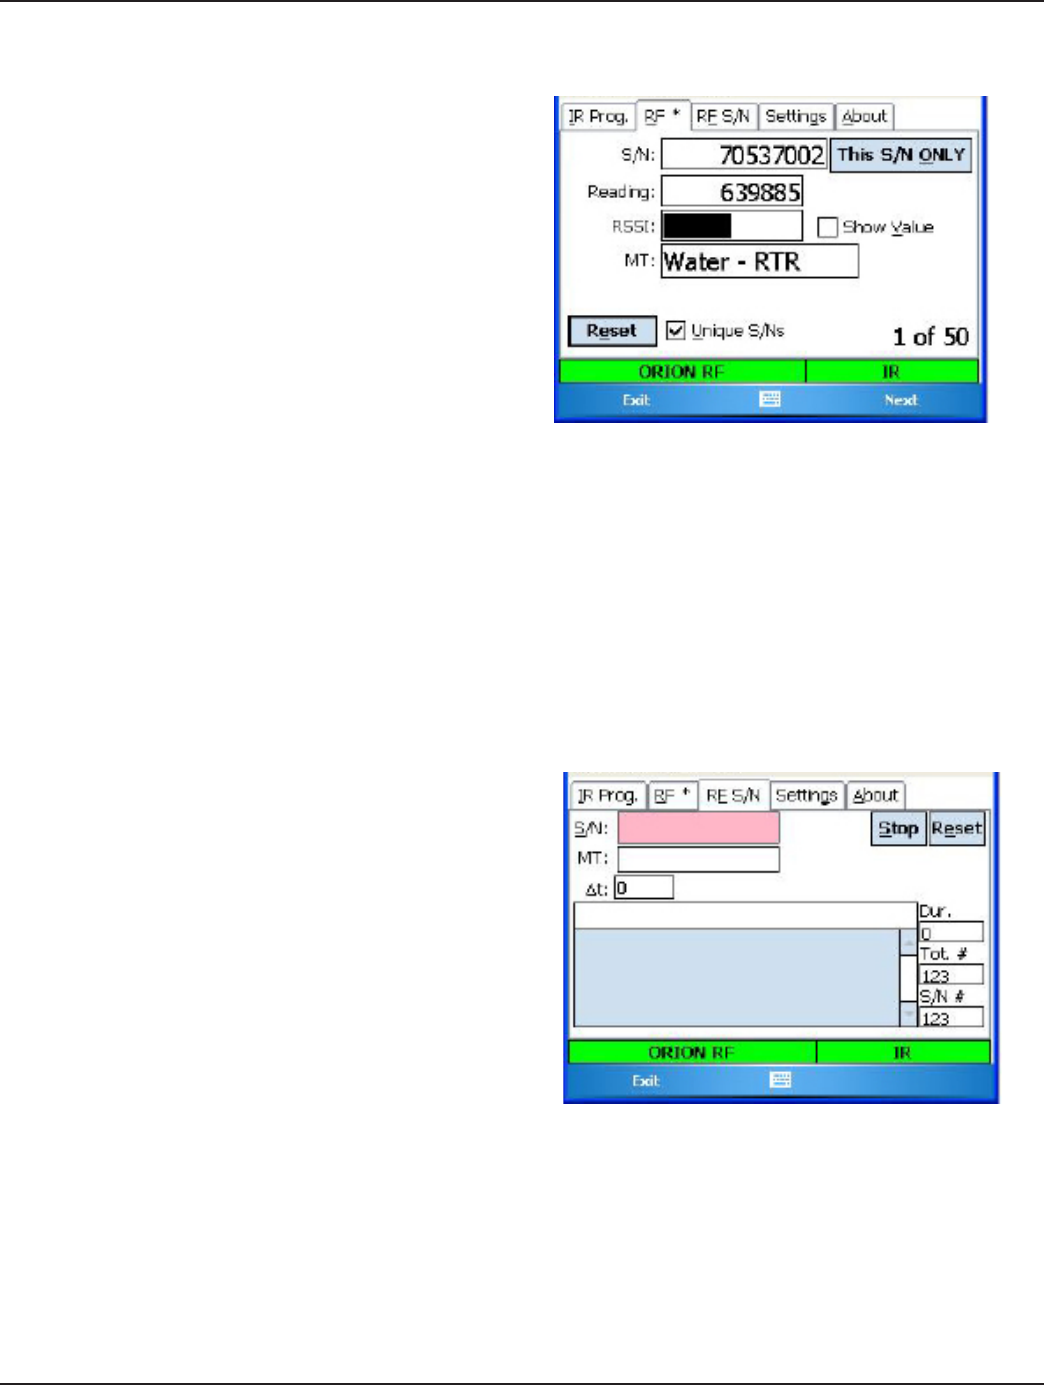
RF
The RF tab on the CE Utility includes the functions to
perform quick reads using radio frequency. The RF screen
displays up to 50 CE endpoints in range, one endpoint at a
time.
To display the next CE endpoint, tap Next.
Figure 41: RF Tab
S/N Displays an ORION CE endpoint serial
number in range.
Reading Displays the odometer value (water or
gas) or the index value (gas only) for the
endpoint.
RSSI Fills with a single bar graph to show the
strength of the RF signal. If you select
Show Value, the field will also show the
numeric value of the signal strength.
MT Displays the meter and type. Example: Water - ADE
Reset Clears the command and refreshes the screen.
Unique S/Ns Receive one read for each endpoint serial number in range.
This S/N ONLY Reads a single endpoint serial number. To activate this function, tap This S/N ONLY, then tap the
RF S/N tab.
RF S/N
The RF S/N tab on the CE Utility includes the functions to
perform a quick read with radio frequency on a single CE
endpoint. The RF S/N screen displays a table of Readings and
corresponding RSSI values and Attempts, plus the Time of
each Reading.
Figure 42: RF S/N Tab
S/N Displays the selected ORION CE endpoint
serial number.
MT Displays the meter and type.
Example: Water - RTR
At Attempts: This field changes to display the
seconds that lapse between one received
transmission and the next.
Stop Stops new data from displaying.
Reset Clears the screen and refreshes. To begin Readings again, tap Start..
Dur Displays the accumulated time in seconds from the first attempt.
Tot. # Displays the number of Attempts
S/N # The number of times the serial number is read.
Page 41
1-12
Installation & Operation Manual
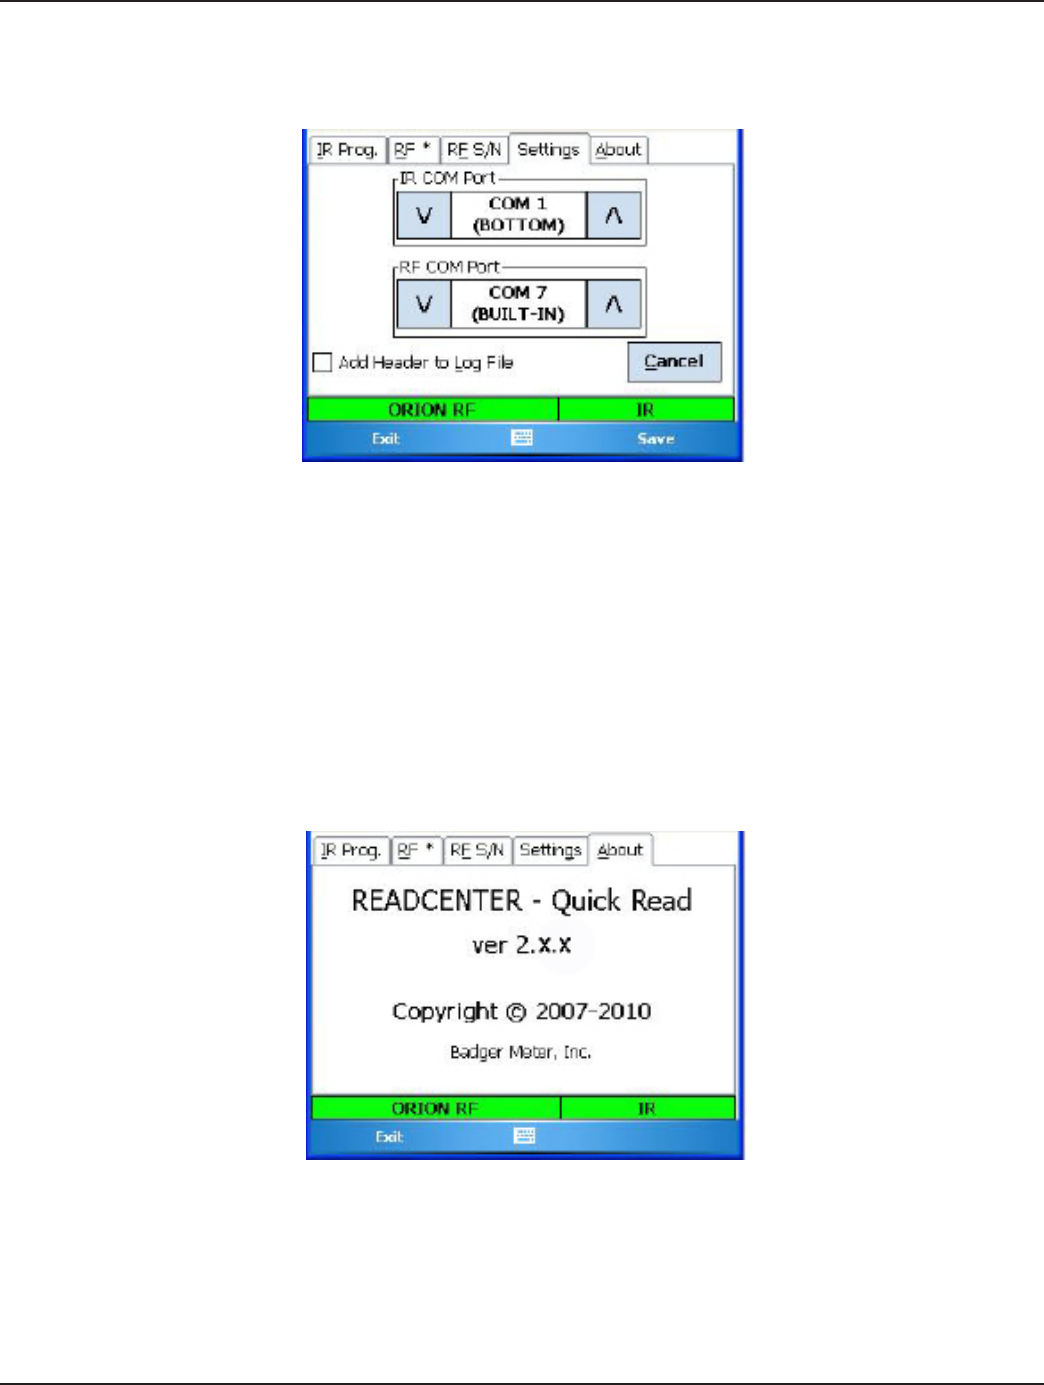
Settings
The COM (communication) ports for the reading technology are displayed on the Settings tab of the ORION CE Utility.
Figure 43: ORION CE COM Settings
• IR COM port - connected using the serial port (COM 1) at the bottom of the handheld
• RF COM port - built in to the handheld (COM 7)
Standard settings are shown above. Adjust the COM ports using the up and down arrows. When the COM ports are adjusted
correctly, tap Save.
Note: Adjustments to the COM ports should be made only under the direction of Badger Meter Technical Support.
About
The About tab displays information about the current version of the Quick Read software.
Figure 44: Software Information

Page 42 1-12
ORION® Automated Meter Reading System for Trimble® Ranger™
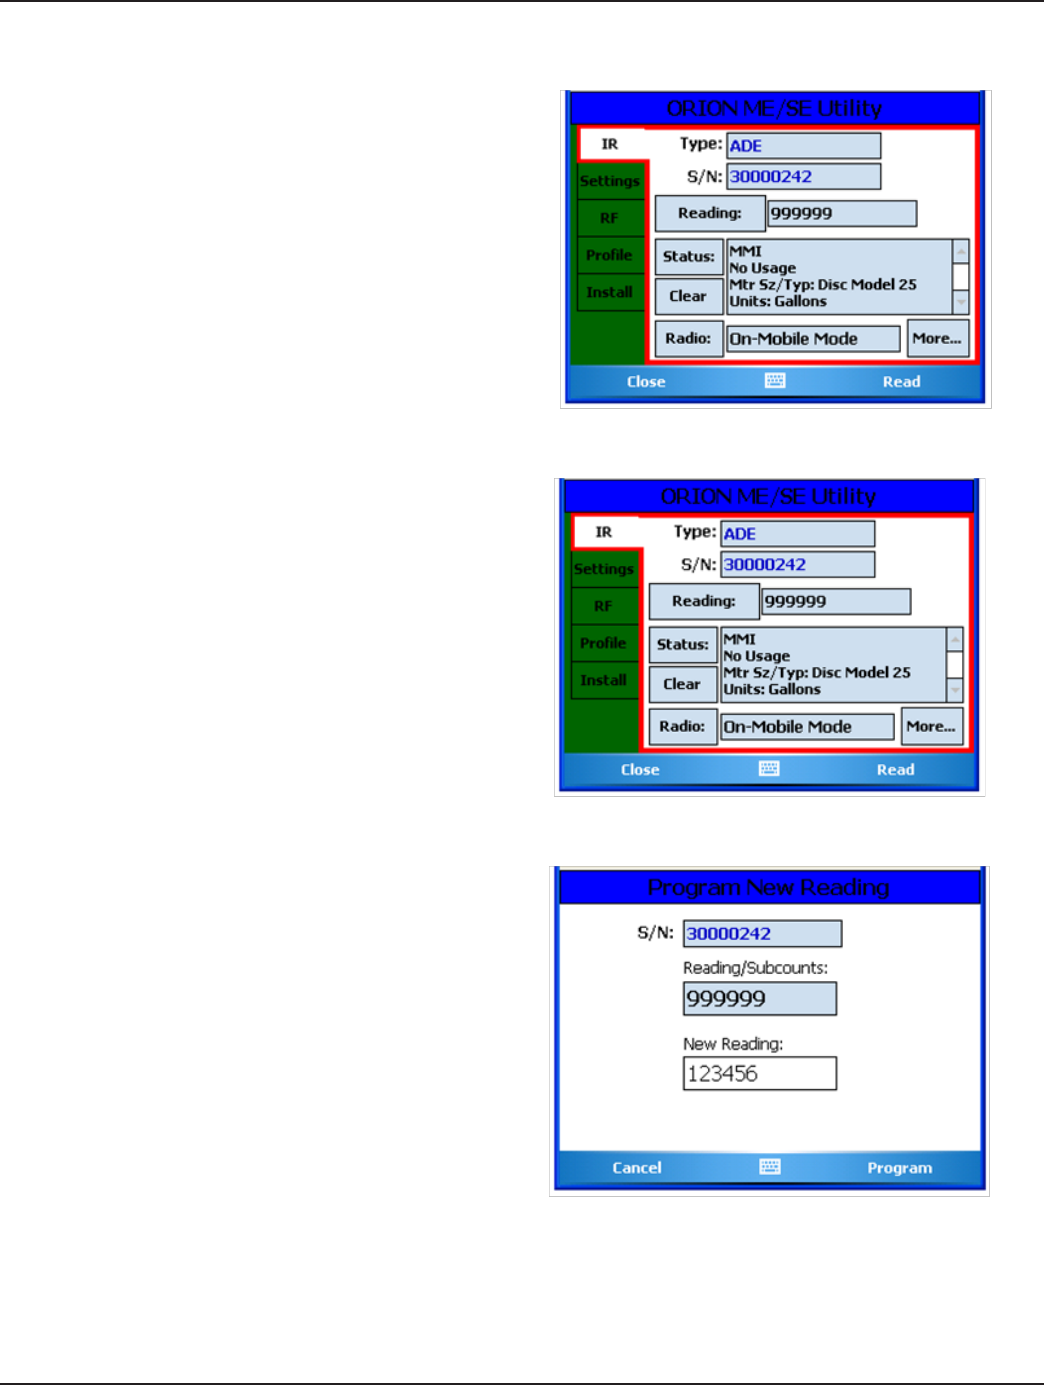
ORION ME/SE Utility
To access the quick read and programming functions for ORION ME/SE endpoints, tap ORION ME on the Program & Quick
Read main menu. The ORION ME is divided into five tabs: IR, RF, Profile, Install and Settings.
IR
Using the functions on the IR tab, you can start and program ORION ME endpoints.
Programming Functions
The Program screen includes these functions:
S/N Displays the serial number of the ORION ME endpoint.
Type Displays the meter type. Example: ADE
Listen Switches to RF and "Hears" the endpoint if it is active.
Reading Used to reprogram the endpoint. ADE readings cannot be reprogrammed but you may tap Reading to
perform a Forced Read.
Status Displays the Status screen for the ME endpoint and provides programming and usage information for
the meter.
Clear Asks if you want to clear exceptions from the endpoint status.
Radio Displays the radio selection screen with the current mode. Allows you to select another mode from
a list of available modes. Refer to "Selecting Modes for ORION ME/SE Endpoints" on page 46 for
additional information.
Read Exports data (read and status) from the endpoint through the optical LED.
Program Changes the odometer or clears a tamper.
HPwr Highpower forces a brief high powered signal so an endpoint will report to a gateway.
More Displays the More Commands screen which includes the firmware version and type of meter. You may
also set the date and time, get battery status or get the results of a flow rate study from this screen.
The purpose of the IR function is to start, stop, pause and program endpoints. An endpoint connected to an RTR with a
tamper (i.e., cut wires between the endpoint and the RTR) must be programmed after the wires are repaired. The following
steps are used to program an ORION endpoint connected to an RTR.
Note: ORION endpoints connected to a Badger Meter ADE or an approved competitor encoder DO NOT require
programming if the wires get cut. The first hour after the wires have been properly repaired, the ORION endpoint
updates itself with the new encoder reading.
Page 43
1-12
Installation & Operation Manual
Programming an ORION ME Endpoint
1. Tap Program & Quick Read on the Main Menu.
Refer to "Program & Quick Read" on page 36
if you need help.
2. Tap to choose ORION ME, then tap Open on the
bottom right of the screen.
Result: The ORION ME/SE Utility login screen opens.
3. Use the keypad to log in.
4. Tap the IR tab to access the ORION ME
programming software.
Figure 45: IR Programming Tab
5. Connect the IR cable to the 9-pin serial port on the
bottom of the handheld.
6. Align the optic read head of the IR cable connected
to the handheld with the endpoint LED port.
7. Tap Read.
Result: The screen lls with endpoint information.
8. Tap Reading to adjust the stored Reading value.
Result: The Program New Reading screen opens.
Figure 46: Endpoint with Reading
9. Using the keypad, type the meter reading to which
you wish to program the endpoint.
Note: Leading zeros are not required, however
it may help to enter leading zeros so that the
endpoint is programmed correctly. Only 7 digits
can be entered when programming an endpoint
regardless of the meter size.
10. Align the optic read head of the IR cable with the
endpoint LED port and tap Program.
Result: The handheld will beep when the new value is
stored.
Figure 47: Program New Reading
11. If you are programming the endpoint due to a tamper, verify that the programming and wire splicing was successful.
Tap the RF tab and and tap Start Reading to perform a Quick Read on the endpoint.
12. If the endpoint still reports a tamper, have the wire splices checked and repaired as necessary.
13. Once the endpoint information has been successfully read, the elds on the screen will be updated.
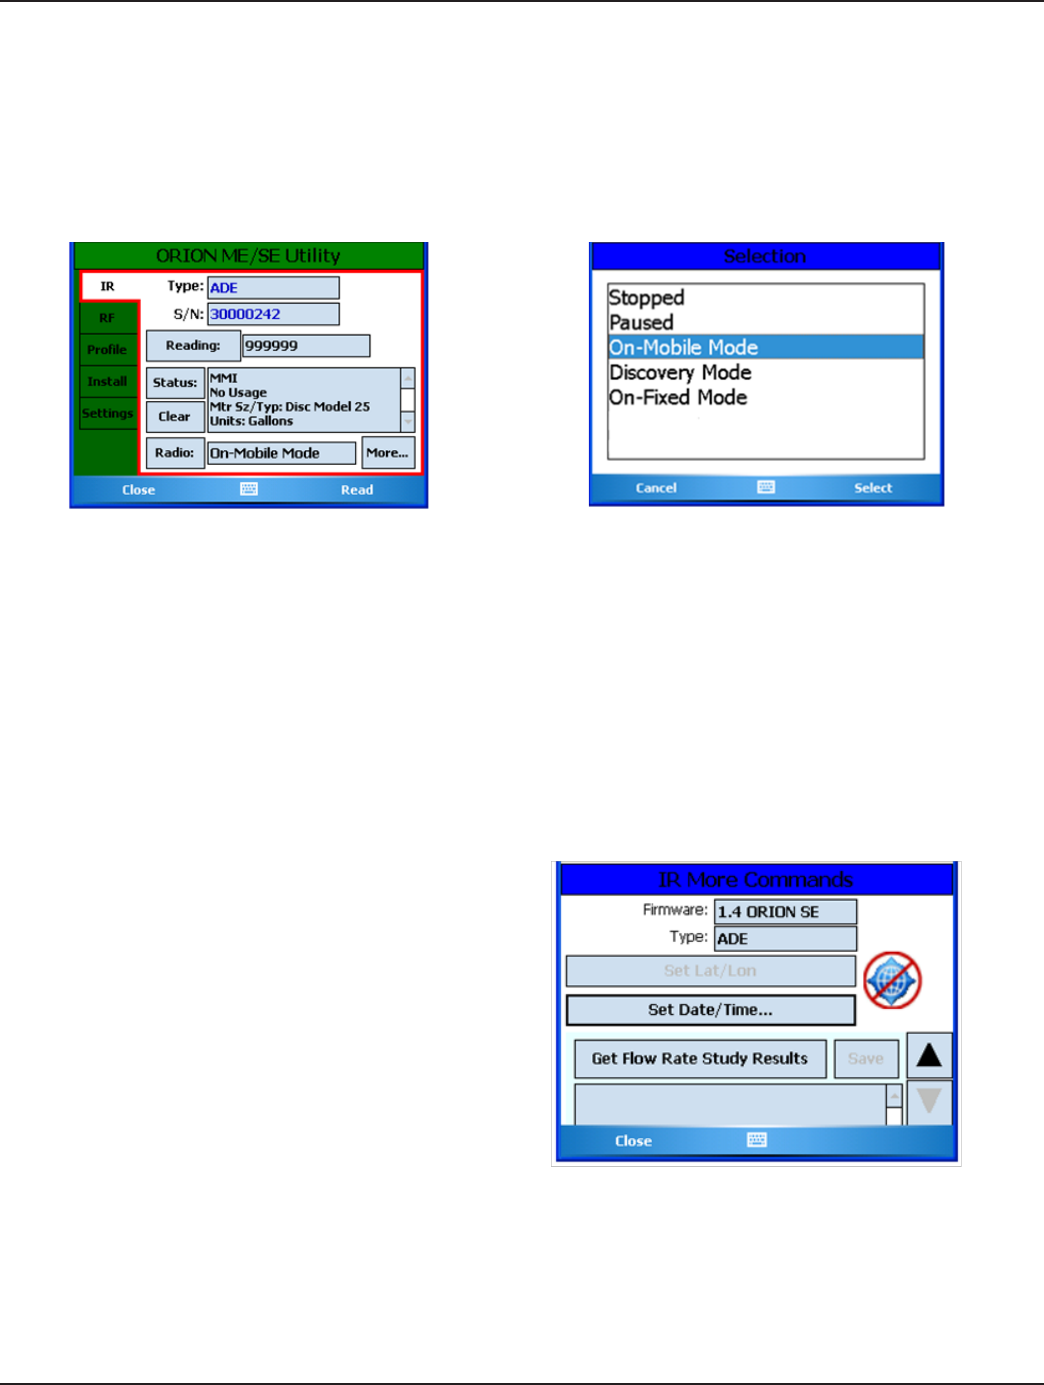
Page 44 1-12
ORION® Automated Meter Reading System for Trimble® Ranger™
Radio Modes for ORION ME/SE Endpoints
All ORION endpoints are programmed at the factory to begin sending meter readings when the register senses flow through
the meter. As a result, you can install ORION endpoints on meters without having to manually start the endpoint. When water
usage has been registered on the meter, the endpoint will send a signal every four (4) seconds.
To start the endpoint before installing the meter, tap the Radio button on the IR programming screen to start the Radio
functions. There are several functions or modes to choose from.
Figure 48: Mode Selection Figure 49: Mode Options
Stopped Stops the endpoint until the endpoint is restarted.
Paused Pauses the endpoint until a unit of water flows through it.
On- Mobile Mode The endpoint always starts in On-Mobile Mode. Every 6 hours the endpoint "talks" to the gateway.
After another six hours, the gateway assigns a time slot to the endpoint. Then the endpoint goes
into On-Fixed Mode. If the endpoint does not communicate with a gateway, it stays in On-Mobile
Mode.
Discovery Mode Done at installation to discover gateways.
On-Fixed Mode Indicator of what the unit is transmitting at the current time. This option should not be used to set
the endpoint.
Tap the More button on the IR screen to see more IR
commands.
The IR More Commands screen displays the Firmware
version and the meter type. The Lat/Longs may be stored
if a GPS antenna is present. The Date and Time can also be
set.
Flow Rate Study for ME/SE endpoints
ME/SE endpoints inside the rmware can run a study for a
week and report High, Low and Average ow rates. A le of
the study is created for ReadCenter Analytics.
Figure 50: More Commands
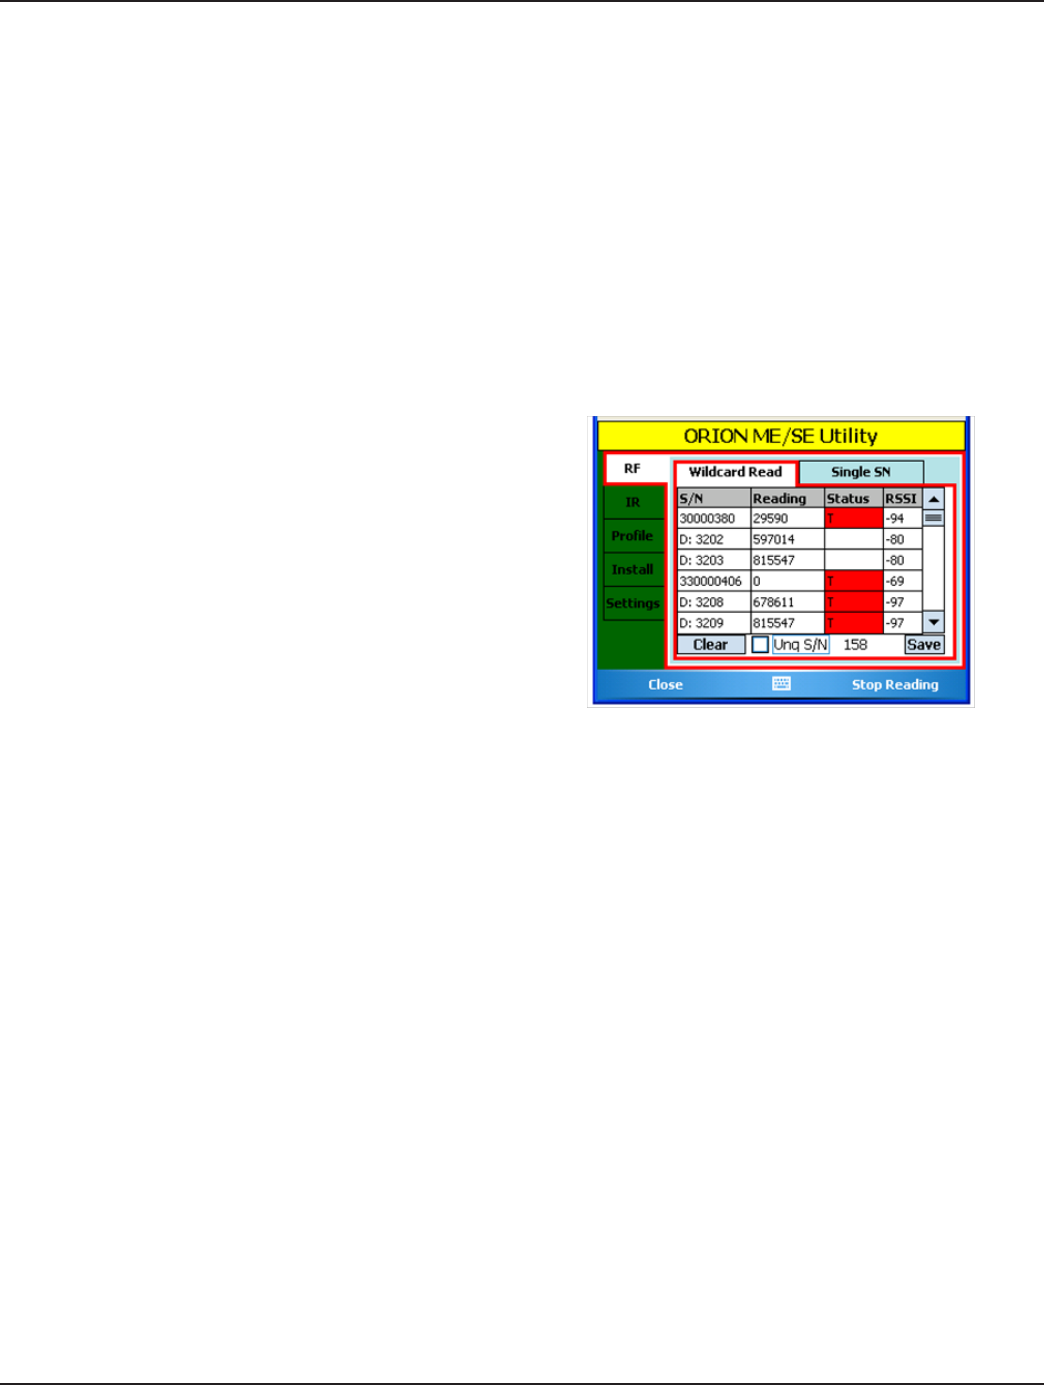
Page 45
1-12
Installation & Operation Manual
RF
Wildcard Read
The Wildcard Read screen displays a reading for all ORION ME endpoints in range up to 50 readings.
S/N Displays the serial number of the ORION ME endpoint.
Reading Displays a reading for the corresponding endpoint serial number.
Status Displays any potential exception issues such as a tamper (T) or no usage (NU). If no exception is noted, the
Status field is blank.
RSSI Display the numeric value of the RF signal strength.
Clear Clears the current screen. Tap Start Reading to begin reading again.
Save Saves the current reading values.
1. Tap the RF reading tab on the ORION ME/SE Utility
screen to select it.
2. To listen for all endpoints in range, tap the
Wildcard Read tab and then tap Start Reading.
Result: All ORION ME/SE readings within range will
display in a table format.
3. View the readings by tapping the up and down
arrows to the right of the table.
Figure 51: Wildcard Quick Read
Single Serial Number Read
The Single SN screen displays a reading for one ORION ME endpoint.
S/N Displays the serial number of the ORION ME endpoint. The meter type displays to the right of the
serial number.
Reading Displays a reading for the corresponding endpoint serial number.
RSSI Display the numeric value of the RF signal strength.
Midnight Reading Displays the reading taken at the previous midnight hour.
Status Displays how the endpoint was programmed originally and displays any potential exception issues
such as a tamper (T) or no usage (NU). Tap the up and down arrows to view all status messages.
More Displays the RF More Commands screen on which you can access the firmware version, endpoint
date and time, location and full status.

Page 46 1-12
ORION® Automated Meter Reading System for Trimble® Ranger™
1. To obtain a reading for a specic endpoint, tap the
Single S/N tab as shown in Figure 52.
2. Key the ORION serial number in the S/N eld, then
tap Start Reading on the lower right of the screen.
Result: The screen displays the reading for the serial
number entered.
3. Tap Stop Reading on the lower right of the screen
to stop the Quick Read.
Figure 52: Single Endpoint Reading
Prole
The Profile tab displays an historical record for the ME/SE endpoint. A water endpoint will store 90 days of hourly readings.
The number of days of storage for more frequent intervals is proportionally decreased (22 days for 15 minute intervals and 7
days of five minute intervals).
This data is stored as blocks of 24 readings. In handheld and mobile applications, customers can request all 90 days or certain
blocks (days) of data.
S/N Displays the serial number of the ORION ME endpoint.
1st Dt/Tm Displays the first date of the selected profile. For example, if you request 7 in the Days field, the
date displayed is 7 days prior to the current date..
Days Select the number of days of data for the profile. Available choices: 1, 7, 14, 30, 60, ALL (90)
Interval Displays the interval for the profile calculation. For example, 60 = hourly reads.
Quantity Display the number of hourly reads chosen/heard.
Consumption The dierence between the start and end reads in the prole requested.
Status(es) Displays any potential issues that require attention. Example: tamper, no usage, etc.
Save Save the data to send back with the route information.
1. Tap the Prole tab.
To use IR, select IR from the drop down and use the IR cable to read the SN. Then tap Prime Read.
or
To use RF, select RF from the drop down and enter the serial number using the keypad. Then tap Read Data.
Result: All profile data for the endpoint, up to 90 days of hourly reads, is collected.
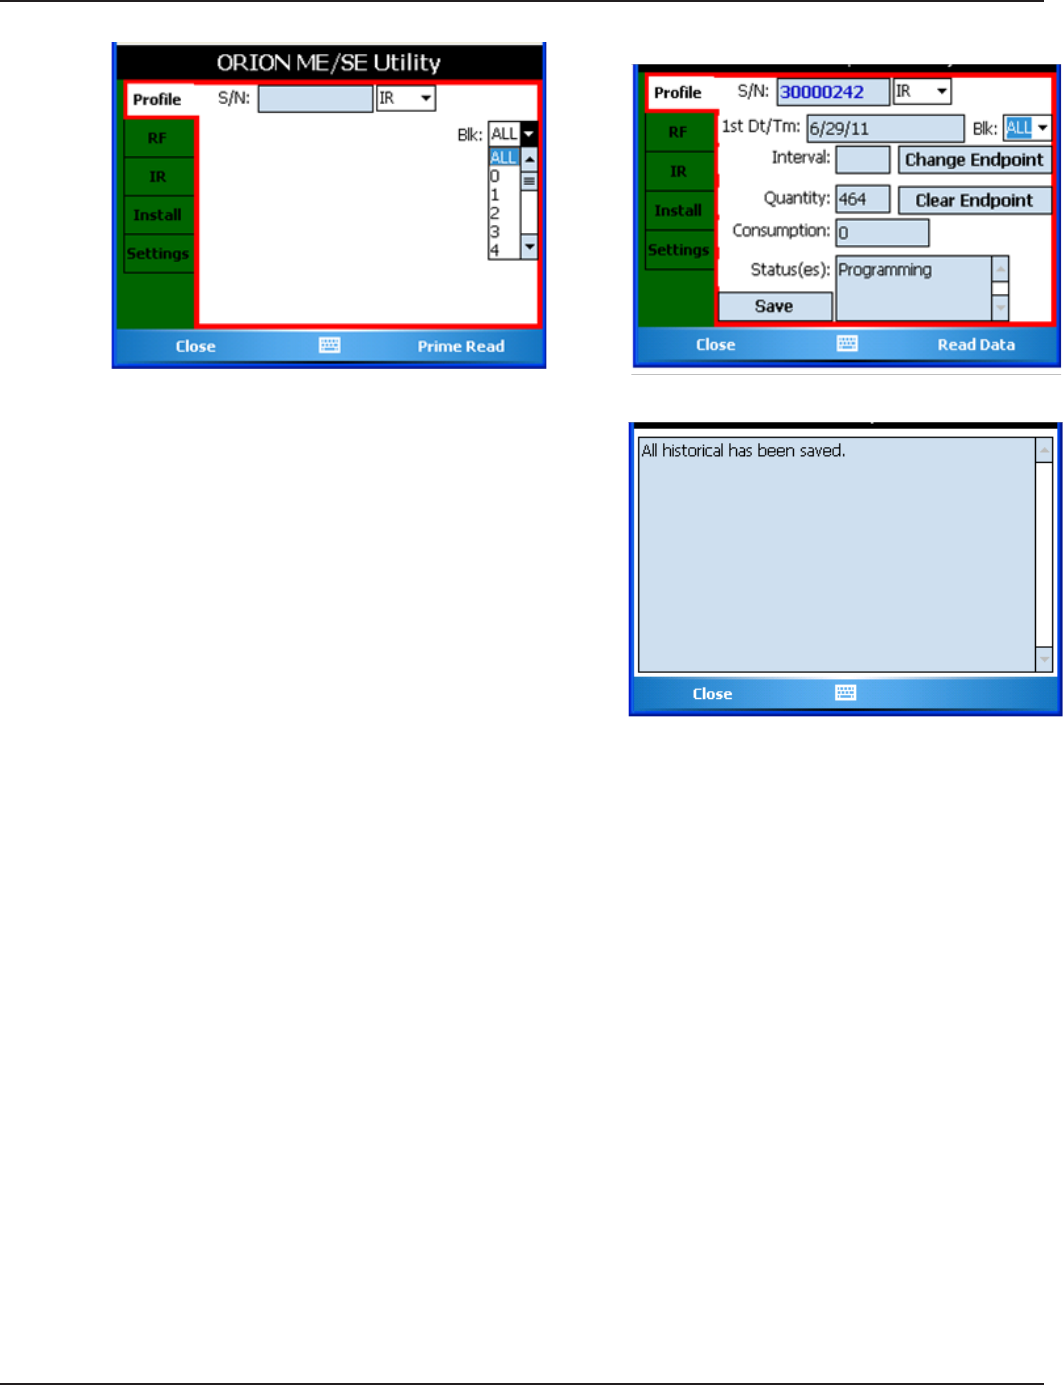
Page 47
1-12
Installation & Operation Manual
Figure 53: Profile Screen - No Data Figure 54: Profile Screen with Data
2. Tap the Save button.
Results: The historical data is saved and can be
viewed in ReadCenter Analytics. A screen displays to
conrm the save. See Figure 55.
Figure 55: Historical Data Saved
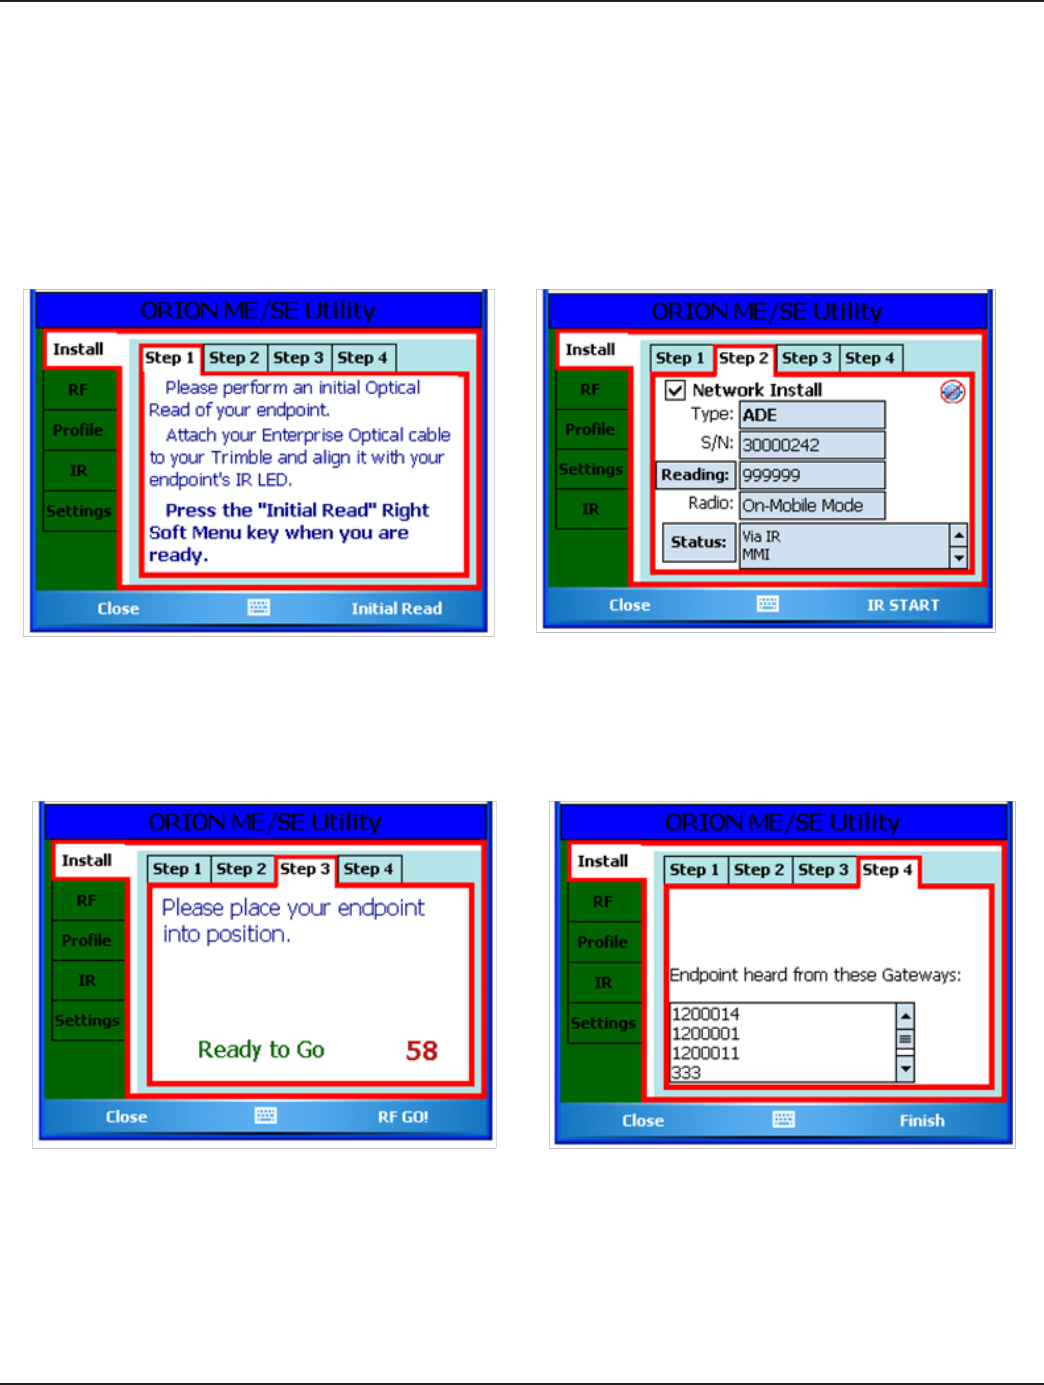
Page 48 1-12
ORION® Automated Meter Reading System for Trimble® Ranger™
Install
The purpose of the Install tab is to let the installer know that the endpoint is being heard from at least one gateway and
that it will switch over to fixed network mode. It also may be used to troubleshoot. If the endpoint fails to switch to a fixed
network, it can be manually assigned to a certain gateway, however, it is always best to let the system decide which gateway
the endpoint gets assigned to.
Step 1 - With the Install tab selected, tap Initial Read.
Step 2 - Tap IR START.
Figure 56: Step 1 Figure 57: Step 2
Step 3 - Tap RF GO!
Step 4 - The endpoint heard from the gateways are listed as shown in Figure 59. Tap Finish.
Figure 58: Step 3 Figure 59: Step 4
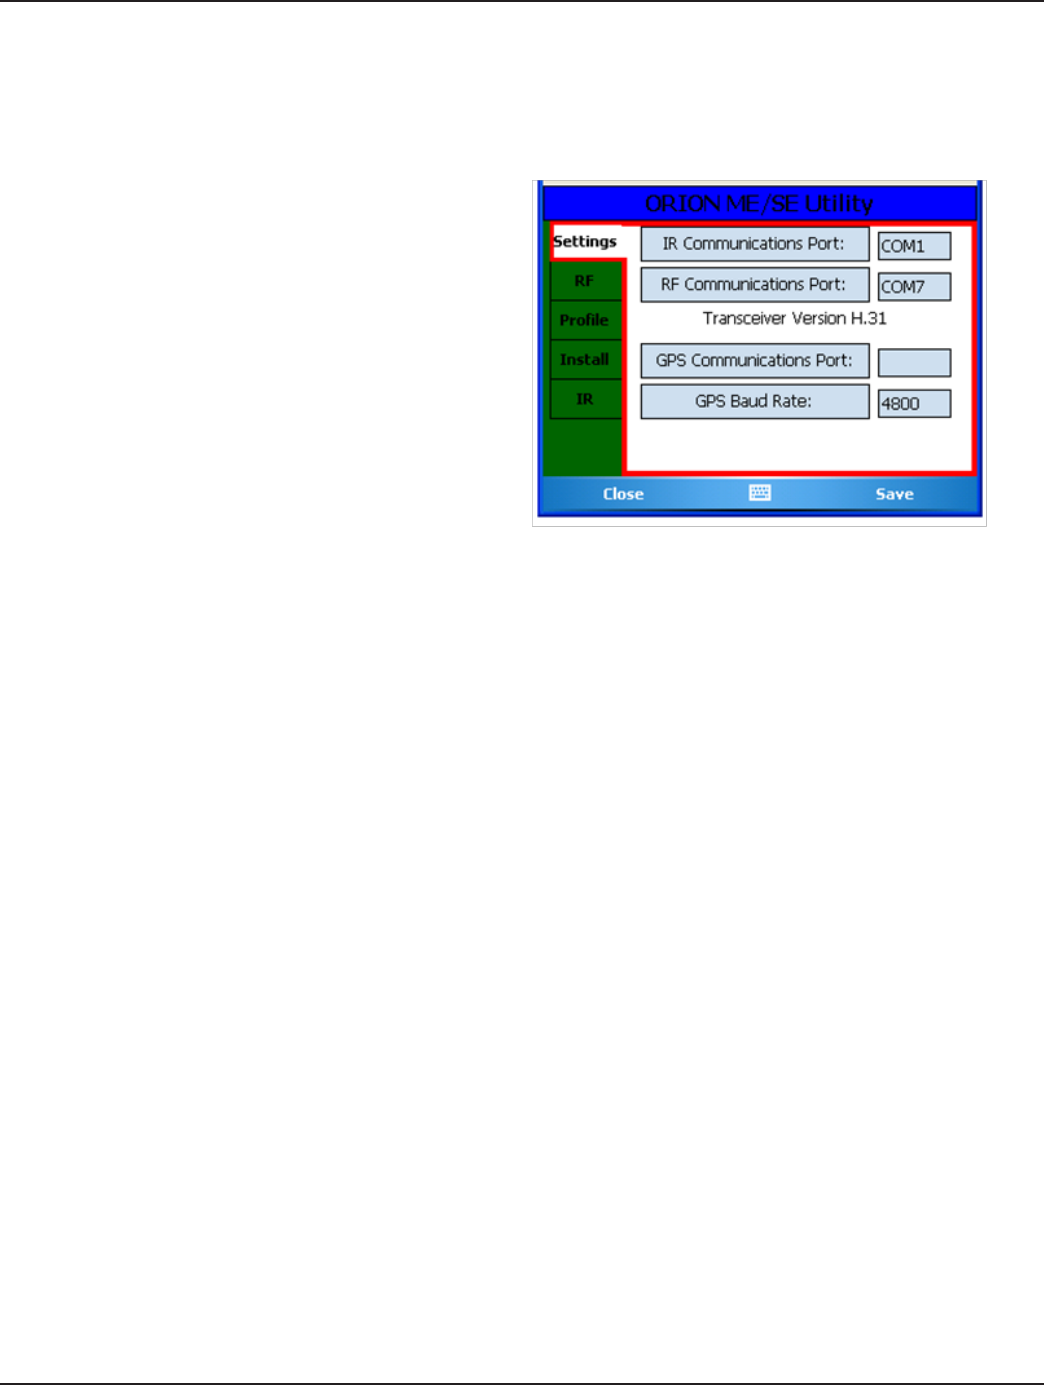
Page 49
1-12
Installation & Operation Manual
Settings
The COM (communications) Ports for any hardware attached to the handheld are displayed on the Settings screen. The
ORION ME transceiver version number is also displayed. Before reading meters for the first time, check the Settings to ensure
the correct COM Ports are set for the the hardware connected to the handheld to establish communication with the software.
1. Tap the Settings tab to access the IR and RF COM
Ports on the handheld.
2. Tap in the COM Port eld and make changes
using the keypad.
3. Tap Save to save any changes. Tap Close to exit
the screen without saving changes.
Note: Adjustments to the COM ports should be made
only under the direction of Badger Meter Technical
Support.
Figure 60: COM Ports
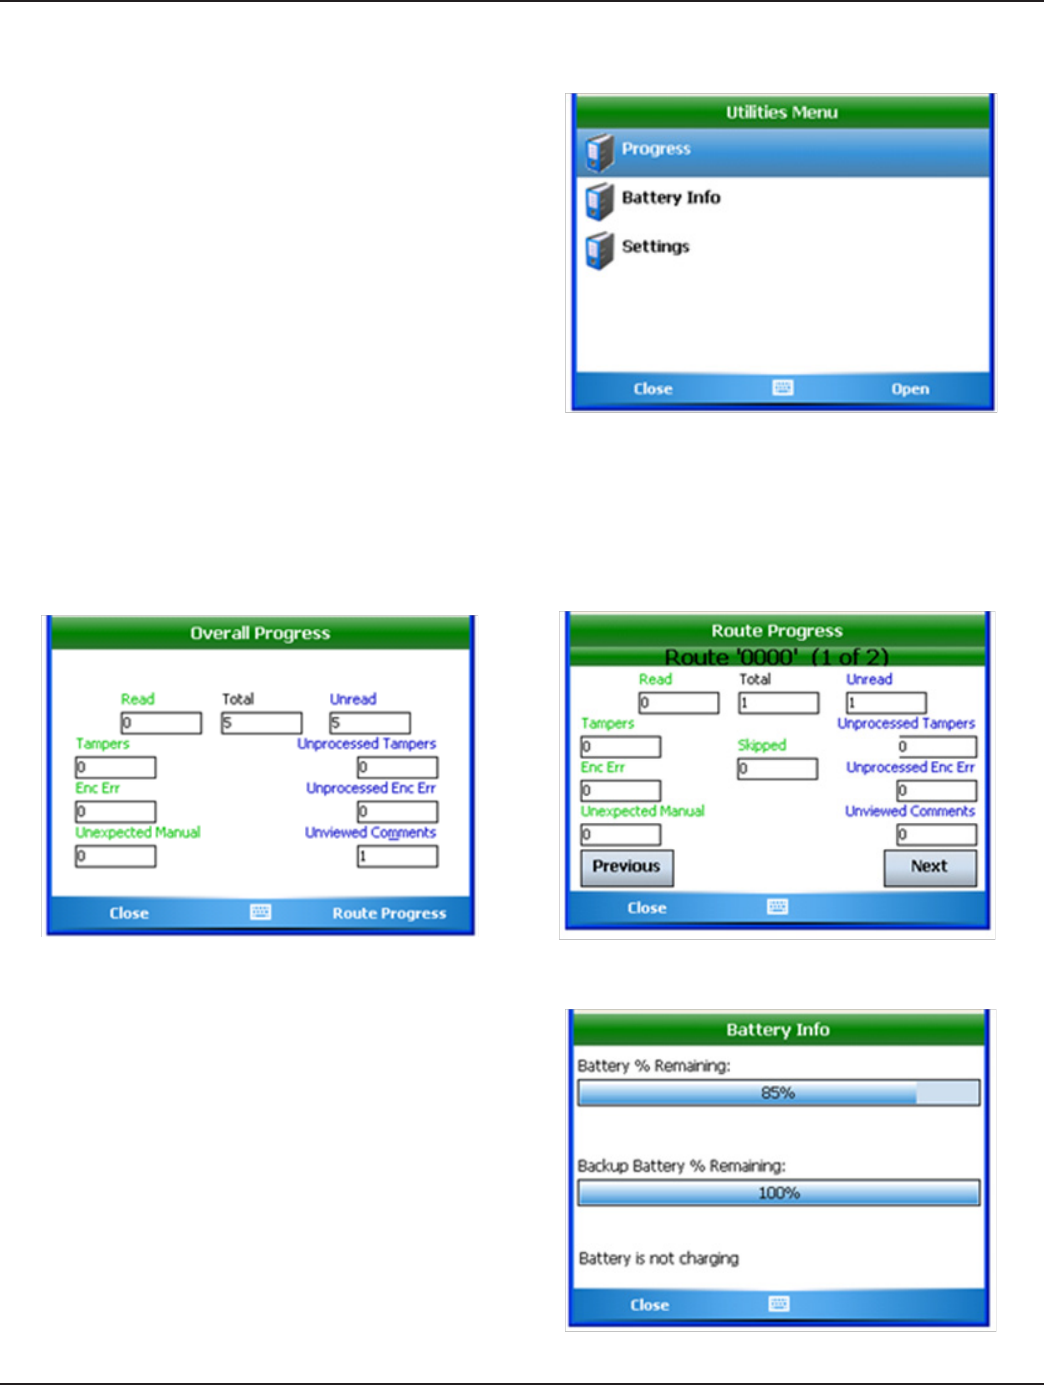
Page 50 1-12
ORION® Automated Meter Reading System for Trimble® Ranger™
Utilities
The Utilities Menu can be accessed either from the Main
Menu or from the Read Menu by tapping Utilities.
The Utilities Menu has three options: Progress, Battery Info
and Settings.
Progress
1. Tap Progress on the Utilities Menu to see a
summary of the number of meters loaded, number
of meters read and other information about the
routes loaded to the handheld.
Figure 61: Utilities Menu
2. If there is more than one route loaded, tap Route Progress to display a summary per route as shown in Figure 63.
3. Tap Previous or Next to view other route summary information. Previous and Next displays if more than one route is
loaded.
4. Tap Close to return to the Utilities Menu.
Figure 62: Route Progress Figure 63: Route 1 of 2
Battery Info
The second option on the Utilities Menu is Battery Info.
1. Tap Battery Info to display:
• the percentage of battery power left in the
handheld
• the percentage of battery power left in the
backup battery
• whether or not the battery is charging
2. Tap Close to return to the Utilities Menu.
Figure 64: Battery Information
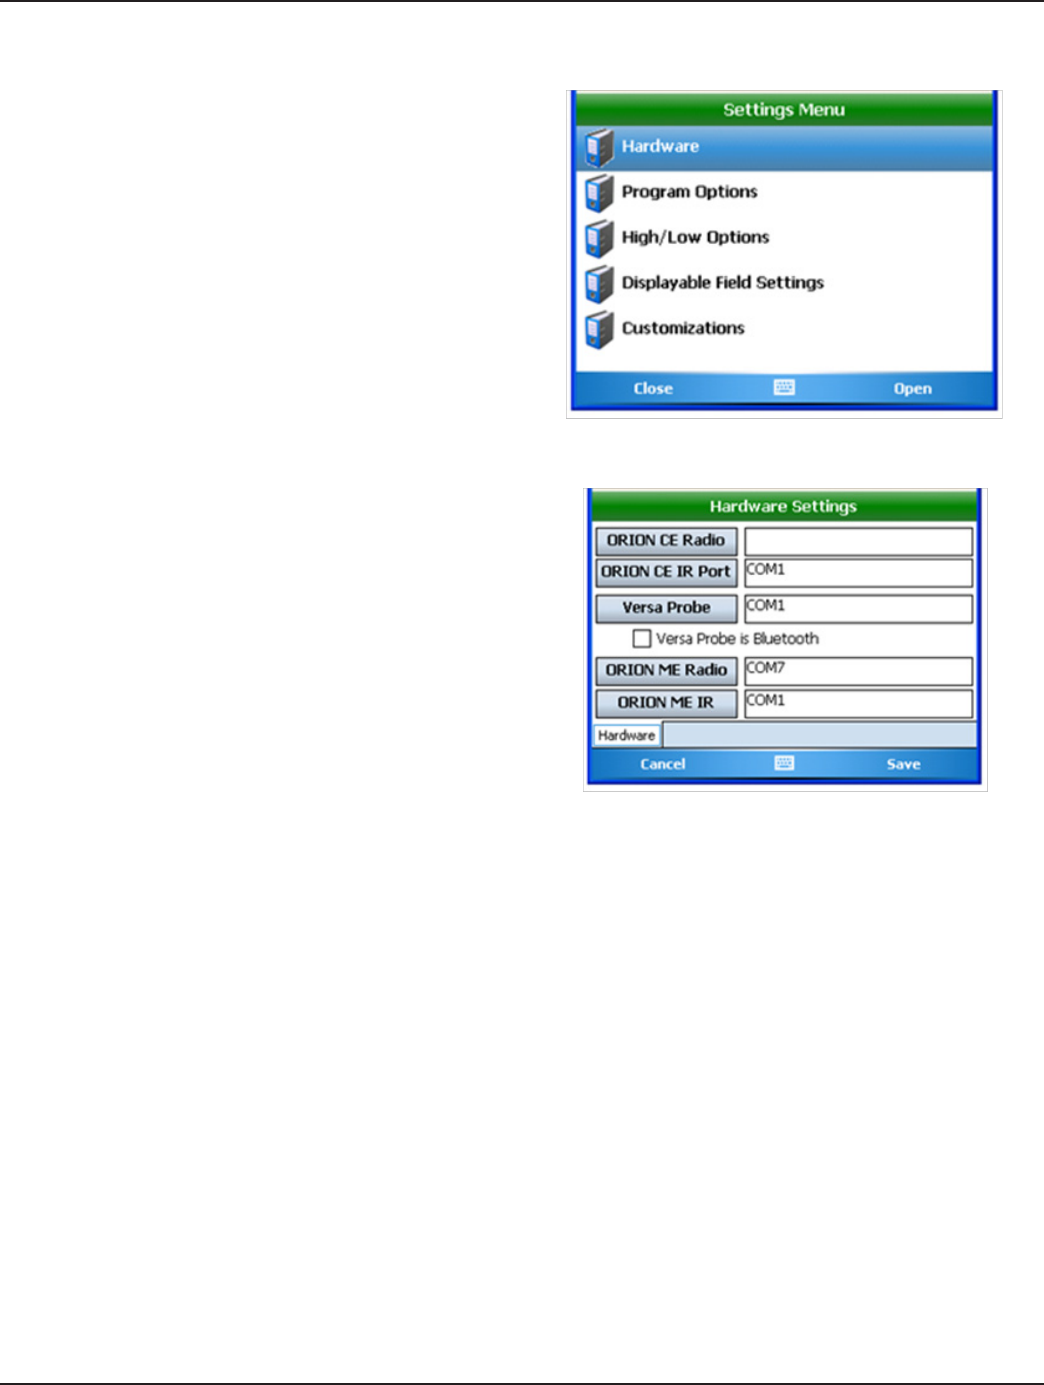
Page 51
1-12
Installation & Operation Manual
Settings
The third option on the Utilities Menu is Settings. Tap
Settings to display the Settings Menu for the handheld.
Note: Although the meter reader can change these
settings, the next time the unit is loaded with a new
route from the reading data management software, it
will return to the default settings. If the settings need
to be changed permanently, consult the reading data
management operator.
The Settings Menu has five sections: Hardware, Program
Options, High/Low Options, Displayable Field Settings
and Customizations. These five sections allow the meter
reader to view the parameters at which the unit operates or
how it treats certain situations. Figure 65: Settings Menu
Hardware
The Hardware Settings screen displays the communication
(COM) ports for the hardware attached to the handheld.
The COM ports will be set during training to establish
communication between the software and the handheld.
COM port settings should be only be changed under the
direction of Badger Meter Technical Support. If the COM ports
must be adjusted, follow these steps.
1. Tap Hardware on the Settings Menu to display the
Hardware Settings screen.
2. Tap the hardware name to display the selection
screen. Figure 66: COM Port Settings
3. Use the up and down arrows to select the setting. Then tap Select.
4. Tap Save to save the change or tap Cancel to return to the Settings Menu without saving any changes.
Note: When using a VersaProbe with a wireless connection to the handheld, tap to check the box next to "Versa Probe is
Bluetooth."
Page 52 1-12
ORION® Automated Meter Reading System for Trimble® Ranger™
Program Options
1. Tap Program Options on the Settings Menu to
display the rst of three Program Options screens.
2. On the Options 1 of 3 screen, tap in the box next to
the option to choose one or more of the settings
that tell the handheld how to handle certain
operations and conditions.
3. Tap Save to save the settings.
4. To advance to the next screen of Program Options
tap 2 of 3.
Figure 67: Program Options 1 of 3
On the Options 2 of 3 screen, choose the settings for route
alerts.
1. Tap to check the Alert on Route Boundary box to
activate an audible alert if the meter reader crosses
from one route to another.
2. Tap the Serv1, Serv2 and Serv 3 buttons to change
the meter reading direction.
Note: The button names can be changed by the
reading data management software operator to
describe the type of utility (e.g., water, gas, sewer).
Tap the up and down arrows to select. Figure 68: Program Options 2 of 3
Tap Enlargement Timeout to change the timeout settings for the enlargement feature. Tap the up and down arrows to
select the desired setting. 5000 (5.0 seconds) is the maximum setting.
3. Tap Save to save any changes.
4. To advance to the last screen of Program Options tap 3 of 3.
On the Options 3 of 3 screen, choose the settings for route
loading and for Quick Keys.
1. Tap to choose FTP Server or Memory Stick for
loading/unloading a route.
2. Tap to choose Single Tap or Double Tap for Quick
Key selection.
3. Tap Save to save any changes to the settings or tap
Cancel to return to the Settings menus without
saving any changes.
Figure 69: Program Options 3 of 3
Page 53
1-12
Installation & Operation Manual
High/Low Options
Tap High/Low Options on the Settings Menu to display the
settings for high or low readings.
Advance on High/Low: The next account displays after a
high or low reading.
Beep on High/Low: An audible alert sounds for a high or low
reading.
Show High/Low Values: Displays the high and low values on
the screen. If the values are set NOT to display by the reading
data management software operator, changing the option
on this screen will not aect the setting. Figure 70: High/Low Reading Options
Hi/Low Readings Fail: When checked, a reading is considered high or low if it MATCHES the high or low value. Unchecked,
the high reading must be HIGHER and the low reading must be LOWER.
High/Low Entry Disposition: The High/Low Options screen opens so you can manually enter reading information.
Displayable Field Settings
Tap Displayable Field Settings on the Settings Menu to see
the User Defined Fields screen. This screen displays the
pre-defined fields that display on the Read screen.
The rst ve eld settings are determined by the reading data
management operator. These elds cannot be changed.
The sixth (Custom) eld may be changed by the meter
reader. Refer to "Read Screen" on page 24 for additional
information.
Tap Custom Fields to display the options for the Custom
Field (Figure 72). Figure 71: Read Screen Fields
Use the up and down arrows to scroll. Then tap to select the desired option. In Figure 72, Module SN is chosen to display in
the Custom eld.
Tap Select. The User Dened Fields screen reopens and the new selection displays below the Custom Fields button and on
the Read screen.
Figure 72: Custom Field Options Figure 73: Custom Field Changed

Page 54 1-12
ORION® Automated Meter Reading System for Trimble® Ranger™
Customizations
Tap Customizations on the Settings Menu to access the
three customization screens. The meter reader has complete
control of these three screens.
The Customization 1 of 3 screen is used to determine what
information is displayed when a bookmark is set or a hot key
is used. This aids the meter reader in finding a bookmark in
the Search mode.
Tap Bookmark Display Using Field or Search Hot Key to
display the selection screen. Tap the desired option. Then
tap Select. The selected options display below the related
button as shown in Figure 74.
To advance to the next screen, tap 2 of 3.
Figure 74: Customization for Bookmarks
On the Customization 2 of 3 screen, the meter read may
change the selections for unread meters.
Tap the Unread Hot Key button to display the selection
screen. Tap the desired option. The tap Select. The selected
option displays below the button as shown in Figure 75.
Check the box to "Treat Skipped in Progress as Unread"
instead of treating the account as read (attempted).
Tap Save to save any changes/selections made.
Also on this screen the meter reader may choose to "Limit
Searches to Current Route." Left unchecked the handheld
will use all the routes loaded on the handheld to conduct
searches. To select this option, tap to check the box and tap
Save.
Figure 75: Customization for Unread Meters
To advance to the next screen, tap 3 of 3.
On the Customization 3 of 3 screen, the meter reader may
choose how to treat a skipped meter.
Tap the Skipped Meter Definition button to display the
selection screen. Tap the desired option for defining a
skipped meter. The tap Select. The selected option displays
below the button as shown in Figure 76.
If "Show message when automated read is applied to a
skipped service" is checked, the screen automatically displays
the Reader/Skip code list, Trouble code list or both when a
meter is skipped.
If an Account/Service is skipped, you must remove the skip
prior to entering a reading. Figure 76: Customization for Skipped Meters
And, if an Account/Service is skipped and an automated reading is read, that reading will be applied to the Account/Service
and the skip condition will be removed. The user is optionally notified of this happening if "Show message when automated
read is applied to a skipped service" is checked. To change the setting, tap to check the box and then tap Save.

Page 55
1-12
Installation & Operation Manual
PROGRAMMING AN ORION GAS MODULE
Gas meters are programmed using ORION ME/SE Utility software.
1. From the Main Menu tap Program & Quick Read.
2. Tap to choose ORION ME, then tap Open.
Result: The ORION ME/SE Utility screen opens.
Figure 77: Main Menu Figure 78: Select ORION ME
3. Tap the IR tab to access the ORION programming
software.
4. Connect the IR cable to the 9-pin serial port on the
bottom of the handheld.
5. Align the IR cable with the gas endpoint. Then tap
Read on the ORION ME/SE Utility screen.
Result: The Gas Drive Circle window opens.
Figure 79: ME/SE Utility Programming
6. Tap Ye s to select a Gas Drive Circle.
Figure 80: Select a Drive Circle
Page 56 1-12
ORION® Automated Meter Reading System for Trimble® Ranger™
Result: The Gas Endpoint Status screen opens. All
detected statuses will have a check mark.
7. Tap Drive Circle Info.
Figure 81: Endpoint Status
8. Select All, Integral or Remote to narrow down the options. Narrow down the selection further by choosing Units,
Resolution and Dials.
Figure 82: Drive Circle Selection Integral/Remote Figure 83: Drive Circle Selection Units
Figure 84: Drive Circle Selection Resolution Figure 85: Drive Circle Selection Dials
9. Tap to highlight the appropriate Gas Drive Circle. Then tap Select.
Page 57
1-12
Installation & Operation Manual
10. Align the IR cable with the endpoint and tap
Program.
Result: The Drive Circle screen changes color and the
Program button becomes inactive.
The gas endpoint is programmed.
Figure 86: Endpoint Status
Figure 87: Endpoint Programmed
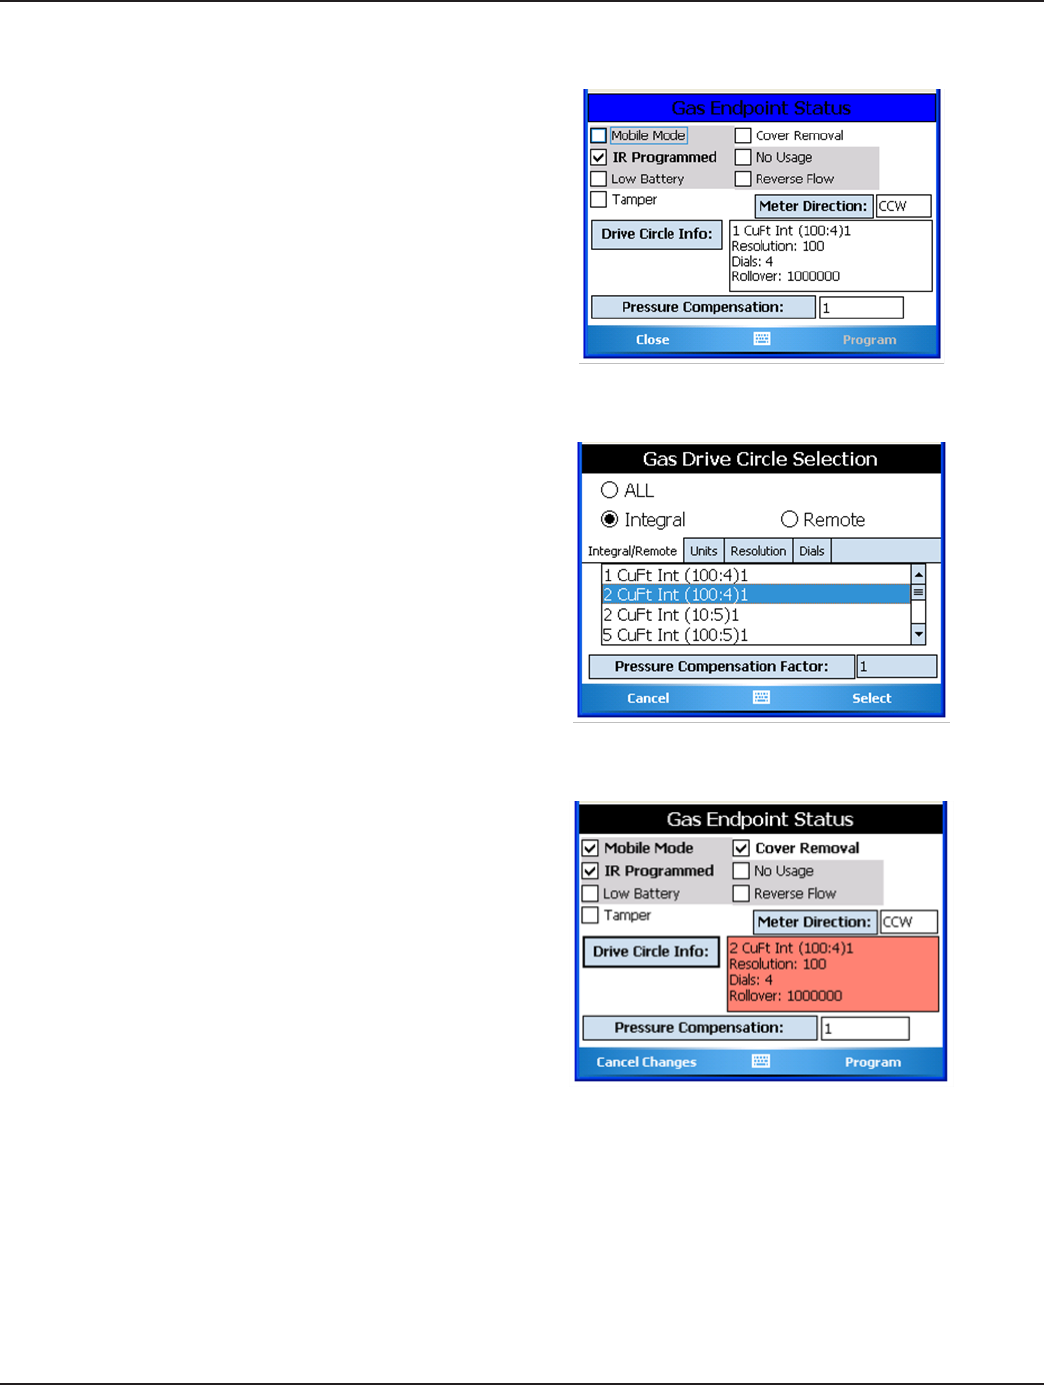
Page 58 1-12
ORION® Automated Meter Reading System for Trimble® Ranger™
Changing the Drive Circle (Reprogramming)
1. Tap Drive Circle Info on the Gas Endpoint Status
screen.
Figure 88: Endpoint Status Screen
2. Tap to highlight a dierent Drive Circle than the
one previously programmed. Then tap Select.
Result: The Drive Circle information changes and the
Program key becomes active.
Figure 89: Selection Screen
3. Tap Program.
Result: The endpoint has been reprogrammed.
Figure 90: Endpoint Programmed
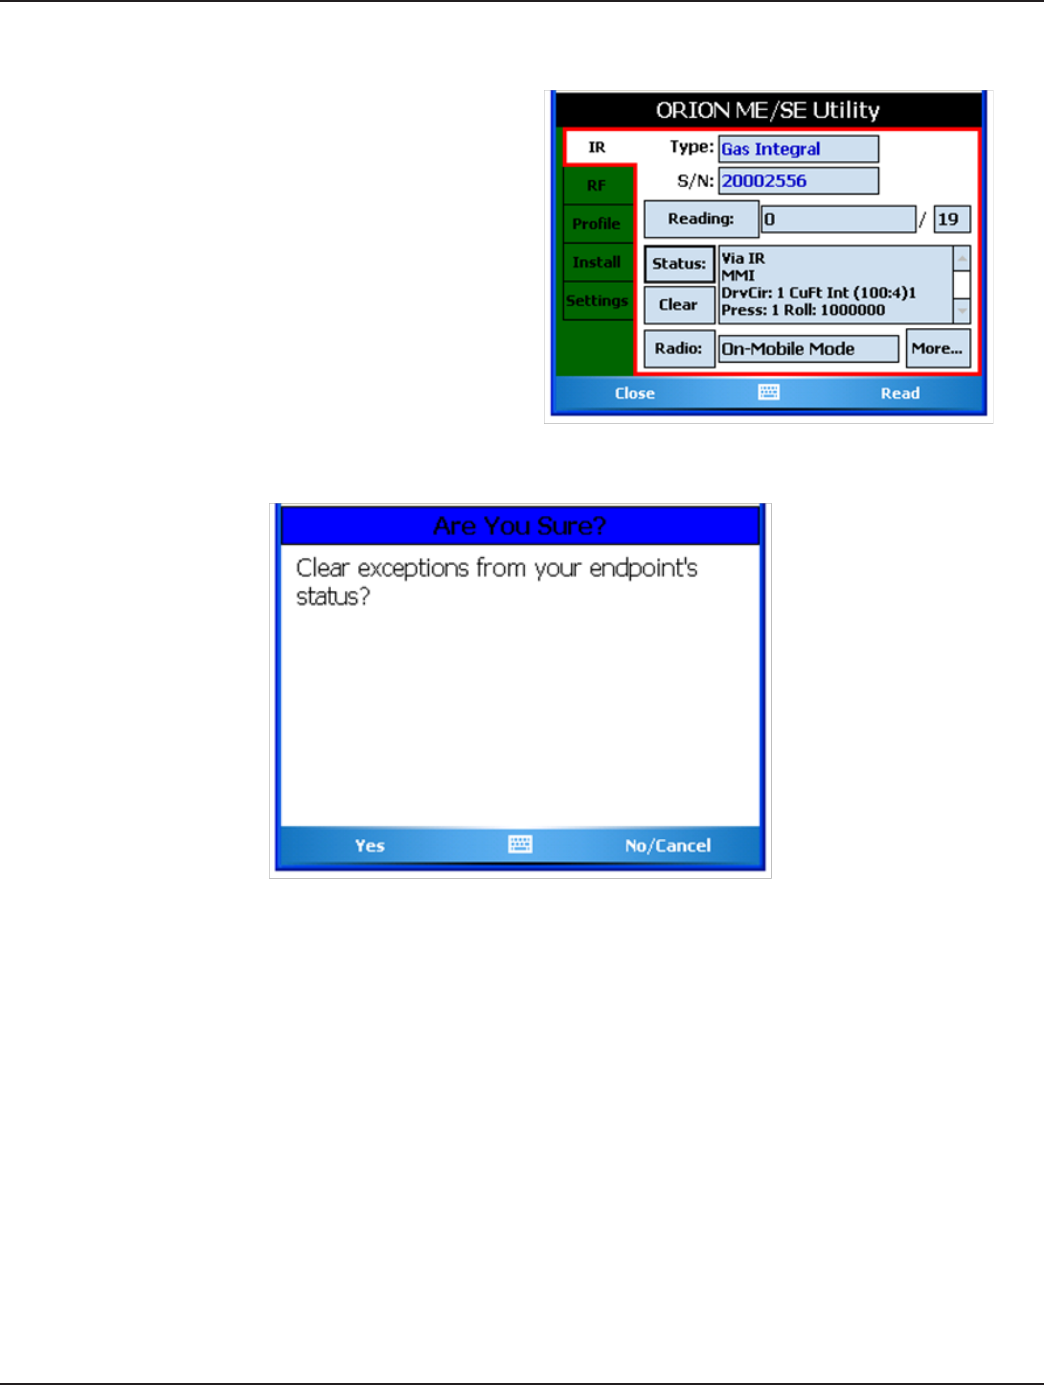
Page 59
1-12
Installation & Operation Manual
Clearing Exceptions
1. On the ORION ME/SE Utility screen, tap Clear.
Result: A window opens asking if you want to clear
exceptions from the endpoint status.
2. Tap Ye s to clear any exceptions.
Figure 91: Clearing Exceptions
Figure 92: Clear Conrmation Screen

Page 60 1-12
ORION® Automated Meter Reading System for Trimble® Ranger™
Appendix

Page 61
1-12
Installation & Operation Manual
Using the Handheld Keypad
Figure 93: Trimble Ranger 3 Keypad

Page 62 1-12
ORION® Automated Meter Reading System for Trimble® Ranger™
Hot Keys and Quick Keys
The handheld software includes a number of Hot Keys and Quick Keys that provide meter reading shortcuts.
Hot Key Press the Fn key then quickly press the alpha key for the function you want to perform.
Example: Press Fn + B to bookmark an account.
Quick Key Double or single press the alpha key (depending on Settings) for the function you want to perform.
Example: To change the route reading direction, press DD on the keypad. To change the route reading
direction back, press DD again.
Read Key Several functions can be performed with a single key press only when the Read screen is in use. They are
displayed in the Read Screen (last) column in the table below.
Key Hot Key Function Quick Key Function
(double/single press)
Read Screen
On-screen Usage
A-- Auto-mode
BBOOKMARK Toggle Bookmark --
C-- Next Bookmark
DRD DIRECT Toggle route reading direction
ERESEQ Resequence (not active)
FRTSTART Route Start
G--
HHI/LO View High/Low Reads for
current account
I--
J-- Encoder error processing
KSETTINGS Settings
L--
MMAN RD Manual Read Entry
NMESSAGE Next account
O-- Read extended comment from
ReadCenter
P-- Previous account
QPROGRESS Progress
RRD CD Reader Code
SSEARCH Search
TTRBL CODE Trouble Code
UUNREAD Next Unread
WNXT SKIP Next Skipped
X--
Y--
ZSKIP Toggle Skipped
Note: Refer to "Settings Tab" on page 44 to change from double press to single press when using quick keys.

Page 63
1-12
Installation & Operation Manual
Technical Support
Errors do not normally occur, so it is important to report all occurrences of error windows to Badger Meter Technical Support.
Note: Trouble Codes and/or information from any Notes you created in Comments Codes/Messages can be useful when
contacting Technical Support.
What to Report
When you contact Technical Support, provide the following information if possible:
• The handheld screen that was active
• The steps being performed at the time
• Any entries that were made on the screen
• The error message, including any error code and explanation that is shown
• The current condition of the laptop
Your Technical Support Specialist may ask you to fax Notes or other information to assist in the investigation.
Contact Badger Meter Technical Support by phone, email or fax
Phone: 800-456-5023
E-mail: TechSupport@BadgerMeter.com
Fax: 888-371-5982

ADE, ORION, ReadCenter and RTR are registered trademarks of Badger Meter, Inc.
Other trademarks appearing in this document are the property of their respective entities.
© 2012 Badger Meter, Inc. All rights reserved.
Due to continuous research, product improvements and
enhancements, Badger Meter reserves the right to change
product or system specications without notice, except to the
extent an outstanding contractual obligation exists.
Badger Meter | P.O. Box 245036, Milwaukee, Wisconsin 53224-9536
800-456-5023 | infocentral@badgermeter.com | www.badgermeter.com