Bartec USA DBLPLUS Tire Pressure Testing Transmitter User Manual Tech300 Plus User GuideR1 24 April 07
Bartec USA LLC. Tire Pressure Testing Transmitter Tech300 Plus User GuideR1 24 April 07
users manual
TECH300plus
USER
GUIDE
BARTEC USA
BARTEC USA, LLC
44231 Phoenix Drive
Sterling Heights, MI 48314
(866)407-TPMS toll free
(586)685-1300 voice
(586)323-3801 fax
TIRE
PRESSURE
MONITORING
SYSTEM
DIAGNOSTIC
and
RESET TOOL

Tech300plus User Guide 5/1/07
24
FAQs- Resolution
Tech300plus User Guide 5/1/07
1
TABLE OF CONTENTS
Important Notices 02
Part Names and Functions 03
Power On and Off Sequence 04
Main Area Display 05
Menu System 08
Reading a TPM Sensor 13
PC Connection Capabilities 16
Installing Program Software to the PC 19
Installing the Drivers to the PC 20
Updating the 21211 23
FAQ’s and Troubleshooting 24
Tech300plus User Guide 5/1/07
2
IMPORTANT NOTICES
Copyright
The contents of this manual may not be reproduced or distributed by any
means electronically, mechanically, recording or otherwise unless written
authorization is given from Bartec USA, LLC.
Disclaimer
All specifications, illustrations and information contained within this manual
are based on the most current information available at the time of
publication. Bartec USA, LLC reserves the right to makes changes at any
time without obligation to notify any person or organization. Bartec USA,
LLC will do its best to keep you the customer informed of any changes
that might affect the tools performance.
Warning: Changes or modifications not expressively approved by the
party responsible for compliance could void the user's authority to
operate the equipment. The term “IC:” before the radio certification
number only signifies that Industry Canada technical specifications were
met.
Note: This equipment has been tested and found to comply with the limits
for a Class A digital device, pursuant to Part 15 of the FCC Rules. These
limits are designed to provide reasonable protection against harmful
interference when the equipment is operated in a commercial
environment. This equipment generates, uses, and can radiate radio
frequency energy and, if not installed and used in accordance with the
instruction manual, may cause harmful interference to radio
communications. Operation of this equipment in a residential area is likely
to cause harmful interference in which case the user will be required to
correct the interference at their expense.
FCC Compliance Model: Tech300plus
FCC ID: SX8-DBLPLUS IC: 5736A-DBLPLUS
This device complies with part 15 of the FCC rules and with RSS-210 of
Industry Canada. Operation is subject to the following two conditions: (1)
this device may not cause harmful interference, and (2) this device must
accept any interference received, including interference that may cause
undesired operation.
Tech300plus User Guide 5/1/07
23
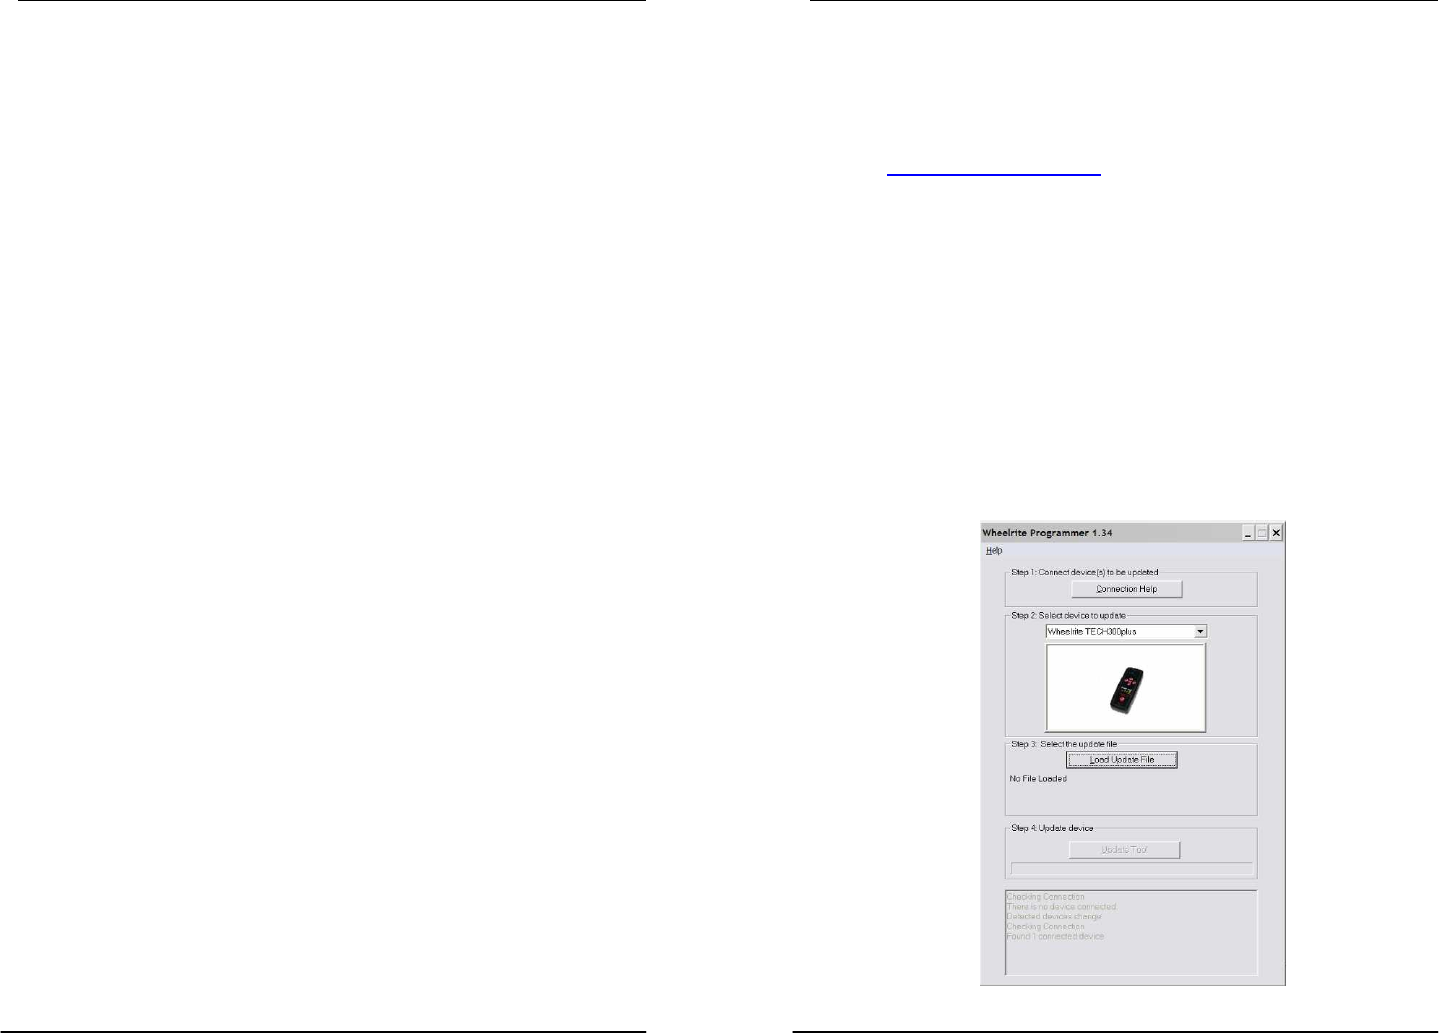
2.3) Updating the TECH300plus TPMS Tool
Once the installation of the software and drivers is complete, you
are ready to update the tool.
To obtain the most recent copy of firmware for yourTECH300plus
tool, visit www.bartecusa.com/ to retrieve the file.
Just as with the loader program, left click the firmware file and
save to your desktop.
1. Launch the Programming Software on the PC.
2. Follow the connection instructions- ensuring a good battery is
installed.
3. Click “Load Update Button” and browse the folder where the
21211 software is stored – on your DESKTOP.
4. Click “Update Tool Button.” – Wait for the program to prompt
you to disconnect the tool.
The tool is now ready to use.

Tech300plus User Guide 5/1/07
22
Tech300plus User Guide 5/1/07
3
PART NAMES AND FUNCTIONS
Once the wizard completes, the following screen is presented.
Click on ‘finish.’ Launch the Wheelrite program. The program will
have an image of the TECH300plus.
1
Note that if any other pc usb port is to be used in the future, it is
good practice to repeat the connection of the TECH300plus to
other USB ports.
Only when this process has been completed is the program and
hardware fully integrated in the PC
Functional Description
Display
Test Button
ESC / Directional Left Button
USB Port
Alternate ON / Directional Up Button
Enter / Directional Right Button
ON / Directional Down Button
3
2
4
2
1
5
6
7
3
6
5
4
7
Tech300plus User Guide 5/1/07
4
Tech300plus User Guide 5/1/07
21
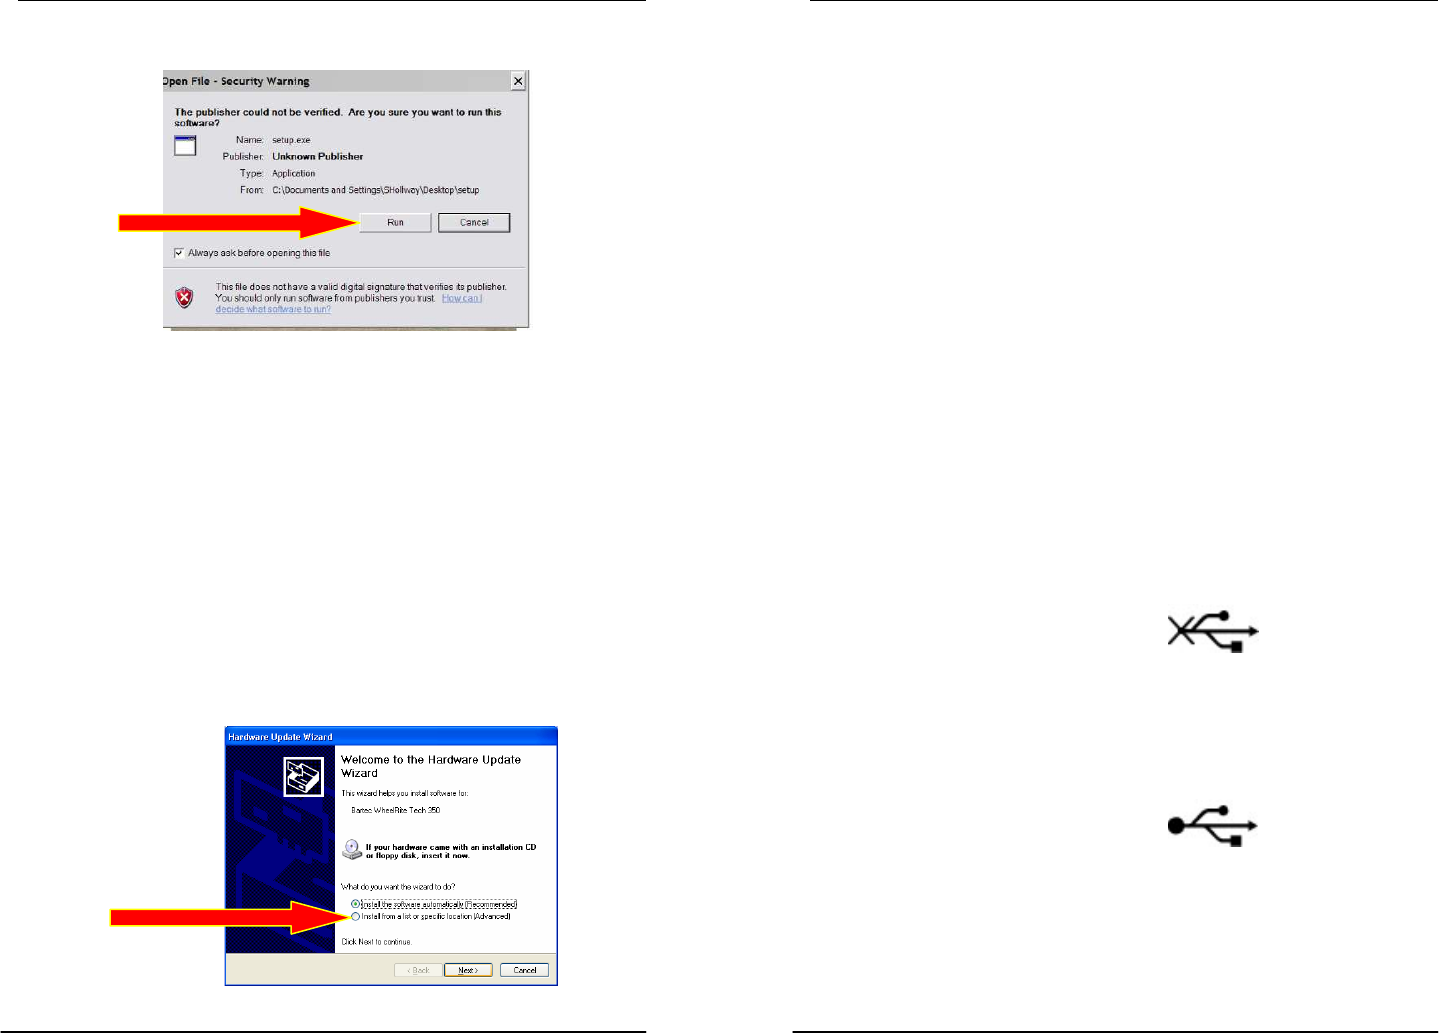
POWER ON/OFF SEQUENCE Select the “INSTALL FROM A LIST OR SPECIFIC LOCATION
(advanced)” button.
The TECH300plus can be powered ON by pressing the ON Button
(Arrow Down) or the Alternate ON (Arrow Up) Button. Click NEXT.
Click the BROWSE button and point to the Bartec folder located in
the program files.
The unit boots up with a Splash Screen that indicates the current
version of software. When the unit powers up it will load all of the
Data it previously saved (see below).
Powering the TECH300plus Off can be achieved in two ways:
1. The TECH300plus will automatically power off after 30
seconds of inactivity.
2. Selecting the “Off” command from the Main Menu.
When the unit is powered off, it will save all of its TPM Data, the last
TPM Type that was read and the last selected Item within the Select
by Make Menu.
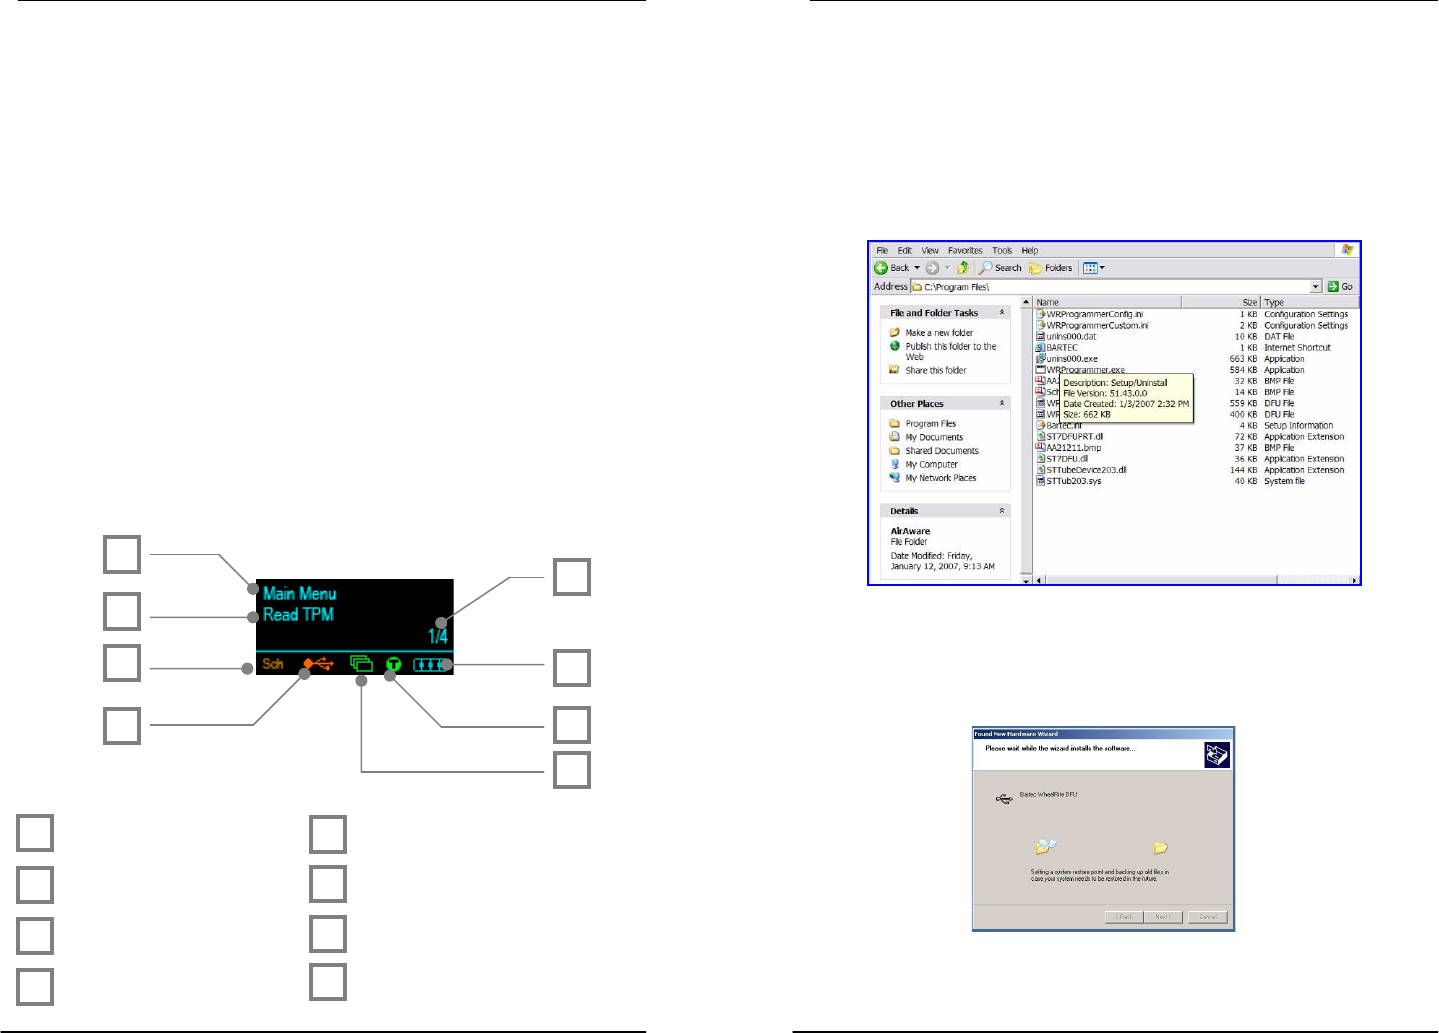
MAIN DISPLAY AREA
Current Menu Page Menu Item Indicator
Current Item Battery Indicator
Selected TPM Test Indicator
USB Indicator Data Available Indicator
1
8
7
6
5
4
3
2
1
3
4
5
6
7
2
8
The OK button should now be lit. Click OK to complete the
installation
Bartec
Tech300plus User Guide 5/1/07
20
Tech300plus User Guide 5/1/07
5
MAIN DISPLAY AREA
Click run if this warning pops up
Follow the wizard’s instructions to install the program to your PC or
Laptop. Use the default destination folder Bartec to prevent
confusion later. The drivers for the tool will be stored in this folder
located in program files.
2.2) Installing the Drivers to your PC
After installing the Bartec loader program, you must install the
drivers for the tool.
Plug the provided USB cable into your PC. While holding the enter
button on the TECH300plus TPMS Tool, plug in the small end of the
USB cable into the tool.
The NEW HARDWARE WIZARD should now launch.
Current Menu Page
This indicates what menu page the user is currently in. Menu pages
contain a number of items in which actions can be carried out or
other menus can be navigated to.
Current Item
This displays the current item that is selected. The action taken
when the Enter / Right Button is pressed is determined by the
current item selected.
Select TPM Manufacturer
The Selected TPM indicates what type of TPM will be tested if the
user presses the Test Button. If the Test Indicator is not visible, this will
be the TPM that was last tested. If the Test Indicator is visible then
this will indicate the new TPM Type that will be tested (see the Test
Indicator for more details).
USB Indicator
The USB indicator becomes visible when it detects 5 volts on the
USB port, i.e. connecting the TECH300plus to your computer via the
supplied USB lead. The indicator has two different states:
1. Initialization state
This is the first state that the TECH300plus enters when the
USB lead is connected. This indicates that the TECH300plus
is trying to establish communications with the PC. If this
indicator remains on for a prolonged amount of time, then
remove the USB lead and check the connections.
2. Communication state
This indicates that the TECH300plus has established
communication with the PC and can now be viewed as a
Mass Storage Device.
When the USB lead is removed the USB icon will disappear.
Tech300plus User Guide 5/1/07
6
Tech300plus User Guide 5/1/07
19
MAIN DISPLAY AREA 2) Updating the TECH300plus TPMS Tool
NOTE: Before the TECH300plus TPMS tool can be updated, the
Programming Software must be loaded on to your PC AND the
drivers must be installed.
Menu Item Indicator
The Menu Item Indicator is provided to allow the user to determine
where he currently is within a menu page.
2.1) Installing the Programming Software on the PC
The indicator is divided into two parts. The first number, before the
forward slash (/), indicates what Item number is currently selected
in the Menu Page, and the second number, the one following the
slash, indicates the total number of Items in the Menu Page.
To obtain the necessary software, visit www.bartecusa.com/ to
retrieve these files.
Battery Indicator From the Bartec USA website Left click on the FIRMWARE
PROGRAMMING TOOL program and save this ZIP file to your
DESKTOP.
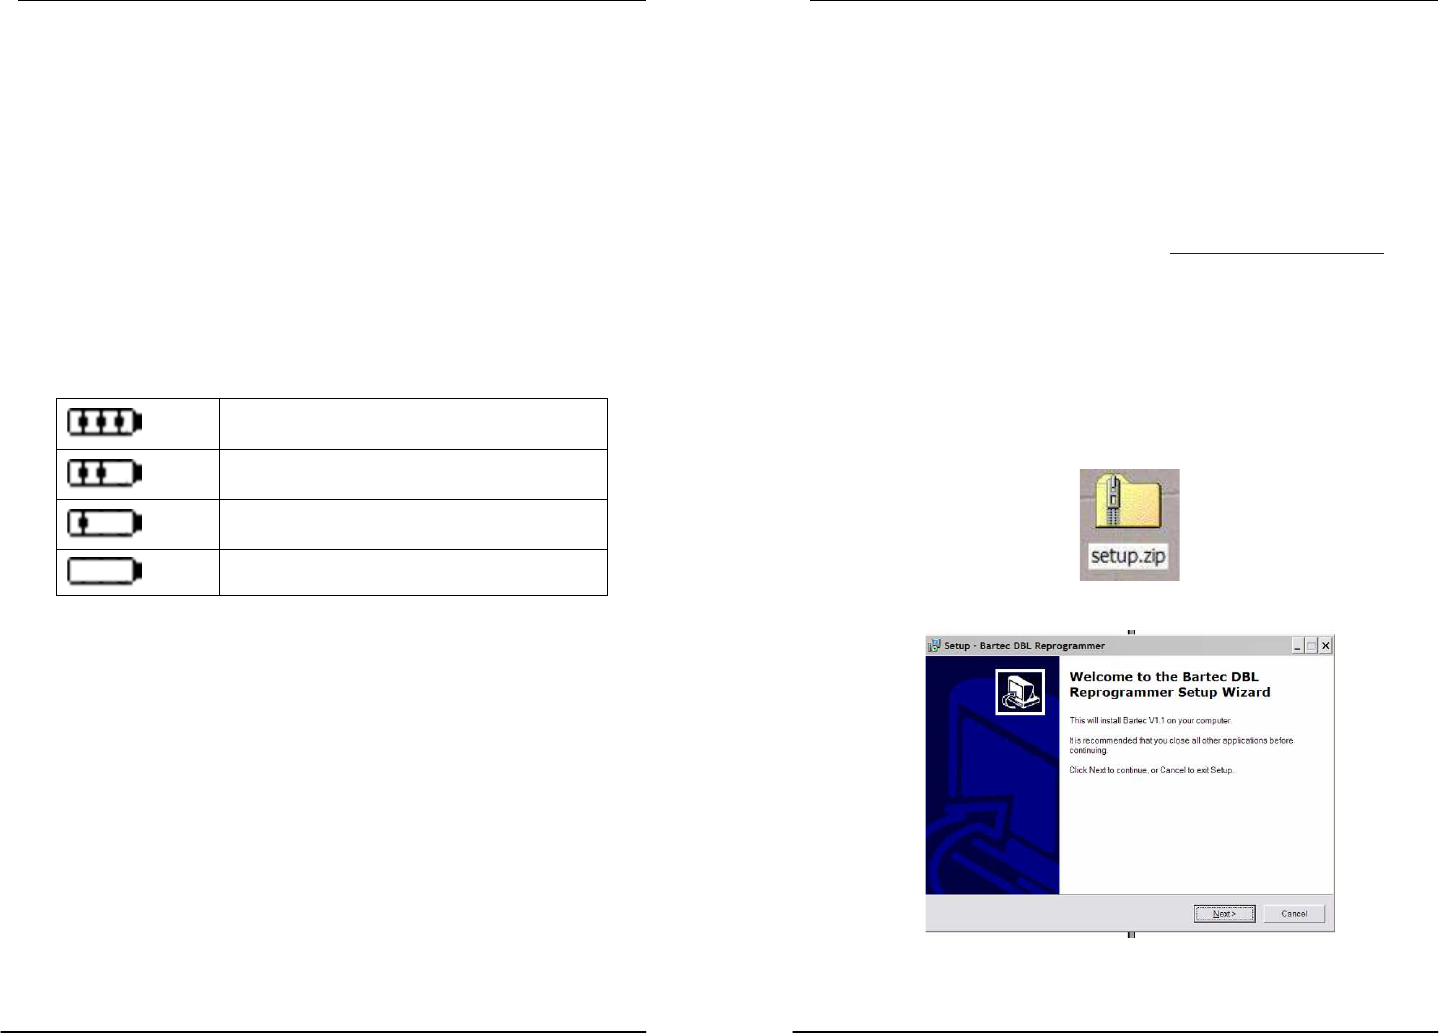
The Battery Indicator provides an estimate of the remaining power
of the battery in the tool.
There is plenty of power in the Battery
There is a moderate amount of
power in the battery
There is little power left in the battery
The battery has almost run out
From your computer’s desktop, double click the Setup Icon to
reveal the install files. Unpack the zipped files.
When there is an insufficient amount of power remaining in the
battery then the TECH300plus will flash its battery icon for two
seconds, save all of the TPM Data and then power itself down.
Test Indicator
The Test Indicator becomes visible when a new TPM Type can be
read. When the indicator is visible, pressing the Test Button will
initiate the reading of the new TPM Type. If the indicator is not
visible then pressing the Test Button will read the last TPM Type
read.
Double click Setup.exe file to launch the installer.

Tech300plus User Guide 5/1/07
18
Tech300plus User Guide 5/1/07
7
MAIN DISPLAY AREA
TECH300plus v1.2.9
TPM SEARCH FOR SELECTOR POSITION 1G
Test Performed On: 27 November 2006 10:08:42
Test Performed by:
Quick Selection
In order to read a TPM with a competitive tool, the user is usually
required to select it from the appropriate menus (See Menu
System), this may involve drilling down the menu several times, e.g.
TPM Type Reads ID Hex ID Dec Battery
State Pressure Temperature Main Menu Select Make Select Model Select Year
Schrader 4096
Manchester 315 MHz
ASK
1 9643BB 9847739 Pass 31.0 PSI 71°F
Failed to Read 2
Schrader 4096
Manchester 315 MHz
ASK
1 33C572 3392882 Pass 30.0 PSI 70°F
Schrader 4096
Manchester 315 MHz
ASK
1 A764C9 10970313 Pass 33.0 PSI 71°F
However, the TECH300plus is an intelligent device that is capable
of determining if all of the possible TPM paths would result in
reading a TPM of the same Type. When all menu paths lead to the
same TPM Type then this TPM Type will be selected and the Test
Indicator will become visible to indicate this.
Data Available Indicator
The TPM Data Indicator becomes visible when there is TPM Data
available for viewing either by the display (See View TPM Data
menu) or via the PC when the TECH300plus is in its Mass Storage
Device mode (See Audit System).
The audit file example above is representative of a single vehicle
with four tires, where one tire failed to read, and a retest was taken
to ensure the TPM was at fault. When there is no data present, the TPM Data Indicator will not be
visible.
Leaving Audit Mode
To leave the Audit mode and re-enable the TECH300plus simply
remove the USB lead.

Tech300plus User Guide 5/1/07
8
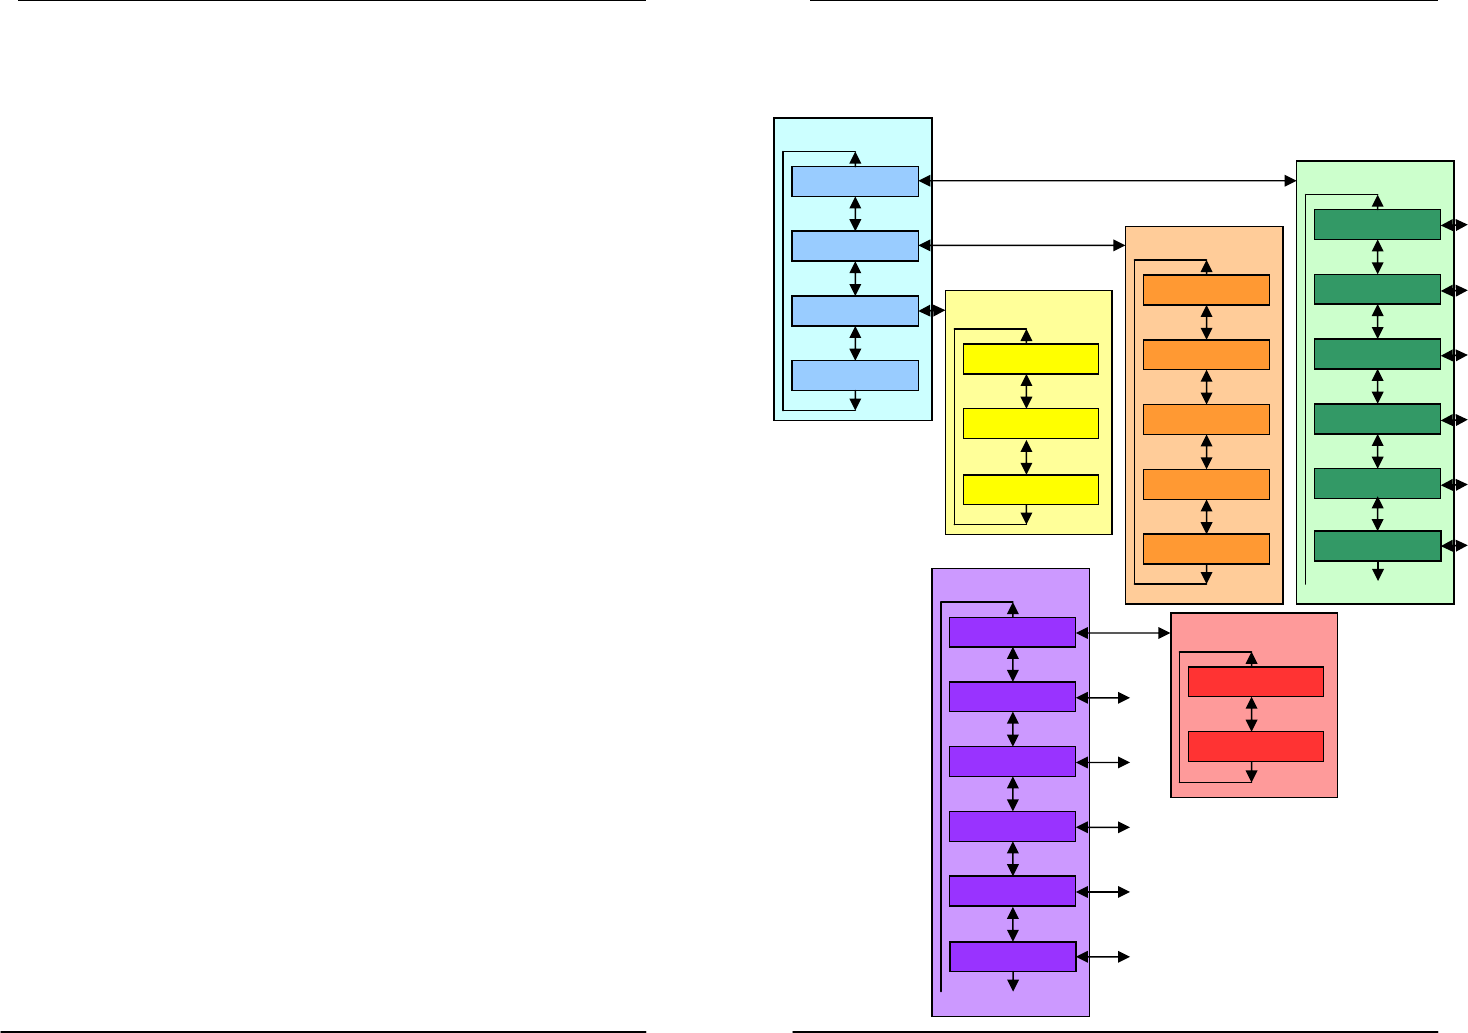
MENU SYSTEM
The TECH300plus utilizes a menu system for easy navigation and
use. Most of the screens on the TECH300plus will indicate to the
user what menu is currently selected via the upper most line of
text.
Menu Navigation
The menu system is navigated by use of the directional keys:
Up Button: Navigates up within the current menu
Down Button: Navigates down within the current menu
Right Button: Navigates to the next menu / actions the
currently selected item.
Left Button: Navigates to the previous menu item.
The Right Button’s function will vary depending upon the currently
selected item and will either action a command or move to a sub
menu of the current menu.
The current position within a Menu Page is indicated by the Menu
Item Indicator that displays the current item selected and the total
number of items on the page. Items are selected by using the Up
and Down Directional buttons and will wrap around when the last
item is selected.
Tech300plus User Guide 5/1/07
17
Viewing the Audit Files
To begin using the Auditing System ensure that the tool has some
data available, indicated by the Data Indicator icon, and then
connect the TECH300plus to a PC via its USB lead.
The PC will begin communicating with the TECH300plus. Once
communication is established the TECH300plus will act as a MSD. If
the MSD does not automatically open its explorer window on the
PC, then the user may browse for the newly connected device
manually.
Once the explorer window is open, you may view a file by right
clicking on the file and selecting Open from the pop-up menu.
Audit File Presentation
The Data presented is in a HTML form format that displays not only
information regarding the TPMs but also publishes the Date of the
Test and allows for the Tester’s name to be entered.
The following is an example of a complete audit of a vehicle’s
tires:
Tech300plus User Guide 5/1/07
16
Tech300plus User Guide 5/1/07
9
PC CONNECTION CAPABILITIES MENU SYSTEM
Menu Navigation
The TECH300plus can be connected to a pc for one of two
purposes
1) Present its stored data- the audit system
2) Update the TECH300plus software program
The USB indicator is functional under both circumstances.
The tool is compatible with PCs running Windows operating
systems (version XP or 2000).
Reduced (audit only) functionality is available with Millennium
edition operating systems.
USB ports can be either version 1 or 2.
There are extra requirements for program updating- eg specific
programming software has to be prior loaded onto the pc.
1) Audit System
The TECH300plus is capable of presenting all of its stored data
within one or more computer files when connected to a PC via an
USB lead. This is the same ‘Mass Storage Mode’ such as used in USB
memory devices. No extra drivers or software have to be loaded
onto the pc (as long as the specified operating systems are used).
The files and the stored TPM Data enable the TECH300plus to be
used as part of an Auditing System.
The tool automatically goes into Mass Storage Device (MSD) mode
when connected to an active USB port on the pc.
It is not necessary to power up the tool prior to connecting to the
pc- it will power up automatically.
It is important not to accidentally press the enter key on the
TECH300plus at the same time as connecting to the pc.
The TECH300plus will produce a single file for each type of TPM Part
that has been read, and a separate record within that file for
each unique TPM of that type.
While the TECH300plus is in its MSD mode, menu functions are
disabled.
Main Menu
3.
Commands
1.Read TPM
2.View TPM
4.Off
Commands
1.Delete TPM
2.Outdoors
3.Indoors
View TPM Data
3.TPM Data
1.TPM Data
2.TPM Data
5.TPM Data
4.TPM Data
Select by Make
1.Acura
2.Audi
3.BMW
5.Cadillac
4.Buick
6.Chevrolet
…
Select by Model
3.DeV
ille
1.CTS
2.CTS
-
V
5.Escalade
4.DTS
Select by Year
1.2006
6.Escalade
…
-
2007
2.2007
…
…
…
…
…
+

Tech300plus User Guide 5/1/07
10
MENU SYSTEM
Main Menu
The Main Menu is the root of the menu system and provides items
that perform the core functions of the TECH300plus.
1. Read TPM
This Item is a sub menu, pressing the Right Button will take
the user to the “Select by Make” menu to begin the TPM
selection process.
2. View TPM Data
This item is a sub menu, pressing the Right Button will take
the user to the “TPM Data” menu.
3. Commands
This Item is a sub menu, pressing the Right Button will take
the user to the “Commands” menu.
4. Off
This item is a command. Pressing the Enter Button will action
the command and turn the unit off. (See Power On/Off
Sequence).
Commands Menu
The Commands Menu allows the user to perform some of the
useful functions of the TECH300plus.
Each item is a command that can be activated by pressing the
Enter Button.
1. Delete TPM Data
This command will delete all the currently saved TPM Data
from the TECH300plus.
2. Outdoors Mode
The TECH300plus is designed for both Indoors and Outdoors
use. Outdoor mode intensifies the brightness, of the display
and provides a reduced User Interface level, displaying
Tech300plus User Guide 5/1/07
15
Where TPM’s are reread several times, then the number of reads of
that TPM is also stored (this data is however only displayed in the
Audit File).
If a 6th unique TPM is read, and the TPM is not one of the current
five stored, then it will replace the last read TPM Data with this new
TPM Data.
Tech300plus User Guide 5/1/07
14
Tech300plus User Guide 5/1/07
11
READING A TPM only two lines of text, however the TECH300plus still remains
intuitive.
TPM Not Found
3. Indoors Mode
Activating this command will put the TECH300plus into the
Indoors Mode. This operates at the default brightness level
and with a complete User Interface.
If the search period expires without reading a TPM then the
TECH300plus will emit a single Audible Beep and indicate on the
display that no TPM was found. If applicable, it will also display any
other information relevant to the TPM part that was not found, e.g.
the Schrader Catalogue Part Number.
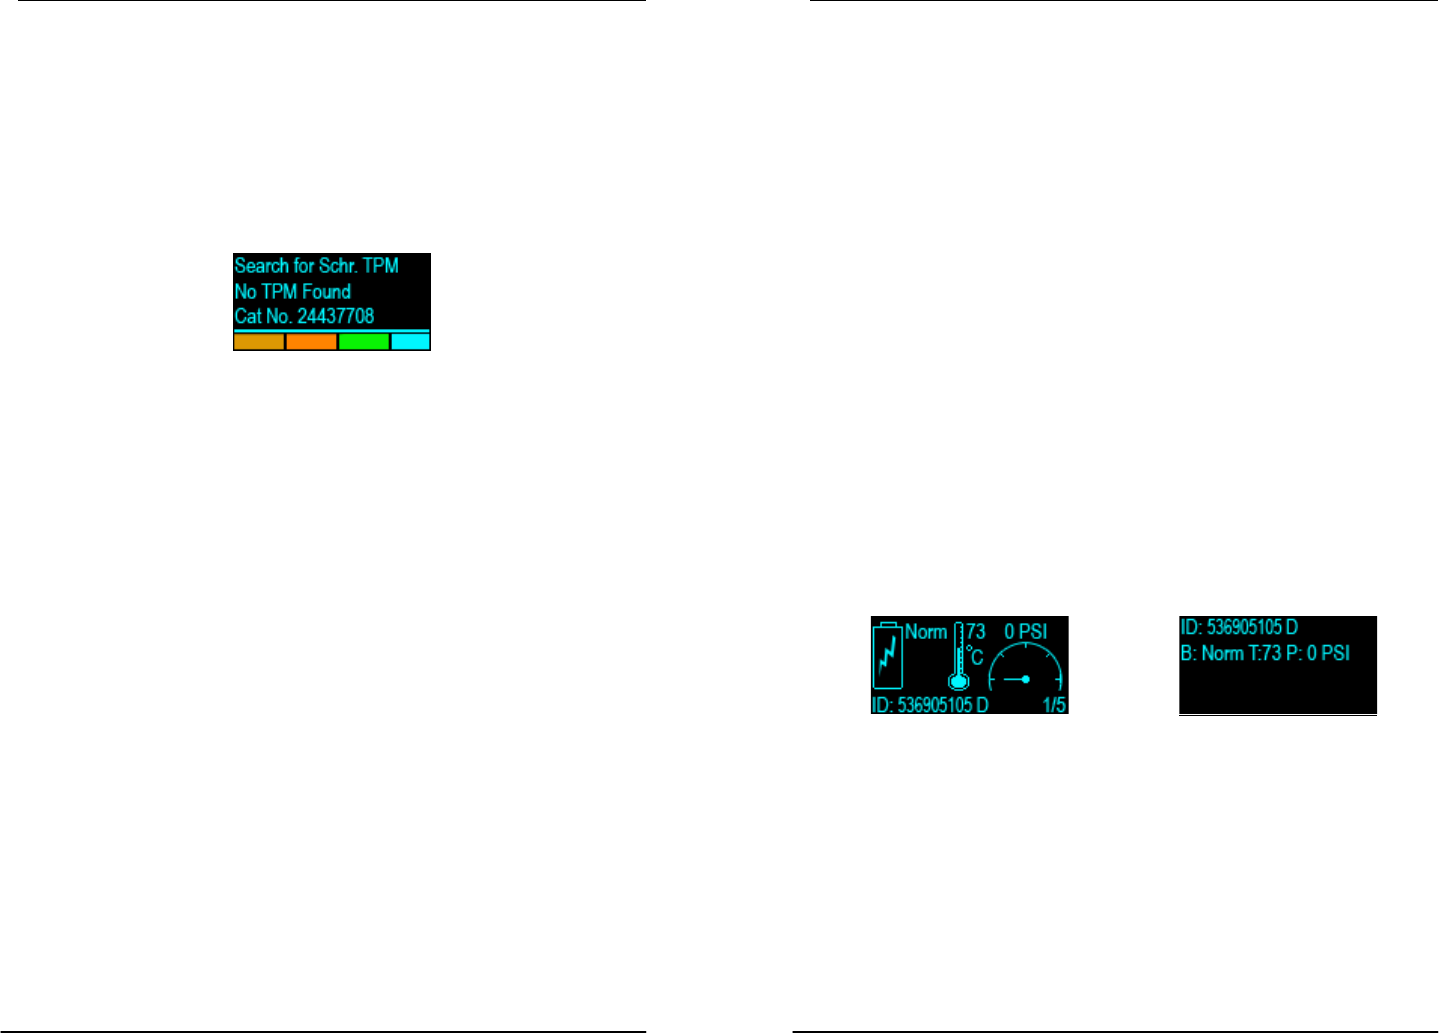
View TPM Data Menu
The TPM Data Menu differs to those of other menu types in that it
does not display the Menu Page name, the Item name or any of
the indicators except for the Item Indicator. Instead, the screen
provides all of the TPM Data applicable to the TPM Type read; this
may include: TPM ID (Hexadecimal & Decimal) Battery State,
Temperature and Pressure.
The TPM Data will still be stored but will indicate that the TPM Failed
to Read. Not all TPMs of the same general Type will display the same
amount of Data, some variations in Parts may display less than
others.
Pressing the Left Button will return the user back to the previous
menu.
The way in which this data is displayed differs with the Mode the
TECH300plus is in.
TPM Data Storage
The TECH300plus is capable of storing up to 5 TPM Data records for
Auditing purposes; this Data is also stored over a power down. TPM
Data is stored chronologically, that is, the last read TPM’s data will
always be displayed in Data Item position 1.
Indoor Mode Outdoor Mode
If a Data Item is empty then the display will regard that as an
Unknown TPM (Note that unknown TPM’s are not displayed in the
Audit File, see Audit System).
As in other Menu Pages, the Up and Down Buttons scroll through
the TPM Data Items, and the Left Button returns to the previous
menu. Pressing the Enter Button will toggle the display format of
the TPM ID between Hexadecimal and Decimal.
If a TPM is read that already exists in the TPM Data, then that TPM
Data record will be updated with the new information and placed
at the top of the list just as if a new TPM had been read.
TPM Data is stored in chronological order - that is the newest TPM
Data is stored at the top of the menu.
TPM’s that failed to be read are also stored, however, the
TECH300plus assumes that any failed read of a TPM that
immediately follows a failed read of a TPM of same Type is an
actual attempt to reread that TPM, and so the TPM Data is just
updated. Failures of the same Type that are interspersed by a
successfully read TPM are stored as separate failures.
If an Item has no TPM Data then the display will indicate that the
TPM is Unknown, i.e. all items will display Unknown if the TPM Data
has just been deleted.

Tech300plus User Guide 5/1/07
12
Select by Make/Model/ Year Menus
The Read TPM item from the Main Menu begins the process of
selecting a TPM to read by placing the user in the Select by Make
Menu. To read a TPM the user must select a Vehicle’s:
Make Æ Model Æ Year
This ensures that the TPM that has been requested for a read is
both correct and trouble free, i.e. no look up chart or manual is
required by the user.
The user may select the TPM by either drilling all the way to the end
of the selection process, i.e. selecting a year then pressing test, or
pressing test when the Test Indicator becomes visible (when the
Test Indicator becomes visible, the user has drilled down sufficiently
in the selection process to find a single TPM Type).
The last selected Item within the Select by Make Menu is stored
such that when the user returns to this menu, the last Vehicle Make
he selected will automatically be highlighted.
Tech300plus User Guide 5/1/07
13
READING A TPM
Once a TPM has been selected, either through the TPM Selection
process (i.e. Test Indicator visible) or simply a subsequent read of
the previously selected type (TPM Indicator not visible) a TPM read
can be initiated by pressing the Test Button.
TPM Activation
When the Test Button is pressed the TECH300plus will begin the
process of reading the TPM, this will be indicated by the display
that details the TPM Type it is activating and a progress bar that
indicates the maximum period for which it will send the LF
Command and look for the UHF response.
TPM activation can be aborted at any time by pressing the ESC
Button. When the activation is aborted, the user will be returned to
the previous menu.
TPM Found
If a TPM of the indicated type is found, then the TECH300plus will
emit a series of tones that follows the pattern of received data. This
TPM Data will immediately be stored and displayed via the TPM
Data Menu (see TPM Data Menu). This newly stored TPM Data will
be placed in Item position 1 and all other TPM Data will be shifted
down a position.
Pressing the ESC Button will return the user back to the menu they
were previously on (i.e. the Menu Page where the user pressed the
Test Button).