Bean Information Technology W1102 Core+ 10.1,Core+11.6 User Manual UM Core v1 3
Bean Information Technology Co., Ltd. Core+ 10.1,Core+11.6 UM Core v1 3
User Manual

CORE+ OPERATION MANUAL
LET’S GET STARTED

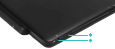
KNOW YOUR PC
1. Power / Reset: Press until bit logo appears
on screen to turn ON. Press until screen
indicates power down to turn OFF.
2. Volume +/-: Press + to increase and - to
decrease.
2
INPUTS & CONTROLS
3. Headphone Jack: 3.5mm stereo output.
4. Left Speaker: High performance audio speakers.
3
4
KNOW YOUR PC
INPUTS & CONTROLS
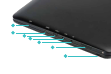
5. Mic: for video chats and recordings.
6. Micro HDMI: Output to display via HDMI cable.
7. USB-C: Utilize for faster data transfer.
8. Micro USB: Allows connectivity with USB-b devices.
9. Charging Port: Use AC Charger for charging.
10. Right Speaker: Side emitting high performance.
11. Micro USB: Second USB-b for convenience.
5
6
7
8
9
10
11
KNOW YOUR PC
INPUTS & CONTROLS

KNOW YOUR PC
INPUTS & CONTROLS
12
12. Front Camera: 5M for Full HD capture.
13. 2-in-1 Covertible: Use as a tablet or as a laptop.
13

DOCKING YOUR PC
Align the docking ports of the tablet
with the docking posts of the keyboard
and gently slide together.
The contacts from tablet will
connect with the contacts of
the keyboard.
To undock, hold keyboard steady
at center top of keyboard (where
it connects to tablet), then pull
tablet straight up.
UNDOCKING
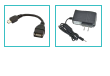
ADAPTERS
A Micro USB to Full size USB adapter
is included for your convenience in
connecting to full size USB devices.
USB ADAPTER
AC Charger included to Charge the
tablet battery. Insert into port marked
“DC” to charge.
AC CHARGER

INDICATOR LIGHTS
Charging
Caps Lock

TOUCH SCREEN
TOUCH SWIPE EXPAND / PINCH

CONNECTING TO WIFI
1. Select the notification icon shown
in your task bar to open ACTION
CENTER.
2. Select wifi icon in the ACTION
CENTER.
3. Select your desired wifi network,
and type in network security key.

ACCESS SETTINGS
2. Select Settings from the Start Menu.
3. Select category and follow prompts.
1. Press Windows icon on the task bar or
Windows key on the keyboard to access
Start Menu.

SET UP PC SECURITY
1. Go to Settings > Accounts.
2. Choose Local Account or Sign in
with Microsoft Account.
3. For Local Account, follow the
steps shown on the screen.
4. For Microsoft Account, tap “sign
in with Microsoft account instead”
and follow prompts.

NOW COMPUTE
1. From the Desktop (main screen),
access Start Menu by pressing
the Windows icon in the task bar
(bottom of screen), or by pressing
the Windows key on the keyboard.
2. From the Start Menu you can
access your files, apps and
settings.
3. If you are a first time user of
Windows 10, we encourage you to
select the Get Started tile on the
Start Menu to get acquainted. WINDOWS KEY

MAKE IT YOURS
1. Pin any app to the Start Menu by
touching and holding it in the
apps list. Select “pin to Start
Menu”.
2. Resize and rearrange any app on
the Start Menu by touching and
holding on the Start Menu, then
select “Resize” and drag it to
your desired location on the
Menu.
3. Change screen appearances by
going to Settings > Personalization,
then have fun!

MANAGE POWER
1. Select Power from the Start Menu
and choose from Sleep, Shut down
or Restart.
2. To adjust power settings, go to:
Settings > System > Power & sleep.
Review settings and follow prompts
to adjust.

MORE CONTROL SETTINGS
1. Press Windows button and “X” key
down simultaneously until the WinX
menu appears.
2. Scroll to make your selection.

NEED ASSISTANCE?
1. How can I bring up Start Menu?
The Desktop will appear after booting up and signing in. To display the Start menu, tap the
Windows icon on the task bar or press the windows key on the keyboard.
2. What to do if tablet freezes?
Hold the Power button down for 8-12 seconds to force power o. Press again for 3-4
seconds to reboot.
3. How can I find the Control Panel?
Press Windows key and "X" together for WinX menu to appear. Select Control Panel.
4. How can I find Command Prompt?
Press Windows key and "X" together for WinX menu to appear. Select Command Prompt.
5. How do I use the camera in a video chat?
Most video chat apps have an option for camera on or o. Make sure it is turned on.
6. How can I get assistance?
Email assistance: Support@beantech.net
Call toll free: 888-808-BEAN
WINDOWS KEY

© 2016 Bean Information Technology, Co. Ltd. Bit is the registered trademark of Bean Information Technology, Co. Ltd. Brands and
product names listed within are the trademarks of their respective companies. Microsoft and Windows 10 are the trademarks of Microsoft
Corporation in the US and worldwide.
www.beantech.net
PRINTED IN CHINA
MW10P2GC6
§ 15.19 Labelling requirements.
This device complies with part 15 of the FCC Rules. Operation is subject to the
following two conditions: (1) This device may not cause harmful interference, and (2)
this device must accept any interference received, including interference that may
cause undesired operation.
§ 15.21 Information to user.
Any Changes or modifications not expressly approved by the party responsible for
compliance could void the user's authority to operate the equipment.
§ 15.105 Information to the user.
Note: This equipment has been tested and found to comply with the limits for a Class
B digital device, pursuant to part 15 of the FCC Rules. These limits are designed to
provide reasonable protection against harmful interference in a residential installation.
This equipment generates uses and can radiate radio frequency energy and, if not
installed and used in accordance with the instructions, may cause harmful interference
to radio communications. However, there is no guarantee that interference will not
occur in a particular installation. If this equipment does cause harmful interference to
radio or television reception, which can be determined by turning the equipment off
and on, the user is encouraged to try to correct the interference by one or more of the
following measures:
-Reorient or relocate the receiving antenna.
-Increase the separation between the equipment and receiver.
-Connect the equipment into an outlet on a circuit different from that to which the
receiver is connected.
-Consult the dealer or an experienced radio/TV technician for help.