Beautiful Enterprise SFQ06 Sound Platform 2 User Manual cover
Beautiful Enterprise Co., Ltd. Sound Platform 2 cover
User Manual
Sound Platform 2
SFQ-06
The exclamation point within an equilateral
triangle is intended to alert the user to the
presence of important operating and
maintenance (servicing) instructions in the
literature accompanying the appliance.
Safety Information
WARNINGS:
.1.
The lightning flash with arrowhead symbol,
within an equilateral triangle is intended to
alert the user to the presence of uninsulated
"dangerous voltage" within the product's
enclosure that may be of sufficient magnitude
to constitute a risk of electric shock to persons.
TO REDUCE THE RISK OF FIRE OR ELECTRIC SHOCK, DO NOT
EXPOSE THIS APPLIANCE TO RAIN OR MOISTURE.
DO NOT REMOVE COVER or OPEN THE CABINET.
Dangerous high voltages are present inside the enclosure.
No user serviceable parts inside. Leave all servicing to
qualified service personnel.
10. Protect the power cord from being walked
on or pinched particularly at plugs, convenience
receptacles, and the point where they exit
from the apparatus.
11. Only use attachments/accessories specified
by the manufacturer.
12. Use only with the cart, stand, tripod, bracket
or table specified by the manufacturer, or
sold with the apparatus. When a cart is used,
use caution when moving the cart/apparatus
combination to avoid injury from tip-over.
13. Unplug this apparatus during lightning
storms or when unused for long periods of
time.
14. Refer all servicing to qualified service
personnel. Servicing is required when the
apparatus has been damaged in any way,
such as power-supply cord or plug is damaged,
liquid has been spilled or objects have
fallen into the apparatus, the apparatus has
been exposed to rain or moisture, does not
operate normally, or has been dropped.
15. Apparatus shall not be exposed to dripping
or splashing and no objects filled with
liquids, such as vase,shall not be placed on
the apparatus.
16. The mains plug is used as disconnect device
and it shall remain readily operable during
intended use. In order to disconnect the
mains plug from the mains completely, the
mains plug should be disconnected from
the mains socket outlet completely.
17. The batteries (battery pack & batteries installed)
shall not be exposed to excessive heat such
as sunshine, fire or the like.
IMPORTANT SAFETY INSTRUCTIONS
1. Read these instructions.
2. Keep these Instructions.
3. Heed all Warnings.
4. Follow all instructions.
5. Do not use this apparatus near water.
6. Clean only with dry cloth.
7. Do not block any ventilation openings. Install
in accordance with the manufacturer's
instructions.
8. Do not install near any heat sources such as
radiators, heat registers, stoves, or other
apparatus (including amplifiers) that produce
heat.
9. Do not defeat the safety purpose of the
polarized or grounding - type plug. A polarized
plug has two blades with one wider than
the other. A grounding type plug has two
blades and a third grounding prong. The
wide blade or the third prong is provided for
your safety. If the provided plug does not fit
into your outlet, consult an electrician for
replacement of the obsolete outlet.
PORTABLE CART WARNING
(Symbol provided by RETAC)

.2.
Reorient or relocate the receiving antenna.
Increase the separation between the equipment
and receiver.
Connect the equipment into an outlet on a
circuit different from that to which the
receiver is connected.
Consult the dealer or an experienced radio TV
technician for help.
Warnings: The device meets the exemption
from the routine evaluation limits in section 2.5
of RSS 102 and users can obtain Canadian
information on RF exposure and compliance
from the Canadian Representative Burnport
Holdings Ltd. 72MT Belcher Pls, East, Calgary,
Alberta, T2Z 2G1, CANADA. Tel: 403-257-4961
FCC&IC Radiation Exposure Statement
This equipment complies with FCC radiation
exposure limits set forth for an uncontrolled
environment and meets the exemption from
the routine evaluation limits in section 2.5 of
RSS 102.
1. This Transmitter must not be co-located or
operating in conjunction with any other
antenna or transmitter.
2. This equipment complies with FCC RF
radiation exposure limits set forth for an
uncontrolled environment. This equipment
should be installed and operated with a
minimum distance of 20 centimeters from
user and bystanders.
For compatibility between the unit and another
device with Bluetooth technology, consult the
device's documentation and dealer. In some
countries, there may be restrictions on using
Blu eto oth de vic es. Che ck wi t h yo ur loc al
authorities.
is a registered trademark of Bluetooth
SIG, Inc
Please read rating label at the bottom of system
for power input and other safety information.
18. Do not place any naked flame sources, such
as lighted candles, on the apparatus.
19. The battery used in this product must be
properly recycled or disposed of. Please
contact your local recycling center for proper
battery handling and disposal instructions.
FCC and IC Information:
This device complies with Part 15 of the FCC
Rules and RSS-210 of the IC Rules. Operation is
subject to the following two conditions: (1) This
device may not cause harmful interference, and
(2) this device must accept any interference
received, including interference that may cause
undesired operation.
Canada IC statments
Le présent appareil est conforme aux CNR
d'Industrie Canada applicables aux appareils
radio exempts de licence. L'exploitation est
autorisée aux deux conditions suivantes : (1)
l'appareil ne doit pas produire de brouillage, et
(2) l'utilisateur de l'appareil doit accepter tout
brouillage radioélectrique subi, même si le
brouillage est susceptible d'en compromettre le
fonctionnement.
Warning: Changes or modifications to this unit
not expressly approved by the party responsible
for compliance could void the user's authority to
operate the equipment.
Note: This equipment has been tested and found
to comply with the limits for a Class B digital
device, pursuant to Part 15 of the FCC Rules.
These limits are designed to provide reasonable
protection against harmful interference in a
residential installation. This equipment generates,
uses, and can radiate radio frequency energy and,
if not installed and used in accordance with the
instructions, may cause harmful interference to
radio communications. However, there is no
guarantee that interference will not occur in a
particular installation. If this equipment does
cause harmful interference to radio or television
reception, which can be determined by turning
the equipment off and on, the user is
encouraged to try to correct the interference by
one or more of the following measures:
.3.
15 cm
(5- 15/16")
10 cm
(3- 15/16")
15 cm
(5-15/
16")
15 cm
(5-15/
16")
15 cm
(5-15/
16")
Front View:
Side View:
Front side Back side
QDID:
CAUTION
-
Proper Installation
Install the system in a place which is level, dry
and neither too hot nor too cold. The appropriate
temperature is between 5 oC and 35 oC.
Install the system in a location with adequate
ventilation to prevent internal heat from
building up inside the unit.
Leave sufficient distance between the system
and TV.
Keep the system away from TV to avoid
interference with TV.
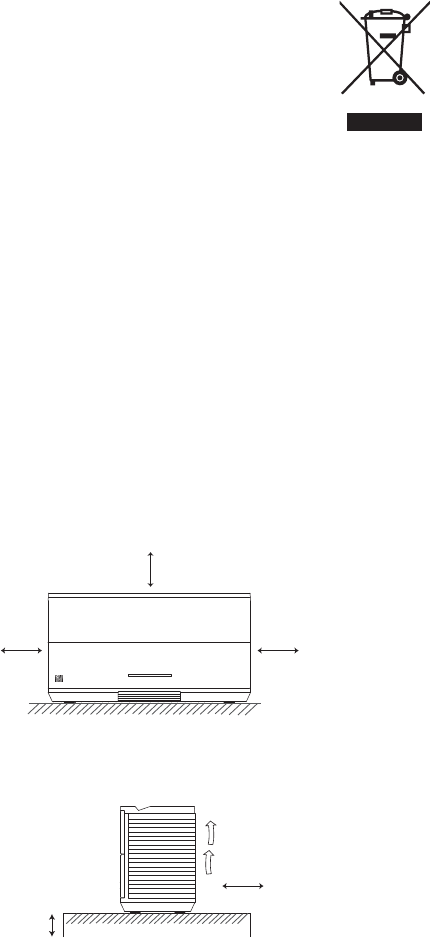
CAUTION
-
Proper Ventilation
To avoid risk of electric shock and fire, and to
prevent damage, locate the apparatus as
follows:
Front: No obstructions and open spacing.
Sides / Top / Back: No obstructions should be
placed in the areas shown by the dimensions
below.
Bottom: Place on the level surface. Maintain an
adequate air path for ventilation by placing on a
stand with a height of 10 cm (3-15/16") or more.
Information for Users on Disposal of Old
Equipment
[European Union]
This symbol indicates that the
electrical and electronic equipment
should not be disposed as
general household waste at its
end-of-life. Instead, the product
should be handed over to the
applicable collection point for
the recycling in accordance
with your national legislation.
By disposing of this product correctly, you will
help to conserve natural resources and will help
prevent potential negative effects on the
environment and human health that could
otherwise be caused by inappropriate waste
handling of this product. For more information
about collection point and recycling of this
product, please contact your local municipal
office, your household waste disposal service or
the shop where you purchased the product.
Penalties may be applicable for incorrect
disposal of this waste, in accordance with
national legislation.
[Other Countries outside the European
Union]
If you wish to dispose of this product, please do
so in accordance with applicable national
legislation or other rules in your country for the
treatment of old electrical and electronic
equipment.
Attention:
This symbol is
only valid in the
European Union.

.4.
Getting Started ............................................................................................................... 5
Package Contents .............................................................................................................................................................. 5
Connecting the AC Adaptor .......................................................................................................................................... 5
System Overview ............................................................................................................ 6
Top View ................................................................................................................................................................................ 6
Front View ............................................................................................................................................................................ 6
Back View .............................................................................................................................................................................. 7
Display Window ................................................................................................................................................................. 7
Selecting the Sound Source .......................................................................................... 7
Basic Operations ............................................................................................................ 8
Turning on/off the System ............................................................................................................................................ 8
Enabling Light Bar ........................................................................................................................................................... 8
Adjusting the Volume ..................................................................................................................................................... 8
Sound Mode ........................................................................................................................................................................ 8
Activating the Power Save Mode ................................................................................................................................. 8
Bluetooth ........................................................................................................................ 9
Downloading the Soundreaq App .............................................................................................................................. 9
Establishing a Bluetooth Connection ......................................................................................................................... 9
Using Multiple Bluetooth Devices ............................................................................................................................... 10
Playing back from Macbook or Macbook Pro ......................................................................................................... 10
Playing back from PC/Notebook .................................................................................................................................. 10
FM ................................................................................................................................... 11
Listening to FM Stations ................................................................................................................................................. 11
Presetting Stations ............................................................................................................................................................ 12
External Device ...............................................................................................................12
True-Wireless Connection ............................................................................................ 13
Charging an External Device ........................................................................................ 13
Optimizing Sound Quality ........................................................................................... 14
Troubleshooting ............................................................................................................ 15
Technical Specifications ................................................................................................ 16
Contents
.5.
Package Contents
Examine whether the following package contents are all included:
Main Unit
Getting Started
AC Adaptor
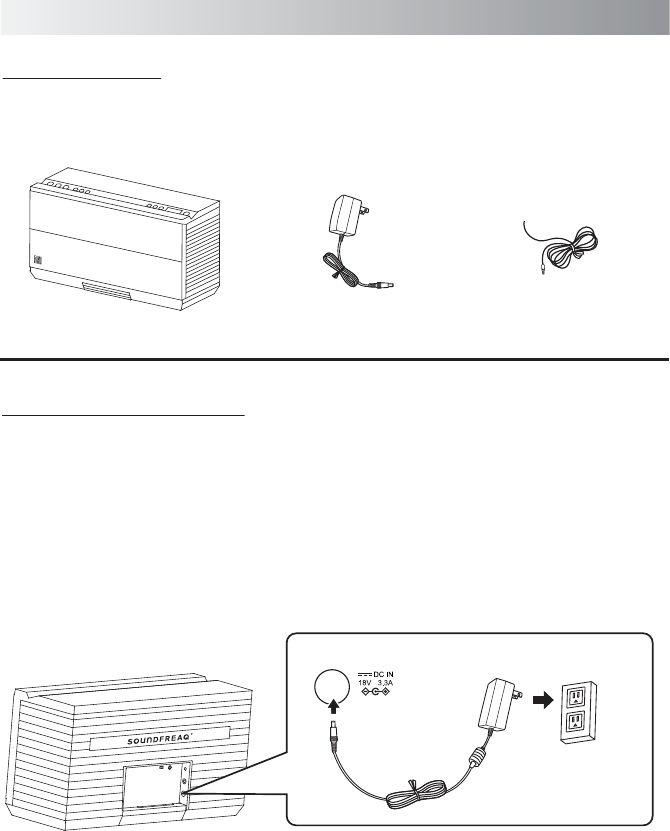
Connecting the AC Adaptor
WARNING! For optimal performance, use only
the supplied AC adaptor.
• Ensure that power supply outlet matches with
the unit AC's input 100-240V~, 50/60Hz
before connection.
Connect one end of the AC adaptor to the DC
IN jack of the unit and the other end to a power
outlet.
FM Antenna
Power outlet
.6.
System Overview
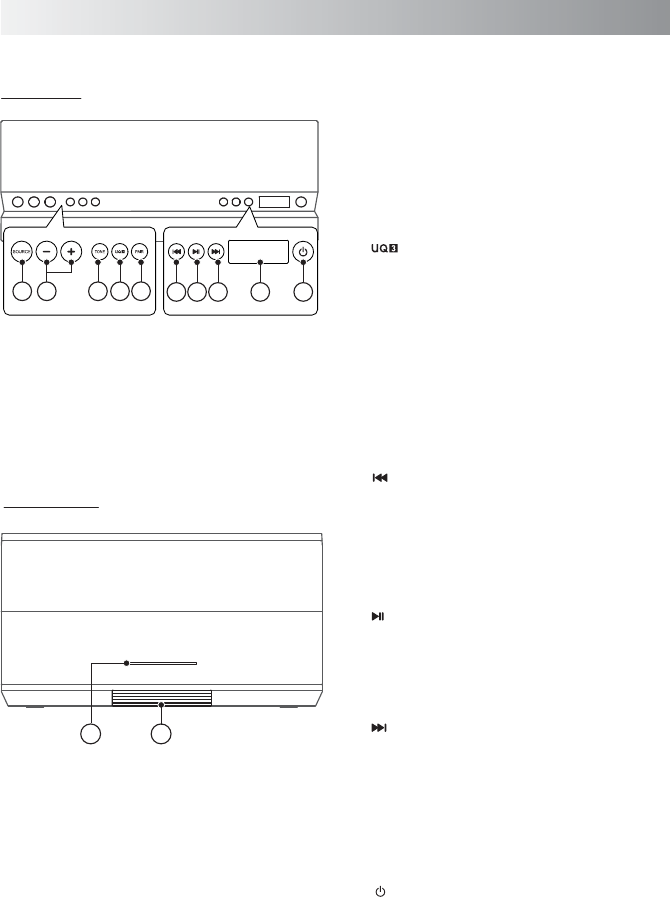
Front View
Top View
11 12
1. SOURCE button
Toggle among Bluetooth, AUX IN and FM
tuner modes.
2. Volume +/- buttons
Press to increase/descrease the volume level.
3. TONE button
Toggle among Bright, Warm and Flat modes.
4. button
Press to activate the UQ3 sound eect. Press
again to deactivate.
Hold separatively this button on the two
units at the same time to create a wirless
connection between them. You need to buy
another one for the better sound eect.
5. PAIR button
Press to place the system into Bluetooth
mode.
6. (Previous/Rewind) button
In Bluetooth mode, press to skip a previous
track. Hold to rewind a track fast.
In FM tuner mode, press to select a preset
station or a frequency you desired. Hold to
activate the auto scanning function.
7. (Play/Pause) button
In Bluetooth mode, press to play or pause a
track.
In FM tuner mode, press to switch between
preset and frequency displays.
8. (Next/fast forward) button
In Bluetooth mode, press to skip a next
track. Hold to fast-forward a track.
In FM tuner mode, press to select a preset
station or a frequency you desired. Hold to
activate the auto scanning function.
9. Display
10. (On/Standby) button
11.Light bar
Blinks once when any button is pressed.
Show the status of Bluetooth connection.
12.Cable tray
1 2 3 4 56 7 8 9 10
.7.
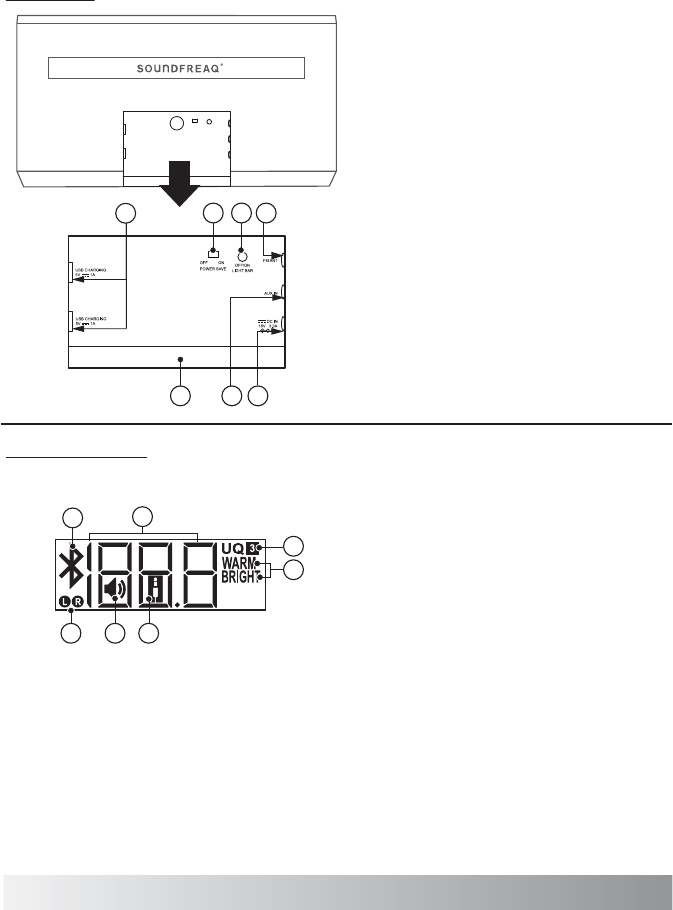
Back View
14 15
17
16
19 18
13
7
1
13. USB CHARGING jack
Charge your external devices.
14.POWER SAVE OFF/ON swtich
Press to activate the power save mode.
15.LIGHT BAR OFF/ON button
16.FM jack
17.DC IN jack
18.AUX IN jack
For transmitting an audio input signals from
an external device.
19. Cable Door
1. L/R indicator
Appears when two units are connected
wirelessly in the Bluetooth mode.
2. Speaker indicator
Appears during the volume level is
adjusted.
3. AUX IN indicator
Appears when the system is in AUX IN mode.
4. Sound eect indicator
Appears when the WARM or BRIGHT sound
eect is activated.
5. UQ3 indicator
Appears when the UQ3 sound eect is
activated.
6. Multi-function display
Indicates the changes of the frequency,
preset and volume level.
Display Window
2 3
6
4
5
Selecting the Sound Source
This system enables you to access three sound sources - Bluetooth, FM tuner and External device.
• If you use the Soundfreaq Remote App, tap the SOURCE button repeatedly on the App.
• Or, press the SOURCE button repeatedly on the System.
.8.
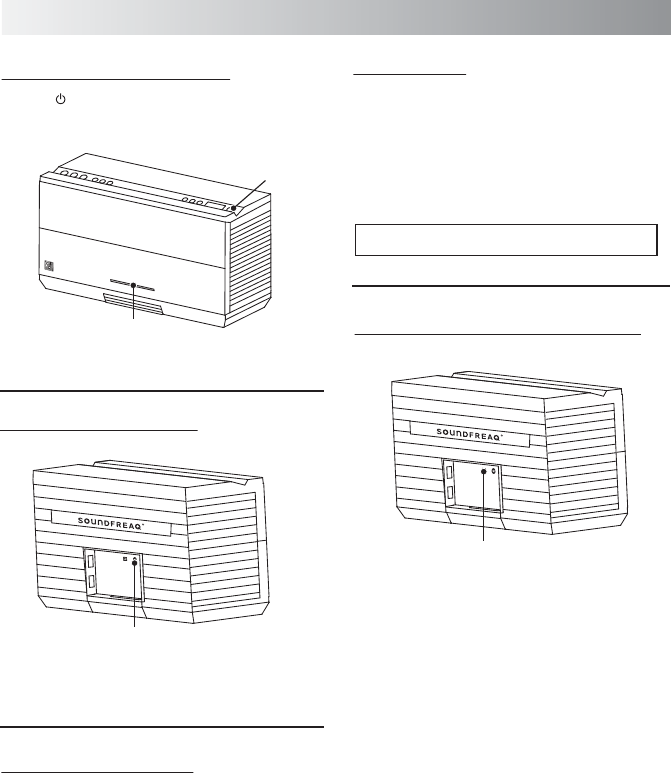
Basic Operation
Turning on/off the System
Tap the button on the top to turn on the
System .
Tap the button again to turn o the System.
Press the button to turn o the light bar. Press
again to turn on the light bar.
Switch the button to “OFF”, the system will
keep on all the time.
Switch the button to “ON”. the system will
power o automatically when the system is
idle for 20 minutes.
Enabling the Light Bar
Activating the Power Save Mode
Adjusting the Volume
You can adjust the volume level from 0 to 30
When one of sound sources is selected by
tapping the volume +/- buttons.
During the process of adjusting, the speaker
indicator will appear on the display.
Light bar
LIGHT BAR OFF
On/Standby button
POWER SAVE OFF/ON
Sound Mode
Sound modes can be selected to enhance the
type of music being played.
Tap the TONE to select the sound mode.
Each time you tap the button, the sound mode
changes as follows:
“BRIGHT” “WARM” Cancel sound mode
.9.
Establishing a Bluetooth Connection
Notes:
• If your mobile phone supports A2DP
protocol, its music will play through the unit.
• You can make a Bluetooth connection with
an iPhone/iPad/iPod touch or any other
Bluetooth-enabled devices with iOS.
1. Tap the button to turn on the System.
2. Tap the SOURCE button repeatedly to select
the Bluetooth mode.
• The indicator appears on the display.
3. Hold the PAIR button for two seconds on top
of unit to put the system in pairing mode.
• The indicator and light bar start blinking
together at a fast rate.
• If you tap the PAIR button for more than 2
seconds during the process of pairing, the
operation will be cancelled.
4. During this period, you can operate the iPad
or Bluetooth-enabled device to pair with the
unit within a 33 feet (10m) range.
• Please check the user manual of the
Bluetooth-enabled device with which you
are initiating pair to learn about Bluetooth
connection with any other devices.
5. Once the unit is detected and its name
"Sound Platform 2" appears on the display
of your Bluetooth-enabled device, key in the
default password "1234" if a prompt
requests it.
Bluetooth
Downloading the Soundfreaq App
We have developed a Soundfreaq
Remote App to give you full control
from your Android devices while
playing audio over the Bluetooth
connection, please download the
"Soundfreaq Remote App" in the App
Store* for FREE.
* iTunes Store is an online store where you can
free download or purchase applications for your
devices. Apps are designed to expand the
functionality of a device.
After paring an iOS device with the system, you
can download the free Soundfreaq Remote App
in the iTunes store or on our website:
www.soundfreaq.com
When the App installation is finished, you can
control the playback from your iOS device. The
app can be used as a remote control.
Warning!
Do not unplug the AC adaptor from the unit
when playing back a track over the Bluetooth
connection.
Soundfreaq

.10.
3. Once completed, the pairing success
screen will come out.
Note: Don’t quit the page immediately. You
may notice that the previous dialog screen
still shows the device not connected.
Just ignore it. It’s confusing to the user.
In fact, it’s connected already.
4. Open iTune, play a song. Then use the mouse
to click the Bluetooth icon at the top right
hand corner of the desktop screen, select
the “Sound Platform 2” option and then
select the “Use as Audio Device (Stereo)”.
After a while (a few seconds), the music will
come out from the system. If not, select the
“Use as Audio Device (Stereo)” once again.
The Sound Quality should be good.
Playing back from PC/Notebook
1. Press the “Start” button to open the “Device
and Printers” dialog box.
2. Turn on the system and press the PAIR
button on the unit to put the unit into the
pair mode.
3. Select the “Add a device” in the “Device and
Printer” dialog box. The “Sound Platform 2”
icon will appear on the display.
4. Double click the “Sound Platform 2” icon and
wait until the device has been added
successfully.
5. Click the “Close” button to close the “Device
and Printer” dialog box. A ”Sound Platform
2” icon appears in the dialog box.
6. Double click the “Sound Platform 2” icon and
the device connection screen will be shown.
7. Click the “Connect” button in the “Music and
Audio” option.
8. Once connected, the pair indicator on the
unit will be solid on and the connection
success screen will be shown.
• The indicator and light bar start blinking
quickly to indicate that the unit and your
device have entered into the connection
mode.
• After a Bluetooth connection is established
successfully, the indicator and the light
bar will be solid on.
6. Select the desired music and press "Play"
button on your device to play back the
music.
• If the indicator and light bar remain on
after blinking for 3 minutes, the pair was
unsuccessful. Try again above steps 3 to 5.
Using Multiple Bluetooth Devices
Only one device can be used at a time, but you
can switch between different Bluetooth devices.
Make sure each device you want to use has
already been paired, to switch devices:
1. On the system, tap the PAIR button.
2. On Bluetooth device, select the connection
to the system.
This device is now the connected device to the
system, (the previous connected device is
now disconnected). Repeat those steps to
switch the connected device again.
Note: If the unit has no sound output,
please check if the volume level of your
Bluetooth device connected to the unit is set to
the minimum, or the Bluetooth device is muted.
Playing back from Macbook or
Macbook Pro
1. In the desktop screen, Select the
“Open Bluetooth Preference”.
2. If there is any old “Sound Platform 2”
records, remove them. Click the “Continue”
button to proceed pairing process.
.11.
FM
1. Tap the button to turn on the System.
2. Tap the SOURCE button repeatedly to select
the FM tuner mode.
3. Select a desired radio station for listening.
For details, see “Presetting a Station”)
4. Adjust the FM antenna’s length and angle
and direction until the best reception is
obtained.
5. If necessary, adjust the volume level.
Listening to a Station
Note: Position the antenna as far away as
possible from the AC adaptor, a TV, or other
radiation source.
1. Plug the supplied FM antenna into the
FM.ANT jack located on the back of unit.
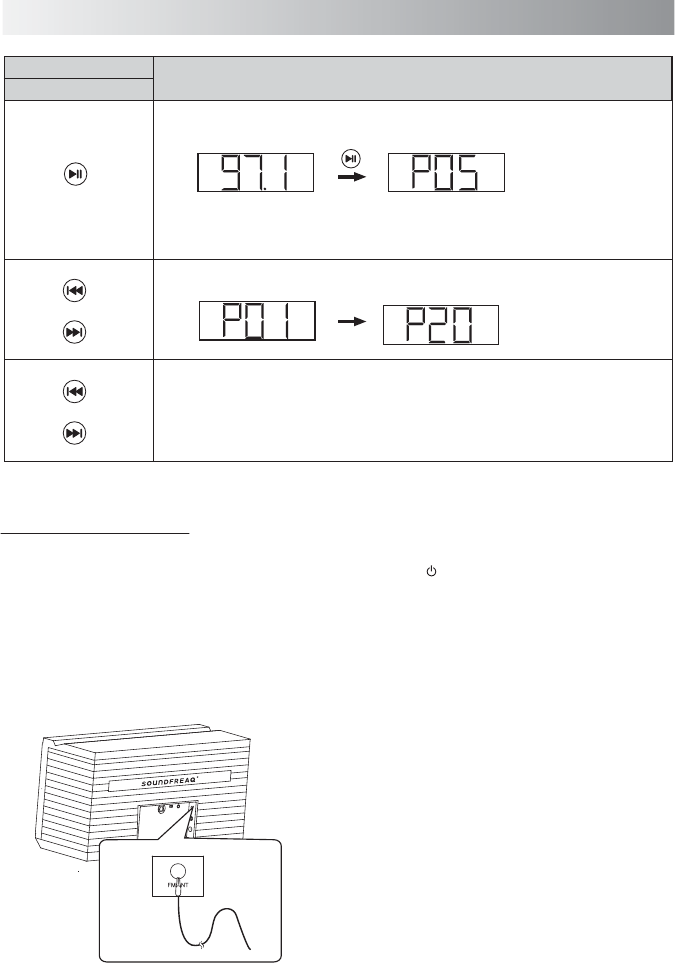
Press the Button Functions
Unit
• Hold this button to enter saving mode. Press to save a channel.
(see "Presetting a station”)
• Switch between the frequency display and preset display.
Tune the desired frequency or channel number based on the different display.
• Select a channel (from 01 to 20).
Change frequency from 87.5MHz to 108.0MHz in the FM mode.
• Hold for more than one second to activate the Auto Scan function, and then
release the button. The frequency will be scanned automatically until a radio
station is found. Or press again to quit search while searching.
Frequency display Preset display
FM Antenna
.12.
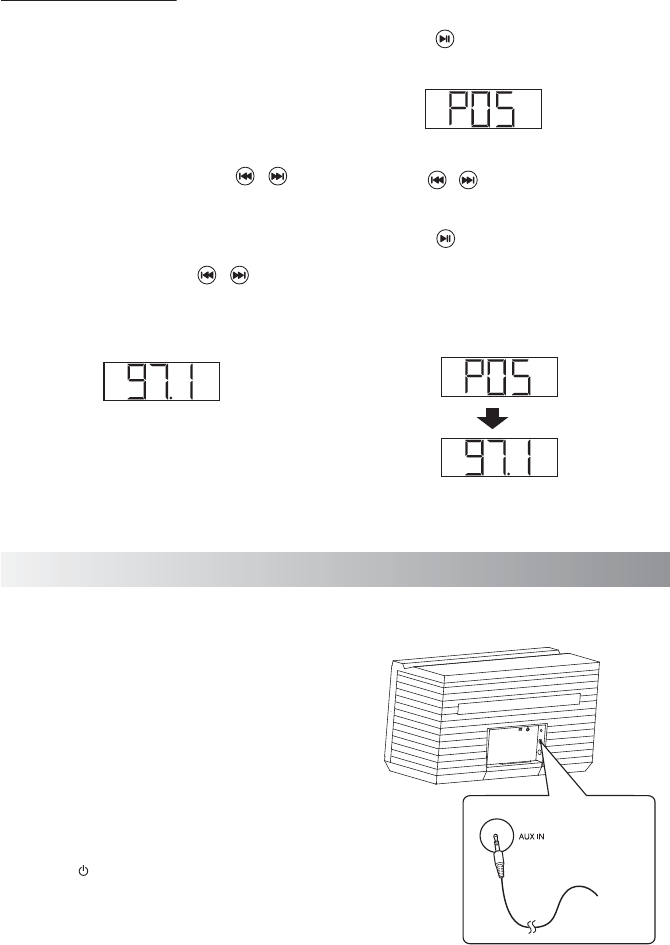
Presetting a Station
1. Select FM tuner mode with the SOURCE
button.
2. Switch to the frequency display if the display
is channel number.
3. Tune a desired frequency. You can use either
of the below methods to tune the frequency.
A. Manual Tuning - Briefly tap the /
button repeatedly to move frequency to
frequency (from 87.5 MHz to 108.0 MHz) until
you find the desired station.
B. Auto Scanning - Hold the / button
until the frequency display starts blinking.
The frequency will be scanned automatically
until a station is found.
System Display
Preset Display
4. Hold the button to start storing a station.
• The channel number starts blinking.
5. Use the / buttons on the System to
select the channel number (from 01 to 20) to
be set.
6. Press the button again to store the
frequency. The selected frequency will then
be stored with the preset number.
• The frequency display will be switched
automatically to preset display after a few
seconds.
External Device
You can enjoy the sound from an optional
component such as a digital music player
through the speakers of this unit. Be sure to
turn off the power of each component before
making any connections. For details, refer to the
instruction manual of the component to be
connected.
Connect an external device to the AUX IN jack
on the back panel of the System using a stereo
audio cable.
1. Tap the button to turn on the System.
2. Tap the SOURCE button repeatedly to select
the AUX IN mode.
3. Start playback on the external device.
Frequency display
To audio output
such as
CD/MD/digital
music player, etc.
.13.
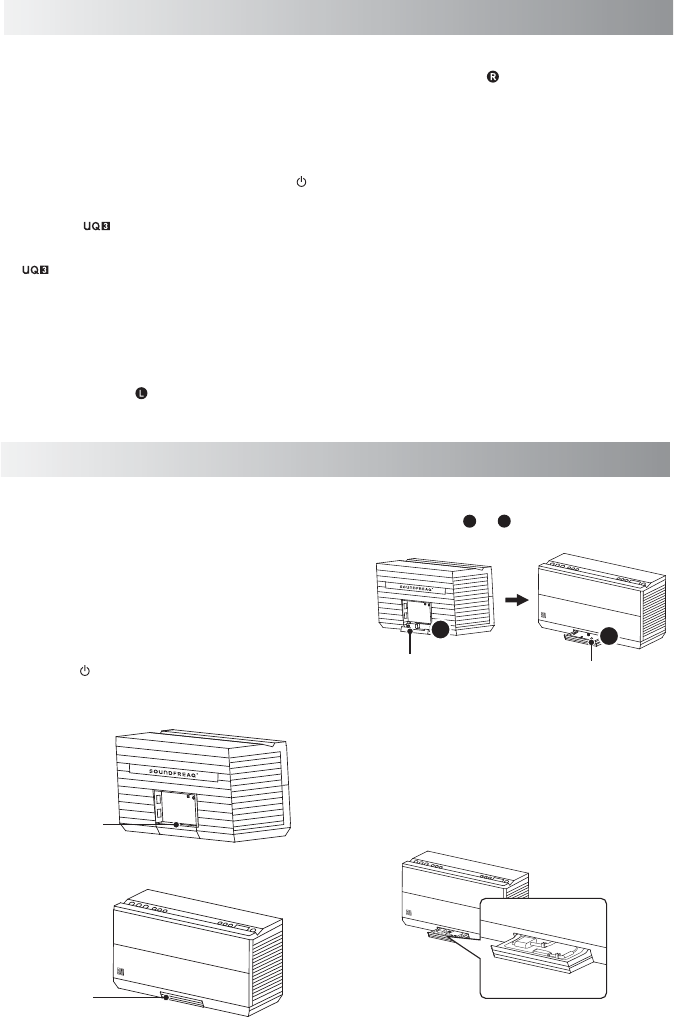
True-Wireless Connection
Two systems can be connected wirelessly and
they can be served as left and right speakers
respectively during playback. You need to
purchase one more system according to your
need for experience.
1. Turn on the two systems by pressing the
button.
2. Hold the button on the one of the two
systems rstly, and at the same time hold the
button on the another system in the
Bluetooth mode. The two light bars will blink.
If the connection is sucessfull, the two light
bars will remain on.
• The system you rst hold will be used as a
main system and it also can be served as a left
speaker with the indicator appearing on
the display.
Charging an External Device
The two USB power ports can be used to charge
most devices that allow for USB charging
(including many mobile phones, smart phones
and wireless headsets).
Note: Please use the USB power cord that came
with your device to connect to the system to
charge.
1. Tap the button to turn on the System.
2. Open the door on the back of the system by
the nger notch.
3. Push to open the cable tray on the front of
the System.
Finger Notch
Door Cable Clamp
Cable Tray
AB
AB
• Another system can be served as a right
speaker with the indicator appearing on
the display.
3. Build the Bluetooth connection between
the main system and your
Bluetooth-enabled device. For details about
the Bluetooth connection, please refer to
the “Establishing a Bluetooth Connection”
on page 9.
4. Press the play button on your
Bluetooth-enabled device to enjoy the
music through the two systems.
• If you tay the Play/Pause, Previous/Next and
Volume buttons on the main sytem, another
system is also adjusted at the same time.
• The UQ3, TONE and SOURCE button need
to be operated respectively.
4. Take the USB cable go through the Cable
Tunnel (from to ) before charging.
5. Connect your device to the USB port with a
USB cord.
Note: Place the plug of the USB cord to the
slot, and then close both the cable tray and
door after charging.

.14.
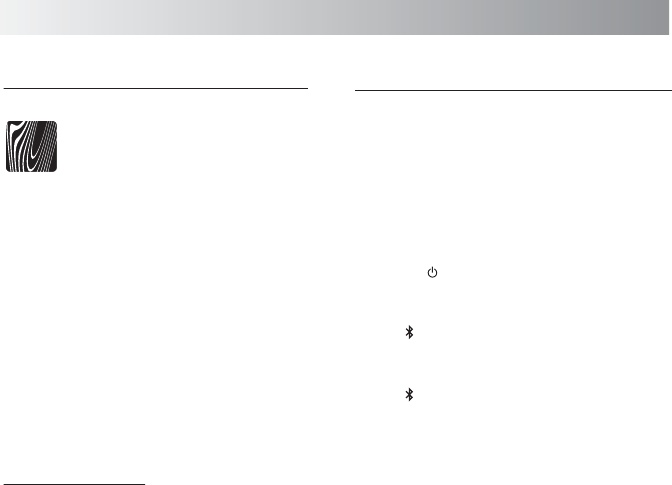
Optimizing Sound Quality
"U-Cubed" is an proprietary technology designed to create an ultra wide stereo sound
field in digital music systems. With exceptional natural sound reproduction of high definition and
fidelity, we create a listening experience where you feel like your speakers are separated much more
than they are.
To activate UQ3 on:
The unit, press the button to activate, press again to deactivate.
On the Remote App, press the button to activate and deactivate.
Tip: The system has been tuned to a balanced acoustic profile. You can use the EQ settings on your
playback device to customize the EQ balance to suit your personal preference. Note: Some
custom EQ settings when combined with UQ3 enhancement may cause distortion.
Tip: The output volume is set by both the volume setting on the system and the source device. Both
may be adjusted to set your preferred listening volume. Typically, sound quality is best when the
volume of the source device is between 70-90%. Note: As with any speaker system, if the
volume on both your source device and the speaker are at maximum output, it may cause
distortion. When using an iOS device or other device that offers a "volume limit" feature, turn
this setting off for higher volume listening.
Tip: Using high quality digital music files with low compression will improve acoustic performance.
TM

.15.
• Remove and reconnect the AC power plug and turn on the system again.
The system does not react
when the buttons are
pressed.
• The unit may be powered off and powered on when playing back a track via
Bluetooth connection. You need to make the connection again.
No sound output is via Bluetooth
or Bluetooth connection cannot
be restored automatically.
Troubleshooting
In These Cases Check the following points
Check this list for a possible troubleshooting solution before calling for service.
• AC adaptor is not inserted securely. Plug in securely.
• The path between the remote control and the sensor on the unit is
blocked.
• The battery of remote control is exhausted.
Hard to listen to broadcasts
because of noise.
• The antenna is not properly extended or positioned.
• Tune to the correct radio channel/frequency.
• Making sure the antenna is further away from any equipment that may be
causing the noise or interference.
Power does not come on.
Unable to operate the
System from the remote
control.
No sound output.
• Check if the volume level is set to the minimum.
• Check if the volume level of your Bluetooth device connected to the system is
set to the minimum.
• Check to make sure your Bluetooth device is not muted.
• Maybe your USB cable is not supported by the system, please try to use
another USB cable.
If you find USB charging
cannot perform after
connecting your device to the
USB jack on the unit.
Bluetooth connection cannot
be established.
• When creating a Bluetooth connection between the unit and your device for
the first time, if the connection is fail, you need to power off your device and
power on again to clear the device name, and make the connection again.
.16.
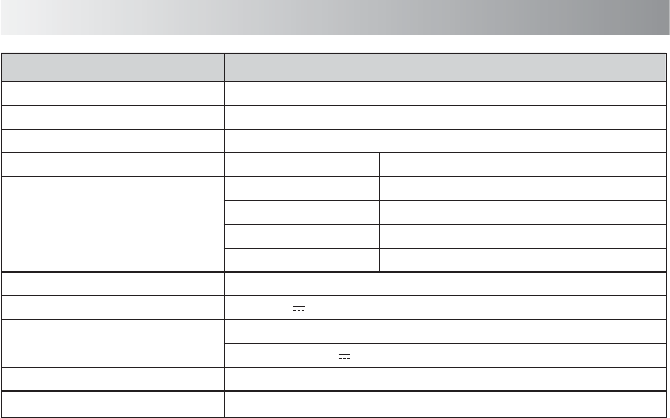
External DC IN (for AC adaptor), AUX IN
DC 18V 3.3A (External DC IN)
Input: AC 100-240V, 50/60Hz
Output: DC 18V 3.3A
329mm(W) * 176.5mm(H) * 125mm(D)
1.97Kg
Model
Name
Support Bluetooth
Support Profile
Bluetooth 1.2, 2.0 and 2.1 compliant
A2DP
Input Sensitivity AUX Input 1200mV
Tuner
Band
Tuning Range
Frequency Step
Preset Stations
Input Terminal
Power Source
AC Adaptor
Dimensions (Approx.)
Weight
Technical Specifications
Sound Platform 2
SFQ-06
FM
87.5 ~ 108.0MHz
100kHz
20
Design and specications are subject to change without notice.
Informations FCC (Commission fédérale des communications U.S.) et IC (Industrie Canada) :
Cet appareil est conforme à l’article 15 du règlement de la FCC. Son utilisation est soumise aux deux
conditions suivantes : (1) cet appareil ne doit pas provoquer d’interférences préjudiciables, et (2) il doit
accepter toute interférence reçue, y compris celles risquant d’engendrer un fonctionnement indésirable.
Déclaration de la FCC et d’IC sur l’exposition aux irradiations :
Cet équipement est conforme aux limitations prévues par la FCC pour l’exposition aux irradiations dans le cadre
d’un environnement d’accès libre et est en conformité avec l’exemption d’évaluation de routine des limitations
de la section 2.5 de la CNR-210.
1. Cet émetteur ne doit pas être situé à proximité ou fonctionner simultanément avec une autre antenne ou
émetteur.
2. Cet équipement est conforme aux limitations prévues par la FCC pour l’exposition aux irradiations RF dans le
cadre d’un environnement d’accès libre. Cet équipement doit être installé et mis en fonctionnement à une
distance minimale de 20 cm de l’utilisateur et des personnes qui l’entourent.
Remarque : ce matériel a été testé et trouvé conforme aux limites de l'article 15 de la règlementation FCC
pour les appareils numériques de classe B. Ces limites sont conçues pour fournir une protection raisonnable
contre les interférences nuisibles dans une installation résidentielle. Ce matériel génère, utilise et peut émettre
des fréquences radio et, s'il n'est pas installé et utilisé conformément aux instructions, peut causer des
interférences nuisibles aux communications radio. Toutefois, il n'existe aucune garantie que des interférences
ne se produiront pas dans une installation particulière. Si ce matériel cause des interférences nuisibles à la
réception radio ou télévision, ce qui peut être déterminé en éteignant l'appareil, l'utilisateur est encouragé à
essayer de corriger l'interférence par une ou plusieurs des mesures suivantes :
• Réorienter ou déplacer l'antenne de réception.
• Augmenter la distance entre l'appareil et le récepteur.
• Brancher l'appareil à une prise de courant sur un circuit diérent de celui auquel le récepteur est branché.
• Consulter le revendeur ou un technicien radio/ télévision expérimenté.
Avertissements : L'appareil répond à l'exemption de l'évaluation de routine des limites de la section 2.5 de
la norme CNR-102 et les utilisateurs peuvent obtenir des informations canadiennes sur l'exposition aux
radiofréquences et la conformité auprès du représentant canadien Burnport Holdings Ltd 72MT Belcher, East,
Calgary, Alberta, T2Z 2G1, CANADA. Téléphone : 403-257-4961
ATTENTION - Installation correcte
• Installez le système sur une surface horizontale, dans un endroit sec et ni trop chaud ni trop froid. La
température d'utilisation se situe entre 5°C et 35°C.
• Installez le système dans un lieu bien aéré pour éviter qu'il ne surchaue.
• Laissez une distance susante entre le système et le téléviseur.
• Éloignez le système du téléviseur an d'éviter les interférences avec ce dernier.
ATTENTION - Ventilation correcte
Pour prévenir tout risque de choc électrique, d'incendie, ou tout autre dommage, placez l'appareil comme
suit :
Face avant : pas d'obstructions et un espace libre.
Côtés / dessus / arrière : aucun obstacle dans les zones indiquées ci-dessous.
Dessous : posez l'appareil sur une surface horizontale. Maintenez une circulation d'air susante pour la
ventilation en plaçant l'appareil sur un support de 10 cm (3-15/16") de haut ou plus.
Consignes de sécurité
AVERTISSEMENTS :
POUR RÉDUIRE LE RISQUE D'INCENDIE OU D'ÉLECTROCUTION, NE PAS EXPOSER CET APPAREIL À LA PLUIE OU À L'HUMIDITÉ.
N'ENLEVEZ PAS LE COUVERCLE et N'OUVREZ PAS LE BOÎTIER.
Des tensions élevées dangereuses sont présentes à l'intérieur.
Non réparable par l'utilisateur. Toutes les réparations doivent être eectuées par un personnel qualié.
IMPORTANTES INSTRUCTIONS DE SÉCURITÉ
1. Lisez attentivement ces instructions.
2. Conservez ces instructions.
3. Respectez tous les avertissements.
4. Suivez toutes les instructions.
5. N'utilisez pas cet appareil près de l'eau.
6. Nettoyez-le avec un linge sec uniquement.
7. Ne bloquez pas les fentes d'aération. Installez l'appareil conformément aux instructions du fabricant.
8. N'installez pas l'appareil près de sources de chaleur telles que radiateurs, registres de chaleur, poêles ou
autres appareils (y compris les amplicateurs) produisant de la chaleur.
9. Ne détruisez pas la fonction de sécurité de la prise polarisée ou avec mise à la terre. Une prise polarisée
comporte deux broches, l'une étant plus large que l'autre. Une prise avec mise à la terre comporte trois
broches, la troisième étant la broche de terre. La broche plus large, ou la broche de terre, sont là pour
votre sécurité. Si la prise fournie ne correspond pas à vos prises secteur, demandez à un électricien de
la remplacer.
10. Protégez le cordon d'alimentation pour qu'il ne soit pas écrasé ou pincé, particulièrement au niveau de la
prise de courant et au point où il sort de l'appareil.
Version Canada
Le symbole de l'éclair dans un triangle est destiné à mettre en garde l'utilisateur contre la présence de tensions
dangereuses à l'intérieur du boîtier du produit, d'une puissance susante pour constituer un risque de choc
électrique.
Le symbole du point d'exclamation dans un triangle est destiné à avertir l'utilisateur de la présence d'importantes
instructions d'utilisation et d'entretien dans la documentation jointe à l'appareil.
11. Utilisez uniquement les accessoires spéciés par le fabricant.
12. Utilisez uniquement avec le chariot, le pied, le trépied, le support ou la table
spéciés par le fabricant ou vendus avec l'appareil. Quand vous utilisez un
chariot, soyez prudent lorsque vous déplacez l'ensemble chariot / appareil pour
éviter les blessures en cas de renversement.
13. Débranchez l'appareil en cas d'orage ou si vous ne l'utilisez pas pendant une période prolongée.
14. Toutes les réparations doivent être eectuées par un personnel qualié. Un entretien est requis lorsque
l'appareil a été endommagé de quelque manière que ce soit, par exemple cordon d'alimentation ou
prise de courant endommagés, liquide renversé sur l'appareil, objets tombés dans l'appareil, exposition
de l'appareil à la pluie ou à l'humidité, ou si l'appareil ne fonctionne pas normalement ou est tombé.
15. L'appareil ne doit pas être exposé aux éclaboussures et aucun objet rempli de liquide ne doit être
posé sur l'appareil.
16. La prise secteur est utilisée comme dispositif de déconnexion et doit rester facilement accessible
pendant l'utilisation. Pour couper l'alimentation électrique de l'appareil, débrancher la che de la
prise murale.
17. Les piles ne doivent pas être exposées à une chaleur excessive (soleil, feu, etc.).
18. Ne placez aucune source de amme nue, telle que des bougies allumées, sur l'appareil.
19. La pile utilisée dans ce produit doit être correctement recyclée ou éliminée. Veuillez vous adresser à votre
centre local de recyclage pour des instructions concernant la manipulation correcte et l'élimination de la
pile.
Pour assurer la compatibilité entre le système l’appareil et un autre appareil avec la technologie Bluetooth,
consultez la documentation de l'appareil et renseignez-vous auprès du concessionnaire. Certains pays
peuvent imposer des restrictions sur l'utilisation des appareils Bluetooth. Veuillez vous renseigner auprès des
autorités locales.
est une marque déposée de Bluetooth SIG, Inc.
Veuillez lire l'étiquette apposée sous le système pour la tension d'entrée et d'autres informations de sécurité.
Avertissement : Tout changement ou modication apportés à cet appareil sans l’approbation expresse de
l’entité responsable de la conformité pourrait annuler le droit de l'utilisateur à se servir l'appareil.
2 Nov 2012
Size: 160 * 120 mm
NE PAS OUVRIR - RISQUE
D'ÉLECTROCUTION
ATTENTION
Vue de face : Vue de côté :
Face avant Face arrière
QDID:
AVERTISSEMENT RELATIF
AU CHARIOT DE TRANSPORT
(Symbole fourni par RETAC)
15cm
(5- 15 /16 ") 15cm
(5- 15 /16 ")
15cm
(5- 15 /16 ")
15cm
(5- 15 /16 ")
15cm
(5- 15 /16 ")
10 cm (3- 15 /16 ")
Save this manual