Beautiful Enterprise SFQ07 Sound Spot User Manual SFQ 07 x
Beautiful Enterprise Co., Ltd. Sound Spot SFQ 07 x
User Manual
Sound Spot
SFQ-07
User Manual
4
CAUTION - Proper Installation
y Install the system in a place which is level,
dry and neither too hot nor too cold. The
appropriate temperature is between 5 oC
and 35 oC.
y Install the system in a location with
adequate ventilation to prevent internal heat
from building up inside the unit.
y Leave sufficient distance between the
system and TV.
y Keep the system away from TV to avoid
interference with TV.
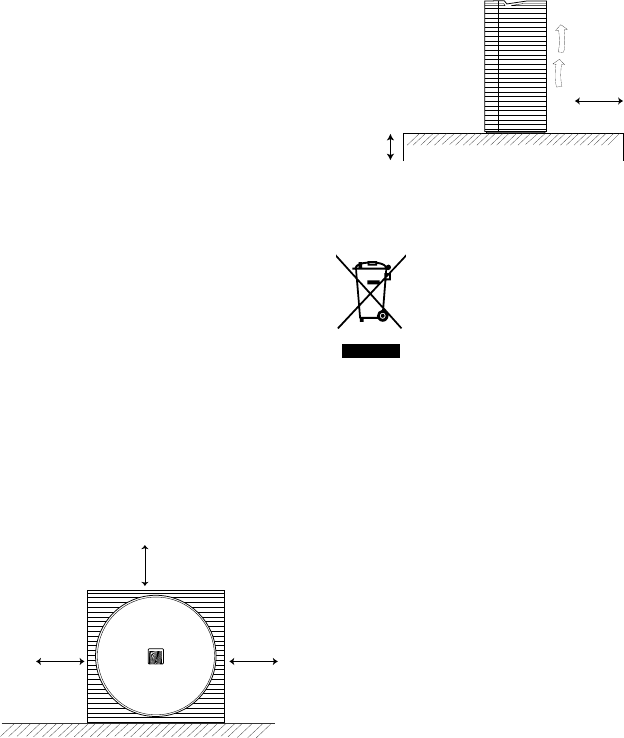
CAUTION - Proper Ventilation
To avoid risk of electric shock and fire, and to
prevent damage, locate the apparatus as
follows:
Front: No obstructions and open spacing.
Sides / Top / Back: No obstructions should be
placed in the areas shown by the dimensions
below.
Bottom: Place on the level surface. Maintain an
adequate air path for ventilation by placing on a
stand with a height of 10 cm (3-15/16") or more.
Front View:
Side View:
Information for Users on
Disposal of Old Equipment
[European Union]
This symbol indicates that the
electrical and electronic
equipment should not be
disposed as general household
waste at its end-of-life. Instead,
the product should be handed
over to the applicable collection
point for the recycling in
accordance with your national
legislation.
By disposing of this product correctly, you will
help to conserve natural resources and will help
prevent potential negative effects on the
environment and human health that could
otherwise be caused by inappropriate waste
handling of this product. For more information
about collection point and recycling of this
product, please contact your local municipal
office, your household waste disposal service or
the shop where you purchased the product.
Penalties may be applicable for incorrect
disposal of this waste, in accordance with
national legislation.
[Other Countries outside the European
Union]
If you wish to dispose of this product, please do
so in accordance with applicable national
legislation or other rules in your country for the
treatment of old electrical and electronic
equipment.
QDID: xxxxxxx
Attention:
This symbol
is only valid
in the
European
Union.
15 cm
(5-
15
/
16
")
15 cm
(5-
15
/
16
")
15 cm
(5-
15
/
16
")
10 cm
(3-
15
/
16
")
15 cm
(5-
15
/
16
")
Front side Back side

5
Contents
Getting Started .............................................................................................. 6
Package Contents ......................................................................................................................... 6
Charging the Built-in Battery ......................................................................................................... 6
Checking Battery Capacity ............................................................................................................ 7
System Overview .......................................................................................... 8
Front View ..................................................................................................................................... 8
Rear View ...................................................................................................................................... 9
Basic Operation .......................................................................................... 10
Turning on/off the System ........................................................................................................... 10
Adjusting the Volume................................................................................................................... 10
Selecting a Sound Mode ............................................................................................................. 10
Activating the Power Saving Mode ............................................................................................. 10
Selecting the Sound Source ...................................................................... 11
Playing back via Bluetooth ........................................................................ 12
Establishing a Bluetooth Connection .......................................................................................... 12
Using Multiple Bluetooth Devices ................................................................................................ 12
Playing back from Macbook or Macbook Pro .............................................................................. 13
Playing back from PC/Notebook ................................................................................................. 13
Playing back from External Source .......................................................... 14
Outputting to other Audio System ............................................................ 15
Dual System Playback ................................................................................ 16
Charging an External Device ..................................................................... 17
Troubleshooting .......................................................................................... 18
Technical Specifications ............................................................................ 19
6
Getting Started
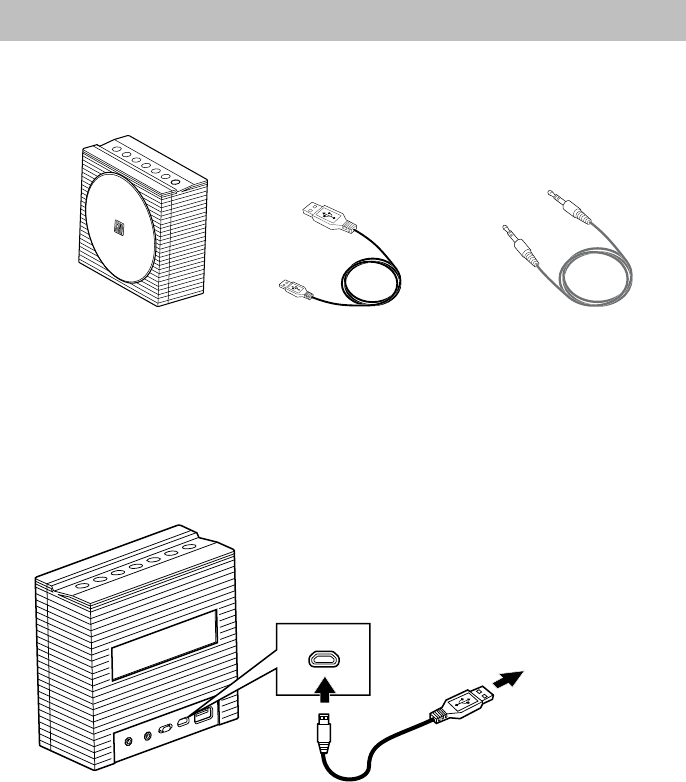
Package Contents
Examine whether the following package contents are all included:
Main Unit USB Power Cable x 1 Aux Cable x 1
Charging the Built-in Battery
This system has a built in Lithium Ion battery to give you portable power.
To charge the system, connect the micro plug of the USB power cable to the 5V IN jack of the
system and the standard plug to USB power output port such as PC USB port. For optimal
performance, use only the supplied USB power cable.
5V IN
To USB power
output port
7
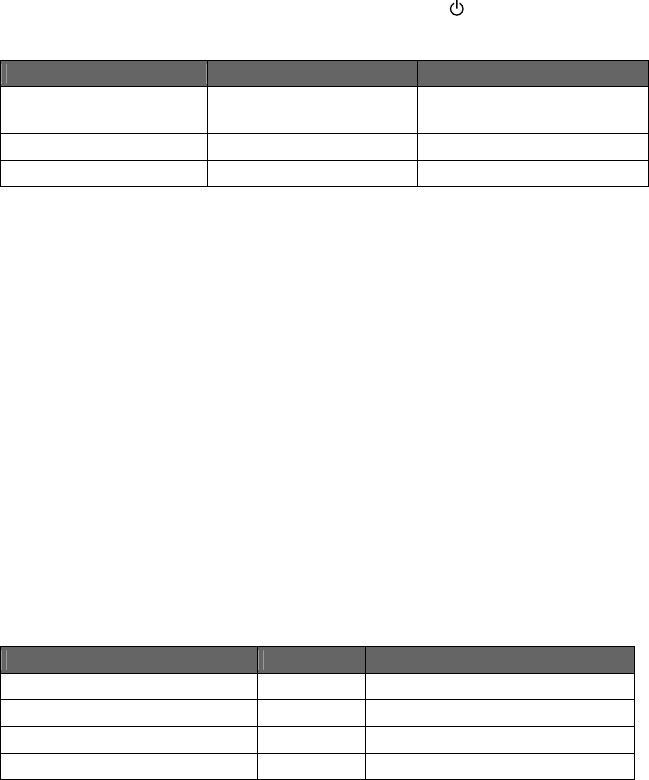
During charging, the charging LED indicator combination with the button will indicate the
charging status as follows:
System Mode During Charging Charging Complete
Standby Blinks in green light at a
slow rate.
Blinks in white light at a slow
rate.
Power On but in idle mode Blinks in green light. Blinks in white light.
BT mode or AUX IN mode Remains on in green light. Remains on in white light.
If the LED indicator blinks alternately in white and green light at a fast rate after powering on, it
means that the built-in battery power is low.
Notes:
y The battery cannot be replaced by the user.
y It takes about 3 hours to charge the battery from empty to full.
y Do not dispose of system in fire; battery may explode or leak.
Type: Li-Ion Battery
Model No: LC18650
Rated Voltage: 3.7V
Capacity: 2200mAh
WARNING!
There is a danger of explosion if the battery is incorrectly replaced. Replace it only with the same
or equivalent type. Do not expose it to excessive heat such as sunshine, fire, etc.
Checking Battery Capacity
After powering on, tap and hold the VOL+ and VOL- buttons together on the system to check the
battery capacity by the LED indicator.
Status Color Capacity
Fast blinking (4 times) Green 66%-100%
Fast blinking (3 times) Green 36%-65%
Fast blinking (2 times) Green 15%-35%
Alternatively blinking at a fast rate Green/White <15%
Note:
y If battery voltage low than 3.2V, the LED indicator will blink 10 times alternatively in white and
green lights, and then the system will power off automatically.
8
System Overview
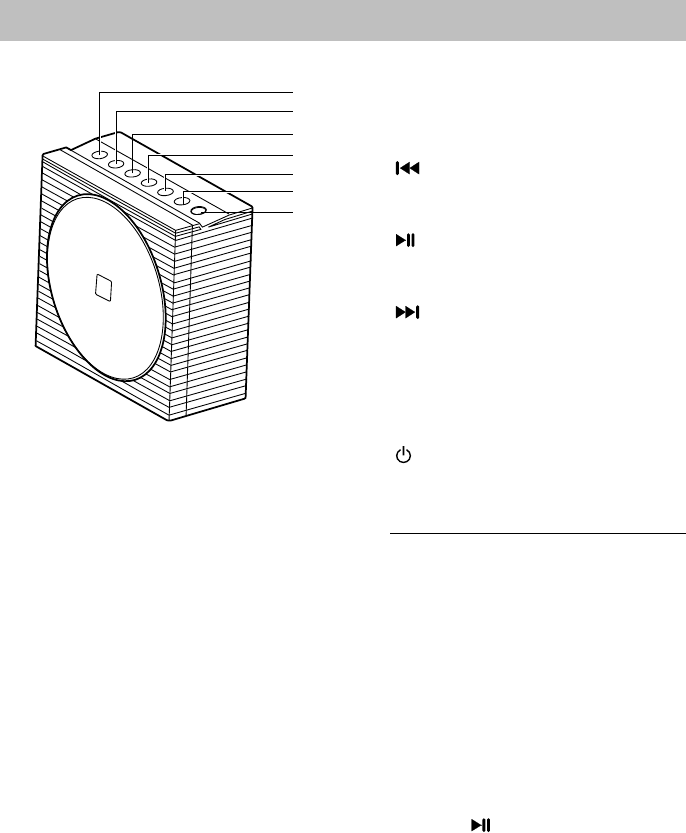
Front View
1. VOL - button
Tap to decrease the volume level.
2. VOL + button
Tap to increase the volume level.
3. (Previous/Rewind) button
In Bluetooth mode, tap to skip a previous
track. Hold to rewind a track fast.
4. (Play/Pause) button
In Bluetooth mode, tap to play or pause a
track.
5. (Next/fast forward) button
In Bluetooth mode, tap to skip a next
track. Hold to fast-forward a track.
6. PAIR button
In Bluetooth mode, tap to put the system
into pairing mode.
7. (On/Standby) button and LED
Indicator
Press to switch between standby and
power-on modes.
- Illuminates and indicates the battery
charging state. (See Charging the
Built-in Battery section)
- When powering on, illuminates and
blinks in white light, and blinks once
when any button is tapped.
- When powering on, indicates the
pairing state.
- When powering on, indicates the
power capacity by holding VOL+ and
VOL – buttons at the same time. (See
Checking Battery Capacity section)
- When powering on, indicates the state
of power saving mode by holding PAIR
and the buttons at the same time.
1
2
3
4
5
6
7
9
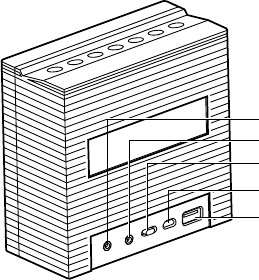
Rear View
8. AUX IN jack
Inputs audio signals from an external
device.
Establish dual system playback with
another system (purchased separately)
via AUX cable (Supplied).
9. AUX OUT jack
Outputs audio signals to an external
device.
Establish dual system playback with
another system (purchased separately)
via AUX cable (Supplied).
10. Sound Effect Switch
Slide to switch among FLAT, BRIGHT,
and WARM EQ settings.
11. 5V IN jack
Charges the built-in battery of the system
via USB power cable (supplied)
12. USB 5V jack
Charges your external USB devices.
8
9
10
11
12
10
Basic Operation
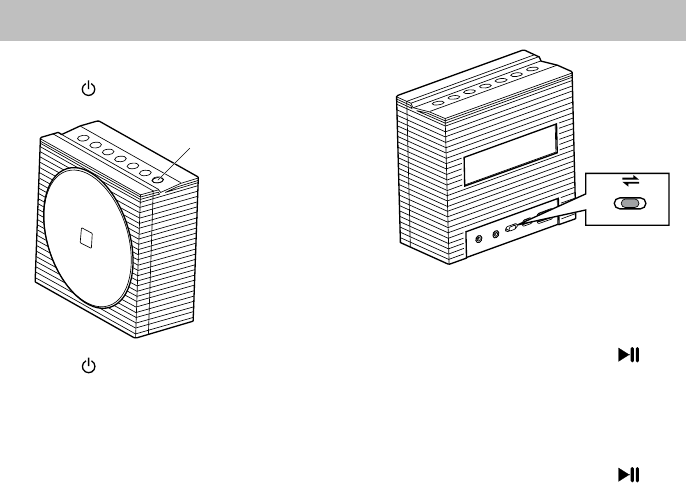
Turning on/off the System
Press the button on the top to turn on the
System.
Press the button again to turn off the
System.
Adjusting the Volume
You can adjust the volume level when one of
sound sources is selected by tapping the
VOL +/- buttons.
Each time you tap VOL + or VOL - button,
the LED indicator will blink once in white light.
If the system is at minimum volume level (or
at maximum volume level), then tap VOL-
button (or VOL+ button), the LED indicator
will keep its status as before without any
action.
Selecting a Sound Mode
Sound modes can be selected to enhance
the type of music being played. You can
select one sound mode of FLAT, BRIGHT,
and WARN by sliding the Sound Effect
Switch on the back of the system.
Activating the Power Saving
Mode
Tap and hold PAIR button and the
button together to disable the Power Saving
mode. The LED indicator will blink twice in
green light to indicate Power Saving mode is
off. The system will keep on all the time.
Tap and hold PAIR button and the
button together again to enable the Power
Saving mode. The LED indicator will blink
once in green light to indicate the Power
Saving mode is activated. The system will
power off automatically when the system is
idle for 45 minutes.
Note:
y If you turn off the system manually, the
system will activate the Power Saving
mode automatically next time even if you
disabled it before.
On/Standby button
BRIGHT
FLAT WARM

11
Selecting the Sound Source
This system enables you to access two sound sources – AUX IN and Bluetooth.
y If AUX IN jack has been inserted, the sound source will switch to AUX IN mode automatically.
Remove the AUX cable from the AUX IN jack, the sound source will switch to Bluetooth
mode automatically.
y When a Bluetooth connection has been established and the system is in Bluetooth mode,
once you insert AUX cable, the system will suspend the Bluetooth playback and switch to
AUX IN mode automatically.
To resume the Bluetooth playback, you need to remove the AUX cable from the AUX IN jack,
and tap the button.

12
Playing back via Bluetooth
Establishing a Bluetooth
Connection
Notes:
y Before establishing the Bluetooth
connection, make sure the AUX IN jack
is not inserted by AUX cable.
y If your mobile phone supports A2DP,
AVRCP profiles, its music will play
through the system.
y You can make a Bluetooth connection
with a mobile phone, an
iPhone/iPad/iPod touch or any other
Bluetooth-enabled devices.
1. Press the button to power on the
system.
y The LED indicator on top panel
illuminates and blinks in white light.
2. Tap PAIR button on top of system to put
in pairing mode.
y The indicator starts blinking at a fast rate.
y If you hold the PAIR button for more than
2 seconds during the process of pairing,
the operation will be cancelled.
3. During this period, you can operate the
mobile phone, iPad or Bluetooth-enabled
device to pair with the system within a 33
feet (10m) range.
y Please check the user manual of the
iPad or Bluetooth-enabled device with
which you are initiating pair to learn
about Bluetooth connection with any
other devices.
4. Once the system is detected and its
name Sound Spot appears on the
display of your Bluetooth-enabled device,
key in the default password 1234 if a
prompt requests it.
y The LED indicator on top panel starts
blinking quickly to indicate that the
system and your device have entered
into the connection mode.
y After a Bluetooth connection is
established successfully, the LED
indicator will remain on in white light.
5. Select the desired music and press Play
button on your device. The system
automatically starts playing back the
music.
y Try again above steps 2 to 4 if the pair
indicator turns solid after blinking for 3
minutes, the pair was unsuccessful.
Using Multiple Bluetooth Devices
Only one device can be used at a time, but
you can switch between different Bluetooth
devices.
Make sure each device you want to use has
already been paired, to switch devices:
1. On Sound Spot, tap PAIR button.
2. On Bluetooth device, select the
connection to Sound Spot.
This device is now the connected device to
Sound Spot, (the previous connected device
is now disconnected). Repeat those steps to
switch the connected device again.
Notes:
y If the system has no sound output,
please check if the volume level of your
Bluetooth device connected to the
system is set to the minimum, or the
Bluetooth device is muted.
y Ensure that the audio cable has been
removed from the AUX IN jack.
13
Playing back from Macbook or
Macbook Pro
1. In the desktop screen, select the Open
Bluetooth Preference.
2. If there is any old Sound Spot records,
remove them. Click the Continue button
to continue pairing process.
3. Once completed, the pairing success
screen will come out.
Note:
y Don’t quit the page immediately. You
may notice that the previous dialog
screen still shows the device not
connected. Just ignore it. It’s confusing
to the user. In fact, it’s connected
already.
4. Open iTune, play a song. Then use the
mouse to click the Bluetooth icon at the
top right hand corner of the desktop
screen, select the Sound Spot option
and then select the Use as Audio
Device (Stereo). After a while (a few
seconds), the music will come out from
the SFQ-07 system. If not, select the Use
as Audio Device (Stereo) once again.
The Sound Quality should be good.
Playing back from PC/Notebook
1. Press the Start button to open the
Device and Printers dialog box.
2. Turn on the SFQ-07 system and tap the
PAIR button on the system to put into the
pair mode.
3. Select the Add a device in the Device
and Printer dialog box. The Sound Spot
icon will appear on the display.
4. Double click the Sound Spot icon and
wait until the device has been added
successfully.
5. Click the Close button to close the
Device and Printer dialog box. A Sound
Spot icon appears in the dialog box.
6. Double click the Sound Spot icon and
the device connection screen will be
shown.
7. Click the Connect button in the Music
and Audio option.
8. Once connected, the LED indicator on
the system will be solid on and the
connection success screen will be
shown.
14
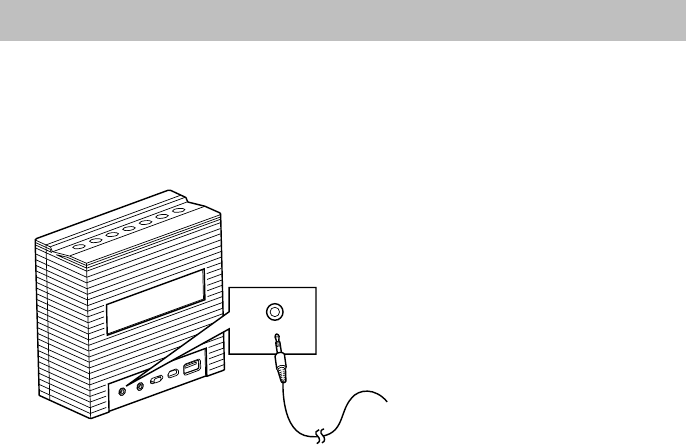
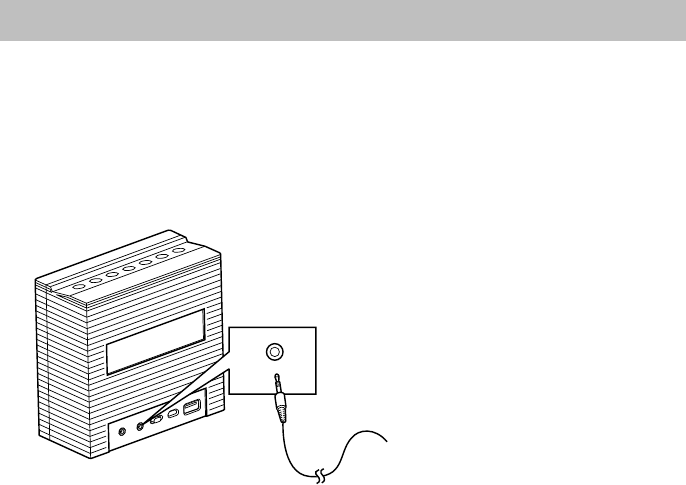
Playing back from External Source
You can enjoy the sound from an optional component such as a digital music player through the
speakers of this system. Be sure to turn off the power of each component before making any
connections. For details, refer to the instruction manual of the component to be connected.
Connect an external device to the AUX IN jack on the back panel of the system using a stereo
audio cable (supplied).
Note:
y When the stereo audio cable is connected to the AUX IN jack, the system will switch to the
AUX IN mode automatically.
1. Turn the system power on.
2. Set the volume to the minimum position.
3. Start playback on the external device.
4. Adjust the volume to meet your listening requirement.
To audio output
such as CD/MD/
digital music
player, etc.
AUX IN
15
Outputting to other Audio System
This system has AUX OUT jack allowing you to connect to auxiliary audio systems such as
speaker, audio amplifier and perhaps wireless audio transmitter.
Be sure to turn off the power of each component before making any connections. For details,
refer to the instruction manual of the component to be connected.
Connect AUX OUT jack on the back panel of the system to an external device using a stereo
audio cable (supplied).
To an external
audio device, such
as speaker, audio
amplifier, etc.
AUX OUT
16
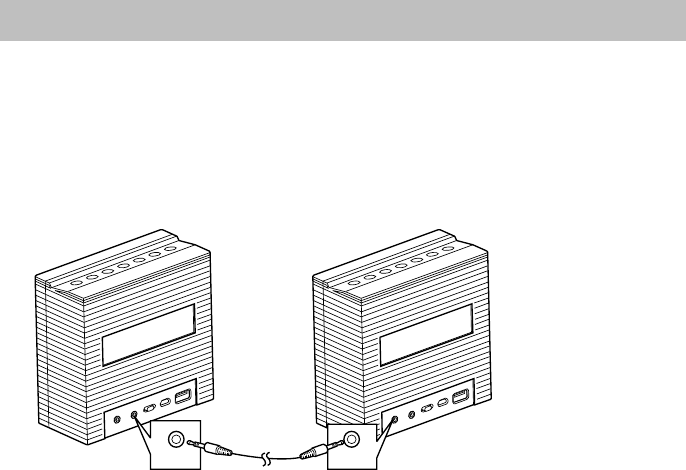
Dual System Playback
Two Sound Spot systems can be connected together via the supplied AUX cable, and they will
play as one speaker system with left and right audio split between each for true stereo
separation. For obtaining the stereo sound effect, you should purchase another Sound Spot
system separately.
Before establishing the dual system playback, be sure to turn off the power of each system.
Connect the AUX OUT jack of one system to AUX IN jack of another system using the supplied
AUX cable.
The Sound Spot that you connect AUX OUT jack will be designated as the master system; and
at the same time, another Sound Spot that you connect AUX IN jack will be designated as the
slave system.
y When the master system is in Bluetooth mode, the left channel and right channel are mixed,
so the slave system will play only in a mono channel.
y When the master system is in AUX IN mode with AUX IN jack inserted with external source,
after connecting to the slave system, the master system will be designated as L channel and
the slave system will be designated as R channel. Now you can enjoy stereo sound effect
using these two systems.
Note:
y During dual system playback operations, you need to adjust the Volume level by tapping
VOL +/ VOL – buttons on each system separately.
AUX OUT AUX IN
17
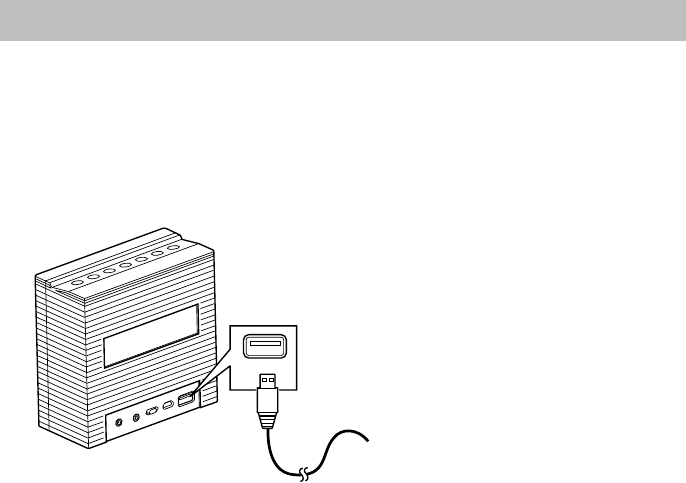
Charging an External Device
The USB 5V jack can be used to charge most devices that allow for USB charging (including
many mobile phones, smart phones and wireless headsets).
1. Connect one end of USB power cord to USB 5V jack of the system, and the other end to
your USB device.
2. Turn on the system to start charging the connected USB device.
Note:
y Please use the USB power cord that came with your device to connect to Sound Spot to
charge.
To preserve Sound Spot’s battery life, external device charging is disabled when running on
battery power at high volumes.
Notes:
y We suggest when using the USB 5V jack to charge external mobile devices, the system’s
battery should be fully charged.
y If the charging current of the USB 5V jack exceeds 0.5A, the charging function will be
unavailable.
USB 5V
To external USB
devices, such as
mobile, smartphone,
etc.

18
Troubleshooting
Check this list for a possible troubleshooting solution before calling for service.
In These Cases Check the Following Points
Power does not come on. y The built-in lithium battery is no power. Charge the
battery.
No sound output. y Check if the volume level is set to the minimum.
y Check if the volume level of your Bluetooth device
connected to the system is set to the minimum.
y Check to make sure your Bluetooth device is not muted.
y Check if your stereo audio cable is connected to the
AUX IN jack of the system. Unplug the cable.
The system is powered off
automatically.
y The system enters the saving energy mode. The system
does not connect with any audio source for more than 45
minutes. Turn on the system again and play back an
audio source.
y The internal battery is exhaused. First, the LED indicator
on the top panel of the system starts blinking ten times;
then the system is powered off. Charge the battery and
turn on the system again.
No sound output is via
Bluetooth or Bluetooth
connection cannot be
restored automatically.
y The system may be powered off and powered on when
playing back a track over Bluetooth connection. You
need to make the connection again.
y Check if your stereo audio cable is connected to the
AUX IN jack of the system. Unplug the cable.
If you find USB charging
cannot perform after
connecting your device to the
USB 5V jack on the system.
y Maybe your USB cable is not supported by the system,
please try to use another USB cable.
y If the volume setting is higher than the threshold value,
the USB 5V jack power will be off.
y If the charging current exceeds 0.5A, the charging
function will be unavailable.
Bluetooth connection cannot
be established.
y When making a Bluetooth connection between the
system and your device for the first time, if the
connection is fail, you need to power off your device and
power on again to clear the device name, and make the
connection again.

19
Technical Specifications
Model SFQ-07
Type Sound Spot
Support Bluetooth Bluetooth 1.2, 2.0 and 2.1 complaint
Support Profile A2DP, AVRCP
Input Sensitivity AUX Input 0.3-0.5V (1.2V max)
Input Terminal External USB IN (for charging the battery), AUX IN
Power Source DC 5V (External USB IN)
Dimensions (Approx.) 133mm (L) x 60.5mm (D) x 128mm (H)
Weight 0.49kg
Design and specifications are subject to change without notice.
Save this manual