Behavior Tech Computer IRFZ66534 Internet Radio Receiver User Manual
Behavior Tech Computer Corporation Internet Radio Receiver Users Manual
Users Manual
Internet Radio Receiver
(Recordable)
IRX
(for IRF and IRZ models)
User’s Manual
2
Copyright Statement
It is a criminal offence, under applicable copyright laws, to make unauthorized
copies of copyright-protected material, including computer programs, films,
broadcasts and sound recordings. This equipment should not be used for such
purposes.
FCC Compliance Statement
This device complies with Part 15 of the FCC Rules. Operation is subject to
the following two conditions:
1. this device may not cause harmful interference, and
2. this device must accept any interference received, including
interference that may cause undesired operation.
FCC Warning Statement
This equipment has been tested and found to comply with the limits for a
Class B digital device, pursuant to Part 15 of the FCC Rules. These limits
are designed to provide reasonable protection against harmful interference
in a residential installation. This equipment generates, uses and can emit
radio frequency energy and, if not installed or used in accordance with the
instructions, may cause interference to radio communications. However,
television reception interference can be determined by turning the
equipment off and on. The user is encouraged to correct the interference by
one or more of the following measures:
Reorient or relocate the receiving antenna
Increase the separation between the equipment and the receiver
Connect the equipment into an outlet different from that to which the
receiver is connected
Consult the dealer or an experienced radio/TV technician for help.

CAUTION
Changes or modifications not expressly approved by the party responsible
for compliance could void the user’s authority to operate the equipment.
FOR EUROPE
“The drive is in conformity with the EMC directive and
low-voltage directive.”
WEEE LOGO
This symbol on the product or on its packaging indicates that this product
shall not be treated as household waste. Instead it shall be handed over to
the applicable collection point for the recycling of electrical and electronic
equipment. By ensuring this product is disposed of correctly, you will help
prevent potential negative consequences for the environment and human
health, which could otherwise be caused by inappropriate waste handling of
this product. The recycling of materials will help to conserve natural
resources. For more detailed information about recycling of this product,
please contact your local city office, your household waste disposal service
or the shop where you purchased the product.
Disposal of Old Electrical & Electronic Equipment (Applicable
in the European Union and other European countries with
separate collection systems)
2
Table of Contents
Before using ................................................................. 3
I. Checking the package contents .................................................. 3
II. Name and function ..................................................................... 5
Getting started .............................................................. 7
I. Setting the Network configuration ............................................. 8
II. Setting up Date and Time ......................................................... 10
II. Setting the Buffer length .......................................................... 10
Basic operation ........................................................... 12
I. Listening to the internet radio .................................................. 12
II. Playing from the USB port ....................................................... 14
Advanced operation .................................................... 16
I. Recording the internet radio program ....................................... 16
II. Adding a radio station .............................................................. 16
III. Reading information ................................................................ 17
IV. UPnP function ......................................................................... 17
V. Configurations ......................................................................... 17
FAQ ............................................................................ 20
Technical Specifications ............................................. 21

3
Before using
Thanks for purchasing IRX internet audio player. IRX is a multifunctional audio
player, which can play and record internet radio programs, and play digital audio
files from USB port,
Please follow the following steps to check the package contents and prepare for
playing.
I. Checking the package contents
A. Internet Radio Player
B. Accessory
Remote
Control 1pc
(With
Battery)
Power adaptor & AC
power cord
1set
Manual 1pc Ethernet Cable 1 pc
(for IRZ model only)
C. Preparing the remote control
1.
Pull out the isolator
2.
Ready to use
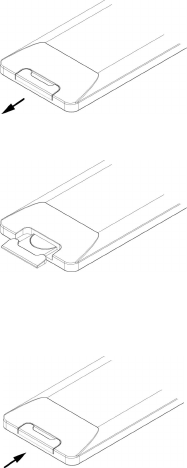
4
Pull out a piece of isolator, then remote control can be used.
D. How to replace battery of remote control
When the remote control runs out of battery, you may follow the instructions to
replace the battery.
1. Open the battery cover
2. Put in CR2025 battery
( Positive pole "+" face
up)
3. Put on the battery cover
Note:
1. The model of the battery is CR2025.
2. Please confirm the polarity before you insert the battery.
5
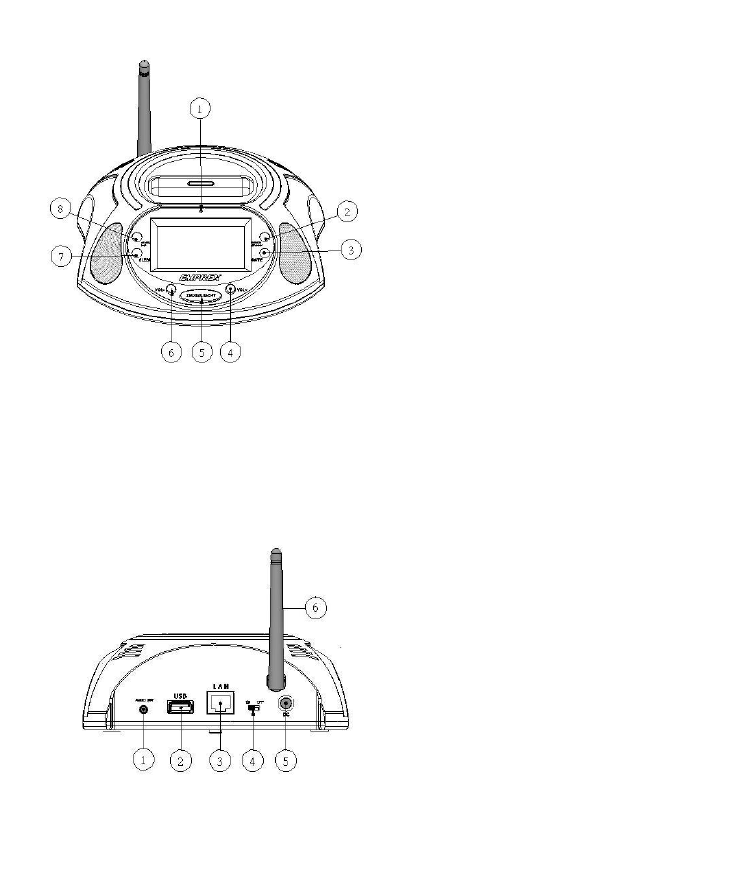
II. Name and function
A. Front Panel
B. Back Panel
1. IR receiver
2. POWER/STANDBY
button
3. MUTE button
4. VOL+ button
5. SNZZOE/LIGHT button
6. VOL- button
7. SLEEP button
8. ALARM/NAP button
1. AUDIO OUT jack
2. USB port
3. LAN port
4. ON/OFF switch
5. DC jack
6. WiFi antenna (for
IRF model only)
6
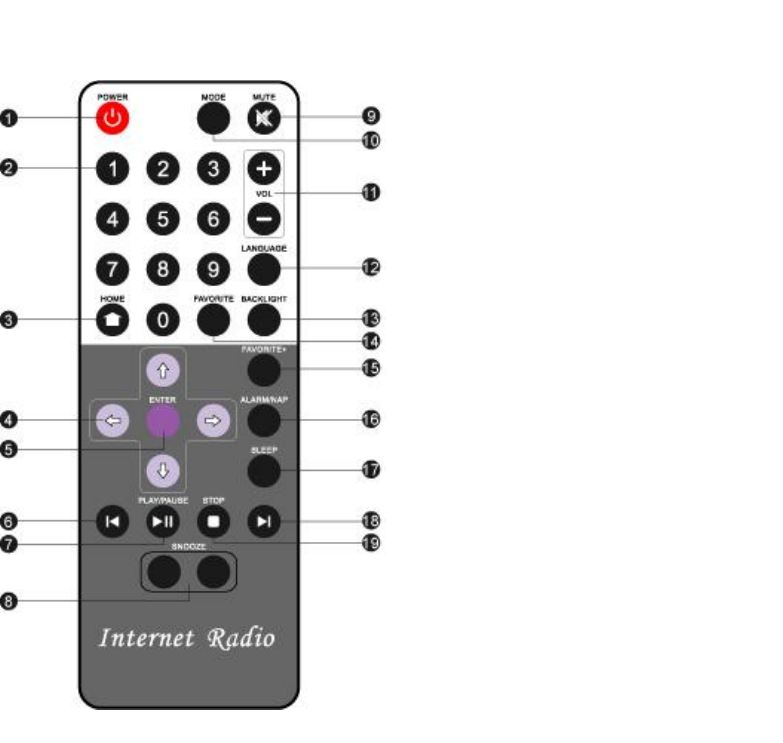
C. Remote Control 1. POWER : Power on/off
2. 0 ~9:Digit keys
3. HOME: GOTO Main menu
4. Direction keys
5. ENTER
6. PREV : Previous
7. PLAY/PAUSE
8. SNOOZE
9. MUTE
10. MODE : Change operation mode (for
IRP model only)
11. VOL+/-
12. LANGUAGE : SELECT MENU
LANGUAGE
13. BACKLIGHT
14. FAVORITE: goto MY FAVORITE
15. FAVORITE+: add to MY FAVORITE
16. ALARM/NAP: select alarm type
17. SLEEP: select sleep type
18. NEXT
19. STOP
7
Getting started
Connect one end of the power adaptor to the DC jack; plug the adaptor into a
power outlet. Then turn on your IRX.
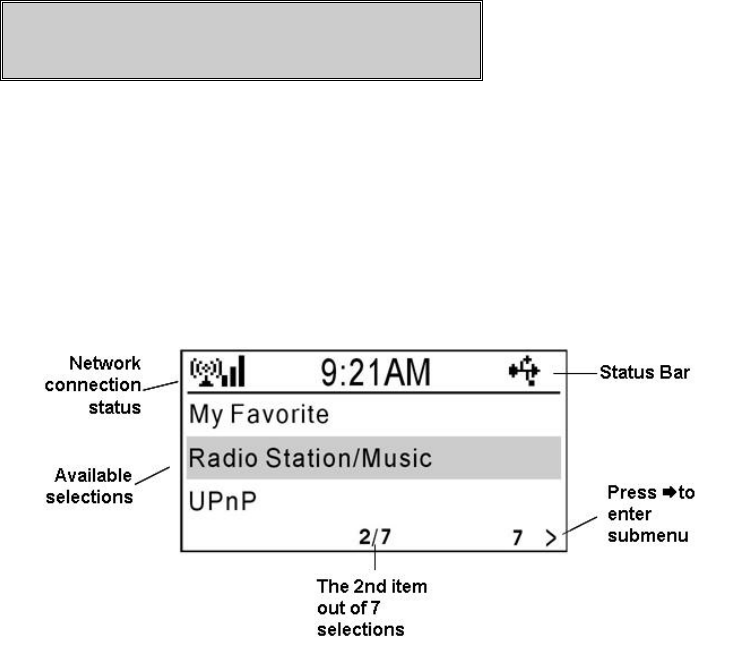
After the initialization, the Main menu screen will be shown.
The Main menu screen,
Note:
1. You can press LANGUAGE key anytime to select a menu language.
2. Press HOME key anytime, IRX will return to the Main menu screen.
Please follow the following steps to set up the IRX.
8
I. Setting the Network configuration
In order to receive the internet radio program, IRX needs to connect to the
internet. You can connect the IRX in you LAN, either by Ethernet cable or
WiFi connection.
A. Network connection
You can use an Ethernet cable to connect the LAN port of IRX and a LAN
port of your router.
Note:
Your router should be setup to be able to link to your Internet Service
Provider.
If your router supports DHCP, then IRX can get an IP address automatically.
From the Main menu, press , key to select "Configuration" item, press
ENTER or key to enter the Configuration menu. Select "Network"
and press ENTER or key to enter the IP Configuration submenu.
Select "Auto Setting(DHCP)", press ENTER or key to enable the Auto
Setting.
Note:
The above steps will be abbreviated as "Configuration Network
IP Configuration Auto Setting (DHCP)" in this manual.
Otherwise, you can set the IP address manually. From the Main menu,
select "Configuration Network IP Configuration Manual Setting
IP Address " to set the IP address. And then input the Subnet Mask,
Default Gateway, and Preferred DNS Server from the same menu screen.
Note:
Please use, keys to change the value of IP address, Subnet
Mask, Default Gateway, and Preferred DNS.

9
B. Wireless connection (for IRF model only)
If your LAN supports wireless access to the internet, you can configure the
IRX for wireless connection.
From the Main menu, select "Configuration Network WiFi
Configuration ". All the available access point will be shown on the
screen. Use, key to select an access point. A key sign will be
shown on the bottom, if the access point is protected by an encryption key.
Press ENTER key to configure IRX to link to the access point.
If the access point is not key protected or the key is input already, you can
select "Direct Connection" to connect to access point. If the access
point is key protected, you have to input the key for the first time. Select
"Enter WEP/WPA" and press ENTER key to input the key.
Press, key to select a character, and use key to move to next
character.
Key sign
Note :
1. IRX use character selection for text entry. The character
sequence is as follows,
2. Move the cursor to a character, and press, key until ( ) shown.
Press key to move the cursor to next character, the previous
10
character will be deleted.
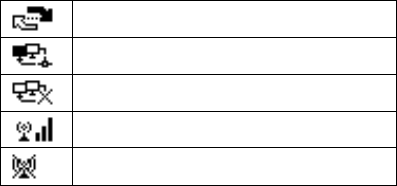
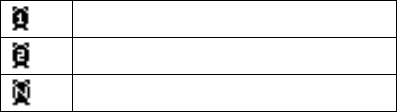
There are different signs indicating the network connection status.
Connecting
Wired connection is successful
Wired connection is failed
WiFi connection is successful
WiFi connection is failed
II. Setting up Date and Time
A. Setting the Date and Time
From the Main menu, select "Configuration Clock Set Date and
Time ".
Press , key to select a field, and press, key to change the value.
Press ENTER key to complete the setting.
B. Set Time Format
From the Main menu, select "Configuration Clock Set Time
Format".
Select "12 Hour" or "24 Hour" format for the time display.
Note:
After the first setup, IRX will adjust the time automatically once the
internet connection is successful.
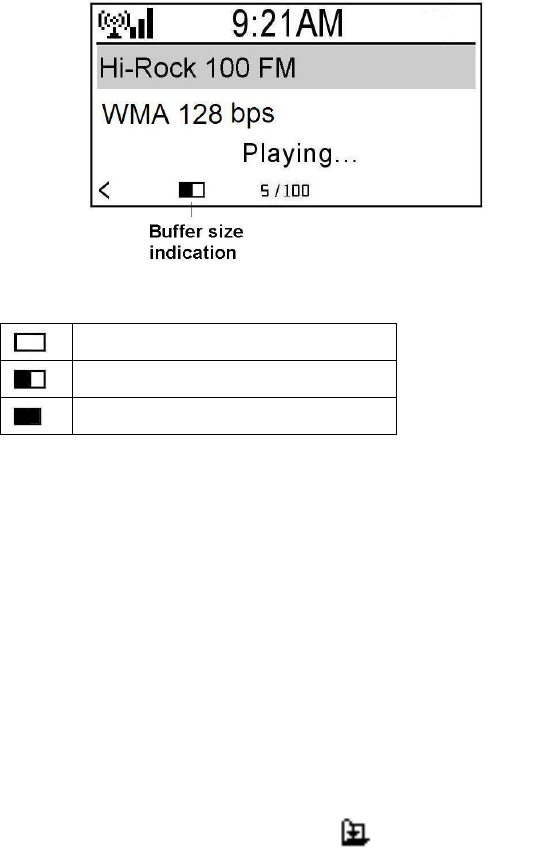
II. Setting the Buffer length
IRX uses a streaming buffer for receiving audio data from internet.
From the Main menu, select "Configuration Buffer ".
11
You can select "2 Seconds", "4 Seconds", or "8 Seconds" for the buffer. If
the internet is busy, you may need longer buffer for smooth play.
12
Basic operation
When you turn on the power of IRX, the Main menu will be shown. Whenever
the HOME key is pressed, the Main menu will be shown.
I. Listening to the internet radio
To start listening to internet radio program, you have to select an internet radio
station. IRX stores thousands of internet radio station information inside.
The station name can be sorted by Genre, or Country. This will help you
find a station easily.
From the Main menu, select "Radio Station/Music ". You can select
either "Genre" or "Country/Location" to sort the station name.
If you select "Genre", then IRX will list the station name by Genre. Press
ENTER key or key to open the group/subgroup. When a list of station
names shown, press, key to select your preferred station.
13
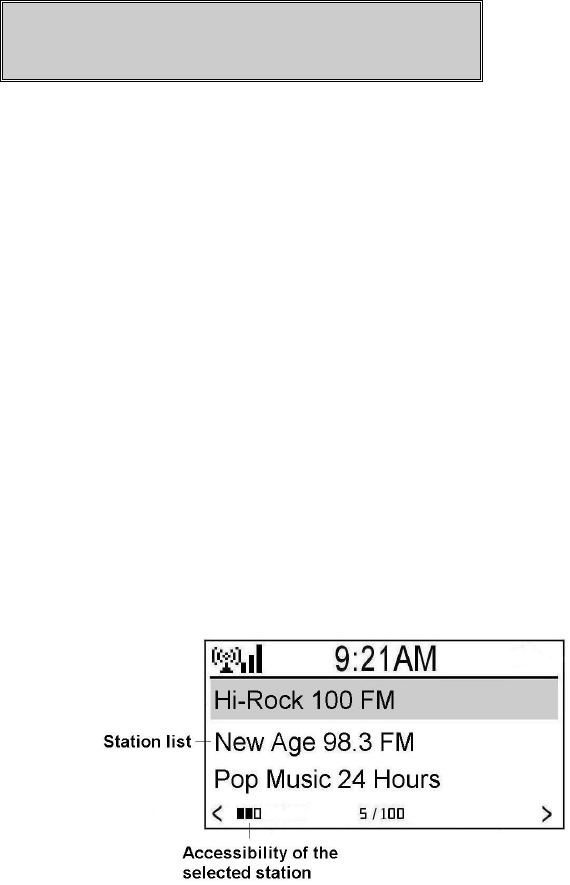
Press ENTER key to start playing the program from the internet radio station.
IRX will show the playing screen which contains the name and other
information of the radio program.
2 seconds buffer
4 seconds buffer
8 seconds buffer
Note:
When IRX is playing a radio program, you still can browse other menu.
IRX will return to the playing screen, if there is no any key operation
for 10 seconds.
From the Main menu, select "Radio Station/Music Country/Location
". IRX will sort the station name by territory and country.
Adding to My Favorite
You can press key when a list of station name shown, and then an option
menu will be shown. Please select "Add to My Favorite", and IRX will add
the station name to My Favorite list. A sign will be shown on the
screen.

14
Note:
When IRX is playing a radio program, you can press FAVORITE+ key to add
the station name to My Favorite list.
Managing My Favorite
From the Main menu select "My Favorite "or press Favorite key of
remote control, all the station names, which you added before, will be shown.
You can select a station name; press ENTER key to listen to the radio
program of the station.
If you press key after selecting a station name on My Favorite list, an
Option menu will be shown. You can Record, Delete, Shift Up, Shift
Down, Rename, or Play radio program from the selected station.
Note:
1. You can press the digit keys, 1, 2 …9, 0, from the remote control, IRX
will connect to the first 10 station names listed in My Favorite.
2. My Favorite can store upto 250 station links.
3. Please refer to "Advanced Operation" chapter of this manual to
Record radio program.
II. Playing from the USB port
IRX can play MP3 and WMA audio files from an USB storage device. Plug
your USB storage device into the USB jack of the IRX. IRX will detect
automatically, an USB sign will be shown on the status bar of screen.
USB sign
From the Main menu, select "USB " to open the USB device and folder or
subfolder. When a MP3 or WMA audio file name shown, you can press
ENTER or PLAY/PAUSE key to start playing the file. Press PLAY/PAUSE
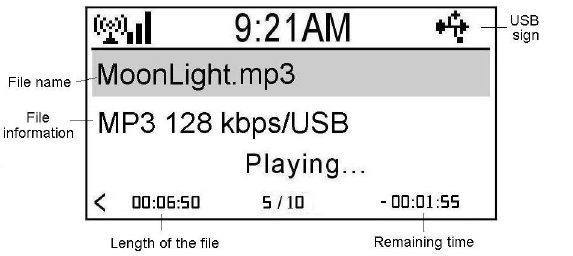
15
key to pause the playing. Press STOP key to stop playing. Press, key
to play previous or next audio file. The screen will show the file name, file
information, and playing information.
When you select a file name and press key, an Option menu will be
shown. You can choose to Delete or Play the file.
Note:
1. Please DO NOT unplug the USB device when IRX is playing from the
USB device.
2. IRX only supports FAT32 file system for the USB storage device.
3. IRX will keep playing all the files, in the same folder, repeatedly.

16
Advanced operation
I. Recording the internet radio program
In order to store recorded file, you should have an USB storage device
connected to the USB jack of IRX.
Press key from the internet radio station name list, an Option menu will
be shown. Choose "Record" and press ENTER key to select a recording
operation.
"Record": Start recording until STOP key is depressed.
"Record(30 Minutes)": Record for 30 minutes, and stop automatically.
The recording time can be 30, 60, 90, or 120 minutes.
When recording is started, a recording status will be shown on the right
bottom of the screen. The IRX will create a folder named mediaU in the
USB device. You can select USB from the Main menu to playback the
recorded file. (Please refer to the "Playing from the USB port" chapter of
this manual)
Note:
1. Please DO NOT unplug the USB device when IRX is
recording.
2. IRX only supports FAT32 file system for the USB storage
device.
II. Adding a radio station
From the Main menu, select "Service Add New Radio Station "to edit

17
the IP address of an internet radio station. Press , key to select a
character, use key to move to next character, and press ENTER key to
complete the input.
III. Reading information
IRX provides a link to some public information.
From the Main menu, select "Information Center ". Select a service of
information provided.
IV. UPnP function
Select "UPnP" from the Main menu to enter the UPnP function.
IRX will list all the available UPnP server in the LAN. Select a
server and press ENTER to link to the server. All the media files in
the server will be listed by category. Select a folder and press
ENTER key to open Select a file and press ENTER key to play.
Note:
1. IRX supports the following UPnP servers, Tversity, and
Twonkey. Please go to its web to purchase or download a
server program. Please follow its instruction to install the
UPnP server in your PC.
2. The file wall in your PC may block the UPnP function, please
refer to the instruction of your UPnP server for the details.
V. Configurations
A. Setting Network parameters
Please refer to the "Setting the network configurations" section of this
manual.
18
B. Setting the Clock
Please refer to the "Setting the Date and Time" section of this manual.
C. Setting an Alarm
IRX supports two alarm setting.
From the Main menu, select "Configuration Alarm Turn On(1) ".
An alarm(1) sign will be shown on the screen. Select "Set Alarm Time"
to set an alarm time. Choose "Set Alarm Sound" to select an alarm
sound. Beep, Melody, and Radio can be set as alarm sound. You can
also set the alarm time as 5, 10, 20, 30, 60, 90, 120 Minutes(NAP).
When you turn off the power, a Clock screen will be shown. An Alarm
sign and remaining time will be shown on the bottom. IRX will beep, play
a melody, or play the radio program after the time period. Press any key
can cancel the alarm. Pressing SNOOZE button or key will postpone the
alarm for 9 minutes.
You can also press ALARM/NAP key or ALARM/NAP button from the
panel to select an alarm setting.
Alarm 1 sign
Alarm 2 sign
Alarm (NAP) sign
D. Selecting a Language
IRX supports several kinds of menu language. Select "Language" and
press ENTER key to change the selection. You can also press
LANGUAGE key to change the language.
E. Setting Backlight
You can turn the backlight of the screen on or off. If you select Power
Saving, the backlight will turn to be darker few seconds later after
depressing a key.

19
F. Setting Sleep Timer
You can set the sleep timer as 15, 30, 60, 90, or 120 Minutes . A Sleep
Timer sign and remaining time will be shown on the screen. IRX will be
off after the time is up.
You can also press SLEEP key or press SLEEP button from the panel to
change the sleep timer.
Sleep Timer sign
G. Selecting a buffer size
Please refer to the "Setting the Buffer Length" section of this manual.
H. Version Update
The version of the firmware will be shown. Press ENTER or key again.
The available version of firmware for upgrade will be shown. You can
select to upgrade the firmware.
I. Reset
Restore the factory default setting.

20
FAQ
Q1: IRF can connect to my access point with password protected. After I delete
the password of my WiFi access point, the IRF can not connect to the WiFi access
point anymore.
Ans 1: If you cancel the password protection of your access point, you need to
delete the key setting in WiFi configuration of IRF. Otherwise, IRF will still use
the key to connect to the access point.
From the Main menu, select "Configuration Network WiFi Configuration ".
Choose your access point, and then select "Enter WEP/WPA " to delete the
key input previously.
Q2: IRX can recognize an USB storage device, but it shows the content of the
device is empty.
Ans 2: Please confirm the file system of the USB storage device is FAT32 or not.
IRX can only supports FAT32 file system.
Please visit www.emprex.com for more products and support information.

21
Technical Specifications
22
23
Version 0.9
JAN. 2008