Behavior Tech Computer KB8188RF Wireless Keyboard User Manual
Behavior Tech Computer Corporation Wireless Keyboard Users Manual
Users Manual

8188RF
Wireless Smart Office Keyboard & Mouse Kit
User’s Guide
Version 1.0
Created August 29, 2002

The information in this document is subject to change without notice and does not represent a commitment
on the part of the vendor.
No warranty of representation, either expressed or implied, is made with respect to the quality, accuracy or
fitness for any particular purpose of this document. The manufacturer reserves the right to make changes to
the content of this document and/or the products associated with it at any time without obligation to notify
any person or organisation of such changes.
In no event will the manufacturer be liable for direct, indirect, special, incidental or consequential damages
arising out of the use or inability to use this product or documentation, even if advised of the possibility of
such damages.
Copyright © 2002. All rights reserved
IBM, PC/AT and PS/2 are registered trademarks of International Business Machines Corporation.
Microsoft, Windows, and Windows NT are registered trademarks of Microsoft Corporation in the United
States of America and/or other countries.
All other trademarks are trademarks of their respective holders.

Table of Contents
1Introduction.................................................................................................1
What's in this package ..............................................................................1
2 System Requirements ................................................................................3
3 Hardware Installation ................................................................................4
4 Software Installation ..................................................................................9
5 Uninstallation.............................................................................................10
6 Smart Office Keyboard Driver ................................................................11
6.1 To Pop Up “KeyMaestro” Dialogue Box........................................11
6.2 To Pop Up “Configure Button” Dialogue Box...............................13
7 Using the Keyboard .................................................................................15
7.1 Office Application Keys Block ........................................................15
7.2 Internet Keys Block ..........................................................................15
7.3 Application Keys Block ...................................................................15
7.4 Multimedia Keys Block....................................................................17
7.5 Enhanced Function Keys Block......................................................17
7.6 Clipboard Keys Block......................................................................20
8Using the Mouse.......................................................................................23
8.1 Using the Mouse Driver ....................................................................23
8.2 The Definition of Mouse Extra Function:........................................25
8.3 Quick Jump Function Introduction................................................26
9 Troubleshooting ........................................................................................28

1
1 Introduction
Congratulations on your purchase of the wireless USB smart Office
keyboard and mouse kit! This keyboard and mouse kit will finally free you
of the constraints of your desktop by providing a wireless connection
between the keyboard or mouse and your PC. Pass around the
keyboard or mouse during meetings without having to bother about a
cable blocking your way or write e-mails and surf the Internet from the
comfort of your living room couch!
The wireless smart Office keyboard and mouse kit consists of a keyboard,
a mouse and a receiver. The whole keyboard is divided into 6 blocks
except the normal keyboard function block. The 6 blocks are Office
Application Keys block, Enhanced Function Key block, Internet Keys
block, Application Keys block, Multimedia Keys block and Clipboard
Keys block. These keys make your keyboard more powerful than ever.
The applications and functions you use everyday are included in these
blocks; just by a touch you can access to applications immediately. It
helps a lot in your daily usage. Beside, the wireless mouse uses an optical
sensor instead of mouse ball. The precise sensor detects motion on
hundreds of surfaces, including wood, plastic, or even your pants leg,
and prevents you from the interference caused by dust.
The most creative design of this Smart Office Keyboard is to use the
build-in Office & clipboard hot keys, and the scroll wheel on the
keyboard to help you saving hands-movement between keyboard and
mouse and this saves your time. We want to make your typing time more
fast, comfortable and joyful.
The Smart Office Keyboard is compatible with Windows® 98, Windows®
2000, Windows® ME and Windows® XP.
With Smart Office Keyboard, the work you do all the time takes less time.
In order to enjoy the full potential of the Smart Office Keyboard, please
read this manual carefully.
What's in this package
A wireless smart Office keyboard
A wireless mouse
A receiver

2
A driver disc
Batteries (4pcs of AA alkaline batteries)

3
2 System Requirements
Microsoft Windows 98, Windows ME, Windows 2000 or
Windows XP operating system
Microsoft Internet Explorer 5.0 or later version (for the Internet keys)
CD-ROM or DVD drive (for CD or Video operation)
Standard sound card (for CD or Video operation)
USB port
Microsoft Office 97 or later version (for Office Application keys and
Enhanced Function keys)
The system supporting ACPI or APM II (for power management
buttons)
ATX mother board and ATX power supply (for power management
buttons)
4
3 Hardware Installation
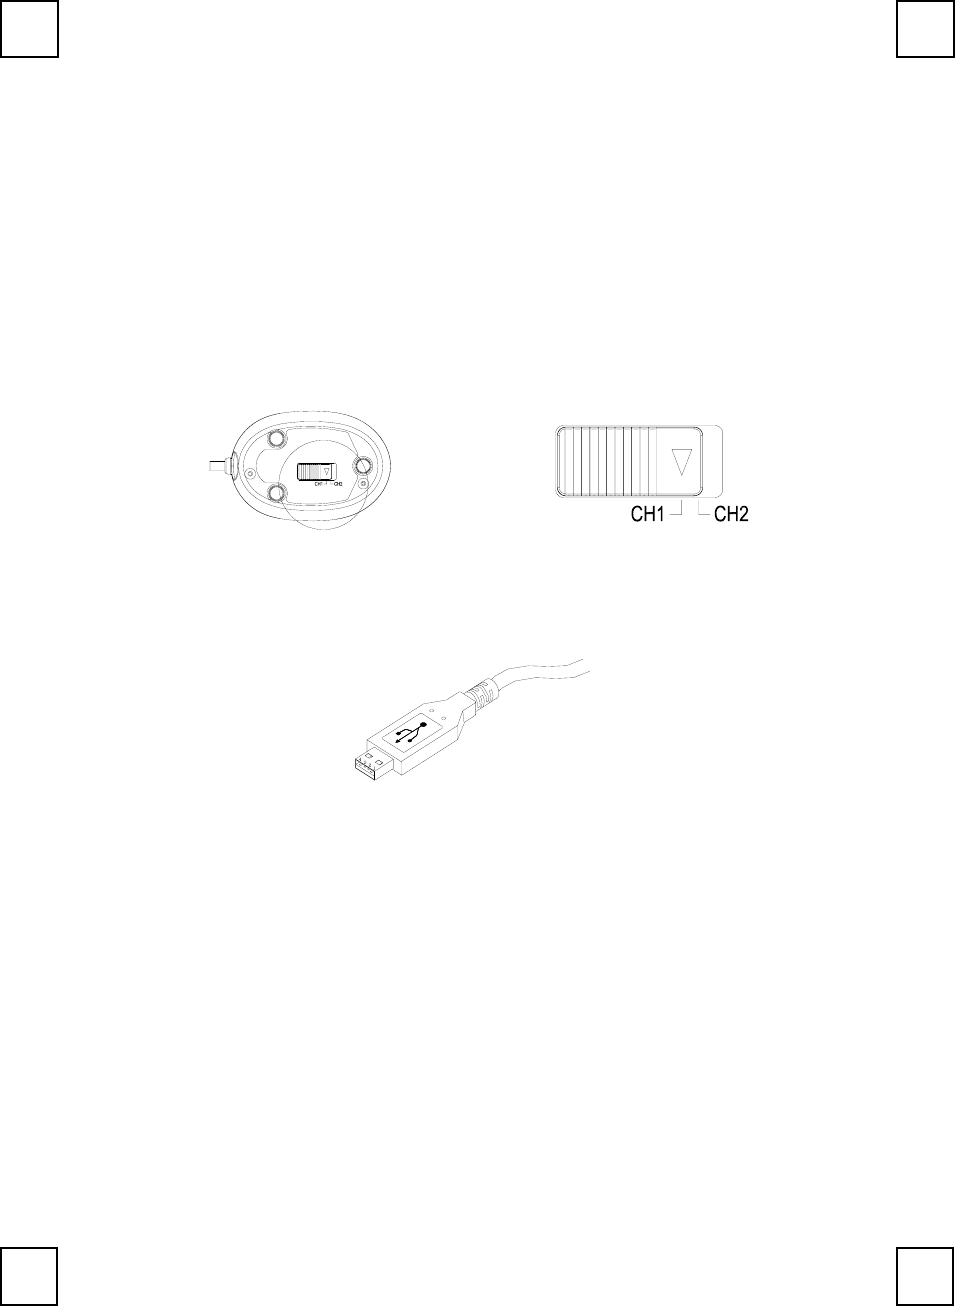
Slide Switch Setting
Step 1: Make sure your PC is switched off.
Step 2: Take the receiver and select channel CH1 or CH2 by using the
slide switch on the back of the receiver. (Remember your
selection.)
Step 3: Connect the receiver to your PC by plugging in the receiver’s USB
connector into your PC.
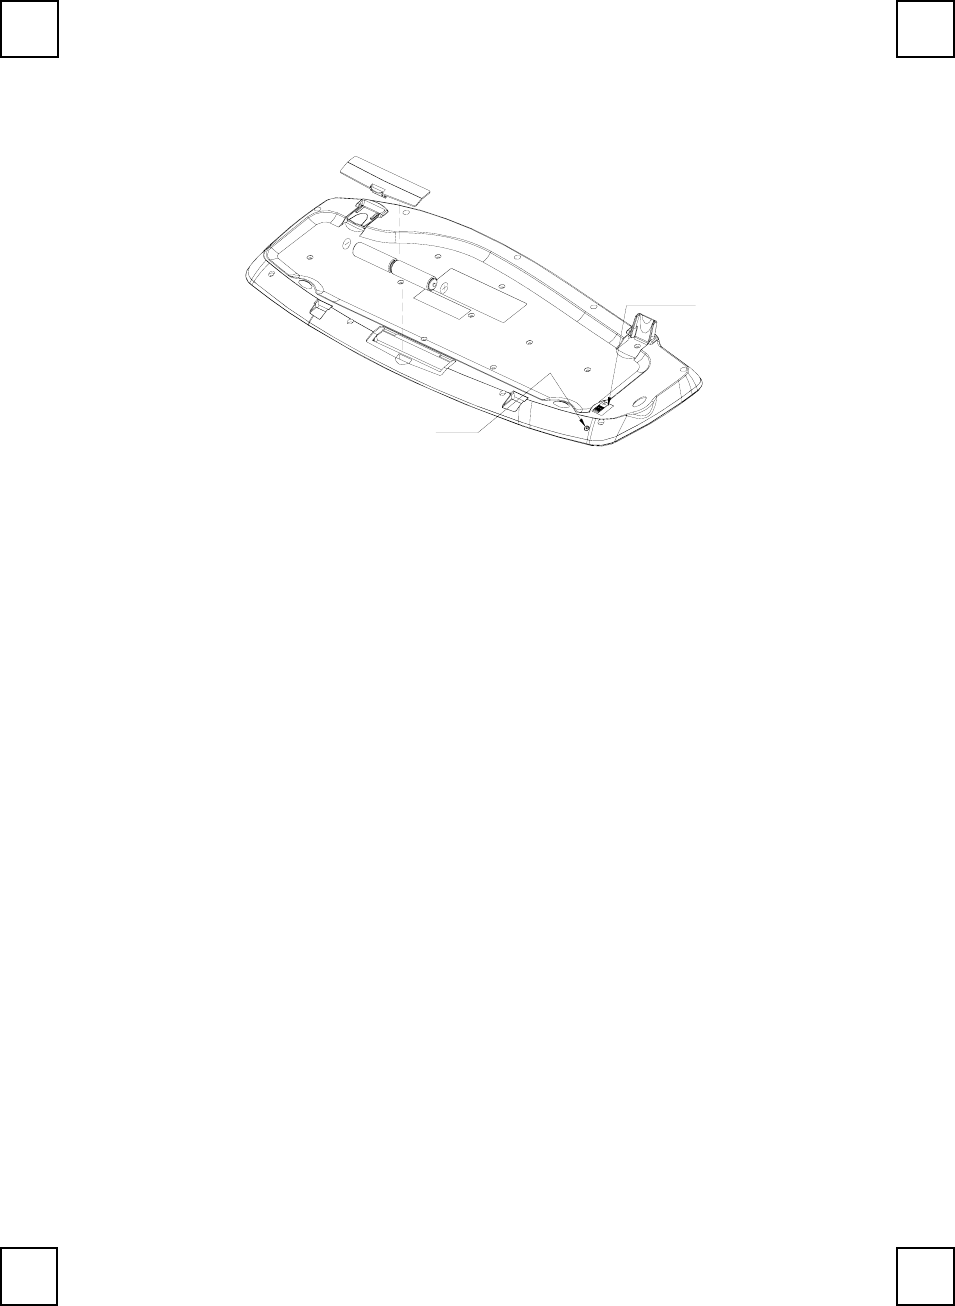
Step 4: Take the keyboard and make sure the batteries on the back are
installed correctly. (Follow the polarity signs in the battery
compartment.)
Bottom View of Slide Switch Setting of Receiver
USB Connector
5
Channel Switch
ID Button
Bottom View of
6
Step 5: Use the slide switch on the back of the keyboard to select the
same channel as the one selected in step 2 on the receiver.
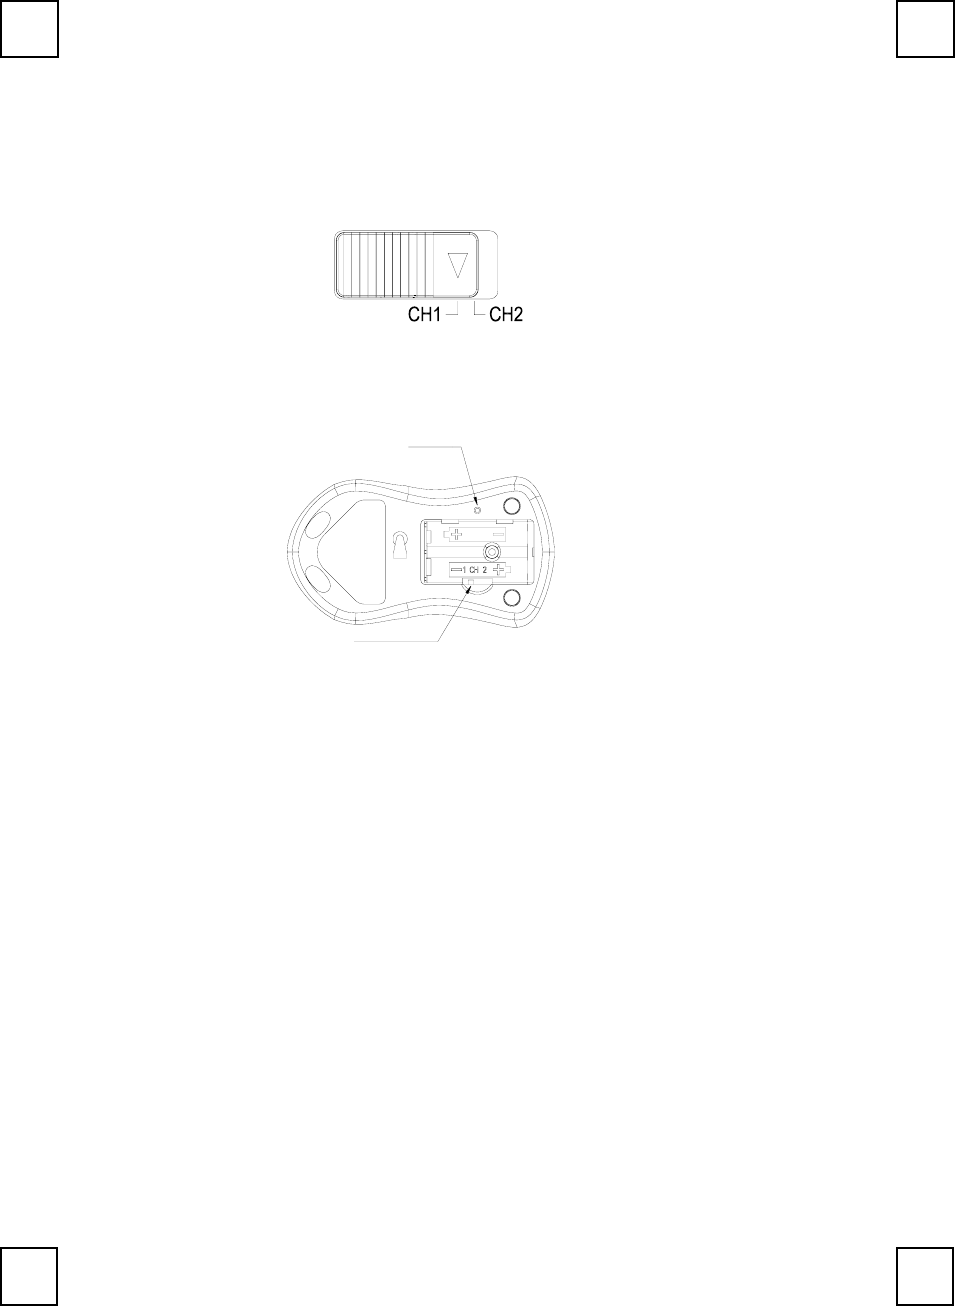
Step 6: Take the mouse and make sure the batteries on the back are
installed correctly. (Follow the polarity signs in the battery
compartment.)
ID Button
Channel Switch
Synch Button
Step 7: Use the slide switch in the battery compartment of the mouse to
select the same channel as the one selected in step 2 and 5.
(Open the battery cover to find the switch channel setting)
Remarks:
1. The keyboard uses 2pcs standard UM-3 (AA) 1.5V batteries, and the
mouse uses 2pcs (AAA) batteries.
2. Battery life for the keyboard is approximately 3-4 months and for the
mouse is approximately 2 months, depending on the intensity of
usage.
3. The optical mouse is designed to save power after 10 minutes of
inactivity. It goes into a sleep mode. Simply move the mouse to wake it
up.
4. Make sure the receiver is placed in a location relatively free of strong
electromagnetic or transmission sources in order to ensure optimal
reception of the keyboard and mouse signal.
Slide Switch Setting
Bottom View of
7
ID Setting
This keyboard kits contains 2 channels and each channel contains 256
sets ID. This extra ID-recognition function helps to protect against
interference from other RF keyboards in the same environment. After
completing the hardware installation you must set the ID’s of the receiver,
mouse and keyboard.
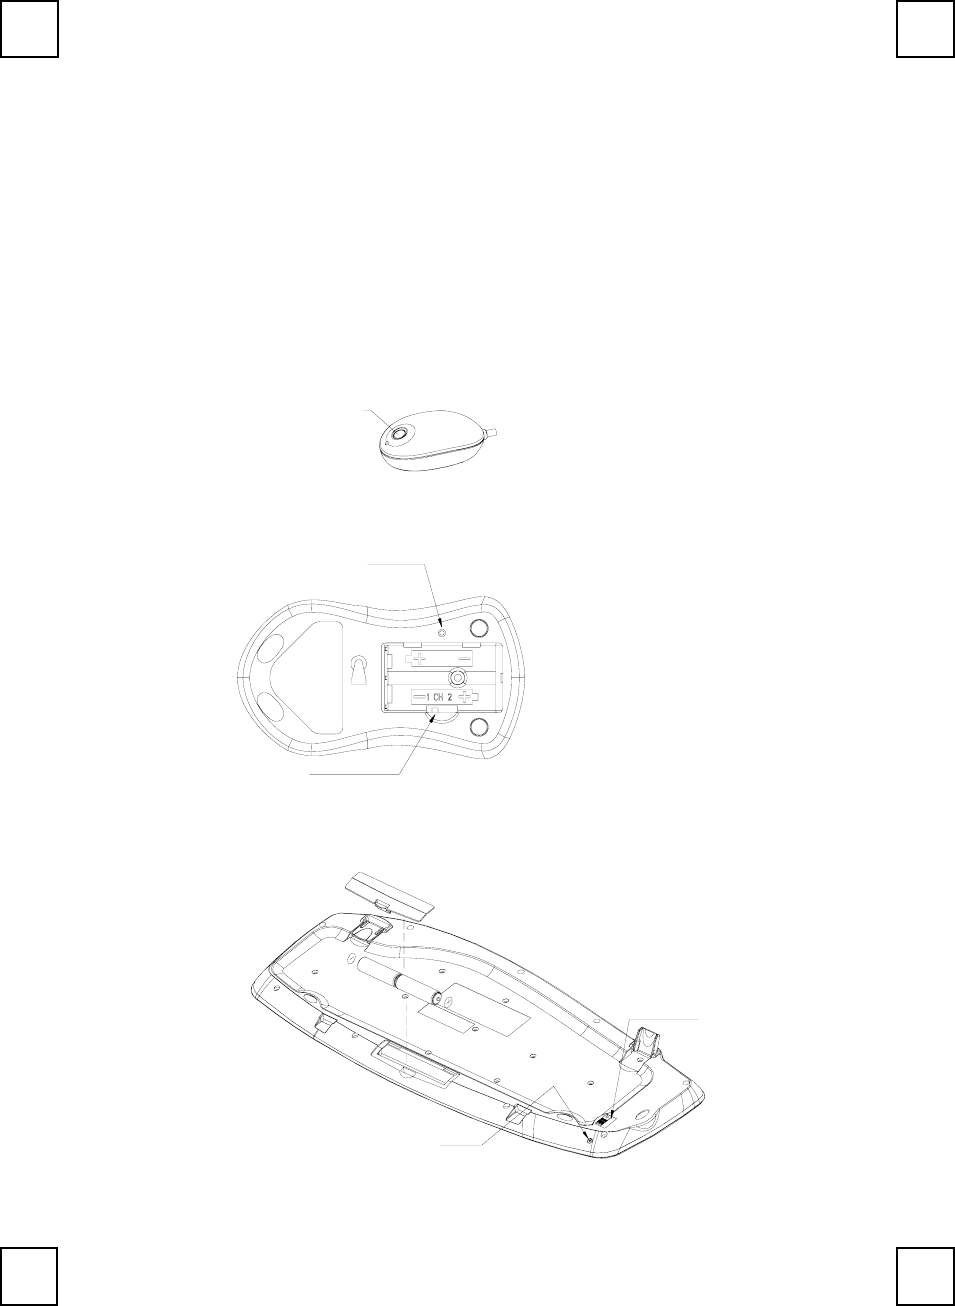
Step 1: Press the ID button on the top of the receiver once.
Step 2: Press the ID button on the bottom of the mouse and hold it until
the receiver light goes to a solid yellow.
ID Button
Channel Switch
Synch Button
Step 3: Press the ID button on the bottom of the keyboard and hold it until
the receiver light goes to a solid yellow.
Channel Switch
ID Button
ID Button
ID Button of Receiver
ID Button of Mouse
ID Button of Keyboard
8
Figure
Remarks:
1. You must follow the procedure above to set the ID of receiver,
mouse and keyboard. Once the receiver ID button is pressed you
have 35 seconds to complete the entire process, or you will need to
begin again.
2. Once the keyboard and mouse USB connectors are plugged in the
yellow receiver light will flash. Once the ID is set, it will remain steadily
lit.
3. When changing the batteries of keyboard there is no need to reset
all the ID’s. Simply reset one of them.
4. When keyboard batteries are low, a battery low icon will show on
the right-bottom corner of the Windows taskbar.
5. When mouse batteries are low, a battery low icon will show on
the right-bottom corner of the Windows taskbar.
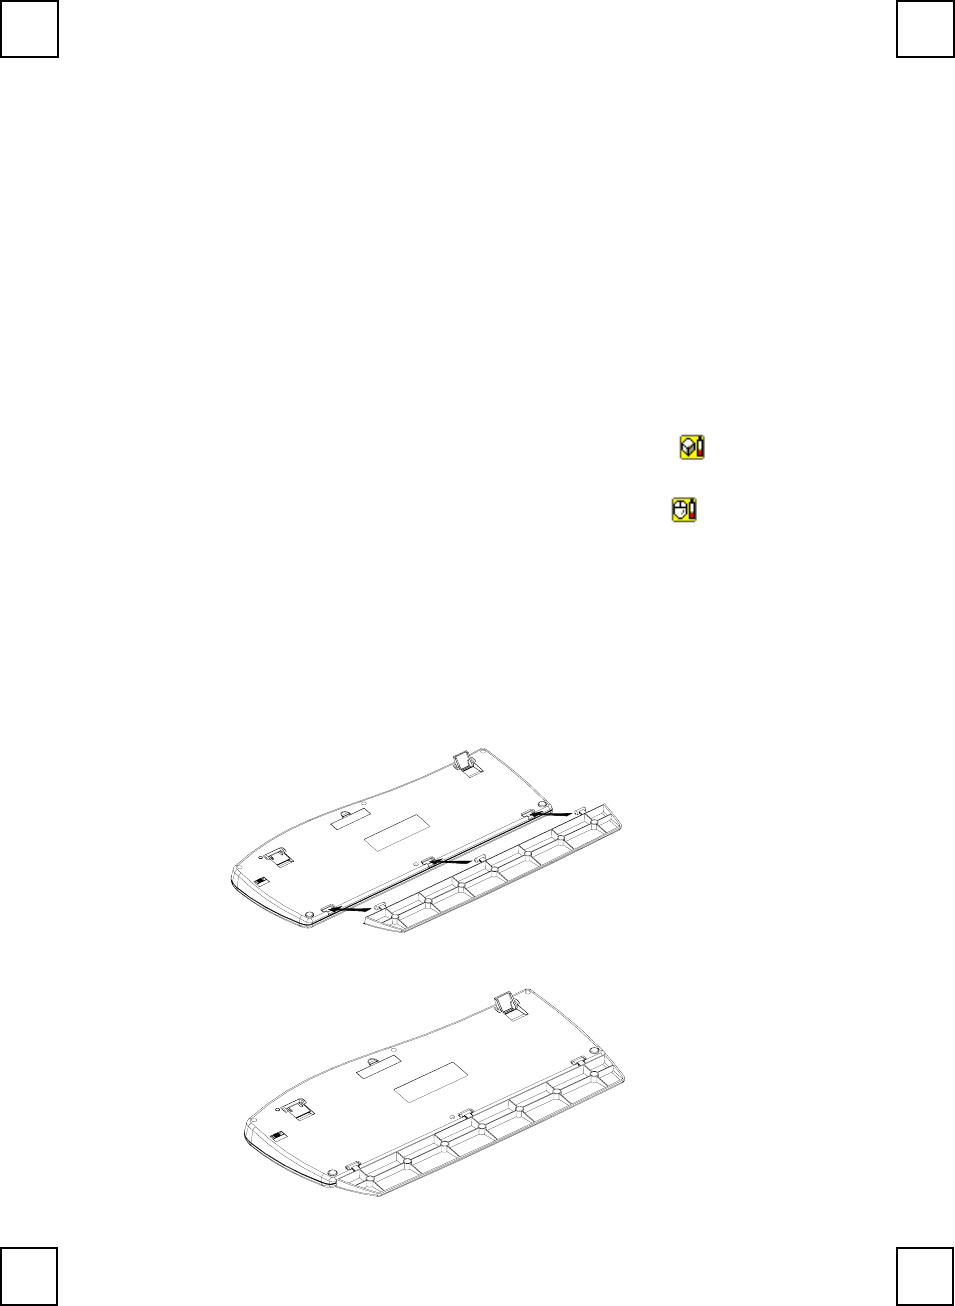
Detachable Palmrest
At your discretion, you may choose to connect the palmrest with the
keyboard.
To connect the palmrest with the keyboard follow figure 1 & figure 2.
Figure
2

9
4 Software Installation
After completing the hardware installation and turning the PC power on
you will have immediate access to the alpha-numeric keys of the
keyboard. In order to utilize the specialty keys you must first install the
keyboard driver using the CD included in the box.
To install the keyboard driver:
Step 1 : Remove any existing keyboard software from the computer.
Step 2: Insert the driver CD in your computers CD-ROM drive, the
software will auto run. If the software installation does not begin,
select the CD-ROM drive on your computer and run
"SetupKey.exe".
Step 3: Follow the on screen instructions to finish the installation
procedure. The driver by default will be installed at C:\Program
Files\KMaestro.
To install the Mouse driver:
In order to take advantage of the special shortcut button functionality of
the mouse you will have to install the mouse driver which is located on
the driver CD included in the box.
Step 1: Make sure the driver CD is in your computers CD-ROM drive.
Step 2: Run the “Setup.exe” in the mouse-driver directory of the driver
CD.
Step 3: Follow the onscreen instructions to finish the installation
procedure.

10
5 Uninstallation
Please note that you have to uninstall the driver first if you want to
reinstall the driver.
To uninstall the keyboard driver:
Step 1: Right-click the driver icon and select "Exit" command to exit
the driver program.
Step 2: Click "Start" menu (on the left-bottom taskbar).
Step 3: Move cursor to "Programs" in "Start" menu.
Step 4: Move cursor again to "KeyMaestro".
Step 5: Select "Uninstallation".
Step 6: Click on the “Remove Program” icon.
Step 7: Click "Yes" to confirm you want to uninstall.
To uninstall the Mouse driver:
Step 1: Click “Start” menu (on the left-bottom taskbar).
Step 2: Move the cursor to”Programs “in Start menu.
Step 3: Move the cursor again to "MMaestro".
Step 4: Select "Uninstall KeyMaestro Mouse Driver".
Step 5: Click Yes to confirm you want to uninstall.
If the keyboard is not working properly, see “Troubleshooting” for tips on
how to solve your problem.

11
6 Smart Office Keyboard Driver
6.1 To Pop Up “KeyMaestro” Dialogue Box
Use left-click of the mouse on
the Smart Office Keyboard
Driver ico on the taskbar, a
“KeyMaestro” dialogue box
will pop up with the following
functions.
6.1.1 Select a HotKey
This function contains the
default function of a key. You
can click on the "Display
Label" box to re-define the
key functions. Please refer to
the “Configure Button”
dialogue below.
6.1.2 Enable Display Label
This command is to show or hide the OSD (On Screen Display).
When the OSD is enabled, each time you press any one of the
multimedia buttons, its function name (button label) will show on
the right-bottom corner on the screen. The default of this function
is enabled.
6.1.3 Enable Taskbar Icon
This command is to show or hide the taskbar driver icon. When the
function is enabled, you can see a driver icon , its function name
(button label) will show on the right-bottom corner of the screen. If
you want to reload it again, you can select Start => Program =>
Configure to launch it. The default of this function is enabled.
6.1.4 Enable Auto Play
This command is to show or hide the auto play function. When the
function is enabled, the Microsoft media play will show on the
screen after you press the “Play” key of the multimedia keys. For
Winamp user, you can use the multimedia keys to control the
Winamp function after you call out the Winamp and disable the

12
Auto play function. The default of this function is enabled.
13
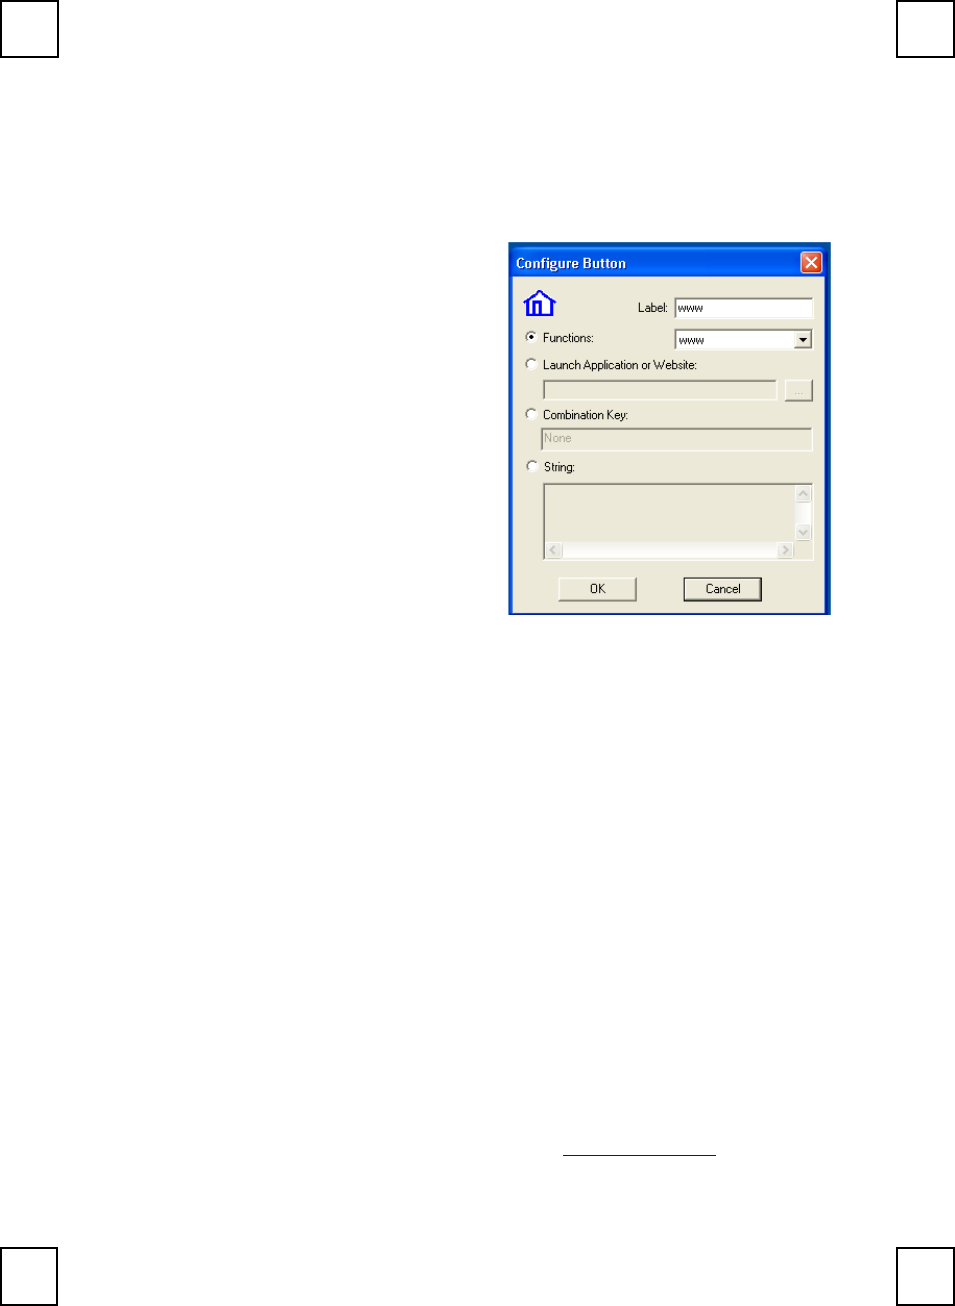
6.2 To Pop Up “Configure Button” Dialogue Box
6.2.1 Label
In the Label box, type the
name of application that the
button will launch, or any
name that will help you
remember the function of the
button. This label will appear
on screen each time you press
the button.
6.2.2 Functions
You can see a list of pre-
defined functions and set one
of it for the button.
6.2.3 Launch Application or Website
Type in the path to an often used application or click the Browse
button to select any file on your computer. If you want to attach a
web page to the button, If you want to attach a web page to the
button, just simply type in the website address in the dialogue box.
6.2.4 Combination Key
In many Windows application, there are many hot keys to execute
some often used commands. Some of the hot keys are combined
with two keys pressed simultaneously, and some are three. It is not
easy to press and to remember those hot keys. Now you can
define those complicated hot keys you always forgot. Any kind of
combination is available. For example, [Alt] + [F4] = close window,
[Ctrl] + [A] = select all.
6.2.5 String
You may define the button as a string of texts which needs to be
input often. The maximum characters are 500. Taking good
advantages of this function can save much your text input time
and makes your works more efficient.
If the keyboard is not working properly, see “Troubleshooting” for tips on

14
how to solve your problem.
15
7 Using the Keyboard
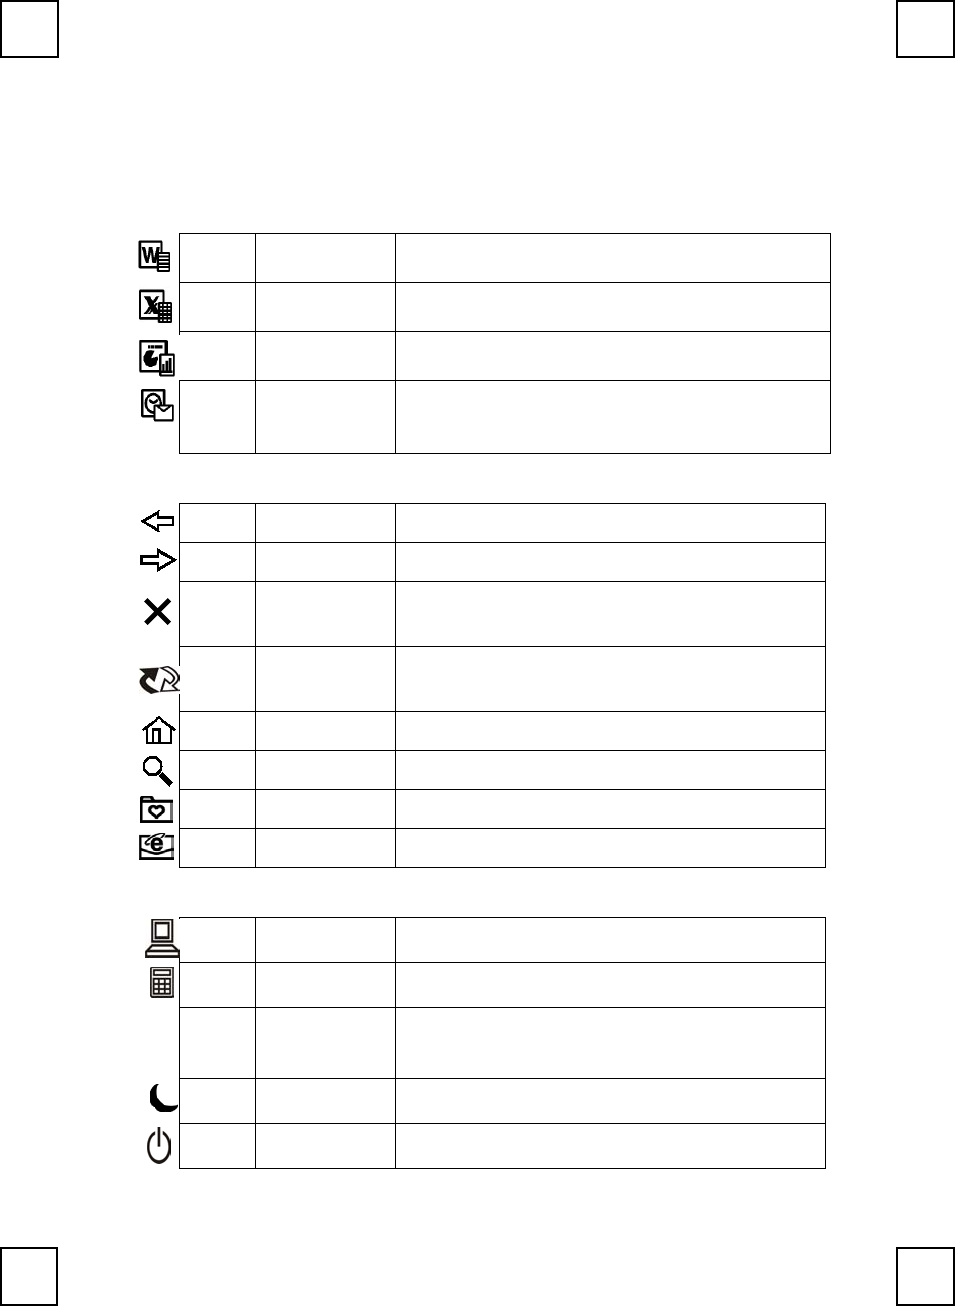
7.1 Office Application Keys Block
Word Open Microsoft Word.
Excel Open Microsoft Excel.
PowerPoint Open Microsoft PowerPoint.
Calendar Open “Calendar” function of Microsoft
Outlook.
7.2 Internet Keys Block
Back Return to the last page you viewed.
Forward View the next page you viewed before.
Stop If a page you are trying to view is taking too
long to open, click this button to stop.
Refresh Refresh the current Web page in order to
make sure you have the latest Web page.
WWW Open the default Internet browser.
Search Open the Internet search menu.
My Favorite Open the Internet “My Favorite” folder.
E-mail Open the default program you use for mail.
7.3 Application Keys Block
My Computer Open “My Computer”.
Calculator Start Microsoft calculator.
Log
Off
Log Off Open the log off windows dialog box.
Sleep Place the computer in Sleep Mode.
Power Turn the computer off.

16
Note: If “Log Off” key function cannot work properly, see
“Troubleshooting” for more information.
17
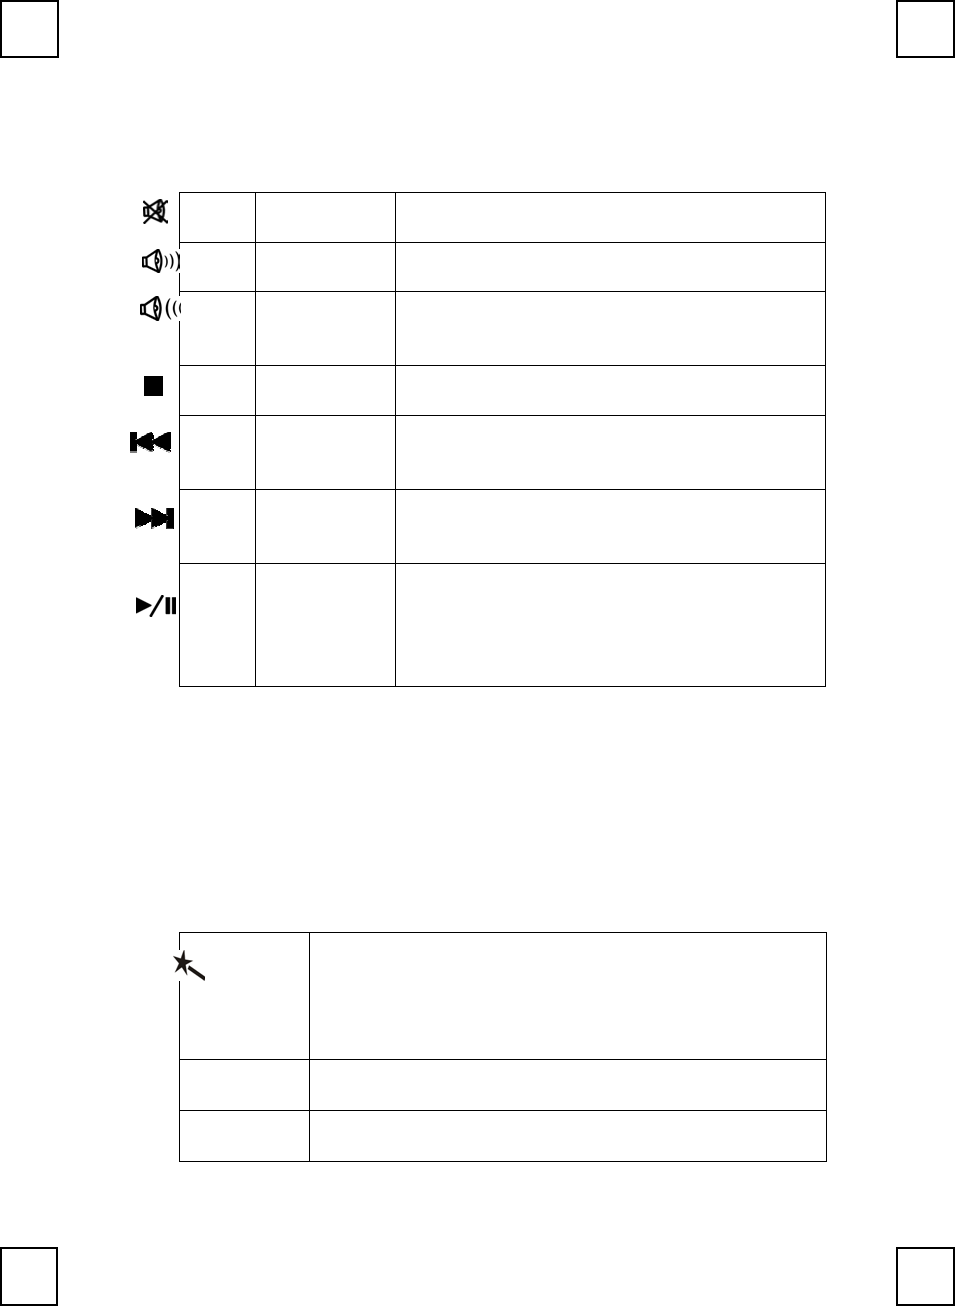
7.4 Multimedia Keys Block
Mute Mute the sound.
Volume up Adjust the volume up.
Volume
down
Adjust the volume down.
Stop Stop the playing.
Previous Skip backward to the previous file/track
when pressing once.
Next Skip forward to the next file/track when
pressing once.
Play/Pause
When the CD or Video is playing, press this
button to pause it, and press the button
again to resume it from the current
position.
7.5 Enhanced Function Keys Block
Enhanced function keys block consists of 12 keys and functions in
two ways:
1. As a part of the main keyboard: F1~F12.
2. As 12 embedded office keys and functions.
Enhanced Function Keys are as follows:
12 keys for other languages.
Office
Wizard
A toggle key for Enhanced office keys. When Office
Wizard LED is on, the enhanced Office function keys
are activated.
F1: Help Open the Help file for the activate window.
F2: New Create a new, blank file in program.

18
F3: Open Open or finds a file in program.
F4: Save save the active file with current file name, location
and file format.
F5: Replace Search for and replaces the specified text and
formatting.
F6: Spell Start the spelling check program in the active
document.
F7: Undo Reverse the last command or deletes the last entry
you typed or action.
F8: Redo Reverse the action of the Undo command.
F9: Reply Reply to the e-mail in Microsoft Outlook or Outlook
Express.
F10: Reply All Replies the e-mail to all in Microsoft Outlook or
Outlook Express.
F11: Forward Forwards the e-mail in Microsoft Outlook or Outlook
Express.
F12: Send Sends out the e-mail in Microsoft Outlook or Outlook
Express.
Prt scr/Sys:
Print prints the file in the active window.
Num Lock: €
Euro sign. Make sure the LED ofboth "Office Wizard"
and "num lock" are on. The € Euro sign only works
when both of the Office Wizard and Num Lock are
activated.
Note: In Spanish Windows, F2 function is designed for “Bold”.
Note: Microsoft Windows operating system and applications must
support different languages for different countries; it limits the

19
functions of embedded office keys. So, some enhanced functions
are only for target language usage. The descriptions of the
enhanced office keys’ functions are for reference and may not
reflect your keyboard exactly.

20
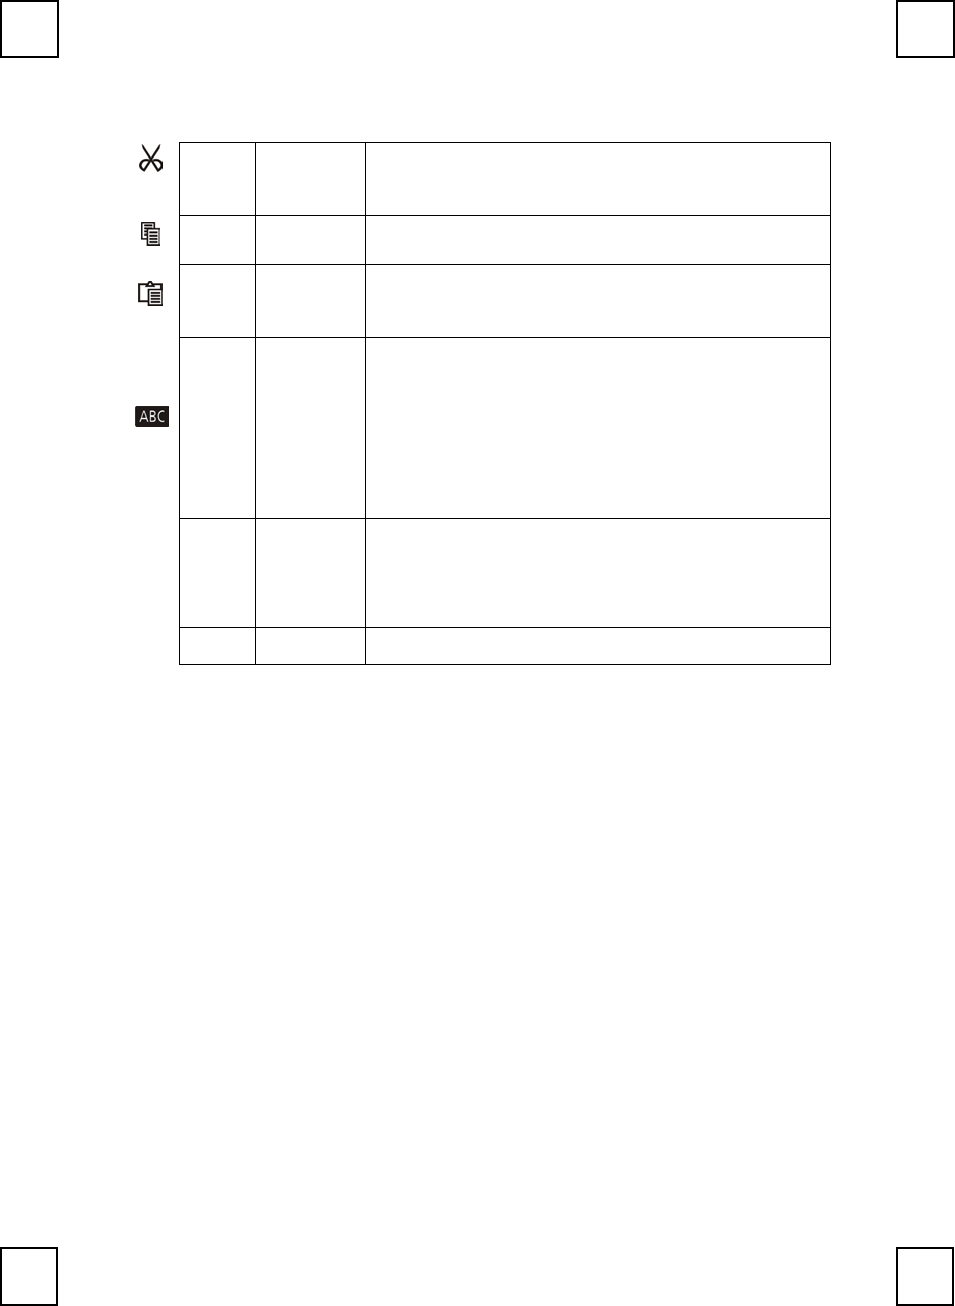
7.6 Clipboard Keys Block
21
Scroll Wheel
1. Works as a mouse with scrolling functions in
2 directions - up and down. You can use the
up and down functions of the Scroll Wheel
to scroll the document horizontally.
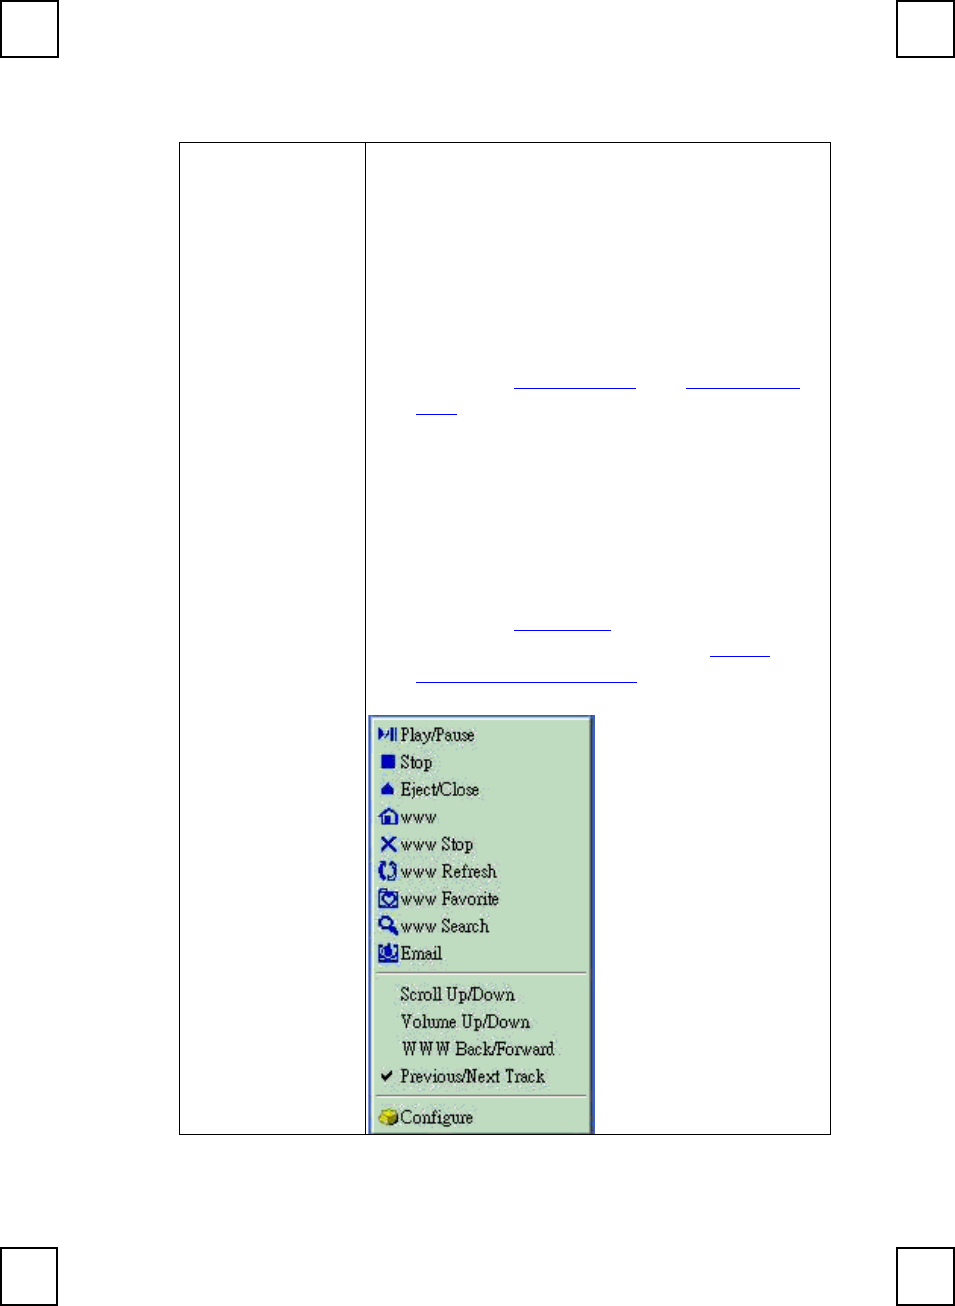
2. Works as a mouse button. When you push
on the scroll wheel, a series functions
dialogue will pop-up as below. Their
functions are divided into 3 parts.
Works as “Internet keys” or “Multimedia
keys”. You can customize the push button
as one of these functions.
Works as Scroll Up/Down, Volume
Up/Down, WWW Back/Forward or
Previous/Next Track. If you customize the
push button as one of these functions,
you only have to use the wheel to control
these functions.
Works as “Configure” function. Please
refer to the description of the "Smart
Office Keyboard Driver" for more
information.
22
Cut Remove the selection from the active
document.
Copy Copy the selection to the Clipboard.
Paste Paste the previously cut or copied items from
the Clipboard.
Mark
Press on the mark key once and use the up,
down, right and left direction keys to select
items. Press the mark key again or any other
keys except the up, down, right, left, home,
end, page up or page down key, the mark
function can be released.
APP. Applicatio
n Switch
Switches the focus to the previous opened
windows when you press the key and chooses
the right one as the active window. The
function is the same as “Alt+Tab”.
Close Close Closes the active Windows Application.
23
8 Using the Mouse
8.1 Using the Mouse Driver
After installing the mouse driver as described in Chapter 4 you will
be able to start up the Mouse Control Panel by left double-clicking
on the KeyMaestro Mouse icon in the Windows task bar. This
should appear after restarting your machine. You can also invoke
the Mouse Control Panel by choosing Start→Programs→MMaestro
→KeyMaestro Mouse Driver.
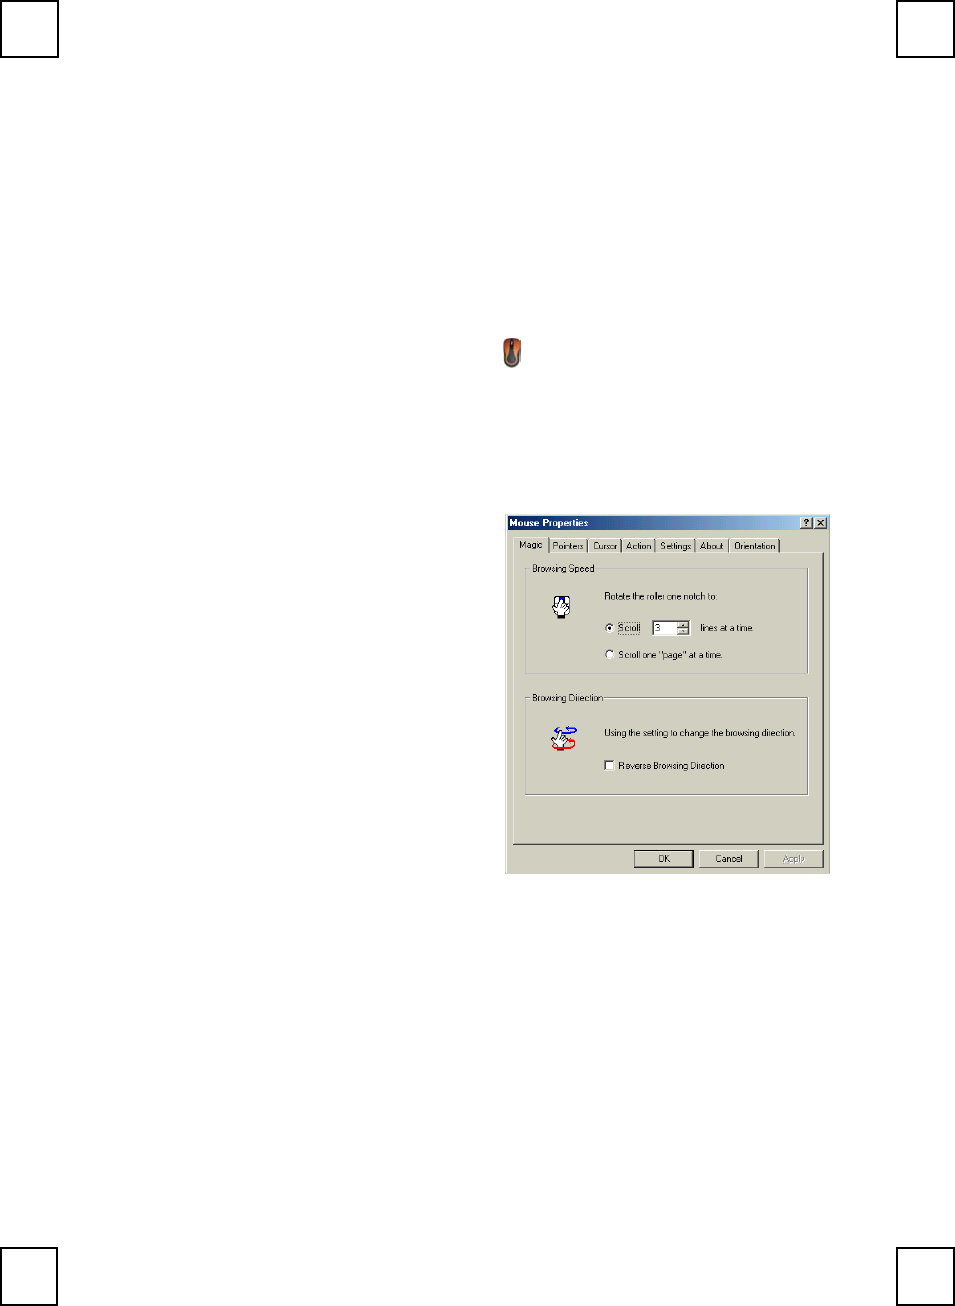
The Mouse Control Panel (KeyMaestro Mouse Properties) window
consist of the following folders:
Magic folder:
allows you to change
the browsing speed and
the direction of the
browsing button.
Pointers folder:
allows you to choose
your favorite pointer
shape.
Cursor folder:
select the special cursor
functions such as trails for
your cursor or loop
function.
Action folder:
re-define the mouse keys function and speed.
Settings folder:
re-assign mouse button shortcuts and/or toggle Office 97
mouse mode on/off.
About folder:
shows the current driver version information.

24
Orientation folder:
allows you to setup the angle of the mouse when moving
upwards.
25
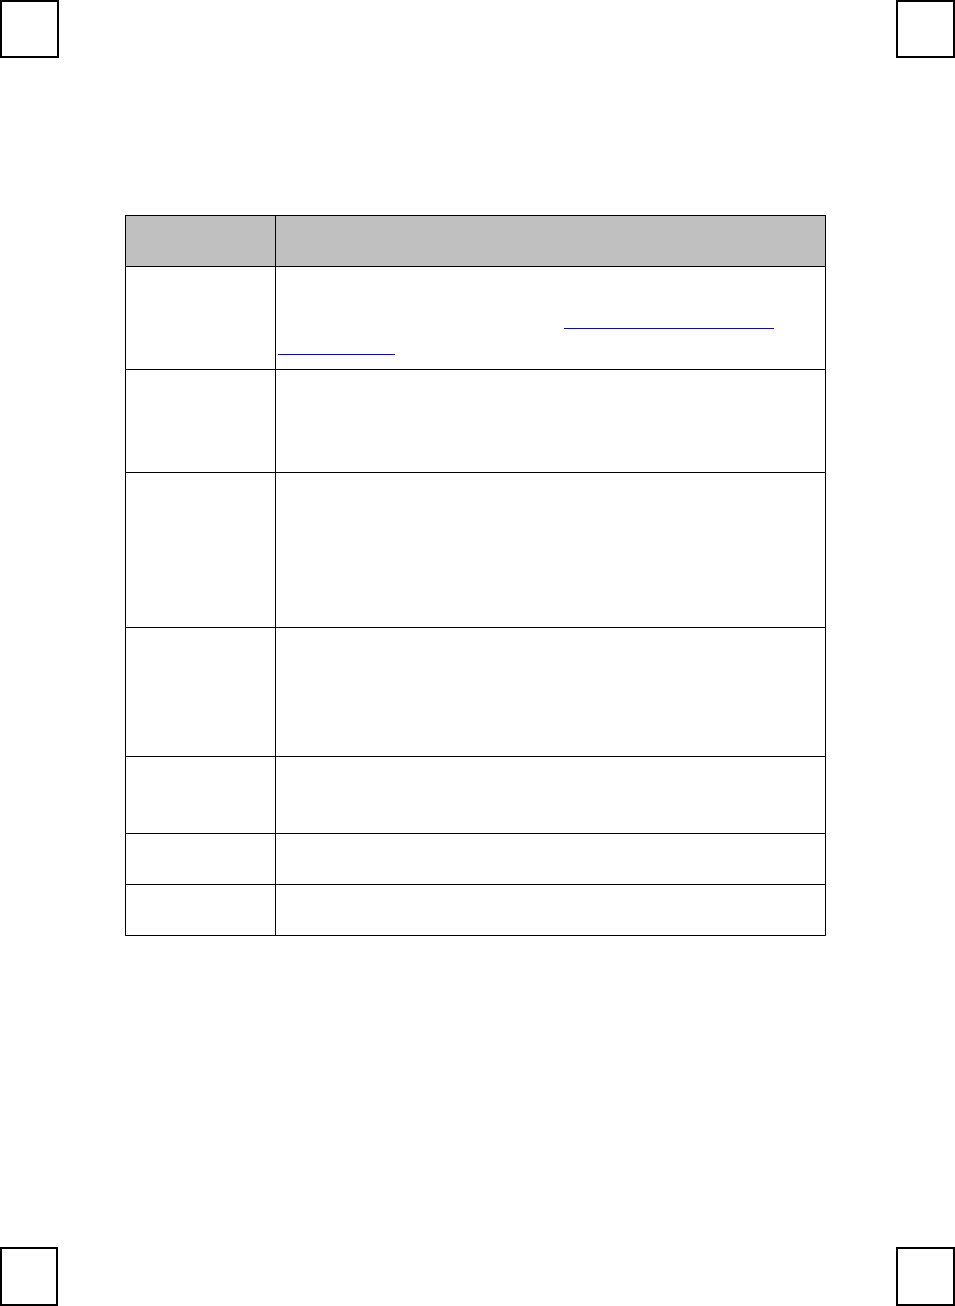
8.2 The Definition of Mouse Extra Function:
Function Definition
Quick Jump
Let you to open 8 special functions quickly.For the
detailed, please refer to the ”Quick Jump Function
Introduction” in next section.
Double Click
Replace the "double click" movement to activate an
application or function, it can save the valuable mouse-
clicks.
Window Zoom
To magnify or de-magnify the data view of a document
in an application that supports it. (this function is workabl
e
when the application you used is with the ctrl + wheel
scrolling function, ie, Word, Excel, PowerPoint and
FrontPage ...)
Switch AP
Switch quickly from one opened application to the othe
r
applications without extra cursor move. Press the “Switc
h
AP” button you set and scroll the wheel button to switch
the applications.
Auto Panning Move the cursor and then the document will scroll slowly
in the direction you just moved.
WWW Back Return to the last page you viewed.
WWW Forward View the next page you viewed before.
26
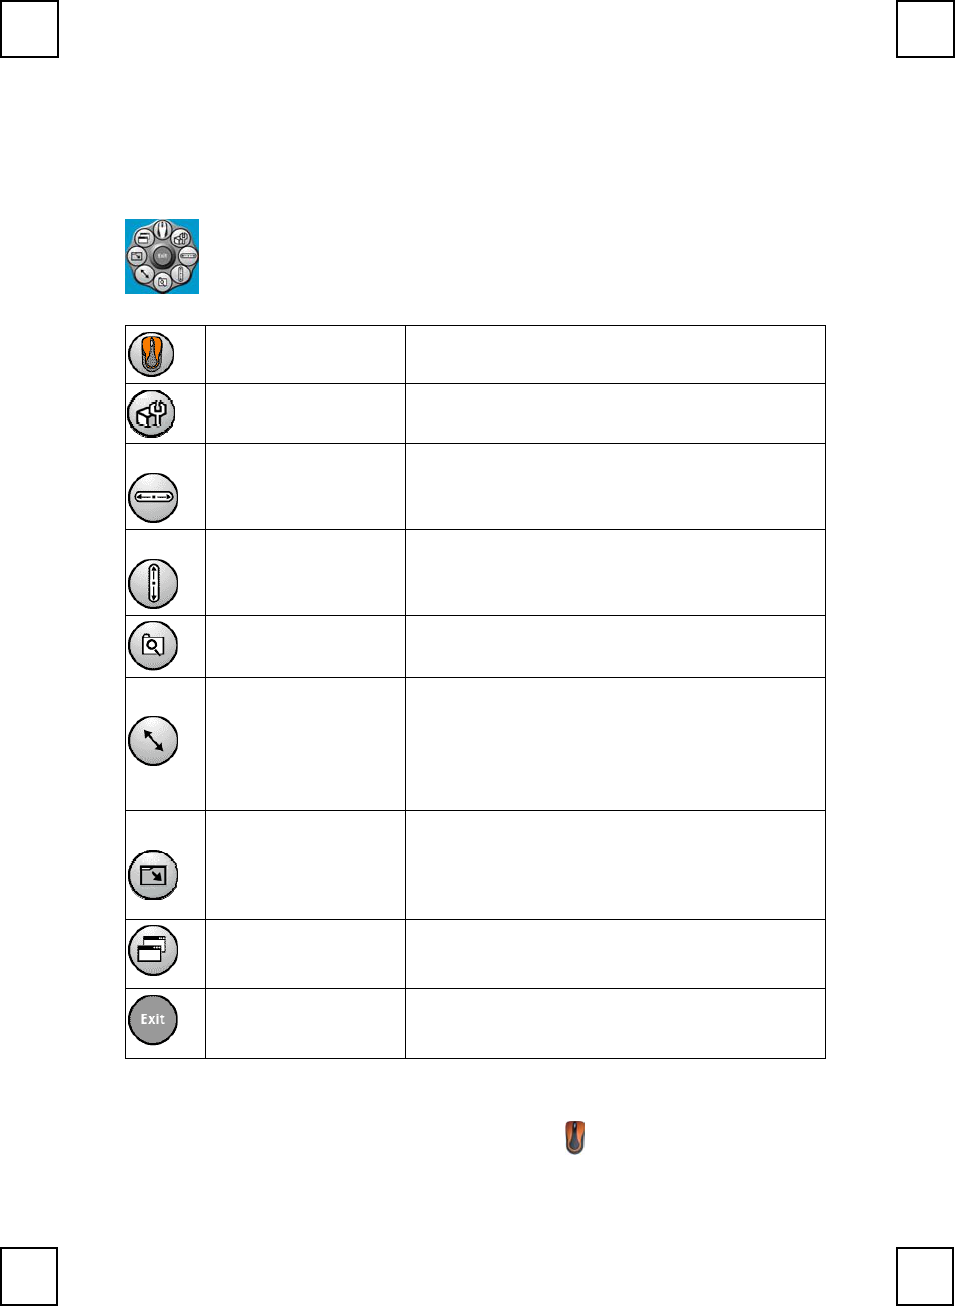
8.3 Quick Jump Function Introduction
Also, after installing the mouse driver and invoking the
KeyMaestro mouse driver program you will have access to 9
special function icons by pressing the scroll wheel once. These 9
functions are:
M
ouse Control Panel
A
ctivate the Mouse Control Panel Menu.
C
ontrol Panel
A
ctivate the “Control Panel” window.
H
orizontal Scroll Bar
Set the cursor to the horizontal scroll bar to
scroll the document horizontally. (the
function does not support Windows XP)
V
ertical Scroll Bar
Set the cursor to the vertical scroll bar to
scroll the document vertically. (the function
does not support Windows XP)
Windows Explorer
A
ctivate the 'Windows Explorer' window.
S
ize Grip
A
djust the frame size of the windows you
opened (the function does not support full
s
creen.The function is also not performed
w
hen the frame of applications are not
adjustable).
M
inimize All Windows
Allow you to minimize all the current
opened applications immediately (this
function is only performed when the
applications are with the minimize function
)
Recall the Last
A
ctive Window Recall the last active window.
Exit Exit the quick jump function panel.
Clicking once more on the scroll wheel will close these icons.
Note: For more detailed information please read the online help by right
clicking on the KeyMaestro Mouse icon in the Windows task bar

27
and select Help.

28
9 Troubleshooting
If you are experiencing problems with your keyboard, please check the
following:
1. Keyboard & Mouse do not work properly
Please re member to set the ID when your keyboard kits do not work
properly.
2. Mouse does not work accurately
Use the mouse only on a clean, flat, non-slippery surface in order to
ensure smooth and accurate cursor action. If you use a mouse-pad,
choose a light-colored one, not a dark one, to use less battery power.
3. The Smart Office Keyboard Software does not work properly
The hot key functions do not work after installing the Smart Office
keyboard software, please make sure if there are any keyboard hot
key drivers installed. Remove all keyboard hot key driver first and re-
install Smart Office Keyboard Software to solve the problem.
4. Add/Remove Smart Office Keyboard Software or Re-install
After installing the Smart Office Keyboard software, the Smart Office
Keyboard icon will display on the system tray. If you want to reinstall
the software for some reasons, you must remove the Smart Office
Keyboard driver from your operating system first. For more detailed
information, please refer to Uninstallation.
Note: If you want to upgrade your Smart Office Keyboard software or it
does not work properly, you can re-install it to solve this problem.
5. Other software applications cannot be installed properly
If it is failed to install other software applications, you have to remove
the Smart Office Keyboard driver from your system tray. After
completing the new software installation, you have to re-install the
Smart Office Keyboard Software again.
6. Multimedia Player cannot play VCD title or MPEG file
Make sure you have installed Windows Media Player version 7 or later
properly. If not, please download the Windows Media Player version 7
or later from Microsoft Web site.

29
7. Word, Excel, PowerPoint, Calendar cannot do action, but the
onscreen can show up
Please make sure you have installed the Office Applications
completely. If Office Applications are not fully installed, those keys
can only see the onscreen display and do not work.
8. Sleep key does not work properly
If you have problems using the sleep button, make sure that the
power management in your PC has been enabled both in the BIOS
and in Windows. For more information on your PC's BIOS settings, refer
to your PC's manual. For more information on how to enable the
power management features in Windows, refer to your Windows
manual.
9. Some enhanced Office functions might lose
Microsoft Windows operating system and applications must support
different language for different countries. It limits the functions of
enhanced office keys. So, some enhanced functions are only for
target language usage. The descriptions of the enhanced function
keys are for reference and may not reflect your keyboard exactly.
10. The "Un-mark" function cannot be released
Press on the mark key once and use the up, down, right and left
direction keys to select items. Press the mark key again or any other
keys except the up, down, right, left, home, end, page up or page
down key, the mark function can be released.
11. The functions of the enhanced Office function keys do not match the
key's printed name or do not work
All enhanced office function keys follow the definitions of the
standard Microsoft shortcut combination keys. They do not need any
support from software driver. In few cases, when you press the target
enhanced office keys, they do not work or have different result. This
means the applications do not support the definitions of the standard
Microsoft shortcut combination keys and the target functions, or the
software applications conflict with the definitions.
We recommend you to contact with the software application dealer
or download the new version application to upgrade your
applications from Microsoft Web site. For example, use Office 2000 to

30
replace Office 97, or use IE 5.0 to replace IE 4.0.

31
Technical Support
If the above instructions do not solve your problem, please contact
Memorex technical support at techsupport@memorex.com, or visit us
online at www.memorex.com for our Frequently Asked Questions (FAQ).
Memorex Products One Year Limited Warranty.
Memorex Products, Inc. will replace this product free of charge if it is
found to be defective in materials or workmanship during normal usage
conditions for a period of one year from date of purchase (proof of
purchase required). Other than product replacement (or refund if
replacement is not possible), Memorex Products will not be responsible
for any incidental or consequential damages arising from use of this
product.
Product Registration:
To register your product please visit us online at www.memorex.com or
write to us with your name, address, phone number, model name, model
number, date of purchase and place of purchase at: Memorex Products,
Inc. 10100 Pioneer Blvd, Suite 110, Santa Fe Springs, CA 90670.

FCC GUIDELINES
This equipment has been tested and found to comply with the limits for a Class B digital device, pursuant to
Part 15 of the FCC Rules. These limits are designed to provide reasonable protection against harmful
interference in a residential installation. This equipment generates, uses and can radiate radio frequency
energy and, if not installed and used in accordance with the instructions may cause harmful interference to
radio communications. However, there is no guarantee that interference will not occur in a particular
installation. If this equipment does cause harmful interference to radio or television reception, which can be
determined by turning the equipment off and on, the user is encouraged to try to correct the interference by
one or more of the following measures:
Reorient or relocate the receiving antenna
Increase the separation between the equipment and receiver
Connect the equipment into an outlet on a circuit different from that to which the receiver is connected.
Consult the dealer or an experienced radio/TV technician for help.
The Class B digital apparatus meets all requirements of the Canadian Interference-Causing Equipment
Regulation.
Cet appareil numerique de la class B respecte toutes les exigences du Règlement sur le materiel brouilleur du
Canada.
Caution:
Any changes or modifications not expressly approved by the party responsible for compliance could
void the user's authority to operate this equipment. Shielded interface cable, if any, must be used in
order to comply with emission limits.
封底內頁
This device complies with Part 15 of the FCC Rules. Operation is subject to the following two
conditions: (1) This device may not cause harmful interference, and (2) this device must accept any
interference received, including interference that may cause undesired operation.

ADVANCE DATA TECHNOLOGY CORPORATION Report No.: 910818R01
FEDERAL COMMUNICATIONS COMMISSION
DECLARATION OF CONFORMITY (DoC)
FOR THE FOLLOWING EQUIPMENT:
PRODUCT NAME: Wireless Receiver
MODEL NO.: RF7000
TRADE NAME: Memorex
IS HEREWITH CONFIRMED AND FOUND TO COMPLY WITH THE REQUIREMENTS OF
CFR 47 PART 15 REGULATION. THE RESULTS OF ELECTROMAGNETIC EMISSION
EVALUATION ARE SHOWN IN THE REPORT NO.: D910818R01 ISSUED ON Sep. 3, 2002
THIS DEVICE COMPLIES WITH PART 15 OF THE FCC RULES. OPERATION IS
SUBJECT TO THE FOLLOWING TWO CONDITIONS:
(1) THIS DEVICE MAY NOT CAUSE HARMFUL INTERFERENCE AND,
(2) THIS DEVICE MUST ACCEPT ANY INTERFERENCE RECEIVED, INCLUDING
INTERFERENCE THAT MAY CAUSE UNDESIRED OPERATION.
RESPONSIBLE PARTY LOCATED WITHIN U.S. TO BE DETERMINED.