Behavior Tech Computer KB8193URF2 Wireless Keyboard User Manual 8193URF2 E Modify
Behavior Tech Computer Corporation Wireless Keyboard 8193URF2 E Modify
Manual
8193URF2 Quick Installation Guide
Important Information
For more detailed information, please refer to the Help file in the Driver CD in the Help directory. The ways to display Help
file are as follows:
- After driver installation, please click the driver icon at the right-bottom in the Window system tray. Click the Help button
on the left-bottom of the driver Configuration dialog box and the help file will pop up. Or
- Please see “Help\ Help.htm” in the Driver CD.
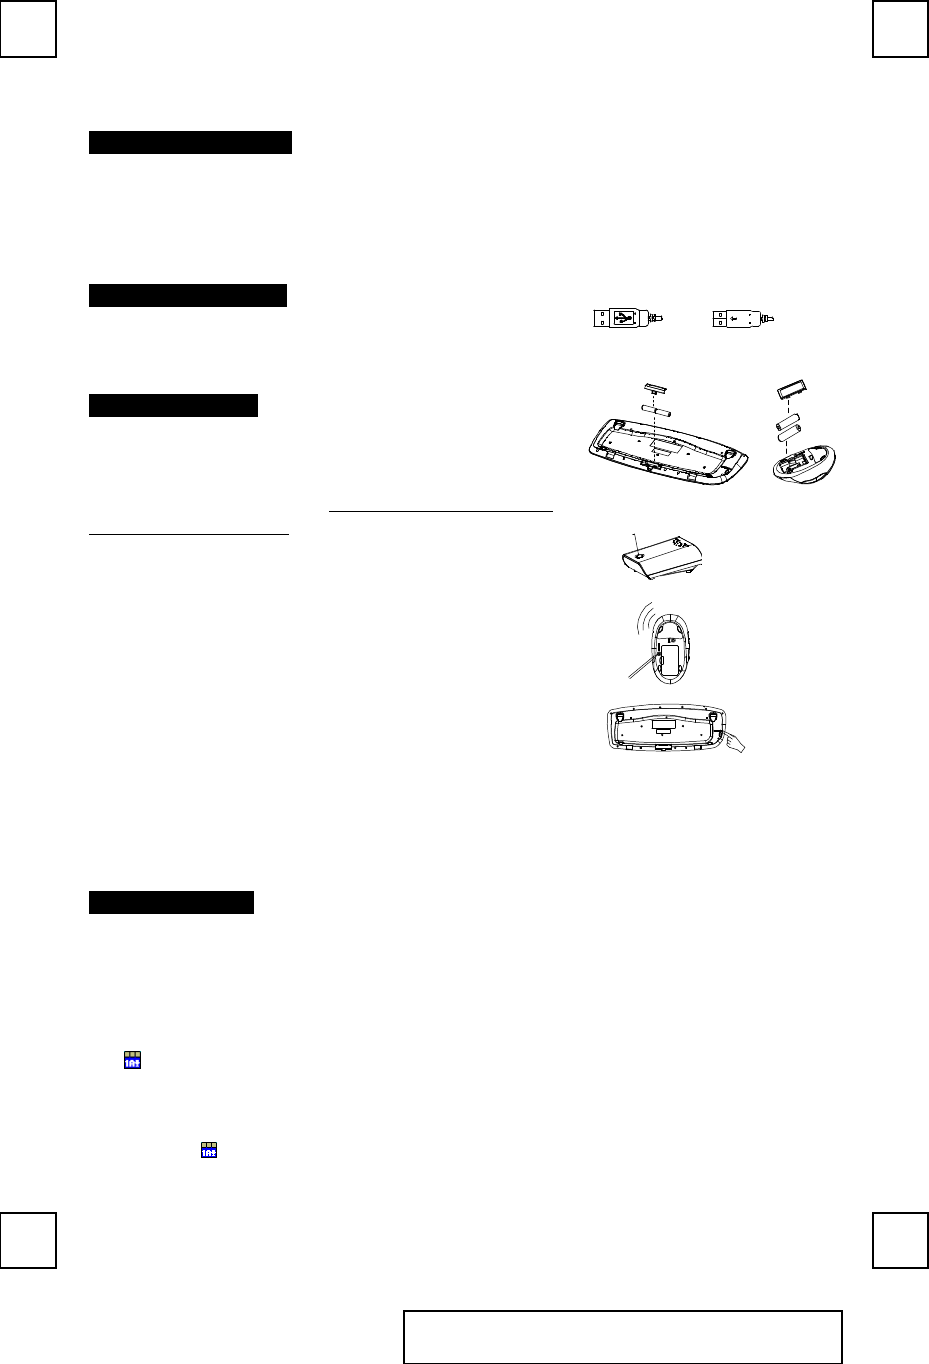
Hardware Installation
Front View of Back View of
USB Connector USB Connector
1. Plug in the receiver connector into your available USB port on PC.
2. Make sure the batteries of the keyboard and mouse are installed
correctly, please follow the polarity signs in the battery compartment.
Pairing Procedure
The pairing button locates on the top of the receiver with a LED under to
show the pairing or data reception status.
The ID-recognition function helps to protect against interference from other
RF products in the same environment. Remember to pair ID when other RF
products affect your keyboard kit.
1. Press the pairing button on the top of the receiver first. Receiver LED
will blink slowly indicating it’s ready to receive keyboard/mouse pairing
information.
2. Next, press the pairing button on the bottom of the mouse once.
3. Then press the pairing button on the top of the receiver again.
4. Finally, press the pairing button on the bottom of the keyboard
Receiver LED flashes 3 times rapidly as indication it’s paired with this
keyboard and mouse.
Note:
- The whole procedure should be complete within 60 seconds.
- Make sure your PC is on and running when doing the pairing
procedure.
ID Button(LED)
- Every time you want to reset each one of the receiver, mouse or keyboard ID, you must follow the procedures
above to set all IDs again.
Driver Installation
n USB Device Driver
The USB device driver is included in Windows operating system.
During initial installation of the USB device, the system will automatically detect a new hardware being added, and then
bring up "Add New Hardware Wizard" dialogue box. Please follow the Wizard's USB driver installation steps. Once this
installation step is completed the basic functions of the USB device will work under the operating system. The additional
functions are provided only after the KeyMaestro application is installed.
n KeyMaestro Input Device Driver
1. Insert the CD labeled "EMPREX" into your CD-ROM.
2. The CD will automatically run and bring up the Setup dialogue box.
3. Follow the on-screen instruction to install the driver.
4. The driver icon will show at the right-bottom of the Windows system tray when the driver is loaded.
Pairing button on the
bottom of the keyboard
Pairing button on
the top of the
receiver (With a
LED under the
pairing button)
Pairing button on the
bottom of the mouse
English
8193URF2 QIG 3100506090 Version 1.0 英文

FCC GUIDELINES
This equipment has been tested and found to comply with the limits for a Class B digital device, pursuant to Part 15 of the
FCC Rules. These limits are designed to provide reasonable protection against harmful interference in a residential
installation. This equipment generates, uses and can radiate radio frequency energy and, if not installed and used in
accordance with the instructions may cause harmful interference to radio communications. However, there is no guarantee
that interference will not occur in a particular installation. If this equipment does cause harmful interference to radio or
television reception, which can be determined by turning the equipment off and on, the user is encouraged to try to correct
the interference by one or more of the following measures:
w Reorient or relocate the receiving antenna.
w Increase the separation between the equipment and receiver.
w Connect the equipment into an outlet on a circuit different from that to which the receiver is connected.
w Consult the dealer or an experienced radio/TV technician for help.
w Use only shielded cables to connect I/O devices to this equipment.
FCC Warning: This device complies with Part 15 of the FCC Rules. Operation is subject to the following two conditions: (1)
this device may not cause harmful interference, (2) this device must accept any interference received, including interference
that may cause undesired operation.
FCC Caution: Any changes or modifications not expressly approved by the party responsible for compliance could
void the user's authority to operate this equipment.
Information to user:
The users manual or instruction manual for an intentional or unintentional radiator shall caution the user that changes or
modifications not expressly approved by the party responsible for compliance could void the user’s authority to operate the
equipment.
This equipment is intended for use in the following countries EU 18 countries:
Austria, Belgium, Denmark, Finland, France, Germany, Ireland, Italy, Luxembourg, Netherlands, Spain, Sweden, United
Kingdom, Portugal, Greece, Switzerland, Norway, and Iceland.
IMPORTANT NOTE:
FCC Radiation Exposure Statement:
This equipment complies with FCC radiation exposure limits set forth for an uncontrolled environment. End users must
follow the specific operating instructions for satisfying RF exposure compliance.
This transmitter must not be co-located or operating in conjunction with any other antenna or transmitter.
低功率電波輻射性電機管理辦法:
第十二條:經型式認證合格之低功率射頻電機,非經許可,公司、商號或使用者均不得擅自變更頻率、加大功率或變更原設計
之特性及功能。
第十四條:低功率射頻電機之使用不得影響飛航安全及干擾合法通信;經發現有干擾現象時,應立即停用,並改善至無干擾時
方得繼續使用。
前項合法通信,指依電信法規定作業之無線電信。
低功率射頻電機需忍受合法通信或工業、科學及醫療用電波輻射性電機設備之干擾。