Behavior Tech Computer KB9089ARF3 Wireless Keyboard User Manual Quick Installation Guide
Behavior Tech Computer Corporation Wireless Keyboard Quick Installation Guide
User manual
Wireless Keyboard/Quick Installation Guide
Important Informatio EMPREX,BTC / 9089 ARF III / 6309 ARF III
- For Windows® 2000 operating system, please go to http://www.emprex.com/ website to download and install the
“KeyMaestro Input Device Driver” to have the Multimedia Player functions.
- For Windows® XP and Windows Vista® operating systems, you could use the keyboard immediately after plugging the
keyboard connector into the PC. If you want to enjoy the full functionality of the keyboard, please visit our website at
http://www.emprex.com/ to download and install the “KeyMaestro Input Device Driver.” Once the driver has been
installed, these hot keys are reprogrammable. They can be configured as a string, a combination key, a web site, an
existing file, or a function that the driver pre-defines for you.
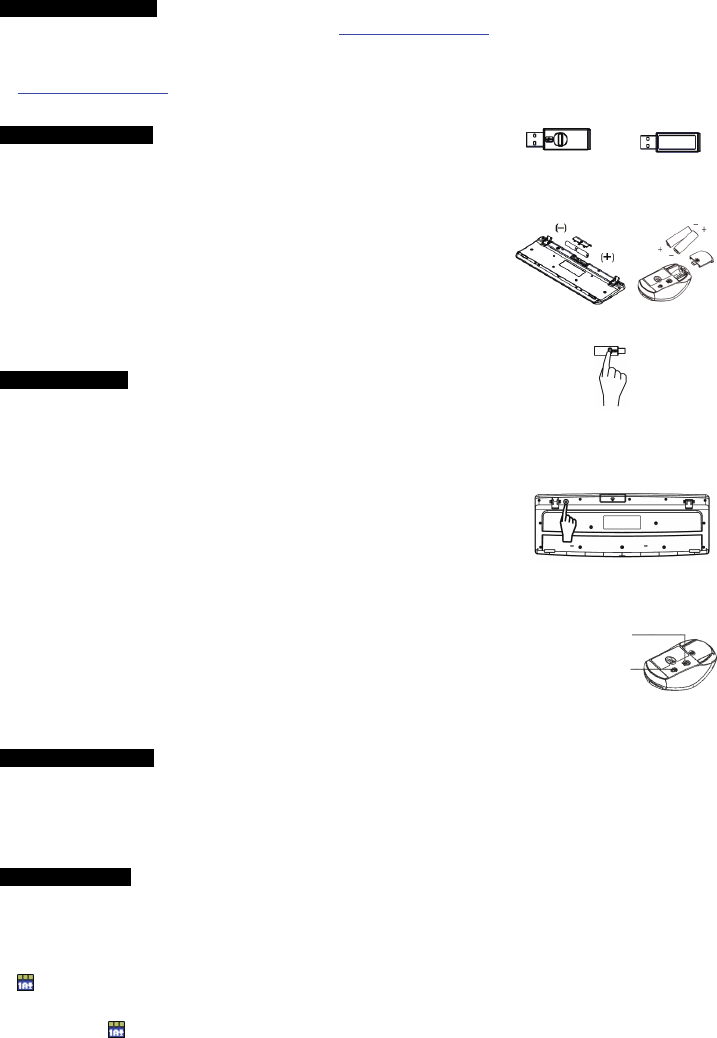
Hardware Installation
1. Make sure the batteries of the keyboard and mouse are installed correctly. Please
follow the polarity signs in the battery compartment.
2. Please make sure the slide switch on the back of the mouse is switched to “on”
before using the mouse. When not in use, please turn the power switch to “off” for
power saving.
3. Plug the receiver directly into your available USB port on PC.
4. Please hold the keyboard and mouse close to the receiver within 30 cm and press
any key to pair ID, and then you can use the wireless kit immediately.
¾ Change the cursor pointer speed
You can modify the mouse pointer speed settings in the control panel.
1. Open the Start Menu by clicking “Start” at the lower-left corner on the screen
2. Then click on Settings / Control Panel / Mouse
3. In the Mouse Properties window that appears, click the Motion tab
4. Move the slide bar toward either the faster end or the slower end
5. Click OK to exit and make the change effective
Pairing Procedure
Please follow the hardware installation procedure mentioned above to install the
wireless kit, and then you can use the wireless kit immediately. If it can’t work, please
follow the steps below to process ID setting of the wireless kit.
1. Press the ID pairing/connect button on the top of the receiver at least 2 seconds
until the receiver LED flashes. The receiver LED will flash 60 seconds to wait for
keyboard and mouse pairing information. (If you release the button within 2
seconds, the ID pairing will fail.)
2. Next, hold the keyboard and press the ID pairing/connect button on the bottom
of the keyboard at least 2 seconds until the LED indicator on the upper right of the
keyboard flashes once. (If you release the button within 2 seconds, the ID pairing
will fail.)
3. Then, press the ID pairing/connect button on the top of the receiver as step 1.
4. Finally, hold the mouse and press the ID pairing/connect button on the bottom of
the mouse at least 2 seconds until the LED indicator flashes once. (If you release
the button within 2 seconds, the ID pairing will fail.)
Note:
- When doing the pairing procedure, please hold the keyboard or mouse close to
the dongle receiver within 30 cm.
- Each procedure should be completed within 60 seconds.
- Make sure your PC is on and running when doing the pairing procedure.
- You don’t have to pair ID again after changing batteries.
- Both the keyboard and mouse can operate freely up to a radius of about 10m
from the receiver.
- Keyboard battery life is up to 15 months and mouse battery life is up to 6 months. It
depends on the intensity of usage.
System Requirements
Available USB port
CD-ROM drive (for CD and Video operation)
Standard sound card (for CD and Video operation)
Microsoft® Internet Explorer 5.0 or later version (for the Internet keys)
Microsoft® Windows® 2000, Windows® XP or Windows Vista® operating system
The system supports ACPI or APM II (for power management buttons)
ATX mother board and ATX power supply (for power management buttons)
Driver Installation
USB Device Driver
The USB device driver is included with your Windows operating system.
During the initial installation of the keyboard USB device, the system will automatically detect that a new hardware device
has been added and will bring up the "Add New Hardware Wizard" dialogue box. Follow the Wizard's USB driver installation
steps. Once this installation step is completed, the basic functions of the USB device will work under the operating system. The
additional functions are provided only after the KeyMaestro driver is installed.
KeyMaestro Input Device Driver
1. After you download the driver, please find the “SetupKey.exe” in the directory and double-click this file.
2. Follow the on-screen instructions to install the driver.
3. The driver icon will show at the bottom right of the Windows system tray when the driver is loaded.
Front view of
receiver Back view of
receiver
Pairin
g
/connect
button on top
of the receiver (With a LED
indicator under the pairing/
connect button)
Power Switch
ID pairin
g
button
/
connect button
Pairing/ connect button on the
bottom of the mouse
Pairing/connect button on the
bottom of the keyboard
En
g
lish

FCC GUIDELINES
This equipment has been tested and found to comply with the limits for a Class B digital device, pursuant to Part 15
of the FCC Rules. These limits are designed to provide reasonable protection against harmful interference in a
residential installation. This equipment generates, uses and can radiate radio frequency energy and, if not installed
and used in accordance with the instructions may cause harmful interference to radio communications. However,
there is no guarantee that interference will not occur in a particular installation. If this equipment does cause
harmful interference to radio or television reception, which can be determined by turning the equipment off and on,
the user is encouraged to try to correct the interference by one or more of the following measures:
Reorient or relocate the receiving antenna.
Increase the separation between the equipment and receiver.
Connect the equipment into an outlet on a circuit different from that to which the receiver is connected.
Consult the dealer or an experienced radio/TV technician for help.
Use only shielded cables to connect I/O devices to this equipment.
FCC Warning: This device complies with Part 15 of the FCC Rules. Operation is subject to the following two
conditions: (1) this device may not cause harmful interference, (2) this device must accept any interference
received, including interference that may cause undesired operation.
FCC Caution: Any changes or modifications not expressly approved by the party responsible for compliance could
void the user's authority to operate this equipment.
Information to user:
The users manual or instruction manual for an intentional or unintentional radiator shall caution the user that changes
or modifications not expressly approved by the party responsible for compliance could void the user’s authority to
operate the equipment.
IMPORTANT NOTE:
FCC Radiation Exposure Statement:
This equipment complies with FCC radiation exposure limits set forth for an uncontrolled environment. End users
must follow the specific operating instructions for satisfying RF exposure compliance.
This transmitter must not be co-located or operating in conjunction with any other antenna or transmitter.