Behavior Tech Computer MS9120RF Wireless Optical Mouse User Manual m2adwlsA Cover
Behavior Tech Computer Corporation Wireless Optical Mouse m2adwlsA Cover
Manual
Filename: m2adwlsA_Cover.doc Title: Cover [multi-language]
Template: HP-Print2K.dot Author: WASSER, Inc. Last Saved By: WASSER, Inc.
Revision #: 3 Page: 1 of 2 Printed: 03/14/02 03:09 PM
hp pavilion home pc
Installing the Wireless Keyboard and Mouse Set

Filename: m2adwlsA_Cover.doc Title: Cover [multi-language]
Template: HP-Print2K.dot Author: WASSER, Inc. Last Saved By: WASSER, Inc.
Revision #: 3 Page: 2 of 2 Printed: 03/14/02 03:09 PM
Federal Communication Commission Interference Statement
This equipment has been tested and found to comply with the limits for a Class B digital device, pursuant to Part 15
of the FCC Rules. These limits are designed to provide reasonable protection against harmful interference in a
residential installation. This equipment generates, uses and can radiate radio frequency energy and, if not installed
and used in accordance with the instructions, may cause harmful interference to radio communications. However,
there is no guarantee that interference will not occur in a particular installation. If this equipment does cause harmful
interference to radio or television reception, which can be determined by turning the equipment off and on, the user
is encouraged to try to correct the interference by one of the following measures:
-Reorient or relocate the receiving antenna.
-Increase the separation between the equipment and receiver.
-Connect the equipment into an outlet on a circuit different from that
to which the receiver is connected.
-Consult the dealer or an experienced radio/TV technician for help.
FCC Caution: To assure continued compliance, (example - use only shielded interface cables when connecting to
computer or peripheral devices). Any changes or modifications not expressly approved by the party responsible for
compliance could void the user's authority to operate this equipment.
This device complies with Part 15 of the FCC Rules. Operation is subject to the following two conditions: (1) This
device may not cause harmful interference, and (2) this device must accept any interference received, including
interference that may cause undesired operation.
Installing the Wireless Keyboard and Mouse Set
1
Filename: m2adwlsA.doc Title: Cover [multi-language]
Template: HP-Print2K.dot Author: WASSER Studios Last Saved By: WASSER, Inc.
Revision #: 35 Page: 1 of 8 Printed: 03/25/02 11:03 AM
English
Installing the Wireless
Keyboard and Mouse Set
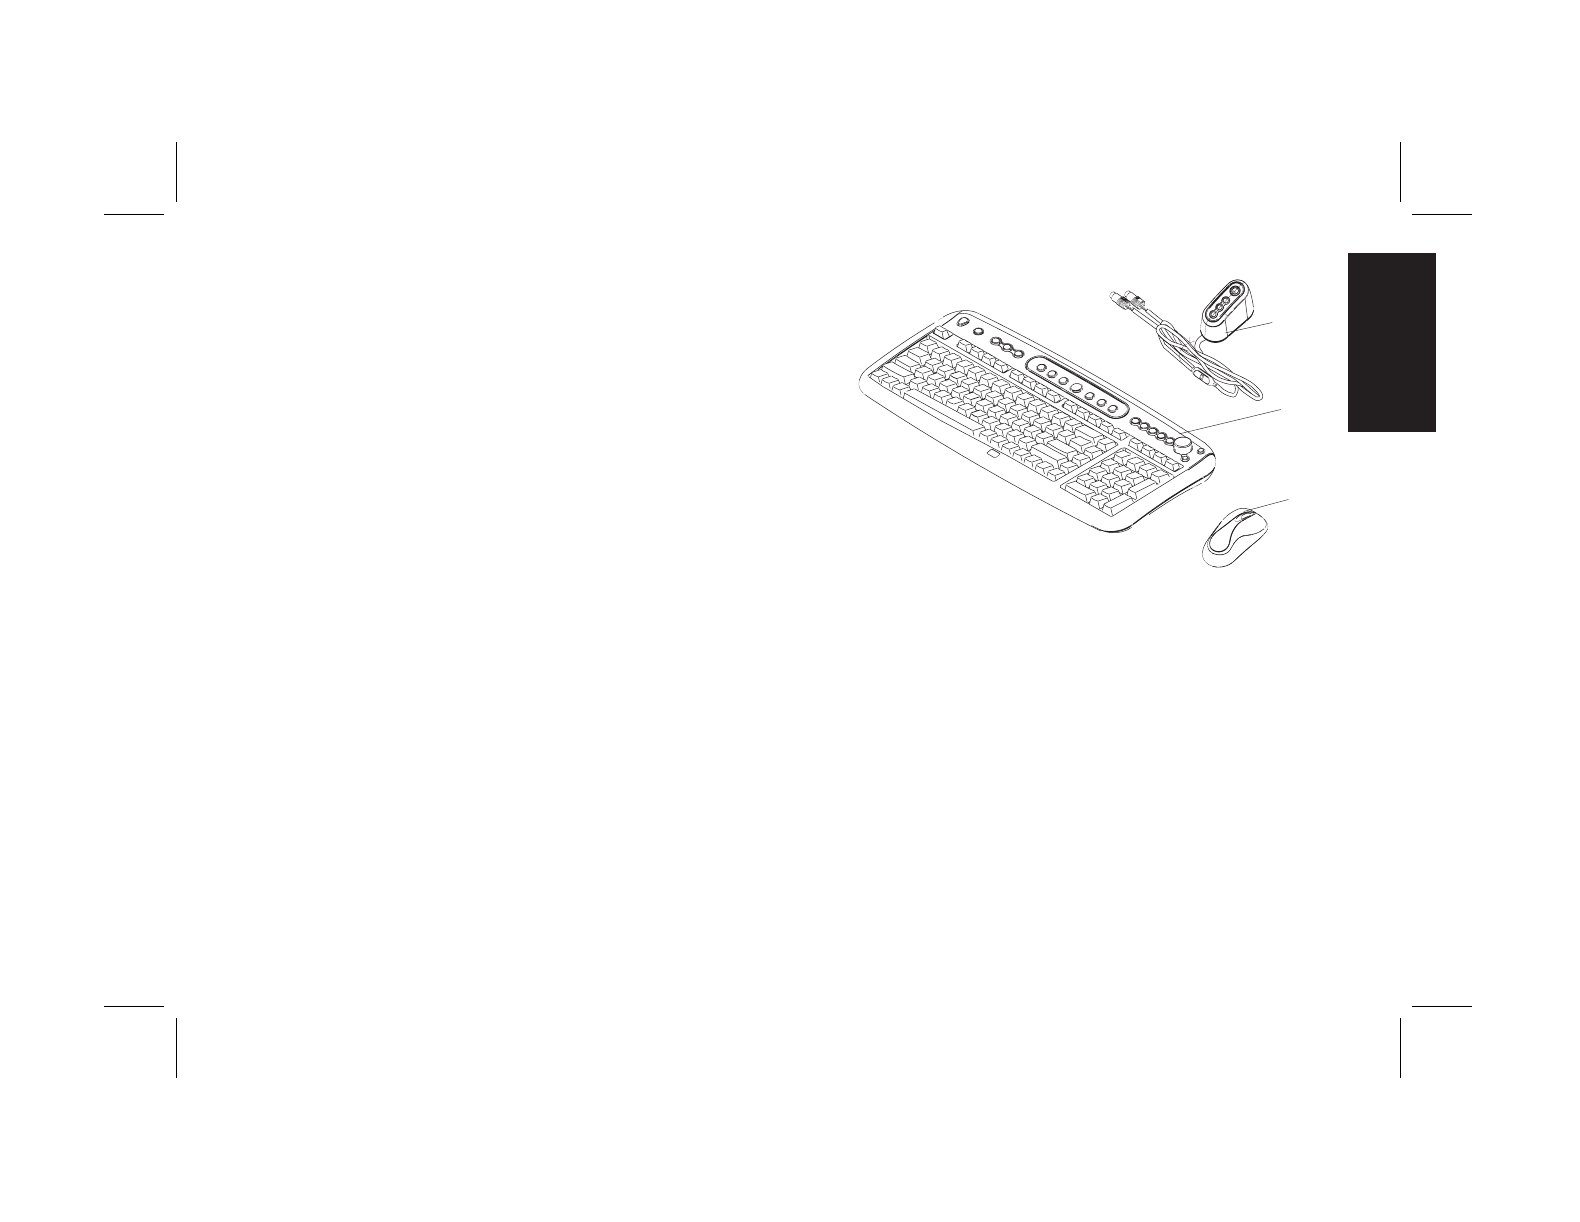
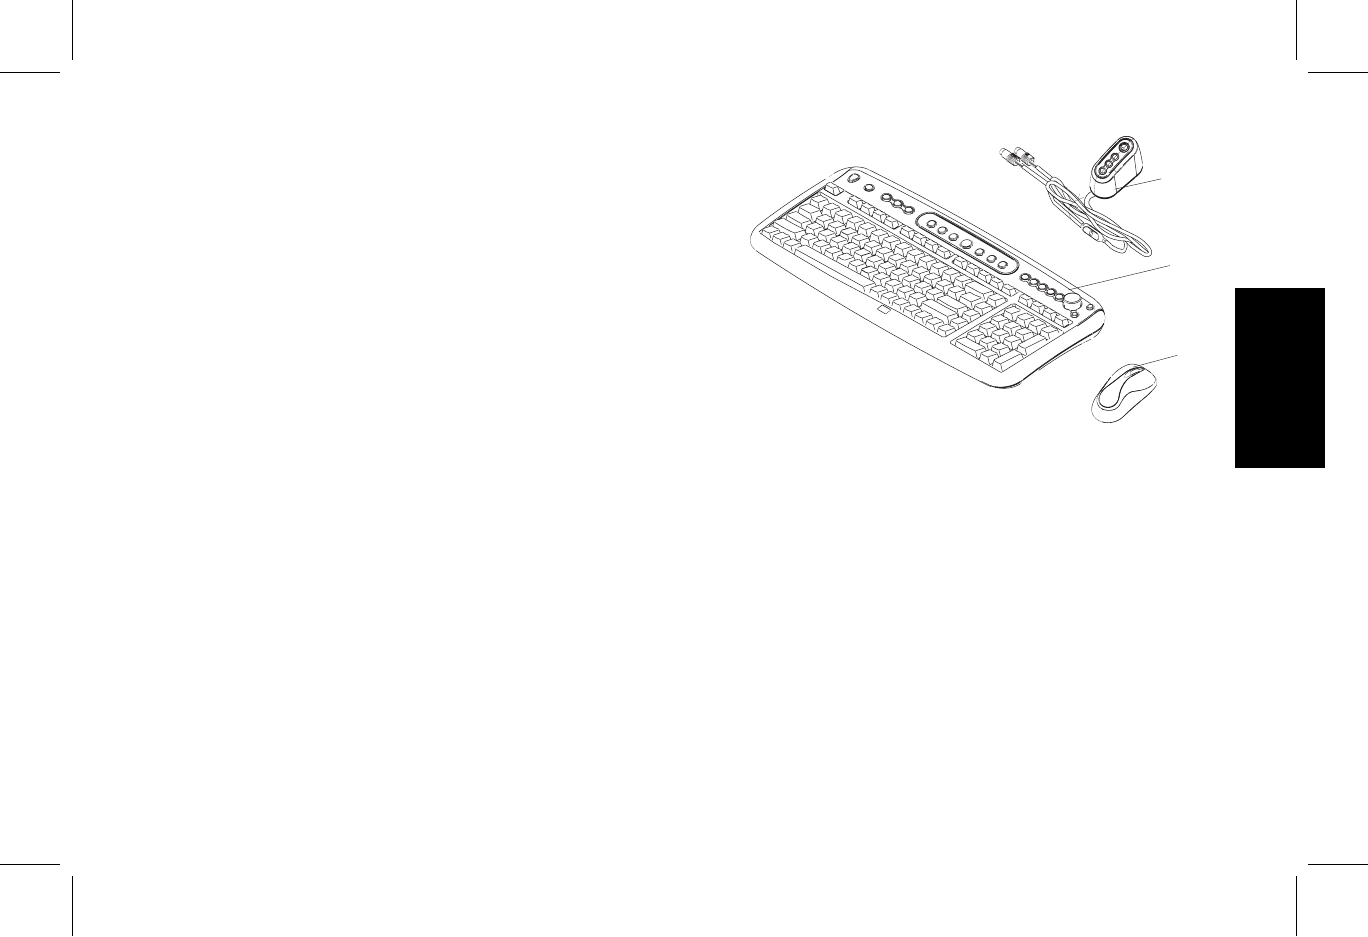
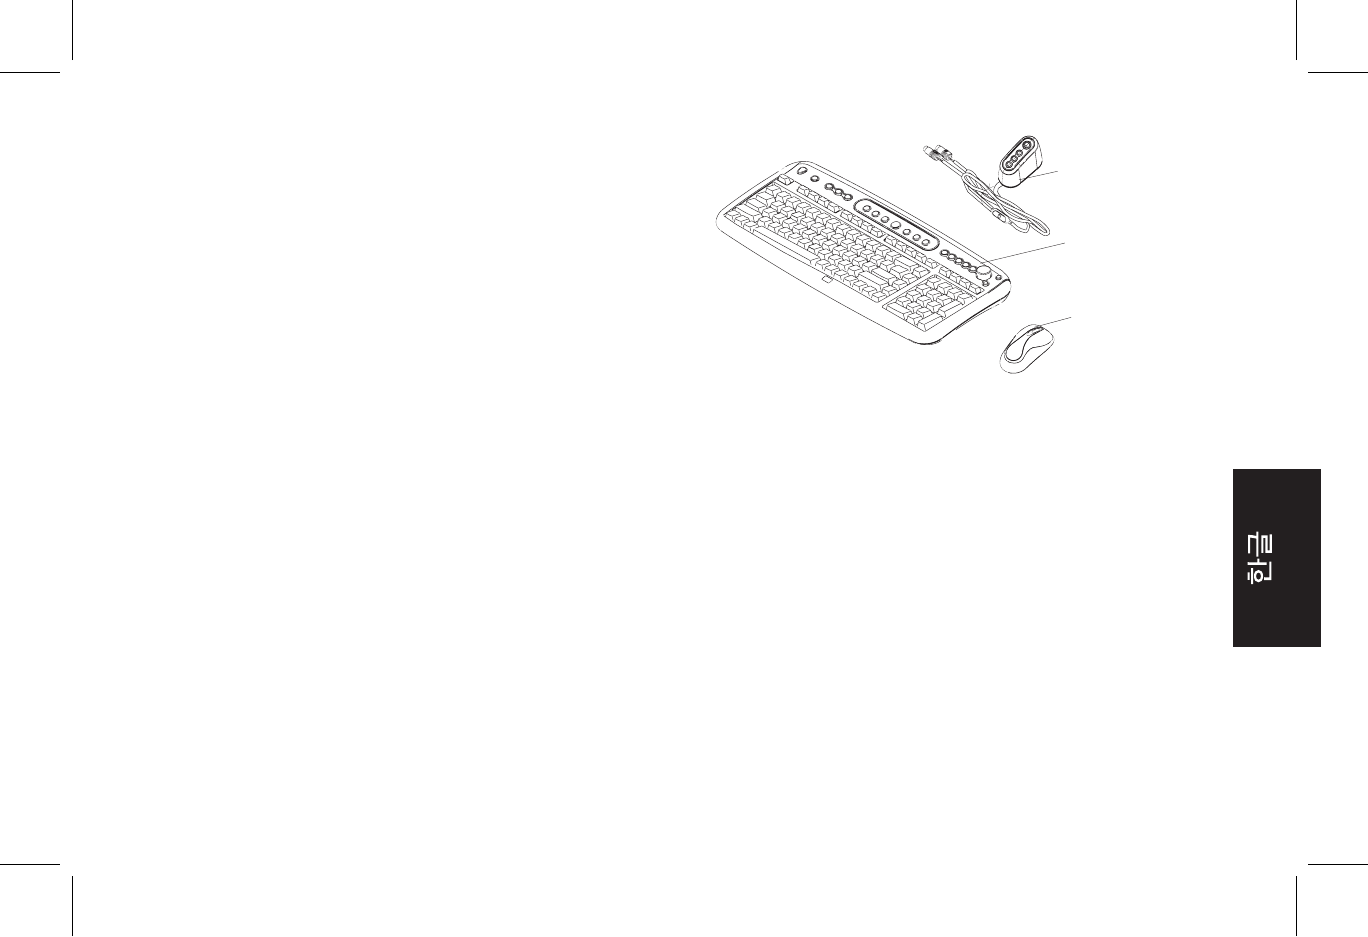
The wireless keyboard and mouse set consists
of a receiver (A) that plugs into the computer, a
wireless keyboard (B), and a wireless mouse (C).
Note:
This wireless set is compatible with your
HP Pavilion home PC and not intended
for use with other computers.
A
B
C
Note:
You can replace the batteries in the mouse and
keyboard without turning off the computer, but the
computer must be on to change the ID settings on
the three units.
2
HP Pavilion home PC
Filename: m2adwlsA.doc Title: Cover [multi-language]
Template: HP-Print2K.dot Author: WASSER Studios Last Saved By: WASSER, Inc.
Revision #: 35 Page: 2 of 8 Printed: 03/25/02 11:03 AM
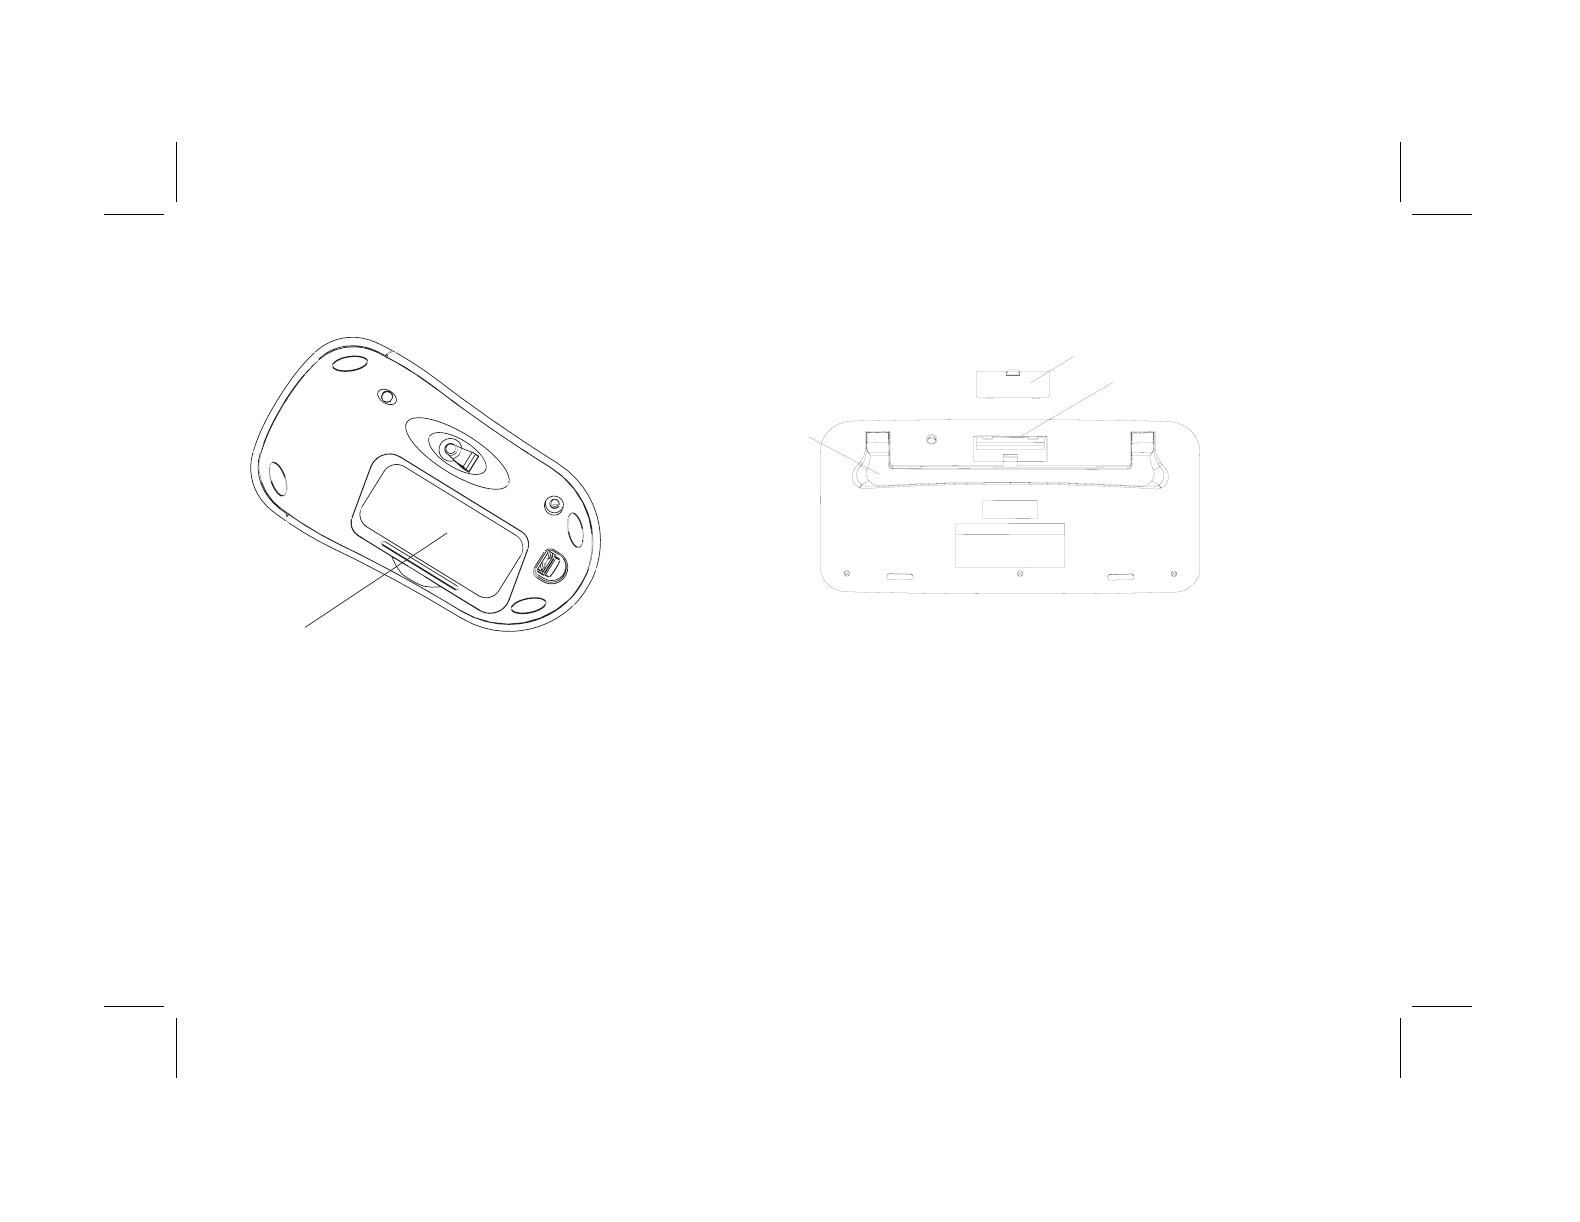
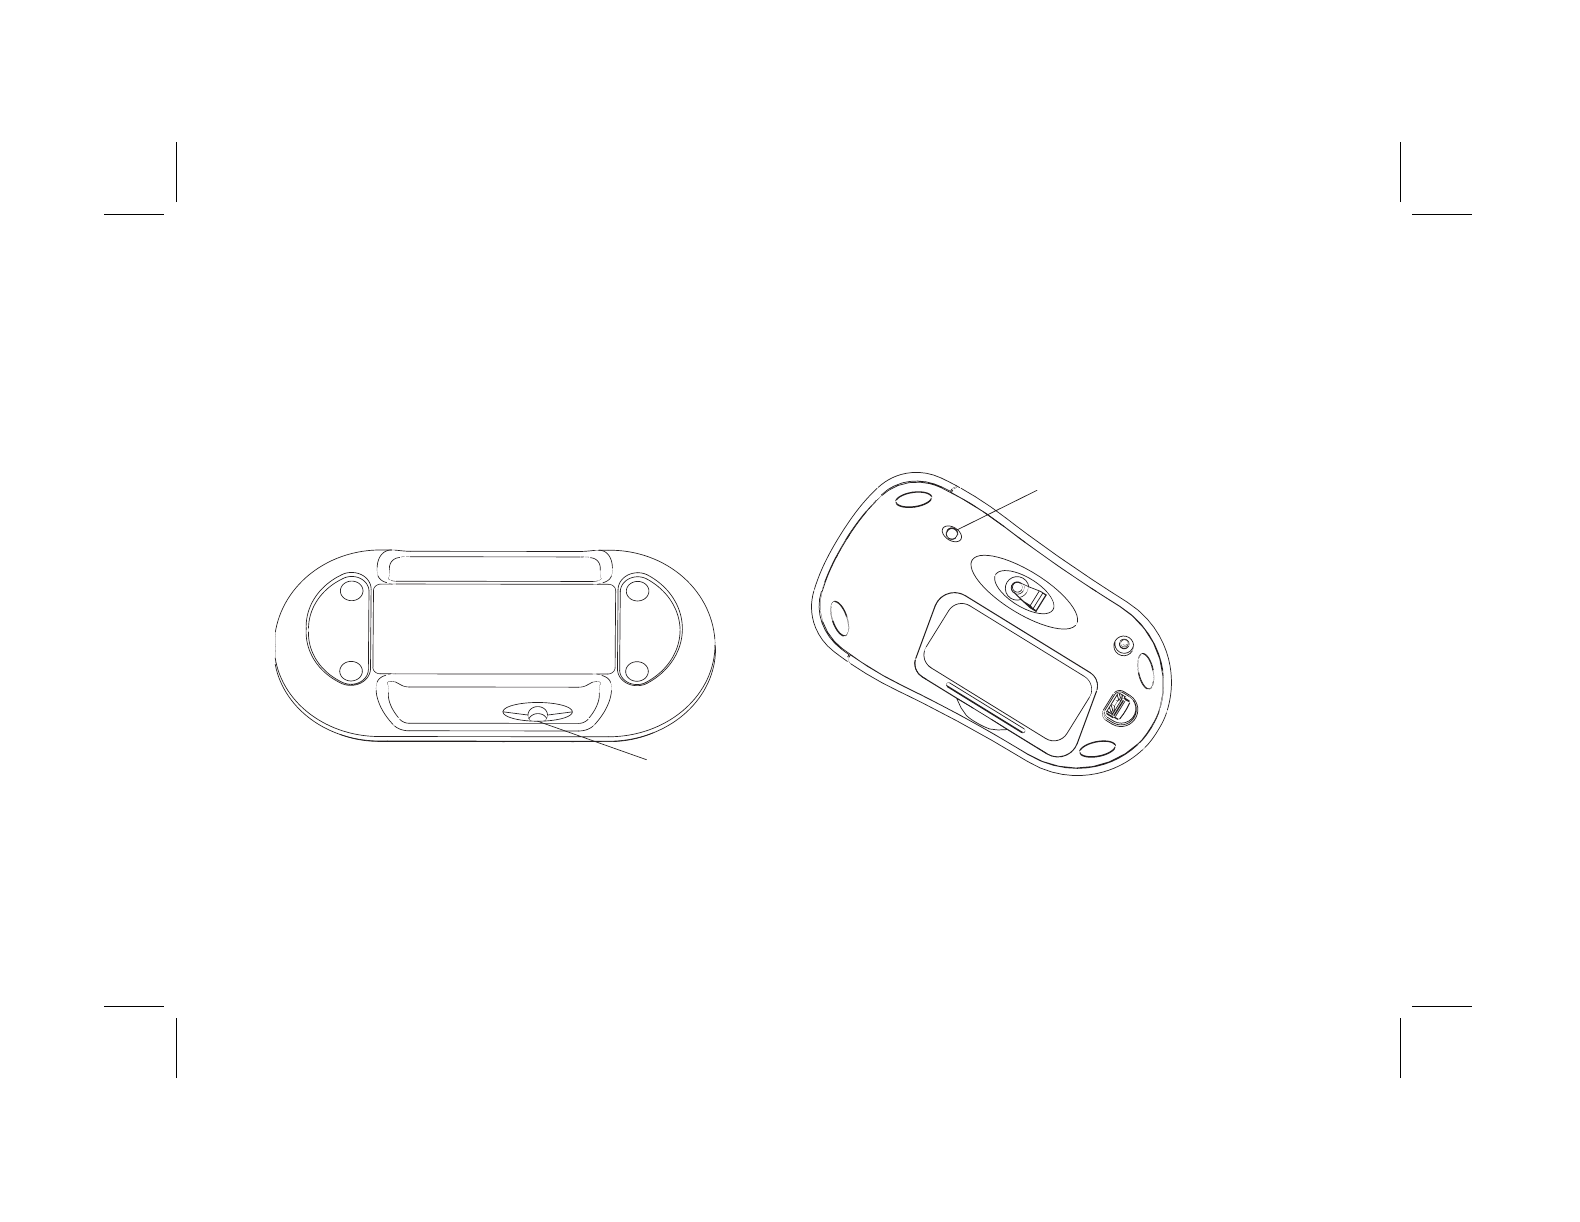
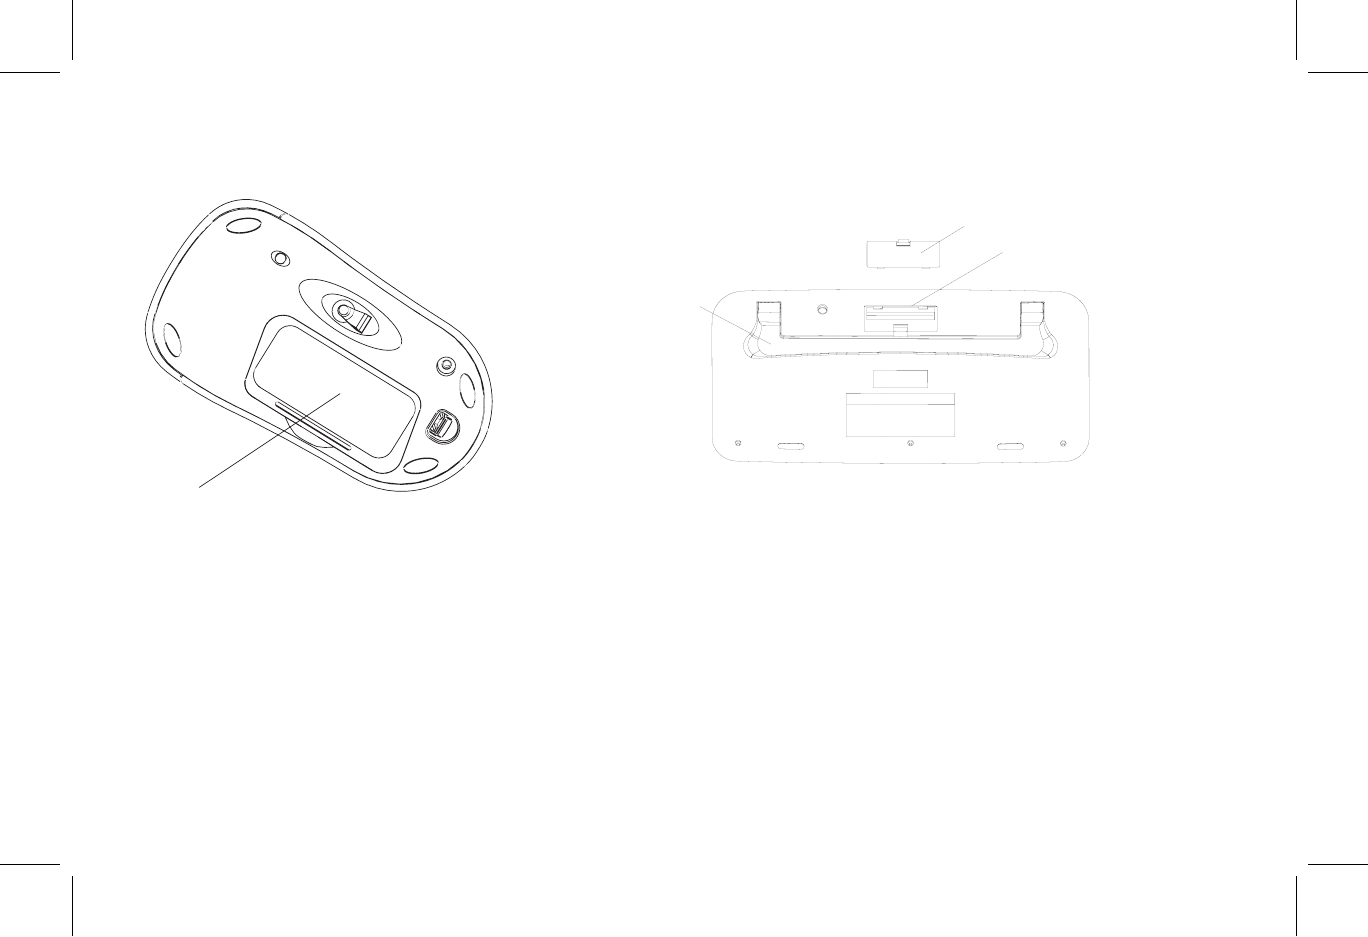
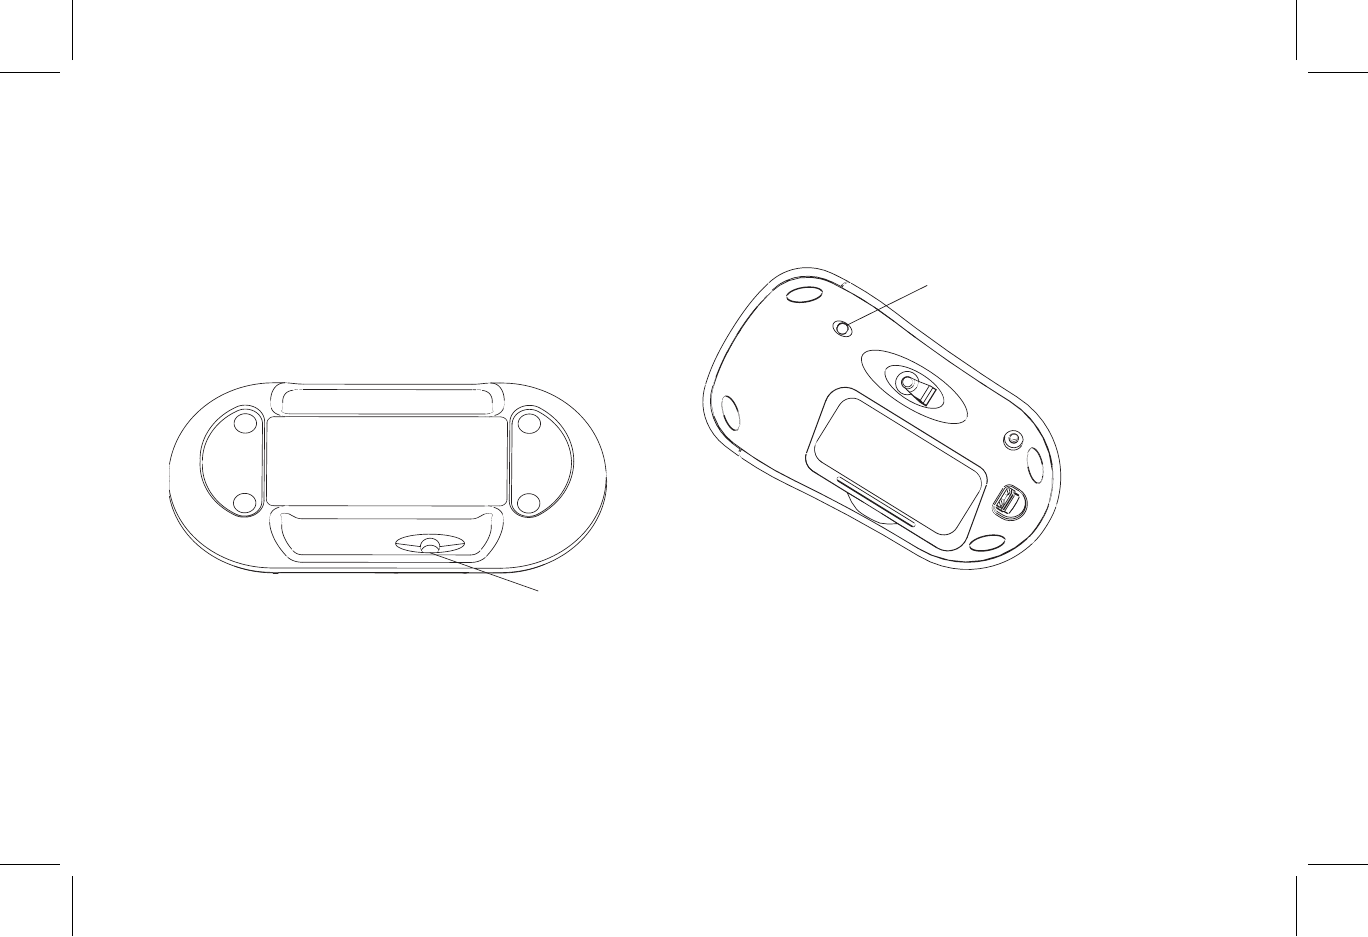
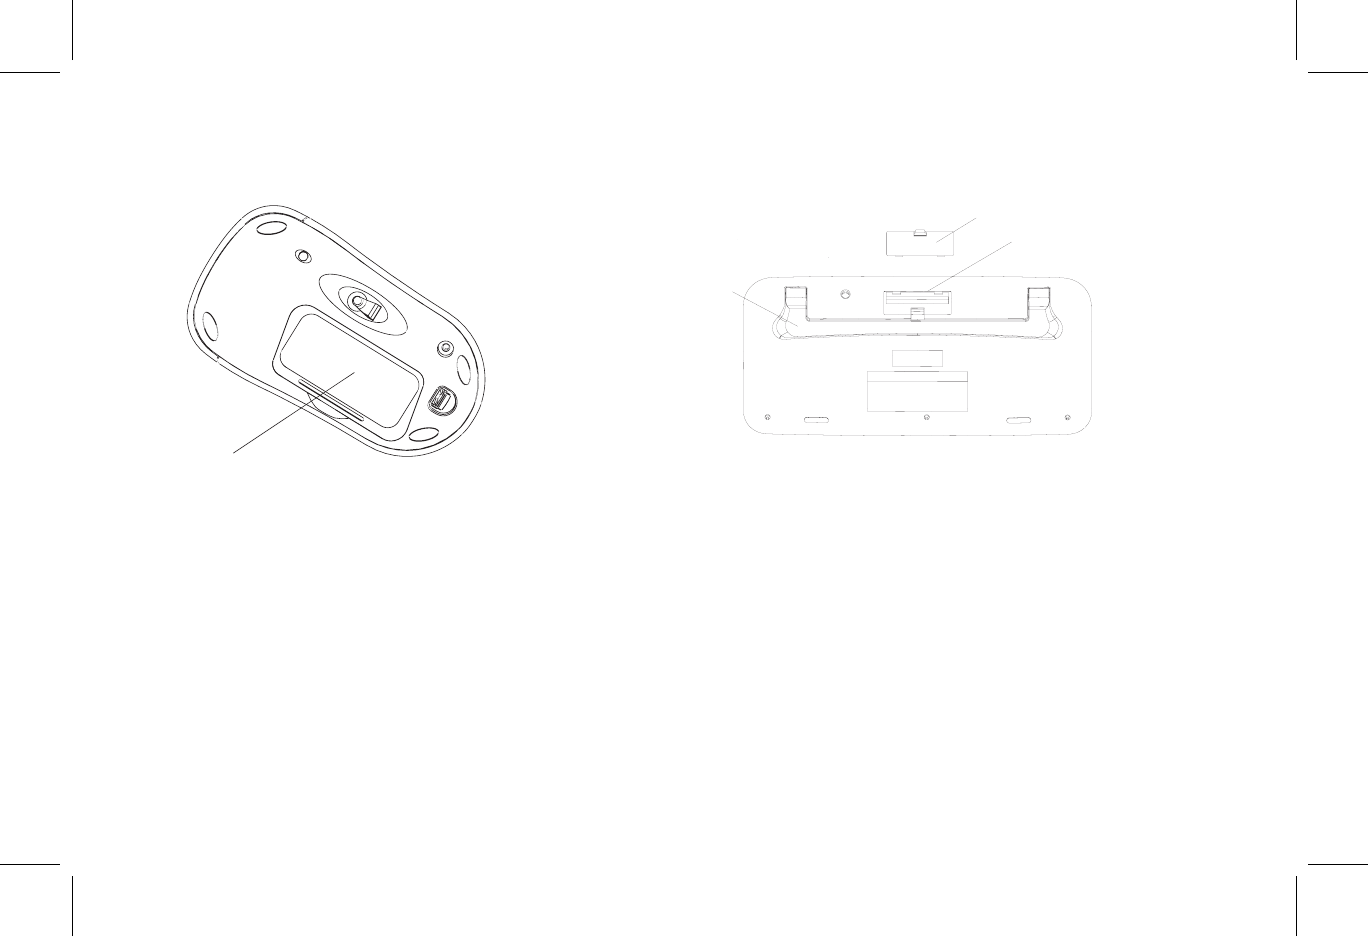
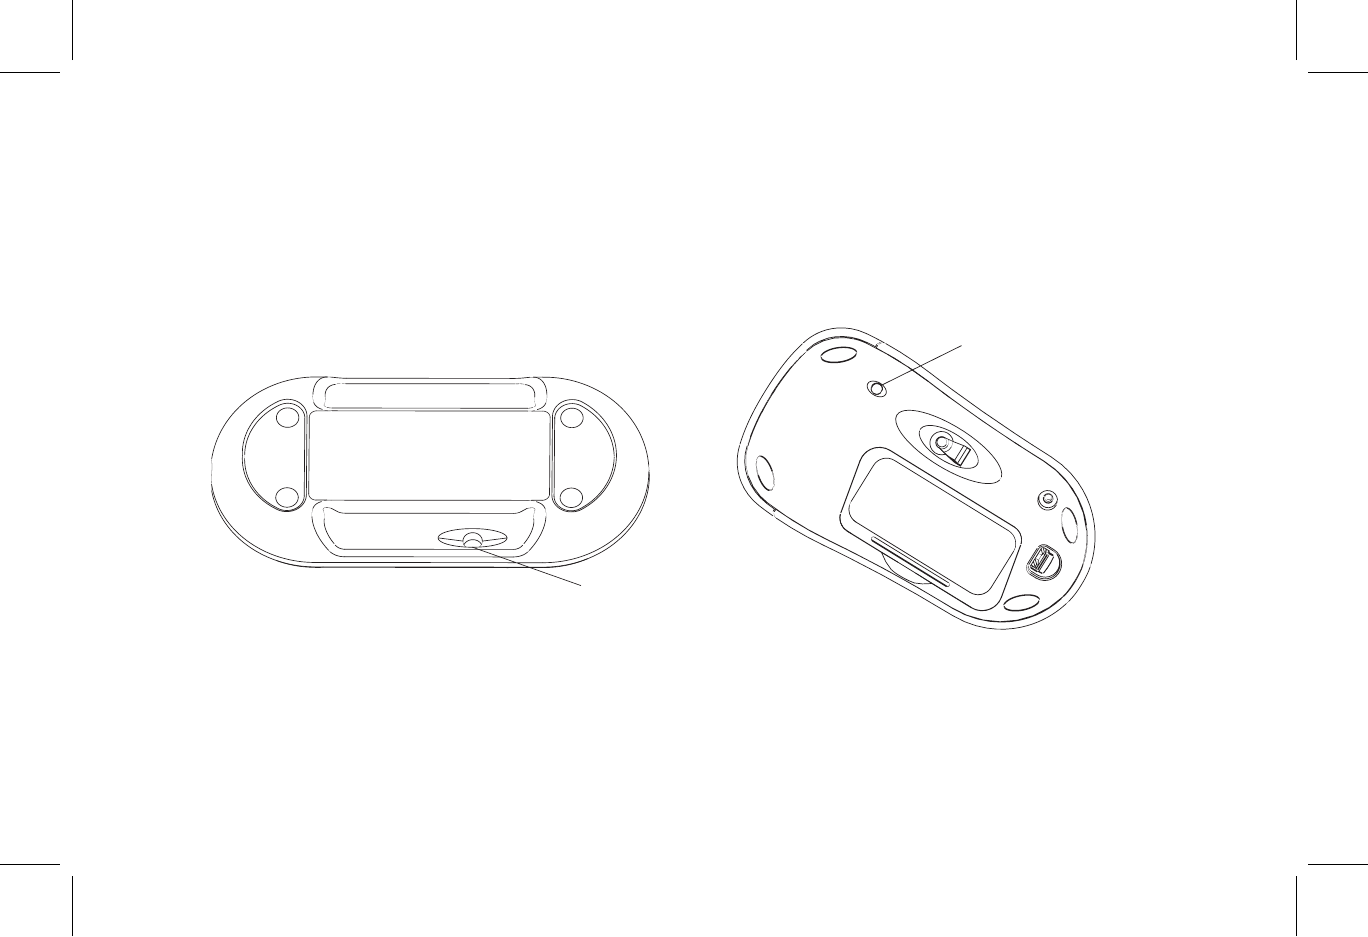
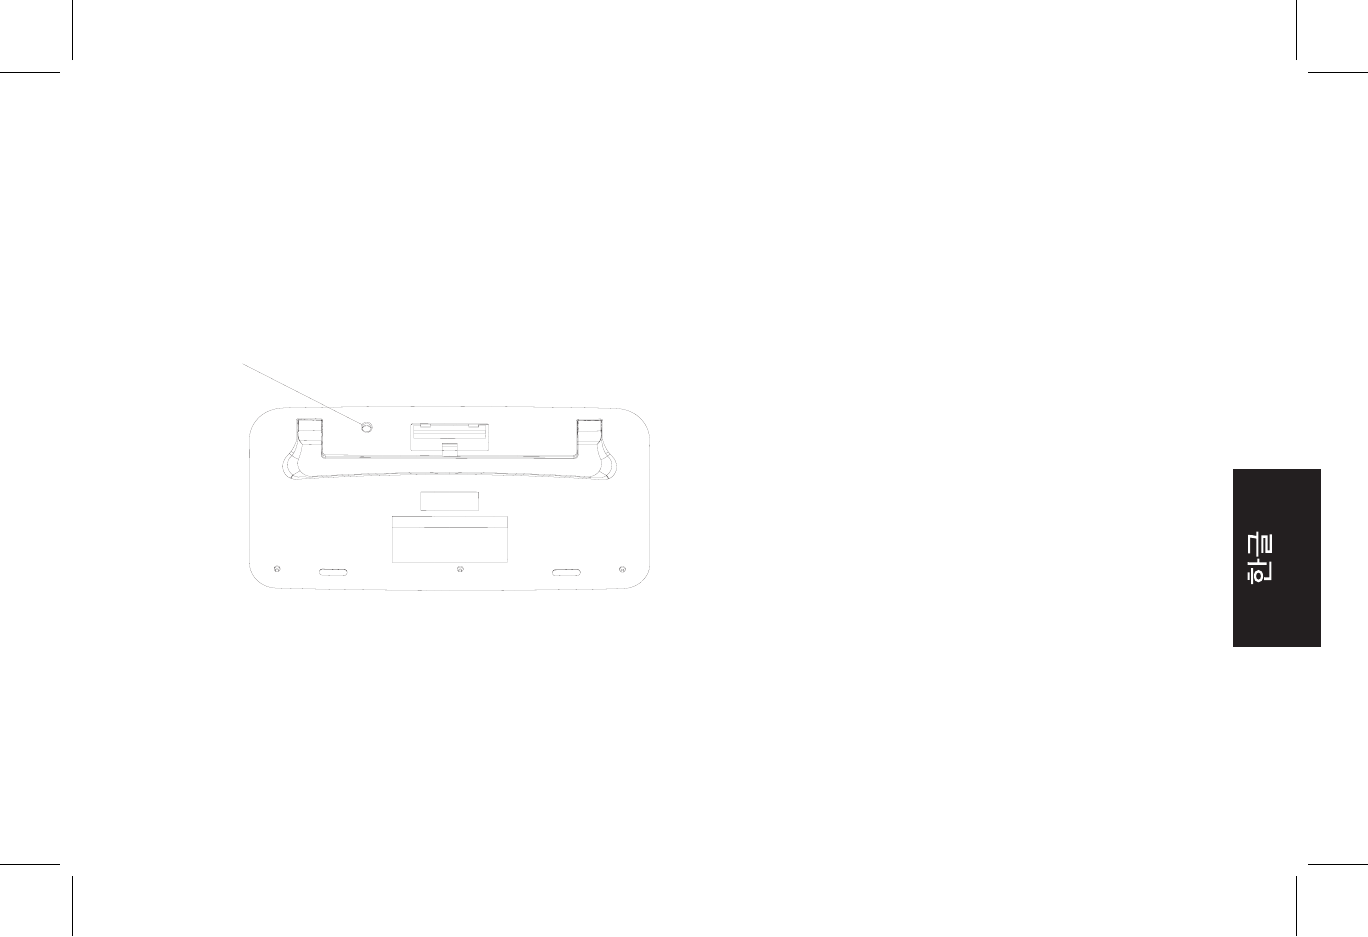
Getting the Mouse Ready
E
Note:
Do not use rechargeable batteries in the mouse.
Install the two AA alkaline batteries (provided) in
the wireless mouse: Remove the cover (E) from
the bottom of the mouse, and insert the batteries.
Note the battery icons, and make sure batteries
are placed in the correct direction. Snap the
cover back into place.
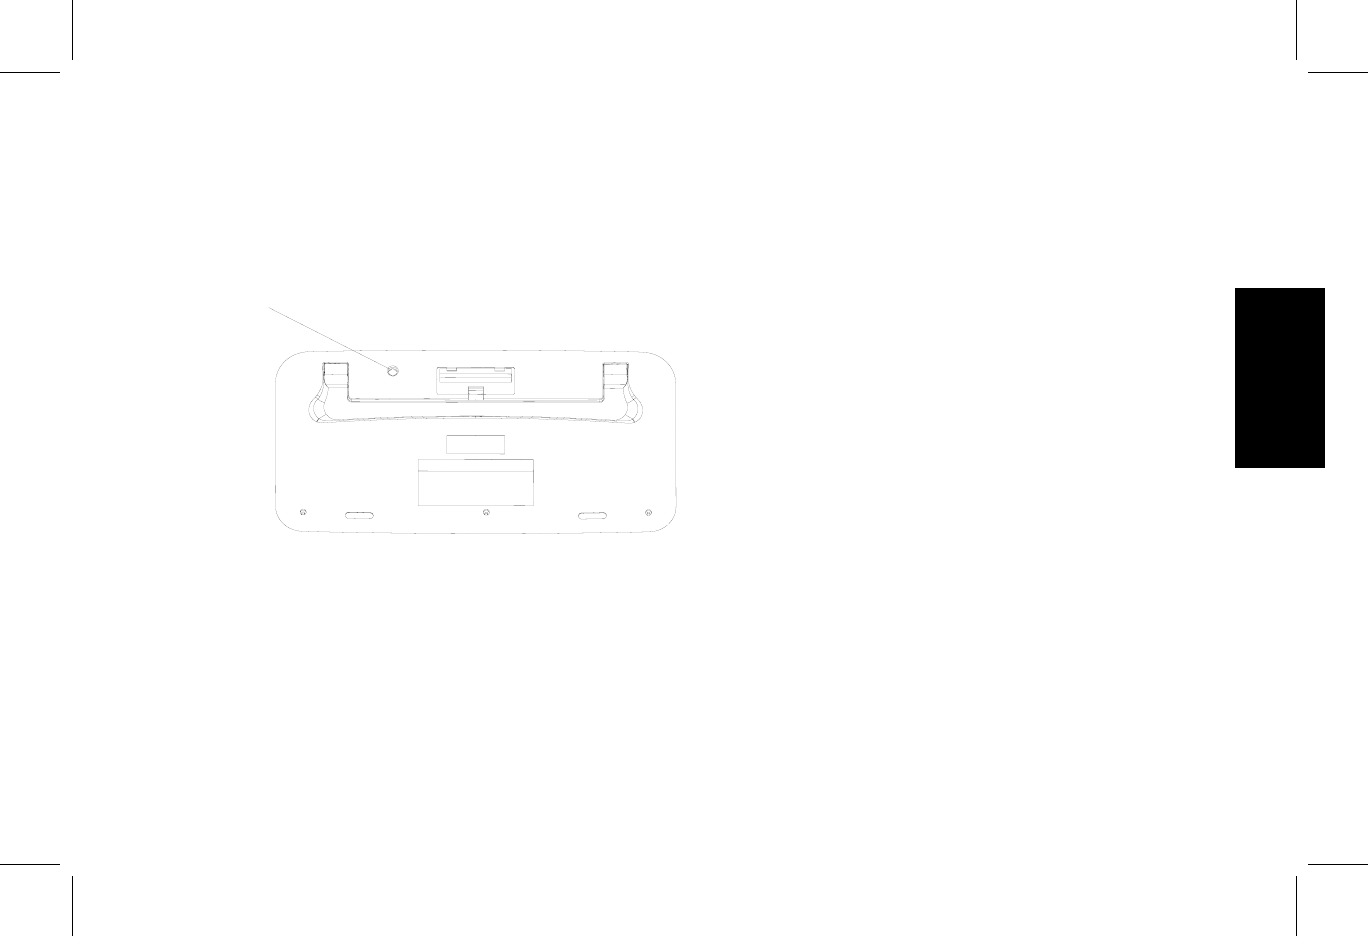
Getting the Keyboard Ready
GH
J
Note:
Do not use rechargeable batteries in the keyboard.
1 Install the two AA alkaline batteries (provided)
in the wireless keyboard: Remove the cover
(G) from the back of the keyboard, and insert
the batteries into the compartment (H). Note
the battery icons, and make sure batteries are
placed in the correct direction. Snap the cover
back into place.
2 Adjust the keyboard height by lifting the
adjustment bar (J).
Installing the Wireless Keyboard and Mouse Set
3
Filename: m2adwlsA.doc Title: Cover [multi-language]
Template: HP-Print2K.dot Author: WASSER Studios Last Saved By: WASSER, Inc.
Revision #: 35 Page: 3 of 8 Printed: 03/25/02 11:03 AM
English
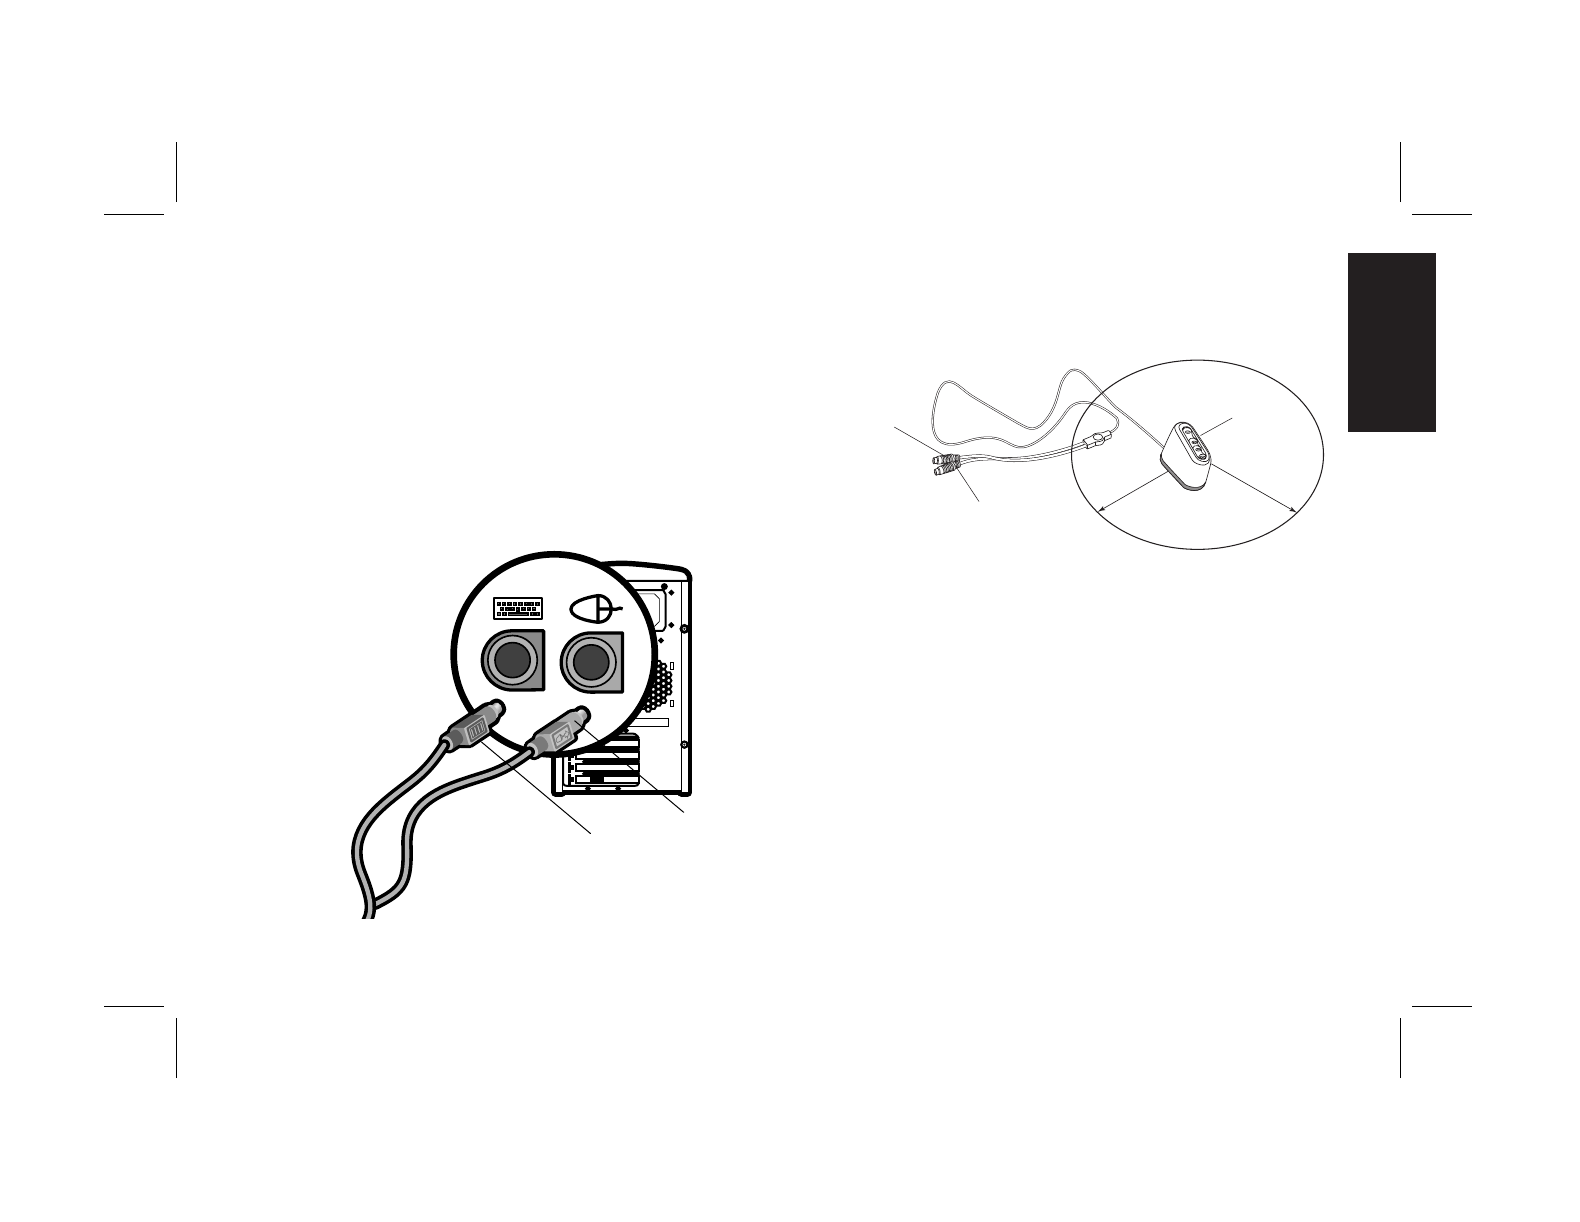
Getting the Receiver Ready
1 Turn off your computer, and disconnect the
power cord and modem/phone cable.
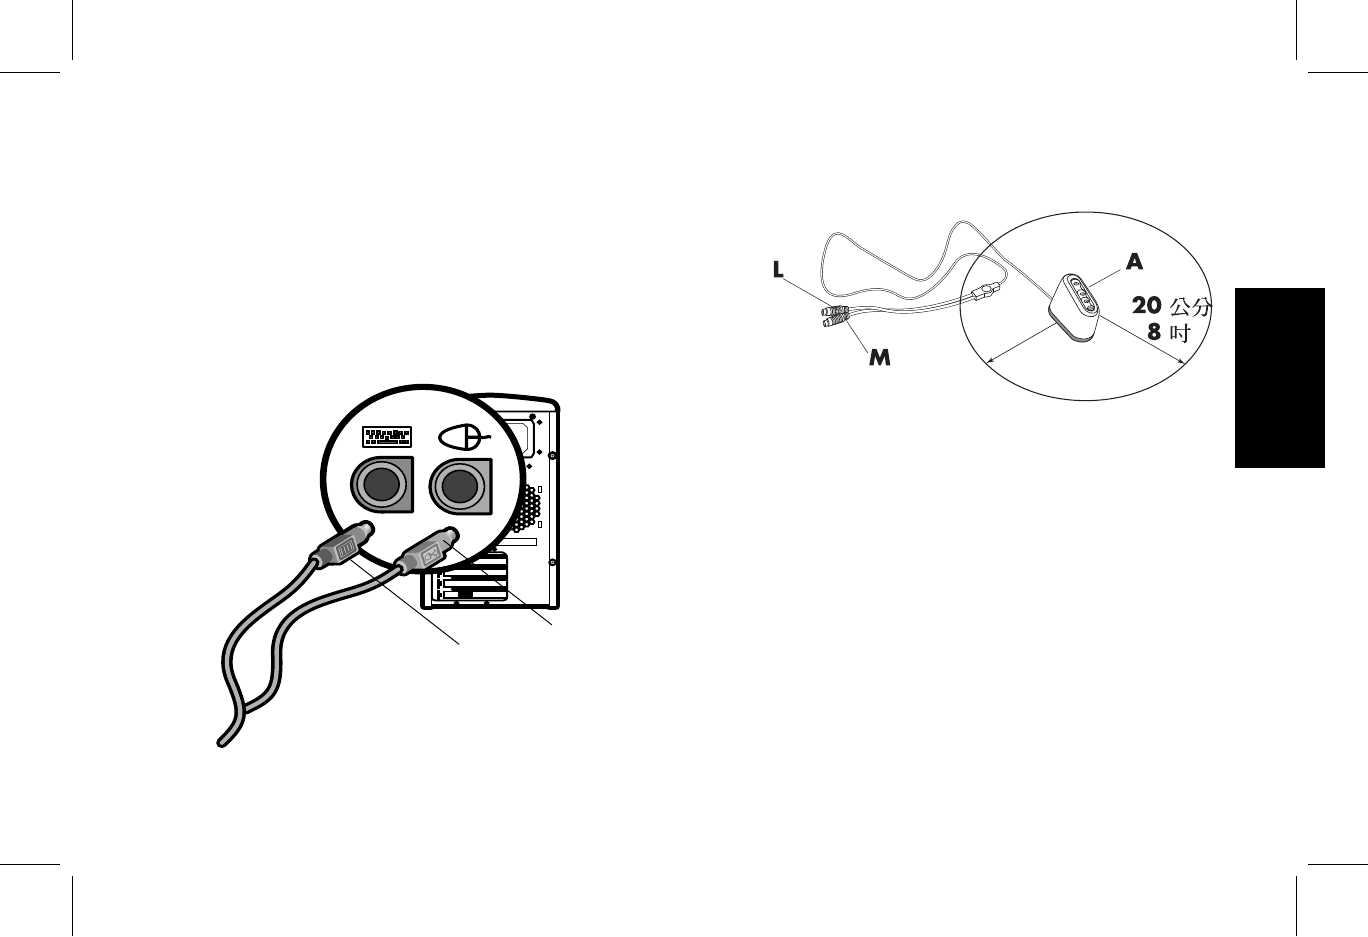
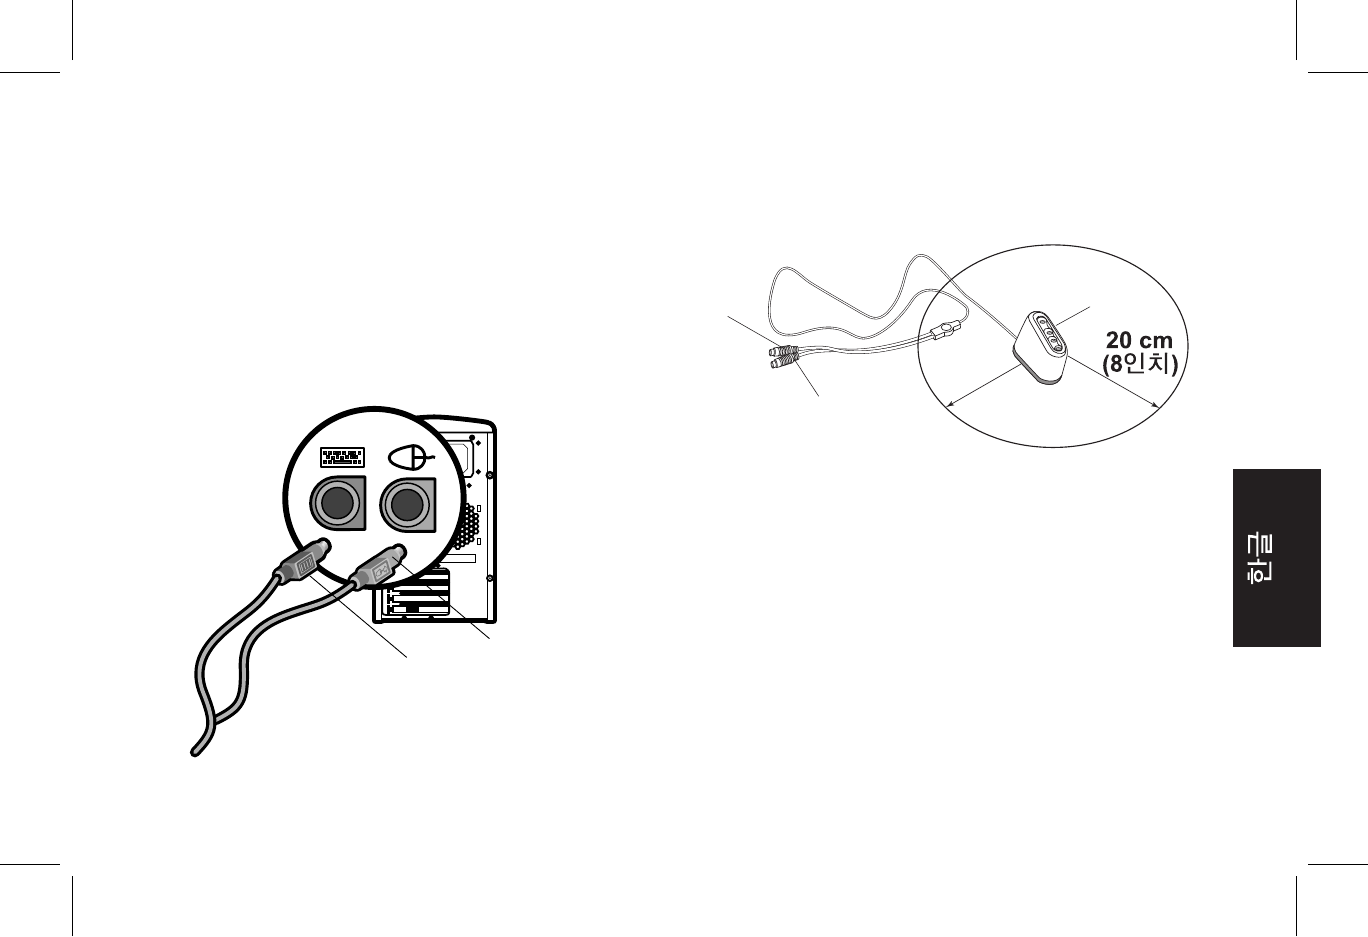
2 Connect the receiver plugs to the mouse PS/2
connector and to the keyboard PS/2 connector
on the back of the computer. Match the
connector colors: the keyboard connector (L) is
purple; the mouse connector (M) is green.
L
M
3 Position the receiver (A) 20 centimeters
(8 inches) away from other electrical devices.
20 cm
8 in
LA
M
4
HP Pavilion home PC
Filename: m2adwlsA.doc Title: Cover [multi-language]
Template: HP-Print2K.dot Author: WASSER Studios Last Saved By: WASSER, Inc.
Revision #: 35 Page: 4 of 8 Printed: 03/25/02 11:03 AM
Setting Up the Wireless Set
1 Connect the power cord and modem/phone
cable to the computer. Turn on the computer.
2 On the bottom of the receiver, press the
ID button (D) once. The top green activity light
will start to blink and will continue blinking
until the next two steps are completed or until
30 seconds pass.
D
3 On the bottom of the mouse, press the
ID button (F) once. The mouse contains
256 channels, or
IDs
, that are randomly
selected when you press the ID button. This
helps protect against interference from other
wireless mice in the same area.
F

Installing the Wireless Keyboard and Mouse Set
5
Filename: m2adwlsA.doc Title: Cover [multi-language]
Template: HP-Print2K.dot Author: WASSER Studios Last Saved By: WASSER, Inc.
Revision #: 35 Page: 5 of 8 Printed: 03/25/02 11:03 AM
English
4 On the bottom of the keyboard, press the
ID button (I) once. The keyboard contains
256 channels, or
IDs
, that are randomly
selected when you press the ID button. This
helps protect against interference from other
wireless keyboards in the same area.
I
Important:
The mouse goes into a sleep or suspend
mode after 20 minutes of inactivity. Click a button
on the mouse to wake it up. (Moving the mouse
does not wake it up.)
Installing the Low Battery
Indicator Software
If you have a Microsoft® Windows® Me or
Windows 98 operating system, you need to
install the
Microsoft Windows 98 & Me keyboard
software solution
CD that contains the low battery
indicator software.
Note:
Skip these steps if you have Windows XP.
To install the low battery indicator software:
1 Insert the Microsoft Windows 98 & Me
keyboard software solution CD into a CD-ROM
or DVD-ROM drive.
2 Double-click My Computer.
3 Double-click the drive icon that has the
inserted CD.
4 Double-click the RF_MMKBD file.
5 Click Setup.
6 When the installation is complete, click OK.
6
HP Pavilion home PC
Filename: m2adwlsA.doc Title: Cover [multi-language]
Template: HP-Print2K.dot Author: WASSER Studios Last Saved By: WASSER, Inc.
Revision #: 35 Page: 6 of 8 Printed: 03/25/02 11:03 AM
7 Remove the CD.
8 Restart the computer. Click Start, Shut
Down, select Restart from the drop-down
list, and then click OK.
Resetting ID Buttons When
Replacing Batteries
When the batteries are replaced in the mouse or
keyboard, the ID buttons on the bottom of each
unit in the wireless set must be reset to allow the
mouse and keyboard to work with the receiver.
To reset the ID buttons, the computer must be
turned on. You must press the receiver ID button
first and then press the mouse and keyboard ID
buttons. Refer to the steps in the section “Setting
Up the Wireless Set
.”
Note:
You can replace the batteries in the mouse and
keyboard without turning off the computer, but the
computer must be on to change the ID settings on
the three units.
Using the Wireless Set
The lights on the receiver indicate (from the top):
3 Receiver activity (The top light flashes when
you move or click the mouse or press any key
on the keyboard.)
3 Scroll lock on
3 Caps lock on
3 Number lock on
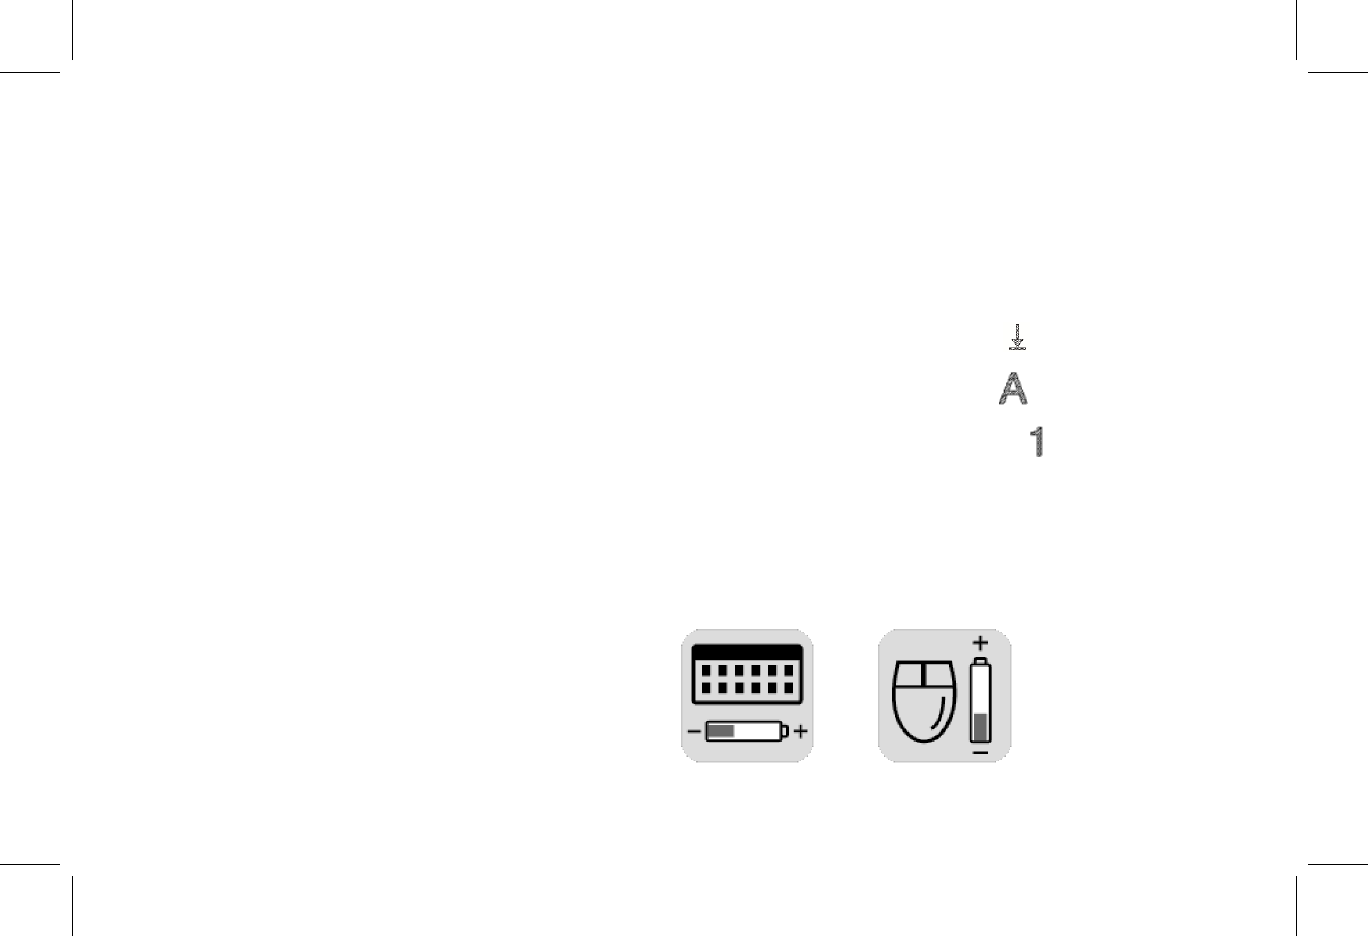
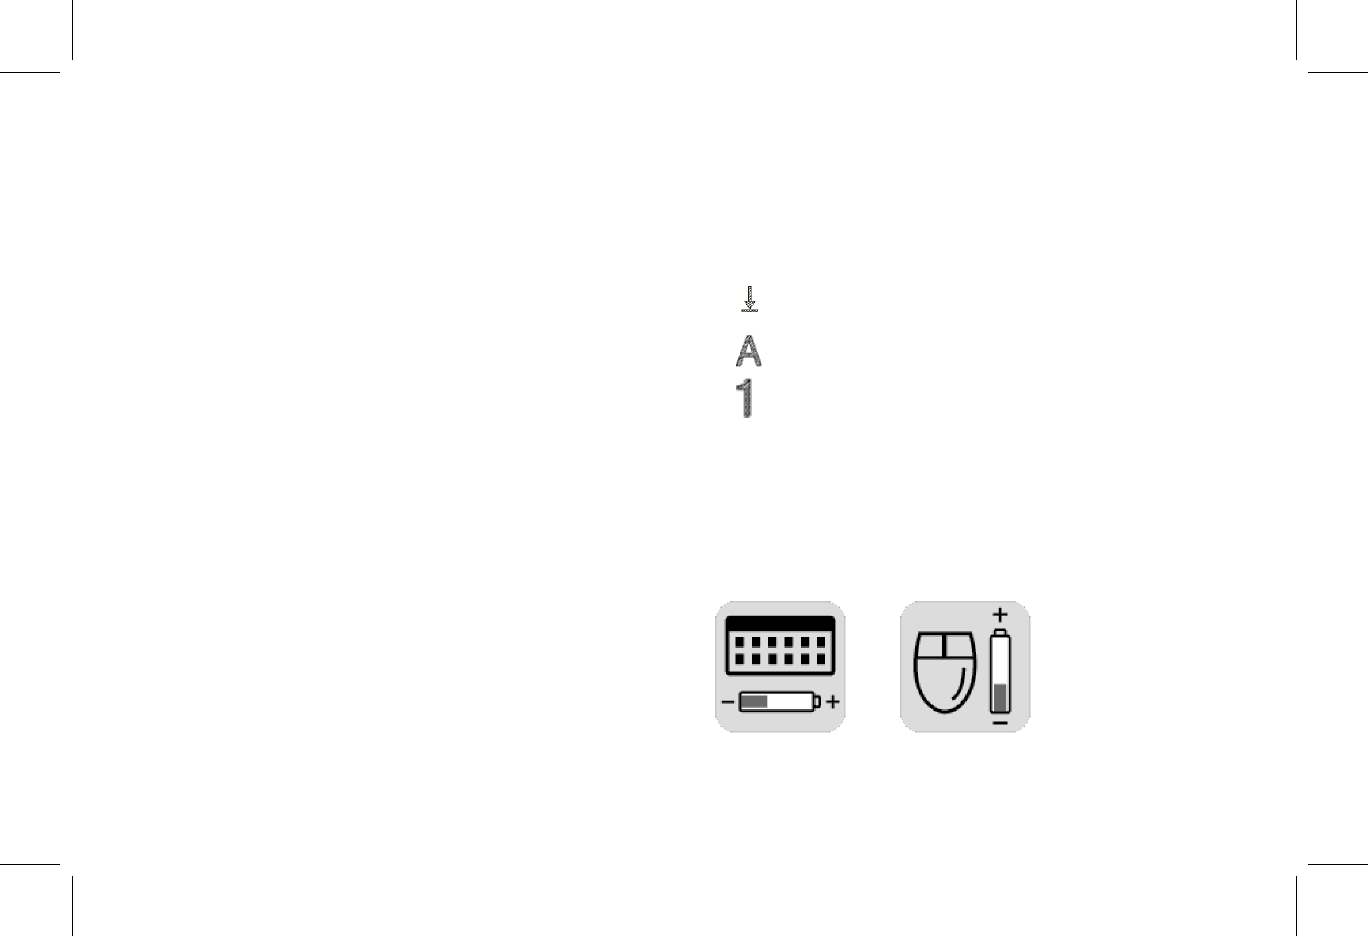
Low Battery Icons
The computer displays a keyboard icon or a
mouse icon in the upper-right corner of the screen
to indicate low batteries in that unit.

Installing the Wireless Keyboard and Mouse Set
7
Filename: m2adwlsA.doc Title: Cover [multi-language]
Template: HP-Print2K.dot Author: WASSER Studios Last Saved By: WASSER, Inc.
Revision #: 35 Page: 7 of 8 Printed: 03/25/02 11:03 AM
English
Troubleshooting
If the wireless mouse or keyboard does not work,
do the following:
3 Check that the receiver cable plugs go to
the PS/2 connectors for the mouse and the
keyboard on the back of the computer. Match
the connector colors.
3 Move or click a button on the mouse, or press
any key on the keyboard to see if the top light
on the receiver flashes. If it doesn’t, press the
receiver ID button once, press the mouse ID
button, and then press the keyboard ID button.
3 Make sure that the batteries are correctly
installed in the mouse and keyboard.
3 Position the receiver at least 20 centimeters
(8 inches) from other electrical devices
(computer, monitor, keyboard, etc.).
3 Check the surface where you are using the
receiver, mouse, and keyboard, and choose a
nonmetallic surface for better reception.
3 If you still experience reception problems, reset
the ID buttons of all three units by following
the steps in the section “Setting Up the
Wireless Set.”

8
HP Pavilion home PC
Filename: m2adwlsA.doc Title: Cover [multi-language]
Template: HP-Print2K.dot Author: WASSER Studios Last Saved By: WASSER, Inc.
Revision #: 35 Page: 8 of 8 Printed: 03/25/02 11:03 AM
安裝無線鍵盤滑鼠組 1
Filename: m2adwlsT_TC.doc Title: Cover [multi-language]
Template: HP-Print2K.dot Author: WASSER Studios Last Saved By: .
Revision #: 33 Page: 1 of 8 Printed: 03/22/02 10:57 AM
繁體中文
安裝無線鍵盤滑鼠組
無線鍵盤滑鼠組包含一個插在電腦上的接收
器 (A)、一個無線鍵盤 (B) 和一個無線滑鼠
(C)。
注意事項:本組無線產品與您的 HP Pavilion 家用電
腦相容,但不適用於其他電腦。
A
B
C
注意事項:您不用關掉電腦就可直接更換滑鼠和鍵
盤的電池,但要變更三個無線裝置的 ID
設定,電腦必須是開著的。
2HP Pavilion 家用電腦
Filename: m2adwlsT_TC.doc Title: Cover [multi-language]
Template: HP-Print2K.dot Author: WASSER Studios Last Saved By: .
Revision #: 33 Page: 2 of 8 Printed: 03/22/02 10:57 AM
備妥滑鼠
E
注意事項:請不要使用可充電式電池。
將附送的兩顆 AA 鹼性電池裝入無線滑鼠
中:拆下滑鼠底部的電池蓋 (E),然後裝上電
池。請按電池圖示所指示的方向將電池確實
裝上後,蓋回蓋子。
備妥鍵盤
G
H
J
注意事項:請不要使用可充電式電池。
1 將附送的兩顆 AA 鹼性電池裝入無線鍵盤
中:拆下鍵盤背面的電池蓋 (G),再將電池
裝入槽中 (H)。請按電池圖示所指示的方向
將電池確實裝上後,蓋回蓋子。
2 拉出腳架 (J) 以調整鍵盤高度。
安裝無線鍵盤滑鼠組 3
Filename: m2adwlsT_TC.doc Title: Cover [multi-language]
Template: HP-Print2K.dot Author: WASSER Studios Last Saved By: .
Revision #: 33 Page: 3 of 8 Printed: 03/22/02 10:57 AM
繁體中文
備妥接收器
1 關閉電腦並拔下電源線和數據機/電話連接
線。
2 將接收器的插頭接到電腦背面的滑鼠 PS/2
接頭和鍵盤 PS/2 接頭。對照接頭的顏
色:鍵盤接頭 (L) 為紫色;滑鼠接頭 (M)
為綠色。
L
M
3 接收器 (A) 需置於距離其他電子裝置 20 公
分(8吋)遠之處。
4HP Pavilion 家用電腦
Filename: m2adwlsT_TC.doc Title: Cover [multi-language]
Template: HP-Print2K.dot Author: WASSER Studios Last Saved By: .
Revision #: 33 Page: 4 of 8 Printed: 03/22/02 10:57 AM
裝接無線鍵盤滑鼠組
1 將電源線和數據機/電話連接線重新接回電
腦,啟動電腦。
2 按一下接收器底部的 ID 鈕 (D)。最上方的
綠色活動指示燈會開始不斷地閃動,燈號
會在完成下兩個步驟或過了 30 秒後停止
閃動。
D
3 按一下滑鼠底部的 ID 鈕 (F)。滑鼠內有
256 個頻道,或稱 ID。當您按下 ID 鈕時,
會隨機選取這些頻道,以避免受到附近其
他無線滑鼠的干擾。
F
安裝無線鍵盤滑鼠組 5
Filename: m2adwlsT_TC.doc Title: Cover [multi-language]
Template: HP-Print2K.dot Author: WASSER Studios Last Saved By: .
Revision #: 33 Page: 5 of 8 Printed: 03/22/02 10:57 AM
繁體中文
4 按一下鍵盤底部的 ID 鈕 (I)。鍵盤內有 256
個頻道,或稱 ID。當您按下 ID 鈕時,會隨
機選取這些頻道,以避免受到附近其他無
線鍵盤的干擾。
I
重要:滑鼠在停止使用 20 分鐘後,就會進入休眠或
暫停模式。按一下滑鼠按鈕就可以繼續使用
(光移動滑鼠並沒有任何作用)。
安裝電力不足指示軟體
如果您的作業系統是 Microsoft® Windows®
Me 或Windows 98,則您需要安裝包含電力
不足指示軟體的 Microsoft Windows 98 &
Me keyboard software solution CD
(Microsoft Windows 98 & Me 鍵盤軟體解決
方案 CD)。
注意事項:但如果是 Windows XP,則請跳過這些
步驟。
安裝電力不足指示軟體:
1 將「Microsoft Windows 98 & Me
keyboard software solution CD」放入 CD-
ROM 或DVD-ROM 光碟機中。
2 連按兩下 [我的電腦]。
3 連按兩下剛放入 CD 的光碟機圖示。
4 連按兩下 RF_MMKBD 檔。
5 按一下 [Setup](安裝)。
6 安裝完成時,按一下 [OK](確定)。
6HP Pavilion 家用電腦
Filename: m2adwlsT_TC.doc Title: Cover [multi-language]
Template: HP-Print2K.dot Author: WASSER Studios Last Saved By: .
Revision #: 33 Page: 6 of 8 Printed: 03/22/02 10:57 AM
7 取出 CD。
8 將電腦重新開機。按 [開始]、[關機],然後
在下拉式清單中選擇 [重新啟動電腦],並
按 [確定]。
更換電池時重新設定 ID 鈕
更換滑鼠或鍵盤的電池後,您需重新設定每
個無線裝置底部的 ID 鈕,好讓滑鼠和鍵盤能
搭配接收器運作。要重新設定 ID 鈕,電腦必
須是要開著的。您必須先按接受器的 ID 鈕,
然後再按滑鼠和鍵盤的 ID 鈕。請參考「裝接
無線鍵盤滑鼠組」一節中的設定步驟。
注意事項:您不用關掉電腦就可直接更換滑鼠和鍵
盤的電池,但要變更三個無線裝置的 ID
設定,電腦必須是開著的。
使用無線鍵盤滑鼠組
接收器上的指示燈分別代表(由上而下):
■ 接收器的活動(當您移動或點一下滑鼠、
或者按下鍵盤的按鍵時,最上面的燈便會
閃動)。
■ 捲動鎖定 (Scroll lock) 開啟
■ 大寫鎖定 (Caps lock) 開啟
■ 數字鎖定 (Number lock) 開啟
電池電力不足圖示
當電腦畫面右上角出現鍵盤或滑鼠圖示時,
表示該裝置的電池電力不足。

安裝無線鍵盤滑鼠組 7
Filename: m2adwlsT_TC.doc Title: Cover [multi-language]
Template: HP-Print2K.dot Author: WASSER Studios Last Saved By: .
Revision #: 33 Page: 7 of 8 Printed: 03/22/02 10:57 AM
繁體中文
疑難排解
如果無線滑鼠或鍵盤無法正常運作,請執行
下列各項:
■ 檢查接收器的連接線是否已插入電腦背面
的滑鼠與鍵盤 PS/2 接頭。對照接頭的顏
色,確認是否誤接。
■ 移動或按下滑鼠按鈕,或按下鍵盤上的任
何按鍵,看看接收器最上方的指示燈是否
會閃動。 如果不會閃動,請先按下接收器
的ID 鈕,再按滑鼠的 ID 鈕,最後按下鍵
盤的 ID 鈕。
■ 請確認滑鼠和鍵盤上的電池都已裝好。
■ 將接收器置於距離其他電子裝置(如電
腦、顯示器、鍵盤等)至少 20 公分(8
吋)遠之處。
■ 檢查使用接收器、滑鼠和鍵盤的表面;非
金屬表面的接收效果較佳。
■ 如果您還有接收方面的問題,請按「裝接
無線鍵盤滑鼠組」一節中的設定步驟,重
新設定這三個無線裝置的 ID 鈕。

8HP Pavilion 家用電腦
Filename: m2adwlsT_TC.doc Title: Cover [multi-language]
Template: HP-Print2K.dot Author: WASSER Studios Last Saved By: .
Revision #: 33 Page: 8 of 8 Printed: 03/22/02 10:57 AM
무선
키보드
및
마우스
세트
설치
1
Filename: m2adwlsO.doc Title: Cover [multi-language]
Template: HP-Print2K.dot Author: WASSER Studios Last Saved By: Edward, Kim
Revision #: 23 Page: 1 of 1 Printed: 03/22/02 11:51 AM
무선 키보드 및 마우스 세트 설치
무선 키보드 및 마우스 세트는 컴퓨터에
연결하는 수신기(A)와 무선 키보드(B) 그리고
무선 마우스(C)로 이루어져 있습니다.
참고:
이
무선
세트는
HP Pavilion
홈
PC
와만
호환되고
다른
컴퓨터에는
사용할
수
없습니다
.
A
B
C
참고:
컴퓨터의
전원을
끄지
않고도
마우스와
키보드의
건전지를
교체할
수
있지만
,
컴퓨터가
켜져
있을
경우에만
세
장치의
ID
설정을
변경할
수
있습니다
.
2
HP Pavilion
홈
PC
Filename: m2adwlsO.doc Title: Cover [multi-language]
Template: HP-Print2K.dot Author: WASSER Studios Last Saved By: Edward, Kim
Revision #: 23 Page: 2 of 2 Printed: 03/22/02 11:51 AM
마우스 사용 준비
E
참고:
마우스에
충전식
배터리를
사용하지
마십시오
.
제공된 두 개의 AA 알카라인 건전지를 무선
마우스에 넣습니다. 마우스 뒷면의 뚜껑(E)을
벗기고 배터리를 넣습니다. 배터리 모양에
주의하여 배터리가 올바른 위치에 있는지
확인합니다. 뚜껑을 맞추어서 닫습니다.
키보드 사용 준비
G
H
J
참고:
키보드에
충전식
배터리를
사용하지
마십시오
.
1 제공된 두 개의 AA 알카라인 건전지를 무선
키보드에 넣습니다. 이를 위해 키보드 뒷면의
뚜껑(G)을 벗기고 (H)에 건전지를 넣습니다.
배터리 모양에 주의하여 배터리가 올바른
위치에 있는지 확인합니다. 뚜껑을 맞추어서
닫습니다.
2 조정 막대(J)를 들어 올려 키보드 높이를
조정합니다
무선
키보드
및
마우스
세트
설치
3
Filename: m2adwlsO.doc Title: Cover [multi-language]
Template: HP-Print2K.dot Author: WASSER Studios Last Saved By: Edward, Kim
Revision #: 23 Page: 3 of 3 Printed: 03/22/02 11:51 AM
수신기 사용 준비
1 컴퓨터를 끄고 전원 코드와 모뎀/전화
케이블을 뺍니다.
2 수신기 플러그를 컴퓨터의 뒤쪽에 있는 PS/2
마우스 커넥터와 PS/2 키보드 커넥터에
연결합니다. 이 때 커넥터 색상을 일치시켜야
합니다. 키보드 커넥터(L)는 보라색이고
마우스 커넥터(M)는 녹색입니다.
LM
3 수신기(A)를 다른 전기 장치에서
20cm(8 인치) 이상 떨어진 곳에 놓으십시오.
LA
M
4
HP Pavilion
홈
PC
Filename: m2adwlsO.doc Title: Cover [multi-language]
Template: HP-Print2K.dot Author: WASSER Studios Last Saved By: Edward, Kim
Revision #: 23 Page: 4 of 4 Printed: 03/22/02 11:51 AM
무선 세트 설치
1 컴퓨터에 전원 코드와 모뎀/전화 케이블을
연결합니다. 컴퓨터를 켭니다.
2 수신기 뒷면의 ID 단추(D)를 한번 누릅니다.
맨 위의 녹색등이 깜박거리고 다음 두 단계가
완료되거나 30 초가 경과될 때까지 계속
깜박거립니다.
D
3 마우스 뒷면의 ID 단추(F)를 한번 누릅니다.
마우스에는 256 개의 채널 또는 ID 가 있으며,
ID 단추를 누를 때 불규칙적으로 선택됩니다.
이는 같은 지역에서 다른 무선
마우스들로부터의 간섭을 피하기 위한
것입니다.
F
무선
키보드
및
마우스
세트
설치
5
Filename: m2adwlsO.doc Title: Cover [multi-language]
Template: HP-Print2K.dot Author: WASSER Studios Last Saved By: Edward, Kim
Revision #: 23 Page: 5 of 5 Printed: 03/22/02 11:51 AM
4 키보드 뒷면의 ID 단추(I)를 한번 누릅니다.
키보드에는 256 개의 채널 또는 ID 가 있으며,
ID 단추를 누를 때 불규칙적으로 선택됩니다.
이는 같은 지역에서 다른 무선
키보드들로부터의 간섭을 피하기 위한
것입니다.
I
중요:
마우스를
20
분
동안
사용하지
않으면
대기
또는
일시
중단
모드로
됩니다
.
마우스
단추를
클릭하면
다시
사용할
수
있습니다
. (
마우스를
움직이는
것만으로는
사용할
수
없습니다
.)
배터리 부족 표시기 소프트웨어 설치
Microsoft® Windows® Me 또는 Windows 98
운영 체제를 사용중인 경우, 배터리 부족
소프트웨어 표시기 소프트웨어가 들어 있는
Microsoft Windows 98 & Me keyboard software
solution CD 를 설치해야 할 수도 있습니다.
참고: Windows XP
가
설치된
경우에는
이
단계를
건너
뛰십시오
.
배터리 부족 표시기 소프트웨어를 설치하려면,
1 Microsoft Windows 98 & Me keyboard
software solution CD(Microsoft Windows 98
및 Me 용 키보드 소프트웨어 솔루션 CD)를
CD-ROM 이나 DVD-ROM 드라이브에
넣습니다.
2 내 컴퓨터를 두 번 클릭합니다.
3 삽입된 CD 가 있는 드라이브 아이콘을 두 번
클릭합니다.
4 RF_MMKBD 파일을 두 번 클릭합니다.
5 Setup(설치)을 클릭합니다.
6
HP Pavilion
홈
PC
Filename: m2adwlsO.doc Title: Cover [multi-language]
Template: HP-Print2K.dot Author: WASSER Studios Last Saved By: Edward, Kim
Revision #: 23 Page: 6 of 6 Printed: 03/22/02 11:51 AM
6 설치가 끝난 다음 확인을 누릅니다.
7 CD 를 제거합니다.
8 컴퓨터를 다시 시작합니다. 시작, 종료를
클릭하고 목록에서 재시작을 선택한 후
확인을 클릭합니다.
배터리를 교환할 때 ID 단추 재설정
마우스나 키보드의 배터리를 교환할 때, 각 무선
세트 장치의 뒷면에 있는 ID 단추를 재설정해야
마우스와 키보드가 수신기와 함께 작동합니다.
ID 단추는 컴퓨터가 켜져 있어야만 재설정할 수
있습니다. 반드시 수신기 ID 단추를 먼저 누르고
마우스와 키보드의 ID 단추를 눌러야 합니다.
"무선 세트 설치" 절의 단계를 따르십시오.
참고
: 컴퓨터의
전원을
끄지
않고도
마우스와
키보드의
건전지를
교체할
수
있지만
,
컴퓨터가
켜져
있을
경우에만
세
장치의
ID
설정을
변경할
수
있습니다
.
무선 세트 사용
수신기의 표시등은 위쪽부터 다음을 나타냅니다.
■ 수신기 활동(마우스를 움직이거나 키보드의
키를 누르면 맨 위의 표시등이 깜박입니다.)
■ - Scroll Lock 키의 사용 여부를 나타냅니다.
■ - Caps Lock 키의 사용 여부를 나타냅니다.
■ - Num Lock 키의 사용 여부를 나타냅니다.
배터리 부족 아이콘
컴퓨터는 해당 장치의 배터리가 부족함을
나타내기 위해 화면의 오른쪽 위에 키보드
아이콘이나 마우스 아이콘을 표시합니다.

무선
키보드
및
마우스
세트
설치
7
Filename: m2adwlsO.doc Title: Cover [multi-language]
Template: HP-Print2K.dot Author: WASSER Studios Last Saved By: Edward, Kim
Revision #: 23 Page: 7 of 7 Printed: 03/22/02 11:51 AM
문제 해결
무선 마우스나 키보드가 작동하지 않을 경우
다음 사항을 확인하십시오.
■ 수신기의 케이블 플러그가 컴퓨터의 뒷면에
있는 마우스 및 키보드용 PS/2 커넥터에
연결되었는지 확인합니다. 이 때 커넥터
색상을 일치시켜야 합니다.
■ 수신기에 있는 맨 위의 표시등이 깜박일 경우
마우스를 움직이거나 키보드의 키를 눌러
봅니다. 작동하지 않을 경우, 수신기 ID
단추를 먼저 누른 후에, 마우스 ID 단추를
누르고 키보드 ID 단추를 누릅니다.
■ 마우스와 키보드에 배터리가 있는지
확인합니다.
■ 수신기를 다른 전기 장치(컴퓨터, 모니터,
키보드 등)로부터 20cm(8 인치) 이상 떨어진
곳에 놓습니다.
■ 수신기, 마우스 및 키보드를 사용중인 표면을
확인합니다. 수신이 잘 되도록 하려면 비금속
표면을 선택하십시오.
■ 수신에 문제가 있을 경우, "무선 세트 설치"
절의 단계를 따라 세 장치의 ID 단추를
재설정합니다.

Filename: BacKCover.doc Title: Cover [multi-language]
Template: HP-Print2K.dot Author: WASSER Studios Last Saved By: WASSER, Inc.
Revision #: 2 Page: 2 of 2 Printed: 03/14/02 03:31 PM
Part Number: 3100505321