Behavior Tech Computer MSM993C Wireless Mouse User Manual M993U C QG E v1 0
Behavior Tech Computer Corporation Wireless Mouse M993U C QG E v1 0
Users Manual
M993U/C QG 英
3100506070 v1.0
M
M9
99
93
3C
C
W
Wi
ir
re
el
le
es
ss
s
M
Mo
ou
us
se
e
Q
Qu
ui
ic
ck
k
I
In
ns
st
ta
al
ll
la
at
ti
io
on
n
G
Gu
ui
id
de
e
Congratulations on your purchasing this exciting RF optical rechargeable mouse. This multi-function
optical office mouse is with great features powerful office application functions and quick access to
Internet and Multimedia menus. All those human-oriented characteristics make you feel more
comfortable and efficient while surfing on the website or using applications. The most special thing of this
mouse is the “3 in 1 receiver set”: receiver + mouse recharger + battery recharger. This thoughtful
design makes the user save more desk space then ever and save money on batteries. After the
MouseMaestro driver installed, you will have “Quick Jump” function by clicking the “Office Button” to call
the most often-used functions in Internet, Multimedia, Office, and other applications. Please install the
MouseMaestro Input Device driver to find more significant functions!
System Requirements
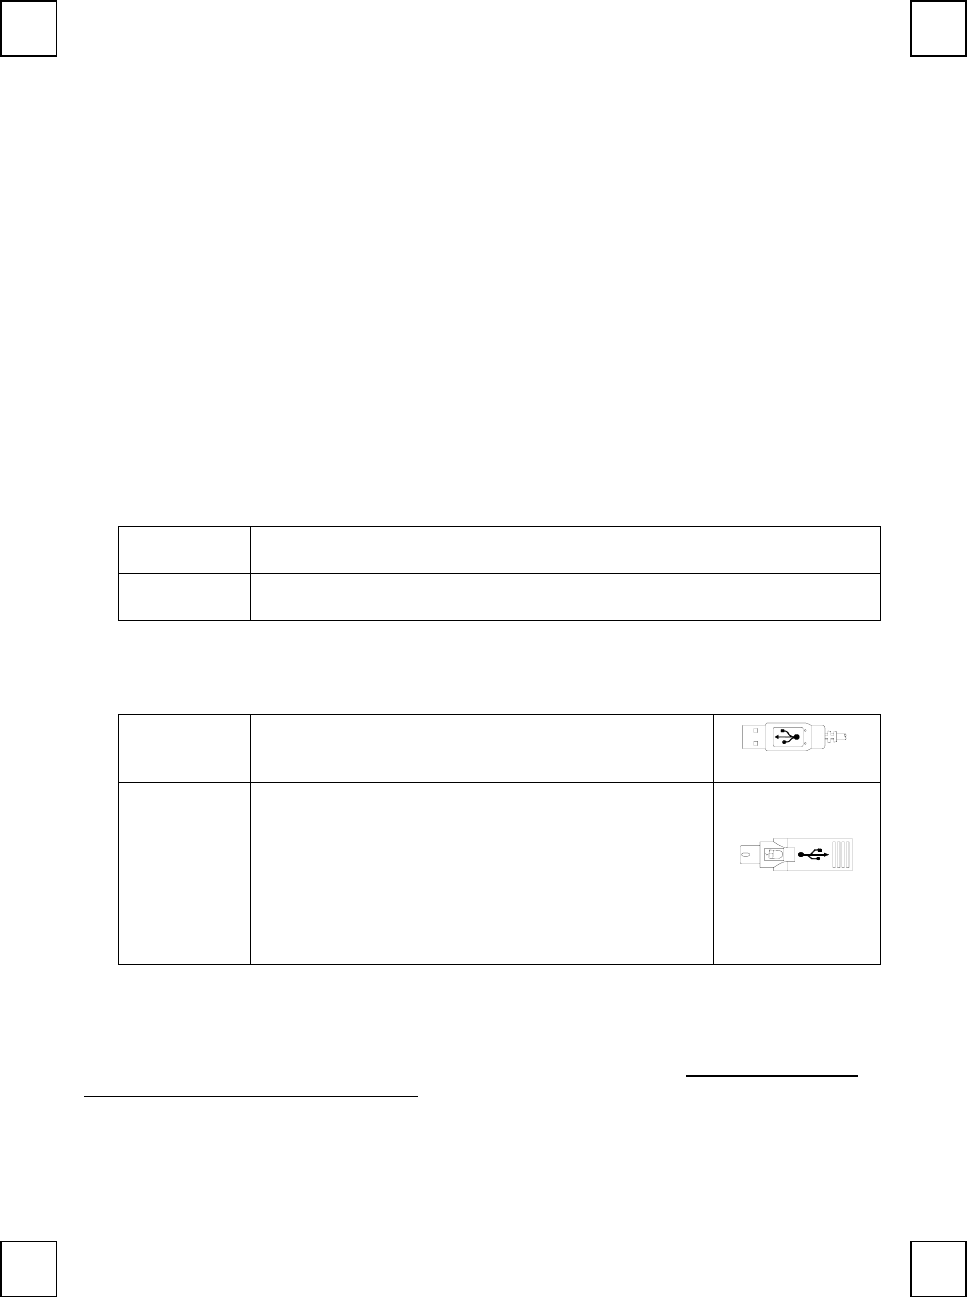
1. Available PS/2 or USB port.
2. Operating system:
USB Model Windows® 98, Windows® ME, Windows® 2000 or Windows® XP operating
system
Combo Model Microsoft® Windows® 98, Windows® ME, Windows® 2000 or Windows® XP
operating system
Hardware Installation
Connect the mouse onto Your PC System
USB Model Just directly plug the USB connector into the USB port on
PC.
USB Connector
Combo Model
(USB Model +
USB to PS/2
adapter)
For PS/2 port system, please use the “Combo Adapter”
(USB to PS/2 adapter). This adapter helps you a lot on
solving the USB to PS/2 port issue.
1. Turn off the PC system first.
2. Connect the combo adaptor onto the USB connector.
3. Directly plug the PS/2 side of the combo adaptor into
the PC PS/2 mouse port.
4. Turn on the PC system.
Combo Connector
(USB to PS/2 Adaptor)
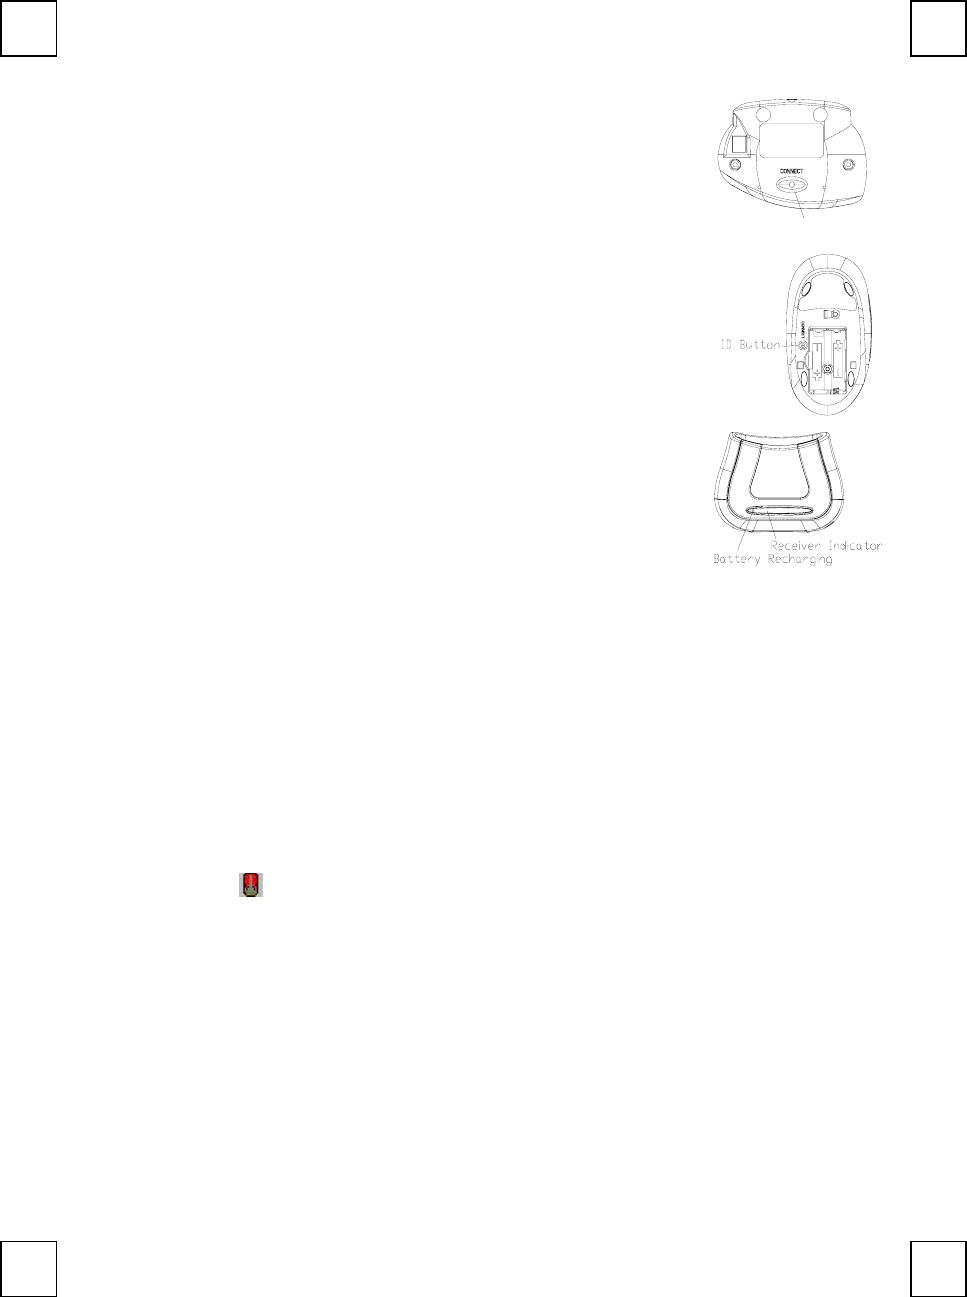
ID Setting
This wireless optical mouse contains 4095 sets ID and 2 channels. The ID-recognition function helps to
protect against interference from other RF products in the same environment. Remember to reset ID
when other RF products affect your mouse.
The word CONNECT labels the ID button on each unit.
The LED in front of the rechargeable set shows connecting condition.
The mouse should be able to work after you first install it. If it can’t work, please follow the steps
below to process ID setting of this RF optical rechargeable mouse.
M993U/C QG 英
3100506070 v1.0
1. Firstly, press the ID button on the bottom of the receiver once.
The receiver indicator at the mouse front side will to wait the signal from the
mouse.
ID BUTTON
2. Then press the ID button on the bottom of the mouse once.
3. The receiver indicator at the rechargeable set front side will flash quickly
and then stop to show the connecting status.
Note:
1. You must follow the procedure above to complete ID setting.
2. The whole procedure should be completed within 60 seconds, or you will need to start again.
Software Installation
1. Insert the driver CD into your CD-ROM.
2. Run “SetupKey.exe”.
3. Then follow the on-screen instruction to install the driver. The default install path is set to c:\Program
Files\MMaestro. You have the option to change the install path during set-up.
4. The driver icon will show on Windows system tray when the installation is complete. The
operating system needs to restart.
Note: Before installing the MouseMaestro input device driver for USB optical mouse, you have to make
sure that the USB device driver has been installed and the USB optical mouse is recognized by
Windows operating system. You may move the mouse to see if it is correspondently, and thus to
know the mouse works well.
M993U/C QG 英
3100506070 v1.0
Battery Low Indication
There are 3 different levels for battery power indication. Battery low icon will show on
Windows system tray when mouse batteries are low (at Level 2 & Level 3).
Power status will show up on Windows system tray when moving the cursor onto MouseMaestro
driver icon .
Level 1: Battery power is full.
Level 2: Battery power is about 30%, power state is low. A battery low icon will
appear beside MouseMaestro driver icon . We suggest you recharge the
rechargeable batteries at this status.
Level 3: Battery runs out off power. Battery low icon will appear beside
MouseMaestro driver icon and keep flashing to give warning message. Please do
recharge the rechargeable batteries when this flashing icon appears, or the
low-powered batteries may cause problem when operating this mouse.
Note:
1. After the rechargeable batteries are recharged, battery low icon will disappear.
2. When the mouse or rechargeable battery is recharging, the Red LED indicator at mouse
front side will flash steadily to show recharging status.
3. After the recharging procedure is complete, the Green LED indicator at mouse front side
will be steady lit.
Important Information
1. This rechargeable optical mouse uses light to sense movement. It cannot work on a glass,
translucent, dark or reflective surface.
2. Use the mouse only on a clean, flat, non-slippery, opaque surface in order to ensure smooth and
accurate cursor action.

M993U/C QG 英
3100506070 v1.0
F
FC
CC
C
G
GU
UI
ID
DE
EL
LI
IN
NE
ES
S
This equipment has been tested and found to comply with the limits for a Class B digital device, pursuant to Part 15 of the FCC Rules.
These limits are designed to provide reasonable protection against harmful interference in a residential installation. This equipment
generates, uses and can radiate radio frequency energy and, if not installed and used in accordance with the instructions may cause
harmful interference to radio communications. However, there is no guarantee that interference will not occur in a particular
installation. If this equipment does cause harmful interference to radio or television reception, which can be determined by turning the
equipment off and on, the user is encouraged to try to correct the interference by one or more of the following measures:
Reorient or relocate the receiving antenna
Increase the separation between the equipment and receiver
Connect the equipment into an outlet on a circuit different from that to which the receiver is connected.
Consult the dealer or an experienced radio/TV technician for help.
The Class B digital apparatus meets all requirements of the Canadian Interference-Causing Equipment Regulation.
Cet appareil numerique de la class B respecte toutes les exigences du Règlement sur le materiel brouilleur du Canada.
This device complies with Part 15 of the FCC Rules. Operation is subject to the following two conditions: (1) This device may not cause
harmful interference. (2) This device must accept any interference received, including interference that may cause undesired
operation.
This equipment is intended for use in the following countries EU 15 countries:
Austria, Belgium, Denmark, Finland, France, Germany, Ireland, Italy, Luxembourg, Netherlands, Spain, Sweden, United Kingdom,
Portugal, Greece. And other non-EU countries: Switzerland, Norway, and Iceland.
低功率電波輻射性電機管理辦法:
第十四條:經型式認證合格之低功率射頻電機,非經許可,公司、商號或使用者均不得擅自變更頻率、加大功率或變更原設計之特性及
功能。
第十七條:低功率射頻電機之使用不得影響飛航安全及干擾合法通信;經發現有干擾現象時,應立即停用,並改善至無干擾時方得繼續
使用。
前項合法通信,指依電信法規定作業之無線電信。
低功率射頻電機需忍受合法通信或工業、科學及醫療用電波輻射性電機設備之干擾。
Caution:
Any changes or modifications not expressly approved by the party responsible for compliance could void the user's authority to operate
this equipment. Shielded interface cable, if any, must be used in order to comply with emission limits.
The information in this document is subject to change without notice and does not represent a commitment on the part of the vendor.
No warranty of representation, either expressed or implied, is made with respect to the quality, accuracy or fitness for any particular
purpose of this document. The manufacturer reserves the right to make changes to the content of this document and/or the products
associated with it at any time without obligation to notify any person or organisation of such changes.
In no event will the manufacturer be liable for direct, indirect, special, incidental or consequential damages arising out of the use or
inability to use this product or documentation, even if advised of the possibility of such damages.
Copyright © 2003. All rights reserved
IBM, PC/AT and PS/2 are registered trademarks of International Business Machines Corporation.
Microsoft, Windows, and Windows NT are registered trademarks of Microsoft Corporation in the United States of America and/or other
countries.
All other trademarks are trademarks of their respective holders.
3100506070 Version 1.0 Dec. 2003 Printed in China