Behringer X V AMP LX1 User Manual To The 4fd56322 945e 4cc9 Bd62 571f6ca25822
User Manual: Behringer X V-AMP LX1-X to the manual
Open the PDF directly: View PDF ![]() .
.
Page Count: 15

User Manual
X V-AMP LX1-X
Ultra-Flexible Modeling Amp/Multi-Eects Processor with
Integrated Expression Pedal
STORE
NOISE G.
COMPR.
REVERB
MODUL.
DELAY
PEDAL
CONFIGURE
BASS EQ PRESENCE
GAIN
2
ND
FUNCTION
COPY
/ VOLUME
ADJUST
TAP
BYPASS/TUNER
TUNER
PHONES
AMP + FX EFFECT
SPEED
VOLUMEFX ONLY
C
O
N
F
I
G
U
R
A
T
I
O
N
P
E
D
A
L
A
S
S
I
G
N
WAH
1
2
3
4

2X V-AMP LX1-X User Manual
Table of Contents
Important Safety Instructions ...................................... 3
Legal Disclaimer ............................................................. 3
Limited Warranty ........................................................... 3
1. Introduction ............................................................... 5
1.1 Before you get started ...................................................... 5
2. Control Elements and Connectors ........................... 5
2.1 Basic advice on using the controls ............................... 5
3. Operating Modes (Congurations) .......................... 8
3.1 Selecting a CONFIGURATION .......................................... 8
3.2 Application (example) ....................................................... 8
4. Presets ........................................................................ 9
4.1 Calling up presets ............................................................... 9
4.2 Editing presets ..................................................................... 9
4.3 Storing presets .................................................................... 9
4.4 Discarding an edited preset/restoring a
single factory preset .................................................................. 9
4.5 Restoring all factory presets ........................................... 9
5. Amp/Speaker Simulation .......................................... 9
6. Eects Processor ...................................................... 10
6.1 Eect descriptions ............................................................ 10
6.2 Reverb ................................................................................... 11
7. Tuner ......................................................................... 12
7.1 Tuning your guitar ............................................................ 12
7.2 Setting reference pitch “A” ............................................ 12
8. Installation ............................................................... 12
8.1 Audio connections ........................................................... 12
9. Specications ........................................................... 13
3X V-AMP LX1-X User Manual
LEGAL DISCLAIMER
LIMITED WARRANTY
Terminals marked with this symbol carry
electrical current of su cient magnitude
to constitute risk of electric shock.
Use only high-quality professional speaker cables with
¼" TS or twist-locking plugs pre-installed. Allother
installation or modi cation should be performed only
by quali edpersonnel.
This symbol, wherever it appears,
alertsyou to the presence of uninsulated
dangerous voltage inside the
enclosure-voltage that may be su cient to constitute a
risk ofshock.
This symbol, wherever it appears,
alertsyou to important operating and
maintenance instructions in the
accompanying literature. Please read the manual.
Caution
To reduce the risk of electric shock, donot
remove the top cover (or the rear section).
No user serviceable parts inside. Refer servicing to
quali ed personnel.
Caution
To reduce the risk of re or electric shock,
do not expose this appliance to rain and
moisture. The apparatus shall not be exposed to dripping
or splashing liquids and no objects lled with liquids,
suchas vases, shall be placed on the apparatus.
Caution
These service instructions are for use
by quali ed service personnel only.
Toreduce the risk of electric shock do not perform any
servicing other than that contained in the operation
instructions. Repairs have to be performed by quali ed
servicepersonnel.
1. Read these instructions.
2. Keep these instructions.
3. Heed all warnings.
4. Follow all instructions.
5. Do not use this apparatus near water.
6. Clean only with dry cloth.
7. Do not block any ventilation openings. Install in
accordance with the manufacturer’s instructions.
8. Do not install near any heat sources such as
radiators, heat registers, stoves, or other apparatus
(including ampli ers) that produce heat.
9. Do not defeat the safety purpose of the polarized
or grounding-type plug. A polarized plug has two blades
with one wider than the other. A grounding-type plug
has two blades and a third grounding prong. The wide
blade or the third prong are provided for your safety. Ifthe
provided plug does not t into your outlet, consult an
electrician for replacement of the obsolete outlet.
10. Protect the power cord from being walked on or
pinched particularly at plugs, convenience receptacles,
and the point where they exit from the apparatus.
11. Use only attachments/accessories speci ed by
themanufacturer.
12. Use only with the
cart, stand, tripod, bracket,
or table speci ed by the
manufacturer, orsold with
the apparatus. When a cart
is used, use caution when
moving the cart/apparatus
combination to avoid
injury from tip-over.
13. Unplug this apparatus during lightning storms or
when unused for long periods of time.
14. Refer all servicing to quali ed service personnel.
Servicing is required when the apparatus has been
damaged in any way, such as power supply cord or plug
is damaged, liquid has been spilled or objects have fallen
into the apparatus, the apparatus has been exposed
to rain or moisture, does not operate normally, or has
beendropped.
15. The apparatus shall be connected to a MAINS socket
outlet with a protective earthing connection.
16. Where the MAINS plug or an appliance coupler is
used as the disconnect device, the disconnect device shall
remain readily operable.
TECHNICAL SPECIFICATIONS AND APPEARANCES
ARE SUBJECT TO CHANGE WITHOUT NOTICE AND
ACCURACY IS NOT GUARANTEED. BEHRINGER IS
PART OF THE MUSIC GROUP MUSICGROUP.COM.
ALL TRADEMARKS ARE THE PROPERTY OF THEIR
RESPECTIVE OWNERS. MUSICGROUP ACCEPTS NO
LIABILITY FOR ANY LOSS WHICH MAY BE SUFFERED
BY ANY PERSON WHO RELIES EITHER WHOLLY OR
IN PART UPON ANY DESCRIPTION, PHOTOGRAPH
OR STATEMENT CONTAINED HEREIN. COLORS AND
SPECIFICATIONS MAY VARY FROM ACTUAL PRODUCT.
MUSIC GROUP PRODUCTS ARE SOLD THROUGH
AUTHORIZED FULLFILLERS AND RESELLERS ONLY.
FULLFILLERSAND RESELLERS ARE NOT AGENTS OF
MUSICGROUP AND HAVE ABSOLUTELY NO AUTHORITY
TO BIND MUSICGROUP BY ANY EXPRESS OR IMPLIED
UNDERTAKING OR REPRESENTATION. THIS MANUAL
IS COPYRIGHTED. NO PART OF THIS MANUAL MAY
BE REPRODUCED OR TRANSMITTED IN ANY FORM
OR BY ANY MEANS, ELECTRONIC OR MECHANICAL,
INCLUDING PHOTOCOPYING AND RECORDING OF ANY
KIND, FOR ANY PURPOSE, WITHOUT THE EXPRESS
WRITTEN PERMISSION OF MUSICGROUPIPLTD.
ALL RIGHTS RESERVED.
© 2012 MUSICGroupIPLtd.
Trident Chambers, Wickhams Cay, P.O. Box 146,
Road Town, Tortola, British Virgin Islands
§ 1 Warranty
(1) This limited warranty is valid only if you purchased
the product from a MUSIC Group Authorized Reseller in
the country of purchase. A list of authorized resellers can
be found on BEHRINGER’s website behringer. com under
“Where to Buy”, or you can contact the MUSIC Group o
ce
closest to you.
(2) MUSICGroup* warrants the mechanical and
electronic components of this product to be free of defects
in material and workmanship if used under normal
operating conditions for a period of one (1) year from
the original date of purchase (see the Limited Warranty
terms in §4 below), unless a longer minimum warranty
period is mandated by applicable local laws. If the product
shows any defects within the speci ed warranty period
and that defect is not excluded under §4, MUSICGroup
shall, at its discretion, either replace or repair the product
using suitable new or reconditioned product or parts.
Incase MUSICGroup decides to replace the entire product,
thislimited warranty shall apply to the replacement
product for the remaining initial warranty period, i.e.,
one (1) year (or otherwise applicable minimum warranty
period) from the date of purchase of the original product.
(3) Upon validation of the warranty claim, the repaired
or replacement product will be returned to the user
freight prepaid by MUSICGroup.
(4) Warranty claims other than those indicated above
are expressly excluded.
PLEASE RETAIN YOUR SALES RECEIPT. IT IS YOUR PROOF
OF PURCHASE COVERING YOUR LIMITED WARRANTY.
THIS LIMITED WARRANTY IS VOID WITHOUT SUCH PROOF
OFPURCHASE.
§ 2 Online registration
Please do remember to register your new BEHRINGER
equipment right after your purchase at behringer. com
under “Support” and kindly read the terms and conditions
of our limited warranty carefully. Registeringyour
purchase and equipment with us helps us process
your repair claims quicker and more e ciently.
Thankyouforyour cooperation!
§ 3 Return materials authorization
(1) To obtain warranty service, please contact the
retailer from whom the equipment was purchased.
Should your MUSIC Group Authorized Reseller not be
located in your vicinity, you may contact the MUSICGroup
Authorized Ful ller for your country listed under
Important Safety
Instructions

4X V-AMP LX1-X User Manual
“Support” at behringer. com. Ifyour country is not
listed, please check if your problem can be dealt with
by our “OnlineSupport” which may also be found under
“Support” at behringer. com. Alternatively,please submit
an online warranty claim at behringer. com BEFORE
returning the product. All inquiries must be accompanied
by a description of the problem and the serial number
of the product. Afterverifying the product’s warranty
eligibility with the original sales receipt, MUSICGroup
will then issue a ReturnMaterials Authorization
(“RMA”)number.
(2) Subsequently, the product must be returned in
its original shipping carton, together with the return
authorization number to the address indicated by
MUSICGroup.
(3) Shipments without freight prepaid will not
beaccepted.
§ 4 Warranty Exclusions
(1) This limited warranty does not cover consumable
parts including, but not limited to, fuses and batteries.
Where applicable, MUSICGroup warrants the valves or
meters contained in the product to be free from defects
in material and workmanship for a period of ninety (90)
days from date of purchase.
(2) This limited warranty does not cover the product
if it has been electronically or mechanically modi ed
in any way. If the product needs to be modi ed or
adapted in order to comply with applicable technical
or safety standards on a national or local level, inany
country which is not the country for which the
product was originally developed and manufactured,
thismodi cation/adaptation shall not be considered a
defect in materials or workmanship. Thislimited warranty
does not cover any such modi cation/adaptation,
regardless of whether it was carried out properly or not.
Under the terms of this limited warranty, MUSICGroup
shall not be held responsible for any cost resulting from
such a modi cation/adaptation.
(3) This limited warranty covers only the product
hardware. It does not cover technical assistance for
hardware or software usage and it does not cover
any software products whether or not contained in
the product. Any such software is provided “AS IS”
unless expressly provided for in any enclosed software
limitedwarranty.
(4) This limited warranty is invalid if the
factory- appliedserial number has been altered or
removed from theproduct.
(5) Free inspections and maintenance/repair work
are expressly excluded from this limited warranty,
inparticular, if caused by improper handling of the
product by the user. This also applies to defects caused
by normal wear and tear, in particular, of faders,
crossfaders, potentiometers, keys/buttons, guitar strings,
illuminantsand similar parts.
(6) Damage/defects caused by the following conditions
are not covered by this limited warranty:
• improper handling, neglect or failure to operate the
unit in compliance with the instructions given in
BEHRINGER user or service manuals;
• connection or operation of the unit in any way
that does not comply with the technical or safety
regulations applicable in the country where the
product is used;
• damage/defects caused by acts of God/Nature
(accident, re, ood, etc) or any other condition that
is beyond the control of MUSICGroup.
(7) Any repair or opening of the unit carried out by
unauthorized personnel (user included) will void the
limitedwarranty.
(8) If an inspection of the product by MUSICGroup
shows that the defect in question is not covered by the
limited warranty, the inspection costs are payable by
thecustomer.
(9) Products which do not meet the terms of this
limited warranty will be repaired exclusively at the buyer’s
expense. MUSICGroup or its authorized service center will
inform the buyer of any such circumstance. If the buyer
fails to submit a written repair order within 6 weeks after
noti cation, MUSICGroup will return the unit C.O.D. with
a separate invoice for freight and packing. Such costs will
also be invoiced separately when the buyer has sent in a
written repair order.
(10) MUSIC Group Authorized Resellers do not sell new
products directly in online auctions. Purchasesmade
through an online auction are on a “buyer beware” basis.
Online auction con rmations or sales receipts are not
accepted for warranty veri cation and MUSICGroup will
not repair or replace any product purchased through an
online auction.
§ 5 Warranty transferability
This limited warranty is extended exclusively to the
original buyer (customer of authorized reseller) andis
not transferable to anyone who may subsequently
purchase this product. No other person (reseller,etc.)
shallbe entitled to give any warranty promise on behalf
of MUSICGroup.
§ 6 Claim for damage
Subject only to the operation of mandatory applicable
local laws, MUSICGroup shall have no liability to the buyer
under this warranty for any consequential or indirect
loss or damage of any kind. In no event shall the liability
of MUSICGroup under this limited warranty exceed the
invoiced value of the product.
§ 7 Limitation of liability
This limited warranty is the complete and exclusive
warranty between you and MUSICGroup. It supersedes
all other written or oral communications related to this
product. MUSICGroup provides no other warranties for
this product.
§ 8 Other warranty rights and
nationallaw
(1) This limited warranty does not exclude or limit the
buyer’s statutory rights as a consumer in any way.
(2) The limited warranty regulations mentioned herein
are applicable unless they constitute an infringement of
applicable mandatory local laws.
(3)
This warranty does not detract from the seller’s
obligations in regard to any lack of conformity of the
product and any hidden defect.
§ 9 Amendment
Warranty service conditions are subject to change without
notice. For the latest warranty terms and conditions
and additional information regarding MUSICGroup’s
limited warranty, please see complete details online at
behringer. com.
* MUSICGroup Macao Commercial O shore Limited of
RuedePequim No. 202-A, Macau Finance Centre 9/J, Macau,
including all MUSICGroup companies

5X V-AMP LX1-X User Manual
1. Introduction
The X V-AMP gives you extensive options to create an awesome stage show.
Thelatest technology, simple and intuitive operation and robust construction
result in optimal performance and dependability.
Your X V-AMP unites a selection of the best and most-liked eects and amp
simulations from our venerable V-AMP 2. These eects and amp simulation
can of course be edited and stored. Additional features, such as compressor,
noisegate and the most current modulation eects, give you a maximum on
exibility and let your creativity come to full expression.
1.1 Before you get started
Your X V-AMP was carefully packed at the factory to assure it will survive the
rigors of the road. If the cardboard packaging looks like it’s been through a lot,
please inspect the contents and look for indications of damage.
◊ In case your X V-AMP is damaged, DO NOT send it directly to us.
Instead, first notify the store where you bought it as well as the carrier
who made the delivery. Otherwise, you may void your warranty.
Always make sure your X V-AMP gets enough air ow and never put it near the
heating or other heat-emitting equipment to avoid damage to the device.
Power is delivered via the enclosed power supply. All requiered safety
precautions have been adhered to. As soon as you connect the X V-AMP to the
mains via the power supply, your X V-AMP is automatically switched on.
1.1.1 Online registration
Please register your new BEHRINGER equipment right after your purchase
by visiting http://behringer.com and read the terms and conditions of our
warranty carefully.
Should your BEHRINGER product malfunction, it is our intention to have it
repaired as quickly as possible. To arrange for warranty service, please contact
the BEHRINGER retailer from whom the equipment was purchased. Shouldyour
BEHRINGER dealer not be located in your vicinity, you may directly contact
one of our subsidiaries. Corresponding contact information is included in the
original equipment packaging (Global Contact Information/European Contact
Information). Should your country not be listed, please contact the distributor
nearest you. A list of distributors can be found in the support area of our
website (http://behringer.com).
Registering your purchase and equipment with us helps us process your repair
claims more quickly and eciently.
Thank you for your cooperation!
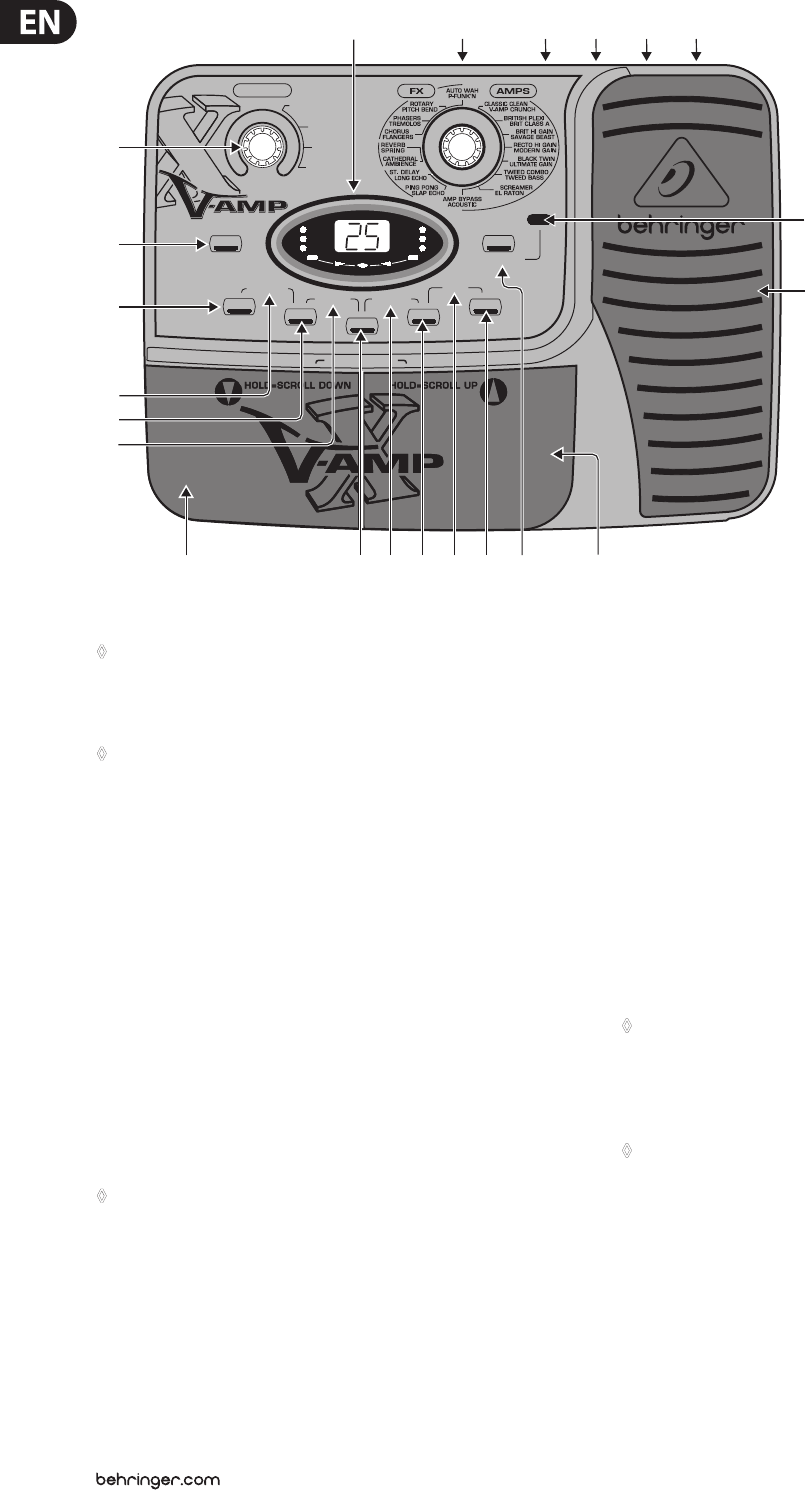
2. Control Elements and Connectors
In this chapter, we will describe dierent control elements of your X V-AMP.
Allcontrols and connectors will be explained in detail, and you will also get
useful advice on how to use them.
2.1 Basic advice on using the controls
Here is some quick information about the most basic and most important control
elements of your X V-AMP.
• Keys (3), (5), (7), (9) and (11) : use these keys to directly select eects
settings and operating modes.
• FX/AMPS control (14) : Uset the right-hand half to select amp simulations in a
preset. The corresponding LED lights up. Use the left-hand half to select the
eects. When eects blocks are selected using the keys (7), (9) and (11),
theLED on the current eect lights up.
• TAP LED (12) : The frequency at which the LED blinks indicates the speed
and/or the rhythm of a delay or a modulation eect (also see chapter 6
“EFFECTS PROCESSOR”).
By keeping TAP depressed, 2nd FUNCTION (13) is activated. By doing this,
thesecond level of the FX/AMPS control (14) (gray) and ADJUST (1) is accessible.
• Footswitches UP (16) and DOWN (17) : Used to select presets; these
presets are indicated in the DISPLAY (15). Footswitches UP (16) and
DOWN (17) are also used to activate the BYPASS/TUNER function
(alsoseechapter7“TUNER”).
• DISPLAY LEDs: PEDAL ASSIGN indicates the function to which the pedal
has been assigned. CONFIGURATION permanently indicates the selected
operating mode.
(1) ADJUST: Used to perform various adjustments. You can nd more
information about using ADJUST in the descriptions of individual control
elements as well as in chapter 6 “EFFECTS PROCESSOR”.
GAIN. Use this control to regulate the drive of the amp simulation,
i.e. the degree of distortion. Use it when none of the keys (3), (5), (7), (9)
or (11) are blinking.
VOLUME: If you hold the TAP key (12) depressed, using ADJUST lets you
adjust the volume of a preset.
(2) STORE. The presets on the X V-AMP are saved using the STORE key. If the
STORE key lights up, it means that a preset has been changed but has not yet
been stored. By keeping the STORE key depressed (longer than 2 seconds),
the newly edited preset is stored. When the STORE LED is no longer lit up,
thestored preset shown in the display is now active.
6X V-AMP LX1-X User Manual
STORE
NOISE G.
COMPR.
REVERB
MODUL.
DELAY
PEDAL
CONFIGURE
BASS EQ PRESENCE
GAIN
2
ND
FUNCTION
COPY
/ VOLUME
ADJUST
TAP
BYPASS/TUNER
TUNER
PHONES
AMP + FX EFFECT
SPEED
VOLUMEFX ONLY
C
O
N
F
I
G
U
R
A
T
I
O
N
P
E
D
A
L
A
S
S
I
G
N
WAH
1
2
3
4
(13)
(18)
(15) (14) (19) (20) (21) (22)
(7) (8) (9) (10) (11)(16)
(4)
(5)
(6)
(2)
(3)
(1)
(12) (17)
Fig. 2.1: X V-AMP user interface
◊ After briefly pressing the STORE key (the STORE key blinks), use the
UP/DOWN keys to select another storage slot. By briefly pressing the
STORE key yet again, the save procedure is canceled. Complete the save
by keeping the STORE key depressed for longer than 2 seconds.
◊ You can restore a single factory preset by keeping the TAP and STORE
keys depressed simul-taneously for longer than 2 seconds. You can also
restore all factory presets. This is done by keeping both TAP and STORE
keys depressed for longer than 2 seconds and then powering up the
X V-AMP (i.e. you start the procedure when your X V-AMP is off).
(3) NOISE G. The NOISE GATE is active and can be edited when the key LED is
lit up. The threshold can be controlled by using ADJUST. When the ADJUST
control is turned all the way to the left, the NOISE GATE is o and the LED is
no longer lit up.
“Release” is adjusted using the ADJUST control while the TAP key is depressed.
How the NOISE GATE works is explained in chapter 6.1.3.
(4) CONFIGURE. By simultaneously pressing NOISE G. (3) and COMPR. (5),
youget to the conguration menu. Use the COMPR. or NOISE G. keys
to alternate between indi-vidual operating modes. This way, youcan
implement a global setting on your X V-AMP that lets you adjust to
dierent studio and live situations. A table with all congurations as well as
additional information on this subject can be found in chapter 3.
◊ Press COMPR. and NOISE G. simultaneously again to leave
CONFIG. mode.
(5) COMPRESSOR. Press this key to get to the compressor menu. Use the
ADJUST control to regulate “ratio”, or use TAP + ADJUST to regulate “attack”.
When the ADJUST control is turned all the way to the left, the COMPRESSOR
is o and the LED is no longer lit up.
How the compressor works is explained in chapter 6.1.3.
(6) BASS EQ. Simultaneously press COMPR. (5) and MODUL. (7) (both LEDs
are blinking) to control bass frequencies in a preset. Use ADJUST to increase
or decrease low frequencies. Keep TAP pressed while turning ADJUST to
determine if you want to aect only the deepest frequencies (ADJUST turned
all the way to the left) or if you also want to aect higher bass frequencies.
(7) MODULATION. After you press this key (its LED blinks), you can select
one of the eight modulation eects by using the FX/AMPS control (14) :
Chorus,anger, phaser, pitch bend, tremolo, rotary, auto wah and P-funk’n.
You get to the second-layer eects (gray) by keeping the TAP key depressed
while you are turning the FX/AMPS control; the 2nd FUNCTION LED lights
up. ADJUST controls the eect ratio in the preset. The speed parameter is
adjusted using TAP. By hitting MODUL. (7) again, or by selecting a dierent
parameter, you quit.
You can nd a more detailed description of modulation eects and how they
function in chapter 6 “EFFECTS PROCESSOR”.
◊ Modulation effects auto wah, pitch bend and P-Funk’n cannot be
used simultaneously with Wah Wah. If you select one of these three
effects while the pedal is already assigned to the wah wah effect,
its assignment to the pedal is annulled (the WAH LED in the display is
no longer lit up).
◊ Assigning the expression pedal to the Wah Wah effect automatically
deactivates auto wah and pitch bend respectively, so that no
modulation effect is active (all modulation effect and ADJUST LEDs
are no longer lit up).
(8) PRESENCE. You activate PRESENCE by simultaneously pressing MODUL.
(7) and DELAY (9) (both LEDs are blinking). Starting at the middle setting
of the ADJUST control (neutral), the share of PRESENCE (high frequencies)
canbe lowered or increased in a preset. Keeping TAP pressed while you turn
ADJUST allows you to determine the center frequency of the lter.
7X V-AMP LX1-X User Manual
(9) DELAY. Pressing this key adjusts DELAY. A delay lets you create a lag in
the input signal similar to an echo. Use ADJUST to regulate the intensity;
when you keep TAP pressed while you turn ADJUST, you set up feedback.
The rhythm in which you tap at the TAP key determines the time between
individual echos.
(10) PEDAL ASSIGN. Press DELAY (9) and REVERB (11) simultaneously to
assign a function to the EXPRESSION PEDAL (“PA” is shown in the display).
Atthe same time, one of the right-hand LEDs in the display is blinking
(speed, eect, volume, wah). Now you can assign one of the following
functions to the pedal:
• Speed: to dial up the SPEED parameter of an eect, hit the respective eect
module key ((7) or (9)) and then briey press TAP: SPEED, TAP and eect
key LEDs are blinking.
• Eect: To modify eect parameters “mix”, “depth”, “feedback” and “decay”
using the pedal, press the eect module key of your choice and then modify
the desired parameter (either using Adjust or Adjust + TAP): the EFFECT LED
blinks in the display (2nd Function and the eect key where applicable).
• Volume: If you want to use the expression pedal to control the
volume, holdTAP and briey move ADJUST. The 2nd FUNCTION and
VOLUME LEDs blink.
• Gain: To use the expression pedal to control GAIN in a preset, you only have
to quickly modify GAIN using ADJUST (VOLUME LED blinks); then, use the
pedal to modify GAIN.
• Wah Wah: Pressing the expression pedal automatically selects the wah
function. The Wah LED blinks.
◊ Summary: To assign a parameter to the expression pedal, you have to
activate “PEDAL ASSIGN” and modify the desired parameter.
◊ Auto wah and pitch bend are automatically deactivated as long as the
expression pedal controls the Wah Wah effect.
◊ To confirm a new selection you made and to abandon PEDAL ASSIGN,
hit DELAY ( 9 ) and REVERB (11) at the same time again.
(11) REVERB. Press this key to set up REVERB. A reverb eect lets you simulate
room characteristics in the overall sound. You can choose between
4dierent reverb types: Ambience, cathedral, spring and reverb.
The FX/AMPS control lets you select between reverb and cathedral, and if
you keep TAP pressed at the same time, then you can additionally select
between spring and ambience (second layer).
The adjustable reverb parameters are decay and mix.
ADJUST controls the mix, and ADJUST + TAP control decay.
A description of individual reverb types can be found in chapter 6.2.
(12) The TAP key performs several functions:
• GAIN/VOLUME: Use ADJUST to determine the amount of distortion (GAIN).
Ifyou keep TAP pressed while you move ADJUST, you control the volume of a
preset instead.
When editing eect blocks, ADJUST lets you access the second function layer
for parameter settings.
• FX/AMPS control and 2nd FUNCTION: Hitting TAP lets you select the
second layer of the eects and AMP simulations (gray).
• Speed: Keep hitting the TAP key in the rhythm of a song, and the selected
eect (delay or modulation eect) adjusts itself automatically to the
tapped rhythm.
(13) 2nd FUNCTION. As soon as any second-layer function on the FX/AMPS
control is dialed up, 2nd FUNCTION LED lights up.
(14) FX/AMPS. A LED on the FX/AMPS control indicates the current AMP model.
Ifthe 2nd FUNCTION LED is also lit up, you’re dealing with one of the second-
layer AMP models (gray); if not, then one of the rst-layer AMP models is
selected (white). By turning FX/AMPS (and by holding tap, if necessary),
youcan switch to another AMP model.
IF the eect block is selected (MODULATION (7), DELAY (9) or REVERB LED
(11) blinks), the respective eect type can be read-o and selected using
the FX/AMPS control. By turning the FX/AMPS control (and by holding TAP,
ifnecessary), you can switch to another eect.
◊ If one of the AMPS LEDs lights up (right half), use ADJUST to control
either GAIN or VOLUME.
◊ If one of the EFFECT LEDs lights up (left half), use ADJUST to control the
respective effect parameters.
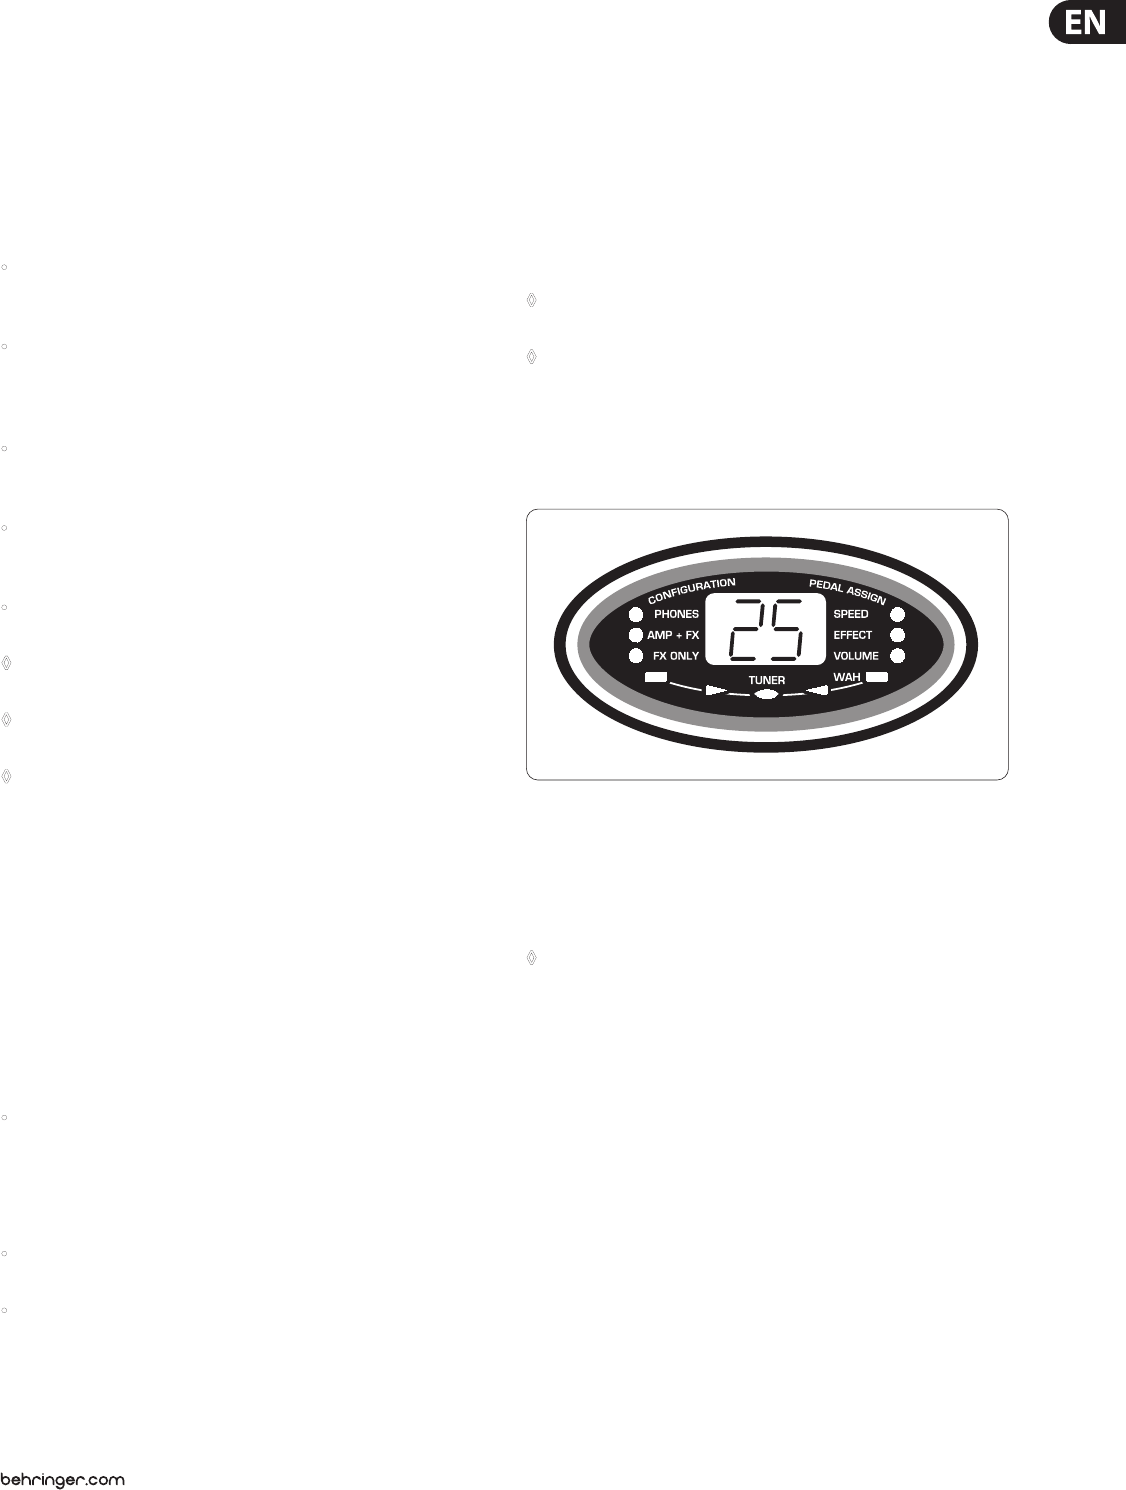
(15) The DISPLAY indicates which preset has been selected and gives
information on the modications done during editing. When the TUNER is
activated, the DISPLAY indi-cates which tone is played on the instrument you
connected to your X V-AMP.
Fig. 2.2: X V-AMP display
(16)
DOWN. Use this footswitch to dial down presets (99 - 00, downwards).
Keepthe footswitch depressed longer to skip through the presets downwards.
(17) UP. Use this footswitch to dial up presets (00 - 99, upwards). Keep the
footswitch depressed longer to skip through the presets upwards.
◊ By simultaneously pressing both footswitches, the TUNER/BYPASS
mode is activated. To deactivate it, you can simply press one of the
footswitches. Additional information on the TUNER can be found in
chapter 7 “TUNER”.
(18) EXPRESSION PEDAL. The expression pedal controls (among others)
the Wah Wah eect. The switch located beneath the pedal switches the
Wah Wah on and o in this case.
PEDAL ASSIGN lets you assign another function to the pedal
(e. g. volume, eect intensity etc.). See also (10).
(19) LINE OUT/PHONES. You can take the audio signal of your X V-AMP at the
LINE OUT/PHONES connector. You can either connect your headphones to the
X V-AMP, or connect the X V-AMP to a mixer.
(20) MONO AMP OUT. Connect the input of your guitar amp here. In contrast to
the LINE OUT/PHONES signal, this signal is reproduced with a level that is
20 dB lower.
(21) INSTRUMENT INPUT. This is the ¼" jack input of your X V-AMP. Connect your
instrument here. Always use high-quality ¼" mono jack cables.
8X V-AMP LX1-X User Manual
(22) AC IN. Connect the enclosed power supply to the AC IN connector.
As soon as you plug the power supply into the mains, your X V-AMP
is automatically “on”. More information on the power supply can be
found in chapter 9 “Specications”.
3. Operating Modes (Congurations)
An outstanding characteristic of the entire V-AMP product line is the freedom
to personally select which signal segments (according to your own needs and
desires) will be fed to the outputs. To optimally adjust your X V-AMP to various
studio and live situations, you can select one of the 9 possible congurations.
These congurations assign where individual signals for line outputs and
headphone outputs are coming from—and all this independent from the
settings stored in the presets.
3.1 Selecting a CONFIGURATION
When you press NOISE GATE (3) and COMPRESSOR (5) at the same time,
CONFIGURATION mode is activated or deactivated. The key LEDs are blinking as
long as you are in CONFIGURATION mode.
Dialing up individual congurations in CONFIGURATION mode is done by using
NOISE G. (3) and COMPR. (5). A table with the respective congurations is
shown below.
Volume is adjustable globally by using the ADJUST control.
Input gain can be adjusted using ADJUST + TAP, so that you can adjust your
X V-AMP globally to instruments with varying output signal levels, whereby the
following goes: a higher setting is for quieter instruments, and a lower setting is
for louder instruments.
OPERATING MODE X V-AMP CONFIGURATION
PHONES (with all
speaker and amp
simulations)
P1 FLAT: Neutral EQ
P2 LOUDNESS: Increasing bass and highs
P3 PRESENCE: Accentuation of upper mids, lowering of bass tones
AMP + FX
(without speaker
simulations)
A1 FLAT: Neutral EQ
A2 LOUDNESS: Increasing bass and highs
A3 PRESENCE: Accentuation of upper mids, lowering of bass tones
only FX (without
speaker and amp
simulations)
F1 FLAT: Neutral EQ
F2 LOUDNESS: Increasing bass and highs
F3 PRESENCE: Accentuation of upper mids, lowering of bass tones
Tab. 3.1: Operating modes (CONFIGURATIONS)
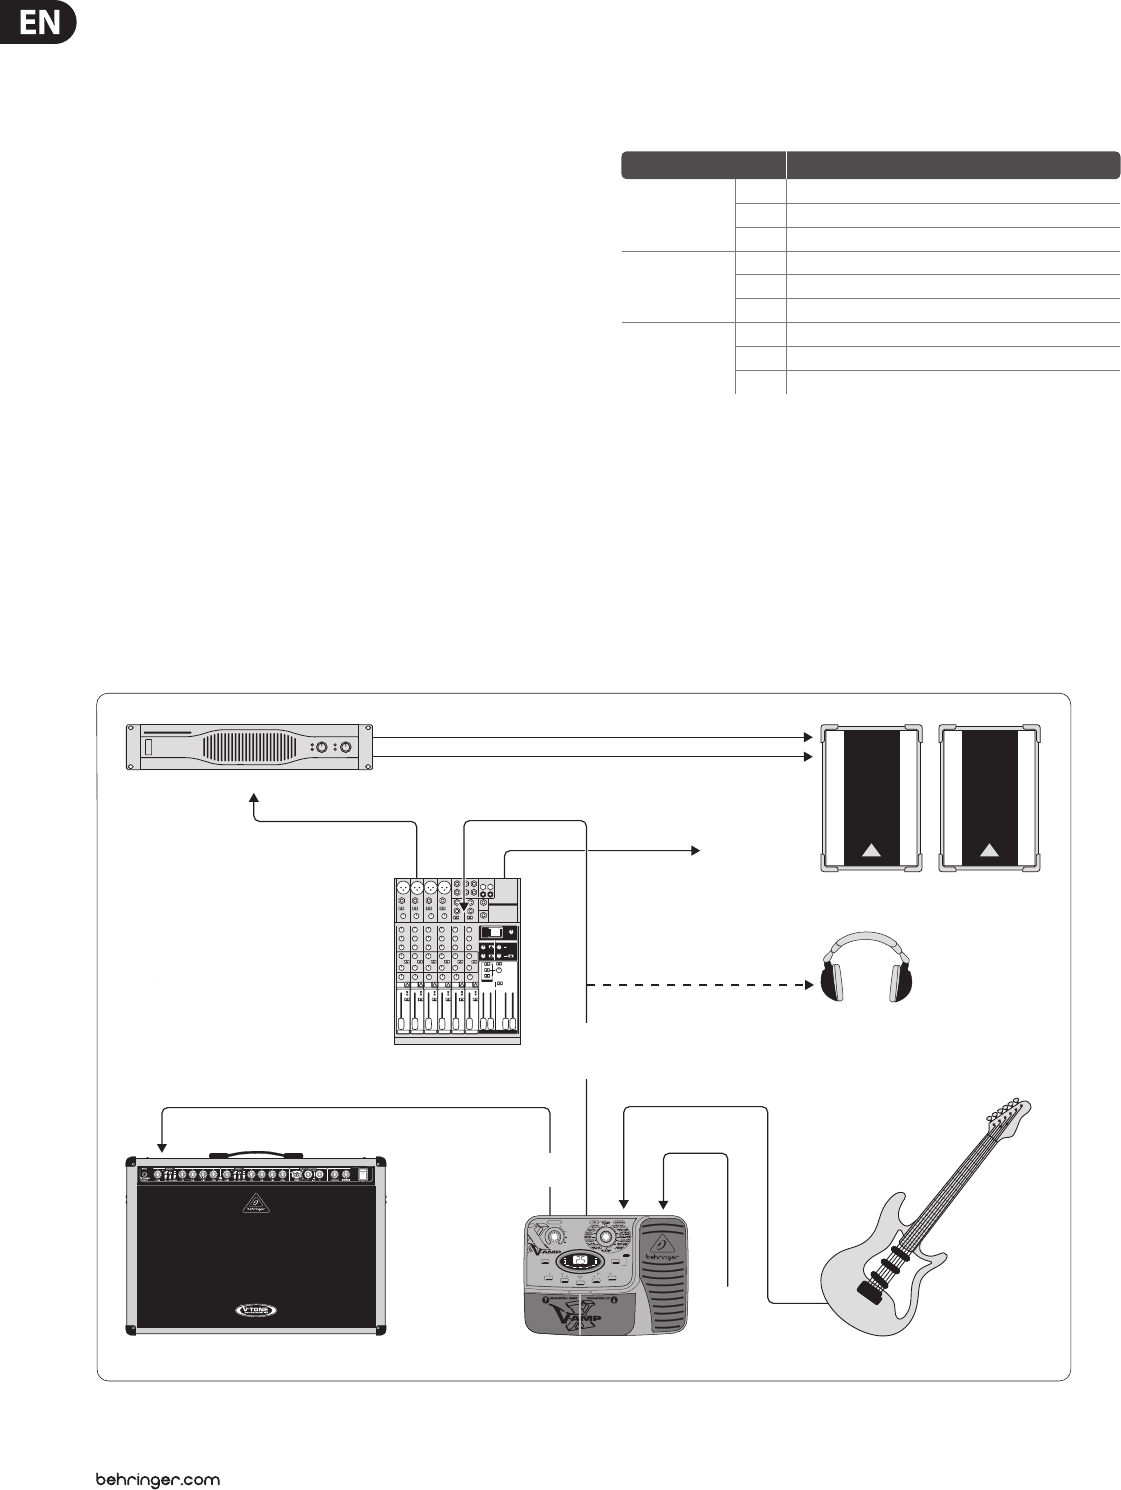
3.2 Application (example)
Our example shows a typical X V-AMP application: Connection to a guitar amp
(BEHRINGER V-TONE GMX212) using operating modes A1-F3 (without speaker
simulation). The V-TONE GMX212 features a stereo aux input, while many other
amps have only a mono instrument input. For jam sessions at your own pad,
connect a set of high-quality headphones (e.g. our BEHRINGER HPS3000) to the
LINE OUT/PHONES connector.
EUROLIVE B1220
Tape Out
Stereo Line InputsMain Out
Rec Out
HPS3000
AC In
Instrument In
V-TONE GMX212
Lo Input
Electric guitar
XENYX1204FX
EUROPOWER EP2000
X V-AMP
Mono
Amp Out
Stereo
Line/Phones
Out
STORE
NOISE G.
COMPR.
REVERB
MODUL.
DELAY
PEDAL
CONFIGURE
BASS EQ PRESENCE
GAIN
2
ND
FUNCTIONCOPY
/ VOLUME
ADJUST
TAP
BYPASS/TUNER
TUNER
PHONES
AMP + FX EFFECT
SPEED
VOLUMEFX ONLY
C
O
N
F
I
G
U
R
A
T
I
O
N
P
E
D
A
L
A
S
S
I
G
N
WAH
1
2
3
4
Fig. 3.1: Standard application (example)

9X V-AMP LX1-X User Manual
4. Presets
Your X V-AMP features 100 user-rewritable presets (00 - 99). Each preset consists
out of a maximum of 7 “ingredients”:
• amp simulation,
• speaker simulation,
• pre-amp eects (noise gate, compressor, Wah Wah),
• adjustable presence and bass EQs,
• modulation eect (e.g. phaser, chorus etc.),
• delay eect and
• reverb.
When the STORE key lights up, it means that a preset was modied but has not
been stored yet. When the STORE LED is no longer on, the stored preset shown
in the display is active. When the STORE key blinks (briey press STORE), youcan
use the UP/DOWN footswitches ((16) & (17)) to dial up another storage space,
where you can then store the current settings. Storing is done by keeping the
STORE key pressed longer than 2 seconds.
A single factory preset can be restored by keeping TAP + STORE pressed for
longer than 2 seconds. You can also restore all factory presets by keeping
TAP+ STORE pressed for longer than 2 seconds while you are powering
up your XV-AMP.
When you dial up a preset or when editing a preset is complete, the key LEDs
indicate the active blocks.
4.1 Calling up presets
The preset you used last is always automatically recalled when you turn your
X V-AMP on.
4.2 Editing presets
Editing presets on your X V-AMP is quick and easy to do. One way to do this is to
call up a preset of your choice and then modify it according to your own taste.
Select an amp model of your choice by turning the FX/AMPS control.
The STORE LED is lit up, signalizing that you have modied a preset. If you now
wish to add a modulation eect to this preset, simply press the MODUL key (7).
Now you can use the FX/AMPS control to make a selection among the eects.
Tostore your settings, keep the STORE key pressed for about 2 seconds.
◊ Almost all delay and modulation effects feature a tempo or time
parameter. Say, you want to adjust an effect to the tempo of your
playback material: To do this, tap the TAP key at least twice in the beat
of your music. The effect tempo adjusts itself automatically to the
tempo of your music.
4.3 Storing presets
When the STORE key is blinking (briey pressing STORE) you can use the
UP/DOWN footswitches ((16) & (17)) to dial up another storage slot so you can
storeyour current settings at this location. You store your settings by keeping
theSTORE key pressed for longer than 2 seconds.
4.4 Discarding an edited preset/restoring a
single factory preset
If you have edited a preset and nd that you don’t like the edited version,
simplychoose a dierent preset to discard your edits. You can restore a single
factory preset by keeping TAP + STORE depressed for longer than 2 seconds.
4.5 Restoring all factory presets
Restoring all factory presets is done by keeping TAP + STORE depressed for
longer than 2 seconds while you power up the X V-AMP.
5. Amp/Speaker Simulation
The very heart of your X V-AMP is its amp/speaker simulation. The X V-AMP
makes it a child’s play for you to choose one of the legendary guitar amps,
be it for brit pop, blues, heavy metal or whatever. In addition, you can tailor
the sound of the respective amp to suit your ideas. On top of all that, you can
even choose digital eect and reverb types for your virtual amp. See chapter 6
“EFFECTS PROCESSOR” for more details.
When you turn on your X V-AMP, it automatically loads the last preset selected.
The LED ring around the FX/AMPS control shows what amp has been selected.
The corresponding LED lights up. To select another amp simply turn the control.
To give you a better overview of the extensive range of amp simulations on
the X V-AMP, we have compiled the following descriptions of the dierent
types of amps.
CLASSIC CLEAN: Back in the ’80s, the Roland JC-120 was the preferred sound
of Buzzy Feiten (guitarist with the Dave Weckl Band). The unique quality of this
transistor amp’s sound is the way its brilliance cuts through any mix. It is ideal for
the New Wave sound of the ’80s that is making a comeback today. By the way,
the JC-120 was also popular among Fender Rhodes pianists.
V-AMP CRUNCH: This amp is ideal for modern blues or jazz. Its sound is not too
subtle, but not in-your-face either—it’s crunchy, that’s all.
BRITISH PLEXI: This amp model, created by leaning closely to a ’59 Marshall
Plexi 100-Watt amp, is particularly well suited for creating clean sounds.
The amp was used by Jimi Hendrix, Eric Clapton and Je Beck.
BRIT CLASS A: This simulation is modeled on the Vox AC 30. This amp
was originally designed in the ’60s when guitarists wanted amps with
enhanced brilliance, a feature that Vox successfully implemented by means
of “revolutionary” bass and treble controls. Brian May and U2’s The Edge are
probably the best-known users of this sound.
BRIT HI GAIN: Compare this model with a Marshall JCM 800. Although the
original was renowned mainly for its distorted sounds, this amp also sounds very
good with low gain settings. It’s good at reproducing Steve Ray Vaughan’s and
Michael Landau’s sounds. In distortion mode it sounds like Gary Moore in his early
days, but it’s also good for heavy metal.
SAVAGE BEAST: Engl is well-known for amps that really cut through. The Savage
120 in particular has built up a large following among guitarists. For some time
now Ritchie Black-more has been a major endorser of this German company,
andRandy Hanson, the best Hendrix since Jimi, also swears by this amp.
Theunique feature of the Savage is its extreme power and is therefore highly
popular with heavy metal guitarists. Silent Force/Sinner guitarist Alex Beyrodt
has been an enthusiastic Engl user for years. An amp for making yourself heard!
NUMETAL GAIN: This model is based on a 1994 Mesa Boogie Dual Rectier
Trem-O-Verb featuring a modern, high-gain sound that also comes over well in a
band context.
MODERN GAIN: Here, the tone control is post-gain, allowing the extremely
distorted sound to cut through the mix. The MODERN HI GAIN sound is ideal
for playing grunge, but is also used by guitarists such as Steve Vai and Joe
Satriani. Among others, Steve Lukather, Nuno Bettencourt and Steve Vai have all
popularized the Soldano sound. If you’re playing a Gibson Les Paul, MODERN HI
GAIN sounds best when you turn down the volume control on the guitar a little.

10 X V-AMP LX1-X User Manual
BLACK TWIN: This simulation was modeled on a Fender Blackface Twin from
1965. In the ’60s this amp was used by jazz, country and even rock guitarists.
What was unique about it was that it was exceptionally loud and was therefore
mainly used for live performances. The secret of the Blackface Twin was that
although you could play it extremely loud, the distortion remained relatively low.
ULTIMATE GAIN: From clean to brutal hi-gain, this “brute” covers the entire
range. The ULTIMATE V-AMP is basically a souped-up rectier amp.
TWEED COMBO: This was Je Beck’s favorite when he recorded the albums Blow
by Blow and Wired. This amp was not actually designed for heavy distortion,
butdue to its low power, it is ideal for uncompromising overdrive sound.
TWEED BASS: This virtual amp is modelled on the Fender 4 x 10 Combo.
Originally designed as a bass amp, it soon became a standard amp of blues
legends such as Steve Ray Vaughan or Billy Gibbons due to its characteristic
distortion. As you would expect, it packs a solid punch in the bass range,
but is still exible enough in the mid and treble ranges.
SCREAMER: Having been around since the beginning of the ’80s, the Ibanez
TubeScreamer TS808 has pretty much achieved cult status. It has the reputation
of being the ultimate classical overdrive/treble booster oor pedal, and is
associated with mighty lead sounds, even though it oers rather modest
distortion. Itssecret is that it “knows” better than other oor pedals how to
squeeze the very last bit out of the amp to which it is connected. If you hook
up a decent tube amp to your X V-AMP (e. g. the BEHRINGER AC112), with this
simulation you can authentically reproduce the eect of the tube screamer—all
this without dishing out too much cash to own a cult piece of equipment.
EL RATON: The Rat from ProCo was also a distortion pedal similar to the tube
screamer, and it also came around about the same time, but its basic sound
and applications couldn’t be more dierent. As the name suggest, the rat is
all about aggressive distortion from the pedal itself, and the TS808 is more
about unobtrusive overdrive in the amp further down the chain. With the rat
simulation, you have the metal sound of the early ’80s totally covered.
AMP BYPASS: In this setting, no amp simulation is selected. This makes it
possible, for example, to play through an external guitar preamp and only use
the eects.
ACOUSTIC: A guitar with steel strings miked with a dynamic microphone is
simulated here. While piezo pickups have the tendency to make the sound
rather hard, using a mic makes the sound much more evened-out. Of course,
the feedback typical for miking acoustic instruments is no longer an issue.
Engl, Fender, Gibson, Ibanez, Marshall, Mesa Boogie, Roland, Soldano, Vox ProCo, Tube Screamer, The Rat as
well the names of musicians and bands are registered trademarks of their respective owners and are in no way
associated with BEHRINGER. The brand names appearing here are mentioned solely to describe the character of
sounds and effects created in the X V-AMP.
6. Eects Processor
A special feature of your X V-AMP is its built-in multi-eects processor module
oering 16 dierent groups of rst-class eects such as chorus, anger, delay,
auto wah as well as various combinations of eects. You can select one eect out
of each of the three eects blocks (modulation, delay and reverb).
◊ The standard operating mode of the multi-effects processor is stereo,
so you can use stereo effects for recording purposes via the LINE OUT or
play in stereo using a second amplifier.
◊ To match speed-based effects to the tempo of the music, please press
the TAP button at least twice in the beat of your music.
6.1 Eect descriptions
The following section contains short descriptions of the eects that you can use.
6.1.1 Reverb and delay algorithms
The delay eects can be modied in three parameters:
• Turn ADJUST to modify “mix”
• Turn ADJUST while TAP is pressed to modify “feedback”, and
• Tap the TAP key in the rhythm of your music to modify “delay time”.
STEREO DELAY: Delays the input signal. Dierent tempo settings let you
create a wide array of delay eects. Be experimental, try going from short to
very long delays.
LONG ECHO: What’s so special about this delay eect is that the repetition
interval of the echos is 50% longer than the time interval measured between
two taps on the TAP key. This way, you can create a frequently used echo eect
very simply: if you tap and play in quarter-note, the echos are located three
eighths away. What the whole thing can sound like is best demonstrated by U2’s
guitarist The Edge.
SLAP ECHO: As the name suggests, a delay with a very short repetition interval.
The X V-AMP takes a half of the time interval measured between the taps on TAP.
The echo velocity doubles.
PING PONG: A delay eect that changes position in the stereo image.
6.1.2 Modulation eects
If modulation eects have been selected (key LED (7) blinks), you can modify up
to four parameters on each eect:
• By turning ADJUST (eect intensity),
• by turning ADJUST while TAP is pressed (second parameter,
please see respective eect description),
• by turning ADJUST while both TAP und MODUL. keys are pressed
(third parameter), you can dial up a dierent eect model (1 - 4), and
• by tapping at the TAP key in the rhythm of music (modulation/speed tempo).
PHASER: The principle behind a phaser is that a second, phase-shifted signal
is added to the audio signal. This makes the sound richer and, above all,
livelier. Thiseect has been popular for decades because it can be used to
produce slightly modulating or strongly alienating eects, regardless of what
instrument you are using. Two of the classic versions of this eect that we
simulate are the four-level MXR Phase 90 (1) and the 12-level Boss PH2 (4).
Additionally, the X V-AMP oers two additional rare versions of an 8-level (2)
and a 10-level (3) phaser.
The second parameter controls resonance, the third controls the
phaser model (1 - 4).
PITCH BEND: The Digitech Whammy pedal and the PS5 Super Shifter from Boss
are extremely well-liked eects that produce an eect signal that is out of tune
with the input signal. Models 1 - 4 oer the best pitch bend eects.
Use ADJUST to determine “mix”.
The PS-5 pitch shifter (1) creates a xed interval consisting of several half-tone
steps to the input tone. With the T-Arm simulation (2), this interval is active
only as long as the pedal key (18) is pressed. The tempo at which the interval is
reached can be modied using the TAP key.
With the Whammy eect (3), detuning depends on the position of the pedal
(pedal up = original tone pitch, pedal down = the interval entered under (2)).

11 X V-AMP LX1-X User Manual
In contrast to the pitch shifter, the detune eect (4) creates a modest out-of-
tune interval, consisting of only a fraction of a half-tone. It sounds roughly like a
permanently activated chorus.
The second parameter controls how much your tone detunes:
• for models 1 to 3 (-12/-7/-5/-3/+3/+4/+5/+7/+12 half-tones),
• for model 4 (-20 to +20% of a half-tone).
The third parameter lets you select between dierent eects modules:
pitch shift (1), T-Arm (2), Whammy (3) and detune (4).
◊ Since pitch bend effects 2 and 3 require the expression pedal,
this automatically disengages other expression pedal functions,
such as Wah Wah. In this case, the pedal assign effect LED lights up.
TREMOLO: Simulates the classic Fender DeLuxe tremolo as well as the Vox AC15
and Gate tremolo. Ever since Trip Hop gained on importance, this volume
modulation eect is totally in.
The second parameter controls the dependence of modulation tempo on volume:
loud input signal = quicker modulation, lower input signal = slower modulation.
The third parameter lets you alternate between dierent tremolo types:
Fender(1), Vox (2), Gate (3) and Panning (4).
ROTARY: This is the quintessential simulation of the classic organ eect normally
produced by speakers rotating at slow or fast speed in an extremely heavy
speaker cabinet. This eect uses the physical principle of the Doppler eect to
modulate the sound.
The second and the third parameters control modulation sound.
FLANGER: This eect is self-explanatory. Originally the anger eect was
produced by running two synchronized tape recorders at the same time.
Thesame signals (e.g. a guitar solo) were recorded on both machines. Puttinga
nger on the left reel of one of the machines caused it and the speed of the
playback to slow. The resulting delay produced phase shifts of the signals.
Outstanding examples of this eect genre are for example the Ultra Flanger on
the BF-3 from Boss (1), and the classic BF-2 (2) as well as the Flanger from MXR (3)
and A/DA (4).
The second parameter controls the resonance (eect feed-back to the input),
andthe third parameter selects the anger model (1 - 4).
CHORUS: This eect adds a slightly modulated o-key element to the original
signal, thus creating a pleasant oating eect through variations in pitch. One of
the most often used studio chorus eects was the Tri Stereo Chorus, with its
12 (!) voices that are modulated against each other. The X V-AMP oers you this
eect in two versions (1, 2). Two additional classics are the Boss Chorus Ensemble
CE-1 (3) and the Roland Dimension D (4).
The second parameter controls modulation depth, and the third parameter
selects the chorus model (1 - 4). Modulation speed can be determined using
the TAP key. High depth and speed values create a signal that is noticeably
out of tune.
AUTO WAH: The American funk in the ’70s proved that auto wah had many
possible applications. Instead of regulating the lter frequency with your foot,
our eect does this automatically, depending on the signal level. In doing so,
oureect is similar to the EHX MuTron III in the up position.
The second parameter determines how quickly the lter is shifted; the third
parameter selects the eects block (1 - 4).
P-FUNK’N: This is our attempt at replicating the legendary MuTron III, and we
succeeded! The most famous user of this eect is probably Bootsy Collins.
The MuTron III had an up/down switch. Here, the eect resembles the MuTron in
the down position.
The second parameter determines how quickly the lter is shifted, while the third
parameter determines the eects block (1 - 4).
6.1.3 Special eects
WAH WAH: The legendary Wah Wah eect owes its fame mainly to Jimi Hendrix.
Describing it is certainly more dicult than simply listening to Hendrix using it
on Voodoo Chile.
◊ Wah Wah is not available when auto wah, P-Funk’n or pitch bend are
being used.
COMPRESSOR: Our simulation is based on the well-known MXR Dyna Comp.
Acompressor limits the dynamic range of a signal, in that the signal level is
reduced as soon as a pre-determined threshold is exceeded. A compressor
lets you achieve noticeable and creative sound eects. How strongly the
compressor kicks in is controlled using ADJUST, allowing you to achieve
apparent sustain). When ADJUST is turned all the way to the left, the compressor
function is deactivated.
The second parameter (attack) controls the amount of time that the compressor
needs to react, once the threshold has been exceeded. If you set up a short attack
time, the compressor will react very fast.
NOISE GATE: Noise gates are used to remove or reduce noise or other
interference. Guitar signals in particular are very sensitive to interference.
Notonly do guitarists often use high-gain settings but guitar pick-ups can
amplify unwanted inter-ference. This can be painfully apparent during breaks
in the music. And how does a noise gate work? It simply mutes the signal during
breaks, eliminating any interference at the same time.
The ADJUST control determines, when the noise gate starts processing.
Thiscontrol lets you decide if you want to suppress background noise more or
less pronouncedly. When ADJUST is turned all the way to the left, the noise gate
function is deactivated.
The second parameter (release) determines the time that the noise gate remains
open after it had fallen below the threshold. If you set up a short release
time, this means that the noise gate will suppress the signal very soon after it
detects noise.
6.2 Reverb
The reverb is still one of the most important eects in a mix or at a live event.
BEHRINGER oers you four dierent reverb programs, so that you can always nd
the kind of reverb that ts your excact situation:
Ambience: short room simulation without reverb tail.
Cathedral: a long, rich reverb, like in a cathedral.
Spring: typical sound of a classic spring reverb.
Reverb: universal, warm reverb simulating a concert hall.
ADJUST controls the reverb intensity, while the second parameter
determines decay.
A/DA, Boss, DyTronics, Electro Harmonix (EHX), MXR, Digitech, Vox as well the names of musicians and
bands are registered trademarks of their respective owners and are in no way associated with BEHRINGER.
The brand names appearing here are mentioned solely to describe the character of sounds and effects created
in the X V-AMP.
12 X V-AMP LX1-X User Manual
7. Tuner
The integrated tuner is activated/deactivated by simultaneously pressing
both footswitches. In doing so, the X V-AMP is switched into bypass mode.
UseADJUSTto modify bypass volume.
7.1 Tuning your guitar
The chromatic tuner automatically recognizes the frequencies of all the standard
guitar notes. For the a string this means a frequency of 110 Hz. When you plug
your guitar into the X V-AMP and play an open string, the tuner will recognize
and display the note. Since the tuner uses an auto-chromatic scale, it can also
recognize semi-tones, which are shown with a “b” in the display.
It may happen, however, that a note is displayed as “A” but is actually slightly out
of tune. This is shown by at least one of the four LEDs at the foot of the display
lighting up. In certain cases even two of the LEDs may light up, which indicates
that the pitch of the note played lies between the pitches represented by the two
LEDs. When the circular tuner LED in the middle lights up, this means the note
played is in tune.
7. 2 Setting reference pitch “A”
To give you maximum freedom for tuning your guitar, you can change the preset
reference pitch “A”. For clarity’s sake, let’s look at this in more detail.
The so-called concert pitch “A” has been raised steadily over time. For example,
the tuning forks used by Bach, Händel or Mozart were 415, 420 or 421 Hz
(oscillations per second). Today’s orchestras tune to “A” at 444 Hz, and the Berlin
Philharmonic Orchestra lead the eld with their own concert pitch “A” at 447 Hz.
The reference “A” on your X V-AMP has been factory-programmed at 440 Hz.
Ifyou are going to play with a big orchestra tuning their instruments to a
reference pitch of 444 Hz, you will need a function that allows you to change your
reference pitch. To activate this function, switch on the tuner by pressing both
footswitches simultaneously. Then, keep TAP pressed down to start calibrating
the tuner. The display will show “40”, which means 440 Hz. Use ADJUST to raise
or lower the reference pitch by up to 15 Hz. The display always shows the last
two digits as the rst digit is always 4. To quit, simply release TAP. Any changes
will be stored automatically. The tones for the other strings on your guitar will
automatically be adjusted to the new reference pitch.
8. Installation
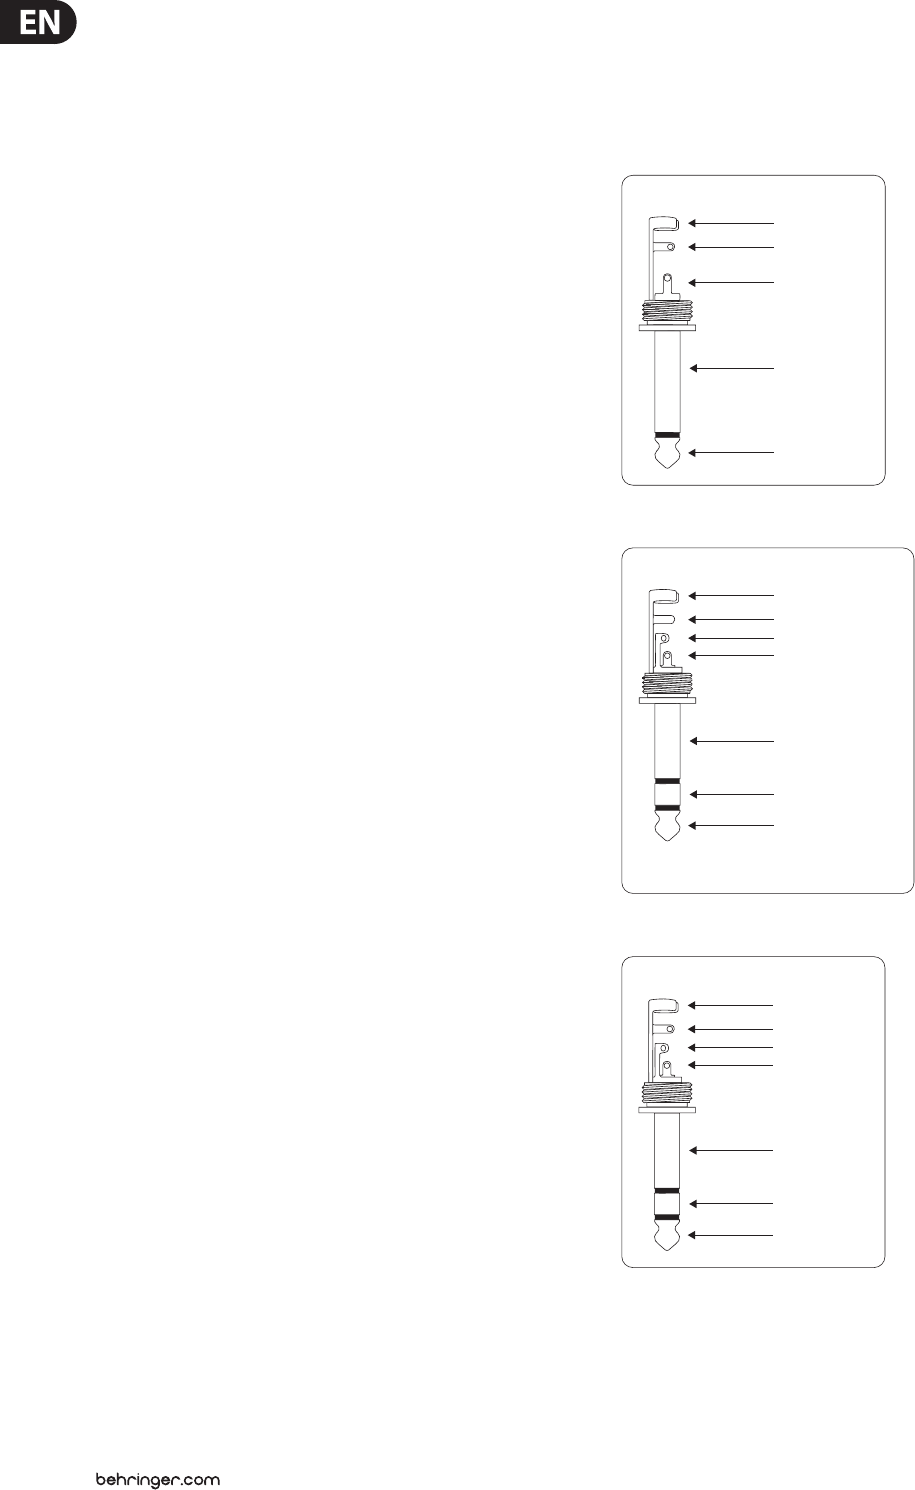
8.1 Audio connections
The input of your BEHRINGER X V-AMP is a mono ¼" TS connector. The line
out/headphone output comes as ¼" TRS stereo connector. The line output works
with both balanced and unbalanced connections.
strain relief clamp
sleeve
tip
sleeve
(ground/shield)
Unbalanced ¼" TS connector
tip
(signal)
Fig. 8.1: ¼" TS connector
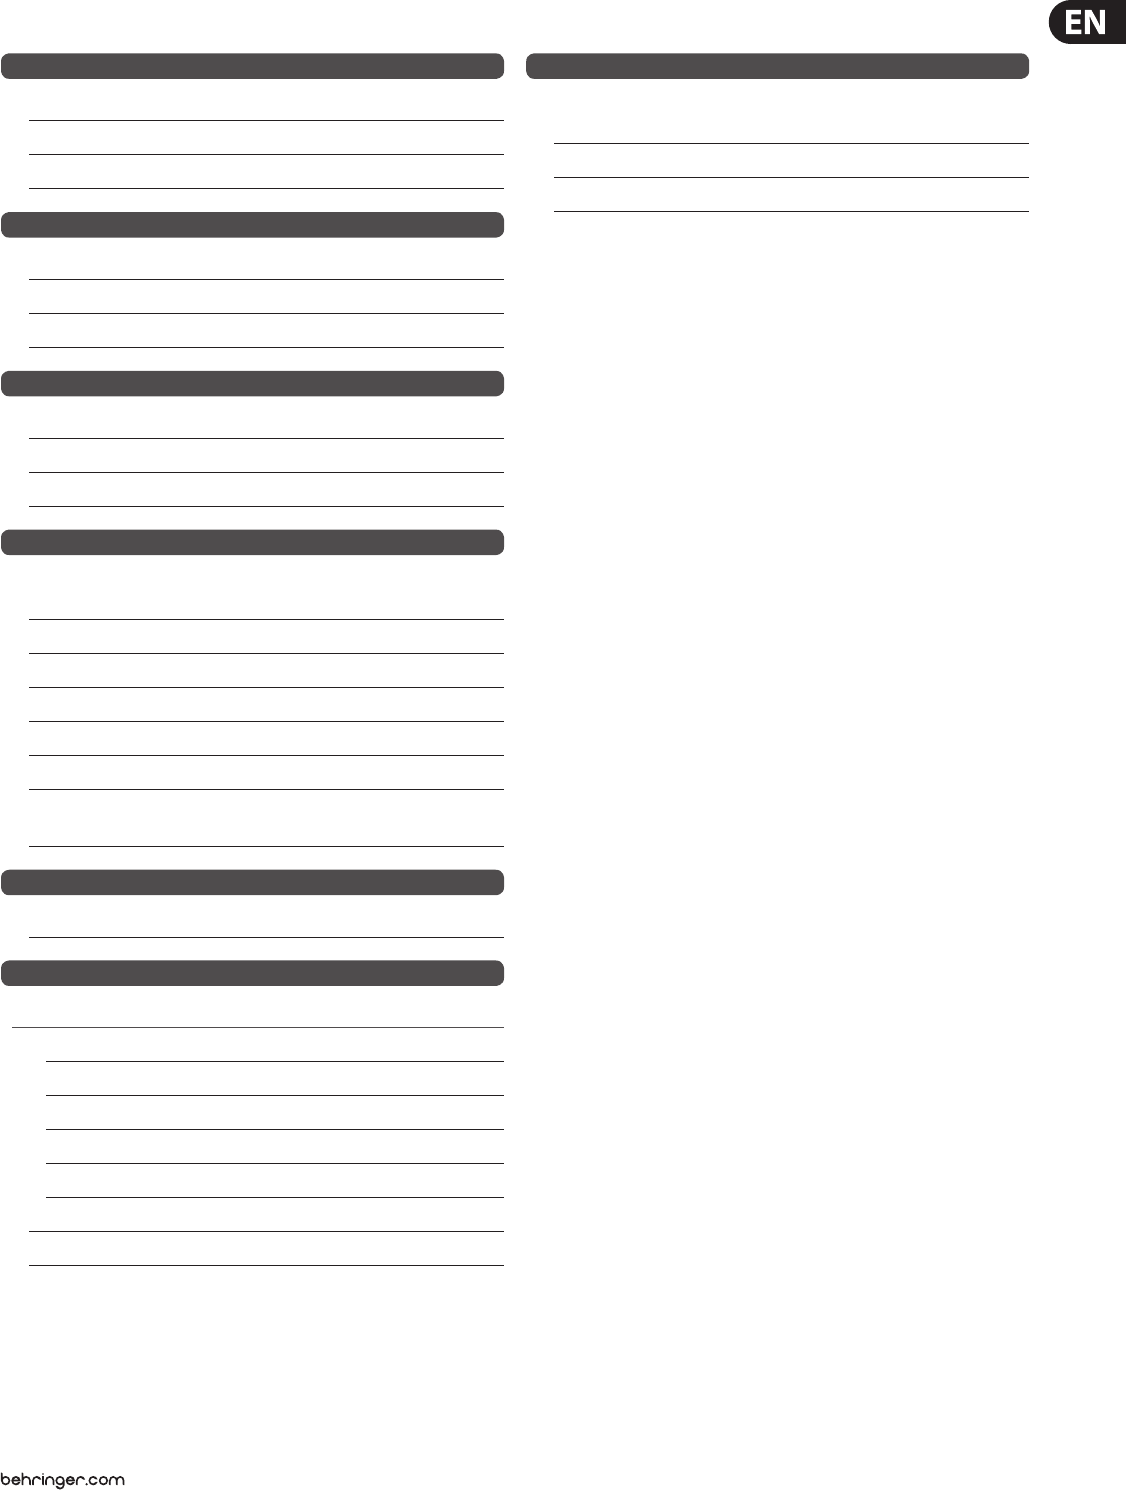
strain relief clamp
sleeve
ring
tip
sleeve
ground/shield
For connection of balanced and unbalanced plugs,
ring and sleeve have to be bridged at the stereo plug.
Balanced ¼" TRS connector
ring
cold (-ve)
tip
hot (+ve)
Fig. 8.2: ¼" TRS connector
strain relief clamp
sleeve
ring
tip
sleeve
ground/shield
¼" TRS headphones connector
ring
right signal
tip
left signal
Fig. 8.3: Headphones connector
13 X V-AMP LX1-X User Manual
9. Specications
Instrument Input
Type ¼" TS connector, unbalanced
Input impedance approx. 1 MΩ
Max. input level +5 dBu
Line/Headphone Output
Type ¼" TRS stereo connector, balanced
Output impedance approx. 50 Ω
Max. output level +13 dBu @ 10 kΩ / +18 dBm @ 100 Ω
Mono Amp Output
Type ¼" TS connector, unbalanced
Output impedance approx. 100 Ω
Max. output level -7 dBu
Digital Signal Processing
Converter 24-bit Delta-Sigma,
64/128-times oversampling
Dynamics A/D 100 dB @ preamp bypass
Dynamics D/A 95 dB
Sample rate 31.250 kHz
DSP 100 Mips
Delay time max. 1960 ms stereo
Run time approx. 5 ms
(Line In >> Line Out)
Display
Type 2-digit, 7-segment LED display
Power Supply
Mains voltage
USA/Canada 120 V~, 60 Hz
U.K./Australia 240 V~, 50 Hz
China/Korea 220 V~, 50 Hz
Europe 230 V~, 50 Hz
Japan 100 V~, 50 - 60 Hz
Power consumption max. 7 W
Mains connection external power supply (2-pole)
Dimensions/Weight
Dimensions (H x W x D) approx. 1.97 x 9.25 x 6.89"
approx. 50 x 235 x 175 mm
Weight approx. 1.76 lbs / 0.80 kg
Shipping weight approx. 4.40 lbs / 2 kg
BEHRINGER constantly strives to maintain the highest quality standards. Modifications may be made,
if necessary, without prior notice. The specifications and appearance of the equipment may therefore differ from
those listed or illustrated.

14 X V-AMP LX1-X User Manual
FEDERAL COMMUNICATIONS
COMMISSION COMPLIANCE
INFORMATION
Responsible Party Name: MUSIC Group Services US Inc.
Address: 18912 North Creek Parkway,
Suite 200 Bothell, WA 98011,
USA
Phone/Fax No.: Phone: +1 425 672 0816
Fax: +1 425 673 7647
X V-AMP LX1-X
complies with the FCC rules as mentioned in the followingparagraph:
This equipment has been tested and found to comply with the limits for a ClassB
digital device, pursuant to part 15 of the FCC Rules. These limits are designed
to provide reasonable protection against harmful interference in a residential
installation. This equipment generates, uses and can radiate radio frequency
energy and, if not installed and used in accordance with the instructions, may cause
harmful interference to radio communications. However, there is no guarantee that
interference will not occur in a particular installation. If this equipment does cause
harmful interference to radio or television reception, which can be determined
by turning the equipment o and on, the user is encouraged to try to correct the
interference by one or more of the followingmeasures:
• Reorient or relocate the receiving antenna.
• Increase the separation between the equipment and receiver.
• Connect the equipment into an outlet on a circuit dierent from that to which the
receiver is connected.
• Consult the dealer or an experienced radio/TV technician forhelp.
This device complies with Part 15 of the FCC rules. Operation is subject to the
following two conditions:
(1) this device may not cause harmful interference, and
(2) this device must accept any interference received, including interference that may
cause undesired operation.
Important information:
Changes or modications to the equipment not expressly approved by MUSIC Group
can void the user’s authority to use the equipment.
X V-AMP LX1-X

We Hear You
