Beijing TierTime Technology 3DP-12 UP Mini 2 User Manual part 2
Beijing TierTime Technology Co. Ltd UP Mini 2 part 2
Contents
- 1. User manual part 1
- 2. User manual part 2
User manual part 2
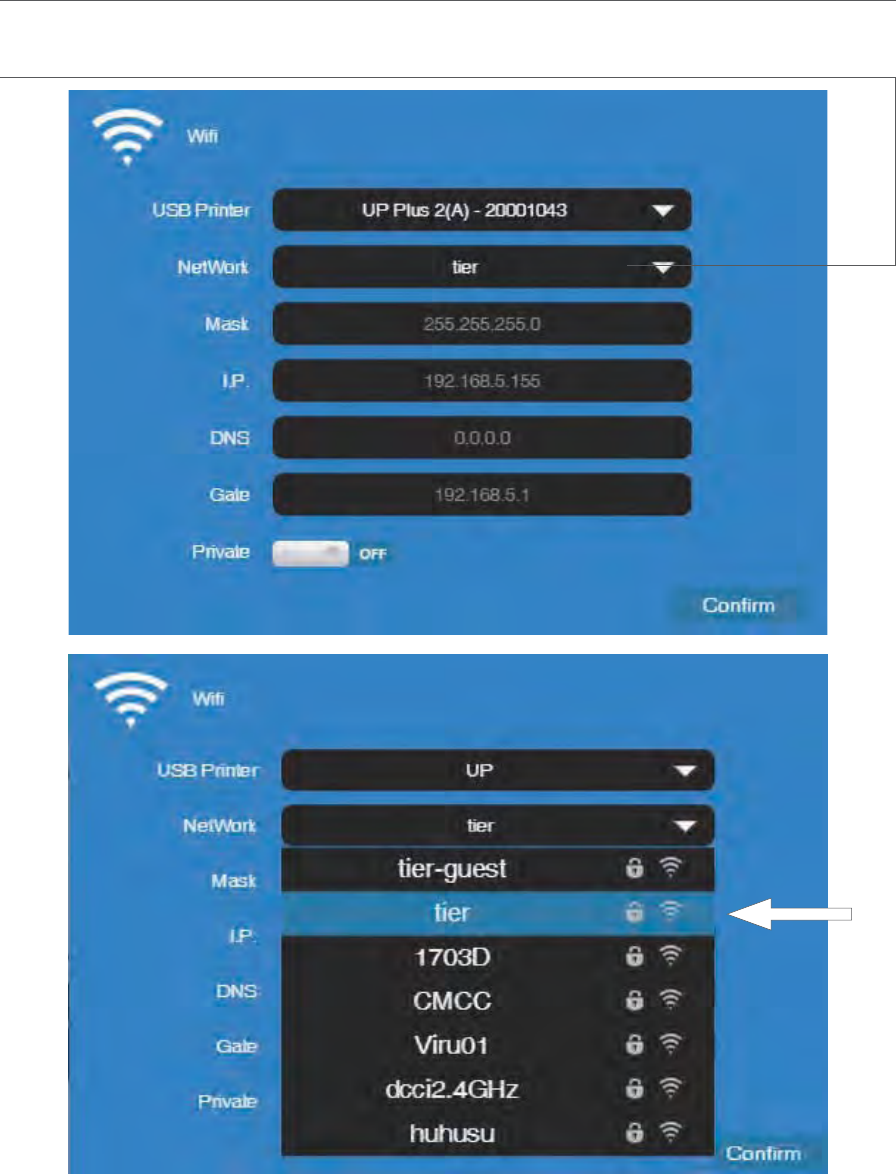
3\ Click network to choose an available network ( user can also use touch screen panel
to setup WIFI connection).
Choose your network from the drop down list.
WIFI Setup (UP Studio) 3-2
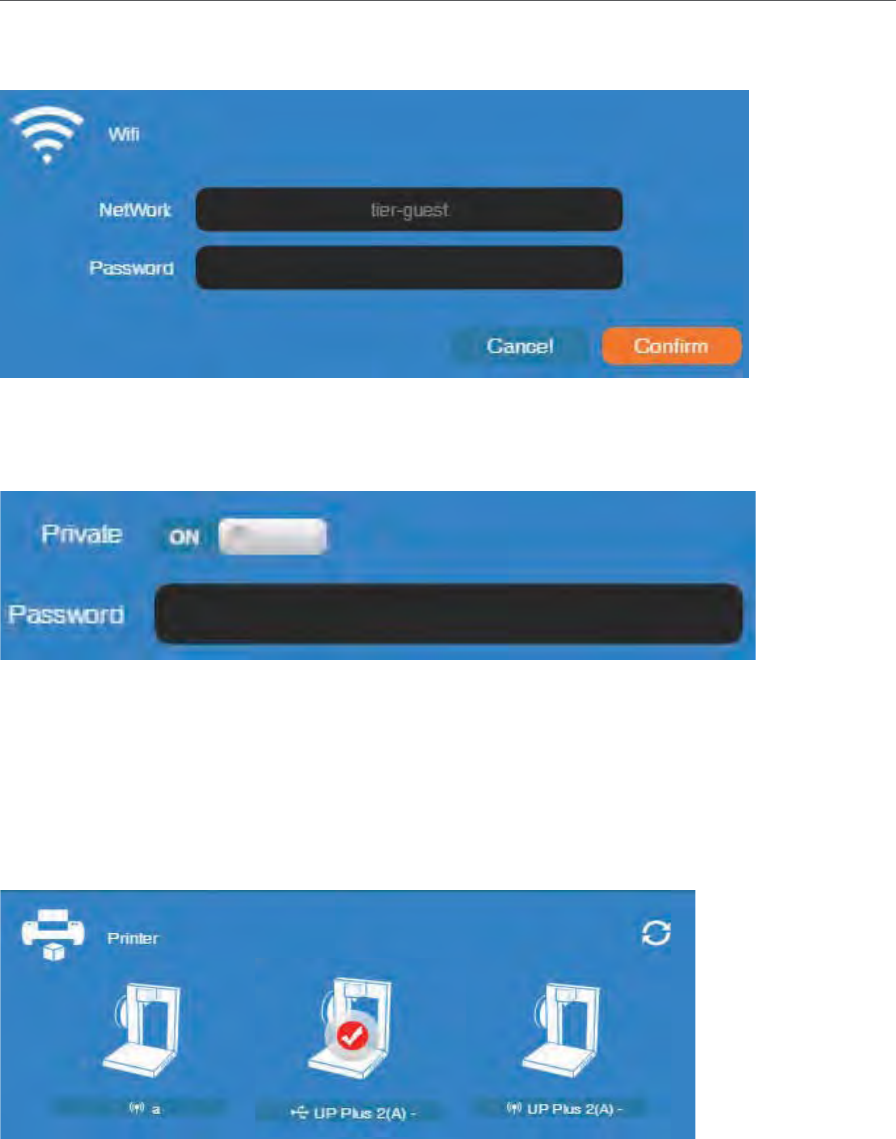
5\ If “Private” is set to ON, a private password could be optionally added to limit printer
WIFI access to trusted users. Please note that the password is a weak protection that can
be accessed and changed by anyone who can connect the machine through USB.
4\ Input the password for the WIFI network.
6\ Printer Tab
Disconnect USB and choose available printers on the network to operate through WIFI.
WIFI Setup (UP Studio) 3-3
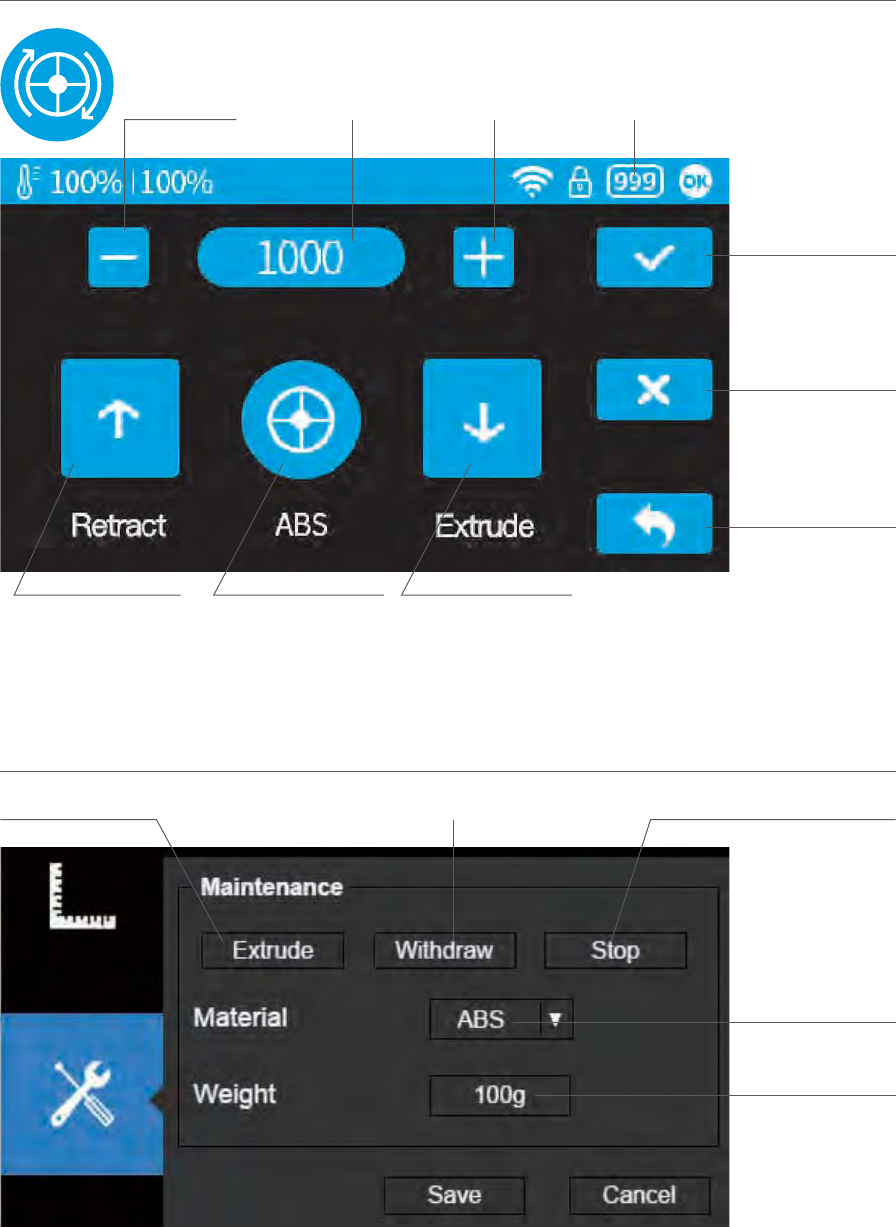
Decrease
Material Weight
adjustment
current ma-
terial weight
Save current
setting
Increase
Set Materials (Touch Screen)
Set Materials (UP Studio)
Stop extru-sion
and heating
withdraw material
Extrude Filament Withdraw Filament Stop All Actions
Select Material
Input Material weight
Change Ma- terial extrude material
Back
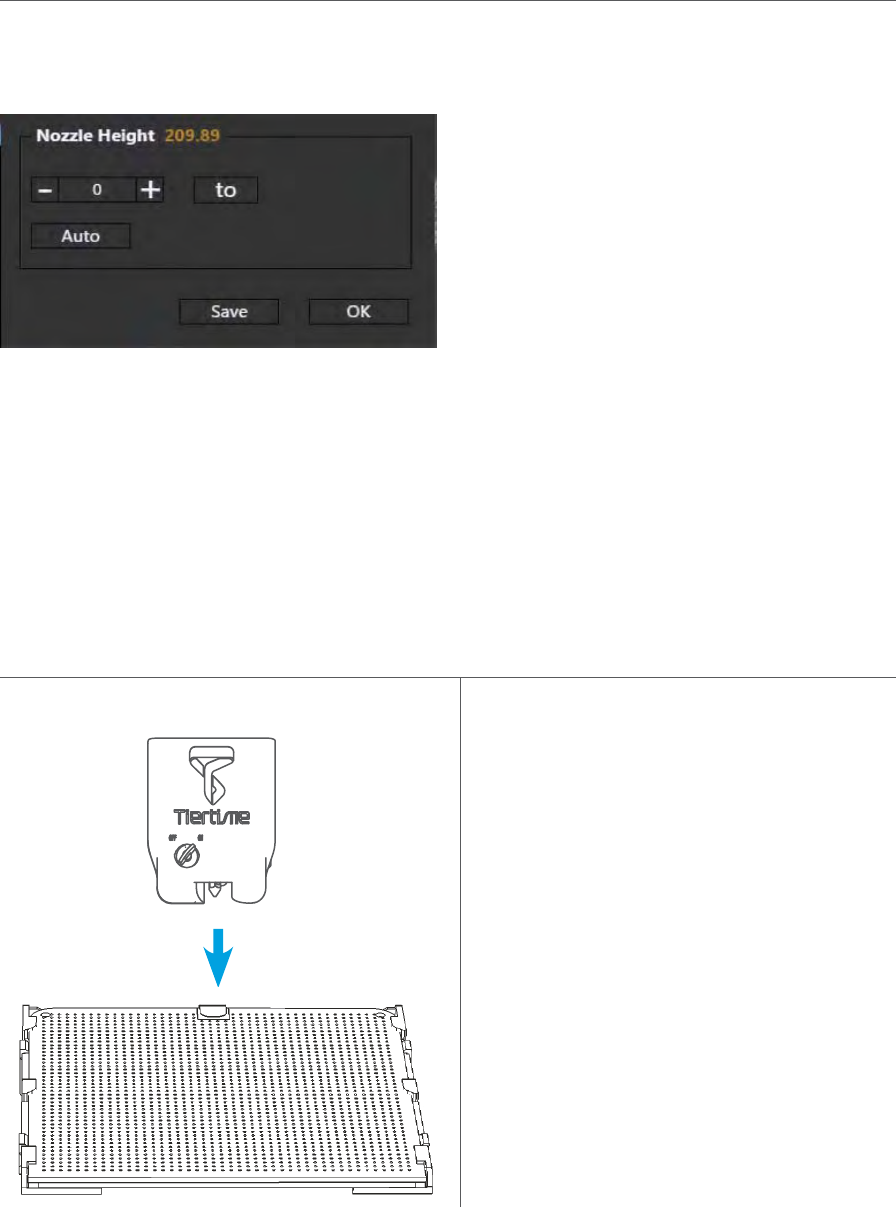
During nozzle height detec- tion, the
print head nozzle will touch the thin
metal sheet on the detector to make
meas- urement.
Open the Calibration panel
At the Nozzle Height section, click “Auto” will initiate the automatic nozzle height de- tection
process.
Clicking +/- button will move the platform up and down, or user could input a specific value
at the text field and click “To” button the move the platform to a specific height. Click save
will replace nozzle height value with current platform height.
Set Nozzle Height (UP Studio)
For setting nozzle height with touch screen please refer to page 16.
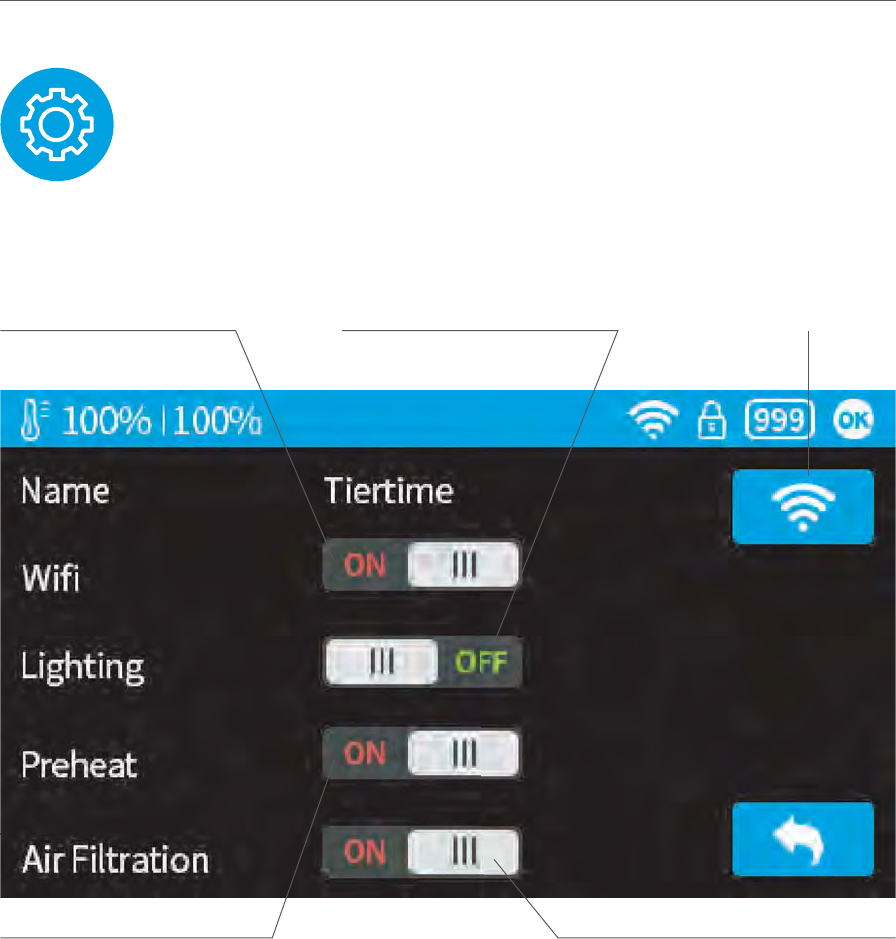
WIFI switch, if swithed off
the WIFI setting button
will not appear.
Peheat switch, when turned on,
for every print job, the printer
will first preheat 15min before
proceed to printing.
Turn on or off the
internal air filtration.
WIFI setting button
internal lighting switch
Machine Configuration

Language and Factory Reset
Model: current machine model
S.N.: machine serial number
Firmware Ver: shows current firmware version Print Time: total print time count
Print Weight: total print weight count
Actived Date: the date of printer activation MAC: mac address of printer
Reset: revert to factory setting. This will change some machine setting to default; remove
total printed time and weight data.
Language: choose language. Current available language: Chinese simplified, Chinese
Traditional, Korean, Japanese, French,Germany, English
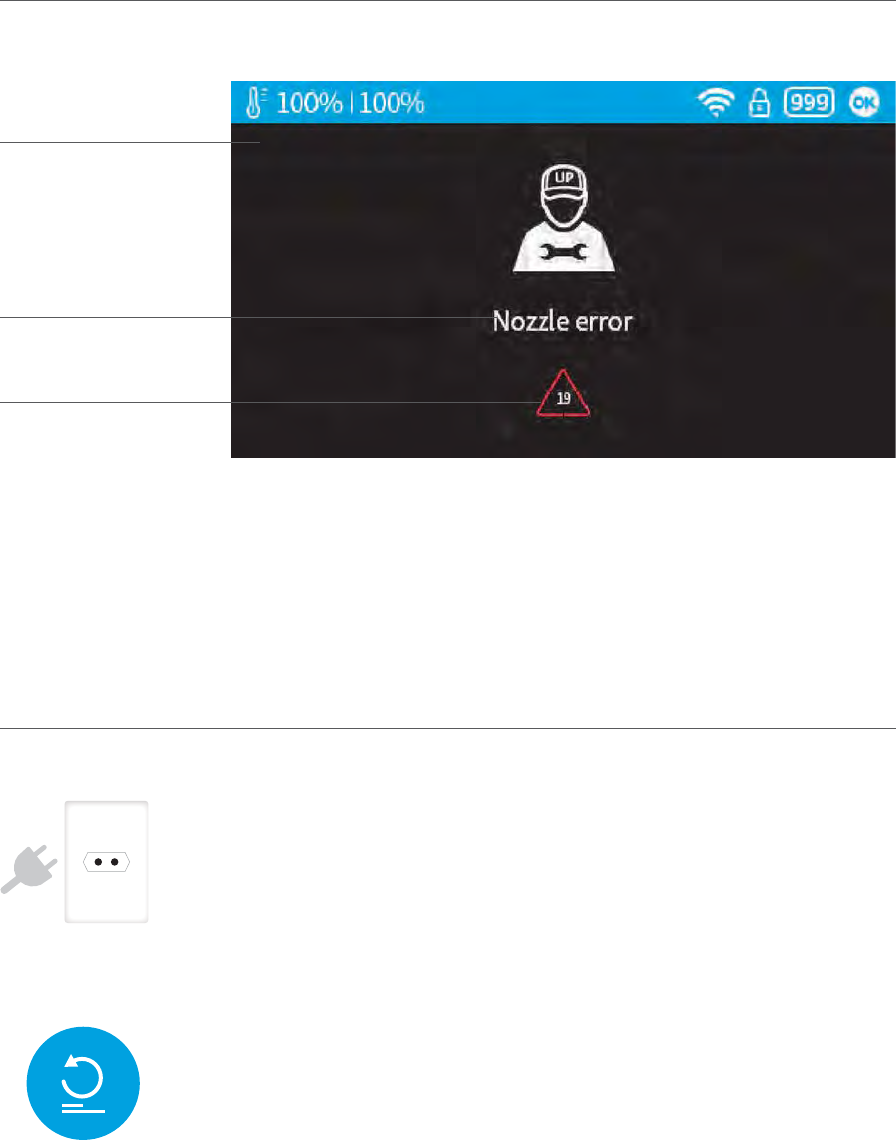
Unplug printer and restart
Suggested solution,
in this case:
Contact support
reinitialize the printer
Error Prompts
Other possible error prompt:
Error code
Error Message
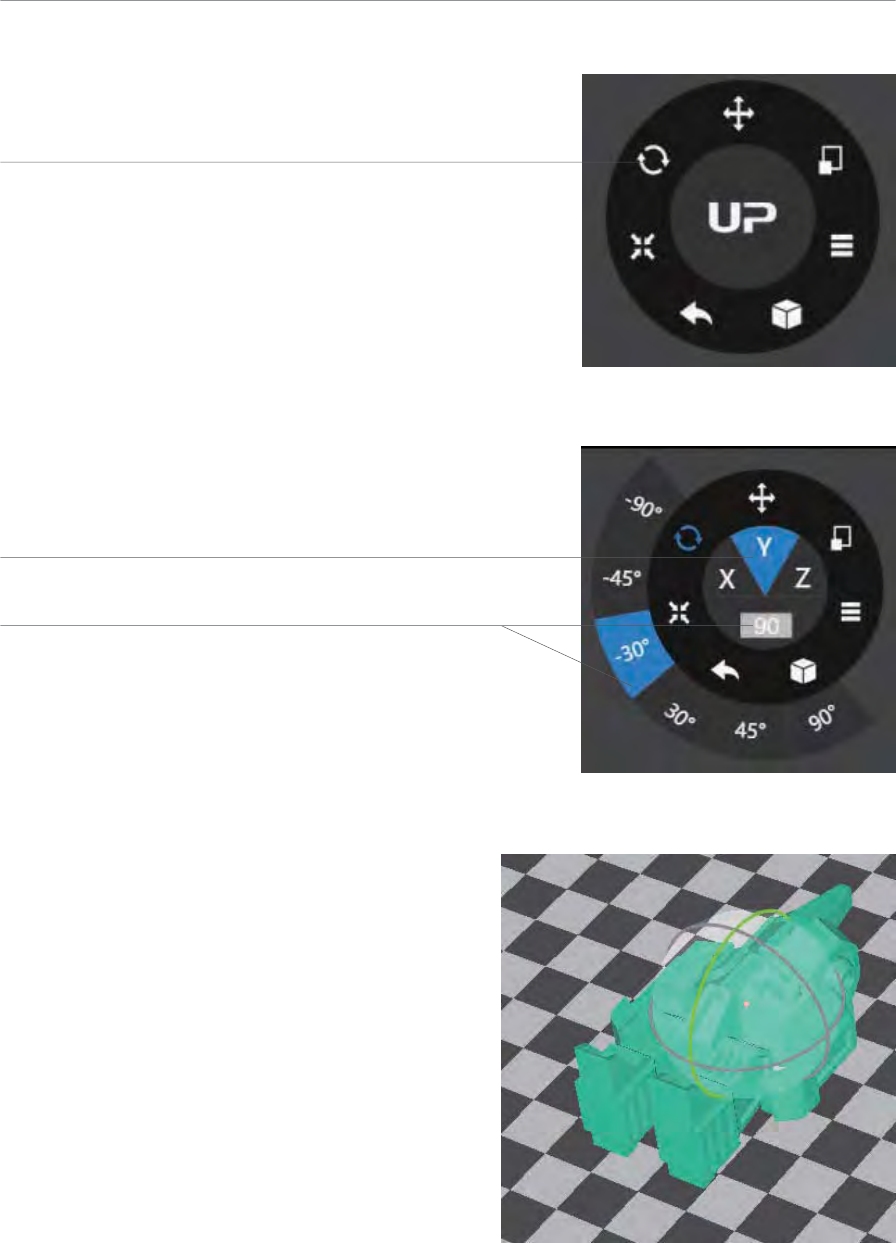
Choose the model and Click rotate button.
Choose rotation axis
User could input a spe- cific value
or choose a preset value for rotation.
Alternatively, user could use the rotation
guide to rotate model in real time by hold
and drag with mouse.
Rotating Models (UP Studio)
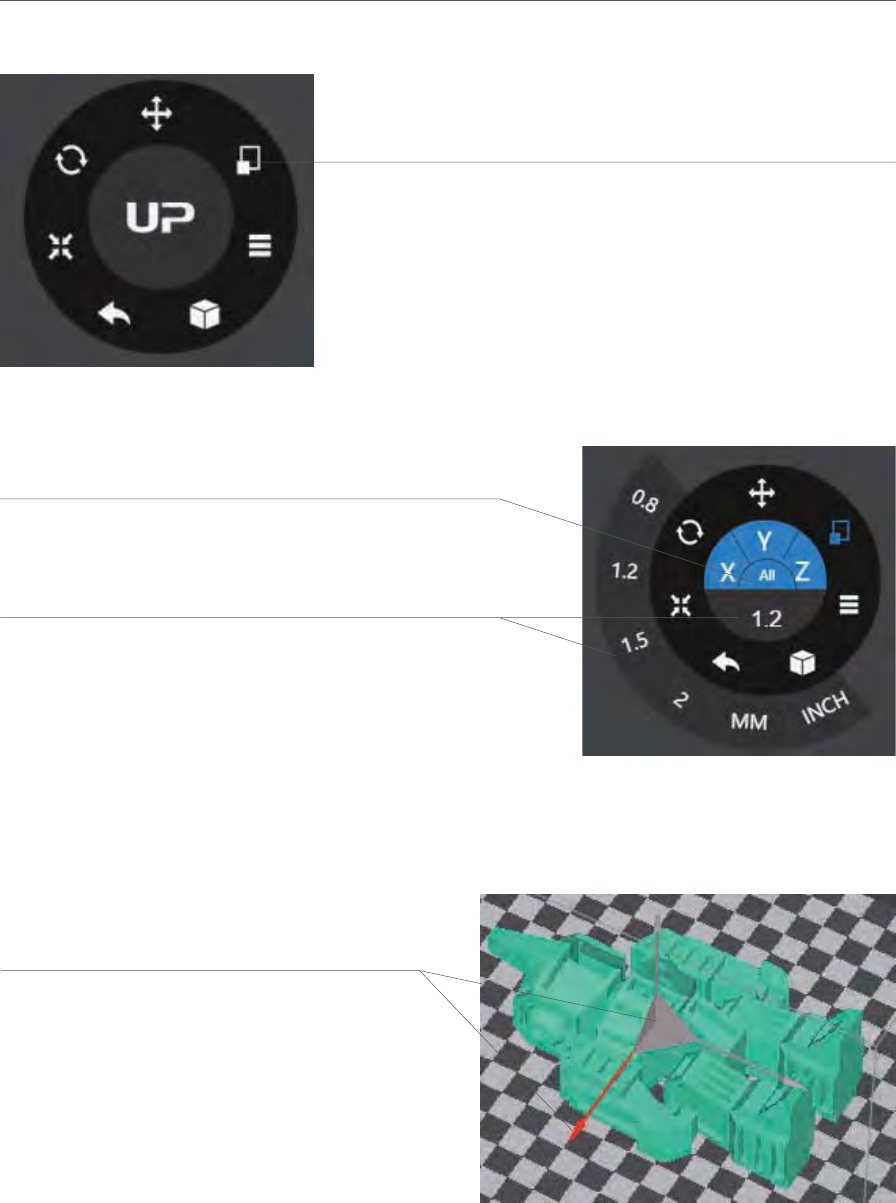
By default the scaling is in all axes.
User could also choose a specific axis for scaling.
User could input a specific scaling
factor or choose a preset value
Click MM or INCH to con- vert models to
sizes of corresponding units.
Alternatively, user could use the scaling guide
on the model. User could scale
in a specific axis or scale in all directions
by hold and drag with mouse.
Scaling Models (UP Studio)
Choose the model and Click rotate button.
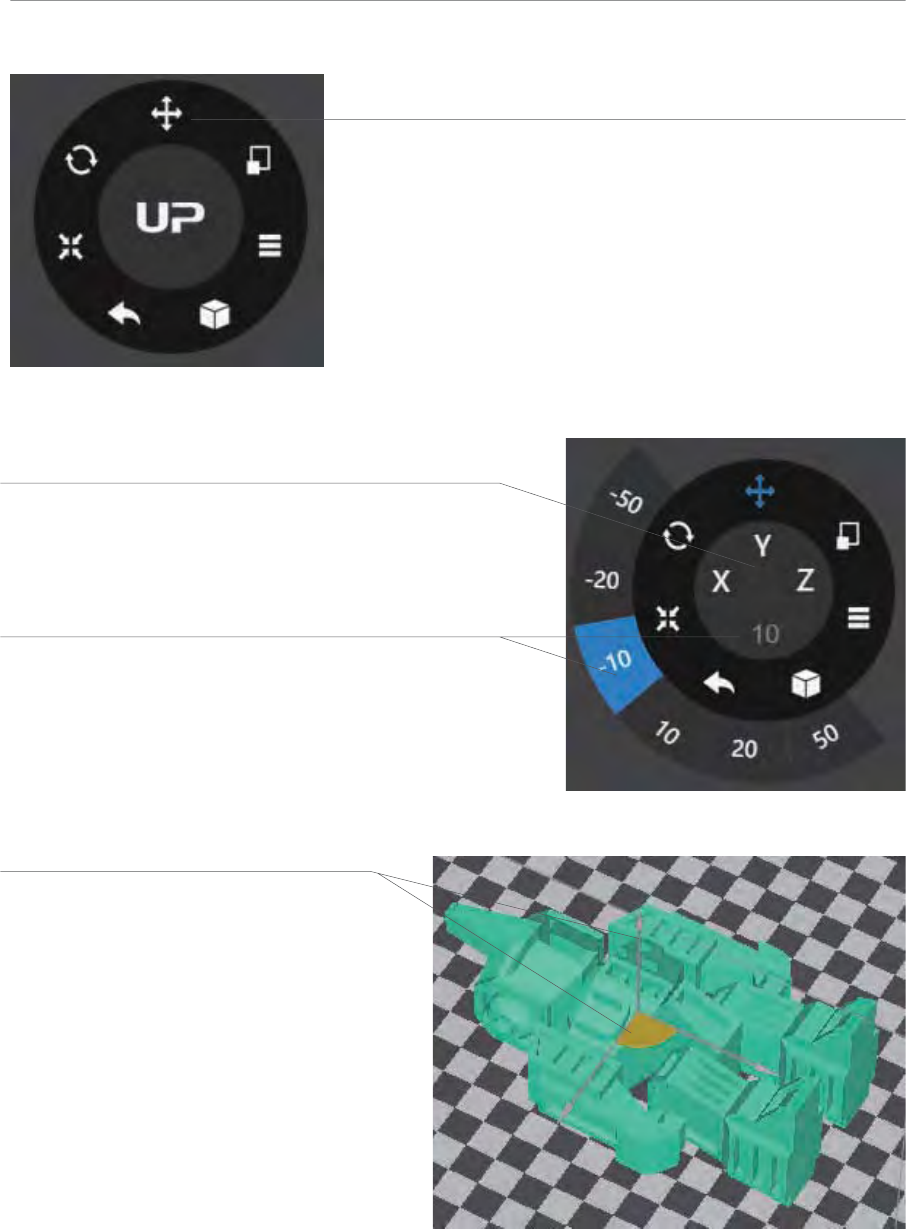
Alternatively, user could use the
translational guide on the model
to move on the X-Y plane or a
single direc- tion by hold and
drag with mouse.
Choose the the direction of movement
User could input a specific value or
choose a preset value for distance
of move- ment.
Move Model (UP Studio)
Choose the model and click the Move button.
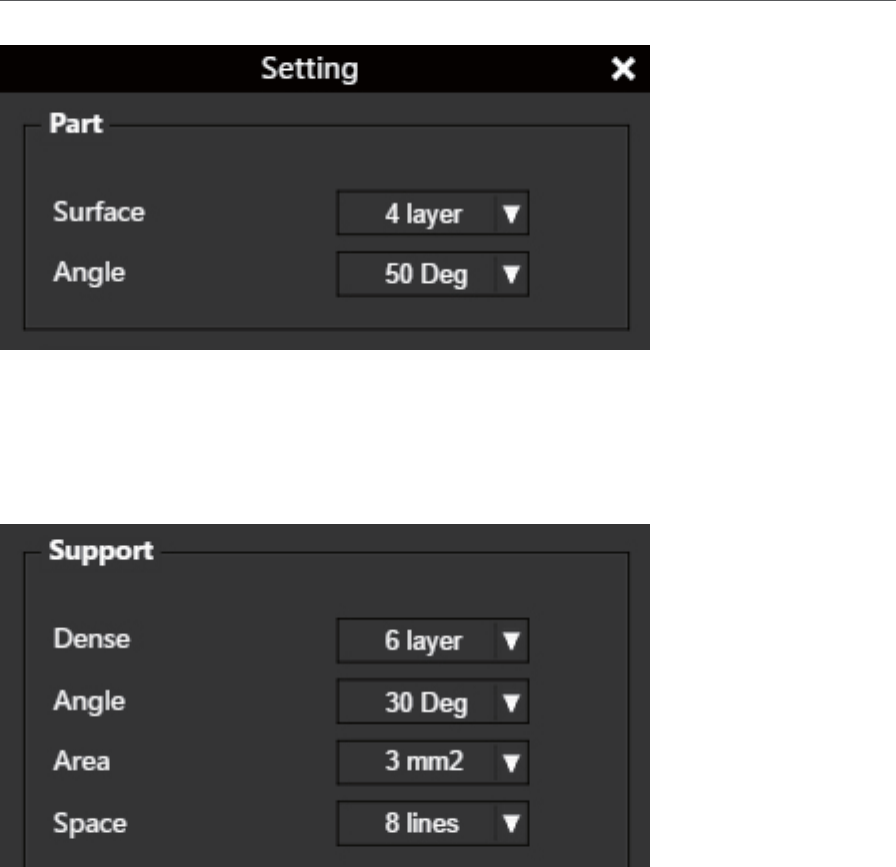
Print Preference
Surface: the number layers at the sealing the top and the bottom of the printed object.
Angle: This determine at which angle the Surface layers start to be printed.
Dense: Choose the number of dense layers between support and supported surfaces.
Angle: Determine the angle which support and dense layer to gen- erated.
Area: Determine the minimal area of surface that will be supported, area less than this vaule
will not be supported.
Space: Determine how desne the support will be, the larger the value the less dense of the
support.
2-1
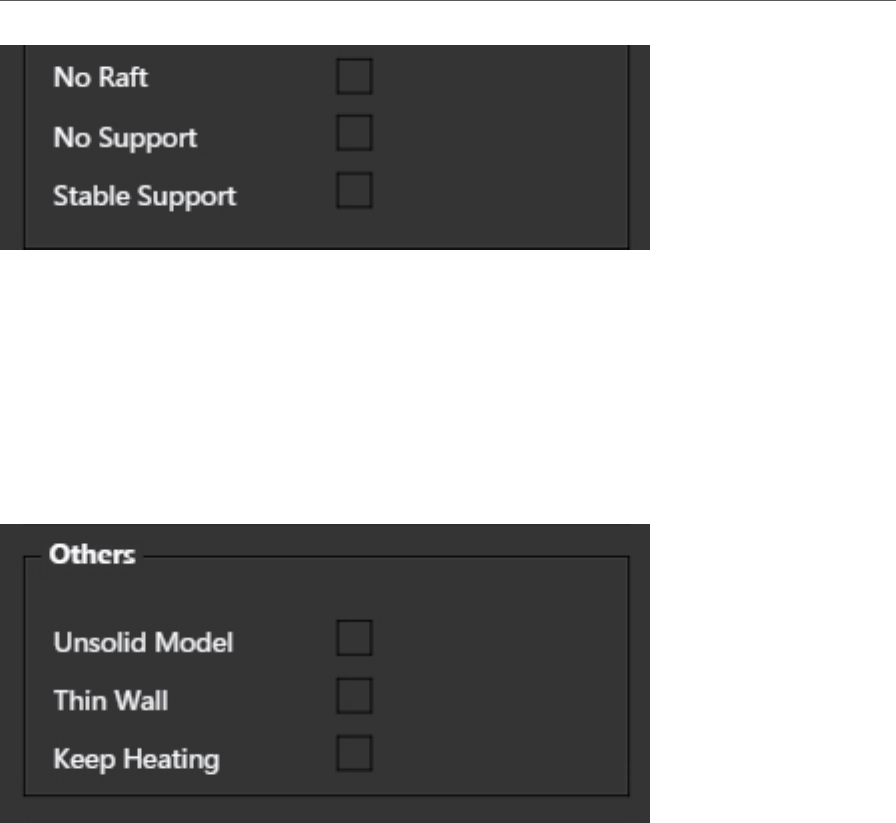
Print Preference 2-2
No Raft: print without raft.
No Support: print without support
Stable Support: Support structure will be stronger but less easy to be removed.
Unsolide Model: The software will autofix nonsolid models
Thin Wall: The Software will detect wall thickness that is too thin to print and expand the
feature to a printable size.
Keep Heating: The platform will be heated after print job is completed.
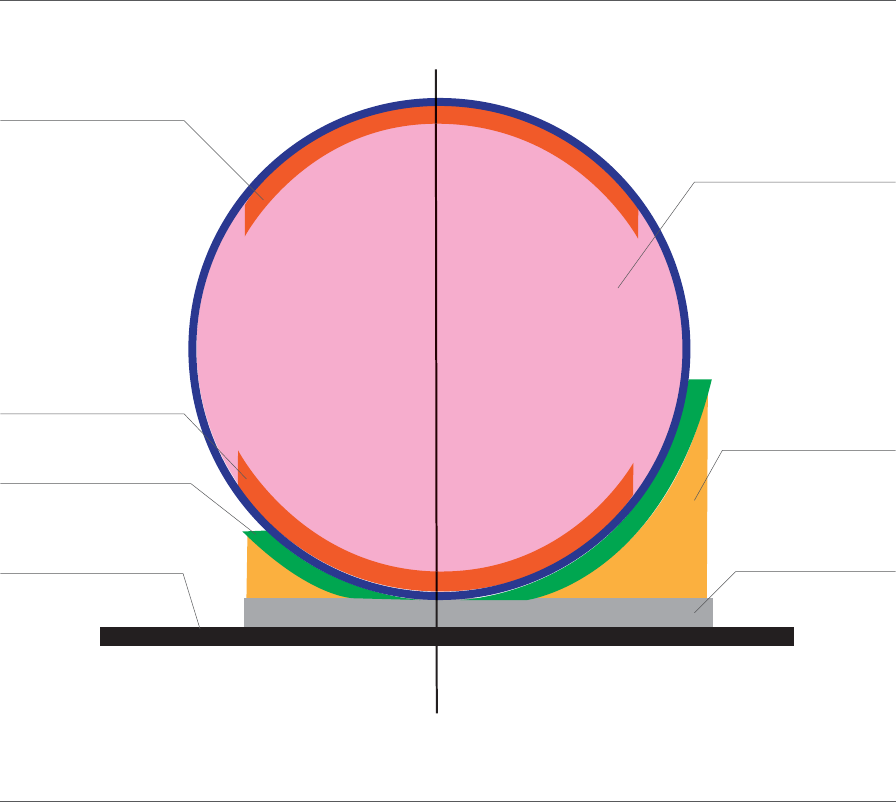
Printing Parameters
Surface
Infill
Support
Raft
Surface
Dense (support)
Print Platform
Suppot Range: < 30oSupport Range: < 90o
Dense: Solid support structure ensures that the surface being supported retains its shape
and surface finish.
Infill: The inner structure of the printed object. The density of the infill can be ad- justed.
Raft: The thick structure that assists with the adhesion of the object to the plat- form.
Surface: The top and bottom layers of the printed object.
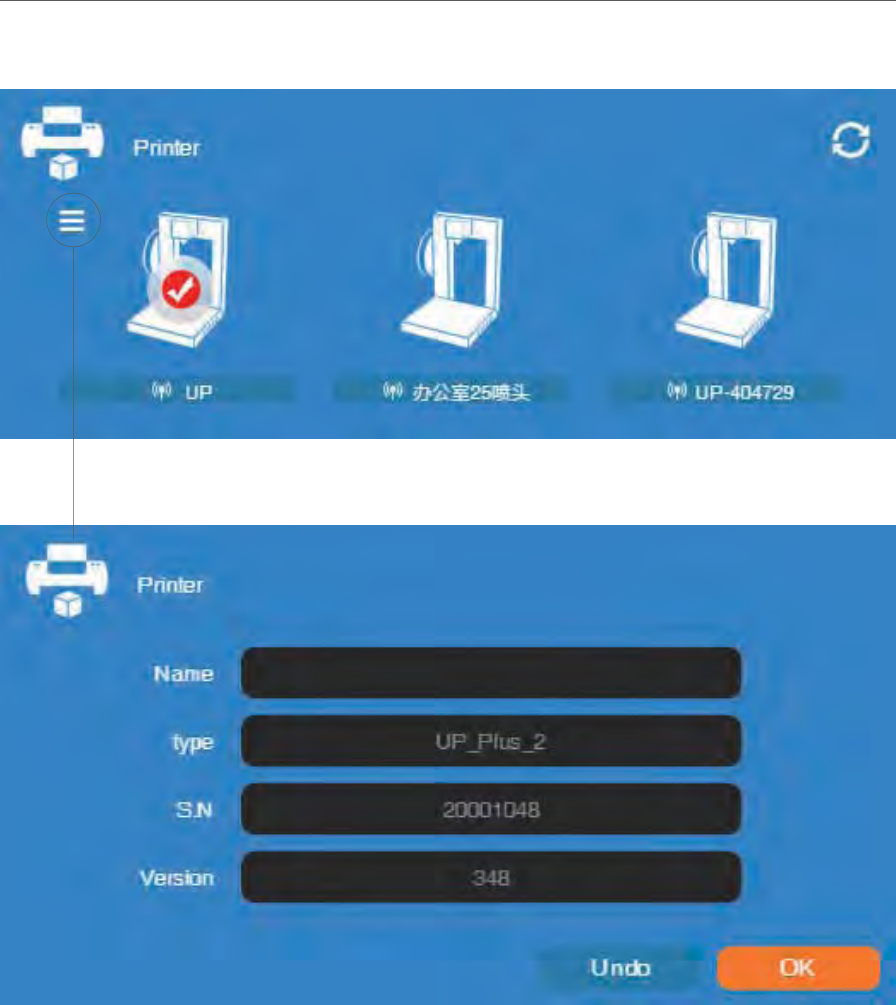
Printer Info
Printer info will be displayed by clicking the small button on the top left hand corner of the
connected printer icon. Information including printer type, serial number and firmware
version will be displayed. User could also set a custom name for the printer at the name
field.
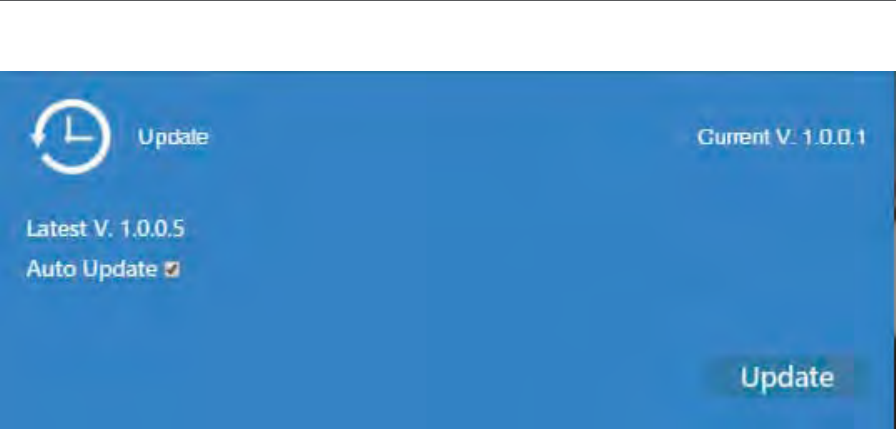
Check Auto Update to allow the software to inform user the latest version.
Software Version and Update
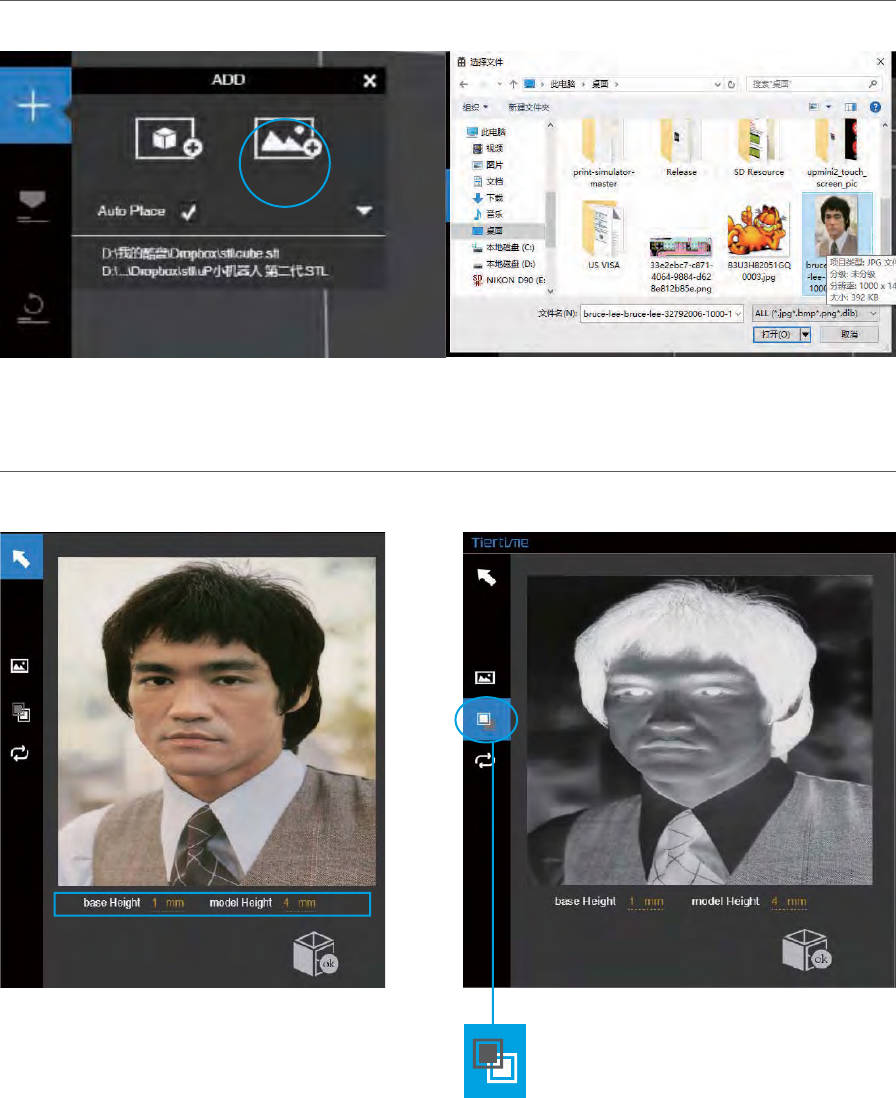
The Base height determine the thickness of a
flat layer that will hold the picture.
Model Height determine the contrast of the
finally print.
The convert negative but- ton will reverse
the pixel intensity so that user could choose
the picture to be protruding from or sunken
into the base.
Convert Picture Into 3D Model
Click add picture button and select a picture.
2-1
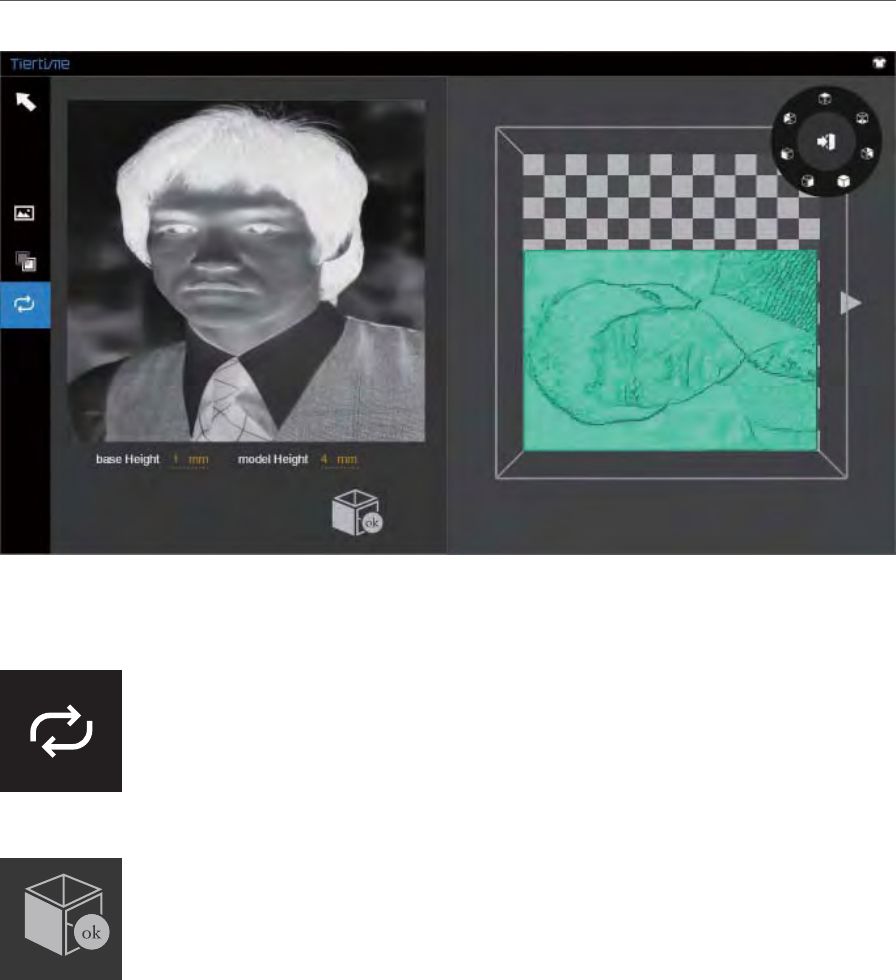
Update 3D model button. This button will convert the modi- fied picture on the left to a 3D
rendering on the right.
OK button send the 3D rendering to the 3D printing interface for printing.
Convert Picture Into 3D Model 2-2

Air Flow Adjustment
knob
Printing Techniques
Ensure accurate nozzle height. If the nozzle height value is too
low, it will cause warping; if it is too high, it will crash the nozzle
into the platform, causing damage and clogging. You can
manually fine-tune the nozzle height value in the "Calibation"
panels. You can try to adjust the nozzle height value plus or
minus 0.1 –0.2mm from the base on previous re- sults.
Calibrate the printing platform well. An unleveled platform usu-
ally causes warping.
Allow enough time for sufficient pre-heating. Please use the
3D Print – Preheat function. A well preheat- ed platform is
essential for printing large objects without warping.
The airflow on print head is adjustable, turn the air flow adjust-
ment knob to change the amount of cooling of printed object.
When printing in PLA, turn the lever counterclockwise to
direct the airflow to the nozzle. This will cool the PLA as soon
as it is extrud- ed and improve print quality. When printing
large object using ABS, turn the lever clockwise to direct the
airflow away from nozzle to slow down the cool- ing and to
prevent warping. Users could experiment with different
amount of cooling to achieve optimal result.
Printing with no raft. It is highly recommended to use raft for
normal printing as it improves adhesion and is required for
leveling compensation. It is turned on by default, but you can
turn it off in the "Print Pre- view" panel if you desire to.
Printing with no support. It is possible to print with- out sup-
porting structures. You can turn off support
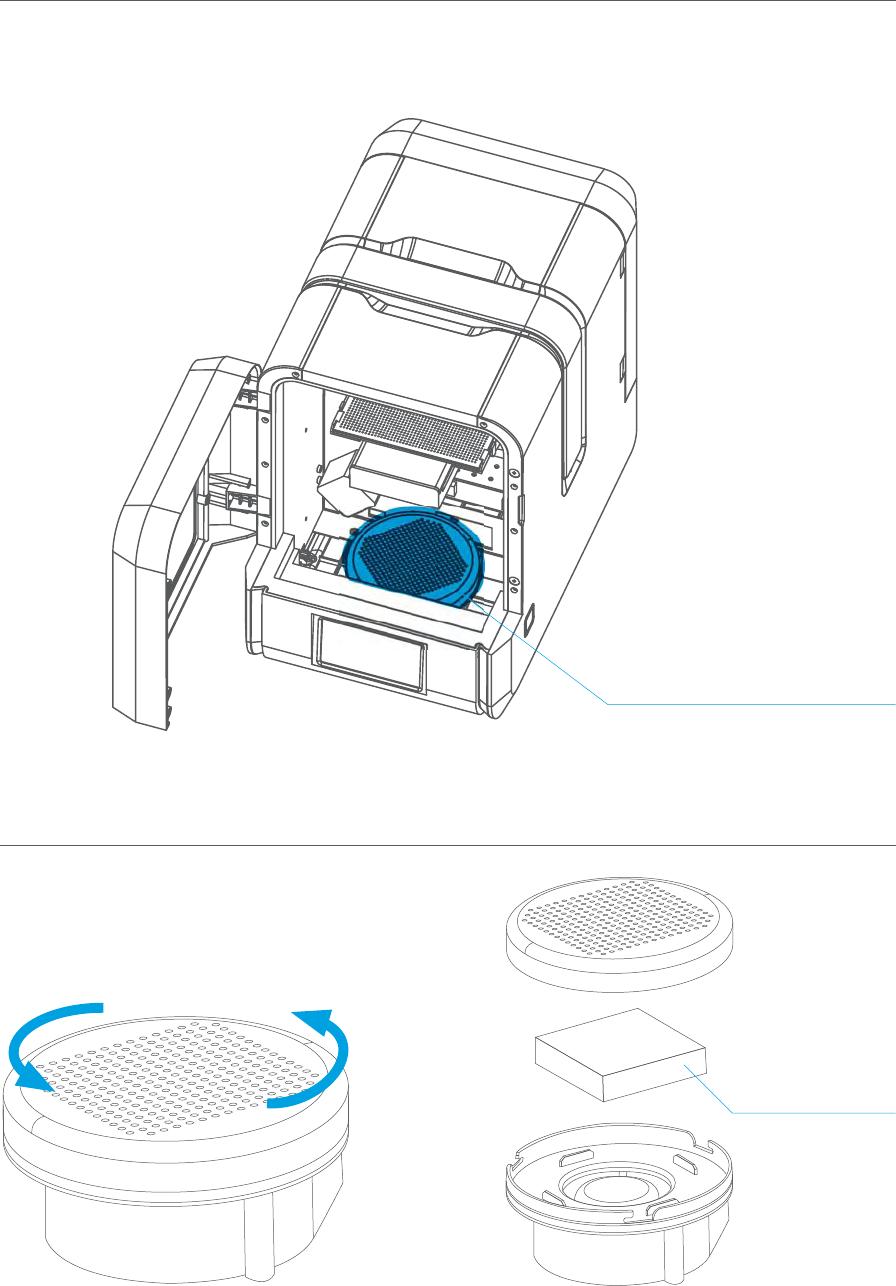
Air Filtration Unit
HEPA-Filter
Front View
Turn anti-clockwise to
open the cap.
Printer Maintenance - Air Filter Replacement
Change air filter for air filatraton unit. It is recommmended to change the filter for every 300
hours of usage or 6 months.

Printer Maintenance - Touch Screen
Remove the 2 screws
on front plate.
FFC cable of LCD
touch screen.
Micro SD card of
LCD touch screen.
Open the front plate.
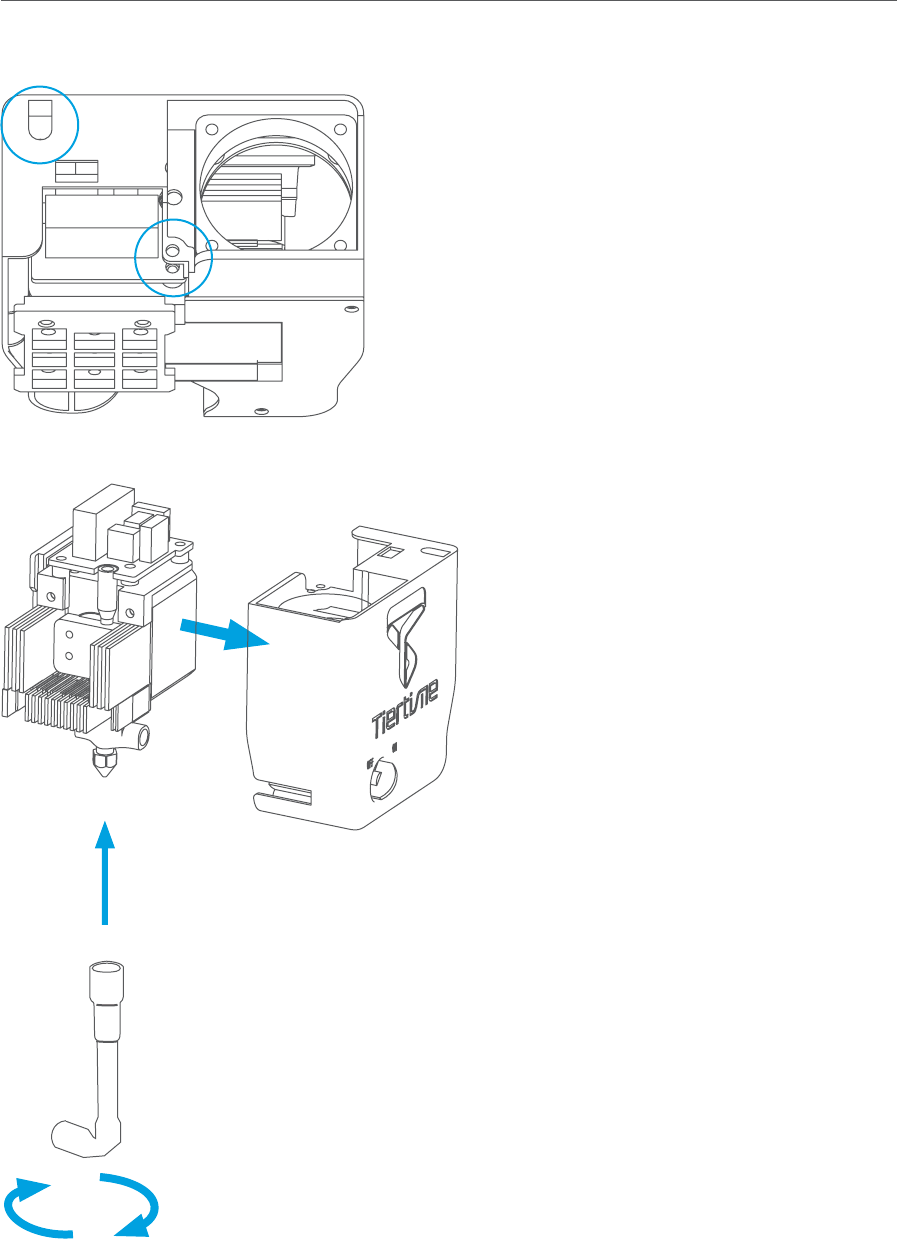
Heat up the nozzle to printing temperature by using the
extrude function in maintenace interface.
Nozzle could be removed by using the nozzle wrench provided.
User does not need to remove printhead cover in order to
remove nozzle.
The printhead cover could be removed
after unscrew 2 bolts.
Print Head Maintenance
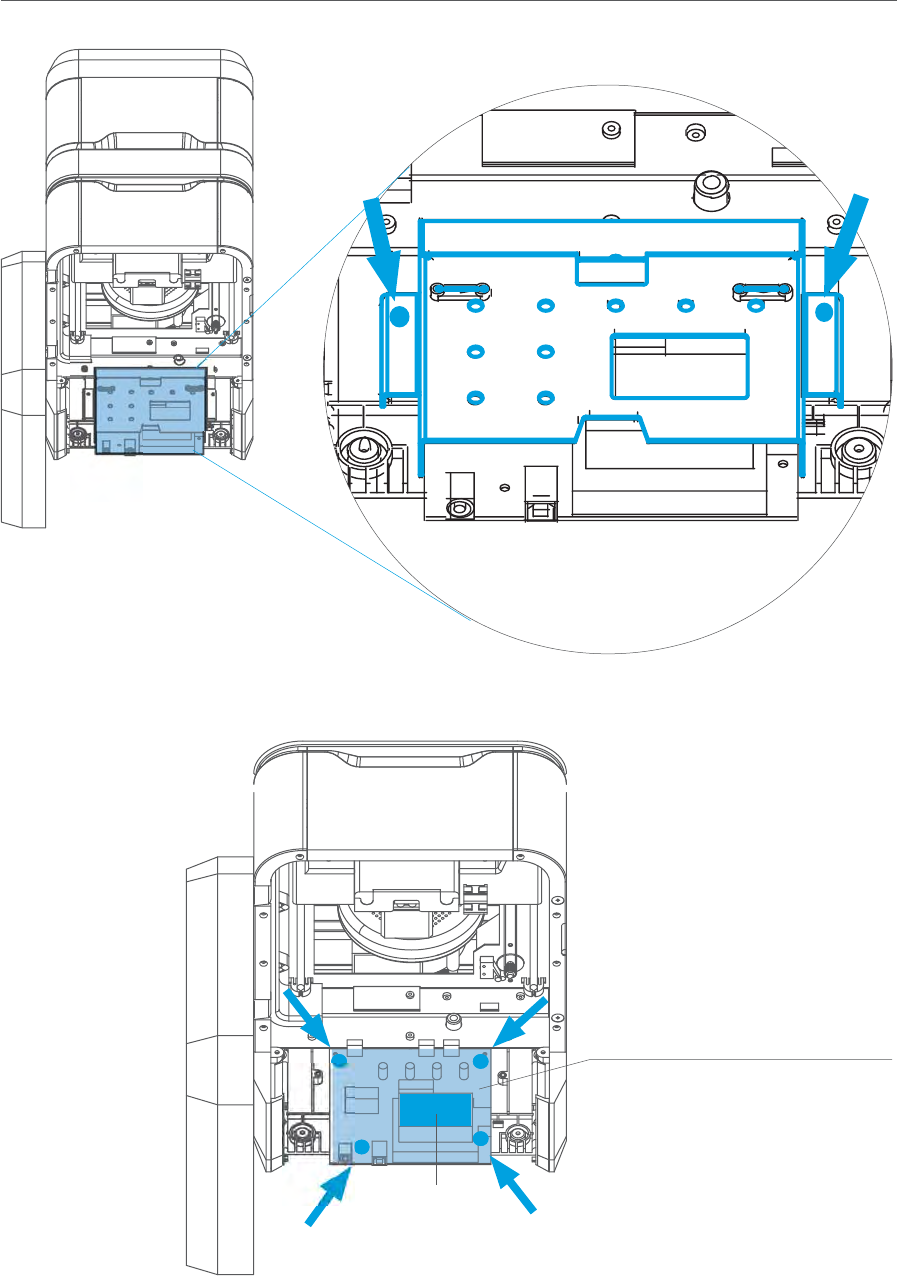
Remove the 2 screws on the
mainboard cover.
Mainboard
CPU
Printer Maintenance - remove motherboard cover
ࡄϙ๗ᅁᬣАឭᰶ䭽ڙथ
ౝ౭喟ࡄϙጯ䭠ࡧ䙿Іᶒ䌜⩟तႼ⎽๔࣓ბ
ᓛԎ喟!݈䚤㥒!UJFSUJNF
⊗ᓛࢇ喟!๗ᅁᬣА
Mail:service@tiertime.net web:www.tiertime.com/www.up3d.com
Tel:010 6433 8663-601/010 6433 8663-805
This device complies with Part 15 of the FCC Rules. Operation is subject to the following two
conditions: (1) this device may not cause harmful interference, and (2) this device must accept any
interference received, including interference that may cause undesired operation.
Changes or modifications not expressly approved by the party responsible for compliance could
void the user's authority to operate the equipment.
NOTE: This equipment has been tested and found to comply with the limits for a Class B digital
device, pursuant to Part 15 of the FCC Rules. These limits are designed to provide reasonable
protection against harmful interference in a residential installation. This equipment generates, uses
instructions, may cause harmful interference to radio communications. However, there is no
guarantee that interference will not occur in a particular installation. If this equipment does cause
harmful interference to radio or television reception, which can be determined by turning the
equipment off and on, the user is encouraged to try to correct the interference by one or more of
the following measures:
-- Reorient or relocate the receiving antenna.
-- Increase the separation between the equipment and receiver.
-- Connect the equipment into an outlet on a circuit different from that to which the receiver is
connected.
-- Consult the dealer or an experienced radio/TV technician for help.
The distance between user and products should be no less than 20cm