Beijing Union Control TL-1000 4.3" WIRELESS CONTROL TOUCH PANEL User Manual
Beijing Union Control Co., Ltd. 4.3" WIRELESS CONTROL TOUCH PANEL
Users Manual
1
Chapter 1 Introduction
In this chapter, TSINGLI control system and products are
introduced. From this chapter, user will make an explicit
understanding of equipment composition of TSINGLI
control system, control method, protocol resolution,
applications, technical parameters and basic functions of
TL-1000 wireless touch panel.
TSINGLI control system
TSINGLI control system is designed for centralized
control system under multi-media circumstance. The
system includes control touch panel, control host, control
interface and supporting software, etc. The controlled
device are mainly multimedia audio-visual equipment, but
not limited to these devices. In theory, TSINGLI control
system can switch in and achieve centralized management
and control of devices that opens control interface to
2
third-party device. Control interface includes
programmable RS-232/RS-422/RS-485 interface,
programmable TCP/IP, UDP/IP interface, programmable
I/O interface, relay interface, Infrared (IR) control
interface, etc.
TSINGLI control system is designed by 32-bit/64-bit
computer platform with Linux operating system. It
supports Ethernet and transfer control information in real
time in dedicated or common Ethernet. The various
control protocols in TSINGLI control system may be
designed independently or completely opened to the user
to support access to other systems, such as BMS or IBMS
systems’ distributed and dispersed control management
requirements to all levels of intelligent building.
TSINGLI control system is powerful, reliable, easy to
expand and able to integrate with other systems seamlessly.
TSINGLI control system can work reliably for continuous
24-hour. It’s widely used in meeting room,
multiple-function hall, training center, monitoring and
commanding center, exhibition center, studio center,
industrial automation, building automation, hotel and
3
household automation and other fields.
Product Information
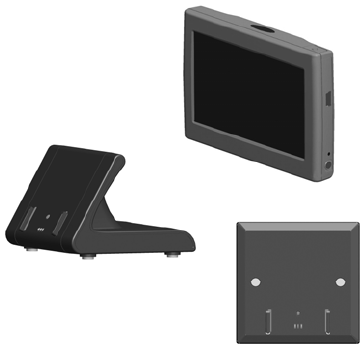
TL-1000 is designed for military, industrial, commercial
or civilian control system environment. It’s a
programmable, multi-purpose wireless two-way control
touch panel equipped with various configurations such as
infrared, and RF. Used cooperatively with wireless AP or
4
the configured wireless transceiver (TL-1000DR or
TL-1000DRT), it can work as human-machine control
interface or terminal of various systems.
TL-1000 wireless touch panel uses 32-bit high
performance processor, so it has a strong display and
driver capability. Its real-time, Preemptible, multitasking,
multithreaded application program structure supports
complex application.
TL-1000 wireless touch panel has features of high-speed,
low power consumption, high-capacity storage and high
reliability. It’s very suitable for the following application
areas: meeting room, training center, exhibition center,
industrial automation, building automation, hotel and
household automation and other fields.
Basic function
Used cooperatively with TL-1000DR or TL-1000DRT
wireless transceiver, TL-1000 wireless touch panel can
work as an independent system. It also can be used as
human-computer control interface or terminal of various
systems.
5
TL-1000 wireless touch panel has powerful programmable
capability. Program for this device with the matching
integrated development software "Vision Master" (referred
to as VM) and "Logic Master" (abbreviated LM) software
in WINDOWS environment can meet different various
applications needs. VM software is used for designing of
TL-1000 wireless touch panel display interface. You can
make human-computer interfaces with different functions,
languages or styles according to application requirements.
By programming various control protocol orders for
TL-1000 wireless touch panel with LM software at the
same time, you can connect to TSINGLI host in manner of
RF (need TL-1000DR or TL-1000DRT), also can control
the third-party equipment directly in manner of RF (need
TL-1000DR or TL-1000DRT).
TL-1000 wireless touch panel has infrared control output
function. It can control infrared devices directly by itself.
TL-1000 wireless touch panel communicates with
TL-1000DR or TL-1000DRT wireless transceiver by
wireless radio frequency mode. It can set 16 different
frequency points near common frequency range 416MHz.

6
TL-1000 wireless touch panel and TL-1000DR or
TL-1000DRT wireless transceiver can achieve
multi-machine interconnection. At the same frequency,
TL-1000 wireless touch panel and TL-1000DR or
TL-1000DRT wireless transceiver can set different host
numeric ID addresses and multiple (up to 15) destination
numeric ID addresses. By setting host numeric ID
addresses and destination numeric ID addresses
correspond with each other, multi-machine on one panel,
multi-panel for one machine, multi-panel on multi-
machine and other multi-machine interconnections can be
easily achieved. Namely, at the same frequency, TL-1000
wireless touch panel and TL-1000DR or TL-1000DRT
wireless transceiver can form a wireless RF
communication network including any combination of 16
devices.
Technical parameter
Item Description
CPU 32 Bit JZ4740 Processor 330MIPS

7
Memory 1GB NAND Flash, 64MB SDRAM
Touch membrane 4-wire resistance induction type
RF frequency range 416MHz
RF wireless
communication
two-way ,Automatic error correction
coding
RF wireless
communication distance
70m for exposure, 30m for indoor
infrared output Programmable infrared control output
Animation effects programmable GIF animation effect
AC97 audio programmable audio(MP3)output
wireless serial port
output
programmable wireless serial port
control output (use with TL-1000DR or
TL-1000DRT)
wireless network
control
Programmable wireless network control
output (use with wireless AP)

8
Display Size
Resolution
Brightness
color
4.3 inch
480*272
400 cd/m2
18-bit color or 260 000 color
True-color 18-bit, 260 000 color
contrast ratio
visual angle
power
apparent color
500:1
horizontally 70°、70°; vertically 70°、50°
5VDC 500mA MINI USB power interface
Red, black, silver, blue, white
Power consumption 2.5W (max)
Working Temperature
Working relative
humidity
0 ℃to 45℃
0% to 90% (45℃)
9
Chapter 2 Ports and configuration
This chapter includes ports and demensions, RF radio
frequency wireless connection, battery and charge, wall
charger, cradle and temperature and humidity monitoring.
Ports and demensions
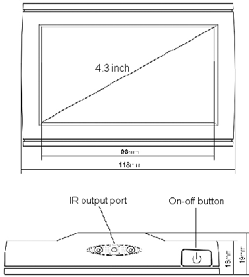
TL-1000 ports and demensions view

10
On-off button
Do start, close, sleep, wake up and other activities to the
equipment.
IR output port
TL-1000 wireless touch panel comes with IR control
output function. Write the infrared control software code
document into control program through Logic Master in
advance, press touch panel button directly to complete the
infrared control signal output. The distance of the infrared
control is 15 meters (the infrared output window aims at
infrared receiver window of the controlled device in
using).
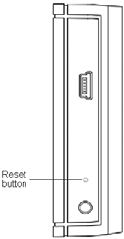
MINI USB port
11
This port can be used as power input of the machine. The
factory provides an external charging power supply 5VDC
500mA. This power supply can charge built-in
rechargeable lithium batteries. In the case of complete
discharge, full charge takes about eight hours.
Reset button
Reset button is in this small hole. If the equipment can not
function properly, you may reset it with this reset button.
12
3.5mm debug port
The port is factory reserved port. Please do not use.
Charge port and guide rail
There is charge port for charging on cradle or wall charger
with guide rail on both sides.
Battery parameter
battery type:lithium polymer battery
battery capacity:1350mAH
rated input:DC 5V
rated output:DC 3.7V
Security: fine quality battery, safe and reliable, stable
performance, high capacity, long standby time; built-in
current-limiting protection, no mercury, lead, cadmium
and other hazardous substances, complies with
environmental requirements.
Charging
TL-1000 wireless touch panel has a built-in battery which
can not be changed by user. To obtain the best
13
performance of the battery, it should be charged
continuously for more than 8 hours in its first use to
ensure it’s full charged. The battery may need to be
re-charged if TL-1000 wireless touch panel hasn’t been
used for a long time.
Once fully charged, TL-1000 wireless touch panel can
work continuously for more than 4 hours at least. (Specific
time depends on usage mode)
Battery status
TL-1000 wireless touch panel can show real-time battery
status on user interface through programming. When the
panel starts to flash, the battery is running out. The device
should be charged by external charger (USB charger,
charging on cradle, wall charger).
Wall charger
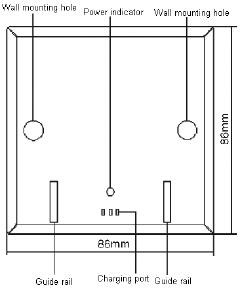
Appearance and dimensions
14
Power indicator
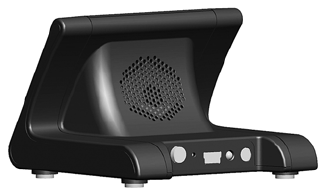
As shown in above figure, the power indicator is below
the equipment. The red indicator is always on when the
equipment is powered up. The power indicator goes out
after TL-1000 wireless touch panel plug in.
Charge port and guide rail
As shown in above figure, the charge port for TL-1000
wireless touch-panel is just below the equipment. There
15
are guide rails on both sides which guide and fix TL-1000
wireless touch panel for charging.
Charging on cradle

16
MINI USB port
MINI USB port is on the rear of the equipment. This port
can be used as power input of the device. The factory
provides an external charging power supply 5VDC 500mA
with the equipment. When TL-1000 wireless touch panel
connected to charging on cradle, this power input will
charge the built-in lithium battery pack. In the case of
complete discharge, the full recharge needs about eight
hours.
Reset button
Reset button is on the rear of charging on cradle. Its main
function is to switch work mode and setting mode of the
device. Hold down the reset button for more than three
seconds when switching and enter the setting mode as
17
serial port’s red and green indicators flash. Click the reset
button in setting mode process, the equipment will enter
work mode and wireless serial port indicators stop
flashing.
Query button
Query button is on the rear of the equipment. When unable
to confirm position of TL-1000 wireless touch panel, hold
down the query button, there will be a respond sound as
long as the touch panel is within the communication
distance of charging on cradle.
Power indicator
Power indicator is on the front of the equipment. The red
indicator is always on when the equipment is powered up.
The power indicator goes out after TL-1000 wireless touch
panel plug in.
18
Charge port and guide rail
Charge port and lead rail is on the front of the equipment.
They are applied to fix and charge TL-1000 wireless touch
panel.
Temperature and humidity monitoring
TL-1000DRT has environmental temperature and
humidity data acquisition function. It can periodically
transfer environmental temperature and humidity data to
TL-1000 touch panel by wireless RF mode. By
programming, the detail data and real-time updates may be
shown on TL-1000 wireless touch panel interface.
RF connection
TL-1000R or TL-1000RW has radio frequency control
mode and must be used together with TL-1000DR or
TL-1000DRT. The RF frequency range is near 416MHz.
It’s a kind of common frequency range micro-power
wireless mode. The wireless control is bidirectional
control.
19
Configure TL-1000R or TL-1000RW with the
assorted integrated development software "Vision Master"
(referred to as VM) and "Logic Master" (referred to as LM)
software in WINDOWS environment. Set frequency range
and address in “Device setup” menu dialog box. Drag RF
channel to the corresponding wireless port in “Device
view” in wireless touch panel’s LM program. This port
number represents the target address, namely the wireless
transceiver address that communicates with it.
Configure charging on cradle TL-1000DR or
TL-1000DRT that has wireless transceiver function with
integrated development software RFX configuration tool
in WINDOWS environment.
First of all, connect PC serial port and charging on cradle
serial port with the accompanying serial port layout line.
Second, change work mode of charging on cradle. Press
and hold the reset button that on the rear of charging on
cradle for more than three seconds. Enter the setting mode
as the red and green indicators on the rear of charging on
cradle flash.
20
After connecting the RFX configuration tool, you can
configure the frequency range (physical frequency), local
host address, destination address (the address of touch
panel) and the baud rate (external). To make two-way
communication, the configuration of wireless transceiver
and wireless touch panel must be the same to the
frequency range and the addresses correspond with each
other.
Chapter 3 Programming and
Debugging
This chapter introduces the debugging usual steps, such as
connection establishment, equipment set up, programming
21
steps, infrared function, network features and device
dynamic settings, etc.
Connection establishment
● touch switch to start TL-1000 wireless touch panel.
● Windows prompts that a new hardware is found. Go to
"cdcecm_demo.inf" and "cdcecm_demo.sys" file
according to the prompt.
● Windows complete the installation of "CDC ECM
network adapter DEMO!
● after TL-1000 sleep/standby, TL-1000 and computer
will be disconnected; you need to unplug the USB cable
from the USB port and connect again. If you still can not
upload program after connection, then restart TL-1000.
Device setup
Set various parameters of touch panel through
“Project/Device setup” item in the menu of "Vision
Master" software or the "Logic Master" software. The
program upload IP address (USB virtual Ethernet mode)
of TL-1000 wireless touch panel is fixed 192.168.100.100.
No IP address set and reset operation should be done to it.

22
As for TL-1000 wireless touch panel, the device settings
are as shown in the following diagram, including IP
address, system clock, sleep time, buzzer length , buzzer
volume, backlight brightness, the sound output volume
(left and right channel), wireless RF frequency, local host
wireless RF ID address
Programming steps
Now take control Pioneer DVD as example to demonstrate
programming steps:
Vision Master
● install Vision Master 1.3.4 version, double-click
icon to run the software.
● click "File" - "New" - "Project" in the main interface of
the software to pop create project menu. Nominate the
project as - "Demo_VM", select the project path -C: \
Documents and Settings\All Users\Project, select the
touch panel type-TL-1000.
● click "File" - "New" - "page" in the main interface of the
software to pop up the page name menu, enter the new
page name-Main. Click "Edit" - "mark as Home". The
23
Vision Master program is in a page form, so the Home
page must be set to determine the displayed page.
● click "Draw"-"text" in the main interface of the software,
then the mouse is in cross shape, draw the desired text box
on the page; click on the “single click to assign text”
button in "click to assign property toolbar" to pop up
assign text menu, input "DVD control demonstration
program", click OK button, the mouse is in hand shape,
click on the text box to assign the text, press "ESC"
button to return to the select status .
● click "Draw" - "button" in the main interface of the
software, then the mouse is in cross shape, draw the
desired button on the page, click the "assign button
style" button to pop up style selector, double-click to
select the appropriate style; the mouse is "hand-shape"
now, click the button to assign style.
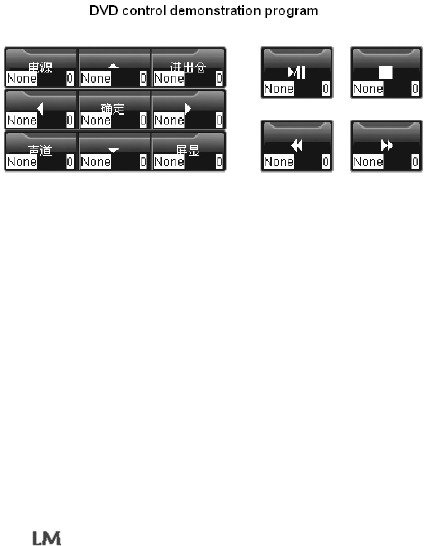
● Draw buttons and composite and arrange them
according to the control functions as shown below:
24
● Click the "Click assign numeric code" button to assign
codes for all of the buttons (please refer to Vision Master
Help file for code introduction); after code assignment, the
number on lower right corner of the button will become
the corresponding code.
● So far, Vision Master programming is accomplished and
can be uploaded to the device.
Logic Master
● Install Logic Master 1.3.4 version software, double-click
the icon to run the software.
● Click "File"-"New Project" in the software main
interface to pop new project menu. Nominate the project

25
as - "Demo_LM", select the project path -C: \ Documents
and Settings \ All Users \ Project.
● Click the "+" in basic equipment window Intelligent
Control System (ICS) to start device menu, drag Wireless
Virtual Control Machine -2 (WVCM2) or right click “add
a device to project" to the device main window.
● select the infrared port IR in device main window, as
shown below:
● Click the "+" in basic equipment IR Devices window to
extend infrared file menu, drag the studied infrared file
(see "infrared functions for "IR learning and import) to the
IR A port.
● Click "Show logical view" button in the main interface
of the software, click the "+" in Project window Wireless
Virtual Control Machine -2 (WVCM2) to extend device
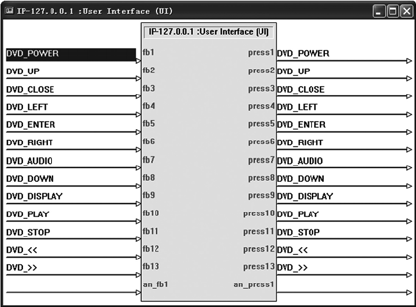
port menu; double-click to select Local bus3: IP-127.0.0.1
in UI: User Interface (UI), the logical main window
displays module structure. The digital output signal
<press> of the touch panel may generate high status signal
26
when there is touch action in the controls corresponding to
the touch panel. As <fb> signal in high status, the high
signal will be transferred to the corresponding control in
the touch interface to display "activate" status. The
position value of <press> signal corresponds to the code of
control in Vision Master.
● Signals’ nomenclature is shown as below:
27
● click "Show Logical View" button in the main interface
of the software, click the"+" in project window Wireless
Virtual Control Machine -2 (WVCM2), extend device port
menu; double-click to select Local bus5: the Port-A in IR:
IR Device: DVD-V7200 (take Pioneer DVD-V7200 as an
example), the module structure is displayed in logical
main window. Add signals of IP-127.0.0.1:User Interface
(UI)to Port-A:IR Device:DVD-V7200 according to
their functions.
● So far, Logic Master programming is accomplished and
can be uploaded to the device
Compile and upload
The program needs to be recompiled after writing or
modification. Select "Project" - "Compile" in menu of
Logic Master or Vision Master Software. After successful
compiling, the system will prompt "Compile successful,
upload or not", click "OK" to upload the project to the
target device.
Program may be saved to the device. After successful
compiling, select "Project" - "upload and save project" in
28
Logic Master or Vision Master software menu to pop up
password input dialog box, enter 4 to10-bit password;
select "Project" - "Download and retrieve project" in
software menu, enter the password that set in uploading.
Select the required location to save the project after
clicking "Select Path" button after input the right
password.
29
IR functions
IR function learning
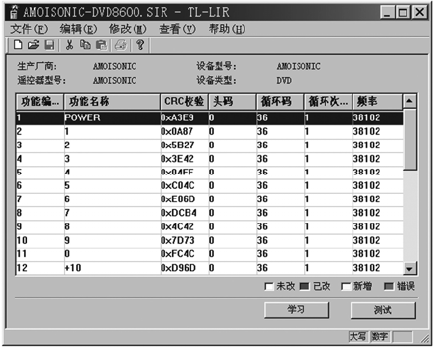
IR function learning needs TSINGLI TL-LIR learner. Run
LIR Infrared learning software with the learner to learn
infrared code of every button of infrared remote in
sequence and generate *. sir IR code file, and import the
IR code file or save it to IR code file library catalog of
Logic Master program.

30
IR file importing
Select and quote IR code file in running Logic Master
program.
Infrared device control
In Logic Master program, the quoted infrared code files
may be listed in sequence that exactly corresponds to the
learning remote control button. The driver and hardware
interface accomplish the output of the corresponding IR
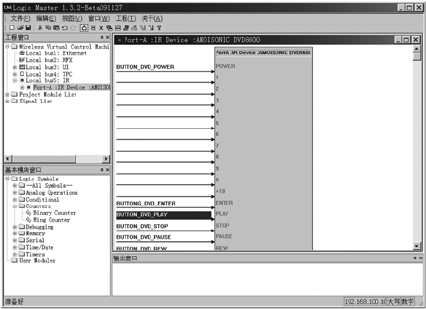
31
function when the corresponding signal changes from low
to high.
32
Equipment dynamic setting(TPC)
Touch panel calibration: as this input activated, the touch
panel enters the calibration interface. The calibration
should be manually carried out following the prompts. The
touch panel interface will automatically re-run and display
"homepage” of the interface.
Buzzer length: there are three options. Trigger the
corresponding option as activating. The last activated
option is valid. "Buzzerlength1" has the shortest duration;
"buzzerlength2" has longer duration, "buzzerlength3" is
the longest.
Buzzer volume: There are four options. Trigger the
corresponding option as activating. The last activated
option is valid. "Buzzervol0" means the buzzer is mute,
the buzzer sounds of "buzzervol1", "buzzervol2" increase
in sequence and “buzzervol3" has the greatest voice.
Backlight brightness: there are five options. Trigger the
corresponding option as activating. The last activated
option is valid. "backlight1" means the LCD panel
33
backlight is turned off, the LCD backlight brightness of
"backlight2", "backlight3", "backlight4" increase in
sequence and "backlight5" has the brightest backlight.
Left and right channel sound output volume (leftvol,
rightvol): it’s analog input. Effective range of the analog
input range is 0, 1, 2 … 49, 50, where 0 is silent, 0-50
volume increase gradually from 0 to 50, and 50 means the
maximum volume.
Left and right channel volume of external input
(leftlinevol, rightlinevol): similar to Left and right channel
sound output volume, indicating the volume of external
input (import third-party audio equipment by wireless
means), only for TL-3000V-type device.
Sleep time (powersavetime): indicates sleep time of touch
panel in minutes, range from 0 to120 minutes. 0 means no
sleep, 1-120-minute means the touch panel will be in sleep
status as no touching within the set period. Press touch
panel after sleep to cancel sleep.
Battery capacity (batterycapacity): shows wireless touch
panel device’s current battery service condition. Its output
is analog.
34
Chapter 4 Tips and Troubleshooting
TL-1000 device uses intelligent power management. Uses
only a "soft switch" to do touch panel start, shutdown,
standby, wake up and other activities.
Start: press on-off button to start the devices when the
TL-1000 device is turned off. It will enter the start
procedure after start. The procedure will take about 10
seconds.
Shutdown: press and hold down on-off button for about 3
seconds when the TL-1000 device is in running status,
then the display (backlight) is turned off and the
equipment goes into shutdown status.
Standby: When the TL-1000 device is in running status,
press on-off button, the display (backlight) will be turned
off and the equipment goes into power save status. The
device preserves various statuses before sleep and restores
them after wake up.
Wake up: When TL-1000 device is in sleep status, press
the on-off button to wake up. The device restores the
35
status before sleep.
Reset: When the device can not start, shutdown, standby
or wake up, you may use the reset button on the touch
panel to reset. Reset start is a cold start of touch panel
device.
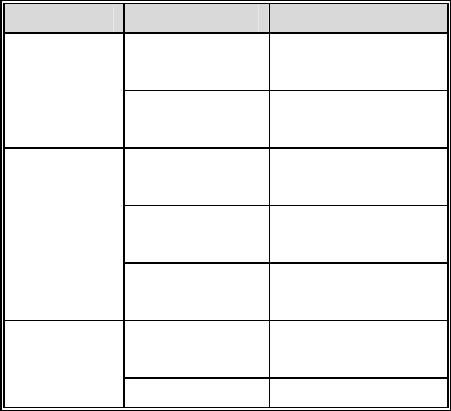
Troubleshooting:
phenomenon probable cause solution
Build-in battery
exhausted
Start with power or after
charging
boot issue
Application
program error
Press reset button
On-off button is not
pressed
Press on-off button
touch panel standby
Press on-off button to
wake up the device
No display on
touch panel
Build-in battery
exhausted
Connect to external
power supply to charge
program error
Check and modify the
program
No sound from
touch panel
Volume is too low Adjust output volume
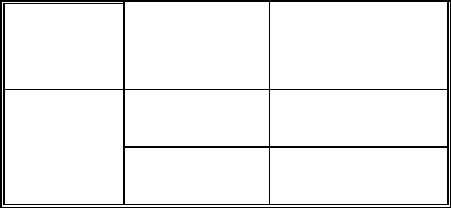
36
No response
after touching
Improper touch
panel calibration or
no calibration
Recalibrate touch panel
Program is not
saved
Check and save the
program
Compile failed
program error
Check and save the
program
Note: For other questions, please contact your supplier.
37
Chapter 5 Battery replacement
and the equipment cleaning
TL-1000 device is equipped with built-in lithium polymer
battery. Its normal working life is longer than 500 times
charge and discharge. The lithium-polymer battery is
selected specially. The parts (order additionally) that
factory provides should be selected and the replacement
should be replaced in accordance with battery instructions
or send to agency. Do not put the equipment into or near
fire or high temperature object at any time.
Please turn off TL-1000 and unplug the USB charging
plug before cleaning. No power operation.
When cleaning, use a semi moist and fluff-free soft cloth
to wipe off dust from the equipment softly and dry it
immediately with a dry cloth. Do not let water into the
device to prevent water penetrate into the equipment and
cause short circuit and so on. You can use a special camera
38
lens cleaning paper or a chamois leather to clean display
(touch membrane). Do not let water penetrate into the gap
between display (touch membrane) and the casing around.
As the compositions of cleaning agents are complicated,
the selection of cleaning agent should ensure that no harm
to the device at first hand.
39
Chapter 6 Warranty and contact
Beijing union control technology Co., Ltd promises a
three-year warranty to the materials or processes of our
products except the following specified parts. The disk
drive or mechanical component that needs adjustment,
power supply, touch panel display parts have one year
warranty. 90-day warranty for touch parts of the touch
panel and battery.
Warranty period starts from the date that factory deliver to
user or through agent. There should be a written record of
the delivery date.
The damage caused by improper installation, improper use,
accidental damage, human modification and vandalism are
not covered under warranty. The company does not
undertake any joint responsibility for any direct or indirect
losses that caused by possible defects of the product.
40
As for the equipment or parts that need repair due to
failure, we reserve the option to repair or replace. Any
repaired equipment or parts have warranty period of 90
days and the former warranty is invalid.
Our enterprise has the final power of interpretation of this
article.
For further help, please send an Email to
public@unioncontrol.com or directly contact us by phone.
Telephone: (86)-(10)-62,243,207.
Website: www.unioncontrol.com.
FCC NOTE : THE MANUFACTURER IS NOT RESPONSIBLE FOR ANY
RADIO OR TV INTERFERENCE CAUSED BY UNAUTHORIZED
MODIFICATIONS TO THIS EQUIPMENT. SUCH MODIFICATIONS
COULD VOID THE USER’S AUTHORITY TO OPERATE THE
EQUIPMENT.
This device complies with Part 15 of the FCC Rules. Operation is subject to the
following two conditions:1. This device may not cause harmful interference, and
2. This device must accept any interference received, including interference that
may cause undesired operation.