Belkin F5D6002 Wireless Desktop Network Card User Manual Manual
Belkin International, Inc. Wireless Desktop Network Card Manual
UserManual.wiki
>
Belkin
>
F5D6002 User Manual
Manual
Navigation menu
Upload a User Manual
Namespaces
Wiki Guide
HTML
PDF
Info
Views
User Manual
Discussion / Help
Navigation
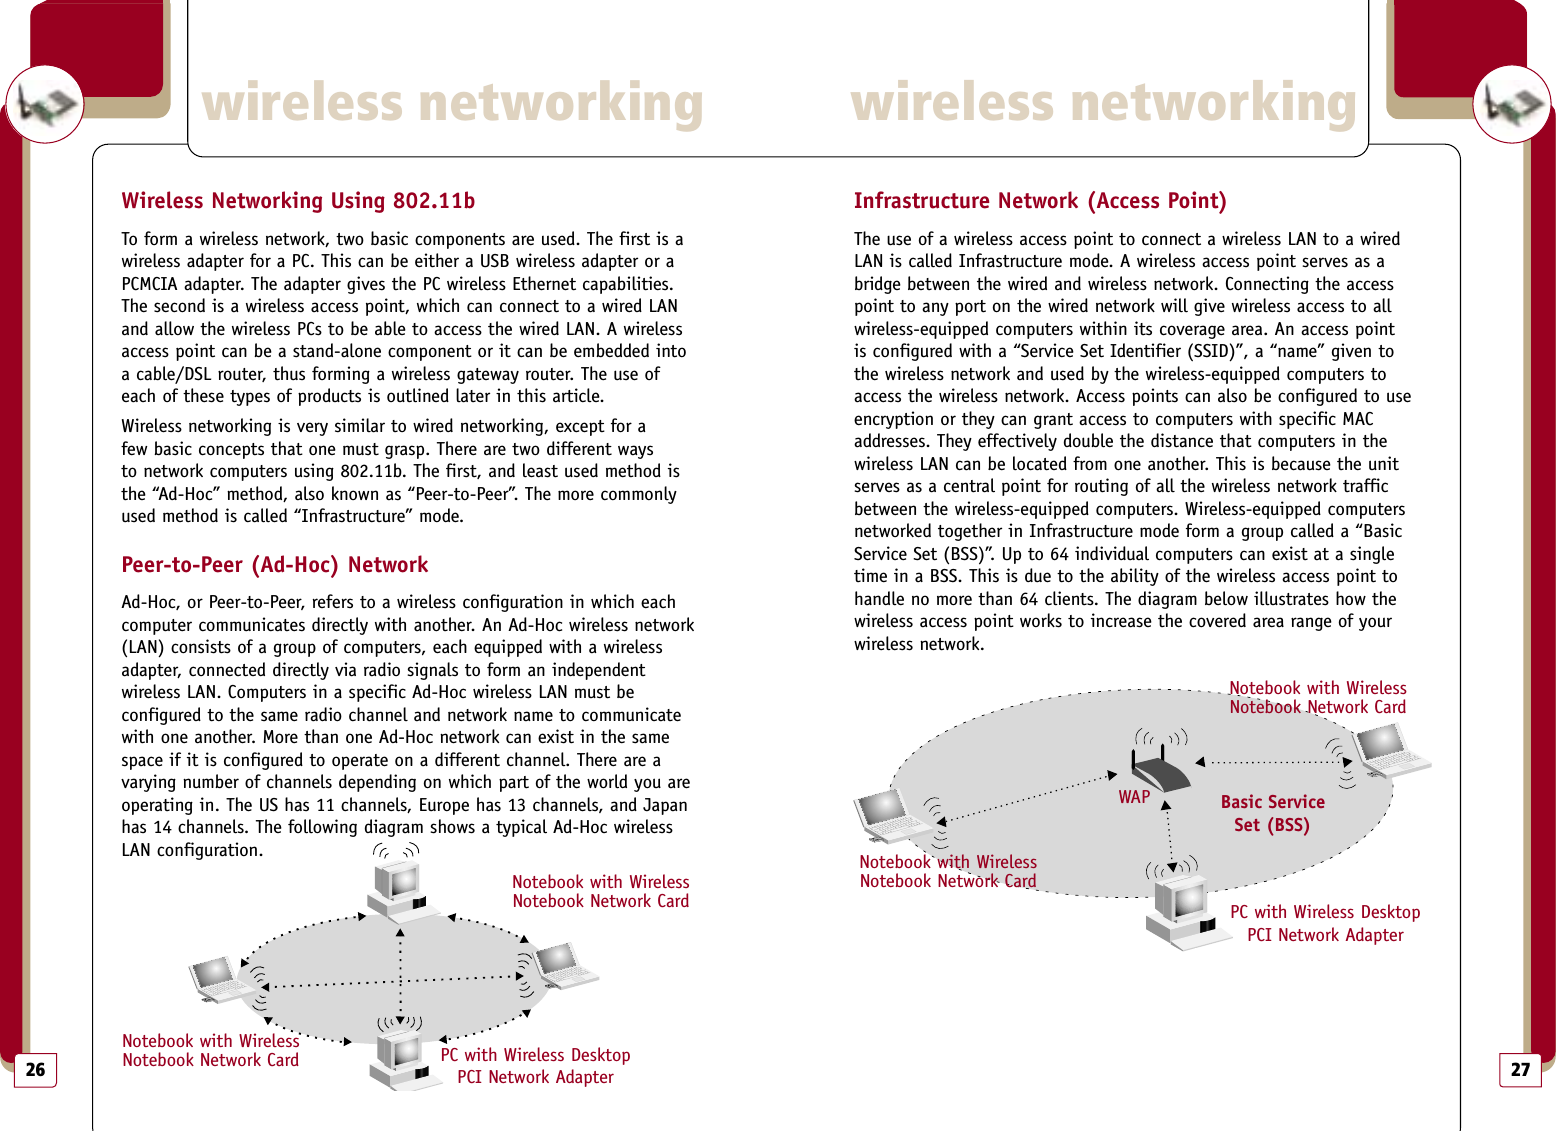
![wireless networking32Glossary of Wireless Networking TermsDHCP: Dynamic Host Configuration Protocol. This protocol automaticallyconfigures the TCP/IP settings of every computer on your home network.DNS Server Address: DNS stands for Domain Name System, which allowsInternet host computers to have a domain name (such as belkin.com) andone or more IP addresses (such as 192.34.45.8). A DNS server keeps adatabase of host computers and their respective domain names and IPaddresses, so that when a domain name is requested (as in typing“belkin.com” into your Internet browser), the user is sent to the proper IP address. The DNS server address used by the computers on your homenetwork is the location of the DNS server your ISP has assigned. DSL Modem: DSL stands for Digital Subscriber Line. A DSL modem usesyour existing phone lines to transmit data at high speeds. Ethernet: A standard for computer networks. Ethernet networks are connected by special cables and switches, and move data around at up to 100 million bits-per-second [? or, megabits-per-second (Mbps)].IP Address: IP stands for Internet Protocol. An IP address consists of aseries of four numbers, separated by periods, that identifies a single,unique Internet computer host. Example: 192.34.45.8. ISP: Internet Service Provider. An ISP is a business that provides connectivity to the Internet for individuals and other businesses or organizations. ISP Gateway Address: (See ISP for definition.) The ISP Gateway Address isan IP address for the Internet router located at the ISP’s office. Thisaddress is required only when using a cable or DSL modem. LAN: Local Area Network. A LAN is a group of computers and devices connected together in a relatively small area (such as a house or anoffice). Your home network is considered a LAN. MAC Address: MAC stands for Media Access Control. A MAC address is thehardware address of a device connected to a network. A MAC address isunique (different) for every device.NAT: Network Address Translation. This process allows all of the computerson your home network to use one IP address. Using the NAT capability ofthe Belkin 4-Port Cable/DSL Gateway Router, you can access the Internetfrom any computer on your home network without having to purchasemore IP addresses from your ISP. 33PPPoE: Point-to-Point Protocol over Ethernet. Point-to-Point Protocol is a method of secure data transmission originally created for dial-up connections; PPPoE is for Ethernet connections. SPI: Stateful Packet Inspection. SPI is the type of corporate-grade Internet security provided by your Belkin 4-Port Cable/DSL Gateway Router. Using SPI, the gateway acts as a “firewall,” protecting your network from computer hackers. Subnet Mask: A subnet mask, which may be a part of the TCP/IP information provided by your ISP, is a set of four numbers configured like an IP address. It is used to create IP address numbers used only within a particular network (as opposed to valid IP address numbers recognized by the Internet, which must be assigned by InterNIC). TCP/IP: Transmission Control Protocol/Internet Protocol. This is the standard protocol for data transmission over the Internet. WAN: Wide Area Network. A WAN connects computers located in geographically separate areas.wireless networkingGlossary of Wireless Networking Terms](https://usermanual.wiki/Belkin/F5D6002/User-Guide-290471-Page-18.png)