Belkin F5D6021 Wireless Notebook Network Card User Manual P73851 B F5D6020 man

Belkin International, Inc. Wireless Notebook Network Card P73851 B F5D6020 man

Contents

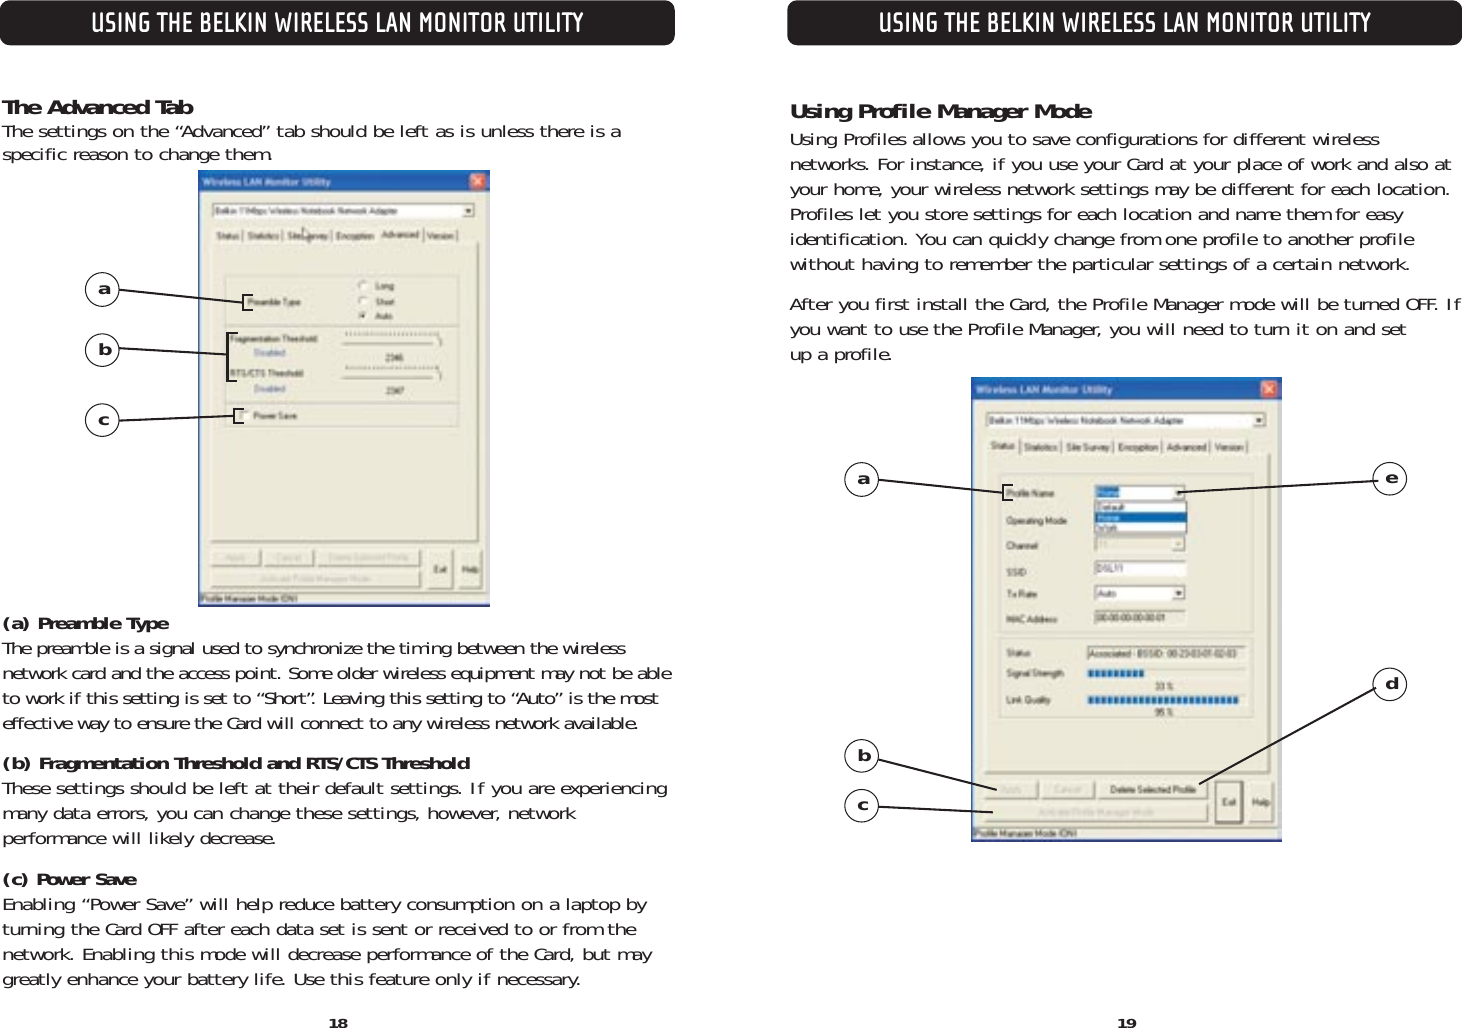
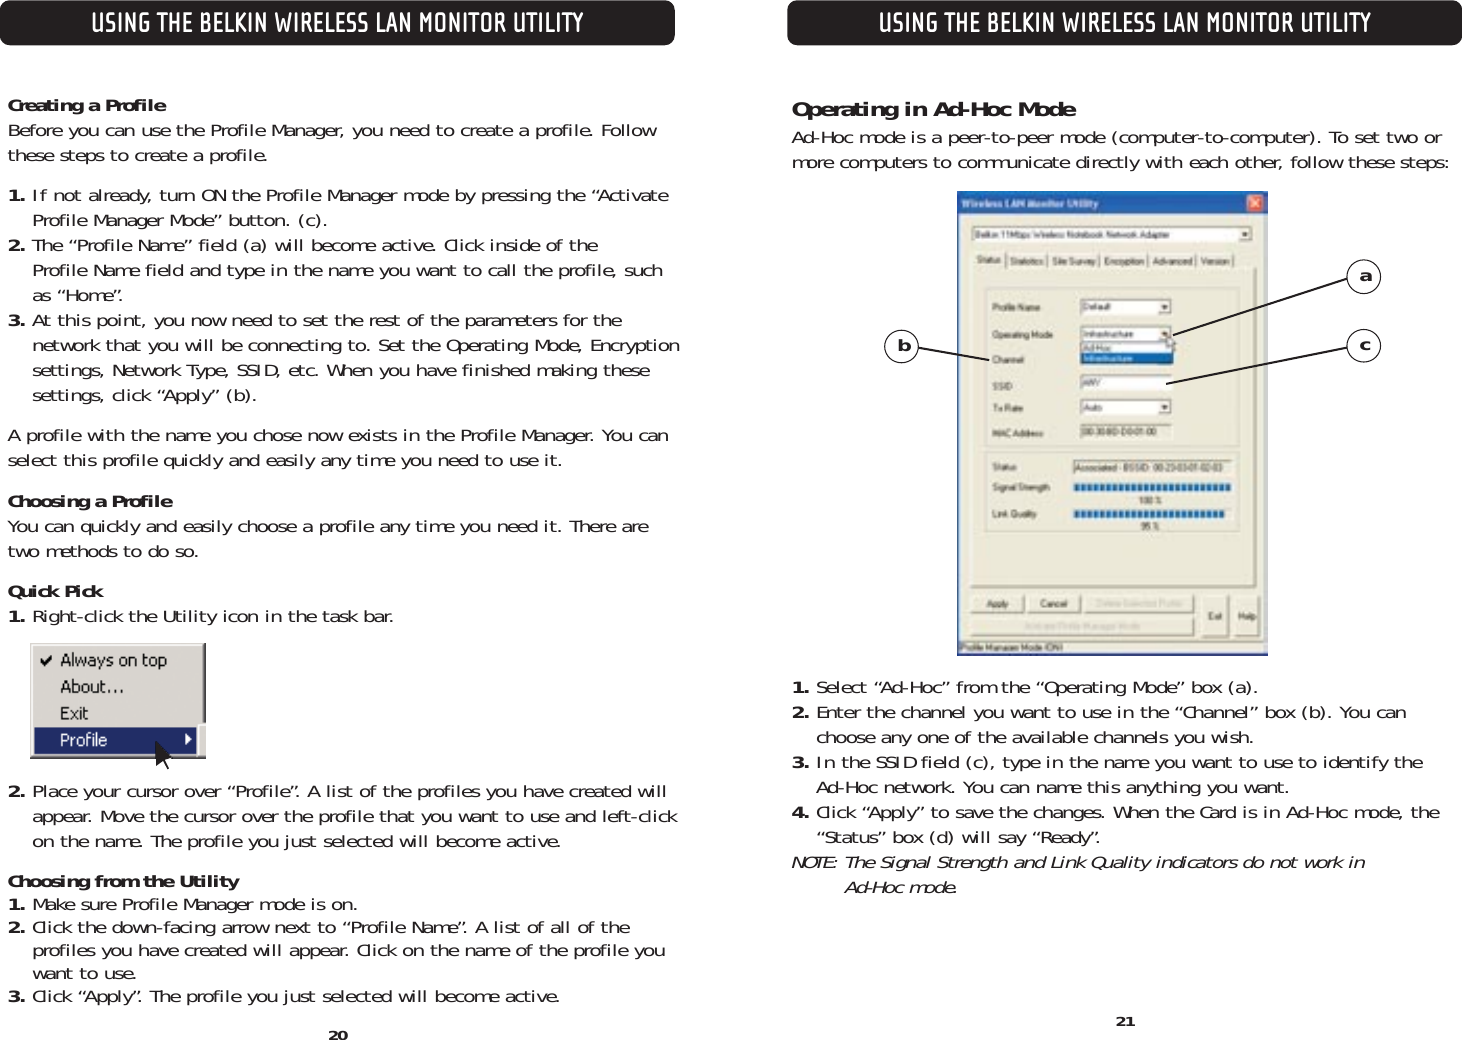
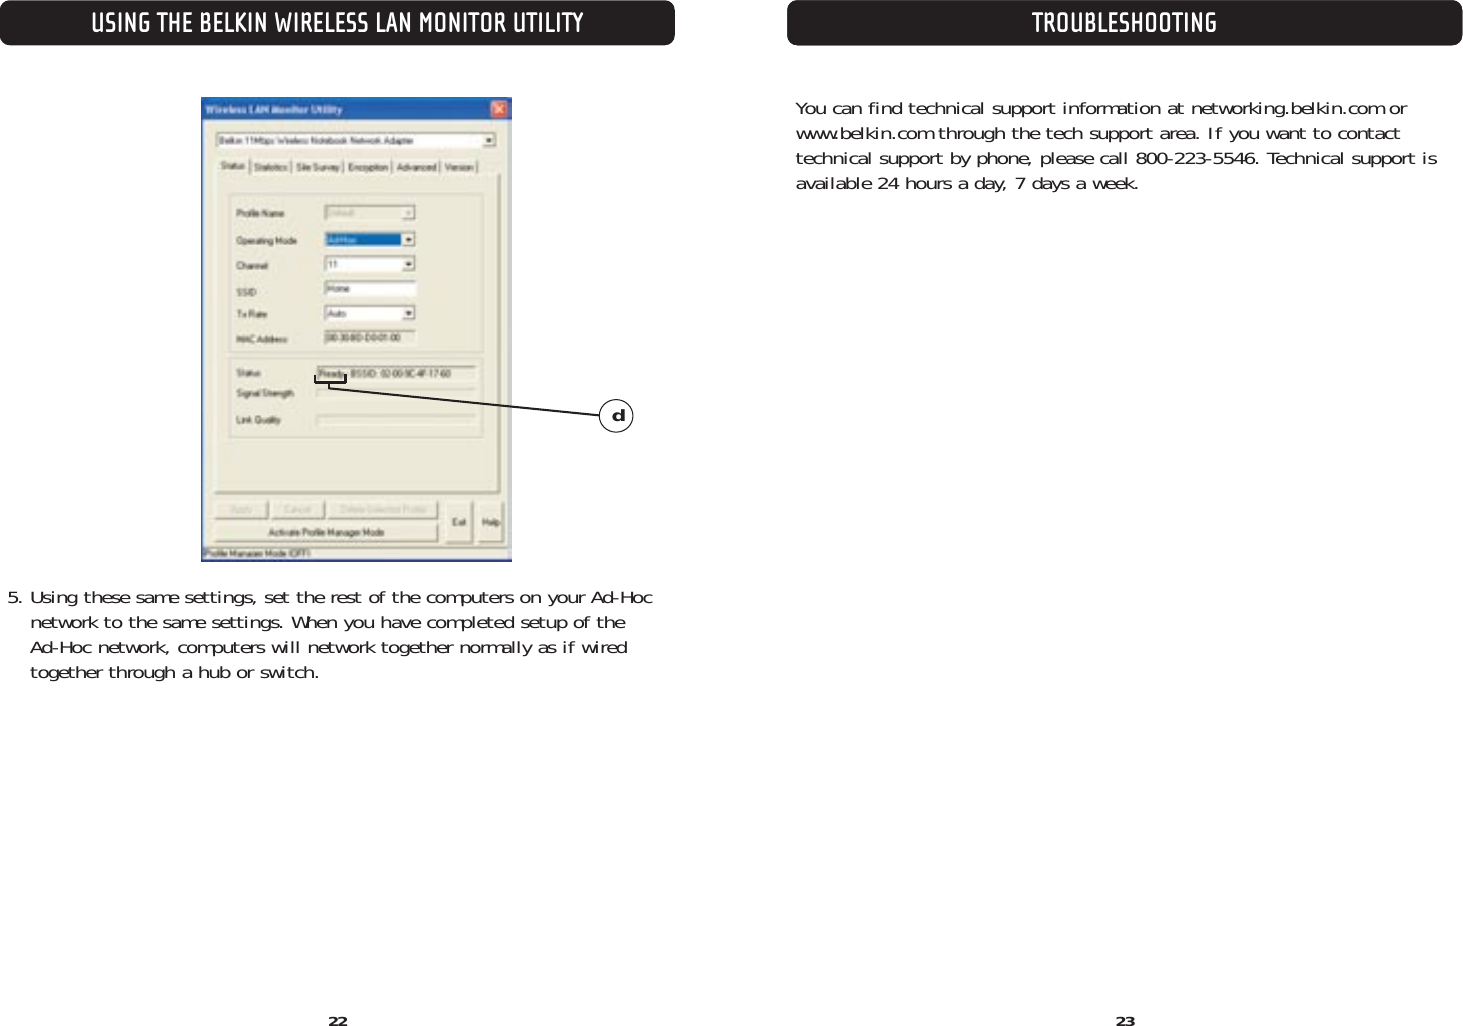
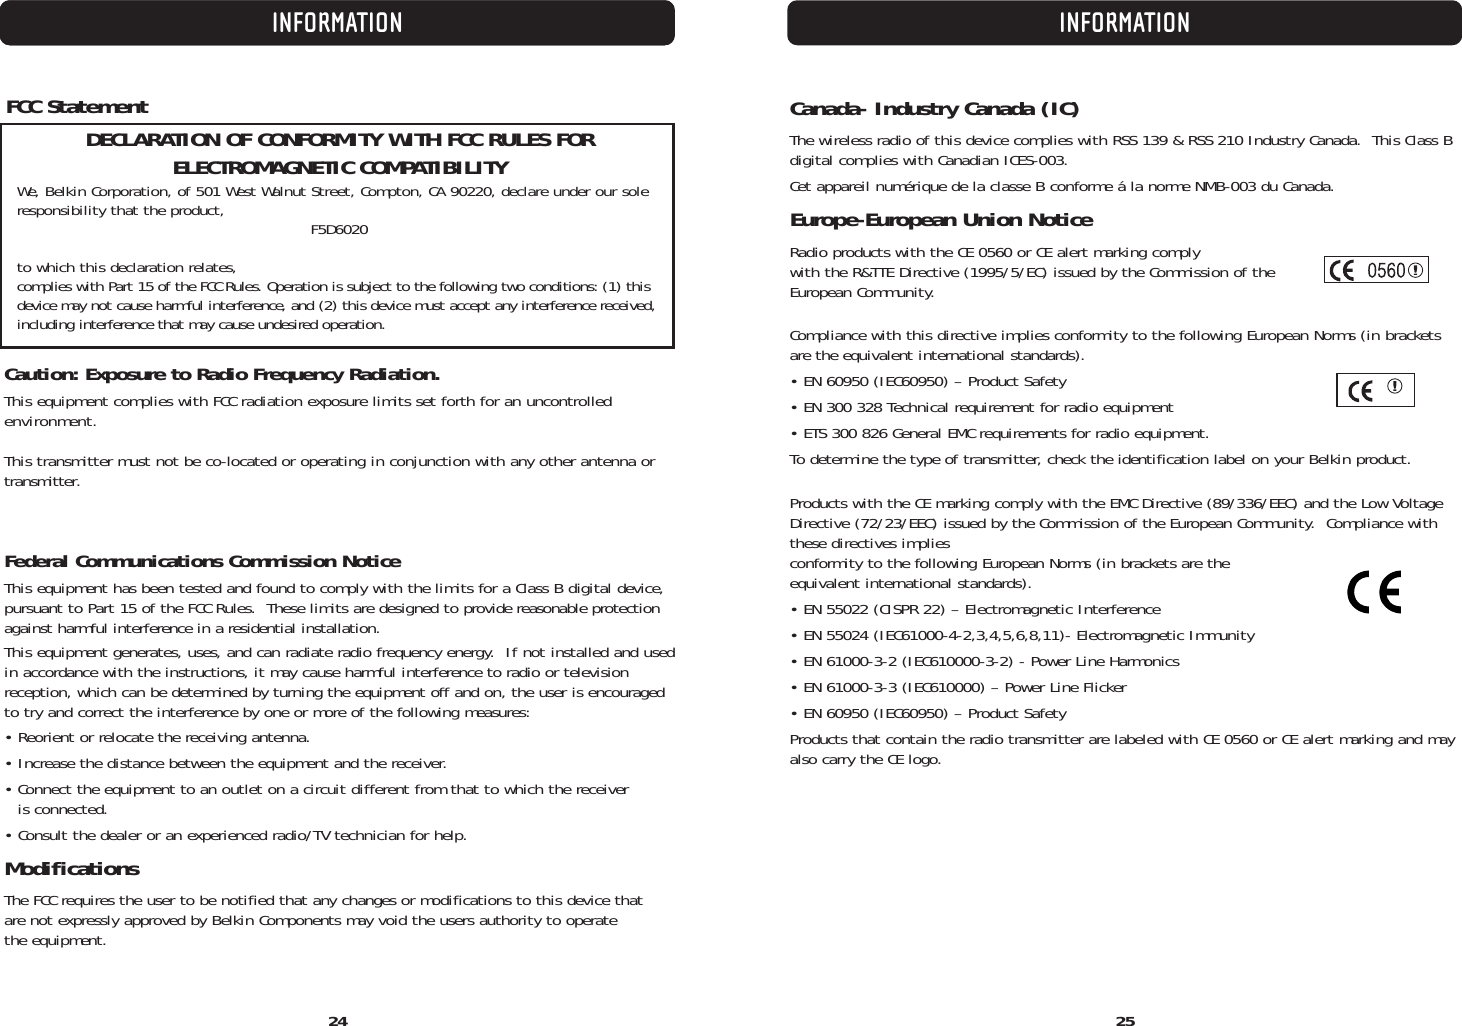
Users Manual Revised

Wireless NotebookNetwork CardConnect your laptop to awireless networkUser ManualF5D6020 ver. 2Belkin Corporation501 West Walnut StreetCompton • CA • 90220 • USATel: 310.898.1100Fax: 310.898.1111Belkin Components, Ltd.Express Business ParkShipton Way • Rushden • NN10 6GLUnited KingdomTel: +44 (0) 1933 35 2000Fax: +44 (0) 1933 31 2000Belkin Components B.V.Starparc Building • Boeing Avenue 3331119 PH Schiphol-Rijk • The NetherlandsTel: +31 (0) 20 654 7300Fax: +31 (0) 20 654 7349Belkin Components, Ltd.7 Bowen Crescent • West GosfordNSW 2250 • AustraliaTel:  +61 (0) 2 4372 8600Fax: +61 (0) 2 4372 8603Belkin Tech SupportUS: 310.898.1100 ext. 2263800.223.5546 ext. 2263Europe: 00 800 223 55 460Australia: 1800 666 040P73851-B© 2002 Belkin Corporation. All rights reserved. All trade names are registered trademarks of respective manufacturers listed.belkin.com
TABLE OF CONTENTS1INTRODUCTIONIntroduction . . . . . . . . . . . . . . . . . . . . . . . . . . . . . . . . . . . . . . . .1Installing and Setting Up the Card  . . . . . . . . . . . . . . . . . . . . . . . . .4Using the Belkin Wireless LAN Monitor Utility  . . . . . . . . . . . . . . . . . .9The Status Tab   . . . . . . . . . . . . . . . . . . . . . . . . . . . . . . . . . . . . 10The Statistics Tab   . . . . . . . . . . . . . . . . . . . . . . . . . . . . . . . . . . .13The Site Survey Tab   . . . . . . . . . . . . . . . . . . . . . . . . . . . . . . . . . 14The Encryption Tab   . . . . . . . . . . . . . . . . . . . . . . . . . . . . . . . . . 15The Advanced Tab   . . . . . . . . . . . . . . . . . . . . . . . . . . . . . . . . . . 18Using Profile Manager Mode   . . . . . . . . . . . . . . . . . . . . . . . . . . . 19Operating in Ad-Hoc Mode  . . . . . . . . . . . . . . . . . . . . . . . . . . . . . 21Troubleshooting . . . . . . . . . . . . . . . . . . . . . . . . . . . . . . . . . . . . .23Information  . . . . . . . . . . . . . . . . . . . . . . . . . . . . . . . . . . . . . . .24Thank you for purchasing the Belkin Wireless Notebook Network Card (theCard). Now you can take advantage of this great new technology and gain thefreedom you need around the home or office without using cables. TheWireless Notebook Network Card works like a conventional network card, butwithout the wires. The easy installation and setup will have you networkingwirelessly in minutes. Please be sure to read through this manual completelyto be sure that you are getting the most out of your Wireless NotebookNetwork Card.FeaturesThe Card complies with the IEEE 802.11b standard in order to communicatewith other 802.11b-compliant wireless devices.•  2.4GHz ISM (Industrial, Science, and Medical) band operation•  Integrated, easy-to-use profile manager for storing multiple wireless network settings for work, school, home, or any other setup •  Wireless interface compliance with the IEEE 802.11b standard•  PCMCIA Interface, for operation in virtually any notebook computer•  64- or 128-bit Wireless (WEP) Encryption•  Wireless access to networked resources•  Support for both infrastructure and ad-hoc (peer-to-peer) networking modes•  Data rate of up to 11Mbps Supports 11, 5.5, 2 or 1Mbps rates (auto-rollback)•  Easy installation and use• Integrated   antenna• LED indicators
INTRODUCTION INTRODUCTION3Applications and Advantages •  Wireless roaming with a laptop around the home or officeOffers the freedom of networking—without cables.•  Difficult-to-wire environmentsEnables networking in buildings with solid or finished walls, or open areaswhere wiring is difficult to install.•  Frequently changing environmentsAdapts easily in offices or environments that frequently rearrange orchange locations.•  Temporary LANs for special projects or peak timeSets up temporary networks such as at trade shows, exhibitions, and construction sites, which need networks on a short-term basis, also companies who need additional workstations for a peak activity period.•  SOHO (Small Office/Home Office) networking needsProvides the easy and quick small network installation SOHO users need.Product SpecificationsHost Interface: 16-bit PCMCIAPower Consumption: 300mA (max)Certification: FCC Class B, CE Mark, C-TickOperating Temperature: 32–131º F (0–55º C)Storage Temperature: -13–158º F (-25–70º C)Typical Operating Range: Indoor: 160' (50m) @ 11Mbps, 260' (80m) @ 5.5Mbps or lowerOutdoor: 490' (150m) @ 11Mbps, up to 1800' (550m) @ 5.5Mbps or lowerSystem Requirements•  PC-compatible laptop with one available PCMCIA slot•  Windows® 98, 2000, Me, or XPPackage Contents•  Belkin Wireless Notebook Network Card• Quick Installation Guide•  Installation Software CD• User ManualKnowing your Belkin Wireless Notebook Network Card(a) Power LED: When the Card receives power, this light will be on.(b) Link LED: When the Card has a link to a wireless network, the light will be solid. When not linked to a wireless network, the light will slowly flash.(c) Card Connector: This is the side of the Card that fits into the PCMCIA slotof your laptop.(d) Antenna: Integrated antenna.2cadb
INSTALLING AND SETTING UP THE CARD4INSTALLING AND SETTING UP THE CARD5Installing your Card is done in three easy steps:1. Install the software FIRST. If you plug your Card into your laptop before you install the software, it will not work until you install the software. 2. Plug the Card into your laptop.3. Let your Windows operating system finish installing the Card.Software and Driver Installation1. Insert the CD into your CD-ROM drive.2. The Belkin Wireless Notebook Network Card Setup Utility screen will automatically appear. If it does not appear within 15-20 seconds, thenselect your CD-ROM drive and double-click on the folder named “Files”. Next double-click on the icon named “F5D6020_UTILITY.exe”.3. In the menu window, drag your mouse over the “Install” button then select“Click here” to start the software installation program.NOTE:  INSTALL THE SOFTWARE FIRST BEFORE YOU INSTALL THE CARDINTO YOUR NOTEBOOK.4. The installer will start. Click on or select “Easy” to continue to the next step. If you are using Windows XP, it is recommended that you use theBelkin Wireless Notebook Network Card Utility to manage the Card’s wireless settings. If you want to use Windows XP to manage the Card,check “Use the Windows XP Wireless Network Connection Utility”.Instructions on how to use the Windows XP Connection Utility are available from Microsoft. Click “Next” to continue.5. After the software installation is finished, the message “You can plug inyour WLAN adapter now” will appear. 6. Insert the Card, label side UP, into your computer’s PCMCIA slot firmlyuntil it stops. The two lights on the side will turn on when it is inserted properly.
INSTALLING AND SETTING UP THE CARDINSTALLING AND SETTING UP THE CARD6 77. After connecting your Card, Windows will detect that new hardware has been installed. Depending on which version of Windows you are using, awindow similar to the one pictured below will appear. Select the optionthat will automatically install the software.8. If you are using Windows 2000 or Windows XP, you may see a screen similar to the one below. This does not mean there is a problem. Select“Continue Anyway”.9. If you are using Windows 98 or Me, you will be asked to restart your computer. Select “Restart”. If you are using Windows 2000 or XP, you willsee a window similar to the one below. Click “Finish”.10. When the installation is complete, the Belkin PCMCIA WLAN Monitor icon will appear on your desktop. To open the Monitor Utility, double-click on this icon.11. A small icon in your system tray (bottom right corner of most screens) will appear. This is your shortcut to the Belkin WLAN Monitor. It alsoindicates the status of your connection.Blue: Connected to a wireless network.Red: No connection to a wireless network.
When you launch the Wireless LAN Monitor Utility (the Utility), you will bepresented with the screen below. The following small icon will also be presentin your system tray.The Utility can be set to always be on top of everything else on your desktopwhen it is open. This setting can be changed if you right-click on the icon inyour system tray.Place a check mark next to “Always on top” to keep the utility on top all ofthe time. Remove the check mark to set the window to move to the backwhen you select another window. You can close the Utility screen withoutshutting the Utility down by clicking Exit (l). Double-clicking on the icon inthe system tray will open the window.Connecting to Your Wireless NetworkIf you already have a wireless router or an access point in your home oroffice, the Card will automatically attempt to connect to your wireless network. In most cases, the Card will be able to connect to your networkautomatically. If your wireless network is using encryption, you will need toset the encryption settings of your Card to match that of your wireless network. For information about configuring your Card, see the next section in this manual.Uninstalling the Software and DriversIf you need to remove the software and drivers for any reason, you can easilyaccomplish this in one of two ways. You can insert the software CD and clickon the “Install” option in the menu, or you can go to the Windows ControlPanel and select the “Add/Remove Programs” option. The Belkin wizard willwalk you through the removal process.INSTALLING AND SETTING UP THE CARD8USING THE BELKIN WIRELESS LAN MONITOR UTILITY9
USING THE BELKIN WIRELESS LAN MONITOR UTILITY11USING THE BELKIN WIRELESS LAN MONITOR UTILITYThe Status Tab(a) Profile NameThe first thing you will notice is the “Profile Name”. Initially this will say“default” and be grayed out until you have set up a profile. Also, the ProfileManager Mode (k) will be “OFF”. Using Profiles allows you to save configurations for different wireless networks. For instance, if you use yourCard at your place of work and also at your home, your wireless network settings may be different for each location. Profiles let you store settings foreach location and name them for easy identification. The “default” profile will contain the initial configuration setting when you install the Card. Tolearn how to use Profiles, see the section of this manual called “Using ProfileManager Mode”.(b) Operating ModeShows the current wireless mode the Card is operating in. There are two operating modes: “Infrastructure” and “802.11 Ad-Hoc”. Infrastructure is themost common mode to operate in and is the factory default setting. UseInfrastructure mode when connecting your PC to a wireless access point or toa wireless router. Ad-Hoc mode is used to connect two or more computerstogether without the use of an access point or wireless router. To change themode, click the down-facing arrow next to the Operating Mode field. Selectthe mode you wish to use, then click “Apply”. For more information aboutoperating in Ad-Hoc mode, see “Operating in Ad-Hoc Mode”.(c) Channel Shows the current channel the Card is operating on. When operating inInfrastructure mode, the channel is set automatically by the access point orwireless router that the Card is connected to. You cannot change the channels in Infrastructure mode. In Ad-Hoc mode, the channel can be setmanually. For more information about operating in Ad-Hoc mode, see“Operating in Ad-Hoc Mode”.(d) SSID The SSID is the wireless network name. This field shows the current SSID withwhich the Card is associated. The default (factory) setting is “ANY”, which willcause the Card to automatically look for any wireless network in the area. Toconnect to a specific wireless network, you can manually enter the SSID ofthe known wireless network. Note that the SSID is case-sensitive, so, capitalletters do make a difference. To change the SSID, click in the SSID field, typethe SSID you want, then click “Apply”.(e) TxRate Displays the current rate of data transmission. There are five Tx rates possible:Fixed 11Mbps—Always transmit and receive at 11Mbps data rate regardless of signal quality.Fixed 5.5Mbps—Always transmit and receive at 5.5Mbps data rate regardless of signal quality.Fixed 2Mbps—Always transmit and receive at 2Mbps data rate regardless of signal quality.Fixed 1Mbps—Always transmit and receive at 1Mbps data rate regardless of signal quality.Auto—Adjust speed according to signal strength. This mode is the recommended setting. It will decrease the amount of transmit and receive errors by reducingthe speed of transmission in favor of receiving error-free data. Note that databeing sent at Fixed 11Mbps with low signal quality will not necessarily get thedata to the computer faster. This is because when errors occur, the data mustbe resent. When the signal quality is low, the chances for errors to occur athigh speeds are greatly increased. Sending the data at lower speeds when thesignal quality is poor will reduce the chances of errors, and thus data will getto the computer in the shortest possible time.adbefghicjkl10
USING THE BELKIN WIRELESS LAN MONITOR UTILITY1312USING THE BELKIN WIRELESS LAN MONITOR UTILITY12(f) MAC Address Shows the MAC address of the Wireless Notebook Network Card.(g) Status Displays the BSSID (in hexadecimal) of the access point with which the Cardis associated. If you are connected to a network, the word “Associated” followed by a series of numbers (the MAC address of the access point) will be displayed. If the Card is scanning for a network, you will see the word “Scanning”.(h) Signal Strength Displays the strength of the wireless signal from 0 to 100%. The closer to100%, the better the signal strength is. The closer you are to a wireless routeror access point, the stronger the signal should be.(i) Link QualityDisplays the quality of the wireless signal from 0 to 100%. The closer to100%, the better the link quality is. Link quality differs from signal strengthby measuring the actual quality of the signal. It is possible to have low signalstrength and high link quality.(j) Activate Profile Manager ModeSee the section called “Using Profile Manager Mode”.(l) Exit ButtonClick “Exit” to close the Wireless LAN Monitor Utility. To access the utilityagain, double-click on the “     “ icon in the bottom right corner of your screen.The Statistics TabThe “Statistics” tab shows you how much data has been sent and receivedand if any errors occurred. Click “Reset” (a) to start at zero. This screen ismostly for diagnostics. Note that the number of unsuccessful data and management frames is recorded. A large number of unsuccessful frames mayindicate that there is a problem or interference in your area.a
The Site Survey TabClicking on the “Site Survey” tab will display a list of all available accesspoints in your area. The following information about each is displayed:(a) BSSID–The MAC address of the access point.(b) SSID–The Service Set Identifier (wireless network name) of the access point.(c) Signal–The signal strength of the related access point. This is a “snapshot” of the signal strength at the time of the site survey. Pressingthe “Re-Scan” (g) button may get a different result.(d) Channel–The current operating channel of the access point.(e) Encryption–Will display “No” when encryption is disabled, “64-bit” when 64-bit encryption is enabled, and “128-bit” when 128-bit encryption isenabled.(f) BSS–Displays the mode that the access point is operating in: Infrastructure or Ad-Hoc.TIP-> Double-clicking on the BSSID of an access point will make the Card join thatparticular network. To check the area for more access points, click “Re-Scan”. 15USING THE BELKIN WIRELESS LAN MONITOR UTILITYUSING THE BELKIN WIRELESS LAN MONITOR UTILITY14dfeabcgThe Encryption TabThe “Encryption” tab is used to set up the wireless encryption settings.There are two ways to set up the encryption settings of your card: “Createwith Passphrase” or “Manual Entry”. Select “64-bit” from the drop-down menu.You will notice when using 64-bit encryption, there are four keys labeled “Key 1” through “Key 4”. Only one key can be used at a time. For ease of use,the software can generate keys using a passphrase that you enter. Thispassphrase can be easily distributed to other wireless-equipped computerusers in your network. For instance, creating a key using the passphrase“Passphrase” generates four keys in 64-bit encryption mode and one key in128-bit encryption mode. In this scenario, a user of a laptop needs only toenter the passphrase and the key number into the computer’s wireless management software to be able to communicate while using encryption. Allcomputers on the network must use the same encryption rate, passphrase, andkey. The passphrase can be changed as often as desired.
16USING THE BELKIN WIRELESS LAN MONITOR UTILITYUSING THE BELKIN WIRELESS LAN MONITOR UTILITYSetting 64-Bit or 128-Bit Encryption Using a Passphrase (Easiest)1. Select “64-bit” or “128-bit” from the drop-down menu (a).2. Select “Create with Passphrase” (b).3. Enter a passphrase and click “Generate” (c). Clicking “Generate” will generate four keys (d) if you choose 64-bit or one key if you choose 128-bit.The keys are obscured for security reasons so they cannot be read by another person. 4. You can now select which 64-bit key you want to use from the ”Default Key ID” drop-down menu. Leave this set to “1” unless you have a specific reason to use another key. Click “Apply” for the changes to be saved.Encryption is now enabled. Each wireless-equipped computer (client) thatneeds to communicate on the wireless network must be set to the sameencryption settings (rate, passphrase, and key).abcdSetting 64-Bit or 128-Bit Manually Using an Alphanumeric Keyword (Advanced)1. Select “64-bit” or “128-bit” encryption from the drop-down menu.2. Select “Manual Entry” then “Alphanumeric: 5 characters” if using 64-bit or “Alphanumeric: 12 characters” if using 128-bit. Enter up to four keys.3. Select the key that you want to use.4. Click “Apply”.Encryption is now enabled. Each wireless-equipped computer (client) thatneeds to communicate on the wireless network must be set to the sameencryption settings (rate, passphrase, and key).Setting 64-Bit or 128-Bit Manually Using a Hexadecimal Key (Advanced)1. Select “64-bit” or “128-bit” from the drop-down menu.2. Select “Manual Entry” then “Hexadecimal: 10 characters (0-9,A-F)” if using64-bit or “Hexadecimal: 26 characters (0-9,A-F)” if using 128-bit. Enter upto four keys.3. Select the key that you want to use.4. Click “Apply”.Encryption is now enabled. Each wireless-equipped computer (client) thatneeds to communicate on the wireless network must be set to the sameencryption settings (rate, passphrase, and key).17
The Advanced TabThe settings on the “Advanced” tab should be left as is unless there is a specific reason to change them.(a) Preamble TypeThe preamble is a signal used to synchronize the timing between the wireless network card and the access point. Some older wireless equipment may not be ableto work if this setting is set to “Short”. Leaving this setting to “Auto” is the most effective way to ensure the Card will connect to any wireless network available.(b) Fragmentation Threshold and RTS/CTS ThresholdThese settings should be left at their default settings. If you are experiencingmany data errors, you can change these settings, however, network performance will likely decrease.(c) Power SaveEnabling “Power Save” will help reduce battery consumption on a laptop byturning the Card OFF after each data set is sent or received to or from thenetwork. Enabling this mode will decrease performance of the Card, but maygreatly enhance your battery life. Use this feature only if necessary.USING THE BELKIN WIRELESS LAN MONITOR UTILITYUSING THE BELKIN WIRELESS LAN MONITOR UTILITY1918abcUsing Profile Manager ModeUsing Profiles allows you to save configurations for different wireless networks. For instance, if you use your Card at your place of work and also atyour home, your wireless network settings may be different for each location.Profiles let you store settings for each location and name them for easy identification. You can quickly change from one profile to another profilewithout having to remember the particular settings of a certain network. After you first install the Card, the Profile Manager mode will be turned OFF. Ifyou want to use the Profile Manager, you will need to turn it on and set up a profile.abced
20USING THE BELKIN WIRELESS LAN MONITOR UTILITYUSING THE BELKIN WIRELESS LAN MONITOR UTILITYCreating a ProfileBefore you can use the Profile Manager, you need to create a profile. Followthese steps to create a profile.1. If not already, turn ON the Profile Manager mode by pressing the “Activate Profile Manager Mode” button. (c).2. The “Profile Name” field (a) will become active. Click inside of the Profile Name field and type in the name you want to call the profile, suchas “Home”.3. At this point, you now need to set the rest of the parameters for the network that you will be connecting to. Set the Operating Mode, Encryptionsettings, Network Type, SSID, etc. When you have finished making thesesettings, click “Apply” (b).A profile with the name you chose now exists in the Profile Manager. You canselect this profile quickly and easily any time you need to use it.Choosing a ProfileYou can quickly and easily choose a profile any time you need it. There aretwo methods to do so.Quick Pick1. Right-click the Utility icon in the task bar.2. Place your cursor over “Profile”. A list of the profiles you have created willappear. Move the cursor over the profile that you want to use and left-clickon the name. The profile you just selected will become active.Choosing from the Utility1. Make sure Profile Manager mode is on.2. Click the down-facing arrow next to “Profile Name”. A list of all of the profiles you have created will appear. Click on the name of the profile youwant to use.3. Click “Apply”. The profile you just selected will become active. 21Operating in Ad-Hoc ModeAd-Hoc mode is a peer-to-peer mode (computer-to-computer). To set two ormore computers to communicate directly with each other, follow these steps:1. Select “Ad-Hoc” from the “Operating Mode” box (a).2. Enter the channel you want to use in the “Channel” box (b). You can choose any one of the available channels you wish.3. In the SSID field (c), type in the name you want to use to identify the Ad-Hoc network. You can name this anything you want.4. Click “Apply” to save the changes. When the Card is in Ad-Hoc mode, the “Status” box (d) will say “Ready”. NOTE: The Signal Strength and Link Quality indicators do not work in Ad-Hoc mode.abc
TROUBLESHOOTING22USING THE BELKIN WIRELESS LAN MONITOR UTILITY235. Using these same settings, set the rest of the computers on your Ad-Hoc network to the same settings. When you have completed setup of the Ad-Hoc network, computers will network together normally as if wiredtogether through a hub or switch.dYou can find technical support information at networking.belkin.com orwww.belkin.com through the tech support area. If you want to contact technical support by phone, please call 800-223-5546. Technical support is available 24 hours a day, 7 days a week.
2524INFORMATIONFCC StatementDECLARATION OF CONFORMITY WITH FCC RULES FOR ELECTROMAGNETIC COMPATIBILITYWe, Belkin Corporation, of 501 West Walnut Street, Compton, CA 90220, declare under our soleresponsibility that the product, F5D6020to which this declaration relates,complies with Part 15 of the FCC Rules. Operation is subject to the following two conditions: (1) thisdevice may not cause harmful interference, and (2) this device must accept any interference received,including interference that may cause undesired operation.Caution: Exposure to Radio Frequency Radiation.This equipment complies with FCC radiation exposure limits set forth for an uncontrolledenvironment. This transmitter must not be co-located or operating in conjunction with any other antenna ortransmitter.Federal Communications Commission NoticeThis equipment has been tested and found to comply with the limits for a Class B digital device,pursuant to Part 15 of the FCC Rules.  These limits are designed to provide reasonable protectionagainst harmful interference in a residential installation.This equipment generates, uses, and can radiate radio frequency energy.  If not installed and usedin accordance with the instructions, it may cause harmful interference to radio or television reception, which can be determined by turning the equipment off and on, the user is encouragedto try and correct the interference by one or more of the following measures:• Reorient or relocate the receiving antenna.• Increase the distance between the equipment and the receiver.• Connect the equipment to an outlet on a circuit different from that to which the receiver is connected.• Consult the dealer or an experienced radio/TV technician for help.ModificationsThe FCC requires the user to be notified that any changes or modifications to this device that are not expressly approved by Belkin Components may void the users authority to operate the equipment.Canada- Industry Canada (IC)The wireless radio of this device complies with RSS 139 & RSS 210 Industry Canada.  This Class Bdigital complies with Canadian ICES-003.Cet appareil numérique de la classe B conforme á la norme NMB-003 du Canada.Europe-European Union NoticeRadio products with the CE 0560 or CE alert marking comply with the R&TTE Directive (1995/5/EC) issued by the Commission of theEuropean Community.         Compliance with this directive implies conformity to the following European Norms (in bracketsare the equivalent international standards).  • EN 60950 (IEC60950) – Product Safety• EN 300 328 Technical requirement for radio equipment• ETS 300 826 General EMC requirements for radio equipment.To determine the type of transmitter, check the identification label on your Belkin product.Products with the CE marking comply with the EMC Directive (89/336/EEC) and the Low VoltageDirective (72/23/EEC) issued by the Commission of the European Community.  Compliance withthese directives implies conformity to the following European Norms (in brackets are the equivalent international standards).• EN 55022 (CISPR 22) – Electromagnetic Interference• EN 55024 (IEC61000-4-2,3,4,5,6,8,11)- Electromagnetic Immunity• EN 61000-3-2 (IEC610000-3-2) - Power Line Harmonics• EN 61000-3-3 (IEC610000) – Power Line Flicker• EN 60950 (IEC60950) – Product SafetyProducts that contain the radio transmitter are labeled with CE 0560 or CE alert marking and mayalso carry the CE logo.INFORMATION
26INFORMATIONBelkin Corporation Limited Lifetime Product WarrantyBelkin Corporation warrants this product against defects in materials and workmanship for its lifetime. If a defect is discovered, Belkin will, at its option, repair or replace the product at nocharge provided it is returned during the warranty period, with transportation charges prepaid, tothe authorized Belkin dealer from whom you purchased the product. Proof of purchase may berequired. This warranty does not apply if the product has been damaged by accident, abuse, misuse, ormisapplication; if the product has been modified without the written permission of Belkin; or ifany Belkin serial number has been removed or defaced.THE WARRANTY AND REMEDIES SET FORTH ABOVE ARE EXCLUSIVE IN LIEU OF ALL OTHERS,WHETHER ORAL OR WRITTEN, EXPRESSED OR IMPLIED. BELKIN SPECIFICALLY DISCLAIMS ANY ANDALL IMPLIED WARRANTIES, INCLUDING, WITHOUT LIMITATION, WARRANTIES OF MERCHANTABILITYAND FITNESS FOR A PARTICULAR PURPOSE.No Belkin dealer, agent, or employee is authorized to make any modification, extension, oraddition to this warranty.BELKIN IS NOT RESPONSIBLE FOR SPECIAL, INCIDENTAL, OR CONSEQUENTIAL DAMAGES RESULTINGFROM ANY BREACH OF WARRANTY, OR UNDER ANY OTHER LEGAL THEORY, INCLUDING BUT NOTLIMITED TO, LOST PROFITS, DOWNTIME, GOODWILL, DAMAGE TO OR REPROGRAMMING, ORREPRODUCING ANY PROGRAM OR DATA STORED IN, OR USED WITH, BELKIN PRODUCTS.Some states do not allow the exclusion or limitation of incidental or consequential damages orexclusions of implied warranties, so the above limitations of exclusions may not apply to you.This warranty gives you specific legal rights, and you may also have other rights that vary fromstate to state.

Navigation menu