Belkin F5D6050 Wireless USB Network Adapter User Manual smc2662w
Belkin International, Inc. Wireless USB Network Adapter smc2662w
Belkin >
Revised Manual
IEEE 802.11b
WN3501AR
Wireless USB
Adapter
TABLE OF CONTENTS
Wireless USB Adapter WN3501AR ........1
Package Checklist.......................................1
Hardware Description ...............................2
Application...........................................................2
LED Indicator .....................................................4
System Requirements..........................................4
Installation ...........................................................5
Driver Installation ......................................6
Windows 98/Me Installation ............................6
Windows 2000 Installation ..............................12
Configuration and Diagnostic Utility ... 15
Utility Installation ..............................................15
Using the Wireless LAN Utility ........................15
Quick-Lanuch Icon ............................................16
Monitor Screen ...................................................17
Statistics Screen ...................................................19
Site Survey Screen ...............................................19
Encryption Screen ..............................................20
Advanced Screen .................................................22
Network Configuration and Planning .. 23
Network Topologies................................ 23
Ad Hoc Wireless LAN ......................................23
Infrastructure Wireless LAN ............................24
Settings the Communication Domain ...........25
Troubleshooting ....................................... 26
USB adapter Installation Problems .................26
Network Connection Problems............. 27
Compliances ............................................. 29
FCC - Class B ..................................................... 29
CSA Statement (Canada) ..................................30
CE Mark Declaration of Conformance ...........30
Specifications ........................................... 31
Terminology ............................................. 32
WIRELESS USB ADAPTER WN3501AR
Wireless USB Adapter WN3501AR is an 11 Mbps
wireless network adapter that seamlessly integrates
with existing Ethernet networks to support
applications such as mobile users or temporary
conferences. This solution offers fast, reliable wireless
connectivity with considerable cost savings over wired
LANs (which include long-term maintenance overhead
for cabling). Just plug wireless cards into your desktop
PCs and start networking.
Using this adapter in conjunction with Wireless Access
Point, you can create an instant network that integrates
seamlessly with 10 Mbps Ethernet LANs. Moreover,
moving or expanding your network is as easy as
moving or installing additional Access Pointsno
wires!
PACKAGE CHECKLIST
The Wireless USB Adapter WN3501AR package
includes:
1 Wireless USB Adapter with dual dipole antenna
(WN3501AR)
1 Driver/Utility diskette
1 USB cable
This User Guide
1
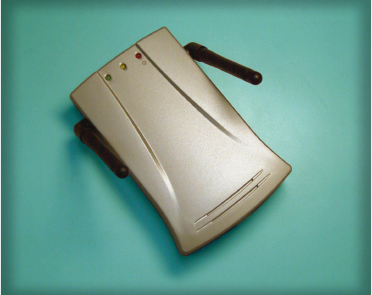
HARDWARE DESCRIPTION
Wireless USB Adapter WN3501AR supports an
11 Mbps half-duplex connection to Ethernet networks.
This adapter is fully compliant with 2.4 GHz DSSS
CSMA/CA wireless networking as defined in IEEE
802.11b. It can be installed in any notebook or
desktop with a USB port. Support is provided for
Windows 98/Me/2000.
Applications
The Wireless USB Adapter WN3501AR offers a fast,
reliable, cost-effective solution for wireless client
access to the network in applications such as:
Remote access to corporate network
information
E-mail, file transfer and terminal emulation
Difficult-to-wire environments
Historic or old buildings, asbestos installations,
and open areas where wiring is difficult to employ
Frequently changing environments
Retailers, manufacturers and banks who frequently
rearrange the workplace and change location
2
Temporary LANs for special projects or peak
time
Trade shows, exhibitions and construction sites
which need a temporary setup for a short time
period. Retailers, airline and shipping companies
who need additional workstations for a peak
period. Auditors who require workgroups at
customer sites
Access to databases for mobile workers
Doctors, nurses, retailers, white-collar workers
who need access to databases while being mobile
in the hospital, retail store or office campus
SOHO (Small Office and Home Office) users
SOHO users who need easy and quick installation
of a small computer network
3
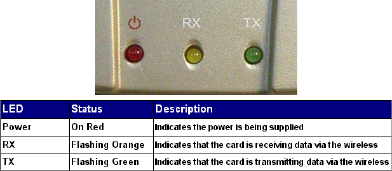
LED Indicators
The Wireless USB Adapter WN3501AR includes three
LED indicators, as described in the following figure
and table.
System Requirements
Before you install the Wireless USB Adapter
WN3501AR, check your system for the following
requirements:
An available USB port in your computer.
Windows 98/Me/2000 (Have the Windows
installation CD-ROM ready for use during
installation).
A minimum of 1 MB of free disk space for
installing the driver and utility program.
Another IEEE 802.11b compliant device installed
in your network, such as the WL11000 Wireless
Access Point, or the Wireless USB Adapter
WN3501AR.
4
INSTALLATION
WARNINGS:
Backup your driver diskette and use the copy as
the working diskette to protect the original from
accidental damage.
1. Select an unused USB port and remove its
protective bracket.
2. Carefully insert the USB cable and press until it is
firmly seated in the USB port.
3. Install the appropriate network driver for your
operating system. Drivers can be found on the
driver diskette. See Driver Installation for more
information.
4. Install the configuration program for your wireless
USB adapter. The SETUP.EXE file can be found
on the utility diskette. See Configuration and
Diagnostic Utility for more information.
5
DRIVER INSTALLATION
The diskette labeled Driver Diskette, that comes
with the package contains all the software drivers
available for the Wireless USB adapter WN3501AR.
Select the driver you need for your system and refer to
this guide for the installation and configuration
procedure.
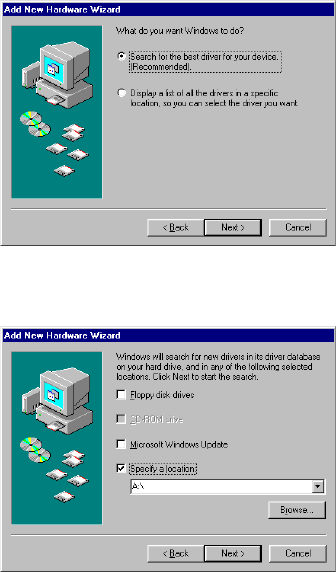
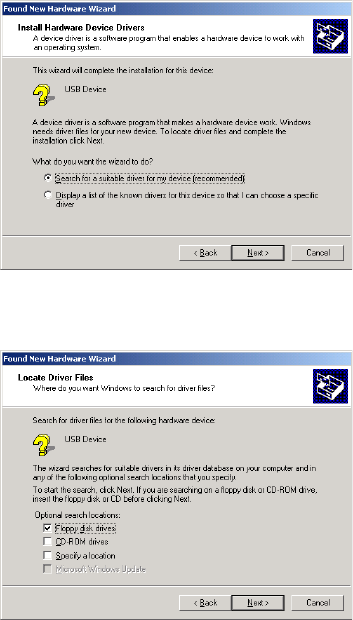
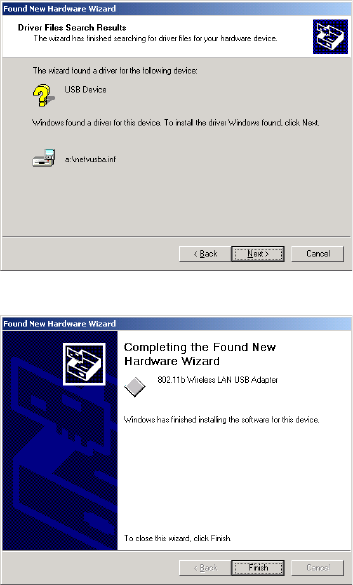
WINDOWS 98/ME INSTALLATION
1. Windows 98/Me will automatically detect the new
hardware and prompt you to install the driver.
Click Next to find the driver.
2. Insert the floppy disk labeled Driver/Utility
diskette specify the location A:\ and click
Next.
6
3. Click Next to copy files from the floppy disk.
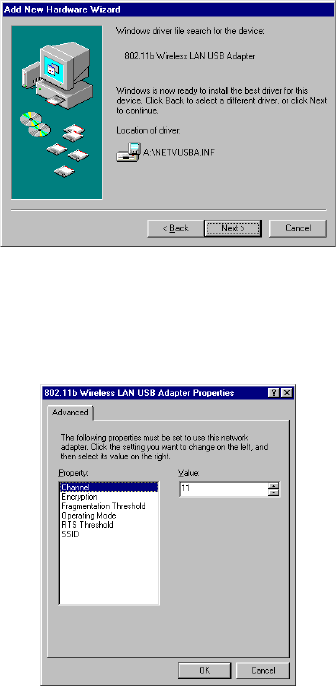
4. Set the Channel to the same radio channel as
that used by the other wireless clients in your
group. However, if you are connecting to a
network via an access point, the adapter will
automatically set the channel to be the same as
that used by the Access Point.
7
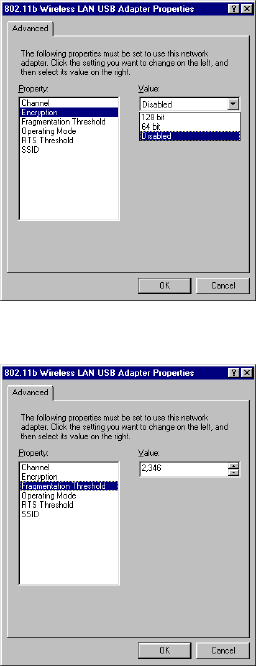
5. For more secure data transmission, set the
Encryption to 128-bit or 64-bit to ensure
wireless network security. The advance Wired
Equivalent Privacy (WEP) is implemented in this
card to prevent unauthorized access. The 128-bit
setting gives a higher level of security but the
setting must be the same for all clients in your
wireless network. (Default: Disabled)
To completely configure WEP, you must use the
Configuration Utility. Please see Encryption
Screen under the Configuration and Diagnostic
Utility section.
6. Set the Fragmentation Threshold. (The Default
is 2346 which means Disabled)
8
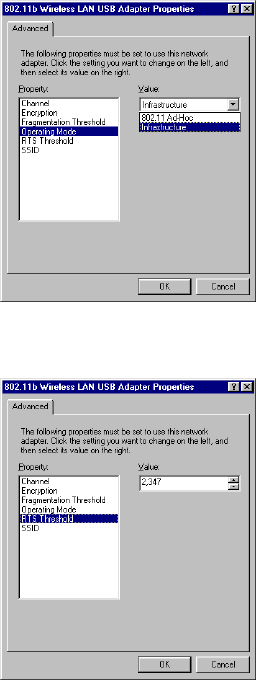
7. Set the Operating Mode to 802.11 Ad-Hoc or
Infrastructure depending on the type of network
you want to connect to.
8. Set the RTS Threshold to the same as that used
by other devices in your network. (The default is
2347 which means Disabled)
9
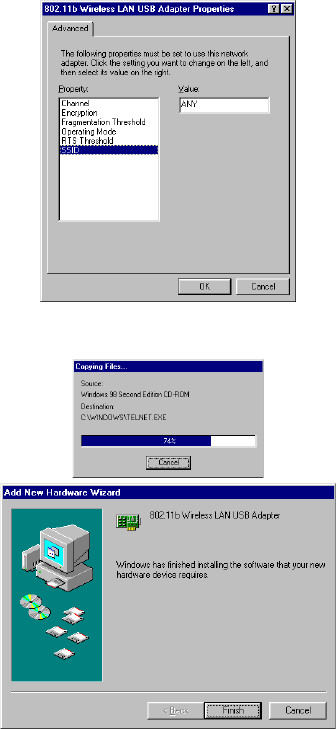
9. Set the SSID identifier to the same as that used
by the ad hoc work group or access point you
want to connect to. If you will be roaming among
multiple Access Points with different BSSIDs, a
value of ANY will allow connection to any
SSID.
10. Insert Windows98/Me CD-ROM and click OK.
Windows will copy source file to your system.
10
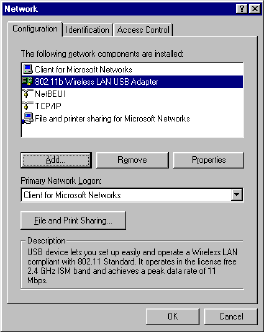
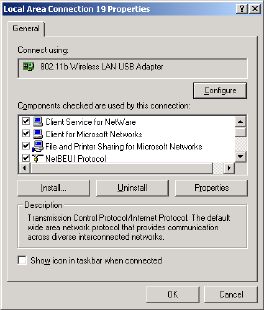
11. If you want to add more protocols after
installation, go to control panel and double-click
Network.
12. Select the Configuration tab and click Add to
install the network protocols you want to use,
such as IPX/SPX, NetBEUI or TCP/IP.
If you install TCP/IP, be sure to set the
appropriate Gateway, DNS Server, and Domain
for your network.
If you install an IPX/SPX compatible protocol,
then you also need to install the Client for
NetWare Networks.
13. Click File and Print Sharing to share files or
printers.
14. Click on the Identification tab on the Network
dialog box, and specify your computer name and
network workgroup.
15. Click OK in the Network dialog box and the
system will restart your computer.
11
WINDOWS 2000 INSTALLATION
1. Windows 2000 will automatically detect the new
hardware and prompt you to install the driver
Click Next to find the driver.
2. Insert the floppy disk labeled Driver/Utility
diskette choose Floppy disk drivesand click
Next.
12
3. Click Next to copy files from the floppy disk.
4. Finish the driver installation.
13
5. If you want to add more protocols after
installation, go to control panel and double click
on Network and Dial-up Connections and
double click Local Area Connection X, click
Properties.
6. Select the General tab and click install to
install the network protocols you want to use,
such as IPX/SPX, NetBEUI or TCP/IP.
If you install TCP/IP, be sure to set the
appropriate Gateway, DNS Server, and Domain
for your network.
If you install an IPX/SPX compatible protocol,
then you also need to install the Client for
NetWare Networks.
14
CONFIGURATION AND DIAGNOSTIC
UTILITY
Wireless USB Adapter WN3501AR provides free
optional management software for quick network
configuration and easy diagnostics. The Driver/
Utility diskette that comes with the package contains
a user-friendly interface for configuring the Wireless
USB Adapter WN3501AR.
Utility Installation
To install the utility software:
1. Insert the Driver/Utility diskette in your PCs
floppy drive (A:).
2. Select run... from Windows Start menu bar.
3. Enter A:\Utility\Setup.exe and click OK.
4. Follow the on-screen instructions to finish
installation.
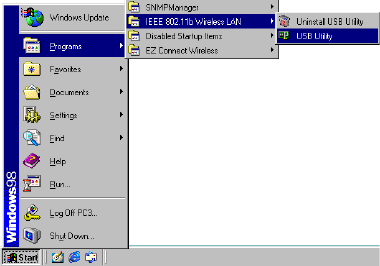
Using the Wireless LAN Utility
Once the installation is completed, the configuration
utility can be accessed by selecting the USB Utility
icon from the IEEE 802.11b Wireless LAN folder.
15

Quick-Launch Icon
After the utility program is running, it will have a
Quick Launch icon in the lower right hand corner
of the task bar.
Double clicking the icon in the Quick Launch bar will
open the USB Utility program, providing quick access
to all settings of the adapter.
This configuration software includes the following
functions:
Monitor - Allow you to monitor network status and
configure parameters for the wireless adapter.
Statistics - Show the statistics of the wireless adapter.
Site Survey - Scan/Show all the APs in range.
Encryption - Provides WEP security control.
Advanced - Allow you to configure the advanced
settings.
Version - Show the version information.
16
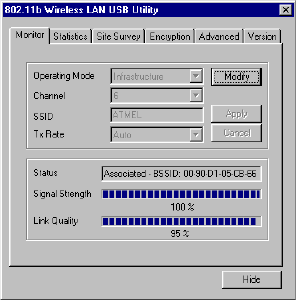
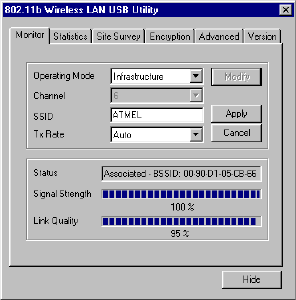
Monitor Screen
When you start the wireless USB utility, the
information window for the WN3501AR is shown as
the figure below. Click on the Monitor tab to
monitor the network status of the wireless adapter,
including the BSS ID, current channel, link quality, and
signal strength.
Click Modify to configure Operating Mode,
Channel, SSID and Tx Rate. After
configuration, just click Apply to save the changes.
Operating Mode - Set the station operation mode to
802.11 AdHoc for network configurations that
do not have any Access Points, or to
Infrastructure for configurations with Access
Points. (Infrastructure is the default setting)
Channel - If you are setting up an ad hoc wireless
LAN (see page 23), set the channel number to the
same radio channel as that used by the other
wireless clients in your group. However, if you are
connecting to a network via an Access Point, then
the channel is automatically set to the channel of
the Access Point that the adapter connects to.
SSID - Input an SSID string that you want to
connect to (ANY is the default setting). If you
will be roaming among multiple Access Points
with different BSSIDs, a value of ANY will
allow connecttion to any SSID.
17
Tx Rate - Indicates the communication rates. Select
appropriate transmission speed to match your
wireless LAN settings. (Default: Fully Automatic)
Note : The Channel can only be set when the
Operating Mode is 802.11 Ad-Hoc.
18
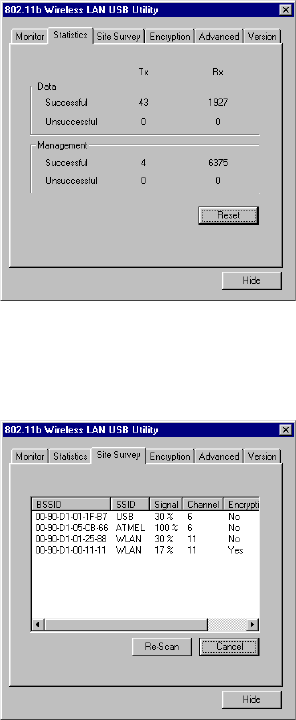
The Statistics screen displays Data Frames and
Management Frames. (Please see Terminology
section for Data Frames and Management
Frames definitions)
Site Survey Screen
The Site Survey screen displays all APs in wireless
LAN, and you can choose one of them to connect to
by double clicking.
19
Statistics Screen
Encryption Screen
Encryption - For more secure data transmission, set
the Encryption to 128-bit or 64-bit to ensure
wireless network security. Wired Equivalent Privacy
(WEP) is implemented in this adapter to prevent
unauthorized access to your wireless network. The
128-bit setting gives a higher level of security, but the
setting must be the same as other clients in your
wireless network. (Default: Disabled)
The WEP (Wired Equivalent Privacy) implemented in
Wireless USB adapter WN3501AR is based on an
RC4 encryption algorithm. The security keys provided
to ensure data confidentiality are four 10 digit keys
for the 64-bit WEP setting (first screen below) and
one 26-digit key for the 128-bit WEP setting (second
screen below). This WEP security protects your
wireless LAN against eavesdropping and unauthorized
access by hackers or unexpected intruders.
Create with Passphrase - Security keys for WEP
encryption are generated from your Passphrase
string, so you must use the same passphrase on all
the other stations in your network.
Manual Entry - Manual Entry allows the user to
manually enter key elements. ( 2 Hexadecimal digits
in each block)
Default Key ID - Choose the Key ID that has the
encryption string you prefer. If you are using a key
generated from Passphrase, you must use the same
Passphrase and key on each station.
20
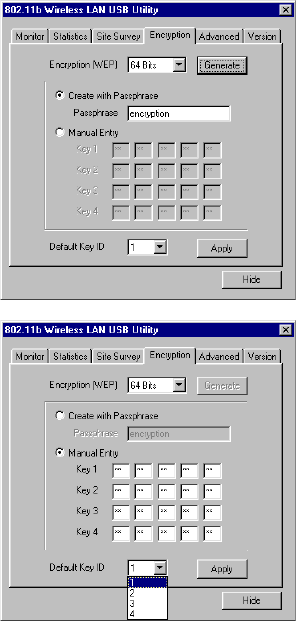
To use the WEP function, take the following steps:
1. Select 128-bit or 64-bit for the Encryption
field.
2. Then choose Create with Passphrase, type a
string in the Passphrase field and click
Generate, then select the key, and click Apply.
Note: Passphrase string can consist of up to 32
alphanumeric character.
Or choose Manual Entry and enter key elements
in one of the keys 1-4, and click Apply.
Note: Each bit key must be hexadecimal.
21
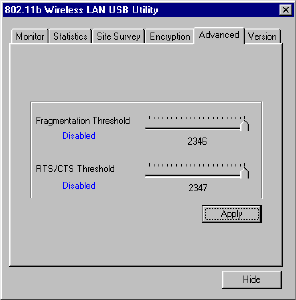
Advanced Screen
Here you can set values of Fragmentation
Threshold(Default: 2346, which means Disabled) and
RTS/CTS Threshold(Default: 2347, which means
Disabled).
22
NETWORK CONFIGURATION AND
PLANNING
WN3501AR Wireless Solution supports a stand-alone
wireless network configuration, as well as an integrated
configuration with 10 Mbps Ethernet LANs.
The WN3501AR USB adapter can be configured as:
Ad hoc for departmental or SOHO LANs
Infrastructure for enterprise LANs
Network Topologies
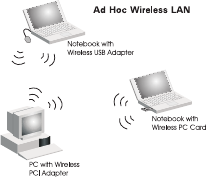
Ad hoc Wireless LAN
An ad hoc wireless LAN consists of a group of
computers, each equipped with a wireless adapter,
connected via radio signals as an independent wireless
LAN. Computers in a specific ad hoc wireless LAN
must therefore be configured to the same radio
channel.
An ad hoc wireless LAN can be used for a branch
office or SOHO operation.
23
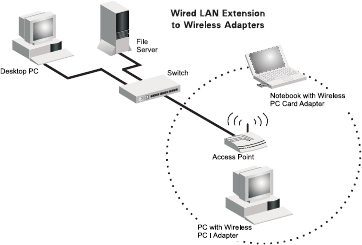
Infrastructure Wireless LAN
The WN3501AR can also provide access to a wired
LAN for wireless workstations. An integrated wired
and wireless LAN is called an Infrastructure
configuration. A Basic Service Set (BSS) consists of a
group of wireless PC users, and an access point that is
directly connected to the wired LAN. Each wireless
PC in this BSS can talk to any computer in its wireless
group via a radio link, or access other computers or
network resources in the wired LAN infrastructure via
the access point.
The infrastructure configuration not only extends the
accessibility of wireless PCs to the wired LAN, but
also doubles the effective wireless transmission range
for wireless PCs by passing their signal through one or
more access points.
A wireless infrastructure can be used for access to a
central database, or for connection between mobile
workers, as shown in the following figure.
24
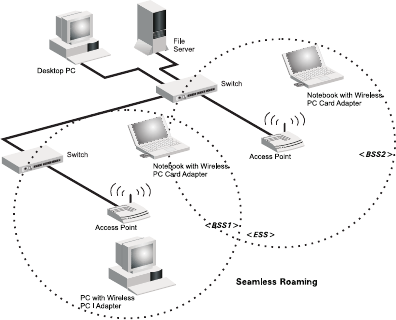
Setting the Communication Domain
Stationary Wireless PCs
The Basic Service Set (BSS) is the communication
domain for each access point. For wireless PCs that do
not need to support roaming, set the domain identifier
(SSID) for the wireless card to the BSS ID of the
access point you want to connect to. Check with your
administrator for the BSS ID of the access point he
wants you to connect to.
Roaming Wireless PCs
A wireless infrastructure can also support roaming for
mobile workers. More than one access point can be
configured to create an Extended Service Set (ESS).
By placing the access points so that a continuous
coverage area is created, wireless users within this ESS
can roam freely. All Wireless adapters and Wireless
Access Points within a specific ESS must be
configured with the same SS ID.
Before setting up an ESS for roaming, you need to
choose a clear radio channel and ideal location for the
Access Points to maximize performance. (Refer to
Using the Wireless LAN Utility on page 15 for
detailed information on installation and usage.)
25
TROUBLESHOOTING
Check the following troubleshooting items before
contacting Technical Support.
USB adapter Installation Problems
If your computer cant find the Wireless USB adapter
WN3501AR or the network driver doesnt install
correctly, check the following:
Make sure the adapter is connected to the USB
port.Check for any hardware problems, such as
physical damage to the adapters connector.
Try the adapter in another USB port. If this also
fails, try using another WN3501AR wireless
adapter that is known to operate correctly.
Make sure your computer is using the latest BIOS.
If there are other network adapters in the
computer, they may cause conflicts. Disable or
remove all other adapters from the computer and
test the wireless adapter separately.
Check for a defective computer or USB port by
trying the adapter in another computer that is
known to operate correctly.
If there are still difficulties, remove the wireless
adapter. Delete the file Vnetusba.sys from c:
\windows\system(For Windows98/Me), c:
\winnt\system32\drivers(For Windows2000).
Then go to Control Panel and delete the
adapter from your network configuration menu.
Restart your PC and reinstall the adapter.
26
NETWORK CONNECTION PROBLEMS
If the LEDs on the USB adapter are not lit, or if you
cant access any network resources from the computer.
Check the following:
Make sure the correct software driver is installed.
Try reinstalling the driver.
Make sure the computer and other network
devices are receiving power.
The access point you want to connect to may not
be functioning correctly. Try using another
Access Point.
If you cannot access a Windows or NetWare
service on the network, check that you have
enabled and configured the service correctly. If
you cannot connect to a particular server, be sure
that you have access rights and a valid ID and
password.
If you cannot access the Internet, be sure you
have configured your system for TCP/IP.
If your wireless station cannot communicate with a
computer on the Ethernet LAN when configured for
Infrastructure mode, check the following:
Make sure the Access Point which the station
associated with is powered on.
Check to make sure your wireless settings (i.e.
WEP, SSID, Channel) match the AP or other
stations you are connecting to.
If you still cant connect, change the Access Point
and all the stations within the BSS to another
radio channel.
27
COMPLIANCES
FCC Class B Certification
This device complies with Part 15 of the FCC Rules.
Operation is subject to the following conditions:
1. This device may not cause harmful interference.
2. This device must accept any interference received,
including interference that may cause undesired
operation.
Warning! This equipment has been tested and found
to comply with the limits for a Class B digital device,
pursuant to Part 15 of the FCC Rules. These limits are
designed to provide reasonable protection against
harmful interference in a residential installation. This
equipment generates, uses and can radiate radio
frequency energy and, if not installed and used in
accordance with the instructions, may cause harmful
interference to radio communications.
However, there is no guarantee that interference will
not occur in a particular installation. If this equipment
does cause harmful interference to radio or television
reception, which can be determined by turning the
equipment off and on, the user is encouraged to try to
correct the interference by one or more of the
following measures:
Reorient or relocate the receiving antenna.
Increase the distance between the equipment and
receiver.
Connect the equipment into an outlet on a circuit
different from the one which the receiver is
connected to.
Consult the dealer or an experienced radio/TV
technician for help.
28
FCC RF Radiation Exposure Statement:
This equipment complies with FCC RF radiation exposure limits set
forth for an uncontrolled environment. This equipment should be
installed and operated with a minimum distance of 20 centimeters
between the radiator and your body.
This transmitter must not be co-located or operating in conjunction
with any other antenna or transmitter.
CSA Statement (Canada)
This digital apparatus does not exceed the Class B
limits for radio noise emissions from digital apparatus
set out in the Radio Interference Regulations of
Industry Canada.
Le présent appareil numérique német pas de bruits
radio-électriques dépassant les limites applicables aux
appareils numériques de la classe B prescrites dens le
Règlement sur le brouillage radioélectrique édicté par
lIndustrie.
CE Mark Declaration of Conformance
This is to certify that this product complies with ISO/
IEC Guide 22 and EN45014. It conforms to the
following specifications:
EMC: EN55022(1988)/CISPR-22(1985) Class B
IEC 61000-4-2(2000) 4kVCD/8kVAD
IEC 61000-4-3(2000) 3V/m
IEC 61000-4-4(2000) 1kV- (power
line)
IEC 61000-4-6(2000) 3Vrms
IEC 61000-4-11(2000) 3Vrms
This product complies with the requirements of the
Low Voltage Directive 73/23/EEC and the EMC
Directive 89/336/EEC, and carries the CE Mark
accordingly.
29
SPECIFICATIONS
Functional Criteria
Data Rate 1, 2, 5.5, 11 Mbps
Transmission Mode Half duplex
Network Connection IEEE 802.11b wireless
Operating Range Max distance of 11Mbps: 180m (590ft)
Max distance of 5.5Mbps: 300m (984ft)
Max distance of 2Mbps: 450m (1476ft)
Max distance of 1Mbps: 550m (1800ft)
Radio Signal
Signal Type Direct Sequence Spread-Spectrum (DSSS)
Operating Frequency USA, Canada and ETSI: 2.4~2.4835GHz
Japan: 2.4~2.497GHz
Sensitivity 1, 2, 5.5 Mbps: -80 dBm,
11 Mbps: -78 dBm (minimum)
Modulation CCK, BPSK, QPSK
Output Power >+15 dBm (minimum)
Physical Characteristics
Current Consumption TX 450 mA Max
RX 320 mA Max
Typical 350 mA Max
Dimensions 133 x 108 x 30 mm (5.23 x 4.25 x 1.18 in)
Weight 181 g (6.38 oz)
Antenna Dual dipole antenna
LED Indicator Power, RX, TX
Host Interface USB specification reversion 1.1
Standards Conformance IEEE 802.11b
Certification
FCC Part 15
ETSI 300.328
ARIB STD 33 & 66
Software
NDIS Driver/Utility Windows 98
Windows Me
Windows 2000
30
TERMINOLOGY
The following is a list of terminology that is used in this document.
Access Point - An internetworking device that seamlessly
connects wired and wireless networks.
Ad-Hoc - An Ad-Hoc wireless LAN is a group of computers
each with LAN adapters, connected as an independent
wireless LAN.
Backbone - The core infrastructure of a network. The
portion of the network that transports information
from one central location to another central location
where it is unloaded onto a local system.
Base Station -In mobile telecommunications, a base station
is the central radio transmitter/receiver that maintains
communications with the mobile radiotelephone sets
within its range. In cellular and personal
communications applications, each cell or micro-cell
has its own base station; each base station in turn is
interconnected with other cells bases.
BSS - BSS stands for Basic Service Set. It is an Access
Point and all the LAN PCs that are associated with it.
Data Frame The packets transmit/receive from the device.
ESS - ESS (ESS-ID, SSID) stands for Extended Service
Set. More than one BSS is configured to become an
Extended Service Set. LAN mobile users can roam
between different BSSs in an ESS (ESS-ID, SSID).
Ethernet - A popular local area data communications
network, which accepts transmission from computers
and terminals. Ethernet operates on a 10 Mbps base
band transmission rate, using a shielded coaxial cable
or over twisted pair telephone wire.
31
Fragmentation Threshold In the 802.11 Standard, the
MAC Layer may fragment and reassamble directed
MSDUs or MMPDUs. The fragmentation and
defragmentation mechanisms allow for fragment re-
transmission.
Infrastructure - An integrated wireless and wired LAN is
called an Infrastructure configuration.
Management Frame Control frame for establishing the
link between Access Point and client station. It should
include the Beacon, Probe, Authentication, and
Association frame.
MSDUs MAC Service Data Units.
MMPDUs MAC Management Protocol Data Units.
Roaming - A wireless LAN mobile user moves around an
ESS and maintains a continuous connection to the
Infrastructure network.
RTS Threshold Transmitters contending for the medium
may not be aware of each other. RTS/CTS mechanism
can solve this Hidden Node Problem. If the packet
size is smaller than the preset RTS Threshold size, the
RTS/CTS mechanism will NOT be enabled.
USB - The Universal Serial Bus allows complete Plug and
Play connection of peripheral devices to a computer.
WEP Wired Equivalent Privacy is based on the use of
64-bit keys and the popular RC4 encryption algorithm.
Wireless devices without a valid WEP key will be
excluded from network traffic.
32