Belkin F5D6231-4 Wireless Cable/DSL Gateway Router User Manual F5D6231 4
Belkin International, Inc. Wireless Cable/DSL Gateway Router F5D6231 4
Belkin >
User Manual

Wireless Cable/DSL Gateway Router
F5D6231-4
Quick Installation Guide


Quick Installation Guide
Wireless Cable/DSL Gateway
-
F5D6231-4
10/100 Mbps Wireless Gateway
with 4 10/100 Mbps (RJ-45) Ethernet LAN Ports, 1 Uplink Port,
and 1 10/100 Mbps (RJ-45) WAN Port
F5D6231-4
E112002-R01

i
Compliances
FCC - Class B
This equipment has been tested and found to comply with the limits for a Class B digital
device, pursuant to Part 15 of the FCC Rules. These limits are designed to provide
reasonable protection against harmful interference in a residential installation. This
equipment generates, uses and can radiate radio frequency energy and, if not installed
and used in accordance with instructions, may cause harmful and, if not installed and
used in accordance with instructions, may cause harmful interference to radio
communications. However, there is no guarantee that the interference will not occur in a
particular installation. If this equipment does cause harmful interference to radio or
television reception, which can be determined by turning the equipment off and on, the
user is encouraged to try to correct the interference by one or more of the following
measures:
• Reorient the receiving antenna
• Increase the separation between the equipment and receiver
• Connect the equipment into an outlet on a circuit different from that to which the
receiver is connected
• Consult the dealer or an experienced radio/TV technician for help
FCC Caution: To assure continued compliance, (example - use only shielded interface
cables when connecting to computer or peripheral devices). Any changes or
modifications not expressly approved by the party responsible for compliance could void
the user’s authority to operate this equipment.
This device complies with Part 15 of the FCC Rules. Operation is subject to the following
two conditions: (1) This device may not cause harmful interference, and (2) this device
must accept any interference received, including interference that may cause undesired
operation.
CAUTION STATEMENT:
FCC Radiation Exposure Statement
This equipment complies with FCC radiation exposure limits set forth for an uncontrolled
environment. This equipment should be installed and operated with a minimum distance
of 20 cm (8 in) between the radiator and your body. This transmitter must not be
co-located or operating in conjunction with any other antenna or transmitter.
In order to maintain compliance with the limits for a Class B digital device, it requires that
you use a quality interface cable when connecting to this device. Changes or
modifications not expressly approved could void the user’s authority to operate this
equipment.

Compliances
ii

iii
Table of Contents
Introduction 1
Package Contents 1
Confirm That You Meet Installation Requirements 1
Hardware Setup 2
Indicator LEDs 2
Connecting Devices 2
Configuring Wireless Connections 3
Configuring Your Computer 4
Configuring Your Computer with Windows 95/98/Me 4
Step 1. Configure TCP/IP Settings 4
Step 2. Disable HTTP Proxy 5
Internet Explorer 5
Netscape 5
Step 3. Obtain IP Settings from Your Gateway 5
Configuring Your Computer with Windows 2000 6
Step 1. Configure TCP/IP Settings 6
Step 2. Disable HTTP Proxy 7
Internet Explorer 7
Netscape 7
Step 3. Obtain IP Settings from Your Gateway 7
Configuring Your Computer with Windows NT 4.0 8
Step 1. Configure TCP/IP Settings 8
Step 2. Disable HTTP Proxy 9
Internet Explorer 9
Netscape 9
Step 3. Obtain IP Settings from Your Gateway 9
Configuring Your Macintosh Computer 10
Step 1. Configure TCP/IP Settings 10
Step 2. Disable HTTP Proxy 11
Internet Explorer 11
Netscape 11
Step 3. Obtain IP Settings from Your Gateway 11
Configuring Your Gateway 12
Configuring LAN 13
Configuring Internet/WAN 14
Configuring Wireless 16
Configuring Firewall 17
Configuring Utilities 18


1
Introduction
Congratulations on your purchase of the Belkin Wireless Gateway.
This Wireless Gateway, F5D6231-4, is a broadband router designed to share
Internet access, provide security, and to network multiple devices with and without
wires. This gateway’s simple installation setup can be used by the least experienced
of users, while providing networking professionals with easy to configure advanced
features. Please read the User Guide for advanced features of this product.
Thank you for purchasing a Belkin product. We know you will enjoy the many
features of the Belkin’s F5D6231-4 Wireless Gateway.
Package Contents
•One F5D6231-4 Wireless Gateway
•One Power Adapter (9 V, 1000 mA)
•This Quick Installation Guide
•One Installation CD
•One Category 5 Fast Ethernet Cable
Confirm That You Meet Installation Requirements
Before proceeding with the installation of your F5D6231-4 Wireless Gateway, please
be sure you have the following:
• A computer with an Ethernet network card installed
• Your Windows CD, if your computer is running Windows 95, 98, NT, Me or 2000
• An Internet connection through a cable or DSL modem, or an external dial-up or
ISDN modem
• An additional Ethernet network cable
• A Web browser such as Internet Explorer or Netscape
I
NSTALLATION
G
UIDE
2
Hardware Setup
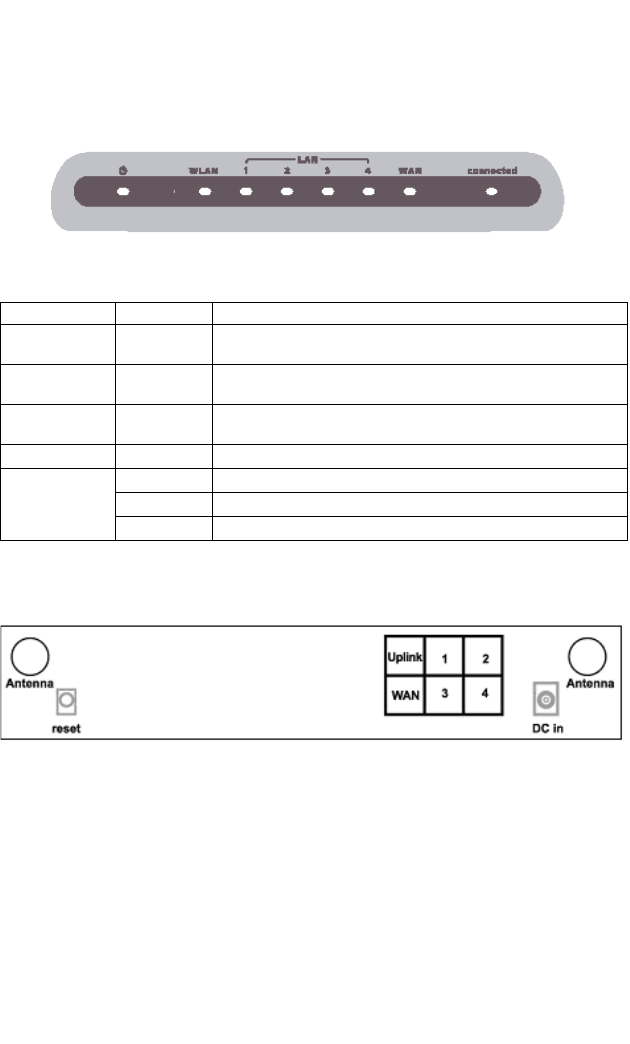
Indicator LEDs
Front Panel
The front panel of the F5D6231-4 Wireless Gateway provides indicator LEDs for
easy monitoring. The following table defines the function of each LED.
Connecting Devices
Rear Panel
1. Connecting Computers with Wires: Connect computers directly to the
Gateway on ports 1-4 on the rear panel. If you have more than 4 computers to
plug in, connect a hub or a switch to one of these ports and connect additional
computers to that device.
2. Connecting Wireless Computers: Simply make sure your wireless computers
are within range of the Gateway.
3. Connecting a Cable Modem or DSL Modem: Connect your Cable or DSL
modem to the WAN port on the rear panel.
4. Power: Plug the power adapter into the power jack (9 V/1000 mA).
LED Condition Status
Ready
(Power)
On Green Gateway is receiving power.
Connected
(Internet Status)
On Green Gateway stays on internet connection.
WLAN
(Wireless AP)
On Green The WAN port has established a valid wireless connection.
WAN On Green The WAN port has established a valid network connection.
LAN
On Green The indicated LAN port has connected at speed of 10 Mbps.
On Amber The indicated LAN port has connected at speed of 100 Mbps.
Blinking The indicated LAN port is transmitting or receiving traffic.

H
ARDWARE
S
ETUP
3
5. Reset Button: The Reset Button is designed and positioned at rear panel for
rebooting and resetting system configuration to its default parameters. It acts
as:
• Reboot: by pushing 2 seconds
• Back to factory default settings: by pushing 5 seconds
Configuring Wireless Connections
Make sure each wireless network adapter is properly installed along with all
associated drivers and utilities. (Please see your wireless adapter’s documentation
for complete setup information.) You may need to change certain settings for your
wireless network card to communicate with the Gateway. Use the following values
where they apply:
Network Type: Infrastructure
SSID: Default (WLAN)
Channel: 11 for North America; 13 for European (ETSI); 2 for Spain; 3 for
France; 14 for Japan
WEP Security: Disable
Note: We recommend establishing your wired connections to the Gateway before
setting up your wireless connections.

I
NSTALLATION
G
UIDE
4
Configuring Your Computer
This Installation Guide provides configuration instructions for Windows 95, 98, Me,
NT4.0 and 2000, as well as for Mac OS 7.x or later. Please be sure that you are
following the proper instruction set for your operating system.
• Configuring Your Computer with Windows 95/98/Me begins on this page.
• Configuring Your Computer with Windows 2000 begins on page 6.
• Configuring Your Computer with Windows NT 4.0 begins on page 8.
• Configuring Your Macintosh Computer begins on page 10.
Configuring Your Computer with Windows 95/98/Me
You may find that the instructions here do not exactly match your version of
Windows. This is because these steps were created from Windows 98. Windows 95
and Windows Millennium Edition are very similar, but not identical, to Windows 98.
Step 1. Configure TCP/IP Settings
After you have completed the hardware setup by connecting your devices, configure
your computer to connect to your F5D6231-4 Gateway. Many ISPs issue these
numbers automatically using a networking technology known as Dynamic Host
Configuration Protocol, or DHCP. Other ISPs will specify your IP address and
associated numbers, which you must enter manually. This is also known as a static
IP address. How your ISP assigns your IP address determines how you will
configure your computer.
Here is what to do:
1. From the Windows desktop, click the “Start” button. Choose “Settings,” then
click “Control Panel.”
2. From “Control Panel” Double-click the “Network” icon.
3. In the “Network” window, under the “Configuration” tab, double-click the “TCP/
IP” component that is listed with your network card.
4. Select the “IP Address” tab. If “Obtain an IP address automatically” is already
selected, your computer is already configured for DHCP. Click “Cancel” to close
each window, and skip to Step 2 “Disable HTTP Proxy.”
5. Locate your IP address and Subnet Mask. Record them in the spaces below.
TCP/IP Configuration Setting
IP Address ____.____.____.____
Subnet Mask ____.____.____.____
Primary DNS Server ____.____.____.____
Secondary DNS Server ____.____.____.____
Default Gateway ____.____.____.____
Host Name

C
ONFIGURING
Y
OUR
C
OMPUTER
5
6. Click the “Gateway” tab and record the numbers listed under “Installed
gateways.”
7. Click the “DNS Configuration” tab. Locate the DNS servers listed under “DNS
Server Search Order.” Record any listed addresses.
8. After writing down your settings, check to make sure you have recorded them
correctly. Click the “IP Address” tab and then click “Obtain an IP address
automatically.” After then, click “OK.”
9. Windows may need your Windows 95/98/Me CD to copy some files. After it
finishes copying, it will then prompt you to restart your system. Click “Yes” and
your computer will shut down and restart.
Step 2. Disable HTTP Proxy
You will need to verify that the “HTTP Proxy” feature of your Web browser is
disabled. This is so that your Web browser will be able to view the configuration
pages inside your Gateway. The following steps are for Internet Explorer and for
Netscape. Determine which browser you use and follow the appropriate steps.
Internet Explorer
1. Open Internet Explorer and click the “Stop” button. Click “Tools,” then select
“Internet Options.”
2. In the “Internet Options” window click the “Connections” tab. Next, click the
“LAN Settings...” button.
3. Clear all the checkboxes.
4. Click “OK,” and then click “OK” again to close the “Internet Options” window.
Netscape
1. Open Netscape and click the stop button. Click “Edit,” then click
“Preferences...”
2. In the “Preferences” window, under “Category” click “Advanced,” then click
“Proxies.” Select “Direct connection to the Internet.” Then, click “OK.”
3. Repeat these steps for each Windows 95/98/Me computer connected to your
F5D6231-4 Wireless Gateway.
Step 3. Obtain IP Settings from Your Gateway
Now that you have configured your computer to connect to your F5D6231-4
Wireless Gateway, it needs to obtain new network settings. By releasing any old IP
settings and renewing them with settings from your F5D6231-4 Wireless Gateway,
you will also verify that you have configured your computer correctly.

I
NSTALLATION
G
UIDE
6
1. Click “Start,” then “Run...”
2. Type “WINIPCFG” and click “OK.” It may take a minute or two for the “IP
Configuration” window to appear.
3. From the drop-down menu, select your network card. Click “Release” and then
“Renew.” Verify that your IP address is now 192.168.2.xxx (2~255), your
Subnet Mask is 255.255.255.0, and your Default Gateway is 192.168. 2.1.
These values confirm that your F5D6231-4 Wireless Gateway is
functioning.
4. Click “OK” to close the “IP Configuration” window.
Now that your computer is configured to connect to your F5D6231-4 Wireless
Gateway, please skip to “Configuring Your Gateway” on page 12.
Configuring Your Computer with Windows 2000
Step 1. Configure TCP/IP Settings
After you have completed the hardware setup by connecting your devices, configure
your computer to connect to your F5D6231-4 Wireless Gateway. Many ISPs issue
these numbers automatically using a networking technology known as Dynamic
Host Configuration Protocol, or DHCP. Other ISPs will specify your IP address and
associated numbers, which you must enter manually. This is also known as a static
IP address. How your ISP assigns your IP address determines how you will
configure your computer.
Here is what to do:
1. From the Windows desktop, click the “Start” button. Choose “Settings,” then
click “Control Panel.”
2. Double-click the “Network & Dial-Up Connections” icon.
3. Double-click the icon that corresponds to the connection to your F5D6231-4
Wireless Gateway.
4. Click “Properties.” After then, double-click “Internet Protocol (TCP/IP).”
5. All information you need to record is on the “Internet Protocol (TCP/IP)
Properties” dialog box. Use the spaces below to record the information.
TCP/IP Configuration Setting
IP Address ____.____.____.____
Subnet Mask ____.____.____.____
Primary DNS Server ____.____.____.____
Secondary DNS Server ____.____.____.____
Default Gateway ____.____.____.____
Host Name

C
ONFIGURING
Y
OUR
C
OMPUTER
7
If “Obtain an IP address automatically” and “Obtain DNS server address
automatically” are already selected, your computer is already configured for DHCP.
Click “Cancel” to close each window, and skip to Step 2 “Disable HTTP Proxy.”
6. Select “Obtain an IP address automatically” and then select “Obtain DNS
server address automatically.” Click “OK.”
7. Click “OK” or “Close” to close each window.
Step 2. Disable HTTP Proxy
You will need to verify that the “HTTP Proxy” feature of your Web browser is
disabled. This is so that your Web browser will be able to view the configuration
pages inside your F5D6231-4 Wireless Gateway. The following steps are for Internet
Explorer and for Netscape. Determine which browser you use and follow the
appropriate steps.
Internet Explorer
1. Open Internet Explorer and click the stop button. Click “Tools,” then “Internet
Options.”
2. In the “Internet Options” window click the “Connections” tab. Next, click the
“LAN Settings...” button.
3. Clear all the checkboxes.
4. Click “OK,” and then click “OK” again to close the “Internet Options” window.
Netscape
1. Open Netscape and click the stop button. Click “Edit,” then click
“Preferences...”
2. In the “Preferences” window, under “Category” double-click “Advanced,” then
click “Proxies.” Select “Direct connection to the Internet.” Then, click “OK.”
Step 3. Obtain IP Settings from Your Gateway
Now that you have configured your computer to connect to your F5D6231-4
Wireless Gateway, it needs to obtain new network settings. By releasing any old IP
settings and renewing them with settings from your F5D6231-4 Wireless Gateway,
you will also verify that you have configured your computer correctly.
1. From the Windows desktop, click the “Start” button, then “Programs,” then
“Accessories,” and then click “Command Prompt.”
2. In the “Command Prompt” window, type “IPCONFIG /RELEASE” and press the
<ENTER> key.

I
NSTALLATION
G
UIDE
8
3. Type “IPCONFIG/RENEW” and press the <ENTER> key. Verify that your IP
address is now 192.168.2.xxx (2~255), your Subnet Mask is 255.255.255.0
and your Default Gateway is 192.168.2.1. These values confirm that your
F5D6231-4 Wireless Gateway is functioning.
4. Type “EXIT” and press <ENTER> to close the “Command Prompt” window.
Now that your computer is configured to connect to your F5D6231-4 Wireless
Gateway, please skip to “Configuring Your Gateway” on page 12.
Configuring Your Computer with Windows NT 4.0
Step 1. Configure TCP/IP Settings
After you have completed the hardware setup by connecting your devices, configure
your computer to connect to your F5D6231-4 Wireless Gateway. Many ISPs issue
these numbers automatically using a networking technology known as Dynamic
Host Configuration Protocol, or DHCP. Other ISPs will specify your IP address and
associated numbers, which you must enter manually. This is also known as a static
IP address. How your ISP assigns your IP address determines how you will
configure your computer.
Here is what to do:
1. From the Windows desktop click “Start,” then “Settings,” and click “Control
Panel.”
2. Double-click the “Network” icon, then select the “Protocols” tab.
3. Double-click “TCP/IP Protocol,” then select the “IP Address” tab.
4. In the “Adapter” drop-down list, be sure your Ethernet adapter is selected. If
“Obtain an IP address automatically” is already selected, your computer is
already configured for DHCP. Click “Cancel,” and skip to Step 2 “Disable HTTP
Proxy.”
5. In the “TCP/IP Properties” dialog box, click the “IP address” tab to locate your
IP address, subnet Mask, and default gateway. Record these values in the
spaces provided below.
6. Click the “DNS” tab to see the primary and secondary DNS servers. Record
these values in the appropriate spaces below.
TCP/IP Configuration Setting
IP Address ____.____.____.____
Subnet Mask ____.____.____.____
Primary DNS Server ____.____.____.____
Secondary DNS Server ____.____.____.____
Default Gateway ____.____.____.____
Host Name

C
ONFIGURING
Y
OUR
C
OMPUTER
9
7. After writing down your IP settings, click the “IP address” tab. Select “Obtain IP
address automatically” and click “OK.”
8. Click “OK” again to close the “Network” window.
9. Windows may copy some files, and will then prompt you to restart your system.
Click “Yes” and your computer will shut down and restart.
Step 2. Disable HTTP Proxy
You will need to verify that the “HTTP Proxy” feature of your Web browser is
disabled. This is so that your Web browser will be able to view the configuration
pages inside your F5D6231-4 Wireless Gateway. The following steps are for Internet
Explorer and for Netscape. Determine which browser you use and follow the
appropriate steps.
Internet Explorer
1. Open Internet Explorer and click the stop button. Click “Tools,” then “Internet
Options.”
2. In the “Internet Options” window click the “Connections” tab. Next, click the
“LAN Settings...” button.
3. Clear all the checkboxes.
4. Click “OK,” and then click “OK” again to close the “Internet Options” window.
Netscape
1. Open Netscape and click the stop button. Click “Edit,” then click
“Preferences...”
2. In the “Preferences” window, under “Category” double-click “Advanced,” then
click “Proxies.” Select “Direct connection to the Internet.” Click “OK.”
Step 3. Obtain IP Settings from Your Gateway
Now that you have configured your computer to connect to your F5D6231-4
Wireless Gateway, it needs to obtain new network settings. By releasing any old IP
settings and renewing them with settings from your F5D6231-4 Wireless Gateway,
you will also verify that you have configured your computer correctly.
1. From the Windows desktop, click the “Start” button, then “Programs.” After
then, select “Command Prompt.”
2. In the “Command Prompt” window, type “IPCONFIG/RELEASE” and press the
<ENTER> key.

I
NSTALLATION
G
UIDE
10
3. Type “IPCONFIG /RENEW” and press the <ENTER> key. Verify that your IP
address is now 192.168.2.xxx (2~255), your Subnet Mask is 255.255.255.0,
and your Default Gateway is 192.168.2.1. These values confirm that your
F5D6231-4 Wireless Gateway is functioning.
4. Type “EXIT” and press <ENTER> to close the “Command Prompt” window.
Now that your computer is configured to connect to your F5D6231-4 Wireless
Gateway, please continue to “Configuring Your Gateway” on page 12.
Configuring Your Macintosh Computer
You may find that the instructions here may not exactly match your screen. This is
because these steps was created using Mac OS 8.5. Mac OS 7.x and above are all
very similar, but may not be identical to Mac OS 8.5.
Step 1. Configure TCP/IP Settings
After you have completed the hardware setup by connecting your devices, configure
your computer to connect to your F5D6231-4 Wireless Gateway. Many ISPs issue
these numbers automatically using a networking technology known as Dynamic
Host Configuration Protocol, or DHCP. Other ISPs will specify your IP address and
associated numbers, which you must enter manually. This is also known as a static
IP address. How your ISP assigns your IP address determines how you will
configure your computer.
Here is what to do:
1. Pull down the Apple Menu. Click “Control Panels” and select “TCP/IP.”
2. In the TCP/IP dialog box, make sure that “Ethernet” is selected in the “Connect
via:” field.
If “Using DHCP Server” is already selected in the “Configure” field, your
computer is already configured for DHCP. Close the TCP/IP dialog box, and
skip to Step 2 “Disable HTTP Proxy.”
3. All the information you need to record is in the “TCP/IP” dialog box. Use the
space below to record the information.
4. After writing down your IP settings, select “Using DHCP Server” in the
“Configure” field and close the window.
TCP/IP Configuration Setting
IP Address ____.____.____.____
Subnet Mask ____.____.____.____
Primary DNS Server ____.____.____.____
Secondary DNS Server ____.____.____.____
Default Gateway ____.____.____.____
Host Name

C
ONFIGURING
Y
OUR
C
OMPUTER
11
5. Another box will appear asking whether you want to save your TCP/IP settings.
Click “Save.”
Step 2. Disable HTTP Proxy
You will need to verify that the “HTTP Proxy” feature of your Web browser is
disabled. This is so that your Web browser will be able to view the configuration
pages inside your F5D6231-4 Wireless Gateway. The following steps are for Internet
Explorer and for Netscape. Determine which browser you use and follow the
appropriate steps.
Internet Explorer
1. Open Internet Explorer and click the stop button. Click “Edit” and select
“Preferences.”
2. In the Internet Explorer Preferences window, under “Network,” select “Proxies.”
3. Uncheck all checkboxes and click “OK.”
Netscape
1. Open Netscape and click the stop button. Click “Edit” and select “Preferences.”
2. In the “Preferences” dialog box, in the left-hand column labeled “Category,”
select “Advanced.” Under the “Advanced” category, select “Proxies.”
3. Select “Direct Connection to the Internet” and click “OK.”
Step 3. Obtain IP Settings from Your Gateway
Now that you have configured your computer to connect to your F5D6231-4
Wireless Gateway, it needs to obtain new network settings. By releasing any old IP
settings and renewing them with settings from your F5D6231-4 Wireless Gateway,
you will also verify that you have configured your computer correctly.
1. Pull down the Apple Menu. Click “Control Panels” and select “TCP/IP.”
2. In the TCP/IP window, your new settings will be shown. Verify that your IP
address is now 192.168.2.xxx (2~255), your Subnet Mask is 255.255.255.0
and your Default Gateway is 192.168.2.1. These values confirm that your
F5D6231-4 Wireless Gateway is functioning.
3. Close the TCP/IP window.
Now that your computer is configured to connect to your F5D6231-4 Wireless
Gateway, please skip to “Configuring Your Gateway” on the next page.

I
NSTALLATION
G
UIDE
12
Configuring Your Gateway
Now that you have successfully configured your computer and retrieved your new
network settings from your F5D6231-4 Wireless Gateway, you are ready to
configure the Gateway’s settings for your LAN.
1. Open your Web browser (i.e. Internet Explorer or Netscape Navigator) and click
the stop button.
2. In the “Address” field type “http://192.168.2.1” or “http://192.168.2.1:88” and
press <ENTER> on your keyboard.
3. On the main page of the Gateway Web console, you will see the Gateway
status information as below. There is no password by default. For security
reasons, you should assign a password as soon as possible (refer to page 19
for password setting).
Notes: 1. That the password login is case sensitive.
2. For detail setting, please refer to online Help function.
C
ONFIGURING
Y
OUR
G
ATEWAY
13
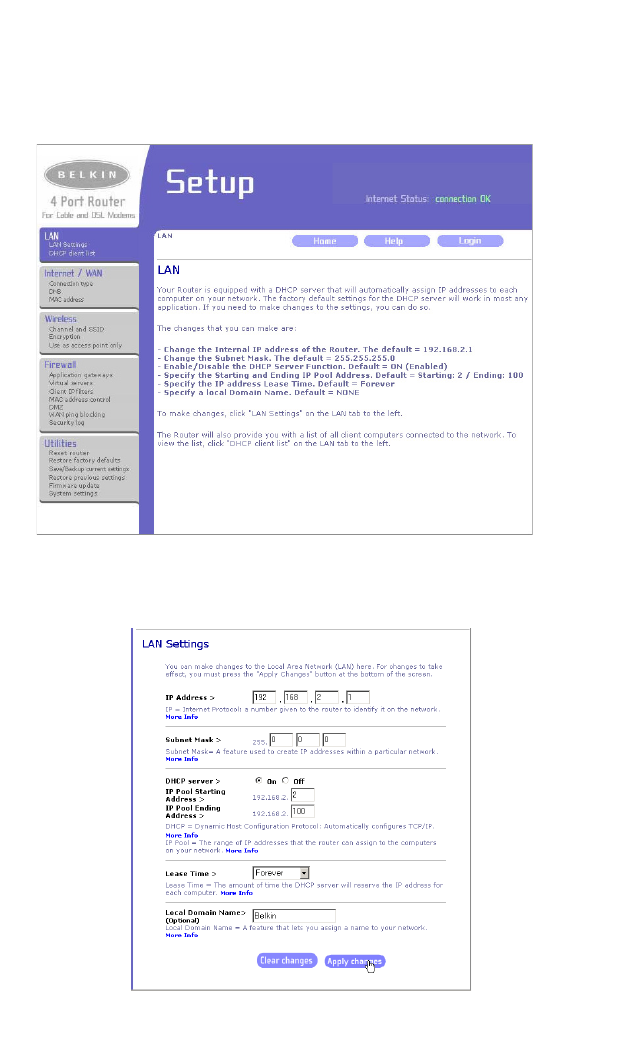
Configuring LAN
1. The F5D6231-4 is equipped with a DHCP server, which means that will
automatically assign IP addresses to each computer on your network, and it will
work properly in most applications.
2. Enter the IP address, subnet mask, and gateway provided to you by your ISP in
the appropriate fields. You recorded these numbers earlier when you
configured your computer to connect to the Gateway.
3. If you have any difficulty for LAN setting, please refer to online “Help” function.

I
NSTALLATION
G
UIDE
14
Configuring Internet/WAN
The Router is capable of connecting to virtually any Internet Service Provider's
system provided that you have correctly configured the Router's settings for
your ISP's connection type. To configure the Router to connect to your ISP, click
on "Connection type" on the Internet/WAN Tab on the left of the screen.
For specific settings, select your connection type, then click “Next“ to proceed.
C
ONFIGURING
Y
OUR
G
ATEWAY
15
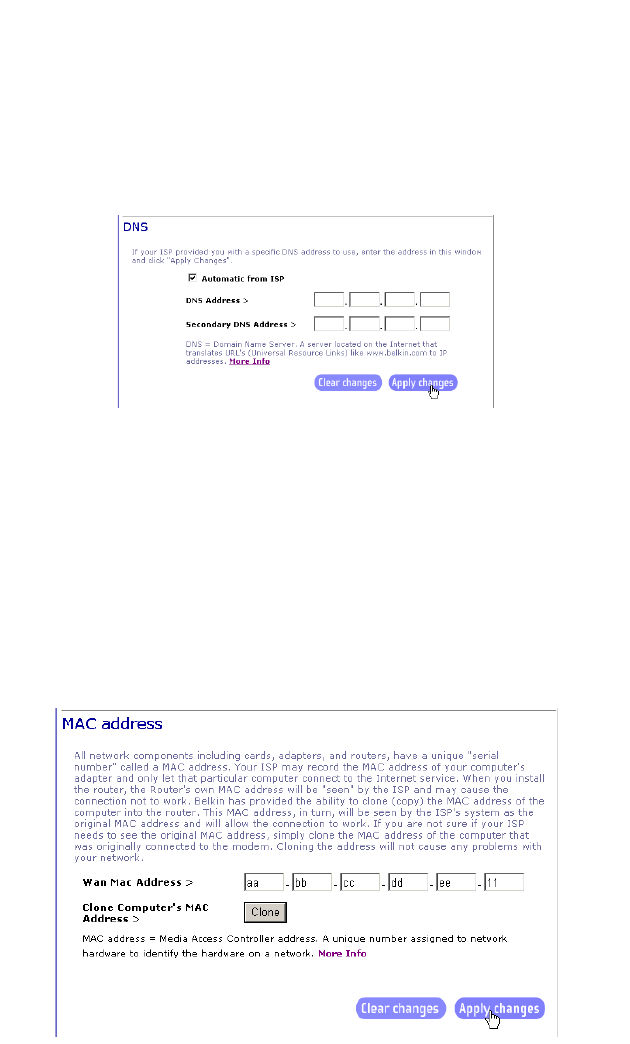
A Domain Name Server (DNS) is like an index of IP addresses and Web
addresses. If you type a Web address into your browser, such as
www.belkin.com, a DNS server will find that name in its index and find the
matching IP address. Most ISPs provide a DNS server for speed and
convenience. Since you are connecting to the Internet with dynamic IP settings,
it is likely that your DNS servers are also provided dynamically.
If you are connecting to the Internet with a dynamic IP address, you probably
do not need to enter anything here.
Some ISPs register the MAC Address of your network card. A MAC (Media
Access Control) Address is a unique identification number (in hexadecimal
digits) given to each networking device. Once your MAC address is registered,
the ISP’s server will verify that the MAC address you are connecting with
matches the one that’s registered. If it does not match, you cannot connect. The
F5D6231-4 Wireless Gateway’s MAC Address will not be the same as your
network card’s address—and therefore will not be the same as the address that
your ISP has registered—so you may need the Gateway to “Clone” the address
from your network card. Then the ISP will find a MAC Address that matches the
one they have recorded.
Your ISP may have assigned you a host name. If so, enter it in the Host Name
Field. Otherwise, enter your Adapter Address in the Mac Address Field. Click
“Clone” button.
I
NSTALLATION
G
UIDE
16
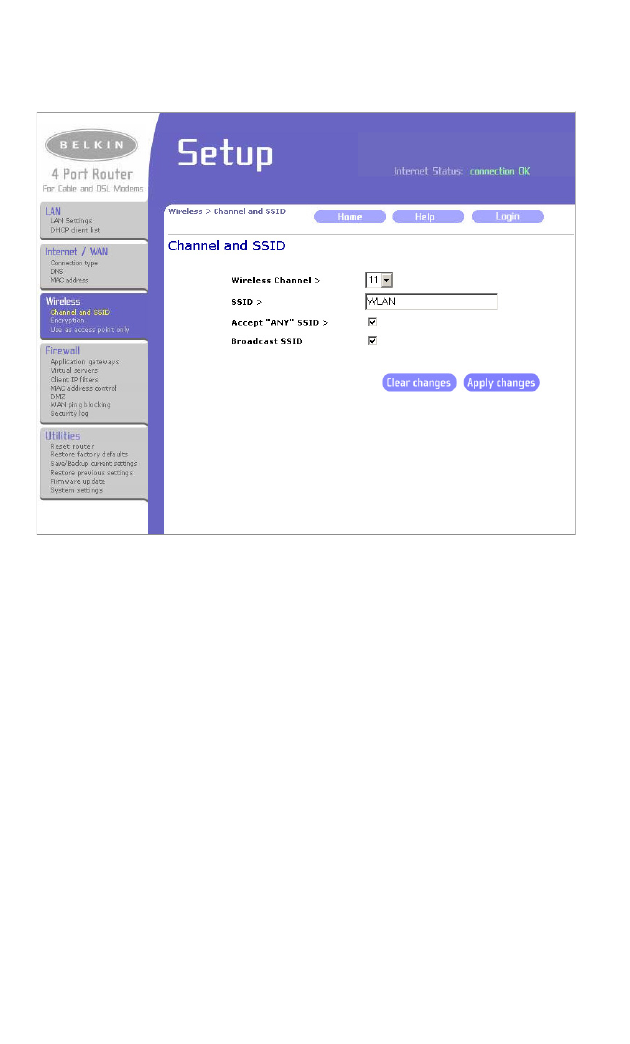
Configuring Wireless
You may need to change certain settings for your wireless network card to
communicate with the Gateway.
SSID: default (WLAN)
Channel: 11 for North America; 13 for European (ETSI); 2 for Spain; 3 for
France; 14 for Japan
Note: We recommend establishing your wired connections to the Gateway before
setting up your wireless connections.
C
ONFIGURING
Y
OUR
G
ATEWAY
17
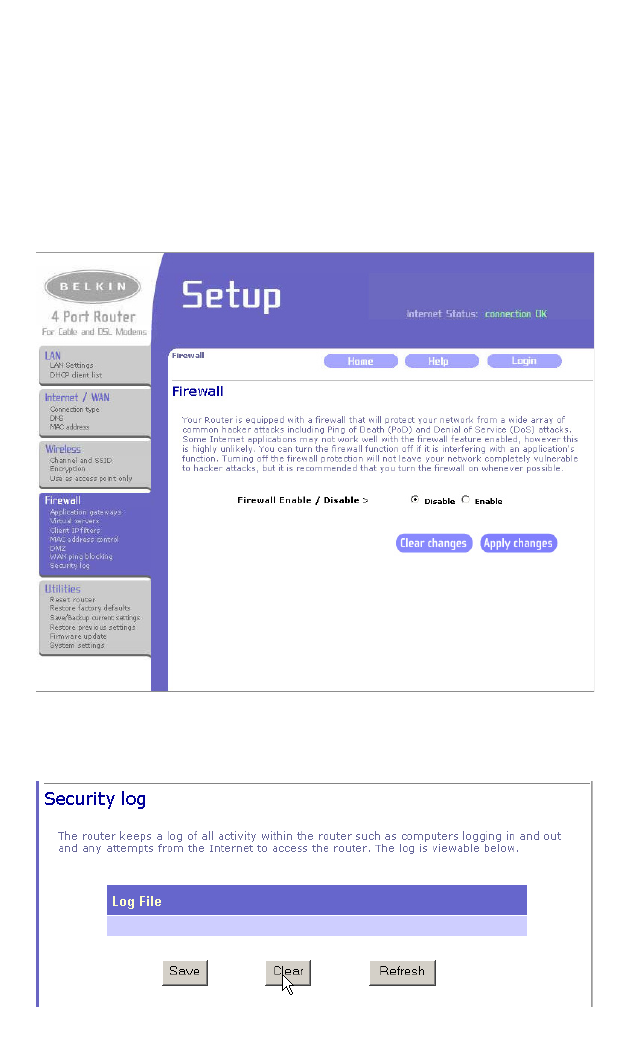
Configuring Firewall
The F5D6231-4 is equipped with a firewall that will protect your network from a
wide array of common hacker attacks including Ping of Death (PoD) and Denial
of Service (DoS) attacks. Some Internet applications may not work well with the
firewall feature enabled, however, this is highly unlikely.
You can turn the firewall function off if it is interfering with an application's
function. Turning off the firewall protection will not leave your network
completely vulnerable to hacker attacks, but it is recommended that you turn
the firewall on whenever possible.
This Gateway Router keeps a log of all activity within the router such as
computers logging in and out and any attempts from the Internet to access the
router.

I
NSTALLATION
G
UIDE
18
Configuring Utilities
The F5D6231-4 lets you manage functions such as assign a password, setting
the time zone, save and backup your configuration, and update firmware.
Before making any change, please read the direction carefully.
1. Click the “Reset Router” button to reset the configuration.
Note: It may be necessary to Reset or Reboot the router if it begins working improperly.
2. To restore the factory default settings, click the "Restore Defaults" button.
Note: Before you restore all of the defaults, recommended you backup your
present settings.
C
ONFIGURING
Y
OUR
G
ATEWAY
19
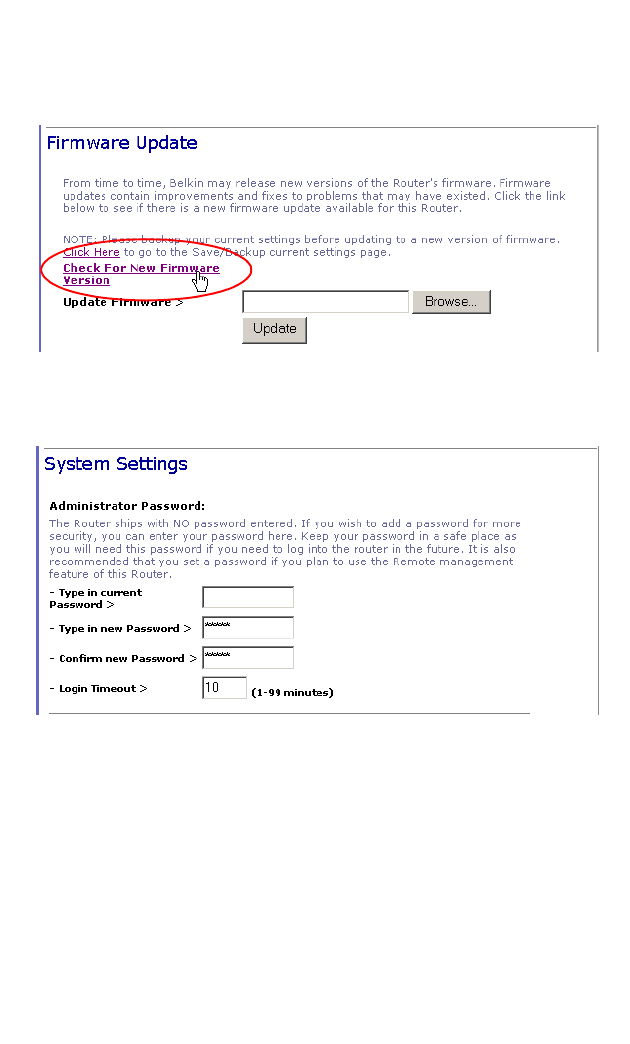
3. Mostly, Belkin may release new versions of the Router's firmware time to time.
Firmware updates contain improvements and fixes to problems that may have
existed. Click the link below to see if there is a new firmware update available
online for this Router.
4. The F5D6231-4 enters with NO password. For more security, you should add a
password here. As you will need this password if you need to log into the router
in the future, therefore, keep your password in a safe place.
Note: It is recommended that you set a password here if you plan to use the Remote
management feature.
Congratulations! Configuration is complete and your F5D6231-4 Wireless
Gateway is now connected to the Internet. There are also some advanced
configuration options that may be configured, but we do not recommend
making any changes to these options unless you need to.

I
NSTALLATION
G
UIDE
20
Common Configurations for Popular ISPs
WAN Types Characteristics Popular ISPs
Dynamic IP
(Clone MAC)
Cable modem ISP, non-hostname based.
Need to clone MAC in the DHCP page of
router.
MediaOne, RoadRunner, Optimum Online,
Time Warner, Charter and Adelphia
Dynamic IP
(Hostname)
Cable ISP, Requires Hostname to
authenticate ie. cx213818-B. Need to enter
the hostname in the DHCP page of the router,
exactly as it appears in your documentation.
@Home Network, Cogoco, ComCast, Cox,
Excite, Rogers, Shaw, Insight, Videotron,
SCV MaxOnline
PPPoE
(DSL)
Usually special software installed on PC,
MacPOET/WinPOET, EnterNet 300.
F5D6231-4 has this software built in and you
can remove it from your PC. You will need to
enter the account name and password that
your ISP provided to you in the PPPoE page
of the router. Leave the service name blank
unless your ISP requires it.
Bell*, Century Tel, Citizens, Primus, Prodigy,
Snet, Sprint FC, Verizon, First World,
Brightnet, Earthlink, Ameritech, Covad,
Mindspring, Sympatico DSL, USwest,
SingNet Broadband, SingTel Magix, Pacific
Internet Broadband
Static
(DSL)
DSL Modem, always on. Need to enter ALL IP
information from ISP in the “Fixed IP” section
of the router.
CableSpeed, Cnet, Direct Link, Drizzle, DSL
Extreme, Earthlink Wireless, Fast Point,
Flashcom, GTE-WhirlWind, Heavenet, HSA
Corp, I-55, InterAccess, LinkLine, Mission,
Nauticom, NAS, Omitel, Onterra, Phatpipe,
Rhythms, Speakeasy, Sterling, XO, Zyan
Static
(Cable)
Cable Modem, Always on, ISP assigns
specific IP information which needs to be
entered on the “Fixed IP” page of the router.
Cox Cable, Sprint, US Cable, Cable-Cable

21
Specifications
Hardware
Model
F5D6231-4
Ports
4 RJ-45 10BASE-T/100BASE-TX Ethernet Port
1 RJ-45 10/100 Mbps WAN Port
1 Uplink Port
Host Processor
CX84200-11
Flash
Upgradeable memory (1 MByte)
SDRAM
8 MByte memory
Wireless Module
PCMCIA interfaced wireless module with Atmel and RFMD solution
Antenna
2 Fixed external antenna
Temperature
Operating: 0 to 40 °C (32 to 104 °F)
Storage: -25 to 60 °C (-25 to 140 °F)
Humidity
Operating: 15% to 95%
Power
9 V, 1000 mA
Cable
CAT 5 UTP
Standards
IEEE 802.3
IEEE 802.3u
IEEE 802.11b
RFC DHCP
RFC NAT

I
NSTALLATION
G
UIDE
22
Compliances
EMI: CE, FCC Class B
Safety: UL 1950, EN60950
Wireless RF
Radio
IEEE 802.11b
Frequency Band
USA
-
FCC: 2412~2462MHz (Ch1~Ch11), 11 channels
Canada
-
IC: 2412~2462MHz (Ch1~Ch11), 11 channels
Europe
-
ETSI: 2412~2472MHz (Ch1~Ch13), 13 channels
Spain: 2457~2462MHz (Ch10~Ch11), 2 channels
France: 2457~2472MHz (Ch10~Ch13), 3 channels
Japan
-
STD-T66/STD-33:2412~2482MHz (Ch1~Ch14), 14 channels
Operating Channel
IEEE 802.11b
Modulation Type (Data Rate)
BPSK for 1 Mbps
QPSK for 2 Mbps
CCK for 5.5/11 Mbps
Radio Technology
DSSS: Direct Sequence Spread Spectrum
Output Power
>+15 dBm; Typically +17 dBm
Current Consumption
TX 450 mA Max.
RX 320 mA Max.
Receive Sensitivity
-80 dBm for 11 Mbps, 8% @ BER 1E-5
-83 dBm for 5.5 Mbps, 8% @ BER 1E-5
-88 dBm for 2 Mbps, 8% @ BER 1E-5
-90 dBm for 1 Mbps, 8% @ BER 1E-5
F5D6231-4
E112002-R01