Belkin F5D8051C N1 Wireless USB Adapter User Manual F5D8051 v3000 manual revised by JOy
Belkin International, Inc. N1 Wireless USB Adapter F5D8051 v3000 manual revised by JOy
UserManual.wiki
>
Belkin
>
F5D8051C User Manual
User manual
Navigation menu
Upload a User Manual
Namespaces
Wiki Guide
HTML
PDF
Info
Views
User Manual
Discussion / Help
Navigation

![F5D8051-v3000 manual revised by JOy Page 8 of 44 [Insert 8011_installer.tif – to be updated 8/1] Note: If the Belkin Wireless Card Installer screen does not appear within 20 seconds, access your CD-ROM by double-clicking on the “My Computer” icon; then double-click on the CD-ROM drive into which the installation CD has been placed. Double-click on the icon named “Setup.exe”, if the Installer does not start. 1.3 The InstallShield Wizard will now start. Click “Next” to continue.](https://usermanual.wiki/Belkin/F5D8051C/User-Guide-765826-Page-8.png)
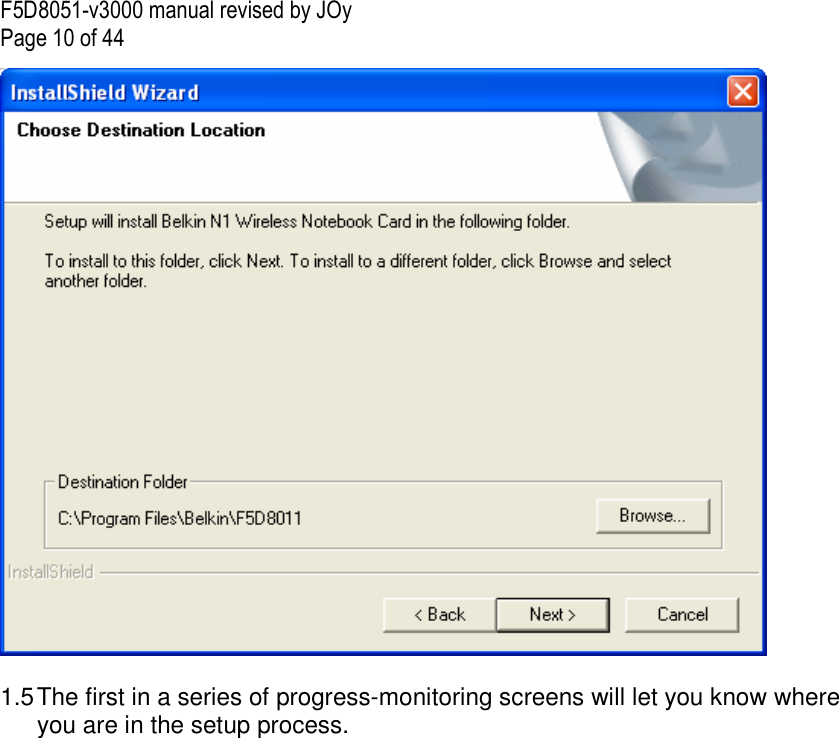
![F5D8051-v3000 manual revised by JOy Page 9 of 44 [insert 8011_Install_1.tif – to be updated 8/1] 1.4 Select a different destination folder for the software installation, or simply click “Next”. [insert 8011_Install_2.tif – to be updated 8/1]](https://usermanual.wiki/Belkin/F5D8051C/User-Guide-765826-Page-9.png)
![F5D8051-v3000 manual revised by JOy Page 11 of 44 [insert 8011_Install_3.tif] 1.6 You might see a screen similar to this one. This DOES NOT mean there is a problem. Our software has been fully tested and is compatible with this operating system. Select “Continue Anyway” and follow the on-screen instructions. [insert 8011_install_4_WHQL_Warning.tif -- use the same screenshot]](https://usermanual.wiki/Belkin/F5D8051C/User-Guide-765826-Page-11.png)
![F5D8051-v3000 manual revised by JOy Page 12 of 44 2. Insert Insert the Adapter into your Computer (Please insert image of Adapter insert into laptop) 2.1 After the software installation is finished, the message “Please plug in your USB Adapter now” will appear. Insert your Adapter. [insert 8011_install_5_Insert_Card.tif] – to be updated 8/1 [Note Mal & Designer – screenshot to read “USB Adapter”]](https://usermanual.wiki/Belkin/F5D8051C/User-Guide-765826-Page-12.png)
![F5D8051-v3000 manual revised by JOy Page 13 of 44 2.2 The Found New Hardware Wizard might appear. (This may take 3–15 seconds.) If it does, continue with the following instruction. Select “Yes, this time only” and click “Next” to install the hardware. If the Found New Hardware Wizard does not appear, skip to step 2.7. [insert 8011_install_6_New_HW.tif – to be updated 8/1] 2.3 Select “Install the software automatically” and click “Next” to install the hardware. [insert 8011_install_6_New_HW_Auto.tif – to be updated 8/1]](https://usermanual.wiki/Belkin/F5D8051C/User-Guide-765826-Page-13.png)
![F5D8051-v3000 manual revised by JOy Page 14 of 44 2.4 The Wizard will now install your software. [insert 8011_install_7_New_HW_Install.tif – to be updated 8/1]](https://usermanual.wiki/Belkin/F5D8051C/User-Guide-765826-Page-14.png)
![F5D8051-v3000 manual revised by JOy Page 15 of 44 2.5 You might see a screen similar to this one. This DOES NOT mean there is a problem. Our software has been fully tested and is compatible with this operating system. Select “Continue Anyway” and follow the on-screen instructions. [insert 8011_install_4_WHQL_Warning.tif – use same screen shot]](https://usermanual.wiki/Belkin/F5D8051C/User-Guide-765826-Page-15.png)
![F5D8051-v3000 manual revised by JOy Page 16 of 44 2.6 The installation is now complete. Click “Finish” to exit. [Insert 8011_install_10_New_HW_Done.tif – to be updated 8/1]](https://usermanual.wiki/Belkin/F5D8051C/User-Guide-765826-Page-16.png)
![F5D8051-v3000 manual revised by JOy Page 17 of 44 2.7 Your computer must reboot for the changes to take effect. Close all other applications and save your data. Then, click “OK” to reboot. [insert screen shot – to be updated 8/1] 3. Configure Use the Belkin Wireless Networking Utility 3.1 After restarting your computer, double-click the Belkin Wireless Networking Utility icon on the desktop screen. [KEEP THE ICON] 3.2 The Belkin Wireless Networking Utility screen will appear. [insert 8011_WNU_Current_Status.tif – use the same screenshot] 3.3 Select a network to connect to from the “Available Networks” list and click “Connect”.](https://usermanual.wiki/Belkin/F5D8051C/User-Guide-765826-Page-17.png)
![F5D8051-v3000 manual revised by JOy Page 18 of 44 [insert 8011_WNU_Current_Status_Connect.tif– use the same screenshot] Note: In order to see your available networks, you must be near a working wireless router or access point. 3.4 The Belkin Wireless Networking Utility icon can also be found on the system tray. [KEEP] Note: Double-clicking on the Belkin Wireless Networking Utility icon on the system tray will bring up the “Utility” screen. Installation is now complete. Using the Belkin Wireless Networking Utility After successfully installing the Belkin Wireless Networking Utility (WNU), configurations for wireless connection and security are just a few easy clicks away.](https://usermanual.wiki/Belkin/F5D8051C/User-Guide-765826-Page-18.png)
![F5D8051-v3000 manual revised by JOy Page 19 of 44 Accessing the Belkin Wireless Networking Utility from the Windows System Tray To access the WNU, simply place your mouse pointer and right-click over the WNU icon on the Windows task tray. [KEEP] [KEEP] If the icon is not present, click on “Start > Programs > Belkin > N1 Wireless USB Network Adapter > Belkin Wireless Networking Utility”. [insert 8011_WNU_Current_Status_Connected.tif] – use the same screenshot The WNU’s default screen is the “Current Status” tab. The “Current Status” tab displays the current Network Status and Available Networks. Network Status This window displays the connectivity status of the current network. It even displays connectivity between the computer and router, and router and Internet. In the event of a connectivity problem,](https://usermanual.wiki/Belkin/F5D8051C/User-Guide-765826-Page-19.png)
![F5D8051-v3000 manual revised by JOy Page 20 of 44 this window can be used to determine the problem’s source (e.g. computer, router, or Internet/modem). Available Networks This window displays the available networks at the current location as well as their SSID, Signal Strength, Security Type, Channel, and Network Type. Lost Wireless Connection If the current wireless connection is lost, a window will pop up and the WNU will attempt to reconnect. – use the same screenshot Connection Failure Other options will appear during attempts to reconnect. To stop connecting, click “Stop” and to reattempt connection, click “Retry”. [This screenshot needs update] Network Status and Solution Tips To further understand the current Network Status, click “Open Wireless Utility”. The default screen will be the “Current Status” tab and the “Network Status” section determines which connections are good and/or faulty. [insert 8011_WNU_Current_Status_Connected.tif, pls circle the “Info” box and message]](https://usermanual.wiki/Belkin/F5D8051C/User-Guide-765826-Page-20.png)
![F5D8051-v3000 manual revised by JOy Page 21 of 44 The WNU also features a “Solution Tips” section that provides troubleshooting guidelines. Setting Wireless Network Profiles The “My Connections” tab on the WNU allows you to add, edit, and delete connection profiles. It also displays signal strength, security, and network type. [insert 8011_WNU_My_Connections.tif– use the same screenshot]](https://usermanual.wiki/Belkin/F5D8051C/User-Guide-765826-Page-21.png)
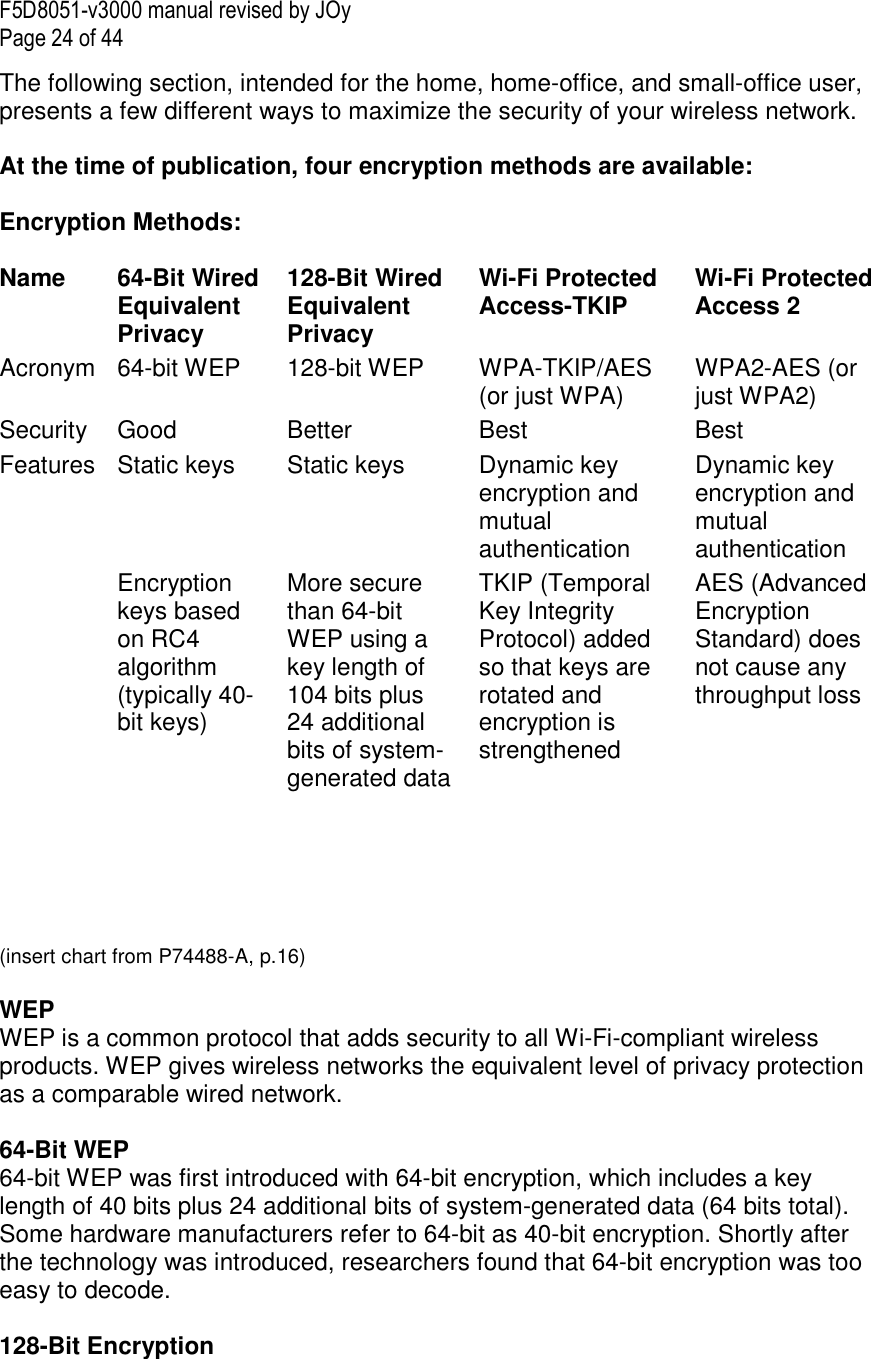
![F5D8051-v3000 manual revised by JOy Page 22 of 44 Securing your Wi-Fi® Network If you choose to connect to a secure network, determine the type of security (WPA or WEP*) and use the appropriate field in the dialog box. [insert 8011_WNU_Connect.tif– use the same screenshot] *Note: Types of security Note: When you select a network using encryption, you will first see the simple security screen. Click the “Advanced” button to see other security options (below).](https://usermanual.wiki/Belkin/F5D8051C/User-Guide-765826-Page-22.png)
![F5D8051-v3000 manual revised by JOy Page 23 of 44 [insert: 8011_WNU_Connect_Adv.tif– use the same screenshot] Wireless Equivalent Privacy (WEP) is a less secure, but more widely adopted wireless security protocol. Depending on the security level (64- or 128-bit), the user will be asked to input a 10- or 26-character hex key. A hex key is a combination of letters, a–f, and numbers, 0–9. Wi-Fi Protected Access (WPA) is the new standard in the wireless security. However, not all wireless cards and adapters support this technology. Please check your wireless adapter’s user manual to check if it supports WPA. Instead of a hex key, WPA uses only passphrases, which are much easier to remember.](https://usermanual.wiki/Belkin/F5D8051C/User-Guide-765826-Page-23.png)

![F5D8051-v3000 manual revised by JOy Page 26 of 44 Setting up your Belkin Wireless Router (or Access Point) to use Security To start using security, you must first enable WEP or WPA for your wireless router (or access point). For Belkin Wireless Routers (or Access Points), these security features can be configured through the web-based interface. See your wireless router’s (or access point’s) manual for directions on how to access the management interface. IMPORTANT: You must now set all wireless network cards/adapters to match these settings. Configuring your Adapter to use Security At this point, you should already have your wireless router (or access point) set to use WPA or WEP. In order for you to gain wireless connection, you must set your N1 Wireless USB Adapter to use the same security settings. Changing the Wireless Security Settings The Belkin N1 Wireless USB Adapter supports the latest WPA security feature as well as the legacy WEP security standard. By default, wireless security is disabled. To enable security, you will first must determine which standard is used by the router (or access point). (See your wireless router’s or access point’s manual for directions on how to access the security settings.) [insert 8011_WNU_My_Connections.tif]](https://usermanual.wiki/Belkin/F5D8051C/User-Guide-765826-Page-26.png)
![F5D8051-v3000 manual revised by JOy Page 27 of 44 – use the same screenshot To access the security settings on your Adapter, click the “My Connections” tab and point to the connection for which you want to change security settings. Click “Edit” to change settings. WEP Setup 64-Bit WEP Encryption 1. Select “WEP” from the “Data Encryption” drop-down menu. 2. After selecting your WEP encryption mode, you can enter your key by typing in the hex key manually. A hex (hexadecimal) key is a combination of numbers and letters from A–F and 0–9. For 64-bit WEP, you must enter 10 hex keys. For instance: AF 0F 4B C3 D4 = 64-bit WEP key [insert UCUI-Connect2aSecureNetwork-Adv.tif] [Add AF0F4BC3D4 to the Encryption key box]](https://usermanual.wiki/Belkin/F5D8051C/User-Guide-765826-Page-27.png)
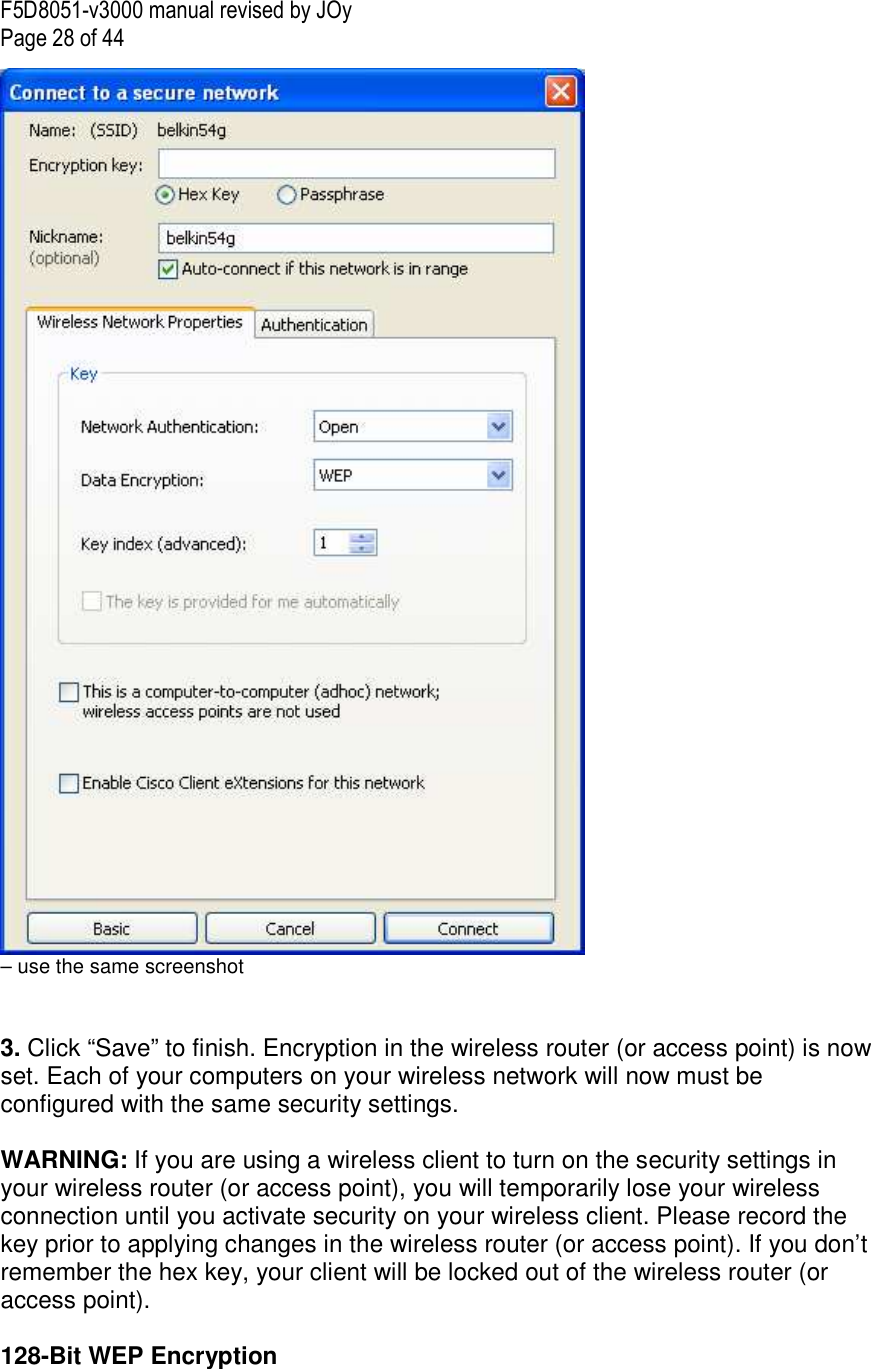
![F5D8051-v3000 manual revised by JOy Page 29 of 44 1. Select “WEP” from the drop-down menu. 2. After selecting your WEP encryption mode, you can enter your key by typing in the hex key manually. A hex (hexadecimal) key is a combination of numbers and letters from A–F and 0–9. For 128-bit WEP, you must enter 26 hex keys. For instance: C3 03 0F AF 0F 4B B2 C3 D4 4B C3 D4 E7 = 128-bit WEP key [insert UCUI-EditInfo-Adv.tif] [Change encryption key to C3 03 0F AF 0F 4B B2 C3 D4 4B C3 D4 E7] – use the same screenshot](https://usermanual.wiki/Belkin/F5D8051C/User-Guide-765826-Page-29.png)
![F5D8051-v3000 manual revised by JOy Page 30 of 44 3. Click “Save” to finish. Encryption in the wireless router (or access point) is now set. You must now configure each of the computers on your wireless network with the same security settings. WARNING: If you are using a wireless client to turn on the security settings in your wireless router (or access point), you will temporarily lose your wireless connection until you activate security on your wireless client. Please record the key prior to applying changes in the wireless router (or access point). If you don’t remember the hex key, your client will be locked out of the wireless router (or access point). WPA-PSK (no server) Choose this setting if your network does not use a radius server. WPA-PSK (no server) is typically used in home and small office networking. 1. From the “Network Authentication” drop-down menu, select “WPA-PSK (no server)”. 2. Enter your network key. This can be from eight to 63 characters and can be letters, numbers, or symbols. This same key must be used on all of the clients (network cards) that you want to include in your wireless network. [insert UCUI-EditInfo-Adv.tif– use the same screenshot]](https://usermanual.wiki/Belkin/F5D8051C/User-Guide-765826-Page-30.png)
![F5D8051-v3000 manual revised by JOy Page 31 of 44 3. Click “Save” to finish. You must now set all clients (network cards) to match these settings. Wireless Networking Utility Options [insert 9010-8.tifKEEP– use the same screenshot]](https://usermanual.wiki/Belkin/F5D8051C/User-Guide-765826-Page-31.png)
![F5D8051-v3000 manual revised by JOy Page 32 of 44 The “Options” tab on the WNU provides the user the ability to customize his or her WNU settings. Wireless Networking Utility Help The WNU “Help” tab provides users with access to online and telephone support, one-click check for upgrades to updated versions of software, and advanced diagnostic tools. [insert 8011_Help.tif– use the same screenshot]](https://usermanual.wiki/Belkin/F5D8051C/User-Guide-765826-Page-32.png)
![F5D8051-v3000 manual revised by JOy Page 33 of 44 Advanced Diagnostic Tools The “Advanced Diagnostic Tools” section is the central control panel for all the settings of the hardware and software components of the wireless network. It provides an array of tests and connectivity services to ensure optimal network performance. [insert 8011_WNU_Help_Diagnostic.tif– use the same screenshot]](https://usermanual.wiki/Belkin/F5D8051C/User-Guide-765826-Page-33.png)

![F5D8051-v3000 manual revised by JOy Page 35 of 44 • All the modem’s LEDs are functioning correctly. If not, see your modem’s user manual. • Reboot the router. • Reboot the modem. If you continue to have issues, please contact Belkin Technical Support. If you are not using a Belkin Wireless Router, consult that router manufacturer’s user guide. 2. Open your wireless utility software by clicking on the icon in the system tray at the bottom right-hand corner of the screen. The tray icon should look like this (the icon may be red or green): [Keep the same icon] 3. The window that opens should have a list of “Available Networks”. Available networks are wireless networks to which you can connect. If you are using a Belkin 802.11g (G Plus) Router, or Belkin 802.11g (54g) Router, “Belkin54g” is the default name. If you are using a Belkin 802.11b Router, the default name should be “WLAN”. If you are NOT using a Belkin Router, please consult your router manufacturer’s user manual for the default name. The name of your wireless network appears in “Available Networks”. If the correct network name is listed in the “Available Networks” list, please follow the steps below to connect wirelessly: 1. Click on the correct network name in the “Available Networks” list. 2. If the network has security (encryption) enabled, you must enter the network key. Click “Connect”. For more information regarding security, see the page entitled: “Securing your Wi-Fi Network” on page xx of this User Manual. 3. Within a few seconds, the tray icon in the lower right-hand corner of your screen should turn green, indicating a successful connection to the network. If you are still unable to access the Internet after connecting to the wireless network, please contact Belkin Technical Support.](https://usermanual.wiki/Belkin/F5D8051C/User-Guide-765826-Page-35.png)