Belkin F7D4515V1A ScreenCast AV 4 - Transmitter User Manual
Belkin International, Inc. ScreenCast AV 4 - Transmitter
Belkin >
User Manual

User Manual
F7D4515 8820-00863 Rev. A01
SCREENCAST AV 4
TABLE OF CONTENTS
Getting Started....................................... 1
Introduction ............................................1
What’s in the Box? .......................................2
Product Pictures .........................................3
General Information................................... 5
Setting the Product Up ................................ 9
Daily Use with Your ScreenCast Remote
and On-Screen Display ............................... 12
ScreenCast AV Settings ...............................13
Naming/Renaming Video Sources..........................13
Renaming All Video Sources ..............................14
Renaming One Video Source..............................14
Naming/Renaming Transmitters ...........................15
Adding/Deleting a Transmitter .............................16
Turning Wireless On/Off ..................................19
Setting/Changing the Language ...........................20
Troubleshooting and FAQs ............................ 21
Connectivity............................................21
Distance and Placement..................................22
Video and Audio ........................................22
Other Information.................................... 24
FCC Statement .........................................24
Belkin International, Inc., Limited 2-Year Product Warranty......25
Technical Support .......................................27

1
Introduction
Thank you for purchasing the ScreenCast AV wireless system.
We built the ScreenCast AV system with a simple goal: to give
people the chance to spend less time staring at their audio/
video components and more time watching their HDTV.
Don’t get us wrong—we love our AV products. But we also like
the idea of the living room being more about living and less about
electronics. And, yes, there are great custom installers out there
who build amazing AV systems that are essentially invisible, but we
wanted a solution that didn’t require cutting holes in perfectly good
walls and the purchase of very expensive long-run HDMI cables.
So we built ScreenCast AV and focused on getting the best
distance and AV quality possible in one easy-to-set-up and easy-to-
use solution.
With a range of up to 100 feet of line-of-sight range (30m) and
30 feet (10m) through many barriers like walls, doors, and audio/video
cabinets, ScreenCast AV can help you design your living space the
way you want it.
And, most importantly, ScreenCast AV provides all of that freedom
without sacrificing picture quality or sound performance—you can
still watch your favorite movies, TV shows, or other AV devices in up
to 1080p quality and up to 5.1 channels of high-definition sound.
So enjoy ScreenCast AV and your newfound freedom to live the
way you want.
GETTING STARTED

2
GETTING STARTED
What’s in the Box?
• ScreenCastAVWirelessTransmitter
• ScreenCastAVWirelessReceiver
• TwoPowerAdapters
• HighSpeedHDMI® Cable
• RemoteControl(batteryincluded)
• IREmitter
• Wall-MountKit
• ManualonCD
3
GETTING STARTED
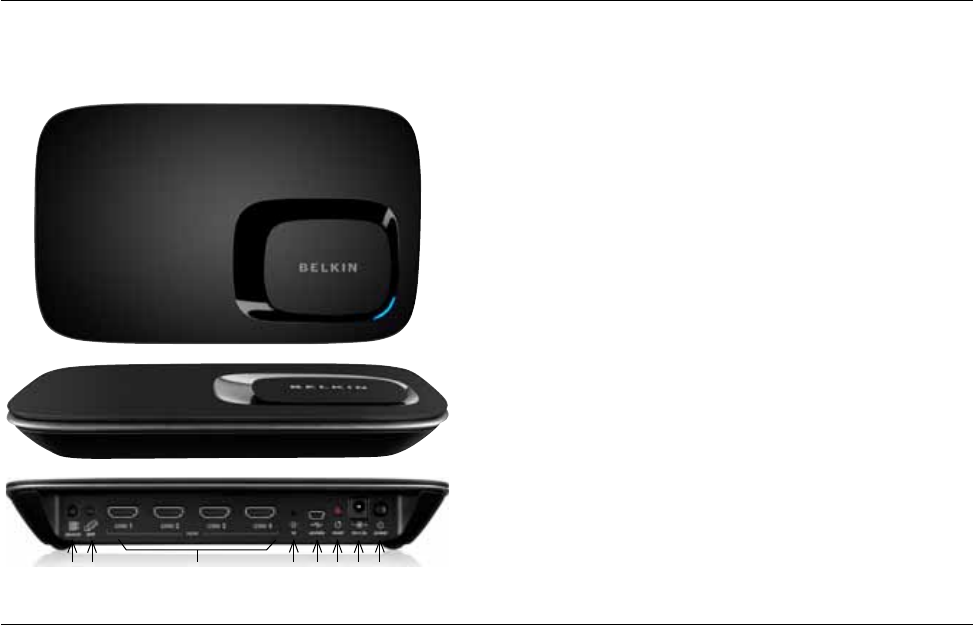
ScreenCast AV 4 Transmitter
NEED HIGH RES IMAGES
(A)(B) (C) (D)(E)(F)(G)(H)
Transmitter:
A. Video source select button
• Allowsyoutocyclebetweenvideoproducts
that you have connected
B. Pairing button for syncing with other ScreenCast receivers
• AllowsyoutoaddadditionalScreenCastreceivers
C. HDMI inputs 1/2/3/4
• ThisiswhereyouconnectyourHDMIsourcedeviceslike
Blu-ray™ disc players, game consoles, or cable/satellite boxes.
D. IR emitter port (3.5mm jack)
• ThisiswhereyouwillconnecttheIRcablethatwill
help you control your AV source devices.
E. USBport
• Thisisforfutureproductupgrades.
F. Reset button
• Ifyoupressthisbuttonforlessthan5seconds,
the ScreenCast transmitter will restart.
• Ifyoupressthisbuttonformorethan5seconds,the
ScreenCast transmitter will be restored to factory defaults.
It will need to be paired again with your receiver.
G. Power input
H. Power (on/off) switch
4
GETTING STARTED
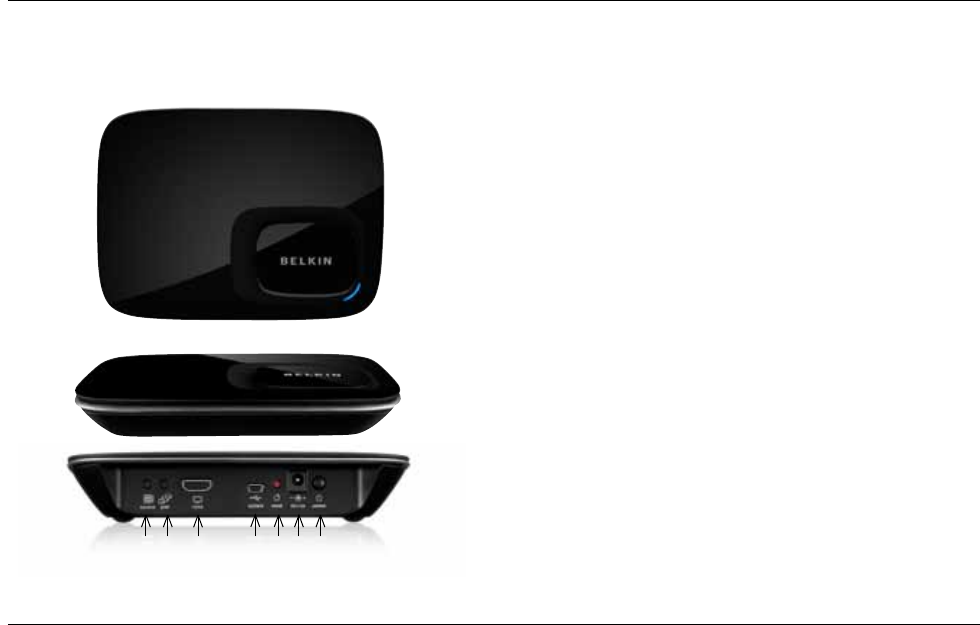
Receiver:
A. Video source select button
• AllowsyoutocyclebetweenAVsourceproductsthat
you have connected
B. Pairing button for syncing with other ScreenCast transmitters
• AllowsyoutoaddadditionalScreenCasttransmitters
C. HDMI output to HDTV
D. USBport
• Thisisforfutureproductupgrades.
E. Resetbutton
• Ifyoupressthisbuttonforlessthan5seconds,
the ScreenCast receiver will restart.
• Ifyoupressthisbuttonformorethan5seconds,theScreenCast
receiver will be restored to factory defaults. It will need to
be paired again with whatever transmitters you are using.
F. Power input
G. Power (on/off) switch
(B)(A) (D)(E)(F)(G)(C)
ScreenCast AV 4 Receiver

5
Your Audio/Video Source Components
ScreenCast AV is designed specifically for products enabled with
HDMI technology like Blu-ray disc players, gaming systems, and
cable or satellite receivers.
At this time, ScreenCast AV does not support analog products with
component or composite connections like VCRs or some DVD players.
Your HDTV
To get the most out of your ScreenCast AV system, we recommend
an HDMI-enabled 1080p TV.
If you have a 720p or 1080i TV it will still work, but you will lose some
of the video quality that ScreenCast AV can provide. Consider this as
an excuse to upgrade!
If you have a TV without HDMI, you will need to upgrade because
ScreenCast AV requires a TV enabled with HDMI technology to work.
GENERAL INFORMATION

6
GENERAL INFORMATION
ScreenCast AV Receiver
The receiver should be placed next to your HDTV since you will need
to connect it to your HDTV via the included HDMI cable.
You can choose to either wall-mount your receiver next to your HDTV
with the included wall-mount kit, or set it on a TV stand or other shelf
near your TV.
Hiding it behind your HDTV or out of sight from your viewing location
is not recommended because the built-in IR receiver needs to be able
to “see” commands from your remote controls.
General Info on Range
ScreenCast AV can reach up to 100 feet (30m) line-of-sight and
approximately 30 feet (10m) through barriers like walls, cabinets,
and doors.
Note: Please remember that every home is different and that
the ranges above are estimates. Actual range will depend on
what materials the walls are made out of and other factors.

7
GENERAL INFORMATION
Controlling Your Video Sources
There are two options for controlling the AV source products
connectedtotheScreenCastAVsystem:HDMI-CECandIR.
These approaches can be used in conjunction with one another,
or you can use IR alone.
IR (Infrared, or “Most Normal AV and TV Remotes”)
The ScreenCast AV system allows you to use your device-specific
remotes, such as one from a Blu-ray disc player, just as you
normally would.
• TheScreenCastAVreceivertakesthesignalthatyour
remote emits (IR) and sends it back to the ScreenCast
AV transmitter. The transmitter then sends those
commands to your devices via the IR emitters.
• Forinstance,youcanpointyourBlu-raydiscplayer’sremote
at the ScreenCast receiver, press “play,” and that command
will be sent back to the ScreenCast transmitter, then through
the IR emitter, and your Blu-ray disc player will play.
• Someproducts,mostnotablyPlayStation3®, use
Bluetooth
®
wireless technology instead of IR.
Bluetooth
is not supported
by the ScreenCast AV system but since
Bluetooth
is a wireless
technology, it is compatible with the ScreenCast AV system.
ScreenCast AV Transmitter
The role of the transmitter is to wirelessly send the content from
your AV source devices like Blu-ray disc players or satellite/cable
boxes to your TV.
The transmitter can be placed within the range guidelines described
on page 6. You may have to experiment a bit with positioning so you
get the best possible experience. The transmitter can be moved,
but the receiver can be adjusted, too.
Remote control commands from your source devices’ remotes can
be relayed from the receiver to the transmitter, and then to each
device via an IR emitter. To do this, you’ll connect the included
IR emitter into the transmitter’s “IR” port, and aim the emitter ends
at your source devices. It does not matter which of the four emitter
ends is in front of each device.
ScreenCast AV is a WHDI™ certified product and can support up to
eight WHDI™ transmitters. So in addition to the 4-port AV transmitter
that came with this product, in the future you might add other wireless
transmitters in the ScreenCast family. For example, you might
have a transmitter for your laptop, and another one for a tablet.

8
GENERAL INFORMATION
HDMI-CEC
HDMI-CECisarelativelynewstandardthatallowsfordevices
connected to one another via HDMI to interact and control one
another. In this version of ScreenCast we have implemented
limitedHDMI-CECfunctionalitytosimple“standby”commands.
IfyouactivateHDMI-CEConyourTVandsourcedevice,
ScreenCast will allow you to use the “standby” button on your
TVremotetoalsoputyourHDMI-CECsourcedeviceinto
standby without having to use your source device’s remote.
A.
9
SETTING THE PRODUCT UP
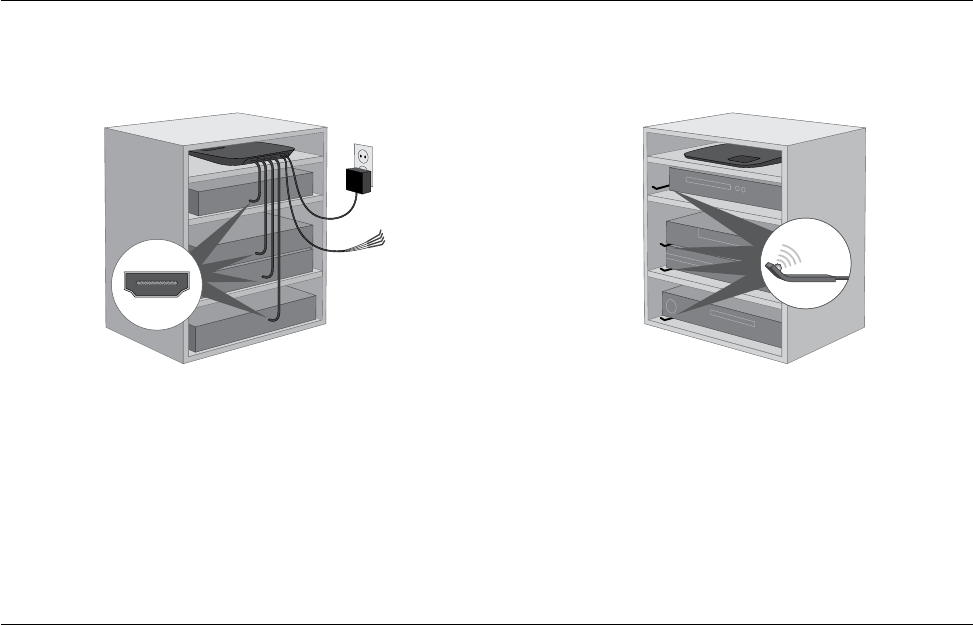
Set Up the ScreenCast AV Transmitter
Figure B
Connect the cable labeled “IR emitter” to the back of the transmitter.
Then route the four ends to the front of your video sources.
These will relay remote control commands from the ScreenCast
receiver. You will complete the setup of these in the section
“SettingUptheIREmitters,”afterthesectiononthereceiver.
Figure A
Connect your ScreenCast AV transmitter to the included
power supply and plug the power supply into an available
power outlet. Press the power button to turn it on.
Connect your HDMI AV source devices to the ScreenCast
AV receiver ports. Make sure all of your video sources
are plugged into power and are turned on.
Connect the IR emitter to the ScreenCast AV transmitter via the
3.5mm connection (it’s similar to a headphone jack). The four ends
of the emitter will relay commands from those devices’ remotes (from
ScreenCast receiver to transmitter to emitter to your devices).
B.
HDMI
C D
10
SETTING THE PRODUCT UP
Figure C
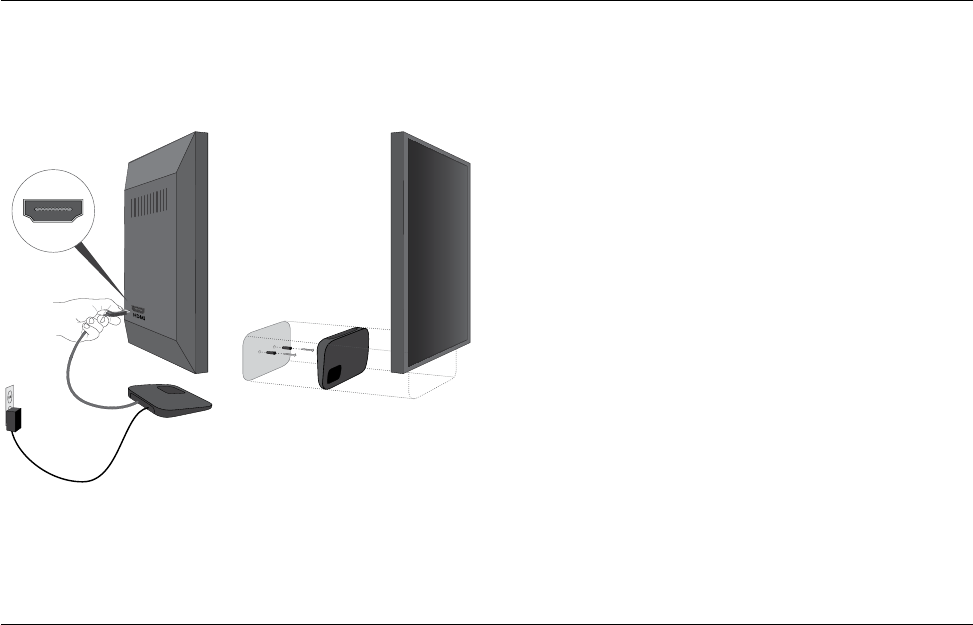
Connect your ScreenCast AV receiver to your HDTV via an
HDMI cable.
Connect your ScreenCast AV receiver to the included power supply
and plug the power supply into an available power outlet. Press the
power button to turn it on.
Figure D (Optional Wall-Mount)
The receiver can be wall-mounted with the included hardware
and placement guide. If you are wall-mounting, make sure that
the IR lens on the receiver can be seen by your remotes.
Tip: To test this, mount the ScreenCast receiver, and take any remote
control to where you’ll be watching the HDTV. The ScreenCast
receiver is in a good position if you see a blue flash on the
receiver’stopLEDwhenyoupressakeyontheremotecontrol.
Set Up the ScreenCast AV Receiver
HDMI
11
SETTING THE PRODUCT UP
Use Your ScreenCast AV Remote to Select Languages
Usetheupanddownbuttonsontheremotetomovethepointerto
yourchoice,andthenpress“OK.”
Set Your TV’s Input to HDMI
TurnyourTVon.UsingtheremotethatcamewithyourTV,setthe
input to the HDMI port to which the ScreenCast is connected. You
should see the ScreenCast language selection screen on your TV:
TV INPUT: HDMI
INPUT
OK
OK
Name Your Video Sources
After the language choice, ScreenCast will show you each of your
video sources in turn. This will give you a chance to pick a useful
name from a list of common video source names. After this step,
you are done with setup.
Setting Up the IR Emitters
Determine where your video sources receive commands from their
remotes. This will usually be some sort of lens on the front panels of
the device. These receivers are known as “IR,” since they receive an
infrared signal.
To determine the location, use the remote that came with each device,
and press a button as you are pointing at the device. Try to move
the remote as close as possible to find out the exact location of
the receiver.
Position each IR emitter end so that its small domed lens is pointing
at the IR receiver on the source device. Then point the device’s
remote at the ScreenCast receiver and press a button. If nothing
happens, adjust the aim of that emitter until it works.
12
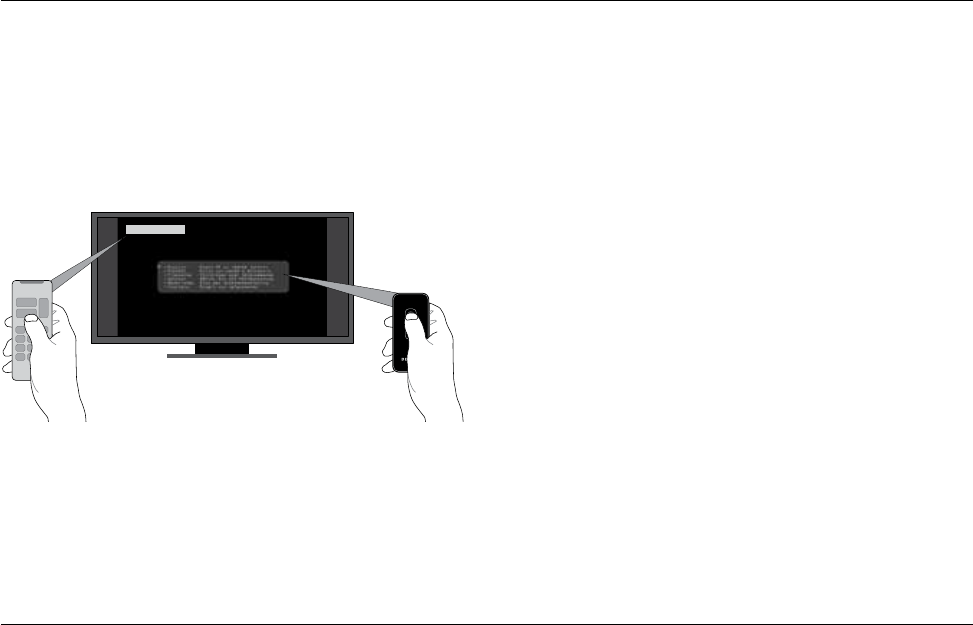
Daily Use with yoUr screencast remote anD on-screen Display
When you touch any button on your ScreenCast remote, the
on-screen display will wake and show a screen like the one
above. In this screen, you have the choice to exit, to pick one
of the four video sources, or to access the Settings menus.
Usetheupanddownbuttonsontheremotetomovethepointer
tothechoiceyou’dlike,andthenpressthe“OK”button.
Note: ScreenCast AV can support more video sources than the four
included with this product. It can do this because it can connect
to multiple ScreenCast AV transmitters. For example, you might
add another 4-port AV transmitter for additional AV devices, a
transmitter for your laptop, and another one for a tablet. All of the
sources from all of those transmitters are gathered here in this list.
In cases where you have more than four sources, you will be able
to scroll the menu above. To add a WHDI™ transmitter, please go
to the section titled “Adding/Deleting a Transmitter” on page 16.
Switching can take up to 10 seconds. This is due to the system
making multiple connections between video source, transmitter,
receiver, and TV.
If you switch to an AV source on another transmitter, it will take up
to 60 seconds.
When the connection is complete, the new video source will show
and the on-screen display will close.
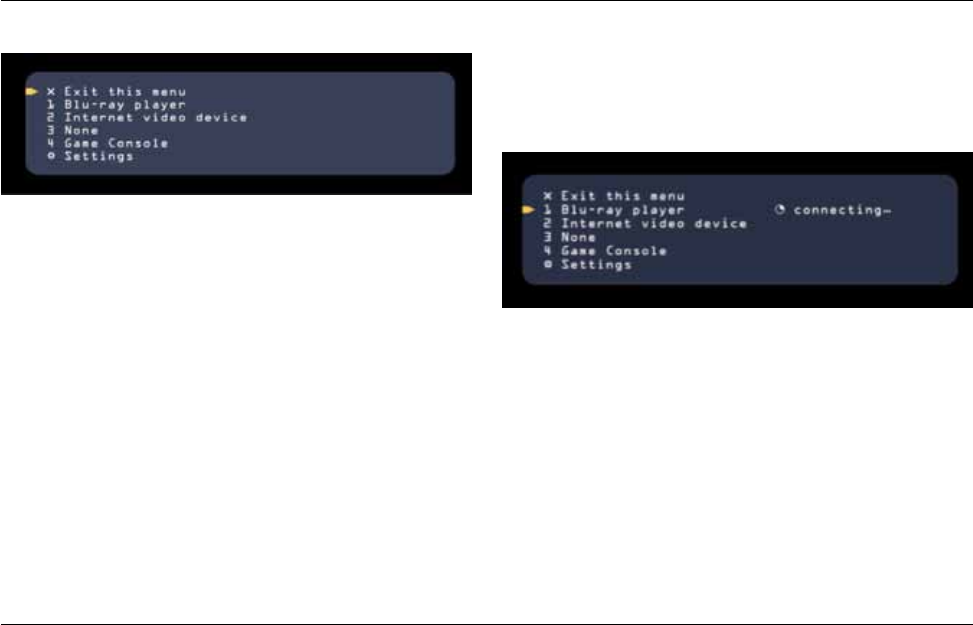
Switching Video Sources
Ifyouchooseadifferentvideosourceandpress“OK,”ScreenCast
will begin switching. The screen will show you that it is in the process
of connecting, like the example below.
13
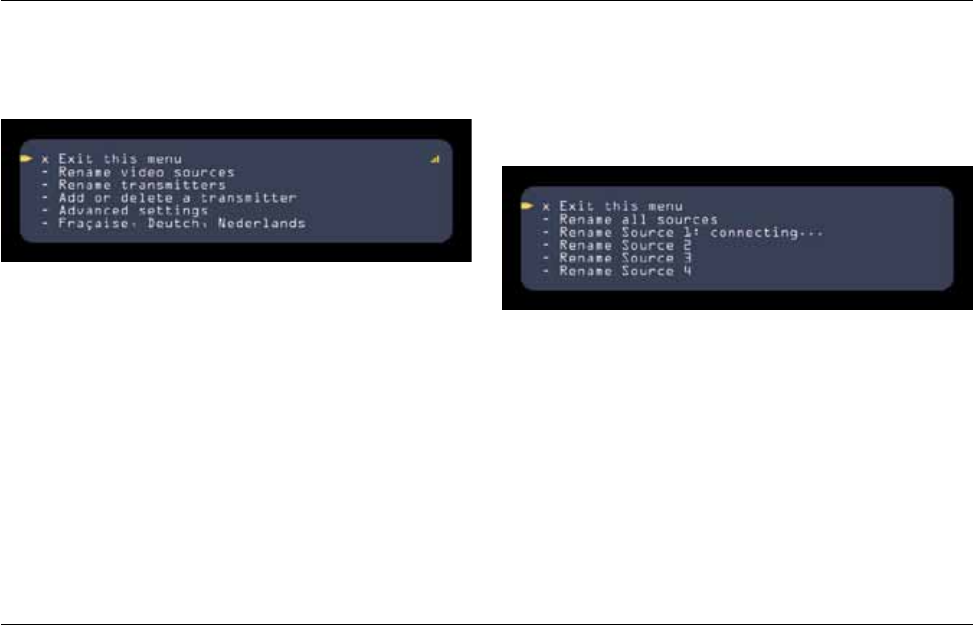
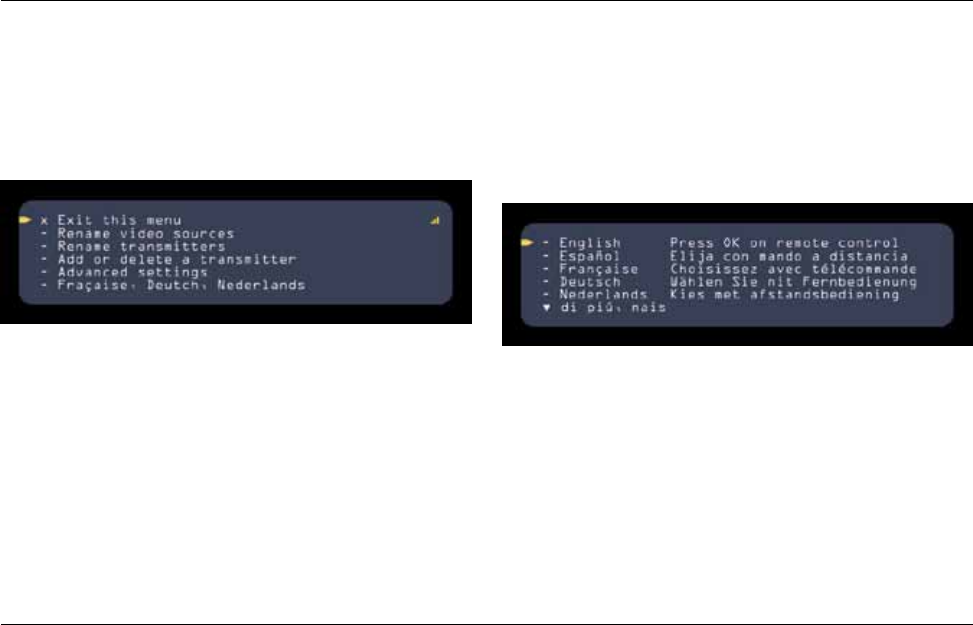
SCREENCAST AV SETTINGS
Press any button on the ScreenCast AV remote to wake the
on-screen display, and then move the pointer to Settings and
pressthe“OK”button.TheSettingsmenubelowwillshow.
Naming/Renaming Video Sources
This option gives you the ability to choose different names for your
video sources. You can rename all four sources, just like you did during
setup. You also have the choice to rename just one of the sources.
The list of sources will show all of your video sources, regardless of
what transmitter they are coming from.
14
SCREENCAST AV SETTINGS
Renaming One Video Source
If you decide to just rename one source, that source will be shown and
you can choose a useful name from the list of common source names.
For ease of use, the names on the list are pre-populated with a variety
of standard device types; please choose the one that you feel best fits
your source device.
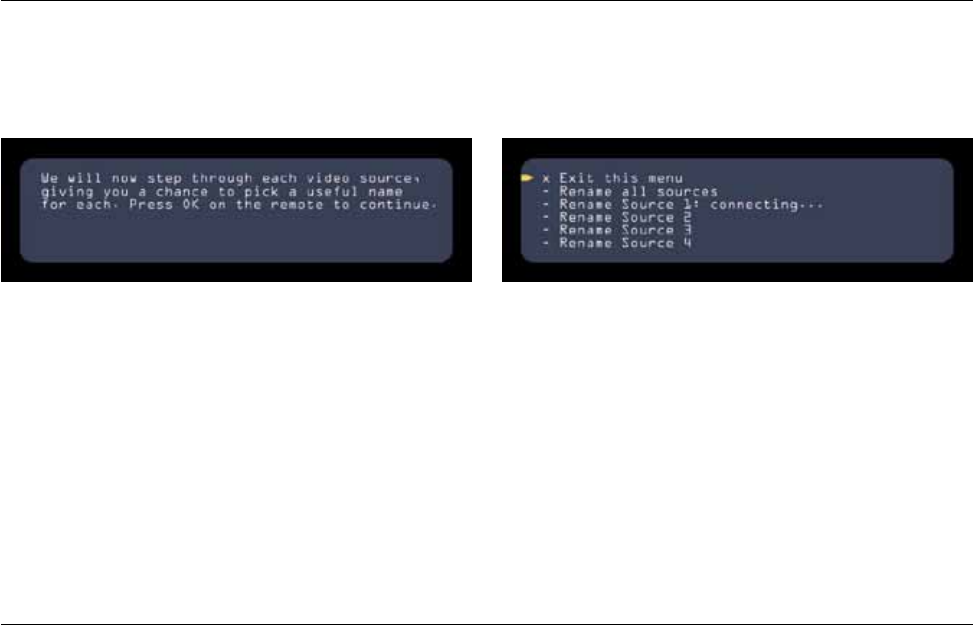
Renaming All Video Sources
If you choose to rename all sources, you will then see the
following message:
Click“OK”andfollowtheon-screeninstructions.
For ease of use, the names on the list are pre-populated with a variety
of standard device types; please choose the one that you feel best fits
your source device.
15
SCREENCAST AV SETTINGS
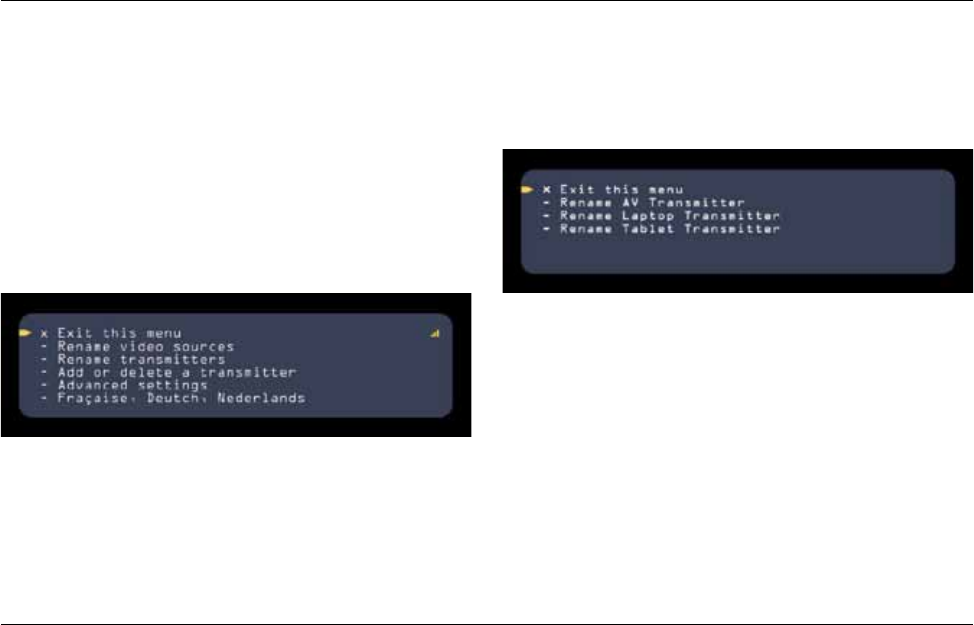
Naming/Renaming Transmitters
ScreenCast AV can support up to eight transmitters. So in addition
to the 4-port AV transmitter that came with this product, you might
add other ScreenCast AV transmitters. For example, you might
have a transmitter for your laptop, and another one for a tablet.
Regardless of if you have one transmitter or many, you may find it
usefultochooseadifferentnameforoneofthem.Keepinmindthat
a transmitter name is different from a video source name. There are
1 to 4 video sources per transmitter.
To name or rename a transmitter, go to the Settings menu and
select “Rename a transmitter.”
You will now have the opportunity to select a new name for your
transmitter from a pre-populated list of common transmitter names.
You will then see the screen below, which will show you a list of the
transmitters that have been connected to your receiver. Select the
transmitteryouwishtorenameandthenselect“OK”ontheremote.
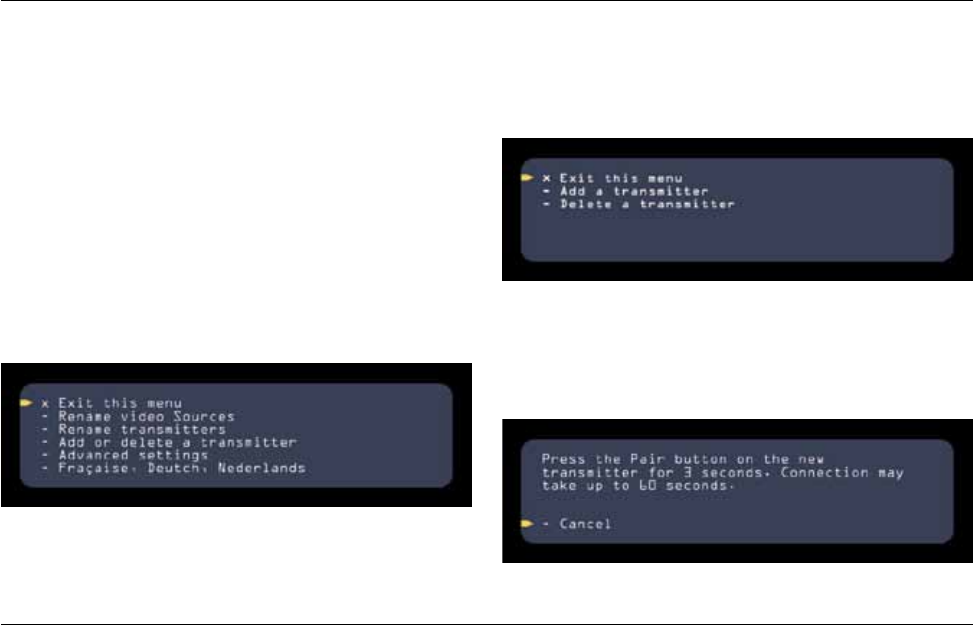
Adding/Deleting a Transmitter
ScreenCast AV is part of the WHDI™ family, so it is possible to
connect a variety of other ScreenCast transmitters to your
ScreenCast AV receiver.
Some of those transmitters have a single video source, while
others have multiple sources. When a transmitter gets added, all
of its sources get added to the list of sources to choose from on
the main on-screen display (the one used for switching sources).
Transmitters will vary in terms of capabilities, so please refer to
the manufacturer info for details on how they would work with your
ScreenCast AV receiver.
UsingyourScreenCastAVremote,usethemenubuttontoopenup
the menu screen and navigate to the “Settings” section; you will see
the screen below.
Adding a Transmitter
In the Settings menu, select “Add or Delete a transmitter.” On the
screen that shows next, you will choose “Add a transmitter.”
Next you’ll be instructed on how to connect the new transmitter.
Press the Pair button on the receiver and then press the Pair button
on the new transmitter; the process is similar to how a
Bluetooth
®
headset connects to a mobile phone. The transmitter and receiver will
exchange information and create a secure connection with each other.
Pairing could take up to 60 seconds.
16
SCREENCAST AV SETTINGS
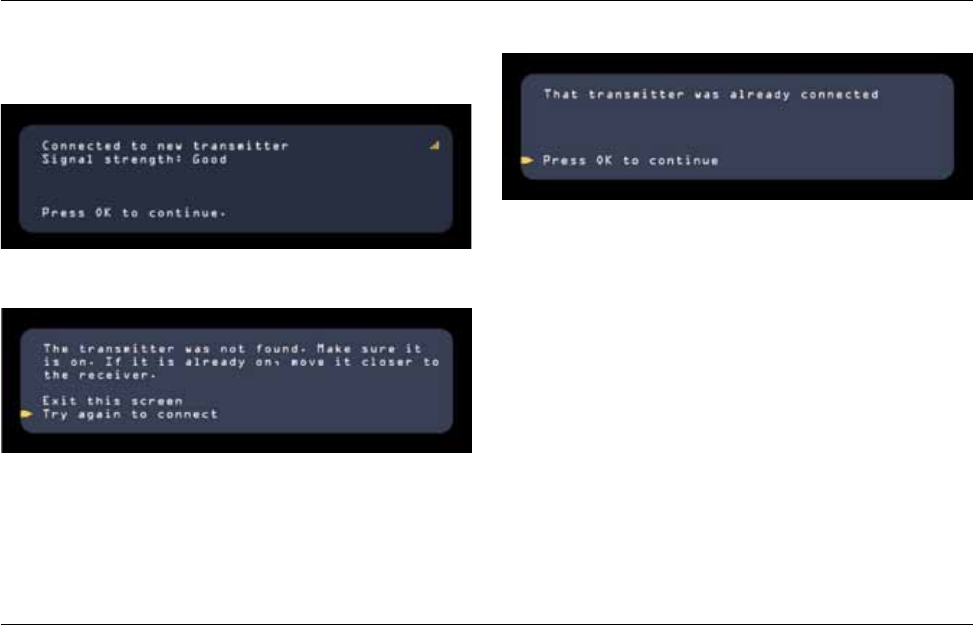
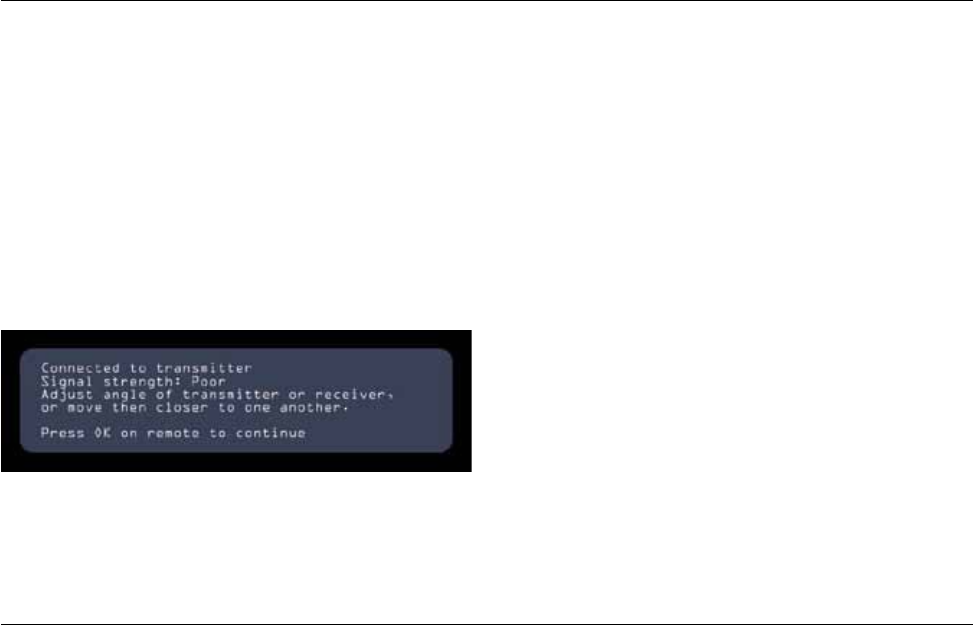
If connection was successful, you will see a screen similar to
the one below.
If connection failed, you will see a screen like the one below:
Tip: To improve the range of the transmitter, you can move it so
that there are fewer barriers (like walls or cabinets) between it and
the receiver. You may find that a simple shift of the product a few
inches or feet will bring you to the desired level of connectivity.
Note: It is possible to initiate connection with a new transmitter by
pressing the “Pair” button on the back of the receiver. The “Pair”
button might be labeled “Connect” on some models. After pressing the
button on the receiver, walk to the transmitter and press the same
Pair/Connect button there.
17
SCREENCAST AV SETTINGS
18
SCREENCAST AV SETTINGS
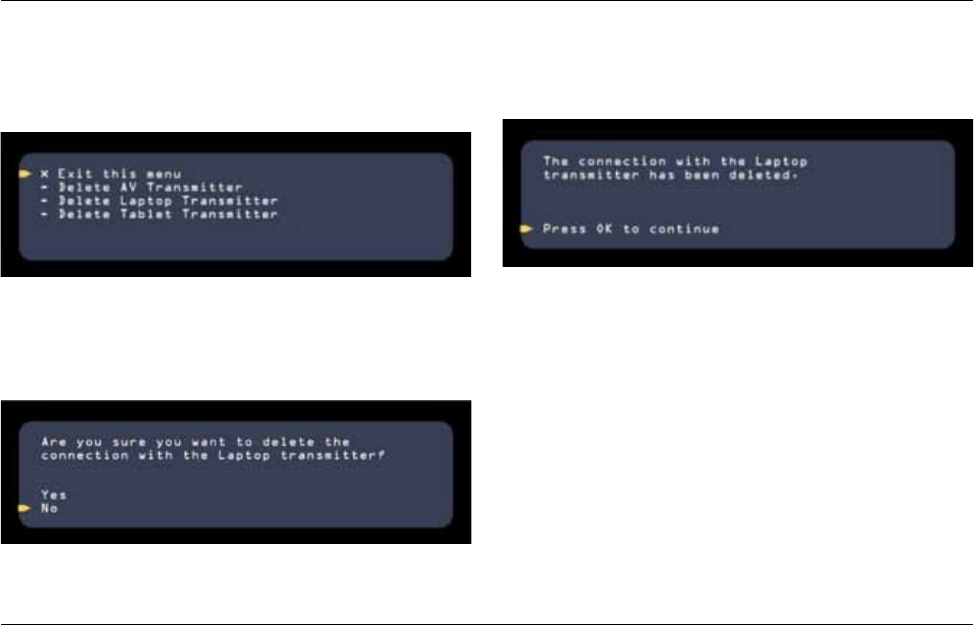
Deleting a Transmitter
To delete a transmitter, you will see a menu like this. Select the
transmitter you wish to delete.
From your list of transmitters, select the device you want to delete
andpress“OK.”
You will then see a screen asking you to confirm your choice, showing
the name of the transmitter in the question.
Once deleted, you will see the following screen.
You can reconnect the transmitter using the instructions
in the “Adding a Transmitter” section.
19
SCREENCAST AV SETTINGS
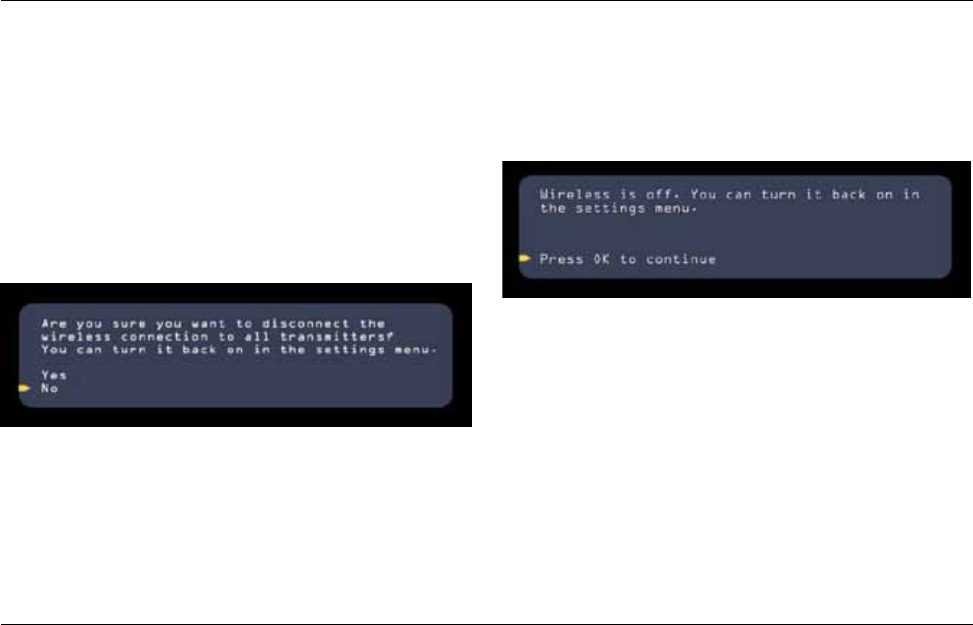
Turning Wireless On/Off
There are very few situations where this would ever be necessary.
If the wireless is turned off, ScreenCast AV will not communicate
with any transmitters and video will not show.
Eventhoughitisnotrecommended,youmayatsomepointwantto
turn off the wireless capabilities of the ScreenCast AV receiver. To
do this, navigate to the menu page and select “Settings,” and then
“turn off wireless.”
You should then see a screen that looks like this:
If you select “Yes” and elect to turn off the wireless,
you will see the following screen:
20
SCREENCAST AV SETTINGS
Setting/Changing the Language
UsingyourScreenCastAVremote,usethemenubuttontoopen
up the menu screen and navigate to the “Settings” section.
The setting page will look like this:
Within “settings” you will see an area marked “languages” at the
bottom of the list.
If you select “languages,” you will see your language options, as in
the example below. You should then select the one you wish to use.

21
TROUBLESHOOTING AND FAQS
What do the LEDs on the receiver mean?
Most of the information you need will appear on the TV screen, but
here’sashortlistofwhattheLEDlightonthetransmitterand
receiver can tell you.
Connectivity
How long will it take for my ScreenCast AV system to “wake up”
and connect?
• Whenturningonthereceiverandtransmitter,itcantakeup
to 15 seconds for the devices to connect with one another.
• Ifyouchangesourcesorvideoresolution,you
may experience up to 10 seconds of connection
time as the devices sync with one another.
• IfyouareaddinganadditionaltransmittertoyourScreenCast
AV system, it can take up to 60 seconds to pair.
Note: The ScreenCast AV system comes with the receiver and
transmitter pre-paired so this should not be necessary unless you
add an additional WHDI™ transmitter or press the reset button long
enough to reset the receiver to factory defaults (5 seconds or more).
When your ScreenCast
unit is…
The light will be…
Starting up Slowly blinking blue
Establishing a
connection
Rapidly blinking blue until the connection
is made. If the connection cannot be made
after one minute, the light will blink amber to
show that a connection failure has occurred.
Connected with good
signal strength
Solid blue
Connected with poor
signal strength
Solid amber
Receiving input from
the remote control
The light will rapidly turn on and off until the
remote button is released.
22
TROUBLESHOOTING AND FAQS
Video and Audio
When I switch sources, why does it often take a few seconds
to bring the new source up on screen?
Switching HDMI sources requires a number of “hand offs” to happen
between your TV, your source device, and the ScreenCast AV system.
Because of this, it may take up to 10 seconds for the HDMI sync
to resolve.
When I switch modes within my device (i.e., from Blu-ray disc
playback to my BD player’s menu), why does the ScreenCast AV
system have to reconnect?
Sometimes different modes of an AV device output content
in different video resolutions; for instance, menus might be in
720p while a game or Blu-ray disc movie could be in 1080p.
When the ScreenCast system switches resolutions, it needs to
reconnect the transmitter and receiver, which is why you may
experience a slight delay until the two units can sync again.
My remote commands don’t seem to work.
Double-check that the IR emitter is fully seated in the back of the
ScreenCast AV transmitter. You should also check to make sure that
the receiver is flashing blue when you trigger a remote command—
that means it is sending the command back to the transmitter. Finally,
check to make sure that your remote batteries are fully charged and/
or fresh so that you get a full-strength signal from your AV remote.
Distance and Placement
ScreenCast AV can reach up to 100 feet (30m) line-of-sight and
approximately 30 feet (10m) through barriers like walls, cabinets, and doors.
Note: Please remember that every home is different and that the ranges
above are estimates. Actual range will depend on the composition of
the barriers and other factors.
There are a variety of situations that could require slightly adjusting
the position and/or placement of your ScreenCast AV transmitter
and/or receiver.
In most, if not all cases, an on-screen message will let you know if
you need to adjust the location of your transmitter and/or receiver.

23
TROUBLESHOOTING AND FAQS
What video formats can the ScreenCast AV system
send to my TV?
• VideoCompatibility:
• 480p,720p(HDTV2D&3D),1080i(HDTV),
1080p(FHDTV2D&3D)
• Supports5.1channelsurroundsound(96KHz)
• 2DVideoResolutionCompatibility
• Upto1080p60Hz:480i/480p/576i/576p/720p/
1080i/1080p VGA, XGA
• 3DVideoSupport:
•1920x1080p@24Hzand1920x720p@24Hz
What audio formats can the ScreenCast AV
system send to my TV?
• 2-6chLPCM@32KHz-192kHz
Other Tech Info
• IndustryStandard:WHDI™
• WHDI™ does not compress or decompress; it uses a video-
modem approach to deliver the highest video quality.

24
OTHER INFORMATION
FCC Statement
DECLARATION OF CONFORMITY WITH FCC RULES
FOR ELECTROMAGNETIC COMPATIBILITY
We,BelkinInternational,Inc.,of12045E.WaterfrontDrive,Playa
Vista, CA 90094, declare under our sole responsibility that the
product, F7D4515v1, to which this declaration relates, complies
with Part 15 of the FCC Rules. Operation is subject to the following
two conditions: (1) this device may not cause harmful interference,
and (2) this device must accept any interference received,
including interference that may cause undesired operation.
Caution: Exposure to Radio Frequency Radiation.
The radiated output power of this device is far below the FCC
radio frequency exposure limits. Nevertheless, the device shall be
used in such a manner that the potential for human contact during
normal operation is minimized. When connecting an external
antenna to the device, the antenna shall be placed in such a
manner to minimize the potential for human contact during normal
operation. In order to avoid the possibility of exceeding the FCC
radio frequency exposure limits, human proximity to the antenna
shall not be less than 20cm (8 inches) during normal operation.
Federal Communications Commission Notice
This equipment has been tested and found to comply with the
limits for a Class B digital device, pursuant to Part 15 of the FCC
Rules. These limits are designed to provide reasonable protection
against harmful interference in a residential installation.
This equipment generates, uses, and can radiate radio frequency
energy. If this equipment does cause harmful interference to radio
or television reception, which can be determined by turning the
equipment off and on, the user is encouraged to try and correct
the interference by one or more of the following measures:
• Reorientorrelocatethereceivingantenna.
• Increasethedistancebetweentheequipmentandthereceiver.
• Connecttheequipmenttoanoutletonacircuitdifferent
from that to which the receiver is connected.
• Consultthedealeroranexperiencedradio/TVtechnicianforhelp.
FCC Caution
Any changes or modifications not expressly approved by the party
responsible for compliance could void the user’s authority to
operate this equipment.
Modifications
The FCC requires the user to be notified that any changes or
modifications to this device that are not expressly approved by
Belkin International, Inc., may void the user’s authority to operate
the equipment.
For operation within 5.15 ~ 5.25GHz frequency range, it is restricted to
indoor environment.

25
OTHER INFORMATION
Belkin International, Inc., Limited
2-Year Product Warranty
What this warranty covers.
Belkin International, Inc. (“Belkin”) warrants to the original
purchaser of this Belkin product that the product shall be free
of defects in design, assembly, material, or workmanship.
What the period of coverage is.
Belkin warrants the Belkin product for two years.
What will we do to correct problems?
Product Warranty.
Belkin will repair or replace, at its option, any defective product
free of charge (except for shipping charges for the product).
Belkin reserves the right to discontinue any of its products without
notice, and disclaims any limited warranty to repair or replace any
such discontinued products. In the event that Belkin is unable to
repair or replace the product (for example, because it has been
discontinued), Belkin will offer either a refund or a credit toward
the purchase of another product from Belkin.com in an amount
equal to the purchase price of the product as evidenced on the
original purchase receipt as discounted by its natural use.
What is not covered by this warranty?
All above warranties are null and void if the Belkin product is not
provided to Belkin for inspection upon Belkin’s request at the sole
expense of the purchaser, or if Belkin determines that the Belkin
product has been improperly installed, altered in any way, or tampered
with. The Belkin Product Warranty does not protect against acts
of God such as flood, lightning, earthquake, war, vandalism, theft,
normal-use wear and tear, erosion, depletion, obsolescence, abuse,
damage due to low voltage disturbances (i.e. brownouts or sags), non-
authorized program, or system equipment modification or alteration.
How to get service
To get service for your Belkin product you
must take the following steps:
1. ContactBelkinInternational,Inc.,at12045E.Waterfront
Drive, Playa Vista, CA 90094, Attn: Customer Service,
or call 800-223-5546, within 15 days of the Occurrence.
Be prepared to provide the following information:
a. The part number of the Belkin product.
b. Where you purchased the product.
c. When you purchased the product.
d. Copy of original receipt.
2. Your Belkin Customer Service Representative will then
instruct you on how to forward your receipt and Belkin
product and how to proceed with your claim.

26
OTHER INFORMATION
Some states do not allow limitations on how long an implied
warranty lasts, so the above limitations may not apply to you.
INNOEVENTSHALLBELKINBELIABLEFORINCIDENTAL,
SPECIAL,DIRECT,INDIRECT,CONSEQUENTIALOR
MULTIPLEDAMAGESSUCHAS,BUTNOTLIMITEDTO,
LOSTBUSINESSORPROFITSARISINGOUTOFTHE
SALEORUSEOFANYBELKINPRODUCT,EVENIF
ADVISEDOFTHEPOSSIBILITYOFSUCHDAMAGES.
This warranty gives you specific legal rights, and you may also have
other rights, which may vary from state to state. Some states do
not allow the exclusion or limitation of incidental, consequential,
or other damages, so the above limitations may not apply to you.
Belkin reserves the right to review the damaged Belkin product.
All costs of shipping the Belkin product to Belkin for inspection
shall be borne solely by the purchaser. If Belkin determines,
in its sole discretion, that it is impractical to ship the damaged
equipment to Belkin, Belkin may designate, in its sole discretion,
an equipment repair facility to inspect and estimate the cost to
repair such equipment. The cost, if any, of shipping the equipment
to and from such repair facility and of such estimate shall be
borne solely by the purchaser. Damaged equipment must remain
available for inspection until the claim is finalized. Whenever
claims are settled, Belkin reserves the right to be subrogated
under any existing insurance policies the purchaser may have.
How state law relates to the warranty
THISWARRANTYCONTAINSTHESOLEWARRANTYOF
BELKIN.THEREARENOOTHERWARRANTIES,EXPRESSED
OR,EXCEPTASREQUIREDBYLAW,IMPLIED,INCLUDING
THEIMPLIEDWARRANTYORCONDITIONOFQUALITY,
MERCHANTABILITYORFITNESSFORAPARTICULAR
PURPOSE,ANDSUCHIMPLIEDWARRANTIES,IFANY,ARE
LIMITEDINDURATIONTOTHETERMOFTHISWARRANTY.

27
OTHER INFORMATION
Technical Support
US
http://www.belkin.com/support

© 2011 Belkin International, Inc. All rights reserved. All trade names are registered
trademarks of respective manufacturers listed. HDMI is a trademark or registered
trademarkofHDMILicensingLLCintheUnitedStatesandothercountries.