Belkin F8E859-MSE WIRELESS OPTICAL MOUSE User Manual P74833 C F8E859 BNDL man indd
Belkin International, Inc. WIRELESS OPTICAL MOUSE P74833 C F8E859 BNDL man indd
Belkin >
USERS MANUAL

Belkin Tech Support
US: 800-223-5546, ext. 2263
310-898-1100, ext. 2263
Europe: 00 800 223 55 460
Australia: 1800 235 546
New Zealand: 0800 235 546
Belkin Corporation
501 West Walnut Street
Compton, CA 90220-5221, USA
310-898-1100
310-898-1111 fax
Belkin Ltd.
Express Business Park, Shipton Way
Rushden, NN10 6GL, United Kingdom
+44 (0) 1933 35 2000
+44 (0) 1933 31 2000 fax
© 2005 Belkin Corporation. All rights reserved. All trade names are registered trademarks of
respective manufacturers listed.
Belkin B.V.
Boeing Avenue 333
1119 PH Schiphol-Rijk, The Netherlands
+31 (0) 20 654 7300
+31 (0) 20 654 7349 fax
Belkin Ltd.
7 Bowen Crescent, West Gosford
NSW 2250, Australia
+61 (0) 2 4372 8600
+61 (0) 2 4372 8603 fax
Wireless Multimedia
Desktop 250

Wireless Multimedia
Desktop 250
User Manual
F8E859-BNDL
Discover easy Internet and multimedia
functionality with wireless convenience
Keyboard
Mouse
User Manual

Table of Contents
Table of Contents
1. Introduction .........................................................................1
Package Contents ................................................................2
Software Compatibility .........................................................2
2. Quick Setup ..........................................................................3
For PS/2 Connections ..........................................................3
For USB Connections ..........................................................4
3. Software Driver Installation ................................................5
For Windows 98 SE, 2000, Me, and XP ..............................5
4. About your Belkin Software ................................................6
Product Features ..................................................................6
For the Keyboard .................................................................6
For the Mouse ....................................................................10
5. Troubleshooting .................................................................13
6. Information ........................................................................15

1
Congratulations and thank you for purchasing the Wireless
Multimedia Desktop 250 by Belkin. We appreciate your business
and we are sure you will enjoy years of reliable use with these
high-quality input devices.
Although the Wireless Multimedia Desktop 250 will function
out-of-the-box as a Human Interface Device (HID) or standard
PS/2 keyboard and mouse, for advanced programmability and
functionality, we recommend that you use the included software.
This will give you added flexibility and allow you to program and
customize your settings, and reassign keys to fit your preference.
Introduction
1
2
3
4
5
6
7
8
9
10
2
Section
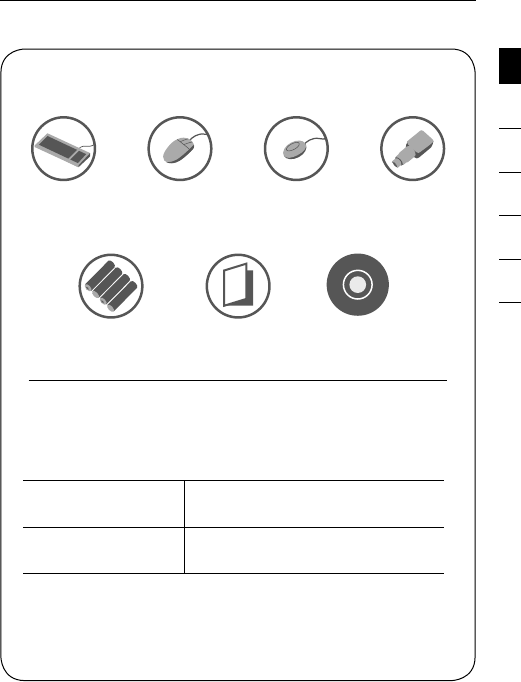
Package Contents
Software Compatibility
Windows® OS
for USB interface:
Windows XP, Me, 2000, 98 SE
Windows OS
for PS/2 interface:
Windows XP, Me, 2000, 98 SE
Wireless
Multimedia
Keyboard
4 AA Batteries
Wireless 5-Button
Optical Mouse
User Manual
USB and PS/2
Receiver
CD Software
Driver
Introduction | Package Contents
PS/2 Adapter
Quick Setup | For PS/2 Connections
3
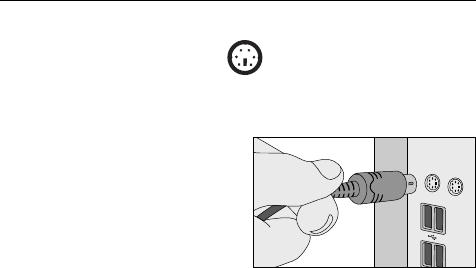
For PS/2 Connections
1. Be sure that your computer is powered off.
2. Connect the receiver to
your computer’s PS/2
ports. The receiver has a
two-headed connector for
the keyboard and mouse
connection (purple is for
the keyboard and the USB
connection, and the green
adapter is for the mouse).
There is also a diagram on
the top connector for identification. Your computer will either
have a matching color scheme or an illustration next to the
port, or both (See Fig. 1).
3. Install the batteries into your keyboard and mouse. Please
make sure you follow the diagram on the inside of the battery
compartment to ensure that you install them correctly.
4. Power on your computer.
The receiver automatically scans for and synchronizes the
keyboard and mouse when you power on the computer. Your
keyboard and mouse should now be functioning.
NOTE: If synchronizing does not occur automatically, please
refer to the information on “Synchronizing” in the Troubleshooting
section at the end of this User Manual.
Fig. 1
Quick Setup | For USB Connections
1
2
3
4
5
6
7
8
9
10
4
Section
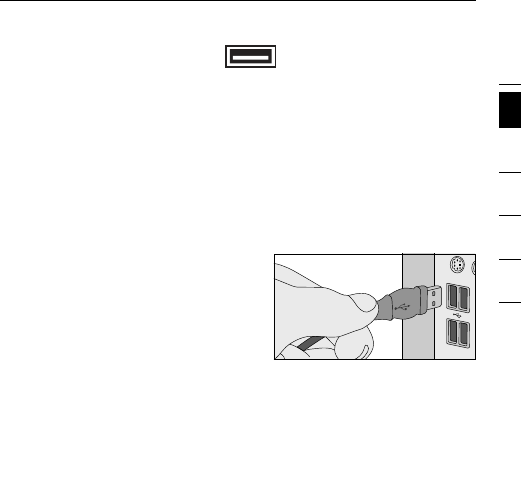
For USB Connections
1. Be sure that your computer is powered on. If you are running
Windows 98 SE, Me, or 2000, you will need to have your old
keyboard and mouse connected during the installation.
2. Install the batteries into your keyboard and mouse. Please
make sure you follow the diagram on the inside of the battery
compartment to ensure that you install them correctly.
3. Connect only the receiver to
your computer with the USB
connector. (Do not connect
the green PS/2 connection as
it is not necessary in a USB
environment) (See Fig. 2).
NOTE: When connecting the USB cable to your computer,
Windows will start a New Hardware Wizard. Windows XP
completes the Wizard automatically. In Windows 98 SE, Me, and
2000, you will need to go through the New Hardware Wizard
setup with your old keyboard and mouse. Windows 98 SE may
require you to insert your Windows 98 SE Installation CD into
your computer’s CD-ROM drive to complete the install.
4. The receiver automatically scans and synchronizes the
keyboard and mouse. Your keyboard and mouse should now
be functioning.
5. If synchronizing does not occur automatically, please refer
to the information on “Synchronizing” in the Troubleshooting
section at the end of this User Manual.
Fig. 2

Software Driver Installation
5
For Windows 98 SE, Me, 2000, and XP
NOTE: The keyboard and mouse should now be functioning
for basic input. If this is not the case, carefully repeat the Quick
Setup procedures in the previous pages. When the keyboard
and mouse are functioning for basic input, install the software
described in the following section.
NOTE: If you have previously installed any keyboard or mouse
driver on your computer, you must uninstall it/them before
proceeding with this installation procedure.
1. Insert your Wireless Multimedia Desktop 250 driver
installation CD into your CD-ROM drive. After a few moments,
the main menu will start automatically.
2. Select “Install Driver” and your computer will begin the
installation process.
3. Follow the on-screen instructions to install the software.
NOTE: If the main CD does not auto-start, click the “Start”
button and select “Run”. From the run dialog box, enter
“<drive>:\Setup.exe” and click “OK” (“<drive>” being the
letter of the drive that identifies your CD-ROM drive under
“My Computer”. For example, if the CD is in drive D, enter
“D:\Setup.exe”.).
4. When prompted, click “Finish” and restart your computer.
This completes the installation process.
6
Section
About your Belkin Software | Product Features
1
2
3
4
5
6
7
8
9
10
Product Features
The Wireless Multimedia Desktop 250 software provides a suite
of tools that will enhance your experience with the Belkin Wireless
Multimedia Desktop 250. It allows you to customize your hot keys
and gives you quick access to your media keys, as well as
other shortcuts.
For the Keyboard
Software installation is required to enable functioning of the
following USB-PS/2 keyboard hot keys:
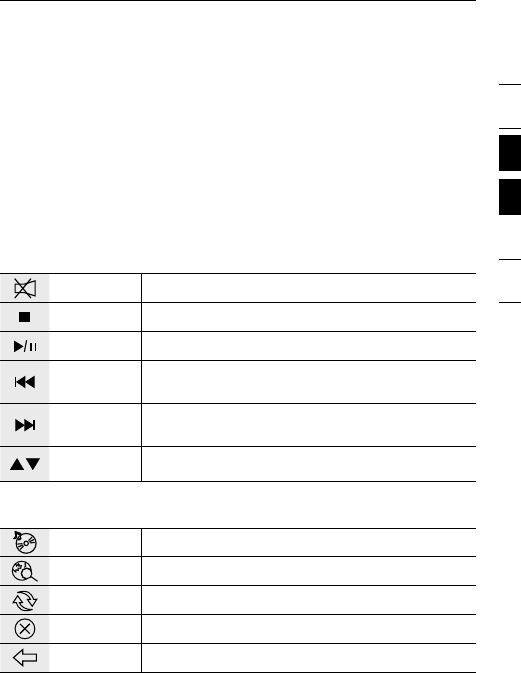
Mute Mutes your system volume.
Stop In Windows Media Player, stops music.
Play/Pause In Windows Media Player, starts or pauses music.
Back In Windows Media Player, moves you back one
track or to the beginning of the current track.
Forward In Windows Media Player, moves selection
forward one track.
Volume
Up/Down Adjusts the main volume of your computer.
NOTE: Your Media Player may have a separate volume control.
Media Opens your default Media Player for music only.
Search Enables web search.
Refresh Reloads the current web page.
Stop Stops page from loading.
Back Moves Internet page back.

7
Forward Moves Internet page forward.
My
Documents Opens your “My Documents” folder.
Home Opens your system’s default Internet browser.
Email* Opens your default email program, such as
Microsoft Exchange or Outlook.
Calculator Opens your Widows system calculator.
Computer Opens up “My Computer”.
Sleep Puts computer into sleep mode.
Battery LED lights up when batteries are low.
*NOTE: If you have a web-based email account, this feature does
not apply.
To program keyboard hot keys:
1. Click “Start”.
2. Click “Programs”.
3. Click “Belkin Multimedia Keyboard”.
4. Then double-click on “Belkin Multimedia Utility Keyboard”.
5. An on-screen display of the hot keys will appear. Select the
button to program.
6. Then under the “Keys” tab, select “Special Function”.
7. In the drop-down menu, select from:
Copy Paste Open New
Cut Redo Save
About your Belkin Software | For the Keyboard

1
2
3
4
5
6
7
8
9
10
8
Section
8. Then click “Apply”.
9. Next, click “OK”.
10. Repeat steps 5–9 to program other hot keys.
To restore default settings, click “Restore All”.
To program a customized hot key:
1. Follow steps 1–5 in “To program keyboard hot keys”.
2. Select “Custom”.
3. Then click “Set”.
4. Follow on-screen instructions to complete programming.
5. Click “Apply”.
6. Then click “OK”.
To customize on-screen color display:
1. Select “OSD” tab.
2. In “Item”, select from (Window, Frame, Text) to program.
3. Then in “Color”, click drop-down menu to select color.
To customize display launch time:
1. Select “OSD” tab.
2. In “Delay”, click drop-down arrow.
3. Then select from “(1-10) seconds”.
4. Click “Apply”.
5. Next, click “OK”.
About your Belkin Software | For the Keyboard

9
To display key status:
1. To display status of “Scroll Lock”, select “Show Scroll
Lock” status.
2. To display status of “Num Lock”, select “Show Num
Lock” status.
3. To display status of “Cap lock” key, select “Show Cap
Lock” status.
4. After selection(s) are completed, click “Apply”.
5. Next, click “OK”
To remove key status, uncheck all selections.
Then click “Apply”.
Next, click “OK”.
About your Belkin Software | For the Keyboard
1
2
3
4
5
6
7
8
9
10
10
Section
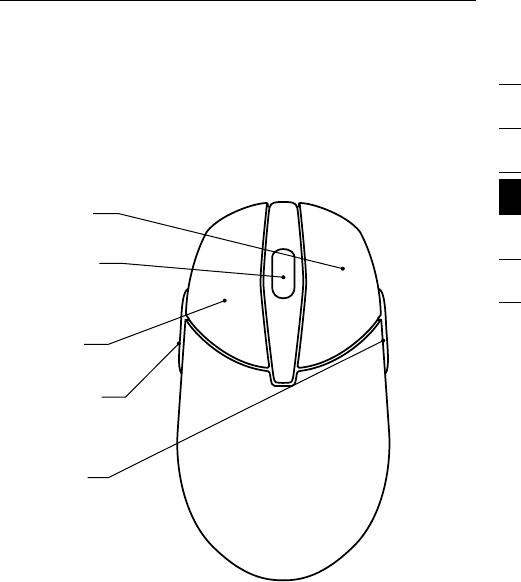
For the Mouse
Mouse Functions
Through your Mouse “Properties” dialog box, you can find and
control the following button-function features:
About your Belkin Software | For the Mouse
Left Button
Primary mouse button
Wheel Button
Quick/auto scroll. Wheel
button lights up red when
batteries are low.
Right Button
Context menu
Fourth Button
Internet Explorer
back (if available)
Fifth Button
Internet Explorer forward
(if available)
Fig. 3

11
To program mouse buttons:
Please note that only the scroll wheel, fourth, and fifth buttons
are programmable through the software. Refer to Fig. 3 of mouse
for description.
1. Click “Start”.
2. Click “Programs”
3. Click “Belkin Multimedia Keyboard”.
4. Then double-click on “Belkin Multimedia Utility Mouse”.
5. Next double-click on the mouse icon on the task bar.
To program wheel speed:
1. Under the “Wheel” tab in wheel mode, select “Enhanced
scroll mode”.
2. Under “Wheel speed” in drop-down menu, select a
number for “scroll lines per scroll unit” or select “one
page per scroll unit”.
3. Click “Apply”.
4. Click “OK”.
To program mouse buttons:
1. Select the “Button” tab.
2. Select a button to program.
3. Choose from the following functions in Table 1.
About your Belkin Software | For the Mouse

1
2
3
4
5
6
7
8
9
10
12
Section
• System Default
• F1 – F10
• Esc
• Backspace
• Enter
• Space
• Delete
• Page Up
• Page Down
• Tab
• Home
• End
• Up
• Down
• Left
• Right
• Undo
• Redo
• Cut
• Copy
• Paste
• Internet Explorer
• Find Computer
• Find File
• System Help
• Middle Button
• Minimize
All Windows
• Run
• Start Menu
• System Property
• Undo Minimize
all Windows
• Control Panel
• Close Application
• Double-Click
• Maximize Window
• Minimize Window
• Drag Lock
• Shift Lock
• Control Lock
• Horizontal Wheel
• Launch
Default Browser
• Launch
Default Email
• Internet Explorer
Backward
• Internet Explorer
Forward
• Universal Scroll
• Auto Scroll
• Universal Zoom
• Connect
to Internet
About your Belkin Software | For the Mouse
4. Click “Apply”.
5. Click “OK”.
Table 1

Troubleshooting
13
Synchronizing the Receiver and Wireless Multimedia
Desktop 250
1. Press the connect button on top of the receiver, and then
press the button on the bottom of the keyboard. It should
connect within 10 seconds.
2. Press the connect button on the top of the receiver, and
then press the button on the bottom of the mouse.
Within 10 seconds, it should connect.
3. If the keyboard did not connect, please repeat step 1.
4. If the mouse did not connect, please repeat step 2.
Switching IDs
If interference occurs while using the keyboard and/or mouse,
switch IDs by following the steps below:
For the Keyboard:
• Press the connect button on top of the receiver, and then
press the button on the bottom of the keyboard. It should
connect within 10 seconds.
• If the keyboard does not connect, please repeat step.

Troubleshooting
1
2
3
4
5
6
7
8
9
10
14
Section
For the Mouse:
• Press the connect button on the top of the receiver, and
then press the button on the bottom of the mouse.
Within 10 seconds, it should connect.
• If the mouse does not connect the first time, please repeat.
If the keyboard and/or mouse is/are not working after installation:
Be sure the receiver’s cables are plugged into either the
computer’s PS/2 ports or a USB port. If you are connecting it via
PS/2, make sure that both plugs are being used (purple keyboard
connector and the USB connection with the green PS/2 adapter).
If you are connecting via USB, make sure that you only connect
the USB connector.
For optimal performance
Place the receiver at least eight inches (20cm) away from the
computer monitor, the computer, any external storage devices,
or other electrical devices.
Make sure you have properly installed the batteries. Check to
make sure the batteries you have installed are not dead (you can
do this by installing them into another device).
If the keyboard does not register keystrokes, replace current
batteries with high-quality alkaline batteries.
If the mouse pointer becomes choppy on-screen, replace current
batteries with high-quality alkaline batteries. Be sure that the
mouse is not on a reflecting surface (such as a transparent,
mirrored, or glossy table). If this is the case, place an opaque or
textured material—or a mouse pad—underneath the mouse.
This will allow the optical mechanism to work accurately.

Information
15
FCC Statement
DECLARATION OF CONFORMITY WITH FCC RULES FOR
ELECTROMAGNETIC COMPATIBILITY
We, Belkin Corporation, of 501 West Walnut Street, Compton, CA 90220, declare
under our sole responsibility that the product,
F8E859-BNDL
to which this declaration relates,
Complies with Part 15 of the FCC Rules. Operation is subject to the following two
conditions: (1) this device may not cause harmful interference, and (2) this device must
accept any interference received, including interference that may cause undesired
operation.
Caution: Exposure to Radio Frequency Radiation.
The radiated output power of this device is far below the FCC radio frequency exposure
limits. Nevertheless, the device shall be used in such a manner that the potential for
human contact during normal operation is minimized. When connecting an external
antenna to the device, the antenna shall be placed in such a manner to minimize the
potential for human contact during normal operation. In order to avoid the possibility of
exceeding the FCC radio frequency exposure limits, human proximity to the antenna shall
not be less than 20cm (8 inches) during normal operation.
Federal Communications Commission Notice
This equipment has been tested and found to comply with the limits for a Class B digital
device, pursuant to Part 15 of the FCC Rules. These limits are designed to provide
reasonable protection against harmful interference in a residential installation.
This equipment generates, uses, and can radiate radio frequency energy. If this
equipment does cause harmful interference to radio or television reception, which can
be determined by turning the equipment off and on, the user is encouraged to try and
correct the interference by one or more of the following measures:
• Reorient or relocate the receiving antenna.
• Increase the distance between the equipment and the receiver.
• Connect the equipment to an outlet on a circuit different from that to
which the receiver is connected.
• Consult the dealer or an experienced radio/TV technician for help.

Information
1
2
3
4
5
6
7
8
9
10
16
Section
Modifications
The FCC requires the user to be notified that any changes or modifications to this device
that are not expressly approved by Belkin Corporation may void the user’s authority to
operate the equipment.
Canada-Industry Canada (IC)
The wireless radio of this device complies with RSS 210 Industry Canada.
This Class B digital apparatus complies with Canadian ICES-003.
Cet appareil numérique de la classe B conforme á la norme NMB-003 du Canada.
Belkin Corporation Limited Lifetime Product Warranty*
Belkin Corporation warrants this product against defects in materials and workmanship
for its lifetime. If a defect is discovered, Belkin will, at its option, repair or replace
the product at no charge provided it is returned during the warranty period, with
transportation charges prepaid, to the authorized Belkin dealer from whom you
purchased the product. Proof of purchase may be required.
This warranty does not apply if the product has been damaged by accident, abuse,
misuse, or misapplication; if the product has been modified without the written
permission of Belkin; or if any Belkin serial number has been removed or defaced.
THE WARRANTY AND REMEDIES SET FORTH ABOVE ARE EXCLUSIVE IN LIEU OF
ALL OTHERS, WHETHER ORAL OR WRITTEN, EXPRESSED OR IMPLIED. BELKIN
SPECIFICALLY DISCLAIMS ANY AND ALL IMPLIED WARRANTIES, INCLUDING, WITHOUT
LIMITATION, WARRANTIES OF MERCHANTABILITY AND FITNESS FOR A PARTICULAR
PURPOSE.
No Belkin dealer, agent, or employee is authorized to make any modification, extension,
or addition to this warranty.
BELKIN IS NOT RESPONSIBLE FOR SPECIAL, INCIDENTAL, OR CONSEQUENTIAL
DAMAGES RESULTING FROM ANY BREACH OF WARRANTY, OR UNDER ANY OTHER
LEGAL THEORY, INCLUDING BUT NOT LIMITED TO, LOST PROFITS, DOWNTIME,
GOODWILL, DAMAGE TO OR REPROGRAMMING, OR REPRODUCING ANY
PROGRAM OR DATA STORED IN, OR USED WITH, BELKIN PRODUCTS.
Some states do not allow the exclusion or limitation of incidental or consequential
damages or exclusions of implied warranties, so the above limitations or exclusions may
not apply to you. This warranty gives you specific legal rights, and you may also have
other rights that vary from state to state.
*Batteries not included under warranty.