Belkin F9K1106V2 Dual-Band Wireless Range Extender User Manual N600 Dual ok
Belkin International, Inc. Dual-Band Wireless Range Extender N600 Dual ok
Belkin >
User Manual

1
Dual-Band Wireless Range Extender
USER MANUAL
8820-01371
Rev. A02
F9K1106v2
Ok JL 10/20/14
TABLE OF CONTENTS
Getting Started
What’s in the Box
Initial Setup
Getting to Know Your Dual-Band Wi-Fi Range Extender
Front Panel
Back Panel
Technical Details
Technical Features
System Requirements
Advanced Settings
Resetting the Dual-Band Wi-Fi Range Extender
Troubleshooting, Support, and Warranty
Troubleshooting
Technical Support
Belkin International, Inc., Limited 2-Year Product Warranty
Regulatory Information
FCC Statement
IC Statement
2
Getting Started
Congratulations on buying an Dual-Band Wireless Range Extender (the Range Extender).
This device will enable you to extend the range of your dual-band router to eliminate
“dead spots” in your wireless network. The dual-band feature extends both your 2.4GHz
and 5GHz networks.
What’s in the Box
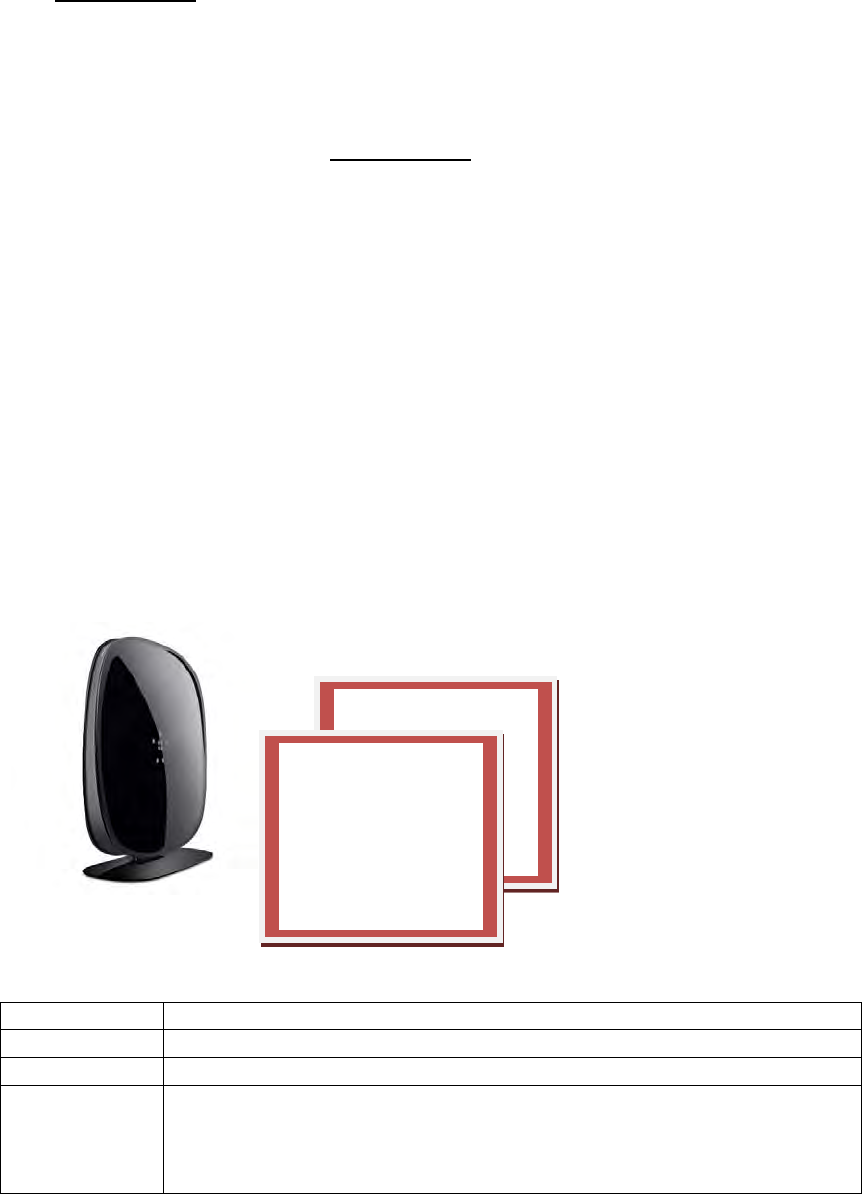
Dual-Band Wireless Range Extender
Quick Installation Guide
User Manual on CD
Initial Setup
To get started, you will need:
Your primary wireless router, its network name (SSID), and password. If it’s a
dual-band router, please be sure you have both SSIDs and passwords.
A personal computer with a web browser
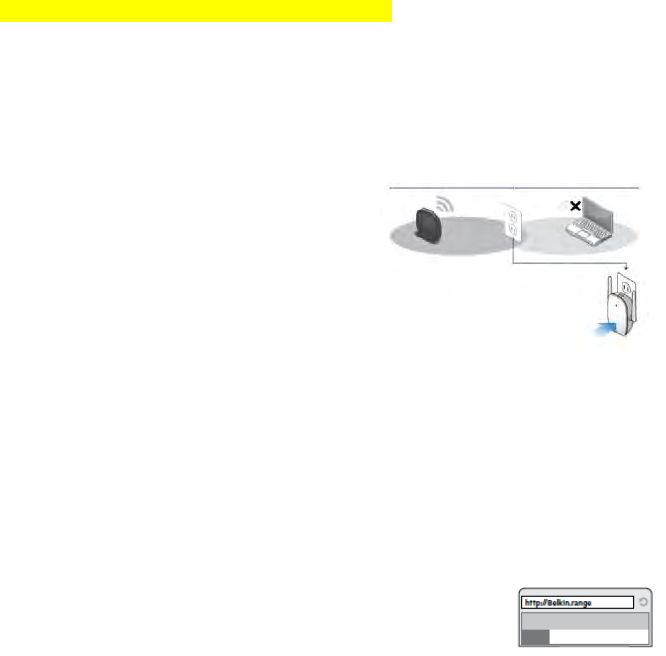
Set Up Your Range Extender Wirelessly
[please derive lineart from QIG: 8820-xxxxx A00]
(JL, 1. Need to apply a new part number for N600 WRX QIG.
2. Then modify N300 WRX QIG 8820-01078 wording as N600 WRX.
3. If necessary, modify the N300 WRX figure with longer antenna.
Step 1
Choose an outlet near the edge of your network’s Wi-Fi coverage.
Step 2
Plug in your N600 DB Range Extender.
Step 3
Connect your computer to the “Belkin.setup” wireless network. Make sure nothing is plugged into your
Ethernet port.
On Windows Vista or Windows 7, please check the option “Connect Automatically” when you select the
network.
Step 4
3
Visit “http://Belkin.range” and follow the on-screen instructions.
Wired Setup
Step 1: Connect the Range Extender to your computer using an Ethernet cable (Ethernet cable not included).
Step 2: Plug the Range Extender into a wall socket or other power source.
Step 3: On your computer, turn off Wi-Fi.
Step 4: Use your favorite browser to visit http://Belkin.range and follow the instructions that appear there.
Step 5: After your setup is complete, please turn on Wi-Fi.
How to reset the Range Extender and get it connected if you change your router’s
network name or password:
1. Locate the Range Extender’s reset button on the base of the unit.
2. With the unit still powered on, press and hold the Range Extender’s reset
button for 10 seconds.
3. Connect your computer to the “Belkin.setup” wireless network. Make sure
nothing is plugged into your Ethernet port.
4. In your Internet browser, open the address “http://Belkin.range” and follow the
on-screen instructions.
Getting to Know Your Dual-Band Wi-Fi Range Extender
(JL, Need to change this photo to N600 WRX with longer antenna)
A) Status Light
Your Range Extender’s status is shown by the light on the front.
Off The Range Extender is not plugged into a power source.
Blinking Blue The Range Extender is starting up.
Solid Blue The Range Extender is connected to the Wi-Fi® network.
Solid Amber The Range Extender is connected to the Wi-Fi network but is
experiencing a weak signal. The weak signal may be either the 2.4GHz
or 5GHz band. A weak signal may lead to performance problems.
Consider moving the Range Extender closer to the wireless router.
modify the line ar
Modify the line art
4
Blinking
Amber The Range Extender is not connected to the Wi-Fi network. Check to
make sure that your wireless router is functioning properly, and/or move
the Range Extender closer to the wireless router.
Alternating
Blue/Amber The Range Extender is ready to be set up. (Refer to “Getting Started”
for instructions on how to set up your Range Extender.)
B) Wi-Fi Protected Setup (WPS) Light and Button
The WPS button on the top of your Range Extender can be used to help establish
a secure connection between your Range Extender and
other WPS-enabled Wi-Fi devices such as computers. To use
the WPS feature on your Range Extender, see “Advanced Settings
> Wi-Fi Protected Setup > Using Wi-Fi Protected Setup.”
The small LED light near the WPS button shows what is happening
while you are using WPS to establish a connection.
Off: Idle
Blinking Blue: The Range Extender is listening for a WPS-enabled
computer or other device.
Solid Blue: The Range Extender has made a secure
connection with the computer or other device.
Blinking Amber: A connection was not created.
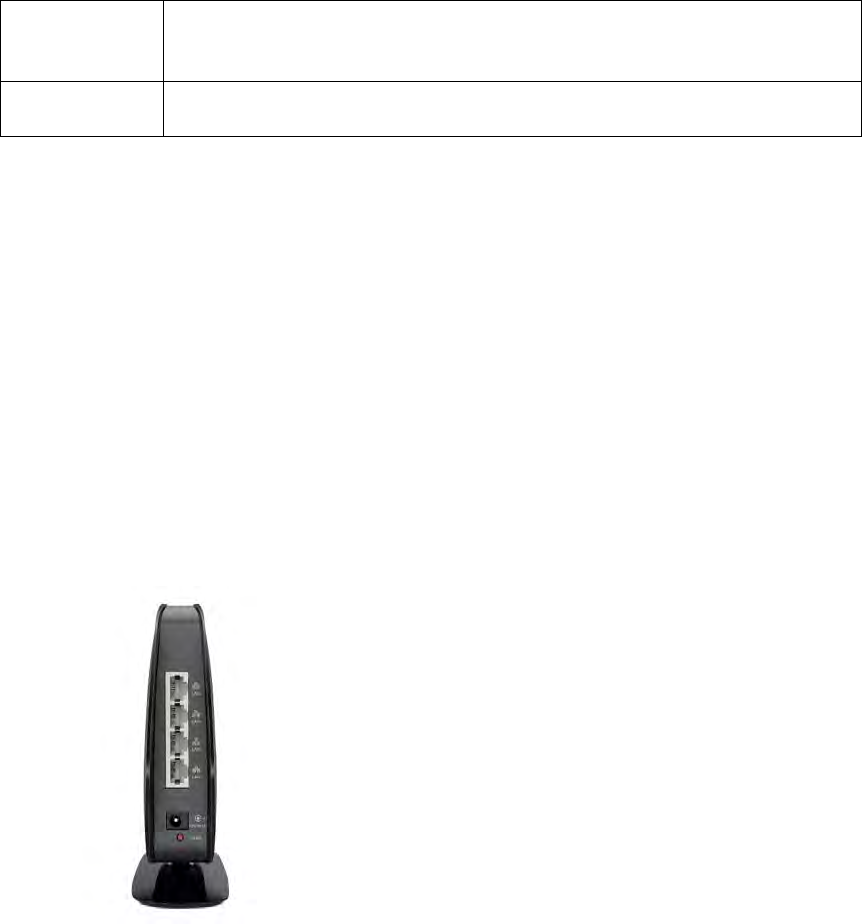
A) Wired (LAN) Connector
Connect AV devices such as a TV, Blu-ray player, gaming console, and other wired
devices to the port using an Ethernet cable (not included).
B) Reset Button
This button is used to restart your Range Extender in rare cases when it functions
incorrectly. Resetting the Range Extender will preserve your settings. This button may
also be used to restore the factory default settings. Please see the Troubleshooting section
for more information.

5
Technical Details
System Requirements:
802.11a/b/g/n 2.4GHz and/or 5GHz wireless router with broadband Internet
connection
At least one computer with:
Installed wireless network interface card and TCP/IP protocol
Windows® XP 32 (SP3 or greater), Windows Vista® 32/64, or Windows 7 32/64;
or Mac OS® X v10.5 or above
Internet Explorer® v7 or above, Firefox®, Google Chrome™, or Safari®
Minimum 1.8GHz processor
Minimum 512MB RAM
Specifications:
Wireless Standards with Link Rate
o IEEE 802.11n (up to 300Mbps for 2.4GHz and 5GHz*)
o IEEE 802.11g (up to 54Mbps*)
o IEEE 802.11a (up to 54Mbps*)
o IEEE 802.11b (up to 11Mbps*)
Wireless Operating Spectrum:
o Simultaneous Dual-Band
o 2.4GHz and 5GHz
Wireless Security:
o Wi-Fi Protected Setup™
o 256-bit WPA®/WPA2® encryption
o 64/128-bit WEP encryption
Ports:
o 1 LAN Fast Ethernet port
Advanced Settings
Connecting to the Web Interface
When you are connected to your Range Extender, you can access the Range Extender’s
Web-Based Advanced User Interface (UI) using your Internet browser. In your browser,
type “belkin.range.” Then press the “Enter” key.
6
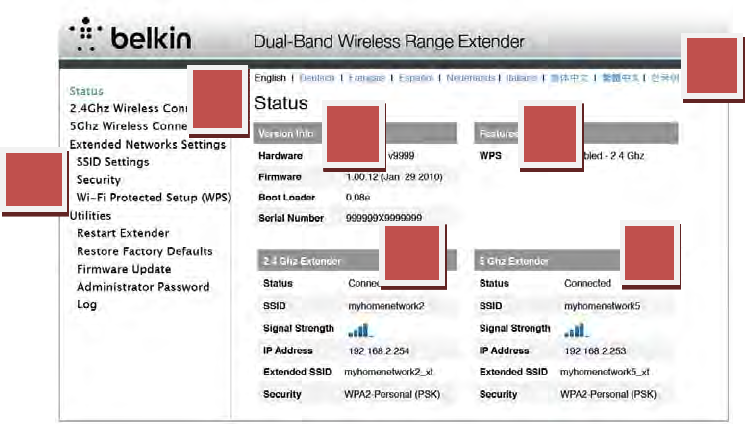
The Status Page
This page shows the detailed status of your Range Extender. The meaning of the various
items is detailed below.
1. Quick-Navigation Links
You can go directly to any of the Range Extender’s advanced UI pages by clicking
directly on these links.
2. Language
Shows the active language for the Advanced User Interface. Select the desired language
by clicking one of the available languages.
3. Page Name
The page you are on can be identified by this name. This User Manual will sometimes
refer to pages by name. For instance, “LAN > LAN Settings” refers to the “LAN
Settings” page.
4. Version Info
The Version Info section gives you information on the hardware part number, version
number, firmware version, and serial number. Belkin Technical Support may ask you for
this information in certain troubleshooting situations.
5. Features
This section details whether the WPS function is enabled or disabled, and for which
extended network (2.4GHz or 5GHz).
6. and 7.
These sections provide detailed information on the 2.4GHz and 5GHz extended
networks.
1
3
2
4 5
67
7
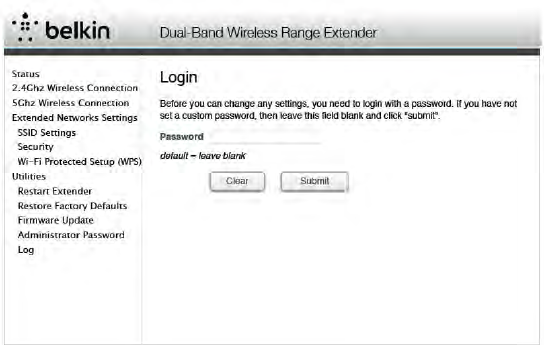
Logging into the Firmware
The Range Extender’s home page is visible to any user who wants to see it. To make any
changes to the Range Extender’s settings, you have to log in. Clicking on any one of the
links on the home page will take you to the login screen. The Range Extender ships with
no password entered. In the login screen, leave the password blank and click the
“Submit” button to log in.
Configuring the 2.4GHz Wireless Connection
This option will change the settings for the Range Extender’s connection to your main
2.4GHz network. You can use this option for the following tasks:
Connecting to a different wireless network
Updating the settings after you’ve changed the wireless settings (e.g., security type
or password) on your Range Extender
Click on the “2.4GHz Wireless Connection” link on the left side of the screen.

8
The Range Extender will provide the following options:
Network Name (SSID) This is the name of the 2.4GHz network you wish to
extend.
Security Type You must specify the type of security for your Range
Extender (WPA2, WPA, WEP, or None).
Password (Key) This is the password or passkey that you normally use
to connect to your wireless router.
Configuring the 5GHz Wireless Connection
This option will change the settings for the Range Extender’s connection to your main
5GHz network. You can use this option for the following tasks:
Connecting to a different wireless network
Updating the settings after you’ve changed the wireless settings (e.g., security type
or password) on your Range Extender
Click on the “5GHz Wireless Connection” option on the left side of the screen.
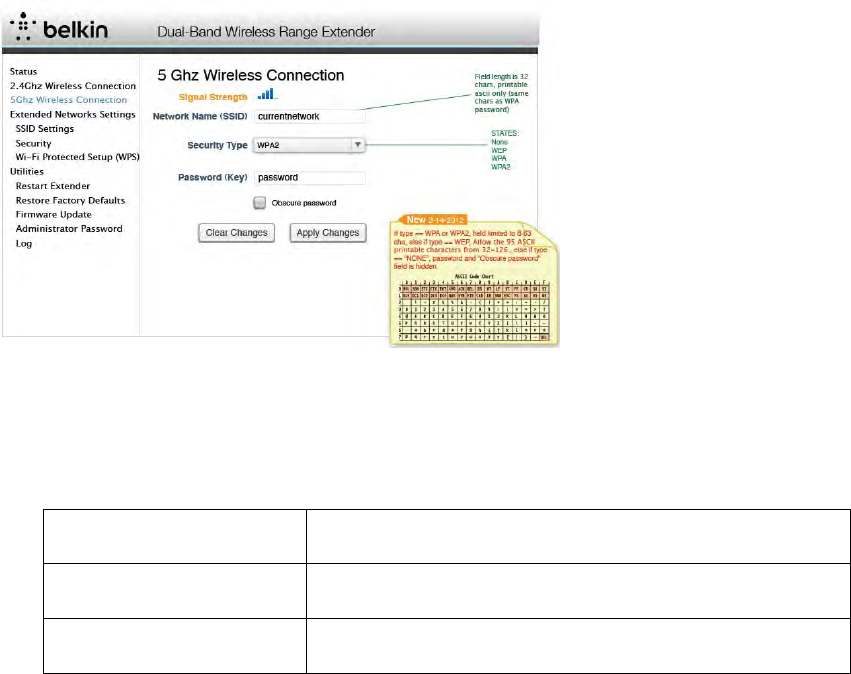
9
The Range Extender will provide the following options:
Network Name (SSID) This is the name of the 5GHz network you wish to
extend.
Security Type You must specify the type of security for your router
(WPA2, WPA, WEP, or None).
Password (Key) This is the password or passkey that you normally use
to connect to your wireless router.
Extended Network Settings
These options enable you to configure your Extended Networks.
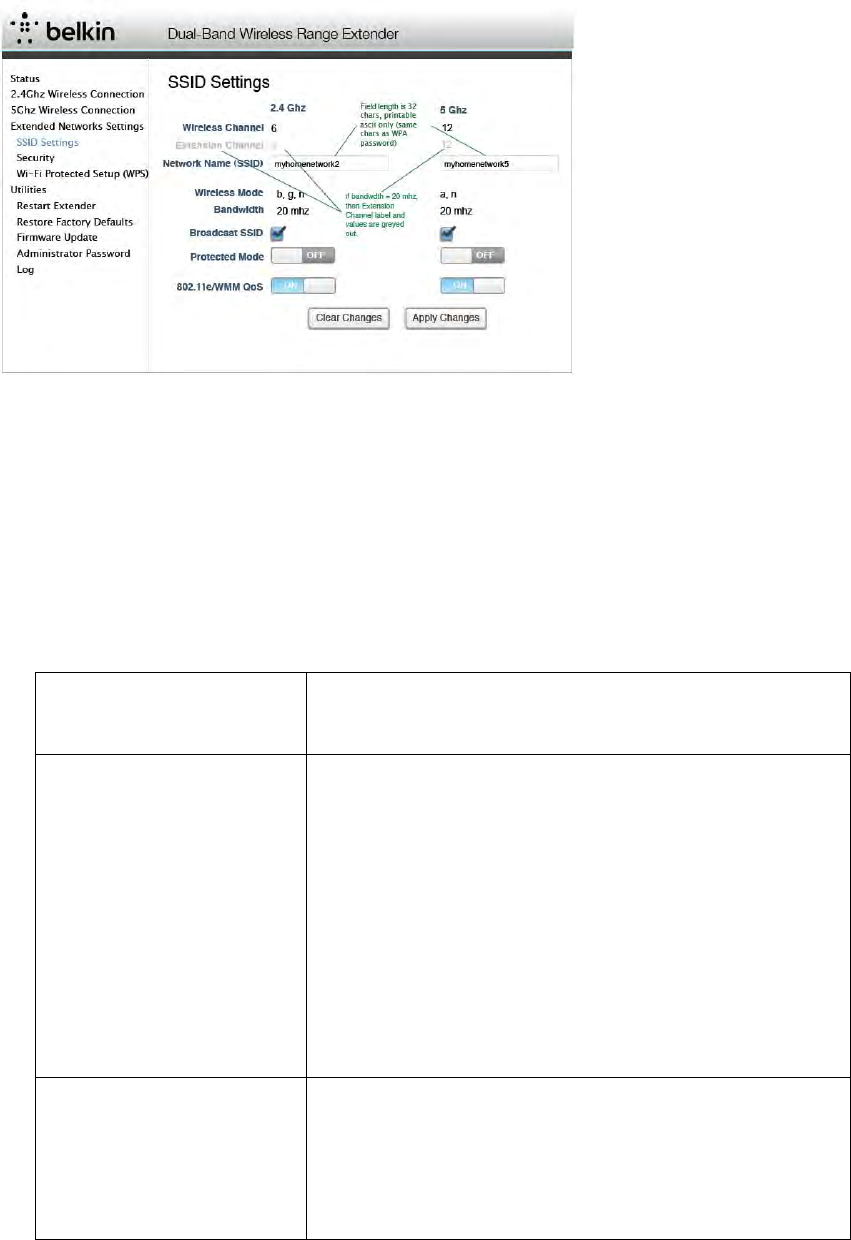
SSIDSettings
This screen enables you to configure the SSID, security, and other features of your
Extended Network.
10
We recommend accepting the default values here, which will mirror your main network.
However, if you wish to change settings for the Extended Network, you can do so here.
The screen is arranged in two columns, one for your 2.4GHz Extended Network and the
second for the 5GHz Extended Network.
For each network, you may configure the following:
Network Name (SSID) This is the name of your extended Wi-Fi Range
Extender as it will show up when you try to connect to
it from a laptop, tablet, etc.
Broadcast SSID Note: This advanced feature should be employed by
advanced users only. For security, you can choose not
to broadcast your extended network’s SSID. Doing so
will keep your network name hidden from computers
that are scanning for the presence of wireless networks.
To turn off the broadcast of the SSID, remove the
check mark from the box next to “Broadcast SSID”,
and then click “Apply Changes.” The change is
immediate. Each wireless computer or device now
needs to be set to connect to your specific SSID. Refer
to the documentation of your computer, tablet, or other
device.
Protected Mode Protected mode ensures proper operation of draft
802.11n-compliant devices on your wireless network
when 802.11g or 802.11b devices are present or when
there is heavy 802.11g or 802.11b traffic in the
operating environment. Use protected mode if your
network consists of a mix of Belkin Double N+
11
Wireless Cards and 802.11g or 802.11b cards. If you
are in an environment that includes little to no 802.11g
or 802.11b wireless network traffic, you will achieve
the best wireless performance with protected mode
OFF. Conversely, in an environment with HEAVY
802.11g or 802.11b traffic or interference, you will
achieve the best wireless performance with protected
mode ON. This will ensure wireless performance is not
affected.
802.11e/WMM QoS 802.11e/WMM QoS is a feature that prioritizes the
traffic on your wireless network based on the type of
traffic. We recommend leaving this enabled for optimal
performance.
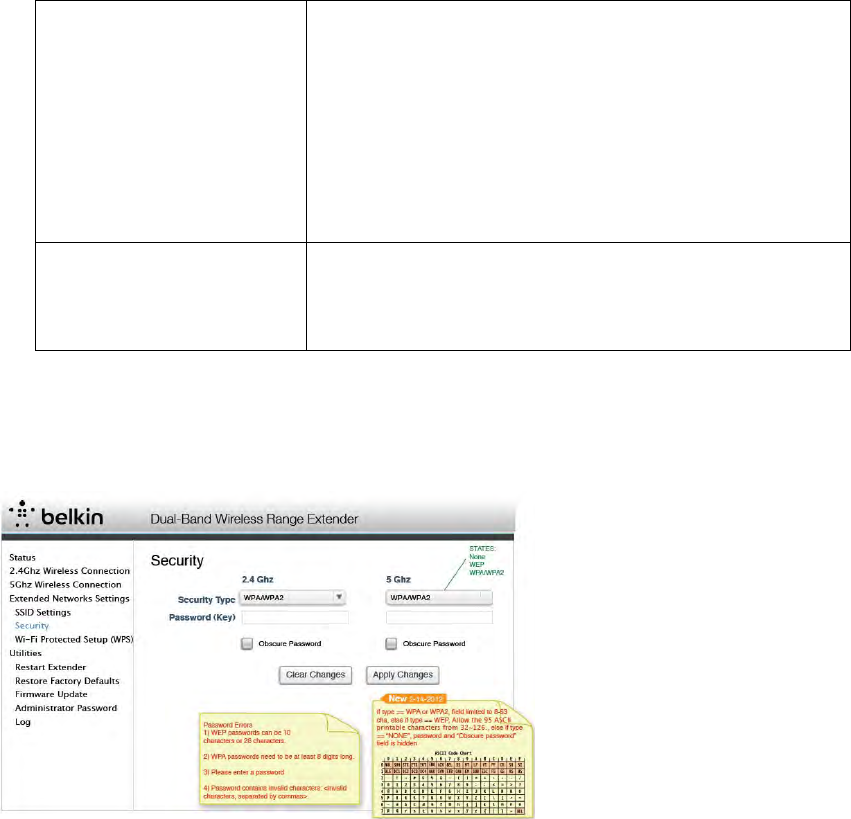
Security
This screen enables you to change the wireless security settings such as WPA or WEP.
We recommend leaving the settings you used when you went through the Setup Wizard.
By default, your Range Extender will use the same security settings as your main
network. However, if you wish, you may specify different security settings here. The
screen is arranged in two columns, one for your 2.4GHz network and the other for your
5GHz network.
Security Type: You may specify the type of security here. Available options are
WPA2/WPA, WEP, and None (no security). We recommend you use the same type of
security as your main router.
Password(Key):
12
For WPA2 security, this can be any set of characters from 8 to 63 characters in length,
(only accept printable ASCII characters). For WEP security, this must be a string of “hex
characters” (0-9 or A-F). (If you specify “None” for the security, this field will be hidden.)
We recommend you use the same password as your main router.
Obscure password:
If this box is checked, the password will be obscured in your browser so that others
cannot see it when you type it in.
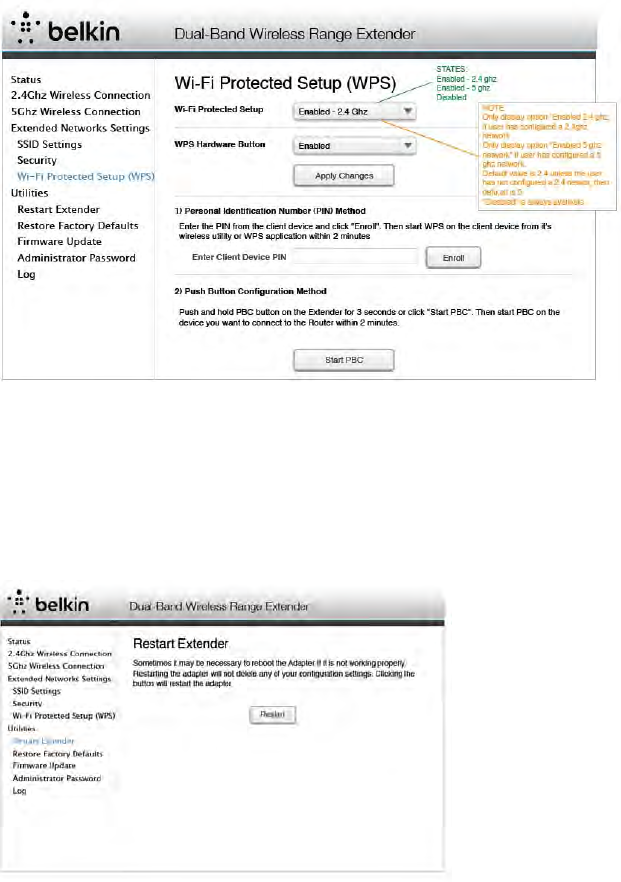
Wi‐FiProtectedSetup
Your Dual-Band Wi-Fi Range Extender supports the Wi-Fi Protected Setup™ (WPS)
specification, which simplifies the setup of a wireless network. WPS uses familiar
methodologies, such as typing in a Personal Identification Number (PIN) or pushing a
button, to enable users to automatically configure network names and strong
WPA/WPA2 data encryption and authentication.
Using Wi-Fi Protected Setup™
Belkin recommends that you set up WPA2 as your wireless security. WPS does not
provide additional security, but rather simplifies the addition of wireless devices to your
wireless network. You may use either the Push Button Configuration (PBC) method or
PIN method to allow a device access to your wireless network.
PBC: Push and hold the WPS button located on the front of your Range Extender for two
seconds and the security LED will flash, indicating that WPS has been initiated. Then,
initiate WPS on the client device within two minutes (refer to your client’s
documentation on this procedure). The wireless device and Range Extender will
automatically exchange a security key and establish a secure connection.
PIN: The client device has a WPS PIN number (eight digits) that will be provided to you
when you initiate the connection to the Range Extender. Enable WPS through the screen
illustrated to the below. Enter the client’s PIN into the Range Extender’s internal registrar
(accessed through this screen). The client will be securely enrolled into your wireless
network within two minutes.
Cross-band is a Belkin wireless feature that allows your range extender to use both Wi-Fi
bands to delivery faster speeds in your network. The feature is automatically enabled
when your range extender is connected to a dual-band router. If your range extender
connects to a single band router, this feature will be disabled. If you wish to disable
Cross-band manually and still connect to a dual-band network type: http://
belkin.range/crossband.asp and uncheck the Cross-Band Enabled box.
13
Resetting the Dual-Band Wi-Fi Range Extender
Restart your Dual-Band Wi-Fi Range Extender
Restoring Factory Defaults
In some situations, it may be necessary to restore factory defaults; this will restore the unit to the
settings when you pulled it out of the box. If you do this, you’ll need to set it up again.
14
Updating the Range Extender’s Firmware via the Web Interface
The following steps show you how to update your Dual-Band Wi-Fi Range Extender’s
firmware using its web interface.
Click the button to “Check for Firmware Updates.” This will show you whether there is new
firmware available.
Download the firmware file and save it to your PC.

15
Click “Choose Update File”; a box will open up. Select the firmware file you just
downloaded.
Click “Update Firmware.”
Troubleshooting, Support, and Warranty
Troubleshooting
BelkinSetupcannotfindmyDual‐BandWi‐FiRangeExtender.
If Belkin Setup is not able to communicate with your Dual-Band Wi-Fi Range Extender
during the installation process, please make sure that the Range Extender is powered on.
The Range Extender is having trouble connecting to your wireless network.
BlinkingAmberLED
This indicates that the Dual-Band Wi-Fi Range Extender is not connected to your
wireless network. Please move the Range Extender closer to your router.
SolidAmberLED
This indicates that the Dual-Band Wi-Fi Range Extender is connected to your wireless
network but the signal is weak. You might experience slower performance. Please move
the Range Extender closer to your router.
Mywirelessnetworkperformanceisslow,inconsistent,suffersfromweak
signal,orI’mhavingdifficultymaintainingaconnectionwithmywireless
network.
Wireless technology is radio-based, which means connectivity and the throughput
performance between devices decreases when the distance between devices increases.
Other factors that will cause signal degradation (metal is generally the worst culprit) are
obstructions such as walls and metal appliances. Note also that connection speed may
decrease as you move your computer farther away from the Range Extender. Finally,
note that all your wireless devices are sharing the same network. So, if you have another
device that is generating a lot of network traffic (for example, transferring large files) that
will compromise the performance of other devices on the network. Try moving
high-traffic devices closer to the Range Extender, or try wiring them to your router with
an Ethernet cable.

16
Reset Button
The “Reset” button is used in rare cases when the Range Extender may function improperly.
Resetting the Range Extender will restore the Range Extender’s normal operation while
maintaining the programmed settings. You can also restore the factory default settings by using
the “Reset” button. Use the restore option in instances where you may have forgotten your custom
password.
Resetting the Dual-Band Wi-Fi Range Extender
Push and release the “Reset” button. The light on the Range Extender will momentarily flash and
then become solid again, indicating that the reset is complete.
Restoring Your Range Extender to Factory Defaults
Press and hold the “Reset” button for at least 10 seconds, and then release it. The light on the
Range Extender will momentarily flash and then will begin to blink. When the light becomes solid
again, the restore is complete.
Technical Support
US
http://www.belkin.com/support
UK
http://www.belkin.com/uk/support
Australia
http://www.belkin.com/au/support
NewZealand
http://www.belkin.com/au/support
Singapore
1800 622 1130
Europe
http://www.belkin.com/uk/support
17
Belkin International, Inc., Limited 2-Year Product Warranty
What this warranty covers.
Belkin International, Inc. (“Belkin”) warrants to the original purchaser of this Belkin
product that the product shall be free of defects in design, assembly, material, or
workmanship.
What the period of coverage is.
Belkin warrants the Belkin product for two years.
What will we do to correct problems?
Product Warranty.
Belkin will repair or replace, at its option, any defective product free of charge
(except for shipping charges for the product). Belkin reserves the right to
discontinue any of its products without notice, and disclaims any limited warranty
to repair or replace any such discontinued products. In the event that Belkin is
unable to repair or replace the product (for example, because it has been
discontinued), Belkin will offer either a refund or a credit toward the purchase of
another product from Belkin.com in an amount equal to the purchase price of the
product as evidenced on the original purchase receipt as discounted by its natural
use.
What is not covered by this warranty?
All above warranties are null and void if the Belkin product is not provided to
Belkin for inspection upon Belkin’s request at the sole expense of the purchaser,
or if Belkin determines that the Belkin product has been improperly installed,
altered in any way, or tampered with. The Belkin Product Warranty does not
protect against acts of God such as flood, lightning, earthquake, war, vandalism,
theft, normal-use wear and tear, erosion, depletion, obsolescence, abuse,
damage due to low voltage disturbances (i.e. brownouts or sags), non-authorized
program, or system equipment modification or alteration.
How to get service.
To get service for your Belkin product you must take the following steps:
1. Contact Belkin International, Inc., at 12045 E. Waterfront Drive, Playa Vista,
CA 90094, Attn: Customer Service, or call (800)-223-5546, within 15 days of the
Occurrence. Be prepared to provide the following information:
a. The part number of the Belkin product.
b. Where you purchased the product.
c. When you purchased the product.
d. Copy of original receipt.
2. Your Belkin Customer Service Representative will then instruct you on how to
forward your receipt and Belkin product and how to proceed with your claim.
18
Belkin reserves the right to review the damaged Belkin product. All costs of
shipping the Belkin product to Belkin for inspection shall be borne solely by the
purchaser. If Belkin determines, in its sole discretion, that it is impractical to ship
the damaged equipment to Belkin, Belkin may designate, in its sole discretion, an
equipment repair facility to inspect and estimate the cost to repair such equipment.
The cost, if any, of shipping the equipment to and from such repair facility and of
such estimate shall be borne solely by the purchaser. Damaged equipment must
remain available for inspection until the claim is finalized. Whenever claims are
settled, Belkin reserves the right to be subrogated under any existing insurance
policies the purchaser may have.
How state law relates to the warranty.
THIS WARRANTY CONTAINS THE SOLE WARRANTY OF BELKIN. THERE
ARE NO OTHER WARRANTIES, EXPRESSED OR, EXCEPT AS REQUIRED
BY LAW, IMPLIED, INCLUDING THE IMPLIED WARRANTY OR CONDITION
OF QUALITY, MERCHANTABILITY OR FITNESS FOR A PARTICULAR
PURPOSE, AND SUCH IMPLIED WARRANTIES, IF ANY, ARE LIMITED IN
DURATION TO THE TERM OF THIS WARRANTY.
Some states do not allow limitations on how long an implied warranty lasts, so the
above limitations may not apply to you.
IN NO EVENT SHALL BELKIN BE LIABLE FOR INCIDENTAL, SPECIAL,
DIRECT, INDIRECT, CONSEQUENTIAL OR MULTIPLE DAMAGES SUCH AS,
BUT NOT LIMITED TO, LOST BUSINESS OR PROFITS ARISING OUT OF THE
SALE OR USE OF ANY BELKIN PRODUCT, EVEN IF ADVISED OF THE
POSSIBILITY OF SUCH DAMAGES.
This warranty gives you specific legal rights, and you may also have other rights,
which may vary from state to state. Some states do not allow the exclusion or
limitation of incidental, consequential, or other damages, so the above limitations
may not apply to you.
DECLARATION OF CONFORMITY WITH FCC RULES FOR
ELECTROMAGNETIC COMPATIBILITY
This device complies with Part 15 of the FCC Rules. Operation is subject to
the following two conditions: (1) This device may not cause harmful
interference, and (2) this device must accept any interference received,
including interference that may cause undesired operation.

19
Regulatory Information
***
FCC Statement
Federal Communication Commission Interference Statement
This equipment has been tested and found to comply with the limits for a Class B
digital device, pursuant to Part 15 of the FCC Rules. These limits are designed to
provide reasonable protection against harmful interference in a residential
installation. This equipment generate, uses, and can radiate radio frequency
energy and, if not installed and used in accordance with the instructions, may
cause harmful interference to radio communications. However, there is no
guarantee that interference will not occur in a particular installation. If this
equipment does cause harmful interference to radio or television reception, which
can be determined by turning the equipment off and on, the user is encouraged to
try to correct the interference by one of the following measures:
● Reorient or relocate the receiving antenna.
● Increase the separation between the equipment and receiver.
● Connect the equipment into an outlet on a circuit different from that to which the
receiver is connected.
● Consult the dealer or an experienced radio/TV technician for help.
FCC Caution: Any changes or modifications not expressly approved by the party
responsible for compliance could void the user’s authority to operate this
equipment.
This device and it's antennas(s) must not be co-located or operating in conjunction with
any other antenna or transmitter except in accordance with FCC multi-transmitter product
procedures.
This device is going to be operated in 5.15~5.25GHz frequency range, it is restricted for
indoor environment only.
For product available in the USA/Canada market, only channel 1~11 can be operated.
Selection of other channels is not possible.
20
IMPORTANT NOTE:
FCC Radiation Exposure Statement:
This equipment complies with FCC radiation exposure limits set forth for an
uncontrolled environment. This equipment should be installed and operated with a
minimum distance of 20cm between the radiator and your body.
IC Statement:
This device complies with Industry Canada license-exempt RSS standard(s).
Operation is subject to the following two conditions: (1) this device may not cause
interference, and (2) this device must accept any interference, including
interference that may cause undesired operation of the device.
Le présent appareil est conforme aux CNR d'Industrie Canada applicables aux appareils radio
exempts de licence. L'exploitation est autorisée aux deux conditions suivantes : (1) l'appareil ne
doit pas produire de brouillage, et (2) l'utilisateur de l'appareil doit accepter tout brouillage
radioélectrique subi, même si le brouillage est susceptible d'en compromettre le fonctionnement.
This device and it's antennas(s) must not be co-located or operating in conjunction with
any other antenna or transmitter except in accordance with IC multi-transmitter product
procedures.
Cet appareil et son antenne (s) ne doit pas être co-localisés ou fonctionnement en association
avec une autre antenne ou transmetteur.
The device for the band 5150–5250MHz is only for indoor use to reduce potential
for harmful interference to co-channel mobile satellite systems.
les dispositifs fonctionnant dans la bande 5150-5250 MHz sont réservés uniquement pour une
utilisation à l’intérieur afin de réduire les risques de brouillage préjudiciable aux systèmes de
satellites mobiles utilisant les mêmes canaux;
For product available in the USA/Canada market, only channel 1~11 can be operated.
Selection of other channels is not possible.
Pour les produits disponibles aux États-Unis / Canada du marché, seul le canal 1 à 11
peuvent être exploités. Sélection d'autres canaux n'est pas possible.
21
IMPORTANT NOTE:
IC Radiation Exposure Statement:
This equipment complies with IC RSS-102 radiation exposure limits set forth for
an uncontrolled environment. This equipment should be installed and operated
with a minimum distance of 20cm between the radiator and your body.
NOTE IMPORTANTE: (Pour l'utilisation de dispositifs mobiles)
Déclaration d'exposition aux radiations:
Cet équipement est conforme aux limites d'exposition aux rayonnements lC établies pour
un environnement non contrôlé. Cet équipement doit être installé et utilisé avec un
minimum de 20 cm de distance entre la source de rayonnement et votre corps.
Caution:
The device for the band 5150–5250MHz is only for indoor usage to reduce potential for
harmful interference to co-channel mobile satellite systems.
Avertissement:
Le dispositif fonctionnant dans la bande 5150-5250MHz est réservé uniquement pour une
utilisation à l'intérieur afin de réduire les risques de brouillage préjudiciable aux systèmes
de satellites mobiles utilisant les mêmes canaux.
22
Back cover
© 2012 Belkin International, Inc. All rights reserved. All trade names are
registered trademarks of respective manufacturers listed. Mac OS and Safari are
trademarks of Apple Inc., registered in the U.S. and other countries. Windows,
Windows Vista, and Internet Explorer are either registered trademarks or
trademarks of Microsoft Corporation in the United States and/or other countries.