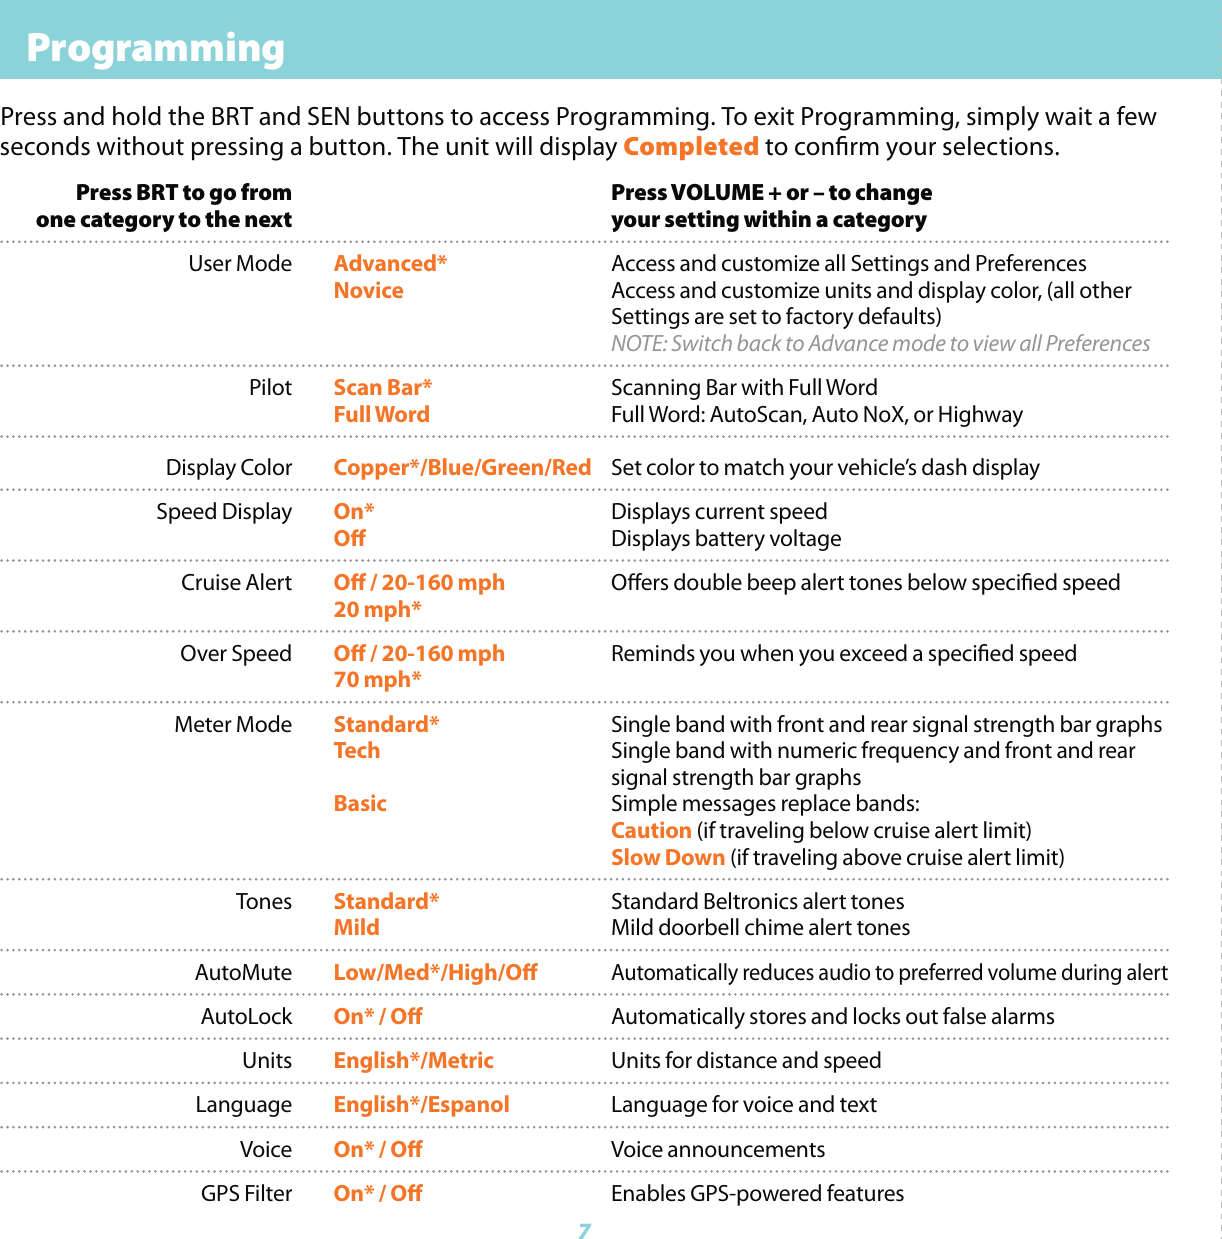
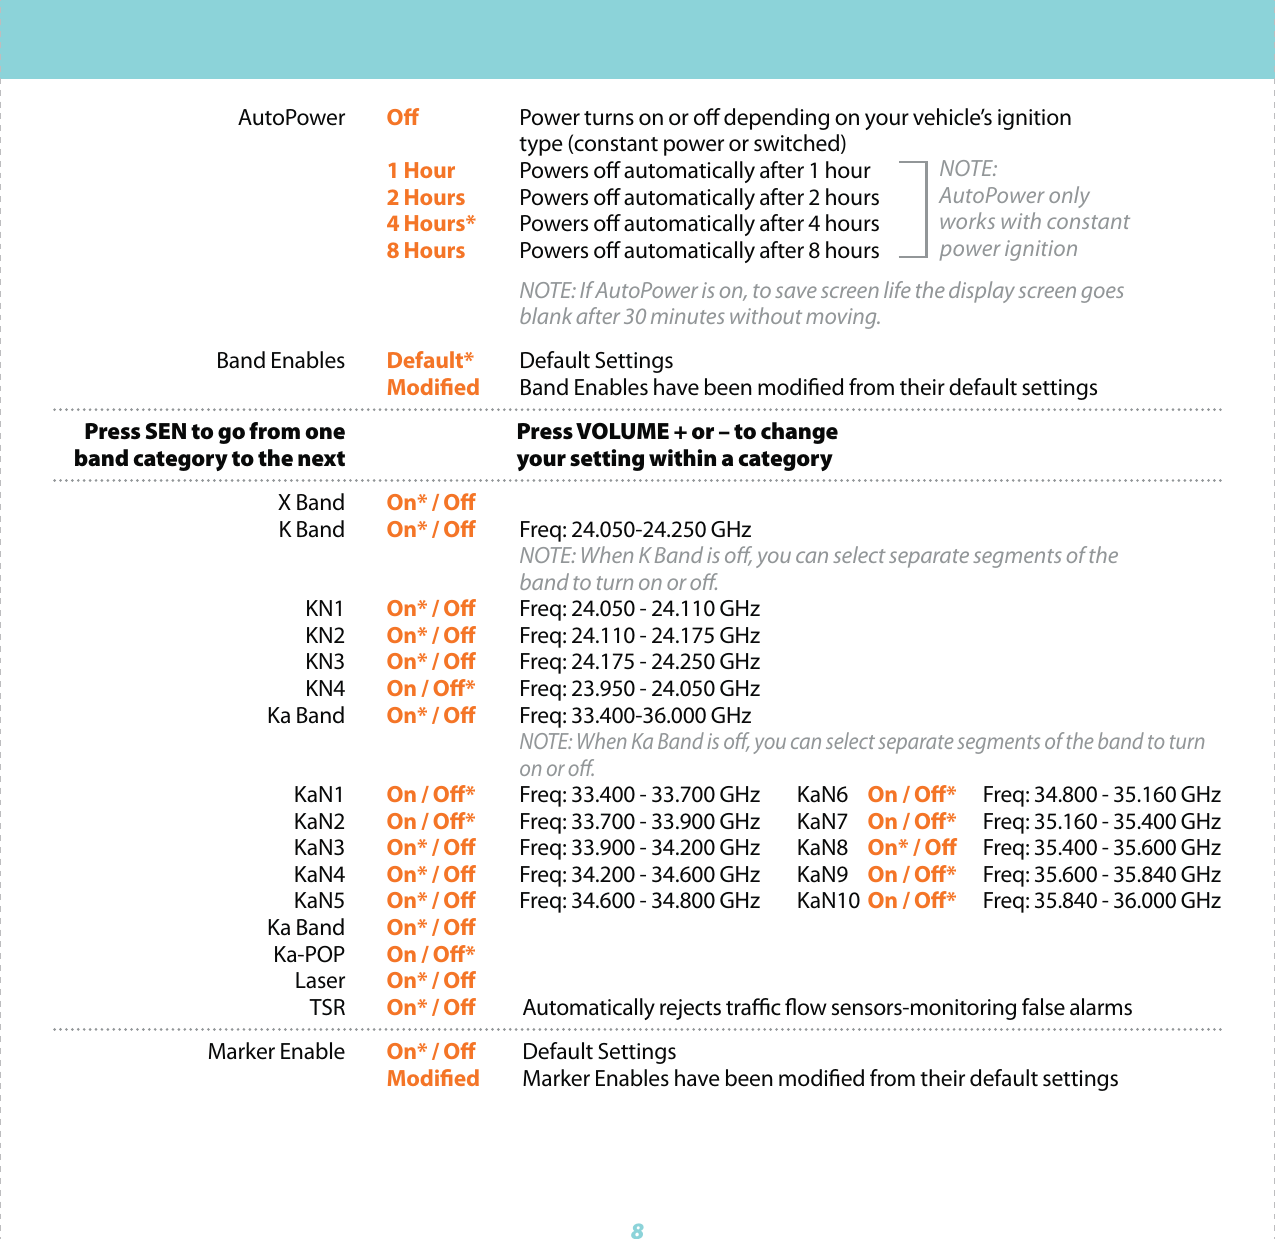
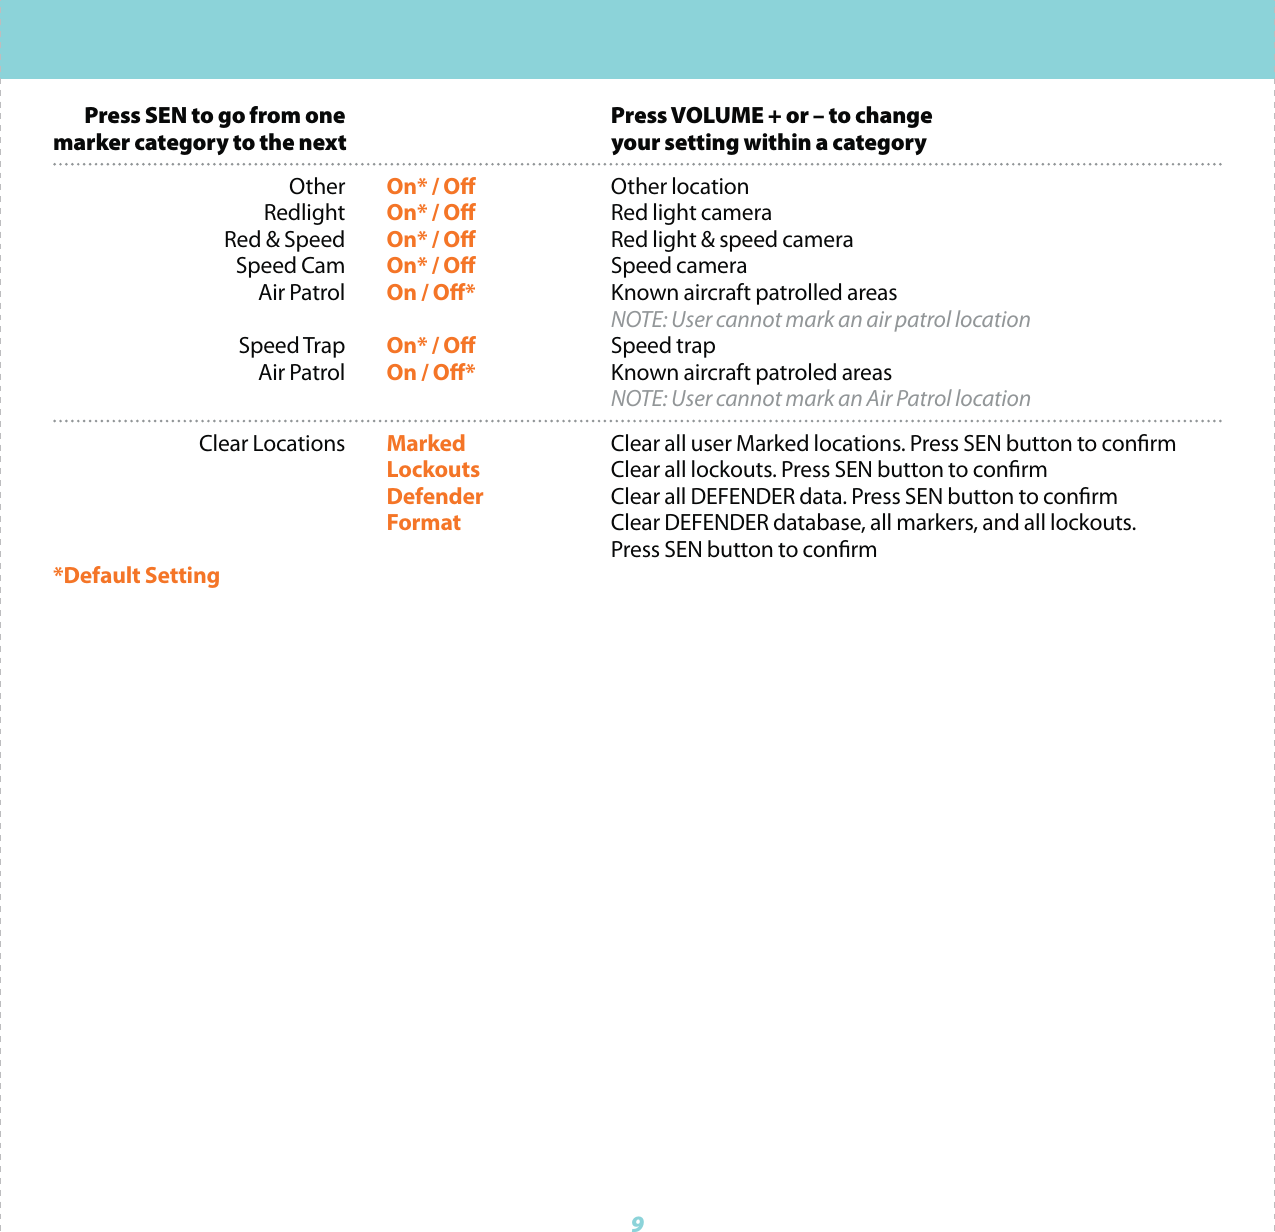
Beltronics USA M6 Radar/Laser Detector with Alert-Signaling Arrows User Manual AW 1220061 1A GT360 QRG REV A

Beltronics USA Inc Radar/Laser Detector with Alert-Signaling Arrows AW 1220061 1A GT360 QRG REV A

User manual_GT-360 Quick Reference Guide.pdf

Quick ReferenceLive life in the passing lane.Arrows indicate direction of the threat.360° Protection with Threat DirectionDual Antenna Front  & Rear Protection GPS Intelligence Rejects False Alerts ESCORT Live Crowd Sourced Alerts Lightning Fast  ResponseGT-360FCC ID:QL4M6
Congratulations GT-360 Features2HIGH DEFINITION 360° PROTECTIONGT-360 features a  new multi-color OLED display.  Brilliant graphics illuminate intuitive icons that identify the type of threat at a glance.•  GT-360’s HD Performance accurately identies real threats sooner than other detectors, and with threat direction arrows, provides you with location information about these threats.•  Updatable IVT Filter™ automatically reduces false alerts from moving In-Vehicle Technology sources such as collision avoidance systems and adaptive cruise control.•  GPS location-based intelligence automatically locks out false alerts and allows you to mark locations for future reference. •  Access to the DEFENDER Database, which warns you of veried speed traps, speed cameras, and red light cameras.•  Built in Bluetooth® technology gives you access to ESCORT’s award winning app, ESCORT Live. The exclusive real-time ticket-protection network which warns you of upcoming alerts received and reported by other users in the area, and gives you access to local speed limit data for over-speed alerts.Take the freedom of the road back with the Beltronics GT-360, equipped with 360° high denition protection, threat direction arrows, and intelligent GPS technology to eliminate false alerts. Go to Beltronics.com for full featured Owner’s Manual.ke the freedom of the road back with the
3Registration and ESCORT LiveFor iPhone:1  Ensure GT-360 power is ON2  Open the App Store on your iPhone  and  search for ESCORT Live Radar.3  Follow the onscreen instructions to download    ESCORT Live Radar and then open the app.4  When prompted, enter the username and      password  you created when registering your     product at Beltronics.com. 5  Press the Settings button           then select     Devices.6  You should see GT-360   listed  with Not Connected   underneath.   Press the GT-360 device    entry  and when prompted   select Pair.7  The Bluetooth icon on the GT-360 display      will appear to conrm that it is paired to   your iPhone.Before downloading ESCORT Live, you must rstregister your device. Be sure to have your device nearby, as you will need its serial number. 1 Visit www.Beltronics.com and click Product  Registration.2 Click the “Registration for all devices” link.3 Follow the onscreen instructions to register  your device.Be sure to write down the username and password you create, as you will need this information to access and download ESCORT Live. (You will also receive an e-mail with this information, once you have registered your device.)For Android based smartphones:1  Ensure GT-360 power is ON.2  On your smartphone go to Bluetooth® Settings  and  make sure that Bluetooth® is ON.3  Press Scan for devices and wait for the device    list to  populate, GT-360 should appear      under  Available devices.4 Press the GT-360 device entry. 5  The Bluetooth icon on the GT-360 display      will appear to conrm that it is paired to your   smartphone.6 Open Google Play on your smartphone    and  search for Escort Live Radar.7  Follow the onscreen instructions to download   Escort  Live Radar and then open the app.8  When prompted, enter the username and      password you created when registering your     product at Beltronics.com.7  Open the app, walk through the tutorial, and   you’re ready to hit the road!
 Installation          44  To adjust view, loosen thumb wheel and adjust angle of mounting bracket. Tighten thumb wheel to secure.5  Tilt the display end of the detector slightly upward and engage with the anged edge of the mounting bracket. The EZ Mag Mount™ magnet holds the detector in place.6  To remove the detector, simply lift the display end of the detector upward. The detector will release from the mount.7  To remove mount from windshield, release locking clamp and pull tab on top of StickyCup.EZ Mag Mount™ Care Instructions: Should the EZ Mag Mount™ StickyCup accumulate debris and lose its stickiness, simply rinse under warm water, gently wipe o debris and allow to air dry.Your new detector comes with the revolutionary EZ Mag Mount™. Simply tilt the display end of the detector up and slide it onto the mounting bracket. The magnetic mount holds the detector in place. To remove the detector from the mount, simply lift the display end of the detector and the detector releases from the mount.Mounting Tips:•  Center of windshield between driver and  passenger.•  Ensure clear view of road ahead and sky  above.•  Avoid windshield wipers and heavily tinted  areas.To mount the detector in your vehicle: 1  Remove paper backing from EZ Mag Mount™ `  StickyCup.2  Ensure the locking clamp is open.3  Firmly press EZ Mag Mount™ StickyCup onto   windshield and close the locking clamp to secure.Locking Clamp (closed)Thumb Wheel ForAngle AdjustmentMounting BracketRelease TabStickyCupGT-360EZ Mag Mount™
Controls & Features5Using GT-3601  Plug small end of SmartCord USB into modular jack on GT-360 and large end of SmartCord USB into your vehicle’s lighter/accessory socket2  GT-360 should power on automatically. If not,   press the device’s power button.  Power requirement  11.0-16.0 Volts DC negative ground  400mA standby, 700 mA maximumNOTE: You can easily access and customize all of your Settings and Preferences by pressing and holding the BRT and SEN buttons. See Settings and Preferences for details.Using SmartCord USB• Mute Button:    -  Press to mute the audio for a specic alert.  -  Press three times to lock out a false alert.  -  Press twice while receiving a locked-out alert    to unlock.  -  When connected to ESCORT Live press and       hold mute button on unit or cord to manually      report to other users a veried X or K-band       alert, or a police ocer observing trac. •  Alert Light: Blinks red when receiving a radar or   laser alert.•  Power Light: Lights green when device is     powered on.•  USB Charging Port: Charge smartphones,      tablets and other USB-charged Devices.Modular JackConnects to SmartCord for powering your deviceEarphone JackConnects to optional 3.5 mm stereo earphone.Modular ConnectorPlugs into detector jackSmartCord USB AdapterConnects to lighter/accessory socket
Continued ➜Display (OSP)OverSpeed alert setting that can be adjusted in Preferences. Bluetooth icon will appear on display screen blue whenpaired to phone and Speed limit data will show here when ESCORT Live App is open. MRKTo mark a location for future alerts, press MRK twice, then VOL + or – to select the type of marker, then MRK again to conrm. Press twice while receiving marker alert to unmarkDisplayShowing current speedPowerPress to turn GT-360 on or oMUTEPress to mute an alert; press three times to lock out a false alert; press twice while receiving a locked-out alert to unlockBRTPress to adjust display brightness (Min, Med, Max, Auto, Dark)SENPress to adjust detector sensitivity (Auto, AutoNoX, AutoLoK, and Highway)VolumePress and hold + or – to adjust volumeMount AreaThe EZ Mag Mount™attaches to device hereDisplayAlert areaOverSpeed AlertBluetoothSpeed Limit DataOverSpeed AlertBluetoothSpeed Limit Data6
 Programming  Press BRT to go from    Press VOLUME + or – to change  one category to the next    your setting within a category User Mode Advanced* Access and customize all Settings and Preferences     Novice Access and customize units and display color, (all other       Settings are set to factory defaults)     NOTE: Switch back to Advance mode to view all Preferences Pilot Scan Bar* Scanning Bar with Full Word  Full Word Full Word: AutoScan, Auto NoX, or Highway Display Color Copper*/Blue/Green/Red Set color to match your vehicle’s dash display Speed Display On* Displays current speed  O Displays battery voltage Cruise Alert O / 20-160 mph Oers double beep alert tones below specied speed  20 mph*  Over Speed O / 20-160 mph Reminds you when you exceed a specied speed  70 mph*  Meter Mode Standard* Single band with front and rear signal strength bar graphs  Tech Single band with numeric frequency and front and rear          signal strength bar graphs     Basic Simple messages replace bands:    Caution (if traveling below cruise alert limit)   Slow Down (if traveling above cruise alert limit) Tones Standard* Standard Beltronics alert tones  Mild Mild doorbell chime alert tones AutoMute Low/Med*/High/O Automatically reduces audio to preferred volume during alert AutoLock On* / O Automatically stores and locks out false alarms Units English*/Metric Units for distance and speed Language English*/Espanol Language for voice and text Voice On* / O Voice announcements GPS Filter On* / O Enables GPS-powered featuresPress and hold the BRT and SEN buttons to access Programming. To exit Programming, simply wait a few seconds without pressing a button. The unit will display Completed to conrm your selections.7
 AutoPower O Power turns on or o depending on your vehicle’s ignition       type (constant power or switched)  1 Hour Powers o automatically after 1 hour  2 Hours Powers o automatically after 2 hours  4 Hours* Powers o automatically after 4 hours  8 Hours Powers o automatically after 8 hours   NOTE: If AutoPower is on, to save screen life the display screen goes          blank after 30 minutes without moving.  Band Enables Default* Default Settings  Modied Band Enables have been modied from their default settings  Press SEN to go from one    Press VOLUME + or – to change  band category to the next    your setting within a category X Band On* / O K Band On* / O  Freq: 24.050-24.250 GHz    NOTE: When K Band is o, you can select separate segments of the          band to turn on or o. KN1 On* / O Freq: 24.050 - 24.110 GHz KN2 On* / O Freq: 24.110 - 24.175 GHz  KN3 On* / O Freq: 24.175 - 24.250 GHz  KN4 On / O* Freq: 23.950 - 24.050 GHz  Ka Band On* / O Freq: 33.400-36.000 GHz    NOTE: When Ka Band is o, you can select separate segments of the band to turn       on or o. KaN1  On / O* Freq: 33.400 - 33.700 GHz  KaN6  On / O* Freq: 34.800 - 35.160 GHz   KaN2 On / O* Freq: 33.700 - 33.900 GHz  KaN7  On / O* Freq: 35.160 - 35.400 GHz  KaN3 On* / O Freq: 33.900 - 34.200 GHz   KaN8  On* / O Freq: 35.400 - 35.600 GHz KaN4 On* / O Freq: 34.200 - 34.600 GHz  KaN9  On / O* Freq: 35.600 - 35.840 GHz  KaN5 On* / O Freq: 34.600 - 34.800 GHz   KaN10  On / O* Freq: 35.840 - 36.000 GHz  Ka Band On* / O Ka-POP On / O* Laser On* / O TSR On* / O Automatically rejects trac ow sensors-monitoring false alarms Marker Enable On* / O Default Settings  Modied Marker Enables have been modied from their default settingsNOTE:AutoPower only works with constant power ignition8
9  Press SEN to go from one    Press VOLUME + or – to change marker category to the next    your setting within a category Other On* / O Other location Redlight On* / O Red light camera  Red & Speed  On* / O Red light & speed camera Speed Cam On* / O Speed camera  Air Patrol On / O* Known aircraft patrolled areas    NOTE: User cannot mark an air patrol location Speed Trap On* / O Speed trap Air Patrol On / O* Known aircraft patroled areas    NOTE: User cannot mark an Air Patrol location  Clear Locations Marked Clear all user Marked locations. Press SEN button to conrm   Lockouts Clear all lockouts. Press SEN button to conrm   Defender Clear all DEFENDER data. Press SEN button to conrm   Format Clear DEFENDER database, all markers, and all lockouts.       Press SEN button to conrm*Default Setting
Contact Us10Beltronics USA, Inc.5442 West Chester Road, West Chester OH 45069Beltronics One Year Limited WarrantyWhat this warranty covers: Beltronics USA, Inc. (“Beltronics”) warrants your Product against all defects in materials and workmanship.For how long: One (1) year from the date of original purchase from an authorized Beltronics dealer.What we will do: If a breach of warranty occurs, Beltronics, at its discretion, will either repair or replace your Product free of charge.What we will not do: Beltronics will not pay shipping charges that you incur for sending your Product to us.What you must do to maintain this warranty: Show original proof of purchase or receipt from an authorized Beltronics dealer.Warranty exclusions: This warranty does not apply to your product under any of the following conditions: 1. The serial number has been removed or modied. 2. Your product has been subjected to misuse or damage (including water damage, physical abuse, and/or improper installation). 3. Your product has been modified in any way. 4. Your receipt or proof-of-purchase is from a non-authorized dealer or internet auction site, including E-bay, U-bid, or other non-authorized resellers. 5. You are not the original purchaser of the Product from an authorized dealer or did not receive it as a gift from the original purchaser of the Product from an authorized dealer.To obtain service: 1. Contact Beltronics (1-800-341-2288) to obtain a Return Authorization Number. 2. Properly pack your Product and include: your name, complete return address, written description of the problem with your Product, daytime telephone number, and a copy of the original proof of purchase or receipt. 3. Label the outside of the package clearly with your Return Authorization Number. Ship the Product pre-paid (insured, for your protection) to: Beltronics USA, Inc., 5442 West Chester Rd., West Chester, OH 45069.LIMITATION OF WARRANTY: The obligations set forth above are Beltronics’ sole obligations and your exclusive remedy. Beltronics makes no other express warranty. Any implied warranty of merchantability or tness for a particular purpose that may be applicable to the Product is limited in duration to the duration of this warranty. Some States do not allow limitations on how long an implied warranty lasts, so the above limitation may not apply to you. BELTRONICS SHALL NOT BE LIABLE FOR CONSEQUENTIAL, SPECIAL OR INCIDENTAL DAMAGES INCLUDING, WITHOUT LIMITATION, DAMAGES ARISING OUT OF THE USE, MISUSE OR MOUNTING OF THE PRODUCT. Some States do not allow the exclusion or limitation of incidental or consequential damages, so the above limitation or exclusion may not apply to you. Beltronics is not responsible for products lost in shipment between the owner and our service center.Other legal rights: This warranty gives you specic legal rights, and you may also have other rights which vary from State to State.©2018 Beltronics USA, Inc. Beltronics®, GT-360™, Escort Live!™, Defender®,  TrueLock™, SmartShield®, SpecDisplay™, AutoSensitivity™ and  EZ Mag Mount™ are trademarks of Beltronics USA, Inc. Manufactured in the Philippines. Features, specications and prices subject to change without notice.FCC NOTE: Modications not expressly approved by the manufacturer could void the user’s FCC granted authority to operate the equipment.FCC ID:QL4M6. CONTAINS FCC ID:QKLBT2This device complies with part 15 of the FCC rules. Operation is subject to the following two conditions: (1) This device may not cause harmful interference, and (2) this device must accept any interference received including interference that may cause undesired operation.866.468.0322  •  Beltronics.comNotes for ProgrammingFor descriptions of features and functions available when connected to ESCORT Live, visit Beltronics.com and download the GT-360 Owner’s Manual.To view serial number and software revision press MRK and MUTE while powering on detector.To restore GT-360 to its original factory Settings, press and hold MRK and BRT while turning the power on. A Restored message will display, acknowledging the reset.Software UpdatesGT-360’s red light and speed camera database is easily updated using our exclusive detector software tools found on our web site. Firmware, or the operating software for the detector, can also be updated using these tools. In order to have access to these updates, you must register your GT-360 at www.Beltronics.com. Once registered, you will receive email notications that updates are now available for your database or rmware. To handle your software and DEFENDER updates you need to connect your GT-360 to a computer rst. You can connect GT-360 to a computer via USB/USB Mini B cable.AW-1220061-1A Artwork QFG BEL GT-360 rev AEcn 1180110

Navigation menu