Benq TX Wireless Transmitter User Manual
Benq Corporation Wireless Transmitter
UserManual.wiki
>
Benq
>
TX User Manual
>
User Manual.pdf
Contents
1.
User Manual (Statements).pdf
2.
User Manual.pdf
User Manual.pdf
Navigation menu
Upload a User Manual
Namespaces
Wiki Guide
HTML
PDF
Info
Views
User Manual
Discussion / Help
Navigation

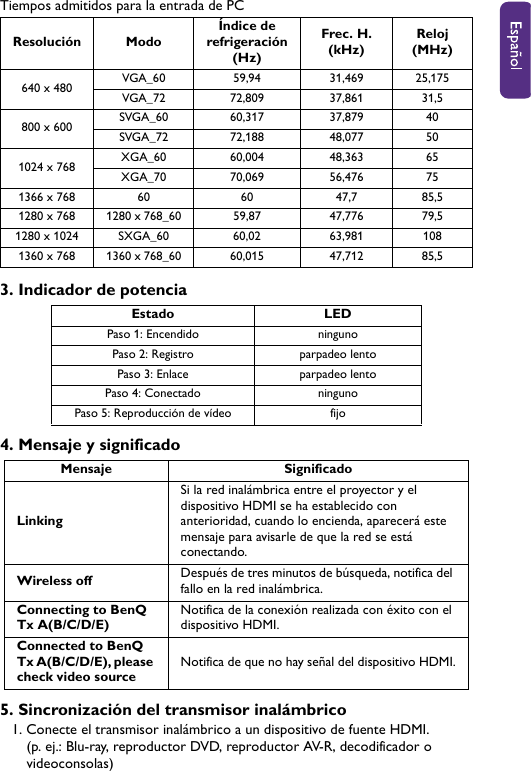
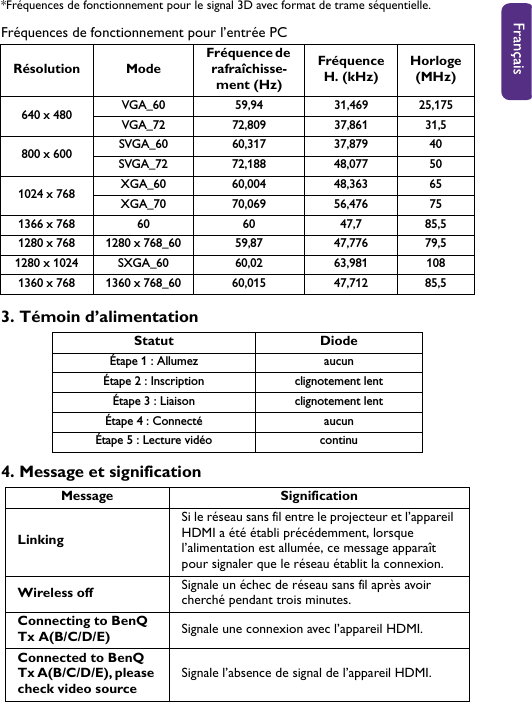
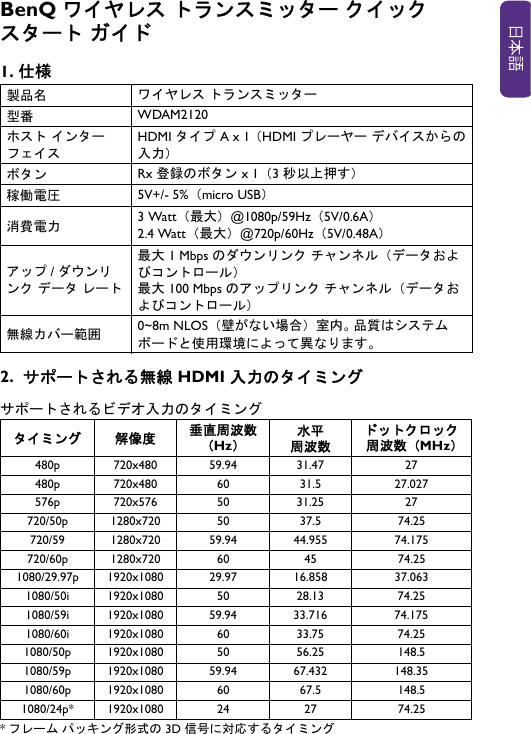
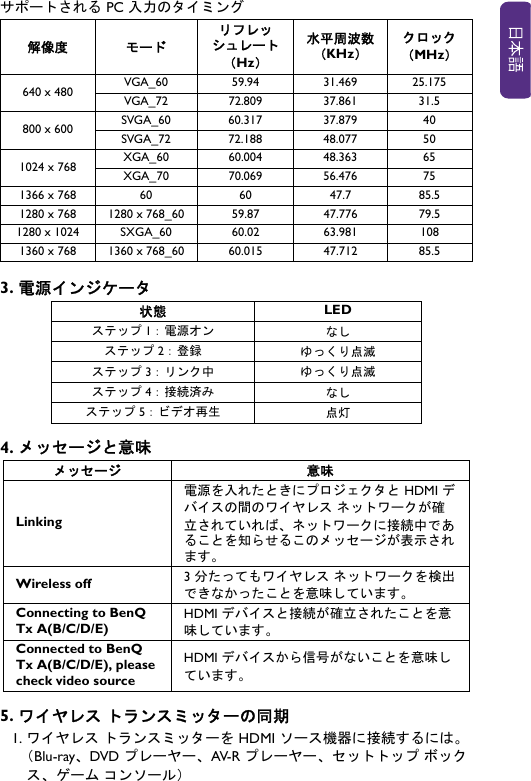
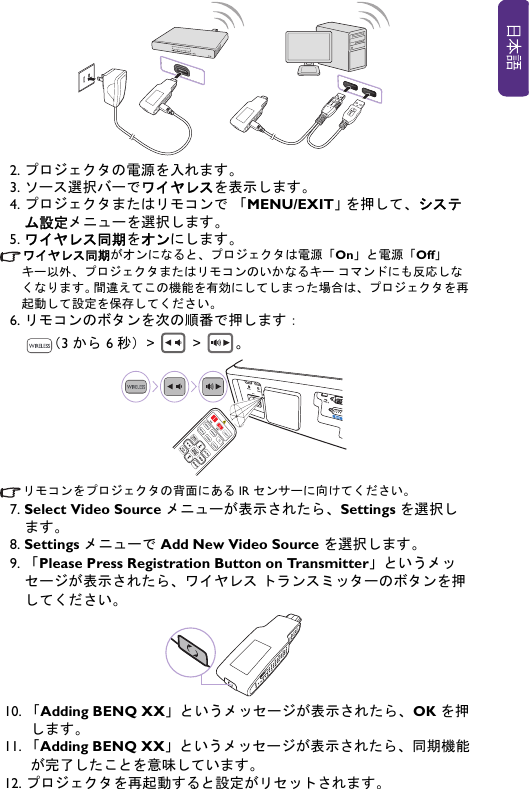
![5. Wireless transmitter synchronization1. Connect the wireless transmitter to an HDMI source device. (e.g. Blu-ray, DVD player, AV-R player, set top boxes, or games consoles)2. Turn on the projector.3. Select Wireless in the source selection bar.4. Press [MENU/EXIT] on the projector or remote control, and select the System Setup menu.5. Set Wireless Sync to On.When Wireless Sync is on, the projector will not respond to any key commands from the projector or remote control, except the power [On] and power [Off] keys. If you've accidentally started this function, please re-start the projector to save the settings.6. Press the buttons on the remote control in the following sequence: (for 3 ~ 6 seconds) > > .Please point the remote control toward the IR sensor on the rear of the projector.7. When the Select Video Source menu displays, select Settings.8. In the Settings menu, select Add New Video Source.9. When the message "Please Press Registration Button on Transmit-ter" displays, press the button on the wireless transmitter.10. When the message "Adding BENQ XX" displays, and select OK.11. When the message "Adding BENQ XX" disappears, the sync function has completed successfully. 12. Restart the projector to reset the settings.](https://usermanual.wiki/Benq/TX.User-Manual-pdf/User-Guide-1969852-Page-3.png)
![2. Encienda el proyector.3. Seleccione Inalámbrica en la barra de selección de fuente.4. Pulse [MENU/EXIT] en el proyector o en el mando a distancia y seleccione el menú Configurac. sistema.5. Establezca Sincr. Inalámbrica en Activado.Cuando Sincr. Inalámbrica esté activado, el proyector no responderá a los comandos de las teclas del proyector o mando a distancia, a excepción del comando de las teclas [On] y [Off]. Si inició accidentalmente esta función, por favor reinicie el proyector para guardar la configuración.6. Pulse los botones del mando a distancia en el siguiente orden: (durante 3 ~ 6 segundos) > > .Posicione el mando a distancia hacia el sensor de infrarrojos en la parte trasera del proyector.7. Cuando el menú muestre Select Video Source, seleccione Settings.8. En el menú Settings, seleccione Add New Video Source.9. Cuando se muestre el mensaje "Please Press Registration Button on Transmitter", pulse el botón en el transmisor inalámbrico.10. Cuando se muestre el mensaje "Adding BENQ XX", seleccione OK.11. Cuando desaparezca el mensaje "Adding BENQ XX", la función de sincronización se habrá completado con éxito. 12. Reinicie el proyector para restablecer la configuración.](https://usermanual.wiki/Benq/TX.User-Manual-pdf/User-Guide-1969852-Page-6.png)
![5. Synchronisation du transmetteur sans fil1. Connectez le transmetteur sans fil à un appareil source HDMI. (p.ex. lecteur Blu-ray, lecteur de DVD, lecteur AV-R, décodeurs, ou consoles de jeux)2. Allumez le projecteur.3. Sélectionnez Sans fil dans la barre de sélection de la source.4. Appuyez [MENU/EXIT] sur le projecteur ou la télécommande et sélectionnez le menu Configuration système.5. Définissez Synchro sans fil sur Activ.Quand Synchro sans fil est activé, le projecteur ne répondra à aucune des commandes des touches du projecteur, à l’exception des touches [On] et [Off]. Si vous avez accidentellement démarré cette fonction, veuillez redémarrer le projecteur pour enregistrer les réglages.6. Appuyez les boutons sur la télécommande dans la séquence suivante : (pendant 3 ~ 6 secondes) > > .Veuillez diriger la télécommande vers le capteur infrarouge situé à l’arrière du projecteur.7. Quand le menu Select Video Source s’affiche, sélectionnez Settings.8. Dans le menu Settings, sélectionnez Add New Video Source.9. Quand le message « Please Press Registration Button on Transmitter » s’affiche, appuyez le bouton sur le transmetteur sans fil.10. Quand le message « Adding BENQ XX » s’affiche, sélectionnez OK.11. Quand le message « Adding BENQ XX » s’affiche, la fonction de synchro est terminée avec succès. 12. Redémarrez le projecteur pour réinitialiser les réglages.](https://usermanual.wiki/Benq/TX.User-Manual-pdf/User-Guide-1969852-Page-9.png)
![5. 無線發射器同步1. 將無線發射器連線至 HDMI 來源裝置。 (例如:藍光、DVD 播放器、AV-R 播放器、機上盒或遊戲主機)2. 啟動投影機。3. 在來源選取列中,選取無線。4. 按下投影機或遙控器上的 [MENU/EXIT],然後選取系統設定功能表。5. 將無線同步設為開啟。若無線同步已開啟,則投影機將不會回應來自投影機或遙控器的任何按鍵指令,但不包括電源 [ On ] 與電源 [ Off ] 按鍵。 若您不慎啟動此功能,請重新啟動投影機以儲存設定。6. 按照下列順序,按下遙控器上的按鈕: (持續 3 ~ 6 秒) > > 。請將遙控器指向投影機後方的紅外線感應器。7. 顯示 Select Video Source 功能表時,請選取 Settings 。8. 在 Settings 功能表中,選取 Add New Video Source。9. 若顯示 「Please Press Registration Button on Transmitter」訊息,請按下無線發射器上的按鈕。10. 若顯示 「Adding BENQ XX」訊息,請選取 OK。11. 若「Adding BENQ XX」訊息已消失,表示已順利完成同步功能。 12. 重新啟動投影機,以重設設定。](https://usermanual.wiki/Benq/TX.User-Manual-pdf/User-Guide-1969852-Page-15.png)

![5. 无线传输器同步1. 将无线传输器连接到 HDMI 信号原设备。(例如蓝光、 DVD 播放器、AV-R 播放器、机顶盒或游戏机)2. 打开投影机。3. 显示信号源选择条中的无线。4. 按投影机或遥控器上的 [MENU/EXIT],并选择系统设置菜单。5. 将无线同步设置为打开。当无线同步打开时,投影机将不会对来自投影机或遥控器的任何按键命令作出反应,但电源 [On] 和电源 [Off] 键除外。 如果您意外启动此功能,请重启投影机以保存设置。6. 按以下顺序按下遥控器上的按钮: (3 ~ 6 秒钟) > > 。请按着遥控器指向投影机后面的红外线传感器。7. 当显示 Select Video Source 菜单时,选择 Settings。8. 在 Settings 菜单中,选择 Add New Video Source。9. 当显示 “Please Press Registration Button on Transmitter”信息时,按无线传输器上的按钮。10. 当显示 “Adding BENQ XX”信息时,选择 OK。11. 当显示 “Adding BENQ XX”信息时,同步功能已成功完成。 12. 重启投影机以重置设置。](https://usermanual.wiki/Benq/TX.User-Manual-pdf/User-Guide-1969852-Page-18.png)