Bentley Kinetics KSENS201 KSemsor- IC3 User Manual K VEST GettingStarted 2
Bentley Kinetics, Inc. KSemsor- IC3 K VEST GettingStarted 2
UserManual.wiki
>
Bentley Kinetics
>
KSENS201 User Manual
Users Manual
Navigation menu
Upload a User Manual
Namespaces
Wiki Guide
HTML
PDF
Info
Views
User Manual
Discussion / Help
Navigation


![Getting Started with K-VEST™ Version 1.0 www.K-VEST.com 7 Installing KINESYNC™ K-VEST requires you to have the KINESYNC™ software installed on your laptop. For product packages that include a laptop, the software comes pre-installed. Otherwise, you will need to install the software. Pre-Installation Check List Before running the KINESYNC™ software installation program, make sure your laptop computer meets the following minimum system requirements: Laptop Computer Requirements ; Processor: 1.5GHZ Centrino or Intel Pentium 4 2.8GHZ ; Memory: 1GB RAM ; Video Card: 128 bit Video Graphics card (separate from motherboard) ; Connection ports 2 USB ports Firewire port including PCMCIA inserts (if video camera uses Firewire connection) 2 PCMCIA slots ; Minimum Screen Resolution: 1024 x 768 Software Requirements ; Microsoft Windows XP (Home or Professional version) with Service Pack 1 or higher. To determine which Service Pack you have on your laptop, right-click on My Computer, choose Properties… and look on the General tab. If needed, you can download and install the latest Windows Service Pack from the following internet address: http://www.microsoft.com/windowsxp/sp2 ; Microsoft Direct-X Runtime components. [CHECK]](https://usermanual.wiki/Bentley-Kinetics/KSENS201/User-Guide-648263-Page-7.png)
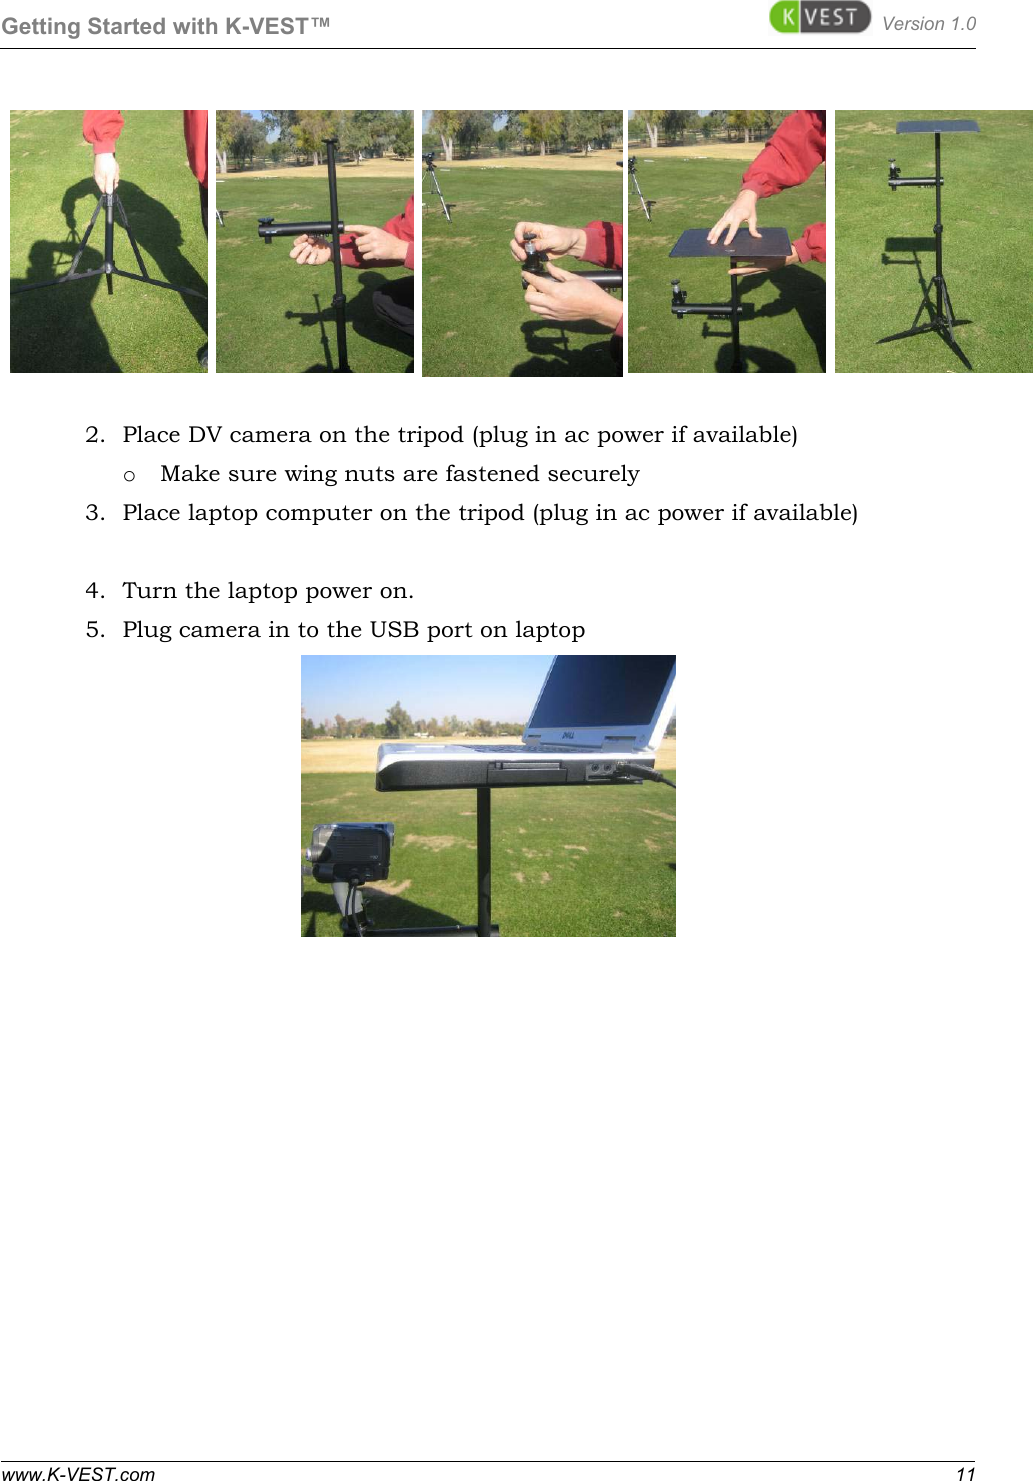
![Version 1.0 Getting Started with K-VEST™ 10 www.K-VEST.com • Tripod Camera-Laptop Stand – Whether you work with your K-VEST out on the golf course, in a lab, or in your living room, you will need to put your laptop on a secure work surface. As an optional accessory, Bentley Kinetics offers an integrated laptop and video camera tripod that has a standing-height platform for your laptop and a place to attach your video camera. At a minimum, you will need a tripod for your camera and a secure place to put your laptop. Setting Up the Laptop and Camera Stand Typically, your laptop and camera is set up directly in front of where you will swing. [aerial diagram showing orientation of tripod stand to golfer] 1. Set up the tripod as follows: o Take stand out of the bag o Spread legs on tripod with grey release button o Slide up extension to desired height o Attach camera bar (center of the bar 30 inches above the ground) o Screw on the camera universal joint to the camera bar o Attach laptop stand to the top of the tripod](https://usermanual.wiki/Bentley-Kinetics/KSENS201/User-Guide-648263-Page-10.png)
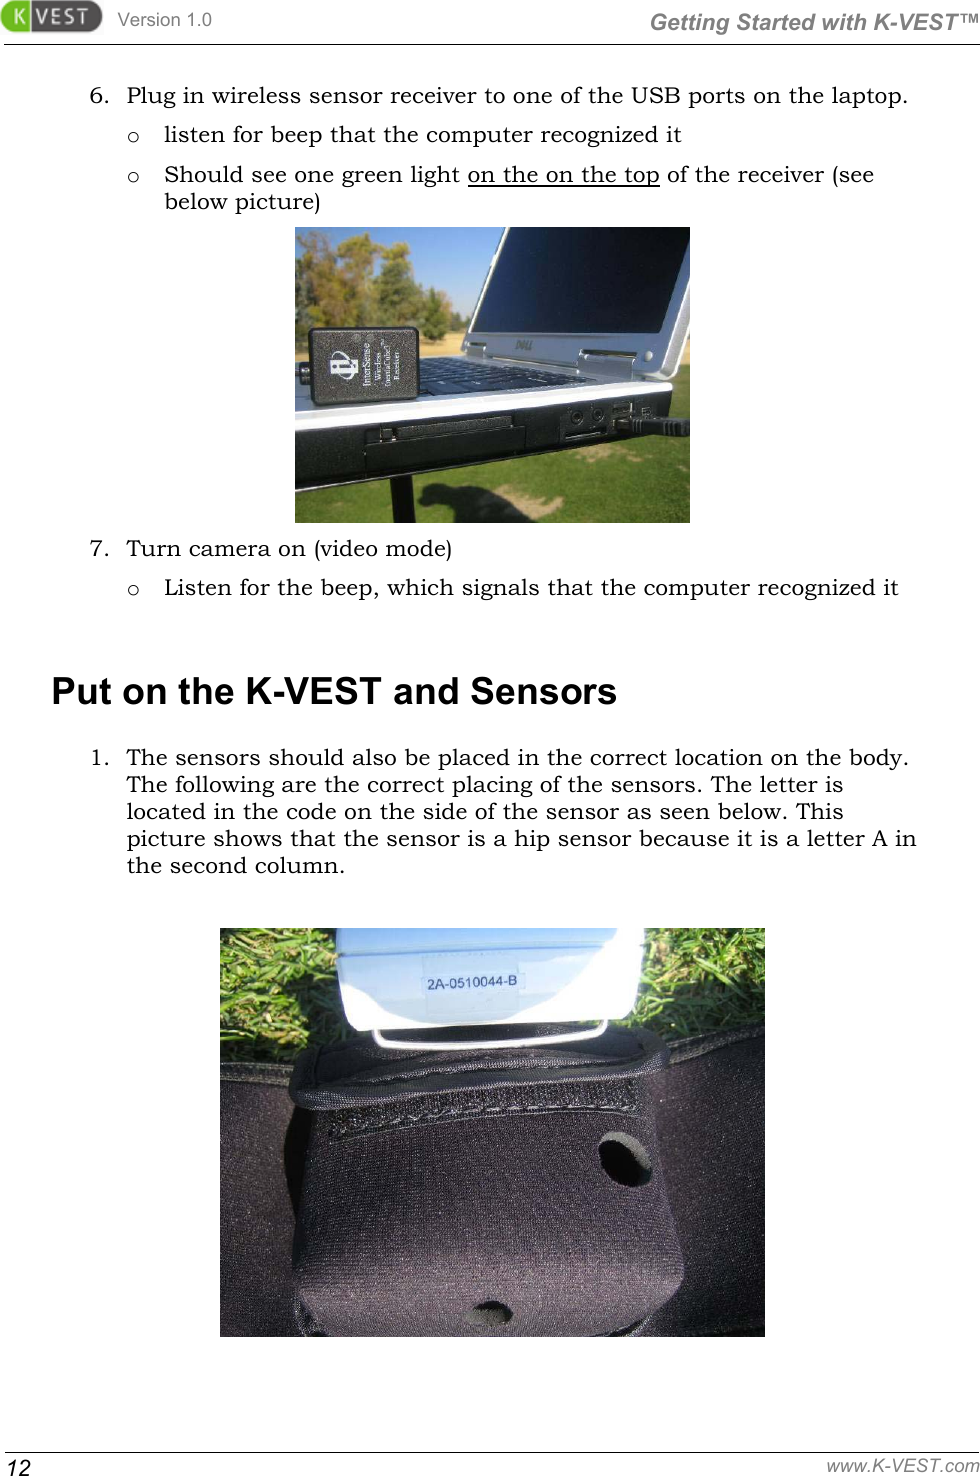
![Getting Started with K-VEST™ Version 1.0 www.K-VEST.com 13 2. Make sure all 3 sensors are positioned in the vest correctly and turned on o all sensors should be placed with the power switch facing “up” in the vest and belt o Power switch should be positioned closest to the fingers on the glove. 3. Turn on all the sensors (should see 1 green light on the top of each sensor (nearest the power switch) until the software is launched – then you should see both green lights) (see picture above) o Make sure top part of the switch is pushed all the way in 4. If the top sensor light is blinking (more than 3 times) that means the battery is low and needs to be charged Putting on the K-VEST Whenever you want to record a golf swing, whether for analysis or exercise purposes, you will need to wear all three components of the K-VEST. To put your K-VEST on: 1. Check to make sure the sensors are installed correctly in their pockets. [more detail] Switch Up Top light green prior 2 green lights After When Placing in Pouch to launching software software has been launched](https://usermanual.wiki/Bentley-Kinetics/KSENS201/User-Guide-648263-Page-13.png)
![Version 1.0 Getting Started with K-VEST™ 14 www.K-VEST.com [new photo] 2. Attach the sensor to the glove. [more detail on this] 3. Turn on each sensor and check to make sure the batteries are fully charged (upper light is steady green). [photo of sensor in pocket with lights on.] If the top sensor light is blinking (more than 3 times) that means the battery is low and needs to be charged 4. Put the shoulder vest on and pull it down so that the shoulder sensor sits snugly against the middle of your back. 5. Put the belt on. Make sure that the hip sensor sits snugly in the small of your lower back. 6. Put the glove on and fasten it snugly. Right-handed players should put the glove on their left hand. Left-handed players should put the glove on their right hand. [New photo] 7.](https://usermanual.wiki/Bentley-Kinetics/KSENS201/User-Guide-648263-Page-14.png)
![Version 1.0 Getting Started with K-VEST™ 16 www.K-VEST.com o Click the New Player button. The New Player window displays. o Enter the player’s information in each field of the New Player window. The fields with a yellow background are required. o Click Save. Whenever you save a new player, the player is automatically loaded into KINESYNC in Collect mode with a new session ready to be recorded. 3. [FIX THIS] Click the name of the player you're working with. If the player has recorded previous sessions, a list of those sessions appears in the Sessions list. The sessions are named using the exact date and time that the session was recorded. The name uses the following format: YYYYMMDDhhmmss (year, month, day, hours, minutes, seconds, using a 24 hour clock.) Additional information about a session is displayed under Session Details when the session name is selected in the Sessions list. 4. Do one of the following to specify the session you want: • If you are recording a new swing, click the New button under the Sessions list to start a new session. This will get you started in Collect mode. • If you are starting KINESYNC to analyze an existing session, click the session name in the list and then click the Load button. This will get you started in Analyze mode.](https://usermanual.wiki/Bentley-Kinetics/KSENS201/User-Guide-648263-Page-16.png)
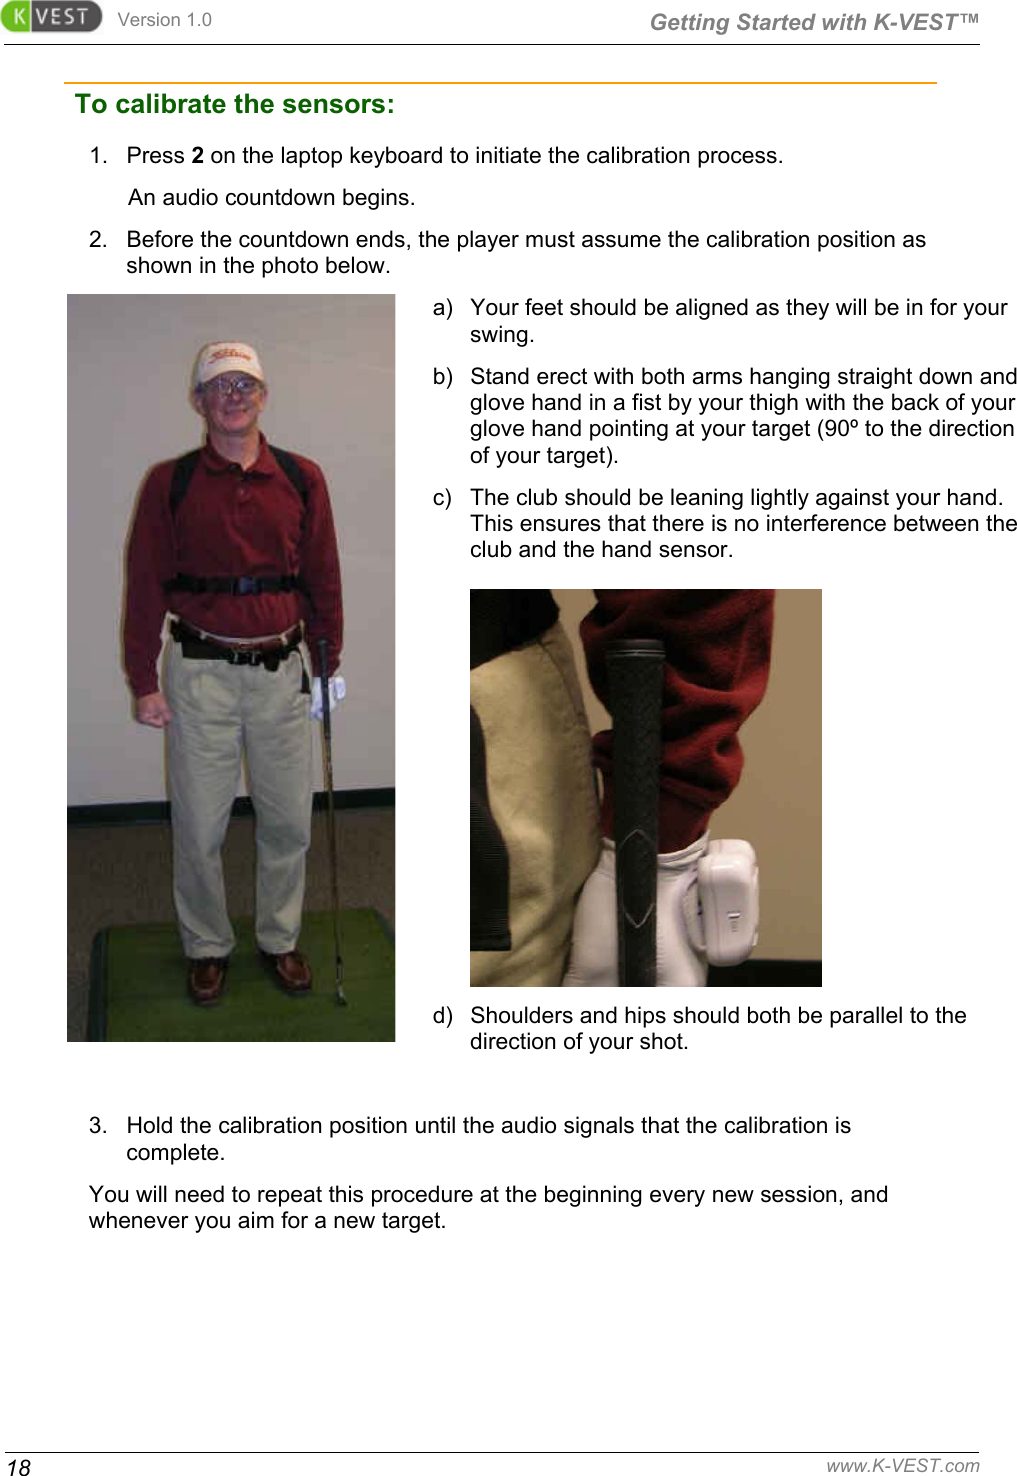
![Getting Started with K-VEST™ Version 1.0 www.K-VEST.com 17 KINESYNC Shortcut Keys [introduces existence of shortcut keys – for 1 – 2 – 3 process] You can press the following keys on your keyboard to perform the following actions. Key Action 1 Enter Collect mode 2 Start calibration 3 Start swing capture H Toggle hips on/off S Toggle shoulders on/off A Toggle arms/hand on/off G Toggle Virtual Guides on/off C Clear current guides from memory N Create new guide for selected body segment and motion Checking the Sensors [describes how to make sure you have the sensors being detected and working properly] 1. Wait about 15 seconds and allow the animation to “activate”. Move each sensor and make sure the corresponding sensor is moving the correct animation on the screen a. If the sensor is moving the wrong animation – re-check the sensor placement b. If the sensor placement is correct then close the software and launch the software again Calibrating the Sensors Every time you put your K-VEST on to record a swing or do exercises, you will need to calibrate the wireless sensors for the intended target.](https://usermanual.wiki/Bentley-Kinetics/KSENS201/User-Guide-648263-Page-17.png)
![Getting Started with K-VEST™ Version 1.0 www.K-VEST.com 19 Capturing Your First Swing If this is your first time using a K-VEST, you may choose to capture a practice swing to familiarize yourself with the use of your K-VEST and the KINESYNC software. Be sure the sensors are calibrated before attempting to capture a swing. QUESTION - TURN THIS INTO FULL "QUICK START" walk through - new instructor, new player... calibrate, capture swing... To capture a swing: 1. Press 1 on the laptop keyboard (or click Collect on the upper toolbar of the KINESYNC window) or to enter Collect mode. 2. Calibrate (appropriate here – since they just calibrated?) 3. Press 3 on the keyboard (or click the Capture button in the KINESYNC window) to initiate a recording. An audio signal starts a countdown for you to get in position and prepare to swing. Wait for the countdown to say “Swing when ready!” a. When signaled, take a deep breath to focus and then swing. The recording stops automatically after 5 seconds. You can repeat this procedure as often as you want until you get a swing that you want to save. Analysis Overview [Section that provides a quick overview of analysis features.] Roadmap of the KINESYNC Display If this is your first time using the KINESYNC software, you may find it helpful to familiarize yourself with the parts of the display and the different controls that allow you to manipulate the display. The KINESYNC screen is divided into regions for each type of information you work with. All KINESYNC information regions and controls are available in Analyze mode, as shown below. The other modes provide a subset of this information.](https://usermanual.wiki/Bentley-Kinetics/KSENS201/User-Guide-648263-Page-19.png)
![Version 1.0 Getting Started with K-VEST™ 20 www.K-VEST.com Getting Help To view the documentation: Choose K-Vest Help from the Help menu on the KINESYNC software menu bar. Try a Simple Exercise [a section that walks users through creating and running an exercise – probably for alignment at address.]](https://usermanual.wiki/Bentley-Kinetics/KSENS201/User-Guide-648263-Page-20.png)
![Getting Started with K-VEST™ Version 1.0 www.K-VEST.com 21 Ending a Session Exiting KINESYNC To exit the KINESYNC software: Choose File > Exit from the menu bar. If you have not yet saved your current session, the KINESYNC software will always prompt you to save your work before exiting. Recharging the Sensors The K-Sensor batteries last approximately 5-9 hours between charges. When the upper green light on a wireless sensor is blinking, it means the battery needs to be charged. [photo - or drawing - of sensor with lights] Each wireless sensor pocket has a hole that allows you to plug the charger directly into the wireless sensor without removing it from the pocket. The charger can be plugged into any standard wall socket. The 1-to-3 connector allows you to recharge all three sensors at the same time. [insert photo of sensors plugged into charger cable with splitter] You should recharge the sensors for at least 1 hour after each use. You can leave the sensors plugged in to recharge whenever your K-VEST is not in use. charge at end of day .. when not in use, plug in to charge](https://usermanual.wiki/Bentley-Kinetics/KSENS201/User-Guide-648263-Page-21.png)
![Version 1.0 Getting Started with K-VEST™ 22 www.K-VEST.com More Information [this section will refer users to the online help, and also to information and webinars on K-WEB]](https://usermanual.wiki/Bentley-Kinetics/KSENS201/User-Guide-648263-Page-22.png)