Bentley Kinetics KSENS401 KSensor User Manual K VEST GettingStarted 2
Bentley Kinetics, Inc. KSensor K VEST GettingStarted 2
Users Manual
Getting Started
with K-VEST™
Version 1.0
March 2006

Version 1.0 Getting Started with K-VEST™
ii www.K-VEST.com
Copyright © 2006 Bentley Kinetics, Inc.
The information in this Document is the intellectual property of Bentley Kinetics, Inc.
This Document may not be reproduced in whole or in part, by any means, without the written
consent of Bentley Kinetics, Inc. All Rights Reserved.
The Software described in this Document and all copies of the Software are the property of
Bentley Kinetics, Inc. The Software is provided under a license agreement containing
restrictions on use and disclosure. The software contains trade secrets of Bentley Kinetics, Inc.
Reverse engineering of the Software is prohibited.
If provided to the U.S. Government, this Software and this Document are provided with Res-
tricted Rights. Use, duplications, or disclosure by the Government is subject to restrictions set
forth in FAR 52-227-19 (c) (2) (June 1987) or DOD FAR Supplement 252.227-7013 (c) (1) (ii)
(June 1988) or the NASA FAR Supplement as applicable. Contractor/Manufacturer is Bentley
Kinetics, Inc.
Trademarks
K-VEST, KINESYNC, K-SENSOR, K-FACTOR, Bentley Kinetics, the Bentley Kinetics logo, and
the K-VEST logo are trademarks of:
Bentley Kinetics, Inc.
49 Constitution Dr.
Bedford, NH 03110
603.472.3519
All other product and company names mentioned in this document are trademarks or
registered trademarks of their respective companies or organizations.
Regulatory Statements and Approvals
FCC Statements:
This device complies with part 15 of the FCC Rules. Operation is subject to the following two
conditions:
(1) This device may not cause harmful interference, and
(2) This device must accept any interference received, including interference that may cause
undesired operation.
Caution: changes or modifications not expressly approved by the party responsible for
compliance could void the user’s authority to operate the equipment.

Getting Started with K-VEST™ Version 1.
0
www.K-VEST.com ii
i
NOTE: This equipment has been tested and found to comply with the limits for a Class B
digital device, pursuant to part 15 of the FCC Rules. These limits are designed to provide
reasonable protection against harmful interference in a residential installation. This equipment
generates, uses and can radiate radio frequency energy and, if not installed and used in
accordance with the instructions, may cause harmful interference to radio communications.
However, there is no guarantee that interference will not occur in a particular installation. If
this equipment does cause harmful interference to radio or television reception, which can be
determined by turning the equipment off and on, the user is encouraged to try to correct the
interference by one or more of the following measures:
—Reorient or relocate the receiving antenna.
—Increase the separation between the equipment and receiver.
—Connect the equipment to an outlet on a circuit different from that to which the receiver is
connected.
—Consult the dealer or an experienced radio/TV technician for help.
Canada - Industry Canada (IC)
This Class B digital apparatus meets all requirements of the Canadian Interference-Causing Equipment Regulations.
cet appareil de la class B respecte toutes les exigences du Reglement sur le matereil brouiller du Canada.
Europe - European Union Notice
All products with the CE marking comply with the EMC Directive (89/336/EEC) and the Low Voltage Directive
(73/23/EEC) issued by the Commission of the European Community.
Compliance with these directives implies conformity to the following European Norms (in brackets are the
equivalent international standards).
• EN 55022 (CISPR 22) - Electromagnetic Interference
• EN 55024 (IEC61000-4-2,3,4,5,6,8,11) - Electromagnetic Immunity
• EN 61000-3-2 (IEC610000-3-2) - Power Line Harmonics
• EN 61000-3-3 (IEC610000-3-3) - Power Line Flicker
• EN 60950 (IEC60950) - Product Safety
Products labeled with the CExxxx or the CE alert marking contain a radio transmitter that complies with the
R&TTE Directive (1999/5/EC) issued by the Commission of the European Community.
Compliance with this directive implies conformity to the following European Norms (in brackets are the
equivalent international standards).
• EN 60950 (IEC60950) - Product Safety
• EN 300 328 Technical requirements for radio equipment.
• ETS 300 893 and ETS 301 489-17 General EMC requirements for radio equipment.
• ETS 301489-1
To determine the type of transmitter, check the identification label on your Product.
Version 1.0 Getting Started with K-VEST™
iv www.K-VEST.com
Precautionary Statements
Any changes or modifications to any K-SENSOR™ unit or K-SENSOR™
wireless receiver not expressly approved by Bentley Kinetics will void
the warranty and any regulatory compliance issued for the system.
Do not drop or otherwise shock the K-SENSOR™ units, because they
can be permanently damaged.
Do not bend, twist, pull strongly or tamper in any way with any part of
the cabling on the K-SENSOR™ wireless receiver.
Take care to avoid electric shocks. Do not plug-in or unplug the
charging cable with wet hands.

Getting Started with K-VEST™ Version 1.
0
www.K-VEST.com
v
Contents
Introduction 6
Installing KINESYNC™ 7
Pre-Installation Check List 7
Running the Software Installation Program 8
Equipment Setup 9
Equipment Inventory 9
Setting Up the Laptop and Camera Stand 10
Put on the K-VEST and Sensors 12
Putting on the K-VEST 13
Using KINESYNC 15
Starting the KINESYNC Software 15
KINESYNC Shortcut Keys 17
Checking the Sensors 17
Calibrating the Sensors 17
Capturing Your First Swing 19
Analysis Overview 19
Roadmap of the KINESYNC Display 19
Getting Help 20
Try a Simple Exercise 20
Ending a Session 21
Exiting KINESYNC 21
Recharging the Sensors 21
More Information 22

Version 1.0 Getting Started with K-VEST™
6 www.K-VEST.com
Introduction
K-VEST™ is a professional-level swing analysis and training system that
integrates state-of-the-art wireless technology with software to give you the
most advanced wireless instructional system on the market. K-VEST™
combines advanced wireless technology with KINESYNC™, a software
application that allows you to capture the motion of a golfer’s swing in real
time, visually and graphically analyze the motion, and then train the golfer
using biofeedback to improve the swing.
The standard K-VEST™ product package includes:
• 3 lightweight wireless sensors that run on rechargeable lithium ion
batteries.
• A shoulder harness and belt, which hold two of the sensors. (The third
sensor attaches to any standard golf glove.)
• A cable for recharging the sensors.
• A wireless receiver with standard USB connector.
• KINESYNC™ swing analysis software.
• Lightweight carrying case.
• 60 day membership to K-WEB™ online @ K-VEST.com
To use K-VEST in a lab or in the field, you will also need the following
equipment:
• Dedicated daylight viewable laptop computer.
• Synchronized high-speed video camera that connects to a computer
using either a FireWire or USB cable and is capable of capturing video
at a rate of at least 30 frames per second.
• A stand or tripod to hold your laptop and video camera
• A set of golf clubs, some golf balls and a glove.
This guide tells you how to install the KINESYNC software, if it is not already
installed, and walks you through the process of getting your equipment set
up, capturing a swing, and doing a practice exercise. You can use this guide
to familiarize yourself with the product before working with other golfers.
However, you may have a friend work with you as a practice student.

Getting Started with K-VEST™ Version 1.
0
www.K-VEST.com
7
Installing KINESYNC™
K-VEST requires you to have the KINESYNC™ software installed on your
laptop. For product packages that include a laptop, the software comes pre-
installed. Otherwise, you will need to install the software.
Pre-Installation Check List
Before running the KINESYNC™ software installation program, make sure
your laptop computer meets the following minimum system requirements:
Laptop Computer Requirements
; Processor: 1.5GHZ Centrino or Intel Pentium 4 2.8GHZ
; Memory: 1GB RAM
; Video Card: 128 bit Video Graphics card (separate from
motherboard)
; Connection ports
2 USB ports
Firewire port including PCMCIA inserts
(if video camera uses Firewire connection)
2 PCMCIA slots
; Minimum Screen Resolution: 1024 x 768
Software Requirements
; Microsoft Windows XP (Home or Professional version)
with Service Pack 1 or higher.
To determine which Service Pack you have on your laptop, right-
click on My Computer, choose Properties… and look on the
General tab.
If needed, you can download and install the latest Windows Service
Pack from the following internet address:
http://www.microsoft.com/windowsxp/sp2
; Microsoft Direct-X Runtime components. [CHECK]

Version 1.0 Getting Started with K-VEST™
8 www.K-VEST.com
Running the Software Installation Program
The KINESYNC software is installed using a typical Windows installation
procedure. The Windows Media Format 9 Series Runtime and video capture
software are installed as part of the KINESYNC installation. This software is
required for KINESYNC to capture and play video.
To install the KINESYNC software:
1. Insert the KINESYNC software CD into your CDROM drive and wait for the
installation procedure to start.
Follow the instructions provided by the installation wizard. If you need
help, refer to the following instructions:
2. When the KINESYNC Software Setup Wizard displays, click Next.
The Select Installation Folder window displays with the default selections.
3. To accept the default selections (recommended), click Next to continue the
installation procedure.
Otherwise:
• Click Browse to select a different folder. (Click Disk Cost if you need to
decide based on available disk space.)
• Click Just me if you only want to current Windows user account to
have access to this software.
• When are satisfied with the selections, click Next to continue the
installation.
A Confirm Installation window displays to indicate that the software is
ready to install.
4. Click Next to continue the procedure.
A window displays to show the progress of the installation.
5. When a window pops up to ask if you want to continue with installation of
the Windows Media Format 9 Series Runtime files, click Yes.
6. Click Yes to accept the terms of the Windows Media Format 9 Series
Runtime license agreement.
7. Click OK when the Windows Media Format 9 Series Runtime installation is
confirmed.
8. Click Close in the KINESYNC Software installation window to complete the
installation.
Tip
It is usually a good idea to reboot your system after installing new software.

Getting Started with K-VEST™ Version 1.
0
www.K-VEST.com 9
Equipment Setup
Whenever you go out in the field to work with K-VEST, you will need to set up
your equipment. This chapter tells you what equipment you need and how to
get it set up.
Equipment Inventory
Whenever you are getting ready to use K-VEST in the field, you should always make
sure you have the following equipment in ready-to-use condition:
• Laptop with KINESYNC software installed – Make sure the laptop is fully charged
and has enough hard disc space to capture a number of video sessions.
• Three K-SENSORS and apparel for shoulders, hips, and hand:
• Shoulder harness with a wireless sensor for shoulder movement detection
• Belt with a wireless sensor for hip movement detection
• Wireless sensor for hand movement detection (byo glove)
The wireless sensors should always be fully charged before going out in the
field. We recommend that you keep all three sensors plugged into the charging
cable whenever the apparatus is not in use. The pockets in the shoulder
harness and belt have holes that allow you to charge the sensors without
removing them from the pockets, which reduces the likelihood of the sensors
getting mixed up.
• Wireless Receiver – This is the receiver that is supplied with K-VEST. It is
designed to receive signals from the three wireless sensors in the vest.
• Digital Video Camera (optional) – If you plan to make a video recording of a
player's swing, you must have a digital camera that is capable of capturing at a
minimum 30 frames per second and is powered by either battery or AC power.
You will also need the USB or Firewire cable to connect the video camera to your
laptop.
Version 1.0 Getting Started with K-VEST™
10 www.K-VEST.com
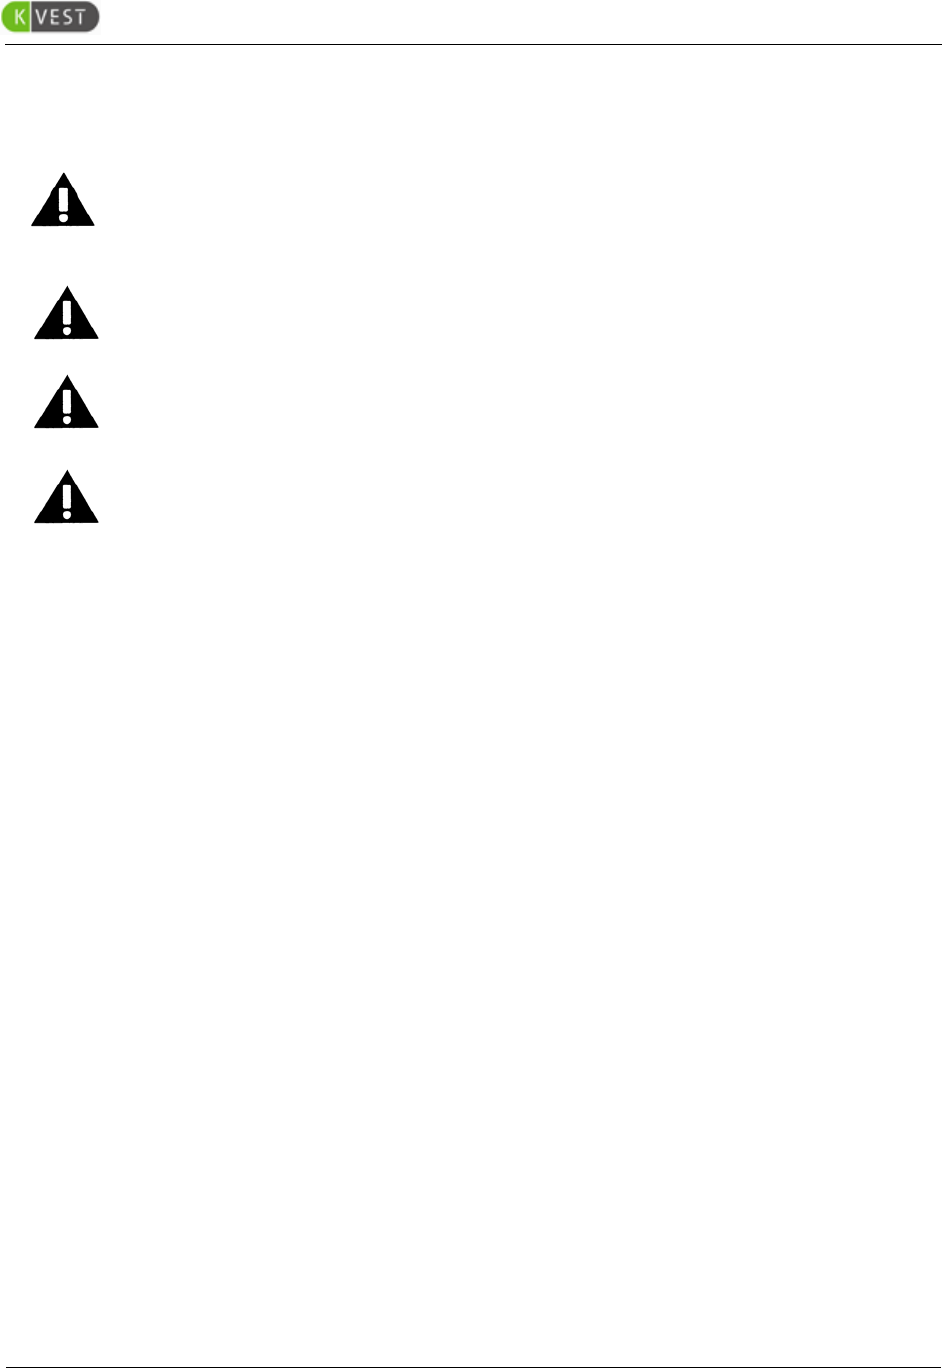
• Tripod Camera-Laptop Stand – Whether you work with your K-VEST out on the golf
course, in a lab, or in your living room, you will need to put your laptop on a
secure work surface. As an optional accessory, Bentley Kinetics offers an
integrated laptop and video camera tripod that has a standing-height platform for
your laptop and a place to attach your video camera. At a minimum, you will
need a tripod for your camera and a secure place to put your laptop.
Setting Up the Laptop and Camera Stand
Typically, your laptop and camera is set up directly in front of where you will swing.
[aerial diagram showing orientation of tripod stand to golfer]
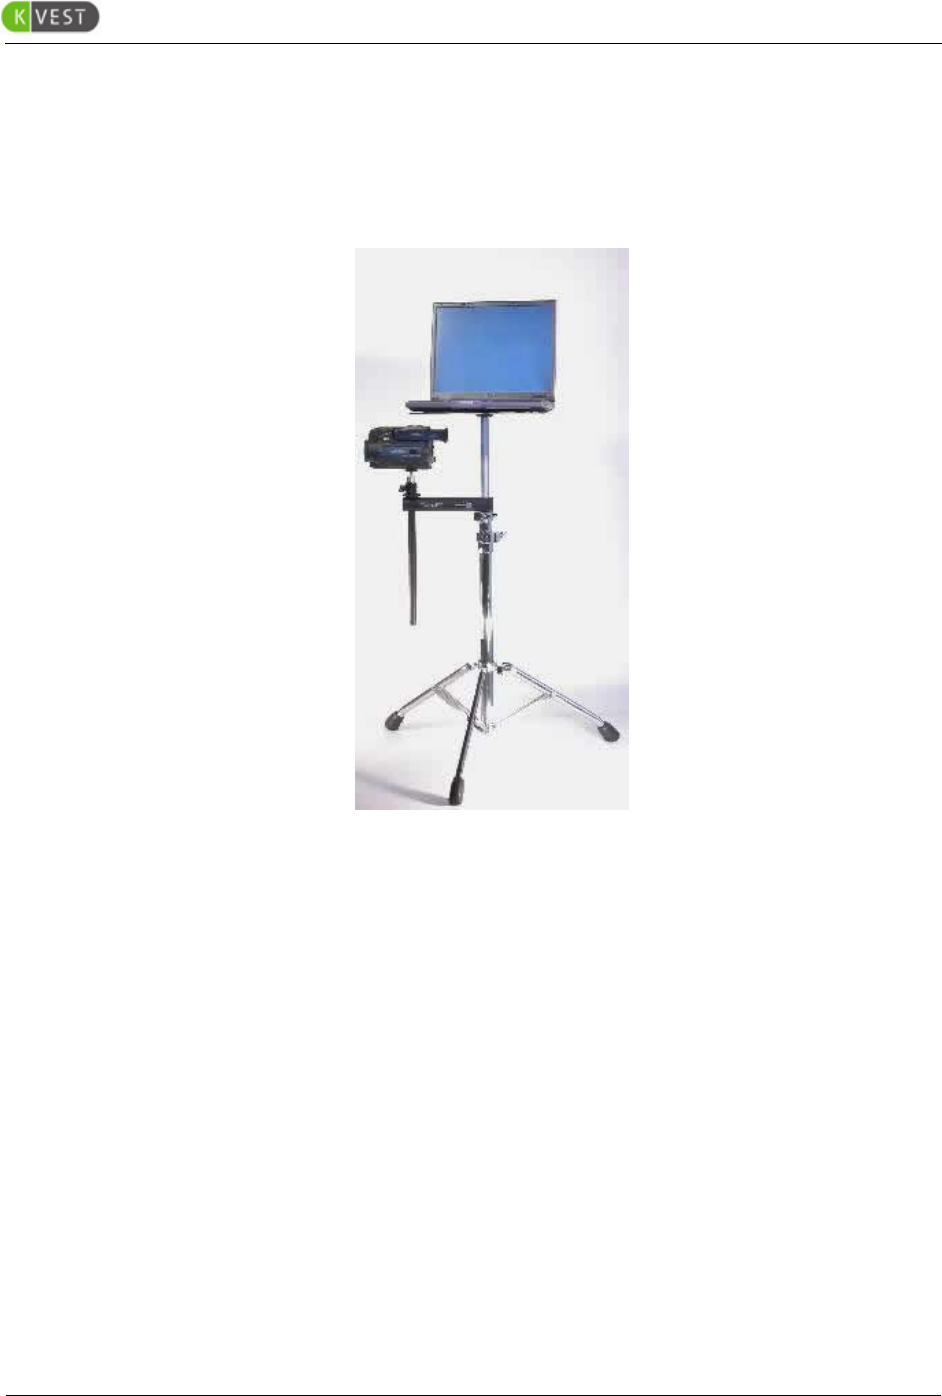
1. Set up the tripod as follows:
o Take stand out of the bag
o Spread legs on tripod with grey release button
o Slide up extension to desired height
o Attach camera bar (center of the bar 30 inches above the ground)
o Screw on the camera universal joint to the camera bar
o Attach laptop stand to the top of the tripod
Getting Started with K-VEST™ Version 1.
0
www.K-VEST.com 11
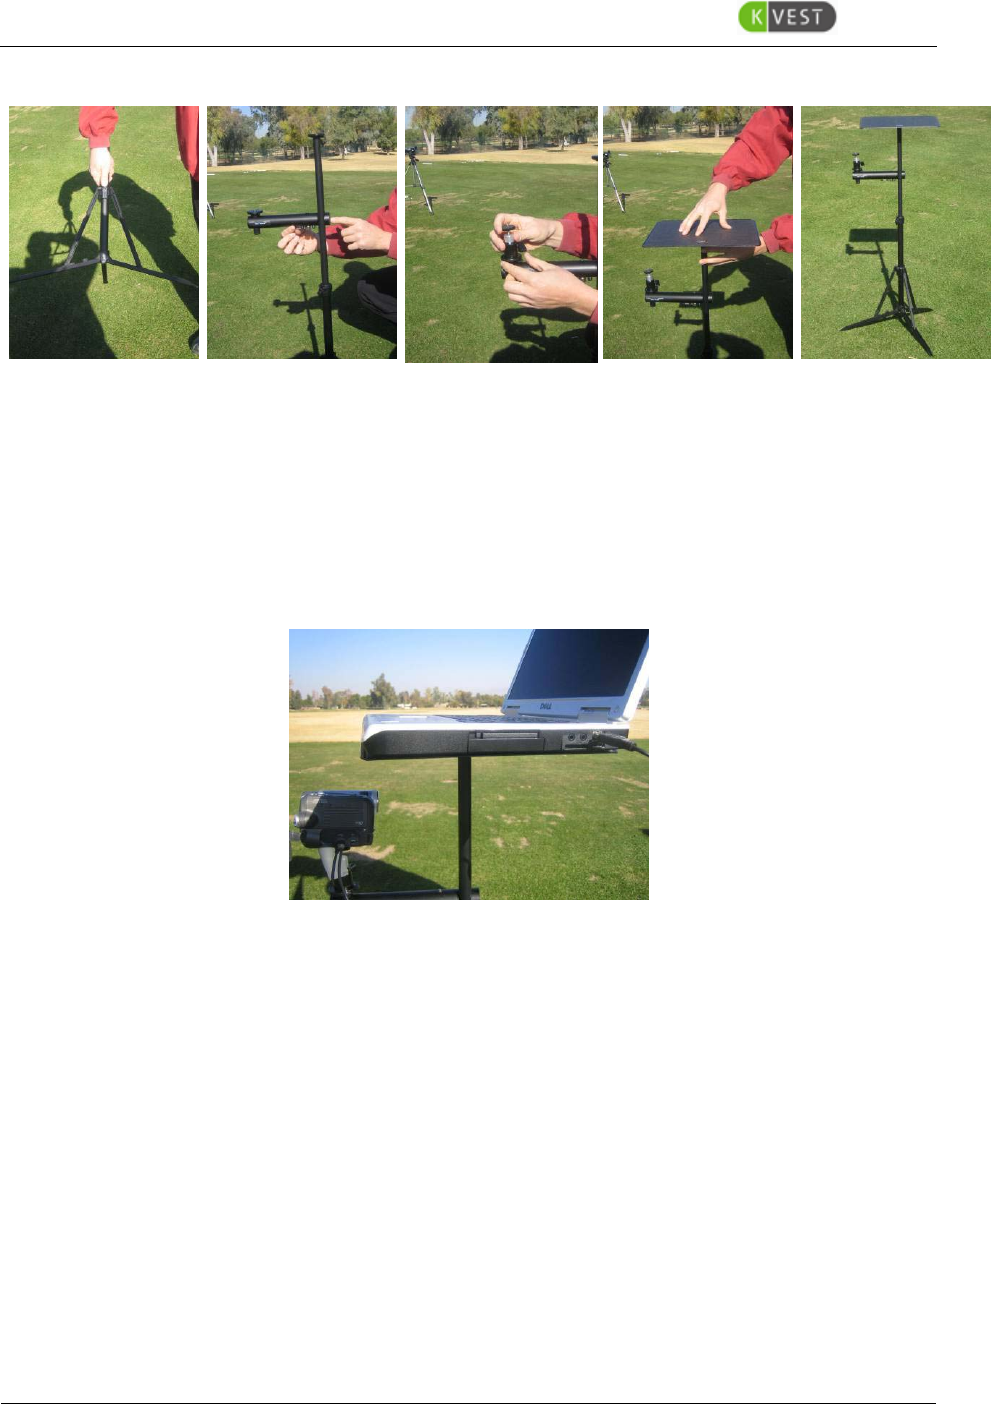
2. Place DV camera on the tripod (plug in ac power if available)
o Make sure wing nuts are fastened securely
3. Place laptop computer on the tripod (plug in ac power if available)
4. Turn the laptop power on.
5. Plug camera in to the USB port on laptop

Version 1.0 Getting Started with K-VEST™
12 www.K-VEST.com
6. Plug in wireless sensor receiver to one of the USB ports on the laptop.
o listen for beep that the computer recognized it
o Should see one green light on the on the top of the receiver (see
below picture)
7. Turn camera on (video mode)
o Listen for the beep, which signals that the computer recognized it
Put on the K-VEST and Sensors
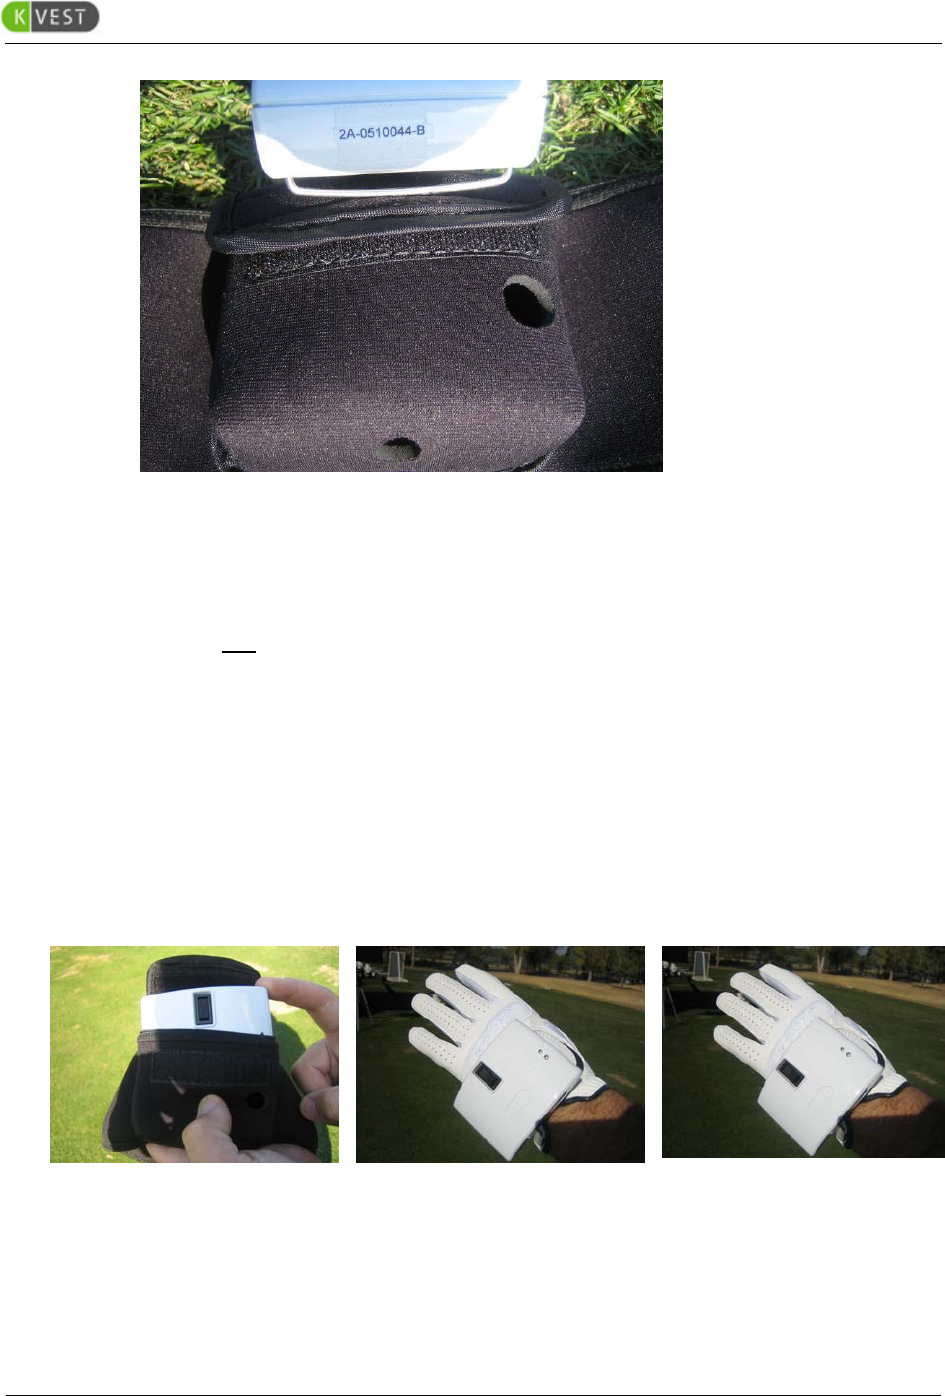
1. The sensors should also be placed in the correct location on the body.
The following are the correct placing of the sensors. The letter is
located in the code on the side of the sensor as seen below. This
picture shows that the sensor is a hip sensor because it is a letter A in
the second column.
Getting Started with K-VEST™ Version 1.
0
www.K-VEST.com 13
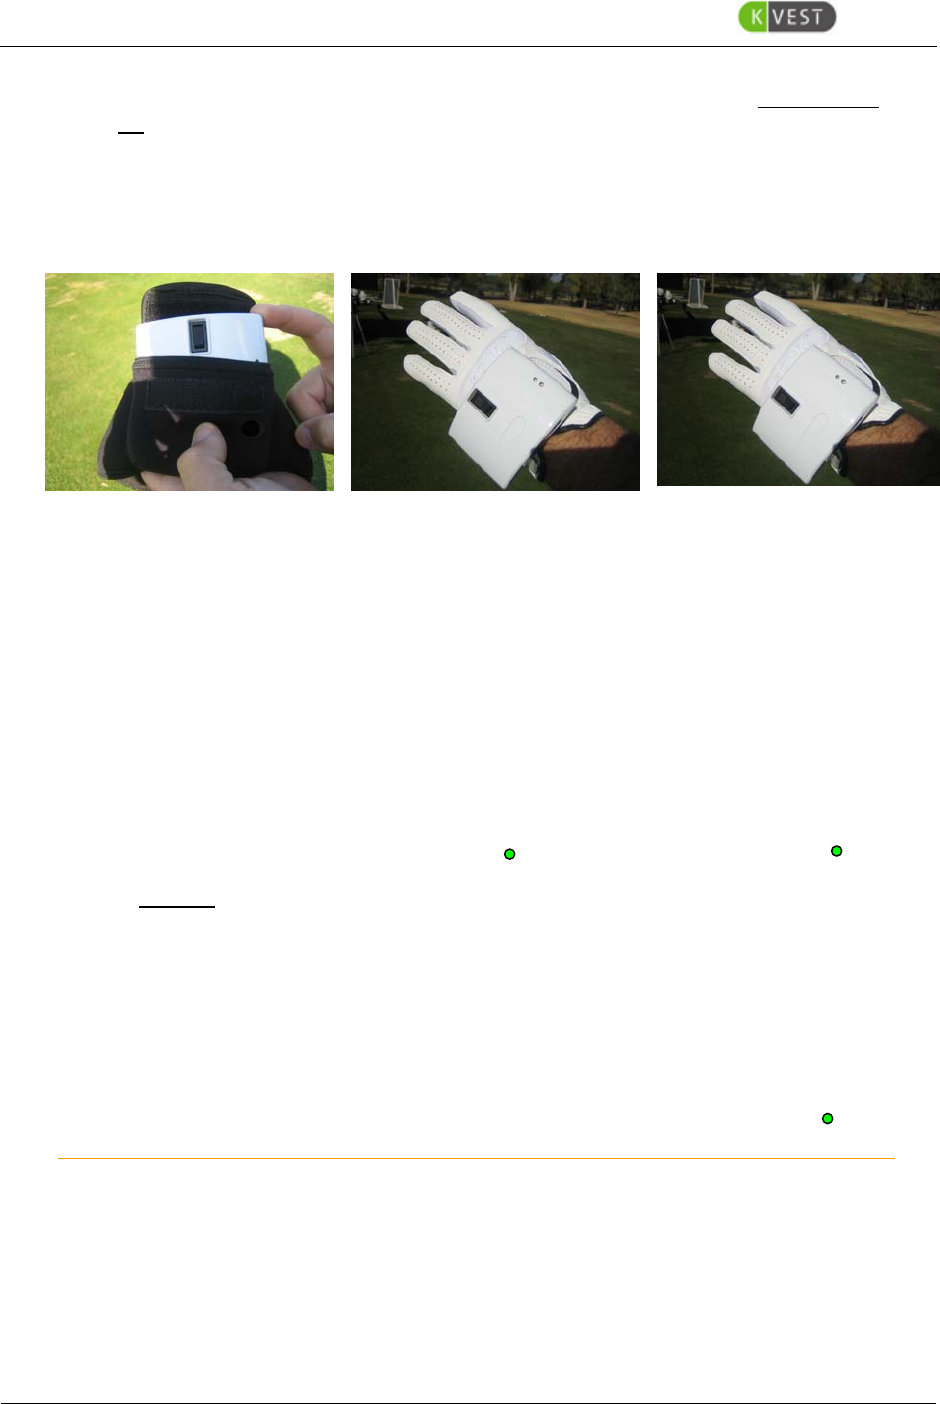
2. Make sure all 3 sensors are positioned in the vest correctly and turned
on
o all sensors should be placed with the power switch facing “up” in
the vest and belt
o Power switch should be positioned closest to the fingers on the
glove.
3. Turn on all the sensors (should see 1 green light on the top of each
sensor (nearest the power switch) until the software is launched –
then you should see both green lights) (see picture above)
o Make sure top part of the switch is pushed all the way in
4. If the top sensor light is blinking (more than 3 times) that means the
battery is low and needs to be charged
Putting on the K-VEST
Whenever you want to record a golf swing, whether for analysis or exercise
purposes, you will need to wear all three components of the K-VEST.
To put your K-VEST on:
1. Check to make sure the sensors are installed correctly in their
pockets. [more detail]
Switch Up Top light green prior 2 green lights After
When Placing in Pouch to launching software software has been launched
Version 1.0 Getting Started with K-VEST™
14 www.K-VEST.com
[new photo]
2. Attach the sensor to the glove. [more detail on this]
3. Turn on each sensor and check to make sure the batteries are fully
charged (upper light is steady green).
[photo of sensor in pocket with lights on.]
If the top sensor light is blinking (more than 3 times) that means the
battery is low and needs to be charged
4. Put the shoulder vest on and pull it down so that the shoulder sensor
sits snugly against the middle of your back.
5. Put the belt on. Make sure that the hip sensor sits snugly in the small
of your lower back.
6. Put the glove on and fasten it snugly. Right-handed players should
put the glove on their left hand. Left-handed players should put the
glove on their right hand.
[New photo]
7.
Getting Started with K-VEST™ Version 1.
0
www.K-VEST.com 1
5
Using KINESYNC
Starting the KINESYNC Software
Whenever you start the KINESYNC software, you will need to have an instructor and
player loaded into memory. The software allows instructors to work with any player in
the database and players can work with any instructor in the database. You can
change instructor or player at any time after you get started. If needed, KINESYNC
gives you the option to create new instructor or new player in the process of getting
started. If needed, you can follow the links to those procedures under Related Topics.
To start the KINESYNC software:
1. Do one of the following to run KINESYNC:
• Double click the KINESYNC shortcut on your desktop.
• Choose All Programs > Bentley Kinetics > KINESYNC from the Windows
XP Start menu.
• Click the KINESYNC icon in the Quickstart toolbar.
The KINESYNC logo is displayed while the software is getting started. Then,
the Instructors window appears so you can load the instructor for this session.
QUESTION - Will icon be in quickstart toolbar?
Whenever KINESYNC starts, the Instructors window is displayed for
you to either select an instructor to load or create a new instructor.
2. Create a new instructor as follows:
o Click the Add button to display the New Instructor window.
o Enter the instructor’s information in each field. All fields except
cell phone and PGA number are required.
o Click Save.
Control is returned to the Instructors window with the new
instructor’s name in the list.
o Click the name of the instructor and then click the Load button.
If you haven’t selected a player yet, the Player Manager window is
displayed.
3. Create a new player as follows:

Version 1.0 Getting Started with K-VEST™
16 www.K-VEST.com
o Click the New Player button.
The New Player window displays.
o Enter the player’s information in each field of the New Player
window. The fields with a yellow background are required.
o Click Save.
Whenever you save a new player, the player is automatically loaded
into KINESYNC in Collect mode with a new session ready to be
recorded.
3. [FIX THIS] Click the name of the player you're working with.
If the player has recorded previous sessions, a list of those sessions appears in
the Sessions list. The sessions are named using the exact date and time that
the session was recorded. The name uses the following format:
YYYYMMDDhhmmss (year, month, day, hours, minutes, seconds, using a 24
hour clock.) Additional information about a session is displayed under Session
Details when the session name is selected in the Sessions list.
4. Do one of the following to specify the session you want:
• If you are recording a new swing, click the New button under the Sessions
list to start a new session. This will get you started in Collect mode.
• If you are starting KINESYNC to analyze an existing session, click the
session name in the list and then click the Load button. This will get you
started in Analyze mode.

Getting Started with K-VEST™ Version 1.
0
www.K-VEST.com 1
7
KINESYNC Shortcut Keys
[introduces existence of shortcut keys – for 1 – 2 – 3 process]
You can press the following keys on your keyboard to perform the following actions.
Key Action
1 Enter Collect mode
2 Start calibration
3 Start swing capture
H Toggle hips on/off
S Toggle shoulders on/off
A Toggle arms/hand on/off
G Toggle Virtual Guides on/off
C Clear current guides from memory
N Create new guide for selected body segment and motion
Checking the Sensors
[describes how to make sure you have the sensors being detected and working
properly]
1. Wait about 15 seconds and allow the animation to “activate”. Move
each sensor and make sure the corresponding sensor is moving the
correct animation on the screen
a. If the sensor is moving the wrong animation – re-check the
sensor placement
b. If the sensor placement is correct then close the software and
launch the software again
Calibrating the Sensors
Every time you put your K-VEST on to record a swing or do exercises, you will need
to calibrate the wireless sensors for the intended target.
Version 1.0 Getting Started with K-VEST™
18 www.K-VEST.com
To calibrate the sensors:
1. Press 2 on the laptop keyboard to initiate the calibration process.
An audio countdown begins.
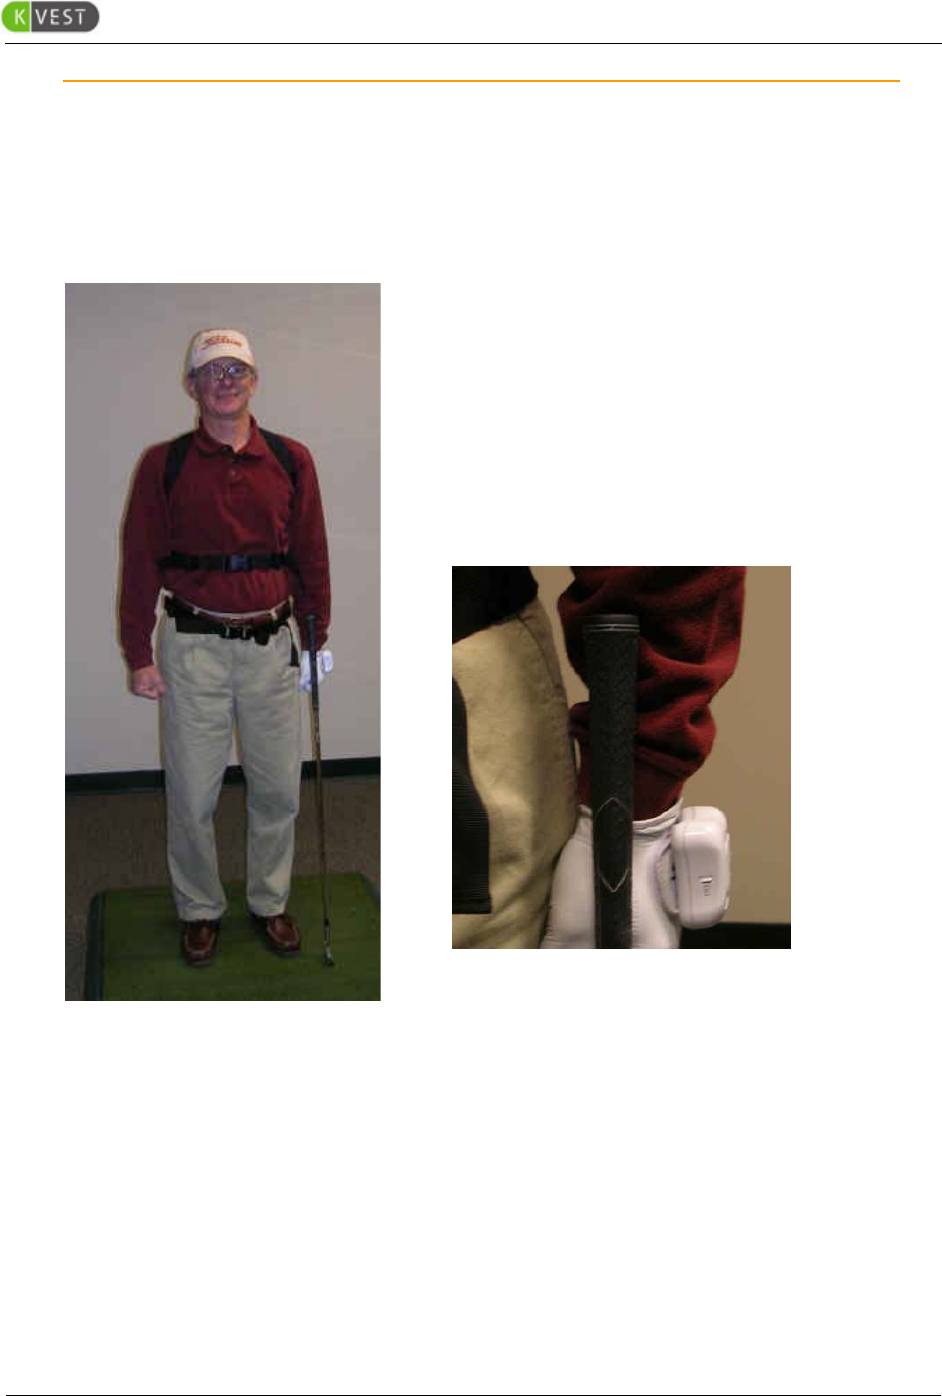
2. Before the countdown ends, the player must assume the calibration position as
shown in the photo below.
a) Your feet should be aligned as they will be in for your
swing.
b) Stand erect with both arms hanging straight down and
glove hand in a fist by your thigh with the back of your
glove hand pointing at your target (90º to the direction
of your target).
c) The club should be leaning lightly against your hand.
This ensures that there is no interference between the
club and the hand sensor.
d) Shoulders and hips should both be parallel to the
direction of your shot.
3. Hold the calibration position until the audio signals that the calibration is
complete.
You will need to repeat this procedure at the beginning every new session, and
whenever you aim for a new target.

Getting Started with K-VEST™ Version 1.
0
www.K-VEST.com 19
Capturing Your First Swing
If this is your first time using a K-VEST, you may choose to capture a practice swing
to familiarize yourself with the use of your K-VEST and the KINESYNC software. Be
sure the sensors are calibrated before attempting to capture a swing.
QUESTION - TURN THIS INTO FULL "QUICK START" walk through - new
instructor, new player... calibrate, capture swing...
To capture a swing:
1. Press 1 on the laptop keyboard (or click Collect on the upper toolbar of the
KINESYNC window) or to enter Collect mode.
2. Calibrate (appropriate here – since they just calibrated?)
3. Press 3 on the keyboard (or click the Capture button in the KINESYNC window)
to initiate a recording.
An audio signal starts a countdown for you to get in position and prepare to
swing. Wait for the countdown to say “Swing when ready!”
a. When signaled, take a deep breath to focus and then swing.
The recording stops automatically after 5 seconds.
You can repeat this procedure as often as you want until you get a swing that you
want to save.
Analysis Overview
[Section that provides a quick overview of analysis features.]
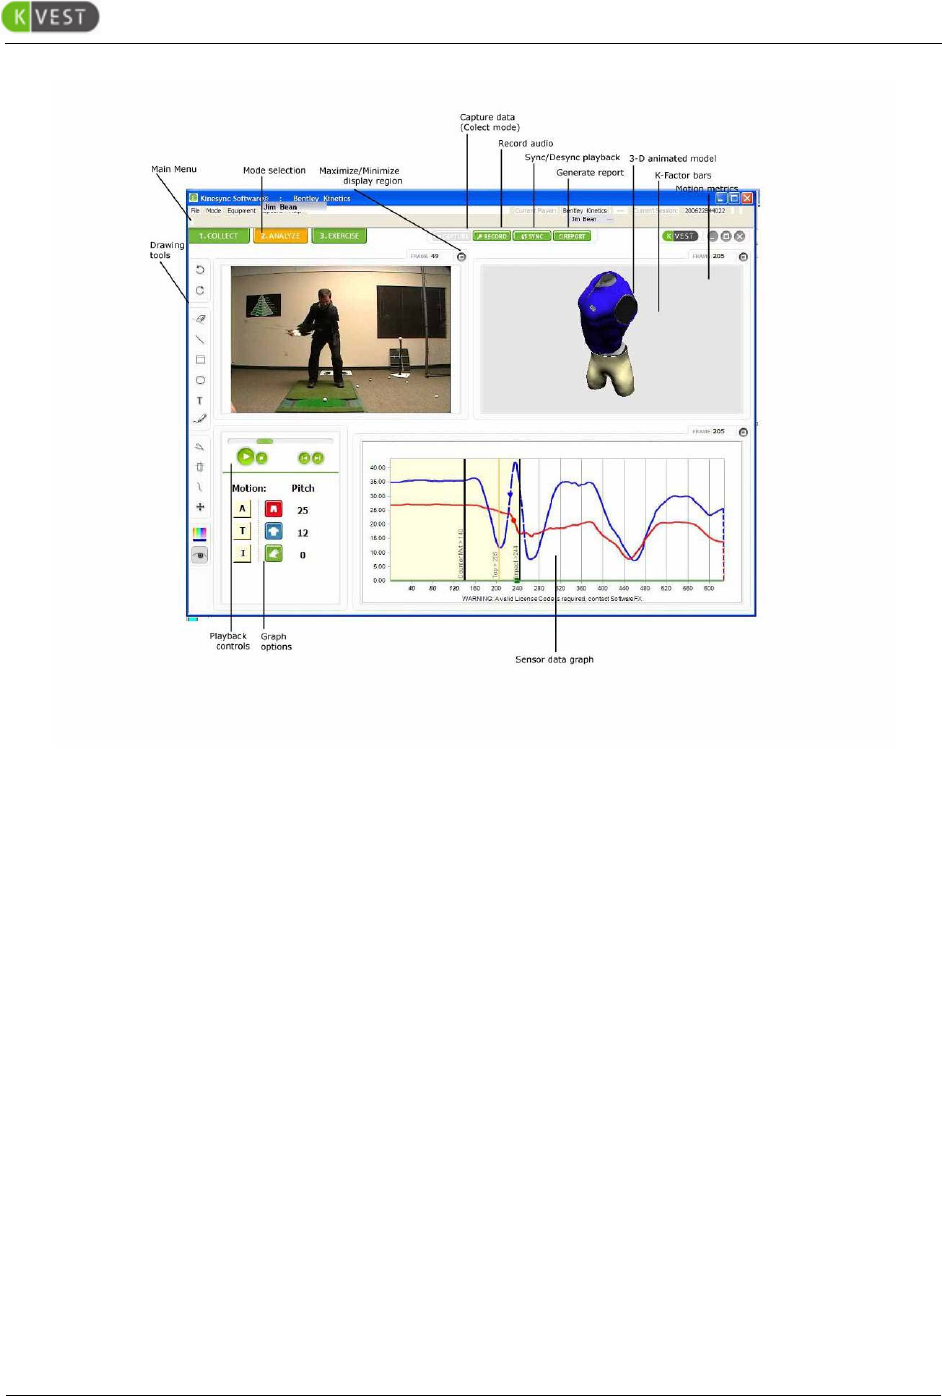
Roadmap of the KINESYNC Display
If this is your first time using the KINESYNC software, you may find it
helpful to familiarize yourself with the parts of the display and the different
controls that allow you to manipulate the display.
The KINESYNC screen is divided into regions for each type of information you
work with. All KINESYNC information regions and controls are available in
Analyze mode, as shown below. The other modes provide a subset of this
information.
Version 1.0 Getting Started with K-VEST™
20 www.K-VEST.com
Getting Help
To view the documentation:
Choose K-Vest Help from the Help menu on the KINESYNC software
menu bar.
Try a Simple Exercise
[a section that walks users through creating and running an exercise –
probably for alignment at address.]

Getting Started with K-VEST™ Version 1.
0
www.K-VEST.com 21
Ending a Session
Exiting KINESYNC
To exit the KINESYNC software:
Choose File > Exit from the menu bar.
If you have not yet saved your current session, the KINESYNC software will always
prompt you to save your work before exiting.
Recharging the Sensors
The K-Sensor batteries last approximately 5-9 hours between charges.
When the upper green light on a wireless sensor is blinking, it means the battery
needs to be charged.
[photo - or drawing - of sensor with lights]
Each wireless sensor pocket has a hole that allows you to plug the charger directly
into the wireless sensor without removing it from the pocket. The charger can be
plugged into any standard wall socket. The 1-to-3 connector allows you to recharge
all three sensors at the same time.
[insert photo of sensors plugged into charger cable with splitter]
You should recharge the sensors for at least 1 hour after each use. You can leave
the sensors plugged in to recharge whenever your K-VEST is not in use.
charge at end of day .. when not in use, plug in to charge

Version 1.0 Getting Started with K-VEST™
22 www.K-VEST.com
More Information
[this section will refer users to the online help, and also to information and
webinars on K-WEB]