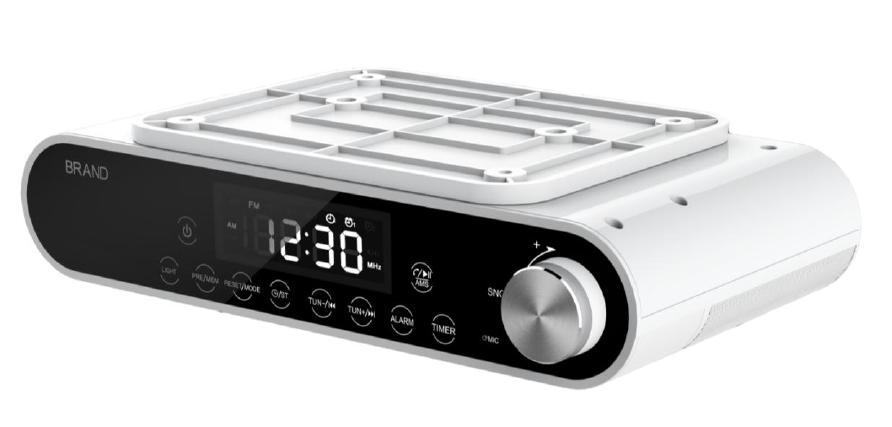
Betrue Technology BTS49 Kitchen Bluetooth Speaker User Manual Shower Bluetooth Speaker
Shenzhen BETRUE Technology Co., Ltd. Kitchen Bluetooth Speaker Shower Bluetooth Speaker
user_manual
1
User’s Manual
Model: BTS49
Bluetooth Kitchen Clock Speaker
With
PLL FM Radio
Dual Alarm
Cooking Timer
(Draft for function sample)

2
1. Cautions
Don’ts
Do not place naked flames, such as lighted candles on or near the
product.
Do not place objects filled with liquids, such as vases on or near the
product.
Do not use or store this product in a place where it is subject to direct
sunlight, heat, excessive dust or vibration.
Do not keep or store this product in wet conditions for long period.
Do not clean this product with water or other liquids.
Do not block or cover the slots and holes in the product.
Do not push foreign objects into the slots or holes in the product.
Do not attempt to open this product yourself. There are no user
serviceable parts inside.
Do not allow children access to plastic bags.
Safety Instructions
Before using this product, read and follow all warnings and instructions.
This product is not intended for use by young children. Young children
should be properly supervised.
This product is intended for household use only and not for
commercial or industrial use.
Do not expose to dripping or splashing.
No naked flame sources, such as lighted candles, should be placed on
the product.
Ventilation should not be impeded by covering ventilation openings
with items such as newspapers, table cloths, curtains and the like.
Make sure the unit is adjusted to a stable position. Damage caused by
using this product in an unstable position or by failure to follow any
other warning or precaution contained within this user manual will
not be covered by warranty.
Use only the AC-DC Power Adapter / Power Supply listed in this User
Manual.
We, suggest retaining the package in case for future transport of the
product.
Warnings
Never remove the casing of this apparatus.
Never place this apparatus on the other electrical
equipment.
3
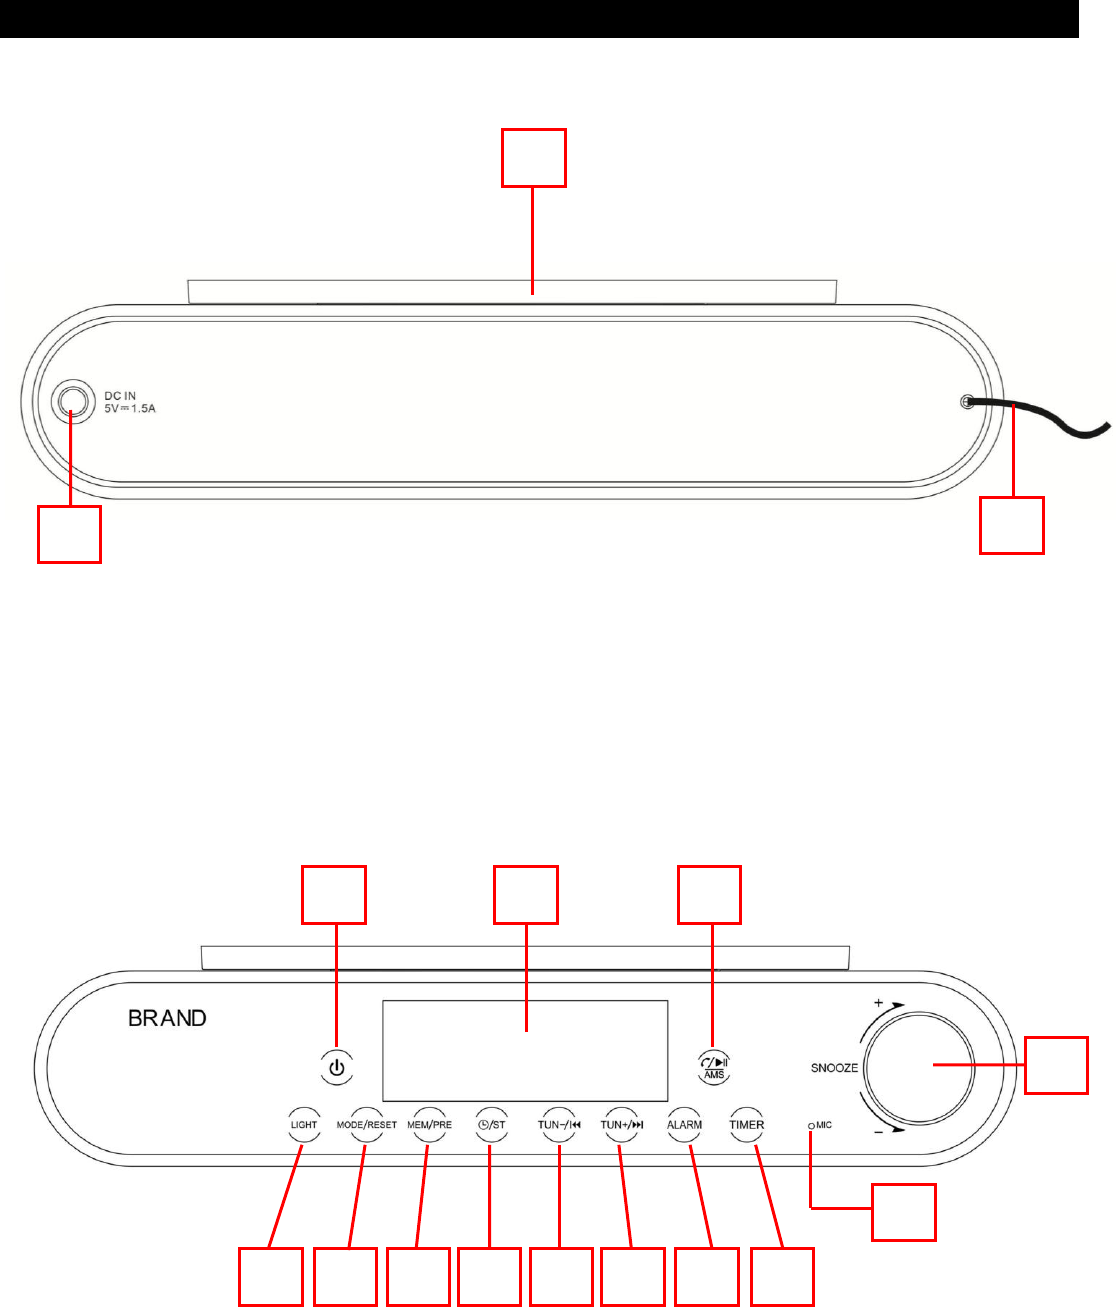
2. Outlook and Controls
2
4
1
9
11
12
13
15
14
5
16
3
8
7
6
10
4
19
17
18
20
21
5
Item
Description
1
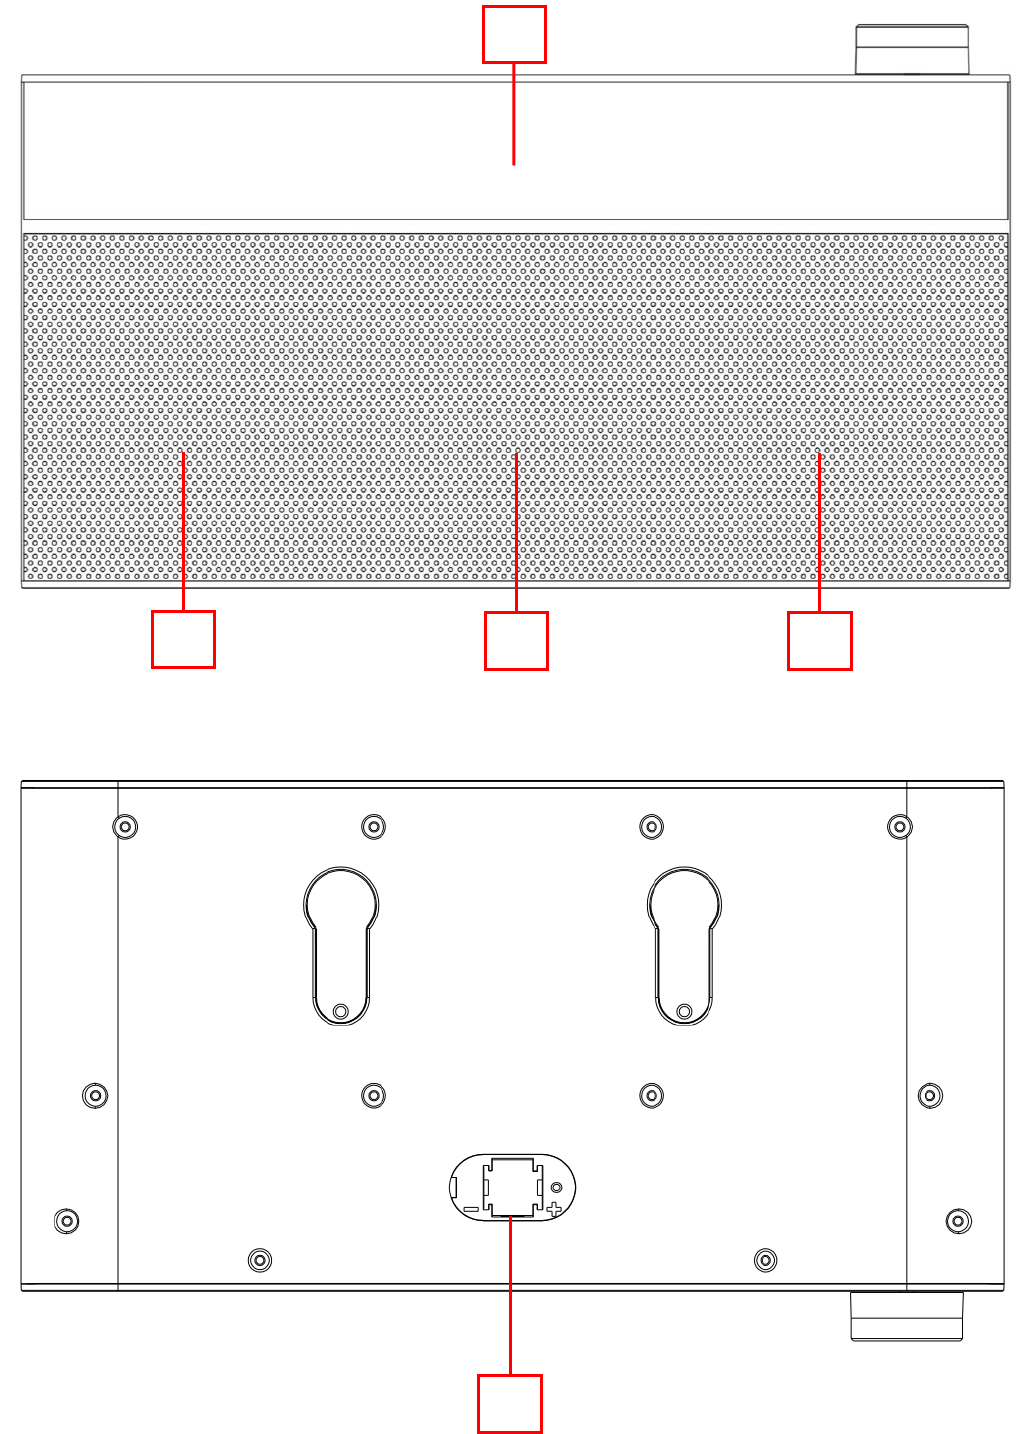
Bracket Mounting Slot (for Slide Unit Into Under Kitchen Bracket)
2
DC INPUT Socket (for DC 5V 1.5A Power Input)
3
FM Wire Antenna
4
Button (Power ON / OFF)
5
LED Segments Display
6
/ /AMS Button
(Play/Pause, Pick up/Hang up call/Last dialed, Auto Memory Stations)
7
LIGHT Button (Light On/Off)
8
RESET/MODE Button (FM / Bluetooth, Reset)
9
PRE / MEM Button (Preset Station / Memory Station)
10
/ ST Button (Clock Set / FM Stereo On/Off)
11
TUN / Button
12
TUN / Button
13
ALARM Button (Set for Alarm 1/2)
14
TIMER Button (Set for Clocking Timer)
15
MIC Position (for hand-free)
16
Adjustment Button ( / , Enter/Snooze)
17
LED Light Bar (White LED x 7)
18
Left Speaker
19
Bass Radiator
20
Right Speaker
21
Battery Compartment
3. First Time Connect to AC - DC Power Adapter
a. Use only original AC to DC power adapter:
Manufacturer: Shenzhen Qixin Electronics Co., Ltd
Model: YNQX09G050150UL
INPUT: 100-240 50 / 60Hz 0.3A
OUPUT: 5V 1.5A
Note: Symbol is AC Voltage and Symbol is DC Voltage.
b. Connect DC power from AC to DC power adaptor:
This device requires 5V 1.5A at least DC input from AC – DC
power adapter.
Plug the 5.5mm DC plug of provided AC to DC power adapter into
“DC INPUT Socket (3)” which located on back of Bluetooth Kitchen
clock device;
c. Manual clock setting.
When first time plug the power adaptor, the clock should show
“00:00” on the display, then manual clock time adjustment is
required.
6
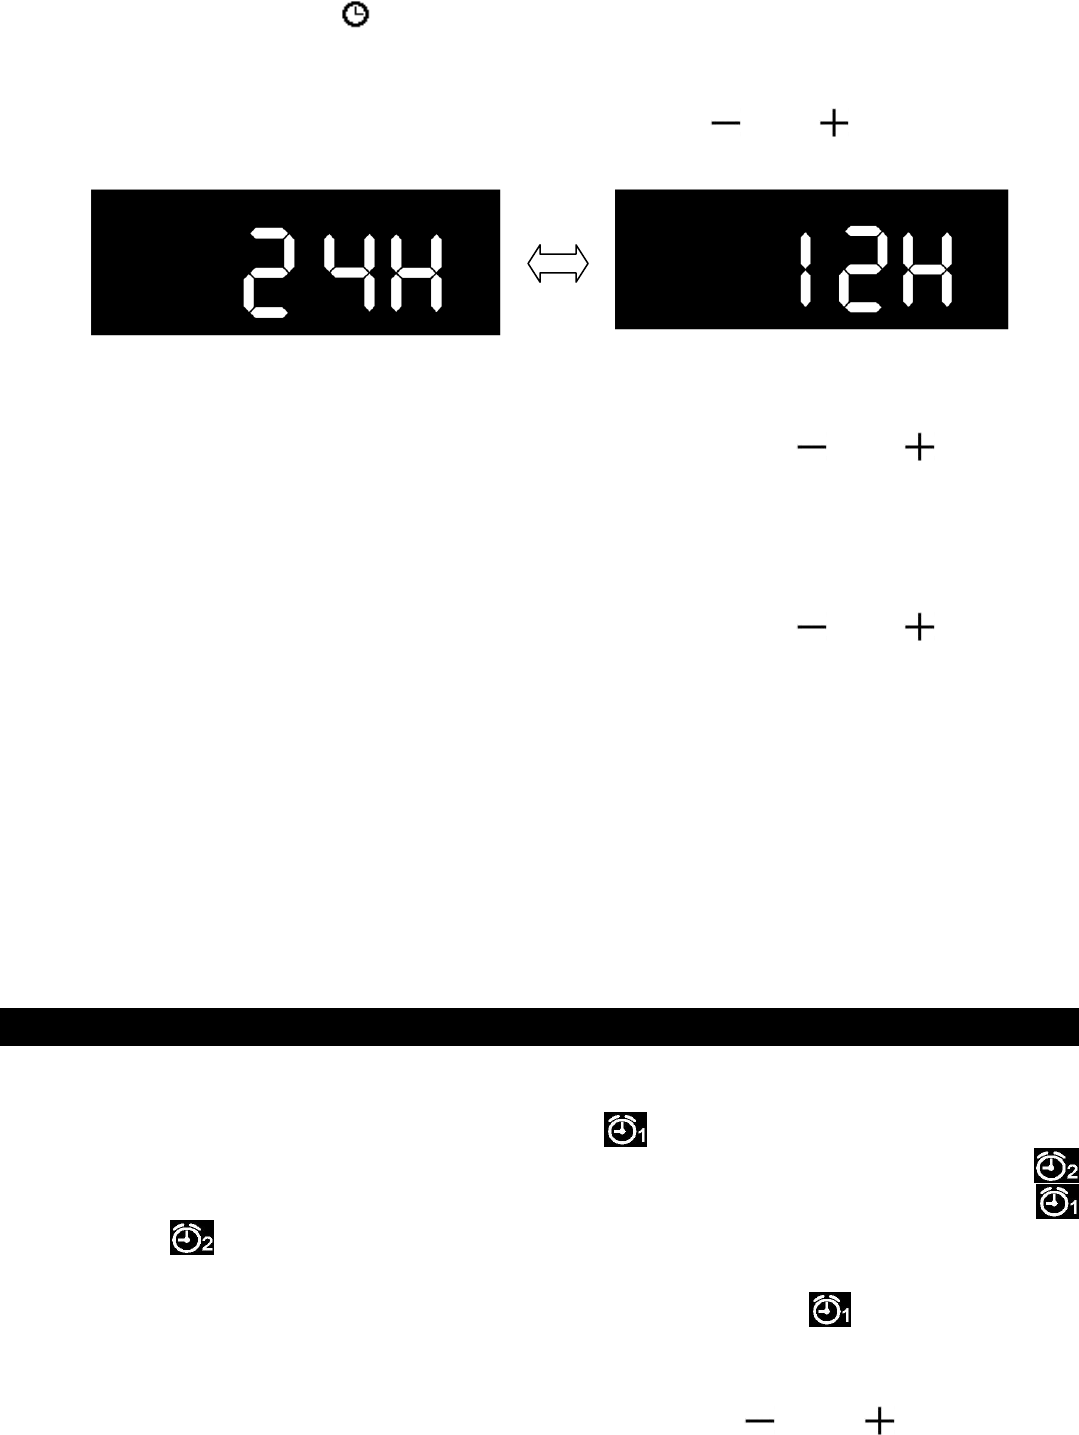
Short press the “/ST (10)” button to entry time format set;
The LED display will show blinking “24H” or “12H” for 6 seconds;
(factory defaulted is “24H”)
Rotates the “Adjustment (16)” button to “ ” or “ ” for selects
the desired time format;
Short press the “Adjustment (16)” button to confirm the time
format set and go for hour set, the number of hour will blinking;
Rotates again the “Adjustment (16)” button to “ ” or “ ” for
selects the hour time as current time;
Short press again the“Adjustment (16)”button to confirm the
hour time set and go for Minute set. The number of minute will
blinking;
Rotates again the “Adjustment (16)” button to “ ” or “ ” for
selects the minute time as current time and short press the
“Adjustment (16)” button to confirm the minute time set.
The clock set adjustment is completed and clock time is showing
on LED display.
Since the device has a AG13(LR44) button cell which will ensure
the time is maintained even during power outage;
The clock time will not be maintained if the backup battery runs
out. In this case the clock should show “00:00”, a new cell is
needed to replace.
Then manual clock time adjustment is required. (see above
4. Set Alarm 1 / Alarm 2 and Wake-Up function
a. Alarm time set:
Short press the “ALARM (13)” button to entry the set alarm
function, first the Alarm 1 symbol ( ) will blinking;
Then short press the “ALARM (13)” button again can switch to
when you want; (Short press this button can switch in between
and repeatedly)
Set Alarm 1 for example:
Short press the “ALARM (13)” button to choose ;
Then short press the “Adjustment (16)” button to confirm and go
for set alarm’s hour, and the number of alarm hour will blinking;
Rotates the “Adjustment (16)” button to “ ” or “ ” for selects
the desired hour of Alarm 1. Short press the “Adjustment (16)”
button to confirm and go for set minute of Alarm 1. The number of
minute will blinking;
7
Then again, rotates the “Adjustment (16)” button to “ ” or “ ”
for selects the desired minute of Alarm 1 and short press the
“Adjustment (16)” button to confirm and go for choose wake-up
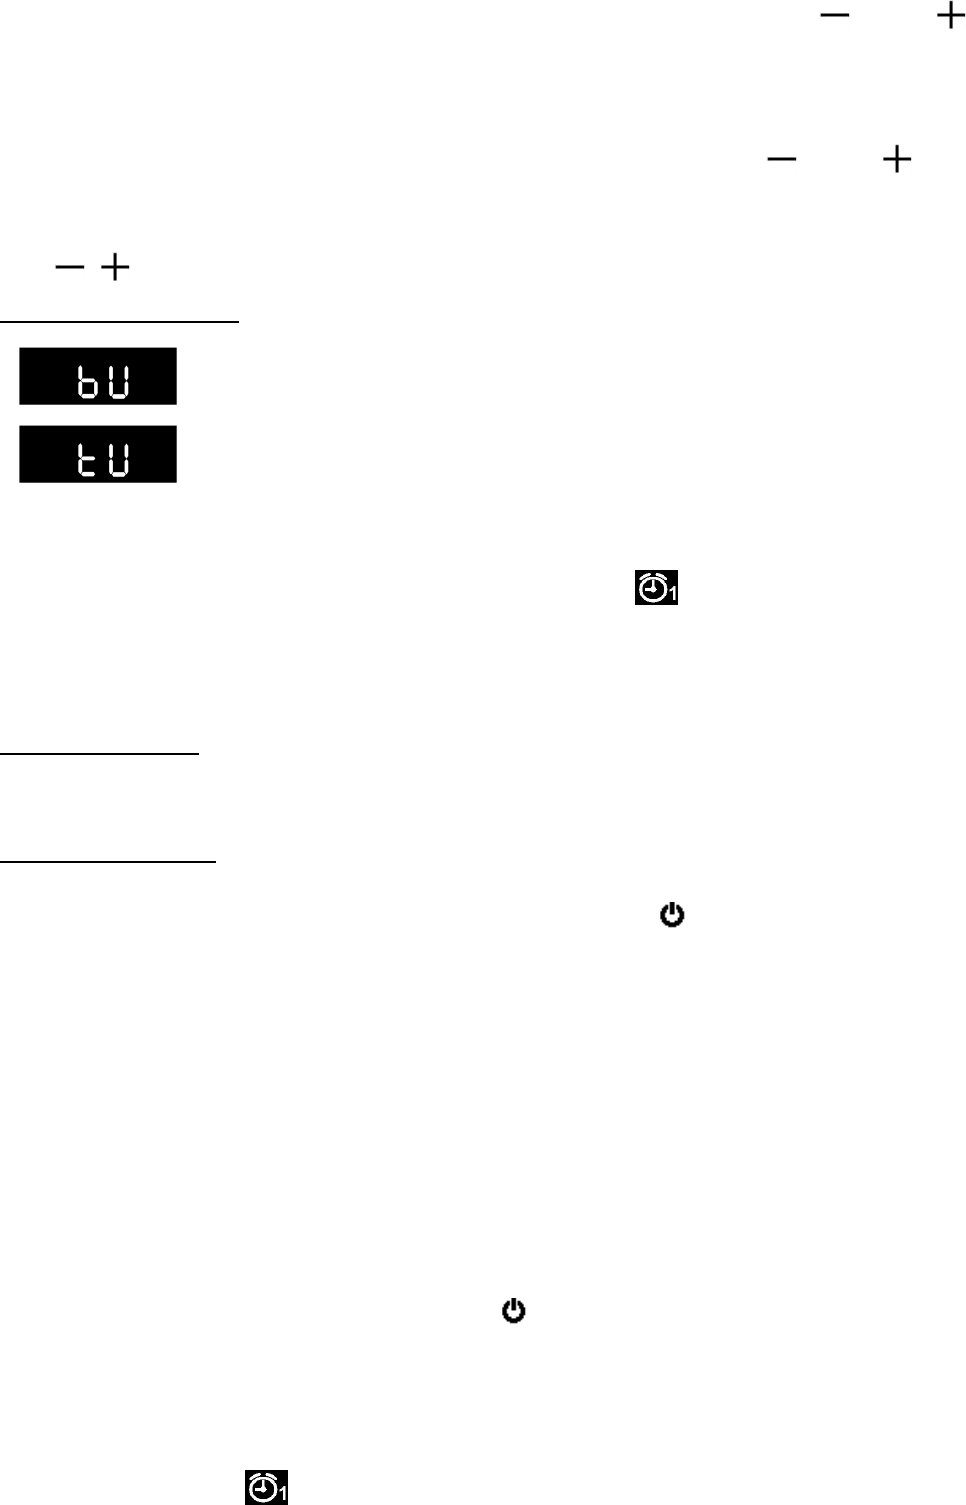
source. The “bU” letter will blinking on LED segments display;
Rotates the “Adjustment (16)” button to position “ ” or “ ” for
choose “bU” or “tU” which as want. The wake-up source could
switch from “bU” to “tU” repeatedly if continually rotates it button
to “/”;
Wake-up source
= Buzz (Beeps)
= Tuner (Current selected FM Radio station)
Short press the “Adjustment (16)” button to confirm once “bU” or
“tU” is selected.
The Alarm 1 settings are completed and icon is showing on
LED display.
Use the same methods for set the Alarm 2 function if you want.
b. Wake-Up Function:
Wake to Buzz
At the selected Alarm time, the wake-up beeps will turn on for 5
minutes. To stop the Alarm, short press the “Alarm (13)” button.
Wake to Radio
At the selected Alarm time, the FM radio will automatically turn on
itself. To stop the FM radio, short press the “ (4)” button to turn
off the device.
c. Dual Alarm time set:
Repeat the above mentioned set Alarm 1 methods to set Alarm 2
for dual alarm function if you want.
d. Use Snooze:
At the time of wake-up beeps in sound, you can short press the
“Adjustment (16)” button for approximately 9 minutes extra for
sleep if you want. The “Zz” icon will appear as identify.
And this snooze function can repeat 3 times if you use it.
Remark: When turn on the device by button will disable the snooze
function if snooze is in using.
e. To disable the Alarm 1 and or Alarm 2 function:
Short press the “ALARM (13)” button to call alarm function, the
Alarm 1 symbol ( ) will blinking;
Short press “ALARM (13)” button again to choose which alarm to
8
disable;
In or blinking status, long press the “ALARM (13)” button
to disable the chosen Alarm.
Disable alarm function will work only when the Alarm 1 and/or
Alarm 2 have been set and in used.
f. To enable the disabled Alarm 1 and or Alarm 2:
For Alarm 1:
Short press the “ALARM (13)” button to call alarm function, the
symbol will blinking and the previous time set will display at
the same time;
Then long press the “ALARM (13)” button to enable the Alarm 1
function which has disabled.
For Alarm 2:
Short press the “ALARM (13)” button to call alarm function, the
symbol will blinking;
Then short press the “ALARM (13)” button again to switch to
Alarm 2, the symbol will blinking and the previous time set
will display at the same time;
Then long press the “ALARM (13)” button to enable the Alarm 2
function which has disabled.
5. Set Cooking Timer
Short press the “Timer (14)” button to entry the countdown timer
mode, the LED display switch from current mode to timer display
mode, the timer symbol will blinking and show “05” minutes
on LED display; (5 minutes is system default running time when
timer is chosen)
Then rotates the “Adjustment (16)” button to “ ” or “ ” for set
your desired time for cooking timer; (01 ~ 300 minutes can be set)
Short press the “Timer (14)” or “Adjustment (16)” button to
confirm and the display will switch back to previous current mode
screen. The Timer symbol ( ) is appearing for indication, the
Cooking Timer is activated.
The last 30 seconds of setting time will be counted down on
display with beep sound until time’s up.
The remaining time of the timer will be circulating display by “time
-> radio frequency -> timer time” repeatedly on LED screen.
To disable the Timer function:
Then long press the “Timer (14)” button to disable function and
the symbol will disappear on LED screen.
6. Kitchen Light ON/OFF
Short press the “Light (7)” button to turn on the kitchen light bar
9
when necessary.
Short press the “Light (7)” button again to turn off the kitchen light
bar.
Information for Kitchen light function:
- For food demonstration.
- It is not suitable for household room illumination.
7. Power ON/OFF
a. Power ON and OFF:
Short press the “ (4)” button to power on the device and use FM
radio from clock display mode; (The FM radio mode will start first
as system default)
In power on mode, short press the “ (4)” button to power off.
b. Use FM Stereo Radio:
Make sure that the FM wire antenna is well adjusted and fixed at
good position; it will increase for radio reception.
Adjust Volume Level
Rotates the “Adjustment (16)” button to “ ” for decreases
volume.
Rotates the “Adjustment (16)” button to “ ” for increases volume.
FM Mute
In you want to mute the radio sound for a while, short press the
“/ (6)” button, the sound will mute and the FM radio
frequency is blinking as identify.
Short press the “/ (6)” button to resume.
FM Station
The first time use the FM radio function; the frequency 87.5MHz
will show on LED segments display and wait for tuning radio
stations;
However, last used radio channel frequency being recall for FM
radio, when you switch mode in-between the FM mode and
Bluetooth mode, or power off and on the device.
c. Manual Tune Radio Frequency:
In FM radio mode;
Press the “TUN / (11)” or “TUN / (12)” button for steps
frequency down or up to receive next station, each press will step
down or up the frequency by 0.1MHz.
Press the “TUN / (11)” or “TUN / (12)” button quickly
until to your desired radio frequency of radio station. Or;
Long press the “TUN / (11)” or “TUN / (12)” button for 2
seconds to entry into manual searching mode. This mode allows
keeping tuning down / up and being stop until next radio station
frequency is received.

10
d. Manual Store for Tuned Radio Frequency into Preset Memory:
After the above mentioned manual tune radio frequency, the
tuned current station’s frequency can be stored by;
Long press the “PRE/MEM (9)” button, the preset “P01” will
appear and blinking on display;
Then short press the “TUN / (11)” or “TUN / (12)” button
to choose your desired preset number (P--) where to store the
tuned radio’s frequency;
Choose “P30” for example, and then short press again the
“PRE/MEM (9)” button to confirm the storage and the screen will
switch back to current radio’s frequency from preset mode.
e. Auto Memory Stations (AMS):
In FM receive mode;
Long press the “AMS (6)” button to entry auto memory stations
function;
The FM radio will turn into AMS mode and searching up from
current receiving radio frequency (example; 90.3MHz) to until a
circle of FM frequency range, from 90.4MHz ~ 108.0MHz then 87.5
~ 90.2MHz, those seeks and received FM station’s frequencies will
be memory and programed into preset list;
As the design, the current receiving radio frequency (90.3MHz) will
become preset “P01” and still as current receiving radio station for
continue uses.
Note:
- All previous preset radio frequencies will be erased when every time
you using the AMS function.
- The AMS function will be stop automatically if preset number “P01 ~
P40” are renew and fully programed.
f. Recall and Change Preset Number:
In current receiving radio frequency;
Short press the “PRE/MEM (9)” button, the current radio
frequency preset number will be recalled for 3 seconds;
Then short press the “TUN / (11)” or “TUN / (12)” button
to choose your desired preset number (P01 – P40) for radio
listening;
The LED display will switch back from preset screen to chosen
radio frequency screen.
Choose the desired preset number at any time you want by the
above mentioned steps.
g. Turn FM Stereo Function OFF and ON:
In some cases; the receiving FM radio station may have FM stereo
switching noise due to poor reception or strong interferences;
Turn off the FM stereo function to improve this issue when it
11
happen;
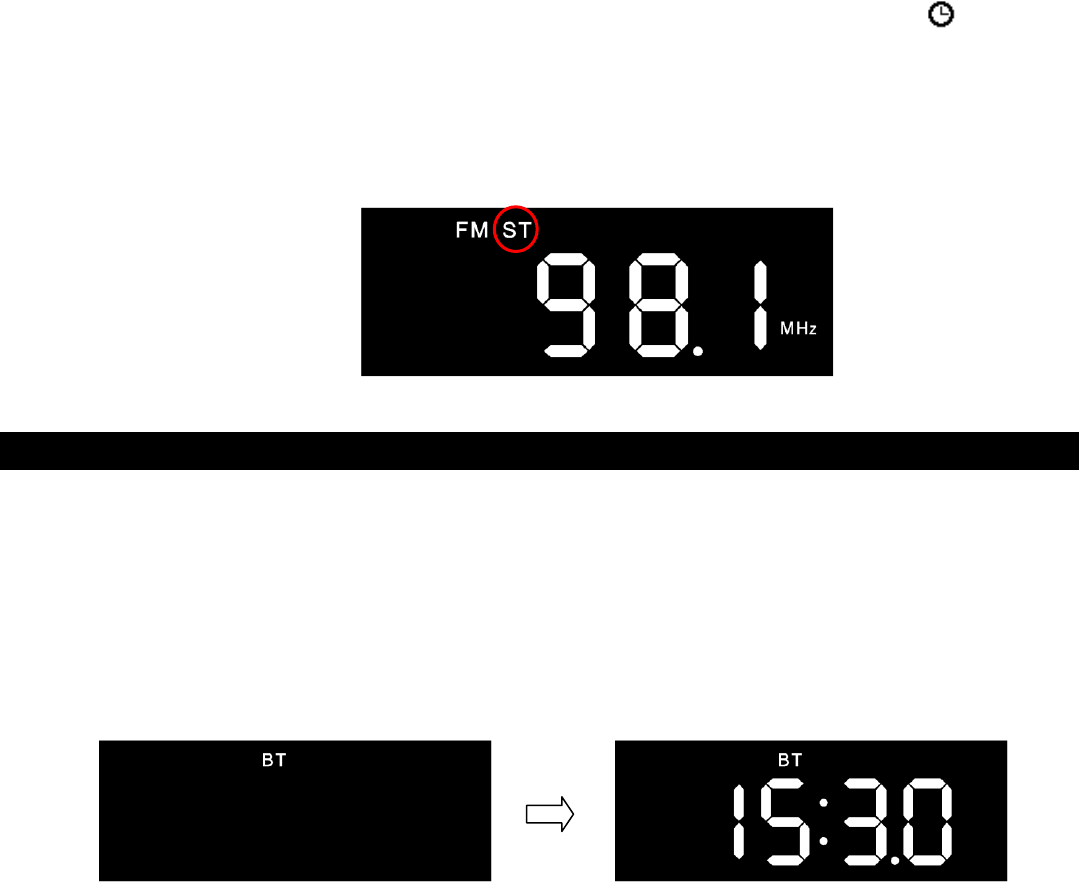
When the receiving FM station is in provided FM stereo
broadcasting, then the “ST” indicator should appear at the top line
of LED segments display. (see below picture)
To turn off the FM stereo function, short press the “ /ST (5)”
button and the “ST” icon will disappear.
Short press it again to turn on the FM stereo function, the FM
stereo function will turn on and the “ST” symbol will appear in 2
seconds.
8. Use Bluetooth Mode
a. Switch in-between Bluetooth and FM mode:
Power on the device, or in FM radio mode;
Short press the “MODE (8)” button to change from FM to
Bluetooth mode, the screen will switch to Bluetooth mode and the
“BT” icon appears.
Short press the “MODE (8)” button can switch in-between from
Bluetooth and FM mode at any time as your desired.
b. Bluetooth device Pairing:
When switched to Bluetooth mode, the device will goes for
reconnect/pairing mode automatically;
Then, activate the Bluetooth function in your Bluetooth device
(such as Mobile Phone or Personal Computer); the device will
enter to Bluetooth searching mode automatically, if not, taps the
related selection to manually enter to searching mode. (refer to
your device’s manual when necessary)
Your mobile device should show “BTS49” in Bluetooth list, and
then select it for pairing. Waiting for some seconds and will see
connected message as shown on your mobile device. (For some
Bluetooth devices. You may need to input “0000” as pairing
password)

12
If pairing is successful, a beep will sound, the “BT” icon light
change to solid from blinking.
Now, you can start to music play from the mobile device by its
music player program.
c. Disconnect from paired device
To disconnect with paired device and for better result;
Long press the “/ (6)” button to disconnect directly and a
series of tones will sound as identify;
Or, you can choose “Disconnect” from Bluetooth paired device list
on your mobile device;
In this case; the Bluetooth Kitchen Clock Speaker will turn back
into “Searching / Pairing” mode in seconds, a series of tones will
sound and the “BT” icon will turn to blinking again from solid.
Now, you can process for new mobile device pair or power Off the
Bluetooth Speaker if you wanted.
d. Disconnect from paired device
Every time you turn On the device and switch to Bluetooth mode;
it will firstly search for the mobile device which has been paired
previously and still in record;
The device will reconnect this mobile device as priority if it’s in
Bluetooth searching device mode and in connection range.
If no device found in some seconds, the device will automatically
turn into pairing mode.
Now you can process for new mobile device pair.
e. Switch to new pairing from connected mode
In Bluetooth connected mode, you can switch the Device into
Bluetooth searching mode for paring with the new device at any
time you desired;
Long press the “/ (6)” button to disconnect directly, a series
of tones will sound as identify and the “BT” icon turn to blinking
from solid.
Now you can process for new mobile device pair.
f. Bluetooth Music Playing Controls
On your Mobile Device
Switch to music player menu and choose a music to start the play
from playlist or by using “ / ” button/icon. Play/Pause the
playing music by using “ /” button or icon.
Adjust the volume level by using the device’s volume control
“Down / Up” button/icon on your Bluetooth device. (Refer to your
mobile device user’s manual when necessary)
On Bluetooth Speaker
In playing music;
13
Press the “/ (6)” button to pause the playing music. To resume
the music press it again.
Rotates the “Adjustment (16)” button to “ ” for decreases
volume.
Rotates the “Adjustment (16)” button to “ ” for increases volume.
The volume controls range can be used from “U00” minimum to
“U30” maximum.
Press the “TUN / (11)” button to play previous music.
Press the “TUN / (12)” button to play next music.
g. Hand Free Function
When there is an incoming call during Bluetooth music playing
mode;
The ringing sound will up and the playing music will pause
automatically;
Long press the “/ (6)” button to reject the call if you want. Or,.
Short press the “/ (6)” button to pick up the call;
Now you are in hand free function with the Bluetooth Kitchen
Clock Speaker.
Short press the “/ (6)” button again to hang up the call when
finished. And the paused music will resume automatically.
Tip: speak to the “MIC (15)” hole direct with distance in 30 ~ 60cm to get
the best speakerphone performance when necessary.
h. Redial Last Call Function
To redial for last called number by the Bluetooth Kitchen Clock
Speaker, even it is in Bluetooth music playing mode.
Short press the “/ (6)” button twice to enter into redial
function, the playing music will pause and switch to hand free
function for redial.
Short press the “/ (6)” button again can hang up the calling.
Make sure that your mobile phone has have last dial call used, if
not, the redial for last call function cannot be activated.
9. Reset the Device
In some circumstances the device’s function may hanging and need to
reset. To reset the device;
Long press the “RESET/MODE (8)” button for 8 seconds to reset
the device;
The LED segments display will show “F001 (example)” as identify
and the device is in reset process, all previous setup will be erased
and back to factory default;
Then, the device will be turned back to clock time display mode, it
will show “00:00”, Then manual clock time adjustment is required.
14
(see above Item 3.c for adjustment steps)
All previous setup will be erased and back to factory default.
Including all previous preset FM stations are clean-up too, use AMS
function to regenerates the preset station list.
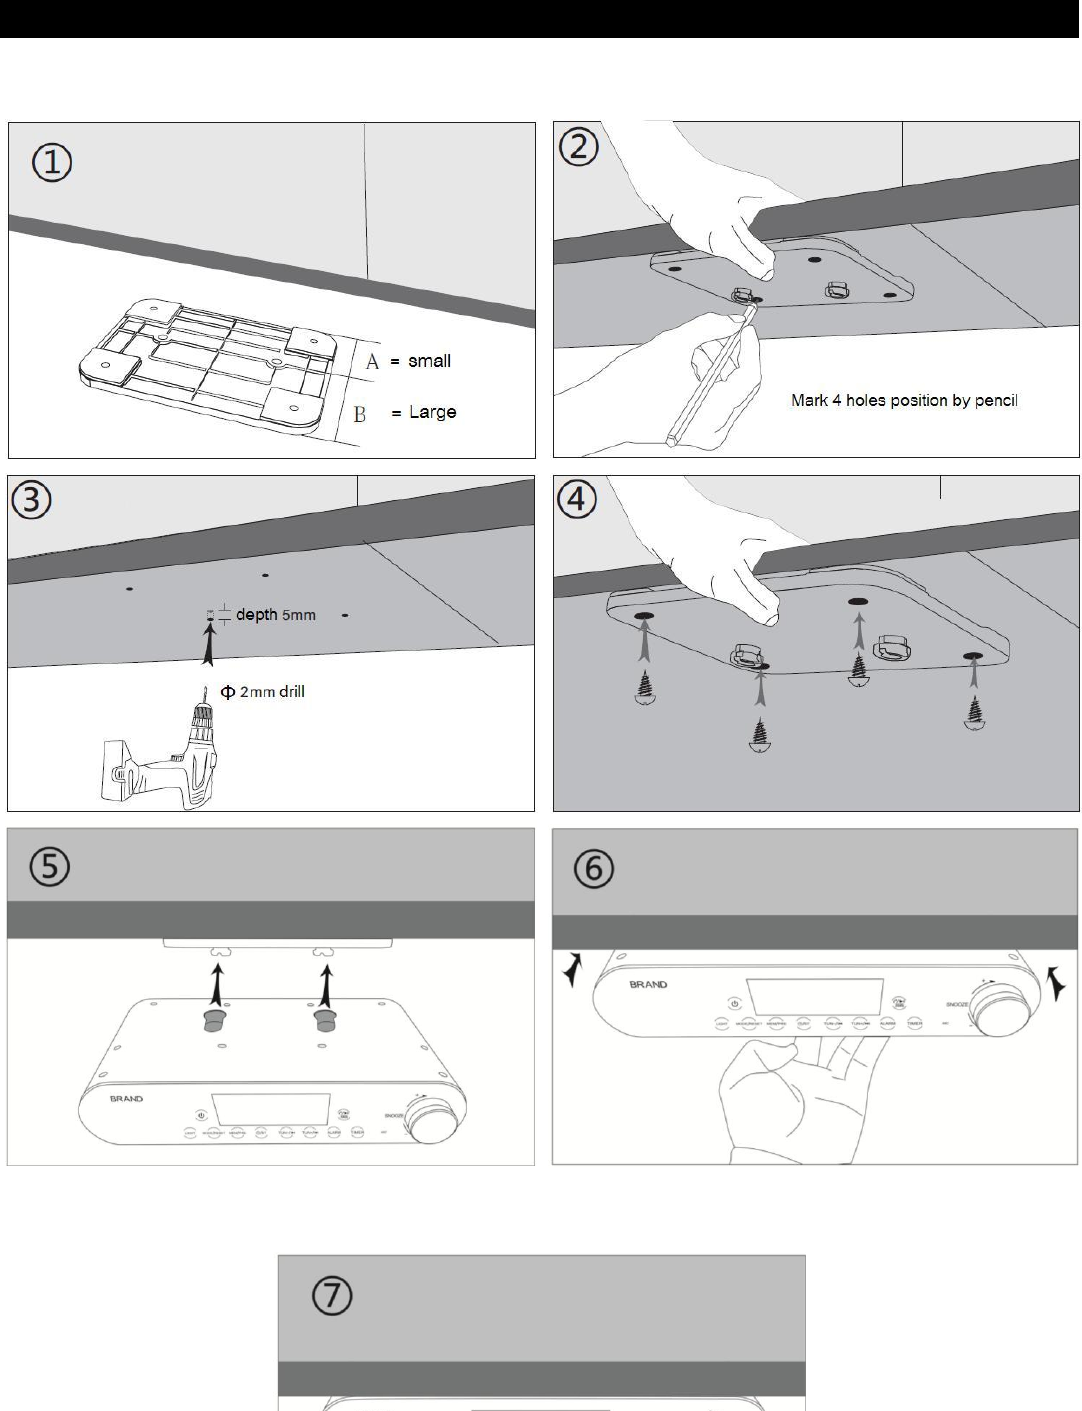
10. Install the Under Kitchen Mounting Bracket
Please use the provided mounting screws (4 pcs in bag) and install the
Bracket and Main Unit as the following pictures illustration:
15
11. Trouble Shooting
No power
Check whether DC plug of AC to DC adaptor is it
firmly plugged into DC jack of main unit.
Check whether the AC to DC power adaptor is it
firmly plugged into AC outlet.
No sound
Check whether volume level is in lower position on
your main unit or and mobile device.
Check if you have selected the correct mode
source.
Make sure that your Bluetooth device is within the
effective operation range.
Check whether the Bluetooth device is paired on
your mobile device.
Check whether the Bluetooth device show
connected on your mobile device.
No radio station
Check whether the FM station’s is tuned in correct
frequency and programed.
No response from
speaker
Restart the speaker by power Off and On.
12. Technical Specification
Unit Dimension
212mm(L) x 120mm(D) x 48mm(H) Main Unit
(with Bracket)
Unit Weight
525g (approx.)
Clock
Alarm 1, Alarm 2
Wake-up by: Beeps or FM radio
Cooking Timer
0 ~ 300 minutes (Counter-down)
Alarm by: Beeps
Bluetooth
Specification
V4.1
Supported Profile
A2DP, AVRCP, HSP
Connection Distance
In 10 meters (open area)
Power
Class II
FM Radio
Tuning Range
87.5MHz – 108MHz
Stereo / Mono
Selectable
Preset Memory
40 stations (max.)
16
Antenna
Wire type
Power Source Input
6mm DC Socket for 5.5mm DC plug
DC Input 5V 1.5A
Audio
Output Power
2W (RMS) x 2 (4 Ohm)
Freq. Responses
80Hz to 16,000Hz
Operating Temperature
0 to 40℃
13. Disclaimer
Updates to Firmware and/or hardware components are made
regularly. Therefore some of the instruction, specifications and pictures in
this documentation may differ slightly from your particular situation. All
items described in this guide for illustration purposes only and may not
apply to particular situation. No legal right or entitlements may be
obtained from the description made in this manual.
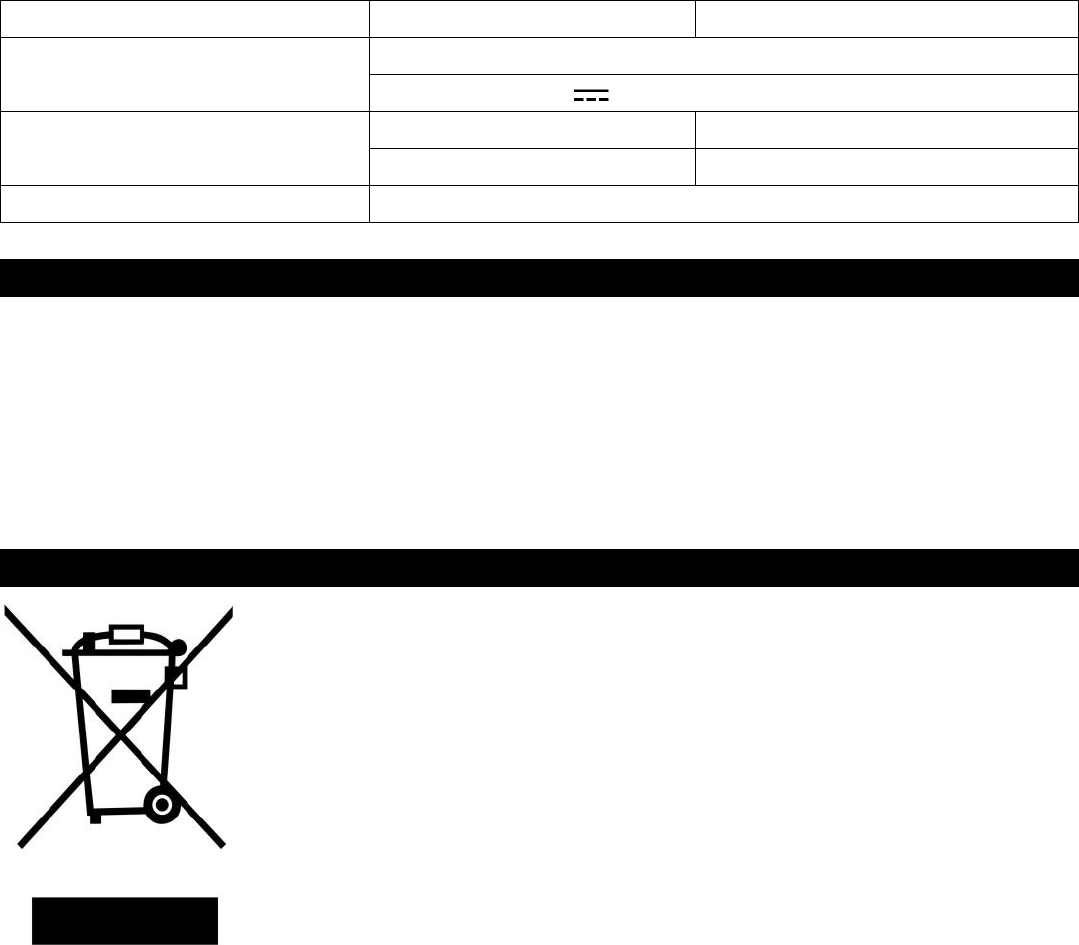
14. Recycling
This symbol indicates that the relevant electrical
product or battery should not be disposed of as general
household waste in Europe. To ensure the correct waste
treatment of the product and battery, please dispose
them in accordance to any applicable local laws of
requirement for disposal of electrical equipment or
batteries. In so doing, you will help to conserve natural
resources and improve standards of environmental
protection in treatment and disposal of electrical waste
(Waste Electrical and Electronic Equipment Directive).
FCC Statement
This equipment has been tested and found to comply with the limits for a Class B
digital device, pursuant to Part 15 of the FCC Rules. These limits are designed to
provide reasonable protection against harmful interference in a residential
installation. This equipment generates uses and can radiate radio frequency
energy and, if not installed and used in accordance with the instructions, may
cause harmful interference to radio communications. However, there is no
guarantee that interference will not occur in a particular installation. If this
equipment does cause harmful interference to radio or television reception, which
can be determined by turning the equipment off and on, the user is encouraged to
try to correct the interference by one or more of the following measures:
-- Reorient or relocate the receiving antenna.
-- Increase the separation between the equipment and receiver.
17
-- Connect the equipment into an outlet on a circuit different from that to which the
receiver is connected.
-- Consult the dealer or an experienced radio/TV technician for help.
Changes or modifications not expressly approved by the party responsible for
compliance could void the user's authority to operate the equipment.