Billionton Systems MDCBTASC32 Bluetooth + MDC Modem Card User Manual
Billionton Systems, Inc. Bluetooth + MDC Modem Card
user manual

MDCBTASC32
User’s Guide &
Manual
1.0

Index
Introduction 1
Features 1
Driver support 2
Driver installation 3
Windows 98 installation 3
Windows ME installation 8
Windows 2000 installation 12
Windows XP installation 18
Installing Bluetooth Software for Windows
20

1
1. Introduction:
The MDCBTAXX32 is designed to provide Modem and Bluetooth functions on a MDC
form Factor card. The Bluetooth function is based on CSR BlueCore03-ROM Single Chip,
which implements the full speed class 2 Bluetooth operations with full 7 slave Pico-net
support. The Bluetooth function of MDCBTAXX32 to host system is USB compliant with
USB V1.1 standard interface. The AZALIA mobile daughter card (MDC) specification
provides a mobile form-factor module and interface for audio/modem codec solutions
based upon the AZALIA Specification, revision 0.7. The MDC specification is open to the
industry to facilitate IHV validation on AZALIA based code.
2. Features:
Data Modem
V.92 / 56 Kbps (K56Flex and V.90)
V.34 (4.8 Kbps to 33.6 Kbps)
V.32 bis (4.8 Kbps to 14.4 Kbps)
V.22 bis (50 bps to 2.4 Kbps)
V21, Bell 103 / Bell 212
V.42 bis/MNP 5 data compression
V.42/MNP 2-4 error correction
Virtual Com port with a throughput of up to 460.8 Kbps
Hayes AT Command set
TIES escape code
Fax Modem Standard
Send and receive rates up to 14.4 kbps, V.17, V.29, V.27ter
ITU-T V.17, V.29, V.27ter, V.21 Ch2 and TIA/EIA 578 Class1 FAX
Bluetooth
CSR BC03 ROM / V1.2 Single chip Bluetooth System
Full speed USB interface support OHCI , UHCI compliant USB V1.1
Full embedded to RFCOMM
Bluetooth specification V1.2
USB specification V1.1
Support BT_ON control Bluetooth ON / OFF feature
Faster Connection
Adaptive Frequency Hopping (AFH)
1

2
Telephony Services
Country Select function
TAM
System Requirements
Pentium based (233 MHz and above)
Windows 98SE,Windows ME, Windows 2000 and Windows XP
MDC 1.0 / 30 pin Slot
8 Mbytes RAM (Drivers occupy ~ 1MB)
Bus Interface
Modem :Compliant to Intel Mobile Audio/Modem Daughter Card Specification 1.0
Bluetooth : USB 1.1 Compliant
Hardware
MDC Modem support Secondary Operating Modes
Bluetooth V1.2 and USB specification V1.1
Power Management
Supports ACPI Power Management and Modem wake-up on Ring.
3. Driver support:
MDC Modem : Windows 98SE, Windows 2000, Windows ME and Windows XP
Bluetooth : Windows 98SE, Windows 2000, Windows ME and Windows XP
3
4. Driver installation:
Before install this modem driver please make sure your PC or Notebook soundcard
driver is ready.
-Windows 98 installation:
Insert the modem card into your PC or Notebook MDC slot and then power on.
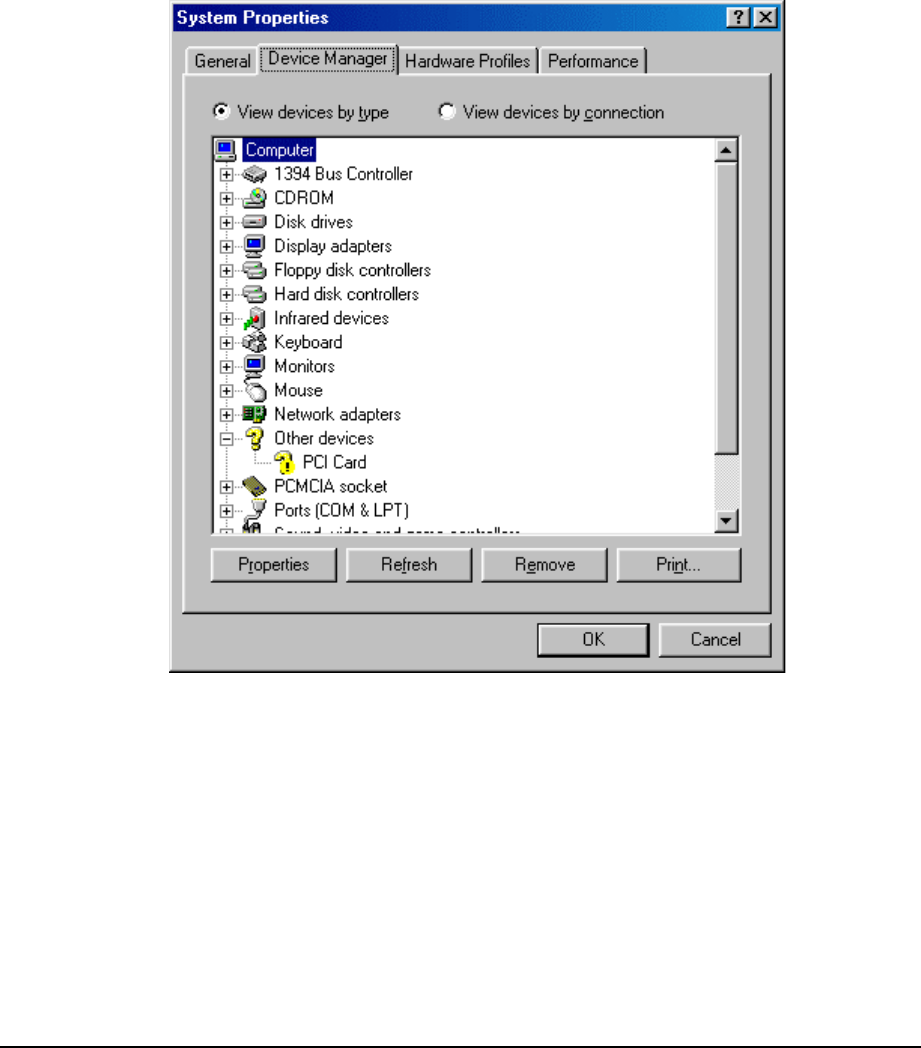
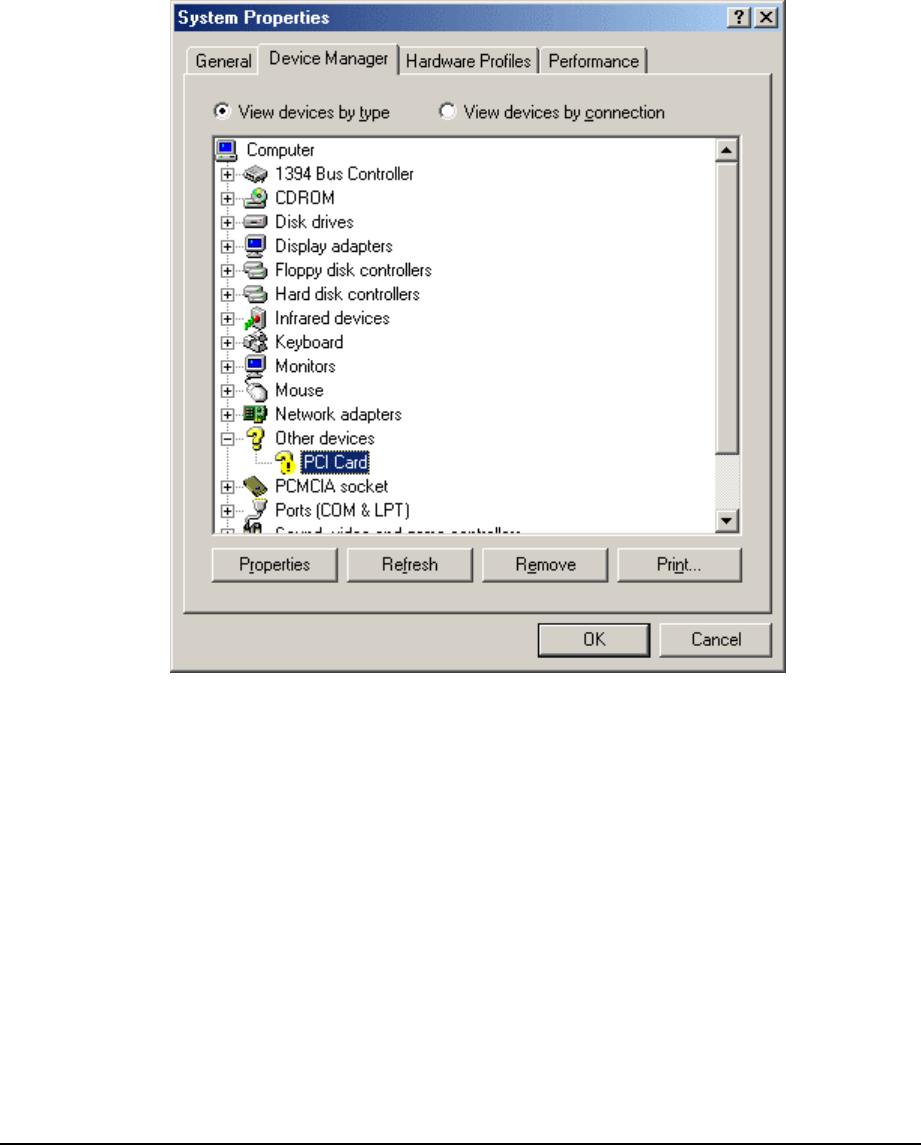
1. After start, please check device manager from control panel, you will see an
exclamation mark on PCI Card this device, please select this device and then click
"Properties".
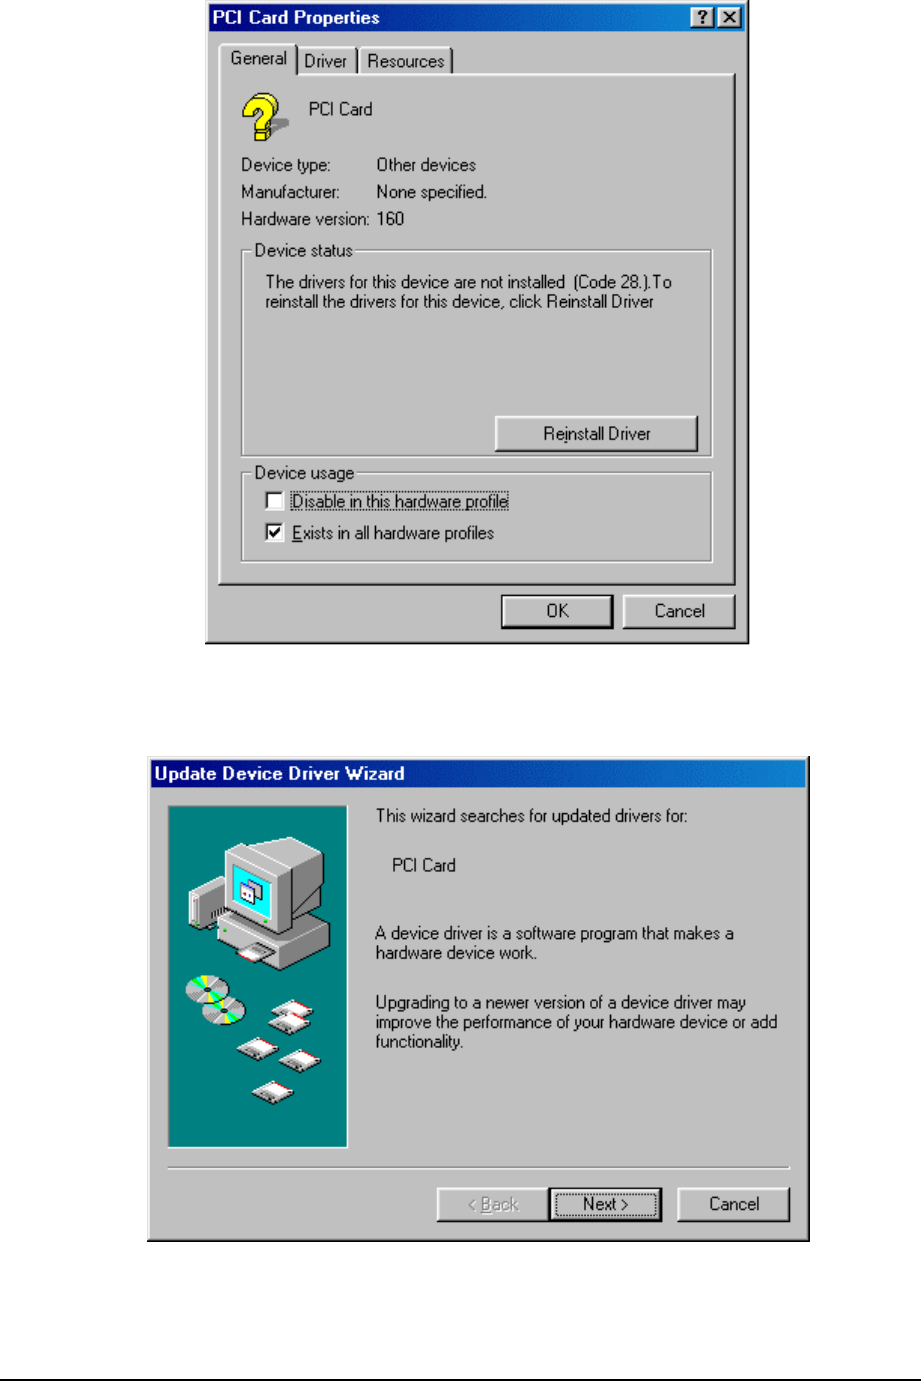
2. Select "Reinstall Driver".
4
3. System will popup "Update Device Driver Wizard" window, and then click the "Next"
Button.
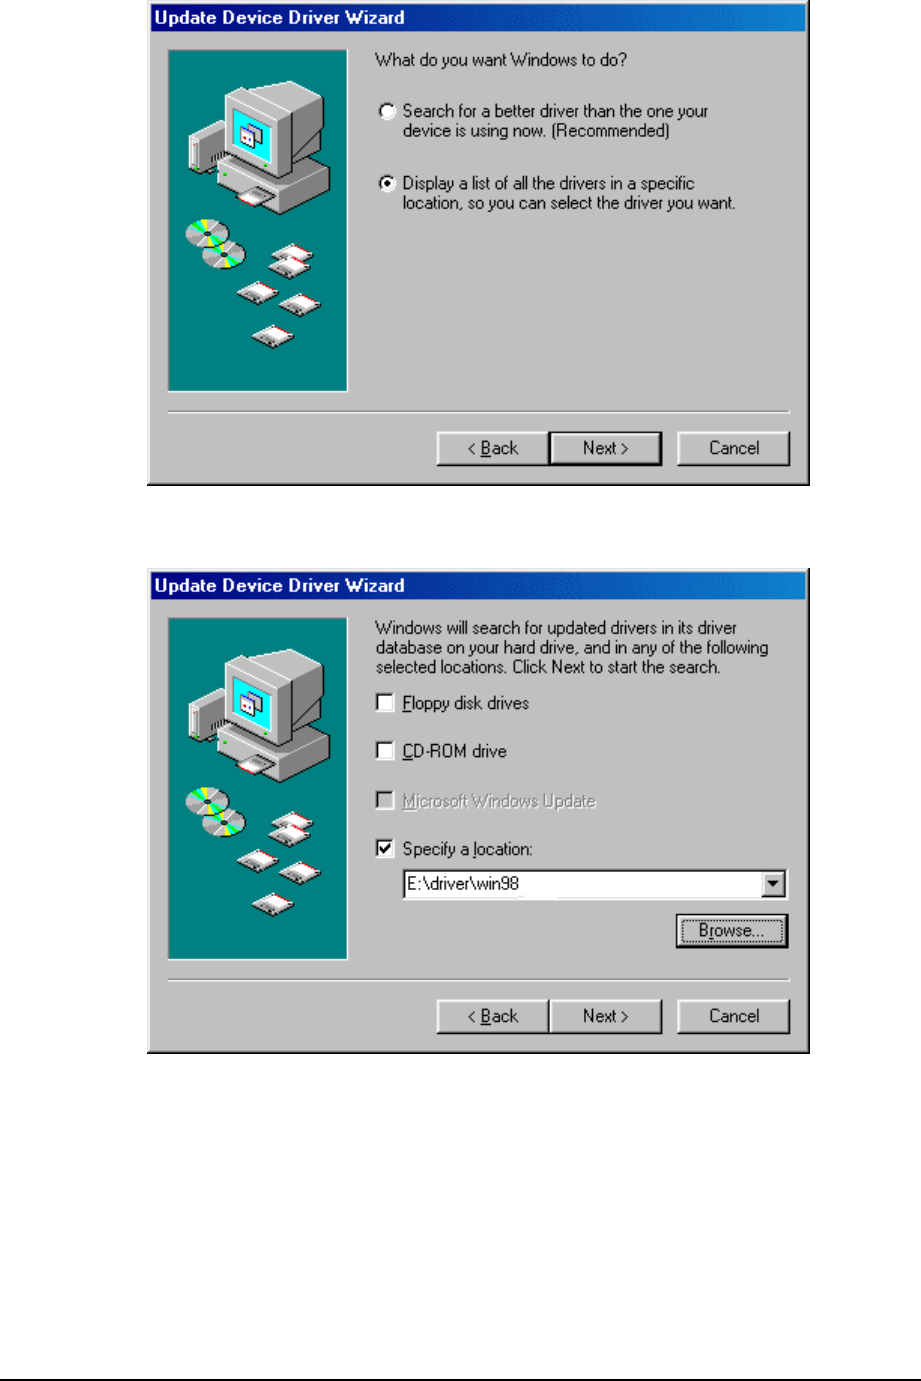
4. Select "Display a list of all the drivers…" and then click the "Next" Button .
5
5. Insert the driver disk and select the driver location, then click the "Next" Button.
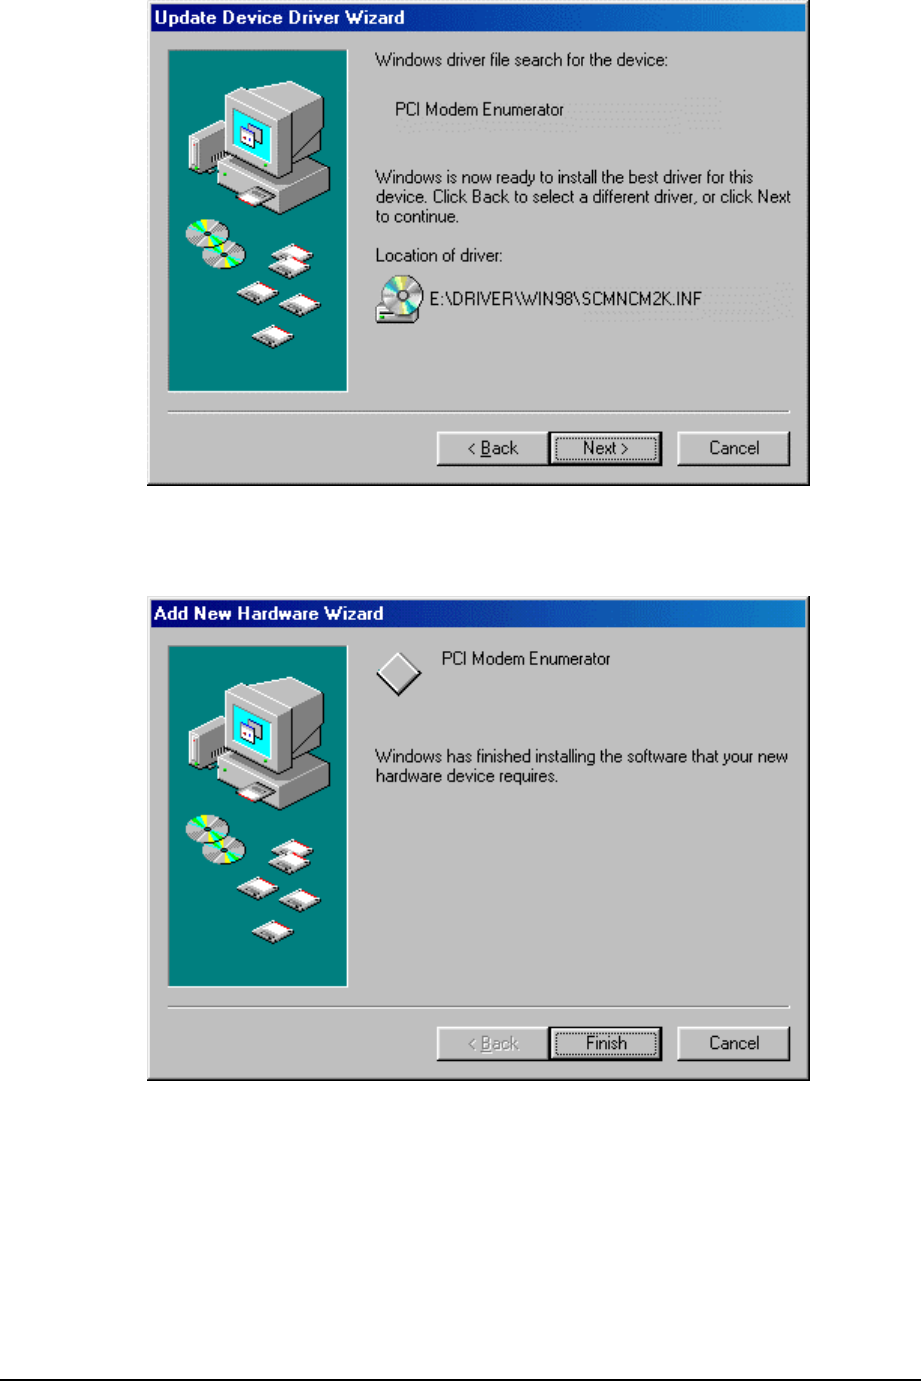
6. Windows 98 will search and recognize the driver of the Device. Click the "Next" Button.
6
7. Windows will automatically copy the driver files and related files into your system. After
copying the driver files, click the "Finish" Button.
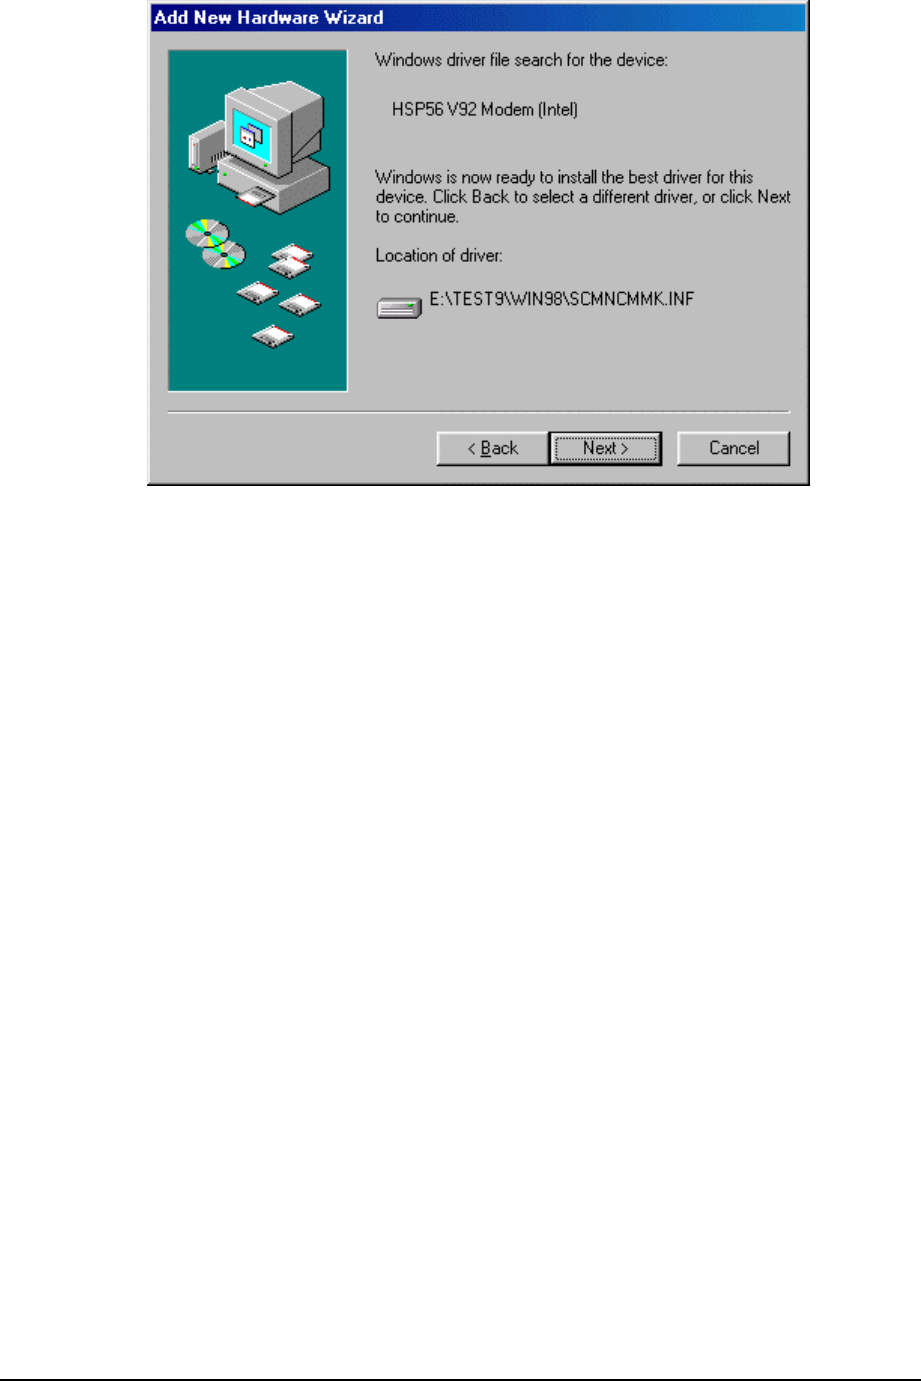
8. The modem will be detected, repeat steps from 4th to 6th and then click the "Next"
Button.
7
9. Click on the "Finish" Button to complete the installation.
8
-Windows ME installation:
Insert the device into your PC or Notebook MDC slot and power on.
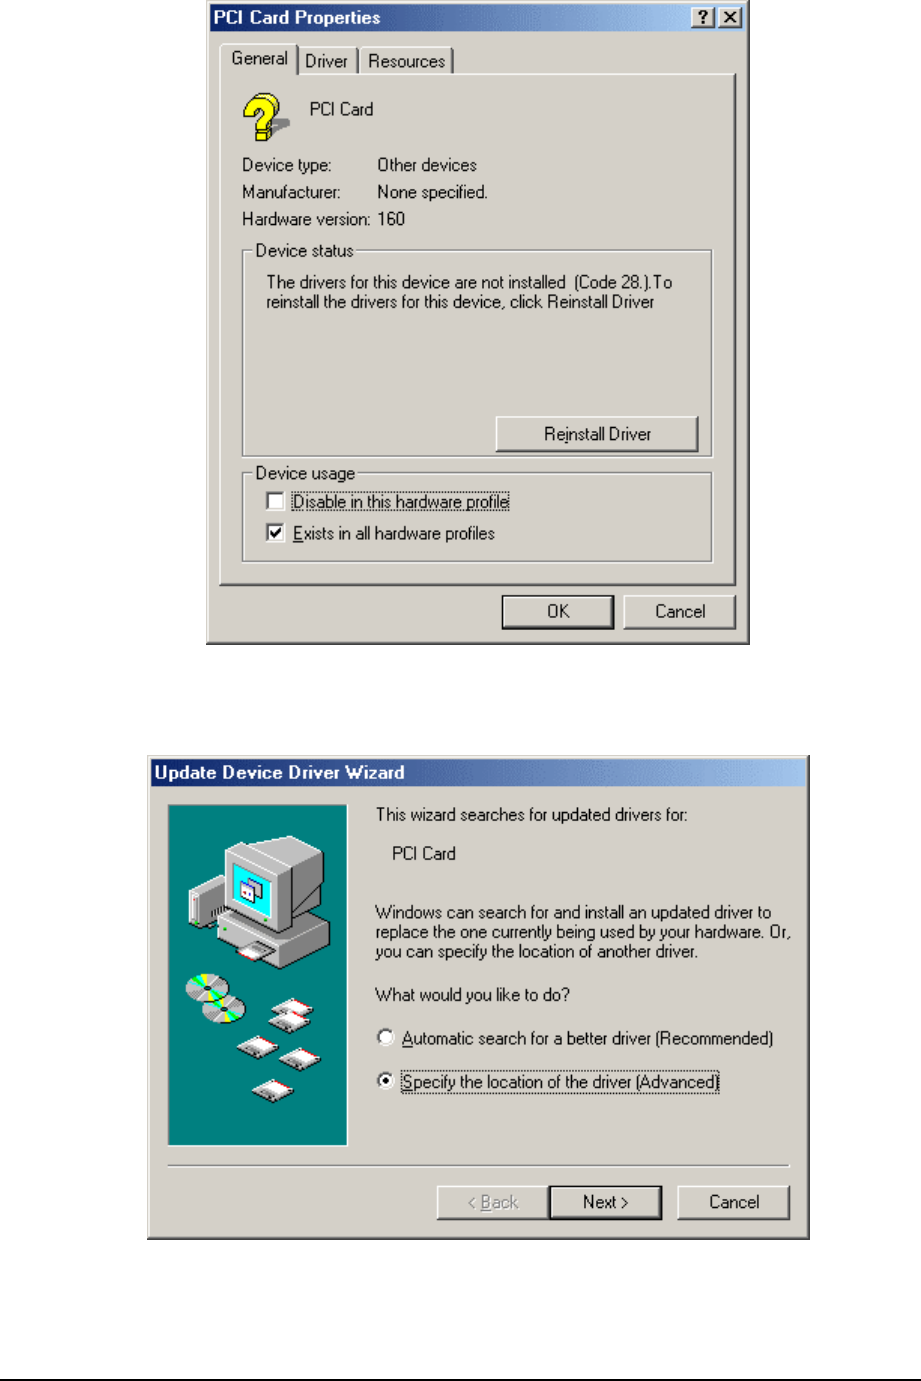
1. After start, please check device manager from control panel, you will see an
exclamation mark on PCI Card this device, please select this device and click
"Properties".
2. Select "Reinstall Driver".
9
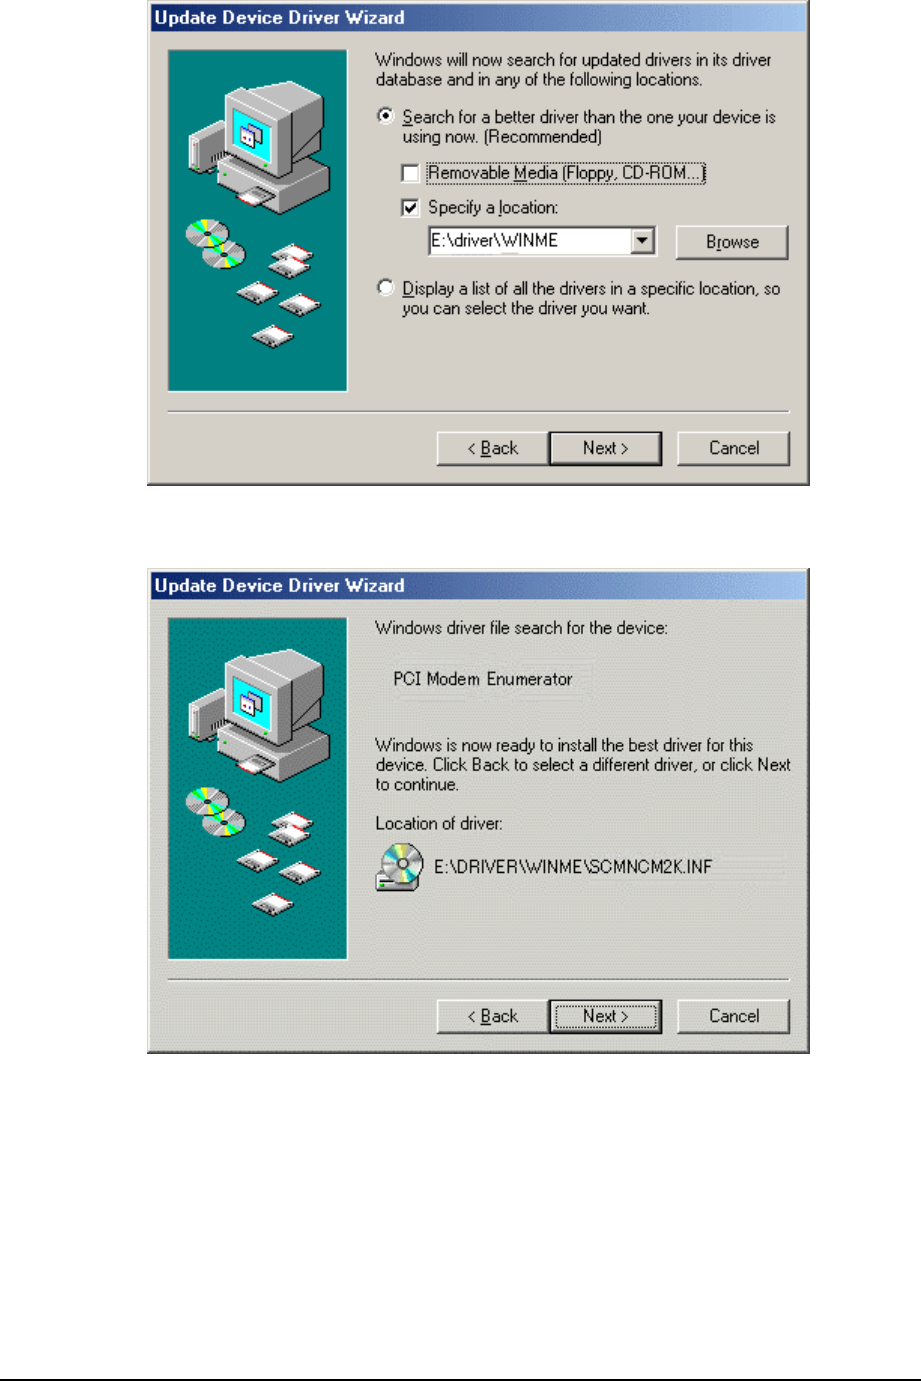
3. System will popup "Update Device Driver Wizard" window, select "Specify the
location of the drivers" and also select "Specify the location", then click "Next".
4. Select "Specify the location of the driver. (Advanced)" Insert the driver CD or
diskette, then select the driver location by keying the driver path.
10
5. Windows ME will automatically copies the driver files and related files into the system.
8. The modem will be detected, repeat steps from 4th to 6th and then click the "Next"
Button.
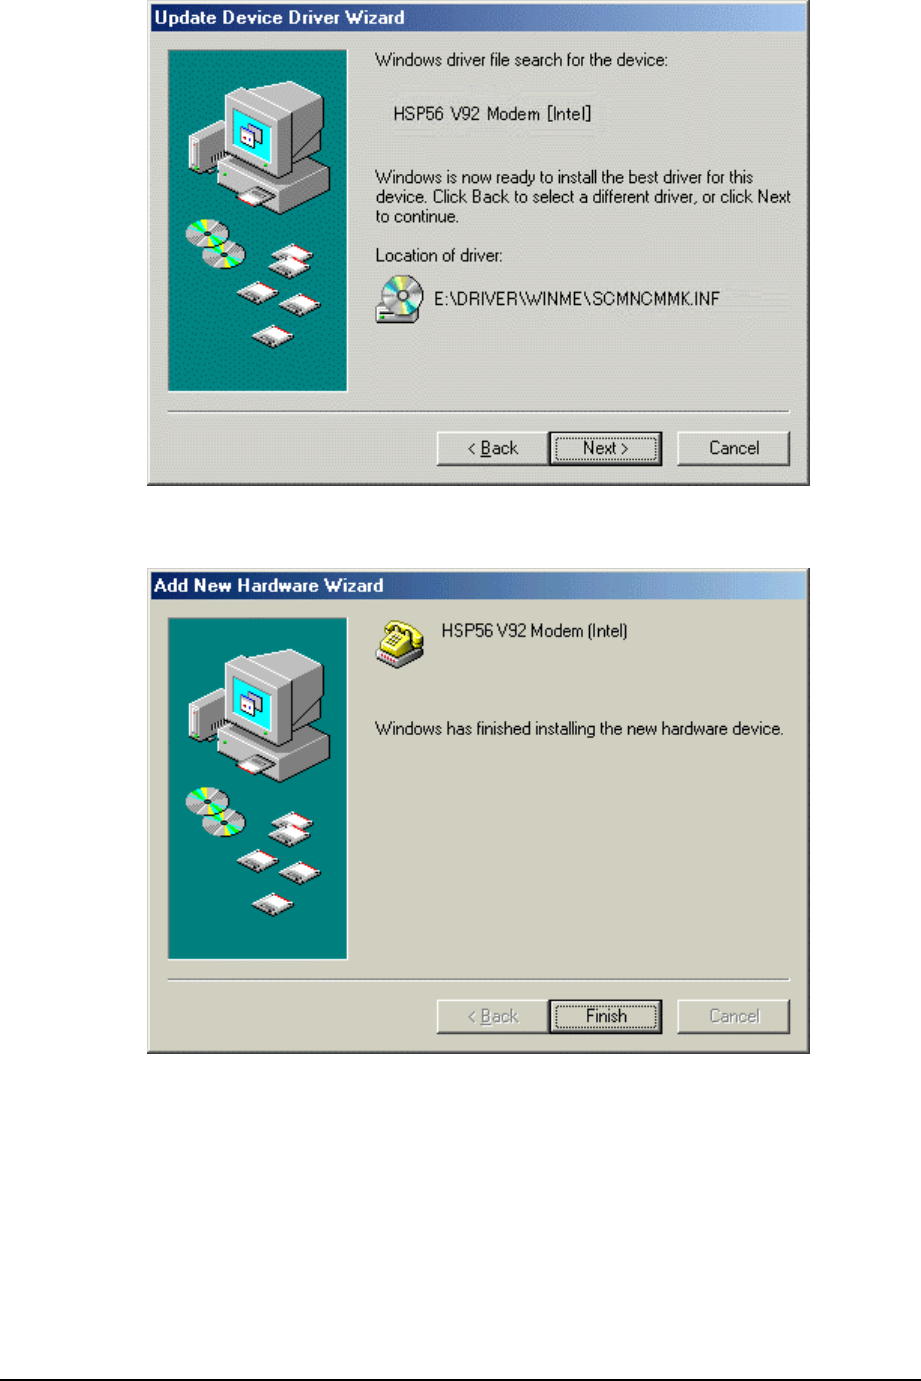
11
9. Click on the "Finish" Button to complete the installation.
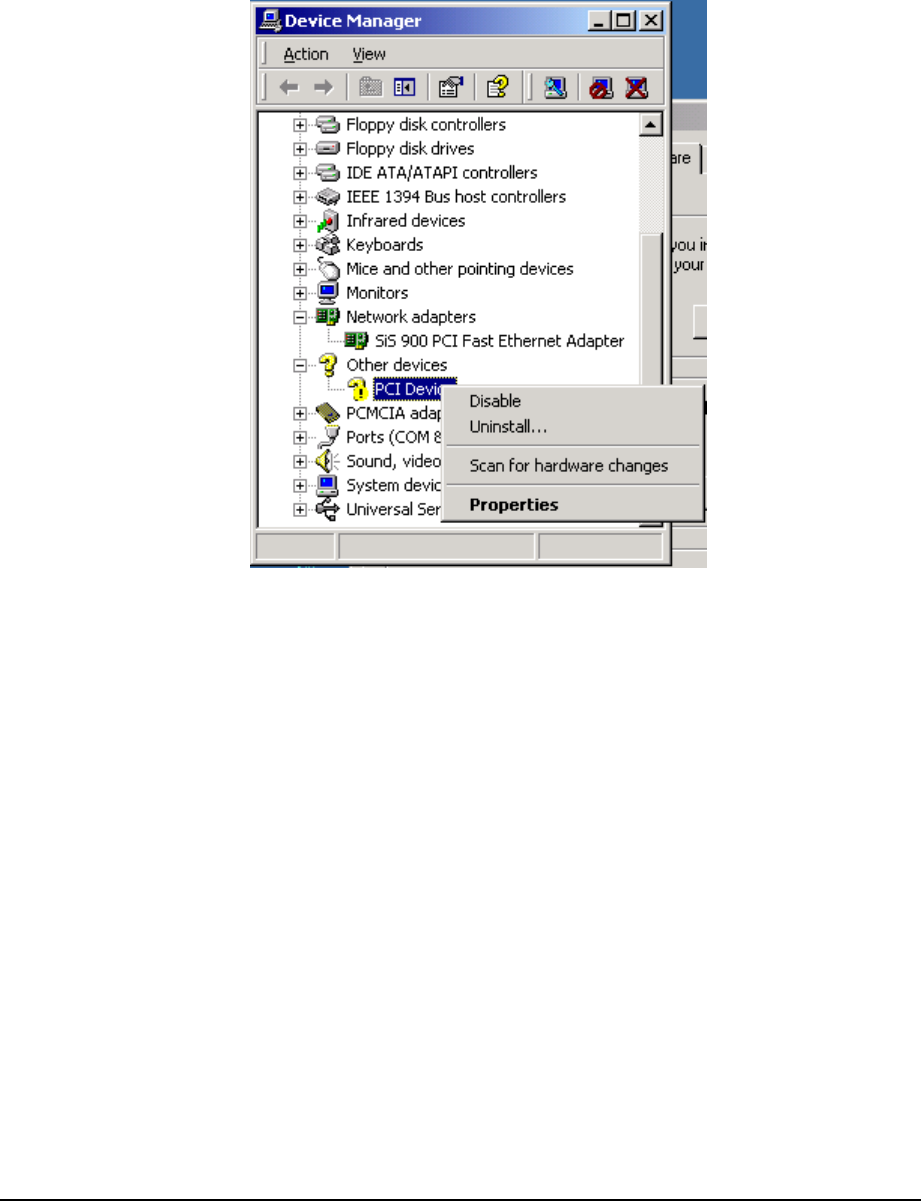
12
-Windows 2000 installation
1. Insert the modem card into your PC or Notebook MDC slot and then power on.
Check device manager from control panel, you will see an exclamation mark on PCI Card
this device, please select this device and click "Properties".
2. Select "Update Driver".
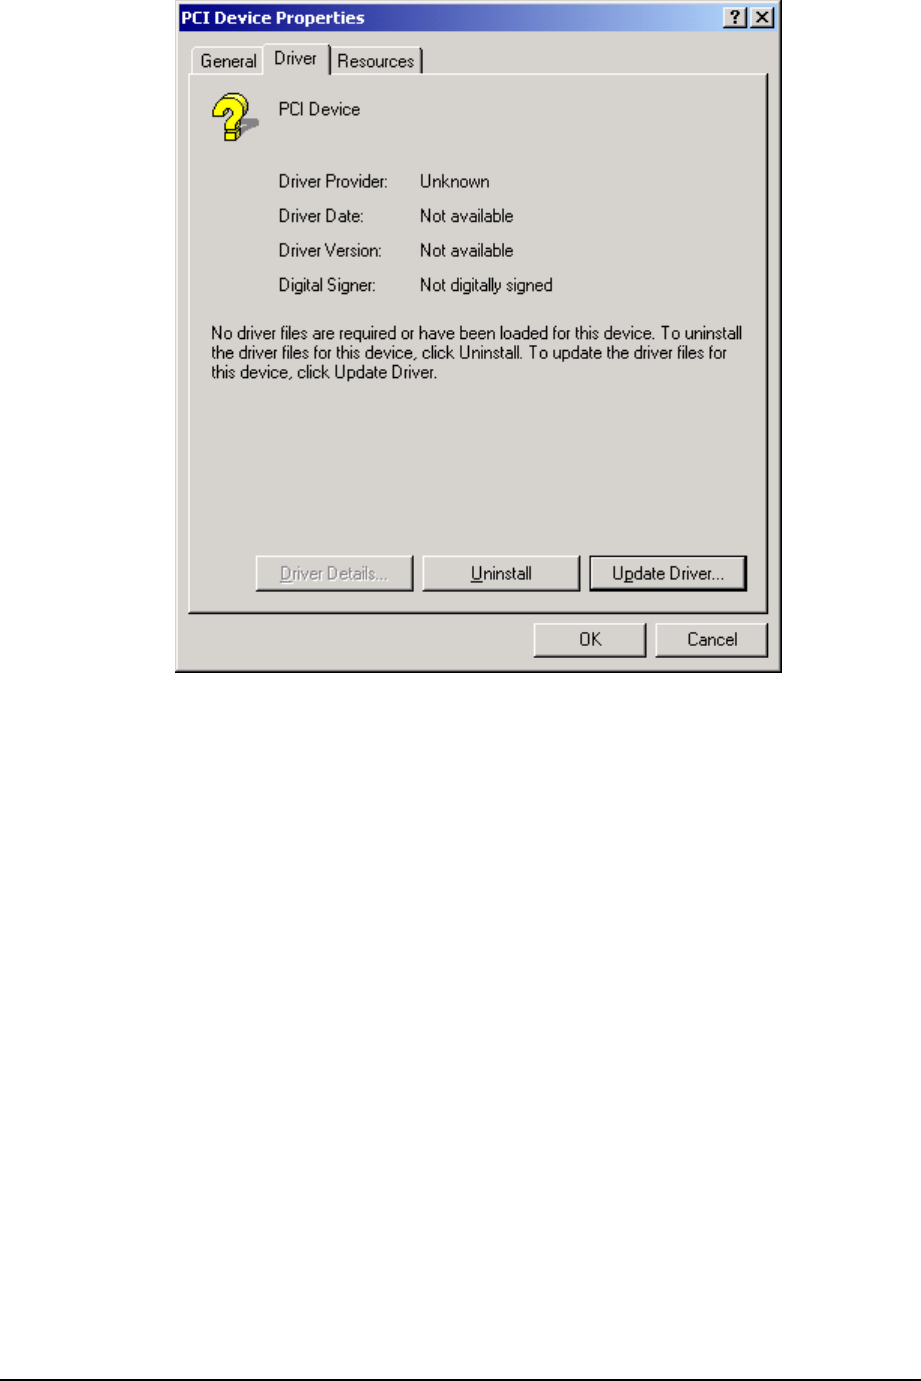
13
3. The system will popup "Update Device Driver Wizard" window then click "Next"
button.
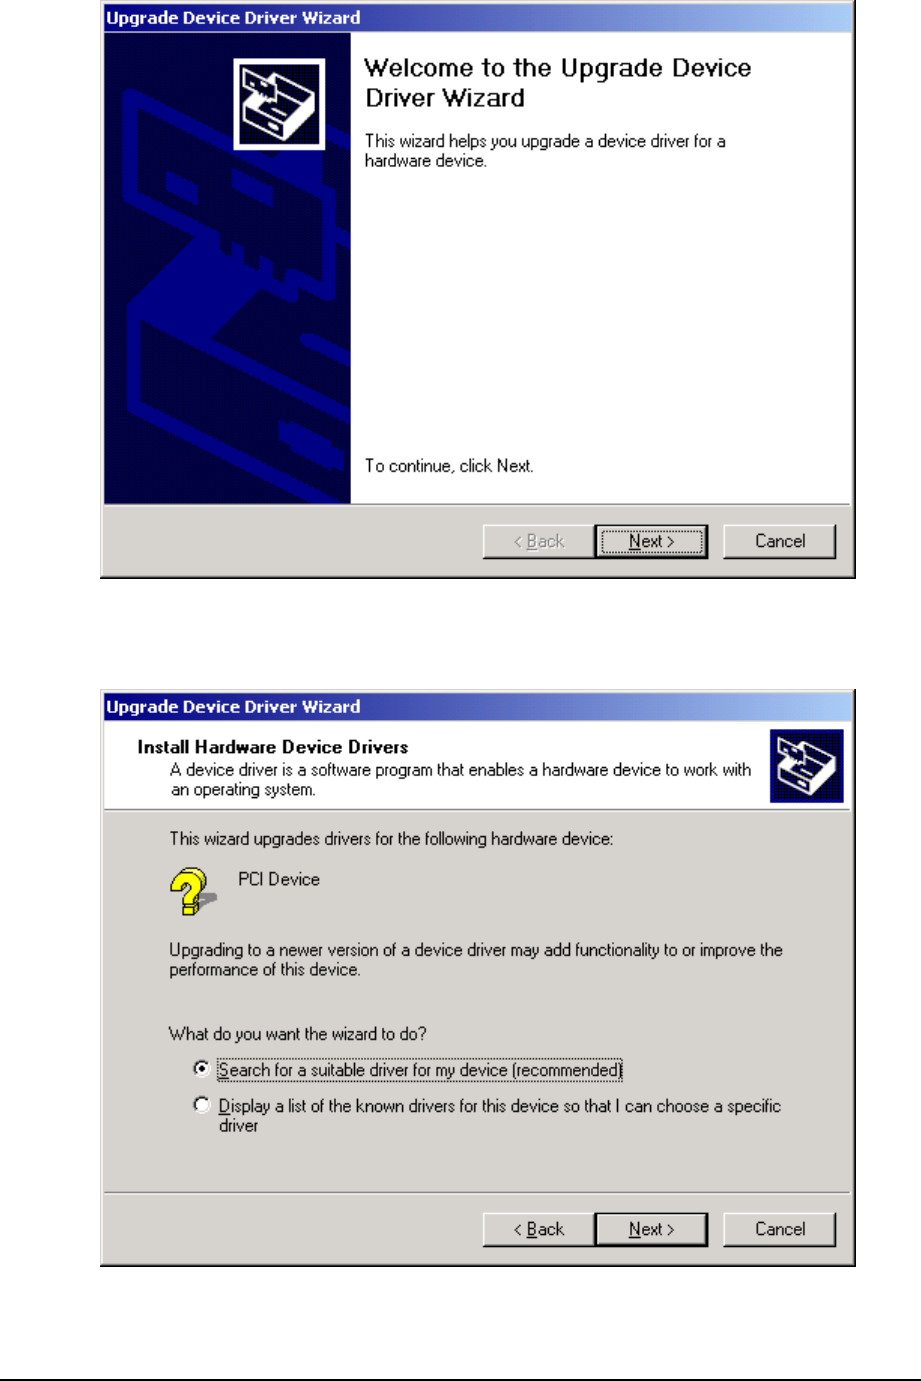
14
4. Please select "Search for a suitable driver for my device (recommended)" then
click "Next".
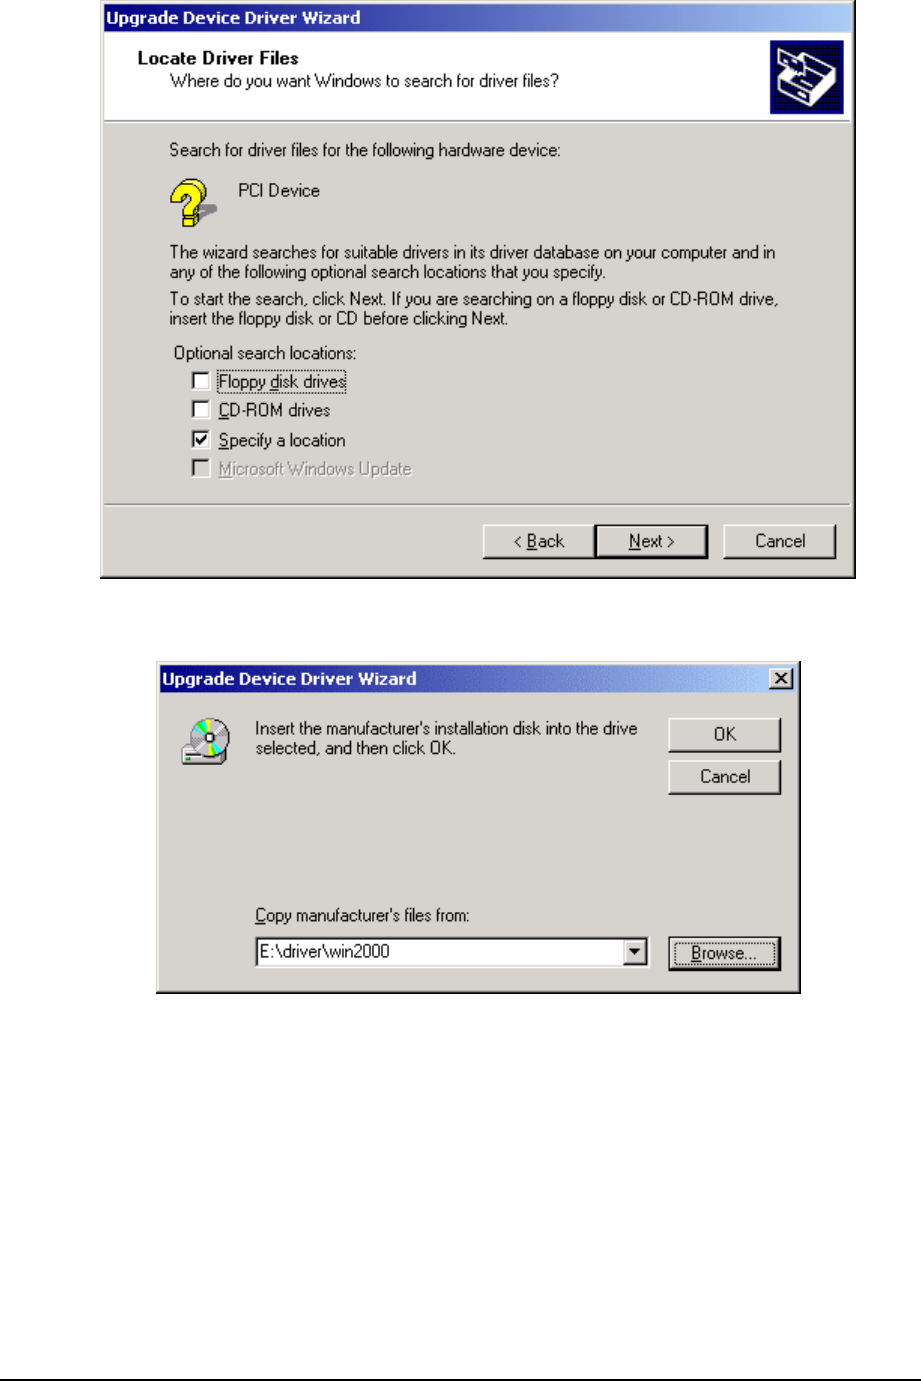
5. Insert the driver disk and select the "Specify a location" then click "Next" button.
15
6. Key in the driver path and then click the "Next" button.
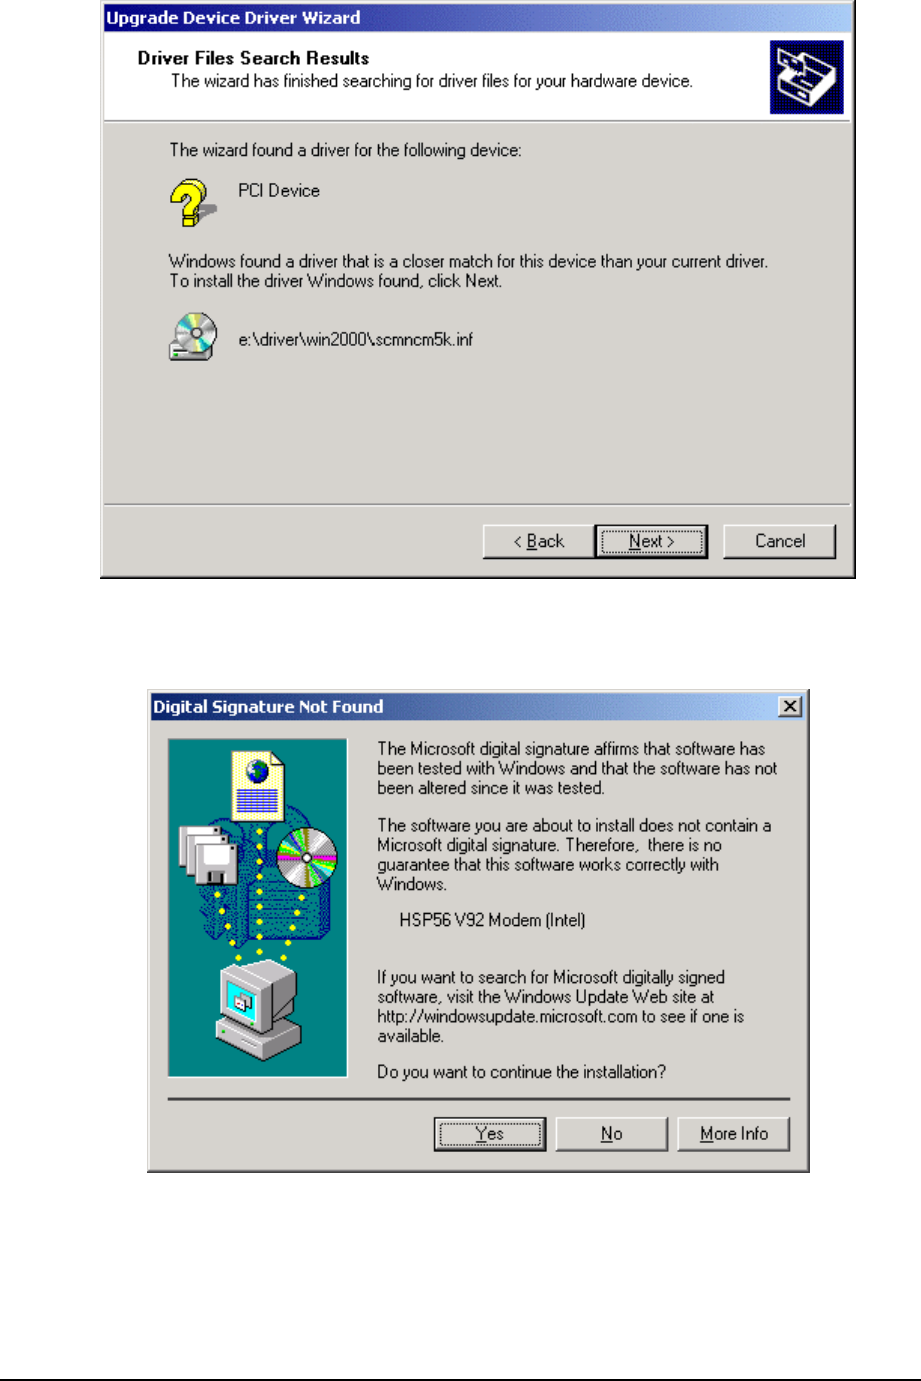
7. Windows 2000 will search and recognize the driver of the device and click the "Next"
button.
16
8. Windows will automatically copy the driver files and related files into the system. The
Windows shows "Digital Signature not Found", then click "Yes" to continue.
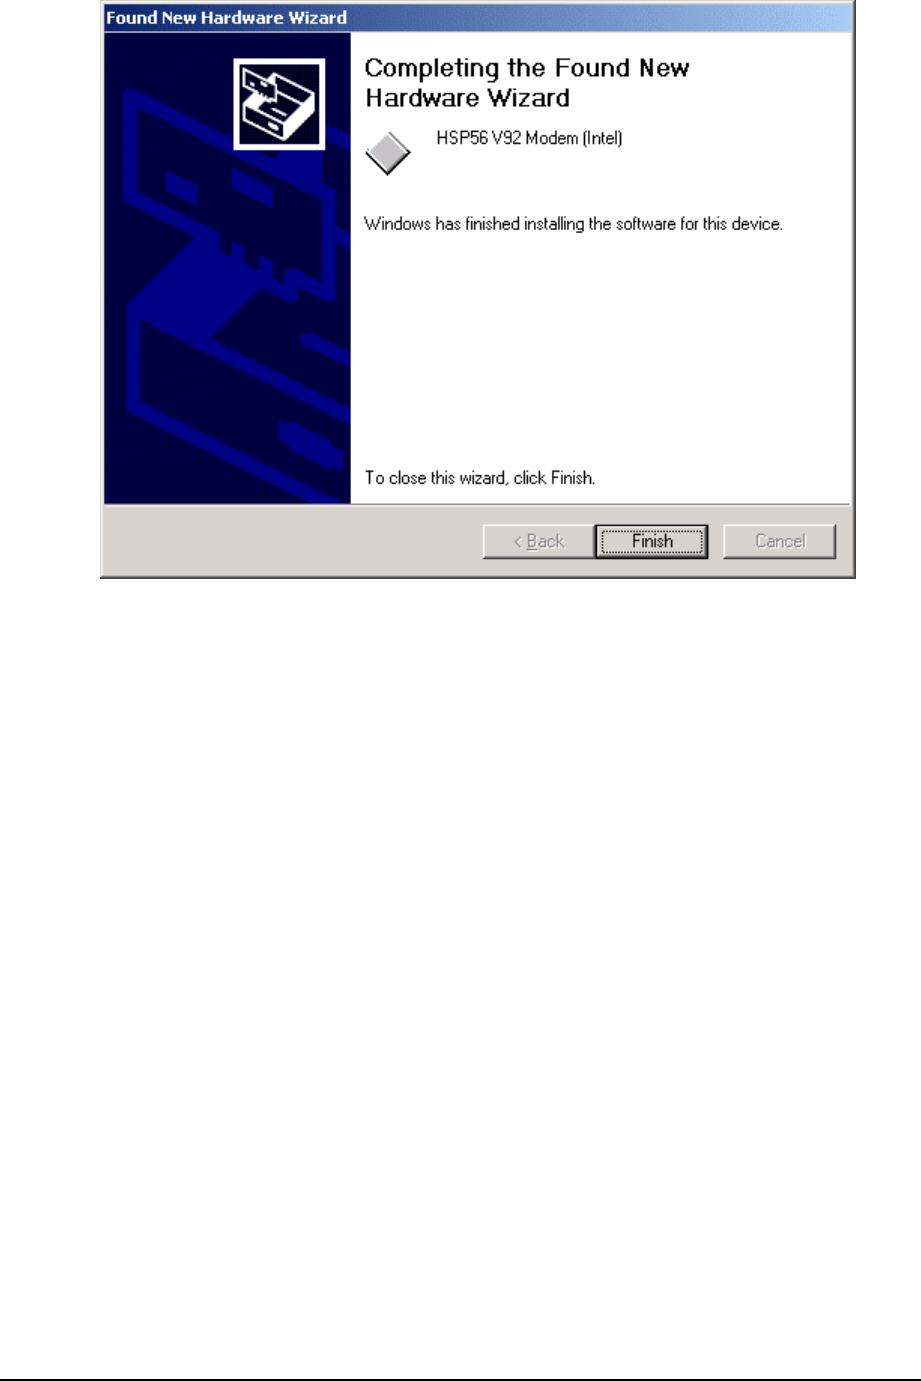
9. After copying the driver files, the device installation is completed please click the
“Finish" button.
17
18
-Windows XP installation
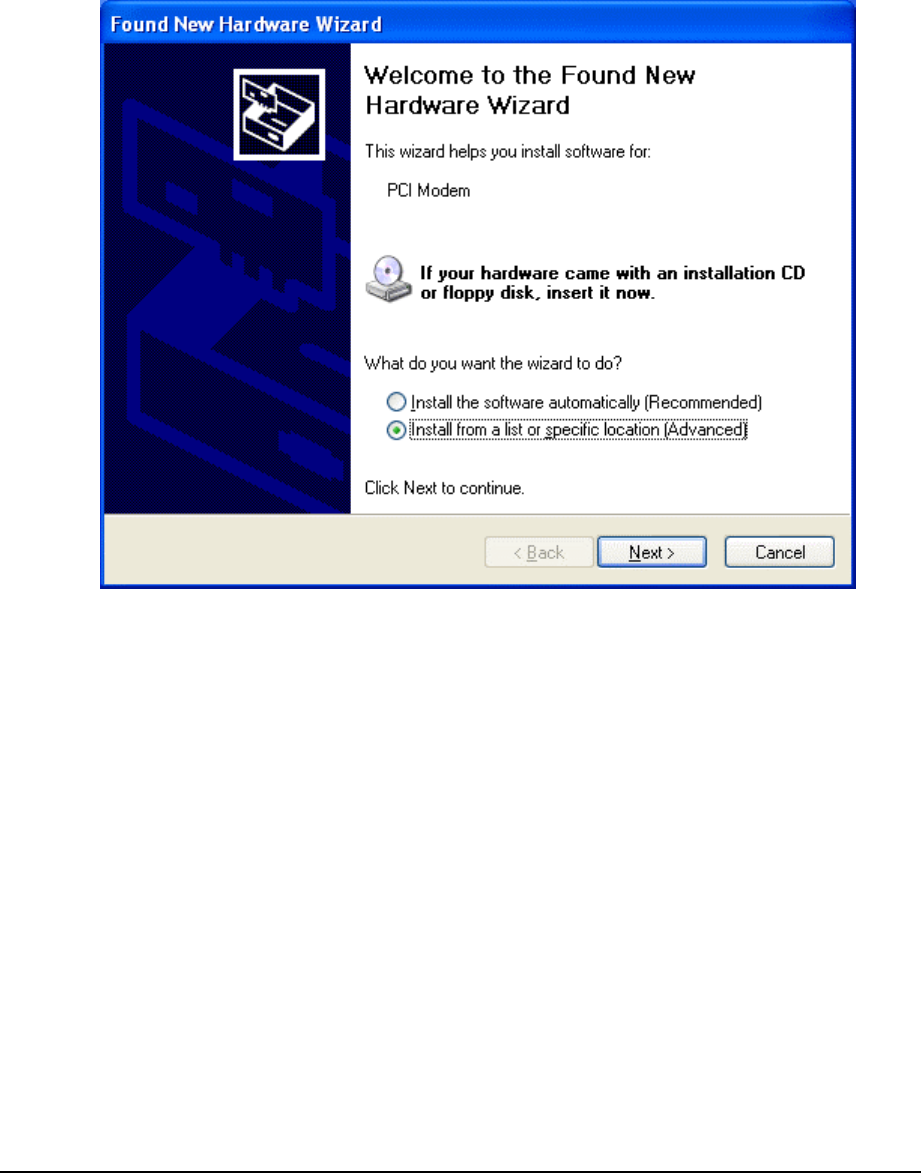
1. Insert the modem card into your PC or Notebook MDC slot and then power on.
The system will recognize the device by displaying the "Found New Hardware Wizard"
dialog box. Select "Install from a list or specify location (Advanced)", and insert the
accompanying CD then click the "Next" button.
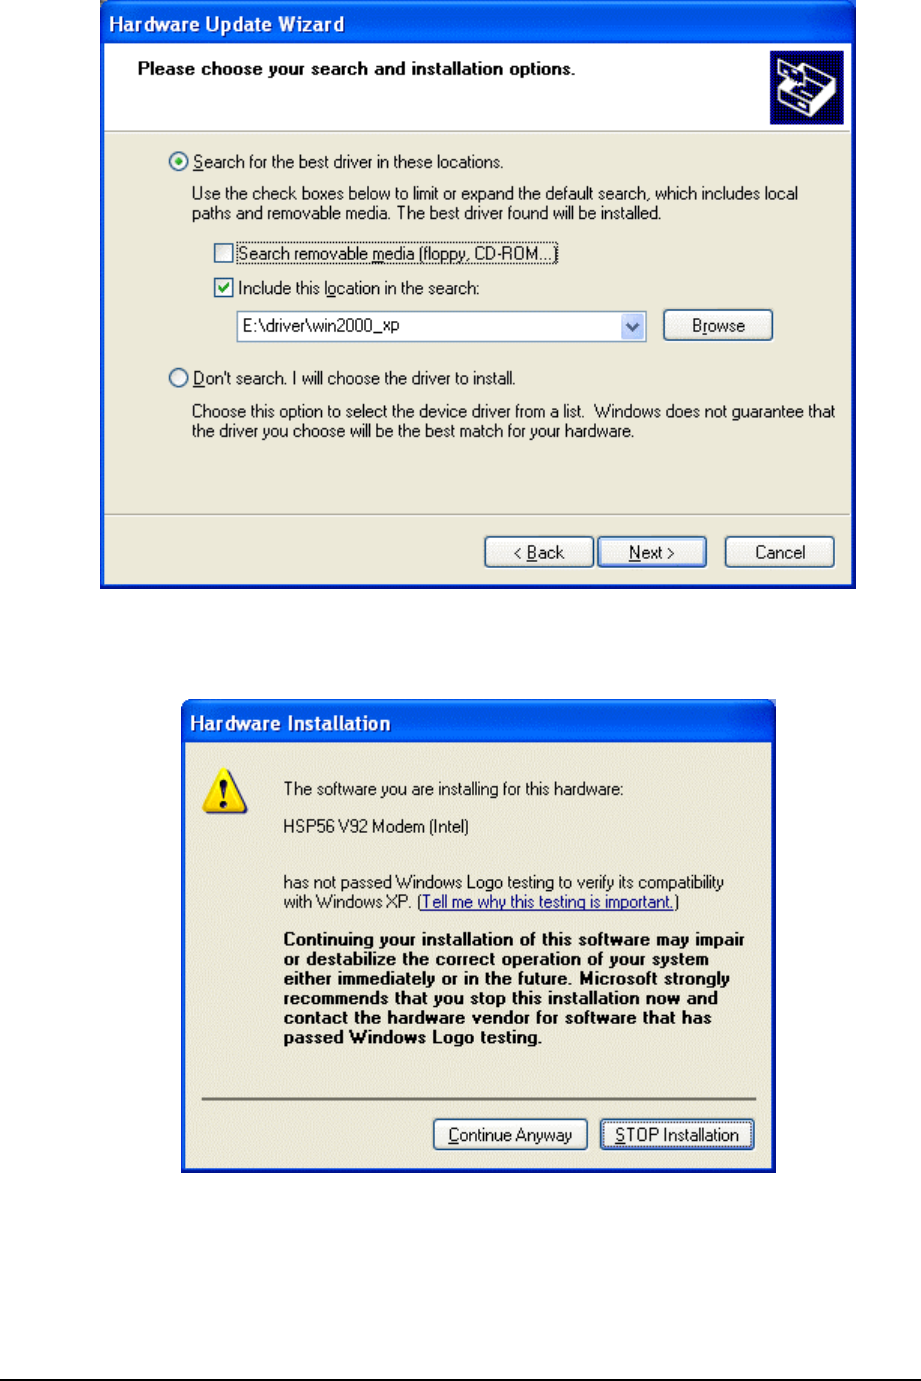
2. Mark ” Include this location in the search”, then enter the directory where the driver
located in.
19
3. The following massage will pop up during driver installing, please click the "Continue
Anyway" button to continue and complete the process.

20
5. Installing Bluetooth software for Windows
Methods for registering new devices using the Bluetooth Utility shall now be described.
A Bluetooth mouse shall be connected and set up using [Bluetooth Settings] as an
example.
[Bluetooth Settings] provides two set-up methods: "Express Mode" and "Custom Mode."
• Express Mode
[Bluetooth Settings] will automatically detect and register services. If several
services (profiles) are supported by the device the service that has been set to the
highest priority shall be selected and registered.
Express Mode is normally recommended for device set-up.
• Custom Mode
After having been detected, the services supported by the device are displayed as
a list, from which you can select the desired function(s).
Custom Mode must be used to set up a device if, for example, you wish to use a
modem station to send a fax (because in Express Mode, the DUN profile will be
automatically selected since it has a higher priority than the FAX profile).
The differences between setting up the same device (a Bluetooth mouse) using Express
Mode and Custom Mode are described on the following pages.
5.1 Express Mode Set-up
5.1.1 Starting Bluetooth Settings
1. Click [Start][All Programs][Bluetooth][Bluetooth Settings].
(Under Windows 2000, click [Start]→[Programs]→[Bluetooth]→[Bluetooth
Settings].)
Note
.The same result can be achieved by right-clicking on the Bluetooth icon in the
task tray and selecting [Bluetooth Settings] from the menu that appears.
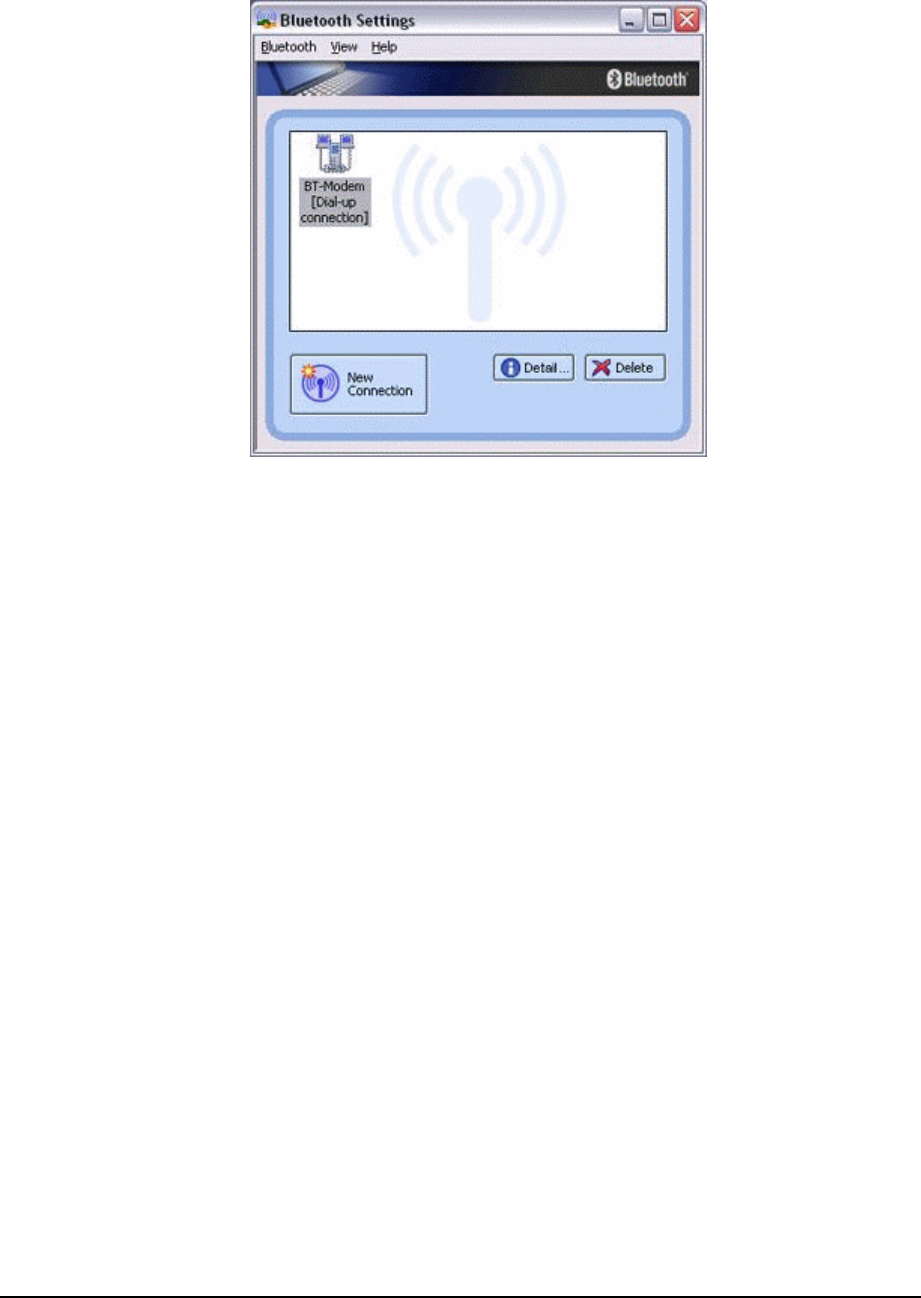
21
The [Bluetooth Settings] window below will appear when other devices have
already been registered.
Please click the [New Connection] button to open the [Add New Connection Wizard]
window. If no devices have been registered yet, please proceed directly to
"Detecting Bluetooth Devices."
5.1.2 Detecting Bluetooth devices
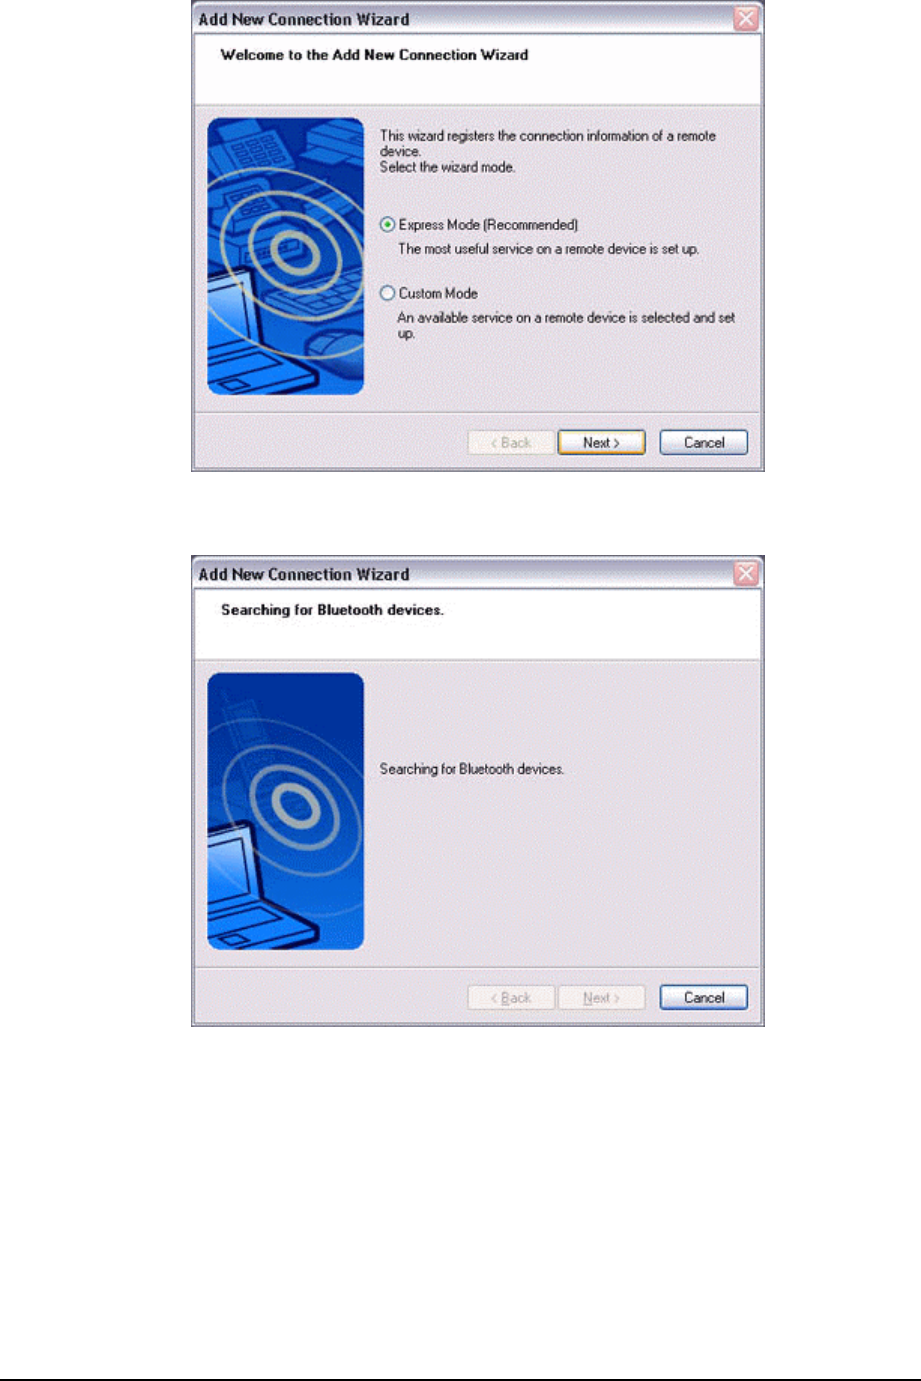
The [Add New Connection Wizard (Welcome to the Add New Connection Wizard)] window
will appear.
1. Switch the device power ON to make it connectable via Bluetooth.
2. Confirm that [Express Mode] has been selected in the [Add New Connection
Wizard (Welcome to the Add New Connection Wizard)] window, and click on
the [Next] button.
22
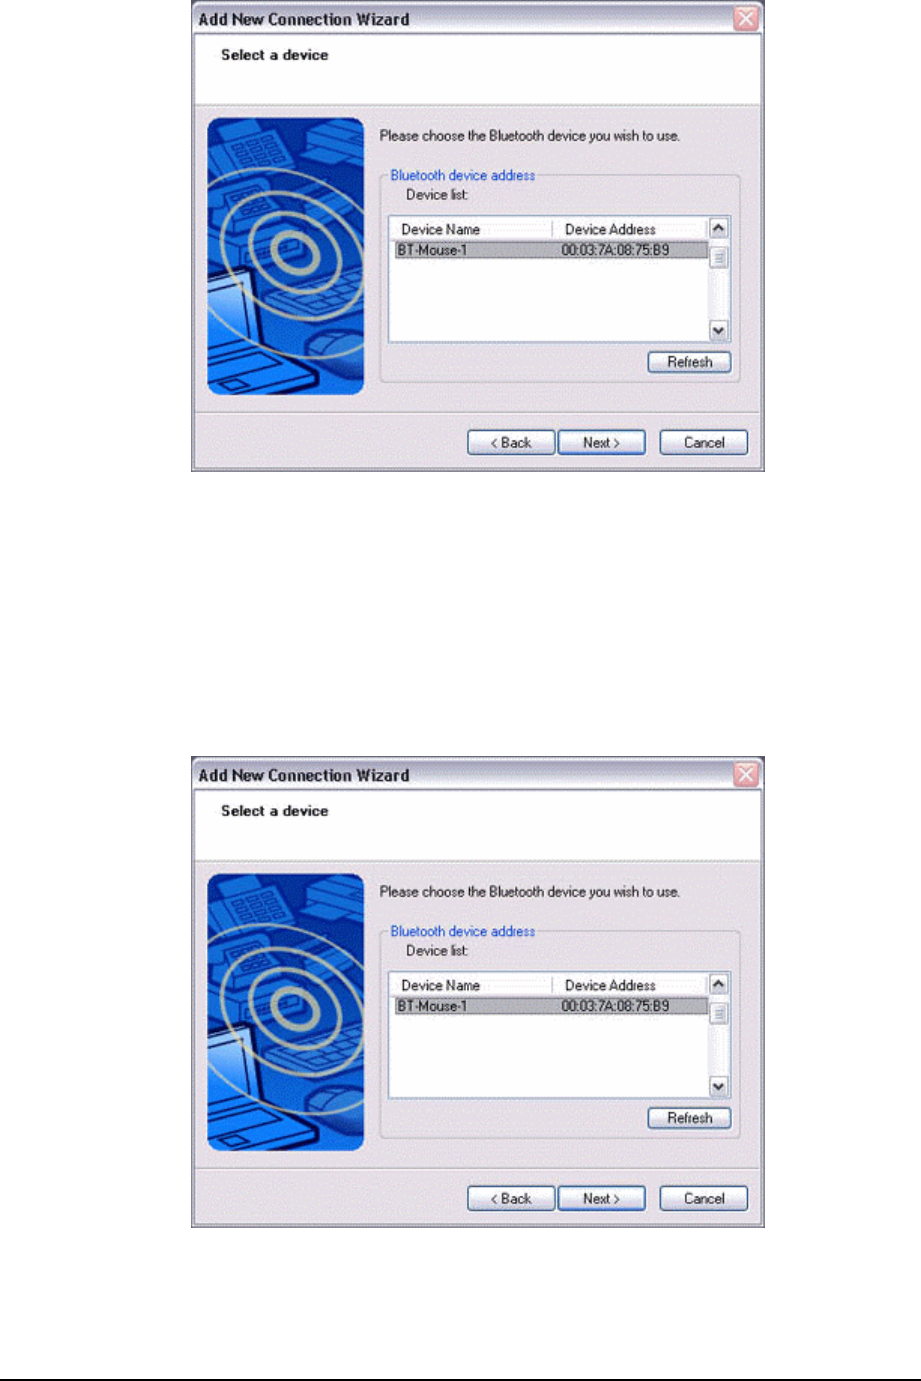
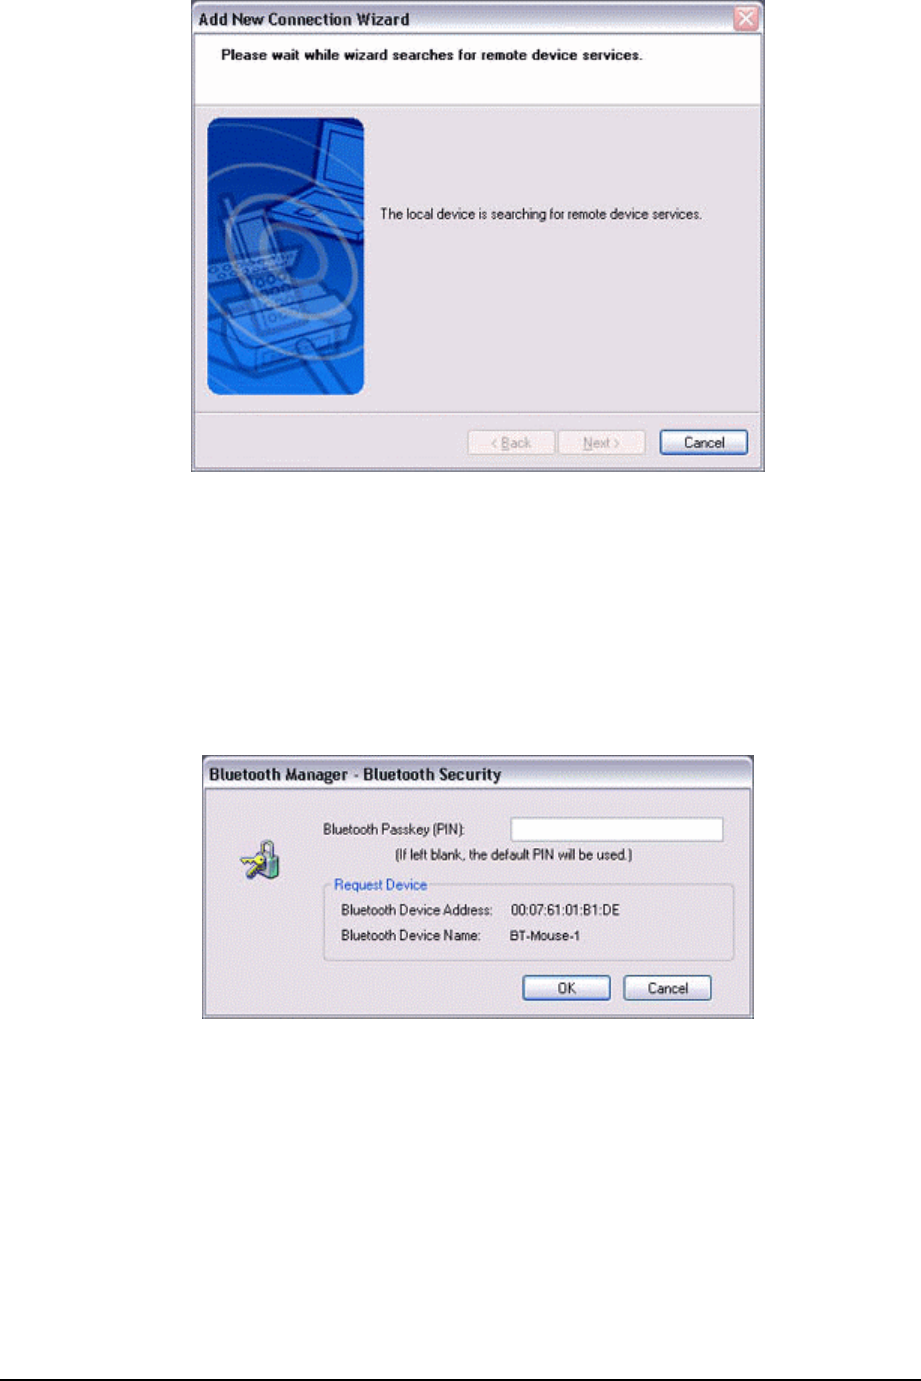
Searching for Bluetooth devices will start.
When the device has been detected, the name and address of the device will
appear in the [Add New Connection Wizard (Select Device)] window.
23
Note
.If no device is found, please confirm that the device has been made
connectable via Bluetooth, and click on the [Update] button.
.A further device search will be performed.
5.1.3 Detecting services
1. Select the device name from [Device List] and click on the [Next] button.
Bluetooth device detection will commence.
24
Note
.If several services (profiles) are supported by the device, the service that has
been set to the highest priority shall be automatically selected and set up in
Express Mode. Please use Custom Mode if you wish to select desired services
manually.
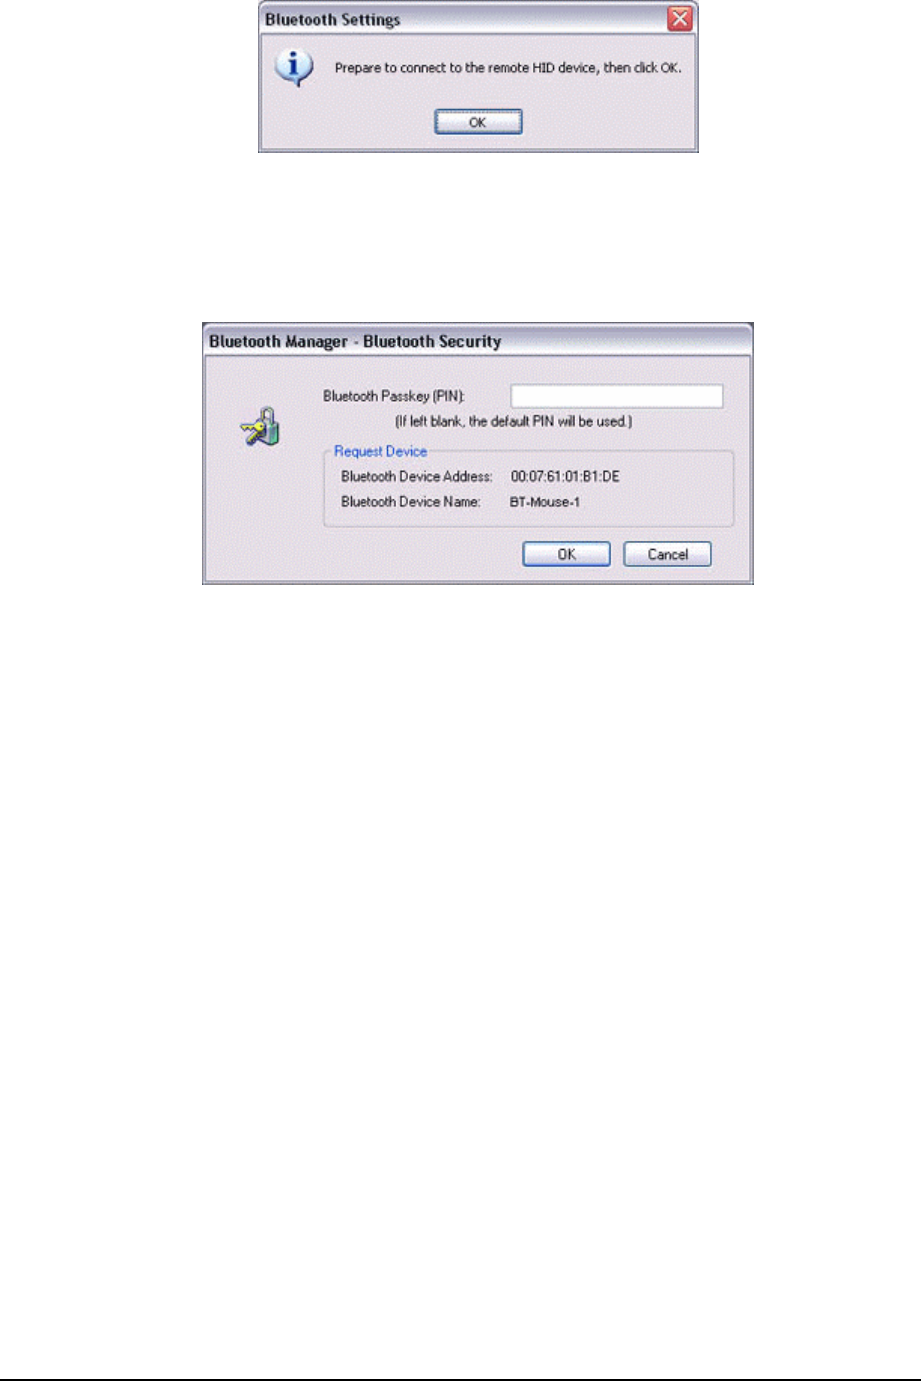
.When a service has been detected, a window prompting you to enter the
Bluetooth passkey (PIN code) may appear. Please enter the passkey and click
on the [OK] button.
.If you have not entered your Bluetooth passkey after a certain amount of time
has passed, the connection process will be cancelled for security reasons.
Please perform the passkey entry process again.
A message will appear prompting you to prepare the device for connection.
2. Click on the [OK] button.
25
Note
.When the settings information has been registered, a window prompting you to
enter your Bluetooth passkey (PIN code) may appear. Please enter your passkey
and click on the [OK] button.
.If you have not entered your Bluetooth passkey after a certain amount of time
has passed, the connection process will be cancelled for security reasons.
Please perform the passkey entry process again.
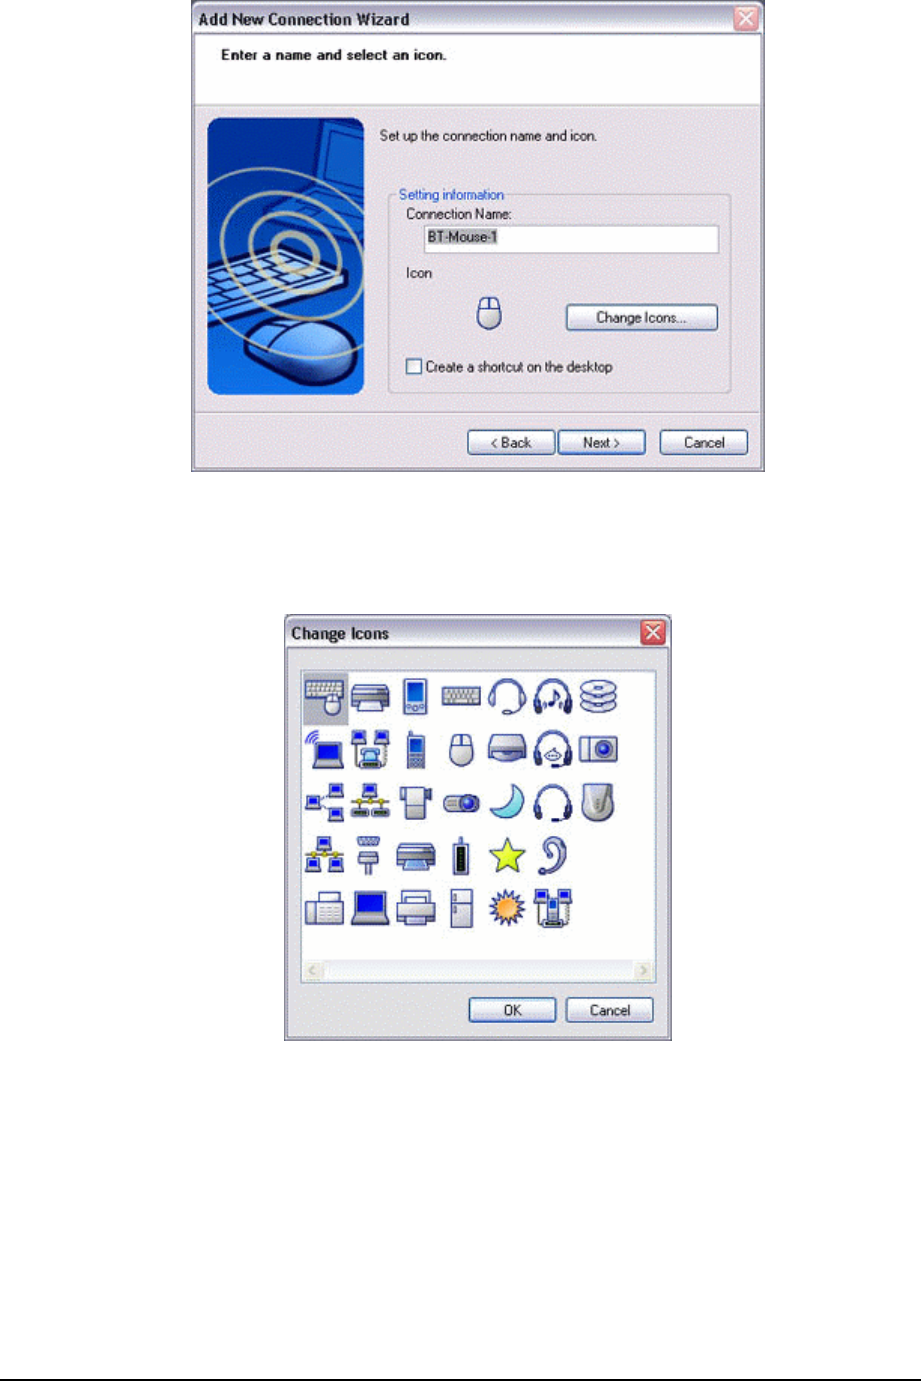
The [Add New Connection Wizard (Connection Name Setup)] window will appear if
a service has been properly detected.
3. Select the type and name of the icon to be displayed once the device has
been registered, and click on the [Next] button.
26
Note
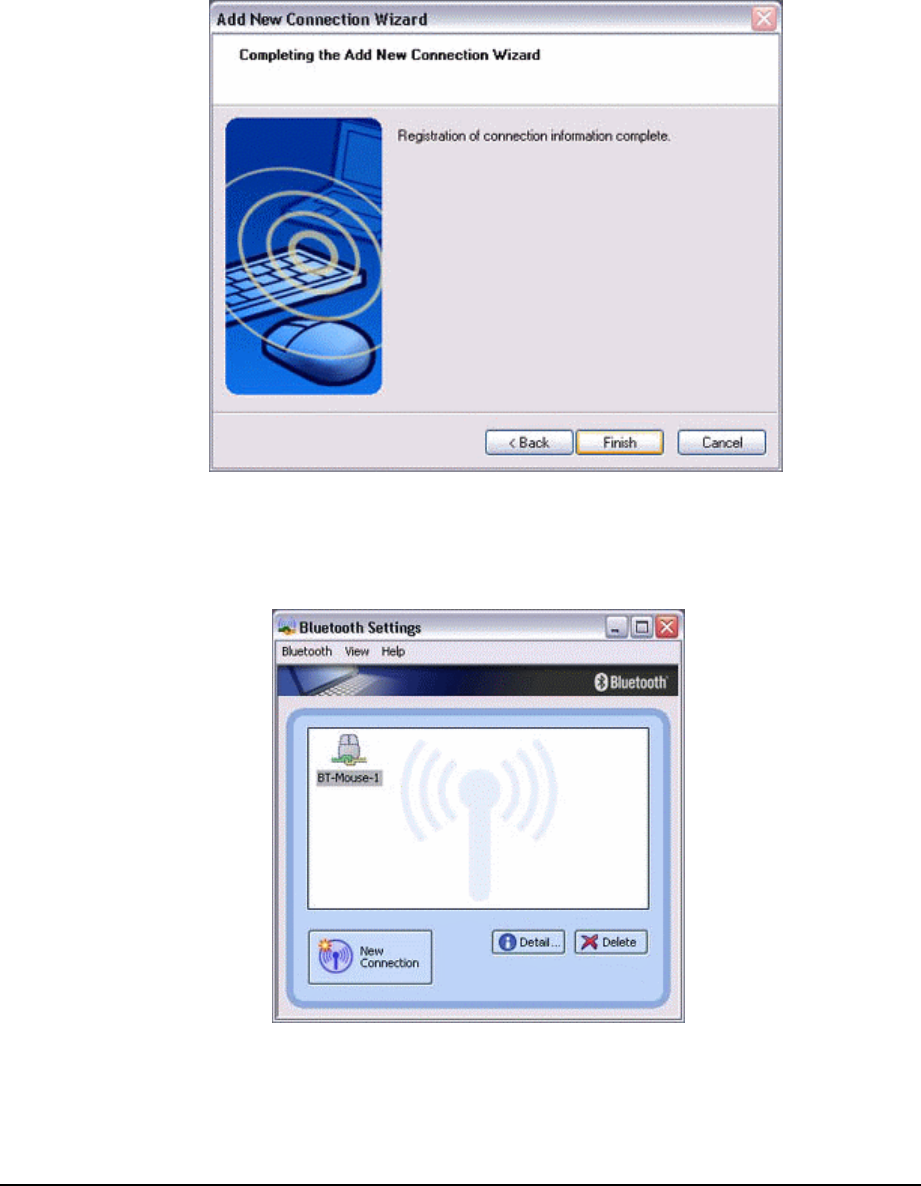
.If you wish to change the icon, please click on the [Change Icon] button and
select your preferred icon from the list that appears.
27
5.1.4 Registering settings information
The [Add New Connection Wizard (Completing the Add New Connection Wizard)] window
will appear.
1. Click on the [Finish] button
The [Bluetooth Settings] window will appear.
The icons of the registered devices will appear, and the devices will be ready to
use.
5.2 Custom Mode Set-up
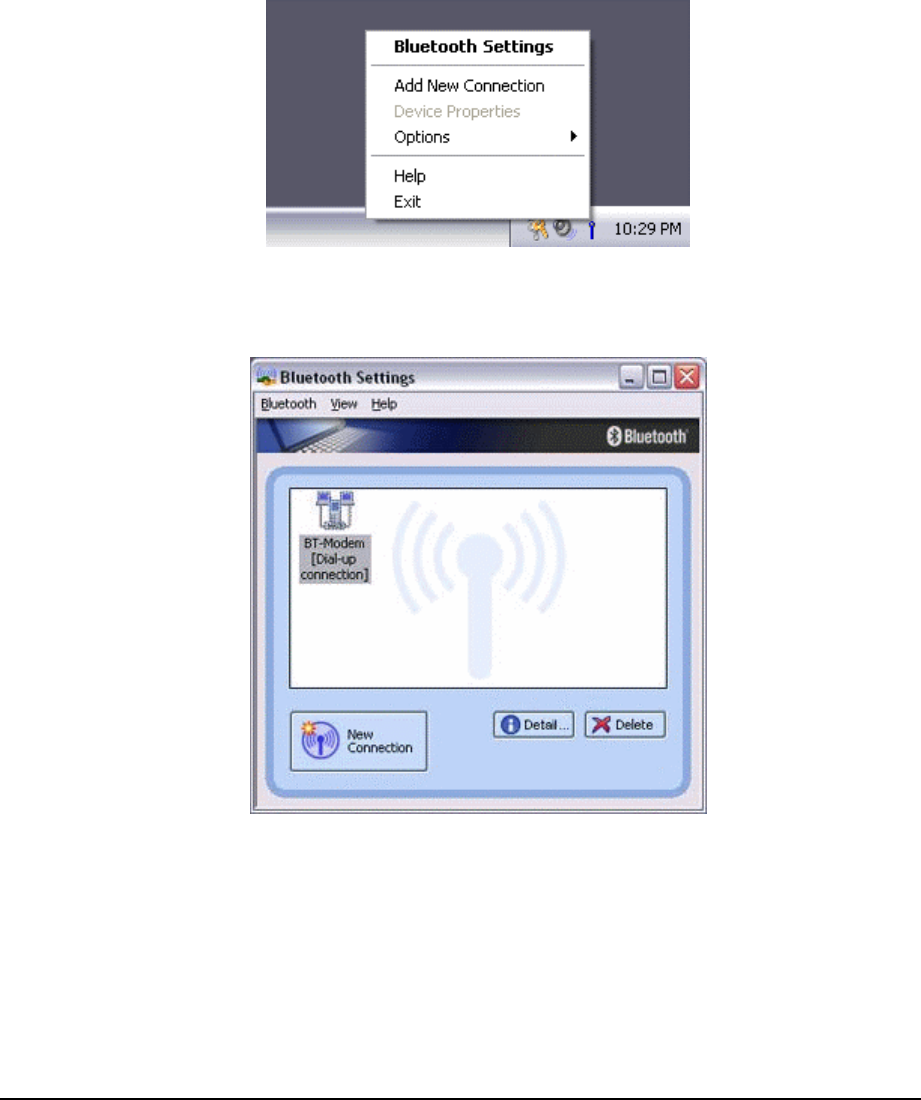
28
5.2.1 Starting Bluetooth Settings
1. Click [Start][All Programs][Bluetooth][Bluetooth Settings].
(Under Windows 2000, click [Start]→[Programs]→[Bluetooth]→[Bluetooth
Settings].)
Note
.The same result can be achieved by right-clicking on the Bluetooth icon in the
task tray and selecting [Bluetooth Settings] from the menu that appears.
The [Bluetooth Settings] window below will appear when other devices have
already been registered.
Please click the [New Connection] button to open the [Add New Connection Wizard]
window. If no devices have been registered yet, please proceed directly to
"Detecting Bluetooth Devices."
5.2.2 Detecting Bluetooth devices
29
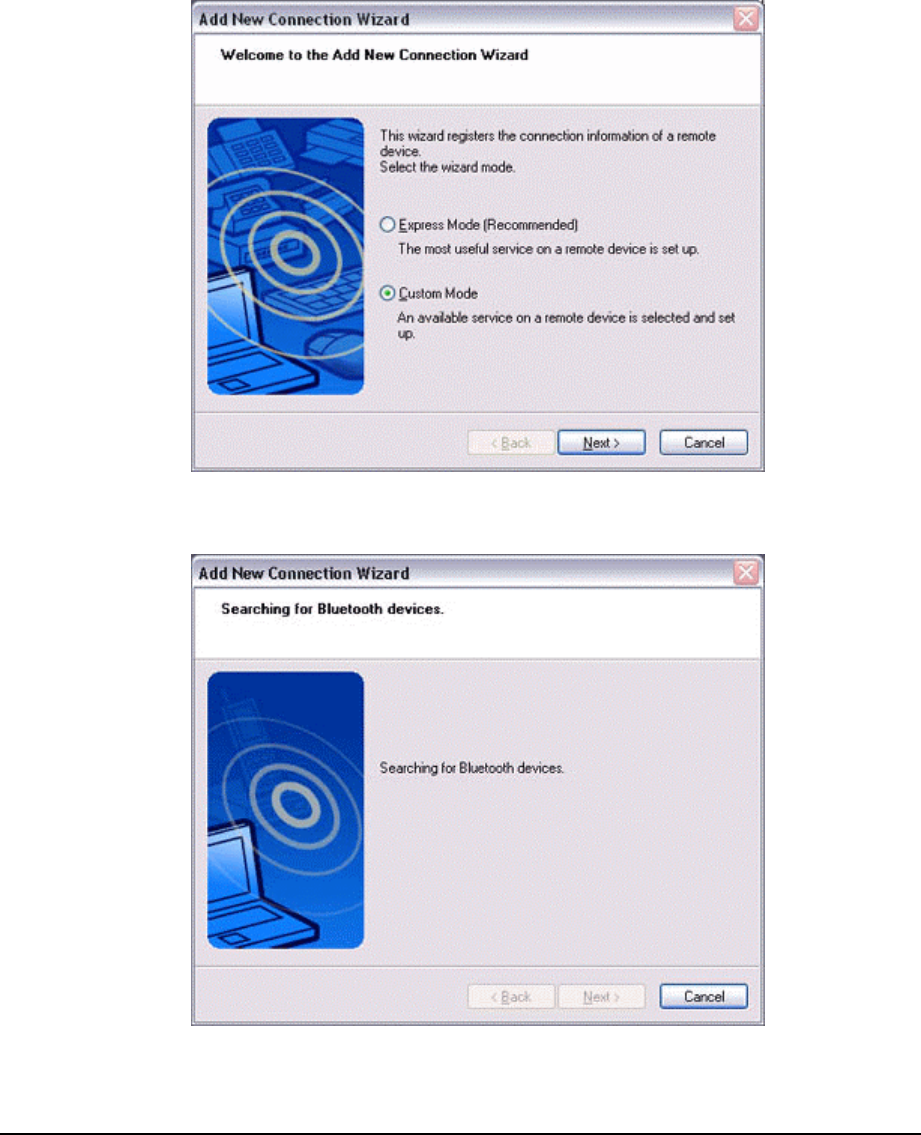
The [Add New Connection Wizard (Welcome to the Add New Connection Wizard)] window
will appear.
1. Switch the device power ON to make it connectable via Bluetooth.
2. Confirm that [Custom Mode] has been selected in the [Add New Connection
Wizard (Welcome to the Add New Connection Wizard)] window, and click on
the [Next] button.
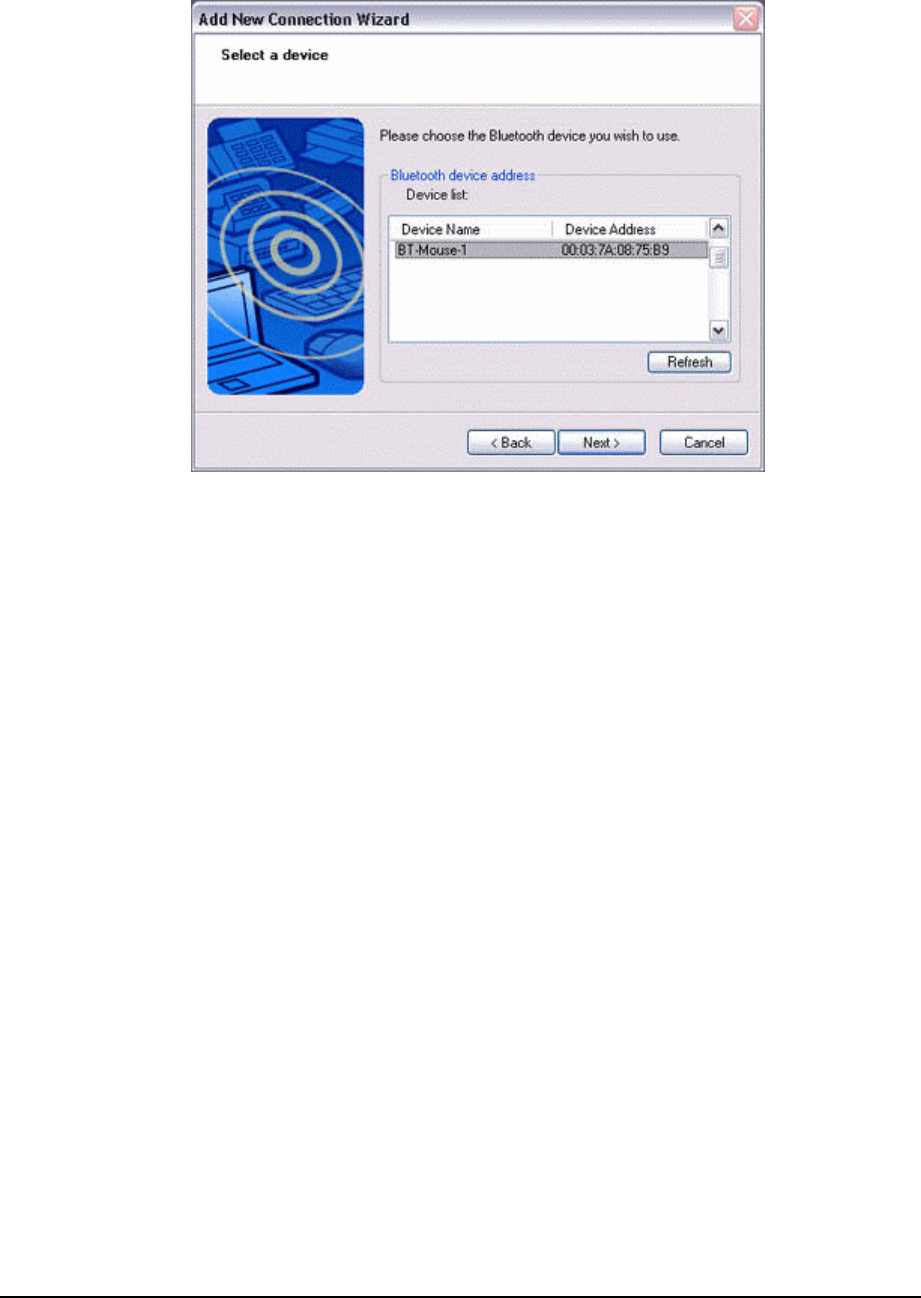
Searching for Bluetooth devices will start.
30
When the device has been detected, the name and address of the device will
appear in the [Add New Connection Wizard (Select Device)] window.
Note
.If no device is found, please confirm that the device has been made
connectable via Bluetooth, and click on the [Update] button.
.A further device search will be performed.
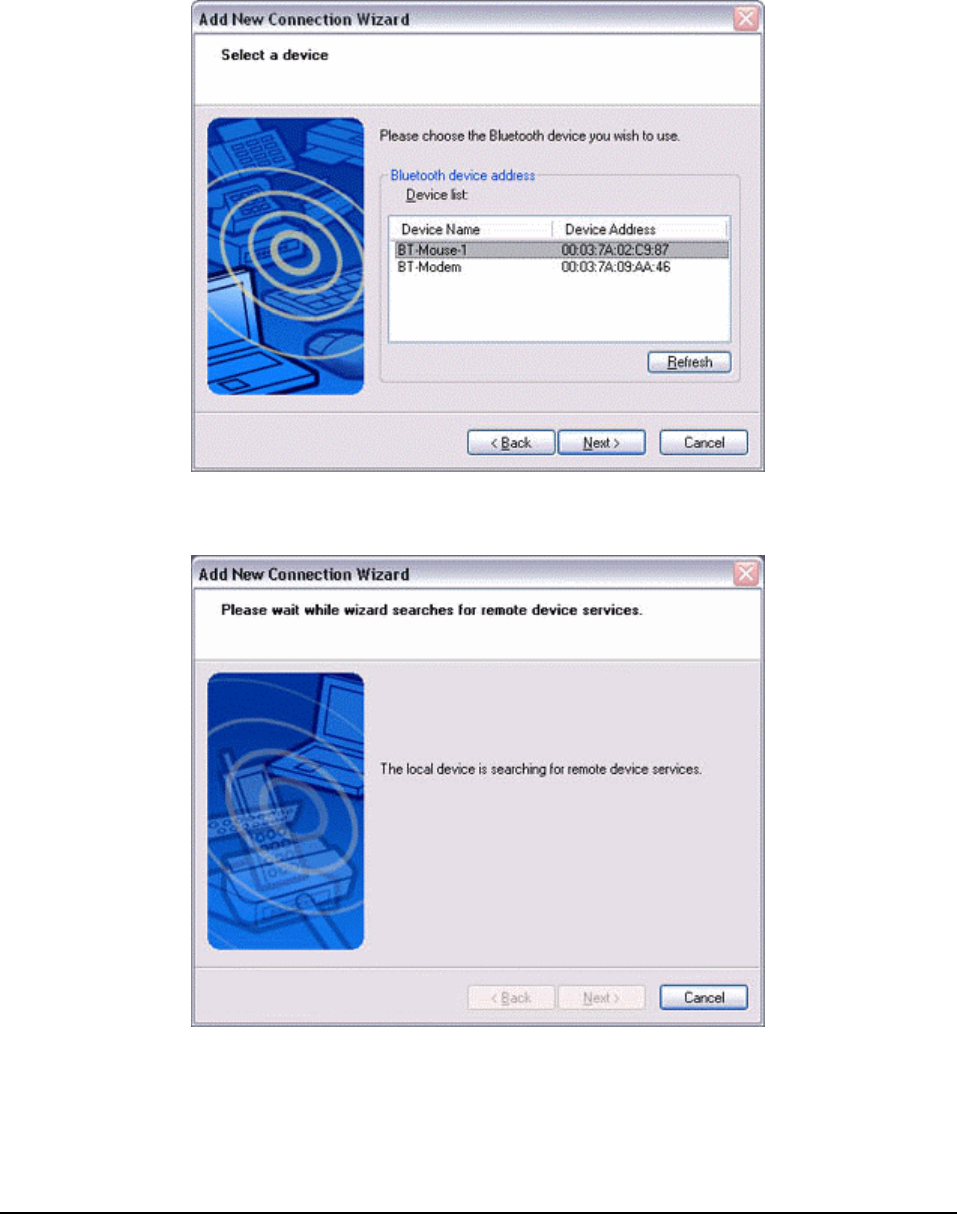
5.2.3 Detecting services
1. Select the device name from [Device List] and click on the [Next] button.
Bluetooth device detection will commence.
Note
32
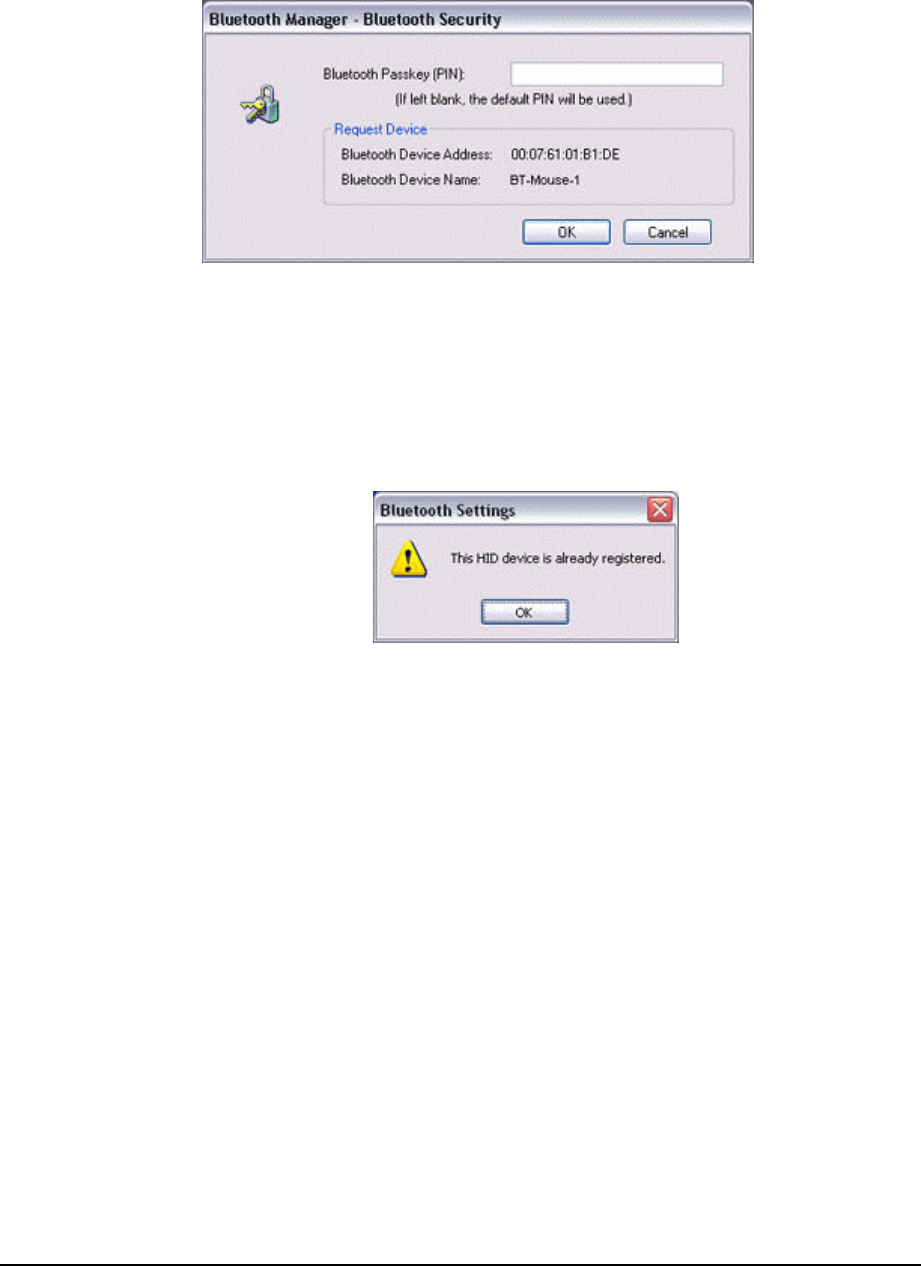
.When a service has been detected, a window prompting you to enter the
Bluetooth passkey (PIN code) may appear. Please enter the passkey and click
on the [OK] button.
.If you have not entered your Bluetooth passkey after a certain amount of time
has passed, the connection process will be cancelled for security reasons.
Please perform the passkey entry process again.
.If you try to register a device that has already been registered, the following
message will appear, and you will not be able to proceed with further operation.
Please click on the [OK] button to close the message.
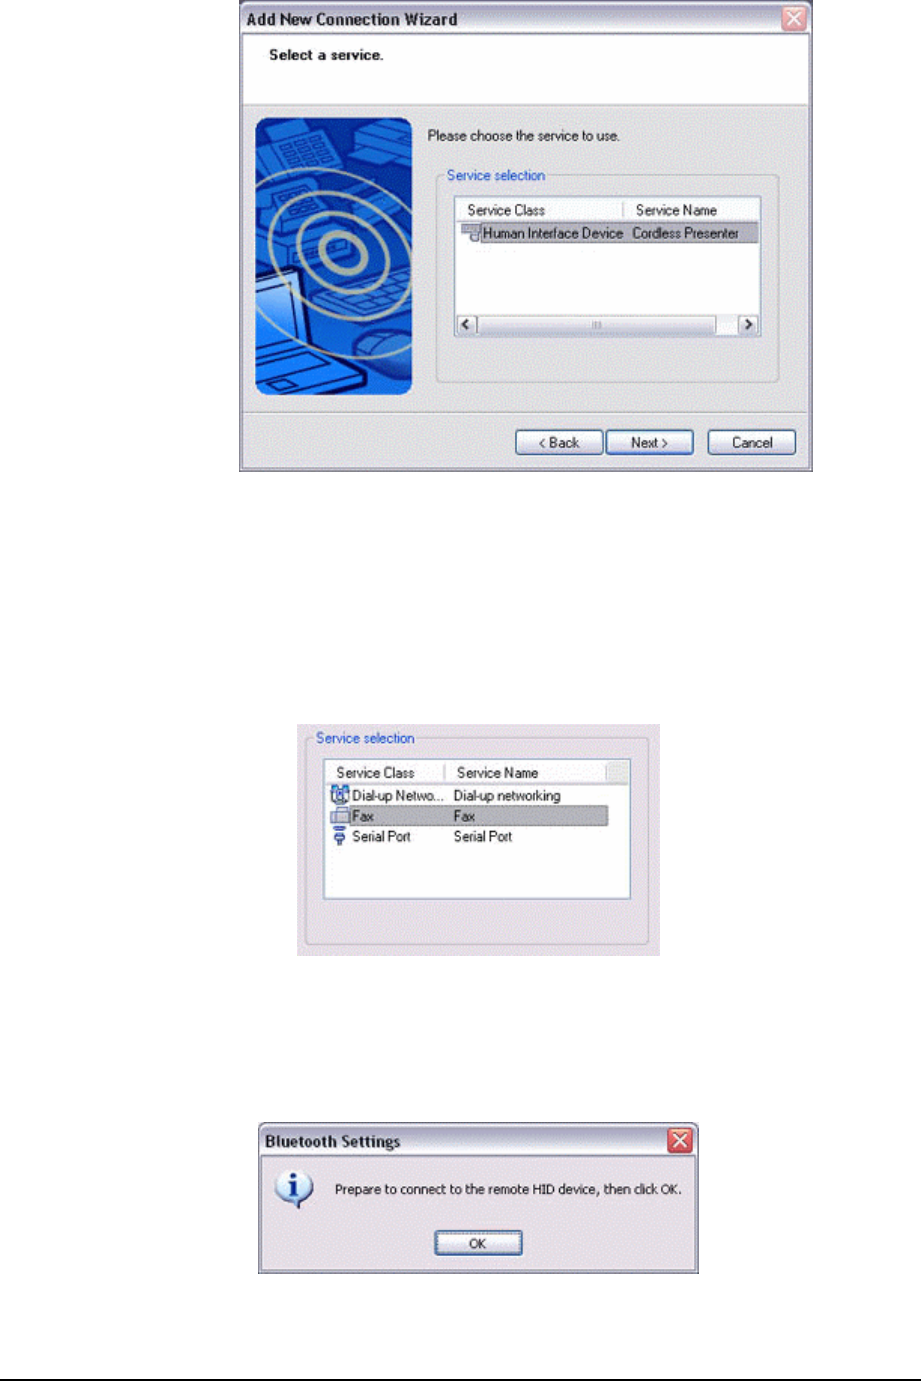
The services supported by the device will be displayed.
2. Select the desired service and click on the [Next] button.
33
Note
.When a device supports several services
If the device supports several services, you can use Custom Mode to manually
select the services (profiles) you wish to use from the list that appears under
[Select Services].
Example: List of wireless modem station services
If Express Mode is used to perform the set-up, the highest-priority service in the
device will be automatically selected and configured.
3. Click on the [OK] button.
34
Note
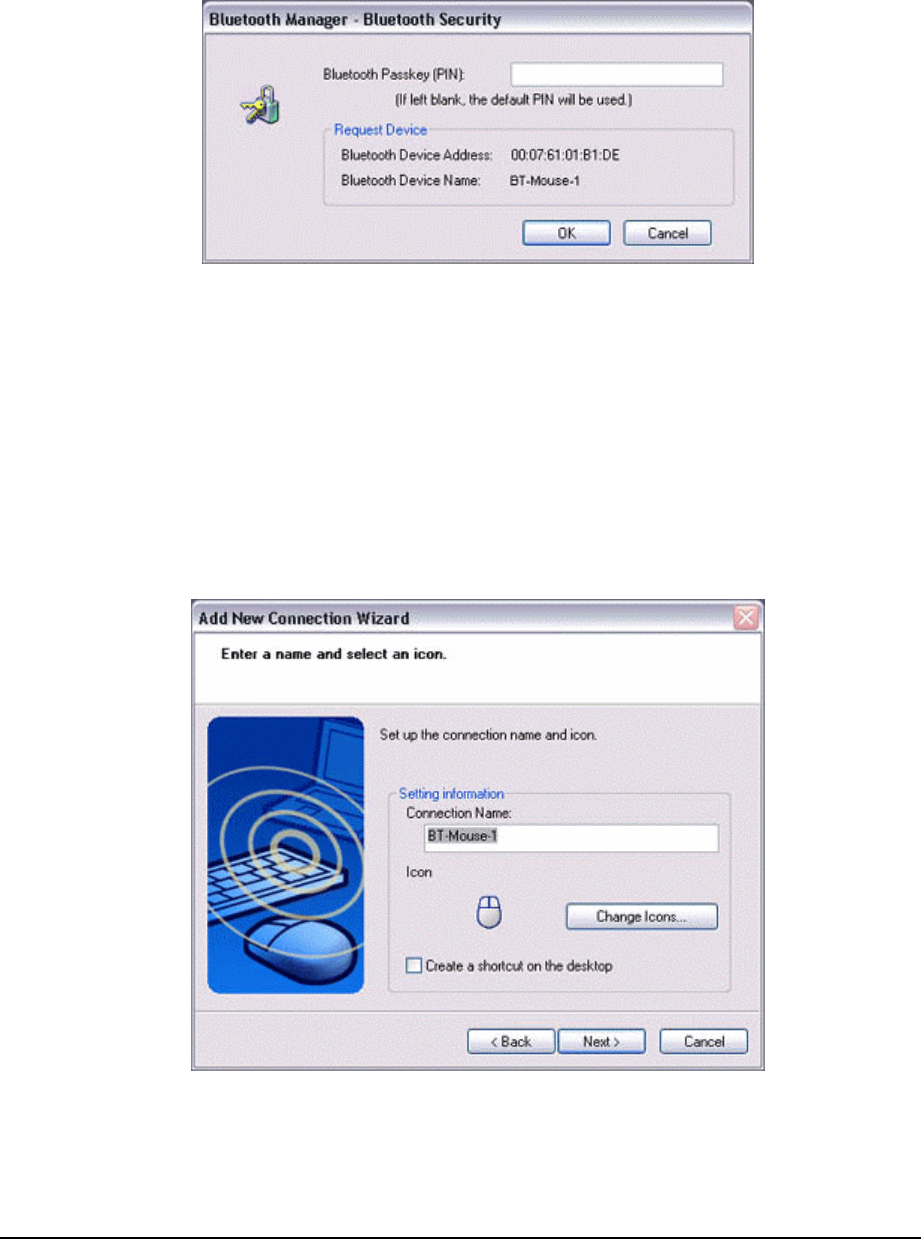
.When the settings information has been registered, a window prompting you to
enter your Bluetooth passkey (PIN code) may appear. Please enter your passkey
and click on the [OK] button.
.If you have not entered your Bluetooth passkey after a certain amount of time
has passed, the connection process will be cancelled for security reasons.
Please perform the passkey entry process again.
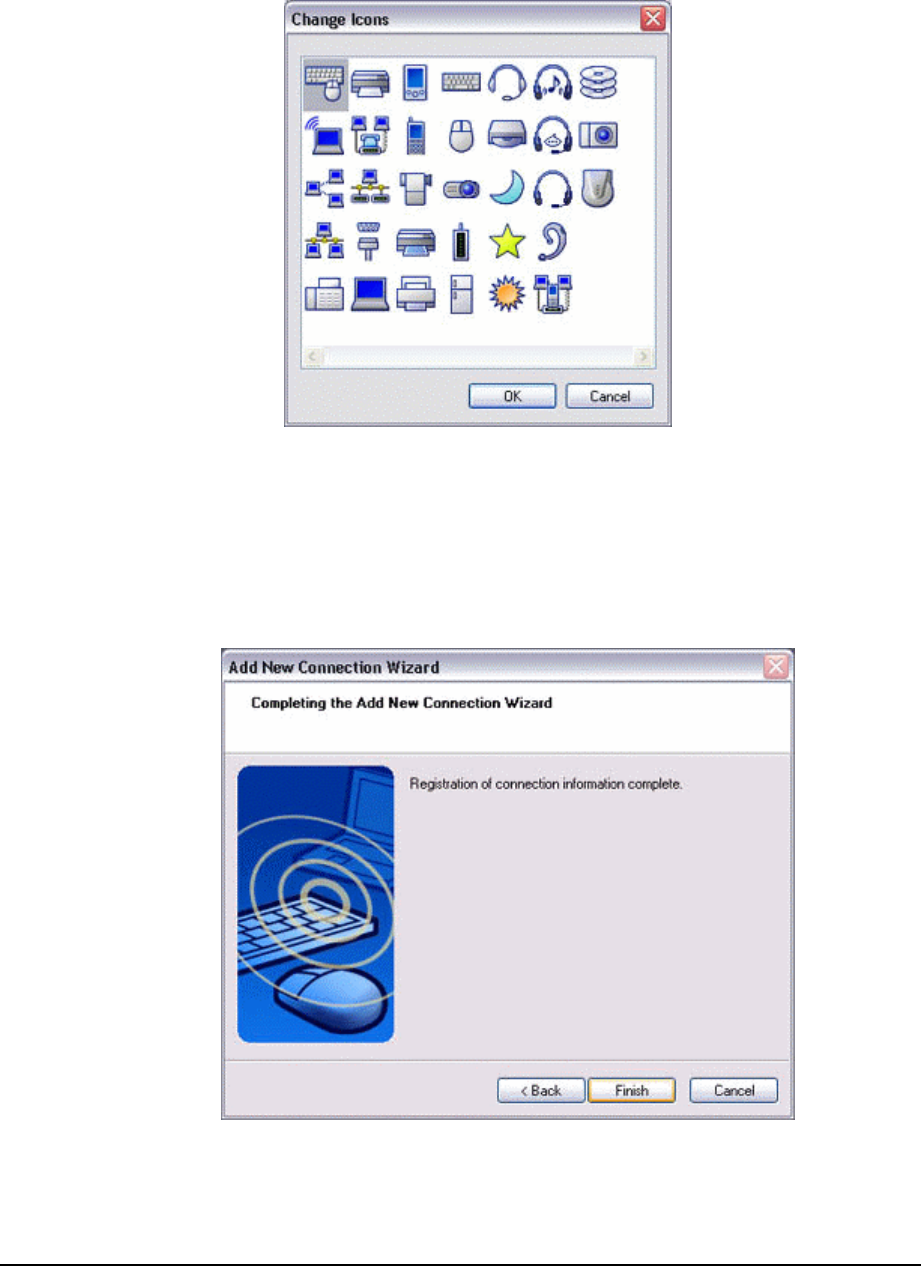
The [Add New Connection Wizard (Connection Name Setup)] window will appear if a
service has been properly detected.
4. Select the type and name of the icon to be displayed once the device has
been registered, and click on the [Next] button.
35
Note
.If you wish to change the icon, please click on the [Change Icon] button and
select your preferred icon from the list that appears.
5.2.4 Registering settings information
The [Add New Connection Wizard (Completing the Add New Connection Wizard)]
window will appear.
1. Click on the [Finish] button
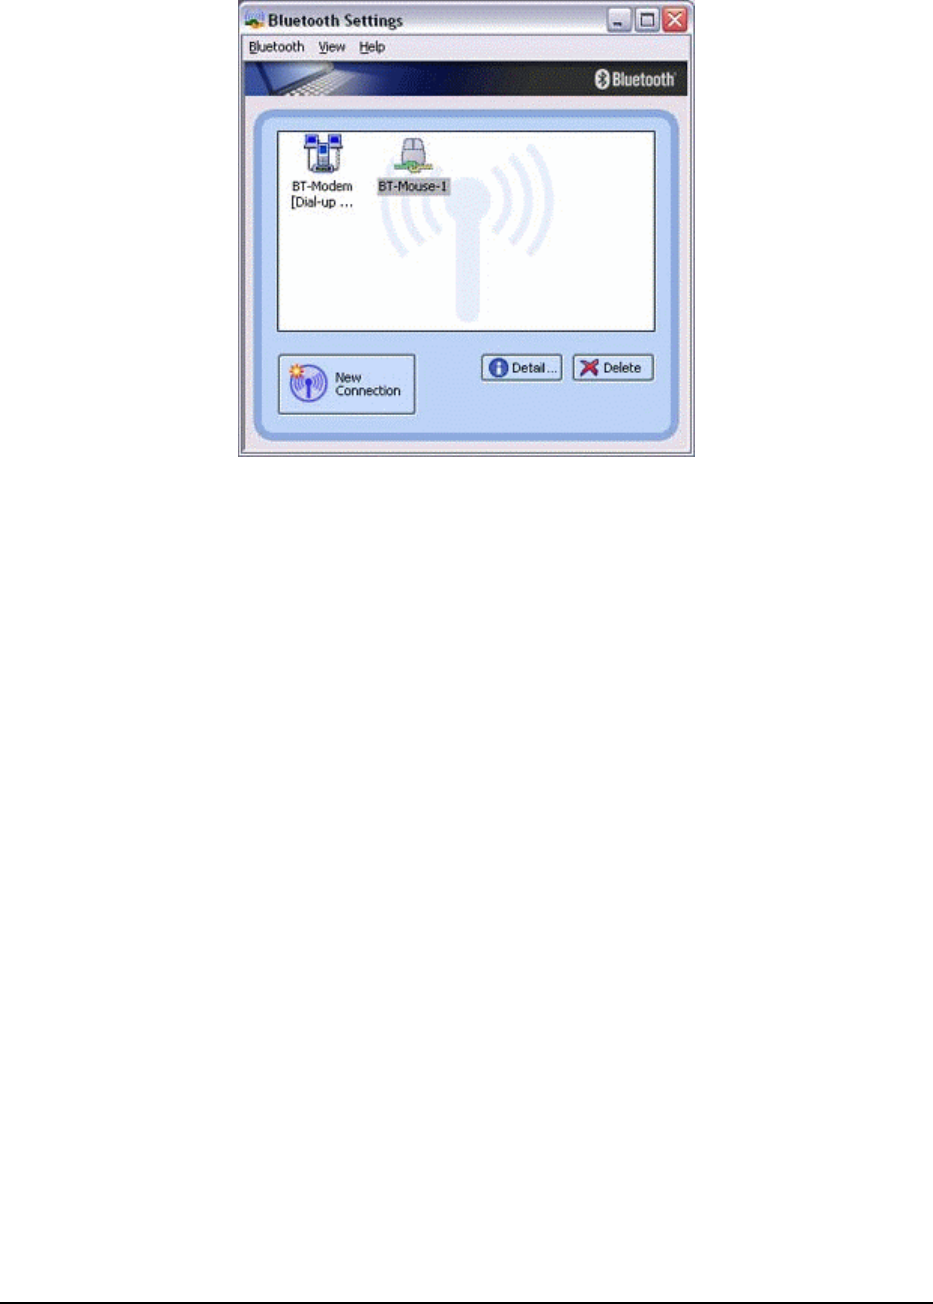
The [Bluetooth Settings] window will appear.
36
The icons of the registered devices will appear, and the devices will be ready to
use.

37
Federal Communication Commission
Interference Statement
This equipment has been tested and found to comply with the limits for a Class B digital
device, pursuant to Part 15 of the FCC Rules. These limits are designed to provide
reasonable protection against harmful interference in a residential installation. This
equipment generates, uses and can radiate radio frequency energy and, if not installed
and used in accordance with the instructions, may cause harmful interference to radio
communications. However, there is no guarantee that interference will not occur in a
particular installation. If this equipment does cause harmful interference to radio or
television reception, which can be determined by turning the equipment off and on, the
user is encouraged to try to correct the interference by one of the following measures:
- Reorient or relocate the receiving antenna.
- Increase the separation between the equipment and receiver.
- Connect the equipment into an outlet on a circuit different from that
to which the receiver is connected.
- Consult the dealer or an experienced radio/TV technician for help.
This device complies with Part 15 of the FCC Rules. Operation is subject to the
following two conditions: (1) This device may not cause harmful interference, and (2)
this device must accept any interference received, including interference that may
cause undesired operation.
FCC Caution: Any changes or modifications not expressly approved by the party
responsible for compliance could void the user's authority to operate this equipment.
IMPORTANT NOTE:
FCC Radiation Exposure Statement:
This equipment complies with FCC radiation exposure limits set forth for an
uncontrolled environment.
This transmitter must not be co-located or operating in conjunction with any other
antenna or transmitter.

38
This device is intended only for OEM integrators under the following conditions:
As long as 2 conditions above are met, further transmitter test will not be required.
However, the OEM integrator is still responsible for testing their end-product for any
additional compliance requirements required with this module installed (for example,
digital device emissions, PC peripheral requirements, etc.).
IMPORTANT NOTE: In the event that these conditions can not be met (for example
certain laptop configurations or co-location with another transmitter), then the FCC
authorization is no longer considered valid and the FCC ID can not be used on the final
product. In these circumstances, the OEM integrator will be responsible for
re-evaluating the end product (including the transmitter) and obtaining a separate FCC
authorization.
End Product Labeling
The final end product must be labeled in a visible area with the following: “Contains TX
FCC ID: NLF-MDCBTASC32”.
Manual Information That Must be Included
The OEM integrator has to be aware not to provide information to the end user
regarding how to install or remove this RF module in the users manual of the end
product which integrate this module.
The users manual for OEM integrators must include the following information in a
prominent location “ IMPORTANT NOTE: To comply with FCC RF exposure
compliance requirements. This transmitter must not be co-located or operating in
conjunction with any other antenna or transmitter.