Binatone Electronics FOCUS73 WIFI Home Video Baby Camera User Manual FOCUS73 UK EN
Binatone Electronics International Ltd. WIFI Home Video Baby Camera FOCUS73 UK EN
Contents
- 1. User Manual
- 2. User Manual II
User Manual
Home Video Camera
USER’S GUIDE
Wi-Fi®
Model: FOCUS73, FOCUS73-2, FOCUS73-3, FOCUS73-4
The features described in this user’s guide are subject to modifications without prior notice.

This User’s Guide has all the information you need to make the most out of your
product.
Please read the Safety Instructions on pages 5 - 6 before you install the unit.
Inside the Box
• 1 x Wi-Fi® Camera Unit
• 1 x Power Adapter
• 1 x Quick Start Guide
• 1 x User Guide
• 4 x Mounting Screws and Dry Wall Plugs
• 1 x Tamper-proof Screw
• 1 x Metal Bracket
• 1 x Wrench Key
Welcome...
to your new Motorola Wi-Fi
®
Thank you for purchasing your new Motorola Wi-Fi® Home Video Camera.
If you have always wondered what happens when you are away, wonder no
more. Now you can monitor your children, pets or property with this easy to use
system. You can install the Camera only from your iPhone®/iPad® or devices for
Android™ and view the Camera video from your PC or Notebook, as well as
devices for Android™ or iPhone®/iPad®.
Please keep your original dated sales receipt for your records. For warranty
service of your Motorola product, you will need to provide a copy of your dated
sales receipt to confirm warranty status. Registration is not required for warranty
coverage.
For product related questions, please call:
Home Video Camera!
US and Canada 1-888-331-3383
Email: support@motorolamonitors.com
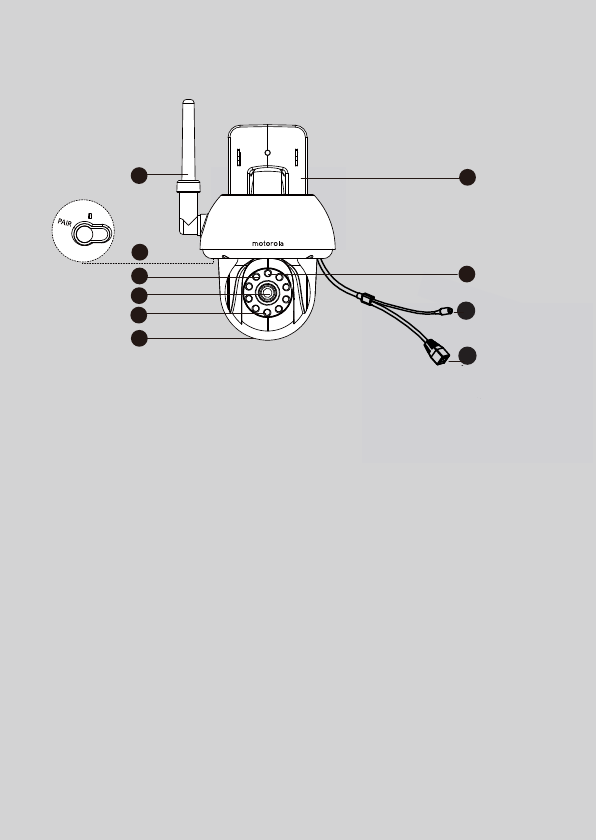
Overview of your Camera
* It is for LAN cable (not included) connection when Wi-Fi
connection is reachable. The LAN connection is not applicable for
smart device App setting up.
Important guidelines for installing your Wi-Fi® Camera Unit
• Use of other 2.4 GHz products, such as other wireless networks, Bluetooth®
systems or microwave ovens may cause interference with this product. Keep
the Wi-Fi® Camera Unit away from these types of products, or turn them off if
they appear to be causing interference.
• Always ensure that you have a good Wi-Fi® connection available.
12
3
6
7
8
4
5
9
10
1. Antenna
2. Wall mount base
3. Infrared LEDs (for night vision)
4. Camera Lens
5. Light Sensor (for night mode
detection)
6. PAIR Button
7.
Dome Shape Cover
8.
Power / Status Indicator
9. Power connection socket
10. LAN interface*
(Adaptive Enthernet Interface for
connecting with various network
devices,such as hub,touter,etc.)

8. Technical Specifications ......................................................................... 50
7. General Information ................................................................................44
6. Help.......................................................................................................... 38
5. Procedure for resetting the Camera....................................................... 37
Working with PC/Notebook .................................................................... 36
torola Monitors Application .... 34
4.3.6 Hubble for Motorola Monitors Settings .................................... 34
4.3.5 General settings ........................................................................ 33
4.3.4 Camera settings ........................................................................ 32
4.3.3 Change your Account Information .......................................... 31
4.3.2 Remove a camera ..................................................................... 31
4.3.1 Add more cameras ................................................................... 30
............................................... 30
4.2.5 General setting ......................................................................... 27
Application ..........27
4.2.4 Camera settings ........................................................................ 26
4.2.3 Change your Account Information .......................................... 25
4.2.2 Remove a camera ..................................................................... 24
4.2.1 Add more cameras ................................................................... 24
Working with devices for Android™ ...................................................... 24
4. Camera .................................................................................................... 22
3.3.4 Add FOCUS73 Camera to your account ................................. 18
... 17
4Table of contents
Table of contents
1. Safety Instructions .....................................................................................5
2. System Requirements ............................................................................... 9
3. Getting started - Connecting Devices....................................................10
3.1 Setup.......................................................................................................... 10
3.2 User Account and Camera Setup on Android™ Devices....................... 11
3.2.1 Power on and connect the FOCUS73 camera ........................ 11
3.2.2 Download the Hubble for Motorola Monitors application ...... 11
3.2.3 Run Hubble for Motorola Monitors App on Android™
device ........................................................................................ 12
3.2.4 Add FOCUS73 Camera to your account ................................. 13
3.3 User Account and Camera Setup:
Working with iPhone®/iPad®................................................................... 17
3.3.1 Power ON and Connect FOCUS73 camera ........................... 17
3.3.2 Download Hubble for Motorola Monitors App ........................ 17
3.3.3 Run Hubble for Motorola Monitors on your iPhone®/iPad®
4.1 Install your Camera and setting up........................................................... 24
4.2 Camera Functions:
4.2.6 Features of Hubble for Motorola Monitors
4.3 Camera Functions:
Working with devices for iPhone®/iPad®
4.3.7 Features of the Hubble for Mo
4.4 Camera Functions:
Safety Instructions 5
ENGLISH
1. Safety Instructions
WARNING:
STRANGULATION HAZARD - In case this unit is being used to monitor
infants or children, keep the unit and adapter cord more than 1 metre
from the cot and out of their reach. Never place camera or cords within a
cot or near a bed. Secure the cord away from children's reach. Never use
extension cords with AC Adapters. Only use the AC Adapters provided.
As with any electrical device, supervision of your pet's usage should be
exercised until your pet is acclimated to the product. If your pet is prone to
chewing, we strongly recommend you keep this and all other electrical
devices out of its reach.
Wi-Fi® CAMERA UNIT SET UP & USE:
●Determine a location for the Wi-Fi® Camera Unit that will provide the
best view of your baby in the cot.
●
Place the Wi-Fi
®
Camera Unit on a flat surface, such as a chest of drawers,
desk, shelf or wall-mount it using the keyhole slot in the camera base.
●NEVER place the Wi-Fi® Camera Unit or cords within the cot.

6Safety Instructions
WARNING
This Wi-Fi® Camera Unit is compliant with all relevant electromagnetic field
standards and is, when handled as described in the User’s Guide, safe to use.
Therefore, always read the instructions in this User’s Guide carefully before
using the device.
• Adult assembly is required due to small parts. Keep all small parts away from
children.
• This product is not a toy. Do not allow children to play with it.
• This Wi-Fi® Camera Unit is not a substitute for responsible adult supervision.
• Keep this user’s guide for future reference.
• Do not place the Wi-Fi® Camera Unit or cords in the cot or within reach of
the baby (the unit should be at least 1 metre away).
• Keep the cords out of reach of children.
• Do not cover the Wi-Fi® Camera Unit with a towel or blanket.
• Test the Wi-Fi® Camera Unit and all its functions so that you are familiar with
it prior to use.
• Do not use the Wi-Fi® Camera Unit near water.
• Do not install the Wi-Fi® Camera Unit near a heat source.
• Only use the power adapter provided. Do not use other power adapters as
this may damage the device.
• Never use extension cords with power adapters.
• Do not touch the plug contacts with sharp or metal objects.
Important instructions:
• Read and Follow Instructions - Please read all the safety and operating
instructions before operating the product. Follow all operating instructions.
• Retain Instructions - The safety and operating instructions should be
retained for future reference.
• Heed Warnings - Comply with all warnings on the product and in the
operating instructions.
• Polarization - Do not defeat the safety purpose of the polarized or
grounding-type plug. A polarized plug has two blades with one wider than
the hands parts of the user’s body other than
The Unit shall be installed and used such that
are maintained at a distance of approximately 8 inches (20 cm) or more.

Safety Instructions 7
ENGLISH
the other. A grounding type plug has two blades and a third grounding
prong. The wide blade or the third prong is provided for your safety. If the
supplied plug does not fit into your outlet, consult an electrician for
replacement of the obsolete outlet.
• Power Sources - This product should be operated only from the type of
power source indicated on the marking label. If you are not sure of the type
of power supplied to your location, consult your camera dealer or local
power company. For products intended to operate from battery power, or
other sources, please refer to the operating instructions
• Overloading - Do not overload wall outlets or extension cords as this can
result in the risk of fire or electric shock. Overloaded AC outlets, extension
cords, frayed power cords, damaged or cracked wire insulation, and broken
plugs are dangerous. They may result in a shock or fire hazard. Periodically
examine the cord, and if its appearance indicates damage or deteriorated
insulation, have it replaced by your service technician.
• Power-Cord Protection - Power supply cords should be routed so that they
are not likely to be walked on or pinched by items placed upon or against
them. Pay particular attention to cords at plugs, convenience receptacles,
and the point where they exit from the product.
• Surge Protectors - It is highly recommended that the camera equipment be
connected to a surge protector. Doing so will protect the equipment from
damage caused by power surges. Surge protectors should bear the UL listing
mark or CSA certification mark.
• Uninterruptible Power Supplies (UPS) - Because this product is designed for
continuous, 24/7 operation, it is recommended that you connect the product
to an uninterruptible power supply. An uninterruptible power supply has an
internal battery that will keep the product running in the event of a power
outage. Uninterruptible power supplies should bear the UL listing mark or
CSA certification mark. CAUTION: Maintain electrical safety. Power line
operated equipment or accessories connected to this product should bear
the UL listing mark or CSA certification mark on the accessory itself and
should not be modified so as to defeat the safety features. This will help avoid
any potential hazard from electrical shock or fire. If in doubt, contact
qualified service personnel.

8Safety Instructions
• Ventilation - Slots and openings on the case are provided for ventilation to
ensure reliable operation of the product and to protect it from overheating.
These openings must not be blocked or covered. The openings should
never be blocked by placing the camera equipment on a bed, sofa, rug, or
other similar surface. This product should never be placed near or over a
radiator or heat register. This product should not be placed in a built-in
installation such as a bookcase or rack unless proper ventilation is provided
and the product manufacturer's instructions have been followed.
• Attachments - Do not use attachments unless recommended by the product
manufacturer, as they may cause a hazard.
• Heat - The product should be located away from heat sources such as
radiators, heat registers, stoves, or other products (including amplifiers) that
produce heat.
• Accessories - Do not place this camera equipment on an unstable cart, stand,
tripod, or table. The camera equipment may fall, causing serious damage to
the product. Use this product only with a cart, stand, tripod, bracket, or table
recommended by the manufacturer or sold with the product. Any mounting of
the product should be according to the manufacturer's instructions and use a
mounting accessory recommended by the manufacturer.
• Camera Extension Cables - Check the rating of your extension cable to
verify its compliance prior to installation.
• Mounting - The cameras provided with this system should be mounted only
as instructed in this guide or the instructions that came with your cameras,
using the supplied mounting brackets.
• Camera Installation - Cameras are not intended for submersion in water. Not
all cameras can be installed outdoors. Check your camera environmental
rating to confirm if they can be installed outdoors. When installing cameras
outdoors, installation in a sheltered area is required.

System Requirements 9
ENGLISH
2. System Requirements
Web Portal
• Windows® systems, 7 or 8 (Java browser plug-in needed)
• Mac OS® version 10.7 or above
• Internet Explorer® version 8.0 or above
• Firefox® version 11.0 or above
• Chrome™ version 18.0 or above
• Safari® version 5.1 or above
• Java™ version 7 or above
Android™ System
• Version 4.0 or above
iPhone®/iPad® iOS
• Version 7.0 or above
10 Getting started - Connecting Devices
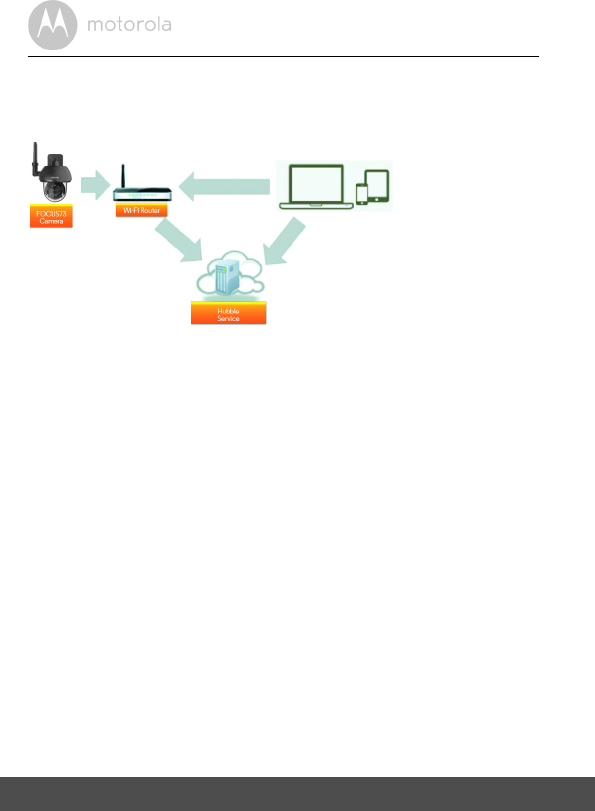
3. Getting started - Connecting Devices
How does it work?
When a user tries to access the Camera, our secure server authenticates the
user’s identity and permits access to the Camera.
3.1 Setup
Connect the Camera to the power adapter, then plug into an suitable mains
power socket and make sure the power switch is in the ON position. The
Camera must be within range of the Wi-Fi® router with which you want to
connect it to. Make sure the password of the router is available for entering
during the in-app setup process.
Status of LED Indication:
- Pair / Setup state: LED is Green and rapidly flashing
- Unconnected state: LED is Green and slowly flashing
- Connected state: LED is Green and always on
- Ready for connection state: LED is Green and slowly flashing
Note:
You can only setup via a compatible smartphone or tablet and not via a PC.
Access your
Camera locally View your Camera from any
compatible device remotely

Getting started - Connecting Devices 11
ENGLISH
3.2 User Account and Camera Setup on Android™
Devices
What you need
• FOCUS73 camera
• FOCUS73 camera power adapter
• Device with Android™ system version 4.0 or above
3.2.1 Power on and connect the FOCUS73 camera
• Connect the FOCUS73 adapter to a suitable mains power socket, insert the
power adapter plug into the socket of the Power Cable.
• The camera’s green LED blinks after the camera has finished booting.
3.2.2 Download the Hubble for Motorola Monitors application
• Go to the Google Play™ Store to search “Hubble for Motorola Monitors”
application.
• Download Hubble for Motorola Monitors application from Google Play™
Store and install it into your Android™ device.
12 Getting started - Connecting Devices
3.2.3 Run Hubble for Motorola Monitors App on Android™ device
• Ensure your Android™ device is connected to your Wi-Fi® router.
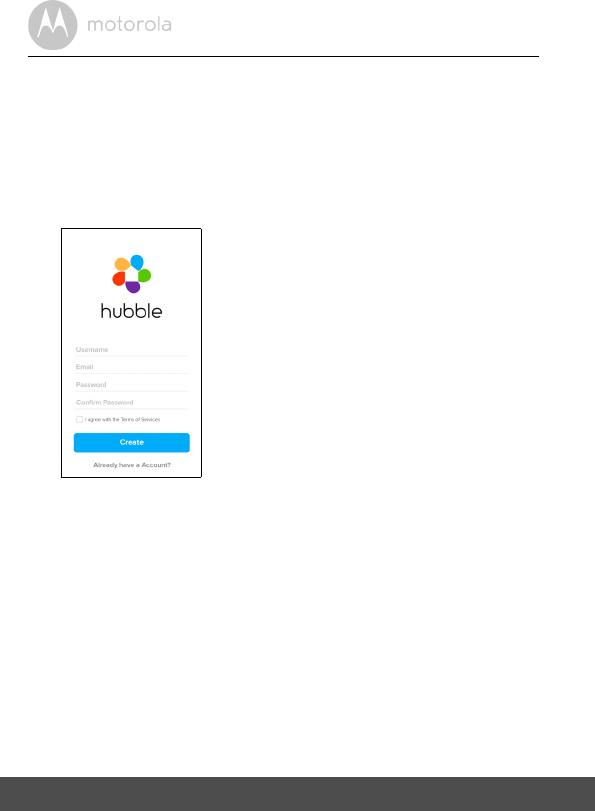
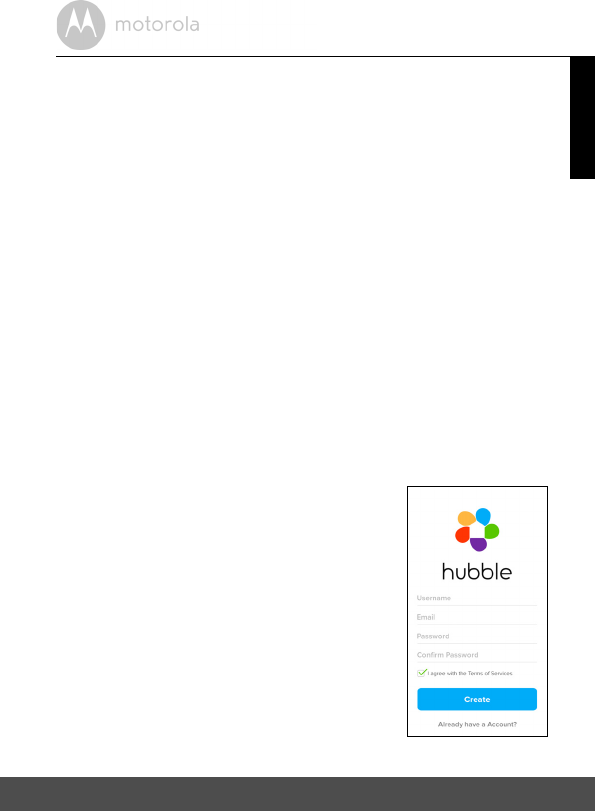
• Run Hubble for Motorola Monitors application and key in your Hubble for
Motorola Monitors account information, select “I agree to the Terms of Use”
before you tap on Create. (Picture A1)
Note: If you have Hubble for Motorola Monitors account, please select Already
have a Account? to go next steps.
A1
Getting started - Connecting Devices 13
ENGLISH
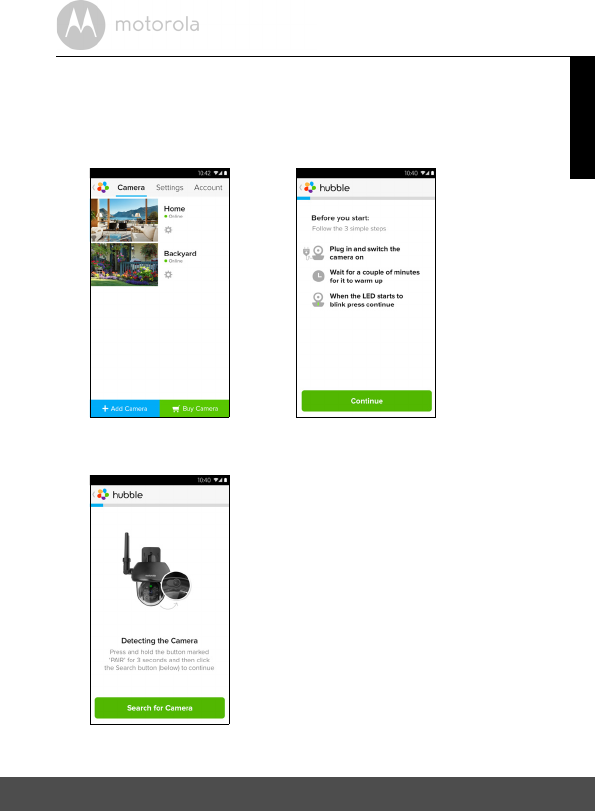
3.2.4 Add FOCUS73 Camera to your account
• New account created and directly login.
• Tap on Add Camera. (Picture A2)
• Tap on Continue. (Picture A3)
• On the screen, it shows the setup instructions. (Picture A4)
A2 A3
A4
14 Getting started - Connecting Devices
• Press and hold the PAIR button for 3 seconds at the side of FOCUS73
camera and the indicator will flash rapidly. Then tap on Search for Camera.
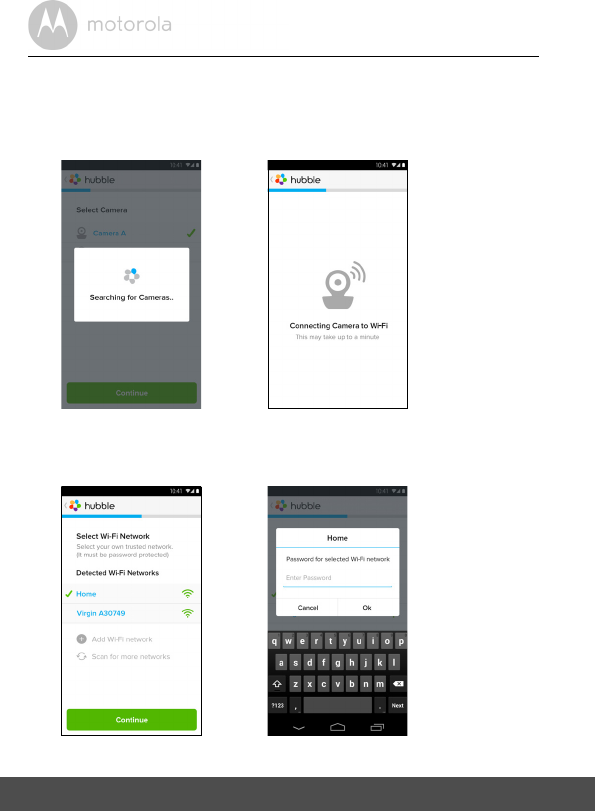
• The App auto searching and connecting your Camera as below pictures.
(A5 & A6)
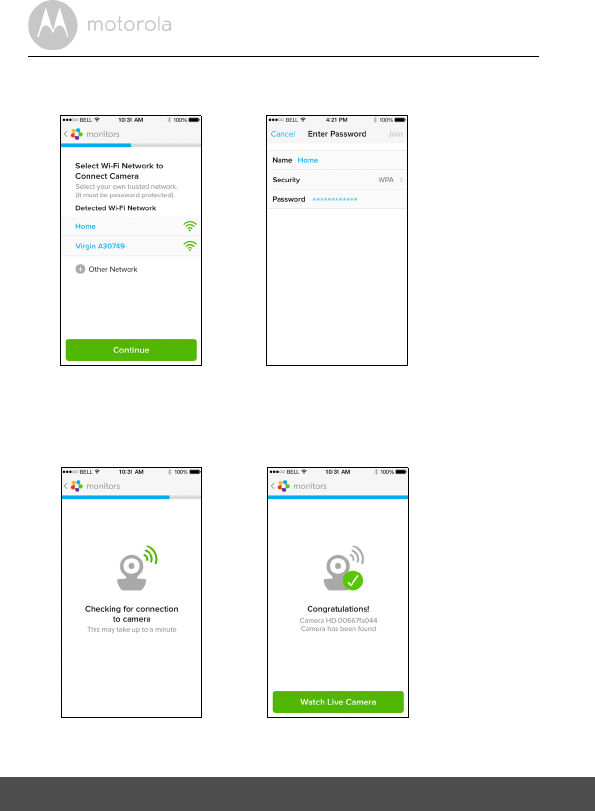
• Select Wi-Fi® Network and tap Continue, enter password then tap on
Connect. (Picture A7, A8)
A5 A6
A7 A8
16 Getting started - Connecting Devices
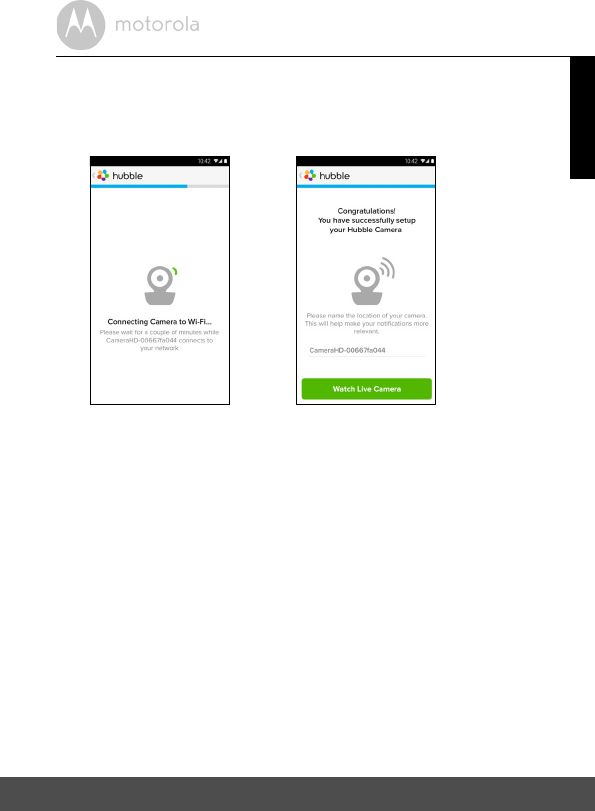
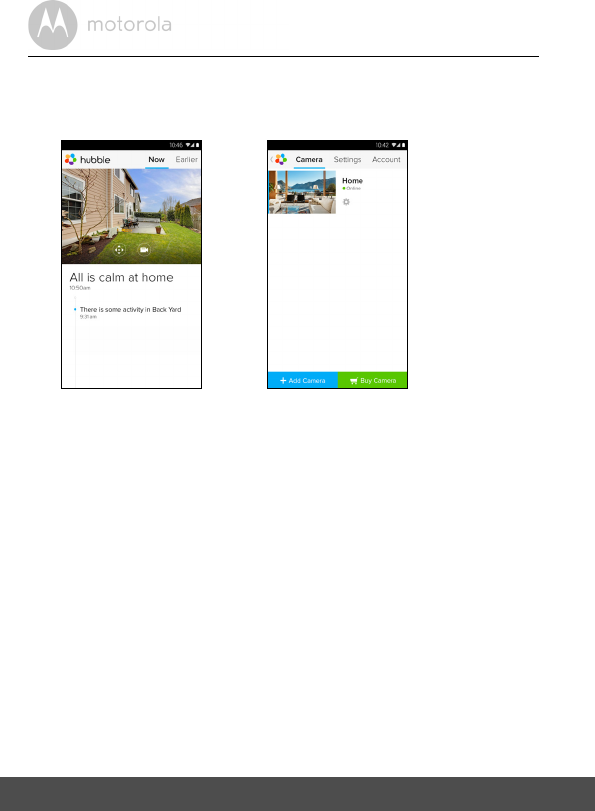
• Tap on Watch Live Camera to view camera video and the LED indicator will
turn on. (Picture A11)
• Tap on Hubble logo and go back to the camera list. (Picture A12)
A11 A12
Account?
Already have a
of Service” before you tap on
of Service then select "I agree to the Terms of
account information, ready through the Terms
and key in your Hubble for Motorola Monitors
• Run Hubble for Motorola Monitors application
account, please select
: If you have a Hubble for Motorola Monitors
Create.
Getting started - Connecting Devices 17
ENGLISH
3.3 User Account and Camera Setup:
Working with iPhone®/iPad®
What you need
• FOCUS73 camera
• FOCUS73 camera power adapter
• iPhone® / iPad® with iOS 7.0 version or up
3.3.1 Power ON and Connect FOCUS73 camera
• Connect the FOCUS73 adapter to a suitable mains power socket, insert the
plug into the socket of the Power Cable.
• Camera green LED blinks after camera booting finish, it means the camera is
ready for setup.
3.3.2 Download Hubble for Motorola Monitors App
• Go to App Store to search “Hubble for Motorola Monitors”.
• Download Hubble for Motorola Monitors App and install it on your iPhone®
/
iPad®.
3.3.3 Run Hubble for Motorola Monitors on your iPhone®
/iPad®
• Ensure your iPhone®/iPad® is connected to your Wi-Fi® Router.
Note
to go next steps.
i1
18 Getting started - Connecting Devices
3.3.4 Add FOCUS73 Camera to your account
• New account created and directly login.
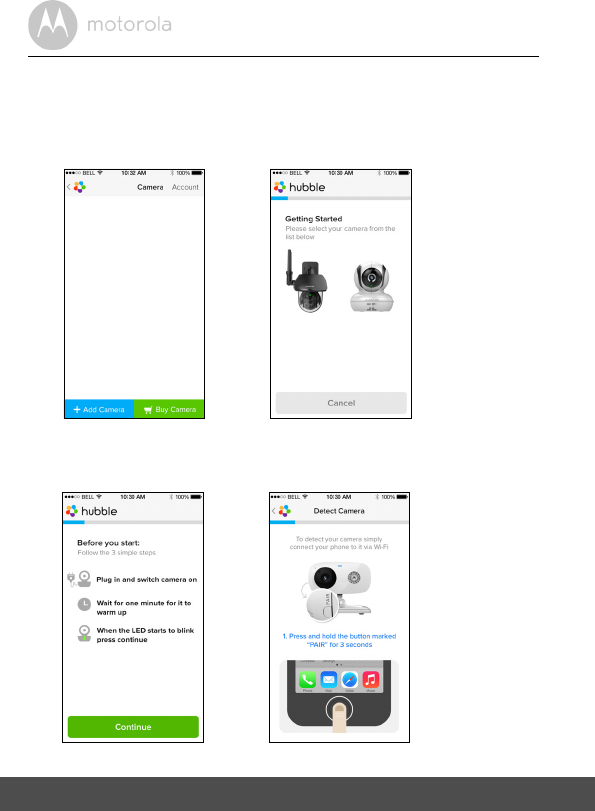
• Tap on Add Camera. (Picture i2)
• Tap on “FOCUS73”. (Picture i3)
i2 i3
FOCUS73 Blink83 / Scout83 /
MBP36HD
• Tap on Continue and follow the instructions (5 steps) as below.
(Pictures i4-i7)
i4 i5
Getting started - Connecting Devices 19
ENGLISH
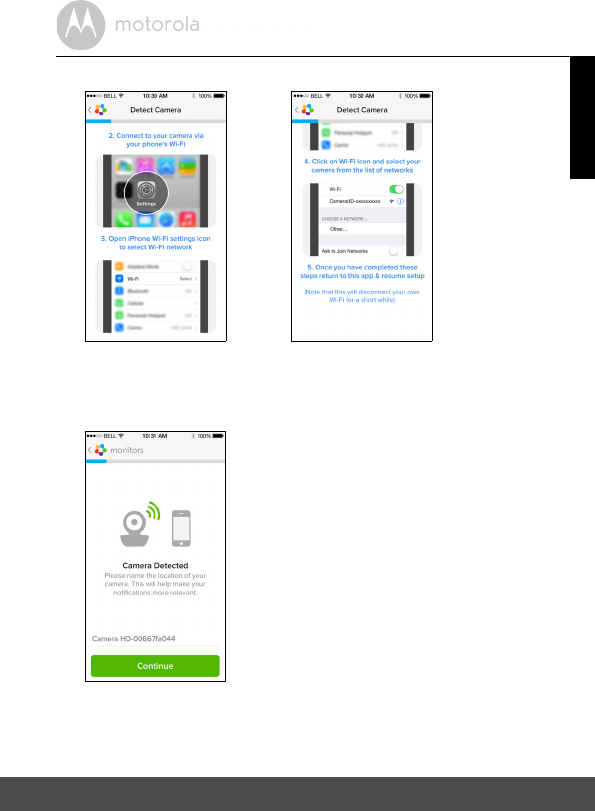
i6 i7
• Follow the steps above to locate the Camera with identification "CameraHD-
xxxxxxxxxx" then tap on Continue. (Picture i8)
i8
20 Getting started - Connecting Devices
• Select Wi-Fi® Network to tap Continue then enter password to tap Next.
(Pictures i9, i10)
i9 i10
• It will take a few minutes for the Camera to connect to the Wi-Fi® network
before showing the connection status (Pictures i11, i12). If connection fails,
please tap on the Retry button and repeat 3.3.4 as instructed above.
i11 i12

Getting started - Connecting Devices 21
ENGLISH
• Press Watch Live Camera to view Camera video. (Picture i13)
• Tap on Hubble logo to go back to Camera list. (Picture i14)
i13 i14
Camera
4. Camera
4.1 Install your Camera and setting up
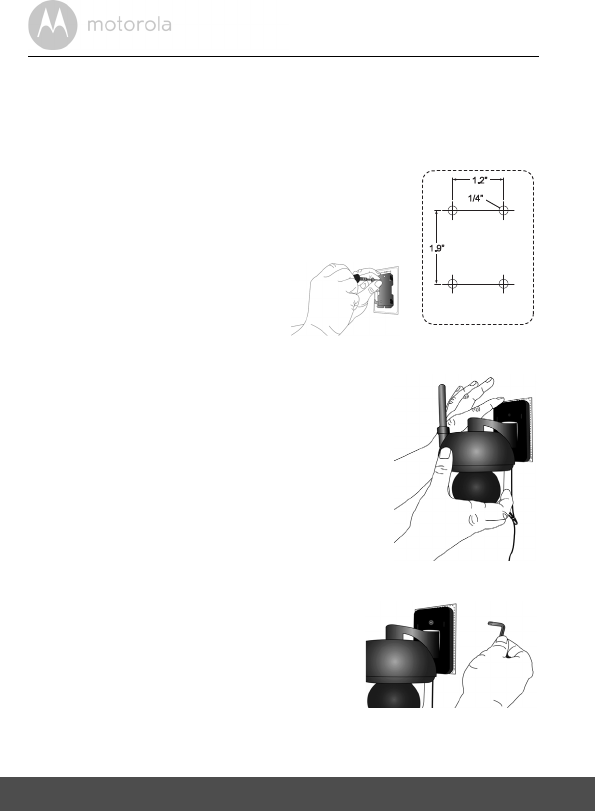
A. Fixing Mounting Plate on the wall.
B. Hanging the Camera unit on the Mounting Plate.
C. Secure the Camera Unit
• Mark the position of the screw holes on the wall.
• Drill 4 holes and hammer the drywall plugs
(included) into the holes as needed.
• Fasten the mounting plate on the wall
with the 4 Philips head screws
(provided).
• Place the 4 mounting slots of the camera
base on to 4 catches on the mounting plate.
• Make sure the unit sits firmly on the
mounting plate with the center holes of 2
parts lined up.
• Fasten the unit to the mounting plate at
the center hole with the tamper-proof
screw by the wrench key provided.
22
Camera
ENGLISH
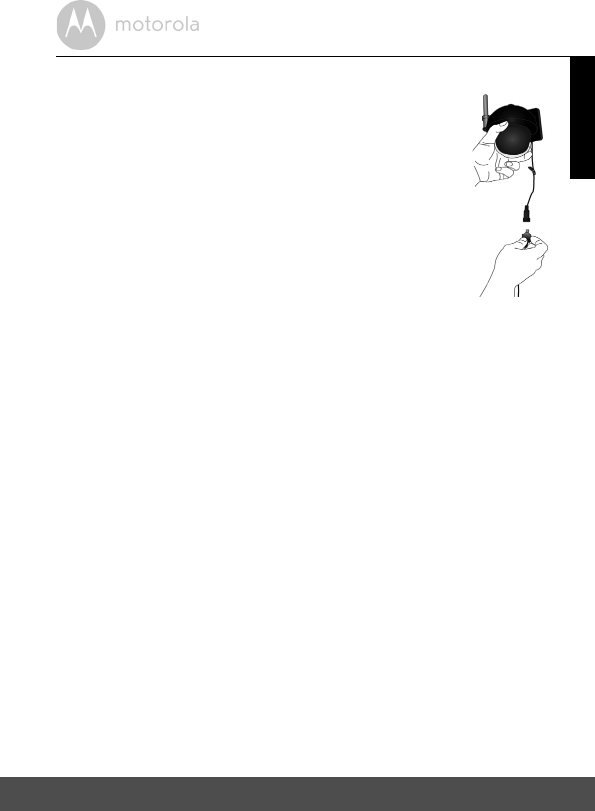
D. Connecting Power Supply for the Camera Unit
• Insert the power adapter plug into the Power
Socket and connect other end of the power
adapter to a suitable mains power socket.
• Connect either via LAN cable to your router/
hub/modem or Wi-Fi® to your router.
• The LED indicator will light up.
23
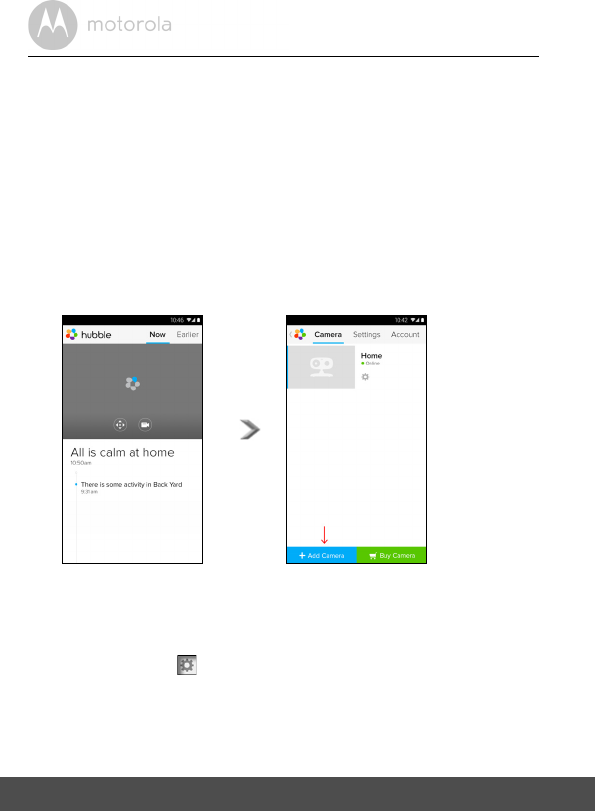
• Run the Hubble for Motorola Monitors application on your Android™ device.
• The Camera view appears on the screen.
4.2.1 Add more cameras
• On Camera view, tap on Hubble logo to go to Add Camera page. (Picture A13)
• Tap on Add Camera to add one more camera follow steps of Android™
device setup 3.2.4. (Picture A14)
• Once the Camera has been added, the Camera view will be automatically
displayed.
4.2 Camera Functions:
Working with devices for Android™
A13 A14
Camera
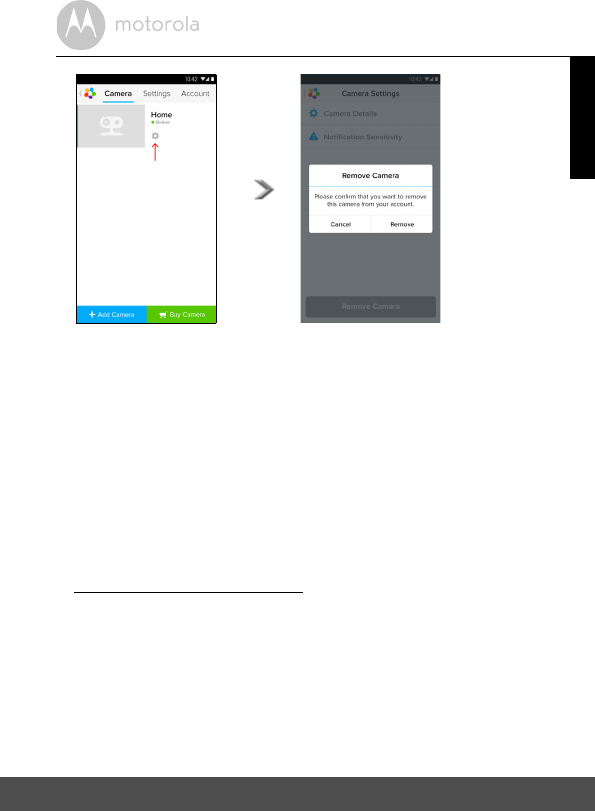
4.2.2 Remove a camera
You can remove a camera from your account by following these steps:
• Tap the Setting icon on General page, then tap on Remove Camera.
(Picture A15)
• Select Remove to delete the unit from camera list. (Picture A16)
24
A15 A16
Camera
ENGLISH
4.2.3 Change your Account Information
You can change the account information using Android™ device.
• Tap Account on General page, the account setting appears on screen.
(Picture A17)
• Tap on Change Password to change your password following the
instruction.
• Tap on Log Out to leave the account.
• Tap on Freemium plan, it will go to the link of Cloud Video Recording
Service, to obtain more information, please visit our website
http://www.hubbleconnected.com.
• Tap on Use to access Remote Connection Setting , use Remote Only by
Selecting Ye s .
• Enable Disconnect Alert , when disconnect it will be "beeps" alert,enable
the disconnect Alert by selecting Ye s .
• Tap on Send Log to send your Hubble for Motorola Monitors Android App
report to our server via e-mail; this should be sent if requested by a customer
service agent.
25