Bioinsec BKS-4800M FINGERPRINT ACCESS CONTROLLER User Manual User Guide
Bioinsec Co.,Ltd FINGERPRINT ACCESS CONTROLLER User Guide
Bioinsec >
USERS MANUAL
Console Manager
- 1 -
User Manual
27, Sep, 2007

Console Manager
- 2 -
Table of Contents
1 About BKS-4800 Series -------------------------------------------------------------------------- 4 -
2 Setup Console Manager-------------------------------------------------------------------------- 4 -
2.1 Installation - 4 -
2.1.1 Installation PC Capacity - 4 -
2.1.2 Console Manger total diagram - 5 -
2.1.3 How to install Console Manager on PC - 5 -
2.1.4 How to uninstall Console Manager on PC - 8 -
2.2 How to setup Console Manager - 9 -
2.2.1 Enter Console Manager - 9 -
2.2.2 Main window and basic word - 12 -
2.3 How to use Console Tele Manager - 16 -
3 How to connect between Terminal & Server---------------------------------------------- 17 -
3.1 Select portHow to register - 17 -
3.2 Setup terminal - 18 -
3.3 Connection of terminal -25-
4 How to enroll User--------------------------------------------------------------------------------- 37 -
4.1 Enroll company - 37 -
4.2 Enroll Group(Department or Branch) - 38 -
4.3 Enroll position - 39 -
4.4 Enroll Userr - 40 -
5 Set schedule & Role -------------------------------------------------------------------------------- 45 -
5.1 Set schedule - 55 -
5.1.1 Set Holiday - 55 -
5.1.2 Set Time Zone - 57 -
5.1.3 Set Time schedule - 58 -
5.2 Transmit Schedule to terminal - 59 -
5.3 Role - 60 -
5.4 Schedule control layout -- 58
6 Transmit------------------------------------------------------------------------------------------------- 63 -
6.1 Download & Upload - 63 -
6.1.1 Download User - 64 -
6.1.2 Delete User - 64 -

Console Manager
- 3 -
6.1.3 Download All user - 65 -
6.1.4 Delete All user - 65 -
6.1.5 Upload FP and EM TYPE - 65 -
6.1.6 Download and delete schedule - 66 -
6.1.7 Download terminal status - 66 -
6.1.8 Firmware update - 66 -
7 Monitoring----------------------------------------------------------------------------------------------- 66 -
8 Report---------------------------------------------------------------------------------------------------- 67 -
8.1 User log data view - 69 -
8.2 All log data view - 65
9 Time & Attendance----------------------------------------------------------------------------------오류!
책갈피가 정의되어 있지 않습니다.
9.1 Enter T&A 오류! 책갈피가 정의되어 있지 않습니다.
9.2 Set T&A condition 오류! 책갈피가 정의되어 있지 않습니다.
9.2.1 Data path 오류! 책갈피가 정의되어 있지 않습니다.
9.2.2 Standard time 오류! 책갈피가 정의되어 있지 않습니다.
9.2.3 Holiday 오류! 책갈피가 정의되어 있지 않습니다.
9.2.4 Enroll others 오류! 책갈피가 정의되어 있지 않습니다.
9.3 Trans T&A data 오류! 책갈피가 정의되어 있지 않습니다.
9.4 Query T&A 오류! 책갈피가 정의되어 있지 않습니다.
9.4.1 Daily 오류! 책갈피가 정의되어 있지 않습니다.
9.4.2 Personal 오류! 책갈피가 정의되어 있지 않습니다.
9.4.3 Period 오류! 책갈피가 정의되어 있지 않습니다.
10 Other function---------------------------------------------------------------------------------------오류!
책갈피가 정의되어 있지 않습니다.
10.1 Check enrolled user of terminal 오류! 책갈피가 정의되어 있지 않습니다.
10.2 Data Utility 오류! 책갈피가 정의되어 있지 않습니다.
10.3 Door Open 오류! 책갈피가 정의되어 있지 않습니다.
10.4 Change window structure 오류! 책갈피가 정의되어 있지 않습니다.
10.5 Sliding message on LCD 오류! 책갈피가 정의되어 있지 않습니다.

Console Manager
- 4 -
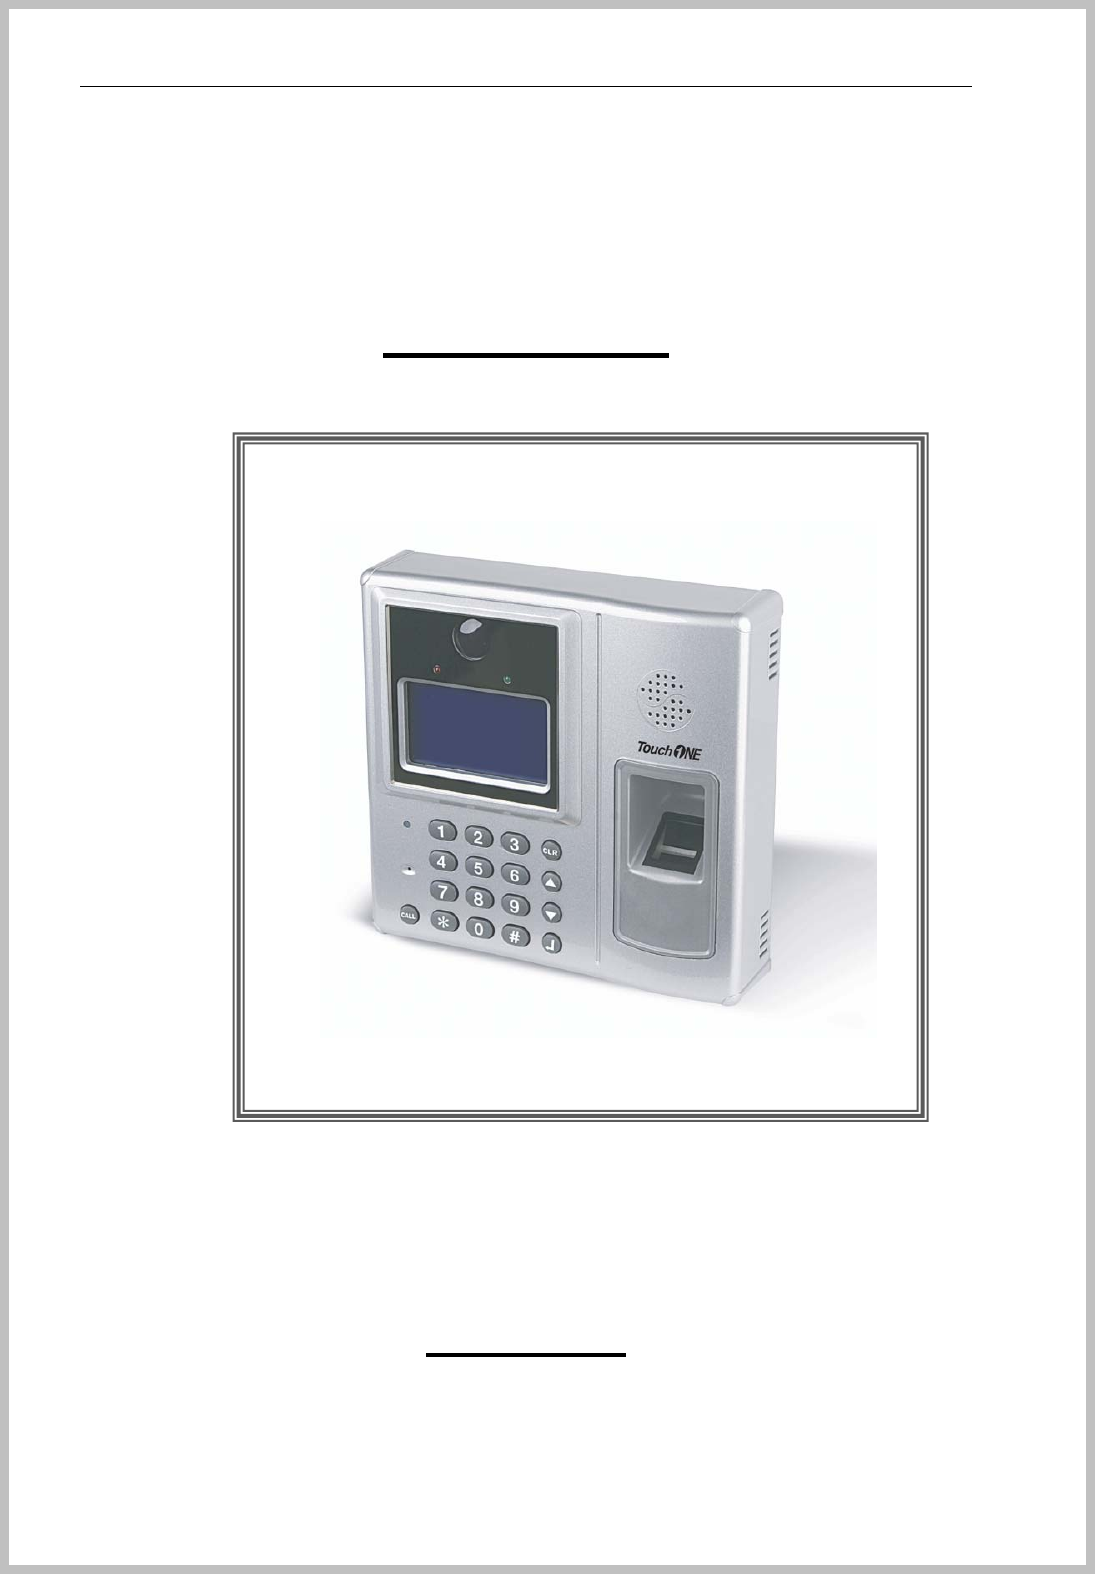
1. About BKS-4800 Series
BKS-4800 security, work place time and attendance, and over-time work verification and other
situations requiring the presence of the authorized personnel. Fingerprint identification technology
bypasses problems of existing security solutions such as EM TYPEcards and keypad locks. These
are prone to security breach from card duplication and misplacement or improper disclosure of
password. These accidents allow for proxy authorization and breach of security.
Fingerprints have constancy and uniqueness and its pattern can be easily and cheaply recorded,
thus making it the most desirable form of biometric recognition system. The new sensor now enables
us to cut costs as well as to miniaturize, both of which will make the technology more practical and
more easily mass marketed.
BKS-4800 supports various I/O protocols and is an optimal solution for managing access-controlled
points. With 128 X 64 pixels blue LCD screen, 12 regular keys and 5 special function keys, make
BKS-4800 user-friendly. Communication is based on TCP/IP is also easy with the included 1 RS232
port, 1 RS485 port, 1 relay signal and 1 external sensor inputs.
2. Setup Console Manager
Installation
Installation PC Capacity
BKS-4800 Manager system : suggested PC application
CPU Pentium 4 1.7 GHz over
RAM 256MB over (512MB suggest to be over)
OS Windows 2000 / XP
HDD 40GB over
Network LAN
THE MANUFACTURER IS NOT RESPONSIBLE FOR ANY RADIO OR TV
INTERFERENCE CAUSED BY UNAUTHORIZED MODIFICATIONS TO THIS
EQUIPMENT. SUCH MODIFICATIONS COULD VOID THE USER’S AUTHORITY TO
OPERATE THE EQUIPMENT.
Console Manager
- 5 -
BKS-4800 Manager system : minimum capacity
CPU Pentium 3 1.0 GHz over
RAM 128MB over
OS Windows NT / 2000 / XP
HDD 20GB over
Network LAN
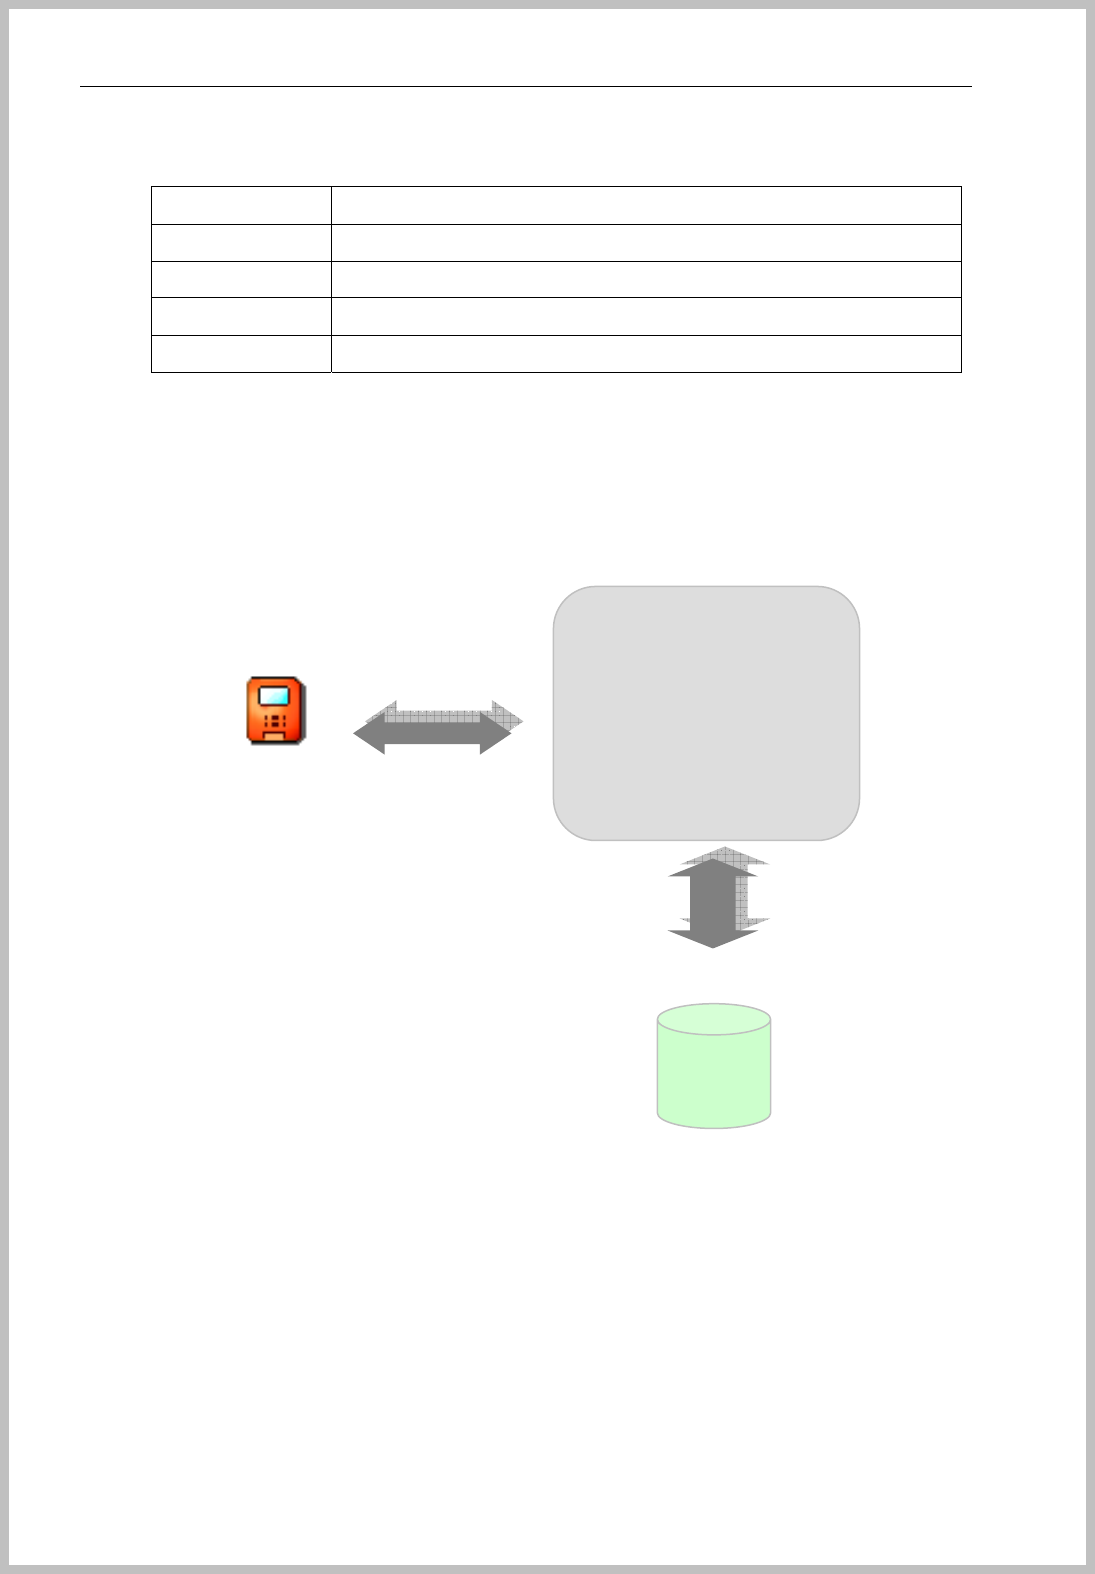
Console Manager total diagram
How to install Console Manager on PC
Content of installation
① Choose the administration PC.
② Check the computer installed Window system. (Windows 2000 / XP)
③ To install Console Manager as to click “Setup.exe”.
④ After installation of Console Manager, input BKS-2600 to USB port.
⑤ Install BKS-2600 driver.
E
En
nr
ro
ol
ll
l
b
ba
as
si
ic
c
d
da
at
ta
a
C
Co
on
nn
ne
ec
ct
ti
io
on
n
c
co
on
nd
di
it
ti
io
on
n
M
Mo
on
ni
it
to
or
ri
in
ng
g
T
T
&
&
A
At
tt
te
en
nd
da
an
nc
ce
e
D
DB
B
Console Manager
Terminal
Console Manager
- 6 -
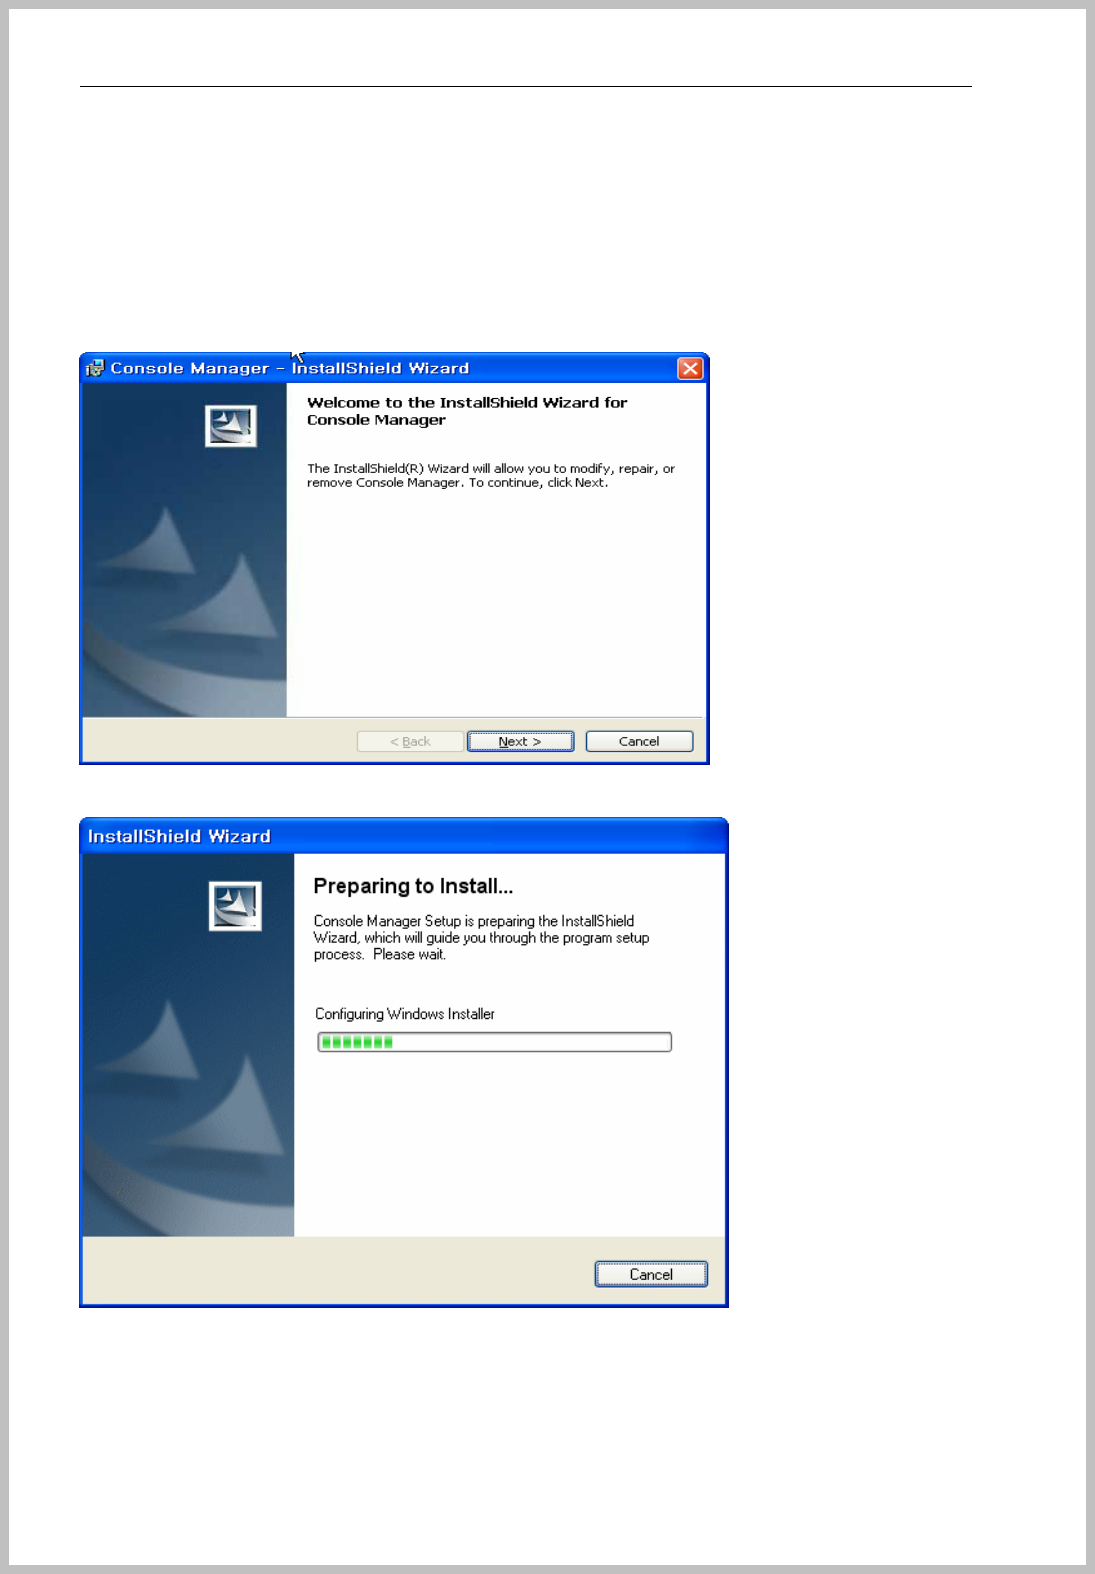
Set Console Manager
Double click the “setup.exe” file and then the below installation window will be shown.
Caution: The Console manager should be set at only C drive.
Please click the Next button.
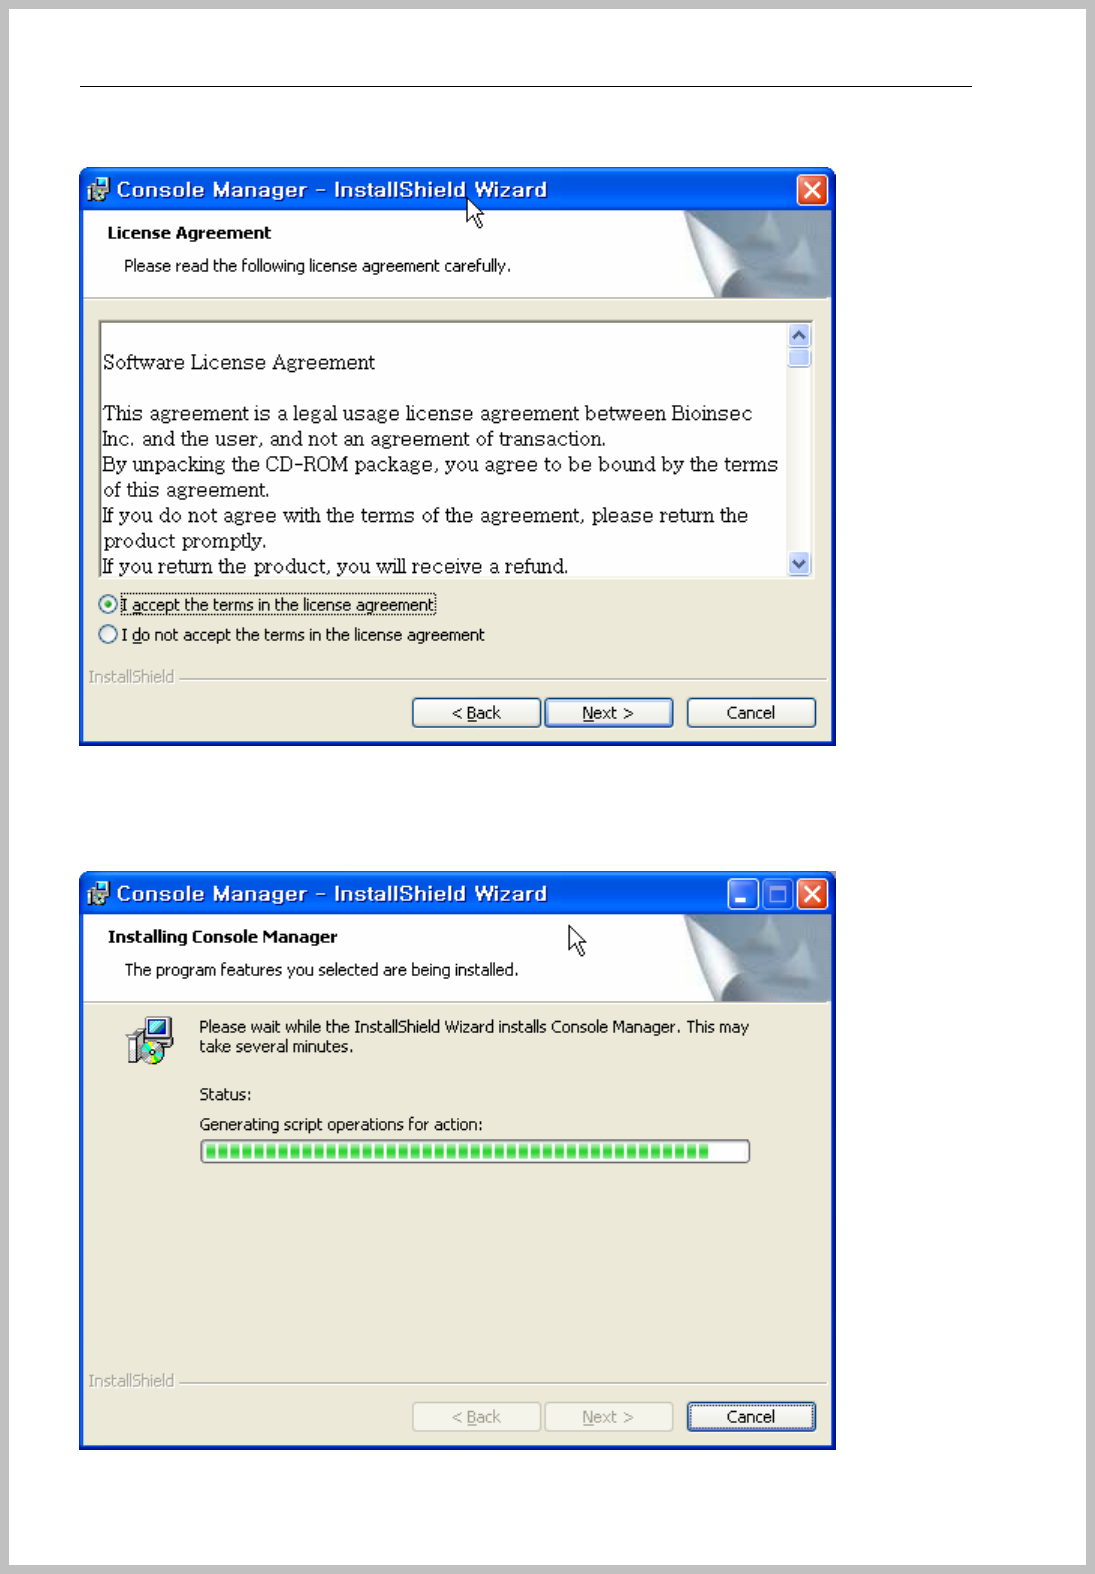
Click the next button after confirm License Agreement.
Console Manager
- 7 -
Click Next button.
Console Manager
- 8 -
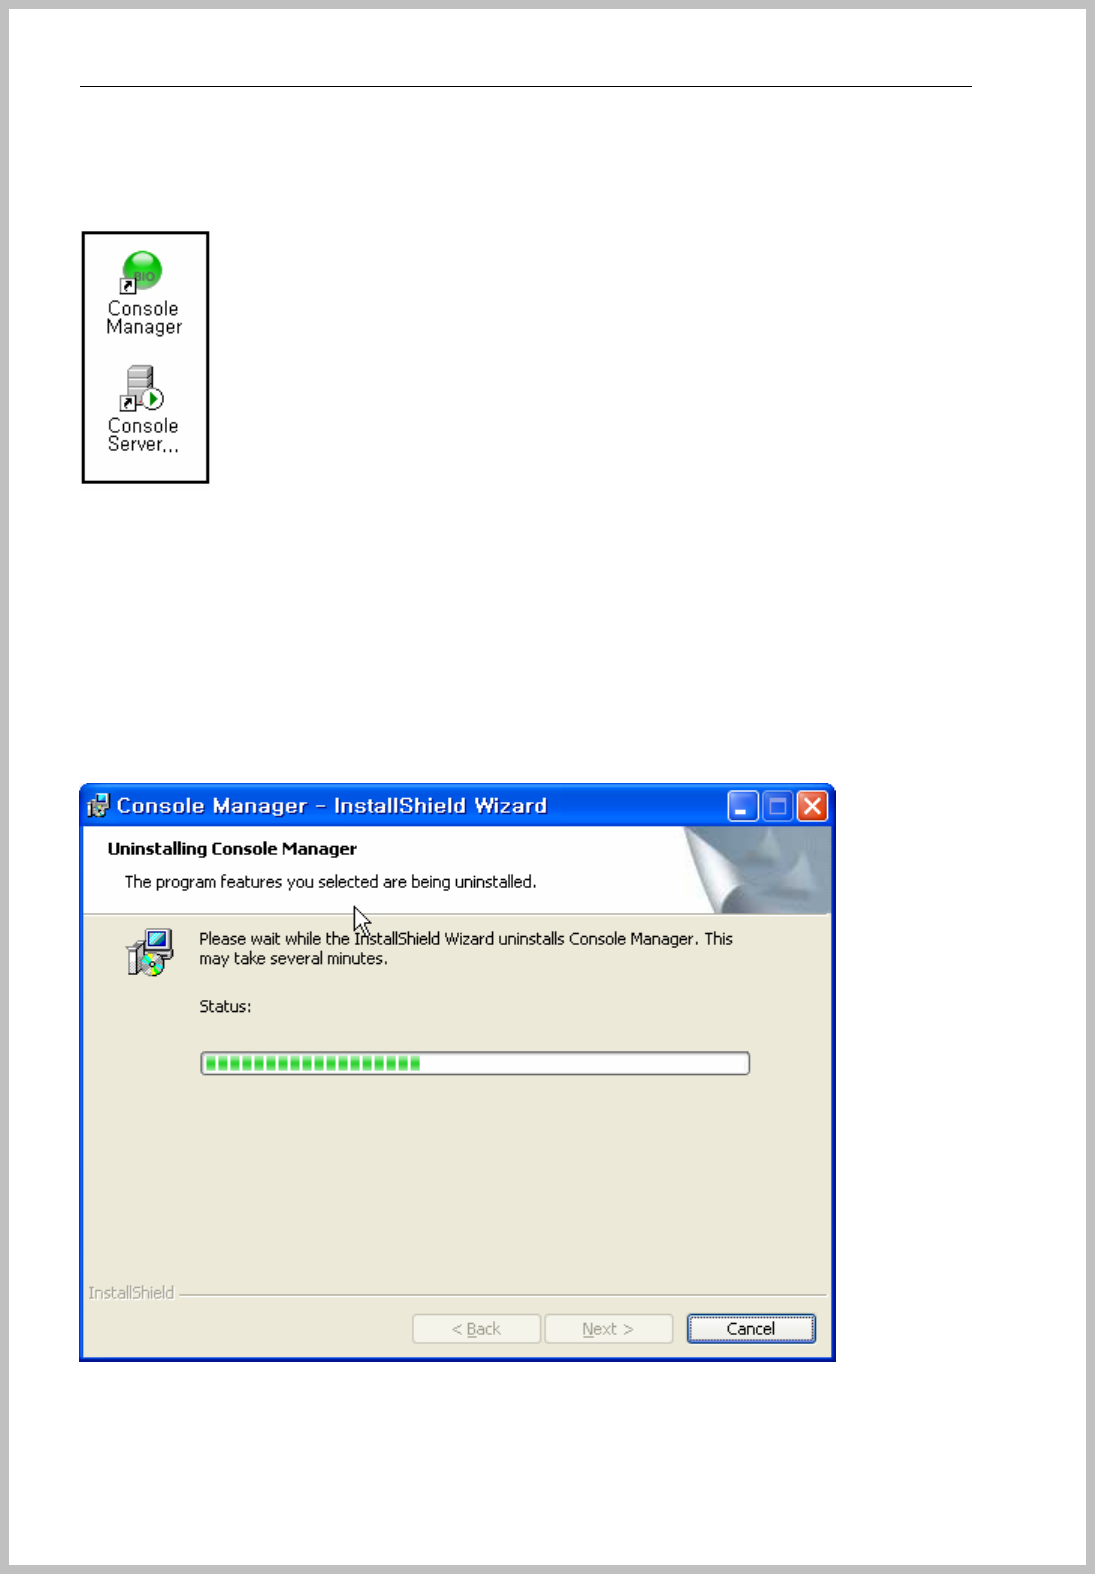
“Console Manager” & “Console Service” Icon created on the desktop.
How to uninstall Console Manager on PC
Uninstall Console Manager
Start – control – Program add/delete – Select Console Manager .
Click the delete button and Console Manager will be removed.
Console Manager
- 9 -
How to setup Console Manager
Console Manager is main control program networked several BIOINSEC terminals on network.
It’s shown all records of communication between terminal and server, that is the reason can
control all LOG related of BKS-4800 terminals.
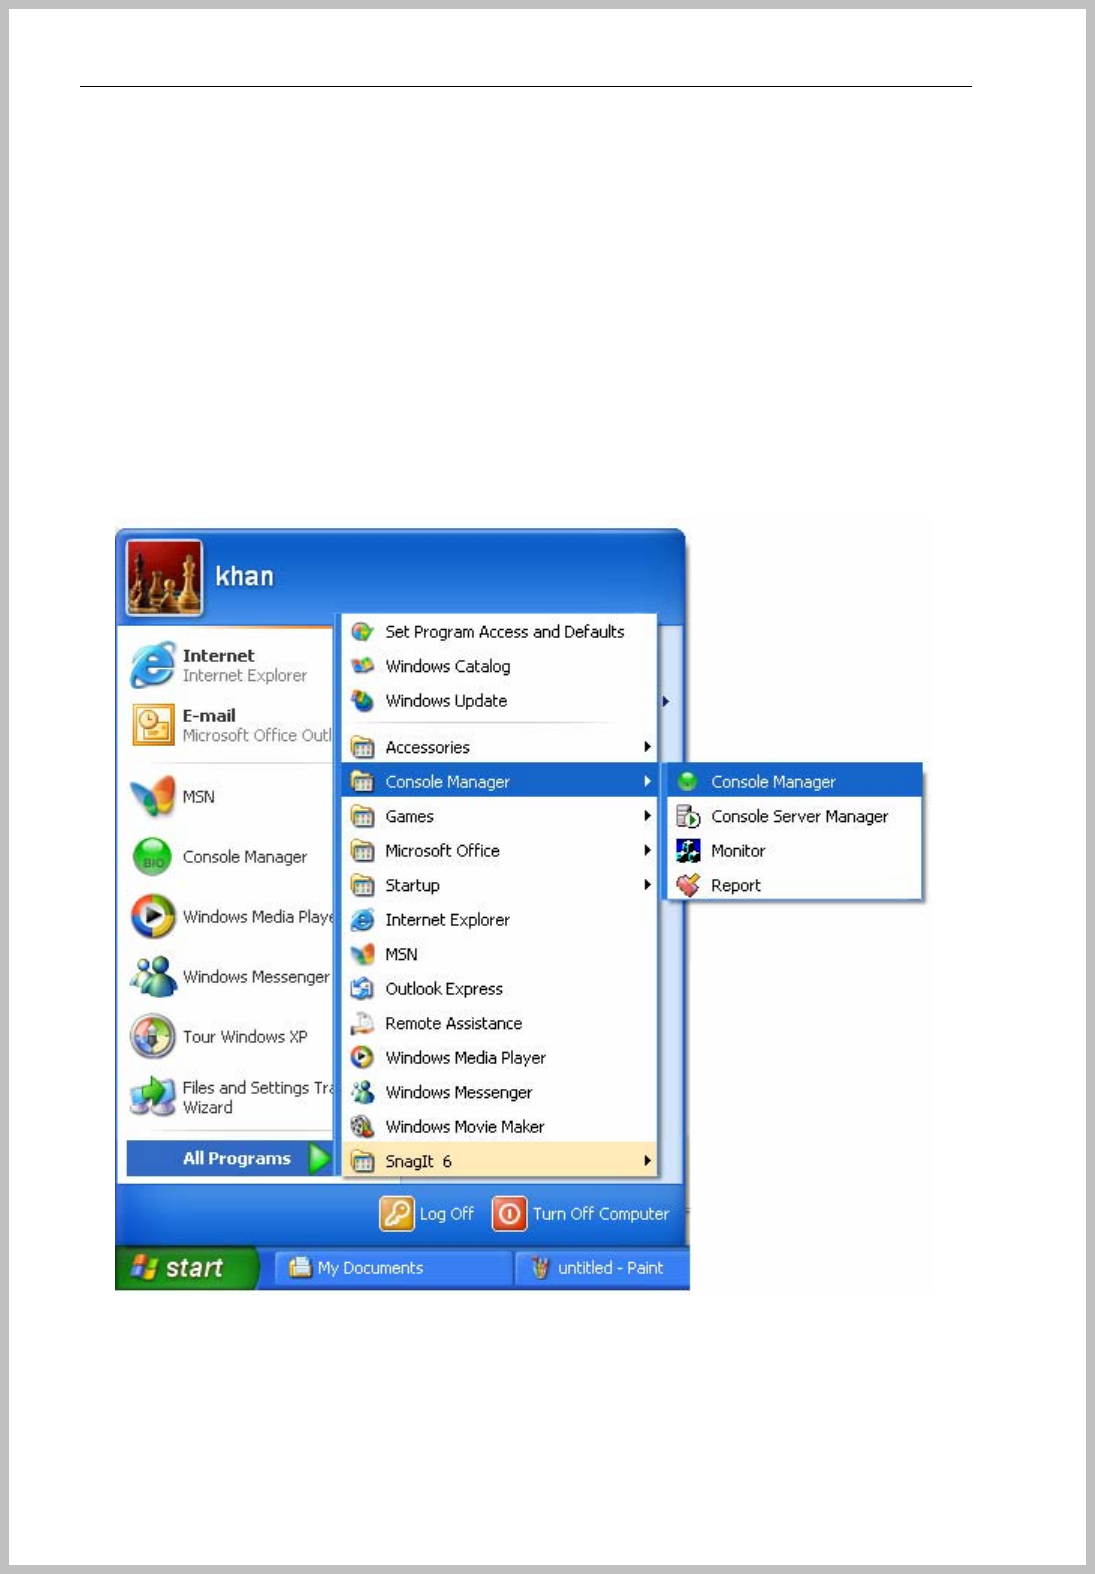
Enter Console Manager
Main long-in window appears after click Console Manager icon on the desktop, Click the
Icon and above window appears.
Initial set value is “ ID : 1 Pass : 1 “, please give new Password for reduction of security
risk.
If the administrator enrolled “Admin Fingerprint,” please click the blue man Icon pointing to
finger icon and place your finger on BKS-2600 scanner.
Console Manager
- 10 -
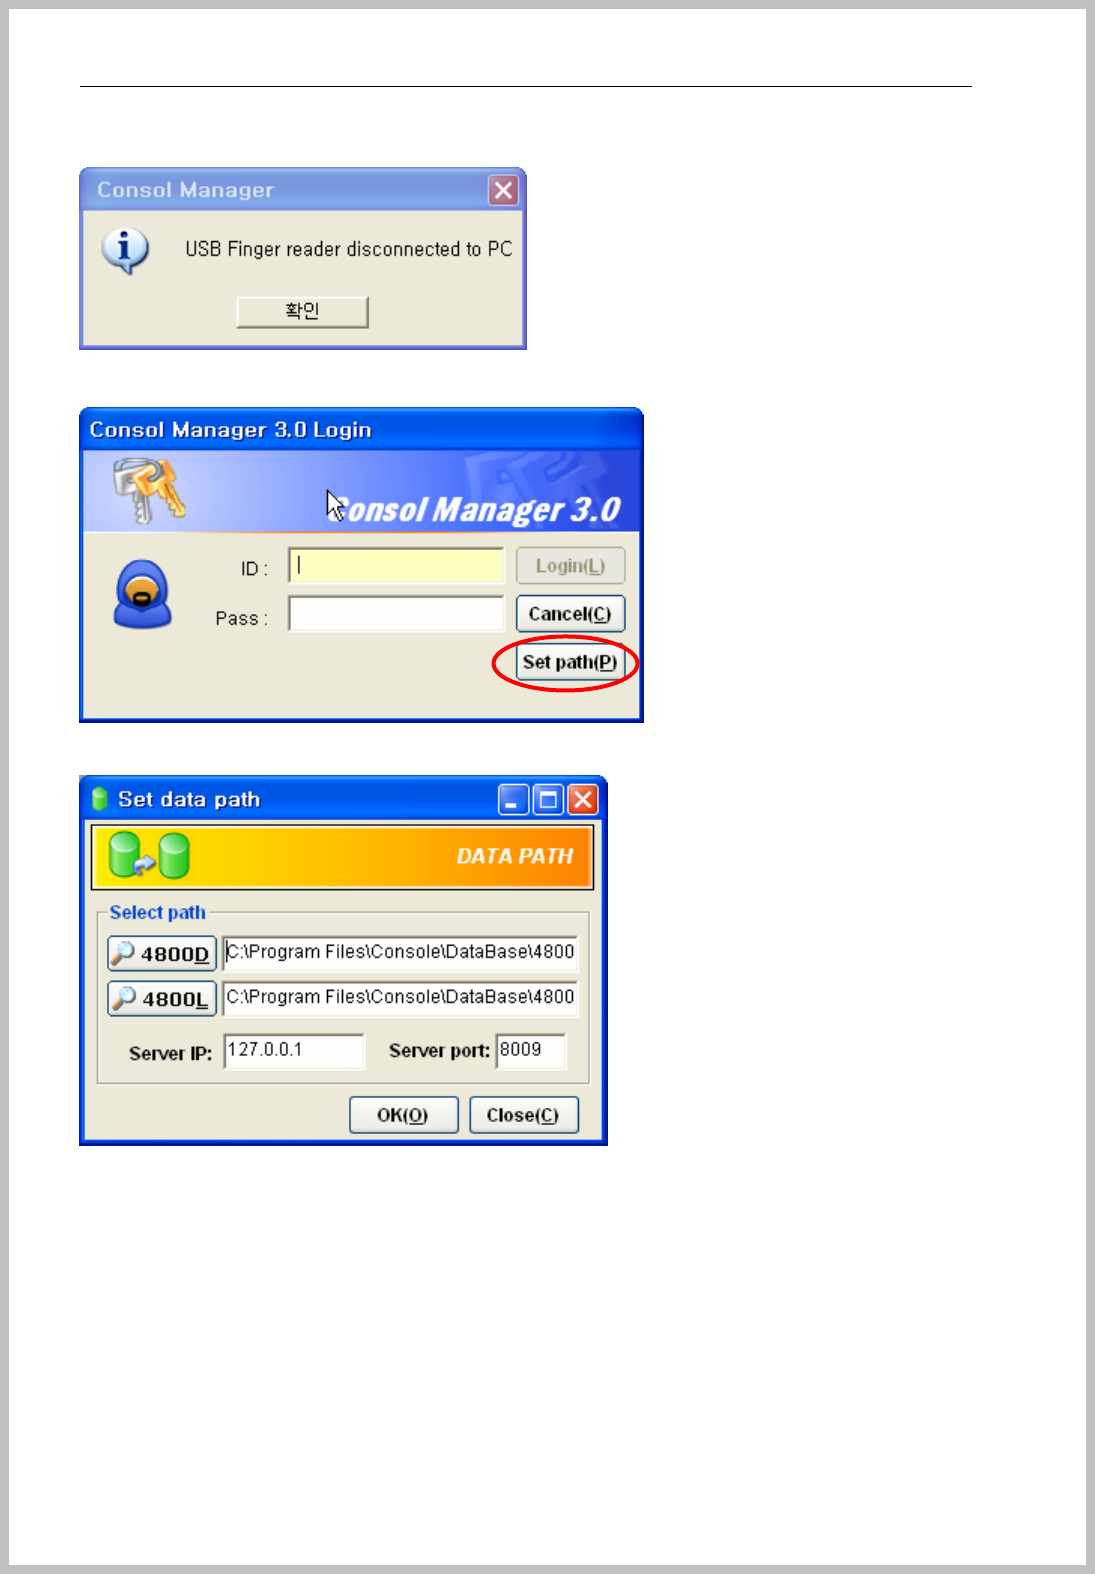
< When USB Scanner doesn’t be connected to PC, this message appears >
Setup path : Please click “Set path” and then the below window appears.
4800D : C:\Program Files\Console\DataBase\4800D.mdb
4800L : C:\Program Files\Console\DataBase\4800D.mdb
Server IP : Computer IP address or input 127.0.0.1
Server Port : 8009
Setting values are automatically set like above menu.
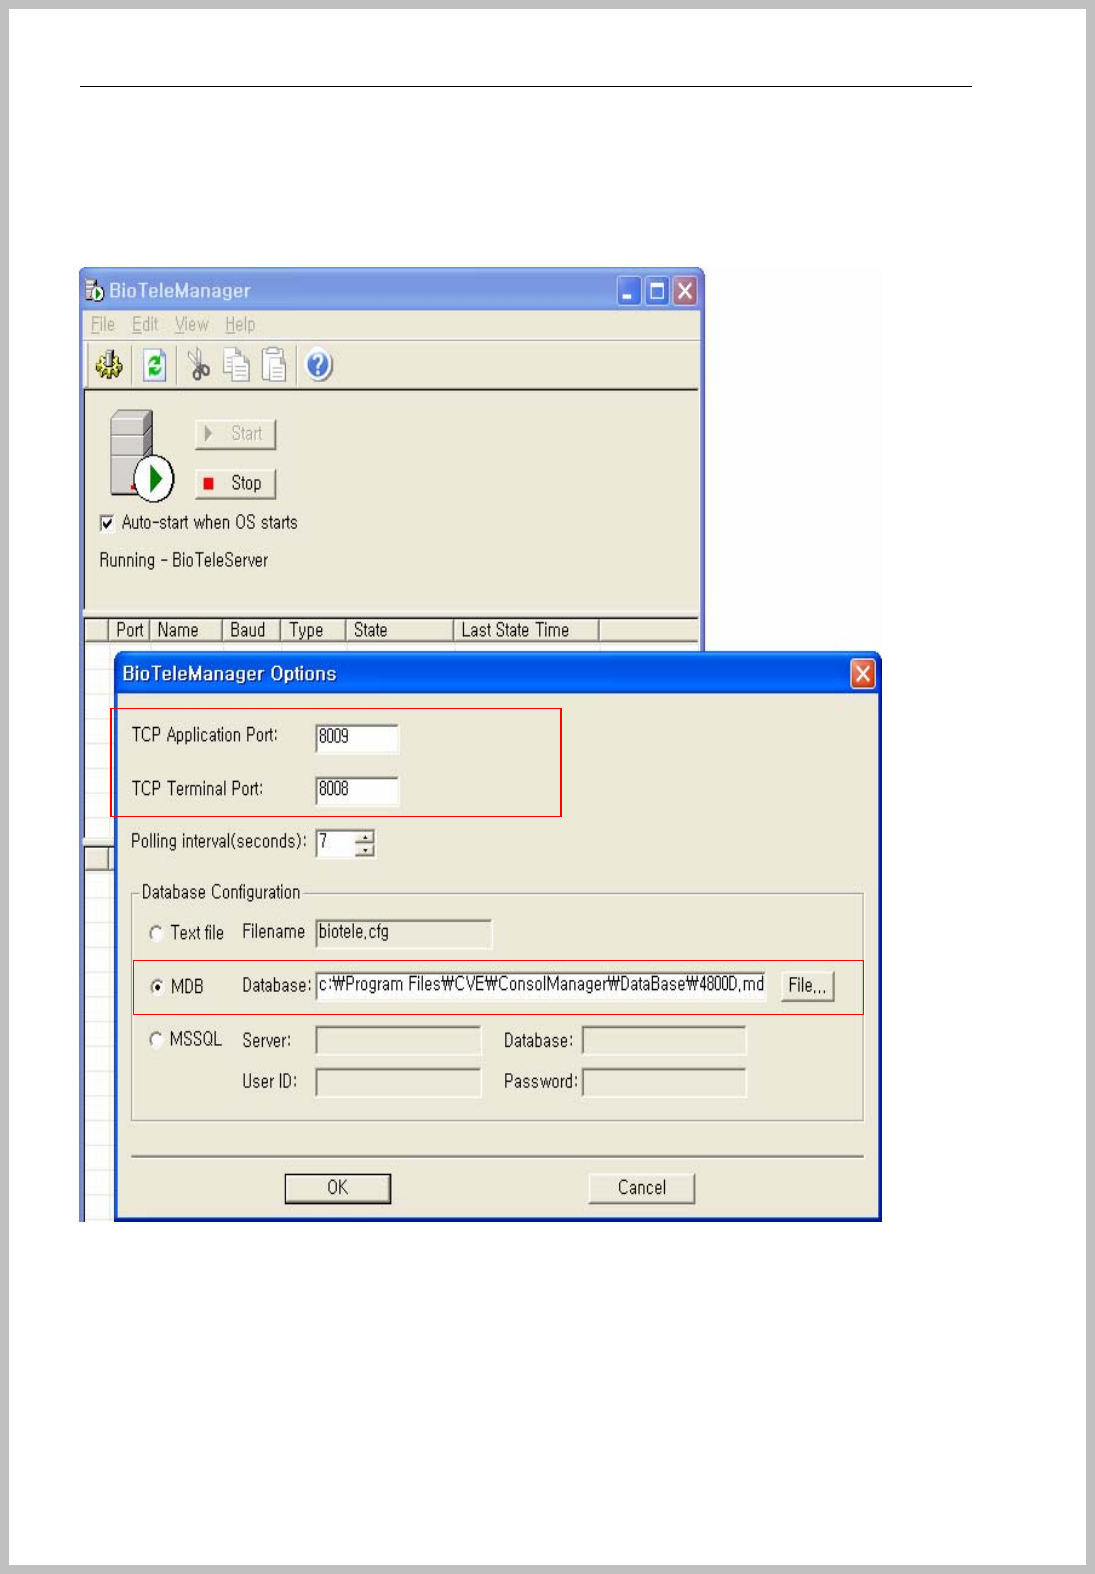
TCP Application Port and TCP/Terminal Port are automatically opened.
Console Manager
- 11 -
Console Manager & Console Server Manager icon displays on the desktop and “Start => Program
=> Console Manager => Console Server Manager”.
Double click the “Console Server Manager” menu
TCP Application Port and Console Manager Server port is automatically set 8009.
TCP/Terminal Port, 8008 also is automatically set as Terminal Port 8008.
After checking all data path clearly, click “OK” button for saving. And then main window appears.
Console Manager
- 12 -
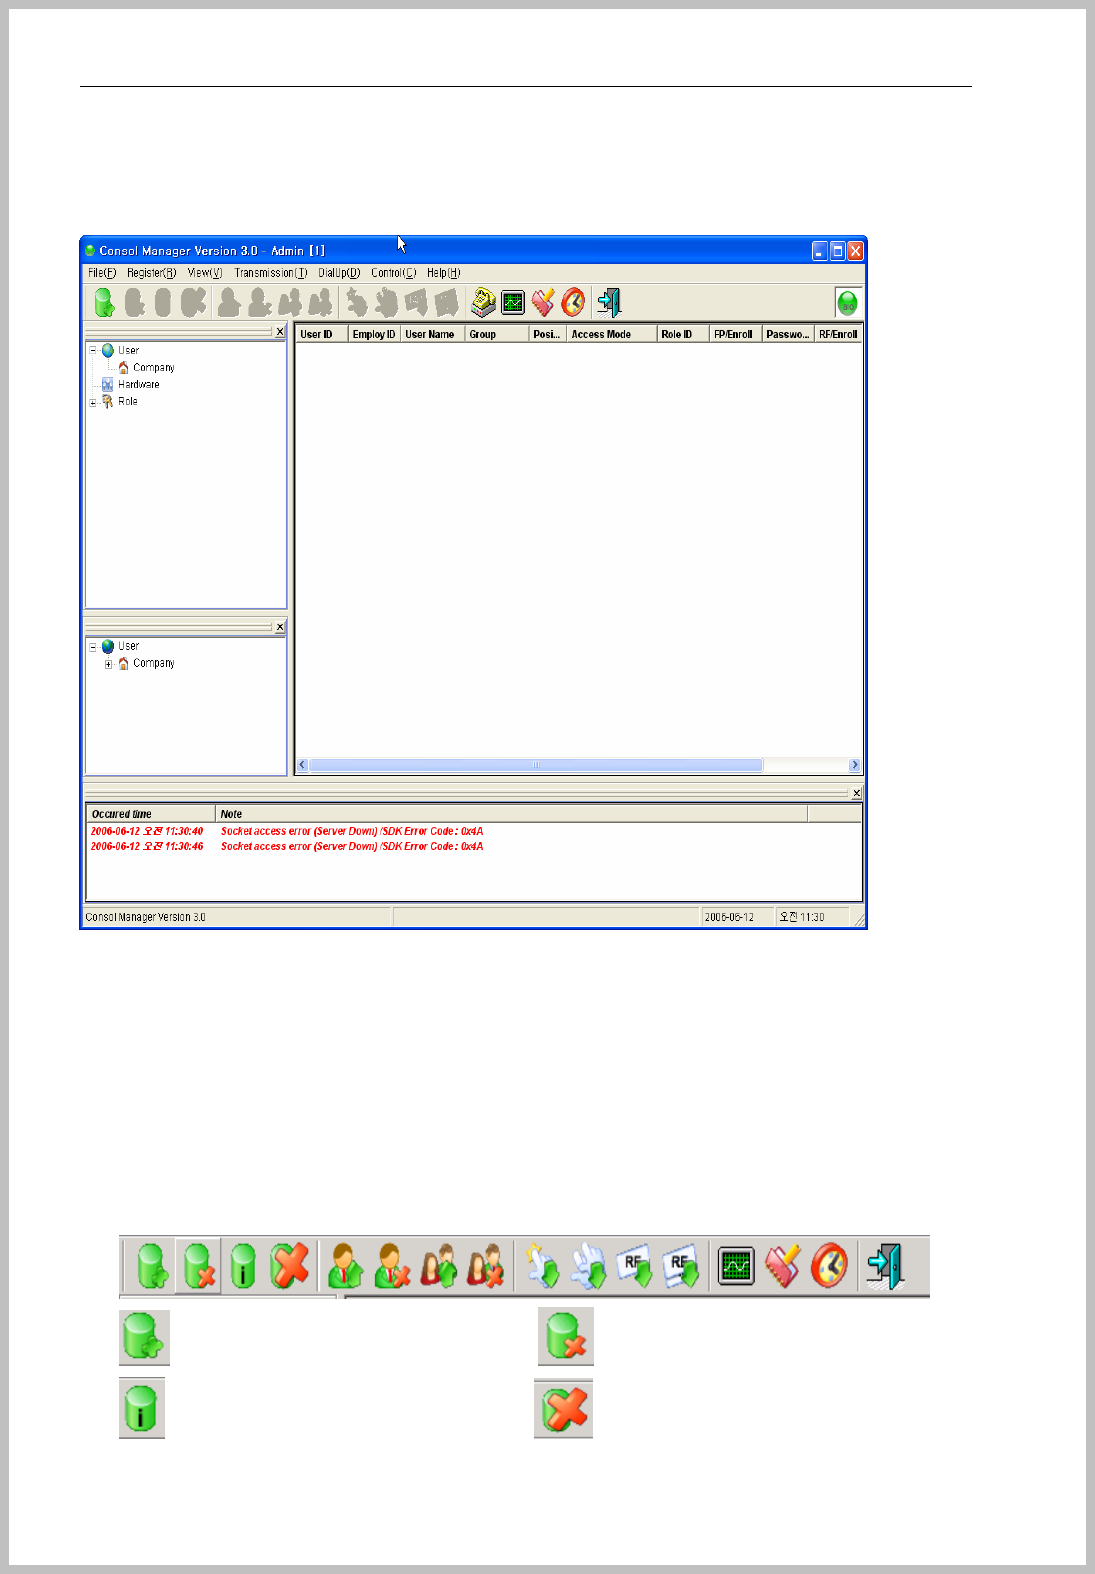
Main window and basic word
Main window is composed to Menu Bar, Tool, Tree View, Icon .
① Menu bar : file, enroll, Setup, View, Transmission, Control, Window, Help.
② Tool : New enroll, delete, Information, Delete all, Transform data, Delete terminal user data,
Transmit all user data, Delete all user data of system, Get FP data from Terminal, Get all FP
data, Get all EM TYPEdata, Monitoring, Report, Time & Attendance, Close etc…
③ Position View : Show the position tree view of user and terminal data.
④ Event view: Show terminal status and event
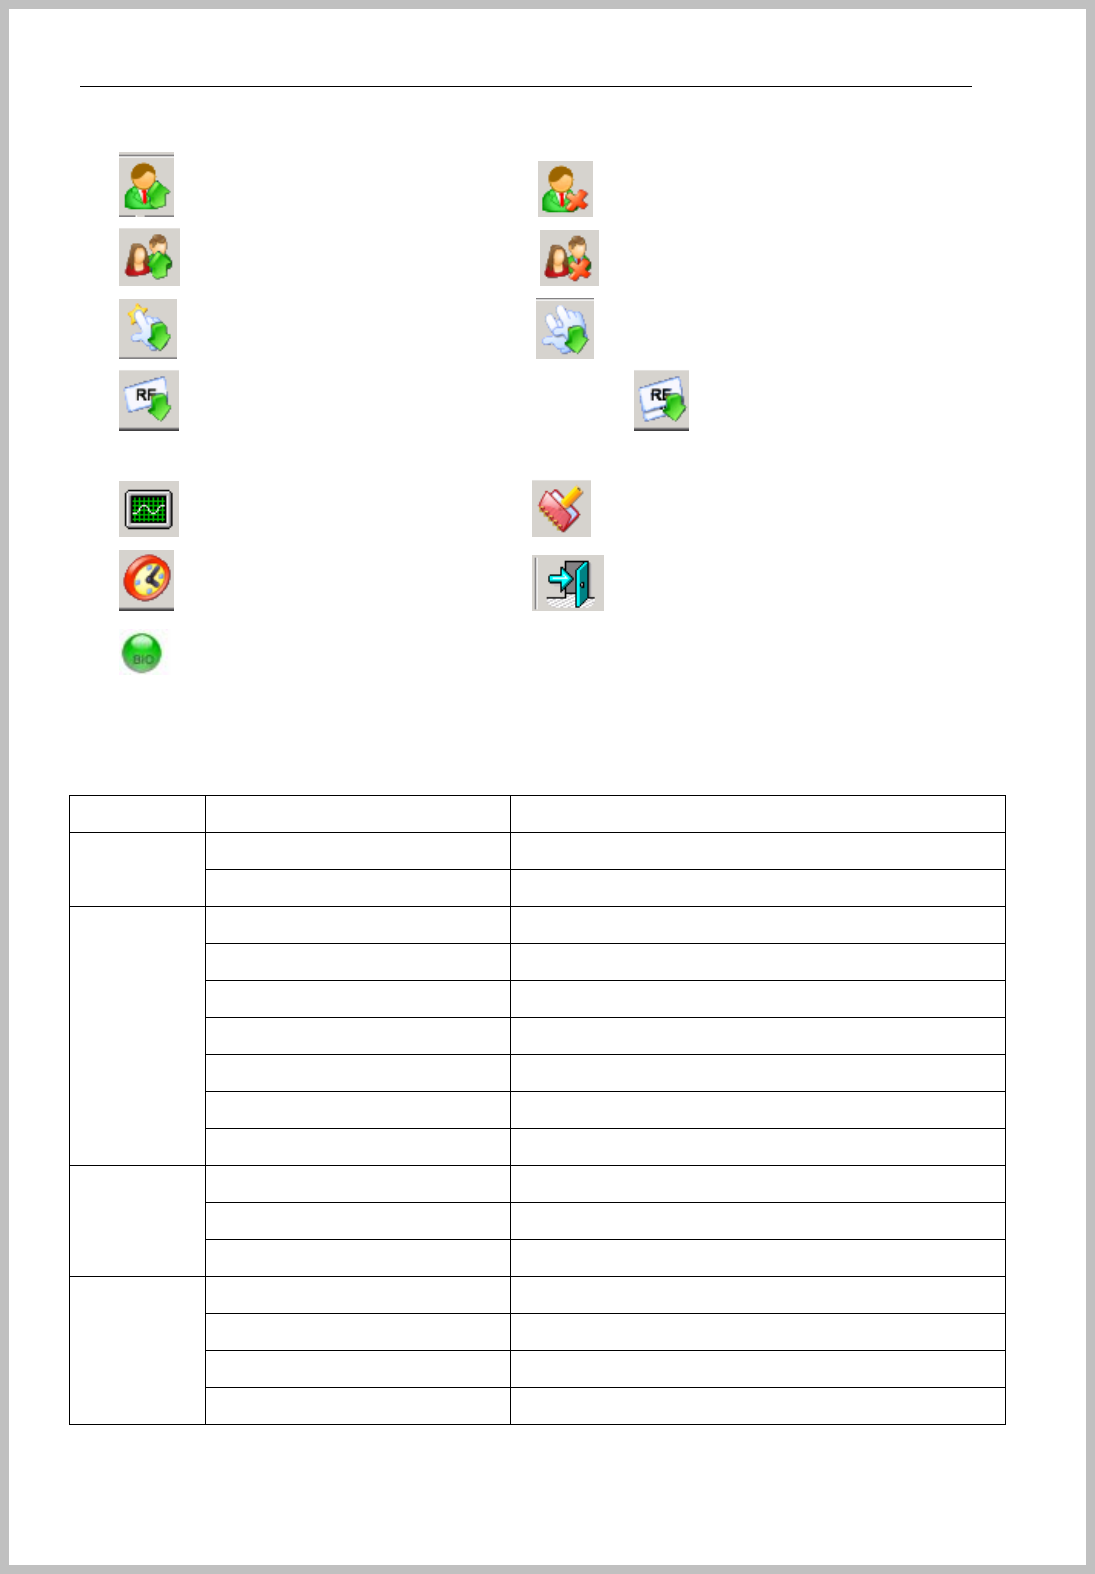
⑤ Menu bar detail description
: Enroll new user : Delete user ,
: Show user information : Delete event window message
Console Manager
- 13 -
: Transmit user data to terminal : Delete user data of terminal
: Transmit all user data to terminal : Delete all user data of terminal
: Get FP data from terminal : Get all FP data from terminal
: Get EM TYPEdata from terminal : Get all EM TYPEdata from
terminal
: Monitoring : Report
: Time & Attendance : Exit
: When service system works well, Console log is turning.
Menu Sub menu contents
Set admin Set administrator file
Close Finish Console Manager
Company Enroll Company
Group Enroll department
Position Enroll position
Set port Enroll terminal port
Terminal Add/delete terminal
Role Setup user access role
Enroll
User Enroll user
Set FP enrollment Set Fingerprint enrollment.
Set data path Set DB path
Setup
Check Com Check the communication with terminal
Admin window Appear administrator window
Position window Appear position window
Event window Appear event window
View
Document window Appear document window

Console Manager
- 14 -
Menu Sub menu contents
Transmit personal data Transmit personal data to terminal
Delete personal data Delete personal data of terminal
Transmit all data Transmit all user data to terminal
Delete all user data Delete all user data from terminal
Get FP data by personal Get fingerprint data from terminal by personal
Get all user FP data Get all fingerprint data from terminal
Get all user EM TYPEdata Get all user EM TYPEdata from terminal
Get EM TYPEdata by personal Ger EM TYPEdata from terminal by personal
Transmission
Check user enroll Check the enrollment.
Download Terminals Download terminal data
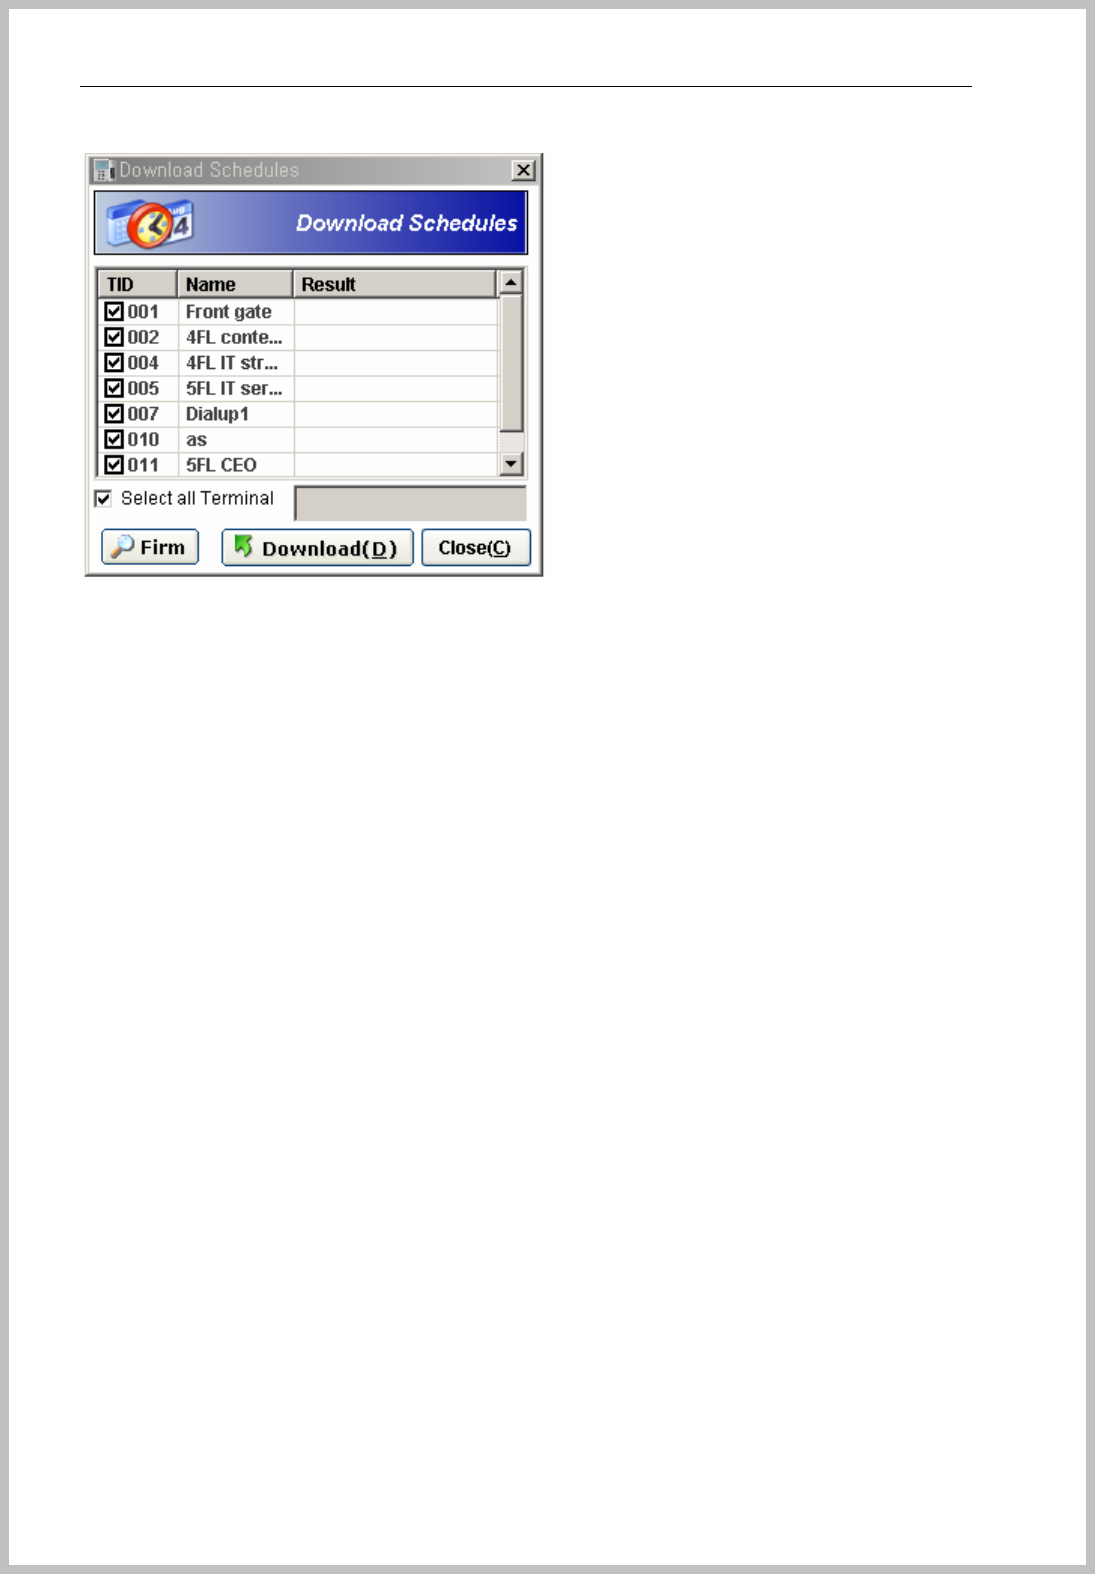
Download Schedules Download schedule data
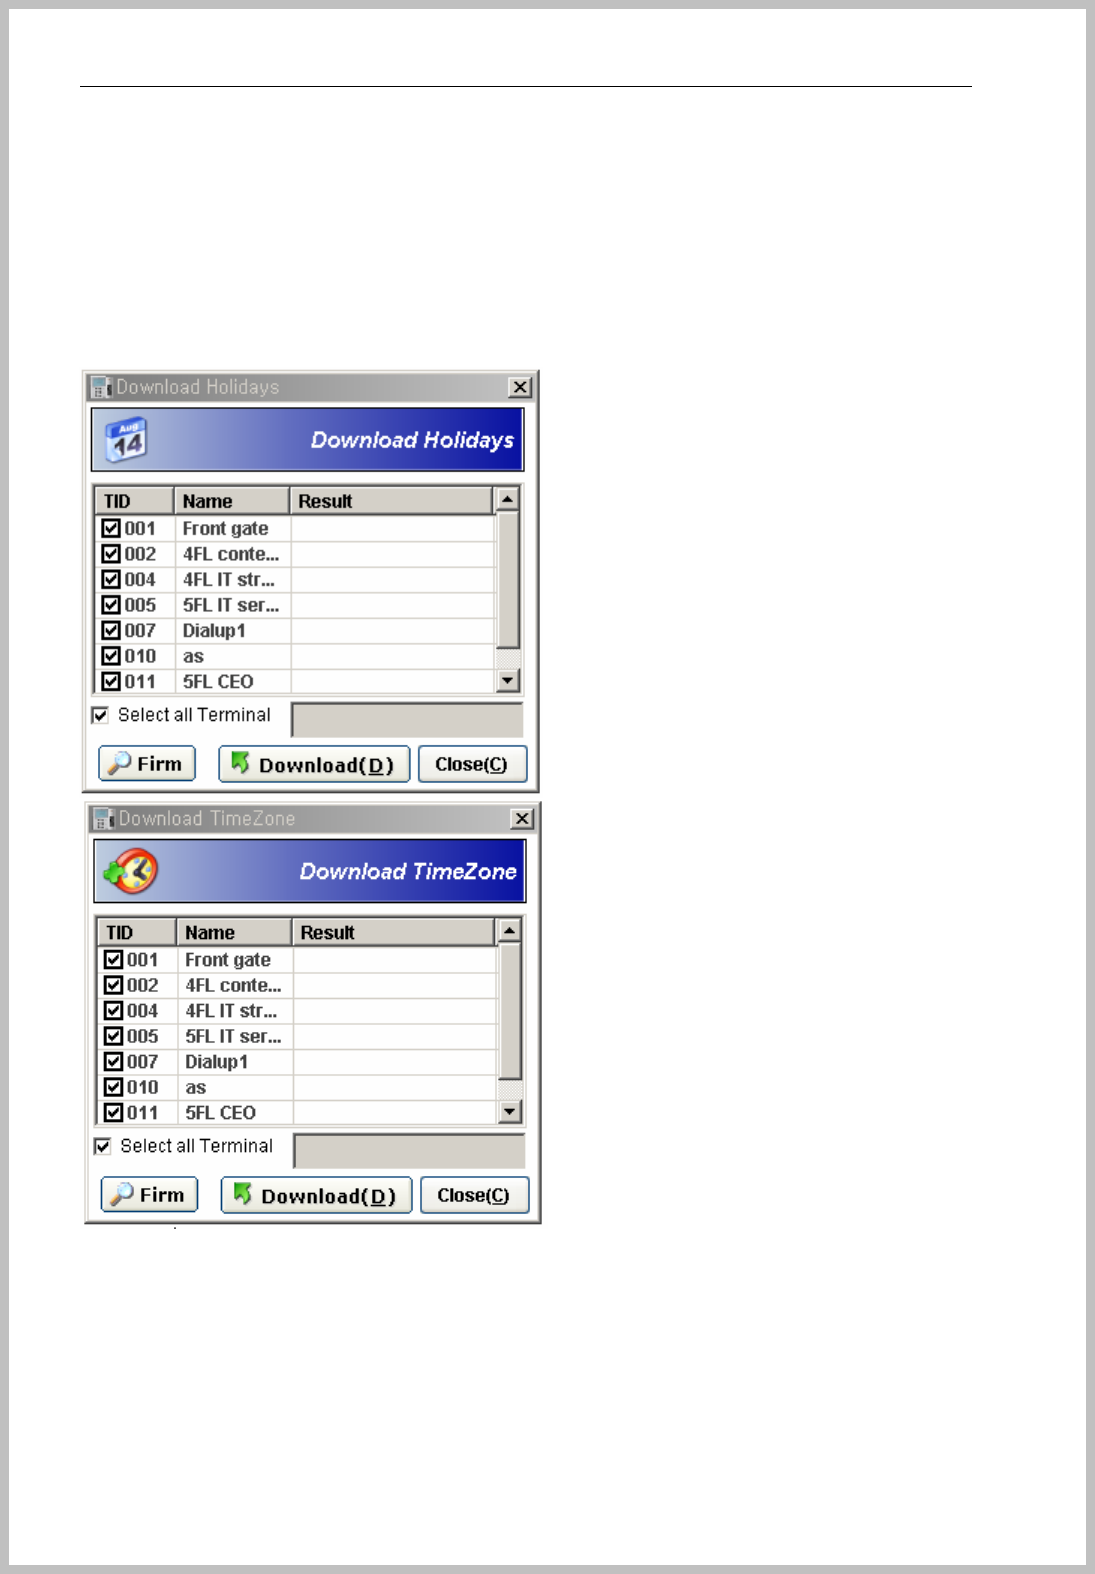
Download Holidays Download Holiday data to terminal
Download Time Zones Download time zone to terminal
Door open Door open
Set door Set door condition
Control
Update Firmware Terminal Firmware
Horizontally Sort horizontal style
Vertically Sort Vertical style
Icon sorting Icon sorting
Cascade Sort cascade
Window
Window List
Help Help Help
Console Manager
- 15 -
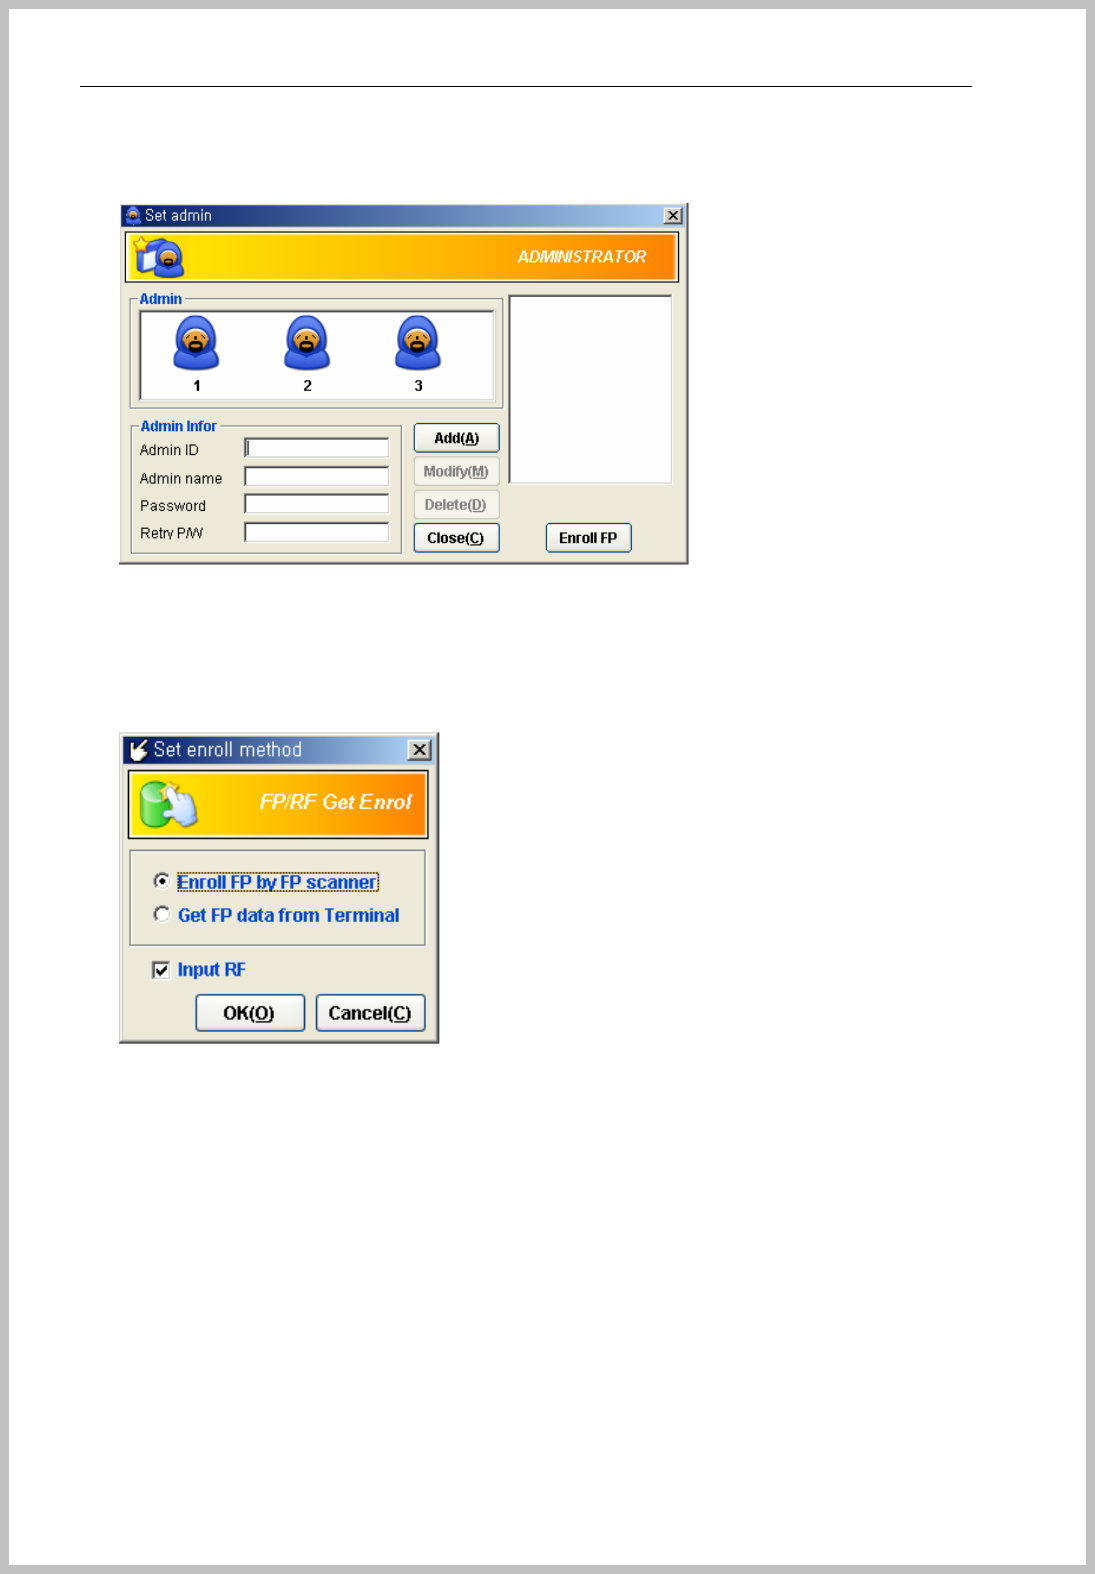
Set administrator
Initial admin is set as “Admin ID 1”, you can add new administrators as push “Add” button after
enrolled new ID and Password. If you want to use fingerprint, please enroll fingerprint as push
“ Enroll FP” button and place your finger on the sensor of BKS-2600 scanner connected to PC.
Set enroll method
Select enrollment method between “Enroll by fingerprint scanner” and “Get Fingerprint data from
terminal”
Please make sure that “Enroll by FP scanner” should connect of BKS-2600 scanner on PC.
And push “OK” button for saving.
Useful description of word
① Download : Send data to terminal
② Upload : Get data from terminal
③ FP : Fingerprint
Console Manager
- 16 -
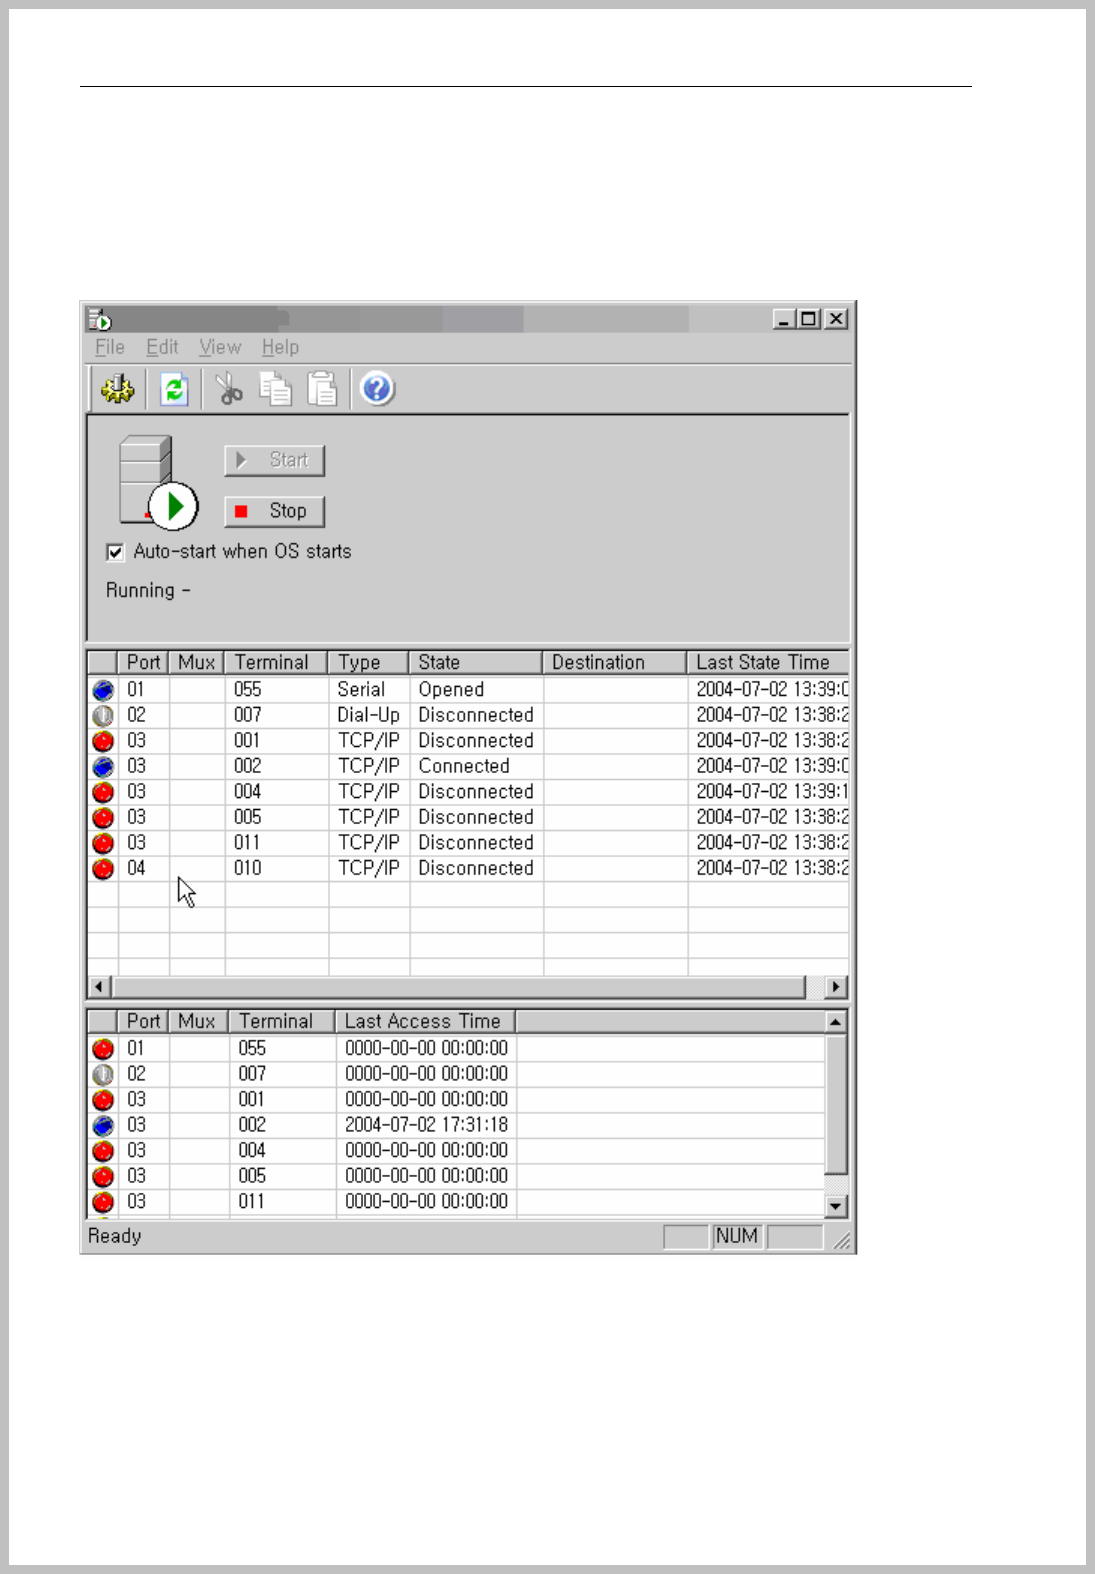
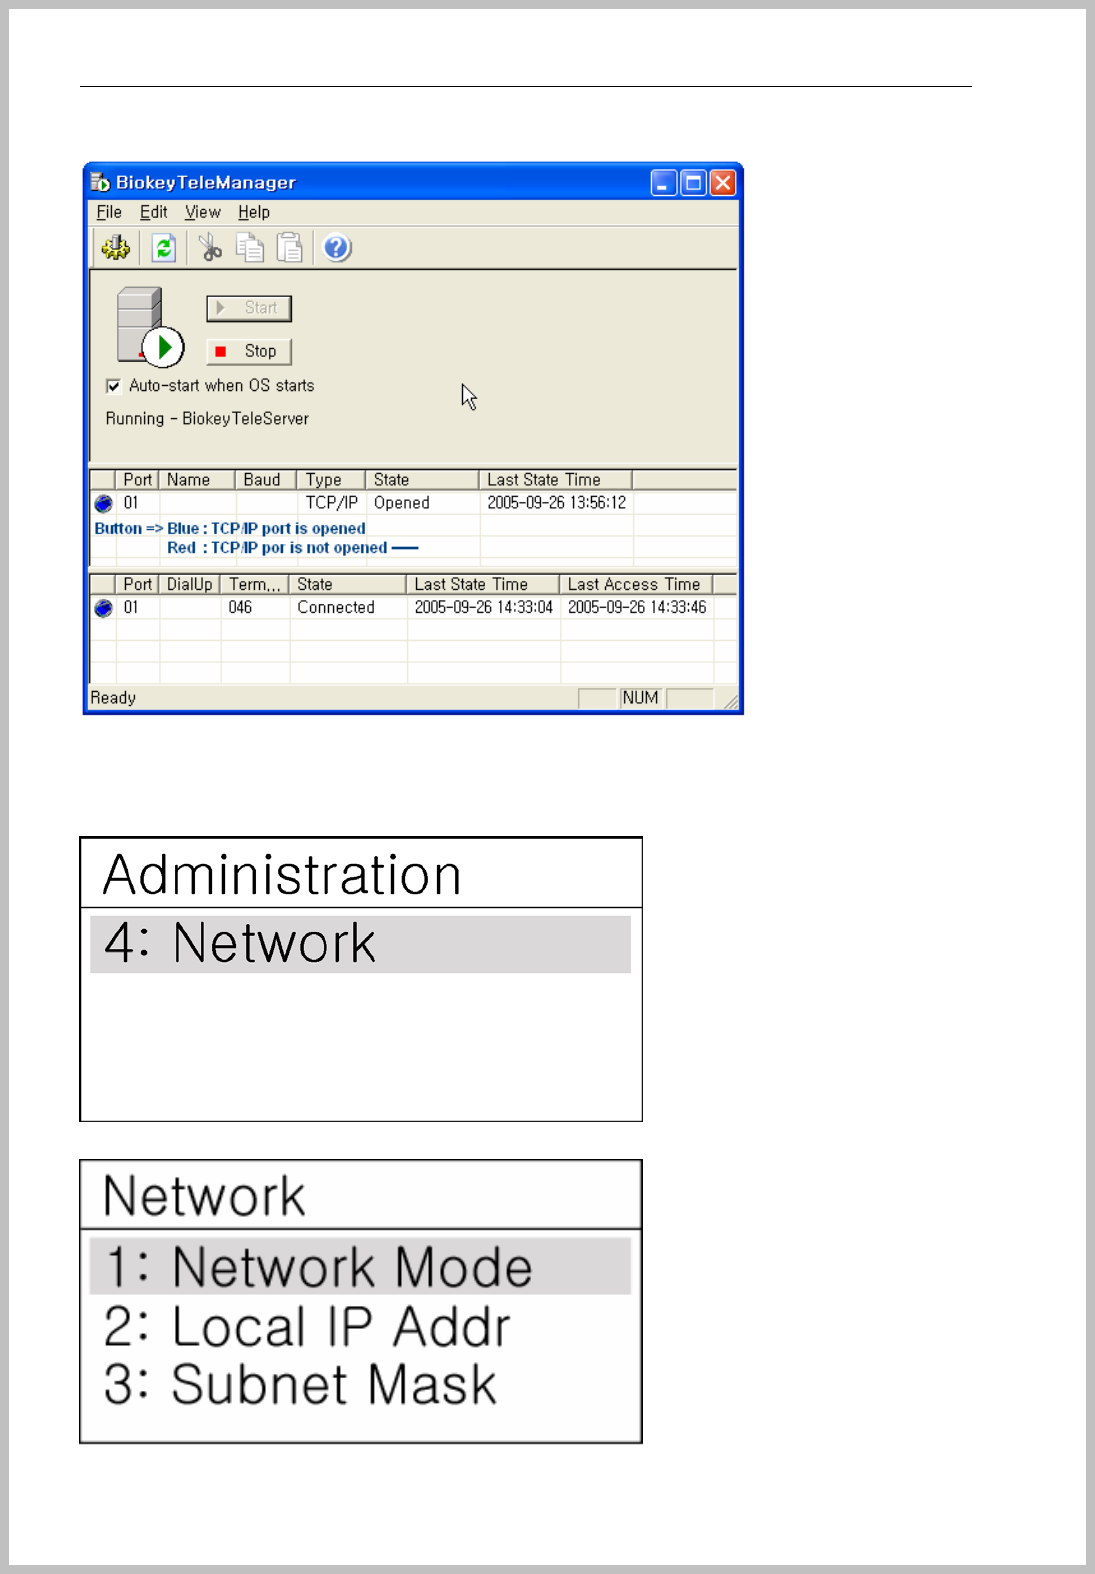
How to use Console Service
For communication with terminal and Console Manager Software, Window service system should be
started.
Click “Bio Tele Manager” Icon on desktop and appears the below window.
Click “Start” button and appears all status of enrolled terminal. Connected state is correct
communication with server and terminal. If the state marked to disconnected, please check all
condition of terminal set value and terminal set value.
Console Manager
- 17 -
3. How to connect between Terminal and Server
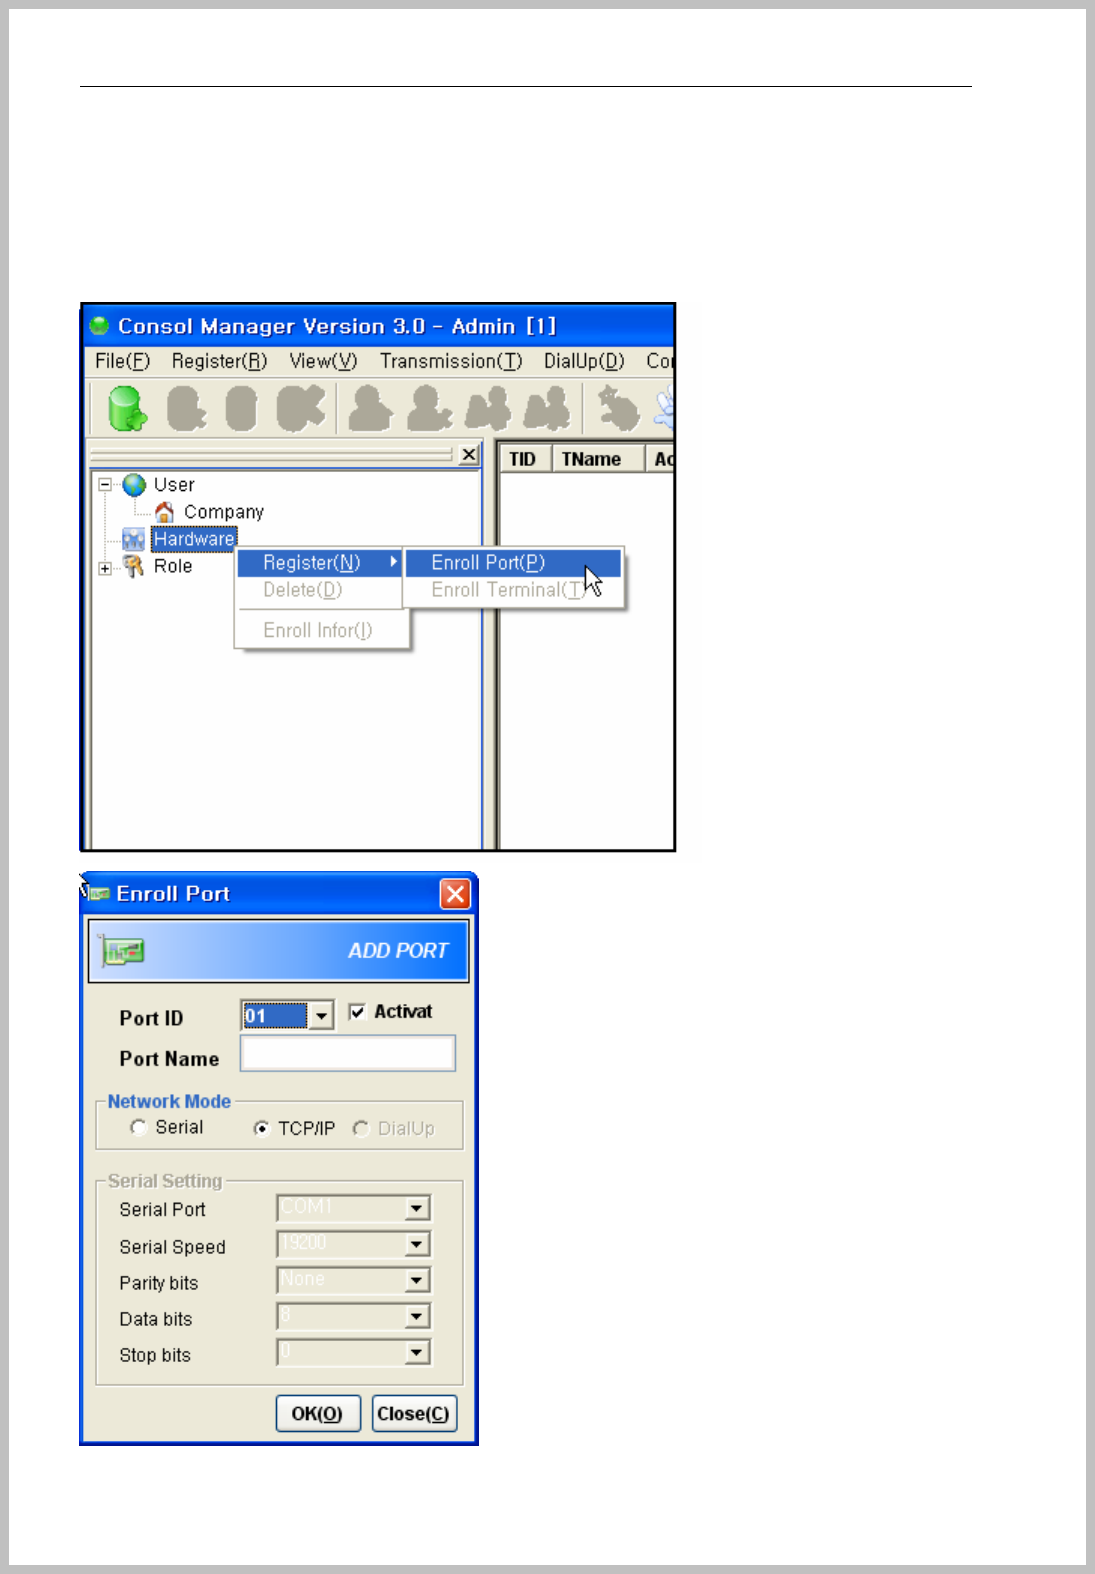
Select port
It initially input 3 kind of terminal port as Dial-up, Serial and TCP/IP.
First choose correct port type and enroll terminal as below.

Console Manager
- 18 -
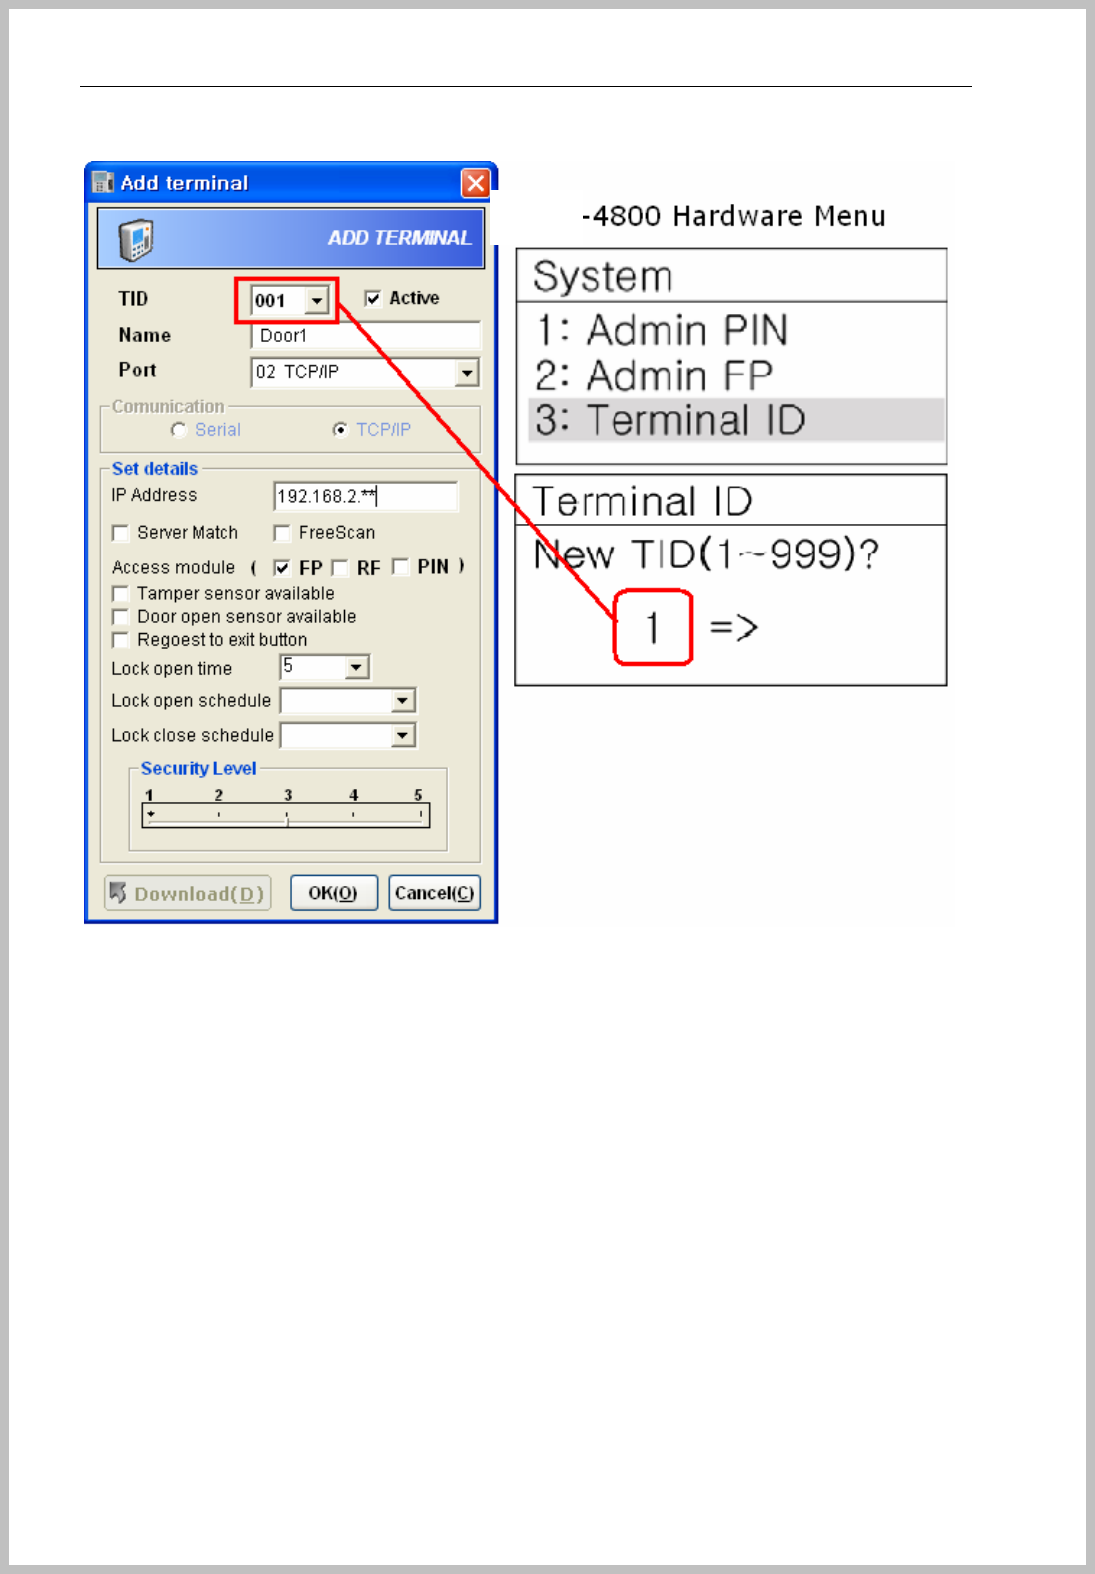
Setup TCP/IP Connection
Enroll Terminal by tree menu or menu bar to TCP/IP port
TID : Terminal ID should match as terminal enrolled terminal ID the stage of
“3.System=>3.Terminal ID => Shown number”
Name : Input terminal name
Select port
Server Match is not available now
Check Free scan mode if you want to use
TCP/IP port should input server PC IP address.
Select Access module
Check Temper sensor, Door open sensor, exit button if it’s available.
Select Security level applied to terminal.
Push “OK” button for saving.
After registration, Stop Console Server Manager and restart and then you can see the
terminal
Console Manager
- 19 -
‘
BKS
Console Manager
- 20 -
z CAUTION : IF YOU SEE RED COLOR BUTTON AND CLOSE STATE, PLEASE
GO TO “4. OPEN PORT FOR THE USER OF WINDOW XP SERVICE PACK2”
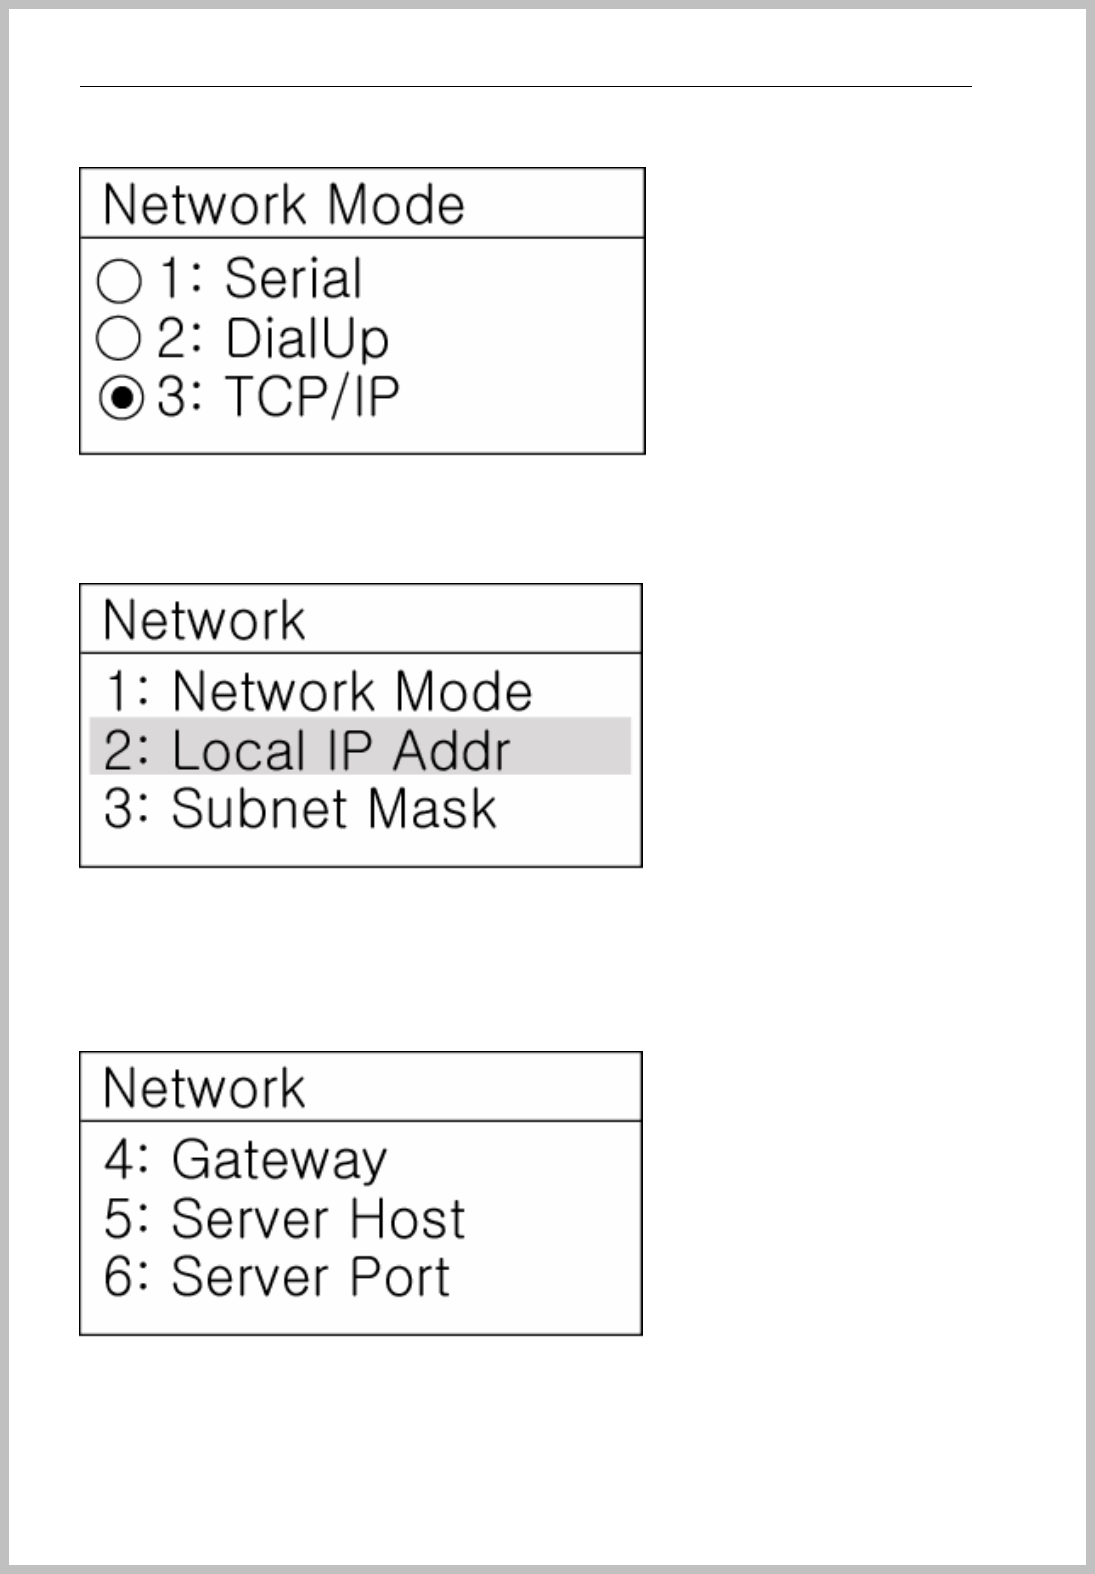
Go to “ 4. Network Mode => 3. TCP/IP => Select TCP/IP network”
Console Manager
- 21 -
Input TCP/IP value
1. Local IP Address : Input Terminal IP address
2. Subnet Mask : Input Subnet Mask address
3. Gateway : Input Gateway address
4. Server Host : Input Server PC’s IP address
5. Server Port : Input port number of PC server. It is set, as 8008 initially, please do not
change without special cause.
Console Manager
- 22 -
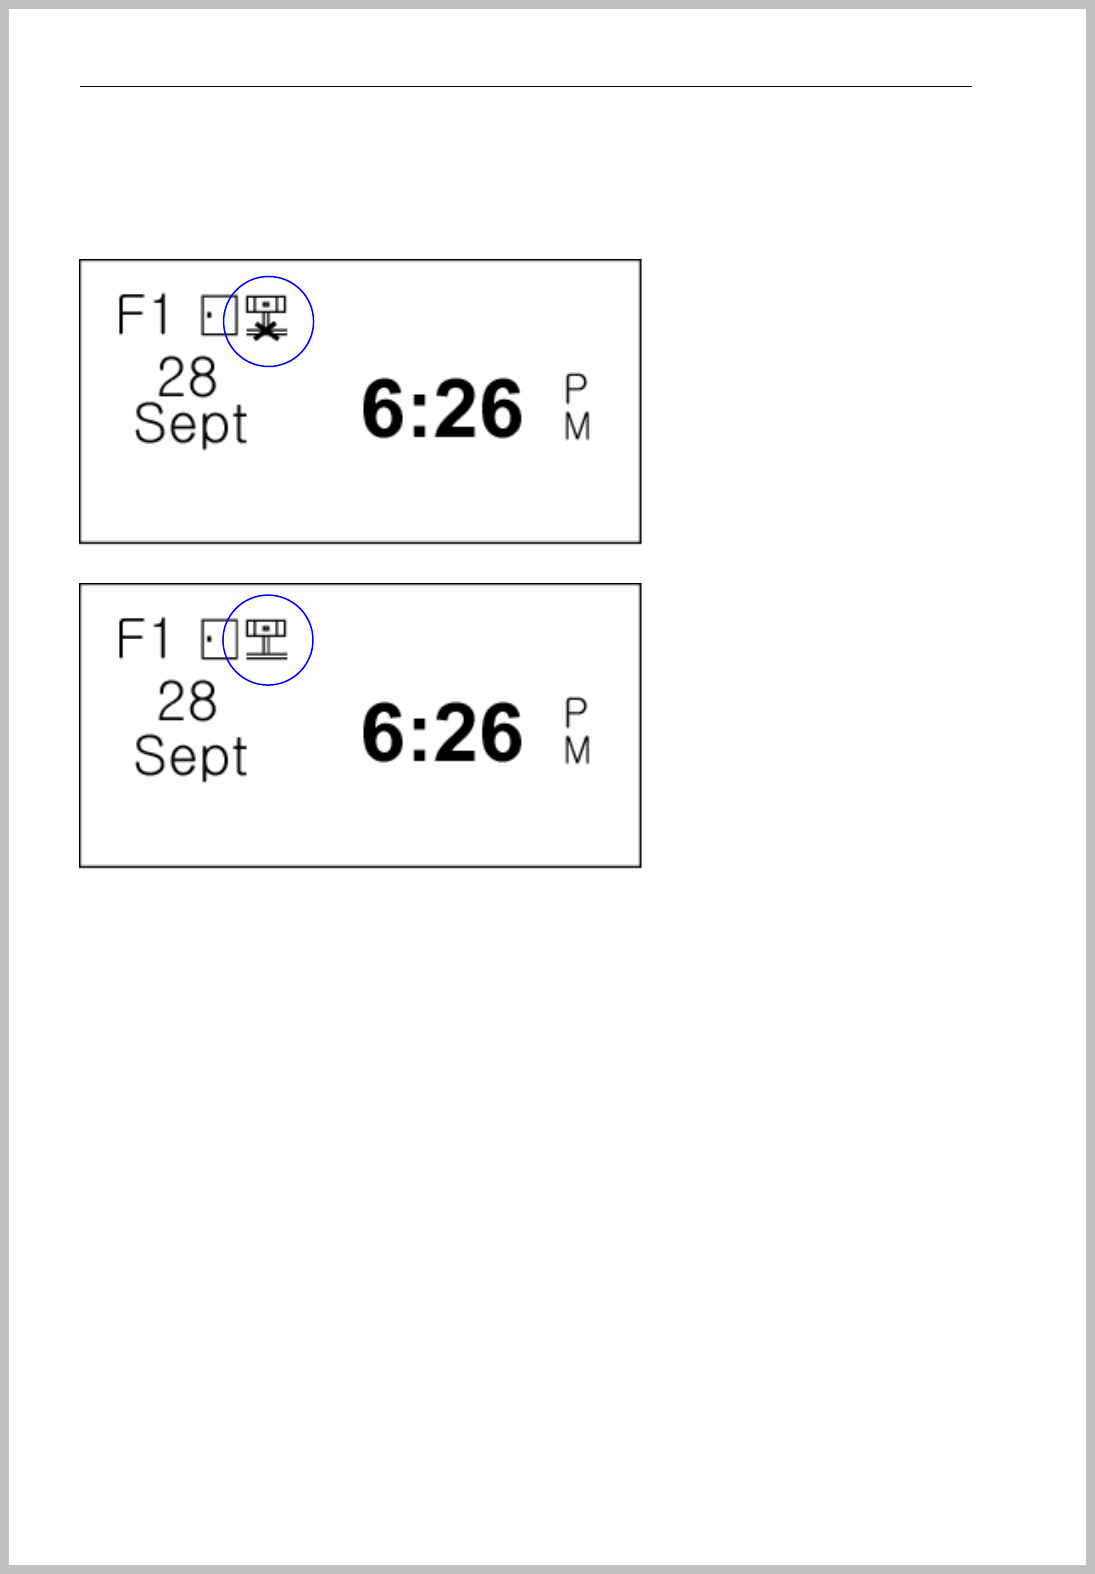
LCD Icon change and network connection state
When you see the TCP/IP network Icon and “ X” means Network disconnected.
All setting value is correct and TCP/IP icon disappears “X” mark.
BKS-4800
BKS-4800
Console Manager
- 23 -
Console Manager connecting states
When you double click terminal on Console Manager, you can see the rotating icon as
follows.
NOTE: If the terminal is disconnected statues with the red cross button, please try the
following steps.
Console Manager
- 24 -
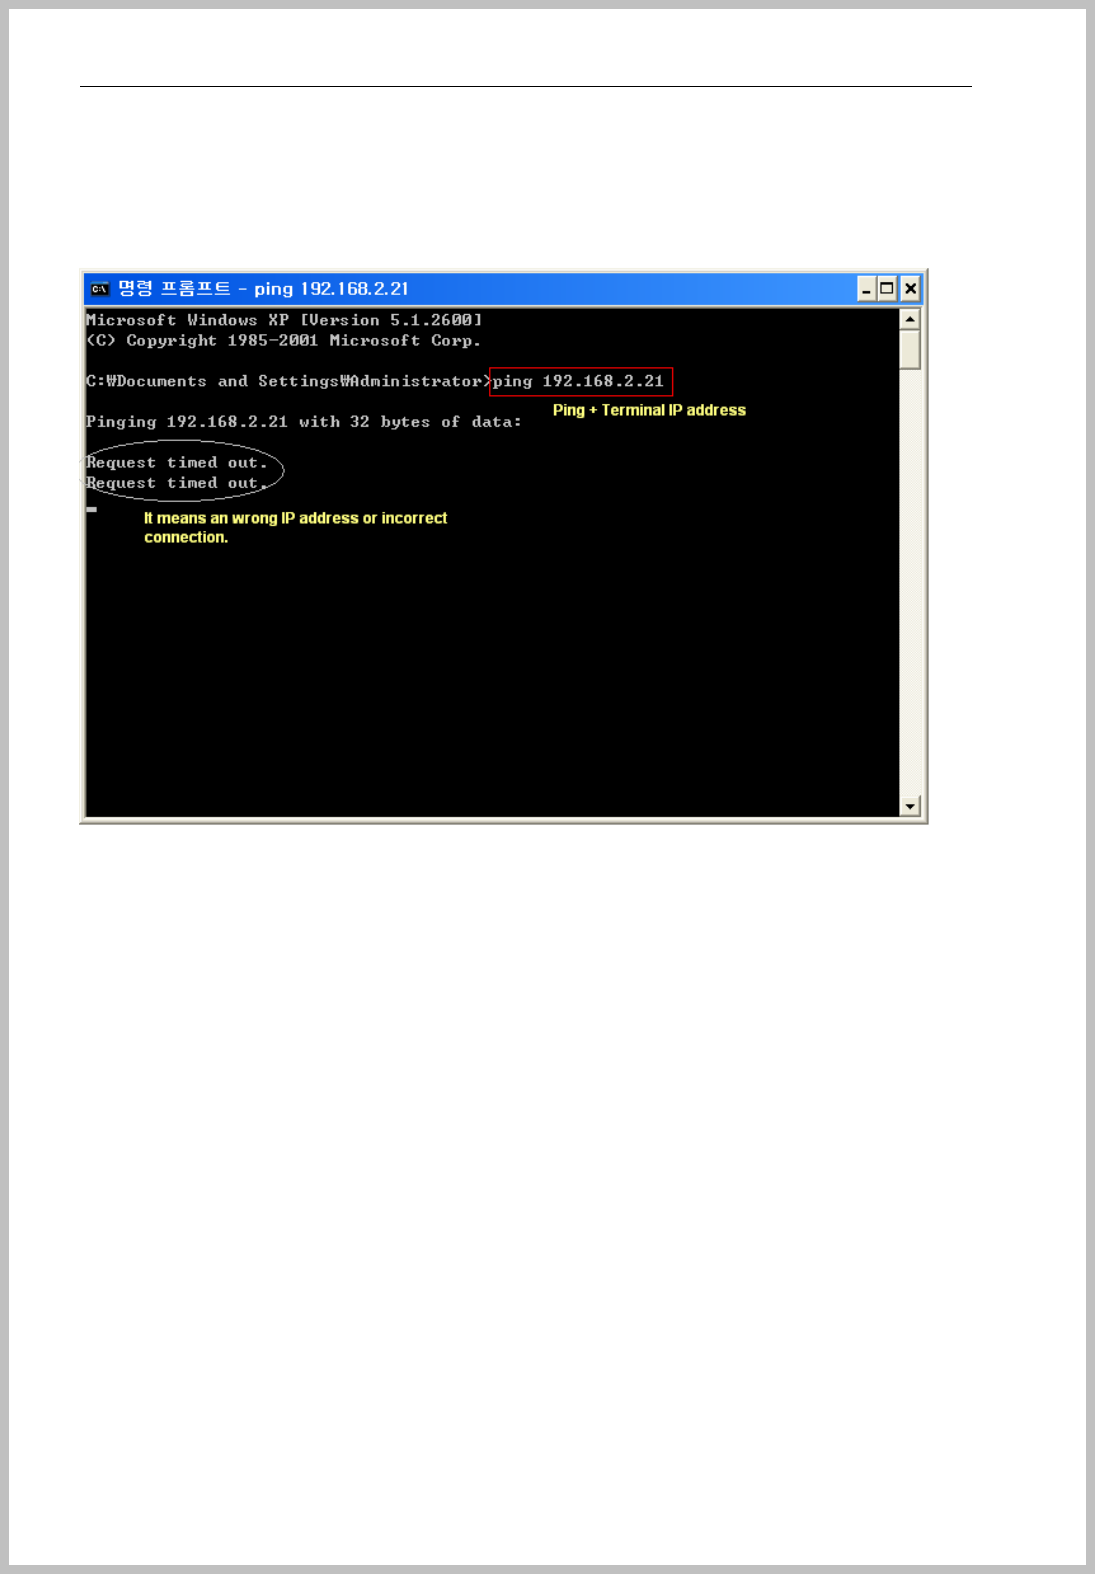
< Terminal IP Address >
Open “command prompt” program on the server PC, write ping + Terminal IP address,
if you got “Request timed out” message, it is the incorrect IP address.
Console Manager
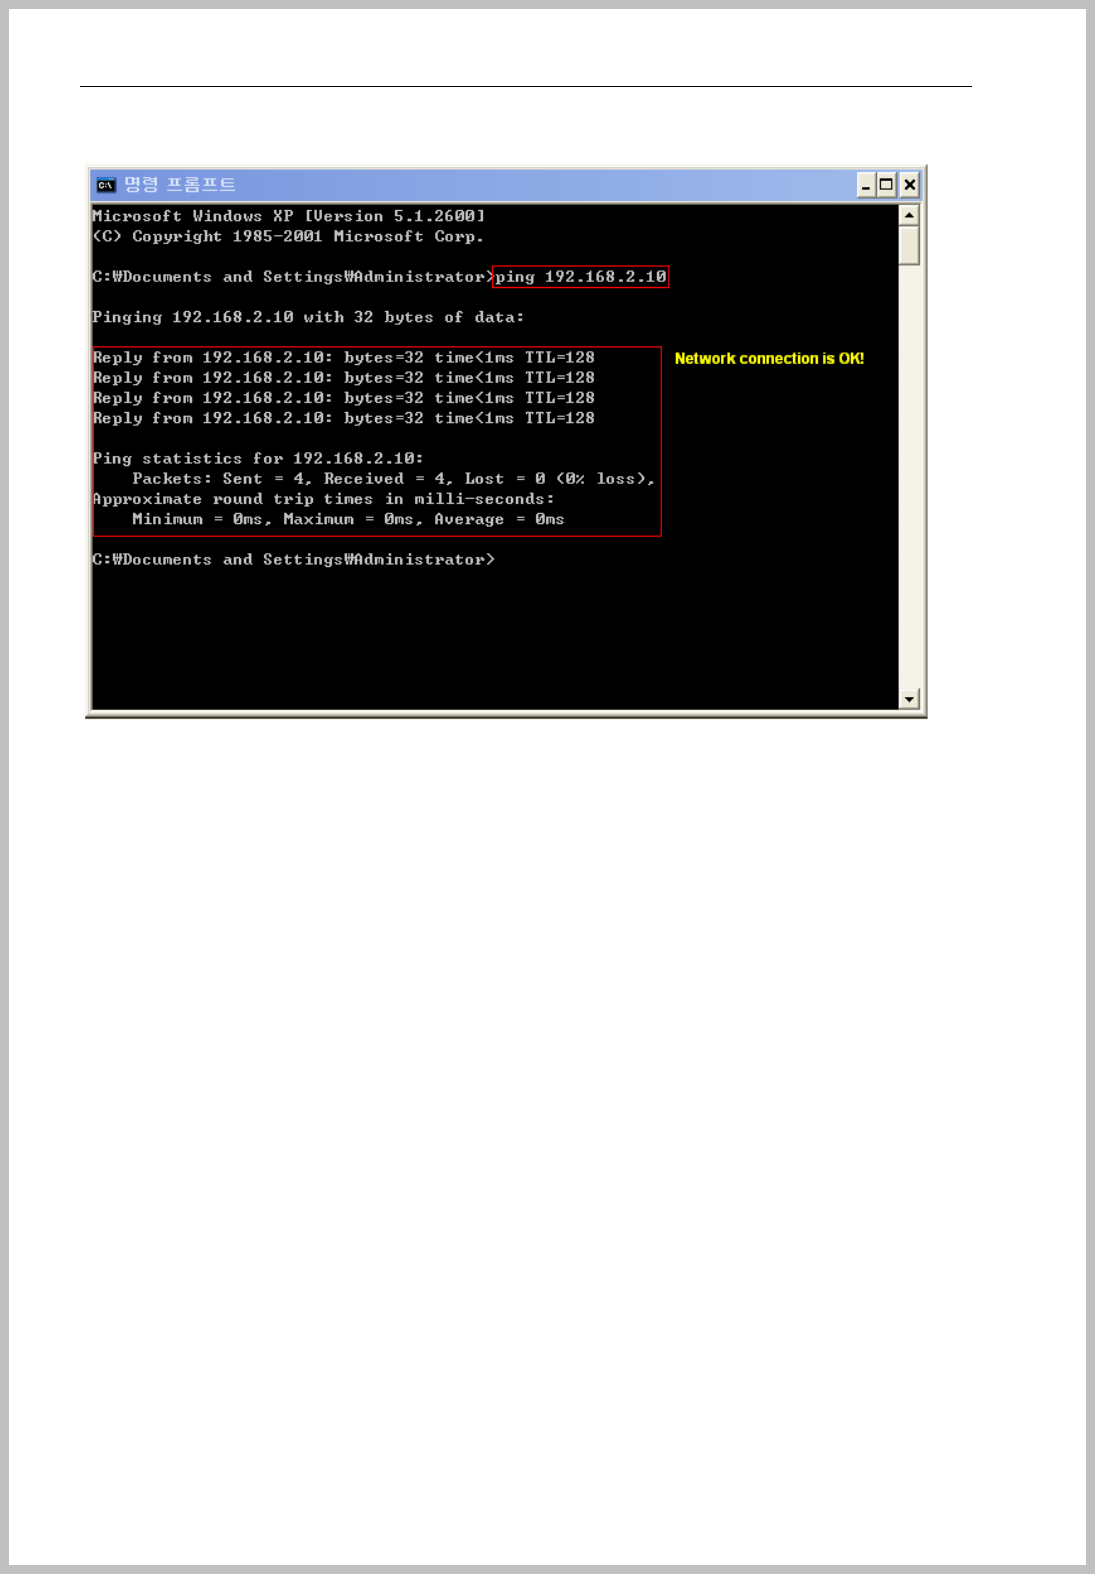
- 25 -
When you receive the above message, it’s the correct IP address for terminal.
< Server IP address >
Open “command prompt” program on the server PC, write “ipconfig” and push “Enter”
key on the keyboard.
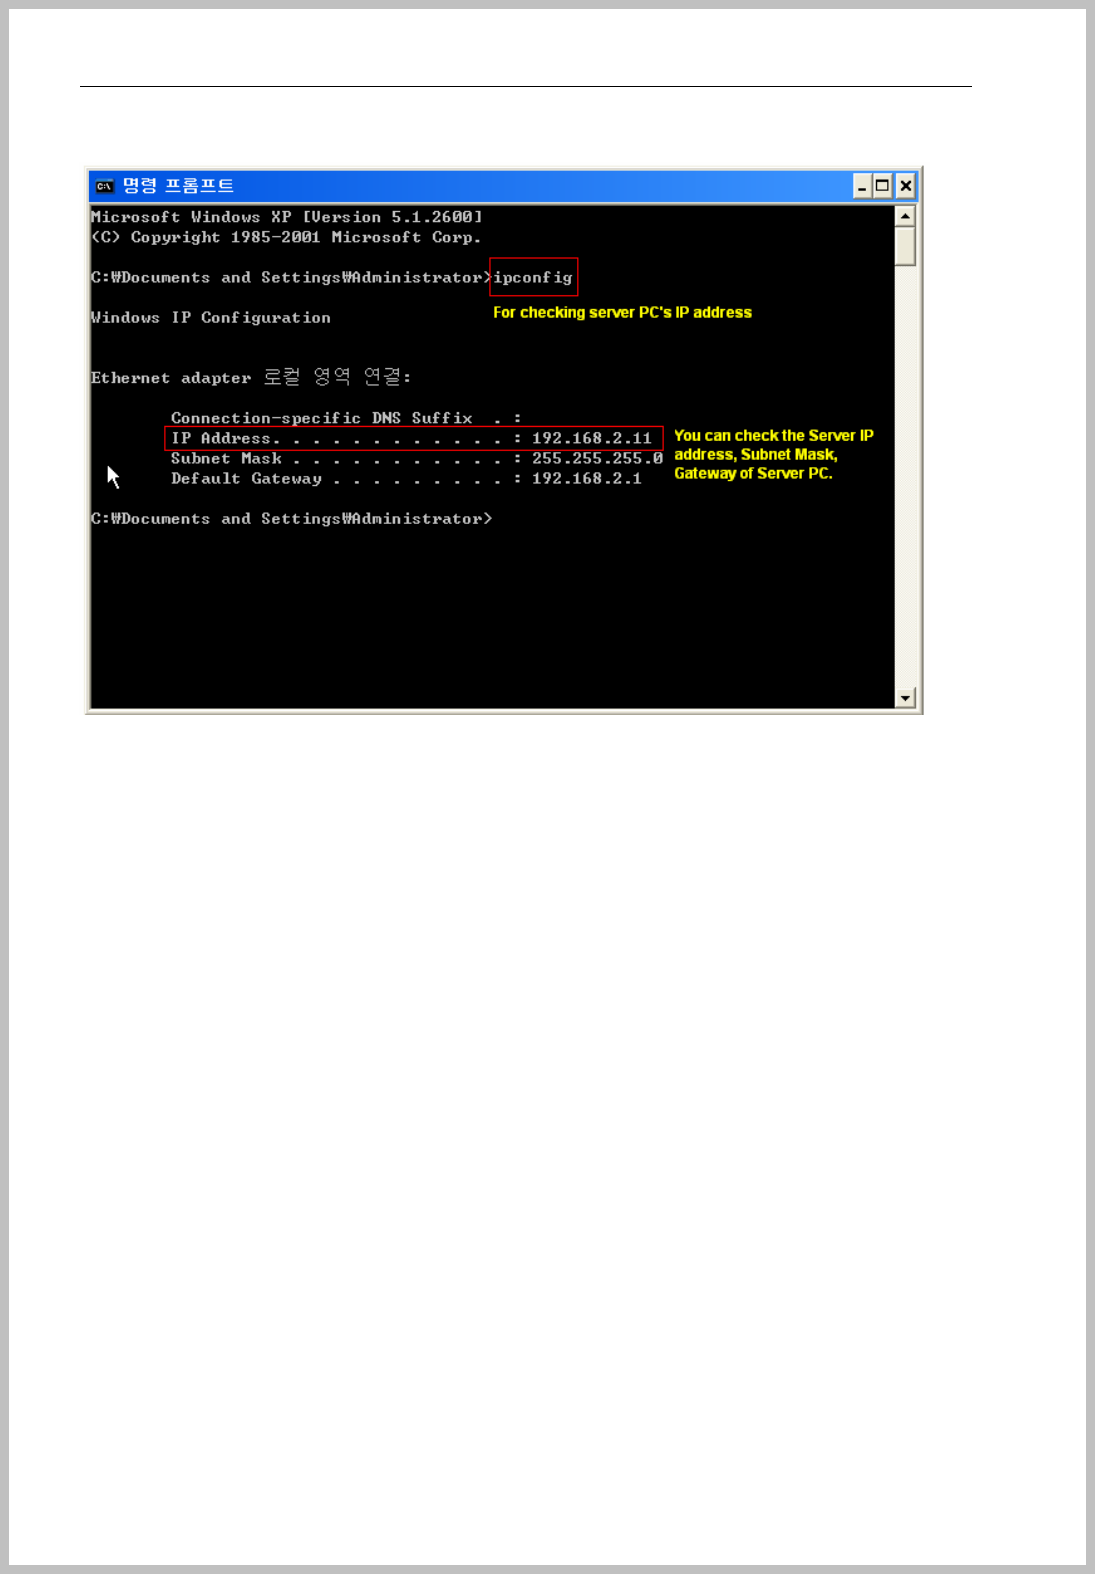
Console Manager
- 26 -
The server PC’s network value is appeared.
Change the correct IP setting value, it should restart “Console Server Manager” to be
recognized changed value.
Console Manager
- 27 -
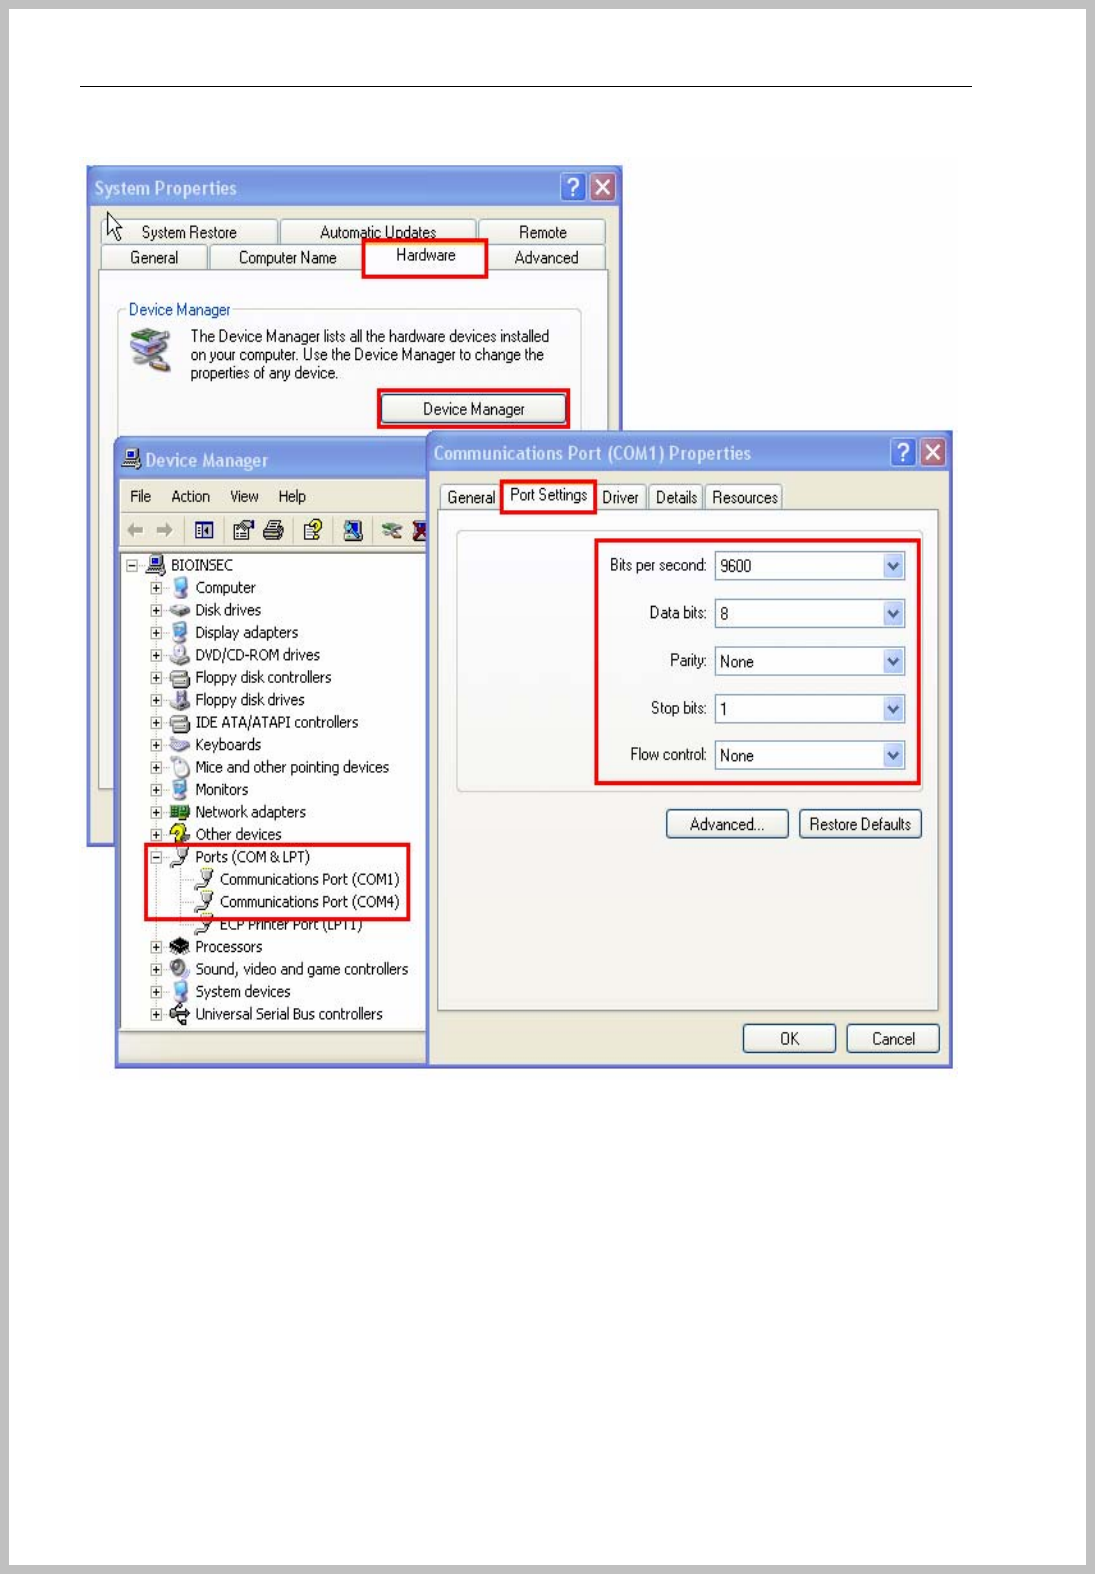
Setup Serial Connection
Enroll Terminal by tree menu or menu bar to Serial port
TID : Terminal ID should match as terminal enrolled terminal ID the stage of
“3.System=>3.Terminal ID => Shown number”( Refer to page 26)
Set Serial Port, Serial Speed and others at the same value of Window setting.
( System Properties=> Hardware tab =>Device Manager => Ports => Double click
“Communication Port” => Communications Port Properties => Port Settings Tab )
Console Manager
- 28 -
Console Manager
- 29 -
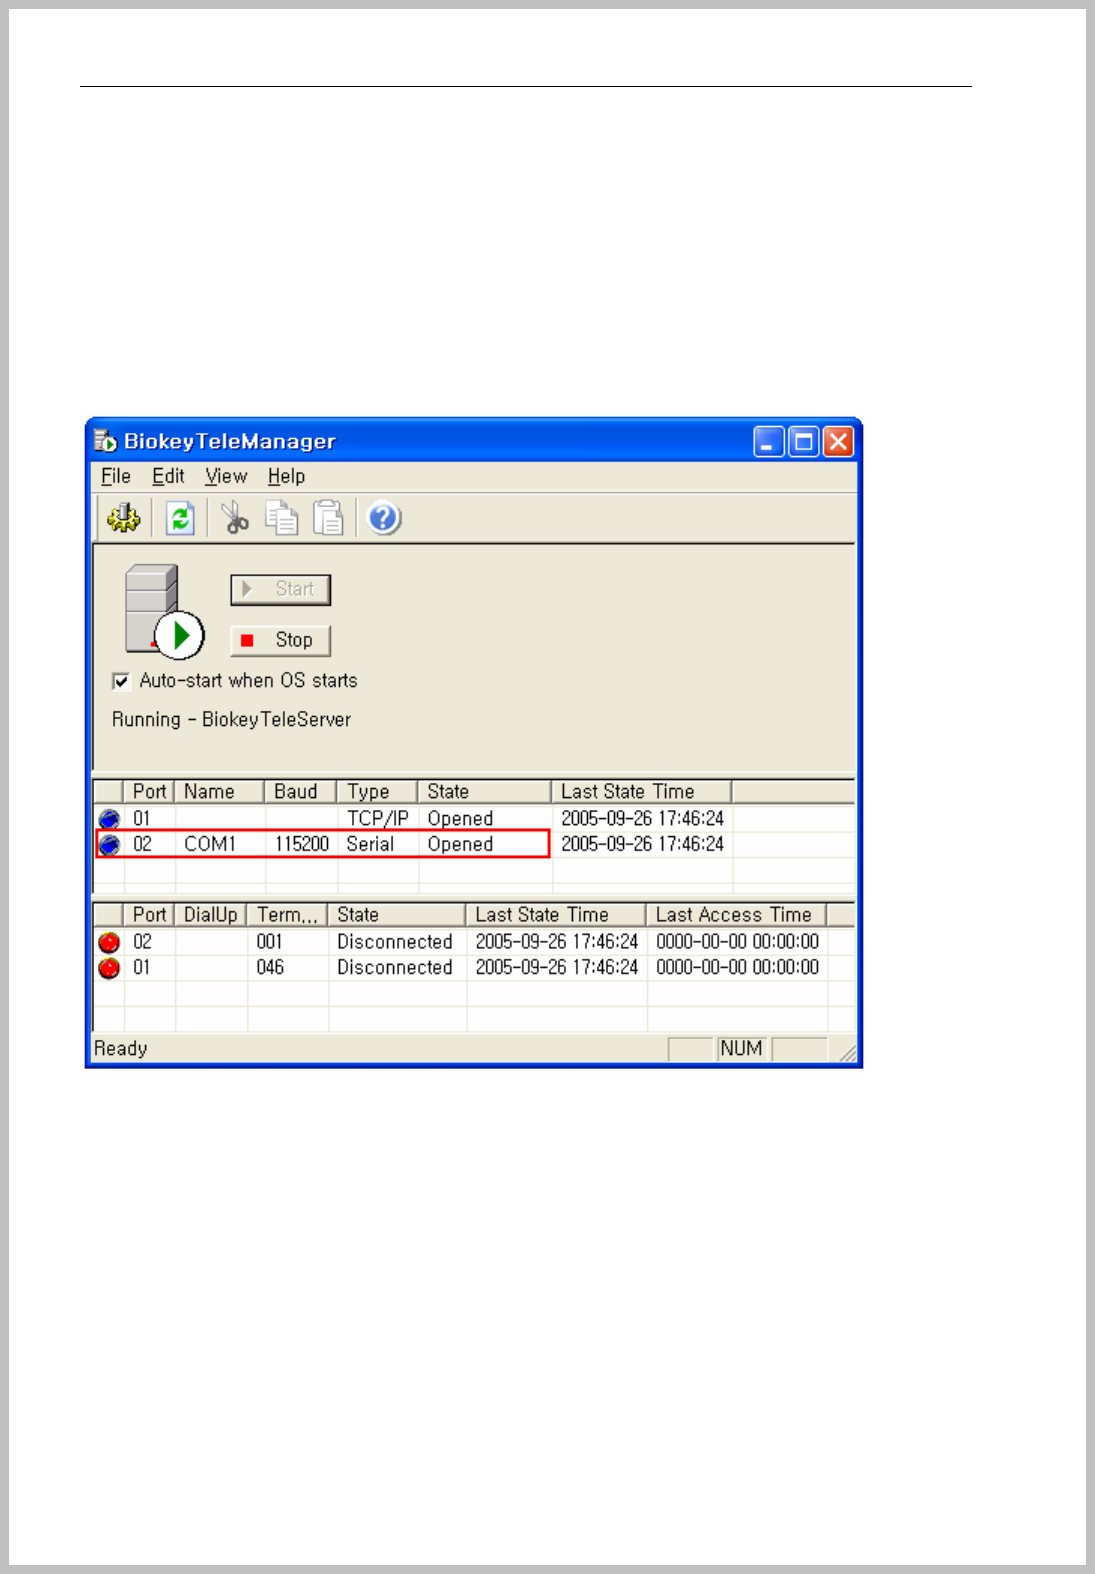
Restart “Console Server Manager” and then changed Opened state of port.
When you push “Start” button on Console Manager, you can see the red box displays
blue button, COM1, 115200, Serial Opened states.
If the COM1 port is not connected with terminals, you occur from the incorrect COM Port
or different Baud rates.
And go to Console Manager and push “Start” button, you can see the blue button and
Serial Opened status.
The first box is for the Port state between terminal and server PC. So it shows blue
button of the opened state.
NOTE: If the port is not opened statues with the red button, please check your computer is
installed SP2. If yes, please refers to page 12~14.

Console Manager
- 30 -
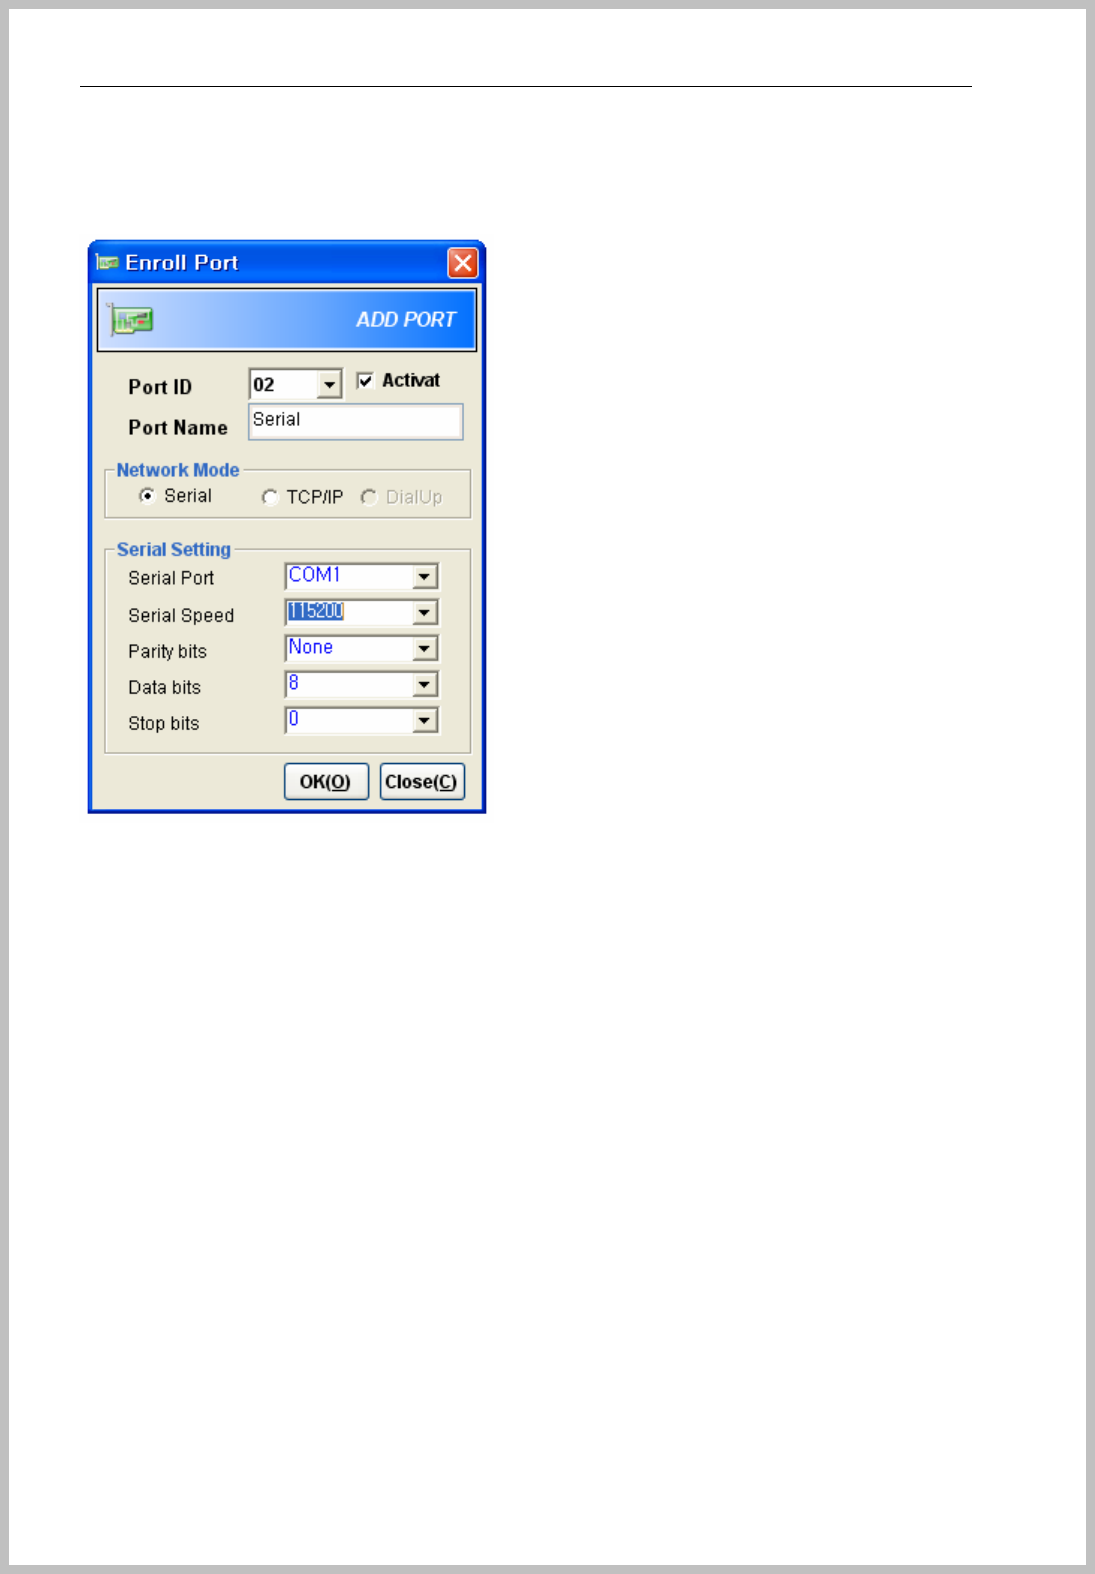
Add Serial terminal
Enroll Terminal by tree menu or menu bar to Serial port
TID : Terminal ID should match as terminal enrolled terminal ID the stage of
“3.System=>3.Terminal ID => Shown number” ( refer to 26 page )
Set the hardware setting of serial communication
Go into the menu of terminal( CFR-3000 : 0 + <┘ ) as to input “1111” as initial
password.
Go to “4. Network Mode => 1. Network Mode => 1.Serial mode”
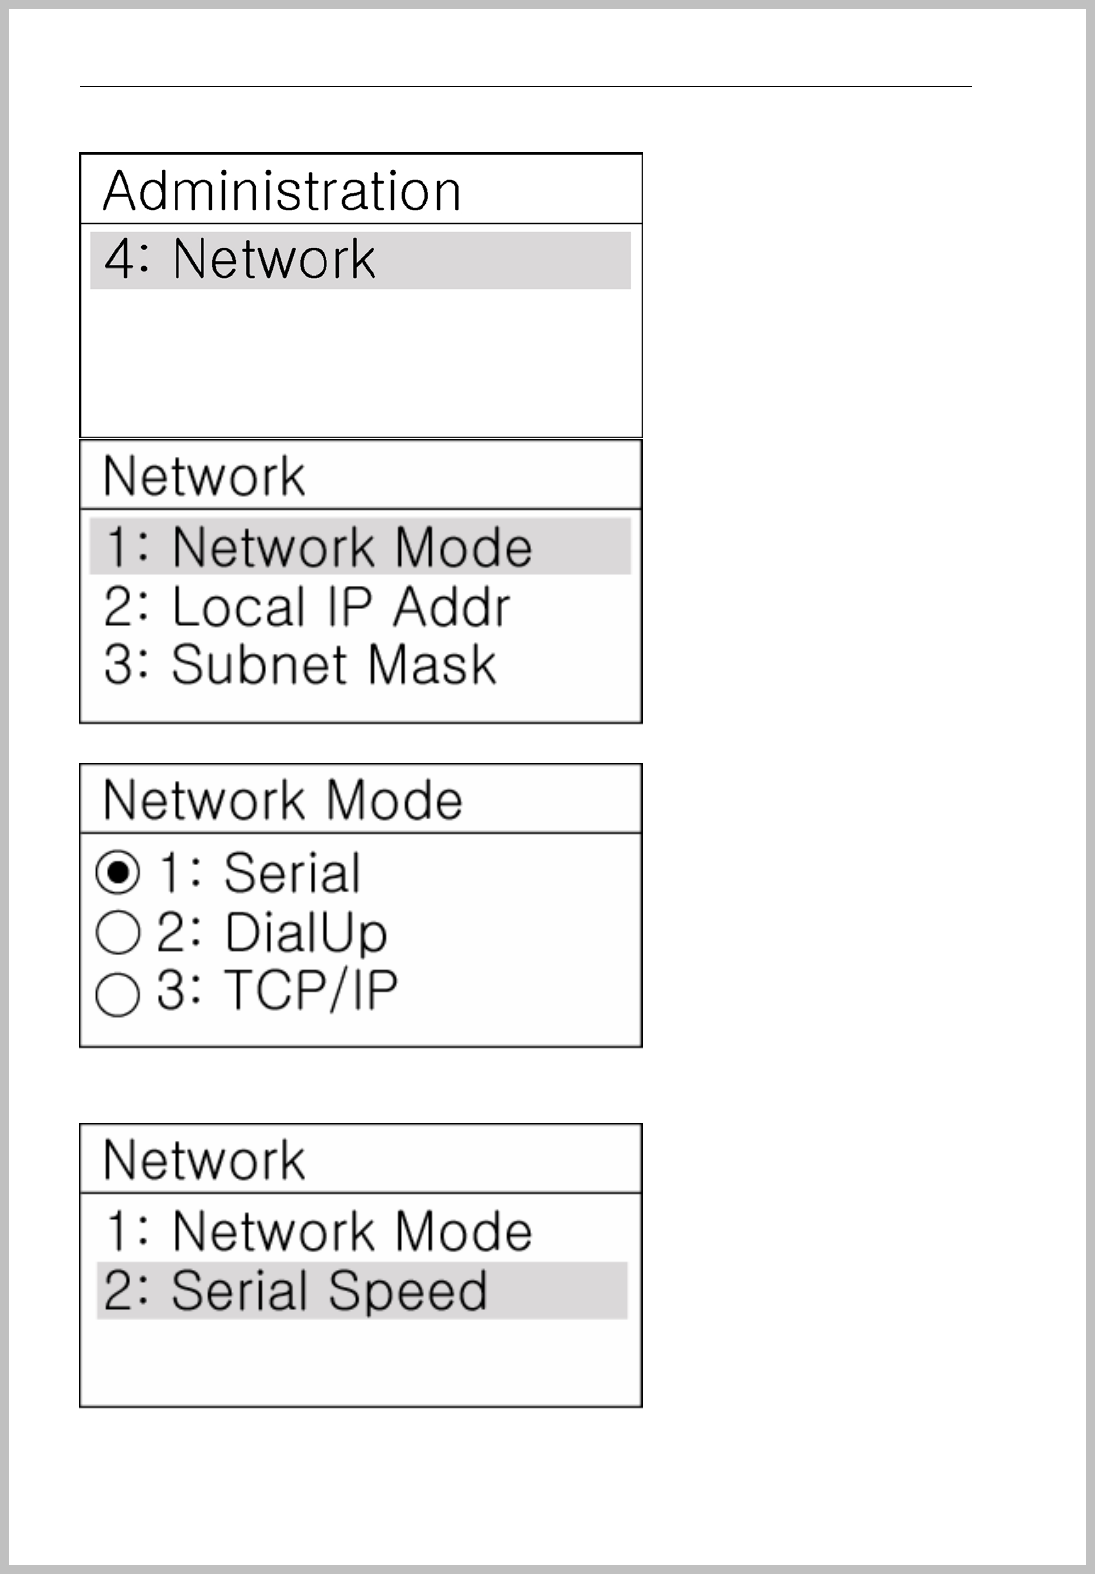
Console Manager
- 31 -
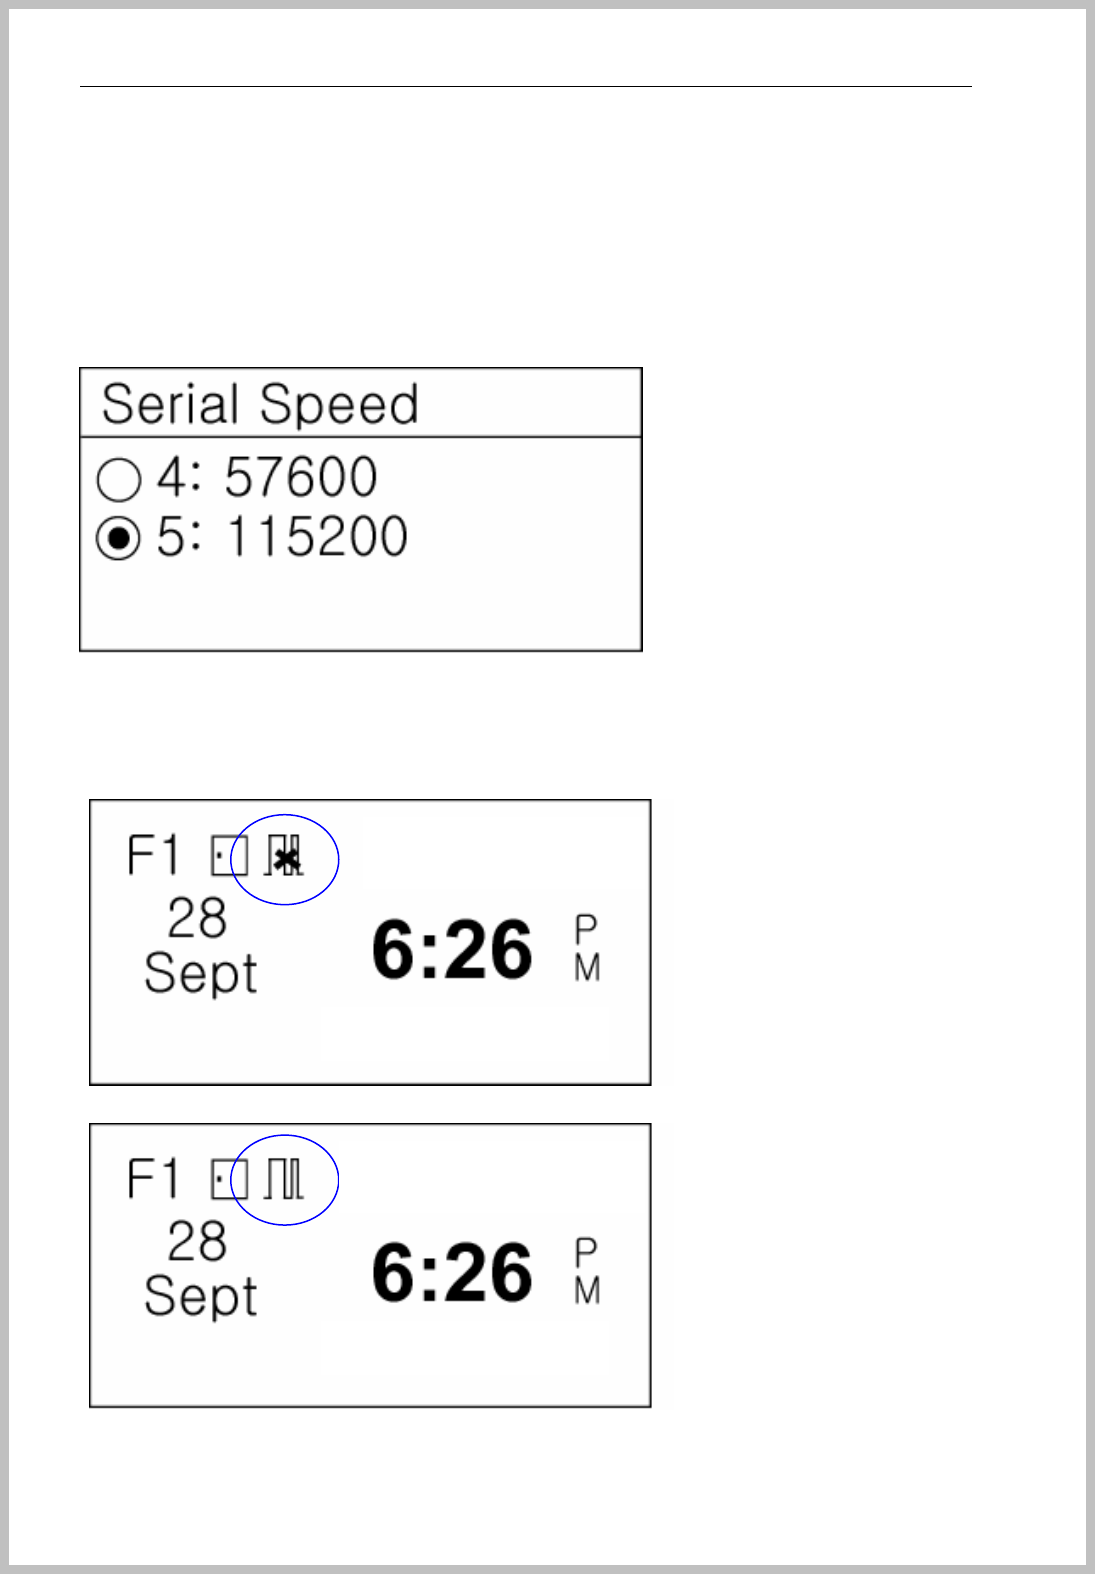
Input Serial Speed as same as Console Manager setting value( Refer to page 34 ).
Console Manager
- 32 -
Select one value as same as Console Manager setting value. ( Refer to page 33~34 )
1. 9600
2. 19200
3. 38400
4. 57600
5. 115200
LCD Icon change and network connection state.
When you see the Serial network Icon and “X” means Network disconnected.
All setting value is correct and Serial icon disappears “X” mark.
BKS-4800
BKS-4800
Console Manager
- 33 -
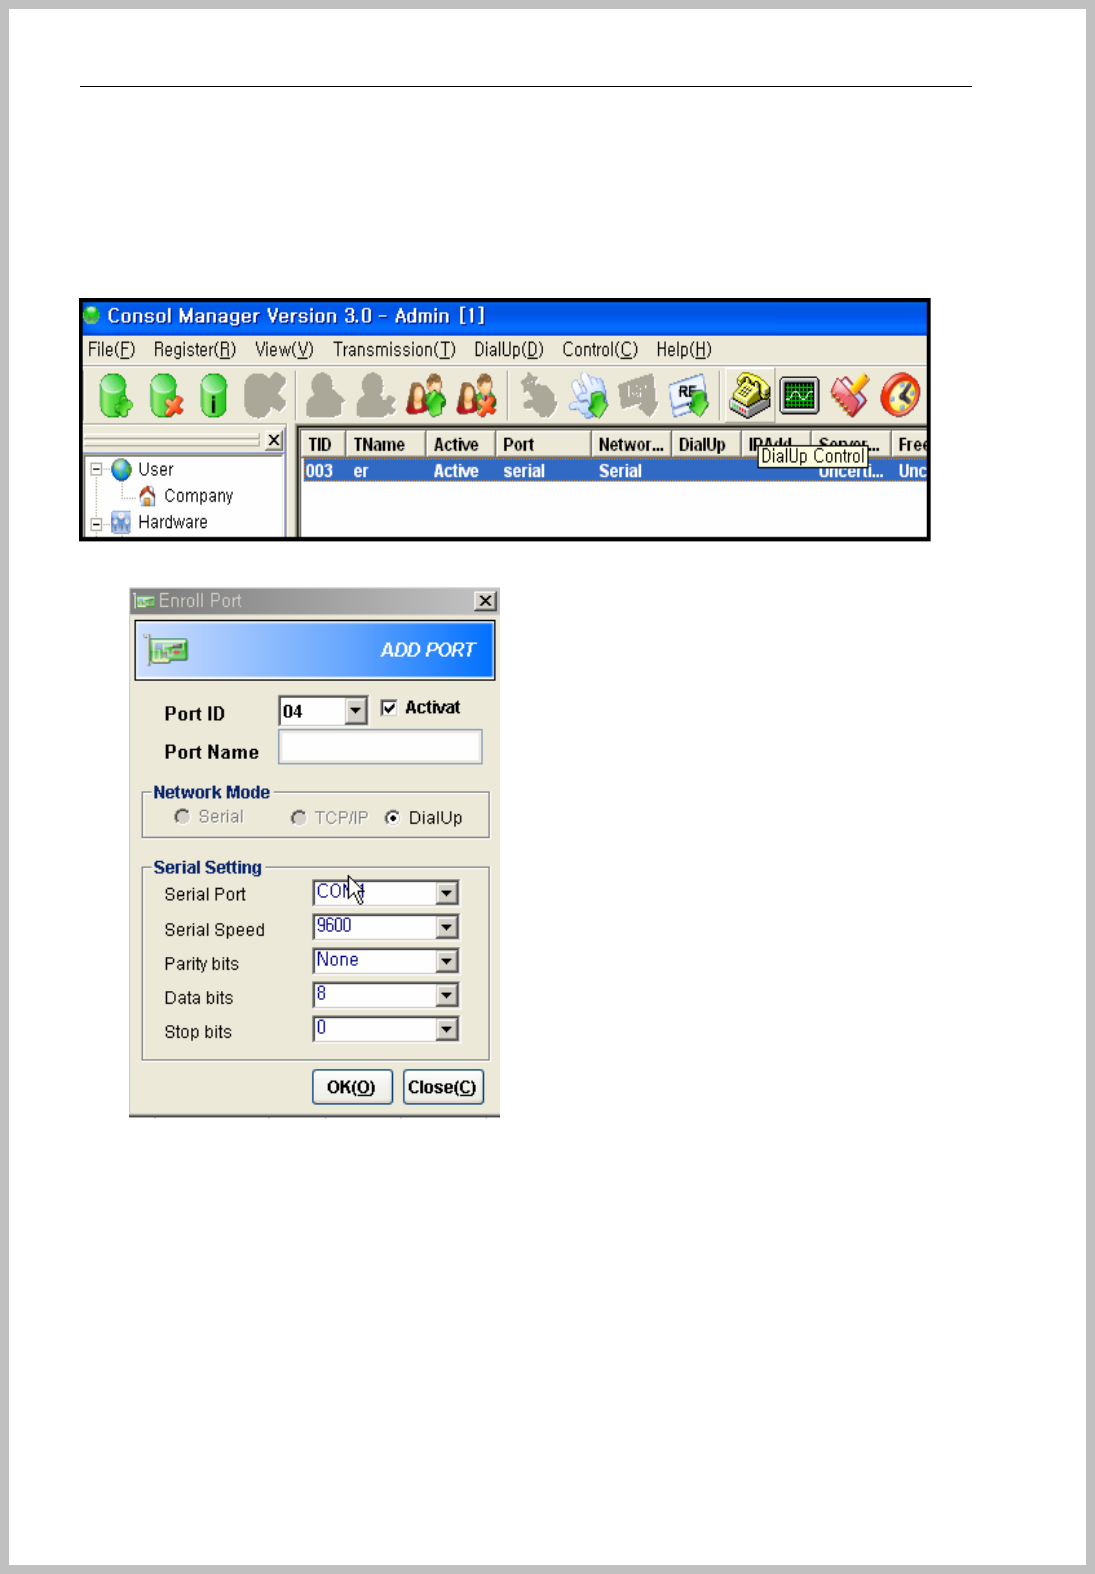
Setup Dial-Up Connection
Go to “DialUp(D) => DialUp Control” of Menu bar and the above Dial-up setting window appears.
Click “ADD” button when cursor is on DialUp (telephone image).
Add port window appears
Input port name first. Set Serial port and serial speed.(Refer to page 34)
Click “ADD” button when cursor is on enrolled Port.
ADD Terminal window appears
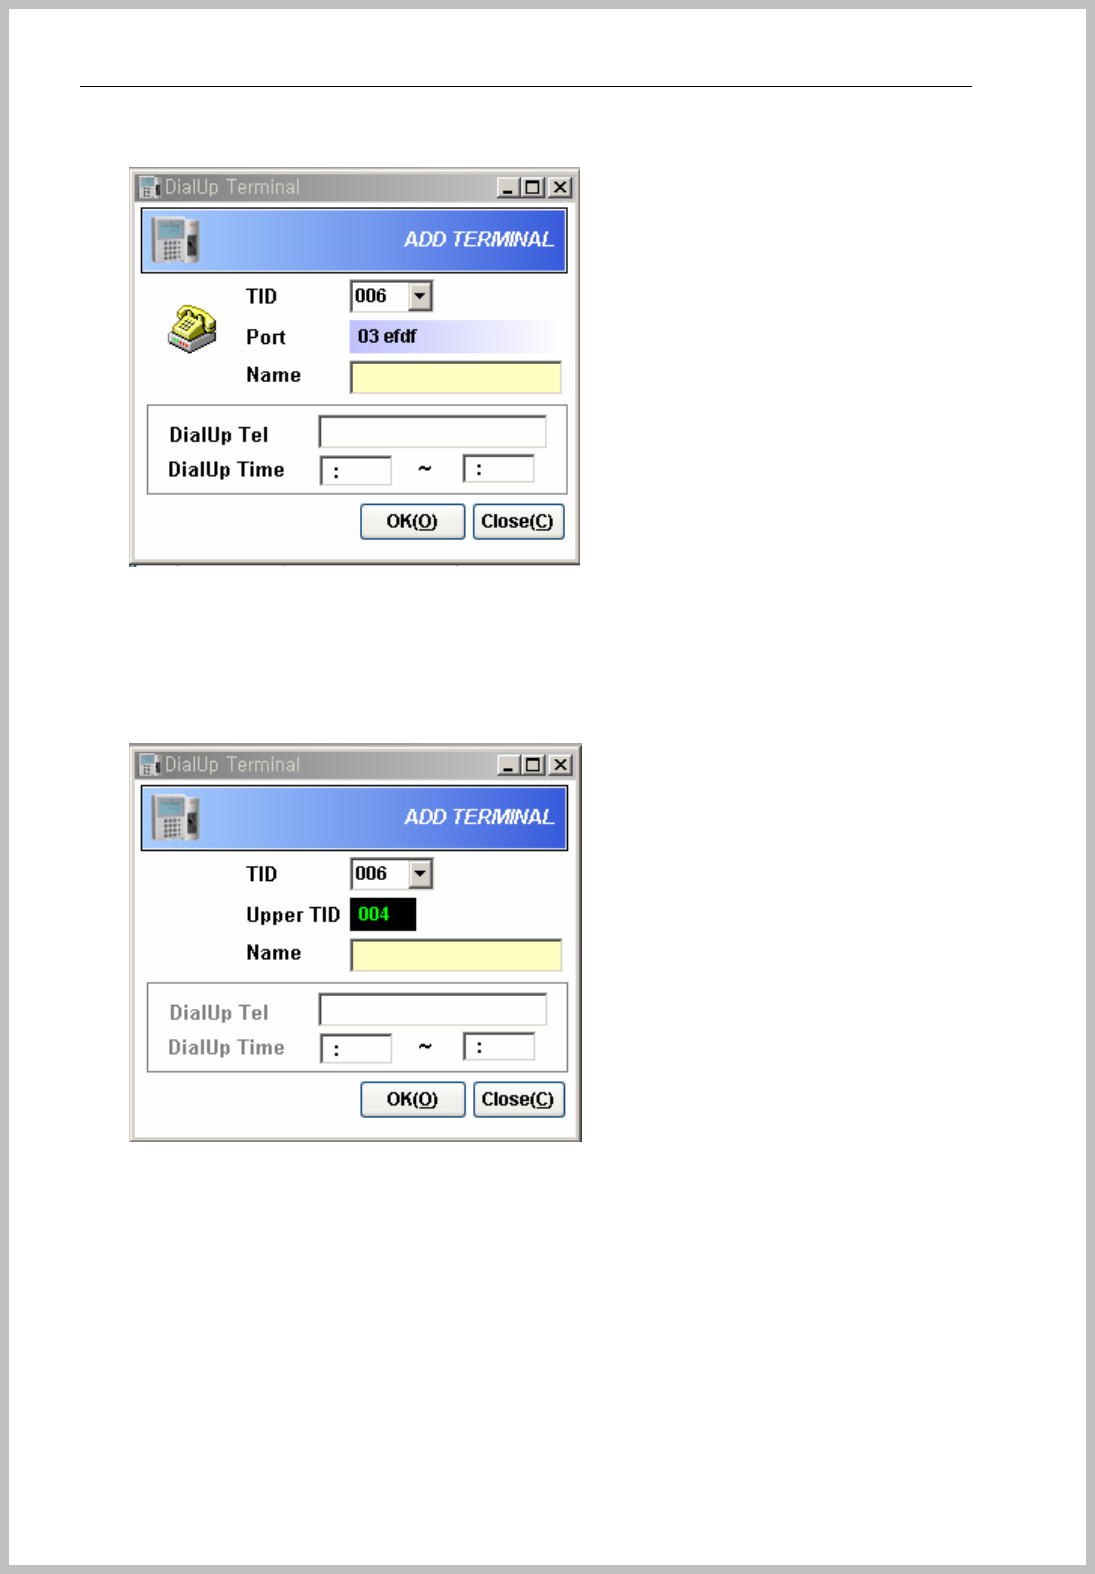
Console Manager
- 34 -
Input “Name” DialUp setting. It should be direct telephone No. extension No is not available.
If the modem is connected to 485 serial connection, give telephone No and Dial-up time to
one terminal only. For enrollment of rest of terminals, Click “ADD” button when cursor is on
enrolled Terminal. The below window appears.
It couldn’t input Tel number and time so just input correct TID & Name.
After set, click DialUp on the menu bar and the below window appears.
The right section is shown enrolled dial-up terminal. For calling to terminal, select terminal
and push “ Connect(D)” button. All modem connection status is shown in “MODEM” and
“SERIAL” section.
For checking dialing status, please check tick mark of Checking Dialing.
10 seconds mean, when terminal doesn’t send data to server for 10 seconds, modem
disconnected. This setting value can’t change in automatic connection, but manual
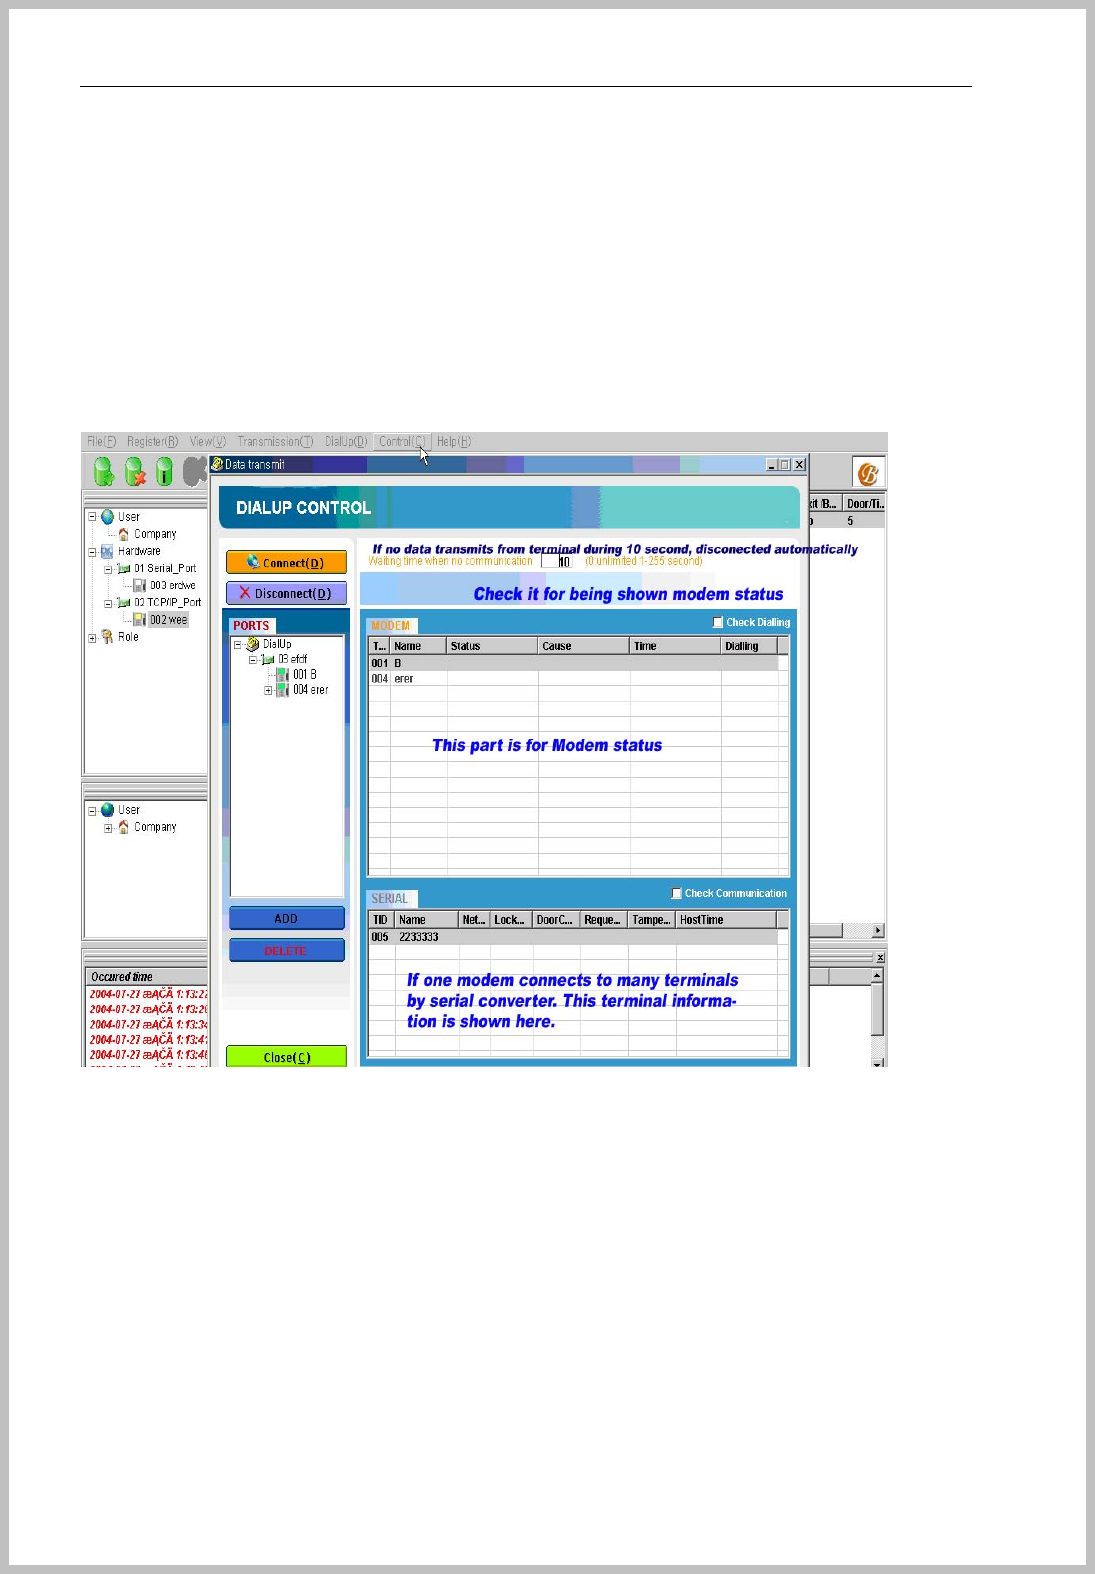
Console Manager
- 35 -
connection as to click Connect button can give new value 0~ 255 seconds. 0 is continually
connection(unlimited connect time) 1 is disconnect after no data for 1 second. 255 is
disconnect after no data for 255 seconds.
If modem connects to several terminals by serial converter, SERIAL section shows all sub
terminals of modem.
After terminal registration, Stop service and restart.
Console Manager
- 36 -
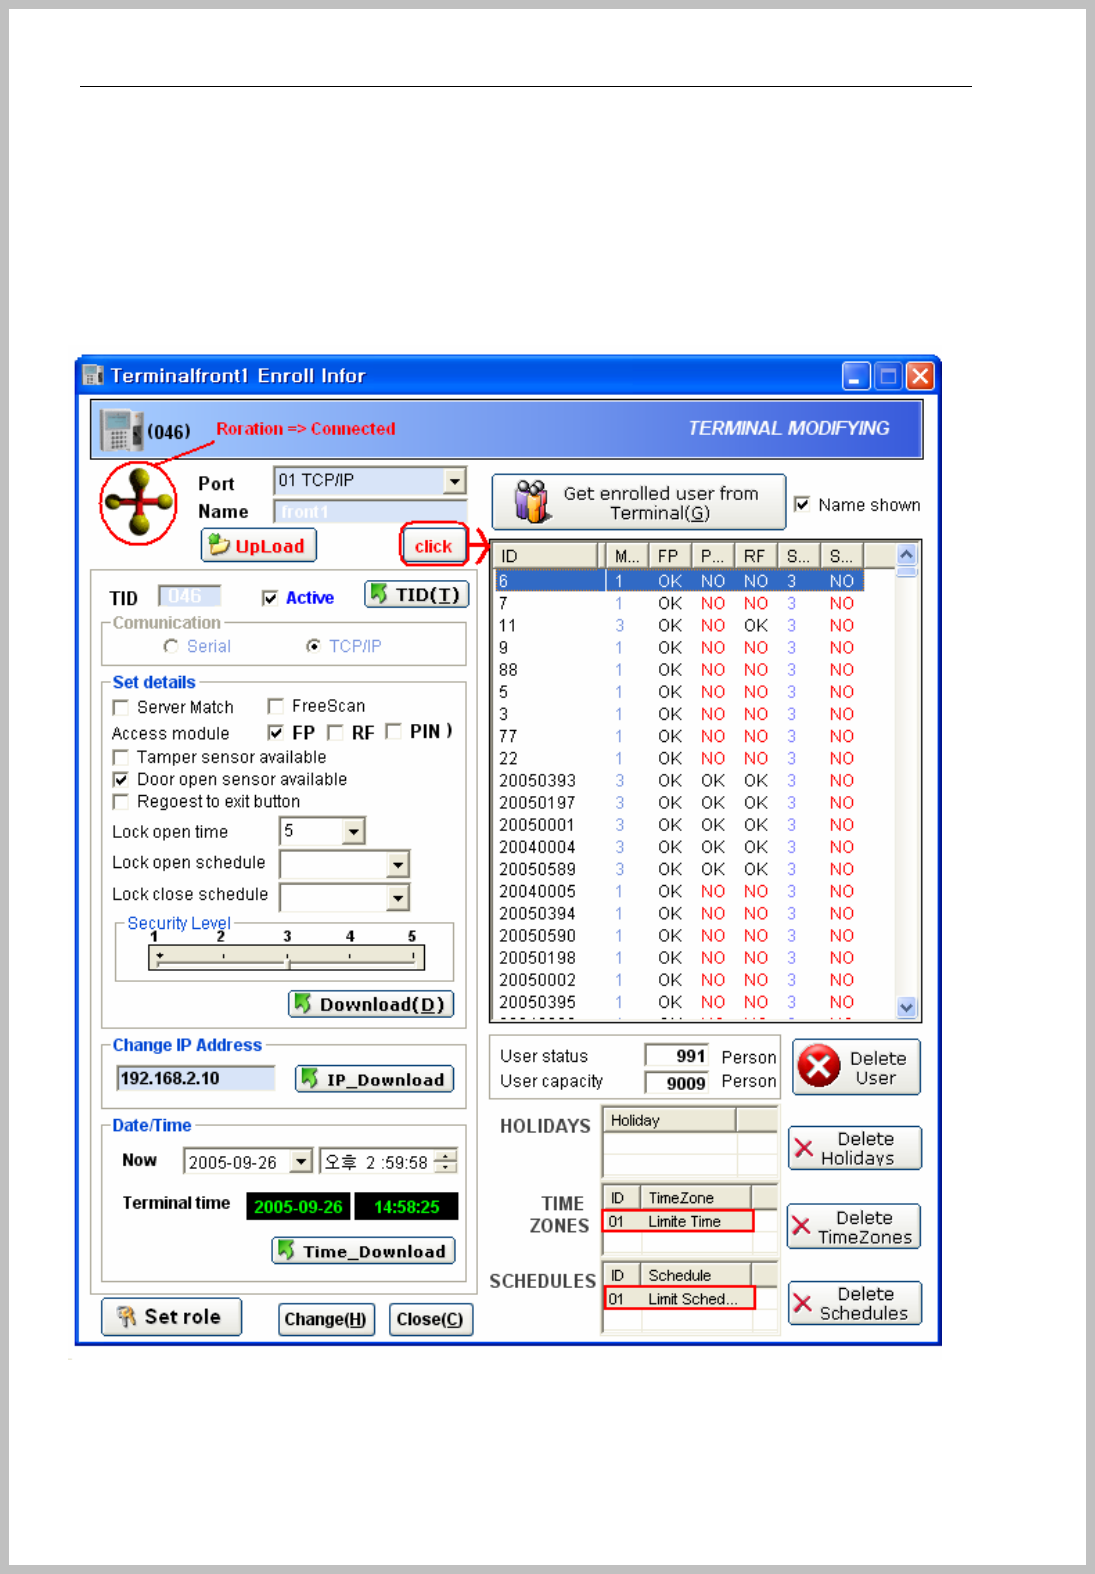
Connection of terminal
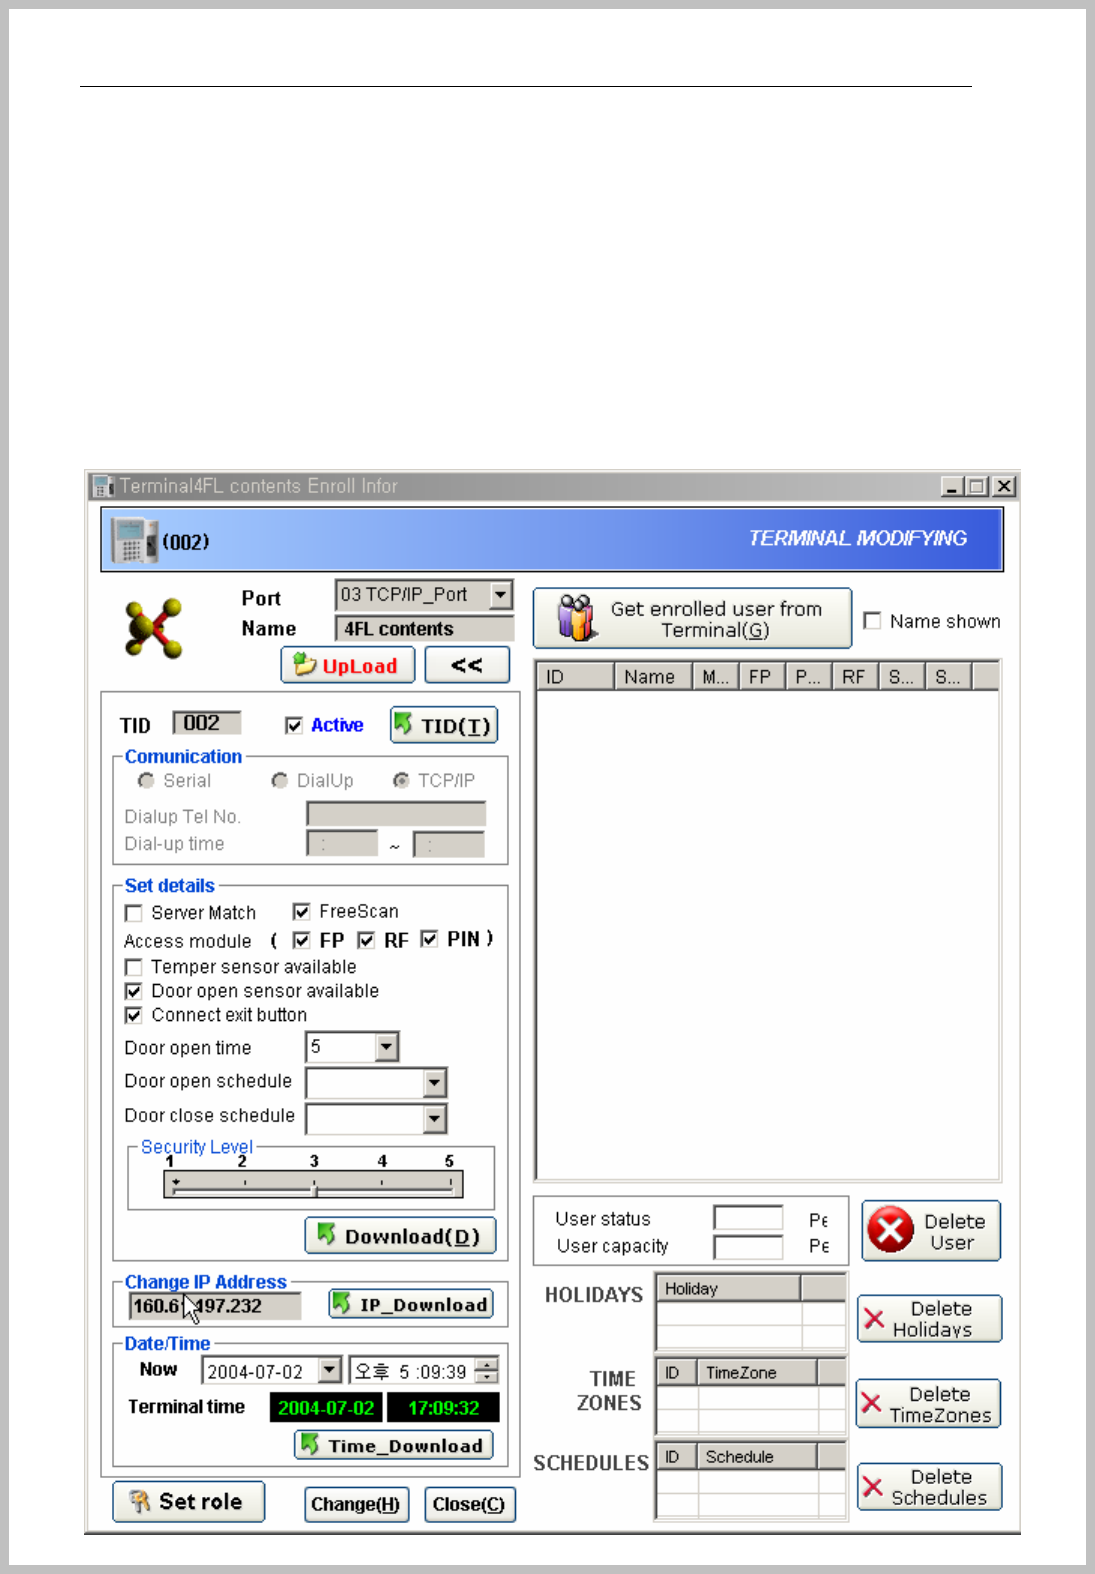
Click to enrolled terminal and appears the below window.
When server connection is well, the mark will be turning, if not, red X mark will be displayed.
If user wants to change setting value, change and click download button for changing terminal
setting value.
All enrolled terminal status appears, and modification and deletion is possible by download and
upload button.
Console Manager
- 37 -
Set details :
Server Match is not available( plan to update this function),
Free scan mode can set here and terminal
Access module : possible to check here and terminal.
Door open time : Door close after 5 seconds.
Door open schedule : If user wants to keep opening door within given schedule time.
Door close schedule : If user wants to keep closing door within given schedule time.
Download : if you change any value, click Download button for applying.
Holiday, TimeZone, Schedule is shown registered value of terminal, so if you want to apply
schedule to user and terminal, it must have schedule value on terminal.
4. How to enroll User
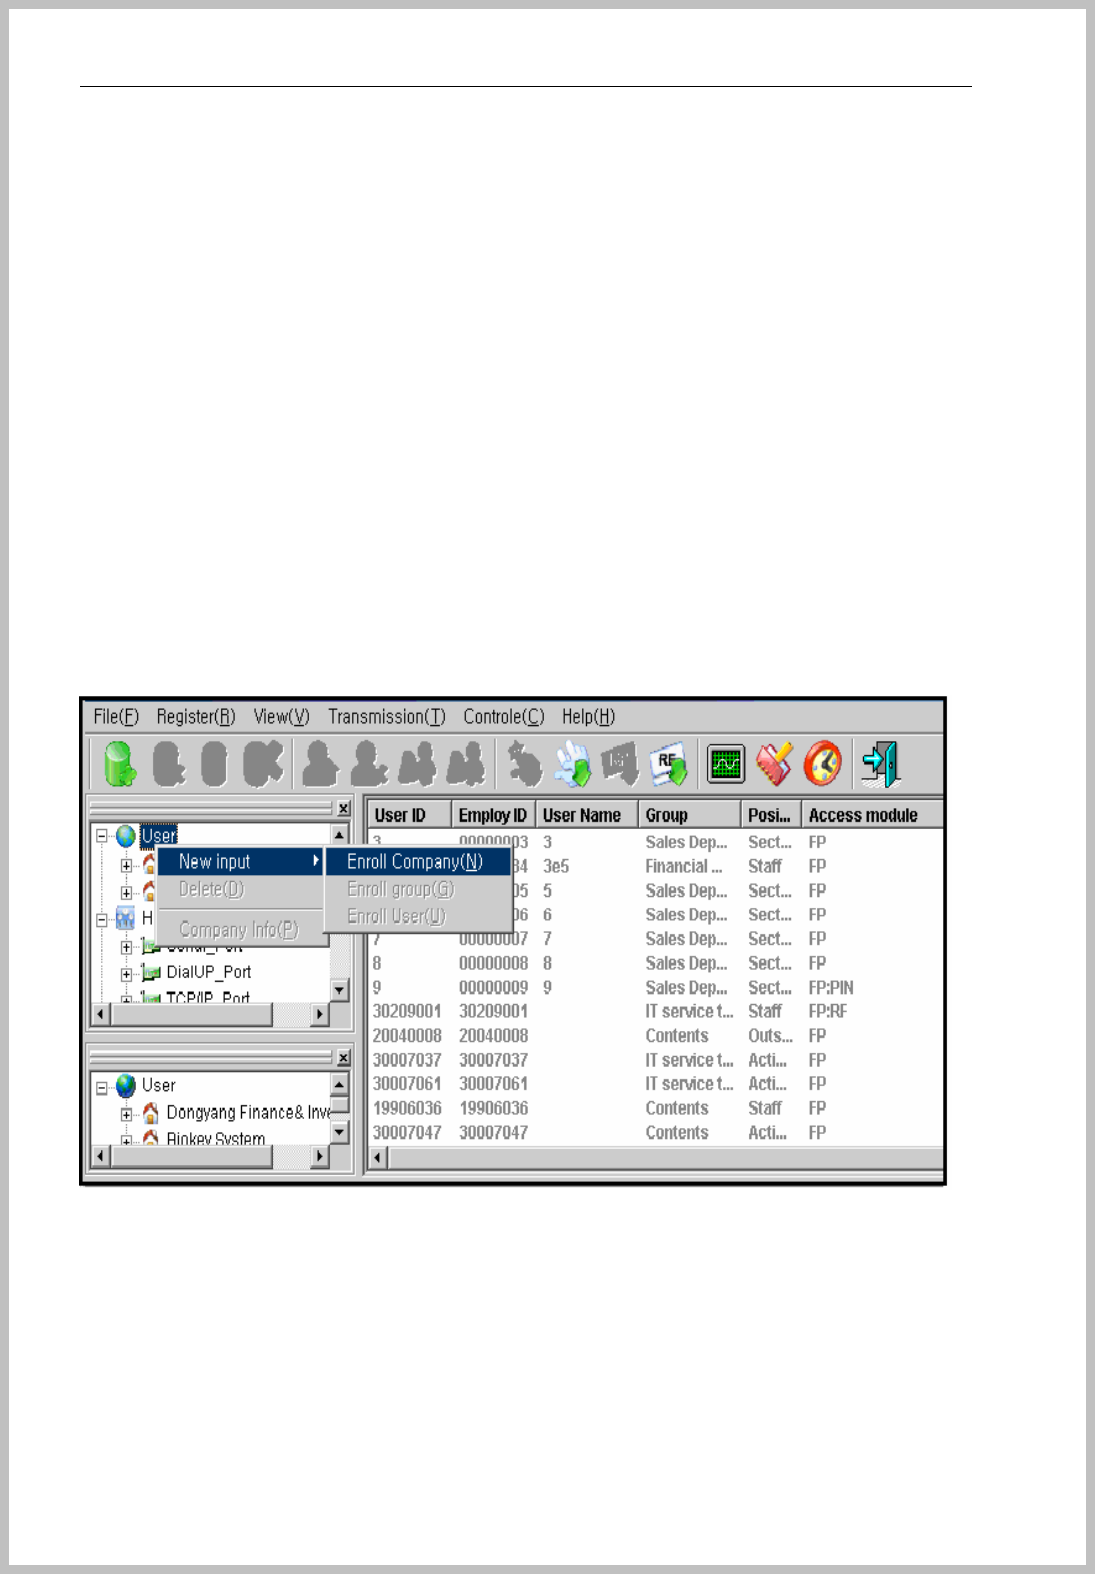
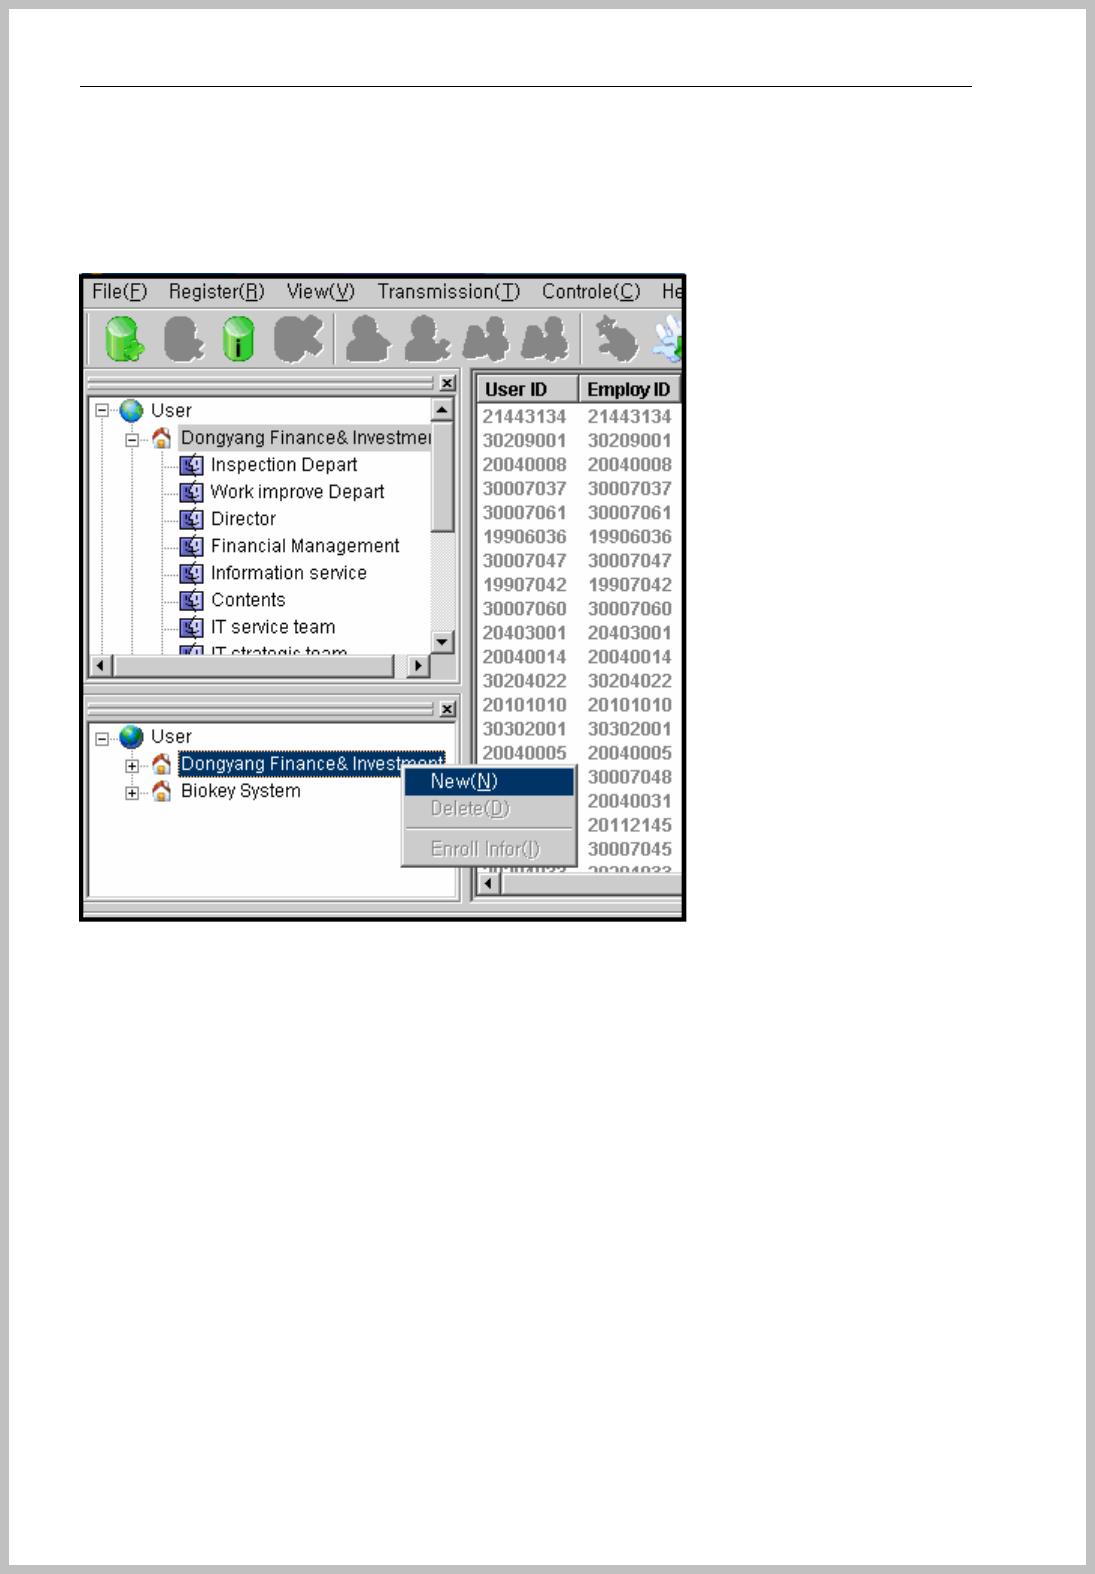
Enroll company
Select User and click the right button of mouse as the below picture or go to menu bar of stage
(Register=> Company=>New).
Console Manager
- 38 -
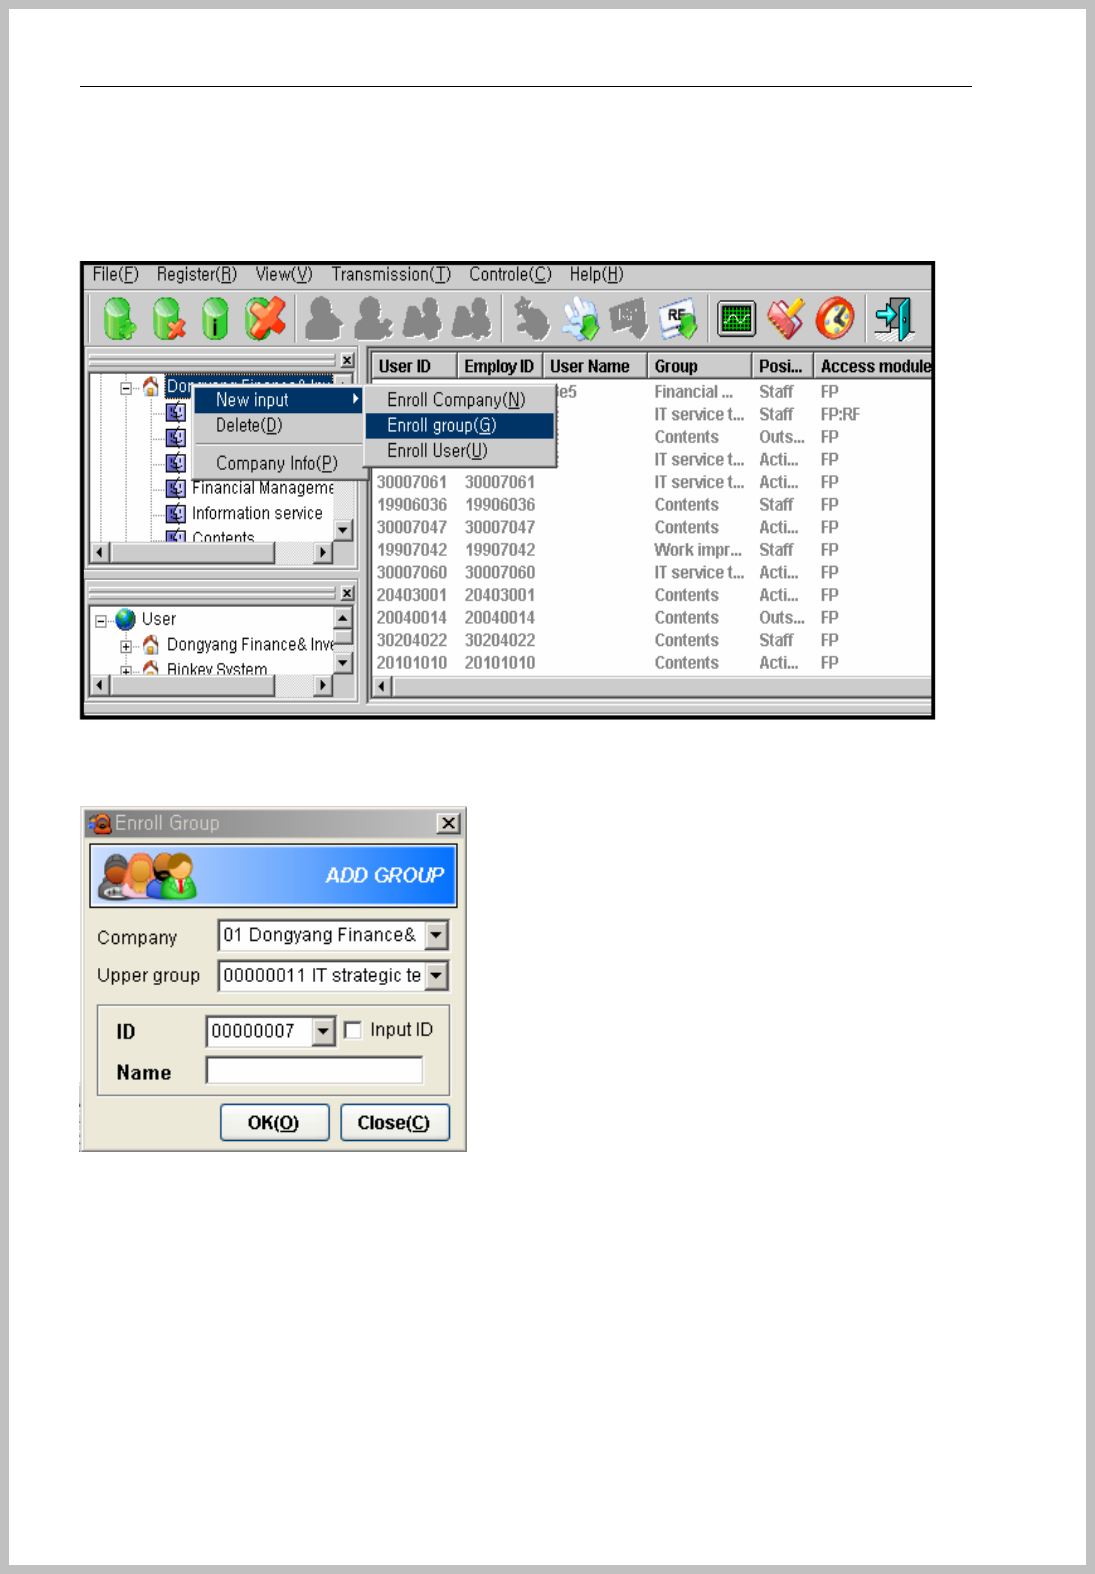
Enroll Group ( Department or Branch )
After enrolled company, enroll group(Company department or branch) as sub menu of enrolled
company.
Sub group can be made under upper group.
Console Manager
- 39 -
Enroll position
Select User and click the right button of mouse as the below picture or go to menu bar of stage
(Register=> Position=>New)
Console Manager
- 40 -
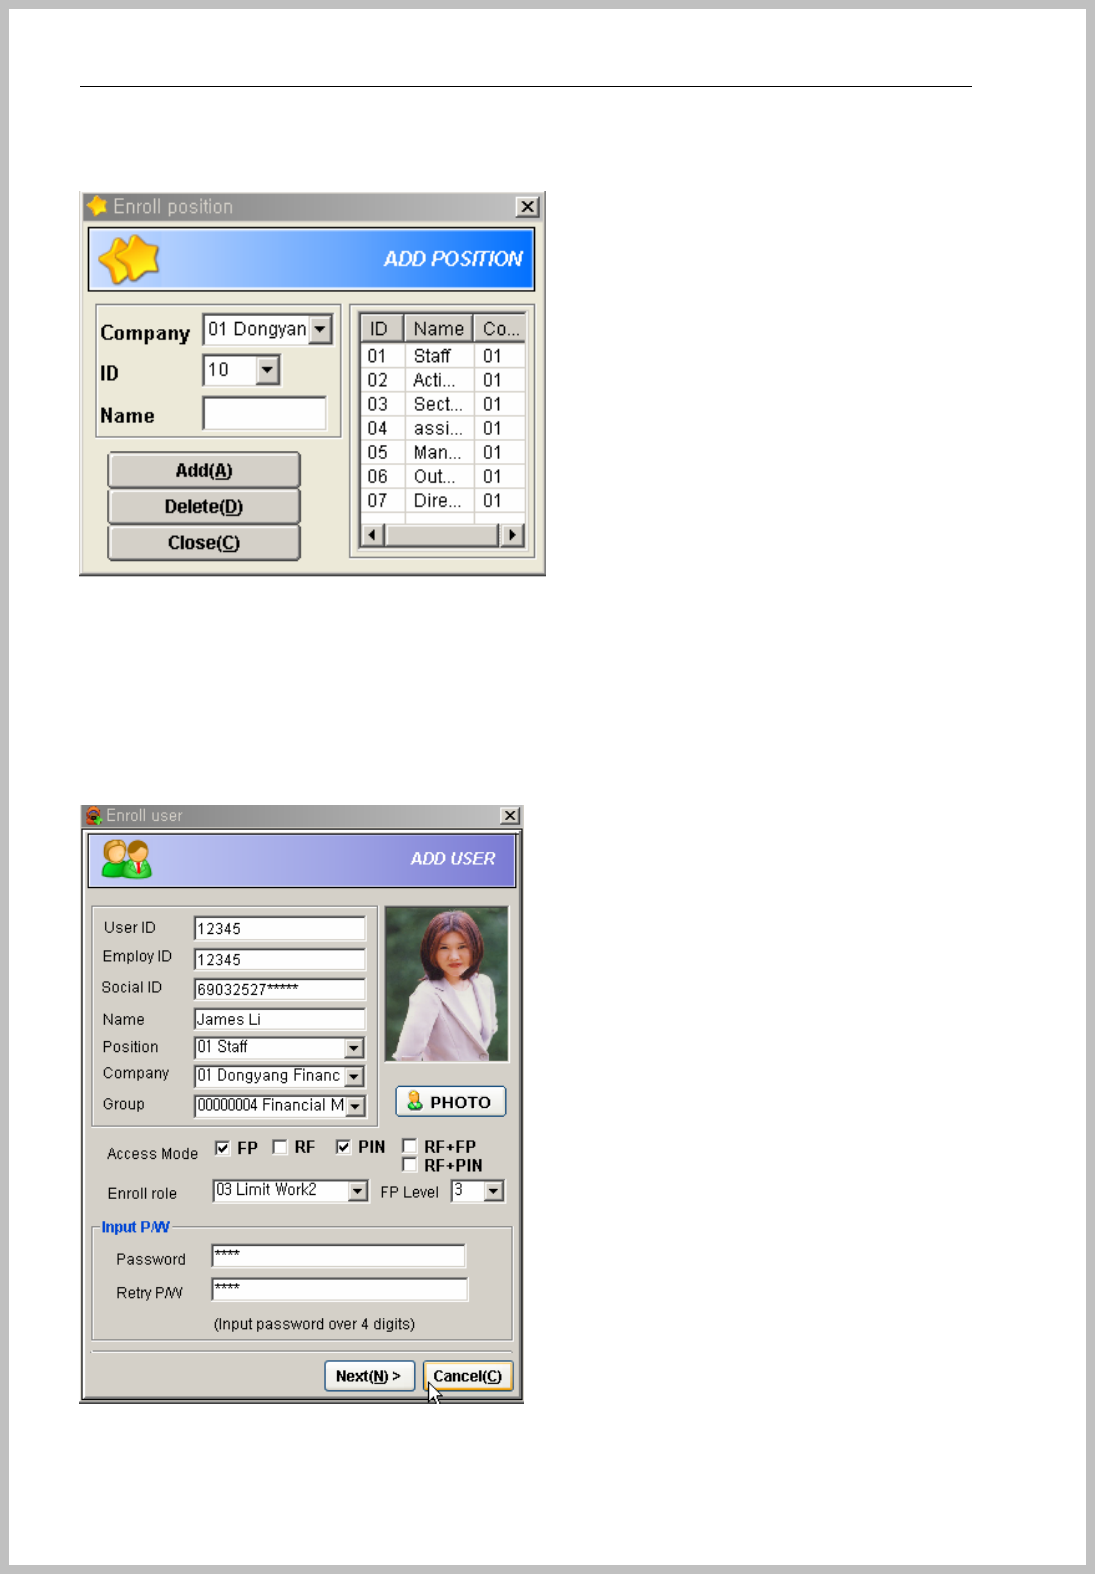
When click enroll position, this window appears. It can be enrolled by company.
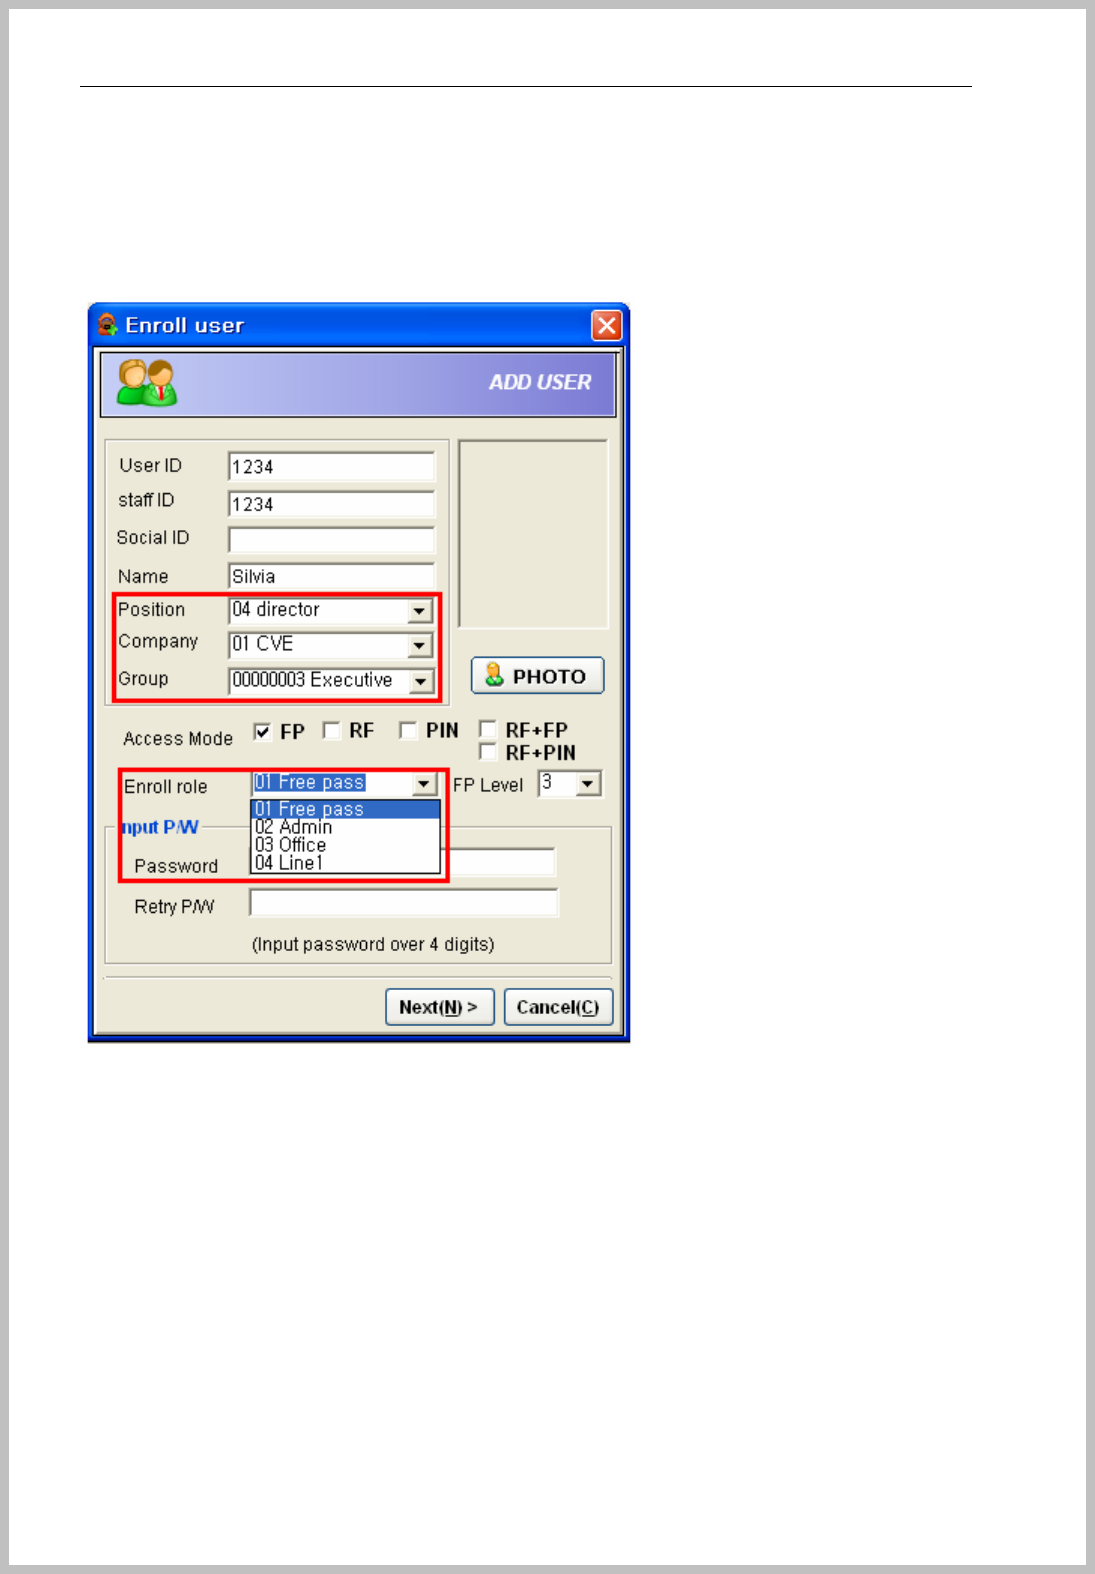
Enroll User
Click the right button of mouse at selected Group or go to menu bar of stage (Register=>
User=>New)
If you want to use Time & Attendance software, should select position, company and group
correctly. BMP file is only available for photo upload.

Console Manager
- 41 -
When BKS-2600 scanner is connected, click “First FP enroll” button for fingerprint enrollment.
input description
*User ID Input User ID the range of 1~8 digit(0~99999999)
*com-ID Company ID or employee No, 1~8(0~99999999) digit.
*User Name Input user name
*Social No Input user social No.
*Position Select user position.
*Depart Select user department
*Access mode Select FR, RF, PIN, RF+FP, RF+PIN
*Set role Set role by personal
Security level Set security level by personal
Password Input 1~8 digit(0~99999999).
Retry Password Retry password for confirmation
z Security level
FP level description
0 Same security level as terminal’s setting level
1 Very low
2 Low
3 Normal
4 High
5 Very high
Console Manager
- 42 -
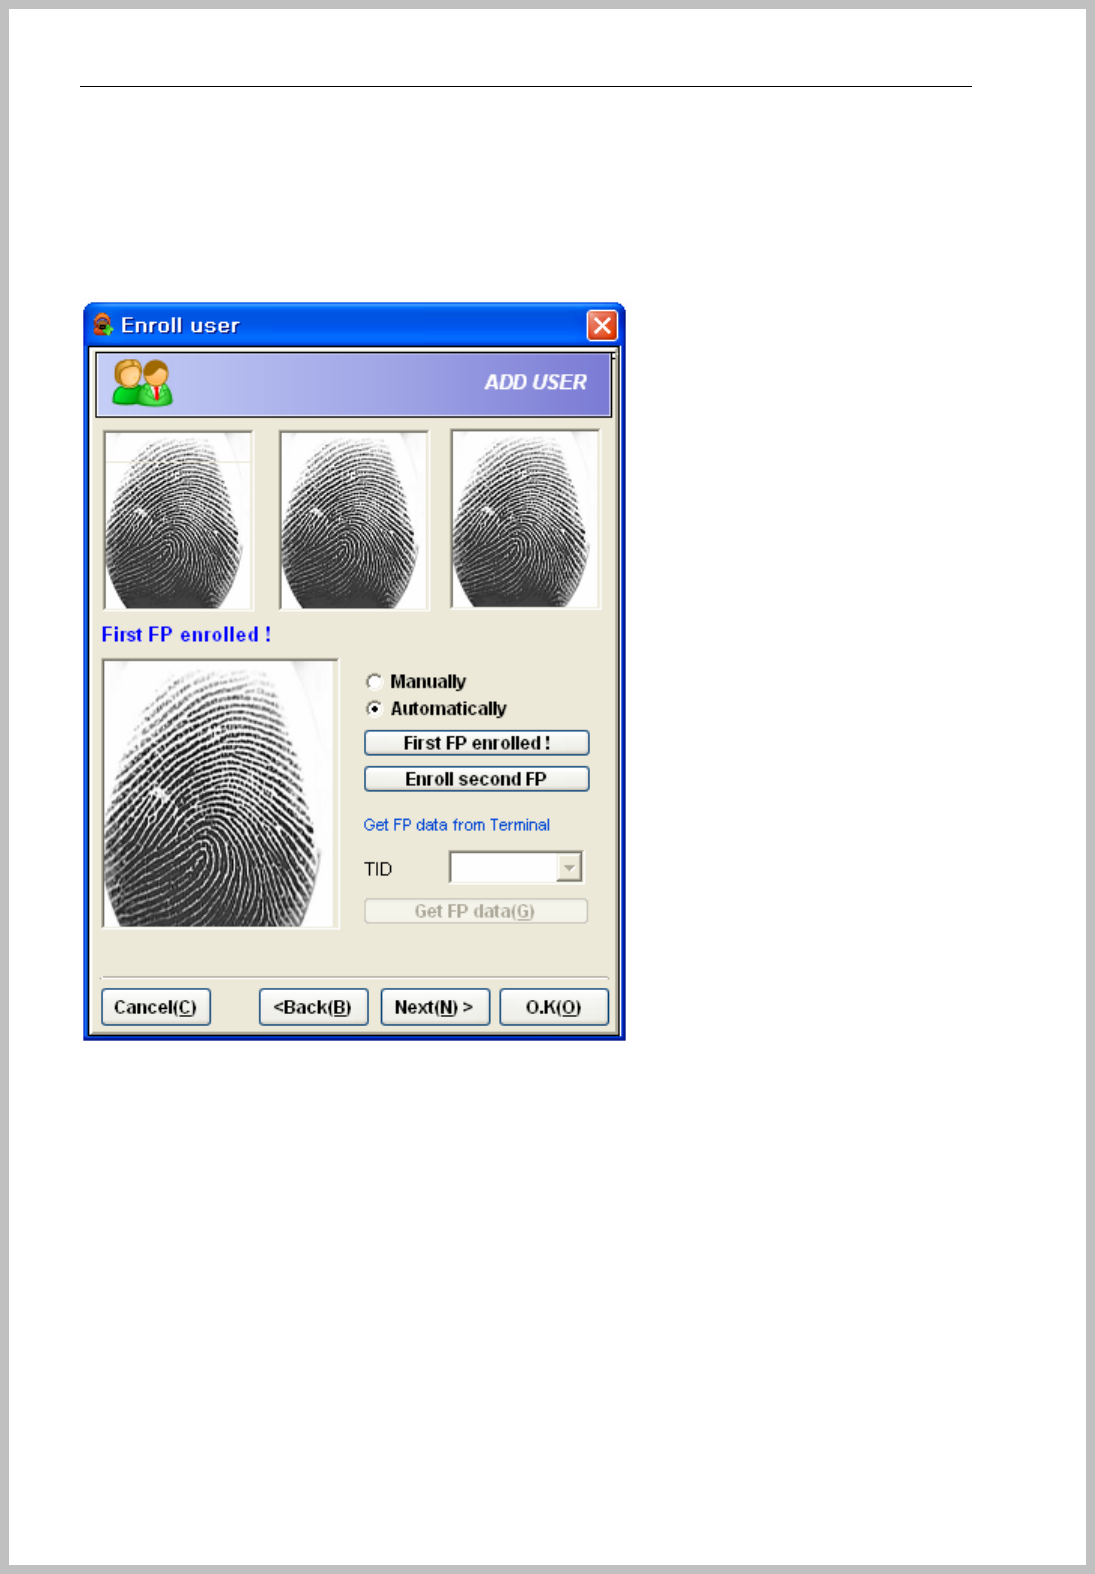
If not, enroll in Terminal and use “Get FP data” function. Please push “Next” button after enrollment
done.
z Manually : Select manually the most optimum image as to click “OK” button.
z Automatically : Select automatically the most optimum image.
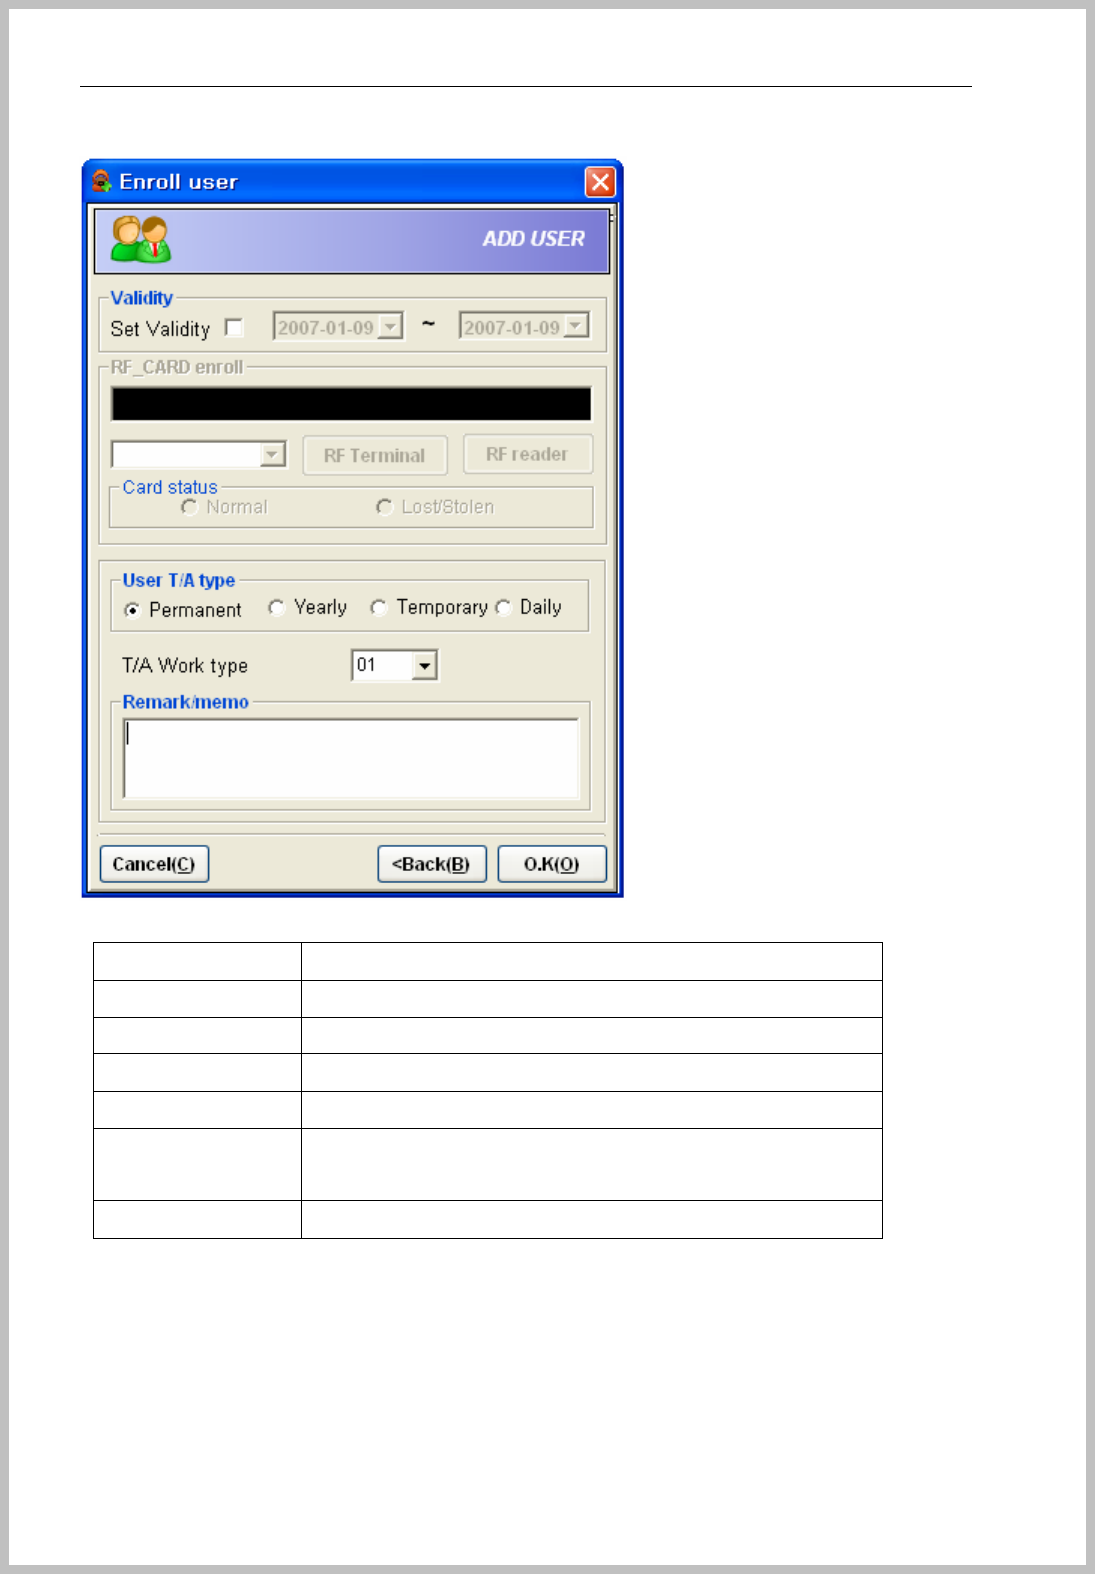
This is for EM TYPEenrollment and work type for Time & Attendance. Push “OK” button after input
done. Please select “User work time status” if you want to Time & Attendance software and detail
information is in Time & Attendance chapter.
Console Manager
- 43 -
Input Description
RF-CARD enroll Enroll RF-CARD by EM TYPEcard reader.
Card status Normal, stolen or lost
*Validity User validity period
User type Permanent, yearly contact, temporally, daily
User work time
status
Set user work time.
Remark/memo Record meno
Validity mean is the user usage period by set value.
This function is for transmit enrolled user data to terminal, and push “Download” button for saving on
terminal.
All enrolled process is done but for using Access limit or Time & Attendance software, please see the
corresponding chapter before user enrollment.
Console Manager
- 44 -
Green color : Dial-up terminal
Black color : TCP/IP, Serial

Console Manager
- 45 -
5. Set Schedule & Role
< Example of How to use >
*Group
A Group : CEO & Executive
B Group : Administrator
C Group : Office Worker
D Group : Factory Worker- Line1
*Access permitted Area
A Group : 1~10 (Terminal ID)
B Group : 4~10 (Terminal ID)
C Group : 4~10 (Terminal ID)
D Group : 7~10 (Terminal ID)
Group Holiday Working time Access time Access Area
A : CEO SUN
SAT
09:00~18:00 All day
with Holiday
All terminals
B : Admin NONE 09:00~18:00 06:00~22:00 TID :4~10
C : Office SUN
2&4th of SAT
1 day of 15th
09:00~18:00
SAT : 09:00~13:00
08:00~19:00
SAT: 08:00~14:00
TID:4~10
D : Line1 SUN
3days of 10,20,30th
09:00~15:00
16:00~19:00
08:00~15:15
16:15~20:00
TID:7~10
Other conditions: National Holiday 19th , All Groups are applied to holiday
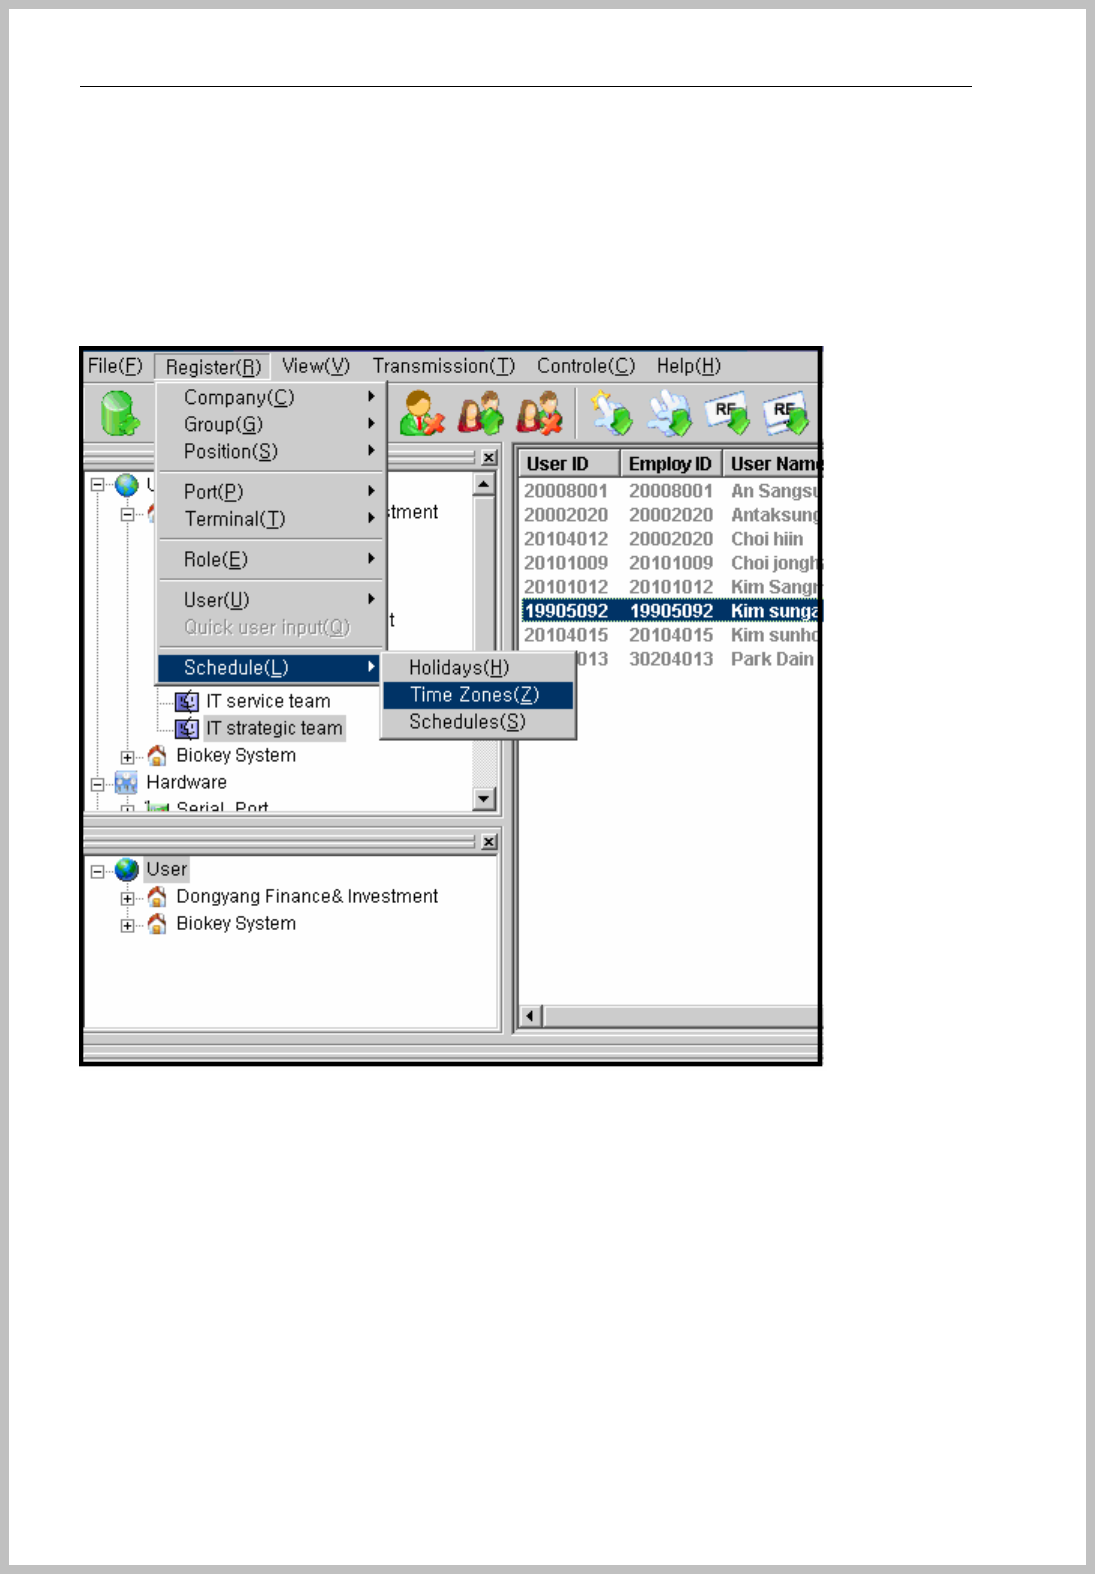
Step1
Holiday Setting
Go to the stage of “menu => Register => Schedule => Holidays”.
You can select a repeated common holiday on the schedule table.
What is repeated common holiday?
Console Manager
- 46 -
Every Sunday, Saturday
Rotating day of week like every 2nd & 4th of Saturday or every 1st of Monday
etc…
You don’t have to enroll on holiday list all these days.
It can be made the 3 holiday table
1. 19th => A,B Group
2. 15th , 19th => C Group
3. 10th , 19th , 20th , 30th => D Group
Select date => Choose Holiday Table => Enroll
Console Manager
- 47 -
Step 2
Time zone setting
Go to the stage of “menu => Register => Schedule => Time Zones.”
Note: You don’t need to register No entry (All day limited to enter) time zone
for default value.
If the working time is 00:09~20:00, you can give one or half hours more time than
working hour for early attend and late leave workers.
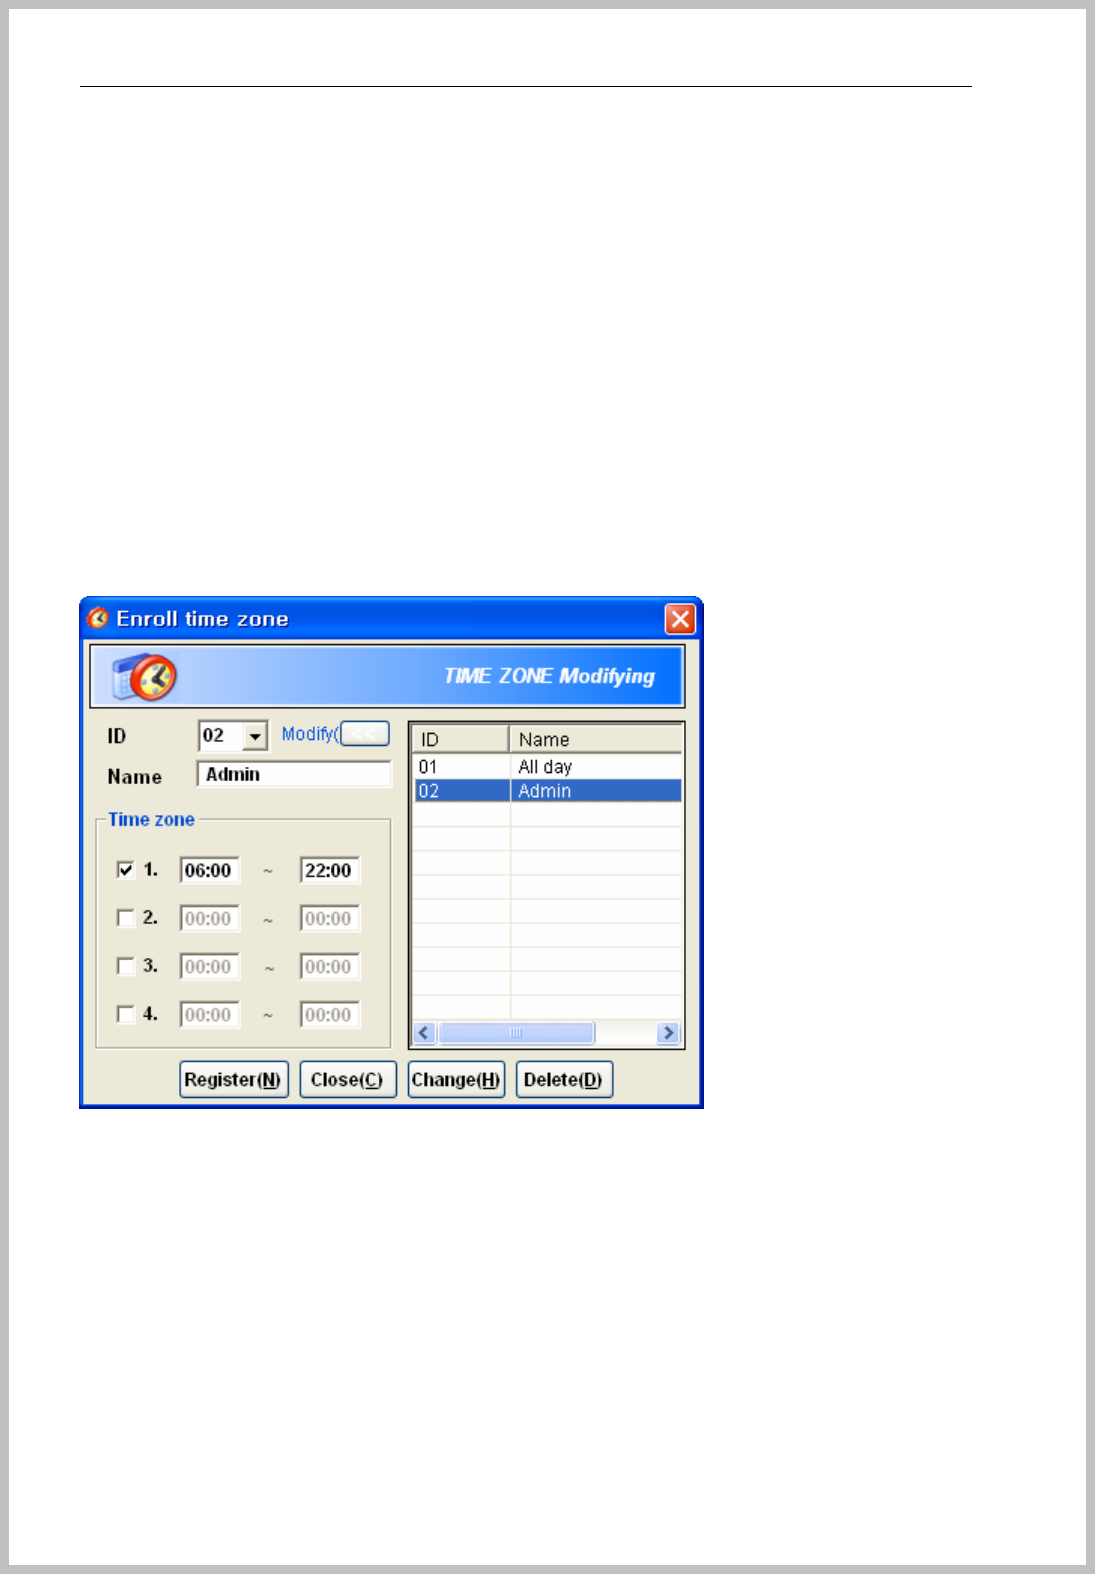
01 Limit Time : 00:00~00:00 => Access granted for all day
02 Admin : 06:00~22:00 => This is for B group of 09:00~18:00 working time.
03 Office : 08:00~20:00 => This is for ABC Group of 09:00~18:00 working
time.
04 SAT : 0800~14:00 => This is for C Group of Saturday 09:00~13:00 working
time.
Console Manager
- 48 -
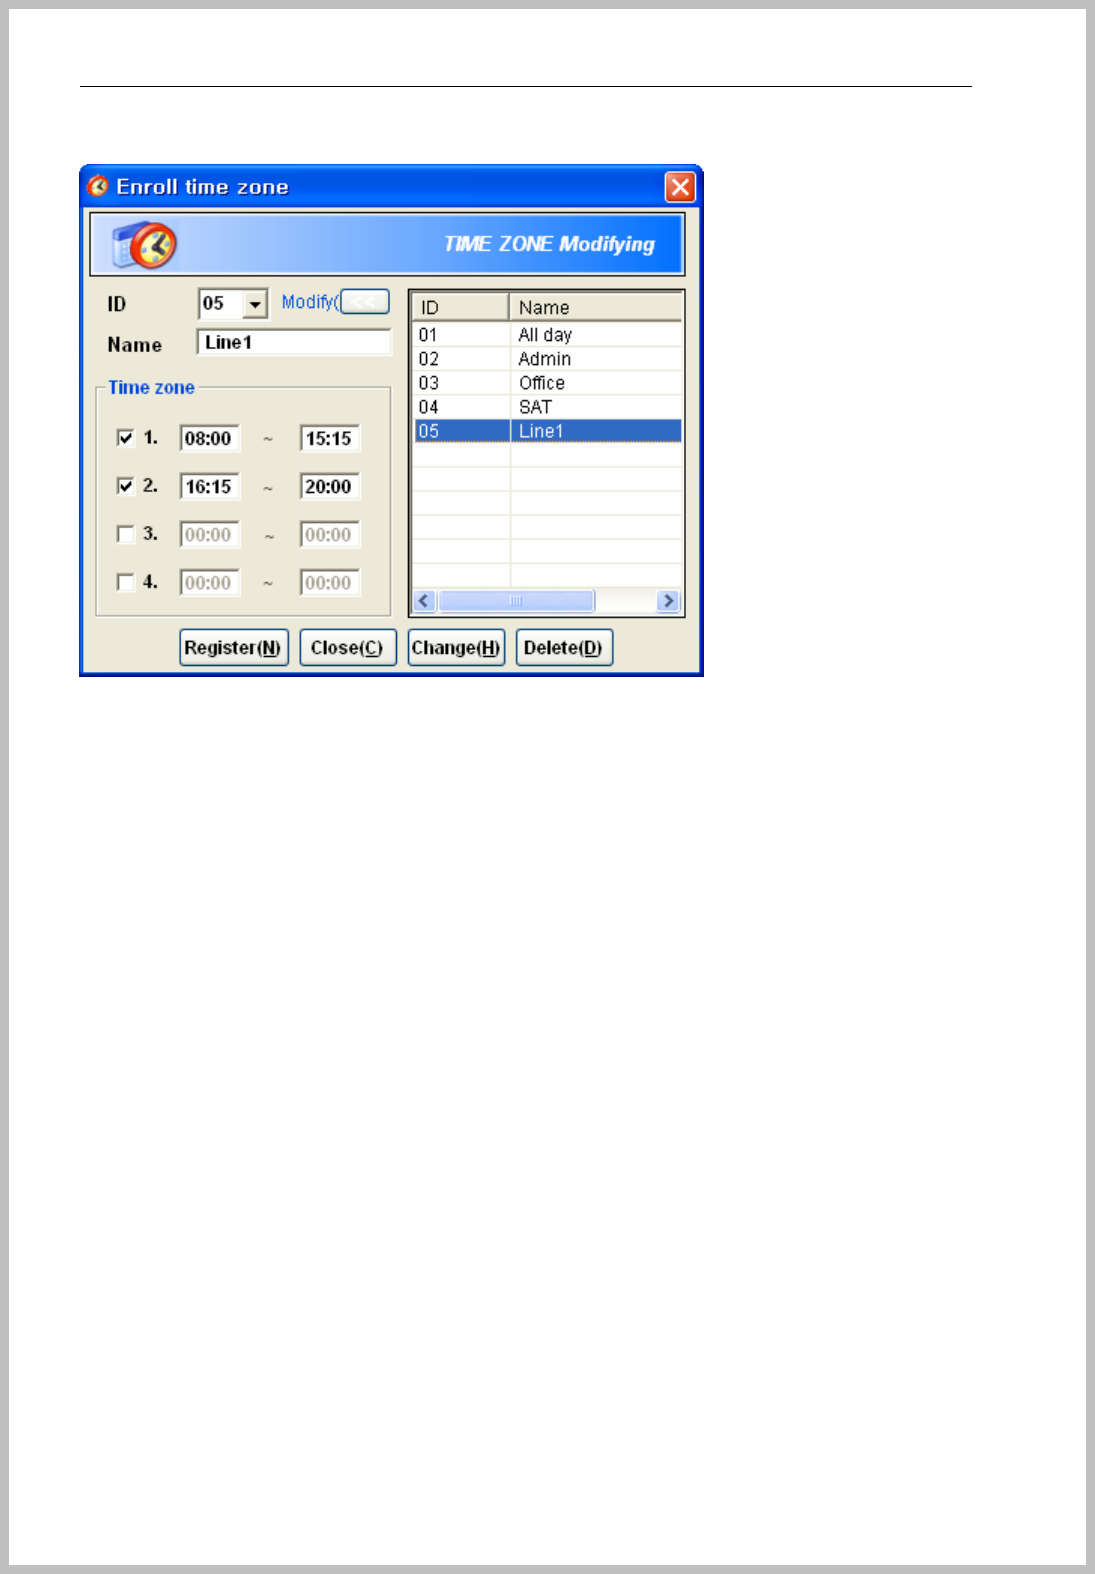
05 Line : 08:00~15:15, 16:15~20:00 => This is for D group of 09:00~19:00 and
15:00~16:30 Break time.
Totally 5 different time zones are required for it.
Step 3
Schedule
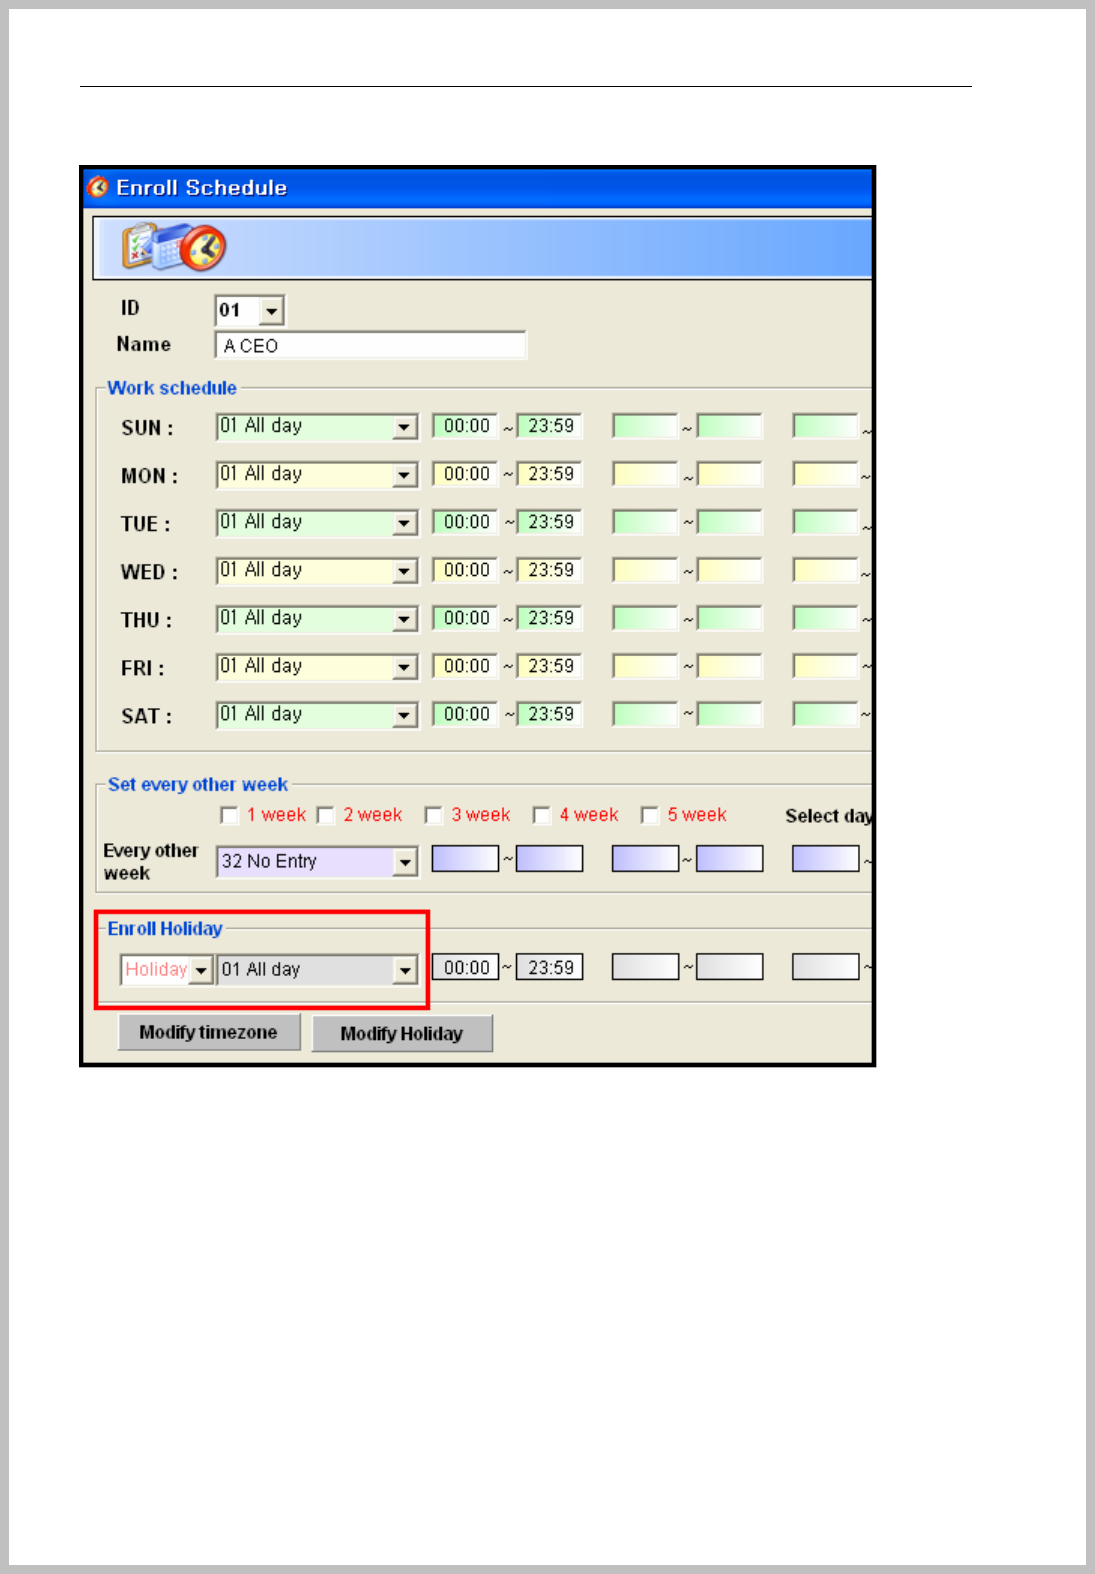
Go to the stage of “menu => Register => Schedule => Schedules”.
A Group setting => Access All day
Select “01 All day” for every setting.
Please be careful of “Enroll Holiday” should be set “Holiday1” and select “01 All day”
Console Manager
- 49 -
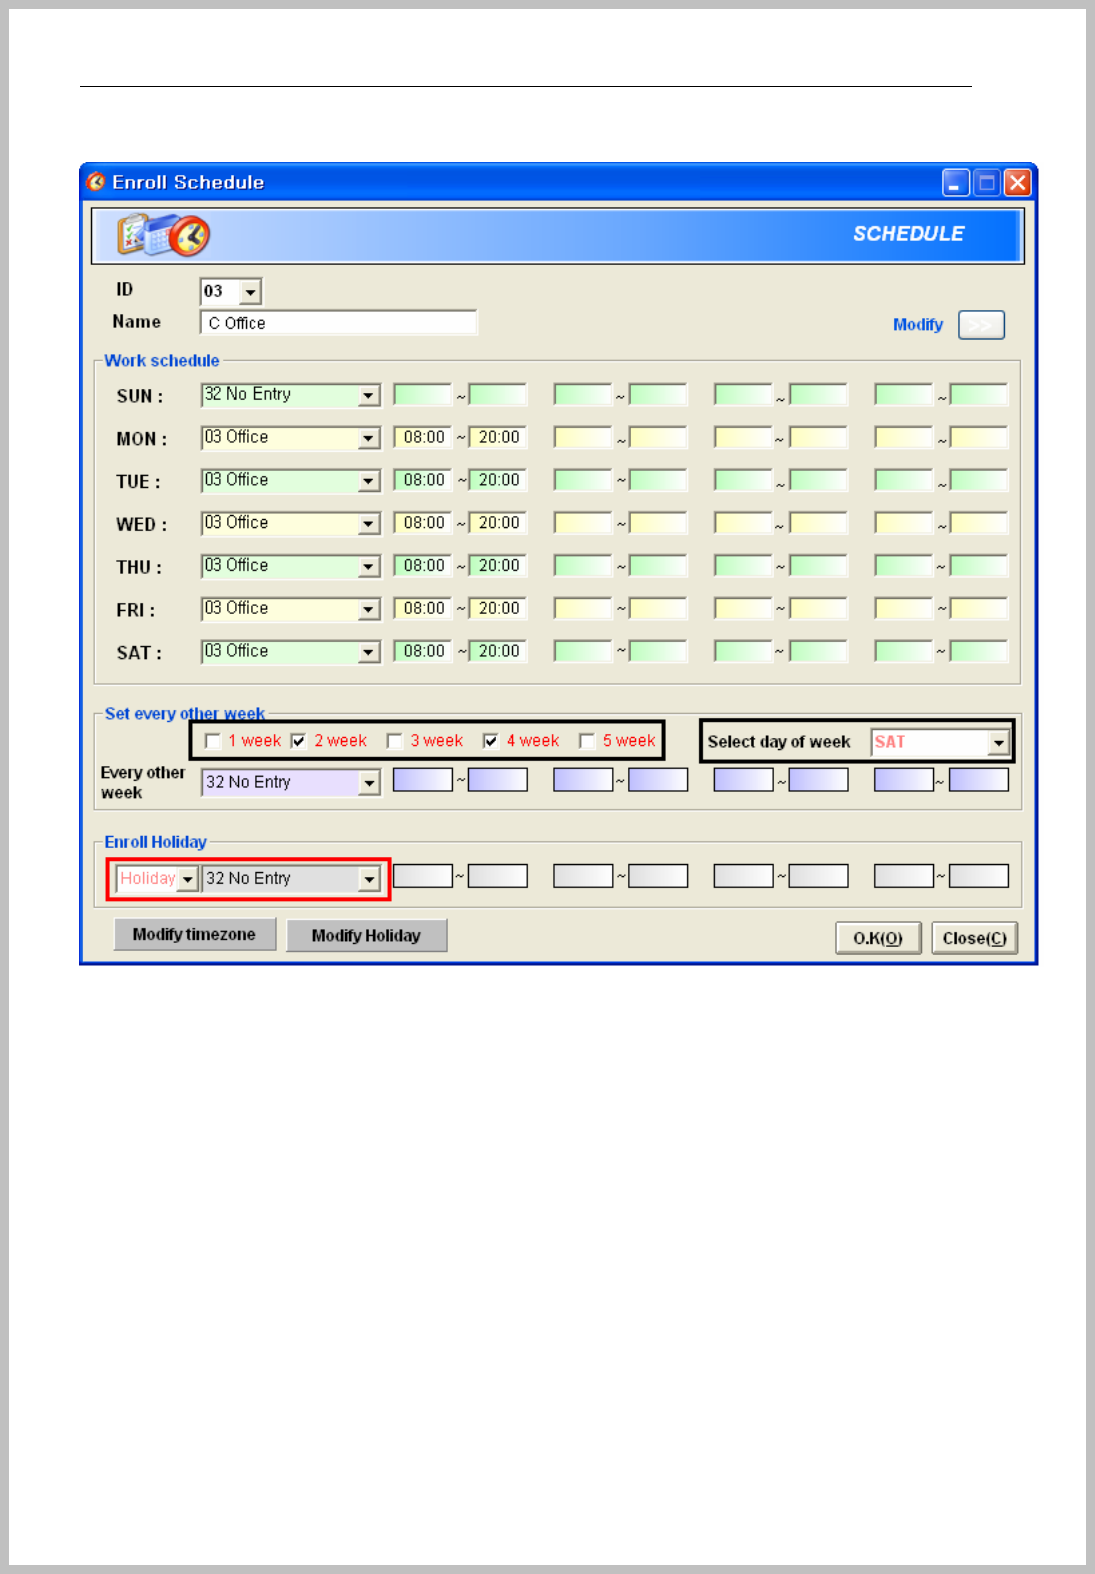
C Group setting
Please be careful of 2nd and 4th Saturday holiday setting and select “32 No Entry”
for Sunday.
Week : 03 Office time zone
Set every other week : check 2nd &4th of Saturday and select “32 No Entry”
Enroll Holiday : Select “Holiday02” and “32 No Entry”
Console Manager
- 50 -
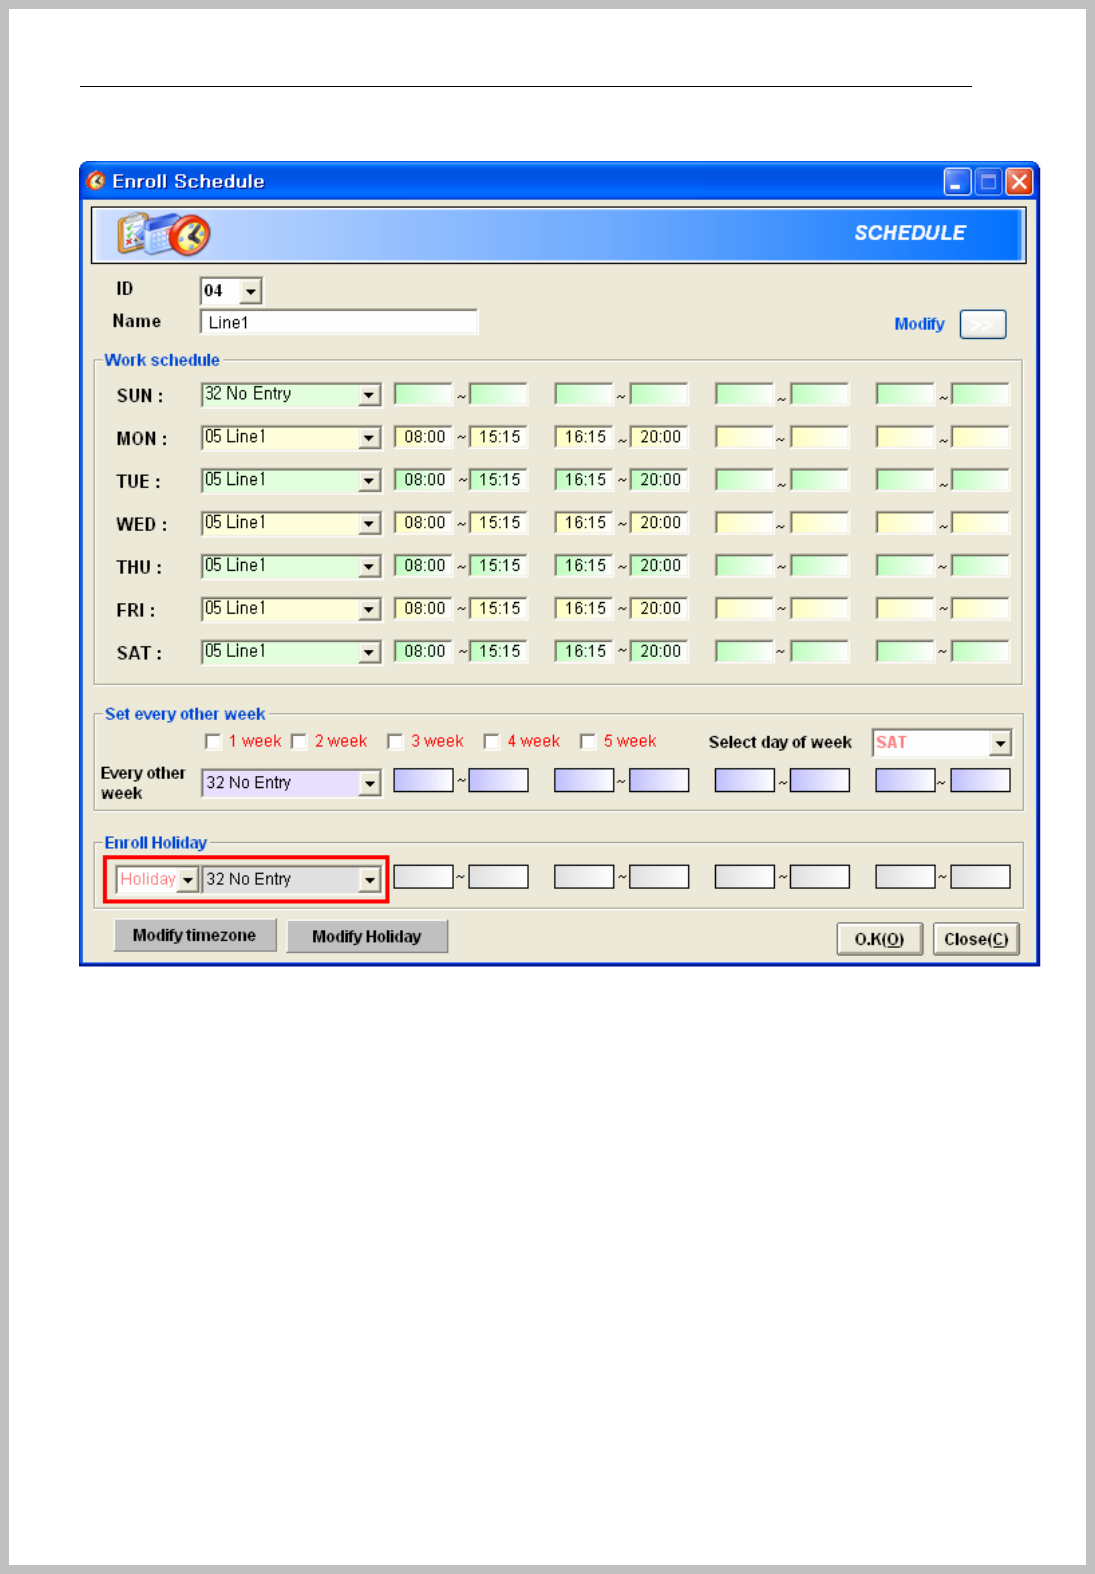
D Group setting
Holiday : Select “Holiday3” and “32 No Entry”
Sunday : Select “32 No Entry”.
Console Manager
- 51 -
All schedules are set as 4 different schedule ID using by time zone and holiday.

Console Manager
- 52 -
Step 3
Role setting
Go to the stage of “menu => Register => Role => New”.
The role setting makes easy access control for several terminals together.
A CEO can pass any door so first you select “01 A CEO” schedule and then add
applied terminals. CEO group can pass any door so select all terminals.
Console Manager
- 53 -
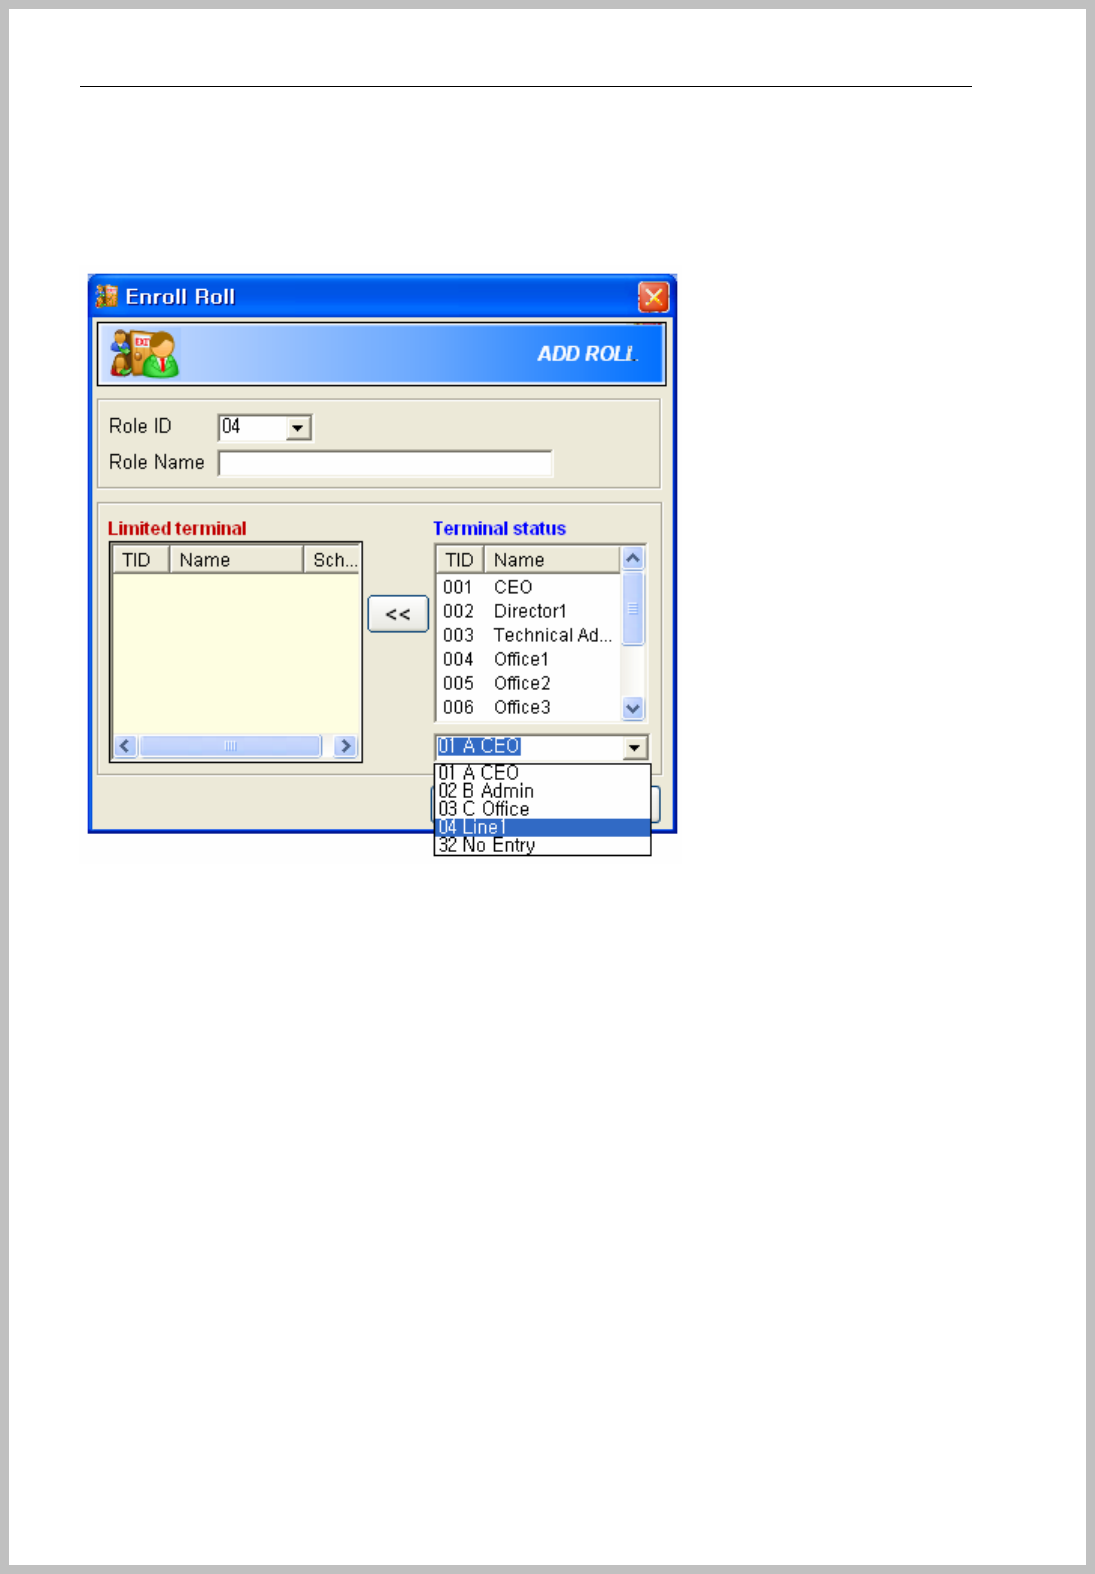
D Line1 group can pass 7~10 terminals only, first select “04 Line1” and add
007~010 TID to Limited terminal field.
001~006 terminals: Select “32 No Entry” and then add to limited terminal field.
Console Manager
- 54 -
Step 4
Apply to user registration
Position : Director applies for“01 Free pass” role
Console Manager
- 55 -
5.1Set Schedule
If terminal uses for Access control, it should be set correctly.
This software makes you manage the weekly schedule and base of Role function together.
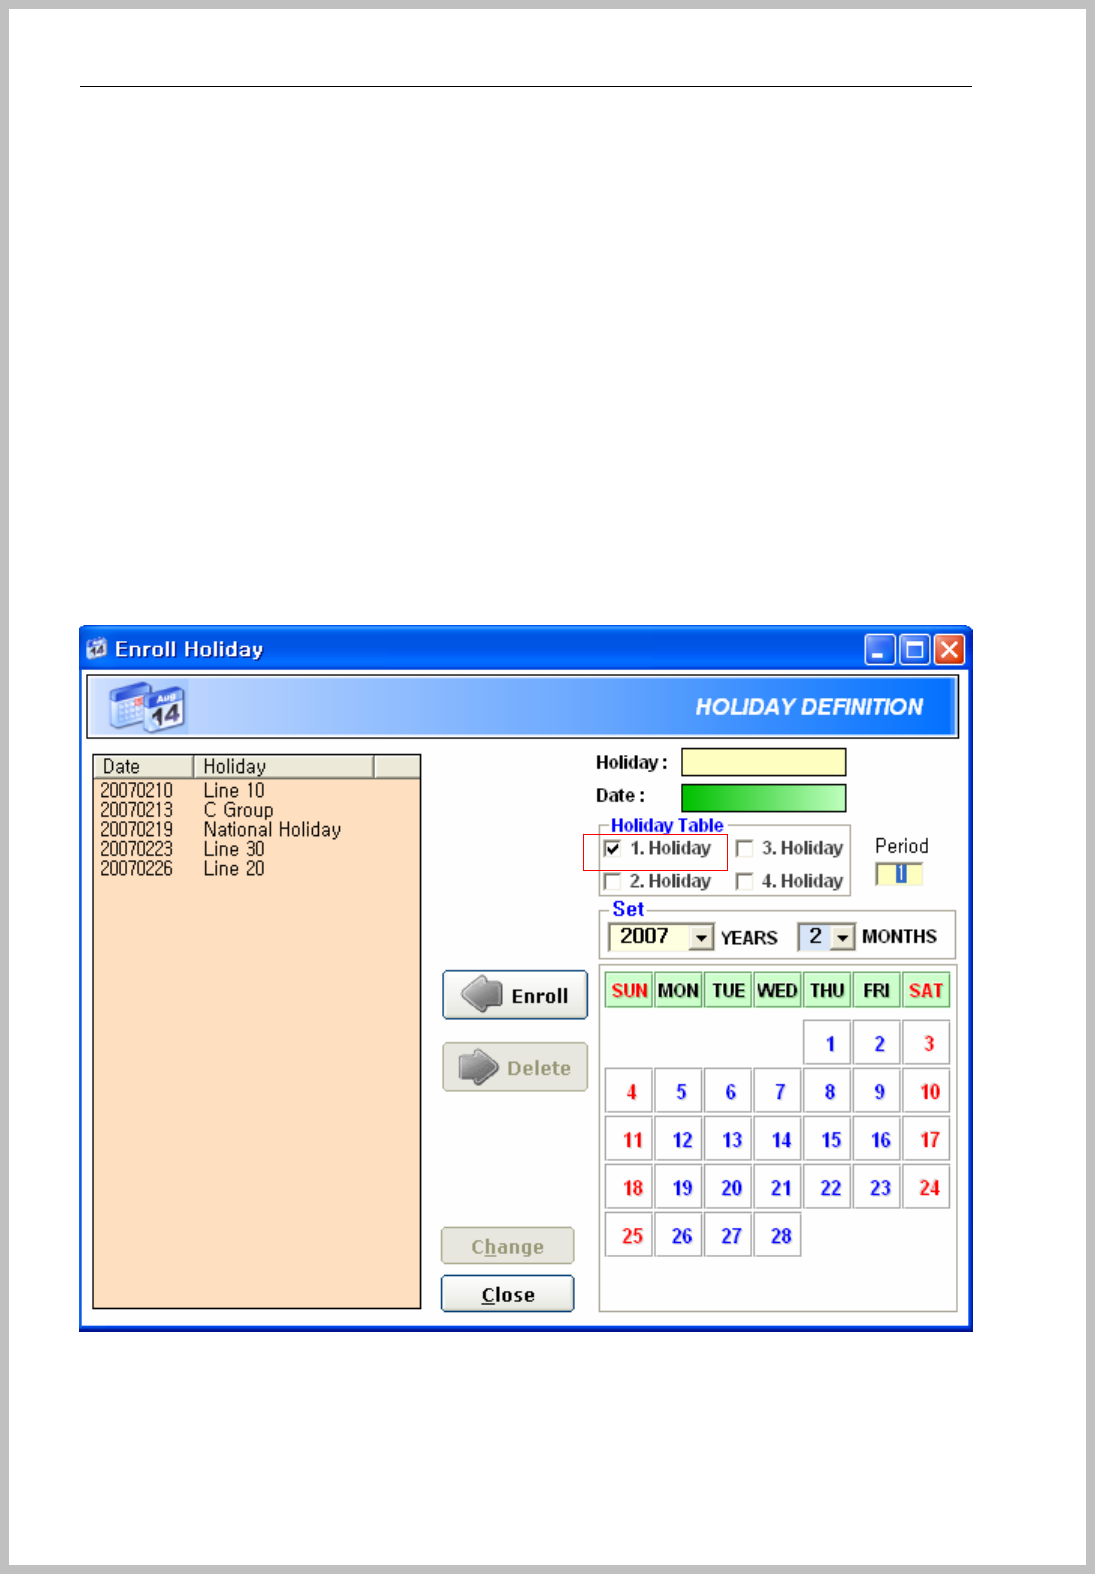
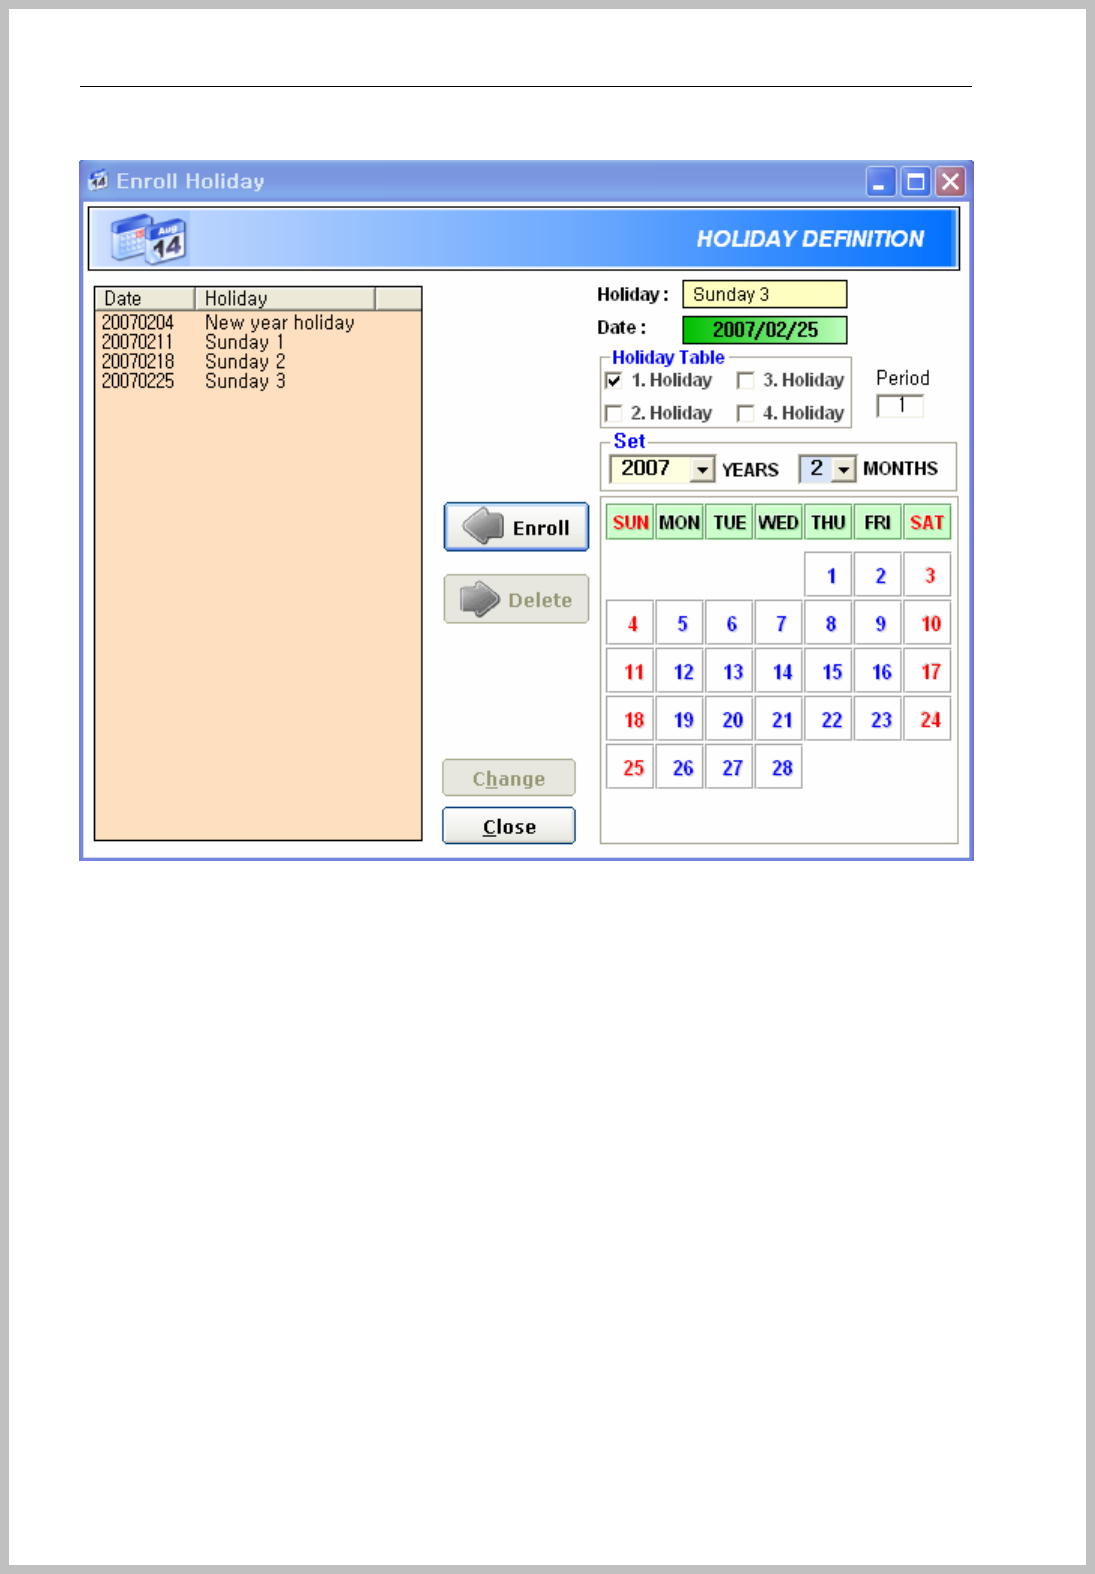
5.1.1Set Holiday
Go to the stage of ( Register=> Schedule=> Holiday)
The below window appears when push “Holiday” of menu
Holiday table is initially set as “1 Holiday” is for dividing holiday type.
For example, Type 1 is for Sunday, Type 2 is for National Holiday, Type 3 is for Company day off and
if 4th of July is including Sunday and National Holiday, please check “1 Holiday” & “2 Holiday”.
Console Manager
- 56 -
Holiday Table section
(EXAMPLE)
“A” group holiday => All Sunday and Saturday
“B” group holiday => All Sunday
“C” group holiday => All Sunday and 3 days of 10, 20 and 30th
EX) “A” group is day off all Sunday and National Holiday
“B” group is day off all Saturday and National Holiday.
“C” group is day off 10,15,20,15,30.
So you can make Holiday 1,2,3 by worker schedule.
For falling on day, check included schedule. For example “A” &”B” group has same holiday as
National Holiday. If it is 6th of July, click and select “1,Holiday” & “2.Holiday” together.
Console Manager
- 57 -
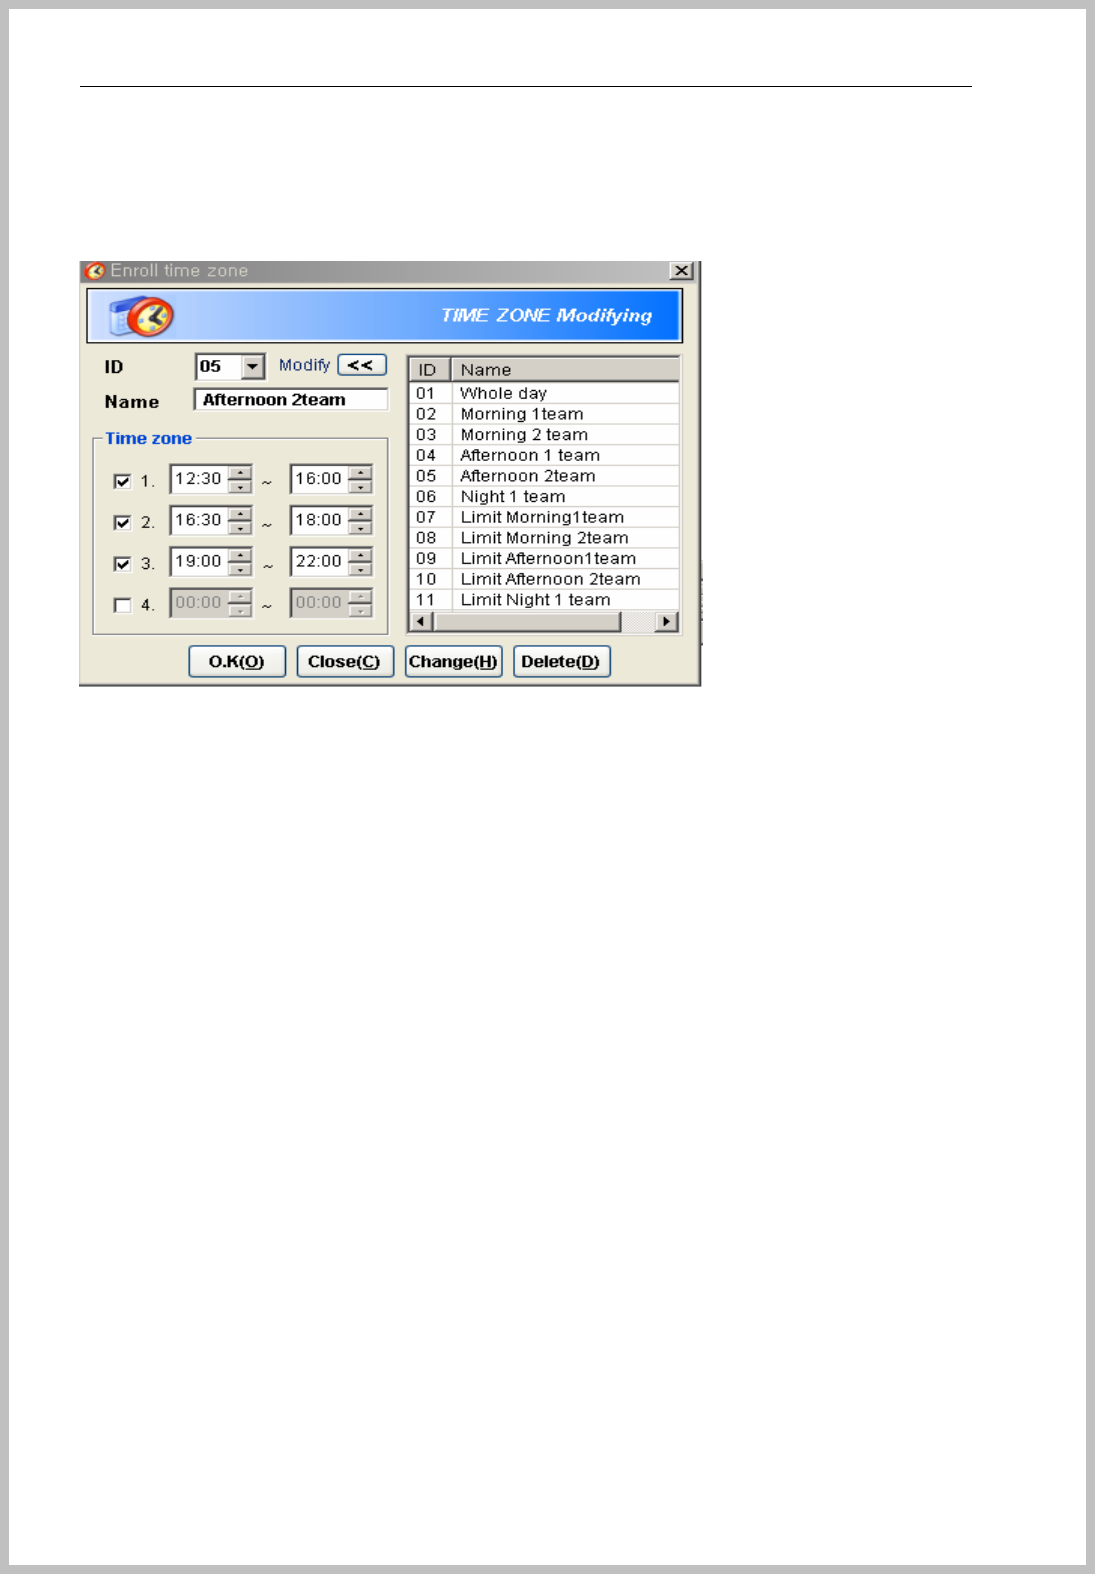
5.1.2Set Time Zone
Go to the stage of (Register=> Schedule=> Time Zones). And the below window appears.
.Input Name and Time Zone. It can be input 4 times a day ( 0 ~ 23:59 ).
For easy comprehension, time zone is divided by working group time as like Morning 1 team & 2
team, Afternoon 1 team & 2 team and Night 1 team.
EX) Whole day : 00:00~24:59
Morning 1team working time : 06:00~ 16:00
Morning 2 team working time : 07:00~10:00, 13:00~19:00
For setting value of time zone.
Morning 1 team : 05:00~17:00
Morning 2 team : 06:00~11:00, 12:00~20:00
You should consider of time gap for enter company and leave company around 30 min~1 hour.
Console Manager
- 58 -
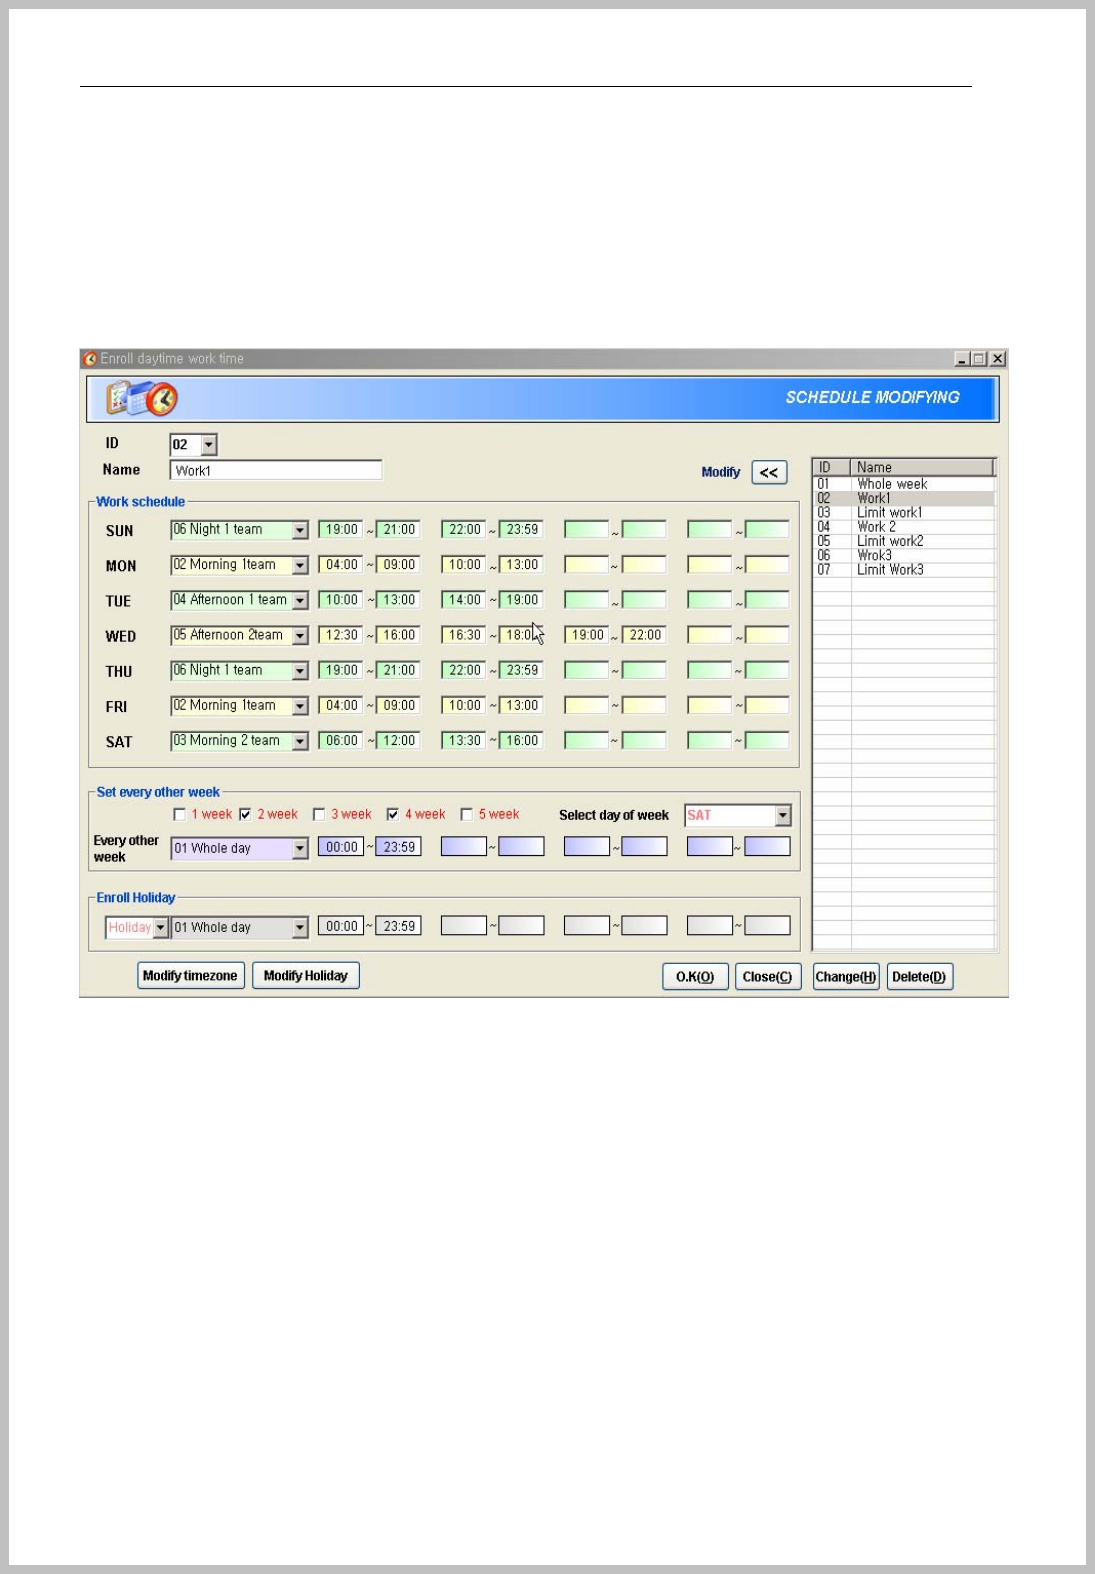
5.1.3Set Time Schedule
After set time zone, set weekly time schedule.
“Set every other week” is for fixed day off, it gets an advantage over the Holiday.
”Enroll “Holiday” should be sleeted of Holiday type and time set by time zone.
Access control time : Please see the above picture. Sunday Night 1 team only can enter the
door during set time(19:00~21:00, 22:00~23:59). When worker try to enter except set
time(00:00~18:59, 21:01~21:59), access denied with authentication failed message
appears
Set every other week : This function is for company extra settled day off every other week.
For example, “A” company is day off 2,4 Saturday. If you want to give value whole day close
door, give time value to 00:00~00:01 or 23:58~23:59.
Enroll Holiday : Please remember Holiday setting and give holiday value. And select one
time zone. For example, you want to open only day time during Holiday, set as 10:00~16:00
or just close whole day set as 00:00~00:01 or 10:00~10:01 (Minimum time gap is 1 min)
Console Manager
- 59 -
5.2Transmit Schedule to terminal
For use of Schedule & Role function, all record should be sent to selected terminal as to click the
“Download” button of the window to be shown after saving.
The below window automatically appears when all process finished.
Without transmit to terminal, schedule and role functions can’t apply.
Console Manager
- 60 -
* Green Color is DialUp connection terminal.
* Black Color is TCP/IP and Serial terminal.
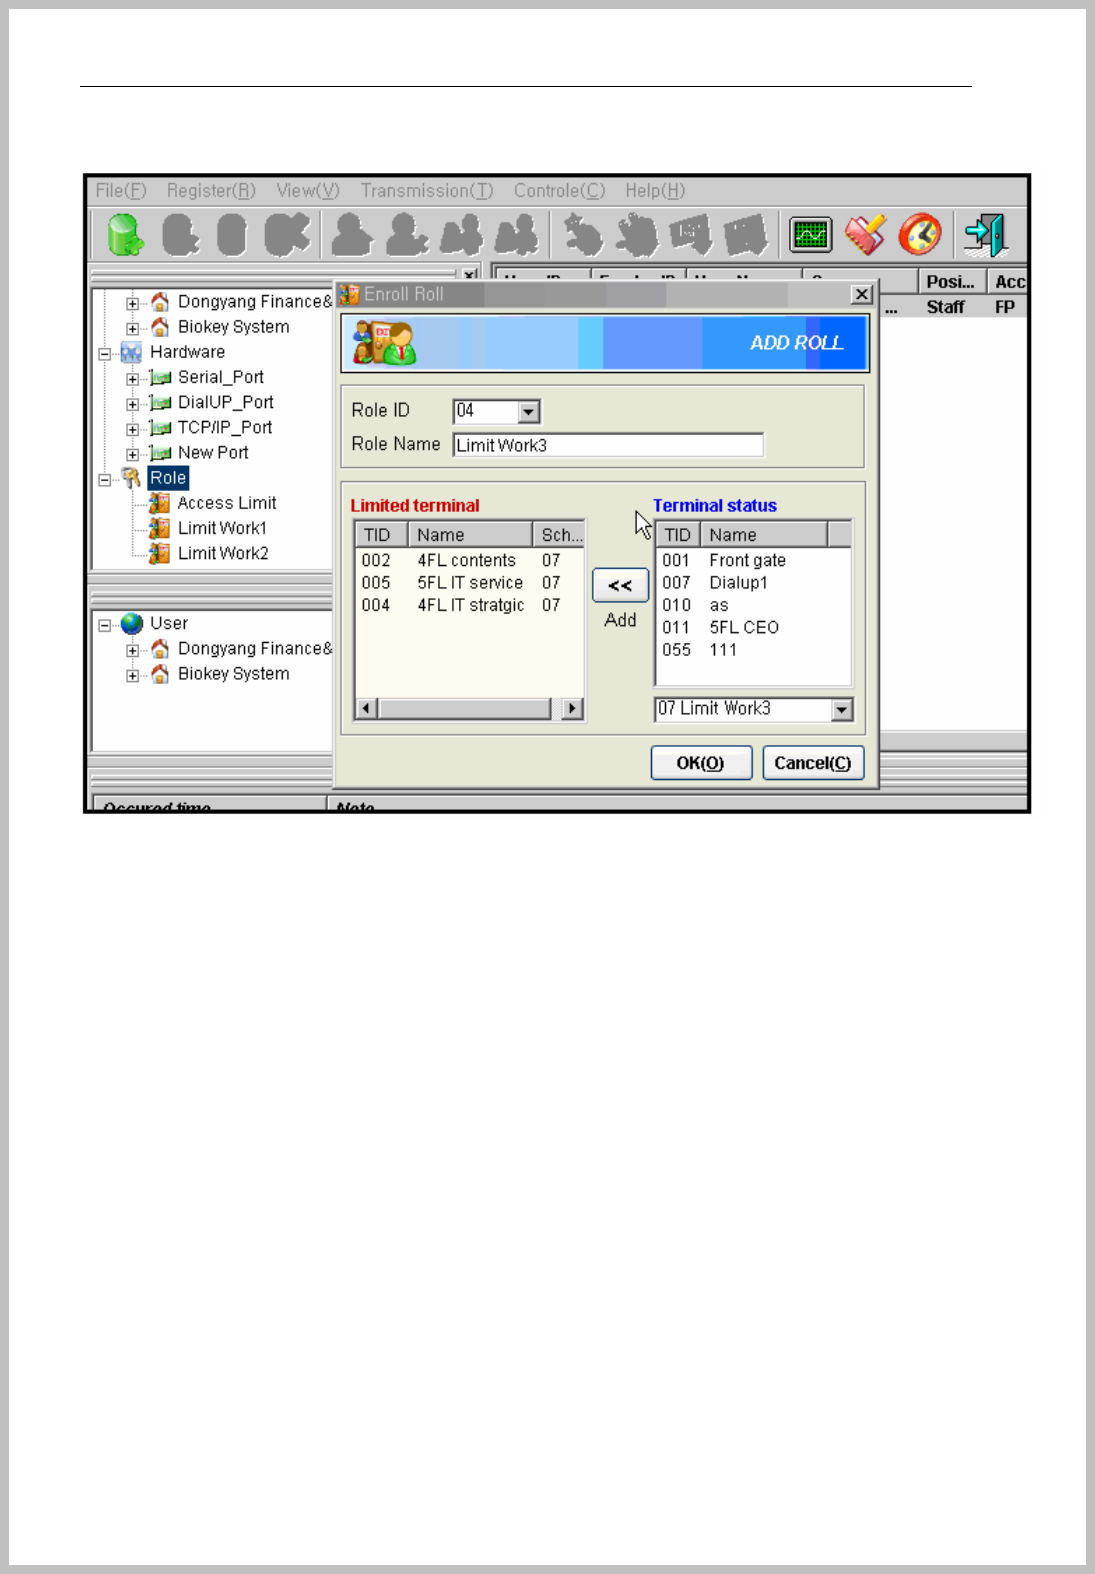
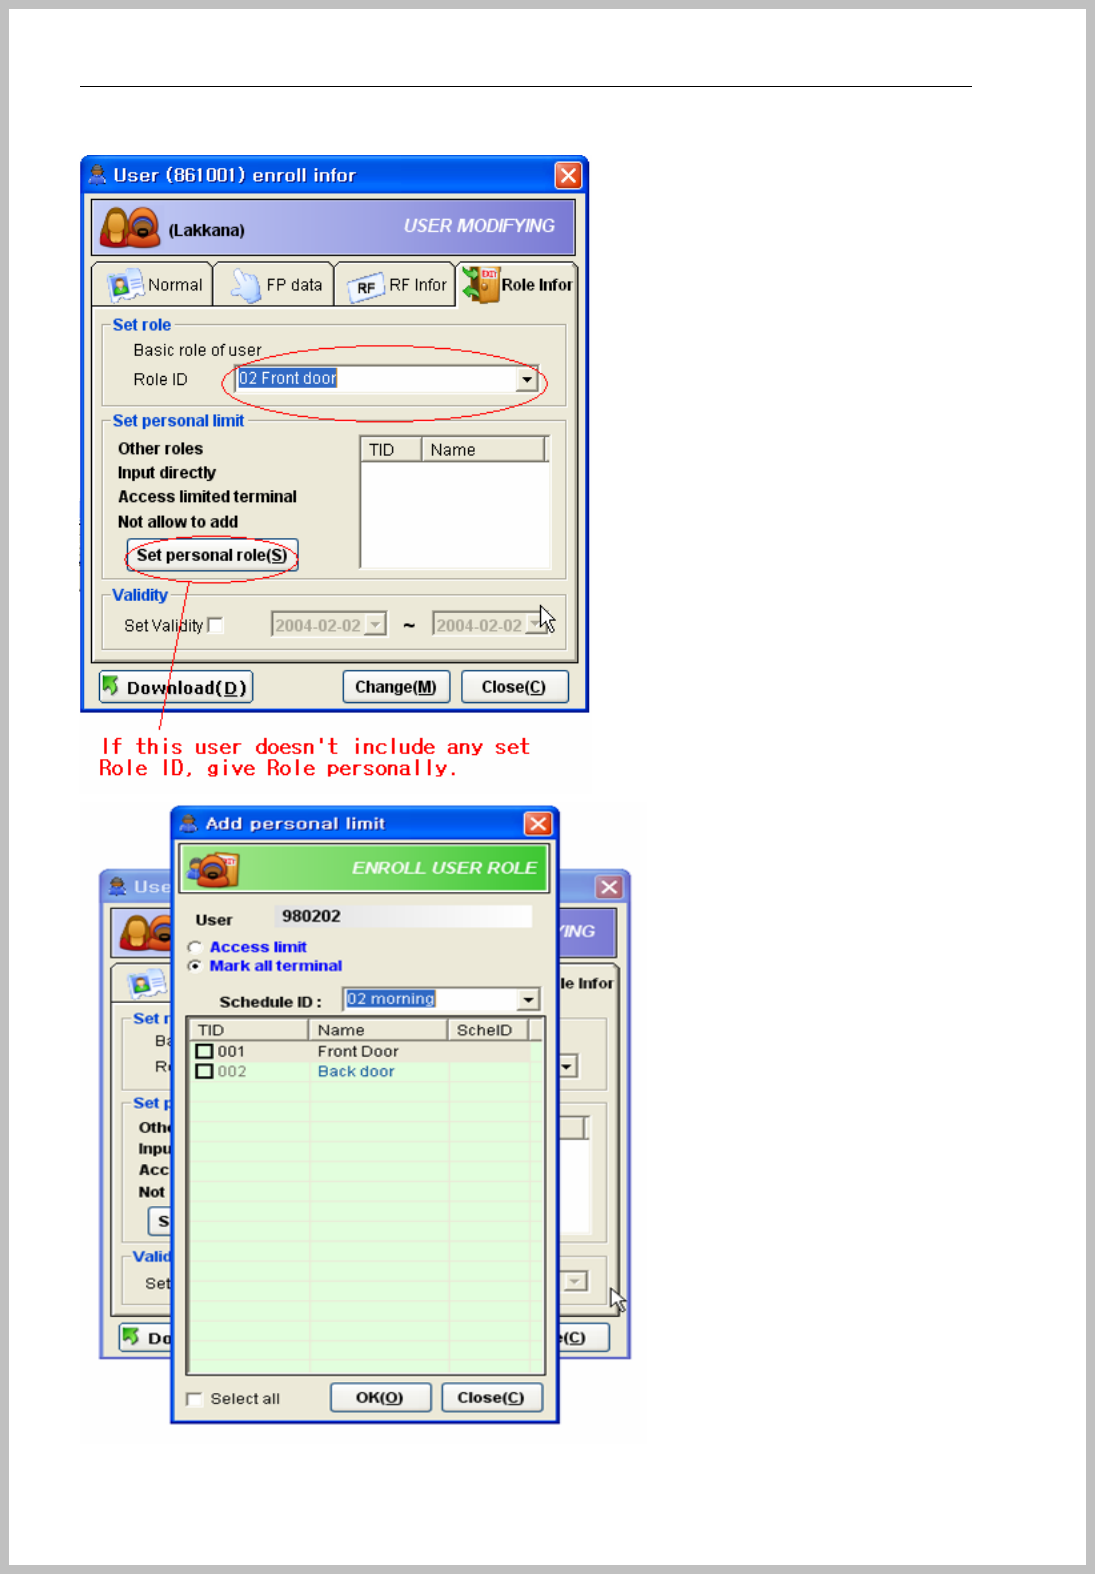
5.3Role
Select Role and click the right button of mouse as the below picture or go to menu bar of stage
(Register=> Role=>New).
First, give Role Name and select on enrolled Schedules of above “OK” button.
Second, Select terminals to be applied.
Third, push “OK” button for saving.
Apply for each user, please select “Enroll role” on process of “Enroll User”
Console Manager
- 61 -
Console Manager
- 62 -
Console Manager
- 63 -
Check TID and click ”OK” button set personal limit.
5.4 Schedule control layout
Holiday : 4 different holiday setting
Time Zone : 4 different time zone a day
Time Zone enrolled ID : 32 time zones are possible
Schedule enrolled ID : 32 schedules are possible
You can management various schedule of access control.
6. Transmit
6.1 Download & Upload
Go to the process of “Transmission” of menu bar. “Download” means “ sending data to terminal” and
“Upload” means “ Get data from terminal”.
Console Manager
- 64 -
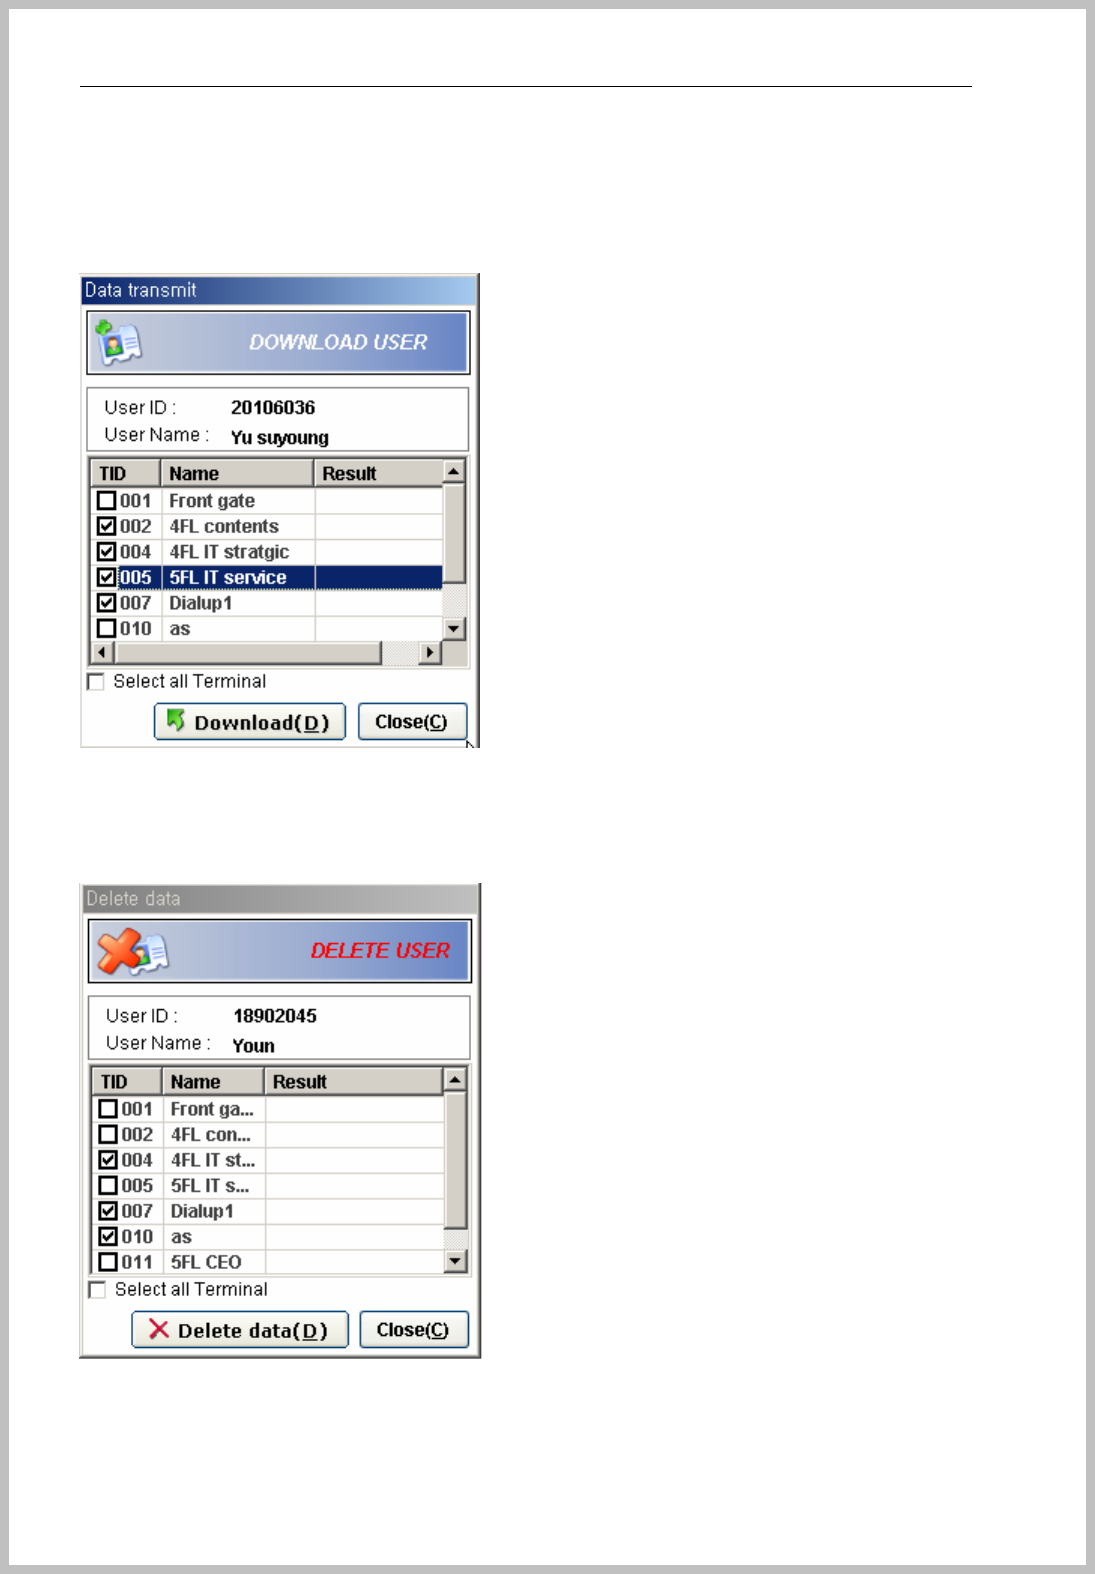
6.1.1 Download User
This is for transmit selected user data to terminal. First, it should select one user to be transmitted.
6.1.2 Delete User
This is for deletion of selected user data from terminal. First, it should select one user to be deleted.

Console Manager
- 65 -
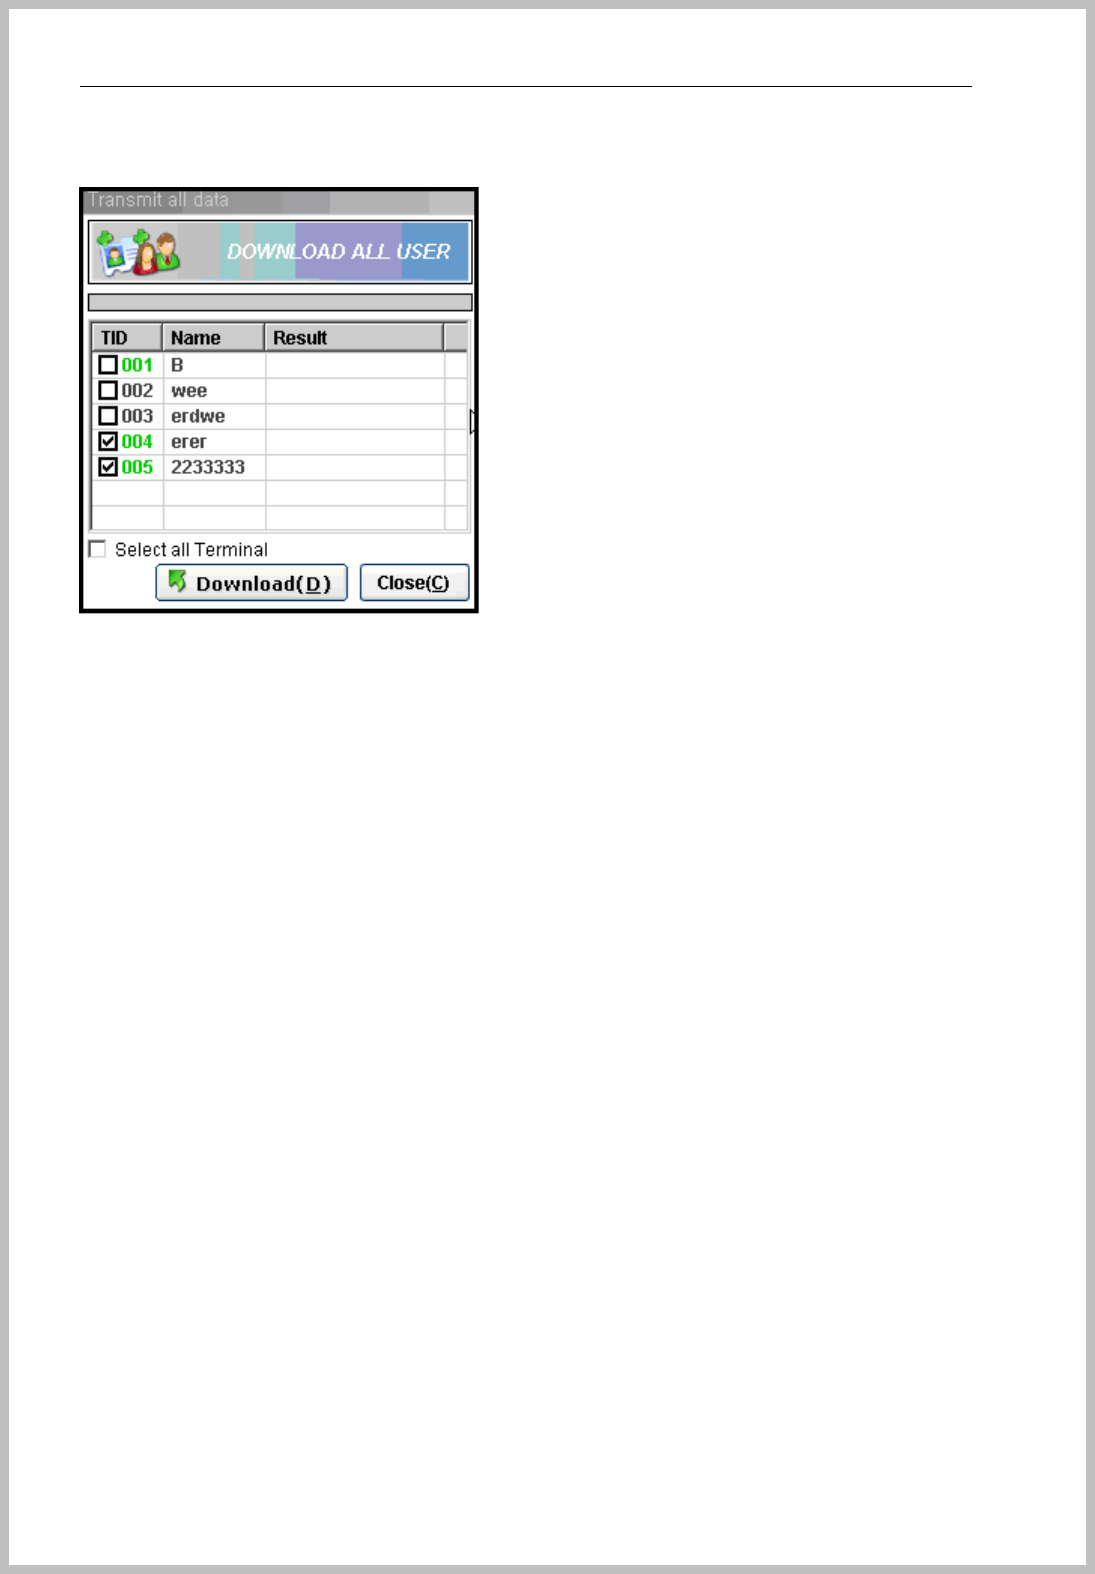
6.1.3 Download All user
This is for transmit all user data of selected group or company to terminal. First, it should select one
group or company to be transmitted.
6.1.4 Delete All user
This is for deletion of all user data from terminal.
6.1.5 Upload FP and RF
This is for get Fingerprint & EM TYPEdata stored in Terminal.
The data modify by User ID.
Console Manager
- 66 -
6.1.6 Download and delete Schedule
Enrolled schedule should transmit to terminal, if not, schedule function not works.
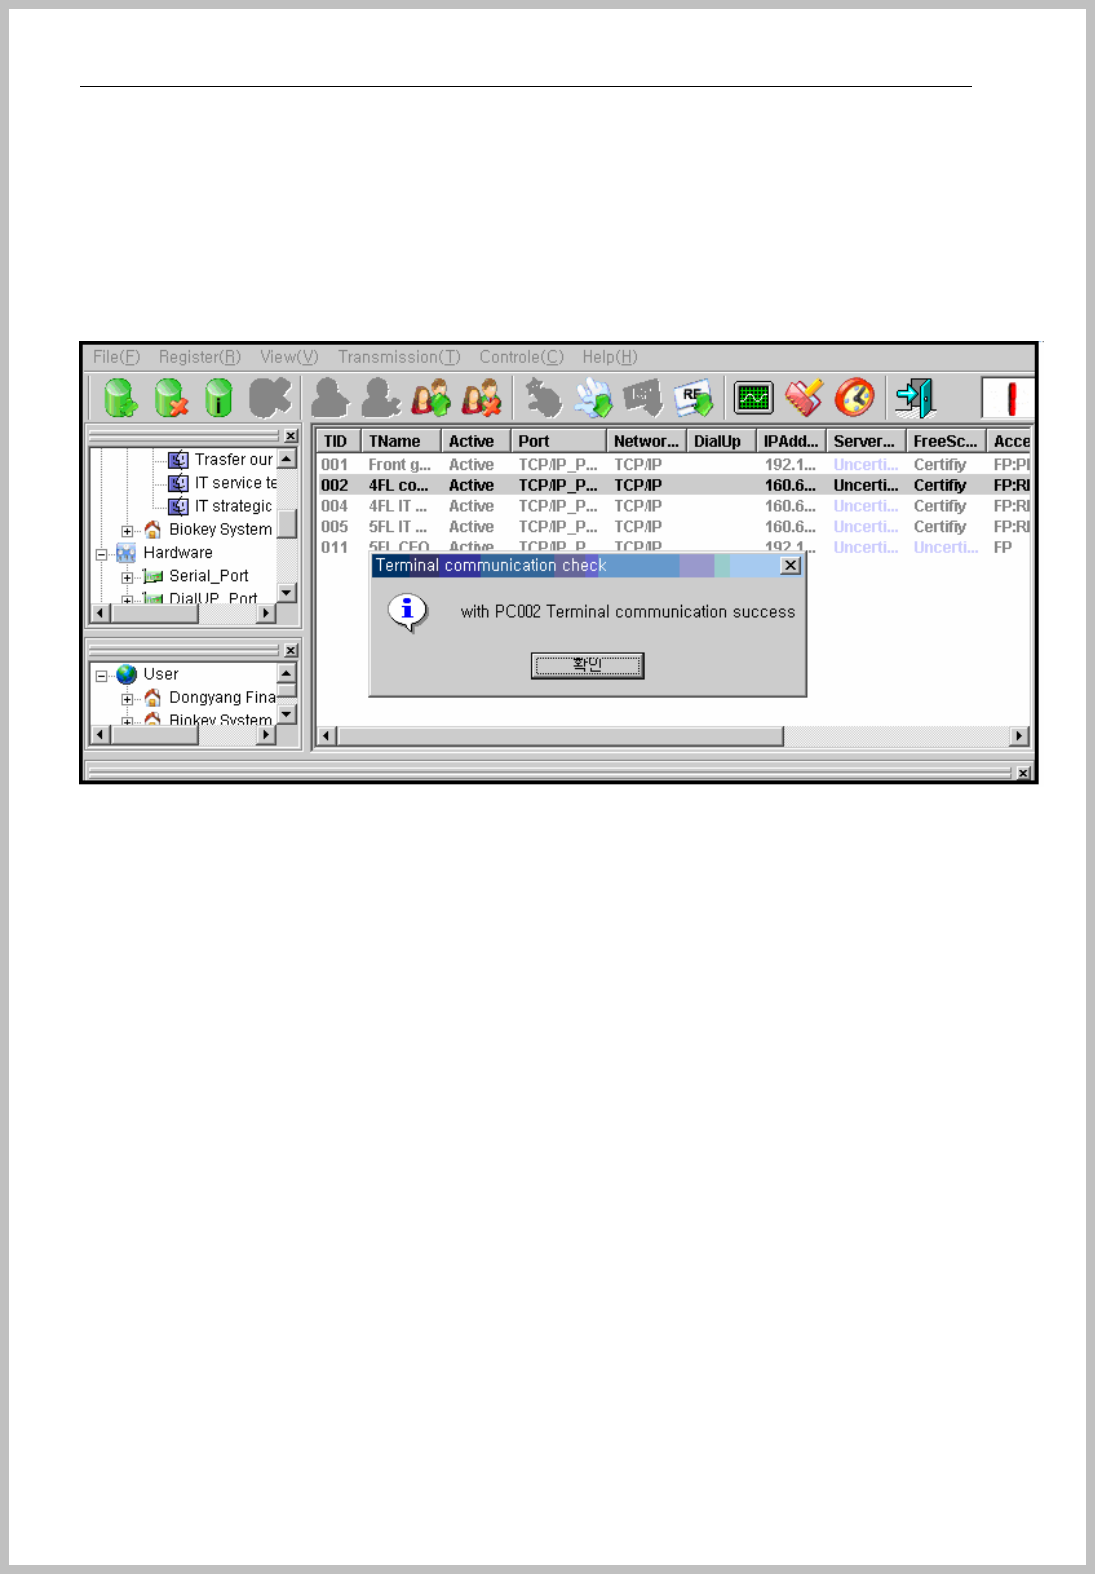
6.1.7 Download terminal
This is for checking terminal status.
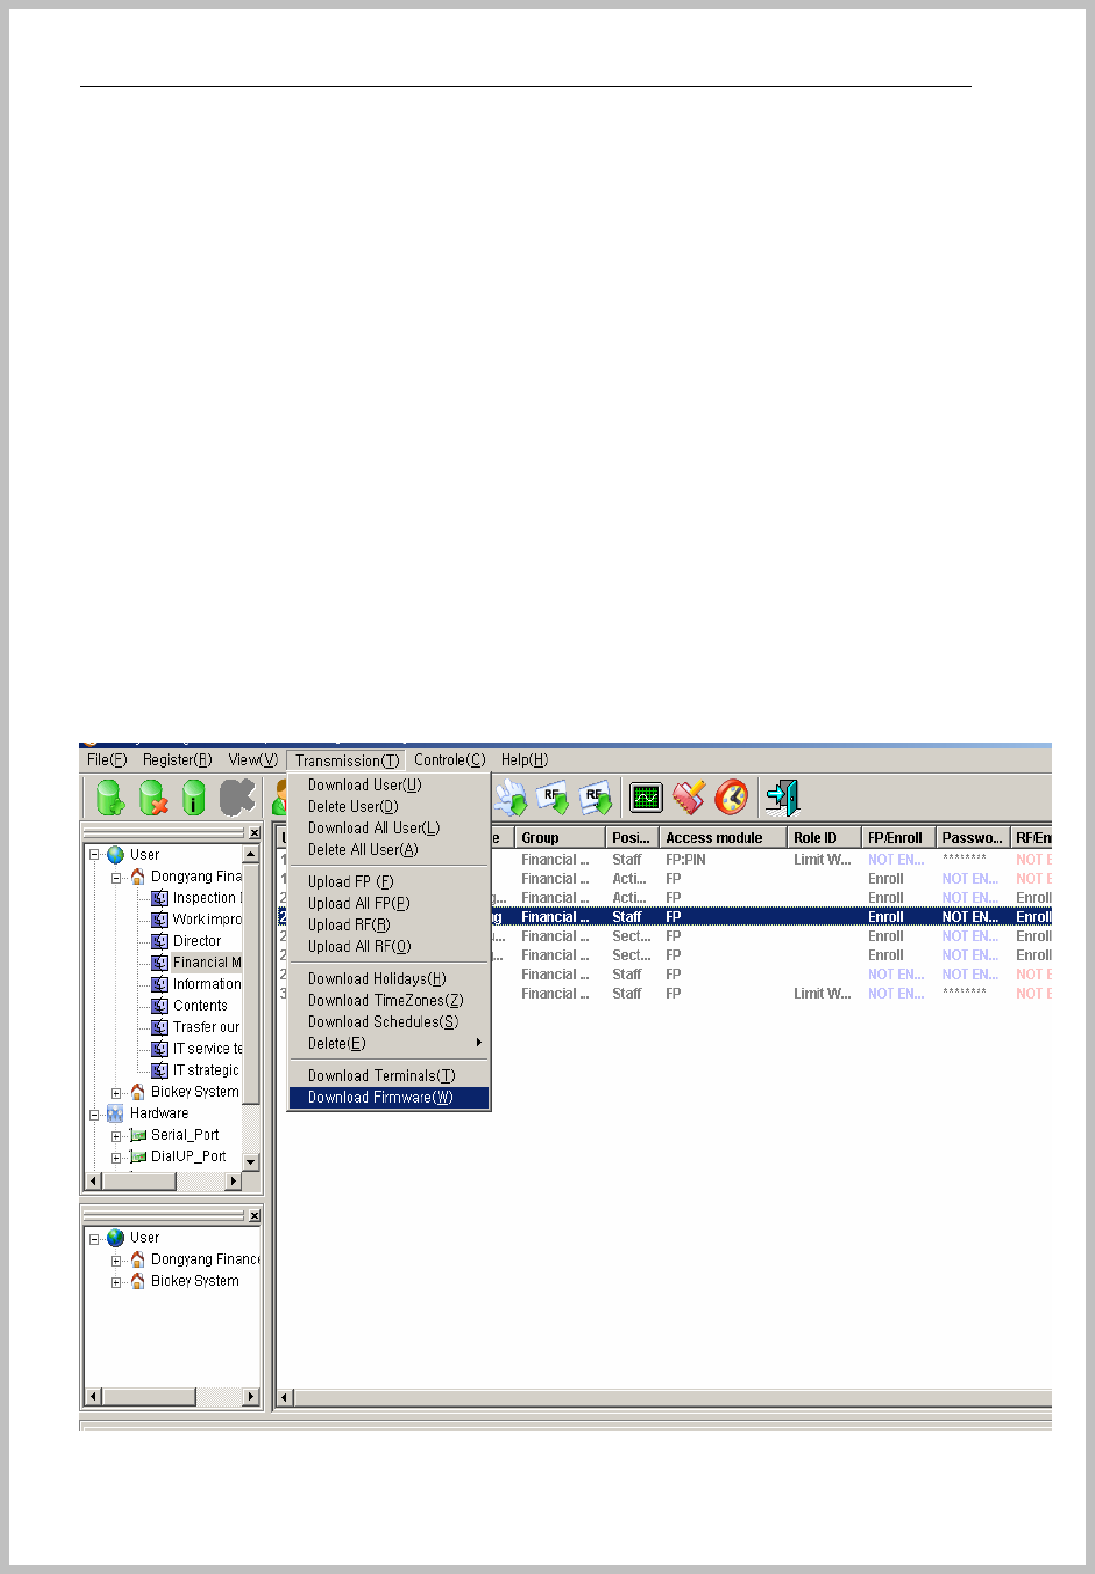
6.1.8 Firmware update
z Supported binary file named “***.bin” by Console System, input to “C:/program/Console”
folder and run Console Manager. Select “Control-> Update firmware” of tool bar.
z As to show of patch by Console, click it and wait till small window appears.
z Click the message and close the window.
z Please reset the terminal.
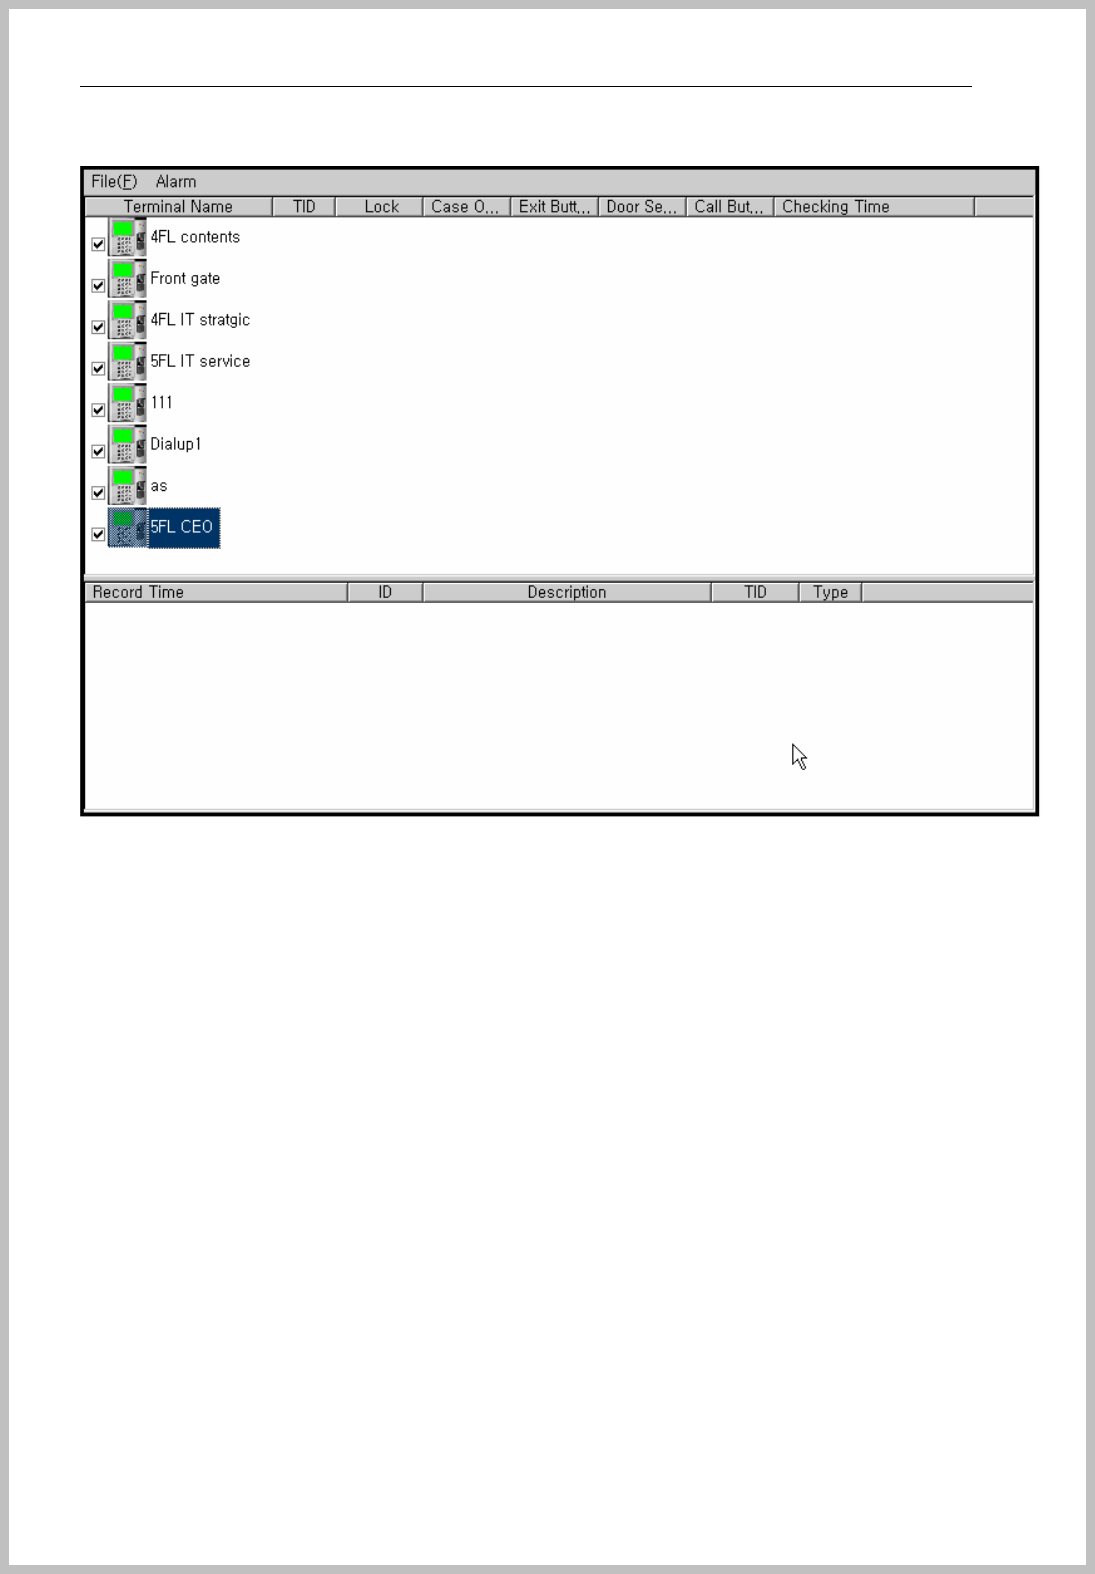
7 Monitoring
After install Console Manager, run as to click icon ‘Monitoring’.
It can real-time monitoring of Lock, case open, exit button door sensor and call button.
The below part is shown the terminal and log record at real-time.
When administrator wants to be off the alarm sound, select ‘Alarm’ of menu bar.
Console Manager
- 67 -
8 Report
<How to use Report>
Search a person the following conditions
Name : John Smith
Group : Line 1
Date : 6/1/2006 ~ 6/31/2006
Time : AM11:00~ PM02:00
Terminal : Terminal 004
Purpose : John Smith tried to access the terminal 4 for the above time, even though
he doesn’t be allowed to enter this time by schedule.

Console Manager
- 68 -
After choose Access Denied of Event section, it is listed many event ID.
137 Access Denied : Access Control => Denied by schedule and role function
146 Access Denied : Lost Card => Denied by lost and stolen card on user
information.
Console Manager
- 69 -
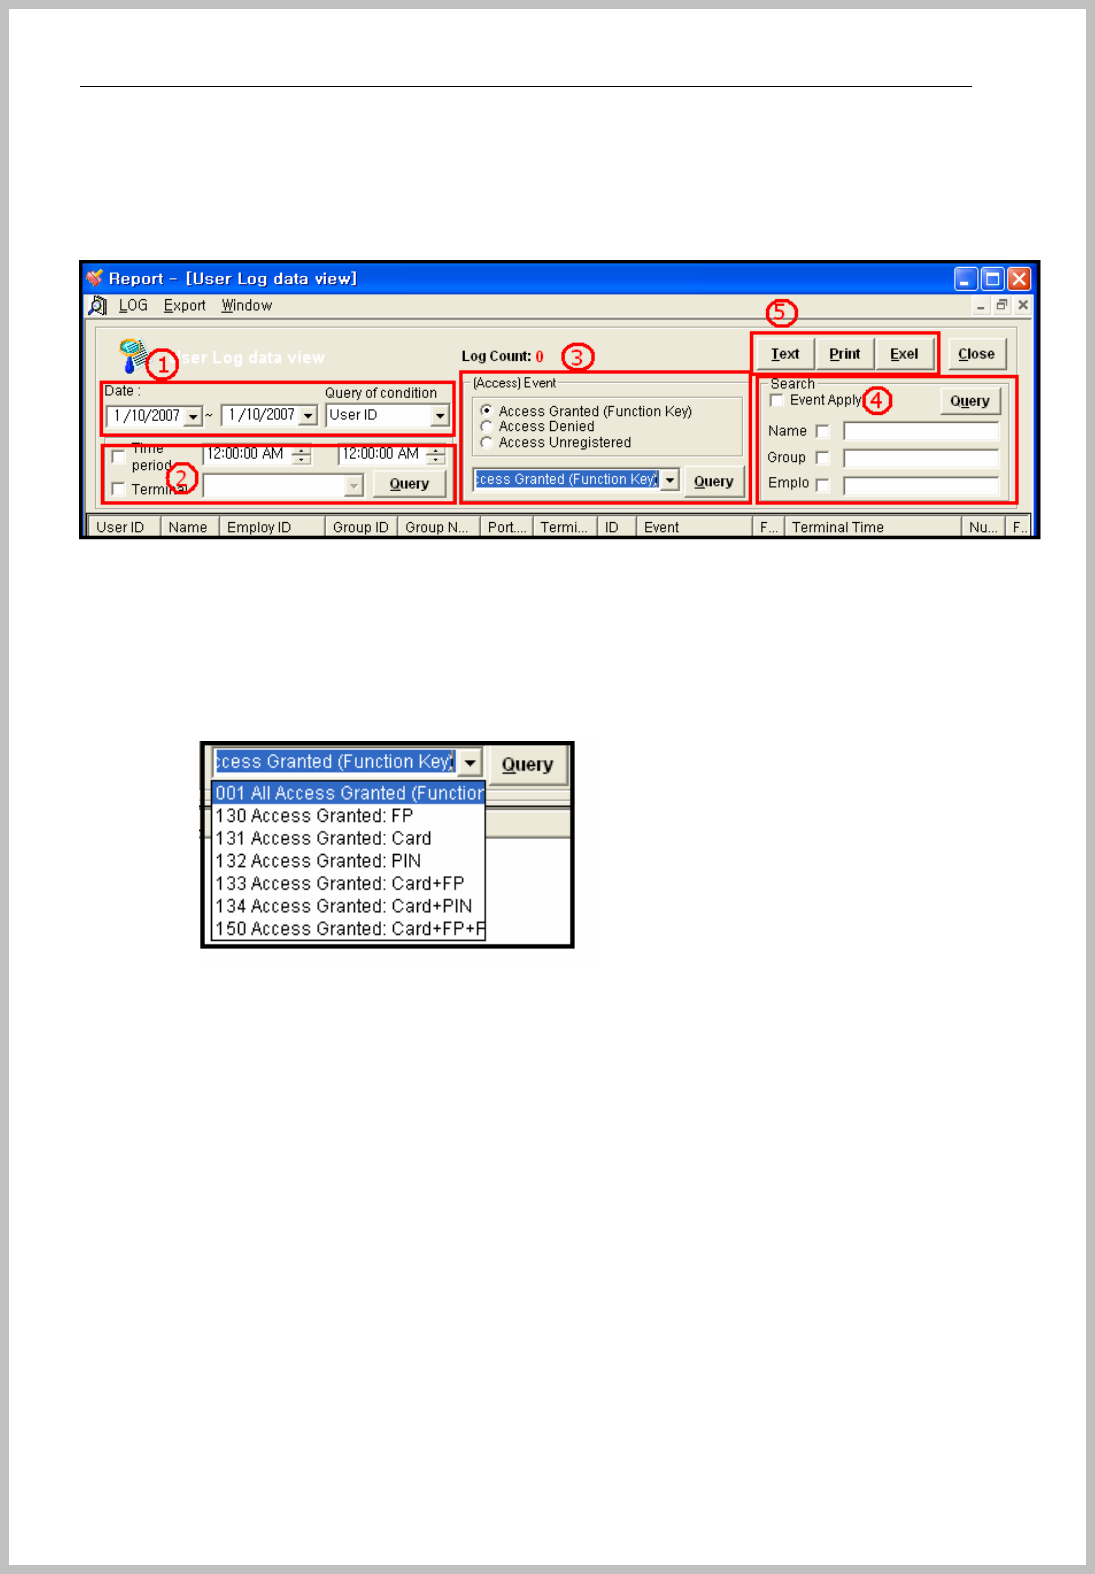
8.1 User log data view
User log data view is set as default window.
This is for user event log record by set period as to push “Query” button.
1. Date : Select the period of date and choose the priority query condition on the scroll
list.
2. Time period and Terminal : it can make more details of searching under result of ①.
3. Access Event : It can be searched by log event type as Access Granted, Access
Denied, Access Unregistered. After done it, select details by granted method.
4. Search : Check the box required conditions of Name, Group and, Employee ID and
then input character or number.
5. Data output by Text, Print, Excel : save by text or excel file and print out.
Console Manager
- 70 -
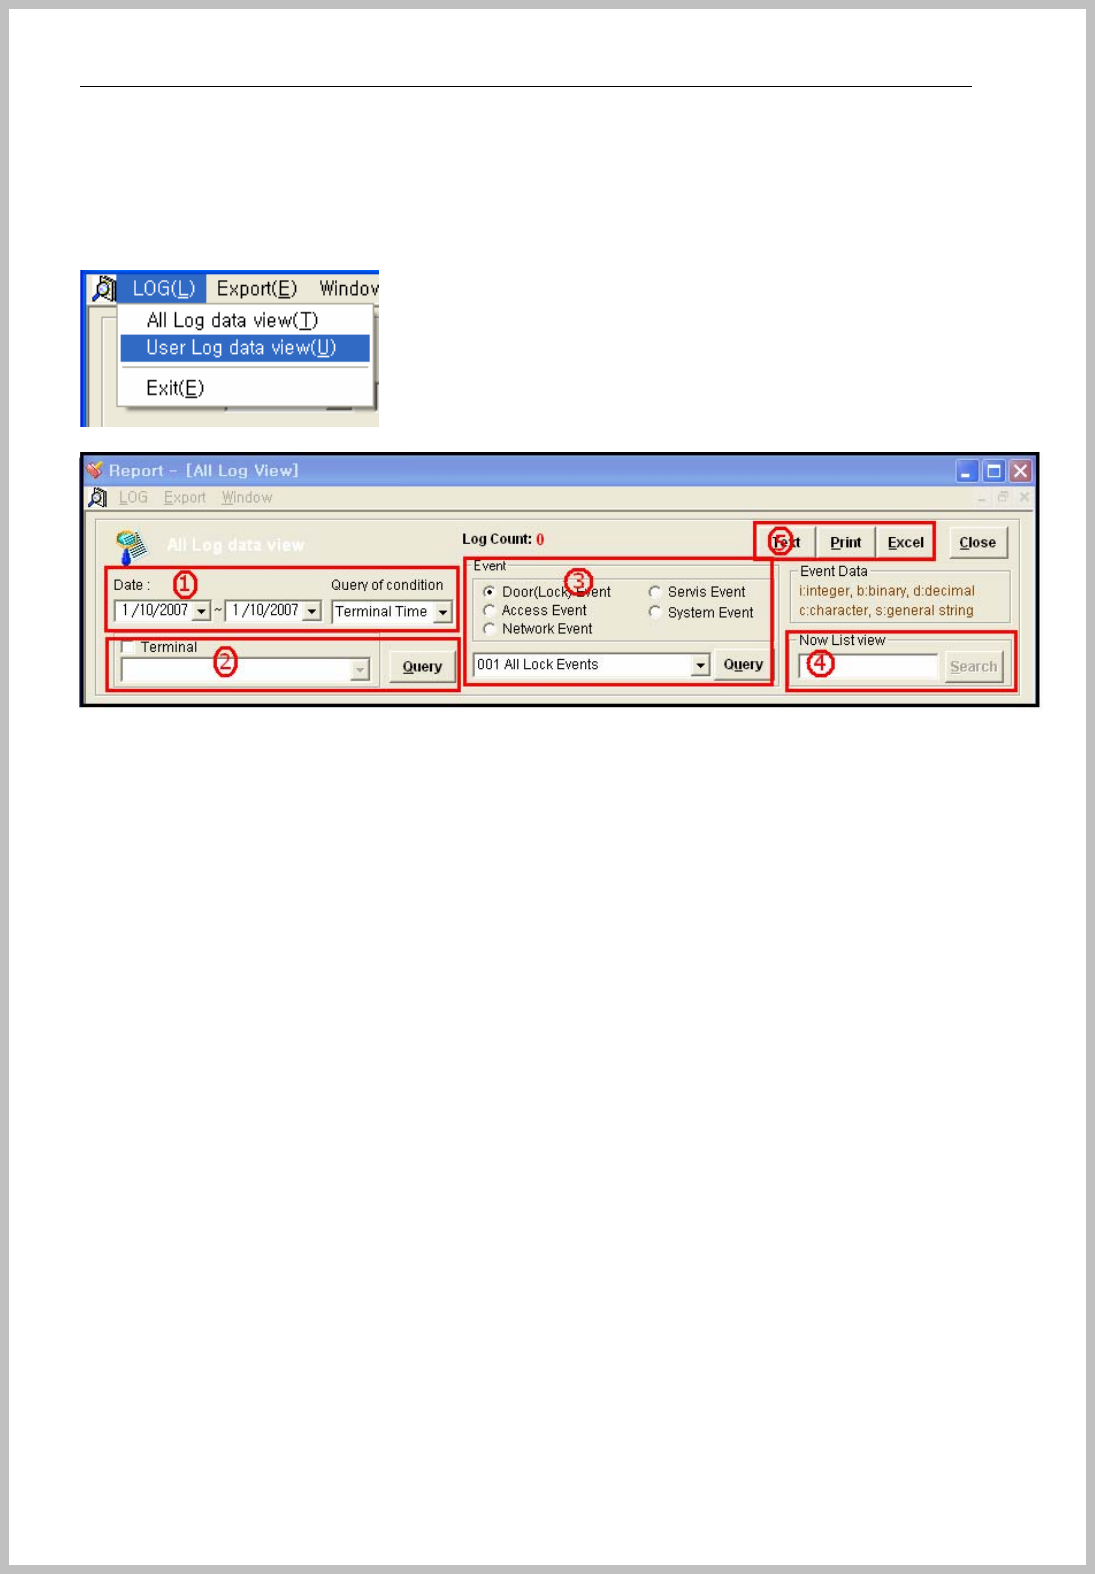
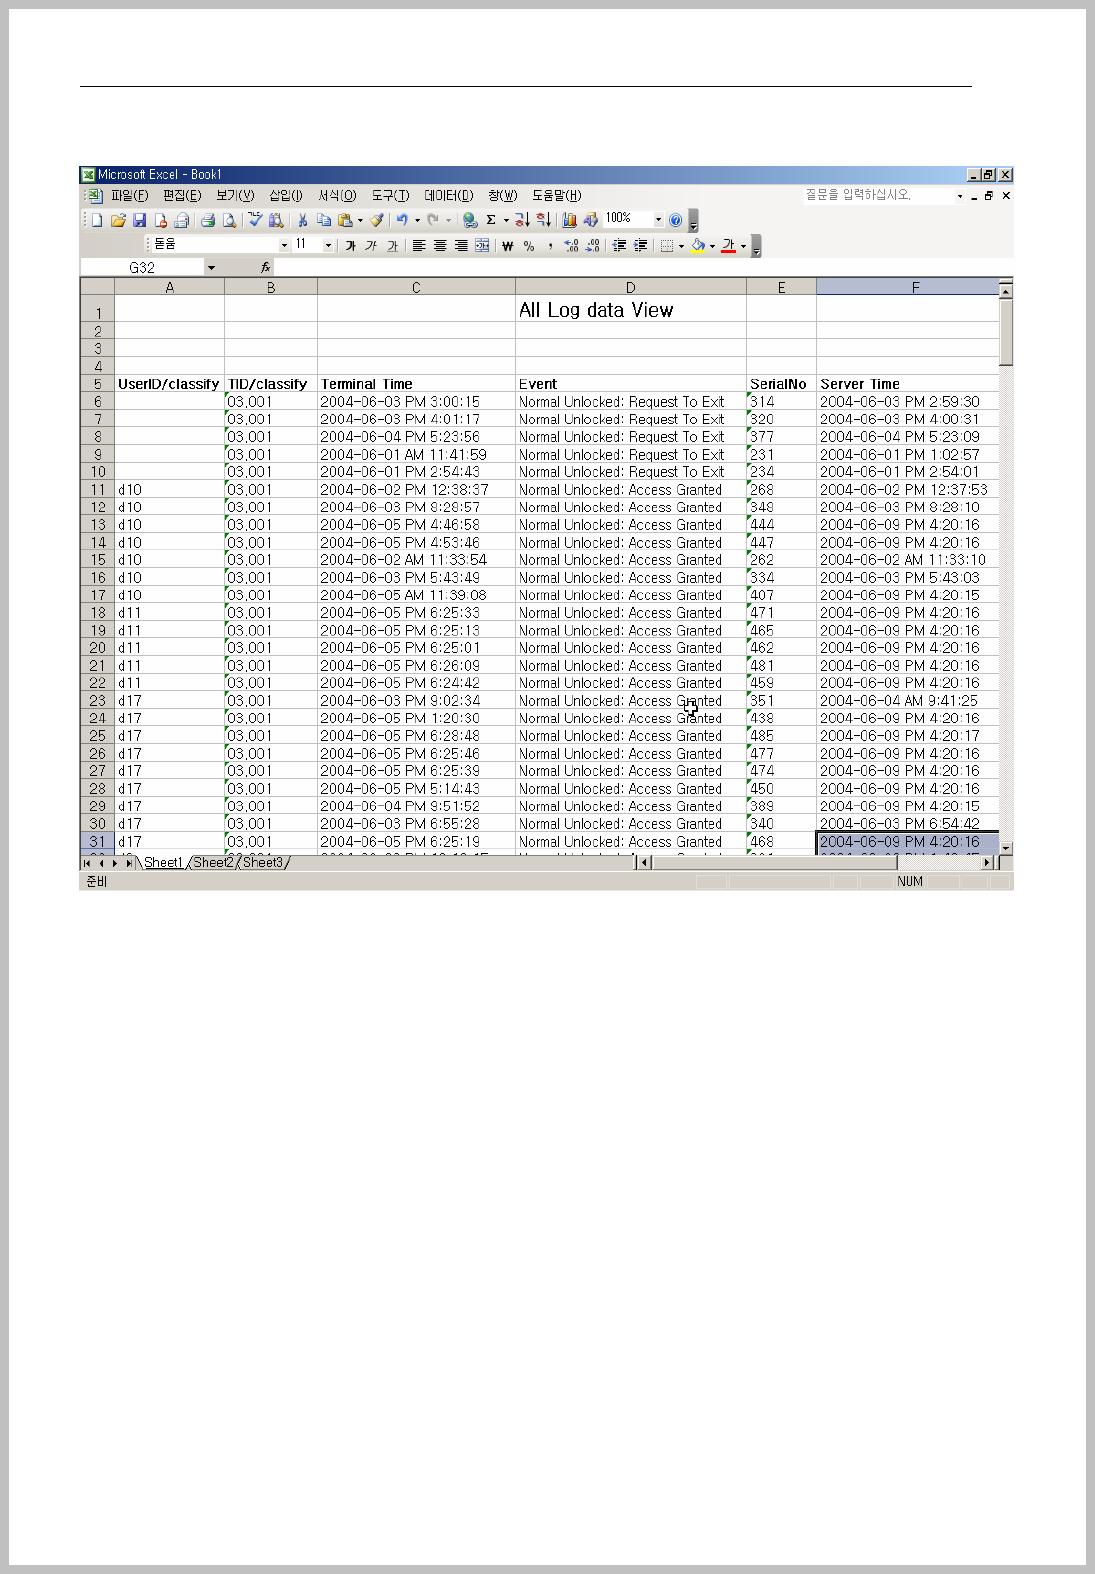
8.2 All log data view
If you need the details of records, not only user data, please select “menu=> Log=> All Log
data view”
1. Date : Select the period of date and choose the priority query condition on the
scroll list.
2. Terminal : Select terminal ID and then click the “Query” button.
3. Event : Door Event – Please choose one main event and you can see the change
of scroll menu by your selection. Select sub query condition of scroll bar.
4. Search : input a words or number for searching on the listed data.
5. Data output by Text, Print, Excel : save by text or excel file and print out.
Console Manager
- 71 -