Bioness Neuromodulation A Bioness L3P-T-RFS-V10 Thigh RF Stimulation Unit User Manual manual2
Bioness Neuromodulation ltd. A Bioness Inc Company Thigh RF Stimulation Unit manual2
Contents
- 1. manual1
- 2. manual2
- 3. manual3
manual2
35
Chapter 5 - System Components and Accessories
L300 Accessories
L300 Hydrogel Electrodes
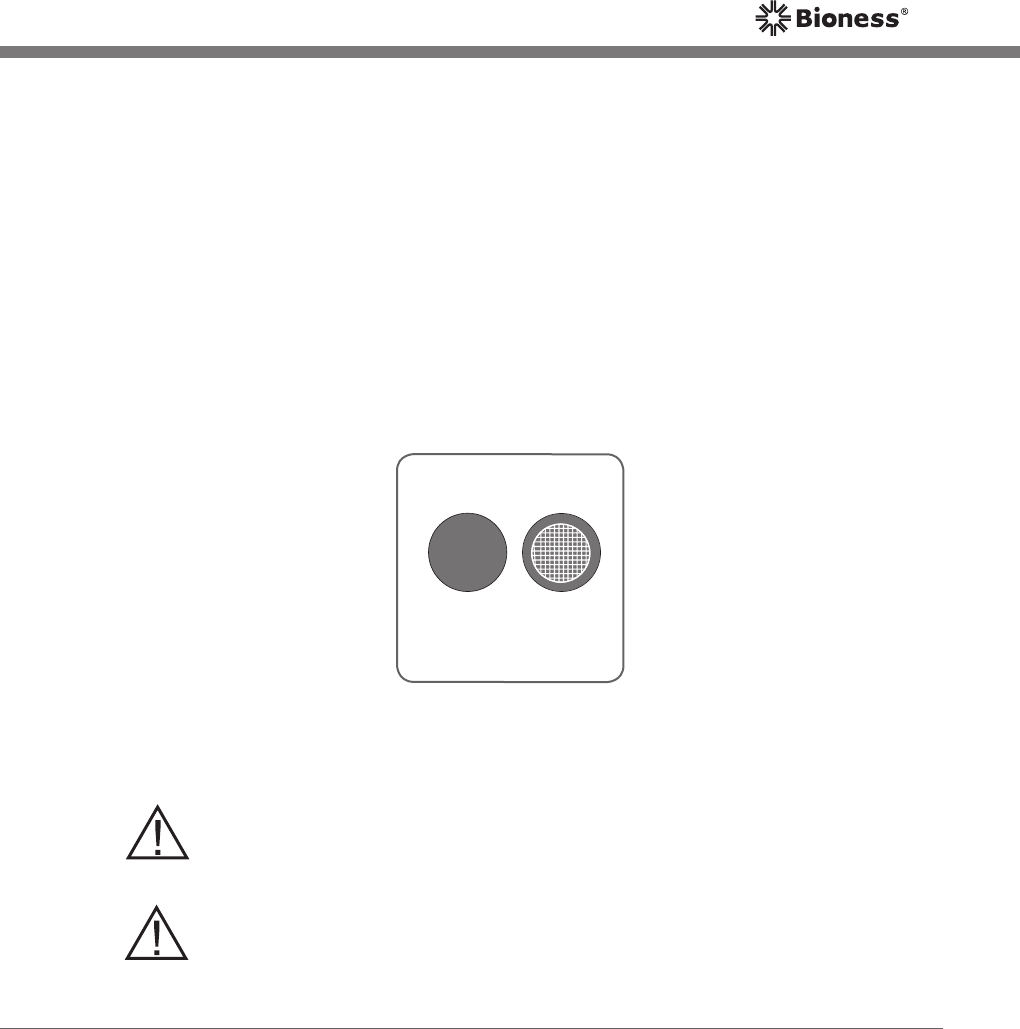
The L300 hydrogel electrodes are used with the L300 FS Cuff. See Figure
9. Two hydrogel electrodes are used to deliver stimulation from the L300 RF
Stim Unit to the muscles in the lower leg. Each hydrogel electrode attaches
to a hydrogel electrode base. The side of the electrode with the grid faces
the electrode base.
Do not use the L300 FS Cuff without electrodes. Always replace the plastic
covers on the hydrogel electrodes between uses.
Hydrogel Electrode
Figure 9: Hydrogel electrode, front (left) and back (right).
Caution: Change the electrodes every two weeks.
Caution: Only use electrodes provided by Bioness Inc.
36
NESS L300 Plus
User’s Guide
L300 Hydrogel Electrode Bases
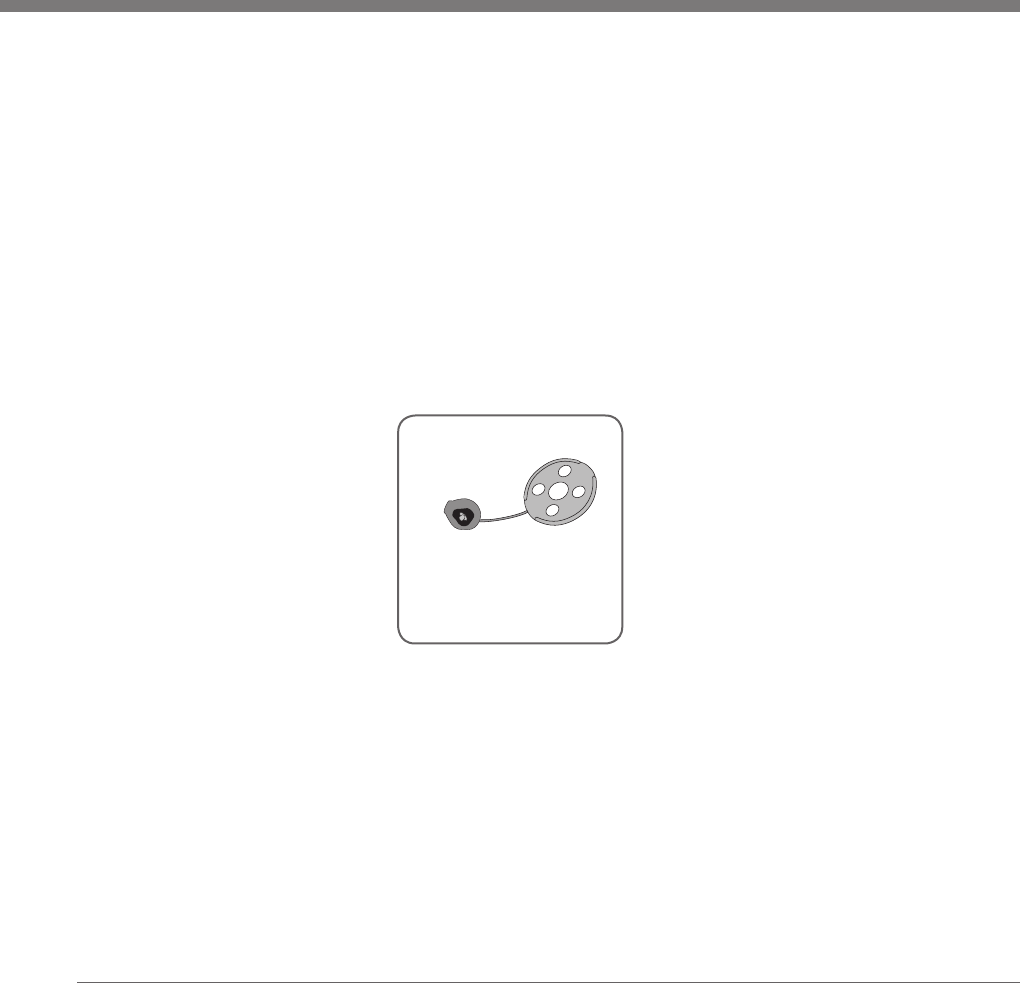
The hydrogel electrode bases are for use with the L300 FS Cuff. See Figure
10. Your clinician will determine the best placement for the hydrogel electrode
bases.
The hydrogel electrodes attach to the hydrogel electrode bases. Always attach
the grid side of the hydrogel electrodes to the hydrogel electrode bases.
Do not move the electrode bases once your clinician has fit them, other
than to replace them. The hydrogel electrode bases need to be replaced
approximately once every two years..
Hydrogel
Electrode Base
Figure 10: Hydrogel electrode base.
37
Chapter 5 - System Components and Accessories
L300 Cloth Electrodes
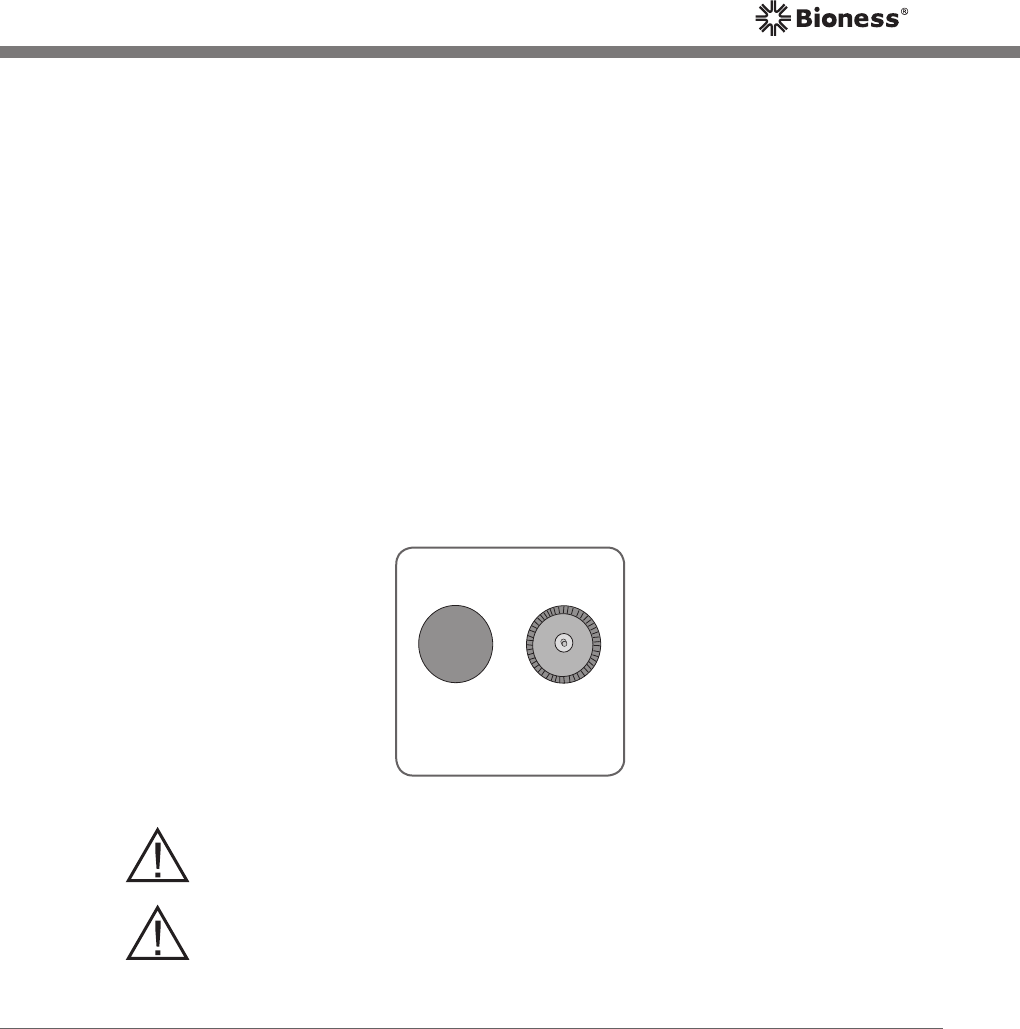
The L300 cloth electrodes are used to deliver stimulation from the L300 RF
Stim Unit to the lower leg muscles. See Figure 11. They are designed to be
skin friendly and provide an alternative for people who do not prefer the L300
hydrogel electrodes. They are also for people who have sensitivities to the
L300 hydrogel electrodes or other known sensitivities (for example, allergy
or skin sensitivity to tape/adhesive).
The L300 FS Cuff uses two cloth electrodes. Each one snaps to a cloth
electrode base.
The L300 cloth electrodes must be wet before use and after every three to
four hours of use. If the L300 FS Cuff is removed for more than one hour, the
cloth electrodes need to be rewet. Allow the cloth electrodes to dry between
uses. Do not use the L300 FS Cuff without electrodes.
Cloth Electrode
Figure 11: L300 cloth electrode, front (left) and back (right).
Caution: Change the electrodes every two weeks.
Caution: Only use electrodes provided by Bioness Inc.
38
NESS L300 Plus
User’s Guide
L300 Cloth Electrode Bases
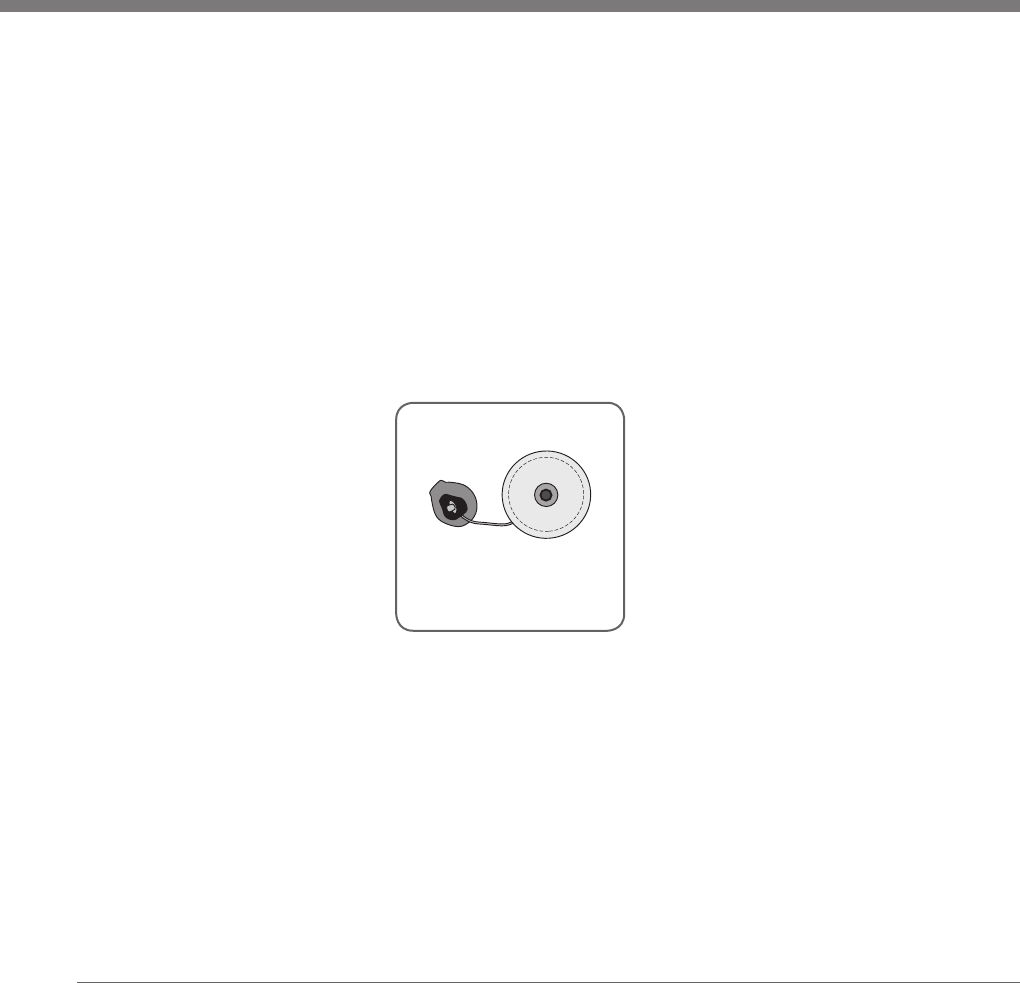
The L300 cloth electrode bases are for use with the L300 FS Cuff. See Figure
12. Your clinician will determine the best placement for the cloth electrode
bases.
The L300 cloth electrodes snap to the L300 cloth electrode bases.
Do not move the electrode bases once your clinician has fit them, other than
to replace them. Cloth electrode bases need to be replaced approximately
once every two years.
Cloth
Electrode Base
Figure 12: L300 cloth electrode base.
39
Chapter 5 - System Components and Accessories
Wrist Strap, Neck Strap, and Belt Pouch
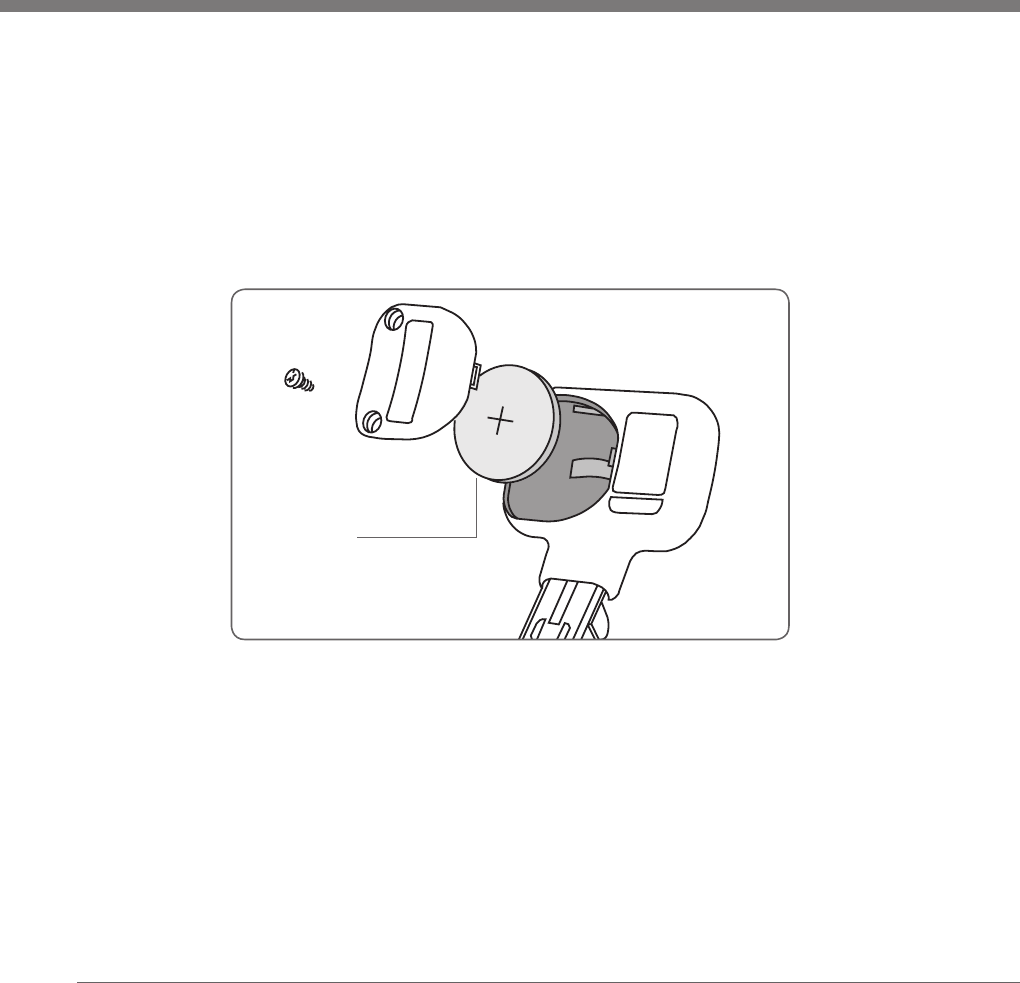
The wrist strap, neck strap, and belt pouch are used to carry the L300 Plus
Control Unit. The wrist and neck straps loop through the top of the Control
Unit. See Figure 13.
Wrist Strap Belt Pouch
Neck Strap
Figure 13: L300 Plus Control Unit carrying options.
40
NESS L300 Plus
User’s Guide
Replacement Battery, Gait Sensor
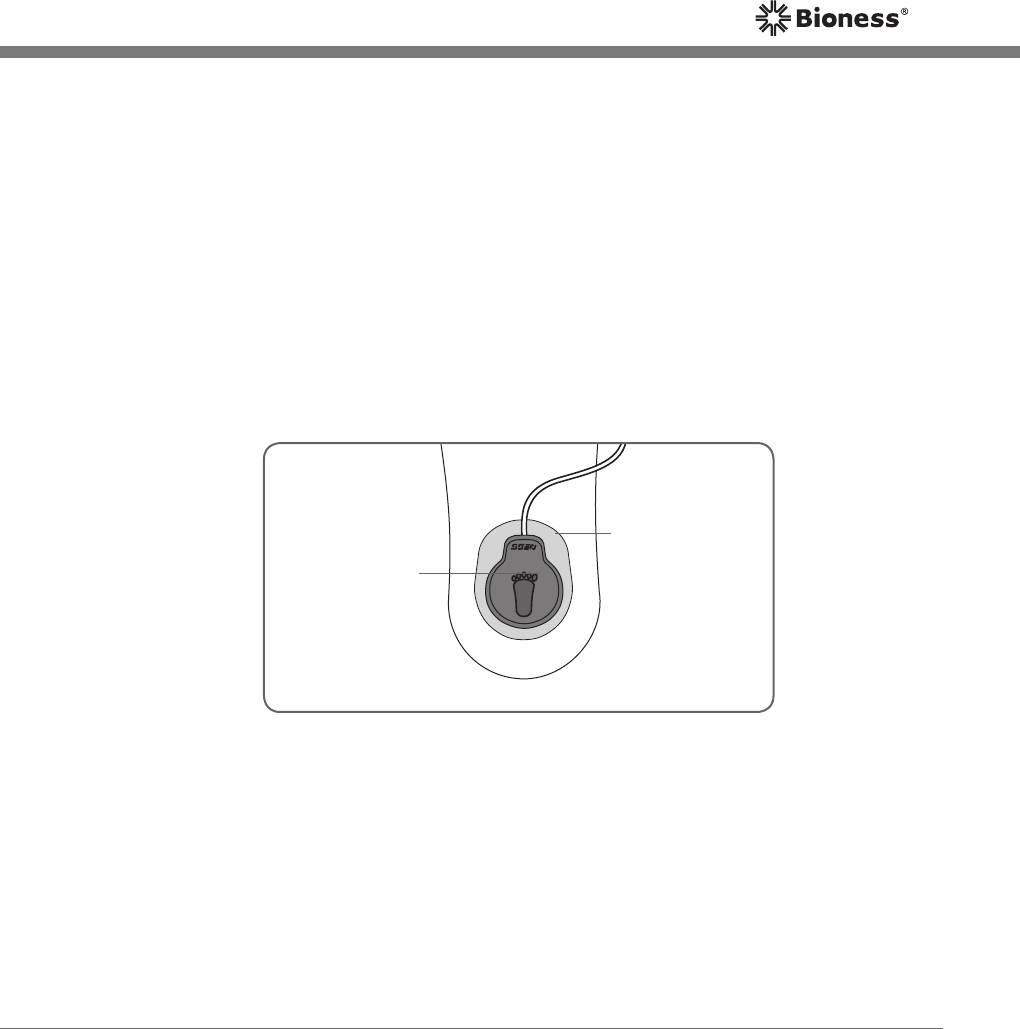
The L300 Plus System Kit includes a replacement coin battery for the Gait
Sensor. The battery will need to be replaced approximately every six months.
See Figure 14.
Gait
Sensor
Battery
Figure 14: Gait Sensor battery.
41
Chapter 5 - System Components and Accessories
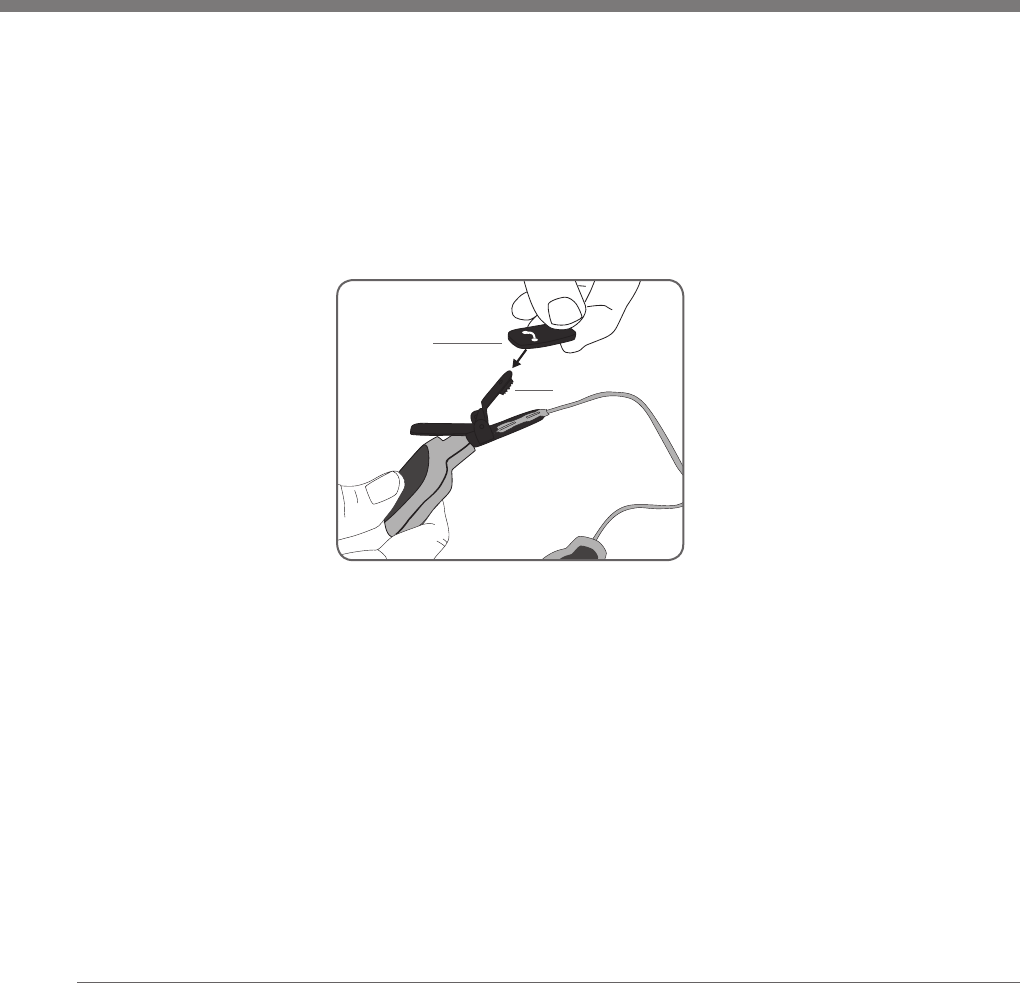
Figure 15: Placement of the Gait Sensor pad and pressure sensor.
Gait Sensor Pads
The Gait Sensor pads are used to stabilize the Gait Sensor pressure sensor
in the shoe. See Figure 15.
One Gait Sensor pad is placed under the insole of the shoe of the affected
leg. The Gait Sensor pressure sensor is then placed on top of the Gait Sensor
pad. Finally, the insole of the shoe is lowered to cover both the pressure
sensor and the Gait Sensor pad.
Place the adhesive side of the Gait Sensor pad down.
Pressure
Sensor
Gait Sensor
Pad
42
NESS L300 Plus
User’s Guide
Shoe Spacers
The shoe spacers are used to protect the rim of the shoe from the clamp of
the gait sensor transmitter. See Figure 16. One shoe spacer is placed over
the inner clamp of the Gait Sensor.
Figure 16: Attaching the shoe spacer.
Phillips Screwdriver
The Phillips screwdriver is used to replace the Control Unit and Gait Sensor
batteries.
Shoe
Spacer
Inner Clamp
43
Chapter 5 - System Components and Accessories
Figure 17: L300 Plus System charger set
L300 Plus Accessories
L300 Plus System Charger Set
The L300 Plus system charger set is used to simultaneously charge the L300
RF Stim Unit, the Thigh RF Stim Unit, and the L300 Plus Control Unit.
The system charger set includes a "W" cable and a charger, and a set of
interchangeable blades for international outlets. The "W" cable and the charger
must be assembled for use. See Figure 17.

44
NESS L300 Plus
User’s Guide
Thigh FS Cuff Distal Panel Subassembly, Large
The Thigh FS Cuff has two panels: a proximal panel and a distal panel. The
distal panel includes the cradle for the Thigh RF Stim Unit. The distal panel
is available in two sizes: small and large.
The Thigh FS Cuff in your L300 Plus System Kit features the small distal panel.
A large distal panel subassembly is also provided, if needed. See Figure 18.
Your clinician will measure your thigh circumference during your L300 Plus
fitting session and determine the appropriate sized distal panel for your Thigh
FS Cuff. If the large distal panel subassembly is needed, your clinician will
reconfigure your Thigh FS Cuff.
Figure 18: Thigh FS Cuff distal panel subassembly, large.
45
Chapter 5 - System Components and Accessories
Thigh FS Cuff Elongation Bar Lock Set
During your L300 Plus fitting session, your clinician will adjust the elongation
bar on the Thigh FS Cuff. The elongation bar is used to adjust the distance
between the Thigh FS Cuff distal and proximal panels. Once the elongation
bar is adjusted, your clinician will lock the position using the lock set. See
Figure 19. Do not attempt to adjust the elongation bar.
Figure 19: Thigh FS Cuff elongation bar lock set.

46
NESS L300 Plus
User’s Guide
Thigh FS Cuff Electrode Marking Ring Set
The electrode marking rings are used to ensure accurate, repeatable positioning
of the Thigh FS Cuff cloth electrodes on the Thigh FS Cuff.
During your L300 Plus fitting session, your clinician will determine the best
position for the Thigh FS Cuff cloth electrodes. Your clinician will then use
the electrode marking ring set to mark the electrode position on the Thigh
FS Cuff. See Figure 20.
Figure 20: Thigh FS Cuff electrode marking ring set.
47
Chapter 5 - System Components and Accessories
Thigh FS Cuff Cloth Electrodes
The Thigh FS Cuff uses two cloth electrodes to deliver stimulation from the
Thigh RF Stim Unit to the muscles in your thigh. See Figure 21. The larger
cloth electrode is placed on the proximal panel. The smaller cloth electrode
is placed on the distal panel.
The Thigh FS Cuff cloth electrodes are larger than the L300 FS Cuff electrodes,
and they do not require electrode bases.
The Thigh FS Cuff cloth electrodes must be wet before use and after every
four hours of use. If the Thigh FS Cuff is removed for more than one hour, the
cloth electrodes need to be rewet. Allow the electrodes to dry between uses.
Do not wear the Thigh FS Cuff without electrodes.
Caution: Change the electrodes every two weeks.
Figure 21: Thigh FS Cuff cloth electrodes.
Caution: Only use electrodes provided by Bioness Inc.

48
NESS L300 Plus
User’s Guide

49
Chapter 6 - Putting On and Taking Off the FS Cuffs
6
Putting On and Taking Off the FS Cuffs
Preparing the Skin
Before you put on the FS Cuffs, you must prepare the skin where the electrodes
will adhere.
To prepare the skin:
1.
Clean the skin where the electrodes will touch with a wet washcloth. If any
lotions are on the skin, clean the skin with soap and water. Rinse well.
2. If necessary, trim excess body hair from the area using scissors. Do not
use a razor. A razor can irritate the skin.
3. Check the skin for signs of irritation. If any irritation is present, stop using
the NESS L300 Plus System. Contact your clinician, and wait for complete
healing before re-using the system.
Checking and Wetting the Electrodes
Before you put on the FS Cuffs, make sure the cloth electrodes are wet and
the covers have been removed from the hydrogel electrodes.
To prepare the electrodes:
1. Check the electrodes for signs of wear. Make certain the electrodes are
not worn out, damaged, or old.
2. Wet the cloth electrodes.
3. If using hydrogel electrodes with the L300 FS Cuff, make certain the
plastic covers have been removed.
50
NESS L300 Plus
User’s Guide
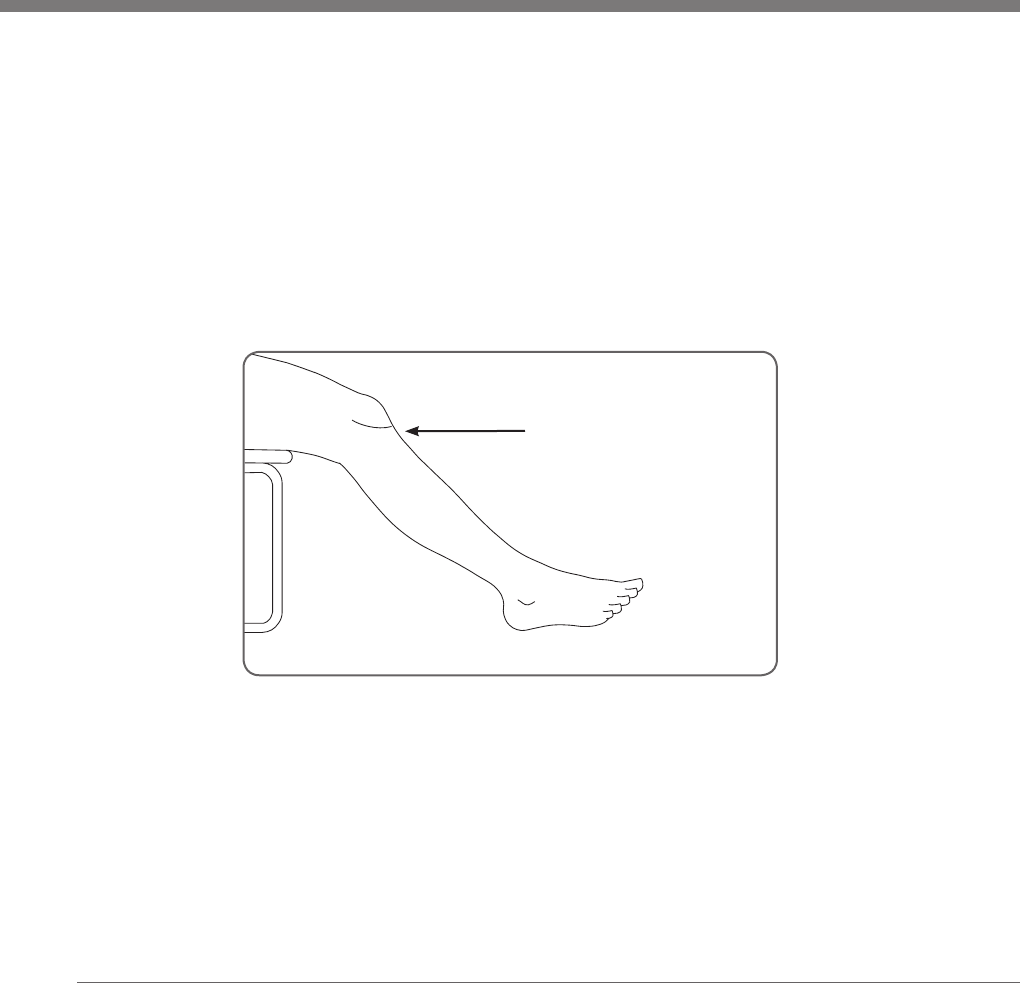
Positioning the L300 FS Cuff
To position the L300 FS Cuff:
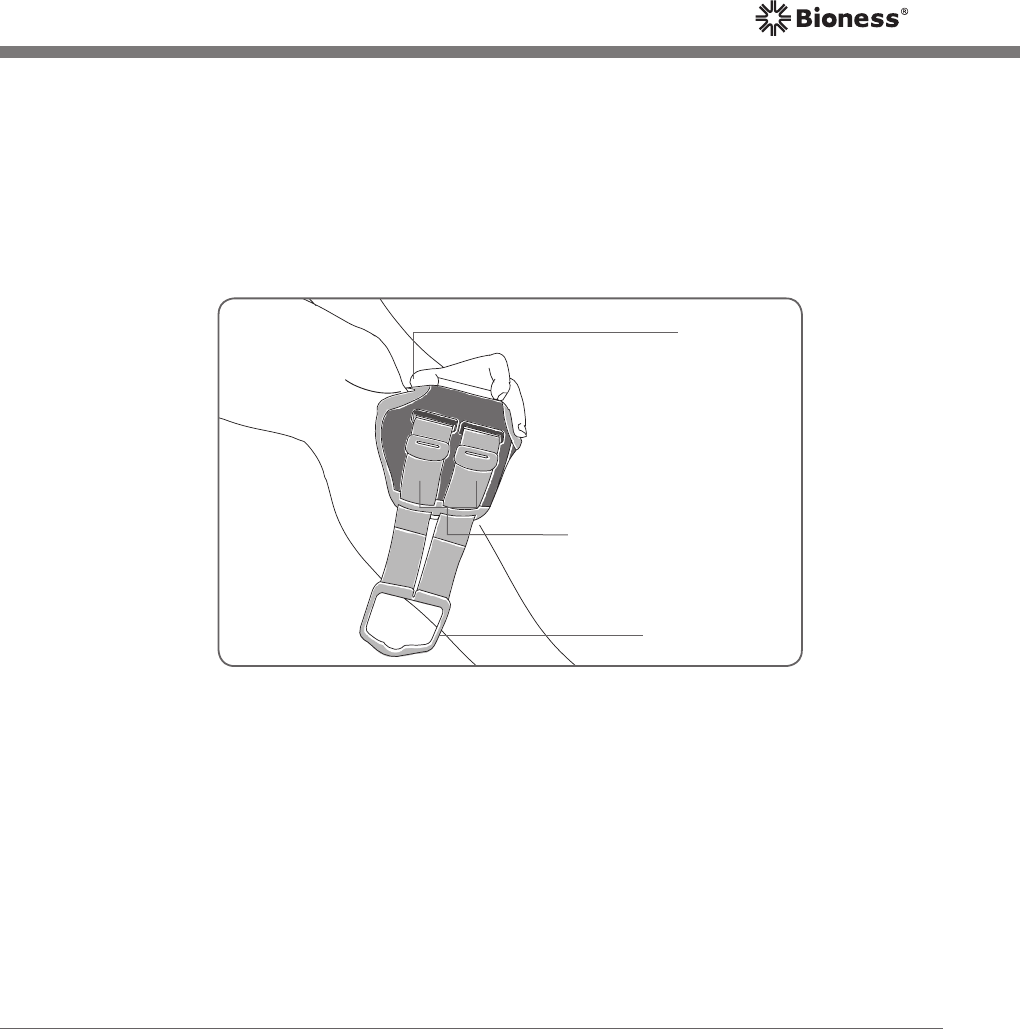
1. While seated, slightly straighten your leg as shown in Figure 22. The
outline of your kneecap should be clearly defined. (Place your foot on a
footrest, if necessary.)
Figure 22: Recommended knee angle for positioning the L300 FS Cuff.
The Locator of the
L300 FS Cuff Fits
Under the Kneecap
51
Chapter 6 - Putting On and Taking Off the FS Cuffs
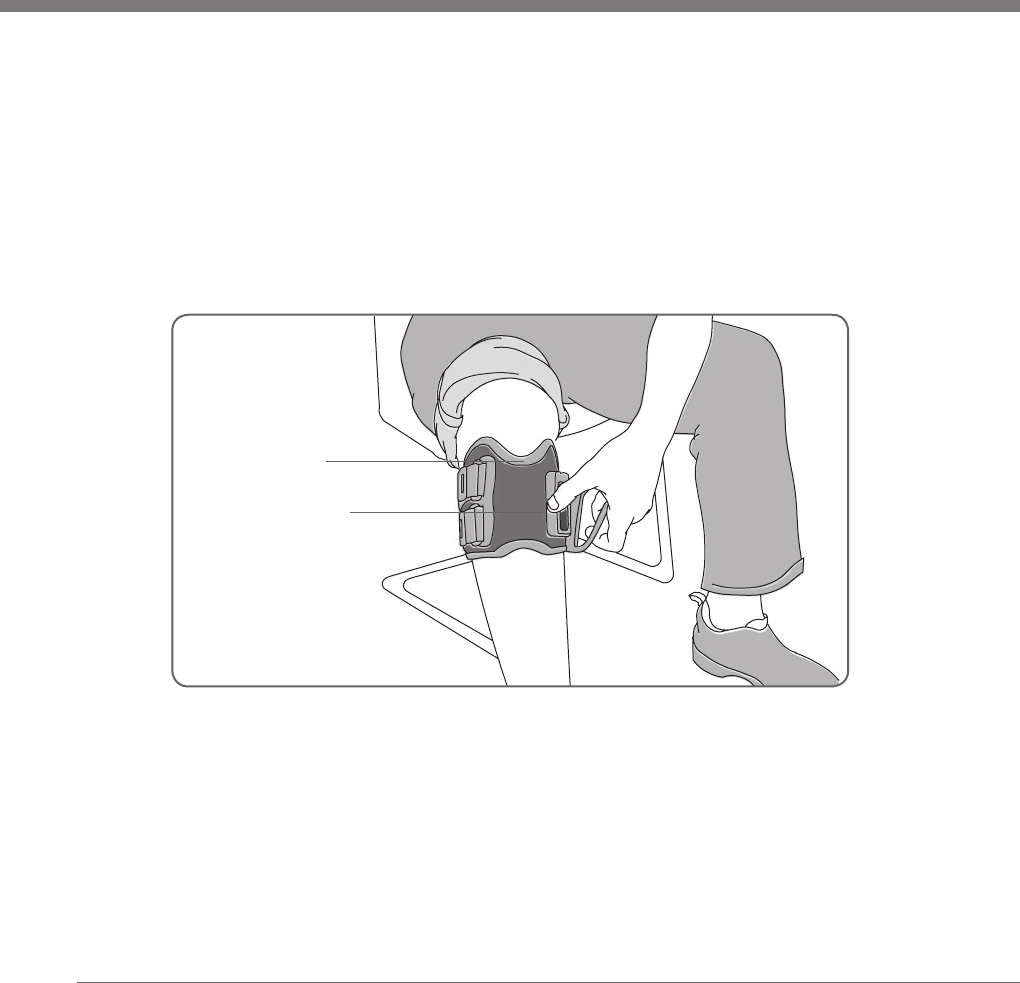
Figure 23: Tilting the L300 FS Cuff for placement on your leg.
2. Make sure the electrodes are attached to the electrode bases. Then,
grasp the front of the FS Cuff by the cradle and tilt the bottom of the FS
Cuff up. Slide the locator up your leg until it rests snugly and comfortably
below your kneecap. See Figure 23.
Strap Handle
Locator
Hook and Loop
Fasteners
52
NESS L300 Plus
User’s Guide
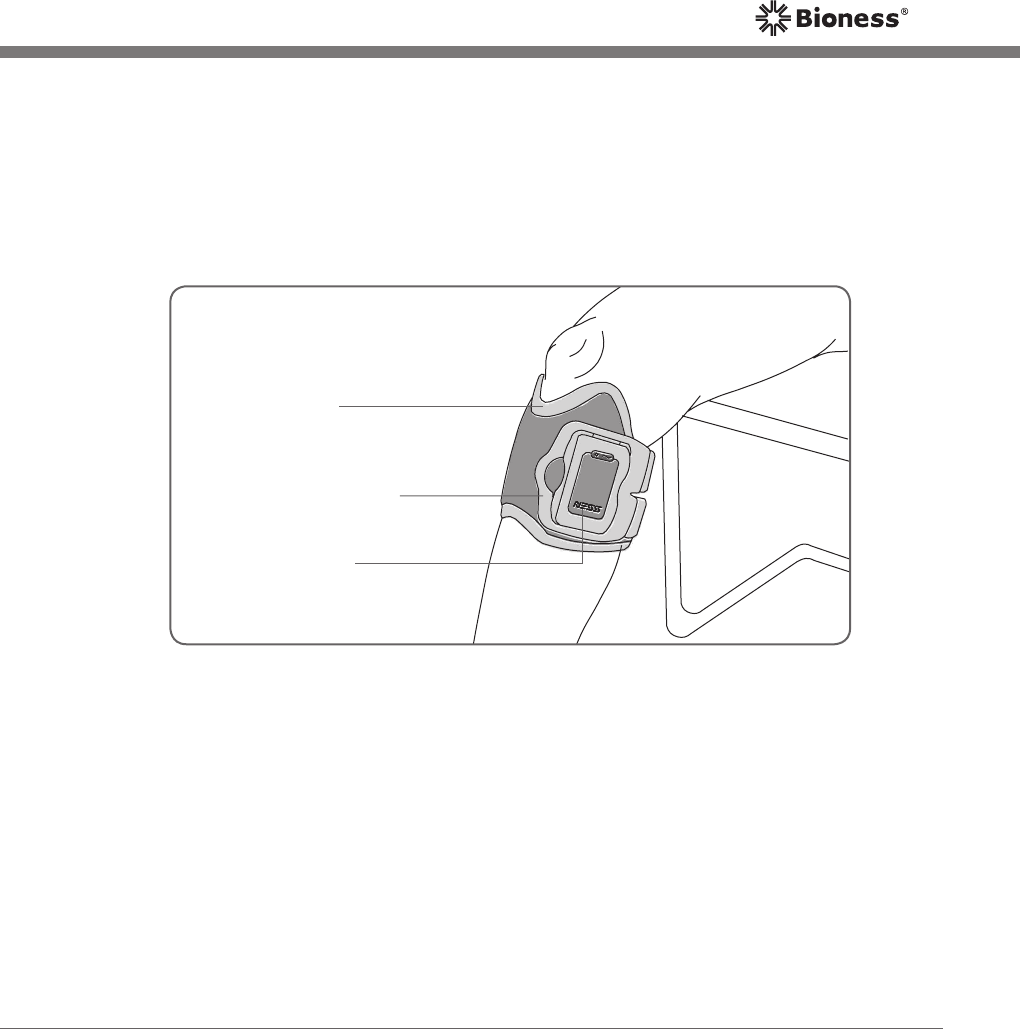
Figure 24: Fastening the L300 FS Cuff strap.
Locator Below
the Kneecap
Thumb on the
Cradle and
Fingers on the
Strap Handle
3. Hold the locator in place and lower the L300 FS Cuff until it rests flush
against your leg. The L300 FS Cuff should gently grip your leg.
4. Grasp the handle of the L300 FS Cuff strap. See Figure 24. With your
thumb on the L300 RF Stim Unit cradle, fasten the strap handle around
the cradle.
53
Chapter 6 - Putting On and Taking Off the FS Cuffs
Figure 25: L300 FS Cuff fastened on the right leg.
Locator Below the
Kneecap
Strap Handle
Around the Cradle
L300 RF Stim Unit
5. Make sure the L300 FS Cuff is correctly positioned. See Figure 25. If it is
not, take off the L300 FS Cuff and reposition it. Adjust the hook and loop
fasteners (see Figure 5) to ensure a snug fit.

54
NESS L300 Plus
User’s Guide
Removing the L300 FS Cuff
To remove the L300 FS Cuff:
1. Turn off the Control Unit.
2. Unhook the L300 FS Cuff strap handle from the cradle.
3. Slowly lift the L300 FS Cuff away from your skin.
4. Gently peel the electrodes from your skin.
5.
If using hydrogel electrodes, reapply the electrode covers to the electrodes.
6. If using cloth electrodes, allow the electrodes to dry.
7.
Fully charge the Control Unit, Thigh RF Stim Unit, and L300 RF Stim Unit
batteries.
Caution: Change the electrodes every two weeks.
Caution: The L300 FS Cuff should be removed from the skin
every three to four hours for 15 minutes to allow the skin to
breathe.
Caution: Wash the L300 FS Cuff as necessary to prevent bacteria/
fungus buildup.
55
Chapter 6 - Putting On and Taking Off the FS Cuffs
Positioning the Thigh FS Cuff on the Quadriceps
To position the Thigh FS Cuff on the quadriceps:
1. Sit in a stable position on the edge of a chair. See Figure 26.
Figure 26: Recommended seated position for putting the Thigh FS Cuff on.
2. Loosen the Thigh FS Cuff straps.

56
NESS L300 Plus
User’s Guide
Figure 27: Using the locator to position the Thigh FS Cuff on the quadriceps.
3. Place the Thigh FS Cuff on the front of your thigh (quadriceps muscle),
with the locator arrow facing up and pointing toward the center of your
knee. See Figure 27.
57
Chapter 6 - Putting On and Taking Off the FS Cuffs
Figure 28: Positioning the distal panel above the knee.
4.
Position the edge of the distal panel approximately 2 inches (5 cm) above
your knee. See Figure 28.

58
NESS L300 Plus
User’s Guide
5. Fasten the FS Cuff distal straps, and tighten the straps to fit. See Figure
29.
Figure 29: The distal straps fastened.
59
Chapter 6 - Putting On and Taking Off the FS Cuffs
6. Fasten the FS Cuff proximal straps, and tighten the straps to fit. See
Figure 30.
Figure 30: The proximal straps fastened.

60
NESS L300 Plus
User’s Guide
Positioning the Thigh FS Cuff on the Hamstrings
To position the Thigh FS Cuff on the hamstrings:
1. Sit in a stable position on the edge of a chair. See Figure 31.
Figure 31: Recommended seated position for putting the Thigh FS Cuff on.
2. Loosen the Thigh FS Cuff straps.
61
Chapter 6 - Putting On and Taking Off the FS Cuffs
Figure 32: Using the locator to position the Thigh FS Cuff on the quadriceps
before rotating the FS Cuff to the hamstrings.
3. Place the Thigh FS Cuff on the front of your thigh, with the locator arrow
facing up and pointing toward the center of your knee. See Figure 32. The
edge of the distal panel should be two to three inches above the knee.

62
NESS L300 Plus
User’s Guide
4. While holding the elongation bar, slowly rotate the FS Cuff to the back
of your thigh. Rotate the FS Cuff until the elongation bar is centered on
the back of the thigh (the hamstrings). See Figure 33.
Figure 33: Positioning the Thigh FS Cuff on the hamstrings.
63
Chapter 6 - Putting On and Taking Off the FS Cuffs
Figure 34: The distal straps fastened.
5.
Fasten the Thigh FS Cuff distal straps and tighten them to fit. See Figure 34.

64
NESS L300 Plus
User’s Guide
6.
Fasten the FS Cuff proximal straps, and tighten them to fit. See Figure 35.
Figure 35: The proximal straps fastened.
Note: The fasteners should be centered along the top of the thigh.
65
Chapter 6 - Putting On and Taking Off the FS Cuffs
Removing the Thigh FS Cuff
To remove the Thigh FS Cuff:
1. Turn off the L300 Plus Control Unit.
2. Loosen the Thigh FS Cuff straps.
3. Unfasten the Thigh FS Cuff straps.
4. Slowly lift the Thigh FS Cuff away from your skin.
5. Allow the electrodes to dry.
6.
Fully charge the Control Unit, Thigh RF Stim Unit, and L300 RF Stim Unit
batteries.
Caution: Change the electrodes every two weeks.
Caution: The Thigh FS Cuff should be removed from the skin
every 3 to 4 hours for 15 minutes to allow the skin to breathe.
Caution: Wash the Thigh FS Cuff as necessary to prevent
bacteria/fungus buildup.

66
NESS L300 Plus
User’s Guide
67
Chapter 7 - Placing the Gait Sensor in the Shoe
Placing the Gait Sensor in the Shoe
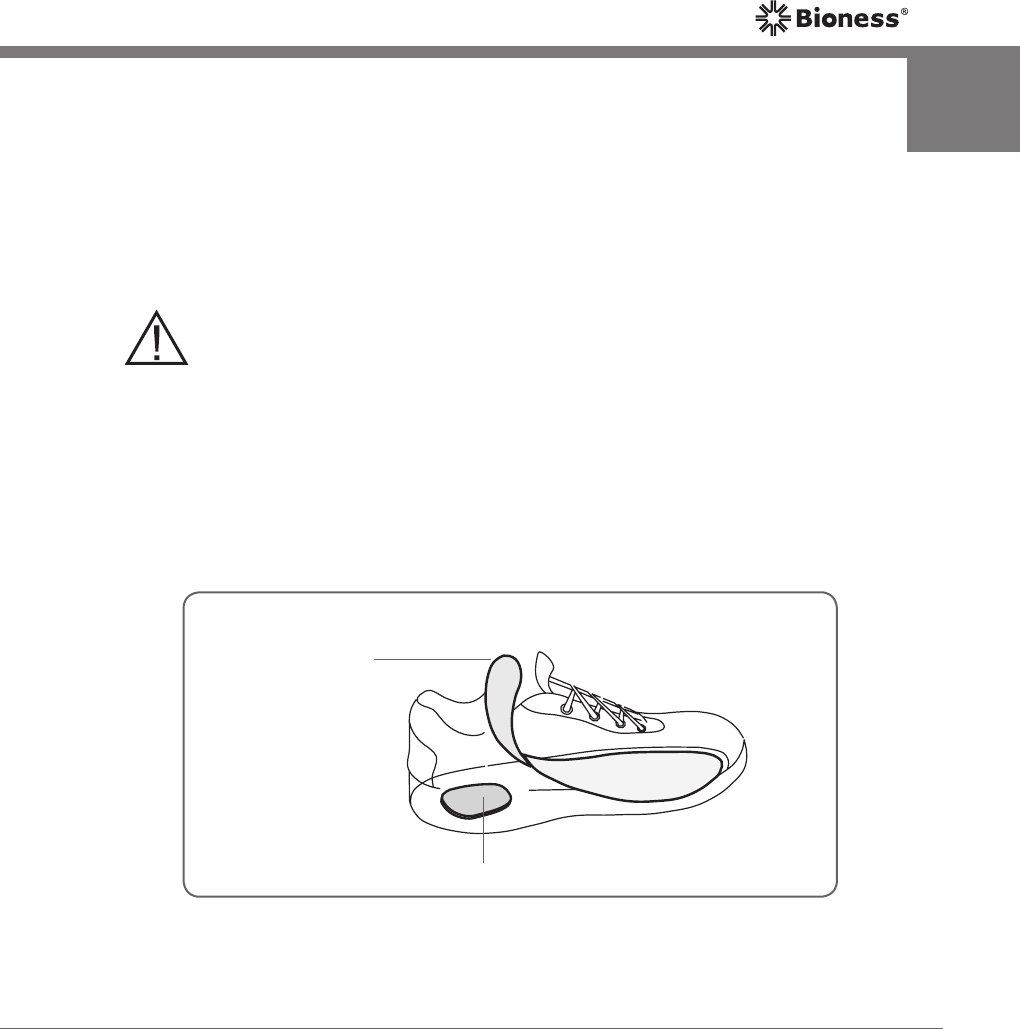
The Gait Sensor pressure sensor is placed under the insole of your shoe. If
your shoe does not have a detachable insole, place the sensor on top of the
insole. Then, place a generic soft, thin (one layer versus two) insole over it.
Generic insoles can be purchased from drugstores, shoe stores, or Bioness.
Caution: Do not use the Gait Sensor with a rigid insole, such
as a custom rigid orthosis or an ankle foot orthosis.
To position the Gait Sensor:
1. Lift the shoe insole.
2. Attach a Gait Sensor pad under the insole, at the heel of the shoe. See
Figure 36.
Figure 36: Placement of the Gait Sensor pad.
Shoe Insole
Gait Sensor Pad
7
68
NESS L300 Plus
User’s Guide
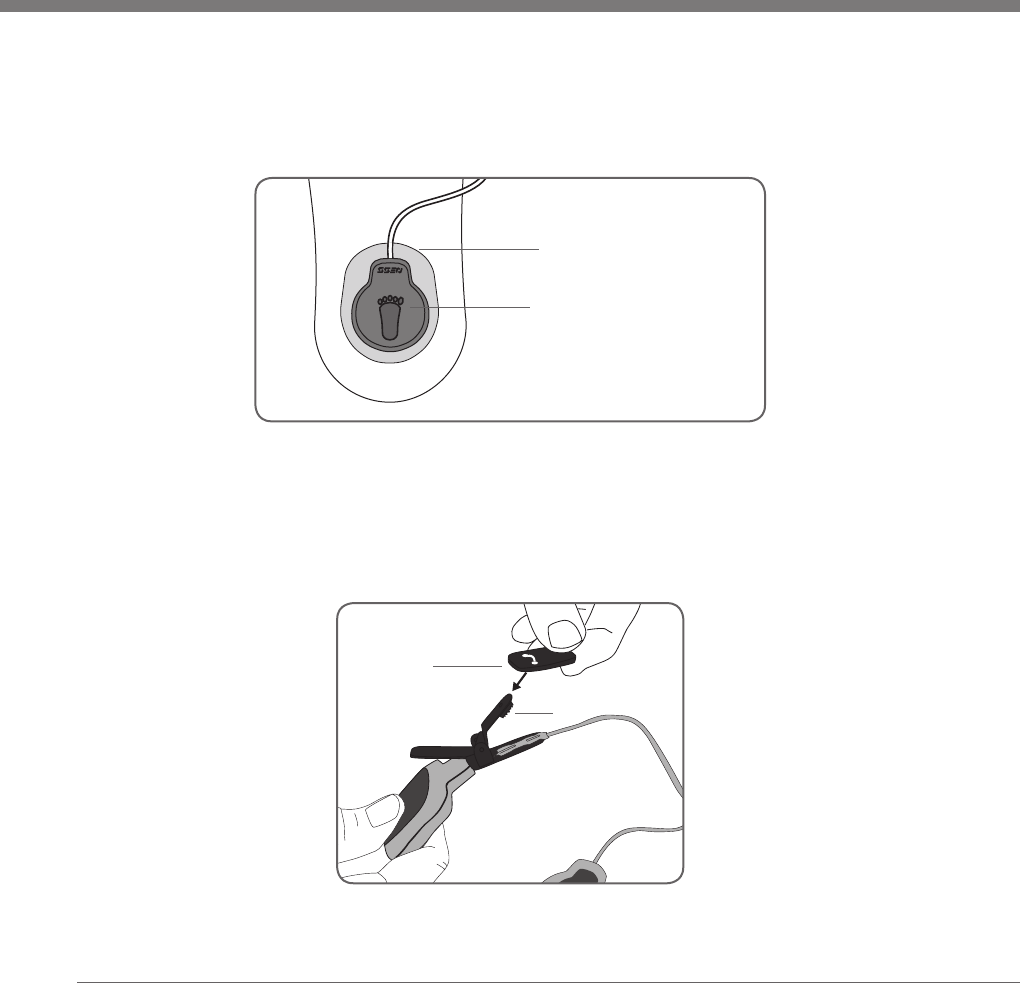
3. Point the wire of the pressure sensor toward the toe of the shoe. Then,
attach the pressure sensor to the Gait Sensor pad. See Figure 37. Refer
to the foot image on the pressure sensor for positioning.
4. Cover the inner clamp on the transmitter with the shoe spacer, if desired.
See Figure 38. The teeth of the clamp may scuff the shoe, if not covered.
Figure 38: Covering the clamp with the shoe spacer.
Foot Image on
Pressure Sensor
Gait Sensor Pad
Shoe
Spacer
Inner Clamp
Figure 37: Positioning the pressure sensor in the shoe
69
Chapter 7 - Placing the Gait Sensor in the Shoe
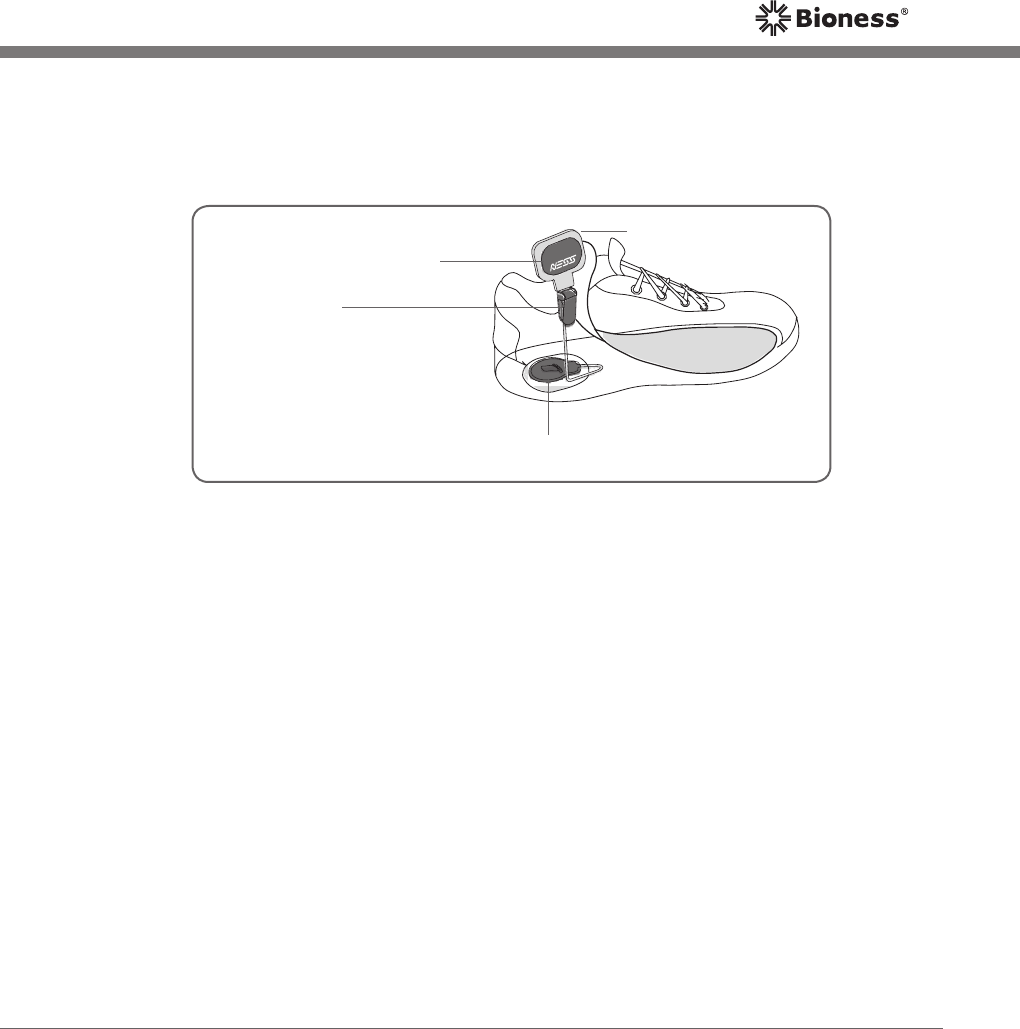
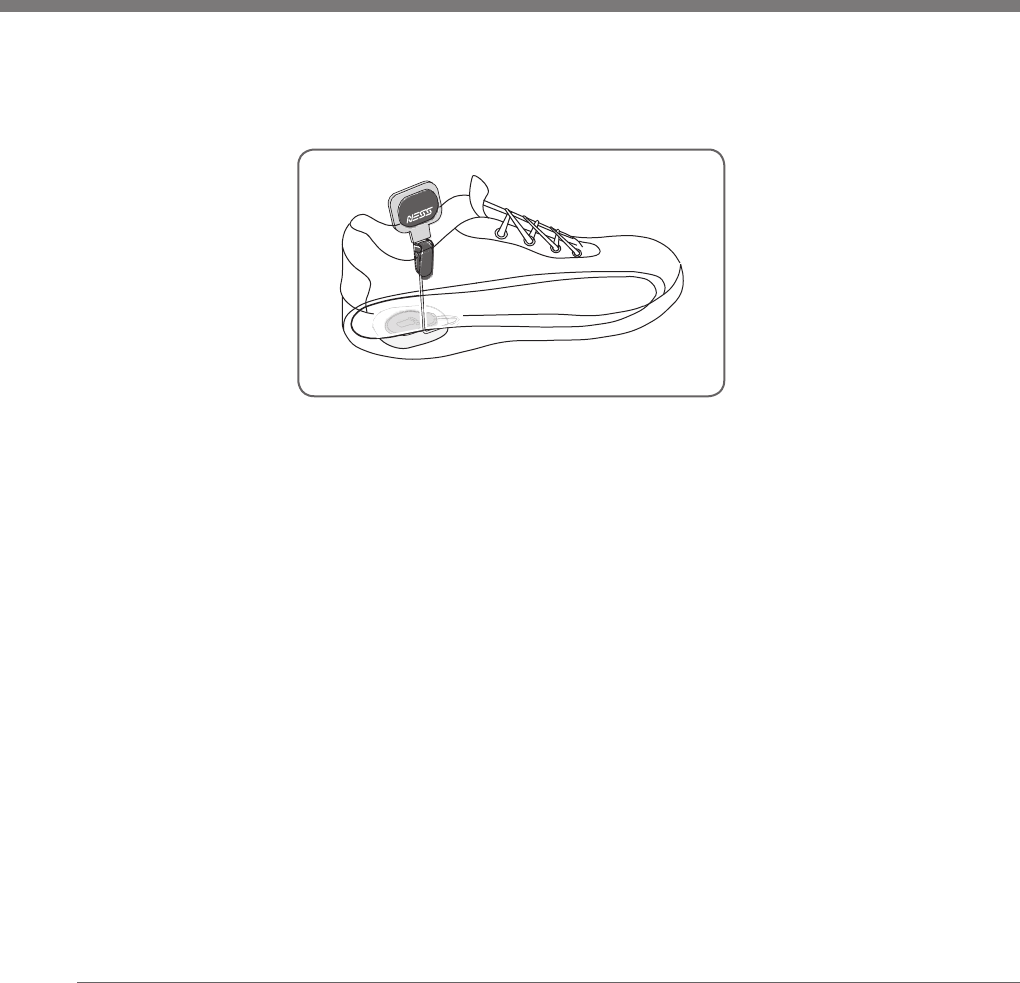
Figure 39: Clamping the transmitter to the inner rim of the shoe.
5. Clamp the Gait Sensor transmitter on to the inner rim of the shoe. Face
the NESS logo on the transmitter away from the ankle. See Figure 39.
Pressure Sensor
Transmitter
Clamp to
Inner Rim of Shoe
NESS Logo Faces away
from Ankle
Left Shoe
70
NESS L300 Plus
User’s Guide
6. Cover the pressure sensor with the insole. Tuck any excess wire under
the insole. See Figure 40.
Left Shoe
Figure 40: Insole covering the pressure sensor and wire.
Switching Shoes/Gait Sensors
When switching the Gait Sensor to a different shoe, make sure to place a
Gait Sensor pad in the other shoe first.
If multiple Gait Sensors are placed in multiple shoes and you want to
switch shoes:
1. Turn off the system.
2. Switch shoes.
3. Turn the system back on.

71
Chapter 8 - Operating the L300 Plus Control Unit
Operating the L300 Plus Control Unit
RF Communication Safety Features
The L300 Plus Control Unit, L300 RF Stim Unit, Thigh RF Stim Unit, and
Gait Sensor must be within RF communication range of each other and their
batteries charged for the L300 Plus System to operate. If the components
become separated, or if a battery is discharged, RF communication will be lost.
If a communication failure occurs that involves the L300 RF Stim Unit:
•The RF Communication Indicator on the Control Unit will flash RED.
•The L300 RF Stim Unit indicator on the Control Unit will be solid RED.
•The status light on the L300 RF Stim Unit will flash RED.
•The Control Unit and L300 RF Stim Unit will emit an audio alert.
•The NESS L300 RF Stim Unit will deliver a warning default stimulation
to lift the foot for six seconds before the L300 Plus System shuts down.
If a communication failure occurs that involves the Thigh RF Stim Unit:
•The RF Communication Indicator on the Control Unit will flash RED.
•The Thigh RF Stim Unit indicator on the Control Unit will be solid RED.
•The status light on the Thigh RF Stim Unit will flash RED.
•The Control Unit and Thigh RF Stim Unit will emit an audio alert.
•The remaining NESS L300 Plus System components will continue to
operate.
8

72
NESS L300 Plus
User’s Guide
Single Component Mode
If communication with the Thigh RF Stim Unit fails and cannot be restored,
you can turn off the RF communication failure indicators for the Thigh RF
Stim Unit and use the L300 FS Cuff in single component mode. In single
component mode, the Thigh RF Stim Unit visual and audio indicators are
disabled.
To turn off communication with the Thigh RF Stim Unit, press the mute
button for three seconds.
When the Control Unit is turned off, the default settings will be restored.
73
Chapter 8 - Operating the L300 Plus Control Unit
Turning On/Off the Control Unit
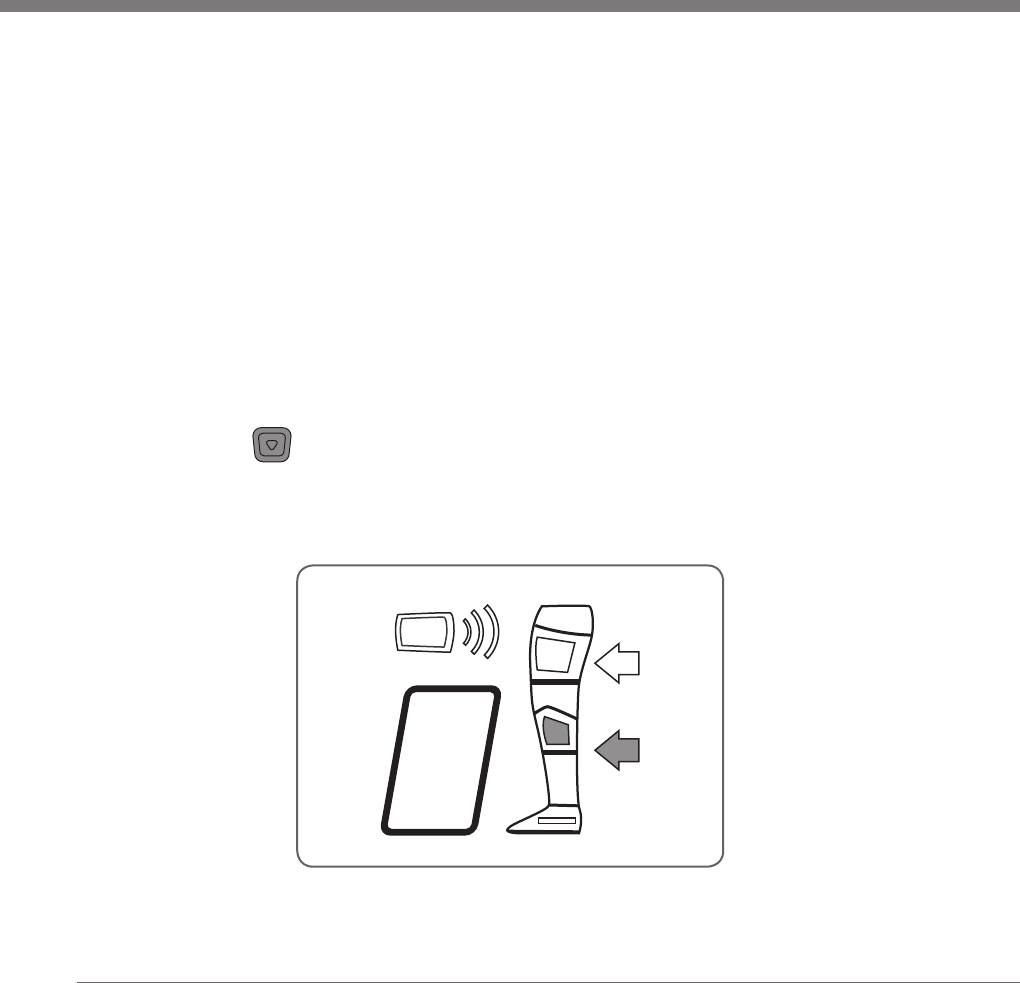
To turn on the L300 Plus Control Unit, press the on/off button once. The
system will start in standby mode. All display indicators will light up for a few
seconds while the system performs a self-test. The on/off button will
flash GREEN to indicate the system is on. To turn off the Control Unit, press
the on/off button once.
Selecting an Operating Mode
Selecting Gait Mode
To select gait mode, turn on the Control Unit, and press the mode button
briefly. The Control Unit will beep and the mode button will start flashing
YELLOW SLOWLY (indicating that stimulation is off). When stimulation is
on, the mode button will flash YELLOW RAPIDLY.
Selecting Training Mode
To select training mode, turn on the Control Unit. Press and hold the mode
button until the Control Unit beeps, the mode button starts flashing
YELLOW SLOWLY (indicating that stimulation is off), and (“t” for training)
alternates with the intensity level in the digital display. When stimulation is
on, the mode button will flash YELLOW RAPIDLY.
Returning to Standby Mode
To return to standby mode from gait or training mode, press the
flashing mode button briefly. The Control Unit will beep, and the mode
button will stop flashing.
74
NESS L300 Plus
User’s Guide
Adjusting Stimulation Intensity
When the Control Unit is first turned on, the stimulation intensity level will
be “5”. This level is set by your clinician. Normally, you will not need to
adjust stimulation intensity other than when walking on different surfaces or
in different shoes.
The L300 Plus Control Unit allows you to adjust stimulation intensity individually
for each RF Stim Unit using the RF Stim Unit selection buttons and the plus
and minus buttons.
Adjusting the L300 RF Stim Unit
To adjust stimulation intensity for the L300 RF Stim Unit:
1.
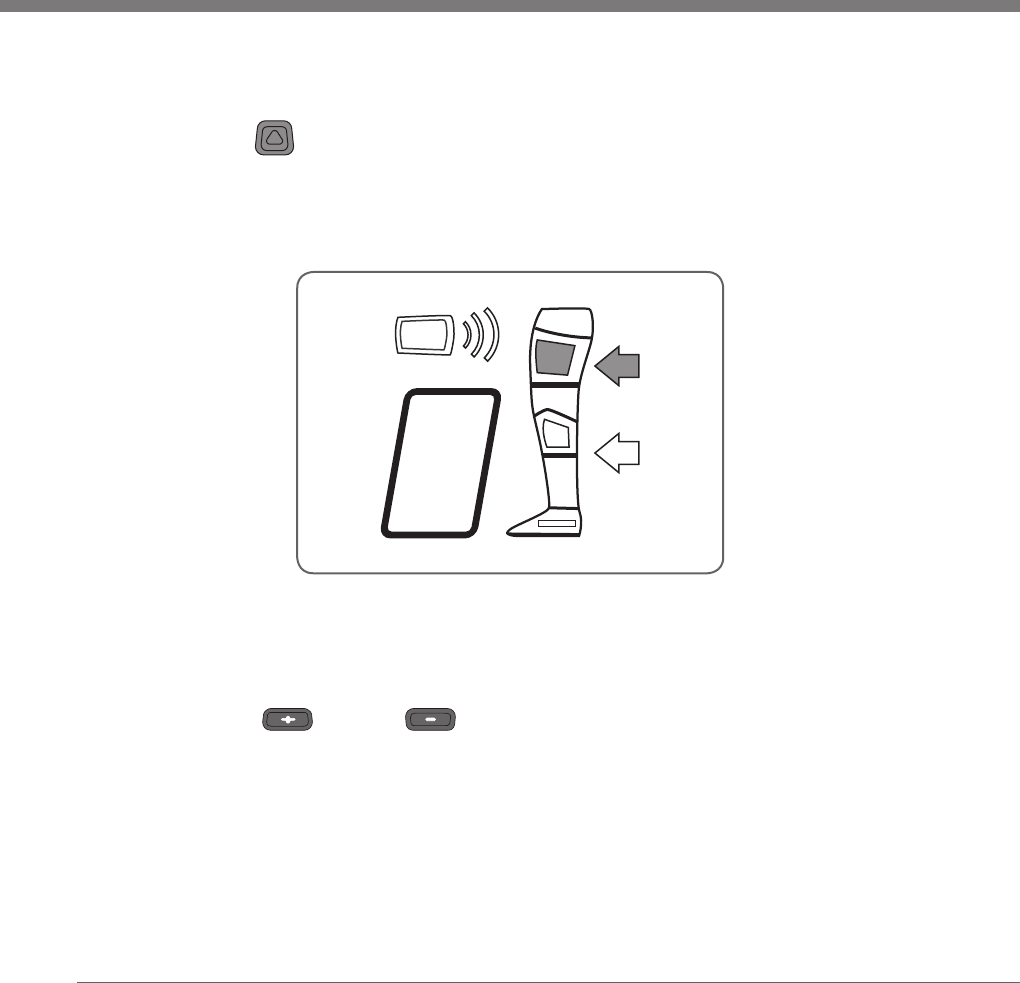
Press the "down" button to select the L300 RF Stim Unit. The L300 RF
Stim Unit indicator and the arrow next to the L300 RF Stim Unit indicator
will light GREEN to confirm the selection. See Figure 41.
Figure 41: L300 RF Stim Unit selected.

75
Chapter 8 - Operating the L300 Plus Control Unit
2. Press the plus or minus intensity adjustment button on the
Control Unit to change the intensity level. The Control Unit will beep with
each change in level. The new level will show in the digital display.
Note: An intensity level of “0” equals no stimulation.
Adjustment Guidelines
If your foot slightly drags or catches on the floor while walking, increase
stimulation intensity in the L300 RF Stim Unit to lift the foot higher.
If your foot rises too high while walking or if stimulation is unpleasant, decrease
stimulation intensity in the L300 RF Stim Unit. Be sure your foot does not
drag or catch on the floor after decreasing the intensity level.
76
NESS L300 Plus
User’s Guide
Adjusting the Thigh RF Stim Unit
To adjust stimulation intensity for the Thigh RF Stim Unit:
1. Press the "up" button to select the Thigh RF Stim Unit. The Thigh RF
Stim Unit indicator and the arrow next to the Thigh RF Stim Unit indicator
will light GREEN to confirm the selection. See Figure 42.
Figure 42: Thigh RF Stim Unit selected.
2. Press the plus or minus intensity adjustment button on the
Control Unit to change the intensity level. The Control Unit will beep with
each change in level. The new level will show in the digital display.
Note: An intensity level of “0” equals no stimulation.

77
Chapter 8 - Operating the L300 Plus Control Unit
Adjustment Guidelines
If your knee is hyper-extended or not straight enough while stepping, then
increase the stimulation intensity level in the Thigh FS Cuff.
If your knee is under-extended or too bent while stepping, then decrease the
stimulation intensity level.

78
NESS L300 Plus
User’s Guide
Testing Stimulation
The stimulation test button is used to manually check the position of the FS
Cuff on the leg. Each FS Cuff can be tested individually.
Testing the L300 FS Cuff
To test the position of the L300 FS Cuff:
1. Place the Control Unit in standby mode.
2.
Press the "down" button to select the L300 RF Stim Unit. The L300 RF
Stim Unit indicator and the arrow next to the L300 RF Stim Unit indicator
will light GREEN to confirm the selection.
3. Press and hold the stimulation test button. The L300 RF Stim Unit
will stimulate until the stimulation test button is released.
Testing the Thigh FS Cuff
To test the position of the Thigh FS Cuff:
1. Press the "up" button to select the Thigh RF Stim Unit. The Thigh RF
Stim Unit indicator and the arrow next to the Thigh RF Stim Unit indicator
will light GREEN to confirm the selection.
2. Press and hold the stimulation test button. The Thigh RF Stim Unit
will stimulate until the stimulation test button is released.
79
Chapter 8 - Operating the L300 Plus Control Unit
Turning on Audio Feedback During Stimulation
The NESS L300 Plus System can be configured to provide audio feedback
during stimulation. You can turn on the audio feedback feature for each RF
Stim Unit individually using the RF selection buttons and the mute button.
Turning on Audio Feedback for the L300 FS Cuff
To turn on audio feedback during stimulation for the L300 FS Cuff:
1. Place the Control Unit in standby mode.
2. Press and hold the "down" button (to select the L300 RF Stim Unit)
and the mute button for three seconds. Both the Control Unit and the
L300 RF Stim Unit will emit an audio alert when stimulation turns on.
To turn off the audio feedback, press the mute button or the on/
off button.
Turning on Audio Feedback for the Thigh FS Cuff
To turn on audio feedback during stimulation for the Thigh FS Cuff:
1. Place the Control Unit in standby mode.
2. Press and hold the "up" button (to select the Thigh RF Stim Unit)
and the mute button for three seconds. Both the Control Unit and the
Thigh RF Stim Unit will emit an audio alert when stimulation turns on.
To turn off the audio feedback, press the mute button or the on/
off button.

80
NESS L300 Plus
User’s Guide
Muting the Audio Alerts
Use the mute button to mute the audio alerts. Only noncritical audio alerts
will be muted.
When the system is turned off, the default volume setting is automatically
restored.
Muting the Thigh RF Stim Unit Alerts
Your L300 Plus System is designed to operate with or without the Thigh FS
Cuff on or operating. However, the L300 Plus Control Unit will recognize that
the Thigh FS Cuff is not on or operating and will emit visual and audio alerts.
To mute the visual and audio alerts for the Thigh FS Cuff and RF Stim Unit,
press and hold the mute button for three seconds. The Control Unit will
cease communication with the Thigh RF Stim Unit.
When the system is turned off, the default settings are automatically restored.