Bissell 3595 User Manual CLEANVIEW REVOLUTION Manuals And Guides L0805567
BISSELL Vacuum, Upright Manual L0805567 BISSELL Vacuum, Upright Owner's Manual, BISSELL Vacuum, Upright installation guides
User Manual: Bissell 3595 3595 BISSELL CLEANVIEW REVOLUTION - Manuals and Guides View the owners manual for your BISSELL CLEANVIEW REVOLUTION #3595. Home:Vacuums & Floor Care Parts:Bissell Parts:Bissell CLEANVIEW REVOLUTION Manual
Open the PDF directly: View PDF ![]() .
.
Page Count: 16
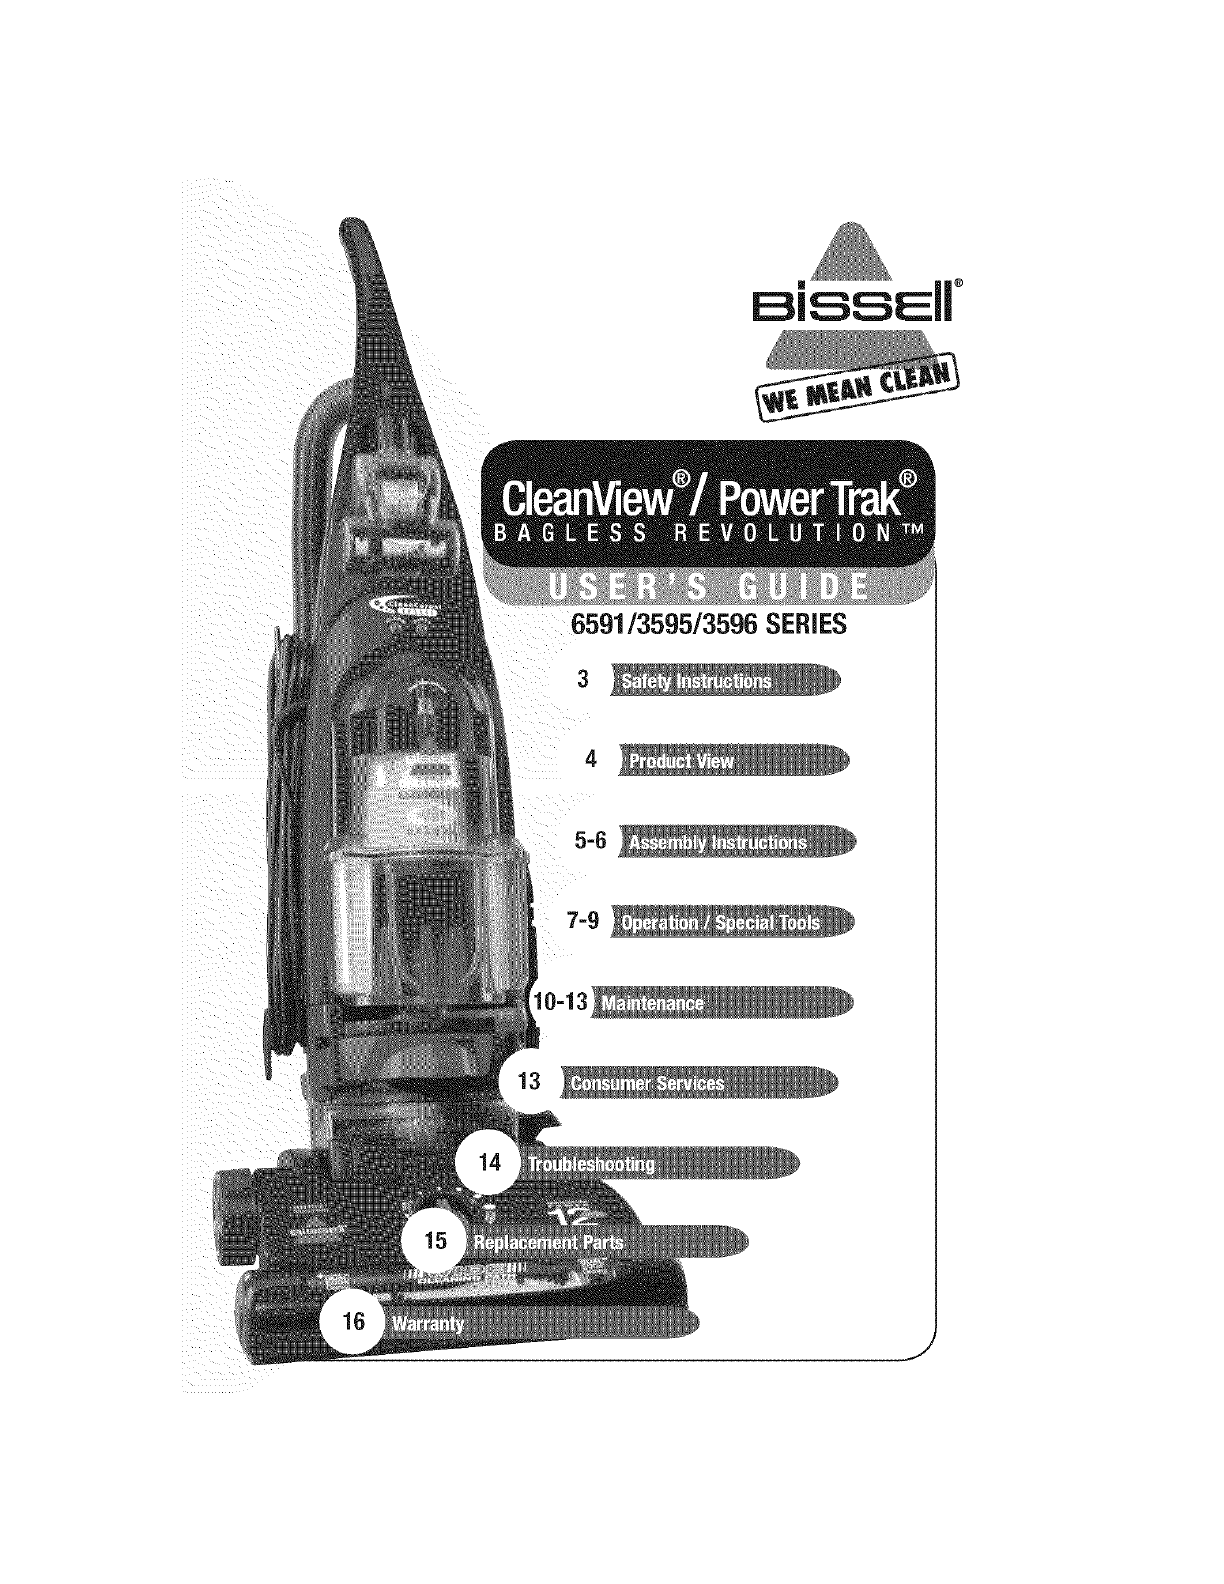
6591/3595/3596 SERIES
3
5=6
We're gladyou purchaseda BISSELLVacuum.Everythingwe know about floor
care went into the design and construction of this complete,high-tech home
vacuuming system.
YourBISSELLVacuumis well made,and we back it with a limited
comprehensiveone-year warranty.We also stand behind it with a
knowledgeable,dedicatedConsumerServices Department,so,should you ever
have a problem,you'll receivefast, considerate assistance.
My great-grandfather inventedthe floor sweeper in 1876. Today,BISSELLis a
global leader in the design, manufacture,and service of high quality homecare
products like your BISSELLVacuum.
Thanksagain, from all of us at BISSELL.
Mark J. Bissell
Presidentand ChiefExecutiveOfficer
0
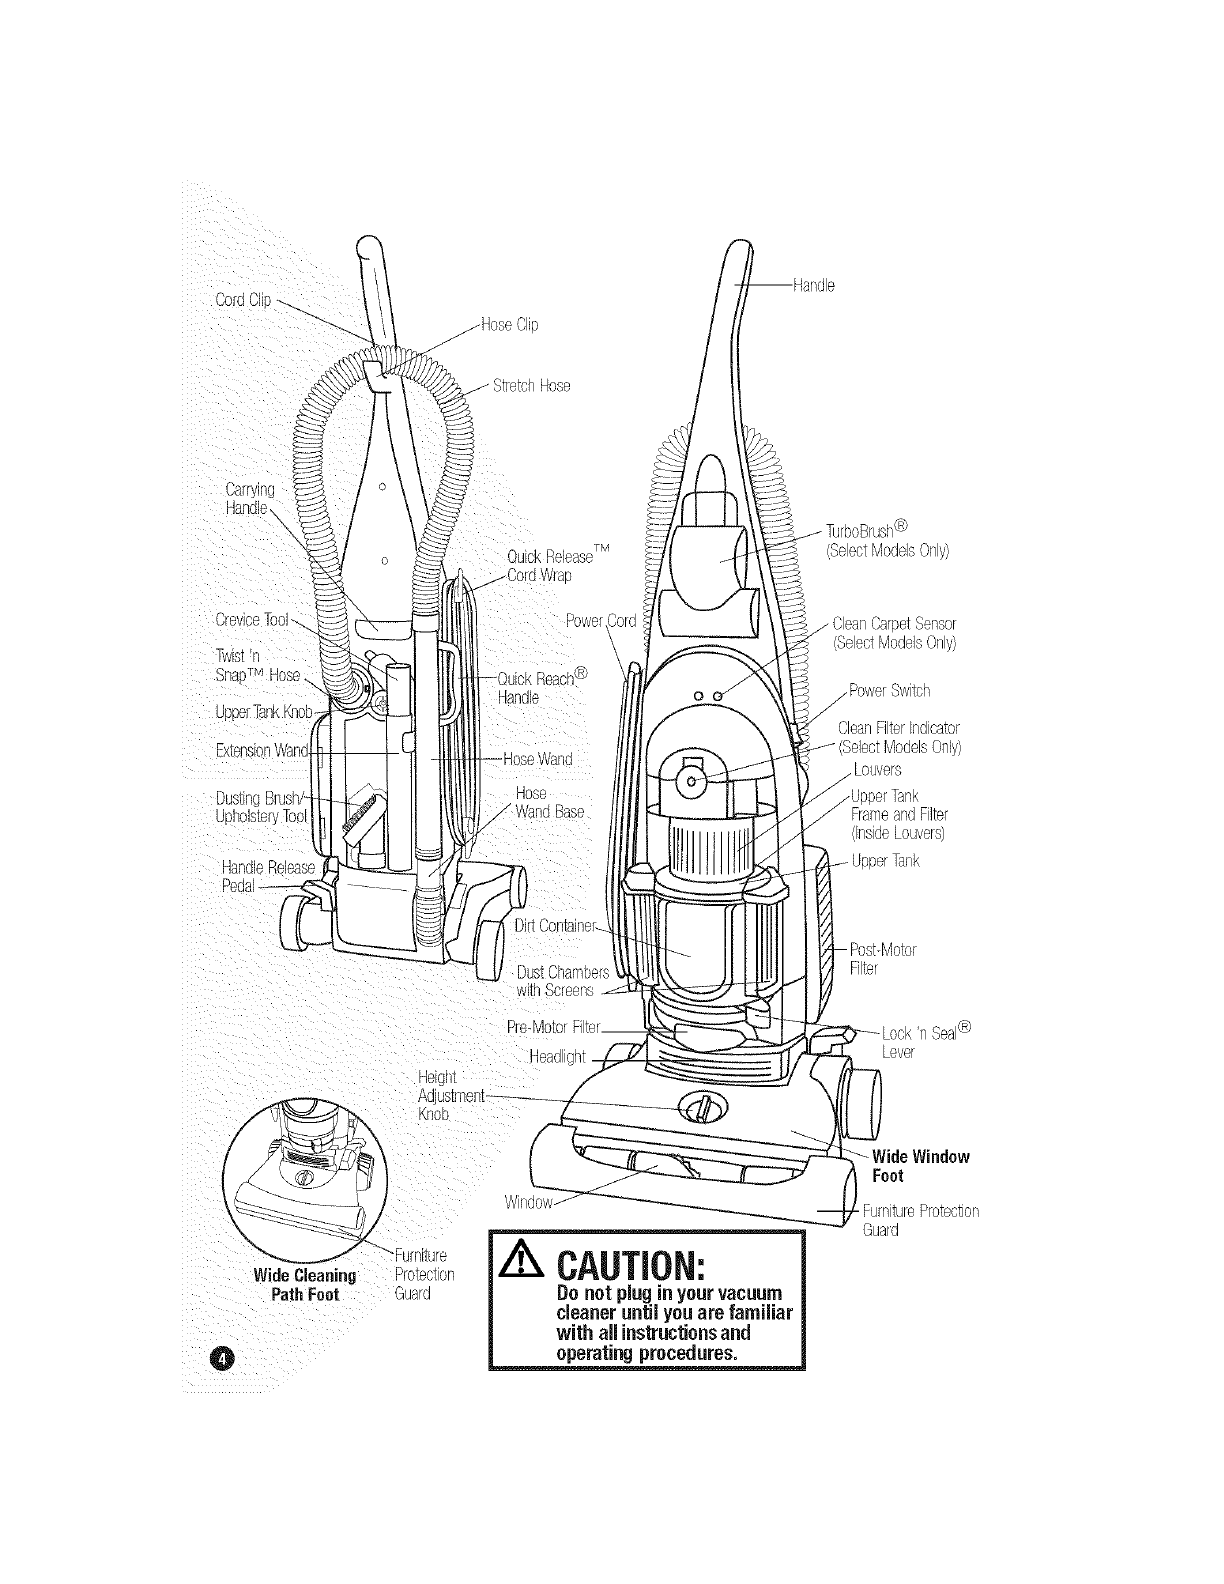
j S_etchHose
Carrying
Hanale,\
\
CreviceTool-
Twbt
Dusti
ur}nolsTey Too
HandleRelease
Pedal
QuickRelease
j_ Cord'@lae
Sowe
withScreen,<
@
(SelectModelsOnly)
CarpetSensor
(SelectModelsOnly)
CleanFilterIndicator
(SelectModelsOnly)
FrameandFilter
(InsideLouvers)
Filter
Wide Cleaning
Path Foot
O
selgrl_
Adj
',,nob
Drotecti
Guarc
Pre-Moro
Heaolgnr
/
CAUTION:
Do not plugin yourvacuum
cleaneruntil youare familiar
with all instructionsand
operating procedures,
Lever
Foot
•FurnitureProtection
Guard
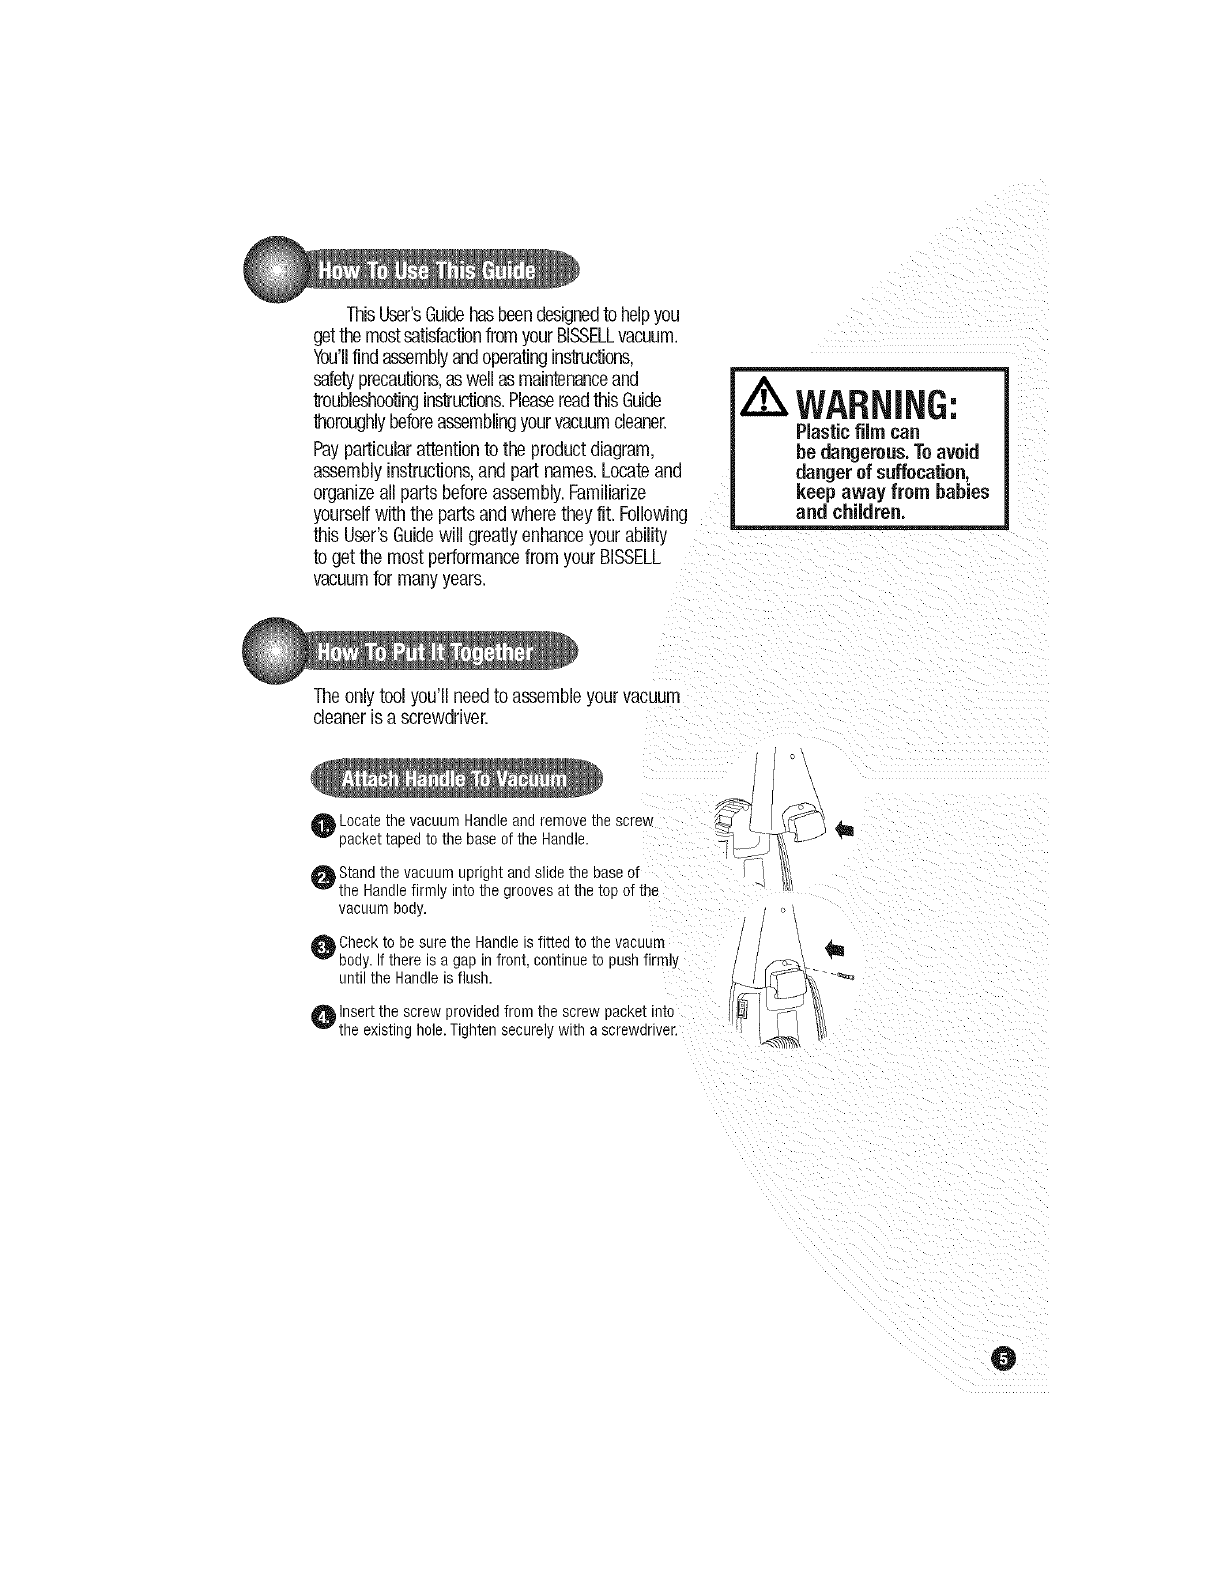
ThisUser'sGuidehasbeendesignedto helpyou
getthemostsatisfactionfromyourBISSELLvacuum.
You'llfind assemblyandoperatingingructions,
safetyprecaddons,aswell asmaintenanceand
troubleshootinginslructions.PleasereadthisGuide
_horoughlybeforeassemblingyourvacuumcleaner.
Payparticularattentionto the productdiagram,
assemblyinstructions,andpart names.Locateand
organizeaJlpartsbeforeassembly.Familiarize
yourselfwiththe partsandwheretheyfit. Following
this User'sGuidewill greatlyenhanceyourability
to get the most performancefromyour BISSELL
vacuumfor manyyears.
Theonlytool you'llneedto assembleyourvacuum
cleaneris a screwdriver.
Locate the vacuum Handle and remove me scre_
packet taped to the base of the Handle.
Stand the vacuum upright and slide the base of
the Handlefirmly into the grooves at the top of the
vacuum body,
Check to be sure the Handle is fitted to tne vacuum
body. If there is a gap in front, continue to push firmly
until the Handle is flush.
O Insert the screw provided from the screw packet into
the existing hole.Tighten securely with a screwdriver.
k
0
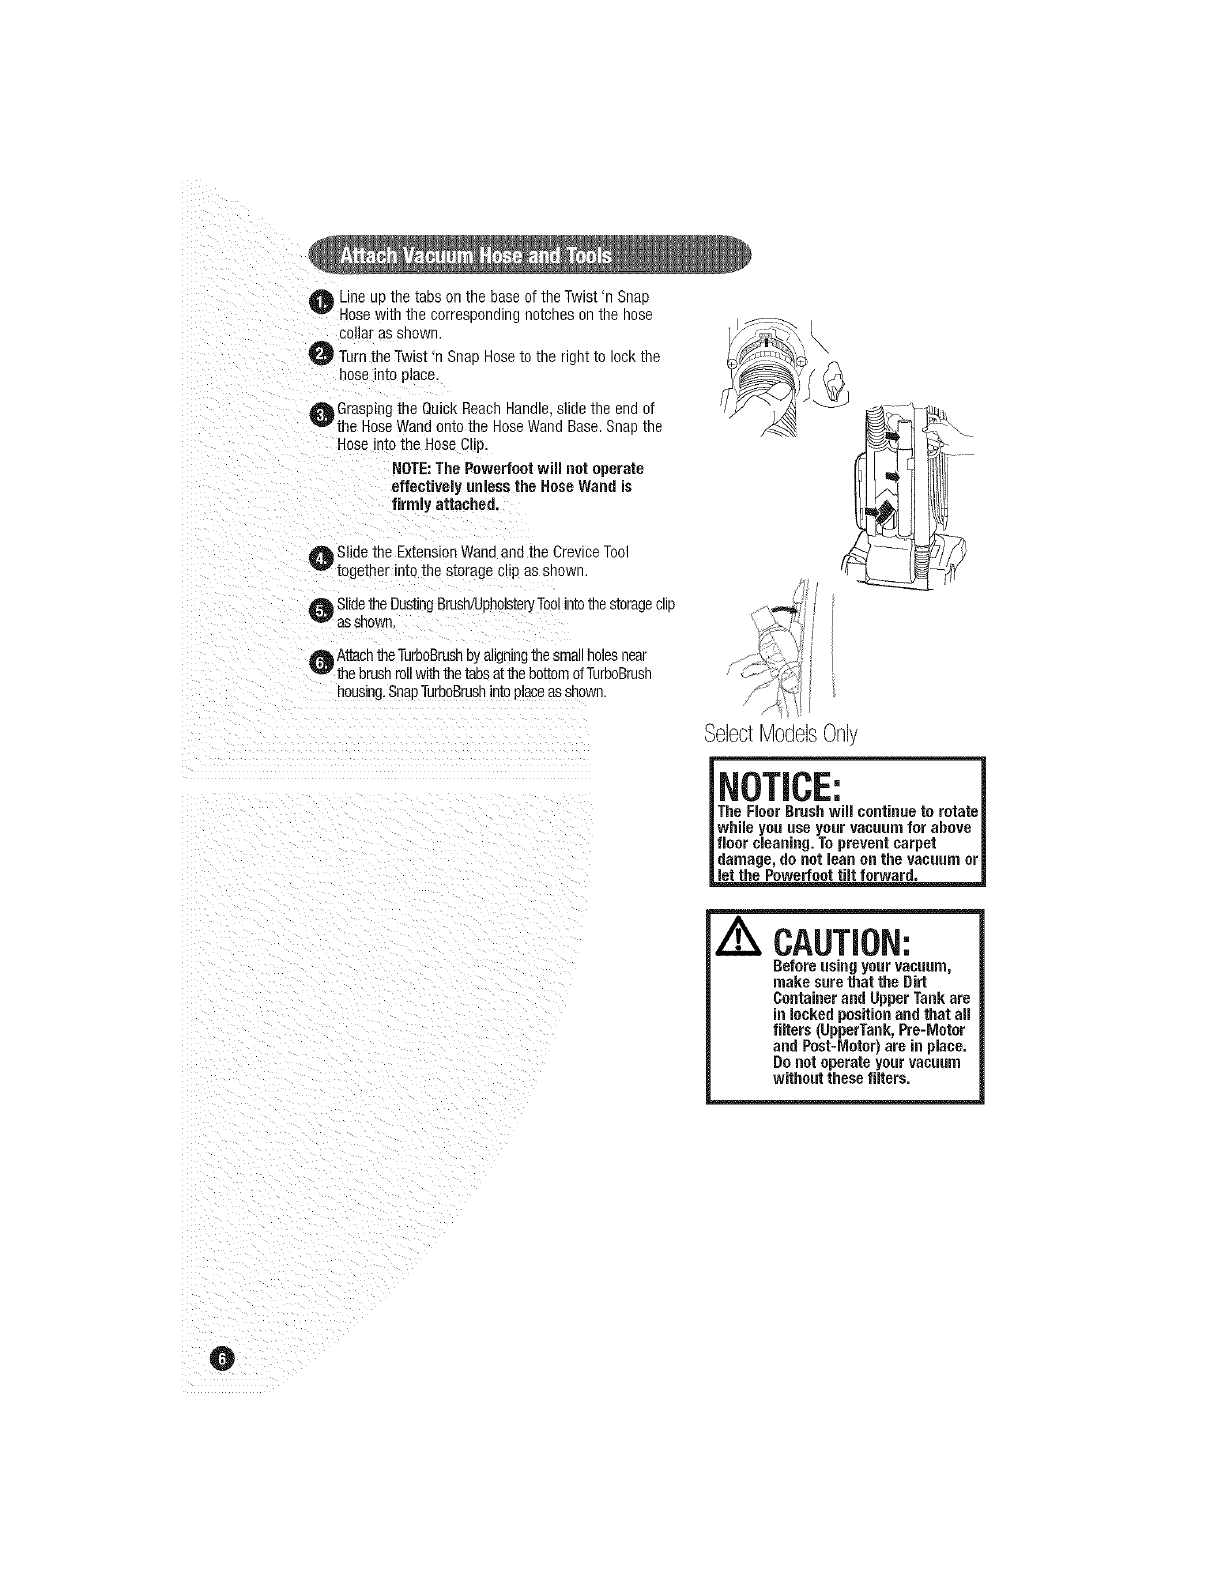
Joe UDrne raps on the base of the Twist 'n Snap
dose Wltll tne corresponding no[cnes on rne hose
collar as shown,
I_ Turn the Twist 'n Snap Hoseto me nght to lock the
hose imo place.
Grasping the Quick Reach Handle,slide the end of
the Hose Wand onto the HoseWand Base.Snap the
Hose into the Hose Clip.
NOTE',The Powerfoot will not operate
effectively unless the HoseWand is
firmly attached.
O Slide the Extension Wand and the Crevice Tool
together into the storage clip as snown
Slidethe DustingBrush/UpholsteryToolintothe storageclip
asshown.
O AttachtheTurboBrushbyaligningthe smallholesnear
the brushrollwith the tabsat the bottomofTurboBrush
housing.SnapTurboBrushintoplaceas shown.
SelectModelsOnly
= =
| floor cleaning. To prevent carpet |
|damage, do not lean on the vacuum or|
let the Powerfoot tilt forward.
CAUTION:
Before using your vacuum,
make sure that the Dirt
Container and Upper Tank are
in locked position and that all
filters (UpperTank, Pre-Motor
and Post-Motor) are in place.
Do not operate yourvacuum
without these filters.
@
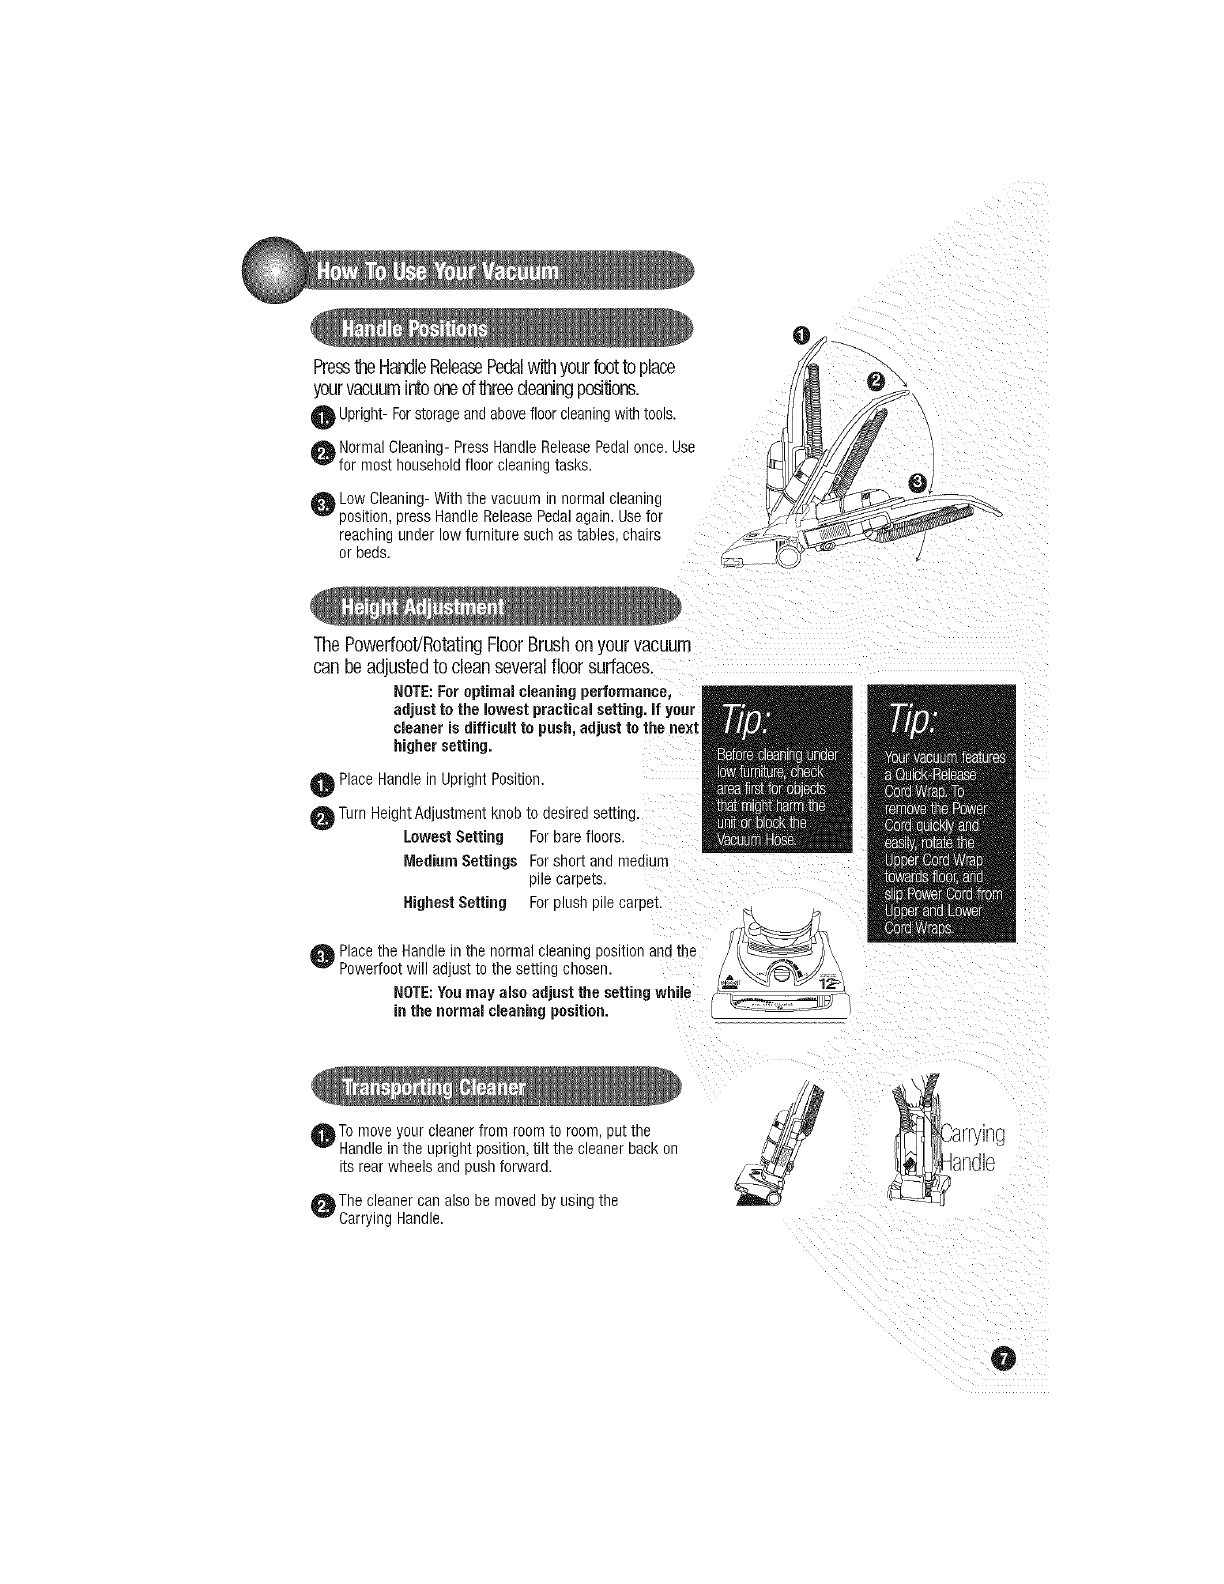
PresstheHandleReleasePedalwithyourfootto place
yourvacuumintooneof threedeaningpurl'done.
Upright- Forstorageand abovefloor cleaning w_[n[oo_s.
Normal Cleaning- Press Handle Release Pedal once. Use
for most household floor cleaning tasks.
OLow Cleaning- With the vacuum in normal cleaning
position, press Handle Release Pedal again. Usefor
reaching under low furniture such as tables, chairs
or beds.
ThePowerfoot/RotatingFloorBrushonyourvacuum
can beadjustedto cleanseveralfloor surfaces.
NOTE:For optimal cleaning performance,
adjust to the lowest practical setting, if your
cleaner is difficult to push, adjust to the next
higher setting.
Place Handle in Upright Position.
O Turn Height Adjustment knob to desired setting.
Lowest Setting For bare floors.
Medium Settings For short and medium
pile carpets.
Nighest Setting For plush pile carpet.
Place the Handle in the normal cleaning position and the
Powerfoot will adjust to the setting chosen.
NOTE:Youmay also adjust the setting while
in the normal cleaning position.
OTo move your cleaner from room to room, pu[ rne
Handle in the upright position, tilt the cleaner bacKon
its rear wheels and push forward.
OThe cleanercanalsobemovedby usingthe
CarryingHandle.
O
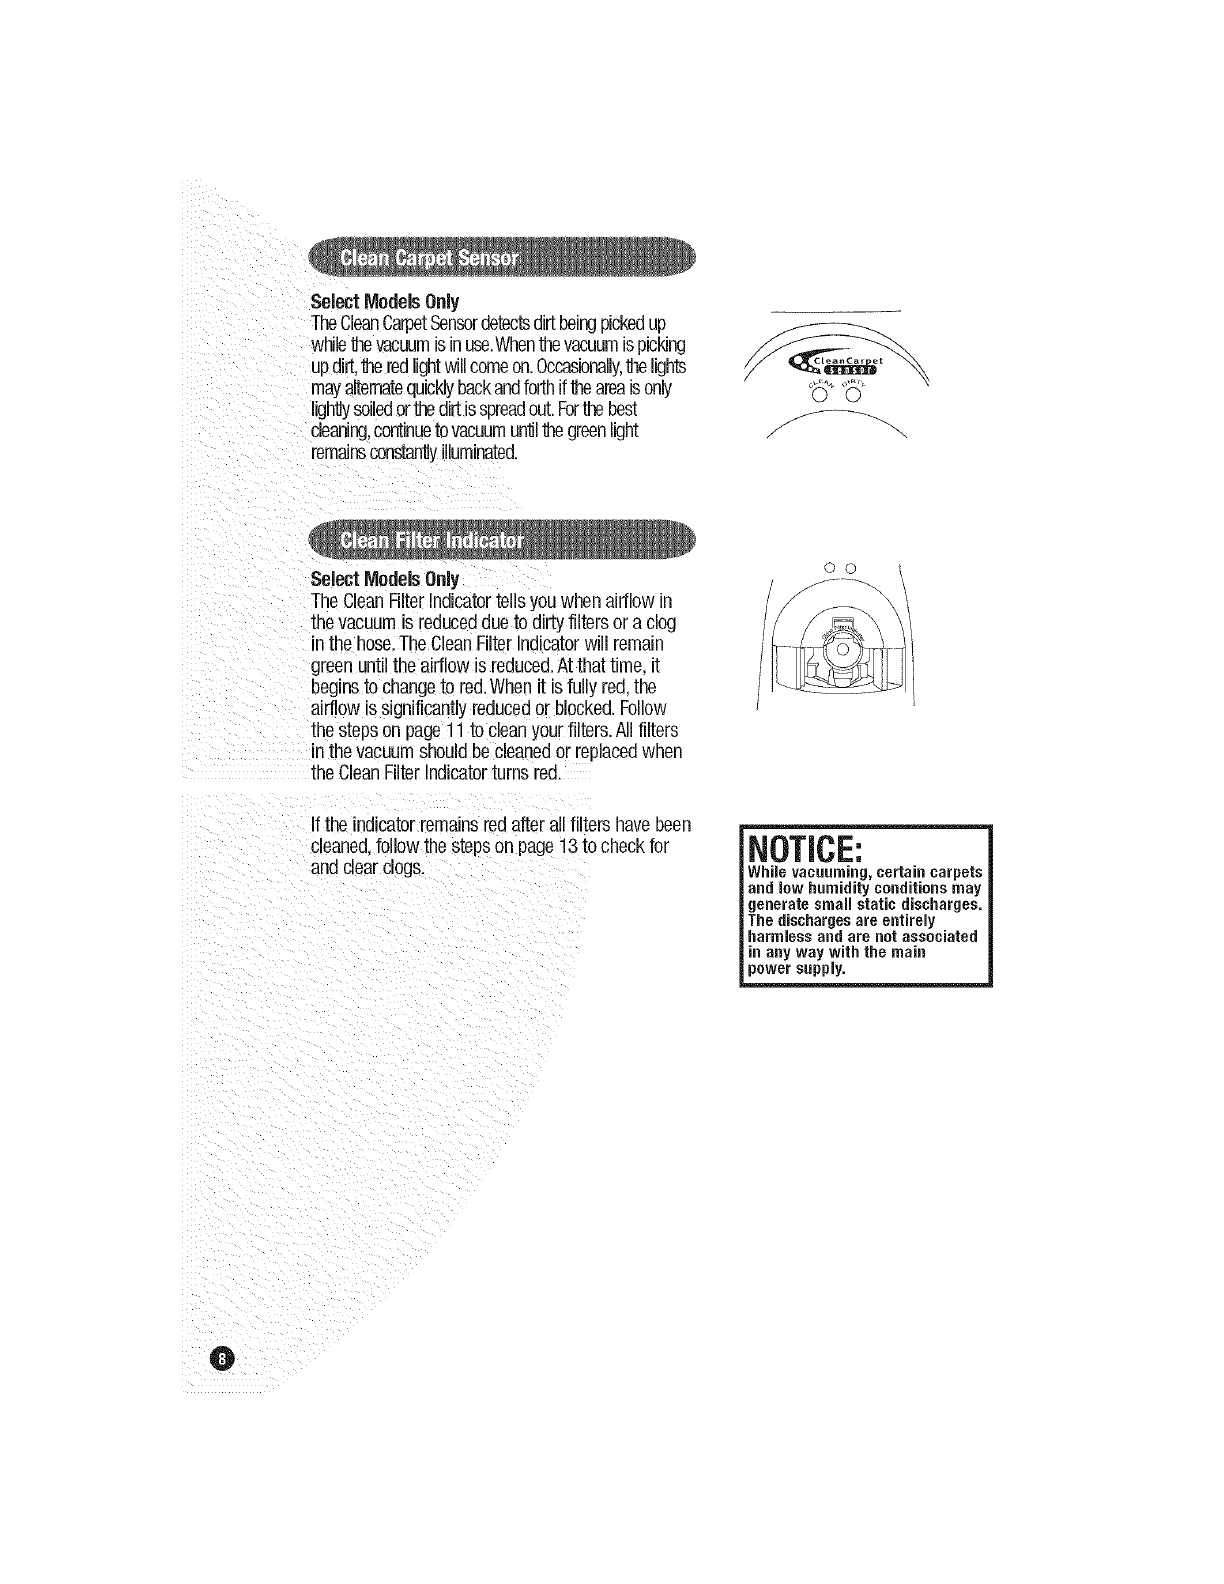
Select ModelsO.ly
TheCleanCarpetSensordetectsdirtbeingpickedup
whilethevacuumisinuse.Whenthevacuumispicking
updirt.theredlightwillcomeon.Occasionally,1helights
mayalternatequicklybackandforthiftheareaisonly
lightlysoiledorthedirtisspreadout.Forthe best
cleaning,continuetovacuumuntilthegreenlight
remainsconstantlyilluminated.
Select ModelsOnly
TheCleanFilterIndicatortellsyou whenairflowin
thevacuum is reduceddueto dirtyfilters or a clog
in the hose.TheCleanFilterIndicatorwill remain
greenuntilthe airflowis reduced.At thattime, it
beginsto changeto red.Whenit is fullyred the
airflowis significantlyreducedor blocked.Follow
the stepson page11to cleanyourfilters.All filters
in thevacuumshouldbecleanedor replacedwhen
the CleanFilterIndicatorturnsred.
If the indicatorremainsredafterallfilters havebeen
cleaned,followthe stenson page13to checkfor
andclearclogs. NOTICE:
Whilevacuuming,certaincarpets
andlawhumidity conditionsmay
generatesmallstaticdischarges.
The dischargesare entirely
harmlessandarenotassociated
inanywaywiththe main
powersupply.
O
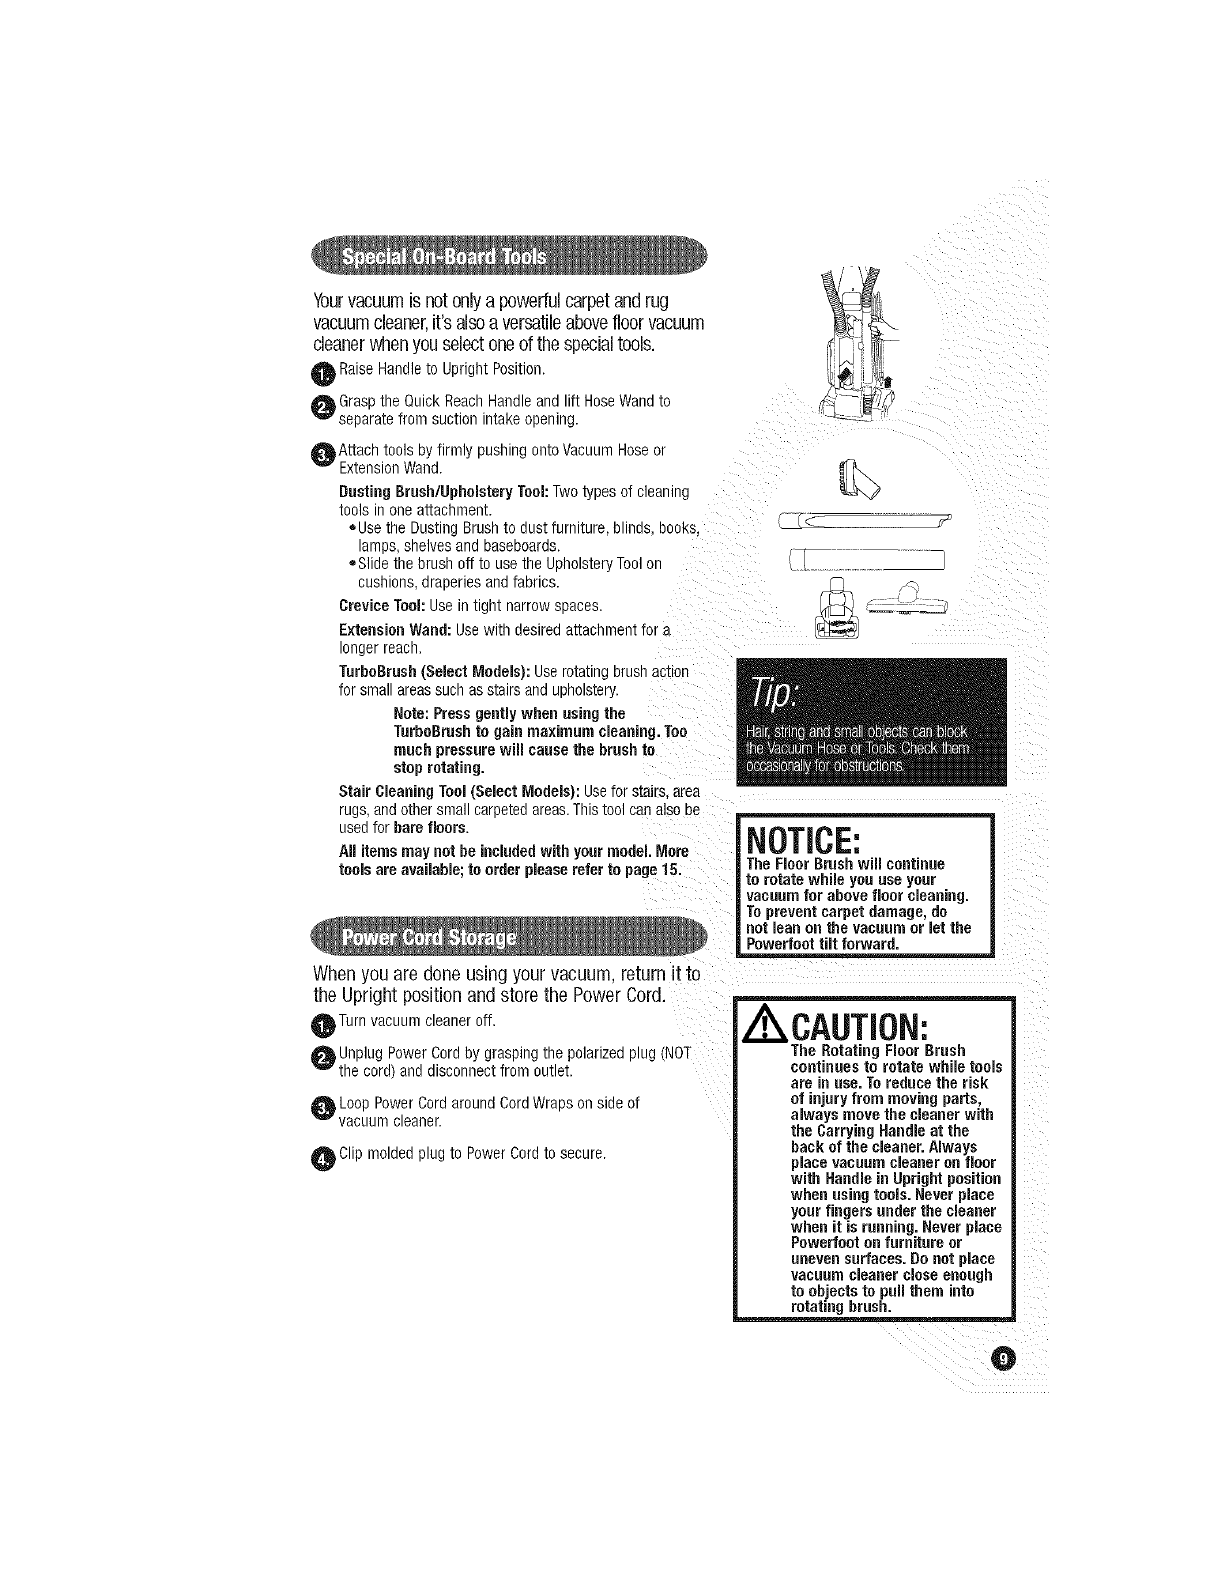
Yourvacuumis not onlya powerfulcarpetandrug
vacuumcleaner,it's alsoa versatileabovefloor vacuum
cleanerwhenyouselectoneof thespecialtools.
Raise Handleto Upright Position.
OGrasp the Quick Reach Handle and ft HoseWand to
separate from suction intake opening.
OAttach tools by firmly pushing onto Vacuum Hoseor
Extension Wand.
Dusting Brush/Upholstery Tool:Twotypes of cleaning
tools inone attachment.
=Usethe Dusting Brush to dust furniture, mines. DOCKS.
lamps,shelves and baseboards.
=Slide the brush off to use the Upholstery Tool or
cushions, draperies and fabrics.
Crevice Tool:Use in tight narrow spaces.
Extension Wand: Usewith desired attachment for a
longer reach.
TurboBrush(Select Models): Use rotating urusn acrton
for small areas such as stairs and upholstery.
Note: Press gently when using the
TurboBrushto gain maximum cleaning. Too
much pressure will cause the brush to
stop rotating.
Stair Cleaning Tool (Select Models): Usefor stairs area
rugs, and other small carpeted areas.This tool can also be
used for bare floors.
All items may not be includedwith your model More
tools are available; to order please refer to page 15.
Whenyou are done using your vacuum,return it to
the Uprightpositionand storethe Power Cord.
OTurn vacuum cleaner off.
Unplug Power Cord by grasping the polarized plug (NOT
the cord) and disconnect from outlet.
O Loop Power Cordaround Cord Wraps on side of
vacuum cleaner.
OClip molded plug to Power Cordto secure.
_F
NOTICE:
The Floor Brush will continue
to rotate while you use your
vacuum for above floor cleaning.
To prevent carpet damage, do
not lean on the vacuum or let the
Powerfeot tin forward.
A\CAUTION:
The Rotating Floor Brush
continues to rotate while tools
are in use.To reduce the risk
of injury from moving parts,
always move the cleaner with
the Carrying Handle at the
back of the cleaner. Always
place vacuum cleaner on floor
with Handle in Upright position
when using tools. Never piece
your fingers under the cleaner
when it is running. Never place
Powerfoot on furniture or
uneven surfaces. Do not place
vacuum cleaner close enough
to objects to pull them into
rotating brush.
O
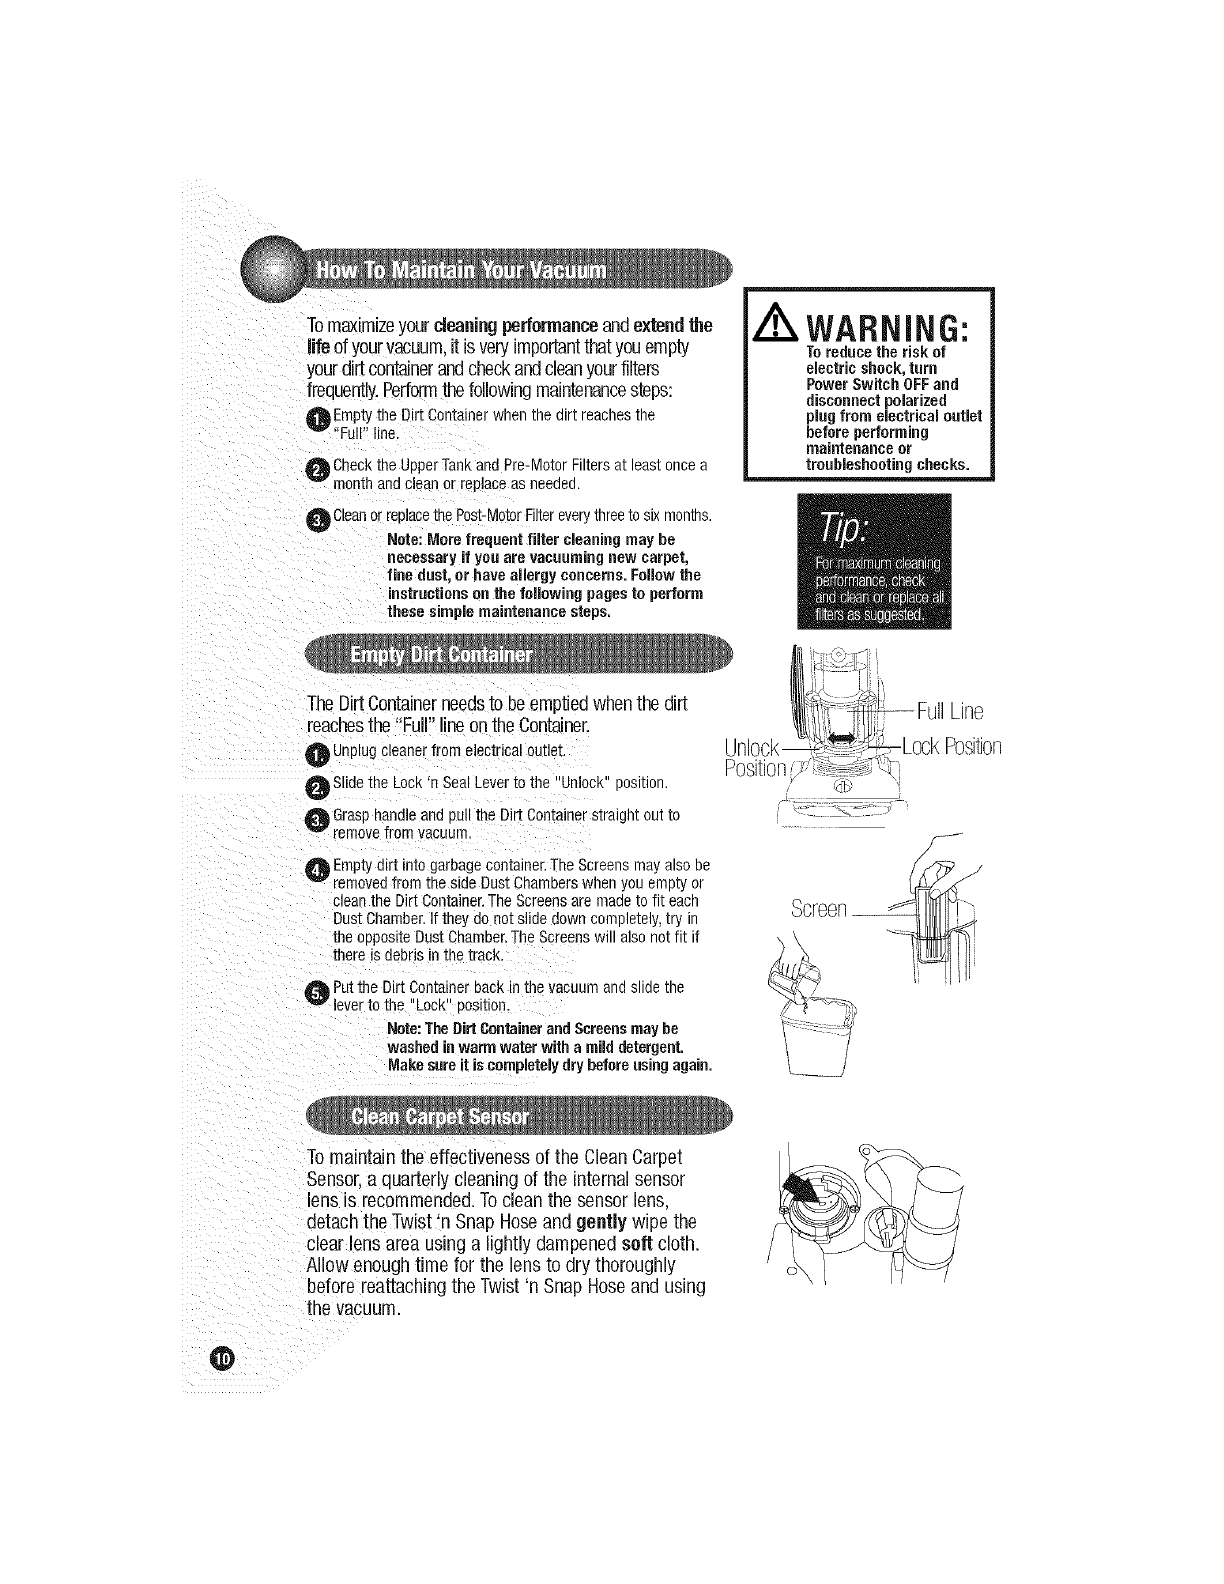
Tomaximizeyourdenning performanceandextendthe
life ofyourvacuum,it is veryimportantthatyouempty
yourdirtcontainerandcheckandcleanyourfilters
frequently.Performthe followingmaintenancesteps:
OEmpty the Dirt Container when me air[ reaclles the
"Full" line.
Check the UpperTank and Pre-Motor Filters at least once a
month and clean or replace as needed.
O Cleanor replacethePost-MotorFiltereverytnree[o six months.
Note:Morefrequent filter cleaningmaybe
necessaryif youarevacuumingnewcarpet,
fine dust,or haveallergy concerns.Followthe
instructionsonthefollowing pagesto perform
these simplemaintenancesteps.
/ WARNING:
To reduce the risk of
electric shock, turn
Power Switch OFFand
disconnect polarized
plug from electrical outlet
before performing
maintenance or
troubleshooting checks.
TheDirtContainerneedsto beemptiedwhenthe dirt
reachesthe Full lineonthe Container.
Unplug cleaner from electrical outlet.
OSlide the LOCK'n Seal Lever to the "Unlock position.
Grasp handle and pull the Dirt Container straight out to
remove from vacuum
Empty dirt into garbage container. The Screens may also be
removed from the side Dust Chambers when you empty or
clean the Dirt Container.The Screens are made to fit each
Dust Chamber. Ifthey do not slide down completely, try in
the opposite Dust Chamber.The Screens will also not fit if
there is debris in the track.
O Put the Dirt Container back in the vacuum and slide the
lever to the "Lock" position.
Note: The Dirt Container and Screensmay he
washed inwarm water with amild detergent.
Make sure it is completely dry before using again.
Screc
To maintainthe effectivenessof the CleanCarpet
Sensor.a quarterly cleaningof the internal sensor
ens is recommended.To cleanthe sensorlens,
detachthe Twist qSnap Hoseand gently wipe the
clear lens area using a lightly dampenedseft cloth.
Allow enoughtime for the lens to dry thoroughly
beforereattachingthe Twistn Snap Hoseand using
the vacuum.
@
Unplug the cleaner from electrical outlet.
OThe UpperTank Filter can be reached by removing the Dirt
Container,reaching underneath the UpperTank and turning
the rim of the Filter Frameto unlock. Pull straigh[ down [o
remove. Brush the dirt off the Louvers and UpperTank Filter.
OThe foam UpperTank Filter may be removed ann nana
washed in cold water with mild detergent. Rinse wen rner
air dry thoroughly before replacing.
OThe UpperTankandLouversmayalsobewipedcleanw_tr
a dampcloth.
Note:Foreasieraccess,the entire UpperTank
maybe removedby turning the knobon the
backof the cleanerto unlockand pullingthe
entiretank straight out.
Unplug the cleaner from electrical outlet.
O The Pre-Motor Filter protects the motor from dirt particles.
It is located in the slide out tray underneath the Dirt
Container.If the filter becomes dirty, pull out the tray, lift
out the filter and clean.
O The Post-MotorFilter assists in the filtration process to
return clean air to the room. It is located behindthe door on
the side of the cleaner. If the filter becomes dirty, open the Pro-Motor
door,removethe filter and clean. Filte,r------_
Note: Select Models come with a white, pleated
NEPAMedia Filter. This filter is not washable (
/
and must be replaced. _
O The standard filters may be hand washed in cold wate_
with mild detergent. Rinse well and air dry thoroughly
before replacing.
Youshouldcheck your vacuumcleaner's Rotating
FloorBrush and DriveBelt regularlyfor wear or
damage.Youshouldalso cleanthe brush and brush
endsof strings,hair,and carpetfibers. Thesecan
wrap aroundthe brush and hamper its abilityto
effectivelyclean your carpet.Also removeany debris
that has accumulatedunderthe brush cover.
O Unplug cleaner from electrical outlet.
Place handle in Low position and turn vacuum cleaner over
so bottom side is up.
O Lift Tab 1 and release the three latches in order 2-4
marked. Lift the Brush Cover off.
Q
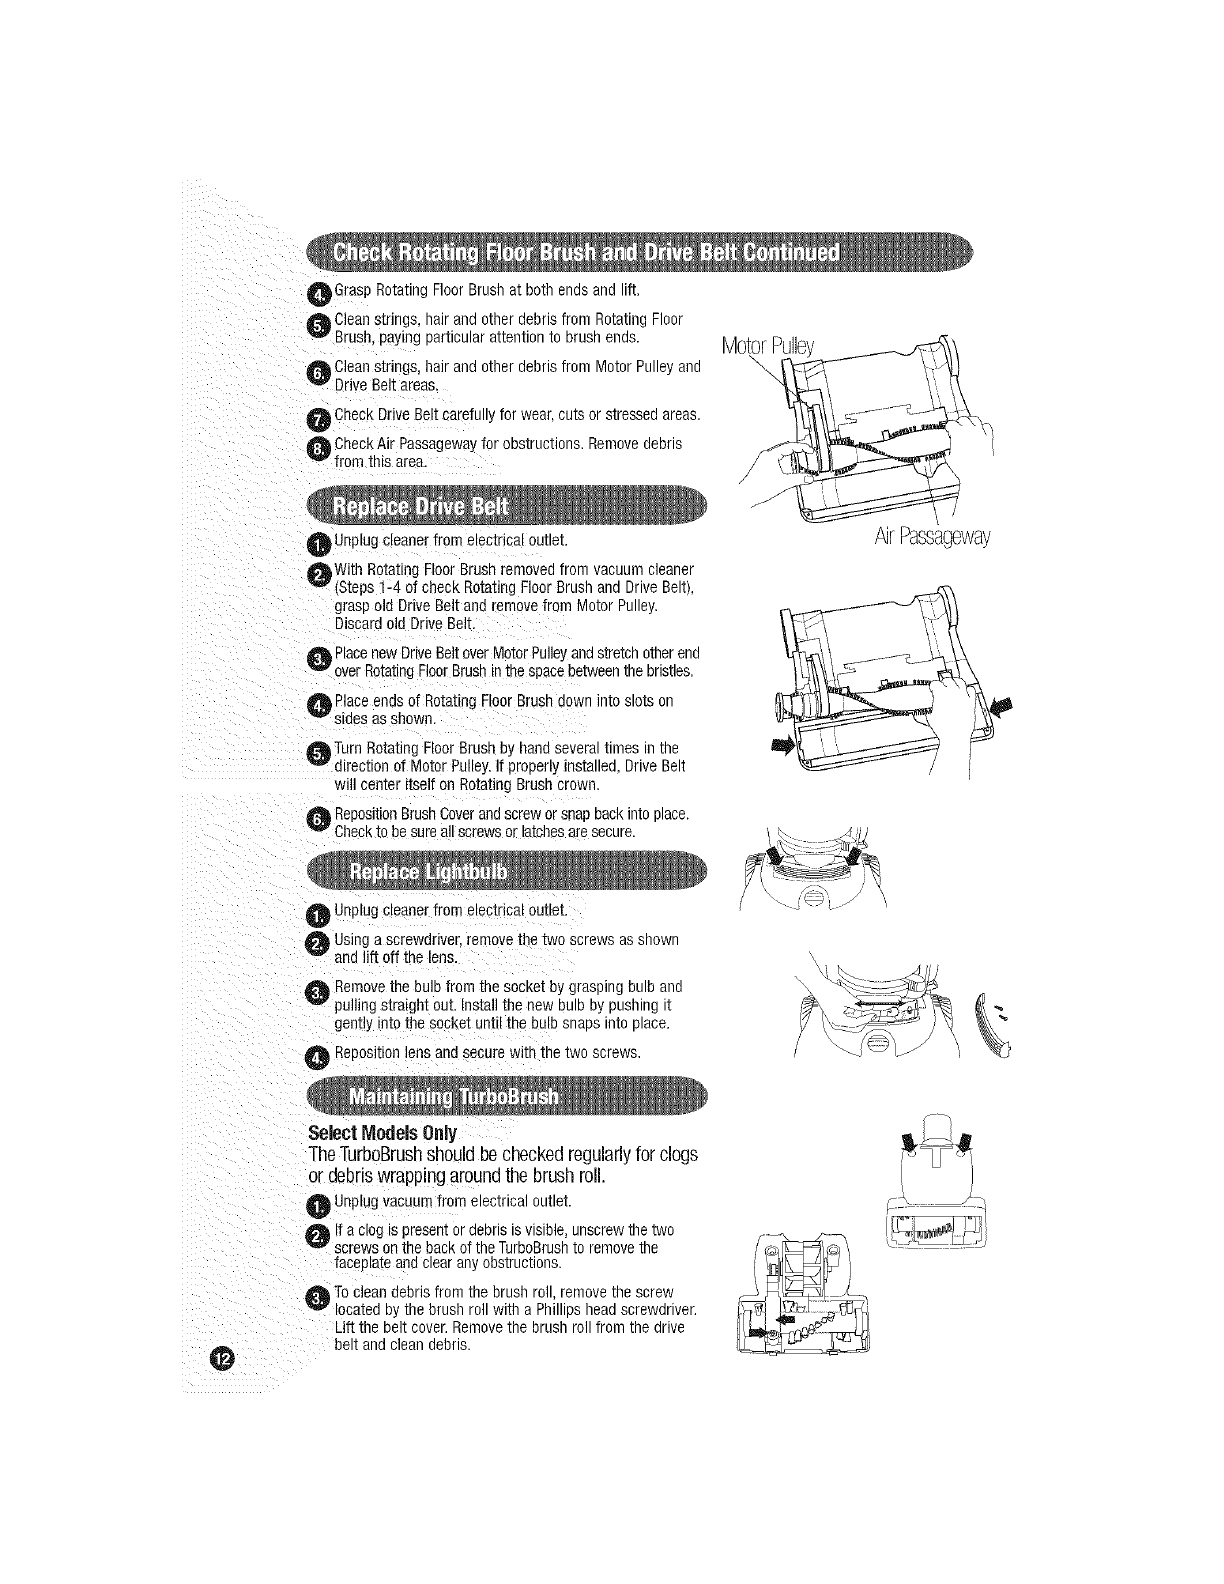
O Grasp Rotating Floor Brush at both ends and lift.
Cleanstnngs, hair and other debris from Rotating Floor
3rush, paying [)articular aEentlon ro orusn ends.
O Cleanstrings, hair and other debris from Motor Pulleyand
Drive Belt areas.
O Check Drive Belt carefu y for wear. cuts or stressea areas.
_ Check Air Passageway for obstructions. Remove debris
from this area.
\
Unplug cleaner from electrical ouue[.
AWJth Rotating Floor Brush removed from vacuum cleaner
v(Steps 1-4 of check Rotating Floor Brush and Drive Belt),
grasp old Drive Belt and remove from Motor Pulley.
3iscard old Drive Belt.
@ ;lace new Drive Belt over Motor Pulley aoa s[re[cn otner end
over RotatingFloorBrushin the spacebetween the bristles.
Place ends of Rotating Floor Brush do_ n into slots on
sides as shown.
OTurn Rotating Floor Brush by hand severa times in the
direction of Motor Pulley. If properly installed Drive Belt
will center itself on Rotating Brush crown.
ReposJtionBrush Coverandscrew or snap back into place.
Checkto be sure all screws or latchesare secure.
g
AirPassageway
Unplug cleaner from electrical outlet.
Using a screwdriver, remove the two screws as shown
and lift off the lens.
Removethe bulb from the socket by grasping bulb and
pulling straight out. Install the new bulb by pushing it
gently into the socket until the bulb snaos into place.
ReposJtionlens and secure with the two screws.
\\
_Lz .... eJ
0
SelectModelsOnly
TheTurboBrushshouldbecheckedregularlyfor clogs
or debriswrappingaroundthe brushroll.
Unplug vacuum from electrical OUtlet.
If a clog ispresent or debris is visible, unscrew [ne two
screws on the back of the TurboBrushto remove tne
faceplate and clear any obstructions.
O Toclean debris from the brush rol, remove me screw
located by the brush roll with a Phil os head screwdriver.
_ift the belt cover. Removethe brush ro from the drive
belt and clean debris.
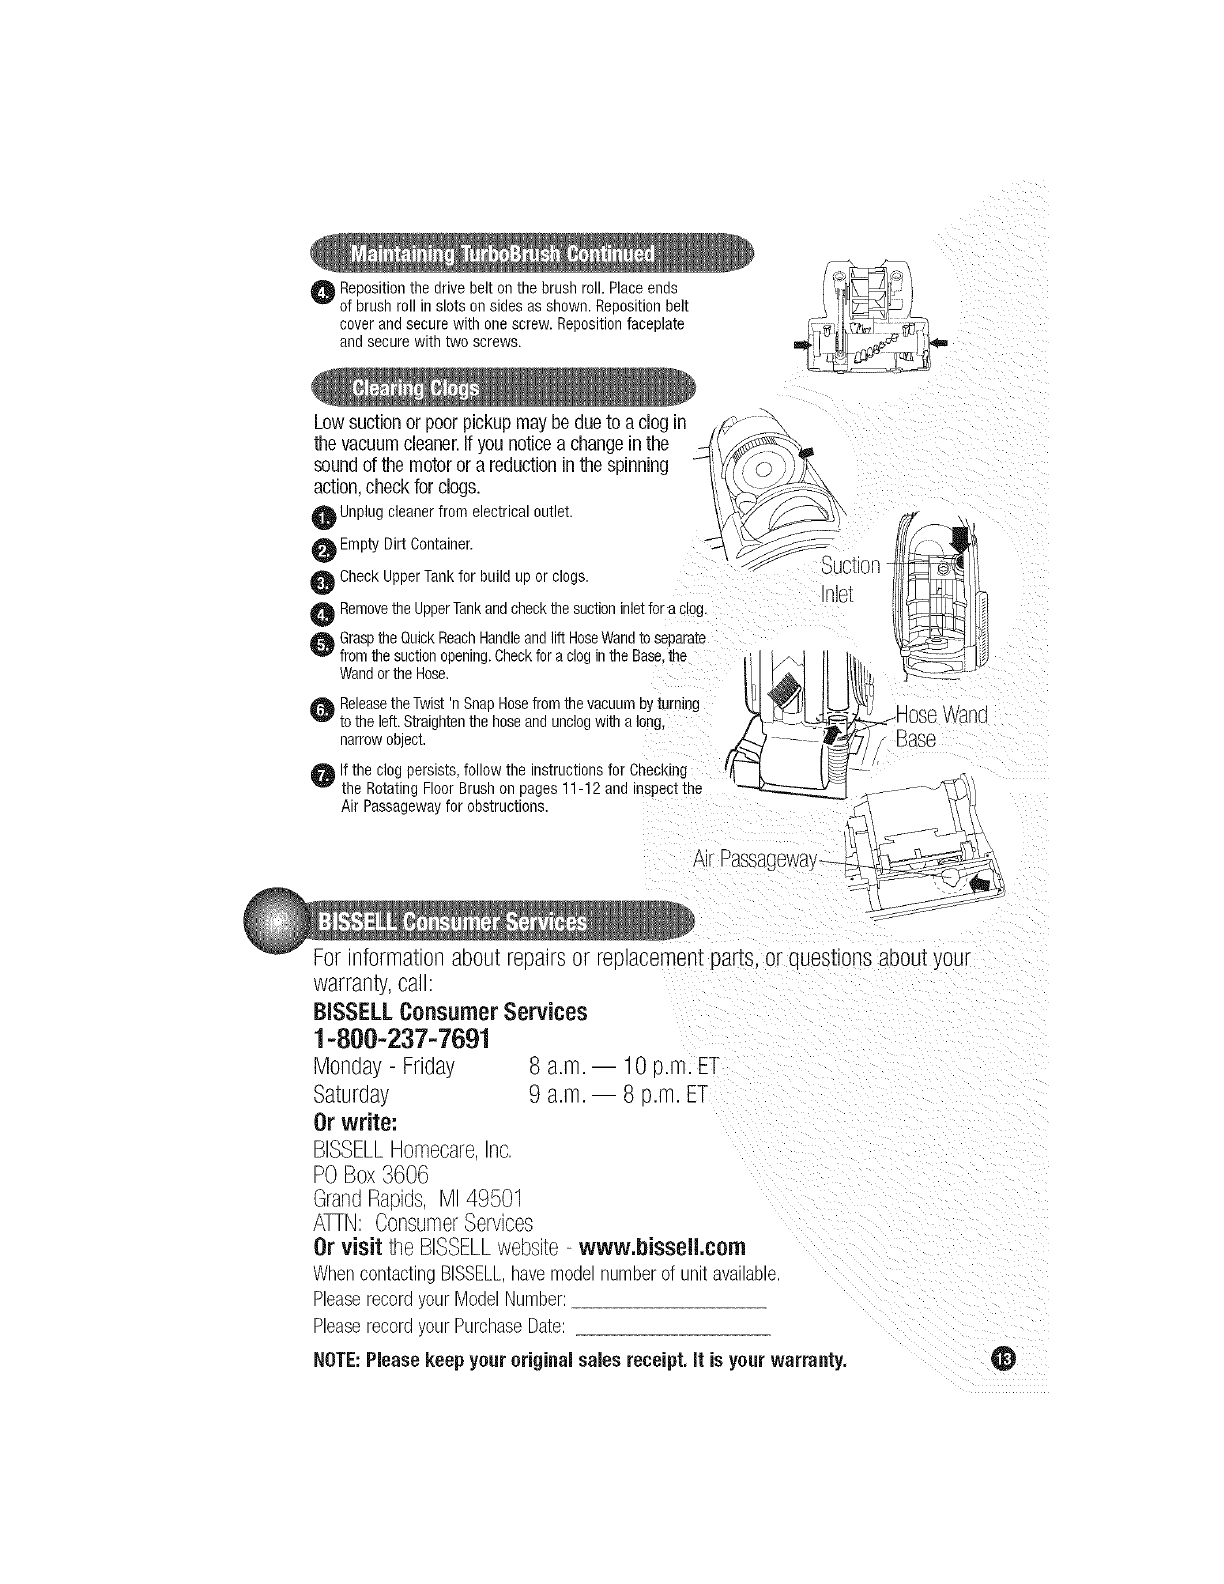
O Repositionthedrivebeltonthebrushroll.Placeends
ofbrushrollinslotsonsidesasshown.Reposmonbelt
coverandsecurewithonescrew.ReoositionfaceEale
andsecurewithtwoscrews.
Lowsuctionorpoorpickupmaybe dueto a clogin //_ _X
the vacuumcleaner.Ifyou noticea changeinthe _/_
soundofthemotororareductioninthespinning -'q y/T/ ¢,_',)T_
action,checkfor clogs. 1.____
0 Unplug cleaner from electrical outlet. _,,/_v'v'v'v'v'v'v'v'_/,___/ ,- ,
Empty Dirt Container. _ \_! _/--_
"_" _J Suction Ii'
0 Check UpperTank for build up or clogs. _/_
Inlet
O Removethe UpperTankand check the suction inlet for a clog. _[_
0 Graspthe Quick ReachHandleand lift HoseWandto separate _z:_,i
from the suction opening.Checkfor a clog in the Base,the I I I/\j II I1_, _
Wandor the Hose. It 1 ]II1/11t
Reeasethe Twst 'n Snap Hosefrom the vacuum by turn ng U _j'
@ to the left.Straighten the hoseand unclog with a long, _,_. _L__ Hose Wand
narrow object, f_ I_/! Base
_ If the clog persists, follow the instructions for Checking /_ (_//' _._,j,_,
the Rotating Floor Brush on pages 11-12 and nspect the '_ 4 - -_--_!\
Air Passagewayfor obstructions. _-_/__
Air Passageway_
For informationabout repairsor replacement parts, or auestions aboutyour
warranty,call:
BISSELLConsumerServices
1-800-237-7691
Monday - Friday 8 a.m. 10 o.m. ET
Saturday 9 a.m. 8 o.m. ET
Or write:
BISSELLHomecare,Inc.
POBox3606
GrandRapids, MI49501
ATTN: ConsumerServices
Or visit the BISSELLwebsite-www.bissell.com
WhencontactingBISSELL,havemodelnumberof unit available,
PleaserecordyourModelNumber:
PleaserecordyourPurchaseDate:
NOTE:Pleasekeep your original sales receipt.It is your warranty. @
Vacuum cleaner won't run
Possible Causes
O Powercord not pluggedin
Blownfuse/trippedbreaker
WARNING:
To reducethe risk of injury from moving
partsand/or electrical shock, turn Power
Switch OFFand disconnectpolarized plug
from electrical outlet before performing
troubleshooting checks.
Remedies
O Checkelectricalplug
O Check!Replacefuseor resetbreaker
Vacuumcleaner orToolswon't pickup dirt
PossibleCauses
O ncorrectHeightAdjustment
0 Hosenot attachedto suctionopening
Twist'n SnapHosenot securelyattached
O Crackor holeinHose
Q Brokenor worn DriveBelt
Q Rotating;Igor Brushbristlesworn
O RotatingFloorBrushjammed
0Clog nvacuum
O DirtContainerfull
@bDirtContainerorUpperTanknotinstalledproperly
Filtersaredirty
_b TurboBrushis cloggedor debrisis wrapped
aroundthe BrushRoll
Vacuumcleaneris difficult to push
PossibleCauses
O IncorrectHeightAdjustment
Visibledirt escapingfrom cleaner
PossibleCauses
O DirtContainerfull
0 Filtersmissingorinstalledincorrectly
0 DirtContainerinstalledincorrectly
Remedies
OAdjust Powertootto correctheight
Q FirmlypushHoseWandintothesuc'donopening
0 MakesureTwist'n SnapHoseis snappedinto
lockedposition
Q CheckHoseand replaceif needed
Q ReplaceDriveBelt,see page12
O Replacebrush
0 Removebrushandcleandebrisfrombrushends
Q Clearclog,see page13
Q EmptyDirt Container
@ Positioncorrectlyandlockin place
CheckandcleanUpperTank,
Pre-MotorandPost-MotorFilters
@bMaintainingTurboBrush,see pages12-13
Remedies
O AdjustPowertootto correctheightsetting
Remedies
0 EmptyDirtContainer
Q CheckUpperTank,Pre-MotorandPost-Motor
Filtersfor correct installation
0 Pullout andre-insertDirtContainercorrectly
CleanCarpetSensornotfunctioningproperly
PossibleCauses Remedies
O CleanCarpetSensorLensis Dirty O CleanInternalSensorLens,seepage10
_) _ CloginSuctionIntakeArea 0 Clearclog,seepage13

Youmaypurchasereplacementpartsfromyourretailer,bycallingBISSELLConsumerServices
orbyvisitingourwebsite.Tolocatearetailernearyou,ortoplaceanorderusingVISA.
MasterCard,DiscoverorAmericanExpress,call:
BISSELLConsumerServices
1-800-237-7691
Or visit our Website - www.bissell.com
item Part No.
1 32074
2 203-1297
3 203-1063
4 203-1228
5 203-6732
6 203-6730
7 203-6624
8 203-1084
9 203-2035
10 203-6726
11 203-6729
12 203-6756
13 203-1195
14 3093
15 3099
16 32076
Part Name
Style7/9/10 DriveBelt !2-Pack
StandardHeadlightBulb
CreviceTool
DustingBrush/UpholsteryToo
TurboBrush(SelectModelsOny)- me
TurboBrush(SelectModelsOnly)-SonicYello_
Stair CleaningTool(SelectModelsOnly;
ExtensionWand
Wire ReinforcedTwist'n SnapVacuumHoseCear
WideWindowFootBrusnRoll - Lime
WideWindowFootBrusnRoll- SonicYeow
WideWindowFootBrushRoll- Taupe
Wide CleaninaPathFootBrusnRo
Style7/8 uDDerTankFilterand Pre-MotorFilterSet
Style7 WashablePost-Motor:ilter Set t2 pack)
Style7 HEPAMedia Post-MotorFilter
@
This warranty gives you specific legal gnrs, anu you Ylavalso haveother rights which may vary from state to
state. It ;ou neeu aaumona_ ns[rucuon regarum_ [n_swarranty or have questions regarding what it may cover,
elease contact BISSELLConst ner Services b\ E-ma releonone or regular mail as described below.
Limited OneYearWarranty
Subject to the *EX}EPTIONSALD EXCLUSIONSidentified below, upon receipt of the product BISSELLHomecare,
_c.wlu repair or replace wire new ol remanuracturea cart ponents or products), at BISSELL'soption, free of
cnarae from the date of EJrcnase oy me anginal )urchaser. for one year any defective or malfunctioning part.
See nformatlon uelow on "If your BISSELLoroaucr snoula require service".
Thiswarranty applies T( sroauc[ useafor sersona ana norcommercial or rental service.This warranty does not
apply to fans or routine _nalmenancecor_oonemssuch as filters, belts, or brushes. Damageor malfunction caused
oy negugence,aDuse qeglecL unautnonzearepair, or an} )mer use not in accordancewith the User's Guide is
no[ coverea.
if yourBISSELLproductshouldrequireservice:
ContactBISSELLConsumerServicesto locatea BISSELLAuthorizedServiceCenterin yourarea.
Ifyouneedinformationaboutrepairsorreplacementparts,orif youhavequestionsaboutyour
warranty,contactBISSELLConsumerServices.
Websiteor E-mail:
www.bissell.co_
Usethe "CustomerServices"tab.
OrCarl:
BISSELLConsumerServices
1-800-237-7691
Monday- Friday8 a.m.- 10 p.m. ET
Saturday9 a.m. - 8 p.m.ET
Orwrite:
BISSELLHomecare,Inc.
POBox3606
6rand Rapids.M149501
AS-rN:ConsumerServices
RiSSELL ROMECARE, iNC. IS NOT LIABLE FOR INCIDENTAL OR CONSEQUENTIAL DAMAGES OF ANY
NATURE ASSOCIATEDWITH THE USE OF THIS PRODUCT.RISSELL SLIABILITY WILL NOT EXCEED THE
PURCHASE PRICE OF THE PRODUCT.
Some states do not allow the exclusion or limitation of incidental or consequential damages, so
the above limitation or exclusion may not apply to you.
*EXCEPTIONSAHD EXCLUSIONSFROM THETERMS OF THE LIMITED WARRANTY
@
THISWARRAHTYIS EXCLUSIVEAND iN LiEU OF ANY OTHERWARRANTIESEITHER
ORALOR WRITTEH. AHY IMPLIED WARRANTIESWHICH MAY ARISEBY OPERATION
OF LAW.INCLUDINGTHE IMPLIED WARRANTIESOF MERCHANTABILITYAHD
FITNESSFORA PARTICULARPURPOSE.ARELiMiTED TO THE ONEYEARDURATION
FROM THEDATEOF PURCHASEAS DESCRIBEDABOVE.
Somestatesuo no[al ow uml[auonson NOWdngan Impuedwarrantylasts,sothe aboveliraitation
ma! norapply[o you.
©2005 BISSELLHomecar_,Inc
GrandRapids,Michigan
All rights r_served Pril/tedin Korea
Part Number603 6720
Rev02/05
Visit our website at:
www bissellcom
