Black And Decker Bdh1850Sm Users Manual
BDH1850SM to the manual 0bbc8b7a-56c4-4f70-8cb2-b8f16a28f69a
2015-02-02
: Black-And-Decker Black-And-Decker-Bdh1850Sm-Users-Manual-158142 black-and-decker-bdh1850sm-users-manual-158142 black-and-decker pdf
Open the PDF directly: View PDF ![]() .
.
Page Count: 40

Thank you for choosing Black & Decker!
PLEASE READ BEFORE RETURNING THIS PRODUCT FOR ANY REASON.
If you have a question or experience a problem with your Black & Decker
purchase, go to http://www.blackanddecker.com/instantanswers
If you can’t find the answer or do not have access to the Internet, call
1-800-544-6986 from 8 a.m. to 5 p.m. EST Mon. - Fri. to speak with an agent.
Please have the catalog number available when you call.
SAVE THIS MANUAL FOR FUTURE REFERENCE.
VEA EL ESPANOL EN LA CONTRAPORTADA.
INSTRUCTIVO DE OPERACIÓN, CENTROS DE SERVICIO Y PÓLIZA DE GARANTÍA.
ADVERTENCIA: LÉASE ESTE INSTRUCTIVO ANTES DE USAR EL PRODUCTO.
To register your new product, call 1-800-544-6986
or visit www.BlackandDecker.com/NewOwner
INSTRUCTION MANUAL
2-N-1 STEAM MOP WITH FRESH SCENT
CATALOG NUMBER
BDH1850SM

2
INTENDED USE
Your Black & Decker steam mop has been designed for sanitizing and cleaning the following
SEALED floors: hardwood, laminate, linoleum, vinyl, ceramic tile, stone, and marble. Upright
unit is for floor use only, hand-held can be used on all surfaces; do not use the unit upside
down. This appliance is intended for indoor household use only.
SAFETY INSTRUCTIONS
WARNING:
Read all safety warnings and all instructions. Failure to follow the warnings
and instructions listed below may result in electric shock, fire and/or serious injury.
WARNING: When using electrical appliances, basic safety precautions, including
the following, should always be followed to reduce the risk of fire, electric shock,
personal injury and material damage.
SAFETY WARNINGS AND INSTRUCTIONS: POLARIZED PLUGS
To reduce the risk of electric shock, this equipment has a polarized plug (one blade is wider
than the other). This equipment must be used with a suitable polarized 2 wire or 3 wire
extension cord. Polarized connections will fit together only one way. Make sure that the
receptacle end of the extension cord has large and small blade slot widths. If the plug does not
fit fully into the extension cord, reverse the plug. If it still does not fit, obtain a suitable extension
cord. If the extension cord does not fit fully into the outlet, contact a qualified electrician to install
the proper outlet. Do not change the tool plug or extension cord in any way.
or the performance of any operation with this appliance other than those recommended
in this instruction manual may present a risk of personal injury.
USING YOUR APPLIANCE
Minimum Gauge for Cord Sets
Volts Total Length of Cord in Feet
120V 0-25 26-50 51-100 101-150
(0-7,6m) (7,6-15,2m) (15,2-30,4m) (30,4-45,7m)
240V 0-50 51-100 101-200 201-300
(0-15,2m) (15,2-30,4m) (30,4-60,9m) (60,9-91,4m)
Ampere Rating
More Not more American Wire Gauge
Than Than
0 - 6 18 16 16 14
6 - 10 18 16 14 12
10 - 12 16 16 14 12
12 - 16 14 12 Not Recommended
SAFETY GUIDELINES - DEFINITIONS
It is important for you to read and understand this manual. The information it contains
relates to protecting YOUR SAFETY and PREVENTING PROBLEMS. The symbols
below are used to help you recognize this information.
DANGER: Indicates an imminently hazardous situation which, if not avoided,
will result in death or serious injury.
WARNING: Indicates a potentially hazardous situation which, if not avoided,
could result in death or serious injury.
CAUTION: Indicates a potentially haz ard ous situation which, if not avoided,
may result in minor or mod er ate injury.
NOTICE: Used without the safety alert symbol indicates potentially hazardous
situation which, if not avoided, may result in property damage.

appliance cord away from heat, oil and sharp edges.
sharp corners or expose cord to heated surfaces.
Do not use appliance in an enclosed space filled with vapor given off by oil-based paint
thinner, some moth-proofing substances, flammable dust, or other explosive or toxic vapors.
delicate, steam-sensitive materials.
treated with wax or some no-wax floors, the sheen may be removed by the heat and
steam action. It is always recommended to test an isolated area of the surface to be
cleaned before proceeding. We also recommend that you check the use and care
instructions from the floor manufacturer.
this may damage it or make it unsafe for use.
If the circuit breaker activates while using the steam function, discontinue product use
immediately and contact the customer support center. (Beware of the risk of electrical shock.)
steam head and cleaning pads get very hot during use.
CAUTION:
Always wear suitable shoes when using your steam mop and when
changing the accessories on your steam mop. Do not wear slippers or open-toed footwear.
become hot during use.
AFTER USE
INSPECTION AND REPAIRS
maintenance or repairs.
parts, damage to switches and any other conditions that may affect its operation.
SAFETY OF OTHERS
physical, sensory or mental capabilities, or lack of experience and knowledge, unless
they have been given supervision or instruction concerning the use of the appliance by
a person responsible for their safety.
RESIDUAL RISKS
Additional residual risks may arise when using the tool which may not be included in the
enclosed safety warnings. These risks can arise from misuse, prolonged use, etc.
Even with the application of the relevant safety regulations and the implementation of
safety devices, certain residual risks can not be avoided. These include:
prolonged periods ensure you take regular breaks.
3
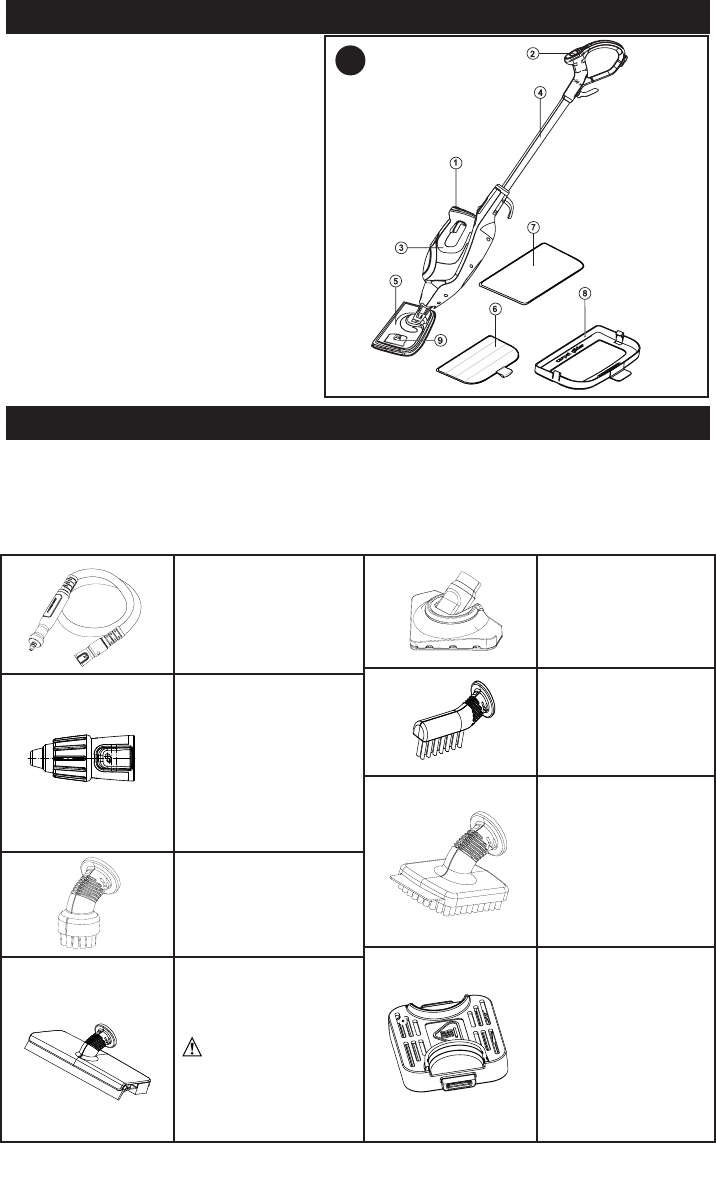
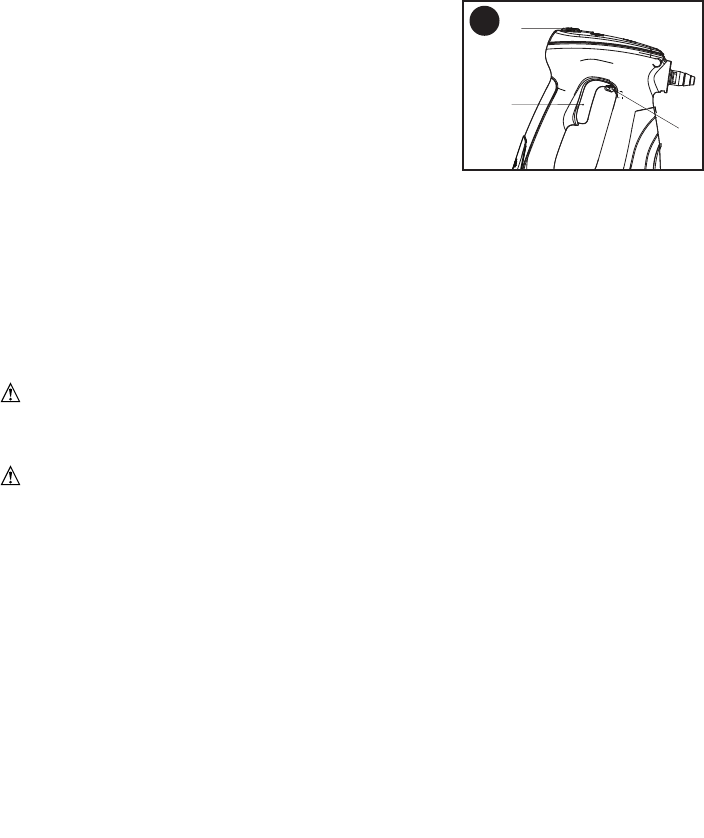
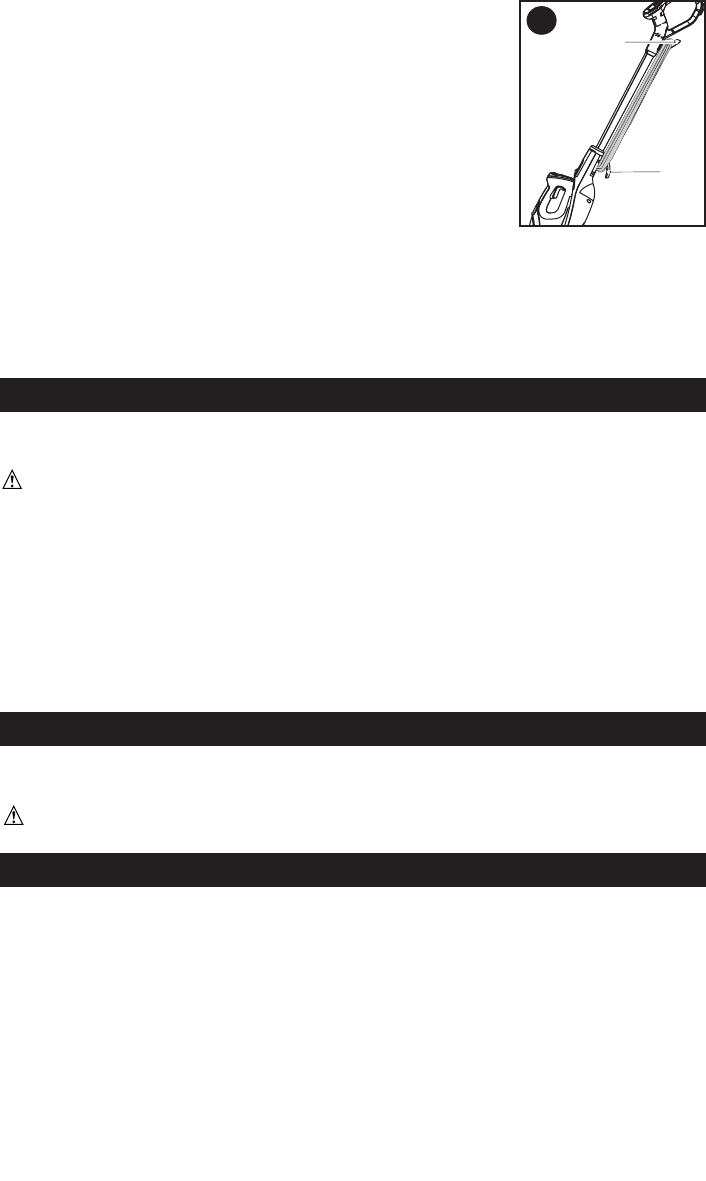
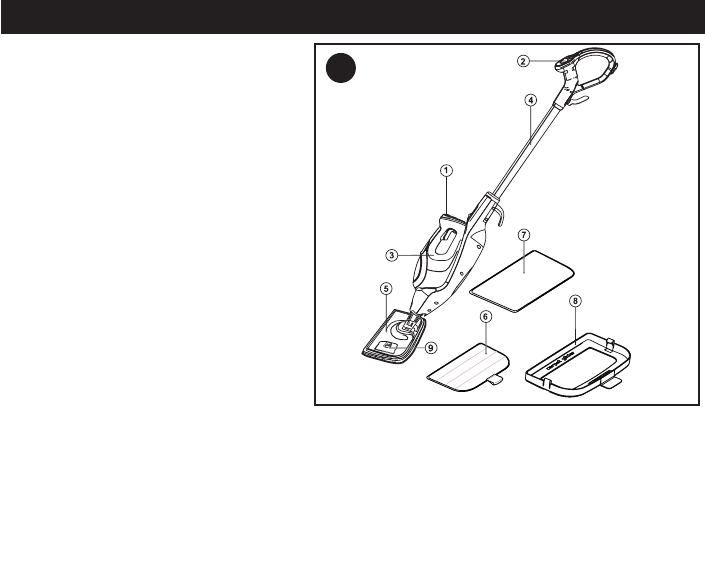
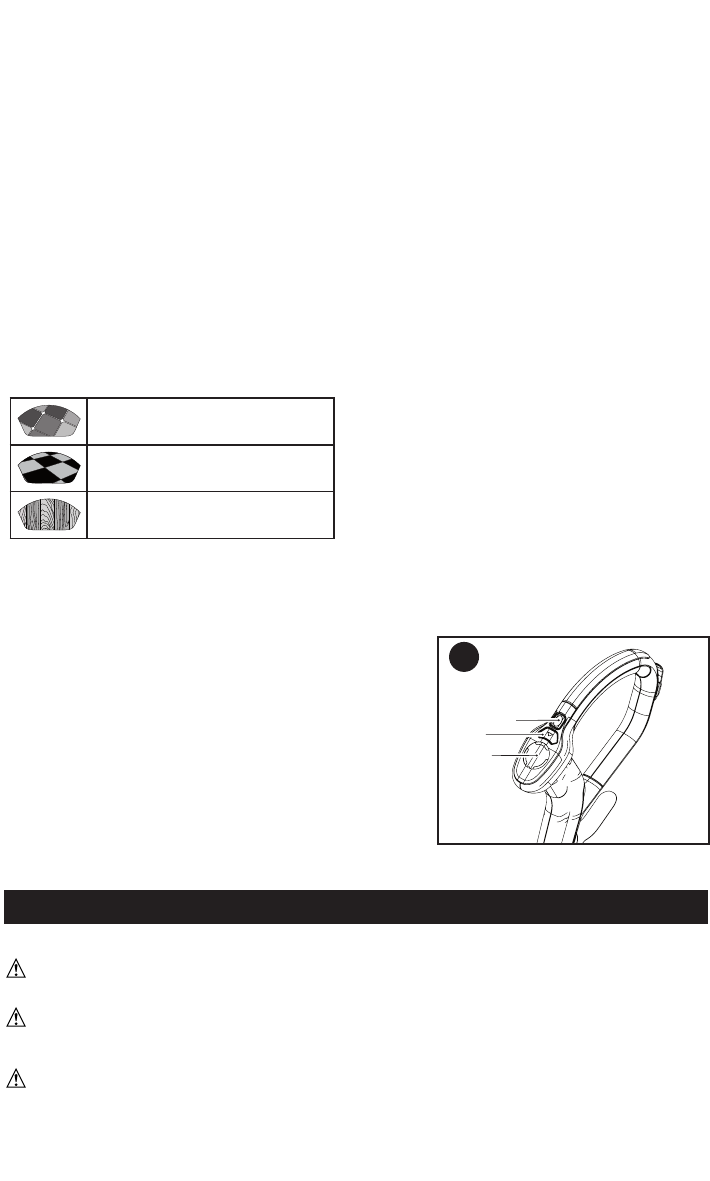
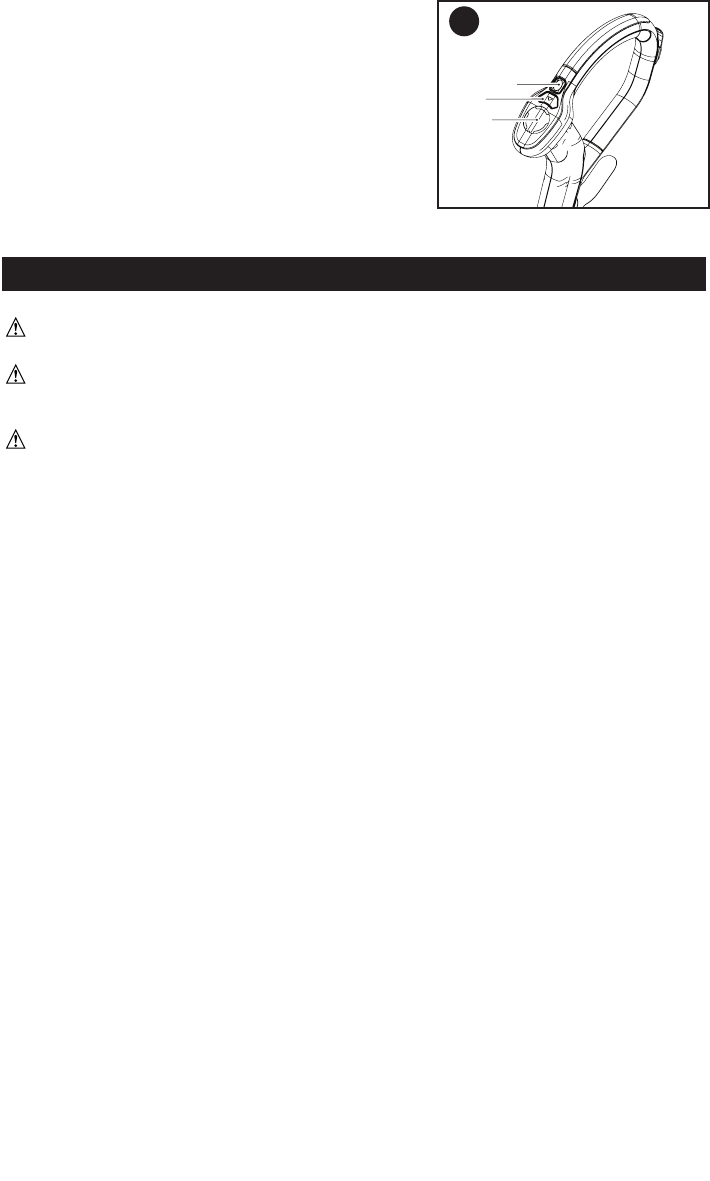
FUNCTIONAL DESCRIPTION
1. ON/Off Switch
2. SmartSelectTM Button
3. Hand-held Steam Cleaner
4. Handle Tube
5. Steam Head
6. Micro-Fiber
Cleaning Pad
7. Resting Mat
8. Carpet Glider
9. Fresh Scent Door
Release Button
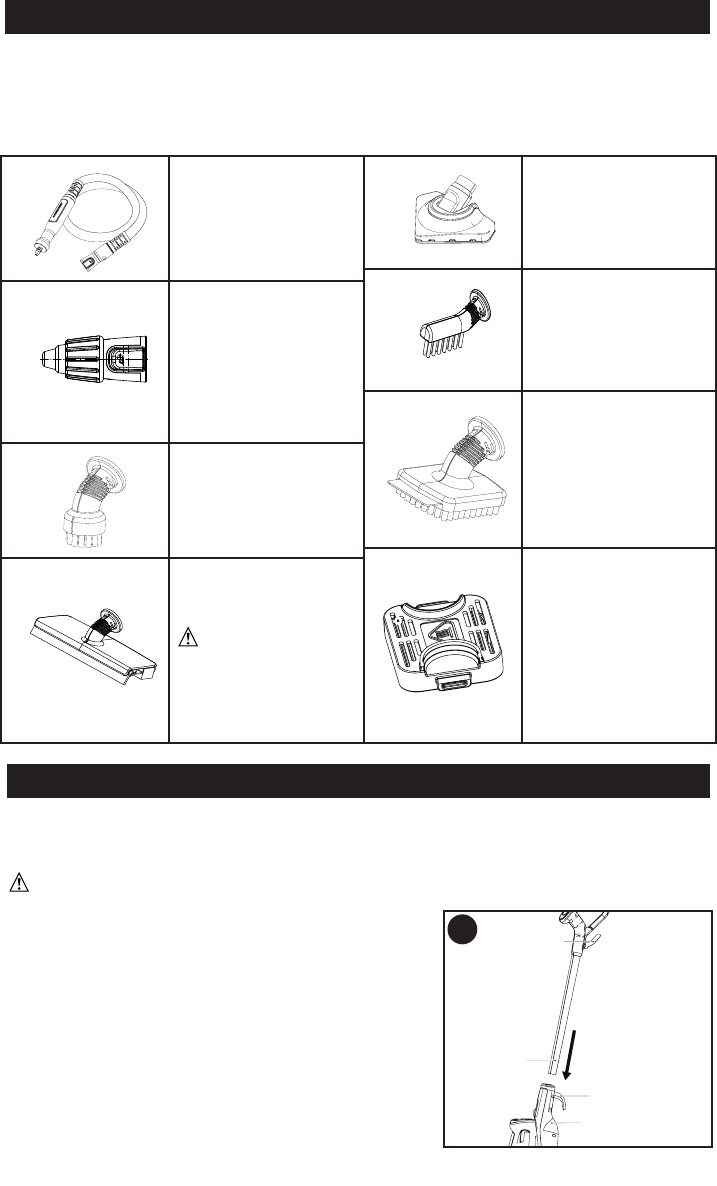
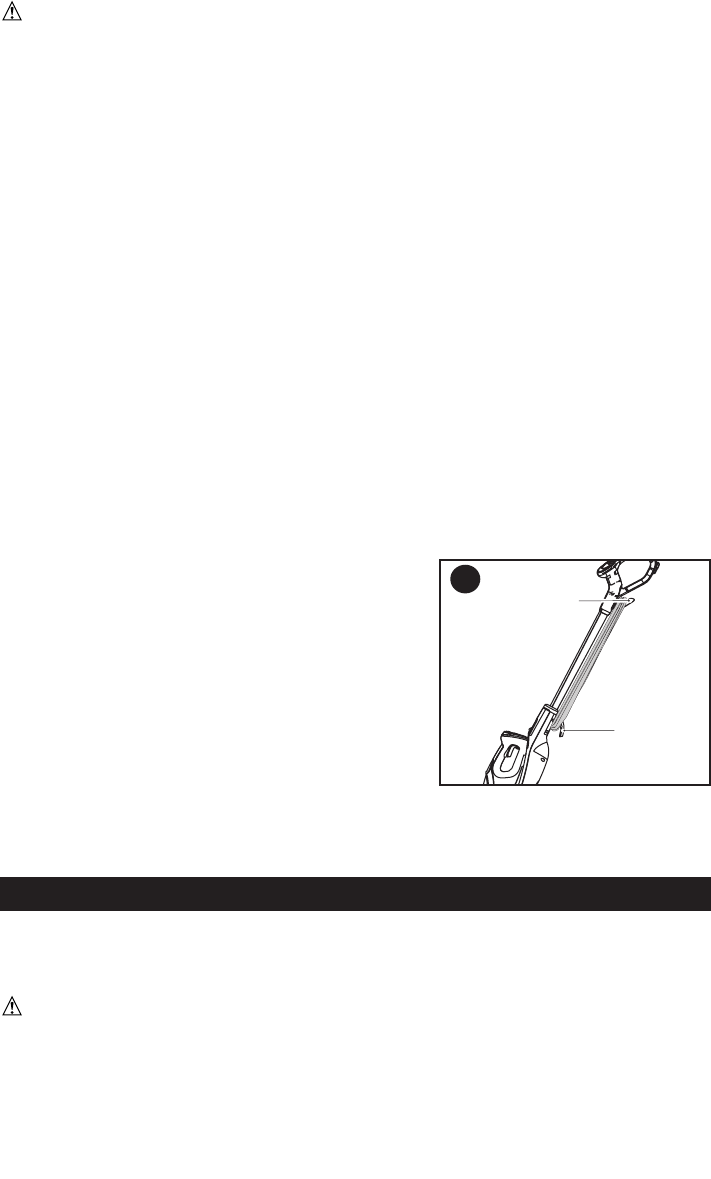
ACCESSORIES
This appliance includes some or all of the following accessories. The performance of your
appliance depends on the accessory used. Black & Decker accessories are engineered
to high quality standards and designed to enhance the performance of your appliance. By
using these accessories you will get the very best from your appliance.
A
4
Flexible hose and
handle.
For convenient use of
all accessories.
Variable steam jet
nozzle.
For higher pressure
steam bursts, twist
to change the spray
pattern of the steam
burst.
Small brush (Blue).
For cleaning small
hard surfaces.
Window Squeegee.
For cleaning glass
doors and windows.
WARNING:
Do not use the
window squeegee on
cold glass. It may cause
the glass to break.
Mini pivot mop.
For cleaning tiles and
large flat surfaces.
Detail grout cleaner.
For cleaning grouted
areas between tiles.
Large scrub brush
cleaner with scraper.
For cleaning heavily
soiled object such as
BBQ’s.
Fresh Scent tab
.
ASSEMBLY
NOTICE: Each steam mop is 100% tested in the factory to ensure product
performance and safety. When assembling your new steam mop for the first time you may
notice water residue inside of the unit.
WARNING: Before attempting any of the following operations, make sure that the
appliance is switched off and unplugged and that the appliance is cold and contains
minimal or no water.
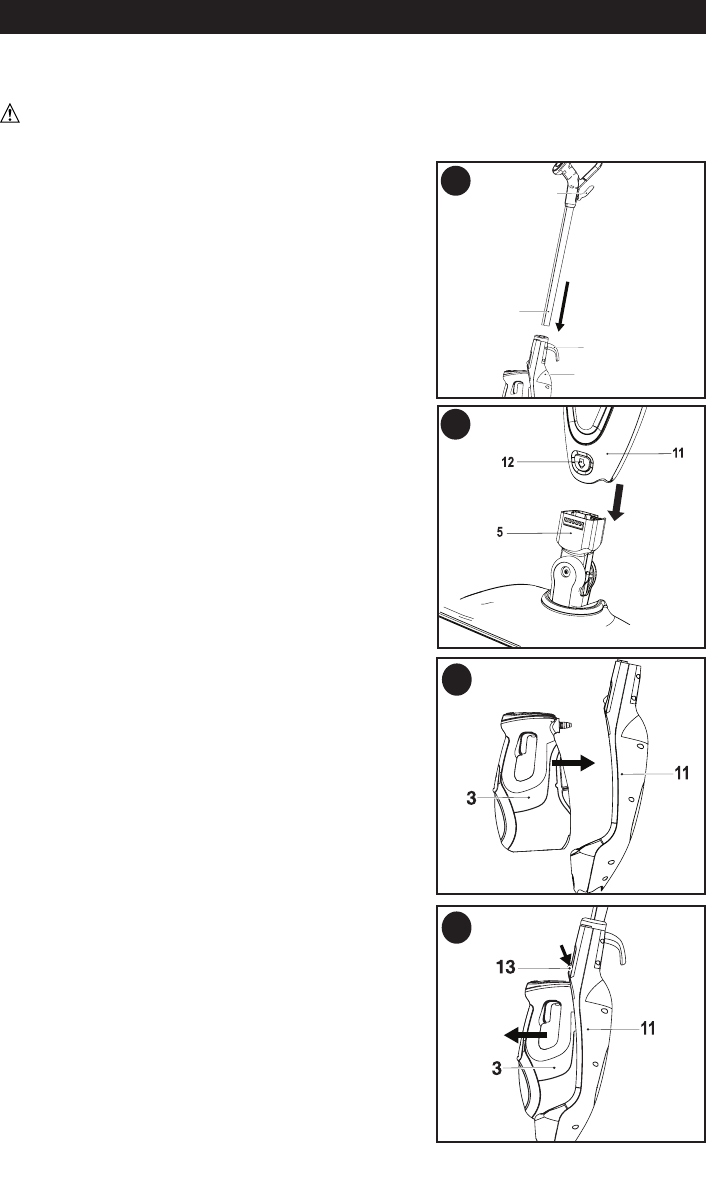
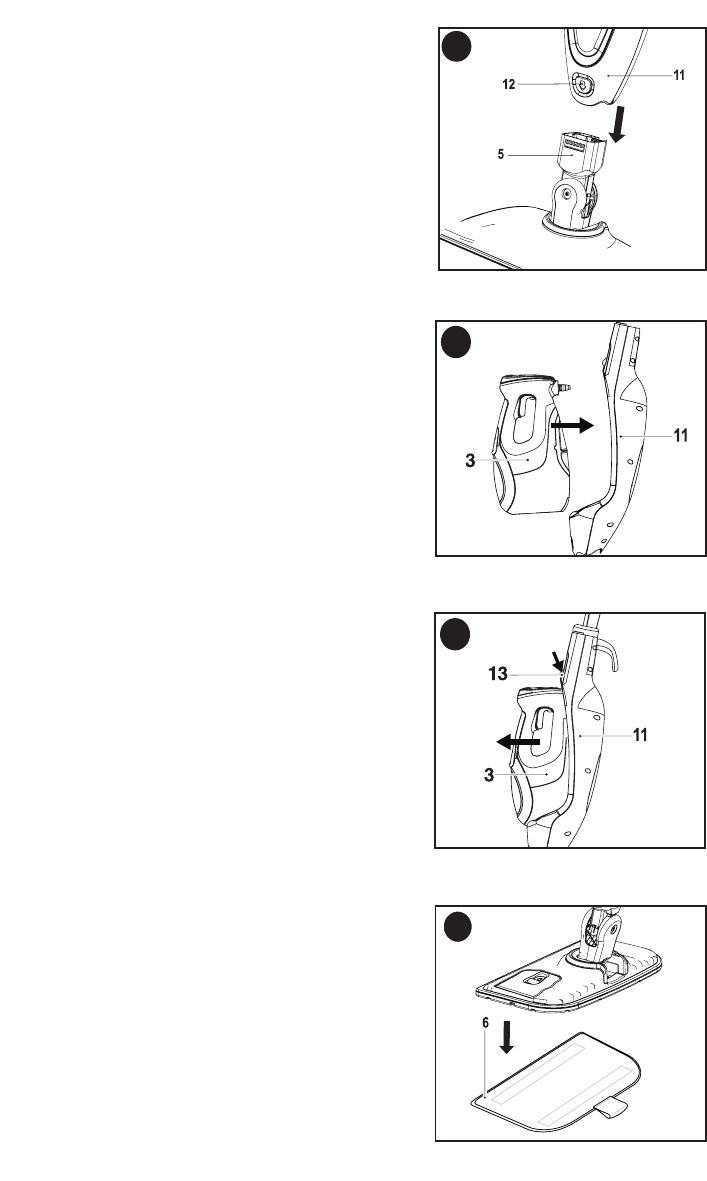
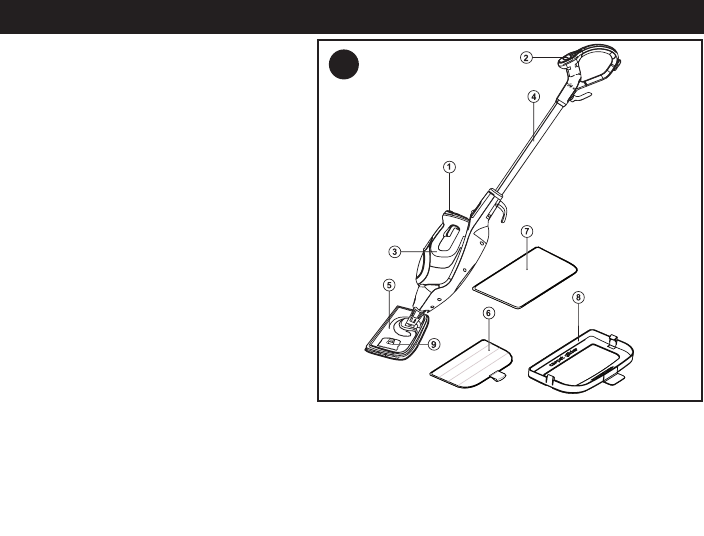
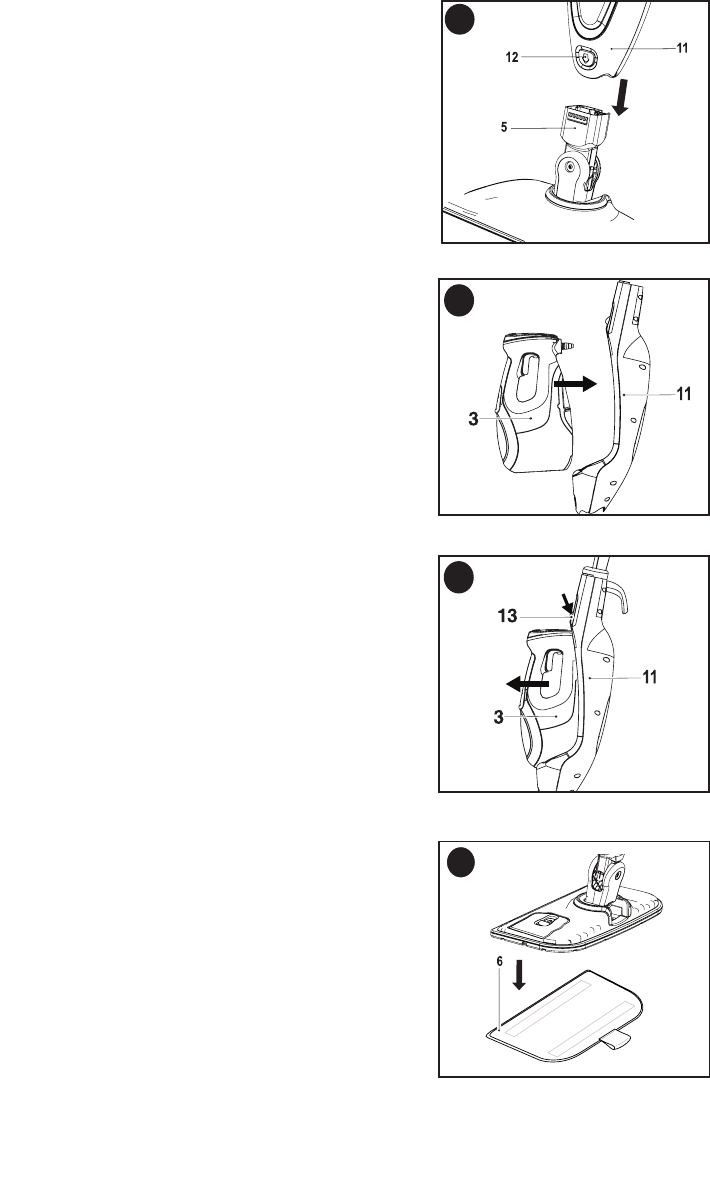
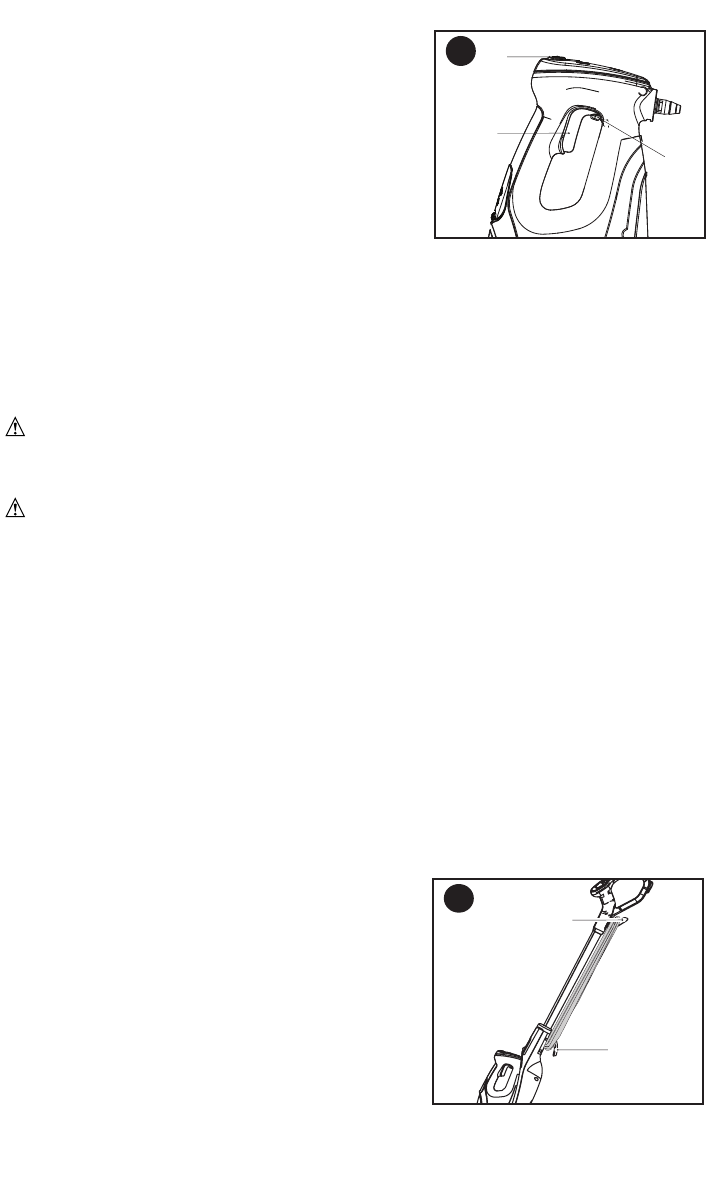
ATTACHING THE HANDLE - Fig. B
bottom end of the handle tube (4) into the top end of the
steam mop body (11) until it is firmly seated and clicks
into place.
ATTACHING THE STEAM HEAD - Fig. C
onto the steam head (5) until it clicks into place.
mop body by pressing the steam head release
button (12) and pulling the steam mop body off the
steam head.
ATTACHING THE HANDHELD STEAM
CLEANER - Fig. D
steam mop body (11) until it clicks into place.
REMOVING THE HAND-HELD STEAM
CLEANER - Fig. E
Push the release button (13) down and pull the hand-held
steam cleaner (3) away from the steam mop body.
5
27
11
4
26
D
27
11
4
26
B
C
27
11
4
26
E

6
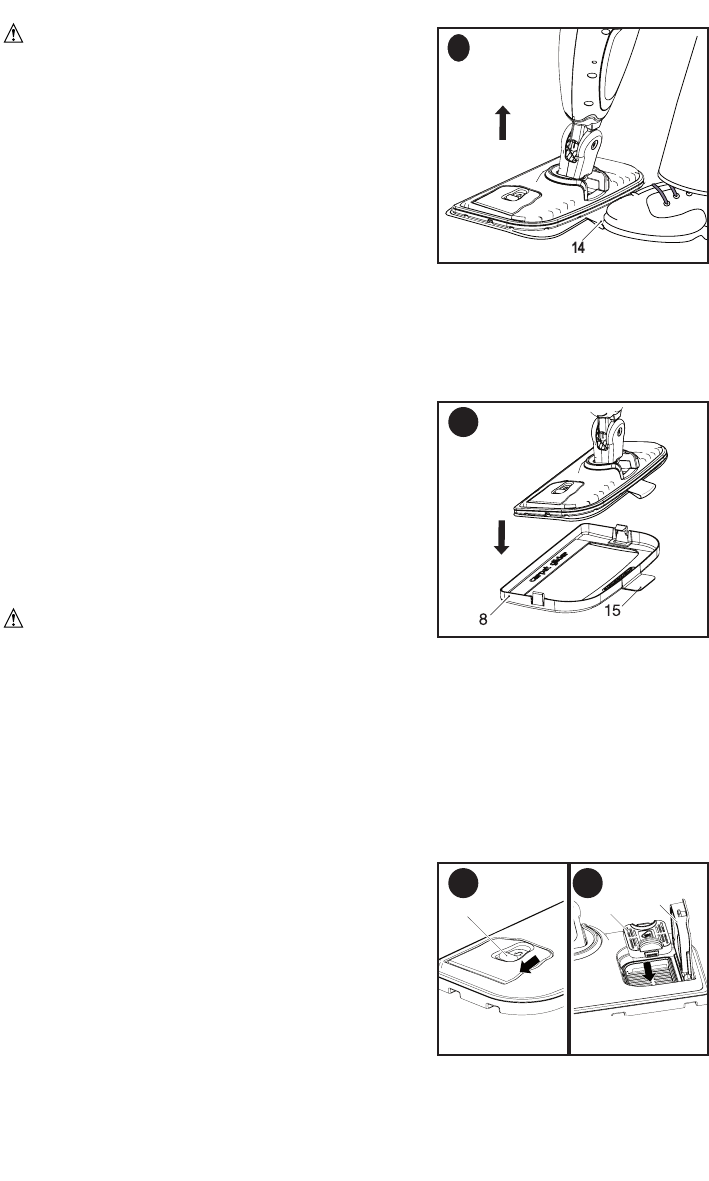
ATTACHING A CLEANING PAD - Fig. F
Replacement cleaning pads are available from your Black
& Decker dealer (cat. no. SMP20).
the ‘hook & loop’ side facing up.
press it down onto the cleaning pad. You are now
ready to steam clean and sanitize your floor.
NOTICE:
Always place the steam mop on the
resting mat (7) with the handle tube (4) in the upright
position when stationary and make sure the steam mop
is turned off when not in use.
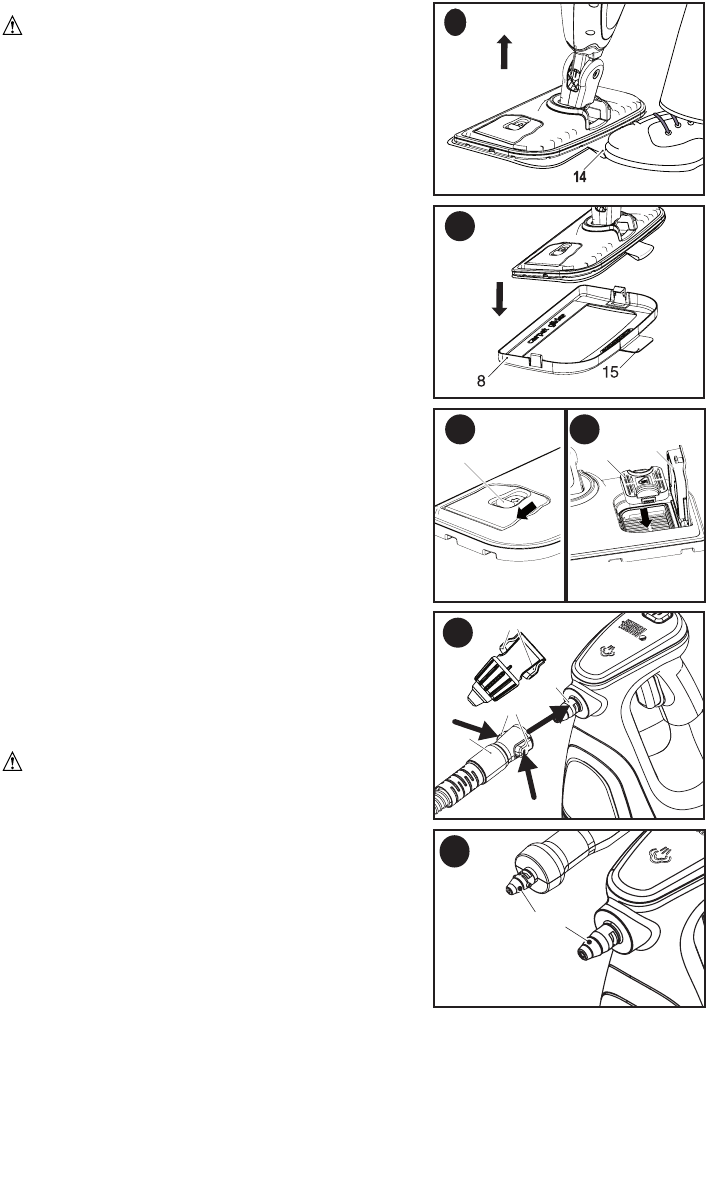
REMOVING A CLEANING PAD - Fig. G
CAUTION: Always wear suitable shoes when
changing the cleaning pad on your steam mop. Do not
wear slippers or open-toed footwear.
until it cools down. (approximately five minutes)
Place the front of your shoe onto the cleaning pad
removal tab (14) and press down firmly.
NOTICE:
Always place the steam mop on the resting mat (7) with the handle (4) in the
upright position when stationary and make sure the steam mop is turned off when not in use.
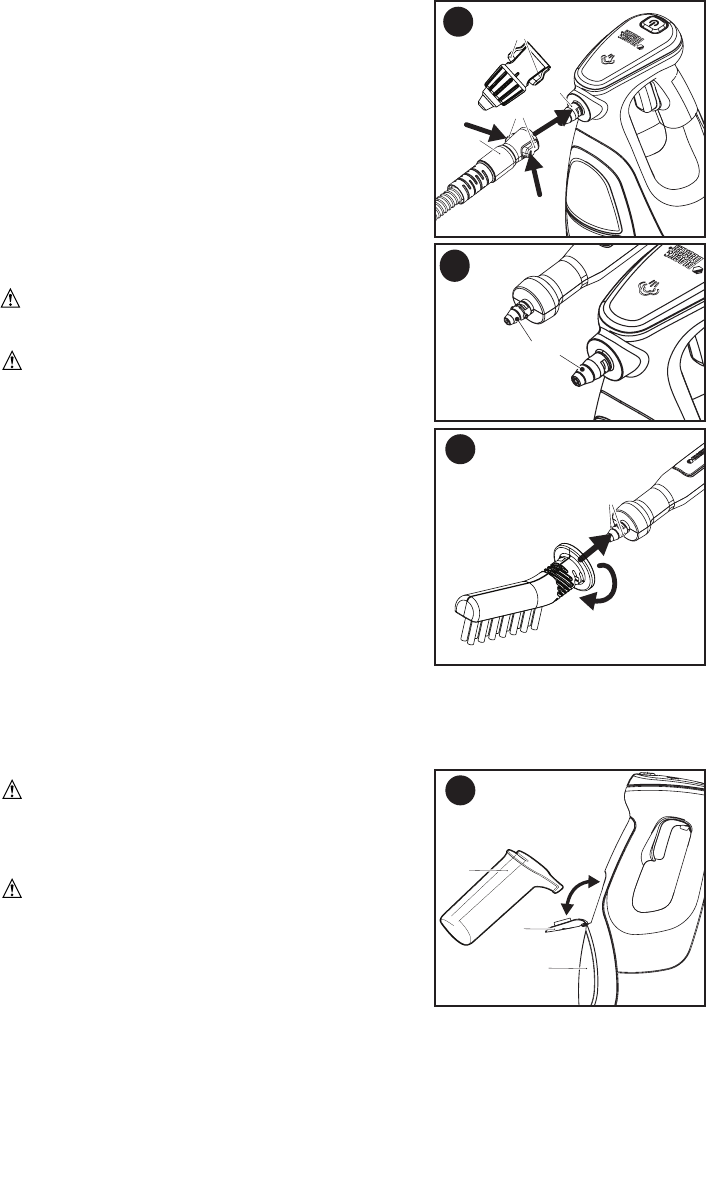
ATTACHING THE CARPET GLIDER - Fig. H
Place carpet glider on the floor.
Lightly press the steam mop with attached cleaning pad
down onto the carpet glider (8) until it clicks into place.
NOTICE:
Always place the steam mop on the
resting mat (7) with the handle tube (4) in the upright
position when stationary and make sure the steam mop
is turned off when not in use.
REMOVING THE CARPET GLIDER
CAUTION: Always wear suitable shoes when
changing the carpet glider on your steam mop. Do not
wear slippers or open-toed footwear.
five minutes)
Lift the steam mop up off the carpet glider.
NOTICE: Always place the steam mop on the resting mat (7) with the handle (4) in the
upright position when stationary and make sure the steam mop is turned off when not in use.
FITTING A SCENT PACK - Fig. I
Return the handle (4) to the upright position and turn
down. (approximately five minutes).
door will open.
shown in figure I2.
auidle click is heard.
NOTICE:
Always place the steam mop on the resting
mat (7) with the handle (4) in the upright position when stationary and make sure the steam
mop is turned off when not in use.
H
F
G
929 30
I1 I2
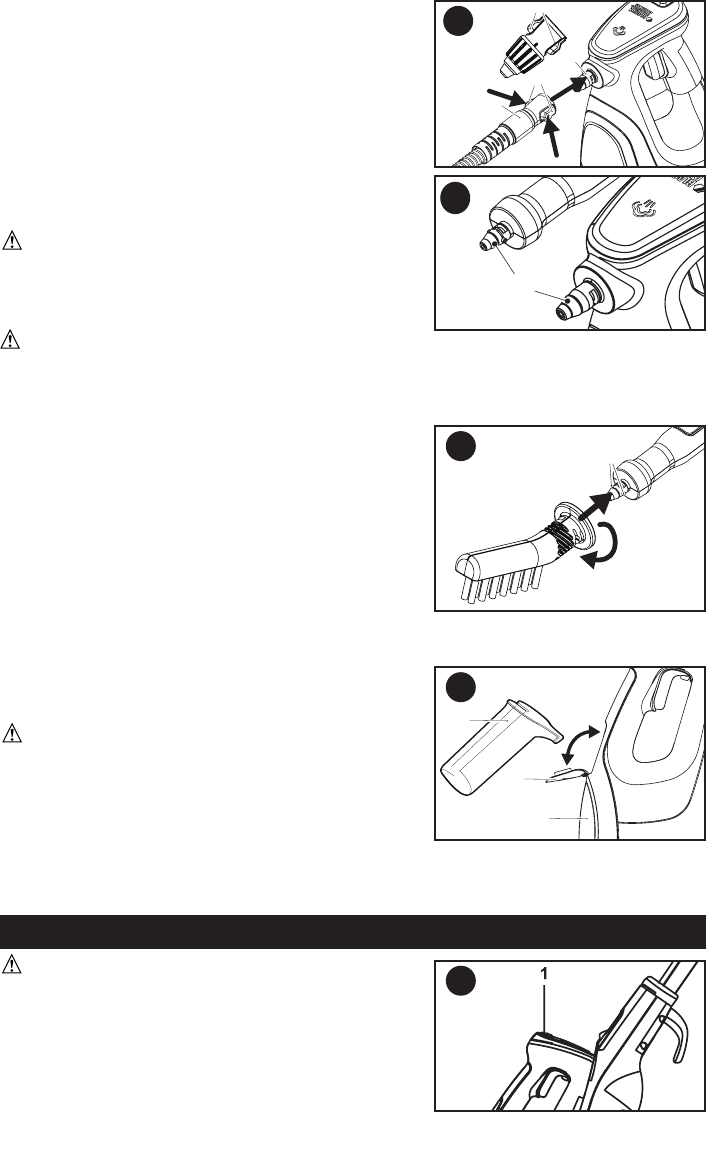
HAND-HELD STEAM CLEANER ATTACHMENTS
NOTICE:
First remove the hand-held steam cleaner
from the steam body.
ATTACHING THE HOSE OR
VARIABLE NOZZLE - Fig. J
Press in the clips (17) on either side of the hose (16)
or variable nozzle.
or variable nozzle with the two slots adjacent to the
steam nozzle on the hand-held steam cleaner or hose.
Firmly press the hose or variable nozzle onto the
steam nozzle (18) of the hand-held steam cleaner or
hose such that it is fully seated, and release the clips.
WARNING: Inspect the seal on the steam
nozzle of the hose and handheld steam cleaner before
each use (Figure K). If the seal is missing or
damaged contact your nearest authorized repair
agent. Do not use the appliance.
CAUTION: Ensure that the hose and/or variable nozzle is securely fastened before
using the hand-held steam cleaner.
ATTACHING OTHER ACCESSORIES TO THE HOSE - Fig. L
align the lugs (19) on the hose with the recesses
on the accessory.
Press the accessory onto the hose and twist clockwise
until the accessory is fully seated and clicks into place.
REMOVING OTHER ACCESSORIES
FROM THE HOSE
accessory counterclockwise then pull away from the hose.
REMOVING THE HOSE
away from the steam nozzle.
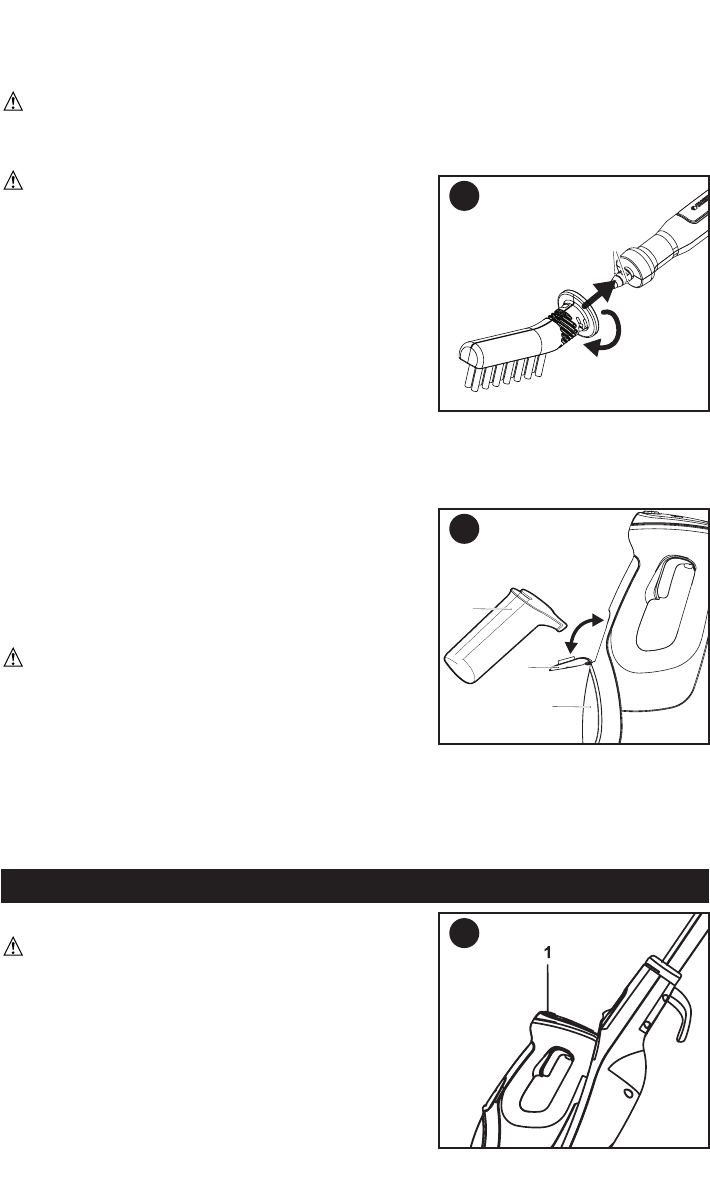
FILLING THE WATER TANK - Fig. M
This Steam Mop incorporates an anti-calcium system to help prolong the life of the system.
NOTICE:
Fill the water tank with regular tap water.
NOTICE:
In areas of very hard water, the use of
de-ionized water is recommended.
WARNING:
Do not over fill the tank. Use supplied
jug (22) to fill tank, and do not fill jug above indicated max line.
Ensure that the appliance is switched off and the
power cord is disconnected from the power supply.
handle tube (4) in the upright position.
.
NOTICE: Always empty the water tank after use.
OPERATION
CAUTION: FOR FLOOR USE ONLY; DO
NOT USE THE UNIT UPSIDE DOWN.
SWITCHING ON/OFF - Fig. N
NOTICE:
When the steam mop is first turned on the
ready to use the water reservoir will glow blue. It takes
approximately 15 seconds for the steam mop to heat up.
7
19
L
3
21
22
M
Seal
K
17
16
18
17
J
N
8
NOTICE:
Never leave the steam mop in one spot on any surface for any period of time.
Always place the steam mop on the resting mat (7) with the handle tube (4) in the upright
position when stationary and make sure the steam mop is turned off when not in use.
NOTICE: Always empty the water tank after use.
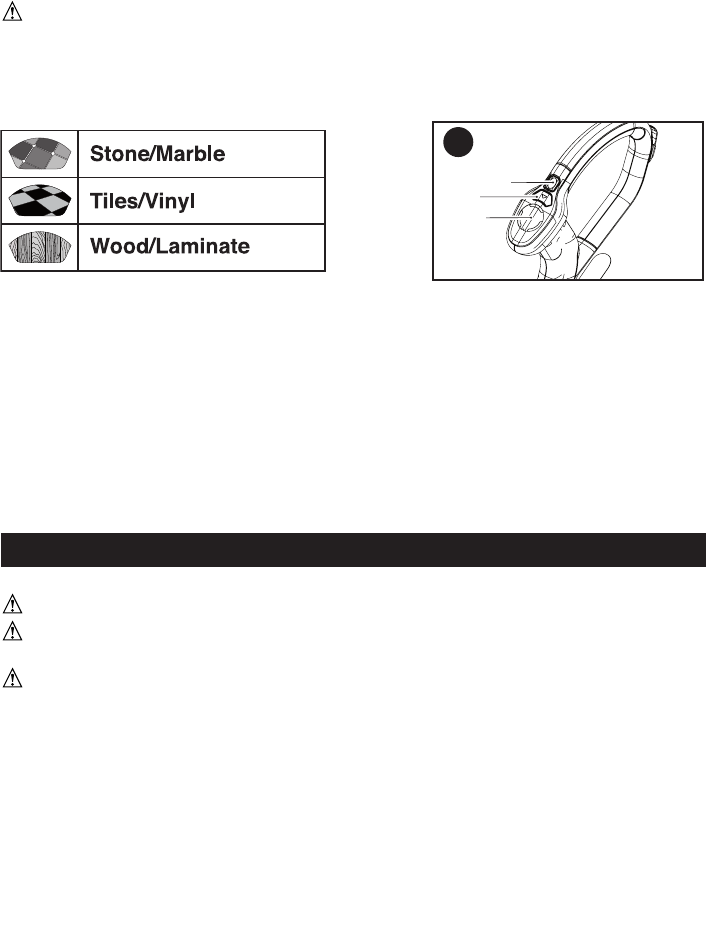
SmartSelectTM Dial - Fig. O
The steam mop is equipped with a SmartSelectTM dial (28) which shows various hard
floor surface cleaning applications. A light will glow next to the selected application. To
change the application, press and release the SmartSelectTM button (2) until the light
glows next to the correct operating mode for your particular hard floor surface.
NOTICE: Do not use on any unsealed hard floor surfaces. Additionally, on
surfaces that have been treated with wax or some no wax floors, the sheen may be
removed by the heat and steam action. It is always recommended to test an isolated
area of the surface to be cleaned before proceeding. We also recommend that you
check the use and care instructions from the floor manufacturer.
Using the SmartSelectTM button (2), choose from one of the following applications:
The steam mop will select the correct volume of steam required for your particular
cleaning operation.
NOTICE: SmartSelectTM has a memory. Switching the steam mop on will recall the
previously used setting.
STEAM BURST BUTTON
The steam burst button is a built in feature that aides in the removal of stubborn floor marks or
stuck on grime.
NOTICE: The steam burst will last for 10 seconds then the steam mop will return to
the chosen setting.
NOTICE: This unit will kill 99.9% of bacteria and germs when used in accordance with
this manual and with the micro fiber pad fitted and a continuous run time of 90 seconds.
HINTS FOR OPTIMUM USE
GENERAL USE
CAUTION: Never use the steam mop without first attaching a cleaning pad.
WARNING: It is important to monitor the water level in the water tank. To refill the
water tank and continue to sanitize/ clean, see Filling the Water Tank section.
CAUTION:
Never leave the steam mop in one spot on any surface for any period of
time. Always place the steam mop on the resting mat (7) with the handle tube in the upright
position when stationary and make sure the steam mop is turned off when not in use.
• Alwaysvacuumorsweepthefloorbeforeusingthesteammop.
slowly, covering a small area at a time.
Donotusechemicalcleanerswithyoursteammop. To remove stubborn stains
from vinyl or linoleum floors, you can pre-treat them with a mild detergent and some
water before using the steam mop.
STEAM MOP CLEANING
Raise the steam mop off the resting mat and lightly press it down onto the cleaning pad.
23
2
28
O
9
SmartSelectTM button (2) until the required setting is reached.
will start to come out of the steam head.
NOTICE: If the system has been run dry it may take up to 30 seconds to prime the
system on first use.
glide easily over the surface to be sanitized/cleaned.
Push and pull the steam mop slowly across the floor to thoroughly steam clean each section.
NOTICE: During use you may turn off the steam pump by returning the handle to
the upright position, this convenient feature will allow you to place the steam mop on
the resting mat for a short time so that you may move items or furniture, then continue
cleaning without the need to switch the appliance off.
down (approximately five minutes).
HAND-HELD STEAM CLEANING - Fig P
NOTICE: To effectively sanitize an area, the lift and
reach head with microfiber pad must be used.
steam mop body (11).
seconds for the hand-held steam cleaner to heat up.
few seconds steam will start to come out of the accessory.
NOTICE: During use you may turn off the steam pump by releasing the trigger switch,
this convenient feature will allow you to place the hand-held steam cleaner down for a
short time on the resting mat so you may move items or furniture, then continue cleaning
without the need to switch the appliance off.
steam mop body.
CARPET REFRESHING
WARNING: It is important to monitor the water level in the water tank. To refill the
water tank and continue to sanitize/ clean, return the handle tube (4) to the upright
water tank with supplied water jug.
CAUTION: Never leave the steam mop in one spot on any surface for any period
of time. Always place the steam mop on the resting mat (7) with the handle tube in the upright
position when stationary and make sure the steam mop is turned off when not in use.
until it clicks into place.
heat up.
SmartSelectTM button (2) to the Wood/Laminate setting.
will start to come out of the steam head.
section.
NOTICE: During use you may turn off the steam pump by returning the handle tube to the
upright position, this convenient feature will allow you to place the steam mop on the resting
mat so that you may move items of furniture with out the need to switch the appliance off.
25
24
1
P
10
AFTER USE - Fig. Q
steam mop cools down. (approximately five minutes)
next use. (Take care to follow the wash care instructions printed
on the cleaning pad).
Wrap the electric cord around the cord hooks (26 & 27).
NOTICE: The top cord hook rotates to easily release the
cord ready for next use.
NOTICE: With the handle tube in the upright position, the cord neatly wrapped
around the cord hooks your steam mop will stand on its own for storage. Alternatively
there is a hanging bracket built into the hand grip which will allow your steam mop to be
hung from a suitable hook on the wall. Always ensure that your wall hook is capable of
supporting the weight of the steam mop safely.
MAINTENANCE AND CLEANING
Your Black & Decker corded appliance has been designed to operate over a long period
upon proper appliance care and regular cleaning.
WARNING: Before performing any maintenance or cleaning on corded appliances
switch off and unplug the appliance.
appliance; never immerse any part of the appliance into a liquid. IMPORTANT: To
assure product SAFETY and RELIABILITY, repairs, maintenance and adjustment
should be performed by authorized service centers or other qualified service
organizations, always using identical replacement parts.
For stubborn marks you can use a mild solution of soap and water to dampen your cloth.
CARE OF THE CLEANING PADS
NOTICE: Follow the cleaning instructions printed on the label of your cleaning pad.
Wash care instructions
softener - Air dry only - Allow to dry fully before re-use.
ACCESSORIES
Recommended accessories for use with your appliance are available from your local
dealer or authorized service center. If you need assistance regarding accessories, please
call: 1-800-544-6986.
WARNING: The use of any accessory not recommended for use with this
appliance could be hazardous.
TROUBLESHOOTING
PROBLEM POSSIBLE CAUSE POSSIBLE SOLUTION
Plug appliance into a working outlet.
fitted. attached.
correctly - LED’s do not
light up.
product repeatedly causes the
circuit fuse to blow, discontinue
use immediately and have it
serviced at a Black & Decker
service center or authorized
servicer.)
26
27
Q

11
SERVICE INFORMATION
customers with efficient and reliable power tool service. Whether you need technical
advice, repair, or genuine factory replacement parts, contact the Black & Decker location
nearest you. To find your local service location, refer to the yellow page directory under
“Tools—Electric” or call: 1-800-544-6986orvisitwww.blackanddecker.com
LIMITED TWO-YEAR HOME USE WARRANTY
Black & Decker (U.S.) Inc. warrants this product to be free from defects in material or
workmanship for a period of two (2) years following the date of purchase, provided that the
product is used in a home environment. This limited warranty does not cover failures due to
abuse, accidental damage or when repairs have been made or attempted by anyone other than
conditions set forth herein will be replaced or repaired at no charge in either of two ways:
The first, which will result in exchanges only, is to return the product to the retailer from whom it
was purchased (provided that the store is a participating retailer).Returns should be made within
the time period of the retailer’s policy for exchanges. Proof of purchase may be required. Please
check with the retailer for its specific return policy regarding time limits for returns or exchanges.
The second option is to take or send the product (prepaid) to a Black & Decker owned or
may be required. Black & Decker owned and authorized service centers are listed under “Tools–
Electric” in the yellow pages of the phone directory or online at www.blackanddecker.com.
This warranty does not apply to accessories. This warranty gives you specific legal rights and
you may have other rights which vary from state to state. Should you have any questions,
intended for commercial use, and accordingly, such commercial use of this product will void this
warranty. All other warranties, express or implied, are hereby disclaimed.
LATIN AMERICA: This warranty does not apply to products sold in Latin America. For products
sold in Latin America, check country specific warranty information contained in the packaging,
call the local company or see the website for such information.
FREE WARNING LABEL REPLACEMENT: If your warning labels become illegible or are
missing, call 1-800-544-6986 for a free replacement.
Imported by
Black & Decker (U.S.) Inc.,
701 E. Joppa Rd.
Towson, MD 21286 U.S.A.
product repeatedly causes the
circuit breaker to trip,
discontinue use immediately
and have it serviced at a Black &
Decker service center or
authorized servicer.)
damaged. at a Black & Decker Service
and change the micro-fiber
cleaning pad.
long. the floor with a damp or wet
cleaning pad still attached when
not in use.
For assistance with your product, visit our websitewww.blackanddecker.comfor the location
1-800-544-6986.
À LIRE AVANT DE RETOURNER CE PRODUIT POUR QUELQUE RAISON QUE CE SOIT :
Sidesquestionsoudesproblèmessurgissentaprèsl’achatd’unproduitBlack&
Decker,consulterlesiteWebwww.blackanddecker.com/instantanswers
pour obtenir des réponses instantanément 24 heures par jour. Si la réponse est
introuvableouenl’absenced’accèsàl’Internet,composerle1800544-6986de
8hà17hHNE,dulundiauvendredi, pourparleravecunagent.Prièred’avoirle
numéro de catalogue sous la main lors de l’appel.
Pour l´achat d´un filtre de rechange composer le 1-888-678-7278
CONSERVER CE MODE D’EMPLOI POUR UN USAGE ULTÉRIEUR.
pour usage domestique seulement.
Merci d’avoir choisi Black & Decker! Consulter le site Web
www.BlackandDecker.com/NewOwner pour enregistrer votre nouveau produit.
MODE D’EMPLOI
BALAI À VAPEUR 2 EN 1 AVEC PARFUM FRAIS
N° DE CATALOGUE
BDH1850SM

13
lignes directrices en matière de sécurité - définitions
Il est important que vous lisiez et compreniez ce mode d’emploi. Les informations qu’il
danger : Indique une situation dangereuse imminente qui, si elle n’est pas évitée,
causera la mort ou des graves blessures.
aVertissement : Indique une situation potentiellement
dangereuse qui, si elle n’est pas évitée, pourrait causer la mort ou de graves
blessures.
mise en garde: Indique une situation potentiellement dangereuse qui, si elle
n’est pas évitée, pourrait causer des blessures mineures ou modérées.
aVis:
potentiellement dangereuse qui, si elle n’est pas évitée, peut résulter en des
UTILISATION PRÉVUE
céramique, la pierre et le marbre. L’unité verticale nettoie les sols seulement, tandis que
Directives
de sécurité
AVERTISSEMENT : Lire tous les avertissements de sécurité et toutes les
consignes. Le non-respect des avertissements et des directives figurant ci-dessous peut
AVERTISSEMENT : Lorsque des outils électriques sont utilisés, des
précautions de base en matière de sécurité, notamment les suivantes, doivent toujours
être observées afin de réduire le risque d’incendie, de décharge électrique, de
blessures corporelles et de dommages matériels.
AVERTISSEMENTS DE SÉCURITÉ ET DIRECTIVES : FICHES
POLARISÉES
Pour réduire le risque de décharge électrique, le présent appareil comporte une fiche
est équipé de fentes de lame de largeurs différentes (petites et grandes). Si la fiche ne
s’insère pas totalement dans la rallonge, la renverser. Si elle ne s’insère toujours pas,
se procurer la rallonge appropriée. Si la rallonge ne s’insère pas complètement dans
la prise, communiquer avec un électricien professionnel pour qu’il installe une prise
Calibre minimal des cordons de rallonge
Tension Longueur totale du cordon en pieds
120V 0-25 26-50 51-100 101-150
(0-7,6m) (7,6-15,2m) (15,2-30,4m) (30,4-45,7m)
240V 0-50 51-100 101-200 201-300
(0-15,2m) (15,2-30,4m) (30,4-60,9m) (60,9-91,4m)
Intensité (A)
moins plus
0 - 6 18 16 16 14
6 - 10 18 16 14 12
10 - 12 16 16 14 12
12 - 16 14 12 Non recommandé

accessoire ou pièce ou encore toute opération réalisée avec cet appareil autre que
celles recommandées dans le présent mode d’emploi peut présenter un risque de
blessures corporelles.
Utilisation de l’appareil
prises de courant.
lorsqu’il fonctionne.
éloigné de la chaleur, de l’huile et des bords tranchants.
comme poignée, ni fermer une porte dessus, ni tirer le cordon contre des bords
inflammables ou d’autres vapeurs explosives ou toxiques.
l’humidité provenant de la vapeur pourrait causer des dommages. En outre, sur les
par la chaleur et l’action de la vapeur. Il est toujours recommandé de tester un endroit
consulter le mode d’emploi et d’entretien fourni par le fabricant de planchers.
(Attention au risque de décharge électrique.)
MISE EN GARDE :
Le couvercle peut devenir chaud durant l’utilisation de l’appareil.
De la vapeur peut s’échapper de l’appareil durant son utilisation.
Être prudent au moment d’utiliser cet appareil. NE PAS toucher les pièces qui peuvent
devenir chaudes durant l’utilisation de l’appareil.
réservoir d’eau.
Après usage
14
15
Inspection et réparations
entretien ou des réparations.
défectueuses. Vérifier si des pièces sont brisées, si des interrupteurs sont endommagés
et s’il y a d’autres problèmes pouvant compromettre le fonctionnement de l’appareil.
réparation autorisé.
ce mode d’emploi.
Sécurité d’autrui
des capacités physiques, sensorielles ou mentales réduites ou ayant un manque
Risques résiduels
Des risques résiduels supplémentaires peuvent survenir au moment d’utiliser l’outil et
peuvent se poser en cas d’utilisation inadéquate, d’utilisation prolongée, etc.
Il est impossible d’éviter certains risques résiduels malgré le respect de toutes les règles
est utilisé durant de longues périodes, s’assurer de prendre régulièrement une pause.
DESCRIPTION FONCTIONNELLE
1. Interrupteur MARCHE/
ARRÊT
2. Bouton SmartSelectMC
3.Balaiàvapeurportatif
4. Poignée
5.Têteàvapeur
6.Tamponnettoyanten
microfibres
7. Tapis de repos
8.Patinàtapis
9. Porte de parfum frais
Bouton de dégagement
A
16
ASSEMBLAGE
REMARQUE :
le rendement et la sécurité du produit. Au moment d’assembler pour la première fois le
AVERTISSEMENT : :Avant de réaliser les opérations suivantes, s’assurer que
l’appareil est éteint et débranché, qu’il est froid et qu’il
renferme peu ou pas d’eau.
FIXATION DE LA POIGNÉE — Fig. B
l’arrière, glisser l’extrémité basse du guidon tubulaire
déclic se fasse entendre.
ACCESSOIRES
L’appareilcomprendl’ensembleouquelques-unsdesaccessoiressuivants.Le
rendementdel’appareildépenddel’accessoireutilisé.LesaccessoiresBlack
&Deckersontconçuspoursatisfaireàdesnormesdequalitéélevéesetpour
améliorerlerendementdevotreappareil.L’utilisationdecesaccessoirespermet
detirerpleinementavantagedel’appareil.
Flexible et poignée
Pour une utilisation
pratique de tous les
accessoires.
réglable
Pour augmenter la
pression des jets de
vapeur, tourner pour
changer la forme du jet.
Petite brosse (bleue)
Pour nettoyer les petites
surfaces dures.
Pour nettoyer les portes
et les fenêtres de verre
ADVERTISSEMENT:
Ne pas utiliser la
verre froid. Le verre
pourrait se briser.
Mini-serpillière pivotante
Pour nettoyer le
carrelage et les grandes
surfaces planes.
Accessoire de
nettoyage détaillé pour
les rainures
Pour nettoyer le coulis
entre les carreaux.
Grande brosse de
récurage avec grattoir
Pour nettoyer les objets
très sales comme les
barbecues.
Tablette de parfum
frais.
27
11
4
26
B
17
FIXATION DE LA TÊTE À VAPEUR — Fig. C
déclic se fasse entendre.
FIXATION DE L’ACCESSOIRE DE BALAI A VAPEUR PORTATIF - Fig. D
qu’un déclic se fasse entendre.
RETRAIT DE L’ACCESSOIRE DE BALAI A VAPEUR PORTATIF - Fig. E
FIXATION D’UN TAMPON NETTOYANT - Fig. F
Des tampons nettoyants de rechange sont offerts auprès
du détaillant Black & Decker local (nº de cat. SMP20).
agrippant’ soit vers le haut.
puis l’appuyer sur le tampon nettoyant. L’appareil
vapeur le plancher.
AVIS :
vapeur est éteint lorsqu’il n’est pas utilisé.
27
11
4
26
D
27
11
4
26
E
F
C
18
RETRAIT D’UN TAMPON NETTOYANT - Fig. G
MISE EN GARDE : Toujours porter des
chaussures adéquates au moment de changer le
le laisser refroidir (environ cinq minutes).
languette de dégagement (14) du tampon nettoyant
et l’enfoncer fermement.
AVIS :
l’appareil est immobile et s’assurer aussi que le balai
FIXATION DU PATIN A TAPIS – Fig. H
AVIS :
l’appareil est immobile. S’assurer aussi que le balai
INTRODUCTION DU PARFUM - FIG. I
de parfum frais (9) pour ouvrir la porte.
(29) comme le montre la figure I2.
AVIS : Toujours mettre le balai à vapeur sur le
tapis de repos (7), la poignée (4) étant à la verticale
lorsque l’appareil est immobile. S’assurer aussi que
le balai à vapeur est éteint lorsqu’il n’est pas utilisé.
DEPOSE DU PATIN A TAPIS
MISE EN GARDE : Toujours porter des
chaussures adéquates au moment de changer le
laisser refroidir (environ cinq minutes).
l’enfoncer fermement.
AVIS :
est éteint lorsqu’il n’est pas utilisé.
ACCESSOIRES DE BALAI A VAPEUR
AVIS :
FIXATION DU TUYAU OU DE LA TUYÈRE RÉGLABLE – fig. K
17
16
18
17
J
H
G
j
oint d'étanchéité
K
929 30
I1 I2
M
19
AVERTISSEMENT :
joint d’étanchéité est manquant ou endommagé, contacter l’agent de réparation autorisé
le plus proche. Ne pas utiliser l’appareil.
MISE EN GARDE : S’assurer que le tuyau, la
tuyère réglable ou les deux sont attachés solidement
INSTALLATION D’AUTRES
ACCESSOIRES AU TUYAU – fig. L
aligner les pattes (19) du tuyau avec les encoches
sur l’accessoire.
enfoncé et s’enclenche en place.
DÉMONTAGE DES AUTRES ACCESSOIRES
DU TUYAU
antihoraire, puis le séparer du tuyau.
RETRAIT DU TUYAU
REMPLISSAGE DU RESERVOIR D’EAU - Fig. M
système contre l’entartrage.
AVIS : Remplir le réservoir d’eau avec de l’eau du robinet.
AVIS : Dans les régions où l’eau est très dure, il est
recommandé d’utiliser de l’eau désionisée.
AVERTISSEMENT : Ne pas trop remplir le
réservoir. Remplir le réservoir avec le pot fourni (22) et
est débranché de l’alimentation.
le réservoir d’eau (3).
AVIS : Toujours vider le réservoir d’eau après l’avoir utilisé.
FONCTIONNEMENT
ALLUMER ET ETEINDRE L’APPAREIL - Fig. N
MISE EN GARDE : UTILISATION POUR LE
PLANCHER SEULEMENT; NE PAS UTILISER
L’APPAREIL A L’ENVERS.
AVIS :
première fois, le témoin du réservoir d’eau passe au
le témoin du réservoir passe au bleu. Il faut environ 15
19
L
3
21
22
M
N
20
AVIS :
AVIS :
Cadran Smart SelectMC
fonctionnement pour la surface particulière de sol dur.
AVIS : Ne pas utiliser sur du bois non scellé ou des planchers lamellés non scellés,
car l’humidité provenant de la vapeur pourrait causer des dommages. En outre, sur les
par la chaleur et l’action de la vapeur. Il est toujours recommandé de tester un endroit
consulter le mode d’emploi et d’entretien fourni par le fabricant de planchers.
Utiliser le cadran SmartSelectMC(2)pourchoisirl’unedesapplicationssuivantes:
volume de vapeur requis pour l’opération de
nettoyage particulière.
AVIS :
vapeur se trouve au dernier réglage utilisé.
BOUTON DE JET DE VAPEUR - Fig. O
incrustée.
de vapeur (23).
AVIS : Le jet de vapeur dure 10 secondes, puis le
AVIS : Si l’appareil est utilisé en conformité avec
le présent manuel, il tue 99,9 % des bactéries et des
germes avec le tampon en microfibres en place et un
temps d’utilisation continue de 90 secondes.
CONSEILS POUR OPTIMISER L’UTILISATION
USAGE GENERAL
MISE EN GARDE :
tampon nettoyant.
AVERTISSEMENT : Il est important de surveiller le niveau d’eau dans le réservoir
d’eau. Pour remplir le réservoir d’eau et continuer de désinfecter ou de nettoyer, voir la
section Remplissage du réservoir d’eau.
MISE EN GARDE :
Pierre/marbre
Carreaux/vinyle
Bois dur/bois lamellé
23
2
28
O

21
les taches tenaces des planchers de vinyle ou de linoléum, on peut les prétraiter avec un
NETTOYAGE A LA VAPEUR
agrippant’ soit vers le haut.
AVIS :
vapeur chaque section.
AVIS :
le tapis de repos pour un moment afin de déplacer des objets ou des meubles, puis de
reprendre le nettoyage sans devoir éteindre l’appareil.
et le laisser refroidir (environ cinq minutes).
NETTOYAGE AU BALAI A VAPEUR PORTATIF - Fig. P
portatif se réchauffe.
AVIS :
Durant l’utilisation, il est possible de
sur le tapis de repos afin de déplacer des objets ou
des meubles, puis de reprendre le nettoyage sans
devoir éteindre l’appareil.
RAFRAICHIR LES TAPIS
AVERTISSEMENT
: Il est important de surveiller le niveau d’eau dans le réservoir
d’eau. Pour remplir le réservoir d’eau et continuer de désinfecter ou de nettoyer la surface,
25
24
1
P
22
MISE EN GARDE :
AVIS :
afin de déplacer des objets ou des meubles, puis de reprendre le nettoyage sans devoir
éteindre l’appareil.
et le laisser refroidir (environ cinq minutes).
APRES USAGE - Fig. Q
minutes).
suivre les directives de nettoyage imprimées sur le
tampon nettoyant.)
AVIS :
de dégager facilement le cordon pour sa prochaine
utilisation.
du rangement.
AVIS :
mur sur un crochet approprié. Toujours s’assurer que le crochet mural peut soutenir le poids
ENTRETIEN ET NETTOYAGE
un minimum d’entretien.
Un fonctionnement satisfaisant continu dépend du bon entretien et du nettoyage régulier
de l’appareil.
AVERTISSEMENT :
appareil avec fil, éteindre l’appareil et le débrancher.
dans l’appareil; ne jamais immerger une partie de l’appareil dans un liquide. IMPORTANT
réglage doivent être réalisés par un centre de réparation autorisé ou tout autre centre de
réparation professionnel, et des pièces de rechange identiques doivent être utilisées.
26
27
Q

humecter le chiffon.
ENTRETIEN DES TAMPONS NETTOYANTS
AVIS : Respecter les directives de nettoyage imprimées sur l’étiquette du tampon nettoyant.
Directivesdelavage
avant de réutiliser.
ACCESSOIRES
Les accessoires recommandés pouvant être utilisés avec l’appareil sont disponibles
auprès du détaillant local ou du centre de réparation autorisé. Pour obtenir de l’aide
concernant les accessoires, composer le : 1 800 544-6986.
AVERTISSEMENT : L’utilisation de tout accessoire non recommandé avec cet
appareil pourrait s’avérer dangereuse.
DÉPANNAGE
PROBLÈME CAUSE POSSIBLE SOLUTION POSSIBLE
pas. non branché. prise en bon état.
répétée le fusible du circuit, arrêter
immédiatement d’utiliser le produit
et le faire réparer dans un centre
de réparation Black & Decker ou
un centre de réparation autorisé.)
répétée le disjoncteur, arrêter
immédiatement d’utiliser le produit
et le faire réparer dans un centre
de réparation Black & Decker ou
un centre de réparation autorisé.)
interrupteur endommagé. l’interrupteur au centre de
centre de réparation autorisé.
pas de vapeur. réservoir.
Le balai laisse de Le tampon nettoyant Débrancher l’appareil de
l’eau sur le plancher. est trop mouillé. la prise de courant, puis remplacer
le tampon nettoyant en
microfibres.
Le balai laisse une Le balai a été laissé trop Lorsqu’il n’est pas utilisé,
marque sur le plancher. longtemps au même
endroit. vapeur sur le plancher tandis
qu’un tampon humide ou mouillé
y est fixé.
Eau dure. Utiliser de l’eau distillée.
Pour de l’aide avec l’outil, consulter notre site Web www.blackanddecker.com pour
l’emplacement du centre de réparation le plus près ou communiquer avec l’assistance
1 800 544-6986.
23

24
INFORMATION SUR LES RÉPARATIONS
Tous les centres de réparation Black & Decker sont dotés de personnel qualifié en
efficace et fiable. Que ce soit pour un avis technique, une réparation ou des pièces de
rechange authentiques installées en usine, communiquer avec l’établissement Black
& Decker le plus près de chez vous. Pour trouver l’établissement de réparation de
1 800 544-6986 ou consulter le site www.
blackanddecker.com
GARANTIE LIMITÉE DE DEUX ANS POUR UNE UTILISATION DOMESTIQUE
utilisé en milieu domestique. La présente garantie limitée ne couvre pas les défaillances
provoquées par un abus, un dommage accidentel ou des réparations ou tentatives de
réparations effectuées par toute autre personne que le personnel de Black & Decker et
de ses centres de réparation agréés. Un produit défectueux qui remplit les conditions
stipulées par la présente garantie sera remplacé ou réparé sans frais d’une des deux
la condition que le magasin soit un détaillant participant).Tout retour doit se faire durant la
requise. Prière de vérifier la politique de retour du détaillant au sujet des délais impartis
pour les retours ou les échanges.
être requise. Les centres de réparation de Black & Decker et les centres de réparation
l’annuaire téléphonique ou en ligne sur www.blackanddecker.com.
commercial. L’usage commercial de ce produit annule par conséquent cette garantie.
Toutes autres garanties, expresses ou implicites, sont déclinées par la présente.
REMPLACEMENT GRATUIT DES ÉTIQUETTES D’AVERTISSEMENT : si les
étiquettes d’avertissement deviennent illisibles ou sont manquantes, composer le
1 800 544-6986 pour en obtenir le remplacement gratuit.
Importedby/Importépar
Black&DeckerCanadaInc.
100CentralAve.
Brockville(Ontario)K6V5W6

LEA EL MANUAL ANTES DE DEVOLVER ESTE PRODUCTO POR CUALQUIER MOTIVO:
SitieneunaconsultaoalgúninconvenienteconsuproductoBlack&Decker,visite
http://www.blackanddecker.com/instantanswers para obtener respuestas
instantáneas las 24 horas del día.
Si no encuentra la respuesta o no tiene acceso a Internet, llame al 1-800-544-6986 de
lunesaviernesde8a.m.a5p.m.horadelEsteparahablarconunagente.
Cuando llame, tenga a mano el número de catálogo.
Para comprar un filtro de repuesto llame al 1-888-678-7278.
CONSERVE ESTE MANUAL PARA FUTURAS CONSULTAS.
SÓLO PARA USO DOMÉSTICO.
GraciasporelegirBlack&Decker! Visite
www.BlackandDecker.com/NewOwnerpararegistrarsunuevoproducto.
MANUAL DE INSTRUCCIONES
TRAPEADOR DE VAPOR 2 EN 1 CON AROMA FRESCO
CATÁLOGO N°
BDH1850SM

26
USO PREVISTO
El trapeador de vapor Black & Decker fue diseñado para higienizar y limpiar los
baldosa de cerámica, piedra y mármol. La unidad vertical es solo para uso en pisos,
el accesorio de mano puede utilizarse sobre todas las superficies; no utilice la unidad
de manera invertida. Este aparato está diseñado únicamente para uso doméstico en
interiores.
Instrucciones de seguridad
adVertencia: Lea todas las advertencias de seguridad y todas las
instrucciones. El incumplimiento de cualquiera de las advertencias e instrucciones
graves.
adVertencia: Al utilizar artefactos eléctricos, siempre se deben tomar
precauciones básicas de seguridad, incluidas las siguientes, para reducir el riesgo de
incendios, descargas eléctricas, lesiones personales y daños materiales.
ADVERTENCIAS E INSTRUCCIONES DE SEGURIDAD: ENCHUFES
POLARIZADOS
Para reducir el riesgo de descargas eléctricas, este equipo posee un enchufe
polarizado (una clavija es más ancha que la otra). Este equipo debe utilizarse con un
cable prolongador polarizado bifilar o trifilar adecuado. Las conexiones polarizadas
encajarán entre sí de una sola manera. Verifique que el extremo del receptáculo del
cable prolongador tenga una ranura para clavija más ancha y la otra menos ancha.
Si el enchufe no encaja por completo en el cable prolongador, voltéelo. Si aún así no
encaja, obtenga un cable prolongador adecuado. Si el cable prolongador todavía no
encaja por completo en el tomacorriente, comuníquese con un electricista calificado
para instalar el tomacorriente adecuado. No altere el enchufe de la herramienta ni el
cable prolongador de ninguna manera.
Calibre mínimo para cables de extensión
Volts Longitud total del cable en pies
120V 0-25 26-50 51-100 101-150
(0-7,6m) (7,6-15,2m) (15,2-30,4m) (30,4-45,7m)
240V 0-50 51-100 101-200 201-300
(0-15,2m) (15,2-30,4m) (30,4-60,9m) (60,9-91,4m)
Amperaje
Más de No más de American Wire Gage
0 - 6 18 16 16 14
6 - 10 18 16 14 12
10 - 12 16 16 14 12
12 - 16 14 12 No se recomienda
Pautas de seguridad/definiciones
Peligro:
muerte o lesiones graves.
adVertencia:
provocará la muerte o lesiones graves.
PrecauciÓn:
provocará lesiones leves o moderadas.
AVISO:
potencial que, si no se evita, puede provocar daños en la propiedad.

27
recomendados en este manual de instrucciones puede presentar un riesgo de lesiones
personales.
Uso del artefacto
esté en uso.
Mantenga el cable del artefacto alejado del calor, el aceite y los bordes afilados.
puerta apretando el cable, no tire del cable cerca de esquinas filosas ni exponga el cable
a superficies calientes.
a base de aceite, algunas sustancias para tratamiento antipolilla, polvo inflamable u
u otros materiales delicados y sensibles al vapor.
vapor podría provocar daños. Tampoco, en superficies que se han tratado con cera o
brillo. Siempre se recomienda hacer una prueba en un área aislada de la superficie a
limpiar antes de proceder. Le recomendamos también que revise las instrucciones de
uso y cuidado del fabricante del piso.
trapeador de vapor, ya que esto podría dañarlo o hacer que su uso sea peligroso.
(Tenga en cuenta el riesgo de descargas eléctricas).
cabezal de vapor y las almohadillas de limpieza se calientan mucho durante el uso.
PRECAUCIÓN: Siempre use calzado adecuado mientras utilice el trapeador de
vapor y cuando cambie los accesorios de éste. No use zapatillas ni calzado que
exponga los dedos de los pies.
caliente durante el uso.
del tanque de agua.
Después del uso
28
Inspecciónyreparaciones
su funcionamiento.
o defectuosa.
manual.
Seguridad de los demás
capacidades físicas, sensoriales o mentales limitadas, o que carezcan de experiencia y
conocimientos, salvo que una persona encargada de su seguridad les haya supervisado
o instruido sobre el uso del artefacto.
Riesgos residuales
Al utilizar la herramienta, pueden presentarse riesgos residuales adicionales, que tal vez
no estén incluidos en las presentes advertencias de seguridad. Estos riesgos puede
deberse al uso indebido, al uso prolongado, etc.
de los dispositivos de seguridad, existen ciertos riesgos residuales que no se pueden
evitar. Estos incluyen:
durante períodos prolongados, asegúrese de tomar descansos regulares.
DESCRIPCIÓN DE LAS FUNCIONES
1. Interruptor de ENCENDIDO/
APAGADO
2. Botón SmartSelectTM
3.Limpiadordevapordemano
4. Mango
5.Cabezaldevapor
6. Almohadilla de limpieza
de microfibra
7.Esteradeapoyo
8. Deslizador para
alfombras
9. Botón de liberación de
la puerta Botón de aroma
fresco
A
29
ENSAMBLAJE
AVISO:
garantizar el rendimiento y la seguridad del producto. Al ensamblar el nuevo trapeador de
vapor por primera vez, posiblemente note residuos de agua dentro de la unidad.
adVertencia: Antes de intentar cualquiera de las siguientes operaciones,
verifique que el artefacto esté apagado y desenchufado, y que esté frío y contenga muy
poca o nada de agua.
Conexión del mango - Fig. B
hacia atrás, deslice el extremo inferior del tubo del
mango (4) dentro del extremo superior de cuerpo del
trapeador de vapor (11) hasta que encaje firmemente
en su lugar y se escuche un clic.
ACCESORIOS
Este aparato incluye algunos o la totalidad de los siguientes accesorios. El rendimiento
del aparato depende del accesorio utilizado. Los accesorios Black & Decker están
diseñados según normas de alta calidad e ideados para mejorar el rendimiento del
aparato. Al utilizar estos accesorios usted obtendrá lo mejor del aparato.
Manguera flexible y
mango
uso de todos los
accesorios.
variable de vapor Para
ráfagas de vapor de
ráfaga de vapor.
Para limpieza de
pequeñas superficies
duras.
Escurridor para
ventanas
Para limpiar puertas y
ventanas de vidrio.
ADVERTENCIA:
No utilice el escurridor
para ventanas sobre
vidrio frío. Esto puede
provocar que el vidrio
se rompa.
Minitrapeador giratorio
Para limpiar baldosas
y grandes superficies
planas.
Limpiador de
detalles de lechada
Para limpiar áreas
enlechadas entre
baldosas.
Limpiador grande de
cepillo para fregar con
rascador
Para limpiar objetos
muy sucios como
parrillas de barbacoa.
Tableta de aroma
fresco.
27
11
4
26
B
30
Conexióndelcabezaldevapor-Fig.C
de vapor (10) sobre el cabezal de vapor (5) hasta
que encaje en su lugar y produzca un clic.
del cabezal de vapor (12) y tirando del cuerpo del
trapeador de vapor para separarlo del cabezal de
vapor.
INSTALACIÓN DEL LIMPIADOR DE VAPOR DE MANO - FIG. D
(3) en el cuerpo del trapeador de vapor (11) hasta
que encaje en su lugar y se escuche un clic.
EXTRACCIÓN DEL LIMPIADOR DE VAPOR DE MANO - FIG. E
del limpiador de vapor de mano (3) separándolo del
cuerpo del trapeador de vapor.
INSTALACIÓN DE UNA ALMOHADILLA DE LIMPIEZA - FIG. F
Puede obtener almohadillas de limpieza de repuesto
del distribuidor Black & Decker (nº. cat. SMP20).
(6) sobre el piso con el lado tipo velcro hacia arriba.
la almohadilla de limpieza. Ahora está listo para
limpiar e higienizar el piso con vapor.
AVISO: Siempre coloque el trapeador de vapor sobre
de vapor esté apagado cuando no esté en uso.
27
11
4
26
D
27
11
4
26
E
F
C
31
EXTRACCIÓN DE UNA ALMOHADILLA DE LIMPIEZA - FIG. G
PRECAUCIÓN: Siempre use calzado
adecuado al cambiar la almohadilla de limpieza del
trapeador de vapor. No use pantuflas ni
calzado que exponga los dedos de los pies.
“APAGUE” el trapeador de vapor.
de apoyo (7) y espere hasta que se enfríe
(aproximadamente cinco minutos).
almohadilla de limpieza.
AVISO: Siempre coloque el trapeador de vapor sobre la estera de apoyo con el mango
apagado cuando no esté en uso.
INSTALACIÓN DEL DESLIZADOR PARA ALFOMBRAS - FIG. H
vapor con la almohadilla de limpieza instalada sobre el
deslizador para alfombras (8) hasta que encaje en su
lugar y se escuche un clic.
AVISO: Siempre coloque el trapeador de vapor
sobre la estera de apoyo (7) con el mango (4) en
que el trapeador de vapor esté apagado cuando no
esté en uso.
EXTRACCIÓN DEL DESLIZADOR PARA
ALFOMBRAS
PRECAUCIÓN: Siempre use calzado
adecuado al cambiar el deslizador para alfombras del
trapeador de vapor. No use pantuflas ni calzado que exponga los dedos de los pies.
(aproximadamente cinco minutos).
AVISO: Siempre coloque el trapeador de vapor sobre la estera de apoyo con el mango
apagado cuando no esté en uso.
COLOCACIÓN DE UN PAQUETE DE
AROMA - (FIG. I)
el trapeador de vapor. Espere a que el trapeador de
vapor se enfríe (aproximadamente cinco minutos).
fresco (9), la puerta se abrirá.
(29) como se muestra en la Figura I2.
abajo hasta que se escuche un clic.
aViso: Siempre coloque el trapeador de vapor sobre la estera de apoyo (7) con el mango
apagado cuando no esté en uso.
H
G
929 30
I1 I2
32
ADITAMENTOS DEL LIMPIADOR DE VAPOR
AVISO: Quite el limpiador de vapor de mano del
cuerpo del trapeador de vapor.
INSTALACIÓN DE LA MANGUERA O LA
BOQUILLA VARIABLE (FIG. J)
lados de la manguera (16).
las dos ranuras adyacentes a la boquilla de vapor en
la manguera o el limpiador de vapor de mano.
variable sobre la boquilla de vapor (18) de la
manguera o el limpiador de vapor de mano de manera
que encaje bien y suelte los sujetadores.
adVertencia: Inspeccione el sello de la
manguera y el limpiador de vapor de mano en la
boquilla de vapor antes de cada uso (Figura J).
PRECAUCIÓN: Asegúrese de que la manguera
y/o la boquilla variable estén firmemente instaladas
antes de utilizar el limpiador de vapor de mano.
INSTALACIÓN DE OTROS ACCESORIOS
EN LA MANGUERA (FIG. K)
cavidades del accesorio.
hacia la derecha hasta que este encaje en su lugar
y se escuche un clic.
EXTRACCIÓN DE OTROS ACCESORIOS
DE LA MANGUERA
el accesorio hacia la izquierda y luego tire de este
separándolo de la manguera.
EXTRACCIÓN DE LA MANGUERA - FIG. L
boquilla de vapor para separarla.
LLENADO DEL TANQUE DE AGUA - FIG. M
vida útil del mismo.
adVertencia: El tanque de agua tiene una capacidad
de 298 cc (10.1 onzas). No llene el tanque en exceso.
AVISO: Llene el tanque de agua con agua potable normal.
AVISO: En áreas con agua muy dura, se
recomienda el uso de agua desmineralizada.
adVertencia: No llene el tanque en
exceso. Utilice el jarro (22) provisto para llenar el
tanque y no llene el jarro más allá de la línea de
máximo indicada.
para llenar el tanque de agua (3).
AVISO: Siempre vacíe el tanque de agua después del uso.
19
L
3
21
22
M
17
16
18
17
J
Junta de estanqueidad
K
33
OPERACIÓN
ENCENDIDO Y APAGADO - FIG. N
PRECAUCIÓN: ÚNICAMENTE PARA USO EN PISOS; NO UTILICE LA
UNIDAD DE MANERA INVERTIDA.
AVISO:
agua irradiará el color rojo. Una vez que el trapeador de vapor esté listo para el uso, el
de vapor demora aproximadamente 15 segundos en
calentarse.
AVISO: Nunca deje el trapeador de vapor en un
solo lugar, sobre cualquier superficie, durante un
período indeterminado. Siempre coloque el trapeador
de vapor sobre la estera de apoyo (7) con el tubo del
y asegúrese de que el trapeador de vapor esté
apagado cuando no esté en uso.
AVISO: Siempre vacíe el trapeador de vapor después del uso.
Dial SmartSelectTM
El trapeador de vapor está equipado con un dial SmartSelectTM (28) que muestra
diversas aplicaciones de limpieza para superficies de piso duras. Una luz brillará junto
SmartSelectTM (2) hasta que la luz se encienda junto al modo de funcionamiento
correcto para la superficie de piso dura específica.
adVertencia: No lo utilice sobre pisos de madera o lámina sin impermeabilizar
ya que la humedad del vapor podría provocar daños. Tampoco, en superficies que se han
puede eliminar el brillo. Siempre se recomienda hacer una prueba en un área aislada de
la superficie a limpiar antes de proceder. Le recomendamos también que revise las
instrucciones de uso y cuidado del fabricante del piso.
Al utilizar el dial SmartSelectTM (2), elija una de las aplicaciones siguientes:
El trapeador de vapor seleccionará el volumen de vapor correcto necesario para su
AVISO: SmartSelectTM cuenta con memoria. . Al encender el trapeador de vapor se
Piedra/Mármol
Baldosas/Vinilo
Madera/Lámina
N
34
BOTÓN DE RÁFAGA DE VAPOR - FIG. O
piso o mugre adherida.
AVISO: La ráfaga de vapor durará 10 segundos
y luego el trapeador de vapor volverá a la
AVISO: Esta unidad matará un 99,9% de las
bacterias y los gérmenes cuando se utiliza de
acuerdo con este manual, con la almohadilla de
microfibra instalada y durante un tiempo de funcionamiento continuo de 90 segundos.
CONSEJOS PARA UN USO ÓPTIMO
USO GENERAL
PrecauciÓn: Nunca utilice el trapeador de vapor sin primero instalar una
almohadilla de limpieza.
adVertencia: Es importante controlar el nivel de agua en el tanque. Para
del tanque de agua.
PrecauciÓn: Nunca deje el trapeador de vapor en un solo lugar, sobre cualquier
superficie, durante un período indeterminado. Siempre coloque el trapeador de vapor
asegúrese de que el trapeador de vapor esté apagado cuando no esté en uso.
45 grados y limpiar lentamente, cubriendo un área pequeña a la vez.
suave y algo de agua antes de utilizar el trapeador de vapor.
LIMPIEZA CON VAPOR
levemente sobre la almohadilla de limpieza.
aproximadamente 15 segundos en calentarse.
TM
segundos, el vapor comenzará a salir por el cabezal de vapor.
AVISO: Si el sistema ha funcionado hasta quedar seco, puede tomar hasta 30 segundos
cebar el sistema para un nuevo uso.
trapeador de vapor se deslizará fácilmente sobre la superficie que se va a higienizar/limpiar.
AVISO: Durante el uso, usted puede apagar la bomba de vapor devolviendo el mango
vapor sobre la estera de apoyo durante unos instantes para poder mover elementos o
muebles, y luego continuar limpiando sin necesidad de apagar el aparato.
el trapeador de vapor se enfríe (aproximadamente cinco minutos).
23
2
28
O
35
LIMPIEZA CON UNIDAD DE VAPOR DE MANO - Fig. P
del trapeador de vapor (10).
mano en el tomacorriente.
(1). El limpiador de vapor de mano demora
aproximadamente 15 segundos en calentarse.
interruptor de gatillo (25) para activar la bomba de
vapor. Después de unos pocos segundos el vapor
comenzará a salir por el accesorio.
AVISO: Durante el uso, usted puede apagar la bomba de vapor soltando el interruptor de
gatillo. Esta conveniente característica le permitirá poner a un lado el limpiador de vapor
de mano durante unos instantes sobre la estera de apoyo para poder mover elementos o
muebles, y luego continuar limpiando sin necesidad de apagar el aparato.
de gatillo y apáguelo. Espere hasta que se enfríe (aproximadamente cinco minutos)
antes de volver a instalarlo en el cuerpo del trapeador de vapor.
RENOVACIÓN DE ALFOMBRAS
adVertencia: Es importante controlar el nivel de agua en el tanque. Para
rellenar eltanque de agua y seguir higienizando/limpiando, devuelva el mango (4) a la
tomacorriente y rellene el tanque de agua con el jarro para agua provisto.
PrecauciÓn: Nunca deje el trapeador de vapor en un solo lugar, sobre cualquier
superficie, durante un período indeterminado. Siempre coloque el trapeador de vapor
instalada sobre el deslizador para alfombras hasta que encaje en su lugar y se escuche
un clic.
aproximadamente 15 segundos en calentarse.
segundos, el vapor comenzará a salir por el cabezal de vapor.
AVISO: Durante el uso, usted puede apagar la bomba de vapor devolviendo el mango
vapor sobre la estera de apoyo durante unos instantes para poder mover elementos o
muebles, y luego continuar limpiando sin necesidad
de apagar el aparato.
DESPUÉS DEL USO - Fig. Q
“APAGUE” el trapeador de vapor.
de apoyo (7) y espere hasta que este se enfríe
(aproximadamente cinco minutos).
tomacorriente.
25
24
1
P
26
27
Q

36
instrucciones de cuidado durante el lavado impresas en la almohadilla de limpieza).
AVISO: El gancho superior para el cable se puede girar para liberar el cable fácilmente
AVISO:
ganchos para, el trapeador de vapor permanecerá parado por sí solo para ser guardado.
le permitirá colgar el trapeador de vapor en un gancho adecuado en la pared. Siempre
asegúrese de que el gancho en la pared tenga capacidad para soportar el peso del
trapeador de vapor con seguridad.
MANTENIMIENTO Y LIMPIEZA
prolongado con un mantenimiento mínimo. El funcionamiento continuo satisfactorio
ADVERTENCIA: Apague y desenchufe el artefacto antes de efectuar cualquier
mantenimiento o limpieza en artefactos con cable.
líquido dentro del artefacto; nunca sumerja ninguna pieza del artefacto en un líquido.
las reparaciones, el mantenimiento y el ajuste deben realizarse en los centros de
mantenimiento autorizados o en otras organizaciones de mantenimiento calificadas,
utilizando siempre piezas de repuesto idénticas.
humedecer el paño.
Cuidado de las almohadillas de limpieza
AVISO: Siga las instrucciones de limpieza impresas en la etiqueta de la almohadilla
de limpieza.
Instrucciones de cuidado durante el lavado: Lavar a máquina a una temperatura tibia de
. No utilizar cloro. No utilizar suavizante para ropa. Secar únicamente al
aire. Dejar secar completamente antes de volver a utilizarlas.
ACCESORIOS
Los accesorios recomendados para uso con el artefacto están disponibles en su
distribuidor o centro de mantenimiento autorizado local. Si necesita ayuda con respecto
a los accesorios, llame al: 1-800-544-6986.
ADVERTENCIA: El empleo de cualquier accesorio no recomendado para uso
con este artefacto puede ser peligroso.
DETECCIÓN DE PROBLEMAS
PROBLEMA CAUSA POSIBLE SOLUCIÓN POSIBLE
enchufado. tomacorriente que funcione.
circuito. circuito. (Si el producto hace que
el fusible del circuito se queme
repetidamente, suspenda su uso
de inmediato y haga que le
realicen mantenimiento en un
centro de mantenimiento
Black & Decker o en un centro de
mantenimiento autorizado).

37
automático. automático. (Si el producto hace
que el interruptor automático se
dispare repetidamente, suspenda
su uso de inmediato y haga que le
realicen mantenimiento en un
centro de mantenimiento
Black & Decker o en un centro de
mantenimiento autorizado).
el interruptor en un centro de
mantenimiento Black & Decker o
en un centro de mantenimiento
autorizado.
vapor. tanque.
rastro de agua en el piso. limpieza está muy tomacorriente y cambie la
mojada. almohadilla de limpieza de
microfibra.
en un solo lugar. vapor sobre el piso con una
almohadilla de limpieza húmeda
o mojada instalada.
Solamente para Propósitos de México
su producto, visite nuestro sitio Web www.blackanddecker.com.mx o llame a la línea
01 800 847 2309/01 800 847 2312.
INFORMACIÓN DE MANTENIMIENTO
capacitado dispuesto a brindar a todos los clientes un servicio eficiente y confiable en
de Black & Decker más cercano a su domicilio. Para ubicar su centro de servicio local,
llame al 1-800-544-6986 o visite nuestro sitio www.blackanddecker.com.
DOS AÑOS DE GARANTÍA LIMITADA PARA USO EN EL HOGAR
Black & Decker (U.S.) Inc. garantiza que este producto está libre de defectos de material
o mano de obra durante un período de dos (2) años desde la fecha de compra, siempre
y cuando el producto se utilice en un entorno doméstico. Esta garantía limitada no cubre
contra fallas debidas a mal uso, daño accidental o cuando se han realizado o intentado
reparaciones por parte de cualquier otra persona ajena a Black & Decker y sus centros de
mantenimiento autorizados. Un producto defectuoso que cumple con las condiciones de
la garantía establecidas en el presente documento será remplazado o reparado sin costo
de una dos maneras:
La primera, que únicamente dará lugar a intercambios, consiste en devolver el producto
al comerciante minorista donde fue comprado (siempre y cuando la tienda sea un
comerciante minorista participante). Las devoluciones deben realizarse dentro del

38
período establecido en la política para intercambios del comerciante minorista. Es
sobre su política específica de devoluciones con respecto a los límites de tiempo para
devoluciones o intercambios.
www.blackanddecker.com.
Esta garantía no se aplica a los accesorios. Esta garantía le otorga derechos legales
específicos y es posible que tenga otros derechos que varían de un estado a otro.
En caso de que tenga alguna pregunta, comuníquese con el gerente del centro de
mantenimiento de Black & Decker más cercano a usted. Este producto no está diseñado
para uso comercial y, en consecuencia, dicho uso comercial de este producto anulará la
garantía. Por medio del presente documento, se declina la responsabilidad de todas las
demás garantías, explícitas o implícitas.
AMÉRICA LATINA: Esta garantía no se aplica a productos vendidos en América Latina.
específica del país contenida en el empaque, llame a la compañía local o visite el sitio

39
·GARANTÍABLACK&DECKER·BLACK&DECKERWARRANTY
. SOLAMENTE PARA PROPOSITOS DE MEXICO
Distributor Name · Sello firma del distribuidor
Date of purchase · Fecha de compra Invoice No. · No. de factura
PRODUCT INFOMATION · IDENTIFICACIÓN DEL PRODUCTO
Catalogo ó Modelo Serial Number · No. de serie
Name · Nombre Last Name · Apellido
Address · Dirección
Ciudad State · Estado
Código Postal Country · País
Telephone · No. Teléfono
2 AÑOS DE GARANTIA
Este producto cuenta con dos años de garantía a partir de la fecha de compra contra
cualquier defecto de su funcionamiento, así como cualquier falla debido a materiales
cargo alguno para el cliente incluyendo la mano de obra, esta incluye los gastos de
diversos señalados.
Nos comprometemos a entregar el producto en un lapso no mayor a 30 días hábiles
autorizados.
ESTA GARANTIA NO APLICA CUANDO:
El producto se hubiese utilizado en condiciones distintas a las normales.
El producto no hubiese sido operado de acuerdo con el instructivo de uso que se
acompaña.
El producto hubiese sido alterado o reparado por personas no autorizadas por
nosotros.
3ra.Seccion de Bosques de las lomas

40
TEL. (01 55) 5326 7100
01 800 847 2309/01 800 847 2312
Grupo Realsa en herramientas,
S.A. de C.V.
Súper Manzana 69 MZ.01 Lote 30
(Av. Torcasita)
Tel. 01 998 884 72 27
Ferre Pat de Puebla, S.A. de C.V.
16 de Septiembre No. 6149
Puebla, Puebla
Tel. 01 222 264 12 12
Ferre Pat de Puebla, S.A. de C.V.
Ejército Mexicano No. 15
Boca del Rio, Veracruz
Tel. 01 229 167 89 89
ServiciodeFabricaBlack&Decker,
S.A. de C.V.
Distrito Federal
Tel. 55 88 95 02
Representaciones Industriales Robles,
S.A. de C.V.
Tezozomoc No. 89
Distrito Federal
Tel. 55 61 86 82
Gpo.ComercialdeHtas.yRefacciones
de Occidente, S.A. de C.V.
Av. La Paz No. 1779
Guadalajara, Jalisco
Tel. 01 33 38 25 69 78
HerramientasyEquiposProfesionales
Tel. 01 81 83 54 60 06
Htas. Portátiles de Chihuahua,
S.A. de C.V.
Av. Universidad No. 2903
Tel. 01 614 413 64 04
Fernando González Armenta
Bolivia No. 605
Tel. 01 833 221 34 50
PerfilesyHerramientasdeMorelia
Gertrudis Bocanegra No. 898
Morelia, Michoacán
Tel. 01 443 313 85 50
Enrique Robles
Av. de la Solidaridad No. 12713
Irapuato, Guanajuato
Tel. 01 462 626 67 39
Hernández Martinez Jeanette
Queretaro, Qro.
Tel. 01 442 245 25 80
SOLAMENTE PARA PROPOSITOS DE MEXICO
PARA OTRAS LOCALIDADES LLAME AL 01 800 847 2309 o 01 800 847 2312.
Cat. No. BDH1850SM Form No. 90604752 NOVEMBER 2013
Copyright©2013Black&Decker PrintedinChina
