Black Box Computer Hardware Remote Emulator Card Users Manual Pc456c
5250 to the manual 03694c77-132d-4d02-82fd-3f570eb889b5
2015-02-02
: Black-Box Black-Box-Black-Box-Computer-Hardware-Remote-Emulator-Card-Users-Manual-481836 black-box-black-box-computer-hardware-remote-emulator-card-users-manual-481836 black-box pdf
Open the PDF directly: View PDF ![]() .
.
Page Count: 156 [warning: Documents this large are best viewed by clicking the View PDF Link!]
CUSTOMER
SUPPORT
INFORMATION
Order toll-free in the U.S.: Call 877-877-BBOX (outside U.S. call 724-746-5500)
FREE technical support 24 hours a day, 7 days a week: Call 724-746-5500 or fax 724-746-0746
Mailing address: Black Box Corporation, 1000 Park Drive, Lawrence, PA 15055-1018
Web site: www.blackbox.com • E-mail: info@blackbox.com
JUNE 1999
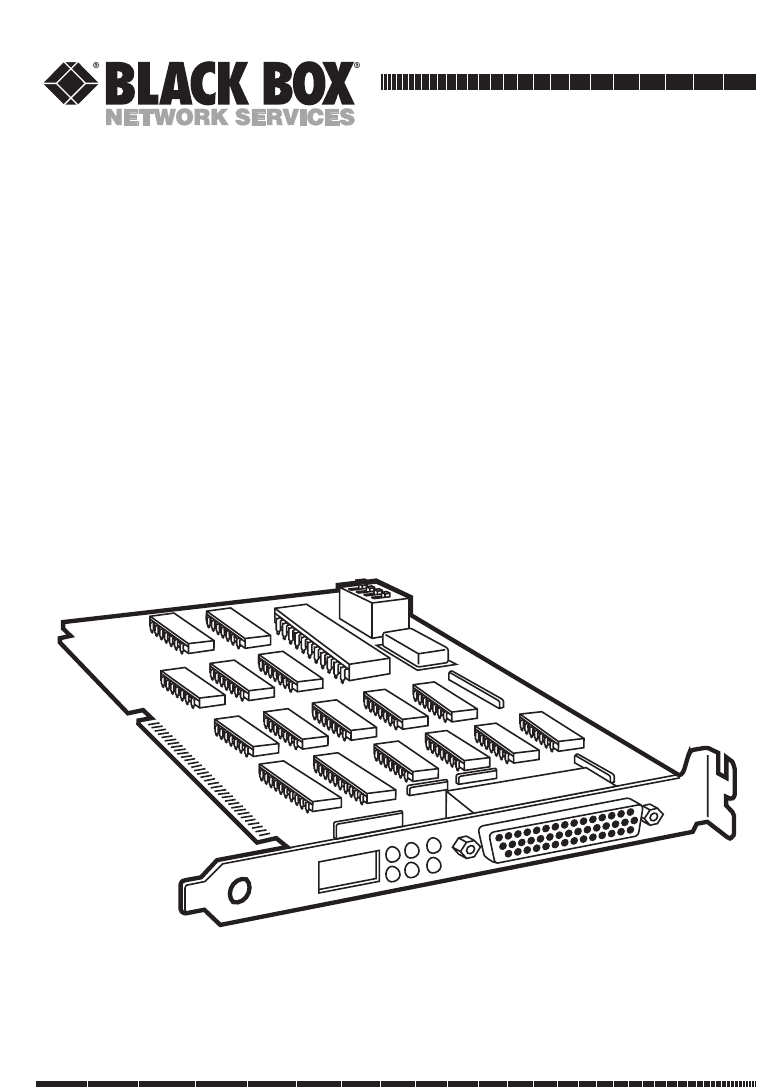
PC456C
5250 Remote Emulator Card

1
5250 REMOTE EMULATOR CARD
FEDERAL COMMUNICATIONS COMMISSION
AND
INDUSTRY CANADA
RADIO FREQUENCY INTERFERENCE STATEMENTS
This equipment generates, uses, and can radiate radio frequency energy and if not
installed and used properly, that is, in strict accordance with the manufacturer’s
instructions, may cause interference to radio communication. It has been tested
and found to comply with the limits for a Class A computing device in accordance
with the specifications in Subpart J of Part 15 of FCC rules, which are designed to
provide reasonable protection against such interference when the equipment is
operated in a commercial environment. Operation of this equipment in a
residential area is likely to cause interference, in which case the user at his own
expense will be required to take whatever measures may be necessary to correct
the interference.
Changes or modifications not expressly approved by the party responsible
for compliance could void the user’s authority to operate the equipment.
This digital apparatus does not exceed the Class A limits for radio noise emission from
digital apparatus set out in the Radio Interference Regulation of Industry Canada.
Le présent appareil numérique n’émet pas de bruits radioélectriques dépassant les limites
applicables aux appareils numériques de la classe A prescrites dans le Règlement sur le
brouillage radioélectrique publié par Industrie Canada.

2
5250 REMOTE EMULATOR CARD
NORMAS OFICIALES MEXICANAS (NOM)
ELECTRICAL SAFETY STATEMENT
INSTRUCCIONES DE SEGURIDAD
1. Todas las instrucciones de seguridad y operación deberán ser leídas antes de
que el aparato eléctrico sea operado.
2. Las instrucciones de seguridad y operación deberán ser guardadas para
referencia futura.
3. Todas las advertencias en el aparato eléctrico y en sus instrucciones de
operación deben ser respetadas.
4. Todas las instrucciones de operación y uso deben ser seguidas.
5. El aparato eléctrico no deberá ser usado cerca del agua—por ejemplo, cerca
de la tina de baño, lavabo, sótano mojado o cerca de una alberca, etc..
6. El aparato eléctrico debe ser usado únicamente con carritos o pedestales que
sean recomendados por el fabricante.
7. El aparato eléctrico debe ser montado a la pared o al techo sólo como sea
recomendado por el fabricante.
8. Servicio—El usuario no debe intentar dar servicio al equipo eléctrico más allá
a lo descrito en las instrucciones de operación. Todo otro servicio deberá ser
referido a personal de servicio calificado.
9. El aparato eléctrico debe ser situado de tal manera que su posición no
interfiera su uso. La colocación del aparato eléctrico sobre una cama, sofá,
alfombra o superficie similar puede bloquea la ventilación, no se debe colocar
en libreros o gabinetes que impidan el flujo de aire por los orificios de
ventilación.
10. El equipo eléctrico deber ser situado fuera del alcance de fuentes de calor
como radiadores, registros de calor, estufas u otros aparatos (incluyendo
amplificadores) que producen calor.
11. El aparato eléctrico deberá ser connectado a una fuente de poder sólo del
tipo descrito en el instructivo de operación, o como se indique en el aparato.

3
5250 REMOTE EMULATOR CARD
12. Precaución debe ser tomada de tal manera que la tierra fisica y la polarización
del equipo no sea eliminada.
13. Los cables de la fuente de poder deben ser guiados de tal manera que no
sean pisados ni pellizcados por objetos colocados sobre o contra ellos,
poniendo particular atención a los contactos y receptáculos donde salen del
aparato.
14. El equipo eléctrico debe ser limpiado únicamente de acuerdo a las
recomendaciones del fabricante.
15. En caso de existir, una antena externa deberá ser localizada lejos de las lineas
de energia.
16. El cable de corriente deberá ser desconectado del cuando el equipo no sea
usado por un largo periodo de tiempo.
17. Cuidado debe ser tomado de tal manera que objectos liquidos no sean
derramados sobre la cubierta u orificios de ventilación.
18. Servicio por personal calificado deberá ser provisto cuando:
A: El cable de poder o el contacto ha sido dañado; u
B: Objectos han caído o líquido ha sido derramado dentro del aparato; o
C: El aparato ha sido expuesto a la lluvia; o
D: El aparato parece no operar normalmente o muestra un cambio en su
desempeño; o
E: El aparato ha sido tirado o su cubierta ha sido dañada.

4
NAME
Attachment 1 of BMPT Vfg 243/1991
Certificate of Compliance by Manufacturer
We hereby certify that the Equipment
Nomenclature: 5250 Remote Emulator Card Model No.: PC456C
is in compliance with the requirements of BMPT Vfg 243/1991 RFI
suppressed. The normal operation of some equipment (e.g., signal
generators) may be subject to specific regulations. Please observe the
notices in this manual.
The marketing and sale of the equipment was reported to the Federal
Office for Telecommunications Permits (BZT). The right to retest this
equipment to verify compliance with the regulation was given to the BZT.
Anhang zur Anlage 1 zur AmtsblVfg 243/1991
Bescheinigung des Herstellers
Hiermit wird bescheinigt, daß der/die/das
DFÜ Emulator
(Gerät, Typ, Bezeichnung)
DIN-VDE-Norm bzw. EN-Norm Bzw. BMPT-AmtsblVfg 243/1991
funkentstört ist.
Dem Bundesamt für Zulassungen in der Telekommunikation wurde das
Inverkehrbringen dieses Gerätes angezeigt und die Berechtigung zur
Überprüfung der Serie auf die Einhaltung der Bestimmungen eingeräumt.

5
5250 REMOTE EMULATOR CARD
TRADEMARKS USED IN THIS MANUAL
'
Quattro is a registered trademark of Borland International, Inc.
Wintronix is a registered trademark of Connectronix Corporation.
ETU is a trademark of Emerald Technology, Inc.
DecisionLink is a registered trademark of HandsOn Software, Inc.
Bar Codes & More, HP, LaserJet; Persuasive Presentations,
Polished Worksheets, ProCollection, and Forms, Etc. are registered
trademarks of Hewlett-Packard.
AS/400, AT, DisplayWrite, IBM, Micro Channel, OS/400, Proprinter,
and Rumba are registered trademarks of International Business
Machines
Corporation. PC Support and PC/XT are trademarks of International
Business Machines Corporation.
ITC Zapf Dingbats is a registered trademark of International Typeface
Corporation.
Helvetica and Palatino are registered trademarks of Linotype Company.
Microsoft is a registered trademark of Microsoft Corporation. Windows is a
trademark of Microsoft Corporation.
Novell and WordPerfect are registered trademarks of Novell Incorporated.
Epson is a registered trademark of Seiko Epson Corporation.
All other trademarks are the property of their respective owners.
DISCLAIMER
This manual was prepared by the manufacturer for use by its customers
and resellers. All attempts have been made to ensure that the information
presented in this manual is correct. However, no liability, expressed or
implied, will be assumed by the manufacturer or its resellers for any
damage resulting from the use of this information.

6
5250 REMOTE EMULATOR CARD
Contents
Chapter Page
1.0 Specifications .............................................................................................................. 8
2.0 Quick Setup Guide .................................................................................................. 11
2.1 Unpacking ........................................................................................................ 11
2.2 Installing the Hardware ................................................................................... 11
2.3 Installing the Software ..................................................................................... 14
2.4 Starting Emulation ........................................................................................... 15
3.0 Introduction ............................................................................................................. 16
3.1 General Overview ............................................................................................. 16
3.2 Interfaces Supported ....................................................................................... 16
3.3 The Rest of This Manual ................................................................................. 17
4.0 Hardware Installation .............................................................................................. 18
4.1 System Requirements ....................................................................................... 18
4.2 The Complete Package .................................................................................... 18
4.3 Procedure for Hardware Installation .............................................................. 19
5.0 Software Installation ................................................................................................ 25
5.1 Installation/Pre-installation under DOS ........................................................ 25
5.2 Installation with Windows ................................................................................. 26
5.2.1 Using Microsoft Windows 95/98 ............................................................. 26
5.2.2 Using Microsoft Windows 3.1x................................................................. 26
5.3 Installation with PC Support ........................................................................... 27
6.0 Configuration ........................................................................................................... 28
6.1 Configuring the Card ...................................................................................... 28
6.2 Basic Configuration ......................................................................................... 31
6.3 Advanced Functions ......................................................................................... 37
6.4 PC Support/400 ............................................................................................... 49
7.0 Operation ................................................................................................................. 50
7.1 Starting Emulation ........................................................................................... 50
7.2 Emulation Procedures under Windows 3.X ................................................... 50
7.3 Hotkey Sequences ............................................................................................ 52
7.4 Status Line ........................................................................................................ 54
7.5 Printing ............................................................................................................. 55
7.6 Ending Emulation ............................................................................................ 60

7
5250 REMOTE EMULATOR CARD
Contents (continued)
Chapter Page
8.0 Advanced Features ................................................................................................... 61
8.1 Record/Playback .............................................................................................. 61
8.2 3812 Printer Emulation ................................................................................... 62
8.3 5219 Printer Emulation ................................................................................... 69
8.4 The Command Language ............................................................................... 72
9.0 Troubleshooting ...................................................................................................... 76
9.1 Common Concerns .......................................................................................... 76
9.2 Error Messages ................................................................................................. 87
9.3 Application Compatibility ............................................................................... 90
9.4 Calling Your Supplier ...................................................................................... 91
9.5 Shipping and Packaging .................................................................................. 91
Appendix A: Names of Executable Files ........................................................................ 92
A.1 User-Run Programs .......................................................................................... 92
A.2 Emulator-Run Programs .................................................................................. 93
A.3 Other Files ........................................................................................................ 93
Appendix B: Code-Set Tables ......................................................................................... 95
Appendix C: Typestyle (FGID) Tables ......................................................................... 101
C.1 5219 Emulation .............................................................................................. 101
C.2 3812 Emulation .............................................................................................. 106
Appendix D: Keyboard-Scan Codes .............................................................................. 128
Appendix E: Keyboard Templates ................................................................................ 131
Appendix F: Related Documentation .......................................................................... 140
Glossary ........................................................................................................................... 141
Index ............................................................................................................................... 149

8
5250 REMOTE EMULATOR CARD
1. Specifications
System Hardware
Requirements — PC: IBM PC, PC/XT, AT, or 100% compatible w/ free
16-bit ISA- or EISA-bus slot and 3.5" diskette drive;
Host: IBM System/3X or AS/400 with an available
synchronous communications port that supports
the SDLC protocol;
DCE (for remote operation only): (1) Pair of sync
modems with appropriate DTE-to-DCE cables
System Software
Requirements — PC: DOS 3.3 or higher;
System/34 Host: System/34 release 9.0;
System/36 Host: System/36 release 5.1 or higher;
System/38 Host: System/38 release 8.0 or higher;
AS/400 Host: OS/400 V2R0 or higher
System Memory
Requirements — PC: 225 KB + 11 KB per display session + 29 KB
per printer session; might require an additional
16 KB to save 132-column graphic screens when
hotkeying between host and DOS sessions
Bus — 16-bit ISA or EISA; not compatible with
Micro Channel Architecture (MCA)
Address Used — Either 300 to 30F, 310 to 31F, 320 to 32F, 340 to 34F,
350 to 35F, 360 to 36F, 380 to 38F, or 3A0 to 3AF
(user-selectable)
Interrupts Used — Either IRQ3, IRQ4, IRQ10, IRQ11, or IRQ15 (user-
selectable)
Cable Required — For local operation:
(1) 20-ft. (6.1-m) cross-pinned adapter cable:
Under EIA RS-232D/CCITT V.24: (1) DB44 male
to DB25 female (EHN064-0020);
Under CCITT X.21: (1) DB44 male to DB15
female (EHN063-0020);
Under CCITT V.35: (1) DB44 male to 34-pin
M-block male (EHN065-0020);
For remote operation:
(1) 20-ft. (6.1-m) straight-thru-pinned adapter cable:
Under EIA RS-232D/CCITT V.24: (1) DB44 male
to DB25 female (EHN061-0020);

9
5250 REMOTE EMULATOR CARD
Under CCITT X.21: (1) DB44 male to DB15
female (EHN060-0020);
Under CCITT V.35: (1) DB44 male to 34-pin
M-block male (EHN062-0020)
Approvals — FCC Part 15 Class A, DOC Class/MDC classe A,
VDE B, CISPR 22 Class B
Standards — Data Communication: EIA RS-232D/CCITT V.24,
CCITT X.21, or CCITT V.35 (the standard used by
your card depends on the adapter cable you attach
to it)
Compatibility — Operating Systems: DOS, Windows (under a DOS
partition);
Software:
By IBM: Application Program Interface (API), File
Support Utility (FSU), File Transfer Facility (FTF),
PC Support/36, PC Support/38, PC Support/400,
and Rumba®;
By Emerald/Andrew: Emulator Transfer Utility
(ETU™);
By HandsOn: Decisionlink®and PC Connect;
By Connectronix: Wintronix®
Interface — Proprietary; with adapter cables, can support EIA
RS-232D/CCITT V.24, CCITT X.21, and CCITT
V.35
Protocol — SDLC
Emulations — Controllers: IBM 5251-12, 5294, and 5394;
Displays: IBM 5251-11, 5291, 5292-1, 3179-1, 3180,
3196, 3197C, and 3197D;
Printers: IBM 5224/5225, 5256, 4210 (under 4214
emulation), 4214 (can only support APF and BGU
with IBM Proprinter®or Epson®EX or LQ models),
3812 (non-IPDS) and 5219 (HP LaserJet only)
PC Ports
Supported — LPT1, LPT2, LPT3, COM1, and COM2
Sessions
Supported — Minimum: One display;
Maximum: Seven (session #1 must be a display,
otherwise any combination of displays and printers;
DOS supports a maximum of five printers)

10
5250 REMOTE EMULATOR CARD
Keyboard-Character
Sets Supported — (18): (2) English: USA/Canada and UK; (4) French:
France (AZERTY), France (QWERTY), Canada,
and Switzerland; (1) French/Dutch: Belgium;
(2) Spanish: Spain and Spanish-Speaking World;
(2) German: Germany/Austria and Switzerland;
(1) Italian; (1) Portuguese; (1) Dutch; (1) Danish;
(1) Swedish; (1) Norwegian; (1) Finnish
Code Sets — ASCII, EBCDIC
Data Rate — Normal operation: Up to 128 kbps for remote
applications, Up to 64 kbps for local applications
(user-selectable with included software);
When DMA channel is disabled: Up to 19.2 kbps
(user-selectable with included software)
User Controls — Software; (1) 4-position DIP switch for address
selection
Indicators — (6) LEDs: TXD, RXD, RTS, CTS, DSR, DCD
Connectors — (1) DB44 (proprietary) female for data communication;
(1) Card-edge male for power
Power — From PC bus: +5 VDC at 620 to 650 mA, –5 VDC at
110 to 130 mA
Heat Emitted — 15.4 btu/hr. (4.5 watts) maximum
Operating
Temperature — 32 to 110˚F (0 to 45˚C)
Storage
Temperature — –22 to +158˚F (–30 to +70˚C)
Humidity — to 95% noncondensing
Size — Half card; 4.2"H x 0.8"W x 6"D (10.7 x 2 x 15.2 cm)
Weight — Net: 0.3 lb. (0.1 kg); Shipping: 3 lb. (1.4 kg)

11
5250 REMOTE EMULATOR CARD
2. Quick Setup Guide
Thank you for buying the 5250 Remote Emulator Card. If you are familiar
with emulation equipment, this chapter is designed to help you get up and
running in a short amount of time. It describes how to do the hardware
installation, software installation, and configuration setup in just a few steps
each.
CAUTION!
The 5250 Remote Emulator Card is a static-sensitive device. Keep the
Card in its protective bag until you are ready to install it.
2.1 Unpacking
Check the package your Card was shipped in for water-related or shipping-
related damage; contact the carrier if you find any. The package should
contain the following:
• (1) 5250 Remote Emulator Card
• (1) 3.5" software diskette
• (1) copy of this manual
Keep the original packaging in case you ever have to reship the card. If
your system requires 5 1⁄4" diskettes, contact your supplier.
2.2 Installing the Hardware
1. Turn OFF the PC and any peripherals that might be attached to it.
Unplug the PC’s power cord or power supply from the electrical
outlet and (if possible) from the PC.
CAUTION!
Make sure that the PC is OFF and its power supply is unplugged and (if
possible) its power cord removed before you begin installing the Card
or connecting any of its cables. Don’t turn the PC back ON until you
have completely finished installing the Card and connecting all of its
cables.

12
5250 REMOTE EMULATOR CARD
WARNUNG!
Vergewisseren Sie sich, dass die PC ausgeschaltet und die
Netzzuleitung entfernt ist bevor irgendwelche Kabel angeschlossen
werden. Schalten Sie Gerät nicht wieder ein bevor alle Kabel
angeschlossen sind. Zur vollständigen Trennung vom Netz ist der
Netzstecker zu ziehen.
2. Disconnect the PC from its monitor and remove the PC’s cover.
Locate an empty expansion slot and remove the slot’s cover (but keep
the slot cover’s screw close by). Touch a grounded surface, other than
the PC’s chassis to dissipate any static charge you might have built up,
then carefully remove the 5250 Remote Emulator Card from its anti-
static bag.
3. Grasp the 5250 Remote Emulator Card by its edges. If the Card’s
factory-default I/O address 300 to 30F is available in your PC, go to
Step 4. Otherwise, using a screwdriver, set the Card’s DIP switch for an
unused I/O address (see Table 2-1 below).
Table 2-1. Possible Settings of the Card’s DIP Switch
Base I/O Switch-Position Number
Address Used 1234
300 to 30F* ON ON ON ON
310 to 31F ON ON ON OFF
320 to 32F ON ON OFF ON
340 to 34F ON OFF ON ON
350 to 35F ON OFF ON OFF
360 to 36F ON OFF OFF ON
380 to 38F OFF ON ON ON
3A0 to 3AF OFF ON OFF ON
* Factory-default setting
4.Press the card firmly into the expansion slot. Screw the slot cover’s
screw back in.
5.Run the Card’s diagnostic program before you replace the PC’s cover:
a) Plug in the monitor, keyboard, and power without replacing the
PC’s cover, then turn ON the PC. (Be extremely careful while you do
this.)
b) At the first DOS prompt, go to the directory where you have the
5250 Remote Emulator Card’s software stored: Type the diskette-

13
5250 REMOTE EMULATOR CARD
drive letter followed by a colon and [ENTER] (if you are keeping it
on a copy of the original diskette) or the hard-disk letter followed
by a colon, a backslash, the subdirectory name, and [ENTER] (if
you’re keeping it on the hard drive).
c) At the next DOS prompt, run the Emulator’s diagnostic program
by typing
emdiag [ENTER]
A copyright screen appears, prompting you to press [ENTER] to
continue. Then a diagnostic screen appears, showing the PC I/O
addresses the Card supports. Use the cursor to highlight the
address you want to test-run, then press [ENTER].
d) If this test fails for the given address, there might be a conflict for
that address that you’re not aware of. Check the address settings of
the PC’s I/O components again, carefully, and try setting the Card
to use a different address. If the test fails for any address you try,
you probably have a bad Card. See Section 9.4.
e) If this test is successful, the program prompts you to let it do a
modem-loopback test. Select “N”; the program ends.
6. Use an appropriate cable to connect the 5250 Remote Emulator Card
to a host’s communication port or to a modem:
For local operation (direct connection to host):
Across EIA RS-232D/CCITT V.24 interface: Cross-pinned DB44
male to DB25 female (product code EHN064-0020);
Across CCITT X.21 interface: Cross-pinned DB44 male to DB15
female (product code EHN063-0020);
Across CCITT V.35 interface: Cross-pinned DB44 male to 34-pin
M-block male (product code EHN065-0020);
For remote operation (connection to host across modem link):
Across EIA RS-232D/CCITT V.24 interface: Straight-through-
pinned DB44 male to DB25 female (product code EHN061-
0020);
Across CCITT X.21 interface: Straight-through-pinned DB44 male
to DB15 female (product code EHN060-0020);
Across CCITT V.35 interface: Straight-through-pinned DB44 male
to 34-pin M-block male (product code EHN062-0020);
7. Remote operation only: Follow the modem manufacturer’s
instructions for installing and configuring the modem to perform
synchronous communication over your type of telephone line.

14
5250 REMOTE EMULATOR CARD
8. Now you can replace the PC’s cover, reattach all cables, and power up
any other peripheral you like.
2.3 Installing the Software
Now install software for the 5250 Remote Emulator Card from the software
diskette included with the Card. (If you are using Microsoft®Windows™,
refer to Sections 5.2 and 7.2 for more information.)
1. If you’re going to keep the Card’s software on diskette, first make a
backup copy of the original diskette and store the original. Then put
the backup diskette into your computer diskette drive, switch to that
drive’s directory, and go to Step 8. If you’re going to keep the Card’s
software on your hard drive, go to Step 2.
2. At the DOS prompt, go to the hard drive’s root directory by typing the
hard-drive letter followed by a colon and [ENTER] (“c: [ENTER]”,
for example).
3. Create a directory at the DOS prompt by typing
md 5251r [ENTER]
4. Insert the 5250 Remote Emulator Card’s software diskette into the
computer’s diskette drive.
5. Assuming the diskette drive is drive a:, copy the software to the new
directory on the hard drive by typing
copy a:\*.* c:\5251r
6. Remove the diskette and put it away.
7. Change to the emulation directory by typing
cd 5251r
8. Run the configuration program by typing
rconfig
9. The 5250 Remote Emulator Card’s software is preconfigured for a
standard setup. Select “Modify” and the Operating Environment setup
screen appears. You will be prompted to move the cursor to make a
selection from its menu. Make sure you choose the host configuration.
Refer to Chapter 6 for more information.
10.After selecting your configuration option(s), press [ESC] (the escape
key) until you return to the main menu. This prompt will appear:

15
5250 REMOTE EMULATOR CARD
Do you want to save this configuration? (Y/N)
Type “Y”. (If you selected “PC Support Only” or “Terminal Emulation
and PC Support,” you will be prompted to enter the correct path for
PC Support™.) Select “Exit” to end the program, then press [ENTER]
to return to the DOS prompt.
2.4 Starting Emulation
To begin emulation with the default configuration, type
cd 5251r [ENTER]
em5251r [ENTER]
To begin emulation with a non-default configuration file, type
cd 5251r [ENTER]
em5251r filename [ENTER]
where filename is the name of the customized file.
The sign-on screen will appear. If you chose the DOS startup as your
Emulator Startup option, the DOS screen will appear, and you will need
to hotkey to the host session. Refer to Section 7.4 for more information.

16
5250 REMOTE EMULATOR CARD
3. Introduction
3.1 General Overview
Thank you for purchasing a 5250 Remote Emulator Card. We hope that
the Card helps you meet all of your PC-to-twinax connectivity needs.
The 5250 Remote Emulator Card brings the best of the twinax and PC
worlds together by connecting your IBM®AS/400®or System/3X to a PC
either directly or across a phone-line-plus-sync-modem SDLC link. The
Card, which operates in DOS or Windows (under a DOS partition), lets
your PC emulate (act like) any of several controllers or display stations and
lets your PC’s printer emulate several types of system printers. At the time
of this writing, it is the fastest card of its type on the market, capable of
local operation at up to 64 kbps or remote operation at up to 128 kbps. It
emulates a 5394 remote controller, which gives it the capability of working
with PC Support software on the AS/400. The Card has 132-column
capability and supports multiple languages.
3.2 Interfaces Supported
The 5250 Remote Emulator Card supports these three interfaces:
•EIA RS-232D, known internationally as V.24, is a standard for
interfacing Data Terminal Equipment (DTEs) with Data
Communications Equipment (DCEs) over short distances.
•X.21 is a general purpose interface between DTEs and Data-Circuit-
Terminating Equipment (DCTs) for operating on synchronous Public
Data Networks (PDN) that provide dialup and leased-line services for
data communication. X.21 supports transmitting at speeds up to
64 Kbps to a maximum distance of 1000 meters (3280.8 feet).
•V.35 is a high-speed interface. The 5250 Remote Emulator Card
supports V.35 transmission at speeds up to 128 kbps (for remote
applications) or up to 64 kbps (for local applications) to a maximum
distance, depending on your data rate and the type of cable you use,
of 600 to 1200 meters (1968.5 to 3937 feet).

17
5250 REMOTE EMULATOR CARD
3.3 The Rest of This Manual
Chapters 4 and 5 of this manual will guide you through step-by-step
installation procedures. Chapter 6 explains how to configure the Card.
Once installed, the 5250 Remote Emulator Card can function without
further operator intervention, but Chapter 7 includes details on all of
the Card's operating functions and Chapter 8 explains the card’s more
advanced features such as record/playback, macros, 3812/5219 printer
emulation, escape commands, and command pass-through. If problems
should arise at any time, Chapter 9 is a troubleshooting guide that might
help you diagnose and possibly fix them.

18
5250 REMOTE EMULATOR CARD
4. Hardware Installation
4.1 System Requirements
4.1.1 PC R
EQUIREMENTS
You must have these PC resources to use the 5250 Remote Emulator Card:
• IBM PC, PC/XT™, AT®, 386, 486, or compatible personal computer
that does not use the Micro Channel®Architecture
• Floppy-diskette drive
• DOS version 3.3 or higher
• 225K of RAM + 11K per display session + 29K per printer session
4.1.2 H
OST
R
EQUIREMENTS
You must have these host resources to use the 5250 Remote Emulator
Card:
• IBM System/34, /36, /38, or AS/400
• Synchronous communications port that supports the SDLC protocol
4.2 The Complete Package
When you receive your Card, check the package it came in for water- or
shipping damage; contact the carrier if you find any. The package should
contain the following:
• (1) 5250 Remote Emulator Card
• (1) 3.5" software diskette
• (1) copy of this manual
Keep the original packaging in case the Card must be reshipped. If your
system requires 5 1⁄4" diskettes, please contact your supplier.

19
5250 REMOTE EMULATOR CARD
4.3 Procedure for Hardware Installation
CAUTION!
The 5250 Remote Emulator Card is static-sensitive. Take the same
precautions you would with any static-sensitive device. One such
precaution is being aware that some elements of your work
environment, such as carpeting, floor mats, dry air from winter heating,
etc., can cause static buildup. To prevent a static discharge, touch a
grounded surface, other than the PC’s chassis, before handling the
Card. Do not touch any components on the Card’s surface, especially
the microprocessor chips; handle the Card by the edges only.
Follow these instructions to install the 5250 Remote Emulator Card in your
PC:
1. Turn OFF and unplug the PC and all devices attached to it.
CAUTION!
Make sure that the PC is OFF and its power supply is unplugged and (if
possible) its power cord removed before you begin installing the Card
or connecting any of its cables. Don’t turn the PC back ON until you
have completely finished installing the Card and connecting all of its
cables.
WARNUNG!
Vergewisseren Sie sich, dass die PC ausgeschaltet und die
Netzzuleitung entfernt ist bevor irgendwelche Kabel angeschlossen
werden. Schalten Sie Gerät nicht wieder ein bevor alle Kabel
angeschlossen sind. Zur vollständigen Trennung vom Netz ist der
Netzstecker zu ziehen.
2. Disconnect the PC from its monitor. If the monitor is sitting on top of
the PC’s case, lift the monitor off and set it aside.
3. Follow the instructions in the PC’s manual for removing the PC’s
cover. Set the cover aside and save the screws for reassembly.
4. Locate an empty expansion slot. Using a screwdriver (or, if necessary,
a socket wrench), remove the slot’s cover. Keep the slot cover’s screw
close by.
5. Touch a grounded surface such as the PC’s chassis to dissipate any
static charge you might have built up, then carefully remove the
5250 Remote Emulator Card from its anti-static bag.

20
NAME
6. When you install the Card into the PC, it uses one of the PC’s I/O
addresses. The Card is factory-preset to use the base I/O address of
300. Since two cards can’t share the same address (that could cause
the PC to crash), you might need to change the 5250 Remote
Emulator Card’s address setting. If you do have to change this setting,
go to the next step; if you don’t, go to Step 8.
7. Locate the DIP switch in the upper left-hand corner of the Card
(see Figure 4-1 below).
Figure 4-1. Location of the Card’s DIP switch.
Using the screwdriver provided with your Card, set the DIP switch to
select an unused I/O address (see Table 4-1 on the next page). Write
down the address you’ve selected so that you’ll have it handy when
you’re ready to do the software configuration.
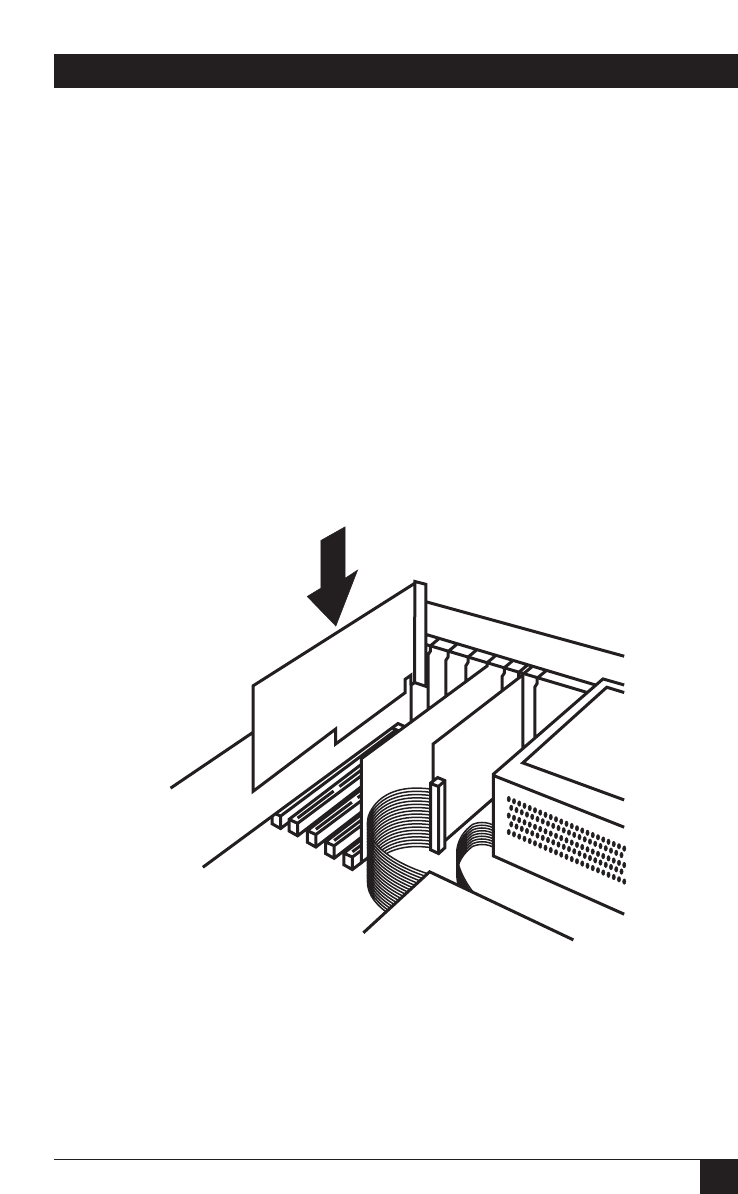
8. Hold the card by its edges (do not touch the components or
circuitry), and insert the card into the expansion slot. Firmly press the
card into the PC motherboard’s socket connector. See Figure 4-2 on
the next page.
9. Align the slot on the Card’s bracket with the hole you opened when
you removed the expansion slot’s cover: Gently lift or press down on
the end of the Card opposite the bracket and connector until the slot
and hole are properly lined up. If they are not properly aligned, the
card will not seat correctly in the PC and will not function properly.
1234
21
5250 REMOTE EMULATOR CARD
Table 4-1. Possible Settings of the Card’s DIP Switch
Base I/O Switch-Position Number
Address Used 1234
300 to 30F* ON ON ON ON
310 to 31F ON ON ON OFF
320 to 32F ON ON OFF ON
340 to 34F ON OFF ON ON
350 to 35F ON OFF ON OFF
360 to 36F ON OFF OFF ON
380 to 38F OFF ON ON ON
3A0 to 3AF OFF ON OFF ON
* Factory-default setting
Figure 4-2. Inserting the card into the PC.
10. Insert the screw you removed from the slot cover into the hole on top
of the Card’s bracket. Tighten it to screw down the Card.

22
5250 REMOTE EMULATOR CARD
11. Run the Card’s diagnostic program before you replace the PC’s cover:
a) Plug in the monitor, keyboard, and power without replacing the
PC’s cover, then turn ON the PC. (Be extremely careful while you
do this.)
b) At the first DOS prompt, go to the directory where you have the
5250 Remote Emulator Card’s software stored: Type the diskette-
drive letter followed by a colon and [ENTER] (if you are keeping
it on a copy of the original diskette) or the hard-disk letter followed
by a colon, a backslash, the subdirectory name, and [ENTER]
(if you’re keeping it on the hard drive).
c) At the next DOS prompt, run the Emulator’s diagnostic program
by typing
emdiag [ENTER]
A copyright screen appears, prompting you to press [ENTER]
to continue. Then, as shown in Figure 4-3 on the next page, a
diagnostic screen appears, showing the PC I/O addresses the
Card supports. Use the cursor to highlight the address the DIP
switch is set for, then press [ENTER].
d) If this test fails for the given address, there might be a conflict for
that address that you’re not aware of. Check the address settings
of the PC’s I/O components again, carefully, and try setting the
Card’s DIP Switch to a different address. If the test fails for several
addresses, make sure the Card is seated properly. If the test fails for
all the addresses you try, the slot it’s in might be defective; reinstall
the Card in a diferent slot. If all addresses still fail, you probably
have a bad Card. See Section 9.3.
e) If this test is successful, the program prompts you to let it do a
modem-loopback test. Go to the next step.

23
5250 REMOTE EMULATOR CARD
12. Use an appropriate cable to connect the 5250 Remote Emulator Card
to a host’s communication port or to a modem:
For local operation (direct connection to host):
Across EIA RS-232D/CCITT V.24 interface: Cross-pinned DB44
male to DB25 female (product code EHN064-0020);
Across CCITT X.21 interface: Cross-pinned DB44 male to DB15
female (product code EHN063-0020);
Across CCITT V.35 interface: Cross-pinned DB44 male to 34-pin
M-block male (product code EHN065-0020);
For remote operation (connection to host across modem link):
Across EIA RS-232D/CCITT V.24 interface: Straight-through-
pinned DB44 male to DB25 female (product code EHN061-
0020);
Across CCITT X.21 interface: Straight-through-pinned DB44 male
to DB15 female (product code EHN060-0020);
Across CCITT V.35 interface: Straight-through-pinned DB44 male
to 34-pin M-block male (product code EHN062-0020);
13. Remote operation only: Follow the modem manufacturer’s
instructions for installing and configuring the modem to perform
synchronous communication over your type of telephone line.
14. Remote operation only: Enter “N” at the prompt to let the Card
initiate its modem-loopback test.
Menu Command Options:
Change Option ←Select Options [ESC] Previous
Screen
EM5251R Diagnostics Program
Select address range that corresponds to the EM5251R
Switch Setting
300-30F
310-31F
320-32F
340-34F
350-35F
360-36F
380-38F
3A0-3AF

24
5250 REMOTE EMULATOR CARD
15. Now you can replace the PC's cover, reattach all cables, and power up
any other peripheral you like. If necessary, put the monitor back on
top of the PC.

25
5250 REMOTE EMULATOR CARD
5. Software Installation
This chapter contains instructions for installing the 5250 Remote Emulator
Card’s software for use with DOS, Windows (under a DOS partition), or PC
Support. You’ll take different kinds of actions to install, configure, and run
this software, and we’ve used a different typestyle to highlight each kind of
action, as shown in this key:
• Actions in boldface type are commands you’ll type in.
• Actions in oouuttlliinneedd ttyyppeeare buttons or icons you’ll click on.
• Underlined actions are menu options you’ll select.
Before installing the software for use with with Windows or PC Support,
you must pre-install it under DOS, as detailed in Section 5.1.
5.1 Installation/Pre-installation under DOS
NOTE
The instructions in this section assume drive A: is the diskette drive. If
the diskette drive has been assigned a different letter, use that letter
instead.
Before beginning to install the 5250 Remote Emulator Card’s software,
make a backup copy of it:
1. Type DISKCOPY A: A: and follow the prompt.
2. Store the original disk in a safe place.
Now install the 5250 Remote Emulator Card’s software by copying it to
your PC’s hard drive:
1. At the DOS prompt, create a directory named “5251R” under the root
directory. Type:
C: [ENTER]
CD\ [ENTER]
MD EM5251R [ENTER]
2. Insert the 5250 Remote Emulator Card’s software diskette into drive
A:.

26
5250 REMOTE EMULATOR CARD
3. Copy the software to the new directory on the hard drive by typing:
COPY A:\*.* C:\5251R [ENTER]
4. When the copying is finished, remove the software diskette and store
it in a safe place.
This completes the DOS installation.
5.2 Installation with Microsoft Windows
5.2.1 U
SING
M
ICROSOFT
W
INDOWS
95/98
To create a shortcut in Windows 95/98 to access the emulation software,
follow these simple steps after installing the software:
1.Insert the PC456C diskette.
2.Right click on the desktop and select New then select SShhoorrttccuutt.
3.Browse the c:\ drive for EM5251R.BAT (it should be in the folder you
installed the software to).
4.Click OOppeenn, NNeexxtt, NNeexxtt, PPiicckk aann IIccoonn, and then FFiinniisshh.
5.2.2 U
SING
M
ICROSOFT
W
INDOWS
3.1
X
To install the 5250 Remote Emulator Card’s software under Windows,
follow these simple steps after finishing preinstallation:
1. Start Windows by typing WIN.
2. Go to the folder where the icon is to be located.
3. From the File menu, select New.
4. Select PPrrooggrraamm IItteemm.
5. For the description, type EM5251R.
6. For the command line, type C:\5251R\EM5251R.PIF.
7. Select CChhaannggee IIccoonn.
8. For the icon name, type C:\5251R\EM5251R.ICO.
9. To save and exit, click on OOKKtwice.

27
5250 REMOTE EMULATOR CARD
10. From the File menu, select New.
11. Select PPrrooggrraamm IItteemm.
12. For the description, type RCONFIG.
13. For the command line, type C:\5251R\RCONFIG.PIF.
14. Select CChhaannggee IIccoonn.
15. For the icon name, type C:\5251R\RCONFIG.ICO.
16. To save and exit, click on OOKKtwice.
You are now ready to begin configuration; follow the instructions in the
next chapter. Be sure to change the hotkey code under the Keyboard
Setup option (see Section 6.3.2). For hints about operating the Card
under Windows, see Section 7.2.
5.3 Installation with PC Support
5.3.1 PC S
UPPORT
/38
To install IBM PC Support/38, follow the installation instructions in its
technical reference manual, IBM Enhanced Emulation. Before you install
the emulation software, configure the 5250 Remote Emulator Card
(see Chapter 6). When you do this, set the virtual disk drive to your
diskette drive and set the emulator startup to DOS (see Section 6.2.2).
Install the emulation software when you’re ready to start emulation
(see Section 7.1.3 for full instructions).
5.3.2 PC S
UPPORT
/36
To install IBM PC Support/36, follow the installation instructions in its
user’s guide. During the installation, when you are asked for the type
of emulation program, specify “Other” and enter the name of the
5250 Remote Emulator Card’s emulation program, EM5251R.EXE.
PC Support/36 takes over from there; no further software installation
is necessary.
You are now ready to begin configuration; follow the instructions in the
next chapter. Be sure to change the hotkey code under the Keyboard
Setup option (see Section 6.3.2).

28
5250 REMOTE EMULATOR CARD
6. Configuration
Before the 5250 Remote Emulator Card can communicate with the host
system, both the host system and the 5250 Remote Emulator Card software
must be configured.
6.1 Configuring the Card
6.1.1 L
AUNCHING
C
ONFIGURATION
The 5250 Remote Emulator Card’s configuration information is contained
in a disk file. A standard default configuration file is included with the
Card’s software. The default file can be changed, or you can create as many
configuration files as needed.
The following keys are used throughout the configuration:
Key(s) Function
[ENTER] Selects and saves your choice
[ESC] (escape) Returns to the previous screen
[¨], [≠], [Æ], and [Ø]Move from one option to another
[SPACE] (space bar) Erases the choice shown at the cursor location,
or toggles through the possible selections for
a given option
Start the configuration process by following these steps:
1A. Under DOS: Make sure you are at the drive and directory where
the 5250 Remote Emulator Card’s software is stored. Then type
CD \5251R [ENTER]. Type RCONFIG at the DOS prompt and
press [ENTER].
1B. Under Windows: Double click on the RRCCoonnffiiggicon.
2. After a few moments, the Main Menu appears as shown in Figure 6-1
on the next page.

29
5250 REMOTE EMULATOR CARD
Figure 6-1. The configuration program’s Main Menu.
3. Use the cursor arrow keys to move the highlighted block on the top
of the Main Menu to one of these options: Modify, Create, Delete,
or Exit. Press [ENTER] to select your choice. (Modify changes the
current configuration. Unless there is a need for more than one
configuration, choose this option. Select Create if a new
configuration is needed.)
6.1.2 M
ODIFY OR
C
REATE A
C
ONFIGURATION
To change an existing configuration, select Modify from the Main Menu.
The default configuration file is named EM5251R. You might want to
modify the default configuration file, rather than create a new one, to
reduce the amount of disk storage.
To create a new configuration file, select Create from the Main Menu.
This creates and stores a new file. Type the new file name, then press
[ENTER].
When you select Modify or Create, the “Operating Environment” setup
screen appears. You will be prompted to select one of these options:
1) Terminal Emulation Only
2) PC Support/400 Only
3) Terminal Emulation and PC Support/400
Menu Command Options:
Change Option ↵Select Options <ESC> Previous Screen
Modify / Create /Delete / Exit File Name =
________________________________
Modify an existing configuration file.
Remote 5250 Configuration Utility
Version x.x
Copyright © 1993 SDE Corp.
When finished, select Exit, then type EM5251R <filename>
to enter emulation.

30
5250 REMOTE EMULATOR CARD
If you choose Option 2, PC Support/400 Only, skip ahead to Section 6.4.
If you choose Option 1, Terminal Emulation Only, the Configuration
Menu will appear, as shown below in Figure 6-2. Follow the appropriate
instructions in the remainder of Sections 6.1 through 6.3.
If you choose Option 3, Terminal Emulation and PC Support/400, the
Configuration Menu will appear, as shown below in Figure 6-2. Follow the
appropriate instructions in the remainder of Sections 6.1 and 6.2, then
press [ESC] and go to Section 6.4.
Figure 6-2. The configuration program’s Configuration Menu.
The items in this menu’s left-hand “Basic Configuration” column are
necessary for the PC’s basic configuration. The items in the right-hand
“Advanced Functions” column are for more advanced configuration of the
PC as a peripheral. For standard DOS operation, the advanced functions
do not need to be changed.
Move the cursor to an option on the Configuration Menu and press
[ENTER]. This displays a second screen of options to select from, as shown
in Figure 6-3 on the next page. The options and possible selections are
described in Sections 6.2 and 6.3.
When you’ve finished making selections from the Configuration Menu,
press [ESC] to return to the Main Menu. You will be prompted to save the
configuration. Choose Yes to save the configuration. Choose No to exit
without saving.
Menu Command Options:
Change Option ↵Select Options <ESC> Previous Screen
Modify / Create /Delete / Exit File Name = EM5251R
________________________________
Basic Configuration Advanced Functions
Host Cable Addresses Display
Basic Setup Keyboard
Language Printer
SDLC Parameters
Define Devices and Addresses on Cable
Basic Configuration Advanced Functions
Host Cable Addresses Display
Basic Setup Keyboard
Language Printer
SDLC Parameters
Define Devices and Addresses on Cable

31
5250 REMOTE EMULATOR CARD
6.1.2 D
ELETE A
C
ONFIGURATION
To delete a configuration file, select Delete from the Main Menu. The
program displays a list of up to eight of these files. (You can create more
than eight configuration files, but the program is only able to display the
first eight in this menu. Move the cursor to the file you want to delete and
press [ENTER]. You will be prompted,
Are you sure you want to delete this file (y/n)?
Press Yand then [ENTER] to delete the file. Press Nand then [ENTER]
to return to the Main Menu.
6.1.3 E
XIT THE
C
ONFIGURATION
P
ROGRAM
After you’ve finished selecting your configuration options, press [ESC]
until this prompt appears:
Do you want to save this configuration? (y/n)
Press Yto save the new configuration, or press Nto discard the changes,
then press [ENTER]. If you selected either Option 2, PC Support/400
Only, or Option 3, Terminal Emulation and PC Support/400, you will
now be prompted to enter the correct path. Finally select Exit to end
the program, then press [ENTER] to return to the DOS prompt.
6.2 Basic Configuration
These are the Basic Configuration options:
• Host cable addresses
• Basic setup options for the PC
• Language type
• SDLC parameters
6.2.1 C
ABLE
A
DDRESSES
At the Configuration Menu, move the cursor to Host Cable Addresses
and press [ENTER]. The Cable Addresses Menu appears, as shown next
in Figure 6-3.

32
5250 REMOTE EMULATOR CARD
Figure 6-3. The Cable Addresses Menu.
You can set these options under this menu:
•Logical Session #: Each device on the twinax line is referred to as a
Logical Unit (LU); when an LU communicates with the host, this is
referred to as a “session.” Up to seven devices can be assigned logical
session numbers.
•Host Address: The host address is the local station address as
configured on the host. Use the space bar to erase an address selection.
You can only use each address once; if you use an address more than
once, an “address conflict” message will appear.
•Device Emulated: The 5250 Remote Emulator Card can emulate IBM
displays or printers. Move the cursor to the Device Emulated column,
and a menu window listing the possible display and printer choices
appears on the screen. The display models you can choose from are
the 5251 Model 11, 5291, 5292/3179, 3180, 3196, 3197C, and 3197D.
The printers you can choose from are the 5256, 5224, 5225, 4214, 5219,
and 3812.
Certain printers have a “text” option or a “graphics” option. Select
the “text” option for basic operation or the “graphics” option if you
want to use advanced printer functions.
Use the [≠](cursor up) and [Ø](cursor down) keys to highlight
your emulation choice and press [ENTER] to select it. Make sure the
Menu Command Options:
Change Option ↵Select Options <ESC> Previous Screen
Modify / Create /Delete / Exit File Name = EM5251R
33
5250 REMOTE EMULATOR CARD
emulation choice for each cable address matches the device that the
system operator has configured the host to expect.
•Printer Type: When you move the cursor to this column, a menu
window listing the possible printer types appears. If the printer
connected to the PC is not listed, a printer definition can be created by
selecting Other, typing a new name, and then defining the printer as
discussed in Section 6.3.3—select Printer Commands Definition under
the Printer-Setup Menu and follow the instructions on page 43.
•PC Port: Select the PC port to which the printer is physically attached.
Choose an “LPT” port for parallel printers or a “COM” port for serial
printers. Move the cursor to the PC Port column, and a window
appears with the following choices: LPT 1, LPT 2, LPT 3, COM 1, or
COM 2. If you choose a “COM” port for serial printers, a second
window will appear on the screen to define communications protocol
for data rate, data bits, stop bits, and parity.
6.2.2 B
ASIC
S
ETUP
Basic Setup options are for configuring the PC in typical applications. At
the Configuration Menu, move the cursor to Basic Setup and press
[ENTER]. The Basic Setup Menu appears, as shown below in Figure 6-4.
Figure 6-4. The Basic Setup Menu.
Menu
Change Previous Screen
Modify / Create /Delete / Exit File Name = EM5251R
Setup Options
Monitor Type Monochrome Color Color
(IBM)
Emulator Startup 3X Emulation DOS
PC Keyboard AT PC/XT Enhanced
Emulated 5250 PC
Keyboard
Key Click Off On
File Transfer No Yes
Virtual Disk ABCD
Direct Hot Key On Off
Select type of monitor connected to PC

34
5250 REMOTE EMULATOR CARD
You can set these options under this menu:
•Monitor Type: Select the type of monitor connected to the PC. The
options are Monochrome, Color, or Color (IBM). To make a selection,
move the highlighted block to your monitor type. Only select Color
(IBM) if you are using a CGA monitor and snow appears on the screen.
•Emulator Startup: After you start emulation, either a DOS screen or a
host screen will appear. To start emulation with a DOS screen, which
you must do if you’re running emulation under PC Support/38, select
DOS. From DOS, you can “hotkey” to enter the host session. To start
emulation with a host screen, select 3X Emulation. From host sessions,
you can hotkey to enter DOS.
•PC Keyboard: Identify which keyboard style is attached to the PC: an
ATstyle (84 keys), PC/XT style (83 keys), or Enhanced style (101/102
keys). Move the cursor with the arrow keys and select the keyboard type
you have attached to your personal computer. If you don’t know which
keyboard you have, look at the keyboard templates in Appendix C.
•Emulated Keyboard: Select the keyboard type to emulate. Keyboards
used with a PC/XT or AT have the same number of keys as the IBM
5250 terminal keyboard; however, they have different key layouts and
scan codes.
For experienced host-system users, the 5250 layout may be more
comfortable. This selection uses the same general layout as a keyboard
used on the host. For PC users, the PC layout may be the best. (See
Appendix D for the keyboard templates.) The normal PC keyboard
layout is restored when DOS is active.
•Key Click: The key click can be turned ON or OFF. If it is ON, you will
hear a clicking sound each time you press a key.
•File Transfer: Select Yes to enable the FTP API used by all file transfer
utilities. Select No to disable the FTP API.
•Virtual Disk: This option defines which disk drive is used by PC
Support/38 as the virtual disk drive. If you’re configuring the Card and
software to run under PC Support/38, select the letter designation of
your diskette drive (normally A:). If you are not using PC Support/38,
ignore this option.
•Direct Hot Key: With the direct hotkey sequences, [ALT][1] through
[ALT][7], you can jump directly from one session to another rather
than jumping sequentially through the sessions (see Section 7.4). This

35
5250 REMOTE EMULATOR CARD
hotkey can be turned ON or OFF. Disable it only if it will cause conflict
with another PC program that also uses one or more of [ALT][1]
through [ALT][7].
6.2.3 L
ANGUAGE
Language options are for matching the host’s language settings. At the
Configuration Menu, move the cursor to Language and press [ENTER].
The Language Options Menu appears, as shown below in Figure 6-5.
Figure 6-5. The Language Options Menu.
You can set these options under this menu:
•Language: The 5250 Remote Emulator Card supports 18 languages.
Select the language that matches the host system’s settings. The
USA / CAN (ORIG) keyboard-language configuration uses the factory-
default keyboard layouts, whereas the USA / CAN (TERM) uses a
layout resembling the terminal keyboard (see Appendix E).
•Keyboard: Select the type of keyboard (U.S. or World Trade)
configured on the host system.
•Multinational: If the host is configured for Multinational, select Yes.
Menu Command Options:
Change Option ↵Select Options <ESC> Previous Screen
Modify / Create /Delete / Exit File Name = EM5251R
________________________________
Language Options
Language USA / CAN (ORIG)
Keyboard US World Trade
Multinational No Yes
Press enter to select desired language.
Language Options
Language USA / CAN (ORIG)
Keyboard US World Trade
Multinational No Yes
Press enter to select desired language.

36
5250 REMOTE EMULATOR CARD
6.2.4 SDLC P
ARAMETERS
SDLC parameters are for matching the host’s line and controller settings.
The system administrator should verify that the settings you choose match
the host configuration. At the Configuration Menu, move the cursor to
SDLC Parameters and press [ENTER]. The SDLC Parameters Menu
appears, as shown below in Figure 6-6.
Figure 6-6. The SDLC Parameters Menu.
You can set these options under this menu:
•Controller Type: The type of remote controller to be emulated.
This setting must match that of the host. The choices are 5394, 5294,
and 5251-12.
NOTE
The System/34 supports only the 5251-12 controller type. System/36 and
System/38 do not support the 5394 remote controller.
•Controller Station Address: An address used to identify the emulator
to the host system. This setting must match that of the host. Enter the
address assigned to the host controller.
Menu Command Options:
Use ↑↓to select parameters ←→to modify values
Change Option ↵Select Options <ESC> Previous Screen
Modify / Create /Delete / Exit File Name = EM5251R
________________________________
SDLC Parameters Values
Controller Type 5394
Station Address 0F
NRZ/NRZI Encoding NRZI
DMA Channel 1 Enable
DMA Channel 3 Enable
IRQ Interrupts IRQ10
Base I/O Address 340-34F
Baud Rate 9600
Select type 5251-12, 5294, or 5394

37
5250 REMOTE EMULATOR CARD
•NRZ/NRZI Encoding: NRZ (Non-Return to Zero) and NRZI
(Non-Return to Zero Inverted) are SDLC transmission-coding options
used to keep synchronization loss between modems to a minimum.
The recom-mended initial setting is NRZI. This setting must match
that of the host.
•Interrupt Request Level: An IRQ (Interrupt Request) is a control
signal sent by the emulator card to demand the PC’s attention. The
Card supports IRQ levels 3, 4, 10, 11, and 15. If you’ve installed the
Card in an 8-bit slot, use IRQ 3 or 4. If you’re running Windows,
use IRQ 10, 11, or 15.
NOTE
PC adapter boards require a unique IRQ level. Make sure the 5250
Remote Emulator Card’s IRQ level is not the same as the IRQ level of
any other board in the same PC.
•DMA Channel 1 and DMA Channel 3: By using DMA (Direct Memory
Access) channels, the 5250 Remote Emulator Card can transmit data
to the host at a higher data rate than 19,200 bps. If you select Disable,
the 5250 Remote Emulator Card will not operate above 19,200 bps.
NOTE
Both channels should be enabled. Problems might occur if both are
disabled.
•Base I/O Address: This is the Card’s address in the PC’s I/O memory.
The address you select here must match the one you set with the Card’s
DIP switches during the hardware installation (see Section 4.3). Refer
to page 16 for the list of addresses you can choose from.
NOTE
PC adapter boards require a unique I/O address. Make sure the 5250
Remote Emulator Card’s I/O address is not the same as the I/O address
of any other board in the same PC.
•Baud Rate: The data rate at which the Card operates, measured in
bits per second. Selecting Modem automatically sets the 5250 Remote
Emulator Card to match the data rate of the attached modem. When
you use a null-modem cable, manually select the data rate for the
communications line.
6.3 Advanced Functions
NOTE
If you selected Option 3, Terminal Emulation and PC Support/400, at the
Operating Environment setup screen (see Section 6.1.2), do not change
any Advanced Functions; press [ESC] and skip ahead to Section 6.4.

38
5250 REMOTE EMULATOR CARD
For Windows applications, you must change the hotkey code (see Section
6.3.2); otherwise, only unique applications will require you to work with
Advanced Functions (consult with your system operator before doing so).
These Advanced Functions menus are available under the Configuration
Menu:
• Display Setup
• Keyboard Setup
• Printer Setup
6.3.1 D
ISPLAY
S
ETUP
Use the Display-Setup Menu, shown in Figure 6-7 below, to set up the
attributes of the screen display.
Figure 6-7. The Display-Setup Menu.
You can set these options under this menu:
•Column Separator: Use this option to change the column separator.
Move the cursor to Column Separator and press [ENTER]. A window
containing an ASCII-character table appears. Move the cursor around
the table to highlight the character you want to be the column
separator, then press the [ENTER] key to select the new character. The
default character is hexadecimal 16, which is a straight horizontal line.
Change Option ↵Select Options <ESC> Previous Screen
Modify / Create /Delete / Exit File Name = EM5251R
Display Setup Options
Column Separator 16 Press ENTER to modify
Status Attribute 07
Field Attributes
EBCDIC to ASCII
Cursor Type " "
Display Adaptor
Save Buffer 16k/32k
Select desired character for column separator

39
5250 REMOTE EMULATOR CARD
•Status Attributes: Use this option to define how the host system’s status
line is displayed on the PC screen. Move the cursor to Status Attributes
and press [ENTER]. Type in the hexadecimal value corresponding to
your desired display-line status attributes. (If your monitor is a
monochrome model, you can find the list of possible values in Table
6-2; if your monitor is a color model, the possible values are listed in
Table 6-3.)
NOTE
The value you enter here is for the first display session. If you’re using a
color monitor, the software automatically assigns each of the following
sessions the correspondingly preceding character attribute. For
example, if you select red text on a black background (hex value 04) for
the first display session, the second session will have cyan text (03), the
third session green text (02), and so on.
•Field Attributes: Host systems use field attributes to identify different
field types on the display screen. For example, a warning or message
field on the screen might be flashing red, while the normal screen
fields might be green. You can customize these field colors to suit your
tastes or applications. When you select the Field Attributes option, a
window appears on the screen showing the current field attributes
(see Figure 6-8 on the next page and Tables 6-1 through 6-3 on the
following two pages).
Figure 6-8. The Field Attributes Menu.
Change Option ↵Select Options <ESC> Previous Screen
Modify / Create /Delete / Exit File Name = EM5251R
Least significant 5250 Attribute Digit (HEX)
0 1 2 3 4 5 6 7 8 9 A B C D E F
_________________________________________________
2 | 02 20 07 70 0A 28 0F 00 04 40 84 C0 0C 48 8C 08
|
3 | 03 30 06 60 0B 38 0E 00 05 50 01 10 0D 58 09 00
|
_________________________________________________
Enter 5250 Display Attribute code to be changed
<20 - 3F 00

40
5250 REMOTE EMULATOR CARD
To change the field attributes at this screen, take these steps:
1. Find your desired IBM 5250 attribute in Table 6-1 on the next page.
Type in the hex value for that field, then press [ENTER]. A “beep”
will sound if you make an invalid choice.
2. Find the attribute you wish to assign to this field in Table 6-2 (if you
have a monochrome monitor) or 6-3 (if you have a color monitor)
on page 39.
3. Type in this value and press [ENTER]. Notice that the field assumes
the attributes you’ve selected.
4. Continue to change attributes until you’re finished, then follow the
directions on the screen to exit.
•EBCDIC to ASCII: (This option is for advanced users only.) The
character-code set used by the host (EBCDIC) is not compatible with
that used by the PC (ASCII). To let both systems communicate, the
5250 Remote Emulator Card’s software uses an EBCDIC-to-ASCII
translation table.
With this menu option, you can customize the table. For example, to
force the “$” character to display as a “#” character, move the cursor to
the EBCDIC to ASCII option and press [ENTER]. The translation table
will appear. Change the table by first entering the EBCDIC code for a
“$” character, which is 5B (see Appendix A for EBCDIC and ASCII
tables). Second, enter the ASCII code for the character to be displayed;
in this case, the ASCII code for the “#” character is 23.
NOTE
You might need to load a new code page into the PC for the desired
character.
•Cursor Type: Use this option to customize your cursor. Choose
between 1 (blinking block), 2 (blinking overline), 3 (no cursor) or 4
(blinking underline).
•Display Adaptor: Some monitors must change modes to display 132
columns, while other monitors may not support 132-column screens at
all. If your monitor supports 132 columns, you must enter the “AL”
value for the 132-column mode to enable 132-column display. (The AL
value is listed in the video card’s manual as the MODE setting. For
most cards, leave the “BL” value at 00.) Type in this value and press
[ENTER].
(text continues on page 43)

41
5250 REMOTE EMULATOR CARD
Table 6-1. IBM 5250 Field Attributes
Hex Value Display
20 Normal display
21 Reverse image
22 High intensity
23 Reverse image, high intensity
24 Underscore
25 Reverse image, underscore
26 High intensity, underscore
27 No display
28 Blink
29 Reverse image, blink
2A High intensity, blink
2B Reverse image, high intensity, blink
2C Underscore, blink
2D Reverse image, underscore, blink
2E High intensity, underscore, blink
2F No display
30 Normal display, column separators
31 Reverse image, column separators
32 High intensity, column separators
33 Reverse image, high intensity, column separators
34 Underscore, column separators
35 Reverse image, underscore, column separators
36 High intensity, underscore, column separators
37 No display
38 Blink, column separators
39 Reverse image, blink, column separators
3A High intensity, blink, column separators
3B Reverse image, high intensity, blink, column separators
3C Underscore, blink, column separators
3D Reverse image, underscore, blink, column separators
3E High intensity, underscore, blink, column separators
3F No display
42
5250 REMOTE EMULATOR CARD
Table 6-2. Monochrome Field Attributes
Hex Value Description
01 Normal, underscore
07 Normal
09 High intensity, underscore
0F High intensity
70 Reverse image
81 Blink, underscore
87 Normal, blink
89 High intensity, blink, underscore
8F High intensity, blink
F0 Reverse image, blink
Table 6-3. Color Field Attributes
1st Digit Background 2nd Digit Foreground
0 Black 0 Black
1 Blue 1 Blue
2 Green 2 Green
3Cyan 3Cyan
4 Red 4 Red
5 Magenta 5 Magenta
6 Brown 6 Brown
7 White 7 White
8 Black Blinking 8 Grey
9 Blue Blinking 9 Light Blue
A Green Blinking A Light Green
B Cyan Blinking B Light Cyan
C Red Blinking C Light Red
D Magenta Blinking D Light Magenta
E Brown Blinking E Yellow
F White Blinking F High-Intensity White

43
5250 REMOTE EMULATOR CARD
(text continued from page 40)
•Save Buffer: If you’re going to use 132-column screens with DOS
graphics applications, you’ll need to allocate extra memory to make
sure these screens are saved when you hotkey between sessions. Select
32K for 132-column screens used in DOS graphics applications, 16K
for all other screens.
6.3.2 K
EYBOARD
S
ETUP
Use the Keyboard-Setup Menu, shown in Figure 6-9 below, to customize
the keyboard. You can modify the hotkey, enable or disable the type-ahead,
and modify scan codes.
Figure 6-9. The Keyboard-Setup Menu.
•Hot Key Code: The Hot Key Code is the series of keystrokes used
to jump from a DOS session to a host session. The default is
[ALT][ESC]. You can customize the hotkey code by pressing
[ENTER] at this option. A new screen displaying the keyboard type
will appear. Press the key you want to combine with [ALT] to form
the hotkey, then press [ENTER].
Menu Command Options:
Change Option ↵Select Options <ESC> Previous Screen
Modify / Create /Delete / Exit File Name = EM5251R
______________________________
Keyboard Setup
Hot Key Code Alt <01> Press ENTER to
modify
Type Ahead Enabled
Scan Code Customize
" "
Define hot key sequence

44
5250 REMOTE EMULATOR CARD
NOTE
If you plan to customize the hotkey, be aware that the emulator cannot
use any keys whose scan codes are higher than 57.
NOTE
For Windows, change the hotkey to [ALT][LEFT SHIFT]. This should
be displayed as ALT <2A>.
•Type Ahead: When Type Ahead is enabled, the PC will hold characters
in its buffer. If the host is not ready to accept the characters, the PC will
send the characters to the host when it is ready for input.
•Scan Code Customize: The Scan Code Customize option lets you
redefine how your keyboard’s keys/characters are represented as
numbers for transmission to the PC (and to the host during host
sessions). Each type of keyboard uses different scan codes to represent
its keys. The keyboard type you select is used on all host sessions during
emulation. Factory-default scan codes are shown in Appendix D.
To change the keyboard scan codes, move the cursor to Scan Code
Customize option and press [ENTER]. The screen then displays the
keyboard layout. Follow the steps below to customize the keyboard:
1. Look at the keyboard layout, and determine the code of the key you
want to change. At the prompt, below the keyboard layout, type in
this code.
2. Press [ENTER] to display the key’s function. In place of the prompt,
the function of the key is displayed in the Normal mode (pressed
alone), the Shifted mode (pressed with the [SHIFT] key), and the
Alt mode (pressed with the [ALT] key). The key’s Normal function
is highlighted.
3. Use the up- and down-arrow keys ([≠]and [Ø]) to highlight the
mode you want to change. Press [ENTER]. A list of all the keys
appears in a window at the right of the screen.
4. Use the arrow keys to highlight the function in this window to assign
to this key. (Use the Page Up [Pg Up] and Page Down [Pg Dn]
keys to bring different sets of functions into this window.) Press
[ENTER]. The window at the right of the screen disappears, and the
keyboard-layout screen reappears. The new function you’ve assigned
appears under the chosen mode for the chosen key.
45
5250 REMOTE EMULATOR CARD
5. Press [ESC] twice and you are prompted to save this keyboard file.
Answer Yto save your changes or Nto discard the changes. Press
[ENTER] and then [ESC] to return to the Main Menu.
6.3.3 P
RINTER
S
ETUP
Use the Printer-Setup Menu (shown in Figure 6-10 below) to create a
special or unique printer configuration.
Figure 6-10. The Printer-Setup Menu.
•Printer Commands Definition: Use the Printer Commands Definition
option to define a new printer or modify the command strings for an
existing printer. (This is not valid for 5219 and 3812 printing.)
Press [ENTER] and type in the session number of the printer to be
added or modified when you are prompted for it. A menu of command
strings (something like what is shown in Table 6-4 on the next page)
will appear. (If you choose a text-only printer, only half of this menu
will be shown, ending with the “Begin NLQ” command for Near Letter
Quality.)
Enter all command strings as sequences of two-digit hexadecimal
control codes, preceded by a hexadecimal number indicating how long
the sequence is.
Menu Command Options:
Change Option ↵Select Options <ESC> Previous Screen
Modify / Create /Delete / Exit File Name = EM5251R
______________________________
Printer Setup
Printer Commands Definition Press
ENTER to
modify
EBCDIC to ASCII translation
Code Page Selection
CPT Delimiters 50 6C
17 to 15 Pitch Correction
AUTO Printer Sharing
Orientation
APO
Paper Size
Modify printer command parameters
46
5250 REMOTE EMULATOR CARD
Table 6-4. Programmable Command Strings
Command String Function
Initialization string Initialize printer
5 cpi 5 characters per inch
10 cpi 10 characters per inch
12 cpi 12 characters per inch
15 cpi 15 characters per inch
8 lpi 8 lines per inch
6 lpi 6 lines per inch
Begin draft string Begin draft-quality printing
Begin NLQ string Begin New Letter Quality (NLQ) printing
Vertical motion string Used for vertical increments of the page
Increment (72, 60, 48) The fraction of an inch used by the vertical
motion string
Offset to variable data Number of values before the variable data
Variable multiplier Number multiplied to the variable to get the
correct value
Page length string Used to setup the page length
Offset to variable data Number of values before the variable data
used for the page length string
Length of variable data Number of values for the variable data
Base to add to variable Amount added to the variable data to get the
correct value
Graphics command string Sets the printer to accept graphics characters
For example, to set up an escape sequence for an HP®LaserJet®III, you
would follow these steps:
1. Find the “6 lpi” control codes in the LaserJet manual.
2. If the manual doesn’t report these codes in hexadecimal, translate
the decimal codes to hex using Appendix B.
3. The HP LaserJet “6 lpi” control codes are:

47
5250 REMOTE EMULATOR CARD
027 038 108 054 068 Decimal
1B 26 6C 36 44 Hexadecimal
Type in “05” to tell the software how many characters/codes long
the sequence is, then type in the codes themselves, like this:
05 1B 26 6C 36 44
You don’t have to press [ENTER] when you finish; the software will
automatically advance to the next line. Command-string sequences
can be a maximum of fifteen (“0F”) characters/codes long.
•EBCDIC to ASCII Translation: (This option is for advanced users only.)
The character-code set used by the host (EBCDIC) is not compatible
with that used by the printer (ASCII). To allow both systems to
communicate, the 5250 Remote Emulator Card’s software uses an
EBCDIC-to-ASCII translation table.
With this menu option, you can customize the table. For example,
to force the “$” character to print as a “#” character, move the cursor
to the EBCDIC to ASCII Translation option and press [ENTER].
The translation table will appear. Change the table by first entering
the EBCDIC code for a “$” character, which is 5B (see Appendix B
for EBCDIC and ASCII tables). Second, enter the ASCII code for
the character to be displayed; in this case, the ASCII code for the
“#” character is 23.
•Code Page Selection (4214 only):The default code-page selection is
Code Page 850. If the printer supports it, you can change to Code
Page 437 by pressing [ENTER] at this field and selecting that page.
Refer to the printer’s manual for information about the code page(s)
the printer uses.
NOTE
When you change to Code Page 437, any changes made to the Code
Page 850 character set will be lost, and vice versa.
•CPT Delimiters: The 5250 Remote Emulator Card’s “command pass-
through” feature lets the Card recognize printer-control commands
and transparently pass them through to the printer. A two-character
delimiter (the default setting is “&%”) signals the card to pass the
command through.
Select the new delimiter by typing the corresponding hexadecimal
character codes (refer to Appendix B) in the spaces on the screen.
See Section 8.4.3 for more information on the command pass-through
feature.

48
5250 REMOTE EMULATOR CARD
•17 to 15 Pitch Correction: Most PC printers do not support 15-pitch
printing, but host systems use 15 pitch in many applications. If the
printer supports 17 pitch and you would like to print 15 pitch, select
this option by moving the cursor to the option and pressing [ENTER].
You will be prompted for the number of the printer session to modify.
Be aware that your printer might print very slowly in 15 pitch.
You can also be turn this option ON and OFF from the Printer-
Control Screen (see Section 7.6.1).
•Auto Printer Sharing: When Auto Printer Sharing is enabled, you can
print from either the host or the PC. Like pitch correction, you can
turn this option ON and OFF from the Printer-Control Screen (see
Section 7.6.1).
NOTE
DOS print jobs will only print during DOS sessions. If you hotkey to a
host session while printing a DOS job, printing will be suspended until
you return to the DOS session.
•Orientation (3812 only):Use this option to select the default print
orientation. Your choices are Computer Output Reduction (COR),
Portrait, or Landscape. You will be prompted for the number of the
printer session to modify.
•APO (3812 only): Use this option to enable or disable Automatic Page
Orientation. When enabled together with COR orientation (see the
preceding paragraph), landscape orientation will be automatically
selected if the page is wider than it is high. Portrait will be selected if
the paper is higher than it is wide. (See Section 8.2 for more
information.) You will be prompted for the number of the printer
session to modify.
•Paper Size: Use this option to select the size of paper used in the
printer as follows:
Normal: Letter size: 8.5 x 11 in. (216 x 280 mm) or
Legal size: 8.5 x 14 in. (216 x 356 mm)
A4: A4 size: 8.27 x 11.69 in. (210 x 297 mm)
No Size: Whatever size is loaded in the printer
You will be prompted for the number of the printer session to modify.

49
5250 REMOTE EMULATOR CARD
6.4 PC Support/400
If PC Support/400 was selected for installation, the adapter-handler screen
will appear (as shown in Figure 6-11 below) and will prompt you to enter
the correct path for PC Support (this is required for PC Support/400
only).
NOTE
PC Support 400 must be installed as a twinax connection, not SDLC.
Figure 6-11. The adapter-handler screen.
Menu Command Options:
Change Option ↵Select Options <ESC> Previous Screen
Modify / Create /Delete / Exit File Name =
________________________________
Configure PC Support/400 to use with EM5251R.
C:\PCS\STARTPCS.BAT
If PCS startup file is not at the default, please enter
correct path name. Press enter to continue, or press ESC
to abort PCS configuration.

50
5250 REMOTE EMULATOR CARD
7. Operation
With the 5250 Remote Emulator Card installed and configured,
host operations can begin.
7.1 Starting Emulation
To activate emulation between the PC and the host system, first vary on
the line, controller, and devices on the host. Then follow the instructions
in Section 7.1.1, 7.1.2, or 7.1.3 as appropriate.
7.1.1 U
NDER
DOS
1. Change to the 5251R directory by typing CD\5251R [ENTER].
2. Type EM5251R [ENTER].
NOTE
If a new configuration file was created, add a space and the
configuration file’s name after “EM5251R”.
A new screen/session appears; what type (a 3X emulation screen and
session or a DOS prompt and session) depends on the startup option
you chose during configuration. The 5250 Remote Emulator Card begins
communicating with the host. Messages on the screen indicate the status
of each session. The hotkey sequence between DOS and emulation
applications is now available.
7.1.2 U
NDER
W
INDOWS
Double-click on the EEMM55225511RRicon.
7.1.3 U
NDER
PC S
UPPORT
/38
NOTE
When you start emulation, do not specify a virtual source drive.
Whenever you have to refer to the virtual source drive, use the letter
designation of the virtual disk you specified in the Card’s configuration
program (see Section 6.2.2).
1. Create a hard-disk directory called “PCS38” by typing MD PCS38.
2. Start emulation by typing EM5251 from the 5251R directory.
3. Hotkey to the S/38 signon screen and sign on.

51
5250 REMOTE EMULATOR CARD
4. Press [5] for the “execute command” option.
5. On the command line, type ADDLIBLE QIWS.
6. Press [3] for the “execute command” option.
7. Call QIWDOWNL.
8. Go to the copy screen, then hotkey to DOS.
9. Switch to your diskette drive and type COPYLINK C:\PCS38. (If your
hard disk has a different letter designation, use that instead of C:.)
The program will begin to copy.
10. When the copying is complete, hotkey to emulation.
11. Execute [CMD1] (the “end” function) twice.
12. Sign off the PC.
13. Reboot the PC.
14. Start emulation.
15. Execute Link 38 from the PCS38 directory.
7.2 Emulation Procedures under Windows 3.X
7.2.1 E
XITING
E
MULATION
To exit emulation, sign off all sessions, then use the hot key [ALT] [SHIFT]
to go into DOS.
7.2.2 E
NDING
E
MULATION
To end emulation, press [CTRL][C].
7.2.3 R
ESTARTING
E
MULATION
To restart emulation, follow these steps:
1. Double-click on the EEMM55225511RRicon.
2. When the message appears, select [C] (continue).
3. If emulation does not start, double-click on the EEMM55225511RRicon
for a second time. This will start emulation.

52
5250 REMOTE EMULATOR CARD
7.2.4 C
OPYING FROM
E
MULATION TO A
D
OCUMENT
To copy from emulation to a document, follow these steps:
1. Put the screen in a window by pressing [ALT][ENTER].
2. Bring up the System Menu by clicking on the system menu’s “minus
button” located in the upper left-hand corner of the screen.
3. Select Edit.
4. Select Mark.
5. Using the mouse, mark the text to be copied.
6. Open the clipboard in Windows.
7. Open Display and select OEM text.
8. Go to the document where the paste will take place.
9. Select Paste.
7.2.5 C
OPYING FROM A
D
OCUMENT TO
E
MULATION
To copy from a document to emulation, follow these steps:
1. Cut the data using the normal sequence for the program.
2. Put the screen in a window by pressing [ALT][ENTER].
3. Put the cursor where the paste will take place.
4. Bring up the System Menu by clicking on the system menu’s “minus
button” located in the upper left-hand corner of the screen.
5. Select Edit.
6. Select Paste.
7.3 Hotkey Sequences
7.3.1 O
VERVIEW
Hotkey sequences are used to toggle from one session to another.
For example, press and hold the [ALT] key and press the [ESC]
key (or press the custom hotkey sequence you chose during the
configuration—see Section 6.3.2) to move from a DOS session
to a host session.
––
––
53
5250 REMOTE EMULATOR CARD
There are two major hotkey sequences, Direct Access and Round-Robin:
•Direct Access: This key sequence moves directly to a host session.
(To be used, this sequence must be enabled during configuration—
see Section 6.2.2.) For example, to move to host session 1, press and
hold [ALT] and press [1]; to move to session 2, press and hold [ALT]
and press [2], etc. To return to DOS, press and hold [ALT] and press
[0] or [8]. If an unconfigured session is pressed, the next available
session will become active.
[ALT][2]
[ALT][7]
•Round-Robin: This key sequence moves sequentially through the
available sessions as illustrated below. Starting at the current session,
this sequence advances to the highest session and then to DOS. From
DOS, this sequence continues back to the lowest session. (The printer-
control screen is the printer session.) To use this method, press and
hold [ALT] and press [ESC] (or the customized sequence—see
Section 6.3.2).
[ALT] [ALT]
[ESC] [ESC]
7.3.2 W
INDOWS
H
OTKEY
S
EQUENCES
Different sequences allow you to jump between applications and sessions
while in Windows.
•Round-Robin (Scrolling) through Applications: Starting at a currently
active emulation, press [ALT] and then [TAB] to scroll through the
active applications. This sequence advances to each of the currently
active applications.
Host Session 2 Host Session 7
Host
Session
Printer-
Control
Screen
DOS
Session
54
5250 REMOTE EMULATOR CARD
[ALT] [ALT]
[TAB] [TAB]
•Round-Robin (Scrolling) through Sessions: You can also scroll through
active applications by pressing [ALT][SHIFT]; you must press
[ENTER] to activate the application. Also use [ALT][SHIFT] (or the
customized hotkey—see Section 6.3.2) instead of [ALT][ESC]to
change sessions while in an emulation window, as shown below; or use
the direct-access sequences [ALT][1], [ALT][2], etc., as described
in the previous section.
[ALT] [ALT]
[SHIFT] [SHIFT]
7.4 Status Line
During emulation, the bottom line of the screen is the session-status line.
It displays information sent from the host, identifies which host address
and session are currently being accessed, and highlights other information
regarding the active sessions. See Table 7-1, below, for a list of the status-
line abbreviations and their meanings. A status abbreviation is active
when highlighted.
Emulation
Program
Manager
Application
Host
Session DOS
Session
Printer-
Control
Screen

55
5250 REMOTE EMULATOR CARD
Table 7-1. Status-Line Abbreviations
Abbreviation Meaning (When Highlighted)
rr-cc CURSOR LOCATION (rr = row, cc = column): Identifies
the cursor location by row and column.
SA SYSTEM AVAILABLE: The host system is communicating
with the active session.
MWnMESSAGE WAITING: A message from the host system is
waiting for the active session. nis the number of the
session the message is waiting for.
KS KEYBOARD SHIFT: Keyboard shift is active.
IM INSERT MODE: The LU session is in insert mode.
II INPUT INHIBITED: Keyboard is locked, either because
the host system has not completed a previous command,
or there is a pending error condition.
KB KEYBOARD BUFFERING: Highlighted when there are
keystrokes waiting to be sent to the host.
SnLOGICAL UNIT: Where nis the active logical session or
unit that is active.
AnHOST ADDRESS: Where nis the host address.
7.5 Printing
Printing from either DOS or host applications on the attached printer is a
standard feature. To print from DOS, use either the DOS print command
or print through a software program. When printing host jobs, specify the
attached printer’s host ID. This lets the host route the print job to the
proper printer. The system operator will assign an ID to the attached
printer when configuring the printer on the host.
56
5250 REMOTE EMULATOR CARD
7.5.1 T
HE
P
RINTER
-C
ONTROL
S
CREEN
The Printer-Control Screen controls host printing sent to the attached
printer. The PC is unaware that printing is taking place, even in a DOS
session, host printing can continue without interruption. However, DOS
printing does not continue in a host session.
Certain printer functions are controlled from the Printer-Control
Screen. While in emulation, hotkey to the session assigned to the printer.
The Printer-Control Screen will appear; it’s divided into three (3) sections,
as shown in Table 7-2 on the next page and described on pages 57 through
59.
Table 7-2. Layout of the Printer-Control Screen
1Options F1 Start/Stop Printer
F2 Truncate/Wrap-around
F3 Line Feed
F4 Form Feed
F5 Cancel Print Job
F6 User Override of Pitch, Quality, etc.
F7 Host Control of Pitch, Quality, etc.
F8 Re-Initialize Printer
F9 Buffer Print
F10 Assign Printer to DOS/Host/Auto
Shift F1 17 to 15 Pitch Correction
2Printer is attached to: Host DOS Auto
Host Status Format Controls PC Printer
Ready User Override Active Selected
System Available Host Control Active Paper Out
Buffer Print Mode Busy
Truncate Fault
17 to 15 Pitch Fix Check Printer
3Session: 5XX6XXX

57
5250 REMOTE EMULATOR CARD
1To select any of the functions in Section 1, press the indicated function
key. See Table 7-3 below for a description of these functions.
Table 7-3. Printer Commands
Command Printer Function
F1 START/STOP: Press [F1] to start or stop the printer.
F2 TRUNCATE/WRAP-AROUND: In truncate mode, narrow-
carriage printers ignore data beyond 8” (80 columns). In
wrap mode, the data prints on the next line.
F3 LINE FEED: Each time the [F3] key is pressed, the paper in
the printer will advance one line.
F4 FORM FEED: The paper advances to the top of the next
page and resets the line and column counts to one.
F5 CANCEL PRINTER JOB: Sends a cancel request to the
System/3X host. This will not cancel data already in the
printer buffer.
F6 USER CONTROL OF PITCH, PRINT QUALITY AND
LINE SPACING: Defines the pitch, printer quality and line
spacing for the attached PC printer. Host commands which
alter these values are ignored.
F7 HOST CONTROL OF PITCH, PRINT QUALITY AND
LINE SPACING: With this enabled, host commands control
pitch, print quality, and line spacing.
F8 RE-INITIALIZE PRINTER: Returns to the original printer
configuration.
F9 BUFFER PRINT: Prints host commands for diagnostics. This
is referred to as a “hex dump.”
F10 ASSIGN PRINTER TO DOS/HOST/AUTO: Prints only DOS
jobs when DOS is highlighted, only host jobs when Host is
highlighted, or automatically selects from host or DOS
when Auto is highlighted.
Shift F1 Shifts from 17- to 15-pitch printing (5219 and 3812
emulations do not support this function). Only affects dot-
matrix printers.

58
5250 REMOTE EMULATOR CARD
2Section 2 of the Printer-Control Screen shows host- and PC-printer status.
These indicators highlight important information regarding the printer’s
status when it is assigned to either the host or the PC. For descriptions of
these messages, see the “Printer is attached to” paragraph below, Table 7-4
below, and Table 7-5 on the next page.
Printer is attached to: Indicates which system is in control of the printer:
the host, DOS, or auto. When Host is highlighted, print jobs can be sent
from the host to the PC printer. When DOS is highlighted, the printer will
not accept print jobs from the host, but a PC print job can print. When
Auto is highlighted, the 5250 Remote Emulator Card automatically
switches from host to PC printing and vice versa without going back to the
printer-control screen (although DOS print jobs will print only during a
DOS session). The screen will highlight the current setting of this option in
reverse video.
Table 7-4. Indicators of Host-Printer Status
Status Message Indicated Condition (When Highlighted)
READY The printer is ready to receive data.
SYSTEM AVAILABLE The host system is operational.
CHECK PRINTER An error condition, such as a paper jam or
out of paper, has been detected by the
printer.
USER OVERRIDE ACTIVE Host commands for pitch, print quality,
and line spacing are ignored (the F6
command).
HOST CONTROL ACTIVE Host commands for pitch, print quality,
and line spacing are active (the F7
command).
BUFFER PRINT MODE The printer is in buffer-print mode (the F9
command). Also known as a “hex dump.”
TRUNCATE Truncate mode is active (the F2
command).
17 TO 15 PITCH FIX 17- to 15-pitch correction is active (the
Shift F1 command).
59
5250 REMOTE EMULATOR CARD
Table 7-5. Indicators of PC-Printer Status
Status Message Indicated Condition (When Highlighted)
SELECT (parallel printer) or Printer is powered ON and ready to
PRINTER READY (serial receive data.
printer)
PAPER OUT Parallel printer only: Printer is out of
paper. Load paper before continuing.
BUSY Parallel printer only: Printer is processing
data.
FAULT Parallel printer only: Indicates a problem
with the printer such as paper jam, out
of paper, hardware failure, etc.
CHECK PRINTER A general indicator that operator
intervention is required for the printer.
3 Section 3 of the Printer-Control Screen shows the active display session,
displayed in reverse video, and the status of all the sessions on the host.
Numbers are session addresses; “X” is displayed for sessions that are not
active.
7.5.2 T
HE
P
RINTER
-O
VERRIDE
S
CREEN
When you press [F6] at the Printer-Control Screen (User Override of CPI,
LPI, and Quality), the Printer-Override Screen appears (see Table 7-6
below). This screen lets you “override” or change settings for the printer
when you print host-print jobs. While User Override is active, host
commands are ignored and the choices shown on this screen control the
printing. (PC-print jobs can’t be controlled from this screen.)
Select any of the printer controls by pressing the function key shown to
the left of the control description. The printer must be in a ready state for
selections to take effect. If the printer is not ready, a message appears and
the selection does not take effect.

60
5250 REMOTE EMULATOR CARD
Table 7-6. The Printer-Override (Emulation Control) Screen
Options F1 Set Printer to 10 CPI
F2 Set Printer to 12 CPI
F3 Set Printer to 15 CPI
F4 Set Printer to 6 LPI
F5 Set Printer to 8 LPI
F6 Set Printer to DRAFT
F7 Set Printer to NLQ
F8
F9 Return to Main Menu
F10
Shift F1
[ALT][ESC] Hot Key to Next Session
Printer is attached to: Host DOS Auto
Host Status Format Controls PC Printer
Ready User Override Active Selected
System Available Host Control Active Paper Out
Buffer Print Mode Busy
Truncate Fault
17 to 15 Pitch Fix Check Printer
Session: 5XX6XXX
7.6 Ending Emulation
7.6.1 U
NDER
DOS
After finishing the work in the host sessions, log off each active display
session. At a sign-on screen, press [CTRL][ALT][DEL] to end emulation
and return to DOS.
7.6.2 U
NDER
W
INDOWS
After finishing the work in the host sessions, log off each active display
session. Hotkey to the DOS portion of the window. Press [CTRL][C]
to end the Windows session.

61
5250 REMOTE EMULATOR CARD
8. Advanced Features
The 5250 Remote Emulator Card has some unique features that come
in handy with certain applications that require extra productivity tools.
These added features include Record/Playback, 3812 printer emulations,
5219 printer emulations, a special command language, and command
pass-through.
8.1 Record/Playback
With the Record/Playback feature, you can record a sequence of
keystrokes and play them back later by pressing only three keys,
which cuts down on repetition.
Use these keys to control the Record/Playback feature:
Keystroke Function
[ALT][F10]Record a sequence of keystrokes (functions as the
<Record> key on a 5250 keyboard)
[ALT][F8] Playback a sequence of keystrokes (functions as the <Play>
key on a 5250 keyboard)
[ALT][F7] Delete a recorded keystroke sequence
[ALT][F9] Clear all recorded keystroke sequences
8.1.1 R
ECORDING A
S
EQUENCE
To record a keystroke sequence, follow these steps:
1. Press and hold the [ALT] key, then press [F10] to enter Record
mode. A blinking Rappears in the lower left-hand corner of the
screen. The number to the right of the blinking Ris the number of
keystrokes available for recording (maximum of 1,000).
2. Press the key (any of [F1] through [F10] or [0] through [9])
to assign as the “trigger key” for the recorded sequence. (You might
want to write down each “trigger key” and its associated sequence in
the NOTES pages at the end of this manual.)
3. Type the keystroke sequence to be recorded.
4. When the keystroke sequence is completed, press [ALT][F10]
again to save the sequence and exit the Record mode.

62
5250 REMOTE EMULATOR CARD
5. To permanently save a recorded sequence to the PC’s hard disk,
hotkey to DOS, then go to the drive and directory where the 5250
Remote Emulator Card’s software is stored. Type SAVEKEYS and
press [ENTER]. A message will appear indicating that the recorded
keys have been saved. (Each time you start emulation, SAVEKEYS.DAT
will be loaded so the saved keystroke sequences can be used.)
8.1.2 P
LAYING A
R
ECORDED
S
EQUENCE
Follow these steps to play back a recorded sequence:
1. Press [ALT][F8] to enter Play mode. A blinking Pappears in the
lower left-hand corner of the screen.
2. Press the “trigger key” (any of [F1] through [F10] or [0] through
[9]) assigned to the recorded sequence you want to play back.
3. The playback begins at the cursor location. When it ends, Play mode
is automatically exited.
8.1.3 D
ELETING A
S
EQUENCE
To delete a recorded sequence, press [ALT][F7]. A blinking Dappears
in the lower left-hand corner of the screen. Press the “trigger key” (any
of [F1] through [F10] or [0] through [9]) assigned to the recorded
sequence you want to delete, and the sequence will be deleted.
8.1.4 C
LEARING
A
LL
S
EQUENCES
To clear all currently recorded keystroke sequences, press [ALT][F9].
A prompt in the lower left-hand corner of the screen asks, “Clear All
(Y/N)?” To clear all the recorded sequences, press Y.
8.2 3812 Printer Emulation
The 5250 Remote Emulator Card lets a local (attached to the PC) laser
printer that supports HP or PPDS modes emulate the IBM 3812 (non-
IPDS) printer. The 3812 printer provides font-changing capability, text
rotation, compression features called Computer Output Reduction (COR),
and Automatic Page Orientation (APO). The 5250 Remote Emulator
Card’s 3812 printer emulation provides font changes and a true 3812 COR
emulation. It also obeys host commands for duplexing like the IBM 3816
printer.

63
5250 REMOTE EMULATOR CARD
The system operator will specify a default font ID when configuring the
3812 address on the host system. The default font ID should be the most
commonly used typestyle. The system operator should select one of the
typestyle numbers from the Typestyle Reference Chart in Appendix C
with an asterisk (*) indicating the default font ID, then change it in the
document, as necessary.
8.2.1 D
ATA
P
ROCESSING
To change font IDs for a data-processing report, add the font number to
the CL or OCL printer statement (for the System/36, convert the font
number to hexadecimal before adding it to the printer statement). Only
the font IDs marked with an asterisk (*) in the Typestyle Reference Chart
in Appendix C can be used in host-printer statements.
The 3812’s COR feature rotates data-processing reports to landscape
orientation and compresses the text to fit 198 columns x 66 lines on the
page. The steps below describe printing using the COR feature. Refer to
Figure 8-1 on page 66.
1. If a Set Text Orientation (STO) command is specified, the report
prints using the STO command to control orientation in the specified
font. If an STO command is not specified, the report continues to
block 2.
2. If APO is enabled (see Section 6.3.3), the report continues to block 3.
With APO disabled, the report continues to block 4.
3. At block 3, the page size is calculated. If the page size is valid
(8 1/2" x 14" or smaller) the report continues to block 6; the report
prints at block 6 depending upon the page layout. An invalid page size
(larger than 8 1/2" x 14") causes the report to continue to block 4.
4. At block 4, the orientation selected in the configuration program
determines the output. If landscape is selected, the report prints in
landscape using the specified font. If portrait is selected, the report
prints in portrait using the specified font.
5. A COR override from the host determines the report orientation.
Host COR overrides include:
System/36 OCL: Text-Yes or Rotate-0
System/38 CL: PRT QLTY (*STD) or (*NLQ), or PGRTT(0)
AS/400: PRT QLTY (*STD) or (*NLQ) and PAGRTT (*COR)

64
5250 REMOTE EMULATOR CARD
A host COR override causes the report to print in portrait with the
selected font. If the host does not override the COR, the report prints
in landscape orientation with the CPI and LPI reduced as shown in
Figure 8-1.
The printer prints a maximum of 182 columns x 64 lines (IBM PPDS
mode) or 198 columns x 66 lines (HP mode) when you use COR to
control the output.
65
5250 REMOTE EMULATOR CARD
Figure 8-1. The decision-making process for page orientation.
START
Page Orientation
Logic
USE STO
COMMAND
4
Orientation
Option
1
Set
Text
Orientation
(Rotation)
2
Automatic Print
Orientation
3
Is
Page Size
Valid?
6
Width
Greater Than
Height?
5
COR
Override From
Host?
YES
NO
YESNO
APO On
APO Off
YESNO
YESNO
YESNO
Orientation set
at Portrait
LANDSCAPE
in requested font
PORTRAIT
in requested font
LANDSCAPE
in requested font
Orientation set
to Landscape
Orientation
NOT set to COR
Orientation
set to COR
Computer Output Reduction (COR)
LANDSCAPE in reduced font:
Vertical spacing is 8 LPI
0.5" margins top and left
10 pitch font to 13 pitch
12 pitch font to 15 pitch
15 pitch font to 19 pitch

66
5250 REMOTE EMULATOR CARD
8.2.2 W
ORD
P
ROCESSING
When the system operator configures the printer on the host, a default
font ID is configured for the printer, which should be the most commonly
used font. The WP program may also have a default font ID. Since the
default font ID can vary depending on the system setup, ask your system
operator if you have questions about the default font ID.
To change the font, either use the font-change commands in the Card’s
command language, or select a font ID number within the word processing
program. Refer to the WP program’s manual for information on changing
font IDs within the program. See Section 8.4.3 for information on font-
change commands for word-processing documents.
The 5250 Remote Emulator Card allows bolding, underlining, and
super/subscripting by recognizing the host commands for these features
in both WP and DP applications. The 5250 Remote Emulator Card uses a
shadow print for bolding, even on small and italic fonts.
8.2.3 P
AGE
L
ENGTH
The printer prints up to 66 lines at 6 LPI in HP mode (the line spacing
may be compressed slightly to fit), or 64 lines at 6 LPI in IBM PPDS mode,
on each page of 8.5" x 11" letter-size paper. The System/36 only allows
65 lines per page on 8.5" x 11" letter-size paper.
The printer prints up to 72 lines at 6 LPI in HP mode (the line spacing
may be slightly compressed to fit) or 70 lines at 6 LPI in IBM PPDS mode
on each page of 8.27" x 11.69" A4 size paper.
8.2.4 P
APER
S
IZE
Configure the printer setup on Card for the paper size used most. The
Card only recognizes these paper sizes:
Letter Paper: 8.5" x 11" (216 x 280 mm)
Legal Paper: 8.5" x 14" (216 x 356 mm)
A4 Paper: 8.27" x 11.69" (210 x 297 mm)
If you choose any other paper dimensions in the word-processing program,
the 5250 Remote Emulator Card ignores them and uses the previous
paper-size choice. The “No Paper Size” selection uses the paper installed
in the tray, regardless of the paper’s size.
8.2.5 B
IN
S
ELECTION
The 5250 Remote Emulator Card selects paper from bin 2 only if the
optional paper tray is installed in the printer. If bin 2 or 3 is chosen in a
host document, the printer will print from bin 1 unless the optional paper
tray is installed.

67
5250 REMOTE EMULATOR CARD
8.2.6 D
UPLEX
P
RINTING
The AS/400 will only recognize duplexing in word processing. To access
duplexing in data processing, type one of these commands from the Card’s
command language into the first line of the document.
¬D0 for simplex printing
¬D1 for landscape duplex printing
¬D2 for portrait duplex printing
Refer to Section 8.3.6 for more information.
8.2.7 D
OCUMENT
/E
NVELOPE
P
RINTING
Print a letter and an envelope from DisplayWrite/36 or AS/400 Office
in the same document by following this procedure:
1. Set the format for the letter, and enter the letter file. On the first
typing line, press [CMD20] for “Change Format.”
2. Select 1 for “Entire Document Options.”
3. Select 1 for “Document Format.”
4. Select 3 for “Typestyle/Color,” type in the font ID Number for
the letter (such as No. 11, 86, etc.), then press [ENTER].
5. From the Document Format screen, select option 4 for “Page
Layout/Paper Options.” Scroll to the second screen of these options
and select a paper size and a paper source. If the letter is more than
one page, select the same paper source for the following pages.
Press [ENTER] to return to the Document Format screen.
6. Press [CMD12] to return to the Document Options screen.
7. You can now set up the alternate format for the envelope.
Select 2 for “Alternate Format.”
8. Select 3 for “Typestyle/Color.” Type in a font ID for the envelope,
such as 5, and press [ENTER] to return to the Alternate Format
screen.
9. Select 4, “Page Layout/Paper Options.” Type in a “first typing line”
of 11, then scroll down to the second screen of the options; choose
a paper width of 7.5 (monarch size) or 9.5 (commercial, #10 size)
and a paper length of 4inches.

68
5250 REMOTE EMULATOR CARD
10. For a paper source, select 5 for “Envelope Feed.” Press [ENTER]
to return to the Alternate Format screen.
11. Select option 1 for “Margins and Tabs” and type in a left margin of 40.
Press [ENTER].
12. Press [CMD3] to return to the document.
13. Type in the text. When you finish, add in a “page end” by pressing
[ALT][P].
14. Now load in the alternate format for the envelope. To do this, press
the [CMD5] key, “Goto,” and type “rf” (Resetting Format). Press
[ENTER].
15. Select option 4 on the Alternate Format screen, “Begin Alternate
Format.” Press [ENTER].
16. The document will now be displayed with the alternate format.
The cursor will be on the first typing line with a left margin of 40.
17. Type in the envelope address and send the file to print. The letter
will print out first, then the envelope.
NOTE
The printer may eject a blank page when changing printing orientation.
If the Buffer light and Ready light remain steady, press the Print/Check
button on the printer’s operator panel to eject the last page.
The System/38 only sends margins and other format specifications to
a printer when they are different from the previous documents or when
the printer has been turned OFF. To choose a different paper size:
1. Select a paper size in the program.
2. Insert paper of the correct size into the printer.
3. Power the printer OFF for about five seconds, then power it back ON
again.
4. Release the job for printing from the host.

69
5250 REMOTE EMULATOR CARD
8.3 5219 Printer Emulation
The 5250 Remote Emulator Card’s 5219 emulation is for LaserJet printers.
The HP LaserJet printer file is automatically used when 5219 emulation is
selected.
The 5250 Remote Emulator Card allows bolding, underlining, and
super/subscript by recognizing the host commands for these features
for DP or WP applications. The different character styles and pitch are
controlled through the IBM typestyle number or font ID. The 5250
Remote Emulator Card uses the IBM typestyle number to select an HP font
from a cartridge. The cartridges shown in the Typestyle Reference Chart in
Appendix C are the only fonts supported.
The system operator will specify a default font ID when configuring the
5219 on the host system, which should be the font ID most commonly
used. Select one of the font-ID numbers from the Typestyle Reference
Chart in Appendix C with an asterisk (*) indicating the default font ID,
then change it as necessary in the DP or WP document.
If data-processing reports are sent to the printer, typestyles in the
printer’s CL or OCL statement must be changed.
8.3.1 D
ATA
P
ROCESSING
Condensed print and “8 lpi” commands do not work in data-processing
documents, because 5219 printers only understand font-ID commands.
For DP documents, such as RPG-generated printouts, the Card uses
the system-default typestyle unless you change the fonts by specifying the
typestyle in the OCL or CL printer statement. Since the host only accepts
certain fonts in OCL and CL statements, you can use only the font IDs
marked with an asterisk (*) from the Typestyle Reference Chart in
Appendix C.
To change typestyles in DisplayWrite/36, use one of the following
commands:
[CMD20], selection No. 1, “Document Option”
[CMD20], selection No. 4, “Display Current Format”
[CMD9], selection No. 7, “Change Font”
See the DisplayWrite®user’s guide for more information on changing
typestyles.
8.3.2 W
ORD
P
ROCESSING
When you configure a 5219 address on the host, you must select a default
font ID. The normal value is 11 (or 0B in hex), which is a 10-pitch font.

70
5250 REMOTE EMULATOR CARD
There are two ways to change fonts for word-processing documents:
either select a typestyle within the word-processing program or use a font-
change command from the Card’s command language in the document.
The word-processing program’s manual should describe how to change
the typestyles within the program.
Some word-processing programs, such as Text Management/38, do not
allow more than one typestyle number per line of text. In such cases, use
the font-change commands in the Card’s command language (see
Section 8.4.1).
8.3.3 P
AGE
L
ENGTH
The 5219 emulation allows 65 lines per page at 6 LPI for word-processing
documents and 66 lines per page at 6 LPI for data-processing documents.
The HP LaserJet printer allows a maximum of 63 lines per page at 6 LPI.
To print 65 lines, the 5250 Remote Emulator Card increases line spacing
from 6 lines per inch to about 6.25 lines per inch. This small change is
normally not noticeable. A similar small change is made to 8-LPI printing
on 8.5" x 11" letter size paper.
The printer prints up to 72 lines at 6 LPI in HP mode (the line spacing
may be slightly compressed to fit), or 70 lines at 6 LPI in IBM mode, on
each page of 8.27" x 11.69" A4 size paper.
8.3.4 P
APER
S
IZE
Configure the printer setup on the Card for the paper size used most.
The Card only recognizes these paper sizes:
Letter Paper: 8.5" x 11" (216 x 280 mm)
Legal Paper: 8.5" x 14" (216 x 356 mm)
A4 Paper: 8.27" x 11.69" (210 x 297 mm)
If you choose any other paper dimensions in the word-processing program,
the 5250 Remote Emulator Card ignores them and uses the previous
paper-size choice. The “No Paper Size” selection uses the paper installed in
the tray, regardless of the paper’s size.
Selecting legal or A4 size paper dimensions on the DisplayWrite/36
“Change Page Format” screen causes the LaserJet display window to flash
“Legal Paper.” If the paper dimensions specified are different from letter,
legal, or A4, the paper size is unchanged.
In Text Management/38, the System/38 does not send paper
dimensions to the printer. Instead, it sends a forms message for legal paper
to the controlling workstation assigned to the printer. To change the paper
tray, take these steps:

71
5250 REMOTE EMULATOR CARD
1. Insert a paper tray of the proper size and press the printer’s RESET
button.
2. Power the printer OFF and back ON.
3. Release the print job at the host.
The System/38 uses a “Printer Support Facility” that sends the margins
and other document-form specifications to a printer only when these
are different from the previous document or when the printer has been
turned OFF. Either way, the LaserJet must be reset when a different paper
tray is installed.
The line-format screens in DisplayWrite/36 (Command 20) also permit
“Justify,” which aligns the right margin. “One-Half Justify” causes only
one-half as much alignment of the right margin. For best results in using
justification, change the zone width from “6” to “1.”
8.3.5 E
NVELOPE
P
RINTING
To print envelopes, specify typestyle number 5, landscape orientation, with
the first line of the address on line 30 and a left margin of 55. A trial run
with a blank sheet of paper will often help identify an error in positioning
the address.
Manual Feed: Select the “Envelope Feed” option in the word-processing
program’s paper-feed selections and a paper size of 11" x 11". The printer
will flash “Manual Feed” on the front-panel display window. Manually feed
the envelope into the printer.
Envelope Tray: Select “Envelope Feed” and a paper size of 7.5" or 9.5"
(or 22 cm). The printer automatically finds the envelope tray (if this has
been installed) and prints the envelope.
Envelope Feeder: Select “Envelope Feed” and a paper width of 7.5"
o 9.5" (or 22 cm). The printer automatically finds the envelope feeder
(if this has been installed) and prints the envelope.
NOTE
The LaserJet may eject a blank page when you change print orientation.
8.3.6 D
UPLEX
P
RINTING
Some LaserJet models can print both simplex (single sided) and duplex
(double sided); for that matter, they can print both long-edge (landscape)
and short-edge (portrait) duplex. However, changing the printer’s
simplex/ duplex mode through its front panel can be time consuming.
Instead, place printing commands on the first line of the document to
control simplex, landscape-duplex, and portrait-duplex printing. Enter one

72
5250 REMOTE EMULATOR CARD
of these commands from the Card’s command language on the first line of
the document:
¬D0 for simplex printing
¬D1 for landscape-duplex printing
¬D2 for portrait-duplex printing
If they are not on the first line, the commands will not become active until
the following page. When the printer receives the printing command, it
will do all printing in that mode until another printing command is
received. In other words, if the printer is most often in simplex mode and
is printing in the duplex mode, be sure to put a simplex command at the
end of the document to return the printer to simplex mode. Envelope
printing between documents won’t change the printer’s mode.
On some duplex printing, if the last page is blank on the back side, the
information for the last page may remain in the printer until the next
printing job is received. To print the last page, take the printer off-line by
pressing the ONLINE button, then press the FORM FEED button to print
the last page. Put the printer back on-line by pressing the ONLINE button
again.
NOTE
Duplexing is supported in word-processing applications on the AS/400,
but the AS/400 does not support duplex printing for data processing.
8.4 The Command Language
The 5250 Remote Emulator Card responds to a command language that
consists of special character sequences you can place in your documents.
The Card recognizes these sequences and sends corresponding codes to
the printer to control the printer’s output. You can use these commands in
either data-processing or word-processing documents.
The Card’s command language consists of three types of commands:
font-change commands, escape commands, and command-pass-through
commands. These are described in the next three sections.
8.4.1 F
ONT
-C
HANGE
C
OMMANDS
To change fonts using font-change commands, type the font-change
command into the document at the place where the font change is to take
effect. The command is immediately active in the document; the Card
prints the specified font until it encounters the next font-change
command.

73
5250 REMOTE EMULATOR CARD
For example, when the ProCollection®cartridge is loaded in the printer,
the codes embedded in the following sentence will cause the word “saves”
to print in bold Helvetica®instead of plain Courier:
On screen: Quality ¬Q45 saves ¬Q85 you time and money.
Prints as: Quality saves you time and money.
NOTE
The host may send the original font code to the printer at the beginning
of each page. If this happens, put a font-change command at the
beginning of each page of the document.
If the font-change command changes the pitch, the host may continue
to format each line with the original font-ID pitch. Text Management/38
and some other word-processing programs don’t let you specify more than
one font ID per line.
Font IDs and font-change commands for the fonts and font cartridges
used by the 3812 and 5219 printer emulations are listed in Appendix C.
Format font-change commands this way:
•3812 Printer Emulation: Enter font-change commands for 3812
emulation using the format ¬Qn, where ¬is a “logical not” (Shift 6),
Qindicates a font change, and nis the typestyle number (font ID).
•5219 Printer Emulation: Enter either of two types of font-change
commands that you can use with 5219 emulation:
¬QHLselects fonts from HP font cartridges: ¬is a “logical not” (Shift
6), Qindicates a font change, Hindicates the HP font cartridge, and L
is one or more uppercase letters that indicate a particular font in the
cartridge;
¬QInselects fonts from IBM font cartridges: ¬is a “logical not”
(Shift 6), Qindicates a font change, Iindicates the IBM font cartridge,
and nis the typestyle number (font ID).
8.4.2 E
SCAPE
C
OMMANDS
You can also insert commands into your document that perform other
functions, such as enabling true 6-LPI printing, causing the Card to ignore
format commands from the host, and sending the printer an ASCII ESC
command. These commands, shown below, are similar to the font-change
commands.

74
5250 REMOTE EMULATOR CARD
Command Function
¬Ex Sends an ASCII ESC command to the printer (HP mode
only).
¬TY Forces true 6-LPI printing (HP mode only).
¬TN Stops forcing true 6-LPI printing (HP mode only).
¬I Makes Card ignore all formatting commands from the host.
¬S Makes Card stop ignoring formatting commands from the
host.
You can send an ESC (escape) print-control command to the printer with
the ¬Ex command (HP mode only); xstands for a sequence of characters
that forms the rest of the command. For example, ¬E(s3B would begin
bold printing; see an HP operator’s manual for a list of the (sXX
commands.
When in HP mode, the printer may compress line spacing to fit 66 lines
onto a page. This might be undesirable at times, especially with preprinted
forms that must align correctly. In these cases, the ¬TY command prevents
the printer from compressing the line spacing, and ¬TN permits it again.
Use the ¬I and ¬S commands to remove unwanted host commands
from a print file. For example, when you print with forms-generating
software, the host recognizes the files as text files and formats them with
unwanted carriage returns and line feeds. Placing the ¬I at the end of a
line and ¬S at the start of the next line causes the 5250 Remote Emulator
Card to remove the host’s carriage returns and line feeds and send only
the data to the printer.
8.4.3 C
OMMAND
P
ASS
-T
HROUGH
The command-pass-through (hex-transparency) feature gives you access
to all of a printer’s built-in features, even if these features are not normally
available through the host software. With the command-pass-through
feature, you can place printer-specific command sequences into your
document, and the 5250 Remote Emulator Card will recognize the
sequences and “pass the commands through” to the printer. Take these
steps to use this feature:.
1. Find the command (control codes) for your desired print feature
in the printer’s manual.
2. Convert the control codes to hexadecimal.
3. Type the delimiter &% (or any custom delimiter configured as
described in Section 6.3.3) into the document at the point in the text

75
5250 REMOTE EMULATOR CARD
where the feature is to take effect. Type in the “turn feature ON”
printer command, then type in the delimiter again. No spaces are
allowed.
4. Move the cursor to the point in the text that you want to end the print
feature. Type in the delimiter, followed by the “turn feature OFF”
printer command, and then the delimiter again. Again, no spaces are
allowed.
For example: If [ESC][E] turns bold printing ON and [ESC][F] turns
bold printing OFF, first convert [ESC][E] to the hexadecimal 1B45
([ESC] = “1B” and [E]= “45”) and [ESC][F] to 1B46. Then insert
the commands into the text like this:
This is a &%1B45&%bold&%1B46&% word.
The above sentence will print on the printer as:
This is a bold word.
NOTES
Spaces are not allowed between the delimiter and the hex code.
Only hexadecimal digits (the numbers 0 through 9 and the letters
A through F) may appear between delimiters.
Errors in the command-pass-through sequence will cause the 5250
Remote Emulator Card to ignore the command and resume printing at
the point the error occurred.
Command pass-through may invalidate horizontal spacing.

76
5250 REMOTE EMULATOR CARD
9. Troubleshooting
The 5250 Remote Emulator Card is designed for easy installation and
reliable operation. However, as with all electronic equipment, difficulties
can arise. This chapter is intended to help you diagnose and solve these
problems.
When trouble does crop up, the cause frequently turns out to be host
configuration, emulator configuration, or modem settings. The devices
emulated by the 5250 Remote Emulator Card must be recognized by the
host, so make certain the configuration of the emulation software matches
that of the host. Make sure the modem settings match the type of network
the emulator is operating with. If this doesn’t solve the problem, take these
steps:
1. Verify that all of the installation steps have been completed
(see Chapters 4 and 5).
2. Run the Card’s diagnostic program.
3. Write down any error messages displayed or strange system-operating
quirks you observe.
4. Try to find the problem and its solution in Sections 9.1 through 9.3.
5. If you’re still stuck, contact your supplier. Go to Section 9.4.
9.1 Common Concerns
PC does not power ON.
Cause: Power cord not plugged in.
Action: Make sure the power cord is plugged into both the power
outlet and the back of the PC.
Cause: Faulty cord or power outlet.
Action: Try another cord or outlet.
Cause: No power connections inside PC.
Action: Check power connections inside the PC that might have
been disconnected during installation of the 5250 Remote
Emulator Card.

77
5250 REMOTE EMULATOR CARD
Graphics characters or blinking characters appear on the screen.
Cause: 5250 Remote Emulator Card not seated properly.
Action: Unplug the PC, open it, and check the installation of the
5250 Remote Emulator Card.
Cause: I/O-address conflict.
Action: Check the addresses of all other cards in the PC (referring
to those cards’ manuals if necessary). If one of the other
cards is using the same address as the 5250 Remote
Emulator Card, you must change one of the two cards’
addresses.
Cause: Cable-address conflict.
Action: Make sure the cable-address settings on the host and
in the 5250 Remote Emulator Card’s software match (see
Section 6.2.1).
Improper keystrokes or no keystrokes appear on the screen.
Cause: PC’s keyboard loose or unplugged.
Action: Make sure the keyboard cable is tightly connected
at both ends.
Cause: Host inhibited.
Action: Check the II indicator on the host session’s status line.
Cause: Wrong keyboard emulation.
Action: Make sure the right keyboard emulation (PC or 5250)
is selected in the 5250 Remote Emulator Card’s
configuration (see Section 6.2.2).
Cursor appears at the top left corner of the screen when emulation starts.
Cause: Invalid station address.
Action: Check the station addresses on the host and in the 5250
Remote Emulator Card’s configuration (see Section 6.2.1).
Cause: Unanswered messages at the host.
Action: Check the host console for unanswered messages.

78
5250 REMOTE EMULATOR CARD
Cursor appears at the top right corner of the screen when emulation starts.
Cause: Invalid station address.
Action: Check the station addresses on the host and in the 5250
Remote Emulator Card’s configuration (see Section 6.2.1).
Cause: Damaged cabling or connections.
Action: Make sure that no cables are broken and that all cable
connections are tight. Substitute another cable if necessary.
“Snow” appears on the screen.
Cause: Wrong monitor type.
Action: Select Color (IBM) monitor type in the configuration
program (see Section 6.2.2)
Printer does not work.
Cause: Printer not configured or configured incorrectly.
Action 1: Make sure that the printer emulation matches the
emulation on the host (see Section 6.2.1).
Action 2: Make sure the printer is configured on the host and in the
5250 Remote Emulator Card’s configuration (see
Section 6.3.3).
Cause: Invalid cable address.
Action: Make sure the cable-address settings on the host and in the
5250 Remote Emulator Card’s software match (see
Section 6.2.1).
Cause: Printer is off line.
Action: Make sure the printer is on line and has paper. Send a
print screen from DOS to see if the printer is
communicating with the PC.
No host communication—emulator will not come on line or cannot be
varied on.
Cause: Communication line to/from host not operating properly.

79
5250 REMOTE EMULATOR CARD
Action: Contact the system operator; he or she might need to IPL
the host. Make sure the host/modem cable is attached
to the emulator. If you can’t find the problem on the
premises at either end, have the telephone company
check the line.
Cause: SDLC encoding not set properly.
Action: The host’s and emulator’s encoding settings must match:
either both NRZ or both NRZI. If you’re unsure what
the host’s setting is, change this setting on the emulator
(see Section 6.2.4) and try to bring it on line again.
Cause: Either host or Card is configured incorrectly.
Action: Make sure the host is configured for the emulator, that
the emulator address is correct at the host, and that the
host configuration and the local configuration match.
Cause: Modem is not the proper type or is not strapped properly.
Action: Verify that both modems are of the proper type for the
network. Make sure the modems can communicate at the
chosen line speed. Check that the modem is “strapped”
for the network type (half- or full-duplex, etc.). Perform
loopback or end-to-end tests to make sure host-site and
emulator-site modems can communicate with each other.
Cause: Host not varied on or subsystem not started.
Action: Vary on the host as described in Section 7.1. Some hosts
require the line, device(s), and subsystem to be varied on
before the host can communicate. Make sure the
subsystem is started.
After you connect the two modems, or when the Card is directly
connected to a host without modems, DCD and DSR should be lit.
Once the host starts polling, the RX LED should flash. If everything
is configured properly, RTS should light, followed immediately by CTS,
followed immediately by TX.
If DCD and/or DSR are not lit, eiter there is a problem with the
configuration of the modem or CSU/DSU, or the cable between the
emulator and the modem or CSU/DSU is defective.
80
5250 REMOTE EMULATOR CARD
To check the cable, remove the cable connections at both ends and
check for bent, broken, or missing pins.
In the modem or CSU/DSU configuration, make sure the DSR (Data Set
Ready) and DCD (Data Carrier Detect) are set to normal operation, not
forced on.
Figure 9-1. LEDs.
DB25
TX
RX
RTS
DSR
CTS
CD

81
5250 REMOTE EMULATOR CARD
If you have tried all of the above solutions and the emulator is still not
active, press the DOS Enter key. This will cause a red error code to appear
in the bottom left corner of the display. Refer to the error code chart in
Table 9-1 for cause and solution.
Table 9-1. Error Codes.
SRC Description Possible Causes(s)
0040 It has been at least thirty seconds a. The modem is not powered on.
since any valid SDLC frame has b. The telephone connection
been received for any address, and between the modems/DCEs is
it has also been at least 30 seconds down.
since the DSR signal has been c. The modem cable is bad or is
present on the cable from the not corrected properly.
modem/DCE. d. The Controller is connected to
This code indicates conditions a modem/DCE with a null-
that would normally result in either modem (cross-pinned) cable, or
error code 0055 or error code 0056, is directly connected to the host
but gives the additional information with straight-through-pinned
that DSR is not present. cable.
e. Modems are configured
incorrectly.
0049 Software has detected that the The MPIC is defective or not
MPIC (host-communications card) installed correctly. The software
has functioned in an invalid did not get the interrupt from the
manner. card, there is an I/O problem, or
the board is bad.

82
5250 REMOTE EMULATOR CARD
Table 9-1 (continued). Error Codes.
SRC Description Possible Causes(s)
0055 Since the startup of the Controller, a. The remote controller has not
no valid SDLC frame has been been varied on at the host.
received for the address. b. NRZI/NONRZI configured on
This error code will not be the remote controller does not
displayed if the Controller has ever match the host configuration.
received any good SDLC frames c. The cable connecting the
for any SDLC address. This is Controller to its local modem/
true even if the address in the DCE (or that connecting the
frame is not the address configured host to its local modem/DCE)
for the remote controller, or any of is too long for the chosen data
the addresses configured for a rate.
multi-card Controller. d. The Controller is connected to
a modem/DCE with a null-
modem (cross-pinned) cable, or
is directly connected to the host
with straight-through-pinned
cable.
e. Modems are configured
incorrectly.
83
5250 REMOTE EMULATOR CARD
Table 9-1 (continued). Error Codes.
SRC Description Possible Causes(s)
0056 It has been at least 30 seconds The remote controller has been
since any valid SDLC frame has varied off at the host.
been received for any address.
However, valid frames were
received earlier.
This error code will not be
displayed if the Controller has
received any good SDLC frames
for any SDLC address in the last
30 seconds. This is true even
if the address in the frame is not
the address configured for the
remote controller, or any of the
addresses configured for a
multi-card Controller.

84
5250 REMOTE EMULATOR CARD
Table 9-1 (continued). Error Codes.
SRC Description Possible Causes(s)
0057 Since the startup of the Controller a. The display stations’s remote
(at least 30 seconds ago), no valid controller has not been varied
SDLC frame has been received for on, but one or more other
this display station’s remote remote controllers configured
controller. on the Controller are still
varied on.
b. The SDLC address configured
for the display station’s remote
controller doesn’t match the
address configured on the host.
c. The display station’s remote
controller has not been
configured on the host at all.
0058 It has been at least 30 seconds The display station’s remote
since any valid SDLC frame has controller has been varied off, but
been received for the display one or more emulated remote
station’s remote controller. controllers in the same Controller
However, frames addressed to this are still varied on.
remote controller were received
earlier.
This error normally shows up only
on multi-card Controllers because
it implies that other frames are
still being received for other
remote controller addresses;
otherwise, error code 0056 would
be displayed, indicating no frames
are being received for any address.

85
5250 REMOTE EMULATOR CARD
Table 9-1 (continued). Error Codes.
SRC Description Possible Causes(s)
0059 An SDLC XID command was The remote-controller model (5294
received for the display station’s or 5394) configured for the remote
remote controller, but that was controller doesn’t match the host
at least 30 seconds ago and no configuration.
SDLC i-frame (data frame) has
been received since.

86
5250 REMOTE EMULATOR CARD
Table 9-1 (continued). Error Codes.
SRC Description Possible Causes(s)
0099 There is no SNA session active for In many cases, when this error
the display station. Normally, this code appears, it will be replaced in
means that the display station or its about 30 seconds with one of the
remote controller is varied off, and previous seven non-Token-Ring
the screen is blank. error codes. If this happens, the
new error code will be more
specific, and should be used to
determine the problem. If error
code 0099 is not replaced, the
problem might be:
a. The display station has been
varied off at the host, though its
remote controller is varied on.
b. The display station is not
configured on the host, or its
twinax address (0 through 6,
local station address) is
configured incorrectly.
Emulator drops off line and will not come back up or stays at a “Vary on
pending” status.
Cause: Interference on telephone line.
Action: Have the phone company check the telephone line.
Cause: Message on console.
Action: Answer, then delete, the message.
Cause: Modem or emulator “locked up.”
Action: Power OFF, then power ON both modems and/or the
emulator.

87
5250 REMOTE EMULATOR CARD
Cause: Subsystem terminated.
Action: Restart the subsystem.
Cause: “Drop line upon sign off” selected as “yes” on the AS/400’s
display description.
Action: Select “no” to drop the line upon sign off.
Slow response time for attached devices.
Cause: Interference on communications line.
Action: Check for interference on the communications line
to/from the host.
Cause: Selected data rate is too slow for the number of attached
devices or the application.
Action: Raise the data-rate settings in the emulator’s configuration
and on the modems.
Cause: Host has nonexistent controller varied on to a multipoint
line.
Action: Check the host status of the line for such a controller. If
the line shows any non-existent controllers that have status
other than “varied off,” vary them off.
9.2 Error Messages
The error messages in this section are generated by the 5250 Remote
Emulator Card during configuration, while starting emulation, or during
active emulation. The IBM Systems/34, /36, /38, and AS/400 have various
error messages to help identify communication problems between the host
and the PC or PC printer. The IBM host also has a “help” facility designed
for error-message recovery. Refer to the IBM Technical Manual for further
details.
9.2.1 R
UN
-T
IME
E
RROR
M
ESSAGES
Address Conflict: The same cable address has been assigned to more than
one logical-unit session.
Bad File Name: The file name cannot be read. This is typically caused
when someone uses the wrong filename extension when typing in a
configuration file’s name. The only valid extension is .CFG.

88
5250 REMOTE EMULATOR CARD
Error Creating File: DOS is unable to create a file in the current disk and
directory. This is usually because the current disk is unavailable or write-
protected.
Error Deleting File: DOS detects an error while attempting to delete a
configuration file. This is usually because the current disk is unavailable or
write-protected.
Error Reading File: The disk file is the wrong size or the data is invalid. If
this error occurs while a user-created file is being read, the file must be
recreated; otherwise, you should reinstall the configuration software.
Error Writing File: DOS detects an error while trying to write data to the
current disk. The current disk might be unavailable, write-protected, or
full. If you can correct the problem, do so, then press Yand DOS will retry
the write; otherwise, press Nto abort the write.
File Already Exists: The indicated file name already exists.
File Could Not Be Found: DOS can’t find the indicated file name. Verify
that the current disk and directory are correct. If so, create a new
configuration file.
File Open Error: DOS detects an error while trying to open the requested
file. Verify that the current disk and directory are correct; if so, you should
reinstall the configuration software.
Invalid Configuration File: The configuration file you are trying to modify
is invalid. Verify that you are specifying the correct file. If so, you’ll have to
delete and recreate the file.
Session is Not a Display Session: The logical session specified for the file
transfer has not been configured or is configured as a printer.
9.2.2 E
RROR
M
ESSAGES ON
L
OADING
E
MULATION
S
OFTWARE
Configuration File is Invalid: The specified configuration file contains
incorrect data. Verify that you are using the correct file. If so, you’ll have to
delete and recreate the configuration file.
Configuration File Not Found: The specified configuration file cannot be
located. Verify that the current disk and directory are correct and that the
correct configuration file is specified.

89
5250 REMOTE EMULATOR CARD
Device ID in Configuration File is Invalid: An incorrect device was found
while processing the configuration file. Verify the device in the
configuration file and, if necessary, delete and recreate the file.
Emulation Adaptor Does Not Respond: The 5250 Remote Emulator Card
has detected a problem. Power OFF the PC and restart emulation. If the
problem persists, verify the hardware configuration. If it is correct, contact
your supplier.
Emulation Adaptor Diagnostic Error: The Card detects an error during
power up. Power OFF the PC and restart emulation. If the problem
persists, contact your supplier.
Error Reading Keyboard Definition File: The emulation software cannot
read the keyboard-definition file. Verify that the current disk and directory
are correct. If so, verify that the 5250 Remote Emulator Card’s software
diskette contains the three files KEYBOARD.BAS, KEYBOARD.CHG, and
KEYBOARD.DEF. If it doesn’t, contact your supplier.
Error Reading Printer Definition File: The emulator software cannot read
the printer-definition file. Verify that the current disk and directory are
correct; if so, check the configuration and make sure that the printer is
correctly configured. If the problem persists, reinstall the software.
Keyboard Definition File is Invalid: The data in the keyboard-definition file
is incorrect. Recopy the three files KEYBOARD.BAS, KEYBOARD.CHG,
and KEYBOARD.DEF from the 5250 Remote Emulator Card’s software
diskette. If this doesn’t help, briefly switch to another keyboard language
and then switch back to your desired language; these three files will be
overwritten and then recreated.
Keyboard Definition File Not Found: The emulation software is unable to
locate the keyboard-definition file. If the current disk and directory are
correct, copy the three files KEYBOARD.BAS, KEYBOARD.CHG, and
KEYBOARD.DEF from the 5250 Remote Emulator Card’s software diskette
into the current disk and directory.
Printer Definition File Not Found: The emulation software is unable to
locate the printer-definition file. Verify the printer configuration; if it is
correct, reinstall the emulation software.

90
5250 REMOTE EMULATOR CARD
9.2.3 PC S
UPPORT
/400 E
RROR
M
ESSAGES
Handler is already resident: If PC Support is not active, reboot the system.
9.2.4 H
OST
E
RROR
M
ESSAGES
The host system also has a set of error messages to report problems with
communication between the host and the display station. These four-digit
error messages consist of codes 0040 through 0054. See the IBM Technical
Reference Manual for your host type (System/34, /36, /38, or AS/400) for
further information on host error messages.
Use the [ERROR RESET] key to clear the error condition and proceed
with the host communications.
9.3 Application Compatibility
The 5250 Remote Emulator Card is compatible with most PC application
programs. The following information may help prevent any conflicts.
9.3.1 M
ICROSOFT
W
INDOWS
The 5250 Remote Emulator Card software is Windows compatible if used
under a Windows DOS partition. Included with the 5250 Remote Emulator
Card’s software are two *.PIFs (Program Information Files) for starting
emulation from Windows. You must enter the pathname of the *.PIF file
on the command line of the NEW PROGRAM OBJECT window when you
create an icon for the emulation software.
9.3.2 DOS S
HELL
Make sure all programs, including the 5250 Remote Emulator Card’s
emulation program, are loaded before you load the DOS Shell. If the
emulation program is loaded from DOS Shell, the next application
program may not load properly, since the PC’s memory is not fully free.
9.3.3 43-
OR
50-L
INE
M
ODE
The ANSI.SYS screen driver must be installed when you use programs with
43- or 50-line mode, such as Quattro®Pro. Otherwise, the number of lines
might revert to another size when you hotkey to a host session and then
back to the DOS session.
The screen colors may change during the hotkeying for some programs
(such as Microsoft Works), but the data will remain unaffected and the
screen colors will be restored after the next startup.

91
5250 REMOTE EMULATOR CARD
9.3.4 H
ANDS
O
N
When you use HandsOn or Novell®Menu for file transfer, the PC clock
might lose the proper time, but data is unaffected.
9.4 Calling Your Supplier
If you determine that your 5250 Remote Emulator Card is malfunctioning,
do not attempt to alter or repair it. It contains no user-serviceable parts.
Contact your supplier: The problem may be solvable over the phone.
Before you do, make a record of the history of the problem. Your
supplier will be able to provide more efficient and accurate assistance
if you have a complete description, including:
• the nature and duration of the problem,
• when the problem occurs,
• the components involved in the problem,
• any particular application that, when used, appears to create the
problem or make it worse,
• the revision level of your software (this is printed on the diskette label),
• the date you purchased the Card,
• the make and model of any attached printer, and
• the type of host system to which the Card is attached.
9.5 Shipping and Packaging
If you need to transport or ship your Card:
• Package it carefully. We recommend that you use the original
container.
• If you are shipping the Card for repair, include its software diskette.
If you are returning the Card, make sure you include everything you
received with the unit. Before you ship, contact your supplier to get
a Return Authorization (RA) number.

92
5250 REMOTE EMULATOR CARD
Appendix A: Names of Executable
Files
This appendix lists the filenames for the executable programs included
with the 5250 Remote Emulator Card’s software. An executable program is
a set of step-by-step instructions the computer follows to complete a task.
Some of the programs listed here are meant to be run directly by the user
and some are meant to be executed by the emulator (“called” by the
emulation program).
A.1 User-Run Programs
EM5251R.EXE The main emulation program. To execute this
program at a DOS prompt, change to the
emulation software’s directory and type EM5251R.
EMDIAG.EXE This utility program checks for communication
between the PC and the 5250 Remote Emulator
Card. If this test is successful, the program checks
for communication with the modem.
EMKBCHK.EXE This utility program helps to determine which type
of keyboard is being used. To execute this program
at a DOS prompt, change to the emulation
software’s directory and type EMKBCHK.
RCONFIG.EXE The configuration program. To execute this
program at a DOS prompt, change to the
emulation software’s directory and type RCONFIG.
SAVEKEYS.EXE Use this program to save keystrokes recorded
during the record/playback feature. You will need
to hotkey out of emulation before you can run this
program. At the DOS prompt, change to the
emulation software’s directory and type
SAVEKEYS.
WININST.EXE This program adds the emset command to the
WINSTART.BAT file. If WINSTART.BAT does not
exist, WININST will create it. At the DOS prompt,
type WININST.

93
5250 REMOTE EMULATOR CARD
A.2 Emulator-Run Programs
HP.EXE This program enables 3812 emulation on a laser
printer in HP mode.
HP4029.EXE This program enables 3812 emulation on an IBM
4029 laser printer in HP mode.
HP5219.EXE This program enables 5219 emulation on a laser
printer in the HP mode.
PPDS4029.EXE This program enables 3812 emulation on an IBM
4029 laser printer in PPDS mode.
PREM.EXE This program enables 4214 emulation on a
dot-matrix printer.
EM5251C.EXE This program activates the controller and starts
communication with the host.
EM5251CA.EXE This program activates the controller under IBM
PC Support/400.
EM5251E.EXE This program runs the emulation software.
EM5251EA.EXE This program runs emulation under
PC Support/400.
EM5251RA.BAT This program sets up the 5250 Remote Emulator
Card to work with PC Support/400.
A.3 Other Files
The 5250 Remote Emulator Card’s software also includes a number of
nonexecutable files. These have suffixes other than .EXE:
*.P12 Printer files using 3812 emulation.
*.P14 Printer files using 4214 emulation.
*.P19 Printer files using 5219 emulation.

94
5250 REMOTE EMULATOR CARD
*.P56 Printer files using Text Mode.
*.DAT File utilized in configuration to make changes for language.
*.CFG Configuration files.
*.HEX Files containing microcode for the 5250 Remote Emulator Card.
*.PIF Program-Information File used in conjunction with Windows.
*.BAS Keyboard-Base File.
*.CHG Keyboard-Change File.
*.DEF Keyboard-Definition File.
*.ICO Icon files.

95
5250 REMOTE EMULATOR CARD
Appendix B: Code-Set Tables
The table that comprises the rest of this appendix shows decimal and
hexadecimal codes and the corresponding characters in the U. S. National
EBCDIC and U. S. National ASCII code sets.
Regarding the U. S. National EBCDIC code set:
• The first 64 characters, 0 to 63 decimal or 0 to 3F hex, are not listed
here because they are very-seldom-used control codes that the 5250
Remote Emulator Card ignores.
• For the 8D, AD, BC and DA hex codes, either of the two listed
characters might print, depending on the printer type or emulation.
• For lists of corresponding characters in EBCDIC versions other than
U. S. National, refer to the IBM 5250 Function Reference Manual,
SA21-9247-6.
Regarding the U.S. National ASCII code set:
• Only the standard 7-bit code set, consisting of character codes 0 to 127
decimal or 0 to 7F hex, is shown here. Many proprietary 8-bit extended
ASCII code sets exist, but none of them are standard.
DECIMAL HEX ASCII
32 20 (SP)
33 21 !
34 22 “
35 23 #
36 24 $
37 25 %
38 26 &
39 27 ’
40 28 (
41 29 )
42 2A *
43 2B +
44 2C ,
45 2D -
46 2E .
47 2F /
48 30 0
49 31 1
50 32 2
51 33 3
52 34 4
53 35 5
54 36 6
55 37 7
56 38 8
57 39 9
58 3A :
59 3B ;
60 3C <
61 3D =
62 3E >
63 3F ?
96
5250 REMOTE EMULATOR CARD
DECIMAL HEX ASCII
0 00 (NUL)
1 01 (SOH)
2 02 (STX)
3 03 (ETX)
4 04 (EOT)
5 05 (ENQ)
6 06 (ACK)
7 07 (BEL)
8 08 (BS)
9 09 (HT)
10 0A (LF)
11 0B (VT)
12 0C (FF)
13 0D (CR)
14 0E (SO)
15 0F (SI)
16 10 (DLE)
17 11 (DC1)
18 12 (DC2)
19 13 (DC3)
20 14 (DC4)
21 15 (NAK)
22 16 (SYN)
23 17 (ETB)
24 18 (CAN)
25 19 (EM)
26 1A (SUB)
27 1B (ESC)
28 1C (FS)
29 1D (GS)
30 1E (RS)
31 1F (US)

97
5250 REMOTE EMULATOR CARD
DECIMAL HEX EBCDIC ASCII
64 40 space @
65 41 req. space A
66 42 â B
67 43 ä C
68 44 à D
69 45 á E
70 46 ã F
71 47 å G
72 48 ç H
73 49 ñ I
74 4A ¢ J
75 4B . K
76 4C < L
77 4D ( M
78 4E + N
79 4F | O
80 50 & P
81 51 é Q
82 52 ê R
83 53 ë S
84 54 è T
85 55 í U
86 56 î V
87 57 ï W
88 58 ì X
89 59 ß Y
90 5A ! Z
91 5B $ [
92 5C * \
93 5D ) ]
94 5E ; ^
95 5F ¬ _
DECIMAL HEX EBCDIC ASCII
96 60 - ‘
97 61 / a
98 62 Â b
99 63 Ä c
100 64 À d
101 65 Á e
102 66 Ã f
103 67 Å g
104 68 Ç h
105 69 Ñ i
106 6A | j
107 6B , k
108 6C % l
109 6D – m
110 6E > n
111 6F ? o
112 70 ø p
113 71 É q
114 72 Ê r
115 73 Ë s
116 74 È t
117 75 Í u
118 76 Î v
119 77 Ï w
120 78 Ì x
121 79 ` y
122 7A : z
123 7B # {
124 7C @ |
125 7D ' }
126 7E = ~
127 7F " (DEL)
98
5250 REMOTE EMULATOR CARD

99
5250 REMOTE EMULATOR CARD
DECIMAL HEX EBCDIC
128 80 Ø
129 81 a
130 82 b
131 83 c
132 84 d
133 85 e
134 86 f
135 87 g
136 88 h
137 89 i
138 8A «
139 8B »
140 8C d
141 8D y or ↓
142 8E
143 8F ±
144 90 °
145 91 j
146 92 k
147 93 l
148 94 m
149 95 n
150 96 o
151 97 p
152 98 q
153 99 r
154 9A ª
155 9B º
156 9C æ
157 9D
158 9E Æ
159 9F €
DECIMAL HEX EBCDIC
160 A0 µ
161 A1 ~
162 A2 s
163 A3 t
164 A4 u
165 A5 v
166 A6 w
167 A7 x
168 A8 y
169 A9 z
170 AA ¡
171 AB ¿
172 AC D
173 AD Y or ↑
174 AE
175 AF ®
176 B0 ^
177 B1 £
178 B2 ¥
179 B3 •
180 B4 ƒ
181 B5 §
182 B6 ¶
183 B7 1/4
184 B8 1/2
185 B9 3/4
186 BA [
187 BB ]
188 BC – or ≠
189 BD ¨
190 BE ´
191 BF _

100
5250 REMOTE EMULATOR CARD
DECIMAL HEX EBCDIC
192 C0 {
193 C1 A
194 C2 B
195 C3 C
196 C4 D
197 C5 E
198 C6 F
199 C7 G
200 C8 H
201 C9 I
202 CA —
203 CB ô
204 CC ö
205 CD ò
206 CE ó
207 CF õ
208 D0 }
209 D1 J
210 D2 K
211 D3 L
212 D4 M
213 D5 N
214 D6 0
215 D7 P
216 D8 Q
217 D9 R
218 DA 1or ≥
219 DB û
220 DC ü
221 DD ù
222 DE ú
223 DF ÿ
DECIMAL HEX EBCDIC
224 E0 \
225 E1 # space
226 E2 S
227 E3 T
228 E4 U
229 E5 V
230 E6 W
231 E7 X
232 E8 Y
233 E9 Z
234 EA 2
235 EB Ô
236 EC Ö
237 ED Ò
238 EE Ó
239 EF Õ
240 F0 0
241 F1 1
242 F2 2
243 F3 3
244 F4 4
245 F5 5
246 F6 6
247 F7 7
248 F8 8
249 F9 9
250 FA 3
251 FB Û
252 FC Ü
253 FD Ù
254 FE Ú
255 FF (NUL)

101
5250 REMOTE EMULATOR CARD

102
5250 REMOTE EMULATOR CARD
Appendix C: Typestyle (FGID)
Tables
The tables on the following pages list the IBM typestyle numbers (font IDs)
that the 5250 Remote Emulator Card uses to select fonts internal to the
printer and from HP font cartridges. Font-change commands for each font
are also listed (see Section 8.4.1). As on the cartridges themselves,
cartridge fonts are listed in ascending order by pitch.
Typestyle numbers with an asterisk (*) next to them are acceptable IBM
font IDs for device configuration and OCL or CL printer commands (in
hexadecimal). Typestyle numbers in parentheses are alternatives that more
closely match the IBM CPI spacing of the font.
Font-change commands begin with a logical not (¬), which is [UPPER
SHIFT] [6] on U. S. keyboards. The caret (^) symbol may be substituted in
non-U.S. applications.
Remember that you can’t right-justify proportional fonts with the IBM
justify command.
C.1 5219 Emulation
Tables C-1 and C-2 on the next few pages list IBM typestyle numbers (font
IDs) and font-change commands for resident (internal to the printer) HP
LaserJet fonts and HP font cartridges with the 5219 printer emulation.
NOTE
Typestyle number 86 prints the resident 10-CPI Courier font at 12 CPI
spacing in portrait (¬QXM). Typestyle number 85 prints the resident 16-
CPI Line Printer font at 12-CPI spacing in landscape (¬QXN).
103
5250 REMOTE EMULATOR CARD
Table C-1. Hewlett-Packard LaserJet Internal Resident Fonts Under
5219 Emulation
Type- Font-
Orien- Point style Change
Printer Model Font tation Pitch Size No. Command
All Models Courier P 10 12 *11 ¬QXG
L 10 12 *5 ¬QXH
Plus & Series II Line Printer P 16.66 8.5 *221 ¬QXJ
Series II Line Printer (8 LPI) P 16.66 8.5 *223 ¬QXL
Series II Line Printer (8 LPI) L 19.0 8.5 *225 ¬QLG
13.3 8.5 *91 ¬QXK
Table C-2. Hewlett-Packard Cartridge Fonts Under 5219 Emulation
Font-Change
Typestyle No. Command
Orien- Point
Font tation Pitch Size Standard Legal Standard Legal
A Cartridge
Courier bold P 10 12 8 — ¬QLA —
L 10 12 9 — ¬QLC —
Courier light P 10 12 6 — ¬QLB —
L 10 12 7 — ¬QLC —
Line Printer light P 16.66 8.5 *221 — ¬QLE —
B Cartridge
Helvetica bold P Prop. 14.4 175 — ¬QBA —
Times Roman med P Prop. 10 *158 — ¬QBB —
Times Roman bold P Prop. 10 *159 — ¬QBC —
Times Roman med itl P Prop. 10 *162 — ¬QBD —
Times Roman light P Prop. 8 154 — ¬QBE —
Line Printer light L 16.66 8.5 255 — ¬QBF —
19.0 8.5 *225 — ¬QBG —

Font-Change
Typestyle No. Command
Orien- Point
Font tation Pitch Size Standard Legal Standard Legal
E Cartridge
Letter Gothic P 12 12 *84 — ¬QNA —
medium L 12 10 88 — ¬QND —
Letter Gothic bold P 12 10 97 — ¬QNB —
L 12 10 98 — ¬QNE —
Letter Gothic P 12 10 107 — ¬QNC —
medium italic L 12 10 108 — ¬QNF —
G Cartridge
Prestige Elite med P 12 10 *80 90 ¬QGUA ¬QGLA
Prestige Elite bold P 12 10 82 92 ¬QGUC ¬QGLC
Prestige Elite P 16.66 7 *222 227 ¬QGUD ¬QGLD
medium (252) (253)
L 16.66 7 216 228 ¬QGUE ¬QGLE
(250) (254)
19 7 214 — ¬QGUF —
Line Draw Set P 12 12 110 — ¬QGF —
H Cartridge
Courier medium P 10 12 *20 30 ¬QHUA ¬QHLA
Courier bold P 10 10 22 32 ¬QHUC ¬QHLC
Courier med italic P 10 12 21 31 ¬QHUB ¬QHLB
Prestige Elite P 16.66 7 *222 227 ¬QHUD ¬QHLD
medium (252) (253)
L 16.66 7 216 228 ¬QHUE ¬QHLE
(250) (254)
19 7 214 — ¬QHUF —
Line Draw Set P 10 12 40 — ¬QHF —
104
5250 REMOTE EMULATOR CARD
105
5250 REMOTE EMULATOR CARD
Font-Change
Typestyle No. Command
Orien- Point
Font tation Pitch Size Standard Legal Standard Legal
L Cartridge
Courier bold P 10 12 8 — ¬QLA —
L 10 12 9 — ¬QLC —
Courier medium P 10 12 6 — ¬QLB —
italic L 10 12 7 — ¬QLD —
Line Printer P 16.66 8.5 *221 — ¬QLE —
medium L 16.66 8.5 255 — ¬QLF —
19 8.5 *225 — ¬QLG —
Prestige Elite P 12 10 *87 — ¬QMA —
medium L 12 10 88 — ¬QMD —
Prestige Elite bold P 12 10 97 — ¬QMB —
L 12 10 98 — ¬QME —
Prestige Elite P 12 10 107 — ¬QMC —
medium italic L 12 10 108 — ¬QMF —
N Cartridge
Letter Gothic P 12 12 *84 — ¬QNA —
medium L 12 12 *85 — ¬QND —
Letter Gothic bold P 12 12 94 — ¬QNB —
L 12 12 95 — ¬QNE —
Letter Gothic P 12 12 104 — ¬QNC —
medium italic L 12 12 105 — ¬QNF —
Q Cartridge
Courier bold P 10 12 8 — ¬QQA —
L 10 12 9 — ¬QQE —
Courier medium P 10 12 6 — ¬QQB —
italic L 10 12 7 — ¬QQF —
Letter Gothic med P 12 12 *84 — ¬QQC —
Letter Gothic bold P 12 12 94 — ¬QQD —
106
5250 REMOTE EMULATOR CARD
Font-Change
Typestyle No. Command
Orien- Point
Font tation Pitch Size Standard Legal Standard Legal
R Cartridge
Presentation bold P 6.5 18 18 28 ¬QRUA ¬QRLA
(240) (242)
L 6.5 18 19 29 ¬QRUD ¬QRLD
(241) (243)
P 8.1 16 16 26 ¬QRUB ¬QRLB
(260) (262)
L 8.1 14 17 27 ¬QRUE ¬QRLE
(261) (263)
P 10 14 14 24 ¬QRUC ¬QRLC
L 10 14 15 25 ¬QRUF ¬QRLF
Letter Gothic P 10 14 *12 34 ¬QRUG ¬QRLG
medium L 10 14 *13 35 ¬QRUH ¬QRLH
PC Line bold P 10 14 36 — ¬QRJ —
L 10 14 37 — ¬QRK —
Line Draw P 10 14 38 — ¬QRM —
L 10 14 39 — ¬QRN —

107
5250 REMOTE EMULATOR CARD
C.2 3812 Emulation
Tables C-3 through C-6 on the next few pages list IBM typestyle numbers
(font IDs) and font-change commands that you’d use to change fonts
within a document with the 3812 printer emulation.
Table C-3. HP Mode Fonts (Resident)
Type- Font-
Orien- Point style Change
Typeface tation Pitch Size No. Command
All LaserJet Models:
Courier P/L 10 12 11 ¬Q11
Line Printer P/L 15 9 223 ¬Q223
17.1 8.5 254 ¬Q254
19 8.0 282 ¬Q282
13.33 9.5 201 ¬Q201
LaserJet IID, III, IIID Printers also have:
Courier P/L 10 12 46 ¬Q46
Courier P/L 10 12 85 ¬Q85
Courier italic P/L 10 12 18 ¬Q18
Courier bold P/L 10 12 88 ¬Q88
Courier P/L 12 10 89 ¬Q89
LaserJet III and IIISi Resident Scalable Fonts:
CG Times P/L Prop. 6 4605 ¬Q4605
8 4606 ¬Q4606
10 4607 ¬Q4607
12 4608 ¬Q4608
14 4609 ¬Q4609
18 4611 ¬Q4611
24 4614 ¬Q4614
30 4617 ¬Q4617
108
5250 REMOTE EMULATOR CARD
Type- Font-
Orien- Point style Change
Typeface tation Pitch Size No. Command
CG Times bold P/L Prop. 6 4625 ¬Q4625
8 4626 ¬Q4626
10 4627 ¬Q4627
12 4628 ¬Q4628
14 4629 ¬Q4629
18 4631 ¬Q4631
24 4634 ¬Q4634
30 4637 ¬Q4637
CG Times italic P/L Prop. 6 4645 ¬Q4645
8 4646 ¬Q4646
10 4647 ¬Q4647
12 4648 ¬Q4648
14 4649 ¬Q4649
18 4651 ¬Q4651
24 4654 ¬Q4654
30 4657 ¬Q4657
CG Times bold italic P/L Prop. 6 4665 ¬Q4665
8 4666 ¬Q4666
10 4667 ¬Q4667
12 4668 ¬Q4668
14 4669 ¬Q4669
18 4671 ¬Q4671
24 4674 ¬Q4674
30 4677 ¬Q4677
Univers medium P/L Prop. 6 4805 ¬Q4805
8 4806 ¬Q4806
10 4807 ¬Q4807
12 4808 ¬Q4808
14 4809 ¬Q4809
18 4811 ¬Q4811
24 4814 ¬Q4814
30 4817 ¬Q4817
109
5250 REMOTE EMULATOR CARD
Type- Font-
Orien- Point style Change
Typeface tation Pitch Size No. Command
Univers medium italic P/L Prop. 6 4825 ¬Q4825
8 4826 ¬Q4826
10 4827 ¬Q4827
12 4828 ¬Q4828
14 4829 ¬Q4829
18 4831 ¬Q4831
24 4834 ¬Q4834
30 4837 ¬Q4837
Univers medium P/L Prop. 6 4845 ¬Q4845
condensed 8 4846 ¬Q4846
10 4847 ¬Q4847
12 4848 ¬Q4848
14 4849 ¬Q4849
18 4851 ¬Q4851
24 4854 ¬Q4854
30 4857 ¬Q4857
Univers medium P/L Prop. 6 4865 ¬Q4865
condensed italic 8 4866 ¬Q4866
10 4867 ¬Q4867
12 4868 ¬Q4868
14 4869 ¬Q4869
18 4871 ¬Q4871
24 4874 ¬Q4874
30 4877 ¬Q4877
ITC Zapf Dingbats®P/L Prop. 6 4985 ¬Q4985
8 4986 ¬Q4986
10 4987 ¬Q4987
12 4988 ¬Q4988
14 4989 ¬Q4989
18 4991 ¬Q4991
24 4994 ¬Q4994
30 4997 ¬Q4997
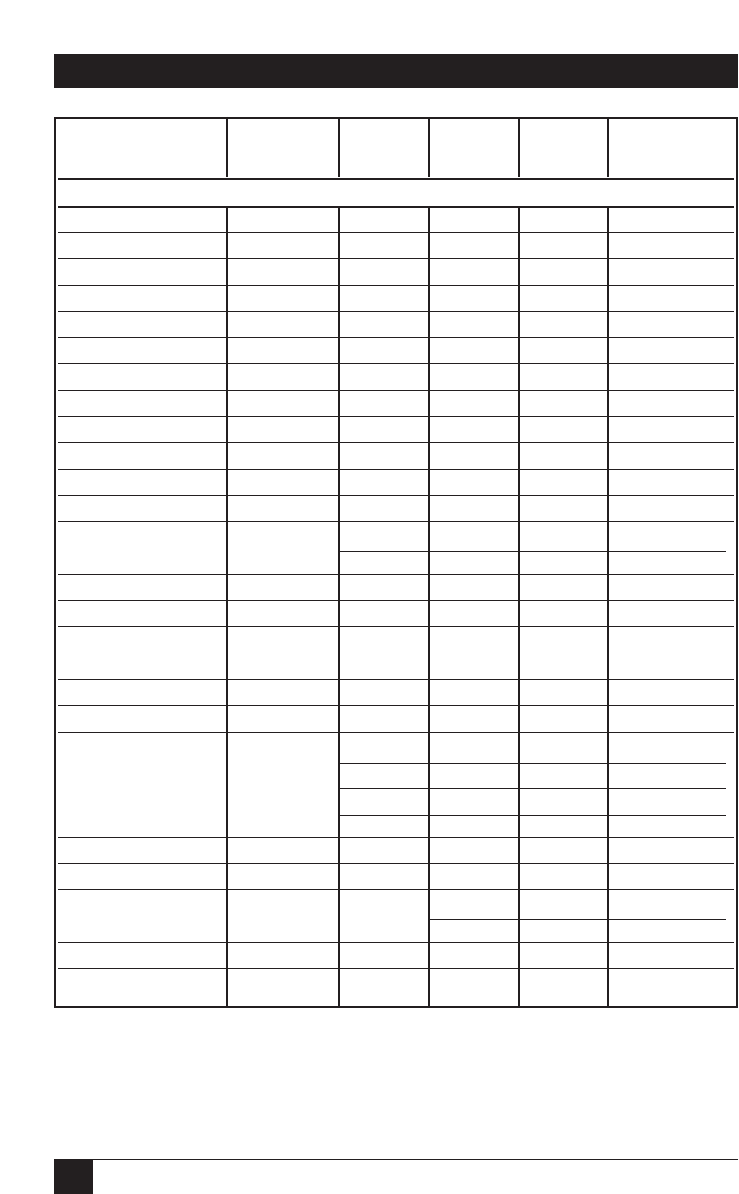
110
5250 REMOTE EMULATOR CARD
Type- Font-
Orien- Point style Change
Typeface tation Pitch Size No. Command
ProCollection Cartridge
Line Printer P/L 17.1 8.5 253 ¬Q253
Courier bold P/L 10 12 45 ¬Q45
Courier italic P/L 10 12 17 ¬Q17
Courier P/L 12 10 85 ¬Q85
Courier bold P/L 12 10 108 ¬Q108
Courier italic P/L 12 10 92 ¬Q92
Courier P 10 12 51 ¬Q51
Courier bold P 10 12 52 ¬Q52
Courier italic P 10 12 53 ¬Q53
Courier P 12 10 93 ¬Q93
Courier bold P 12 10 94 ¬Q94
Courier italic P 12 10 95 ¬Q95
Prestige Elite P/L 15 7 220 ¬Q220
12 10 83 ¬Q83
Prestige Elite bold P/L 12 10 113 ¬Q113
Prestige Elite italic P/L 12 10 114 ¬Q114
Prestige Elite P 15 7 219 ¬Q219
12 10 97 ¬Q97
Prestige Elite bold P 12 10 98 ¬Q98
Prestige Elite italic P 12 10 99 ¬Q99
Letter Gothic P/L 27 3.6 291 ¬Q291
19 6 281 ¬Q281
17.1 9.5 257 ¬Q257
12 12 66 ¬Q66
Letter Gothic bold P/L 12 12 69 ¬Q69
Letter Gothic italic P/L 12 12 68 ¬Q68
Times Roman P Prop. 8 163 ¬Q163
10 164 ¬Q164
Times Roman bold P Prop. 10 165 ¬Q165
Times Roman italic P Prop. 10 166 ¬Q166

111
5250 REMOTE EMULATOR CARD
Type- Font-
Orien- Point style Change
Typeface tation Pitch Size No. Command
Times Roman P Prop. 12 167 ¬Q167
Times Roman bold P Prop. 12 168 ¬Q168
Times Roman italic P Prop. 12 169 ¬Q169
Times Roman P Prop. 8 173 ¬Q173
10 174 ¬Q174
Times Roman bold P Prop. 10 175 ¬Q175
Times Roman italic P Prop. 10 176 ¬Q176
Times Roman P Prop. 12 177 ¬Q177
Times Roman bold P Prop. 12 178 ¬Q178
Times Roman italic P Prop. 12 179 ¬Q179
Helvetica P Prop. 8 183 ¬Q183
. 10 184 ¬Q184
Helvetica bold P Prop. 10 185 ¬Q185
Helvetica italic P Prop. 10 186 ¬Q186
Helvetica P Prop. 12 187 ¬Q187
Helvetica bold P Prop. 12 188 ¬Q188
Helvetica italic P Prop. 12 189 ¬Q189
Helvetica bold P Prop. 14 190 ¬Q190
Helvetica bold P Prop. 14 191 ¬Q191
WordPerfect®Cartridge
CG Times P Prop. 6 4685 ¬Q4685
8 4686 ¬Q4686
CG Times bold P Prop. 8 4706 ¬Q4706
CG Times italic P Prop. 8 4814 ¬Q4814
CG Times P Prop. 10 4687 ¬Q4687
CG Times bold P Prop. 10 4707 ¬Q4707
CG Times italic P Prop. 10 4815 ¬Q4815
CG Times P Prop. 12 4688 ¬Q4688
CG Times bold P Prop. 12 4708 ¬Q4708
CG Times italic P Prop. 12 4816 ¬Q4816
CG Times P Prop. 14 4689 ¬Q4689
CG Times bold P Prop. 14 4709 ¬Q4709
112
5250 REMOTE EMULATOR CARD
Type- Font-
Orien- Point style Change
Typeface tation Pitch Size No. Command
CG Times italic P Prop. 14 4817 ¬Q4817
CG Times bold P Prop. 18 4711 ¬Q4711
24 4714 ¬Q4714
Univers P Prop. 14 4789 ¬Q4789
18 4791 ¬Q4791
24 4794 ¬Q4794
Microsoft Cartridge
Helvetica P Prop. 8 34102 ¬Q34102
10 34103 ¬Q34103
Helvetica bold P Prop. 10 34123 ¬Q34123
Helvetica italic P Prop. 10 34231 ¬Q34231
Helvetica P Prop. 12 34104 ¬Q34104
Helvetica bold P Prop. 12 34124 ¬Q34124
Helvetica italic P Prop. 12 34232 ¬Q34232
Helvetica bold P Prop. 14 34125 ¬Q34125
Times Roman P Prop. 8 5686 ¬Q5686
10 5687 ¬Q5687
Times Roman bold P Prop. 10 5707 ¬Q5707
Times Roman italic P Prop. 10 5815 ¬Q5815
Times Roman P Prop. 12 5688 ¬Q5688
Times Roman bold P Prop. 12 5708 ¬Q5708
Times Roman italic P Prop. 12 5816 ¬Q5816
Times Roman bold P Prop. 14 5709 ¬Q5709
Line Printer P/L 15 8.5 223 ¬Q223
Polished Worksheets®Cartridge
Prestige Elite P/L 15 7 221 ¬Q221
12 10 86 ¬Q86
Prestige Elite bold P/L 12 10 111 ¬Q111
Prestige Elite italic P/L 12 10 112 ¬Q112
Prestige Elite P/L 15 7 219 ¬Q219
12 10 97 ¬Q97
Prestige Elite bold P/L 12 10 98 ¬Q98
Prestige Elite italic P/L 12 10 99 ¬Q99

113
5250 REMOTE EMULATOR CARD
Type- Font-
Orien- Point style Change
Typeface tation Pitch Size No. Command
Letter Gothic P/L 27 3.6 290 ¬Q290
12 12 87 ¬Q87
Letter Gothic bold P/L 12 12 110 ¬Q110
Letter Gothic italic P/L 12 12 109 ¬Q109
Letter Gothic P/L 27 3.6 292 ¬Q292
12 12 90 ¬Q90
Letter Gothic bold P/L 12 12 107 ¬Q107
Letter Gothic italic P/L 12 12 106 ¬Q106
Presentation bold P/L 8.1 16 434 ¬Q434
Presentation bold P/L 8.1 16 431 ¬Q431
Persuasive Presentations®Cartridge
Letter Gothic P/L 10 14 39 ¬Q39
Letter Gothic P/L 10 14 38 ¬Q38
Presentation bold P/L 10 14 6 ¬Q6
Presentation bold P/L 10 14 7 ¬Q7
Presentation bold P/L 8.1 16 434 ¬Q434
Presentation bold P/L 8.1 16 431 ¬Q431
Presentation bold P/L 6.5 18 435 ¬Q435
Presentation bold P/L 6.5 18 432 ¬Q432
Presentation bold P/L 5.7 24 436 ¬Q436
Presentation bold P/L 5.7 24 433 ¬Q433
Helvetica Outline P/L Prop. 24 34115 ¬Q34115
Helvetica Outline P/L Prop. 24 34116 ¬Q34116
Serifa P/L Prop. 24 34215 ¬Q34215
Serifa P/L Prop. 24 34216 ¬Q34216
Line Draw P/L 10 14 31 ¬Q31
PC Line bold P/L 10 14 32 ¬Q32
114
5250 REMOTE EMULATOR CARD
Type- Font-
Orien- Point style Change
Typeface tation Pitch Size No. Command
Forms, Etc.®Cartridge
Univers P/L Prop. 6 33101 ¬Q33101
Prop. 8 33102 ¬Q33102
Univers bold P/L Prop. 8 33122 ¬Q33122
Prop. 10 33123 ¬Q33123
Prop. 12 33124 ¬Q33124
Prop. 14 33125 ¬Q33125
Helv Cond. Black bold P/L Prop. 24 34128 ¬Q34128
OCR-A P 10 12 19 ¬Q19
Tax Line Draw P/L 10 12 30 ¬Q30
Bar Codes & More®Cartridge
Letter Gothic P/L 15 9.5 230 ¬Q230
12 12 87 ¬Q87
10 14 40 ¬Q40
OCR-A P 10 12 19 ¬Q19
OCR-B P 10 12 3 ¬Q3
Code 3 of 9 P 8.1 12 60 ¬Q60
4.6 12 240 ¬Q240
EAN/UPC 10 Mil P Prop. 12 170 ¬Q170
EAN/UPC 13 Mil bold P Prop. 12 171 ¬Q171
USPS Zip P/L Prop. 12 172 ¬Q172
Line Draw P/L 10 12 33 ¬Q33
Text Equations Cartridge
Prestige Elite P 15 7 221 ¬Q221
17.1 7 256 ¬Q256
12 10 86 ¬Q86
Prestige Elite bold P 12 10 111 ¬Q111
Prestige Elite italic P 12 10 112 ¬Q112
CG Times P Prop. 8 157 ¬Q157
Prop. 10 158 ¬Q158
CG Times bold P Prop. 10 159 ¬Q159
CG Times italic P Prop. 10 155 ¬Q155

115
5250 REMOTE EMULATOR CARD
Type- Font-
Orien- Point style Change
Typeface tation Pitch Size No. Command
Global Text Cartridge
CG Century Schoolbook P/L Prop. 8 16950 ¬Q16950
10 16951 ¬Q16951
CG Century Schlbk bold P/L Prop. 10 16971 ¬Q16971
CG Century Schlbk italic P/L Prop. 10 17079 ¬Q17079
CG Triumvirate P/L Prop. 10 33335 ¬Q33335
CG Triumvirate bold P/L Prop. 14 33357 ¬Q33357
Pretty Faces Cartridge
Microstyle P Prop. 18 5910 ¬Q5910
Microstyle bold P Prop. 36 5920 ¬Q5920
Hobo Medium P Prop. 30 5930 ¬Q5930
14 5940 ¬Q5940
Thunderbird P Prop. 54 5950 ¬Q5950
Signet Roundhand P Prop. 18 5960 ¬Q5960
14 5970 ¬Q5970
ITC Dingbats P Prop. 36 5980 ¬Q5980
18 5990 ¬Q5990

116
5250 REMOTE EMULATOR CARD
Type- Font-
Point style Change
Font Pitch Size No. Command
Courier outline Prop. 6 416 ¬Q416
8 426 ¬Q426
10 436 ¬Q436
12 446 ¬Q446
14 456 ¬Q456
18 466 ¬Q466
24 476 ¬Q476
30 486 ¬Q486
Courier bold outline Prop. 6 420 ¬Q420
8 430 ¬Q430
10 440 ¬Q440
12 450 ¬Q450
14 460 ¬Q460
18 470 ¬Q470
24 480 ¬Q480
30 490 ¬Q490
Courier italic outline Prop. 6 424 ¬Q424
8 434 ¬Q434
10 444 ¬Q444
12 454 ¬Q454
14 464 ¬Q464
18 474 ¬Q474
24 484 ¬Q484
30 494 ¬Q494
Courier bold italic outline Prop. 6 428 ¬Q428
8 438 ¬Q438
10 448 ¬Q448
12 458 ¬Q458
14 468 ¬Q468
18 478 ¬Q478
24 488 ¬Q488
30 498 ¬Q498
117
5250 REMOTE EMULATOR CARD
Type- Font-
Point style Change
Font Pitch Size No. Command
Helvetica outline Prop. 6 2304 ¬Q2304
8 2314 ¬Q2314
10 2324 ¬Q2324
12 2334 ¬Q2334
14 2344 ¬Q2344
18 2354 ¬Q2354
24 2364 ¬Q2364
30 2374 ¬Q2374
Helvetica bold outline Prop. 6 2305 ¬Q2305
8 2315 ¬Q2315
10 2325 ¬Q2325
12 2335 ¬Q2335
14 2345 ¬Q2345
18 2355 ¬Q2355
24 2365 ¬Q2365
30 2375 ¬Q2375
Helvetica italic outline Prop. 6 2306 ¬Q2306
8 2316 ¬Q2316
10 2326 ¬Q2326
12 2336 ¬Q2336
14 2346 ¬Q2346
18 2356 ¬Q2356
24 2366 ¬Q2366
30 2376 ¬Q2376
Helvetica bold italic outline Prop. 6 2307 ¬Q2307
8 2317 ¬Q2317
10 2327 ¬Q2327
12 2337 ¬Q2337
14 2347 ¬Q2347
18 2357 ¬Q2357
24 2367 ¬Q2367
30 2377 ¬Q2377
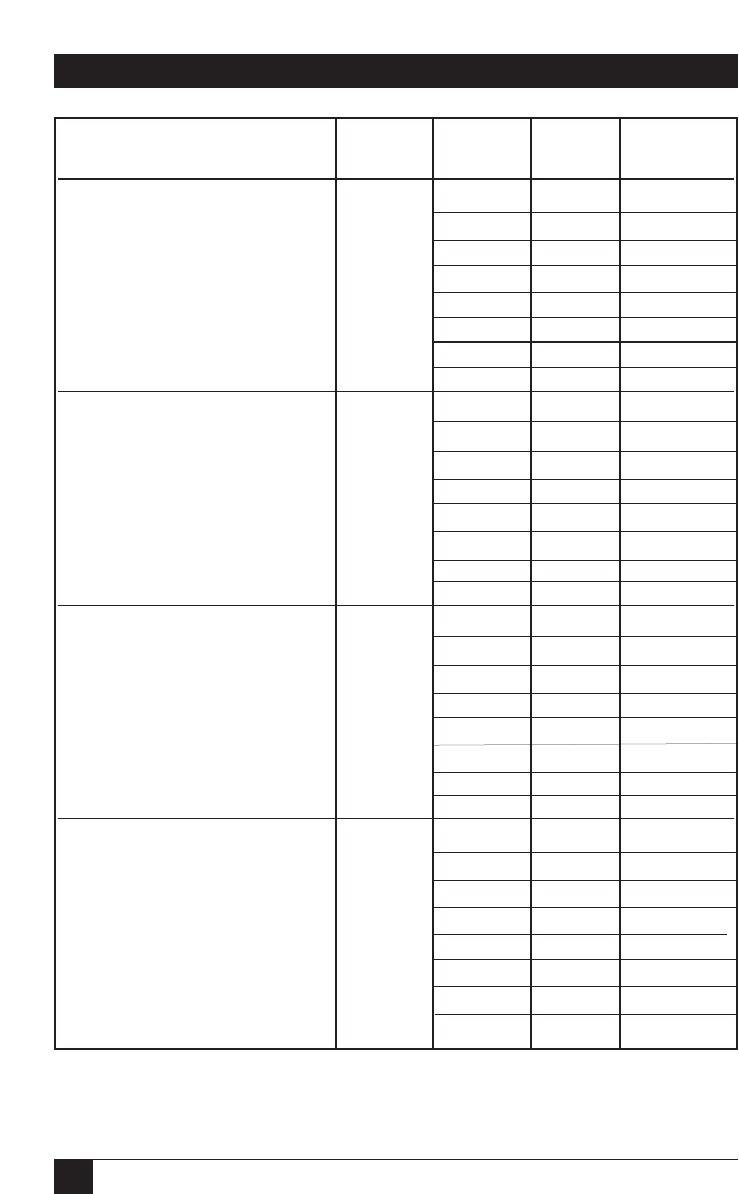
118
5250 REMOTE EMULATOR CARD
Type- Font-
Point style Change
Font Pitch Size No. Command
Times New Roman outline Prop. 6 2308 ¬Q2308
8 2318 ¬Q2318
10 2328 ¬Q2328
12 2338 ¬Q2338
14 2348 ¬Q2348
18 2358 ¬Q2358
24 2368 ¬Q2368
30 2378 ¬Q2378
Times New Roman bold outline Prop. 6 2309 ¬Q2309
8 2319 ¬Q2319
10 2329 ¬Q2329
12 2339 ¬Q2339
14 2349 ¬Q2349
18 2359 ¬Q2359
24 2369 ¬Q2369
30 2379 ¬Q2379
Times New Roman italic outline Prop. 6 2310 ¬Q2310
8 2320 ¬Q2320
10 2330 ¬Q2330
12 2340 ¬Q2340
14 2350 ¬Q2350
18 2360 ¬Q2360
24 2370 ¬Q2370
30 2380 ¬Q2380
Times New Roman bold italic Prop. 6 2311 ¬Q2311
outline 8 2321 ¬Q2321
10 2331 ¬Q2331
12 2341 ¬Q2341
14 2351 ¬Q2351
18 2361 ¬Q2361
24 2371 ¬Q2371
30 2381 ¬Q2381
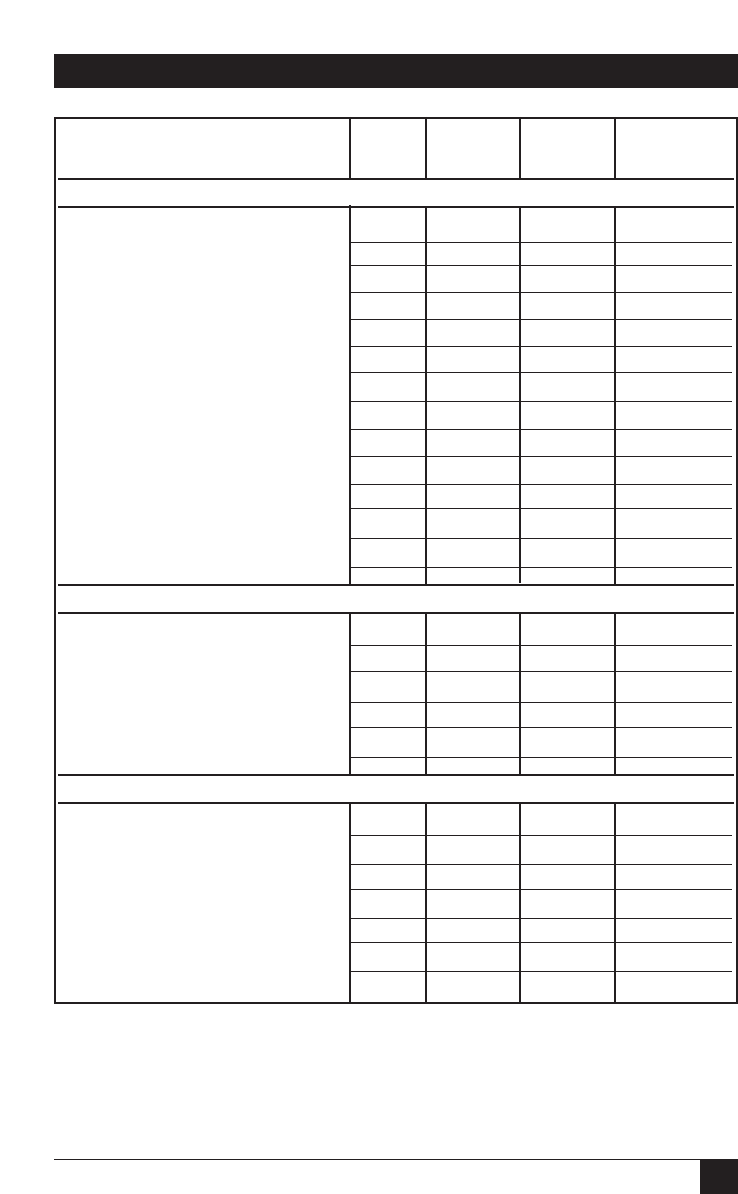
119
5250 REMOTE EMULATOR CARD
Type- Font-
Point style Change
Font Pitch Size No. Command
Universal Cartridge 1255800
Prestige Elite 12 10 86* ¬Q86
Prestige Elite italic 12 10 112 ¬Q112
Courier italic 10 12 18 ¬Q18
Presentor 10 14 25 ¬Q25
Letter Gothic 12 12 87* ¬Q87
Letter Gothic italic 12 12 109 ¬Q109
Letter Gothic symbol 12 12 80* ¬Q80
Times Roman Prop. 10 5687 ¬Q5687
Times Roman bold Prop. 10 5707 ¬Q5707
Times Roman italic Prop. 10 5815 ¬Q5815
Helvetica Prop. 10 34103 ¬Q34103
Helvetica bold Prop. 10 34123 ¬Q34123
Helvetica italic Prop. 10 34231 ¬Q34231
Letter Gothic symbol 12 12 88 ¬Q88
Italic Cartridge 1255801
Courier italic 10 12 18 ¬Q18
Courier symbol 10 12 8 ¬Q8
Courier italic 12 10 92 ¬Q92
Courier 15 9 223* ¬Q223
Courier bold italic Prop. 12 155 ¬Q155
Courier symbol 10 12 13* ¬Q13
Prestige Cartridge 1255802
Prestige Pica 10 12 12* ¬Q12
Prestige Elite 12 10 86* ¬Q86
Prestige Elite bold 12 10 111 ¬Q111
Prestige Elite italic 12 10 112 ¬Q112
Prestige 17.1 8.5 256 ¬Q256
Prop. 12 164 ¬Q164
Prestige Elite symbol 12 10 89 ¬Q89
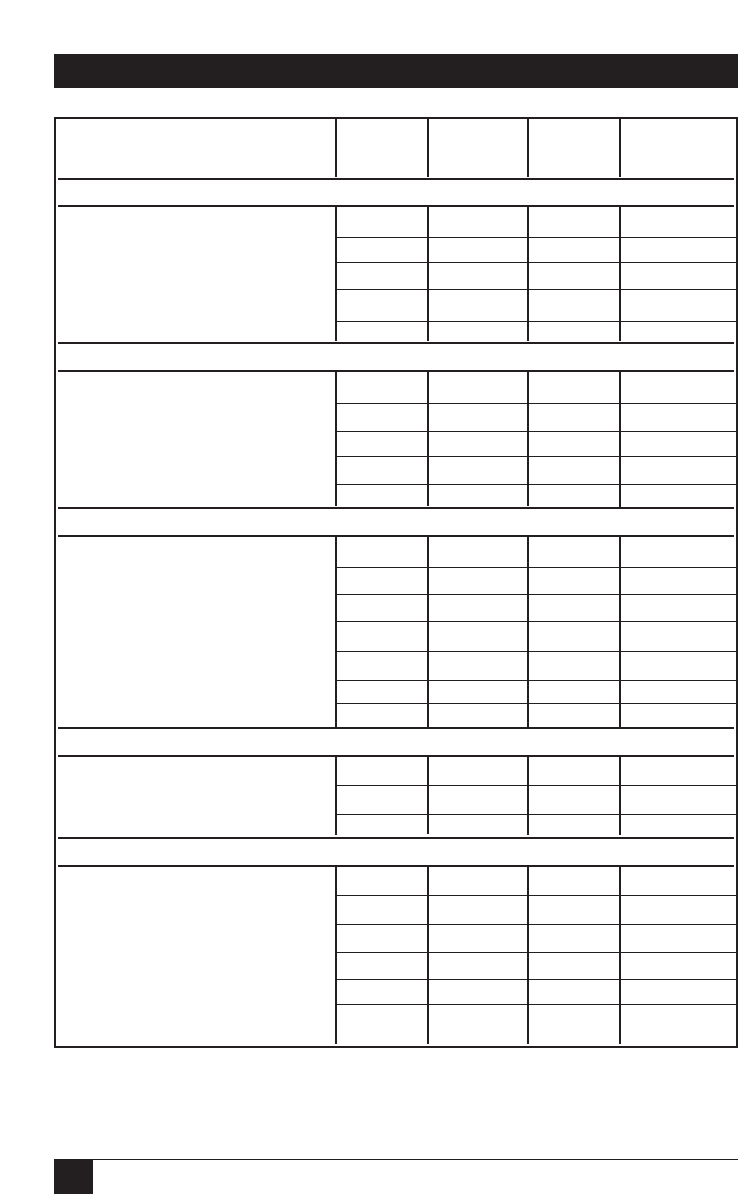
120
5250 REMOTE EMULATOR CARD
Type- Font-
Point style Change
Font Pitch Size No. Command
Letter Gothic Cartridge 1555803
Letter Gothic 10 14 36 ¬Q36
12 12 87* ¬Q87
Letter Gothic bold 12 12 110 ¬Q110
Letter Gothic italic 12 12 109 ¬Q109
Letter Gothic symbol 12 12 88 ¬Q88
Delegate Cartridge 1255804
Delegate 10 12 2 ¬Q2
Adjutant 12 10 95 ¬Q95
Modern Prop. 12 158* ¬Q158
Essay Prop. 12 160* ¬Q160
Essay italic Prop. 12 162* ¬Q162
Script/OCR Cartridge 1255805
Script 12 10 84* ¬Q84
Olde World 12 10 96 ¬Q96
Title Prop. 12 157 ¬Q157
APL 12 10 76 ¬Q76
OCR-A 10 12 19 ¬Q19
OCR-B 10 12 3 ¬Q3
APT/TN 12 10 77 ¬Q77
Orator Cartridge 1255806
Orator bold 8.1 16 434 ¬Q434
6.5 18 435 ¬Q435
Orator 10 14 5* ¬Q5
Compressed Cartridge 12255807
Prestige 15 9 221 ¬Q221
Letter Gothic 15 9 222* ¬Q222
17.1 8.5 255 ¬Q255
20 7.5 281 ¬Q281
25 6 285 ¬Q285
Letter Gothic light italic 12 10 91* ¬Q91
121
5250 REMOTE EMULATOR CARD
Type- Font-
Point style Change
Font Pitch Size No. Command
Press Roman Cartridge 1255808
Press Roman Prop. 10 186 ¬Q186
Press Roman bold Prop. 10 187 ¬Q187
Press Roman italic Prop. 10 188 ¬Q188
Press Roman bold italic Prop. 10 189 ¬Q189
Press Roman symbol 12 10 185 ¬Q185
Foundry Cartridge 1255809
Foundry Prop. 10 190 ¬Q190
Foundry bold Prop. 10 191 ¬Q191
Foundry italic Prop. 10 194 ¬Q194
Foundry italic bold Prop. 10 195 ¬Q195
Foundry symbol Prop. 10 192 ¬Q192
Testimonial Cartridge 1255820
Testimonial Prop. 12 5943 ¬Q5943
14 5944 ¬Q5944
18 5945 ¬Q5945
Engravers’ Old English Cartridge 1255821
Engravers’ Old English Prop. 12 37431 ¬Q37431
14 37432 ¬Q37432
18 37433 ¬Q37433
Times Roman Cartridge 1255822
Times Roman Prop. 12 5688 ¬Q5688
Times Roman bold Prop. 14 5709 ¬Q5709
18 5710 ¬Q5710
Times Roman Cartridge 1255823
Times Roman Prop. 6 5685 ¬Q5685
8 5686 ¬Q5686
Times Roman bold italic Prop. 10 5835 ¬Q5835
Times Roman Prop. 10 5687 ¬Q5687
Times Roman bold Prop. 10 5707 ¬Q5707
Times Roman italic Prop. 10 5815 ¬Q5815
122
5250 REMOTE EMULATOR CARD
Type- Font-
Point style Change
Font Pitch Size No. Command
Combo (Data Stream 1) Cartridge 1255824
Prestige Elite 12 10 86* ¬Q86
Helvetica Prop. 14 34105 ¬Q34105
Orator 10 14 5* ¬Q5
OCR-A 10 12 19 ¬Q19
OCR-B 10 12 3 ¬Q3
Helvetica Cartridge 1255825
Helvetica Prop. 12 34104 ¬Q34104
Helvetica bold Prop. 14 34125 ¬Q34125
18 34126 ¬Q34126
Helvetica Cartridge 1255826
Helvetica Prop. 6 34101 ¬Q34101
8 34102 ¬Q34102
Helvetica bold italic Prop. 10 34251 ¬Q34251
Helvetica Prop. 10 34103 ¬Q34103
Helvetica bold Prop. 10 34123 ¬Q34123
Helvetica italic Prop. 10 34231 ¬Q34231
Cursive Cartridge 1255827
Cursive Prop. 12 41783 ¬Q41783
14 41803 ¬Q41803
18 41804 ¬Q41804
Palatino®Cartridge 1255828
Palatino Prop. 12 6200 ¬Q6200
14 6219 ¬Q6219
18 6220 ¬Q6220
Palatino Cartridge 1255829
Palatino Prop. 6 6197 ¬Q6197
8 6198 ¬Q6198
10 6199 ¬Q6199
Palatino bold Prop. 10 6218 ¬Q6218
Palatino italic Prop. 10 6327 ¬Q6327
Palatino bold italic Prop. 10 6347 ¬Q6347
123
5250 REMOTE EMULATOR CARD
Type- Font-
Point style Change
Font Pitch Size No. Command
Optima Cartridge 1255830
Optima Prop. 12 33336 ¬Q33336
Optima bold Prop. 14 33356 ¬Q33356
18 33357 ¬Q33357
Optima Cartridge 1255831
Optima Prop. 6 33333 ¬Q33333
8 33334 ¬Q33334
10 33335 ¬Q33335
Optima bold Prop. 10 33355 ¬Q33355
Optima italic Prop. 10 33463 ¬Q33463
Optima bold italic Prop. 10 33483 ¬Q33483
Century Schoolbook Cartridge 1255832
Century Schoolbook Prop. 12 16952 ¬Q16952
Century Schoolbook bold Prop. 14 16972 ¬Q16972
18 16973 ¬Q16973
Century Schoolbook Cartridge 1255833
Century Schoolbook Prop. 6 16949 ¬Q16949
8 16950 ¬Q16950
10 16951 ¬Q16951
Century Schoolbook bold Prop. 10 16971 ¬Q16971
Century Schoolbook italic Prop. 10 17079 ¬Q17079
Century Schoolbook bold italic Prop. 6 17099 ¬Q17099
Goudy Old Style Cartridge 1255834
Goudy Old Style Prop. 12 4920 ¬Q4920
Goudy Old Style bold Prop. 14 4940 ¬Q4940
Goudy Old Style bold Prop. 18 4941 ¬Q4941
Goudy Old Style Cartridge 1255835
Goudy Old Style Prop. 6 4917 ¬Q4917
8 4918 ¬Q4918
10 4919 ¬Q4919
Goudy Old Style bold Prop. 10 4939 ¬Q4939
Goudy Old Style italic Prop. 10 5047 ¬Q5047
Goudy Old Style bold italic Prop. 10 5067 ¬Q5067
124
5250 REMOTE EMULATOR CARD
Type- Font-
Point style Change
Font Pitch Size No. Command
Baskerville Cartridge 1255836
Baskerville Prop. 12 8504 ¬Q8504
Baskerville bold Prop. 14 8524 ¬Q8524
18 8525 ¬Q8525
Baskerville Cartridge 1255837
Baskerville Prop. 6 8501 ¬Q8501
8 8502 ¬Q8502
10 8503 ¬Q8503
Baskerville bold Prop. 10 8523 ¬Q8523
Baskerville italic Prop. 10 8631 ¬Q8631
Baskerville bold italic Prop. 10 8651 ¬Q8651
Futura Cartridge 1255838
Futura Book Prop. 12 33592 ¬Q33592
Futura Heavy Prop. 14 33602 ¬Q33602
18 33603 ¬Q33603
Futura Cartridge 1255839
Futura Book Prop. 6 33589 ¬Q33589
8 33590 ¬Q33590
10 33591 ¬Q33591
Futura Heavy Prop. 10 33601 ¬Q33601
Futura Book italic Prop. 10 33719 ¬Q33719
Futura Heavy italic Prop. 10 33729 ¬Q33729
Code 3 of 9 N/A 4.6 21 ¬Q21
8.1 22 ¬Q22
EAN/UPC N/A 13 mil 23 ¬Q23
10 mil 24 ¬Q24
USPS Zip N/A N/A 26 ¬Q26
Line Draw N/A N/A 312 ¬Q312

125
5250 REMOTE EMULATOR CARD
Table C-7. HP4029 Mode Fonts (Resident).
Type- Font-
Point style Change
Font Pitch Size No. Command
Courier 10 12 11* ¬Q11
Courier bold 10 12 46 ¬Q46
Courier 15 8.5 223* ¬Q223
17.1 8.5 254 ¬Q254
126
5250 REMOTE EMULATOR CARD
Table C-8. HP4029 Mode Fonts (on HP Font Cartridges).
Type- Font-
Point style Change
Font Pitch Size No. Command
Combo Cartridge 1255824
OCR-A 10 12 19 ¬Q19
OCR-B 10 12 3 ¬Q3
Prestige Elite 12 10 86* ¬Q86
Orator 10 14 5* ¬Q5
Courier 12 10 85* ¬Q85
Helvetica Prop. 14 34105 ¬Q34105
Supports M Cartridge 1255841
Prestige Elite 12 10 86* ¬Q86
Prestige Elite bold 12 10 111 ¬Q111
Prestige Elite italic 12 10 112 ¬Q112
Supports R Cartridge 1255842
Orator bold 6.5 18 435 ¬Q435
8.1 16 434 ¬Q434
10 14 38 ¬Q38
Letter Gothic 10 14 40 ¬Q40
Lines I 10 14 31 ¬Q31
Lines II 10 14 32 ¬Q32

127
5250 REMOTE EMULATOR CARD
Type- Font-
Point style Change
Font Pitch Size No. Command
Supports U/V Cartridge 1255843
Swiss 721 Prop. 6 34101 ¬Q34101
8 34102 ¬Q34102
Swiss 721 bold Prop. 10 34123 ¬Q34123
12 34124 ¬Q34124
14 34125 ¬Q34125
Letter Gothic 15 9.5 230 ¬Q230
Supports Z Cartridge 1255844
Press Roman Prop. 8 185 ¬Q185
10 186 ¬Q186
Press Roman bold Prop. 10 187 ¬Q187
Press Roman italic Prop. 10 188 ¬Q188
Press Roman Prop. 12 189 ¬Q189
Press Roman bold Prop. 12 190 ¬Q190
Press Roman italic Prop. 12 191 ¬Q191
Press Roman bold Prop. 14 192 ¬Q192
Letter Gothic 17.1 8.5 255 ¬Q255
Supports Z Cartridge 1255845
Swiss 721 Prop. 10 34103 ¬Q34103
Swiss 721 italic Prop. 10 34231 ¬Q34231
Swiss 721 Prop. 12 34104 ¬Q34104
Swiss 721 italic Prop. 12 34232 ¬Q34232
Swiss 721 Prop. 8 34102 ¬Q34102
Swiss 721 bold Prop. 10 34123 ¬Q34123
12 34124 ¬Q34124
14 34125 ¬Q34125
Letter Gothic 17.1 8.5 255 ¬Q255

128
5250 REMOTE EMULATOR CARD
Type- Font-
Point style Change
Font Pitch Size No. Command
Courier 10 12 11* ¬Q11
Courier bold 10 12 46 ¬Q46
Courier italic 10 12 18 ¬Q18
Courier bold 12 10 108 ¬Q108
Courier italic 12 10 92 ¬Q92
Courier 16.7 8.5 252 ¬Q252
12 10 85* ¬Q85
Supports N Cartridge 1255847
Letter Gothic 12 12 87* ¬Q87
Letter Gothic bold 12 12 110 ¬Q110
Letter Gothic italic 12 12 109 ¬Q109
Supports T Cartridge 1255848
Swiss 721 Prop. 6 34101 ¬Q34101
8 34102 ¬Q34102
Swiss 721 bold Prop. 10 34123 ¬Q34123
12 34124 ¬Q34124
14 34125 ¬Q34125
8 34122 ¬Q34122
Tax Line Draw 10 12 30 ¬Q30
OCR-A 10 12 19 ¬Q19
Bar None Cartridge
Code 3 of 9 N/A 4.6 21 ¬Q21
8.1 22 ¬Q22
EAN/UPC N/A 13 mil 23 ¬Q23
10 mil 24 ¬Q24
USPS Zip N/A N/A 26 ¬Q26
Letter Gothic (Roman 8) N/A 10 36 ¬Q36
12 88 ¬Q88
15 225 ¬Q225
Presentation (Roman 8) N/A 18 50 ¬Q50
Presentation (Legal) N/A 18 51 ¬Q51
Line Draw N/A N/A 312 ¬Q312

129
5250 REMOTE EMULATOR CARD
Appendix D: Keyboard-Scan
Codes
The keyboard diagrams on the next two pages show the four types of
keyboards you will normally encounter in 5250 Remote Emulator Card
applications, along with the factory-default values of their scan codes. You
can change the scan codes that the Card relays from the keyboard
connected to the Card’s PC by using the Scan Code Customize option
under the Advanced Functions—Keyboard menu in the configuration
software (see Section 6.3.2). To make sure which code maps to which
function, see Appendix E.
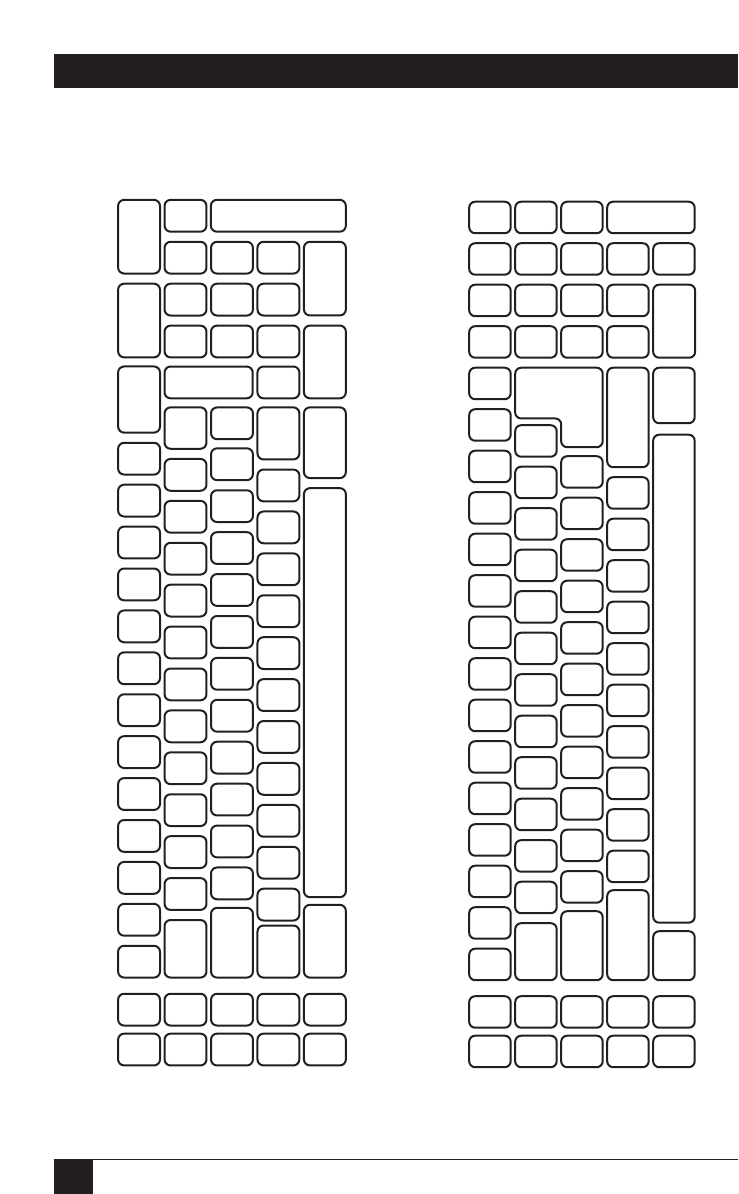
130
5250 REMOTE EMULATOR CARD
3B 3C
3D 3E
3F 40
41 42
43 44
01
0F
1D
2A
38
02 03 04 05 06 07 08 09 0A 0B 0C 0D 0E 45 46
39
36
3A 52
10 11 12 13 14 15 16 17 18 19 1A 1B
1E 1F 20 21 22 23 24 25 26 27 28
2C 2D 2E 2F 30 31 32 33 34 35
47 48 49 4A
4B 4C 4D
4F 50 51 4E
53
1C
PC Keyboard
2B
29
37
3B 3C
3D 3E
3F 40
41 42
43 44
29
0F
1D
2A
38
02 03 04 05 06 07 08 09 0A 0B 0C 0D 2B 0E 01 45 46 54
39
36
3A 52
10 11 12 13 14 15 16 17 18 19 1A 1B
1E 1F 20 21 22 23 24 25 26 27 28
2C 2D 2E 2F 30 31 32 33 34 35
47 48 49 37
4B 4C 4D 4A
4F 50 51 4E
53
1C
AT Keyboard
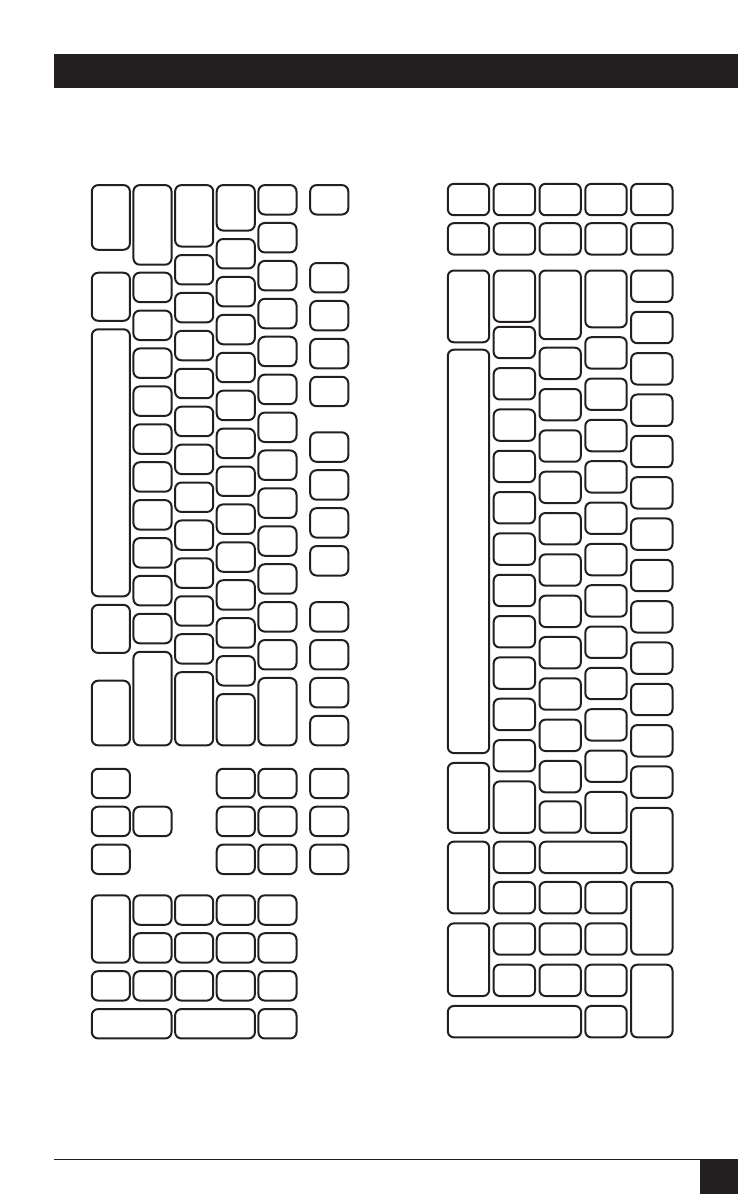
131
5250 REMOTE EMULATOR CARD
01
Enhanced PC Keyboard
1D
2A
3A
29 02 03 04 05 06 07 08 09 0A 0B 0C 0D 0E 5B 5E 62 45 65 37 4A
0F
38 39
2B
1C
36
59
68
2C
1E
10 11 12 13 14 15 16 17 18 19 1A 1B
1F 20 21 22 23 24 25 26 27 28
2D 2E 2F 30 31 32 33 34 35
3C3B 3D 3E 403F 41 42 4443 57 58 66 46 67
5C 5F 63
5D 61 64
60
47 48 49
4B 4C 4D
4E
4F 50 51
52 53
5A
7C 6F
6C 6D
6E 7D
71 70
72 73
3E
20
54
57
7E
31 32 33 34 35 36 37 38 39 3A 3B 3C 3D 48 4C
0F
56
68 40
21 22 23 24 25 26 27 28 29 2A 2B 2C
11 12 13 14 15 16 17 18 19 1A 1B
01 02 03 04 05 06 07 08 09 0A
47 48 49 4E
44 45 46
41 42 43 4D
4A
2D
5250 Keyboard
0E
1C
0C

132
5250 REMOTE EMULATOR CARD
Appendix E: Keyboard Templates
Table E-1 below gives a general definition for each 5250 (host) key. Use the
table with the keyboard templates on the next eight pages to keep track of
where the functions you need are. There is one keyboard template for
each possible combination of PC Keyboard and Emulated Keyboard (see
Section 6.2.2). In addition, there are two pairs of templates for the
Enhanced keyboard, one for the USA / CAN (ORIG) language and one
for the USA / CAN (TERM) langauge (see Section 6.2.3). (We’ve included
an Emulator Card template with each keyboard template to give you a set
of single-page quick reference guides.)
Use the information in this appendix with that in Appendix D when you
want to customize your keyboard’s scan codes.
Table E-1. Key Functions
5250 Keys Functions of the Keys
[CMD] Causes the host to disregard the normal function
of a repeating key and perform the function
assigned in the host’s program instead.
[DEL] Deletes the character where the cursor is located.
[DUP] Requests that the host program duplicate the data
from the same field in the previous record.
[ERASE INPUT] Erases data entered in all input fields. The cursor
will move to the top left corner of the screen.
[ERROR RESET] Unlocks keyboard after it is locked because of an
error condition. Will also reset the help, insert,
command, and system-request modes.
[FIELD +] Can be used as a field-exit key in all fields.
[FIELD –] Operates much like the [FIELD +] key, but in
signed-numeric and numeric fields only.
[FIELD EXIT] Used to exit fields that are specified in a program
as field-exit required, or as right-justified.
[HELP] Describes the current error condition. The
[ERROR RESET] key will reset the help
message
and error condition to restore the screen and
unlock the keyboard.
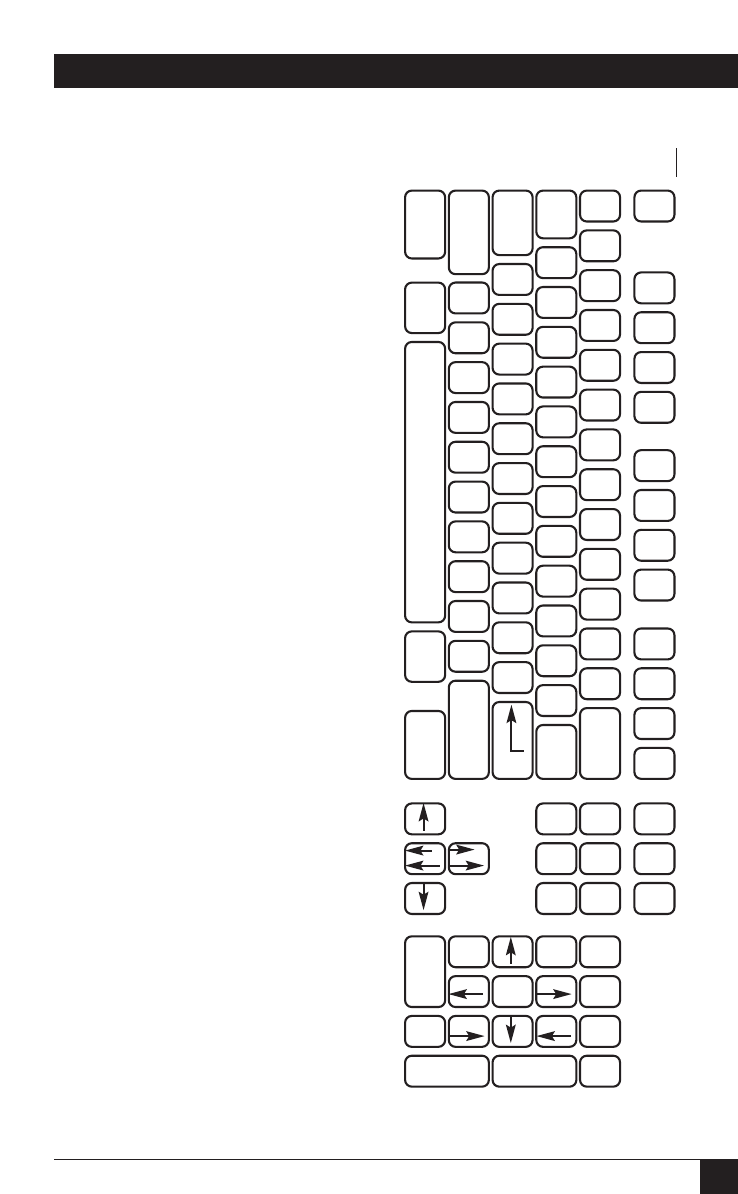
133
5250 REMOTE EMULATOR CARD
Enhanced PC Keyboard
Hot Key
SysReq
Attn
{
¢
}
|
|
\
¬
6
Cmd 13
Cmd 1
Cmd 14
Cmd 2
Cmd 15
Cmd 3
Cmd 16
Cmd 4
Cmd 17
Cmd 5
Cmd 18
Cmd 6
Cmd 19
Cmd 7
Cmd 20
Cmd 8
Cmd 21
Cmd 9
Cmd 22
Cmd 10
Cmd 23
Cmd 11
Cmd 24
Cmd 12
SysReq
Print
Help Clear
TstReq
Num
Lock
/*
,-
Field –
+
Field +
.
Del
7
Home
0
Insert
89
Roll
46
1
Dup
3
Roll Enter
Field Exit
Enter
CmdCmdError Reset
Roll
Roll
PC Style on Enhanced Keyboard (ORIG)
Template for the 5250 Remote Emulator Card
Command Summary: Status Line:
Configuration Program: EMCONFIG rr-cc Cursor location (row-column)
Start Emulation: EM5251 SA System Available
MW Message Waiting
End Emulation: KS Keyboard Shift
at 3X or AS/400 Main Menu: OFF [ENTER] IM Insert Mode
at 3X or AS/400 Sign-On Screen: [ALT][CTRL][DEL] II Input Inhibited
KB Keyboard Buffering
Hotkey to DOS or Sn n = active logical unit
Printer-Control Screen: [ALT][ESC] An n = active host address
Legend
Alt——
Shift—
Normal

134
5250 REMOTE EMULATOR CARD

135
5250 REMOTE EMULATOR CARD
Enhanced PC Keyboard
Hot Key
Attn
{
¢
}
|
¬
6
Cmd 13
Cmd 1
Cmd 14
Cmd 2
Cmd 15
Cmd 3
Cmd 16
Cmd 4
Cmd 17
Cmd 5
Cmd 18
Cmd 6
Cmd 19
Cmd 7
Cmd 20
Cmd 8
Cmd 21
Cmd 9
Cmd 22
Cmd 10
Cmd 23
Cmd 11
Cmd 24
Cmd 12
SysReq
Print
TstReq
Help
Clear
Dup Print -
Field –
+
Field +
9
Roll
3
Roll
Dup
Insert
Insert
Delete
Erase
Input
Field Exit
Enter
CmdError Reset
Roll
Home
Roll
1
Dup
PC Style on Enhanced Keyboard (TERM)
Legend
Alt——
Shift—
Normal
Template for the 5250 Remote Emulator Card
Command Summary: Status Line:
Configuration Program: EMCONFIG rr-cc Cursor location (row-column)
Start Emulation: EM5251 SA System Available
MW Message Waiting
End Emulation: KS Keyboard Shift
at 3X or AS/400 Main Menu: OFF [ENTER] IM Insert Mode
at 3X or AS/400 Sign-On Screen: [ALT][CTRL][DEL] II Input Inhibited
KB Keyboard Buffering
Hotkey to DOS or Sn n = active logical unit
Printer-Control Screen: [ALT][ESC] An n = active host address

136
5250 REMOTE EMULATOR CARD
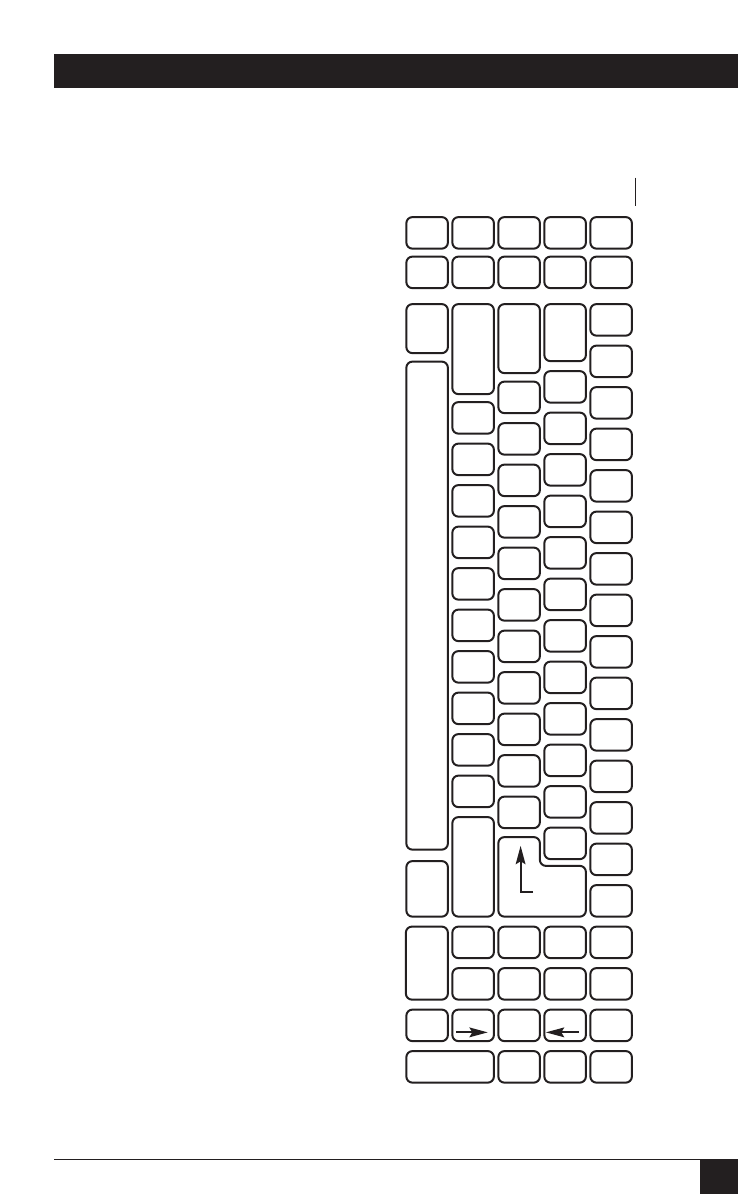
137
5250 REMOTE EMULATOR CARD
AT Keyboard
{
¢
}
|
|
\
Hot Key
Help
Num
Lock
Caps Lock
Clear
TstReq
Attn
SysReq
Enter –
Field –
Print
*
E Input
.
Del
+
Field +
9
Roll
1
Dup
3
Roll
¬
6
~
`
Error Reset
Field Exit
Cmd 21
Cmd 11
Cmd 1
Cmd 22
Cmd 12
Cmd 2
Cmd 24
Cmd 14
Cmd 4
Cmd 16
Cmd 6
Cmd 18
Cmd 8
Cmd 17
Cmd 7
Cmd 19
Cmd 9
Cmd 20
Cmd 10
Cmd 23
Cmd 13
Cmd 3
Cmd 15
Cmd 5
PC Style on AT Keyboard
Legend
Alt——
Shift—
Normal
Template for the 5250 Remote Emulator Card
Command Summary: Status Line:
Configuration Program: EMCONFIG rr-cc Cursor location (row-column)
Start Emulation: EM5251 SA System Available
MW Message Waiting
End Emulation: KS Keyboard Shift
at 3X or AS/400 Main Menu: OFF [ENTER] IM Insert Mode
at 3X or AS/400 Sign-On Screen: [ALT][CTRL][DEL] II Input Inhibited
KB Keyboard Buffering
Hotkey to DOS or Sn n = active logical unit
Printer-Control Screen: [ALT][ESC] An n = active host address

138
5250 REMOTE EMULATOR CARD
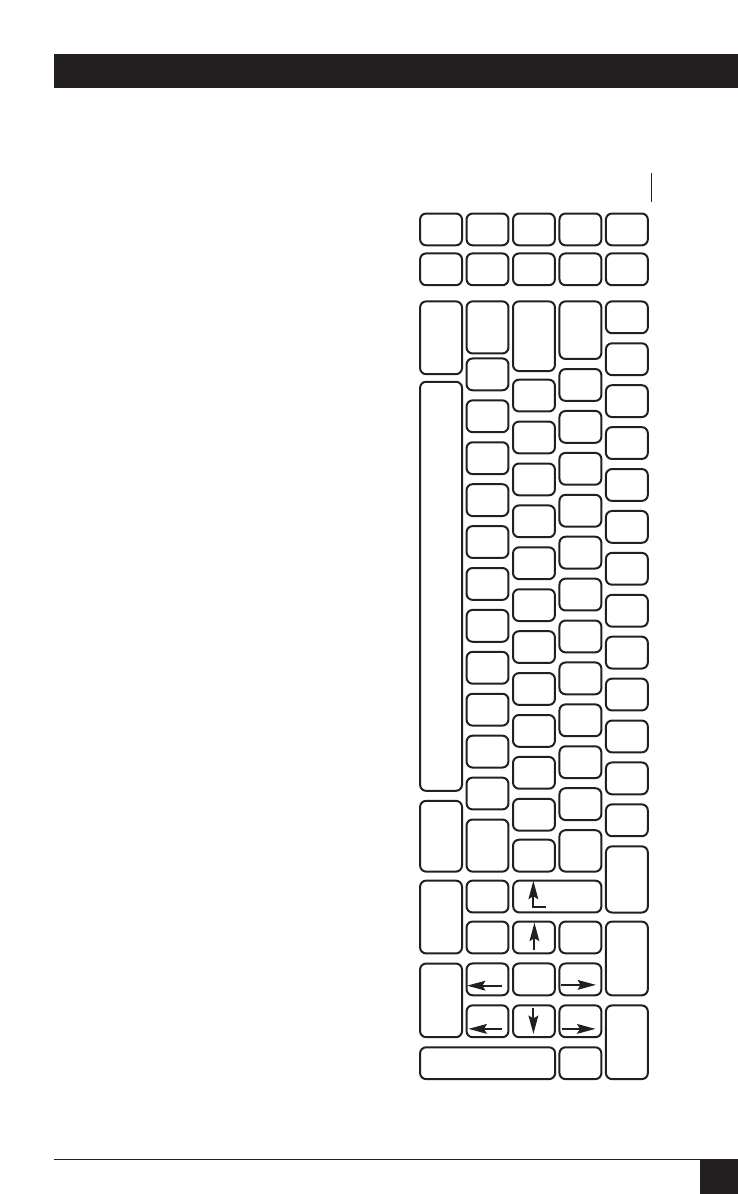
139
5250 REMOTE EMULATOR CARD
PC Keyboard
Error Reset
Cmd 21
Cmd 11
Cmd 1
Cmd 22
Cmd 12
Cmd 2
Cmd 24
Cmd 14
Cmd 4
Cmd 16
Cmd 6
Cmd 18
Cmd 8
Cmd 17
Cmd 7
Cmd 19
Cmd 9
Cmd 20
Cmd 10
Cmd 23
Cmd 13
Cmd 3
Cmd 15
Cmd 5
~
`
{
¢
}
|
|
\
Num Lock Clear
TstReq
+
Field +
89
Roll
46
1
Dup
23
Roll
Print
*
Caps Lock
E Input
.
Del
Enter
–
Field –
Hot Key
Help
Field
Exit
SysReq
Attn
0
Insert
PC Style on PC Keyboard
Legend
Alt——
Shift—
Normal
Template for the 5250 Remote Emulator Card
Command Summary: Status Line:
Configuration Program: EMCONFIG rr-cc Cursor location (row-column)
Start Emulation: EM5251 SA System Available
MW Message Waiting
End Emulation: KS Keyboard Shift
at 3X or AS/400 Main Menu: OFF [ENTER] IM Insert Mode
at 3X or AS/400 Sign-On Screen: [ALT][CTRL][DEL] II Input Inhibited
KB Keyboard Buffering
Hotkey to DOS or Sn n = active logical unit
Printer-Control Screen: [ALT][ESC] An n = active host address

140
5250 REMOTE EMULATOR CARD

141
5250 REMOTE EMULATOR CARD
Appendix F: Related
Documentation
Here is a list of manuals that might be helpful during the installation and
operation of PC Support:
IBM PC Support/36 Messages Guide, SC21-9525
IBM PC Support/36 Organizer, SC21-9563
IBM PC Support/36 User’s Guide, SC21-9088
IBM PC Support/38 Messages Guide, SC21-9360
IBM PC Support/38 Technical Reference, SC21-9090
IBM PC Support/38 User’s Guide, SC21-9089
IBM PC Support AS/400 DOS Installation and Administration Guide,
SC41-0006
IBM PC Support AS/400 DOS and OS/2 Technical Reference, SC41-
8091
IBM PC Support AS/400 User’s Guide for DOS, SC41-8199

142
5250 REMOTE EMULATOR CARD
Glossary
active session: The host session that you are currently using, as opposed to an
inactive session.
adapter, adaptor: A card that provides communications between part of a device
and the processor.
address: In a computer, the location where the data is stored.
API (Application Program Interface): System software that provides resources to
create user-interface features and to route programs or data.
APO (Auto Page Orientation): Software decides by the size of the page if the data is
to be printed in landscape or portrait orientation.
application: Software program used on a personal computer (PC).
ASCII (American Standard Code for Information Interchange): The character set
used by personal computer systems, as opposed to EBCDIC, the set used by IBM
mainframes. Systems that link PCs to these mainframes must include a device to
translate between the two character sets.
attribute: A characteristic, such as “bold” or “italic.”
auto configure: Configures a program automatically during the initialization
process.
automatic printer sharing: Automatically switches from PC printing to host printing
and vice versa.
backup: To save a second copy of data on some storage medium.
balun: The device used to convert twisted-pair wiring to the twinax connectors used
on the T-connector.
baud rate: The transmission speed of the serial port, which is measured in bits per
second (bps).
BGU: Business Graphics Utility.
BIOS (Basic Input/Output System): A set of programs encoded in read-only
memory (ROM) of IBM PC-compatible computers that facilitate the transfer of
data and control instructions between the computer and peripherals.

143
5250 REMOTE EMULATOR CARD
blank character: A character that is not displayed but occupies a position on the
display screen.
buffer: An area in the memory that holds data temporarily.
cache memory: RAM (random access memory) set aside to store the most
frequently accessed information stored in RAM.
character: A letter of the alphabet, a number, punctuation mark, or any other
symbol that represents information.
character set: A set of alphabetic, numeric, and special characters that may be
displayed or printed by a system unit or device.
code page: Set of coded characters often displayed as an array or code table.
column separator: A vertical line used to separate one field from another.
command: An instruction that directs the system to perform a particular operation.
command keys: The keys on the top row(s) of the keyboard that are used to
request a pre-assigned function of the system.
command pass-through: This feature gives you access to all of a printer’s built-in
features, even if these features are not normally available through the host
software. Printer-specific command sequences are placed into the data sent to the
printer from the host. The display station recognizes these sequences and “passes
the command through” to the printer.
configuration: Software setup of a computer program or system.
connector: A plug connected to a cable that fastens to a port of a device.
controller: A device used to coordinate and control the operation of one or more
devices with a remote host system.
COR (Computer Output Reduction): Rotates data-processing reports to landscape
orientation and then compresses the text to fit pages measuring 198 columns by 66
lines.
cpi: Characters per inch.
CTS (Clear to Send): The attached DTE may begin transmitting.
cursor: A character which indicates the position that data entry will occur.

144
5250 REMOTE EMULATOR CARD
DCD (Data Carrier Detect): The local modem is receiving data from the remote
modem.
default: The value assumed when no other value is specified.
default setting: The standard setting for a feature which automatically appears
unless the user selects a different setting.
delimiter: A character that marks the beginning and/or end of a unit of data.
DIP switch: Used to provide user-accessible configuration settings.
direct access: A hotkey sequence used to take the user directly to the next host
session configured.
display screen: A cathode-ray tube that is used to display alphanumeric characters.
display station: An input/output device containing a display screen and an
attached keyboard. Also called a terminal.
DOS (Disk Operating System): A single-user operating system developed by
Microsoft. DOS can be referred to as PC-DOS for the PC, PS/1, and PS/2 series, or
referred to as MS-DOS for non-IBM PCs.
DOS EMM386: A type of memory-management software.
dot-matrix: A text printer that prints a series of dots to create characters.
driver: A program routine that contains instructions necessary to control the
operation of a peripheral.
DRS (Data Set Ready): This indicates that the modem is connected to the
telephone circuit.
DTE (Data Terminal Equipment): A “communication destination” device such as a
PC or terminal, as opposed to a “communication relay” device such as a modem.
duplex: Prints on both sides of the paper.
EBCDIC (Extended Binary Coded Decimal Interchange Code): The character set
used by IBM mainframes, as opposed to ASCII, the set used by most personal
computer systems.
emulation: The duplication or imitation of one device by another device.

145
5250 REMOTE EMULATOR CARD
emulator card: A card that is installed into a PC, which enables the PC and PC
printer to emulate host devices while allowing access to PC applications.
expanded memory: When storage of the RAM on the board makes the size of the
computer larger than it actually is.
extended memory: Memory that has been added to allow programs greater than
640K of RAM to run on a computer.
FGID (Font Global Identifier): Font identifier used by IBM to standardize typestyle
numbers used globally.
field attributes: Control characters stored in the character buffer in the first
character position of a field.
field: An undefined area that contains a certain type of data.
file extension: A three-letter suffix, used to describe a file’s contents, appended to
a DOS file name.
file transfer: A process used to transfer a file from one storage location to another.
font: (1) A collection of characters of a given typeface and (sometimes) size. (2)
Used generically to mean the collection of coded fonts, font-character sets, and
code pages. (3) A font file that contains characters that must be used in
conjunction with a code-page file.
form feed: The advancing of a form in the printer to the top of the next page by a
code sent to the printer from the computer.
hex, hexadecimal: A number system with a base of sixteen, using the “digits” 0
through 9 and A through F.
hex transparency: See command pass-through.
host: The central controlling processing unit in a twinax environment.
hot key, hotkey: A particular key or key combination that accesses a menu
command.
HP mode: Third-party printer, if compatible, will receive HP LaserJet commands.
IBM mode: Same as HP, but will receive IBM LaserJet commands.

146
5250 REMOTE EMULATOR CARD
interface: The hardware and/or software that permit the exchange of information
between computers or devices.
intensity: The brightness level at which characters are displayed on screen.
I/O (Input/Output): Transferring of data between the central processing unit and
a peripheral device. Each transfer is an output from one device and an input into
another device.
IRQ (Interrupt Request) Level: A hardware flag to the PC software that a hardware
product needs immediate interaction with the software.
keyboard template: Pattern of a keyboard.
key click: Keys will make clicking sounds when depressed unless disabled.
landscape: A printing orientation in which the text prints across the length of a
page.
LED (light-emitting diode): A light located on the back of the emulator card that
lights up when the card communicates with the host.
line feed: A character code that advances the cursor on screen or in the printer to
the next line.
logical unit (abbreviated “LU”): Manages the exchange of data between the user
and a host application.
lpi (lines per inch): The number of lines per vertical inch of paper.
macros: Keystrokes that have been saved and which can be played back.
memory address: A code number that specifies a specific area in a computer’s
random access memory (RAM).
message line: See status message.
microcode: One or more micro instructions.
Microsoft Windows: Windowing environment and application-program interface
(API) for DOS that gives IBM PCs and compatibles a graphical user interface.
motherboard: The main circuit board in a PC.

147
5250 REMOTE EMULATOR CARD
nonshifted: Allows keys to be entered as characters or functions similar to when a
shift key is not held down on a PC or typewriter.
NRZ (Non-return to Zero): A binary encoding technique in which a change in state
represents a binary one, and no change in state represents a binary zero.
NRZI (Non-return to Zero Inverted): A binary encoding technique in which a
change in state represents a binary zero and no change in state represents a binary
one.
parity: Error-detection system for a serial device. A method of error detection in
which a redundant bit is added to each character in order to make the sum of the
bits in the character either even or odd.
PC Support: An IBM host/PC communications program that provides the
emulator card with access to virtual-disk, virtual-printer, and shared-folder
functions.
pitch: The number of characters per horizontal inch, or the positioning intervals of
characters in a line of text.
pixel: The smallest displayable unit on a video screen, out of which the displayed
image is constructed.
portrait: A printing orientation in which the text prints across the width of a page.
PPDS (Personal Printer Data Stream): A printer-programming language for some
IBM laser printers.
prompt: A display symbol, word, or phrase that requests the user to enter data from
the keyboard.
RAM (Random Access Memory): A storage device in which data is entered and
retrieved in a non-sequential manner.
record/playback: Keyboard macro used to save keystrokes and then play them
back.
resident: Program is in the memory.
root directory: Directory that contains a list of files stored on that disk.
Round-Robin: A hotkey sequence used to take the user sequentially through the
highest host session, then to the Printer Control Screen, and then to DOS.

148
5250 REMOTE EMULATOR CARD
router: PC Support/36, /38 and AS/400 programs that run on the personal
computer (PC) and the host system. Routers manage communications between the
PC Support facilities on the system and PC.
RTS (Request to Send): This indicates that the DTE has data to send.
RXD (Receive Data): Data from the host is being received by the 5250 Remote
Emulator Card.
scan code: Code used to transmit data from the keyboard to the PC.
session: An active connection between the terminal emulation and a host system. A
session is opened when the user signs on.
Set Text Orientation (STO): This command causes text to be printed in a specified
orientation regardless of paper size.
SDLC (Synchronous Data Link Control): An IBM communications protocol
commonly used in SNA environments.
simplex: Prints on only one side of the paper.
status attributes: An option used to define how the status line is displayed.
status line: An information line displayed on screen that displays information to
the operator concerning the processing of the text.
status message: Information on the last line of the display screen that tells the
operator about display station conditions.
stop bits: The number of bits sent to terminate each character sent to a serial
printer.
third-party: Software and/or hardware made by a company other than the original
manufacturer.
truncate: To break off a part of a number or character string.
twisted pair: A pair of small insulated wires, commonly used in telephone cables,
that are twisted around each other to minimize interference from other wires in
the cable.
TXD (Transmit Data): Data is being transmitted by the 5250 Remote Emulator
Card to the host.

149
5250 REMOTE EMULATOR CARD
upper memory block: A block of memory between the 640K unit of conventional
memory and the 1MB running on MS-DOS on an IBM-compatible PC.
virtual disk: Lets the user assign a portion of the host disk to the PC.
virtual printer: Lets users print data from the PC to a host-system printer.
workstation: A display station or printer.

150
5250 REMOTE EMULATOR CARD
Index
1
132-column . . . . . . . . . . . . . . . . . . . . . . . . . . . . . . . . . . . . . . . . . 16, 43
15-pitch printing . . . . . . . . . . . . . . . . . . . . . . . . . . . . . . . . . . . . . 48
17 to 15 Pitch Correction . . . . . . . . . . . . . . . . . . . . . . . . . . . . . . 48
3
3812 printer emulations . . . . . . . . . . . . . . . . . . . . . . . . . . . . . . . 61
3812/5219 printer emulation . . . . . . . . . . . . . . . . . . . . . . . . . . 17
5
5219 emulation . . . . . . . . . . . . . . . . . . . . . . . . . . . . . . . . . . . . . . 69, 70, 101
5219 printer emulations . . . . . . . . . . . . . . . . . . . . . . . . . . . . . . . 61
5250 (host) key . . . . . . . . . . . . . . . . . . . . . . . . . . . . . . . . . . . . . . 131
6
6-LPI printing . . . . . . . . . . . . . . . . . . . . . . . . . . . . . . . . . . . . . . . 73, 74
A
address conflict . . . . . . . . . . . . . . . . . . . . . . . . . . . . . . . . . . . . . . 32
Advanced Functions . . . . . . . . . . . . . . . . . . . . . . . . . . . . . . . . . . 30, 38
APO . . . . . . . . . . . . . . . . . . . . . . . . . . . . . . . . . . . . . . . . . . . . . . . 48, 63
AS/400 . . . . . . . . . . . . . . . . . . . . . . . . . . . . . . . . . . . . . . . . . . . . . 18
ASCII-character table . . . . . . . . . . . . . . . . . . . . . . . . . . . . . . . . . 38
Auto Printer Sharing . . . . . . . . . . . . . . . . . . . . . . . . . . . . . . . . . 48
Automatic Page Orientation (APO) . . . . . . . . . . . . . . . . . . . . . 62
B
backup copy . . . . . . . . . . . . . . . . . . . . . . . . . . . . . . . . . . . . . . . . 25
Base I/O Address . . . . . . . . . . . . . . . . . . . . . . . . . . . . . . . . . . . . 37
Basic Configuration . . . . . . . . . . . . . . . . . . . . . . . . . . . . . . . . . . 30, 31
Basic Setup . . . . . . . . . . . . . . . . . . . . . . . . . . . . . . . . . . . . . . . . . 33
C
Cable Addresses . . . . . . . . . . . . . . . . . . . . . . . . . . . . . . . . . . . . . 31
Calling Your Supplier . . . . . . . . . . . . . . . . . . . . . . . . . . . . . . . . . 91
CCITT V.35 . . . . . . . . . . . . . . . . . . . . . . . . . . . . . . . . . . . . . . . . . 23
CCITT X.21 . . . . . . . . . . . . . . . . . . . . . . . . . . . . . . . . . . . . . . . . . 23
Clearing All Sequences . . . . . . . . . . . . . . . . . . . . . . . . . . . . . . . . 62
Code Page . . . . . . . . . . . . . . . . . . . . . . . . . . . . . . . . . . . . . . . . . . 47
Column Separator . . . . . . . . . . . . . . . . . . . . . . . . . . . . . . . . . . . 38
COM port . . . . . . . . . . . . . . . . . . . . . . . . . . . . . . . . . . . . . . . . . . 33

151
5250 REMOTE EMULATOR CARD
command language . . . . . . . . . . . . . . . . . . . . . . . . . . . . . . . . . . 72
command pass-through . . . . . . . . . . . . . . . . . . . . . . . . . . . . . . . 17, 61, 74, 75
communication port . . . . . . . . . . . . . . . . . . . . . . . . . . . . . . . . . . 23
Computer Output Reduction (COR) . . . . . . . . . . . . . . . . . . . . 48, 62
Configuration Menu . . . . . . . . . . . . . . . . . . . . . . . . . . . . . . . . . . 31
configuration options . . . . . . . . . . . . . . . . . . . . . . . . . . . . . . . . . 31
Controller Station Address . . . . . . . . . . . . . . . . . . . . . . . . . . . . . 36
Controller Type . . . . . . . . . . . . . . . . . . . . . . . . . . . . . . . . . . . . . . 36
CPT Delimiters . . . . . . . . . . . . . . . . . . . . . . . . . . . . . . . . . . . . . . 47
CSU/DSU . . . . . . . . . . . . . . . . . . . . . . . . . . . . . . . . . . . . . . . . . . 80
Cursor Type . . . . . . . . . . . . . . . . . . . . . . . . . . . . . . . . . . . . . . . . . 40
D
DCD . . . . . . . . . . . . . . . . . . . . . . . . . . . . . . . . . . . . . . . . . . . . . . . 79, 80
default configuration . . . . . . . . . . . . . . . . . . . . . . . . . . . . . . . . . 15, 28, 29
diagnostic program . . . . . . . . . . . . . . . . . . . . . . . . . . . . . . . . . . . 22, 76
DIP switch . . . . . . . . . . . . . . . . . . . . . . . . . . . . . . . . . . . . . . . . . . 20, 22
Direct Access . . . . . . . . . . . . . . . . . . . . . . . . . . . . . . . . . . . . . . . . 53
Direct Hot Key . . . . . . . . . . . . . . . . . . . . . . . . . . . . . . . . . . . . . . 34
Display Adaptor . . . . . . . . . . . . . . . . . . . . . . . . . . . . . . . . . . . . . . 40
DMA (Direct Memory Access) channels . . . . . . . . . . . . . . . . . . 37
DMA Channel 1 . . . . . . . . . . . . . . . . . . . . . . . . . . . . . . . . . . . . . 37
DMA Channel 3 . . . . . . . . . . . . . . . . . . . . . . . . . . . . . . . . . . . . . 37
DOS graphics applications . . . . . . . . . . . . . . . . . . . . . . . . . . . . . 43
DOS prompt . . . . . . . . . . . . . . . . . . . . . . . . . . . . . . . . . . . . . . . . 25
DOS session . . . . . . . . . . . . . . . . . . . . . . . . . . . . . . . . . . . . . . . . . 52
DOS partition 2 . . . . . . . . . . . . . . . . . . . . . . . . . . . . . . . . . . . . . . 5
DSR . . . . . . . . . . . . . . . . . . . . . . . . . . . . . . . . . . . . . . . . . . . . . . . 79, 80
duplex mode . . . . . . . . . . . . . . . . . . . . . . . . . . . . . . . . . . . . . . . . 72
Duplex Printing . . . . . . . . . . . . . . . . . . . . . . . . . . . . . . . . . . . . . 71
E
EBCDIC to ASCII . . . . . . . . . . . . . . . . . . . . . . . . . . . . . . . . . . . . 40, 47
EIA RS-232D . . . . . . . . . . . . . . . . . . . . . . . . . . . . . . . . . . . . . . . . 16
EIA RS-232D/CCITT V.24 . . . . . . . . . . . . . . . . . . . . . . . . . . . . . 23
escape commands . . . . . . . . . . . . . . . . . . . . . . . . . . . . . . . . . . . . 17
execute command . . . . . . . . . . . . . . . . . . . . . . . . . . . . . . . . . . . 51
F
Field Attributes . . . . . . . . . . . . . . . . . . . . . . . . . . . . . . . . . . . . . . 39, 40
File Transfer . . . . . . . . . . . . . . . . . . . . . . . . . . . . . . . . . . . . . . . . 34
font IDs . . . . . . . . . . . . . . . . . . . . . . . . . . . . . . . . . . . . . . . . . . . . 63, 73
font-change commands . . . . . . . . . . . . . . . . . . . . . . . . . . . . . . . 66, 72, 73
font-ID pitch . . . . . . . . . . . . . . . . . . . . . . . . . . . . . . . . . . . . . . . . 73

152
5250 REMOTE EMULATOR CARD
H
hexadecimal character codes . . . . . . . . . . . . . . . . . . . . . . . . . . . 47
horizontal spacing . . . . . . . . . . . . . . . . . . . . . . . . . . . . . . . . . . . 75
Host Address . . . . . . . . . . . . . . . . . . . . . . . . . . . . . . . . . . . . . . . . 32
host ID . . . . . . . . . . . . . . . . . . . . . . . . . . . . . . . . . . . . . . . . . . . . . 55
host session . . . . . . . . . . . . . . . . . . . . . . . . . . . . . . . . . . . . . . . . . 52
host sessions . . . . . . . . . . . . . . . . . . . . . . . . . . . . . . . . . . . . . . . . 44
Hot Key Code . . . . . . . . . . . . . . . . . . . . . . . . . . . . . . . . . . . . . . . 43
hotkey . . . . . . . . . . . . . . . . . . . . . . . . . . . . . . . . . . . . . . . . . . . . . 4, 50, 51, 52, 53, 60
HP or PPDS modes . . . . . . . . . . . . . . . . . . . . . . . . . . . . . . . . . . . 62
I
I/O address . . . . . . . . . . . . . . . . . . . . . . . . . . . . . . . . . . . . . . . . . 37
I/O addresses 20, 22 . . . . . . . . . . . . . . . . . . . . . . . . . . . . . . . . . .
IBM 3812 (non-IPDS) printer 62 . . . . . . . . . . . . . . . . . . . . . . . .
IBM System/34, /36, /38 . . . . . . . . . . . . . . . . . . . . . . . . . . . . . . 18
IBM typestyle number or font ID . . . . . . . . . . . . . . . . . . . . . . . 69
IBM® AS/400® . . . . . . . . . . . . . . . . . . . . . . . . . . . . . . . . . . . . . . 16
IRQ (Interrupt Request) . . . . . . . . . . . . . . . . . . . . . . . . . . . . . . 37
K
key click . . . . . . . . . . . . . . . . . . . . . . . . . . . . . . . . . . . . . . . . . . . . 34
keyboard emulation . . . . . . . . . . . . . . . . . . . . . . . . . . . . . . . . . . 77
Keyboard Setup . . . . . . . . . . . . . . . . . . . . . . . . . . . . . . . . . . . . . . 43
Keyboard Setup option . . . . . . . . . . . . . . . . . . . . . . . . . . . . . . . . 27
keyboard template . . . . . . . . . . . . . . . . . . . . . . . . . . . . . . . . . . . 34, 131
keyboard type . . . . . . . . . . . . . . . . . . . . . . . . . . . . . . . . . . . . . . . 44
keystroke sequence . . . . . . . . . . . . . . . . . . . . . . . . . . . . . . . . . . . 61
L
Language options . . . . . . . . . . . . . . . . . . . . . . . . . . . . . . . . . . . . 35
local operation . . . . . . . . . . . . . . . . . . . . . . . . . . . . . . . . . . . . . . 23
local station address . . . . . . . . . . . . . . . . . . . . . . . . . . . . . . . . . . 32
Logical Unit (LU) . . . . . . . . . . . . . . . . . . . . . . . . . . . . . . . . . . . . 32
LPT port . . . . . . . . . . . . . . . . . . . . . . . . . . . . . . . . . . . . . . . . . . . 33
M
Main Menu . . . . . . . . . . . . . . . . . . . . . . . . . . . . . . . . . . . . . . . . . 29, 31, 45
Manual Feed . . . . . . . . . . . . . . . . . . . . . . . . . . . . . . . . . . . . . . . . 71
modem . . . . . . . . . . . . . . . . . . . . . . . . . . . . . . . . . . . . . . . . . . . . . 23, 37, 80
modem-loopback test . . . . . . . . . . . . . . . . . . . . . . . . . . . . . . . . . 22, 23
Monitor Type . . . . . . . . . . . . . . . . . . . . . . . . . . . . . . . . . . . . . . . 34

153
5250 REMOTE EMULATOR CARD
N
Near Letter Quality . . . . . . . . . . . . . . . . . . . . . . . . . . . . . . . . . . . 45
NRZ/NRZI Encoding . . . . . . . . . . . . . . . . . . . . . . . . . . . . . . . . . 37
null-modem cable 37
O
OEM text . . . . . . . . . . . . . . . . . . . . . . . . . . . . . . . . . . . . . . . . . . . 52
Orientation . . . . . . . . . . . . . . . . . . . . . . . . . . . . . . . . . . . . . . . . . 48
P
Page Length . . . . . . . . . . . . . . . . . . . . . . . . . . . . . . . . . . . . . . . . 66
Paper Size . . . . . . . . . . . . . . . . . . . . . . . . . . . . . . . . . . . . . . . . . . 66
parallel printers . . . . . . . . . . . . . . . . . . . . . . . . . . . . . . . . . . . . . . 33
PC motherboard . . . . . . . . . . . . . . . . . . . . . . . . . . . . . . . . . . . . . 20
PC printing . . . . . . . . . . . . . . . . . . . . . . . . . . . . . . . . . . . . . . . . . 58
PC Support/38 . . . . . . . . . . . . . . . . . . . . . . . . . . . . . . . . . . . . . . 27, 34
PC Support/400 . . . . . . . . . . . . . . . . . . . . . . . . . . . . . . . . . . . . . 29, 37, 49
PC-to-twinax connectivity . . . . . . . . . . . . . . . . . . . . . . . . . . . . . . 16
Play mode . . . . . . . . . . . . . . . . . . . . . . . . . . . . . . . . . . . . . . . . . . 62
printer definition . . . . . . . . . . . . . . . . . . . . . . . . . . . . . . . . . . . . 33
Printer-Control Screen . . . . . . . . . . . . . . . . . . . . . . . . . . . . . . . . 48, 56, 58, 59
Printer-Override Screen 59
Printer-Setup Menu . . . . . . . . . . . . . . . . . . . . . . . . . . . . . . . . . . 45
Printing . . . . . . . . . . . . . . . . . . . . . . . . . . . . . . . . . . . . . . . . . . . . 55
R
Record/Playback . . . . . . . . . . . . . . . . . . . . . . . . . . . . . . . . . . . . 61
remote operation . . . . . . . . . . . . . . . . . . . . . . . . . . . . . . . . . . . . 23
Round-Robin . . . . . . . . . . . . . . . . . . . . . . . . . . . . . . . . . . . . . . . . 53
Round-Robin (Scrolling) . . . . . . . . . . . . . . . . . . . . . . . . . . . . . . 53, 54
RPG-generated printouts . . . . . . . . . . . . . . . . . . . . . . . . . . . . . . 69
RTS . . . . . . . . . . . . . . . . . . . . . . . . . . . . . . . . . . . . . . . . . . . . . . . . 79
S
Save Buffer . . . . . . . . . . . . . . . . . . . . . . . . . . . . . . . . . . . . . . . . . . 43
Scan Code Customize . . . . . . . . . . . . . . . . . . . . . . . . . . . . . . . . . 44
SDLC link . . . . . . . . . . . . . . . . . . . . . . . . . . . . . . . . . . . . . . . . . . 16
SDLC parameters . . . . . . . . . . . . . . . . . . . . . . . . . . . . . . . . . . . . 36
SDLC protocol . . . . . . . . . . . . . . . . . . . . . . . . . . . . . . . . . . . . . . 18
serial printers . . . . . . . . . . . . . . . . . . . . . . . . . . . . . . . . . . . . . . . 33
session-status line . . . . . . . . . . . . . . . . . . . . . . . . . . . . . . . . . . . . 54
Shipping and Packaging . . . . . . . . . . . . . . . . . . . . . . . . . . . . . . . 91
station address . . . . . . . . . . . . . . . . . . . . . . . . . . . . . . . . . . . . . . . 77, 78

154
5250 REMOTE EMULATOR CARD
Status Attributes . . . . . . . . . . . . . . . . . . . . . . . . . . . . . . . . . . . . . 39
System Menu . . . . . . . . . . . . . . . . . . . . . . . . . . . . . . . . . . . . . . . . 52
System/34 . . . . . . . . . . . . . . . . . . . . . . . . . . . . . . . . . . . . . . . . . . 36
System/36 and System/38 . . . . . . . . . . . . . . . . . . . . . . . . . . . . . 36
System/38 . . . . . . . . . . . . . . . . . . . . . . . . . . . . . . . . . . . . . . . . . . 68, 70, 71
System/3X . . . . . . . . . . . . . . . . . . . . . . . . . . . . . . . . . . . . . . . . . . 16
Text Management/38 . . . . . . . . . . . . . . . . . . . . . . . . . . . . . . . . 70
TX . . . . . . . . . . . . . . . . . . . . . . . . . . . . . . . . . . . . . . . . . . . . . . . . 79
U
U. S. National EBCDIC . . . . . . . . . . . . . . . . . . . . . . . . . . . . . . . . 95
U.S. National ASCII code set . . . . . . . . . . . . . . . . . . . . . . . . . . . 95
V
V.35 . . . . . . . . . . . . . . . . . . . . . . . . . . . . . . . . . . . . . . . . . . . . . . . 16
Virtual Disk . . . . . . . . . . . . . . . . . . . . . . . . . . . . . . . . . . . . . . . . . 34, 50
W
Windows . . . . . . . . . . . . . . . . . . . . . . . . . . . . . . . . . . . . . . . . . . . 27, 28, 44
Word Processing . . . . . . . . . . . . . . . . . . . . . . . . . . . . . . . . . . . . . 66, 69
word-processing programs . . . . . . . . . . . . . . . . . . . . . . . . . . . . . 70
X
X.21 . . . . . . . . . . . . . . . . . . . . . . . . . . . . . . . . . . . . . . . . . . . . . . . 16

1000 Park Drive • Lawrence, PA 15055-1018 • 724-746-5500 • Fax 724-746-0746
© Copyright 1999. Black Box Corporation. All rights reserved.
